

Page 1

Table of Contents. . . . . . . . . . . . . . . . . . . 1
Important Safety Instructions. . . . . . . . . 2
Precautions . . . . . . . . . . . . . . . . . . . . . . . 6
Power Sources . . . . . . . . . . . . . . . . . . . . . 8
Using the Stand . . . . . . . . . . . . . . . . . . . . 8
Location of Controls . . . . . . . . . . . . . . . . 9
Remote Control . . . . . . . . . . . . . . . . . . . 11
• Battery Installation . . . . . . . . . . . . . . . . . 12
• Effective Distance of the
Remote Control Transmitter . . . . . . . . . 13
Connection . . . . . . . . . . . . . . . . . . . . . . . 13
• Connecting the Unit to a TV Using the
A/V Cable. . . . . . . . . . . . . . . . . . . . . . . . 13
• Connecting the Unit to a TV Using the
S-Video Cable . . . . . . . . . . . . . . . . . . . . 14
• Connecting Another Unit to this DVD
Player . . . . . . . . . . . . . . . . . . . . . . . . . . 15
About Discs . . . . . . . . . . . . . . . . . . . . . . 16
Setup Menu. . . . . . . . . . . . . . . . . . . . . . . 18
• General Setup Menu . . . . . . . . . . . . . . . 19
• Audio Setup Menu . . . . . . . . . . . . . . . . . 20
• Video Setup Menu . . . . . . . . . . . . . . . . . 21
• Preference Setup Menu. . . . . . . . . . . . . 21
Basic Operation . . . . . . . . . . . . . . . . . . . 23
• Headphone Jack(s) . . . . . . . . . . . . . . . . 23
• Screen Mode . . . . . . . . . . . . . . . . . . . . . 23
• Volume Control . . . . . . . . . . . . . . . . . . . 23
• Display Button . . . . . . . . . . . . . . . . . . . . 24
DVD Operation . . . . . . . . . . . . . . . . . . . . 25
• Playback of a DVD . . . . . . . . . . . . . . . . 25
• Skip . . . . . . . . . . . . . . . . . . . . . . . . . . . . 27
• Search . . . . . . . . . . . . . . . . . . . . . . . . . . 27
• Slow Motion . . . . . . . . . . . . . . . . . . . . . . 27
• Pause/Frame . . . . . . . . . . . . . . . . . . . . . 27
• Title/Chapter Search . . . . . . . . . . . . . . . 28
• Title/Time Search. . . . . . . . . . . . . . . . . . 28
• Chapter/Time Search. . . . . . . . . . . . . . . 28
• Bookmark. . . . . . . . . . . . . . . . . . . . . . . . 29
• Repeat Playback . . . . . . . . . . . . . . . . . . 30
• Repeat A-B Playback. . . . . . . . . . . . . . . 30
• Audio Menu . . . . . . . . . . . . . . . . . . . . . . 31
• Subtitle Menu. . . . . . . . . . . . . . . . . . . . . 31
• DVD Menu . . . . . . . . . . . . . . . . . . . . . . . 31
• Title Menu . . . . . . . . . . . . . . . . . . . . . . . 31
• Zoom In/Out. . . . . . . . . . . . . . . . . . . . . . 32
• Angle . . . . . . . . . . . . . . . . . . . . . . . . . . . 32
• Programmed Playback . . . . . . . . . . . . . 33
CD Operation . . . . . . . . . . . . . . . . . . . . . 34
• Playback of a CD. . . . . . . . . . . . . . . . . . 34
• Pause. . . . . . . . . . . . . . . . . . . . . . . . . . . 34
• Random Playback . . . . . . . . . . . . . . . . . 35
• Skip . . . . . . . . . . . . . . . . . . . . . . . . . . . . 35
• Search . . . . . . . . . . . . . . . . . . . . . . . . . . 35
• Selecting Tracks Using the
Number Buttons. . . . . . . . . . . . . . . . . . . 36
• Repeat Playback . . . . . . . . . . . . . . . . . . 36
Picture CD Operation . . . . . . . . . . . . . . 37
Troubleshooting Guide . . . . . . . . . . . . . 38
Care and Maintenance. . . . . . . . . . . . . . 40
Specifications. . . . . . . . . . . . . . . . . . . . . 41
1
TABLE OF CONTENTS
Page 2

2
IMPORTANT SAFETY INSTRUCTIONS
CAUTION: TO REDUCE THE RISK OF ELECTRIC SHOCK, DO NOT REMOVE
COVER (OR BACK). NO USER-SERVICEABLE PARTS INSIDE. REFER
SERVICING TO QUALIFIED SERVICE PERSONNEL. (This Caution
Marking and Rating Label are located on the upper side of the stand.)
CAUTION
RISK OF ELECTRIC SHOCK
DO NOT OPEN
CAUTION:
THIS DIGITAL VIDEO DISC PLAYER EMPLOYS A LASER SYSTEM.
TO ENSURE PROPER USE OF THIS PRODUCT, PLEASE READ THIS OWNER’S
MANUAL CAREFULLY AND RETAIN FOR FUTURE REFERENCE. SHOULD THE UNIT
REQUIRE MAINTENANCE, CONTACT AN AUTHORIZED SERVICE LOCATION-SEE
SERVICE PROCEDURE.
USE OF CONTROLS, ADJUSTMENTS OR THE PERFORMANCE OF PROCEDURES
OTHER THAN THOSE SPECIFIED HEREIN MAY RESULT IN HAZARDOUS
RADIATION EXPOSURE.
TO PREVENT DIRECT EXPOSURE TO LASER BEAM, DO NOT TRY TO OPEN THE
ENCLOSURE. VISIBLE LASER RADIATION MAY BE PRESENT WHEN THE
ENCLOSURE IS OPENED. DO NOT STARE INTO BEAM.
WARNING:
TO REDUCE THE RISK OF FIRE OR ELECTRIC SHOCK, DO NOT EXPOSE THIS
PRODUCT TO RAIN OR MOISTURE.
DANGEROUS VOLTAGE:
The lightning flash with arrowhead symbol within an equilateral triangle
is intended to alert the user to the presence of uninsulated dangerous
voltage within the product’s enclosure that may be of sufficient
magnitude to constitute a risk of electric shock to persons.
ATTENTION:
The exclamation point within an equilateral triangle is intended to
alert the user to the presence of important operating and
maintenance (servicing) instructions in the literature accompanying
the appliance.
DANGER:
Invisible and hazardous laser radiation when open and interlock
failed or defeated. Avoid direct exposure to beam.
Page 3

3
FCC NOTICE:
This equipment has been tested and found to comply with the limits for a Class B digital device,
pursuant to part 15 of the FCC Rules. These limits are designed to provide reasonable
protection against harmful interference in a residential installation. This equipment generates,
uses and can radiate radio frequency energy and, if not installed and used in accordance with
the instructions, may cause harmful interference to radio communications.
However, there is no guarantee that interference will not occur in a particular installation. If this
equipment does cause harmful interference to radio or television reception, which can be
determined by turning the equipment off and on, the user is encouraged to try to correct the
interference by one or more of the following measures:
• Reorient or relocate the receiving antenna.
• Increase the separation between the equipment and receiver.
• Connect the equipment into an outlet on a circuit different from that to which the receiver
is connected.
• Consult the dealer or an experienced radio/TV technician for help.
Modifications not authorized by the manufacturer may void user’s authority to operate this
device.
FCC CAUTION:
To assure continued compliance, follow the attached installation instructions and use only
shielded cables when connecting to other devices. Also, any changes or modifications not
expressly approved by the party responsible for compliance could void the user’s authority to
operate the equipment.
ATTENTION:
POUR ÉVITER LES CHOC ÉLECTRIQUES, INTRODUIRE LA LAME LA PLUS LARGE
DE LA FICHE DANS LA BORNE CORRESPONDANTE DE LA PRISES ET POUSSER
JUSQU’AU FOND.
SURGE PROTECTORS:
It is recommended to use a surge protector for AC connection. Lightning and power surges
ARE NOT covered under warranty for this product.
IMPORTANT SAFETY INSTRUCTIONS
LASER WARNING:
This unit employs a laser. Only qualified service personnel should attempt to service this
device due to possible eye injury.
This Class B digital apparatus complies with Canadian ICES-003.
Cet appareil numérique de la classe B est conforme à la norme NMB-003 du Canada.
WARNING:
TO REDUCE THE RISK OF FIRE OR ELECTRIC SHOCK, AND ANNOYING
INTERFERENCE, USE THE RECOMMENDED ACCESSORIES ONLY.
Page 4

Dear Customer:
Selecting fine audio equipment such as the unit you’ve just purchased is only the start of your
musical enjoyment. Now it’s time to consider how you can maximize the fun and excitement
your equipment offers. Memorex wants you to get the most out of your equipment by playing it
at a safe level. One that lets the sound come through loud and clear without annoying blaring
or distortion and, most importantly, without affecting your sensitive hearing.
Sound can be deceiving. Over time your hearing “comfort level” adapts to higher volumes of
sound. So what sounds “normal” can actually be loud and harmful to your hearing. Guard
against this by setting your equipment at a safe level BEFORE your hearing adapts.
To establish a safe level:
• Start your volume control at a low setting.
• Slowly increase the sound until you can hear it comfortably and clearly, and without distortion.
Once you have established a comfortable sound level:
• Set the dial and leave it there.
Taking a minute to do this now will help to prevent hearing damage or loss in the future. After
all, we want you listening for a lifetime.
We Want You Listening For A Lifetime
Used wisely, your new sound equipment will provide a lifetime of fun and enjoyment. Since
hearing damage from loud noise is often undetectable until it is too late, Memorex recommends
that you avoid prolonged exposure to excessive noise. This list of sound levels is included for
your protection.
Decibel
Level
Example
30 Quiet library, soft whispers
40 Living room, refrigerator, bedroom away from traffic
50 Light traffic, normal conversation, quiet office
60 Air conditioner at 20 feet, sewing machine
70 Vacuum cleaner, hair dryer, noisy restaurant
80 Average city traffic, garbage disposals, alarm clock at two feet
THE FOLLOWING NOISES CAN BE DANGEROUS UNDER CONSTANT EXPOSURE:
90 Subway, motorcycle, truck traffic, lawn mower
100 Garbage truck, chain saw, pneumatic drill
120 Rock band concert in front of speakers, thunderclap
140 Gunshot blast, jet engine
180 Rocket launching pad
4
IMPORTANT SAFETY INSTRUCTIONS
Page 5

5
1. Read these Instructions.
2. Keep these Instructions.
3. Heed all Warnings.
4. Follow all instructions.
5. Do not use this apparatus near water.
6. Clean only with a dry cloth.
7. Do not install near any heat sources such as radiators, heat registers, stoves, or
other apparatus (including amplifiers) that produce heat.
8. Do not defeat the safety purpose of the polarized or grounding-type plug. A
polarized plug has two blades with one wider than the other. A grounding-type
plug has two blades and a third grounding prong. The wide blade or the third
prong are provided for your safety. When the provided plug does not fit into your
outlet, consult an electrician for replacement of the obsolete outlet.
9. Protect the power cord from being walked on or pinched particularly at plugs,
convenience receptacles, and the point where they exit from the apparatus.
10. Unplug this apparatus during lightning storms or when unused for long periods of
time.
11. Do not expose this product to dripping or splashing. Do not place objects filled
with liquids, such as vases, on this product.
12. The AC/DC adapter of the apparatus is used as a disconnect device and should
not be obstructed, or should be easily accessed, during intended use. To be
completely disconnected from the power input, the AC/DC adapter of the
apparatus should be disconnected from the mains.
13. CAUTION: To reduce the risk of fire or explosion, do not expose batteries to
excessive heat such as sunshine, fire or other heat sources.
IMPORTANT SAFETY INSTRUCTIONS
Page 6

6
PRECAUTIONS
NOTES ON HANDLING:
• When shipping the DVD player, always use the original shipping carton and
packing materials. For maximum protection, repack the unit as it was originally
packed at the factory.
• Do not use volatile liquids, such as insect spray, near the DVD player. Do not
leave rubber or plastic products in contact with the DVD player for a long time.
They will leave marks on the finish.
• The top and rear panels of the DVD player may become warm after a long
period of use. This is normal and not a malfunction.
• When the DVD player is not in use, be sure to remove the disc and turn off the
power.
NOTE ON LOCATING THE DVD PLAYER:
When you place this DVD player near a TV, radio or VCR, the playback picture may
become poor and the sound may be distorted. In this case, move the DVD player
away from the TV, radio or VCR.
NOTES ON CLEANING:
Use a soft, dry cloth for cleaning.
• For stubborn dirt, soak the cloth in a weak detergent solution, wring well and
wipe. Use a dry cloth to wipe it dry. Do not use any type of solvent, such as
thinner or benzene, as they may damage the surface of the DVD player.
• If you use a chemical-saturated cloth to clean the unit, follow that product’s
instructions.
Warning: Cleaning and adjustment of lenses and/or other components of playback
mechanism should be performed by a qualified service technician.
CAUTION:
To reduce the risk of injury, only charge with supplied rechargeable Battery; other
types of batteries may burst causing personal injury or damage.
NOTES ON MOISTURE CONDENSATION:
See the Troubleshooting Guide on page 38 for more information on condensation
in the unit and what to do about it.
Page 7

7
USING THE STAND
Simply rotate the Stand outward to utilize. To put back, rotate it so it is flat against
the unit.
Page 8

8
POWER SOURCES
AC CONNECTION
Insert the small end of the AC adapter into the jack on the side of the unit. Insert the
other end (with the 2 blades) into a conveniently located AC outlet having 120V AC,
60Hz.
AC ADAPTER SPECIFICATIONS:
DC 12V Z
NOTES:
• To disconnect the AC adapter, remove it from the DC IN jack on the side of the
unit as well as from the AC outlet.
• Use the enclosed AC adapter for this product only.
CHARGING THE BATTERY
The Battery Low indicator will appear on the screen when the battery is low and
needs recharging.
With the power off, insert the small end of the AC adapter into the DC IN jack on the
side of the unit. Insert the other end (with the 2 blades) into a conveniently-located
AC outlet having 120V AC, 60Hz. The CHARGE indicator will blink red as the battery
is charging and will light solid red when charging has completed. Disconnect the AC
adapter plugs when charging has finished.
NOTES:
• Fully charge the Battery for 3.5 hours before using it for the first time. After the
initial charge, it should take approximately 3.5 hours to charge.
• A fully-charged Battery can operate for about four hours.
• Charge the Battery at least once every three months, even if you are not using it.
• The Battery is internal and cannot be replaced.
• The Battery can charge only when the unit is in the OFF mode.
To DC 12V IN Jack
Page 9

9
LOCATION OF CONTROLS
7 8 109 115 6
151312 14 1716 18
41 2 3
FRONT/TOP/RIGHT SIDE
1. DISPLAY/SCREEN Button
2 MENU/AV IN/OUT Button
3. SETUP Button
4. Display
5. Skip o Button
6. Skip n Button
7. STOP n Button
8. PLAY/PAUSE ®p Button
9. Headphone 1 Jack
10. VOLUME Control
11. Headphone 2 Jack
12. Left Speaker
13. Right Speaker
14. Remote Sensor
15. Navigation (π,†,√,®)/OK Control
16. AV IN Jack
(AV CABLE PART NO.
0704-109480-00000*)
17. S-VIDEO OUT Jack
18. AV OUT Jack
*Consumer Replaceable Part
(See page 39 to order.)
Page 10

10
LOCATION OF CONTROLS (CONTINUED)
4 5
1 2 3
REAR/LEFT SIDE
1. Open Door Switch
2. CD Compartment Door
3. Power Button
4. Stand
5. DC IN Jack 12V z
(AC ADAPTER PART NO.
0251-207150-80008*)
*Consumer Replaceable Part (See page 39 to order.)
Page 11

11
REMOTE CONTROL
REPEAT
PAU S E /
FRAME
S
TOP
MENUDISPLAY
CLEAR GOTO
SETUP
BOOKMARK
ZOOMSLOWTITLE
/OK
A-B PROG RANDOM
AUDIO ANGLE SUBTITLE
12 34
56
90
78
3
2
5
6
7
8
9
10
11
12
13
14
15
1
16
4
18
17
20
19
21
22
23
25
24
26
27
28
REMOTE
1. SLOW Button
2. TITLE Button
3. Number Buttons (0-9)
4. Navigation π Button
5. DISPLAY Button
6. Navigation √ Button
7. PLAY (®)/OK Button
8. PAUSE/FRAME Button
9. Navigation † Button
10. Skip n Button
11. Skip o Button
12. Repeat A-B Button
13. REPEAT Button
14. AUDIO Button
15. ANGLE Button
16. SETUP Button
17. BOOKMARK Button
18. ZOOM Button
19. CLEAR Button
20. GOTO Button
21. MENU Button
22. Navigation ® Button
23. STOP Button
24. Search √√ Button
25. Search ®® Button
26. PROG (Program) Button
27. RANDOM Button
28. SUBTITLE Button
REMOTE CONTROL PART
NO. 0861-002600-10000*
*Consumer Replaceable Part
(See page 39 to order.)
Page 12

12
REMOTE CONTROL (CONTINUED)
BATTERY INSTALLATION
BATTERY PRECAUTIONS
Follow these precautions when using batteries in this device:
1. CAUTION – Danger of explosion if battery is incorrectly replaced. Replace only with the same
or equivalent type.
2. Use only the size and type of batteries specified.
3. Be sure to follow the correct polarity when installing the batteries as indicated in the Battery
Compartment. A reversed battery may cause damage to the device.
4. Do not mix different types of batteries together (e.g. Alkaline, Rechargeable and Carbon-zinc)
or old batteries with fresh ones.
5. If the device is not to be used for a long period of time, remove the batteries to prevent damage
or injury from possible battery leakage.
6. Do not try to recharge a battery not intended to be recharged; it can overheat and rupture.
(Follow battery manufacturer’s directions.)
7. Remove batteries promptly if consumed.
8. Clean the battery contacts and also those of the device prior to battery installation.
1. Insert a pencil, or other pointy object, into the
groove on the Battery Compartment to help
slide the compartment out.
2. Install a CR2025 battery, paying attention to
the polarity diagram in the Battery
Compartment (positive side up).
3. Replace the Battery Compartment.
ADDITIONAL BATTERY PRECAUTIONS
WARNING: Risk of fire, explosion, and burns. Do not disassemble, crush, heat above 100°C
(212°F), or incinerate.
Dispose of used batteries promptly according to local recycling or waste regulations. Never put
batteries in mouth. If swallowed, contact your physician or local poison control center. Do not
disassemble and do not dispose of in fire.
CAUTION: Replace battery with exact same battery only. Use of another battery may present
a risk of fire or explosion.
CAUTION: The battery used in this device may present a risk of fire or chemical burn if
mistreated.
Do not use a damaged battery. If a battery pack has leaking fluids, do not touch any fluids.
In case of eye contact with fluid, do not rub eyes. Immediately flush eyes thoroughly with water
for at least 15 minutes, lifting upper and lower lids, until no evidence of the fluid remains. Seek
medical attention.
Do not short the external contacts on a battery.
Page 13

13
CONNECTION
CONNECTING THE UNIT TO A TV USING THE A/V CABLE
From AUDIO/
VIDEO OUT
NOTES FOR CONNECTING TO A TV:
• If your TV has an S-Video input, connect the DVD player with the S-Video cable
(as described on the next page) for best results.
• Set the TV’s TV/VIDEO button or switch to the VIDEO setting.
• When connecting the unit, refer to the owner’s manual of the TV, as well as this manual.
• When connecting the unit to the TV, make sure the power is off and both units are
unplugged before making any connections.
• Connect the unit to your TV directly. If you connect the unit through a VCR, the
playback picture will be distorted because DVD video discs are copy protected.
• Press and hold the MENU/AV IN/OUT button to select AV OUT.
REMOTE CONTROL (CONTINUED)
EFFECTIVE DISTANCE OF THE REMOTE CONTROL TRANSMITTER
R
E
P
E
A
T
P
A
U
S
E/
F
R
A
M
E
S
T
O
P
M
E
N
U
D
I
SP
L
A
Y
C
L
EA
R
G
O
T
O
S
E
T
U
P
B
O
O
K
M
A
R
K
Z
O
O
M
S
L
O
W
T
I
T
L
E
/
O
K
A
B
P
R
O
G
R
A
N
D
O
M
A
U
D
I
O
A
N
G
L
E
S
U
B
T
I
T
L
E
1
2
3
4
5
6
9
0
7
8
R
E
P
E
A
T
P
A
U
S
E
/
F
R
A
M
E
S
T
O
P
M
E
N
U
D
I
S
P
L
A
Y
C
L
E
A
R
G
O
T
O
S
E
T
U
P
B
O
O
K
M
A
R
K
Z
O
O
M
S
L
O
W
T
I
T
L
E
/
O
K
A
B
P
R
O
G
R
A
N
D
O
M
A
U
D
I
O
A
N
G
L
E
S
U
B
T
I
T
L
E
1
2
3
4
5
6
9
0
7
8
R
E
P
E
A
T
P
A
U
S
E
/
F
R
A
M
E
S
T
O
P
M
E
N
U
D
I
S
P
L
A
Y
C
L
E
A
R
G
O
T
O
S
E
T
U
P
B
O
O
K
M
A
R
K
Z
O
O
M
S
L
O
W
T
IT
L
E
/
O
K
A
-
B
P
R
O
G
R
A
N
D
O
M
A
U
D
IO
A
N
G
L
E
S
U
B
T
I
T
L
E
1
2
3
4
5
6
9
0
7
8
20f
t
NOTES:
• When there is an obstacle between
the DVD and the transmitter, the
transmitter may not operate.
• When direct sunlight, an incandescent
lamp, fluorescent lamp or any other
strong light shines on the Remote
Sensor of the DVD, the remote
operation may be unstable.
Page 14
14
CONNECTION (CONTINUED)
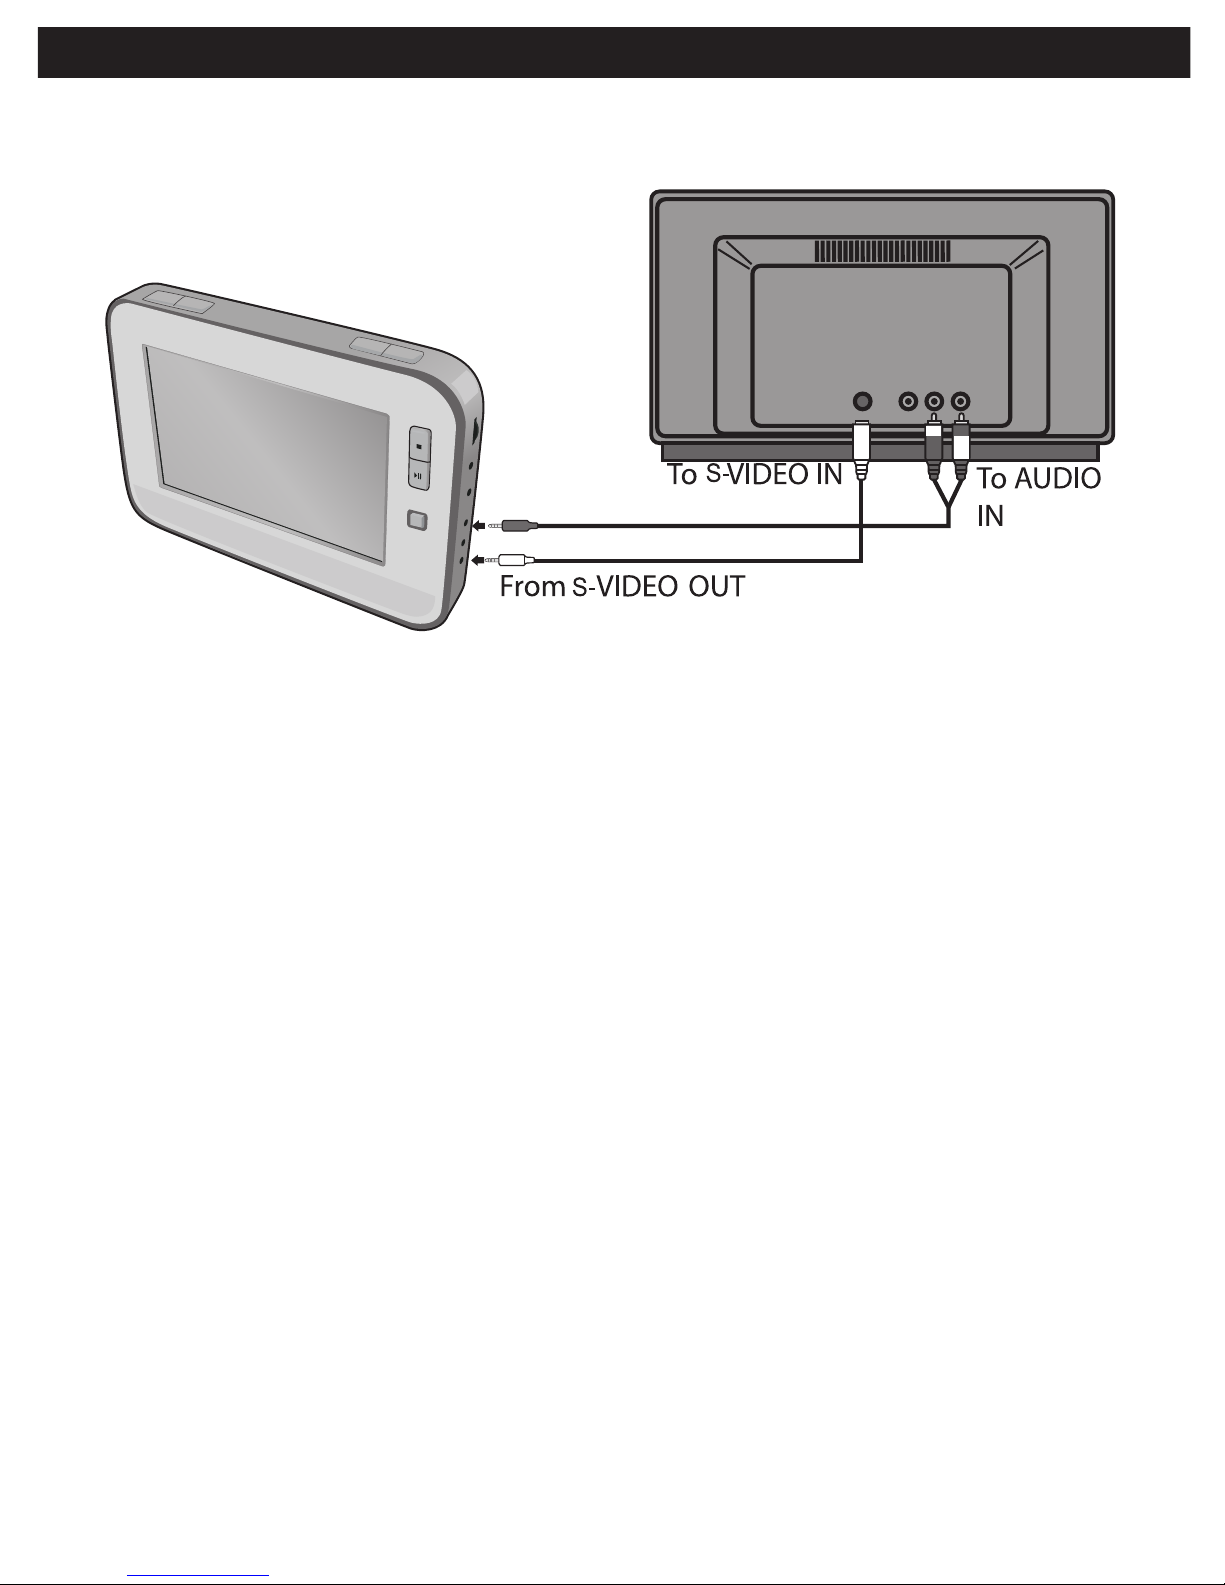
CONNECTING THE UNIT TO A TV USING THE S-VIDEO CABLE
From AUDIO/
VIDEO OUT
NOTES FOR CONNECTING TO A TV:
• The TV must have an S-Video IN jack.
• Set the TV’s TV/VIDEO button or switch to the S-VIDEO setting.
• When connecting the unit, refer to the owner’s manual of the TV, as well as
this manual.
• When connecting the unit to the TV, make sure the power is off and both units are
unplugged before making any connections.
• Connect the unit to your TV directly. If you connect the unit through a VCR, the
playback picture will be distorted because DVD video discs are copy protected.
• When S-Video cable (not included) is connected, the unit will automatically switch
to S-video.
• Press and hold the MENU/AV IN/OUT button to select AV OUT.
• When the S-Video cable is plugged in and in AV OUT mode, the unit display will
turn off and will appear on your TV instead.
Page 15
15
CONNECTION (CONTINUED)
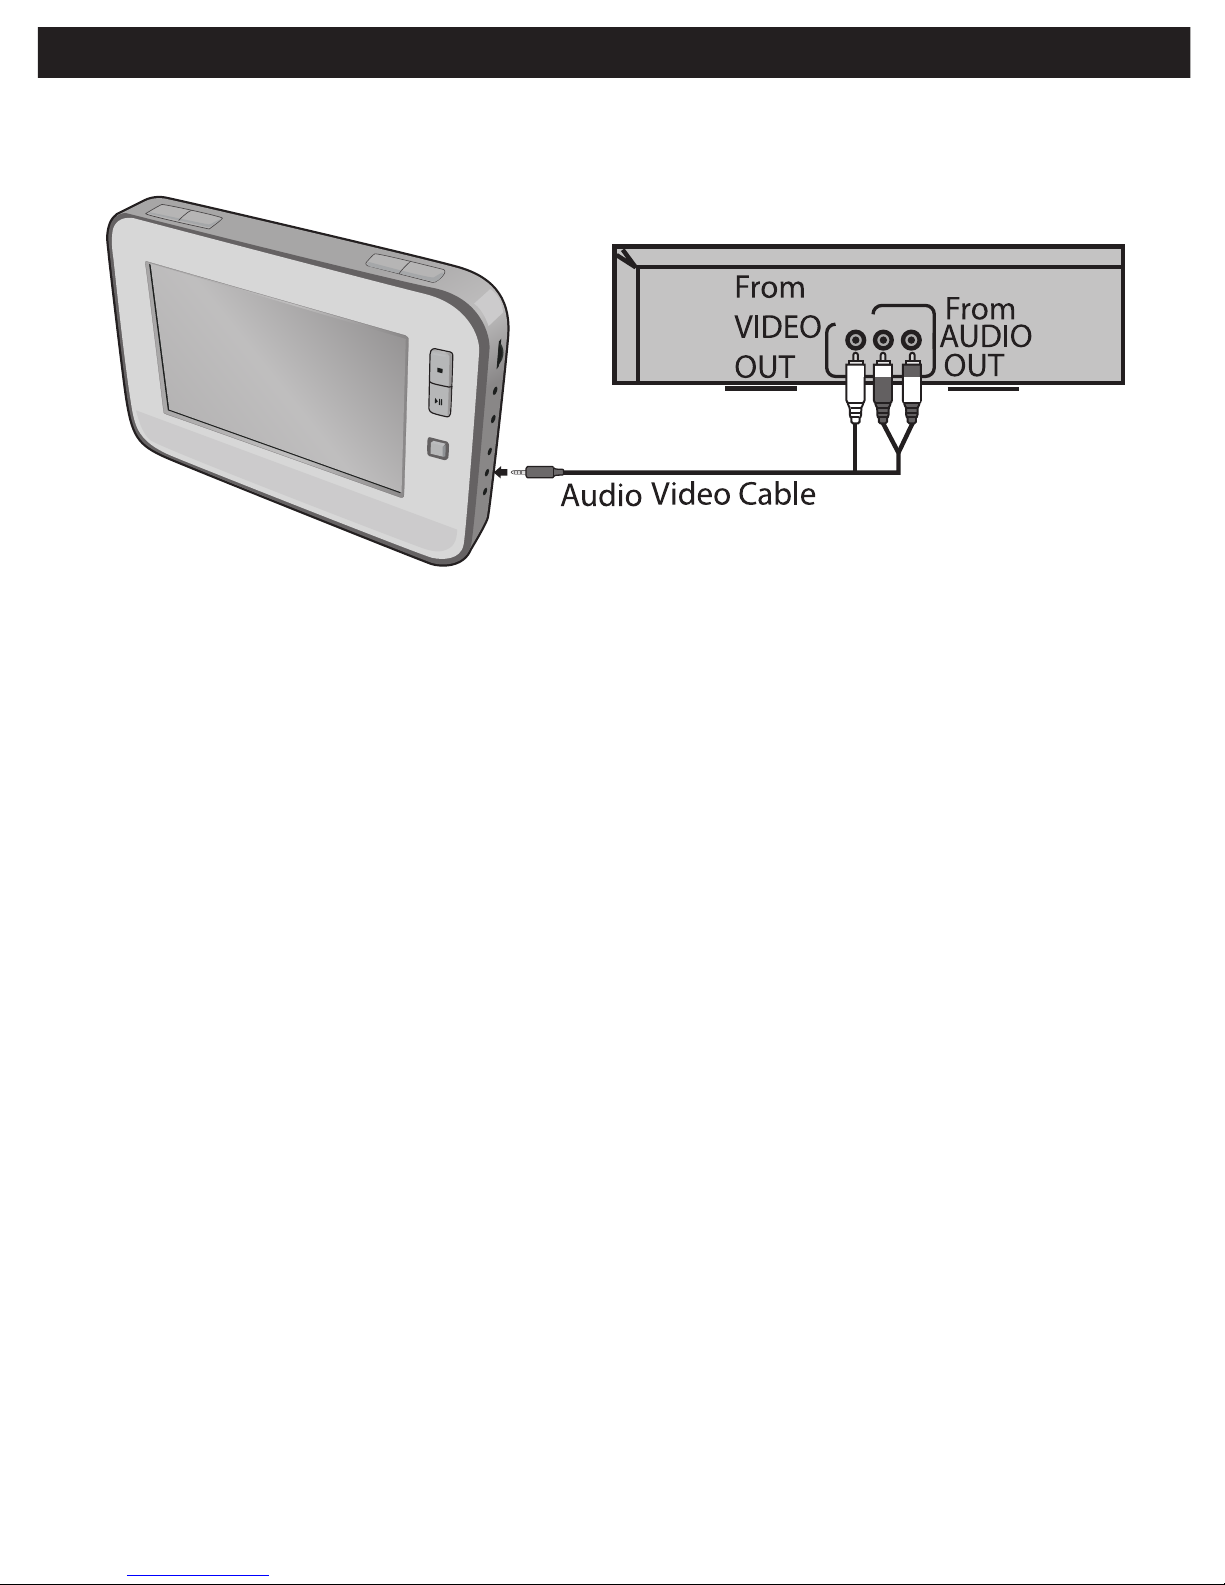
CONNECTING ANOTHER UNIT TO THIS DVD PLAYER
To Audio/
Video IN
NOTES FOR CONNECTING:
• When connecting the DVD, refer to the owner’s manuals of the TV and stereo
system, as well as this manual.
• When connecting the DVD, make sure the power is off and all units are unplugged
before making any connections.
• Press and hold the MENU/AV IN/OUT button to select AV IN.
Page 16
16
ABOUT DISCS
PLAYABLE DISCS:
The following discs can be played back on this DVD player:
The region code for this DVD player is listed on the bottom of the player.
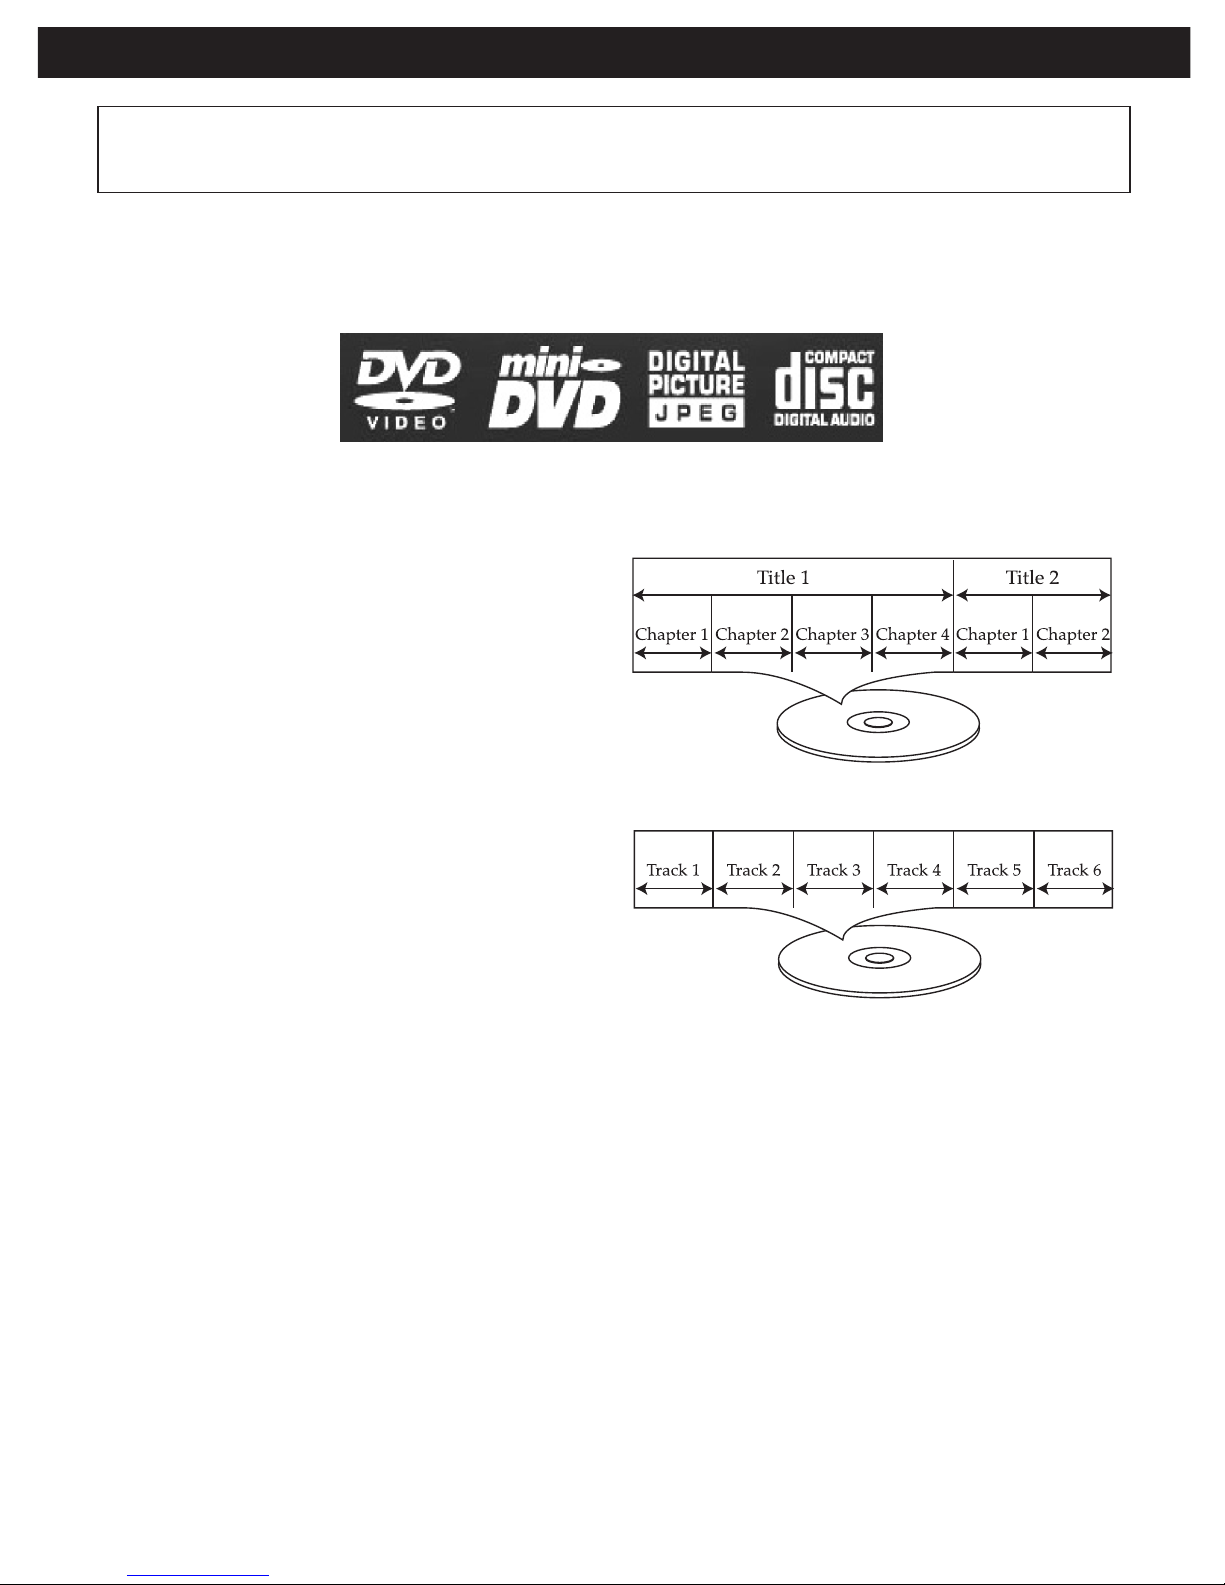
DISC TYPES:
DVD
Data on most DVDs is divided into sections
called “titles” and then into subsections called
“chapters”, each of which is given a title or
chapter number. Some features of this DVD
player will not operate with some DVD discs
as they are preset. If a function you selected
does not run as desired, refer to the manual
accompanying the DVD disc.
AUDIO CD
Data on an audio CD is divided into sections
called “tracks”, each of which is given a track
number.
IMPORTANT:
It is important that you read the manual that accompanies the DVD disc, as there are
features that are on the DVD player that cannot be used with certain DVDs. There
are also extra features on the DVD disc that are different for each DVD disc, so they
are not explained in this owner’s manual.
Page 17

Notes on Copyright:
It is forbidden by law to copy, broadcast, show, broadcast on cable, play in public and
rent copyrighted material without permission. DVD video discs are copy protected,
and any recordings made from these discs will be distorted. This product incorporates
copyright protection technology that is protected by U.S. patents and other intellectual
property rights. Use of this copyright protection technology must be authorized by
Rovi Corporation, and is intended for home and other limited viewing uses only
unless otherwise authorized by Rovi Corporation. Reverse engineering and
disassembly are prohibited.
Region Management Information:
This DVD Player is designed and manufactured to respond to the Region
Management Information that is recorded on a DVD disc. If the Region number
described on the DVD disc does not correspond to the Region number of this DVD
player, this DVD player cannot play that disc. You may not be able to play back some
DVD video discs on this player if they were purchased from outside your geographic
area or made for business purposes. When you try to play back an unauthorized disc,
"Wrong Region" appears on the TV screen.
17
ABOUT DISCS (CONTINUED)
Page 18
The Setup menu lets you customize the DVD player by allowing you to select various
language preferences, turn screen saver on and off, adjust what type of television
screen you have and more.
Use the following instructions to navigate and change the options as described on the
upcoming pages.
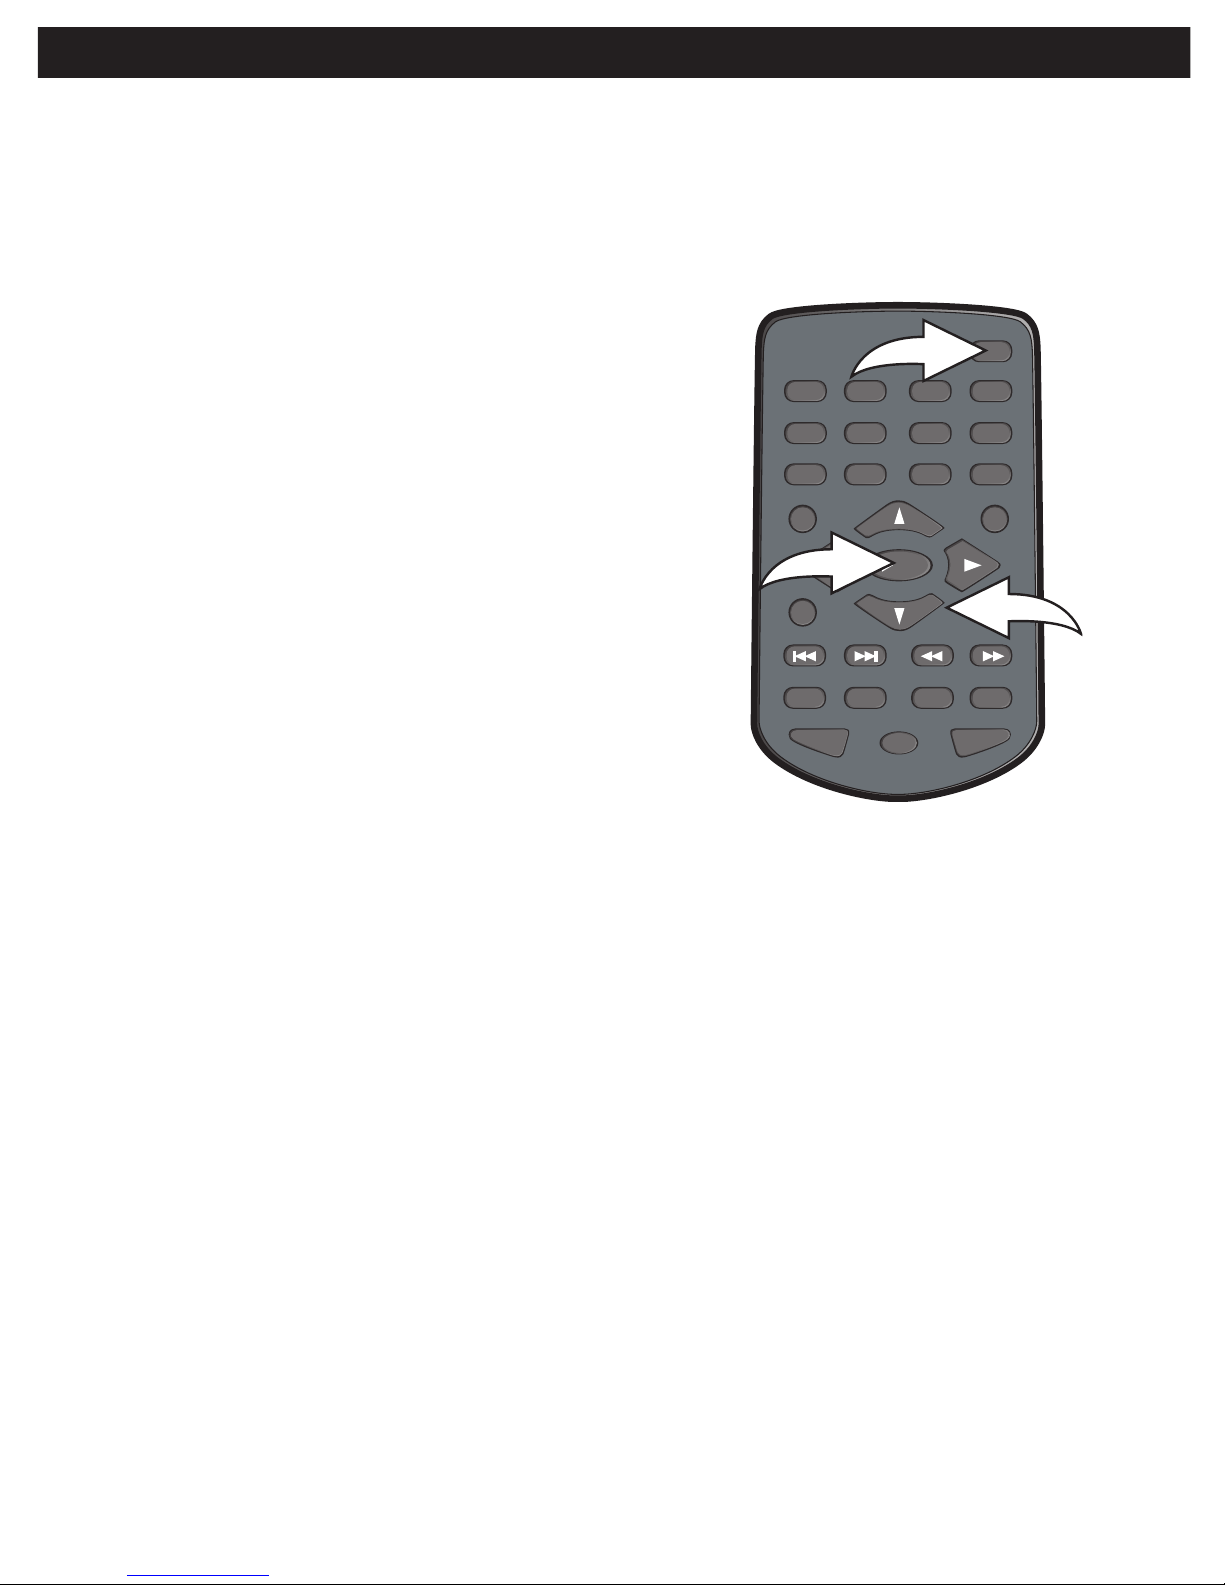
1. While in the Stop mode, press the SETUP
button 1 to enter the Setup menu.
2. Select one of the Setup icons at the top of
the screen using the Navigation (√,®)
buttons 2, then press the PLAY (®)/OK
button 3 to select it.
3. Use the Navigation (π,†) buttons 2 to
select one of the Setup options, then press
the PLAY (®)/OK button 3 to select it.
4. Use the Navigation (π,†) buttons 2 to
change the desired setting, then press
the PLAY (®)/OK button 3 to make
the change.
5. To return to the previous menu, simply
press the Navigation (√) button 2. Exit by
pressing the SETUP button 1 again.
(NOTE: You can also exit by selecting the Exit Setup menu icon.)
REMOTE CONTROL VERSUS MAIN UNIT:
This manual describes using the remote control. Buttons on the remote control or the
main unit can be used. However, the buttons on the remote control and the main unit
differ as follows:
REMOTE MAIN UNIT
Navigation (π,†,√,®) Buttons Navigation (π,†,√,®)/OK Control
PLAY (®)/OK Button Press PLAY Button to play or press
the Navigation (π,†,√,®)/OK
Control for OK.
DISPLAY Button DISPLAY/SCREEN Button
18
SETUP MENU
REPEAT
PAU SE /
FRAME
STOP
MENUDISPLAY
CLEAR GOTO
SETUP
BOOKMARK
ZOOMSLOWTITLE
/
OK
A-B PROG RANDOM
AUDIO ANGLE SUBTITLE
12 34
56
90
78
2
1
3
Page 19
19
SETUP MENU (CONTINUED)
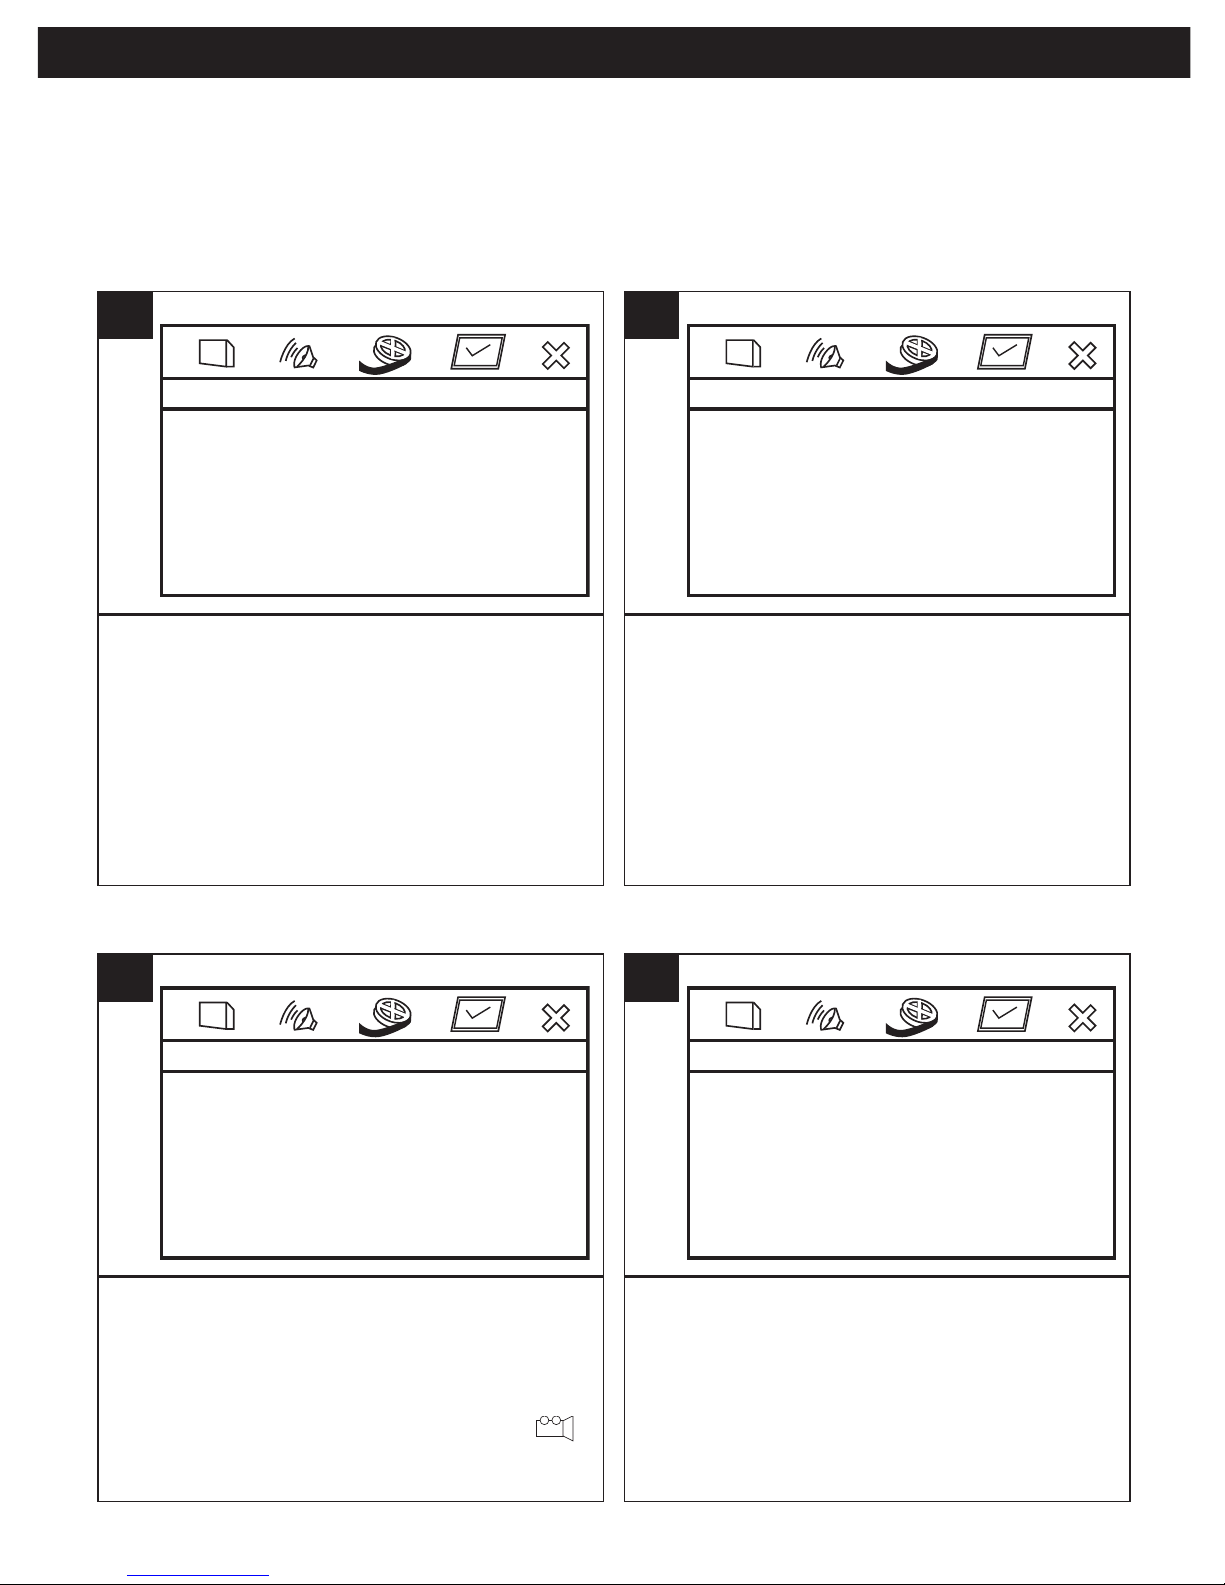
Pan Scan: Video material formatted in the Pan
Scan style is played back in that style (the left
and right edges are cut off).
Letter Box: Wide-screen images are shown
on the screen with a black band at the top
or bottom.
Wide Screen: Select when the unit is connected
to a wide-screen TV.
-- General Setup Page --
TV Display Wide
Ntsc
On
On
Off
Eng
TV Type
Angle Mark
OSD Lang
Off
Captions
Screen Saver
Last Memory
1
Select for the AV output signal:
NTSC: Select when using an NTSC TV.
PAL: Select when using a PAL TV.
IMPORTANT: In the USA, the standard is
NTSC.
-- General Setup Page --
TV Display Wide
Ntsc
On
On
Off
Eng
TV Type
Angle Mark
OSD Lang
Off
Captions
Screen Saver
Last Memory
1
GENERAL SETUP MENU:
Press the SETUP button to enter the menu, select GENERAL SETUP using the Navigation (√,®)
buttons, then press the PLAY (®)/OK button to select it. Select/change the Setup option as
described on page 18.
TV DISPLAY
TV TYPE
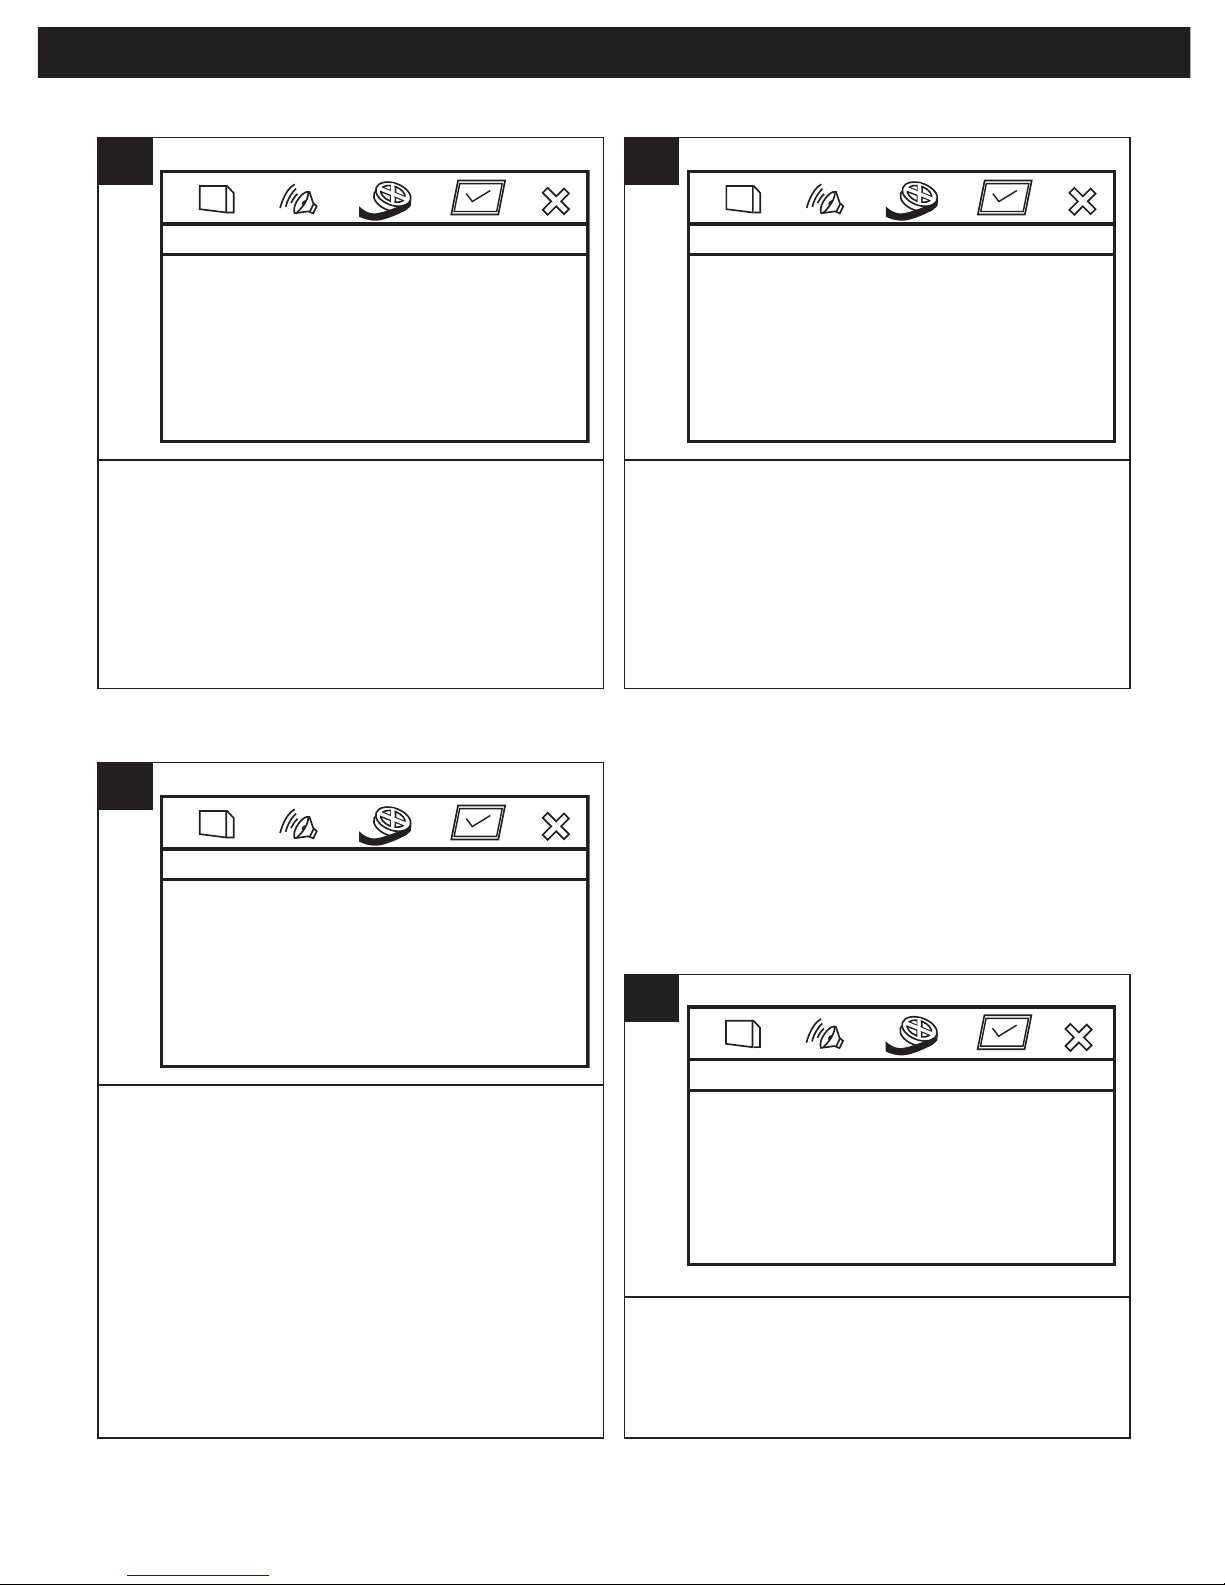
Some discs may contain scenes which have
been shot simultaneously from a number of
different camera angles. This feature only
works on discs with more than one camera
angle. The jacket will be marked with “ ”.
Turn this option ON to enable camera angles.
-- General Setup Page --
TV Display Wide
Ntsc
On
On
Off
Eng
TV Type
Angle Mark
OSD Lang
Off
Captions
Screen Saver
Last Memory
1
Select the desired language (English,
French, German, Spanish or Italian) for the
On-Screen display to display text. Note that
the DVD must have the language included
in order to display it.
-- General Setup Page --
TV Display Wide
Ntsc
On
On
Off
Eng
TV Type
Angle Mark
OSD Lang
Off
Captions
Screen Saver
Last Memory
1
ANGLE MARK
OSD LANGUAGE
Page 20
20
SETUP MENU (CONTINUED)
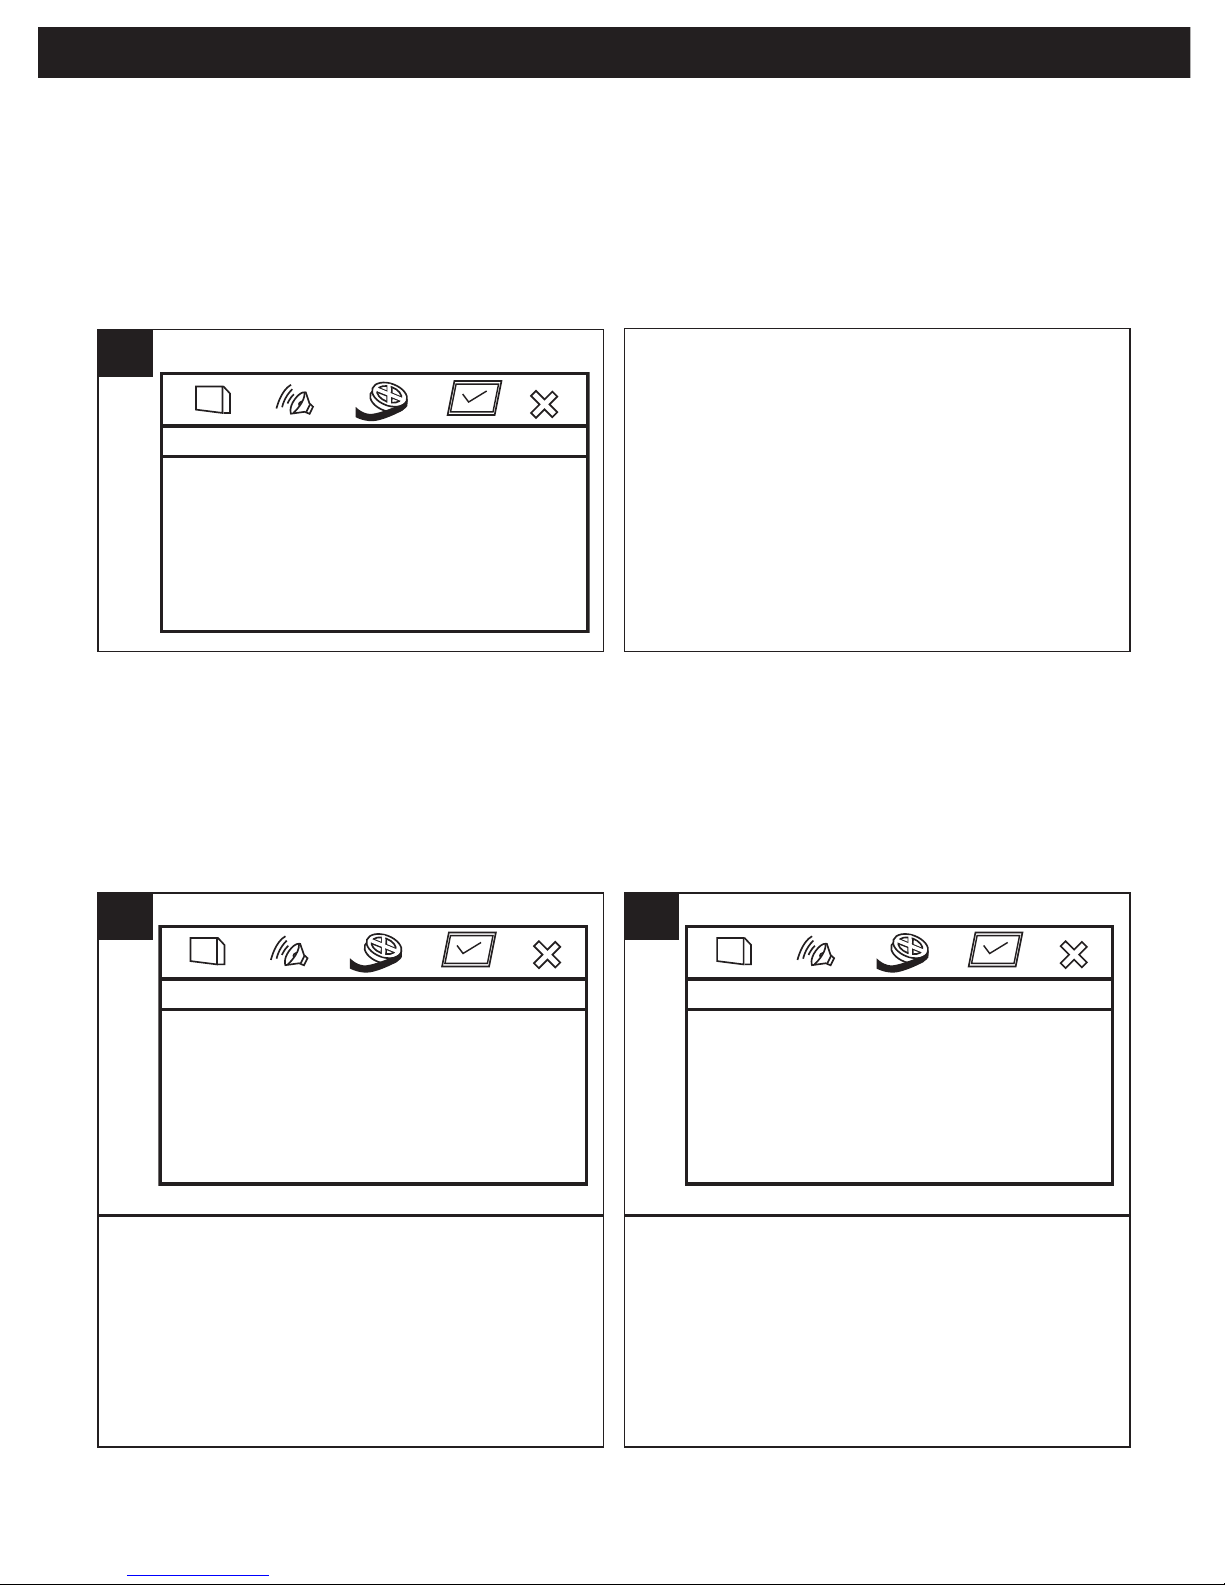
When this option is set to ON, the screen
saver will come on when the unit stops for
approximately five minutes.
When this option is OFF, the screen saver
will not come on.
-- General Setup Page --
TV Display Wide
Ntsc
On
On
Off
Eng
TV Type
Angle Mark
OSD Lang
Off
Captions
Screen Saver
Last Memory
1
When this option is set to ON, during
playback of a DVD, if you change the unit to
another source (i.e. switch to AV OUT),
when you playback the disc again, it will
resume to the last segment before
changed/stopped. However, if the disc is
changed, there will be no Last Memory
function and it will just playback the disc
from the beginning.
When this option is OFF, the segment will
not be saved.
-- General Setup Page --
TV Display Wide
Ntsc
On
On
Off
Eng
TV Type
Angle Mark
OSD Lang
Off
Captions
Screen Saver
Last Memory
1
SCREEN SAVER
LAST MEMORY
Lt/Rt: Select to hear the sound in theatrical
downmix mode.
Stereo: Select to hear the sound in stereo
downmix mode.
-- Audio Setup Page --
Downmix Str
1
DOWNMIX
AUDIO SETUP MENU:
Press the SETUP button to enter the menu,
select AUDIO SETUP using the Navigation
(√,®) buttons, then press the PLAY (®)/OK
button to select it. Select/change the Setup
option as described on page 18.
When this option is set to ON, closed
captions will appear on the screen for the
hearing impaired (if originally recorded on
the DVD). When this option is OFF, the
closed captions will not appear.
NOTE: The Caption function is for the TV in
CC1 only.
-- General Setup Page --
TV Display Wide
Ntsc
On
On
Off
Eng
TV Type
Angle Mark
OSD Lang
Off
Captions
Screen Saver
Last Memory
1
CAPTIONS
Page 21
21
SETUP MENU (CONTINUED)
Adjust the settings as follows:
Brightness: Adjust to lighten or darken the
picture.
Contrast: Adjust to increase or decrease
the contrast.
Saturation: Adjust to increase or decrease
the overall saturation.
-- Video Setup Page --
00
00
00
Brightness
Contrast
Saturation
1
PICTURE SETTINGS
Select the language the DVD will be played
back in (English, German, French, Spanish
or Italian). The DVD must be recorded in the
selected language, otherwise the default
language of the DVD will be played.
-- Preference Page --
Audio Eng
Eng
Eng
Subtitle
Disc Menu
Default
1
Select the language the Subtitle (OSD) will
be in (English, German, French, Spanish or
Italian). The DVD must be recorded in the
selected language, otherwise the default
language of the DVD will be shown.
-- Preference Page --
Audio Eng
Eng
Eng
Subtitle
Disc Menu
Default
1
PREFERENCE SETUP MENU:
Before entering the PREFERENCE SETUP menu, remove the disc from the unit or press the
STOP n button twice to stop playback. Press the SETUP button to enter the menu, select
PREFERENCE SETUP using the Navigation (√,®) buttons, then press the PLAY (®)/OK
button to select it. Select/change the Setup option as described on page 18.
AUDIO LANGUAGE
SUBTITLE
VIDEO SETUP MENU:
Press the SETUP button to enter the menu, select VIDEO SETUP using the Navigation (√,®)
buttons, then press the PLAY (®)/OK button to select it. Use the Navigation (π,†) buttons to
select one of the Setup options, then press the PLAY (®)/OK button to select it. Use the
Navigation (√,®) buttons to change the desired setting, then press the PLAY (®)/OK button
to return to the previous setting. Return to the previous menu as described on page 18.
Page 22
22
SETUP MENU (CONTINUED)
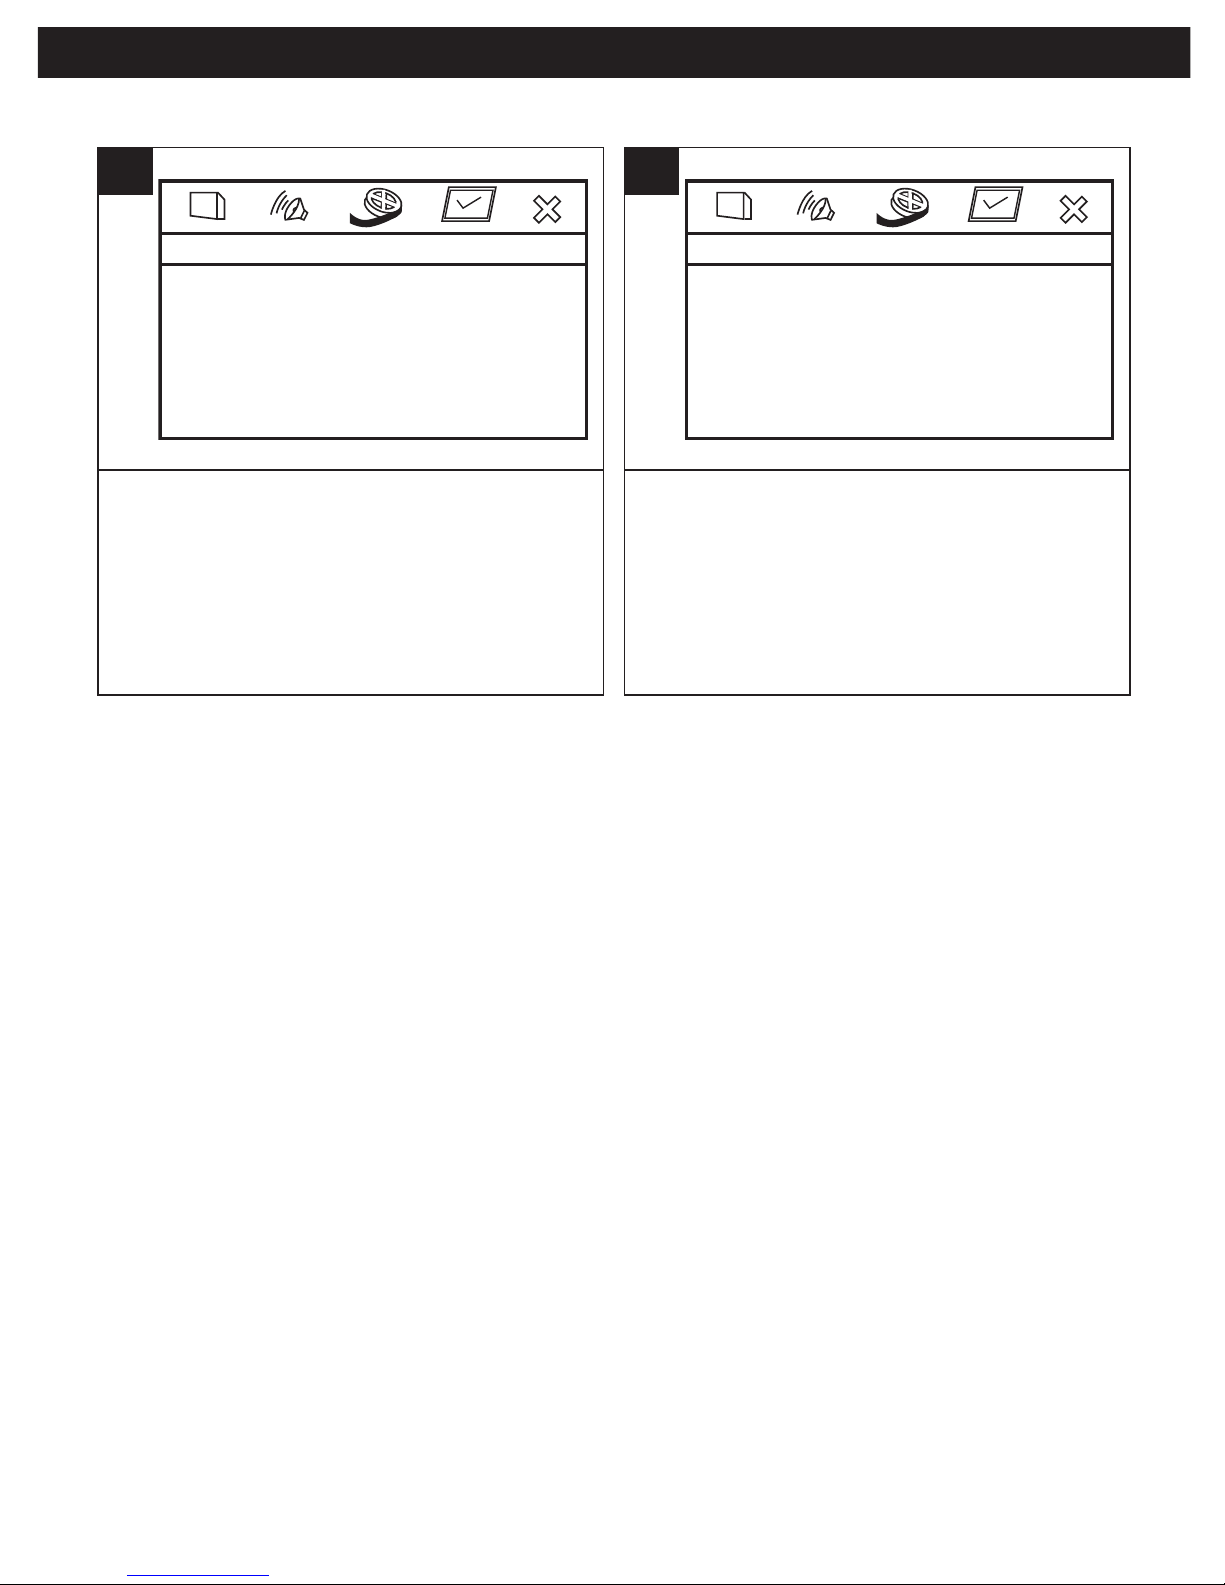
Select the language the DISC MENU will be
in (English, German, French, Spanish or
Italian). The DVD’s DISC MENU must be
made in the selected language, otherwise
the default language of the DVD will be
shown.
-- Preference Page --
Audio Eng
Eng
Eng
Subtitle
Disc Menu
Default
1
Select this option to reset all the preferences
to their original factory settings.
-- Preference Page --
Audio Eng
Eng
Eng
Subtitle
Disc Menu
Default
1
DISC MENU
DEFAULT
NOTE: Before entering the PREFERENCE SETUP menu, remove the disc from the unit or
press the STOP button twice to stop playback.
Page 23
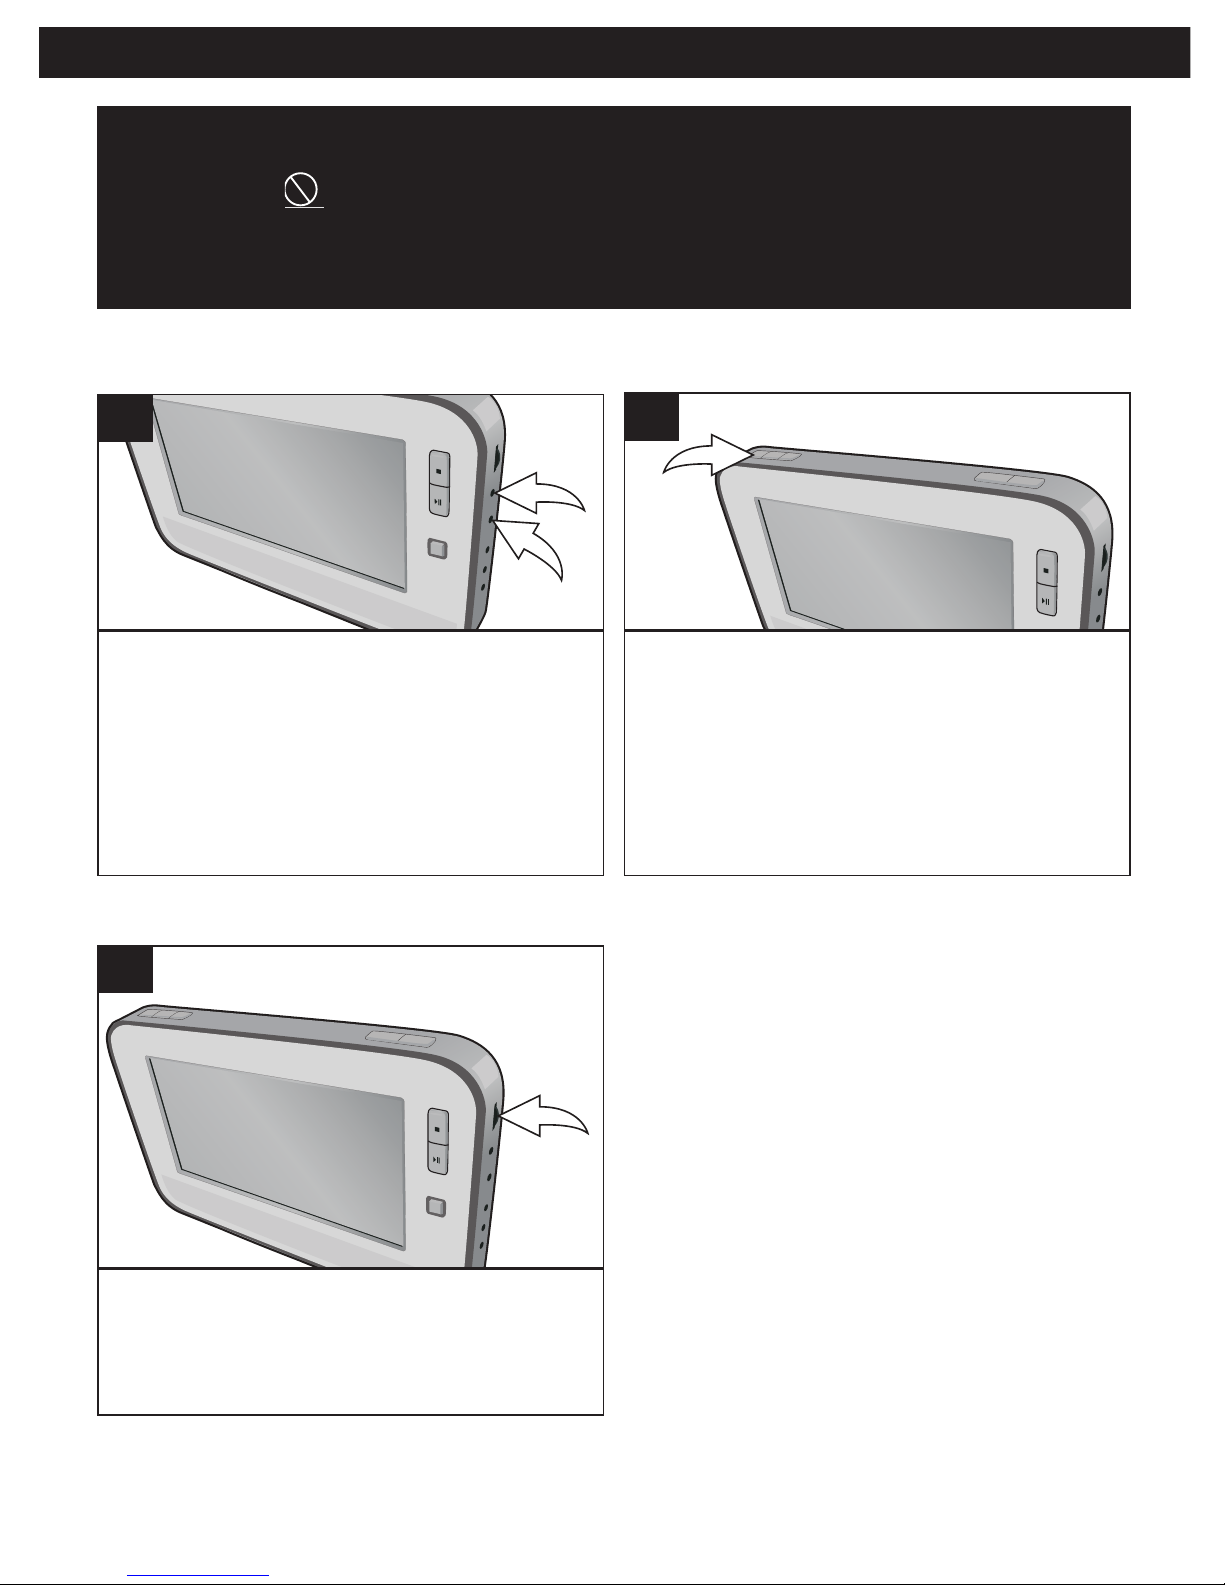
23
BASIC OPERATION
IMPORTANT:
When “ ” appears while pressing a button, this means that the
corresponding function cannot be performed either on the disc inserted,
or in the selected mode.
For private listening, plug headphones into
one or both of the Headphone jacks. The
speakers will be disconnected when
headphones are connected.
1
HEADPHONE JACK(S)
Press and hold the DISPLAY/SCREEN
button to cycle between standard 4:3 size
(TV) and full screen (will fill the
LCD screen).
NOTE: The SCREEN MODE is just for
adjusting the built-in screen’s display only,
not for the Video Output.
1
SCREEN MODE
The main Volume control is located on the side
of the unit. Adjust as desired.
1
VOLUME CONTROL
Page 24
24
OPERATION (CONTINUED)
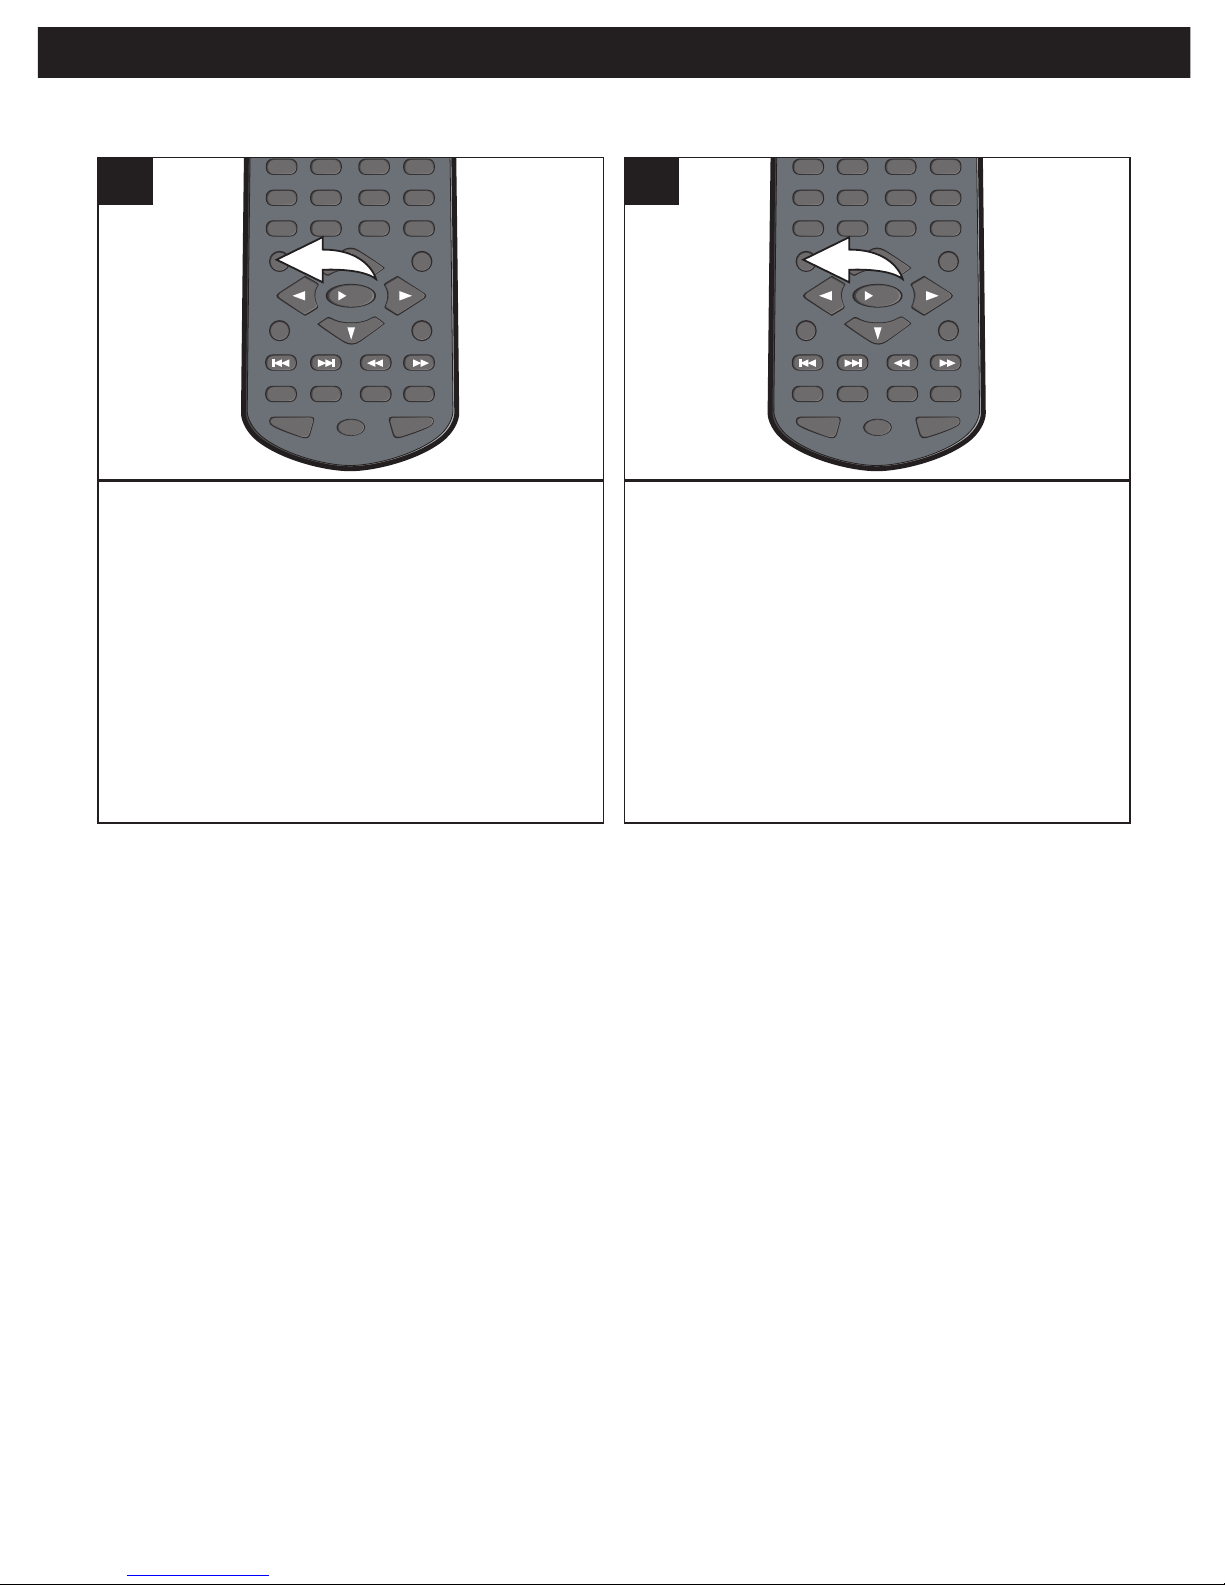
While playing a DVD, press the DISPLAY
button to cycle as follows:
1st press: Title elapsed time
2nd press: Title remaining time
3rd press: Chapter elapsed time
4th press: Chapter remaining time
5th press: Display off
REPEAT
PAUS E/
FRAME
STOP
MENUDISPLAY
CLEAR GOTO
S
/OK
A-B PROG RANDOM
AUDIO ANGLE SUBTITLE
12 34
56
90
78
1
While playing a CD, press the DISPLAY
button to cycle as follows:
1st press: Single remaining time
2nd press: Total elapsed time
3rd press: Total remaining time
4th press: Single elapsed time
REPEAT
PAUS E/
FRAME
STOP
MENUDISPLAY
CLEAR GOTO
S
/OK
A-B PROG RANDOM
AUDIO ANGLE SUBTITLE
12 34
56
90
78
2
DISPLAY BUTTON
Page 25
25
DVD OPERATION
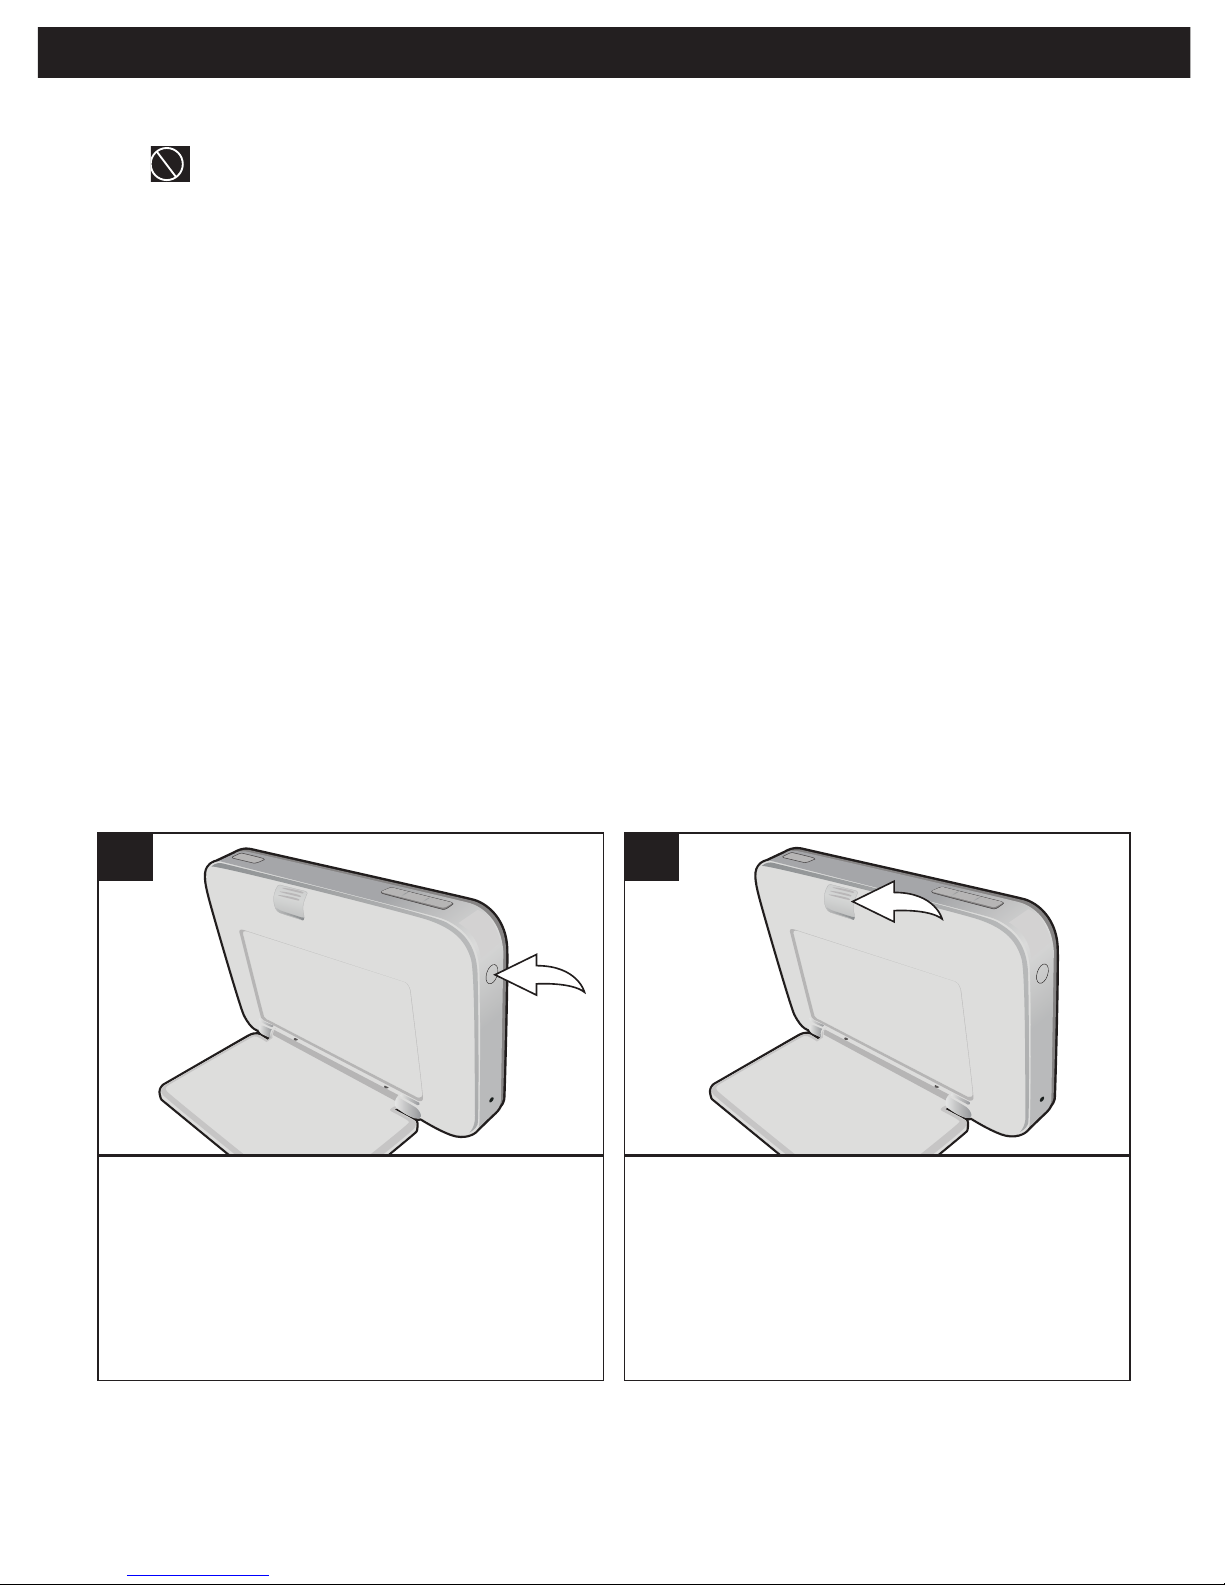
Press the Power button to turn the unit on;
the Power button will light.
NOTE: To turn this unit off, press the Power
button again.
1
Slide the Open Door switch downward to
open the unit; “Open” will appear on the
screen. Insert a disc with the label side
facing up on the disc tray.
2
PLAYBACK OF A DVD
IMPORTANT NOTES:
•“ ”will appear on the screen during operation if you try to access a function that is not
available on the disc.
• Some discs may take a few seconds to load.
• If a disc is inserted incorrectly, dirty, damaged, or is not present at all, “NO DISC” will
appear in the display.
• Always hold the disc without touching either of its surfaces. When inserting a disc, position
it with the printed title side facing up, align it with the guides and place it in its proper position.
• It is important that you read the manual that accompanies the DVD disc as there are features
on this DVD player that cannot be used with certain DVDs. There are also extra features that
are different for each DVD disc, so they are not explained in this owner’s manual.
• If the unit is in Stop mode, Pause mode or if there is no disc in the disc tray, the screen
saver will appear on the screen after five minutes.
• Press and hold the MENU/AV IN/OUT button to select AV OUT. Otherwise, the display will
not show a picture.
NOTE: If you press and hold this button while already playing a DVD, it will reload the disc.
• There is a RESET button inside the disc door for resetting the system in case it freezes.
You will need a thin pointed object, such as a nail or paper clip, to press the RESET button.
CONTINUED ON THE NEXT PAGE
Page 26
26
DVD OPERATION (CONTINUED)
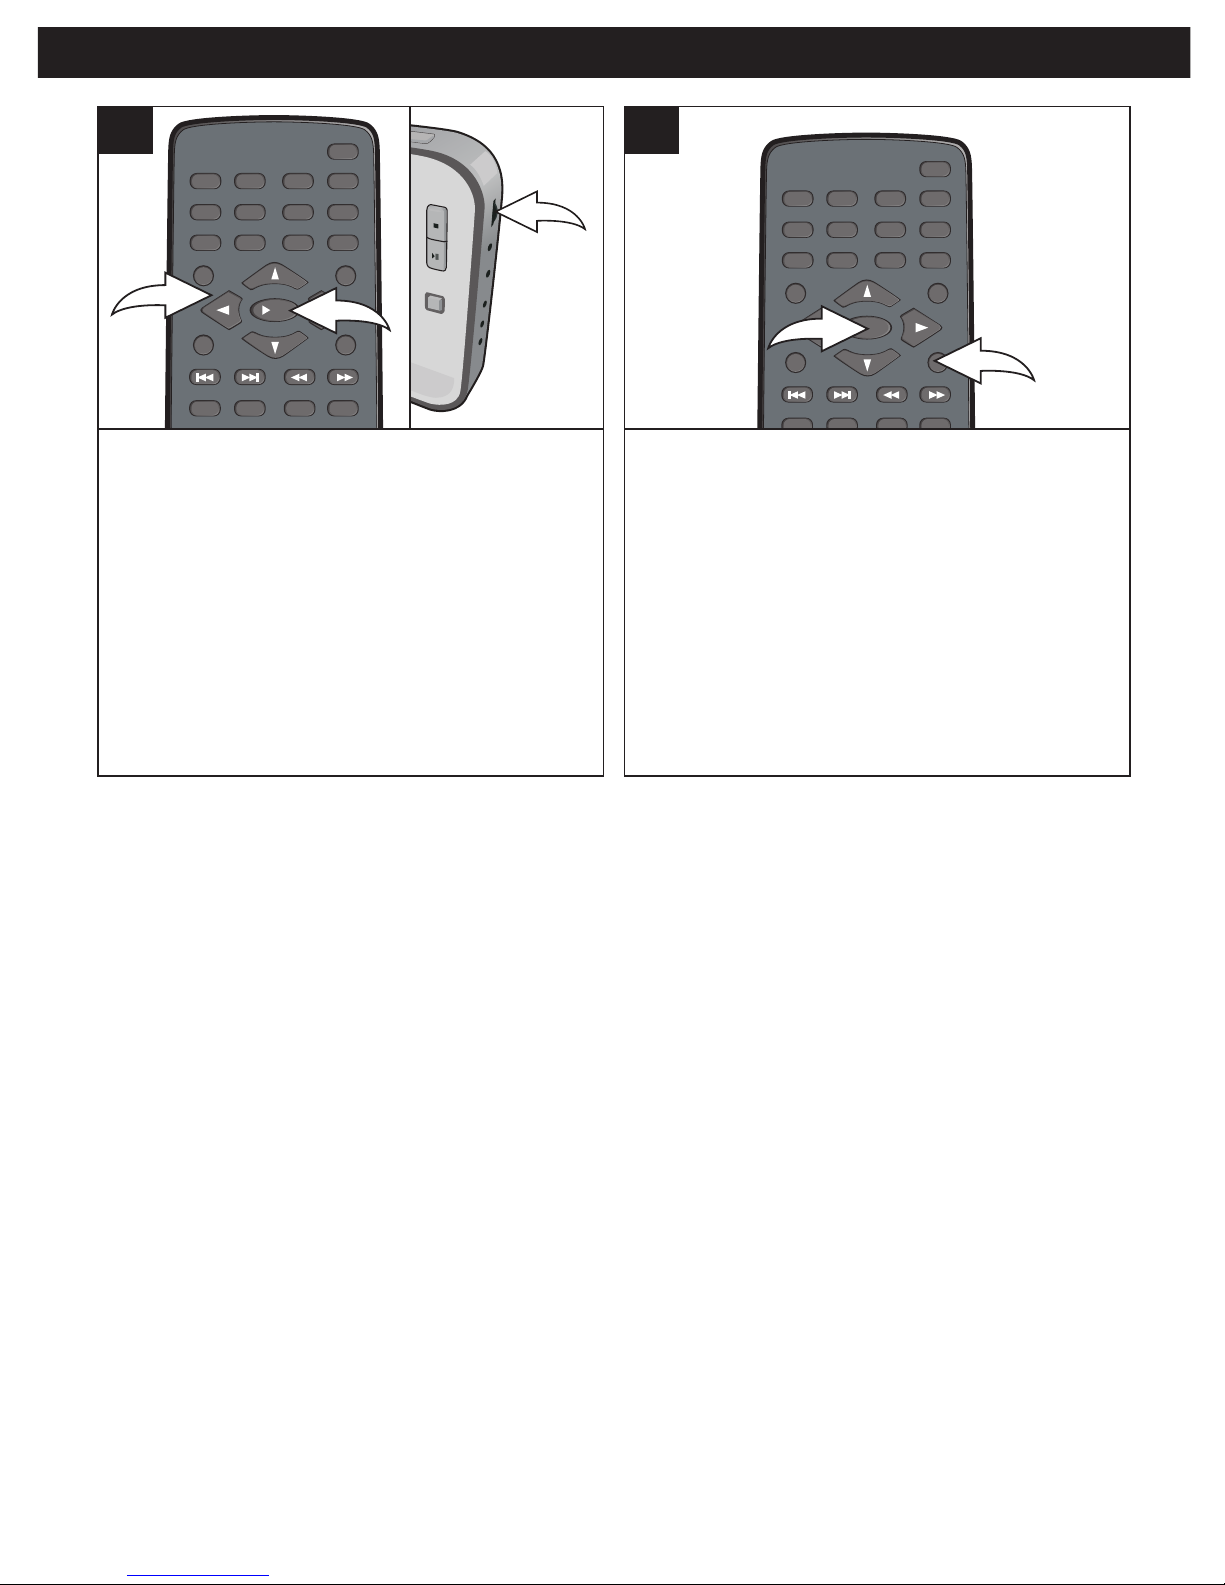
Close the disc tray. After loading, the menu
screen of the DVD should appear. Use the
Navigation (√,®,π,†) buttons 1 to select
the desired option and press the PLAY
(®)/OK button 2 to select it. Adjust the
VOLUME control 3 as desired.
NOTE:
If the menu screen does not appear, press
the MENU button to access it.
REPEAT
PAUS E/
FRAME
S
TOP
M
ENUDISPLAY
CLEAR GOTO
S
ETUP
BOOKMARK
ZOOMSLOWTITLE
/
OK
A-B PROG RANDOM
AUDIO ANGLE SUBTITLE
12 34
56
90
78
2
1
3
To stop playback, press the Stop button 1;
“PRESS PLAY KEY TO CONTINUE” will
appear on the screen. Because the unit will
remember where you stopped, simply press
the PLAY (®)/OK button 2 to resume
playback where you left off (resuming
playback). If the Stop button 1 is pressed
twice, the screen shows “ n ” and the unit
will stop completely.
REPEAT
PAUS E/
FRAME
STOP
MENUDISPLAY
CLEAR GOTO
SETUP
BOOKMARK
ZOOMSLOWTITLE
/OK
A-B PROG RANDOM
12 34
56
90
78
1
2
4
NOTES:
• If a MENU appears on the TV screen, press the Navigation (√,®,π,†) buttons to select
the desired option/item, then press the PLAY (®)/OK button. Please make sure to refer to
the disc’s jacket or case for additional information.
• Resuming playback may not work on all discs.
3
Page 27
27
DVD OPERATION (CONTINUED)
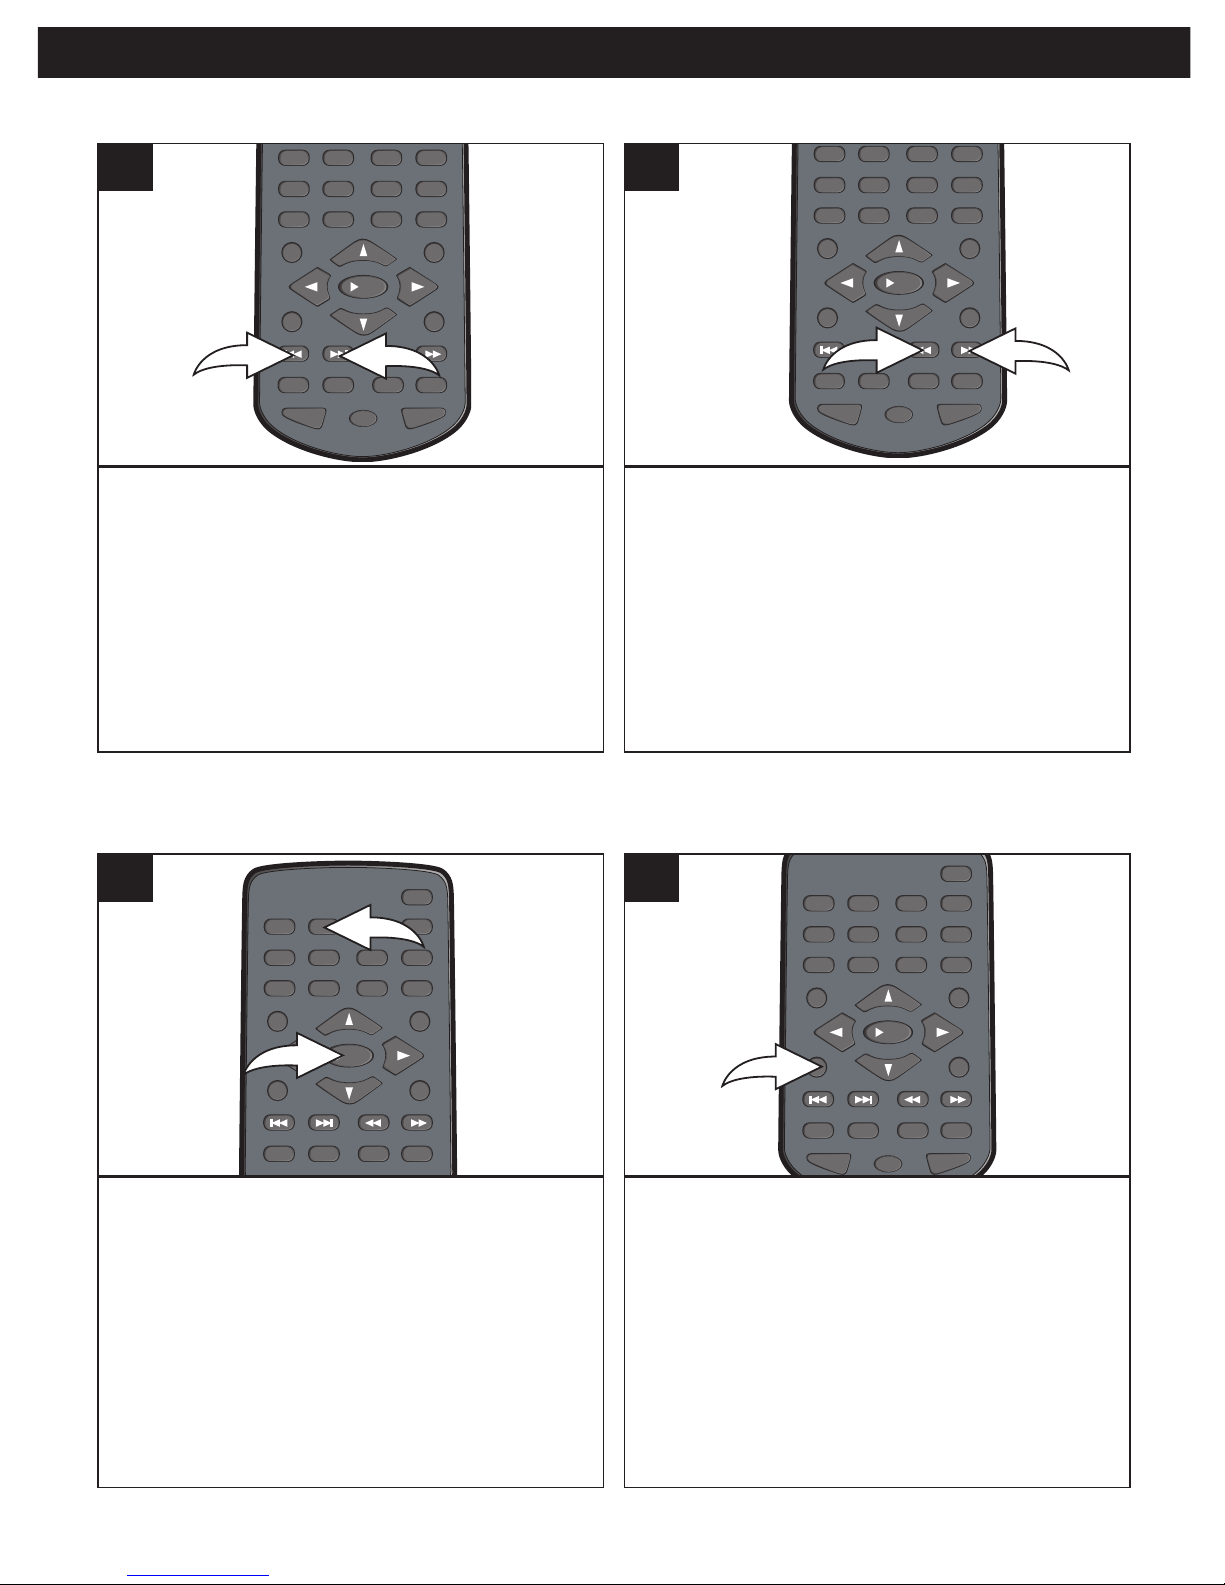
Press the Skip n button 1 to advance the
DVD to the beginning of the next chapter.
Press the Skip o button 2 to move the DVD
to the beginning of the current or previous
chapters.
NOTE: While in play mode, the Navigation
(√,®) buttons on the main unit can act as
fast backward and fast forward respectively.
REPEAT
PAUS E/
FRAME
S
TOP
M
ENUDISPLAY
C
LEAR GOTO
S
BOOKMARK
ZOOMSLOWTITLE
/
OK
A-B PROG RANDOM
AUDIO ANGLE SUBTITLE
12 34
56
9
0
78
1
2
1
During playback, press either the Search ®®
button 1 or Search √√ button 2 to move the
DVD forward or backward at double (x2) speed to
locate a specific section. Repeatedly press these
buttons and the speed will increase to x4, x8, x16,
x32 and resume normal playback.
NOTE: When in Search mode, the DVD will move
forward or backward at high speed until the PLAY
(®)/OK button is pressed again; normal playback
will resume at that point.
REPEAT
PAUS E/
FRAME
STOP
MENUDISPLAY
CLEAR GOTO
S
/OK
A-B PROG RANDOM
AUDIO ANGLE SUBTITLE
12 34
56
90
78
1
2
1
SKIP
SEARCH
During playback, press the SLOW button 1
to move the DVD forward in slow motion
speeds of 1/2, 1/4, 1/8, 1/16 and resume
normal playback. The sound will be muted.
You can also resume normal playback by
pressing the PLAY (®)/OK button 2.
REPEAT
PAUS E/
FRAME
STOP
MENUDISPLAY
CLEAR GOTO
S
ETUP
BOOKMARK
ZOOMSLOWTITLE
/OK
A-B PROG RANDOM
AUDIO ANGLE SUBTITLE
12 34
56
90
78
1
2
1
Press the PAUSE/FRAME button once to
pause the picture.
Repeatedly press the PAUSE/FRAME
button again to advance the DVD one frame
at a time.
NOTE: To resume normal playback, press
the PLAY (®)/OK button.
REPEAT
PAUS E/
F
RAME
STOP
MENUDISPLAY
CLEAR GOTO
SETUP
BOOKMARK
ZOOMSLOWTITLE
/
OK
A-B PROG RANDOM
AUDIO ANGLE SUBTITLE
12 34
56
90
78
1
SLOW MOTION
Use this feature to move the DVD in slow motion.
PAUSE/FRAME
Page 28
28
DVD OPERATION (CONTINUED)
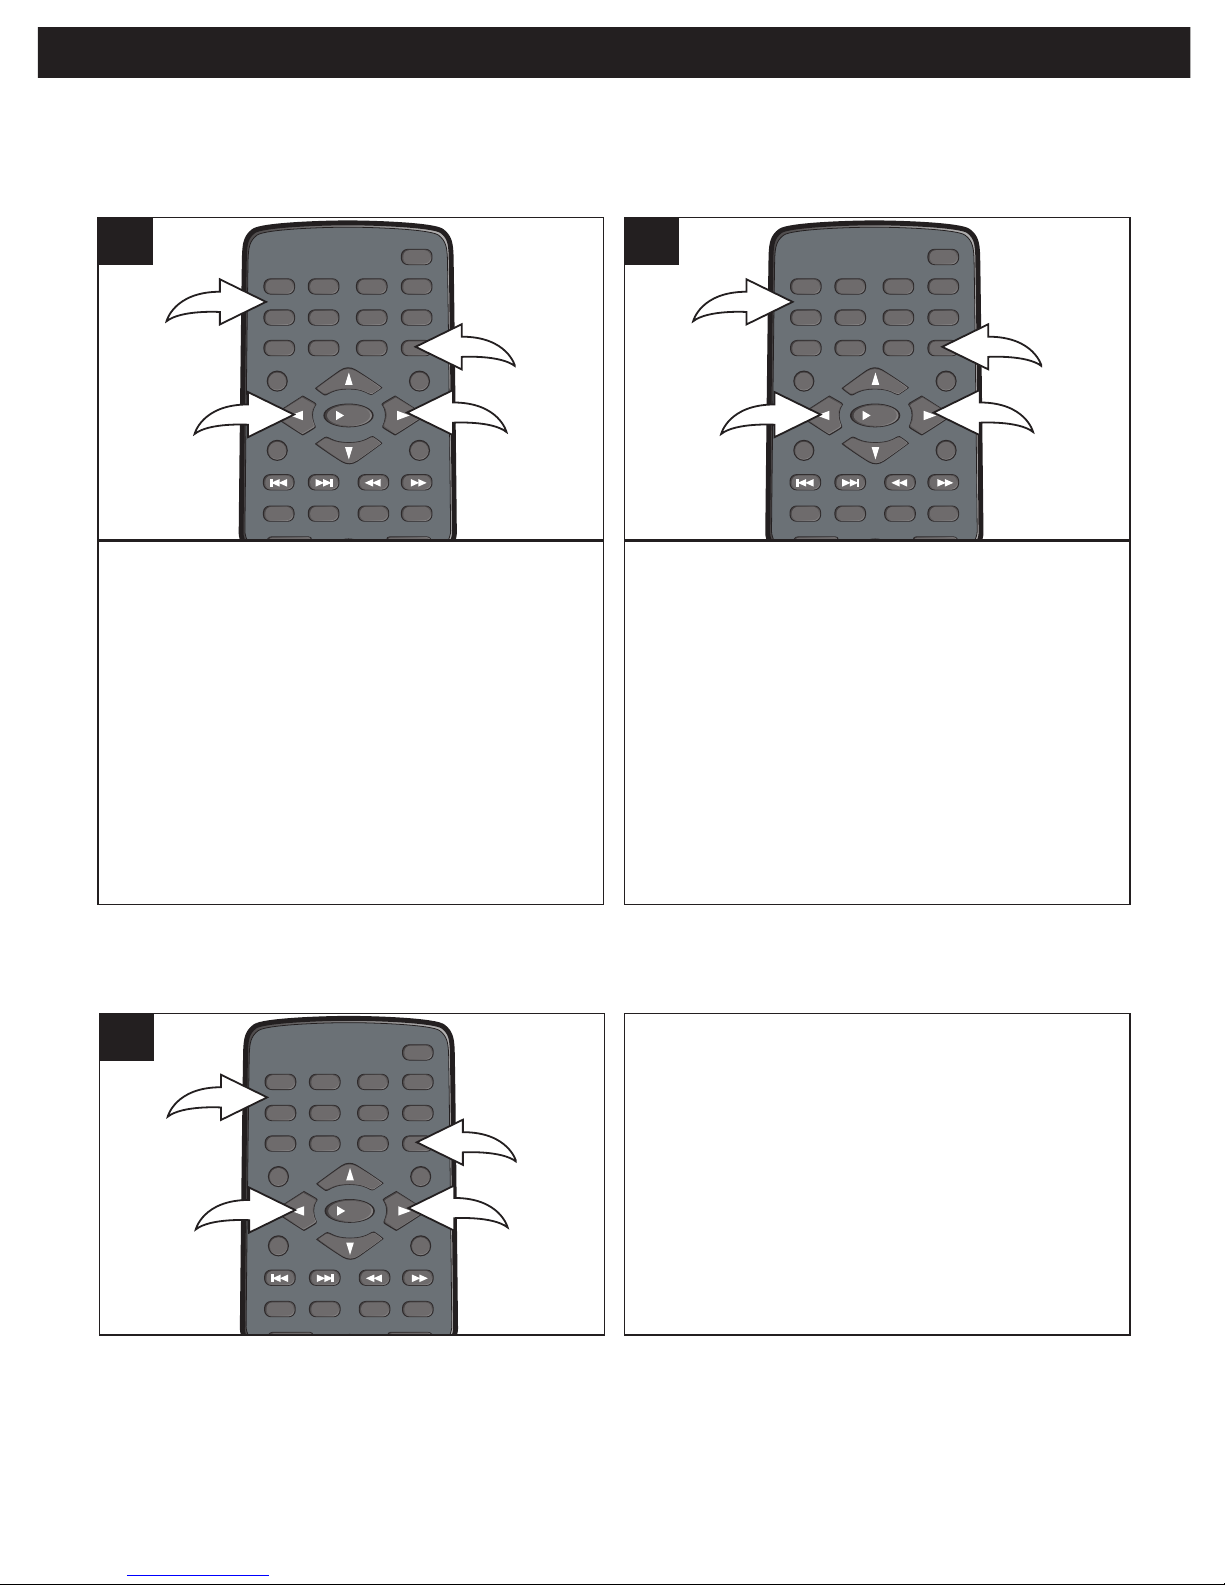
Press the GOTO button 1 once.
Press the Navigation (√,®) buttons 2 to
select TITLE, then use the Number buttons
3 to select the desired title number.
Playback will start immediately.
OR
Press the Navigation (√,®) buttons 2 to
select CHAPTER, then use the Number
buttons 3 to select the desired chapter
number. Playback will start immediately.
REPEAT
P
AUSE/
FRAME
STOP
MENUDISPLAY
CLEAR GOTO
SETUP
BOOKMARK
ZOOMSLOWTITLE
/OK
A-B PROG RANDOM
AUDIO ANGLE SUBTITLE
12 34
56
9
0
78
1
2
2
3
1
Press the GOTO button 1 twice.
Press the Navigation (√,®) buttons 2 to
select TITLE, then use the Number buttons
3 to select the desired title number.
Playback will start immediately.
OR
Press the Navigation (√,®) buttons 2 to
select TIME, then use the Number buttons 3
to select the desired time (Hour/Minutes/
Seconds). Playback will start immediately.
REPEAT
P
AUSE/
FRAME
STOP
MENUDISPLAY
CLEAR GOTO
SETUP
BOOKMARK
ZOOMSLOWTITLE
/OK
A-B PROG RANDOM
AUDIO ANGLE SUBTITLE
12 34
56
9
0
78
1
2
2
3
1
TITLE/CHAPTER SEARCH
Use this feature to directly go to a specific title
and/or chapter.
Press the GOTO button 1 three times.
Press the Navigation (√,®) buttons 2 to
select CHAPTER, then use the Number
buttons 3 to select the desired chapter
number. Playback will start immediately.
OR
Press the Navigation (√,®) buttons 2 to
select TIME, then use the Number buttons 3
to select the desired time (Hour/Minutes/
Seconds). Playback will start immediately.
REPEAT
PAUS E/
FRAME
STOP
MENUDISPLAY
CLEAR GOTO
SETUP
BOOKMARK
ZOOMSLOWTITLE
/OK
A-B PROG RANDOM
AUDIO ANGLE SUBTITLE
12 34
56
90
78
1
2
2
3
1
CHAPTER/TIME SEARCH
Use this feature to directly go to a specific chapter and/or time.
TITLE/TIME SEARCH
Use this feature to directly go to a specific title
and/or time.
Page 29
29
DVD OPERATION (CONTINUED)
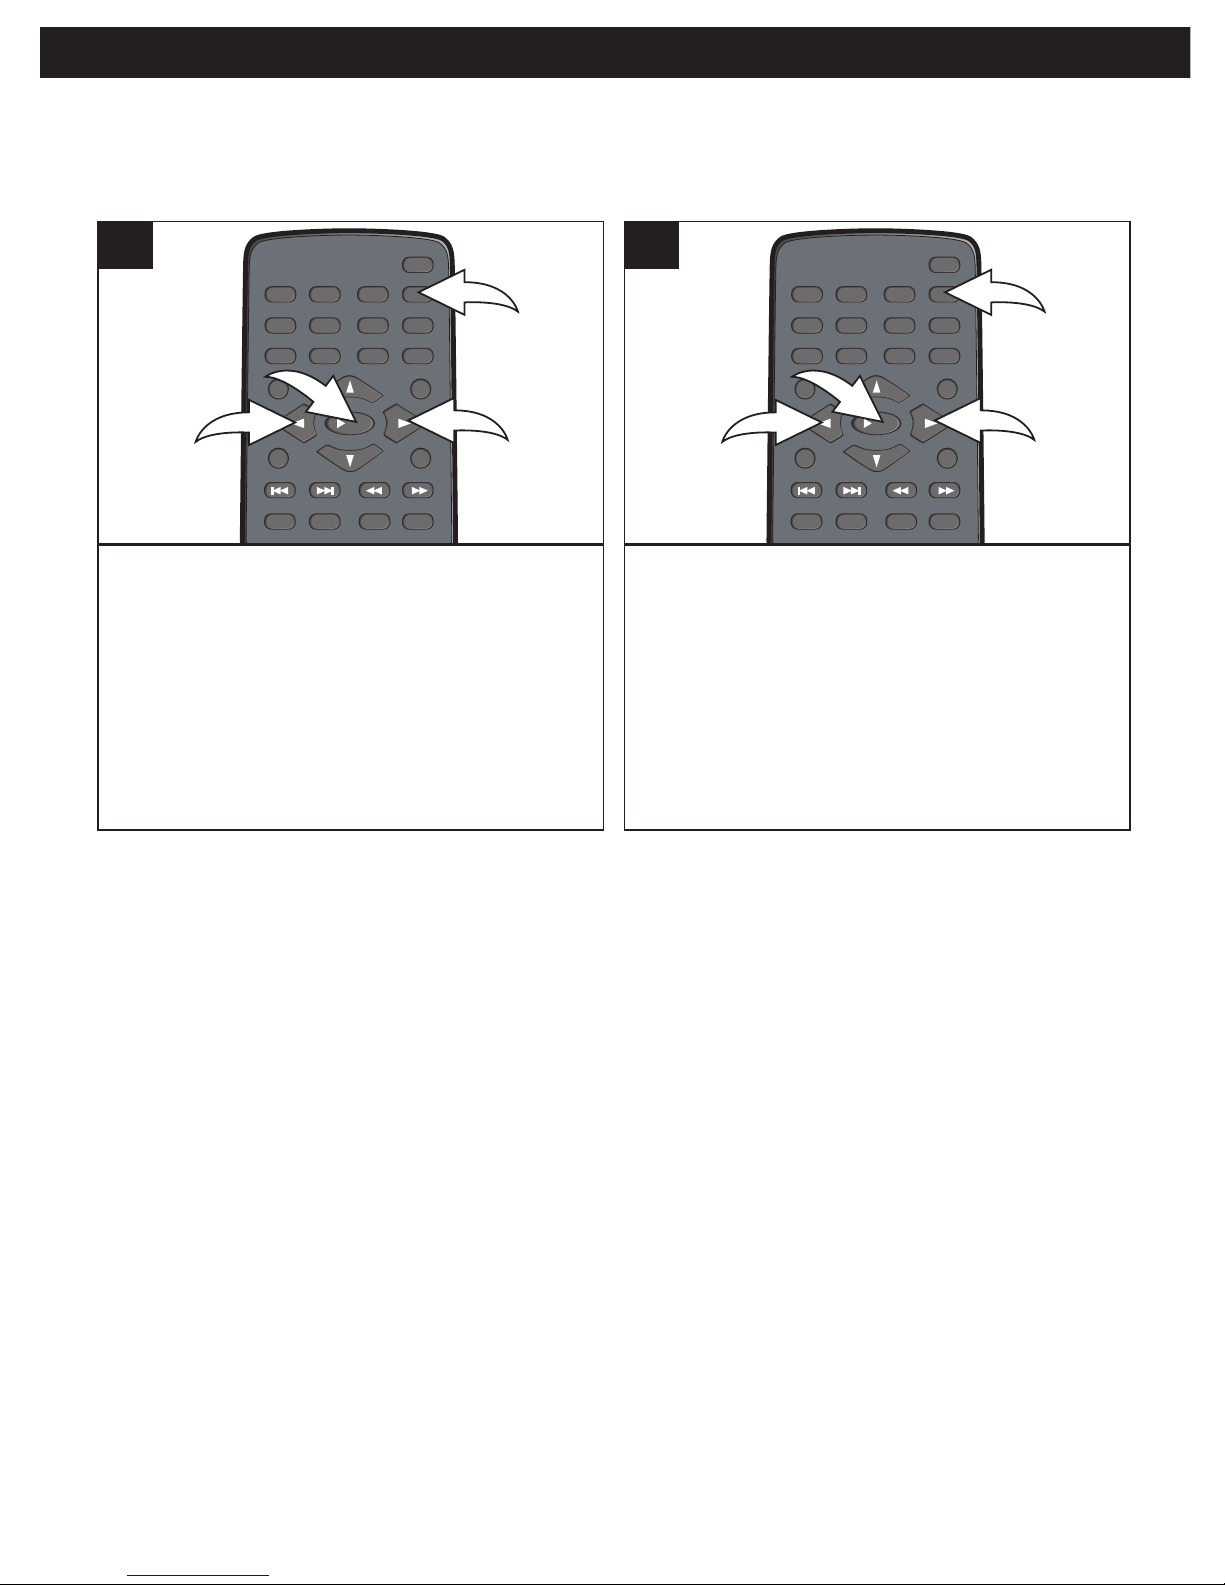
During playback, press the BOOKMARK
button 1; the bookmark menu will appear
on the screen. Use the Navigation (√,®)
buttons 2 to select a blank bookmark box,
then when the desired scene appears, press
the PLAY (®)/OK button 3 to bookmark it. To
remove the bookmark menu from the screen,
press the BOOKMARK button 1 again.
REPEAT
PAUS E/
FRAME
STOP
MENUDISPLAY
C
LEAR GOTO
SETUP
BOOKMARK
ZOOMSLOWTITLE
/OK
A-B PROG RANDOM
A
UDIO ANGLE SUBTITLE
12 34
56
9
0
78
1
2
2
3
1
To go to a previously bookmarked section,
press the BOOKMARK button 1; the
bookmark menu will appear on the screen.
Use the Navigation (√,®) buttons 2 to
select the desired bookmark and press the
PLAY (®)/OK button 3; the DVD will then
begin playing at that point.
REPEAT
PAUS E/
FRAME
STOP
MENUDISPLAY
C
LEAR GOTO
SETUP
BOOKMARK
ZOOMSLOWTITLE
/OK
A-B PROG RANDOM
A
UDIO ANGLE SUBTITLE
12 34
56
9
0
78
1
2
2
3
2
BOOKMARK
This unit allows you to bookmark up to 12 sections of a DVD for later viewing
as follows:
TO DELETE A BOOKMARK, simply select the bookmark that you want to delete in
the Bookmark menu, then press the CLEAR button.
NOTE:
If the disc is changed or the disc compartment door is opened, all the bookmarks will
be cleared.
Page 30
30
DVD OPERATION (CONTINUED)
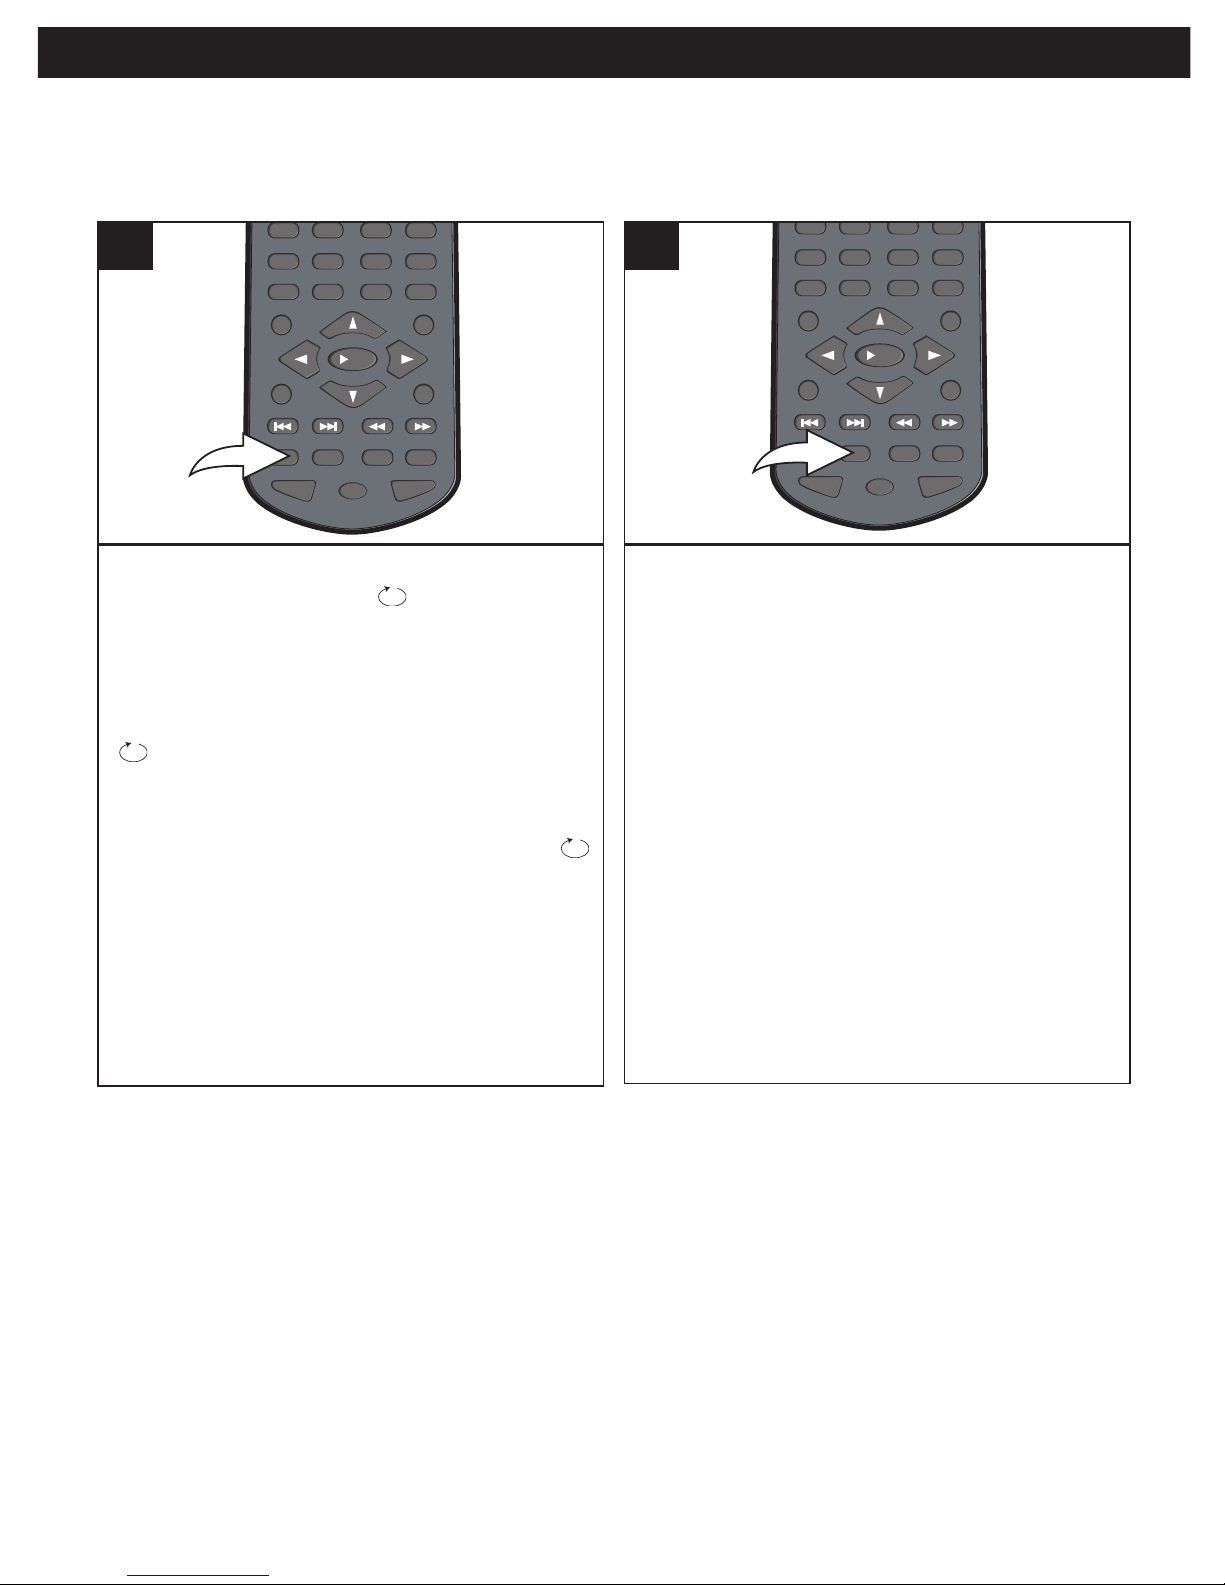
While in the Playback mode, press the
REPEAT button once; “ CHAPTER” will
appear on the screen for a few seconds and
the currently playing Chapter will repeat
continuously.
Press the REPEAT button a second time;
“ TITLE” will appear on the screen for a
few seconds and the currently playing Title
will repeat continuously.
Press the REPEAT button a third time; “
ALL” will appear on the screen for a few
seconds and all chapters/titles will play
continuously.
Press the REPEAT button once more to
cancel Repeat mode.
REPEAT
P
AUSE/
FRAME
STOP
M
ENUDISPLAY
CLEAR GOTO
S
/OK
A-B PROG RANDOM
A
UDIO ANGLE SUBTITLE
12 34
56
9
0
78
1
While in the Playback mode, press the
Repeat A-B button to define where you want
the section to start. Press the Repeat A-B
button again to define where you want the
section to end; the unit will then play the
selected area continuously. Press the
Repeat A-B button again to cancel Repeat
A-B mode.
REPEAT
PAUS E/
FRAME
STOP
M
ENUDISPLAY
CLEAR GOTO
S
/OK
A-B PROG RANDOM
A
UDIO ANGLE SUBTITLE
12 34
56
90
78
1
REPEAT PLAYBACK
While playing back a DVD, this unit can
repeatedly playback a chapter or title.
REPEAT A-B PLAYBACK
While playing back a DVD, this unit can
repeatedly playback a specific section.
NOTE:
Repeat may not work properly with some discs.
Page 31
31
DVD OPERATION (CONTINUED)
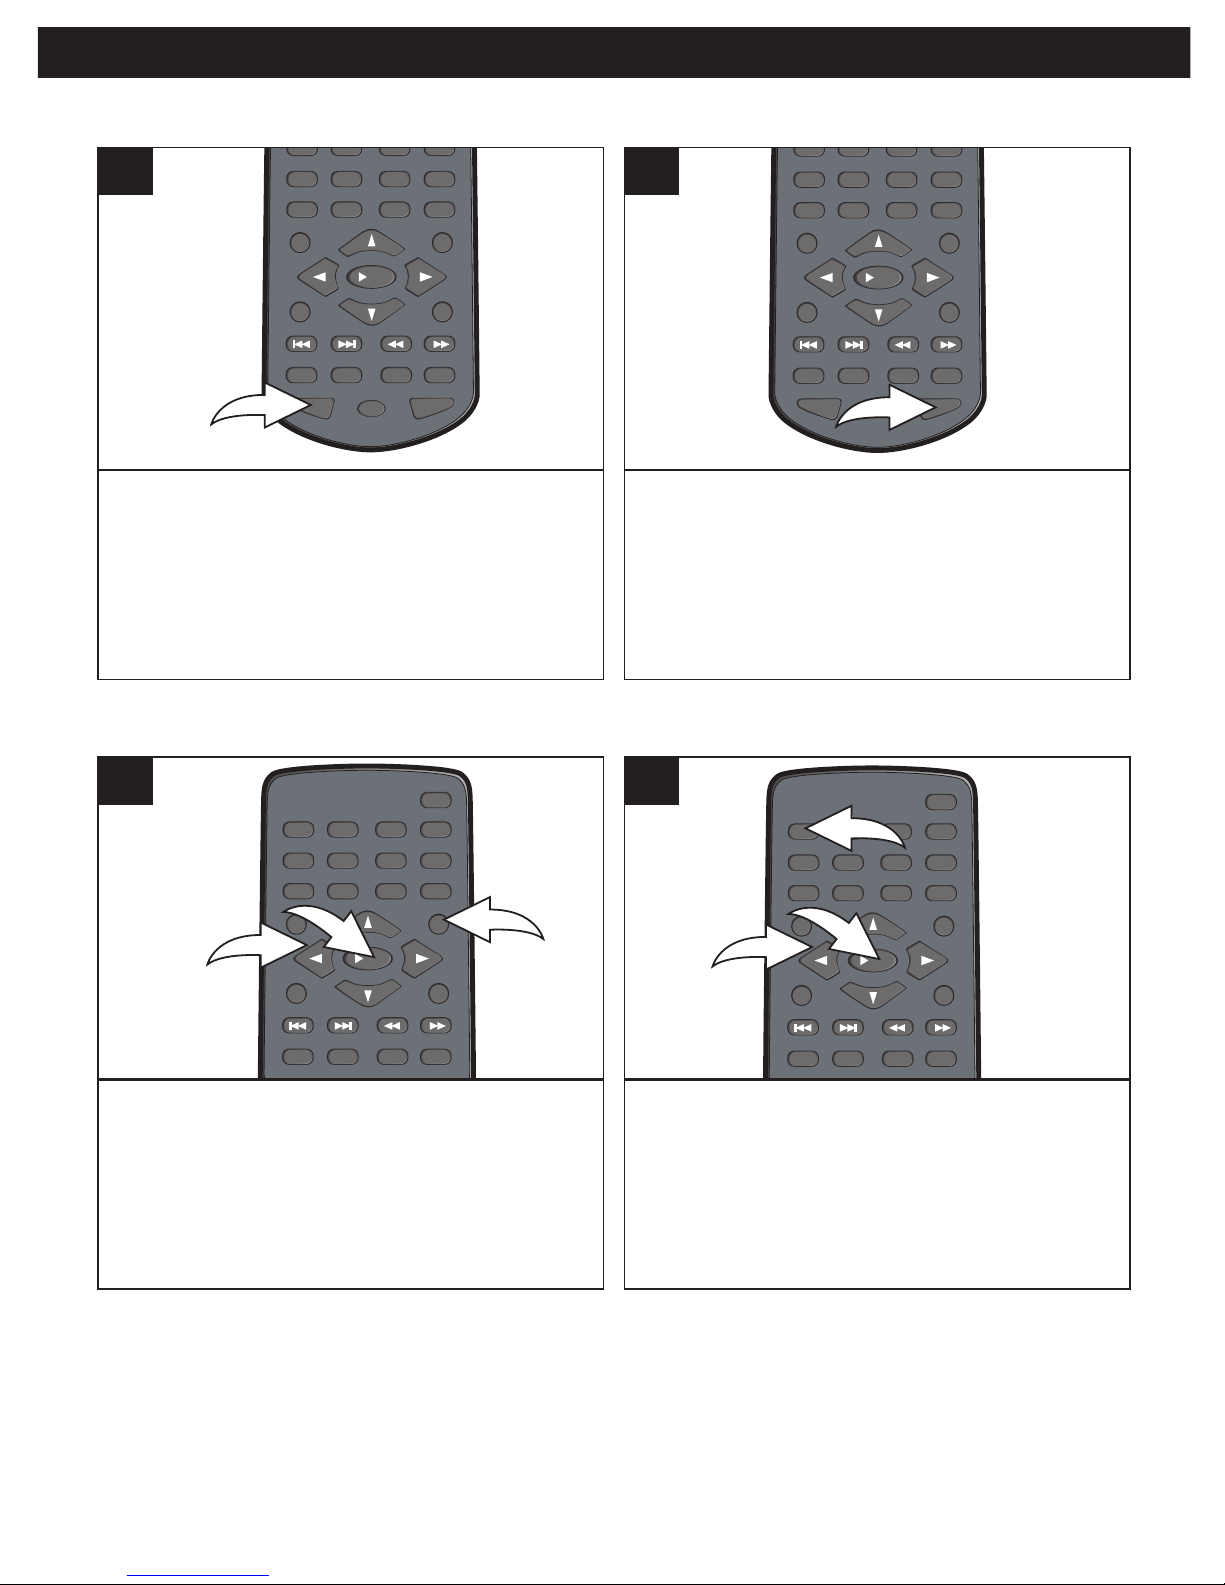
Press the AUDIO button repeatedly to
change the audio language.
This feature is not available on all discs.
REPEAT
P
AUSE/
FRAME
STOP
M
ENUDISPLAY
CLEAR GOTO
S
/OK
A-B PROG RANDOM
AUDIO ANGLE SUBTITLE
12 34
56
90
78
1
Press the SUBTITLE button repeatedly to
select a subtitle language, and to turn the
subtitle menu on/off.
This feature is not available on all discs.
REPEAT
P
AUSE/
FRAME
STOP
M
ENUDISPLAY
CLEAR GOTO
S
/OK
A-B PROG RANDOM
AUDIO ANGLE SUBTITLE
12 34
56
9
0
78
1
AUDIO MENU SUBTITLE MENU
Press the MENU button 1 and the Main
Menu of the disc will appear. Use the
Navigation (√,®,π,†) buttons 2 to select
the desired option, and then press the PLAY
(®)/OK button 3.
This is not available on all discs.
REPEAT
PAUS E/
FRAME
STOP
MENUDISPLAY
CLEAR GOTO
S
ETUP
B
OOKMARK
Z
OOMSLOWTITLE
/OK
A-B PROG RANDOM
AUDIO ANGLE SUBTITLE
1
234
56
90
78
1
2
3
1
Press the TITLE button 1 and the Title
Menu of the disc will appear. Use the
Navigation (√,®,π,†) buttons 2 to select
the desired option, and then press the PLAY
(®)/OK button 3.
This is not available on all discs.
R
EPEAT
PAUS E/
FRAME
STOP
MENUDISPLAY
CLEAR GOTO
SETUP
BOOKMARK
ZOOMSLOWTITLE
/OK
A
-B PROG RANDOM
AUDIO ANGLE SUBTITLE
1
234
56
90
78
1
2
3
1
DVD MENU
TITLE MENU
Page 32
32
DVD OPERATION (CONTINUED)
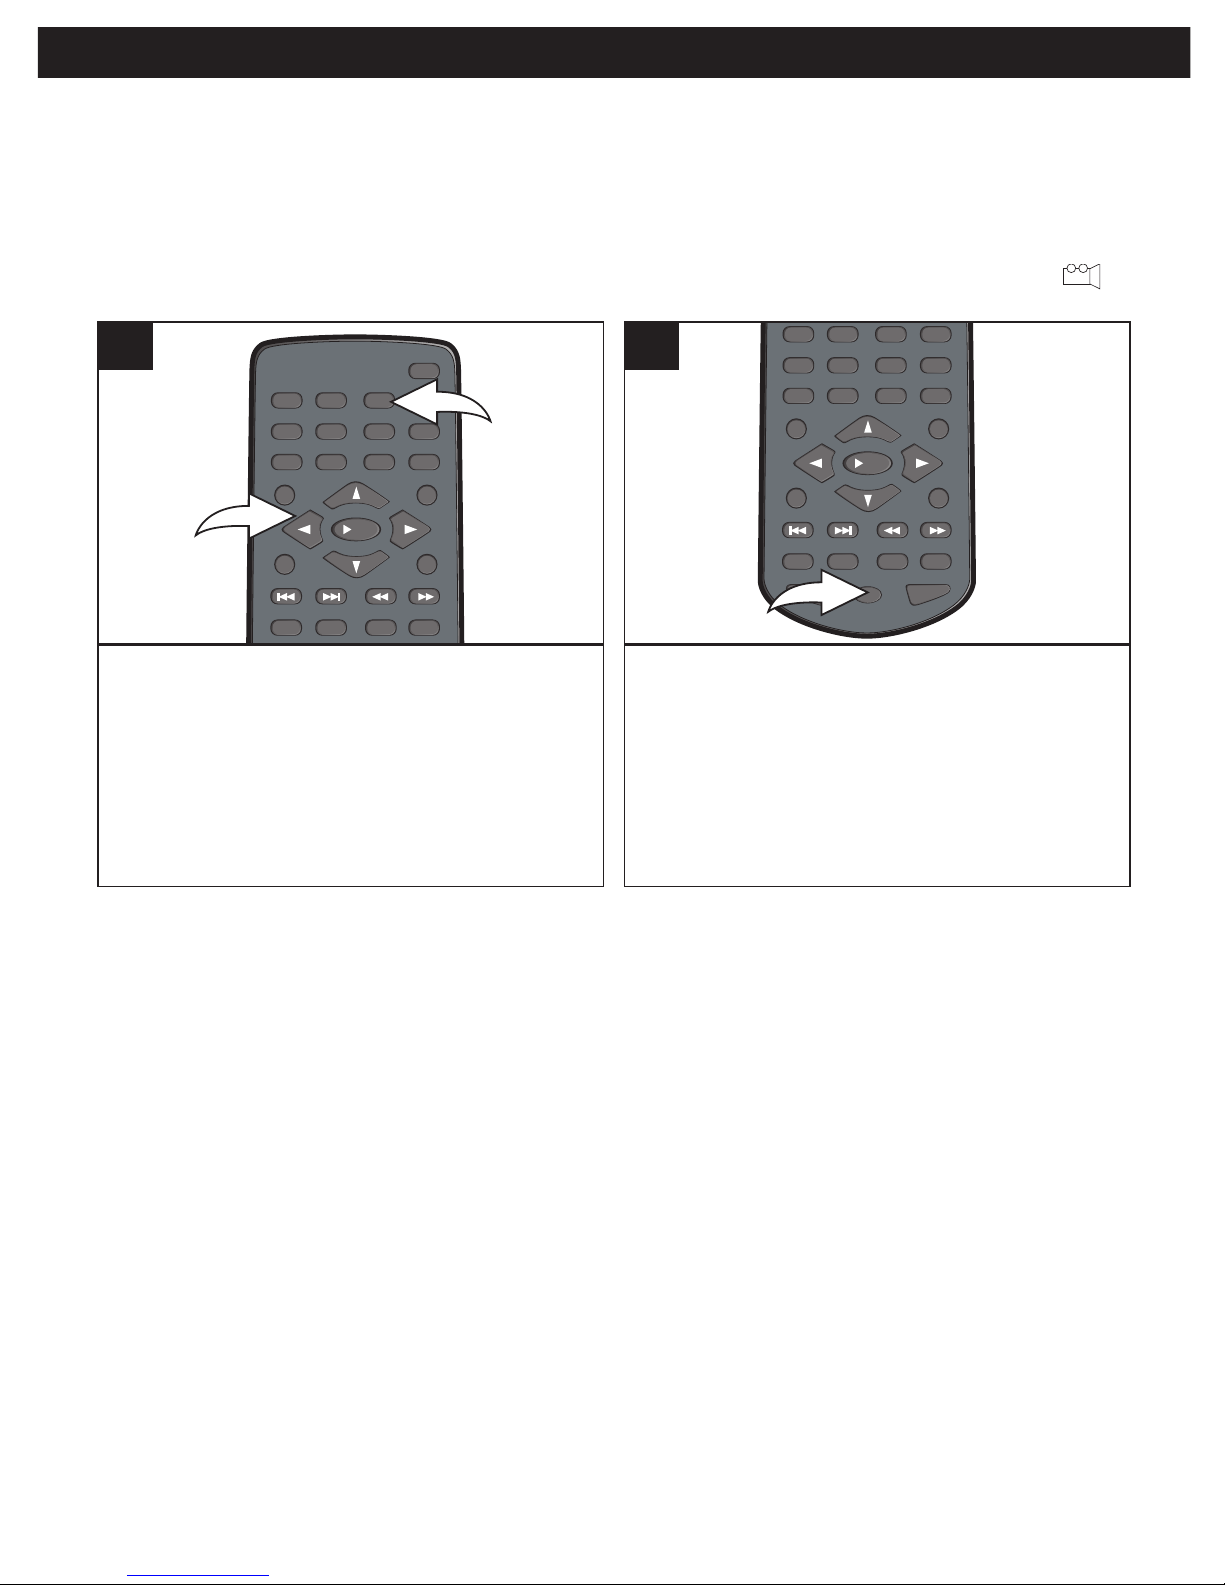
Press the ZOOM button 1 once during Normal,
Slow or Still playback modes, and the unit will
zoom x2. Repeatedly press to cycle through the
following options: x3, x4, 1/2, 1/3, 1/4 and
resume normal view. Use the Navigation
(√,®,π,†) buttons 2 to move the image on
the TV screen. This is not available on all discs.
REPEAT
PAUS E/
F
RAME
STOP
MENUDISPLAY
CLEAR GOTO
SETUP
BOOKMARK
ZOOMSLOWTITLE
/OK
A-B PROG RANDOM
1
234
56
90
78
1
2
1
Press the ANGLE button repeatedly to select
an alternate angle.
This feature is not available on all discs.
REPEAT
P
AUSE/
FRAME
STOP
M
ENUDISPLAY
CLEAR GOTO
S
B
OOKMARK
Z
OOMSLOWTITLE
/OK
A-B PROG RANDOM
AUDIO ANGLE SUBTITLE
1
234
56
90
78
1
ZOOM IN/OUT
The image on the screen can be magnified/
minimized as follows:
ANGLE
Some discs may contain scenes which have
been shot simultaneously from a number of
different camera angles. This feature only
works on discs with more than one camera
angle. The jacket will be marked with “ ”.
Page 33
33
DVD OPERATION (CONTINUED)
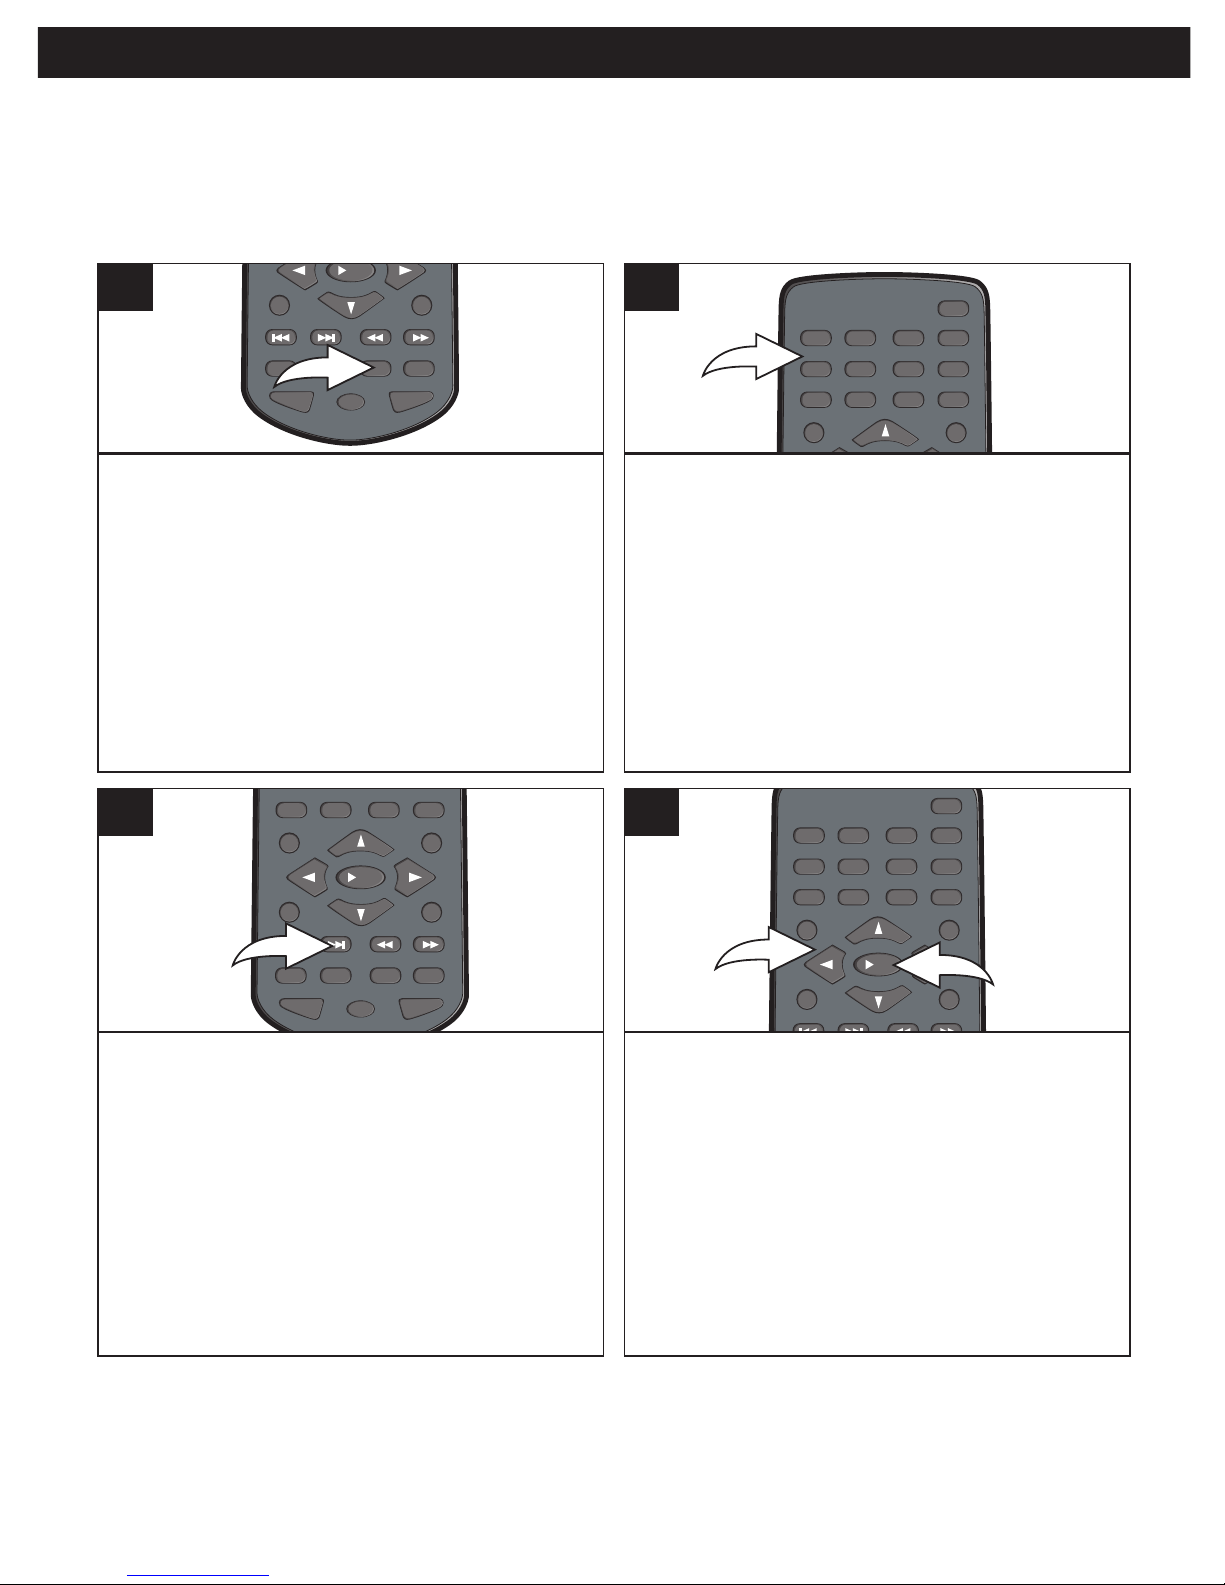
During playback of a DVD disc, press the
PROG button; the Program menu will
appear on the TV screen.
REPEAT
PAUS E/
FRAME
S
TOP
M
/OK
A-B PROG RANDOM
AUDIO ANGLE SUBTITLE
1
1
Select the first title and chapter to be played
back using the Number buttons to input two
numbers for each program track, one for the
title and one for the chapter. After inputting
the two numbers, the cursor will jump to the
next program.
NOTE: To clear and input the program
chapter again, please select the program
chapter, then press the PLAY (®)/OK button
and input the number again.
MENUDISPLAY
C
LEAR GOTO
SETUP
BOOKMARK
ZOOMSLOWTITLE
1
234
56
90
78
2
Repeat step 2 until all desired chapters
have been programmed (up to 20).
If you would like to program more than 10
chapters, press the Skip n button to go to
the next screen.
NOTE: You can also use the Navigation
(√,®,π,†) buttons to select "NEXT n" at
the bottom of the Program menu, then press
the PLAY (®)/OK button.
REPEAT
P
AUSE/
FRAME
STOP
M
ENUDISPLAY
CLEAR GOTO
S
/OK
A-B PROG RANDOM
AUDIO ANGLE SUBTITLE
1
90
7
3
Use the Navigation (√,®,π,†) button 1 to
select "Start" at the bottom of the Program
menu; then press the PLAY (®)/OK button
2 to begin programmed playback. Playback
will begin on the first chapter that you
programmed and the player will continue to
play all of the chapters that you programmed
in the order in which you programmed them.
After all programmed chapters have been
played, the unit will stop automatically.
PAUS E/
FRAME
STOP
MENUDISPLAY
C
LEAR GOTO
SETUP
BOOKMARK
ZOOMSLOWTITLE
/
OK
12 34
56
90
78
2
1
4
PROGRAMMED PLAYBACK
The DVD player in this unit has a 20 chapter programmable memory that allows you to program
up to 20 chapters on any disc for playback in any desired order. You may program 20 different
chapters or you may also program certain chapters to play more than once. To perform
Programmed Playback, proceed as follows:
TO CANCEL AND STOP THE PROGRAM FUNCTION:
Press the PROG button; the Program menu will appear on the TV screen. Use the Navigation
(√,®,π,†) buttons to select "Stop" at the bottom of the Program menu; then press the
PLAY (®)/OK button. Press the PROG button again to exit the Program menu.
Page 34
34
CD OPERATION
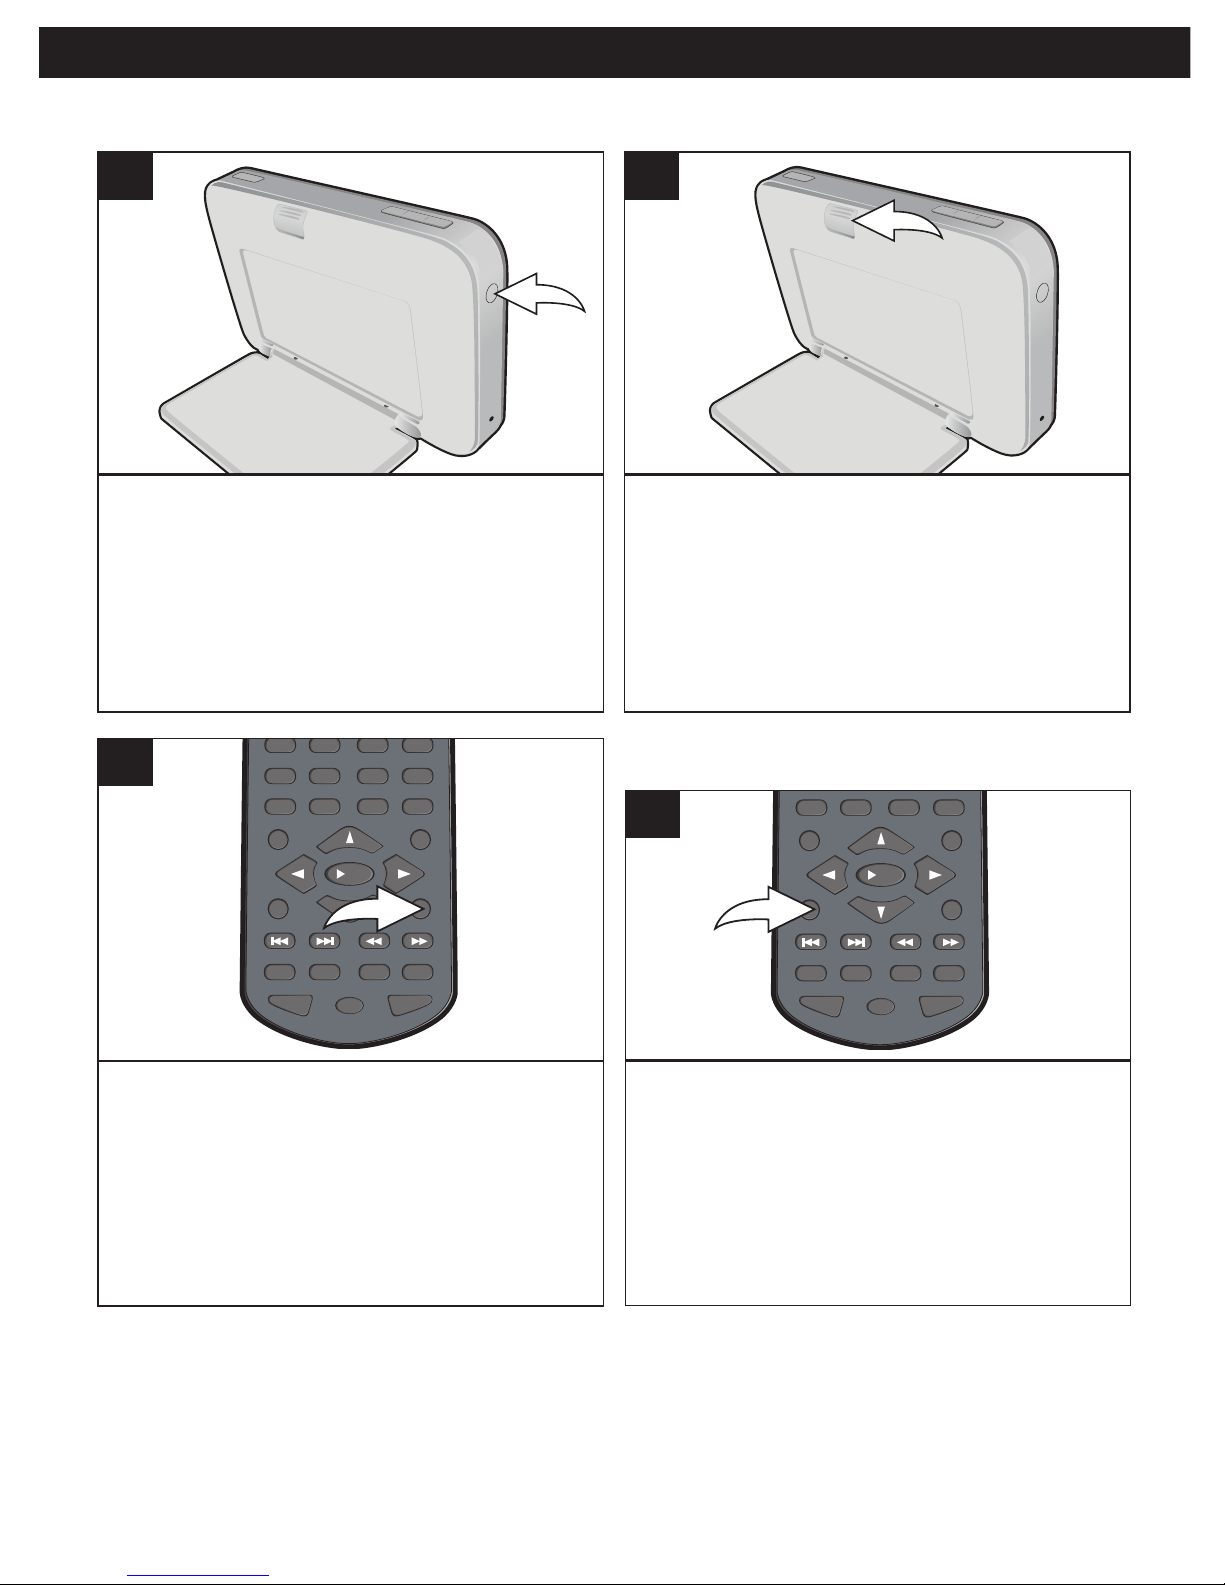
Close the disc tray. After loading, playback
will start automatically. To stop playback,
press the STOP button.
REPEAT
PAUS E/
FRAME
STOP
MENUDISPLAY
CLEAR GOTO
S
/
OK
A-B PROG RANDOM
AUDIO ANGLE SUBTITLE
12 34
56
90
78
3
Press the PAUSE/FRAME button to pause
playback; the Pause indicator will appear on
the screen.
NOTE: Press the PLAY (®)/OK button to
resume playback; the Pause indicator will
turn into the Play indicator again.
R
EPEAT
P
AUSE/
FRAME
S
TOP
M
ENUDISPLAY
CLEAR GOTO
S
/OK
A
-B PROG RANDOM
AUDIO ANGLE SUBTITLE
1
9
0
1
PAUSE
Press the Power button to turn the unit on;
the Power button will light.
NOTE: To turn this unit off, press the Power
button again.
1
Slide the Open Door switch downward to
open the unit; “Open” will appear on the
screen. Insert a disc with the label side
facing up on the disc tray.
2
PLAYBACK OF A CD
Page 35
35
CD OPERATION (CONTINUED)
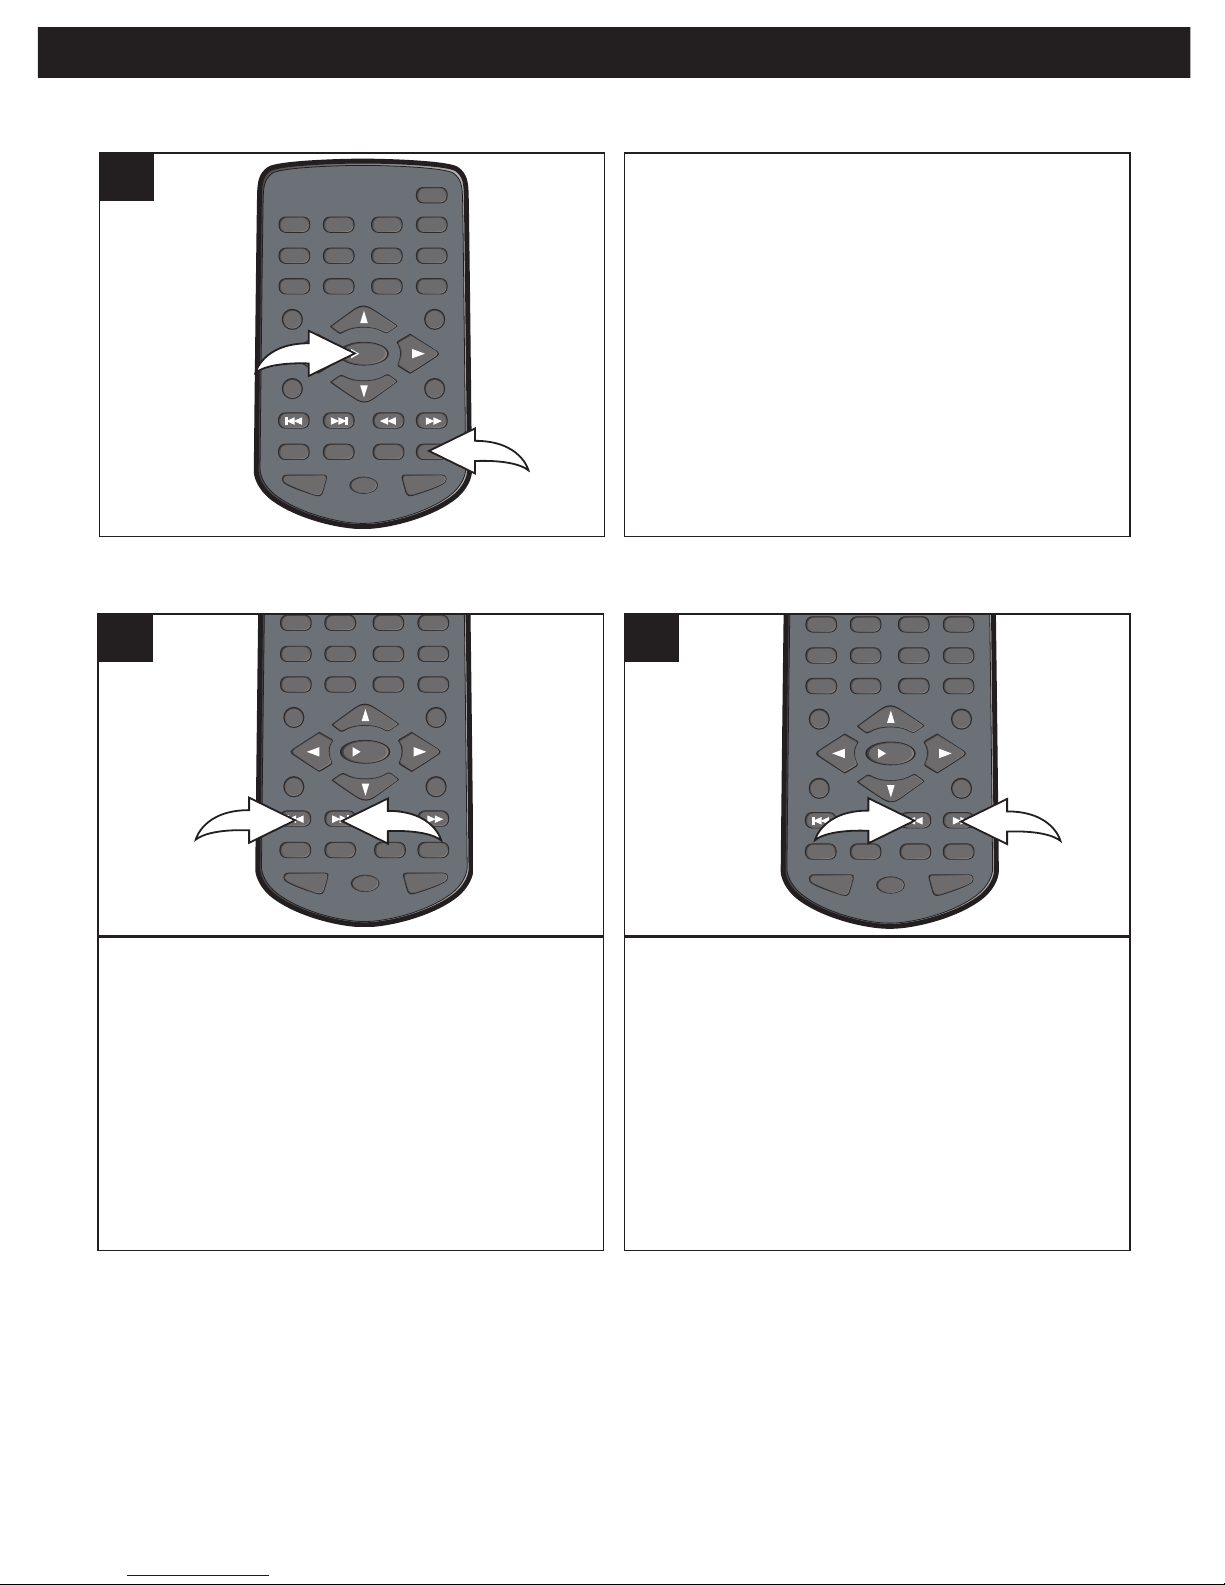
While in the Stop mode, press the
RANDOM button 1 once, “RANDOM” will
appear on the screen; press the PLAY
(®)/OK button 2 and the unit will randomly
playback all the tracks on the CD. To cancel
Random, press the RANDOM button 1 until
“RANDOM” disappears on the screen.
REPEAT
PAUS E/
FRAME
S
TOP
M
ENUDISPLAY
CLEAR GOTO
S
ETUP
B
OOKMARK
Z
OOMSLOWTITLE
/
OK
A-B PROG RANDOM
AUDIO ANGLE SUBTITLE
12 34
56
90
78
1
2
1
RANDOM PLAYBACK
Press the Skip n button 1 to advance to
the beginning of the next track.
Press the Skip o button 2 to move to the
beginning of the previous track.
REPEAT
PAUS E/
FRAME
STOP
MENUDISPLAY
CLEAR GOTO
S
/OK
A-B PROG RANDOM
A
UDIO ANGLE SUBTITLE
12 34
56
90
78
1
2
1
During playback, press either the Search ®®
button 1 or Search √√ button 2 to move the
disc forward or backward at double (x2) speed
to locate a specific section. Repeatedly press
these buttons and the speed will increase to x4,
x8, x16, x32 and resume normal playback.
NOTE: When in Search mode, the disc will
move forward or backward at high speed until
the PLAY (®)/OK button is pressed again;
normal playback will resume at that point.
REPEAT
PAUS E/
FRAME
STOP
MENUDISPLAY
C
LEAR GOTO
S
/OK
A-B PROG RANDOM
AUDIO ANGLE SUBTITLE
12 34
56
90
78
1
2
1
SKIP
SEARCH
Page 36
36
CD OPERATION (CONTINUED)
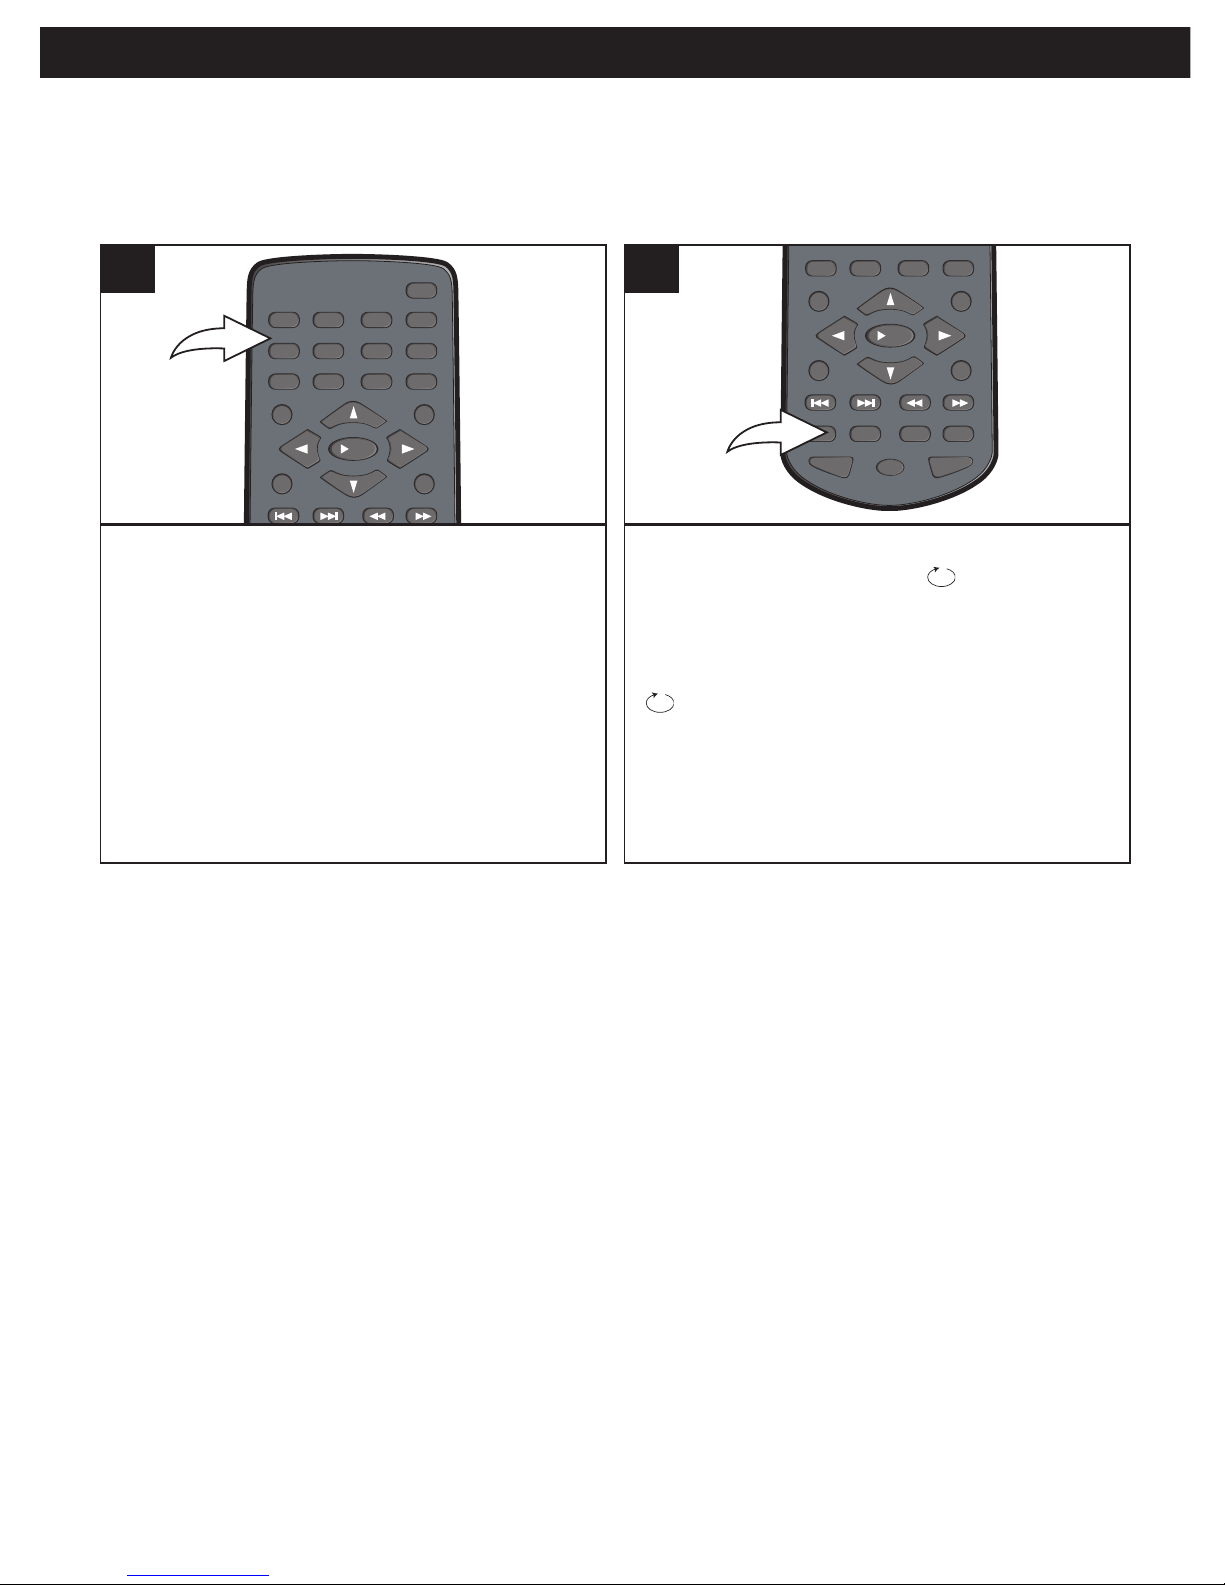
During playback, press the Number buttons
corresponding to the track number to select
your desired track, and the unit will playback
the desired track automatically.
NOTE: Enter a two-digit number to select a
track, i.e. for the first track, press "0" and then
"1" or for the tenth track, press "1", "0", etc.
PAUS E/
FRAME
STOP
MENUDISPLAY
CLEAR GOTO
S
ETUP
BOOKMARK
ZOOMSLOWTITLE
/OK
12 34
56
90
78
1
SELECTING TRACKS USING THE
NUMBER BUTTONS
While in the Playback mode, press the
REPEAT button once; “ TRACK” will
appear on the screen and the currently
playing track will repeat continuously.
Press the REPEAT button a second time;
“ ALL” will appear on the screen and all
of the tracks on the disc will play
continuously.
Press the REPEAT button once more to
cancel Repeat mode.
REPEAT
PAUS E/
FRAME
STOP
MENUDISPLAY
CLEAR GOTO
S
/OK
A-B PROG RANDOM
A
UDIO ANGLE SUBTITLE
1
90
7
1
REPEAT PLAYBACK
While playing back a disc, this unit can
repeatedly playback one or all track(s) on
a disc.
Page 37
37
PICTURE CD OPERATION
REPEAT
P
AUSE/
FRAME
STOP
MENUDISPLAY
C
LEAR GOTO
S
/
OK
A-B PROG RANDOM
AUDIO ANGLE SUBTITLE
12 34
56
9
0
78
1
3
5
2
4
3
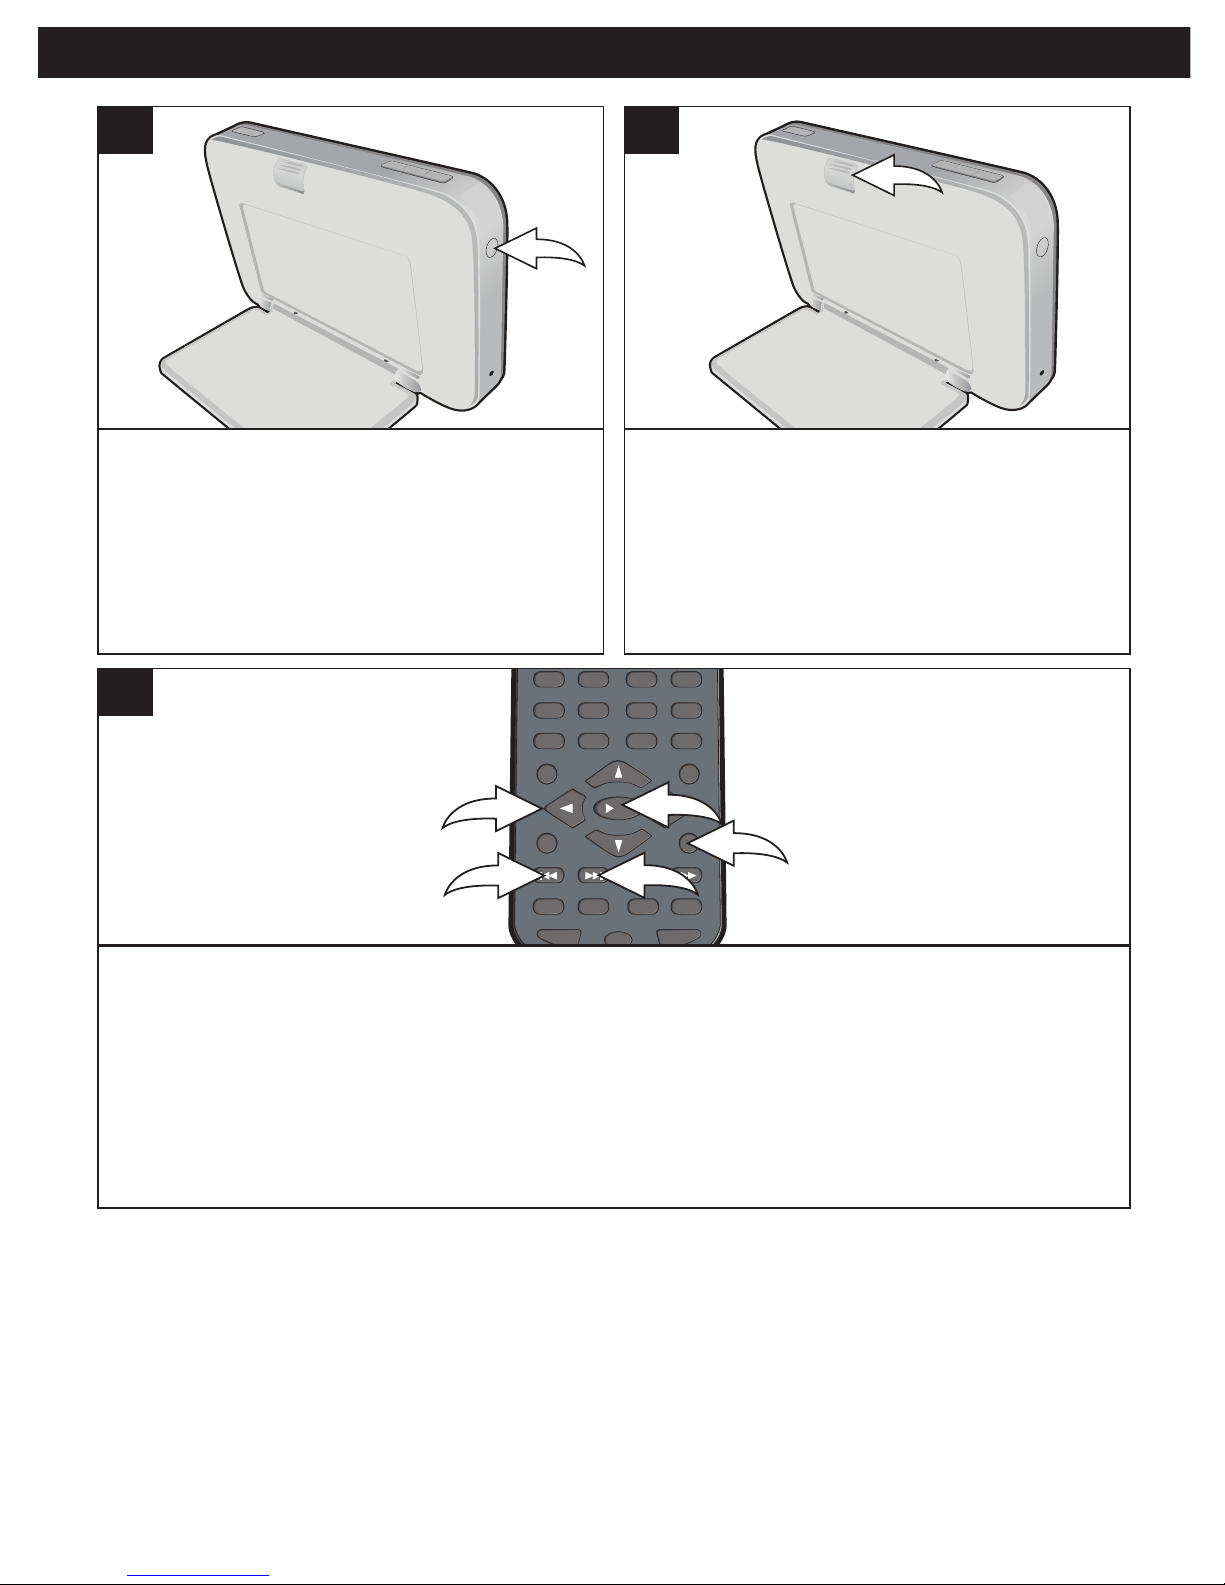
Press the Power button to turn the unit on;
the Power button will light.
NOTE: To turn this unit off, press the Power
button again.
1
Slide the Open Door switch downward to
open the unit; “Open” will appear on the
screen. Insert a disc with the label side
facing up on the disc tray.
2
NOTES:
• You can rotate the picture on-screen using the Navigation (√,®,π,†) buttons during
slideshow playback.
• If the disc contains multiple folders, playback will not begin automatically. Use the
Navigation (π,†) buttons to select the desired folder, then select the picture files within the
folder that you wish to view.
After loading a picture CD, the pictures will automatically show as a slideshow on the
screen. (If playback does not start automatically, press the PLAY (®)/OK button 5 to start
playback.) Press the Skip n1or o 2 button to select the next or previous picture. After the
slideshow is done, it will go to thumbnail view. You can press the Stop button 3 to stop the
slideshow before it is finished; then the thumbnail view will appear. In thumbnail view, you
can press the Skip n1or o 2 button to go to the next or previous page. Press the
Navigation (√,®,π,†) buttons 4 to select the desired picture then press the PLAY (®)/OK
button 5 to view it.
Page 38
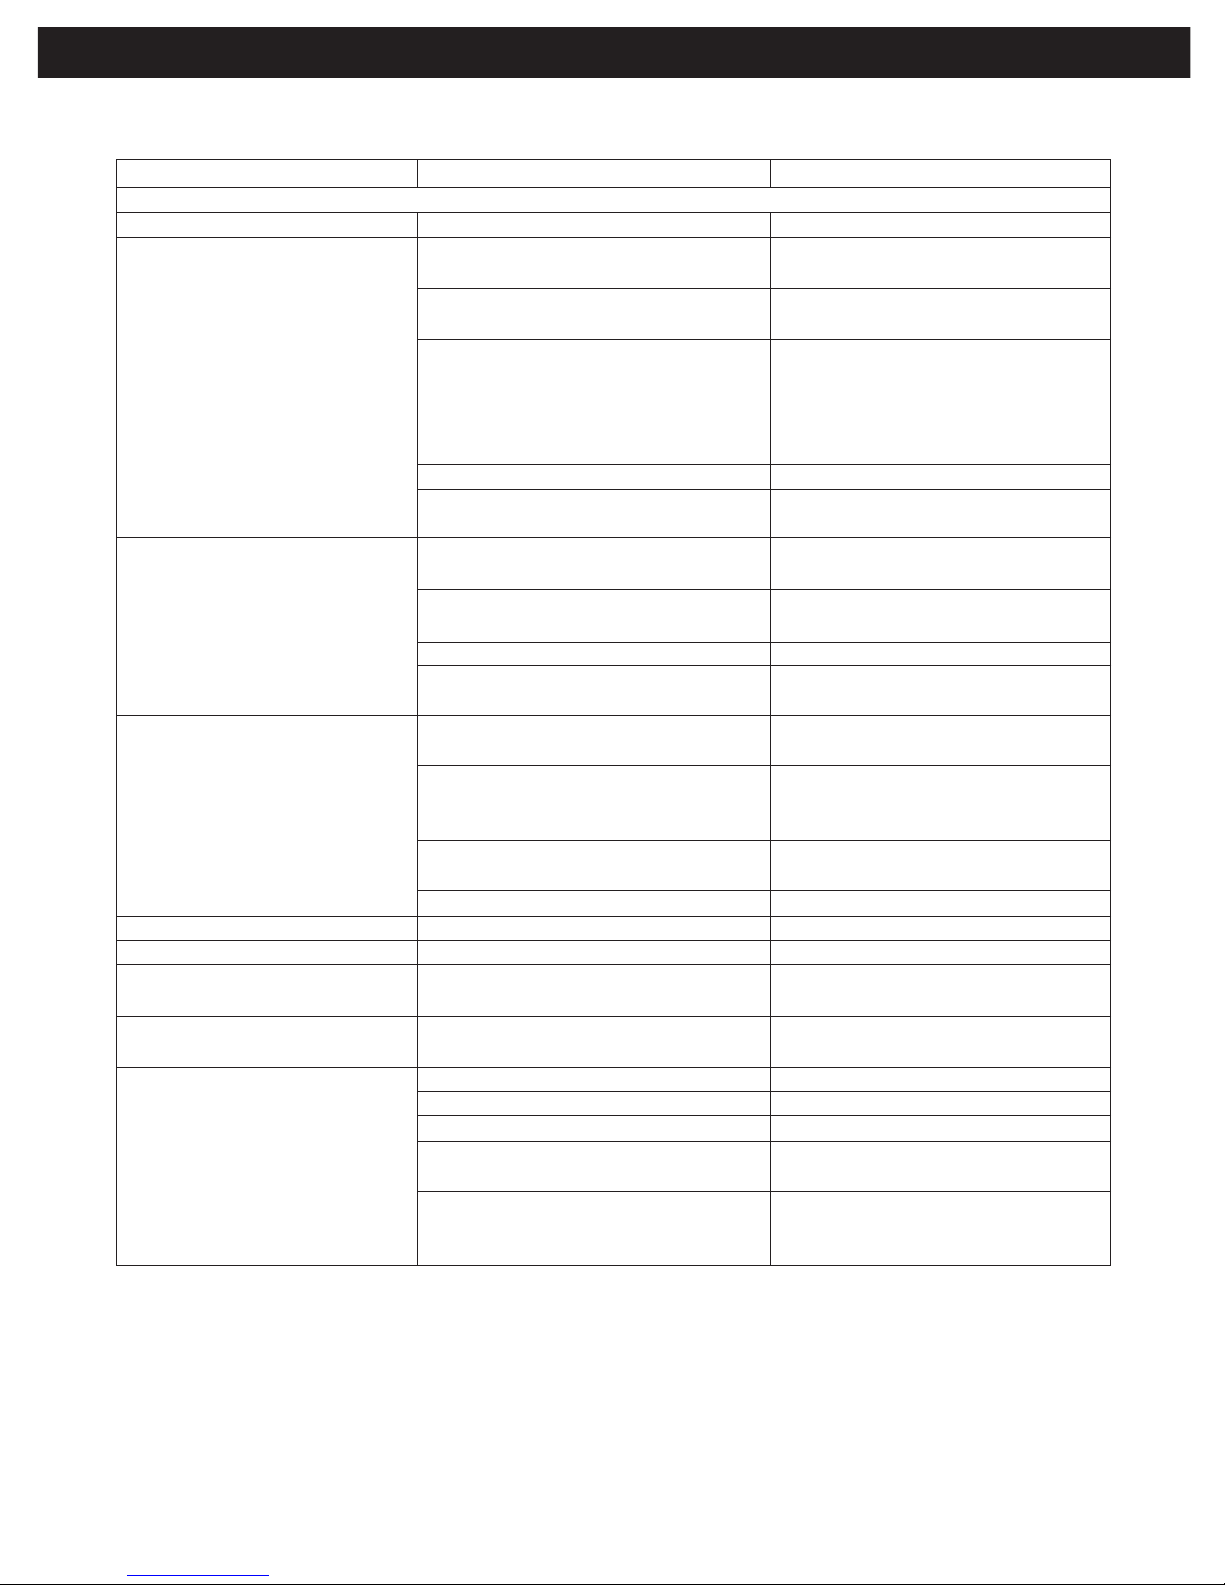
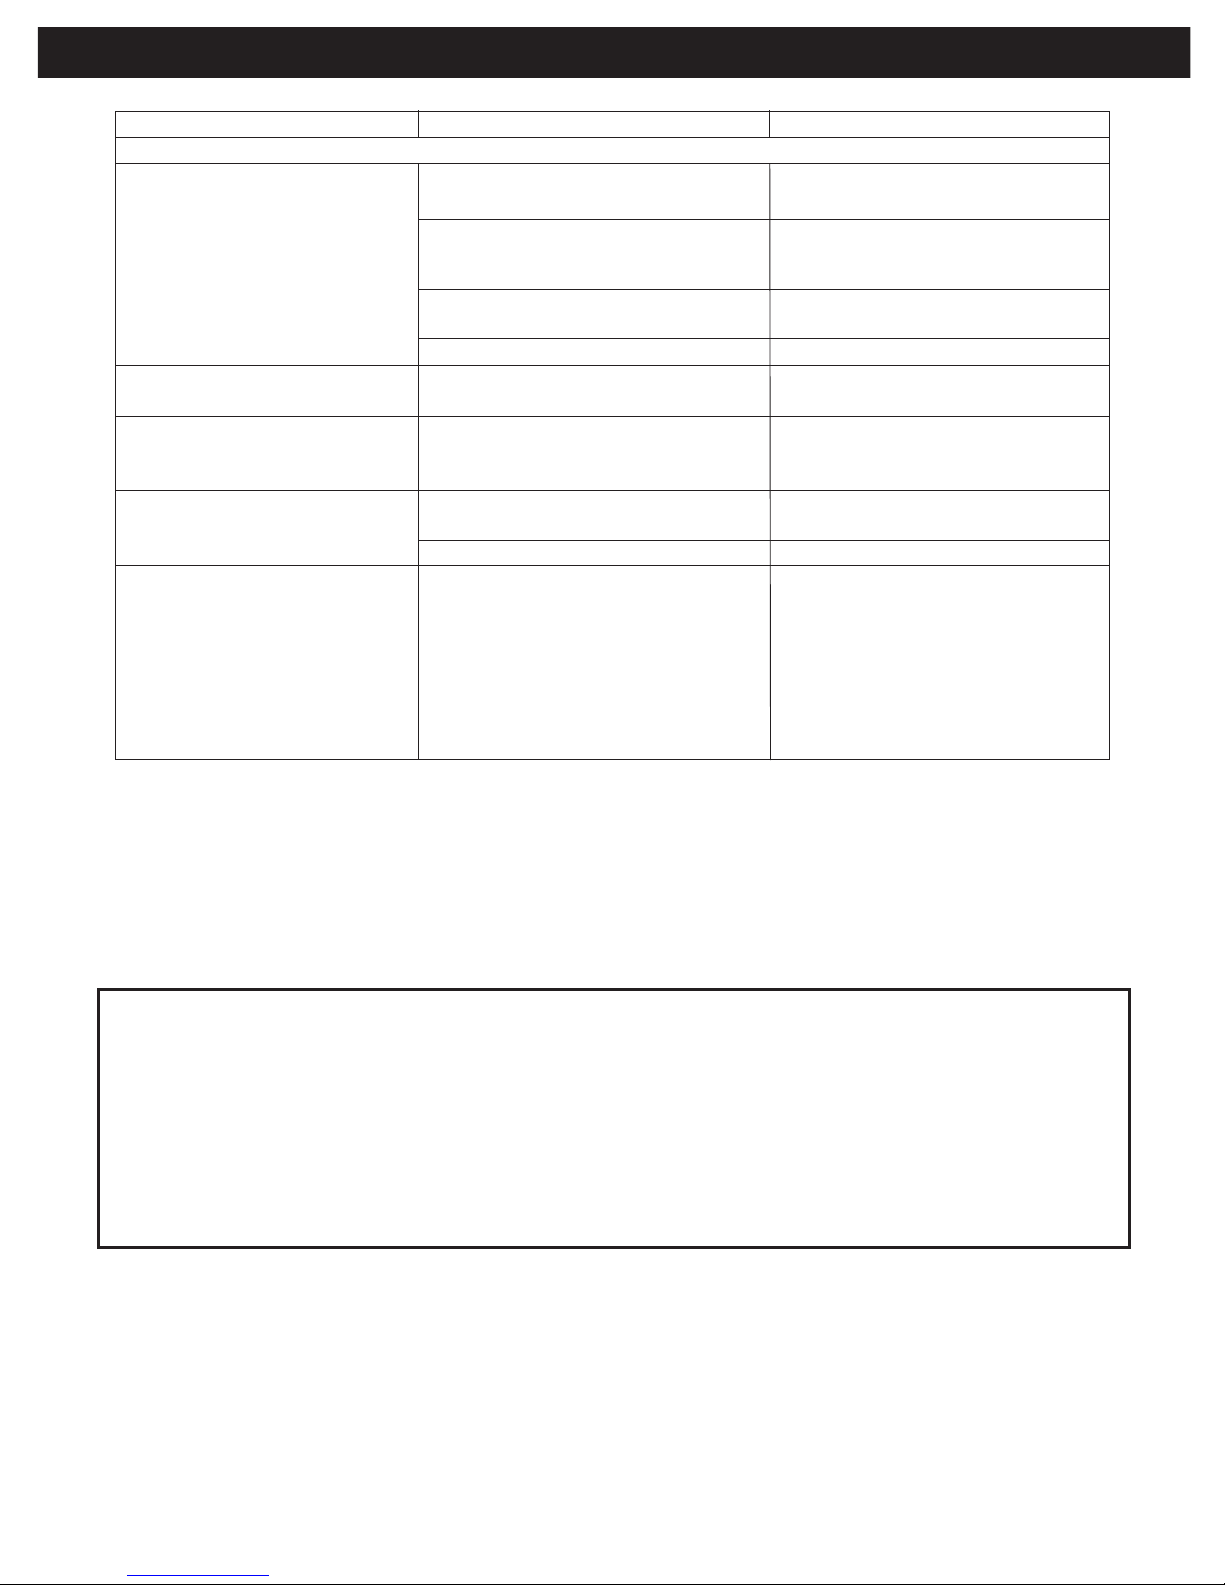
Check the following before requesting service:
38
TROUBLESHOOTING GUIDE
S
YMPTOM
G
ENERAL
No power.
Power on, but unit not functioning
properly.
No picture.
No sound.
Playback picture rolls.
The playback picture is poor.
The Search feature is not working.
The picture is not fitting properly.
The remote control is not working.
P
OSSIBLE SOLUTION
Recharge battery.
Unplug the unit and wait about one to
two hours to allow the player to dry.
This unit cannot play discs, other than
DVD, standard CDs, or picture CDs.
P
ress the RESET button inside the
disc door to reset the system.
Clean disc and insert label side-up.
This is normal; try another function.
Connect the equipment according to the
instructions in this manual.
Select the appropriate video input
mode, usually VIDEO or AV.
Connect the video cables securely.
Press and hold MENU/AV IN/OUT
button to select AV OUT.
Connect the equipment according to the
instructions in this manual.
Select the appropriate audio input
mode.
Connect the audio cables securely.
Turn the audio receiver on.
Set menu option to NTSC.
Clean the disc.
This is normal on some discs.
Select the correct TV type (PS, LB, WIDE)
which matches the TV you are using.
Install a fresh battery.
Install battery according to the diagram.
Aim the remote at the sensor.
Operate within 20 ft, or reduce the light
in the room.
Move obstacle.
P
OSSIBLE CAUSE
Battery is empty.
Condensation has formed.
Wrong type of disc inserted.
U
nit needs to be reset.
The disc is dirty or inserted incorrectly.
Some features and functions are not
available on all discs.
The equipment is not connected properly.
The INPUT
of the TV is not set to receive
the DVD signal output.
The video cables not securely connected.
AV IN/OUT set to IN.
The equipment is not connected properly.
The equipment connected with the audio
cable is not set to receive the DVD signal
input.
The audio cables are not securely
connected.
The connected receiver’s power is off.
Unit needs to be reset to NTSC.
The disc is dirty.
Some discs have sections that do not
allow searching.
Wrong menu option is selected in the
Setup menu.
The battery is weak or dead.
The battery is not installed properly.
The remote is not aimed at the sensor.
Distance is too far or there is too much
light in the room.
There is an obstacle in the path of the
beam.
Page 39
39
TROUBLESHOOTING GUIDE (CONTINUED)
SYMPTOM
D
VD
The unit does not start playback.
Some functions do not operate as
s
tated.
S
elected language is not being
shown in the subtitles, or spoken.
Subtitles are not working properly.
Angle cannot be changed.
POSSIBLE SOLUTION
Insert DVD correctly.
M
ake sure to insert a DVD; “DVD
V
IDEO” will appear in the display.
P
lace the disc on the disc tray correctly
inside the guide.
Clean the disc.
This is normal; try another function.
T
his is normal; try another disc.
This is normal; try another disc.
Turn the subtitles on.
Try another disc, or wait for a scene
which allows a different camera angle.
P
OSSIBLE CAUSE
DVD not inserted, or inserted upside-down.
A non-playback disc is inserted.
The disc is not placed in the guide.
The disc is dirty.
Some features and functions are not
available on all discs.
If the audio or subtitle language does not
appear on the disc, then the initial setting
will not be seen/heard.
Subtitles appear only when the discs
contain them.
Subtitles not turned on.
Angles may not be recorded on the disc
(see disc jacket/case), or they may only
be recorded on certain scenes.
FOR ADDITIONAL SET-UP OR OPERATING ASSISTANCE, PLEASE VISIT OUR
WEBSITE AT:
WWW.MEMOREX.COM
FOR CONSUMER REPLACEABLE PART(S), VERIFY PART NUMBER(S) ON
PAGES 9, 10 AND 11, THEN CONTACT OUR PARTS AND ACCESSORIES
FULFILLMENT CENTER AT: 1-800-379-8439.
Page 40
Caring for Discs
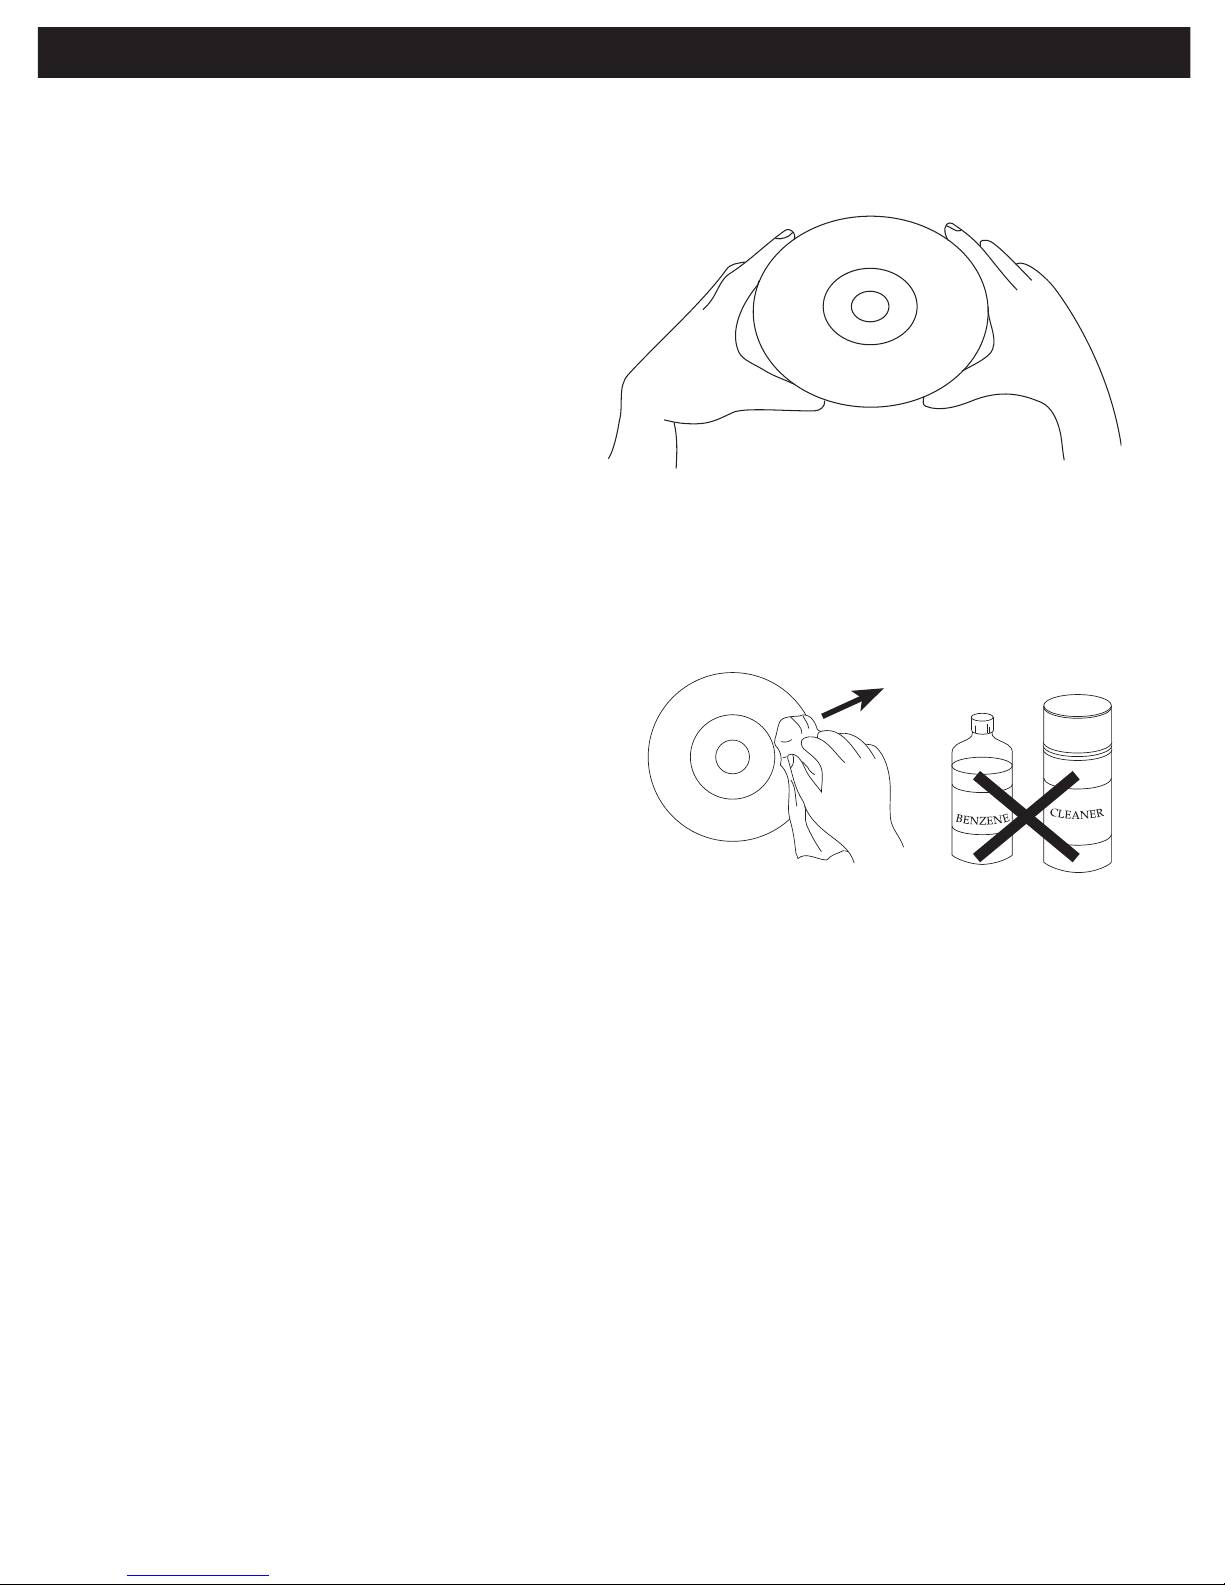
• Treat the disc carefully. Handle the disc only by its edges. Never allow your fingers to
come in contact with the shiny, unprinted side of the disc.
• Do not attach adhesive tape,
stickers, etc. to the disc label.
• Clean the disc periodically with a
soft, lint-free, dry cloth. Never use
detergents or abrasive cleaners to
clean the disc. If necessary, use a
CD cleaning kit.
• If a disc skips or gets stuck on a
section of the disc, it is probably dirty or damaged (scratched).
• When cleaning the disc, wipe in straight lines from the center of the disc to the
outer edge of the disc. Never wipe in circular motions.
• Discs should be stored in their cases after each use to avoid damage.
• Do not expose discs to direct sunlight,
high humidity, high temperatures or
dust, etc. Prolonged exposure or
extreme temperatures can warp the
disc.
• Do not stick or write anything on either
side of the disc. Sharp writing
instruments, or the ink, may damage
the surface.
Cleaning the Unit
• To prevent fire or shock hazard, disconnect your unit from the AC power source
when cleaning.
• The finish on your unit may be cleaned with a dust cloth and should be cared for like
other portable electronics. Use caution when cleaning and wiping the plastic parts.
• Mild soap and a damp cloth may be used on the front panel.
• Do not spray cleaners directly onto the unit. When using a cleaner, spray onto a
cleaning cloth and then wipe the unit.
40
CARE AND MAINTENANCE
Page 41

Power Requirements .........................................................DC IN 12V (Center Positive z)
Battery..................................................Rechargeable Li-Polymer Battery DC 7.4V, 2400 mAh
Weight..............................................................................................................................2.1 lbs
Dimensions ...............................................................10 (L) x 6.2 (W) x 1.9 (Thickness) inches
LCD Display..................................................................................................................8 inches
Operating Temperature ..........................................................................................32° to 104°F
Operating Humidity Range ................................................................< 95% (no condensation)
Accessories ....................AC Adapter, Remote Control, Remote Battery, Audio/Video Cable
Discs Played:
DVD-VIDEO Disc
12cm single-sided, single layer
12cm single-sided, dual layer
12cm double-sided, single layer
8cm single-sided, single layer
8cm single-sided, dual layer
8cm double-sided, single layer
COMPACT DISC
12cm disc
8cm disc
Video Output Level ...........................................................................................................1Vp-p
Audio Output Level...............................................................................700mVrms (1KHz, 0dB)
Audio Signal Output Characteristics:
Frequency Responses:
DVD (Linear Audio) ......................................................20Hz-20KHz (48KHz/96KHz sampling)
CD Audio................................................................................................................20Hz-20KHz
S/N Ratio............................................................................................................................70dB
Wow and Flutter..................................................................................Below Measurable Level
Pickup:
Wavelength......................................................................................................................655nm
Laser Power ...................................................................................................................Class 1
Specifications are subject to change without notice.
41
SPECIFICATIONS
Imation Enterprises, Corp.
1 Imation Way, Oakdale, MN 55128-3414 USA • memorex.com
© Imation Corp.
Memorex and the Memorex logo are trademarks
of Imation Corp. and its affiliates.
 Loading...