

Page 1
OWNER’S MANUAL
MANUAL DE INSTRUCCIONES
DVD PLAYER / Hi-Fi VIDEO CASSETE RECORDER
DVD COMPACTOS / VIDEOGRABADOR Hi-Fi ESTEREO
MVD4541
ENGLISHESPAÑOL
If you purchase a universal remote control from your local retailer, please contact the
remote manufacturer for the required programming code.
Si usted a comprado un control remoto universal, por favor comunicace con el fabricante
para el codico de programaccion requerido.
When shipped from the factory, the TV/CABLE menu option is set to the “CABLE
(Cable T elevision) mode.
If not using CABLE (Cable TV), set this menu option to the “TV” mode.
Al salir la unidad de fábrica, la opción de menú de TV/CABLE se ajusta al modo de
“
CABLE” (Televisión por cable).
Si no utiliza CABLE, ajuste esta opción de menú al modo de “TV”.
Before operating the unit, please read this manual thoroughly .
Antes de usar la unidad, lea detenidadmente este manual de instrucciones.
2F3P421A[E] Cover 1/25/05, 12:00 PM1
ATTENTION
ATENCION
TV/CABLE MODE SELECTION
SELECCION DE MODO DE TV/CABLE
”
Page 2
ENGLISH
CAUTION:
CAUTION
RISK OF ELECTRIC SHOCK
DO NOT OPEN
TO REDUCE THE RISK OF ELECTRIC
SHOCK, DO NOT REMOVE COVER (OR
BACK). NO USER-SERVICEABLE PARTS
INSIDE. REFER SERVICING TO QUALIFIED
SERVICE PERSONNEL.
The lightning flash with arrowhead
symbol, within an equilateral triangle is
intended to alert the user to the presence
of uninsulated dangerous voltage within
the product's enclosure that may be of
sufficient magnitude to constitute a risk
of electric shock to persons.
The exclamation point within an equilateral
triangle is intended to alert the user to
the presence of important operating and
maintenance (servicing) instructions in
the literature accompanying the appliance.
WARNING:
NOTE:
Please keep all packaging material for at least 90 days in case you need to return this product to your place of purchase or
Memorex.
WARNING: This equipment has been tested and found to comply with the limits for a Class B digital device, pursuant to
CAUTION: Changes or modifications not expressly approved by the partly responsible for compliance with the FCC
CAUTION:
THIS DIGITAL VIDEO PLAYER EMPLOYS A LASER SYSTEM.
TO ENSURE PROPER USE OF THIS PRODUCT, PLEASE READ THIS USER'S GUIDE CAREFULLY AND RETAIN FOR
FUTURE REFERENCE. SHOULD THE UNIT REQUIRE MAINTENANCE, CONTACT AN AUTHORIZED SERVICE LOCATION-SEE SERVICE PROCEDURE.
TO REDUCE THE RISK OF FIRE OR ELECTRIC SHOCK, DO NOT EXPOSE THIS APPLIANCE TO RAIN
OR MOISTURE.
Part 15 of the FCC Rules. These limits are designed to provide reasonable protection against harmful
interference in a residential installation. This equipment generates, uses and can radiate radio frequency
energy and, if not installed and used in accordance with the instructions, may cause harmful interference to
radio communications.
However, there is no guarantee that interference will not occur in a particular installation. If this equipment
does cause harmful interference to radio or television reception, which can be determined by turning the
equipment off and on, the user is encouraged to try to correct the interference by one or more of the
following measures:
- Reorient or relocate the receiving antenna.
- Increase the separation between the equipment and receiver.
- Connect the equipment into an outlet on a circuit different from that to which the receiver is connected.
- Consult the dealer or an experienced radio/TV technician for help.
Rules could void the user's authority to operate this equipment.
USE OF CONTROLS, ADJUSTMENTS OR THE PERFORMANCE OF PROCEDURES OTHER THAN THOSE SPECIFIED
HEREIN MAY RESULT IN HAZARDOUS RADIATION EXPOSURE.
TO PREVENT DIRECT EXPOSURE TO LASER BEAM, DO NOT TRY TO OPEN THE ENCLOSURE. VISIBLE LASER
RADIATION MAY BE PRESENT WHEN THE ENCLOSURE IS OPENED. DO NOT STARE INTO BEAM.
Location of the required Marking
The rating sheet and the safety caution are on the rear of the unit.
CERTIFICATION: COMPLIES WITH FDA RADIATION PERFORMANCE
STANDARDS, 21 CFR SUBCHAPTER J.
20
2
2F3P421A[E] (02-05) 1/25/05, 12:00 PM2
Page 3

IMPORT ANT SAFEGUARDS
1. READ INSTRUCTIONS
All the safety and operating instructions should be read before the unit is operated.
2. RETAIN INSTRUCTIONS
The safety and operating instructions should be retained for future reference.
3. HEED WARNINGS
All warnings on the unit and in the operating instructions should be adhered to.
4. FOLLOW INSTRUCTIONS
All operating and use instructions should be followed.
5. CLEANING
Unplug this unit from the wall outlet before cleaning. Do not use liquid cleaners or aerosol cleaners.
Use a damp cloth for cleaning the exterior cabinet only.
6. ATTACHMENTS
The manufacturer of this unit does not make any recommendations for attachments, as they may cause hazards.
7. WATER AND MOISTURE
Do not use this unit near water. For example, near a bathtub, washbowl, kitchen sink, laundry tub, in a wet basement, or
near a swimming pool.
8. ACCESSORIES
Do not place this unit on an unstable cart, stand, tripod, bracket, or table.
The unit may fall, causing serious injury, and serious damage to the unit.
8A. An appliance and cart combination should be moved with care. Quick stops,
excessive force, and uneven surfaces may cause the appliance and cart
combination to overturn.
9. VENTILATION
Slots and openings in the cabinet back or bottom are provided for ventilation,
to ensure reliable operation of the unit, and to protect it from overheating.
These openings must not be blocked or covered. The openings should never be blocked by placing the unit on a bed,
sofa, rug, or other similar surface. This unit should never be placed near or over a radiator or heat source. This unit
should not be placed in a built-in installation such as a bookcase or rack unless proper ventilation is provided and/or the
manufacturer’s instructions have been adhered to.
10. POWER SOURCES
This unit should be operated only from the type of power source indicated on the rating plate. If you are not sure of the
type of power supply to your home, consult your appliance dealer or local power company. For units intended to operate
from battery power, or other sources, refer to the operating instructions.
11. GROUNDING OR POLARIZATION
This unit is equipped with a polarized alternating-current line plug (a plug having one blade wider than the other). This
plug will fit into the power outlet only one way. This is a safety feature. If you are unable to insert the plug fully into the
outlet, try reversing the plug. If the plug should still fail to fit, contact your electrician to replace your obsolete outlet. Do
not defeat the safety purpose of the polarized plug, if your unit is equipped with a 3-wire grounding-type plug, a plug
having a third (grounding) pin. This plug will only fit into a grounding-type power outlet. This too, is a safety feature. If you
are unable to insert the plug into the outlet, contact your electrician to replace your obsolete outlet.Do not defeat the
safety purpose of the grounding-type plug.
12. POWER-CORD PROTECTION
Power-supply cords should be routed so that they are not likely to be walked on or pinched by items placed upon or
against them, paying particular attention to cords at plugs, convenience receptacles, and the point where they exit from
the appliance.
13. LIGHTNING
To protect your unit from a lightning storm, or when it is left unattended and unused for long periods of time, unplug it
from the wall outlet and disconnect the antenna or cable system. This will prevent damage to the unit due to lightning and
power line surges.
14. POWER LINES
An outside antenna system should not be located in the vicinity of overhead power lines or other electric light or power
circuits, or where it can fall into such power lines or circuits. When installing an outside antenna system, extreme care
should be taken to keep from touching such power lines or circuits, as contact with them might be fatal.
15. OVERLOADING
Do not overload wall outlets and extension cords, as this can result in a risk of fire or electric shock.
16. OBJECT AND LIQUID ENTRY
Do not push objects through any openings in this unit, as they may touch dangerous voltage points or short out parts that
could result in fire or electric shock. Never spill or spray any type of liquid into the unit.
17. OUTDOOR ANTENNA GROUNDING
If an outside antenna or cable system is connected to the unit, be sure the antenna or cable system is grounded to
provide some protection against voltage surges and built-up static charges, Section 810 of the National Electrical Code,
ANSI/NFPA 70, provides information with respect to proper grounding of the mast and supporting structure, grounding of
the lead-in wire to an antenna discharge unit, size of grounding conductors, location of antenna discharge unit, connection to grounding electrodes, and requirements for the grounding electrode.
18. SERVICING
Do not attempt to service this unit yourself as opening or removing covers may expose you to dangerous voltage or other
hazards. Refer all servicing to qualified service personnel.
PORT ABLE CART W ARNING
(symbol provided by RETAC)
S3125A
ENGLISH
3
2F3P421A[E] (02-05) 1/25/05, 12:00 PM3
Page 4

IMPORTANT SAFEGUARDS
19. DAMAGE REQUIRING SERVICE
Unplug this unit from the wall outlet and refer servicing to qualified service personnel under the following conditions:
a. When the power-supply cord or plug is damaged.
b. If liquid has been spilled, or objects have fallen into the unit.
c. If the unit has been exposed to rain or water.
d. If the unit does not operate normally by following the operating instructions. Adjust only those
controls that are covered by the operating instructions, as an improper adjustment of other controls may result in
damage and will often require extensive work by a qualified technician to restore the unit to its normal operation.
e. If the unit has been dropped or the cabinet has been damaged.
20. REPLACEMENT PARTS
21. SAFETY CHECK
22. HEAT
23. DISC TRAY
24. CONNECTING
25. LASER BEAM
26. DISC
27. NOTE TO CABLE TV SYSTEM INSTALLER
f. When the unit exhibits a distinct change in performance, this indicates a need for service.
When replacement parts are required, be sure the service technician uses replacement parts specified by the manufacturer or those that have the same characteristics as the original part.
Unauthorized substitutions may result in fire, electric shock or other hazards.
Upon completion of any service or repairs to this unit, ask the service technician to perform safety checks to determine
that the unit is in proper operating condition.
The product should be situated away from heat sources such as radiators, heat registers, stoves, or other products
(including amplifiers) that produce heat.
Keep your fingers well clear of the disc tray as it is closing. It may cause serious personal injury.
When you connect the product to other equipment, turn off the power and unplug all of the equipment from the wall
outlet. Failure to do so may cause an electric shock and serious personal injury. Read the owner's manual of the other
equipment carefully and follow the instructions when making any connections.
Do not look into the opening of the disc tray or ventilation opening of the product to see the source of the laser beam. It
may cause sight damage.
Do not use a cracked, deformed, or repaired disc. These discs are easily broken and may cause serious personal injury
and product malfunction.
This reminder is provided to call the CABLE TV system installer’s attention to Article 820-40 of the NEC that provides
guidelines for proper grounding and, in particular, specifies that the cable ground shall be connected to the grounding
system of the building, as close to the point of cable entry as practical.
EXAMPLE OF ANTENNA GROUNDING AS PER THE
GROUND CLAMP
ELECTRIC SERVICE
EQUIPMENT
NEC-NATIONAL ELECTRICAL CODE
S2898A
CONDENSATION
Moisture will form in the operating section of the DVD/VCR if the player is brought from cool surroundings into a warm room
or if the temperature of the room rises suddenly. When this happens, the DVD/VCR's performance will be impaired.
To prevent this, let the DVD/VCR stand in its new surroundings for about an hour before switching it on, or make sure that the
room temperature rises gradually.
Condensation may also form during the summer if the DVD/VCR is exposed to the breeze from an air conditioner. In such
cases, change the location of the DVD/VCR.
NATIONAL ELECTRICAL CODE
ANTENNA LEAD IN WIRE
ANTENNA
DISCHARGE UNIT
(NEC SECTION 810-20)
GROUNDING CONDUCTORS
(NEC SECTION 810-21)
GROUND CLAMPS
POWER SERVICE GROUNDING
ELECTRODE SYSTEM
(NEC ART 250, PART H)
4
2F3P421A[E] (02-05) 1/25/05, 12:01 PM4
Page 5

Features
DVD/CD Player/Video Cassette Recorder
• DVD/CD player with Video Cassette Recorder - Unique space saving design combines a DVD/CD player and a Hi-Fi Video
cassette recorder. The DVD disc has much more capacity, but is the same size as the audio CD disc. Picture quality is higher than
Super VHS. Audio quality is higher than audio CD. The DVD PLAYER can play back audio CDs.
• High Quality Picture - More than 500 lines (VCR mode: 230 lines) of Horizontal Resolution. It exceeds Super VHS (400 lines)
or Laser Disc (430 lines) in resolution.
VCR Section
• Stereo/SAP Reception - This VCR is designed to receive stereo and second audio program (SAP) broadcasts where
available.
• 4 Video Heads - Provides optimal picture quality for special effects playback.
• 19µm HEAD - For superior picture quality even in SLP mode, 19 micron width technology helps to avoid crosstalk and boost
SLP picture quality to near SP levels. With precision technology, ghosts and color beats are virtually eliminated.
• Hi-Fi Stereo Sound - With a frequency response of 20 to 20,000 Hz and a dynamic range of better than 90dB, this VCR
provides a level of excellence that rivals compact discs.
• One-touch Timer Recording (OTR) - Simply by pressing the REC/OTR button, the VCR can be programmed for up to 6
hours of recording with an immediate start.
DVD Section
• Compatible with a wide range of DVD audio outputs
Coaxial Digital Audio Jack:
• When a component with a built-in Dolby Digital decoder is connected, Dolby Digital sound can produce the effect of being
in a movie theater or a concert hall.
• Surround standard different from Dolby Digital. This format is already in use in many theaters.
• The MPEG audio of DVD discs recorded in this format can be enjoyed.
• The Linear PCM sound of a 48 kHz/16 bit through 96 kHz/24 bit exceeds audio CD sound.
• Progressive scan - Progressive scan displays all the horizontal lines of a picture at one time, as a single frame. This unit
converts the interlaced (480i) video from DVD into progressive (480p) format for connection to a progressive display. It
increases the vertical resolution.
• Multi-Language - Since this DVD matches with 124 language-subtitles/-soundtracks, you can enjoy selecting a favorite one
(You cannot select the language that is not recorded on the disc).
• Multi-Angle - Pictures of Sports or a Live Concert are recorded with many cameras. When you play such a disc, you can
change the angles during playback (If a Multi-Angle is not recorded on the disc, you can not change the angle).
• Repeat Playback - You can repeat chapter, track, title, sides or material between two selected points.
• Program/Random Playback (CD) - Y ou can play back tracks in programmed or random-selected sequences.
• Zoom - You can zoom in on the selected subject on the screen during playback.
• Video Aspect Ratio - You can change the aspect ratio of the screen for your monitor/television on a suitable disc.
• Parental Control - You can limit the playback of scenes or sounds of adult DVD discs which have a parental level rating.
ENGLISH
This product incorporates copyright protection technology that is protected by U.S. patents and other intellectual property
*
rights. Use of this copyright protection technology must be authorized by Macrovision, and is intended for home and other
limited viewing uses only unless otherwise authorized by Macrovision. Reverse engineering or disassembly is prohibited.
Manufactured under license from Dolby Laboratories. “Dolby” and the double-D symbol are trademarks of Dolby Laborato-
*
ries.
Unauthorized recording of copyrighted television programs, films, video cassettes and other materials may infringe the
*
rights of copyright owners and be contrary to copyright laws.
2F3P421A[E] (02-05) 1/25/05, 12:01 PM5
5
Page 6

Contents
IMPORTANT SAFEGUARDS .................................. 3
Features ................................................................... 5
Contents................................................................... 6
Parts and functions .................................................. 7
Remote control......................................................... 8
Power source ........................................................... 9
Basic connections .................................................. 10
Antenna to DVD/VCR connection ..................... 10
DVD/VCR to TV connection.............................. 10
CABLE TV connections ......................................... 11
Playback connections ............................................ 12
Setting up the VCR section .................................... 14
Setting the video channel.................................. 14
Setting the language ......................................... 14
Auto clock setting.............................................. 15
Manual clock setting ......................................... 16
Tuner setting ..................................................... 16
To add/delete channels..................................... 16
Noise elimination............................................... 16
Tape playback operation........................................ 17
Loading and Unloading a cassette tape............ 17
Cassette tape playback..................................... 17
Special playback ............................................... 17
ZERO RETURN function .................................. 18
Video index search system ............................... 18
Recording............................................................... 19
Recording a TV program................................... 19
One-touch Timer Recording (OTR)................... 20
Timer recording................................................. 20
Advanced function of VCR section ........................ 22
Stereo recording and playback ......................... 22
Second Audio Program (SAP) .......................... 22
Duplicating a video tape.................................... 22
Disc playback operation ......................................... 23
Disc ................................................................... 23
Setting setup language ..................................... 23
Playback procedure .......................................... 24
Special playback ............................................... 24
Zooming ............................................................ 24
Locating desired scene ..................................... 25
Marking desired scenes .................................... 25
Changing soundtrack language ........................ 25
Subtitles ............................................................ 25
Changing angles ............................................... 26
Title selection .................................................... 26
DVD menu ........................................................ 26
Repeat playback ............................................... 26
Program playback (CD) .................................... 26
Random playback (CD)..................................... 27
MP3 playback ................................................... 27
Advanced function of DVD section ........................ 28
Parental control................................................. 28
Temporary disabling of rating level by
DVD disc ........................................................... 28
Setting language ............................................... 29
Setting the aspect ratio of TV screen................ 29
Setting the picture mode ................................... 29
Setting on screen display.................................. 30
Status display of disc ........................................ 30
Dynamic Range Control.................................... 30
Progressive scan .............................................. 30
Language code list ................................................. 31
Problems and troubleshooting ............................... 32
Video head cleaning .............................................. 33
Specifications ......................................................... 34
6
2F3P421A[E] (06-09) 1/25/05, 12:01 PM6
Page 7
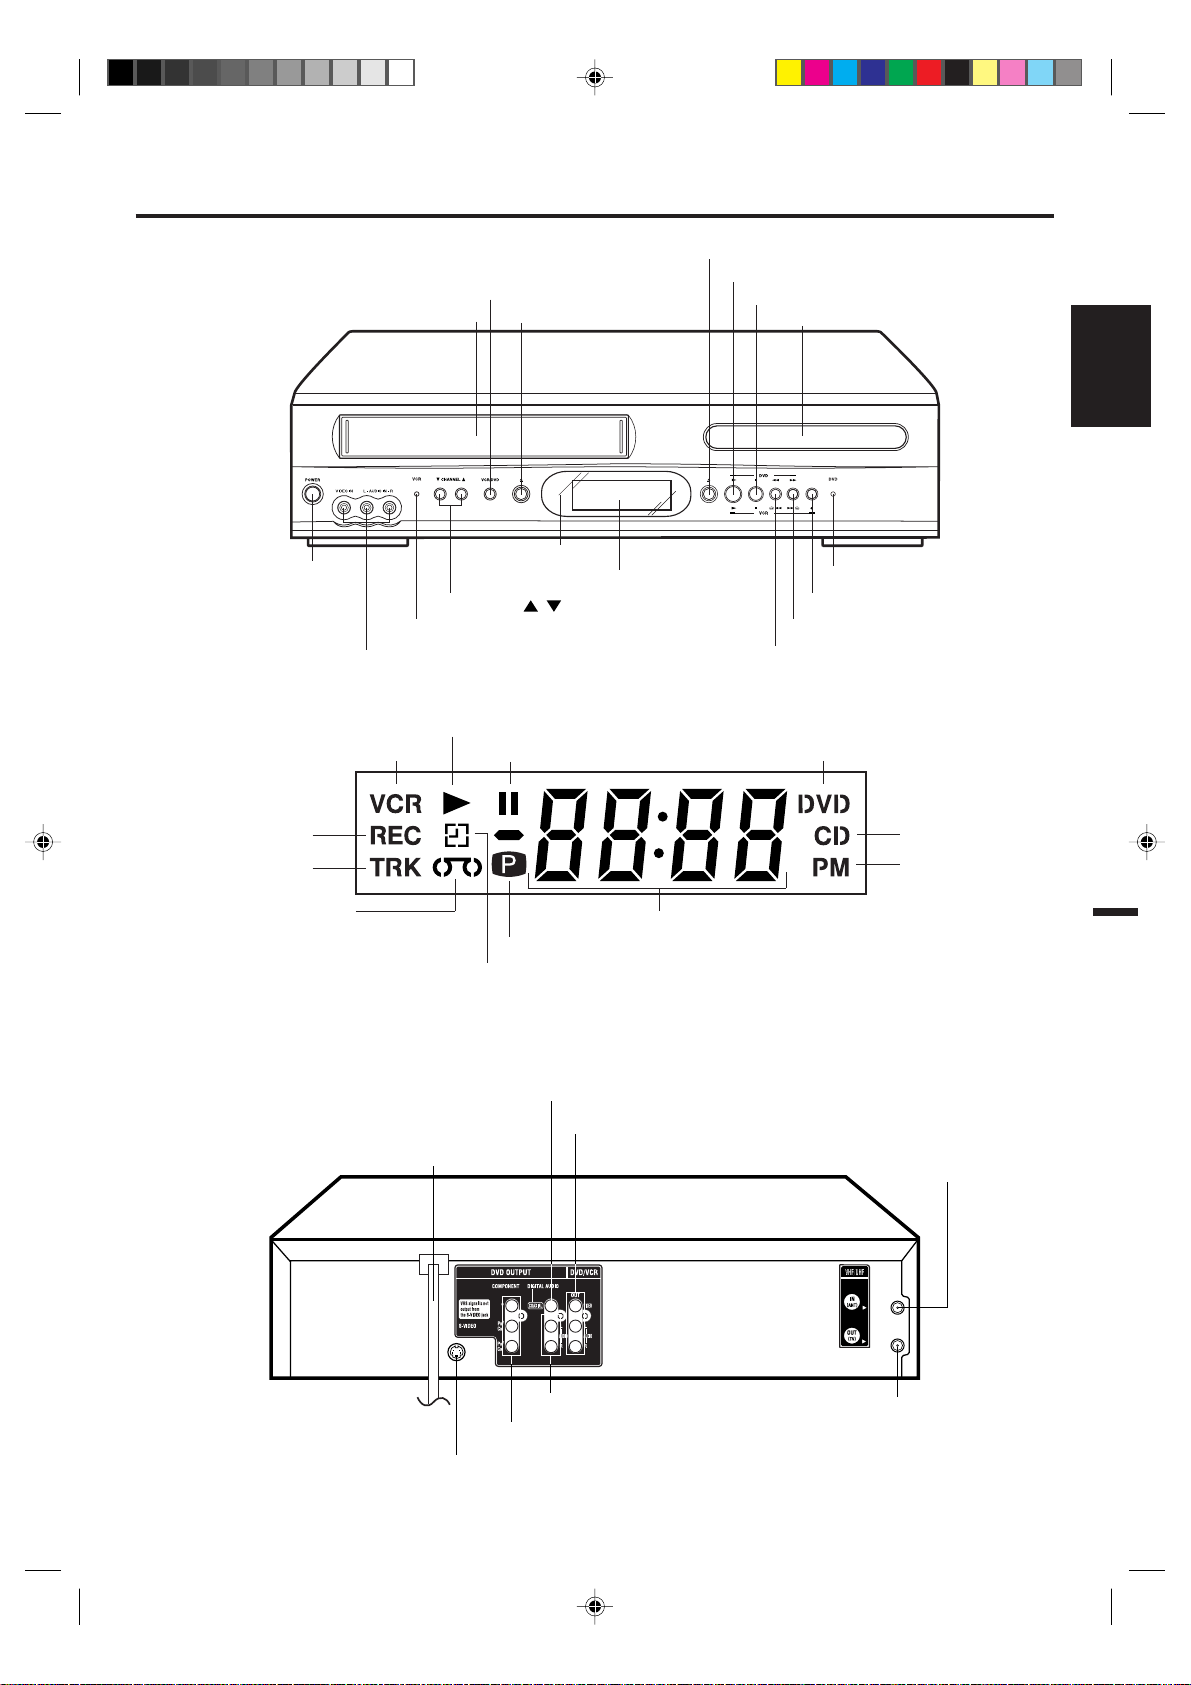
Parts and functions
Front
POWER
button
Display window
VCR/DVD mode selector button
Cassette Loading Slot
Remote sensor
CHANNEL
VCR indicator
AUDIO (L/R)/VIDEO IN jacks
Play indicator
VCR indicator
Pause indicator
EJECT button
Display window
/ buttons
OPEN/CLOSE button
PLAY button
STOP button
Disc tray
ENGLISH
DVD indicator
REC/OTR button
FF (Fast Forward) button
REW (Rewind) button
DVD indicator
REC indicator
TRK indicator
Video tape indicator
Timer recording indicator
NOTE:
Some discs may be displayed wrong or e.g. chapter number, playback time, etc. may not be displayed.
Number indicator (Title, Chapter, Track playing time or other information)
Progressive scanning indicator
Rear
DVD COAXIAL DIGITAL AUDIO OUT jack
DVD/VCR common AUDIO (L/R)/VIDEO OUT jacks
AC power cord
20
DVD AUDIO (L/R) OUT jacks
DVD COMPONENT OUT jacks
DVD S-VIDEO OUT jacks
RF OUT jack
CD indicator
PM indicator
RF IN jack
2F3P421A[E] (06-09) 1/25/05, 12:01 PM7
7
Page 8
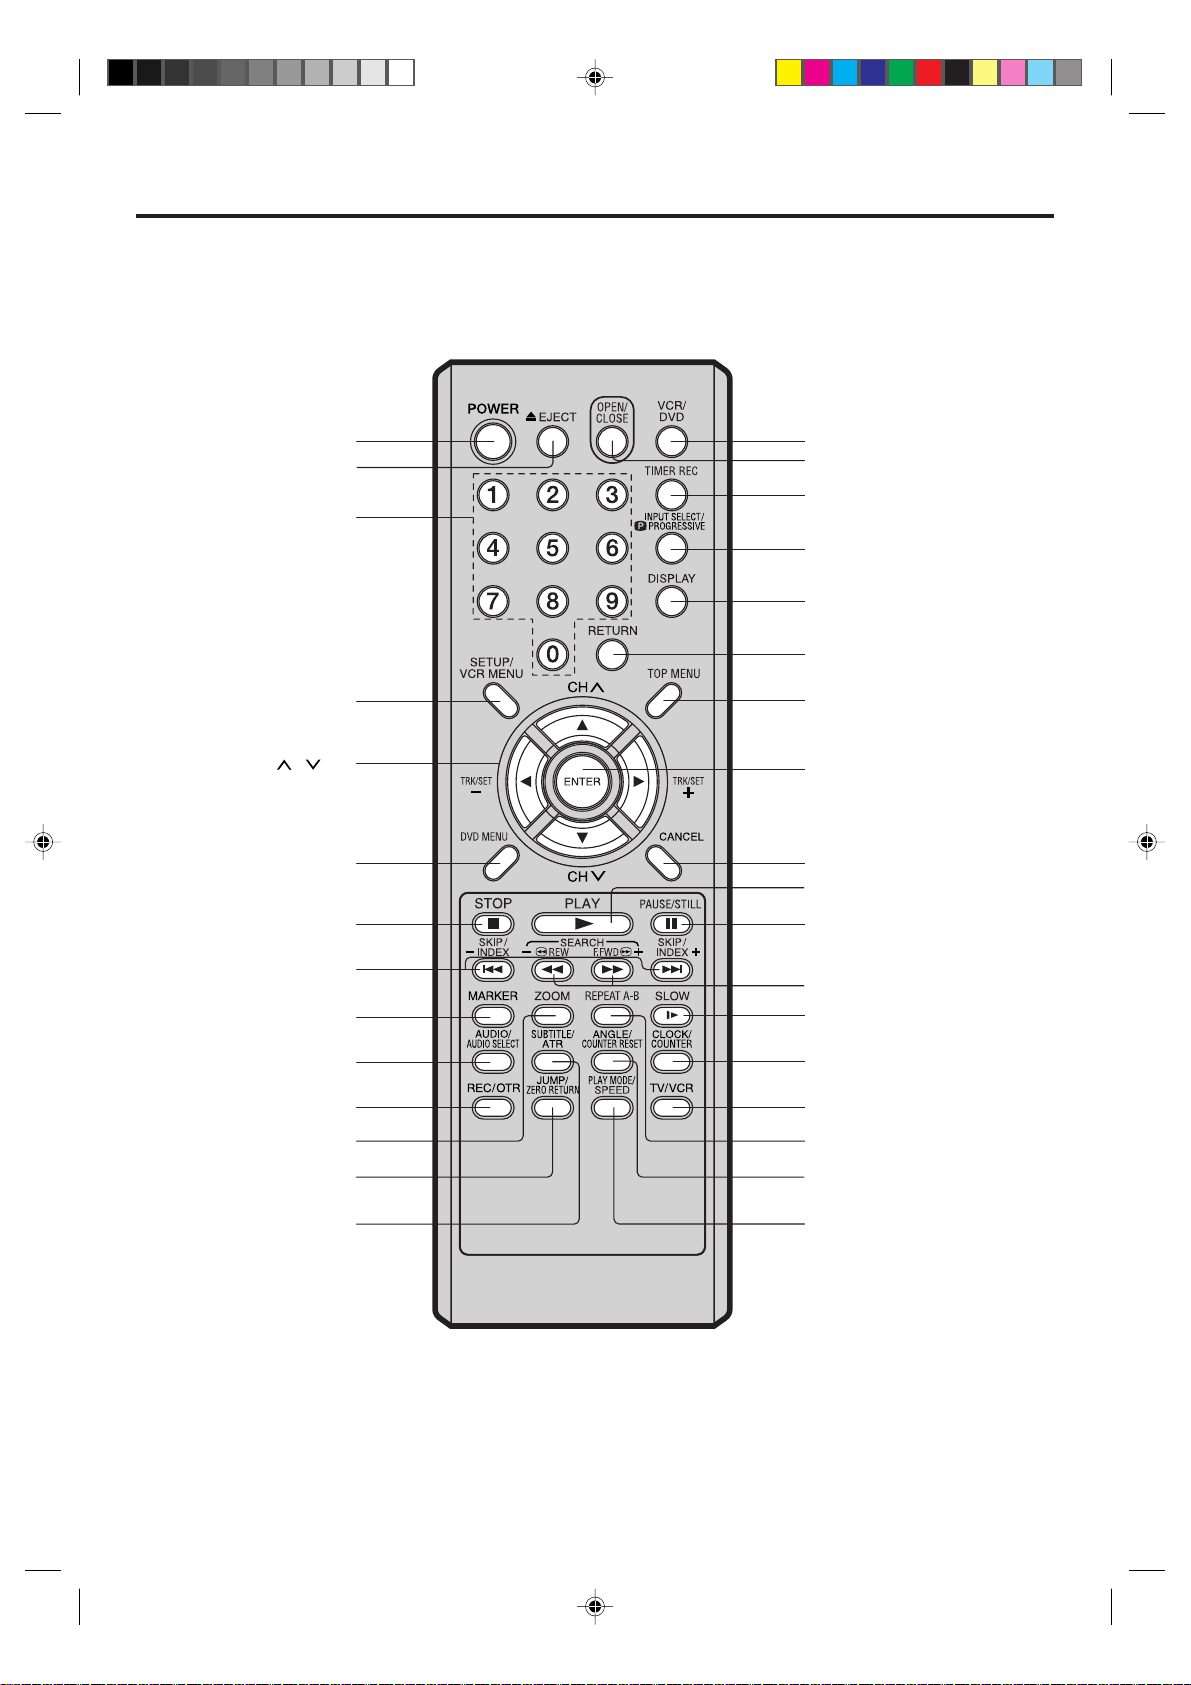
Remote control
POWER [9]
EJECT [17]
0 – 9 [16]
SETUP [23]
VCR MENU [14]
CH
TRK/SET + / – [14]
Cursor Buttons [15]
DVD MENU [26]
INDEX + / – [18]
/ [9]
STOP [17] [24]
SKIP [24]
MARKER [25]
VCR/DVD [9]
OPEN/CLOSE [24]
TIMER REC [20]
INPUT SELECT [22]
PROGRESSIVE [30]
DISPLAY [15] [25]
RETURN [23]
TOP MENU [26]
ENTER [14]
CANCEL [21]
PLAY [17] [24]
PAUSE/STILL [18] [24]
SEARCH + / – [17] [24]
SLOW [18] [24]
AUDIO SELECT [22]
AUDIO [25]
REC/OTR [19]
ZOOM [24]
JUMP [25]
ZERO RETURN [18]
SUBTITLE [25]
ATR [18]
8
2F3P421A[E] (06-09) 1/25/05, 12:01 PM8
CLOCK/COUNTER [18]
TV/VCR [14]
REPEAT A-B [26]
ANGLE [26]
COUNTER RESET [18]
PLAY MODE [26]
SPEED [19]
Page 9
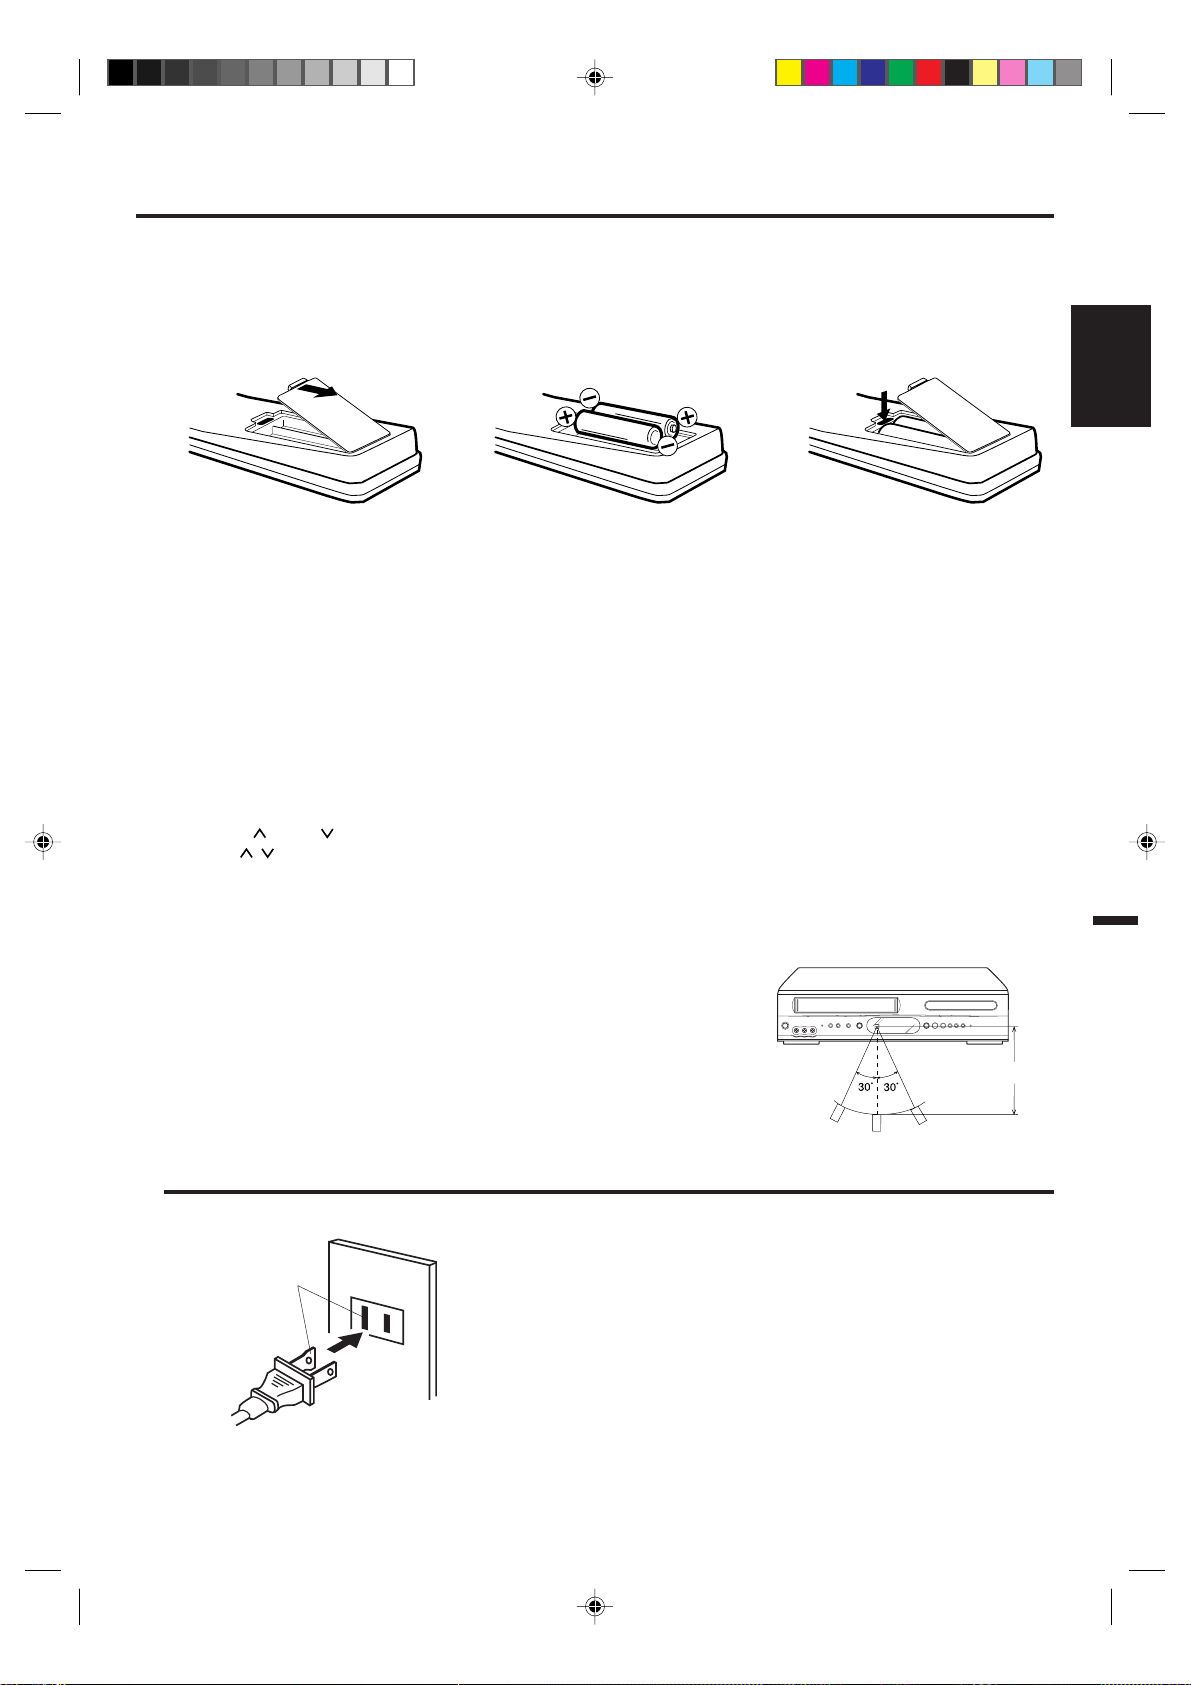
Inserting Batteries
Remote control / Power source
Open the battery
1
compartment cover in the
direction of the arrow.
Install two “AAA” batteries (not
23
supplied),
polarity diagram in the battery
compartment.
paying attention to the
Replace the compartment
cover.
Battery precautions
The precautions below should be followed when using batteries in this device:
1. Use only the size and type of batteries specified.
2. Be sure to follow the correct polarity when installing the batteries as indicated in the battery compartment.
batteries may cause damage to the device. To avoid a potential short circuit, insert the “–” end first.
3.
Do not mix different types of batteries together (e.g. Alkaline and Carbon-zinc) or old batteries with fresh ones.
4. If the device is not to be used for a long period of time, remove the batteries to prevent damage or injury from possible
battery leakage.
5. Do not try to recharge batteries not intended to be recharged; they can overheat and rupture (Follow battery manufacturer’s directions).
Reversed
Remote control basics
• Press POWER to turn the DVD/VCR on or off.
• Press CH
• The CH
• You can directly access specific channels using Number keys pad.
• Each press of VCR/DVD on the remote control, switches the screen between the VCR screen (VCR mode) and the DVD
screen (DVD mode).
or CH to move through the channels one channel at a time.
/ and SET +/– are also used to navigate on-screen menu system.
ENGLISH
Operation
• Aim the remote control at the remote sensor and press control buttons to operate.
• Operate the remote control within 30° angle on either side of the remote sensor,
up to a distance of Approx. 5 meters.
AC Outlet
Wider Hole
and Blade
Polarized AC Cord Plug
(One blade is wider than the other.)
TO USE AC POWER SOURCE
Use the AC polarized line cord provided for operation on AC. Insert the AC
cord plug into a standard 120V 60Hz polarized AC outlet.
NOTES:
Never connect the AC line cord plug to other than the specified
•
voltage (120V 60Hz). Use the attached power cord only.
If the polarized AC cord does not fit into a non-polarized AC
•
outlet, do not attempt to file or cut the blade. It is the user’s
responsibility to have an electrician replace the obsolete outlet.
If you cause a static discharge when touching the unit and the
•
unit fails to function, simply unplug the unit from the AC outlet
and plug it back in. The unit should return to normal operation.
Approx. 5 meters
Power source
9
2F3P421A[E] (06-09) 1/25/05, 12:01 PM9
Page 10
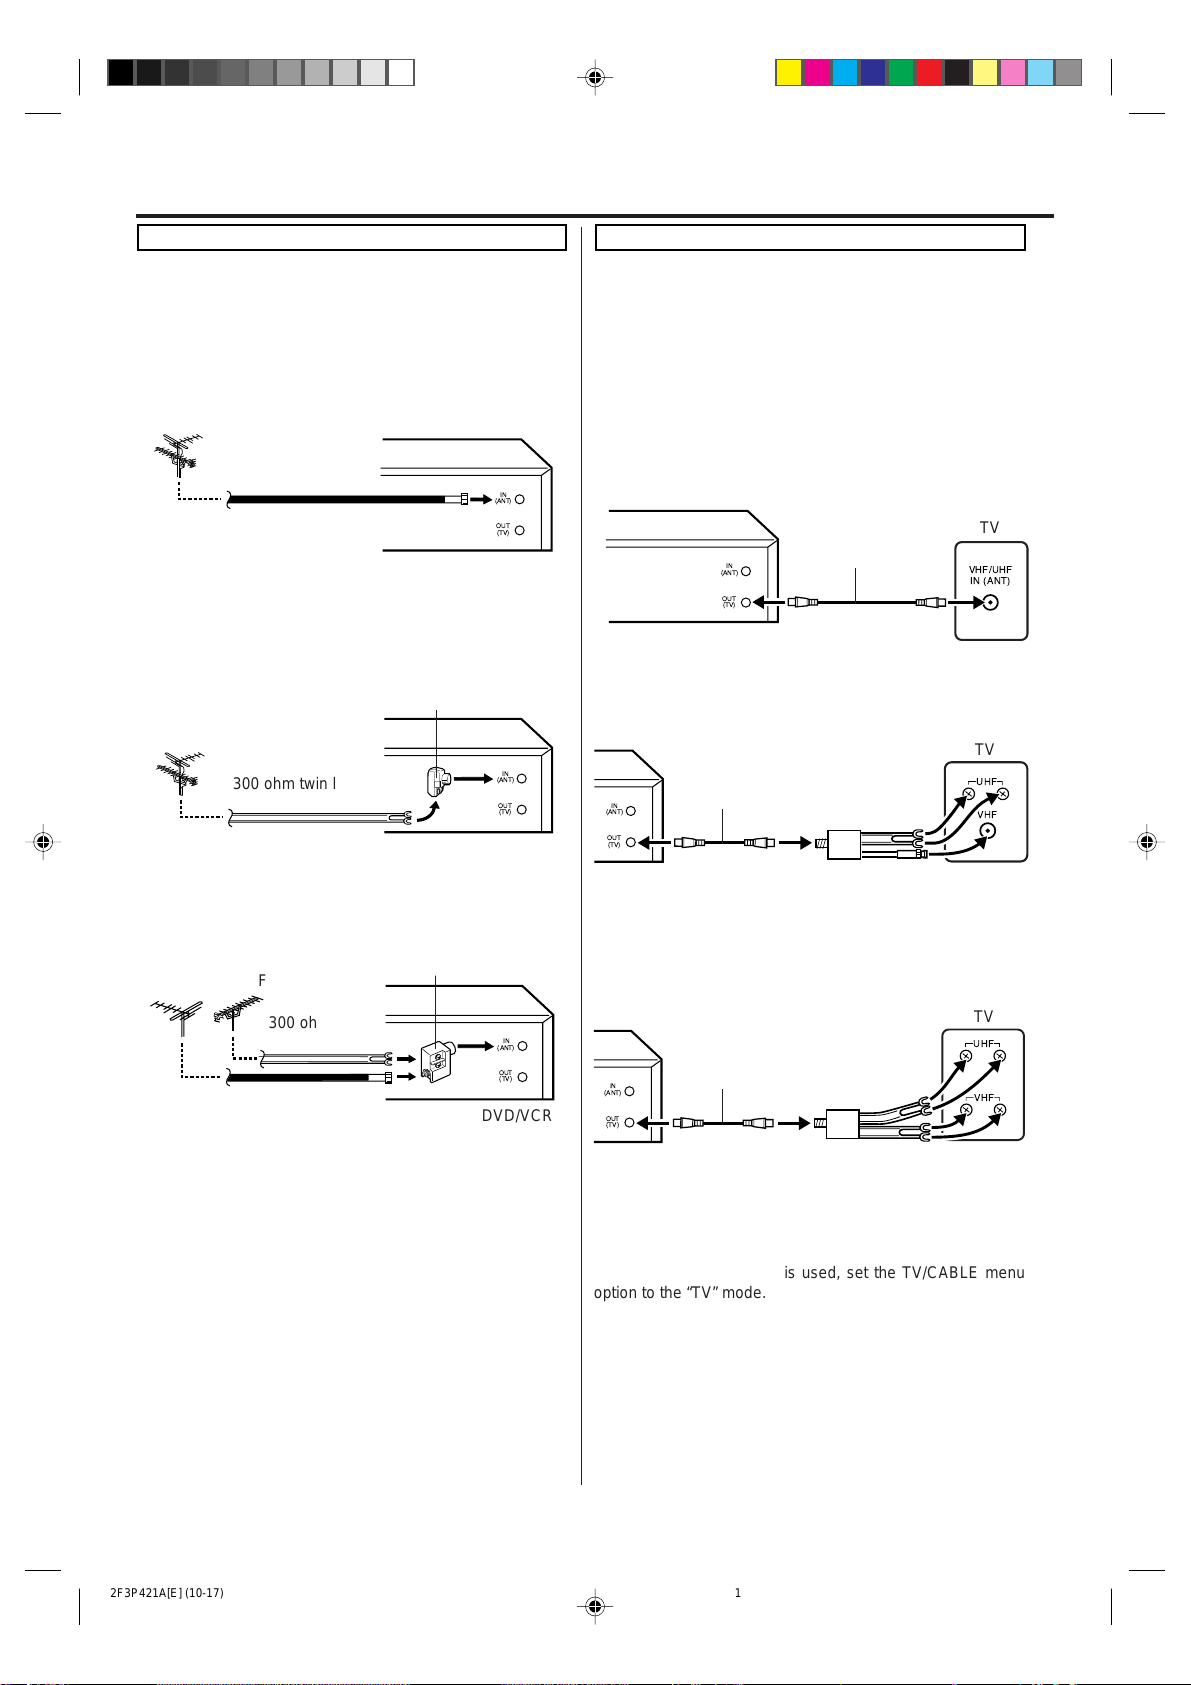
Basic connections
Antenna to DVD/VCR connection
The DVD/VCR must be connected “between” the antenna and
the TV . First, disconnect the antenna from the TV and connect
it to the DVD/VCR. Then connect the DVD/VCR to the TV.
Below are 3 common methods of connecting an antenna system to a DVD/VCR. Find the type of antenna system you are
using and follow the connection diagram.
Example 1: Combination VHF/UHF antenna with 75 ohm
Example 2: Combination VHF/UHF antenna with 300 ohm
Example 3: Separate VHF and UHF antennas
VHF UHF
NOTE:
If both VHF and UHF antennas have 300 ohm twin lead (flat)
wires, use a combiner having two 300 ohm inputs and one 75
ohm output.
coaxial cable
75 ohm coaxial
cable
twin lead (flat) wire
300 ohm twin lead
(flat) wire
Combiner
75/300 ohm inputs
75 ohm output (not supplied)
300 ohm twin
lead (flat) wire
75 ohm coaxial
cable
IN
(ANT)
OUT
(TV)
DVD/VCR
Matching transformer
300 ohm input 75 ohm
output (not supplied)
IN
(ANT)
OUT
(TV)
DVD/VCR
(ANT)
OUT
(TV)
DVD/VCR
IN
DVD/VCR to TV connection
After you have connected the antenna to the DVD/VCR, you
must connect the DVD/VCR to the TV.
Below are 3 common methods of connecting your DVD/VCR
to a TV. Find the type of TV you are using and follow the connection diagram.
This DVD/VCR has a single 75 ohm output for connection to a
TV . If your TV has separate VHF and UHF antenna inputs (numbers 2 and 3 below), use a splitter to connect the DVD/VCR to
the TV for VHF and UHF reception.
Example 1: TV with single 75 ohm VHF/UHF antenna
Example 2: TV with 300 ohm UHF and 75 ohm VHF
IN
(ANT)
OUT
(TV)
DVD/VCR
Example 3: TV with 300 ohm UHF and 300 ohm VHF
IN
(ANT)
OUT
(TV)
DVD/VCR
input
75 ohm coaxial
cable (supplied)
(ANT)
IN
OUT
(TV)
DVD/VCR
antenna inputs
75 ohm coaxial cable
(supplied)
antenna inputs
75 ohm coaxial cable
(supplied)
Splitter 75 ohm input
75/300 ohm outputs
(not supplied)
Splitter 75 ohm input
300 ohm output
(not supplied)
TV
VHF/UHF
IN (ANT)
TV
UHF
VHF
TV
UHF
VHF
NOTES:
• A clear picture will not be obtained by the main unit unless
the antenna signal is good. Connect the antenna to the
main unit properly.
• For better quality recording, an indoor antenna or a
telescopic antenna is not recommended. The use of an
outdoor type antenna is required.
• If you are not sure about the connection, please refer to
qualified service personnel.
10
2F3P421A[E] (10-17) 1/25/05, 12:01 PM10
NOTE:
If a VHF or UHF antenna is used, set the TV/CABLE menu
option to the “TV” mode.
Page 11
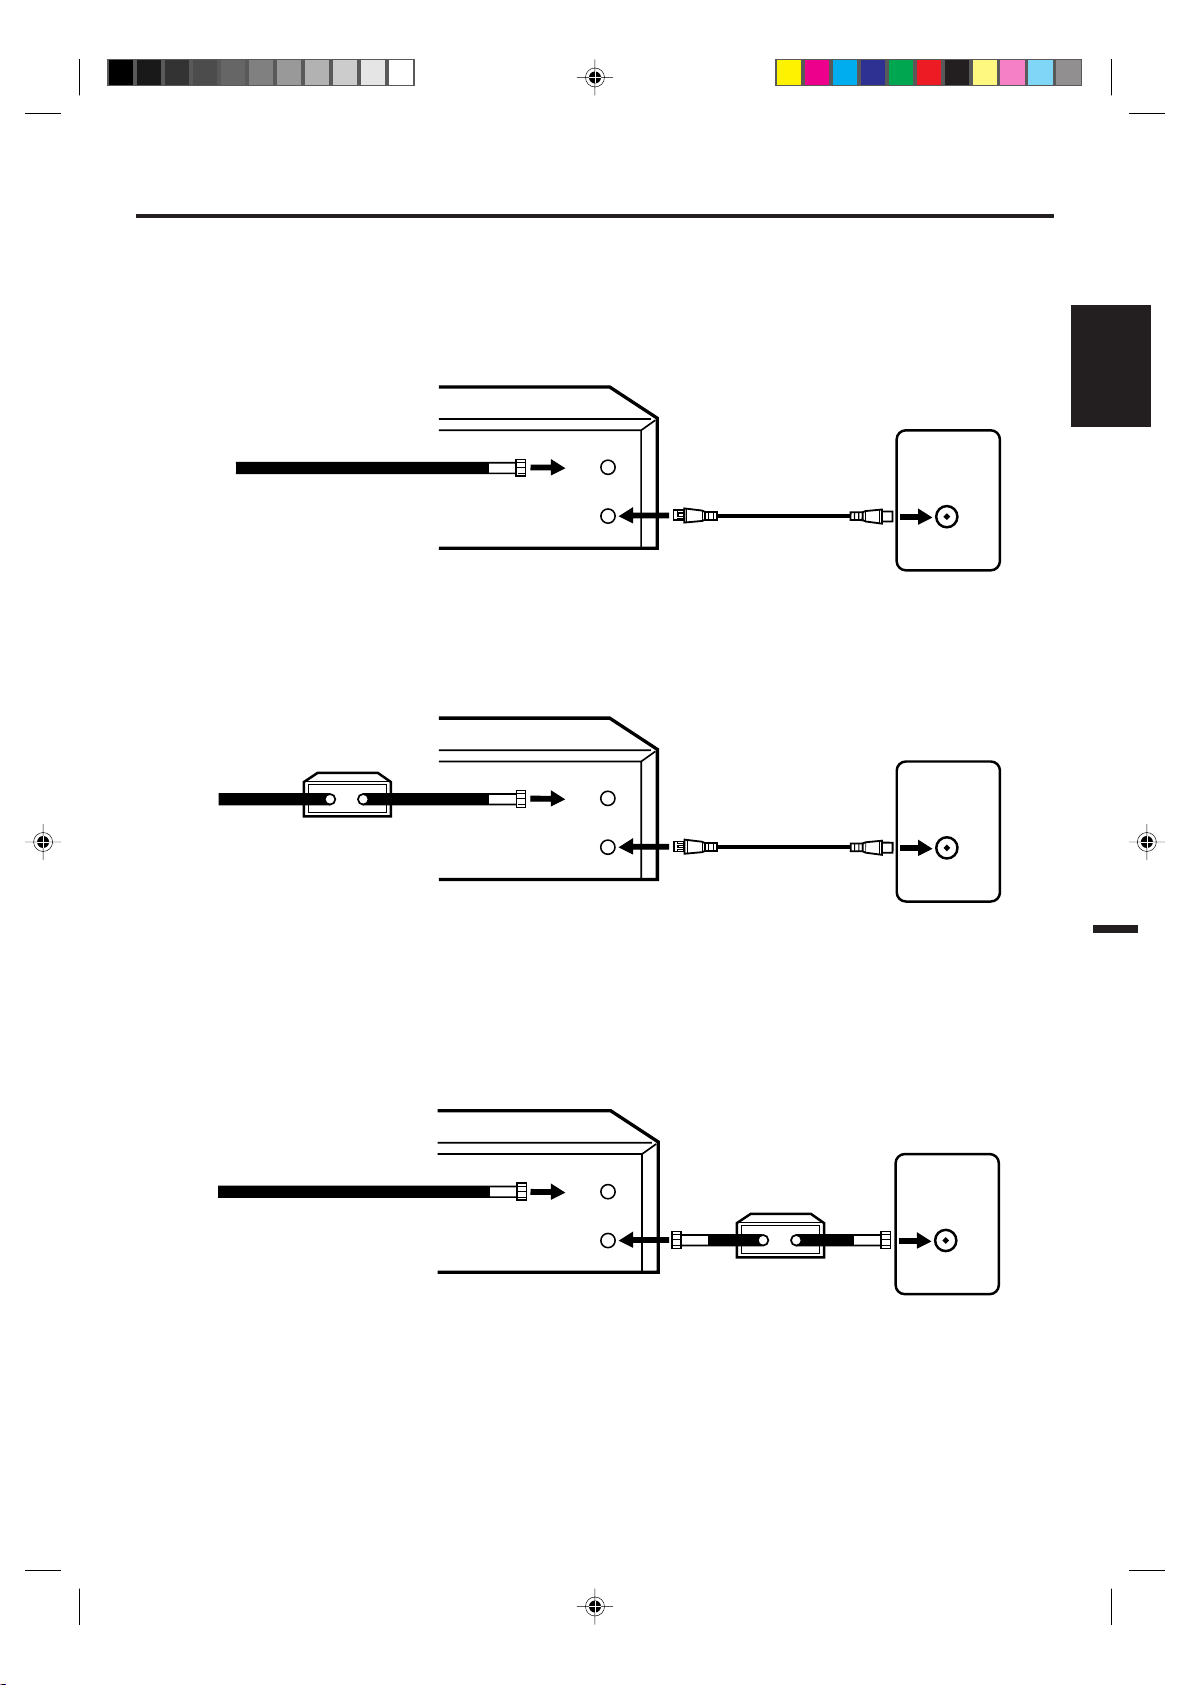
CABLE TV connections
Many cable companies offer services permitting reception of extra channels including pay or subscription channels. This DVD/
VCR has an extended tuning range and can be tuned to most cable channels without using a cable company supplied converter
box, except for those channels which are intentionally scrambled. If you subscribe to a special channel which is scrambled, you
must have a descrambler box for proper reception.
Example 1:
DVD/VCR
IN
(ANT)
Incoming Cable
OUT
(TV)
ALLOWS:*Recording of nonscrambled channels.
Use of the programmable timer.
*
Recording of one channel while watching another.
*
Example 2:
DVD/VCR
Converter/
Descrambler
IN
(ANT)
Incoming
Cable
OUT
(TV)
ALLOWS:*Recording of channels through the converter box
(scrambled and unscrambled).
Using the programmable timer to record only the
*
channel selected at the converter box.
PREVENTS:*Recording one channel while watching another.
Using the DVD/VCR tuner to select channels.
*
TV
VHF/UHF
IN (ANT)
TV
VHF/UHF
IN (ANT)
NOTE:
T o record from converter/descrambler , DVD/
VCR tuner must be tuned to the converter
output channel, usually channel 3 or 4.
ENGLISH
Example 3:
DVD/VCR
IN
(ANT)
Converter/Descrambler
VHF/UHF
Incoming Cable
OUT
(TV)
ALLOWS:*Recording of nonscrambled channels.
Use of the programmable timer.
*
Recording an unscrambled channel while watching any
*
channel selected at the converter box.
PREVENT:*Recording scrambled channels.
NOTE:
If you are playing a tape or using the tuner
built into the DVD/VCR, the converter must
be set to the video channel output of the DVD/
VCR (either 3 or 4).
NOTE: Whenever a Converter/Descrambler box is placed before the DVD/VCR, you must tune the DVD/VCR to the output
of the Converter/Descrambler box, usually channel 3 or 4.
2F3P421A[E] (10-17) 1/25/05, 12:01 PM11
TV
IN (ANT)
11
Page 12
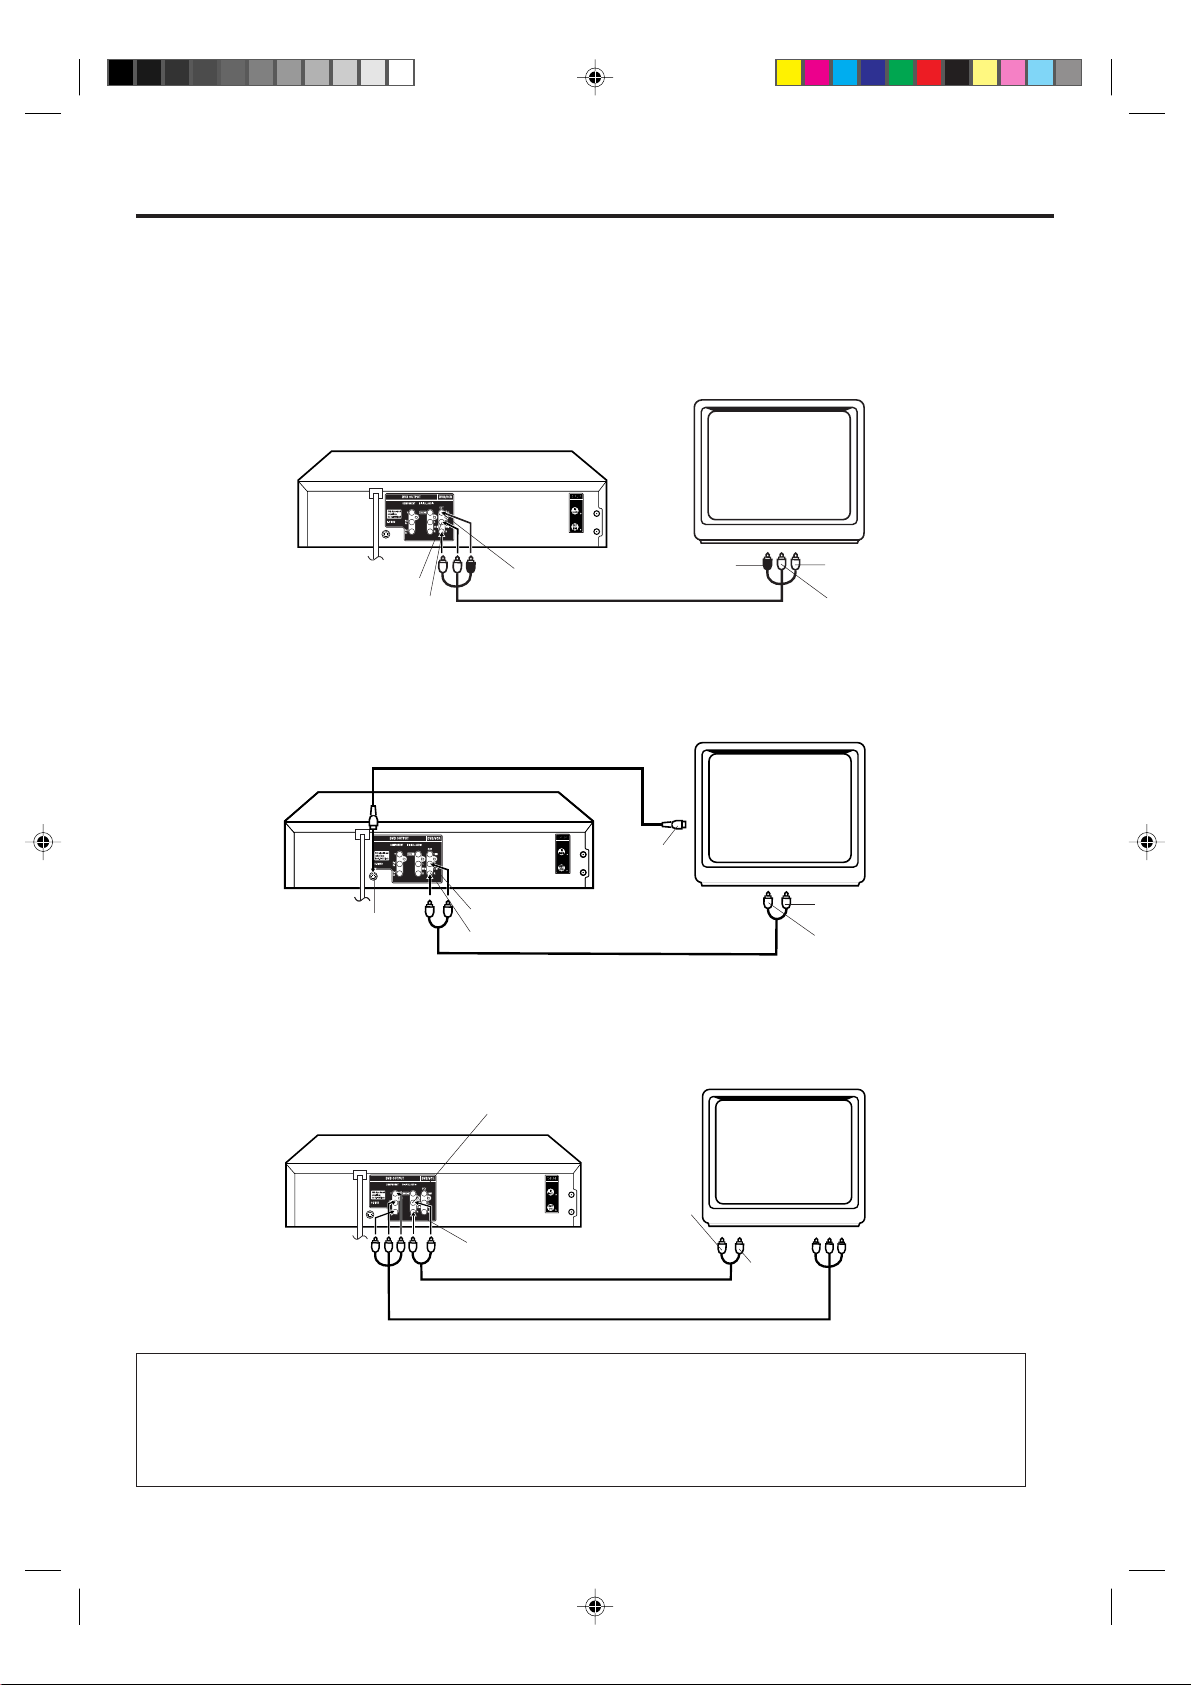
Playback connections
The exact arrangement you use to interconnect various video and audio components to the DVD/VCR is dependent on the model
and features of each component. Check the Owner's Manual provided with each component for the location of video and audio
inputs and outputs.
Connect to a TV with Audio/Video Output
You can enjoy playback by connecting the unit to a TV.
Connect the unit to a TV equipped with audio input (L/R) and video input jacks using the supplied audio/video cable.
TV
DVD/VCR
20
Audio (L) Output
Audio (R) Output
Connect to a TV with S-Video Output (for DVD/CD playback)
If your TV has an S-VIDEO input, you can get higher quality by connecting it with the S-VIDEO output of the unit using the
S-video cable instead of connecting the video input of the TV to the VIDEO jack of the unit.
Video Output
AUDIO/VIDEO cable (supplied)
To Video
Input
TV
To Audio (R) Input
To Audio (L) Input
S-Video cable (not supplied)
DVD/VCR
20
S-Video Output
Connect to a TV with Component Video Output (for DVD/CD playback)
You can enjoy high quality picture by connecting the unit’s COMPONENT VIDEO OUT jacks to the COMPONENT VIDEO IN
jacks of your TV with the COMPONENT video cables (not supplied).
DVD/VCR
Audio (L) Output
Audio (R) Output
AUDIO cable (not supplied)
Audio (L) Output
To S-Video
Input
To Audio (R) Input
To Audio (L) Input
TV
To Component
Video Output
20
Audio (R) Output
AUDIO cable (not supplied)
T o Audio (L)
Input
T o Audio
(R) Input
To Component
Video Input
COMPONENT VIDEO cable (not supplied)
NOTES:
• When connecting to a TV using the VIDEO or S-video jack, make sure that the PROGRESSIVE indicator on the display
window is not lit. If it is lit, the VIDEO and S-VIDEO outputs do not feed the correct signals and you cannot see any
picture. To turn off the PROGRESSIVE indicator, make the Progressive scanning mode inactive (see page 30).
• When the component video input jacks on a TV is of the BNC type, use an adapter to convert a pin jack to a BNC jack
(not supplied).
12
2F3P421A[E] (10-17) 1/25/05, 12:01 PM12
Page 13
Playback connections
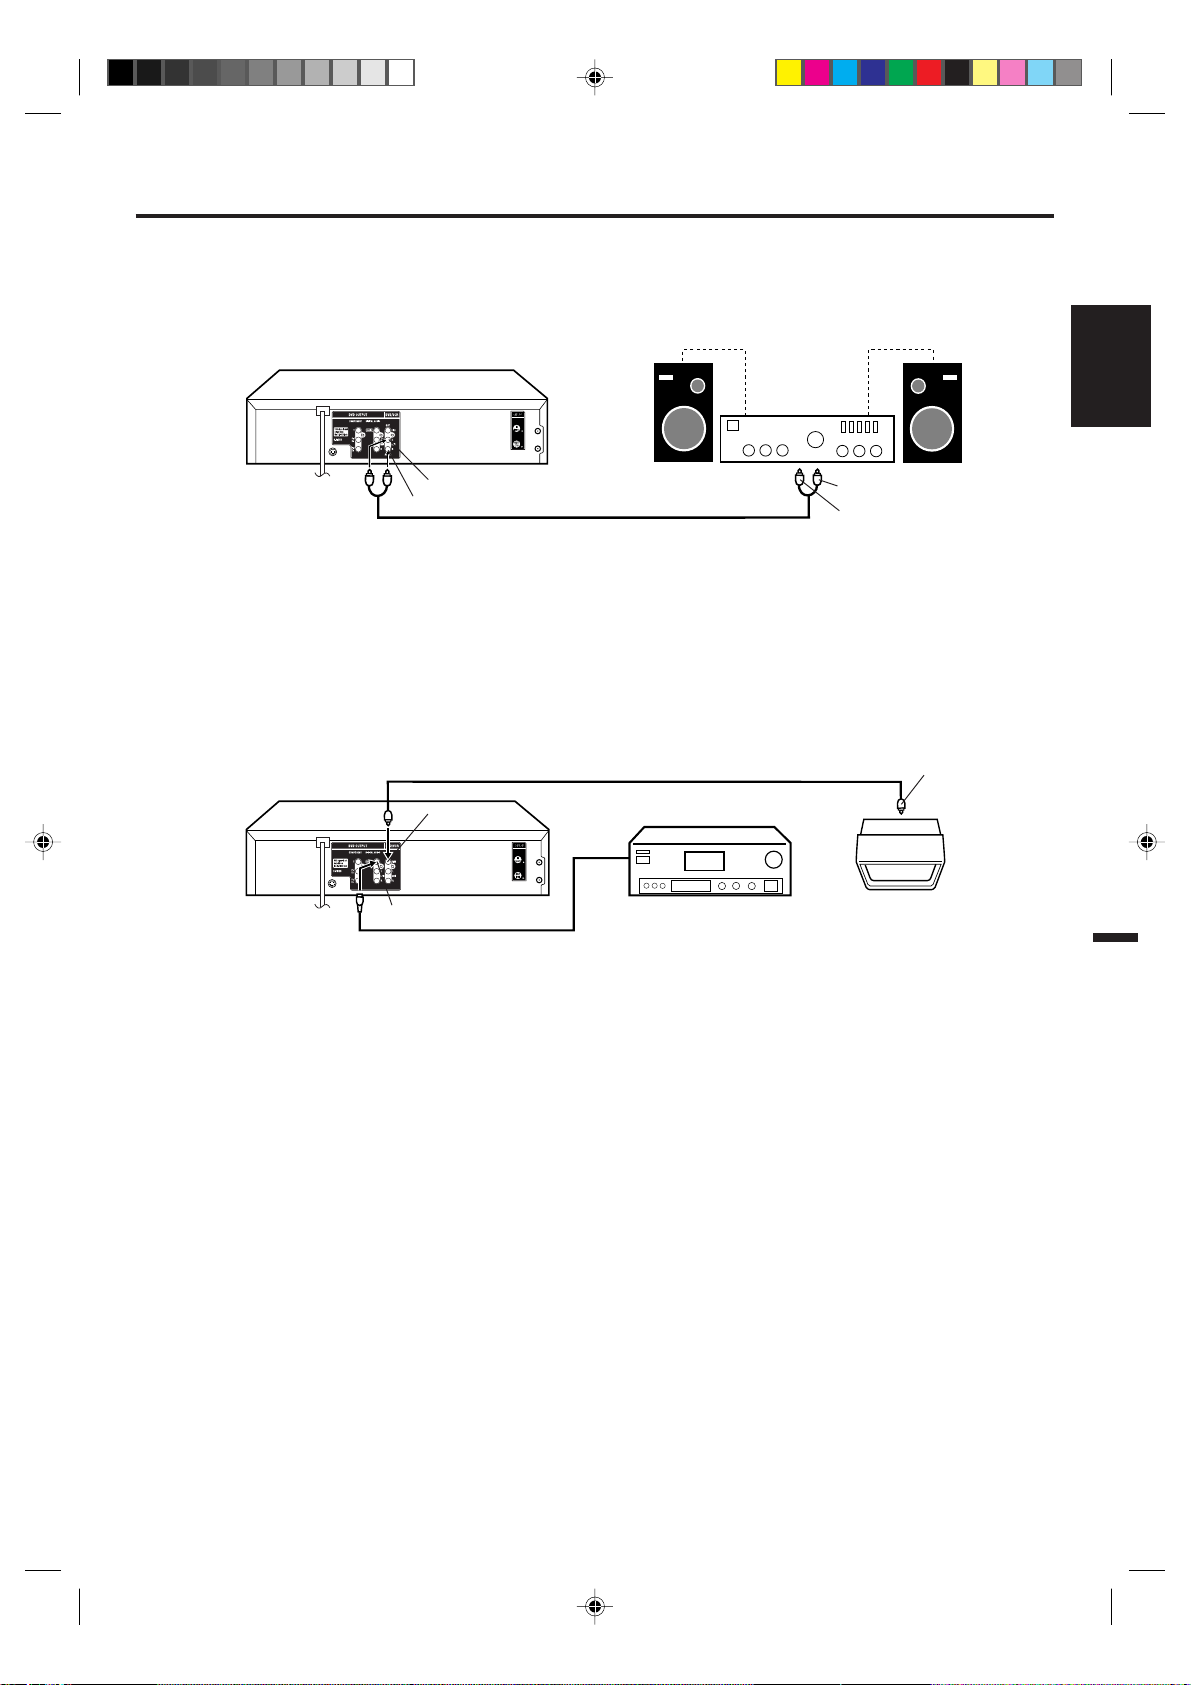
Connect to a Stereo Amplifier with Audio Output
You can enjoy high quality audio by connecting the audio output to your amplifier.
Connect the AUDIO OUT jacks to any line-level inputs (such as AUX, DVD, CD, etc.) of an audio amplifier.
DVD/VCR
Stereo Amplifier
20
Audio (L) Output
Audio (R) Output
Connect to an AV Amplifier with built-in digital surround
If you are using an Amplifier with a built-in digital surround as follows, you can enjoy the various audio systems such as Dolby
Digital by using the Coaxial Digital Output.
Use this connection to connect an:
• AV amplifier with built-in *Dolby Digital decoder
DVD/VCR
Video Output
20
Coaxial Digital Audio Output
Coaxial digital cable (not supplied)
AUDIO cable (not supplied)
Video cable (not supplied)
AV Amplifier with
built-in various
decoder as above
To Audio (L) Input
To Audio (R) Input
To Video
Input
TV
NOTE:
Y ou may connect to a TV with a Component video cable (not supplied) or SVideo cable (not supplied) instead of a
video cable (not supplied).
ENGLISH
NOTES:
•
The DVD OUTPUT jacks (COAXIAL, AUDIO L/R, S-VIDEO and COMPONENT) are useful only for DVD section.
•
The VHS signal is output only from the composite jacks (DVD/VCR OUTPUT) and UHF/VHF OUT .
•
When you make the connections above, do not set DOLBY DIGITAL to DOLBY DIGITAL to ON on the AV Amplifier. If you
do, a loud noise will suddenly come out from the speakers, affecting your ears or causing the speakers to be damaged.
2F3P421A[E] (10-17) 1/25/05, 12:01 PM13
13
Page 14
〈+/-/ENTER/MENU〉
MENU
TIMER REC SET
AUTO REPEAT
ON OFF
ON OFF
SAP
CH SETUP
SYSTEM SETUP
〈+/-/ENTER/MENU〉
SYSTEM SETUP
CLOCK SET
LANGUAGE/IDIOMA/LANGUE
NO NOISE BACKGROUND
AUTO CLOCK
STANDARD TIME
DAYLIGHT SAVING TIME
ON OFF
ON OFF
Setting up the VCR section
Setting the video channel
To view playback of a recorded tape or DVD disc, or to
watch a program selected by the VCR's channel
selector, the TV must be set to channel 3 or 4 (video
channel).
When a TV is connected with the 75 ohm coaxial cable only.
1 Press and hold 3 or 4 on the
remote control for 3 seconds
in the standby mode to select
CH 3 or 4. The selected channel number will flash on the display for about 4 seconds.
2 Turn ON the TV and set to CH 3 or 4 to correspond with
the channel selected in step 1.
3 Press POWER to turn on the DVD/VCR.
4 Press VCR/DVD to select the VCR mode. The VCR
indicator on the front panel will light.
5 Press TV/VCR to select the VCR position.
The VCR indicator will appear in the display.
6 Select any channel to receive a TV station in your area.
The channel number will appear on the screen for about
4 seconds.
For a push-button TV tuner
If CH 3 or 4 corresponding to the video channel cannot be
tuned on your TV, proceed as follows: set the VCR 3/4
channel selector and the TV to CH 3 or 4, playback a
prerecorded tape and tune the TV to receive a sharp color
picture from the video cassette recorder. Refer to your TV
owner's manual for details.
NOTES:
• When shipped from factory, the video channel is set to
CH 3.
• If the unit does not operate properly, or No key operation (by the unit and/or the remote control): Static elec-
tricity, etc., may af fect the player's operation. Disconnect the
AC power cord once, then connect it again.
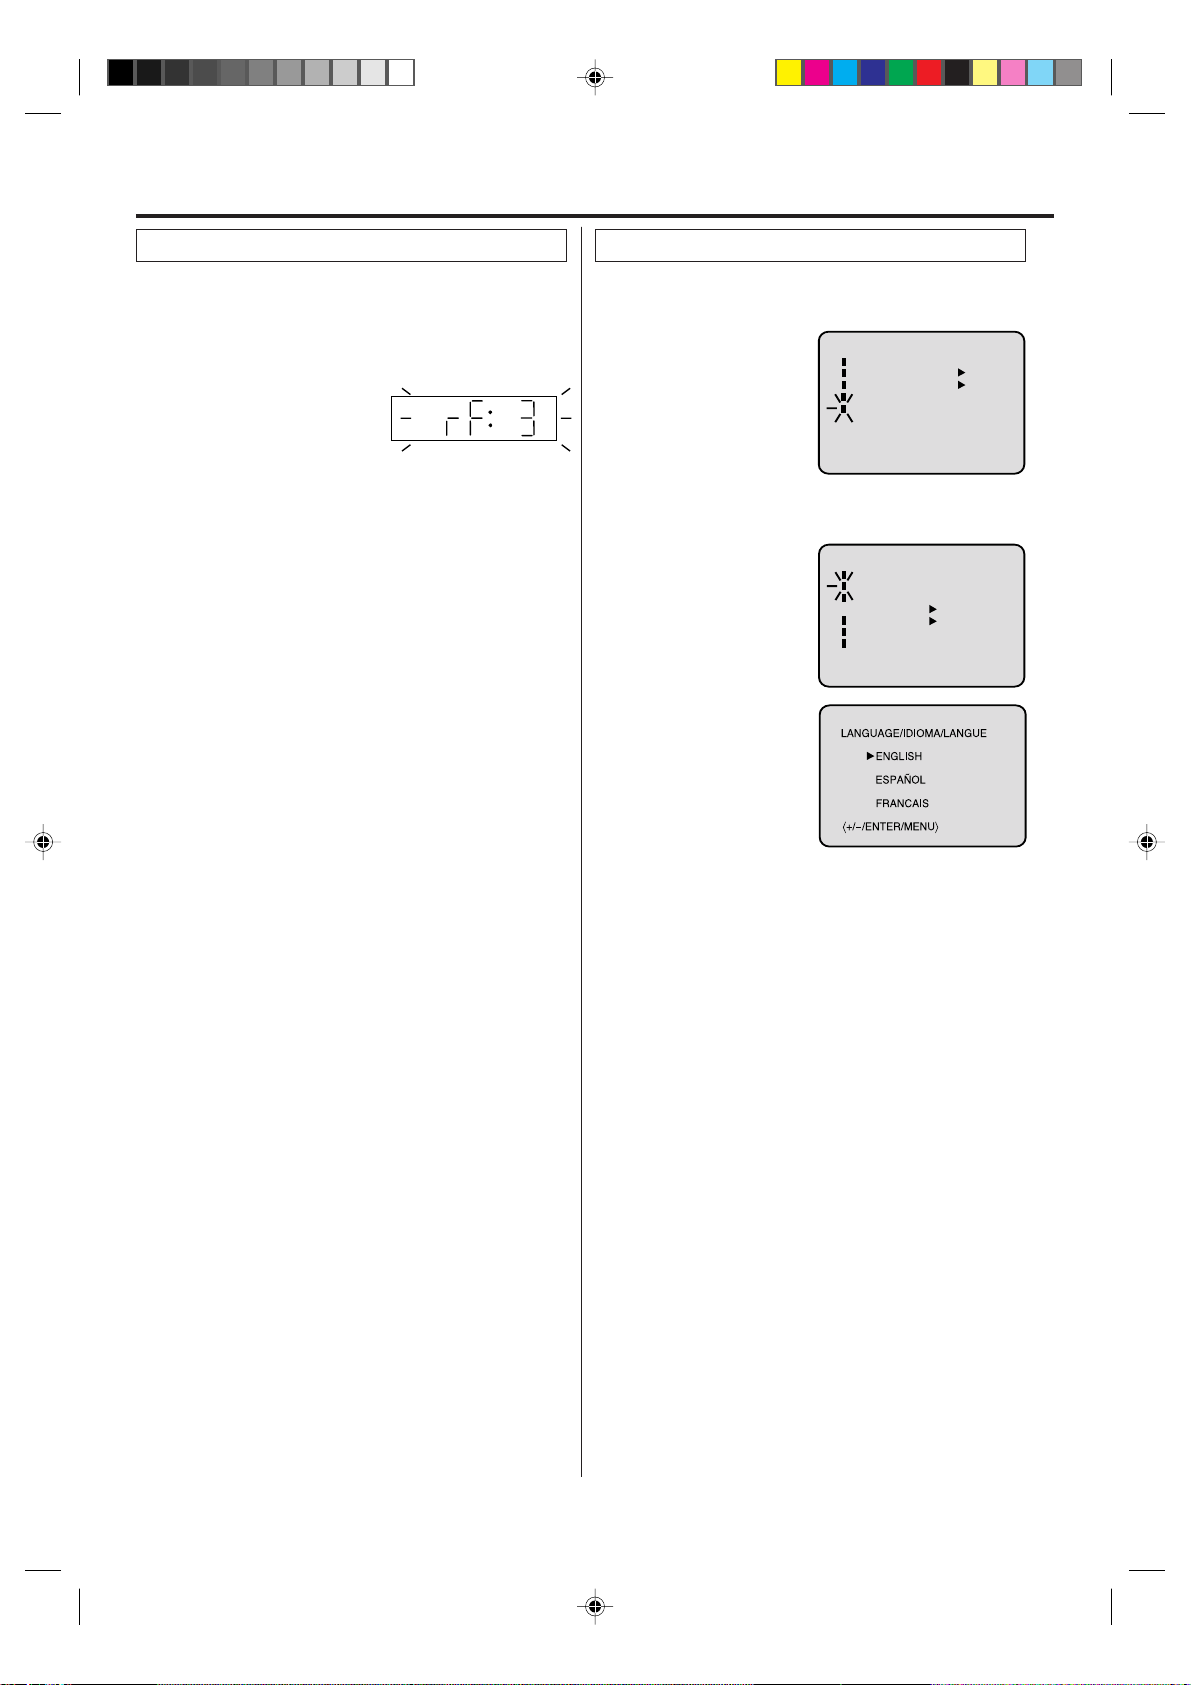
Setting the language
You can choose from three different languages
(English, French and Spanish) for the on-screen displays.
1 Press VCR MENU.
The VCR menu screen
will appear. Press SET +
or – to select the
“SYSTEM SETUP” menu,
then press ENTER.
If you use the unit for the
first time and press VCR
MENU, instead of the main menu screen on the right the
“SYSTEM SETUP” menu screen in step 2 may appear.
2 Press SET + or – to select
the “LANGUAGE” option,
then press ENTER.
3 Press SET + or – to select
the desired language: English (ENGLISH), Spanish
(ESPAÑOL) or French
(FRANCAIS), then press
ENTER.
4 Press VCR MENU until the MENU screen is cleared.
NOTES:
• Both the VCR and the DVD have their own menu option
(See page 23).
• If no buttons are pressed for more than 60 seconds, the
MENU screen will return to normal TV-operation automatically.
14
2F3P421A[E] (10-17) 1/25/05, 12:01 PM14
Page 15
Setting up the VCR section
Auto clock setting
The Auto clock function will automatically set the builtin clock (Month, Day, Year and Time) when the DVD/
VCR is connected to an Antenna or Cable system and it
is turned off. As the DVD/VCR searches for a receivable
station in your area and it receives a broadcast signal
for Auto clock, the Auto clock needs several minutes to
set itself.
1 Connect the Antenna or Cable system.
• If you use a cable box, turn it on.
2 Plug the AC Power cord to the AC outlet.
3 Make sure the DVD/VCR is turned off.
• If you press POWER, the Auto clock set is not effective.
4 After the clock is set on the display window, press
POWER.
• Depending on the reception condition, it may take approx.
thirty minutes.
5 Press DISPLAY to check the clock on the screen.
6 If the clock is not set, check the Antenna condition. The
Auto clock may not function properly if the reception condition is not good.
Auto clock adjustment
The Auto clock adjustment will be performed at 12:00 PM
everyday if you turn off the DVD/VCR.
• If you use a cable box and you want Auto clock adjustment
to be performed, the cable box must be left on.
• The Auto clock adjustment is not effective when there is a
difference of more than 5 minutes exists between the
built-in clock time and the actual time.
To set Auto clock to off
When shipped from factory, the “AUT O CLOCK” option is set
to ON.
But if you do not want Auto clock set (adjustment):
1 Turn on the DVD/VCR.
2 Press VCR MENU.
3 Press SET + or – to select the “SYSTEM SETUP’ option,
then press ENTER.
4 Press SET + or – to select the “AUTO CLOCK” option.
5 Press ENTER to select “OFF”.
6 Press VCR MENU repeatedly to return to the normal
screen.
• When the “AUTO CLOCK” is set to “OFF”, the Auto Clock
adjustment does not function.
• Set the clock manually (see page 16).
4 Press SET + or – to select your time zone, then press
ENTER.
ATLANTIC : GMT – 4 hours
EASTERN : GMT – 5 hours
CENTRAL : GMT – 6 hours
MOUNTAIN : GMT – 7 hours
PACIFIC : GMT – 8 hours
ALASKA : GMT – 9 hours
HAWAII : GMT – 10 hours
AUTO : AUTO SET
(GMT: Greenwich Mean Time)
5 Press VCR MENU twice to return to the normal screen.
NOTE:
To be able to select the standard time, the clock must first
be set by “AUTO CLOCK” once.
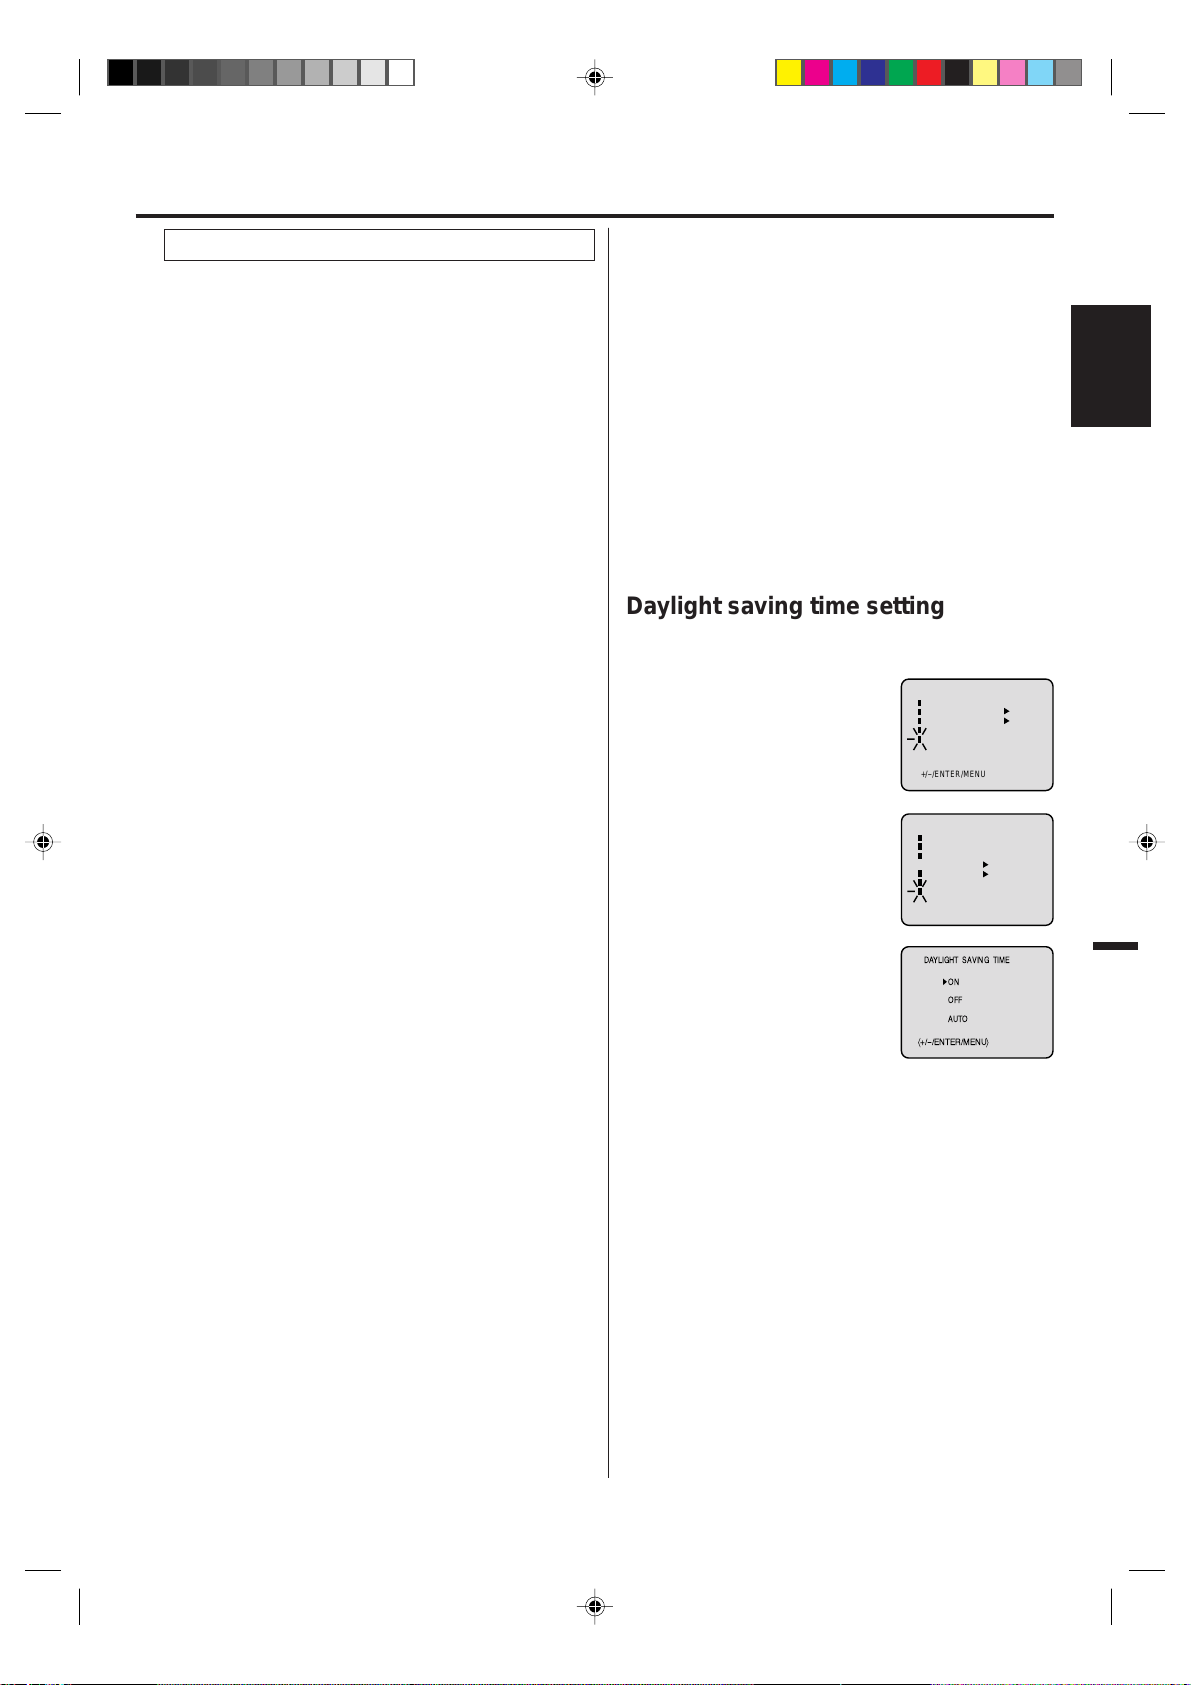
Daylight saving time setting
You can set the Daylight saving time automatically or
manually.
1 Press VCR MENU. Press SET +
or – to select the “SYSTEM
SETUP” option, then press
ENTER.
2 Press SET + or – to select the
“DAYLIGHT SA VING TIME”
option, then press ENTER.
3 Press SET + or – to select one of
the options, then press ENTER.
Press VCR MENU until the
MENU screen is cleared.
ON: for manual setting
(forward one hour)
OFF: for manual setting
(back one hour)
AUTO: for automatic setting
(read XDS in the signal)
When you want to set the Daylight Saving Time manually, on
the first Sunday in April you set to “ON”, and on the last Sunday in October you set to “OFF”.
MENU
TIMER REC SET
AUTO REPEAT
SAP
CH SETUP
SYSTEM SETUP
〈+/-/ENTER/MENU〉
SYSTEM SETUP
CLOCK SET
LANGUAGE/IDIOMA/LANGUE
NO NOISE BACKGROUND
AUTO CLOCK
STANDARD TIME
DAYLIGHT SAVING TIME
〈+/-/ENTER/MENU〉
DAYLIGHT SAVING TIME
á+/-
ON
OFF
AUTO
/ENTER/MENU
ON OFF
ON OFF
ON OFF
ON OFF
ñ
ENGLISH
To set standard time
In the rare event that you live within broadcast range of two
stations in two different time zones, the DVD/VCR may
recognize the wrong station for the Auto clock set.
To correct the situation:
1 Press VCR MENU.
2 Press SET + or – to select the “SYSTEM SETUP”
option, then press ENTER.
3 Press SET + or – to select the “STANDARD TIME”
option, then press ENTER.
2F3P421A[E] (10-17) 1/25/05, 12:01 PM15
NOTES:
• When shipped from factory, the “DAYLIGHT SAVING
TIME” option is set to “AUTO” position.
• When the clock is not set, Daylight Saving Time setting is
not available.
• When there is no Daylight Saving Time in your area, always
select “OFF” position in step 3.
15
Page 16
Setting up the VCR section
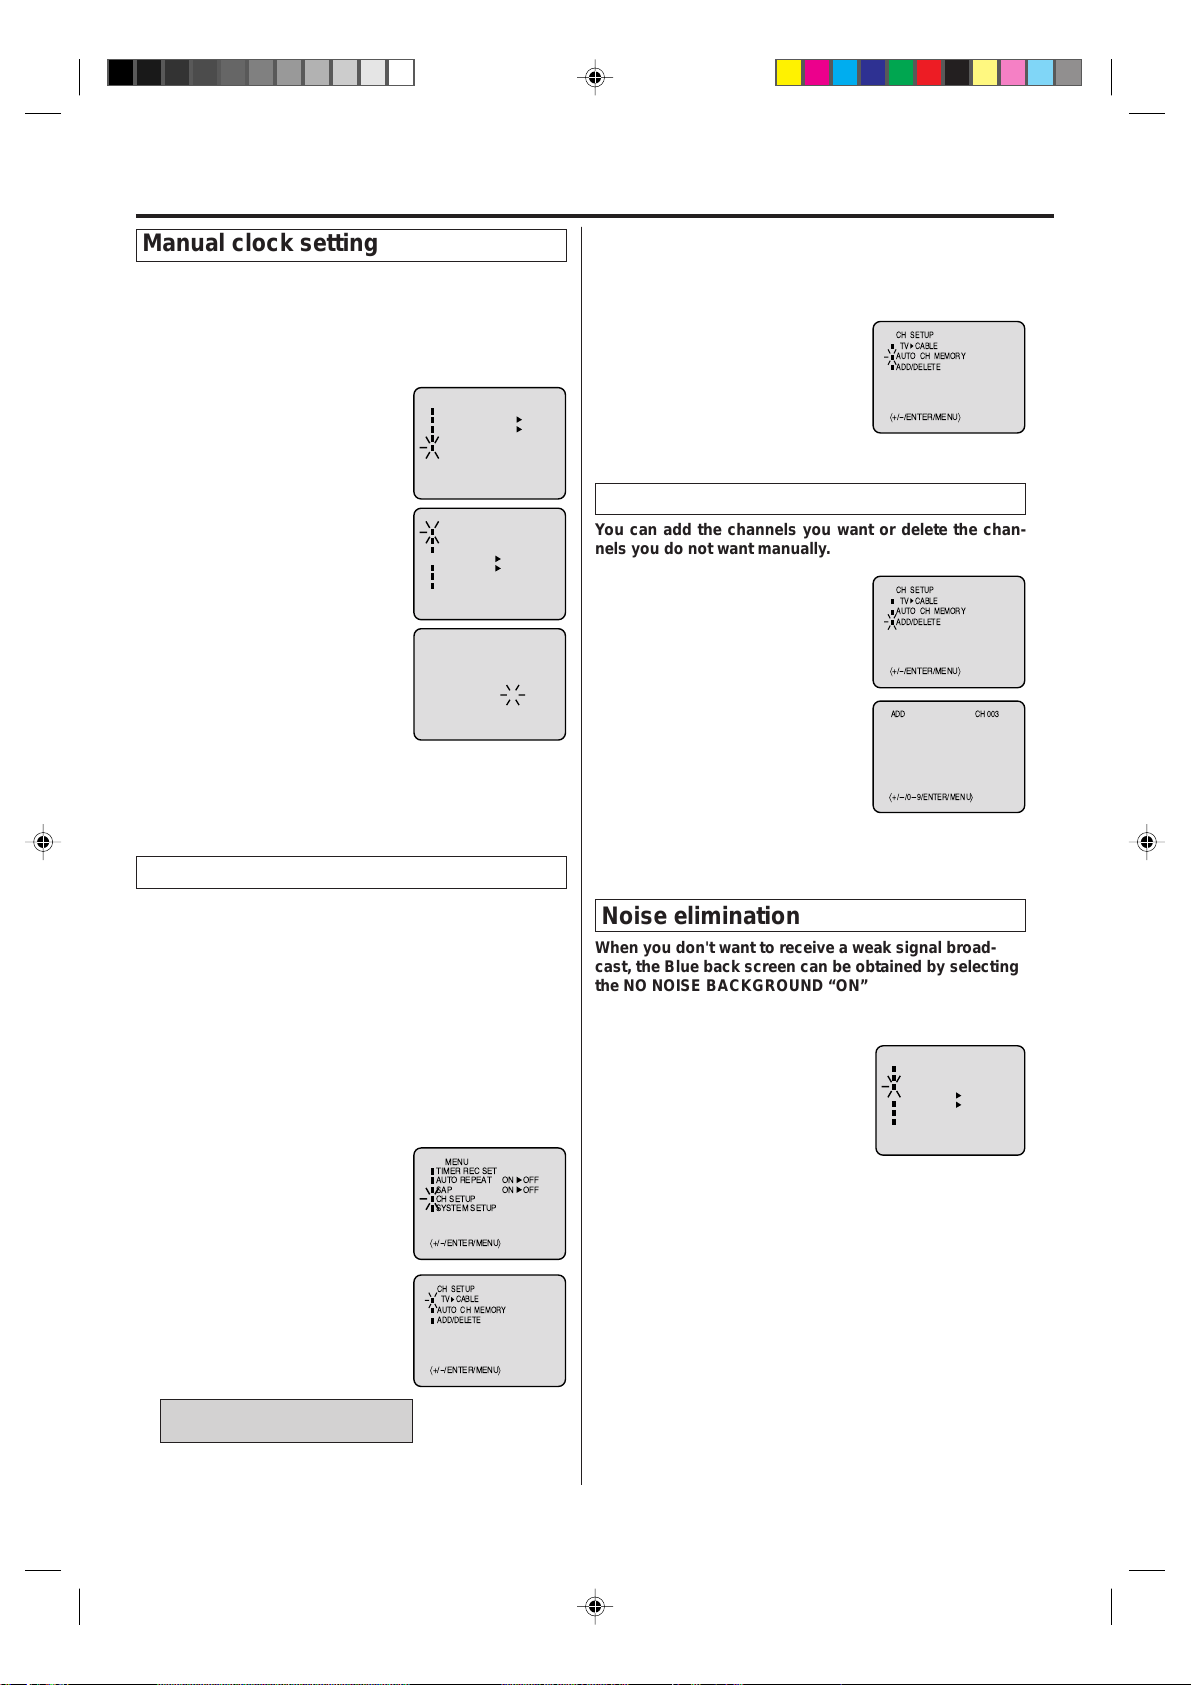
Manual clock setting
You must set the date and time manually for Timer
Recordings, ON/OFF Timer and Daylight Saving Time if
the Auto clock process did not set them correctly.
Example: Setting the clock to “8:30 AM”, 26th (SAT) March,
2005.
1 Press VCR MENU.
Press
SET + or –
“SYSTEM
to select the
SETUP” option, then
press ENTER.
2 Press SET + or – to select the
“CLOCK SET” option, then press
ENTER.
3 Press SET + or – to set the month,
then press ENTER.
4 Set the day, year and time as in
MENU
TIMER REC SET
AUTO REPEAT
SAP
CH SETUP
SYSTEM SETUP
〈+/-/ENTER/MENU〉
SYSTEM SETUP
CLOCK SET
LANGUAGE/IDIOMA/LANGUE
NO NOISE BACKGROUND
AUTO CLOCK
STANDARD TIME
DAYLIGHT SAVING TIME
〈+/-/ENTER/MENU〉
ON OFF
ON OFF
ON OFF
ON OFF
step 3.
3
After setting the clock, date and time
starts functioning automatically.
MONTH
26 (SAT)
DAY
2005
YEAR
8 : 30 AM
TIME
〈+/-/ENTER/CANCEL/MENU〉
NOTES:
• After a 30 minute power failure or disconnection of the
power plug, the time display will be lost. In this case, set
the present time again if the Auto clock did not set correctly.
• T o move cursor backward, press CANCEL.
Tuner setting
This DVD/VCR is equipped with a channel memory
feature which allows channels to skip up or down to the
next channel set into memory, skipping over unwanted
channels. Before selecting channels, they must be
programmed into the DVD/VCR’s memory. In addition to
normal VHF and UHF channels, this DVD/VCR can
receive up to 113 Cable TV channels. To use this DVD/
VCR with an antenna, set the TV/CABLE menu option to
the TV mode. When shipped from the factory, this menu
option is in the CABLE mode.
TV/CABLE selection
1 Press VCR MENU.
Press SET + or – to select the “CH
SETUP” mode, then press ENTER.
MENU
TIMER REC SET
AUTO REPEAT
SAP
CH SETUP
SYSTEM SETUP
ON OFF
ON OFF
Automatic memory tuning
The VCR can receive a maximum of 181 channels by
presetting the channels into memory.
1 In the “CH SETUP” menu, press
SET + or – to select “AUTO CH
MEMORY”, then press ENTER.
2 The DVD/VCR will begin memoriz-
CH SETUP
TV CABLE
AUTO CH MEMORY
ADD/DELETE
á+/-
/ENTER/MENU
ñ
ing all the channels available in
your area.
To add/delete channels
You can add the channels you want or delete the channels you do not want manually.
1 Press VCR MENU.
Press SET + or – to select the
“CH SETUP” mode, then press
CH SETUP
TV CABLE
AUTO CH MEMORY
ADD/DELETE
ENTER.
2 Press SET + or – to select the
á+/-
/ENTER/MENU
ñ
“ADD/DELETE” mode, then press
ENTER.
CH 003ADD
3 Select the desired channel to be
memorized or deleted using SET
+ or – button, or using Number
keys.
á
+/-/0-9/ENTER/MENU
ñ
4 Press ENTER to select the “ADD” or “DELETE”.
5 Press VCR MENU until the MENU screen is cleared.
Noise elimination
When you don't want to receive a weak signal broadcast, the Blue back screen can be obtained by selecting
the NO NOISE BACKGROUND “ON”. When the unit is
shipped from the factory, the NO NOISE BACKGROUND
is set to the “ON”.
1 In the “SYSTEM SETUP” menu,
press SET + or – to select “ NO
NOISE BACKGROUND”.
2 Press ENTER to select the “ON”
position.
3 Press VCR MENU until the MENU screen is cleared.
SYSTEM SETUP
CLOCK SET
LANGUAGE/IDIOMA/LANGUE
NO NOISE BACKGROUND
AUTO CLOCK
STANDARD TIME
DAYLIGHT SAVING TIME
〈+/-/ENTER/MENU〉
ON OFF
ON OFF
á+/-
/ENTER/MENU
2 Press SET + or – to select the
TV/CABLE mode.
3 Press ENTER to select the TV or
CH SETUP
TV CABLE
AUTO CH MEMORY
ADD/DELETE
CABLE mode.
The arrow indicates the selected
á+/-
/ENTER/MENU
mode.
TV - VHF/UHF channels
CABLE- CABLE TV channels
4 Press VCR MENU until the MENU screen is cleared.
16
2F3P421A[E] (10-17) 1/25/05, 12:01 PM16
ñ
ñ
Page 17
Tape playback operation
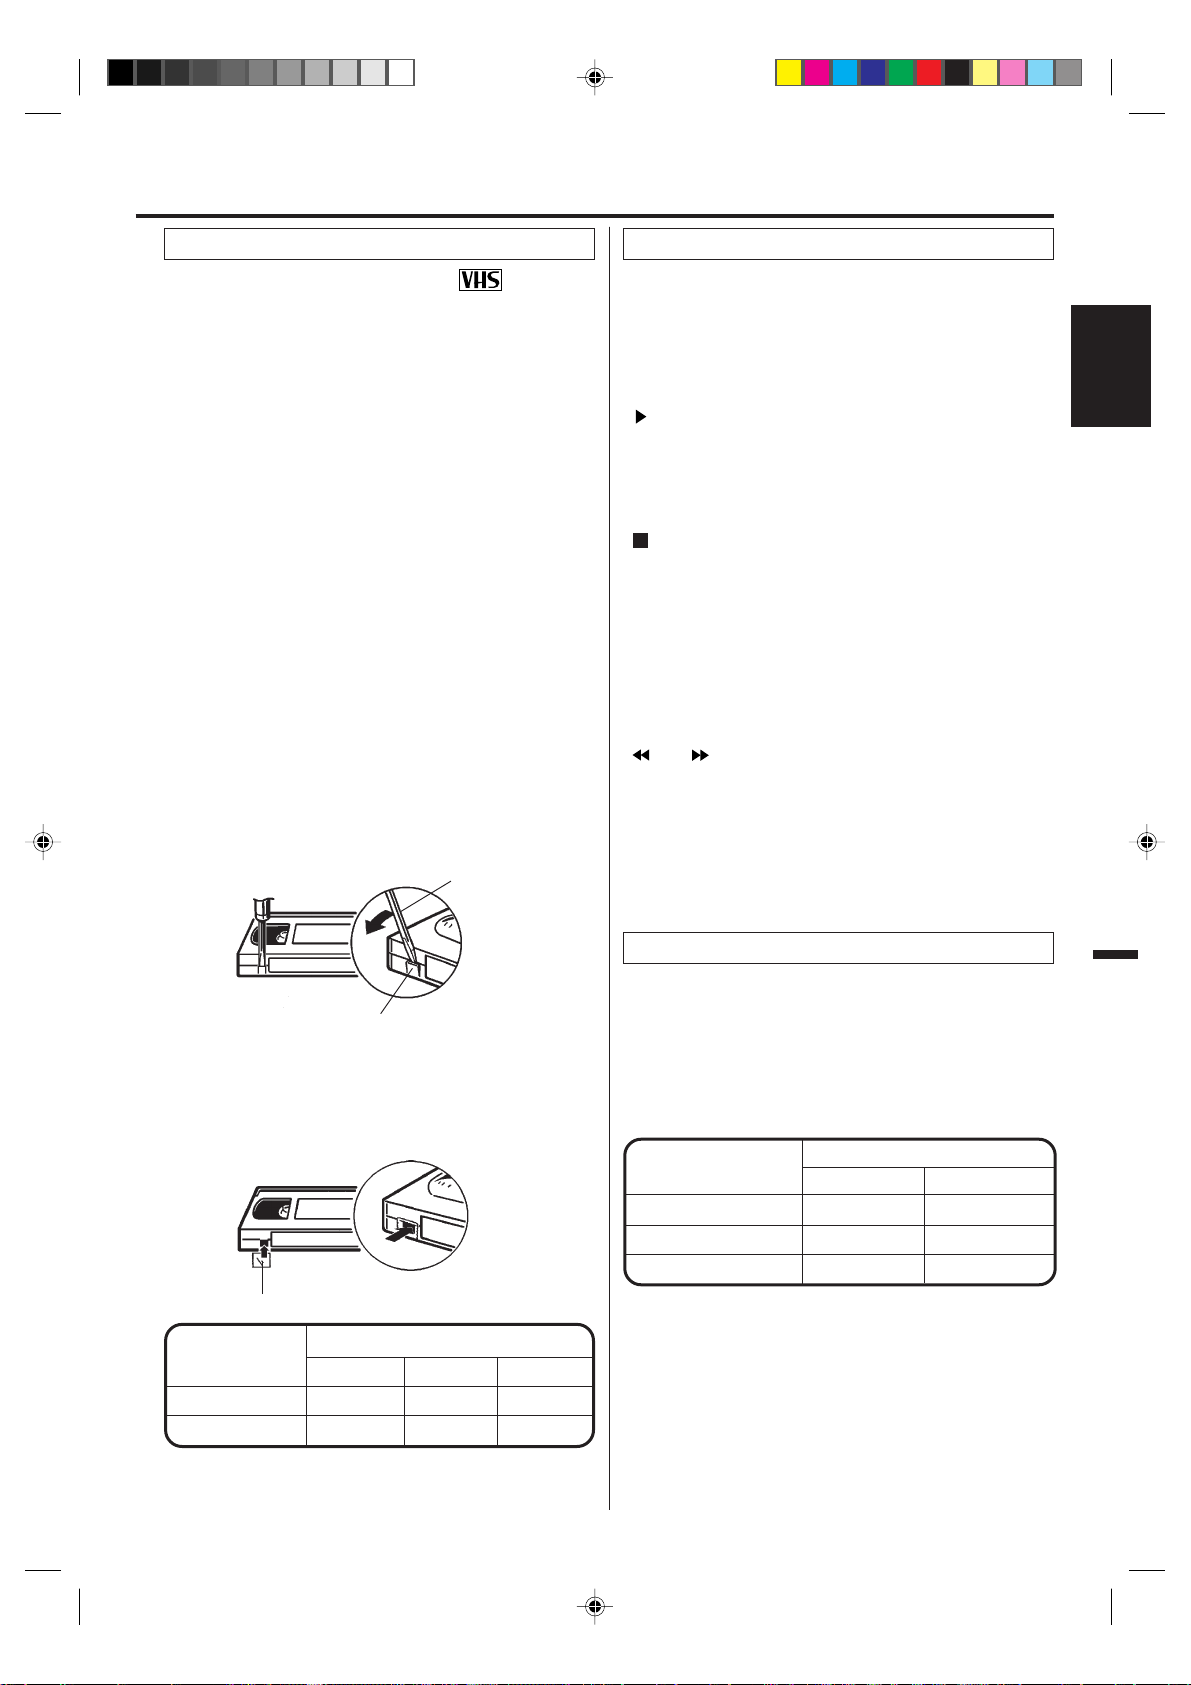
Loading and Unloading a cassette tape
Use only video cassette tapes marked
.
Loading
Push the center of the tape until it is automatically retracted
into the unit.
Automatic power on and play
When loading a cassette tape without the erase prevention
tab intact, the unit will turn on automatically and playback will
start immediately.
Insert the cassette with its labeled side facing you.
An inverted video cassette cannot be inserted.
Unloading
To unload a video cassette, press EJECT on the remote
control, or press 5 (EJECT) on the unit.
Automatic eject
If the unit automatically rewinds the tape to the
beginning (AUTO REWIND FEATURE), the tape will
be ejected automatically (see page 19).
To prevent accidental erasure
After recording, break off the erase prevention tab if you do
not wish to record over the tape.
Screwdriver
Cassette tape playback
Load a prerecorded tape (When loading a cassette tape
without the erase prevention tab, playback will start automatically).
To start playback
Press PLAY to begin playback.
“
” will appear on the screen.
To stop playback
Press STOP once.
The tape will stop, but remain fully loaded and ready to play.
” will appear on the screen.
“
NOTES:
• This unit selects the playback tape speed SP, LP or SLP
automatically.
• The Cassette tape and DVD disc can be played back simultaneously. If you press VCR/DVD, the tape playback and
DVD playback alternate with each other on the screen.
To rewind or forward the tape rapidly
Press REW or F.FWD in the Stop mode.
“ ” or “ ” will appear on the screen.
FORWARD/REVERSE PICTURE SEARCH
If you want to see the tape during REW or FWD mode, press
and hold the REW or F.FWD. The backward or forward
visual search picture will be seen on the screen. Release to
return to the REW or F.FWD mode.
ENGLISH
Erase prevention tab
To record again
Cover the hole with adhesive tape.
Be careful the tape does not extend past the edges of the
video cassette housing.
Adhesive tape
Tape Speed
SP (Standard Play)
2-2/3 hours 2 hours 1 hour
SLP (Super Long Play)
Video cassette tape
T-160 T-120 T-60
8 hours 6 hours 3 hours
Special playback
Picture Search
Reverse picture search function
Press REW x 1 or x 2 during the playback.
Forward picture search function
Press F.FWD x 1 or x 2 during the playback.
To return to playback: Press PLAY.
SPEED SEARCH TIMES
TAPE SPEED
SP (Standard Play)
LP (Long Play)
SLP (Super Long Play)
PICTURE SEARCH SPEED
PRESS ONCE
3 X
7 X
9 X
PRESS TWICE
5 X
9 X
15 X
Still Picture
Press PAUSE during playback. To resume normal playback:
Press PLAY.
17
2F3P421A[E] (10-17) 1/25/05, 12:01 PM17
Page 18
Tape playback operation
Slow Motion
During playback press SLOW.
To return to playback: Press PLAY or SLOW.
Slow tracking and vertical lock adjustment
If noise bars appear in the picture during slow motion, press
the TRK + or – to reduce the noise bars.
If the still picture jitters excessively, press TRK + or – to
stabilize the still picture.
Frame by Frame Picture
Press PAUSE during playback.
Press SLOW one by one: The picture advances frame by
frame.
To return to playback: Press PLAY or PAUSE.
Adjusting tracking condition
Automatic tracking adjustment
Whenever you insert a tape and start playback, automatic
tracking starts working and continuously analyzes the signal
to enable optimum picture quality during playback.
Manual tracking adjustment
If automatic tracking cannot eliminate noises well during
playback, press TRK +/– to eliminate the noises.
“MANUAL TR.” will appear . Press it briefly for a fine adjustment,
or press and hold for a coarse adjustment.
• Press ATR to reactivate automatic tracking again.
“AUTO TR.” will appear.
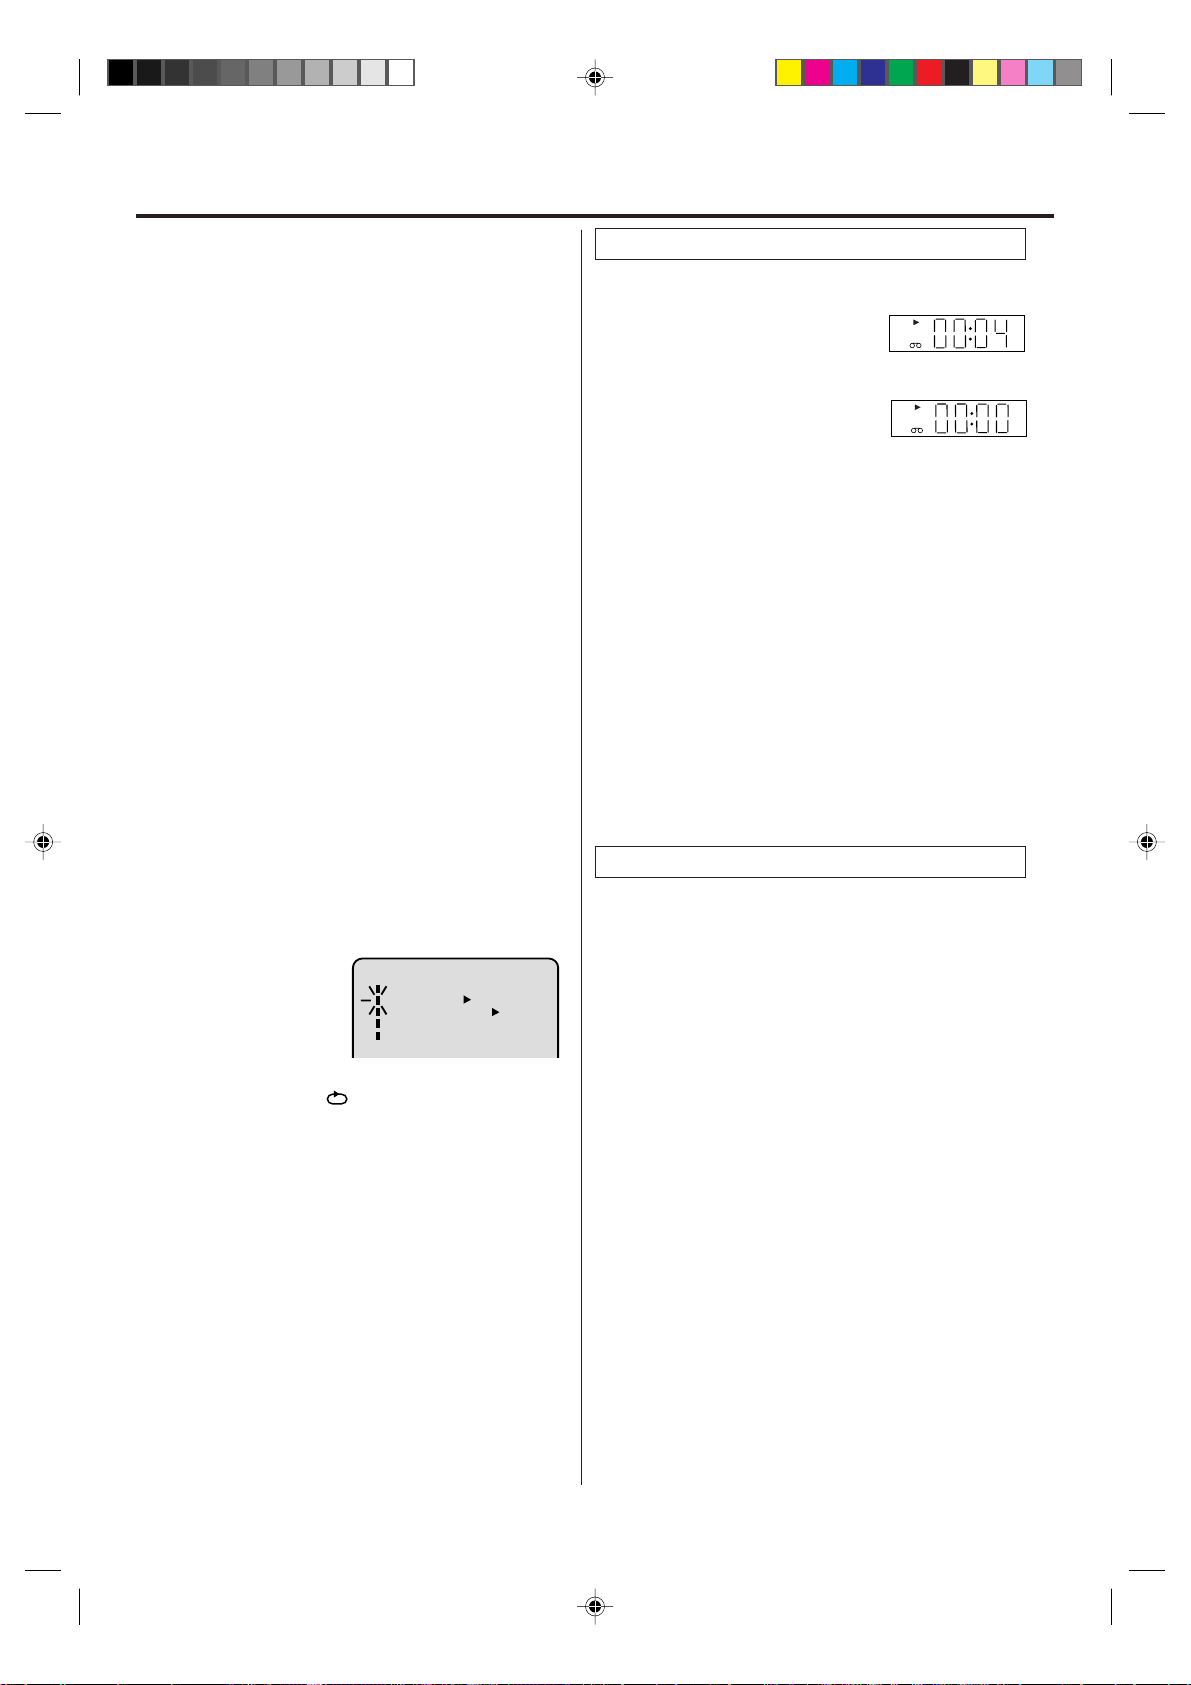
ZERO RETURN function
This function makes tape-rewinding stop at the counter
00:00:00 position automatically.
Press DISPLAY.
1
The counter display shows the tape
running time during playback or recording.
Press COUNTER RESET at the
2
desired tape position. The counter
display will be reset to the
“00:00:00” position (e.g. the beginning of recording).
Press STOP when playback or recording is finished.
3
Press ZERO RETURN.
The tape will be rewinded or fast forwarded and automatically stop at the “00:00:00” position.
The CLOCK/COUNTER-button
Press CLOCK/COUNTER. The clock and tape counter alternate with each other in the display.
NOTES:
•
If you rewind the tape beyond “00:00:00”, a minus sign
(“–”) will be displayed in front of the time.
•
When you load a tape, the counter will reset to “00:00:00”.
•
The counter does not function on nonrecorded (blank) sections of the tape. When you rewind, fast forward or play tapes
through blank sections, the counter stops.
VCR
VCR
Repeat playback
The entire video tape will be played until its end. The tape will
then automatically rewind to the beginning and the playback
will be repeated.
1
Press VCR MENU. Press SET + or – to select “AUTO
REPEAT”.
Then press ENTER
2
lect “ON” or “OFF”.
If “ON” is selected, the playback will be repeated endlessly.
Press VCR MENU until the menu screen is cleared.
3
if you press DISPLA Y, “ ” will appear on the screen.
T o start the playback, press PLAY.
4
The playback will be repeated endlessly.
To cancel repeat mode:
Follow the above step 1, then press ENTER to select the
OFF position. Press VCR MENU to return to the TV.
NOTES:
• The audio output is muted during Picture Search, Still Picture
Slow Motion and Frame by Frame Picture.
• During Picture Search mode there will be noise bars which are
caused by the system.
• The Special Playback will automatically change to playback
after approx. 5 minutes to protect the video tape against excessive wear.
to se-
MENU
TIMER REC SET
AUTO REPEAT
SAP
CH SETUP
SYSTEM SETUP
ON OFF
ON OFF
Video index search system
This function enables you to locate the beginning of any
recording made on the VCR.
Recording an INDEX MARK
The Index Search function automatically records an INDEX
mark on the tape whenever a recording is initiated.
Index Search
77
Press INDEX
For Succeeding programs: Press INDEX
For Preceding programs: Press INDEX
(Additional press increases the INDEX NO. up to 9.)
When the INDEX
searching the INDEX NO. selected and finds the portion,
then playback starts automatically.
To stop the Index Search, press STOP.
NOTES:
When you record an INDEX mark at the very beginning of the
•
tape, the mark may not be found.
During INDEX search, the tape may stop and begin to play
•
at a slightly different location.
INDEX may not function properly with old or worn out video
•
tapes.
INDEX marks may not be found if it is extremely close to the
•
point where the search began.
In recording, if you stop recording temporarily, the INDEX
•
mark is not recorded on the tape.
66
7 or
6 during stop or play mode.
77
66
77
6 6
7 or
6 is pressed, the unit starts
77
6 6
77
7.
77
66
6 .
66
18
2F3P421A[E] (18-23) 1/25/05, 12:01 PM18
Page 19
Recording
Recording a TV program
Recording and viewing the same TV program.
Load a cassette tape with the erase prevention tab intact.
1
The unit will automatically turn on.
Press SPEED to select the desired tape speed SP or
2
SLP.
The tape counter and SP or SLP will appear on the
screen for about 4 seconds.
3
Set the TV/CABLE option to the appropriate position
(see page 16).
Press Number keys or CH / to select the channel
4
to be recorded.
1-9 Press 0 twice and then 1-9 as required.
10-12 Press 0 first and then the remaining 2 digits
13-99 Press 2 digits in order.
100-125 Press the 3 digits in order.
VHF/UHF/CABLE CHANNELS
Example: To select 2, Press 002.
in order from left to right.
Example: Press 012 for “12”.
Example: Press 22 for “22”.
Example: Press 110 for “110”.
TV CABLE
VHF
2-13
UHF
14-69
14-36 (A) (W)
37-59 (AA) (WW)
60-85 (AAA) (ZZZ)
86-94 (86) (94)
95-99 (A-5) (A-1)
100-125 (100) (125)
01 (5A)
VHF
2-13
STD/HRC/IRC
To stop recording
Press STOP to stop recording.
“
” will appear on screen for about 4 seconds.
To stop recording temporarily
Press PAUSE/STILL to avoid recording unwanted material.
“ ” will appear on screen for about 4 seconds.
Press again to continue the recording.
NOTES:
•
The pause function will be released after 5 minutes to prevent
damage to the tape or the VCR. The VCR will change to the
STOP mode.
•
You can select a recording channel in the recording pause
mode.
Recording one program while watching
another
While the VCR is recording, press TV/VCR to select the TV
position.
The “VCR” will go off and recording will continue.
Select the TV channel you want to watch by using the TV
channel selector.
NOTE:
Some CABLE hookups do not permit viewing one channel
while recording another. See page 11.
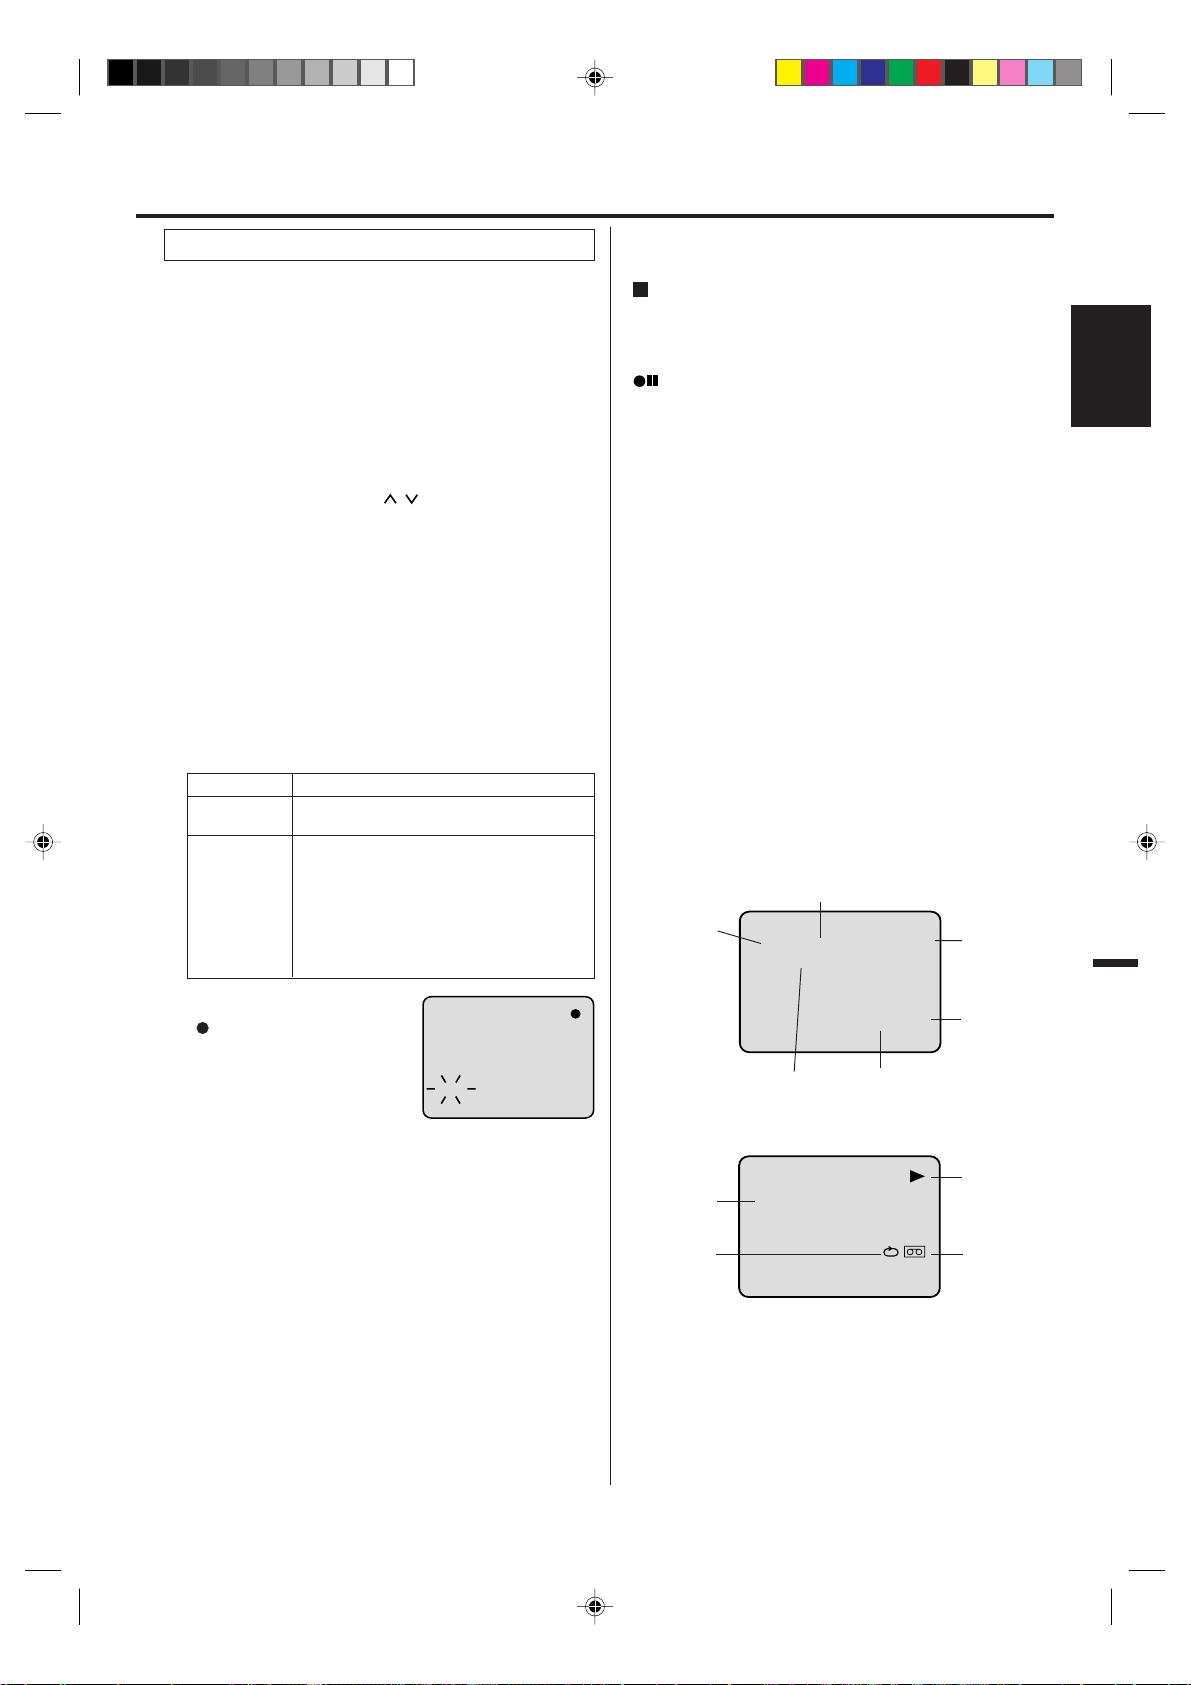
To Display VCR operation Status
Press DISPLAY. The clock, day of the week and more informa-
tion will be indicated.
While watching TV
CLOCK
DAY OF THE WEEK
8 : 47
AM
MON
STEREO SAP
CH 125
CHANNEL
ENGLISHENGLISH
Press REC/OTR.
5
“
” will appear on the screen
for about 4 seconds and “REC”
will appear on the display.
INDEX
NOTES:
• If the erase prevention tab is removed, the tape will eject when
REC/OTR is pressed for recording.
• If you wish to watch the DVD playback during the normal
recording on VCR, press VCR/DVD to change to DVD mode
and perform the DVD playback (see page 24).
• You can not record disc material in DVD, Audio CD, etc. onto
a video tape with this DVD/VCR.
CH 110
00 : 00 : 00 SP
STEREO AND
SECOND AUDIO
PROGRAM (SAP)
While operating a tape
HI-FI
STEREO
AUTO
REPEAT
To cancel the display: Press DISPLAY until all indicators
disappear.
8 : 30AM MON
HI-FI
REAL TIME COUNTER
00 : 15 : 12 SP
TAPE
SPEED
OPERATING
MODE
TAPE IN
Auto rewind feature
This VCR will automatically rewind the tape when the tape has
ended (except during OTR and TIMER REC). It will also eject
the tape.
19
2F3P421A[E] (18-23) 1/25/05, 12:01 PM19
Page 20
Recording
One-touch Timer Recording (OTR)
The One-touch Timer Recording feature provides a
simple and convenient way to make a timed recording.
Example: One-touch Timer Recording for 30 minutes.
Load a cassette tape with the erase prevention tab
1
intact.
The unit will automatically turn on.
Press SPEED to select the desired tape speed SP or
2
SLP.
The tape counter and SP or SLP will appear on the
screen for about 4 seconds.
3
Set the TV/CABLE option to the appropriate position.
Press Number keys or CH
4
/ to select the channel
to be recorded.
Press REC/OTR. Press the button again to stop record-
5
ing after 30 minutes. Each additional press of REC/OTR
will increase recording time as shown in the chart below,
up to a maximum of 6 hours. The OTR and recording time
will appear on the screen for about 4 seconds. And, “REC”
will keep blinking in the display.
Press
Recording time Press
once
twice
3 times
4 times
5 times
NORMAL REC
0:30
1:00
1:30
2:00
6 times
7 times
8 times
9 times
10 times
Recording time
3:00
4:00
5:00
6:00
NORMAL REC
To cancel OTR
Press STOP or turn off the power.
” will appear on screen for about 4 seconds.
“
NOTE:
If you wish to watch the DVD playback during the OTR, press
VCR/DVD to change to DVD mode and perform the DVD
playback (see page 24).
20
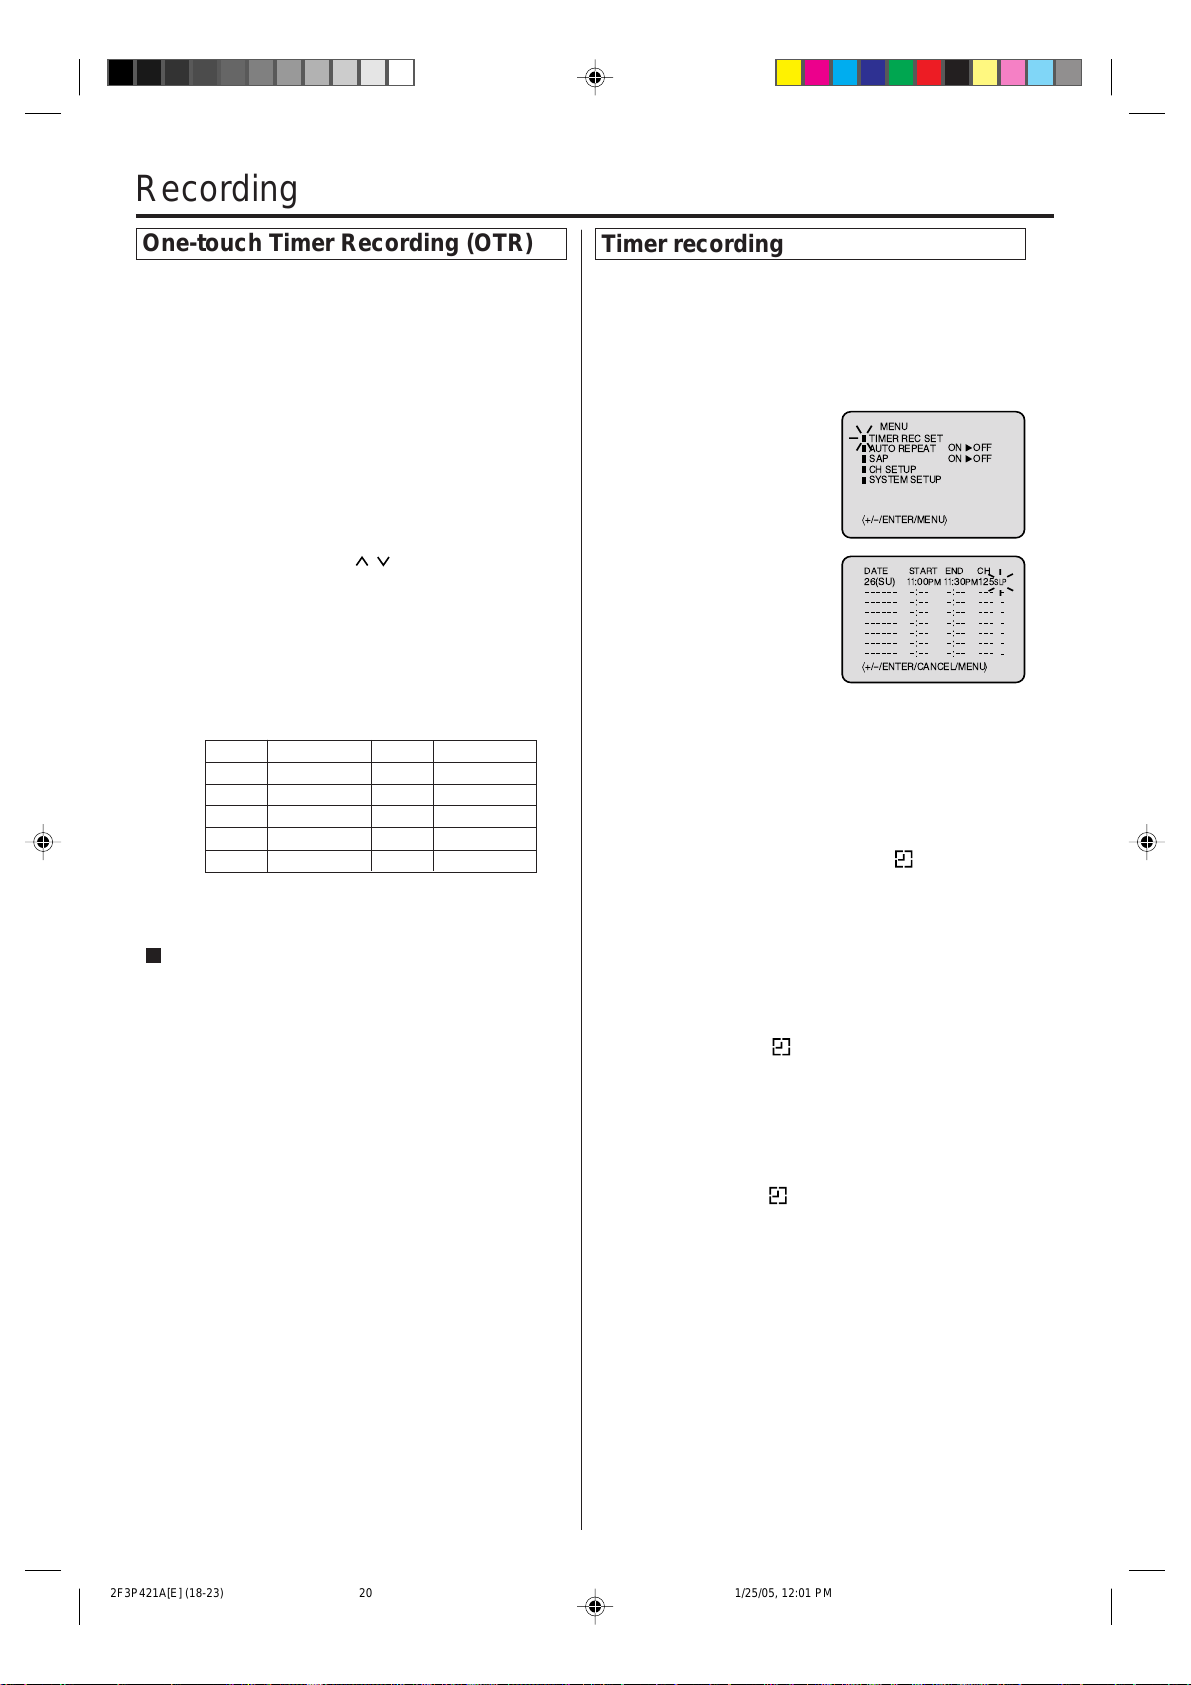
Timer recording
Timer recording can be programmed on-screen with the
remote control. The built-in timer allows automatic
unattended recording of up to 8 programs within 1 month.
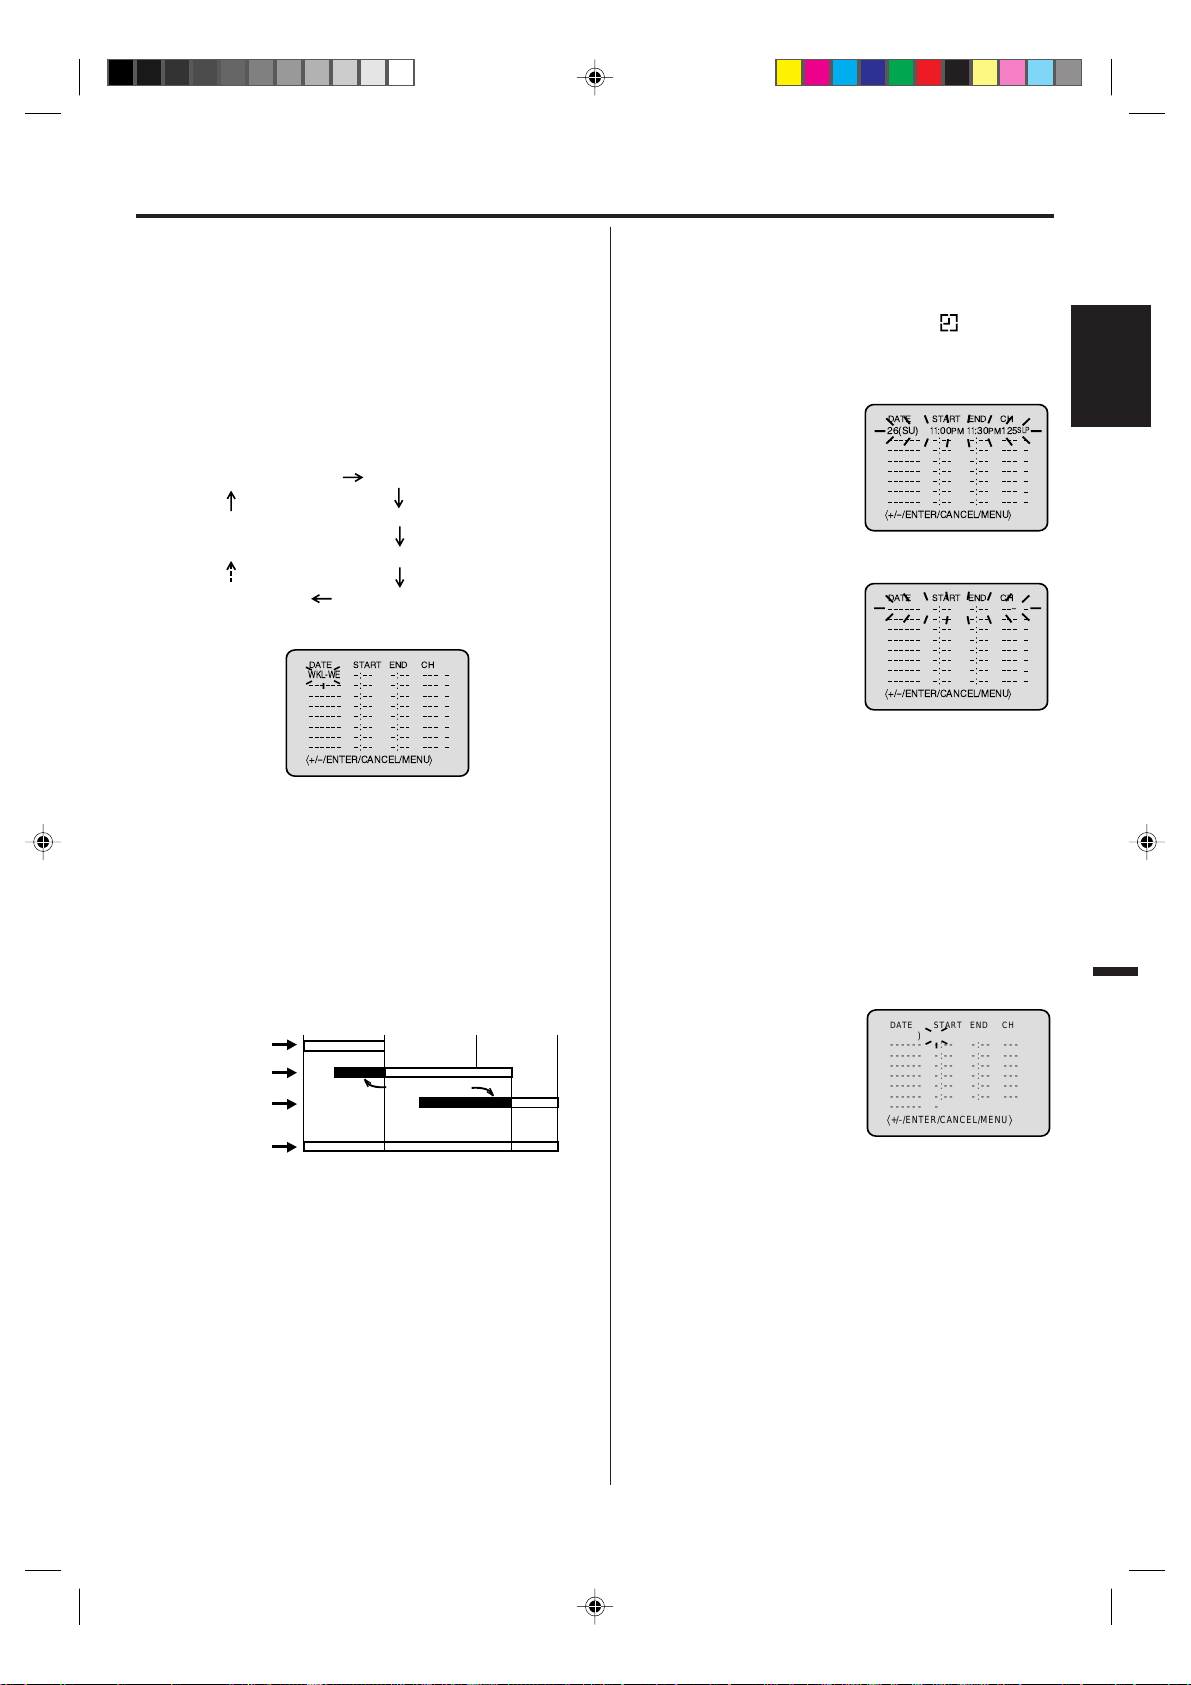
Example: Program a timer recording for the 26th day,
channel 125 (CABLE), 11:00 - 11:30 PM on timer program
number 1 (Tape speed: SLP).
Press VCR MENU. Select
1
the “TIMER REC SET”
option, then press ENTER.
Press SET + or – to select
2
one of the program line,
then press ENTER.
Press SET + or – to select
3
the date, then press
ENTER.
Set the start time, end time,
4
channel and tape speed as
in step 3.
NOTES:
•
Press CANCEL to move cursor backward for correction.
•
To record from external source set the channel to “L”. “L”
will appear next to CH 125 (or 69).
To enter other programs, repeat step 2 through 4.
5
• To return to the normal screen, press VCR MENU twice.
6
Press TIMER REC. The clock symbol ( ) will appear
on the display and the VCR stands by for recording. At
the same time, VCR mode will change to DVD mode
automatically. You can use DVD even if the VCR is in
the Timer recording mode.
If you do not use the DVD, turn the power off.
The timer recording will start at 20 seconds before the
time you predetermined.
NOTES:
•
If the clock symbol (
in spite of the pressing of TIMER REC, the cassette may
not have been loaded yet. (see page 17)
•
If the cassette is ejected in spite of the pressing of TIMER
REC, the erase prevention tab of the cassette may have
been removed. (see page 17)
NOTES:
If the clock symbol ( ) blinks when the timer recording
•
ended, the TV program has not been completely recorded
because of an insufficient tape supply. Press TIMER REC to
cancel the timer program or press EJECT to remove the
cassette tape.
During timer recording standby mode, the VCR mode can-
•
not be selected. To use the VCR, press TIMER REC at first,
then press VCR/DVD to change to VCR mode. After you use
the VCR,
press TIMER REC again to put the VCR into timer
recording standby mode.
If you press TIMER REC during timer recording, the record-
•
ing operation will
again within the programmed time, the recording operation
will start again.
After a 30 minute power failure or disconnection of the power
•
plug, all programmed recording settings and time display will
be lost upon resumption of power. In this case, reset the
clock (see page 15) and reprogram any timer recordings.
) does not appear on the display
be interrupted. If you press TIMER REC
MENU
TIMER REC SET
AUTO REPEAT
SAP
CH SETUP
SYSTEM SETUP
á+/-
/ENTER/MENU
DATE START END CH
26(SU)11:00PM11:30PM
á+/-
/ENTER/CANCEL/MENU
ON OFF
ON OFF
ñ
125
SLP
ñ
2F3P421A[E] (18-23) 1/25/05, 12:01 PM20
Page 21
Recording
Timer recording special case
Weekly (e.g. WKL-TU: each Tuesday) or daily (e.g. MO-SA:
Monday to Saturday) Timer recording.
Follow the procedure of timer recording on the previous page.
At picture 3 press SET + or – repeatedly until the desired setting
appears. Then press ENTER.
When you press SET – repeatedly, the indicator at DATE will
change as follows, in this case the day is Friday.
The current day (Friday) SU-SA (Sunday to Saturday)
One month later
minus one day
MO-SA (Monday to Saturday)
MO-FR (Monday to Friday)
WKL-WE WKL-TH (Weekly Thursday)
(Weekly Wednesday)
DATE START END CH
WKL-WE
á+/-
/ENTER/CANCEL/MENU
ñ
In case Timer programs-overlap
Do not overlap timer programs as portions of the conflicting
programs will be lost. The first recording time has priority over
the next recording time as shown in the diagram below.
Program 1
Program 2
Program 3
Recording
Control Settings
8 : 00
Prog.1
9 : 00
Deleted Parts
Non Recorded Portion Parts
Prog.2 Prog.3
10 : 00
11 : 00
Confirmation / Cancellation of the Timer
recording
If the Timer has been activated, press TIMER REC to
1
deactivate the Timer. The clock symbol ( ) will disappear. Then press VCR/DVD to change to VCR mode.
To confirm Timer program:
2
At picture 1 on the previous
page select the “TIMER REC
SET” option and press
ENTER.
Then the timer program list
as right will appear on the
screen.
To cancel Timer program:
3
Press SET + or – to select
the unnecessary program,
then press CANCEL to cancel the program.
Press VCR MENU repeatedly until the TV-picture appears.
4
NOTES:
• If there are other timer record programs remaining, TIMER
REC must be pressed to reactivate the timer, otherwise the
remaining timer record programs will be ignored.
• You cannot confirm the Timer program during timer recording operation.
You can also correct the programmed setting in program
•
confirm mode.
At step 2 above, press ENTER to enter the program input
mode. Then press ENTER repeatedly until the item you wish
to correct blinks. Then correct the data with SET + or –.
Then press VCR MENU repeatedly until the TV-picture
appears.
DATE START END CH
26(SU)11:00PM11
á+/-
/ENTER/CANCEL/MENU
DATE START END CH
á+/-
/ENTER/CANCEL/MENU
DATE START END CH
26(SU)11:00PM11
–––––– –:–– –:–– –––
–––––– –:–– –:–– –––
–––––– –:–– –:–– –––
–––––– –:–– –:–– –––
–––––– –:–– –:–– –––
–––––– –:–– –:–– –––
–––––– –:–– –:–– –––
á+/–
/ENTER/CANCEL/MENU ñ
:30PM125
:30PM125
SLP
ñ
Ð
ñ
SLP
–
–
–
–
–
–
–
ENGLISHENGLISH
NOTES:
•
The daily/weekly recording can be made continuously until
the recording is canceled or the tape reaches the end.
•
During timer recording the automatic rewinding mechanism
does not function.
2F3P421A[E] (18-23) 1/25/05, 12:01 PM21
21
Page 22

Advanced function of VCR section
Stereo recording and playback
The VHS Hi-Fi audio system permits high fidelity recording of MTS STEREO TV broadcasts.
When a MTS STEREO broadcast is received, the word
“STEREO” will appear on the
screen and the program can be
viewed or recorded in stereo.
The Hi-Fi STEREO recording procedure is the same as for
normal recordings.
NOTE:
When using a CABLE system, stereo TV programs may be
transmitted over a mono cable channel. In this case the word
“STEREO” will not appear and the sound will be in mono.
Output selection
When viewing an MTS STEREO TV program, or playing a
prerecorded VHS Hi-Fi STEREO videotape, press AUDIO
SELECT to select how the audio will be heard through the
speakers. Normally set to the Hi-Fi STEREO position, this
button can be set to the MONO position if the stereo
broadcast or videotape audio is of poor quality. The “R” and
“L” positions allow the audio from the Right or Left Hi-Fi
channel to be heard over both TV speakers. This button has
no effect when viewing a MONO videotape or TV program.
Each time when you press the button, output selection
display appears on the screen for several seconds. Refer to
the chart below.
OUTPUT
SELECTION
STEREO
L ch
R ch
MONO
SOUND HEARD ON BOTH
SPEAKERS
STEREO
LEFT CHANNEL AUDIO
RIGHT CHANNEL AUDIO
MONO
STEREO
Duplicating a video tape
If you connect the VCR to another VCR or camcorder, you
can duplicate a previously recorded tape.
Make all connections before turning on the power.
1
Load a blank cassette tape with the erase prevention tab
intact into the recording VCR.
Load a previously recorded tape into the playback VCR
or CAMCORDER.
Press SPEED to select the desired tape speed SP or SLP .
2
It is recommended that you set the Speed to the SP mode
on the recording VCR for best results.
3
Press INPUT SELECT to select
AUDIO/VIDEO input position. “L” will
appear in the display.
Press REC/OTR on the recording VCR, then press
4
PAUSE/STILL.
Press the PLAY button on the playback VCR or
5
CAMCORDER, then press the PAUSE/STILL button.
Release the recording pause and the playback still simul-
6
taneously to begin the duplicating process.
Connection with second Video recorder
Playback VCR
To VIDEO OUT To AUDIO (R) OUT
To AUDIO (L) OUT
AUDIO/VIDEO Cord (supplied)
Recording VCR
Second Audio Program (SAP)
Your VCR is fitted with a SAP broadcast system which
enables you to switch to a second audio program when
viewing a selected channel.
This function applies only when the program is broadcast in multi-languages through the SAP broadcast
system.
Press VCR MENU. Then press SET + or – to select
1
“SAP”.
Then press ENTER to select “ON”.
2
Then press VCR MENU until the menu
3
screen is cleared.
Listening to SAP
When the VCR is turned on or a channel selection is made,
make certain the letters “SAP” appears on the screen. This
means that the “Second Audio Program” broadcasting is
available.
NOTES:
When playing back a tape that is not recorded in Hi-Fi stereo
•
mode, the audio will automatically be monaural.
When listening to a VHS Hi-Fi video tape or MTS broadcast
•
through the VHF/UHF jack (Audio/Video cord not connected),
the sound will be monaural.
22
To VIDEO IN
To AUDIO (R) IN
To AUDIO (L) IN
Connection with Video camera
Playback Camcorder
To AV Jack
Recording VCR
To AUDIO (R) IN
To AUDIO (L) IN
AUDIO/VIDEO Cord (not supplied)
To VIDEO IN
For duplicating a previously recorded tape from a
camcorder, follow the camcorder manufacturer’s instructions. A typical camcorder dubbing hookup is shown above.
2F3P421A[E] (18-23) 1/25/05, 12:01 PM22
Page 23

Disc playback operation
/Enter/Setup/Return
No disc
Menu
Subtitle
Audio
OSD
English
English
English
/Setup/Return
English
Menu
Subtitle
Audio
OSD
English
English
/Setup/Return
English
English
Disc
This unit applies to DVD discs from Region 1 or Region ALL.
The loaded Disc (DVD, Audio-CD and MP3-CD) will be recognized automatically.
The suitable Disc-formats are: DVD, CD-R and CD-RW.
Some CD-R/RW discs may be incompatible.
Do not play DVD-ROM, DVD-Audio, CDV, Video-CD, CD-G or
Photo CD to prevent accidental erasure of prerecorded material.
This unit cannot record disc material in DVD, Audio CD etc.
onto a video tape.
If you press REC/OTR during DVD playback, a symbol mark
“ ” will appear on the screen for approx. 4 seconds.
Title
When two or more movies are recorded on a disc, the disc is
divided into two or more sections. Each section is called a
“TITLE”.
Chapter
The titles can be subdivided into many sections.
Each section is called a “CHAPTER”.
Track
An Audio CD can contain several items.
These are assigned to the tracks.
DVD DISC
TITLE 1 TITLE 2
CHAPTER 1
CHAPTER 2 CHAPTER 2 CHAPTER 3CHAPTER 1
Setting setup language
The setup language can be selected.
Press VCR/DVD to se-
1
lect the DVD mode (The
DVD indicator will light).
“No Disc” will appear on
the screen (If a DVD disc
has already loaded, the
playback will start automatically).
Press SETUP in the
2
stop mode. The SETUP
MENU of DVD will appear on the screen.
Press or to
3
select option, then
press or ENTER.
ENGLISHENGLISH
Audio-CD
CD
TRACK 1 TRACK 2 TRACK 3 TRACK 4 TRACK 5
Removing Disc from Case
Be sure to hold the edge of disc. Do
not touch the surface of the disc.
Pick up the disc gently from the case.
• Do not scratch the disc.
• Do not get dirt on the surface of
the disc.
• Do not stick a label or adhesive
tape on the disc.
• Do not drop or bend the disc.
Storing Disc
• Store the disc in the case to
avoid risk of scratches, dirt or
damage.
• Do not leave disc exposed to direct sunlight or in hot or humid
places.
Cleaning Disc
Wipe the disc with a clean, dry
cloth from center to edge.
• Do not wipe the disc round.
• Do not use liquid or aerosol
cleaners.
4
Press
“OSD”,
guage (e.g. English).
5
To make the SETUP screen disappear, press SETUP (or
RETURN).
If the DVD/VCR does not operate properly: Static electric-
ity, etc., may affect the player's operation. Disconnect the AC
power cord once, then connect it again.
or
to select
then press or
to select desired lan-
23
2F3P421A[E] (18-23) 1/25/05, 12:02 PM23
Page 24

Disc playback operation
Playback procedure
Press OPEN/CLOSE.
1
The disc tray will open.
Place a disc onto the tray.
2
Hold the disc, position it with the printed label side up, align
it with the guides, and place it in its proper position.
Press PLAY or OPEN/CLOSE.
3
The disc tray closes automatically.
On the screen, “ ” changes to “Reading” and then play-
back will commence.
• A menu screen may appear on the TV screen, if the
disc has a menu feature. In this case, press , ,
, or ENTER to operate a menu feature.
Press STOP to end playback.
4
• The DVD/VCR memorizes the stopped point, depending onthe disc. “ ” appears on the screen. Press PLA Y
to resume playback (from the scene point).
• If you press STOP again (“
or unload the disc, the DVD/VCR will clear the stopped
point.
Then press OPEN/CLOSE.
5
The disc tray opens.
Remove the disc and press POWER.
The disc tray closes automatically and DVD/VCR turns off.
NOTES:
• If a non-compatible disc is loaded, “Incorrect Disc”, “Region
Code Error” or “Parental Error” will appear on the TV screen
according to the type of loaded disc. In this case, check your
disc again (see pages 23 and 28).
• Some discs may take a minute or so to start playback.
• A “Prohibition” symbol “
the screen. This symbol means either the feature you tried is
not available on the disc, or the DVD/VCR can not access
the feature at this time. This does not indicate a problem with
the DVD/VCR.
• When you set a single-faced disc label downwards (i.e. the
wrong way up) and press PLA Y or OPEN/CLOSE, “Reading”
will appear and remain on the screen for approx. 40 seconds
and then it will change to “Incorrect Disc”.
• Some playback operations of DVDs may be intentionally fixed
by software producers. Since this DVD/VCR plays DVDs according to the disc contents the software producers designed,
some playback features may not be available. Also refer to
the instructions supplied with the DVDs.
• When playing DTS-encoded Audio CDs, excessive noise will
be heard from the analog stereo outputs. To avoid possible
damage to the audio system, the consumer should take
proper precautions when the analog stereo outputs of the
DVD/VCR are connected to an amplification system.
” appears on the screen)
” may appear at the upper left of
24
Special playback
There may be a slight delay between pressing the button
and the function activation.
Fast Forward Playback
Press F.FWD during normal playback.
Each press of F.FWD will increase the speed of the search
(x2), (x4), (x8), (x20).
• To resume normal playback, press PLAY.
Review Playback
Press REW during normal playback.
Each press of REW will increase the speed of the search
(x2), (x4), (x8), (x20).
• To resume normal playback, press PLAY.
Still Playback
Press PAUSE/STILL during normal playback.
• To resume normal playback, press PLA Y.
Frame Advance
Press PAUSE/STILL during still playback.
One frame is advanced each time you press PAUSE/STILL.
• To resume normal playback, press PLA Y.
Slow-motion Playback
Press SLOW during
Each press of SLOW will change the speed of the slow x1/2,
x1/4, x1/6, x1/7.
• To resume normal playback, press PLA Y.
• To resume the still playback, press PAUSE/STILL.
normal playback or still playback.
Locating a chapter or track
Press SKIP (
playback to locate a chapter that you want to watch.
Each time you press the button, a chapter or track is skipped.
NOTE:
The unit is capable of holding a still video image or On screen
display image on your television screen indefinitely. If you leave
the still video image or On screen display image displayed on
your TV for an extended period of time, you risk permanent
damage to your television screen. Projection televisions are
very susceptible.
77
7) Forward or SKIP (
77
66
6) Reverse during
66
Zooming
This unit will allow you to zoom in on the frame image. You
can then make selections by switching the position of the
frame.
Press ZOOM during playback.
1
The center part of the image will be zoomed in.
Each press of ZOOM will change the ZOOM
(x 1.3),
Press
2
You may move the frame from the center position to UP,
DOWN, LEFT or RIGHT direction.
In the zoom mode press ZOOM repeatedly to return to a
3
1:1 view (
NOTE:
You can use the Pause, Slow, Search or Skip feature in the
zoom mode.
2 (x 1.5) and 3 (x 2.0).
C C
D D
B B
C /
C C
D or
D D
A A
B /
A to view a different part of the frame.
B B
A A
Off).
1
2F3P421A[E] (24-27) 1/25/05, 12:02 PM24
Page 25

Disc playback operation
Locating desired scene
Use the title, chapter and time recorded on the disc to
locate the desired point to play back.
To check the title, chapter and time, press DISPLAY. (see
page 30)
Press JUMP during
1
playback or stop mode.
Press or to select
2
the “Time”, “Title” or
“Chapter”.
Press Number keys to change the number.
3
• If you input a wrong number, press CANCEL.
• Refer to the package supplied with the disc to check the
numbers.
Press ENTER.
4
Playback starts.
• When you change the title, playback starts from
Chapter 1 of the selected title.
• Some discs may not work in the above operation.
Time
Title
Chapter
/Enter/0 9/Cancel/Jump
/6
/
/
Marking desired scenes
The unit stores the points that you want to watch again up
to 3 points. You can resume playback from each scene.
Marking the scenes
Press MARKER
1
during playback.
Select the blank Marker
2
using / .
Then press ENTER at the desired scene.
• Repeat this procedure to set the other 2 scenes.
Press MARKER to remove this display.
3
Marker 1
Marker 2
Marker 3
/Enter/Cancel/Marker
Changing soundtrack language
You can select the language when you play a multilingual
disc.
Press AUDIO during playback.
1
The current soundtrack language will appear.
2
Press AUDIO repeatedly until the desired language is selected.
The on-screen display will disappear after a few seconds.
1/8 Eng DolbyDigital
Subtitles
Turning the subtitles on and off
When playing back a disc recorded with subtitles, you can
turn the subtitles on or off.
Press SUBTITLE during playback until “Off”
appears.
Changing the subtitle language
You can select the language when playing back a disc
recorded with multi-lingual subtitles.
Press SUBTITLE repeatedly during playback until your desired language appears.
The on-screen display will disappear after
a few seconds.
NOTES:
• If the desired language is not heard after pressing the button
several times, the language is not recorded on the disc.
• Depending on the DVD you may be unable to turn on, turn
off, or change the subtitles, even if they are recorded on the
disc. While playing the DVD, the subtitle may change while
opening or closing the disc tray, or while changing the title.
• In some cases, the subtitle language is not changed to the
selected one immediately.
Off
1/32 Eng
ENGLISH
Returning to the scenes
Press MARKER during
1
playback or stop mode.
Press / to select
2
the Marker 1-3.
3
Press ENTER.
Playback starts from the marked scene.
Marker 1
Marker 2
Marker 3
/Enter/Cancel/Marker
27
54
00
01
16
25
02
08
31
To cancel the mark
Press MARKER.
1
Press / to select the Marker 1-3.
2
Press CANCEL.
3
To remove this display, press MARKER.
NOTES:
• Some discs may not work with the marking operation.
• The marking is canceled when you
the power off.
•
Some subtitles recorded around the marker may fail to appear.
open the disc tray or turn
25
2F3P421A[E] (24-27) 1/25/05, 12:02 PM25
Page 26

Program Playback
Disc playback operation
Changing angles
When playing back a disc recorded with multi-angle facility,
you can change the angle that you are viewing the scene
from.
Press ANGLE during playback.
1
The current angle will appear.
Press ANGLE repeatedly until the desired angle is se-
2
lected.
NOTE:
Depending on the DVD, you may not be able to change the
angles even if multi-angles are recorded on the disc.
1/9
Title selection
Two or more titles are recorded on some discs. If the
title menu is recorded on the disc, you can select the
desired title.
Press TOP MENU during playback.
1
Title menu appears on the screen.
• Press TOP MENU again to resume playback at the
scene when you pressed TOP MENU.
Press / or / to select the desired title.
2
Press ENTER or PLAY.
3
The playback of the selected title will start.
DVD menu
Some DVDs allow you to select the disc contents using
the menu. When you play back these DVDs, you can
select the subtitle language and soundtrack language,
etc. using the DVD menu.
Press DVD MENU during playback.
1
The DVD menu appears on the screen.
• Press DVD MENU again to resume playback at the
scene when you pressed DVD MENU.
2
Press / or / to select the desired item.
Press ENTER. The menu continues to another screen.
3
Repeat steps 2 and 3 to set the item completely.
NOTE:
Depending on the DVD, you may be unable to select the
title, and a “title menu” may simply be called a “menu” or
“title” in the instructions supplied with the disc.
Repeat playback
Title, Chapter, Track Playback
Press PLAY MODE during playback or stop mode.
1
Audio-CD
Play Mode
Repeat
/Play Mode
:
Off
:
Off
Repeat
/Play Mode
DVD
:
Off
26
Press ENTER once or twice to select “Chapter” or “Title”.
2
In case of CD, at first press
press ENTER once or twice to select “Track” or “All”.
DVD
/Play Mode
:
Chapter
Repeat
Press PLAY MODE again to make the screen disappear.
3
•
Press PLAY to start Repeat playback.
To resume normal playback, select Repeat “Off”.
•
to select “Repeat” and then
Audio-CD
Play Mode
Repeat
:
:
/Play Mode
Off
All
A-B Repeat Playback
A-B repeat playback allows you to repeat material between
two selected points.
Press REPEAT A-B
1
during playback.
The start point is selected.
Press REPEAT A-B
2
again.
The end point is selected.
Playback starts at the
point that you selected.
Playback stops at the end point, returns to Point A automatically, then starts again.
To resume normal playback press REPEAT A-B again.
“
NOTES:
• Some discs may not work with the repeat operation.
• I
n A-B repeat mode, subtitles near point A or B may not appear .
• During the A-B Repeat Playback the ANGLE feature will not
operate.
• You may not be able to set A-B Repeat, depending on the
scenes of the DVD.
•
A-B repeat does not work with an interactive DVD and MP3-CD.
” appears on the screen.
Off
A
B
A
Program playback (CD)
You can arrange the order of tracks on the disc.
Press PLAY MODE in
1
the stop mode.
Press ENTER repeatedly
2
until the program table
shown at right appears.
Example: In case you
3
wish to program in order
of 7, 3, 11:
Enter as 7 , 3 , 11.
If you input a wrong
number, press CANCEL.
Press / or /
4
to select “Program
Playback” and press
ENTER. “Program Playback” will appear on the screen.
The program you selected will begin to playback in the
order set. To return to normal playback, select “Play
Mode: Off” at step 2 above.
Play Mode
Repeat
Play Mode
Repeat
17
23 5811
31
16912
Clear Program Playback
:
Off
:
Off
/Play Mode
:
Program
:
4710
/Enter/0 9/Cancel/Play Mode
Off
2F3P421A[E] (24-27) 1/25/05, 12:02 PM26
Page 27

Random playback (CD)
Press PLAY MODE in
1
the stop mode.
2
Press / to select
“Random”.
3
Press PLAY.
Play Mode
Repeat
:
Random
:
Off
/Enter/Play Mode
“Random Play” will appear on the screen and Random
Playback will start.
NOTES:
• To cancel program play, select “Clear” at step 4 and press
ENTER.
• The program is cancelled when you open the disc tray or turn
the power off.
• Random playback can not be combined with Repeat playback.
MP3 playback
This player can play back the MP3-data which has been
recorded on CD-R or CD-RW. To produce the MP3-data,
you need a Windows-PC with CD-ROM drive and a MP3encoding Software (not supplied).
The Apple-HFS-System can not be played.
MP3 CD Information
Limitations on MP3 CD playback
• MP3 CD is the disc that is standardized by ISO9660, its file
name must include 3-digits extension letters, “mp3”.
• The directory and file names of the MP3 CD must correspond
to the ISO standardized files.
• This unit can read 999 files per disc. If one directory has
more than 999 files, it reads up to 999 files, the remaining
files will be omitted.
• As for multi-session disc, only the first session can be
played.
• If the CD has both audio tracks and MP3 files, only audio
tracks are played.
• It may take more than one minute for this unit to read MP3
files depending on its structure.
• Music recorded by “Joliet Recording Specification” can be
played back, the file name is displayed (within 10 letters) on
the screen. Long file names will be condensed.
• The music files recorded by “Hierarchical File System” (HFS)
cannot be played.
Limitations on display
• The maximum number for display is 10 letters. Available
letters for display are the following: capital or small alphabets
of A through Z, numbers of 0 through 9, and _ (under score).
• Other characters than those above are replaced by a
hyphen.
Disc playback operation
Press OPEN/CLOSE.
1
The disc tray will open.
Place a disc onto the tray.
Press PLAY or OPEN/CLOSE. The disc tray closes auto-
2
matically. On the TV-screen, “Reading” will appear. Reading will take as much time as the number of file.
-
/72
8
flower
9
Lies and Truthwinter fall
Rain
Strawberry
--:--
-
/72
--:--
A MP3 menu screen will
3
appear on the TV screen.
Press / or ENTER to
select folder.
Press / or / or Number keys to select the de-
4
CD
Pops
1
Japan
2
Bay Bridge
3
CLOSE MY EYES
4
DIVE TO BLUE
5
Honey
6
BLUE EYES13Welcome party
7
Blurry Eyes14Thailand
10
11
12
/0-9/Enter/Play Mode
sired track, then press ENTER. Track is selected and play
commences.
• In case the folder includes more than 15 tracks, press
or to display next track list.
-
/72
CD
Pops
1
Japan
2
Bay Bridge
3
CLOSE MY EYES
4
DIVE TO BLUE
5
Honey
6
BLUE EYES13Welcome party
7
Blurry Eyes14Thailand
Press STOP to end playback.
5
8
9
10
11
12
/0-9/Enter/Play Mode
--:--
flower
Lies and Truthwinter fall
Rain
Strawberry
CD
Pops
15
Mother
16
Hold Your Last
/0-9/Enter/Play Mode
• The unit records the stopped point. “ ” appears on the
screen. Press PLAY to resume playback (from the
scene point).
• If you press STOP again or unload the disc, the unit will
clear the stopped point.
Then press OPEN/CLOSE.
6
The disc tray opens.
Remove the disc and press POWER.
The disc tray closes automatically and DVD/VCR turns off.
NOTES:
• During MP3-Playback, you can not use SEARCH, A-B Re-
peat functions.
• You can use Repeat (Track or All), Random functions and
Program playback for MP3 CD Playback.
ENGLISH
Notes on MP3 files
To play back MP3 CD in the recorded order,
1. Use MP3 software that records data alphabetically or
numerically.
2. Name each file including two-digit or three-digit number (e.g.
“01” “02” or “001” “002”).
3. Refrain from making too many sub-folders.
CAUTION:
• Some MP3 CDs can not be played back depending on the
recording conditions.
• The CD-R/RW that has no music data or non-MP3 files can
not be played back.
2F3P421A[E] (24-27) 1/25/05, 12:02 PM27
27
Page 28

Your disc exceeds
the parental control level 1.
Parental Control Level
Cancel Picture
/Enter/Return
Advanced function of DVD section
Parental control
Some discs are specified not suitable for children. Such
discs can be prevented from play back with the unit.
Parental control setting
Press SETUP in the stop mode.
1
Press or to select
option.
Then press or ENTER.
Press once to select “Parental Off”, then press
2
ENTER until the level you desire appears (e.g.: 1).
3
Press once to select “Password ”.
Then press Number keys to input a 4-digit
(e.g.: 1234).
• If you input a wrong number, press CANCEL.
• Be sure to remember this number!
Level Off : The parental control setting does not
Level 1 : DVD software for adults cannot be
Level 8 : All DVD software can be played back.
Select from level 1 to level 8.
On a scale of 1-8, “1” is the most restrictive.
Press ENTER.
4
1234
function.
played back.
change to .
Password
Parental
Output
/0-9/Enter/Cancel/Setup/Return
---Off
Interlace
password
Temporary disabling of rating level
by DVD disc
Depending on the DVD disc, the disc may try to
temporarily cancel the rating level that you have set.
It is up to you to decide whether to cancel the rating
level or not.
Load a DVD disc and press PLAY or OPEN/CLOSE (see
1
page 24).
If the DVD disc has
2
been designed to
temporarily cancel the
Rating level, the screen
which follows the
“Reading” screen will
change, depending on
which disc is played. If
you select “YES” with
ENTER key, “Your disc exceeds the parental control level
1.” (e.g.) screen will then appear.
If you wish to cancel the set rating level temporarily,
3
select “Parental Control Level” with
press ENTER. If the 4-digits password at step 3 on left
column has been set, the password entering screen will
appear as shown in step 4 below.
Alternatively, if the password has not been set, playback
will commence. If you don’t know (or have forgotten) the
password, select “Cancel Picture”.
The setting screen will disappear. Press OPEN/CLOSE
to remove the disc.
or , then
To make SETUP screen disappear, press SETUP.
5
To unlock the Parental control setting
Cancel the password so as to set the Parental level freely
again,
Select “Password ”
1
(step 2) and press Number
keys to input your 4-digit
password.
Then press ENTER.
If the input password was right, will appear.
2
You can move to “Parental 1”(e.g.) to input the desired
level or to cancel parental control.
NOTES:
• If each setup (pages 23, 28 ~ 30) has been completed,
the unit can always be worked under the same
conditions (especially with DVD discs).
Each setup will be retained in the memory if you turn
the power off.
• Depending on the discs, the unit cannot limit playback.
• Some discs may not be encoded with specific rating level
information though its disc jacket says “adult”. For those
discs, the age restriction will not work.
• Do not forget the password. If you forget the password,
contact customer service.
Password
Parental
Output
/0-9/Enter/Cancel/Setup/Return
1234
1
Interlace
Enter the password
4
with Number keys.
Then press ENTER.
If you interrupt the
entering, press
RETURN.
Playback will commence if the entered password was
5
correct.
NOTE:
This temporary cancellation of rating level will be kept until
the disc is ejected.
When the disc is ejected, the original rating level will be set
again automatically.
Please enter the
4
digit password
9/
Cancel
/ReturnEnter/0
28
2F3P421A[E] (28-BACK) 1/25/05, 12:02 PM28
Page 29

Advanced function of DVD section
Tv Screen
Display
Picture ModeOnAuto
/Setup/Return
4:3
Tv Screen
Display
Picture Mode
On
/Setup/Return
4:3
Auto
Setting language
You can select the language of the disc menu messages
of DVDs.
Press SETUP in the stop mode.
1
Press
Press or ENTER, then press or to select desired
2
option.
Press or to
3
select your desired
language.
English, Francais, Espanol:
The selected language will be heard or seen.
Other:
Other language can be selected (see the “Language
code list” on page 31).
Automatic: (Subtitle)
• The unit will automatically select the same language in
• When the unit selects the same language as the
• When you do not use the same language as the
or to select option.
Menu
Subtitle
Audio
OSD
/Setup/Return
the AUDIO setting.
AUDIO, the subtitles will not appear during playback.
AUDIO, the subtitles will appear during playback.
English
English
English
English
Setting the aspect ratio of TV screen
You can select the aspect ratio for your TV.
Press SETUP in the stop mode.
1
Press or to select option.
Press
2
Screen”.
Press
3
select your desired
screen type.
You have the following screen sizes to choose from:
4:3 Letter box
Select this mode when connecting to a conventional TV.
When playing back a wide screen-DVD disc, it displays
the wide picture with black bands at the top and bottom of
screen.
4:3 Pan Scan
It displays the wide picture on the whole screen with left
and right edges automatically cut off.
16:9
Select this mode when connecting to a wide-screen TV.
A wide screen picture is displayed full size.
or ENTER, then press or to select “Tv
or to
Wide
ENGLISH
Off: (Subtitle)
Subtitles do not appear.
Original: (Audio)
The unit will select the first priority language of each disc.
To make SETUP screen disappear, press SETUP.
4
NOTE:
If the selected language is not recorded on the disc, the firstpriority language is selected.
To make SETUP screen disappear, press SETUP.
4
NOTE:
If the DVD disc is not formatted in the pan & scan style, it
displays 4:3 style.
Setting the picture mode
The image of smoother motion can be obtained by
setting Picture Mode to Film when you view a DVD
from the DVD player connected with the component
input.
Press SETUP in the stop mode.
1
Press or to select option.
Press or ENTER, then press or to select
2
“Picture mode”.
Press or to
3
select your desired
picture mode.
Auto: The unit recognizes the picture source (film or
video) of the current disc according to the disc
information.
2F3P421A[E] (28-BACK) 1/25/05, 12:02 PM29
29
Page 30

Advanced function of DVD section
Password
Parental
Output
Off
Interlace Interlace
Progressive
/Enter/Setup/Return
----
Setting on screen display
On screen display can be switched on or off when you
press the DISPLAY button.
Press SETUP in the stop mode.
1
Press or to select option.
2
Press or ENTER, then
press or to select
“Display”.
3
Press
or to select
“On” or “Off”.
On: On screen displays appears when you press any
buttons (factory setting).
Off: On screen displays do not appear when you press
any buttons except SETUP, SEARCH MODE,
PLA Y MODE, MARKER and DISPLAY.
To make SETUP screen disappear, press SETUP.
4
Status display of disc
Each press of DISPLA Y, the status display of the disc will
appear on the screen and change as follows.
DVD
00:34:56 01:12:33
To make status display disappear, press DISPLAY again.
AUDIO CD
Track 11/99
When you playback the CD disc, the status display will
appear on the screen and continue displaying.
34:56 71:33
Tv Screen
Display
Picture Mode
/Setup/Return
Title 1/99
1/8
Eng DolbyDigital
1/32
Eng
4:3
On
Auto
00:34:56 01:12:33
Chapter 1/999
Progressive scan
The unit supports the Progressive scanning system as
well as the conventional interlaced scanning system.
If your TV is equipped with component jacks which
support the progressive video input, you can enjoy high
quality picture by making the Progressive scanning
mode active.
Press PROGRESSIVE in the stop mode.
1
The PROGRESSIVE indicator “ ” on the display
window will light.
Press PLAY to start playback.
2
• To make the progressive scanning mode inactive, press
PROGRESSIVE in the stop mode.
The PROGRESSIVE indicator “
window will go off.
NOTE:
You also can change the scanning mode by selecting Output in
the option.
1/9
About PROGRESSIVE SCANNING MODE
To display video on the TV screen, the conventional
scanning method is called “Interlaced scanning.” With this
method, only half of the horizontal lines are displayed at a
time. So two fields complete a single picture (frame); i.e.,
the first field, containing all the odd-numbered lines, is
displayed followed by the second field, containing all the
even-numbered lines.
The Progressive scanning system scans all horizontal
lines at a time, so you can double the number of lines
compared with the interlaced scanning, resulting in a
high-density, flicker-free picture.
” on the display
Dynamic Range Control
DRC (Dynamic Range Control) enables you to control
the dynamic range so as to achieve a suitable sound
for your equipment.
1
Press SETUP in the stop mode.
Press or to select option.
Press or ENTER to
2
select “Dialogue”.
3
press
or to select
Dialogue
Off:DRC(Std)
desired setting.
On: DRC (TV):
Loud sound such as explo-
/Setup/Return
sion or similar is toned down slightly when played
back. This makes it suitable for when it is connected
to a stereo.
Off: DRC (Std):
It plays back at the recording level on the disc.
NOTES:
• This function works only during playback of Dolby Digital
recorded discs.
• The level of Dynamic Range Reduction may differ
depending on DVD video disc.
30
To enjoy a progressive scanned video, the TV connected
to the unit must have Progressive inputs.
Depending on the material source format, DVD discs can
be classified into two categories; film and video (note that
some DVD discs contain both a film source and a video
source). Film sources are recorded as 24-frame-persecond information, while (NTSC) video sources are
recorded as 30-frame-per second (60-field-per-second
interlaced) information.
When the unit plays back a film source material,
uninterlaced progressive output signals are created using
the original information. When a video source material is
played back, the unit interleaves lines between the
interlaced lines on each to create the interpolated picture
and outputs as the progressive signal.
NOTES:
• Some discs may not be played back with the progressive scanning mode correctly because of the disc characteristics or recording condition.
• There are some progressive TV and High-Definition TV sets that
are not fully compatible with the unit, resulting in the unnatural
picture when playing back a DVD disc in the Progressive scanning mode. In such a case, use the Interlaced scanning mode.
• You cannot make the progressive scanning mode active in following cases.
– The unit is in the VCR mode.
– The disc is played back in the DVD mode.
2F3P421A[E] (28-BACK) 1/25/05, 12:02 PM30
Page 31

Language code list
Enter the appropriate code number for the initial settings “Menu”, “Subtitle” and/or “Audio” (see page 29).
Language Name Code Language Name Code Language Name Code Language Name Code
Abkhazian 1112 Fiji 1620 Lingala 2224 Singhalese 2919
Afar 1111 Finnish 1619 Lithuanian 2230 Slovak 2921
Afrikaans 1116 French 1628 Macedonian 2321 Slovenian 2922
Albanian 2927 Frisian 1635 Malagasy 2317 Somali 2925
Amharic 1123 Galician 1722 Malay 2329 Spanish 1529
Arabic 1128 Georgian 2111 Malayalam 2322 Sundanese 2931
Armenian 1835 German 1415 Maltese 2330 Swahili 2933
Assamese 1129 Greek 1522 Maori 2319 Swedish 2932
Aymara 1135 Greenlandic 2122 Marathi 2328 Tagalog 3022
Azerbaijani 1136 Guarani 1724 Moldavian 2325 Tajik 3017
Bashkir 1211 Gujarati 1731 Mongolian 2324 Tamil 3011
Basque 1531 Hausa 1811 Nauru 2411 Tatar 3030
Bengali; Bangla 1224 Hebrew 1933 Nepali 2415 Telugu 3015
ENGLISH
Bhutani 1436 Hindi 1819 Norwegian 2425 Thai 3018
Bihari 1218 Hungarian 1831 Oriya 2528 Tibetan 1225
Breton 1228 Icelandic 1929 Panjabi 2611 Tigrinya 3019
Bulgarian 1217 Indonesian 1924 Pashto, Pushto 2629 Tonga 3025
Burmese 2335 Interlingua 1911 Persian 1611 Turkish 3028
Byelorussian 1215 Irish 1711 Polish 2622 Turkmen 3021
Cambodian 2123 Italian 1930 Portuguese 2630 Twi 3033
Catalan 1311 Japanese 2011 Quechua 2731 Ukrainian 3121
Chinese 3618 Javanese 2033
Corsican 1325 Kannada 2124 Romanian 2825 Uzbek 3136
Croatian 1828 Kashmiri 2129 Russian 2831 Vietnamese 3219
Czech 1329 Kazakh 2121 Samoan 2923 Volapük 3225
Danish 1411 Kirghiz 2135 Sanskrit 2911 Welsh 1335
Dutch 2422 Korean 2125 Scots Gaelic 1714 Wolof 3325
English 1524 Kurdish 2131 Serbian 2928 Xhosa 3418
Esperanto 1525 Laothian 2225 Serbo-Croatian 2918 Yiddish 2019
Estonian 1530 Latin 2211 Shona 2924 Yoruba 3525
Rhaeto-Romance
2823 Urdu 3128
Faroese 1625 Latvian, Lettish 2232 Sindhi 2914 Zulu 3631
2F3P421A[E] (28-BACK) 1/25/05, 12:02 PM31
31
Page 32

Problems and troubleshooting
Use the following check list for troubleshooting when you have problems with your unit. Consult your local dealer or service
outlet if problems persist.
Be sure all connections are properly made when using with other units.
SYMPTOMS POSSIBLE SOLUTIONS
DVD/VCR
DVD/VCR does not operate.
No picture.
No sound.
The remote control does not function.
No CABLE reception.
VCR
TV recording does not work.
Timer recording does not work.
Noise bars on screen.
DVD
Display is not shown in your language.
Playback doesn’t start.
Stopping playback, search, slowmotion play, repeat play, or program
play, etc. cannot be performed.
•Make sure the power cord is plugged in.
•Try another AC outlet.
•Power is off, check fuse or circuit breaker.
•Unplug unit, then plug it back in.
•Select the DVD or VCR mode before operating.
• Antenna connection is not correct or antenna cable is disconnected.
• Check the unit is connected correctly.
• The video channel is not in the correct position or the TV is not set to
the video channel 3 or 4.
• The video input selector of the TV is not set to VIDEO. Set to VIDEO (or
equivalent).
• Channel is set to the external mode.
• Check the unit is connected correctly.
• Check the input selector of the amplifier is set properly.
• The unit is in the Special playback mode.
• Aim at the remote control at the remote sensor.
• Operate within Approx. 5 Meters or reduce the light in the room.
• Clear the path of the beam.
• The batteries are weak. Replace the batteries.
• Check the batteries are inserted correctly.
•Check all CABLE connections.
•Station or CABLE system problems, try another station.
•The erase prevention tab of the video cassette is broken off.
•The unit is in the external input mode.
• The time is not set correctly.
• The recording start/end time is not set correctly.
• TIMER REC has not been pressed (
• Tracking adjustment beyond range of automatic tracking circuit. T ry
Manual tracking adjustment.
• Video heads are dirty.
• The tape is worn or damaged.
•Select proper language in the menu options.
• No disc is inserted.
• The disc may be dirty. Clean up the disc.
• The unit cannot play DVD-ROMs, etc.
• Some discs may not do some of the functions.
is not lit).
PAGE
9
–
–
9
–
10,11
10~13
14
–
–
10~13
–
18,24
9
11
17,19
15,16
20
20
18
33
–
23
24
23
23
–
No picture, or the screen is blurred or
divided into two parts.
32
2F3P421A[E] (28-BACK) 1/25/05, 12:02 PM32
• The progressive scanning mode is active through the unit is
connected to a TV via the VIDEO OUT jack.
30
Page 33

Problems and troubleshooting / Video head cleaning
SYMPTOMS POSSIBLE SOLUTIONS PAGE
No 4:3 (16:9) picture. • The setup does not match your TV.
No on-screen display. • Select Display On.
29
30
No surround sound. • The setup does not match your stereo system.
The unit or remote operation key is
not functioning.
Playback does not start when the title
is selected.
Audio soundtrack and/or subtitle
language is not changed when you
play back a DVD.
No subtitle.
Angle cannot be changed.
appears on the screen.
• Turn off the unit and unplug the AC power cord for several minutes,
then replug it.
• Check the Parental setup.
• Multilingual language is not recorded on the DVD disc.
• Some discs have no subtitles.
• Subtitles are cleared. Press SUBTITLE.
• Multi-angles are not recorded on the DVD disc.
• The function is prohibited with the unit or the disc.
13
–
28
29
25,29
26
24
Video head cleaning
Auto head cleaner
Auto Head Cleaning system cleans the video heads automatically when
a cassette is inserted or ejected to prevent dirt from accumulating on the
heads. However, manual head cleaning signifies that the head is getting
dirty and occurs when playing poor quality or damaged tapes. If the
heads require cleaning, use a high quality head cleaning system or have
them cleaned professionally.
Video head clogging
The video heads are the means by which the DVD/VCR reads the picture from the tape during playback. In the unlikely event
that the heads become dirty enough to be clogged, no picture will be played back. This can easily be determined if, during
playback of a known good tape, there is good sound, but no picture (picture is extremely snowy). If this is the case, have the
DVD/VCR checked by qualified service personnel.
Good Picture
Snowy Picture
ENGLISH
NOTES:•DO NOT A TTEMPT TO CLEAN THE VIDEO HEADS OR SER VICE THE UNIT BY REMOVING THE REAR COVER.
PLEASE KEEP ALL PACKAGING MATERIAL FOR A T LEAST 90 DAYS IN CASE YOU NEED T O RETURN THIS
2F3P421A[E] (28-BACK) 1/25/05, 12:02 PM33
Video heads may eventually wear out and should be replaced when they fail to produce clear pictures.
•
To help prevent video head clogging, use only good quality VHS tapes. Discard worn out tapes.
•
FOR ADDITIONAL SET-UP OR OPERATING ASSISTANCE, PLEASE VISIT OUR WEBSITE AT
WWW.MEMOREXELECTRONICS.COM OR CONTACT CUST OMER SERVICE A T (954) 660-7100.
PRODUCT TO YOUR PLACE OF PURCHASE OR MEMOREX.
FOR PAR TS AND ACCESSORIES, CONTACT FOX INT'L A T 1-800-321-6993.
33
Page 34

Specifications
GENERAL
Power supply:
Power consumption:
Weight:
Dimensions:
Inputs/Outputs:
Video:
Audio:
Antenna:
Hi-Fi frequency response:
Hi-Fi dynamic range:
VCR section
Video head:
Audio track:
Tuner:
RF channel output:
F .FWD/REW Time
at 25˚C (77˚F):
AC 120V 60Hz
Operation: 18W
Stand by: 2W
7.7 lbs (3.5 kg)
Width : 16-15/16 inches (430 mm)
Height : 3-7/8 inches (99 mm)
Depth : 8-15/16 inches (227 mm)
In: 1 Vp-p/75 ohms
Out: 1 Vp-p/75 ohms
In: –8 dBm/50k ohms
Out: –8 dBm/1k ohms
UHF/VHF IN/OUT: 75 ohms coaxial
20Hz to 20,000Hz
More than 90 dB
4 Rotary Heads
Hi-Fi Sound - 2 Tracks / MONO Sound - 1 Track
181 Channel Freq. Synthesized
VHF 2-13
UHF 14-69
CABLE TV 14-36 (A)-(W)
Channel 3 or 4, Switchable
F.FWD Time: Approx. 4 minute and 50 seconds
REW Time: Approx. 2 minute and 30 seconds
(with T-120 Cassette Tape)
37-59 (AA)-(WW)
60-85 (AAA)-(ZZZ)
86-94 (86)-(94)
95-99 (A-5)-(A-1)
100-125 (100)-(125)
01 (5A)
DVD section
Signal system:
Applicable disc:
Audio characteristics
frequency response:
S/N Ratio:
Harmonic distortion:
Wow and flutter:
Dynamic range:
Output:
Pickup:
ACCESSORIES:
NTSC
DVD (12 cm, 8 cm), CD (12 cm, 8 cm)
DVD: 4Hz - 22kHz
CD: 4Hz - 20kHz
90 dB
0.02%
Less than 0.01% Wrms
More than 90 dB
Video : (RCA) 1 Vp-p/75 ohms
Audio : (RCA) –12 dBm/1k ohms
Digital Audio : 0.5 Vp-p/75 ohms
CD : Wavelength: 770 - 800 nm
Maximum output power: 0.7 mW
DVD :Wavelength: 645 - 660 nm
Maximum output power: 0.5 mW
Remote control x 1
75 ohm Coaxial Cable x 1
AUDIO/VIDEO Cable x 1
Design and specifications are subject to change without notice.
34
2F3P421A[E] (28-BACK) 1/25/05, 12:03 PM34
Page 35

MEMO
○○○○○○○○○○○○○○○○○○○○○○○○○○○○○○○○○○○○○○○○○○○○○○○○○○○○○○○
○○○○○○○○○○○○○○○○○○○○○○○○○○○○○○○○○○○○○○○○○○○○○○○○○○○○○○○
○○○○○○○○○○○○○○○○○○○○○○○○○○○○○○○○○○○○○○○○○○○○○○○○○○○○○○○
○○○○○○○○○○○○○○○○○○○○○○○○○○○○○○○○○○○○○○○○○○○○○○○○○○○○○○○
○○○○○○○○○○○○○○○○○○○○○○○○○○○○○○○○○○○○○○○○○○○○○○○○○○○○○○○
○○○○○○○○○○○○○○○○○○○○○○○○○○○○○○○○○○○○○○○○○○○○○○○○○○○○○○○
○○○○○○○○○○○○○○○○○○○○○○○○○○○○○○○○○○○○○○○○○○○○○○○○○○○○○○○
○○○○○○○○○○○○○○○○○○○○○○○○○○○○○○○○○○○○○○○○○○○○○○○○○○○○○○○
○○○○○○○○○○○○○○○○○○○○○○○○○○○○○○○○○○○○○○○○○○○○○○○○○○○○○○○
○○○○○○○○○○○○○○○○○○○○○○○○○○○○○○○○○○○○○○○○○○○○○○○○○○○○○○○
○○○○○○○○○○○○○○○○○○○○○○○○○○○○○○○○○○○○○○○○○○○○○○○○○○○○○○○
○○○○○○○○○○○○○○○○○○○○○○○○○○○○○○○○○○○○○○○○○○○○○○○○○○○○○○○
○○○○○○○○○○○○○○○○○○○○○○○○○○○○○○○○○○○○○○○○○○○○○○○○○○○○○○○
○○○○○○○○○○○○○○○○○○○○○○○○○○○○○○○○○○○○○○○○○○○○○○○○○○○○○○○
○○○○○○○○○○○○○○○○○○○○○○○○○○○○○○○○○○○○○○○○○○○○○○○○○○○○○○○
○○○○○○○○○○○○○○○○○○○○○○○○○○○○○○○○○○○○○○○○○○○○○○○○○○○○○○○
○○○○○○○○○○○○○○○○○○○○○○○○○○○○○○○○○○○○○○○○○○○○○○○○○○○○○○○
○○○○○○○○○○○○○○○○○○○○○○○○○○○○○○○○○○○○○○○○○○○○○○○○○○○○○○○
○○○○○○○○○○○○○○○○○○○○○○○○○○○○○○○○○○○○○○○○○○○○○○○○○○○○○○○
○○○○○○○○○○○○○○○○○○○○○○○○○○○○○○○○○○○○○○○○○○○○○○○○○○○○○○○
○○○○○○○○○○○○○○○○○○○○○○○○○○○○○○○○○○○○○○○○○○○○○○○○○○○○○○○
○○○○○○○○○○○○○○○○○○○○○○○○○○○○○○○○○○○○○○○○○○○○○○○○○○○○○○○
○○○○○○○○○○○○○○○○○○○○○○○○○○○○○○○○○○○○○○○○○○○○○○○○○○○○○○○
○○○○○○○○○○○○○○○○○○○○○○○○○○○○○○○○○○○○○○○○○○○○○○○○○○○○○○○
○○○○○○○○○○○○○○○○○○○○○○○○○○○○○○○○○○○○○○○○○○○○○○○○○○○○○○○
○○○○○○○○○○○○○○○○○○○○○○○○○○○○○○○○○○○○○○○○○○○○○○○○○○○○○○○
○○○○○○○○○○○○○○○○○○○○○○○○○○○○○○○○○○○○○○○○○○○○○○○○○○○○○○○
○○○○○○○○○○○○○○○○○○○○○○○○○○○○○○○○○○○○○○○○○○○○○○○○○○○○○○○
○○○○○○○○○○○○○○○○○○○○○○○○○○○○○○○○○○○○○○○○○○○○○○○○○○○○○○○
○○○○○○○○○○○○○○○○○○○○○○○○○○○○○○○○○○○○○○○○○○○○○○○○○○○○○○○
○○○○○○○○○○○○○○○○○○○○○○○○○○○○○○○○○○○○○○○○○○○○○○○○○○○○○○○
2F3P421A[E] (28-BACK) 1/25/05, 12:03 PM35
Page 36

ESPAÑOL
El símbolo del rayo dentro de un
triángulo equilátero tiene por finalidad
PRECAUCION
RIESGO DE DESCARGA
ELECTRICA NO ABRIR
AVISO:
AVISO: Para reducir el riesgo de incendio o descarga eléctrica, no exponga esta unidad a la lluvia ni a la humedad.
NOTA:
Por favor guarde todo el material de embalaje durante por lo menos 90 días en caso de que necesite devolver este producto
a su lugar de compra o Memorex.
PARA REDUCIR EL RIESGO DE DESCARGA
ELECTRICA, NO RETIRE LA CUBIERTA (O POSTERIOR). EN EL INTERIOR DEL APARATO NO HAY
COMPONENTE ALGUNO QUE PRECISE SERVICIO DE
MANTENIMIENTO A CARGO DEL USUARIO. SOLICITE
CUALQUIER OPERACION DE MANTENIMIENTO A
PERSONAL DE SERVICIO CALIFICADO.
alertar al usuario acerca de la presencia
de tensión peligrosa (sin aislación) en el
interior del producto, que puede tener la
intensidad suficiente como para constituir
un riesgo de descarga eléctrica.
El signo de exclamación dentro de un
triángulo equilátero tiene por finalidad
alertar al usuario de importantes
instrucciones de operación y
mantenimiento (servicio) en la literatura
que acompaña a este aparato.
ADVERTENCIA: Este equipo ha sido sometido a pruebas y cumple con los límites establecidos para un aparato digital de
PRECAUCION: El usuario corre el riesgo de perder la autorización para hacer funcionar este equipo en caso de que ejecute
PRECAUCION:
ESTE TOCADISCOS DE VIDEO DIGITAL UTILIZA UN SISTEMA LASER.
PARA UTILIZAR CORRECTAMENTE ESTE PRODUCTO, LEA CUIDADOSAMENTE ESTE MANUAL DE
INSTRUCCIONES Y GUARDELO PARA SU REFERENCIA EN EL FUTURO. SI FUERA NECESARIO HACER UN
MANTENIMIENTO DE ESTE APARATO, CONSULTE CON UN CENTRO DE SERVICIO AUTORIZADO-LEA EL
PROCEDIMIENTO DE SERVICIO.
EL USO DE LOS CONTROLES, AJUSTES O LA REALIZACION DE OTROS PROCEDIMIENTOS QUE NO SEAN LOS
ESPECIFICADOS AQUI PUEDE PROVOCAR UNA EXPOSICION A RADIACIONES PELIGROSAS.
PARA EVITAR LA EXPOSICION DIRECTA A LOS RAYOS LASER, NO TRATE DE ABRIR LA CAJA. PUEDE HABER UNA
RADIACION LASER VISIBLE AL ABRIR LA CAJA.
NO MIRE HACIA EL RAYO.
Clase B, de acuerdo con la Parte 15 del Reglamento de la FCC. Estos límites están diseñados para
proporcionar protección razonable contra interferencias perjudiciales en una instalación residencial. Este
equipo genera o emplea energía de radiofrecuencia y, si no es instalado y empleado de acuerdo con estas
instrucciones, puede causar interferencias perjudiciales a las radiocomunicaciones.
Sin embargo, no garantizamos que no ocurrirán interferencias en una instalación en particular. Si este
equipo causa interferencias perjudiciales a la recepción radial o televisiva, situación que puede ser
determinada apagando y encendiendo el equipo, se sugiere al usuario que trate de corregir tal
interferencia mediante una o más de las siguientes medidas:
- Reorientar o relocalizar la antena receptora.
- Incrementar la separación entre el equipo y el receptor.
- Conectar el equipo a un tomacorriente o circuito diferente al que está conectado al receptor.
- Consultar con el concesionario o un técnico experimentado solicitándole su asistencia.
un cambio o modificación no aprobado por la parte responsable para la conformidad con las Reglas FCC.
Lugar de la marca requerida
La hoja de especificaciones y las precauciones para su seguridad
están en la parte trasera del aparato.
CERTIFICACION: CUMPLE CON LAS NORMAS DE PRESTACIONES
CON RADIACION DE LA FDA, 21 CFR SUBCAPITULO J.
2
2F3P421A[SP] (02-05) 1/25/05, 12:03 PM2
20
Page 37

PARA SU SEGURIDAD
1. LEA LAS INSTRUCCIONES
Antes de usar la unidad, lea detenidamente todas las instrucciones de seguridad y operación.
2. CONSERVE ESTE MANUAL DE INSTRUCCIONES
Conserve las instrucciones de seguridad y operación para consultas futuras.
3. RESPETE LAS ADVERTENCIAS
Observe estrictamente todas las advertencias impresas en la unidad y las incluidas en el manual de instrucciones.
4. SIGA LAS INSTRUCCIONES
Siga todas las instrucciones de operación y uso.
5. LIMPIEZA
Antes de limpiar este videograbador, desconéctelo del tomacorriente mural. No use limpiadores líquidos ni aerosol. Utilice sólo un
paño húmedo para limpiar el exterior del mueble.
6. ENCHUFES
El fabricante de esta unidad no hace ninguna recomendación de accesorios ya que pueden ser peligrosos.
7. AGUA Y HUMEDAD
No utilice este aparato cerca del agua. Por ejemplo cerca de una bañera, lavabo, pileta de la cocina, lavadero, en un sótano húmedo
o cerca de una piscina.
8. ACCESORIOS
No instale esta unidad en un carro, soporte, trípode o mesa inestables. La unidad podría caerse,
causando serias lesiones, resultando también severamente dañada a la unidad.
8A. La combinación de aparato y carro deberá ser movida con cuidado. Las detenciones bruscas, la
fuerza excesiva y las superficies disparejas podrán hacer que el aparato y el carro se vuelven.
9. VENTILACION
Las ranuras y aberturas en la parte trasera o inferior del mueble son para ventilación permiten un
funcionamiento fiable de la unidad, protegiendo contra calentamiento excesivo. Estas aberturas no
deberán ser bloqueadas ni cubiertas. Para evitar bloquear las aberturas, nunca sitúe la unidad
encima de una cama, sofá, alfombra u otra superficie similar. Tampoco instale la unidad cerca o
encima de un radiador o calefactor. La unidad no deberá ser instalado en un mueble empotrado,
como ser una repisa para libros o bastidor, a menos que se pueda garantizar una ventilación
adecuada, y/o cuando las instrucciones del fabricante así lo especifiquen.
10. FUENTES DE ALIMENTACION
Esta unidad sólo deberá ser operada mediante el tipo de fuente de alimentación especificado en la etiqueta indicadora. Si no está
seguro del tipo de fuente de alimentación que tiene en su casa, consulte a su distribuidor o a la compañía de electricidad local. En
el caso de unidades diseñadas para funcionar a pilas o con otras fuentes de alimentación, consulte el manual de instrucciones
respectivo.
11. CONEXIÓN A TIERRA O POLARIZACION
Esta unidad está equipada con una clavija polarizada de corriente alterna (una clavija que tiene una espiga más ancha que la otra).
Esta clavija solamente puede ser insertada en el tomacorriente en una sola dirección. Esta es una medida de seguridad. Si no
pudiera insertar completamente la clavija en el tomacorriente, vuelva a intentarlo invirtiendo la clavija. Si aún no fuera posible insertar
la clavija, tome contacto con un electricista para que reemplace su tomacorriente obsoleto. Si su unidad está equipada con una
clavija de conexión a tierra de 3 alambres (una clavija con una tercera espiga de conexión a tierra), no modifique las características
de seguridad de la clavija polarizada. Este tipo de clavija sólo puede ser insertado en un tomacorriente con contacto a tierra. Esto
también es una medida de seguridad. Si no pudiera insertar la clavija en el tomacorriente, tome contacto con un electricista para
que reemplace su tomacorriente obsoleto. No modifique las características de seguridad de la clavija de conexión a tierra.
12. PROTECCION DEL CABLE DE ALIMENTACION
Los cables de alimentación deberán ser tendidos de manera tal que la probabilidad de que sean pisados o aplastados por otros
objetos sea mínima. Preste especial atención a las clavijas de los cables, a los receptáculos, y al punto por donde salen del aparato.
13. TORMENTAS ELECTRICAS
Como medida de protección durante tormentas eléctricas, o cuando el videograbador permanezca sin uso durante períodos
prolongados de tiempo, desconéctelo del tomacorriente mural y desconecte la antena o el sistema de cable. Esto evitará que la
unidad resulte dañada por tormentas eléctricas o sobretensiones en la línea de alimentación.
14. LINEAS DE ALIMENTACION
Una antena exterior no deberá ser instalada en la cercanía de líneas de alimentación aéreas ni de otros circuitos de iluminación
eléctrica o potencia, o donde pueda caerse y hacer contacto con tales líneas o circuitos. Al instalar un sistema de antena exterior,
tenga mucho cuidado de no tocar tales líneas o circuitos de alimentación, ya que el contacto con ellos podría ser fatal.
15. SOBRECARGA
No sobrecargue los tomacorrientes murales ni los cables de extensión, ya que esto podría causar incendios o descargas
eléctricas.
16. ENTRADA DE OBJETOS Y LIQUIDOS
Nunca introduzca objetos de ningún tipo por las aberturas de la unidad, ya que podría tocar peligrosos puntos de alta tensión o
piezas de cortocircuito, provocando incendios o descargas eléctricas. Nunca derrame ni rocíe ningún tipo de líquido sobre la
unidad.
17. CONEXION A TIERRA DE LA ANTENA EXTERIOR
Si se conecta una antena externa o sistema de cable a la unidad, cerciórese de que el sistema de antena o cable está conectado
a tierra para darle protección contra sobretensión y acumulación de carga estática. La Sección 810 del Código Nacional de
Electricidad, ANSI/NFPA 70, entrega información acerca de la manera correcta de conectar a tierra el mástil y la estructura
soportante, puesta a tierra del alambre de entrada a una unidad de descarga de antena, tamaño de los conductores de puesta a
tierra, ubicación de la nidad de descarga de la antena, conexión a los electrodos de tierra, y requisitos para el electrodo de tierra.
18. SERVICIO
No intente reparar la unidad usted mismo; al abrir o retirar las cubiertas usted se expondrá a alta tensión y a otros peligros. Solicite
todo servicio a personal calificado.
AVISO PARA CARRO PORTATIL
(símbolo provisto por RETAC)
S3125A
ESPAÑOL
2F3P421A[SP] (02-05) 1/25/05, 12:03 PM3
3
Page 38

PARA SU SEGURIDAD
19. DAÑOS QUE REQUIERAN REPARACION
En los siguientes casos, desconecte la unidad del tomacorriente mural y llame a un técnico de servicio calificado:
a. Cuando el cable de alimentación o la clavija estén dañados.
b. Si se ha derramado líquido sobre la unidad, o si algún objeto ha caído dentro del videograbador.
c. Si la unidad ha sido expuesta a la lluvia o al agua.
d. Cuando a pesar de haber seguido las instrucciones de operación, la unidad no funcione normalmente.
Ajuste solamente los controles indicados en el manual de instrucciones; el ajuste incorrecto de otros controles
podrá causar daños a la unidad, la que por lo general requerirá de un prolongado trabajo de reparación (por un
técnico calificado) para que sus condiciones normales de operación puedan ser restablecidas.
e. Si la unidad se ha caída o si el gabinete se ha dañado.
f. Cuando la unidad muestre un cambio notorio en su rendimiento.
20. PIEZAS DE REPUESTO
Cuando sea necesario reemplazar piezas, asegúrese de que el técnico de servicio emplee las piezas de repuesto
especificadas por el fabricante, o piezas que tengan las mismas características que las piezas originales. Los cambios
no autorizados podrán causar incendios, descargas eléctricas y otros problemas.
21. REVISION DE SEGURIDAD
Al finalizar cualquier servicio de mantenimiento o reparación de esta unidad, solicítele al técnico que efectúe
comprobaciones de seguridad para determinar si el videograbador se encuentra o no en condiciones óptimas de operación
22. CALOR
El producto debe ser situado lejos de fuente de calor como radiadores, reguladores de calefacción, estufas o otros productos
(incluyendo amplificadores) que se producen calor.
23. BANDEJA DEL DISCO
No acerque sus dedos a la bandeja del disco cuando se está cerrando. Puede recibir heridas graves.
24. CONEXION
Cuando conecte el producto a otro equipo, desconecte la alimentación y desenchufe todos los equipos del
tomacorriente. Si no lo hace, puede provocar una descarga eléctrica y heridas graves.
Lea cuidadosamente el manual de instrucciones del otro equipo y respete las instrucciones al hacer las conexiones.
25. RAYO LASER
No mire por la ranura de la bandeja del disco por las salidas de circulación de aire del producto para ver la fuente del
rayo láser. Puede dañar sus ojos.
26. DISCO
No utilice un disco rayado, deformado o reparado. Estos discos se pueden romper fácilmente y provocar serias heridas o
averías en el producto.
27. NOTA PARA LA PERSONA QUE INSTALE EL SISTEMA CATV
Se ha incluido este recordatorio para llamar la atención de quien instale el sistema CABLE TV, con respecto al Artículo
820-40 de la NEC, que entrega directivas de guía para realizar una conexión adecuada a tierra y, en particular,
especifica que el cable de puesta a tierra debe ser conectado al sistema de conexión a tierra del edificio, lo más cerca
del punto de entrada del cable como sea posible.
EJEMPLO DE CONEXION A TIERRA DE LA ANTENA
SEGUN EL CODIGO NACIONAL DE ELECTRICIDAD
.
ALAMBRE DE ENTRADA DE LA ANTENA
ABRAZADERA
DE TIERRA
EQUIPO DE SERVICIO
ELECTRICO
NEC - CODIGO NACIONAL DE ELECTRICIDAD
S2898A
CONDENSACION
Se condensará humedad en la sección de funcionamiento del DVD/VCR si se lo trae de un lugar fresco a una habitación
caliente o si la temperatura en la habitación sube repentinamente. En este caso, se verán afectadas las prestaciones del
DVD/VCR. Para evitarlo, deje el DVD/VCR a la nueva temperatura durante aproximadamente una hora antes de conectarlo,
o haga que la temperatura en la habitación suba gradualmente. También puede condensarse humedad durante el verano si
el DVD/VCR está expuesta a una corriente de aire del acondicionador de aire. En estos casos, cambie el lugar donde está
instalado el DVD/VCR.
UNIDAD DE DESCARGA DE LA ANTENA
(NEC, SECCION 810-20)
CONDUCTORES DE PUEST A A
TIERRA (NEC, SECCION 810-21)
ABRAZADERAS DE TIERRA
SERVICIO DE ALIMENTACION DE SISTEMA
ELECTRODO DE PUESTA A TIERRA
(NEC ART 250, PARTE H)
4
2F3P421A[SP] (02-05) 1/25/05, 12:03 PM4
Page 39

Caracteristicas
Reproductor de DVD/CD / Videograbador
• Reproductor de DVD/CD con videograbador - Exclusivo diseño que combina un reproductor de DVD/CD y un
videograbador Hi-Fi y ofrece un considerable ahorro de espacio. El disco DVD posee mucha más capacidad,
aunque tiene el mismo tamaño que un CD. La calidad de imagen es superior a la Super VHS. La calidad de audio
es superior a la de un CD de audio. El reproductor de DVD puede reproducir discos CD de video y CD de audio.
• Alta calidad de imágenes - Más de 500 líneas (modo VCR: 230 líneas) de resolución horizontal. Supera la
resolución de Super VHS (400 líneas) o Laser Disc (430 líneas).
Sección VCR
• Recepción estéreo/SAP - Esta TV fue diseñada para recibir transmisiones segundo programa de sonido (SAP) y
en estéreo cuando existen.
• 4 cabezas de video - Proporcionan una calidad de imagen óptima para la reproducción de efectos especiales.
• Cabeza de 19
ayuda a evitar interferencias y aumenta la calidad de la imagen SLP hasta aproximarla a los niveles de la imagen
SP. Gracias a la tecnología de precisión se consigue la práctica eliminación de imágenes fantasma y de manchas de
color.
• Sonido estéreo de alta fidelidad (HI-FI) - Con respuesta de frecuencia de 20 a 20,000 Hz y rango dinámico mejor
que 90 dB, este VCR brinda un nivel de excelencia que está al nivel de los discos compactos.
• Grabación por temporizador de un solo toque (OTR) - Simplemente presionando el botón REC/OTR, el
videograbador se podrá programar para un máximo de 6 horas de grabación con un comienzo inmediato.
Sección DVD
• Compatible con una gran gama de salidas de audio DVD
Toma de audio digital coaxial:
• Cuando se conecta un equipo con un decodificador Dolby Digital integrado, los sonidos en Dolby Digitalpueden
producir el efecto de estar en un cine o en una sala de conciertos.
• Audio surround estándar diferente al Dolby Digital. Este formato ya se utiliza en varios cines.
• El podrádisfrutar del audio MPEG de los discos DVD que están grabados en este formato.
• El sonido PCM Lineal de 48 kHz/16 bit por 96 kHz/24 bit supera el sonido de los discos compactos de audio.
• Exploración progresiva - La exploración progresiva presenta al mismo tiempo todas las líneas horizontales de una
imagen, como un solo fotograma. Esta unidad convierte el vídeo entrelazado (480i) de DVD al formato progresivo
(480p) para realizar una conexión a una pantalla progresiva, aumentando la resolución vertical.
• Múltiples idiomas - Dado que este DVD admite 124 idiomas-subtítulos/-bandas sonoras, siempre podrá disfrutar de
su selección favorita (No es posible seleccionar un idioma que no esté grabado en el disco).
• Múltiples ángulos - Las imágenes de los deportes o conciertos en vivo se graban con muchas cámaras. Cuando
reproduzca estos discos, puede cambiar de ángulo durante la reproducción (No es posible seleccionar múltiples
ángulos si no están grabados en el disco).
• Reproducción repetida - Se puede repetir el capítulo, canción, título, lados o el material entre dos puntos
seleccionados.
• Reproducción de programas/aleatoria (CD) - Puede reproducir pistas en secuencias de programas o
seleccionadas aleatoriamente.
• Zoom - Se puede acercar con un zoom sobre el sujeto seleccionado en la escena durante la reproducción.
• Relación de aspecto del video - Puede cambiar la relación de aspecto de la pantalla de acuerdo al formato de su
monitor/televisor en un disco apropiado.
• Control para mayores de edad - Puede restringir la reproducción de escenas o sonidos de los discos DVD para
mayores de edad, que tienen un nivel de control por los padres.
µm - Ofrece calidad de imagen superior incluso en modo SLP, la tecnología de 19 micras de anchura
ESPAÑOL
* Este producto incorpora una tecnología de protección de copyright que está protegida por patentes estadounidenses
y otros derechos de propiedad intelectual. El uso de esta tecnología de protección de copyright debe ser autorizado
por Macrovision y está previsto exclusivamente para uso doméstico y otros usos de visualización limitados, a
menos que Macrovision lo autorice. Está prohibido desmontar o aplicar técnicas de ingeniería inversa.
* Fabricado bajo licencia de Dolby Laboratories. “Dolby” y el símbolo de la doble D son marcas registradas por Dobly
Laboratories.
* La grabación no autorizada de programas de televisión con derechos de autor, película, video cassettes y otros
materiales, puede infringir la ley de derechos autorales y ser contraria a las leyes pertinentes.
2F3P421A[SP] (02-05) 1/25/05, 12:03 PM5
5
Page 40

Indice
PARA SU SEGURIDAD ........................................... 3
Caracteristicas ......................................................... 5
Indice........................................................................ 6
Partes y sus funciones ............................................. 7
Control remoto ......................................................... 8
Fuente de alimentación............................................ 9
Conexiones basicos ............................................... 10
Conexion de antena a DVD/VCR...................... 10
Conexion del DVD/VCR a un televisor ................
Conexiones de TV cable ........................................ 11
Conexión para reproducción .................................. 12
Ajuste de la sección VCR ...................................... 14
Ajuste del canal de video .................................. 14
Seleccion de idioma en pantalla ....................... 14
Ajuste de reloj automatico................................. 15
Ajuste del reloj manual...................................... 16
Ajuste del sintonizador...................................... 16
Borrado de un canal de la memoria/
Eliminacion de buido......................................... 16
Eliminacion de ruido.......................................... 16
Reproducción de cintas ......................................... 17
Colocacion y extraccion de videocassettes ...... 17
Reproducción de cintas de cassette ................. 17
Reproduccion especial...................................... 17
Función VUELTA A CERO ............................... 18
Sistema de búsqueda de índices de vídeo ....... 18
Grabacion............................................................... 19
Grabacion de un programa de TV .................... 19
Grebacion por temporizador de un
solo toque (OTR) .............................................. 20
Grabacion por temporizador ............................. 20
Funciones avanzadas de la sección VCR ............. 22
Grabacion y reproduccion estereofonicas ........ 22
Segundo programa de sonido (SAP) ................ 22
Duplicacion de una cinta de video .................... 22
10
Reproduccion de discos......................................... 23
Disco ................................................................. 23
Ajuste de la selección de idioma....................... 23
Procedimiento de reproducción ........................ 24
Reproducción especial...................................... 24
Zooming (acercamiento) ................................... 24
Búsqueda de la escena deseada...................... 25
Marcación de escenas deseadas ..................... 25
Cambio del idioma de la pista de sonido .......... 25
Subtítulos .......................................................... 25
Cambio de ángulos ........................................... 26
Selección de título............................................. 26
Menú DVD ........................................................ 26
Reproducción repetida...................................... 26
Programación de reproducción
(disco compacto)............................................... 26
Reproducción aleatoria (disco compacto)......... 27
Reproducción de MP3 ...................................... 27
Funciones avanzadas de la sección DVD ............. 28
Ajuste de restricciones para menores............... 28
Deshabilitación temporal del nivel de rating
(clasificación) del disco DVD ............................ 28
Selección del idioma del menú ......................... 29
Ajuste de la relación de aspecto de la
pantalla de TV................................................... 29
Configuración del mode de imagen .................. 29
Selección de las indicaciones en la pantalla..... 30
Datos del status del Disco ................................ 30
Control de la Gama Dinámica........................... 30
Exploración progresiva ..................................... 30
Lista de códigos de idiomas................................... 31
Problemas y localización de averías...................... 32
Limpieza de la cabeza de video............................. 33
Especificaciones ....................................... TRASERA
6
2F3P421A[SP] (06-09) 1/25/05, 12:03 PM6
Page 41

Partes y sus funciones
Delantera
Botón selector de modo VCR/DVD
Apertura para carga de la cinta
Botón POWER
T omas AUDIO(L/R)/VIDEO IN
Ventana de la pantalla
Indicador VCR
Botónes CHANNEL
Indicador VCR
Indicador Play
Botón EJECT
Ventana de la pantalla
Sensor de control remoto
/
Indicador Pause
Botón OPEN/CLOSE
Botón PLAY
Botón STOP
Bandeja del disco
ESPAÑOL
Indicador DVD
Botón REC/OTR
Botón F.FWD
Botón REW
Indicador DVD
Indicador REC
Indicador TRK
Videocassette en la unidad
NOTA:
Indicador numérico (Título, Capítulo, Tiempo de reproducción u otra información)
Modo de exploración progresiva
Visualizador de grabación por temporizador
Indicador CD
Indicador PM
Es posible que algunos discos se muestren de forma equivocada o que, por ejemplo, no se muestre la
información de número de capítulo, tiempo de reproducción, etc.
Trasera
Toma DVD COAXIAL DIGITAL AUDIO OUT
Tomas AUDIO (L/R)/VIDEO OUT comunes de DVD/VCR
Cordón de AC
20
Conector de entrada de RF
2F3P421A[SP] (06-09) 1/25/05, 12:03 PM7
Tomas DVD AUDIO (L/R) OUT
Tomas DVD COMPONENT OUT
Tomas DVD S-VIDEO OUT
Conector de salide de RF
7
Page 42

Control remoto
POWER [9]
EJECT [17]
0 – 9 [16]
SETUP [23]
VCR MENU [14]
CH
TRK/SET + / – [14]
Cursor Buttons [15]
DVD MENU [26]
INDEX + / – [18]
/ [9]
STOP [17] [24]
SKIP [24]
MARKER [25]
VCR/DVD [9]
OPEN/CLOSE [24]
TIMER REC [20]
INPUT SELECT [22]
PROGRESSIVE [30]
DISPLAY [15] [25]
RETURN [23]
TOP MENU [26]
ENTER [14]
CANCEL [21]
PLAY [17] [24]
PAUSE/STILL [18] [24]
SEARCH + / – [17] [24]
SLOW [18] [24]
AUDIO SELECT [22]
AUDIO [25]
REC/OTR [19]
ZOOM [24]
JUMP [25]
ZERO RETURN [18]
SUBTITLE [25]
ATR [18]
8
2F3P421A[SP] (06-09) 1/25/05, 12:03 PM8
CLOCK/COUNTER [18]
TV/VCR [14]
REPEAT A-B [26]
ANGLE [26]
COUNTER RESET [18]
PLAY MODE [26]
SPEED [19]
Page 43

Coloque las pilas
Control remoto/Fuente de alimentación
Abrir la tapa del compartimento
1
de las pilas siguiendo la
dirección de la flecha.
Coloque dos pilas “AAA”, (no
23
suministradas) prestando atención
a las marcas de polaridad en el
compartimiento de las pilas.
Recoloque la tapa del
compartimiento.
PRECAUCION CON LAS PILAS
Las precauciones a continuación deben ser cumplidas cuando se utilizan pilas en esta unidad:
1. Utilice solo un tipo especificado de pilas.
2. Cuando coloca las pilas asegúrese de colocarlas con la polaridad correcta, tal como se indica en el
compartimiento de las pilas. Las pilas colocadas invertidas pueden causarle daños a la unidad.
3. No mezcle tipos diferentes de pilas (ej.: pilas alcalinas y carbón zinc), o pilas viejas y nuevas.
4. Si la unidad no va a ser utilizada por un largo período, extraiga las pilas para evitar daños o heridas resultantes de
posibles fugas.
5. No intente recargar las pilas que no sean recargables ya que se pueden recalentar y romperse (Siga las
indicaciones del fabricante de pilas).
Funciones básicas del control remoto
• Presione POWER para encender o apagar el DVD/VCR.
• Presione CH
•CH
• Los botones de número permiten acceder directamente a canales concretos.
• Cada vez que se presiona VCR/DVD en el control remoto, la pantalla alterna entre la pantalla VCR (modo VCR) y
/ y SET +/– se utilizan también para navegar por el sistema de menús en pantalla.
la pantalla DVD (modo DVD).
o CH para desplazarse por los canales uno a la vez.
ESPAÑOL
Funcionamiento
• Apunte el mando a distancia al sensor remoto y presione los botones de
control para hacer funcionar.
• Utilice el control remoto dentro de un ángulo de 30˚ hacia ambos lados del
sensor remoto, hasta una distancia de unos 5 metros.
Tomacorriente de CA
Orificio y hoja
más anchos
Cable de corriente alterna polarizado
(una pata es más ancha que la otra.)
PARA UTILIZAR CORRIENTE ALTERNA (CA)
Utilice el cable de CA polarizado sumistrado para CA operación.
Conecte el enchufe pequeño en el extremo del cable al conectador de
entrada de CA en el parte trasera del DVD/VCR, luego inserte el
enchufe más ancho de cable de CA en un tomacorriente de CA de
120V, 60Hz polarizado.
NOTAS:
• Nunca conecte el enchufe cordon de CA a otro voltaje que no sea el
especificado (120V 60Hz). Utilice solamente el cordon eléctrico
suministrado.
• Si el cordon de CA polarizada no se ajusta en un tomacorriente de
CA no polarizada, no intente limar o cortar las clavijas. Es responsabilidad
de usuario hacer que un electricista reemplace el tomacorriente
inadecuado.
• Si usted causa una descarga estática cuando toca la undad y este
falla, simplemente desenchufe la unidad del tomacorriente, espere
algunos minutos y enchufela otra vez. La unidad deberá funcionar
normalmente.
Aproximadamente 15PIES(5m)
Fuente de alimentación
9
2F3P421A[SP] (06-09) 1/25/05, 12:03 PM9
Page 44

Conexiones basicos
Conexion de antena a DVD/VCR
El DVD/VCR debe conectarse “entre” la antena y el televisor.
Primero, desconecte la antena del televisor y conéctela al
DVD/VCR. Luego, conecte el DVD/VCR al televisor. A continuación
se describen 3 métodos comunes para conectar
de antena a un DVD/VCR. Encuentre el tipo de sistema de
antena que esté utilizando y siga el diagrama de conexiones.
Ejemplo 1: Combinacion de antena de VHF/UHF con
cable coaxial de 75 ohmios
Cable coaxial de
75 ohmios
Ejemplo 2: Combinacion de antena de VHF/UHF con
cable de cabeza doble (PLANO) de 300
ohmios
Transformador igualador entrada de 300
ohmios salida de 75 ohmios (no suministrado)
Cable de cabeza doble
(PLANO) de 300 ohmios
Ejemplo 3: Antenas separadas de VHF y UHF
Combinador entradas de 75/300 ohmios
salida de 75 ohmios (no suministrado)
VHF UHF
Cable de
cabeza doble
(PLANO) de
300 ohmios
Cable coaxial de
75 ohmios
NOTA:
Si las antenas de VHF y UHF tienen un cable doble de 300
ohmios (plano), utilice un combinador que tenga dos
entradas de 300 ohmios y una salida de 75 ohmios.
un sistema
IN
(ANT)
OUT
(TV)
DVD/VCR
IN
(ANT)
OUT
(TV)
DVD/VCR
IN
(ANT)
OUT
(TV)
DVD/VCR
Conexion del DVD/VCR a un televisor
Una vez que haya conectado la antena al DVD/VCR, usted
tendrá que conectar el DVD/VCR al televisor. A continuación
se describen 3 métodos comunes para conectar su DVD/
VCR a un televisor. Identifique el tipo de televisor que esté
utilizando y siga el diagrama de conexiones.
Este DVD/VCR dispone de una única salida de 75 ohmios
para conexión a un televisor. Si su televisor dispone de
entradas de antena de VHF y UHF separadas (números 2 y
3 a continuación), utilice un divisor para conectar el DVD/VCR
al televisor para recepción de VHF y UHF.
Ejemplo 1: Televisor con entrada única de 75 ohmios
Ejemplo 2: Televisor con entrada de 300 ohmios para
IN
(ANT)
OUT
(TV)
DVD/VCR
Ejemplo 3: Televisor con entrada de 300 ohmios para
IN
(ANT)
OUT
(TV)
DVD/VCR
para VHF/UHF
Cable coaxial de 75
(ANT)
IN
OUT
(TV)
ohmios (suministrado)
VHF/UHF
IN (ANT)
DVD/VCR
antena de UHF y de 75 ohmios para antena
de 300 ohmios
Cable coaxial de 75
ohmios (suministrado)
Divisor entrada de 75
ohmios salidas de 75/300
ohmios (no suministrado)
antena de UHF y de 300 ohmios para antena
de VHF
Cable coaxial de 75 ohmios
(suministrado)
Divisor entrada de 75
ohmios salidas de 300
ohmios (no suministrado)
TV
TV
UHF
VHF
TV
UHF
VHF
NOTAS:
• El unidad no ofrecerá una imagen clara a menos
que la señal de antena sea fuerte. Asegúrese de
conectar correctamente la antena al unidad.
• Para grabaciones de mejor calidad, le recomendamos
usar una antena exterior. No utilice una antena inte
rior o una antena telescópica.
• Si no está seguro acerca de la conexión, consulte a
un técnico de servicio calificado.
10
2F3P421A[SP] (10-17) 1/25/05, 12:03 PM10
NOTA:
Si se utiliza una antena VHF o UHF, ajuste la opcion de menu
TV/CABLE al modo “TV”.
Page 45

Conexiones de TV cable
Muchas compañías de TV cable ofrecen servicios que permiten recibir canales adicionales, incluyendo canales
pagados o por suscripción. Al tener una gama de sintonización ampliada, este DVD/VCR puede sintonizar la mayoría
de los canales de TV cable sin necesidad de usar un caja convertidora proporcionada por la compañía de TV cable,
salvo aquellos canales que han sido intencionalmente codificados.
Si se suscribe a un canal especial que esté codificado, usted deberá usar una caja decodificadora para poder recibir dicho canal.
Ejemplo 1:
DVD/VCR
TV
IN
(ANT)
Cable entrante
OUT
(TV)
PERMITE:*Grabar desde canales no codificados.
Usar el temporizador programable.
*
Grabar desde un canal mientras se ve otro.
*
VHF/UHF
IN (ANT)
ESPAÑOL
Ejemplo 2:
DVD/VCR
Convertidor/
Decodificador
IN
(ANT)
Cable entrante
OUT
(TV)
PERMITE:*Grabar desde canales a través de la caja convertidora
(codificados y no codificados).
Usar el temporizador programable para grabar sólo desde
*
el canal seleccionado en la caja convertidora.
NO PERMITE:*Grabar desde un canal mientras se ve otro.
Usar el sintonizador del DVD/VCR para seleccionar ca-
*
nales.
Ejemplo 3:
DVD/VCR
IN
(ANT)
Cable entrante
OUT
(TV)
NOTA:
Para grabar desde el convertidor/
decodificador, el sintonizador del DVD/
VCR deberá ser sintonizado al canal de
salida del convertidor, normalmente al
canal 3 ó 4.
Convertidor/Decodificador
TV
VHF/UHF
IN (ANT)
TV
VHF/UHF
IN (ANT)
PERMITE:*Grabar desde canales no codificados.
Usar el temporizador programable.
*
Grabar desde un canal no codificado mientras se ve
*
cualquier canal seleccionado en la caja convertidora.
NO PERMITE:*Grabar desde canales codificados.
NOTA:
Al reproducir una cinta o usar el
sintonizador incorporado del DVD/VCR,
el convertidor deberá ser ajustado a la
salida de canal de video del DVD/VCR
(3 ó 4).
NOTA: Siempre que haya una caja convertidora/decodificadora instalada antes que el DVD/VCR, usted
debera sintonizar el DVD/VCR a la salida de la caja convertidora/decodificadora, usualmente al canal
3 ó 4.
2F3P421A[SP] (10-17) 1/25/05, 12:03 PM11
11
Page 46

Conexión para reproducción
La opción que elija para la interconexión de los diversos componentes de video y de audio al DVD/VCR dependerá del modelo
y de las funciones de cada uno de los componentes. Busque en los manuales o guías del usuario suministrados con cada uno
de los componentes la ubicación exacta de las entradas y salidas de video y audio.
Conexión a un TV con salida de audio/video
Puede disfrutar de la reproducción conectando la unidad a un TV.
Conecte la unidad a un TV equipado con tomas de entrada de audio (L/R) y entrada de vídeo a través del cordón de audio/
vídeo incluido.
A SALIDA DE VIDEO
DVD/VCR
20
TV
A SALIDA DE AUDIO (IZQUIERDA)
A SALIDA DE AUDIO (DERECHA)
A ENTRADA
DE VIDEO
Cordón AUDIO/VIDEO (suministradas)
A ENTRADA DE AUDIO
(DERECHA)
A ENTRADA DE AUDIO
(IZQUIERDA)
Conexión a un TV con salida S-Video (para reproducción de DVD/CD)
Si su TV dispone de una entrada de S-VIDEO, puede obtener una mayor calidad conectándolo a la salida de S-VIDEO de la
unidad a través del cordón S-video, en lugar de conectar la entrada de vídeo del TV a la toma VIDEO de la unidad.
TV
Cordón S-VIDEO (no incluido)
DVD/VCR
A SALIDA DE
S-VIDEO
A SALIDA DE AUDIO (IZQUIERDA)
A SALIDA DE AUDIO (DERECHA)
20
Cordón AUDIO (no incluido)
A ENTRADA
DE S-VIDEO
A ENTRADA DE AUDIO
(DERECHA)
A ENTRADA DE AUDIO
(IZQUIERDA)
Conexión a un TV con salida de vídeo de componentes (para reproducción de DVD/CD)
Puede disfrutar de una imagen de alta calidad al conectar las tomas de salida de vídeo de componentes a las tomas de
entrada de vídeo de componentes del TV a través de los cables de vídeo de componentes (no incluidos).
TV
DVD/VCR
A SALIDA DE AUDIO (IZQUIERDA)
A ENTRADA DE
AUDIO (IZQUIERDA)
A ENTRADA DE
AUDIO (DERECHA)
A entrada de video de
componentes
A salida de video de
componentes
20
A SALIDA DE AUDIO (DERECHA)
Cordón AUDIO (no suministrado)
Cable de VIDEO DE COMPONENTES (no suministrado)
NOTAS:
• Al conectar a un televisor usando la toma VIDEO o S-VIDEO verifique que el indicador PROGRESSIVE de la
ventana de visualización no esté encendido. Si está encendido, las salidas VIDEO y S-VIDEO no suministran las
señales correctas y no se puede ver la imagen. Para apagar el indicador PROGRESSIVE, desactive el modo de
exploración progresiva (véase la página 30).
• Si las tomas de entrada de vídeo de componentes de su televisor son de tipo BNC, utilice un adaptador para
convertir una clavija de patillas en una clavija BNC (no incluida).
12
2F3P421A[SP] (10-17) 1/25/05, 12:03 PM12
Page 47

Conexión para reproducción
Conexión a un amplificador estéreo con salida de audio
Puede disfrutar de audio de alta calidad conectando la salida de audio a un amplificador.
Conecte las tomas de SALIDA DE AUDIO a cualquier entrada de línea (como AUX, DVD, CD, etc.) de un
amplificador de audio.
DVD/VCR
Amplificador
estéreo
20
A SALIDA DE AUDIO
(IZQUIERDA
A SALIDA DE AUDIO
(DERECHA)
Cordón AUDIO (no suministrado)
A ENTRADA DE AUDIO
(DERECHA)
A ENTRADA DE AUDIO
(IZQUIERDA)
Conexión a un amplificador AV con sonido envolvente digital integrado
Si va a utilizar un amplificador con sonido envolvente digital integrado como se indica a continuación, podrá
disfrutar de las diversas opciones de audio como Dolby Digital mediante la salida digital coaxial.
Utilice esta conexión para conectar un:
• Amplificador AV con decodificador *Dolby Digital integrado
DVD/VCR
20
Salida de audio digital coaxial
Cable digital coaxial (no suministrado)
Cordón VIDEO (no suministrado)
Conector de Salida VIDEO
Amplificador AV con
varios decodificadores
integrados como se
indica anteriormente
NOTA:
Puede realizar la conexión a un TV
mediante un cable de video de
componentes (no suministrado) o un
cable S-Video (no suministrado) en
lugar de mediante un cable de video
(no suministrado).
A ENTRADA DE
VIDEO
TV
ESPAÑOL
NOTAS:
• Las tomas DVD OUTPUT (COAXIAL, AUDIO L/R, S-VIDEO y COMPONENT) sólo son útiles para la sección DVD.
• La señal VHS sólo se envía a través de la toma de componentes (DVD/VCR OUTPUT) y UHF/VHF OUT.
• Cuando haga las conexiones que se muestran arriba, no ajuste DOLBY DIGITAL a DOLBY DIGITAL con ON en el
Amplificador A V . Si lo hace, saldrá repentinamente un ruido fuerte por los altavoces, afectando sus oídos o dañando
los altavoces.
2F3P421A[SP] (10-17) 1/25/05, 12:03 PM13
13
Page 48

〈+/-/ENTER/MENU〉
MENU
TIMER REC SET
AUTO REPEAT
ON OFF
ON OFF
SAP
CH SETUP
SYSTEM SETUP
〈+/-/ENTER/MENU〉
SYSTEM SETUP
CLOCK SET
LANGUAGE/IDIOMA/LANGUE
NO NOISE BACKGROUND
AUTO CLOCK
STANDARD TIME
DAYLIGHT SAVING TIME
ON OFF
ON OFF
Ajuste de la sección VCR
Ajuste del canal de video
Para vizualizar la reproducción de una cinta
grabada, o para ver un programa seleccionado
por el selector de canal del videograbador, el
televisor deberá estar ajustado al canal 3 ó 4
(canal de video).
Cuando se conecta el TV sólo con un cable de antena.
1 Mantenga presionado 3 o 4 en
el control remote durante 3
segundos en el modo espera
para seleccionar CH 3 o 4. El
número del canal seleccionado parpadeará en la pantalla
durante 4 segundos.
2 Encienda el televisor y ajústelo al canal 3 ó 4, en
correspondencia con el canal seleccionado en el paso 1.
3 Presione POWER para encender el DVD/VCR.
4 Presione VCR/DVD para seleccionar el modo VCR.
El indicador VCR del panel frontal se iluminará.
5 Presione el botón selector TV/VCR para seleccionar la
posición VCR. El indicador VCR se iluminará.
6 Seleccione cualquier canal para recibir un canal de TV
de su zona.
El número de canal aparecerá en la pantalla durante
unos 4 segundos.
Para un sintonizador de TV de pulsador
Si el CH 3 ó 4, correspondiente al canal de video, no puede
sintonizarse en su televisor, proceda como sigue: ajuste el
selector de canal 3/4 del videograbador al canal 3 ó 4,
reproduzca una cinta pregrabada y sintonice el televisor
para recibir una clara imagen en color desde el
videograbador. Para mayores detalles, consulte el manual
de instrucciones de su televisor.
NOTAS:
• El canal de vídeo preajustado en fábrica es CH 3.
• Si el aparato no funciona correctamente, o No se
pueden presionar los botones (en la unidad y/o
control remoto): La electricidad estática, etc. puede
afectar el funcionamiento del tocadiscos. Desenchufe el
cable eléctrico de CA una vez y vuelva a enchufar.
Seleccion de idioma en pantalla
Puede escoger entre tres idiomas diferentes (inglés,
francés y español) para los despliegues en pantalla.
1 Presione VCR MENU.
Aparece la pantalla del
menú de la VCR.
Presione SET + ó – para
seleccionar la option
“SYSTEM SETUP”, luego
presione ENTER.
Si utiliza la unidad por
primera vez y presiona VCR MENU, es posible que
aparezca la pantalla de menú “SYSTEM SETUP” del
paso 2 en lugar de la pantalla del menú principal.
2 Presione SET + ó – para
seleccionar el modo
“LANGUAGE”, luego
presione ENTER.
3 Presione SET + ó – para
seleccionar el idioma
deseada: inglés (ENGLISH), español
(ESPAÑOL) o francés
(FRANCAIS), luego
presione ENTER.
4 Presione VCR MENU para volver a la imagen normal de
TV.
NOTAS:
• Tanto el VCR como el DVD tienen sus propias opciones
de menú (ver página 23).
• Si no se presiona ningún botón en más de 60 segundos,
la pantalla MENU volverá automáticamente a su función
normal de TV.
14
2F3P421A[SP] (10-17) 1/25/05, 12:03 PM14
Page 49

Ajuste de la sección VCR
Ajuste de reloj automatico
La función de reloj automático ajusta automáticamente
el reloj integrado (mes, día, año y hora) cuando se
conecta el unidad a una antena ó sistemas de cable y se
lo apaga. Conforme la unidad busca una estación en su
área, y recibe una señal de emisión para el reloj
automático, éste tarda varios minutos en ajustarse.
1 Connecte la antena ó sistema de cable.
• Si utiliza una caja de cable, enciéndala.
2 Enchufe el cable eléctrico de CA a un tomacorriente CA.
3 Compruebe que el unidad está apagado.
• Si presiona POWER, el ajuste automático no se activará
4 Después de poner el reloj en hora en la ventana de
visualización pulse POWER.
• Según las condiciones de recepción, puede tardar unos
treinta minutos.
5 Presione DISPLAY para verificar el reloj en la pantalla.
6 Si el reloj no ha quedado ajustado, verifique el estado de la
antena. El reloj automático no funciona en el estado de
recepción.
Reajuste del reloj automatico
El reajuste del reloj automático se hará a las 12:00 PM todos
los días si el unidad está desconectado.
• Si utiliza una caja de cable y desea hacer el ajuste del
reloj automático, debe dejar encendida la caja de cable.
• El ajuste de reloj automático no es efectivo cuando hay
una diferencia de más de 5 minutos entre la hora del
reloj integrado y la hora real.
Para desconectar el reloj automático
Cuando sale de fábrica, la opción “AUTO CLOCK” está en ON.
Si no desea ajustar el reloj automático (reajuste):
1 Conecte el unidad.
2 Presione VCR MENU.
3 Presione SET + ó – para seleccionar opción “SYSTEM
SETUP”, luego presione ENTER.
4 Presione SET + ó – para seleccionar “AUTO CLOCK”.
5 Presione ENTER para seleccionar “OFF”.
6 Presione dos veces VCR MENU para volver a la
pantalla normal.
• Cuando el “AUTO CLOCK” está en “OFF”, el ajuste
del reloj automático y la función de la hora de verano
no funcionarán.
• Ajuste manualmente el reloj (consulte la página 16).
Para ajustar a la hora real normal
En el caso, poco frecuente, de que viva en una región
donde se reciban dos emisora en hosos horarios diferentes,
el unidad puede reconocer la emisora equivocada para el
ajuste del reloj automático.
Para corregir la situación:
1 Presione VCR MENU.
2 Presione SET + ó – para seleccionar opción “SYSTEM
SETUP”, luego presione ENTER.
3 Presione SET + ó – para seleccionar la opción
“STANDARD TIME” y presione ENTER.
4 Presione SET + ó – para seleccionar su huso horario y
presione ENTER.
ATLANTICO : GMT – 4 HORAS
(GMT: Greenwich Mean Time)
ESTE : GMT – 5 HORAS
CENTRAL : GMT – 6 HORAS
MONTAÑA : GMT – 7 HORAS
PACIFICO : GMT – 8 HORAS
ALASKA : GMT – 9 HORAS
HAWAI : GMT – 10 HORAS
AUTO : AJUSTE AUTOMA TICO
5 Presione dos veces VCR MENU para volver a la pantalla
normal.
NOTA:
Para poder seleccionar la hora estándar, el reloj debe
ajustarse primero una ves a “AUTO CLOCK”.
Ajuste de la hora de verano
Se puede ajustar automática ó manualmente la hora de
verano.
1 Presione VCR MENU.
Presione SET + ó – para
seleccionar opción “SYSTEM
SETUP”, luego presione ENTER.
2 Presione el botón SET + ó – para
seleccionar “DAYLIGHT SAVING
TIME”, luego presione ENTER.
3 Presione SET + ó – para
seleccionar una de las
operacione y presione ENTER.
Presione VCR MENU hasta que
se borre la pantalla MENU.
ON: for manual setting
(forward one hour)
OFF: for manual setting
(back one hour)
AUTO: for automatic setting
(read XDS in the signal)
Cuando desea ajustar manualmente la hora de verano,
ajuste a “ON” el primer domingo de abril y ajuste a “OFF” el
último domingo de octubre.
NOTAS:
• Cuando sale de fábrica, la opción de la hora de verano
está en la posición “AUTO”.
• Cuando el reloj no está ajustado, no puede utilizar el
ajuste de la hora de verano.
• Cuando no hay hora de verano en su región, seleccione
siempre la posición “OFF” en el paso 3.
MENU
TIMER REC SET
AUTO REPEAT
SAP
CH SETUP
SYSTEM SETUP
〈+/-/ENTER/MENU〉
SYSTEM SETUP
CLOCK SET
LANGUAGE/IDIOMA/LANGUE
NO NOISE BACKGROUND
AUTO CLOCK
STANDARD TIME
DAYLIGHT SAVING TIME
〈+/-/ENTER/MENU〉
DAYLIGHT SAVING TIME
á+/-
ON
OFF
AUTO
/ENTER/MENU
ON OFF
ON OFF
ON OFF
ON OFF
ñ
15
ESPAÑOL
2F3P421A[SP] (10-17) 1/25/05, 12:03 PM15
Page 50

Ajuste de la sección VCR
Ajuste del reloj manual
Debe seleccionar la fecha y la hora manualmente para
las grabaciones con temporizador, el temporizador de
encendido/apagado y el horario de verano si el proceso
de reloj automático no las ha ajustado correctamente.
Ajuste automático de los canales
Su videograbadora puede recibir un máximo de 181 canales
prorgramándolos en la memoria.
1 En el menú “CH SETUP”, pulse
Ejemplo: Ajuste del reloj a miércoles, 8:30 AM 26 (SAB)
marzo, 2005.
1 Presione VCR MENU.
Presione SET + ó – para
seleccionar la option “SYSTEM
SETUP”, luego presione ENTER.
2 Presione SET + ó – para
MENU
TIMER REC SET
AUTO REPEAT
SAP
CH SETUP
SYSTEM SETUP
〈+/-/ENTER/MENU〉
ON OFF
ON OFF
2 El DVD/VCR empezará a
seleccionar la opción “CLOCK
SET”, luego presione ENTER.
3 Presione SET + ó – para
establecer el mes, y a
continuación presione ENTER.
4 Ajuste el día, año y hora de
SYSTEM SETUP
CLOCK SET
LANGUAGE/IDIOMA/LANGUE
NO NOISE BACKGROUND
AUTO CLOCK
STANDARD TIME
DAYLIGHT SAVING TIME
〈+/-/ENTER/MENU〉
ON OFF
ON OFF
Puede añadir los canales que desee o borrar los que no
desee manualmente.
1 Presione VCR MENU.
acuerdo con el procedimiento del
paso 3.
3
Una vez ajustado el reloj, la fecha
y la hora empiezan a funcionar
automáticamente.
NOTAS:
MONTH
26 (SAT)
DAY
2005
YEAR
8 : 30 AM
TIME
〈+/-/ENTER/CANCEL/MENU〉
2 Presione SET + ó – para
3 Seleccione el canal que desea
• Después de un corte de corriente de treinta minutos o de
haberse desconectado el cable de alimentación, se dejará
de visualizar la hora. En este caso, vuelva a ajustar la hora
actual si el Reloj automático no la ajustó correctamente.
• Para desplazar el cursor hacia atrás, pulse CANCEL.
Ajuste del sintonizador
4 Presione ENTER para seleccionar
5 Presione el botón VCR MENU para volver a la imagen
Este DVD/VCR está equipado con una función de memorización
de canales que permite avanzar o retroceder al siguiente
canal almacenado en la memoria, pasando por alto los
canales no deseados. Antes de seleccionar canales, éstos
deberán ser programados en la memoria del DVD/VCR.
Además de los canales normales de VHF y UHF, este
DVD/VCR puede recibir hasta 113 canales de TV cable.
Para usar el DVD/VCR con una antena, ajuste la opcion de
MENU al mode TV. Este interruptor viene ajustado de
Cuando no desea recibirlas señales de transmisión
débiles, Puede hacer que aparezca una pantalla azul negro
seleccionando el FONDO SIN RUIDO “ON” Este aparato
sale de fábrica con el FONDO SIN RUIDO en “ON”.
1 En el menú “SYSTEM SETUP”,
fábrica a la posición CABLE.
Seleccion de TV/CABLE
1 Presione VCR MENU.
Presione el botón SET + ó – para
seleccionar la opción “CH
SETUP”, luego presione el botón
ENTER.
MENU
TIMER REC SET
AUTO REPEAT
SAP
CH SETUP
SYSTEM SETUP
á+/-
/ENTER/MENU
ON OFF
ON OFF
ñ
2 Presione el botón ENTER para
3 Presione el botón VCR MENU para volver a la imagen
SET + o – para seleccionar
“AUTO CH MEMORY” y, a
CH SETUP
TV CABLE
AUTO CH MEMORY
ADD/DELETE
continuación, pulse ENTER.
á+/-
memorizar todos los canales
/ENTER/MENU
disponibles en su zona.
Borrado de un canal de la
memoria/Eliminacion de buido
Presione SET + ó – para
seleccionar la option “SYSTEM
SETUP”, luego presione ENTER.
seleccionar la opción “ADD/
DELETE”, luego presione ENTER.
memorizar o borrar utilizando el
botón SET + ó –, o bien mediante
los botones de número.
“ADD” ó “DELETE”.
normal de TV.
CH SETUP
TV CABLE
AUTO CH MEMORY
ADD/DELETE
á+/-
/ENTER/MENU
á
+/-/0-9/ENTER/MENU
Eliminacion de ruido
SYSTEM SETUP
presione el botón SET + ó – para
seleccionar la opción “NO NOISE
BACKGOUND”.
seleccionar la posición “ON”.
normal de TV.
CLOCK SET
LANGUAGE/IDIOMA/LANGUE
NO NOISE BACKGROUND
AUTO CLOCK
STANDARD TIME
DAYLIGHT SAVING TIME
〈+/-/ENTER/MENU〉
ñ
ñ
ñ
ON OFF
ON OFF
CH 003ADD
2 Presione SET + ó – para
seleccionar el modo TV/CABLE.
3 Presione ENTER para seleccionar
CH SETUP
TV CABLE
AUTO CH MEMORY
ADD/DELETE
el modo TV o CABLE.
á+/-
La flecha indica el modo
/ENTER/MENU
seleccionado.
TV - VHF/UHF channels
CABLE- CABLE TV channels
4 Presione VCR MENU dos veces para volver a la imagen
normal de TV.
16
2F3P421A[SP] (10-17) 1/25/05, 12:03 PM16
ñ
Page 51

Reproducción de cintas
Colocacion y extraccion de videocassettes
Use sólo videocassette marcado
.
Colocacion
Presione en el centro del videocassette hasta que se retraiga
automáticamente.
Encendido y reproduccion automatica
Cuando se carga un videocassette desprovisto de su lengüeta
de protección contra borrados accidentales, el unidad se
encenderá automaticamente y la reproducción comenzará
inmediatamente.
Inserte el cassette con el lado de la etiqueta de cara hacia usted.
El videocassette no puede ser insertado al revés.
Extraccion
Para extraer un cassette de la unidad, presione EJECT del
control remoto o presione dos veces el botón 5 (EJECT)
del unidad.
Expulsion automatica
Si el unidad rebobina automáticamente al comienzo de la
cinta (FUNCION DE REBOBINADO AUTOMATICO), la cinta
será automáticamente expulsada (ver página 19).
Para evitar borrados accidentales
Tras la grabación, desprenda la lengüeta de protección
contra borrados accidentales si no desea grabar sobre la
cinta.
Lengüeta para evitar el borrado
Destonillador
PARA VOLVER A GRABAR
Cubra el orificio con cinta aislante (vinílica).
Tenga cuidado de que la cinta no exceda los extremos del
portacassette.
Reproducción de cintas de cassette
Coloque una cinta pregrabada (Cuando se carga una cinta
de cassette sin la lengüeta de prevención de borrado, la
reproducción comenzará automáticamente).
Para iniciar la reproduccion
Presione PLAY. La reproducción comenzará.
” aparecerá en pantalla.
“
Para interrumpir reproduccion
Presione STOP (PARADA) una vez. La cinta parará, pero
permanecerá cargada y lista para reproducir.
“
” aparecerá en pantalla.
NOTAS:
• Este unidad selecciona automáticamente la velocidad de
la cinta de reproducción SP, LP o SLP.
• Se puede reproducir simultáneamente el videocassette y
el disco DVD. Si presiona VCR/DVD, se alterna en
pantalla la reproducción de la cinta y del DVD.
Rebobinado o avance rapido de la cinta
Presione REW (rebobinado) o F.FWD (avance rápido),
cuando el modo de parada está activado. “ ” o “ ”
aparecerá en la pantalla.
BUSQUEDA DE IMAGEN EN AVANCE/
REBOBINADO
Si usted desea ver el programa de cinta durante el modo de
REW o F.FWD, mantenga presionado REW o F.FWD.
La imagen de búsqueda visual del retroceso (avance) será
aparecido en la pantalla. Suéltalo para volver al modo de
REW o F.FWD.
Reproduccion especial
Búsqueda de imagen
Función de búsqueda de imagen hacia atrás
Presione REW una o dos veces durante la reproducción.
Función de búsqueda de imagen hacia delante
Presione F.FWD una o dos veces durante la reproducción.
Para volver a la reproducción: Presione PLAY.
TIEMPOS DE BUSQUEDA
VELOCIDAD DE
LA CINTA
SP (Reproducción normal)
LP (Large duración)
SLP (Superlarge duración)
VELOCIDAD DE BUSQUEDA
PRESIONAR
UNA VEZ
3 veces la normal
7 veces la normal
9 veces la normal
PRESIONAR
DOS VECES
5 veces la normal
9 veces la normal
15 veces la normal
ESPAÑOL
Chinta adhesiva
Velocidad de
cinta
SP (Standard Play)
SLP (Super Long Play)
2F3P421A[SP] (10-17) 1/25/05, 12:03 PM17
T-160 T-120 T-60
2-2/3 horas 2 horas 1 hora
8 horas 6 horas 3 horas
Imagen fija
Presione PAUSE durante la reproducción. Para continuar la
reproducción normal: Presione PLAY.
Cinta de videocassette
17
Page 52

Reproducción de cintas
Camara lenta
Durante la reproducción presione SLOW.
Para volver a la reproducción: Presione PLAY o SLOW.
Ajuste del seguimiento y ajuste vertical en
camara lenta
Si aparecen franjas de interferencia en la imagen, presione los
botones TRK + o – para reducir la interferencia. Si la imagen
fija oscila demasiado, presione los botones TRK + o –.
Avance cuadro a cuadro
Presione PAUSE durante la reproducción.
Presione SLOW repetidamente: La imagen avanza cuadro a
cuadro.
Para volver a la reproducción: Presione PLAY o PAUSE.
Ajuste de la condición de seguimiento
Ajuste de seguimiento automático
Al introducir una cinta e iniciar la reproducción, se pone en
funcionamiento el seguimiento automático que analiza
continuamente la señal para ofrecer una calidad de imagen
óptima durante la reproducción.
Ajuste de seguimiento manual
Si el seguimiento automático no logra eliminar correctamente
las interferencias durante la reproducción, presione TRK +/–
para eliminarlas manualmente.
Aparecerá “MANUAL TR.”. Presione brevemente para un
ajuste ligero, o mantenga presionado para un ajuste más
marcado.
• Presione ATR para volver a activar el seguimiento automático.
Aparecerá “AUTO TR.”.
Reproducción repetida
Toda la cinta de vídeo se reproducirá hasta el final. La cinta
será entonces rebobinada hasta el principio y se repetirá la
reproducción.
Presione VCR MENU. Presione S ET + ó – para
1
seleccionar “AUTO REPEAT”.
A continuación, presione
2
ENTER para seleccionar
“ON” o “OFF”.
Si se selecciona “ON”, la
reproducción se repetirá
indefinidamente.
Presione VCR MENU hasta que se borre la pantalla de
3
menú.
Si presiona DISPLAY, “ ” aparecerá en pantalla.
Para iniciar la reproducción, presione PLA Y.
4
La reproducción se repetirá indefinidamente.
Para cancelar el modo de repetición:
Siga los pasos 1, luego presione ENTER para seleccionar la
posición OFF. Presione VCR MENU para retornar a TV.
NOTAS:
• La salida de audio es silenciada durante Búsqueda de
imagen, Imagen fija, Camera lenta y Avance cuadro a
cuadro.
• Durante el modo de Búsqueda de imagen aparecerán franjas
de interferencia provocadas por el sistema.
• La reproducción especial cambiará automáticamente a
reproducción transcurridos unos 5 minutos para proteger la
cinta de video contra un desgaste excesivo.
MENU
TIMER REC SET
AUTO REPEAT
SAP
CH SETUP
SYSTEM SETUP
ON OFF
ON OFF
18
Función VUELTA A CERO
Esta función hace que el rebobinado de la cinta se
detenga automáticamente cuando el contador llega a la
posición 00:00:00.
Presione DISPLAY.
1
El visualizador del contador muestra
el tiempo de ejecución de la cinta
durante la reproducción o grabación.
Presione COUNTER RESET en la
2
posición deseada de la cinta. El
visualizador del contador se reseteará a la posición
“00:00:00” (por ejemplo,
Presione STOP cuando finalice la reproducción o grabación
3
Presione ZERO RETURN.
La cinta se rebobinará o avanzará rápidamente y se
detendrá automáticamente en la posición “00:00:00”.
el principio de la grabación).
VCR
VCR
.
Botón CLOCK/COUNTER
Presione CLOCK/COUNTER. El reloj y el contador de cinta
se alternan en el visualizador.
NOTAS:
• Si usted rebobina la cinta más allá de “00:00:00” un signo
menos (“–”) será visualizado frente a la hora.
• Cuando una cinta es cargada, el contador cambiará a
“00:00:00”.
• El contador no funciona en secciones no grabadas (en
blanco) de la cinta. Al rebobinar la cinta, o en el avance rápido
o reproducción de una cinta en las secciones en blanco, el
contador parará.
Sistema de búsqueda de índices de vídeo
Esta función permite localizar el inicio de cualquier
grabación realizada en el VCR.
Grabación de una MARCA DE ÍNDICE
La función Búsqueda de índices graba automáticamente
una marca de ÍNDICE en la cinta cada vez que se inicia una
grabación.
Búsqueda de índices
Presione INDEX o durante el modo de parada o de
reproducción.
Para programas posteriores: Presione INDEX
Para programas anteriores: Presione INDEX .
(Al presionar sucesivamente, se aumenta el número de
ÍNDICE hasta 9.)
Cuando se presiona INDEX o , la unidad inicia la
búsqueda del Número de ÍNDICE seleccionado y, una vez
encontrado, se inicia la reproducción automáticamente.
Para detener la búsqueda de índices, presione STOP.
NOTAS:
• Es posible que no se encuentre una marca de ÍNDICE si se
grabó al principio de la cinta.
• Durante la búsqueda de ÍNDICES, es posible que la cinta se
detenga y se inicie la reproducción en una ubicación
ligeramente diferente.
• La función de ÍNDICES puede no funcionar correctamente
con cintas de vídeo viejas o gastadas.
•
Es posible que no se encuentre las marcas de ÍNDICE si ésta se
encuentra muy cerca del punto en el que se inicia la búsqueda.
• Durante la grabación, si se detiene temporalmente la
grabación, la marca de ÍNDICE no se graba en la cinta.
.
2F3P421A[SP] (18-23) 1/25/05, 12:03 PM18
Page 53

Grabacion
Grabacion de un programa de TV
Grabacion y visualizacion simultanea del mismo programa
Coloque un cassette en el cual la lengüeta de protección
1
contra borrados accidentales esté intacta. El unidad se
encenderá automáticamente.
Presione selector SPEED para seleccionar la velocidad
2
de cinta deseada SP o SLP.
El contador y SP o SLP se aparecerá en la pantalla
durante 4 segundos aproximadamente.
3
Ajuste la opción TV/CABLE en la posición apropiada (ver
página 16).
Presione botones de número o CH / para
4
seleccionar el canal a ser grabado.
1-9 Presione 0 dos veces y luego 1 al 9 como se
10-12 Presione primero el 0 y luego los 2 dígitos
13-99 Presione 2 dígitos en orden.
100-125 Presione 3 dígitos en orden.
VHF/UHF/CABLE CANALS
requiera. Ej.:para seleccionar 2, presione 002.
restantes en el orden de izquierda a derecha.
Ej.: presione 012 para “12”.
Ej.: presione 22 para “22”.
Ej.: Presione 110 para “110”.
TV CABLE
VHF
2-13
UHF
14-69
14-36 (A) (W)
37-59 (AA) (WW)
60-85 (AAA) (ZZZ)
86-94 (86) (94)
95-99 (A-5) (A-1)
100-125 (100) (125)
01 (5A)
VHF
2-13
STD/HRC/IRC
PARA DETENER LA GRABACION
Presione de parada STOP para detener la grabacion.
“ ” aparecerá en pantalla durante 4 segundos aproximadamente.
P ARA DETENER TEMPORALMENTE LA
GRABACION
Presione PAUSE/STILL para evitar grabar material no
deseado.
“ ” aparecerá en pantalla durante 4 segundos
aproximadamente. Presione nuevamente o presione REC/
OTR para continuar la grabación.
NOTAS:
• La función pausa será desactivada después de 5 minutos
para prevenir daños a la cinta o el VCR. El VCR cambiará
al modo STOP.
• En el modo de pausa de grabación se puede seleccionar un
canal para grabar.
PARA GRABAR UN PROGRAMA MIENTRAS
SE VE OTRO
Mientras el VCR está grabando, presione selector TV/VCR
para seleccionar la posición TV.
El indicador TV/VCR se apagará y la grabación continuará.
Seleccione el canal de TV que desea mirar usando el
selector de canal del TV.
NOTA:
Algunos sistemas de conexión TV Cable no permiten ver un
canal mientras se está grabando otro. Ver página 11.
Para mostrar el estado de funcionamiento de VCR
Presione DISPLAY. Se mostrará la información de reloj, día de
la semana y otros datos.
Mientras mira tv
DIA DE LA
RELOJ
8 : 47
AM
MON
STEREO SAP
CH 125
CANAL
ESPAÑOL
Presione el botón REC/OTR.
5
“
” aparecerá en la pantalla
durante 4 segundos
aproximadamente. El indicador
“REC” aparecerá en pantalla.
NOTAS:
• Si se quita la lengüeta para evitar el borrado, se expulsará la
cinta al presionar REC/OTR para grabar.
• Si desea ver la reproducción de DVD durante la grabación
normal en VCR, presione VCR/DVD para cambiar al modo
DVD y ejecutar la reproducción de DVD (ver página 24).
• No es posible grabar material de disco en DVD, CD de audio,
etc. en un videocassette con este DVD/VCR.
INDEX
CH 110
PROGRAMA
DE AUDIO
00 : 00 : 00 SP
CONTADOR DE TIEMPO REAL
VELOCIDAD
DE CINTA
Mientras opera una cinta
MODO DE FUNCIONMIENTO
8 : 30AM MON
ESTEREO
HI-FI
AUTOMÁTICO DE REPETICIÓN
Para cancelar las pantallas: Presione DISPLAY hasta que
desaparezcan todas las indicaciones.
HI-FI
00 : 15 : 12 SP
HAY CINTA
FUNCION DE REBOBlNADO AUTOMATICO:
Este VCR rebobinará automáticamente la cinta cuando ésta
ha finalizado (excepto durante las funciones OTR, TIMER
REC). Este eyectará la cinta.Este VCR rebobinará
automáticamente la cinta cuando ésta ha finalizado (excepto
durante las funciones OTR, TIMER REC). Este eyectará la
cinta.
19
2F3P421A[SP] (18-23) 1/25/05, 12:03 PM19
Page 54

Grabacion
Grebacion por temporizador de un
solo toque (OTR)
La prestación de grabación por temporizador de un solo
toque proporciona una forma simple y conveniente de
efectuar una grabación con temporizador.
Ejemplo: Una grabación por temporizador de un solo toque
para 30 minutos.
Coloque un cassette con la lengüeta de protección
1
contra borrados accidentales esté intacta.
El aparato se encenderá automáticamente.
Presione SPEED para seleccionar la velocidad de la
2
cinta deseada SP o SLP.
El contador y SP o SLP aparecerán en pantalla durante 4
segundos aproximadamente.
Ajuste la opción TV/CABLE en la posición apropiada.
3
Presione botones de número o CH / para
4
seleccionar el canal a ser grabado.
Presione REC/OTR para comenzar la grabación.
5
Presione el botón nuevamente para detener la grabación
después de 30 minutos. Cada presión de REC/OTR
aumentará el tiempo de grabación tal como se muestra
en el cuadro a continuación, hasta un máximo de 6
horas. OTR y el tiempo de grabación aparecerá en
pantalla durante 4 segundos. Y “REC” seguirá
parpadeando en el visualizador.
Presione
Una Vez
2 Veces
3 Veces
4 Veces
5 Veces
Tiempo de Grabac.
GRABAC. NORMAL
0:30
1:00
1:30
2:00
Presione
6 Veces
7 Veces
8 Veces
9 Veces
10 Veces
Tiempo de Grabac.
3:00
4:00
5:00
6:00
GRABAC. NORMAL
Para cancelar OTR
Presione STOP (PARADA) para apagar la energía.
“ ■ ” aparecerá en pantalla durante 4 segundos
aproximadamente.
NOTA:
Si desea ver la reproducción de DVD durante la grabación
OTR, presione VCR/DVD para cambiar al modo DVD y ejecutar
la reproducción de DVD (ver página 24).
20
Grabacion por temporizador
La grabacion con temporizador puede ser programada en
la pantalla del TV con el control remoto.
El temporizador incorporado le permite grabar
automáticamente sin prestar atención hasta 8 programas
durante 1 mes.
Ejemplo: Programe una grabación con temporizador para el
día 26, canal 125 (CABLE), 11:00 - 11:30 hrs. PM en el
programa de temporización número 1 (VELOCIDAD DE
CINTA: SLP).
Presione VCR MENU.
1
Seleccione la opción “TIMER
REC SET” y presione ENTER.
Presione SET + o – para
2
seleccionar el N° de
programa, luego presione
ENTER.
Presione SET + o – para
3
seleccionar la fecha deseada,
luego presione ENTER.
Ajuste el tiempo de partida,
4
tiempo de término, canal y
velocidad de cinta como en
paso 3.
NOTAS:
• Presione CANCEL para mover el cursol hacia atrás
para hacer una corrección.
• Para grabar de una fuente externa, ajuste el canal a “L”.
“L” aparecerá al lado del canal 125 (o 69).
Para fijar otros programas, repita los pasos 2 al 4 para
5
fija el otro programas.
• Para volver a la pantalla normal, presione dos veces
VCR MENU.
Presione TIMER REC. El símbolo de reloj ( ) aparecerá
6
en el visualizador y el VCR quedará en modo de espera
para grabación. Al mismo tiempo, el modo VCR cambiará
automáticamente a modo DVD. Es posible utilizar el DVD
incluso cuando el VCR está en modo de grabación por
temporizador. Si no utiliza el DVD, apáguelo.
La grabación por temporizador se iniciará 20 segundos
antes de la hora predeterminada
NOTAS:
• Si el símbolo de reloj (
) no aparece en el visualizador a
pesar de presionar TIMER REC, es posible que todavía
no se haya cargado el videocassette (ver página 17).
• Si se expulsa el videocassette a pesar de haber presionado
TIMER REC, es posible que se haya quitado la lengüeta
de protección de borrado (ver página 17).
NOTAS:
• Si el símbolo de reloj (
) parpadea al finalizar la grabación
por temporizador, el programa de TV no se ha grabado en
su totalidad debido a falta de cinta suficiente. Presione
TIMER REC para cancelar el programa del temporizador o
presione EJECT para extraer el videocassette.
• Durante el modo de espera de la grabación por temporizador,
no puede seleccionarse el modo VCR. Para utilizar el VCR,
presione TIMER REC primero, a continuación presione
VCR/DVD para cambiar a modo VCR. Después de usar el
VCR, presione TIMER REC de nuevo para dejar el VCR en
modo de espera de grabación por temporizador.
• Si presiona TIMER REC durante la grabación por
temporizador, la grabación se interrumpirá. Si presiona
TIMER REC de nuevo dentro del tiempo programado, la
grabación se reanudará.
• Después de un corte de corriente de treinta minutos o de
haberse desconectado el cable de alimentación, al
recuperarse la corriente se habrán perdido los ajustes de
grabación y la hora en pantalla. En este caso reajuste el
reloj (ver pàg. 15) y reprograme las grabaciones por
temporizador.
MENU
TIMER REC SET
AUTO REPEAT
SAP
CH SETUP
SYSTEM SETUP
á+/-
/ENTER/MENU
DATE START END CH
26(SU)11:00PM11:30PM
á+/-
/ENTER/CANCEL/MENU
.
ON OFF
ON OFF
ñ
125
SLP
ñ
2F3P421A[SP] (18-23) 1/25/05, 12:04 PM20
Page 55

Grabacion
Caso especial de grabación por temporizador
Semanal (ej.: WKL-TU: cada martes (Tuesday) o diaria (ej.:
MO-SA: grabación por temporizador de lunes (Monday) a
sábado (Saturday).
Siga el procedimiento de grabación por temporizador de la
página anterior. En la imagen 3 presione SET + ó – varias
veces hasta que aparezca el ajuste deseado. A continuación,
presione ENTER.
Al presionar SET – varias veces, el indicador de DATE
cambiará de la siguiente forma, en caso de que hoy sea
viernes (Friday).
El día de hoy (Viernes) SU-SA (Domingo to Sabádo)
Un mes después
menos undía
WKL-WE WKL-TH (Semanal Jueves)
(Semanal Miércoles)
DATE START END CH
WKL-WE
á+/-
MO-SA (lunes to Sabádo)
MO-FR (Lunes to Viernes)
/ENTER/CANCEL/MENU
ñ
Confirmación / Cancelación de la grabación
por temporizador
Si se ha activado el temporizador, presione TIMER
1
REC para desactivar el temporizador. El símbolo de reloj
( ) desaparecerá. A continuación, presione VCR/DVD
para cambiar al modo VCR.
2
PARA CONFIRMAR EL AJUSTE:
En la imagen 1 de la página
anterior seleccione la opción
TIMER REC SET y presione
ENTER.
A continuación aparecerá
en pantalla la lista de
programas del
temporizador como se
muestra a la derecha.
3
PARA CANCELAR UN PROGRAMA
Presione SET + ó – para
seleccionar el programa
que no necesita más y
presione CANCEL para
cancelar un programa.
DATE START END CH
26(SU)11:00PM11
á+/-
/ENTER/CANCEL/MENU
DATE START END CH
á+/-
/ENTER/CANCEL/MENU
:30PM125
SLP
ñ
Ð
ñ
ESPAÑOL
Superposición de programas de temporizador
No superponga programas distintos, dado que se perderán
las partes conflictivas de los mismos. La primera hora de
programación tendrá prioridad sobre la siguiente hora de
programación, tal y como se muestra en el diagrama.
Programa 1
8 : 00
Programa 2
Programa 3
Ajuste del
control de
grabación
NOTAS:
• La grabación cada día/semana podrá efectuarse de
manera continua hasta que se cancele o se alcance el
final de la cinta.
• Durante la grabación con temporizador, el mecanismo de
rebobinado automático no funciona.
9 : 00
Partes borradas
Sección no grabada
Prog.1 Prog.2 Prog.3
10 : 00
11 : 00
4
Presione VCR MENU varias veces hasta que aparezca la
imagen de TV.
NOTAS:
• Si quedan otros programas de grabación por temporizador,
debe presionarse TIMER REC para volver a activar el
temporizador. De lo contrario, se pasarán por alto los
programas de grabación por temporizador restantes.
• No es posible confirmar el programa por temporizador durante la grabación por temporizador.
• Puede corregir el ajuste programado en el modo de
confirmación de programa.
En el paso 2 anterior, presione ENTER para acceder al modo
de entrada del programa. A continuación, presione ENTER
varias veces hasta que parpadee el elemento que desea
corregir. Corrija entonces los datos con SET + ó –. Finalmente,
presione VCR MENU varias veces hasta que aparezca la
imagen del TV.
DATE START END CH
26(SU)11:00PM11
–––––– –:–– –:–– –––
–––––– –:–– –:–– –––
–––––– –:–– –:–– –––
–––––– –:–– –:–– –––
–––––– –:–– –:–– –––
–––––– –:–– –:–– –––
–––––– –:–– –:–– –––
á+/–
/ENTER/CANCEL/MENU ñ
:30PM125
SLP
–
–
–
–
–
–
–
2F3P421A[SP] (18-23) 1/25/05, 12:04 PM21
21
Page 56

Funciones avanzadas de la sección VCR
Grabacion y reproduccion estereofonicas
El sistema de audio de alta fidelidad VHS permite hacer
grabaciones de alta fidelidad de emisoras MTS STEREO TV.
Cuando se recibe una
transmisión MTS STEREO,
aparecerá la palabra
“STEREO” en la pantalla y el
programa puede verse o
grabarse en estéreo. El procedimiento de grabación Hi-Fi
STEREO es el mismo que para las grabaciones normales.
NOTA:
Cuando utilice un sistema CABLE, los programas de TV en
estero pueden transmitirse a un canal de cable monoaural.
En este caso, el indicador “STEREO” no aparecerá y el
sonido se escuchará en monoaural.
SELECCION DE SALIDA
Cuando vea un programa MTS STEREO TV o se reproduzca una
videocinta VHS HI-FI STEREO pregrabada, presione AUDIO SE-
LECT para seleccionar el audio a escuchar por ambos altavoces.
Normalmente deje en la posición HI-FI STEREO, este botón puede
moverse a la posición MONO si la transmisión en estéreo o el audio de la videocinta es de mala calidad. Las posiciones “R” y “L”
permiten escuchar el audio del canal HI-FI derecho o izquierdo en
ambos altavoces del televisor. Este botón no tiene influencia cuando
ve una videocinta o programa de TV MONO. Cada vez que oprime
este botón, aparece la indicación seleccion de salida en la pantalla
durante varios segundos. Consulte el siguiente cuadro.
STEREO
Duplicacion de una cinta de video
Si usted conecta el VCR a otro VCR o cámara de video,
usted puede duplicar una cinta previamente grabada.
Haga todas las conexiones antes de encender la unidad.
1
Coloque una cinta de cassette en blanco con las lengüetas
de prevención de borrado intactas dentro del grabador de VCR.
Coloque una cinta de previamente grabada dentro del
reproductor de VCR o una CAMARA DE VIDEO.
Presione SPEED para seleccionar la velocidad de cinta
2
deseada, SP o SLP.
Se recomienda que fije la VELOCIDAD DE LA CINTA al
modo SP en la grabación de VCR para obtener mejores
resultados.
3
Presione de INPUT SELECT para
seleccionar posición de entrada de
AUDIO/VIDEO. La indicación de “L”
encenderá.
Presione REC/OTR en el grabador del VCR, luego presione
4
PAUSE/STILL.
Presione el botón PLAY de reproducción en el VCR o
5
CAMCORDER, luego presione PAUSE/STILL.
Libere la pausa de grabación y la pausa de reproducción
6
al mismo tiempo para iniciar el proceso de duplicación.
Conexión a un segundo reproductor de VCR
REPRODUCTOR DE VCR
SELECCION
DE SALIDA
ESTEREO
CANAL IZQ
CANAL DER
MONO
EL SONIDO SE ESCUCHA
POR AMBOS ALTA VOCES
ESTEREO
CANAL DE AUDIO IZQUIERDO
CANAL DE AUDIO DERECHO
MONO
Segundo programa de sonido (SAP)
Su videograbador tiene un sistema de emisiones SAP
que permite que escuche un segundo programa de
sonido mientras ve un canal seleccionado.
Esta función sirve sólo para programas transmitidos en
múltiples idiomas mediante el sistema de transmisión SAP.
Presione VCR MENU. Presione SET + o – para
1
seleccionar el modo “SAP”.
Presione ENTER para seleccionar la posición “ON”.
2
3
A continuación, presione VCR MENU hasta que se borre
la pantalla de menú.
PARA ESCUCHAR EN SAP (Segundo
programa de sonido)
Cuando el aparato de TV está encendido o se hace una
selección de canal, asegúrese de que aparece aparecen las
letras “SAP” en la pantalla. Esto significa que se puede
recibir transmisiones en. “Segundo programa de sonido”.
NOTAS:
• Cuando se reproduce una cinta no grabada en el modo
estéreo Hi-Fi, el audio se conmutará automáticamente a
monoaural.
• Cuando escuche una videocinta VHS Hi-Fi o una
transmisión MTS por la toma VHF/UHF (sin conectar el
cable de audio/video), el sonido se escuchará en monoaural.
22
A SALIDA DE
VIDEO
Cordón AUDIO/VIDEO
(suministrado)
A ENTRADA
DE VIDEO
GRABADORA VCR
A ENTRADA DE AUDIO (DERECHA)
A ENTRADA DE AUDIO (IZQUIERDA)
A SALIDA DE AUDIO
(DERECHA)
A SALIDA DE AUDIO
(IZQUIERDA)
Conexión a una cámara de video
REPRODUCTOR DE LA CAMARA DE VIDEO
A conector para AV
GRABADORA VCR
A ENTRADA DE AUDIO (DERECHA)
A ENTRADA DE AUDIO (IZQUIERDA)
Cordón AUDIO/VIDEO (no suministrado)
A ENTRADA DE VIDEO
Para duplicación de una cinta previamente grabada desde
una cámara de video, siga las instrucciones del fabricante.
Abajo se muestra un sistema tipico de conexión de
duplicación de cámara de video.
2F3P421A[SP] (18-23) 1/25/05, 12:04 PM22
Page 57

Reproducción de discos
/Enter/Setup/Return
No disc
Menu
Subtitle
Audio
OSD
English
English
English
/Setup/Return
English
Menu
Subtitle
Audio
OSD
English
English
/Setup/Return
English
English
Disco Ajuste de la selección de idioma
Este aparato sólo funciona con discos DVD de la región 1o All.
El disco cargado (DVD, CD de audio y CD MP3) se reconocerá
automáticamente.
Los formatos de disco apropiados son: DVD, CD-R y CD-RW.
Algunos discos CD-R/RW pueden ser incompatibles.
No reproduzca un DVD-ROM, DVD-Audio, CDV , CD de video,
CD-G o Foto CD para evitar el borrado accidental del
material pregrabado.
Esta unidad no puede grabar material de disco de DVD, CD
de audio, etc. en una cinta de vídeo.
Si presiona REC/OTR durante la reproducción de DVD,
aparece en pantalla el símbolo “ ” durante unos 4
segundos.
Título
Cuando hay dos o más películas grabados en un disco, el
disco se divide en dos o más secciones.
Cada sección se denomina un “TITULO”.
Capítulo
Los títulos pueden subdividirse en muchas secciones.
Cada sección se denomina un “CAPITULO”.
Canción
Un CD de audio puede contener varios elementos.
Estos se asignan a las canciones.
Permite seleccionar el idioma.
Presione VCR/DVD
1
para seleccionar el
modo DVD (El
indicador DVD se
iluminará). “No Disc”
aparecerá en pantalla
(Si el disco DVD ya fue
introducido, empezará
a correrlo
inmediatamente).
Presione SETUP en el
2
modo de parada. El
MENÚ DE AJUSTE de
DVD aparecerá en
pantalla.
Presione o para
3
seleccionar opción
luego presione
ENTER.
,
o
ESPAÑOL
DVD DISC
TITLE 1 TITLE 2
CHAPTER 1
TRACK 1 TRACK 2 TRACK 3 TRACK 4 TRACK 5
Para sacar el disco de su caja
Sujete firmemente por el borde del
disco. No toque la superficie del disco.
Saque suavemente el disco de la caja.
• No raye el disco.
• No ensucie la superficie del
disco.
• No pegue una etiqueta o cinta
adhesiva en el disco.
• No deje caer o doble el disco.
Para guardar el disco
• Guarde el disco en su caja para
evitar el riesgo de ralladuras,
polvo o daños.
• No deje el disco expuesto a los
rayos del sol o en lugares o
húmedos.
CHAPTER 2 CHAPTER 2 CHAPTER 3CHAPTER 1
CD de audio
4
Presione
seleccionar “OSD”.
Presione o para
seleccionar el idioma
deseado
ENGLISH).
5
Para que desaparezca la pantalla SETUP , presione SETUP
(o RETURN).
Si el aparato no funciona correctamente:
La electricidad estática, etc. puedeafectar el funcionamiento
deltocadiscos. Desenchufe el cableeléctrico de CA una vez
y vuelva aenchufar.
o para
(porejemplo
Para limpiar el disco
Frote el disco con un paño limpio,
seco, desde el centro a los bordes.
• No frote el disco con un
movimiento circular.
• No utilice limpiadores líquidos o en aerosol.
2F3P421A[SP] (18-23) 1/25/05, 12:04 PM23
23
Page 58

Reproducción de discos
Procedimiento de reproducción
Presione OPEN/CLOSE en el aparato.
1
Se abrirá la bandeja del disco.
Coloque un disco en la bandeja. Sujete el disco, colóquelo
2
con el lado de etiqueta impresa hacia arriba, alinee en las
guía y coloque el disco en su posición correcta.
Presione PLAY o OPEN/CLOSE en el aparato.
3
La bandeja del disco se cierra automáticamente.
En la pantalla del TV la indicación “ ” cambia a
“Reading” y empieza la reproducción.
• Aparece la pantalla del menú en la pantalla de TV, si el
disco tiene una función de menú. En este caso, presione
, , , o ENTER para activar una función de
menú.
Presione STOP para terminar la reproducción.
4
• El aparato graba el punto de parada, según el disco.
Aparece “ ” en la pantalla. Presione PLA Y para continuar
reproduciendo (desde el mismo punto).
• Si presiona nuevamente STOP o se retira el disco
(Aparece “
de parada.
5
A continuación, presione OPEN/CLOSE.
Se abrireá la bandeja del disco.
Extraiga el disco y presione POWER.
La bandeja se cierra automáticamente y el DVD/VCR se
apaga.
NOTAS:
• Si se coloca un disco no compatible, aparecerá “Incorrect
Disc”, “Region Code Error” o “Parental Error” en la
pantalla de TV dependiendo del tipo de disco cargado. En
este caso, revisar el disco nuevamente (Ver páginas 23 y
28).
• Algunos discos pueden demorar un minuto antes de
empezar la reproducción.
• Puede aparecer un símbolo “ ” de “Prohibido” en la parte
superior izquierda de la pantalla. El símbolo indica que la
función seleccionada no está disponible en el disco o que el
DVD/VCR no puede acceder a esa función en ese momento.
No indica un problema con el DVD/VCR.
• Cuando coloque un disco de una sola cara con esa etiquetq
abajo (i.e. del lado incorrecto) y presione PLAY o OPEN/
CLOSE en el aparato, “Reading” aparecerá y permanecerá
en pantalla durante unos 40 segundos y, a continuación,
cambiará a “Incorrect Disc”.
• Algunas funciones de reproducción de DVD pueden haber
sido elegidas por el productor de la película. Como este
aparato reproduce los DVD de acuerdo con las posibilidades
introducidas por el productor, algunas funciones de
reproducción pueden no existir. Consulte además las
instrucciones que vienen con el DVD.
• Cuando toque CD’s de audio codificados DTS, se
escuchará ruido excesivo de las salidas análogas stereo.
Para evitar posibles daños al sistema de audio, el
consumidor debe tomar las debidas precauciones cuando
las salidas análogas stereo del aparato DVD estén
conectadas a un sistema de amplificación.
” en la pantalla), el aparato borrará el punto
24
Reproducción especial
Puede ocurrir una leve demora entre el momento en que
presiona el botón y que se active la función.
Reproducción con avance rápido
Presione F.FWD durante la reproducción normal.
Cada vez que presione F.FWD, aumentará la velocidad de la
búsqueda (x2), (x4), (x8), (x20).
• Para seguir con la reproducción normal, presione PLAY.
Reproducción con retroceso rápido
Presione REW durante la reproducción normal.
Cada vez que presione REW, aumentará la velocidad de la
búsqueda (x2), (x4), (x8),
(x20).
• Para seguir con la reproducción normal, presione PLAY.
Reproducción Fija
Presione PAUSE/STILL durante la reproducción normal
para hacer una pausa en la reproducción.
• Para seguir con la reproducción normal, presione PLAY.
Avance cuadro por cuadro
Presione PAUSE/STILL durante la imagen fija.
Avanza un cuadro cuando presione PAUSE/STILL una vez.
• Para seguir con la reproducción normal, presione PLAY.
Reproducción de cámara lenta
Presione SLOW durante la reproducción normal o cuadro a
cuadro.
Cada vez que presione SLOW, cambiará la velocidad del
slow x1/2, x1/4, x1/6, x1/7.
• Para seguir con la reproducción normal, presione PLAY.
• Para volver a la imagen fija, presione PAUSE/STILL.
Búsqueda de un capítulo o canción
Presione SKIP ( ) en avance o SKIP ( ) en retroceso
durante la reproducción para buscar un capítulo que desea
ver. Cada vez que presione el botón, se salta un capítulo o
canción.
NOTA:
El aparato puede mantener una imagen fija de video o la
imagen visualizada en la pantalla, en su pantalla de TV,
permanentemente. Si deja la imagen fija de video o la
imagen visualizada en la pantalla en su TV durante mucho
tiempo, puede dañar permanentemente la pantalla de TV.
Los televisores de proyección tienen tendencia a sufrir este
problema.
Zooming (acercamiento)
Esta unidad le permitirá hacer acercamientos de la imagen
del marco y podrá efectuar selecciones cambiando la
posición del marco.
Presione ZOOM durante la reproducción.
1
La parte central de la imagen se agranda.
Cada vez que presione el ZOOM cambiará el ZOOM
1 (x1.3), 2 (x1.5) y 3 (x2.0).
Presione / o / para ver una parte diferente
2
del marco. Puede mover el marco del centro hacia UP
(arriba), DOWN (abajo), LEFT (izquierda), RIGHT (derecha).
En el modo ZOOM presione ZOOM varias veces para
3
regresar a una visión 1:1 ( Off).
NOTA:
Puede seleccionar la reproducción con pausa, cámara lenta o
búsqueda en el modo zoom.
2F3P421A[SP] (24-27) 1/25/05, 12:04 PM24
Page 59

Reproducción de discos
Búsqueda de la escena deseada
Utilice el título, capítulo y tiempo grabados en el disco
para buscar el punto que desea reproducir.
Para comprobar el título, el capítulo y el tiempo, presione
DISPLAY (ver página 30).
Presione JUMP
1
la reproducción.
Presione o para
2
seleccionar el “Time”,
“Title” o “Chapter”.
Presione las teclas numéricas (0-9) para cambiar el
3
número.
• Si entra un número equivocado, presione CANCEL.
• Consulte la caja en la que viene el disco para
confirmar los números.
Presione ENTER.
4
Empieza la reproducción.
• Cuando cambie el título, empieza a reproducir desde el
capítulo 1 del título seleccionado.
•
Este procedimiento puede no funcionar en algunos discos.
durante
Time
Title
Chapter
/Enter/0 9/Cancel/Jump
/6
/
/
Marcación de escenas deseadas
El aparato memoriza los puntos que desea ver nuevamente.
Puede continuar la reproducción desde dicha escena.
Marcación de escenas
Presione MARKER
1
durante la reproducción.
2
Seleccionar el Marker en
blanco utilizando / ,
después presione ENTER en la escena deseada.
•
Repita este procedimiento para ajustar las otras 2 escenas.
Presione MARKER para que desaparezca este despliegue.
3
Para volver a las escenas
Presione MARKER du-
1
rante la reproducción o
el modo stop.
2
Presione o para
seleccionar el Marker 1-3.
3
Presione ENTER.
La reproducción empieza desde la escena marcada.
Para cancelar la marca
1
Presione MARKER.
2
Presione o para seleccionar el Marker 1-3.
Presione CANCEL.
3
Para eliminar este visualizador, presione MARKER.
NOTAS:
• Es posible que algunos discos no admitan la función de
marcación.
• La marcación se cancela cuando abra la bandeja del disco o
desconecta el aparato.
• Algunos subtítulos grabados cerca del marcador puede no
aparecer.
Marker 1
Marker 2
Marker 3
/Enter/Cancel/Marker
Marker 1
Marker 2
Marker 3
/Enter/Cancel/Marker
27
00
01
02
54
16
25
08
31
Cambio del idioma de la pista de sonido
Se puede seleccionar el idioma cuando reproduce un
disco en múltiples idiomas.
Presione AUDIO durante la
1
reproducción.
Aparecerá el idioma actual de
la pista de sonido.
2
Presione AUDIO hasta que quede seleccionado el idioma
deseado.
El despliegue en pantalla desaparecerá después de unos
cuantos segundos.
1/8 Eng DolbyDigital
Subtítulos
Aparición y desaparición de subtítulos
Cuando reproduzca un disco con subtítulos grabados,
puede hacer que éstos aparezcan o desaparezcan.
Presione SUBTITLE durante la
reproducción hasta que aparezca “Off”.
Cambio del idioma de los subtítulos
Puede seleccionar el idioma para reproducir un disco
grabado con subtítulos en múltiples idiomas.
Presione SUBTITLE durante la
reproducción hasta que aparezca el
idioma deseado.
El despliegue en pantalla desaparecerá
después de unos cuantos segundos.
NOTAS:
• Si no puede seleccionar el idioma deseado después de
presionar el botón varias veces, el idioma no fue grabado en
el disco.
• Dependiendo del DVD quizá no pueda activar, desactivar o
cambiar los subtítulos, incluso si están grabados en el disco.
Al reproducir el DVD, el subtítulo puede cambiar cuando se
abre o cierra la bandeja del disco, o cuando se cambia el
título.
• En algunos caso, el idioma de los subtítulos no cambia
inmediatamente al seleccionado.
Off
1/32 Eng
ESPAÑOL
2F3P421A[SP] (24-27) 1/25/05, 12:04 PM25
25
Page 60

Reproducción de discos
Program Playback
Cambio de ángulos
Cuando reproduce un disco grabado en múltiples
ángulos, puede cambiar el ángulo de visión de la
escena.
Presione ANGLE durante la
1
reproducción. Aparecerá el
angle actual.
Presione ANGLE varias veces hasta que seleccione el
2
angle deseado.
NOTA:
En algunos DVD, puede no ser posible cambiar los ángulos
incluso cuando se grabó en múltiples ángulos en el disco.
1/9
Selección de título
Hay dos o más títulos grabados en algunos discos. Si
se ha grabado el menú de título en el disco, puede
seleccionar el título deseado.
Presione TOP MENU durante la reproducción.
1
El menú de títulos aparece en pantalla.
• Presione de nuevo TOP MENU para reanudar la
reproducción en la escena en la que había presionado
TOP MENU.
2
Presione / o / para seleccionar el título
deseado.
Presione ENTER o PLAY.
3
Empieza la reproducción del título seleccionado.
Menú DVD
Algunos DVD permiten seleccionar el contenido del
disco con el menú.
Cuando reproduce este tipo de DVD, puede seleccionar
el idioma de los subtítulos, idioma de la pista de sonido,
etc. con el menú DVD.
Presione DVD MENU durante la reproducción.
1
Aparece el menú DVD en la pantalla.
• Presione nuevamente DVD MENU para volver a
reproducir la escena en la que se estaba
reproduciendo cuando presionó DVD MENU.
2
Presione / o / para seleccionar el ítem deseado.
Presione ENTER.
3
El menú continúa en otra pantalla. Repita los pasos 2 y 3
para terminar de seleccionar el ítem completamente.
NOTA:
En algunos DVD, quizá no pueda seleccionar el título, y un
“menú de títulos” puede simplemente llamarse un “menú” o
“título” en las instrucciones suministradas con el disco.
Reproducción repetida
Reproducción de título, capítulo, canción
Presione PLAY MODE durante la reproducción.
1
CD de audio
Play Mode
Repeat
/Play Mode
:
Off
:
Off
Repeat
/Play Mode
DVD
:
Off
26
Presionar ENTER una o dos veces para seleccionar el
2
“Chapter” o “Title”.
Si se trata de un CD de audio, presione primero para
seleccionar “Repeat” y, a continuación, presione ENTER
una o dos veces para seleccionar “Track” o “All”.
DVD
/Play Mode
:
Chapter
Repeat
Presionar PLAY MODE nuevamente para que
3
desaparezca la pantalla.
• Presionar PLAY para iniciar la reproducción repetida.
•
Para volver a reproducción normal, seleccionar Repeat “Off”.
CD de audio
Play Mode
Repeat
/Play Mode
:
Off
:
All
Reproducción repetida A-B
La reproducción repetida A-B le permite repetir el material
entre los dos puntos seleccionados.
Presione REPEAT A-B
1
durante la reproducción.
Se selecciona el punto
inicial.
Presione nuevamente
2
REPEAT A-B. Se
selecciona el punto final.
Empieza a reproducir
en el punto seleccionado.
La reproducción se detiene en el punto final, vuelve al
punto A y vuelve a empezar nuevamente.
Para continuar con la reproducción normal, presione
nuevamente REPEAT A-B. Aparece “
NOTAS:
•
La función de repetición puede no funcionar en algunos discos.
• En el modo de repetición A-B pueden no aparecer los
subtítulos cerca del punto A o B.
• Durante la reproducción repetida la característica ANGLE no
operará.
• Puede no ser posible programar la repetición A-B en algunas
escenas del DVD.
• La repetición A-B no funciona con un DVD interactivo, y MP3CD.
A
B
A
” en la pantalla.
Off
Programación de reproducción
(disco compacto)
Se puede cambiar el orden de las canciones en el disco.
Presione PLAY MODE
1
en el modo de parada.
Presione ENTER varias
2
veces hasta que
aparezca la tabla de
programas que se
muestra a la derecha.
Ejemplo: Si desea
3
programar en orden 7,
3, 11: Entre como 7
, 3 , 11.
Si pone un número
equivocado, Presione
CANCEL.
Presionar / o
4
para seleccionar
programación de
reproducción y presionar ENTER. “Program Playback”
aparecerá en pantalla. Los programas que seleccionó se
empezarán a reproducir en orden.
Para volver a la reproducción normal, seleccione “Play
Mode: Off” en el paso 2 anterior.
Play Mode
Repeat
Play Mode
Repeat
17
23 5811
31
16912
Clear Program Playback
/
la
:
Off
:
Off
/Play Mode
:
Program
:
4710
/Enter/0 9/Cancel/Play Mode
Off
2F3P421A[SP] (24-27) 1/25/05, 12:04 PM26
Page 61

Reproducción de discos
Reproducción aleatoria (disco
compacto)
Presione PLAY MODE
1
en el modo stop.
2
Presione / para
seleccionar “Random”
Play Mode
Repeat
:
Random
:
Off
/Enter/Play Mode
(aleatorio).
Presionar PLAY.
3
“Random Play” aparecerá en pantalla y se iniciará la
reproducción aleatoria.
NOTAS:
• Para cancelar el programa de play, seleccione “Clear”
(salir) y presione ENTER.
• El programa se cancela cuando abra la bandeja del disco
o cuando se desconecta el aparato.
• La reproducción aleatoria no puede combinarse con la
reproducción repetida.
Reproducción de MP3
Esta unidad puede reproducir datos MP3 grabados en un
CD-R o CD-RW. Para reproducir los datos MP3 se necesita
un PC con Windows, unidad de CD-ROM y software
codificador de MP3 (no incluido).
No se puede reproducir el sistema Apple-HFS.
Información de CD MP3
Limitaciones de la reproducción de CD MP3
• El CD MP3 es un disco estandarizado por ISO9660, su
nombre de archivo debe incluir la extensión de tres caracteres
“mp3”.
• El directorio y los nombres de archivo del CD MP3 deben
respetar los de los archivos estándar ISO.
• Esta unidad puede leer 999 archivos por disco. Si un
directorio tiene más de 999 archivos, lee hasta el archivo
999 y omite los restantes.
• Por lo que respecta a los discos multisesión, sólo se puede
reproducir la primera.
• Si el CD tiene tanto pistas de audio como archivos MP3,
sólo se reproducen los archivos de audio.
• Puede que la unidad tarde más de un minuto en leer
archivos MP3 dependiendo de su estructura.
• Puede reproducirse música grabada con “Joliet Recording
Specification”, el nombre de archivo se mostrará en pantalla
(hasta 10 letras). Los nombres de archivo largos serán
condensados.
• Los archivos de música grabados mediante HFS
(Hierarchical File System) no pueden reproducirse.
Limitaciones en el visualizador
• El número máximo de caracteres mostrado por el
visualizador es 10. Los caracteres que pueden mostrase son
los siguientes: letras mayúsculas o minúsculas de la A a la
Z, números del 0 al 9, y _ (subrayado).
• Los caracteres no incluidos en los citados anteriormente se
sustituyen por un guión.
Notas sobre archivos MP3
Para reproducir un CD MP3 en el orden en que se grabó,
1. Utilice software MP3 que grabe datos alfabética o
numéricamente.
2. Nombre cada archivo incluyendo un número de dos o tres
dígitos (p.ej. “01” “02” o “001” “002”).
3. No cree demasiadas subcarpetas.
PRECAUCIÓN:
• Algunos CD MP3 no podrán reproducirse dependiendo de
las condiciones de grabación.
• Los CD-R/RW que no contengan datos de música o archivos
MP3 no podrán reproducirse.
Presione OPEN/CLOSE.
1
Se abrirá la bandeja del disco.
Coloque un disco en la bandeja.
Presione PLAY o OPEN/CLOSE.
2
La bandeja del disco se cierra automáticamente. En la
pantalla del TV aparecerá “Reading”. La lectura llevará
tanto tiempo como requiera el número de archivos.
En la pantalla del TV
3
aparecerá una pantalla de
menú MP3.
Presione / o ENTER
para seleccionar la carpeta.
Presione
4
/ o / o los botones de número para
CD
Pops
1
Japan
2
Bay Bridge
3
CLOSE MY EYES
4
DIVE TO BLUE
5
Honey
6
BLUE EYES13Welcome party
7
Blurry Eyes14Thailand
/0-9/Enter/Play Mode
8
9
10
11
12
-
/72
--:--
flower
Lies and Truthwinter fall
Rain
Strawberry
seleccionar la pista deseada y, a continuación, presione
ENTER. Se selecciona la pista y se inicia la reproducción.
• En caso de que la carpeta incluya más de 15 pistas,
presione o para que se muestre la siguiente lista
de pistas.
-
/72
-
/72
CD
Pops
1
Japan
2
Bay Bridge
3
CLOSE MY EYES
4
DIVE TO BLUE
5
Honey
6
BLUE EYES13Welcome party
7
Blurry Eyes14Thailand
Presione STOP para detener la reproducción.
5
8
9
10
11
12
/0-9/Enter/Play Mode
--:--
flower
Lies and Truthwinter fall
Rain
Strawberry
CD
Pops
15
Mother
16
Hold Your Last
/0-9/Enter/Play Mode
• La unidad graba el punto de parada. “
” aparece en
--:--
pantalla. Presione PLAY para reanudar la reproducción
(desde el punto de la escena).
• Si presiona de nuevo STOP o extrae el disco, la unidad
borrará el punto de parada.
A continuación presione OPEN/CLOSE en el aparato.
6
Se abre la bandeja del disco.
Saque el disco y presione POWER.
La bandeja del disco se cierra automáticamente y se
desconecta el aparato.
NOTAS:
• Durante la reproducción de MP3, no se pueden utilizar las
funciones SEARCH, A-B Repeat.
• Durante la reproducción de un CD MP3 se puede utilizar la
función Repeat (Track o All), las funciones aleatorias y ia
programacion de reproduccion.
ESPAÑOL
2F3P421A[SP] (24-27) 1/25/05, 12:04 PM27
27
Page 62

Your disc exceeds
the parental control level 1.
Parental Control Level
Cancel Picture
/Enter/Return
Funciones avanzadas de la sección DVD
Ajuste de restricciones para menores
Algunos discos están especificados como inapropiados
para niños. Puede restringir la reproducción de tales
discos en la unidad.
Ajuste de restricciones para menores
Presione SETUP en el modo
1
de parada.
Presione
seleccionar opción .
Presione o ENTER.
2
Presione una vez para seleccionar “Parental Off” y, a
continuación, presione ENTER hasta que aparezca el nivel
deseado (p. ej.: 1).
3
Presione una vez para seleccionar “ ”.
A continuación presione los botones de número para
entrar una contraseña de 4 dígitos (p. ej.: 1234).
• Si entra un número de contraseña equivocado,
presione CANCEL.
• Asegúrese de recordar su número!
Nivel Off : El ajuste de restricciones para menores no
Nivel 1 :
Nivel 8 : Se puede reproducir todo el DVD.
Seleccione entre el nivel 1 al nivel 8.
En una escala del 1 al 8, “1” es el más restrictivo.
Presione ENTER.
4
1234
Para que desaparezca la pantalla de ajuste, presione
5
SETUP.
Para desbloquear el ajuste de restricciones
para menores
Cancele la contraseña para ajustar libremente el nivel de
restricciones para menores,
Seleccione “Password
1
presione los botones de
número para entrar la
contraseña de 4 dígitos. A
continuación, presione ENTER.
2
Si la contraseña entrada era correcta, aparecerá
Puede desplazarse a “Parental 1”, por ejemplo, para
entrar el nivel deseado o para cancelar el control de
restricciones.
NOTAS:
• Una vez completado cada ajuste (P.23, 28-30), el
aparato puede seguir funcionando en las mismas
condiciones (especialmente con discos DVD).
Cada ajuste puede mantenerse en la memoria aunque
desconecte el aparato.
•
Para algunos discos, el aparto no puede prohibir la reproducción.
• Algunos discos no puede codificarse con determinada
información de nivel de prohibición aunque la etiqueta del
disco diga “adulto”. Para estos discos no funcionará la
prohibición para menores.
• No olvide la contraseña. Si olvida la contraseña, póngase
en contacto con el servicio al cliente.
28
2F3P421A[SP] (28-BACK) 1/25/05, 12:04 PM28
o para
funciona.
El DVD para mayores no puede reproducirse.
cambiar a .
” (paso 2) y
.
Password
Parental
Output
/0-9/Enter/Cancel/Setup/Return
Password
Parental
Output
/0-9/Enter/Cancel/Setup/Return
---Off
Interlace
1234
1
Interlace
Deshabilitación temporal del nivel de
rating (clasificación) del disco DVD
Dependiendo del disco DVD, el disco puede tratar de
cancelar temporalmente el nivel de rating que haya
ajustado. Depende de usted si decide cancelar el nivel
de la rating o no.
Introduzca el disco DVD y presione PLAY o OPEN/CLOSE
1
en la unidad (ver pág. 24).
Si el disco DVD fue
2
diseñado para cancelar
temporalmente el nivel
del Rating, cambiará la
pantalla que aparece
después del “Reading”
(lectura) dependiendo
del disco que se esté
tocando. Si selecciona
“YES” con ENTER aparecerá la pantalla de “Your disc
exceeds the parental control level 1”.
Si desea cancelar el nivel de clasificación ajustado
3
temporalmente, seleccione “Parental Control Level” con
o y después presione ENTER. Si entró una
contraseña de 4 dígitos en el paso 3 de la columna
izquierda, aparecerá la pantalla de entrar contraseña
como aparece en el paso 4.
Alternativamente, si no se ha establecido ninguna
contraseña, comenzará la reproducción. Si desconoce (u
olvidó) la contraseña, seleccione “Cancel Picture”.
La pantalla de ajuste desaparecerá. Presione OPEN/
CLOSE para sacar el disco.
Entre la contraseña con
4
los botones de número.
Después, presione
ENTER.
Si interrumpe la
introduccion de la
contraseña, presione
RETURN.
La reproducción comenzará si se introdujo la
5
contraseña correcta.
NOTA:
Esta cancelación temporal del nivel del rating se mantendrá
hasta que se saque el disco.
Cuando se extraiga el disco se establecerá el nivel de rating
original de manera automática.
Please enter the
4
digit password
9/
Cancel
/ReturnEnter/0
Page 63

Funciones avanzadas de la sección DVD
Tv Screen
Display
Picture ModeOnAuto
/Setup/Return
4:3
Tv Screen
Display
Picture Mode
On
/Setup/Return
4:3
Auto
Selección del idioma del menú
Se puede seleccionar el idioma de los mensajes del menú
de disco de los DVD.
Presione SETUP en el modo de parada.
1
Presione
2
Presione
Menu
Presione o
3
para seleccionar su
idioma deseado.
English, Francais, Espanol:
Se podrá escuchar o ver en idioma seleccionado.
Other:
Puede seleccionarse otro idioma (Ver la “Tabla de
idiomas” en la página 31).
Automatic: (Subtitle)
• El aparato seleccionará automáticamente el mismo
idioma seleccionado para el AUDIO.
• Cuando el aparato selecciona el mismo idioma que
para el AUDIO los subtítulos no aparecen durante la
reproducción.
• Cuando no utilice el mismo idioma que el AUDIO, los
subtítulos aparecerán durante la reproducción.
Off: (Subtitle)
No aparecen subtítulos.
o para seleccinar opción .
o ENTER y presione o para seleccionar
Menu
Subtitle
Audio
OSD
/Setup/Return
English
English
English
English
Ajuste de la relación de aspecto de
la pantalla de TV
Se puede seleccionar la relación de aspecto para su TV.
Presione SETUP en el modo de parada.
1
Presione o para seleccionar opción .
Presionar
2
para seleccionar “Tv Screen”.
Presione
3
seleccionar su tipo de
pantalla deseado.
Puede escoger entre los siguientes tamaños de pantalla:
4:3 : Letter box
Seleccione este modo cuando ese ha conectado a un TV
convencional, cuando se reproducen discos DVD de
pantalla ancha.
Muestra la imagen ancha con bandas negras arriba y
abajo de la pantalla.
4:3 : Pan Scan
Muestra la imagen ancha en toda la pantalla con los
bordes izquierdo y derecho cortados automáticamente.
16:9
Seleccione este modo cuando conecte un TV de pantalla
ancha. Aparece una imagen en pantalla ancha a su
tamaño máximo.
Para que desaparezca la pantalla SETUP , presione SETUP.
4
o ENTER, después presionar o
o para
: Wide
ESPAÑOL
Original: (Audio)
El aparato seleccionar el idioma de máxima prioridad en
cada disco.
Para que desaparezca la pantalla SETUP, presione
4
SETUP.
NOTA:
Si el idioma seleccionado no se encuentra en el disco, se
seleccionará el idioma de con prioridad máxima.
NOTA:
Si no se ha formateado el disco DVD en el estilo pan y scan,
aparece en el estilo 4:3.
Configuración del modo de imagen
Se puede obtener una imagen en movimiento más
nítida si se elige la opción Film para el modo Picture al
ver un DVD desde el reproductor de DVD conectado a
la entrada componente.
Pulse SETUP en el modo de parada.
1
Pulse o para seleccionar la opción .
Pulse o ENTER y, a continuación, pulse o
2
para seleccionar “Picture mode”.
Pulse o para
3
seleccionar el modo de
imagen que desee y, a
continuación.
Auto: la unidad reconoce la fuente de la imagen
(película o video) del disco actual, según la
información del disco.
29
2F3P421A[SP] (28-BACK) 1/25/05, 12:04 PM29
Page 64

Funciones avanzadas de la sección DVD
Password
Parental
Output
Off
Interlace Interlace
Progressive
/Enter/Setup/Return
----
Selección de las indicaciones en la pantalla
Aparecen o desaparecen las indicaciones en la
pantalla cuando presione los botones DISPLAY.
Presione SETUP en el modo de parada.
1
Presione
Presione
2
y presione o para
seleccionar “Display”.
Presione o para
3
seleccionar “On” o “Off”.
On: Aparecen las indicaciones en la pantalla cuando
Off: No aparecen las indicaciones en la pantalla
4
Para que desaparezca la pantalla SETUP, presione
SETUP.
o para seleccionar opción .
o ENTER
Tv Screen
Display
Picture Mode
/Setup/Return
presione los botones (ajuste de fábrica).
cuando presione los botones salvo SETUP,
SEARCH MODE, PLAY MODE, MARKER y
DISPLAY.
4:3
On
Auto
Datos del status del Disco
Cada vez que presione DISPLAY aparecerán los datos del
status del disco en la pantalla y cambiará de la siguiente manera.
DVD
00:34:56 01:12:33
Para que desaparezca el status del disco, presione
DISPLAY nuevamente.
Title 1/99
1/8
1/32
00:34:56 01:12:33
Chapter 1/999
Eng DolbyDigital
Eng
1/9
CD de audio
Track 11/99
Al reproducir el disco CD, la visualización del estado
aparecerá en la pantalla y continuará mostrándose.
34:56 71:33
Control de la Gama Dinámica
El DRC (Control de la Gama Dinámica) le permite controlar
la gama dinámica para obtener un sonido conveniente
para su equipo.
Presione SETUP en el modo de parada. Presione o
1
para seleccionar opción .
Presione o ENTER
2
para seleccionar “Dialogue”.
Presione o para
3
seleccionar la
configuración deseada.
On: DRC (TV):
Se reduce el volumen de los sonidos altos, como explosiones
y similares, durante la reproducción. Esta opción es
adecuada si el dispositivo se conecta al equipo de música.
Off: DRC (Std):
Se reproduce con el nivel de grabación del disco.
NOTAS:
• Esta función sólo se activa durante la reproducción de discos grabados Dolby Digital.
• El nivel de Reducción de la Gama Dinámica podrá ser
diferente dependiendo del disco de vídeo DVD.
Dialogue
Off:DRC(Std)
/Setup/Return
30
Exploración progresiva
La unidad admite el sistema de exploración progresiva,
además del sistema convencional de exploración entrelazada.
Si su televisor cuenta con tomas de componentes que admiten
la entrada de vídeo progresivo, podrá disfrutar de imágenes
de gran calidad activando el modo de exploración progresiva.
Presione PROGRESSIVE en el modo de parada. Se
1
enciende el indicador PROGRESSIVE “ ” de la ventana
de visualización.
Presione PLAY para comenzar la reproducción.
2
• Para desactivar el modo de exploración progresiva,
presione PROGRESSIVE en el modo de parada. Se
apagará el indicador PROGRESSIVE “ ” de la ventana
de visualización.
NOTA:
T ambién puede cambiar el modo
de búsqueda seleccionando Out-
put (Salida) en la opción .
Acerca del MODO DE EXPLORACIÓN PROGRESIVA
Para visualizar vídeo en una pantalla de televisión, el método
convencional de exploración se denomina “exploración
entrelazada”. Con este método, en cada momento sólo se
visualizan la mitad de las líneas horizontales. De esta forma, dos
campos completan una imagen (fotograma). Es decir, el primer
campo, que contiene las líneas impares, se muestra seguido del
segundo campo, que contiene las líneas pares.
El sistema de exploración progresiva barre todas las líneas
horizontales al mismo tiempo, de forma que se puede doblar el
número de líneas en comparación con la exploración entrelazada,
lo que genera una imagen con mayor resolución y sin parpadeo.
Para poder ver vídeo con exploración progresiva, el televisor
que esté conectado a la unidad debe tener entradas progresivas.
Dependiendo del formato de origen del material, los discos
DVD se pueden clasificar en dos categorías: películas y
vídeo (algunos discos DVD contienen origen tanto de película
como de vídeo). Los orígenes de película se graban con
información presentada a 24 fotogramas por segundo,
mientras que los de vídeo (NTSC) se graban a 30 fotogramas
por segundo (60 campos por segundo, con entrelazado).
Cuando la unidad reproduce un material con origen de
película, se crean señales de salida progresiva no
entrelazada a partir de la información original.
Cuando se reproduce un material con origen de vídeo, la
unidad interpola líneas entre las líneas entrelazadas para
crear la imagen interpolada y la suministra como imagen
progresiva.
NOTAS:
• Puede que algunos discos no se reproduzcan correctamente
con el modo de exploración progresiva, debido a las
características del disco o a su estado de grabación.
• Hay algunos televisores progresivos y de alta definición que
no son totalmente compatibles con la unidad, lo que provocará
la presentación de una imagen poco natural cuando se
reproduzca un disco DVD en modo de exploración progresiva.
En ese caso, utilice el modo de exploración entrelazada.
• No se puede activar el modo de exploración progresiva en
los siguientes casos.
– Cuando la unidad está en modo VCR.
– Cuando el disco se está reproduciendo en modo DVD.
2F3P421A[SP] (28-BACK) 1/25/05, 12:05 PM30
Page 65

Lista de códigos de idiomas
Entre el número de código apropiado para los ajustes iniciales “Menu”, “Subtitle” y/o “Audio” (consulte las página 29).
Nombre de idioma Código Nombre de idioma Código Nombre de idioma Código Nombre de idioma Código
Abkhazian 1112 Fiji 1620 Lingala 2224 Singhalese 2919
Afar 1111 Finnish 1619 Lithuanian 2230 Slovak 2921
Afrikaans 1116 French 1628 Macedonian 2321 Slovenian 2922
Albanian 2927 Frisian 1635 Malagasy 2317 Somali 2925
Amharic 1123 Galician 1722 Malay 2329 Spanish 1529
Arabic 1128 Georgian 2111 Malayalam 2322 Sundanese 2931
Armenian 1835 German 1415 Maltese 2330 Swahili 2933
Assamese 1129 Greek 1522 Maori 2319 Swedish 2932
Aymara 1135 Greenlandic 2122 Marathi 2328 Tagalog 3022
Azerbaijani 1136 Guarani 1724 Moldavian 2325 Tajik 3017
Bashkir 1211 Gujarati 1731 Mongolian 2324 Tamil 3011
Basque 1531 Hausa 1811 Nauru 2411 Tatar 3030
Bengali; Bangla 1224 Hebrew 1933 Nepali 2415 Telugu 3015
Bhutani 1436 Hindi 1819 Norwegian 2425 Thai 3018
Bihari 1218 Hungarian 1831 Oriya 2528 Tibetan 1225
Breton 1228 Icelandic 1929 Panjabi 2611 Tigrinya 3019
Bulgarian 1217 Indonesian 1924 Pashto, Pushto 2629 Tonga 3025
Burmese 2335 Interlingua 1911 Persian 1611 Turkish 3028
Byelorussian 1215 Irish 1711 Polish 2622 Turkmen 3021
Cambodian 2123 Italian 1930 Portuguese 2630 Twi 3033
Catalan 1311 Japanese 2011 Quechua 2731 Ukrainian 3121
Chinese 3618 Javanese 2033
Corsican 1325 Kannada 2124 Romanian 2825 Uzbek 3136
Rhaeto-Romance
2823 Urdu 3128
ESPAÑOL
Croatian 1828 Kashmiri 2129 Russian 2831 Vietnamese 3219
Czech 1329 Kazakh 2121 Samoan 2923 Volapük 3225
Danish 1411 Kirghiz 2135 Sanskrit 2911 Welsh 1335
Dutch 2422 Korean 2125 Scots Gaelic 1714 Wolof 3325
English 1524 Kurdish 2131 Serbian 2928 Xhosa 3418
Esperanto 1525 Laothian 2225 Serbo-Croatian 2918 Yiddish 2019
Estonian 1530 Latin 2211 Shona 2924 Yoruba 3525
Faroese 1625 Latvian, Lettish 2232 Sindhi 2914 Zulu 3631
2F3P421A[SP] (28-BACK) 1/25/05, 12:05 PM31
31
Page 66

Problemas y localización de averías
Utilice la siguiente lista de verificación de localización de averías cuando tiene problemas con este aparato.
Consulte con su concesionario local o tienda de servicio si continúan los problemas.
Compruebe que se han hecho correctamente todas las conexiones cuando utilice con otros aparatos.
SINTOMA POSIBLE SOLUCION
DVD/VCR
El DVD/VCR no funciona.
Ausencia de imagen.
No hay sonido.
No funciona el mando a distancia.
La recepción CABLE no es
posible.
VCR
La grabación no funciona.
La grabación con
temporizador no funciona.
Barras de ruido en la pantalla.
DVD
La lengua deseada no se muestra.
No empieza la reproducción.
No puede parar la reproducción,
búsqueda, cámara lenta,
reproducción repetida o
reproducción programada, etc.
No se ve la imagen, o la pantalla
está borrosa o dividida en dos
partes.
Página
• Verifique que el cable de alimentación esté conectado.
• Pruebe con otro tomacorriente de CA.
• La alimentación está desconectada; revise el fusible o el
interruptor automático.
Desconecte la unidad, y vuelva a conectarla al cabo de una hora.
•
• Seleccione primero el modo DVD o VCR.
• La conexión de antena no es la correcta o el cable de antena
está desconectado.
• El canal de video no está en la posición correcta.
• El canal de TV no está en el canal 3 ó 4.
• El selector de entrada de vídeo del TV no se ha ajustado en
VIDEO. Ajústelo en VIDEO (o equivalente).
• El canal se ha ajustado en el modo externo.
• Compruebe que el selector de entrada del amplificador está
en la posición correcta.
• Seleccionar la posición correcta de la Salida de Audio en el
amplificador AV.
• El aparato está en un modo de reproducción especial.
• Apunte el mando a distancia hacia el sensor remoto.
Utilice a una distancia de menos de 5 metros o baje la luz en la habitación.
•
• Elimine los obstáculos para el rayo infrarrojo.
• Las pilas están gastadas. Cambie las pilas.
• Compruebe que las pilas están bien colocadas.
• Revise todas las conexiones del sistema CABLE.
• La estación o el servicio de TV cable están con problemas;
pruebe con otra estación.
Las lengüetas de prevención de borrado del video están quebradas.
•
• La unidad está en el modo de entrada externa.
• La hora no ha sido fijada correctamente.
• El comienzo y término de la grabación no se ha fijado
correctamente.
• El botón TIMER REC no han sido presionados (El Símbolo
TIMER REC
• Ajuste el tracking más allá del rango del circuito automático.
• Las cabezas del video están sucios.
• La cinta está dañada o gastada.
• Select proper language in the menu options.
• No hay disco colocado.
• El disco puede estar sucio. Limpie el disco.
• El aparato no puede reproducir DVD-ROM, etc.
• Algunos discos pueden no aceptar algunas funciones.
• El modo de exploración progresiva está activo en la unidad
conectada a un televisor a través de la salida VIDEO OUT.
no está visualizador).
9
–
–
9
–
10,11
10~13
14
–
–
10~13
–
18,24
9
11
17,19
15,16
20
20
18
33
–
23
24
23
23
–
30
32
32
2F3P421A[SP] (28-BACK) 1/25/05, 12:05 PM32
Page 67

Problemas y localización de averías / Limpieza de la cabeza de video
SINTOMA POSIBLE SOLUCION
No se ve la imagen en 4:3 (16:9).
No hay indicaciones en la pantalla.
No se escucha el sonido ambiental.
Una tecla del aparato o mando a
distancia no lo hace funcionar.
No empieza la reproducción al
seleccionar el título.
El idioma de la pista de sonido de
audio y/o subtítulos no cambia al
reproducir un DVD.
No se ven los subtítulos.
No cambia el ángulo.
Aparece
en la pantalla.
• El ajuste no corresponde al de su TV.
• Seleccione Display On.
• El ajuste no corresponde al de su sistema estéreo.
• Desconecte el aparato y desenchufe el cable eléctrico de CA
durante varios minutos. Vuelva a enchufar.
• Verifique el ajuste del nivel de prohibición.
• No se han grabado múltiples idiomas en el disco DVD.
• Algunos discos no tienen subtítulos.
• Los subtítulos se han eliminado. Presione SUBTITLE.
• No se ha grabado desde múltiples ángulos en el disco DVD.
• La función está prohibida para este aparato o disco.
Limpieza de la cabeza de video
Limpieza automática de las cabezas
El sistema de limpieza automática de las cabezas limpia
las cabezas de vídeo automáticamente cuando se inserta
o se expulsa una cinta, con el fin de evitar que se acumule
suciedad en las cabezas. Sin embargo, la limpieza manual
de las cabezas significa que la cabeza se está ensuciando
y tiene lugar cuando se reproducen cintas dañadas o de
mala calidad. Si es necesario limpiar las cabezas, utilice
un sistema de limpieza de cabezas de alta calidad o
encargue su limpieza a un profesional.
Página
29
30
13
–
28
29
ESPAÑOL
25,29
26
24
Buena imagen Imagen “nevada”
Obstruccion de las cabezas de video
Las cabezas de video constituyen el mecanismo por el que el DVD/VCR lee las imágenes de la cinta durante la
reproducción. En el caso poco probable de que las cabezas se ensucien lo suficiente como para quedar obstruidas,
ninguna imagen será reproducida. Esto se puede determinar fácilmente si, durante la reproducción de una buena
cinta de video, se emite un sonido de calidad, pero no se produce imagen alguna (la imagen está extremadamente
“nevada”). De ser así, use un sistema de limpieza de cabezas de alta calidad o haga que las limpien
profesionalmente.
NOTAS:
PARA INFORMACION ADICIONAL SOBRE LOS AJUSTES U OPERACION, FA VOR DE VISITAR NUESTRA PAGINA WEB
FAVOR DE CONSERV AR TODO EL EMP AQUE POR LO MENOS POR 90 DIAS EN CASO DE QUE TENGA QUE DEVOL VER
NO INTENTE LIMPIAR LAS CABEZAS DE VIDEO O REPARAR LA UNIDAD QUIT ANDO LA CUBIERT A
•
SUPERIOR.
• Las cabezas de video pueden finalmente llegar a desgastarse y tendrán que ser cambiadas cuando
sean incapaces de producir imágenes claras.
• Para ayudar a prevenir la obstrucción de las cabezas de video, utilice solamente cintas VHS de
buena calidad. Deseche cintas desgastadas.
WWW.MEMOREXELECTRONICS.COM O LLAMAR A SERVICIO A CLIENTES AL NO. (954) 660-7100.
ESTE PRODUCTO AL LUGAR DE COMPRA O A MEMOREX PARA OBTENER REFACCIONES Y ACCESORIOS,
COMUNICARSE A FOX INT’L AL NO. 1-800-321-6993.
33
2F3P421A[SP] (28-BACK) 1/25/05, 12:05 PM33
Page 68

Especificaciones
GENERALIDADES
Fuente de alimentación:
Consumo de energía:
Peso:
Dimensiones:
Entradas/Salidas:
Entrada de video:
Salida de video:
Entrada de audio:
Salida de audio:
Antena:
Respuesta de frecuencia Hi-Fi:
Gama dineámica de Hi-Fi:
VCR
Video cabezas:
Pistas de audio:
Sintonizador:
Salida de canal RF:
Tiempo de avance
rápido/rebobinado
en + 25˚C (77˚F):
Tocadiscos de DVD/Discos compactos
Señal de Sistema:
Disco utilizable:
Características de audio
respuesta de frecuencia:
S/N Ratio:
Distorsión armónica:
Variaciones de velocidad:
Gama dinámica:
Salidas:
Captor:
120V CA, 60 Hz
Operation: 18 Vatios
Stand by: 2 Vatios
7,7 libras (3,5 kg)
Anchura : 16-15/16 pulgadas (430 mm)
Altura : 3-7/8 pulgadas (99 mm)
Profundidad : 8-15/16 pulgadas (227 mm)
1 Vp-p/75 ohmios
1 Vp-p/75 ohmios
–8 dBm/50k ohmios
–8 dBm/1k ohmios
UHF/VHF 75 ohmios coaxial
20Hz a 20,000Hz
Mayor de 90 dB
4 cabezas
Sonido Hi-Fi - 2 pistas
Sonido monofónico - 1 pista
181 canales de frecuencia sintetizada
VHF 2 - 13
UHF 14 - 69
CATV 14 - 36 (A) - (W)
Canales 3 ó 4
F.FWD: Approximadamente 4 minuto y 50 segundos
REW: Approximadamente 2 minuto y 30 segundos
NTSC
DVD (12 cm, 8 cm), CD (12 cm, 8 cm)
DVD: 4Hz - 22kHz
CD: 4Hz - 20kHz
90 dB
0,02%
Menos de 0,01%Wrms
Mayor de 90dB
Video : (RCA) 1 Vp-p/75 ohmios
Audio : (RCA) –12 dBm/1k ohmios
Audio digital : 0,5 Vp-p/75 ohmios
CD : Longitud de onda: 770 - 800 nm
DVD : Longitud de onda: 645 - 660nm
37 - 59 (AA) - (WW)
60 - 85 (AAA) - (ZZZ)
86 - 94 (86) - (94)
95 - 99 (A-5) - (A-1)
100 - 125 (100) - (125)
01 (5A)
(con videocassette T-120)
Potencia máxima de salida: 0,7 mW
Potencia máxima de salida: 0,5 mW
ACCESORIOS:
Control Remoto x 1
Cable Coaxial de 75 ohmios x 1
Cordón AUDIO/VIDEO x 1
El diseño y las especificaciones están sujetas a cambios sin previo aviso
Weston,FL 33331
Printed in Thailand Impreso en Tailandia
J2F3P421A SH 05/02
34
2F3P421A[SP] (28-BACK) 1/25/05, 12:05 PM34
K
Visit our website at www.memorexelectronics.com
Visite nuestro portal de internet en www.memorexelectronics.com
Memcorp,Inc.
 Loading...