

Page 1
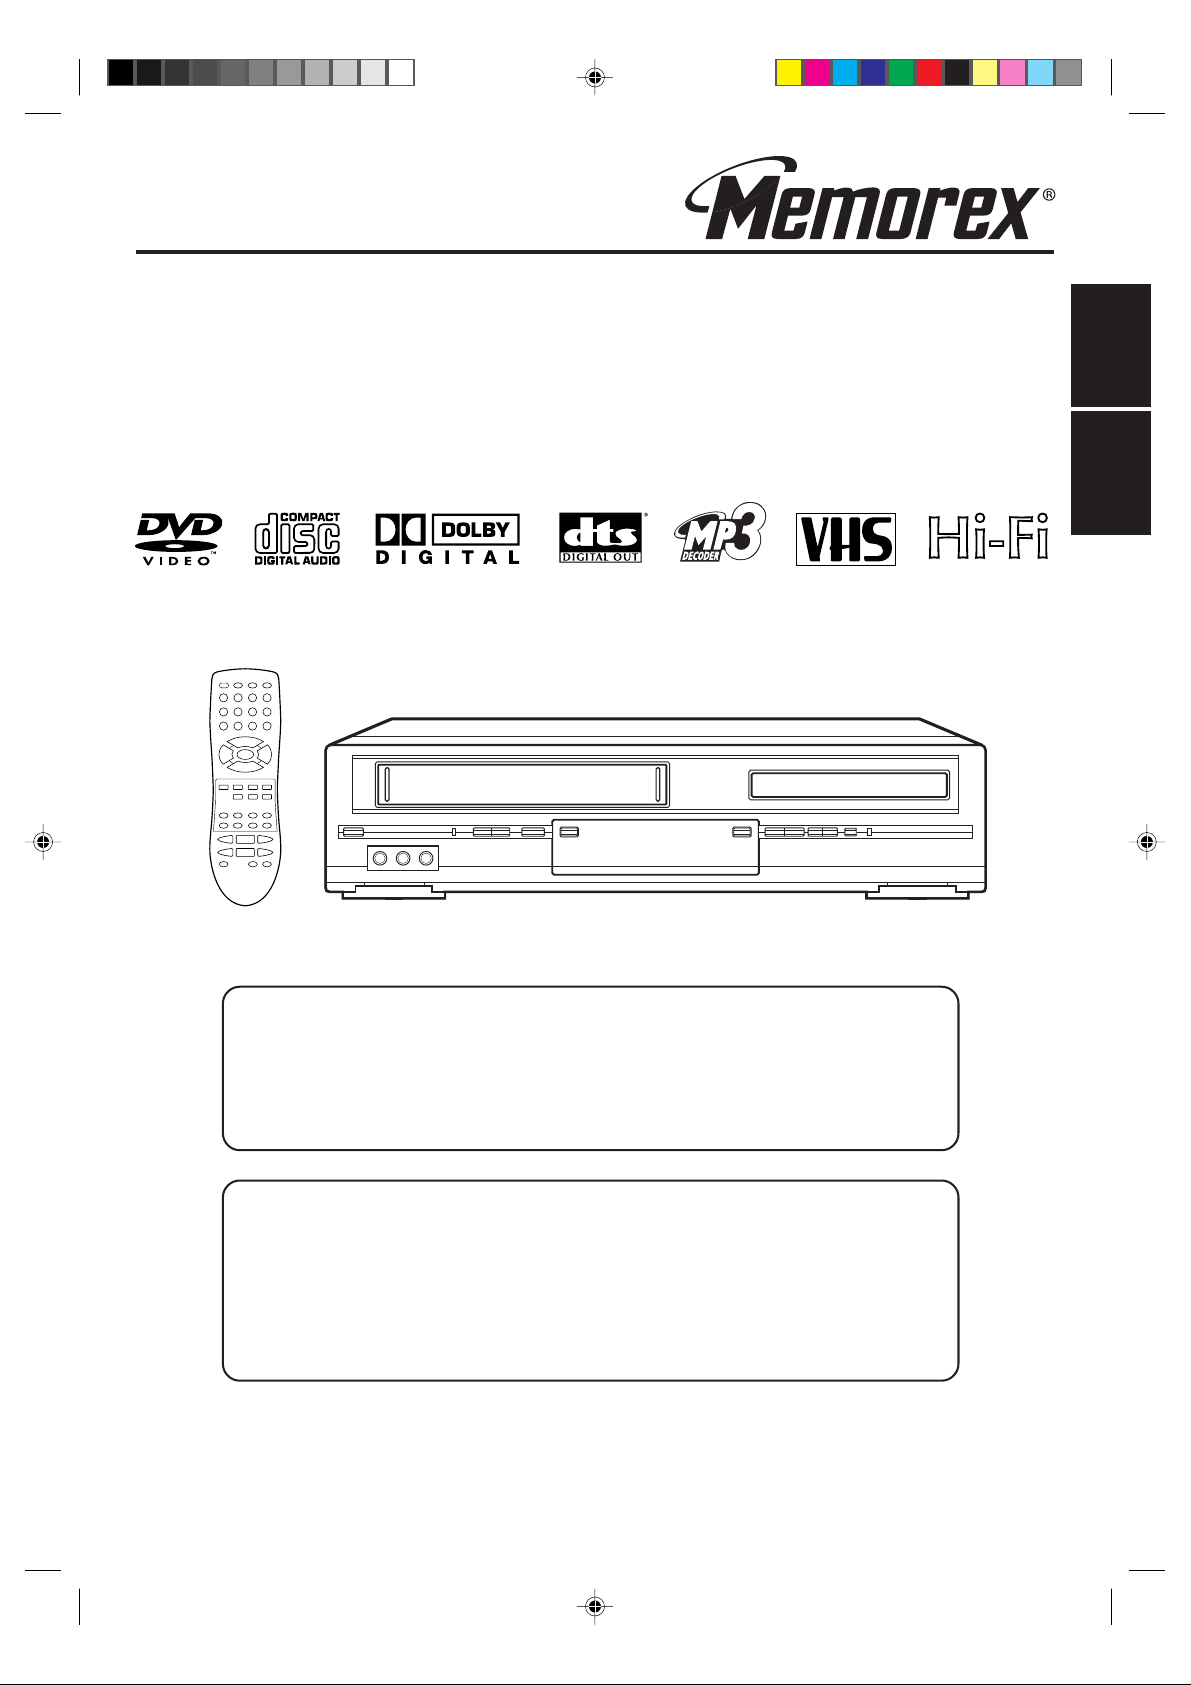
OWNER’S MANUAL
MANUAL DE INSTRUCCIONES
DVD PLAYER / Hi-Fi VIDEO CASSETE RECORDER
DVD COMPACTOS / VIDEOGRABADOR Hi-Fi ESTEREO
MVD4540
ENGLISHESPAÑOL
If you purchase a universal remote control from your local retailer, please contact the
remote manufacturer for the required programming code.
Si usted a comprado un control remoto universal, por favor comunicace con el fabricante
para el codico de programaccion requerido.
When shipped from the factory, the TV/CA TV menu option is set to the "CATV" (Cable
T elevision) mode.
If not using CA TV (Cable TV), set this menu option to the "TV" mode.
Al salir la unidad de fábrica, la opción de menú de TV/CATV se ajusta al modo de
"CATV" (Televisión por cable).
Si no utiliza CATV, ajuste esta opción de menú al modo de "TV".
Before operating the unit, please read this manual thoroughly .
Antes de usar la unidad, lea detenidadmente este manual de instrucciones.
2A77001AE Cover 8/29/02, 10:52 AM1
ATTENTION
ATENCION
TV/CATV MODE SELECTION
SELECCION DE MODO DE TV/CATV
Page 2
3
CH.
IN
OUT
ANT.
DIGITAL AUDIO AUDIO S-VIDEO COMPONENT
DVD OUTPUT
L
R
VIDEO
OPTICAL COAXIAL
AUDIO
L
R
4
( )
TV
( )
Y
PB/C
B
PR/C
R
ENGLISH
CAUTION:
CAUTION
RISK OF ELECTRIC SHOCK
DO NOT OPEN
TO REDUCE THE RISK OF ELECTRIC
SHOCK, DO NOT REMOVE COVER (OR
BACK). NO USER-SERVICEABLE
PAR TS INSIDE. REFER SERVICING TO
QUALIFIED SERVICE PERSONNEL.
The lightning flash with arrowhead
symbol, within an equilateral triangle is
intended to alert the user to the presence
of uninsulated dangerous voltage within
the product's enclosure that may be of
sufficient magnitude to constitute a risk
of electric shock to persons.
The exclamation point within an equilateral
triangle is intended to alert the user to
the presence of important operating and
maintenance (servicing) instructions in
the literature accompanying the appliance.
WARNING:
TO REDUCE THE RISK OF FIRE OR ELECTRIC SHOCK, DO NOT EXPOSE THIS APPLIANCE TO RAIN OR MOISTURE.
NOTE:
Please keep all packaging material for at least 90 days in case you need to return this product to your place of purchase
or Memorex.
WARNING: This equipment has been tested and found to comply with the limits for a Class B digital device,
pursuant to Part 15 of the FCC Rules. These limits are designed to provide reasonable protection
against harmful interference in a residential installation. This equipment generates, uses and can
radiate radio frequency energy and, if not installed and used in accordance with the instructions,
may cause harmful interference to radio communications.
However, there is no guarantee that interference will not occur in a particular installation. If this
equipment does cause harmful interference to radio or television reception, which can be
determined by turning the equipment off and on, the user is encouraged to try to correct the
interference by one or more of the following measures:
- Reorient or relocate the receiving antenna.
- Increase the separation between the equipment and receiver.
- Connect the equipment into an outlet on a circuit different from that to which the receiver is
connected.
- Consult the dealer or an experienced radio/TV technician for help.
CAUTION: Changes or modifications not expressly approved by the partly responsible for compliance with
the FCC Rules could void the user's authority to operate this equipment.
CAUTION:
THIS DIGITAL VIDEO PLAYER EMPLOYS A LASER SYSTEM.
TO ENSURE PROPER USE OF THIS PRODUCT, PLEASE READ THIS USER'S GUIDE CAREFULLY AND
RETAIN FOR FUTURE REFERENCE. SHOULD THE UNIT REQUIRE MAINTENANCE, CONTACT AN
AUTHORIZED SERVICE LOCATION-SEE SERVICE PROCEDURE.
USE OF CONTROLS, ADJUSTMENTS OR THE PERFORMANCE OF PROCEDURES OTHER THAN THOSE
SPECIFIED HEREIN MAY RESULT IN HAZARDOUS RADIATION EXPOSURE.
TO PREVENT DIRECT EXPOSURE T O LASER BEAM, DO NOT TRY T O OPEN THE ENCLOSURE. VISIBLE
LASER RADIATION MAY BE PRESENT WHEN THE ENCLOSURE IS OPENED. DO NOT STARE INTO
BEAM.
Location of the required Marking
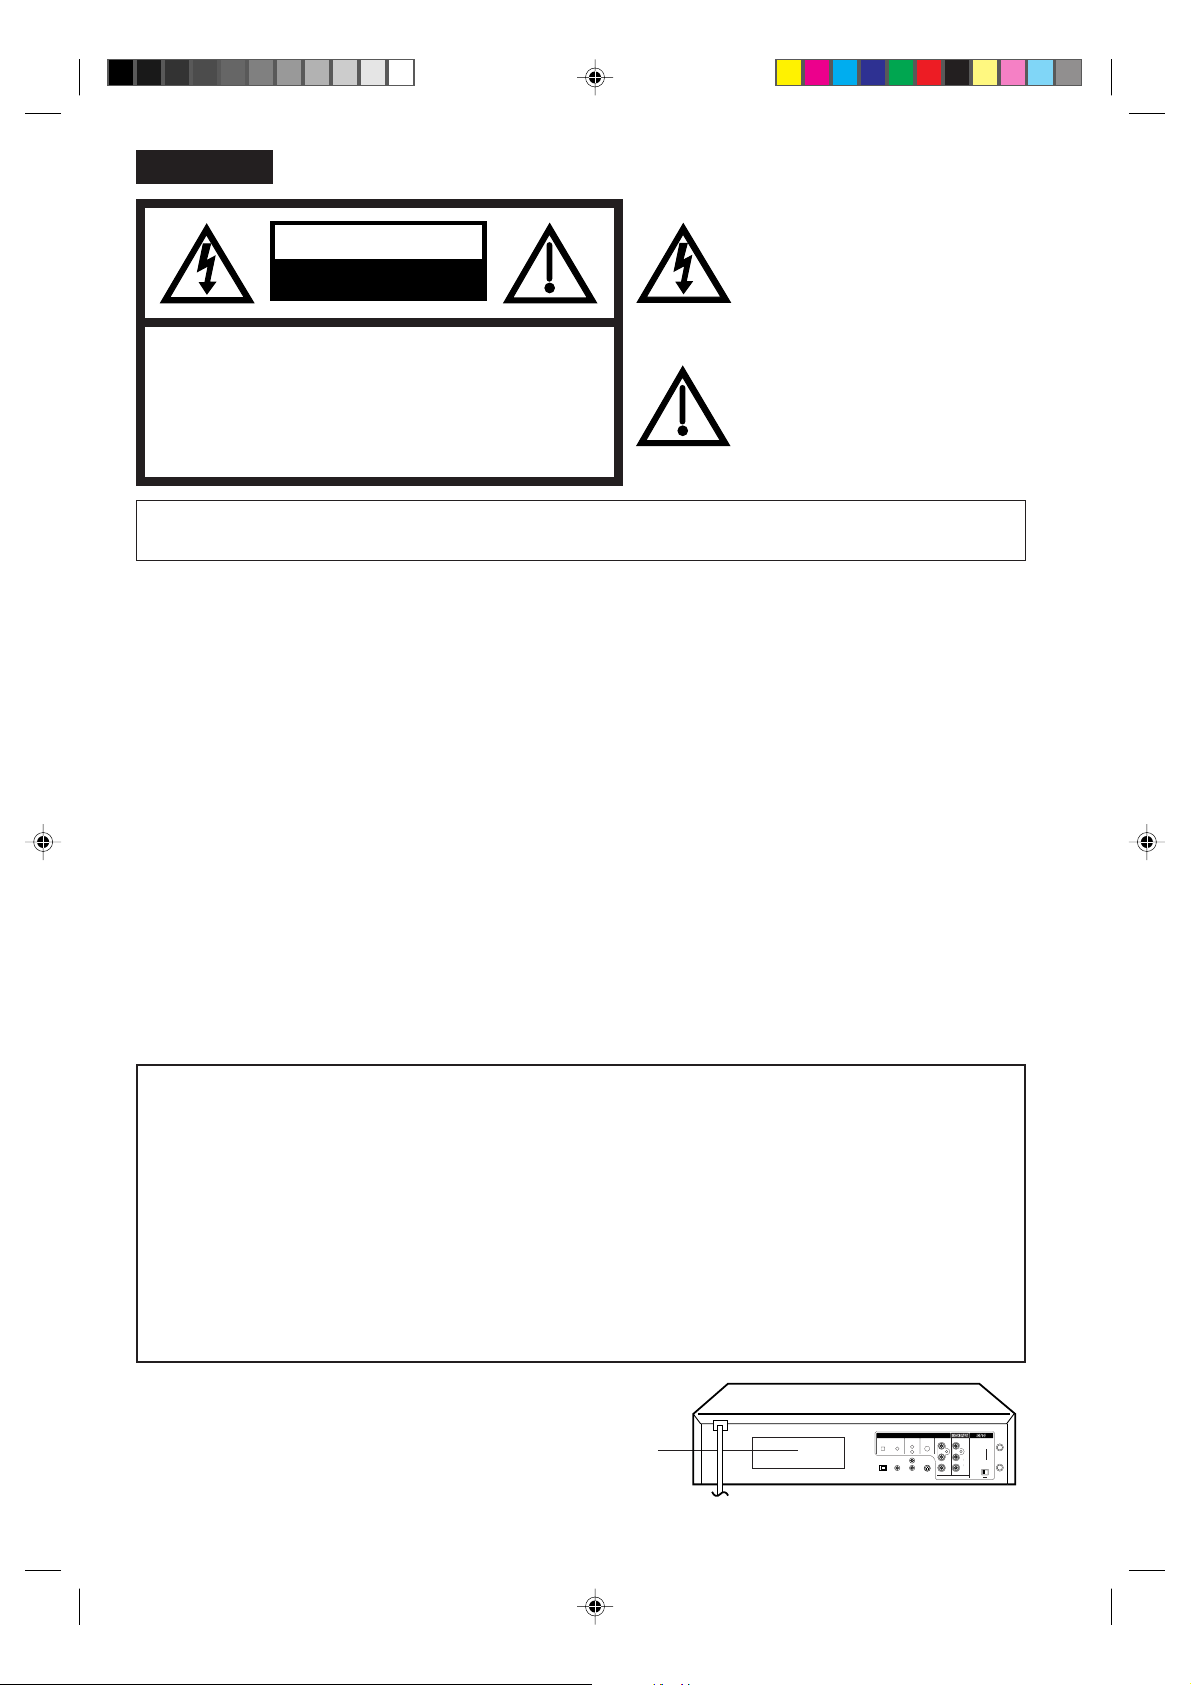
The rating sheet and the safety caution are on the rear of the unit.
CERTIFICATION: COMPLIES WITH FDA RADIATION PERFORMANCE
STANDARDS, 21 CFR SUBCHAPTER J.
2
2A77001AE(02-05) 8/29/02, 10:51 AM2
Page 3

IMPORT ANT SAFEGUARDS
1. READ INSTRUCTIONS
All the safety and operating instructions should be read before the unit is operated.
2. RETAIN INSTRUCTIONS
The safety and operating instructions should be retained for future reference.
3. HEED WARNINGS
All warnings on the unit and in the operating instructions should be adhered to.
4. FOLLOW INSTRUCTIONS
All operating and use instructions should be followed.
5. CLEANING
Unplug this unit from the wall outlet before cleaning. Do not use liquid cleaners or aerosol cleaners.
Use a damp cloth for cleaning the exterior cabinet only .
6. ATTACHMENTS
The manufacturer of this unit does not make any recommendations for attachments, as they may cause
hazards.
7. WATER AND MOISTURE
Do not use this unit near water. For example, near a bathtub, washbowl, kitchen sink, laundry tub, in a wet
basement, or near a swimming pool.
8. ACCESSORIES
Do not place this unit on an unstable cart, stand, tripod, bracket, or table.
The unit may fall, causing serious injury , and serious damage to the unit.
8A. An appliance and cart combination should be moved with care. Quick stops,
excessive force, and uneven surfaces may cause the appliance and cart
combination to overturn.
9. VENTILATION
Slots and openings in the cabinet back or bottom are provided for ventilation,
to ensure reliable operation of the unit, and to protect it from overheating.
These openings must not be blocked or covered. The openings should never be blocked by placing the unit
on a bed, sofa, rug, or other similar surface. This unit should never be placed near or over a radiator or heat
source. This unit should not be placed in a built-in installation such as a bookcase or rack unless proper
ventilation is provided and/or the manufacturer’s instructions have been adhered to.
10. POWER SOURCES
This unit should be operated only from the type of power source indicated on the rating plate. If you are not
sure of the type of power supply to your home, consult your appliance dealer or local power company. For
units intended to operate from battery power, or other sources, refer to the operating instructions.
11. GROUNDING OR POLARIZA TION
This unit is equipped with a polarized alternating-current line plug (a plug having one blade wider than the
other). This plug will fit into the power outlet only one way. This is a safety feature. If you are unable to insert
the plug fully into the outlet, try reversing the plug. If the plug should still fail to fit, contact your electrician to
replace your obsolete outlet. Do not defeat the safety purpose of the polarized plug, if your unit is equipped
with a 3-wire grounding-type plug, a plug having a third (grounding) pin. This plug will only fit into a grounding-type power outlet. This too, is a safety feature. If you are unable to insert the plug into the outlet, contact
your electrician to replace your obsolete outlet.Do not defeat the safety purpose of the grounding-type plug.
12. POWER-CORD PROTECTION
Power-supply cords should be routed so that they are not likely to be walked on or pinched by items placed
upon or against them, paying particular attention to cords at plugs, convenience receptacles, and the point
where they exit from the appliance.
PORT ABLE CART W ARNING
(symbol provided by RETAC)
S3125A
ENGLISH
2A77001AE(02-05) 8/29/02, 10:51 AM3
3
Page 4

IMPORTANT SAFEGUARDS
13. LIGHTNING
To protect your unit from a lightning storm, or when it is left unattended and unused for long periods of time,
unplug it from the wall outlet and disconnect the antenna or cable system. This will prevent damage to the
unit due to lightning and power line surges.
14. POWER LINES
An outside antenna system should not be located in the vicinity of overhead power lines or other electric
light or power circuits, or where it can fall into such power lines or circuits. When installing an outside
antenna system, extreme care should be taken to keep from touching such power lines or circuits, as
contact with them might be fatal.
15. OVERLOADING
Do not overload wall outlets and extension cords, as this can result in a risk of fire or electric shock.
16. OBJECT AND LIQUID ENTRY
Do not push objects through any openings in this unit, as they may touch dangerous voltage points or short
out parts that could result in fire or electric shock. Never spill or spray any type of liquid into the unit.
17. OUTDOOR ANTENNA GROUNDING
If an outside antenna or cable system is connected to the unit, be sure the antenna or cable system is
grounded to provide some protection against voltage surges and built-up static charges, Section 810 of the
National Electrical Code, ANSI/NFPA 70, provides information with respect to proper grounding of the mast
and supporting structure, grounding of the lead-in wire to an antenna discharge unit, size of grounding
conductors, location of antenna discharge unit, connection to grounding electrodes, and requirements for
the grounding electrode.
18. SERVICING
Do not attempt to service this unit yourself as opening or removing covers may expose you to dangerous
voltage or other hazards. Refer all servicing to qualified service personnel.
19. DAMAGE REQUIRING SERVICE
Unplug this unit from the wall outlet and refer servicing to qualified service personnel under the following
conditions:
a. When the power-supply cord or plug is damaged.
b. If liquid has been spilled, or objects have fallen into the unit.
c. If the unit has been exposed to rain or water.
d. If the unit does not operate normally by following the operating instructions. Adjust only those
controls that are covered by the operating instructions, as an improper adjustment of other controls
may result in damage and will often require extensive work by a qualified technician to restore the
unit to its normal operation.
e. If the unit has been dropped or the cabinet has been damaged.
f . When the unit exhibits a distinct change in performance, this indicates a need for service.
20. REPLACEMENT PARTS
When replacement parts are required, be sure the service technician uses replacement parts specified by
the manufacturer or those that have the same characteristics as the original part.
Unauthorized substitutions may result in fire, electric shock or other hazards.
21. SAFETY CHECK
Upon completion of any service or repairs to this unit, ask the service technician to perform safety checks to
determine that the unit is in proper operating condition.
22. WALL OR CEILING MOUNTING
The product should be mounted to a wall or ceiling only as recommended by the manufacturer.
23. HEAT
The product should be situated away from heat sources such as radiators, heat registers, stoves, or other
products (including amplifiers) that produce heat.
24. DISC TRAY
Keep your fingers well clear of the disc tray as it is closing. It may cause serious personal injury.
25. CONNECTING
When you connect the product to other equipment, turn off the power and unplug all of the equipment from
the wall outlet. Failure to do so may cause an electric shock and serious personal injury. Read the owner's
manual of the other equipment carefully and follow the instructions when making any connections.
4
2A77001AE(02-05) 8/29/02, 10:51 AM4
Page 5
IMPORTANT SAFEGUARDS / Power Source
26. LASER BEAM
Do not look into the opening of the disc tray or ventilation opening of the product to see the source of the
laser beam. It may cause sight damage.
27. DISC
Do not use a cracked, deformed, or repaired disc. These discs are easily broken and may cause serious
personal injury and product malfunction.
28. NOTE TO CATV SYSTEM INST ALLER
This reminder is provided to call the CATV system installer’s attention to Article 820-40 of the NEC that
provides guidelines for proper grounding and, in particular, specifies that the cable ground shall be connected to the grounding system of the building, as close to the point of cable entry as practical.
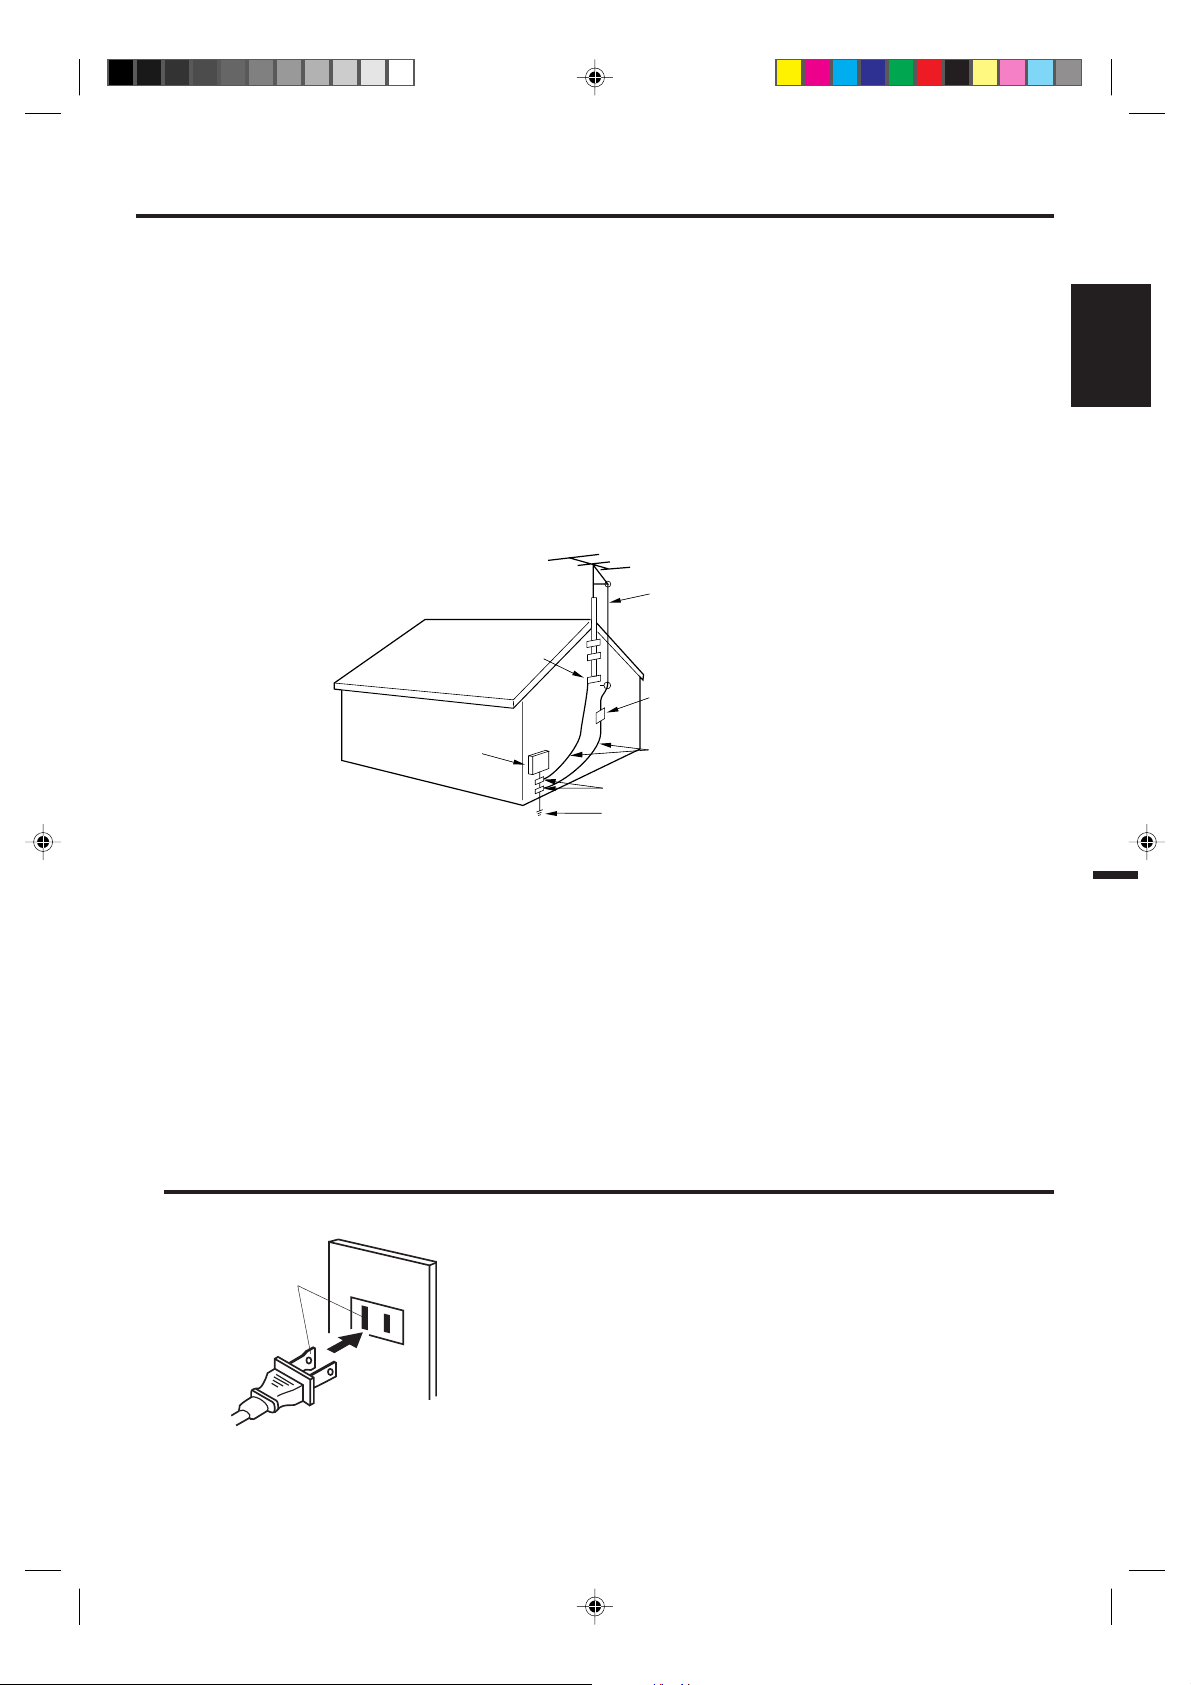
EXAMPLE OF ANTENNA GROUNDING AS PER THE
NATIONAL ELECTRICAL CODE
ANTENNA LEAD IN WIRE
ENGLISH
GROUND CLAMP
ELECTRIC SERVICE
EQUIPMENT
NEC-NATIONAL ELECTRICAL CODE
S2898A
CONDENSATION
Moisture will form in the operating section of the DVD/VCR if the player is brought from cool surroundings into a
warm room or if the temperature of the room rises suddenly. When this happens, the DVD/VCR's performance
will be impaired.
To prevent this, let the DVD/VCR stand in its new surroundings for about an hour before switching it on, or
make sure that the room temperature rises gradually.
Condensation may also form during the summer if the DVD/VCR is exposed to the breeze from an air
conditioner. In such cases, change the location of the DVD/VCR.
ANTENNA
DISCHARGE UNIT
(NEC SECTION 810-20)
GROUNDING CONDUCTORS
(NEC SECTION 810-21)
GROUND CLAMPS
POWER SERVICE GROUNDING
ELECTRODE SYSTEM
(NEC ART 250, PART H)
Power Source
AC Outlet
Wider Hole
and Blade
Polarized AC Cord Plug
(One blade is wider than the other.)
TO USE AC POWER SOURCE
Use the AC polarized line cord provided for operation on AC. Insert
the AC cord plug into a standard 120V 60Hz polarized AC outlet.
NOTES:
Never connect the AC line cord plug to other than the specified
•
voltage (120V 60Hz). Use the attached power cord only.
If the polarized AC cord does not fit into a non-polarized AC
•
outlet, do not attempt to file or cut the blade. It is the user’s
responsibility to have an electrician replace the obsolete outlet.
If you cause a static discharge when touching the unit and the
•
unit fails to function, simply unplug the unit from the AC outlet
and plug it back in. The unit should return to normal operation.
2A77001AE(02-05) 8/29/02, 10:51 AM5
5
Page 6

Features
DVD/CD Player/Video Cassette Recorder
• DVD/CD player with V ideo Cassette Recorder - Unique space saving design combines a DVD/CD player and a Hi-Fi V ideo
cassette recorder. The DVD disc has much more capacity, but is the same size as the audio CD disc. Picture quality is higher
than Super VHS. Audio quality is higher than audio CD. The DVD PLAYER can play back audio CDs.
• High Quality Picture - More than 500 lines (VCR mode: 230 lines) of Horizontal Resolution. It exceeds Super VHS (400
lines) or Laser Disc (430 lines) in resolution.
VCR Section
• Stereo/SAP Reception - This VCR is designed to receive stereo and separate audio program (SAP) broadcasts where
available.
• 4 Video Heads - Provides optimal picture quality for special effects playback.
µm HEAD - For superior picture quality even in SLP mode, 19micron width technology helps to avoid crosstalk and
• 19
boost SLP picture quality to near SP levels. With precision technology, ghosts and color beats are virtually eliminated.
• Hi-Fi Stereo Sound - With a frequency response of 20 to 20,000 Hz and a dynamic range of better than 90dB, this VCR
provides a level of excellence that rivals compact discs.
• One-touch Timer Recording (OTR) - Simply by pressing the REC/OTR button, the VCR can be programmed for up to 5
hours of recording with an immediate start.
DVD Section
• Compatible with a wide range of DVD audio outputs
Digital Audio Jack (Optical or Coaxial):
• When a component with a built-in Dolby Digital decoder is connected, Dolby Digital sound can produce the effect of
being in a movie theater or a concert hall.
• DTS is a surround sound standard different from Dolby Digital. This format is already in use at many theaters. By
connecting this unit to a DTS decoder or an AV amplifier with a built-in DTS decoder, the DTS audio of DVD discs
recorded in this format can be enjoyed. However, audio will not be output from the analog audio output jacks.
• The MPEG audio of DVD discs recorded in this format can be enjoyed.
• The Linear PCM sound of a 48 kHz/16 bit through 96 kHz/20 bit exceeds audio CD sound.
• Multi-Language - Since this DVD matches with 136 language-subtitles/-soundtracks, you can enjoy selecting a favorite
one. (Y ou can not select the language that is not recorded on the disc.)
• Multi-Angle - Pictures of Sports or a Live Concert are recorded with many cameras. When you play such a disc, you
can change the angles during playback. (If a Multi-Angle is not recorded on the disc, you can not change the angle.)
• Repeat Playback - You can repeat chapter, track, title, sides or material between two selected points.
Memory/Random Playback - You can play back tracks, titles or chapters in programmed or random-selected sequences.
•
• Zoom - You can zoom in on the selected subject on the screen during playback.
• Video Aspect Ratio - You can change the aspect ratio of the screen for your monitor/television on a suitable disc.
• Parental Control - Y ou can limit the playback of scenes or sounds of adult DVD discs which have a parental level rating.
This product incorporates copyright protection technology that is protected by method claims of certain U.S. patents
*
and other intellectual property rights owned by Macrovision Corporation and other rights owners. Use of this copyright
protection technology must be authorized by Macrovision Corporation and is intended for home and other limited
viewing uses only unless otherwise authorized by Macrovision Corporation. Reverse engineering or disassembly is
prohibited.
Manufactured under license from Dolby Laboratories. “Dolby” and the double-D symbol are trademarks of Dolby
*
Laboratories. Confidential unpublished works. © 1992-1997 Dolby Laboratories, Inc. All rights reserved.
“DTS” and “DTS Digital Out” are trademarks of Digital Theater Systems, Inc.
*
*
Unauthorized recording of copyrighted television programs, films, video cassettes and other materials may infringe the
rights of copyright owners and be contrary to copyright laws.
6
2A77001AE(06-11) 8/29/02, 10:48 AM6
Page 7
Contents
Before using your unit
IMPORTANT SAFEGUARDS ..........................3
Power Source...................................................5
Features ...........................................................6
Contents...........................................................7
Parts and functions ..........................................8
Display .............................................................9
Remote control...............................................10
Basic connections ..........................................12
CATV (CABLE TV) connections.....................14
Playback connection ......................................16
Setting up the VCR section
Setting the video channel............................... 18
Setting the language ...................................... 18
Auto clock setting ........................................... 19
Manual clock setting....................................... 21
Tuner setting................................................... 22
To ADD/DELETE channels ............................ 23
Noise elimination............................................ 23
Loading and Unloading a cassette tape......... 24
Tape playback operation
Cassette tape playback .................................. 25
Special playback ............................................ 26
ZERO RETURN function................................ 27
Video index search system ............................ 27
Recording
Recording a TV program ................................ 28
One-touch Timer Recording (OTR)................ 30
Timer recording .............................................. 31
Advanced function of VCR section
Stereo recording and playback ...................... 33
Separate Audio Program (SAP) ..................... 33
Duplicating a video tape................................. 34
Disc playback operation
Disc ................................................................ 35
Setting setup language .................................. 36
Playback procedure........................................ 37
Special playback ............................................ 38
Zooming ......................................................... 39
Repeat playback............................................. 40
Memory playback/Random playback ............. 41
MP3 playback................................................. 42
Changing soundtrack language ..................... 43
Changing subtitles language.......................... 43
Changing angles ............................................ 44
Title selection ................................................. 44
DVD menu...................................................... 44
Advanced function of DVD section
Parental control .............................................. 45
Setting menu language .................................. 47
Setting subtitle language................................ 48
Setting audio soundtrack language................ 49
Setting the aspect ratio of TV screen ............. 50
Setting on screen display ............................... 51
Setting Audio.................................................. 52
Setting Operation ........................................... 53
Setting Background........................................ 54
Setting Screen Saver (DVD only) ................... 54
Setting initial setup ......................................... 55
Output sound conversion table....................... 55
Status display of disc ..................................... 56
Table of languages ......................................... 57
Additional information
Problems and troubleshooting ....................... 58
Video head cleaning....................................... 59
Specifications ................................................. 60
ENGLISH
2A77001AE(06-11) 8/29/02, 10:48 AM7
7
Page 8
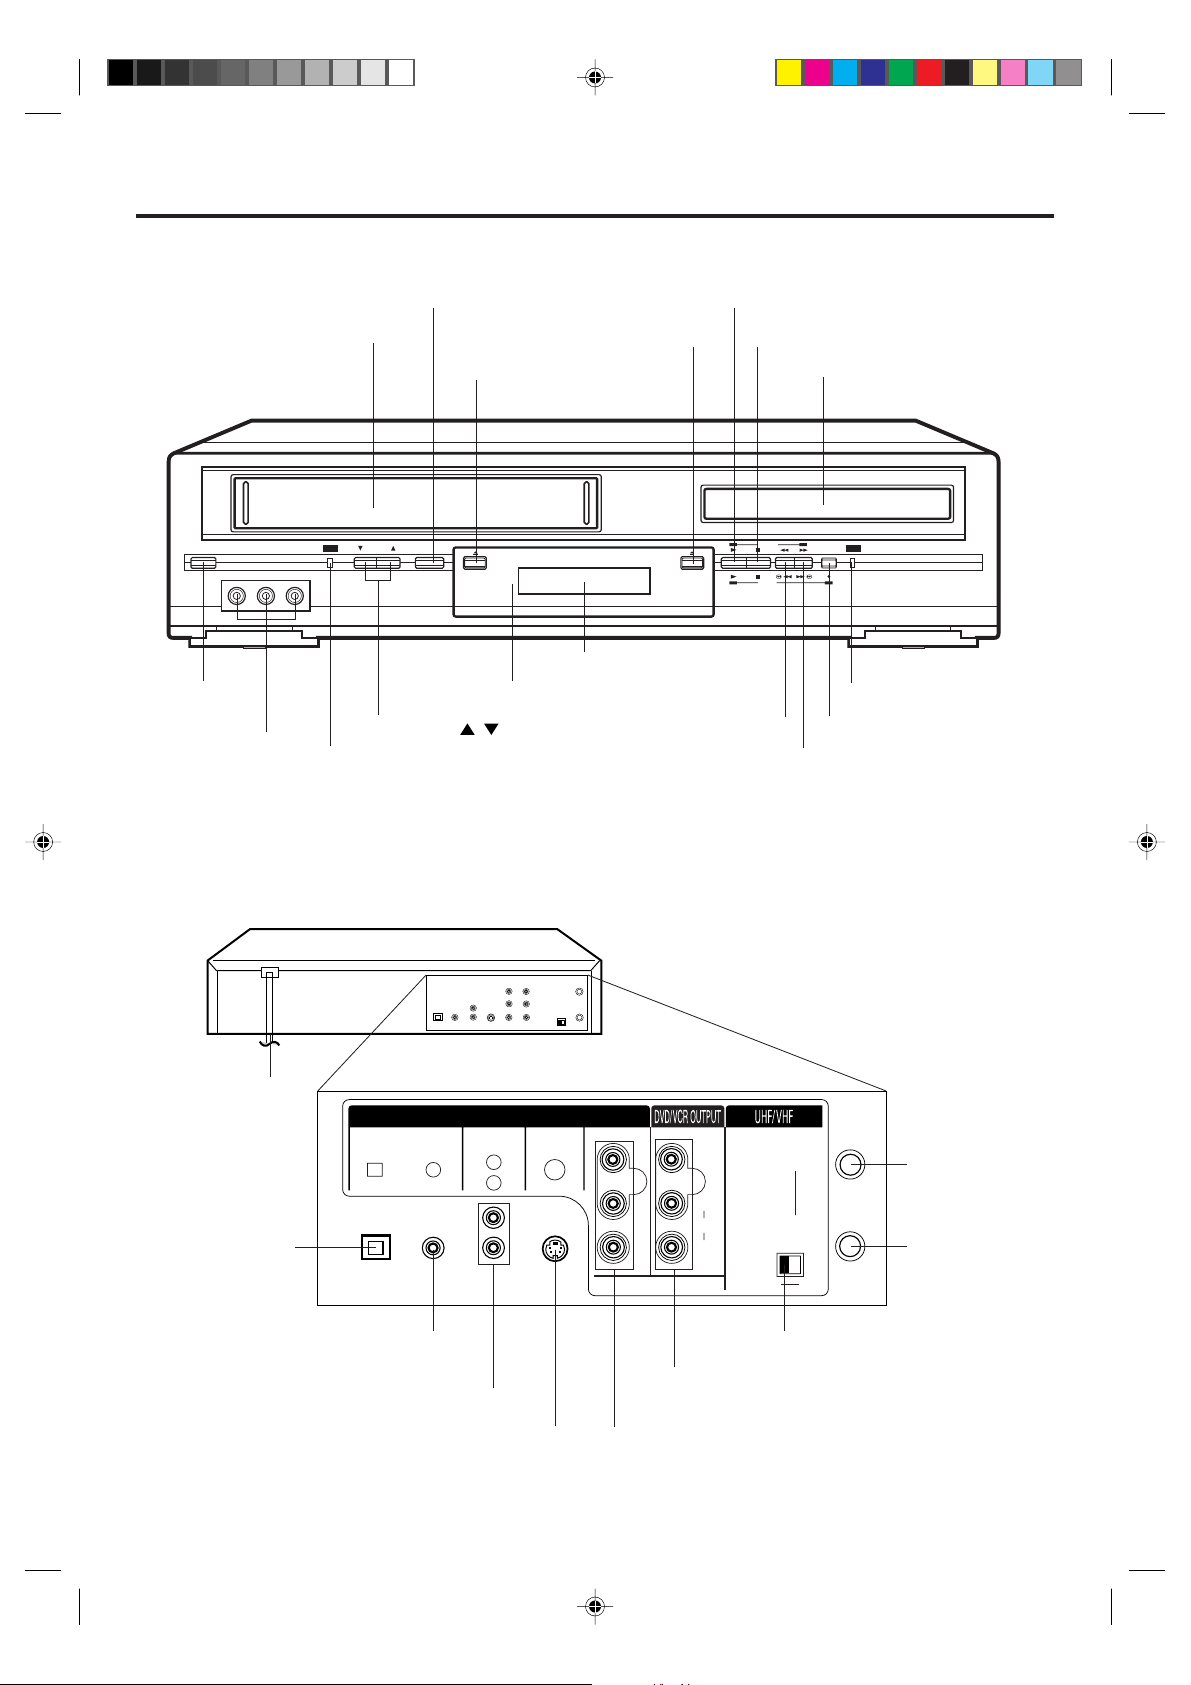
Parts and functions
Front
VCR/DVD mode selector button
Cassette Loading Slot
POWER CHANNEL
VIDEO IN L - AUDIO IN - R
VCR DVD
POWER
button
AUDIO (L/R)/
VIDEO IN jacks
VCR indicator
OPEN/CLOSE button
EJECT button
VCR/DVD
Remote sensor
CHANNEL / buttons
Display window
REW (Rewind) button
PLA Y button
STOP button
Disc tray
DVD
VCR
DVD indicator
REC button
FF (Fast Forward) button
Rear
AC power cord
DVD OPTICAL
DIGITAL AUDIO
OUT jack (dust
protection cap)
DIGITAL AUDIO AUDIO S-VIDEO COMPONENT
OPTICAL COAXIAL
DVD COAXIAL DIGITAL
AUDIO OUT jack
DVD AUDIO (L/R) OUT jacks
DVD S-VIDEO OUT jack
DVD OUTPUT
L
R
CH.
3
IN
( )
ANT.
OUT
( )
TV
4
PB/C
PR/C
Y
VIDEO
B
L
AUDIO
R
R
3/4 Channel Selector Switch
DVD/VCR common AUDIO (L/R)/VIDEO OUT
jacks
DVD COMPONENT OUT jacks
RF IN jack
RF OUT jack
8
2A77001AE(06-11) 8/29/02, 10:48 AM8
Page 9
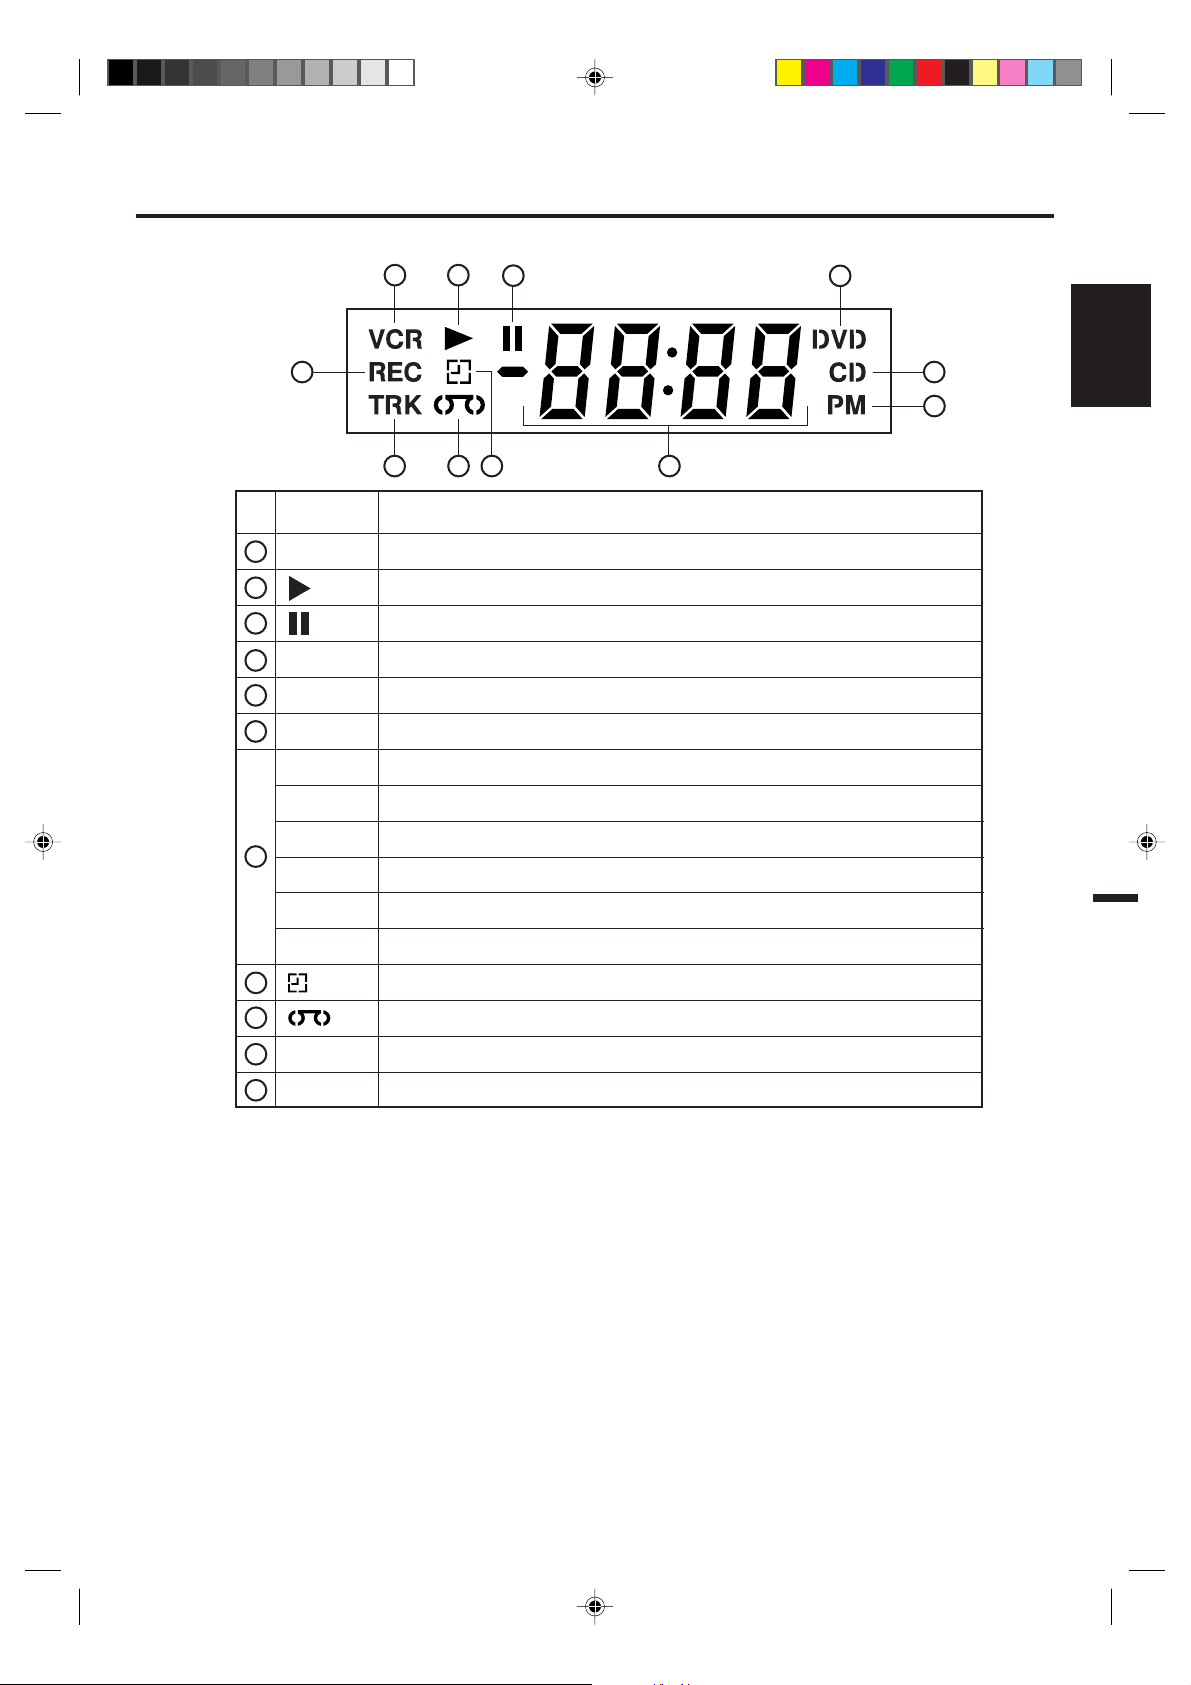
Display window
Display
1 2
11
10
No. Display Description
1
2
3
4
5
6
7
VCR
DVD
CD
PM
10 : 00
01 : 00
2
C002
VCR mode
Playback (lights) / Auto resume (flashes)
Still picture
DVD disc is inserted.
CD is inserted.
Display for afternoon (not lit during morning hours)
Clock display (colon[ : ] flashes)
Counter display by hour/minute at VCR/DVD / by minute/second at CD
Track number display for CD
TV channel display for VCR
3
89
7
4
5
6
ENGLISH
C036
L
8
9
10
TRK
11
REC
Note:
Some discs may be displayed wrong or e.g. chapter number, playback time, etc. may not be displayed.
CATV channel display
External input display
Timer recording display
Video tape is in the unit
Track display for CD
Normal recording display (flashes during One-touch Timer Recording - OTR)
2A77001AE(06-11) 8/29/02, 10:48 AM9
9
Page 10
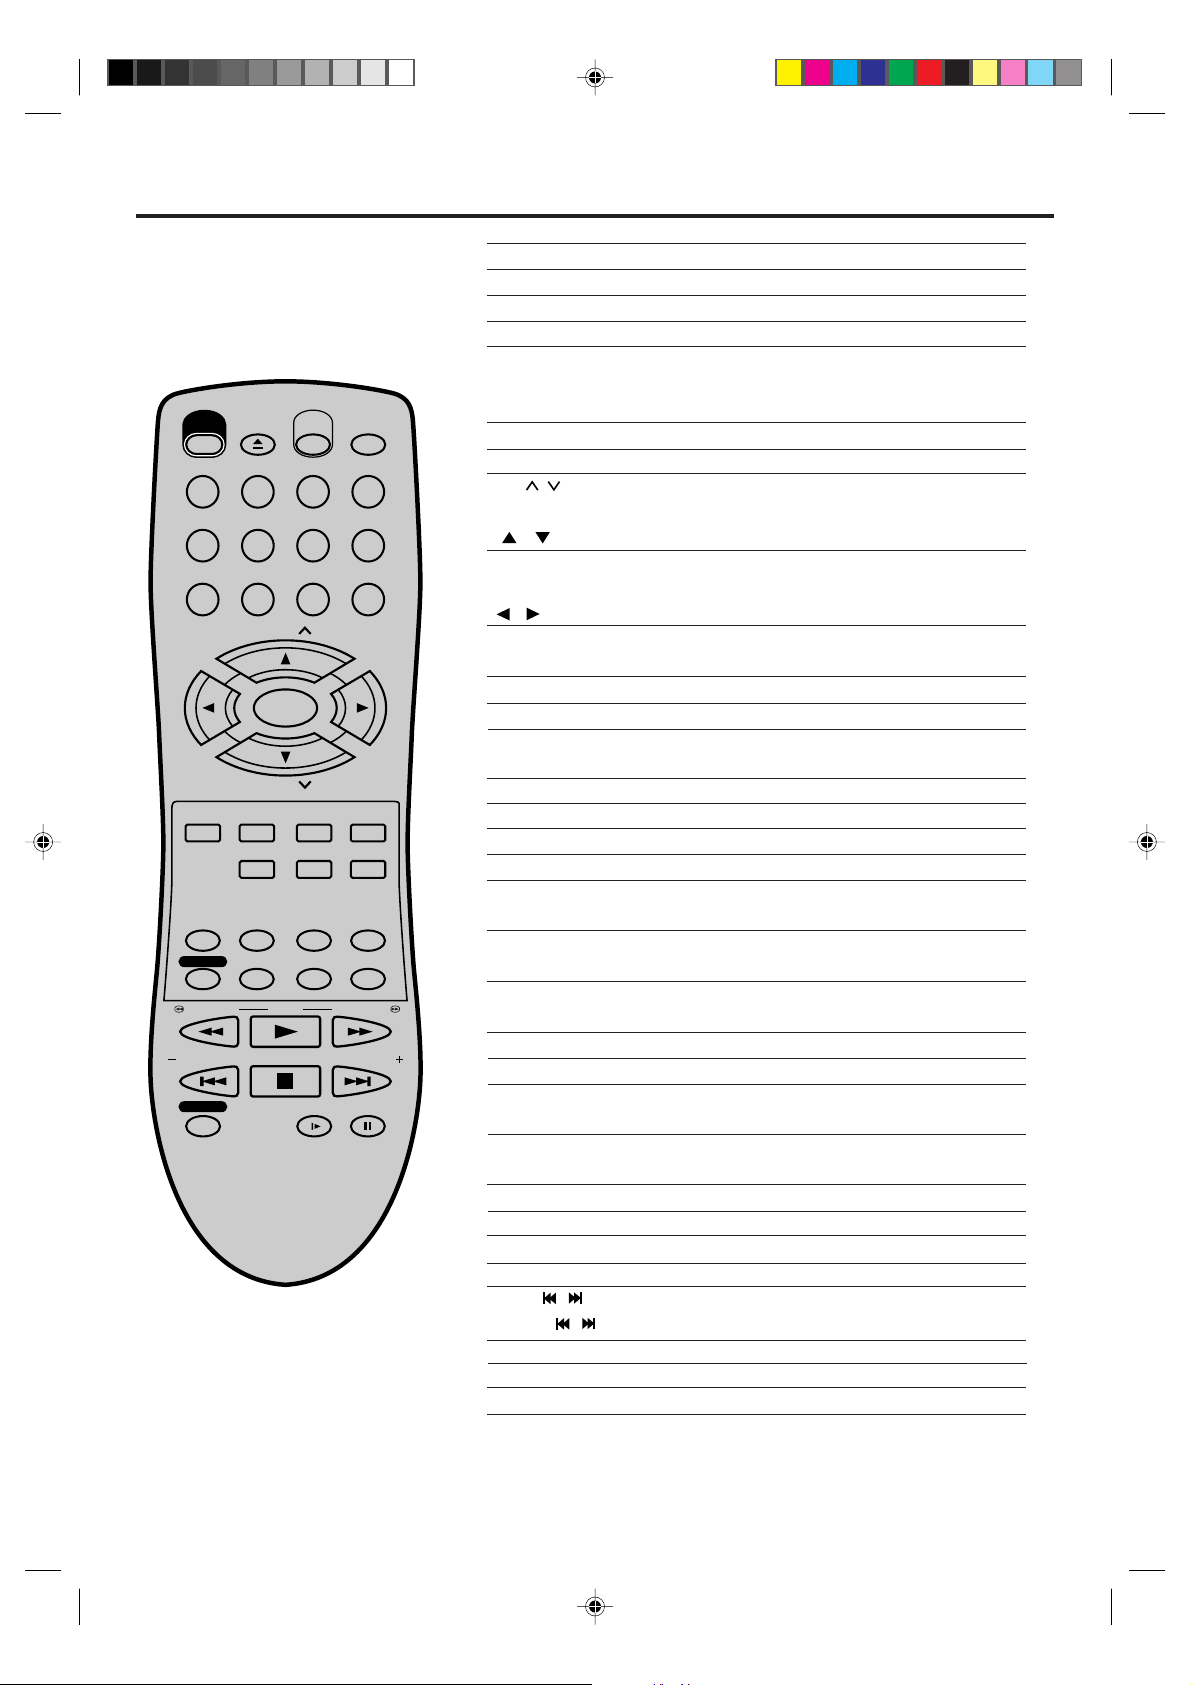
Remote control
OPEN/
CLOSE
EJECT
POWER
123
456
789
CH
TRACKING/
SET
—
DVD MENU
AUDIO/
AUDIO SELECT
TIMER REC
REW/SEARCH SEARCH/F.FWD
INDEX/SKIP
REC/OTR
SELECT/
ENTER
CH
SET UP/
VCR MENU
ZOOM
MEMORY/
COUNTER RESET
ZERO RETURN
SUB TITLE/
ATR
PLAY
STOP
VCR/DVD
DISPLAY/CALL
INPUT SELECT
0
CLEAR/
RETURN
CANCEL
TITLE REPEA T A-B
ANGLE/
CLOCK/
COUNTER
PLAY MODE/
TV/VCR
SPEED
SKIP/
INDEX
SLOW PAUSE/STILL
TRACKING/
Page
POWER Power on/off 18
EJECT Eject a cassette tape 24
OPEN/CLOSE Open or Close the tray 37
VCR/DVD Switch to operate VCR or DVD 18,40
0-9 Direct channel selection of TV 23,28
Input setting 41
Enter a password 45
DISPLAY/CALL Display VCR or DVD operation status 29,56
INPUT SELECT Switch the connected TV to external mode 34
CH
/ Select channel of the connected TV or VCR
28,30
/ Cursor buttons 36
TRACKING/SET –/+
Setting buttons 31,32
Manual tracking buttons in playback mode 26
/ Cursor buttons 18
SELECT/ENTER Enter information in the menu 18
SET
+
DVD MENU Select menu of a DVD disc 44
SET UP/VCR MENU
Select option in the menu 36
Display menu of setup 18,36,45-55
CLEAR/CANCEL Delete Timer program 32
Cancel input data in the setting mode 21,31,39,41
RETURN Remove DVD set up menu 36
ZOOM Zoom (for DVD playback) 39
TITLE Select title of a DVD disc 44
REPEAT A-B
AUDIO/AUDIO SELECT
Repeat playback between A and B (DVD/CD)
Switches sound between mono, stereo and SAP
40
33
Change sound track language of DVD 43
MEMORY Arrange the order of titles, chapters or tracks 41
ZERO RETURN
Stop the tape when the counter reaches 00:00
27
ANGLE Change playback angle of a DVD disc 44
COUNTER RESET
CLOCK/COUNTER
TIMER REC
Reset the counter to 00:00 27
Change the front Display mode 27
Set the unit to start recording at a preset time.31,32
SUB TITLE Set Subtitle of a DVD disc 43
A TR Digital AUTO TRACKING 26
PLAY MODE Select playback mode 40,41
SPEED Sets the tape speed for recording 28,30
TV/VCR Switches between TV and VCR 18,29
REW/SEARCH Rewind/Review playback 25,26,38
PLAY Playback 25,37
F .FWD/SEARCH
SKIP
INDEX
/
/ Search for the INDEX mark of a tape 27
Fast Forward/Forward search playback
25,26,38
Skip chapter to forward or reverse direction
38
STOP Stop 25,37
REC/OTR Recording 28,30,34
SLOW Slowmotion playback 26,38
PAUSE/STILL Still picture/Recording pause on/off 26,29,34,38
10
2A77001AE(06-11) 8/29/02, 10:48 AM10
Page 11
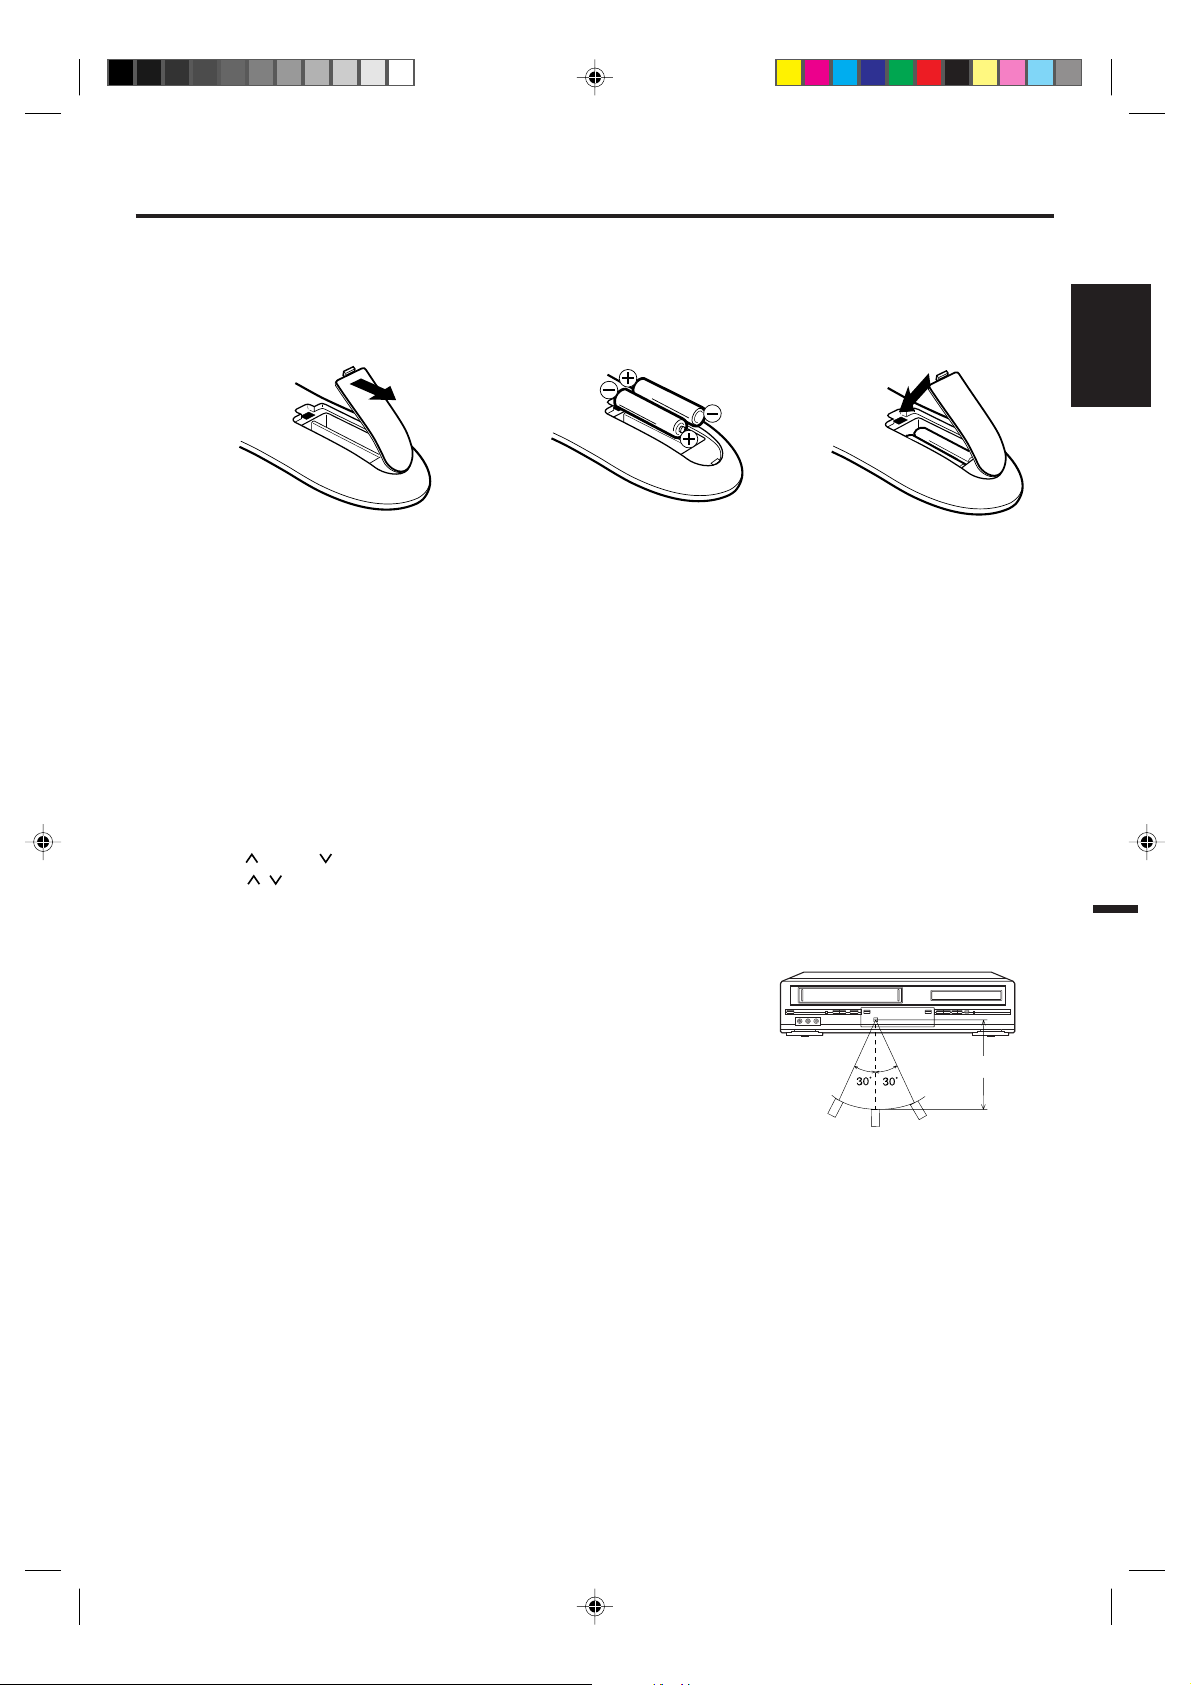
Inserting Batteries
Remote control
Open the battery
1
compartment cover in the
direction of the arrow.
Install two "AAA" batteries (not
23
supplied),
polarity diagram in the battery
compartment.
paying attention to the
Replace the compartment
cover.
Battery precautions
The precautions below should be followed when using batteries in this device:
1.Use only the size and type of batteries specified.
2.Be sure to follow the correct polarity when installing the batteries as indicated in the battery compartment.
Reversed batteries may cause damage to the device. To avoid a potential short circuit, insert the “–” end first.
3.
Do not mix different types of batteries together (e.g. Alkaline and Carbon-zinc) or old batteries with fresh ones.
4.If the device is not to be used for a long period of time, remove the batteries to prevent damage or injury from
possible battery leakage.
5.Do not try to recharge batteries not intended to be recharged; they can overheat and rupture. (Follow battery
manufacturer’s directions.)
Remote control basics
• Press POWER to turn the DVD/VCR on or off.
• Make sure VCR/DVD switch is set to VCR/DVD.
• Tap CH
• The CH / and SET +/– are also used to navigate on-screen menu system.
• You can directly access specific channels using Number keys pad.
• Each press of VCR/DVD on the remote control, switches the screen between the VCR screen (VCR mode)
and the DVD screen (DVD mode).
or CH to move through the channels one channel at a time.
ENGLISH
Operation
• Aim the remote control at the remote sensor and press control buttons
to operate.
• Operate the remote control within 30° angle on either side of the remote
sensor, up to a distance of Approx. 5 meters.
Approx. 5 meters
11
2A77001AE(06-11) 8/29/02, 10:48 AM11
Page 12

Basic connections
If you are using an antenna system, follow these instructions. If you are a cable (CATV) subscriber,
ahead to page 14 for the proper connections.
skip
ANTENNA TO DVD/VCR CONNECTION
The DVD/VCR must be connected "between" the antenna and the TV. First, disconnect the antenna from the TV
and connect it to the DVD/VCR. Then connect the DVD/VCR to the TV . Below are 3 common methods of connecting
an antenna system to a DVD/VCR. Find the type of antenna system you are using and follow the connection
diagram.
Combination VHF/UHF Antenna with 75 ohm Coaxial Cable
1
75 ohm Coaxial Cable
Combination VHF/UHF Antenna with 300 ohm Twin Lead (Flat) Wire
2
DVD/VCR
IN
(ANT.)
OUT
(TV)
DVD/VCR
Matching Transformer
300 ohm Input
75 ohm output
(not supplied)
300 ohm Twin Lead (Flat) Wire
Separate VHF and UHF Antennas
3
75/300 ohm Inputs
VHF
NOTE:
NOTES: • A clear picture will not be obtained by the DVD/VCR unless the antenna signal is good. Connect the
If both VHF and UHF antennas have 300 ohm twin lead (flat) wires, use a combiner having two 300
ohm inputs and one 75 ohm output.
antenna to the DVD/VCR properly.
• For better quality recording, an indoor antenna or a telescopic antenna is not recommended. The use of
an outdoor type antenna is required.
• If you are not sure about the connection, please refer to qualified service personnel.
UHF
300 ohm Twin Lead (Flat) Wire
75 ohm Coaxial Cable
Combiner
75 ohm output
(not supplied)
IN
(ANT.)
OUT
(TV)
DVD/VCR
IN
(ANT.)
OUT
(TV)
12
2A77001AE(12-15) 8/29/02, 11:03 AM12
Page 13
Basic connections
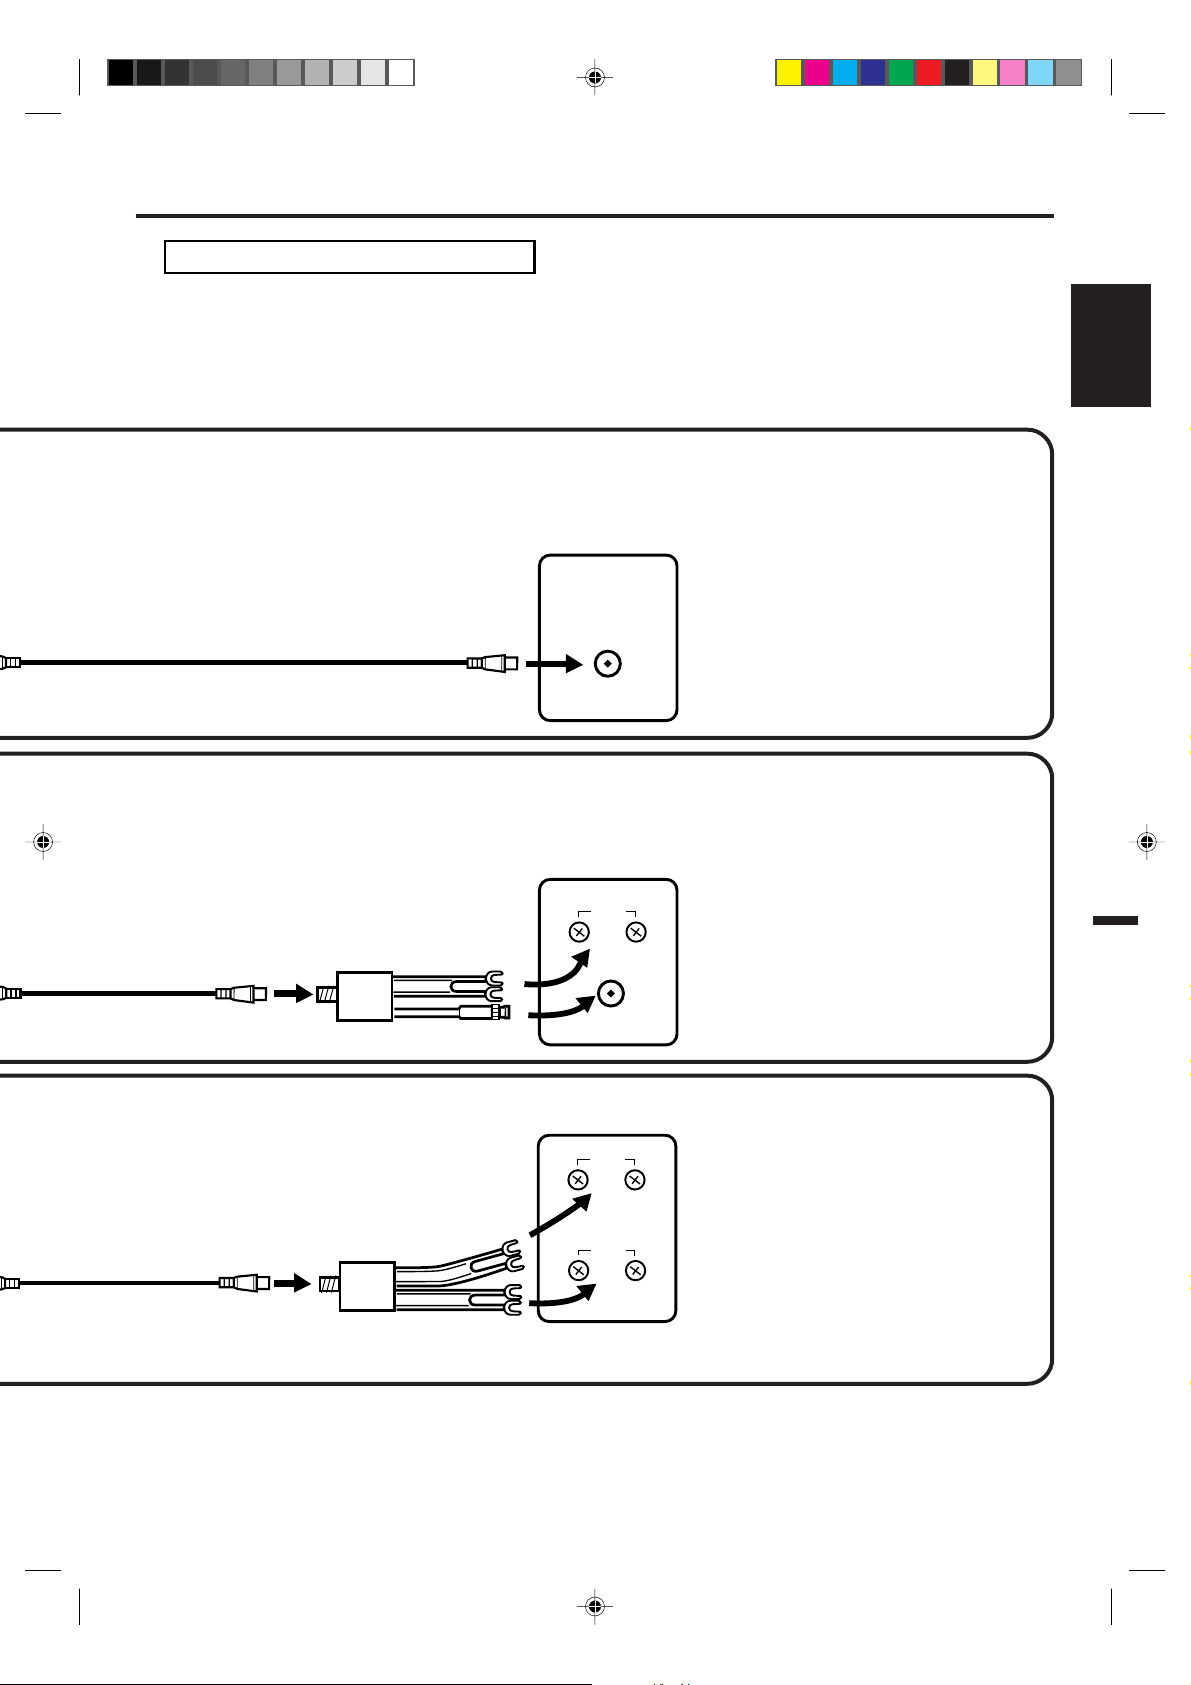
DVD/VCR TO TV CONNECTION
After you have connected the antenna to the DVD/VCR, you must connect the DVD/VCR to the TV.
Below are 3 common methods of connecting your DVD/VCR to a TV . Find the type of TV you are using and follow
the connection diagram.
This DVD/VCR has a single 75 ohm output for connection to a TV . If your TV has separate VHF and UHF antenna
inputs (numbers 2 and 3 below), use a splitter to connect the DVD/VCR to the TV for VHF and UHF reception.
ENGLISH
75 ohm Coaxial Cable (supplied)
Splitter
75 ohm Input
75/300 ohm outputs
75 ohm Coaxial Cable
(supplied)
(not supplied)
TV
VHF/UHF IN
TV
UHF
VHF
NOTE: If a VHF or UHF antenna is
used, set the TV/CATV
menu option to the "TV"
mode.
TV with single 75 ohm VHF/UHF
antenna input
NOTE: If a VHF or UHF antenna is
used, set the TV/CATV
menu option to the "TV"
mode.
TV with 300 ohm UHF and 75 ohm VHF
antenna inputs
Splitter
75 ohm Input
300 ohm outputs
75 ohm Coaxial Cable
(supplied)
2A77001AE(12-15) 8/29/02, 11:03 AM13
(not supplied)
TV
UHF
VHF
NOTE: If a VHF or UHF antenna is
used, set the TV/CATV
menu option to the "TV"
mode.
TV with 300 ohm UHF and 300 ohm VHF
antenna inputs
13
Page 14
CATV (CABLE TV) connections
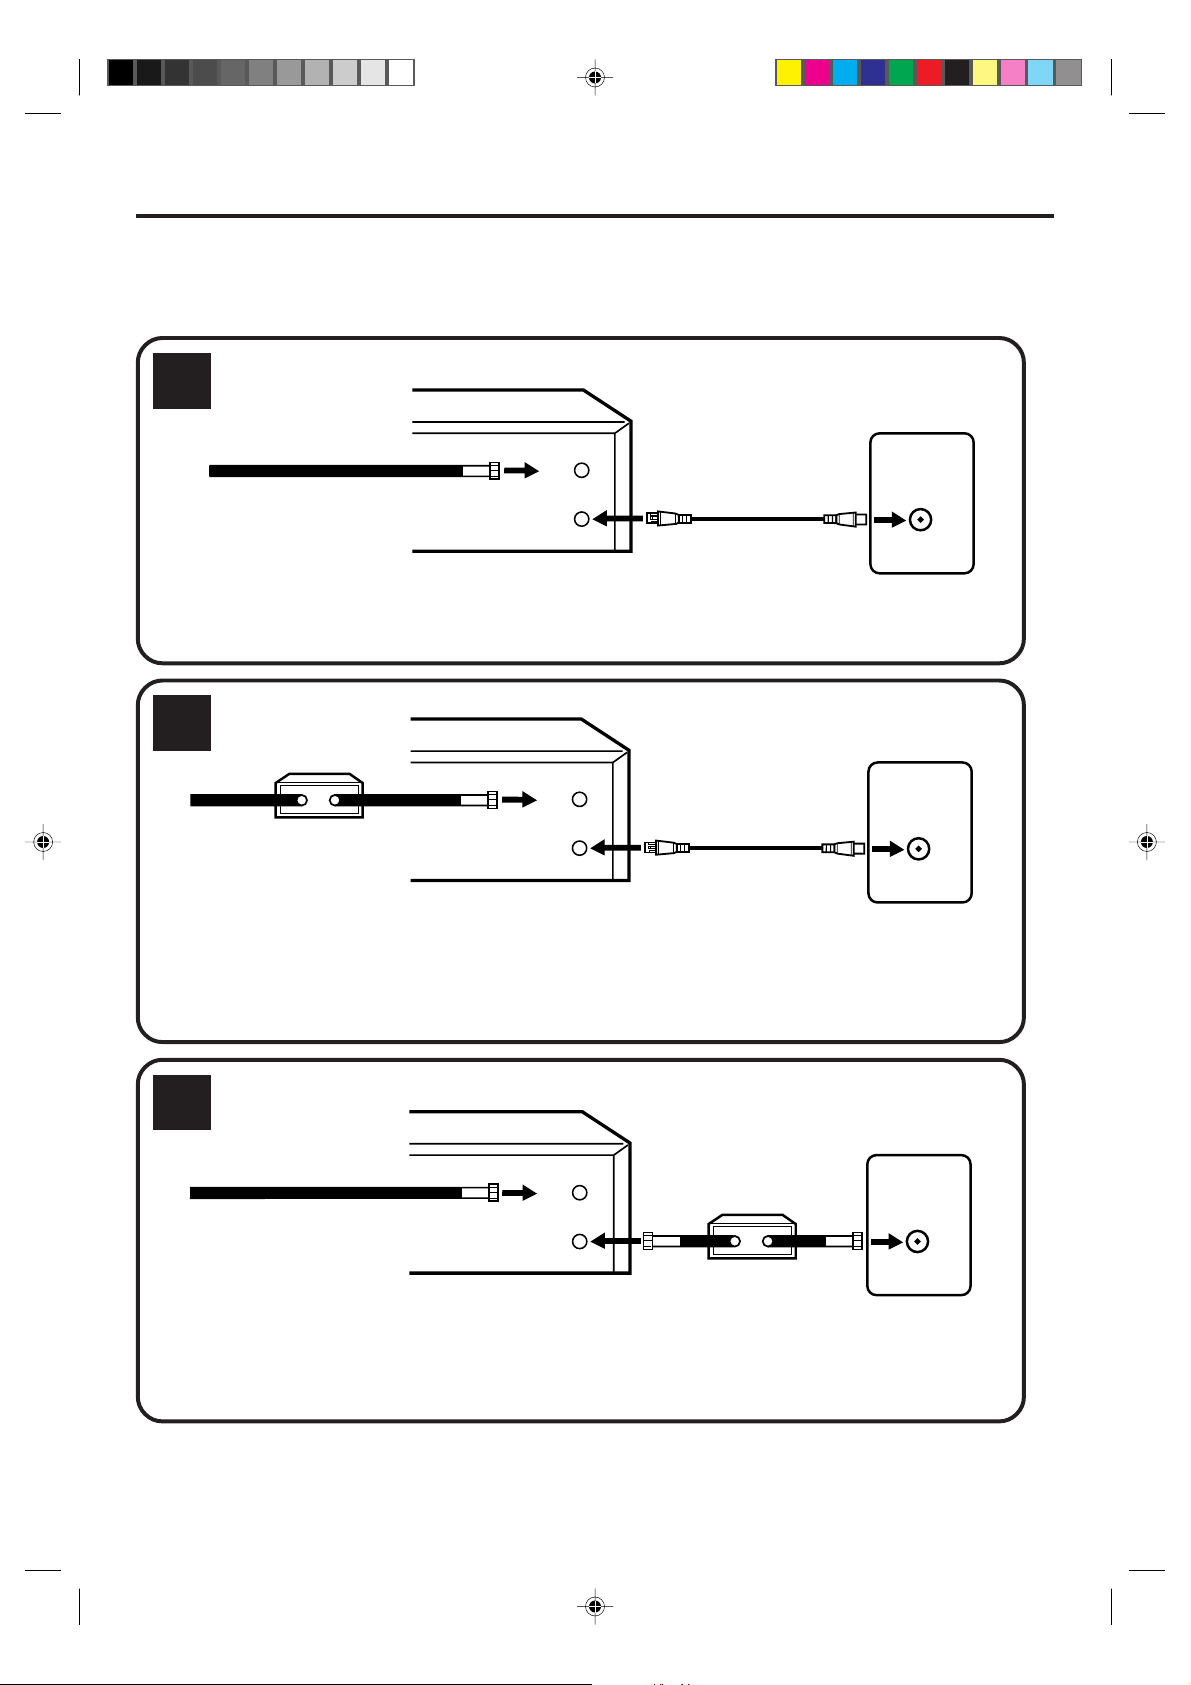
Many cable companies offer services permitting reception of extra channels including pay or subscription channels.
This DVD/VCR has an extended tuning range and can be tuned to most cable channels without using a cable
company supplied converter box, except for those channels which are intentionally scrambled. If you subscribe to
a special channel which is scrambled, you must have a descrambler box for proper reception.
1
DVD/VCR
IN
Incoming Cable
ALLOWS:*Recording of nonscrambled channels.
Use of the programmable timer.
*
Recording of one channel while watching another.
*
2
Converter/
Descrambler
Incoming
Cable
ALLOWS:*Recording of channels through the converter box
(scrambled and unscrambled).
Using the programmable timer to record only the
*
channel selected at the converter box.
PREVENTS:*Recording one channel while watching another.
Using the DVD/VCR tuner to select channels.
*
(ANT.)
OUT
(TV)
DVD/VCR
(ANT.)
OUT
(TV)
IN
TV
VHF/UHF
IN (ANT)
TV
VHF/UHF
IN (ANT)
NOTE:
To record from converter/descrambler,
DVD/VCR tuner must be tuned to the
converter output channel, usually
channel 3 or 4.
3
DVD/VCR
TV
IN
Incoming Cable
ALLOWS:*Recording of nonscrambled channels.
Use of the programmable timer.
*
Recording an unscrambled channel while watching
*
any channel selected at the converter box.
PREVENTS: Recording scrambled channels.
(ANT.)
OUT
(TV)
Converter/Descrambler
NOTE:
If you are playing a tape or using the
tuner built into the DVD/VCR, the
converter must be set to the video
channel output of the DVD/VCR (either
3 or 4).
VHF/UHF
IN (ANT)
NOTE: Whenever a Converter/Descrambler box is placed before the DVD/VCR, you must tune the DVD/VCR
to the output of the Converter/Descrambler box, usually channel 3 or 4.
14
2A77001AE(12-15) 8/29/02, 11:03 AM14
Page 15
CATV (CABLE TV) connections
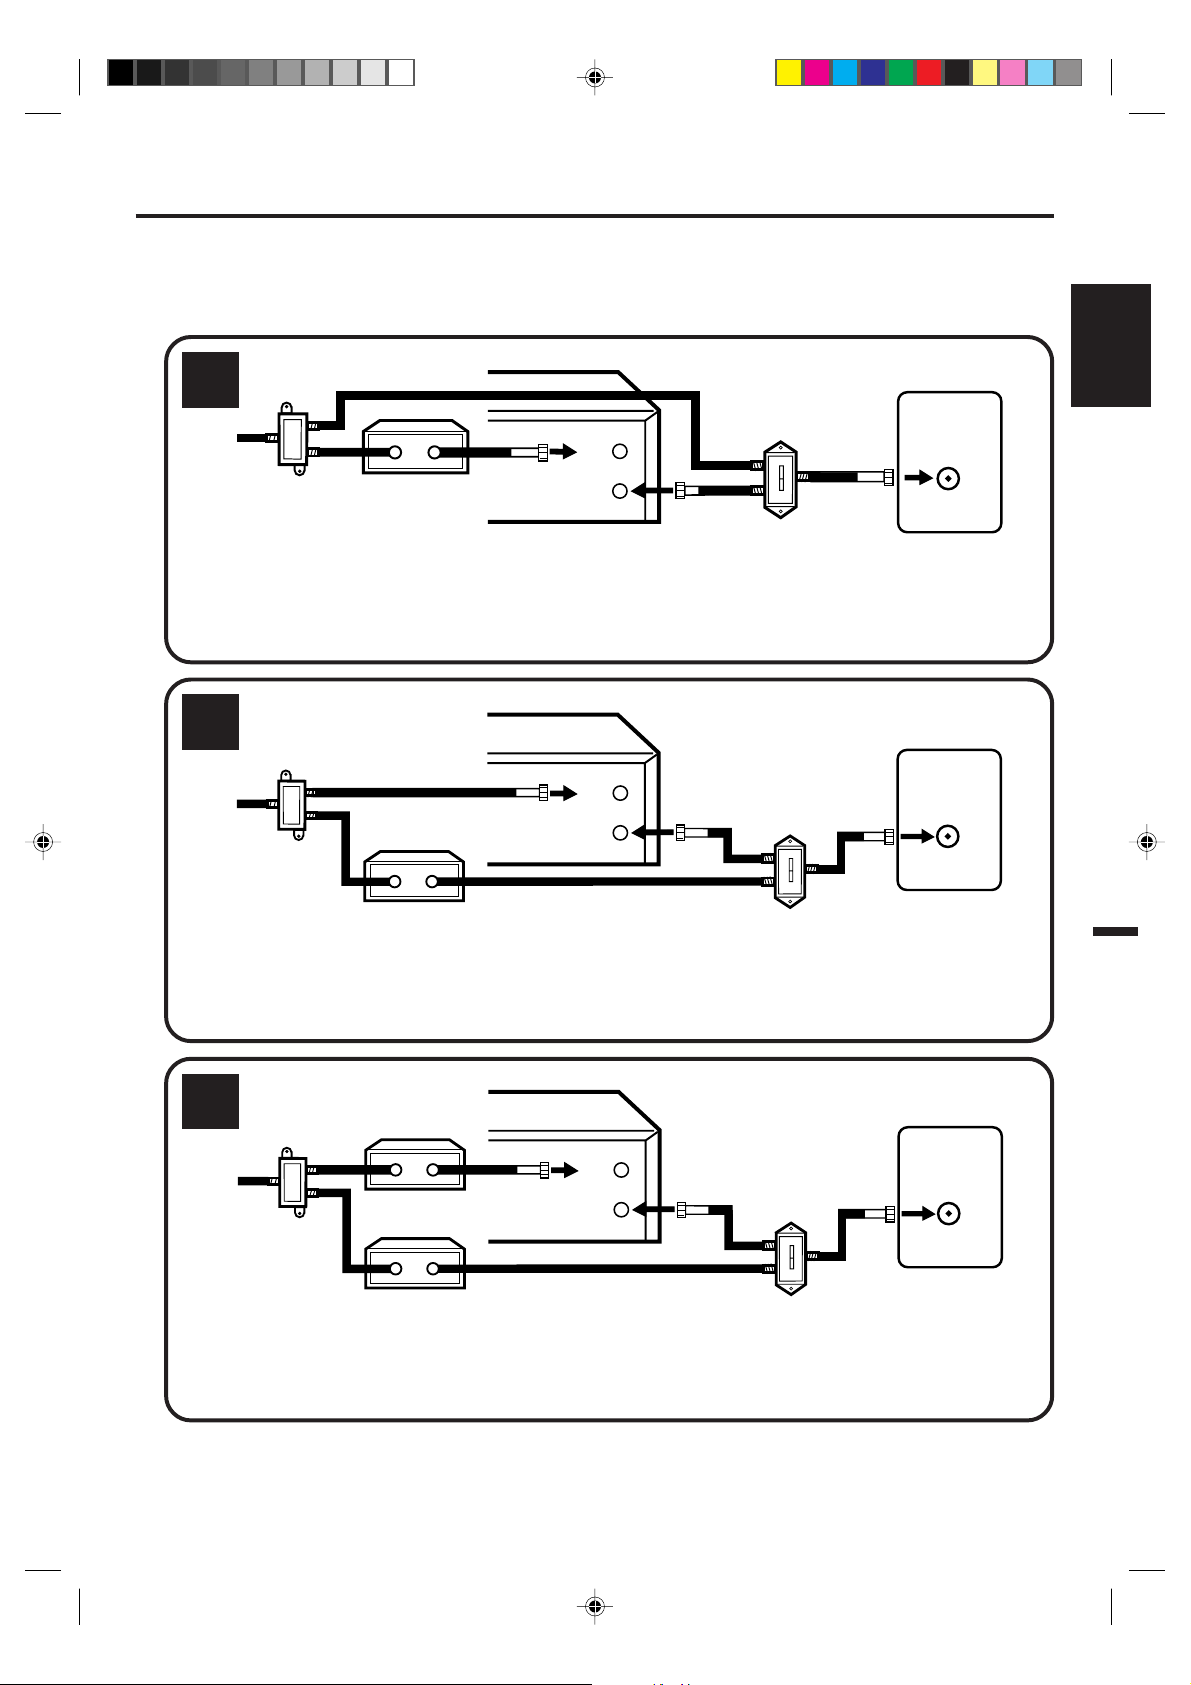
IMPORTANT: Make sure the TV/CATV menu option is set to the "CATV" mode.
This DVD/VCR cannot receive scrambled programs since it does not contain a descrambler. In order to receive scrambled
programs, your existing descrambler must be used. Descrambler boxes are available from cable companies. Consult
your local cable company for more information concerning connection to their descrambler equipment. There are many
ways to connect your DVD/VCR to a cable system. Below are six common methods of connection.
DVD/VCR
4
Splitter
TV
ENGLISH
A/B Switch
A
B
Incoming
Cable
Converter/Descrambler
IN
(ANT.)
OUT
(TV)
ALLOWS:*Recording of one channel while watching another.
Using the programmable timer to record only the channel selected at the converter box.
*
Recording of all channels through the converter box.
*
PREVENTS:*Watching scrambled channels while recording another channel.
Using the DVD/VCR tuner to select channels.
*
DVD/VCR
5
Splitter
IN
(ANT.)
Incoming
Cable
Converter/
Descrambler
ALLOWS:*Recording of nonscrambled channels.
Recording of one channel while watching another.
*
Watching premium channels through the converter while recording nonscrambled channels.
*
Using the programmable timer.
*
PREVENTS: Recording scrambled channels.
OUT
(TV)
A/B Switch
A
B
VHF/UHF
IN (ANT)
TV
VHF/UHF
IN (ANT)
6
Splitter
Incoming
Cable
ALLOWS:*Recording of all channels through the converter box.
Recording a scrambled or unscrambled channel while watching another (scrambled or
*
unscrambled) channel.
Using the programmable timer to record only the channel selected at the converter box.
PREVENTS: Using the DVD/VCR tuner to select channels.
2A77001AE(12-15) 8/29/02, 11:03 AM15
*
Converter/
Descrambler
Converter/
Descrambler
DVD/VCR
IN
(ANT.)
OUT
(TV)
A/B Switch
A
B
TV
VHF/UHF
IN (ANT)
15
Page 16
Playback connection
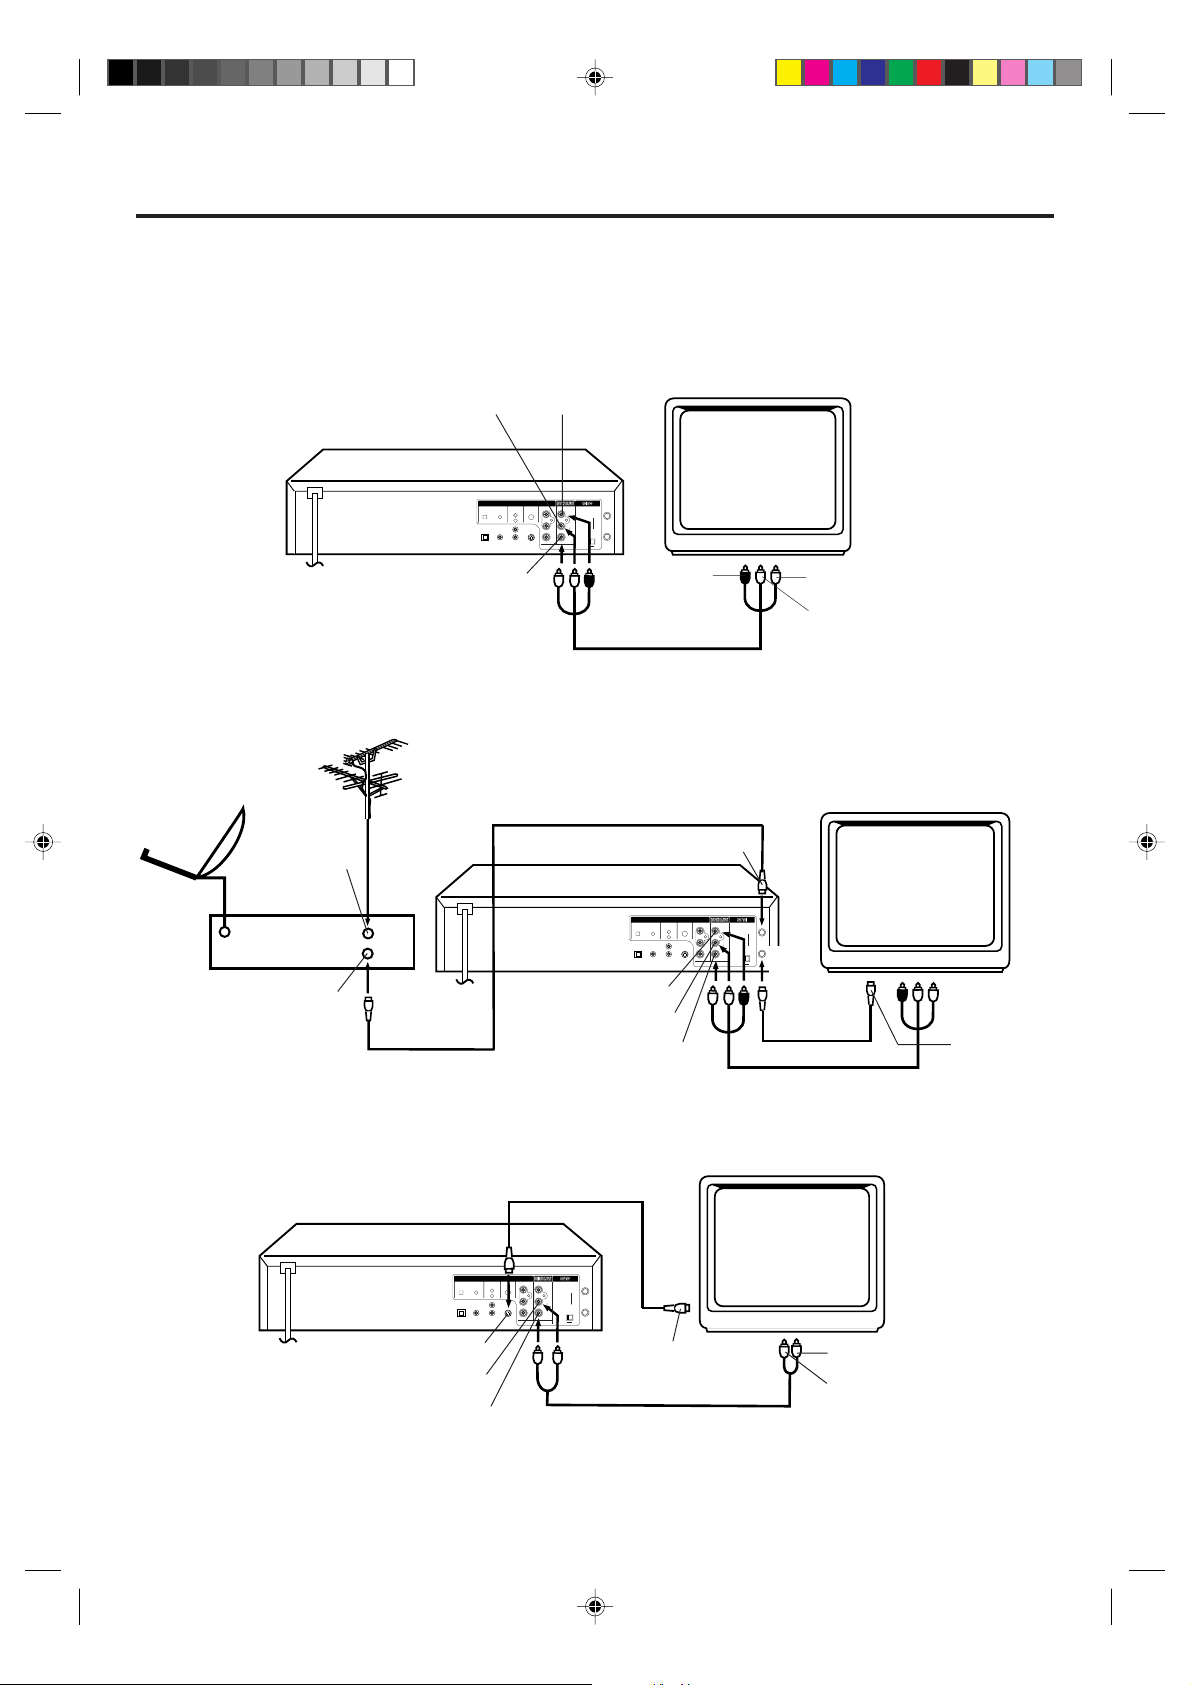
The exact arrangement you use to interconnect various video and audio components to the DVD/VCR is dependent
on the model and features of each component. Check the Owner's Manual provided with each component for the
location of video and audio inputs and outputs.
Connect to a TV with Audio/Video Output
Use the supplied AUDIO/VIDEO Cord.
TV
DVD/VCR
Audio (L) Output
DVD OUTPUT
DIGITAL AUDIO AUDIO S-VIDEO COMPONENT
OPTICAL COAXIAL
L
R
Video Output
IN
Y
VIDEO
( )
ANT.
PB/C
B
L
OUT
AUDIO
( )
TV
PR/C
R
R
CH.
3
4
Audio (R) Output
Connect to a BS TUNER
VHF/UHF
Antenna
Satellite
Antenna
ANT. Input
BS Tuner
ANT. output
Connect to a TV with S-Video Output
To Video
Input
AUDIO/VIDEO Cord (supplied)
75 ohm Coaxial Cable (not supplied)
DVD/VCR
T o ANT. Input
DVD OUTPUT
DIGITAL AUDIO AUDIO S-VIDEO COMPONENT
OPTICAL COAXIAL
Y
L
R
PB/C
B
PR/C
R
VIDEO
L
AUDIO
R
CH.
3
Video Output
Audio (L) Output
Audio (R) Output
AUDIO/VIDEO Cord (supplied)
IN
( )
ANT.
OUT
( )
TV
ANT .
4
Output
75 ohm Coaxial
Cable (supplied)
To Audio (R) Input
To Audio (L) Input
TV
T o ANT.
Input
DVD/VCR
S-Video Output
Audio (L) Output
16
2A77001AE(16-21) 8/29/02, 11:02 AM16
S-Video Cord (not supplied)
DIGITAL AUDIO AUDIO S-VIDEO COMPONENT
OPTICAL COAXIAL
Audio (R) Output
DVD OUTPUT
L
R
IN
Y
VIDEO
( )
ANT.
PB/C
B
L
OUT
AUDIO
( )
TV
PR/C
R
R
CH.
3
4
To S-Video Input
AUDIO Cord (not supplied)
TV
To Audio (R) Input
To Audio (L) Input
Page 17
Playback connection
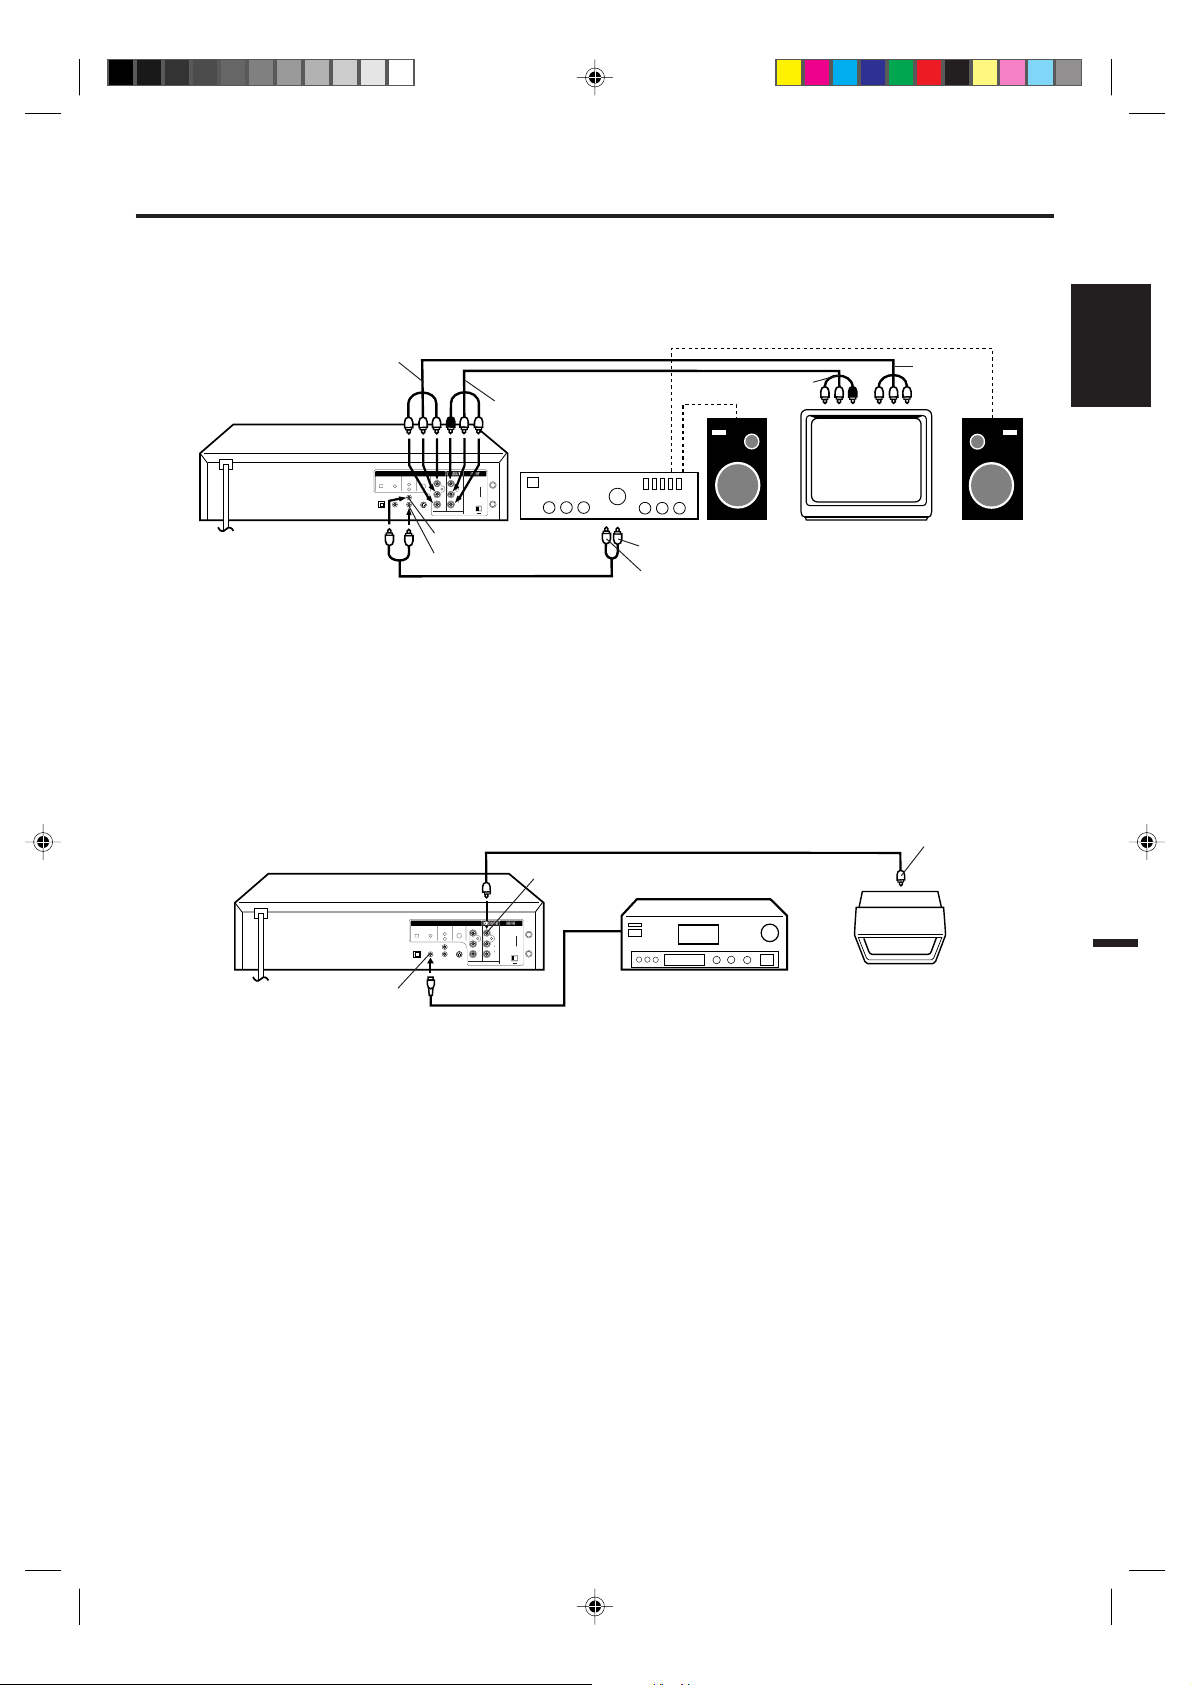
Connect to a Stereo Amplifier with Audio Output
If your TV has a COMPONENT VIDEO IN jack, you can connect the DVD/VCR to the TV with a COMPONENT
cable (not supplied) as shown below. COMPONENT VIDEO output jack can send higher quality video signal to a
TV than S-Video output.
To Component
Video Output
DVD/VCR
COMPONENT VIDEO Cord (not supplied)
AUDIO/VIDEO Cord (supplied)
T o Audio/Video Output
DVD OUTPUT
DIGITAL AUDIO AUDIO S-VIDEO COMPONENT
OPTICAL COAXIAL
L
R
Y
VIDEO
PB/C
B
L
AUDIO
PR/C
R
R
Audio (L) Output
Audio (R) Output
Stereo Amplifier
IN
( )
ANT.
OUT
( )
TV
CH.
3
4
T o Audio/Video Input
To Audio (L) Input
TV
To
Component
Video Input
To Audio (R) Input
AUDIO Cord (not supplied)
Connect to an AV Amplifier with built-in digital surround
If you are using an Amplifier with a built-in digital surround as follows, you can enjoy the various audio systems
such as Dolby Digital and DTS by using the Optical or Coaxial Digital Output.
Use this connection to connect an:
• AV amplifier with built-in *Dolby Digital decoder
• AV amplifier with built-in *DTS decoder
DVD/VCR
Coaxial digital
Audio Output
Video Output
DVD OUTPUT
DIGITAL AUDIO AUDIO S-VIDEO COMPONENT
OPTICAL COAXIAL
L
R
IN
Y
VIDEO
( )
ANT.
PB/C
B
L
OUT
AUDIO
( )
TV
PR/C
R
R
CH.
3
4
Coaxial digital cable
(not supplied)
Video cord (not supplied)
AV Amplifier with
built-in various
decoder as above
NOTE:
You may connect to a TV with a
Component video cable(not supplied) or
S-Video cable(not supplied) instead of
a video cable(not supplied).
To Video
Input
TV
ENGLISH
Connecting the optical digital cable
You may connect to an AV Amplifier with an Optical digital cable (not supplied) instead of a Coaxial digital
cable.
When you connect the optical digital cable (not supplied), remove the dust protection cap from the rear panel.
When not using the optical digital cable, attach the dust protection cap to protect against dust.
NOTES:
•
The OPTICAL, COAXIAL, DVD AUDIO L/R, S-VIDEO and COMPONENT jacks are useful only for DVD section.
On these connections, VCR functions can not be used and also the VCR MENUs don’t appear.
VHS signal is output only from the composite jack (DVD/VCR VIDEO/AUDIO OUTPUT) and UHF/VHF OUT.
•
When you make the connections above, do not set DOLBY DIGIT AL to DOLBY DIGIT AL or DTS to ON on the A V
Amplifier. If you do, a loud noise will suddenly come out from the speakers, affecting your ears or causing the
speakers to be damaged.
•
Caution for the optical digital audio output connector: Do not connect to an amplifier (with an optical digital input
connector) which does not contain a Dolby Digital or DTS decoder. Otherwise, any attempt to play DVDs may
cause such a high level of noise that it may be harmful to your ears and damage your speakers.
•
DTS audio will be output only from the COAXIAL or OPTICAL output. To hear DTS audio, DTS-Decoder is
necessary.
When playing DTS-encoded CDs, only noise will be heard from the speakers or analogue stereo outputs.
•
Some DTS decoders which do not support DVD-DTS interface may not work properly with the unit.
2A77001AE(16-21) 8/29/02, 11:02 AM17
17
Page 18
Setting the video channel / Setting the language
á
+/-/ENTER/MENU
ñ
SYSTEM SET UP
CLOCK SET
LANGUAGE/IDIOMA/LANGUE
NO NOISE BACKGROUND
AUTO CLOCK
STANDARD TIME
DAYLIGHT SAVING TIME
ON OFF
ON OFF
Setting the video channel
To view playback of a recorded tape
or DVD disk, or to watch a program
selected by the VCR's channel
selector, the TV must be set to
channel 3 or 4 (video channel).
OPEN/
CLOSE
EJECT
POWER
123
456
789
CH
TRACKING/
SET
—
DVD MENU
SELECT/
SET UP/
VCR MENU
ENTER
CH
CLEAR/
CANCEL
VCR/DVD
DISPLAY/CALL
INPUT SELECT
0
TRACKING/
SET
RETURN
+
When a TV is connected with the 75 ohm coaxial cable only.
Press POWER to turn on the DVD/VCR.
1
Press VCR/DVD to select the VCR mode. The VCR indicator
2
on the front panel will light.
Set the 3/4 Channel selector switch on the rear panel to CH
3
3 or 4.
Turn ON the TV and set to CH 3 or 4 to correspond with the
4
channel selected in step 3.
Press TV/VCR to select the VCR position.
5
The VCR indicator will appear in the display.
Select any channel to receive a TV station in your area.
6
The channel number will appear on the screen for about
4 seconds.
For a push-button TV tuner
If CH 3 or 4 corresponding to the video channel cannot be tuned
on your TV, proceed as follows: set the VCR 3/4 channel selector
and the TV to CH 3 or 4, play back a prerecorded tape and tune
the TV to receive a sharp color picture from the video cassette
recorder. Refer to your TV owner's manual for details.
ZOOM
TITLE REPEAT A-B
ANGLE/
AUDIO/
MEMORY/
AUDIO SELECT
TIMER REC
REW/SEARCH SEARCH/F.FWD
INDEX/SKIP
REC/OTR
COUNTER RESET
ZERO RETURN
SUB TITLE/
ATR
PLAY
STOP
CLOCK/
COUNTER
PLAY MODE/
TV/VCR
SPEED
SKIP/
INDEX
SLOW PAUSE/STILL
NOTES:
• If the unit does not operate
properly, or if it does not respond
to commands via the unit and/or
the remote control: Static electric-
ity , etc., may affect the player's operation. Disconnect the AC power cord
once, then connect it again.
• Both the VCR and the DVD have their
own menu option (See page 36).
• If no buttons are pressed for more
than 60 seconds, the MENU screen
will return to normal TV-operation
automatically.
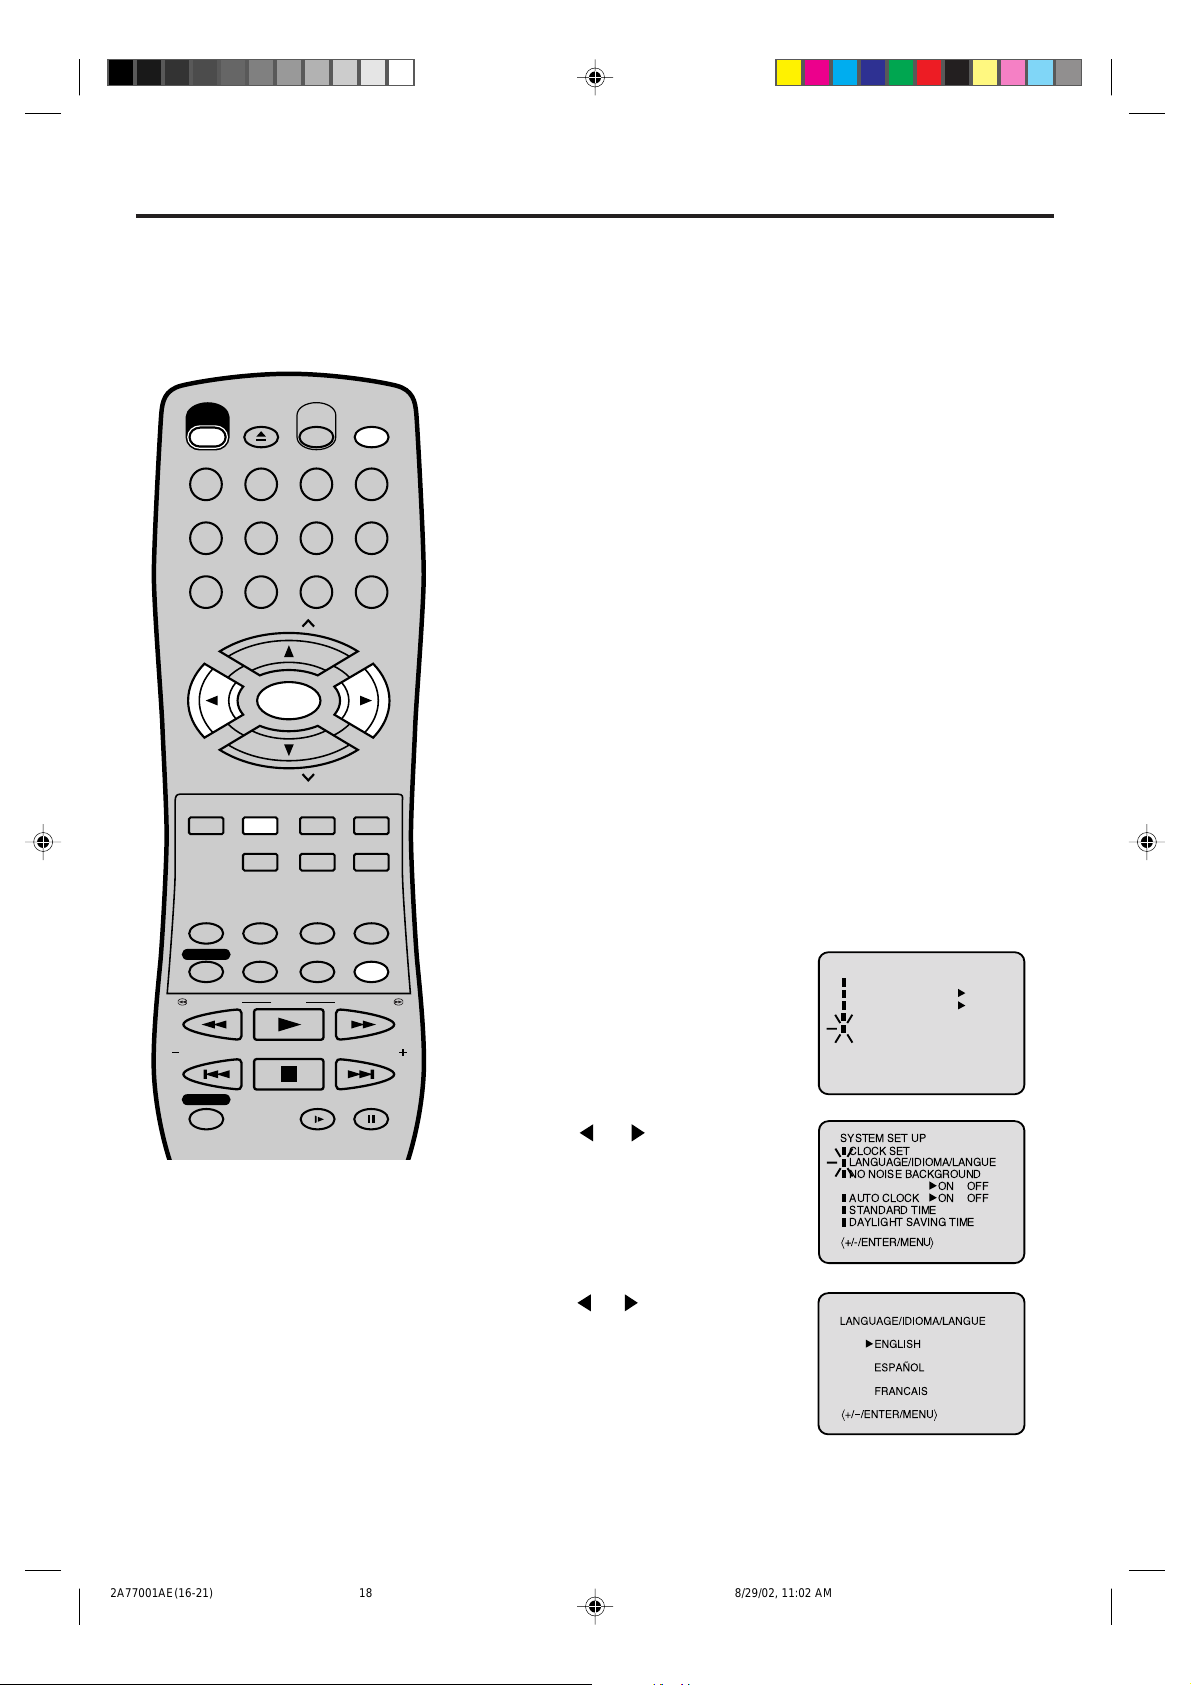
Setting the language
You can choose from three different languages (English,
French and Spanish) for the on-screen displays.
Press VCR MENU,
1
If you use the unit for the first time
and press VCR MENU, instead of
the main menu screen on the right
the “SYSTEM SET UP” menu
screen in step 2 may appear.
Press or to select the
2
“LANGUAGE” option, then press
ENTER.
Press
3
language: English (ENGLISH),
or to select the desired
Spanish (ESPAÑOL) or French
(FRANCAIS), then press ENTER.
Press VCR MENU until the MENU screen is cleared.
4
MENU
TIMER REC SET
AUTO REPEAT
SAP
CH SET UP
SYSTEM SET UP
〈+/-/ENTER/MENU〉
ON OFF
ON OFF
18
2A77001AE(16-21) 8/29/02, 11:02 AM18
Page 19
Auto clock setting
á
+/Ð/ENTER/MENU
ñ
STANDARD TIME
ATLANTIC
CENTRAL
PACIFIC
EASTERN
MOUNTAIN
ALASKA
HAWAII
AUTO
The Auto Clock feature enables automatic clock setting and updating, and also automates Time Zone
and Daylight Saving Time settings by receiving XDS (Extended Data Service) information carried on the
channel signal.
Preparation:
You must set the antenna connection before the AC cord plug is
inserted into the AC outlet.
EJECT
POWER
123
456
789
CH
TRACKING/
SET
Ð
DVD MENU
AUDIO/
AUDIO SELECT
TIMER REC
SELECT/
ENTER
CH
SET UP/
VCR MENU
ZOOM
MEMORY/
ZERO RETURN
SUB TITLE/
ATR
COUNTER RESET
PLAY MODE/
OPEN/
CLOSE
VCR/DVD
DISPLAY/CALL
INPUT SELECT
0
CLEAR/
RETURN
CANCEL
TITLE REPEAT A-B
ANGLE/
CLOCK/
COUNTER
TV/VCR
SPEED
TRACKING/
SET
+
Auto clock setting
After you set the antenna connection and plug the AC cord into an AC
outlet (in that order), you must WAIT 30 MINUTES before turning the
power switch to the on position to prevent interference with the Auto
Clock activation function.
After the clock is set automatically, you may have to set the Time
Zone and Daylight Saving Time.
Press POWER to turn on the DVD/VCR after the Auto Clock operation
is completed.
•
When shipped from factory, the AUTO CLOCK option is set to ON position.
•
If you turn the DVD/VCR on during Auto Clock setting, the clock is not set.
•
With cable box connection, if the Auto Clock Setting is unsuccessful,
please select the PBS channel carrying the XDS information, then
turn the DVD/VCR off. After 30 minutes, turn the DVD/VCR on, and
if
the clock is not set automatically, set the clock manually. (See page 21)
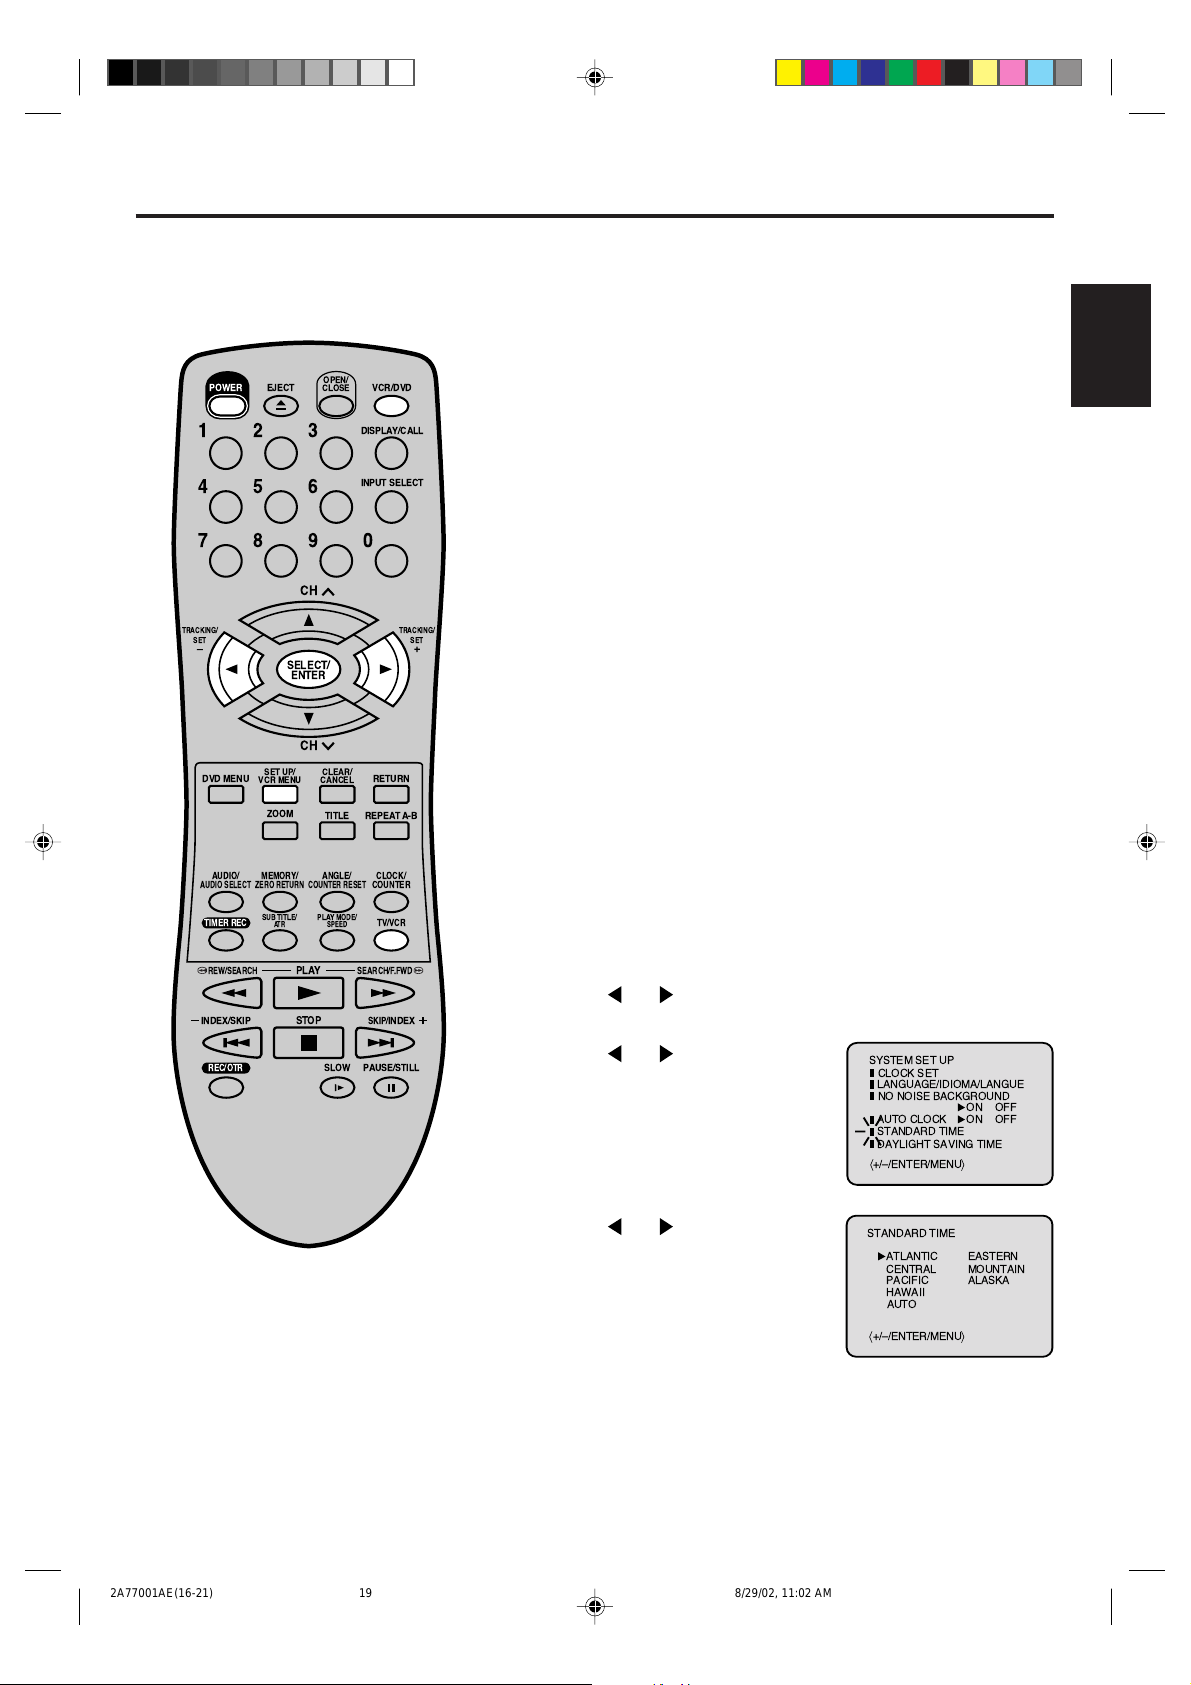
Time Zone setting (STANDARD TIME)
In the rare event that you live within broadcast range of two stations
in two different time zones, the DVD/VCR may recognize the
wrong station for the AUTO CLOCK set. To correct the situation:
Preparation:
Turn ON the TV.
•
When a TV is connected with an audio/video cable, select the video
•
input mode on the TV.
When a TV is connected only with an antenna cable, set to the
•
video channel 3 or 4. Then select VCR position with TV/VCR.
Press VCR/DVD to select the VCR mode. (The VCR indicator will
•
light.)
ENGLISH
REW/SEARCH SEARCH/F.FWD
INDEX/SKIP
REC/OTR
PLAY
STOP
SLOW PAUSE/STILL
SKIP/
INDEX
NOTE:
•
After performing the Auto Clock
setting, in some cases the clock may
display an incorrect time zone. Y ou can
correct the clock by selecting your
Time Zone setting per the instructions
above.
•
When the clock is not set or you set
the clock manually, Time Zone setting
is not available.
Press VCR MENU. The VCR menu screen will appear.
1
Press
or to select the SYSTEM SET UP menu, then
press ENTER.
Press or to select the
2
“STANDARD TIME” option, then
press ENTER.
Press or to select your Time
3
Zone, then press the ENTER.
Press VCR MENU until the MENU screen is cleared.
4
SYSTEM SET UP
CLOCK SET
LANGUAGE/IDIOMA/LANGUE
NO NOISE BACKGROUND
AUTO CLOCK
STANDARD TIME
DAYLIGHT SAVING TIME
á
+/Ð/ENTER/MENU
ON OFF
ON OFF
ñ
19
2A77001AE(16-21) 8/29/02, 11:02 AM19
Page 20
Auto clock setting
á
+/-/ENTER/MENU
ñ
SYSTEM SET UP
CLOCK SET
LANGUAGE/IDIOMA/LANGUE
NO NOISE BACKGROUND
AUTO CLOCK
STANDARD TIME
ON OFF
ON OFF
DAYLIGHT SAVING TIME
á
+/Ð/ENTER/MENU
ñ
DAYLIGHT SAVING TIME
ON
OFF
AUTO
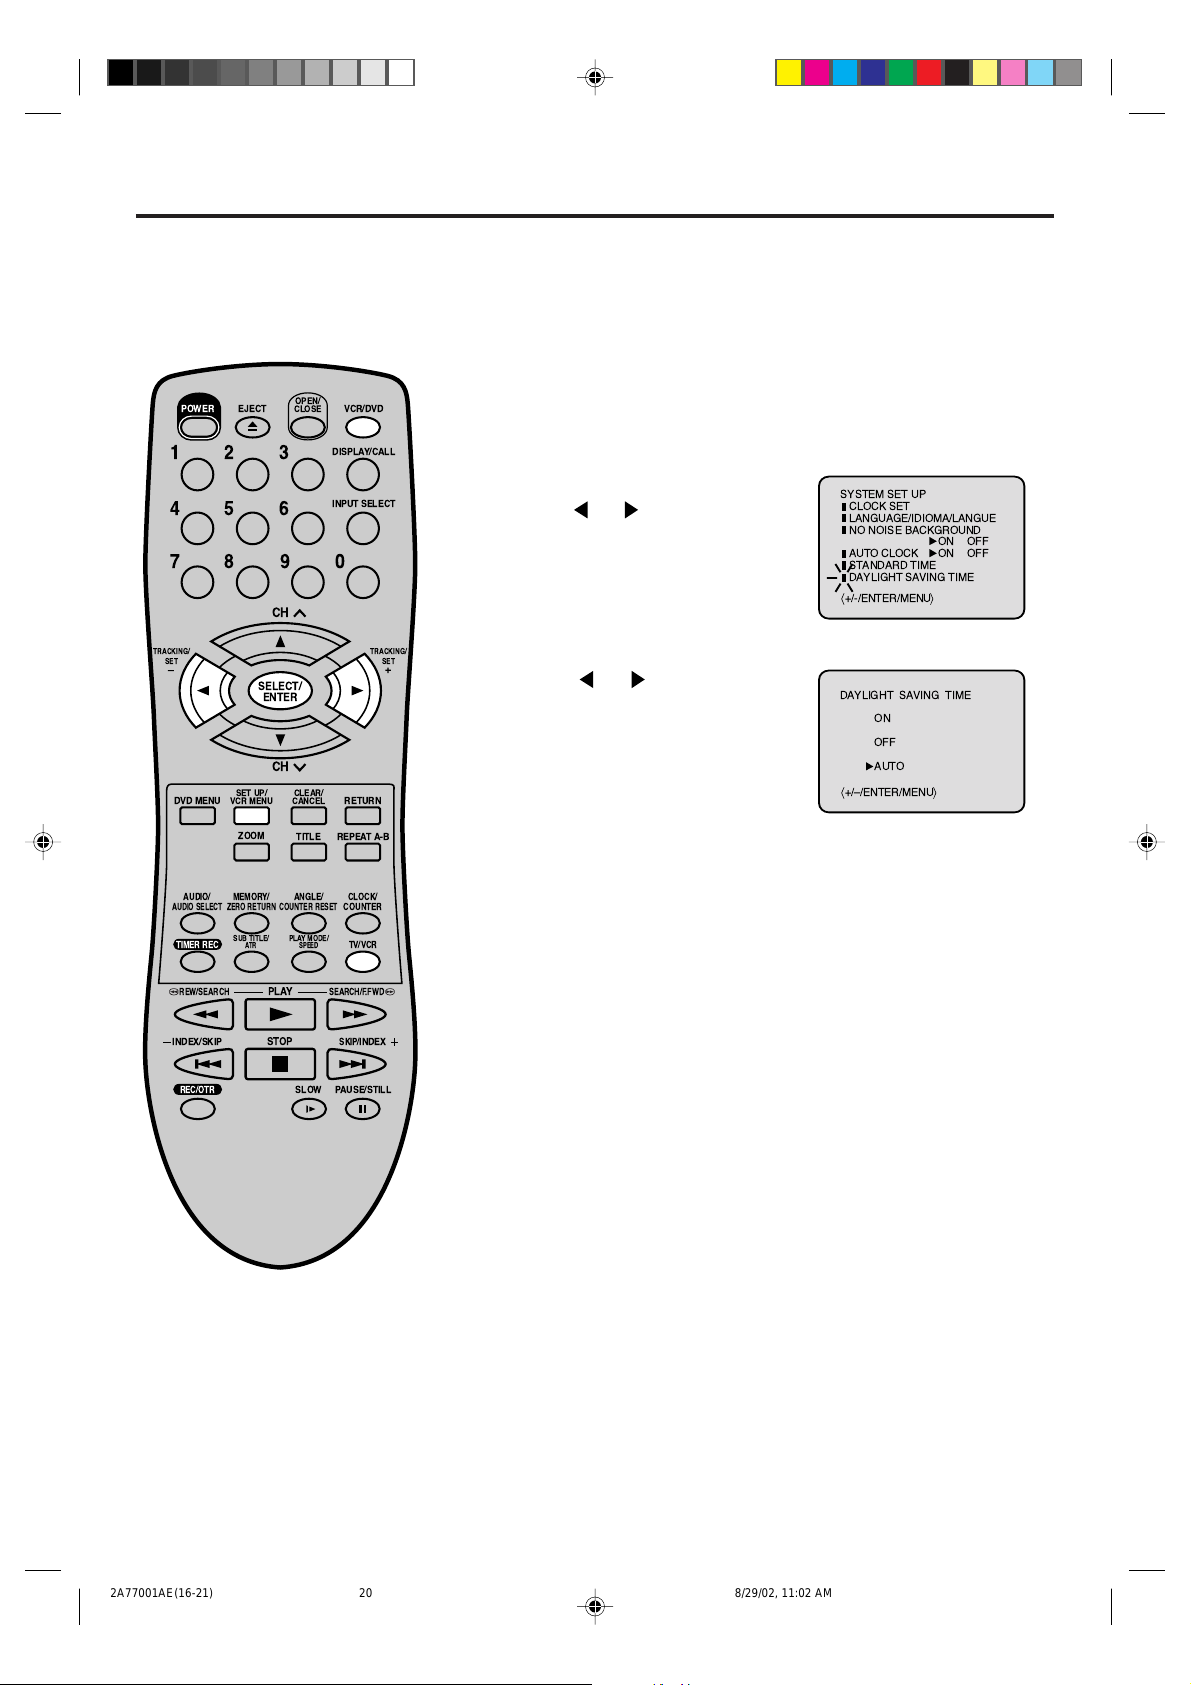
Daylight saving time setting
You can set the Daylight saving
time automatically or manually .
OPEN/
CLOSE
EJECT
POWER
123
456
789
CH
TRACKING/
SET
Ð
DVD MENU
AUDIO/
AUDIO SELECT
TIMER REC
SELECT/
ENTER
CH
SET UP/
VCR MENU
ZOOM
MEMORY/
ZERO RETURN
SUB TITLE/
ATR
COUNTER RESET
VCR/DVD
DISPLAY/CALL
INPUT SELECT
0
CLEAR/
RETURN
CANCEL
TITLE REPEAT A-B
ANGLE/
CLOCK/
COUNTER
PLAY MODE/
TV/VCR
SPEED
TRACKING/
SET
+
Preparation:
Turn ON the TV.
•
When a TV is connected with an audio/video cable, select the
•
video input mode on the TV.
When a TV is connected only with an antenna cable, set to the
•
video channel 3 or 4. Then select VCR position with TV/VCR.
Press VCR/DVD to select the VCR mode. (The VCR indicator
•
will light.)
Repeat the step 1 on page 19 and
1
press or to select DAYLIGHT
SAVING TIME, then press ENTER.
Press or to select one of
2
the options, then press ENTER.
ON:
for manual setting
(forward one hour)
OFF:
for manual setting
(back one hour)
AUTO:
for automatic setting
(read XDS in the signal)
When you want to set the Daylight Saving Time manually, on
the first Sunday in April you set to “ON”, and on the last
Sunday in October you set to “OFF”.
20
2A77001AE(16-21) 8/29/02, 11:02 AM20
REW/SEARCH SEARCH/F.FWD
INDEX/SKIP
REC/OTR
PLAY
STOP
SLOW PAUSE/STILL
SKIP/
INDEX
NOTES:
When shipped from factory, the DAYLIGHT SAVING TIME
•
option is set to “AUTO” position.
When the clock is not set, Daylight Saving Time setting is not
•
available.
•
When there is no Daylight Saving Time in your area, always
select “OFF” position in step 2.
Page 21
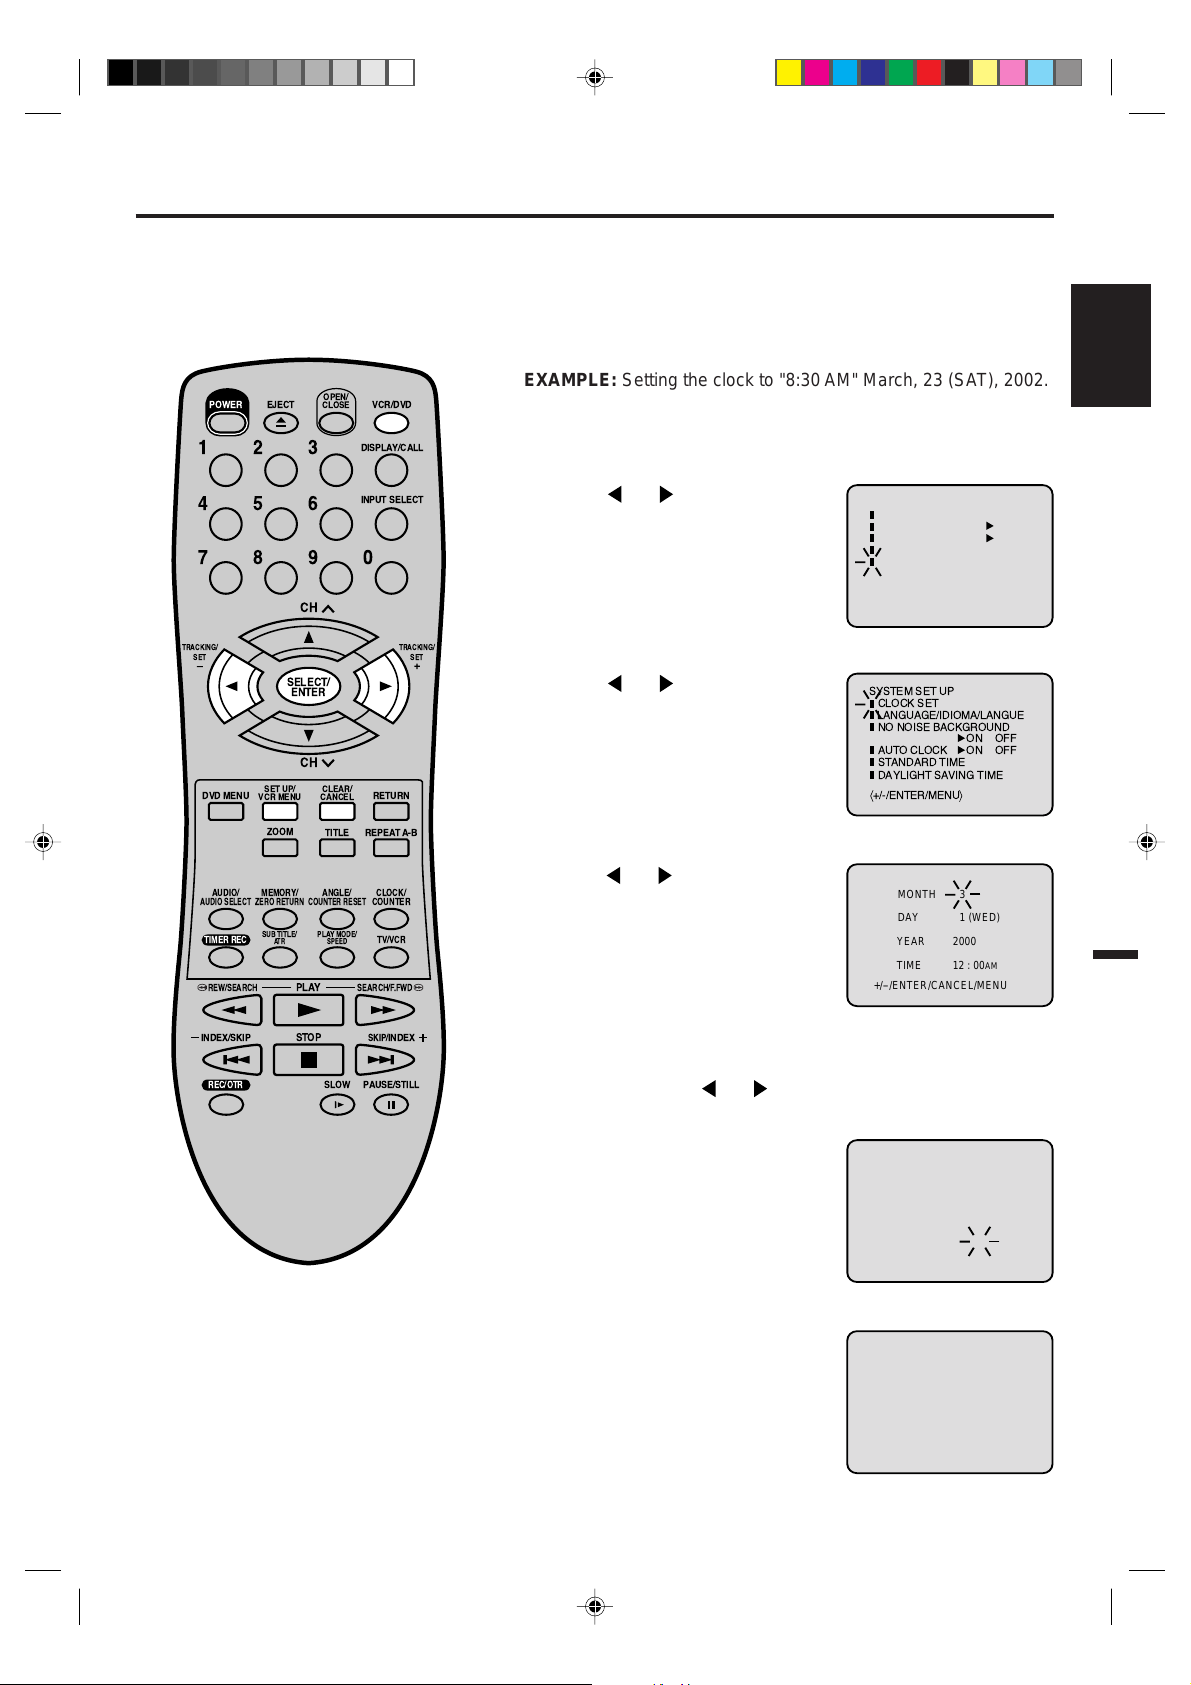
Manual clock setting
〈+/-/ENTER/CANCEL/MENU〉
MONTH
DAY
YEAR
TIME
3
1 (WED)
2000
12 : 00
AM
〈+/-/ENTER/CANCEL/MENU〉
MONTH
DAY
YEAR
TIME
3
23 (SAT)
2002
8 : 30
AM
8 : 30
AM
SAT
You must set the date and time for
timer recordings.
OPEN/
CLOSE
EJECT
POWER
123
456
789
CH
TRACKING/
SET
Ð
DVD MENU
SET UP/
VCR MENU
SELECT/
ENTER
CH
CLEAR/
CANCEL
VCR/DVD
DISPLAY/CALL
INPUT SELECT
0
TRACKING/
SET
RETURN
+
Preparation:
Turn ON the TV and set to the video input mode.
•
•
Press VCR/DVD to select the VCR mode. (The VCR indicator
will light.)
EXAMPLE: Setting the clock to "8:30 AM" March, 23 (SAT), 2002.
Press VCR MENU. The VCR menu screen will appear.
1
Press or to select the
2
“SYSTEM SET UP” menu, then
press ENTER.
Press or to select the
3
“CLOCK SET” option, then press
ENTER.
MENU
TIMER REC SET
AUTO REPEAT
SAP
CH SET UP
SYSTEM SET UP
〈+/-/ENTER/MENU〉
SYSTEM SET UP
CLOCK SET
LANGUAGE/IDIOMA/LANGUE
NO NOISE BACKGROUND
AUTO CLOCK
STANDARD TIME
DAYLIGHT SAVING TIME
á
+/-/ENTER/MENU
ON OFF
ON OFF
ON OFF
ON OFF
ñ
ENGLISH
ZOOM
TITLE REPEAT A-B
ANGLE/
AUDIO/
MEMORY/
ZERO RETURN
SUB TITLE/
ATR
PLAY
STOP
COUNTER RESET
AUDIO SELECT
TIMER REC
REW/SEARCH SEARCH/F.FWD
INDEX/SKIP
REC/OTR
CLOCK/
COUNTER
PLAY MODE/
TV/VCR
SPEED
SKIP/
INDEX
SLOW PAUSE/STILL
NOTE:
After a power failure or disconnection
of the power, the timer settings will be
lost. In this case, reset the present time.
Press or to set the month,
4
then press ENTER.
To make corrections any time during the process
Press CANCEL repeatedly until the item you want to change
blinks, then press or .
Set the day, year and time as in
5
step 4.
After setting the clock, date and
6
time starts functioning
automatically.
2A77001AE(16-21) 8/29/02, 11:02 AM21
21
Page 22
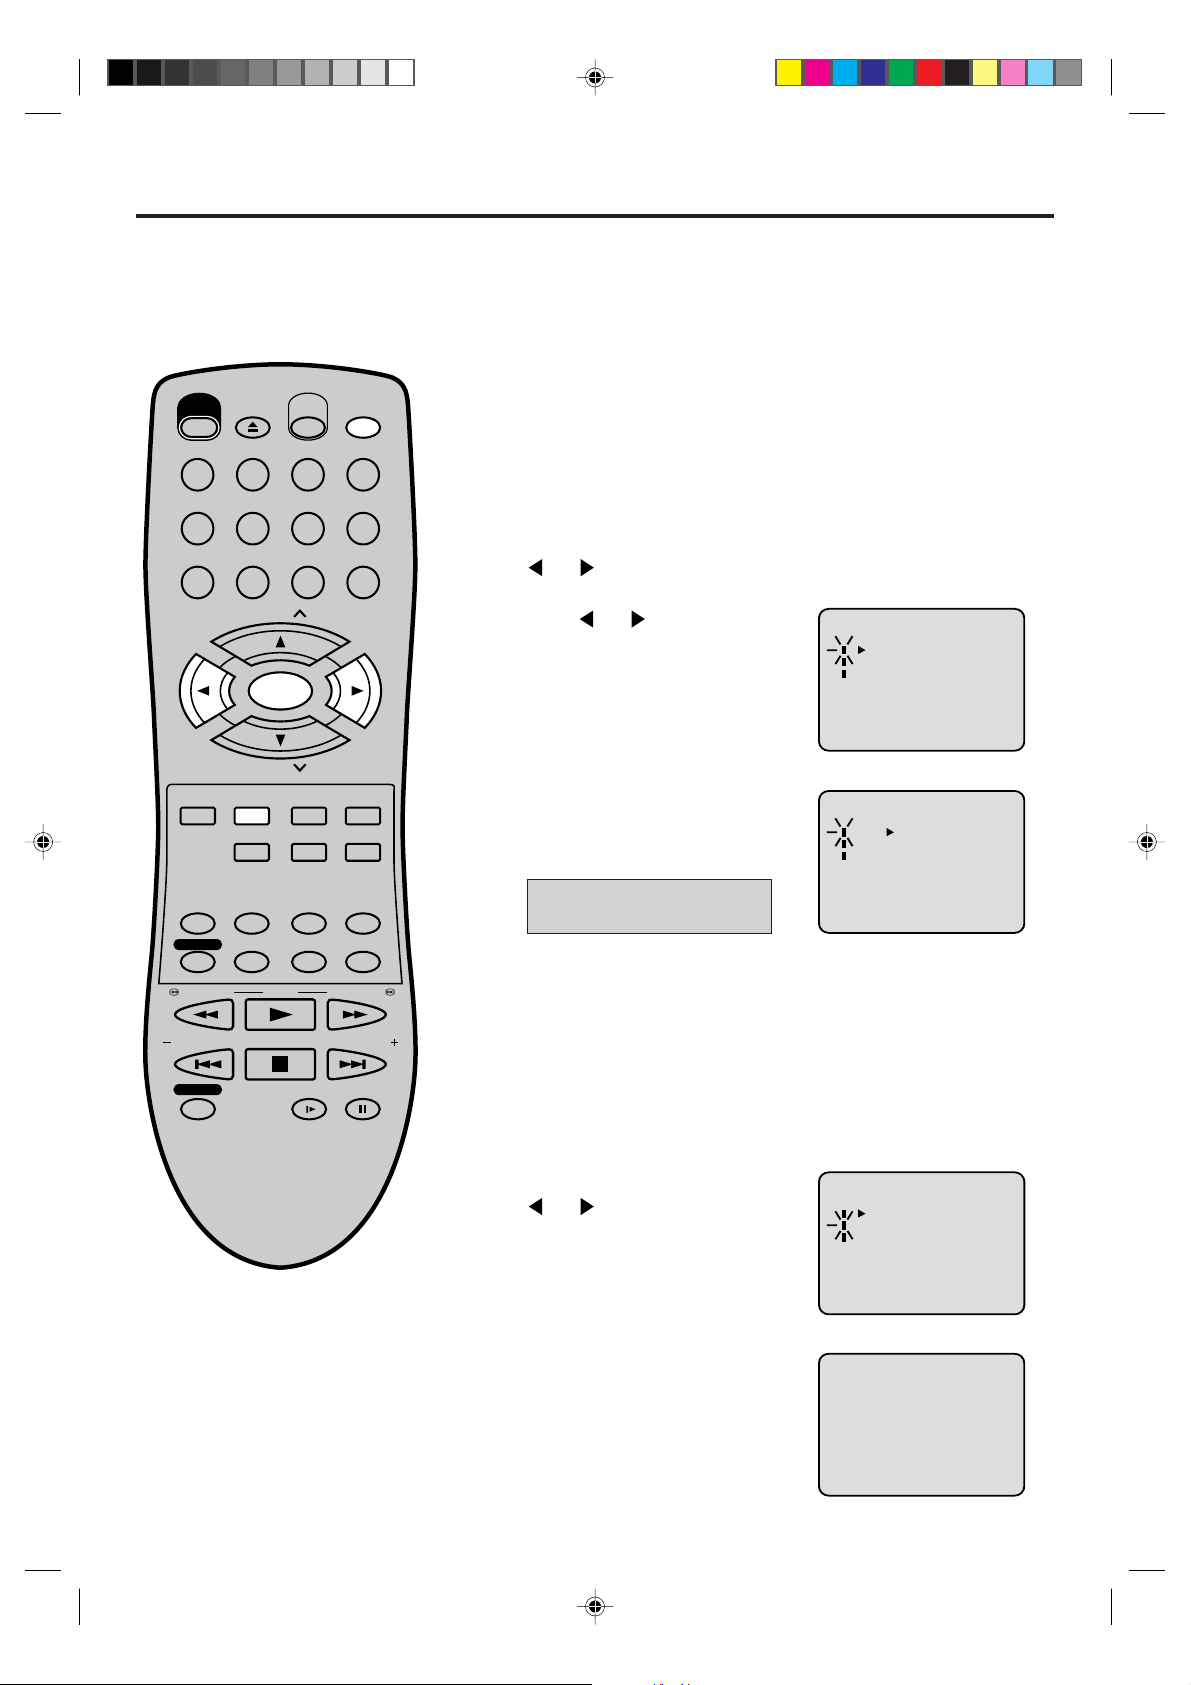
Tuner setting
〈+/—/ENTER/MENU〉
CH SET UP
TV CATV
AUTO CH MEMORY
ADD/DELETE
〈+/—/ENTER/MENU〉
CH SET UP
TV CATV
AUTO CH MEMORY
ADD/DELETE
〈+/-/ENTER/MENU〉
CH SET UP
TV CATV
AUTO CH MEMORY
ADD/DELETE
CH 002
This DVD/VCR is equipped with a channel memory feature which allows channels to skip up or down to
the next channel set into memory, skipping over unwanted channels. Before selecting channels, they
must be programmed into the DVD/VCR’s memory . In addition to normal VHF and UHF channels, this DVD/
VCR can receive up to 113 Cable TV channels. To use this DVD/VCR with an antenna, set the TV/CATV
menu option to the TV mode. When shipped from the factory, this menu option is in the CATV mode.
Preparation:
Turn ON the TV and set to the video input mode.
OPEN/
CLOSE
EJECT
POWER
123
VCR/DVD
DISPLAY/CALL
•
•
Press VCR/DVD to select the VCR mode. (The VCR indicator
will light.)
456
789
CH
TRACKING/
SET
—
DVD MENU
AUDIO/
AUDIO SELECT
TIMER REC
REW/SEARCH SEARCH/F.FWD
INDEX/SKIP
SELECT/
ENTER
CH
SET UP/
VCR MENU
ZOOM
MEMORY/
COUNTER RESET
ZERO RETURN
SUB TITLE/
ATR
PLAY
STOP
CLEAR/
CANCEL
TITLE REPEAT A-B
ANGLE/
PLAY MODE/
SPEED
INPUT SELECT
0
TRACKING/
SET
+
RETURN
CLOCK/
COUNTER
TV/VCR
SKIP/
INDEX
TV/CATV selection
Press VCR MENU. The VCR menu screen will appear. Press
1
or to select “CH SET UP”, then press ENTER.
Press or to select the “TV/
2
CATV” option.
Then press ENTER to select the
3
TV or CATV mode. The arrow
indicates the selected mode.
TV - VHF/UHF channels
CATV - CABLE TV channels
Press VCR MENU until the menu screen is cleared.
4
REC/OTR
SLOW PAUSE/STILL
NOTE:
Y ou can’t select “CH SET UP” if you
set the channel to “L”.
22
2A77001AE(22-27) 8/29/02, 11:01 AM22
Setting channels automatically
The VCR can receive a maximum of 181 channels by
presetting the channels into memory.
Repeat above step 1 and press
1
or to select “AUTO CH
MEMORY”.
Then press ENTER.
2
The auto tuning will start. The
channel display will count up and
when finished, the screen returns
to normal.
Page 23
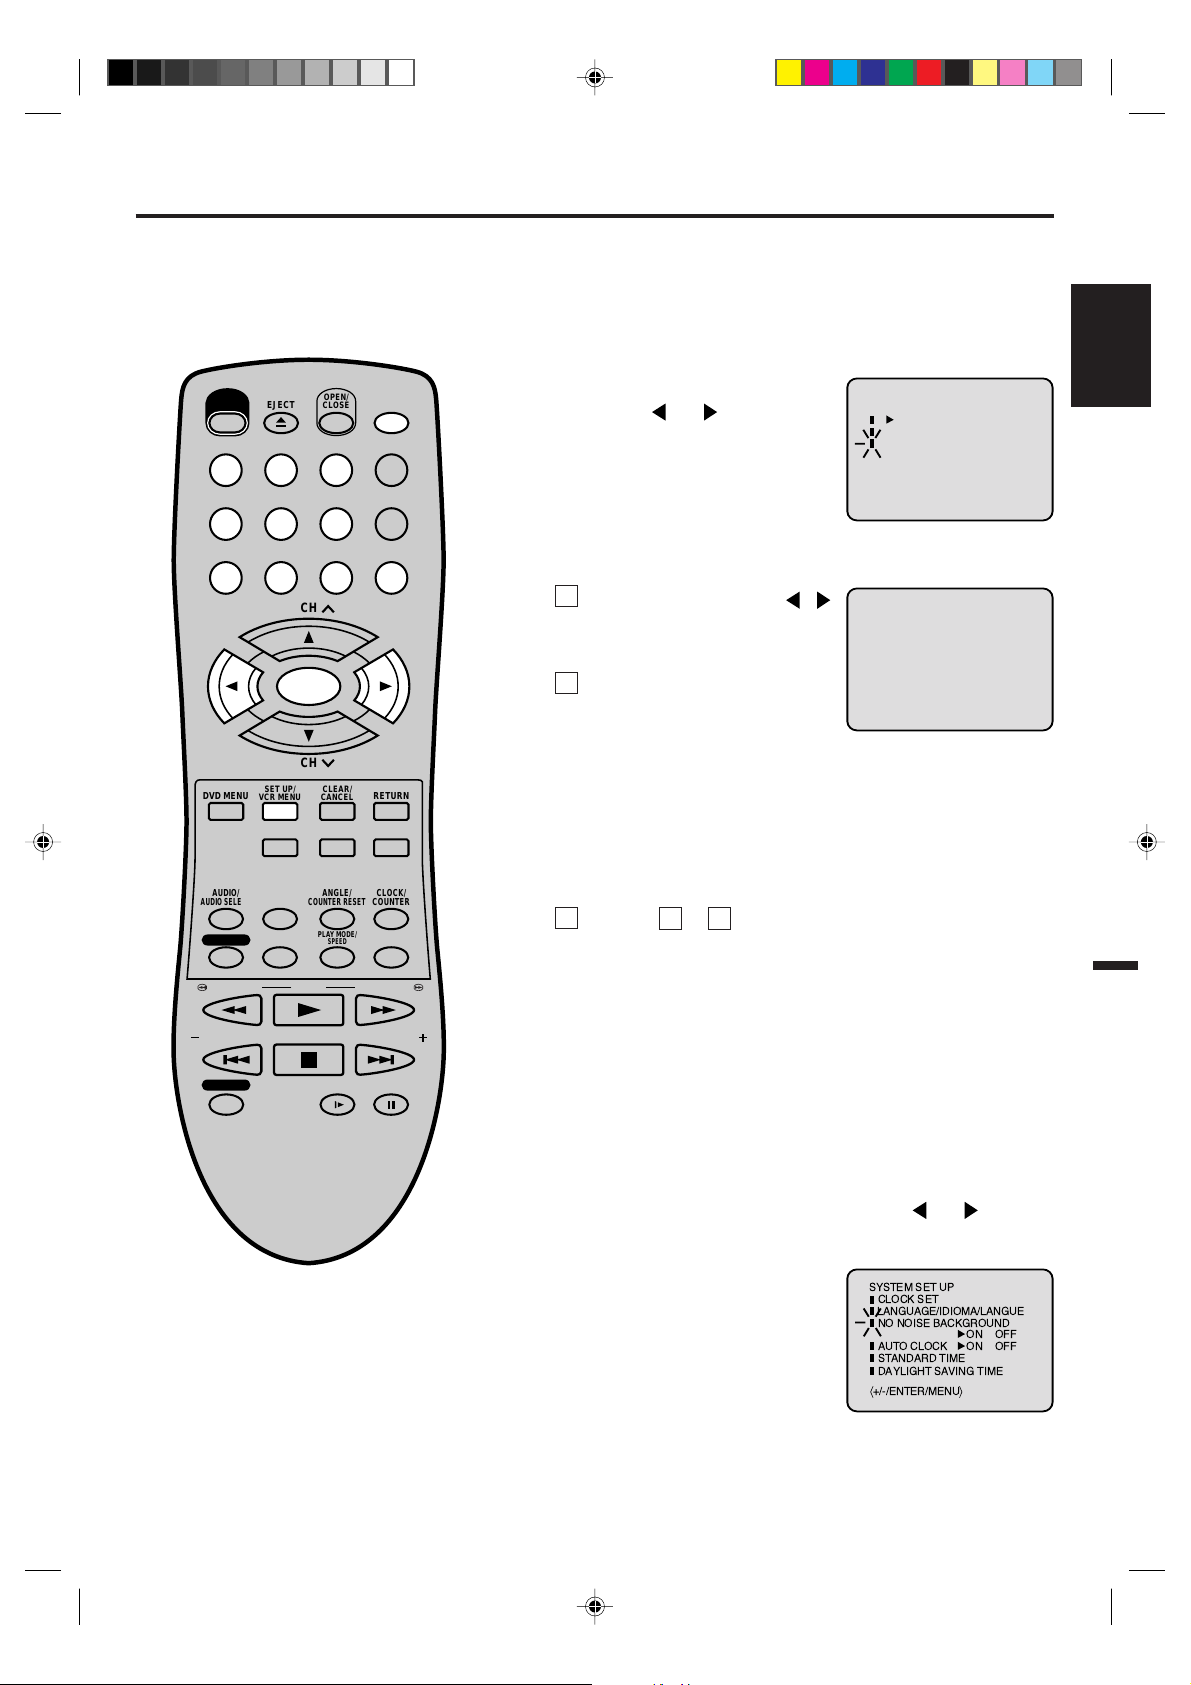
To ADD/DELETE channels / Noise elimination
T o ADD/DELETE channels
You can add the channels you want
or delete the channels you do not
want manually.
OPEN/
CLOSE
EJECT
POWER
123
456
789
CH
TRACKING/
SET
—
DVD MENU
AUDIO/
AUDIO SELECT
TIMER REC
REW/SEARCH SEARCH/F.FWD
SELECT/
ENTER
CH
SET UP/
VCR MENU
ZOOM
MEMORY/
COUNTER RESET
ZERO RETURN
SUB TITLE/
ATR
PLAY
VCR/DVD
DISPLAY/CALL
INPUT SELECT
0
CLEAR/
RETURN
CANCEL
TITLE REPEAT A-B
ANGLE/
CLOCK/
COUNTER
PLAY MODE/
TV/VCR
SPEED
TRACKING/
SET
+
Preparation:
Turn ON the TV and set to the video input mode.
•
•
Press VCR/DVD to select the VCR mode. (The VCR indicator
will light.)
Repeat the step 1 on page 22.
1
Then press
or to select the
“ADD/DELETE” option and press
ENTER.
To Add or Delete desired channels
2
1
Press Number keys or
to select a channel number
/
CH SET UP
TV CATV
AUTO CH MEMORY
ADD/DELETE
〈+/-/ENTER/MENU〉
ADD
you want to add or delete.
2
To add channels
Press ENTER until “ADD”
〈+/-/0-9/ENTER/MENU〉
appears on the screen to set
to add the unmemorized
channel.
To delete channels
Press ENTER until “DELETE” appears on the screen to
set to delete the channel from memory. The channel
number will blink.
3
Repeat to to add or delete other channel.
Press VCR MENU until the menu screen is cleared.
3
1
2
ENGLISH
CH 003
INDEX/SKIP
REC/OTR
2A77001AE(22-27) 8/29/02, 11:01 AM23
STOP
SLOW PAUSE/STILL
SKIP/
INDEX
Noise elimination
When you don't want to receive a weak signal broadcast, the
Blue back screen can be obtained by selecting the NO NOISE
BACKGROUND "ON". When the unit is shipped from the
factory, the NO NOISE BACKGROUND is set to the "ON".
Repeat the steps 1~2 on page 21 and press
1
or to select
“ NO NOISE BACKGROUND” .
Press ENTER to select the “ON”
2
position.
Press VCR MENU until the menu screen is cleared.
3
SYSTEM SET UP
CLOCK SET
LANGUAGE/IDIOMA/LANGUE
NO NOISE BACKGROUND
AUTO CLOCK
STANDARD TIME
DAYLIGHT SAVING TIME
á
+/-/ENTER/MENU
ON OFF
ON OFF
ñ
23
Page 24
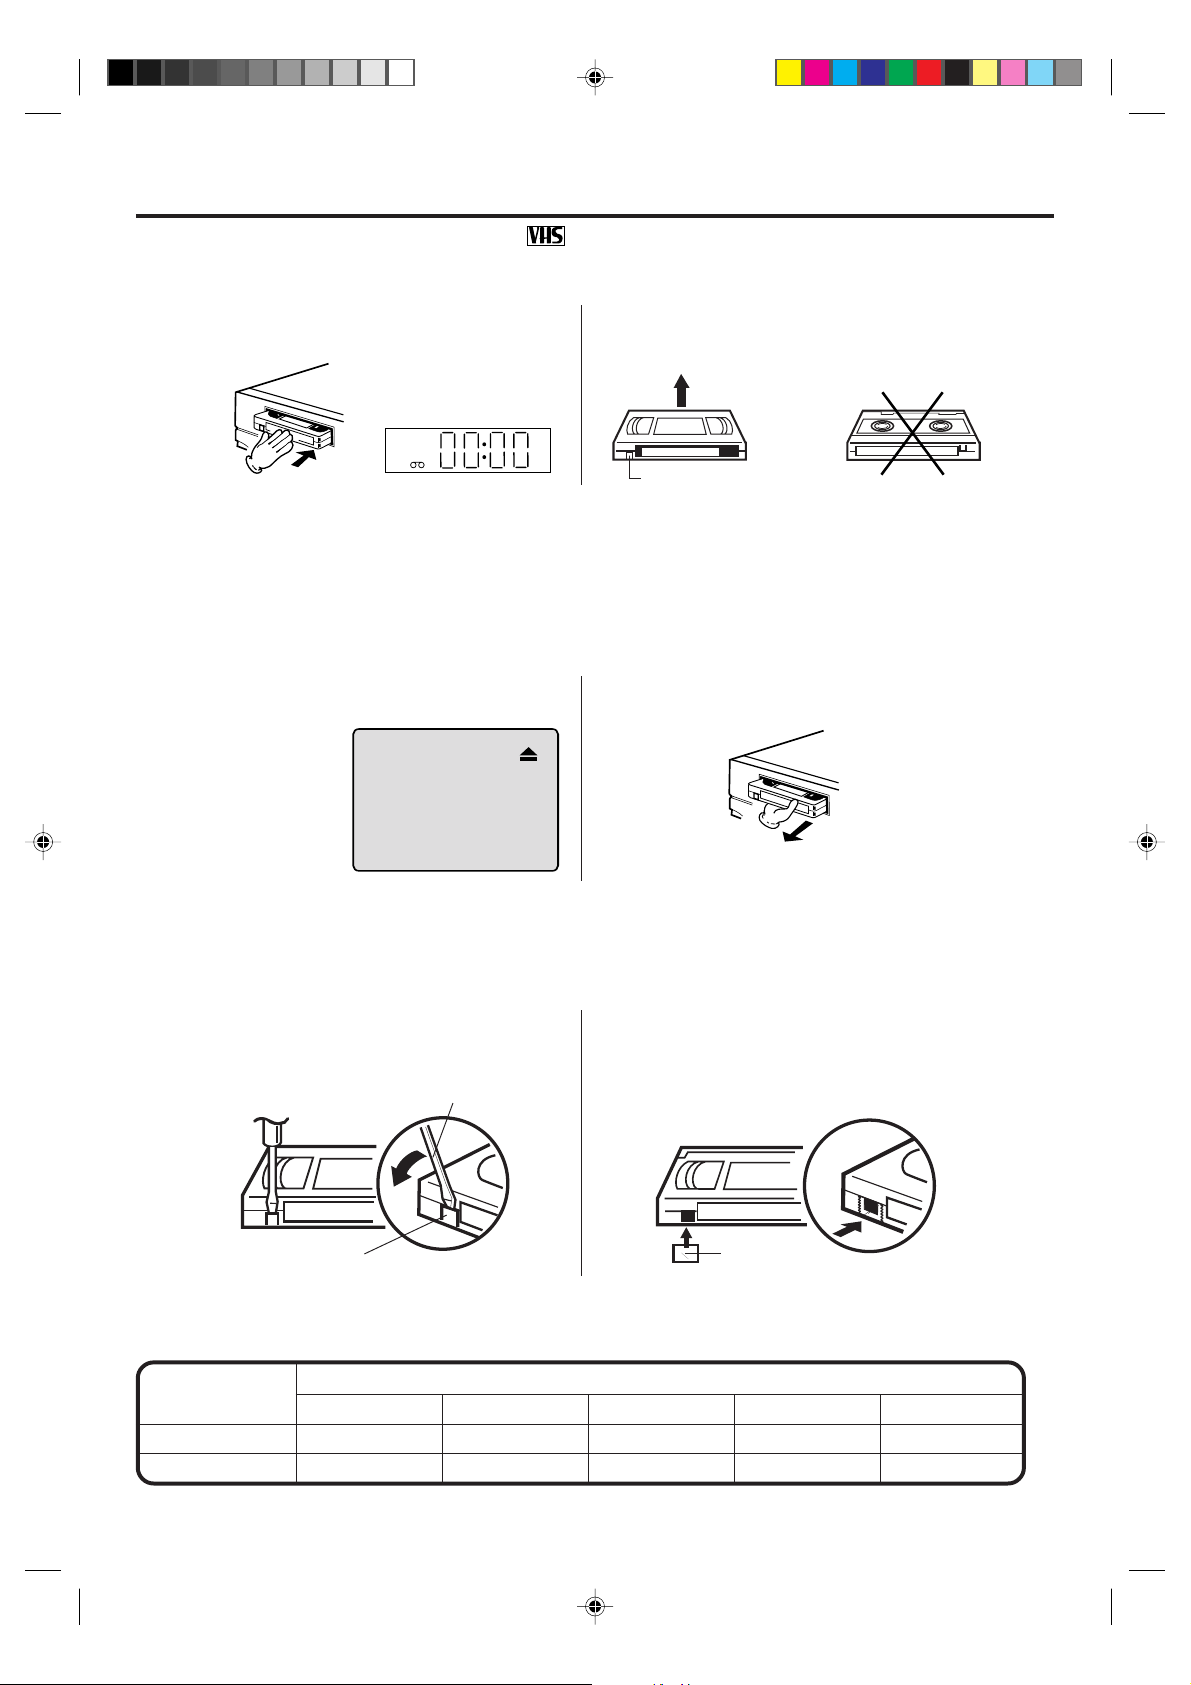
Loading and Unloading a cassette tape
Use only video cassette tapes marked .
Loading
Push the center of the tape until it is automatically
inserted.
VCR
Automatic power ON
When you insert a cassette tape the VCR power will turn ON automatically.
Automatic playback
When loading a cassette tape without an erase prevention tab, playback will start automatically.
Unloading
Press EJECT on the unit or the Remote.
12
Insert the cassette tape with its labeled side facing up
and the erase prevention tab positioned at your left.
An inverted cassette tape cannot be inserted.
Erase prevention tab
Remove the cassette tape.
Automatic tape eject
This VCR will automatically rewind the tape when the tape has ended. When the tape is rewound to its
beginning, the cassette tape will be ejected automatically.
To prevent accidental erasure
Remove the erase prevention tab with a screwdriver.
Screwdriver
Erase prevention tab
To record again
Cover the hole with a piece of adhesive tape.
Adhesive tape
Tape speed and maximum recording time
Tape Speed
SP (Standard Play)
SLP (Super Long Play)
T-160 T-120 T-90 T-60 T-30
2-2/3 hours 2 hours 1-1/2 hours 1 hour 30 minutes
8 hours 6 hours 4-1/2 hours 3 hours 1-1/2 hours
Video cassette tape
24
2A77001AE(22-27) 8/29/02, 11:01 AM24
Page 25
OPEN/
CLOSE
EJECT
POWER
123
456
VCR/DVD
DISPLAY/CALL
INPUT SELECT
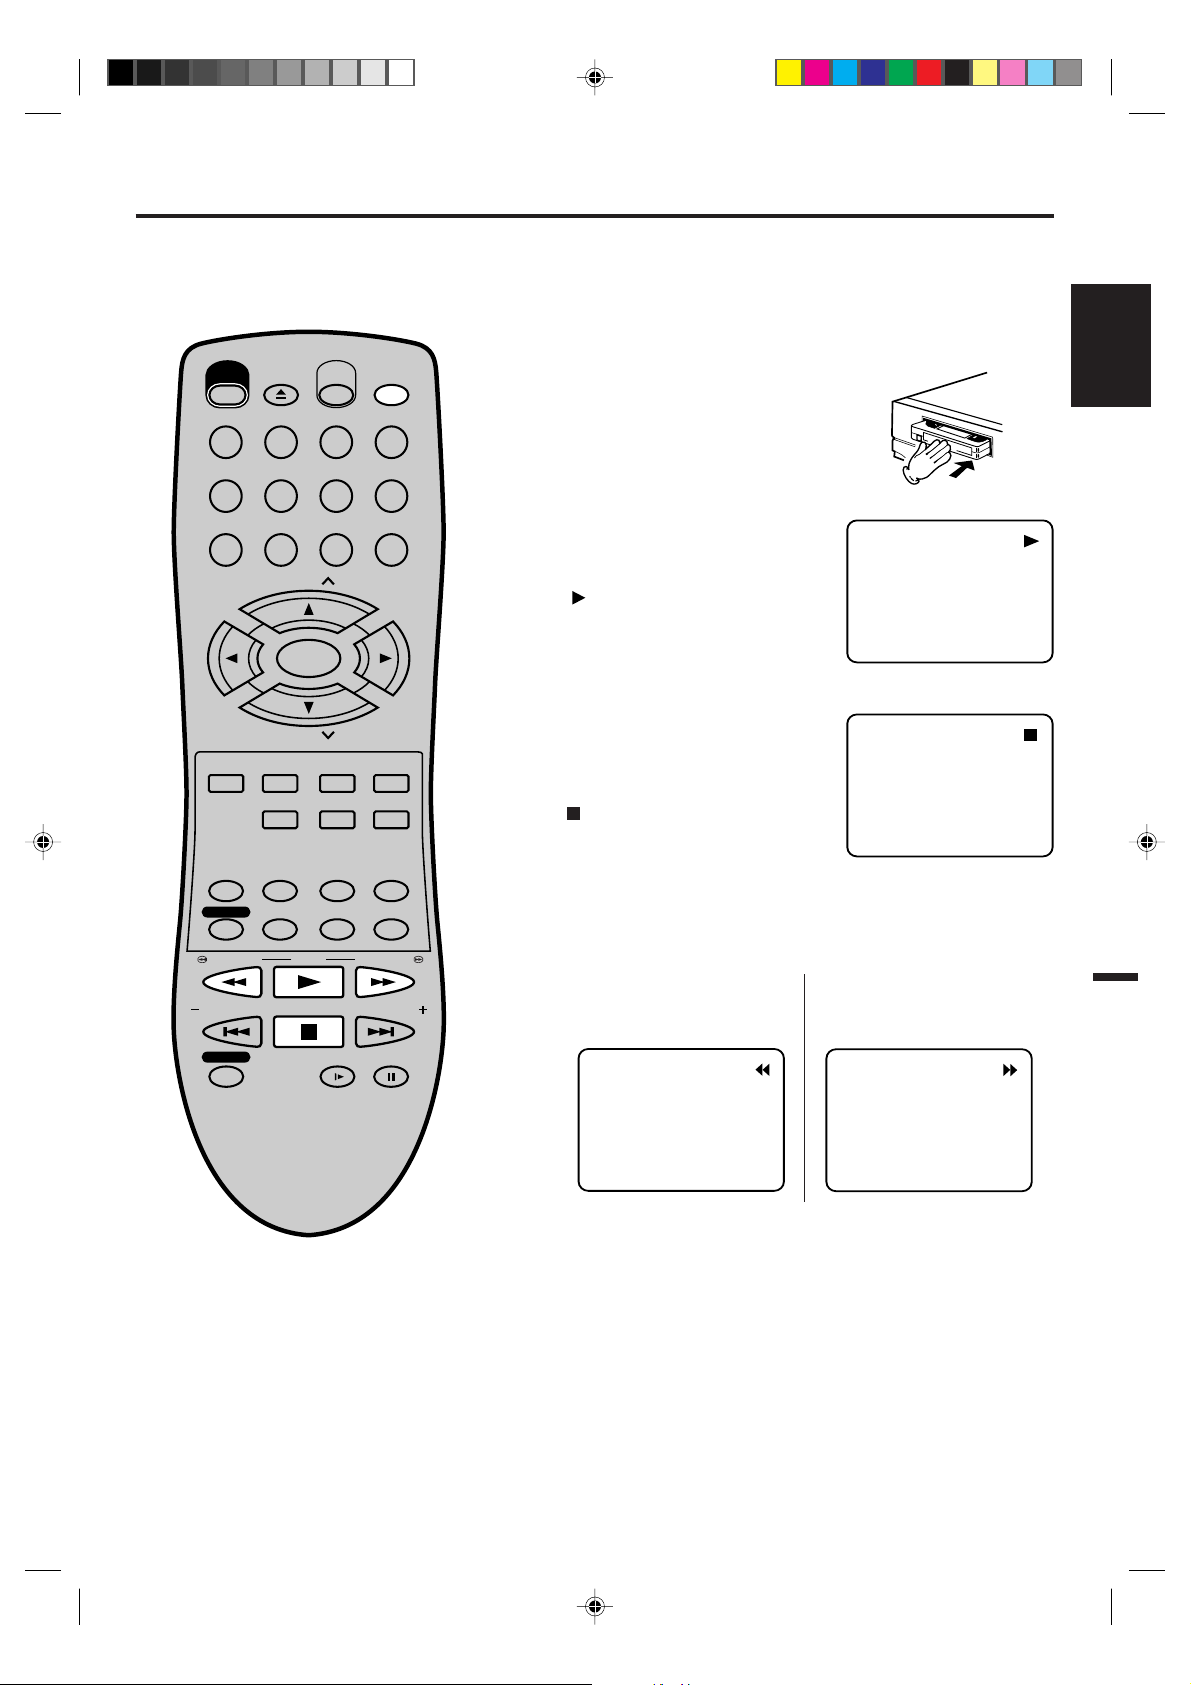
Cassette tape playback
Preparation:
Turn ON the TV and set to the video input mode.
•
•
Press VCR/DVD to select the VCR mode. (The VCR indicator
will light.)
Load a prerecorded tape
1
(When loading a cassette tape
without the erase prevention
tab, playback will start automatically).
ENGLISH
789
CH
TRACKING/
SET
—
DVD MENU
AUDIO/
AUDIO SELECT
TIMER REC
REW/SEARCH SEARCH/F.FWD
INDEX/SKIP
REC/OTR
SELECT/
ENTER
CH
SET UP/
VCR MENU
ZOOM
MEMORY/
COUNTER RESET
ZERO RETURN
SUB TITLE/
ATR
PLAY
STOP
CLEAR/
CANCEL
TITLE REPEAT A-B
ANGLE/
PLAY MODE/
SPEED
SLOW PAUSE/STILL
0
TRACKING/
RETURN
CLOCK/
COUNTER
TV/VCR
SKIP/
INDEX
To start playback
2
Press PLAY.
Playback will start.
" will appear on the screen
"
SET
+
for about 4 seconds.
To stop playback
Press STOP once.
The tape will stop but remain
fully loaded and ready to play.
" will appear on the screen
"
for about 4 seconds.
To rewind the tape or forward it rapidly
Stop the playback or recording with STOP.
To rewind the tape:
Press REW.
To forward the tape:
Press F.FWD.
NOTES:
• This VCR selects the playback tape
speed SP, LP or SLP automatically.
• The Cassette tape and DVD disc can
be played back simultaneously. If you
press VCR/DVD, the tape playback
and DVD playback alternate with each
other on the screen.
• When you select the VCR mode during
DVD playback, DVD playback will stop
automatically after approx. 5 minutes.
2A77001AE(22-27) 8/29/02, 11:01 AM25
To stop the tape-winding, press STOP. To switch to playback
directly (without STOP), press PLAY.
Forward/Reverse picture search mode
When the tape is being wound, you can switch to picture search
mode (see next page). To do this, press REW or F.FWD and hold
it down. The unit will resume the tape winding as soon as the
button is released.
25
Page 26
Special playback
〈+/-/ENTER/MENU〉
MENU
TIMER REC SET
AUTO REPEAT
ON OFF
ON OFF
SAP
CH SET UP
SYSTEM SET UP
Picture Search
Reverse picture search function
Press REW x 1 or x 2 during the playback.
Forward picture search function
Press F.FWD x 1 or x 2 during the playback.
To return to playback: Press PLAY.
SPEED SEARCH TIMES
TAPE SPEED
SP (Standard Play)
LP (Long Play)
SLP (Super Long Play)
PICTURE SEARCH SPEED
PRESS ONCE
3 X
7 X
9 X
PRESS TWICE
5 X
9 X
15 X
Still Picture
Press PAUSE during playback. To resume normal
playback: Press PLAY.
Slow Motion
During playback press SLOW.
To return to playback: Press PLAY or SLOW.
Slow tracking and vertical lock adjustment
If noise bars appear in the picture during slow motion,
press the TRACKING + or – to reduce the noise bars.
If the still picture jitters excessively, press TRACKING
+ or – to stabilize the still picture.
Frame by Frame picture
Press PAUSE during playback.
Press SLOW repeatedly. The picture advances frame
by frame.
To return to playback: Press PLAY or PAUSE.
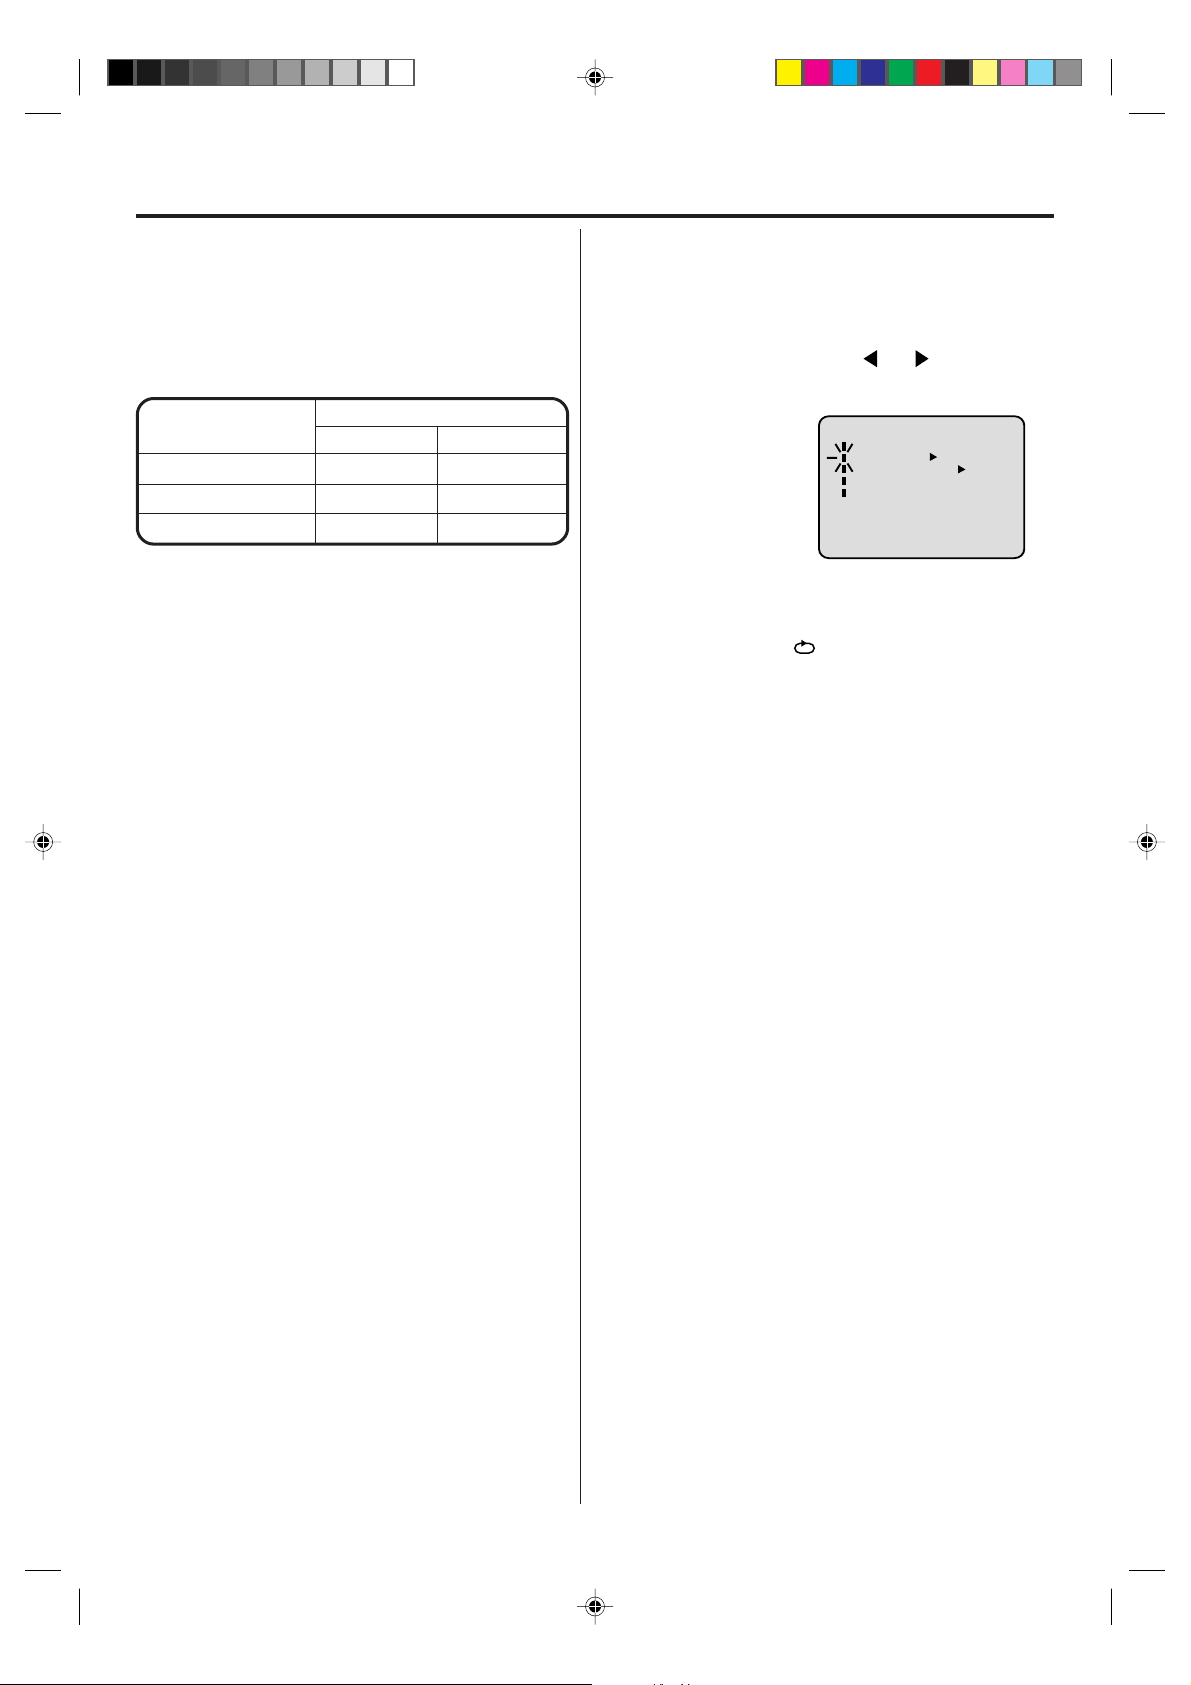
Repeat playback
The entire video tape will be played until its end. The
tape will then automatically rewind to the beginning and
the playback will be repeated.
Press SETUP MENU. Press or to select
1
AUTO REPEAT.
Then press ENTER
2
select [ON] or [OFF].
If [ON] is selected, the
playback will be
repeated endlessly.
Press VCR MENU until the menu screen is
3
cleared.
if you press CALL, " " will appear on the screen.
To start the playback, press PLAY.
4
The playback will be repeated endlessly.
To cancel repeat mode:
Follow the above step 1, then press ENTER to select
the OFF position. Press VCR MENU to return to the
TV.
to
Adjusting tracking condition
Automatic tracking adjustment
Whenever you insert a tape and start playback,
automatic tracking starts working and continuously
analyzes the signal to enable optimum picture quality
during playback.
Manual tracking adjustment
If automatic tracking cannot eliminate noises sufficiently
during playback, press TRACKING +/– to eliminate the
noises.
“MANUAL TR.” will appear. Press it briefly for a fine
adjustment, or press and hold for a coarse adjustment.
•
Press ATR to reactivate automatic tracking again.
“AUTO TR.” will appear.
NOTES:
•
The audio output is muted during SPEED SEARCH,
STILL, FRAME ADVANCE and SLOW MOTION.
• During picture search mode there will be noise bars
which are caused by the system.
• The Special Playback will automatically change to
playback after approx. 5 minutes to protect the video
tape against excessive wear.
26
2A77001AE(22-27) 8/29/02, 11:01 AM26
Page 27
+3
ZERO RETURN function / Video index search system
VCR
CH 001
INDEX
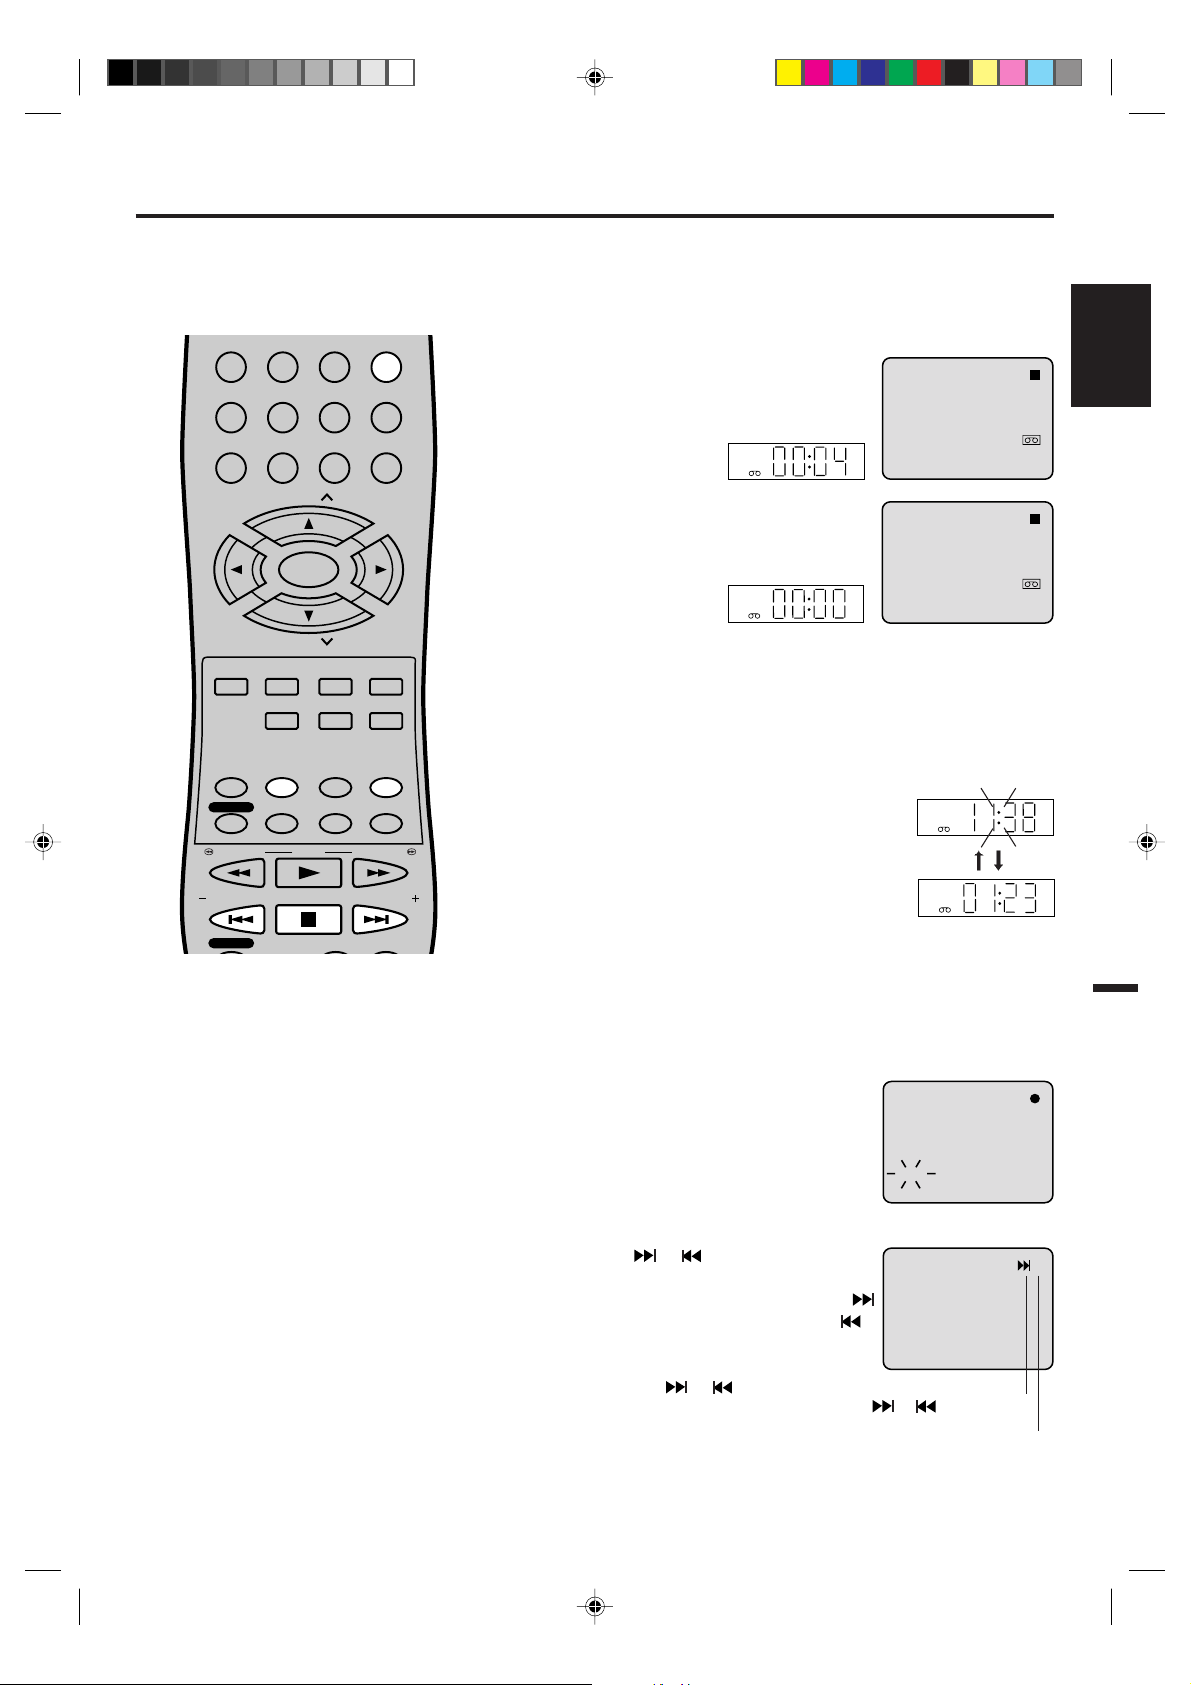
ZERO RETURN function
This function makes tape-rewinding
stop at the counter 00:00:00 position
automatically.
CH
CH
CLEAR/
CANCEL
TITLE REPEAT A-B
ANGLE/
COUNTER RESET
PLAY MODE/
SPEED
PLAY
DISPLAY/CALL
INPUT SELECT
0
TRACKING/
SET
RETURN
CLOCK/
COUNTER
TV/VCR
+
123
456
789
TRACKING/
SET
—
DVD MENU
AUDIO/
AUDIO SELECT
TIMER REC
REW/SEARCH SEARCH/F.FWD
SELECT/
ENTER
SET UP/
VCR MENU
ZOOM
MEMORY/
ZERO RETURN
SUB TITLE/
ATR
Preparation:
Turn ON the TV and set it to the video input mode.
•
•
Press VCR/DVD to select the VCR mode. (The VCR indicator
will light.)
Press CALL.
1
The counter display shows the tape
running time during playback or
8 : 47
AM
MON
STEREO SAP
recording.
VCR
Press COUNTER RESET at the desired
2
tape position. The counter display will be
reset to the "00:00:00" position (e.g. the
8 : 47
STEREO SAP
AM
00 : 04 : 38 SP
MON
begining of recording).
VCR
Press STOP when playback or recording is finished.
3
Press ZERO RETURN.
00 : 00 : 00 SP
The tape will be rewinded or fast forwarded and automatically
stop at the ”00:00:00” position.
The CLOCK/COUNTER-button
Press CLOCK/COUNTER. The clock and tape
counter alternate with each other in the display.
CH 001
CH 001
ENGLISH
INDEX/SKIP
REC/OTR
STOP
SKIP/
INDEX
SLOW PAUSE/STILL
NOTES for Counter Display:
•
If you rewind the tape beyond
“00:00:00”, a minus sign (“–”) will be
displayed in front of the time.
•
When you load a tape, the counter will
reset to “00:00:00”.
•
The counter does not function on
nonrecorded (blank) sections of the
tape. When you rewind, fast forward or
play tapes through blank sections, the
counter stops.
NOTES for Video index search system:
•
When you record an INDEX mark at
the very beginning of the tape, the
mark may not be found.
•
During INDEX search, the tape may
stop and begin to play at a slightly
different location.
•
INDEX may not function properly with
old or worn out video tapes.
•
INDEX marks may not be found if it is
extremely close to the point where the
search began.
•
In recording, if you stop recording
temporarily, the INDEX mark is not
recorded on the tape.
VCR
Video index search system
This function enables you to locate the beginning of any
recording made on the VCR.
Recording an INDEX MARK
The Index Search function automatically
records an INDEX mark on the tape
whenever a recording is initiated.
Index Search
Press INDEX or during stop or play
mode.
For Succeeding programs: Press INDEX .
For Preceding programs: Press INDEX .
(Additional press increases the INDEX NO.
up to 9.)
When the INDEX or is pressed, the
unit starts searching the INDEX NO.
selected and finds the portion, then playback
starts automatically.
To stop the Index Search, press STOP.
or is displayed
INDEX NO. (up to 9)
27
2A77001AE(22-27) 8/29/02, 11:01 AM27
Page 28
Recording a TV program
Recording and viewing the
same TV program
OPEN/
CLOSE
EJECT
POWER
123
456
789
CH
TRACKING/
SET
—
DVD MENU
AUDIO/
AUDIO SELECT
TIMER REC
REW/SEARCH SEARCH/F.FWD
INDEX/SKIP
REC/OTR
SELECT/
ENTER
CH
SET UP/
VCR MENU
ZOOM
MEMORY/
COUNTER RESET
ZERO RETURN
SUB TITLE/
ATR
PLAY
STOP
VCR/DVD
DISPLAY/CALL
INPUT SELECT
0
CLEAR/
RETURN
CANCEL
TITLE REPEAT A-B
ANGLE/
CLOCK/
COUNTER
PLAY MODE/
TV/VCR
SPEED
SKIP/
INDEX
SLOW PAUSE/STILL
TRACKING/
Preparation:
Turn ON the TV and set to the video input mode.
•
•
Press VCR/DVD to select the VCR mode. (The VCR indicator
will light.)
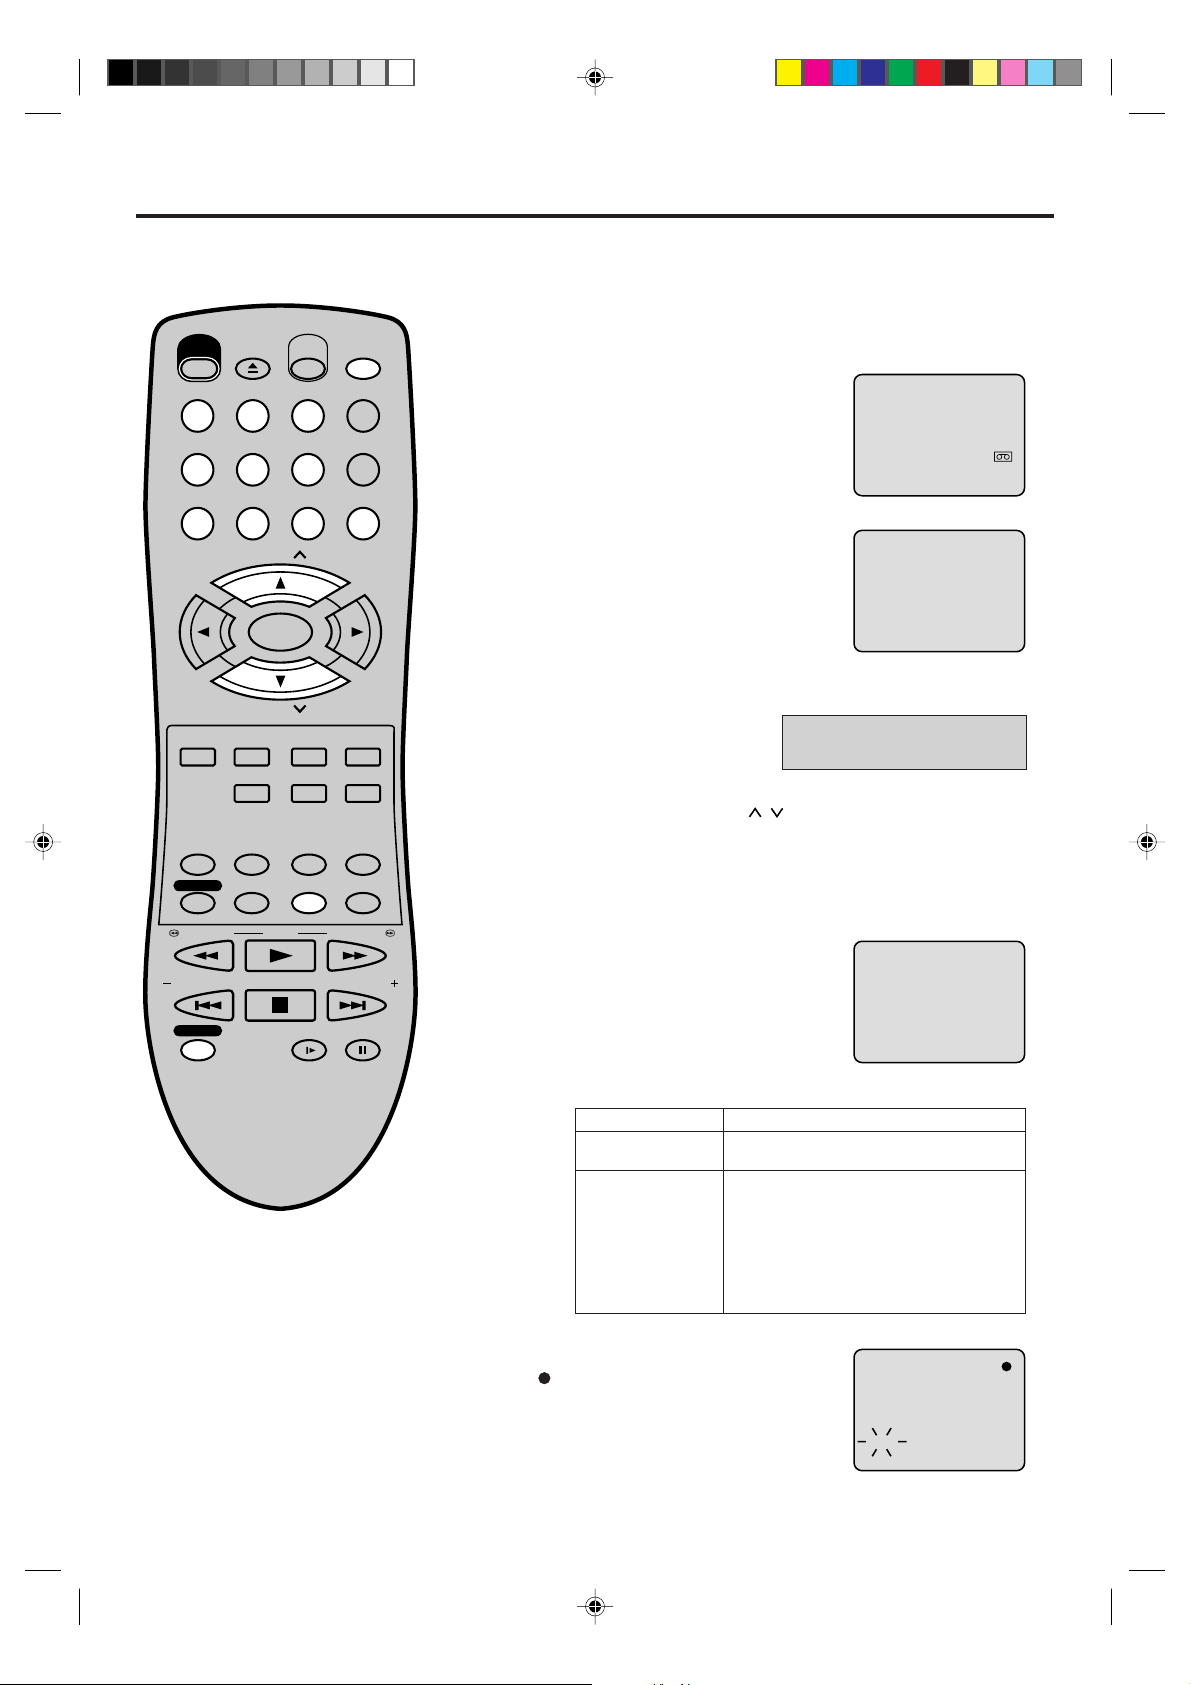
Load a cassette tape with the erase
1
prevention tab intact.
The VCR will automatically turn on.
Press SPEED to select the desired tape
2
speed SP or SLP.
The tape counter and SP or SLP will
SET
+
appear on the screen for about 4
seconds.
Set the TV/CATV option to the appropriate position (See page
3
22).
00 : 00 : 00 SP
TV - VHF/UHF channels
CATV - CABLE TV channels
Press Number keys or CH / to select the channel to be
4
recorded.
1-9 Press 0 twice and then 1-9 as required. Example: To
select 2, Press “002”.
10-12 Press 0 first and then the remaining 2 digits in order
from left to right.
13-99 Press 2 digits in order.
Example: Press 012 for “12”.
CH 110
Example: Press 22 for “22”.
100-125 Press the 3 digits in order.
Example: Press 110 for “110”.
NOTES:
• If the erase prevention tab is removed,
the tape will eject when REC/OTR is
pressed for recording.
• If you wish to watch the DVD playback
during the normal recording on VCR,
press VCR/DVD to change to DVD
mode and perform the DVD playback
(see page 37).
• You can not record disc material in
DVD, Video CD, Audio CD, etc. onto a
video tape with this DVD/VCR.
28
2A77001AE(28-33) 8/29/02, 11:00 AM28
VHF/UHF/CATV CHANNELS
TV CATV
VHF
2-13
UHF
14-69
Press REC/OTR.
5
" " will appear on the screen for
about 4 seconds and “REC” will
appear on the display.
VHF
2-13
STD/HRC/IRC
14-36 (A) (W)
37-59 (AA) (WW)
60-85 (AAA) (ZZZ)
86-94 (86) (94)
95-99 (A-5) (A-1)
100-125 (100)(125)
01 (5A)
CH 110
INDEX
Page 29
OPEN/
CLOSE
EJECT
POWER
123
456
VCR/DVD
DISPLAY/CALL
INPUT SELECT
Recording a TV program
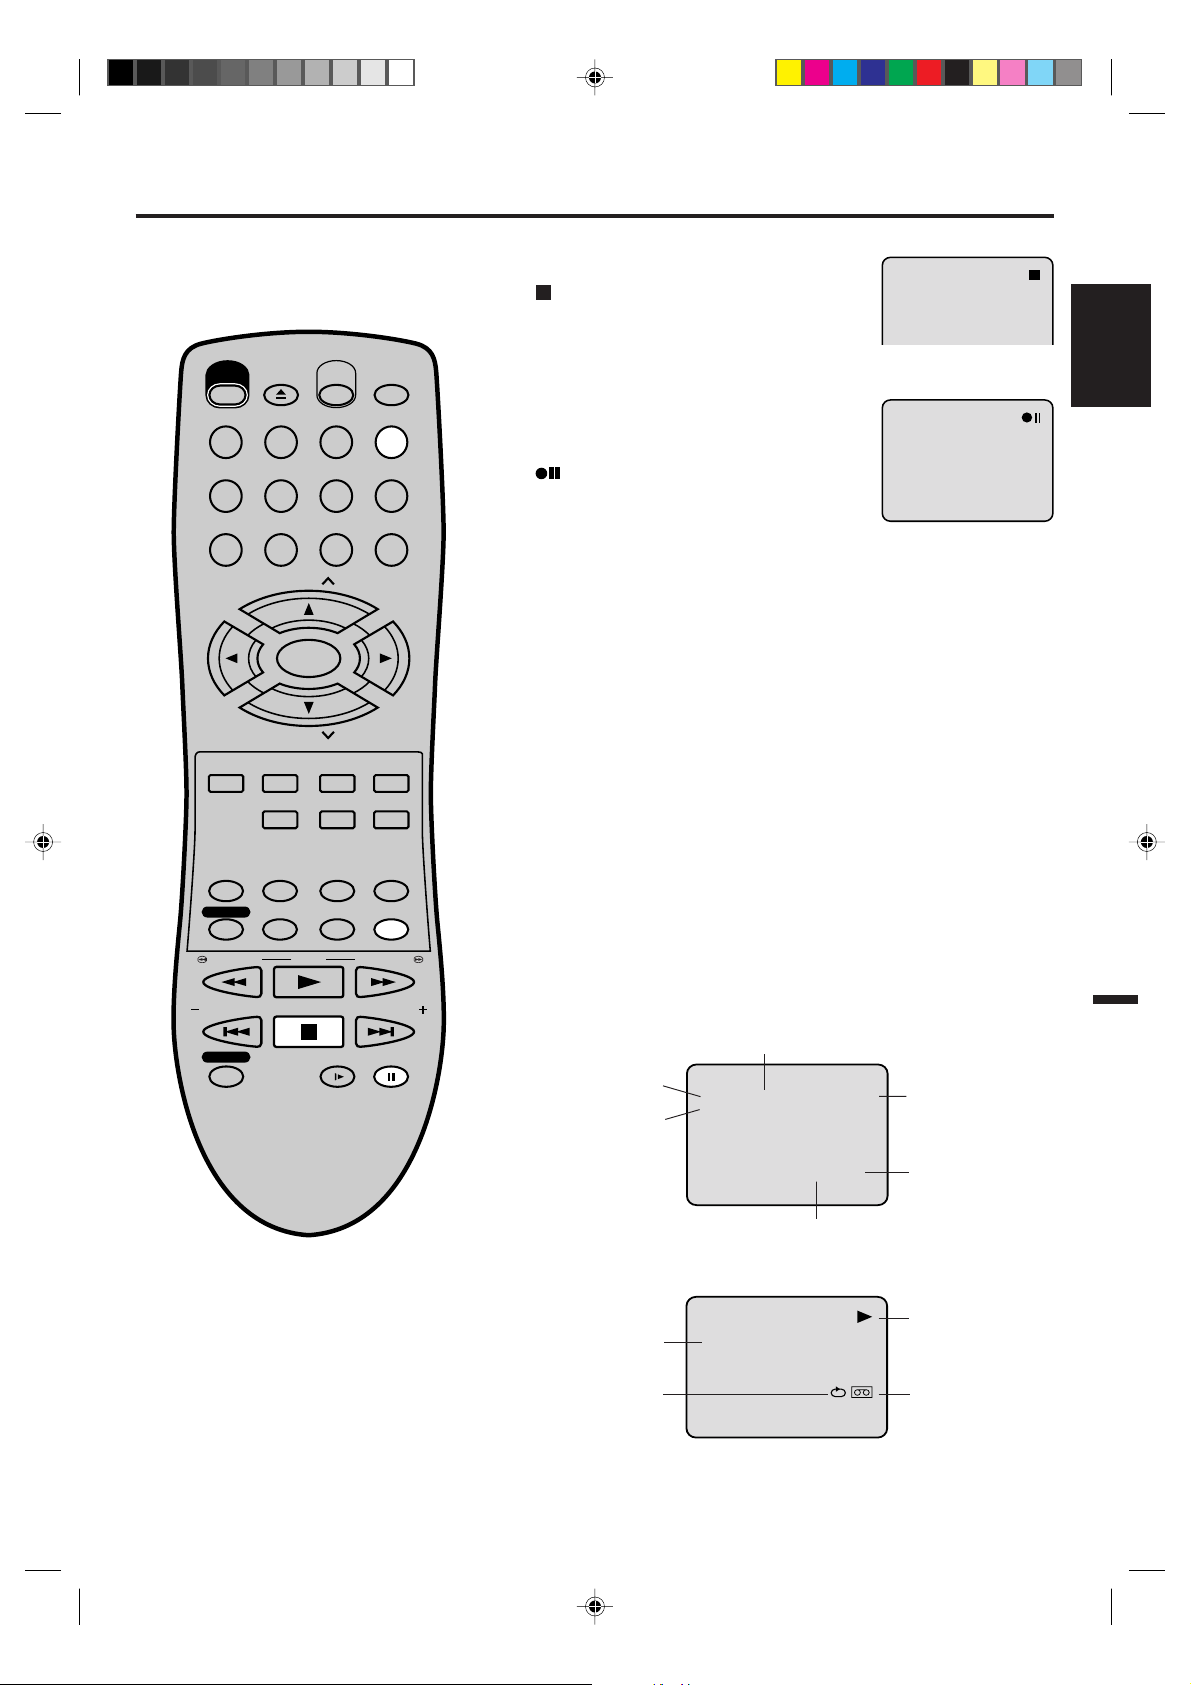
To stop recording
Press STOP to stop recording.
" will appear on screen for about 4
"
seconds.
To stop recording temporarily
Press PAUSE/STILL to avoid recording
unwanted material. Press again to continue
the recording.
"
" will appear on screen for about 4
seconds.
ENGLISH
789
CH
TRACKING/
SET
—
DVD MENU
AUDIO/
AUDIO SELECT
TIMER REC
REW/SEARCH SEARCH/F.FWD
INDEX/SKIP
REC/OTR
SELECT/
ENTER
CH
SET UP/
VCR MENU
ZOOM
MEMORY/
COUNTER RESET
ZERO RETURN
SUB TITLE/
ATR
PLAY
STOP
CLEAR/
CANCEL
TITLE REPEAT A-B
ANGLE/
PLAY MODE/
SPEED
SLOW PAUSE/STILL
0
TRACKING/
RETURN
CLOCK/
COUNTER
TV/VCR
SKIP/
INDEX
NOTES:
•
The pause function will be released after 5 minutes to prevent damage
to the tape or the VCR. The VCR will change to the STOP mode.
•
You can select a recording channel in the recording pause mode.
SET
+
Recording one program while watching another
While the VCR is recording, press TV/VCR to select the TV position.
The “VCR” will go off and recording will continue.
Select the TV channel you want to watch by using the TV channel
selector.
NOTE:
Some CATV hookups do not permit viewing one channel while
recording another. See pages 14,15.
To Display VCR operation Status
Press CALL. The clock, day of the week and more information will be
indicated.
While watching TV
CLOCK
STEREO AND
SEPARATE AUDIO
PROGRAM (SAP)
DAY OF THE WEEK
8 : 47
AM
MON
STEREO SAP
00 : 00 : 00 SP
CH 125
CHANNEL
TAPE SPEED
Auto Rewind feature
This VCR will automatically rewind the
tape when the tape has ended (except
during OTR and TIMER REC). It will
also eject the tape.
2A77001AE(28-33) 8/29/02, 11:00 AM29
REAL TIME COUNTER
While operating a tape
OPERATING
MODE
TAPE INAUTO REPEAT
HI-FI STEREO
8 : 30
HI-FI
AM
MON
CH 125
00 : 15 : 12 SP
To cancel the display: Press CALL until all indicators disappear.
29
Page 30
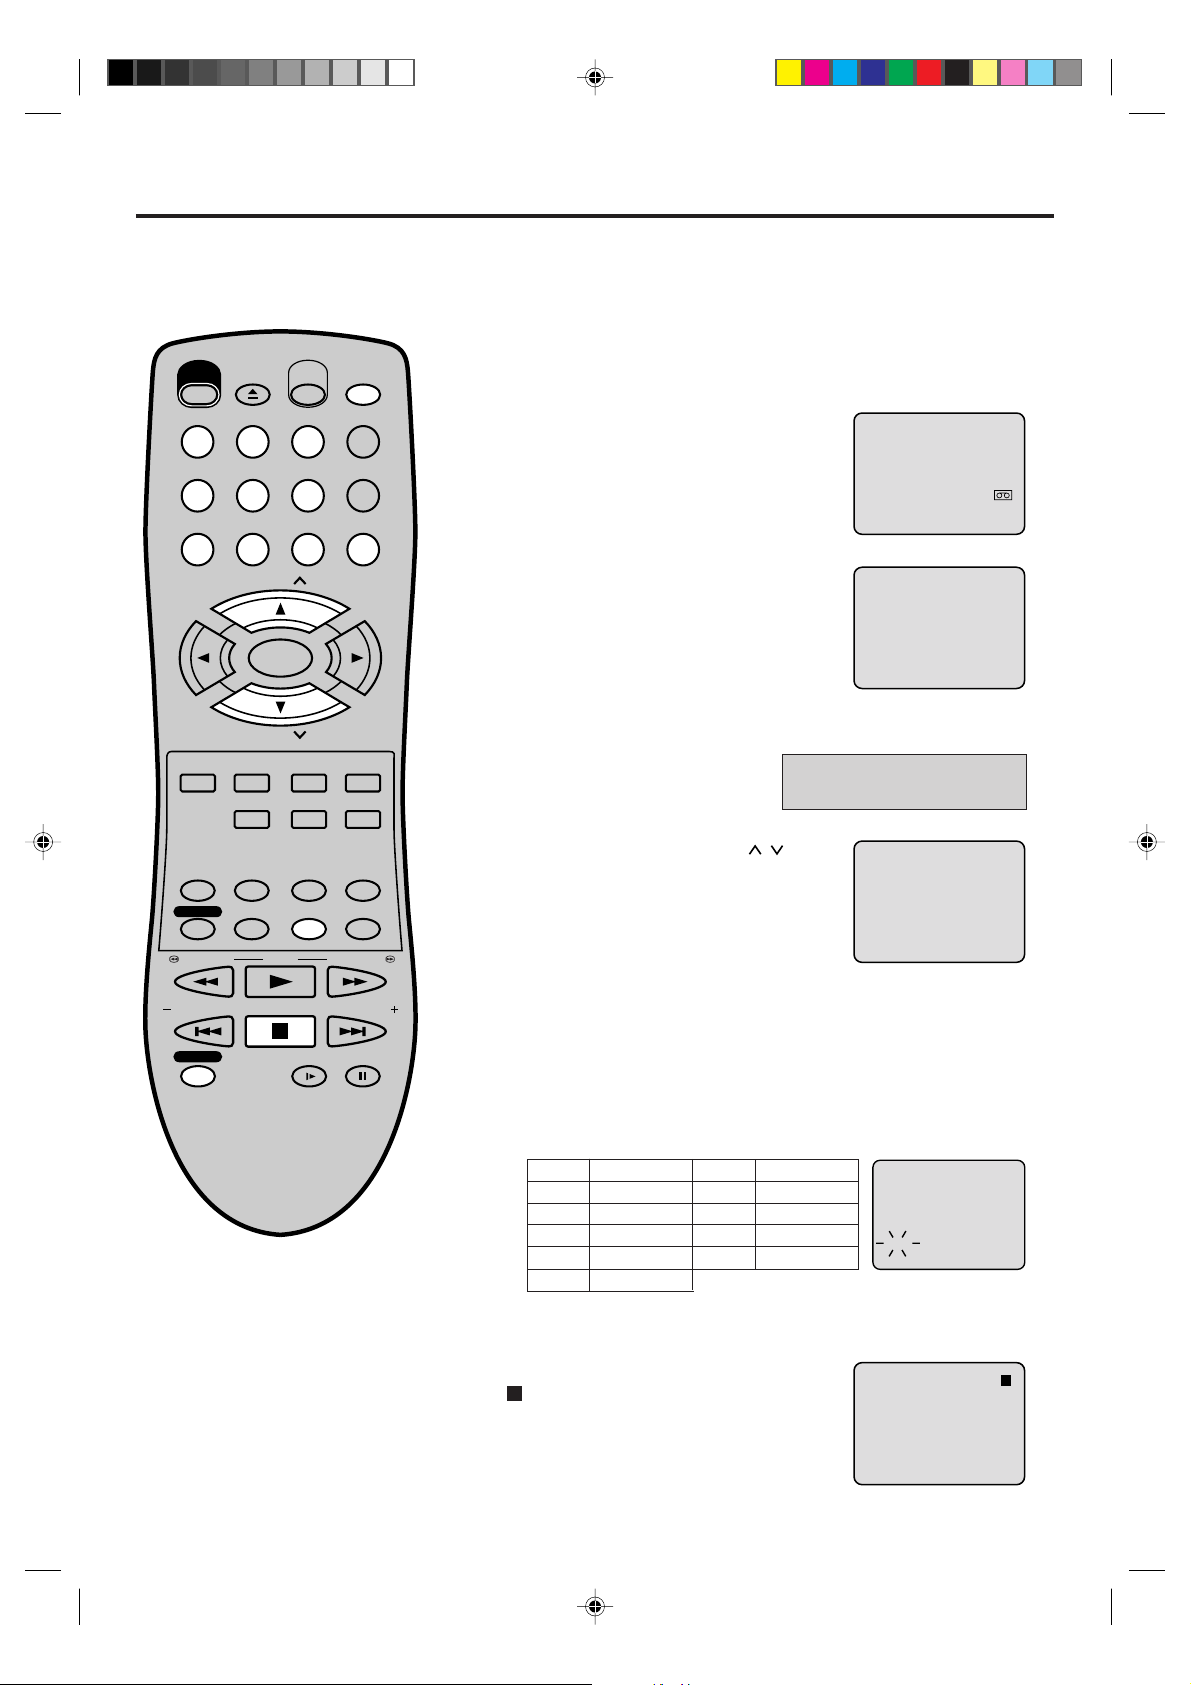
One-touch Timer Recording (OTR)
The One-touch Timer Recording
feature provides a simple and
convenient way to make a timed
recording.
OPEN/
CLOSE
EJECT
POWER
123
456
789
CH
TRACKING/
SET
—
DVD MENU
SELECT/
SET UP/
VCR MENU
ZOOM
ENTER
CH
VCR/DVD
DISPLAY/CALL
INPUT SELECT
0
CLEAR/
RETURN
CANCEL
TITLE REPEAT A-B
TRACKING/
SET
+
Preparation:
Turn ON the TV and set to the video input mode.
•
•
Press VCR/DVD to select the VCR mode. (The VCR indicator
will light.)
Example: One-touch Timer Recording for 30 minutes.
Load a cassette tape with the erase
1
prevention tab intact.
The VCR will automatically turn on.
Press SPEED to select the desired tape
2
speed SP or SLP.
The tape counter and SP or SLP will
appear on the screen for about 4
seconds.
Set the TV/CATV option to the appropriate position (See page
3
22).
00 : 00 : 00 SP
TV - VHF/UHF channels
CATV - CABLE TV channels
ANGLE/
AUDIO/
MEMORY/
AUDIO SELECT
TIMER REC
REW/SEARCH SEARCH/F.FWD
INDEX/SKIP
REC/OTR
COUNTER RESET
ZERO RETURN
SUB TITLE/
ATR
PLAY
STOP
PLAY MODE/
CLOCK/
COUNTER
TV/VCR
SPEED
SKIP/
INDEX
SLOW PAUSE/STILL
NOTE:
If you wish to watch the DVD playback
during the OTR, press DVD/VCR to
change to DVD mode and perform the
DVD playback (see page 37).
Press Number keys or CH
4
select the channel to be recorded.
Press REC/OTR. Press the button again to stop recording after
5
30 minutes. Each additional press of REC/OTR will increase
/ to
recording time as shown in the chart below, up to a maximum of
5 hours. The OTR and recording time will appear on the screen
for about 4 seconds. And, REC will keep blinking in the display.
Press
once
twice
3 times
4 times
5 times
Recording time
NORMAL REC
0:30
1:00
1:30
2:00
Press
6 times
7 times
8 times
9 times
Recording time
3:00
4:00
5:00
NORMAL REC
INDEX
To cancel OTR
Press STOP or turn off the power.
" will appear on screen for about 4
"
seconds.
CH 110
OTR 0 : 30
CH 125
30
2A77001AE(28-33) 8/29/02, 11:00 AM30
Page 31
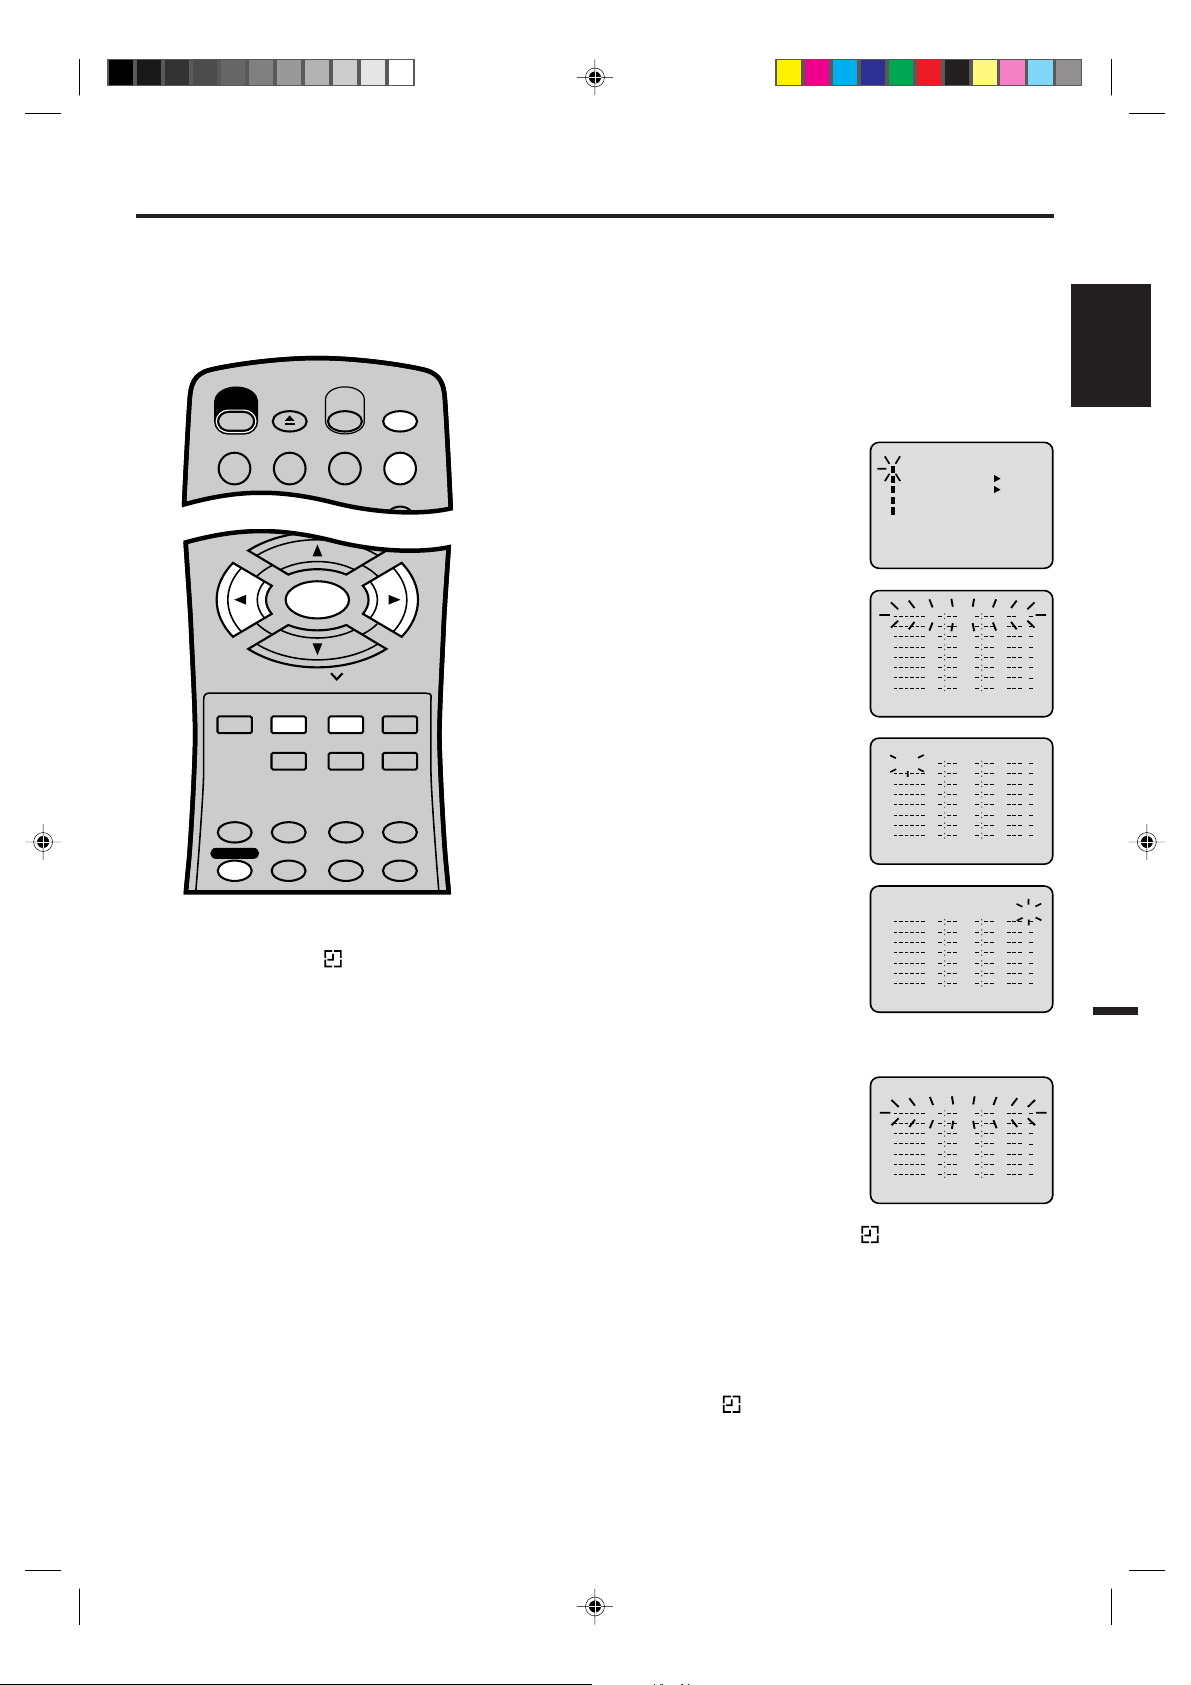
Timer recording
CH
DVD MENU
RETURN
SET UP/
VCR MENU
CLEAR/
CANCEL
ANGLE/
COUNTER RESET
CLOCK/
COUNTER
PLAY MODE/
SPEED
AUDIO/
AUDIO SELECT
TV/VCR
ZOOM
TRACKING/
SET
—
TRACKING/
SET
+
TITLE REPEAT A-B
TIMER REC
SUB TITLE/
ATR
SELECT/
ENTER
123
EJECT
OPEN/
CLOSE
VCR/DVD
DISPLAY/CALL
INPUT SELECT
456
POWER
Timer recording can be programmed
on-screen with the remote control.
The built-in timer allows automatic
unattended recording of up to 8
programs within 1 month.
MEMORY/
ZERO RETURN
Preparation:
Press VCR/DVD to select the VCR mode.
•
Load a cassette tape with the erase prevention tab intact.
Press the CALL button to verify that the time and date are
•
correct (see page 29).
Example: Program a timer recording for the 26th day, channel 125
(CATV), 11:00 - 11:30 PM on timer program number 1 (Tape speed: SLP).
Press VCR MENU. Select the
1
“TIMER REC SET” option , then
press ENTER.
Press SET + or – to select one of the
2
program line, then press ENTER.
Press SET + or – to select the date,
3
then press ENTER.
MENU
TIMER REC SET
AUTO REPEAT
SAP
CH SET UP
SYSTEM SET UP
〈+/—/ENTER/MENU〉
DATE START END CH
〈+/—/ENTER/CANCEL/MENU〉
DATE START END CH
26(SU)
〈+/—/ENTER/CANCEL/MENU〉
ON OFF
ON OFF
—
ENGLISH
2A77001AE(28-33) 8/29/02, 11:00 AM31
NOTES:
•
If the clock symbol(
) blinks when the
timer recording ended, the TV program
has not been completely recorded
because of an insufficient tape supply.
Press TIMER REC to cancel the timer
program or press EJECT to remove
the cassette tape.
•
During timer recording standby mode,
the VCR mode cannot be selected. To
use the VCR, press TIMER REC at
first, then press VCR/DVD to change
to VCR mode. After you use the VCR,
press TIMER REC again to put the VCR
into timer recording standby mode.
•
If you press TIMER REC during timer
recording, the recording operation will
be interrupted. If you press TIMER
REC again within the programmed time,
the recording operation will start again.
•
After a power failure or disconnection
of the power plug, all programmed
recording settings and time display
will be lost upon resumption of power.
In this case, reset the clock (see page
21) and reprogram any timer
recordings.
Set the start time, end time, channel
4
and tape speed as in step 3.
DATE START END CH
26(SU)11:00PM11
NOTES:
Press CANCEL to move cursor backward
•
for correction.
To record from external source set the
•
〈+/—/ENTER/CANCEL/MENU〉
channel to "L". "L" will appear next to CH
125 (or 69).
To enter other programs, repeat step
5
2 through 4.
DATE START END CH
26(SU)11:00PM11
• To return to the normal screen,
press VCR MENU twice.
Press TIMER REC. The clock symbol( ) will appear on the
6
display and the VCR stands by for recording. At the same
〈+/—/ENTER/CANCEL/MENU〉
time, VCR mode will change to DVD mode automatically. You
can use DVD even if the VCR is in the Timer recording mode.
If you do not use the DVD, turn the power off.
The timer recording will start at 5 seconds before the time you
predetermined.
NOTES:
If the clock symbol(
•
) does not appear on the display in spite
of the pressing of TIMER REC, the cassette may not have been
loaded yet. (see page 24)
If the cassette is ejected in spite of the pressing of TIMER REC,
•
the erase prevention tab of the cassette may have been
removed. (see page 24)
:30PM125
:30PM125
SLP
SLP
31
Page 32
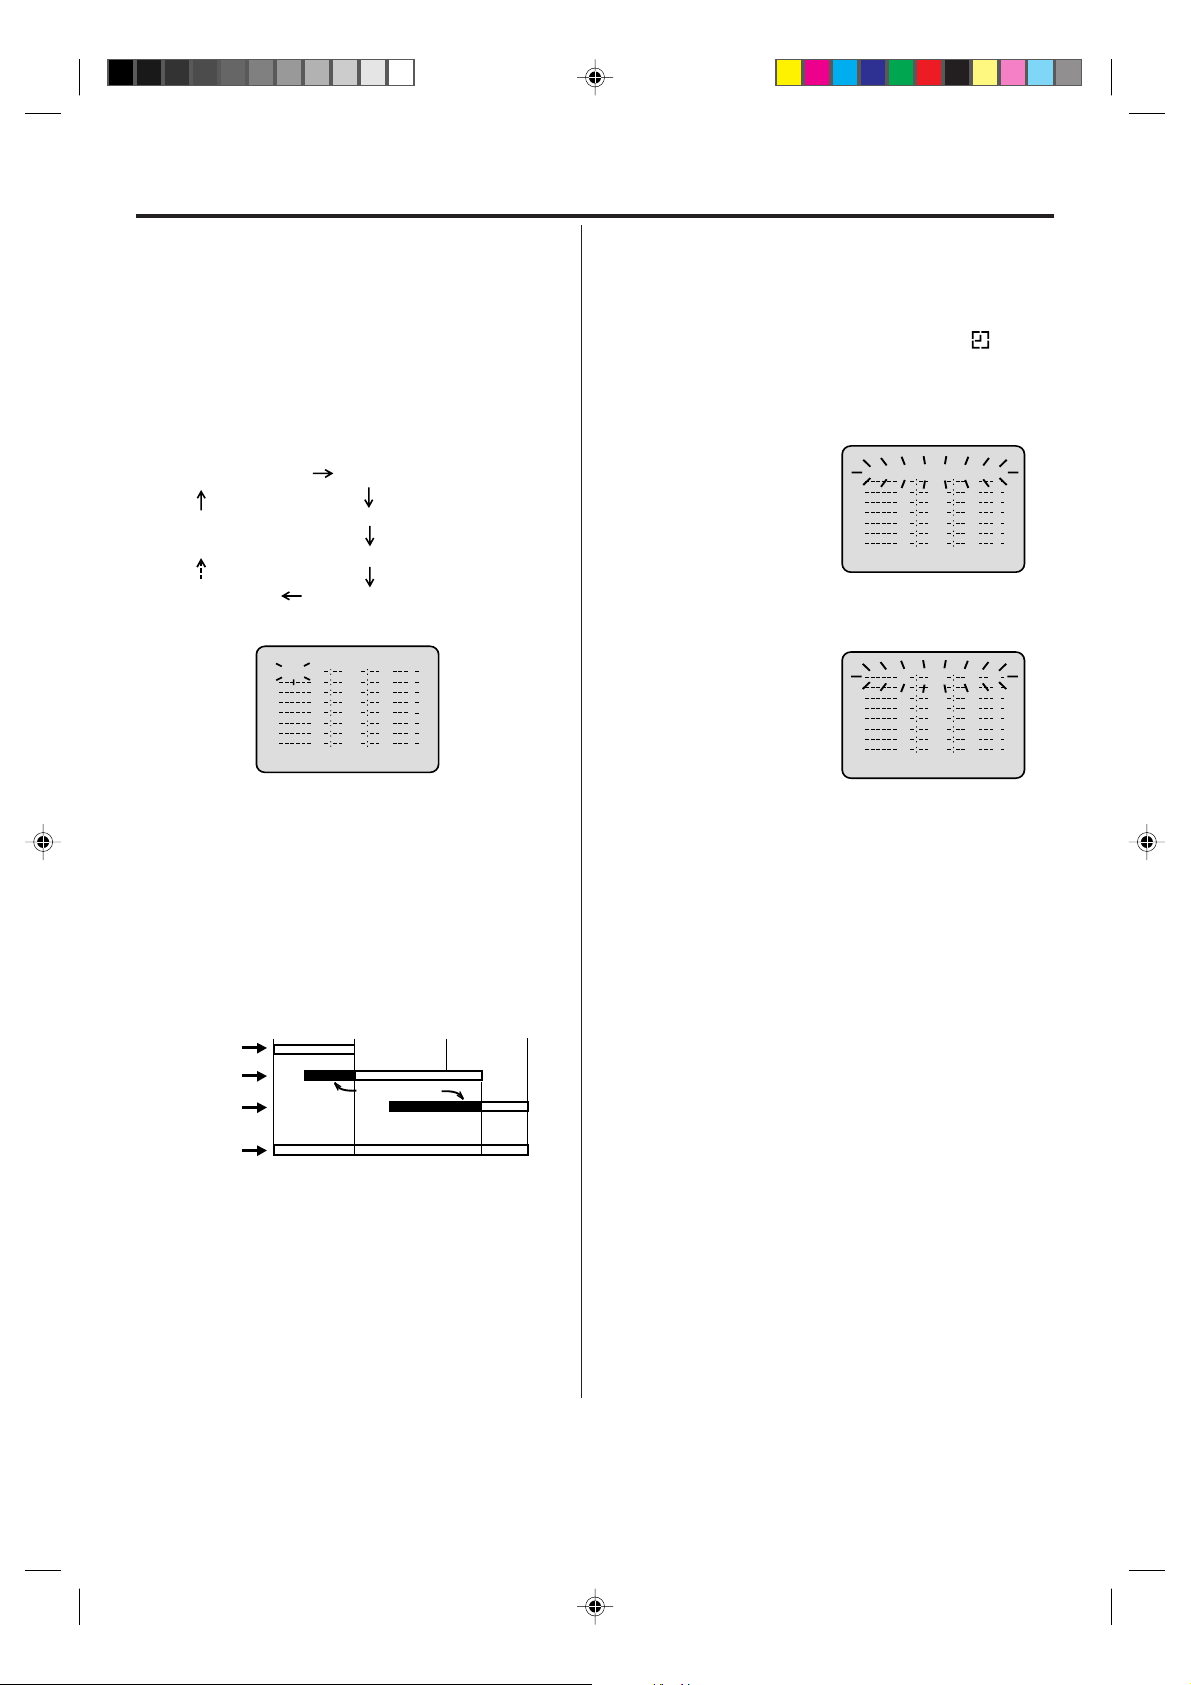
Timer-recording
〈+/—/ENTER/CANCEL/MENU〉
DATE START END CH
—
〈+/—/ENTER/CANCEL/MENU〉
DATE START END CH
26(SU)11:00PM11
:30PM125
SLP
Timer recording special case
Weekly (e.g. WKL-TU: each Tuesday) or daily (e.g.
MO-SA: Monday to Saturday) Timer recording
Follow the procedure of timer recording on the previous
page. At picture 3 press SET + or – repeatedly until the
desired setting appears. Then press ENTER.
When you press SET – repeatedly, the indicator at
DATE will change as follows, in this case the day is
Friday.
The current day (Friday) SU-SA (Sunday to Saturday)
One month later
minus one day
WKL-WE WKL-TH (Weekly Thursday)
(Weekly Wednesday)
DATE START END CH
WKL-WE
〈+/—/ENTER/CANCEL/MENU〉
MO-SA (Monday to Saturday)
MO-FR (Monday to Friday)
Confirmation / Cancellation of the Timer
recording
If the Timer has been activated, press TIMER REC
1
to deactivate the Timer. The clock symbol(
disappear. Then press VCR/DVD to change to
VCR mode.
To confirm Timer program:
2
At picture 1 on the
previous page select the
“TIMER REC SET” option
and press ENTER.
Then the timer program
list as right will appear on
the screen.
To cancel Timer program:
3
Press SET + or – to
select the unnecessary
program, then press
CANCEL to cancel the
program.
) will
In case Timer programs-overlap
•
Do not overlap timer programs as portions of the
conflicting programs will be lost. The first recording
time has priority over the next recording time as shown
in the diagram below.
Program 1
Program 2
Program 3
Recording
Control Settings
8 : 00
NOTES:
•
The daily/weekly recording can be made continuously until the recording is canceled or the tape
reaches the end.
•
During timer recording the automatic rewinding
mechanism does not function.
Prog.1
9 : 00
Deleted Parts
Non Recorded Portion Parts
Prog.2 Prog.3
10 : 00
11 : 00
Press VCR MENU repeatedly until the TV-picture
4
appears.
NOTES:
• If there are other timer record programs remaining,
TIMER REC must be pressed to reactivate the timer,
otherwise the remaining timer record programs will be
ignored.
• You cannot confirm the Timer program during timer
recording operation.
• You can correct or cancel a programmed setting in
program confirm mode.
32
2A77001AE(28-33) 8/29/02, 11:00 AM32
Page 33
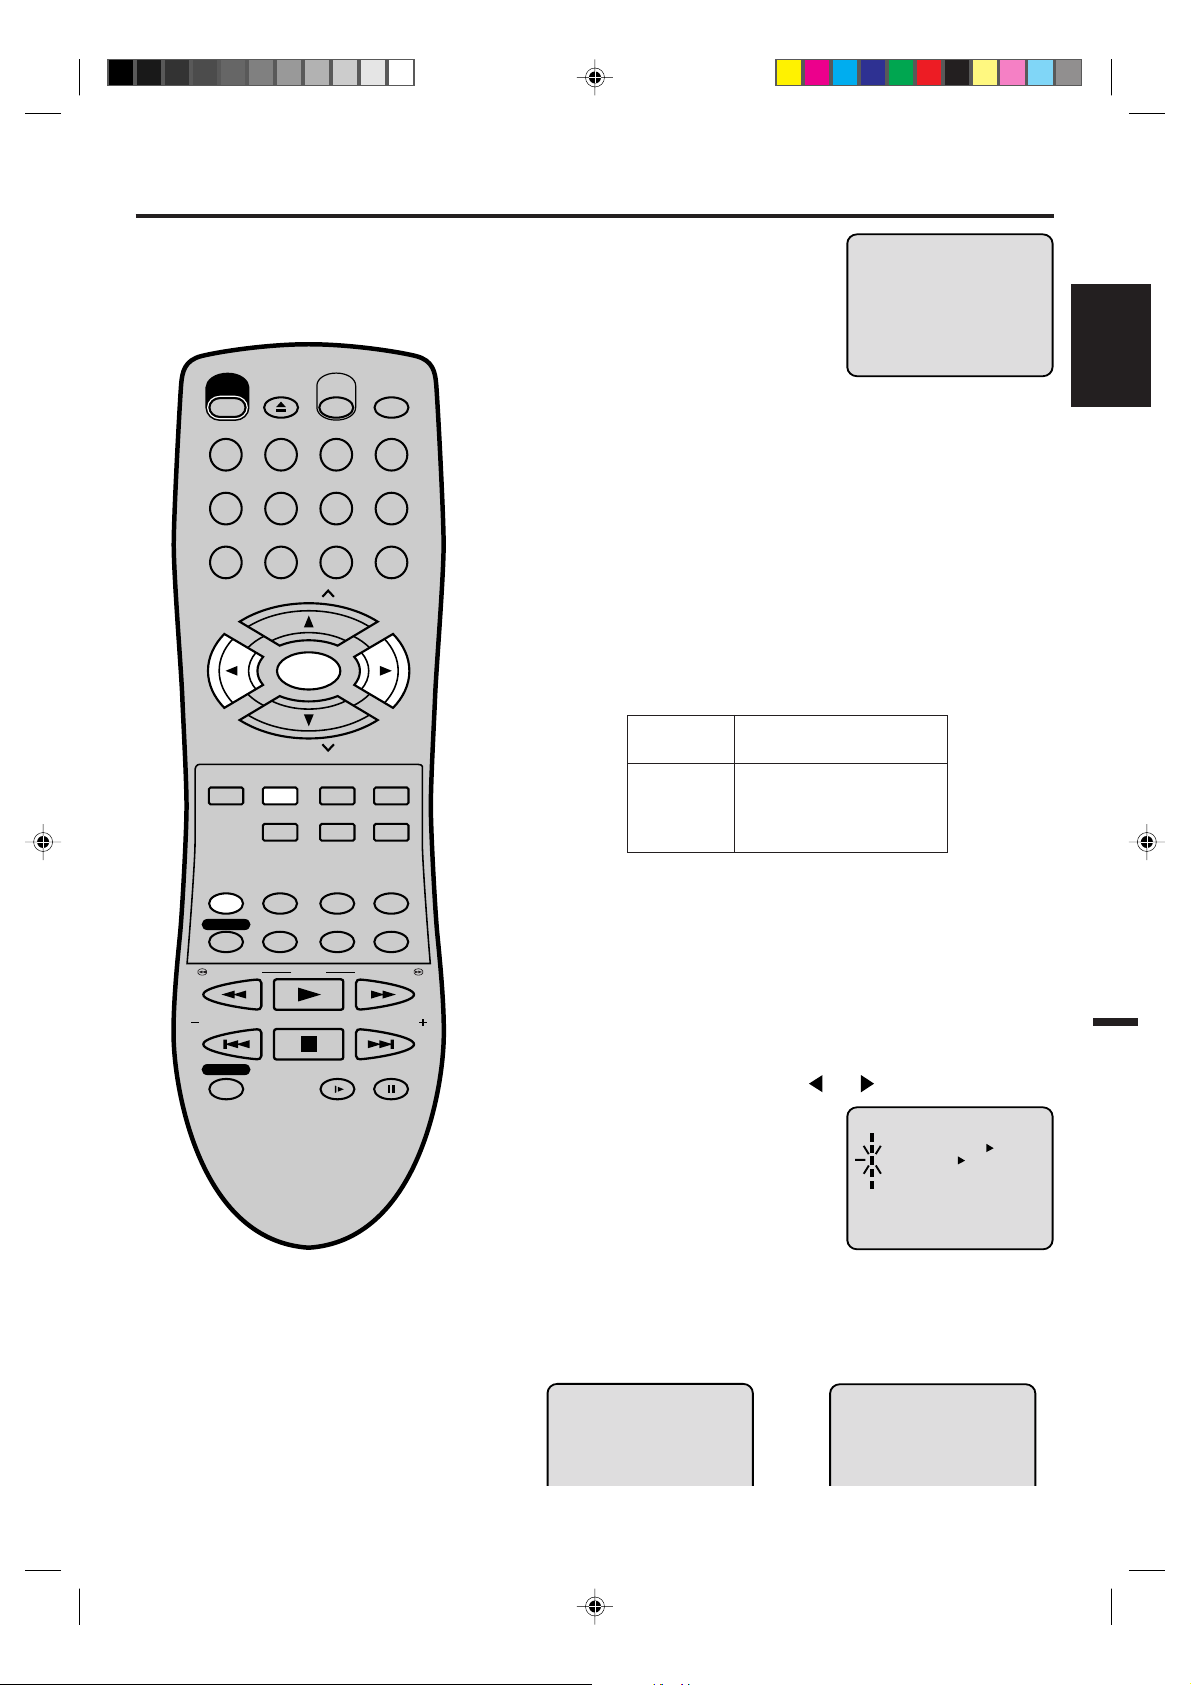
Stereo recording and playback / Separate Audio Program (SAP)
Stereo recording and
playback
The VHS Hi-Fi audio system permits high
fidelity recording of MTS STEREO TV
broadcasts.
OPEN/
CLOSE
EJECT
POWER
123
456
789
CH
TRACKING/
SET
—
DVD MENU
SELECT/
SET UP/
VCR MENU
ZOOM
ENTER
CH
VCR/DVD
DISPLAY/CALL
INPUT SELECT
0
CLEAR/
RETURN
CANCEL
TITLE REPEAT A-B
TRACKING/
SET
+
When a MTS STEREO broadcast is
received, the word STEREO will appear on the screen and the program can
STEREO
be viewed or recorded in stereo.
The Hi-Fi STEREO recording procedure
is the same as for normal recordings.
NOTE:
When using a CATV system, stereo TV programs may be transmitted
over a mono cable channel. In this case the word "STEREO" will not
appear and the sound will be in mono.
Output selection
When viewing an MTS STEREO TV program, or playing a prerecorded
VHS Hi-Fi STEREO videotape, press AUDIO SELECT to select how
the audio will be heard through the speakers. Normally set to the Hi-Fi
STEREO position, this button can be set to the MONO position if the
stereo broadcast or videotape audio is of poor quality. The "R" and "L"
positions allow the audio from the Right or Left Hi-Fi channel to be heard
over both TV speakers. This button has no effect when viewing a MONO
videotape or TV program. Each time when you press the button, OUTPUT
SELECTION display appears on the screen for several seconds. Refer
to the chart below.
OUTPUT
SELECTION
STEREO
L CH
R CH
MONO
SOUND HEARD ON BOTH
SPEAKERS
STEREO
LEFT CHANNEL AUDIO
RIGHT CHANNEL AUDIO
MONO
ENGLISH
ANGLE/
AUDIO/
MEMORY/
AUDIO SELECT
TIMER REC
REW/SEARCH SEARCH/F.FWD
INDEX/SKIP
REC/OTR
COUNTER RESET
ZERO RETURN
SUB TITLE/
ATR
PLAY
STOP
CLOCK/
COUNTER
PLAY MODE/
TV/VCR
SPEED
SKIP/
INDEX
SLOW PAUSE/STILL
NOTES:
•
When playing back a tape that is not
recorded in Hi-Fi stereo mode, the
audio will automatically be monaural.
•
When listening to a VHS Hi-Fi video
tape or MTS broadcast through the
VHF/UHF jack (Audio/Video cord not
connected), the sound will be
monaural.
Separate Audio Program (SAP)
Your VCR is fitted with a SAP broadcast system which enables
you to switch to a separate audio program when viewing a
selected channel.
This function applies only when the program is broadcast in
multi-languages through the SAP broadcast system.
Press VCR MENU. Then press or to select "SAP".
1
Then press ENTER to select [ON].
2
Then press VCR MENU until the
menu screen is cleared.
Listening to SAP
When the VCR is turned on or a channel selection is made, make
certain the letters "SAP" appears on the screen. This means that the
"Separate Audio Program" broadcasting is available.
STEREO SAP
OR
MENU
TIMER REC SET
AUTO REPEAT
SAP
CH SET UP
SYSTEM SET UP
〈+/—/ENTER/MENU〉
SAP
ON OFF
ON OFF
2A77001AE(28-33) 8/29/02, 11:00 AM33
33
Page 34
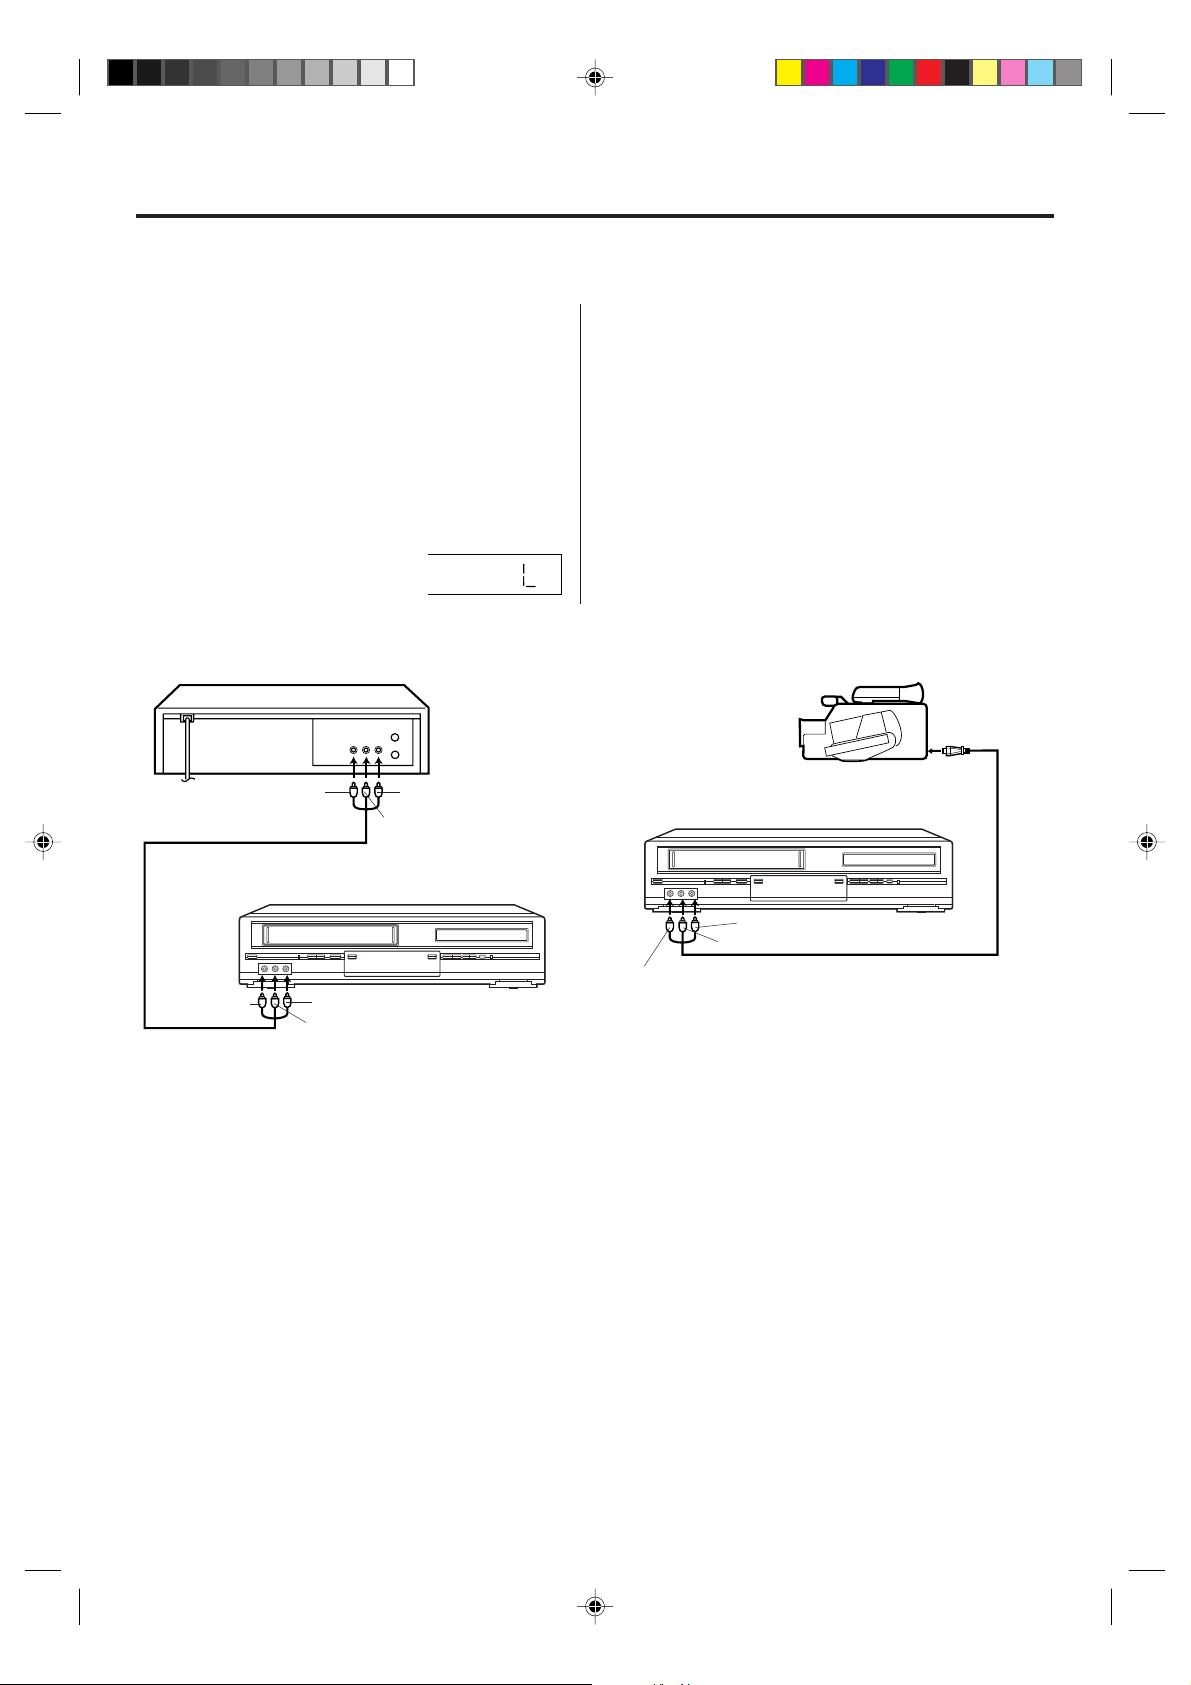
Duplicating a video tape
Duplicating a video tape
If you connect the VCR to another VCR or camcorder, you can duplicate a previously recorded tape.
Make all connections before turning on the power.
Load a blank cassette tape with the erase preven-
1
tion tab intact into the recording VCR.
Load a previously recorded tape into the playback
VCR or CAMCORDER.
Press SPEED to select the desired tape speed SP
2
or SLP.
It is recommended that you set the Speed to the
SP mode on the recording VCR for best results.
Press INPUT SELECT to select AUDIO/VIDEO
3
input position. "L" will appear in
the display.
Connection with second Video recorder
Playback VCR
To VIDEO OUT
AUDIO/VIDEO Cord (supplied)
Recording VCR
To AUDIO (R) OUT
To AUDIO (L) OUT
Press REC/OTR on the recording VCR, then press
4
PAUSE/STILL.
Press PLA Y on the playback VCR or CAMCORDER,
5
then press PAUSE/STILL.
Release the recording pause and the playback still
6
simultaneously to begin the duplicating process.
Connection with Video camera
Playback Camcorder
To AV Jack
Recording VCR
To VIDEO IN
To AUDIO (R) IN
To AUDIO (L) IN
To AUDIO (R) IN
To AUDIO (L) IN
To VIDEO IN
For duplicating a previously recorded tape from a
camcorder, follow the camcorder manufacturer’s
instructions. A typical camcorder dubbing hookup
is shown above.
AUDIO/VIDEO Cord (not supplied)
34
2A77001AE(34-39) 8/29/02, 10:55 AM34
Page 35
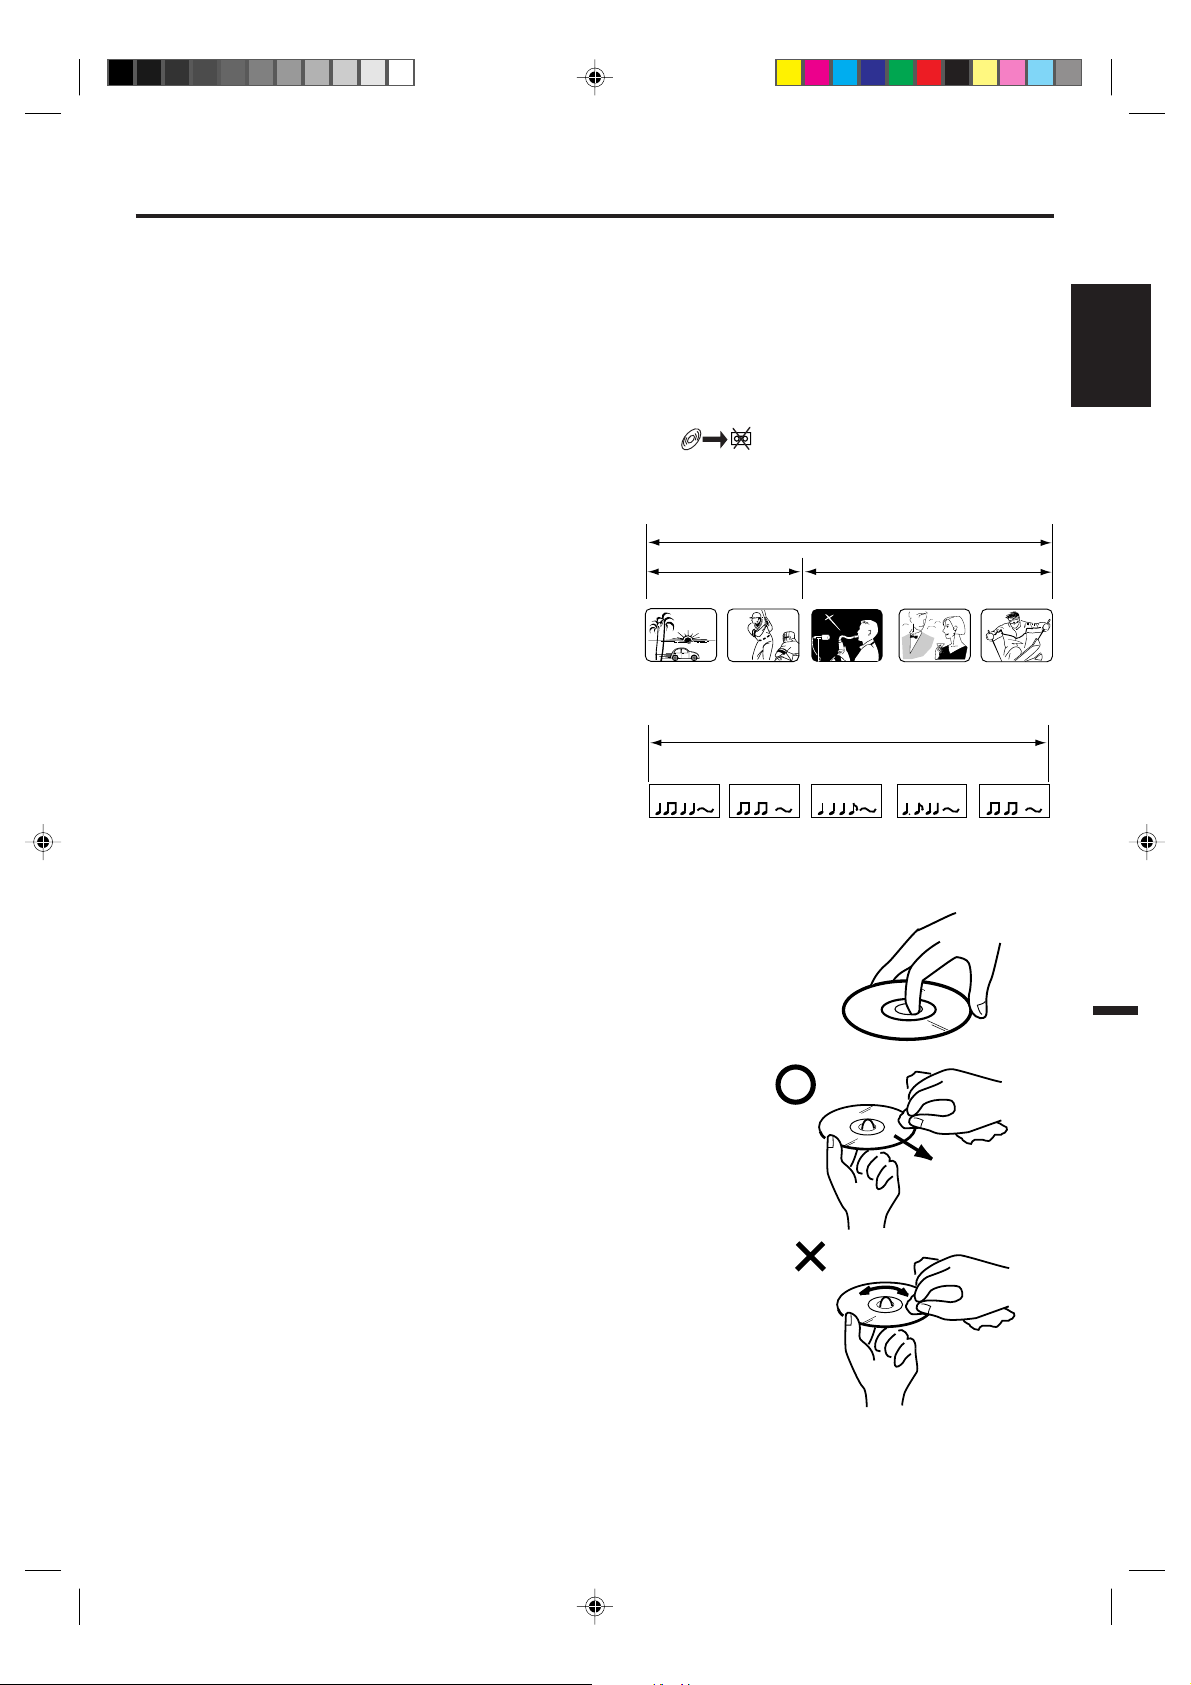
Disc
This unit applies to DVD discs from Region 1 only.
The loaded Disc (DVD, Audio-CD and MP3-CD) will be recognized automatically.
The suitable Disc-formats are: DVD, CD-R and CD-RW.
Some CD-R/RW discs may be incompatible.
Do not play DVD-ROM, DVD-Audio, CDV, Video-CD, CD-G or Photo CD to prevent accidental erasure of prerecorded material.
This unit cannot record disc material in DVD, Audio CD etc. onto a video tape.
If you press the REC/OTR during DVD playback, a symbol mark "
seconds.
" will appear on the screen for aprox.4
ENGLISH
Title
When two or more movies are recorded on a disc,
the disc is divided into two or more sections. Each
section is called a “TITLE”.
CHAPTER 1
Chapter
The titles can be subdivided into many sections.
Each section is called a “CHAPTER”.
Track
An Audio CD can contain several items.
These are assigned to the tracks.
TRACK 1 TRACK 2 TRACK 3 TRACK 4 TRACK 5
Removing Disc from Case
Be sure to hold the edge of disc. Do not touch the surface of the disc.
Pick up the disc gently from the case.
• Do not scratch the disc.
• Do not get dirt on the surface of the disc.
• Do not stick a label or adhesive tape on the disc.
• Do not drop or bend the disc.
DVD DISC
TITLE1 TITLE2
CHAPTER 2 CHAPTER 2 CHAPTER 3CHAPTER 1
Audio-CD
CD
Storing Disc
• Store the disc in the case to avoid risk of scratches, dirt or damage.
• Do not leave disc exposed to direct sunlight or in hot or humid places.
Cleaning Disc
Wipe the disc with a clean, dry cloth from center to edge.
• Do not wipe the disc round.
• Do not use liquid or aerosol cleaners.
2A77001AE(34-39) 8/29/02, 10:55 AM35
35
Page 36
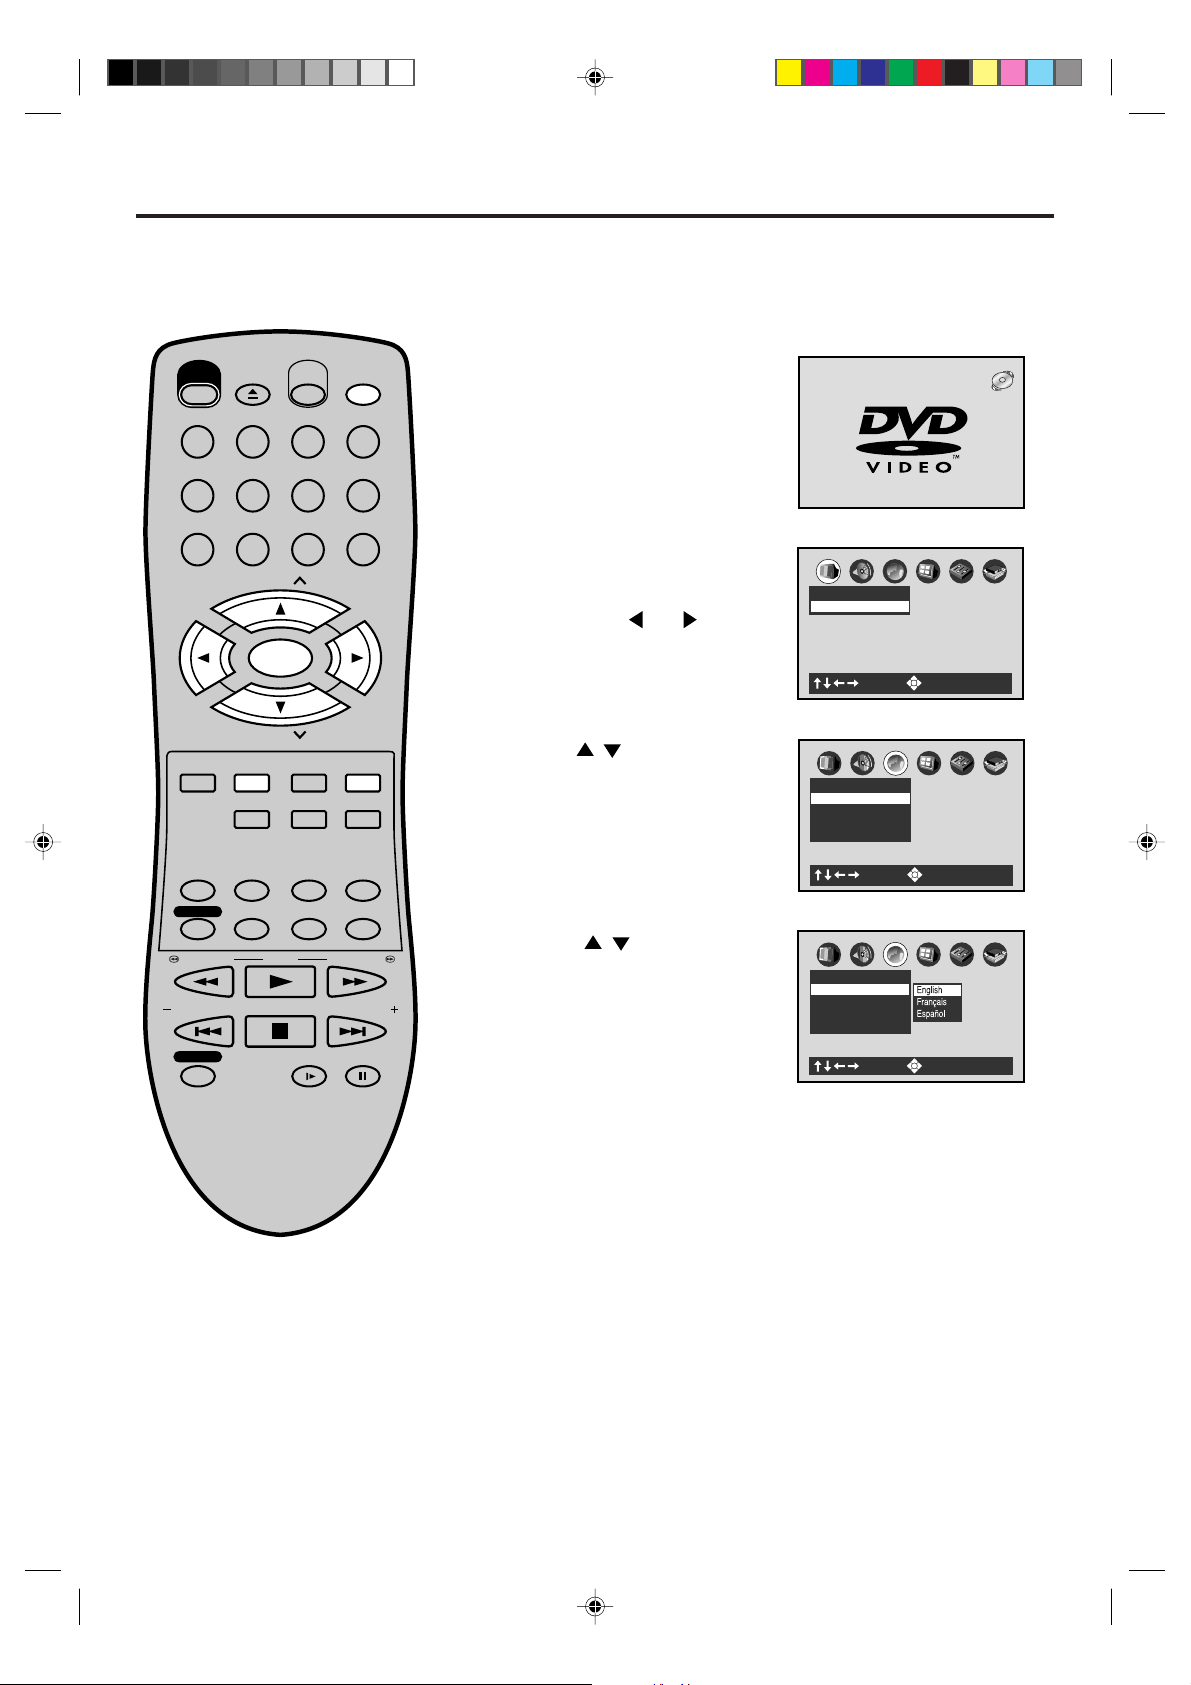
A
B
C
Language
Subtitle Language ENG
Audio Language ENG
Disc Menu Language ENG
On-Screen Language ENG
: Select : Enter
Setting setup language
The setup language can be selected.
OPEN/
CLOSE
EJECT
POWER
123
456
789
CH
TRACKING/
SET
—
DVD MENU
SELECT/
SET UP/
VCR MENU
ZOOM
ENTER
CH
VCR/DVD
DISPLAY/CALL
INPUT SELECT
0
CLEAR/
RETURN
CANCEL
TITLE REPEAT A-B
TRACKING/
SET
+
Preparation:
Turn ON the TV and set to the video input mode.
•
When using an amplifier, switch on the amplifier.
•
Press VCR/DVD to select the
1
DVD mode. (The DVD indicator
will light.)
“No Disc” will appear on the
screen. (If a DVD disc has already
loaded, the playback will start
automatically.)
Press SET UP in the stop mode.
2
The SETUP MENU of DVD will
appear on the screen.
Then press or to select
Picture
TV Shape 4:3LB
“Language”.
Press / to select On-Screen
3
Language, then press ENTER.
C
B
A
: Select : Enter
ANGLE/
AUDIO/
MEMORY/
AUDIO SELECT
TIMER REC
REW/SEARCH SEARCH/F.FWD
INDEX/SKIP
REC/OTR
COUNTER RESET
ZERO RETURN
SUB TITLE/
ATR
PLAY
STOP
PLAY MODE/
CLOCK/
COUNTER
TV/VCR
SPEED
SKIP/
INDEX
SLOW PAUSE/STILL
If the DVD/VCR does not operate
properly: Static electricity, etc., may
affect the player's operation. Disconnect
the AC power cord once, then connect
it again.
Press
4
language: English (English),
French (Français) or Spanish
(Español), then press ENTER.
/ to select desired
A
Language
On-Screen Language ENG
Dsc Menu Language ENG
Audio Language ENG
Subtitle Language ENG
C
B
English
Fran ais
Espa ol
: Select : Enter
NOTE: To make the SETUP screen disappear, press SET UP
(or RETURN).
2A77001AE(34-39) 8/29/02, 10:55 AM36
36
Page 37
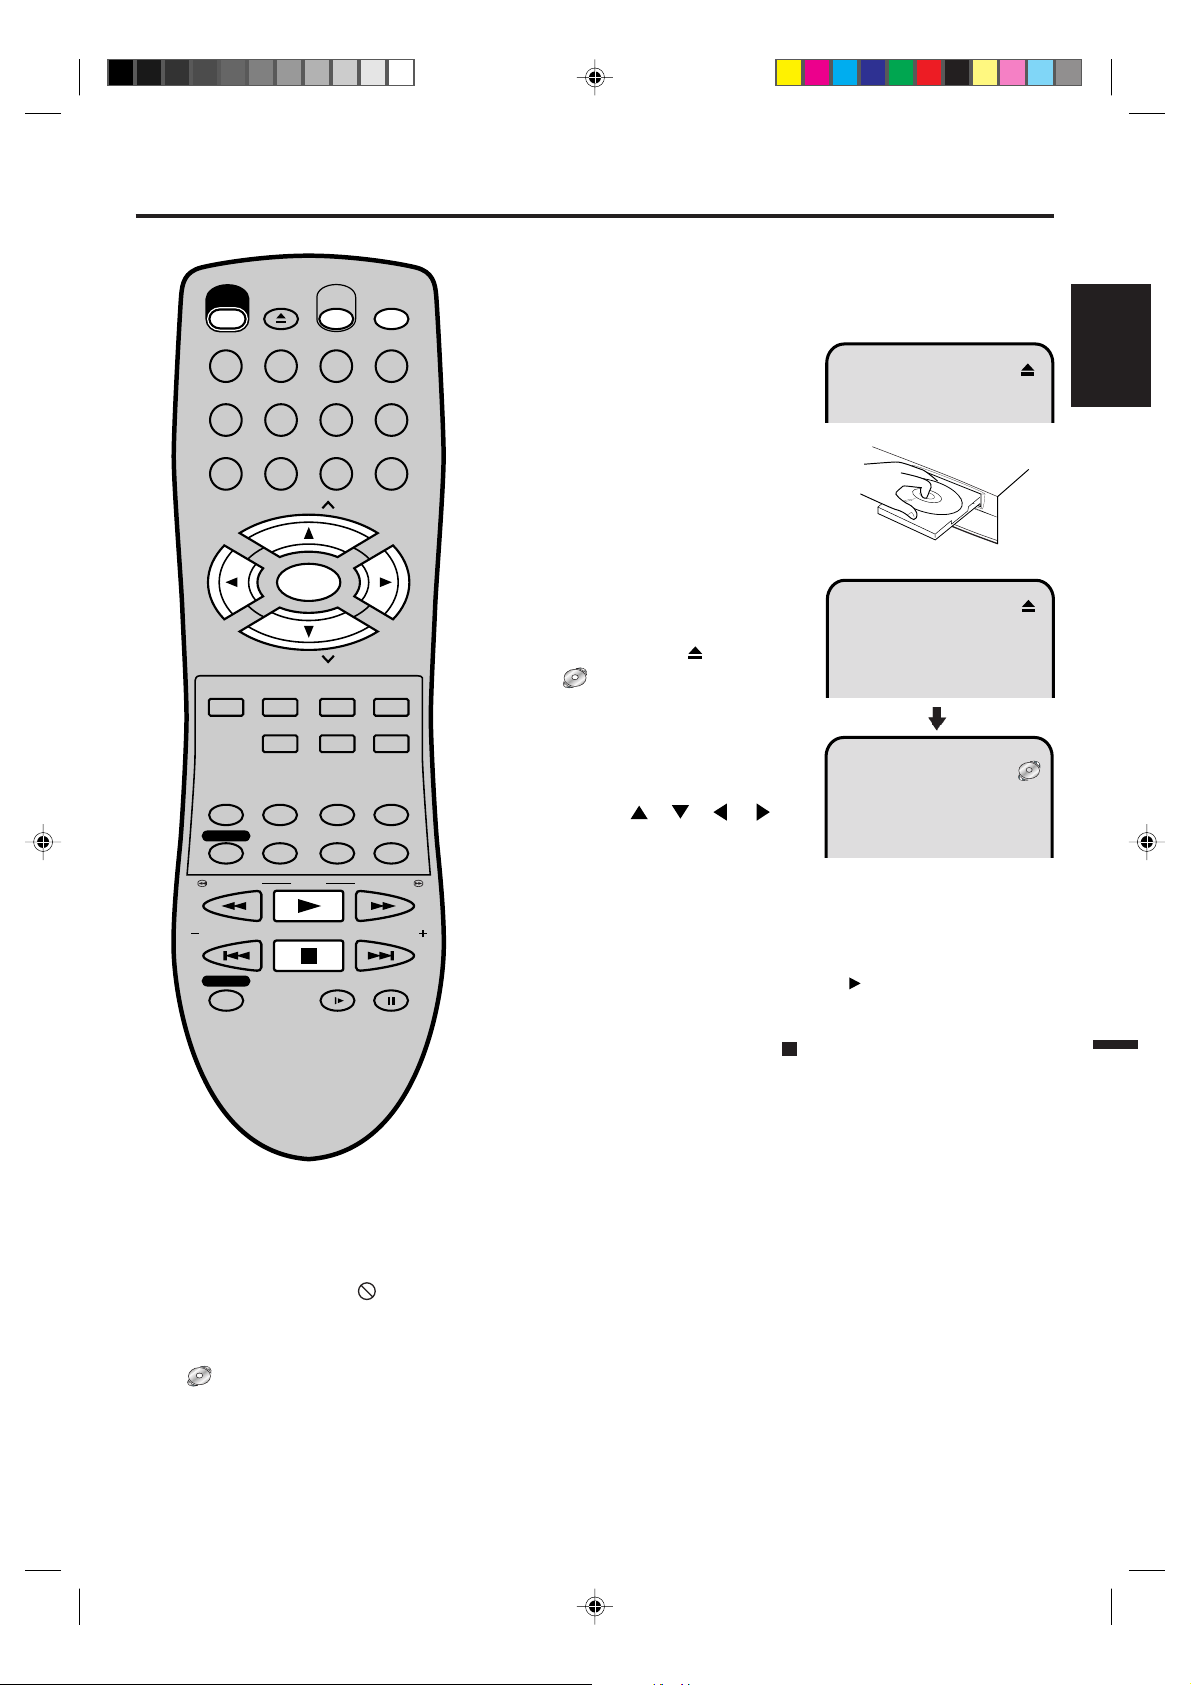
POWER
EJECT
OPEN/
CLOSE
VCR/DVD
Playback procedure
Preparation:
Turn ON the TV and set to the video input mode.
•
•
Press VCR/DVD to select the DVD mode. (The DVD indicator
will light.)
123
456
789
CH
DISPLAY/CALL
INPUT SELECT
0
Press OPEN/CLOSE.
1
The disc tray will open.
Place a disc onto the tray.
2
Hold the disc, position it with the
printed label side up, align it with
the guides, and place it in its
TRACKING/
SET
—
SELECT/
ENTER
TRACKING/
SET
+
proper position.
Press PLAY or OPEN/CLOSE.
3
The disc tray closes automatically.
DVD MENU
SET UP/
VCR MENU
ZOOM
CH
CLEAR/
CANCEL
TITLE REPEAT A-B
RETURN
On the screen,
” and then playback will
“
commence.
changes to
• A menu screen may appear on
the TV screen, if the disc has
AUDIO/
AUDIO SELECT
ZERO RETURN
TIMER REC
MEMORY/
SUB TITLE/
ATR
ANGLE/
COUNTER RESET
PLAY MODE/
SPEED
COUNTER
CLOCK/
TV/VCR
a menu feature. In this case,
press
, , , or
ENTER to operate a menu
feature.
REW/SEARCH SEARCH/F.FWD
INDEX/SKIP
PLAY
STOP
SKIP/
INDEX
Press STOP to end playback.
4
• The DVD/VCR memorizes the stopped point, depending on
the disc. “To Return To The Last Scene Viewed, Press Play.
To Disable This Operation, Press STOP Again.” appears on
REC/OTR
SLOW PAUSE/STILL
the screen for approx. 4 seconds. “
” will continue blinking
in the display until the playback is stopped completely. Press
PLAY to resume playback (from the scene point).
• If you press STOP again (“
” appears on the screen) or
unload the disc, the DVD/VCR will clear the stopped point.
Then press OPEN/CLOSE.
5
The disc tray opens.
Remove the disc and press POWER.
The disc tray closes automatically and DVD/VCR turns off.
NOTES:
• If a non-compatible disc is loaded, "Please Check Disc", "Disc playback unauthorized Consult owners manual
for further information" or "Parental Lock" will appear on the TV screen according to the type of loaded disc. In
this case, check your disc again (See pages 35 and 45).
• Some discs may take a minute or so to start playback.
• A “Prohibition” symbol
may appear at the upper right of the screen. This symbol means either the feature you
tried is not available on the disc, or the DVD/VCR can not access the feature at this time. This does not indicate
a problem with the DVD/VCR.
When you set a single-faced disc label downwards (ie. the wrong way up) and press PLAY or OPEN/CLOSE,
•
" " will appear and remain on the screen for approx. 40 seconds and then it will change to "Please Check Disc".
• Some playback operations of DVDs may be intentionally fixed by software producers. Since this DVD/VCR plays
DVDs according to the disc contents the software producers designed, some playback features may not be
available. Also refer to the instructions supplied with the DVDs.
• When playing DTS-encoded Audio CDs, excessive noise will be heard from the analog stereo outputs. To avoid
possible damage to the audio system, the consumer should take proper precautions when the analog stereo
outputs of the DVD/VCR are connected to an amplification system.
37
ENGLISH
2A77001AE(34-39) 8/29/02, 10:55 AM37
Page 38
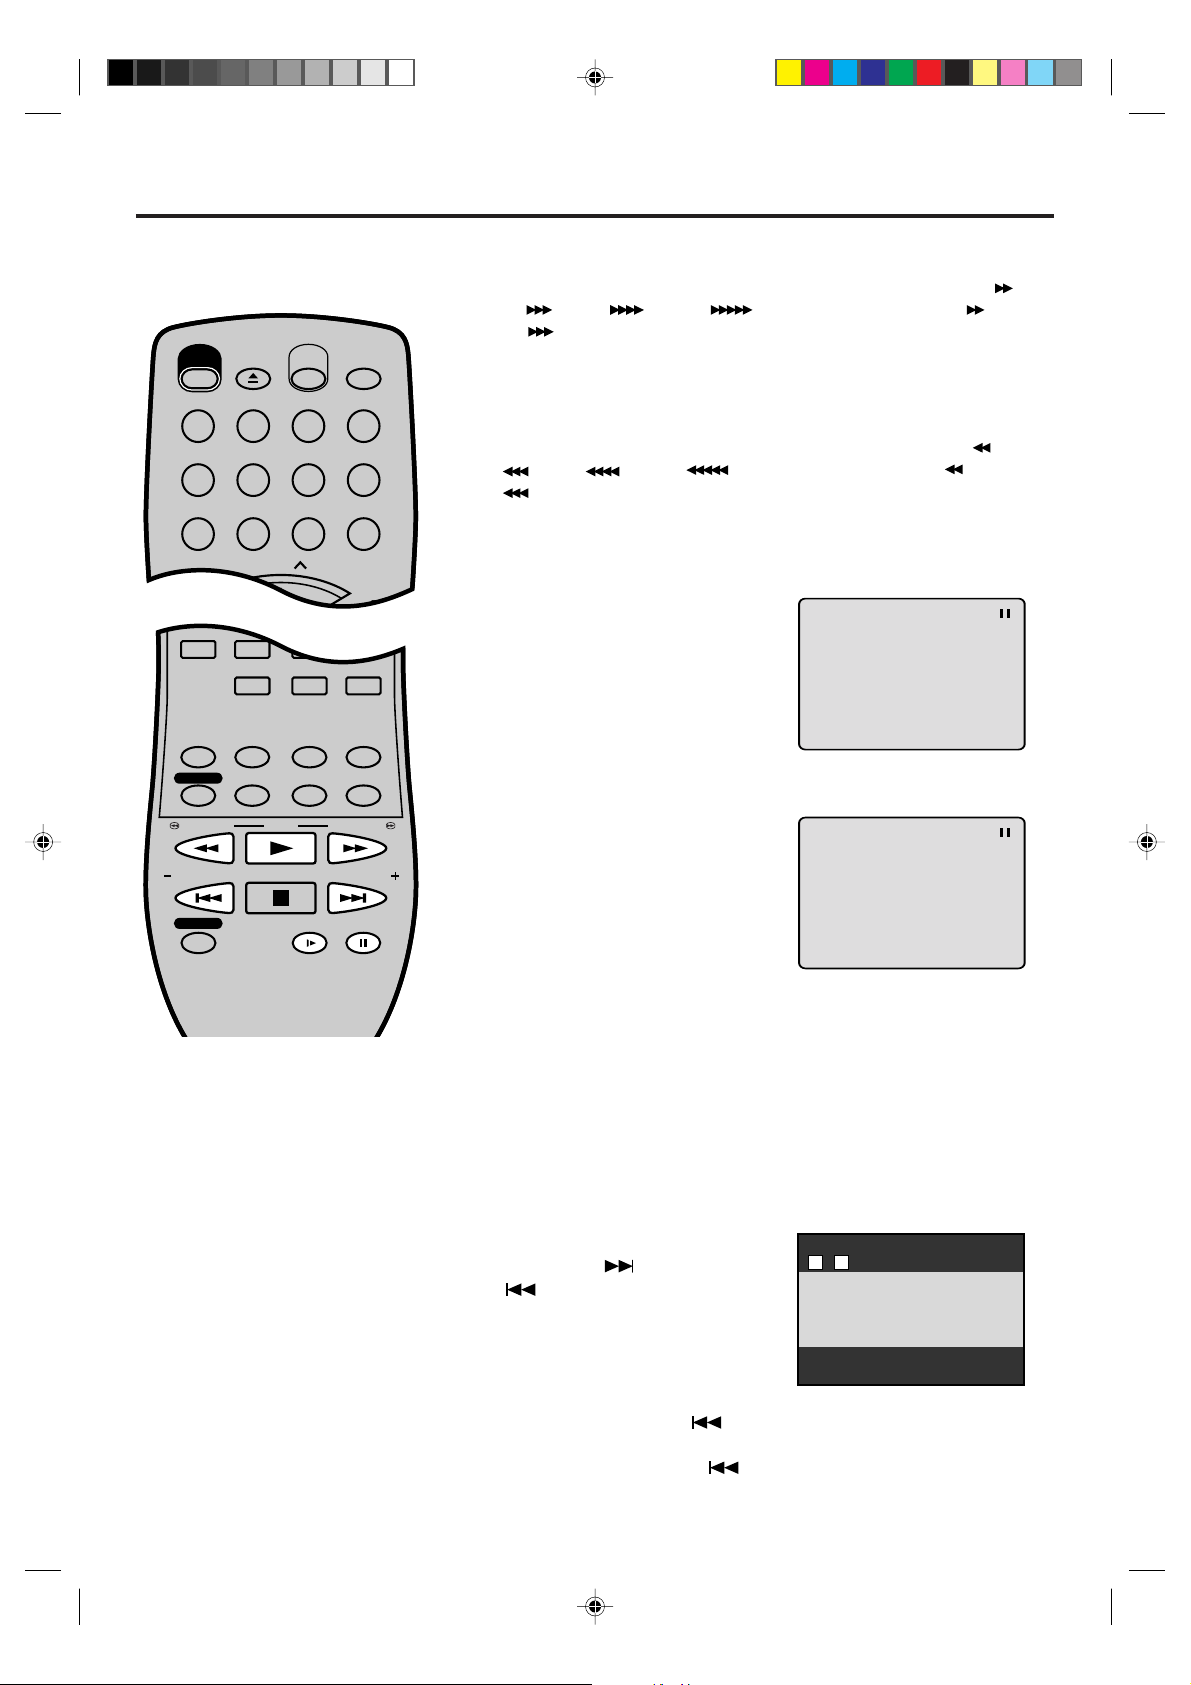
Special playback
EJECT
OPEN/
CLOSE
CH
VCR/DVD
DISPLAY/CALL
TRACKING/
SET
TRACKING/
SET
POWER
123
INPUT SELECT
456
0
789
T C
11
DVD MENU
RETURN
SET UP/
VCR MENU
CLEAR/
CANCEL
ANGLE/
COUNTER RESET
CLOCK/
COUNTER
PLAY MODE/
SPEED
AUDIO/
AUDIO SELECT
TV/VCR
PLAY
INDEX/SKIP
SKIP/
INDEX
SLOW PAUSE/STILL
STOP
ZOOM
TITLE REPEAT A-B
REW/SEARCH SEARCH/F.FWD
TIMER REC
REC/OTR
MEMORY/
ZERO RETURN
SUB TITLE/
ATR
Note: There may be a slight delay
between pressing the button and the
function activation.
Fast Forward Playback
Press F.FWD during normal playback.
Each press of F.FWD will increase the speed of the search x2 ( ),
x8 ( ), x30 ( ), x100 ( ). (in case of Audio-CD: x4 ( ) and
x8 ( ) are available)
• To resume normal playback, press PLAY.
Review Playback
Press REW during normal playback.
Each press of REW will increase the speed of the search x2 ( ), x8
( ), x30 ( ), x100 ( ). (in case of Audio-CD: x4 ( ) and x8
( ) are available)
• To resume normal playback, press PLAY.
Still Playback
Press PAUSE/STILL during normal
playback.
To resume normal playback, press
PLAY.
Frame Advance
Press PAUSE/STILL during still play-
back.
One frame is advanced each time
you press PAUSE/STILL.
NOTES:
• The unit is capable of holding a still
video image or On screen display image
on your television screen indefinitely. If
you leave the still video image or On
screen display image displayed on your
TV for an extended period of time, you
risk permanent damage to your
television screen. Projection televisions
are very susceptible.
• Some titles may not display chapter
numbers.
• When you set “Title Stop” to “Off” (See
page 53), you can access chapter in
another title. If you go back to the
preceding title by pressing the SKIP, the
DVD/VCR locates the first chapter of the
title. When “Title Stop” is set to “On”.
you can access chapters only within the
current title.
38
2A77001AE(34-39) 8/29/02, 10:55 AM38
To resume normal playback, press
PLA Y.
Slow-motion Playback
Press SLOW during
Each press of SLOW will change the speed of the slow x1/2, x1/4,
x1/8.
• To resume normal playback, press PLAY.
• To resume the still playback, press PAUSE/STILL.
normal playback or still playback.
Locating a chapter or track
Press SKIP ( ) Forward or SKIP
(
) Reverse during playback to
locate a chapter or track that you
want to watch.
Each time you press the button, a
“C (chapter)” number or “T (track)”
number is skipped.
When you press SKIP ( ), playback starts from the beginning
of the current chapter or track.
When you press SKIP (
beginning of the preceding chapter or track.
) twice, playback starts from the
Page 39
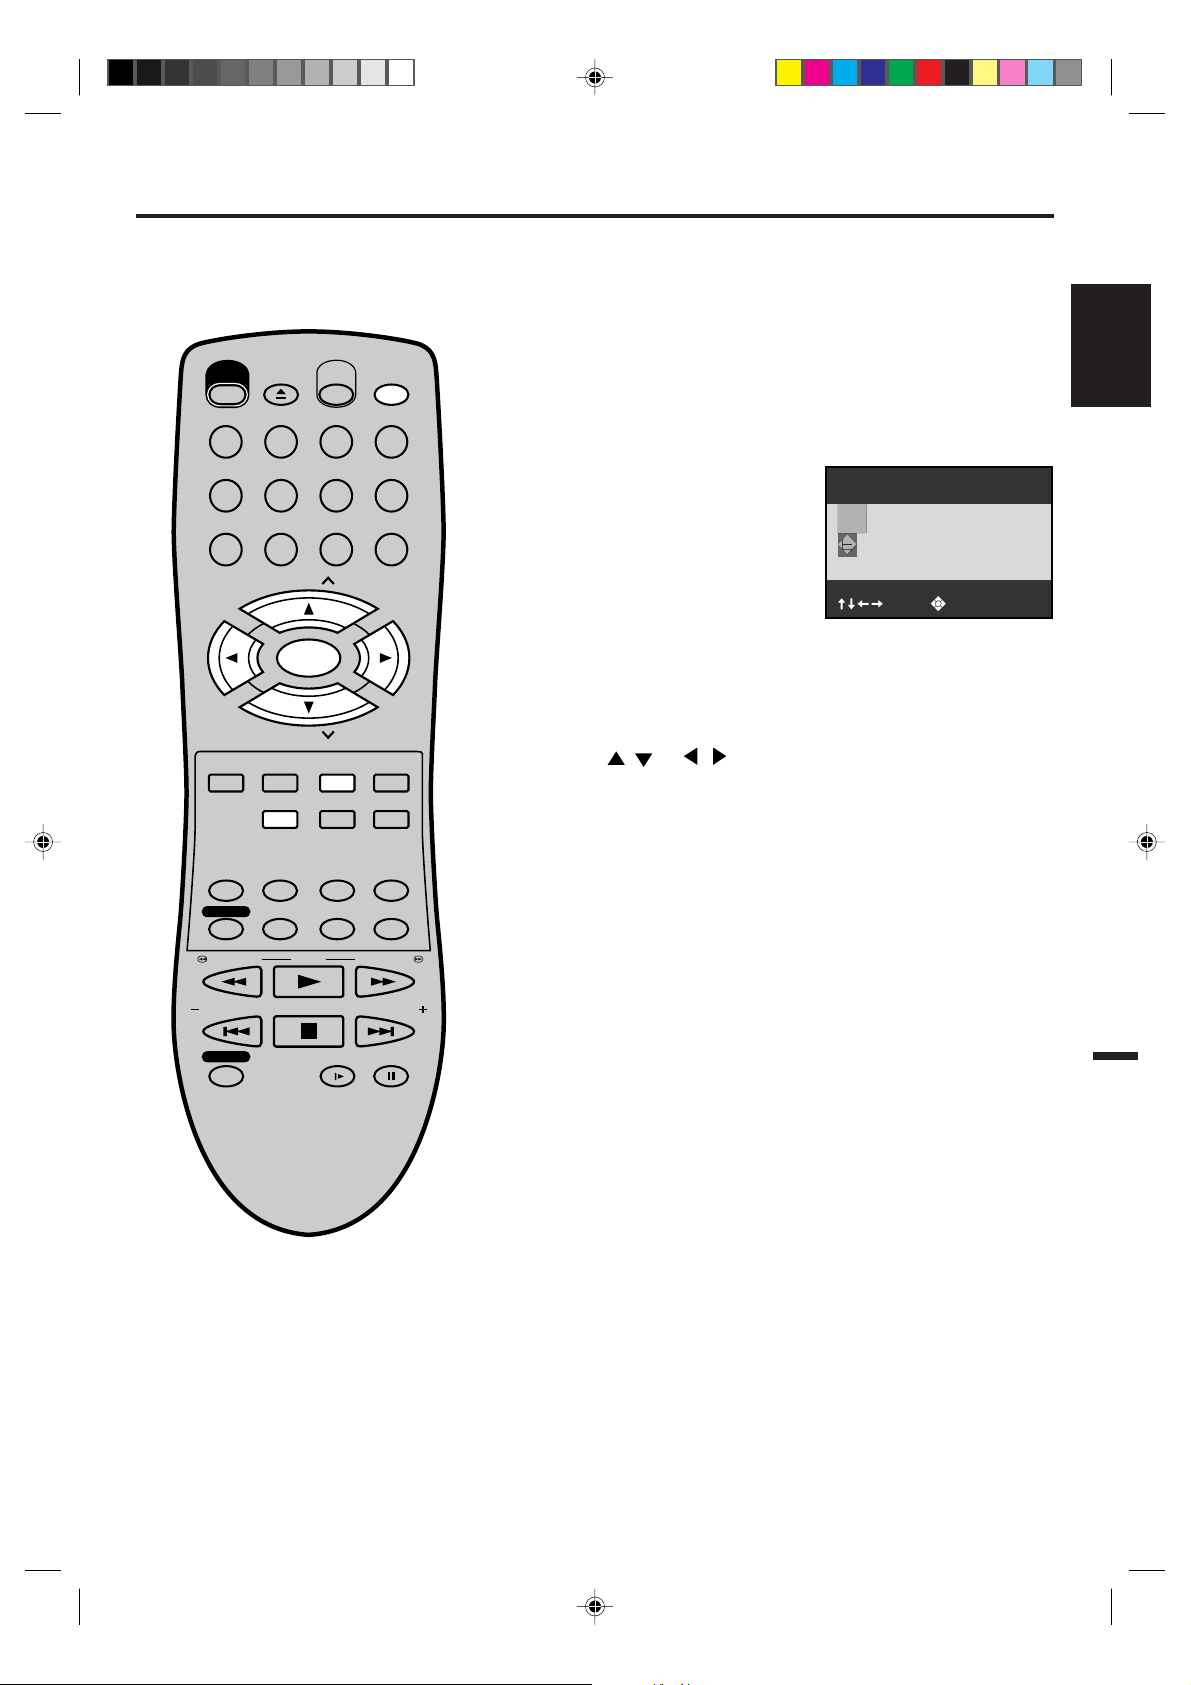
Zooming
Preparation:
Turn ON the TV and set to the video input mode.
•
Press VCR/DVD to select the DVD mode. (The DVD indicator
•
will light.)
OPEN/
CLOSE
EJECT
POWER
123
456
789
CH
TRACKING/
SET
—
DVD MENU
AUDIO/
AUDIO SELECT
TIMER REC
REW/SEARCH SEARCH/F.FWD
SELECT/
ENTER
CH
SET UP/
VCR MENU
ZOOM
MEMORY/
COUNTER RESET
ZERO RETURN
SUB TITLE/
ATR
PLAY
CLEAR/
CANCEL
TITLE REPEAT A-B
ANGLE/
PLAY MODE/
SPEED
VCR/DVD
DISPLAY/CALL
INPUT SELECT
0
TRACKING/
SET
+
RETURN
CLOCK/
COUNTER
TV/VCR
Zooming
This unit will allow you to zoom in on the frame image. You can
then make selections by switching the position of the frame.
Press ZOOM during playback.
1
The center part of the image will
be zoomed in.
As you repeatedly press the
ENTER or ZOOM while “ZOOM”
is selected, the magnification level
changes. Variation of the levels
includes image reduction.
• If you select “EXIT” and press
the ENTER, you can turn off the symbol mark, keeping the
current magnification level.
Press / or / to view a different part of the frame.
2
You may move the frame from the center position to UP,
DOWN, LEFT or RIGHT direction.
• Press CLEAR to restore the zoom point to the center of the
picture.
While “ZOOM” is selected, press ZOOM repeatedly to return to
3
a 1:1 view.
ZOOM
EXIT
Zoom Off
: Select : Change
ENGLISH
INDEX/SKIP
REC/OTR
STOP
SLOW PAUSE/STILL
SKIP/
INDEX
39
2A77001AE(34-39) 8/29/02, 10:55 AM39
Page 40
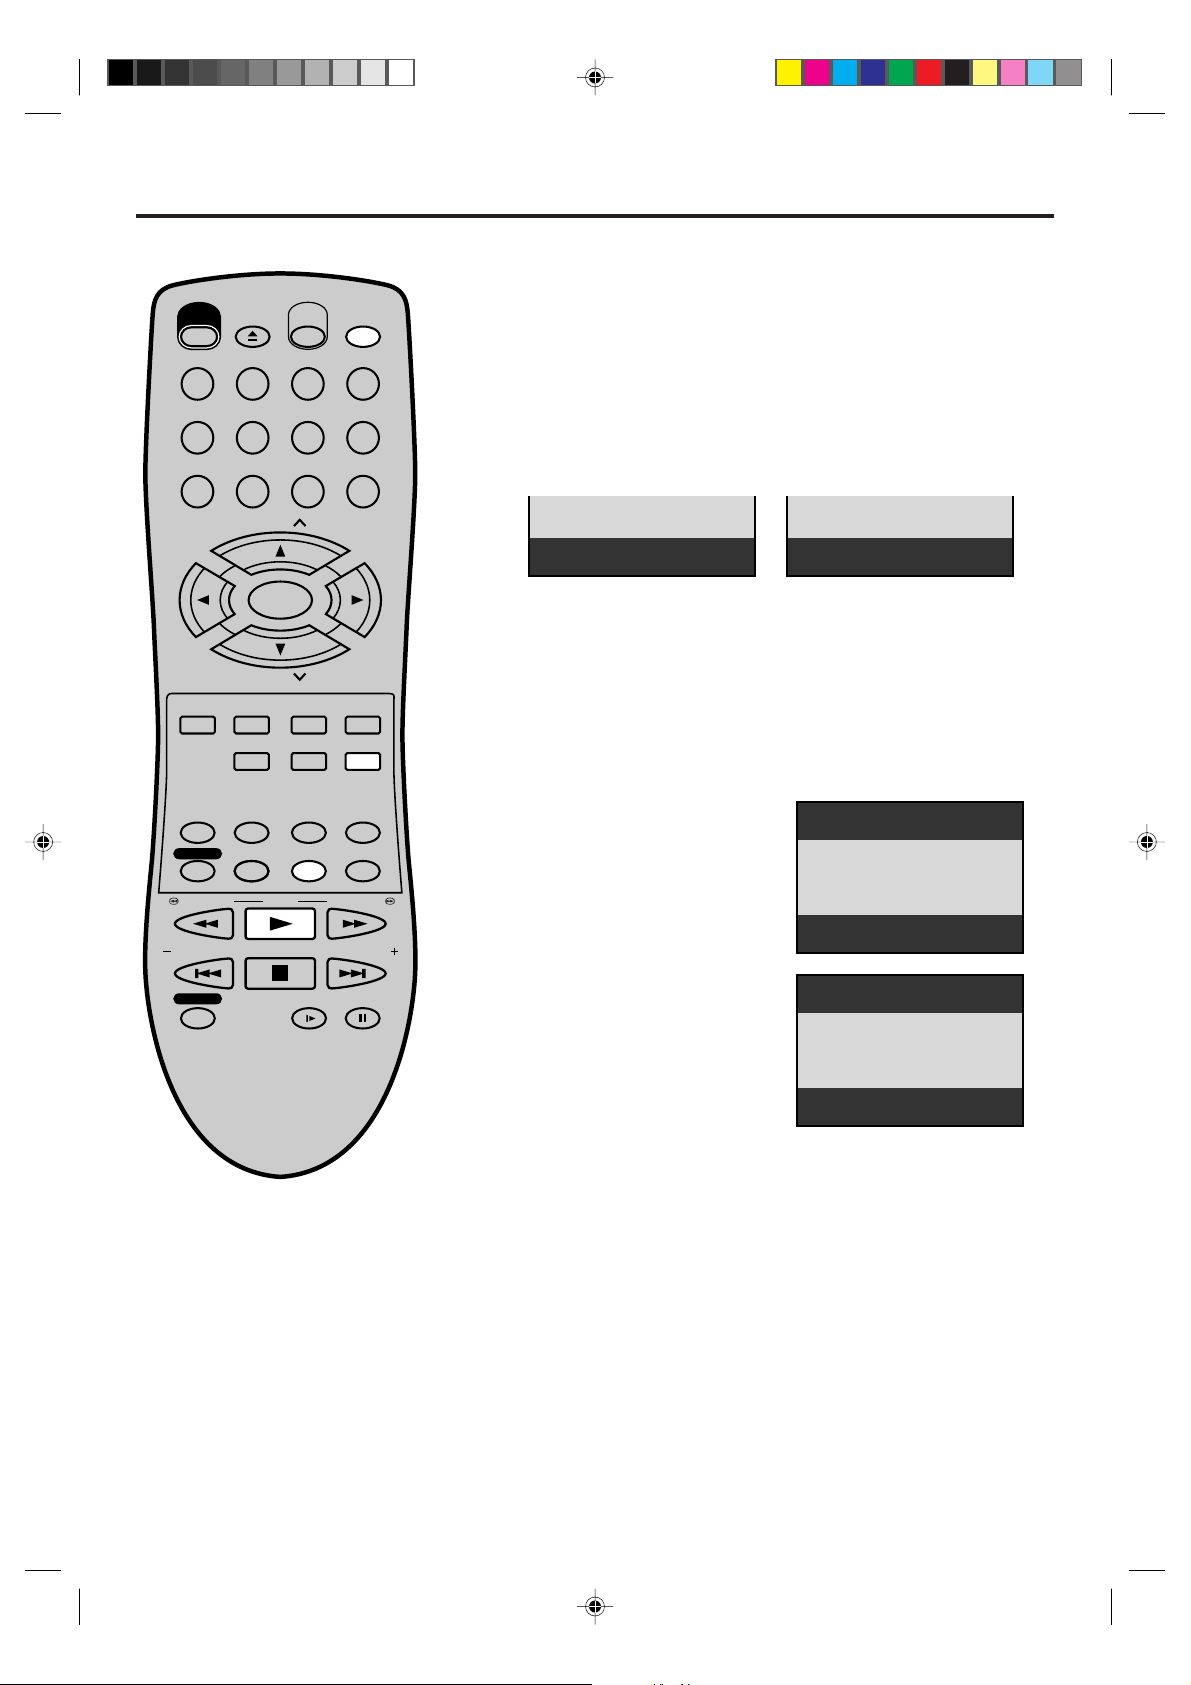
Repeat playback
Track Repeat
OPEN/
CLOSE
POWER
EJECT
VCR/DVD
Preparation:
Turn ON the TV and set to the video input mode.
•
Press VCR/DVD to select the DVD mode. (The DVD indicator
•
will light.)
123
456
789
CH
TRACKING/
SET
—
DVD MENU
AUDIO/
AUDIO SELECT
TIMER REC
REW/SEARCH SEARCH/F.FWD
INDEX/SKIP
REC/OTR
SELECT/
ENTER
CH
SET UP/
VCR MENU
ZOOM
MEMORY/
COUNTER RESET
ZERO RETURN
SUB TITLE/
ATR
PLAY
STOP
CLEAR/
CANCEL
TITLE REPEAT A-B
ANGLE/
PLAY MODE/
SPEED
SLOW PAUSE/STILL
DISPLAY/CALL
INPUT SELECT
0
TRACKING/
SET
+
RETURN
CLOCK/
COUNTER
TV/VCR
SKIP/
INDEX
REPEAT PLAYBACK
Press PLAY MODE repeatedly to select “Chapter Repeat”,
1
“Title Repeat” or “ALL Repeat”. (In case of CD, select “Track
Repeat” or “ ALL Repeat”.)
DVD
Chapter Repeat
During playback repeat playback will start automatically.
2
During stop mode press PLAY within about 5 seconds after
CD
you press PLAY MODE to start repeat playback.
• To resume normal playback, select Off.
A-B Repeat Playback
A-B repeat playback allows you to repeat material between two
selected points.
Press REPEAT A-B during
1
playback.
The start point is selected.
A
-
Press REPEAT A-B again.
2
The end point is selected.
Playback starts at the point that
you selected. Playback stops at
the end point, returns to Point A
automatically, then starts again.
To resume normal playback,
press REPEAT A-B again.
“Repeat Off” appears on the screen.
A-B
NOTES:
•
Some discs may not work with the
repeat operation.
•
In A-B repeat mode, subtitles near
point A or B may not appear.
•
During the A-B Repeat Playback the
ANGLE feature will not operate.
•
You may not be able to set A-B Repeat, depending on the scenes of the
DVD.
•
A-B repeat does not work with an interactive DVD and MP3-CD.
•
Random playback can not be combined with Repeat playback.
40
2A77001AE(40-45) 8/29/02, 11:07 AM40
Page 41
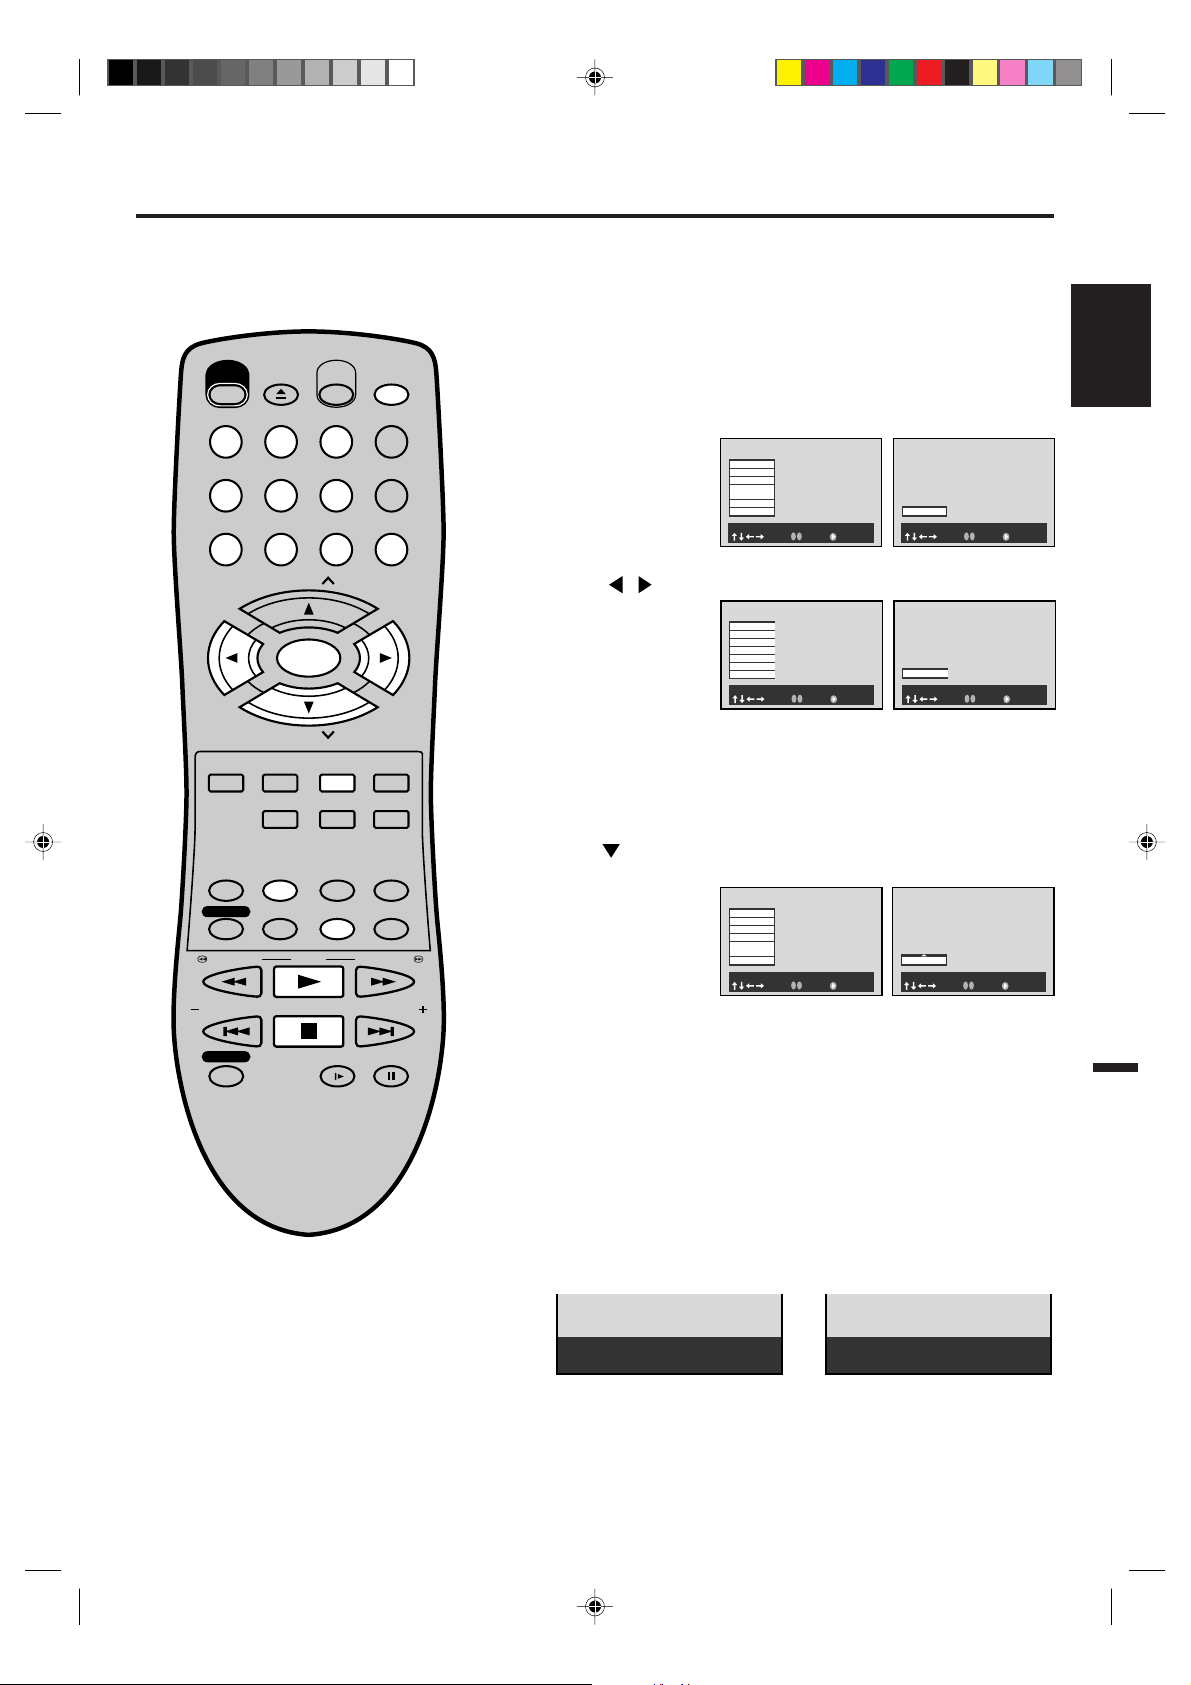
1 T:- -CT:- -
-
2 T:- -CT:- -
-
3 T:- -CT:- -
-
4 T:- -CT:- -
-
5 T:- -CT:- -
-
6 T:- -CT:- -
-
7 T:- -CT:- -
-
: Select 0-9 : Input : Play
Memory
OPEN/
: Select 0-9 : Input : Play
Memory
1 T:01 CT:002
2 T:02 CT:004
3 T:
- -
CT:- -
-
4 T:- -CT:- -
-
5 T:- -CT:- -
-
6 T:- -CT:- -
-
7 T:- -CT:- -
-
: Select 0-9 : Input : Play
Memory
1 T:01 CT:002
2 T:
- -
CT:- -
-
3 T:- -CT:- -
-
4 T:- -CT:- -
-
5 T:- -CT:- -
-
6 T:- -CT:- -
-
7 T:- -CT:- -
-
CLOSE
EJECT
POWER
123
VCR/DVD
DISPLAY/CALL
Memory playback/Random playback
Preparation:
•
Turn ON the TV and set to the video input mode.
•
Press VCR/DVD to select the DVD mode. (The DVD indicator
will light.)
Memory playback
You can arrange the order of titles, chapter or tracks on the disc.
Press MEMORY.
1
In stop mode
In play back
ENGLISH
456
789
CH
TRACKING/
SET
—
DVD MENU
AUDIO/
AUDIO SELECT
TIMER REC
REW/SEARCH SEARCH/F.FWD
INDEX/SKIP
REC/OTR
SELECT/
ENTER
CH
SET UP/
VCR MENU
ZOOM
MEMORY/
COUNTER RESET
ZERO RETURN
SUB TITLE/
ATR
PLAY
STOP
CLEAR/
CANCEL
TITLE REPEAT A-B
ANGLE/
PLAY MODE/
SPEED
SLOW PAUSE/STILL
INPUT SELECT
0
TRACKING/
SET
+
RETURN
CLOCK/
COUNTER
TV/VCR
SKIP/
INDEX
1 T:- -CT:- -
-
Memory
: Select 0-9 : Input : Play
Press / to
2
select “T” or “CT”.
In stop mode
In play back
Use Number keys
to Input the
favorite number.
1 T:01 CT:002
Memory
: Select 0-9 : Input : Play
T : Title number
CT : Chapter number or track number
• If you input a large number than the number that is recorded
on the disc, the bar will be skipped.
• The input number into "T" for CD or MP3 is not effective.
Press or ENTER.
3
In stop mode
In play back
Set the “T” and
“CT” to bar that
you want to enter
as in step 2.
2 T:02 CT:004
Memory
: Select 0-9 : Input : Play
• When you select another chapter in the same title, you do
not need to select the title number.
• To cancel the programmed selection, press CANCEL.
NOTES:
•
The memory
playback
is cancelled
when press STOP during memory
playback.
• Random playback can not be
combined with Repeat playback.
• You can program up to 30 selections
into the memory.
• Depending on the DVD, Chapter
Random operation may not work
during playback.
• You cannot use the random playback
with memory playback.
2A77001AE(40-45) 8/29/02, 11:07 AM41
Press PLAY to start MEMORY playback.
4
• To resume normal playback, press CANCEL.
Random playback
Press PLAY MODE repeatedly to select “ Chapter Random”
1
or “Title Random”.(In case of CD, select Track Random)
DVD
Chapter Random
During playback random playback will start automatically.
2
Track Random
During stop mode press PLAY within about 5 seconds after
you press PLAY MODE to start random playback.
• To resume normal playback, select Off.
CD
41
Page 42
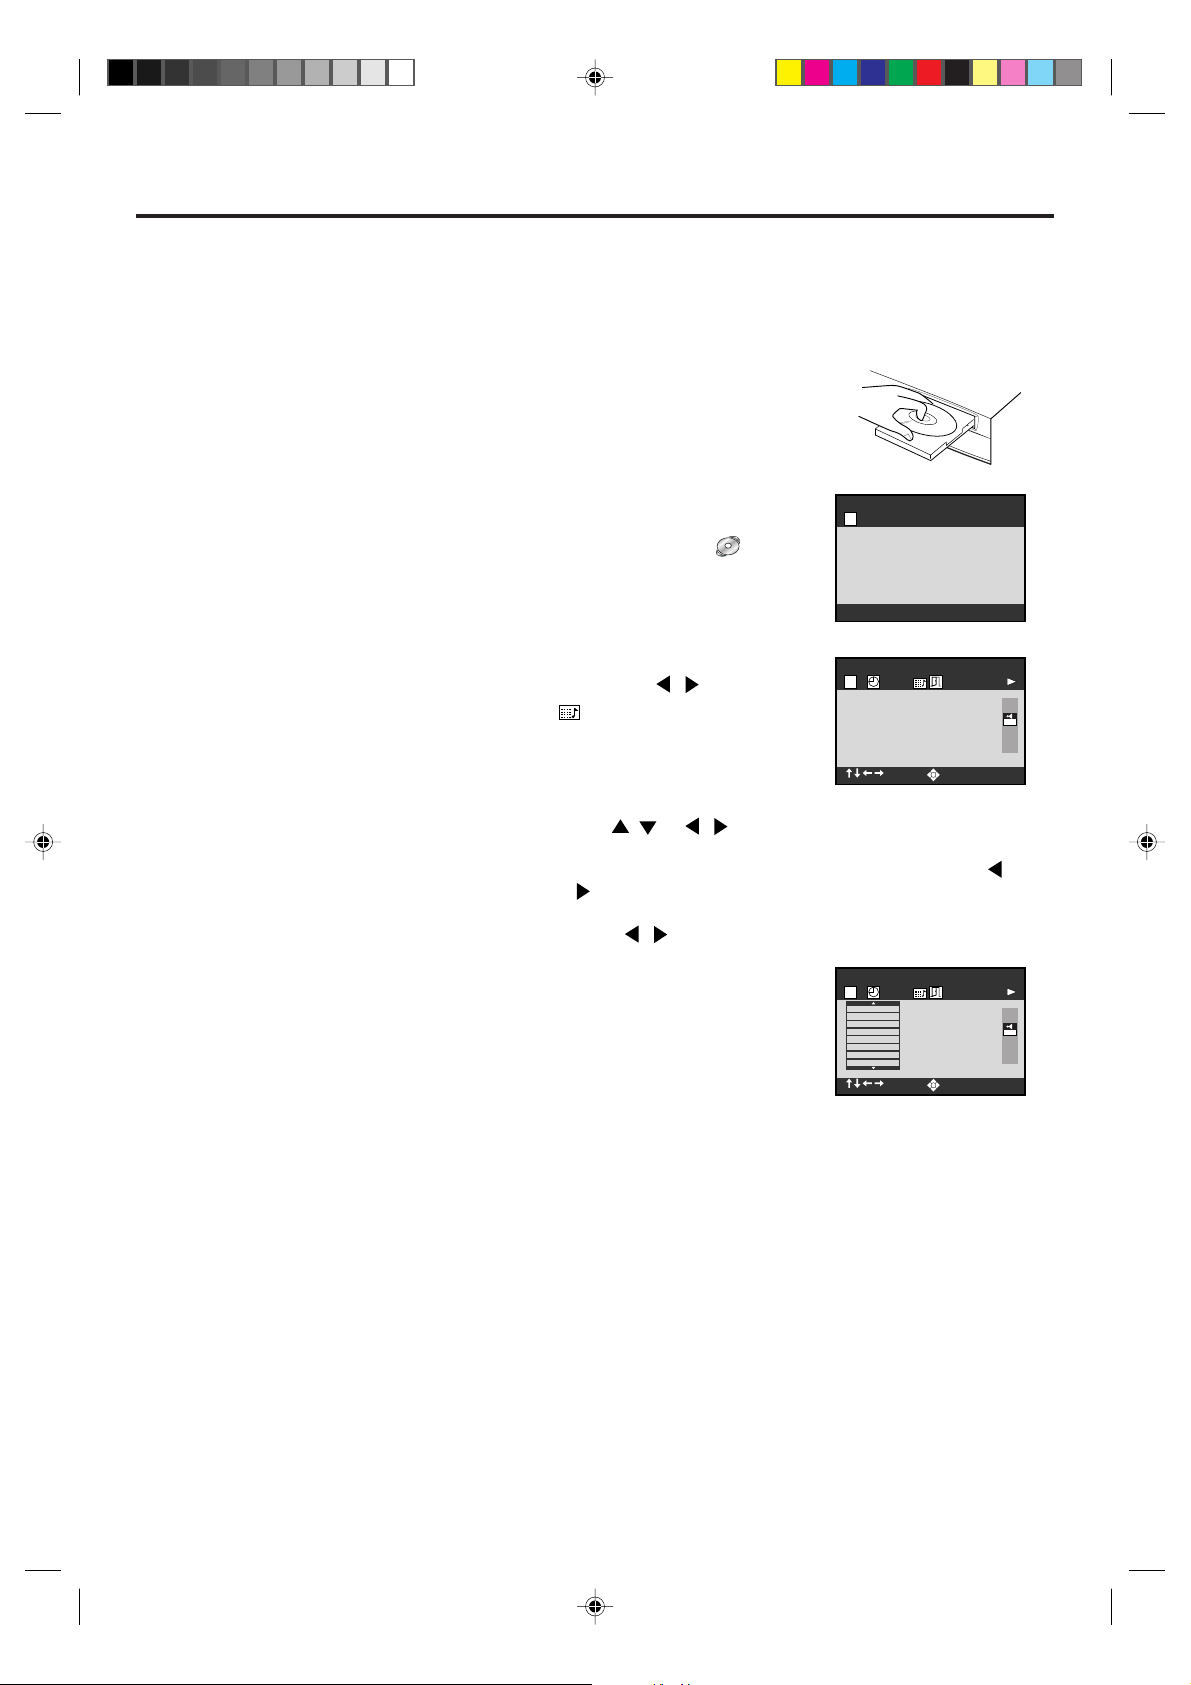
MP3 Playback
This player can play back the MP3-data
which has been recorded on CD-R or CDRW. To produce the MP3-data, you need a
Windows-PC with CD-ROM drive and a MP3encoding Software (not supplied).
The Apple-HFS-System can not be played.
MP3 CD Information
Limitations on MP3 CD playback
• MP3 CD is the disc that is standardized by
ISO9660, its file name must include 3-digits
extension letters, “mp3”.
• The directory and file names of the MP3
CD must correspond to the ISO
standardized files.
• This unit can read 200 files per disc. If
one directory has more than 200 files, it
reads up to 200 files, the remaining files will
be omitted.
• As for multi-session disc, only the first
session can be played.
• If the CD has both audio tracks and MP3
files, only audio tracks are played.
• It may take more than one minute for this
unit to read MP3 files depending on its
structure.
• Music recorded by “Joliet Recording
Specification” can be played back, the file
name is displayed (within 8 letters) on the
screen. Long file names will be condensed.
• The music files recorded by “Hierarchical
File System” (HFS) cannot be played.
Limitations on display
• The maximum number for display is 8
letters. Available letters for display are the
following: capital or small alphabets of A
through Z, numbers of 0 through 9, and _
(under score).
• Other characters than those above are
replaced in hyphen.
Notes on MP3 files
To play back MP3 CD in the recorded order,
1.Use MP3 software that records data
alphabetically or numerically.
2. Name each file including a two-digit or three-
digit number (e.g. “01” “02” or “001” “002”).
3. Refrain from making too many sub-folders.
CAUTION:
• Some MP3 CDs can not be played back
depending on the recording conditions.
• The CD-R/RW that has no music data or
non-MP3 files can not be played back.
Preparation:
Turn ON the TV and set to the video input mode.
•
Press VCR/DVD to select the DVD mode. (The DVD
•
indicator will light.)
Press OPEN/CLOSE.
1
The disc tray will open.
Place a disc onto the tray.
Press PLAY or OPEN/CLOSE.
2
The disc tray closes automatically.
On the TV-screen, “
” and then
11
T
reading file number will appear.
Reading will take as much
time as the number of file.
Press DISPLAY.
3
Then press
MP3
and press ENTER.
Press / or
4
ENTER. Track is selected and play commences.
•
In case the folder includes more than 9 tracks, press
/ to select
/
to select the desired track, then press
T
1 000:23
: Select : Enter
MP3
to display next track list.
• To remove track list, press CANCEL.
• Press
/
to select “T” and press Number keys your
desired to input.
1 000:23
: Select : Search
MP3
Press STOP to end playback.
5
T
1. \ CRYINI~1
2. \ DANGER~1
3. \ GITARREN
4. \ LILYWA~1
5. \ MERCYS~1
6. \ OBSESS~1
7. \ PINKPA~1
8. \ RUNNIN~1
• The unit records the stopped track.
Press PLAY to resume playback (from the beginning of
track).
• If you press STOP again or unload the disc, the unit will
clear the stopped track.
Press OPEN/CLOSE.
6
The disc tray opens.
Remove the disc and press POWER.
The disc tray closes automatically and DVD/VCR turns off.
NOTES:
•
During MP3-Playback, you can not use SEARCH, A-B
Repeat functions.
•
You can use Repeat(Track or All) and Random functions for
MP3 CD Playback.(See page 40 and 41)
EAM
PCM
/
EAM
PCM
42
2A77001AE(40-45) 8/29/02, 11:07 AM42
Page 43
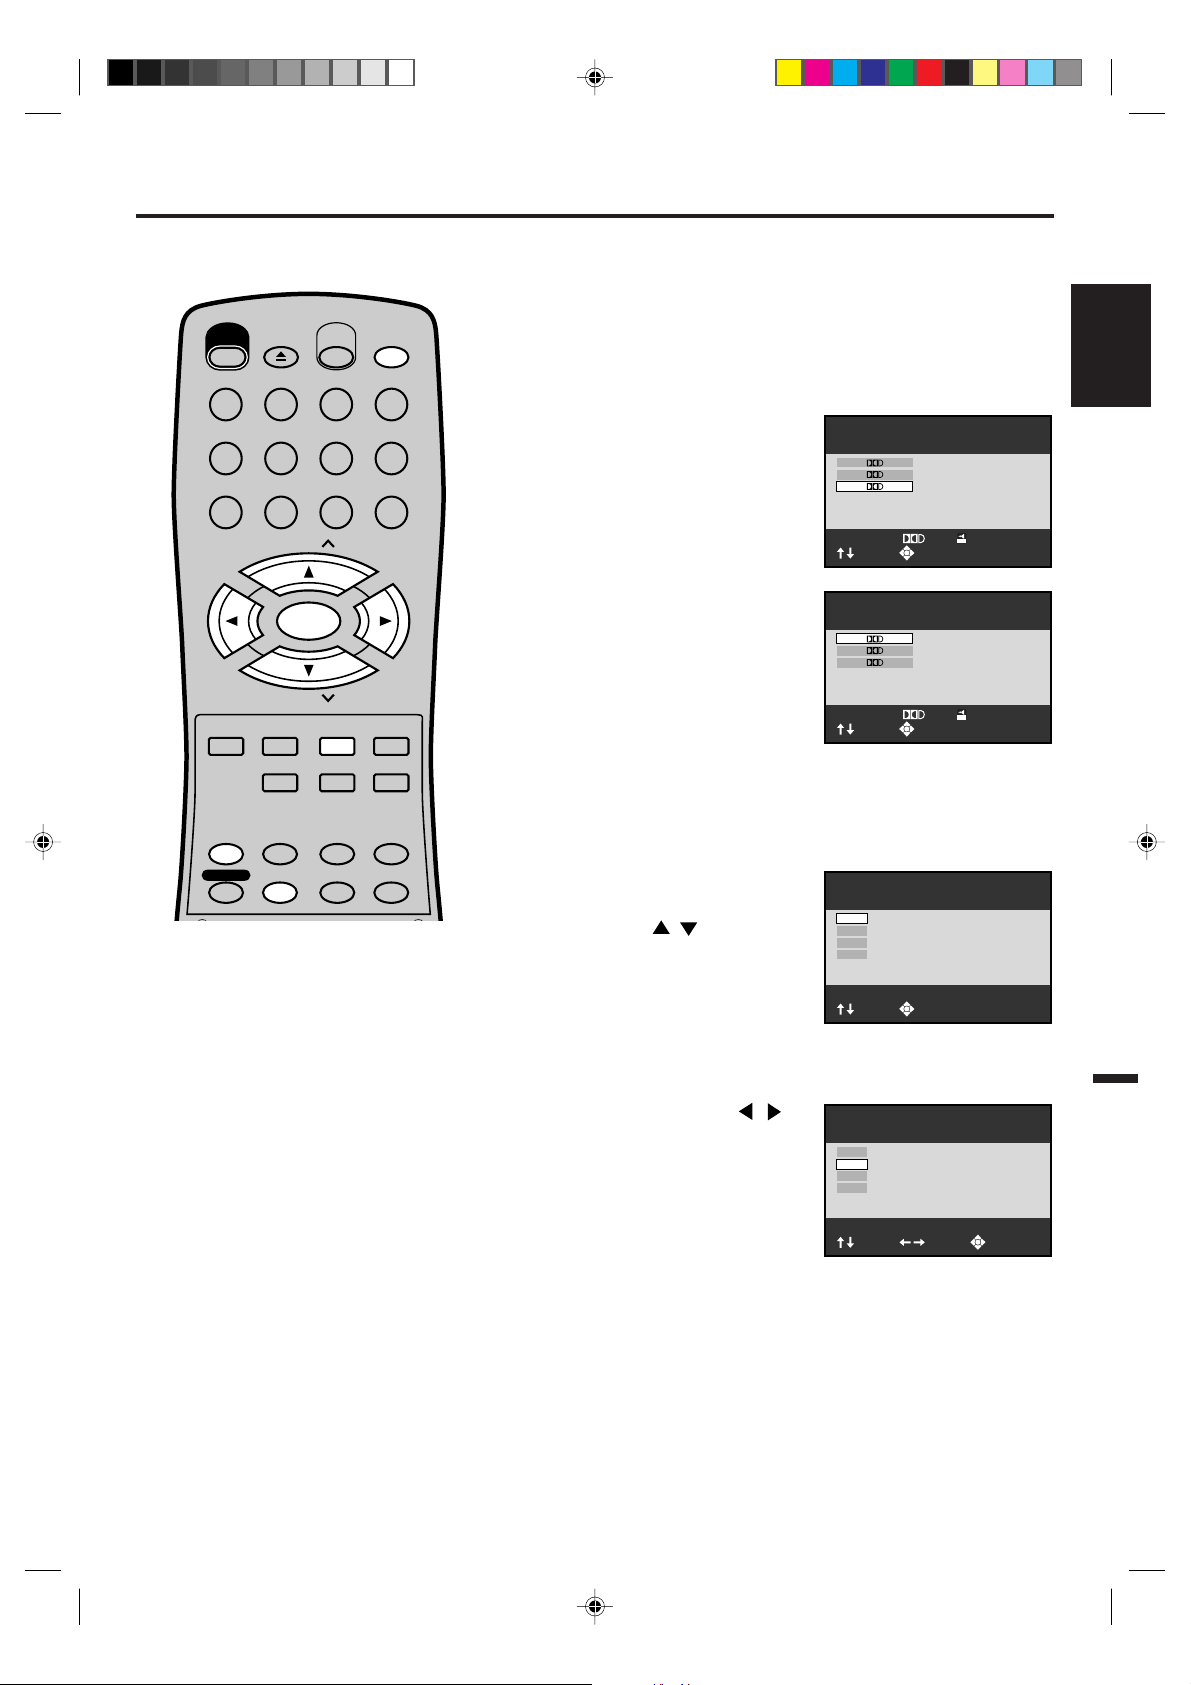
Changing soundtrack language / Changing Subtitles language
Preparation:
Turn ON the TV and set to the video input mode.
•
Press VCR/DVD to select the DVD mode. (The DVD indicator
•
will light.)
OPEN/
CLOSE
EJECT
POWER
123
456
789
VCR/DVD
DISPLAY/CALL
INPUT SELECT
0
Changing soundtrack language
You can select the language when you play a multilingual disc.
Press AUDIO during playback.
1
The current soundtrack language
is displayed.
ENG1 2CH
ENG2 5.1CH
FRE1 2CH
ENGLISH
CH
TRACKING/
SET
—
DVD MENU
AUDIO/
AUDIO SELECT
TIMER REC
SELECT/
ENTER
CH
SET UP/
VCR MENU
ZOOM
MEMORY/
COUNTER RESET
ZERO RETURN
SUB TITLE/
ATR
CLEAR/
CANCEL
TITLE REPEAT A-B
ANGLE/
PLAY MODE/
SPEED
TRACKING/
RETURN
CLOCK/
COUNTER
TV/VCR
SET
+
NOTES:
• If the desired language is not heard after
pressing AUDIO several times, the
language is not recorded on the disc.
• Changing soundtrack or subtitle
language is cancelled when you open the
disc tray or turn the power off. The initial
default language or available language
will be heard and seen if the disc is
played back again.
•
Depending on the DVD you may be
unable to turn on, turn off, or change the
subtitles, even if they are recorded on the
disc. While playing the DVD, the subtitle
may change while opening or closing the
disc tray, or while changing the title.
•
During some scenes, the subtitles may not
appear immediately after you select “On”.
• The abbreviation of the language
appears instead of the language name.
Refer to the list of languages and their
abbreviations. (See on page 57.)
Press AUDIO repeatedly until
2
the desired language is selected.
The on-screen display will disappear after a few seconds.
Audio:FRE1 2CH
: Select : Return
ENG1 2CH
ENG2 5.1CH
FRE1 2CH
2CH
• To turn off the soundtrack
setting display,press the
CLEAR or ENTER.
Audio:ENG1 2CH
: Select : Return
2CH
Changing Subtitles language
You can select the language when playing back a disc recorded
with multi-lingual subtitles.
Press SUB TITLE during
1
playback.
Then press
/ to select the
desired language.
• To turn off the subtitle setting
display, press the CLEAR or
ENTER.
• To turn the subtitles off, select
“Off”.
Press SUB TITLE or
2
turn Subtitles on or off.
/
to
Off
ENG 1
SPA 1
FRE 1
- - -
Subtitle:
Subtitle:ENG1 On
Off
: Select : Return
Off
ENG 1
SPA 1
FRE 1
: Select : Return
: On/Off
2A77001AE(40-45) 8/29/02, 11:07 AM43
43
Page 44
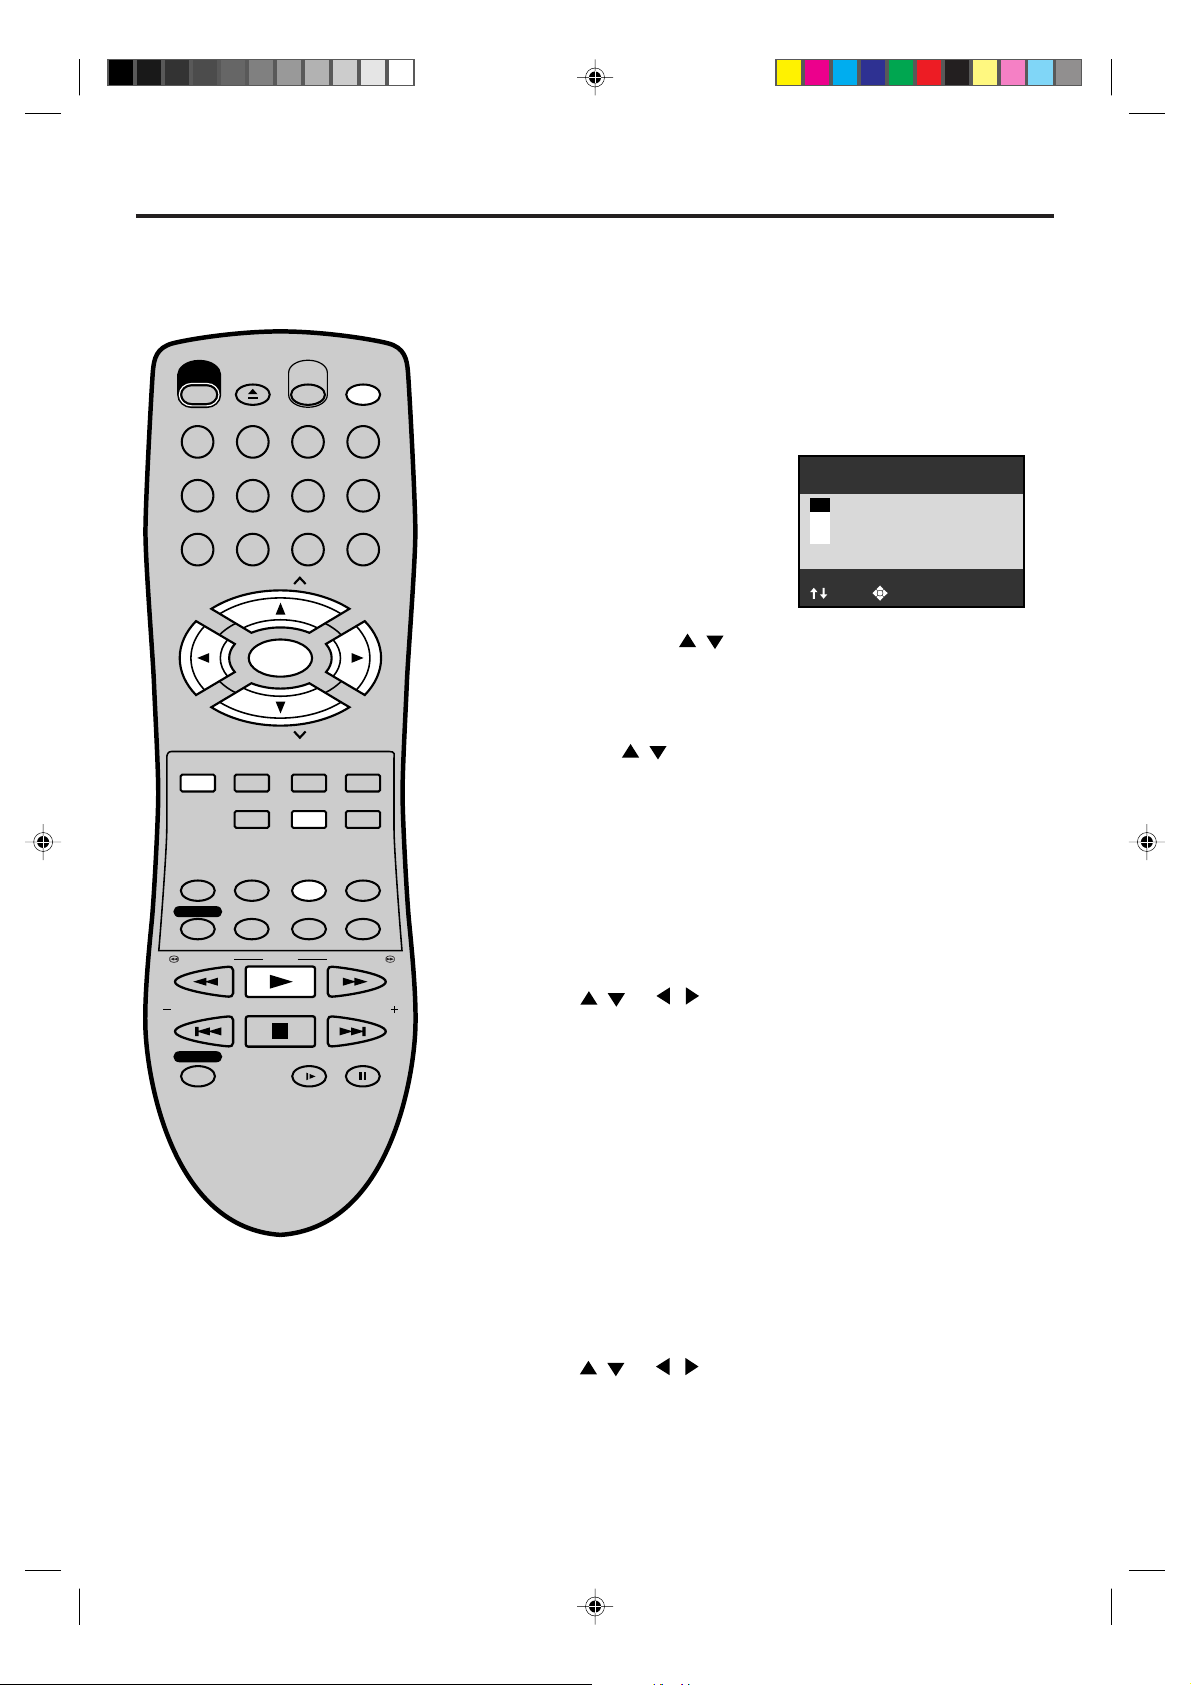
: Select : Return
Angle :1
2
3
1
Changing angles / Title selection / DVD menu
Preparation:
Turn ON the TV and set to the video input mode.
•
Press VCR/DVD to select the DVD mode. (The DVD indicator
•
will light.)
OPEN/
CLOSE
EJECT
POWER
123
456
789
CH
TRACKING/
SET
—
DVD MENU
AUDIO/
AUDIO SELECT
TIMER REC
REW/SEARCH SEARCH/F.FWD
SELECT/
ENTER
CH
SET UP/
VCR MENU
ZOOM
MEMORY/
COUNTER RESET
ZERO RETURN
SUB TITLE/
ATR
PLAY
CLEAR/
CANCEL
TITLE REPEAT A-B
ANGLE/
PLAY MODE/
SPEED
VCR/DVD
DISPLAY/CALL
INPUT SELECT
0
TRACKING/
SET
+
RETURN
CLOCK/
COUNTER
TV/VCR
Changing Angles
When playing back a disc recorded with multi-angle facility,
can change the angle that you are viewing the scene from.
Press ANGLE during playback.
1
The current angle will appear.
Press ANGLE or / repeatedly until the desired angle is
2
selected.
• To turn off the angle number display, press the CLEAR.
• You can change the camera angle directly by pressing the
number keys corresponding to its angle number instead of
using the
/ .
you
Title Selection
Two or more titles are recorded on some discs. If the title menu
is recorded on the disc, you can select the desired title.
Press TITLE during playback.
1
Title menu appears on the screen.
• Press TITLE again to resume playback at the scene
when you pressed TITLE.
Press / or / to select the desired title.
INDEX/SKIP
REC/OTR
STOP
SLOW PAUSE/STILL
SKIP/
INDEX
2
Press ENTER or PLAY.
3
The playback of the selected title will start.
DVD Menu
Some DVDs allow you to select the disc contents using the
menu.
When you play back these DVDs, you can select the subtitle
language and sound-track language,etc. using the DVD menu.
Press DVD MENU during playback.
1
NOTE:
Depending on the DVD, you may not
be able to change the angles even if
The DVD menu appears on the screen.
• Press DVD MENU again to resume playback at
the scene when you pressed DVD MENU.
multi-angles are recorded on the disc,
Press / or / to select the desired item.
or you may be unable to select the title,
2
and a “title menu” may simply be called
a “menu” or “title” in the instructions
supplied with the disc.
Press ENTER.
3
The menu continues to another screen. Repeat steps 2 and 3 to
set the item completely.
44
2A77001AE(40-45) 8/29/02, 11:07 AM44
Page 45
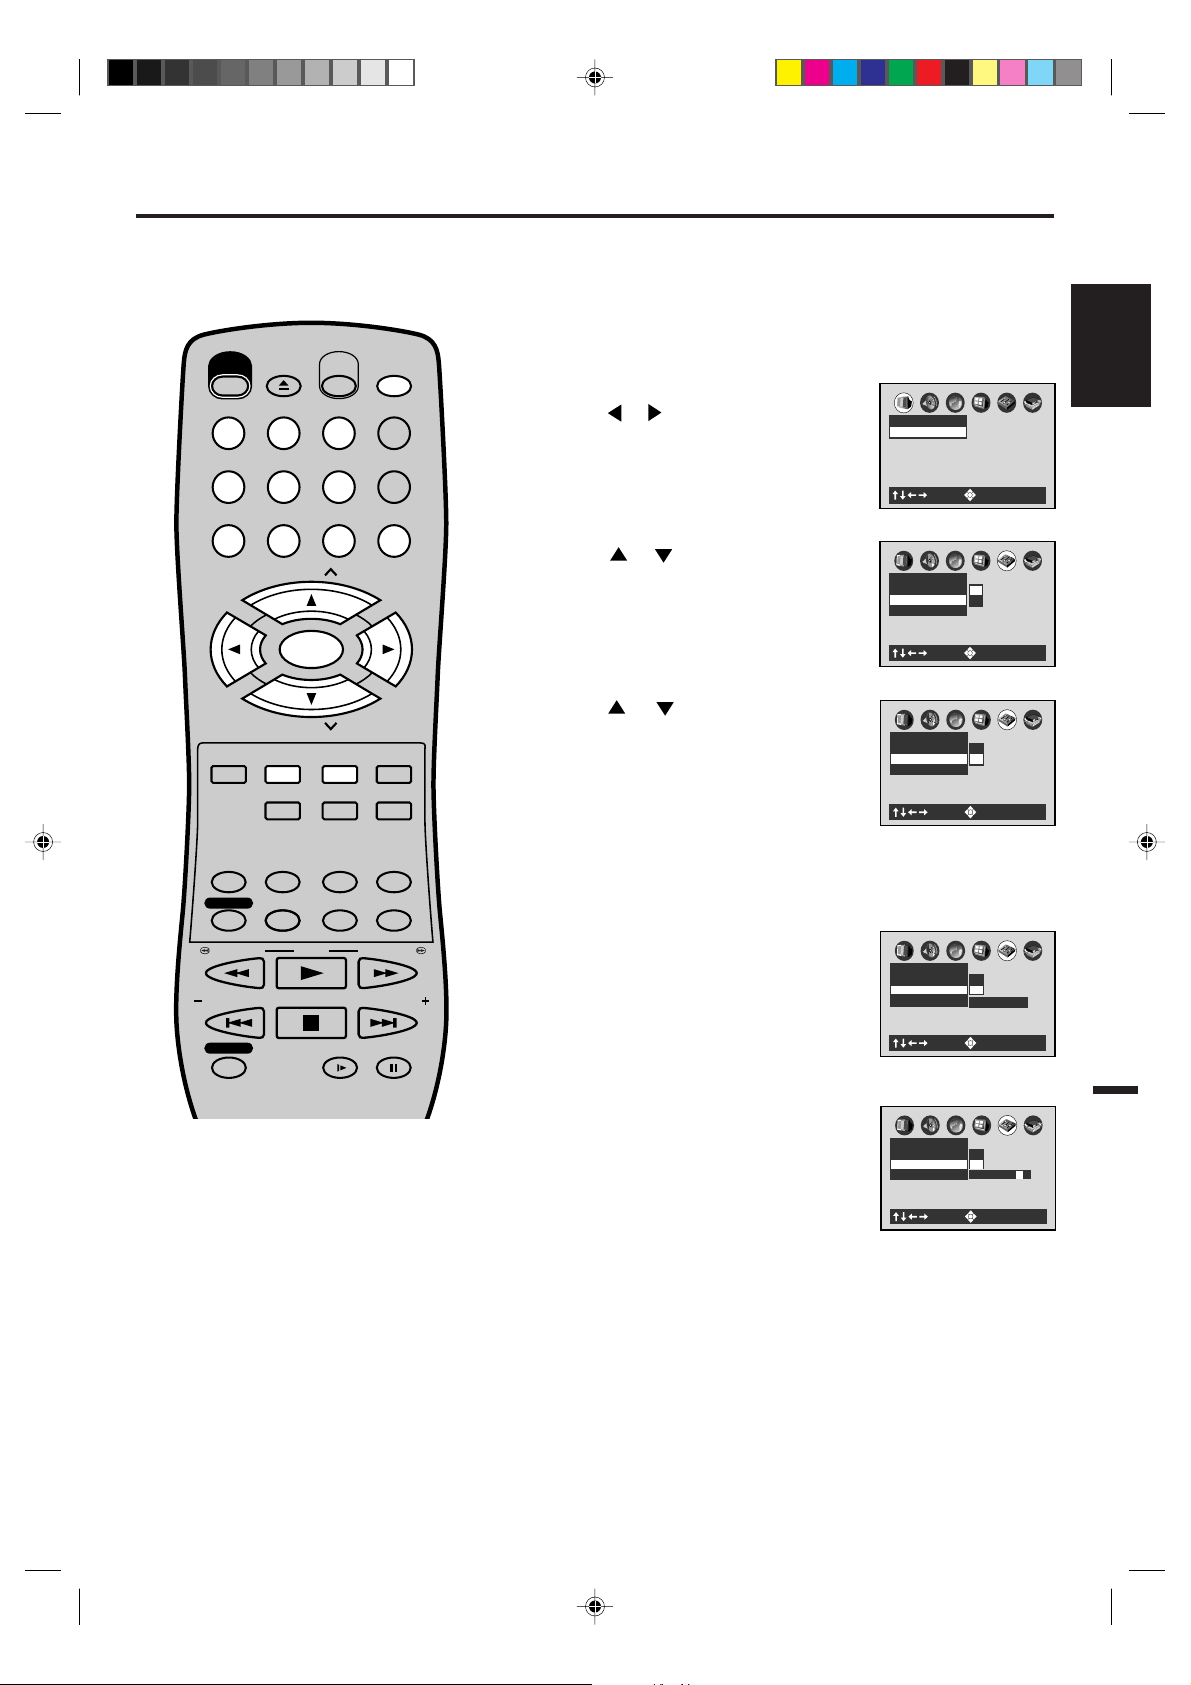
Parental control
Some discs are specified not suitable
for children. Such discs can be
prevented from play back with the
unit.
OPEN/
CLOSE
EJECT
POWER
123
456
789
CH
TRACKING/
SET
—
DVD MENU
AUDIO/
AUDIO SELECT
TIMER REC
SELECT/
ENTER
CH
SET UP/
VCR MENU
ZOOM
MEMORY/
COUNTER RESET
ZERO RETURN
SUB TITLE/
ATR
VCR/DVD
DISPLAY/CALL
INPUT SELECT
0
CLEAR/
RETURN
CANCEL
TITLE REPEAT A-B
ANGLE/
CLOCK/
COUNTER
PLAY MODE/
TV/VCR
SPEED
TRACKING/
SET
+
Preparation:
Turn ON the TV and set to the video input mode.
•
Press VCR/DVD to select the DVD mode. (The DVD indicator
•
will light.)
Parental control setting
Press SET UP in the stop mode.
1
Press
Press or to select “Parental Lock”,
2
then press ENTER.
Press or to select Off or On.
3
or to select “Operation”.
Off: The parental lock feature does
not function.
After pressing the ENTER, follow
step 4 below.
On: To activate the parental lock fea-
ture or change the setting, press
follow steps 4-6 below.
TV Shape 4:3LB
Pause/Still AutoOnOff
Parental Lock Off
Title Stop Off
Pause/Still AutoOnOff
Parental Lock Off
Title Stop Off
the ENTER button and
C
B
A
Picture
: Select : Enter
C
B
A
Operation
: Select : Enter
C
B
A
Operation
: Select : Enter
ENGLISH
REW/SEARCH SEARCH/F.FWD
INDEX/SKIP
REC/OTR
PLAY
STOP
SLOW PAUSE/STILL
SKIP/
INDEX
NOTES:
If each setup (page 45~55) has been
•
completed, the unit can always be
worked under the same conditions
(especially with DVD discs).
Each setup will be retained in the
memory if you turn the power off.
Depending on the discs, the unit can-
•
not limit playback.
Some discs may not be encoded with
•
specific rating level information though
its disc jacket says "adult". For those
discs, the age restriction will not work.
Do not forget the password. If you forget
•
the password, contact customer service.
Press Number keys to input a 4-digits
4
password then press the ENTER
button.
• If you input a wrong number, press
CANCEL.
Enter the code of a country/area whose
5
standards were used to rate the DVD
disc. (See the list on the page 46.)
C
B
A
Operation
Pause/Still Auto
Parental Lock Off
Title Stop Off
: Select : Enter
C
B
A
Operation
Pause/Still AutoOnOff
Parental Lock Off
Title Stop Off
: Select : Enter
Off
On
Security Code
Area Code U S
----
2A77001AE(40-45) 8/29/02, 11:08 AM45
45
Page 46
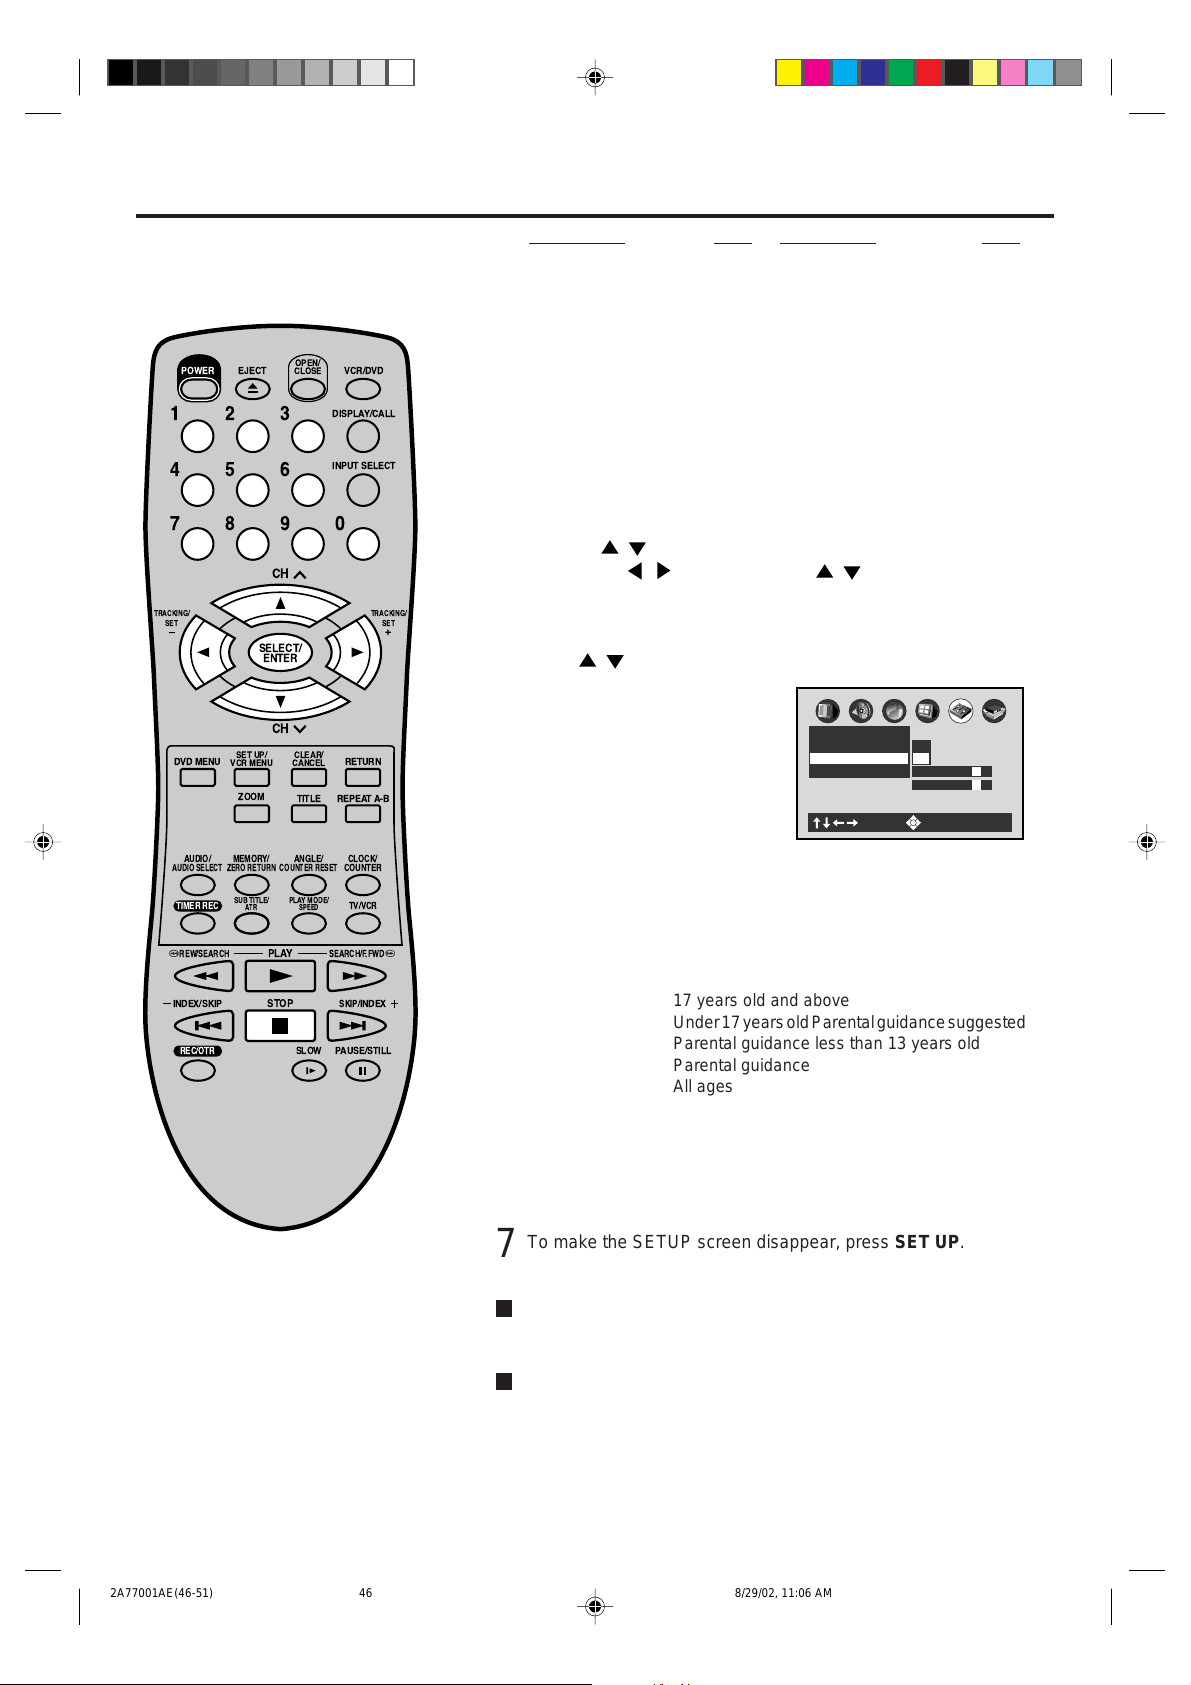
Parental control (Continued)
OPEN/
CLOSE
EJECT
POWER
123
456
789
CH
TRACKING/
SET
Ð
DVD MENU
AUDIO/
AUDIO SELECT
TIMER REC
REW/SEARCH SEARCH/F.FWD
INDEX/SKIP
REC/OTR
SELECT/
ENTER
CH
SET UP/
VCR MENU
ZOOM
MEMORY/
ZERO RETURN
SUB TITLE/
ATR
PLAY
STOP
CLEAR/
CANCEL
TITLE REPEAT A-B
ANGLE/
COUNTER RESET
PLAY MODE/
SPEED
SLOW PAUSE/STILL
VCR/DVD
DISPLAY/CALL
INPUT SELECT
0
TRACKING/
SET
RETURN
CLOCK/
COUNTER
TV/VCR
SKIP/
INDEX
Country/Area Code
AUSTRALIA AU
BELGIUM BE
CANADA CA
CHINA CN
CHINA HONG KONG HK
DENMARK DK
FINLAND FI
FRANCE FR
GERMANY DE
INDONESIA ID
IT ALY IT
JAP AN JP
Country/Area Code
NETHERLANDS NL
NORWAY NO
PHILIPPINES PH
RUSSIAN FEDERATION R U
SINGAPORE SG
SP AIN ES
SWEDEN SE
SWITZERLAND CH
T AIWAN TW
THAILAND TH
UNITED KINGDOM GB
UNITED ST A TES US
MALAYSIA MY
a) Press / to select the first character.
b) Press the
/ to shift and press / to select the second
character.
+
c) Press ENTER.
Press / to select the parental lock level, then press ENTER.
6
C
B
A
Operation
Pause/Still AutoOnOff
Parental Lock Off
Title Stop Off
Area Code U S
Level 7
: Select : Enter
You cannot play DVD discs rated higher than the level you selected
unless you cancel the parental lock function.
For example, when you select level 7, discs rated higher than level
7 are locked out and cannot be played.
The parental lock level is equivalent to following the USA movie ratings.
Level 7: NC-17
Level 6: R
Level 4: PG 13
Level 3: PG
Level 1: G
17 years old and above
Under 17 years old Parental guidance suggested
Parental guidance less than 13 years old
Parental guidance
All ages
46
2A77001AE(46-51) 8/29/02, 11:06 AM46
The parental lock levels for other countries/areas other than the U.S.
are included for future use. Check the appropriate parental lock level
when you buy a DVD disc equipped with the parental lock feature in
the future.
To make the SETUP screen disappear, press SET UP.
7
To change the parental lock level
Follow steps 4- 6.
To change your 4-digit security code
1) After selecting “On” or “Off” press STOP four times, then press
ENTER.
The 4-digit security code is cleared.
2) Press Number Keys to create a new 4-digit security code.
3) Press ENTER.
Page 47
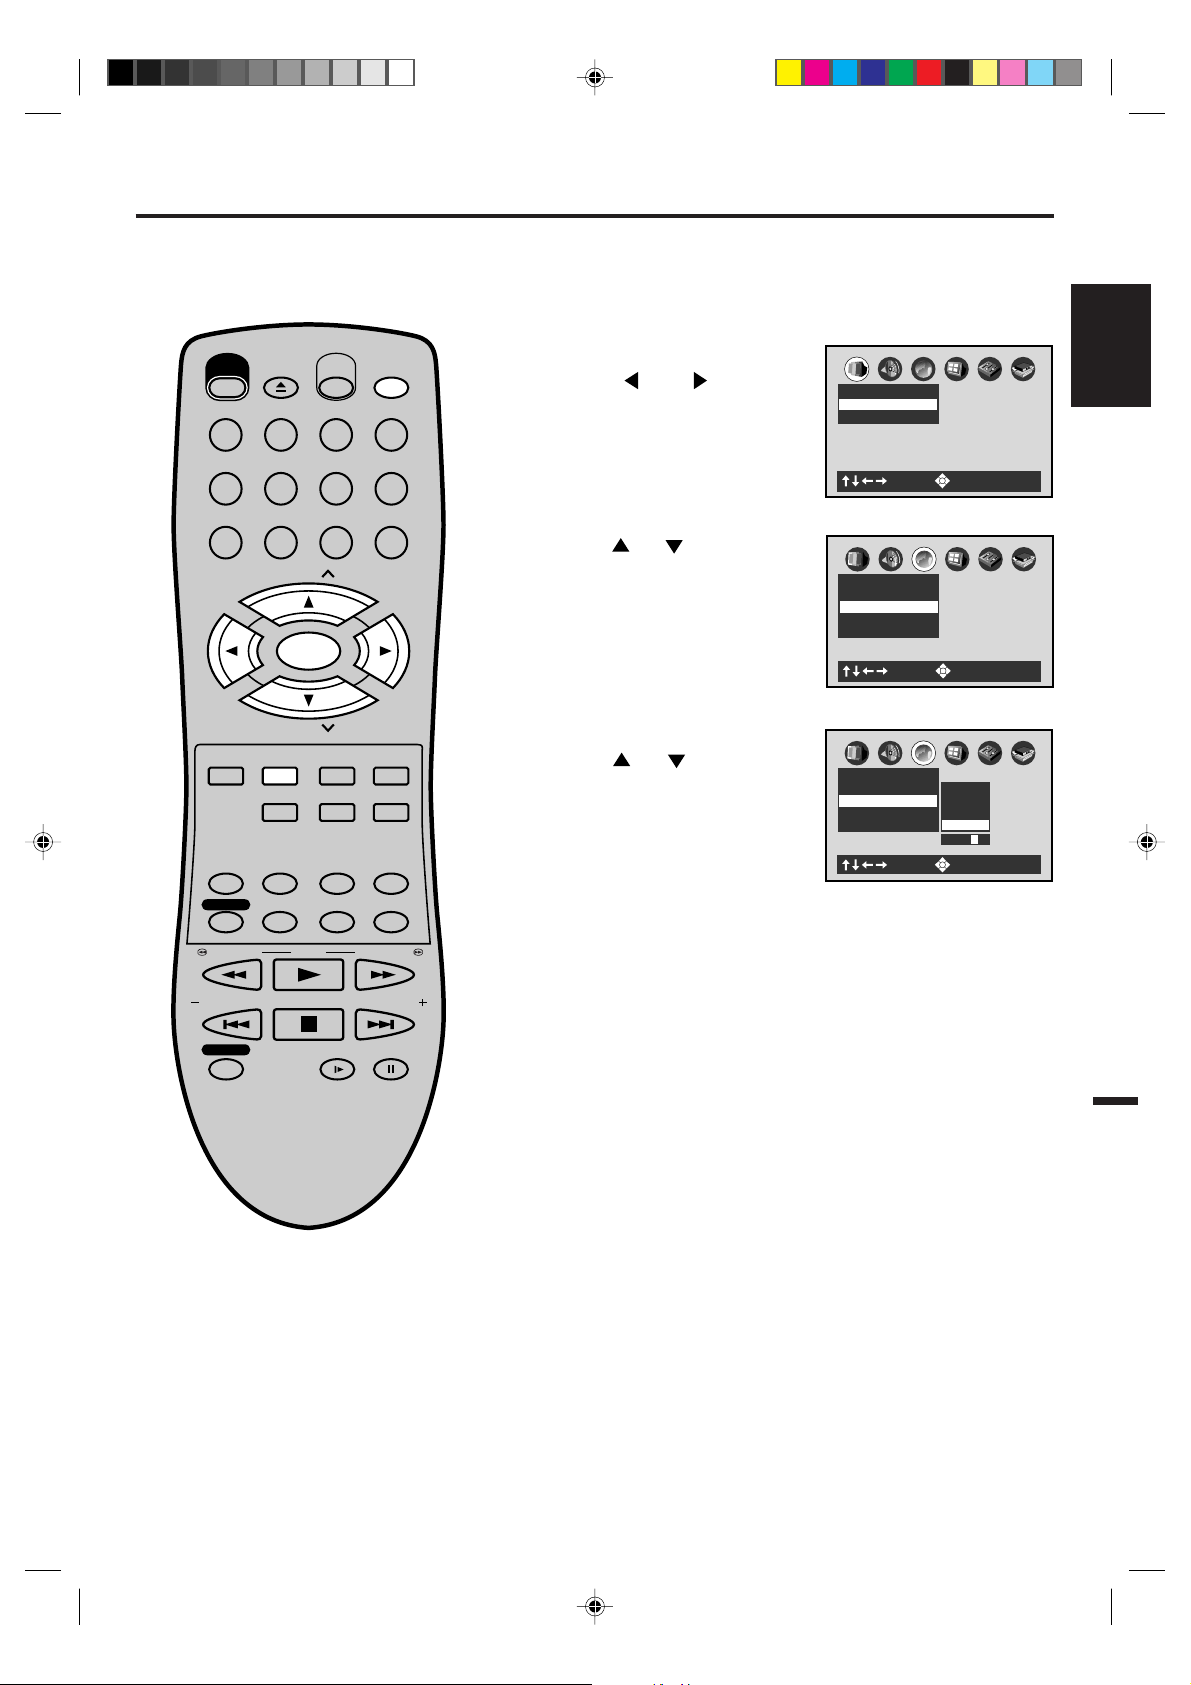
Setting menu language
You can select the language of the
disc menu messages of DVDs.
OPEN/
CLOSE
EJECT
POWER
123
456
789
CH
TRACKING/
SET
—
DVD MENU
AUDIO/
AUDIO SELECT
TIMER REC
REW/SEARCH SEARCH/F.FWD
INDEX/SKIP
SELECT/
ENTER
CH
SET UP/
VCR MENU
ZOOM
MEMORY/
COUNTER RESET
ZERO RETURN
SUB TITLE/
ATR
PLAY
STOP
VCR/DVD
DISPLAY/CALL
INPUT SELECT
0
CLEAR/
RETURN
CANCEL
TITLE REPEAT A-B
ANGLE/
CLOCK/
COUNTER
PLAY MODE/
TV/VCR
SPEED
SKIP/
INDEX
TRACKING/
SET
+
Preparation:
Turn ON the TV and set to the video input mode.
•
•
Press VCR/DVD to select the DVD mode. (The DVD indicator
will light.)
Press SET UP in the stop mode.
1
Press
“Language”.
or to select
TV Shape 4:3LB
VIDEO OUT SELECT
Picture
C
B
A
: Select : Enter
Press
2
Menu Language”.
or to select “Disc
A
Language
On-Screen Language ENG
Disc Menu Language ENG
Audio Language ENG
Subtitle Language ENG
C
B
: Select : Enter
Press ENTER.
3
Press
or to select your
desired language, then press
ENTER.
On-Screen Language ENG
Disc Menu Language ENG
Audio Language ENG
Subtitle Language ENG
Language
A
C
B
English
French
Spanish
Others
Code E S
: Select : Enter
English, French, Spanish
The selected language is the first-priority Menu language.
Others: Other languages can be selected (See the Table of
languages on page 57).
ENGLISH
REC/OTR
2A77001AE(46-51) 8/29/02, 11:06 AM47
SLOW PAUSE/STILL
To make the SETUP screen disappear, press SET UP.
4
47
Page 48
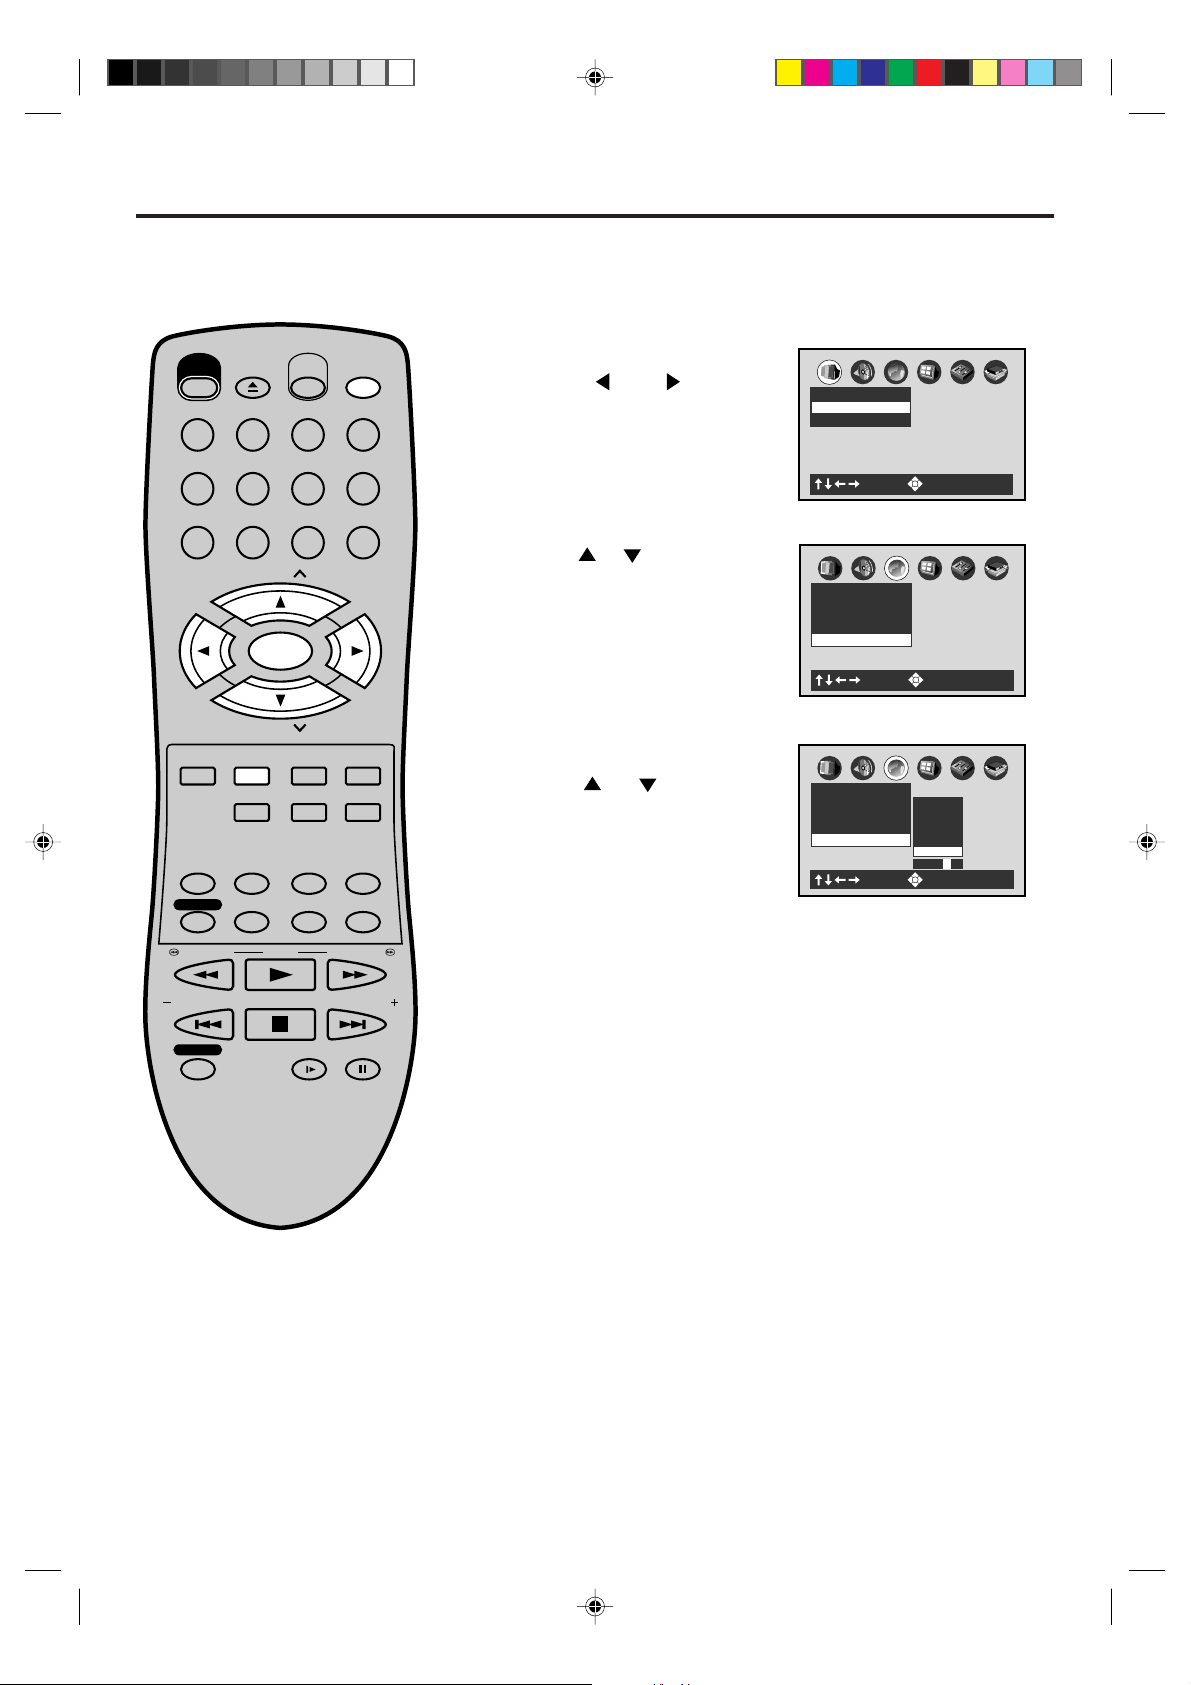
A
B
C
: Select : Enter
Picture
TV Shape 4:3LB
VIDEO OUT SELECT
Setting subtitle language
The same subtitle language can
always be selected even if you replace
the disc or turn the power off.
OPEN/
CLOSE
EJECT
POWER
123
456
789
CH
TRACKING/
SET
—
DVD MENU
AUDIO/
AUDIO SELECT
TIMER REC
REW/SEARCH SEARCH/F.FWD
INDEX/SKIP
REC/OTR
SELECT/
ENTER
CH
SET UP/
VCR MENU
ZOOM
MEMORY/
COUNTER RESET
ZERO RETURN
SUB TITLE/
ATR
PLAY
STOP
VCR/DVD
DISPLAY/CALL
INPUT SELECT
0
CLEAR/
RETURN
CANCEL
TITLE REPEAT A-B
ANGLE/
CLOCK/
COUNTER
PLAY MODE/
TV/VCR
SPEED
SKIP/
INDEX
SLOW PAUSE/STILL
TRACKING/
SET
+
Preparation:
Turn ON the TV and set to the video input mode.
•
Press VCR/DVD to select the DVD mode. (The DVD indicator
•
will light.)
Press SET UP in the stop mode.
1
Press
or to select
“Language”.
Press
2
Language”.
Press ENTER.
3
Press
desired language, then press
ENTER.
or to select “Subtitle
or to select your
A
Language
On-Screen Language ENG
Disc Menu Language ENG
Audio Language ENG
Subtitle Language ENG
: Select : Enter
A
Language
On-Screen Language ENG
Disc Menu Language ENG
Audio Language ENG
Subtitle Language ENG
: Select : Enter
C
B
C
B
English
French
Spanish
No Subtitle
Others
Code E S
English, French, Spanish
The subtitle is displayed with the selected language if it is
recorded on the disc.
Others: If you want to select another language, enter the
language code (See the Table of languages on page 57).
NOTES:
• If the selected language is not recorded
on the disc, the first-priority language is
selected.
• Some DVD discs may be set to display
Subtitles in a different language than
you selected. A prior subtitle language
may be programmed on the disc.
48
2A77001AE(46-51) 8/29/02, 11:06 AM48
No Subtitle:
Subtitles do not appear.
To make the SETUP screen disappear, press SET UP.
4
Page 49
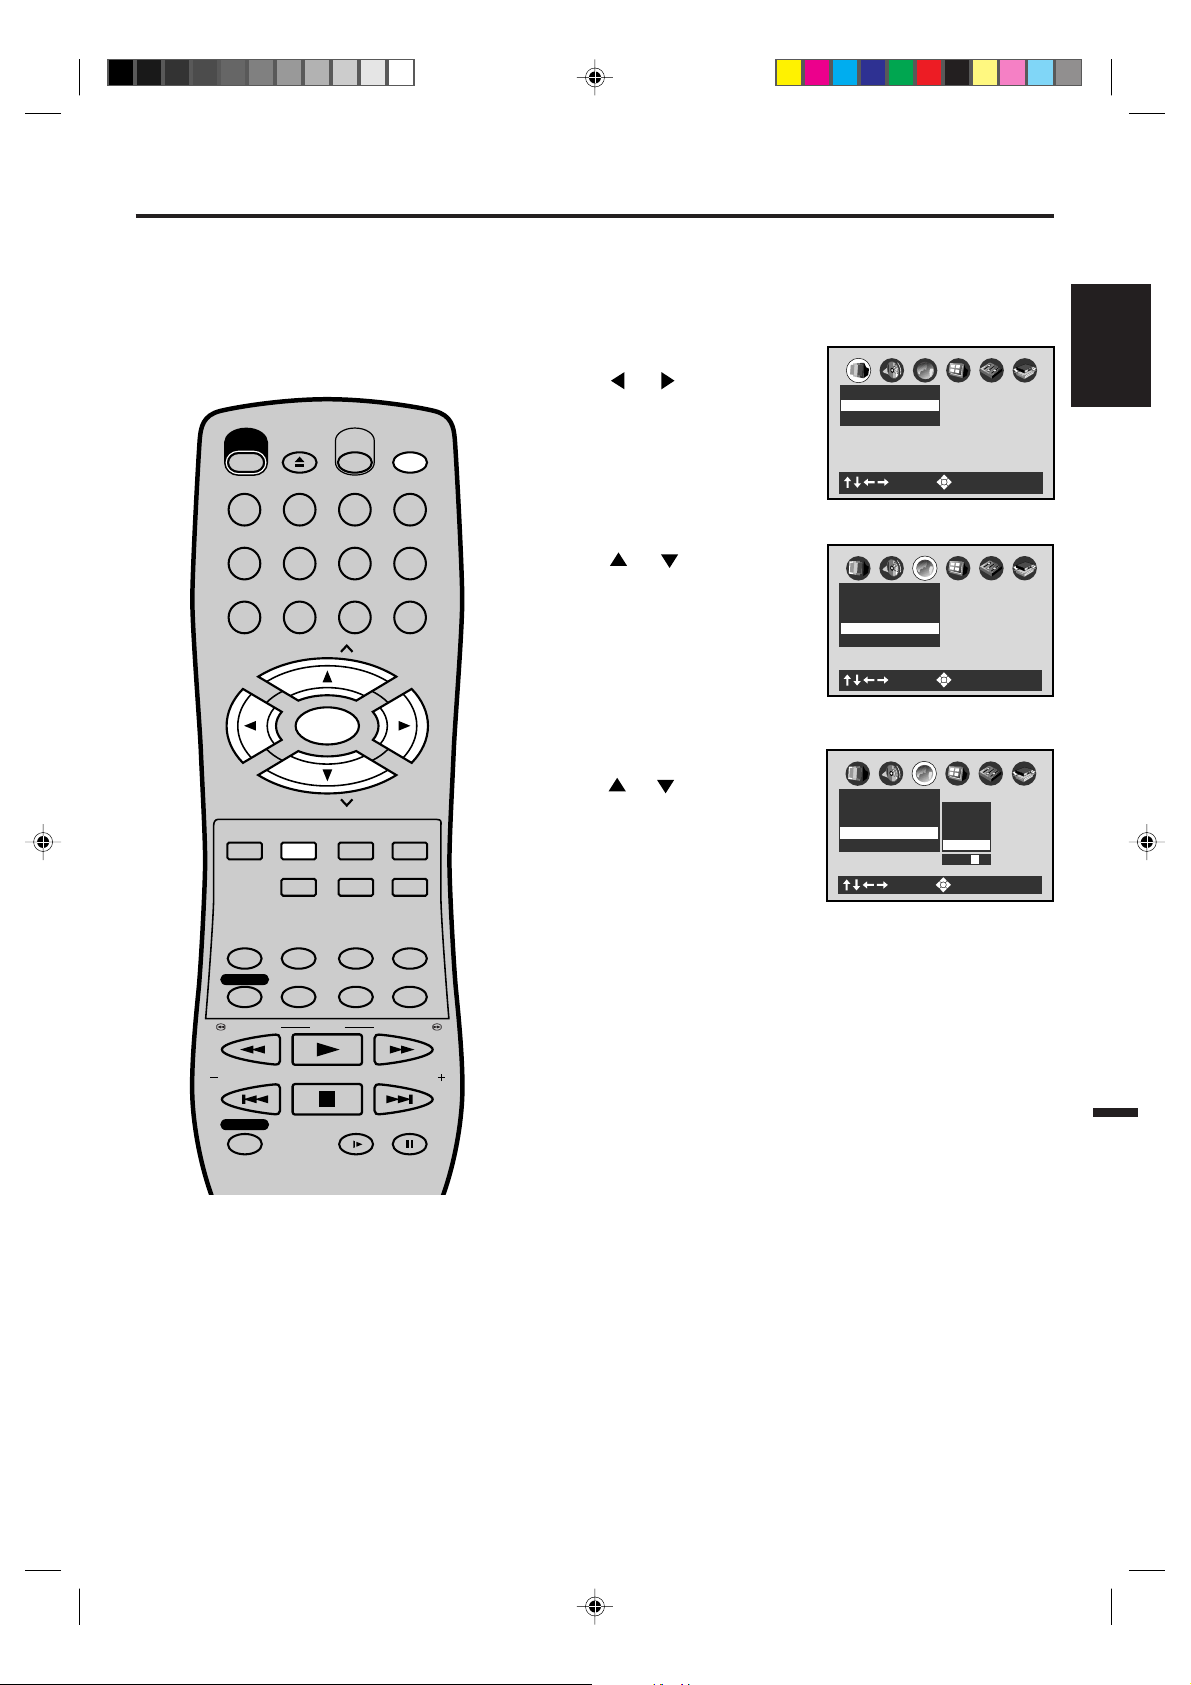
Setting audio soundtrack language
The same audio soundtrack language
can always be selected by your unit
even if you replace the disc or turn
the power off.
OPEN/
CLOSE
EJECT
POWER
123
456
789
CH
TRACKING/
SET
—
DVD MENU
SELECT/
SET UP/
VCR MENU
ZOOM
ENTER
CH
VCR/DVD
DISPLAY/CALL
INPUT SELECT
0
CLEAR/
RETURN
CANCEL
TITLE REPEAT A-B
TRACKING/
SET
+
Preparation:
Turn ON the TV and set to the video input mode.
•
•
Press VCR/DVD to select the DVD mode. (The DVD indicator
will light.)
Press SET UP in the stop mode.
1
Press
or to select
“Language”.
Press
2
Language”.
Press ENTER.
3
Press
or to select “Audio
or to select your
desired Audio Language, then
press ENTER.
TV Shape 4:3LB
VIDEO OUT SELECT
On-Screen Language ENG
Disc Menu Language ENG
Audio Language ENG
Subtitle Language ENG
On-Screen Language ENG
Disc Menu Language ENG
Audio Language ENG
Subtitle Language ENG
C
B
A
Picture
: Select : Enter
C
B
A
Language
: Select : Enter
C
B
A
Language
: Select : Enter
English
French
Spanish
Others
Code E S
ENGLISH
ANGLE/
AUDIO/
MEMORY/
AUDIO SELECT
TIMER REC
REW/SEARCH SEARCH/F.FWD
INDEX/SKIP
REC/OTR
COUNTER RESET
ZERO RETURN
SUB TITLE/
ATR
PLAY
STOP
CLOCK/
COUNTER
PLAY MODE/
TV/VCR
SPEED
SKIP/
INDEX
SLOW PAUSE/STILL
NOTES:
• If the selected language is not recorded on the disc, the original
language will be heard.
• Some DVD discs may be played in a
different language than you selected.
A prior language may be programmed
on the disc.
English, French, Spanish
The language you have selected will play if it is recorded on
the disc.
Others: If you want to select another language, enter the
language code (See the Table of languages on page 57).
To make the SETUP screen disappear, press SET UP.
4
2A77001AE(46-51) 8/29/02, 11:06 AM49
49
Page 50
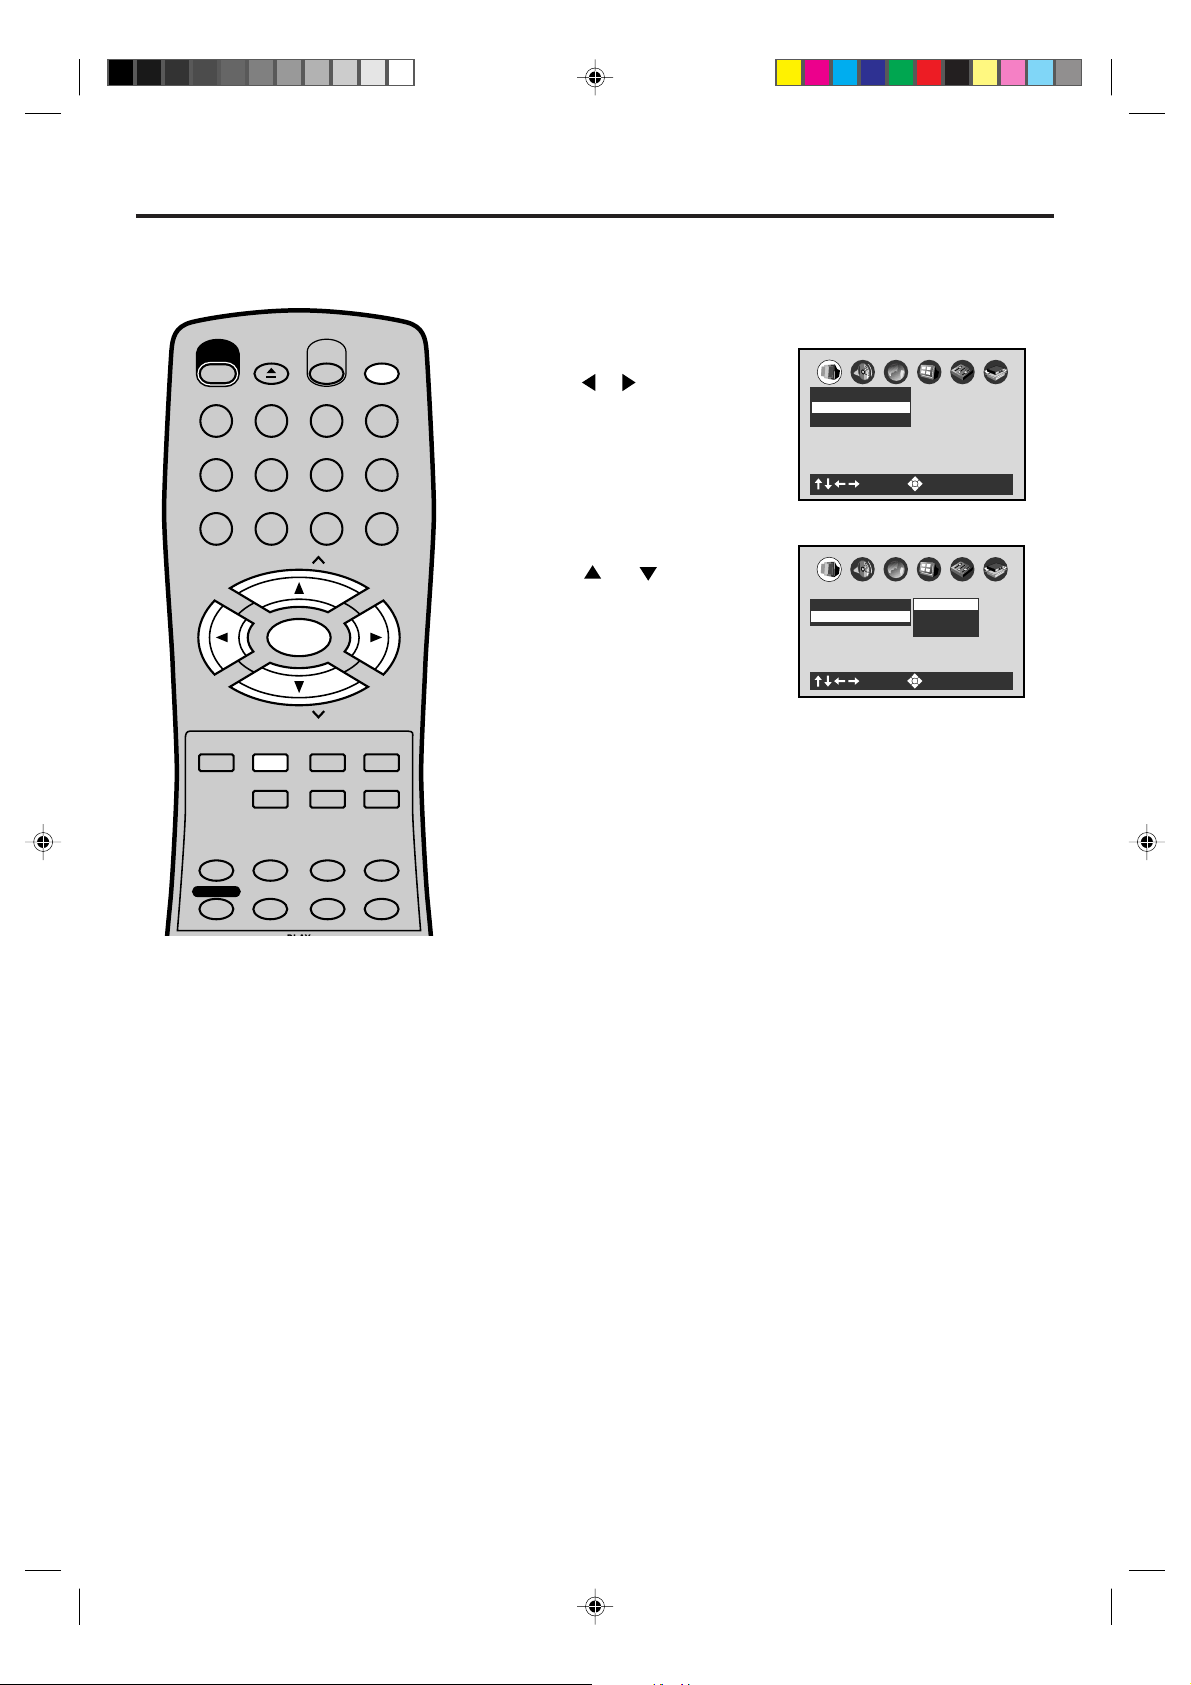
A
B
C
: Select : Enter
Picture
TV Shape 4:3LB
VIDEO OUT SELECT
Setting the aspect ratio of TV screen
A
B
C
TV Shape 4:3LB
Picture
: Select : Enter
16:9 Widescreen
4:3 Normal
4:3 Letterbox
You can select the aspect ratio for
your TV.
OPEN/
CLOSE
EJECT
POWER
123
456
789
CH
TRACKING/
SET
—
DVD MENU
AUDIO/
AUDIO SELECT
TIMER REC
SELECT/
ENTER
CH
SET UP/
VCR MENU
ZOOM
MEMORY/
COUNTER RESET
ZERO RETURN
SUB TITLE/
ATR
VCR/DVD
DISPLAY/CALL
INPUT SELECT
0
CLEAR/
RETURN
CANCEL
TITLE REPEAT A-B
ANGLE/
CLOCK/
COUNTER
PLAY MODE/
TV/VCR
SPEED
TRACKING/
SET
+
Preparation:
Turn ON the TV and set to the video input mode.
•
•
Press VCR/DVD to select the DVD mode. (The DVD indicator
will light.)
Press SET UP in the stop mode.
1
Press
or to select
“Picture”.
Press ENTER.
2
Press
or to select your
desired screen type, then press
ENTER.
You have the following screen sizes to choose from:
4:3 Letterbox:
Select when a standard 4:3 TV is connected.
Displays theatrical images with masking bars above and below
the picture.
4:3 Normal:
Select when a standard 4:3 TV is connected.
Displays pictures cropped to fill your TV screen. Either or both
sides of the picture are cut off.
NOTES:
• The displayable picture size is preset on
the DVD video disc. Therefore, the
playback picture of some DVD video
discs may not conform to the picture size
you select.
• When you play DVD video discs
recorded in the 4:3 picture size only, the
playback picture always appears in the
4:3 picture size regardless of the TV
shape setting.
• If you select “16:9 widescreen” and you
own a 4:3 TV set, the DVD playback
picture will be horizontally distorted
during playback. Images will appear to
be horizontally compressed. Always be
sure that your TV shape conforms to the
actual TV in use.
50
2A77001AE(46-51) 8/29/02, 11:06 AM50
16:9 Widescreen:
Select this mode when connecting to a wide-screen TV.
A wide screen picture is displayed full size.
To make the SETUP screen disappear, press SET UP.
3
Page 51
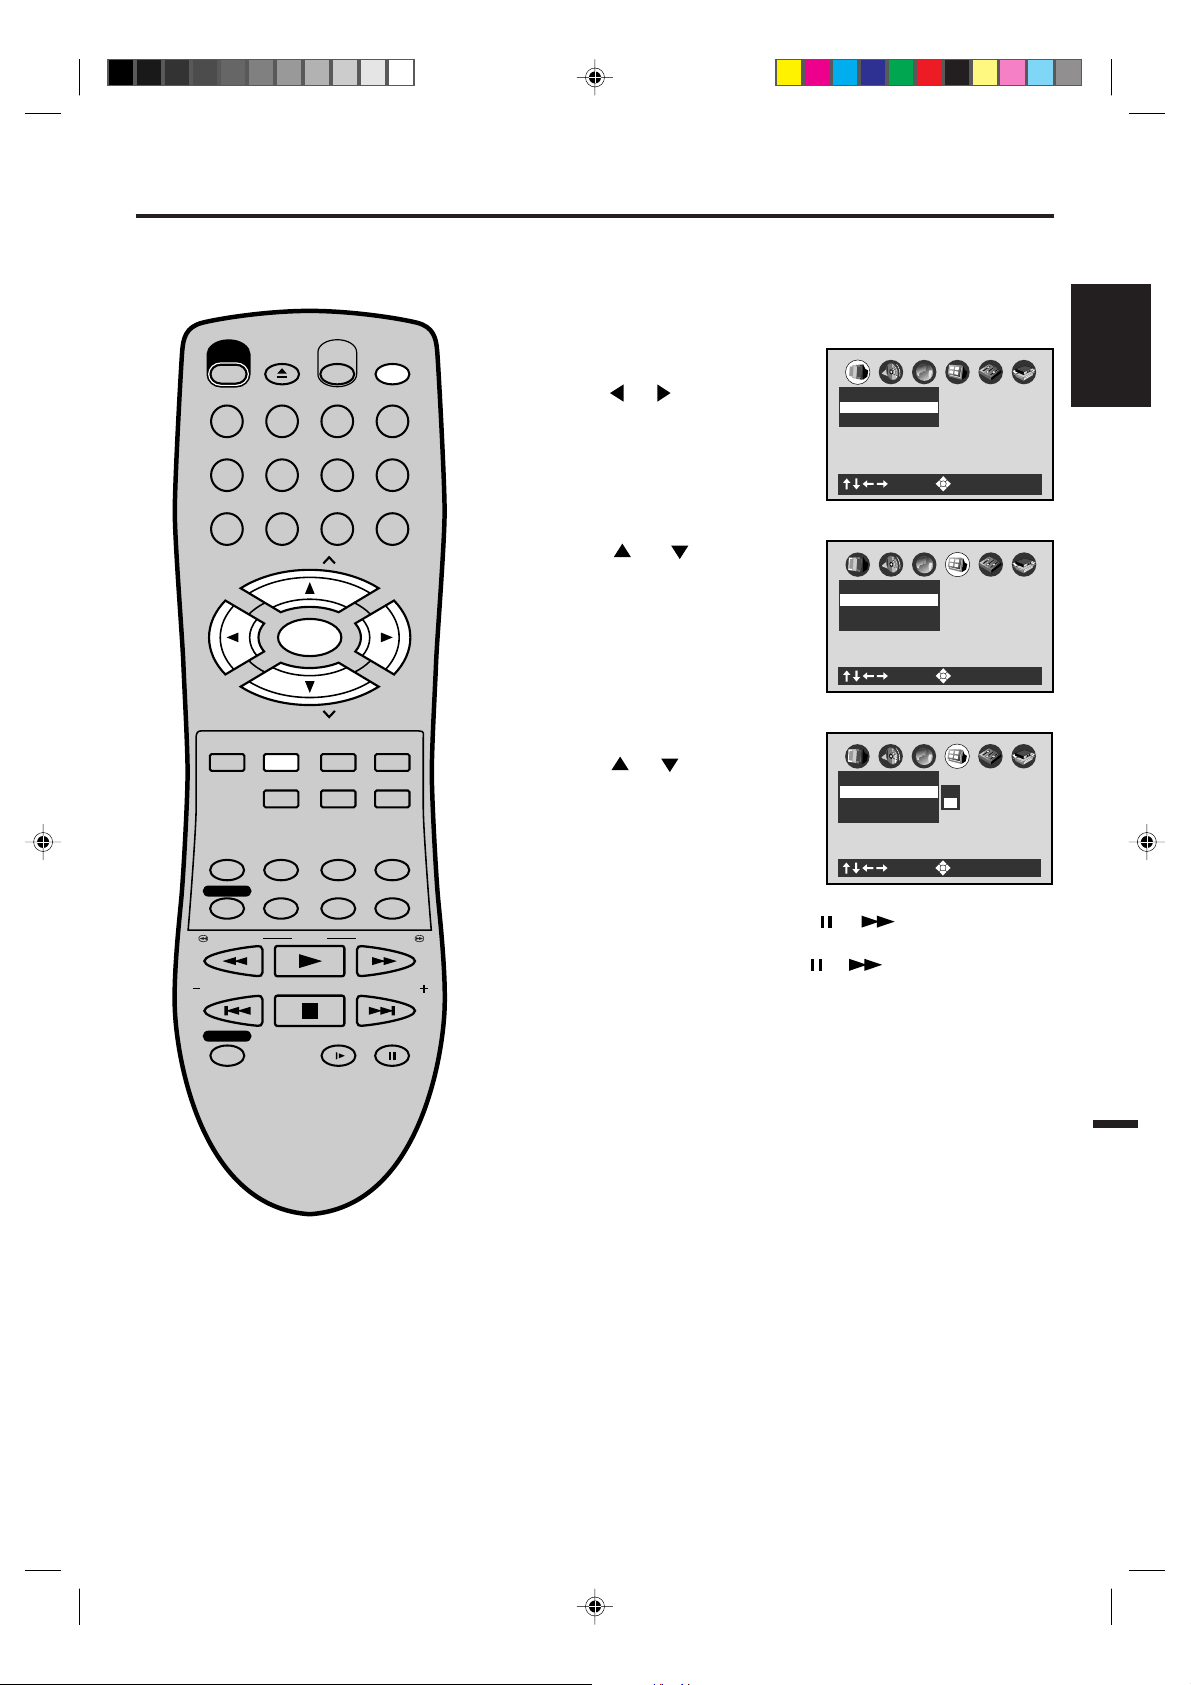
A
B
C
: Select : Enter
Picture
TV Shape 4:3LB
VIDEO OUT SELECT
OPEN/
CLOSE
EJECT
POWER
123
VCR/DVD
DISPLAY/CALL
Setting on Screen display
Preparation:
Turn ON the TV and set to the video input mode.
•
•
Press VCR/DVD to select the DVD mode. (The DVD indicator
will light.)
Press SET UP in the stop mode.
1
Press
or to select “Display”
ENGLISH
456
789
CH
TRACKING/
SET
—
DVD MENU
AUDIO/
AUDIO SELECT
TIMER REC
REW/SEARCH SEARCH/F.FWD
INDEX/SKIP
SELECT/
ENTER
CH
SET UP/
VCR MENU
ZOOM
MEMORY/
COUNTER RESET
ZERO RETURN
SUB TITLE/
ATR
PLAY
STOP
CLEAR/
CANCEL
TITLE REPEAT A-B
ANGLE/
PLAY MODE/
SPEED
INPUT SELECT
0
TRACKING/
SET
RETURN
CLOCK/
COUNTER
TV/VCR
SKIP/
INDEX
Press
2
Screen Display”.
+
or to select “On-
B
A
Display
On-Screen Display On
Background Picture
Screen Saver On
C
: Select : Enter
Press ENTER.
3
Press
or to select “On” or
“Off”, then press ENTER.
On-Screen Display Off
Background Picture
Screen Saver On
Display
C
B
A
Off
On
: Select : Enter
On: Operational modes (e.g. “ ”, “ ”) appear when you
press the buttons (factory setting).
Off: Operational modes (e.g. “ ”, “ ”) do not appear when
you press any buttons.
REC/OTR
2A77001AE(46-51) 8/29/02, 11:06 AM51
SLOW PAUSE/STILL
To make the SETUP screen disappear, press SET UP.
4
51
Page 52
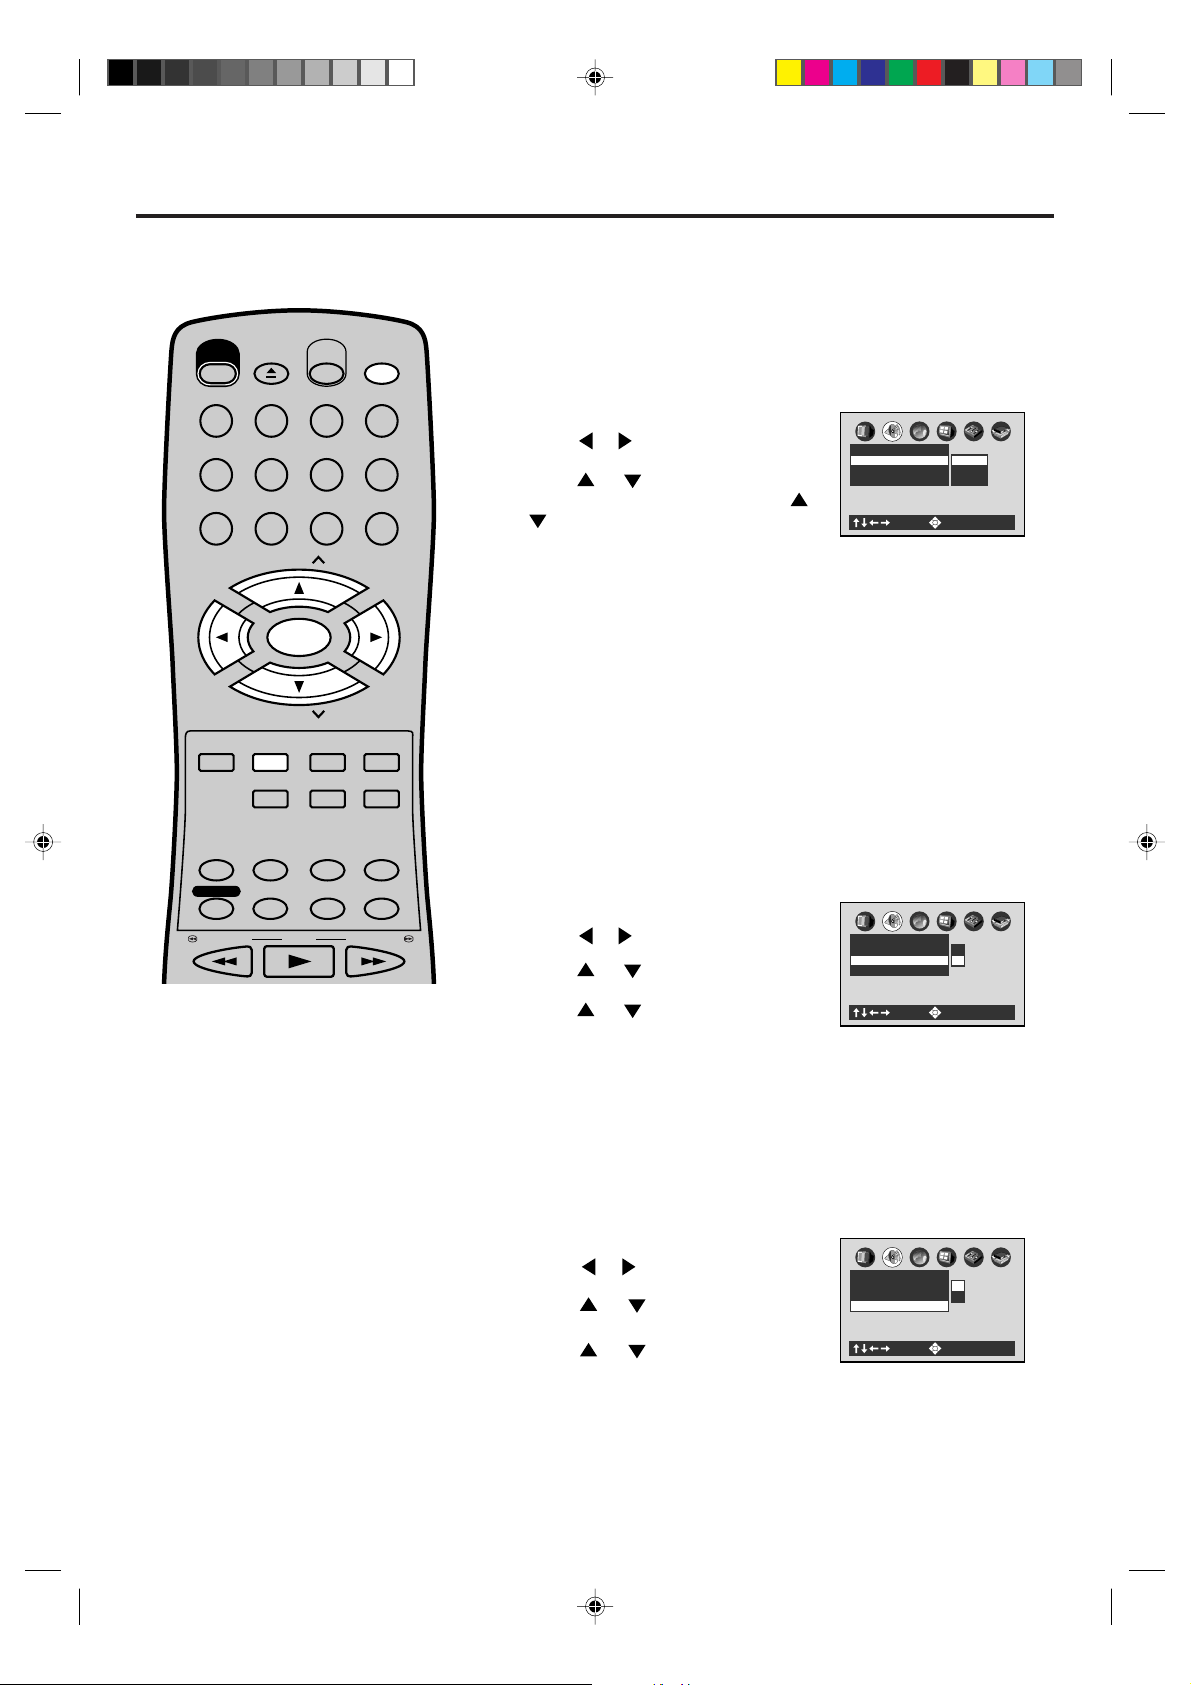
A
B
C
Audio
Karaoke Vocal On
Dynamic Range Control
On
Audio Out Select Bitstream
Analog 2ch
PCM
Bitstream
: Select : Enter
Setting Audio
A
B
C
Audio
Karaoke Vocal Off
Dynamic Range Control
On
Audio Out Select Bitstream
: Select : Enter
On
Off
A
B
C
Audio
Karaoke Vocal Off
: Select : Enter
Dynamic Range Control
On
Audio Out Select BitstreamOnOff
OPEN/
CLOSE
EJECT
POWER
123
456
789
CH
TRACKING/
SET
—
DVD MENU
SELECT/
SET UP/
VCR MENU
ZOOM
ENTER
CH
DISPLAY/CALL
INPUT SELECT
CLEAR/
CANCEL
TITLE REPEAT A-B
VCR/DVD
0
TRACKING/
RETURN
Preparation:
Turn ON the TV and set to the video input mode.
•
•
Press VCR/DVD to select the DVD mode. (The DVD indicator
will light.)
Audio Out Select
Select the output sound format corresponding to your system
connection.
For details of sound recording systems, see on page 55.
Press SET UP in the stop mode.
1
Press
Press or to select “Audio Out
2
Select”, then press ENTER. Press
or to select “Audio”.
or
to select your desired output sound,
then press ENTER.
Bitstream: Select when connected to an amplifier equipped with a Dolby
Digital, DTS, MPEG1 or MPEG2 decoder. The DVD/VCR outputs
SET
+
digital audio information in the bitstream format when you play a
DVD video disc recorded on the Dolby Digital, DTS, MPEG1 or
MPEG2 recording system.
Analog 2ch: Select when connected to a TV, Dolby Pro Logic or stereo
system
via the analog audio jacks.
PCM: Select when connected to a 2 channel digital stereo amplifier.
The DVD/VCR outputs sounds in the PCM 2ch format when you
play a DVD video disc recorded on the Dolby Digital.
MPEG1 or
MPEG2 recording system.
To make the SETUP screen disappear, press SET UP.
3
ANGLE/
PLAY MODE/
SPEED
CLOCK/
COUNTER
TV/VCR
AUDIO/
MEMORY/
AUDIO SELECT
TIMER REC
REW/SEARCH SEARCH/F.FWD
COUNTER RESET
ZERO RETURN
SUB TITLE/
ATR
PLAY
NOTES:
• The Dynamic Range Control function
works only during playback of Dolby
Digital recorded discs.
• The level of Dynamic Range Control
may differ depending on the DVD video
disc.
• The vocal output feature is used during
playback of Dolby Digital (multi-channel)
recorded DVD KARAOKE discs. This
feature allows you to turn off vocal audio
tracks, or restore them for background
accompaniment.
• When playing KARAOKE, connect the
appropriate audio equipment such as an
amplifier to the DVD player.
52
Dynamic Range Control
Turn on or off a function that makes faint sounds easier to hear
even if you lower the volume during late hours playback.
Press SET UP in the stop mode.
1
Press
Press or to select “Dynamic
2
Range Control”, then press ENTER.
Press
or to select “Audio”.
or to select “On” or “Off”,
then press ENTER.
Off: Full dynamic range is maintained.
On: Dynamic range is reduced.
To make the SETUP screen disappear,
3
press SET UP.
Karaoke Vocal
Turn on or off the vocal output during DVD KARAOKE disc playback.
Press SET UP in the stop mode.
1
Press
Press or to select “Karaoke
2
Vocal”, then press ENTER.
Press
or to select “Audio”.
or to select “On” or “Off”,
then press ENTER.
Off: The primary vocal is not output.
On: The primary vocal is output when
it is recorded on the disc.
To make the SETUP screen disappear,
3
press SET UP.
2A77001AE(52-57) 8/29/02, 11:05 AM52
Page 53
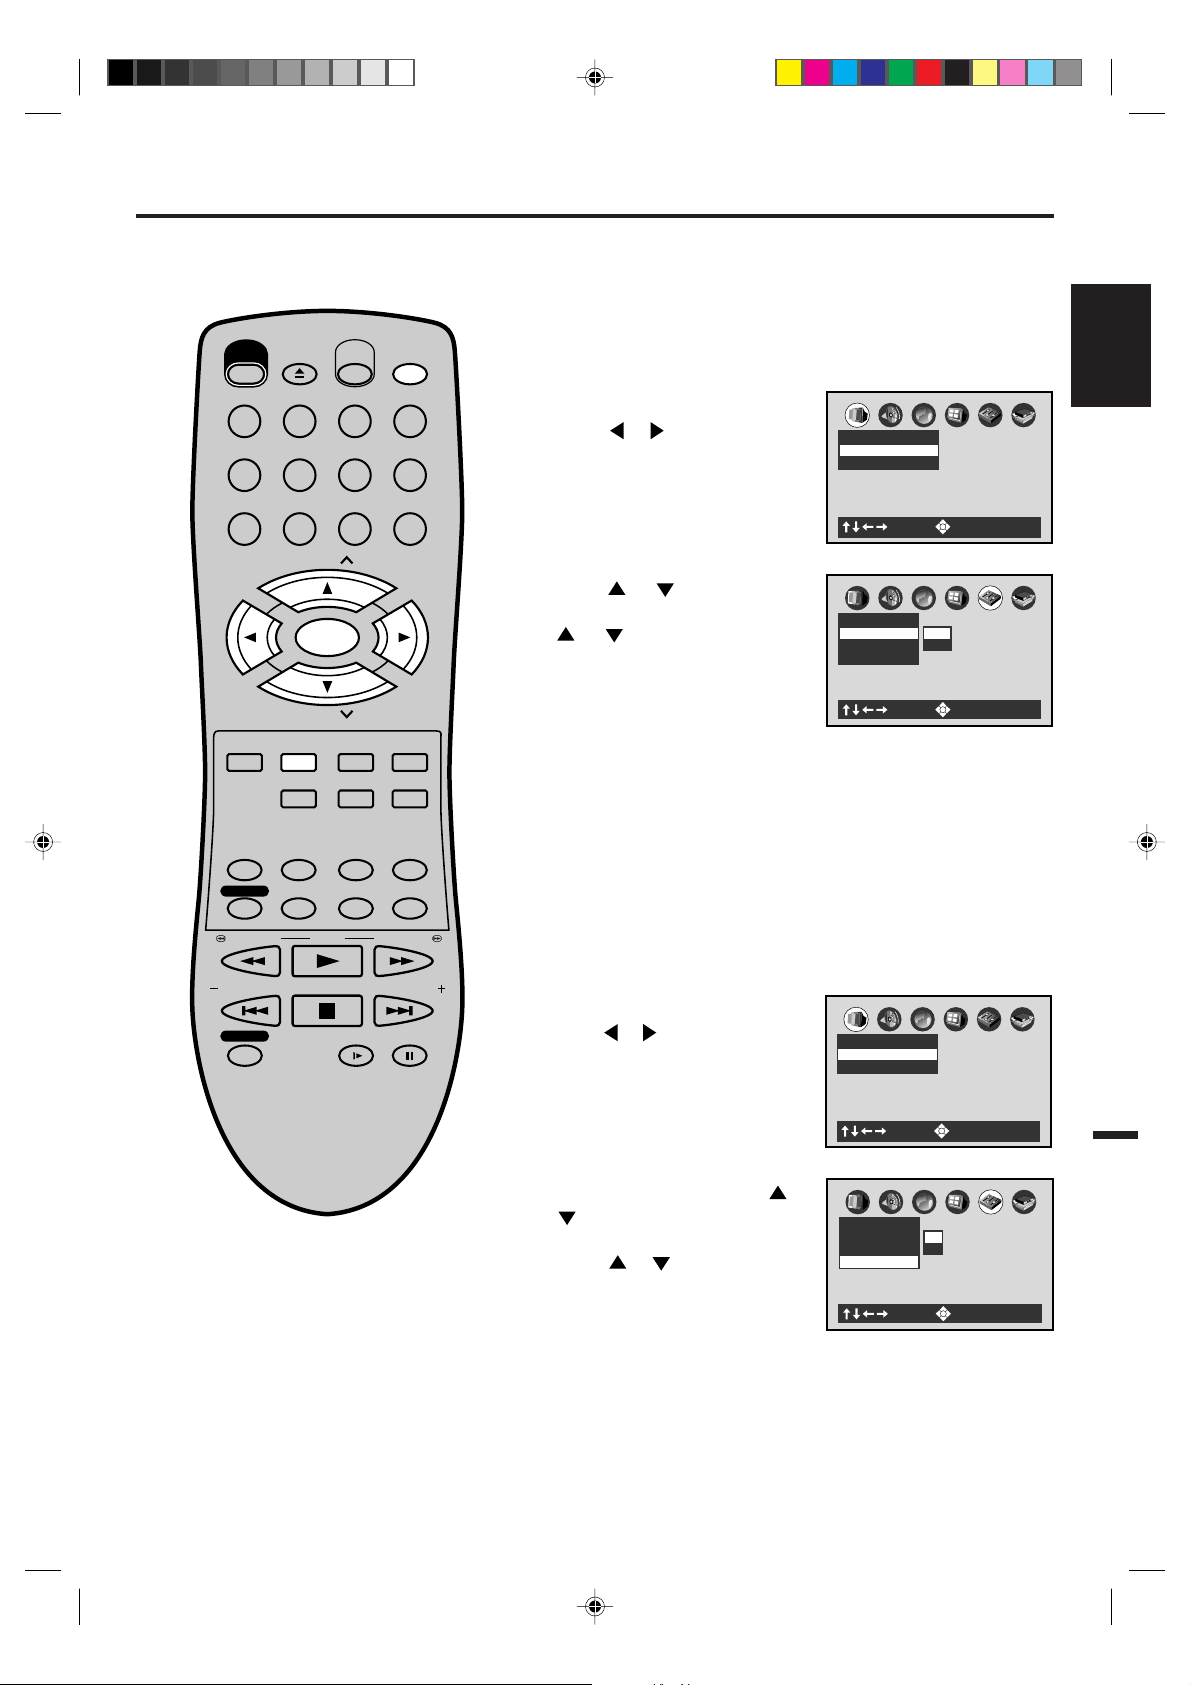
POWER
EJECT
OPEN/
CLOSE
VCR/DVD
Setting Operation
Preparation:
Turn ON the TV and set to the video input mode.
•
•
Press VCR/DVD to select the DVD mode. (The DVD indicator
will light.)
Pause/Still
Select the resolution of still pictures.
123
456
789
CH
TRACKING/
SET
—
DVD MENU
AUDIO/
AUDIO SELECT
TIMER REC
REW/SEARCH SEARCH/F.FWD
INDEX/SKIP
REC/OTR
SELECT/
ENTER
CH
SET UP/
VCR MENU
ZOOM
MEMORY/
COUNTER RESET
ZERO RETURN
SUB TITLE/
ATR
PLAY
STOP
CLEAR/
CANCEL
TITLE REPEAT A-B
ANGLE/
PLAY MODE/
SPEED
SLOW PAUSE/STILL
DISPLAY/CALL
INPUT SELECT
0
TRACKING/
SET
RETURN
CLOCK/
COUNTER
TV/VCR
SKIP/
INDEX
Press SET UP in the stop mode.
1
Press
“Operation”.
Press or to select “Pause/
2
+
Still”, then press ENTER. Press
“Frame”, then press ENTER.
or to select
or to select “Auto” or
TV Shape 4:3LB
VIDEO OUT SELECT
Operation
Pause/Still Auto
Parental Lock Off
Title Stop Off
C
B
A
Picture
: Select : Enter
C
B
A
Auto
Frame
: Select : Enter
ENGLISH
Auto: For normal use. Still and fast motion images can be
paused.
Frame:The resolution of still pictures is improved, so that you
can make a motionless picture clearer when you pause
it.
To make the SETUP screen disappear, press SET UP.
3
Title Stop
Turn on or off a feature that automatically stops playback after a
title has been viewed.
Press SET UP in the stop mode.
1
Press or to select “Operation”.
TV Shape 4:3LB
VIDEO OUT SELECT
Picture
C
B
A
2A77001AE(52-57) 8/29/02, 11:05 AM53
: Select : Enter
Press ENTER, then press or
2
to select “Title Stop”, then
press ENTER.
Press
or to select “On” or
Operation
Pause/Still Auto
Parental Lock Off
Title Stop Off
“Off”, then press ENTER.
Off: The DVD/VCR continues
: Select : Enter
after playback of a title is
completed.
On: The DVD/VCR stops after
playback of a title is completed.
To make the SETUP screen disappear, press SET UP.
3
C
B
A
Off
On
53
Page 54
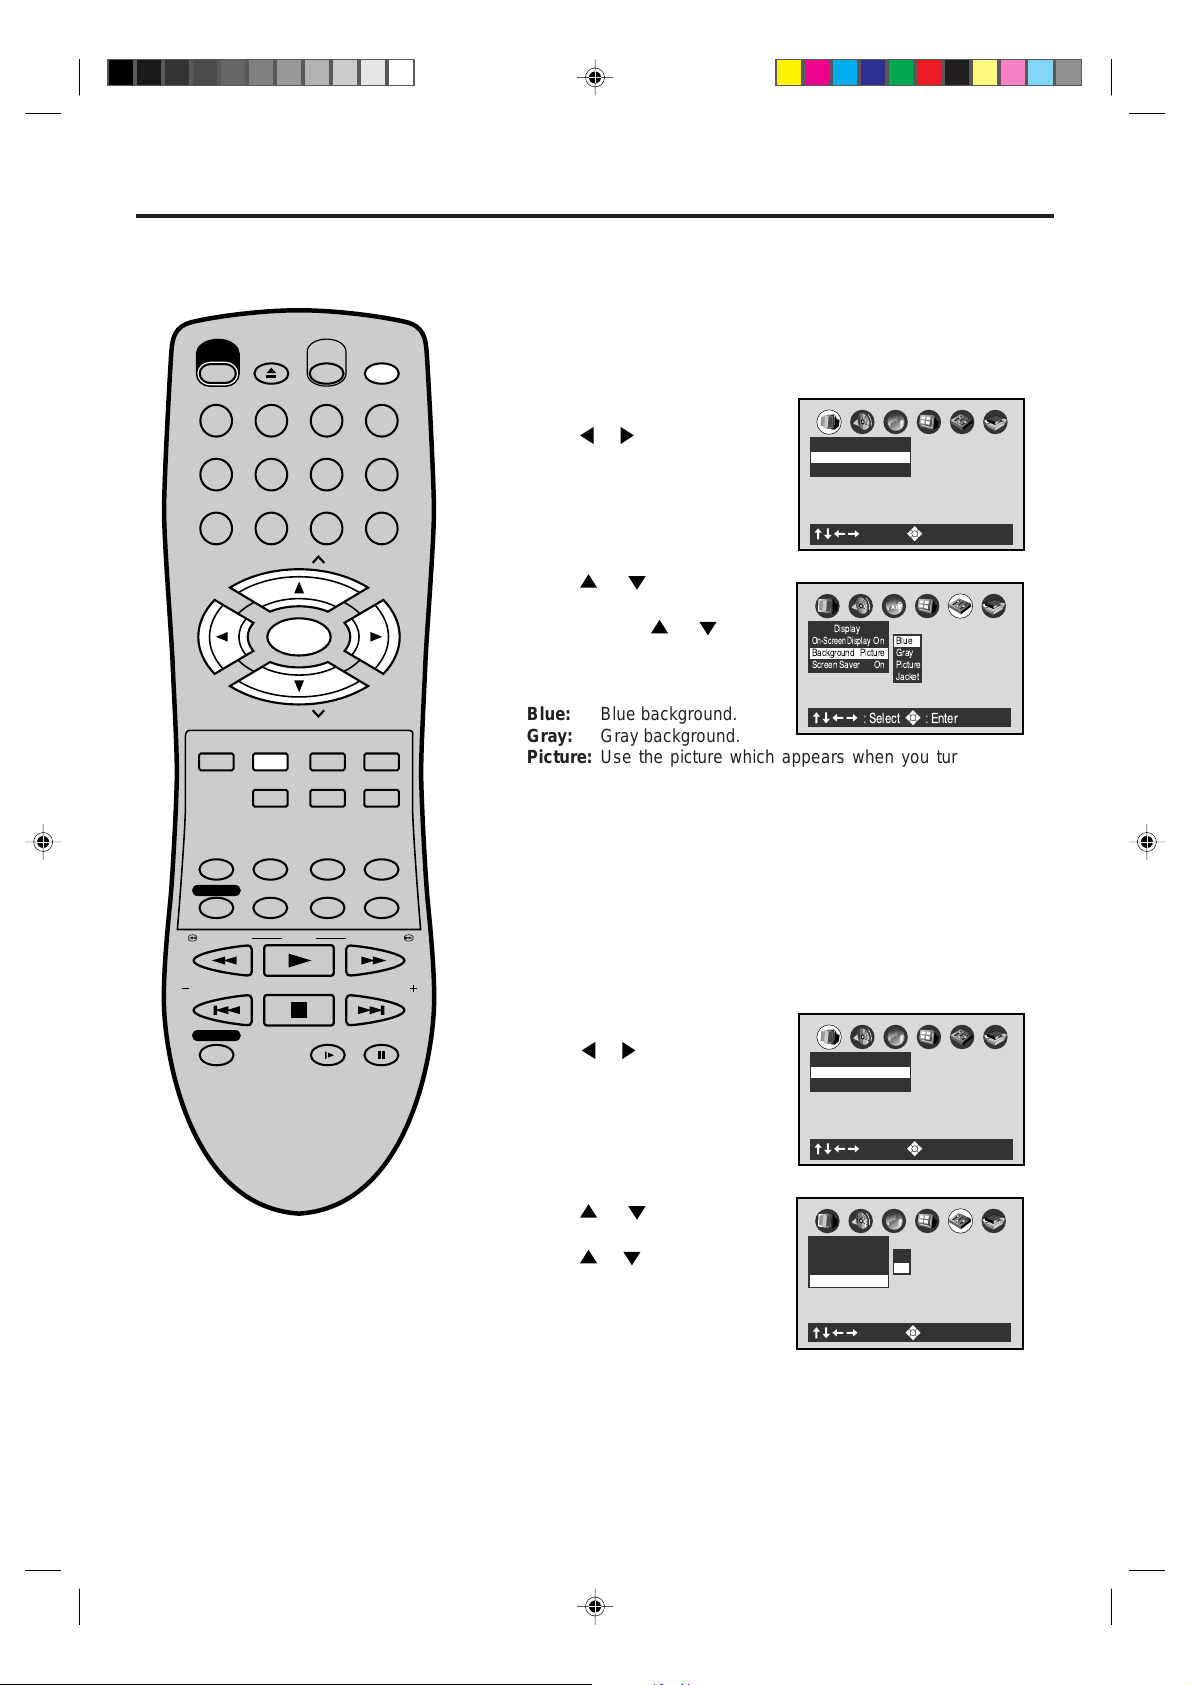
A
B
C
: Select : Enter
Picture
TV Shape 4:3LB
VIDEO OUT SELECT
Setting Background/Setting Screen Saver
A
B
C
Display
Screen Saver On
On-Screen Display
On
Gray
Picture
Jacket
Blue
: Select : Enter
Background Picture
A
B
C
: Select : Enter
Picture
TV Shape 4:3LB
VIDEO OUT SELECT
A
B
C
Display
Screen Saver On
Background Picture
On-Screen Display
On
On
Off
: Select : Enter
Preparation:
Turn ON the TV and set to the video input mode.
•
•
Press VCR/DVD to select the DVD mode. (The DVD indicator
will light.)
POWER
EJECT
OPEN/
CLOSE
VCR/DVD
Setting Background
Select the background color or background picture.
123
456
789
CH
TRACKING/
SET
—
DVD MENU
AUDIO/
AUDIO SELECT
TIMER REC
REW/SEARCH SEARCH/F.FWD
INDEX/SKIP
SELECT/
ENTER
CH
SET UP/
VCR MENU
ZOOM
MEMORY/
COUNTER RESET
ZERO RETURN
SUB TITLE/
ATR
PLAY
STOP
CLEAR/
CANCEL
TITLE REPEAT A-B
ANGLE/
PLAY MODE/
SPEED
DISPLAY/CALL
INPUT SELECT
0
TRACKING/
SET
+
RETURN
CLOCK/
COUNTER
TV/VCR
SKIP/
INDEX
Press SET UP in the stop mode.
1
Press
Press or to select
2
“Background”, then press
ENTER. Press
or to select “Display”.
or to
select your desired background,
then press ENTER.
Blue: Blue background.
Gray: Gray background.
Picture: Use the picture which appears when you turn on the
DVD/VCR as a background.
Jacket: Use the jacket picture included on some discs as a
background. If it is not included, a gray background will
be substituted.
To make the SETUP screen disappear, press SET UP.
3
Setting Screen Saver (DVD only)
To turn the screen saver on or off.
REC/OTR
SLOW PAUSE/STILL
54
2A77001AE(52-57) 8/29/02, 11:05 AM54
Press SET UP in the stop mode.
1
Press
or to select
“Display”.
Press or to select “Screen
2
Saver”, then press ENTER.
Press
or to select “On” or
“Off”, then press ENTER.
Off: The screen saver is disen-
gaged.
On: The screen saver operates
in 10 minutes after you press
PAUSE/STILL.
To make the SETUP screen disappear, press SET UP.
3
Page 55
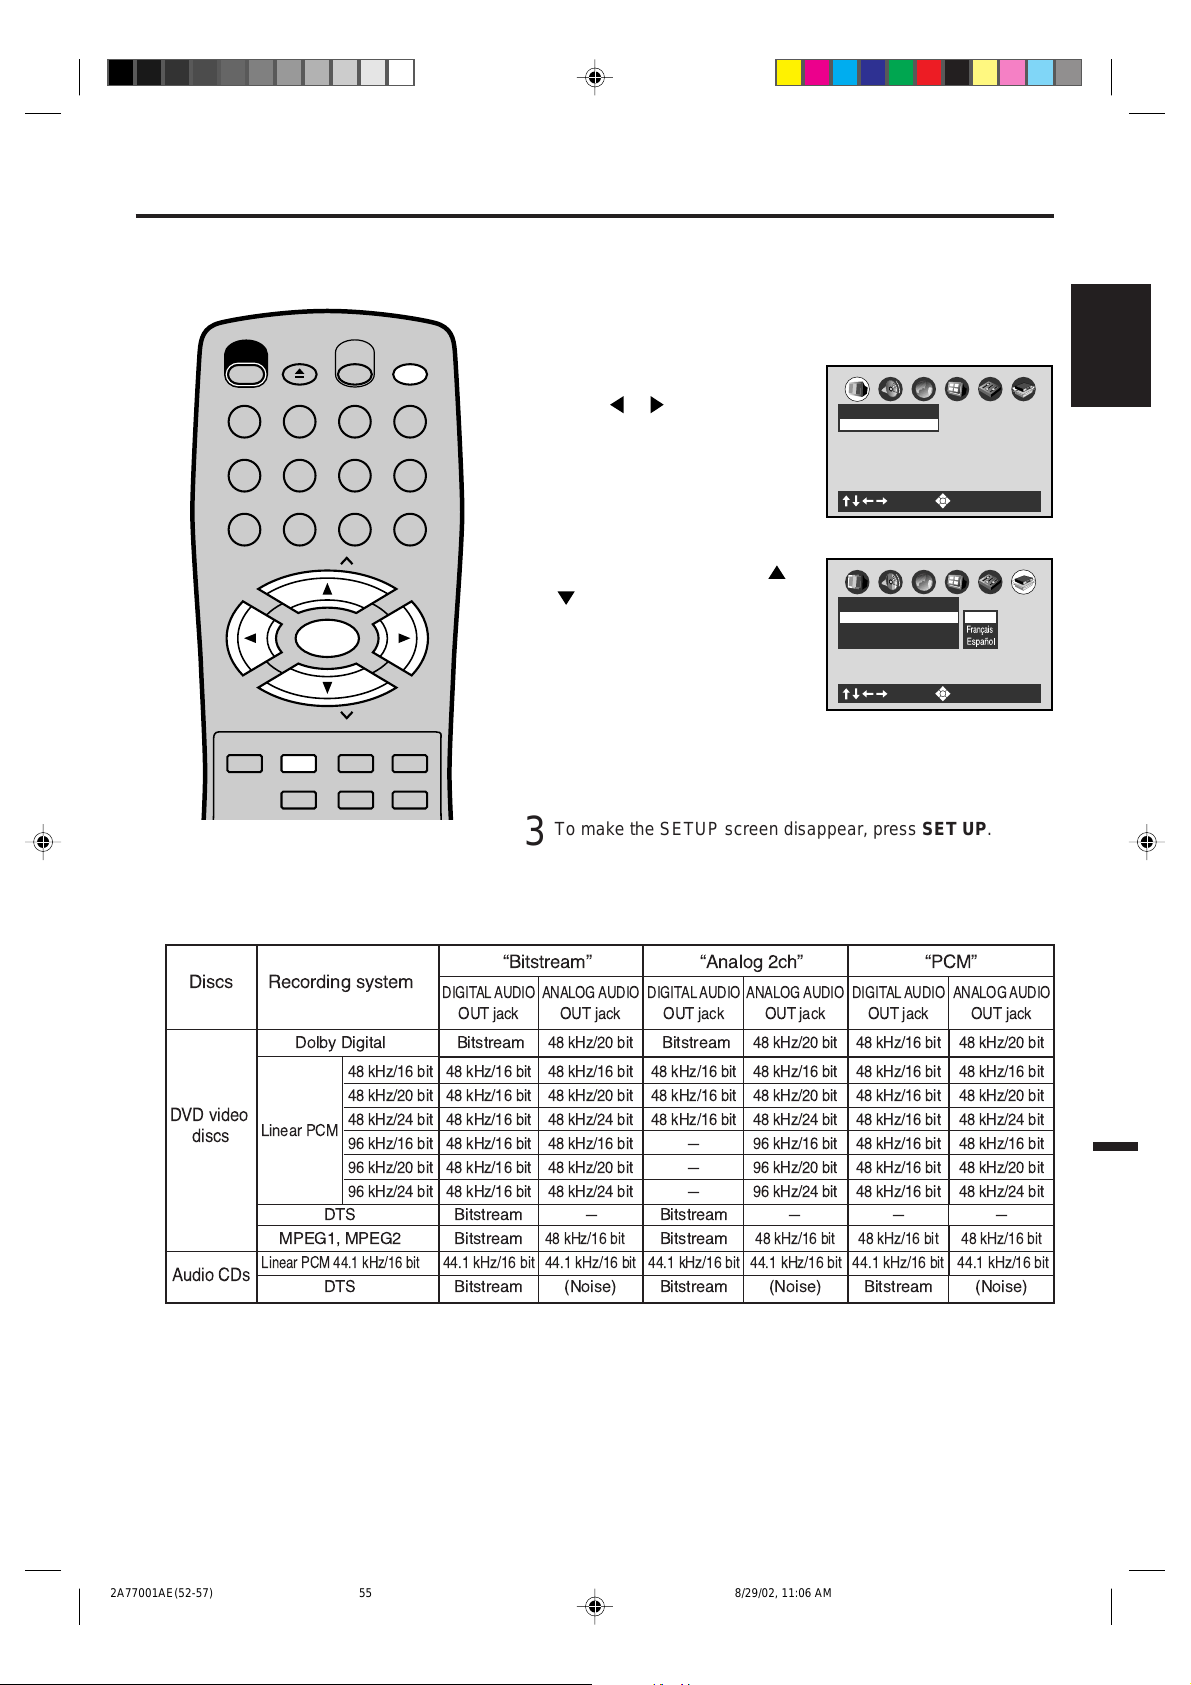
Setting initial setup/output sound conversion table
You can install the initial system
setting.
OPEN/
CLOSE
EJECT
POWER
123
456
789
CH
TRACKING/
SET
—
DVD MENU
SELECT/
SET UP/
VCR MENU
ZOOM
ENTER
CH
VCR/DVD
DISPLAY/CALL
INPUT SELECT
0
CLEAR/
RETURN
CANCEL
TITLE REPEAT A-B
TRACKING/
Preparation:
Turn ON the TV and set to the video input mode.
•
•
Press VCR/DVD to select the DVD mode. (The DVD indicator
will light.)
Setting initial setup
Press SET UP in the stop mode.
1
Press
Setup”.
Press ENTER, then press or
2
SET
+
Language”, “TV Shape” or
“Audio Out Select”.
or to select “Initial
to select “On-Screen
TV Shape 4:3LB
On-Screen Language ENG
TV Shape 4:3LB
Audio Out Select Bitstream
C
B
A
Picture
: Select : Enter
C
B
A
Initial Setup
: Select : Enter
English
Fran ais
Espa ol
ENGLISH
On-Screen Language: See on page 36.
TV Shape: See on page 50.
Audio Out Select: See on page 52.
To make the SETUP screen disappear, press SET UP.
3
Output sound conversion table (sampling frequency/quantization bit)
You can select the output sound format corresponding to your system connection (see page 52).
ÒBitstreamÓ ÒAnalog 2chÓ ÒPCMÓ
Discs
DVD video
discs
Audio CDs
Recording system
Dolby Digital
48 kHz/16 bit
48 kHz/20 bit
Linear PCM
MPEG1, MPEG2
Linear PCM 44.1 kHz/16 bit
48 kHz/24 bit
96 kHz/16 bit
96 kHz/20 bit
96 kHz/24 bit
DTS
DTS
DIGITALAUDIO
OUT jack
Bitstream
48 kHz/16 bit
48 kHz/16 bit
48 kHz/16 bit
48 kHz/16 bit
48 kHz/16 bit
48 kHz/16 bit
Bitstream
Bitstream
44.1 kHz/16 bit
Bitstream
ANALOG AUDIO
OUT jack
48 kHz/20 bit
48 kHz/16 bit
48 kHz/20 bit
48 kHz/24 bit
48 kHz/16 bit
48 kHz/20 bit
48 kHz/24 bit
Ð
48 kHz/16 bit
44.1 kHz/16 bit
(Noise)
DIGITALAUDIO
OUT jack
Bitstream
48 kHz/16 bit
48 kHz/16 bit
48 kHz/16 bit
Bitstream
Bitstream
44.1 kHz/16 bit 44.1 kHz/16 bit 44.1 kHz/16 bit
Bitstream
Ð
Ð
Ð
ANALOG AUDIO
DIGITALAUDIO
OUT jack
48 kHz/20 bit
48 kHz/16 bit
48 kHz/20 bit
48 kHz/24 bit
96 kHz/16 bit
96 kHz/20 bit
96 kHz/24 bit
48 kHz/16 bit
48 kHz/16 bit
48 kHz/16 bit
48 kHz/16 bit
48 kHz/16 bit
48 kHz/16 bit
48 kHz/16 bit
ÐÐ
48 kHz/16 bit
48 kHz/16 bitÐ48 kHz/16 bit
44.1 kHz/16 bit
(Noise)
OUT jack
Bitstream
ANALOG AUDIO
OUT jack
48 kHz/20 bit
48 kHz/16 bit
48 kHz/20 bit
48 kHz/24 bit
48 kHz/16 bit
48 kHz/20 bit
48 kHz/24 bit
(Noise)
2A77001AE(52-57) 8/29/02, 11:06 AM55
55
Page 56
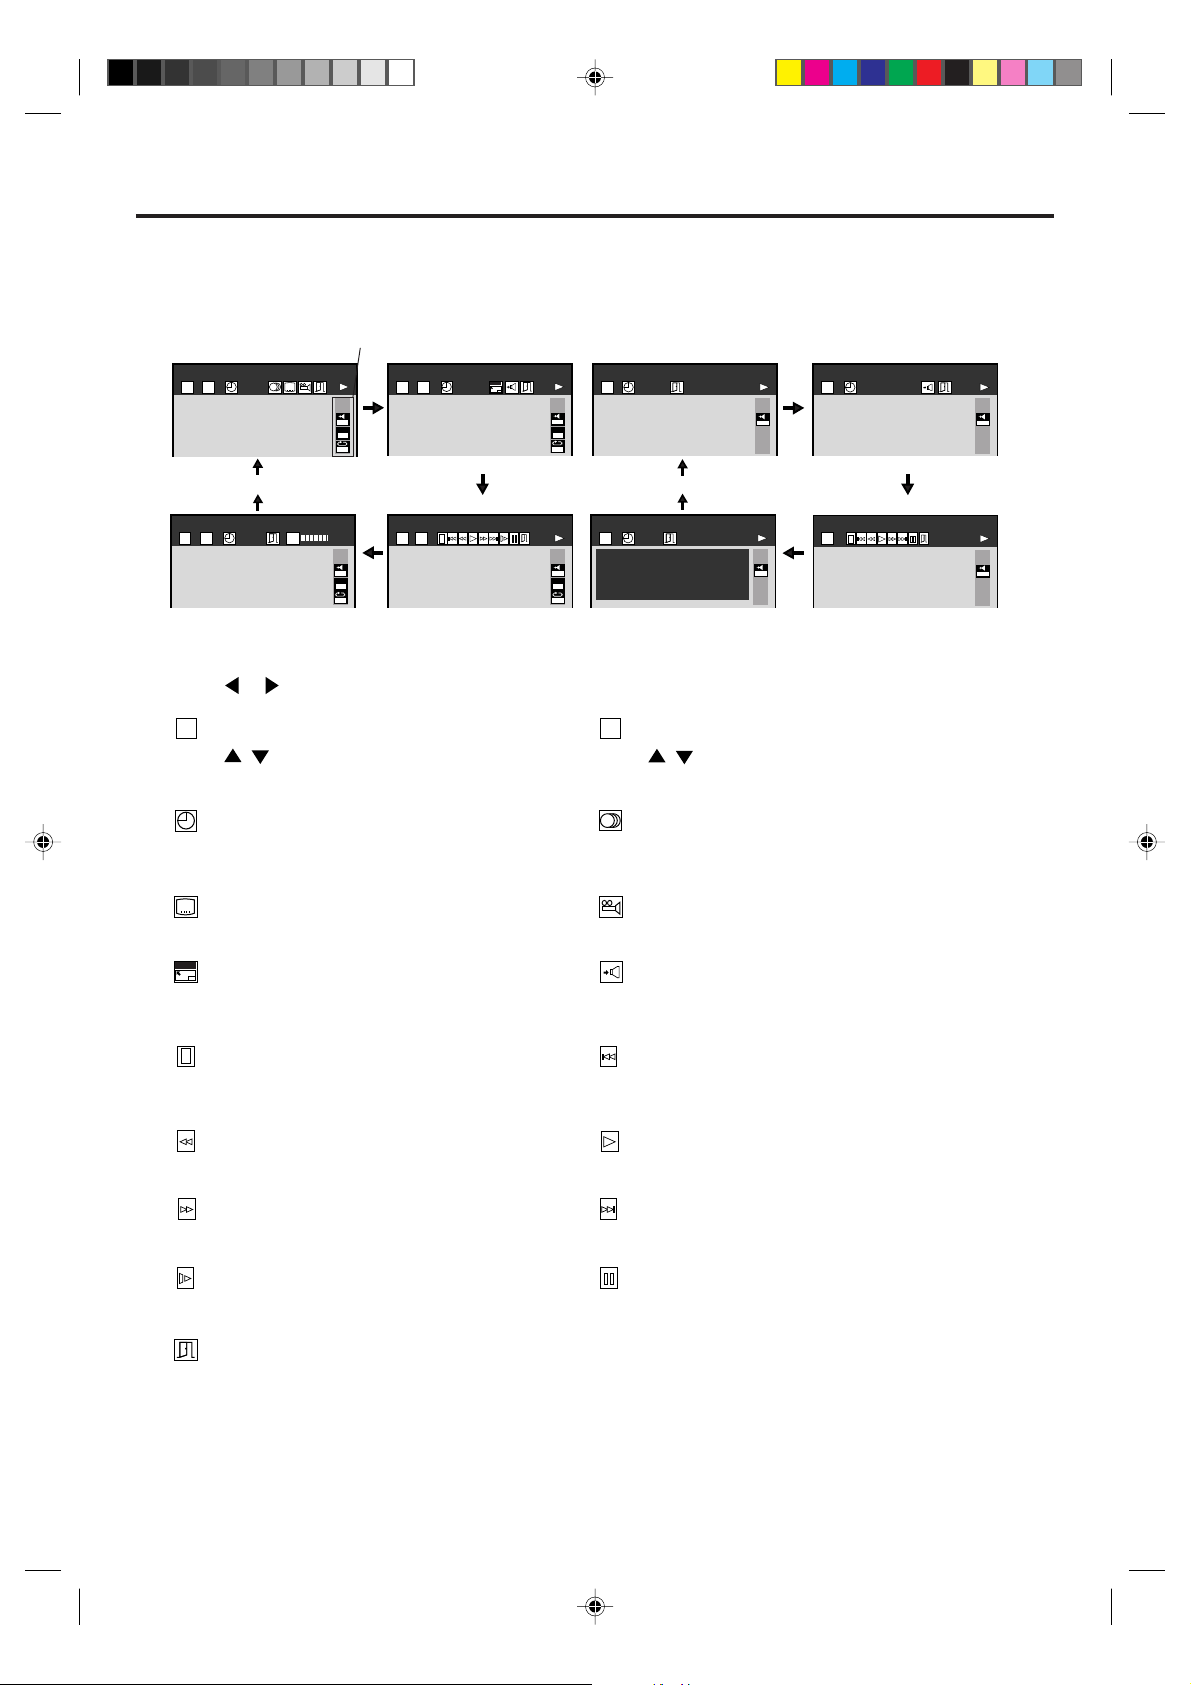
Status display of Disc
You can view information on the operation status and access the settings.
With each press of DISPLAY, the status of the disc will appear on the screen and change as follows.
1
Symbol mark of the feature
DVD
T C
2 3 0:08:16
you selected is displayed.
EPMEAM
T C
EAM
2CH
IOOM
X
1
C
2 3 -0:21:28
ZOOM
CD
T
EAM
2CH
IOOM
X
C
1 00:30
1
EAM
PCM
T
1 -03:38
EPM
EAM
EAM
PCM
OFF
BIT
T C
2 3 0:08:16
Press or to select the desired symbol mark, then press ENTER.
2
: Title number (Track number)
T
Press / or Number keys to locate a title or
track, then press PLAY.
: Elapsed (remaining) time of the current title
Press Number keys to locate a desired Location,
RATE
9.2Mbps
EAM
2CH
IOOM
X
1
C
T C
2 3
T
EAM
IOOM
1 01:14
-----
CD TEXT
Disc Title:
2CH
No Text
Track Title:
X
1
No Text
C
: Chapter number
C
Press
then press PLAY.
Audio setting
See page 43.
then press PLAY.
: Subtitle setting
See page 43.
ZOOM
: To zoom a picture
See page 39.
: Angle setting
See page 44.
: Audio Out Select setting
BST: Bitstream 2CH:Analog 2ch PCM:PCM
See page 52.
: To stop playback
See page 37.
: Playback starts from the beginning of the
current chapter or track.
See page 38.
OFF
T
-----
EAM
PCM
1
/ or Number keys to locate a Chapter,
EAM
PCM
: Fast reverse playback
See Page 38.
: Fast forward playback
See page 38.
: To begin slow motion playback
See page 38.
: To turn off the display
CD TEXT
Displays CD text data if included on the audio
CDs. (Some letters may not be displayed
properly depending on the disc.)
56
2A77001AE(52-57) 8/29/02, 11:06 AM56
: To start playback
See page 37.
: To locate succeeding chapters or tracks.
See page 38.
: To pause playback
See page 38.
Data transfer rate (Mbit/s)
Amount of picture, sound and subtitle data in the DVD
video disc transferred per second.
The larger the value is, the more data processed, but
this does not necessarily insure better picture quality.
Page 57
Table of languages
Enter the appropriate code for the initial settings "Audio", "Subtitle" and/or "Menu" (see pages 47-49).
Abbreviation
–––
CHI (ZH)
DUT (NL)
ENG (EN)
FRE (FR)
GER (DE)
ITA (IT)
JPN (JA)
KOR (KO)
MA Y (MS)
SPA (ES)
AA
AB
AF
AM
AR
AS
AY
AZ
BA
BE
BG
BH
BI
BN
BO
BR
CA
CO
CS
CY
DA
DZ
EL
EO
ET
EU
FA
FI
FJ
FO
FY
GA
GD
GL
Language
No alternate
language
Chinese
Dutch
English
French
German
ltalian
Japanese
Korean
Malay
Spanish
Afar
Abkhazian
Afrikaans
Amharic
Arabic
Assamese
Aymara
Azerbaijani
Bashkir
Belorussian
Bulgarian
Bihari
Bislama
Bengali, Bangla
Tibetan
Breton
Catalan
Corsican
Czech
Welsh
Danish
Bhutani
Greek
Esperanto
Estonian
Basque
Persian
Finnish
Fiji
Faroese
Frisian
Irish
Scottish Gaelic
Galician
Abbreviation
GN
GU
HA
HI
HR
HU
HY
IA
IE
IK
IN
IS
IW
JI
JW
KA
KK
KL
KM
KN
KS
KU
KY
LA
LN
LO
LT
LV
MG
MI
MK
ML
MN
MO
MR
MT
MY
NA
NE
NO
OC
OM
OR
PA
PL
PS
Language
Guarani
Gujarati
Hausa
Hindi
Croatian
Hungarian
Armenian
Interlingua
Interlingue
Inupiak
Indonesian
Icelandic
Hebrew
Yiddish
Javanese
Georgian
Kazakh
Greenlandic
Cambodian
Kannada
Kashmiri
Kurdish
Kirghiz
Latin
Lingala
Laotian
Lithuanian
Latvian, Lettish
Malagasy
Maori
Macedonian
Malayalam
Mongolian
Moldavian
Marathi
Maltese
Burmese
Nauru
Nepali
Norwegian
Occitan
(Afan) Oromo
Oriya
Panjabi
Polish
Pashto, Pushto
Abbreviation
PT
QU
RM
RN
RO
RU
RW
SA
SD
SG
SH
SI
SK
SL
SM
SN
SO
SQ
SR
SS
ST
SU
SV
SW
TA
TE
TG
TH
TI
TK
TL
TN
TO
TR
TS
TT
TW
UK
UR
UZ
VI
VO
WO
XH
YO
ZU
Language
Portuguese
Quechua
Rhaeto-Romance
Kirundi
Rumanian
Russian
Kinyarwanda
Sanskrit
Sindhi
Sango
Serbo-Croatian
Singhalese
Slovak
Slovenian
Samoan
Shona
Somali
Albanian
Serbian
Siswati
Sesotho
Sundanese
Swedish
Swahili
T amil
T elugu
T ajik
Thai
Tigrinya
Turkmen
T agalog
Setswana
T ongan
Turkish
Tsonga
T atar
Twi
Ukrainian
Urdu
Uzbek
Vietnamese
Volapük
Wolof
Xhosa
Y oruba
Zulu
ENGLISH
2A77001AE(52-57) 8/29/02, 11:06 AM57
57
Page 58
Problems and troubleshooting
Use the following check list for troubleshooting when you have problems with your unit. Consult your local
dealer or service outlet if problems persist.
Be sure all connections are properly made when using with other units.
SYMPTOMS POSSIBLE SOLUTIONS
DVD/VCR
DVD/VCR does not operate.
No picture.
No sound.
The remote control does not
function.
No CATV reception
VCR
TV recording does not work.
Timer recording does not work.
Noise bars on screen.
DVD
Display is not shown in your
language.
Playback doesn’t start.
Stopping playback, slow-motion
play, repeat play, or memory play,
etc. cannot be performed.
•Make sure the power cord is plugged in.
•Try another AC outlet.
•Power is off, check fuse or circuit breaker.
•Unplug unit, then plug it back in.
•Select the DVD or VCR mode before operating.
Antenna connection is not correct or antenna cable is disconnected.
•
• The video channel is not in the correct position or the TV is not
set to the video channel 3 or 4.
• Check the unit is connected correctly.
• The video input selector of the TV is not set to VIDEO. Set to
VIDEO (or equivalent).
• Channel is set to the external mode.
• Check the unit is connected correctly.
• Check the input selector of the amplifier is set properly.
• The unit is in the Special playback mode.
• Aim at the remote control at the remote sensor.
• Operate within Approx. 5 Meters or reduce the light in the room.
• Clear the path of the beam.
• The batteries are weak. Replace the batteries.
• Check the batteries are inserted correctly.
• Check the frequency code is set correctly.
•Check all CATV connections.
•Station or CATV system problems, try another station.
•The erase prevention tab of the video cassette is broken off.
•The unit is in the external input mode.
• The time is not set correctly.
• The recording start/end time is not set correctly.
• The TIMER has not been pressed ( is not lit).
• Tracking adjustment beyond range of automatic tracking circuit.
Try Manual tracking adjustment.
• Video heads are dirty.
• The tape is worn or damaged.
•Select proper language in the menu options.
• No disc is inserted.
• The disc may be dirty. Clean up the disc.
• The unit cannot play DVD-ROMs, etc.
• Some discs may not do some of the functions.
• When you press VCR MENU while watching a DVD with the
connections of the DVD exclusive terminal (S-VIDEO cable or
COMPONENT cable) to a TV, you cannot perform all the DVD
functions. In this case, wait for approx. 60 seconds with no
pressing of any buttons.
PAGE
5
–
–
5
18,36
12~15
18
12~17
–
–
12~17
–
26,38
11
14,15
24,28
19
31
31
26
59
–
36
37
35
35
–
–
58
2A77001AE(58-BACK) 8/29/02, 11:05 AM58
Page 59
Problems and troubleshooting / Video head cleaning
SYMPTOMS POSSIBLE SOLUTIONS PAGE
No 4:3 (16:9) picture • The setup does not match your TV.
No on-screen display • Select Display On.
No surround sound • The setup does not match your stereo system.
50
51
17
The unit or remote operation key
is not functioning.
Playback does not start when the
title is selected.
Audio soundtrack and/or subtitle
language is not changed when
you play back a DVD.
No subtitle
Angle cannot be changed. • Multi-angles are not recorded on the DVD disc.
appears on the screen.
• Turn off the unit and unplug the AC power cord for several
minutes, then replug it.
• Check the Parental setup.
• Multilingual language is not recorded on the DVD disc.
• Some discs have no subtitles.
• Subtitles are cleared. Press SUB TITLE.
• The function is prohibited with the unit or the disc.
Video head cleaning
Video head clogging
The video heads are the means by which the DVD/VCR reads
the picture from the tape during playback. In the unlikely event
that the heads become dirty enough to be clogged, no picture
will be played back. This can easily be determined if, during
playback of a known good tape, there is good sound, but no
picture (picture is extremely snowy). If this is the case, have
the DVD/VCR checked by qualified service personnel.
Good Picture Snowy Picture
–
45
48,49
48
44
–
ENGLISH
NOTES:•DO NOT ATTEMPT TO CLEAN THE VIDEO HEADS OR SERVICE THE UNIT BY REMOVING THE
REAR COVER.
Video heads may eventually wear out and should be replaced when they fail to produce clear pictures.
•
To help prevent video head clogging, use only good quality VHS tapes. Discard worn out tapes.
•
FOR ADDITIONAL SET-UP OR OPERATING ASSISTANCE, PLEASE VISIT OUR WEBSITE AT
WWW.MEMCORPINC.COM OR CONTACT CUSTOMER SER VICE AT 1-800-919-3647
PLEASE KEEP ALL P ACKAGING MATERIAL FOR A T LEAST 90 DAYS IN CASE YOU NEED T O RETURN THIS
PRODUCT TO YOUR PLACE OF PURCHASE OR MEMOREX.
FOR PAR TS AND ACCESSORIES, CONTACT FOX INT'L AT 1-800-321-6993.
59
2A77001AE(58-BACK) 8/29/02, 11:05 AM59
Page 60

Specifications
GENERAL
Power supply:
Power consumption:
Weight:
Dimensions:
Inputs/Outputs:
Video:
Audio:
Antenna:
Hi-Fi Frequency Response:
Hi-Fi Dynamic Range:
VCR section
Video Head:
Audio Track:
Tuner:
RF Channel Output:
F.FWD/REW T ime at 25˚C (77˚F):
AC 120V 60Hz
Operation: 20W
Stand by: 3W
9.9lbs (4.5 kg)
Width : 16-15/16 inches (430 mm)
Height: 3-7/8 inches (99 mm)
Depth : 12-3/8 inches (314.5 mm)
In: 1Vp-p/75 ohm
Out: 1Vp-p/75 ohm
In: –8dBm/50K ohm
Out: –8dBm/1K ohm
UHF/VHF IN/OUT: 75 ohm coaxial
20Hz to 20,000Hz
More than 90dB
4 Rotary Heads
Hi-Fi Sound - 2 Tracks / MONO Sound - 1 Track
181 Channel Freq. Synthesized
VHF 2-13
UHF 14-69
CATV 14-36 (A)-(W)
Channel 3 or 4, Switchable
Approx. 1minute and 48 seconds (with T-120 Cassette Tape)
37-59 (AA)-(WW)
60-85 (AAA)-(ZZZ)
86-94 (86)-(94)
95-99 (A-5)-(A-1)
100-125 (100)-(125)
01 (5A)
DVD section
Signal system:
Applicable disc:
Audio characteristics:
Frequency response:
S/N Ratio:
Harmonic distortion:
Wow and flutter:
Dynamic range:
Output:
Pickup:
ACCESSORIES:
60
NTSC
DVD (12cm, 8cm), CD (12cm, 8cm)
DVD: 4Hz - 22KHz
CD: 4Hz - 20KHz
90dB
0.01%
Below Measurable Level
90dB
Video : (RCA) 1 Vp-p/75ohm
Audio : (RCA) –8 dBm/1Kohm
Digital Audio : 0.5Vp-p/75 ohm
CD : Wavelength: 775 - 805 nm
Maximum output power: 0.5 mW
DVD : Wavelength: 640 - 660 nm
Maximum output power: 1.0 mW
Remote control x 1
75 ohm Coaxial Cable x 1
AUDIO/VIDEO Cable x 1
2A77001AE(58-BACK) 8/29/02, 11:05 AM60
Page 61

Memo
○○○○○○○○○○○○○○○○○○○○○○○○○○○○○○○○○○○○○○○○○○○○○○○○○○○○○○○
○○○○○○○○○○○○○○○○○○○○○○○○○○○○○○○○○○○○○○○○○○○○○○○○○○○○○○○
○○○○○○○○○○○○○○○○○○○○○○○○○○○○○○○○○○○○○○○○○○○○○○○○○○○○○○○
○○○○○○○○○○○○○○○○○○○○○○○○○○○○○○○○○○○○○○○○○○○○○○○○○○○○○○○
○○○○○○○○○○○○○○○○○○○○○○○○○○○○○○○○○○○○○○○○○○○○○○○○○○○○○○○
○○○○○○○○○○○○○○○○○○○○○○○○○○○○○○○○○○○○○○○○○○○○○○○○○○○○○○○
○○○○○○○○○○○○○○○○○○○○○○○○○○○○○○○○○○○○○○○○○○○○○○○○○○○○○○○
○○○○○○○○○○○○○○○○○○○○○○○○○○○○○○○○○○○○○○○○○○○○○○○○○○○○○○○
○○○○○○○○○○○○○○○○○○○○○○○○○○○○○○○○○○○○○○○○○○○○○○○○○○○○○○○
○○○○○○○○○○○○○○○○○○○○○○○○○○○○○○○○○○○○○○○○○○○○○○○○○○○○○○○
ENGLISH
○○○○○○○○○○○○○○○○○○○○○○○○○○○○○○○○○○○○○○○○○○○○○○○○○○○○○○○
○○○○○○○○○○○○○○○○○○○○○○○○○○○○○○○○○○○○○○○○○○○○○○○○○○○○○○○
○○○○○○○○○○○○○○○○○○○○○○○○○○○○○○○○○○○○○○○○○○○○○○○○○○○○○○○
○○○○○○○○○○○○○○○○○○○○○○○○○○○○○○○○○○○○○○○○○○○○○○○○○○○○○○○
○○○○○○○○○○○○○○○○○○○○○○○○○○○○○○○○○○○○○○○○○○○○○○○○○○○○○○○
○○○○○○○○○○○○○○○○○○○○○○○○○○○○○○○○○○○○○○○○○○○○○○○○○○○○○○○
○○○○○○○○○○○○○○○○○○○○○○○○○○○○○○○○○○○○○○○○○○○○○○○○○○○○○○○
○○○○○○○○○○○○○○○○○○○○○○○○○○○○○○○○○○○○○○○○○○○○○○○○○○○○○○○
○○○○○○○○○○○○○○○○○○○○○○○○○○○○○○○○○○○○○○○○○○○○○○○○○○○○○○○
○○○○○○○○○○○○○○○○○○○○○○○○○○○○○○○○○○○○○○○○○○○○○○○○○○○○○○○
○○○○○○○○○○○○○○○○○○○○○○○○○○○○○○○○○○○○○○○○○○○○○○○○○○○○○○○
○○○○○○○○○○○○○○○○○○○○○○○○○○○○○○○○○○○○○○○○○○○○○○○○○○○○○○○
○○○○○○○○○○○○○○○○○○○○○○○○○○○○○○○○○○○○○○○○○○○○○○○○○○○○○○○
○○○○○○○○○○○○○○○○○○○○○○○○○○○○○○○○○○○○○○○○○○○○○○○○○○○○○○○
○○○○○○○○○○○○○○○○○○○○○○○○○○○○○○○○○○○○○○○○○○○○○○○○○○○○○○○
2A77001AE(58-BACK) 8/29/02, 11:05 AM61
61
 Loading...