

Page 1
OWNER’S MANUAL
MANUAL DE INSTRUCCIONES
9” COLOR TELEVISION COMBINATION DVD/CD
PLAYER AC/DC
TELEVISOR EN COLORES DE 9” COMBINADO
CON REPRODUCTOR DVD/CD CA/CC
MVD2009CB
ENGLISH
ESPAÑOL
If you purchase a universal remote control from your local retailer, please contact the
remote manufacturer for the required programming code.
Si usted a comprado un control remoto universal, por favor comunicace con el fabricante
para el codico de programaccion requerido.
SELECCION DE MODO DE TV/CATV
When shipped from the factory, the TV/CATV menu option is set to the "CATV" (Cable
T elevision) mode.
If not using CATV (Cable TV), set this menu option to the "TV" mode.
Al salir la unidad de fábrica, la opción de menú de TV/CATV se ajusta al modo de
"CATV" (Televisión por cable).
Si no utiliza CATV, ajuste esta opción de menú al modo de "TV".
Before operating the unit, please read this manual thoroughly.
Antes de usar la unidad, lea detenidadmente este manual de instrucciones.
5G60701A E Cover 6/11/03, 6:08 PM1
ATTENTION
ATENCION
TV/CATV MODE SELECTION
Page 2

ENGLISH
CAUTION
RISK OF ELECTRIC SHOCK
DO NOT OPEN
CAUTION: TO REDUCE THE RISK OF ELECTRIC
SHOCK, DO NOT REMOVE COVER
(OR BACK). NO USER-SERVICEABLE
PARTS INSIDE. REFER SER VICING T O
QUALIFIED SERVICE PERSONNEL.
The lightning flash with arrowhead
symbol, within an equilateral triangle is
intended to alert the user to the
presence of uninsulated dangerous
voltage within the product's
enclosure that may be of sufficient magnitude to constitute a risk of electric shock.
The exclamation point within an
equilateral triangle is intended to alert
the user to the presence of important
operating and maintenance (servicing)
instructions in the literature accompanying the appliance.
WARNING:TO PREVENT FIRE OR SHOCK HAZARD, DO NOT EXPOSE THIS APPLIANCE TO RAIN
OR MOISTURE.
NOTE: Please keep all packaging material for at least 90 days in case you need to return this product
to your place of purchase or Memorex.
WARNING: This equipment has been tested and found to comply with the limits for a Class B digital device,
CAUTION: Changes or modifications not expressly approved by the partly responsible for compliance with
CAUTION:
THIS DIGITAL VIDEO PLAYER EMPLOYS A LASER SYSTEM.
TO ENSURE PROPER USE OF THIS PRODUCT, PLEASE
READ THIS OWNER'S MANUAL CAREFULLY AND RETAIN
FOR FUTURE REFERENCE. SHOULD THE UNIT REQUIRE
MAINTENANCE, CONTACT AN AUTHORIZED SERVICE LOCATION-SEE SERVICE PROCEDURE.
pursuant to Part 15 of the FCC Rules. These limits are designed to provide reasonable protection against harmful interference in a residential installation. This equipment generates, uses and
can radiate radio frequency energy and, if not installed and used in accordance with the instructions, may cause harmful interference to radio communications.
However, there is no guarantee that interference will not occur in a particular installation. If this
equipment does cause harmful interference to radio or television reception, which can be
determined by turning the equipment off and on, the user is encouraged to try to correct the
interference by one or more of the following measures:
- Reorient or relocate the receiving antenna.
- Increase the separation between the equipment and receiver.
- Connect the equipment into an outlet on a circuit different from that to which the receiver is
connected.
- Consult the dealer or an experienced radio/TV technician for help.
the FCC Rules could void the user's authority to operate this equipment.
Location of the required Marking
The rating sheet and the safety caution
are on the rear of the unit.
USE OF CONTROLS, ADJUSTMENTS OR THE PERFORMANCE OF PROCEDURES OTHER THAN THOSE SPECIFIED
HEREIN MAY RESULT IN HAZARDOUS RADIATION EXPOSURE.
TO PREVENT DIRECT EXPOSURE TO LASER BEAM, DO NOT
TRY TO OPEN THE ENCLOSURE. VISIBLE LASER RADIATION MAY BE PRESENT WHEN THE ENCLOSURE IS OPENED.
DO NOT STARE INT O BEAM.
2
5G60701A E P02-05 6/11/03, 6:08 PM2
CERTIFICATION: COMPLIES WITH
FDA RADIATION PERFORMANCE
STANDARDS, 21 CFR SUBCHAPTER J.
Page 3

IMPORT ANT SAFEGUARDS
1. READ INSTRUCTIONS
All the safety and operating instructions should be read before the unit is operated.
2. RETAIN INSTRUCTIONS
The safety and operating instructions should be retained for future reference.
3. HEED WARNINGS
All warnings on the unit and in the operating instructions should be adhered to.
4. FOLLOW INSTRUCTIONS
All operating and use instructions should be followed.
5. CLEANING
Unplug this unit from the wall outlet before cleaning. Do not use liquid cleaners or aerosol cleaners.
Use a damp cloth for cleaning the exterior cabinet only.
6. ATTACHMENTS
The manufacturer of this unit does not make any recommendations for attachments, as they may cause
hazards.
7. WATER AND MOISTURE
Do not use this unit near water. For example, near a bathtub, washbowl, kitchen sink, laundry tub, in a wet
basement, or near a swimming pool.
8. ACCESSORIES
Do not place this unit on an unstable cart, stand, tripod, bracket, or table.
The unit may fall, causing serious injury, and serious damage to the unit.
8A. An appliance and cart combination should be moved with care. Quick stops,
excessive force, and uneven surfaces may cause the appliance and cart
combination to overturn.
9. VENTILATION
Slots and openings in the cabinet back or bottom are provided for ventilation,
and to ensure reliable operation of the unit, and to protect it from overheating.
These openings must not be blocked or covered. The openings should never be blocked by placing the unit
on a bed, sofa, rug, or other similar surface. This unit should never be placed near or over a radiator or heat
source. This unit should not be placed in a built-in installations such as a bookcase or rack unless proper
ventilation is provided or the manufacturer’s instructions have been adhered to.
10. POWER SOURCES
This unit should be operated only from the type of power source indicated on the rating plate. If you are not
sure of the type of power supply to your home, consult your appliance dealer or local power company. For
units intended to operate from battery power, or other sources, refer to the operating instructions.
11. GROUNDING OR POLARIZATION
This unit is equipped with a polarized alternating-current line plug (a plug having one blade wider than the
other). This plug will fit into the power outlet only one way . This is a safety feature. If you are unable to insert
the plug fully into the outlet, try reversing the plug. If the plug should still fail to fit, contact your electrician to
replace your obsolete outlet. Do not defeat the safety purpose of the polarized plug, if your unit is equipped
with a 3-wire grounding-type plug, a plug having a third (grounding) pin. This plug will only fit into a grounding-type power outlet. This too, is a safety feature. If you are unable to insert the plug into the outlet, contact
your electrician to replace your obsolete outlet.
Do not defeat the safety purpose of the grounding-type plug.
PORTABLE CART W ARNING
(symbol provided by RETAC)
S3126A
ENGLISH
5G60701A E P02-05 6/11/03, 6:08 PM3
3
Page 4

IMPORTANT SAFEGUARDS (Continued)
12. POWER-CORD PROTECTION
Power-supply cords should be routed so that they are not likely to be walked on or pinched by items placed
upon or against them, paying particular attention to cords at plugs, convenience receptacles, and the point
where they exit from the appliance.
13. LIGHTNING
To protect your unit from a lightning storm, or when it is left unattended and unused for long periods of time,
unplug it from the wall outlet and disconnect the antenna or cable system. This will prevent damage to the
unit due to lightning and power line surges.
14. POWER LINES
An outside antenna system should not be located in the vicinity of overhead power lines or other electric
light or power circuits, or where it can fall into such power lines or circuits. When installing an outside
antenna system, extreme care should be taken to keep from touching such power lines or circuits, as
contact with them might be fatal.
15. OVERLOADING
Do not overload wall outlets and extension cords, as this can result in a risk of fire or electric shock.
16. OBJECT AND LIQUID ENTRY
Do not push objects through any openings in this unit, as they may touch dangerous voltage points or short
out parts that could result in fire or electric shock. Never spill or spray any type of liquid into the unit.
17. OUTDOOR ANTENNA GROUNDING
If an outside antenna or cable system is connected to the unit, be sure the antenna or cable system is
grounded to provide some protection against voltage surges and built-up static charges, Section 810 of the
National Electrical Code, ANSI/NFPA 70, provides information with respect to proper grounding of the mast
and supporting structure, grounding of the lead-in wire to an antenna discharge unit, size of grounding
conductors, location of antenna discharge unit, connection to grounding electrodes, and requirements for
the grounding electrode.
18. SERVICING
Do not attempt to service this unit yourself as opening or removing covers may expose you to dangerous
voltage or other hazards. Refer all servicing to qualified service personnel.
19. DAMAGE REQUIRING SERVICE
Unplug this unit from the wall outlet and refer servicing to qualified service personnel under the following
conditions:
a. When the power-supply cord or plug is damaged.
b. If liquid has been spilled, or objects have fallen into the unit.
c
. If the unit has been exposed to rain or water.
d. If the unit does not operate normally by following the operating instructions. Adjust only those
controls that are covered by the operating instructions, as an improper adjustment of other controls
may result in damage and will often require extensive work by a qualified technician to restore the
unit to its normal operation.
e. If the unit has been dropped or the cabinet has been damaged.
f
20. REPLACEMENT PARTS
21. SAFETY CHECK
22. HEAT
23. DISC TRAY
24. CONNECTING
25. SOUND VOLUME
. When the unit exhibits a distinct change in performance, this indicates a need for service.
When replacement parts are required, be sure the service technician uses replacement parts specified by
the manufacturer or those that have the same characteristics as the original part.
Unauthorized substitutions may result in fire, electric shock or other hazards.
Upon completion of any service or repairs to this unit, ask the service technician to perform safety checks to
determine that the unit is in proper operating condition.
The product should be situated away from heat sources such as radiators, heat registers, stoves, or other
products (including amplifiers) that produce heat.
Keep your fingers clear of the disc tray as it is closing. It may cause serious personal injury.
When you connect the product to other equipment, turn off the power and unplug all of the equipment from
the wall outlet. Failure to do so may cause an electric shock and serious personal injury. Read the owner's
manual of the other equipment carefully and follow the instructions when making any connections.
Reduce the volume to the minimum level before you turn on the product. Otherwise, sudden high volume
sound may cause hearing or speaker damage.
4
5G60701A E P02-05 6/11/03, 6:08 PM4
Page 5

26. SOUND DISTORTION
Do not allow the product to output distorted sound for an extended period of time. It may cause speaker
overheating and fire.
27. HEADPHONES
When you use the headphones, keep the volume at a moderate level. If you use the headphones continuously with high volume sound, it may cause hearing damage.
28. LASER BEAM
Do not look into the opening of the disc tray or ventilation opening of the product to see the source of the
laser beam. It may cause eye damage.
29. DISC
Do not use a cracked, deformed, or repaired disc. These discs are easily broken and may cause serious
personal injury and product malfunction.
30. NOTE TO CATV SYSTEM INST ALLER
This reminder is provided to call the CATV system installer’s attention to Article 820-40 of the NEC that
provides guidelines for proper grounding and, in particular, specifies that the cable ground shall be connected to the grounding system of the building, as close to the point of cable entry as practical.
ENGLISH
EXAMPLE OF ANTENNA GROUNDING AS PER THE
ELECTRIC SERVICE
EQUIPMENT
NEC-NATIONAL ELECTRICAL CODE
S2898A
CONDENSATION
Moisture will form in the operating section of the player if the player is brought from cool surroundings
into a warm room or if the temperature of the room rises suddenly. When this happens, player's
performance will be impaired.
To prevent this, let the player stand in its new surroundings for about an hour before switching it on, or
make sure that the room temperature rises gradually.
Condensation may also form during the summer if the player is exposed to the breeze from an air
conditioner. In such cases, change the location of the player.
NATIONAL ELECTRICAL CODE
ANTENNA LEAD
IN WIRE
GROUND
CLAMP
ANTENNA
DISCHARGE UNIT
(NEC SECTION 810-20)
GROUNDING CONDUCTORS
(NEC SECTION 810-21)
GROUND CLAMPS
POWER SERVICE GROUNDING
ELECTRODE SYSTEM
(NEC ART 250, PART H)
5G60701A E P02-05 6/11/03, 6:08 PM5
5
Page 6

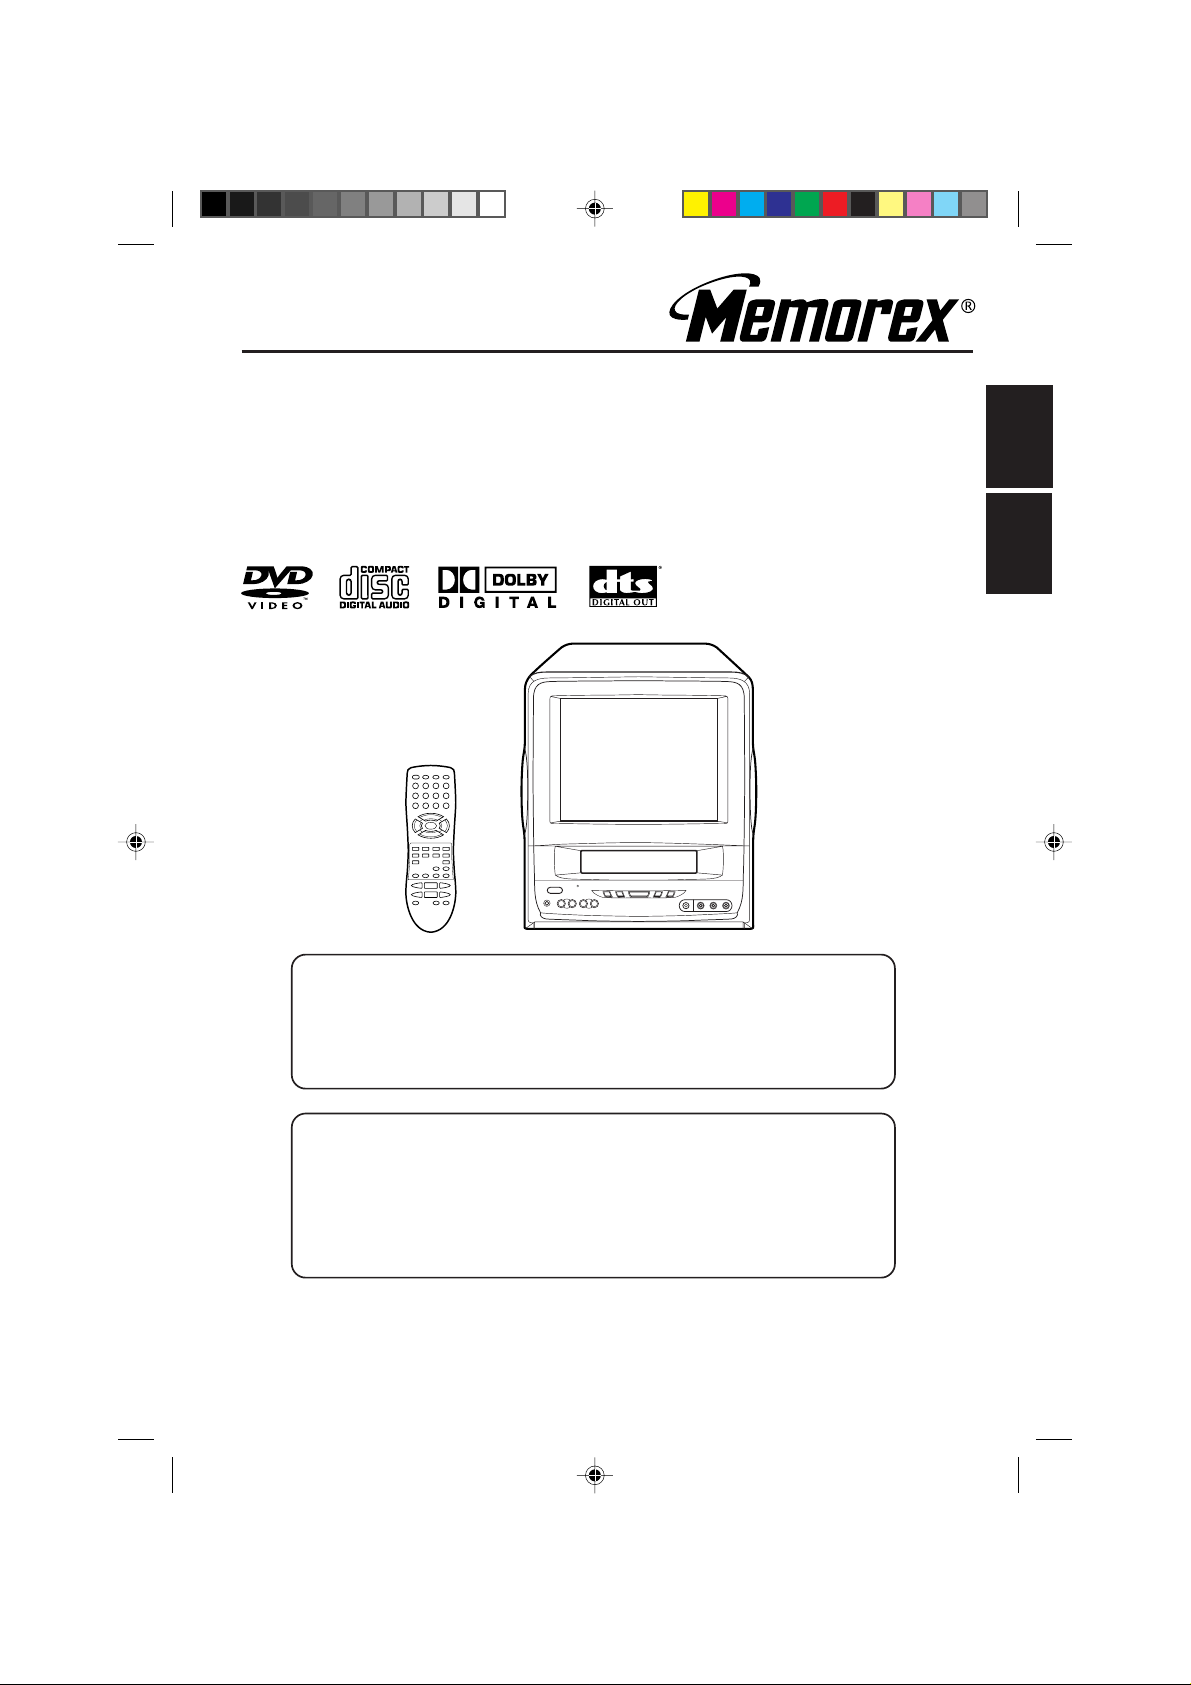
Features
Color TV With DVD/CD player
Unique space saving design combines a 9" color TV and a DVD/CD player.
The DVD disc has much more capacity, but is the same size as the audio CD disc. Picture/Audio quality of the DVD
exceeds other software. Picture quality is higher than Super VHS. Audio quality is higher than audio CD. The DVD
also has special options; audio language selection, subtitle language selection or multi-angle, etc.
The DVD PLAYER can play back audio CDs.
High Quality Picture
Horizontal Resolution
More than 500 lines. It exceeds Super VHS (400 lines) or Laser Disc (430 lines) in resolution.
Compatible with a wide range of DVD audio outputs
Digital Audio Jack (Coaxial)
• When a component with a built-in Dolby Digital decoder is connected, Dolby Digital sound can produce the effect
of being in a movie theatre or a concert hall.
• Surround standard different from Dolby Digital. This format is already in use in many theatres. By connecting this
unit to a DTS decoder or an A V amplifier with a built-in DTS decoder , the DTS audio of DVD discs recorded in this
format can be enjoyed. However, audio will not be output from the analog audio output jacks.
• By connecting this unit to an AV amplifier with a built-in MPEG decoder, the MPEG audio of DVD discs recorded
in this format can be enjoyed.
• The Linear PCM sound of a 48 kHz/24 bit through 96 kHz/24 bit exceeds audio CD sound.
Convenience Features
Direct selection of your desired scenes using Title/Chapter/Time/Track - You can play back from the desired
scene.
Recalling Up to 3 Scenes (DVD only) - You can program up to 3 scenes in memory and recall the marked scenes.
Frame Advance - The PAUSE/STILL moves one frame at a time.
Slow Motion - The SLOW moves you back and forth through the program by 4 steps of 1/8-1/2 times.
Repeat Playback - You can repeat chapter, track, title, sides or material between two selected points.
Program Playback - You can play back tracks in programmed sequences.
Zoom (DVD only) - You can zoom in the selected subject on the screen during playback.
Note: Make sure that discs are suitable for the following functions.
Multi-Language - Maximum 32 language subtitles and maximum 8 language soundtracks can be played back for
movies or programes.
Multi-Angle - Pictures of Sports or a Live Concert are recorded with many cameras. When you play such a disc,
you can change the angles during playback.
Parental Control - You can limit the play back of scenes or sounds of adult DVD discs which have parental level.
Video Aspect Ratio - You can change the aspect ratio of the screen for your monitor.
TV Features
120V AC or DC Operation - This TV/DVD is designed to operate from household AC current or from a 12V DC
car cigarette lighter socket.
181 Channel Tuner - Receives standard VHF and UHF broadcast channels and up to 113 cable channels. The
actual number of channels received depends upon channel reception in your area or your cable system.
Closed Caption Decoder With Full Text Mode - Displays text captions or full screen text on the screen for
hearing impaired viewers.
Picture Adjustments Using The Remote Control - The On-Screen display allows precise remote control adjustment of BRIGHTNESS, CONTRAST , COLOR, TINT and SHARPNESS.
Programmable TV Sleep Timer - Operable from the remote control, the TV can be programmed up to 120
minutes to turn off automatically.
On-Screen 3 Language Display - You can select one of 3 languages, English, Spanish or French for on-screen
programming.
V-Chip - The V-Chip function can read the rating of a TV program or movie content if the program is encoded
with this information. V-chip will allow you to set a restriction level.
This product incorporates copyright protection technology that is protected by method claims of certain U.S.
patents and other intellectual property rights owned by Macrovision Corporation and other rights owners. Use
of this copyright protection technology must be authorized by Macrovision Corporation and is intended for
home and other limited viewing uses only unless otherwise authorized by Macrovision Corporation. Reverse
engineering or disassembly is prohibited.
6
5G60701A E P06-11 6/11/03, 6:08 PM6
Page 7

Contents
Before using your unit
IMPORTANT SAFEGUARDS .............................................. 3
Features ............................................................................... 6
Contents............................................................................... 7
Safety precautions ............................................................... 8
Parts and functions .............................................................. 9
Remote control................................................................... 10
Power sources ................................................................... 11
Antenna connections.......................................................... 12
Cable TV connections ........................................................ 13
TV operation
Setting the on screen display language ............................. 14
TV operation....................................................................... 15
Closed caption ................................................................... 17
To memorize channels ....................................................... 18
Setting the V-Chip .............................................................. 20
Picture control adjustment.................................................. 23
Stereo and second audio program (SAP) .......................... 24
Playback operation
Disc .................................................................................... 25
Preparation/Status display of disc...................................... 26
Playback procedure ........................................................... 27
Special playback ................................................................ 28
Advanced Function
Zooming/Locating desired scene ....................................... 29
Repeat/Random/Program playback and Repeat A-B......... 30
Marking desired scenes ..................................................... 31
Changing soundtrack language/Subtitles .......................... 32
Changing angles/Title selection/DVD menu....................... 33
Additional Information
Setting language ................................................................ 34
Setting the aspect ratio of TV screen/
Setting on screen display ................................................... 35
Dynamic Range Control .....................................................36
Parental control setting ..................................................... 37
To change the parental level .............................................. 38
Temporary disabling of rating level by DVD disc................ 39
Language code list ............................................................. 40
Reception disturbances...................................................... 41
Connections to other equipment ........................................ 42
Problems and troubleshooting .............................................
Specifications ..................................................................... 46
ENGLISH
44
5G60701A E P06-11 6/11/03, 6:08 PM7
7
Page 8

Safety precautions
WARNING!
INSTALL THE TV/DVD IN YOUR CAR
• For a car equipped with air bags, be sure to follow the manufacturer’s instructions whenever performing any
electrical wiring work. Incorrect wiring can cause the air bag system of a car to malfunction.
• Never cut the insulation from the power supply lead in an attempt to draw power for another device.
Doing so can overload the current capacity of the lead, creating the danger of fire and electric shock.
• For proper installation and wiring special technical knowledge is required. If you have any doubts about
where to position or how to install components, contact the retailer where you purchased the product, your
automobile dealership, or an automotive service provider. Note that you will be charged separately for
installation work.
• Use all of the components that come with this product only as directed. Improper use of components can
damage interior components or result in improper anchoring of components, which creates the danger of
accident and personal injury.
• Improper installation creates the danger of fire and accident.
• Take care so wires are not pinched between chassis parts, by screws or by the seat as it slides on its rails,
etc. Such conditions can cut wires and cause shorts, creating the danger of accident, electric shock, and fire.
• Avoid installation in areas subject to strong vibration and areas where secure anchoring cannot be achieved.
Components installed in such areas can work loose, creating the danger of accident and personal injury.
• Never install the TV/DVD on the dashboard or in any other location where it obstructs forward vision.
• Never attach the stand to the roof of your car. Doing so creates the danger of the TV/DVD falling down.
• Never attach the stand to a sharply angled surface or to a surface that causes the TV/DVD to face downwards.
Such installation can cause the TV/DVD to fall.
• Be sure to turn the ignition key of the car to the “OFF” position before connecting or disconnecting wires and
cables. Failure to do so creates the danger of electric shock and personal injury.
DRIVING SAFETY
• Never watch the TV/DVD or try to adjust settings while driving. Doing so creates the danger of traffic accident.
Before operating the TV/DVD, be sure to stop the car in a safe area.
• Never install the unit on the dashboard or in any other location where it obstructs forward vision. Items that
obstruct forward vision in a motor car may be illegal.
Also, make sure that all components are installed where they do not interfere with operation of the steering
wheel, shift lever, brake pedal, etc., for example under the driver’s seat, and where they do not endanger
passengers. Improper installation creates the danger of traffic accident and personal injury.
• Make sure all cables are bundled together so they do not interfere with car operation, as described in this
manual. Improperly installed cables create the danger of entanglement with the steering wheel, shift lever,
brake pedal, etc.
IMPORTANT NOTES:
• The unit is designed for use with a 12V DC automotive power supply. Never use it in a truck, bus, or any
other car that has a 24V power supply.
• Be sure to stop your car in a safe area before watching or adjusting the TV/DVD.
• Operating the TV/DVD for a long time with the engine of your car stopped can run down your car’s battery.
• Never leave the TV/DVD in areas exposed to temperature extremes or strong direct sunlight. Leaving it in a
closed car, in direct sunlight, near a heater, etc. can cause deformation of the case. Using this product in
areas that are colder than 5°C (41°F) or hotter than 40°C (104°F) can result in poor image quality.
• Never use benzene or other chemical agents for cleaning.
Chemicals can damage the case and remove markings. Use a soft cloth moistened with a weak solution of
water and mild neutral detergent. Wring out all excess moisture from the cloth before wiping.
• Never drop the TV/DVD or otherwise subject it to strong impact.
• Should the TV/DVD ever begin to emit smoke, abnormal odor, or a strange noise, immediately turn off power
and unplug the unit from the cigarette lighter socket. Continued use of the TV/DVD under any of these
conditions creates the danger of fire and electric shock.
• Do not continue to use the TV/DVD if it is malfunctioning and does not produce a video image or sound.
Whenever you notice such symptoms, immediately turn off power, unplug the TV/DVD from the cigarette
lighter socket. Continued use of the TV/DVD creates the danger of fire and electric shock.
• When you leave your car unattended for long periods, be sure to unplug the TV/DVD from the cigarette
lighter socket. Leaving the TV/DVD plugged in can run down the car’s battery.
8
5G60701A E P06-11 6/11/03, 6:08 PM8
Page 9
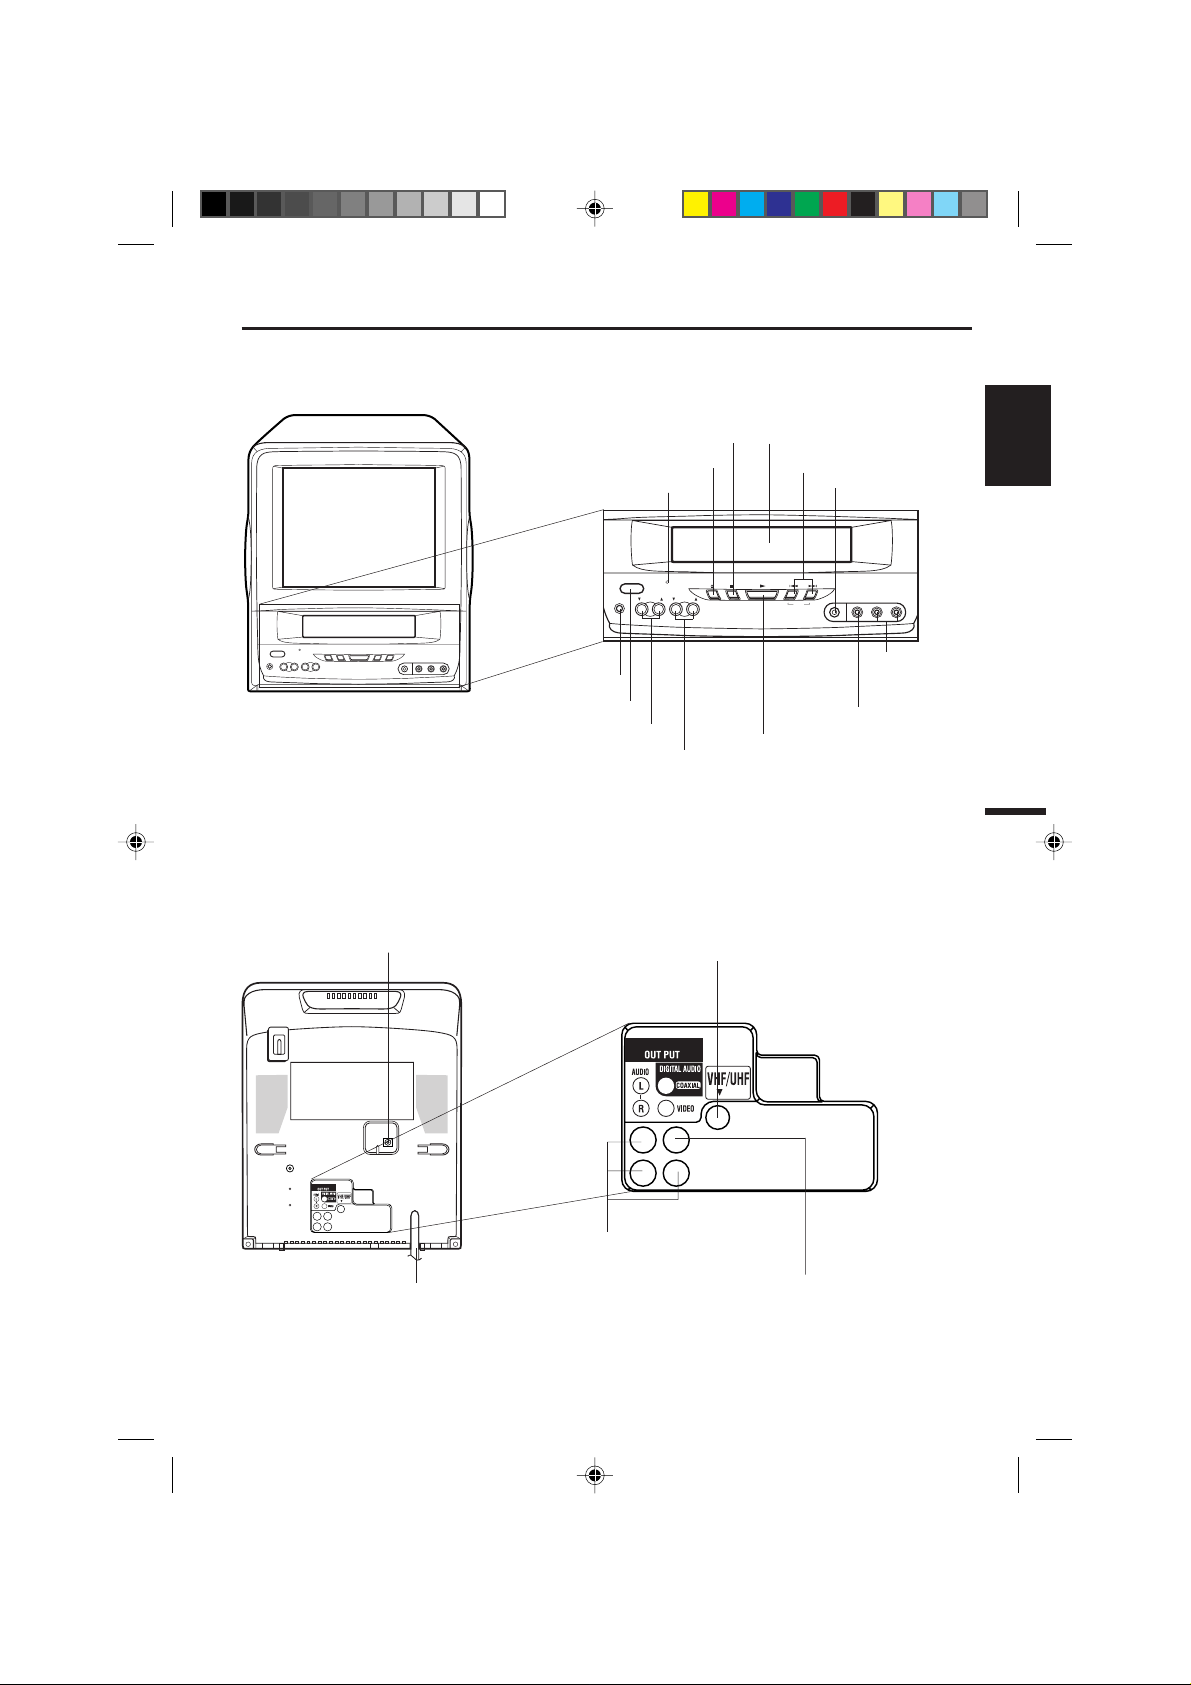
Front
Parts and functions
Rear
DC input jack
STOP button
OPEN/CLOSE button
Power indicator
POWER
POWER
Remote sensor
POWER button
VOLUME UP/DOWN buttons
CHANNEL UP/DOWN buttons
CHANNELVOLUME
OPEN/CLOSE STOP
RF IN jack
Disc tray
SKIP buttons
PLAY
SKIP
PLAY button
Headphones jack
(MONO)
VIDEO IN L — AUDIO IN — R
PHONES
AUDIO IN
(L/R) jacks
VIDEO IN jack
ENGLISH
AC power cord
5G60701A E P06-11 6/11/03, 6:08 PM9
AUDIO (L/R)/ VIDEO OUT jacks
COAXIAL DIGITAL AUDIO OUT jack
9
Page 10

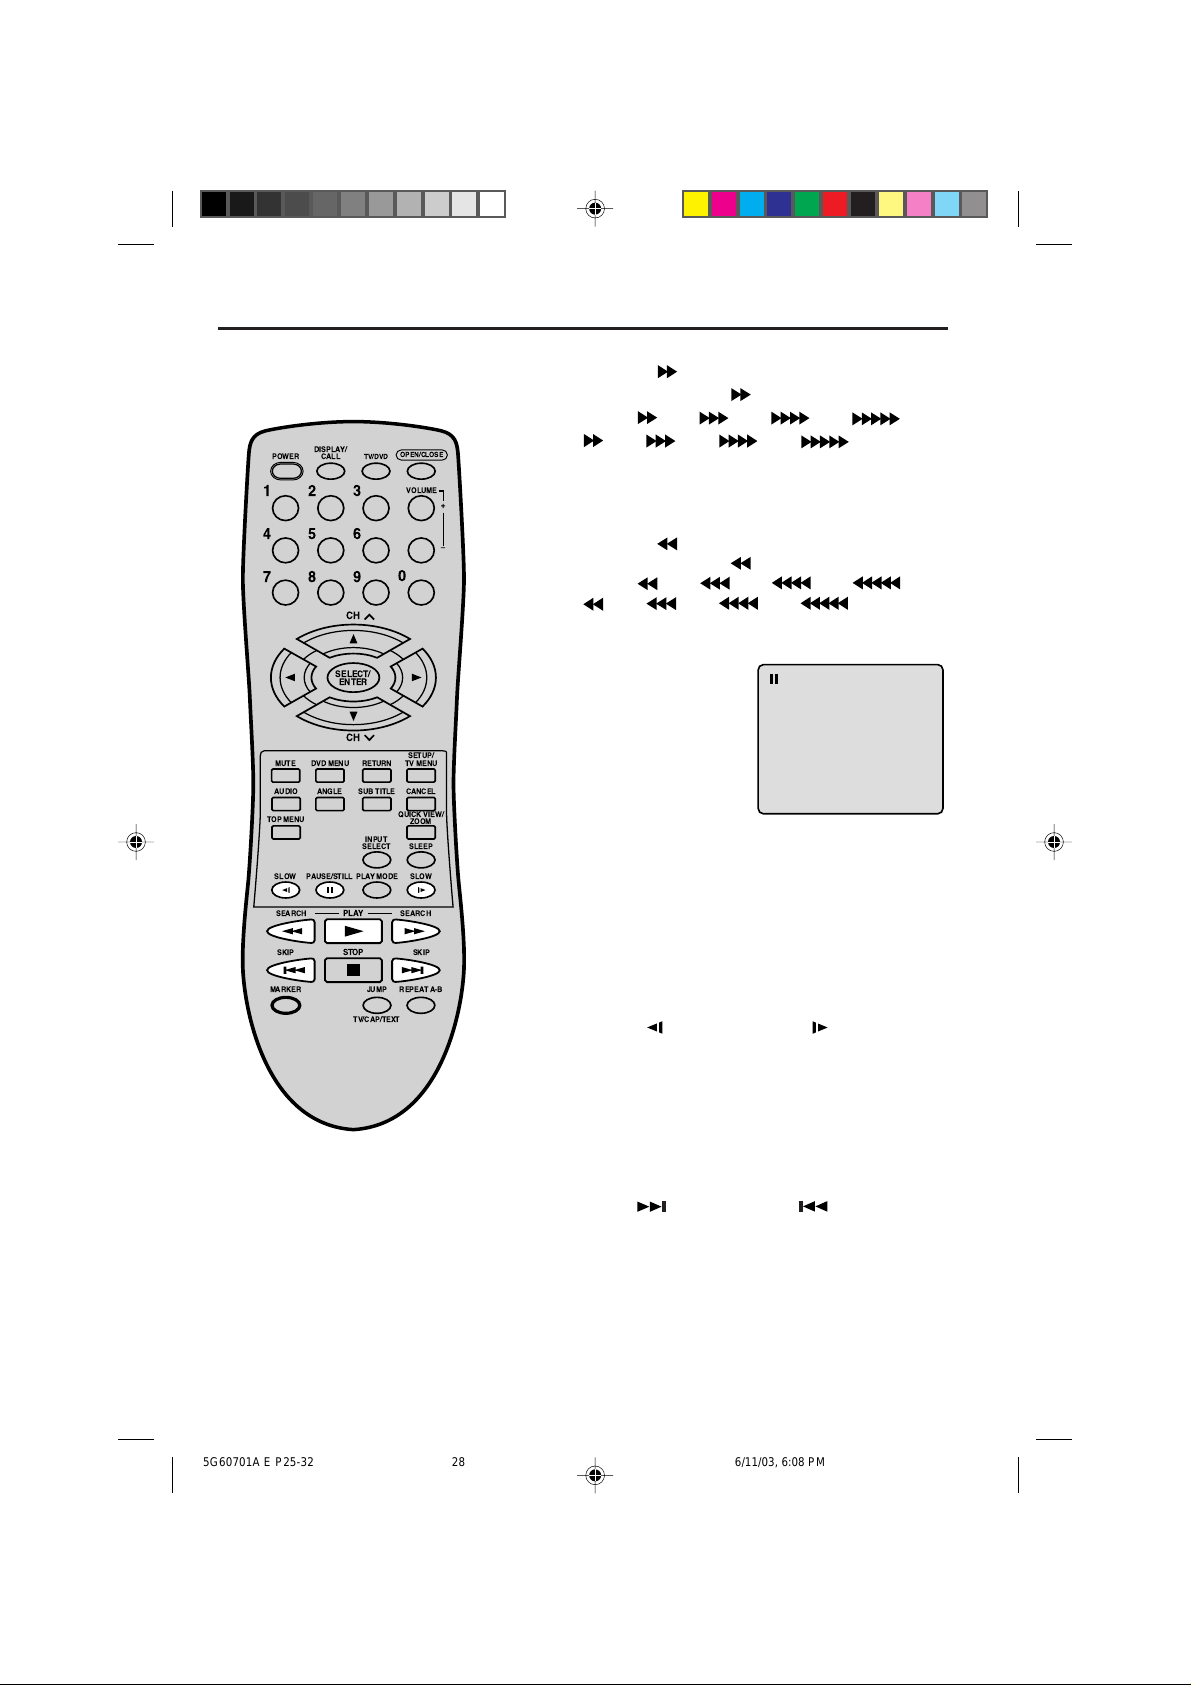
Remote control
DISPLAY/
CALL TV/DVDPOWER
123
456
7890
SELECT/
ENTER
MUTE
DVD MENU
ANGLE
AUDIO
TOP MENU
SLOW SLOW
SEARCH SEARCH
SKIP
MARKER JUMP
CH
CH
RETURN
SUB TITLE
INPUT
SELECT
PLAY MODEPAUSE/STILL
PLAY
STOP
TV/CAP/TEXT
OPEN/CLOSE
SETUP/
TV MENU
CANCEL
QUICK VIEW/
ZOOM
SLEEP
SKIP
REPEAT A-B
Page
POWER Power On/Off 14,15,26
DISPLAY/CALL Call TV information 16
TV/DVD Switch between TV/A V and DVD 26
OPEN/CLOSE Open or Close the tray 27,39
0-9 Direct channel selection of TV 15,19
VOLUME +/– Adjust volume of TV 15
/ Select channel of TV 16
CH
SELECT/ENTER Enter information in the menu 14,18~22
MUTE Switch off the sound 16
DVD MENU Display DVD menu 33
RETURN Remove DVD set up menu 34~39
SETUP/TV MENU
AUDIO Switch the sound of TV 24
ANGLE Change playback angle 33
SUB TITLE Set subtitle 32
CANCEL
TOP MENU Select title 33
QUICK VIEW/ZOOM Switch between present/last channel 16
INPUT SELECT Switch between TV/AV 43
SLEEP Sleep timer 16
SLOW Forward/Reverse- slow motion 28
PAUSE/STILL Pause CD sound 28
PLAY MODE Select playback mode 30
SEARCH Fast Forward/Review playback 28
PLAY Playback 27,28,30,33,39
SKIP Skip chapter to forward or reverse 28
STOP Stop 27
MARKER Index 31
JUMP Locating desired scene 29
TV/CAP/TEXT Switch between TV/Caption/Text in 17
REPEAT A-B Repeat playback between A and B 30
Call DVD information 26
Input setting 29,30
Enter a password 20,22,37~39
Cursor buttons 14,18~23
27,29,31,33~38
27,29~31,33~39
TV mode - Display menu of TV
DVD mode - Call up initial setup mode
14,18~23,25
34~38
Change sound track language 32
Reset information in the menu 20,22,23,29~31,37,38
Zoom 29
Still picture of DVD
direction
Closed Caption mode
10
5G60701A E P06-11 6/11/03, 6:08 PM10
Page 11
Remote control
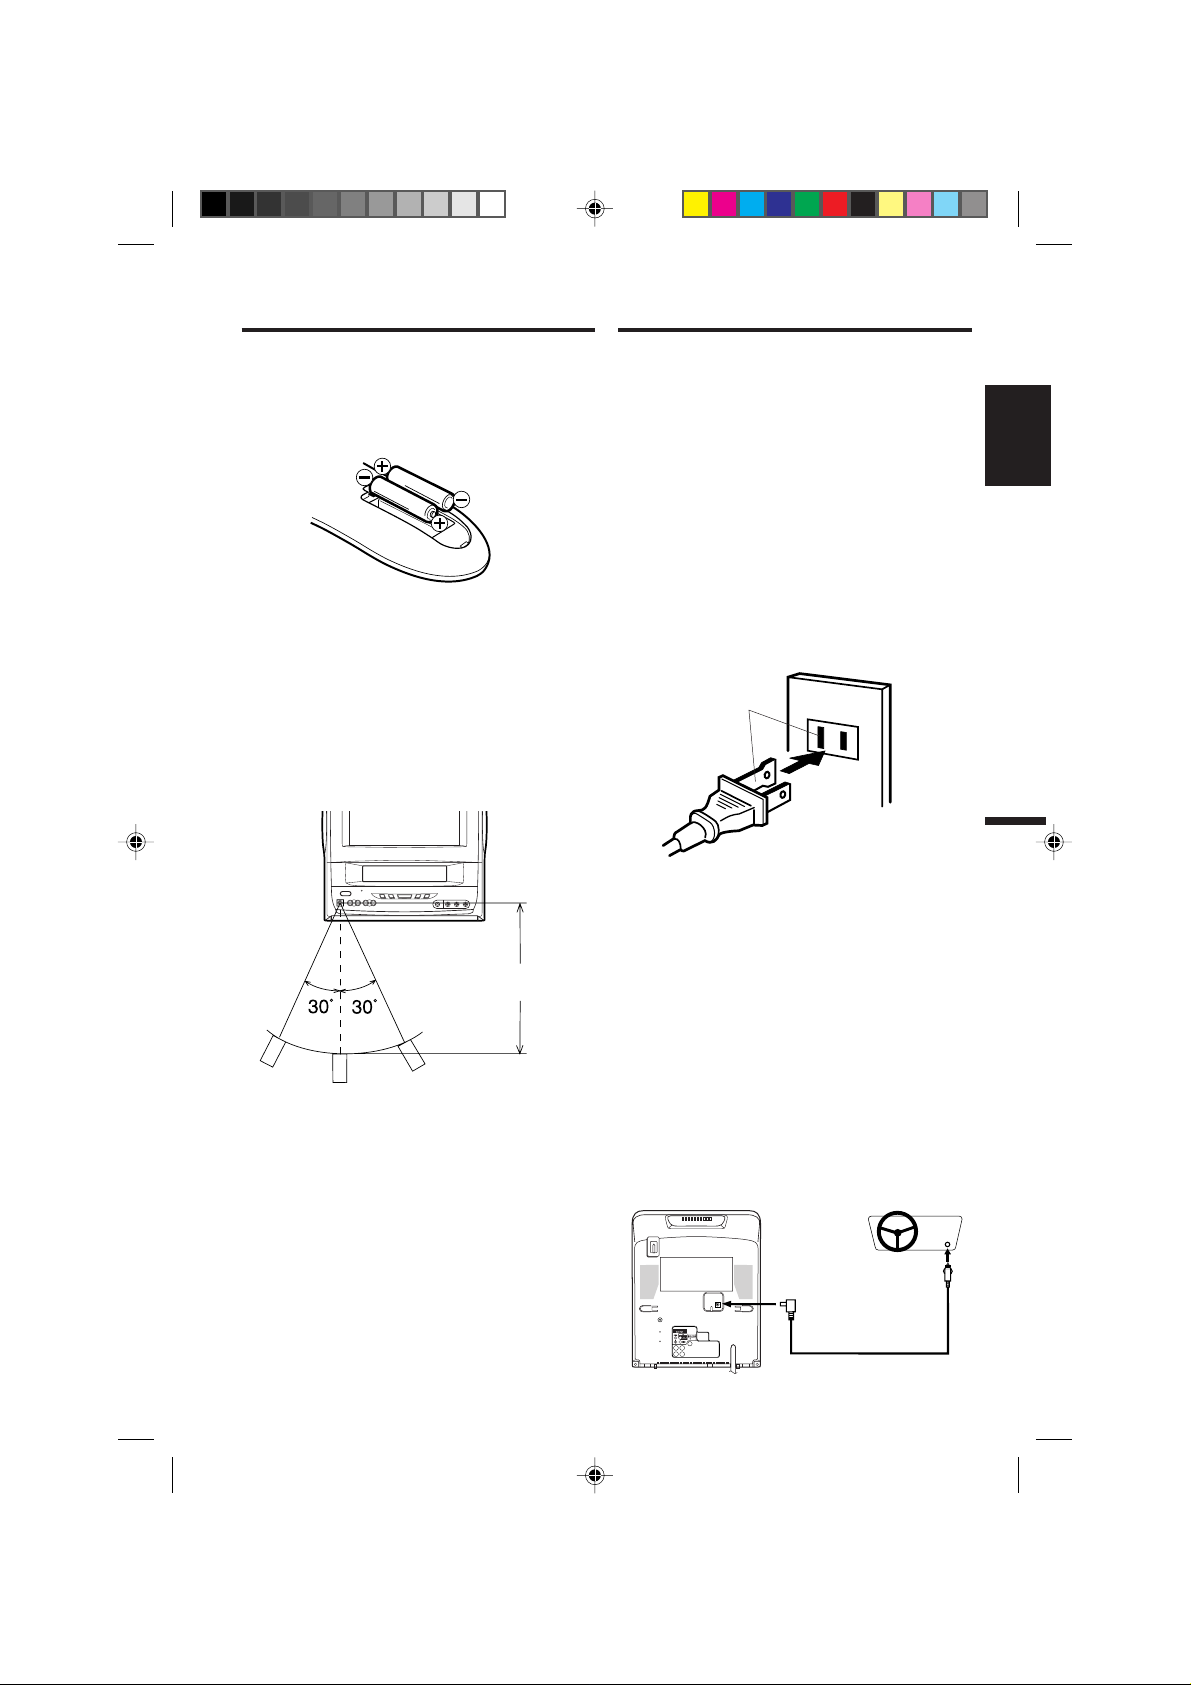
Inserting Batteries
Open the battery compartment cover in the direction of
the arrow.
Install two "AAA" batteries (not supplied), paying
attention to the polarity diagram in the battery compartment.
Replace the compartment cover.
Operation
• Aim the remote control at the remote sensor and
press control buttons to operate.
• Operate the remote control within 30° angle on
either side of the remote sensor, up to a distance of Approx. 5 meters.
Power sources
TO USE AC POWER
Use the AC polarized line cord provided for operation
on AC. Insert the AC cord plug into a standard 120V
60Hz polarized AC outlet.
NOTES:
• Never connect the AC line cord plug to anything other
than the specified voltage (120V 60Hz). Use the
attached power cord only.
• If the polarized AC cord does not fit into a
nonpolarized AC outlet, do not attempt to file or cut
the blade. It is the user's responsibility to have an
electrician replace the obsolete outlet.
• If you cause a static discharge when touching the
unit, and the unit fails to function, simply unplug the
unit from the AC outlet, wait a few minutes, and
plug it back in. The unit should return to
normal operation.
AC Outlet
Wider Hole
and Blade
Polarized AC Cord Plug
(One blade is wider than the other)
ENGLISH
Approx. 5 meters
NOTES:
•
Do not leave the remote control unit exposed to direct
sunlight or in hot or humid places.
•
The remote control unit uses infrared beams to
transmit signals, so sunlight or fluorescent light on the
remote sensor may shorten operating distance.
•
Incorrect use of batteries may cause them to leak or
burst. Read the battery warnings and use the batteries properly.
•
Do not mix old and new batteries.
•
Remove batteries if the remote control will not be
operated for an extended period of time.
5G60701A E P06-11 6/11/03, 6:08 PM11
TO USE DC POWER
By using the DC car cord supplied with the TV/DVD,
you can operate this TV/DVD from a cigarette lighter
socket in any car that utilizes a negative ground
system.
The fused 12V DC car cord has been designed to
power the set from the external DC power (12 volt
negative ground) through the TV/DVD DC input jack.
Connect the smaller plug on the end of the cord to the
DC input jack on the rear of the TV/DVD, then insert
the other end of the car cord into the cigarette lighter
socket of your car. Make sure that the cord makes a
firm connection. It may be necessary to try several
insertions, rotating the plug for proper electrical
connection.
TV/DVD
To DC Input Jack
Car Cord (supplied)
CAR
To Cigarette
Lighter Socket
11
Page 12
Power sources
Antenna connections
NOTES: • ALWAYS TURN THE TV/DVD TO “OFF”
BEFORE SWITCHING THE IGNITION OF
THE CAR ENGINE.
• Make sure that the negative terminal of the
battery is grounded.
This set is designed for use with negative
grounding systems only.
• Use the supplied car cord only.
When the TV/DVD is not in use, always discon-
•
nect it from the car cigarette lighter socket to
avoid a battery drain.
• If the TV/DVD is to be directly connected to a
12V DC power source, for example, recreational vehicle (RV) applications, make sure
the power cord is connected after the ignition
switch to avoid battery drain.
Do not operate the TV/DVD if the car battery is
•
weak. Peak current from the car alternator could
blow the DC fuse.
• Check the battery’s charge level regularly
when the TV/DVD is used in a vehicle.
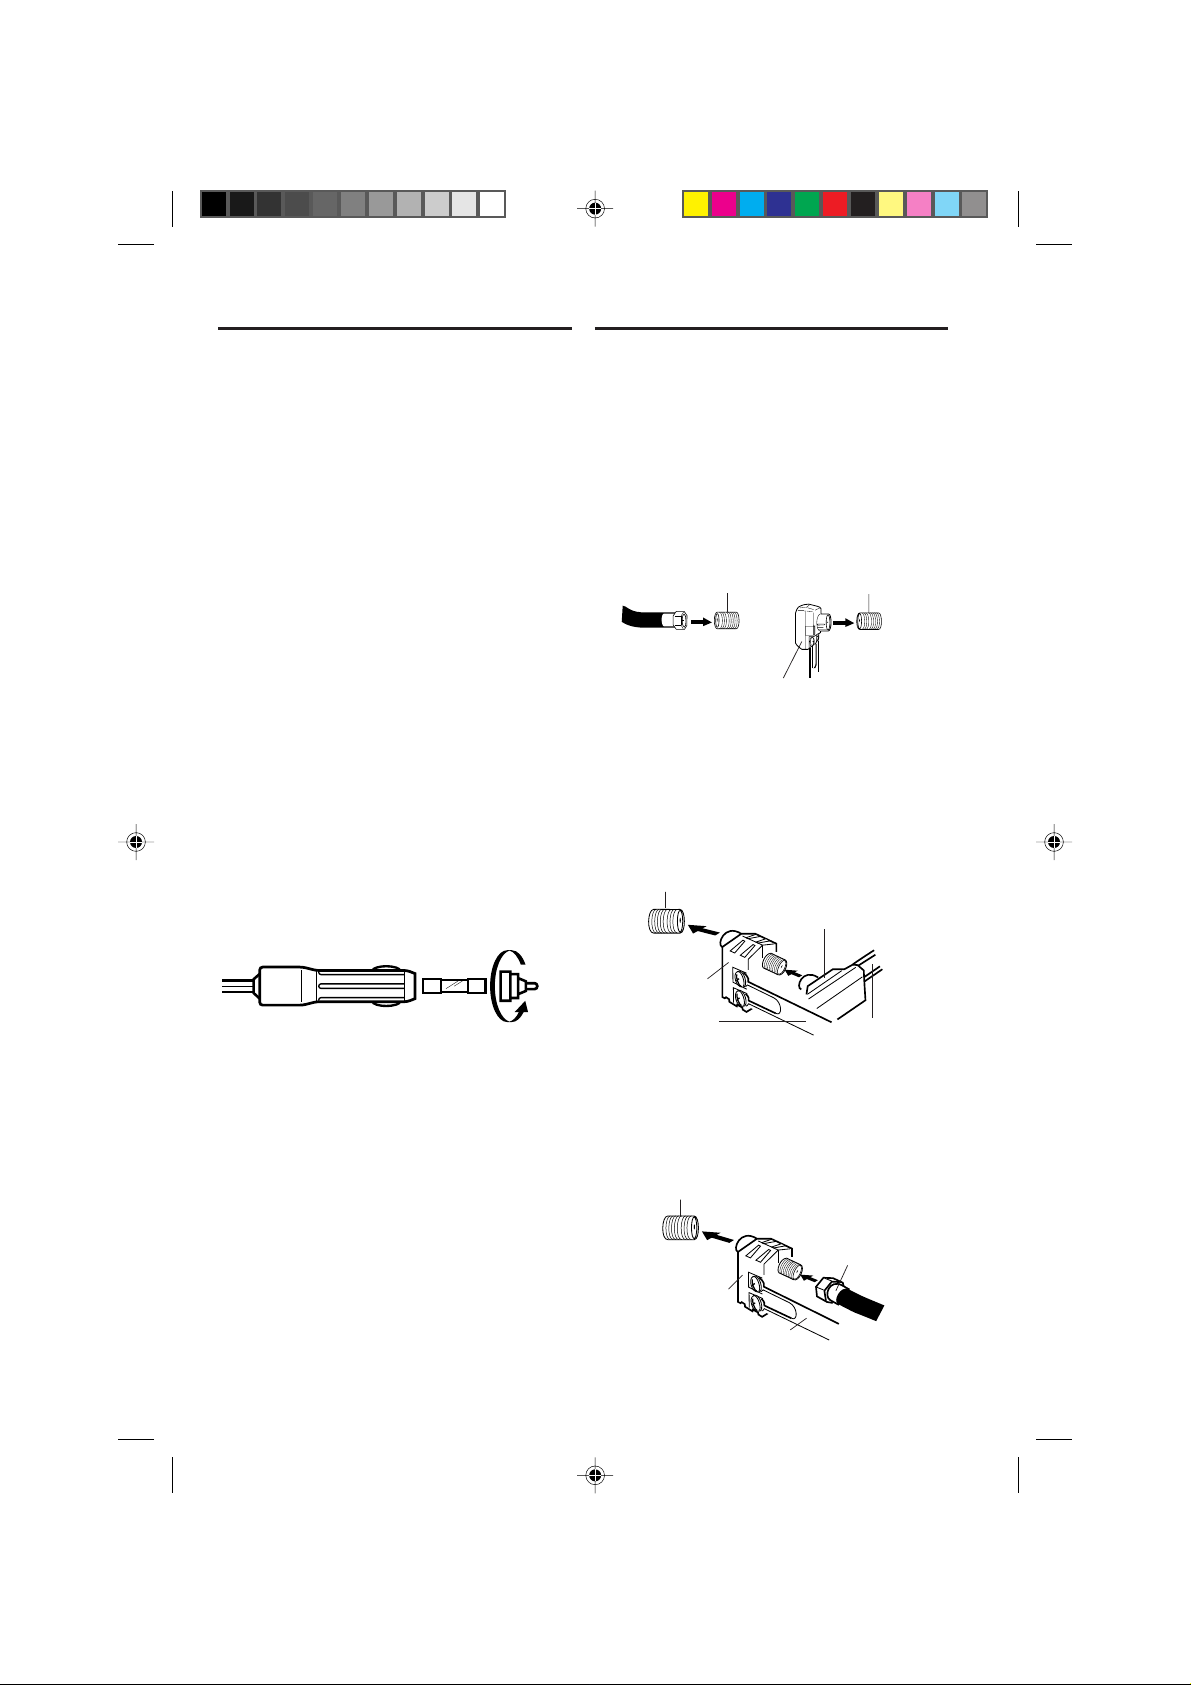
REPLACING THE FUSE IN THE CAR
BATTERY CORD PLUG
If the fuse in the car battery cord plug blows, replace
it with a new 8 A fuse (Fast Blow Type) as shown
below. Unscrew the tip of the plug to remove.
If you are using an indoor or outdoor antenna, follow the instructions below that correspond to your
antenna system. If you are using a cable TV service
(CATV), see page 13 for Cable TV connections.
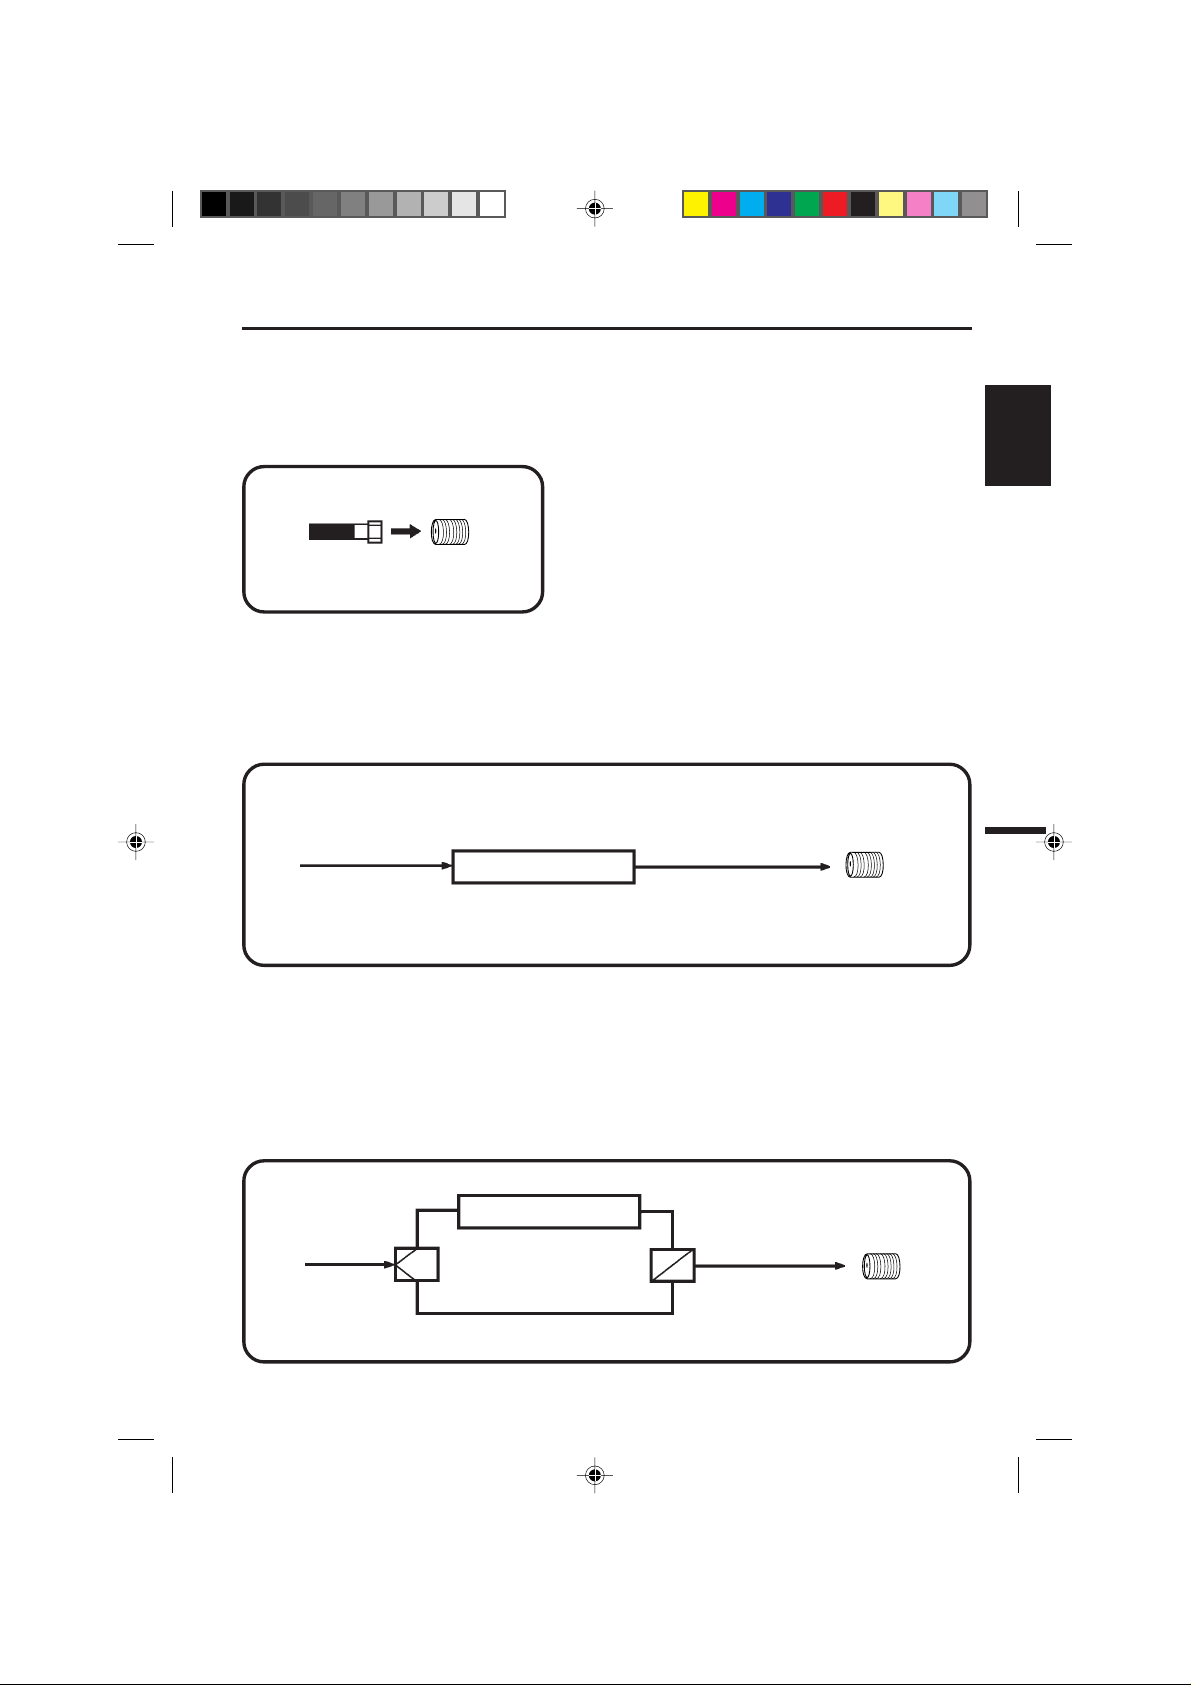
Combination VHF/UHF Antenna
(
Single 75 ohm cable or 300 ohm
twin-lead wire
Connect the 75 ohm cable from the combination VHF/
UHF antenna to the Antenna Jack.
If your combination VHF/UHF antenna has a 300 ohm
twin-lead wire, the use of the 300-75 ohm Matching
Transformer may be necessary.
75 ohm
Coaxial
Cable
)
Antenna Jack Antenna Jack
300-75 ohm Matching Transformer
Combination VHF/UHF Antenna
(
Separate VHF and UHF 300 ohm
twin-lead wires
Connect the UHF 300 ohm twin-lead wire to the Combiner
(not supplied). Connect the VHF 300 ohm twin-lead
wire to the 300-75 ohm Matching Transformer. Attach
the Transformer to the Combiner, then attach the
Combiner to the Antenna Jack.
Antenna Jack
)
300-75 ohm Matching
Transformer
PLUG
8A FUSE
12
5G60701A E P12-17 6/11/03, 6:08 PM12
TIP
Combiner
UHF 300 ohm
VHF 300 ohm
Separate VHF/UHF Antennas
(
75 ohm VHF cable and 300 ohm UHF
twin-lead wires
Connect the VHF 75 ohm cable and UHF 300 ohm
twin-lead wire to the Combiner (not supplied). Attach
the Combiner to the Antenna Jack.
Antenna Jack
Combiner
)
VHF 75 ohm
UHF 300 ohm
Page 13
Cable TV connections
This TV/DVD has an extended tuning range and can tune most cable channels without using a Cable
TV Converter box. Some cable companies offer “premium pay channels” in which the signal is
scrambled. Descrambling these signals for normal viewing requires the use of a descrambler device
which is generally provided by the cable company.
FOR SUBSCRIBERS TO BASIC CABLE TV SERVICE
Antenna
Jack
75 ohm
Coaxial Cable
FOR SUBSCRIBERS TO SCRAMBLED CABLE TV SERVICE
If you subscribe to a cable TV service which requires the use of a Converter/Descrambler box, connect the
incoming 75 ohm Coaxial Cable to the Converter/Descrambler box. Using another 75 ohm Coaxial Cable,
connect the output jack of the Converter/Descrambler box to the Antenna Jack on the TV/DVD. Follow the
connections shown below. Set the TV/DVD to the output channel of the Converter/Descrambler box (usually
channel 3 or 4) and use the Converter/Descrambler box to select channels.
For basic cable service not requiring a Converter/Descrambler
box, connect the CATV 75 ohm Coaxial Cable directly to the
Antenna Jack on the back of the TV/DVD.
ENGLISH
Incoming
75 ohm
CATV Cable
Converter/
Descrambler
75 ohm Cable to
TV/DVD
Antenna
Jack
FOR SUBSCRIBERS TO UNSCRAMBLED BASIC CABLE TV SERVICE WITH
SCRAMBLED PREMIUM CHANNELS
If you subscribe to a cable TV service in which basic channels are unscrambled and premium channels require the
use of a Converter/Descrambler box, you may wish to use a signal Splitter and an A/B Switch box (available from
the Cable company or an electronics supply store). Follow the connections shown below. With the switch in the “B”
position, you can directly tune any nonscrambled channels on your TV/DVD. With the switch in the “A” position, tune
your TV/DVD to the output of the Converter/Descrambler box (usually channel 3 or 4) and use the Converter/
Descrambler box to tune scrambled channels.
Incoming
75 ohm
CATV Cable
Splitter
Converter/
Descrambler
A/B Switch
A
B
75 ohm Cable
to TV/DVD
Antenna
Jack
5G60701A E P12-17 6/11/03, 6:08 PM13
13
Page 14
<
/ / / /MENU
>
V-CHIP SET
LANGUAGE/IDIOMA/LANGUE
<
/ / / /MENU
>
V-CHIP SET
LANGUAGE/IDIOMA/LANGUE
Setting the on screen display language
<
/ /ENTER/MENU
>
LANGUAGE/IDIOMA/LANGUE
ENGLISH
ESPAÑOL
FRANCAIS
You can choose from three dif ferent languages (English, French and Spanish) for the on-screen displays.
Adjustment menus and messages will appear in the language of your choice.
On-screen language selection (step 5) will automatically appear on the screen when you press the TV MENU
button initially. Select the language you prefer first, then proceed with the other menu options.
To turn on the TV/DVD, press POWER. The Power indicator
1
will light.
DISPLAY/
CALL TV/DVDPOWER
123
OPEN/CLOSE
Press TV MENU in the TV mode.
2
The TV menu screen will appear.
456
7890
CH
SELECT/
ENTER
CH
MUTE
DVD MENU
AUDIO
ANGLE
TOP MENU
SLOW SLOW
SEARCH SEARCH
SKIP
MARKER JUMP
PLAY
STOP
RETURN
SUB TITLE
INPUT
SELECT
PLAY MODEPAUSE/STILL
TV/CAP/TEXT
SETUP/
TV MENU
CANCEL
QUICK VIEW/
ZOOM
SLEEP
SKIP
REPEAT A-B
Press or until the OPTION
3
menu appears.
or to select the
Press
4
“LANGUAGE” option, then press
or button.
Press or to select the
5
desired language: English
(ENGLISH), Spanish
(ESPAÑOL) or French
(FRANCAIS), then press
ENTER.
Press TV MENU until the MENU
screen is cleared.
NOTES:
If the unit does not operate properly
•
(by the buttons on the unit and/or the
remote control) disconnect the AC
cord, wait a few minutes and plug it
back in. Static electricity, etc., may have
affected the player's operation.
The TV section has its own menu and also
•
DVD section has its own menu (see page
34).
14
5G60701A E P12-17 6/11/03, 6:08 PM14
Page 15
DISPLAY/
CALL TV/DVDPOWER
123
OPEN/CLOSE
To turn on the TV/DVD, press
1
POWER.
Adjust the volume level by
2
pressing VOLUME + or – . The
volume level will be indicated on
the screen by green bars. As the
volume level increases, so do
the number of bars. If the volume
decreases, the number of green
bars also decreases.
TV operation
VOLUME 32
ENGLISH
456
7890
CH
SELECT/
ENTER
CH
MUTE
DVD MENU
AUDIO
ANGLE
TOP MENU
SLOW SLOW
SEARCH SEARCH
SKIP
MARKER JUMP
PLAY
STOP
RETURN
SUB TITLE
INPUT
SELECT
PLAY MODEPAUSE/STILL
TV/CAP/TEXT
SETUP/
TV MENU
CANCEL
QUICK VIEW/
ZOOM
SLEEP
SKIP
REPEAT A-B
NOTES:
If a channel with no broadcast is
•
selected, the sound will automatically be muted.
If a station being viewed stops
•
broadcasting, the TV will automatically shut itself off after 15 minutes.
Set the TV/CATV menu
3
option to the appropriate
position. (See page 18.)
Press the Direct Channel selection
4
buttons to select the channel.
TV - VHF/UHF channels
CATV - CABLE TV channels
TV Mode Direct Channel Selection
When the TV/CA TV menu option is
in the TV position, all channels can
be instantly selected by using two
buttons. (for example, to select
channel 2, press “0”, then “2”. If
you press only “2”, channel
selection will be delayed for a few
seconds.) For channels 10 and
above, press the 2 digits in order.
CATV Mode Direct Channel Selection
When the TV/CATV menu option is in the CATV position, channels
can be selected as follows:
TO SELECT CA TV CHANNELS:
1-9: Press “0” twice, then 1-9 as needed. Example, to select
channel 2, press "002".
10-12: Press “0”, then the remaining 2 digits. Example, to
select channel 12, press "012".
13-99: Press the 2 digits in order. Example, to select channel
36, press "36".
100-125: Press the 3 digits in order. Example, to select channel
120, press "120".
NOTE FOR CHANNELS 1-12:
If only 1 or 2 buttons are pressed, the corresponding channel
will be selected in 2 seconds.
TV
VHF
2-13
UHF
14-69
CATV
VHF
2-13
STD/HRC/IRC
14-36
(A) (W)
37-59
(AA) (WW)
60-85
(AAA) (ZZZ)
86-94
(86) (94)
95-99
(A-5) (A-1)
100-125
(100) (125)
01
(5A)
CH 012
5G60701A E P12-17 6/11/03, 6:08 PM15
15
Page 16
STEREO SAP CH 012
SEL. MONO+SAP
TV operation
DISPLAY/
CALL TV/DVDPOWER
123
OPEN/CLOSE
CHANNEL /
Press and release CH or . The
channel automatically stops at the
next channel set into memory.
For proper operation, before selecting channels, they should be set into
the memory. See pages 19 and 20
“To memorize channels”
456
7890
CH
SELECT/
ENTER
CH
MUTE
DVD MENU
AUDIO
ANGLE
TOP MENU
SLOW SLOW
SEARCH SEARCH
SKIP
MARKER JUMP
PLAY
STOP
RETURN
SUB TITLE
INPUT
SELECT
PLAY MODEPAUSE/STILL
TV/CAP/TEXT
SETUP/
TV MENU
CANCEL
QUICK VIEW/
ZOOM
SLEEP
SKIP
REPEAT A-B
CALL
Press DISPLAY/CALL to display the
current information on the screen.
Press DISPLAY/CALL again to clear
the call display.
• Channel number or VIDEO mode
• Stereo or SAP (second audio
program) audio status
• Audio output status
QUICK VIEW
This button allows you to go back to
the last channel selected by pressing QUICK VIEW. Press QUICK
VIEW again to return to the last
channel you were watching.
MUTE
Press MUTE to switch off the sound.
The TV/DVD’s sound will be silenced
and “MUTE” will briefly appear on the
screen. The sound can be switched
back on by pressing this button
again or one of the VOLUME + or –
buttons.
SLEEP
To set the TV/DVD to turn off after a
preset amount of time, press SLEEP
on the remote control. The clock will
count down 10 minutes for each press
of SLEEP (120, 110, ...10, 0). After the
sleep time is programmed, the display
will appear briefly every ten minutes
to remind you that the sleep timer is
operating. To confirm the sleep timer
setting, press SLEEP and the remaining time will be displayed for a few
seconds. To cancel the sleep timer,
press SLEEP repeatedly until the dis-
play turns to 0.
MUTE
SLEEP
120
16
5G60701A E P12-17 6/11/03, 6:08 PM16
Page 17

Closed caption
WHAT IS CLOSED CAPTIONING?
This television has the capability to decode and display Closed Captioned television programs. Closed Captioning
will display text on the screen for hearing impaired viewers or it will translate and display text in another language.
Captions: This Closed Caption Mode will display text on the
DISPLAY/
CALL TV/DVDPOWER
123
456
7890
SELECT/
ENTER
MUTE
DVD MENU
AUDIO
ANGLE
TOP MENU
SLOW SLOW
CH
CH
SUB TITLE
PLAY MODEPAUSE/STILL
RETURN
INPUT
SELECT
OPEN/CLOSE
SETUP/
TV MENU
CANCEL
QUICK VIEW/
ZOOM
SLEEP
screen in English or another language (depending on the setting of the Closed Captions CH 1/2).
Generally, Closed Captions in English are transmitted on Captions Channel 1 and Closed Captions in other languages are
transmitted on Captions Channel 2.
The Captions will appear in places on the screen where they will
least interfere with the picture, usually on the bottom of the screen.
News programs will usually show three-line Closed Captions
which scroll onto the screen.
Most other shows provide two or three lined Captions placed
near the character who is speaking so the viewer can follow the
dialogue. Words in italics or underlined describe titles, words in
foreign languages or words requiring emphasis. Words that are
sung usually appear enclosed by musical notes.
Text: The Text Closed Caption Mode will usually fill the screen
with a programming schedule or other information.
After selecting a Closed Caption Mode, it will stay in effect until it
is changed, even if the channel is changed.
If the Captions signal is lost due to a commercial or a break in
the signal, the Captions will reappear when the signal is received
again. If the channels are changed, the Captions will be delayed
approximately 10 seconds.
For television programs broadcasting with Closed Captions, look
in your TV guide for the Closed Captions symbol (CC).
ENGLISH
SEARCH SEARCH
SKIP
MARKER JUMP
PLAY
STOP
TV/CAP/TEXT
SKIP
REPEAT A-B
TO VIEW CLOSED CAPTIONS
Press TV/CAP/TEXT to switch
between normal TV and the two
closed caption modes (captions
and full screen text). Closed
captioning will display text on the
screen for hearing impaired
viewers.
NOTES:
• When selecting Closed Captions, the captioning will be delayed approximately 10 seconds.
• If no caption signal is received, no captions will appear, but the television will remain in the Caption Mode.
• Misspellings or unusual characters may occasionally appear during Closed Captioning. This is normal with
Closed Captioning, especially with live programs. This is because during live programs, captions are also
entered live. These transmissions do not allow time for editing.
• When Captions are being displayed, on-screen displays, such as volume and mute may not be seen or may
interfere with Closed Captions.
• Some cable systems and copy protection systems may interfere with the Closed Captioned signal.
• If using an indoor antenna or if TV reception is very poor, the Closed Caption Decoder may not appear or
may appear with strange characters or misspelled words. In this case, adjust the antenna for better reception
or use an outdoor antenna.
5G60701A E P12-17 6/11/03, 6:08 PM17
17
Page 18

<
/ / / /MENU
>
TV/CATV
ADD/DELETE
CATV
ADD
AUTO CH MEMORY
<
/ / / /MENU
>
TV/CATV
ADD/DELETE
CATV
ADD
AUTO CH MEMORY
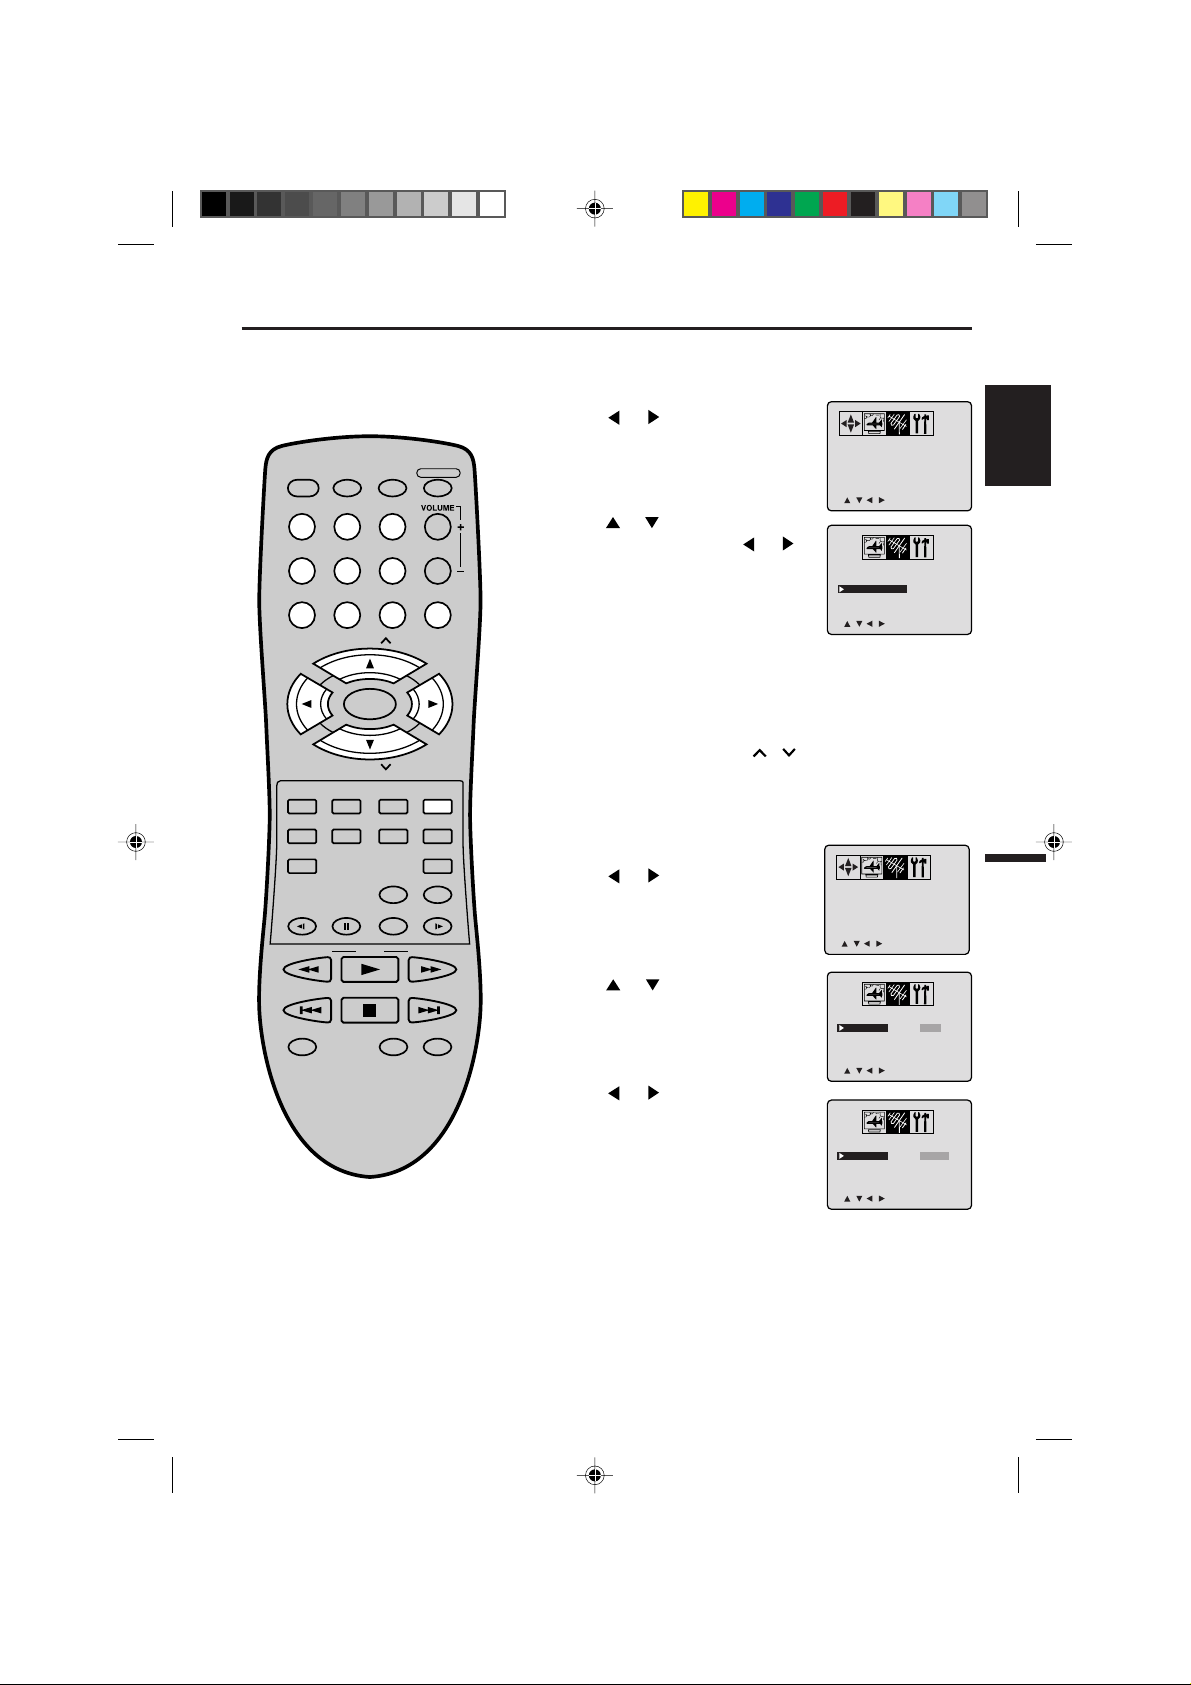
To memorize channels
<
/ / / /MENU
>
TV/CATV TV
ADD/DELETE ADD
AUTO CH MEMORY
This TV/DVD is equipped with a channel memory feature which allows channels to skip up or down to the next
channel set into memory, skipping over unwanted channels. Before selecting channels, they must be programmed into the TV/DVD’s memory . In addition to normal VHF and UHF channels, this TV/DVD can receive up
to 113 Cable TV channels. To use this TV/DVD with an antenna, set the TV/CATV menu option to the TV mode.
When shipped from the factory, this menu option is in the CATV mode.
TV/CATV SELECTION
Press TV MENU in the TV mode.
1
DISPLAY/
CALL TV/DVDPOWER
123
456
7890
SELECT/
ENTER
OPEN/CLOSE
CH
The TV menu screen will appear.
Press
2
3
or until the SET UP
menu appears.
or to select the “TV/
Press
CATV” option.
CH
DVD MENU
ANGLE
RETURN
SUB TITLE
INPUT
SELECT
PLAY MODEPAUSE/STILL
PLAY
STOP
TV/CAP/TEXT
QUICK VIEW/
REPEAT A-B
MUTE
AUDIO
TOP MENU
SLOW SLOW
SEARCH SEARCH
SKIP
MARKER JUMP
SETUP/
TV MENU
CANCEL
ZOOM
SLEEP
SKIP
Press or to select the TV
4
or CATV mode.
TV - VHF/UHF channels
CATV - CABLE TV channels
Press TV MENU until the MENU
5
screen is cleared.
CATV CHART
The chart below is typical of many cable system channel allocations.
18
5G60701A E P18-24 6/11/03, 6:08 PM18
Page 19
DISPLAY/
<
/ / / /MENU
>
TV/CATV
ADD/DELETE
CATV
ADD
AUTO CH MEMORY
CALL TV/DVDPOWER
123
456
7890
OPEN/CLOSE
CH
To memorize channels
AUTOMA TIC MEMORY TUNING
Press TV MENU in the TV mode. The TV menu screen
1
will appear.
Press
2
appears.
Press or to select the “AUTO
3
CH MEMORY”, then press
The TV will begin memorizing all the
channels available in your area.
Press TV MENU until the MENU
4
screen is cleared.
or until SET UP menu
or .
TV/CATV
ADD/DELETE
AUTO CH MEMORY
<
/ / / /MENU
TV/CATV
ADD/DELETE
AUTO CH MEMORY
<
/ / / /MENU
CATV
ADD
ENGLISH
>
CATV
ADD
>
SELECT/
ENTER
CH
MUTE
AUDIO
TOP MENU
SLOW SLOW
SEARCH SEARCH
SKIP
MARKER JUMP
DVD MENU
ANGLE
RETURN
SUB TITLE
SELECT
PLAY MODEPAUSE/STILL
PLAY
STOP
TV/CAP/TEXT
INPUT
SETUP/
TV MENU
CANCEL
QUICK VIEW/
ZOOM
SLEEP
SKIP
REPEAT A-B
TO ADD/DELETE CHANNELS
Select the desired channel to be
1
memorized or deleted using Direct
Channel Selection (0-9), or CH
Press TV MENU. The TV
2
menu screen will appear.
Press or until SET UP menu
3
appears.
Press or to select the “ADD/
4
DELETE”.
Press or to select ADD or
5
DELETE, whichever function you
want to perform.
Press TV MENU until the MENU
6
screen is cleared.
or
.
TV/CATV
ADD/DELETE
AUTO CH MEMORY
<
/ / / /MENU
TV/CATV
ADD/DELETE
AUTO CH MEMORY
<
/ / / /MENU
CATV
ADD
>
CATV
DELETE
>
Repeat steps 1-6 for other channels
7
you want to add or delete.
19
5G60701A E P18-24 6/11/03, 6:08 PM19
Page 20
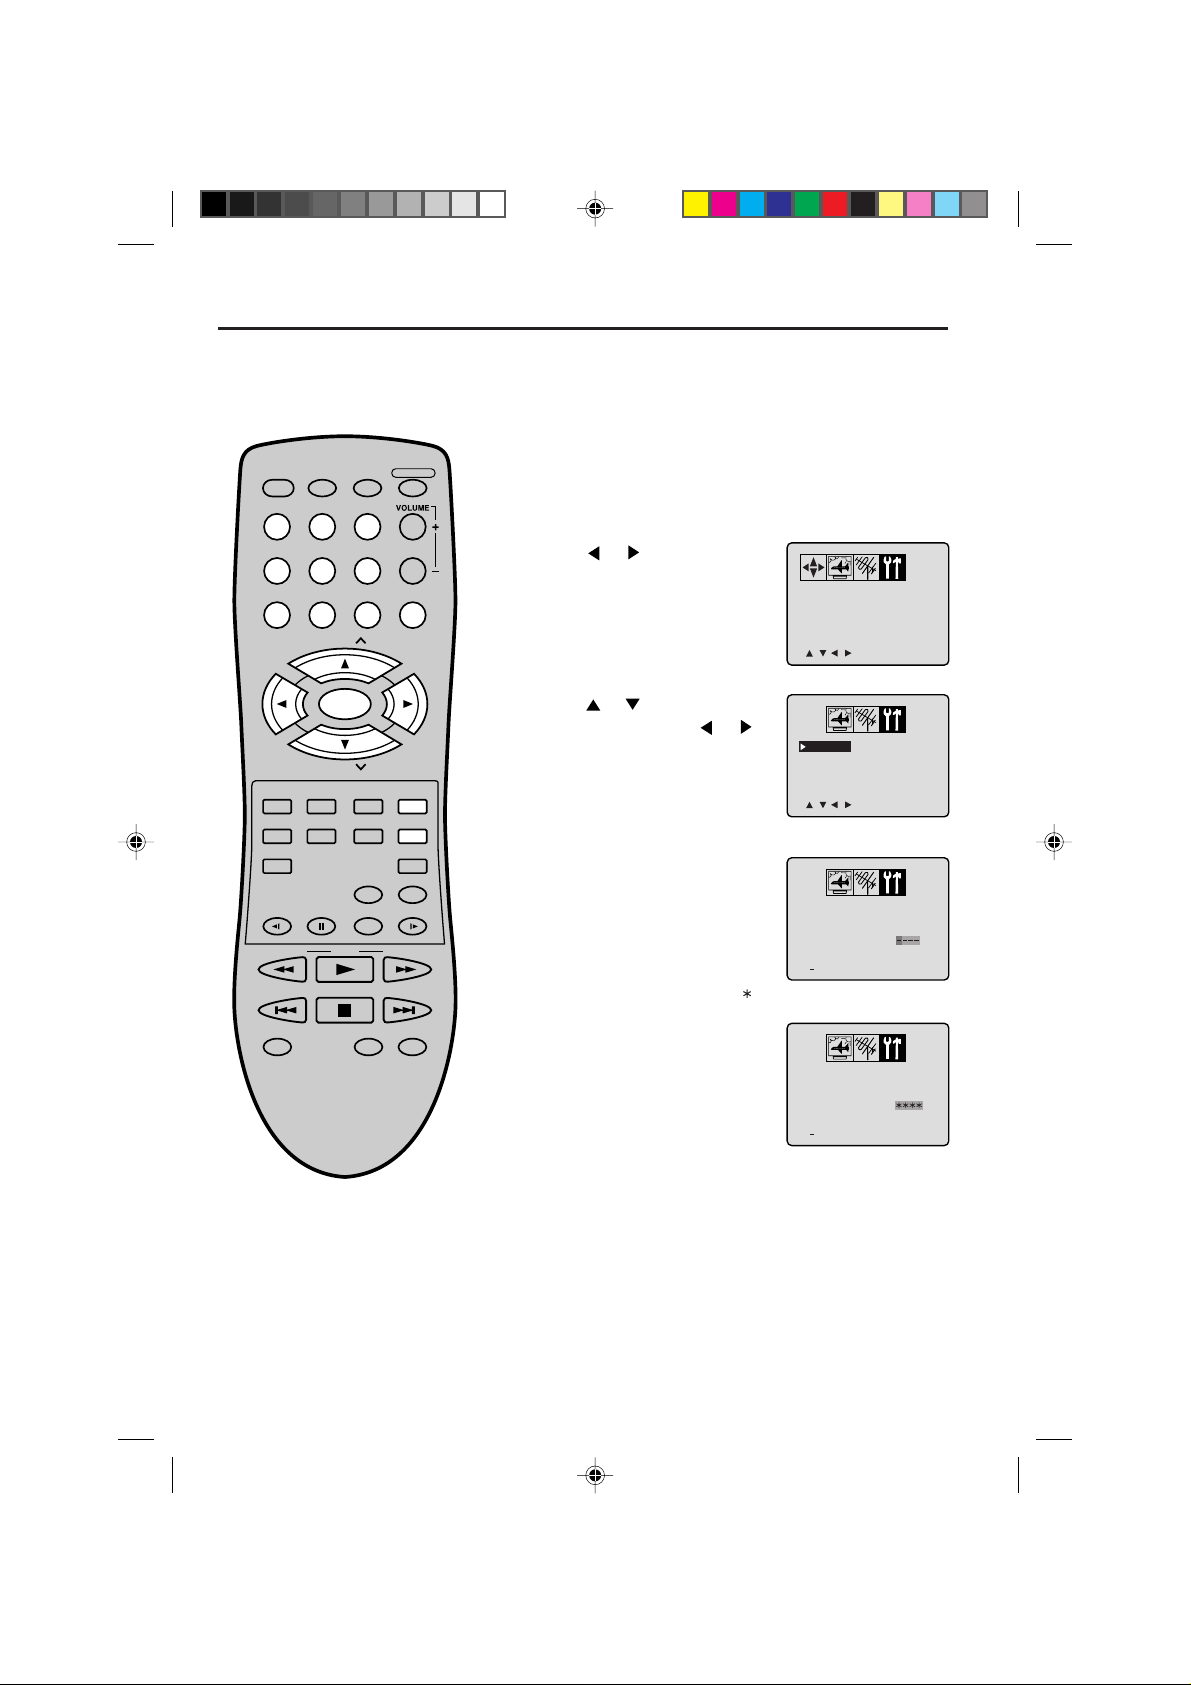
<
0 9/ENTER/CANCEL/MENU
>
V-CHIP SET
CONFIRM
PASSWORD :
<
0 9/ENTER/CANCEL/MENU
>
V-CHIP SET
NEW
PASSWORD
:
<
/ / / /MENU
>
V-CHIP SET
LANGUAGE/IDIOMA/LANGUE
Setting the V-Chip
<
/ / / /MENU
>
V-CHIP SET
LANGUAGE/IDIOMA/LANGUE
This TV/DVD is equipped with a V-Chip Controller which provides you with channel viewing access
controls and restrictions. This function is to prevent your children from watching violence or sexual
scenes, that you may choose to exclude.
To use the V-Chip function, you must register a password.
TO REGISTER P ASSWORD
DISPLAY/
CALL TV/DVDPOWER
123
OPEN/CLOSE
Press TV MENU in the TV mode. The TV menu
1
screen will appear.
456
7890
CH
SELECT/
ENTER
CH
MUTE
DVD MENU
AUDIO
ANGLE
TOP MENU
SLOW SLOW
SEARCH SEARCH
SKIP
MARKER JUMP
PLAY
STOP
RETURN
SUB TITLE
INPUT
SELECT
PLAY MODEPAUSE/STILL
TV/CAP/TEXT
SETUP/
TV MENU
CANCEL
QUICK VIEW/
ZOOM
SLEEP
SKIP
REPEAT A-B
Press or until the OPTION
2
menu appears.
Press or to select the “V-
3
CHIP SET”, then press
Enter the password (4 digits)
4
using Direct Channel Selection
(0-9), then press ENTER.
• If you put a wrong number, press
CANCEL.
Enter the same password again
5
for confirmation, then press
ENTER.
Now the password is registered
and the V-Chip setting menu will
appear on the display.
or .
" " appears instead of the number.
NOTES:
If you forget the password, you can-
•
not set the V-Chip.
T o avoid forgetting the password, write
•
it down and keep in a safe place.
20
5G60701A E P18-24 6/11/03, 6:08 PM20
Page 21
<
/ / / /MENU
>
MOVIE RATING
CHANGE PASSWORD
V-CHIP SET
V-CHIP
TV RATING
: PG-13
: ON
: TV-Y
<
/ / / /MENU
>
MOVIE RATING
CHANGE PASSWORD
V-CHIP SET
V-CHIP
TV RATING
: PG-13
: OFF
: TV-Y
<
/ / / /MENU
>
MOVIE RATING
CHANGE PASSWORD
V-CHIP SET
V-CHIP
TV RATING
: OFF
: OFF
: TV-Y
<
/ / / /MENU
>
MOVIE RATING
CHANGE PASSWORD
V-CHIP SET
V-CHIP
TV RATING
: OFF
: OFF
: OFF
TO SET THE V-CHIP
<
/ / / /MENU
>
MOVIE RATING
CHANGE PASSWORD
V-CHIP SET
V-CHIP
TV RATING
: OFF
: OFF
: TV-Y
<
/ / / /MENU
>
MOVIE RATING
CHANGE PASSWORD
V-CHIP SET
V-CHIP
TV RATING
: PG-13
: OFF
: TV-Y
In the V-CHIP SET menu, press
1
or to select the “TV
RATING”.
Setting the V -Chip
DISPLAY/
CALL TV/DVDPOWER
123
456
7890
SELECT/
ENTER
MUTE
DVD MENU
AUDIO
ANGLE
TOP MENU
SLOW SLOW
SEARCH SEARCH
CH
CH
PLAY
RETURN
SUB TITLE
INPUT
SELECT
PLAY MODEPAUSE/STILL
OPEN/CLOSE
SETUP/
TV MENU
CANCEL
QUICK VIEW/
ZOOM
SLEEP
To use after the TV is protected
When a program is received with the
V-Chip protection applied, enter the
password. Protection can be temporarily overridden.
NOTES:
• The V-Chip function is activated only
on programs and tapes that have
the rating signal.
• If you are changing channels using
a VCR or a cable box, while the TV
remains on channel 3 or 4, the VChip operates differently. When you
enter your password to temporarily
release the block on any channel,
you have completely disabled the VChip function for all stations. To
reset the V-Chip turn your TV off
and back on.
• Some cable boxes are built with a
delay feature, in some cases it can
take up to 10 seconds for a program
to appear after the password has
been input.
Press or to display the
2
desired setting.
OFF : TV RATING is not set
TV-Y : All children
TV-Y7: 7 years old and above
TV-G : General Audience
TV-PG: Parental guidance
TV-14 : 14 years old and above
TV-MA: 17 years old and above
When you select TV- Y7, TV-PG, TV-14 or TV-MA, press
DISPLAY/CALL to show the contained rating. Press
/ to select the desired item you want.
Press
3
“MOVIE RATING”.
Press or to select
4
rating.
or to select the
desired
OFF : MOVIE RATING is not set
G:All ages
PG : Parental guidance
PG-13 : Parental guidance
less than 13 years old
R:Under 17 years old
Parental guidance suggested
NC-17 : 17 years old and above
X:Adult only
Press
5
6
or to select “V-
CHIP”.
or to Display “ON”.
Press
Now your settings were set into
the memory.
Press TV MENU until the MENU
7
screen is cleared.
ENGLISH
/ or
21
5G60701A E P18-24 6/11/03, 6:08 PM21
Page 22

MOVIE RATING
CONFIRM
PASSWORD
CHANGE PASSWORD
V-CHIP SET
V-CHIP
TV RATING
: OFF
:
: OFF
: OFF
<
0 9/ENTER/CANCEL/MENU
>
MOVIE RATING
NEW
PASSWORD
CHANGE PASSWORD
V-CHIP SET
V-CHIP
TV RATING
: OFF
:
: OFF
: OFF
<
0 9/ENTER/CANCEL/MENU
>
<
/ / / /MENU
>
V-CHIP SET
LANGUAGE/IDIOMA/LANGUE
<
/ / / /MENU
>
V-CHIP SET
LANGUAGE/IDIOMA/LANGUE
<
/ / / /MENU
>
MOVIE RATING
CHANGE PASSWORD
V-CHIP SET
V-CHIP
TV RATING
: OFF
: OFF
: OFF
<
0 9/ENTER/CANCEL/MENU
>
V-CHIP SET
PASSWORD
:
Setting the V-Chip
DISPLAY/
CALL TV/DVDPOWER
123
456
7890
SELECT/
ENTER
MUTE
DVD MENU
AUDIO
ANGLE
TOP MENU
SLOW SLOW
SEARCH SEARCH
CH
CH
PLAY
RETURN
SUB TITLE
INPUT
SELECT
PLAY MODEPAUSE/STILL
OPEN/CLOSE
SETUP/
TV MENU
CANCEL
QUICK VIEW/
ZOOM
SLEEP
TO CHANGE PASSWORD
Press TV MENU in the TV mode.
1
The TV menu screen will appear.
Press
2
3
4
5
or until OPTION
menu appears.
or to select the “V-
Press
CHIP SET”, then press
or .
Enter the Password using Direct
Channel Selection (0-9), then
press ENTER.
• If you put a wrong number, press
CANCEL.
or to select
Press
“CHANGE PASSWORD”, then
or .
press
SKIP
MARKER JUMP
STOP
TV/CAP/TEXT
SKIP
REPEAT A-B
22
5G60701A E P18-24 6/11/03, 6:08 PM22
Enter the new password using
6
Direct Channel Selection (0-9),
then press ENTER.
Enter the new password again
7
for confirmation, then press
ENTER.
Press TV MENU repeatedly to
8
return to normal screen.
Page 23
<
/ / / /CANCEL/MENU
>
BRIGHTNESS
CONTRAST0+32
0
0
0
COLOR
TINT
SHARPNESS
<
/ / / /MENU
>
BRIGHTNESS
CONTRAST0+32
0
0
0
COLOR
TINT
SHARPNESS
Picture control adjustment
Picture controls are factory preset but you can adjust them individually as follows:
Press TV MENU in the TV mode.
1
The TV menu screen will appear.
Press or until PICTURE
DISPLAY/
CALL TV/DVDPOWER
123
456
7890
SELECT/
ENTER
OPEN/CLOSE
CH
2
menu appears.
Press
3
you want to adjust.
or to select the item
ENGLISH
CH
MUTE
DVD MENU
AUDIO
ANGLE
TOP MENU
SLOW SLOW
SEARCH SEARCH
SKIP
MARKER JUMP
PLAY
STOP
RETURN
SUB TITLE
INPUT
SELECT
PLAY MODEPAUSE/STILL
TV/CAP/TEXT
SETUP/
TV MENU
CANCEL
QUICK VIEW/
ZOOM
SLEEP
SKIP
REPEAT A-B
NOTE:
The CONTRAST default setting is set
to maximum at the factory.
Press or to adjust the
4
setting.
BRIGHTNESS
CONTRAST
COLOR
TINT
SHARPNESS
After your desired setting
5
changes press TV MENU until
increase brightness
increase contrast
brilliant color
greenish color
makes picture clearer
the MENU screen is cleared.
CANCEL
Pressing CANCEL while making
picture adjustments will return all
adjustments to the factory preset
levels.
decrease brightness
decrease contrast
pale color
reddish color
makes picture softer
23
5G60701A E P18-24 6/11/03, 6:08 PM23
Page 24
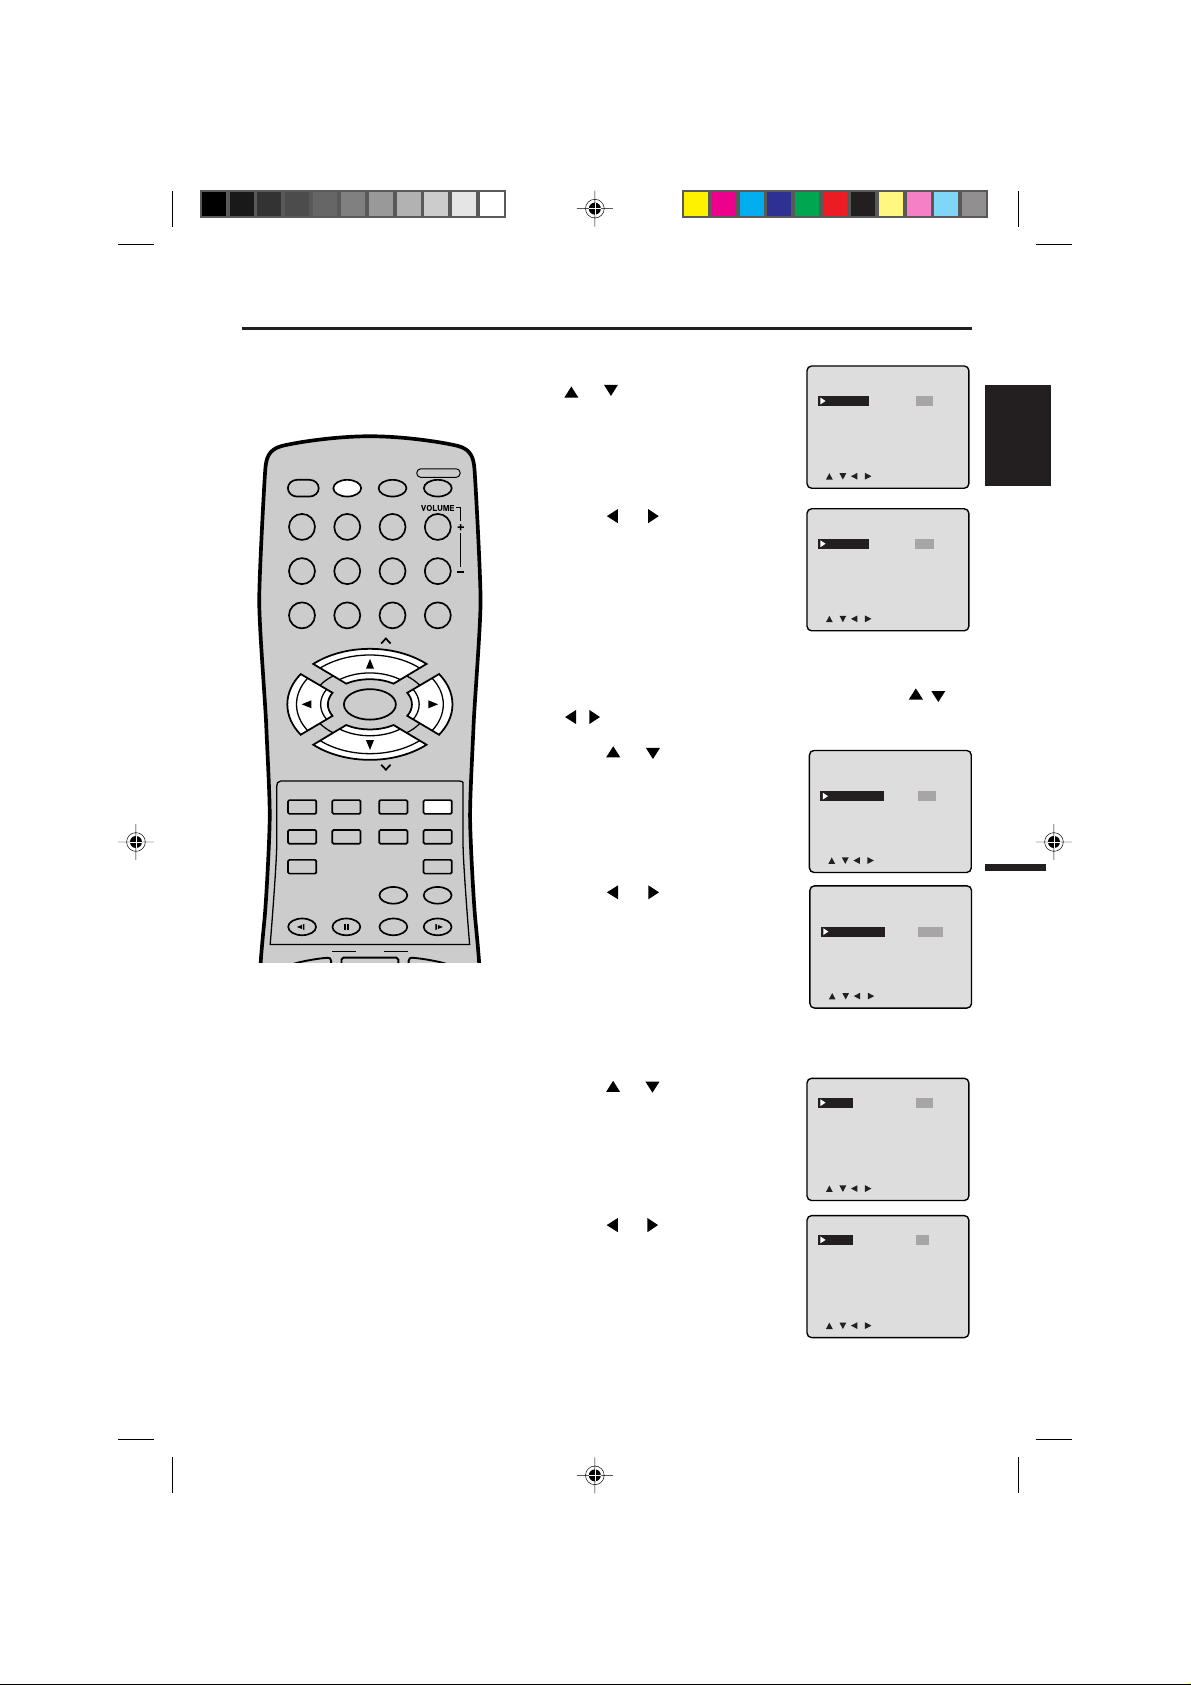
Stereo and second audio program (SAP)
STEREO SAP CH 013
STEREO CH 013
SEL. STEREO
The TV/DVD is equipped with a feature known as Multi-channel TV Sound or MTS. MTS broadcasts greatly
enhance TV viewing by bringing you programs with high fidelity stereo sound.
MTS also provides an extra channel called the Second Audio Program or SAP which broadcasters can use to
transmit a second language for bilingual transmission or for other purposes.
LISTENING TO STEREO SOUND
DISPLAY/
CALL TV/DVDPOWER
123
456
7890
SELECT/
ENTER
MUTE
DVD MENU
AUDIO
ANGLE
TOP MENU
SLOW SLOW
SEARCH SEARCH
SKIP
MARKER JUMP
CH
CH
RETURN
SUB TITLE
INPUT
SELECT
PLAY MODEPAUSE/STILL
PLAY
STOP
TV/CAP/TEXT
OPEN/CLOSE
SETUP/
TV MENU
CANCEL
QUICK VIEW/
ZOOM
SLEEP
SKIP
REPEAT A-B
When the TV is turned on or a
channel selection is made, make
certain the STEREO appears on
the screen. This means that
"Stereo" broadcasting is available. You can enjoy stereo
sound from the left and right
speakers.
• When "Mono" broadcasting is
received, no indication is
displayed.
• If the broadcast signal is not
strong enough or clear stereo
sound is not available, press
AUDIO to change to mono
sound. The noise should be
eliminated. Press it again to
return to the stereo sound.
LISTENING TO SAP (SECOND AUDIO PROGRAM)
When the TV is turned on or a
channel selection is made, make
certain the SAP appears on the
screen. This means that the
"Second Audio Program"
broadcasting is available.
TO SELECT DESIRED SOUND
Press AUDIO to select the
desired sound.
24
5G60701A E P18-24 6/11/03, 6:08 PM24
MONO+SAP BROADCASTING
MONO SOUND
(MAIN)
SAP SOUND
STEREO+SAP BROADCASTING
STEREO SOUND
(MAIN)
MONO SOUND
(MAIN)
MONO + SAP SOUND
(MONO)
SAP SOUND
MONO + SAP SOUND
(MAIN)
Page 25
Disc
The unit detects whether the disc loaded is a DVD disc or Audio CD and automatically sets the mode.
Disc Notes
Do not play DVD-ROM, DVD-Audio, CD-ROM, CD-R, CDV, CD-G, Video CD or Photo CD to prevent accidental
erasure of prerecorded material.
This unit applies to DVD discs from Region 1 only. Other Region number discs cannot be played with this unit.
This unit does not play MP3 files.
ENGLISH
Title/Chapter/Track
Title
When two or more movies are recorded on a disc,
the disc is divided into two or more sections. Each
section is called a “TITLE”.
TITLE1 TITLE2
CHAPTER 1
CHAPTER 2 CHAPTER 2 CHAPTER 3CHAPTER 1
DVD DISC
Chapter
The titles can be subdivided into many sections. Each section is called a “CHAPTER”.
Track
An Audio CD can contain several items.
These are assigned to the tracks.
TRACK 1 TRACK 2 TRACK 3 TRACK 4 TRACK 5
Removing Disc from Case
Be sure to hold the edge of disc. Do not touch the surface of the disc.
Pick up the disc gently from the case.
• Do not scratch the disc.
• Do not get dirt on the surface of the disc.
• Do not stick a label or adhesive tape on the disc.
• Do not drop or bend the disc.
Storing Disc
• Store the disc in the case to avoid risk of scratches, dirt or damage.
• Do not leave disc exposed to direct sunlight or in hot or humid places.
CD
Cleaning Disc
Wipe the disc with a clean, dry cloth from center to edge.
• Do not wipe the disc in a circular motion.
• Do not use liquid or aerosol cleaners.
5G60701A E P25-32 6/11/03, 6:08 PM25
25
Page 26
Preparation/Status display of disc
The following pages describe the
setup/operation in DVD mode.
DISPLAY/
POWER
CALL
123
456
789
SELECT/
MUTE
DVD MENU
ANGLEAUDIO
TOP MENU
SLOW
PAUSE/STILL
SEARCH SEARCH
SKIP SKIP
MARKER
TV/DVD
CH
ENTER
CH
RETURN
SUB TITLE
INPUT
SELECT SLEEP
PLAYMODE
PLAY
STOP
JUMP
TV/CAP/TEXT
OPEN/CLOSE
VOLUME
0
SETUP/
TV MENU
CANCEL
QUICK VIEW/
ZOOM
SLOW
REPEATA-B
+
Ð
Preparation
Before DVD/CD operation, please make preparations as follows.
Insert the AC cord plug into a standard 120V 60Hz polarized
1
AC outlet.
• If the AC cord plug is plugged in for the first time, wait for
about 5 seconds before pressing POWER.
NOTE: When connecting to other equipment, unplug the unit
from the AC outlet.
Press POWER on the unit or on the remote control to turn on
2
the unit. The POWER indicator will light.
• Every time you press POWER, the TV/DVD starts from TV
mode.
• When using an amplifier, switch on the amplifier.
Press TV/DVD to select DVD
3
mode.
The DVD startup screen will appear on the screen.
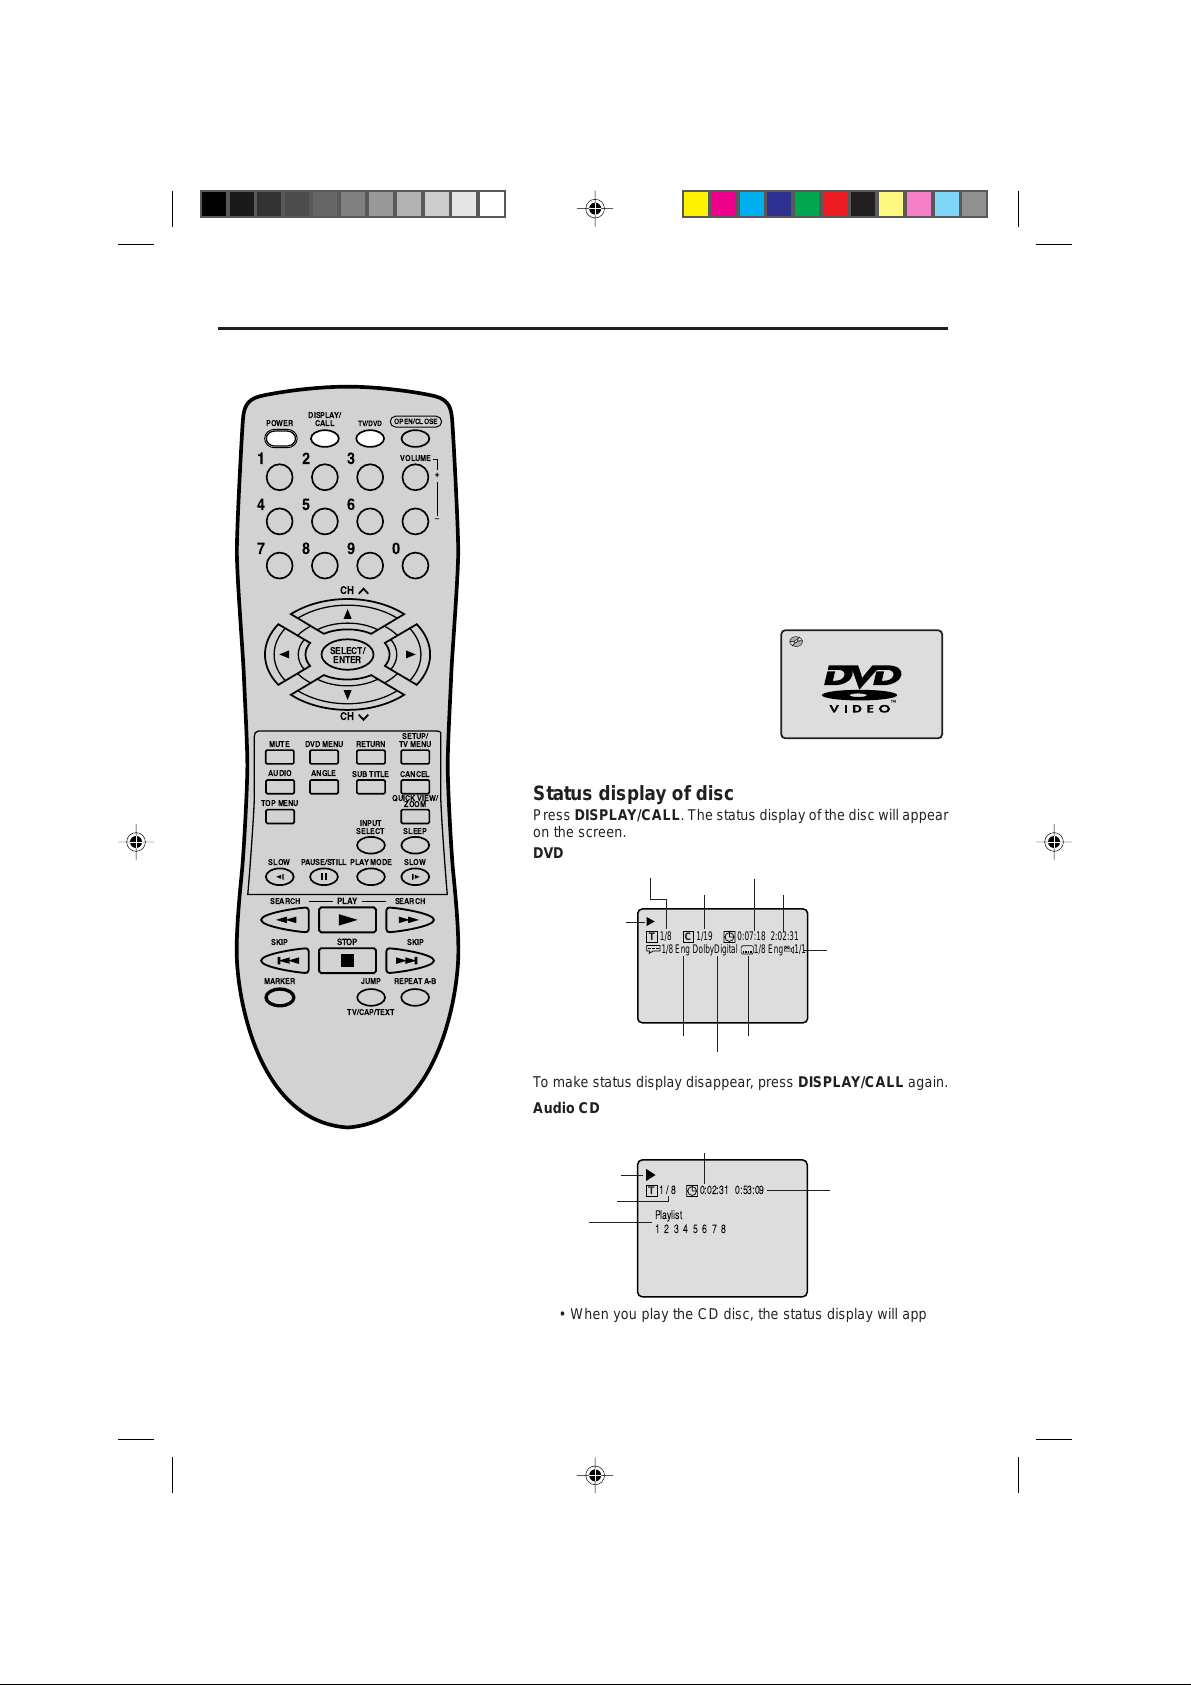
Status display of disc
Press DISPLAY/CALL. The status display of the disc will appear
on the screen.
DVD
Disc operation
To make status display disappear, press DISPLAY/CALL again.
Audio CD
Title number Title elapsed playing time
Chapter number
1/8
C
T
1/8Eng DolbyDigital
Audio language
A kind of audio
1/19
Title total time
0:07:18 2:02:31
1/1
1/8 Eng
Subtitle language
Camera angle
NOTE:
If the unit does not operate properly:
Static electricity, etc., may affect the player's operation. Disconnect the AC power
cord once, then connect it again.
26
5G60701A E P25-32 6/11/03, 6:08 PM26
Track elapsed playing time
Disc operation
Track number
Play list
1/8
T
0:02:31 0:53:09
Playlist
12345678
Track total time
• When you play the CD disc, the status display will appear
on the screen and continue displaying.
Page 27
DISPLAY/
POWER
CALL
123
456
789
MUTE
DVD MENU
ANGLEAUDIO
TOP MENU
SLOW
PAUSE/STILL
SEARCH SEARCH
SKIP SKIP
MARKER
CH
SELECT/
ENTER
CH
PLAY
STOP
RETURN
SUB TITLE
PLAYMODE
OPEN/CLOSE
TV/DVD
VOLUME
0
SETUP/
TV MENU
CANCEL
QUICK VIEW/
ZOOM
INPUT
SELECT SLEEP
SLOW
JUMP REPEAT A-B
+
Ð
NOTES:
• If a non-compatible disc is loaded, “Incorrect Disc”, “Region Code Error” or “Parental Error” will appear on the TV screen according to the type of loaded disc. If these
appear, check your disc again (see pages
25 and 37).
• Some discs may take a minute or so to
start playback.
• When you set a single-faced disc label
downwards (ie. the wrong way up) and
press PLAY or OPEN/CLOSE on the unit,
“
” will appear on the display for 3 about
seconds and then “No Disc” will be displayed.
• Some playback operations of DVDs may
be intentionally fixed by software producers. Since this unit plays DVDs according
to the disc contents the software producers designed, some playback features may
not be available. Also refer to the instructions supplied with the DVDs.
• When playing DTS-encoded Audio CDs,
excessive noise will be heard from the
analogue stereo outputs. To avoid possible damage to the audio system, the consumer should take proper precautions
when the analogue stereo outputs of the
DVD player are connected to an amplification system.
Playback procedure
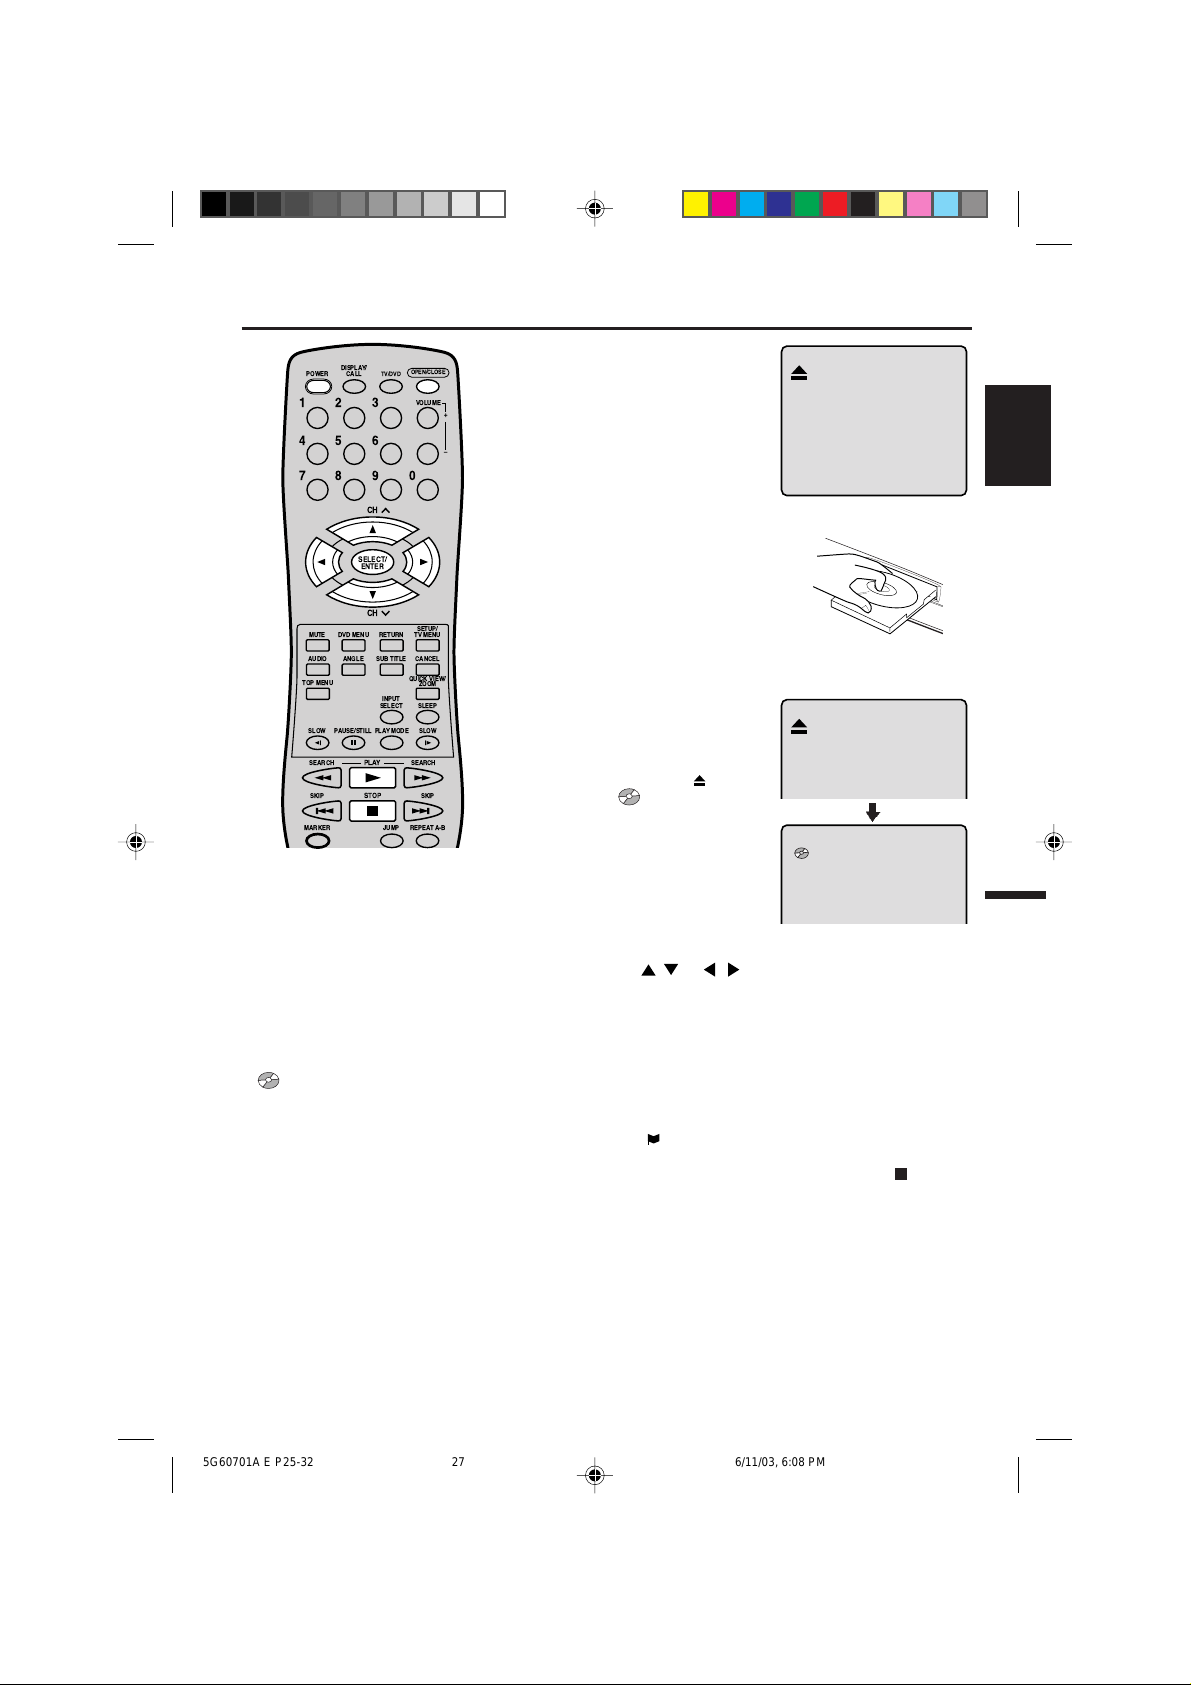
Press OPEN/CLOSE on
1
the unit or the remote control.
The disc tray will open.
Place a disc onto the tray.
2
Position it with the printed
label side up, align it with
the guides, and place it in
its proper position.
Press OPEN/CLOSE or
3
PLA Y.
The disc tray closes automatically.
The TV-screen,
to “
” and then playback
commences.
• A menu screen will
appear on the TV screen,
if the disc has a menu
feature.
Press / or / to make a selection.
4
Press SELECT.
5
• Title is selected and play commences.
Press STOP to end playback.
6
• The unit memorizes the stopped point, depending on the
disc. “
playback (from the scene point).
• If you press STOP again or unload the disc (“
on the screen.), the unit will clear the stopped point.
To stop the playback, press STOP.
7
Then press OPEN/CLOSE.
The disc tray opens.
Remove the disc and press POWER.
The disc tray closes automatically and unit turns off.
changes
” appears on the screen. Press PLAY to resume
ENGLISH
” appears
27
5G60701A E P25-32 6/11/03, 6:08 PM27
Page 28
Special playback
Note: There may be a slight delay between when you press the button and
the function activating.
DISPLAY/
POWER
CALL
123
456
789
OPEN/CLOSE
TV/DVD
VOLUME
+
Ð
0
CH
Fast Forward Playback
Press SEARCH during normal playback.
Each press of the SEARCH
of the search
(CD:
(x 2), (x 4), (x 8), (x 15).
(x 2), (x 4), (x 8), (x 20))
button will increase the speed
• To resume normal playback, press PLAY.
Review Playback
Press SEARCH during normal playback.
Each press of the SEARCH
of the search
(CD:
(x 2), (x 4), (x 8), (x 15).
(x 2), (x 4), (x 8), (x 20))
• To resume normal playback, press PLAY.
button will increase the speed
SELECT/
ENTER
CH
MUTE
DVD MENU
ANGLEAUDIO
TOP MENU
SLOW
PAUSE/STILL
SEARCH SEARCH
SKIP SKIP
MARKER
PLAY
STOP
RETURN
SUB TITLE
QUICK VIEW/
INPUT
SELECT SLEEP
PLAYMODE
JUMP
REPEATA-B
TV/CAP/TEXT
SETUP/
TV MENU
CANCEL
ZOOM
SLOW
NOTE:
The unit is capable of holding a still video
image or On screen display image on your
television screen indefinitely. If you leave
the still video image or On screen display
image displayed on your TV for an extended period of time, you risk permanent
damage to your television screen. Projection televisions are very susceptible.
Still Playback
Press PAUSE/STILL during
normal playback to pause playback.
To resume normal playback,
press PLAY.
Frame Advance
Press PAUSE/STILL during still playback.
One frame is advanced each time you press PAUSE/STILL.
T o resume normal playback, press PLAY.
Slow-motion Playback
Press SLOW
normal playback or still playback.
Each press of SLOW will change the speed of the slow x1/2,
x1/4, x1/6, x1/8.
• T o resume normal playback, press PLAY.
• To resume the still playback, press PAUSE/STILL.
( )
Reverse or SLOW
( )
Forward during
Locating a chapter or track
Press SKIP( ) Forward or SKIP( ) Reverse during
playback to locate a chapter that you want to watch.
Each time you press the button, a chapter or track is
skipped.
28
5G60701A E P25-32 6/11/03, 6:08 PM28
Page 29

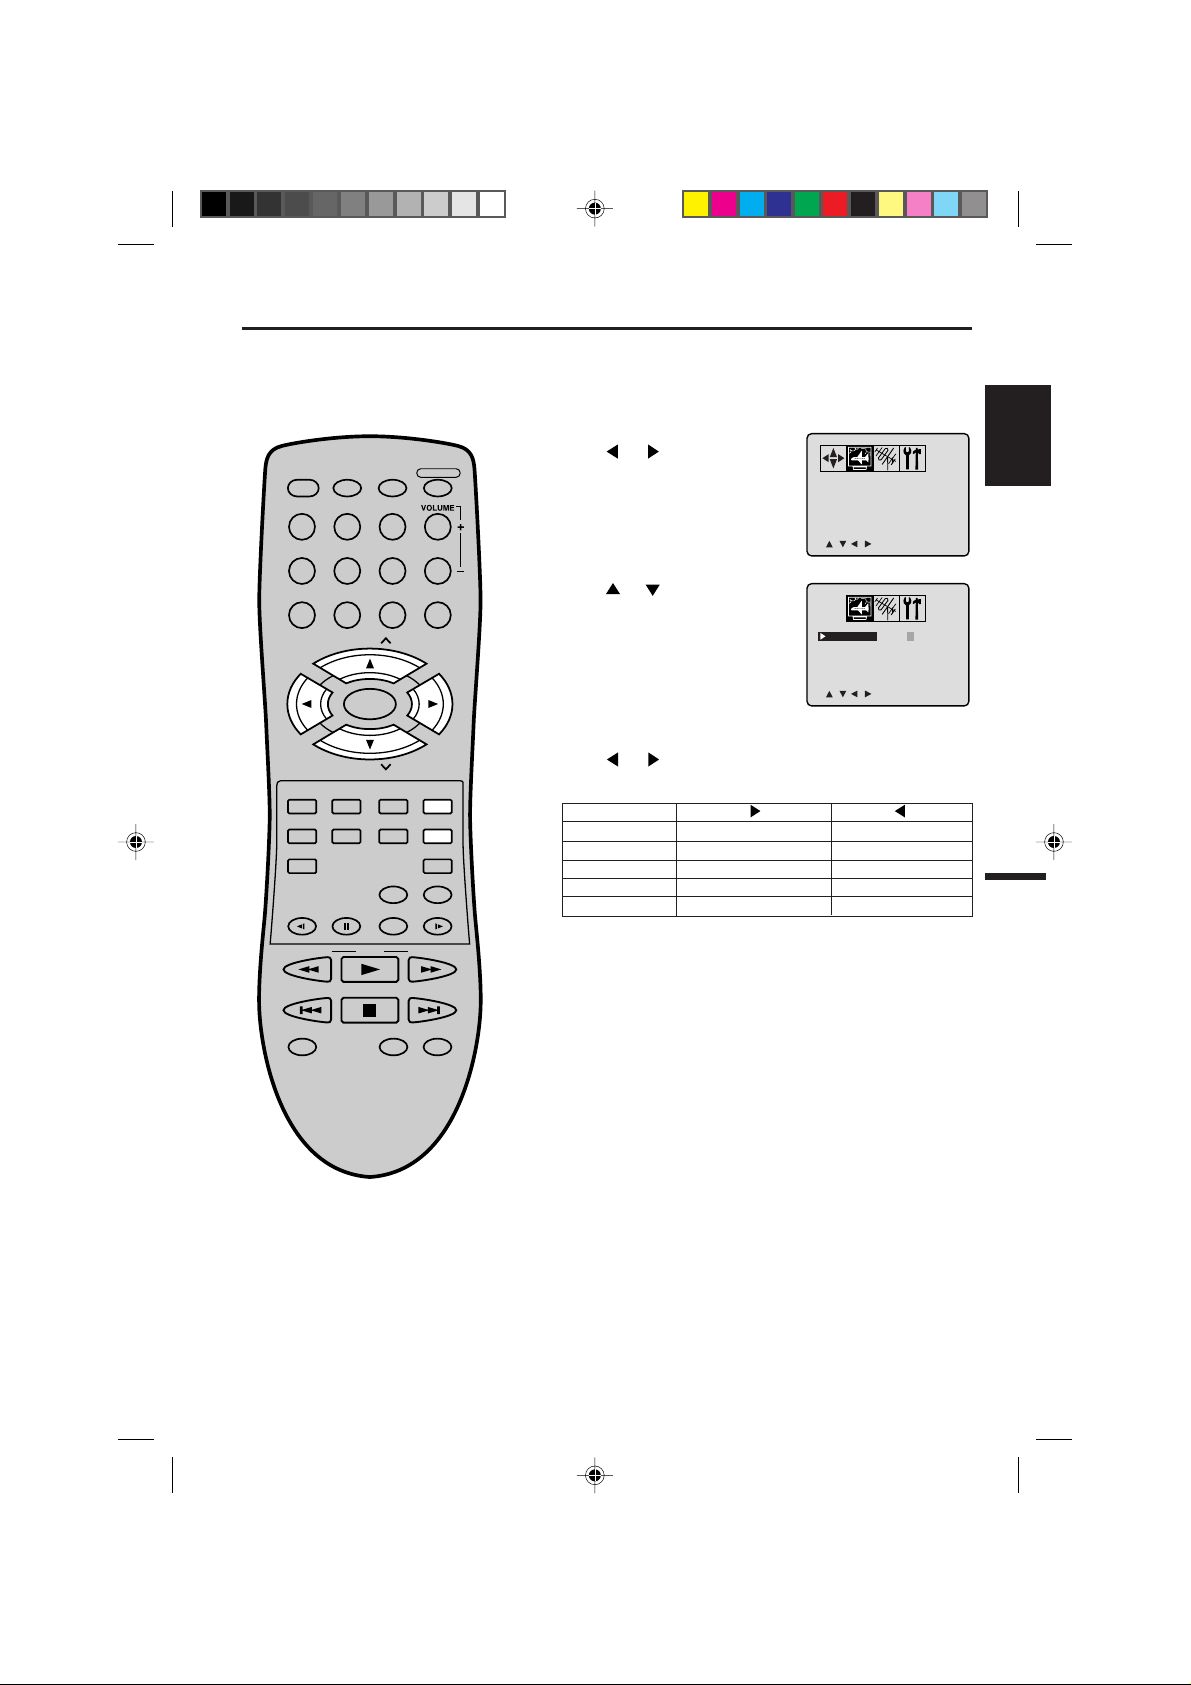
1
Zooming/Locating desired scene
Zooming
This unit will allow you to zoom in on the frame image. You
can then make selections by switching the position of the
frame.
DISPLAY/
CALL
TV/DVD
POWER
123
456
789
CH
SELECT/
ENTER
CH
MUTE
TOP MENU
SLOW
SEARCH SEARCH
SKIP SKIP
MARKER
DVD MENU
ANGLEAUDIO
PAUSE/STILL
RETURN
SUB TITLE
INPUT
SELECT SLEEP
PLAYMODE
PLAY
STOP
JUMP
TV/CAP/TEXT
OPEN/CLOSE
VOLUME
0
SETUP/
TV MENU
CANCEL
QUICK VIEW/
ZOOM
SLOW
REPEATA-B
+
Ð
Press TV/DVD to select
1
DVD mode.
Press ZOOM during playback.
The center part of the
image will be zoomed in.
Each press of ZOOM will
change the ZOOM
(x 2),
2 (x 3) and 3
1
(x 4).
Press
2
/ / / to view a different part of the frame.
You may move the frame from the centre position to UP,
DOWN, LEFT or RIGHT direction.
In the zoom mode press ZOOM repeatedly to return to a
3
1:1 view (
Off).
Locating Desired Scene
Use the title, chapter and time recorded on the disc to
locate the desired point to play back.
Press JUMP during play-
1
back.
Jump
_ _ / 19
C
1 / 8
T
2:02:31 / 2:02:31
/Enter/0 9/Cancel/Jump
ENGLISH
Press or to select the “C (Chapter)”, “T (Title/
2
NOTES:
• You can select the Pause, Slow or
Search playback in the zoom mode.
• Some discs may not respond to zoom
feature.
Track)” or “
Press Number buttons (0–9) to input the number.
3
• If you input a wrong number, press CANCEL.
• Refer to the package supplied with the disc to check the
numbers.
Press ENTER.
4
(Time)”.
• Playback starts.
• When you change the title, playback starts from
Chapter 1 of the selected title.
• Some discs may not work in the above operation.
29
5G60701A E P25-32 6/11/03, 6:08 PM29
Page 30

A
AB
Repeat/Random/Program playback and Repeat A-B
Program Playback
Playlist
5 8 3
0:02:31 0:25:14
5 / 8
T
Press PLAY MODE during playback or stop mode.
Each time you press PLAY MODE, playback mode changes as follows.
DVD
On screen
display
→
Title: Repeats the current title.
↓
Chapter: Repeats the current chapter.
↓
Off: Resumes normal playback.
• During stop mode, PLAY MODE key is not effective.
SELECT/
ENTER
Operation
Audio CD
On screen
display
→
All: Repeats entire disc.
↓
Track: Repeats the current track.
↓
Random Play:
Plays the tracks in random order.
↓
*Program: Plays the tracks in program order.
↓
(Status display)
: Resumes normal playback.
• During stop mode, you can not select “
Operation
Track”.
CH
MUTE
TOP MENU
SLOW
SEARCH SEARCH
DVD MENU
ANGLEAUDIO
PAUSE/STILL
RETURN
SUB TITLE
INPUT
SELECT SLEEP
PLAYMODE
PLAY
QUICK VIEW/
SETUP/
TV MENU
CANCEL
ZOOM
SLOW
*Program menu
Use number buttons (0–9) to
enter the track’s number you
want to program, then press
ENTER. The track number and
total time are displayed. Repeat
this step to enter additional
tracks. When you have finished
entering tacks, press PLAY to
start Program playback.
A playlist of your programmed
tracks is displayed.
SKIP SKIP
MARKER
NOTES:
• If you put a wrong number, press CANCEL.
• To cancel program play, press ST OP 3 times.
• To clear the programs on the program menu, press CANCEL until all programs
will be cleared.
• The program is cancelled when you open the disc tray or turn off the power.
STOP
JUMP
REPEATA-B
Repeat A-B
Repeat A-B playback allows you to repeat material between two selected points.
Press REPEAT A-B during playback.
1
The start point is selected.
Press REPEAT A-B again.
2
The end point is selected. Playback starts at the point that you selected.
Playback stops at the end point, returns to Point A automatically, then starts
again.
To resume normal playback press REPEAT A-B again. “
Off” appears on the screen.
Program
1 5 8:29
2 8 8:54
3 3 7:31
__
4
Total 3 0:25:14
/Enter/0 9/Cancel/Play/PlayMode
NOTES:
• Some discs may not work with the repeat operation.
• In Repeat A-B mode, subtitles near point A or B may not appear.
• You may not be able to set Repeat A-B, depending on the scenes of the DVD.
• Repeat A-B does not work with interactive DVDs.
30
5G60701A E P25-32 6/11/03, 6:08 PM30
Page 31

Marking desired scenes
Marker
/Enter/Cancel/Marker
T
C
1
T
C
2
T
C
3
08 500
12 270
17 040
1
1
1
3
4
6
Marker
/Enter/Cancel/Marker
T
C
1
T
C
2
T
C
3
08 500
12 270
17 040
1
1
1
3
4
6
Marker
/Enter/Cancel/Marker
T
C
1
T
C
2
T
C
3
08 50013
Marker
/Enter/Cancel/Marker
T
C
1
T
C
2
T
C
3
The TV/DVD stores the points that you
want to watch again. You can resume
playback from that scene.
DISPLAY/
POWER
CALL
123
456
789
SELECT/
ENTER
MUTE
DVD MENU
ANGLEAUDIO
TOP MENU
SLOW
PAUSE/STILL
TV/DVD
CH
CH
RETURN
SUB TITLE
INPUT
SELECT SLEEP
PLAYMODE
OPEN/CLOSE
VOLUME
0
SETUP/
TV MENU
CANCEL
QUICK VIEW/
ZOOM
SLOW
+
Ð
Marking the Scenes
Press MARKER during
1
playback.
Select the blank Marker
2
using
/ , then press
ENTER at the desired
scene.
• Up to 3 scenes can be
selected.
• Repeat this procedure to
set the other 2 scenes.
Press MARKER to remove this display.
3
Returning to the Scenes
Press MARKER during
1
playback or stop mode.
ENGLISH
SEARCH SEARCH
SKIP SKIP
MARKER
PLAY
STOP
JUMP
TV/CAP/TEXT
REPEATA-B
NOTES:
•
The marking is canceled when you open
the disc tray or turn the power off.
•
Some subtitles recorded around the
marker may fail to appear. [DVD]
5G60701A E P25-32 6/11/03, 6:08 PM31
Press or to select
2
the Marker 1-3.
Press SELECT.
3
Playback starts from the marked scene.
To Cancel the Mark
Press MARKER.
1
Press or to select the Marker 1-3.
2
Press CANCEL.
3
31
Page 32

1/8 Eng Dolby Digital
2/8 Fra Dolby Digital
Changing soundtrack language/Subtitles
Changing soundtrack language
You can select the language when you play a multilingual
disc.
Press AUDIO during play-
1
DISPLAY/
CALL
TV/DVD
POWER
123
456
789
CH
OPEN/CLOSE
VOLUME
0
+
Ð
back.
The current soundtrack
language will appear.
Press AUDIO repeatedly
2
until the desired language
is selected.
SELECT/
ENTER
MUTE
TOP MENU
CH
DVD MENU
ANGLEAUDIO
RETURN
SUB TITLE
INPUT
SETUP/
TV MENU
CANCEL
QUICK VIEW/
ZOOM
NOTES:
• If the desired language is not heard after pressing the SUB TITLE button several times, the language is not recorded
on the disc.
• Changing soundtrack language is cancelled when you open the disc tray. The
initial default language or available language will be heard if the disc is played
back again.
• Changing subtitle language is cancelled
when you open the disc tray.
• Some functions may not work on some
DVDs. Y ou may not be able to turn subtitles on or off or change subtitles. While
playing the DVD, the subtitle may
change when:
- you open or close the disc tray
- you change the title.
• In some cases, the subtitle language is
not changed to the selected one immediately.
The on-screen display will
disappear after a few seconds.
Subtitles
Turning the Subtitles On and Off
When playing back a disc recorded with subtitles, you
can turn the subtitles on or off.
Press SUB TITLE during play-
back until “Off” appears.
Changing the subtitle language
You can select the language when playing back a disc
recorded with multi-lingual subtitles.
Press SUB TITLE repeat-
1
edly during playback until
your desired language appears.
The on-screen display will disappear after a few seconds.
2
Off
1/32 Eng
32
5G60701A E P25-32 6/11/03, 6:08 PM32
Page 33

1/9
Changing angles/Title selection/DVD menu
DISPLAY/
CALL
TV/DVD
CH
POWER
123
456
789
OPEN/CLOSE
VOLUME
0
+
Ð
Changing Angles
When playing back a disc recorded with multi-angle facility, you can change the view angle.
Press ANGLE during play-
1
back.
The current angle will ap-
pear.
Press ANGLE repeatedly until the desired angle is selected.
2
ENGLISH
SELECT/
ENTER
CH
MUTE
DVD MENU
ANGLEAUDIO
TOP MENU
SLOW
PAUSE/STILL
SEARCH SEARCH
SKIP SKIP
MARKER
PLAY
STOP
RETURN
SUB TITLE
QUICK VIEW/
INPUT
SELECT SLEEP
PLAYMODE
JUMP
REPEATA-B
TV/CAP/TEXT
SETUP/
TV MENU
CANCEL
ZOOM
SLOW
NOTES:
• Depending on the DVD, you may not be
able to change the angles even if multiangles are recorded on the DVD.
• Depending on the DVD, you may not be
able to select the title. Depending on the
DVD, a “title menu” may simply be called
a “menu” or “title” in the instructions supplied with the disc.
Title Selection
Two or more titles are recorded on some discs. If the title
menu is recorded on the disc, you can select the desired
title.
Press TOP MENU during playback.
1
Title menu appears on the screen.
Press / or / to select the desired title.
2
Press ENTER or PLAY.
3
The playback of the selected title will start.
DVD Menu
Some DVDs allow you to select the disc contents using the
menu.
When you play back these DVDs, you can select the subtitle language and sound-track language,etc. using the
DVD menu.
Press DVD MENU during playback.
1
The DVD menu appears on the screen.
• Press DVD MENU again to resume playback at the scene
when you pressed DVD MENU.
Press / or / to select the desired item.
2
Press ENTER.
3
The menu continues to another screen. Repeat steps 2
and 3 to set additional items if any.
33
5G60701A E P33-38 6/11/03, 6:08 PM33
Page 34

/Enter/Setup/Return
OSD Language
Francais
Espanol
English
/Enter/Setup/Return
Language
Menu English
Audio English
Subtitle English
OSD Language English
Setting language
Main Menu
/Enter/Setup/Return
Language
Picture
Sound
Parental
You can change the default settings
to customise performance to your
preference.
DISPLAY/
POWER
CALL
123
456
789
OPEN/CLOSE
TV/DVD
VOLUME
+
Ð
0
CH
Press TV/DVD to select
1
DVD mode.
Press SETUP in the stop
mode.
Press
or to select
“Language”, then press
or ENTER.
Press or to select
2
“OSD Language”, then
press
or ENTER.
SELECT/
ENTER
CH
MUTE
DVD MENU
ANGLEAUDIO
TOP MENU
SLOW
PAUSE/STILL
SEARCH SEARCH
SKIP SKIP
MARKER
PLAY
STOP
RETURN
SUB TITLE
QUICK VIEW/
INPUT
SELECT SLEEP
PLAYMODE
JUMP
REPEATA-B
TV/CAP/TEXT
SETUP/
TV MENU
CANCEL
ZOOM
SLOW
NOTES:
• If the selected soundtrack language is
not recorded on the disc, the original
language will be heard.
• If the selected subtitle language is not
recorded on the disc, the first-priority
language is selected.
Press or to select de-
3
sired language (e.g. English), then press ENTER.
The menu returns to “Language” menu automatically.
• If you want to return to the
previous menu, press
or RETURN.
Repeat steps 2-3 for other “Language” setting.
4
Other Selection: (Menu/Audio/Subtitle)
If you want to select another language, enter the language
code (see the Language code list on page 40).
Off: (subtitle)
Subtitles do not appear.
Press SETUP to remove the Menu screen.
5
34
5G60701A E P33-38 6/11/03, 6:08 PM34
Page 35

Picture
Display
On
TV Screen
4:3
Setting the aspect ratio of TV screen/Setting on screen display
TV Screen
4:3
4:3
16:9
Picture
TV Screen
4:3
Display
On
Picture
TV Screen
4:3
Display
Off
/Enter/Setup/Return
Main Menu
Language
Picture
Sound
Parental
Setting the aspect ratio of TV screen
You can select the aspect ratio for your TV.
Press TV/DVD to select
1
DVD mode.
DISPLAY/
CALL
TV/DVD
POWER
123
456
789
OPEN/CLOSE
VOLUME
0
+
Ð
Press SETUP in the stop
mode or No Disc.
Press
or to select
“Picture”, then press
ENTER.
Press or to select
2
“TV Screen”, then press
or ENTER.
or
ENGLISH
CH
SELECT/
ENTER
CH
MUTE
DVD MENU
ANGLEAUDIO
TOP MENU
SLOW
PAUSE/STILL
SEARCH SEARCH
SKIP SKIP
MARKER
PLAY
STOP
RETURN
SUB TITLE
QUICK VIEW/
INPUT
SELECT SLEEP
PLAYMODE
JUMP
REPEATA-B
TV/CAP/TEXT
SETUP/
TV MENU
CANCEL
ZOOM
SLOW
NOTE:
If the DVD disc is not formatted in the pan
& scan style, it displays 4:3 style.
Press or to select
3
your desired screen type,
then press ENTER.
Y ou have the following screen sizes to choose from:
16:9
Wide screen
Select this mode when connecting to a wide-screen TV.
A wide screen picture is displayed full size.
4:3
Letterbox
Select this mode when connecting to a conventional TV.
When playing back a wide screen-DVD disc, it displays the
wide picture with black bands at the top and bottom of
screen.
4:3
Panscan
It displays the wide picture on the whole screen with left
and right edges automatically cut off.
• If you want to return to the previous menu, press
or
RETURN.
Press SETUP to remove the Menu screen.
4
Status on screen display
On screen display can be switched on or off when you
press the buttons.
Press SETUP in the stop mode or No Disc.
1
2
3
or to select “Picture”, then press or ENTER.
Press
Press or to select
“Display”.
Press or ENTER to
select “On” or “Off”.
5G60701A E P33-38 6/11/03, 6:08 PM35
On: On screen displays appear when you press the
buttons (factory setting).
Off: On screen displays do not appear when you press
any buttons.
• If you want to return to the previous menu, press
RETURN.
Press SETUP to remove the Menu screen.
4
or
35
Page 36

/Enter/Setup/Return
Sound
DRC On
Main Menu
/Enter/Setup/Return
Language
Picture
Sound
Parental
/Enter/Setup/Return
Sound
DRC Off
Dynamic Range Control
DRC (Dynamic Range Control) enables you to control the dynamic range
so as to achieve a suitable sound for
your equipment.
POWER
DISPLAY/
CALL
TV/DVD
OPEN/CLOSE
Press TV/DVD to select
1
DVD mode.
Press SETUP in the stop
mode.
Press
or to select
“Sound”.
123
456
789
CH
SELECT/
ENTER
CH
MUTE
TOP MENU
SLOW
SEARCH SEARCH
SKIP SKIP
MARKER
DVD MENU
ANGLEAUDIO
PAUSE/STILL
RETURN
SUB TITLE
INPUT
SELECT SLEEP
PLAYMODE
PLAY
STOP
JUMP
TV/CAP/TEXT
VOLUME
0
SETUP/
TV MENU
CANCEL
QUICK VIEW/
ZOOM
SLOW
REPEATA-B
+
Ð
Press or ENTER to se-
2
lect “DRC”.
Press or ENTER to se-
3
lect “On” or “Off”.
• If you want to return to the previous menu, press
RETURN.
Press SETUP to remove the Menu screen.
4
or
NOTES:
• This function works only during playback of Dolby Digital recorded discs.
• The level of Dynamic Range Reduction
may differ depending on DVD video
disc.
36
5G60701A E P33-38 6/11/03, 6:08 PM36
Page 37

Parental
Password Off
Parental Level Off
Some discs are specified not suitable
/Enter/Setup/Return
Parental Level
Off
1
2
3
4
5
for children. Such discs can be limited
not to play back with the unit.
DISPLAY/
POWER
CALL
123
456
789
TV/DVD
OPEN/CLOSE
VOLUME
0
+
Ð
Parental control setting
Press TV/DVD to select
1
DVD mode.
Press SETUP in the stop
mode.
Press
“Parental”, then press
ENTER.
Press or to select
2
“Parental Level”, then press
or to select
or ENTER.
Main Menu
Language
Picture
Sound
or
Parental
/Enter/Setup/Return
ENGLISH
CH
SELECT/
ENTER
CH
MUTE
DVD MENU
ANGLEAUDIO
TOP MENU
SLOW
PAUSE/STILL
SEARCH SEARCH
SKIP SKIP
MARKER
PLAY
STOP
RETURN
SUB TITLE
QUICK VIEW/
INPUT
SELECT SLEEP
PLAYMODE
JUMP
REPEATA-B
TV/CAP/TEXT
SETUP/
TV MENU
CANCEL
ZOOM
SLOW
NOTES:
• If each setup (P.34–38) has been
completed, the unit can always be
worked under the same conditions
(especially with DVD discs).
Each setup will be retained in the
memory when you turn the power off.
• Depending on the discs, the unit cannot limit playback.
• Some discs may not be encoded with
specific rating level information though
its disc jacket says “adult.” For those
discs, the age restriction will not work.
Press or to select a
3
level from Off or 1–8. Press
or ENTER to set the se-
lected level.
• Level Off: The parental control setting does not function.
• Level 8: Almost all DVD software can be played back.
• Level 1: DVD software for adults cannot be played
back.
• Select from the level 1 to level 8. The limitation will be
more severe as the level number is lower.
Press or to select
4
“Password”, then press
or ENTER.
Press number buttons (0–
5
9) for the password.
Don’t forget the password.
Parental
Password Off
Parental Level 1
Password
Password 1234
• If you input a wrong
number, press CANCEL.
Press ENTER to store the
6
password.
Note: Now the rating is
locked and the setting can-
Parental
Password On
Parental Level 1
not be changed unless you
enter the correct password.
• If you want to return to the previous menu, press
or RETURN.
Press SETUP to remove the parental control screen.
7
37
5G60701A E P33-38 6/11/03, 6:08 PM37
Page 38

To change the parental level
Parental
Password Off
Parental Level 1
/Enter/Setup/Return
Parental Level
3
4
5
6
7
8
Parental
Password On
Parental Level 1
Parental
Password Off
Parental Level 1
Parental
Password Off
Parental Level 8
Parental
Password On
Parental Level 8
Password
Password 1234
Password
Password
____
Press TV/DVD to select DVD mode.
1
Press SETUP in the stop mode or No Disc.
Press
DISPLAY/
CALL
TV/DVD
POWER
123
456
789
CH
OPEN/CLOSE
VOLUME
0
+
Ð
ENTER.
Press or to select
2
“Password”, then press
or ENTER.
Press number buttons (0–
3
9) to enter the password
you have stored.
• If you input a wrong number, press CANCEL.
or to select “Parental”, then press or
SELECT/
ENTER
CH
MUTE
DVD MENU
ANGLEAUDIO
TOP MENU
SLOW
PAUSE/STILL
SEARCH SEARCH
SKIP SKIP
MARKER
PLAY
STOP
RETURN
SUB TITLE
QUICK VIEW/
INPUT
SELECT SLEEP
PLAYMODE
JUMP
REPEATA-B
TV/CAP/TEXT
SETUP/
TV MENU
CANCEL
ZOOM
SLOW
NOTE:
Do not forget the password. If you forget
the password, contact the dealer that you
purchased the unit from.
Press ENTER.
4
The password is now Off.
Press or to select
5
“Parental Level”. Then
press
or ENTER. The
Parental Level screen is displayed.
Press or to select a
6
level from Off or 1–8 and
then press
Press or to select
7
“Password” and then press
or ENTER.
or ENTER.
Press number buttons (0–
8
9) to enter a 4-digit password.
Note: Y ou can enter a new password.
Press ENTER.
9
The parental level is now
changed and locked.
38
5G60701A E P33-38 6/11/03, 6:08 PM38
• If you want to return to the previous menu, press
RETURN.
Press SETUP to remove the parental control screen.
10
or
Page 39

Temporary disabling of rating level by DVD disc
Depending on the DVD disc, the disc
may try to temporarily cancel the
rating level that you have set.
It is up to you to decide whether to
cancel the rating level or not.
Load a DVD disc and press
1
PLA Y (see page 27).
DISPLAY/
CALL
TV/DVD
POWER
123
456
789
CH
SELECT/
ENTER
CH
MUTE
TOP MENU
SLOW
SEARCH SEARCH
SKIP SKIP
MARKER
DVD MENU
ANGLEAUDIO
PAUSE/STILL
RETURN
SUB TITLE
INPUT
SELECT SLEEP
PLAYMODE
PLAY
STOP
JUMP
TV/CAP/TEXT
OPEN/CLOSE
VOLUME
0
SETUP/
TV MENU
CANCEL
QUICK VIEW/
ZOOM
SLOW
REPEATA-B
+
Ð
If the DVD disc has been designed to temporarily cancel
2
the Rating level, the screen which appears after inserting
a DVD will change, depending on which disc is played. If
you select “YES” with the ENTER key, “Your disc exceeds
the parental control level.” screen will then appear.
Your disc exceeds the parental control level.
Password
____
Enter/0–9/Cancel/Return
If you wish to cancel the set rating level temporarily, enter
3
the 4-digit password.
Then press ENTER.
Alternatively, if the password has not been set, playback
will commence. If you don’t know (or have forgotten) the
password, select “STOP”.
The setting screen will disappear. Press OPEN/CLOSE to
remove the disc.
To quit entering, press RETURN.
Playback will commence if the entered password was cor-
4
rect.
ENGLISH
NOTE:
This temporary cancellation of rating level
will be kept until the disc is ejected.
When the disc is ejected, the original rating
level will be set again automatically.
5G60701A E P39-47 6/11/03, 6:08 PM39
39
Page 40

Language code list
Enter the appropriate code number for the initial settings "AUDIO", "SUBTITLE" and/or "MENU LANGUAGE"
(see page 34).
Language Name Code Language Name Code Language Name Code
Abkhazian 1112 Fiji 1620 Lingala 2224 Singhalese 2919
Afar 1111 Finnish 1619 Lithuanian 2230 Slovak 2921
Afrikaans 1116 French 1628 Macedonian 2321 Slovenian 2922
Albanian 2927 Frisian 1635 Malagasy 2317 Somali 2925
Amharic 1123 Galician 1722 Malay 2329 Spanish 1529
Arabic 1128 Georgian 2111 Malayalam 2322 Sundanese 2931
Armenian 1835 German 1415 Maltese 2330 Swahili 2933
Assamese 1129 Greek 1522 Maori 2319 Swedish 2932
Aymara 1135 Greenlandic 2122 Marathi 2328 Tagalog 3022
Azerbaijani 1136 Guarani 1724 Moldavian 2325 Tajik 3017
Bashkir 1211 Gujarati 1731 Mongolian 2324 Tamil 3011
Basque 1531 Hausa 1811 Nauru 2411 Tatar 3030
Bengali; Bangla 1224 Hebrew 1933 Nepali 2415 Telugu 3015
Bhutani 1436 Hindi 1819 Norwegian 2425 Thai 3018
Bihari 1218 Hungarian 1831 Oriya 2528 Tibetan 1225
Breton 1228 Icelandic 1929 Panjabi 2611 Tigrinya 3019
Bulgarian 1217 Indonesian 1924 Pashto, Pushto 2629 Tonga 3025
Burmese 2335 Interlingua 1911 Persian 1611 Turkish 3028
Byelorussian 1215 Irish 1711 Polish 2622 Turkmen 3021
Cambodian 2123 Italian 1930 Portuguese 2630 Twi 3033
Catalan 1311 Japanese 2011 Quechua 2731 Ukrainian 3121
Chinese 3618 Javanese 2033 Rhaeto-Romance 2823 Urdu 3128
Corsican 1325 Kannada 2124 Romanian 2825 Uzbek 3136
Croatian 1828 Kashmiri 2129 Russian 2831 Vietnamese 3219
Czech 1329 Kazakh 2121 Samoan 2923 Volapük 3225
Danish 1411 Kirghiz 2135 Sanskrit 2911 Welsh 1335
Dutch 2422 Korean 2125 Scots Gaelic 1714 Wolof 3325
English 1524 Kurdish 2131 Serbian 2928 Xhosa 3418
Esperanto 1525 Laothian 2225 Serbo-Croatian 2918 Yiddish 2019
Estonian 1530 Latin 2211 Shona 2924 Yoruba 3525
Faroese 1625 Latvian, Lettish 2232 Sindhi 2914 Zulu 3631
Language Name Code
40
5G60701A E P39-47 6/11/03, 6:08 PM40
Page 41

Reception disturbances
Most types of television interference can be remedied by adjusting the height and position of the VHF/UHF
antenna. Outdoor antennas are recommended for best results. The most common types of television
interference are shown below. If one of these symptoms appear when the TV/DVD is connected to a Cable
TV system, the disturbance may be caused by the local Cable TV company broadcast.
IGNITION
Black spots or horizontal streaks may appear, the picture may flutter or
drift. Usually caused by interference from automobile ignition systems,
neon lamps or AC powered tools and appliances such as drills or hair
dryers.
GHOSTS
Ghosts are caused by the television signal following two paths. One is
the direct path and the other is reflected by tall buildings, hills or other
large objects. Changing the direction or position of the antenna may
improve the reception.
SNOW
If the TV/DVD is located far from the TV station, in a fringe reception
area where the signal is weak, small dots may appear in the picture.
If the signal is extremely weak, the installation of a larger external
antenna may be necessary.
ENGLISH
RADIO FREQUENCY INTERFERENCE (RFI)
Caused by two-way radios, this type of interference produces moving
ripples or diagonal streaks in the picture. Some cases may cause a
loss of contrast in the picture. Changing the direction and position of
the antenna or installing an RFI filter may improve the picture.
PICTURE SIZE VARIATION
A slight picture size variation is normal when you adjust the CONTRAST
or BRIGHTNESS settings.
CARE AND MAINTENANCE
To prevent fire or shock hazard, disconnect the TV/DVD from the power source before cleaning.
The finish on the cabinet may be cleaned with mild soap and a soft, damp cloth and cared for as other furniture.
Use caution when cleaning or wiping the plastic parts.
5G60701A E P39-47 6/11/03, 6:08 PM41
41
Page 42

Connections to other equipment
The exact arrangement you use to interconnect various video and audio components to the TV/DVD is dependent on the model and features of each component. Check the Owner's Manual provided with each component
for the location of video and audio inputs and outputs.
Using an Audio Amplifier
Rear of TV/DVD
Amplifier
Audio (L) Output
Audio (R) Output
AUDIO cord (not supplied)
To Audio (L) InputTo Audio (R) Input
Using an AV Amplifier with built-in digital surround
If you are using an Amplifier with a built-in digital surround as follows, you can enjoy the various audio systems
including Dolby Digital Surround audio that sounds just like the movie.
Connect an AV amplifier with built-in Dolby Digital decoder, DTS decoder, MPEG decoder or etc as
shown below.
Rear of TV/DVD
Coaxial Digital
Audio Output
Coaxial digital cable (not supplied)
To Coaxial Digital Audio Input
AV Amplifier with built-in digital surround
decoder as listed above
Front
Speaker
(Left)
TV/DVD
Surround
Speaker (Left)
Subwoofer
Center Speaker
Front
Speaker
(Right)
Surround
Speaker
(Right)
*
Manufactured under license from Dolby Laboratories. “Dolby” and the double-D symbol are trademarks of Dolby
Laboratories. Confidential unpublished works. © 1992-1997 Dolby Laboratories, Inc. All rights reserved.
*
“DTS” and “DTS Digital Out” are trademarks of Digital Theater Systems, Inc.
NOTES:
•
When you make the connections above, do not set DOLBY DIGITAL to DOLBY DIGITAL, MPEG to MPEG to ON on the AV
Amplifier. If you do, a loud noise will suddenly come out from the speakers, affecting your ears or causing the speakers to be
damaged.
•
Some DTS decoders which do not support DVD-DTS interface may not work properly with the unit.
42
5G60701A E P39-47 6/11/03, 6:08 PM42
Page 43

Connections to other equipment
Using the audio/video inputs
If you connect the TV/DVD to VCR, camcorder or TV game, you can select by pressing INPUT SELECT.
Press INPUT SELECT repeatedly to select the desired mode.
“LINE” or TV channel will display on the screen.
1. To connect the TV/DVD to a VCR
Press the INPUT SELECT to select the desired mode to use the TV as a monitor.
Operate your VCR as usual.
VCR
VIDEO IN
To Audio/Video
OUT
Audio/Video cord (not supplied)
2. To connect the TV to a camcorder
To playback from the camcorder, connect the camcorder to the TV/DVD as shown.
Camcorder
VIDEO IN
NOTE:
In the DVD mode this key will not
operate.
LINE
Front of TV/DVD
(MONO)
PHONES VIDEO IN L – AUDIO IN – R
AUDIO IN (R)
AUDIO IN (L)
Front of TV/DVD
(MONO)
PHONES VIDEO IN L – AUDIO IN – R
ENGLISH
To Audio/Video OUT
Audio/Video cord (not supplied)
3. To connect the TV to a TV Game
The TV/DVD can also be used as a display device for many video games. However, due to the wide variety of different
types of signal generated by these devices and subsequent hook-up variations required, they have not all been included in
AUDIO IN (R)
AUDIO IN (L)
the suggested connection diagrams. You'll need to consult each component's Owner's Manual for additional information.
Front of TV/DVD
VIDEO IN
To Audio/Video OUT
Audio/Video cord (not supplied)
5G60701A E P39-47 6/11/03, 6:08 PM43
(MONO)
PHONES VIDEO IN L – AUDIO IN – R
AUDIO IN (R)
AUDIO IN (L)
43
Page 44

Problems and troubleshooting
Use the following check list for troubleshooting when you have problems with your unit. Consult your local
dealer or service outlet if problems persist.
Be sure all connections are properly made when using with other units.
SYMPTOMS POSSIBLE SOLUTIONS
POWER
TV/DVD does not operate.
TV BROADCAST RECEPTION
Poor sound or No sound
Poor picture or No picture
Poor reception on some channels
Poor color or no color
Picture wobbles or drifts
No CATV reception
Horizontal or diagonal bars on
screen
No reception above channel 13
TV shuts off
Closed - Caption is not activated.
Display is not shown in your
language.
• Make sure the power cord is plugged in.
• Try another AC outlet.
• Power is off, check fuse or circuit breaker.
• Unplug unit, then plug it back in.
•Connect the DC car cord to the cigarette lighter socket.
•The DC car cord fuse is drown, replace fuse.
• Station or CATV experiencing problems, tune to another station.
• Check Volume adjustments.
• Check for sources of possible interference.
• Station or CATV experiencing problems, tune to another station.
• Check antenna or CATV connections, reorient antenna.
• Check for sources of possible interference.
• Check picture control adjustments.
• Station or CATV experiencing problems, tune to another station.
• Station signal is weak, reorient antenna to receive weaker station.
• Check for sources of possible interference.
• Station or CATV experiencing problems, tune to another station.
• Make sure channels are set into memory.
• Check picture control adjustments.
• Check antenna or CATV connections, reorient antenna.
• Check for sources of possible interference.
• Station or CATV experiencing problems, tune to another station.
• Make sure channels are set into memory.
• CATV company is scrambling signal.
• Check antenna orientation.
• Check all CATV connections.
• Set TV/CATV menu option to the CATV mode.
• Station or CATV system problems, try another station.
• Check antenna connections, reorient antenna.
• Check for sources of possible interference.
• Make sure TV/CATV menu option is in the appropriate mode.
• If using antenna, check UHF antenna connections.
• No broadcast on station tuned.
• Sleep Timer is set.
• Power interrupted.
• TV station experiencing problems or program tuned is not closed
captioned. Try another channel.
• Check CATV connection or VHF/UHF antenna, reposition or rotate antenna.
• Press TV/CAP/TEXT button to turn on the closed caption decoder.
• Select proper language in the menu options.
PAGE
11,12
15
15
41
15
12,13
41
23
15
12,13
41
15
19
23
12,13
41
15
19
–
12
13
18
15
12,13
41
18
12
15
16
–
15
12,13
17
14
44
5G60701A E P39-47 6/11/03, 6:08 PM44
Page 45

Problems and troubleshooting
SYMPTOMS POSSIBLE SOLUTIONS
DVD
Playback doesn’t start.
No picture • TV/DVD selector is not set correctly.
No sound
Picture is distorted during CUE or
REVIEW.
Stopping playback, search, slowmotion play, repeat play, or
program play, etc. cannot be
performed.
No 4:3 (16:9) picture • The setup does not match your TV.
No on-screen display • Select Display On.
No surround sound • The setup does not match your stereo system.
The unit or remote operation key
is not functioning.
Playback does not start when the
title is selected.
Audio soundtrack and/or subtitle
language is not changed when
you play back a DVD.
No subtitle
Angle cannot be changed. • Multi-angles are not recorded on the DVD disc.
“
” appears on the screen.
REMOTE CONTROL
The remote control does not
function.
• No disc is inserted.
• The disc may be dirty. Clean up the disc.
• The unit cannot play CD-ROMs, etc.
• Check the input selector of the amplifier is set properly.
• The unit is in the Special playback mode.
• Select the correct Audio Output position on AV amplifier.
• The picture will be distorted occasionally.
• Some discs may not do some of the functions.
• Turn off the unit and unplug the AC power cord for several minutes, then replug it.
• Check the RATING LEVEL setup.
• Multilingual language is not recorded on the DVD disc.
• Some discs have no subtitles.
• Subtitles are cleared. Press SUB TITLE.
• The function is prohibited with the unit or the disc.
• Aim at the remote control at the remote sensor.
• Operate within Approx. 5 Meters or reduce the light in the room.
• Clear the path of the beam.
• The batteries are weak. Replace the batteries.
• Check the batteries are inserted correctly.
PAGE
27
25
–
26
–
28
42
–
–
35
35
42
–
37~39
34
32
33
–
11
ENGLISH
For additional set-up or operating assistance, please visit our WEBSITE at www.memorexelectronics.com
or contact CUSTOMER SERVICE at 1-800-919-3647
Please keep all packaging material for at least 90 days in case you need to return this product to your
FOR PARTS AND ACCESSORIES, CONTACT FOX INT'L AT 1-800-321-6993
5G60701A E P39-47 6/11/03, 6:08 PM45
place of purchase or Memorex.
45
Page 46

Specifications
GENERAL
Power supply:
Power consumption:
Weight:
Dimensions:
Operating temperature:
Operating humidity:
AC 120V 60Hz
DC 12V
Operation: 55W (AC120V, DC12V)
Stand by: 5W (AC120V)
17.6lbs (8 kg)
Width : 10-15/16 inches (278 mm)
Height: 12-1/4 inches (311.5 mm)
Depth : 12-5/16 inches (312.5 mm)
5° - 40°C
Less than 80%
TELEVISION
Picture tube:
Tuner type:
Receiving channels:
Antenna input:
Speaker:
Audio output power:
DVD/CD player
Signal system:
Applicable disc:
Audio characteristics
frequency response:
S/N Ratio:
Harmonic distortion:
Wow and flutter:
Input/Output:
Digital audio out:
Pickup:
9” (228.6 mm diagonal)
Quartz PLL Frequency Synthesized
VHF 2-13
UHF 14-69
CATV 14-36 (A)-(W)
37-59 (AA)-(WW)
60-85 (AAA)-(ZZZ)
86-94 (86)-(94)
95-99 (A-5)-(A-1)
100-125 (100)-(125)
01 (5A)
VHF/UHF In 75 ohm coaxial
3" (76 mm), 8 ohm x 2
1.2W + 1.2W
NTSC
1. DVD (12cm, 8cm)
2. CD (12cm, 8cm)
DVD: 4Hz - 22KHz
CD: 4Hz - 20KHz
90dB
0.06%
Below Measurable Level
Inputs : Video : (RCA) 1 Vp-p/75ohm
Audio : (RCA) – 8 dBm/50Kohm
Outputs :Video : (RCA) 1 Vp-p/75ohm
Audio : (RCA) – 8 dBm/1Kohm
0.5Vp-p 75ohms terminated
CD : Wavelength: 775 - 815 nm
Maximum output power: 0.5 mW
DVD : Wavelength: 650 - 666 nm
Maximum output power: 2.0 mW
ACCESSORIES:
Remote control
T elescopic Antenna
12V DC Car Cord
Carry ’Bag
46
5G60701A E P39-47 6/11/03, 6:08 PM46
Page 47

Memo
○○○○○○○○○○○○○○○○○○○○○○○○○○○○○○○○○○○○○○○○○○○○○○○○○○○○○○○○
○○○○○○○○○○○○○○○○○○○○○○○○○○○○○○○○○○○○○○○○○○○○○○○○○○○○○○○○
○○○○○○○○○○○○○○○○○○○○○○○○○○○○○○○○○○○○○○○○○○○○○○○○○○○○○○○○
○○○○○○○○○○○○○○○○○○○○○○○○○○○○○○○○○○○○○○○○○○○○○○○○○○○○○○○○
○○○○○○○○○○○○○○○○○○○○○○○○○○○○○○○○○○○○○○○○○○○○○○○○○○○○○○○○
○○○○○○○○○○○○○○○○○○○○○○○○○○○○○○○○○○○○○○○○○○○○○○○○○○○○○○○○
○○○○○○○○○○○○○○○○○○○○○○○○○○○○○○○○○○○○○○○○○○○○○○○○○○○○○○○○
○○○○○○○○○○○○○○○○○○○○○○○○○○○○○○○○○○○○○○○○○○○○○○○○○○○○○○○○
○○○○○○○○○○○○○○○○○○○○○○○○○○○○○○○○○○○○○○○○○○○○○○○○○○○○○○○○
○○○○○○○○○○○○○○○○○○○○○○○○○○○○○○○○○○○○○○○○○○○○○○○○○○○○○○○○
○○○○○○○○○○○○○○○○○○○○○○○○○○○○○○○○○○○○○○○○○○○○○○○○○○○○○○○○
○○○○○○○○○○○○○○○○○○○○○○○○○○○○○○○○○○○○○○○○○○○○○○○○○○○○○○○○
○○○○○○○○○○○○○○○○○○○○○○○○○○○○○○○○○○○○○○○○○○○○○○○○○○○○○○○○
ENGLISH
○○○○○○○○○○○○○○○○○○○○○○○○○○○○○○○○○○○○○○○○○○○○○○○○○○○○○○○○
○○○○○○○○○○○○○○○○○○○○○○○○○○○○○○○○○○○○○○○○○○○○○○○○○○○○○○○○
○○○○○○○○○○○○○○○○○○○○○○○○○○○○○○○○○○○○○○○○○○○○○○○○○○○○○○○○
○○○○○○○○○○○○○○○○○○○○○○○○○○○○○○○○○○○○○○○○○○○○○○○○○○○○○○○○
○○○○○○○○○○○○○○○○○○○○○○○○○○○○○○○○○○○○○○○○○○○○○○○○○○○○○○○○
○○○○○○○○○○○○○○○○○○○○○○○○○○○○○○○○○○○○○○○○○○○○○○○○○○○○○○○○
○○○○○○○○○○○○○○○○○○○○○○○○○○○○○○○○○○○○○○○○○○○○○○○○○○○○○○○○
○○○○○○○○○○○○○○○○○○○○○○○○○○○○○○○○○○○○○○○○○○○○○○○○○○○○○○○○
○○○○○○○○○○○○○○○○○○○○○○○○○○○○○○○○○○○○○○○○○○○○○○○○○○○○○○○○
○○○○○○○○○○○○○○○○○○○○○○○○○○○○○○○○○○○○○○○○○○○○○○○○○○○○○○○○
○○○○○○○○○○○○○○○○○○○○○○○○○○○○○○○○○○○○○○○○○○○○○○○○○○○○○○○○
○○○○○○○○○○○○○○○○○○○○○○○○○○○○○○○○○○○○○○○○○○○○○○○○○○○○○○○○
5G60701A E P39-47 6/11/03, 6:08 PM47
47
Page 48

ESPAÑOL
AVISO:
PARA REDUCIR EL RIESGO DE DESCARGA
ELECTRICA, NO RETIRE LA CUBIERTA (O
POSTERIOR). EN EL INTERIOR DEL APARATO
NO HAY COMPONENTE ALGUNO QUE
PRECISE SERVICIO DE MANTENIMIENTO A
CARGO DEL USUARIO. SOLICITE CUALQUIER
OPERACION DE MANTENIMIENTO A PERSONAL DE SERVICIO CALIFICADO.
PRECAUCION
RIESGO DE DESCARGA
ELECTRICA NO ABRIR
El símbolo del rayo dentro de un
triángulo equilátero tiene por finalidad
alertar al usuario acerca de la
presencia de tensión peligrosa (sin
aislación) en el interior del producto,
que puede tener la intensidad suficiente
como para constituir un riesgo de
descarga eléctrica.
El signo de exclamación dentro de un
triángulo equilátero tiene por finalidad
alertar al usuario de importantes
instrucciones de operación y
mantenimiento
que acompaña a este aparato.
(servicio) en la literatura
AVISO: Para reducir el riesgo de incendio o descarga eléctrica, no exponga esta unidad a la lluvia ni a la
humedad.
NOTA: Por favor guarde todo el material de embalaje durante por lo menos 90 días en caso de que
necesite devolver este producto a su lugar de compra o Memorex.
ADVERTENCIA: Este equipo ha sido sometido a pruebas y cumple con los límites establecidos para un aparato
PRECAUCION: El usuario corre el riesgo de perder la autorización para hacer funcionar este equipo en caso de
PRECAUCION:
ESTE TOCADISCOS DE VIDEO DIGITAL UTILIZA UN
SISTEMA LASER.
PARA UTILIZAR CORRECTAMENTE ESTE PRODUCTO, LEA
CUIDADOSAMENTE ESTE MANUAL DE INSTRUCCIONES Y
GUARDELO PARA SU REFERENCIA EN EL FUTURO. SI
FUERA NECESARIO HACER UN MANTENIMIENTO DE
ESTE APARATO, CONSULTE CON UN CENTRO DE
SERVICIO AUTORIZADO-LEA EL PROCEDIMIENTO DE
SERVICIO.
EL USO DE LOS CONTROLES, AJUSTES O LA
REALIZACION DE OTROS PROCEDIMIENTOS QUE NO
SEAN LOS ESPECIFICADOS AQUI PUEDE PROVOCAR
UNA EXPOSICION A RADIACIONES PELIGROSAS.
PARA EVITAR LA EXPOSICION DIRECTA A LOS RAYOS
LASER, NO TRATE DE ABRIR LA CAJA. PUEDE HABER
UNA RADIACION LASER VISIBLE AL ABRIR LA CAJA.
NO MIRE HACIA EL RAYO.
digital de Clase B, de acuerdo con la Parte 15 del Reglamento de la FCC. Estos límites están
diseñados para proporcionar protección razonable contra interferencias perjudiciales en una
instalación residencial. Este equipo genera o emplea energía de radiofrecuencia y, si no es
instalado y empleado de acuerdo con estas instrucciones, puede causar interferencias
perjudiciales a las radiocomunicaciones.
Sin embargo, no garantizamos que no ocurrirán interferencias en una instalación en particular.
Si este equipo causa interferencias perjudiciales a la recepción radial o televisiva, situación que
puede ser determinada apagando y encendiendo el equipo, se sugiere al usuario que trate de
corregir tal interferencia mediante una o más de las siguientes medidas:
- Reorientar o relocalizar la antena receptora.
- Incrementar la separación entre el equipo y el receptor.
- Conectar el equipo a un tomacorriente o circuito diferente al que está conectado al receptor.
- Consultar con el concesionario o un técnico experimentado solicitándole su asistencia.
que ejecute un cambio o modificación no aprobado por la parte responsable para la
conformidad con las Reglas FCC.
Lugar de la marca requerida
La hoja de especificaciones y las
precauciones para su seguridad están
en la parte trasera del aparato.
CERTIFICACION: CUMPLE CON LAS
NORMAS DE PRESTACIONES CON
RADIACION DE LA FDA, 21 CFR
SUBCAPITULO J.
2
5G60701A S P02-05 6/11/03, 6:08 PM2
Page 49

PARA SU SEGURIDAD
1. LEA LAS INSTRUCCIONES
Antes de usar la unidad, lea detenidamente todas las instrucciones de seguridad y operación.
2. CONSERVE ESTE MANUAL DE INSTRUCCIONES
Conserve las instrucciones de seguridad y operación para consultas futuras.
3. RESPETE LAS ADVERTENCIAS
Observe estrictamente todas las advertencias impresas
4. SIGA LAS INSTRUCCIONES
Siga todas las instrucciones de operación y uso.
5. LIMPIEZA
Antes de limpiar este videograbador, desconéctelo del tomacorriente mural. No use limpiadores líquidos ni
aerosol. Utilice sólo un paño húmedo para limpiar el exterior del mueble.
6. ENCHUFES
El fabricante de esta unidad no hace ninguna recomendación de accesorios ya que pueden ser peligrosos.
7. AGUA Y HUMEDAD
No utilice este aparato cerca del agua. Por ejemplo cerca de una bañera, lavabo, pileta de la cocina,
lavadero, en un sótano húmedo o cerca de una piscina.
8. ACCESORIOS
No instale esta unidad en un carro, soporte, trípode o mesa inestables. La unidad podría caerse, causando
serias lesiones, resultando también severamente dañada a la unidad.
8A. La combinación de aparato y carro deberá ser movida con cuidado. Las detenciones bruscas, la fuerza
excesiva y las superficies disparejas podrán hacer que el aparato y el carro se vuelven.
9. VENTILACION
Las ranuras y aberturas en la parte trasera o inferior del mueble son para ventilación y permiten un
funcionamiento fiable de la unidad, protegiendo contra calentamiento excesivo. Estas aberturas no deberán
ser bloqueadas ni cubiertas. Para evitar bloquear las aberturas, nunca sitúe la unidad encima de una
cama, sofá, alfombra u otra superficie similar. Tampoco instale la unidad
cerca o encima de un radiador o calefactor. La unidad no deberá ser instalado
en un mueble empotrado, como ser una repisa para libros o bastidor, a menos
que se pueda garantizar una ventilación adecuada, o cuando las instrucciones
del fabricante así lo especifiquen.
10. FUENTES DE ALIMENTACION
Esta unidad sólo deberá ser operada mediante el tipo de fuente de alimentación
especificado en la etiqueta indicadora. Si no está seguro del tipo de fuente de
alimentación que tiene en su casa, consulte a su distribuidor o a la
compañía de electricidad local. En el caso de unidades diseñadas para
funcionar a pilas o con otras fuentes de alimentación, consulte el manual de instrucciones respectivo.
11. CONEXIÓN A TIERRA O POLARIZACION
Esta unidad está equipada con una clavija polarizada de corriente alterna (una clavija que tiene una espiga
más ancha que la otra). Esta clavija solamente puede ser insertada en el tomacorriente en una sola
dirección. Esta es una medida de seguridad. Si no pudiera insertar completamente la clavija en el
tomacorriente, vuelva a intentarlo invirtiendo la clavija. Si aún no fuera posible insertar la clavija, tome
contacto con un electricista para que reemplace su tomacorriente obsoleto. Si su unidad está equipada con
una clavija de conexión a tierra de 3 alambres (una clavija con una tercera espiga de conexión a tierra), no
modifique las características de seguridad de la clavija polarizada. Este tipo de clavija sólo puede ser
insertado en un tomacorriente con contacto a tierra. Esto también es una medida de seguridad. Si no
pudiera insertar la clavija en el tomacorriente, tome contacto con un electricista para que reemplace su
tomacorriente obsoleto. No modifique las características de seguridad de la clavija de conexión a tierra.
en la unidad y las incluidas en el manual de instrucciones.
AVISO PARA CARRO PORTATIL
(símbolo provisto por RETAC)
S3126A
ENGLISH
ESPAÑOL
5G60701A S P02-05 6/11/03, 6:08 PM3
3
Page 50

PARA SU SEGURIDAD
12. PROTECCION DEL CABLE DE ALIMENT ACION
Los cables de alimentación deberán ser tendidos de manera tal que la probabilidad de que sean pisados o
aplastados por otros objetos sea mínima. Preste especial atención a las clavijas de los cables, a los
receptáculos, y al punto por donde salen del aparato.
13. TORMENTAS ELECTRICAS
Como medida de protección durante tormentas eléctricas, o cuando el videograbador permanezca sin uso
durante períodos prolongados de tiempo, desconéctelo del tomacorriente mural y desconecte la antena o
el sistema de cable. Esto evitará que la unidad resulte dañada por tormentas eléctricas o sobretensiones
en la línea de alimentación.
14. LINEAS DE ALIMENTACION
Una antena exterior no deberá ser instalada en la cercanía de líneas de alimentación aéreas ni de otros
circuitos de iluminación eléctrica o potencia, o donde pueda caerse y hacer contacto con tales líneas o
circuitos. Al instalar un sistema de antena exterior, tenga mucho cuidado de no tocar tales líneas o circuitos
de alimentación, ya que el contacto con ellos podría ser fatal.
15. SOBRECARGA
No sobrecargue los tomacorrientes murales ni los cables de extensión, ya que esto podría causar
incendios o descargas eléctricas.
16. ENTRADA DE OBJETOS Y LIQUIDOS
Nunca introduzca objetos de ningún tipo por las aberturas de la unidad, ya que podría tocar peligrosos
puntos de alta tensión o piezas de cortocircuito, provocando incendios o descargas eléctricas. Nunca
derrame ni rocíe ningún tipo de líquido sobre la unidad.
17. CONEXION A TIERRA DE LA ANTENA EXTERIOR
Si se conecta una antena externa o sistema de cable a la unidad, cerciórese de que el sistema de antena o
cable está conectado a tierra para darle protección contra sobretensión y acumulación de carga estática.
La Sección 810 del Código Nacional de Electricidad, ANSI/NFPA 70, entrega información acerca de la
manera correcta de conectar a tierra el mástil y la estructura soportante, puesta a tierra del alambre de
entrada a una unidad de descarga de antena, tamaño de los conductores de puesta a tierra, ubicación de la
nidad de descarga de la antena, conexión a los electrodos de tierra, y requisitos para el electrodo de tierra.
18. SERVICIO
No intente reparar la unidad usted mismo; al abrir o retirar las cubiertas usted se expondrá a alta tensión y
a otros peligros. Solicite todo servicio a personal calificado.
19. DAÑOS QUE REQUIERAN REPARACION
En los siguientes casos, desconecte la unidad del tomacorriente mural y llame a un técnico de servicio
calificado:
a. Cuando el cable de alimentación o la clavija estén dañados.
b. Si se ha derramado líquido sobre la unidad, o si algún objeto ha caído dentro del videograbador.
c. Si la unidad ha sido expuesta a la lluvia o al agua.
d. Cuando a pesar de haber seguido las instrucciones de operación, la unidad no funcione normalmente.
Ajuste solamente los controles indicados en el manual de instrucciones; el ajuste incorrecto de otros
controles podrá causar daños a la unidad, la que por lo general requerirá de un prolongado trabajo
de reparación (por un técnico calificado) para que sus condiciones normales de operación puedan
ser restablecidas.
e. Si la unidad se ha caída o si el gabinete se ha dañado.
f. Cuando la unidad muestre un cambio notorio en su rendimiento.
20. PIEZAS DE REPUESTO
Cuando sea necesario reemplazar piezas, asegúrese de que el técnico de servicio emplee las piezas de
repuesto especificadas por el fabricante, o piezas que tengan las mismas características que las piezas
originales. Los cambios no autorizados podrán
21. REVISION DE SEGURIDAD
Al finalizar cualquier servicio de mantenimiento o reparación de esta unidad, solicítele al técnico que
efectúe comprobaciones de seguridad para determinar si el videograbador se encuentra o no en
condiciones óptimas de operación.
22. CALOR
El producto debe ser situado lejos de fuente de calor como radiadores, reguladores de calefacción, estufas o
otros productos (incluyendo amplificadores) que se producen calor.
23. BANDEJA DEL DISCO
Tenga cuidado de no introducir los dedos en la bandeja del disco cuando se esté cerrando. Puede recibir
heridas graves.
24. CONEXION
Cuando conecte el producto a otro equipo, desconecte la alimentación y desenchufe todos los equipos del
tomacorriente. Si no lo hace, puede provocar una descarga eléctrica y heridas graves.
Lea cuidadosamente el manual de instrucciones del otro equipo y respete las instrucciones al hacer las
conexiones.
25. VOLUMEN DEL SONIDO
Reduzca el volumen a su nivel mínimo antes de conectar el producto. De lo contrario, un volumen alto
puede lastimar sus oídos o en los altavoces.
causar incendios, descargas eléctricas y otros problemas.
(CONTINUACION)
4
5G60701A S P02-05 6/11/03, 6:08 PM4
Page 51

26. DISTORSION DEL SONIDO
No permita que el producto emita un sonido distorsionado durante un periodo de tiempo prolongado.
Puede provocar un calentamiento excesivo del altavoz que resulte en un incendio.
27. ALTAVOCES
Cuando utilice altavoces, mantenga el volumen a un nivel moderado. Si utiliza los altavoces continuamente
a un volumen alto, puede lastimar sus oídos.
28. RAYO LASER
No mire por la ranura de la bandeja del disco por las salidas de circulación de aire del producto para ver la
fuente del rayo láser. Puede causar daños en los ojos.
29. DISCO
No utilice un disco rayado, deformado o reparado. Estos discos se pueden romper fácilmente y provocar
serias heridas o averías en el producto.
30. NOTA PARA LA PERSONA QUE INSTALE EL SISTEMA CATV
Se ha incluido este recordatorio para llamar la atención de quien instale el sistema CATV, con respecto al
Artículo 820-40 de la NEC, que entrega directivas de guía para realizar una conexión adecuada a tierra y,
en particular, especifica que el cable de puesta a tierra debe ser conectado al sistema de conexión a tierra
del edificio, lo más cerca del punto de entrada del cable como sea posible.
EJEMPLO DE CONEXION A TIERRA DE LA ANTENA
SEGUN EL CODIGO NACIONAL DE ELECTRICIDAD
ALAMBRE DE ENTRADA DE LA ANTENA
ABRAZADERA
DE TIERRA
UNIDAD DE DESCARGA DE LA ANTENA
(NEC, SECCION 810-20)
ENGLISH
ESPAÑOL
EQUIPO DE SERVICIO
ELECTRICO
NEC - CODIGO NACIONAL DE ELECTRICIDAD
S2898A
CONDUCTORES DE PUEST A A
TIERRA (NEC, SECCION 810-21)
ABRAZADERAS DE TIERRA
SERVICIO DE ALIMENTACION DE SISTEMA
ELECTRODO DE PUESTA A TIERRA
(NEC ART 250, PARTE H)
CONDENSACION
Se condensará humedad en la sección de funcionamiento del tocadiscos si se lo trae de un lugar fresco a una
habitación caliente o si la temperatura en la habitación sube repentinamente. En este caso, se verán afectadas
las prestaciones del tocadiscos. Para evitarlo, deje el tocadiscos a la nueva temperatura durante
aproximadamente una hora antes de conectarlo, o haga que la temperatura en la habitación suba gradualmente.
También puede condensarse humedad durante el verano si el tocadiscos está expuesta a una corriente de aire
del acondicionador de aire. En estos casos, cambie el lugar donde está instalado el tocadiscos.
5G60701A S P02-05 6/11/03, 6:08 PM5
5
Page 52

Caracteristicas
TV a Color con Tocadiscos de DVD/CD
Diseño único ahorra-espacio que combina un TV a color de 9" con un tocadiscos DVD/CD.
El disco DVD tiene mucha más capacidad, pero es del mismo tamaño que los discos compactos de audio.
Lacalidad de imagen/audio del DVD supera la calidad de los otros software. La calidad de imagen es mayor quela del
Super VHS. La calidad el audio es mayor que la de los discos compactos de audio.
El DVD también tieneopciones especiales; selección de idioma de audio, selección de idioma de subtítulos o múltiples
ángulos parauna misma escena, etc. El TOCADISCOS DE DVD puede reproducir los discos compactos de audio.
Alta calidad de imágenes
Resolución horizontal
Más de 500 líneas. Supera la resolución del Super VHS (400 líneas) o discos láser (430 líneas).
Compatible con una gran gama de salidas de audio DVD
Toma de audio digital coaxial
• Cuando se conecta un equipo con un decodificador Dolby Digital integrado, los sonidos en Dolby Digitalpueden
producir el efecto de estar en un cine o en una sala de conciertos.
• Audio surround estándar diferente al Dolby Digital. Este formato ya se utiliza en varios cines. Al conectar esta unidad a
un decodificador DTS o a un amplificador AV con decodificador DTS integrado, se puede disfrutar del audio DTS de los
discos DVD grabados en este formato. Sin embargo, el audio no saldrá de los jacks análogos de salida de audio.
• Mediante la conexión de este aparato a un amplificador AV con un decodificador MPEG integrado, podrádisfrutar del
audio MPEG de los discos DVD que están grabados en este formato.
• El sonido PCM Lineal de 48 kHz/24 bit por 96 kHz/24 bit supera el sonido de los discos compactos de audio.
Funciones convenientes
Selección directa de sus escenas deseadas, utilizando el Título/Capítulo/Tiempo/Canción - Puede reproducir la
escena deseada.
Llamada de hasta 3 escenas (sólo DVD) - Puede programar hasta 3 escenas en la memoria y llamar las escenas marcadas.
Avance de cuadros - El P AUSE/STILL mueve un cuadro a la vez.
Cámara lenta - La opción SLOW es para avanzar o retroceder en el programa mediante 4 pasos de 1/8-1/2 veces.
Reproducción repetida - Se puede repetir el capítulo, canción, título, lados o el material entre dos puntos seleccionados.
Reproducción programada - Se pueden reproducir canciones en una secuencia programada.
Zoom (sólo DVD) - Se puede acercar con un zoom sobre el sujeto seleccionado en la escena durante la reproducción.
Nota: Compruebe si los discos tienen las siguientes funciones.
Múltiples idiomas - Puede reproducir con un máximo de 32 idiomas para los subtítulos y un máximo de 8 idiomas para
la pista de sonido para sus películas o programas.
Múltiples ángulos - Las imágenes de los deportes o conciertos en vivo se graban con muchas cámaras. Cuando
reproduzca estos discos, puede cambiar de ángulo durante la reproducción.
Control para mayores de edad - Puede restringir la reproducción de escenas o sonidos de los discos DVD para
mayores de edad, que tienen un nivel de control por los padres.
Relación de aspecto del video - Puede cambiar la relación de aspecto de la pantalla de acuerdo al formato de su monitor.
Características de la TV
Funcionamiento con 120V CA ó 12V CD - Este TV/DVD ha sido diseñado para funcionar con corriente alterna común,
o 12V de corriente continua proveniente del encendedo de cigarrillos de un automóvil.
Capacidad para 181 canales - Recibe un máximo de 113 canales de cable con emisiones estandares VHF y UHF. El
número real de canales que se pueden recibir depende de la recepción de canales en su área o de su sistemade cable.
Descodificador de leyendas codificada con modo de texto completo - Muestra las leyendas de los textos o eltexto
del programa en pantalla completa para las personas con problemas de audición.
Ajustes de imagen utilizando el controlador remoto - La indicación en pantalla permite el ajuste preciso de BRIGHTNESS (brillo), COLOR, CONTRAST (contraste), SHARPNESS (definicion) y TINT (tinte), con el controlador remoto.
Temporizador programable de TV - Puede ser operado con el control remoto y el TV puede ser programadohasta en
120 minutos para que se apague automáticamente.
Indicación en pantalla de 3 lenguas - Usted puede seleccionar una de 3 lenguas, inglés, español o francés
porprogramación en pantalla.
Chip V - La función de prohibición para menores con Chip V puede leer la clasificación de un programa de TV opelícula,
si el programa tiene codificada esta información. El Chip V permite seleccionar el nivel de prohibición.
Este producto incorpora una tecnología de protección de derechos de autor, que a su vez está protegida
pordeterminadas patentes de los EE UU y otros derechos de propiedad intelectual propiedad de
MacrovisionCorporation y otros propietarios de dichos derechos. El uso de esta tecnología protegida por los
derechos de autor debe estar autorizada por Macrovision Corporation y es exclusivamente para uso doméstico
y otros usos limitados a menos que sea autorizado de otra manera por Macrovision Corporation.
Se prohibeel desarmado y el estudio de su diseño para copiarlo.
6
5G60701A S P06-11 6/11/03, 6:09 PM6
Page 53

Indice
Antes de utilizear su aparato
PARA SU SEGURIDAD ....................................................... 3
Caracteristicas ..................................................................... 6
Indice.................................................................................... 7
Precauciones para su seguridad.......................................... 8
Partes y sus funciones ......................................................... 9
Control remoto ................................................................... 10
Fuente de alimentación...................................................... 11
Conexiones de la antena ................................................... 12
Conexiones de TV cable .................................................... 13
Operacion del TV
Seleccion de idioma en pantalla ........................................ 14
Operacion del TV ............................................................... 15
Subtítulo cerrado................................................................ 17
Para memorizer canales .................................................... 18
Seleccion Chip-V................................................................ 20
Ajustes de control de imagen............................................. 23
Segundo programa de sonido (SAP) y estereo ................. 24
Función de reproducción
Disco .................................................................................. 25
Preparación/Estado del disco ............................................ 26
Procedimiento de reproducción ......................................... 27
Reproducción especial....................................................... 28
Función de adelantada
Zoom/Búsqueda de la escena deseada............................. 29
Reproducción repetida/
Repetida A-B ........................................................................
Marcado de escenas deseadas ......................................... 31
Cambio del idioma de la pista de sonido/Subtítulos .......... 32
Cambio de ángulos/Selección de título/Menú DVD ........... 33
Información adicional
Selección del idioma .......................................................... 34
Ajuste del formato (relación de aspecto) de la pantalla
de la TV/Ajuste de la visualización en pantalla .................. 35
Control de Gama Dinámica................................................ 36
Ajuste de restricciones para menores................................ 37
Cambio del nivel de restricciones para menores ............... 38
Deshabilitación temporal del nivel de rating (clasificación)
del disco DVD .................................................................... 39
Lista de códigos de idiomas............................................... 40
Disturbios de recepcion...................................................... 41
Conexiones de toma Audio/Video...................................... 42
Problemas y localización de averías.................................. 44
Especificaciones ................................................................ 46
Reproducción de programa/
ESPAÑOL
30
5G60701A S P06-11 6/11/03, 6:09 PM7
7
Page 54

Precauciones para su seguridad
!ADVERTENCIA!
INSTALE EL TV/DVD EN SU COCHE
• Para los coches equipados con colchones de aire, siga sin falta las instrucciones del fabricante para los trabajos de
cableado eléctrico. Un cableado incorrecto puede provocar un mal funcionamiento del sistema de colchón de aire de
su coche.
• No corte nunca la aislación del cable de alimentación eléctrica para derivar corriente a otro aparato. Esto puede
provocar una sobrecarga de la capacidad de corriente del cable, pudiendo provocar un incendio o descarga eléctrica.
• Para una instalación correcta y cableado es necesario tener un conocimiento técnico especializado. Si tiene dudas
sobre la posición o cómo instalar las piezas, consulte con la tienda donde compró el producto, el concesionario de su
automóvil o un taller de servicio de automóviles. Recuerde que se le cobrará el trabajo de instalación por separado.
• Utilice todas las piezas que vienen con este producto sólo según las instrucciones. Un uso incorrecto de las piezas
puede dañar las piezas en el interior o producir un anclaje incorrecto de las piezas, con el consiguiente peligro de
accidente o de sufrir heridas.
• Una instalación incorrecta puede exponerlo a un incendio o accidente.
• Tenga cuidado para no atrapar los cables entre las piezas del chasis, con los tornillos, por el asiento que se desliza
por sus carriles, etc. Esto puede cortar los cables y provocar un cortocircuito, exponiéndolo a un accidente, descarga
eléctrica o incendio.
• Evite instalar en lugares expuestos a una fuerte vibración y en lugares donde no pueda anclar firmemente. Las
piezas instaladas en lugares donde puedan aflojarse exponiéndolo a un accidente o herida.
• No instale el TV/DVD en el tablero de instrumentos o en otro lugar donde pueda estorbar la visibilidad.
• No instale el soporte en el techo de su coche. Esto puede ser peligroso ya que el TV/DVD puede caerse.
• No instale el soporte en una superficie de ángulo agudo o en una superficie que obligue al TV/DVD a mirar hacia
abajo. Esta instalación puede hacer que el TV/DVD se caiga.
• Gire la llave de encendido del coche a la posición "OFF" antes de conectar o desconectar los cables y conductores.
Si no lo hace puede exponerse a una descarga eléctrica o heridas.
SEGURIDAD EN LA CONDUCCION
• No mire el TV/DVD o trate de hacer ajustes durante la conducción. Puede provocar un accidente de tránsito. Antes
de hacer funcionar el TV/DVD, pare el coche en un lugar seguro.
• No instale el aparato en el tablero o en otro lugar que pueda ser un obstáculo para su visibilidad. Los productos
que impiden la visión hacia adelante en un vehículo pueden ser ilegales.
Además, confirme que todas las piezas están instaladas en un lugar donde no sean una molestia para la
conducción, el volante de la dirección, palanca de cambios, pedal del freno, etc., instálelo por ejemplo debajo del
asiento del conductor donde no ponga en peligro a los pasajeros. Una instalación incorrecta lo expone a un
accidente de tránsito y puede herirlo.
• Compruebe que todos los cables están atados y que no interfieren con el funcionamiento del coche, tal como se
describe en este manual. Los cables mal instalados pueden enredarse en el volante de la dirección, palanca de
cambios, pedal del freno, etc.
NOTAS IMPORT ANTES
• El aparato fue diseñado para ser utilizado con la alimentación eléctrica de CC de 12V del automóvil. No lo utilice en
un camión, ómnibus u otro coche que tenga alimentación eléctrica de 24V .
• Pare siempre su coche en un lugar seguro antes de ver o ajustar el TV/DVD.
• El uso del TV/DVD durante largo tiempo con el motor del coche parado hará que se agote la batería del coche.
• No deje el TV/DVD en un lugar expuesto a temperaturas extremas o a los rayos del sol. Si lo deja en un coche cerrado
bajo los rayos del sol, cerca de la calefacción, etc. puede deformarse su caja. El uso de este producto en lugares más
fríos que 5ºC o más calientes que 40ºC puede producir una mala calidad de la imagen.
• No utilice bencina u otros productos químicos para su limpieza.
Los productos químicos pueden dañar la caja y borrar las marcas. Utilice un paño suave empapado en una solución
neutra de agua y detergente suave. Exprima la humedad excesiva del paño antes de limpiar.
• No deje caer el TV/DVD o exponga a un golpe fuerte.
• Si empieza a salir humo por el TV/DVD o siente un olor o ruido anormales, desconecte inmediatamente el interruptor
principal y desenchufe el aparato del encendedor de cigarrillos. El uso continuado del TV/DVD en estas condiciones
puede exponerlo a un incendio o descarga eléctrica.
• No continúe utilizando el TV/DVD si tiene una avería y no se ven las imágenes de video o no se escucha el sonido. Si
nota estos síntomas, desconecte inmediatamente el interruptor principal y desenchufe el TV/DVD del encendedor de
cigarrillos. El uso continuado del TV/DVD en estas condiciones puede exponerlo a un incendio o descarga eléctrica.
• Cuando deje su coche sin vigilancia durante mucho tiempo, desenchufe el TV/DVD del encendedor de cigarrillos. Si
deja el TV/DVD enchufado, puede agotarse la batería del coche.
8
5G60701A S P06-11 6/11/03, 6:09 PM8
Page 55

Delantera
Partes y sus funciones
Trasera
Interruptor de alimentación (POWER)
Botones de volumen (VOLUME ▲/▼)
Botones selectores de canal (CHANNEL ▲/▼)
Jack de la entrada de CD
Botón parada (STOP)
Botón de apertura/cierr
(OPEN/CLOSE)
Indeicador POWER
Sensor de
control remote
Jack de la antena de UHF/VHF
Bandeja del disco
Botones de salto (SKIP)
Toma de auriculares
POWER
POWER
CHANNELVOLUME
OPEN/CLOSE STOP
PLAY
SKIP
PHONES
(MONO)
VIDEO IN L — AUDIO IN — R
ESPAÑOL
T omas AUDIO
IN (L/R)
Toma VIDEO IN
Botón reproducción (PLAY)
Cordón de CA
5G60701A S P06-11 6/11/03, 6:09 PM9
Tomas AUDIO (L/R)/VIDEO OUT
Salida de audio digital coaxial
9
Page 56

Control remoto
DISPLAY/
CALL TV/DVDPOWER
123
456
7890
SELECT/
ENTER
MUTE
DVD MENU
ANGLE
AUDIO
TOP MENU
SLOW SLOW
SEARCH SEARCH
SKIP
MARKER JUMP
CH
CH
RETURN
SUB TITLE
INPUT
SELECT
PLAY MODEPAUSE/STILL
PLAY
STOP
TV/CAP/TEXT
OPEN/CLOSE
SETUP/
TV MENU
CANCEL
QUICK VIEW/
ZOOM
SLEEP
SKIP
REPEAT A-B
Página
POWER Conexión/Desconexión 14,15,26
DISPLAY/CALL Consultar información de la TV 16
TV/DVD Cambiar entre TV/AV y DVD 26
OPEN/CLOSE Abra o cierre la bandeja 27,39
0-9 Dirigir selección de canales de la TV 15,19
VOLUME +/– Ajustar volumen de TV 15
/ Seleccionar canal de TV 16
CH
SELECT/ENTER
MUTE Quitar el sonido 16
DVD MENU Mostrar el menú del DVD 33
RETURN Quitar el menú del DVD 34~39
SETUP/TV MENU Mostrar el menú de la TV 14,18~23,25
AUDIO Cambiar el sonido de la TV 24
ANGLE Cambie el ángulo de reproducción 33
SUB TITLE Mostrar subtítulos 32
CANCEL
TOP MENU Seleccione el título 33
QUICK VIEW/ZOOM Cambiar entre el canal actual/anterior 16
INPUT SELECT Cambiar entre TV/AV 43
SLEEP Desactivación Automática (Sleep Timer) 16
SLOW Avance/retroceso-cámara lenta 28
PAUSE/STILL Pausa sonido del CD 28
PLAY MODE Seleccione el modo de reproducción 30
SEARCH
PLAY Reproducción 27,28,30,33,39
SKIP Salte el capítulo en avance o retroceso 28
STOP Parada 27
MARKER Indice 31
JUMP Localización de la escena deseada 29
TV/CAP/TEXT Cambiar entre TV/Caption/Text 17
REPEAT A-B Repita la reproducción entre A y B 30
Consultar información del DVD 26
Introducir ajuste 29,30
Entre una contraseña 20,22,37~39
Botones de cursor 14,18~23
Introducir información en el menú
Seleccionar opciones del menú
27,29,31,33~38
14,18~22
27,29~31,33~39
Llamar el modo de ajuste inicial 34~38
Cambie el idioma de la pista de sonido 32
Resetear información en el menú 20,22,23,29~31,37,38
Zoom 29
Fijar imagen del DVD
Reproducción en avance/retroceso rápidos
28
Modo Caption Cerrado
10
5G60701A S P06-11 6/11/03, 6:09 PM10
Page 57

Control remoto
Coloque las pilas
Abrir la tapa del compartimento de las pilas siguiendo la
dirección de la flecha.
Coloque dos pilas “AAA”, (no suministradas) prestando
atención a las marcas de polaridad en el compartimiento
de las pilas.
Recoloque la tapa del compartimiento.
Funcionamiento
• Apunte el mando a distancia al sensor remoto y
presione los botones de control para hacer
funcionar.
• Utilice el control remoto dentro de un ángulo de 30˚
hacia ambos lados del sensor remoto, hasta una
distancia de unos 5 metros.
15 PIES (5m)
NOTAS:
• No permita que el mando a distancia quede
expuesto a los rayos del sol o en un lugar caliente o
húmedo.
• El mando a distancia utiliza rayos infrarrojos para
transmitir las señales y la luz del sol o luces
fluorescentes reflejadas en el sensor remoto pueden
obligar a acercarse para hacer funcionar el mando.
• Un uso incorrecto de las pilas puede provocar fugas
o explotar. Lea las advertencias sobre las pilas y
utilice las pilas correctamente.
• No mezcle pilas viejas y nuevas.
• Saque las pilas si no se va a utilizar el mando a
distancia durante mucho tiempo.
Fuente de alimentación
PARA UTILIZAR CORRIENTE ALTERNA (CA)
Utilice el cable de CA polarizado sumistrado para CA
operación. Conecte el enchufe pequeño en el
extremo del cable al conectador de entrada de CA en
el parte trasera del TV/DVD, luego inserte el enchufe
más ancho de cable de CA en un tomacorriente de
CA de 120V, 60Hz polarizado.
NOTAS:
• Nunca conecte el enchufe cordon de CA a otro
voltaje que no sea el especificado (120V 60Hz).
Utilice solamente el cordon eléctrico suministrado.
• Si el cordon de CA polarizada no se ajusta en un
tomacorriente de CA no polarizada, no intente limar
o cortar las clavijas.
Es responsabilidad de usuario hacer que un
electricista reemplace el tomacorriente inadecuado.
• Si usted causa una descarga estática cuando toca la
undad y este falla, simplemente desenchufe la
unidad del tomacorriente, espere algunos minutos y
enchufela otra vez. La unidad deberá funcionar
normalmente.
Orificio y hoja
más anchos
PARA UTILIZAR LA CORRIENTE CONTINUA (CD)
El uso del cable de CC del coche incluido con el TV/
DVD permite hacer funcionar el TV/DVD desde el
encendedor de cigarrillos de cualquier coche que
tenga un sistema a tierra negativo.
El cable de CC del coche de 12 V con fusible fue
diseñado para recibir electricidad de una fuente de
CC externa (tierra negativa de 12 voltios) a través de
la toma de entrada CC del TV/DVD.
Conecte el enchufe pequeño en la punta del cable a
la toma de entrada CC en la parte trasera del TV/
DVD e inserte la otra punta del cable de coche en el
encendedor de cigarrillos de su coche. Compruebe
que el cable está bien enchufado. Puede ser
necesario tratar de insertar varias veces, girando el
enchufe, para que la conexión eléctrica se haga
correctamente.
TV/DVD
Tomacorriente de CA
Cable de corriente alterna polarizado
(una pata es más ancha que la otra.)
COCHE
Encendedor de Cigarrillos
Jack de entrada de CD
Cordón de coche (provisto)
ESPAÑOL
5G60701A S P06-11 6/11/03, 6:09 PM11
11
Page 58

Fuente de alimentación
NOTAS:• APAGUE SIEMPRE EL TV/DVD (POSICIÓN
CAMBIO DEL FUSIBLE EN EL ENCHUFE
DEL CABLE DE BATERIA DE COCHE
Si se funde el fusible en el enchufe del cable de
batería del coche, cambie por un nuevo fusible de 8
A. (tipo fundido rápido) tal como se indica a
continuación.
Desatornille la punta del enchufe para desmontarlo.
“OFF”) ANTES DE PONER EN MARCHA
EL MOTOR DEL AUTOMÓVIL.
• Verifique que el terminal negativo de la
batería está conectado a tierra.
Este equipo está diseñado para su uso con
sistemas de puesta a tierra negativa
exclusivamente.
• Utilice sólo el cable de coche incluido.
• Cuando no utilice el TV/DVD, desconéctelo
siempre del encendedor de cigarrillos para
evitar que se agote la batería.
• No haga funcionar el TV/DVD si la batería
del coche tiene poca carga. La corriente en
pico del alternador del coche puede fundir
el fusible de CC.
• Compruebe el nivel de carga de la batería
con frecuencia cuando utilice el TV/ DVD
en un vehículo.
ENCHUFE
FUSIBLE
DE 8A
PUNTA
Conexiones de la antena
Si usted está utilizando una antena para interiores o
exteriores, siga las instrucciones de abajo que
correspondan a su sistema de antena. Si está
utilizando el servicio de TV cable (CATV), vea la
página 13 para las conexiones de TV cable.
Antena combinada de VHF/UHF (Cable
único de 75 ohmios o cable con doble
conductor de 300 ohmios)
Conecte el cable de 75 ohmios de la antena combinada
de VHF/UHF en el jack de la antena.
Si su antena combinada de VHF/UHF posee un cable de
dos conductores de 300 ohmios, es posible que sea
necesario utilizar un transformador de adaptación de 30075 ohmios.
coaxial de
75 ohmios
Antena combinada de VHF/UHF (Cables
de 300 ohmios independientes de dos
conductores de VHF y de UHF)
Conecte el cable de dos conductores de 300 ohmios de
UHF en el combinador (no suministrado). Conecte el cable
de dos conductores de 300 ohmios de VHF en el
transformador de adaptación de 300-75 ohmios.
Conecte el transformador al combinador, y luego conecte
el combinador al jack de la antena.
Jack de
antena
Combinador
UHF 300 ohmios
Antenas independientes de VHF/UHF
(cable de VHF de 75 ohmios y cables de
dos conductores UHF de 300 ohmios)
Conecte el cable de 75 ohmios de VHF y el cable de dos
conductores de 300 ohmios de UHF al combinador (no
suministrado). Conecte el combinador en el jack de la
antena.
Cable
Jack de
antena
Jack de
antena
Jack de
antena
Transformador de
adaptacion de 30075 ohmios
Transformador de
adaptacion de
300-75 ohmios
VHF 300 ohmios
12
5G60701A S P12-17 6/11/03, 6:09 PM12
VHF 75 ohmios
Combinador
UHF 300 ohmios
Page 59

Conexiones de TV cable
Este TV/DVD posee amplios límites de sintonización y puede ser sintonizado a la mayoría de los canales
de cable sin utilizar una caja convertidora de TV cable. Algunas de las compañías de TV cable ofrecen
“canales pagados premiados” en los cuales la señal ha sido codificada. La decodificación de estas
señales para la recepción normal requiere el uso de un mecanismo decodificador que lo suministra
generalmente la compañía de cable.
PARA ABONADOS AL SERVICIO BASICO DE TV CABLE
Para el servicio básico de cable y cuando no es necesario un
convertidor/caja decodificadora, conecte el cable coaxial de 75
ohmios de CATV al jack de la antena en la parte trasera del
TV/DVD.
Cable coaxial de
75 ohmios
Jack de
antena
PARA ABONADOS AL SERVICIO CODIFICADO DE TV CABLE
Si usted es abonado a un servicio de TV cable que requiere el uso de un convertidor/caja decodificadora,
conecte el cable coaxial entrante de 75 ohmios al convertidor/caja decodificadora. Utilizando otro cable coaxial
de 75 ohmios conecte el jack de salida del convertidor/caja decodificadora al jack de la antena del TV/DVD.
Vea las conexiones mostradas abajo. Sintonice el TV/DVD al canal de salida del convertidor/caja
decodificadora (generalmente canal 3 ó 4), y utilice el convertidor/caja decodificadora para seleccionar los
canales.
Cable entrante
de 75 ohmios
de CATV
Convertidor/Decodificador
Cable de 75
ohmios el TV/DVD
Jack de
antena
PARA ABONADOS AL SERVICIO DE TV CABLE BASICO NO CODIFICADO CON CANALES PREMIADOS CODIFICADOS
Si usted está abonado a un servicio de TV cable en el cual los canales básicos no están codificados y los
canales premiados requieren el uso de un convertidor/caja decodificadora, puede desear utilizar un divisor de
señales y una caja de conmutación A/B (disponible en las compañías de cable o en las tiendas de artículos
electrónicos). Vea las conexiones mostradas abajo. Con el conmutador en la posición "B", usted puede
sintonizar directamente cualquiera de los canales no codificados en su TV/DVD. Con el conmutador en la
posición "A", sintonice su TV/DVD a la salida del convertidor/caja decodificadora (generalmente canal 3 ó 4), y
utilice el convertidor/caja decodificadora para sintonizar los canales codificados.
ESPAÑOL
Cable entrante
de 75 ohmios
de CATV
Divisor
5G60701A S P12-17 6/11/03, 6:09 PM13
Convertidor/Decodificador
Conmutador A/B
A
B
Cable de 75
ohmios el TV/DVD
Jack de
antena
13
Page 60

Seleccion de idioma en pantalla
<
/ / / /MENU
>
V-CHIP SET
LANGUAGE/IDIOMA/LANGUE
<
/ / / /MENU
>
V-CHIP SET
LANGUAGE/IDIOMA/LANGUE
<
/ /ENTER/MENU
>
LANGUAGE/IDIOMA/LANGUE
ENGLISH
ESPAÑOL
FRANCAIS
Puede escoger entre tres idiomas diferentes (inglés, francés y español) para los despliegues en pantalla. Los
menús y mensajes de ajuste aparecerán en el idioma de su elección.
La selección de idioma en la pantalla (paso 5) aparecerá automáticamente en la pantalla cuando presione TV/
MENU al principio. Seleccione primero el idioma preferido y vaya a las otras opciones de menú.
Para encenber el TV/DVD, presione POWER se encenderá el
1
indicador Power.
DISPLAY/
CALL TV/DVDPOWER
123
456
7890
SELECT/
ENTER
MUTE
DVD MENU
AUDIO
ANGLE
TOP MENU
SLOW SLOW
SEARCH SEARCH
SKIP
CH
CH
PLAY
STOP
RETURN
SUB TITLE
INPUT
SELECT
PLAY MODEPAUSE/STILL
OPEN/CLOSE
SETUP/
TV MENU
CANCEL
QUICK VIEW/
ZOOM
SLEEP
SKIP
Presione TV MENU.
2
Aparecerá la pantalla del menú
de la TV.
Presione ó hasta que
3
aparezca el menú OPTION.
Presione
4
seleccionar “LANGUAGE”, luego
presione
Presione ó para
5
seleccionar el idioma deseada:
ó para
ó .
inglés (ENGLISH), español
(ESPAÑOL) o francés
(FRANCAIS), luego presione el
botón ENTER.
MARKER JUMP
REPEAT A-B
TV/CAP/TEXT
Notas:
•
Si la unidad no funciona correctamente
(mediante los botones de la unidad y los
del control remoto), desconecte el cable
de alimentación, espere unos minutos y
vuelva a conectarlo. El funcionamiento del
reproductor puede haberse visto afectado
por la electricidad estática u otros
problemas.
•
La sección de la TV tiene su propio menú al
igual que la sección del DVD (ver página 34).
14
5G60701A S P12-17 6/11/03, 6:09 PM14
Presione TV MENU para volver a
la imagen normal de TV.
Page 61

DISPLAY/
CALL TV/DVDPOWER
123
456
7890
SELECT/
ENTER
MUTE
DVD MENU
AUDIO
ANGLE
TOP MENU
SLOW SLOW
SEARCH SEARCH
SKIP
MARKER JUMP
STOP
CH
CH
RETURN
SUB TITLE
INPUT
SELECT
PLAY MODEPAUSE/STILL
PLAY
TV/CAP/TEXT
OPEN/CLOSE
SETUP/
TV MENU
CANCEL
QUICK VIEW/
ZOOM
SLEEP
SKIP
REPEAT A-B
NOTAS:
• Si se ha seleccionado un canal sin
emisión, el sonido se silenciará
automáticamente.
• Si una estación que estaba viendo
deja de transmitir, el televisor se
desconectará automáticamente
después de 15 minutos.
Operacion del TV
Para encender el TV/DVD,
1
presione el botón POWER.
Ajuste el nivel de volumen
2
presionando el botón + ó – de
VOLUME. El nivel de volumen
será indicado en la pantalla por
medio de barras verdes y una
indicación de número. A medida
que el volumen aumenta, se
incrementan el número de barras
y l a indicación de número. Si se
reduce el volumen, el número de
barras verdes y la indicación de
número decrecen.
Ajuste el modo TV/CATV
3
a la posición apropiada.
(Vea página 18.)
Presione el botón de selección
directa de canal.
4
Selección directa de canal en
modo de TV Cuando la opción de
menú de TV/CA TV sea ajustada al
modo de TV, todos los canales
podrán ser seleccionados en forma
instantánea usando sólo dos
botones. (Por ejemplo, para
seleccionar el canal 2, presione “0”
y “2”. Si usted sólo presiona “2”, la selección del canal se
retardará unos minutos.) Para los canales de 10 en adelante,
presione los dos digitos en orden.
Selección directa de canal en modo de CATV
Cuando la opción de menú de TV/CA TV sea ajustada al modo de
CATV, los canales podrán ser seleccionados de la siguiente
forma:
PARA SELECCIONAR LOS CANALES DE CATV:
1-9
10-12 Primero presione “0”, y luego los 2 dígitos restantes.
13-99 Presione los 2 dígitos en orden.
100-125 Presione los 3 dígitos en orden.
Presione “0” dos veces, y luego 1-9 según sea necesario.
Por ejemplo, para seleccionar el canal 2, presione "002".
Por ejemplo, para seleccionar el canal 12, presione "012".
Por ejemplo, para seleccionar el canal 36, presione "36".
TV - Canales de VHF/UHF
CATV - Canales de TV CABLE
Por ejemplo, para seleccionar el canal 120, presione "120".
NOTA REFERENTE A LOS CANALES 1-12:
Si usted sólo presiona 1 ó 2 botones, el canal correspondiente
será seleccionado al cabo de 2 segundos.
TV
VHF
2-13
UHF
14-69
CATV
VHF
2-13
STD/HRC/IRC
14-36
(A) (W)
37-59
(AA) (WW)
60-85
(AAA) (ZZZ)
86-94
(86) (94)
95-99
(A-5) (A-1)
100-125
(100) (125)
01
(5A)
VOLUME 32
ESPAÑOL
CH 012
5G60701A S P12-17 6/11/03, 6:09 PM15
15
Page 62

STEREO SAP CH 012
SEL. MONO+SAP
Operacion del TV
DISPLAY/
CALL TV/DVDPOWER
123
456
7890
SELECT/
ENTER
MUTE
DVD MENU
AUDIO
ANGLE
TOP MENU
SLOW SLOW
SEARCH SEARCH
SKIP
MARKER JUMP
CH
CH
RETURN
SUB TITLE
INPUT
SELECT
PLAY MODEPAUSE/STILL
PLAY
STOP
TV/CAP/TEXT
OPEN/CLOSE
SETUP/
TV MENU
CANCEL
QUICK VIEW/
ZOOM
SLEEP
SKIP
REPEAT A-B
16
CANNAL /
Presione y libere CH ó La
unidad se detendrá
automáticamente en el siguiente
canal almacenado en la memoria.
Antes de seleccionar canales, éstos
deberán ser almacenados en la
memoria del televisor. Consulte la
sección “Cómo memorizar canales”
en las páginas 19 y 20.
LLAMADA
Presionar DISPLAY/CALL para ver
la información actual en la pantalla.
Presionar DISPLAY/CALL
nuevamente para que desaparezca
esta información.
•
Número de canal o modo de VIDEO
• Stereo o status de audio SAP
(segundo programa de sonido)
• Status de la salida de audio
VISION RAPIDA
Este botón le permite retroceder
hasta el último canal sintonizado al
presionar QUICK VIEW. Presione
este botón otra vez para regresar al
último canal que estaba mirando.
SILENCIAMIENTO
Presione MUTE botón para silenciar
el sonido. El sonido del TV/DVD
será silenciado y aparecerá
brevemente en pantalla la indicación
“MUTE”. El sonido puede ser
devuelto a su nivel original
presionando otra vez este botón o
uno de los botones + ó – de
VOLUME.
DORMIR
Para programar el TV/DVD para que
se apague después de cierto tiempo
programado, presione SLEEP del
control remoto. El reloj entrará en
cuenta regresiva, 10 minutos por
cada presión SLEEP (120, 110,
...10, 0). Después que el tiempo de
apagado está programado, aparecerá una indicación brevemente
cada diez minutos para recordarle que la función de apagado
automático está activada. Para confirmar el tiempo del
temporizador de apagado, presione SLEEP y el tiempo restante
aparecerá brevemente.
Para cancelar el temporizador de apagado, presione SLEEP
varias veces hasta que la indicación muestre 0.
MUTE
SLEEP
120
5G60701A S P12-17 6/11/03, 6:09 PM16
Page 63

Subtítulo cerrado
¿QUE ES LA RECEPCION DE TEXTO?
Este televisor tiene capacidad para descodificar y mostrar los programas de televisión con emisión de texto.
Esta función mostrará el texto en pantalla para los usuarios con problemas de audición o traducirá y mostrará
el texto que se encuentre en otra lengua.
DISPLAY/
CALL TV/DVDPOWER
123
456
7890
SELECT/
ENTER
MUTE
DVD MENU
AUDIO
ANGLE
TOP MENU
SLOW SLOW
SEARCH SEARCH
SKIP
MARKER JUMP
STOP
CH
CH
RETURN
SUB TITLE
INPUT
SELECT
PLAY MODEPAUSE/STILL
PLAY
TV/CAP/TEXT
OPEN/CLOSE
SETUP/
TV MENU
CANCEL
QUICK VIEW/
ZOOM
SLEEP
SKIP
REPEAT A-B
NOTAS:
Cuando seleccione la recepción de texto, las leyendas aparecerán durante 10 segundos aproximadamente.
•
Si no se recibe la señal de emisión de texto, no aparecerán leyendas, pero el televisor permanecerá en el
•
modo de recepción de texto.
Cuando las leyendas estén en pantalla puede ser que las indicaciones de funciones como volumen y
•
silenciamiento no aparezcan ya que interferirían con las leyendas.
Ocasionalmente podrán aparecer faltas de ortografía o caracteres extraños durante la recepción de texto.
•
Esto es normal en este modo, especialmente con los programas en vivo. Esto se debe a que durante los
programas en vivo, los textos son ingresados sin edición, ya que no hay tiempo para la misma.
Algunos sistemas de cable y sistemas de protección contra copias pueden interferir con la señal de emisión
•
de texto.
Si utiliza una antena interior o si la recepción del TV es muy insuficiente, el texto de las emisiones puede no
•
aparecer o mostrar caracteres extraños y errores de ortografía. En tal caso, ajuste la antena para mejorar la
recepción o utilice una antena externa.
Leyendas: Este modo de recepción de texto mostrará el texto
en pantalla en inglés u otra lengua (dependiendo de la
programación CH. 1 ó 2 de recepción de texto).
Generalmente las emisiones de textos en inglés son recibidas
en el canal 1 de recepción de texto y los textos en otras
lenguas son recibidos en el canal 2 de recepción de texto.
Las leyendas aparecerán en los lugares de la pantalla que
interfieran mínimamente con la imagen, generalmente en la
parte inferior de la misma. Los programas de noticias
mostrarán generalmente tres líneas de leyendas que
cambiarán en la pantalla. La mayoría de los otros programas
ofrecen dos o tres líneas de leyendas colocadas cerca del
personaje que está hablando de tal manera que el usuario
pueda seguir el diálogo.
Las letras itálicas o subrayadas indican títulos, palabras en
lenguas extranjeras o palabras que requieren énfasis. Las
letras de canciones aparecen encerradas entre notas
musicales.
Texto: El modo de recepción de texto llenará la pantalla con la
programación de programas y otras informaciones.
Después de seleccionar uno de los modos de recepción de
texto, éste continuará activado hasta que se lo cambie,
independientemente de que se sintonice otro canal.
Si se pierde la señal de la emisión de texto debido a un aviso
comercial o al corte de la señal, las leyendas reaparecerán
cuando la señal sea recibida nuevamente.
Si se cambia de canal, las leyendas se retardarán en 10
segundos aproximadamente.
Para recibir emisiones de programas de televisión con emisión
de texto, refiérase a su guía de TV en la que estarán
indicadas con el símbolo (CC).
PARA MIRAR EMISIONES DE
TEXTO
Presione TV/CAP/TEXT para
conmutar entre TV normal y los
dos modos de recepción de
texto (leyendas y texto en toda la
pantalla). Este modo mostrará el
texto en la pantalla para los
usuarios con problemas de
audición.
ESPAÑOL
17
5G60701A S P12-17 6/11/03, 6:09 PM17
Page 64

14A15B16C17D18E19F20G21H22
I
32S33T34U35V36W37AA38BB39CC40
DD
23J24K25L26M27N28O29P30Q31
R
50NN51OO52PP53QQ54RR55SS56TT57UU58
VV
41EE42FF43GG44HH45II46JJ47KK48LL49
MM
68
III69JJJ70KKK71LLL
72
MMM
73
NNN74OOO75PPP76QQQ
59WW60
AAA61BBB62CCC63DDD64EEE65FFF66GGG67HHH
8686878788888989909091919292939394
94
77
RRR78SSS79TTT80UUU81VVV82WWW83XXX84YYY85ZZZ
104
104
105
105
106
106
107
107
108
108
109
109
110
110
111
111
112
112
95
A-596A-497A-398A-299A-1
100
100
101
101
102
102
103
103
122
122
123
123
124
124
125
125015A
113
113
114
114
115
115
116
116
117
117
118
118
119
119
120
120
121
121
Números en este TV
Canal de CATV correspondientes
Para memorizer canales
<
/ / / /MENU
>
TV/CATV
ADD/DELETE
CATV
ADD
AUTO CH MEMORY
<
/ / / /MENU
>
TV/CATV
ADD/DELETE
CATV
ADD
AUTO CH MEMORY
<
/ / / /MENU
>
TV/CATV TV
ADD/DELETE ADD
AUTO CH MEMORY
Este TV/DVD está equipado con una función de memorización de canales que permite avanzar o retroceder al
siguiente canal almacenado en la memoria, pasando por alto los canales no deseados. Antes de seleccionar
canales, éstos deberán ser programados en la memoria del TV/DVD. Además de los canales normales de VHF y
UHF , este TV/DVD puede recibir hasta 113 canales de TV cable. Para usar el TV/DVD con una antena, ajuste la
opción de menú TV/CATV al modo “CATV”.
SELECCION DE TV/CATV
Presione TV MENU en el mode de TV. Aparece
DISPLAY/
CALL TV/DVDPOWER
OPEN/CLOSE
123
456
7890
CH
1
la pantalla del menú de la TV.
Presione
2
aparezca el menú SET UP.
ó hasta que
SELECT/
ENTER
CH
DVD MENU
ANGLE
RETURN
SUB TITLE
INPUT
SELECT
PLAY MODEPAUSE/STILL
PLAY
STOP
TV/CAP/TEXT
QUICK VIEW/
REPEAT A-B
MUTE
AUDIO
TOP MENU
SLOW SLOW
SEARCH SEARCH
SKIP
MARKER JUMP
SETUP/
TV MENU
CANCEL
ZOOM
SLEEP
SKIP
Presione
3
seleccionar “TV/CATV”.
Presione ó para
4
seleccionar “TV” ó “CATV”. La
ó para
flecha indica el modo
seleccionado.
TV - Canales de VHF/UHF
CATV - Canales de TV CABLE
Presione TV MENU hasta que se
5
borre la pantalla MENU.
CANALES CATV
El cuadro abajo muestra el sistema típico de la localización de los
canales por cable.
18
5G60701A S P18-24 6/11/03, 6:09 PM18
Page 65

<
/ / / /MENU
>
TV/CATV
ADD/DELETE
CATV
DELETE
AUTO CH MEMORY
<
/ / / /MENU
>
TV/CATV
ADD/DELETE
CATV
ADD
AUTO CH MEMORY
<
/ / / /MENU
>
TV/CATV
ADD/DELETE
CATV
ADD
AUTO CH MEMORY
<
/ / / /MENU
>
TV/CATV
ADD/DELETE
CATV
ADD
AUTO CH MEMORY
<
/ / / /MENU
>
TV/CATV
ADD/DELETE
CATV
ADD
AUTO CH MEMORY
DISPLAY/
CALL TV/DVDPOWER
OPEN/CLOSE
Para memorizer canales
SINTONIZACION DE MEMORIA AUTOMATICA DE CANAL
Presione TV MENU en el mode de TV .
1
Aparece la pantalla del menú de la TV.
Presione
2
aparezca el menú SET UP.
ó hasta que
123
456
7890
CH
SELECT/
ENTER
CH
MUTE
DVD MENU
AUDIO
ANGLE
TOP MENU
SLOW SLOW
SEARCH SEARCH
SKIP
MARKER JUMP
PLAY
STOP
RETURN
SUB TITLE
INPUT
SELECT
PLAY MODEPAUSE/STILL
TV/CAP/TEXT
SETUP/
TV MENU
CANCEL
QUICK VIEW/
ZOOM
SLEEP
SKIP
REPEAT A-B
Presione ó para seleccionar
3
“AUTO CH MEMORY”, a
continuación presione
ó . El
TV comenzará a memorizar todos
los canales disponibles en su área.
Presione TV MENU hasta que se
4
borre la pantalla MENU.
PARA ADICIONAR/BORRAR CANALES
Seleccione los canales deseados a
1
agregar o borrado mediante los
botones de Selección Directa
de Canal (0-9) o CH
Presione TV MENU. Aparece la
2
pantalla del menú de la TV.
Presione ó hasta que
3
aparezca el menú SET UP.
Presione ó para seleccionar
4
“ADD/DELETE”.
Presione ó para seleccionar
5
“ADD” (añadir) ó “DELETE” (borrar),
dependiendo de la función que
quiera realizar.
ó .
ESPAÑOL
Presione TV MENU hasta que se
6
borre la pantalla MENU.
Repita los pasos 1 y 6 para ser
7
añadido o borrado cada canal.
19
5G60701A S P18-24 6/11/03, 6:09 PM19
Page 66

Seleccion Chip-V
<
0 9/ENTER/CANCEL/MENU
>
V-CHIP SET
CONFIRM
PASSWORD :
<
0 9/ENTER/CANCEL/MENU
>
V-CHIP SET
NEW
PASSWORD
:
<
/ / / /MENU
>
V-CHIP SET
LANGUAGE/IDIOMA/LANGUE
<
/ / / /MENU
>
V-CHIP SET
LANGUAGE/IDIOMA/LANGUE
Este TV/DVD está equipado con un V-Chip Controller que le permite restringir y controlar el acceso a
determinados canales. Esta función es útil para evitar que los niños vean escenas de violencia o de
contenido sexual que usted puede decidir evitarles.
Para usar la función V-Chip debe registrar una contraseña.
PARA REGISTRE CONTRASEÑA
DISPLAY/
CALL TV/DVDPOWER
123
456
7890
OPEN/CLOSE
CH
Presione TV MENU en el mode de TV.
1
Aparece la pantalla del menú de la TV.
Presionar ó hasta que
2
aparezca el menú OPTION.
SELECT/
ENTER
CH
MUTE
AUDIO
TOP MENU
SLOW SLOW
SEARCH SEARCH
SKIP
MARKER JUMP
DVD MENU
ANGLE
RETURN
SUB TITLE
INPUT
SELECT
PLAY MODEPAUSE/STILL
PLAY
STOP
TV/CAP/TEXT
QUICK VIEW/
REPEAT A-B
SETUP/
TV MENU
CANCEL
ZOOM
SLEEP
SKIP
Presione
3
seleccionar la “V-CHIP SET” la
ó para
continuación presione
Entre la contraseña (4 cifras) con
4
los botones de selección directa
de canal (0-9) y presione ENTER.
• Si entra un número de
contraseña equivocado,
presione CANCEL.
Entre nuevamente la misma
5
contraseña para la seguridad y
presione ENTER.
Ahora se ha registrado la
contraseña y el menú de
configuración de V-Chip aparecerá
en la pantalla.
ó .
Aparece “ ” en lugar del número.
NOTAS:
Si se olvida de la contraseña, no
•
podrá ajustar el V-Chip.
Para no olvidarse de la contraseña,
•
anótela y guárdela en un lugar
seguro.
20
5G60701A S P18-24 6/11/03, 6:09 PM20
Page 67

<
/ / / /MENU
>
MOVIE RATING
CHANGE PASSWORD
V-CHIP SET
V-CHIP
TV RATING
: PG-13
: ON
: TV-Y
<
/ / / /MENU
>
MOVIE RATING
CHANGE PASSWORD
V-CHIP SET
V-CHIP
TV RATING
: PG-13
: OFF
: TV-Y
<
/ / / /MENU
>
MOVIE RATING
CHANGE PASSWORD
V-CHIP SET
V-CHIP
TV RATING
: OFF
: OFF
: TV-Y
<
/ / / /MENU
>
MOVIE RATING
CHANGE PASSWORD
V-CHIP SET
V-CHIP
TV RATING
: OFF
: OFF
: OFF
Seleccion Chip-V
<
/ / / /MENU
>
MOVIE RATING
CHANGE PASSWORD
V-CHIP SET
V-CHIP
TV RATING
: OFF
: OFF
: TV-Y
<
/ / / /MENU
>
MOVIE RATING
CHANGE PASSWORD
V-CHIP SET
V-CHIP
TV RATING
: PG-13
: OFF
: TV-Y
PARA AJUSTAR EL V-CHIP
En el menú V-CHIP SET,
1
presione
seleccionar “TV RATING”.
ó para
DISPLAY/
CALL TV/DVDPOWER
123
456
7890
SELECT/
ENTER
MUTE
DVD MENU
AUDIO
ANGLE
TOP MENU
SLOW SLOW
Para utilizar el televisor después de
proteger el TV.
Cuando se reciba un programa al que
se aplica el ajuste del V-Chip,
introduzca la contraseña.
La protección puede cancelarse.
NOTAS:
• La función V-Chip se activa sólo en
los programas y cintas que tienen
señal de prohibición.
• Si está cambiando los canales
utilizando una caja de cable
mientras que el TV/DVD está
sintonizando en el canal 3 ó 4, el VChip funciona de forma diferente.
Cuando entre su contraseña para
cancelar temporalmente el bloqueo
en cualquier canal, se desactivará
enteramente la función del V-Chip
para todas las emisoras. Para
reponer el V-Chip, desconecte el
TV/DVD y vuelva a conectar.
• Algunas cajas de cable fueron
diseñadas con una función de
retardo, en algunos casos puede
demorar unos 10 segundos
para que un programa aparezca
después de entrar una contraseña.
CH
CH
SUB TITLE
PLAY MODEPAUSE/STILL
RETURN
INPUT
SELECT
OPEN/CLOSE
SETUP/
TV MENU
CANCEL
QUICK VIEW/
ZOOM
SLEEP
Presione ó para que
2
aparezca el ajuste deseado.
No se ajusta a TV RATING
OFF :
TV-Y : Todos los niños
TV-Y7 : 7 años ó mayor
TV-G : Audiencia general
TV-PG:
Con autorización de los padres
TV-14 : 14 años ó mayor
TV-MA: 17 años ó mayor
• Cuando seleccione TV- Y7, TV-PG, TV-14 ó TV-MA, presione
DISPLAY/CALL para mostrar el nivel de prohibición.
Presione
/ ó / para seleccionar la clasificación
deseada.
Presione
3
seleccionar “MOVIE RATING”.
Presione ó para seleccionar
4
prohibición deseada.
ó para
OFF : No se ajusta a MOVIE
RATING
G:
PG :
PG-13 :
Para autorización de los padre
Con autorización de padres
Con autorización de padres
Menos de 13 años
R:Menores de 17 años se recomienda
Se seguire autorizaciós de los padres
NC-17 : 17 años ó mayor
X:Sólo para adultos
Presione
5
seleccionar “V-CHIP”.
Presione
6
aparezca “ON”. Sus ajustes
ó para
ó para que
quedan grabados en la
memoria.
Presione TV MENU hasta que se
7
borre la pantalla de MENU.
ESPAÑOL
21
5G60701A S P18-24 6/11/03, 6:09 PM21
Page 68

MOVIE RATING
NEW
PASSWORD
CHANGE PASSWORD
V-CHIP SET
V-CHIP
TV RATING
: OFF
:
: OFF
: OFF
<
0 9/ENTER/CANCEL/MENU
>
<
/ / / /MENU
>
MOVIE RATING
CHANGE PASSWORD
V-CHIP SET
V-CHIP
TV RATING
: OFF
: OFF
: OFF
Seleccion Chip-V
<
/ / / /MENU
>
V-CHIP SET
LANGUAGE/IDIOMA/LANGUE
<
/ / / /MENU
>
V-CHIP SET
LANGUAGE/IDIOMA/LANGUE
<
0 9/ENTER/CANCEL/MENU
>
V-CHIP SET
PASSWORD
:
MOVIE RATING
CONFIRM
PASSWORD
CHANGE PASSWORD
V-CHIP SET
V-CHIP
TV RATING
: OFF
:
: OFF
: OFF
<
0 9/ENTER/CANCEL/MENU
>
PARA CAMBIAR LA CONTRASEÑA
Presione TV MENU en el mode de TV . Aparece la
1
pantalla del menú de la TV.
DISPLAY/
CALL TV/DVDPOWER
123
456
7890
SELECT/
ENTER
MUTE
DVD MENU
AUDIO
ANGLE
TOP MENU
SLOW SLOW
SEARCH SEARCH
SKIP
MARKER JUMP
CH
CH
RETURN
SUB TITLE
INPUT
SELECT
PLAY MODEPAUSE/STILL
PLAY
STOP
TV/CAP/TEXT
OPEN/CLOSE
SETUP/
TV MENU
CANCEL
QUICK VIEW/
ZOOM
SLEEP
SKIP
REPEAT A-B
Presione
2
aparezca el menú OPTION.
Presione
3
seleccionar “V-CHIP SET”, a
ó hasta que
ó para
continuación presione
Entre la contraseña (4 cifras)
4
con los botones de selección
directa de canal (0-9) y
presione ENTER.
• Si entra un número de
contraseña equivocado,
presione CANCEL.
Presione
5
seleccionar “CHANGE
ó para
PASSWORD”, a continuación
presione
Entre la contraseña nueva (4
6
cifras) con los botones de
ó .
selección directa de canal (0-
9) y presione ENTER.
ó .
Vuelva a escribir la nueva
7
contraseña para confirmarla y
presione ENTER.
Presione repetidamente TV
8
MENU para volver a la pantalla
normal.
22
5G60701A S P18-24 6/11/03, 6:09 PM22
Page 69

Ajustes de control de imagen
<
/ / / /CANCEL/MENU
>
BRIGHTNESS
CONTRAST0+32
0
0
0
COLOR
TINT
SHARPNESS
<
/ / / /MENU
>
BRIGHTNESS
CONTRAST0+32
0
0
0
COLOR
TINT
SHARPNESS
Los controles de imagen han sido preajustados en fábrica, pero usted puede reajustarlos individualmente como sigue:
Presione TV MENU en el mode de TV.
1
Aparece la pantalla del menú de la TV.
Presione ó hasta que
DISPLAY/
CALL TV/DVDPOWER
123
456
7890
SELECT/
ENTER
OPEN/CLOSE
CH
2
aparezca el menú PICTURE.
Presione
3
para seleccionar el punto que
ó repetidamente
desea ajustar.
ESPAÑOL
CH
MUTE
DVD MENU
AUDIO
ANGLE
TOP MENU
SLOW SLOW
SEARCH SEARCH
SKIP
MARKER JUMP
PLAY
STOP
RETURN
SUB TITLE
INPUT
SELECT
PLAY MODEPAUSE/STILL
TV/CAP/TEXT
SETUP/
TV MENU
CANCEL
QUICK VIEW/
ZOOM
SLEEP
SKIP
REPEAT A-B
NOTA:
La función contraste se prejusta en
fábrica máximo nivel.
Presione ó dos veces para
4
hacer el ajuste.
BRIGHTNESS
(BRILLO)
CONTRAST
(CONTRASTE)
COLOR
(COLOR)
TINT
(TINTE)
SHARPNESS
(DEFINICION)
Después de encontrar el ajuste
5
deseado presionar TV MENU
aumenta el brillo
aumenta el contraste
color brillante
color hacia el verde
le imagen es más nítida
hasta que desaparezca la
pantalla de MENU.
REPOSICION
Al presionar CANCEL durante los
ajustes de imagen hará que los
mismos regresen a los niveles
preajustados en fábrica.
disminuye el brillo
disminuye el contraste
tiene un color pálido
color rojizo
le imagen es más suave
23
5G60701A S P18-24 6/11/03, 6:09 PM23
Page 70

Segundo programa de sonido (SAP) y estereo
STEREO SAP CH 013
STEREO CH 013
SEL. STEREO
El aparato de TV/DVD está equipado con una función conocida como sonido de TV multicanal o MTS. Las
transmisiones MTS permiten disfrutar mejor de la TV ya que sus programas tienen un sonido en estéreo de alta
fidelidad. MTS también tiene un canal adicional llamado segundo programa de sonido o SAP que los canales de TV
pueden utilizar para transmitir un segundo idioma en las transmisiones bilingües o para otros propósitos.
PARA ESCUCHAR SONIDOS EN ESTEREO
DISPLAY/
CALL TV/DVDPOWER
OPEN/CLOSE
123
456
7890
CH
SELECT/
ENTER
CH
MUTE
DVD MENU
AUDIO
ANGLE
TOP MENU
SLOW SLOW
SEARCH SEARCH
SKIP
MARKER JUMP
PLAY
STOP
RETURN
SUB TITLE
INPUT
SELECT
PLAY MODEPAUSE/STILL
TV/CAP/TEXT
SETUP/
TV MENU
CANCEL
QUICK VIEW/
ZOOM
SLEEP
SKIP
REPEAT A-B
Cuando el aparato de TV está
encendido o se hace una selección
de canal, asegúrese de que aparece
“STEREO” en la pantalla. Esto
significa que se pueden recibir
transmisiones en “Estéreo”. Puede
disfrutar de los sonidos en estéreo
utilizando las altavoces izquierdo y
derecho.
• Cuando se reciben transmisiones
“Monoaural” no aparece ninguna
indicación.
• Si la señal transmisora no es lo
suficientemente fuerte o no puede
escuchar nítidamente los sonidos
en estéreo, presione AUDIO para
cambiar a un sonido monoaural.
Con este deberán eliminarse los
ruidos. Presione nuevamente para
escuchar los sonidos en estéreo.
PARA ESCUCHAR EN SAP (SEGUNDO PROGRAMA DE SONIDO)
Cuando el aparato de TV está
encendido o se hace una
selección de canal, asegúrese
de que aparece SAP en la
pantalla. Esto significa que se
puede recibir transmisiones en
“Segundo programa de sonido”.
PARA SELECCIONAR SONIDO DESEADO
Presione el botón AUDIO para
seleccionar el sonido deseado.
24
5G60701A S P18-24 6/11/03, 6:09 PM24
TRANSMISION MONOAURAL+SAP
SONIDO MONOAURAL
(PRINCIPAL)
SONIDO
SEPARADO
MONOAURAL+SEPARADO
TRANSMISION ESTEREO+SAP
SONIDO ESTEREO
(PRINCIPAL)
SONIDO MONOAURAL
(PRINCIPAL )
SONIDO SEPARADO
MONOAURAL +SEPARADO
SONIDO
(PRINCIPAL)
SONIDO
(PRINCIPAL)
Page 71

Disco
El aparato detecta si el disco colocado es un DVD o un disco compacto de audio y ajusta
automáticamente el modo.
Notas sobre los discos
No reproduzca un DVD-ROM, DVD-Audio, CD-ROM, CD-R, CDV, CD-G, Video CD o Foto CD para evitar el
borrado accidental del material pregrabado.
Este aparato sólo funciona con discos DVD de la región 1. Los discos con otros números de región no pueden
reproducirse en este aparato.
Esta unidad no toca archivos MP3.
Título/Capítulo/Canción
Título
Cuando hay dos o más películas grabados en un
disco, el disco se divide en dos o más secciones.
Cada sección se denomina un “TITULO”.
TITULO1 TITULO2
CAPITULO 1
CAPITULO 2 CAPITULO 2 CAPITULO 3CAPITULO 1
DISCO DVD
Capítulo
Los títulos pueden subdividirse en muchas secciones. Cada sección se denomina un “CAPITULO”.
Canción
Un disco compacto de audio puede contener varios elementos.
Estos se asignan a las canciones.
CD
CANCION 1 CANCION 2 CANCION 3 CANCION 4 CANCION 5
Para sacar el disco de su caja
Sujete firmemente por el borde del disco. No toque la superficie del disco.
Saque suavemente el disco de la caja.
• No raye el disco.
• No ensucie la superficie del disco.
• No pegue una etiqueta o cinta adhesiva en el disco.
• No deje caer o doble el disco.
Para guardar el disco
• Guarde el disco en su caja para evitar el riesgo de ralladuras, polvo o daños.
• No deje el disco expuesto a los rayos del sol o en lugares calientes o húmedos.
Para limpiar el disco
Frote el disco con un paño limpio, seco, desde el centro a los bordes.
• No frote el disco con un movimiento circular.
• No utilice limpiadores líquidos o en aerosol.
ESPAÑOL
5G60701A S P25-30 6/11/03, 6:09 PM25
25
Page 72

Preparación / Estado del disco
En las siguientes páginas se describe
la instalación y la operación en modo
DVD.
DISPLAY/
POWER
CALL
123
456
789
SELECT/
ENTER
MUTE
DVD MENU
ANGLEAUDIO
TOP MENU
SLOW
PAUSE/STILL
SEARCH SEARCH
SKIP SKIP
MARKER
TV/DVD
CH
CH
RETURN
SUB TITLE
INPUT
SELECT SLEEP
PLAYMODE
PLAY
STOP
JUMP
TV/CAP/TEXT
OPEN/CLOSE
VOLUME
0
SETUP/
TV MENU
CANCEL
QUICK VIEW/
ZOOM
SLOW
REPEATA-B
+
Ð
Preparación
Antes de poner en funcionamiento el DVD/CD, efectúe las
siguientes preparaciones.
Introduzca el cable de CA en una toma de corriente
1
estándar de CA polarizada de 120 V y 60 Hz.
• Si el cable de CA se enchufa por vez primera, espere
unos 5 segundos antes de presionar POWER.
NOTA: Al conectar a otros equipos, desenchufe la unidad
de la toma de CA.
Presione POWER en la unidad o en el mando a distancia
2
para encender la unidad. Se encenderá el indicador
POWER.
• Cada vez que presiona POWER, el TV/DVD se enciende
desde el modo TV .
• Cuando use un amplificador,
enciéndalo.
Presione TV/DVD para
3
seleccionar el modo DVD.
Aparecerá la pantalla de inicio
del DVD.
Estado del disco
Presione DISPLAY/CALL. Aparecerá la pantalla de estado del
disco.
Disco de vídeo DVD
Funcionamiento
del disco
Número del título
Número del capítulo
1/8
T
Tiempo transcurrido de reproducción del título
Tiempo total del título
1/19
C
1/8Eng DolbyDigital
0:07:18 2:02:31
1/1
1/8 Eng
Ángulo de la cámara
NOTA:
Si la unidad no funciona
correctamente:
La electricidad estática, etc., puede
afectar al funcionamiento del
reproductor. Desconecte el cable de CA
y vuelva a conectarlo.
26
5G60701A S P25-30 6/11/03, 6:09 PM26
Idioma del sonido
Idioma de los subtítulos
Un tipo de sonido
Para que desaparezca la pantalla de estado, presione
DISPLAY/CALL de nuevo.
CD de AUDIO
Tiempo transcurrido de reproducción de la pista
Funcionamiento
del disco
Número de la pista
Lista de
reproducción
1/8
T
0:02:31 0:53:09
Playlist
12345678
Tiempo total de la
pista
• Cuando reproduzca el disco CD, aparecerá la pantalla de
estado.
Page 73

Procedimiento de reproducción
DISPLAY/
POWER
CALL
123
456
789
MUTE
DVD MENU
ANGLEAUDIO
TOP MENU
SLOW
PAUSE/STILL
SEARCH SEARCH
SKIP SKIP
MARKER
CH
SELECT/
ENTER
CH
PLAY
STOP
RETURN
SUB TITLE
PLAYMODE
OPEN/CLOSE
TV/DVD
VOLUME
0
SETUP/
TV MENU
CANCEL
QUICK VIEW/
ZOOM
INPUT
SELECT SLEEP
SLOW
JUMP REPEAT A-B
+
Ð
Nota:
Si se coloca un disco no compatible,
•
aparecerá “Incorrect Disc”, “Region Code
Error” o “Parental Error” en la pantalla de
TV dependiendo del tipo de disco cargado.
En este caso, revisar el disco nuevamente
(Ver páginas 25 y 37).
Algunos discos pueden demorar un minuto
•
antes de empezar la reproducción.
Cuando coloque un disco de una sola cara
•
con esa etiquetq abajo (i.e. del lado
incorrecto) y presione PLAY o OPEN/
CLOSE en el aparato, aparecerá “
la pantalla durante 3 segundos y después
aparecerá continuamente la palabra “No
Disc”.
•
Algunas funciones de reproducción de DVD
pueden haber sido elegidas por el productor
de la película. Como este aparato reproduce los DVD de acuerdo con las
posibilidades introducidas por el productor,
algunas funciones de reproducción pueden
no existir. Consulte además las
instrucciones que vienen con el DVD.
•
Cuando toque CD’s de audio codificados
DTS, se escuchará ruido excesivo de las
salidas análogas stereo. Para evitar
posibles daños al sistema de audio, el
consumidor debe tomar las debidas
precauciones cuando las salidas análogas
stereo del aparato DVD estén conectadas
a un sistema de amplificación.
” en
Presione OPEN/CLOSE
1
en el aparato.
Se abrirá la bandeja del
disco.
Coloque un disco en la
2
bandeja. Sujete el disco,
colóquelo con el lado de
etiqueta impresa hacia
arriba, alinee en las guía y
coloque el disco en su
posición correcta.
Presione PLAY u OPEN/
3
CLOSE en el aparato.
La bandeja del disco se
cierra automáticamente.
En la pantalla del TV la
indicación “
” cambia a
“ ” y empieza la
reproducción.
• Aparece la pantalla del
menú en la pantalla de
TV, si el disco tiene una
función de menú.
Presione / ó / para seleccionar el título.
4
Presione SELECT.
5
• Se selecciona el título y empieza la reproducción.
Presione STOP para terminar la reproducción.
6
• El aparato graba el punto de parada, según el disco.
Aparece“
” en la pantalla. (Presione PLAY para
continuar reproduciendo (desde el mismo punto).
• Si presiona nuevamente STOP o se retira el disco
(Aparece “
” en la pantalla), el aparato borrará el punto
de parada.
Para la reproducción, presione STOP.
7
A continuación presione OPEN/CLOSE en el aparato.
Se abre la bandeja del disco.
Saque el disco y presione POWER.
La bandeja del disco se cierra automáticamente y se
desconecta el aparato.
ESPAÑOL
27
5G60701A S P25-30 6/11/03, 6:09 PM27
Page 74

Reproducción especial
Nota: Puede ocurrir una leve demora
entre el momento en que presiona el
botón y que se active la función.
DISPLAY/
POWER
CALL
123
456
789
SELECT/
ENTER
MUTE
DVD MENU
ANGLEAUDIO
TOP MENU
SLOW
PAUSE/STILL
SEARCH SEARCH
SKIP SKIP
MARKER
TV/DVD
CH
CH
RETURN
SUB TITLE
INPUT
SELECT SLEEP
PLAYMODE
PLAY
STOP
JUMP
TV/CAP/TEXT
OPEN/CLOSE
VOLUME
0
SETUP/
TV MENU
CANCEL
QUICK VIEW/
ZOOM
SLOW
REPEATA-B
+
Ð
Reproducción con avance rápido
Presione SEARCH ( ) durante la reproducción normal.
Cada vez que presione el botón de SEARCH (
la velocidad de la búsqueda
(x2), (x4), (x8),
(x15).
(CD:
(x 2), (x 4), (x 8), (x 20))
• Para seguir con la reproducción normal, presione PLAY.
), aumentará
Reproducción con retroceso rápido
Presione SEARCH ( ) durante la reproducción normal.
Cada vez que presione el botón de SEARCH (
la velocidad de la búsqueda
(x2), (x4), (x8),
), aumentará
(x15).
(x 2), (x 4), (x 8), (x 20))
(CD:
• Para seguir con la reproducción normal, presione PLAY.
Reproducción Fija
Presione PAUSE/STILL
durante la reproducción
normal para hacer una pausa
en la reproducción.
Para seguir con la
reproducción normal,
presione PLAY.
Avance cuadro por cuadro
Presione PAUSE/STILL durante la imagen fija.
Avanza un cuadro cuando presione PAUSE/STILL una vez.
Para seguir con la reproducción normal, presione PLAY.
Nota:
El aparato puede mantener una imagen
fija de video o la imagen visualizada en
la pantalla, en su pantalla de TV,
permanentemente. Si deja la imagen
fija de video o la imagen visualizada en
la pantalla en su TV durante mucho
tiempo, puede dañar permanentemente
la pantalla de TV. Los televisores de
proyección tienen tendencia a sufrir
este problema.
28
5G60701A S P25-30 6/11/03, 6:09 PM28
Reproducción de cámara lenta
Presione SLOW ( ) para retroceder o SLOW (
avanzar durante la reproducción normal o imagen fija.
Cada vez que presione el botón de SLOW, cambiará la
velocidad del slow x1/2, x1/4, x1/6, x1/8.
• Para seguir con la reproducción normal, presione PLAY.
• Para volver a la imagen fija, presione PAUSE/STILL.
) para
Búsqueda de un capítulo o canción
Presione SKIP (
77
7) en avance o SKIP (
77
durante la reproducción para buscar un capítulo que desea
ver. Cada vez que presione el botón, se salta un capítulo o
canción.
66
6) en retroceso
66
Page 75

Jump
2:02:31 / 2:02:31
1 / 8
_ _ / 19
/Enter/0 9/Cancel/Jump
T
C
1
Zoom/Búsqueda de la escena deseada
Zooming (acercamiento)
Esta unidad le permitirá hacer acercamientos de la imagen
del marco y podrá efectuar selecciones cambiando la
posición del marco.
DISPLAY/
CALL
TV/DVD
POWER
123
456
789
CH
SELECT/
ENTER
CH
MUTE
TOP MENU
SLOW
SEARCH SEARCH
SKIP SKIP
MARKER
DVD MENU
ANGLEAUDIO
PAUSE/STILL
RETURN
SUB TITLE
INPUT
SELECT SLEEP
PLAYMODE
PLAY
STOP
JUMP
TV/CAP/TEXT
OPEN/CLOSE
VOLUME
0
SETUP/
TV MENU
CANCEL
QUICK VIEW/
ZOOM
SLOW
REPEATA-B
+
Ð
Presione TV/DVD para
1
seleccionar mode de
DVD.
Presione ZOOM durante
la reproducción.
La parte central de la
imagen se agranda.
Cada vez que presione el
ZOOM cambiará el ZOOM
1 (x2), 2 (x3) y 3
(x4).
Presione el botón
2
del marco. Puede mover el marco del centro hacia UP
/ / / para ver una parte diferente
(arriba), DOWN (abajo), LEFT (izquierda), RIGHT (derecha).
En el modo ZOOM presione ZOOM varias veces para
3
regresar a una visión 1:1 (
Off).
Búsqueda de la escena deseada
Utilice el título, capítulo y tiempo grabados en el disco
para buscar el punto que desea reproducir.
Presione JUMP durante
1
la reproducción.
ESPAÑOL
Nota:
• Puede seleccionar la reproducción con
pausa, cámara lenta o búsqueda en el
modo zoom.
• Puede que algunos discos no
respondan a la función de Zoom.
5G60701A S P25-30 6/11/03, 6:09 PM29
2
Presione ó para seleccionar el “C (capítulo)”, “
(tiempo/canción)” ó “ (título)”.
Presione las teclas numéricas (0-9) para cambiar el
3
número.
• Si entra un número equivocado, presione CANCEL.
• Consulte la caja en la que viene el disco para
confirmar los números.
Presione ENTER.
4
• Empieza la reproducción.
• Cuando cambie el título, empieza a reproducir desde el
capítulo 1 del título seleccionado.
• Este procedimiento puede no funcionar en algunos
discos.
T
29
Page 76

Reproducción repetida/Reproducción de programa/Repetida A-B
Program Playback
Playlist
5 8 3
0:02:31 0:25:14
5 / 8
T
A
AB
Presione PLAY MODE durante el modo de reproducción o el de parada.
Cada vez que presione PLAY MODE, el modo de reproducción cambia de la siguiente forma.
DVD
Presentación
en pantalla
→
Título: Repite el título actual.
↓
Capítulo:
Repite el capítulo actual.
↓
Off: Vuelve a la reproducción normal.
• Durante el modo de parada, la tecla PLA Y MODE no
funciona.
SELECT/
ENTER
Operación
CD de AUDIO
Presentación
en pantalla
→
All: Repite todo el disco.
↓
Pista: Repite la pista actual.
↓
Reproducción
aleatoria: Reproduce las pistas en orden
↓
*Programa: Reproduce las pistas en orden de
↓
aleatorio.
programa.
(Pantalla de
estado): Vuelve a la reproducción normal.
Operación
CH
MUTE
TOP MENU
SLOW
SEARCH SEARCH
SKIP SKIP
DVD MENU
ANGLEAUDIO
PAUSE/STILL
RETURN
SUB TITLE
INPUT
SELECT SLEEP
PLAYMODE
PLAY
STOP
QUICK VIEW/
SETUP/
TV MENU
CANCEL
ZOOM
SLOW
• Durante el modo de parada, no puede seleccionar
“
Pista”.
*Menú de programa
Use los botones numéricos
(0–9) para escribir el número de
la pista que desea programar, y a
continuación presione ENTER.
Se muestran el número de la
pista y el tiempo total. Repita este
paso para introducir pistas
adicionales. Cuando haya
Program
1 5 8:29
2 8 8:54
3 3 7:31
__
4
Total 3 0:25:14
/Enter/0 9/Cancel/Play/PlayMode
terminado de introducir pistas,
presione PLAY para empezar la
reproducción de programa. Se
MARKER
JUMP
REPEATA-B
muestra una lista de reproducción
de sus pistas programadas.
NOTAS:
• Si introduce un número incorrecto, presione CANCEL.
• Para cancelar la reproducción de programa, presione STOP 3 veces.
• Para borrar los programas del menú de programas, presione CANCEL hasta
que se borren todos los programas.
• El programa se cancela cuando abre la bandeja del disco o apaga el aparato.
Reproducción repetida A-B
La reproducción repetida A-B le permite repetir el material entre los dos puntos seleccionados.
Presione REPEAT A-B durante la reproducción.
1
Se selecciona el punto inicial.
Presione nuevamente REPEAT A-B. Se selecciona el punto final. Empieza a
2
reproducir en el punto seleccionado. La reproducción se detiene en el punto
final, vuelve al punto A y vuelve a empezar nuevamente.
Para continuar con la reproducción normal, presione nuevamente REPEAT A-B. Aparece “
Off
Nota:
• La función de repetición puede no funcionar en algunos discos.
• En el modo de repetición A-B pueden no aparecer los subtítulos cerca del punto A o B.
• Puede no ser posible programar la repetición A-B en algunas escenas del DVD.
• La repetición A-B no funciona con un DVD interactivo.
30
” en la pantalla.
5G60701A S P25-30 6/11/03, 6:09 PM30
Page 77

Marcado de escenas deseadas
Marker
/Enter/Cancel/Marker
T
C
1
T
C
2
T
C
3
08 500
12 270
17 040
1
1
1
3
4
6
Marker
/Enter/Cancel/Marker
T
C
1
T
C
2
T
C
3
08 500
12 270
17 040
1
1
1
3
4
6
Marker
/Enter/Cancel/Marker
T
C
1
T
C
2
T
C
3
08 50013
Marker
/Enter/Cancel/Marker
T
C
1
T
C
2
T
C
3
El TV/DVD almacena los puntos que
usted desee ver de nuevo. Puede volver
a iniciar la reproducción a partir de esa
escena.
DISPLAY/
POWER
CALL
123
456
789
SELECT/
ENTER
MUTE
DVD MENU
ANGLEAUDIO
TOP MENU
SLOW
PAUSE/STILL
TV/DVD
CH
CH
RETURN
SUB TITLE
INPUT
SELECT SLEEP
PLAYMODE
OPEN/CLOSE
VOLUME
0
SETUP/
TV MENU
CANCEL
QUICK VIEW/
ZOOM
SLOW
+
Ð
Marcado de escenas deseadas
Presione MARKER
1
durante la reproducción.
Seleccione el marcador
2
en blanco usando
/ ,
y a continuación presione
ENTER en la escena
deseada.
• Se pueden seleccionar
hasta 3 escenas.
• Repita el mismo
procedimiento para establecer las otras 2 escenas.
Presione MARKER para eliminar esta pantalla.
3
Para volver a las escenas
Presione MARKER
1
durante el modo de
reproducción o el de
parada.
ESPAÑOL
SEARCH SEARCH
SKIP SKIP
MARKER
PLAY
STOP
JUMP
TV/CAP/TEXT
REPEATA-B
NOTAS:
•
La marca se cancela cuando abre la
bandeja del disco o apaga el aparato.
•
Algunos subtítulos grabados alrededor
del marcador puede que no aparezcan.
[DVD]
5G60701A S P31-40 6/11/03, 6:09 PM31
Presione o para
2
seleccionar el marcador
1-3.
Presione SELECT.
3
La reproducción comienza a partir de la escena marcada.
Para cancelar la marca
Presione MARKER .
1
Presione o para seleccionar el marcador 1-3.
2
Presione CANCEL
3
.
31
Page 78

Cambio del idioma de la pista de sonido/Subtítulos
1/8 Eng Dolby Digital
2/8 Fra Dolby Digital
Cambio del idioma de la pista de sonido
Se puede seleccionar el idioma cuando reproduce un
disco en múltiples idiomas.
Presione AUDIO durante
1
POWER
DISPLAY/
CALL
TV/DVD
OPEN/CLOSE
la reproducción.
RETURN
SUB TITLE
INPUT
VOLUME
0
SETUP/
TV MENU
CANCEL
QUICK VIEW/
ZOOM
+
Ð
123
456
789
CH
SELECT/
ENTER
CH
MUTE
DVD MENU
ANGLEAUDIO
TOP MENU
Nota:
• Si no se escucha el idioma deseado
después de presionar el botón varias
veces, el idioma no fue grabado en el
disco.
• El cambio del idioma en la pista de
sonido se cancela cuando abra la
bandeja del disco o desconecte el
aparato apague el aparato. El idioma
por omisión inicial o idioma existente
volverá a escucharse cuando vuelva a
reproducir el disco.
• El cambio del idioma de los subtítulos
se cancela cuando abre la bandeja del
disco.
• Puede que algunas funciones no
funcionen en algunos DVD. Quizá no
pueda activar o desactivar los subtítulos
ni cambiarlos. Al reproducir el DVD, el
subtítulo puede cambiar cuando:
- abre o cierra la bandeja del disco
- cambia el título.
• En algunos caso, el idioma de los
subtítulos no cambia inmediatamente
al seleccionado.
Aparecerá el idioma actual
de la pista de sonido.
Presione AUDIO hasta
2
que quede seleccionado
el idioma deseado.
El despliegue en pantalla
desaparecerá después de
unos cuantos segundos.
Subtítulos
Aparición y desaparición de subtítulos
Cuando reproduzca un disco con subtítulos grabados,
puede hacer que éstos aparezcan o desaparezcan.
Presione SUB TITLE durante
la reproducción hasta que
aparezca "Off".
Cambio del idioma de los subtítulos
Puede seleccionar el idioma para reproducir un disco
grabado con subtítulos en múltiples idiomas.
Presione SUB TITLE
1
durante la reproducción
hasta que aparezca el
idioma deseado.
El despliegue en pantalla desaparecerá después de unos
2
cuantos segundos.
Off
1/32 Eng
32
5G60701A S P31-40 6/11/03, 6:09 PM32
Page 79

1/9
Cambio de ángulos / Selección de título / Menú DVD
Cambio de ángulos
Cuando reproduce un disco grabado en múltiples
ángulos, puede cambiar el ángulo de visión de la
escena.
Presione ANGLE durante
DISPLAY/
CALL
TV/DVD
POWER
123
456
789
CH
OPEN/CLOSE
VOLUME
0
+
Ð
1
la reproducción.
Aparecerá el angle actual.
Presione ANGLE varias veces hasta que seleccione el
2
angle deseado.
ESPAÑOL
SELECT/
ENTER
CH
MUTE
DVD MENU
ANGLEAUDIO
TOP MENU
SLOW
PAUSE/STILL
SEARCH SEARCH
SKIP SKIP
MARKER
PLAY
STOP
RETURN
SUB TITLE
QUICK VIEW/
INPUT
SELECT SLEEP
PLAYMODE
JUMP
REPEATA-B
TV/CAP/TEXT
SETUP/
TV MENU
CANCEL
ZOOM
SLOW
Notas:
• En algunos DVD, puede no ser posible
cambiar los ángulos incluso cuando se
grabó en múltiples ángulos en el DVD.
• En algunos DVD puede nos ser posible
seleccionar el título. En algunos DVD el
“menú de título” puede tener el nombre
de “menú” o de “título” en las
instrucciones que vienen con el disco.
Selección de título
Hay dos o más títulos grabados en algunos discos. Si
se ha grabado el menú de título en el disco, puede
seleccionar el título deseado.
Presione TOP MENU durante la reproducción.
1
Aparece el menú de título en la pantalla.
Presione / ó / para seleccionar el título
2
deseado.
Presione ENTER o PLAY.
3
Empieza la reproducción del título seleccionado.
Menú DVD
Algunos DVD permiten seleccionar el contenido del
disco con el menú.
Cuando reproduce este tipo de DVD, puede seleccionar
el idioma de los subtítulos, idioma de la pista de sonido,
etc. con el menú DVD.
Presione DVD MENU durante la reproducción.
1
Aparece el menú DVD en la pantalla.
• Presione nuevamente DVD MENU para volver a
reproducir la escena en la que se estaba
reproduciendo cuando presionó el botón DVD MENU.
Presione / ó / para seleccionar el ítem deseado.
2
Presione ENTER.
3
El menú continúa en otra pantalla. Repita los pasos 2 y
3 para terminar de seleccionar el ítem completamente.
33
5G60701A S P31-40 6/11/03, 6:09 PM33
Page 80

/Enter/Setup/Return
OSD Language
Francais
Espanol
English
/Enter/Setup/Return
Language
Menu English
Audio English
Subtitle English
OSD Language English
Selección del idioma
Main Menu
/Enter/Setup/Return
Language
Picture
Sound
Parental
Puede cambiar los parámetros
predeterminados para personalizar el
funcionamiento como prefiera.
DISPLAY/
POWER
CALL
123
456
789
OPEN/CLOSE
TV/DVD
VOLUME
+
Ð
0
CH
Presione TV/DVD para
1
seleccionar el modo DVD.
Presione SETUP en el
modo de parada.
Presione
o para
seleccionar “Language”, y
a continuación presione
o ENTER.
Presione o para
2
seleccionar “OSD
Language”, y a
continuación presione
o ENTER.
SELECT/
ENTER
CH
MUTE
DVD MENU
ANGLEAUDIO
TOP MENU
SLOW
PAUSE/STILL
SEARCH SEARCH
SKIP SKIP
MARKER
PLAY
STOP
RETURN
SUB TITLE
QUICK VIEW/
INPUT
SELECT SLEEP
PLAYMODE
JUMP
REPEATA-B
TV/CAP/TEXT
SETUP/
TV MENU
CANCEL
ZOOM
SLOW
NOTAS:
• Si el idioma seleccionado para la banda
sonora no está grabado en el disco, se
reproduce el idioma original.
• Si el idioma seleccionado para los
subtítulos no está grabado en el disco,
se selecciona el idioma prioritario.
Presione o para
3
seleccionar el idioma
deseado (por ejemplo
Spanish), y a continuación
presione ENTER.
El menú vuelve al menú
"Language"
automáticamente.
• Si desea volver al menú anterior, presione
Repita los pasos 2-3 para otros ajustes de "Language".
4
o RETURN.
Otra selección: (Menu/Audio/Subtitle)
Si desea seleccionar otro idioma, introduzca el código del
idioma (véase la lista de códigos de idioma de la página
40).
Off: (subtítulo)
Los subtítulos no aparecen.
Presione SETUP para eliminar la pantalla Menú.
5
34
5G60701A S P31-40 6/11/03, 6:09 PM34
Page 81

Picture
Display
On
TV Screen
4:3
Ajuste del formato (relación de aspecto) de la pantalla de
TV Screen
4:3
4:3
16:9
Picture
TV Screen
4:3
Display
On
Picture
TV Screen
4:3
Display
Off
/Enter/Setup/Return
Main Menu
Language
Picture
Sound
Parental
la TV / Ajuste de la visualización en pantalla
Ajuste del formato (relación de aspecto) de
la pantalla de la TV
Puede seleccionar el formato de su TV.
Presione TV/DVD para
1
DISPLAY/
CALL
TV/DVD
POWER
123
456
789
CH
SELECT/
ENTER
CH
MUTE
TOP MENU
SLOW
SEARCH SEARCH
SKIP SKIP
MARKER
DVD MENU
ANGLEAUDIO
PAUSE/STILL
RETURN
SUB TITLE
INPUT
SELECT SLEEP
PLAYMODE
PLAY
STOP
JUMP
TV/CAP/TEXT
OPEN/CLOSE
VOLUME
0
SETUP/
TV MENU
CANCEL
QUICK VIEW/
ZOOM
SLOW
REPEATA-B
+
Ð
seleccionar el modo DVD.
Presione SETUP en el modo
de parada o No Disc.
Presione
seleccionar “Picture”, y a
continuación presione o
ENTER.
Presione o para
2
seleccionar “TV Screen”, y a
continuación presione
ENTER.
Presione o para
3
seleccionar el tipo de pantalla
deseada, y a continuación
presione ENTER.
Puede elegir entre los siguientes tamaños de pantalla:
16:9
Seleccione este modo al conectar a un TV de pantalla ancha. Se
muestra una imagen en pantalla ancha a toda pantalla.
4:3
Seleccione este modo al conectar a un TV convencional. Al
reproducir un disco DVD para pantalla ancha, presenta la imagen
ocupando toda la anchura del TV , con bandas negras en la parte
superior e inferior de la imagen.
4:3
Presenta la imagen ocupando toda la pantalla, y recortando
automáticamente los extremos izquierdo y derecho.
• Si desea volver al menú anterior, presione
Presione SETUP para eliminar la pantalla Menú.
4
o para
o
Pantalla ancha
Letterbox
Panscan
o RETURN.
Ajuste de la visualización en pantalla
La visualización del estado en pantalla se puede activar o
desactivar con los botones.
Presione SETUP en el modo de parada o No Disc.
1
Presione
presione
o para seleccionar “Picture”, y a continuación
o ENTER.
ESPAÑOL
NOTA:
Si el disco DVD no está formateado en el estilo
"pan & scan", muestra el estilo 4:3.
5G60701A S P31-40 6/11/03, 6:09 PM35
Presione o para
2
seleccionar “Display”.
Presione o ENTER para
3
seleccionar "On" u "Off".
On: La visualización en pantalla aparece cuando se pulsan
los botones (ajuste de fábrica).
Off: La visualización en pantalla no aparece cuando se pulsa
cualquier botón.
• Si desea volver al menú anterior, presione RETURN.
Presione SETUP para eliminar la pantalla Menú.
4
35
Page 82

Control de Gama Dinámica
/Enter/Setup/Return
Sound
DRC On
Main Menu
/Enter/Setup/Return
Language
Picture
Sound
Parental
/Enter/Setup/Return
Sound
DRC Off
El DRC (Control de Gama Dinámica) le
permite controlar la gama dinámica
para lograr un sonido conveniente
Presione TV/DVD para
1
para su equipo.
DISPLAY/
POWER
CALL
123
456
789
SELECT/
ENTER
OPEN/CLOSE
TV/DVD
VOLUME
+
Ð
0
CH
Presione
2
seleccionar DRC.
3
CH
MUTE
DVD MENU
ANGLEAUDIO
TOP MENU
SLOW
PAUSE/STILL
SEARCH SEARCH
PLAY
RETURN
TV MENU
CANCEL
SUB TITLE
QUICK VIEW/
INPUT
SELECT SLEEP
PLAYMODE
SETUP/
ZOOM
SLOW
4
seleccionar mode de TV.
Presione SETUP en el
modo de parada.
Presione
ó para
seleccionar “Sound”.
o ENTER para
Presione o ENTER para
seleccionar “On” o “Off”.
• Si desea volver al menú anterior, presione o
RETURN.
Presione SETUP para retirar la pentalla de Menu.
SKIP SKIP
MARKER
STOP
JUMP
TV/CAP/TEXT
REPEATA-B
Notas:
• DRC funciona sólo con la reproducción de
grabaciones Dolby Digital.
• El nivel de DRC puede variar según el disco
de vídeo DVD.
36
5G60701A S P31-40 6/11/03, 6:09 PM36
Page 83

Ajuste de restricciones para menores
/Enter/Setup/Return
Parental
Password Off
Parental Level Off
/Enter/Setup/Return
Main Menu
Language
Picture
Sound
Parental
Algunos discos no son apropiados
para los niños. Estos discos pueden
limitarse para no reproducirse con la
unidad.
DISPLAY/
POWER
CALL
123
456
789
SELECT/
MUTE
DVD MENU
ANGLEAUDIO
TOP MENU
SLOW
PAUSE/STILL
SEARCH SEARCH
SKIP SKIP
MARKER
TV/DVD
CH
ENTER
CH
RETURN
SUB TITLE
INPUT
SELECT SLEEP
PLAYMODE
PLAY
STOP
JUMP
TV/CAP/TEXT
OPEN/CLOSE
VOLUME
0
SETUP/
TV MENU
CANCEL
QUICK VIEW/
ZOOM
SLOW
REPEATA-B
+
Ð
Presione TV/DVD para seleccionar mode de DVD.
1
Presione SETUP en el
modo de parada.
Presione ó para
seleccionar “Parental” y
presione
Presionar el botón
2
o ENTER.
ó
para seleccionar
restricción para menores
y después presionar
ó
ENTER.
Presione o para
3
seleccionar un nivel desde
Off o 1–8. Presione
ENTER para ajustar el
nivel seleccionado.
o
Parental Level
Off
1
2
3
4
5
/Enter/Setup/Return
• Nivel no: No funciona el ajuste de restricciones para
menores.
• Nivel 8: Se puede reproducir todo el DVD.
• Nivel 1: El DVD para mayores no puede reproducirse.
• Seleccione entre el nivel 1 al nivel 8. La limitación será
más severa conforme el número sea más bajo.
Presione o para
4
seleccionar “Password”, y a
continuación presione
ENTER.
o
Parental
Password Off
Parental Level 1
ESPAÑOL
Notas:
• Una vez completado cada ajuste
(P.34-38), el aparato puede seguir
funcionando en las mismas
condiciones (especialmente con
discos DVD).
Cada ajuste puede mantenerse en la
memoria aunque desconecte el
aparato.
• Para algunos discos, el aparto no puede
prohibir la reproducción.
• Algunos discos no puede codificarse
con determinada información de nivel
de prohibición aunque la etiqueta del
disco diga “adulto”. Para estos discos
no funcionará la prohibición para
menores.
5G60701A S P31-40 6/11/03, 6:09 PM37
Presione los botones
5
numéricos (0-9) para
introducir la contraseña. No
Password
Password 1234
olvide la contraseña.
• Si introduce un número
incorrecto, presione
CANCEL.
Presione ENTER para
6
guardar la contraseña.
Nota: Ahora la clasificación
está bloqueada y el ajuste
Parental
Password On
Parental Level 1
no puede cambiarse a
menos que introduzca la
contraseña correcta.
• Si desea volver al menú anterior, presione
o RETURN.
Presionar SETUP para retirar la pantalla de restricciones
7
para menores.
37
Page 84

Cambio del nivel de restricciones para menores
Parental
Password Off
Parental Level 1
/Enter/Setup/Return
Parental Level
3
4
5
6
7
8
Parental
Password On
Parental Level 1
Parental
Password Off
Parental Level 1
Parental
Password Off
Parental Level 8
Parental
Password On
Parental Level 8
Password
Password 1234
Password
Password
____
Presione TV/DVD para seleccionar mode de DVD.
1
Presione SETUP en el modo de parada o no hay disco.
ó para seleccionar Parental y presione
o ENTER.
DISPLAY/
CALL
TV/DVD
POWER
123
456
789
CH
SELECT/
ENTER
OPEN/CLOSE
VOLUME
0
+
Ð
Presione
o ENTER.
Presione ó para
2
seleccionar “Password” y
presione
Presionar los botones de
3
los números (0-9) para
introducir la contraseña
que haya almacenado.
• Si introduce un número incorrecto, presione CANCEL.
Presione ENTER.
4
Esto cancela la prohibición.
CH
MUTE
DVD MENU
ANGLEAUDIO
TOP MENU
SLOW
PAUSE/STILL
SEARCH SEARCH
SKIP SKIP
MARKER
PLAY
STOP
RETURN
SUB TITLE
QUICK VIEW/
INPUT
SELECT SLEEP
PLAYMODE
JUMP
REPEATA-B
TV/CAP/TEXT
SETUP/
TV MENU
CANCEL
ZOOM
SLOW
Nota:
No se olvide de la contraseña. Si se olvida
de la contraseña, hable con la tienda
donde compró este aparato.
Presione
5
seleccionar “Parental Level”
y presione
ó para
o ENTER.
Se muestra la pantalla de
Restricciones para menores.
Presione ó para
6
seleccionar un nivel desde
Off o 1-8 y a continuación
presione
Presione ó para
7
seleccionar “Password” y
presione
Presionar los botones de
8
los números (0-9) para
o ENTER.
o ENTER.
introducir la contraseña.
Nota: puede cambiar la contraseña si así lo desea.
Presione ENTER.
9
Ahora el nivel de la
restricción queda cambiado
y fijo.
• Si desea volver al menú anterior, presione o
RETURN.
Presionar SETUP para retirar la pantalla de restricciones
10
para menores.
38
5G60701A S P31-40 6/11/03, 6:09 PM38
Page 85

Deshabilitación temporal del nivel de rating (clasificación)
Dependiendo del disco DVD, el disco
puede tratar de cancelar temporalmente
el nivel de rating que haya ajustado.
Depende de usted si decide cancelar
el nivel de la rating o no.
Introduzca el disco DVD y
1
presione PLAY (ver página 27).
del disco DVD
DISPLAY/
CALL
TV/DVD
POWER
123
456
789
CH
SELECT/
ENTER
CH
MUTE
TOP MENU
SLOW
SEARCH SEARCH
SKIP SKIP
MARKER
DVD MENU
ANGLEAUDIO
PAUSE/STILL
RETURN
SUB TITLE
INPUT
SELECT SLEEP
PLAYMODE
PLAY
STOP
JUMP
TV/CAP/TEXT
OPEN/CLOSE
VOLUME
0
SETUP/
TV MENU
CANCEL
QUICK VIEW/
ZOOM
SLOW
REPEATA-B
+
Ð
Si el disco DVD fue diseñado para cancelar temporalmente
2
el nivel del Rating, cambiará la pantalla que aparece
después del "Reading" (lectura) dependiendo del disco
que se esté tocando. Si selecciona "YES" con el botón
ENTER aparecerá la pantalla de "su disco excede el nivel
de restricciones para menores".
Your disc exceeds the parental control level.
Password
____
Enter/0–9/Cancel/Return
Si desea cancelar el nivel de clasificación ajustado
3
temporalmente, introduzca la contraseña de 4 dígitos.
A continuación, presione ENTER.
Alternativamente, si no se ha establecido ninguna
contraseña, comenzará la reproducción. Si desconoce (u
olvidó) la contraseña, seleccione "STOP".
La pantalla de ajuste desaparecerá. Presione OPEN/
CLOSE para sacar el disco.
Para salir, presione RETURN.
La reproducción comenzará si se introdujo la contraseña
4
correcta.
ESPAÑOL
Nota:
Esta cancelación temporal del nivel del
rating se mantendrá hasta que se saque el
disco. Cuando se extraiga el disco se
establecerá el nivel de rating original de
manera automática.
5G60701A S P31-40 6/11/03, 6:09 PM39
39
Page 86

Lista de códigos de idiomas
Entre el número de código apropiado para los ajustes iniciales “AUDIO”, “SUBTITLE” y/o “MENU LANGUAGE” (consulte las páginas 34).
Nombre de idioma Código Nombre de idioma Código
Abkhazian 1112 Fiji 1620 Lingala 2224 Singhalese 2919
Afar 1111 Finnish 1619 Lithuanian 2230 Slovak 2921
Afrikaans 1116 French 1628 Macedonian 2321 Slovenian 2922
Albanian 2927 Frisian 1635 Malagasy 2317 Somali 2925
Amharic 1123 Galician 1722 Malay 2329 Spanish 1529
Arabic 1128 Georgian 2111 Malayalam 2322 Sundanese 2931
Armenian 1835 German 1415 Maltese 2330 Swahili 2933
Assamese 1129 Greek 1522 Maori 2319 Swedish 2932
Aymara 1135 Greenlandic 2122 Marathi 2328 Tagalog 3022
Azerbaijani 1136 Guarani 1724 Moldavian 2325 Tajik 3017
Bashkir 1211 Gujarati 1731 Mongolian 2324 Tamil 3011
Basque 1531 Hausa 1811 Nauru 2411 Tatar 3030
Bengali; Bangla 1224 Hebrew 1933 Nepali 2415 Telugu 3015
Bhutani 1436 Hindi 1819 Norwegian 2425 Thai 3018
Bihari 1218 Hungarian 1831 Oriya 2528 Tibetan 1225
Breton 1228 Icelandic 1929 Panjabi 2611 Tigrinya 3019
Bulgarian 1217 Indonesian 1924 Pashto, Pushto 2629 Tonga 3025
Burmese 2335 Interlingua 1911 Persian 1611 Turkish 3028
Byelorussian 1215 Irish 1711 Polish 2622 Turkmen 3021
Cambodian 2123 Italian 1930 Portuguese 2630 Twi 3033
Catalan 1311 Japanese 2011 Quechua 2731 Ukrainian 3121
Chinese 3618 Javanese 2033 Rhaeto-Romance 2823 Urdu 3128
Corsican 1325 Kannada 2124 Romanian 2825 Uzbek 3136
Croatian 1828 Kashmiri 2129 Russian 2831 Vietnamese 3219
Czech 1329 Kazakh 2121 Samoan 2923 Volapük 3225
Danish 1411 Kirghiz 2135 Sanskrit 2911 Welsh 1335
Dutch 2422 Korean 2125 Scots Gaelic 1714 Wolof 3325
English 1524 Kurdish 2131 Serbian 2928 Xhosa 3418
Esperanto 1525 Laothian 2225 Serbo-Croatian 2918 Yiddish 2019
Estonian 1530 Latin 2211 Shona 2924 Yoruba 3525
Faroese 1625 Latvian, Lettish 2232 Sindhi 2914 Zulu 3631
Nombre de idioma Código
Nombre de idioma Código
40
5G60701A S P31-40 6/11/03, 6:09 PM40
Page 87

Disturbios de recepcion
La mayoría de los tipos de interferencia de televisión pueden ser solucionados ajustando la altura y la
posición de la antena de VHF/UHF. Para obtener los mejores resultados se recomiendan las antenas
exteriores. Los tipos más comunes de interferencia de televisión están mostrados abajo. Si aparece
uno de estos síntomas cuando el TV/DVD está conectado a un sistema de TV cable, el disturbio puede
ser causado por la compañía local emisora de TV cable.
IGNICION
Aparecen manchas negras o bandas horizontales y la imagen puede
ondular o ser inestable. Es generalmente causado por interferencia
proveniente de los sistemas de encendido de los automóviles,
lámparas de neón o máquinas herramientas de CA y artículos
electrodomésticos tales como taladros y secadores de cabello.
FANTASMAS
Los fantasmas son causados por una señal de televisión que fluye por
dos vías. Una es la vía directa y la otra es la reflejada por los edificios
altos, colinas u otros objetos grandes. El cambiar la dirección o
posición de la antena puede mejorar la recepción.
NIEVE
Si el TV/DVD está ubicado lejos de la estación de TV, en un área de
recepción limitada donde la señal es débil, pueden aparecer pequeños
puntos en la imagen. Si la señal es extremadamente débil, puede ser
necesario instalar una antena externa más grande.
ESPAÑOL
INTERFERENCIA DE RADIO FRECUENCIA (RFI)
Causada por radios de dos vías, este tipo de interferencia produce
ondulaciones que se mueven o líneas diagonales en la imagen.
En algunos casos puede causar pérdida de contraste de la misma.
El cambiar la dirección y la posición de la antena, o la instalación de un
filtro de RFI puede mejorar la imagen.
VARIACION DEL TAMAÑO DE LA IMAGEN
Una pequeña variación del tamaño de la imagen es normal cuando
usted ajusta los controles de CONTRASTE o BRILLO.
CUIDADOS Y MANTENCION
Para evitar incendios o peligros de choques eléctricos, desconecte el TV/DVD de la fuente de CA antes de la
limpieza. La terminación del gabinete puede ser limpiada con un paño suave y un jabón suave y como otros
muebles. Tome precauciones cuando limpia o pasa un paño en las partes de plástico.
5G60701A S P41-back 6/11/03, 6:09 PM41
41
Page 88

Conexiones de toma Audio/Video
La instalación exacta a utilizar para hacer las conexiones de los distintos componentes de video y audio en el
TV depende del modelo y funciones de cada componente. Confirme en el manual de instrucciones de cada
componente para la posición de las entradas y salidas de video y de audio.
Utilización de un amplificador de audio
Atrás del TV/DVD
Amplificador
Salida de audio (izq.)
Salida (der.) de audio
A la entrada
(der.) de audio
Cable de AUDIO (no suministrado)
A la entrada
(izq.) de audio
Cómo utilizar un Amplificador AV con sonido digital integrado
Si está utilizando un Amplificador con surround digital integrado, puede disfrutar de los distintos sistemas de
audio, incluyendo el audio con Dolby Surround que hasta ahora sólo se podía disfrutar en los cines.
A continuación se muestra cómo conectar un amplificador AV con decodificador Digital Dolby
integrado, decodificador DTS, decodificador MPEG, etc.
Atrás del TV/DVD
Salida de audio
digital coaxial
Cable digital coaxial
(no suministrado)
A la entrada de
audio digital coaxial
Amplificador AV con decodificador de
surround digital integrado como aparece
arriba enlistado.
Altavoz
delantero
(izquierdo)
TV/DVD
Altavoz ambiental
(izquierdo)
Altavoz de
subgraves
Altavoz central
Altavoz
delantero
(derecho)
Altavoz
ambiental
(derecho)
Fabricado bajo licencia de Dolby Laboratories. “Dolby” y el símbolo de la doble D son marcas registradas por
*
Dobly Laboratories. Trabajos confidenciales no publicados. © 1992-1997 Dolby Laboratories, Inc. Todos los
derechos reservados.
"DTS" y "DTS Digital Out" son marcas registradas de Digital Theater Systems, Inc.
*
NOTAS:
Cuando haga las conexiones explicadas arriba, en el amplificador AV NO ponga en “ON” la función DOLBY DIGITAL to
•
DOLBY DIGITAL, MPEG to MPEG. Si lo hace, los altavoces emitirán un sonido muy alto que podría causar daños a sus
oídos o a los altavoces.
Algunos decodificadores DTS que no soportan la interfase DVD-DTS tal vez no funcionen adecuadamente con la unidad.
•
42
5G60701A S P41-back 6/11/03, 6:09 PM42
Page 89

Conexiones de toma Audio/Video
Cómo utilizar las entradas de audio/video
Si conecta el TV/DVD a la videograbadora, cámara de video o juego de video, puede seleccionar presionando
INPUT SELECT.
Presione repetidamente el botón INPUT SELECT para seleccionar el modo deseado.
Aparecerá "LINE" o TV en la pantalla durante 4 segundos.
LINE
1. Para conectar el TV/DVD a una videograbadora
Presionar INPUT SELECT para seleccionar el modo deseado para utilizar la TV como monitor.
Operar la videograbadora como siempre.
VCR
A salida de
Audio/Video
A entrada de Audio (izq.)
Cordon de Audio/Video (no está incluido)
Frente del TV/DVD
(MONO)
PHONES VIDEO IN L – AUDIO IN – R
2. Para conectar el TV a la videocámara
Para reproducir de la videocámara, conecte la videocámara en el TV tal como se indica.
NOTA:
Esta botón no funcionará en el
modo DVD.
A entrada de Video
A entrada de Audio (der.)
ESPAÑOL
Videocámara
A entrada de Video
A salida de Audio/Video
Cordon de Audio/Video (no está incluido)
Frente del TV/DVD
(MONO)
PHONES VIDEO IN L – AUDIO IN – R
A entrada de Audio (der.)
A entrada de Audio (izq.)
3. Para conectar el TV/DVD a un juego de TV.
El TV/DVD puede utilizarse también como pantalla para muchos juegos de video. Sin embargo, debido a que
existe una gran variedad de tipos diferentes de señales generadas por estos aparatos y diferentes requisitos
de conexión correspondientes, no se han incluido todas las posibilidades posibles en los diagramas de
conexión sugeridos. Para más detalles, deberá consultar el manual de instrucciones de cada componente.
Frente del TV/DVD
A entrada de Video
A salida de Audio/Video
Cordon de Audio/Video (no está incluido)
(MONO)
PHONES VIDEO IN L – AUDIO IN – R
A entrada de Audio (der.)
A entrada de Audio (izq.)
43
5G60701A S P41-back 6/11/03, 6:09 PM43
Page 90

Problemas y localización de averías
Utilice la siguiente lista de verificación de localización de averías cuando tiene problemas con este aparato.
Consulte con su concesionario local o tienda de servicio si continúan los problemas.
Compruebe que se han hecho correctamente todas las conexiones cuando utilice con otros aparatos.
SINTOMA POSIBLE SOLUCION
ENERGIA
•Verifique que el cable de alimentación esté conectado.
•Pruebe con otro tomacorriente de CA.
El TV/DVD no funciona
RECEPCION DE PROGRAMAS DE TV
Sonido de baja calidad o
ausencia de sonido
Imagen de baja calidad o
ausencia de imagen
Mala recepción en algunos
canales
Mala definición de los colores o
ausencia de color
La imagen presenta oscilación o
desplazamiento
La recepción CATV no es posible
Aparecen barras horizontales o
verticales en la pantalla
La recepción no es posible más
allá del canal 13
El televisor se apaga
La función de subtítulo cerrado
no es activada.
La lengua deseada no se muestra.
•La alimentación está desconectada; revise el fusible o el
interruptor automático.
Desconecte la unidad, y vuelva a conectarla at cabo de una hora.
•
•
El fusible del cordón de CD está quemado, sustituya el fusible.
•La estación o el servicio de TV cable están con problemas;
sintonice otra estación.
•Verifique los ajustes de volumen.
•Determine si hay posibles fuentes de interferencia.
•La estación o el servicio de TV cable están con problemas;
sintonice otra estación.
•Revise las conexiones de la antena o sistema CATV; reoriente
la antena.
•Determine si hay posibles fuentes de interferencia.
•Verifique los ajustes de los controles de imagen.
•La estación o el servicio de TV cable están con problemas;
sintonice otra estación.
•La señal de la estación es débil; reoriente la antena.
•Determine si hay posibles fuentes de interferencia.
•La estación o el servicio de TV cable están con problemas;
sintonice otra estación.
•Verifique que haya canales almacenados en la memoria.
•Verifique los ajustes de los controles de imagen.
•Revise las conexiones de la antena o sistema CATV; reoriente
la antena.
•Determine si hay posibles fuentes de interferencia.
•La estación o el servicio de TV cable están con problemas;
sintonice otra estación.
•Verifique que haya canales almacenados en la memoria.
•El servicio CATV está transmitiendo una señal codificada.
•Reoriente la antena.
•Revise todas las conexiones del sistema CATV.
•Ajuste la opción de menú de TV/CATV al modo CATV.
•La estación o el servicio de TV cable están con problemas;
pruebe con otra estación.
•Revise las conexiones de la antena y reoriente la antena.
•Determine si hay posibles fuentes de interferencia.
•Asegúrese de que la opción de menú TV/CATV está ajustado a
la posición apropiada en la selección de menú de la pantalla.
Si está usando una antena, revise las conexiones de la antena de UHF.
•
•La estación sintonizada no está transmitiendo.
•El temporizador de desactivación automática ha sido activado.
•El suministro de energía se ha interrumpido.
•Estación de TV está experimentando problemas o programa
sintonizado no es en modo de subtítulo cerrado. Pruebe en otro canal.
•Asegúrese de conexión de CATV o antena VHF/UHF,
reposición o gire antena.
•Precione el botón de TV/CAP/TEXT para encender la
codificador de subtítulo cerrado.
•Seleccione la lengua apropiada en las selecciones de menú.
Página
11,12
12,13
12,13
12,13
12,13
12,13
15
15
41
15
41
23
15
41
15
19
23
41
15
19
–
12
13
18
15
41
18
12
15
16
–
15
17
14
44
5G60701A S P41-back 6/11/03, 6:09 PM44
Page 91

Problemas y localización de averías
SINTOMA POSIBLE SOLUCION
DVD
No empieza la reproducción.
No hay imagen. • El selector TV/DVD no está ajustado correctamente.
No hay sonido.
La imagen se ve distorsionada
durante la localización progresiva
o regresiva.
No puede parar la reproducción,
búsqueda, cámara lenta,
reproducción repetida o
reproducción programada, etc.
No se ve la imagen en 4:3 (16:9). • El ajuste no corresponde al de su TV.
No hay indicaciones en la pantalla. • Seleccione Display On.
No se escucha el sonido ambiental. • El ajuste no corresponde al de su sistema estéreo.
Una tecla del aparato o mando a
distancia no lo hace funcionar.
No empieza la reproducción al
seleccionar el título.
El idioma de la pista de sonido de
audio y/o subtítulos no cambia al
reproducir un DVD.
No se ven los subtítulos.
No cambia el ángulo. • No se ha grabado desde múltiples ángulos en el disco DVD.
Aparece “
CONTROL REMOTO
No funciona el mando a distancia.
” en la pantalla.
• No hay disco colocado.
• El disco puede estar sucio. Limpie el disco.
• El aparato no puede reproducir CD-ROM, etc.
• Compruebe que el selector de entrada del amplificador está en
la posición correcta.
• El aparato está en un modo de reproducción especial.
•
Seleccionar la posición correcta de la Salida de Audio en el amplificador AV.
• La imagen puede quedar distorsionada a veces.
• Algunos discos pueden no aceptar algunas funciones.
• Desconecte el aparato y desenchufe el cable eléctrico de CA
durante varios minutos. Vuelva a enchufar.
• Verifique el ajuste del nivel de prohibición.
• No se han grabado múltiples idiomas en el disco DVD.
• Algunos discos no tienen subtítulos.
• Los subtítulos se han eliminado. Presione SUB TITLE.
• La función está prohibida para este aparato o disco.
• Apunte el mando a distancia hacia el sensor remoto.
• Utilice a una distancia de menos de 5 metros o baje la luz en la
habitación.
• Elimine los obstáculos para el rayo infrarrojo.
• Las pilas están gastadas. Cambie las pilas.
• Compruebe que las pilas están bien colocadas.
Página
27
25
–
26
–
28
42
–
–
35
35
42
–
37~39
34
32
33
–
11
ESPAÑOL
Para informacion adicional sobre los ajustes u operacion, favor de visitar nuestra pagina web
www.memorexelectronics.com o llamar a servicio a clientes al no. 1-800-919-3647
Favor de conservar todo el empaque por lo menos por 90 dias en caso de que tenga que de volver
este producto al lugar de compra o a memorex para obtener refacciones y accesorios, comunicarse
5G60701A S P41-back 6/11/03, 6:09 PM45
a fox int’l al no. 1-800-321-6993
45
Page 92

Especificaciones
GENERALIDADES
Fuente de alimentación:
Consumo de energía:
Peso:
Dimensiones:
Temperatura de
operación:
Humedad de
funcionamiento:
TELEVISOR
Tubo de imagen:
Tipo de sintonizador:
Canales de recepción:
Entrada de antena:
Altavoz:
Potencia de salida de
audio:
Tocadiscos de DVD/
Discos compactos
Señal de Sistema:
Disco utilizable:
Características de audio
respuesta de frecuencia:
S/N Ratio:
Distorsión armónica:
Variaciones de velocidad:
Entradas/Salidas:
Salida de audio digital:
Captor:
Accesorio:
120V CA, 60 Hz
12V CD
Operation: 55 Vatios (120V CA, 12V CD)
Stand by: 5 Vatios (120V CA)
17,6 libras (8 kg)
Anchura : 10-15/16 pulgadas (278 mm)
Altura : 12-1/4 pulgadas (311.5 mm)
Profundidad : 12-5/16 pulgadas (312,5 mm)
5° - 40°C
Menos de 80%
9” (228.6 mm diagonalmente)
Cuarzo PLL frecuencia sintetizada
VHF 2-13
UHF 14-69
CATV 14-36 (A)-(W)
Cable coaxial de entrada de VHF/UHF 75 ohmios
3" (76 mm), 8 ohmios x 2
1,2W + 1,2W
NTSC
1. DVD (12cm, 8cm)
2. CD (12cm, 8cm)
DVD: 4Hz - 22KHz
CD: 4Hz - 20KHz
90dB
0,06%
Por debajo del Nivel Medible
Entradas : Video : (RCA) 1 Vp-p/75 ohmios
Salidas : Video : (RCA) 1 Vp-p/75 ohmios
0,5Vp-p 75ohmios terminados
CD : Longitud de onda: 775 – 815 nm
DVD : Longitud de onda: 650 – 666nm
Control Remoto
Antene telescópia
12V CD cordón de coche
TR
Carry ’Bag
37-59 (AA)-(WW)
60-85 (AAA)-(ZZZ)
86-94 (86)-(94)
95-99 (A-5)-(A-1)
100-125 (100)-(125)
01 (5A)
Audio : (RCA) – 8 dBm/50K ohmios
Audio : (RCA) – 8 dBm/1K ohm
Potencia máxima de salida: 0,5 mW
Potencia máxima de salida: 2,0 mW
03/07
U
46
5G60701A S P41-back 6/11/03, 6:09 PM46
Memcorp,Inc.
Weston,FL 33331
Printed in Thailand Impreso en Tailandia
Visit our website at www.memorexelectronics.com
Visite nuestro portal de internet en www.memorexelectronics.com
 Loading...