

Page 1
Is it live or is it Memorex? TM
MVD1402
14" COLOR TV WITH DVD PLAYER
DiGiTAL AUDEO
ooofooo t°.o
o o o
DiGiTAL
j __
Page 2
Contents ...................................................................... !
_mportant Safety Instructions ................................... 2
Precautions ................................................................. 5
Power Source ............................................................. 5
Location of Controls .................................................. 6
o Front ....................................................................... 6
, Rear Panel .............................................................. 6
o Remote ................................................................... 7
Remote Control .......................................................... 8
o Battery Installation .................................................. 8
o Effective Distance of the Remote
ControJ Transmitter ................................................. 8
Antenna Connections ................................................ 9
Connection Using the Front AIV In Jacks ............... 9
Cable (CATV)/Satellite Connections ....................... 10
Connection from an External Unit .......................... 11
, Connection Using Coaxial Cable .......................... 1!
o Connection Using A!V Cables ............................... 1!
o Connection Using the Component Y/PB/PR
Jacks .....................................................................12
Connection to an E×ternalUnit ..............................12
o Connection Using theA/V Out Jacks ...................12
, Connection Using the Coaxial Jack ...................... 13
About Discs ..............................................................14
Setting the TV Menus ............................................... 16
o Video Setup Menu ................................................ !6
o Audio Setup Menu ................................................16
, Timer Setup Menu ................................................17
o Settingthe On Timer ............................................18
o Setting the Off Timer ............................................. 19
, Settingthe Sleep Timer........................................19
, Settingthe Remind Timer.....................................20
o Setup Menu ..........................................................21
, Channel Setup Menu ............................................24
, SettingChannels intoMemory .............................25
o Adding and DeletingChannels .............................26
, Calendar Setup Menu ...........................................27
TV Parental Control..................................................28
o ParentalControlSetup .........................................28
o TV RatingSetup ...................................................29
, MPAA Rating Setup ..............................................30
o Lock Menu ............................................................31
DVD Setup Menus ....................................................32
, General Setup Menu ............................................32
, Parental ................................................................ 33
Basic Operation ........................................................34
, Display..................................................................34
, Mute ...................................................................... 34
o TV/AV .................................................................... 34
o TV/DVD ................................................................. 34
o R STD (Picture Standard) .................................... 34
o Headphone Jack ...................................................34
o Calendar ............................................................... 35
, Time ...................................................................... 35
o Volume Buttons .................................................... 35
TV Basic Operation .................................................. 36
, Scan ...................................................................... 37
o Recall....................................................................37
Closed Captions ....................................................... 38
DVD Basic Operation ...............................................39
o Audio Mode ..........................................................39
o DVD Call Button ................................................... 39
, Mute ...................................................................... 39
, Playback ofa DVD ............................................... 40
o Skip ....................................................................... 41
, FastSearch ..........................................................41
, Slow ...................................................................... 41
o Pause/Step ...........................................................41
o Title/ChapterSearch .............................................42
o Title/Chapter/TimeSearch ....................................42
o Repeat Playback ..................................................42
o A=B Repeat Playback ...........................................42
o Audio Language ...................................................43
o Subtitle Menu ........................................................43
• DVD Menu ............................................................ 43
o TitleMenu .............................................................43
o Zoom In ................................................................ 43
o Angle ..................................................................... 43
o Programmed Playback .........................................44
CD/VCD BASIC OPERATION ................................... 45
o Playback of a CDiVCD ......................................... 45
o Selecting tracks using the Skip (_I) or (I_)
Button (For VCD ONLY) .......................................45
o Selecting track using the Number Buttons ........... 45
o Selecting Tracks Using The Navigation
Buttons (For CD ONLY) ....................................... 45
o Forward/Reverse..................................................46
o Playa SingleTrack/Repeat Play..........................46
o RepeatA-B Play ................................................... 46
o PBC (VCD Only) ................................................... 46
o Audio ..................................................................... 46
o Programmed Playback(VCD Only) ....................... 47
P_CTURE CD BASIC OPERATION ........................... 48
TrouMeshooting Guide ............................................ 49
Care and Maintenance .............................................5!
Specifications ........................................................... 52
Page 3
i CAUTION
o
CAUTION:TO REDUCE THE RrSK OF ELECTRrC SHOCK, DO NOT
REMOVE COVER (OR BACK). NO USER-SERVICEABLE
PARTS INSIDE,REFERSERVICINGTO QUALIFIED SERVICE
PERSONNEL
The rightning flash with arrowhead symbor
within an equiraterar triangle is intended to alert
the user to the presence of uninsurated
dangerous voltage within the product's
enclosure that may be d sufficient magnitude to
constitute a risk of electric shock to persons.
The exclamation point within an equilateral
triangle is intended to alert the user to the
presence of important operating and
maintenance (servicing) instructions in the
literature accompanying the appliance.
This Caution Marking was located at the rear enclosure of
the apparatus.
CAUTION:
THIS DIGITAL VIDEO DISC PLAYER EMPLOYS A
LASER SYSTEM.
TO ENSURE PROPER USE OF THIS PRODUCT,
PLEASE READ THIS OWNER'S MANUAL CAREFULLY
AND RETAIN FOR FUTURE REFERENCE. SHOULD
THE UNIT REQUIRE MAINTENANCE, CONTACT AN
AUTHORIZED SERVICE LOCATION-SEE SERVICE
PROCEDURE.
USE OF CONTROLS, ADJUSTMENTS OR THE
PERFORMANCE OF PROCEDURES OTHER THAN
THOSE SPECIFIED HEREIN MAY RESULT IN
HAZARDOUS RADIATION EXPOSURE.
TO PREVENT DIRECT EXPOSURE TO LASER BEAM,
DO NOT TRY TO OPEN THE ENCLOSURE. VISIBLE
LASER RADIATION MAY BE PRESENT WHEN THE
ENCLOSURE IS OPENED. DO NOT STARE INTO BEAM.
WARNING:
TO REDUCE THE RISK OF FIRE OR ELECTRIC
SHOCK, DO NOT EXPOSE THIS PRODUCT TO RAIN
OR MOISTURE.
WARNING:
TO REDUCE THE RISK OF FIRE OR ELECTRIC
SHOCK, AND ANNOYING INTERFERENCE, USE THE
RECOMMENDED ACCESSORIES ONLY.
SURGE PROTECTORS:
It is recommended to use a surge protector for AC
connection. Lightning and power surges ARE NOT
covered under warranty for this product.
The symbol for class II
(Double Insulation)
DANGER:
Invisible and hazardous laser radiation when
open and interlock failed or defeated. Avoid
direct exposure to beam.
FCC NOTICE:
This equipment has been tested and found to comply
with the limits for a Class B digital device, pursuant to
part 15 of the FCC Rules. These limits are designed to
provide reasonable protection against harmful
interference in a residential installation. This equipment
generates, uses and can radiate radio frequency energy
and, if not installed and used in accordance with the
instructions, may cause harmful interference to radio
communications.
However, there is no guarantee that interference will not
occur in a particular installation. If this equipment does
cause harmful interference to radio or television
reception, which can be determined by turning the
equipment off and on, the user is encouraged to try' to
correct the interference by one or more of the following
measures:
Reorient or relocate the receiving antenna.
Increase the separation between the equipment and
receiver.
Connect the equipment into an outlet on a circuit
different from that to which the receiver is connected.
Consult the dealer or an experienced radio/TV
technician for help.
FCC WARNING:
To assure continued compliance, follow the attached
installation instructions and use only shielded cables
when connecting to other devices. Modifications not
authorized by the manufacturer may void user's authority
to operate this device.
ATTENTION:
POUR EVlTER LES CHOC ELECTRIQUES, INTRODUIRE
LA LAME LA PLUS LARGE DE LA FICHE DANS LA BORNE
ICORRESPONDANTE DE LA PRISES ET POUSSER
mJUSQU'AU FOND.
Manufactured under license from Dolby Laboratories.
"Dolby" and the double-D symbol are trademarks of Dolby Laboratories.
Page 4

Beforeusingtheunit,besureto readalloperatinginstructions carefully. Please note that these are general
precautions and may not pertain to your unit. For example, this unit may not have the capability to be connected to
an outdoor antenna.
1. READ iNSTRUCTiONS
All the safety and operating instructions should be read before the product is operated.
2. RETAIN iNSTRUCTiONS
The safety and operating instructions shouUdbe retained for future reference.
3. HEED WARNINGS
All warnings on the product and in the operating instructions should be adhered to.
4. FOLLOW iNSTRUCTIONS
All operating and use instructions should be followed.
5. CLEANING
Unplug this product from the wall outlet before cleaning. Do not use liquid cleaners or aerosol cleaners. Use a dry cloth
for cleaning.
6. ATTACHMENTS
Do not use attachments not recommended by the product's manufacturer as they may cause hazards.
7. WATERAND IVIOISTURE
Do not use this product near water-for example: near a bathtub, washbowl, kitchen sink or laundry tub; in a wet
basement; or near a swimming pool.
Do not place this product on an unstable cart, stand, tripod, bracket or table. The product may fall, causing _..,_,_,,,_,_,,,,,_o._,,,_,,c_
serious injury and serious damage to the product. Use only with a cart, stand, tripod, bracket or table
recommended by the manufacturer or sold with the product. Any mounting d the product should follow the
manufacturer's instructions, and should use a mounting accessory" recommended by the manufacturer.
8A. An appliance and cart combination should be moved with care. Quick stops, excessive force and
uneven surfaces may cause the appliance and cart combination to overturn.
g. VENTILATION .........
Slots and openings in the cabinet and in the back or bottom are provided for ventilation, to ensure reliable operation of
the product and to protect it from overheating. These openings must not be blocked or covered. The openings should
never be blocked by placing the product on a bed, sofa, rug or other similar surface. This product should never be
placed near or over a radiator or heat source. This product should not be placed in a built-in installation such as a
bookcase or rack unless proper ventilation is provided or the manufacturer's instructions have been adhered to.
10. POWER SOURCES
This product should be operated only from the type of power source indicated on the marking label, if you are not sure of
the type of power supply to your home, consult your appliance dealer or local power company. For products intended to
operate from battery power, or other sources, refer to the operating instructions.
11. GROUNDING OR POLARIZATION
This product is equipped with a polarized alternating-current line plug (a plug having one blade wider than the other).
This plug will fit into the power outlet only one way. This is a safety feature. If you are unable to insert the plug fully into
the outlet, try reversing the plug. If the plug should still fail to fit, contact your electrician to replace your obsolete outlet.
Do not defeat the safety purpose of the polarized plug.
12. POWER-CORD PROTECTION
Power-supply cords should be routed so that they are not likely to be walked on or pinched by items placed upon or
against them, paying particular attention to cords at plugs, convenience receptacles, and the point where they exit from
the appliance.
13. UGHTNING
To protect your product from a lightning storm, or when it is left unattended and unused for long periods of time, unplug it
from the wall outlet and disconnect the antenna or cable system. This will prevent damage to the product due to lightning
and power-line surges.
14. POWER UNES
An outside antenna system should not be located in the vicinity of overhead power lines or other electric light or power
circuits, or where it can fall into such power lines or circuits. When installing an outside antenna system, extreme care
should be taken to keep from touching such power lines or circuits as contact with them might be fatal.
15. OVERLOADING
Do not overload wall outlets and extension cords as this can result in a risk of fire or electric shock.
16. OBJECT AND LIQUID ENTRY
Never push objects of any kind into this product through openings as they may touch dangerous voltage points or short out
parts that could result in fire or electric shock. Never spill or spray any type of liquid on the product.
Page 5
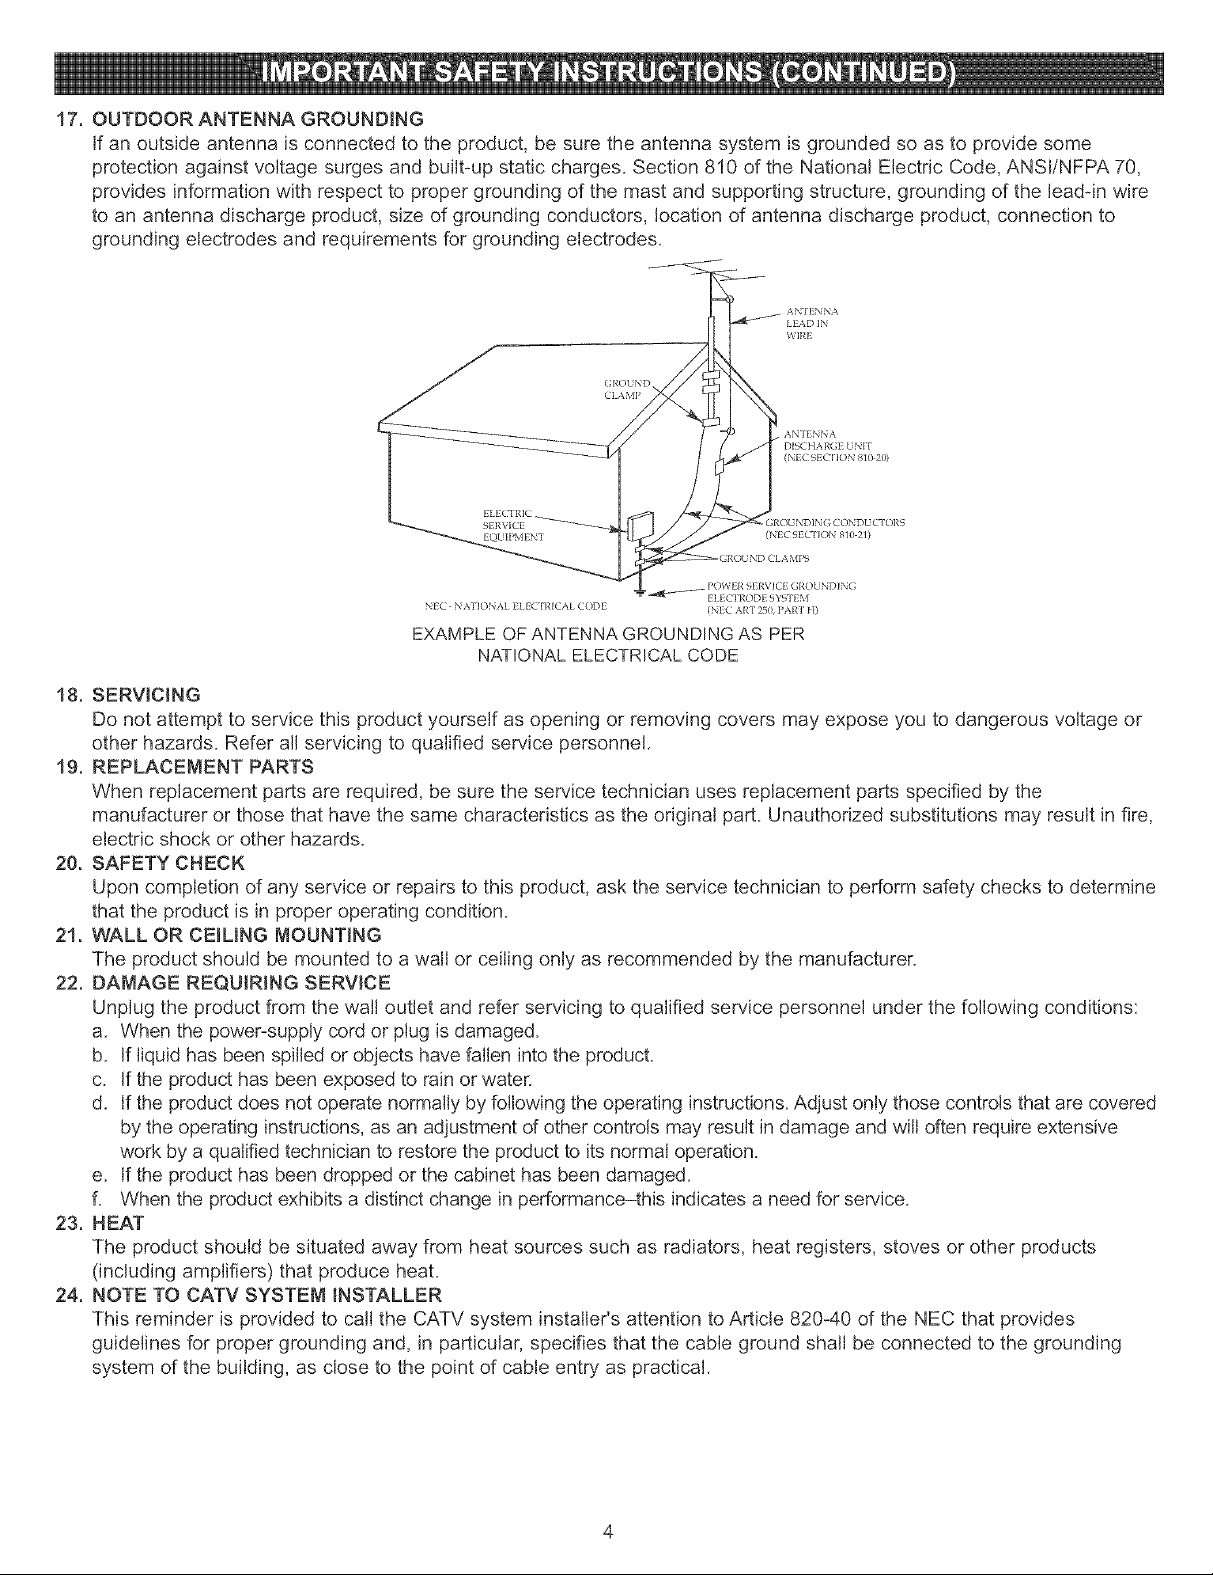
17.OUTDOORANTENNAGROUNDING
Ifanoutsideantennaisconnectedtotheproduct,besuretheantennasystemisgroundedsoasto providesome
protectionagainstvoltagesurgesandbuilt-upstaticcharges.Section810oftheNationalElectricCode,ANSI/NFPA70,
providesinformationwithrespecttopropergroundingofthemastandsupportingstructure,groundingofthelead-inwire
toanantennadischargeproduct,sizeofgroundingconductors,locationofantennadischargeproduct,connectionto
groundingelectrodesandrequirementsforgroundingelectrodes.
LE4D IN
WIRE
CLAMP
AN'I ENNA
DISCt IARGE UNIT
(NEC91 CIION 810 20)
ELEC'I RIC
SERVICE _ :; CONDUCTORS
EQUIPMENT (NEC 9ECTrK)N 810 21)
POWER SERVICE GROL NDING
NEC N ATIONAL ELI ,'_ICAL CODE (NEC ART _0, PART H)
EXAMPLE OF ANTENNA GROUNDING AS PER
NATIONAL ELECTRICAL CODE
18, SERVICING
Do not attempt to service this product yourself as opening or removing covers may expose you to dangerous voltage or
other hazards. Refer all servicing to qualified service personnel.
19. REPLACEMENT PARTS
When replacement parts are required, be sure the service technician uses replacement parts specified by the
manufacturer or those that have the same characteristics as the original part. Unauthorized substitutions may result in fire,
electric shock or other hazards.
20. SAFETY CHECK
Upon completion of any service or repairs to this product, ask the service technician to perform safety checks to determine
that the product is in proper operating condition.
21. WALL OR CEILING MOUNTING
The product should be mounted to a wall or ceiling only as recommended by the manufacturer.
22. DANAGE REQUIRING SERVICE
Unplug the product from the wall outlet and refer servicing to qualified service personnel under the following conditions:
a. When the power-supply cord or plug is damaged.
b. If liquid has been spilled or objects have fallen into the product.
c. If the product has been exposed to rain or water.
d. If the product does not operate normally by following the operating instructions. Adjust only those controls that are covered
by the operating instructions, as an adjustment of other controls may result in damage and will often require extensive
work by a qualified technician to restore the product to its normal operation.
e. If the product has been dropped or the cabinet has been damaged.
f. When the product exhibits a distinct change in performance-this indicates a need for service.
23. HEAT
The product should be situated away from heat sources such as radiators, heat registers, stoves or other products
(including amplifiers) that produce heat.
24. NOTE TO CATV SYSTEM INSTALLER
This reminder is provided to call the CATV system installer's attention to Article 820-40 of the NEC that provides
guidelines for proper grounding and, in particular, specifies that the cable ground shall be connected to the grounding
system of the building, as close to the point of cable entry" as practical.
_{r'_ ELECTI¢¢ )DE S'_%TEM
Page 6
NOTES ON HANDLING:
When shipping this unit, always use the original
shipping carton and packing materials. For maximum
protection, repack the unit as it was originally packed
at the factory.
Do not use volatile liquids, such as insect spray, near
the player. Do not leave rubber or plastic products in
contact with the DVD player for a long time. They will
leave marks on the finish.
The top and rear panels of the player may become
warm after a long period of use. This is normal and
not a malfunction.
When the player is not in use, be sure to remove the
disc and turn off the power.
If you do not use the player for a long period, the unit
may not function properly in the future. Turn on and
use the player occasionally.
NOTES ON LOCATING THE DVD PLAYER:
When you place this player near another TV, radio or
VCR, the playback picture may become poor and the
sound may be distorted. In this case, move the player
away from the TV, radio or VCR.
NOTES ON CLEANING:
Use a soft, dry cloth for cleaning.
For stubborn dirt, soak the cloth in a weak detergent
solution, wring well and wipe. Use a dry cloth to wipe
it dry. Do not use any type of solvent, such as thinner
and benzene, as they may damage the surface of the
player.
If you use a chemical-saturated cloth to clean the unit,
follow that product's instructions.
Warning: Cleaning and adjustment of lenses and/or
other components of playback mechanism should be
performed by a qualified service technician.
TO OBTAIN A CLEAR PICTURE:
The DVD player is a high technology, precision device, if
the optical pick-up lens and disc drive parts are dirty or
worn down, the picture quality becomes poor. To obtain a
clear picture, we recommend regular inspection and
maintenance (cleaning or parts replacement) every 1,000
hours of use depending on the operating environment.
For details, contact your nearest dealer.
NOTES ON MOISTURE CONDENSATION:
Moisture condensation damages the DVD player, Please
read the following carefully.
Moisture condensation occurs, for example, when you
pour a cold drink into a glass on a warm day. Drops of
water form on the outside of the glass. In the same way,
moisture may condense on the optical pick-up lens inside
this unit, one of the most crucial internal parts d the DVD
player.
Moisture condensation occurs during the following
cases:
When you bring the DVD player directly from a cold place
to a warm place.
When you use the DVD player in a room where you just
turned on the heater, or a place where the cold wind from
the air conditioner directly hits the unit.
in summer, when you use the DVD player in a hot and
humid place just after you moved the unit from an air
conditioned room.
When you use the DVD player in a humid place.
Do not use the DVD player when moisture condensation
may occur.
if you use the DVD player in such a situation, it may
damage discs and internal parts. Remove the disc,
connect the power cord d the DVD player to the wall
outlet, turn on the DVD player and leave it "ON" for two
or three hours. After two or three hours, the DVD player
will have warmed up and evaporated any moisture. Keep
the DVD player connected to the wall outlet and moisture
condensation will seldom occur.
Insert theAC plug (with the 2 blades) into a conveniently located AC outlet having 120V,
60Hz.
NOTE: The AC plug supplied with the unit is polarized to help minimize the possibility of
electric shock. If the AC plug does not fit into a nonpolarized AC outlet, do not file or cut
the wide blade. It is the user's responsibility to have an electrician replace the obsolete
outlet.
\
AC Outlet
AC Plug
Page 7
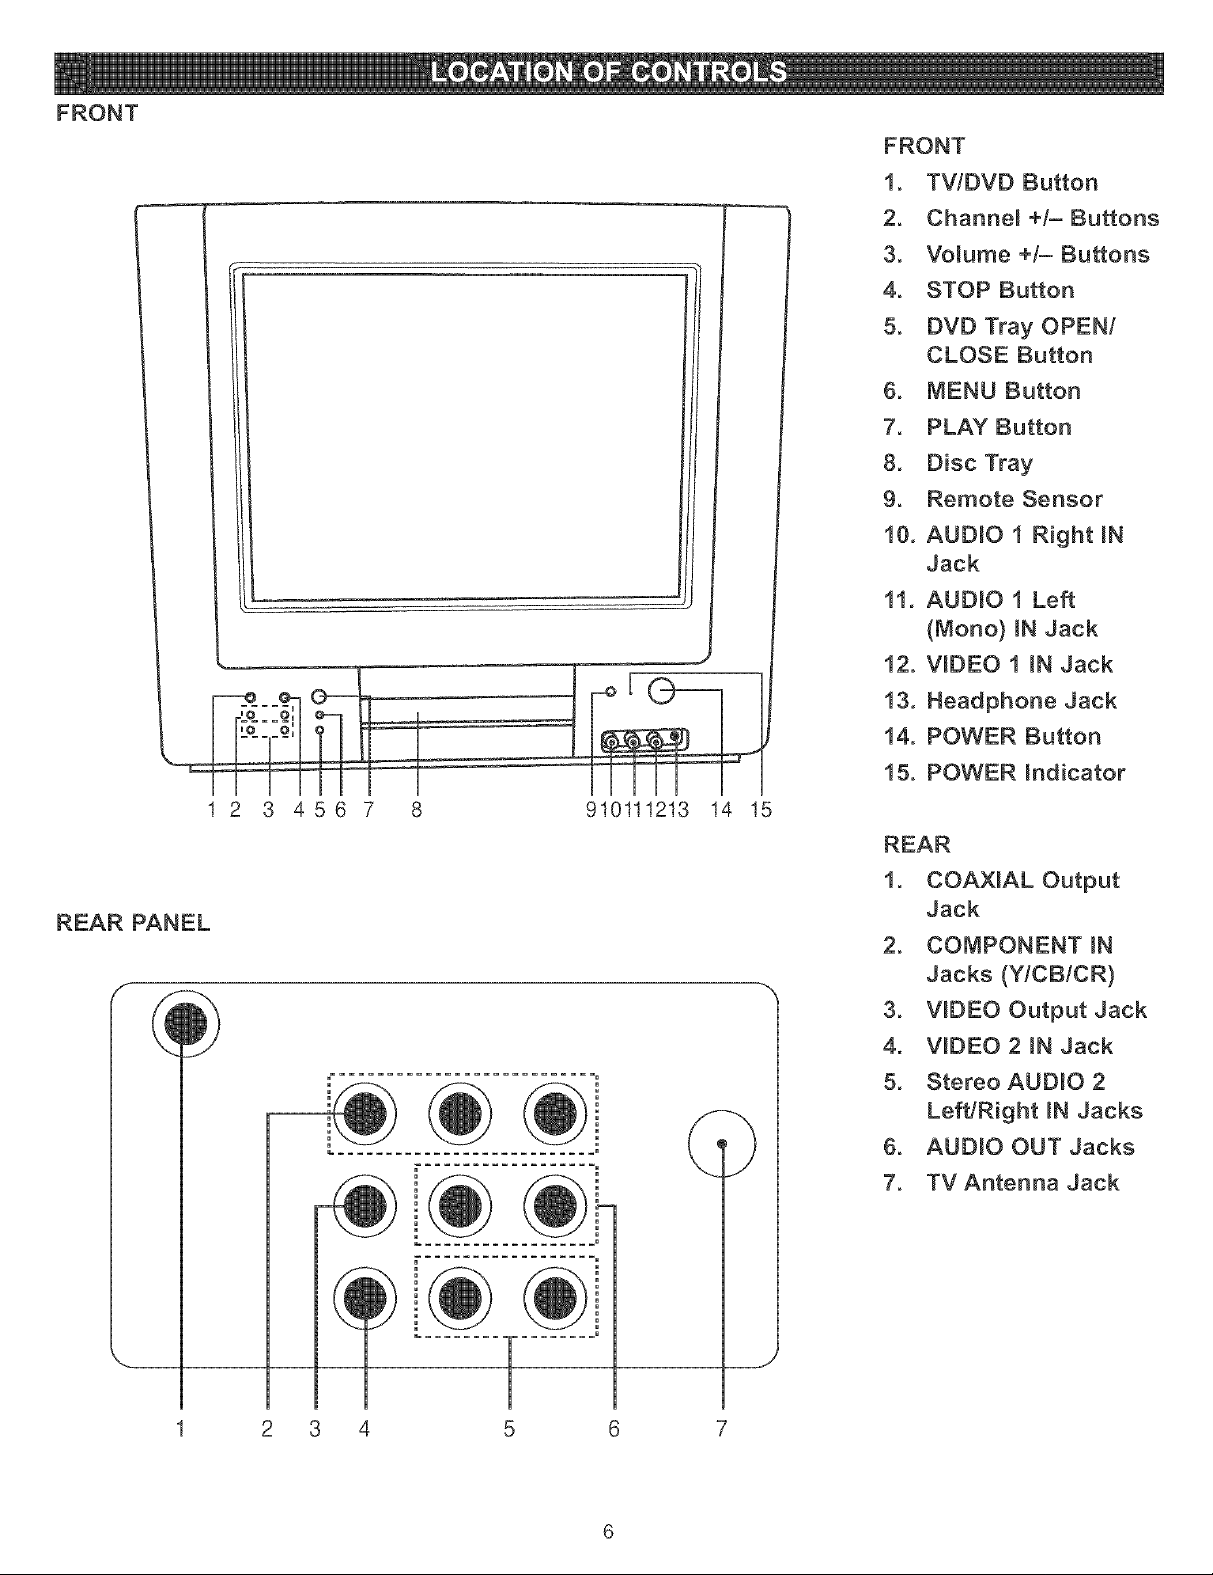
FRONT
FRONT
1. TV/BVB Button
2. Channel +/- Buttons
3. Vomume +/- Buttons
4. STOP Button
5. BVB Tray OPEN/
CLOSE Button
6. MENU Button
7. PLAY Button
8. Disc Tray
9. Remote Sensor
10. AUBNO 1 Right mN
Jack
11. AUDLO 1 Left
(Mono) BNJack
12. WBEO 1 BN Jack
REAR PANEL
13. Headphone Jack
14. POWER Button
15. POWER hdicator
1 2 3 456 7 8 910111213 14 15
1. COAXIAL Output
Jack
2. COMPONENT _N
Jacks (Y/CB/CR)
3. WBEO Output Jack
4. WDEO 2 BN Jack
5. Stereo AUDIO 2
Left/Right mNJacks
6. AUDIO OUT Jacks
7. TV Antenna Jack
2 3 4
Page 8
1 24
2__ _ [____ _25SCANRECALL DISPLAY MUTE !I 26
27
-- 28
5
6
10__
CALENDAR
11--
12__
13
STOP
14_
15
18
AUDIO
SEARCH
20--
21
DCALL SUBTITLE
23
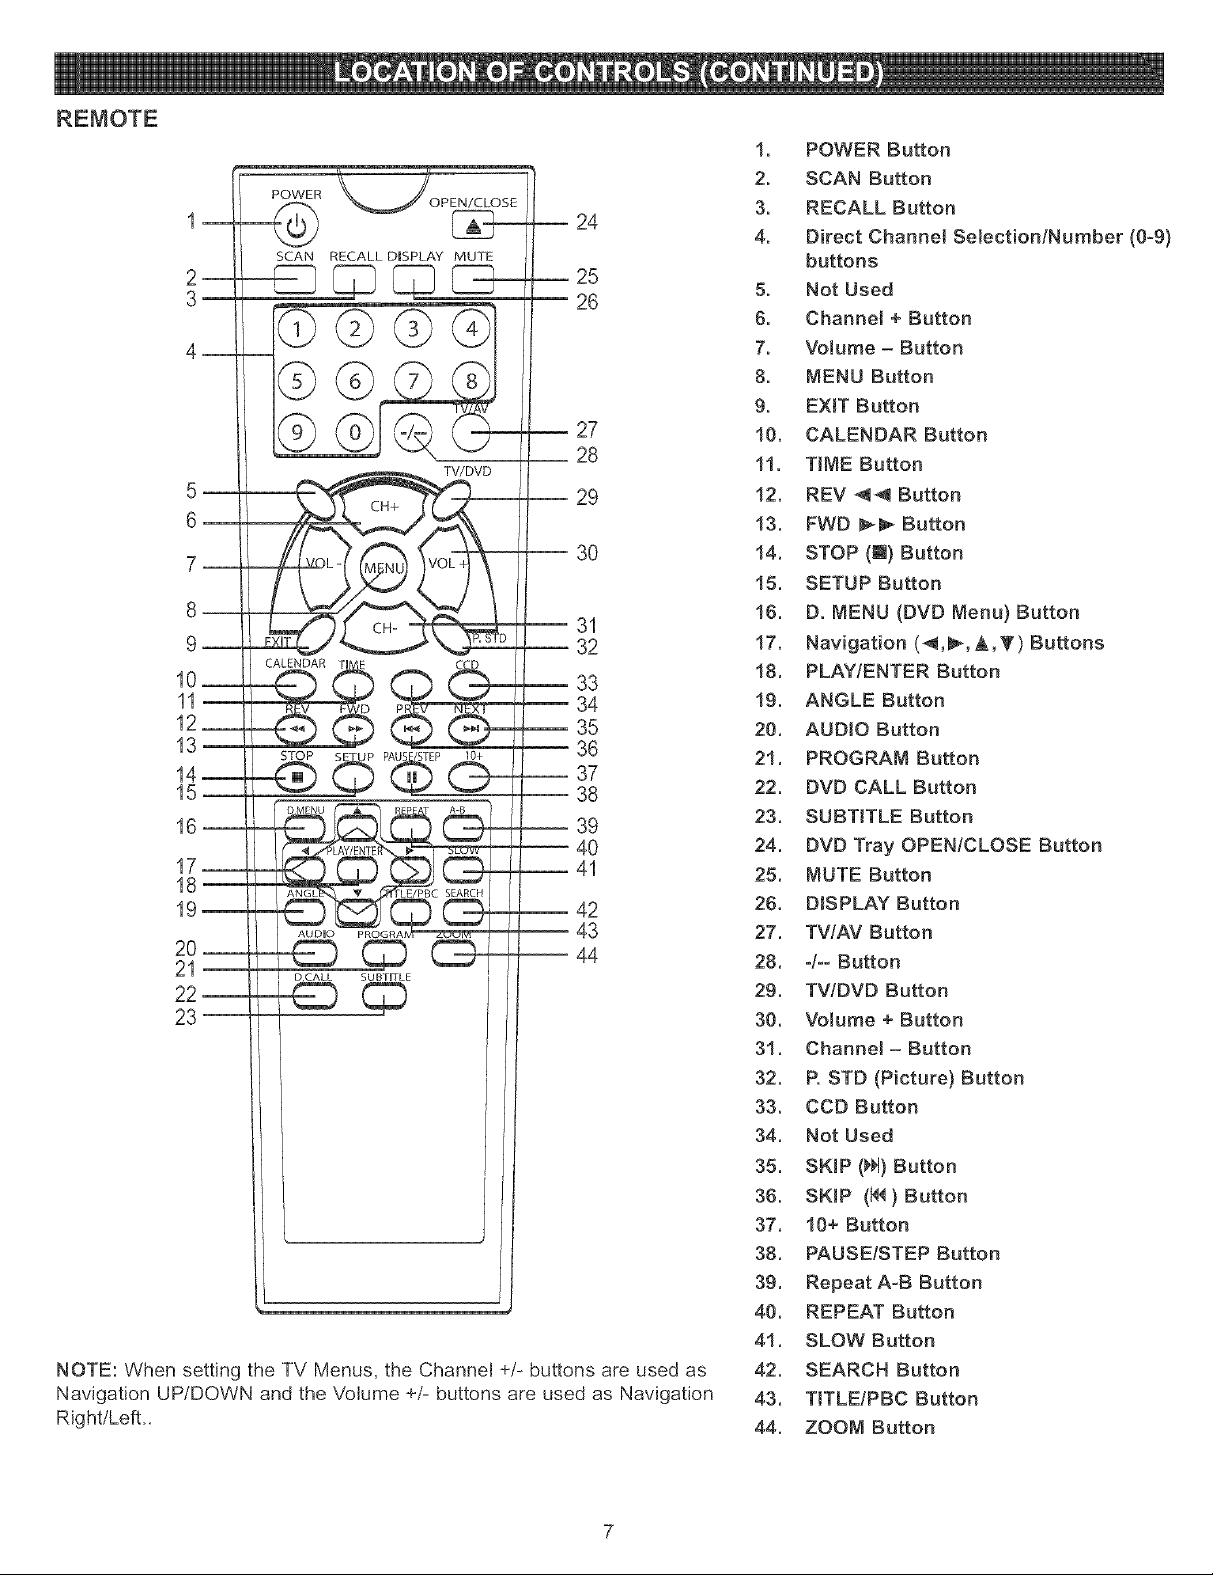
NOTE: When setting the TV Menus, the Channel +/- buttons are used as
Navigation UP/DOWN and the Volume +/- buttons are used as Navigation
Right/Left_
29
3O
31
-- 32
33
34
35
36
-- 37
38
-- 39
-- 40
--41
42
43
-- 44
1. POWER Button
2, SCAN Button
3, RECALL Button
4. Direct Channel Selection/Number (0-9)
buttons
5, Not Used
6. Channel + Button
7, Volume - Button
8. MENU Button
9, EXIT Button
10, CALENDAR Button
11, TiME Button
12, REV 44 Button
13. FWD _ Button
14. STOP (@) Button
15. SETUP Button
16. D. MENU (DVD Menu) Button
17, Navigation (_,_,A,_') Buttons
18. PLAY/ENTER Button
19, ANGLE Button
20. AUDIO Button
21. PROGRAM Button
22, DVD CALL Button
23. SUBTITLE Button
24. DVD Tray OPEN/CLOSE Button
25. MUTE Button
26, DISPLAY Button
27. TV/AV Button
28. -/- Button
29, TVtDVD Button
30, Volume + Button
31. Channel- Button
32, R STD (Picture) Button
33, COD Button
34. Not Used
35. SKIP (_1)Button
36. SKIP (I4_} Button
37. 10+ Button
38. PAUSE/STEP Button
39. Repeat A-B Button
40. REPEAT Button
41. SLOW Button
42, SEARCH Button
43. TITLEtPBC Button
44, ZOOM Button
Page 9
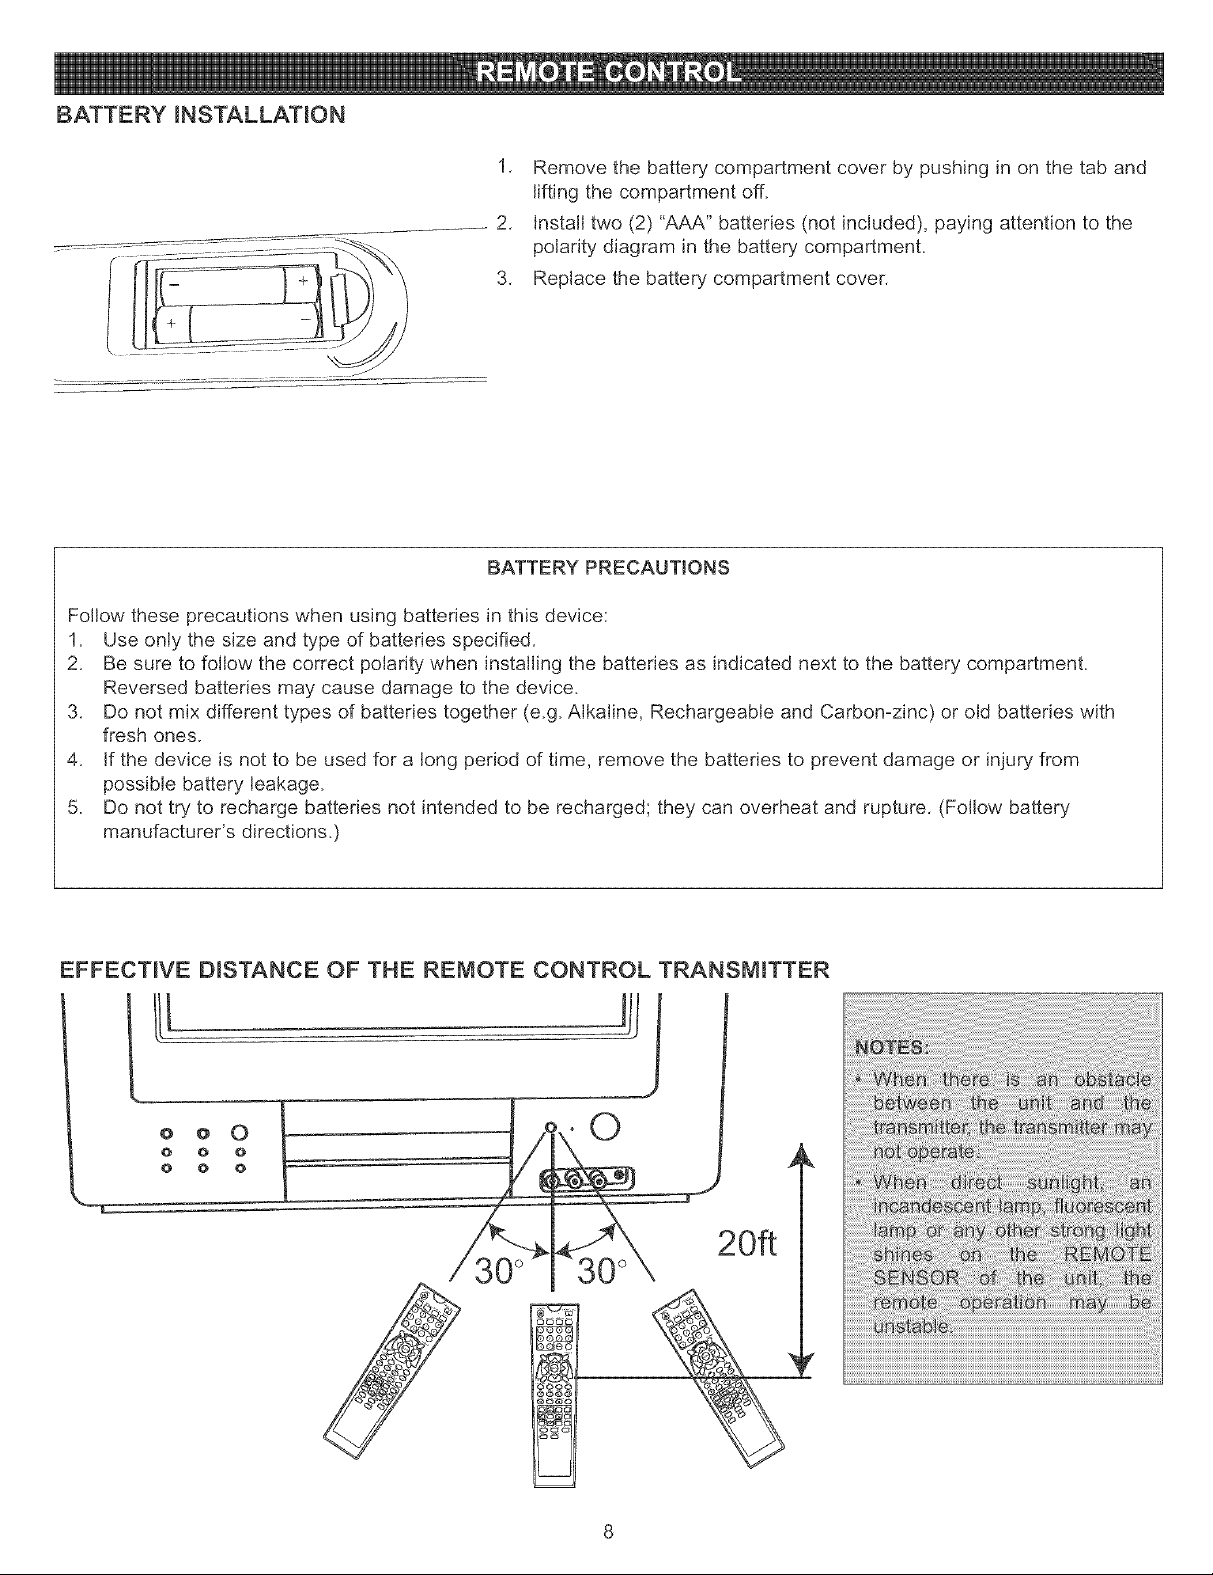
BATTERY INSTALLATION
1, Remove the battery compartment cover by pushing in on the tab and
lifting the compartment off.
2, Install two (2) "AAA" batteries (not included), paying attention to the
polarity diagram in the battery compartment.
3, Replace the battery compartment cover.
BATTERY PRECAUTIONS
Follow these precautions when using batteries in this device:
1. Use only the size and type of batteries specified.
2, Be sure to follow the correct polarity when installing the batteries as indicated next to the battery compartment.
Reversed batteries may cause damage to the device.
3, Do not mix different types of batteries together (e.g. Alkaline, Rechargeable and Carbon-zinc) or old batteries with
fresh ones.
4, If the device is not to be used for a long period of time, remove the batteries to prevent damage or injury from
possible battery leakage.
5. Do not try to recharge batteries not intended to be recharged; they can overheat and rupture, (Follow battery
manufacturer's directions.)
EFFECTIVE DISTANCE OF THE REMOTE CONTROL TRANSMITTER
O
20ft
Page 10

OUTDOOR VHF/UHF ANTENNA CONNECTION (ANTENNA NOT INCLUDED)
Follow the instructions for the type of antenna system you intend to use. If using Cable or satellite, see the next page.
Combination VHF/UHF
Antenna (Single 75 ohm cable
or 300 ohm twin-lead wire}
f'_ Antenna Antenna
75 ohm
CoaxiaJ
Cable 300-75 ohm
Connect the 75 ohm cable from
combination VHF/UHF antenna to the
antenna jack.
If your combination antenna has a 300
ohm twin-lead wire, use a 300-75 ohm
matching transformer (NOT SUPPLIED).
Jack Jack
UHF/
VHF
Matching
OR
Combination VHF/UHF
Antenna (Separate VHF and
UHF 300 ohm twin-leads}
f Antenna 300o75 ohm
Jack Matching
_z,a Transformer
_1II
VHF
Combiner
UHF 300 ohm _.... .... , j
Connect the UHF twin-lead wire to a
combiner (NOT SUPPLIED). Connect
the VHF twin-lead to a 300-75 ohm
matching transformer (NOT SUPPLIED).
Attach the transformer to the combiner.
Attach the combiner to the antenna jack.
Separate VHF/UHF Antennas
f Antenna __
Jack
Connect the 75 ohm cable from the VHF
antenna and the UHF antenna twin-lead
wire to a combiner (NOT SUPPLIED).
Attach the combiner to the antenna jack.
NOTE: If your VHF antenna has a twin-
lead wire, use a 300-75 ohm matching
transformer, then connect the
transformer to the combiner.
The optimal use for the front A/V jacks are to connect an A/V component that is used only occasionally, such as a
camcorder or video game. Connect the Audio/Video output jacks of the external unit to the Audio Input jacks and the Video
input jack.
IH
To access the unit connected to Ill
these jacks, press the TV/AV
button so VIDEO1 appears on
the screen. To resume normal
TV viewing, simply press the
TV/AV button again.
EXTERNALSOURCE
(i.e.camcorder,videogame)
J
ttt
AUDIO/VIDEOCord(Not Supplied)
FAQs:
My extema/ unit has only 1 audio jack, but this unit has two Audio Input jacks, how do I connect it?
Simply connect it to the "L (Mono)" Audio Input jack, but the sound will be monaural.
How do I watch the extemai unit connected to the Audio!Video Input jacks?
Press the TV/AV button so VIDEO1 appears on the screen, then start the external source.
Are the cables inc/uded?
No, the cables are sold separately, visit your local electronics store.
Page 11
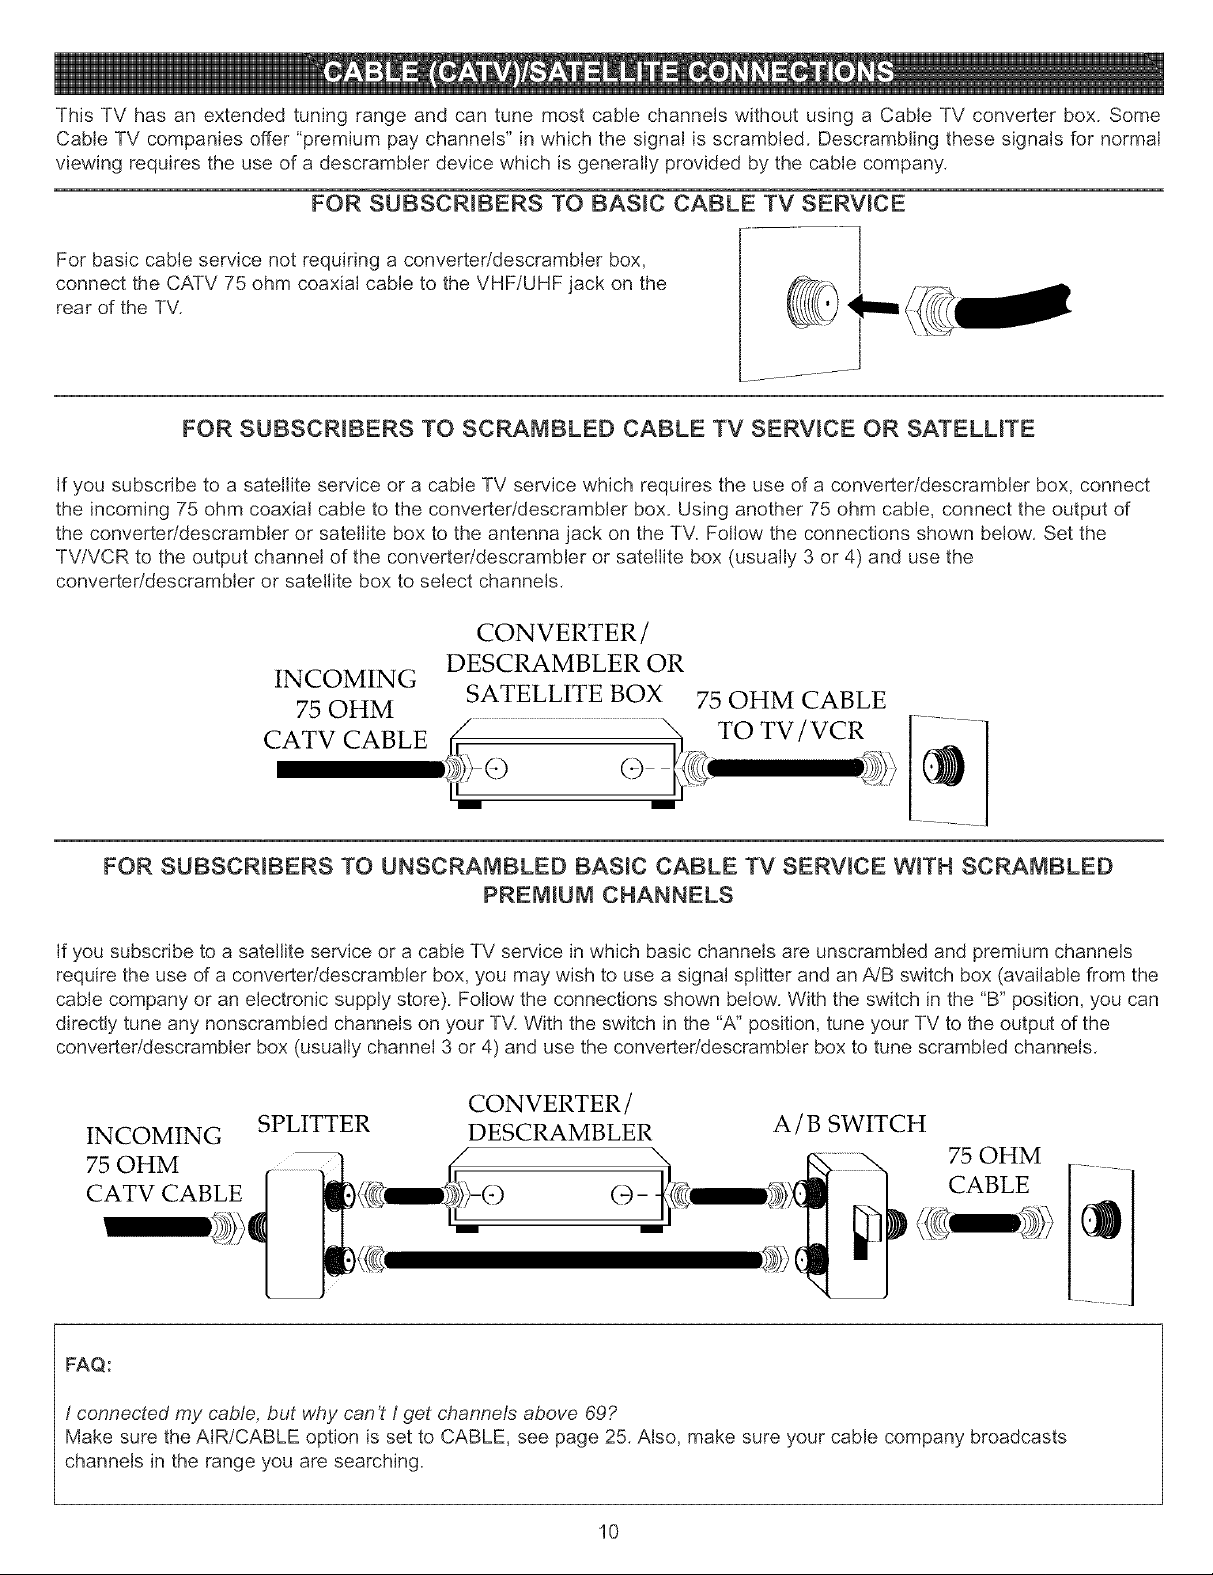
ThisTVhasanextendedtuningrangeandcantunemostcablechannelswithoutusinga CableTVconverterbox.Some
CableTVcompaniesoffer"premiumpaychannels"inwhichthesignalisscrambled.Descramblingthesesignalsfornormal
viewingrequirestheuseofadescramblerdevicewhichisgenerallyprovidedbythecablecompany.
FOR SUBSCRIBERS TO BASIC CABLE TV SERVICE
For basic cable service not requiring a converteddescrambler box,
connect the CATV 75 ohm coaxial cable to the VHF/UHF jack on the
rear of the TV.
........ I ......
FOR SUBSCRIBERS TO SCRAMBLED CABLE TV SERVICE OR SATELLITE
If you subscribe to a satellite service or a cable TV service which requires the use of a converteddescrambler box, connect
the incoming 75 ohm coaxial cable to the converteddescrambler box. Using another 75 ohm cable, connect the output of
the converteddescrambler or satellite box to the antenna jack on the TV. Follow the connections shown below. Set the
TV/VCR to the output channel of the converter/descrambler or satellite box (usually 3 or 4) and use the
converteddescrambler or satellite box to select channels.
CONVERTER/
INCOMING
75 OHM
DESCRAMBLER OR
SATELLITE BOX
75 OHM CABLE
m m
FOR SUBSCRIBERS TO UNSCRAMBLED BASIC CABLE TV SERVICE WITH SCRAMBLED
PREMIUM CHANNELS
If you subscribe to a satellite service or a cable TV service in which basic channels are unscrambled and premium channels
require the use of a converter/descrambler box, you may wish to use a signal splitter and an A/B switch box (available from the
cable company or an electronic supply store). Follow the connections shown below. With the switch in the "B" position, you can
directly tune any nonscrambled channels on your TV. With the switch in the "A" position, tune your TV to the output of the
converter/descrambler box (usually channel 3 or 4) and use the converter/descrambler box to tune scrambled channels.
CONVERTER/
INCOMING
SPLITTER
DESCRAMBLER A / B SWITCH
75 OHM
CABLE
FAQ:
I connected my cable, but why can't I get channels above 69?
Make sure the AIR/CABLE option is set to CABLE, see page 25. Also, make sure your cable company broadcasts
channels in the range you are searching.
10
Page 12
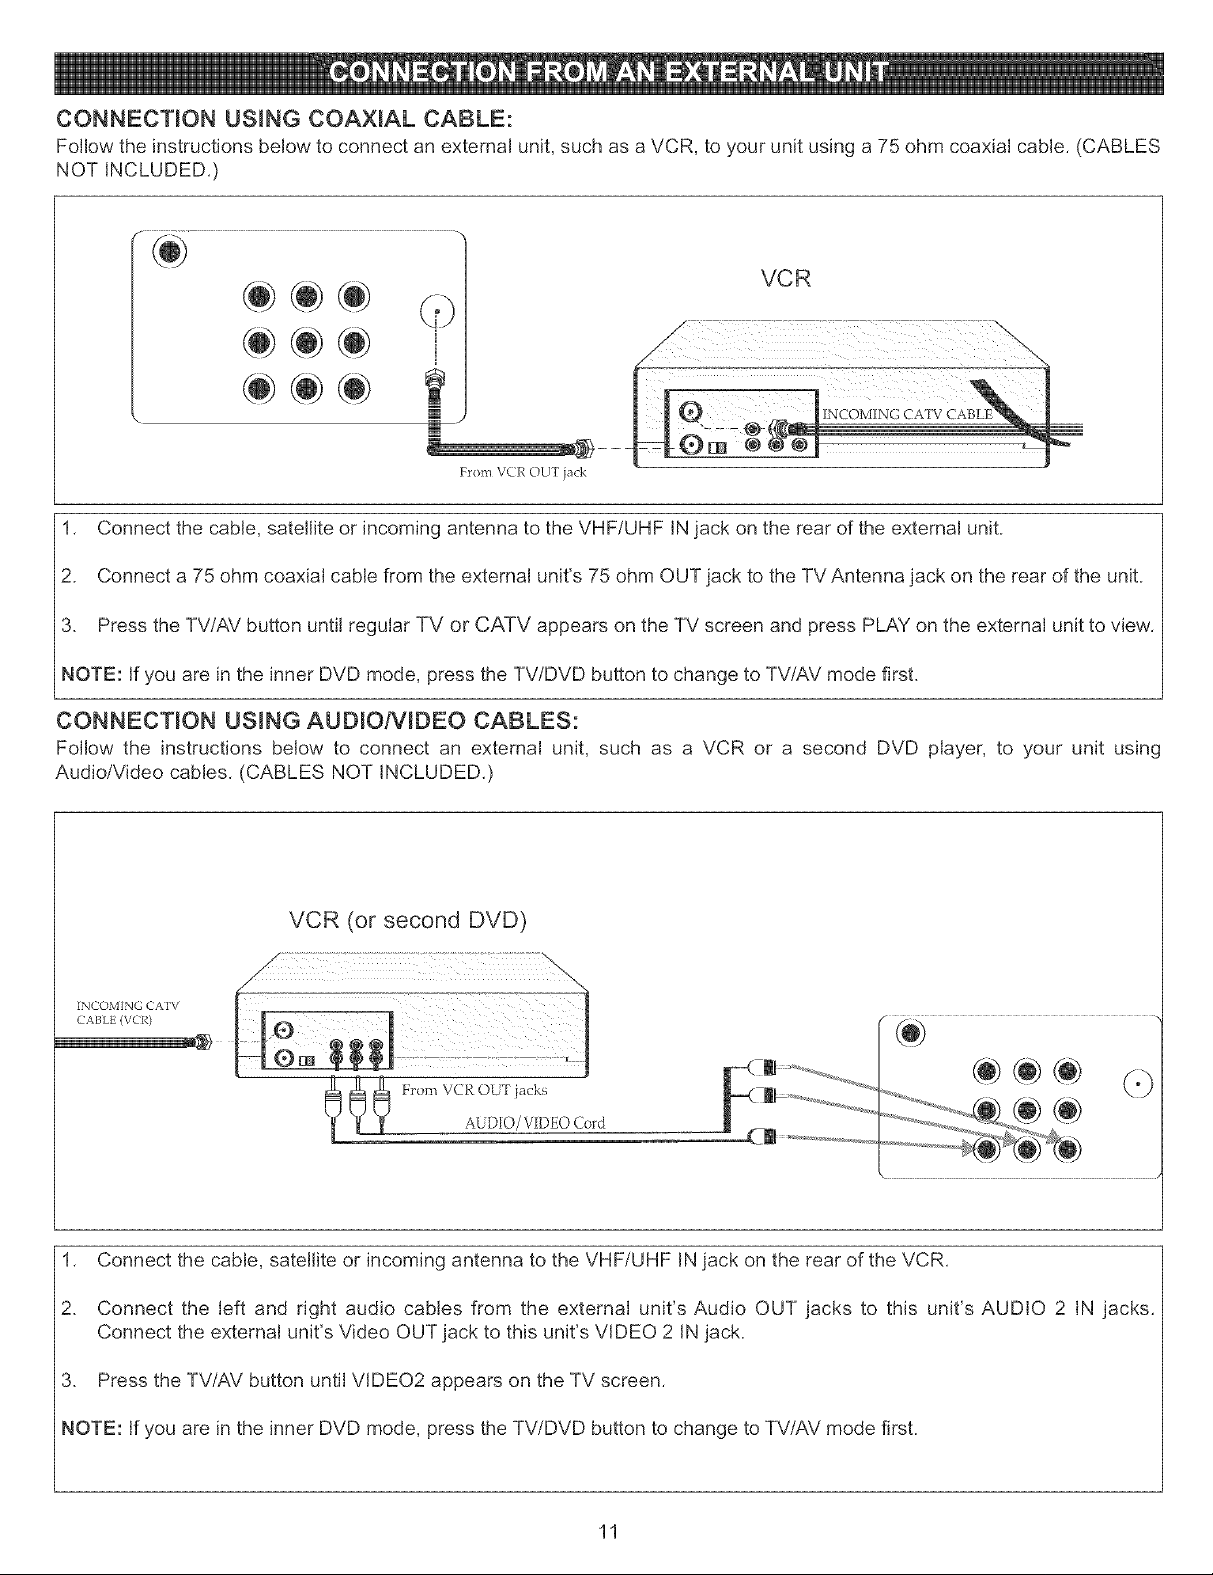
CONNECTION USNNG COAXmAL CABLE:
Follow the instructions below to connect an external unit, such as a VCR, to your unit using a 75 ohm coaxial cable. (CABLES
NOT INCLUDED.)
VCR
Fxom VCR OU'[ jack
1. Connect the cable, satellite or incoming antenna to the VHF/UHF INjack on the rear of the external unit.
2. Connect a 75 ohm coaxial cable from the external unit's 75 ohm OUT jack to the TV Antenna jack on the rear of the unit.
3. Press the TV/AV button until regular TV or CATV appears on the TV screen and press PLAY on the external unit to view.
NOTE: If you are in the inner DVD mode, press the TV/DVD button to change to TV/AV mode first.
CONNECTION USmNG AUD_O/V_DEO CABLES:
Follow the instructions below to connect an external unit, such as a VCR or a second DVD player, to your unit using
Audio/Video cables. (CABLES NOT iNCLUDED.)
VCR (or second DVD)
CABLE (VCR)
iNCOMING CAFV
From VCR OUT jacks
AUDIO/VIDEOCord
1. Connect the cable, satellite or incoming antenna to the VHF/UHF IN jack on the rear of the VCR.
2. Connect the left and right audio cables from the external unit's Audio OUT jacks to this unit's AUDIO 2 IN jacks.
Connect the external unit's Video OUT jack to this unit's VIDEO 2 IN jack.
3. Press the TV/AV button until VIDEO2 appears on the TV screen.
NOTE: If you are in the inner DVD mode, press the TV/DVD button to change to TV/AV mode first.
11
Page 13
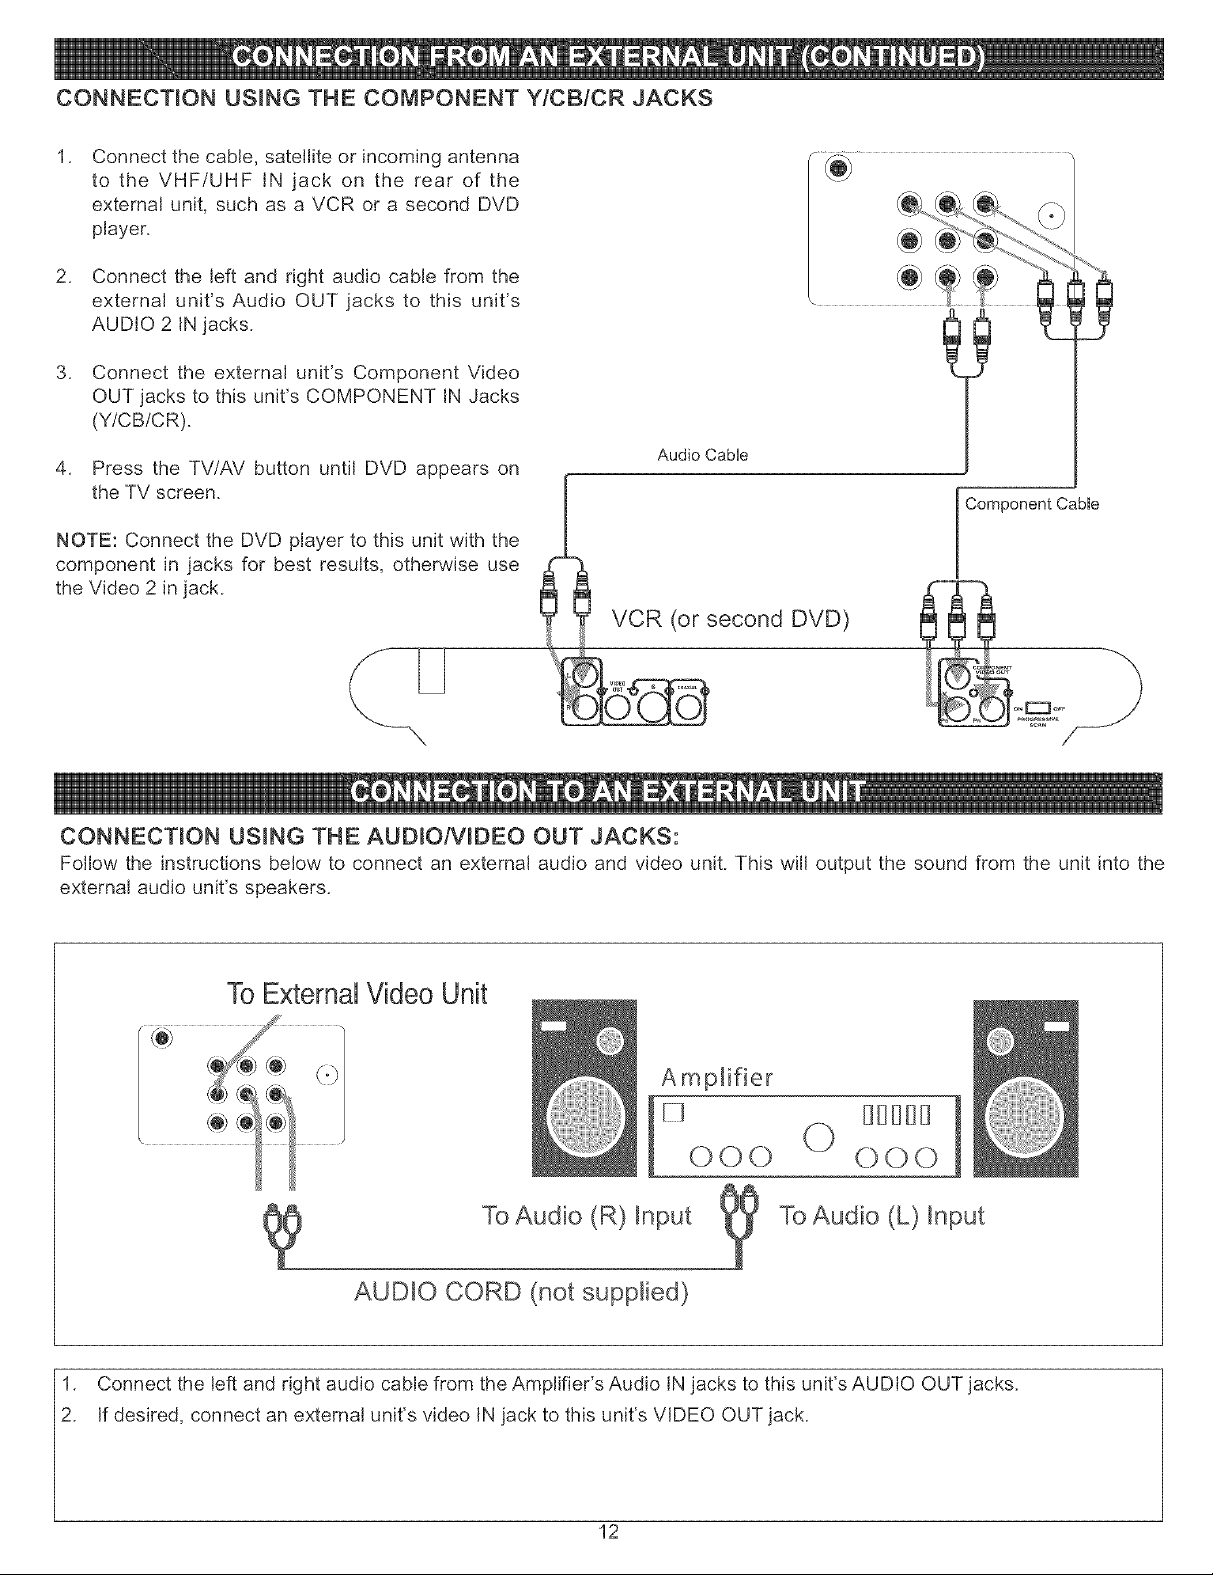
CONNECTION USING THE COMPONENT Y/CB/CR JACKS
.
Connect the cable, satellite or incoming antenna
to the VHF/UHF IN jack on the rear of the
external unit, such as a VCR or a second DVD
player.
2. Connect the left and right audio cable from the
external unit's Audio OUT jacks to this unit's
AUDIO 2 IN jacks.
3. Connect the external unit's Component Video
OUT jacks to this unit's COMPONENT IN Jacks
(Y/CB/CR).
4. Press the TV/AV button until DVD appears on
the TV screen.
NOTE: Connect the DVD player to this unit with the
component in jacks for best results, otherwise use
the Video 2 in jack.
Audio CabUe
VCR (or second DVD)
l
Component Cable
CONNECTION USING THE AUDIO/VIDEO OUT JACKS:
Follow the instructions below to connect an external audio and video unit. This will output the sound from the unit into the
external audio unit's speakers.
To External Video Unit
FI [][![![1[] I
000 000
To Audio (R) Input To Audio (L) Input
AUDIO CORD (not supplied)
1. Connect the left and right audio cable from the Amplifier's Audio IN jacks to this unit's AUDIO OUT jacks.
2. If desired, connect an external unit's video IN jack to this unit's VIDEO OUT jack.
12
Page 14
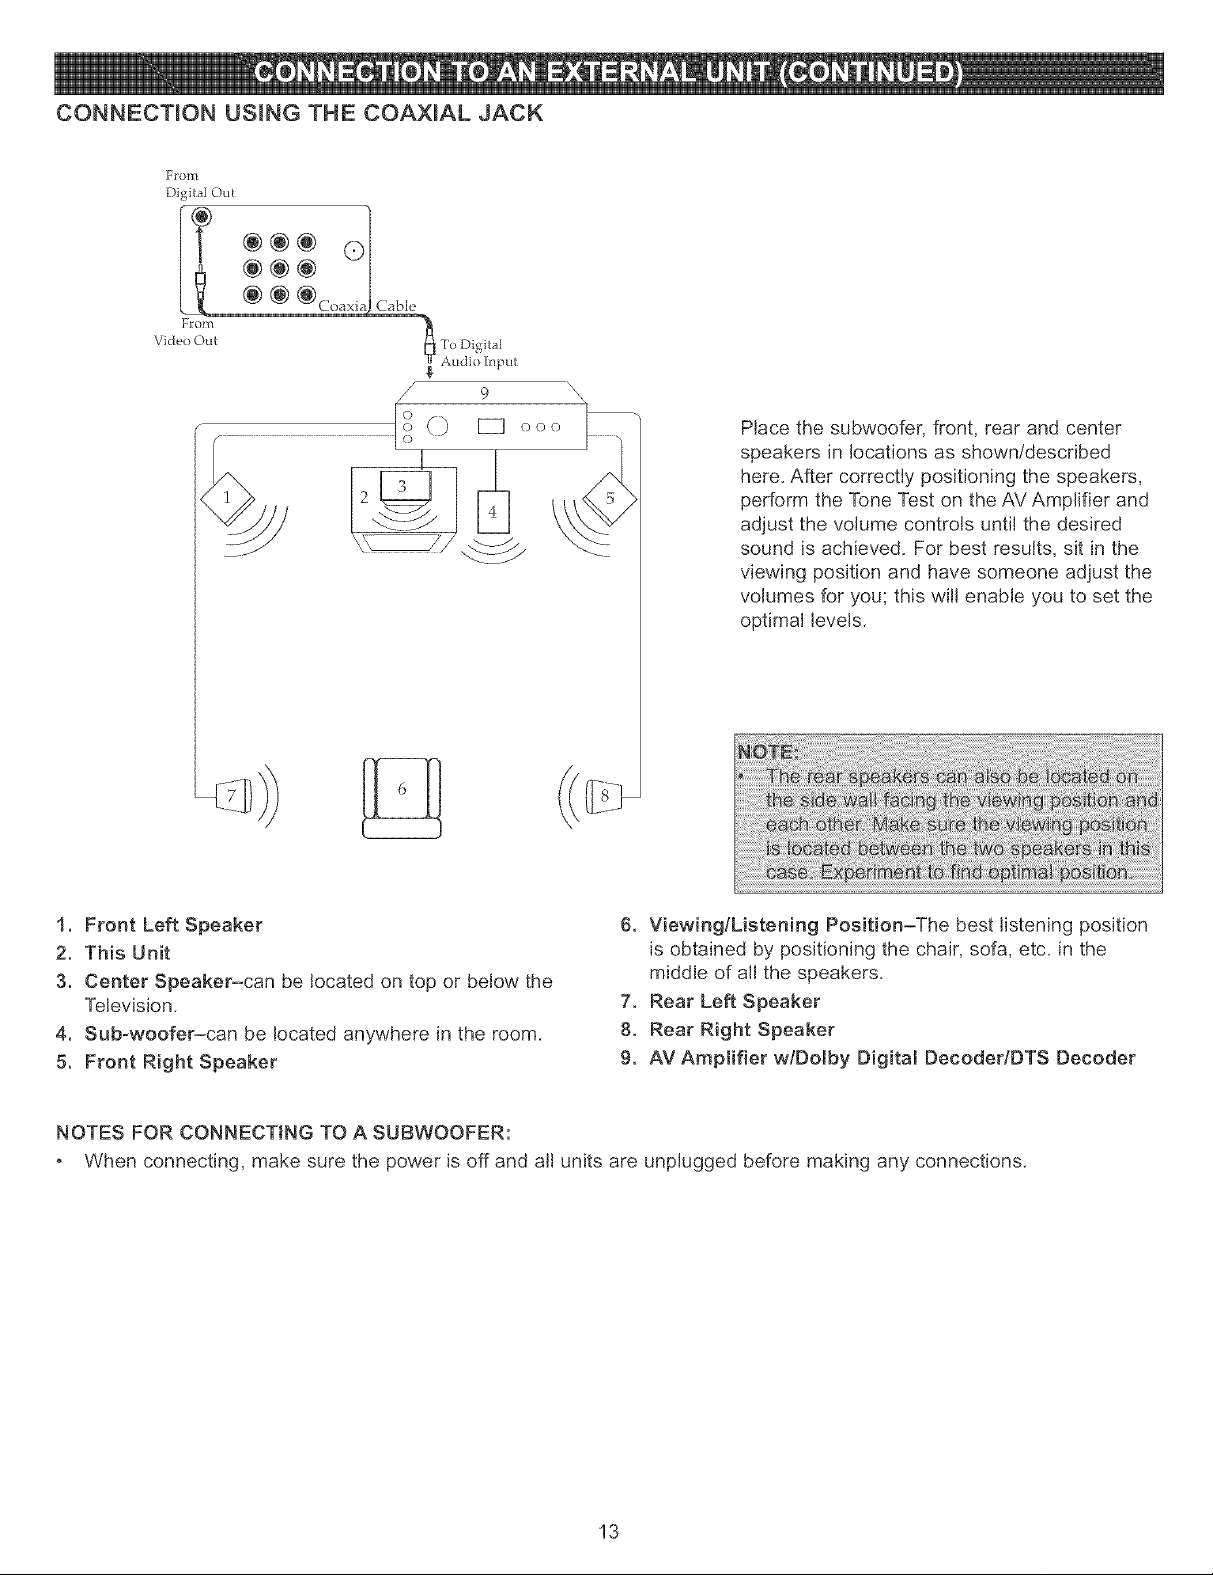
CONNECTION USING THE COAXIAL JACK
F£om
Digital OBt
@@@ (D
Fro]]]
Video Out
/ 9 \\
Place the subwoofer, front, rear and center
speakers in locations as shown/described
here. After correctly positioning the speakers,
perform the Tone Test on the AV Amplifier and
adjust the volume controls until the desired
sound is achieved. For best results, sit in the
viewing position and have someone adjust the
volumes for you; this will enable you to set the
optimal levels.
1. Front Left Speaker
2. This Unit
3. Center Speaker-can be located on top or below the
Television.
4. Sub-woofer-can be located anywhere in the room.
5. Front Right Speaker
6. Viewing/Listening Position-The best listening position
is obtained by positioning the chair, sofa, etc. in the
middle of all the speakers.
7. Rear Left Speaker
8. Rear Right Speaker
9. AV Amplifier w/Dolby Digital DecodedDTS Decoder
NOTES FOR CONNECTING TO A SUBWOOFER:
When connecting, make sure the power is off and all units are unplugged before making any connections.
13
Page 15
The region number for this DVD Player is: I_if4_'_l
See the following page for information regarding region numbers.
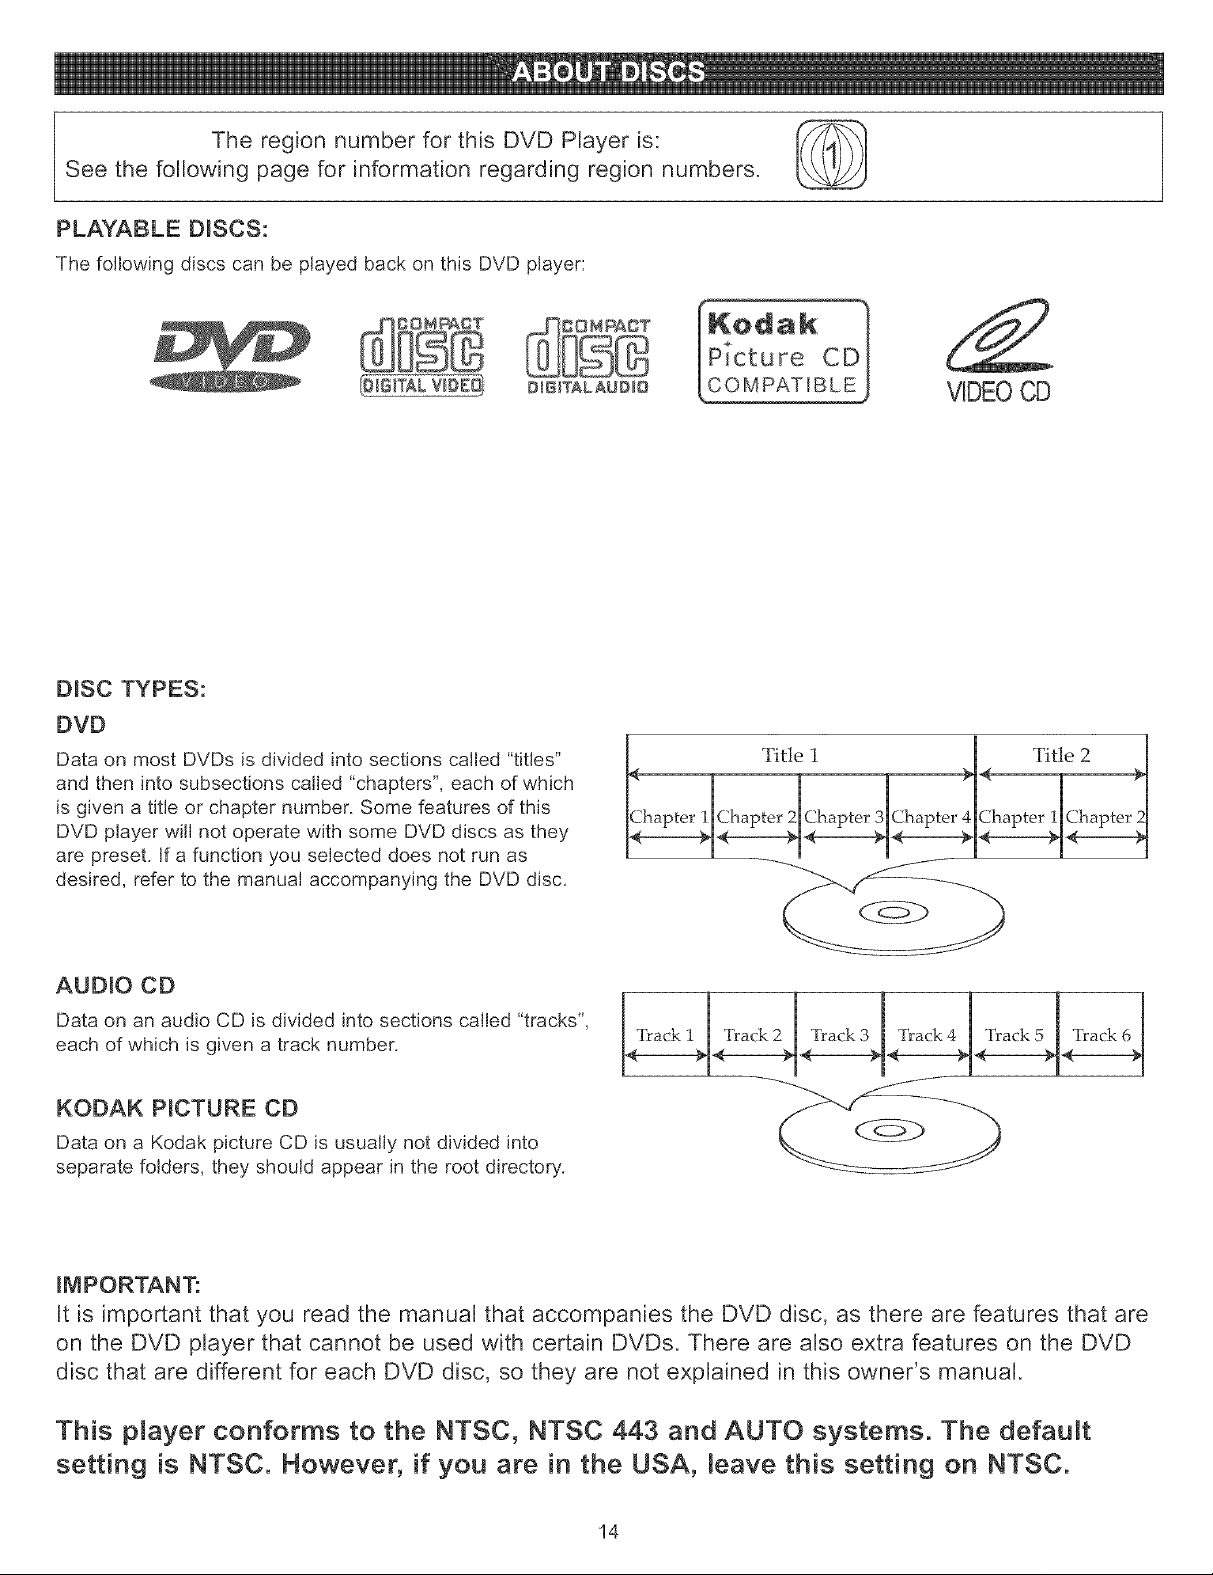
PLAYABLE D_SCS:
The following discs can be played back on this DVD player:
OJGITALAUD_O
DISC TYPES:
DVD
Data on most DVDs is divided into sections called "titles"
and then into subsections called "chapters", each of which
is given a title or chapter number. Some features of this
DVD player will not operate with some DVD discs as they
are preset. If a function you selected does not run as
desired, refer to the manual accompanying the DVD disc.
<
Chapter I
VIDEOCD
Title 1
Chapter 2 Chapter 3 Chapter 4
AUDIO CD
Data on an audio CD is divided into sections called "tracks",
each of which is given a track number.
Track 2 Track 3 Track 4 Track 5
KODAK PICTURE CD
Data on a Kodak picture CD is usually not divided into
separate folders, they should appear in the root directory.
IMPORTANT:
It is important that you read the manual that accompanies the DVD disc, as there are features that are
on the DVD player that cannot be used with certain DVDs. There are also extra features on the DVD
disc that are different for each DVD disc, so they are not explained in this owner's manual.
This player conforms to the NTSC, NTSC 443 and AUTO systems. The default
setting is NTSC. However, if you are in the USA, Leave this setting on NTSC.
14
Page 16

Notes on Copyright:
It is forbidden by law to copy, broadcast, show, broadcast on cable, play in public and rent copyrighted
material without permission. DVD video discs are copy protected, and any recordings made from these
discs will be distorted. This product incorporates copyright protection technology that is protected by
method claims of certain U.S. patents and other intellectual property rights owned by Macrovision
Corporation and other rights owners. Use of this copyright protection technology must be authorized by
Macrovision Corporation, and is intended for home and other limited viewing uses only, unless
otherwise authorized by Macrovision Corporation. Reverse engineering or disassembly is prohibited.
Region Management information:
This DVD Player is designed and manufactured to respond to the Region Management hformation that
is recorded on a DVD disc. ff the Region number described on the DVD disc does not correspond to
the Region number of this DVD player, this DVD player cannot play that disc. You may not be able to
play back some DVD video discs on this player if they were purchased from outside your geographic
area or made for business purposes. When you try to play back an unauthorized disc, "Wrong Region"
appears on the TV screen.
15
Page 17
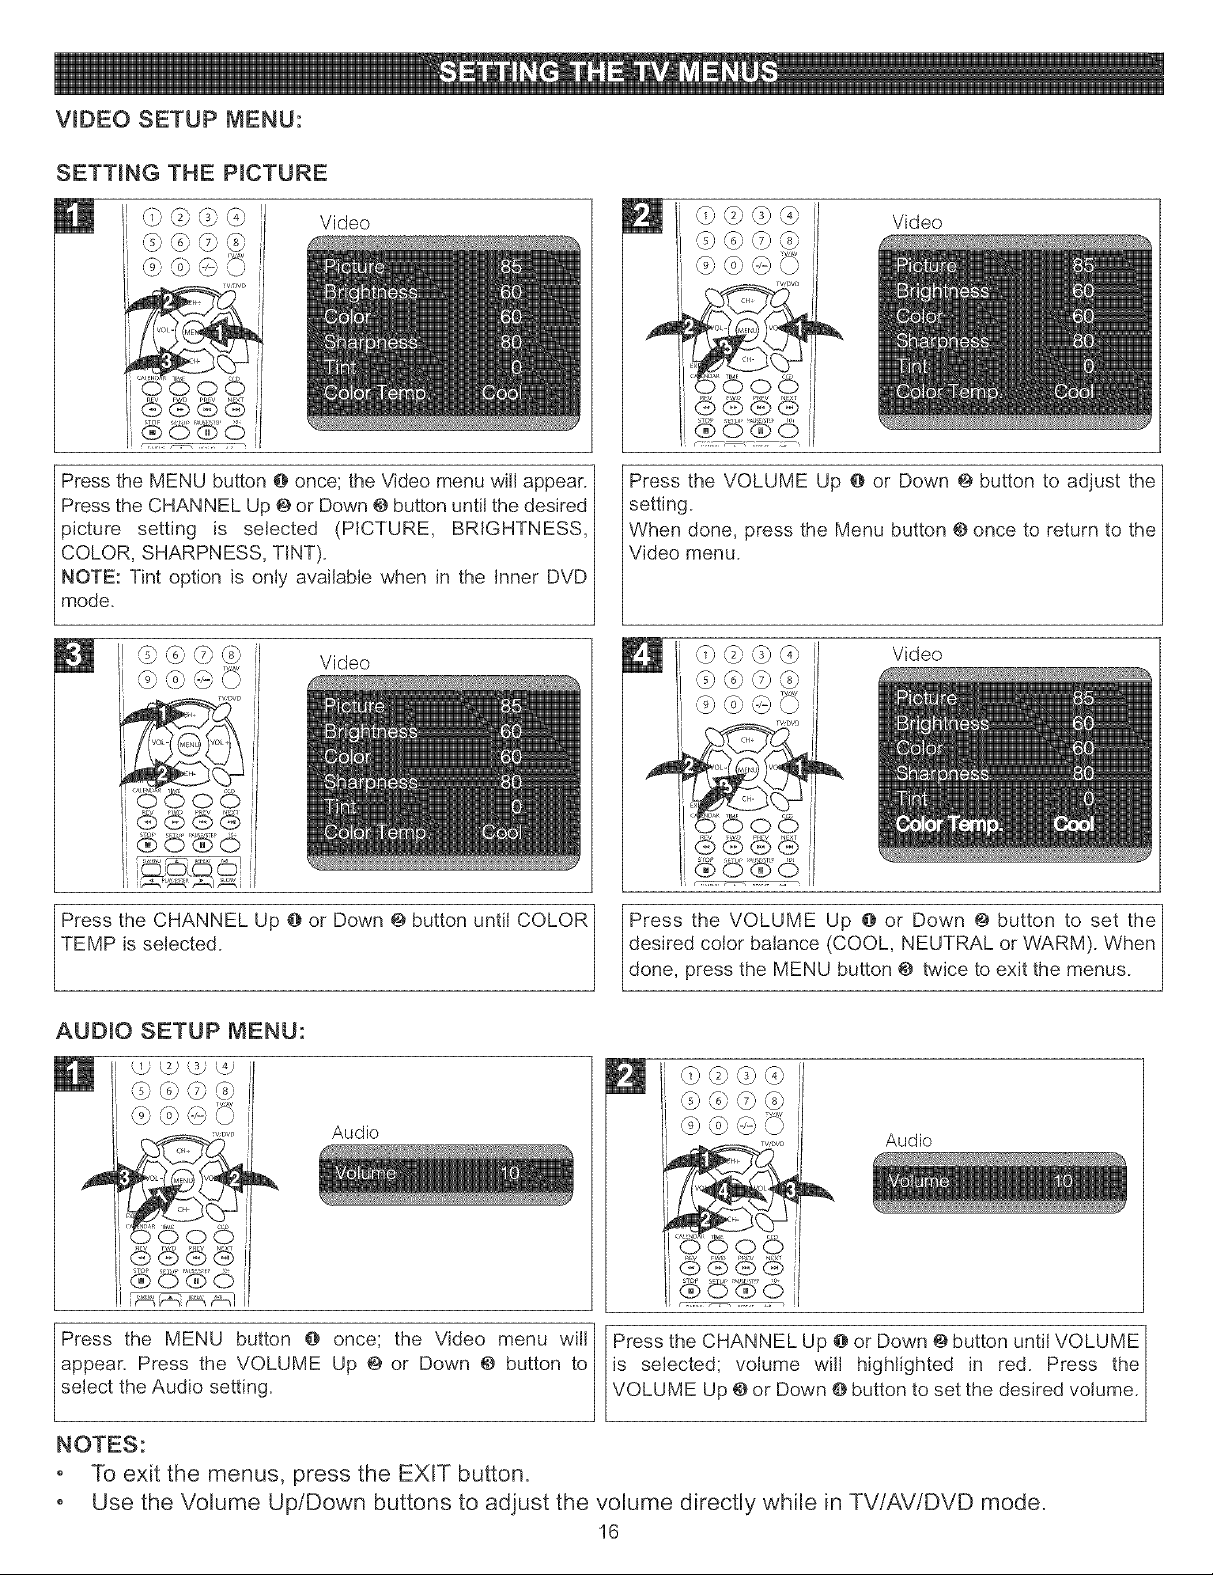
WDEO SETUP MENU:
SETTING THE PICTURE
,_©@@
'L.S
Press the MENU button @once; the Video menu will appear.
Press the CHANNEL Up @ or Down @button until the desired
picture setting is selected (PICTURE, BRIGHTNESS,
COLOR, SHARPNESS, TINT).
NOTE: Tint option is only available when in the Inner DVD
mode.
_jj
Video
Video
@_@_
Video
@@@@
Press the VOLUME Up @ or Down @button to adjust the
setting.
When done, press the Menu button @once to return to the
Video menu.
©@@@
Video
,@@©@
@@@,_
i
Press the CHANNEL Up @ or Down @ button untt COLOR
TEMP is selected.
Press the VOLUME Up @ or Down @button to set the
desired color balance (COOL, NEUTRAL or VVARM). When
done, press the MENU button @ twice to exit the menus.
AUDIO SETUP MENU:
W) L22(:d L!]
_@@@
@ (o)(B (=)
Audio
_@_
Audio
@©_0
Press the MENU button @ once; the Video menu wil I
select the Audio setting.
appear. Press the VOLUME Up @ or Down @ button to
NOTES:
• To exit the menus, press the EXIT button.
• Use the Volume Up/Down buttons to adjust the volume directly while in TV/AV/DVD mode.
Press the CHANNEL Up @or Down @button until VOLUME
B
is selected; volume wil highlighted in red. Press the
VOLUME Up @or Down @button to set the desired volume.
16
Page 18

TIMER SETUP MENU (CANNOT BE USED WHEN IN DVD MODE):
SETTING THE CLOCK
Timer
SCAN RECAL_D_SPLA¥MUTE
Timer
While in TV/AV mode, press the MENU button @ once; the
Video menu will appear. Press the VOLUME Up @or Down
@button to select the Timer setting.
NOTE: You can press the TIME button @to directly enter to
Time Setting while in TV/AV mode.
(b 0>6b@>
Press the VOLUME Up @ or Down @ button to set thel
current hour, then press the CHANNEL Down button @;the /
minutes will be highlighted in red.
Timer
Press the CHANNEL Up @or Down @ button until CLOCK
is selected; the hours will be highlighted in red.
NOTE: The clock is a 24 hour (military time) type clock.
Timer
]
Press the VOLUME Up @ or Down @button to set the
|
current minute. When done, press the EXIT button @ to exit
/
the menus.
17
Page 19

SETTING THE ON TIMER
Timer
While in TV/AV mode, press the MENU button @ once; the]
Video menu will appear. Press the VOLUME Up @or Down /
@button to select the Timer setting.
NOTE: You can press the TIME button @to directly enter toj
Timer Setting while in TV/AV mode. /
Timer
'\J
Timer
,\_ _,
,_,
G© 6
r ................. ,
]
Press the CHANNEL Up @ or Down @button until TIME ONJ
is selected; the hours will be highlighted in red.
/
Timer
VDJD
]
Press the VOLUME Up @ or Down @ button to set the_
desired On hour, then press the CHANNEL Down button @;_
the minutes will be highlighted in red. /
Timer
_,%,
Press the CHANNEL Up @ or Down @ button until CH._
SELECT is selected.
NOTE:
When the actual time matches the Timer On time, the unit will automatically turn on.
Press the VOLUME Up @ or Down @button to set the
|
desired On minute.
]
Press the VOLUME Up @ or Down @button to set the
desired On Channel (the channel the unit will turn on to).
/
When done, press the EX T button @to ex t the menus.
Timer
18
Page 20

SETTING THE OFF TIMER
Timer
While in TV/AV mode, press the MENU button @ once; the]
Video menu will appear. Press the VOLUME Up @or Down /
@button to select the Timer setting. /
NOTE: You can press the TIME button @to directly enter toj
Timer Setting while in TV/AV mode. /
Timer
/.
Timer
"_ (¢ r_ (8>
',d.,' kj)
k j'
Press the CHANNEL Up @or Down @ button until TIME
OFF is selected; the hours will be highlighted in red.
Timer
.,J
Press the VOLUME Up @ or Down @ button to set the]
desired Off hour, then press the CHANNEL Down button @;j
the minutes will be highlighted in red. j
Press the VOLUME Up @ or Down @button to set the
desired Off minute. When done, press the EXIT button @to
exit the menus.
/
NOTE:
When the actual time matches the Timer Off time, the unit will automatically turn off.
SETTING THE SLEEP TIMER
'_!.,'(.'3',-8.' Timer
While in TV/AV mode, press the MENU button @ once; the
Video menu will appear. Press the VOLUME Up @or Down
@ button to select the Timer setting. Press the CHANNEL
Up @or Down @button until SLEEP TIME is selected.
NOTE: You can press the TIME button @to directly enter to
Timer Setting while in TV/AV mode.
Press the VOLUME Up @ or Down @ button to set the desired
Sleep Time, When done, press the EXIT button @ to exit the
menus, The sleep timer will count down and when it reaches
0, the unit will turn off,
NOTE: For the Sleep Timer, you can select from 0 -!80, i,e,
set to 10 for the unit turn off automatically after 10 minutes, set
to 180 to turn off the unit automatically after 180 minutes,
Timer
19
Page 21

SETTING THE REMIND TIMER
Timer
While in TV/AV mode, press the MENU button @ once; the
Video menu will appear. Press the VOLUME Up @or Down
@button to select the Timer setting.
NOTE: You can press the TIME button @to directly enter to
Timer Setting while in TV/AV mode.
Timer
Timer
\J
Press the CHANNEL Up @ or Down @button until REMIND
TIME is selected; the hours will be highlighted in red.
/,_ Y-.'h
P W'DW
Timer
Press the VOLUME Up @ or Down @ button to set the]
desired Remind hour, then press the CHANNEL Down /
Press the VOLUME Up @ or Down @button to set the
desired Remind minute.
button 0; the minutes will be highlighted in red. /
/
Timer
Press the CHANNEL Down button @, the CH.SWITCH will
be highlight in red. Press the VOLUME Up @ or Down @
button to set the desired channel which you want to switch
to when the actual time reaches the Remind Time. When
done, press the MENU button O repeatedly to exit the
menus.
NOTE:
When the actual time reaches matches the Remind time, it will switch to the channel which you set. This is useful for
you if you won't miss the favorite TV program while you watching on another program at different TV channel.
2O
Page 22

SETUP MENU:
SETTING THE LANGUAGE
_} {_} @ @ Setup
@@©@
@@@G
iv,_vL,
.@
©@@,_
\/
w_vD
Press the MENU button @ once; the Video menu will]
appear. Press the VOLUME Up @ or Down @ button toj
select the Setup setting. Press the CHANNEL Up @ orj
Down @button until LANGUAGE is selected, j
SETTING THE BACKGROUND (TV/CATV MODE ONLY)
5} (2} ¢_}5} Setup
@@©@
@@@C}
Press the VOLUME Up @ or Down @ button to set the]
|
desired Language (ENGLISH, FRENCH or SPANISH)._
When done, press the EXIT button @to exit the menus. |
@@©@
@@@_v
,v,svD
_'0o©
Press the MENU button @ once; the Video menu will] Press the VOLUME Up @ or Down @ button to turn the
appear. Press the VOLUME Up @ or Down @ button to/ Background ON (the background will be blue if no signal is
select the Setup setting. Press the CHANNEL Up O or/ received) or OFF. When done, press the EXiT button @ to
Down @ button until BACKGROUND is selected. | exit the menus.
/
/
SETTING THE BLACK STRETCH
Setup@@@@
@@©@
Press the MENU button @ once; the Video menu will]
appear. Press the VOLUME Up @ or Down @ button to /
select the Setup setting. Press the CHANNEL Up O or/
Down @button until BLACK STRETCH is selected. /
@@©,@
© @ @ y_<
Press the VOLUME Up @ or Down @button to turn the]
Background ON (the contrast range will automatically be_
increased) or OFF. When done, press the EXIT button @ to_
exit the menus. |
/
21
/
Page 23

SETTINGTHEVNR(VIDEONOISEREDUCTION
_@_@ Setup
@@@@
eeeO
Press the MENU button @ once; the Video menu will]
appear. Press the VOLUME Up @ or Down @ button to_
select the Setup setting. Press the CHANNEL Up O or[
Down @button until VNR is selected. /
SETTING THE FADE
Setup
,_j @,@
@ ,-, @,y'<
Press the VOLUME Up @or Down @button to turn the VNR]
ON (this will allow the picture tube to warm up and gently_
turn on, thus increasing the life of the picture tube) or OFF._
When done, press the EXIT button @to exit the menus. /
/
Press the MENU button @ once; the Video menu will] Press the VOLUME Up @ or Down @ button to turn the
appear. Press the VOLUME Up @ or Down @ button to/ Fade ON (the background will be blue if no signal is
select the Setup setting. Press the CHANNEL Up @ or/
Down @ button until FADE is selected. / received) or OFF. When done, press the EXIT button @to
exit the menus.
/
22
Page 24

SETTING THE CLOSED CAPTIONS
{i} ¢j2}(3} _4} Setup
@@@@
@©@Y<
G@@,_
Press the MENU button @ once; the Video menu will]
appear. Press the VOLUME Up @ or Down @ button to /
select the Setup setting. Press the CHANNEL Up O or/
Down @button until C. CAPTION is selected. |
SETTING THE TV TO DEMO MODE
C} ,@@ q}
Setup
@@10@
C9@@ _
\J
J
G©©@
8b©'_'©
Press the MENU button @ once; the Video menu will]
appear. Press the VOLUME Up @ or Down @ button to /
select the Setup setting. Press the CHANNEL Up e or/
Down @button until DEMO MODE is selected. |
Press the VOLUME Up @ or Down @ button to turn Closed]
|
Captions off or on and select a mode (see page 38 for_
details). When done, press the EXIT button @ to exit the_
menus. /
/
@@@@
@@©@
Press the VOLUME Up button to activate the Demo mode;]
/
the unit will then enter the Demo mode and the screen will|
show various features.
/
/
/
@ @ ,G@
@ 3 ,@,_<
To stop Demo mode, press the EXIT button.
23
Page 25

CHANNEL SETUP MENU:
SETTING THE CHANNEL SYSTEM
II _ _ _ _ Channel
,_@©@
\J
,V,DVD
While in the TV mode, press the MENU button @ once; the_
Video menu will appear. Press the VOLUME Up 0 or Down 0 /
button to select the Channel Setting. Press the CHANNEL Up_
or Down O button until CHANNEL SYSTEM is selected. /
SETTING THE FINE TUNING
_4P,£2}qg (g Channel
@@©@,
While in the TV mode, press the MENU button @once; the]
Video menu will appear. Press the VOLUME Up 0 or Down_
0 button to select the Channel Setting. Press the_
CHANNEL Up O or Down O button until CURRENT CH. is_
selected. /
]
Press the VOLUME Up @or Down O button to set the desired]
/
Channel System (AUTO, NTSC or NTSC443). When done, /
press the EXiT button @to exit the menus.
NOTE: in USA,the system is NTSC. |
O}(b @ @
@@@@
LJ_
_© o©
Press the VOLUME Up @ or Down 0 button to select a
desired channel to fine tune.
/
(b @,,@@
Channel
@@(b@
,@@,@ >_<
_©
Press the CHANNEL Up @ or Down 0 button until FiNE is/
selected, then press the VOLUME Up button 0.
@@@,@
@@@Y<
]
Fine tune the channel using the VOLUME Up @or Down O|
button. When done, press the EXIT button 0 to exit the_
menus.
/
24
]
|
/
Page 26

SETTING CHANNELS INTO MEMORY
This unit is equipped with a channel memory feature which allows channels to skip up or down to the next channels set into
memory, skipping over unwanted channels. Before selecting channels, they must be programmed into the unit's memory. In
addition to normal VHF/UHF channels, this unit can receive up to 125 Cable TV channels.
Channel
_ v,Dv
While in the TV mode, press the MENU button @ once; the
Video menu will appear. Press the VOLUME Up @or Down
@ button to select the Channel Setting. Press the
CHANNEL Up O or Down @ button until ANTENNA is
selected.
Channel
Press the CHANNEL Up @ or Down @ button until AUTO
PROGRAM is selected.
Press the VOLUME Up @ or Down @ button to select TV
(VHF/UHF Channels) or CATV (Cable TV).
,© @
kj'
Press the VOLUME Up button @ to start Auto
Programming and the unit will automatically cycle through
all the channels and store active channels into memory.
When finished, press the EXIT button @to exit the menu
settings.
FAQs:
How many channels will / actually receive ?
The actual number of channels that can be received depends on how many channels your cable or satellite company, or
local area, provides. Contact your company to determine the number of channels in your area.
25
Page 27

ADDING AND DELETING CHANNELS
After setting channels into memory, you can add or delete channels as follows:
Channel
w;ov_
While in the TV mode, press the MENU button @once; the
Video menu wtl appear. Press the VOLUME Up @or Down
@ button to select the Channel Setting. Press the
CHANNEL Up O or Down @ button untt CURRENT CH. is
selected.
fT_
Press the CHANNEL Up @ or Down @ button until SKIP is]
selected.
Channel
Press the VOLUME Up @ or Down @ button to select a
desired channel to add or delete.
Press the VOLUME Up @ or Down @ button to turn Skip]
feature ON (to skip the channel) or OFF (to memorize the_
channel). When done, press the EXIT button @ to exit the_
/
menus. /
26
Page 28

CALENDAR SETUP MENU:
CaEendar
E×
©©©6
_'_"©
Press the MENU button @ once; the Video menu wi11_
appear. Press the VOLUME Up @ or Down @ button to_
sebct the Cabndar setting.
@@@@
@@,©@
@ @'@ _x
,Y<
wDvp
Cabndar
@@@@
Calendar
,@@©@
q
Press the CHANNEL Down button @ until the year is]
|
sebcted. Press the VOLUME Up @or Down @ button to set_
the year, then press the CHANNEL Down button @; the /
month will be higNighted.
Calendar
eeeCs
W4SV)
/
Press the VOLUME Up @ or Down @ button to set the_
month, then press the CHANNEL Down button @; the day_
will be higNighted.
]
Press the VOLUME Up @or Down @ button to set the day.]
/
When done, press the EXIT button @to exit the menus. |
|
/
27
Page 29

V-Chipenablesparentsto preventtheirchildrenfromwatchinginappropriatematerialonTV.V-Chipreadstheratingsfor
programming(exceptfornews,sports,uneditedmoviesonpremiumcableandEmergencySystemsignals),thendenies
accesstoprogrammingiftheprogram'sratingmeetsthelimitationsyouselect.Inthiscase,theprogramwillbeblocked.
PARENTAL CONTROL SET-UP
Password
While in the TV/AV mode, press the MENU button @ once;]
the Video menu will appear. Press the VOLUME Up @ or_
Down @ button to select the Password. Press the_
CHANNEL Up _ or Down @ button until PASSWORD is_
highlighted in red. /
Parental Lock
Password
You will be prompted to enter the password to enter this
menu. Enter the four digit password (The default password
is 1234) using the Direct Channel Selection/Number (0-9)
buttons.
0)@@@
@@©@',
@@@£
\x
Change Password
o©
©"®©
TO CHANGE THE PASSWORD: After entering the menu,]
press the CHANNEL Up @or Down @button until CHANGE_
PASSWORD is selected to change the password, then press_
the VOLUME Up button @. /
'_-----------------_' Parental Lock
,.J
PARENTAL LOCK is selected.
Press the CHANNEL Up @ or Down @ button until
(0-9)
(0-9), enter the desired password, then enter again to
lUsing the Direct Channel Selection!Number buttons
confirm and make sure to write it down.
/
@ @ @ _"_ Parental Lock
@ @ @
i
i
i
i
i
i
i
i
i
i
Press the VOLUME Up @ or Down @ button to turn
PARENTAL LOCK opt on On or Off,
2_
28
Page 30

TV RATING SET-UP
Parental Lock
Enter the Parental Lock menu and turn on the V-chip option
as described on page 28 (steps 1 and 2).
@@@@
TV Rating
'_
'_
@@@@
@@@@
Press the CHANNEL Up @or Down @button until TV
RATING is selected, then the VOLUME Up @or Down O
button to select it.
@@©@
i
i
i
i
i
i
i
i
i
i
i
TV Rating
Press the CHANNEL Up @ or Down @ button to select a
rating and then the VOLUME Up button @ to BLOCK
(ratings at or above cannot be viewed) or UNBLOCK
(ratings at or under can be viewed).
Y: All ages
Y7: Ages 7 and up
G: General Audience MA:
PG: Parental Guidance
less than 14 years
old
Mature Audiences
Only
14: Parental Guidance
"B" is blocked and "U" is Unblocked.
You can also block some or all criteria for each level for
Fantasy Violence (FV), Sexual Dialogue (D), Language (L),
Sexual Situations (S) or Violence (V).
Using the CHANNEL Up @ or Down @ button, select the
desired criteria (to reach the criteria, cycle through the
columns using these buttons), then press the VOLUME Up
button @to turn the option On or Off.
When finished, press the Menu button O to return to the
Parental Lock menu or press Exit button @ to Exit the
menus.
29
Page 31

MPAA RATING SET-UP
Parental Lock
©,@@@
@,@@@
@,@@,,x
Enter the Parental Lock menu and turn on the V-chip option
as described on page 28 (steps 1 and 2).
@@©@
MPAA RATING
6© 6
Press the CHANNEL Up @ or Down @ button to select a
rating and then the VOLUME Down button @to BLOCK
(ratings at or above cannot be viewed) or UNBLOCK
(ratings at or under can be viewed).
G: All ages R: Under 17 years old,
PG: Parental Guidance Parental Guidance
PG43: Parental Guidance suggested
less than 13 years N017:17 years old and
old above
X: Adult only
Press the CHANNEL Up @or Down @ button until MPAA
RATING is selected, then press the VOLUME Up @ or
Down O button to select it.
When finished, press the Menu button @ to return to the
Parental Lock menu or press Exit button @ to Exit the
menus.
"B" is blocked and "U" is Unblocked.
3O
Page 32

LOCK MENU
Parental Lock
Enter the Parental Lock menu and turn on the V-chip option Press the CHANNEL Up @ or Down @ button until LOCK
as described on page 28 (steps 1 and 2). MENU is selected.
Lock
,_, _{-__,
@ @ @ @
Press the VOLUME Up @ or Down @to enter the Lock
menu. Press the CHANNEL Up @ or Down O button to
select AV Lock or Program Lock. Press the VOLUME Up @
or Down @to turn the option ON or OFF.
NOTE: When AV Lock is ON, the Audio/Video l/Video 2/Component (DVD) IN connections will be locked (cannot be
used in this case.).
For the Program Lock, you must select the channel which need to lock before entering the Parental Lock menu in step 1.
When Program Lock is ON, the selected channel will be locked.
When finished, press the Menu button @ to return to the
Parental Lock menu or press Exit button @ to Exit the
menus.
31
Page 33

GENERALSETUPMENU:
WhileintheDVDstopmodeORwhileinDVDmodeandwithouta DVDinserted,
presstheSETUPbutton@oncetoselecttheGENERALSETUPPage,selectan
optionbelowusingtheNavigation(A,_')buttons@,thenselectusingtheNavigation
(_,_) buttons@,thenselect/changethesetupoptionusingtheNavigation(A,_)
buttons@andthePLAY/ENTERbutton@.Toexitthesetupmenu,presstheSETUP
button@twice.
TV DISPLAY ANGLE MARK
TV DispUay LB
S pdif Output
Screen Saver Off
4:3/PS: SeFect when the unit is connected to an external conventional
TV. Video materiaF formatted in the Pan Scan styFe is prayed back in that
styFe (the Feftand right edges are cut off).
4:3iLB: SeFect when the unit is connected to an external normal TV.
Wide-screen images are shown on the screen with a black band at the
top and bottom.
16:9: Select when the unit is connected to an external wide-screen TV.
Select ON to turn the anglemarks on and OFF to turn them
off.
Anglemarks are not available on all DVDs.
OSD LANGUAGE SPD[F OUTPUT
TV DispUay LB
Angle Mark On
Spdif Output
Sc[een Saver Off
Select the desired language (ENGLISH, SPANISH) for the On-
Screen display to display text. Note that the DVD must have
the language included in order to display it.
SPDIF OFF: An analog surround sound format is output through the
rear connectors for two channel audio out or 5.1 channel audio out.
SPDIF/RAW or PCM: This surround sound format is output to a
Dolby Digital/DTS decoder through the coaxial out iack.
OSD Lang ENG
Spdif Output
CaPtions On
Screen Saver Off
rv DispUay LB
OSD Lang £NG
cap_0r, or,
screen
Saver Off
CAPTIONS SCREEN SAVER
OSD Lang ENG
Spdif Output
When this option is set to ON, closed captions will appear
on the screen for the hearing impaired (if originally recorded
on the DVD). When this option is OFF, the closed captions
will not appear.
When this option is set to ON, the screen saver wi[[ come on
when the unit stops or the image is paused for
approximately 3.5 minutes.
When this option is OFF, the screen saver will not come on.
32
"W DispUay LB
Caption On
Page 34

TheParentaloptionenablesparentstopreventtheirchildrenfromwatchinginappropriatematerialonaDVD.It readsthe
ratingsforprogramming,thendeniesaccessto programmingiftheprogram'sratingmeetsthelimitationsyouselect.Inthis
case,theuserwillhavetoenterapassword.
WhileintheDVDstopmodeORwhileinDVDmodeand
withoutaDVDinserted,presstheSETUPbutton@twice;
thePasswordPagewillappear.UsetheNavigation(A,T)
buttons@toselectPARENTAL.
'2' m.
PresstheNavigation(1_)buttonandthenselectthedesired
aarentalsettingfortheDVDplayerusingtheNavigation
(A,_')buttons.
1tKIDSAFE}: Kidsafe. suggested.
2 (G}: All ages. 6 (R): Under 17 years
3 (PG): Parental old, Parental
Guidance. Guidance strongly
4 (PG!3}: Parental Guidance suggested.
less than ! 3 years 7 (N0!7): 17 years old and
old. above.
5 (PGR): Under 17 years 8 (ADULT): Adult only.
old, Parental OFF: Allows all
Guidance programming.
"Q®©Q
(S'(_::S ><
_© o ©
Press the PLAY/ENTER button @ and the password screen
will appear. Input the 4 digit password using the Direct
Channel Selection/Number (0-9) buttons @, then press the
PLAY/ENTER button @.
NOTE:
The default password is 1234.
DEFAULT: While in DVD stop mode, press the SETUP button twice, then select DEFAULT using the Navigation (A, _!')
buttons, then press the PLAY/ENTER button twice to change the DVD defaults (except password and parental) to the
factory settings.
To change the password, select PASSWORD using the
Navigation (A, T) buttons @, then press the PLAY/ENTER
button @ twice; the password screen will appear. Enter the
Old Password, New Password and then the New Password
again using the Direct Channel SelectiontNumber (0-9)
buttons @,then press the PLAY/ENTER button @to confirm
the change.
33
Page 35

DISPLAY
,_©_
LJ
While in the TV mode, press the Display button to show
the current channel. If in an AV mode, the mode will
appear when pressed. Press again to clear the display.
TV/AV
SCAN nECALLDIS_LA_¸ MU_
QQGQ
w,_,,D
Press the Mute button @ to turn off the sound; the unit's
sound will be silenced and "Mute" will appear on the
screen. The sound can be turned back on by pressing this
button again or one of the VOLUME Up @ or Down @
buttons.
TVIDVD
SCAN _C_L _>_S_'L_¥_UT_
_, ,_#(4)
\J
_©_©o©
Press to select TV (CATV), VIDEO 1(Front jacks), VIDEO
2 (Rear jacks) or DVD (Component).
RSTD(PictureStandard}
Press to select between the picture modes (Standard,
Vivid, Personal, Listen {select just to listen, not to watch},
or Movie).
_'©o©
Press to select tithe TV mode or the INNER DVD mode.
HEADPHONE JACK
For private listening, plug headphones into this jack. The
speakers will be disconnected when a plug is inserted into
this jack.
34
Page 36

CALENDAR
TIME
,, j'
_G,_,,©
Press to access the Calendar setting menu (see page 27),
VOLUME Buttons
Set the sound as follows:
Press the VOLUME Up @/Down @ buttons to adjust the
sound level.
Press to access the Time setting menu (see page 17).
NOTE: This menu cannot be accessed while in the DVD
mode.
35
Page 37

PressthePOWERbutton@ontheremote,orfrontofthe
unit,to turnontheunit;thePOWERindicatorwilllight
yellow.PresstheTV/AVbutton@repeatedlytoselectthe
TVmode.Iftheunitisin DVDmode,presstheTV/DVD
button@first,thenpresstheTV/AVbuttonrepeatedlyto
selectTVmode.
.......,_\_7
LJ
OPTIONS
TV: If using a
VHF/UHF
antenna.
CATV: If using Cable
TV.
Change the Antenna option to select between TV or CATV.
Select AIR if using VHF/UHF antenna, and select CATV if
using Cable TV (see page 25, steps ! and 2).
Lj'
Adjust the volume level by pressing the VOLUME Up @ or
Down @button.
NOTES:
When ANTENNA option is set to AIR, only channels
up to 69 can be chosen. When set to CABLE,
channels up to 125 can be chosen.
FAQs:
For proper operation, before selecting channels, they must
be set into the unit's Program memory, see page 25.
Press and release the CHANNEL Up @ or Down @button.
The unit automatically stops at the next channel set into
memory.
Direct Program Selection/Number buttons (0-9) @
Use these buttons to select a channel. The channel number
will appear at the top right corner of the screen.
• For Channels 1 through 9, press 1-9 @ as desired.
For Channels 10 through 99, press -/-- button O once,
then enter the 2 digit channel number in order.
For Channels 100 through 125, press -/-- button O twice,
then enter the 2 digit channel number in order.
Why do I only receive 69 channels, when my cable goes much higher?
The TV/CATV option must be set to CATV when using cable, see step 2 above.
Why are some channels scrambled?
You must subscribe to these channels through your cable company.
36
Page 38

SCAN
__SCAN_FCAU _> A¥ MU_
j v D N XT
o ©
Press the SCAN button and the unit will automatically scan
each station. When you see a channel you would like to
view, press the SCAN button again.
Press the RECALL button to switch between the present
channel and the last channel chosen.
37
Page 39

WHAT iS CLOSED CAPTiONiNG?
This television has the capability to decode and display
Closed Captioned television programs. Closed Captioning
will display text on the screen for hearing-impaired viewers or
it will translate and display text in another language.
CLOSED CAPTIONING WHTH A VCR
Closed Captioned programs can be recorded and played
back on a VCR with the Closed Captioned text intact. The
Closed Captioned text will disappear during Cue (Fast
Forward Search), Review (Rewind Search) and Pause
Modes or if the VCR tracking is not adjusted properly.
TO VLEW CLOSED CAPTmONS
Select the CC option in the menu to switch between normal
TV and the Closed Caption Modes (Captions and Full Screen
Text).
C1: This Closed Caption Mode will display text on the screen
in English or another language. Generally, Closed Captions in
English are transmitted on Captions 1.
02-04: These Closed Caption Modes will display text on the
screen in English or another language. Generally, Closed
Captions in other languages are transmitted on these
channels.
TEXT: The Text Closed Caption Mode will usually fill the
screen with a programming schedule or other information.
Select between TT1, TT2, TT3 or TT4.
After selecting a Closed Caption Mode, it will stay in effect
until it is changed, even if the channel is changed. If the
Captions signal is lost due to a commercial or a break in the
signal, the Captions will reappear when the signal is received
again. If the channels are changed, the Captions will be
delayed approximately 10 seconds.
The Captions will appear in places on the screen where they
will least interfere with the picture, usually on the bottom of
the screen. News programs will usually show three-line
Closed Captions which scroll onto the screen. Most other
shows provide two or three lined Captions placed near the
character who is speaking so the viewer can follow the
dialogue.
Words in italics or underlined describe titles, words in foreign
languages or words requiring emphasis. Words that are sung
usually appear enclosed by musical notes.
For television programs broadcasting with Closed Captions,
look in your TV guide for the Closed Captions symbol (CC).
NOTES:
When selecting Closed Captions, the captioning will be delayed approximately 10 seconds.
Misspellings or unusual characters may occasionally appear during Closed Captioning. This is normal with Closed
Captioning, especially with live programs. This is because during live programs, captions are also entered live. These
transmissions do not allow time for editing.
When Captions are being displayed, on-screen displays, such as Mute, may not be seen or may interfere with Closed
Captions.
Some cable systems and copy protection systems may interfere with the Closed Captioned signal.
If using an indoor antenna or if TV reception is very poor, the Closed Caption Decoder may not appear or may appear with
strange characters or misspelled words. In this case, adjust the antenna for better reception or use an outdoor antenna.
CLOSED CAPTIONS
FAQs:
i ,- _vl>
When / press the RECALL or MUTE button, the captions do
not appear, is this normal?
Yes, this is normal for this unit. Once the display information
o
disappears, the captions will continue.
G© 6
I entered the Captions mode, but no captions are appearing,
why ?
Press the CCD button to turn the Closed Captions on to the
setting as set in the Caption's menu (see page 23). Press
again to turn off.
Closed Captioning will display text on the screen for the
hearing impaired.
If no caption signal is received, no captions will appear, but
the television will remain in the Caption mode.
Why is there a big black box on the screen?
Because you are in a Captions mode. Turn the captions off,
or select a different Captions mode.
38
Page 40

AUDIO MODE
You can cycle between the audio modes as follows:
BVB CALL BUTTON
-- -j
_©o©
For DVD, Press the AUDIO button repeatedly to cycle
through the audio languages available on the playing DVD.
For CD/VOD, Press the AUDIO button repeatedly to cycle
through Stereo, Mono Left, Mono Right and Mix-Mono.
MUTE
Power _OPEN/CLOS_
_'_
_©o©
G©_6
Press the DVD CALL (D. CALL) button to show the elapsed
time and remaining time of the playing disc. Each time the
DVD CALL button is pressed, the time will change on the
screen as follows:
DVD: Title Elapsed, Title Remain, Chapter Elapsed,
Chapter Remain, Display Off.
VCD: repeatedly press the button for Single Elapsed,
Single Remain, Total Elapsed, Total Remain or Display Off.
W,DVD
...............
Press the Mute button @ to turn off the sound; the unit's
sound will be silenced and "Mute" will appear on the
screen. The sound can be turned back on by pressing this
button again or one of the VOLUME Up @ or Down @
buttons.
39
Page 41

IMPORTANTNOTES:
"_" wJJJappear on the TV screen during operation if you try to access a function that is not available on the disc.
Some discs may take a few seconds to load.
If a disc is inserted incorrectly, dirty, damaged, or is not present at all, "NO DISC" will appear in the display.
Always hold the disc without touching either of its surfaces. When inserting a disc, position it with the printed title side
facing up, align it with the guides and place it in its proper position.
It is important that you read the manual that accompanies the DVD disc as there are features that are on this DVD
player that cannot be used with certain DVDs. There are also extra features that are different for each DVD disc, so they
are not explained in this owner's manual.
PLAYBACK OF A DVD
SCAN KeCAL_I_ISmA¥MUlE
k;/ _J
YDJD
_$,$,__m_,,
\J
Press the POWER button @ to turn on the unit; the]
POWER indicator will light yellow. Press the TV/DVDI
button @ repeatedly to select the DVD mode. j
3C2_E
D©®£
_D@©@
9@e_
5©oe
=D©®c
Press the OPEN/CLOSE button @ to close the disc tray.
"LOADING" will appear on the screen. After loading, the
menu screen of the DVD should appear. Use the
Navigation (4,_,A,W) buttons @ to select the desired
option and the PLAY/ENTER button @ to select it.
If the password is set and the inserted disc is within the
Parental Ratings set, then the Password screen will
appear, prompting you to enter the password.
[tess pe OPEN/CLOSE button to open the disc tray,
OPEN will appear on the screen. Insert a disc will the
abe s de fac ng up on the d sc tray.
/
To stop playback, press the Stop (rot)button @; "PRESS
PLAY KEY TO CONTINUE" will appear on the TV screen.
Because the unit will remember where you stopped, simply
press the PLAY/ENTER button @ to resume playback
where you left off (resuming playback).
If the Stop (W)button @ is pressed twice, the unit will stop
completely.
NOTES:
If a MENU appears on the TV screen, press the Navigation (_,_, _, W) buttons to select the desired option/item, then
press the PLAY/ENTER button. Please make sure to refer to the disc's jacket or case for additional information.
Resuming playback may not work on all discs.
When the unit is on and in the Stop mode for 30 minutes, it will revert to the Standby mode automatically.
4O
Page 42

SKNP FAST SEARCH
Press the SKIP (J,_)button @ to advance the DVD to the
beginning of the next chapter.
Press the SKIP (_4_) button @ to move the DVD to the
beginning of the previous chapter.
SLOW
Use this feature to move the DVD in slow motion.
Dudng playback, press either the FWD I_ @ or REV 44
@ button to move the DVD forward or backward at double
(x2) speed to locate a specific section. Repeatedly press
these buttons and the speed will increase to x4, x8, x16, x32
(the sound will be muted) and resume normal playback.
You can also resume normal playback by pressing the
PLAY/ENTER button @.
I
Dudng playback, press the SLOW button @ to move the
DVD forward in slow motion speeds of 1/2 ,1/4, 1/8 , 1/16
(the sound will be muted) and resume normal playback.
You can also resume normal playback by pressing the
PLAY/ENTER button @.
Press the PAUSE/STEP button @ to pause the picture.
Repeatedly press the PAUSE/STEP button @ to play the
DVD one frame at a time.
Press the PLAY/ENTER button @ to resume normal
playback.
if the Screen Saver option (page 32) is set to ON, the
screen saver will appear in approximately 3.5 minutes.
41
Page 43

TITLE/CHAPTER SEARCH
Use this feature to directly go to a specific title and/or chapter.
o®oO
_© o ©
'_ ©
_ I
Press the SEARCH button @ once. Press the Navigation
(_,_) buttons @ to select the Title, then use the Direct
Channel Selection/Number buttons (0-9) @ to select the
desired title number. Playback will start immediately.
OR
Press the Navigation (_,_) buttons @ to select the
Chapter, then use the Direct Channel Selection/Number
buttons (0-9) @ to select the desired chapter number.
Playback will start immediately.
TITLE/CHAPTER/TmME SEARCH
Use this feature to directly go to a specific title and/or time,
_©®®®
_®®®®
ooo©
_©oo
Press the SEARCH button @ twice. Press the Navigation (_,_)
buttons @ to select the Title, then use the Direct Channel
Sebction/Number buttons(0-9) @to selectthe desiredtitle number.
Playbackwillstartimmediately. OR
Pressthe Navigation (_i,_) buttons@toselect theTime, then usethe
DirectChannel Selection/Numberbuttons(0-9)@to selectthedesired
TitleTime(Hour/Minutes/Seconds);playbackwillstartimmediately.
Pressthe SEARCHbutton@a thirdtime.Pressthe Navigation (_,_)
buttons @to select the chapter, then use the Direct Channe!
Selection/Number buttons (0-9) @to select the desired chapter
number.Playback willstartimmediately. OR
Pressthe Navigation(_,_) buttons@to selectthe ChapterTime,then
usethe DirectChannelSelection/Numberbuttons(0-9)@to selectthe
desired chapter time (Hour/Minutes/Seconds); playback will start
immediately.
To enter a title or chapter number larger than 9, press the 10+
the 10+ button once "1-" will appear, then press the Number 5
by press the Number 2 button, etc.).
REPEAT PLAYBACK
While playing back a DVD, this unit can repeatedly play
back a chapter or title.
'8'©o©
©©©@
While in the Playback mode, press the REPEAT button once; "(')
CHAPTER" will appear on the TV screen and the currently playing
Chapter will repeat continuously.
While in the Playback mode, press the REPEAT button a second
time; 'q ) TITLE" will appear on the TV screen and the currently
playing Title wil! repeat continuously.
While in the Playback mode, press the REPEAT button a third time;
"{*} ALL" wil! appear on the TV screen and the complete disc will
repeat continuously. Press the REPEAT button once more to
cancel Repeat mode.
button to enter the first digit (i.e. for Title/Chapter 15, press
button; for Title/Chapter 22, press the 10+ button twice follow
A-B REPEAT PLAYBACK
While playing back a DVD, this unit can repeatedly play
back a specific section.
TV/DVD
G©©6
While in the Playback mode, press the Repeat A-B button to
define where you want the section to start. Press the Repeat
A-B button again to define where you would like the section
to end, the unit will then play the selected area continuously.
Press the Repeat A-B button again to cancel A-B Repeat
mode.
NOTE:
o If you enter a time that exceeds the time limit of the DVD, then "_" will appear, and you must try again.
o Repeat may not work properly with some discs.
42
Page 44

AUDIO LANGUAGE SUBTITLE MENU
G©M
Press the AUDIO button repeatedly to change the audio]
language. This feature is not available on all discs.
DVD MENU
wpvr_
G©©G
Press the DMENU button @, and the Main Menu of the disc
will appear. Use the Navigation (411,1_,A,_') buttons @ to
select the desired option, and then press the PLAY/ENTER
button @.
This is not available on all discs.
ZOOM IN
The image on the screen can be magnified as follows:
Press the SUBTITLE button repeatedly to select a subtitle
language, and to turn the subtitle menu on/off. This feature is
not available on all discs.
TITLE MENU
Press the TITLE/PBC button @, and the Title Menu of the
disc will appear. Use the Navigation (_l,l_,Ak,_') buttons @
to select the desired option, and then press the
PLAY/ENTER button @.
This is not available on all discs.
Some discs may contain scenes which have been shot
simultaneously from a number of different camera angles.
This feature only works on discs with more than one camera
angle. The jacket will be marked with "L_} ".
C2) CD C2_
,,,^ _u,,E t
CDCD
Press the ZOOM button @ once during Normal, Slow or
Pause playback modes, and the unit will zoom x2. Press
once or twice more and the unit will zoom x3/x4. Use the
Navigation (_1,1_, A, 'IF) buttons @ to move the image on the
TV screen. Press the ZOOM button @ once more to cancel
the zoom function.
This is not available on all discs.
PEr _v_D pnFv _FXT
QQ Q(Z_
joo
While in the Playback mode, press the ANGLE button; the
total number of angles will appear on the screen.
Repeatedly press the ANGLE button to select the desired
angle; the angle will change in one to two seconds.
This is not available on all discs.
43
Page 45

PROGRAMMED PLAYBACK
The DVD player in this unit has a 20 chapter programmable memory that allows you to program up to 20 chapters on any
disc for playback in any desired order. You may program 20 different chapters or you may also program certain chapters to
play more than once. To perform programmed playback, proceed as follows:
©©©®_
@®©®_
ooo©
0000
GG_M
Select the first title and chapter to be played back using the
Direct Channel Selection/Number buttons (0-9) @; the next
Press the PROGRAM button, the Program menu will appear
on the TV screen.
program will automatically be highlighted.
To enter a title or chapter number larger than 9, press the
10+ button to enter the first digit (i.e. for Title/Chapter 15,
)tess the 10+ button once "1-" will appear, then press the
Number 5 button; for Title/Chapter 22, press the 10+ button
twice follow by press the Number 2 button, etc.).
NOTE: If an incorrect title or chapter has been entered, it
will remain highlighted and you need to enter the available
chapter again.
r_
o©
6 ©"G"©
CD C) CD
CZ) CD
Repeat step 2 until all desired chapters have been
programmed. You can repeat a chapter more than once if
desired.
To program more than 10 programs, scroll to the 1¢tsymbol
at the bottom right of the screen using the Navigation
(4,1_, A, T) buttons @ and press the PLAY/ENTER button
@.
To play, scroll to START using the Navigation (_,_,A,_')
buttons @, then press the PLAY/ENTER button @. Playback
will begin on the first chapter that you programmed and the
player will continue to play all of the chapters that you
programmed in the order in which you programmed them.
TO CANCEL THE PROGRAM FUNCTION:
Press the PROGRAM button to enter the program menu, then select STOP using the Navigation (_1,I_, A,_') buttons, then
press the PLAY/ENTER button. To exit the program menu, select EXIT using the Navigation (41,1_, A, T) buttons, then press
the PLAY/ENTER button to exit the menu."
_(ZZ)CO C)l
44
Page 46

PLAYBACK OF A CD/VCD
_(_A_ R_c^u pusH,^Y_ur_
T, J
PressthePOWERbutton_toturnontheun,t:thePOWER][_resslheOPEN/CLOSEbuttontoopenthed,sctray,
indicator will light yellow. Press the TV/DVD button @/ _OPEN will appear on the screen. Insert a disc will the
repeatedly to select the UVU mode. / /label side facing up on the disc tray.
/ /
SELECTmNG TRACKS USmNG THE SKNP (_) OR
(I_4)BUTTON (FOR VCB ONLY)
Press the OPEN/CLOSE button @ to close the disc tray.
"CLOSE" will appear on the screen. FOR CD: After loading,
the TRACK menu will appear on the TV screen. Press the
Navigation (A,_') buttons @ to select the desired track.
Press the PLAY/ENTER button @ to start playback.For
VCD: after loading, playback will start automatically. Press
the STOP ([]) button _9to stop playback
SELECTING TRACKS USING THE NUMBER
BUTTONS
sc_ _EC^LLE,ISPC^VMUTE
For CD: During playback, press the Number buttons
corresponding to the track numbers to select your desired
track, and the unit will playback the desired track
automatically.
NOTE: For track no. 2, press "0", "0" and "2"; playback will
start immediately.
For VOD: during playback, press the number 0-9 button for
track 0 to track 9, for numbers larger than 9, press the 10+
button to enter the first digit (i.e. for track 15, press the 10+
button once "1-" will appear, then press the Number 5
button, for track 22, press the 10+ button twice follow by
)tess the Number 2 button, etc.).
During playback, press the Skip(}¢J) @ or (_4_)@ button to
select a track to be played.
SELECTING TRACKS USING THE
NAVIGATION BUTTONS (FOR CD ONLY)
During playback, simply press the Navigation (_,_')
buttons @ to select the desired track, then press the
PLAY/ENTER button @ to confirm and play the track. Press
the STOP ([]) button @to stop playback.
45
Page 47

FORWARDm m/REVERSE 44 PLAY A S_NGLE TRACKIREPEAT PLAY
For CD: To pHay a song and then stop, seHect the track as
described on the previous page, then press the REPEAT button
@ once; "SingW' will appear on the TV screen and the unit will
repeat the seHected track once.
Each press of the FWD _ @ or REV 44 @ will increase the
search as follows:
1st press: x 2
2nd press: x 4
3rd press: x 8
4th press: x 16
5th press: x 32
6th press: Resume NormaH PHayback
Press the PLAY/ENTER button @ to resume normaH pHayback.
To Repeat pHaya track, simpHy select the track as described on
the previous page, then press the REPEAT button @ twice;
"Repeat One" will appear on the TV screen and the unit will
repeat the seHected track continuousHy until the STOP (l)
button @ is pressed.
Press the REPEAT button @ a third time; "Repeat Foiler" will
appear on the TV screen and the unit will repeat the tracks
inside the folder (i.e. on the disc) until the STOP (_) button @
is pressed.
Press the REPEAT button @ a fourth time; "FoHder" will appear
on the TV screen and the unit will repeat the tracks inside the
foiler (i.e. on the disc) once.
For VCD: To Repeat pHay a track, simpHy seHect the track as
described on the previous page, then press the REPEAT button
@ once; "_"_ TRACK" will appear on the TV screen and the unit
will repeat the seHected track continuously until the STOP (_)
button @ is pressed.
To Repeat all tracks on a CD, press the REPEAT button @ a
second time; , ALL" will appear on the TV screen and the
unit will repeat the CD continuously until the STOP (_) button
@ is pressed.
To cancel Repeat play, press the REPEAT button until the
Repeat indicator disappears from the screen.
REPEAT A-B PLAY
While playing back a CD, this unit can repeatedly play back
a specific section.
While in the Playback mode, press the Repeat A-B button to
define where you want the section to start. Press the Repeat
A-B button again to define where you would like the section
to end, the unit will then play the selected area continuously.
Press the Repeat A-B button again to cancel Repeat A-B
mode.
PBC (VCD ONLY}
automatically
has this function. To turn off the PBC, press the TFLE/PBC
button once.
IThe PBC Function will activate if the VCD
NOTE: Some disc may not have the PBC function.
AUDIO
Press the AUDIO button to cycle through the audio modes.
The audio modes vary depending on the disc inserted, but
include MONO LEFT, MONO RIGHT, MIX-MONO and
STEREO.
46
Page 48

PROGRAMMED PLAYBACK (VCD ONLY)
The DVD player in this unit has a 20 chapter programmable memory that allows you to program up to 20 chapters on any
disc for playback in any desired order. You may program 20 different chapters or you may also program certain chapters to
play more than once. To perform programmed playback, proceed as follows:
©©©®
@®©®_
ooo©
0000
'_"©o©
GG_M
Select the first title and tracks to be played back using the
Direct Channel Selection/Number buttons (0-9) @; the next
Press the PROGRAM button, the Program menu will appear
on the TV screen.
program will automatically be highlighted.
To enter a title or track number larger than 9, press the 10+
button to enter the first digit (i.e. for Title/Track 15, press
the 10+ button once "1-" will appear, then press the
Number 5 button; for Title/Track 22, press the 10+ button
twice follow by press the Number 2 button, etc.).
NOTE: If an incorrect title or track has been entered, it will
remain highlighted and you need to enter the available track
again.
r_
o©
6 ©"G"©
CDOCD
OO
i
Repeat step 2 until all desired tracks have been programmed.
You can repeat a track more than once if desired.
To program more than 10 programs, scroll to the f_ symbol at
the bottom right of the screen using the Navigation
(41,I_, A, T) buttons @and press the PLAY/ENTER button @.
To play, scroll to START using the Navigation (_,I_,,_,_')
buttons @, then press the PLAY/ENTER button @. Playback
will begin on the first track that you programmed and the
player will continue to play all of the tracks that you
programmed in the order in which you programmed them.
TO CANCEL THE PROGRAM FUNCTION:
During Program playback, press the PROGRAM button to enter the program menu, then select STOP using the Navigation
(_II,I_,A,T) buttons, then press the PLAY/ENTER button. To exit the program menu, select EXIT using the Navigation
(41,1_, A, T) buttons, then press the PLAY/ENTER button to exit the menu.
_(Z) CO CDI
47
Page 49

W_DVD
PressthePOWERbuttonOtoturnontheunit;thePOWER]...Press.t,heOPEN/CLOSEbuttontoopenthedisctray,
indicator will light yellow. Press the TV/DVD button @/ OPEN will appear on the screen. Insert a disc will the
repeatedly to select the DVD mode. / abe s de fac ng up on the d sc tray.
C _:,? S
'5' '_ '3 _
L2_ _ LS_
_©o©
Press the OPEN/CLOSE button @to close the disc tray.
"CLOSE" will appear on the screen. After loading, the
folder/picture menu will appear on the TV screen. Press the
Navigation (A,T) button @ to select the desired
folder/photo. Press the PLAY/ENTER button @to confirm.
If a folder is selected, press the Navigation (A,_') button
@ to select the desired picture. Then press the
PLAY/ENTER button @to play the picture. Press the STOP
(m) button @to stop playback. To select other folders, press
the Navigation (41) button @ while in the stop mode to go
back to select the folders. Use the Navigation (A,T)
button @to select the desired folder again.
48
Page 50

Checkthefollowingbeforerequestingservice:
SYMPTOM POSSIBLESOLUTION
GENERAL
Nopower.
Poweron,butunitnotfunctioning
properly.
Nopicture.
Nosound.
Playbackpicturerolls.
Theplaybackpictureis poor.
TheSearchfeatureisnotworking.
Thepictureisnotfittingproperly.
Theremotecontrolisnotworking.
POSSIBLECAUSE
ACcordunplugged.
Condensationhasformed.
Wrongtypeofdiscinserted.
Unitneedstobereset.
Thediscisdirtyorinsertedincorrectly.
Somefeaturesandfunctionsarenot
availableonalldiscs.
Theequipmentisnotconnectedproperly.
TheINPUToftheTVisnotsettoreceive
theDVDsignaloutput.
Thevideocables(ifusinganexternal
unit)arenotsecurelyconnected.
TheconnectedexternalTVpowerisoff.
Theequipmentisnotconnectedproperly.
Theexternalequipmentconnectedwith
theaudiocableisnotsettoreceivethe
DVDsignalinput.
Theaudiocables(if usinganexternal
unit)arenotsecurelyconnected.
Theconnectedreceiver'spowerisoff.
UnitneedstoberesettoNTSC.
Thediscisdirty.
Somediscshavesectionsthatdonot
allowsearching.
Wrongmenuoptionisselectedinthe
GeneralSetupMenu.
Thebatteriesareweakordead.
Thebatteriesarenotinstalledproperly.
Theremoteisnotaimedatthesenson
Distanceistoofarorthereistoomuch
lightintheroom.
Thereisanobstacleinthepathofthe
beam.
PlugintheACcordtoanACoutlet.
Unplugtheunitandwaitaboutoneto
twohourstoallowtheplayerto dry.
Thisunitcannotplaydiscs,otherthan
DVD,VCDor standardCDs.
PressthePOWERbutton,thenunplug
theACcord.Waitoneminuteandthen
plugtheunit back in.
Clean disc and insert label side-up.
This is normal; try another function.
Connect the equipment according to
the instructions in this manual.
Press the TV/DVD button to select TV_then
press the TViAV button to select DVD.
Connect the video cables securely.
Turn the TV on.
Connect the equipment according to
the instructions in this manual.
Select the appropriate audio input
mode.
Connect the audio cables securely.
Turn the audio receiver on.
Set menu option to NTSC.
Clean the disc.
This is normal on some discs.
Select the TV type (4:3PS, 4:3LB, 16:9)
which matches the external TV used.
Install fresh batteries.
Install batteries according to the diagram.
Aim the remote at the sensor.
Operate within 20ft, or reduce the light
in the room.
Move obstacle.
49
Page 51

SYMPTOM
I POSStBLECAUSE I POSSIBLESOLUTION
DVD
Theunitdoesnotstartplayback.
Somefunctionsdonotoperateas
stated.
Selectedlanguageisnotbeing Thisisnormal;tryanotherdisc.
showninthesubtitles,or spoken.
Subtitlesarenotworkingproperly.
Anglecannotbechanged.
TheRatingLevelpasswordhas
beenforgotten.
VCO (VIOEO CO)
No menu playback. _ The VCD inserted does not have the | Press the TITLE/PBC button to turn off
RatinglevelsettoblocktheDVD.
DVDnotinserted,orinsertedupside-down.
DVDisnotselected.
Thediscisnotplacedintheguide.
The disc is dirty.
Some features and functions are not
available on all discs.
If the audio or subtitle language does not
appear on the disc, then the initial setting
will not be seen/heard.
Subtitles appear only when the discs
contain them.
Subtitles not turned on.
Angles may not be recorded on the disc
(see disc jacket/case), or they may only
be recorded on certain scenes.
Call the number listed on the warranty to
get the information to reset the
password.
Enter your password, and/or change
the rating level.
Insert DVD correctly.
Press the TV/DVD button to select the
DVD mode.
Place the disc on the disc tray correctly
inside the guide.
Clean the disc.
This is normal; try another function.
This is normal; try another disc.
Turn the subtitles on.
Try another disc, or wait for a scene
which allows a different camera angle.
After receiving the information, reset
the password and write it down.
Jplayback control, j_the PBC function.
FOR ADDITIONAL SE%UP OR OPERATING ASSISTANCE, PLEASE VISIT OUR WEBSITE AT
WWW.MEMOREXELECTRONtCS.COM OR CONTACT CUSTOMER SERVICE AT
(954}660o7100
PLEASE KEEP ALL PACKAGING MATERIAL FOR AT LEAST 90 DAYS IN CASE YOU NEED TO RETURN
THINS PRODUCT TO YOUR PLACE OF PURCHASE OR MEMOREX.
FOR PARTS AND ACCESSORIES, CONTACT FOX INTERNATIONAL AT 1_800_321_6993.
5O
Page 52

Caringfor Discs
Treatthedisccarefully.Handlethedisconlybyitsedges.Neverallowyourfingerstocomeincontactwiththeshiny,unprinted
sideofthedisc.
Donotattachadhesivetape,stickers,etc.tothedisclabel.
Cleanthediscperiodicallywithasoft,lint-free,drycloth.Neverusedetergentsorabrasivecleanerstocleanthedisc.If
necessary,useaCDcleaningkit.
Ifadiscskipsorgetsstuckonasectionofthedisc,itisprobablydirtyordamaged(scratched).
Whencleaningthedisc,wipeinstraightlinesfromthecenterofthedisctotheouteredgeofthedisc.Neverwipeincircular
motions.
t
Discs should be stored in their cases after each use to avoid damage.
Do not expose discs to direct sunlight, high humidity, high temperatures or dust, etc. Prolonged exposure or extreme
temperatures can warp the disc.
Do not stick or write anything on either side of the disc. Sharp writing instruments, or the ink, may damage the surface.
Cleaning the Unit
To prevent fire or shock hazard, disconnect your unit from the AC power source when cleaning.
The finish on your unit may be cleaned with a dust cloth and cared for as other furniture. Use caution when cleaning and
wiping the plastic parts.
Mild soap and a damp cloth may be used on the front panel.
51
Page 53

Power Requirements .......................................................................................................... AC120V, 60Hz
Power Consumption ........................................................................................................................... 70W
Weight .......................................................................................................................................... 28.5 Lbs
Dimensions .................................................................................... 16.4 (W) x 14.8 (H) x 15.5 (D) inches
Picture Tube .......................................................................................................... 14" Color Picture Tube
Speaker Output Power ................................................................................................................... 2 x 2W
Signal System .................................................................................................................................. NTSC
TV Tuner ....................................... Support Mode: NTSC. Supports both TV (Air) and CATV (Cable TV)
Operating Temperature ......................................................................................................... +5 ° to +35°C
Operating Humidity Range ......................................................................... 5% to 90% (no condensation)
Discs Played:
DVD-VIDEO Disc
12cm single-sided, single layer
12cm single-sided, dual layer
12cm double-sided, single layer
8cm single-sided, single layer
8cm single-sided, dual layer
8cm double-sided, single layer
COMPACT DISC (V_DEO CD)
12cm disc
8cm disc
Video Output Level .......................................................................................................................... 1Vp-p
Audio Output Level ..................................................................................................... 2Vrms (1KHz, 0dB)
Audio Signa_ Output Characteristics:
Frequency Responses:
DVD (Linear Audio) ...................................................................... 20Hz-20KHz (48KHzi96KHz sampling)
CD Audio ............................................................................................................................... 20Hz-20KHz
SiN Ratio ...................................................................................................................................... 70dB
Wow and Flutter ............................................................................................ Below Measurable Level
Pickup:
Wavelength ................................................................................................................................ 655nm
Laser Power ............................................................................................................................. Class 1
Specifications are subject to change without notice.
52
Page 54

Memcorp, fnc.
Weston, FL
Printed in Hong Kong
Visit our website at www.memorexelectronics.com
 Loading...