

Page 1

Page 2

Contents
Important safety instructions-1
Identification of Controls-------4
Front ------------------------------------------------------4
Back-------------------------------------------------------5
Remote Controller -------------------------------------6
Installing batteries -------------------------------------7
Effective range of the Remote----------------------7
Installation --------------------------8
Antenna installation -----------------------------------8
Connecting video and audio equipment ---------9
Connect side AV input terminals -------------------9
Connecting rear AV input terminals----------------9
Connecting Component input----------------------10
Connecting the AV outputs--------------------------11
Basic Operation------------------12
Turning on -----------------------------------------------12
Turning off -----------------------------------------------12
Main Menu Overview ---------------------------------13
Menu navigation ---------------------------------------13
Watching AV program---------------------------------14
Switching from AV to TV -----------------------------14
Displaying the information banner ----------------14
Using the program guide ----------------------------14
Tuning in----------------------------15
To enter the PRESET menu ------------------------15
Auto Program-------------------------------------------15
Skipping an unnecessary channel ----------------16
Checking the DTV signal strength ----------------16
Sound Control-------------------- 18
Adjusting Picture-----------------19
Adjusting picture --------------------------------------19
Changing picture size -------------------------------19
Timer Setting----------------------20
To enter the CLOCK menu-------------------------20
Auto Clock Setup-------------------------------------20
Manual Clock Setup ---------------------------------20
On timer setup-----------------------------------------21
Setting Sleep timer ----------------------------------21
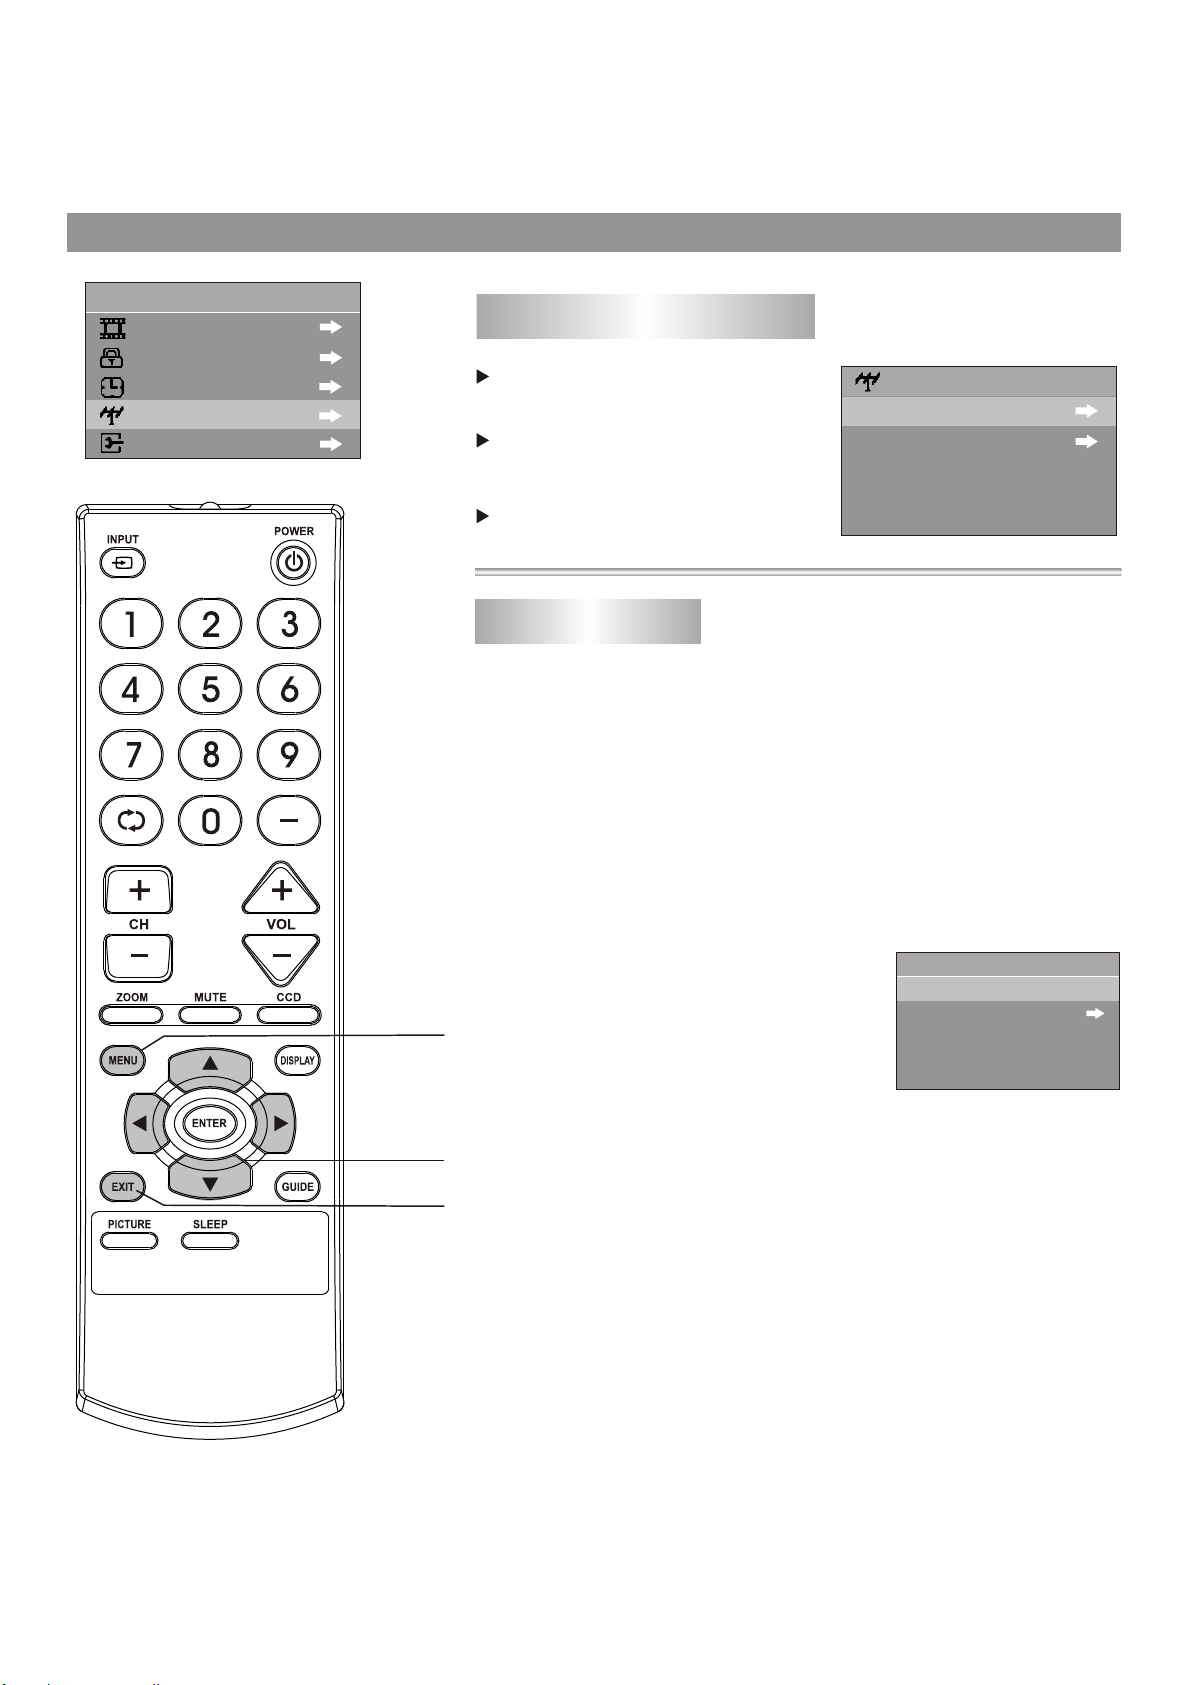
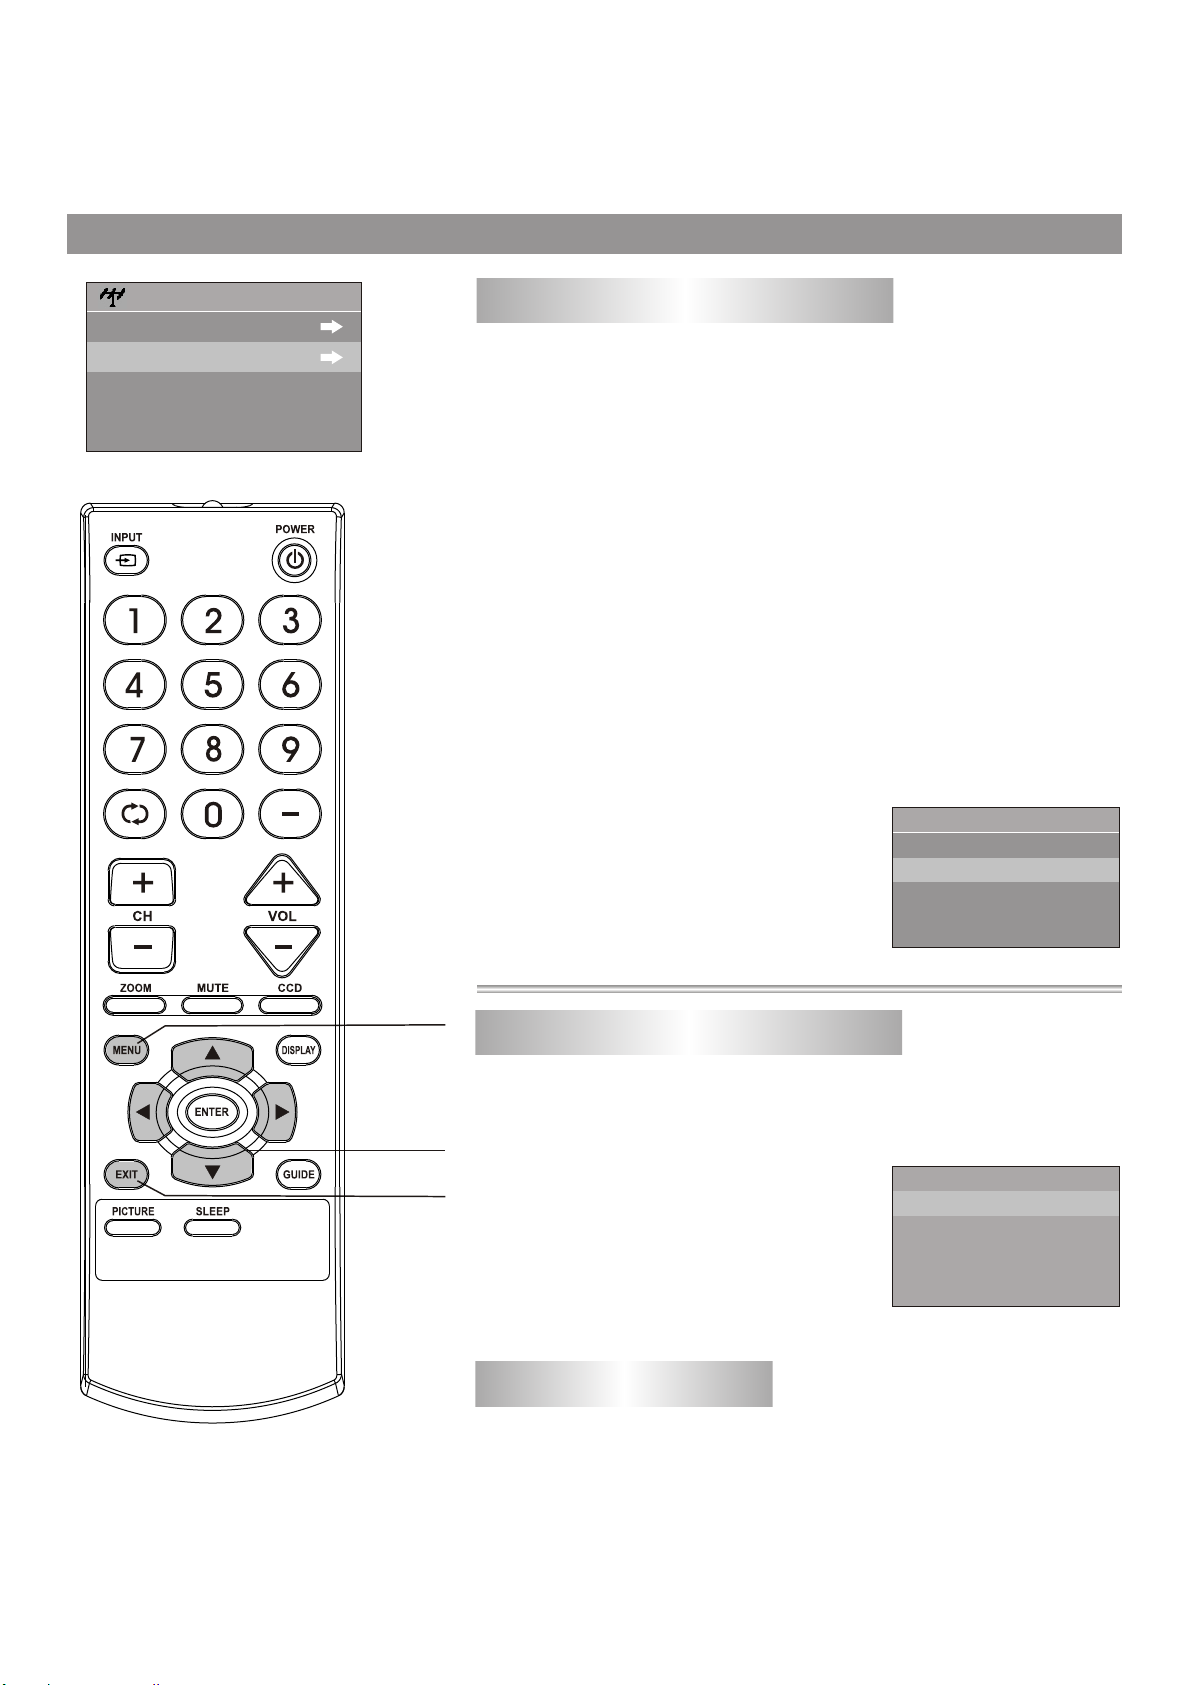
System Setting -------------------22
To enter the EXTRA menu-------------------------22
Selecting the OSD menu language-------------22
Selecting AUDIO language ------------------------22
Setting up Closed Captioning ---------------------23
Selecting the caption type -------------------------23
Customizing digital Closed Captions------------24
Parental Control------------------25
To enter the P.LOCK menu -----------------------25
Setting up the P.LOCK password-----------------25
Enabling Parental Controls-------------------------26
Setting up MPAA ratings ---------------------------26
Setting up TV ratings--------------------------------27
Setting up Canadian English ratings ------------28
Setting up Canadian French ratings-------------28
Setting up RRT5 criteria ratings------------------29
Troubleshooting -----------------30
Viewing channel label --------------------------------16
Channel Selection--------------- 17
Specifications---------------------33
Page 3
IMPORTANT SAFETY INSTRUCTIONS
FCC NOTICE:
This device complies with Part 15 of the FCC
Rules. Operation is subject to the following two
conditions: (1) this device may not cause harmful
interference, and (2) this device must accept any
interference received, including interference that
may cause undesired operation.
Warning: Changes or modifications to this unit
not expressly approved by the party responsible
for compliance could void the user’s authority to
operate the equipment.
NOTE: This equipment has been tested and
found to comply with the limits for a Class B
digital device, pursuant to Part 15 of the FCC
Rules. These limits are designed to provide
reasonable protection against harmful
interference in a residential installation. This
equipment generates, uses and can radiate
radio frequency energy and, if not installed and
used in accordance with the instructions, may
cause harmful interference to radio
communications.
However, there is no guarantee that interference
will not occur in a particular installation. If this
equipment does cause harmful interference to
radio or television reception, which can be
determined by turning the equipment off and on,
the user is encouraged to try to correct the
interference by one or more of the
following measures:
• Reorient or relocate the receiving antenna.
• Increase the separation between the
equipment and receiver.
• Connect the equipment into an outlet on a
circuit different from that to which the receiver
is connected.
• Consult the dealer or an experienced
radio/TV technician for help.
WARNING:
TO REDUCE THE RISK OF FIRE OR ELECTRIC SHOCK,
DO NOT EXPOSE THIS PRODUCT TO RAIN
OR MOISTURE.
WARNING:
TO REDUCE THE RISK OF FIRE OR ELECTRIC SHOCK,
AND ANNOYING INTERFERENCE, USE THE
RECOMMENDED ACCESSORIES ONLY.
SURGE PROTECTORS:
It is recommended to use a surge protector for AC
connection. Lightning and power surges ARE NOT covered
under warranty for this product.
ATTENTION:
POUR ÉVITER LES CHOC ÉLECTRIQUES, INTRODUIRE
LA LAME LA PLUS LARGE DE LA FICHE DANS LA BORNE
CORRESPONDANTE DE LA PRISES ET POUSSER
JUSQU’AU FOND.
FCC WARNING:
To assure continued compliance, follow the attached
installation instructions and use only shielded cables when
connecting to other devices. Modifications not authorized by
the manufacturer may void user’s authority to operate
this device.
This Class B digital apparatus complies with Canadian
ICES-003.
Cet appareil numérique de la classe B est conforme à la
norme NMB-003 du Canada.
This TV is capable of receiving unscrambled digital
programming for both cable and external UHF/VHF
antenna (A TSC) and also can receive NTSC (cable
and external UHF/VHF antenna) programs.
1
Page 4

IMPORTANT SAFETY INSTRUCTIONS (CONTINUED)
P
ORTABLE CART WARNING
(symbol provided by RETAC)
The lightning flash with arrowhead symbol
CAUTION
RISK OF ELECTRIC SHOCK
DO NOT OPEN
CAUTION: TO REDUCE THE RISK OF ELECTRIC SHOCK, DO NOT
REMOVE COVER (OR BACK). NO USER-SERVICEABLE PARTS
INSIDE. REFER SERVICING TO QUALIFIED SERVICE PERSONNEL.
(This Caution Marking and Rating Label are located at the rear enclosure of the unit.)
WARNING: TOREDUCE THE RISK OF FIRE OR ELECTRIC SHOCK, DO NOTEXPOSE THIS APPLIANCE T O RAIN OR MOISTURE.
TO PREVENT ELECTRIC SHOCK, MATCH THE WIDE BLADE OF THE PLUG TO THE WIDE SLOT AND FULLY INSERT.
Before using the unit, be sure to read all operating instructions carefully. Please note that these are general
precautions and may not pertain to your unit. For example, this unit may not have the capability to be connected to
an outdoor antenna.
1. READ INSTRUCTIONS
All the safety and operating instructions should be read before the product is operated.
2. RETAIN INSTRUCTIONS
The safety and operating instructions should be retained for future reference.
3. HEED WARNINGS
All warnings on the product and in the operating instructions should be adhered to.
4. FOLLOW INSTRUCTIONS
All operating and use instructions should be followed.
5. CLEANING
Unplug this product from the wall outlet before cleaning. Do not use liquid cleaners or aerosol cleaners. Use a dry cloth
for cleaning.
6. ATTACHMENTS
Do not use attachments not recommended by the product's manufacturer as they may cause hazards.
7. WATER AND MOISTURE
Do not use this product near water–for example: near a bathtub, washbowl, kitchen sink or laundry tub;
in a wet basement; or near a swimming pool.
8. ACCESSORIES
Do not place this product on an unstable cart, stand, tripod, bracket or table. The product may fall, causing
serious injury and serious damage to the product. Use only with a cart, stand, tripod, bracket or table
recommended by the manufacturer or sold with the product. Any mounting of the product should follow the
manufacturer’s instructions, and should use a mounting accessory recommended by the manufacturer.
8A. An appliance and cart combination should be moved with care. Quick stops, excessive force and
uneven surfaces may cause the appliance and cart combination to overturn.
9. VENTILATION
Slots and openings in the cabinet and in the back or bottom are provided for ventilation, to ensure reliable operation of
the product and to protect it from overheating. These openings must not be blocked or covered. The openings should
never be blocked by placing the product on a bed, sofa, rug or other similar surface. This product should never be
placed near or over a radiator or heat source. This product should not be placed in a built-in installation such as a
bookcase or rack unless proper ventilation is provided or the manufacturer's instructions have been adhered to.
10. POWER SOURCES
This product should be operated only from the type of power source indicated on the marking label. If you are not sure of
the type of power supply to your home, consult your appliance dealer or local power company. For products intended to
operate from battery power, or other sources, refer to the operating instructions.
11. GROUNDING OR POLARIZATION
This product is equipped with a polarized alternating-current line plug (a plug having one blade wider than the other).
This plug will fit into the power outlet only one way. This is a safety feature. If you are unable to insert the plug fully into
the outlet, try reversing the plug. If the plug should still fail to fit, contact your electrician to replace your obsolete outlet.
Do not defeat the safety purpose of the polarized plug.
12. POWER-CORD PROTECTION
Power-supply cords should be routed so that they are not likely to be walked on or pinched by items placed upon or
against them, paying particular attention to cords at plugs, convenience receptacles, and the point where they exit from
the appliance.
within an equilateral triangle is intended to alert
the user to the presence of uninsulated
dangerous voltage within the product’s
enclosure that may be of sufficient magnitude to
constitute a risk of electric shock to persons.
The exclamation point within an equilateral
triangle is intended to alert the user to the
presence of important operating and
maintenance (servicing) instructions in the
literature accompanying the appliance.
2
Page 5
IMPORTANT SAFETY INSTRUCTIONS (CONTINUED)
ANTENNA
LEAD IN
WIRE
ANTENNA
DISCHARGE UNIT
(NEC SECTION 810-20)
GROUNDING CONDUCTORS
(NEC SECTION 810-21)
GROUND CLAMPS
POWER SERVICE GROUNDING
ELECTRODE SYSTEM
(NEC ART 250, PART H)
NEC - NATIONAL ELECTRICAL CODE
ELECTRIC
SERVICE
EQUIPMENT
GROUND
CLAMP
S2898A
13. LIGHTNING
To protect your product from a lightning storm, or when it is left unattended and unused for long periods of time, unplug it
from the wall outlet and disconnect the antenna or cable system. This will prevent damage to the product due to lightning
and power-line surges.
14. POWER LINES
An outside antenna system should not be located in the vicinity of overhead power lines or other electric light or power
circuits, or where it can fall into such power lines or circuits. When installing an outside antenna system, extreme care
should be taken to keep from touching such power lines or circuits as contact with them might be fatal.
15. OVERLOADING
Do not overload wall outlets and extension cords as this can result in a risk of fire or electric shock.
16. OBJECT AND LIQUID ENTRY
Never push objects of any kind into this product through openings as they may touch dangerous voltage points or short out
parts that could result in fire or electric shock. Never spill or spray any type of liquid on the product.
17. OUTDOOR ANTENNA GROUNDING
If an outside antenna is connected to the
product, be sure the antenna system is
grounded so as to provide some protection
against voltage surges and built-up static
charges. Section 810 of the National
Electric Code, ANSI/NFPA 70, provides
information with respect to proper
grounding of the mast and supporting
structure, grounding of the lead-in wire to
an antenna discharge product, size of
grounding conductors, location of antenna
discharge product, connection to grounding
electrodes and requirements for grounding
electrodes.
18. SERVICING
Do not attempt to service this product
yourself as opening or removing covers may expose you to dangerous voltage or other hazards. Refer all servicing to
qualified service personnel.
19. REPLACEMENT PARTS
When replacement parts are required, be sure the service technician uses replacement parts specified by the
manufacturer or those that have the same characteristics as the original part. Unauthorized substitutions may result in fire,
electric shock or other hazards.
20. SAFETY CHECK
Upon completion of any service or repairs to this product, ask the service technician to perform safety checks to determine
that the product is in proper operating condition.
21. WALL OR CEILING MOUNTING
The product should be mounted to a wall or ceiling only as recommended by the manufacturer.
22. DAMAGE REQUIRING SERVICE
Unplug the product from the wall outlet and refer servicing to qualified service personnel under the following conditions:
a. When the power-supply cord or plug is damaged.
b. If liquid has been spilled or objects have fallen into the product.
c. If the product has been exposed to rain or water.
d. If the product does not operate normally by following the operating instructions. Adjust only those controls that are covered
by the operating instructions, as an adjustment of other controls may result in damage and will often require extensive work
by a qualified technician to restore the product to its normal operation.
e. If the product has been dropped or the cabinet has been damaged.
f. When the product exhibits a distinct change in performance–this indicates a need for service.
23. HEAT
The product should be situated away from heat sources such as radiators, heat registers, stoves or other products
(including amplifiers) that produce heat.
24. NOTE TO CATV SYSTEM INSTALLER
This reminder is provided to call the CATV system installer's attention to Article 820-40 of the NEC that provides
guidelines for proper grounding and, in particular, specifies that the cable ground shall be connected to the grounding
system of the building, as close to the point of cable entry as practical.
EXAMPLE OF ANTENNAGROUNDING AS PER
NATIONALELECTRICAL CODE
3
Page 6

Front
Identification of Controls
2
3
1
4
MENU
5
VOL- VOL+
6
7 9
CH- CH+
8
INPUT
1. Power button
2. Indicator
3. Remote sensor
4. INPUT button: video input select.
5. MENU button: to enter into menu operation.
6. VOL- button: volume down adjust; menu item adjust.
7. VOL+ button: volume up adjust; menu item adjust.
8. CH- button: channel down select; menu item select.
9. CH+ button: channel up select; menu item select.
4
Page 7
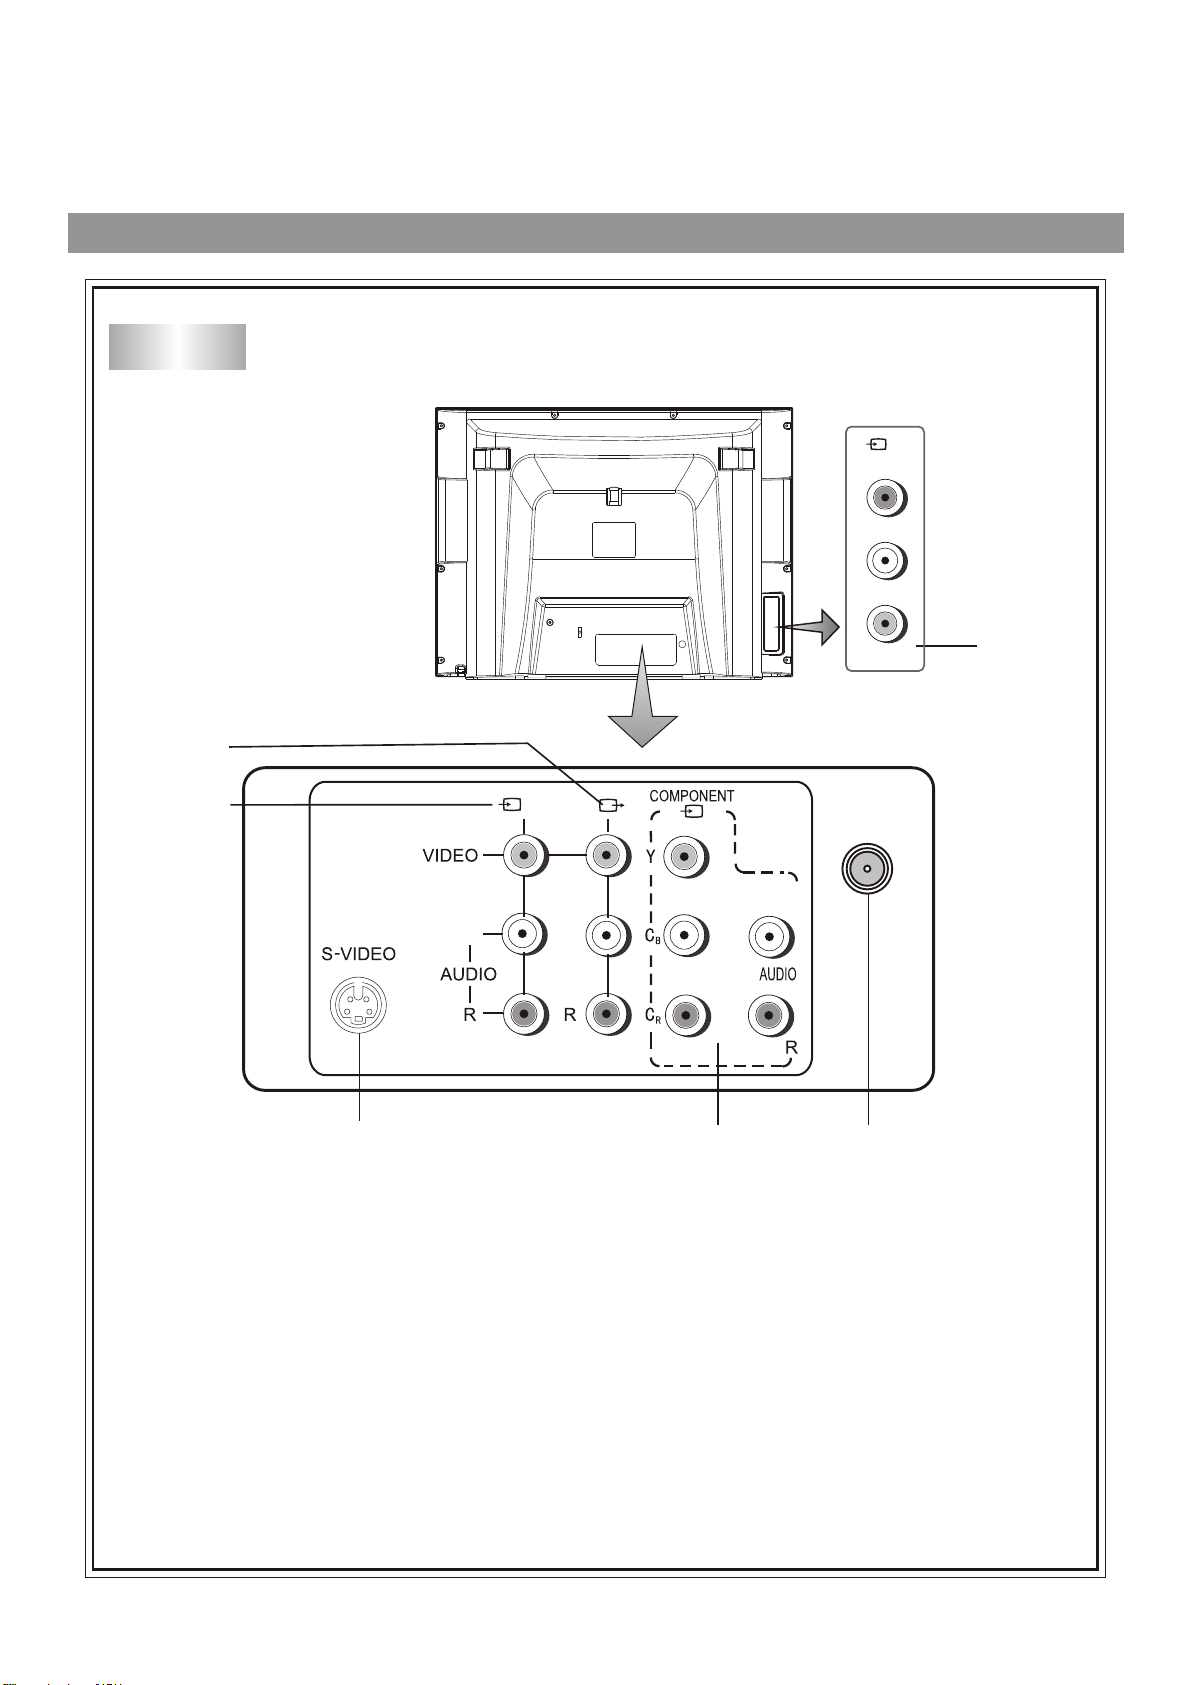
Back
3
Identification of Controls (continued)
( )
2
R
L/MONO
VIDEO
6
( )
2
L/MONO L
1
1
4
1. S-VIDEO input
2. AV1 input (VIDEO, AUDIO L/MONO, R)
3. AV output(VIDEO, AUDIO L, R)
4. COMPONENT input (Y, CB ,CR , AUDIO L/MONO, R)
L/M ONO
5
5. Antenna input
6. AV2 input (VIDEO, AUDIO L/MONO, R)
5
Page 8
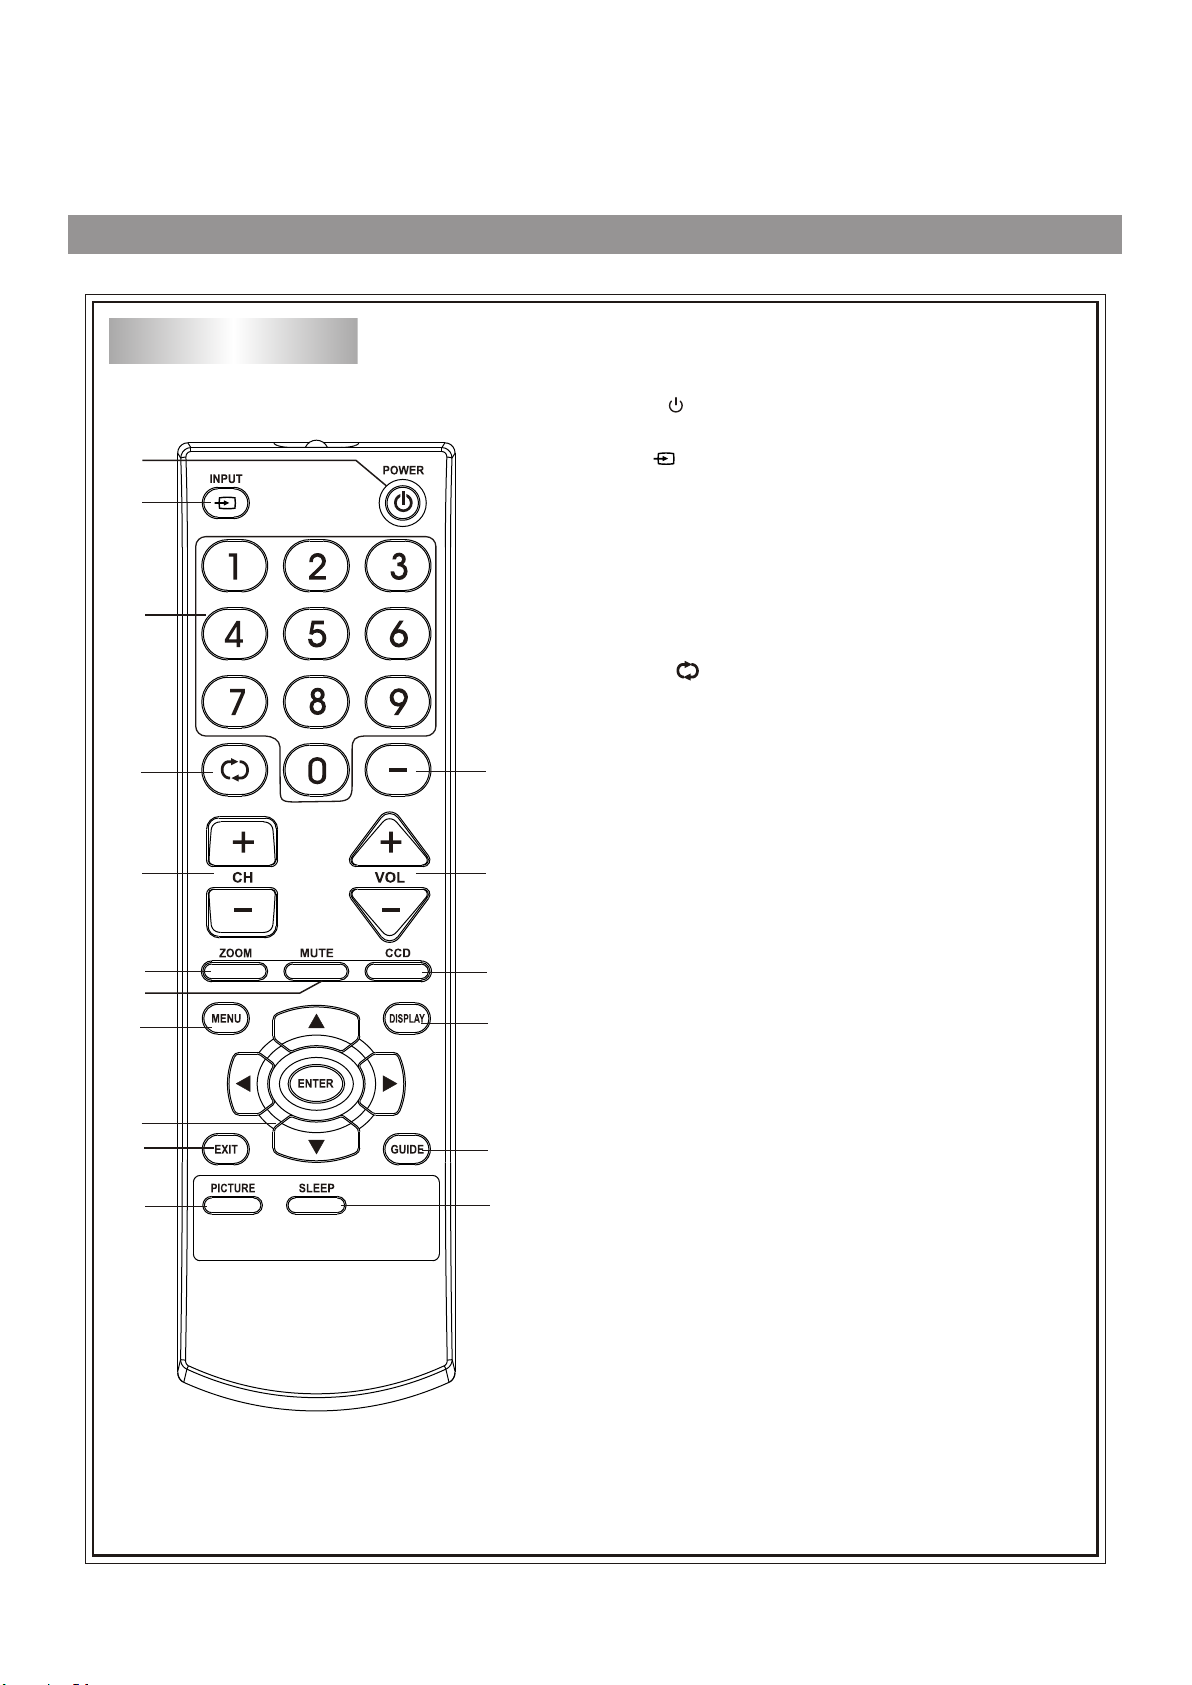
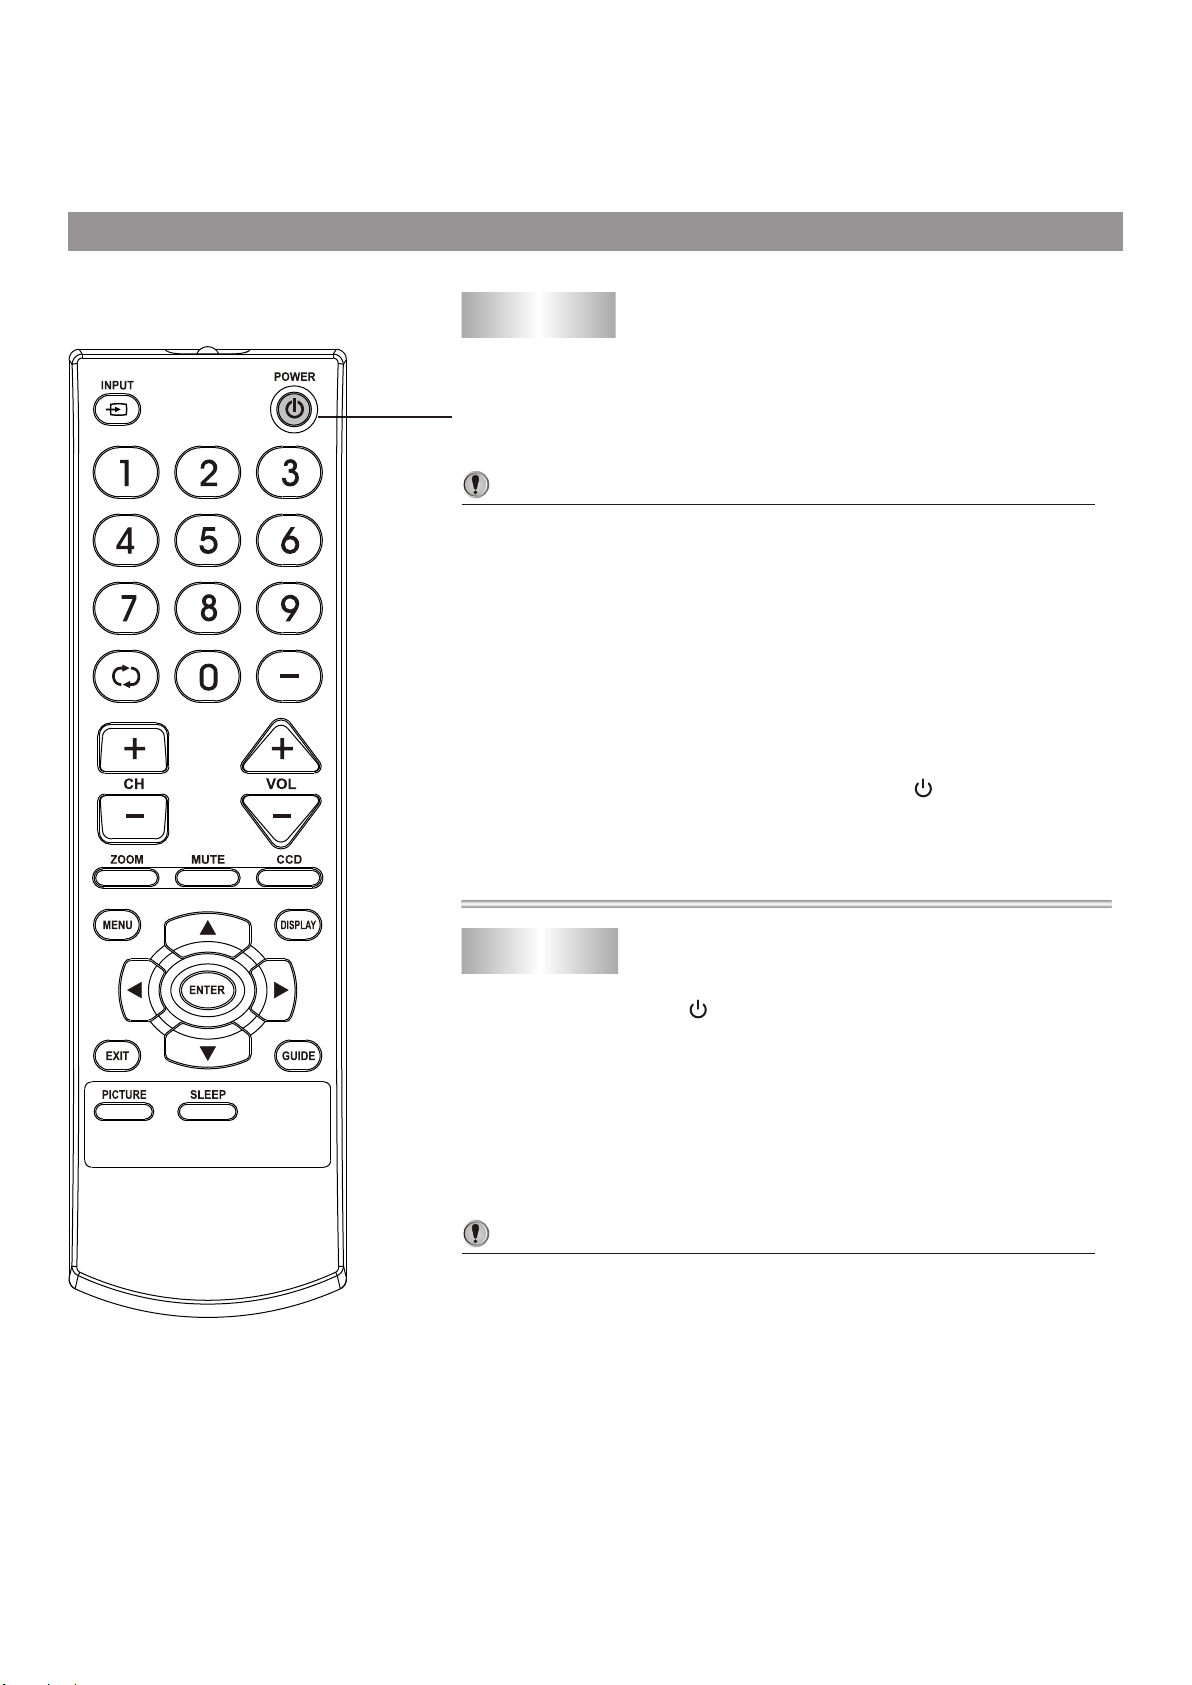
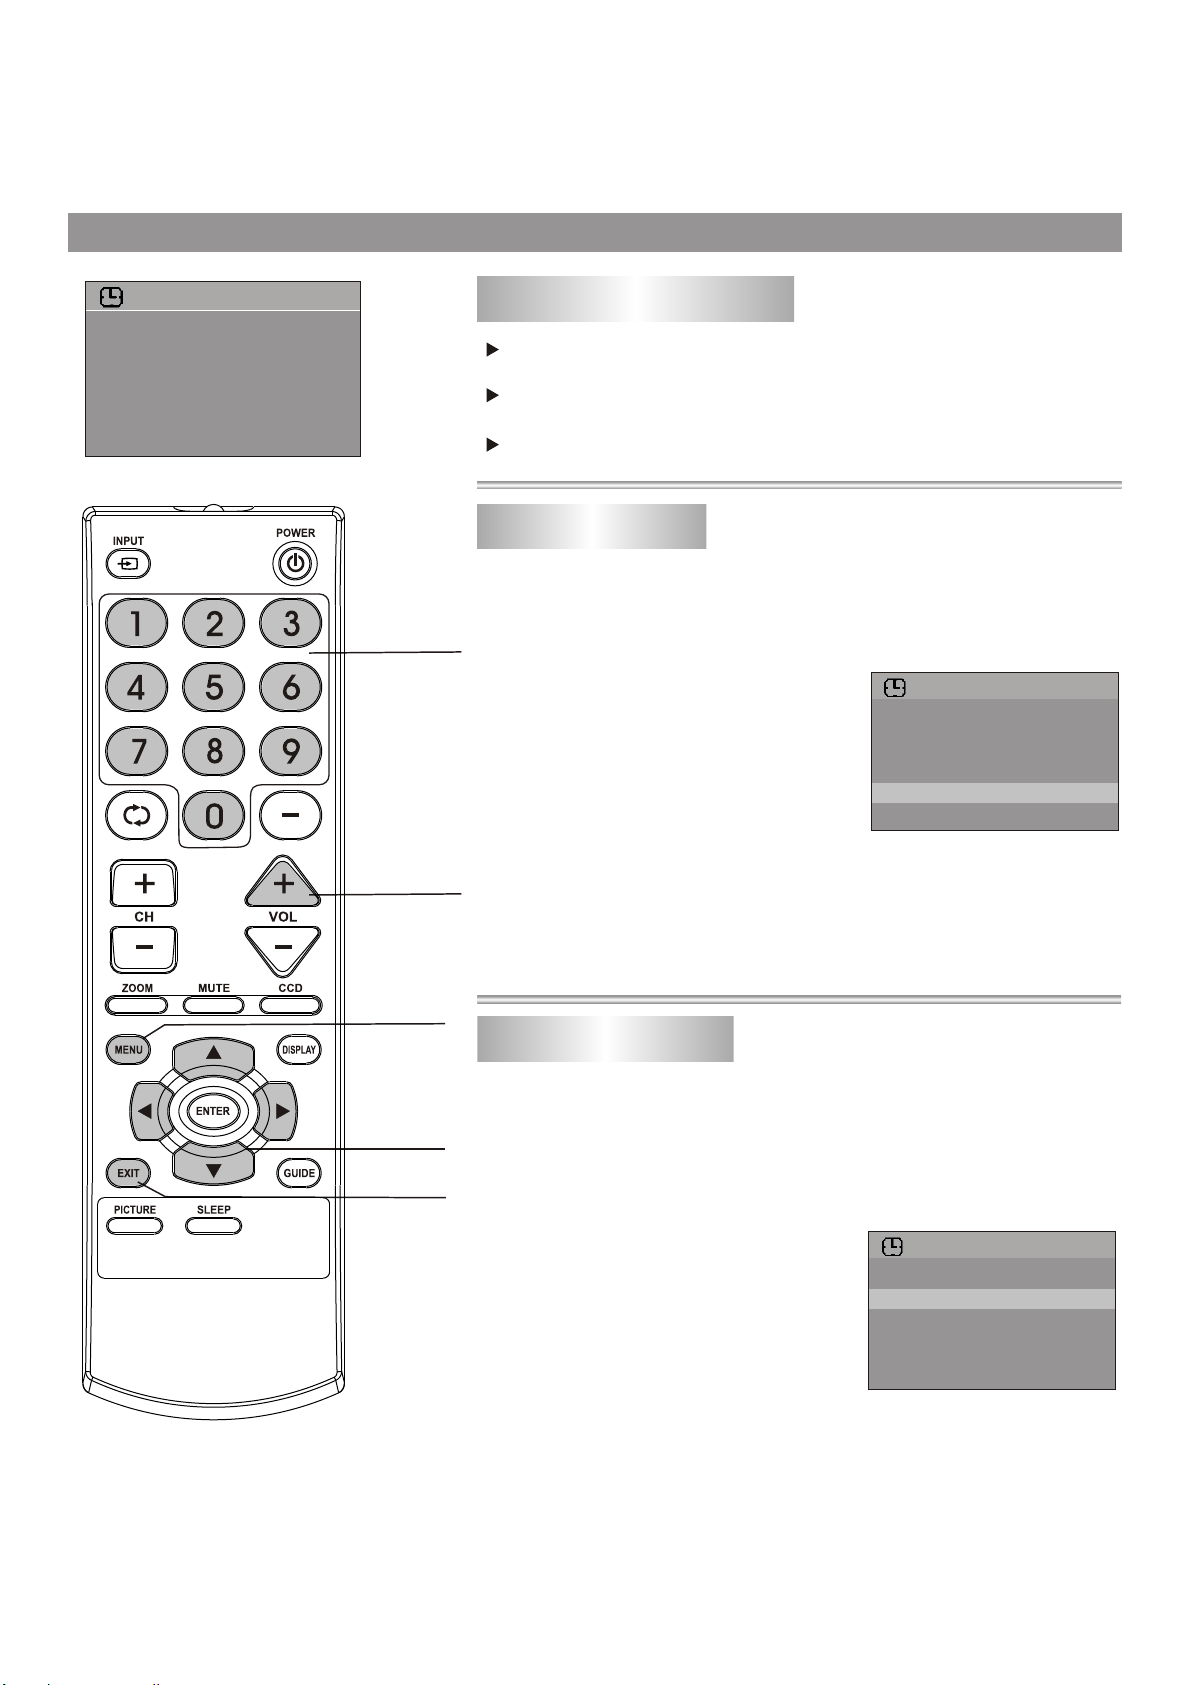
Remote Controller
1
2
3
5
6
8
9
11
13
14
16
Identification of Controls(continued)
1. POWER
Turn the unit on or off
2.INPUT
To quickly select input source
3. Direct channel selector/number buttons
Use these number buttons to select channel or input
password
4. Dash (-)
Used to enter a program number for multiple program
channels such as 2-1,2-2,etc.
5. RETURN
To quickly return to the previous viewed channel
6. CH+/-
To select channels upward or downward
4
7. VOL+/-
Used to adjust volume.
8. ZOOM
To change picture size in DTV mode.
7
9. MUTE
Sound mute
10. CCD
To turn the CCD on or off
10
11. MENU
12
15
17
To access the Menu main page
12. DISPLAY
To display channel status or signal information
13. Menu navigation button: 5634
56: To move upward or downward in menu
operation;
34: To move left or right in menu operation;
To adjust selected menu item in menu
operation;
14. EXIT
Used to exit the menu
15. GUIDE
To display program guide.
16. PICTURE
To select the picture mode
17. SLEEP
To set Sleep timer
6
Page 9
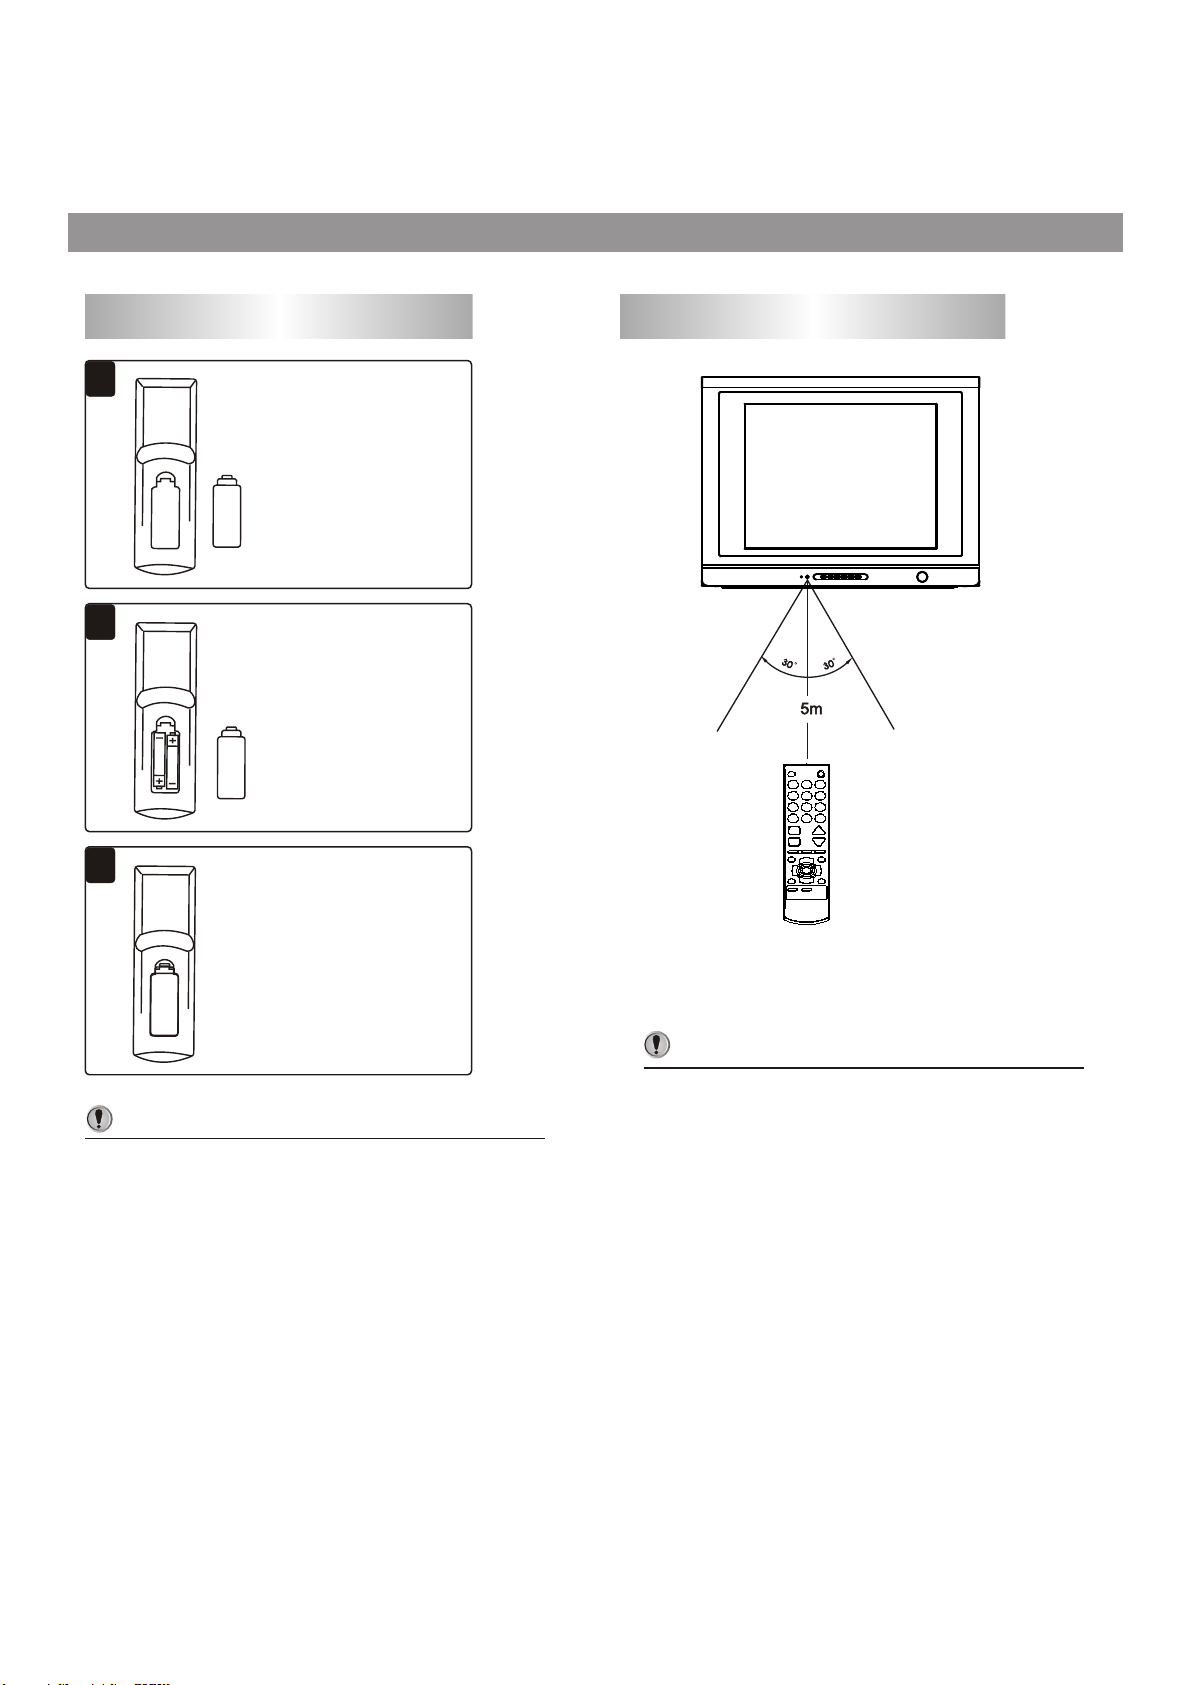
Installing batteries
Effective range of the Remote
11
Open the battery cover.
22
In sert two si ze-AA A
batteries.
<(Place the batteries
with their terminals
corresponding to the
(+) and (–) indications
i n t h e b a t t e r y
compartment.)
33
Replace the cover.
Notes:
/
Do not try to recharge batteries they are not
intended to be recharged.
/
Use only the size and type of batteries specified.
Do not mix different types of batteries together
or old batteries with fresh ones.
/
When the remote control will not be used for a
long period of time or when the batteries are
worn out, remove the batteries.
/
Do not throw the batteries into a fire. Dispose of
used batteries in the specified manner.
/
Do not drop, dampen or disassemble the remote
control.
Notes:
/
When there is an obstacle between the TV
and the transmitter, the transmitter may not
operate.
/
When direct sunlight, and incandescent lamp,
fluorescent lamp or any other strong light
shines on the REMOTE SENSOR of the TV,
the remote operation may be unstable.
7
Page 10
Installation
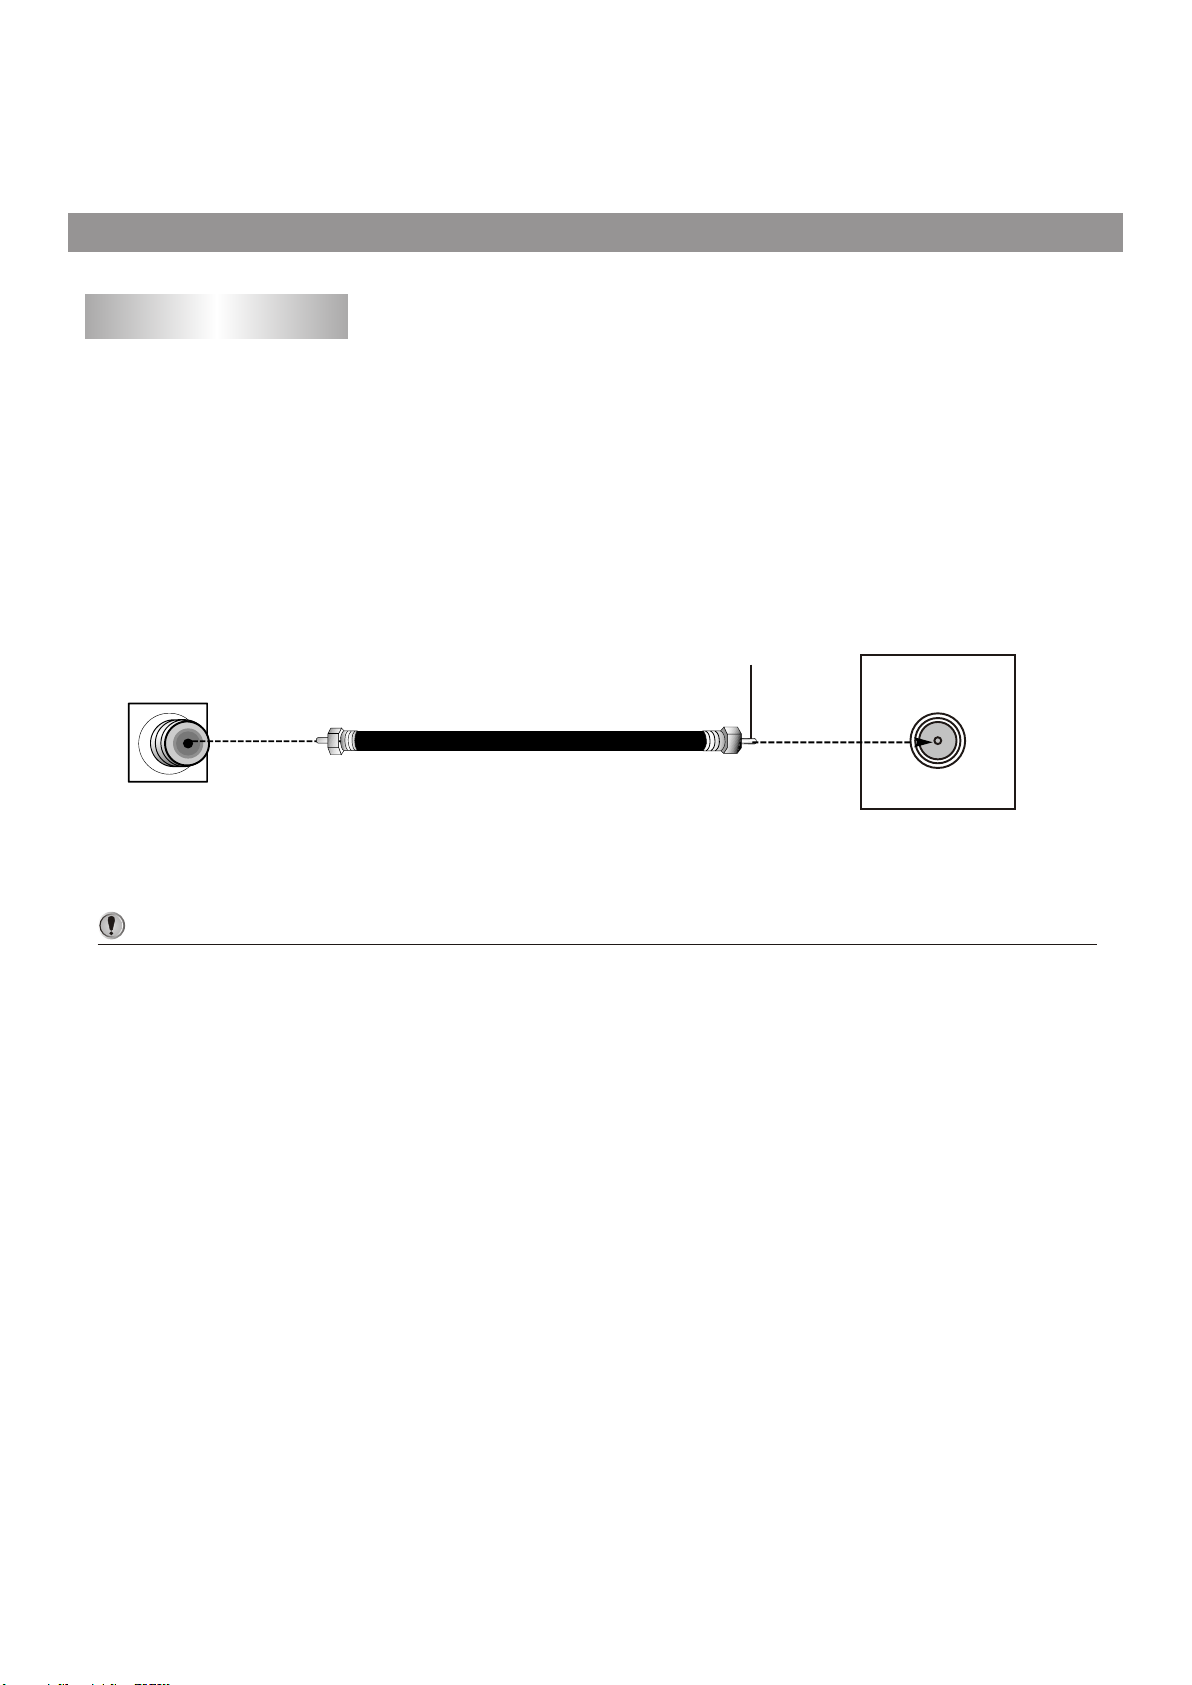
Antenna installation
INSTALL the unit in a room where direct light will not fall upon the screen. Total darkness or a reflection on
the picture screen may cause eyestrain. Soft and indirect lighting is recommended for comfortable
viewing.
Optimum reception of colour requires a good signal and will generally mean that an outdoor antenna must
be used. The exact type and position of the antenna will depend upon your particular area.
Wall Antenna
Socket
Bronze Wire
RF Coaxial Cable(75 ohm)
Antenna Input
Notes:
/ It is recommended that the 75-ohm coaxial cable be used to eliminate interference and noise which
may occur due to radio wave conditions.
/ The antenna cable should not be bundled with the power cord and the like.
/ If the antenna is not installed properly, contact your dealer for assistance.
8
Page 11
Installation (continued)
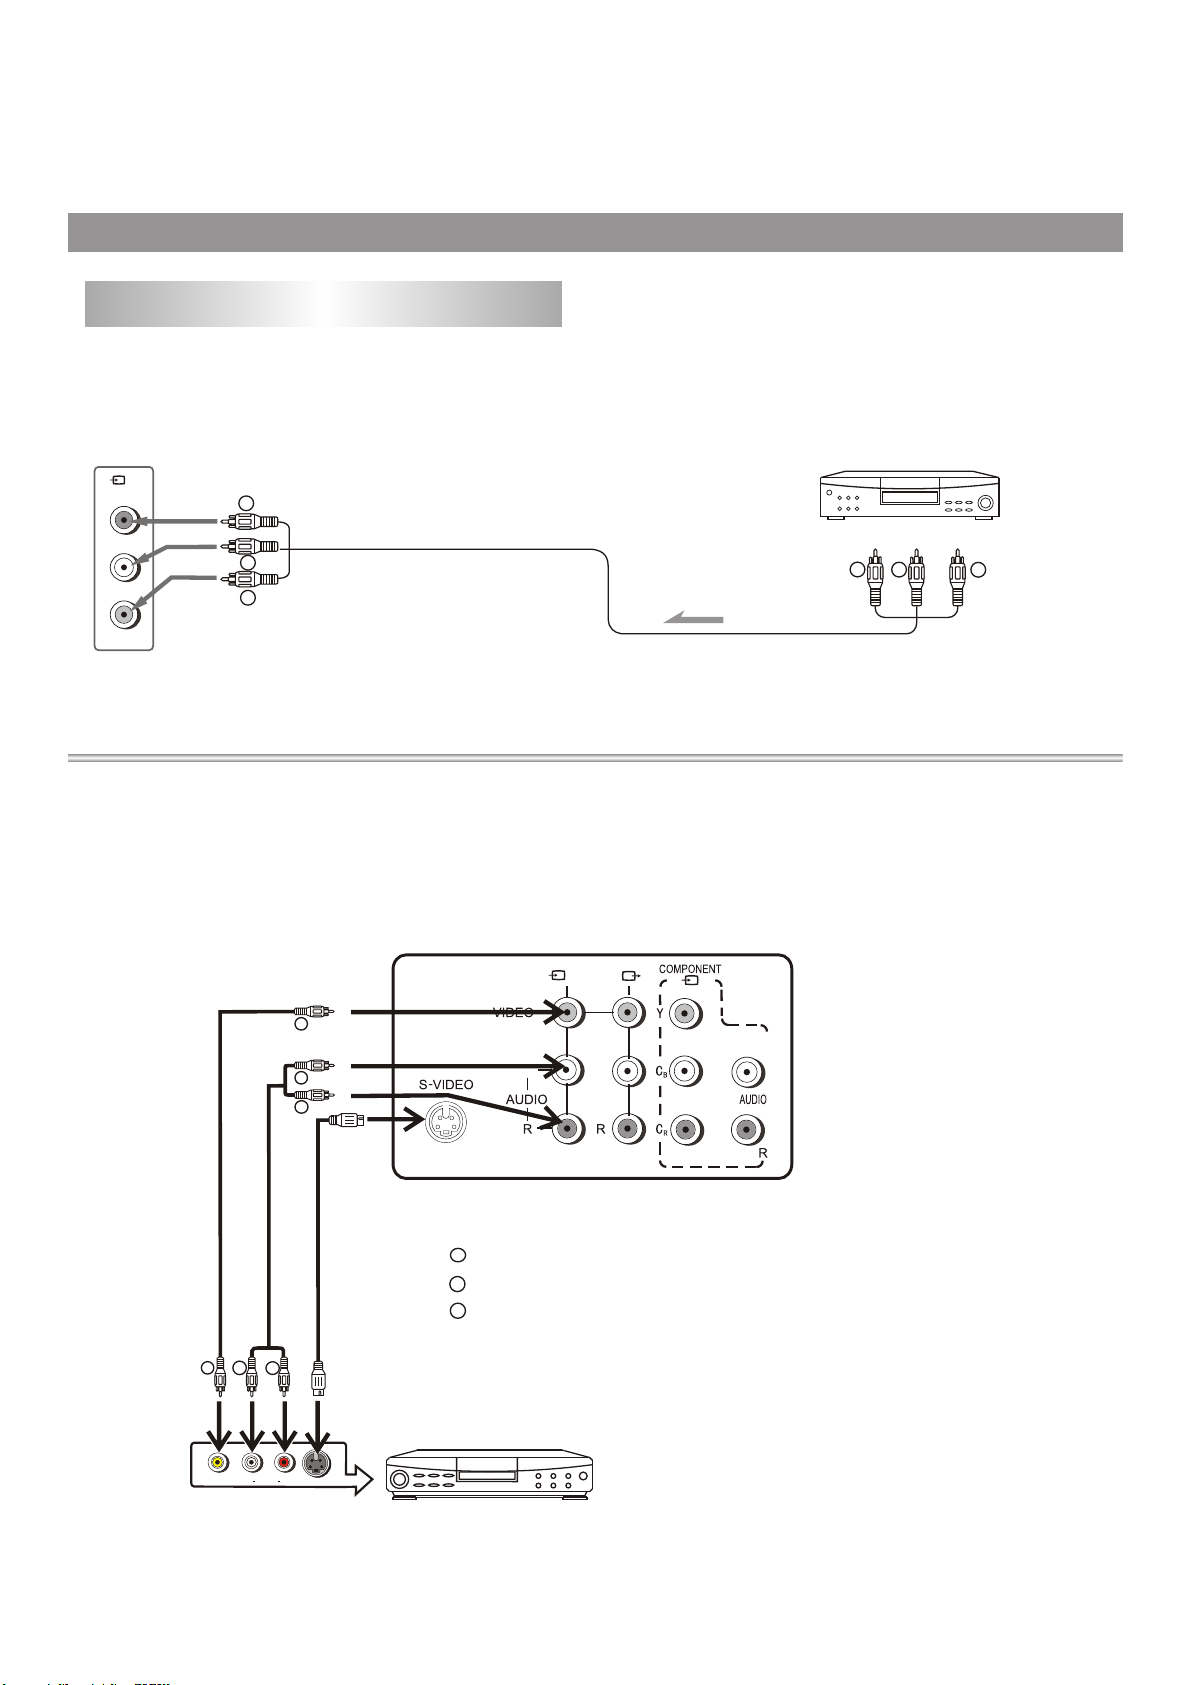
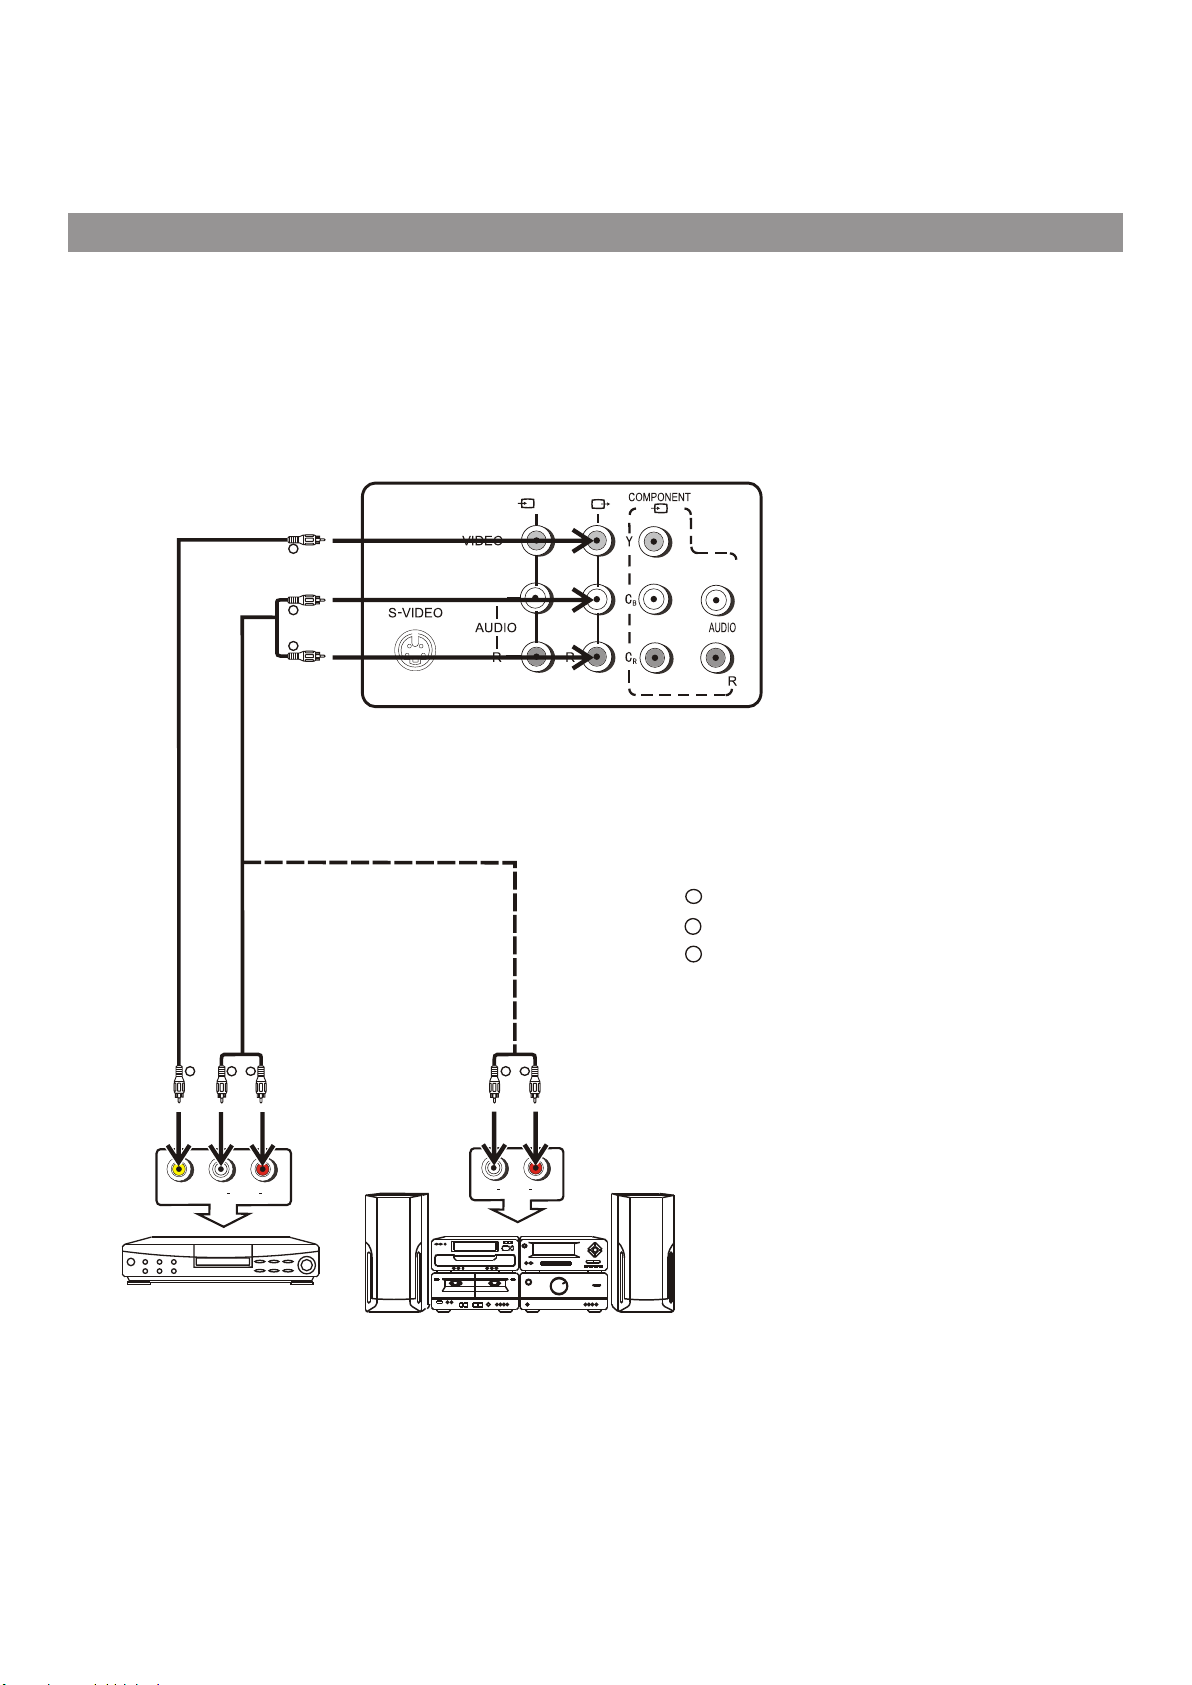
Connecting video and audio equipment
This TV set provides 2 groups of AV input terminals and one group of COMPONENT input terminals for your
convenient connection to VCR, DVD or other video equipment to enjoy the high quality picture.
Please refer to the owner's manual of the equipment to be connected as well.
Connect Side AV Input Terminals
( )
2
R
RR
L/MONO
VIDEO
WW
T
YY
Signal
o ud o ut
VIDEO EQUIPMENT
RR
A i
o
pu
ts
WW
YY
To Video output
To view the program from the AV2 input terminals, please press INPUT button on the remote control
repeatedly until AV2 appears on the screen.
Connecting Rear AV Input Terminals
Connect the Audio/Video cables between the Audio(L,R)/Video terminal on the unit and the video equipment.
For better video, you can use the S-Video terminal if your source supports it.
To view the program from the AV1 input terminals, please press INPUT button on the remote control repeatedly until
AV1 appears on the screen.
( )
1
To Video input
To
Audio inputs
Y
w
R
L/MONO L
L/M ONO
To Video
output
Y
VIDE O OUT
To S-Video
input
Y
: Yellow (video)
w
: White (audio L/MONO)
R
: Red(audio R)
To Audio outputs
w
R
To S-Video
output
Note:
S-VIDEO input uses the same circuit as
VIDEO1, and the S-VIDEO terminal
overrides the VIDEO1 terminal. When
both S-video and video1 signal are input,
the S-video signal is selected and the
OSD is "SVIDEO". To view video1 signal,
disconnect the S-VIDEO connection.
L
R
AUDIO OUT
S-VIDEO O UT
VIDEO EQUIPMENT
9
Page 12
Installation (continued)
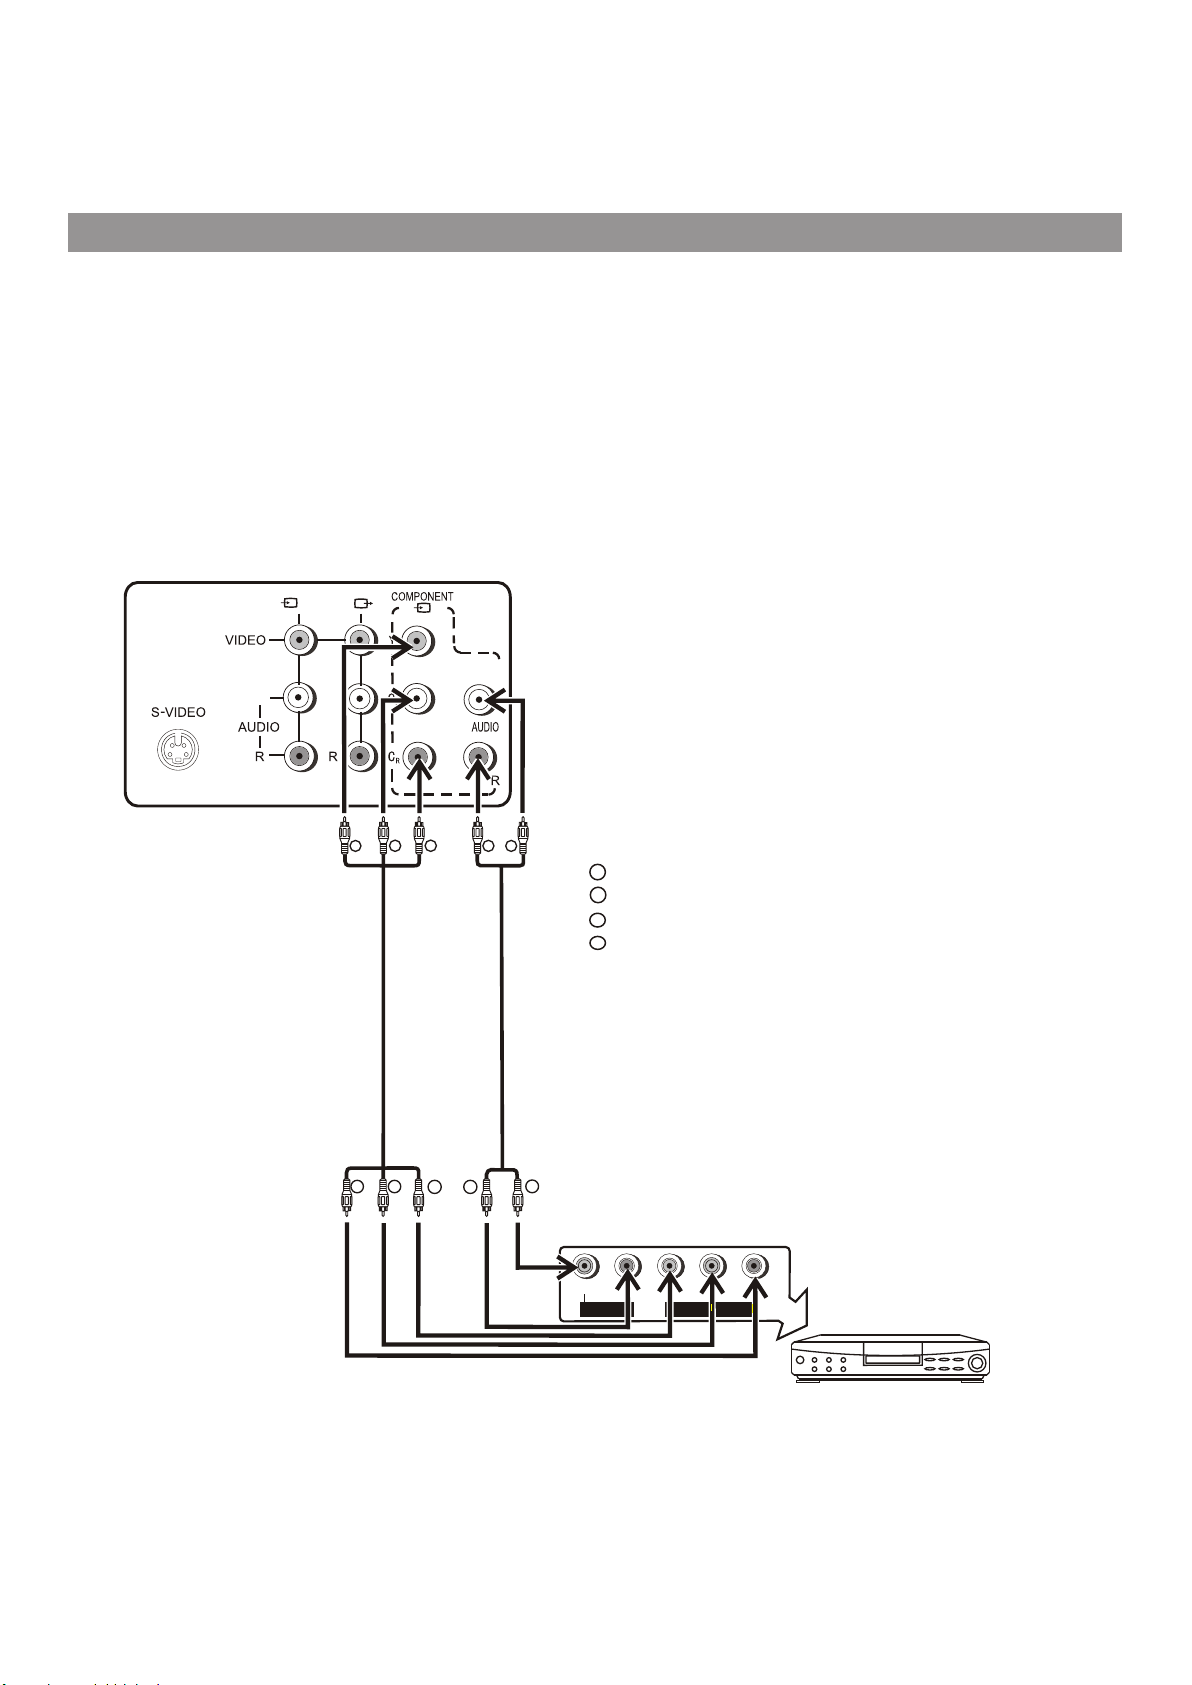
Connecting COMPONENT input
Connect the component video cable between Y,CB,CR input terminals on the unit and Y,CB,CR output terminals on
the DVD player.
Connect the Audio cable between the audio input terminals on the unit and audio output terminals on the DVD
player.
To view the program from the COMPONENT input terminals, please press INPUT button on the remote control
repeatedly until COMPONENT appears on the screen.
( )
1
L/M ONO
L/MONO L
Note:
This unit can only receive YCbCr
signal but not YPbPr signal through
COMPONENT input.
R
G
B
Video Cable
G
B
R
W
:White (audio L/MONO )
w
:Red (audio R,CR)
R
G
:Green (Y)
B
:Blue (CB)
Audio Cable
R
R
W
C
R
C
b
r
COM PONEN T OUTP UT
Y
L
AUD IO OUTP UT
DVD Player, etc
10
Page 13
Installation (continued)
Connecting the AV outputs
You can connect an audio system to the AV output terminals on the TV set rear to enjoy a high-quality sound from the
audio system, or you can connect the AV output terminals to the VCR to record the program you like.
( )
To Video output
Y
To Audio outputs
w
R
L/MONO L
1
L/M ONO
w w
R R
Y
To Video input
VID EO IN
L
AUDIO IN
To Audio inputs
R
VCR for Recording
To Audio inputs
R
L
AUDIO IN
Audio System
Y
: Yellow (video)
w
: White (audio L)
R
: Red(audio R)
11
Page 14
Basic Operation
Turning on
Power On/
Standby
Insert the AC plug into a conveniently located AC
1
outlet.
If no picture appears and the standby indicator lights up, then the TV
set is in STANDBY mode. Now please follow step 2.
Notes:
The AC plug supplied with the unit is polarized to help minimize the
possibility of electric shock. If the AC plug does not fit into a
nonpolarized AC outlet, do not file or cut the wide blade. It is the
user's responsibility to have an electrician replace the obsolete
outlet.
To prevent electric shock, do not use a
(polarized) plug with an extension cord
receptacle or other outlet unless the blades
can be fully inserted.
In STANDBY mode, press the Power button on the
2
TV set or on the remote controller and the TV set will
be turned on.
Turning off
Press the Power button on the remote controller or
1
on the TV set to turn off the TV set.
If you do not intend to use your TV for an extended
2
period of time, unplug the power cord from the power
outlet.
Notes:
4 The TV set can turn off automatically by Sleep timer function
(needs to be set in advance).
4 If there is no input signal for 15 minutes, the TV set can turn off
automatically.
4 After you turn off the TV, you should wait at least 5 seconds if
you want to turn the TV on again.
12
Page 15
Basic Operation (continued)
Navigating the menus
This unit has a simple, easy-to-use menu system that appears on the screen. This system makes it convenient and
fast to use features on the unit. You can also display the status of TV features while watching a program.
Main Menu Overview (TV Mode)
MAIN MENU
PICTURE
P.LOCK
CLOCK
PRESET
EXTRA
PICTURE
CONTRAST
BRIGHTNESS
COLOR
TINT
SHARPNESS
P.LOCK
PARENTAL LOCK
CHANGE PASSWORD
CLOCK
ON TIMER
CLOCK
DST
AUTO CLOCK
ZONE
PRESET
AUTO PROGRAM
CH SETUP
EXTRA
CLOSED CAPTION
MENU LANGUAGE
AUDIO LANGUAGE
PARENTAL LOCK
LOCK
RATINGS LOCKS
AUTO PROGRAM
ANTENNA
STRAT
CH SETUP
CH NO
SKIP
LABEL*
DIG SIGNAL*
CLOSED CAPTION
CC DISPLAY
CC SETTING
RATINGS LOCKS
MPAA RATING
TV RATING
CANADA ENGLISH
CANADA FRENCH
CC SETTING
CC TYPE
CC MODE*
CC CUSTOMER*
Note:
! Items marked with * do not appear in all modes.
! Some menu items are grayed out and are not selectable.
Menu navigation
With the power on, press the MENU button to display the main menu.
1
Press or button to select menu.6 5
2
Press button to enter the menu.3or4
3
Within the menu, use or to select, use to adjust or enter sub-menu.6 5 3or4
4
Press MENU button to return to the previous menu.
5
Press EXIT button to exit the main menu and return to your program.
Note:
lTo clearly introduce the menu operations , this operation manual provides a description based on operation with
the remote control.
lThe illustrations and on-screen displays in this manual are for explanation purposes(some are enlarged, others
cropped) and may vary slightly from the actual ones.
13
Page 16
Basic Operation (continued)
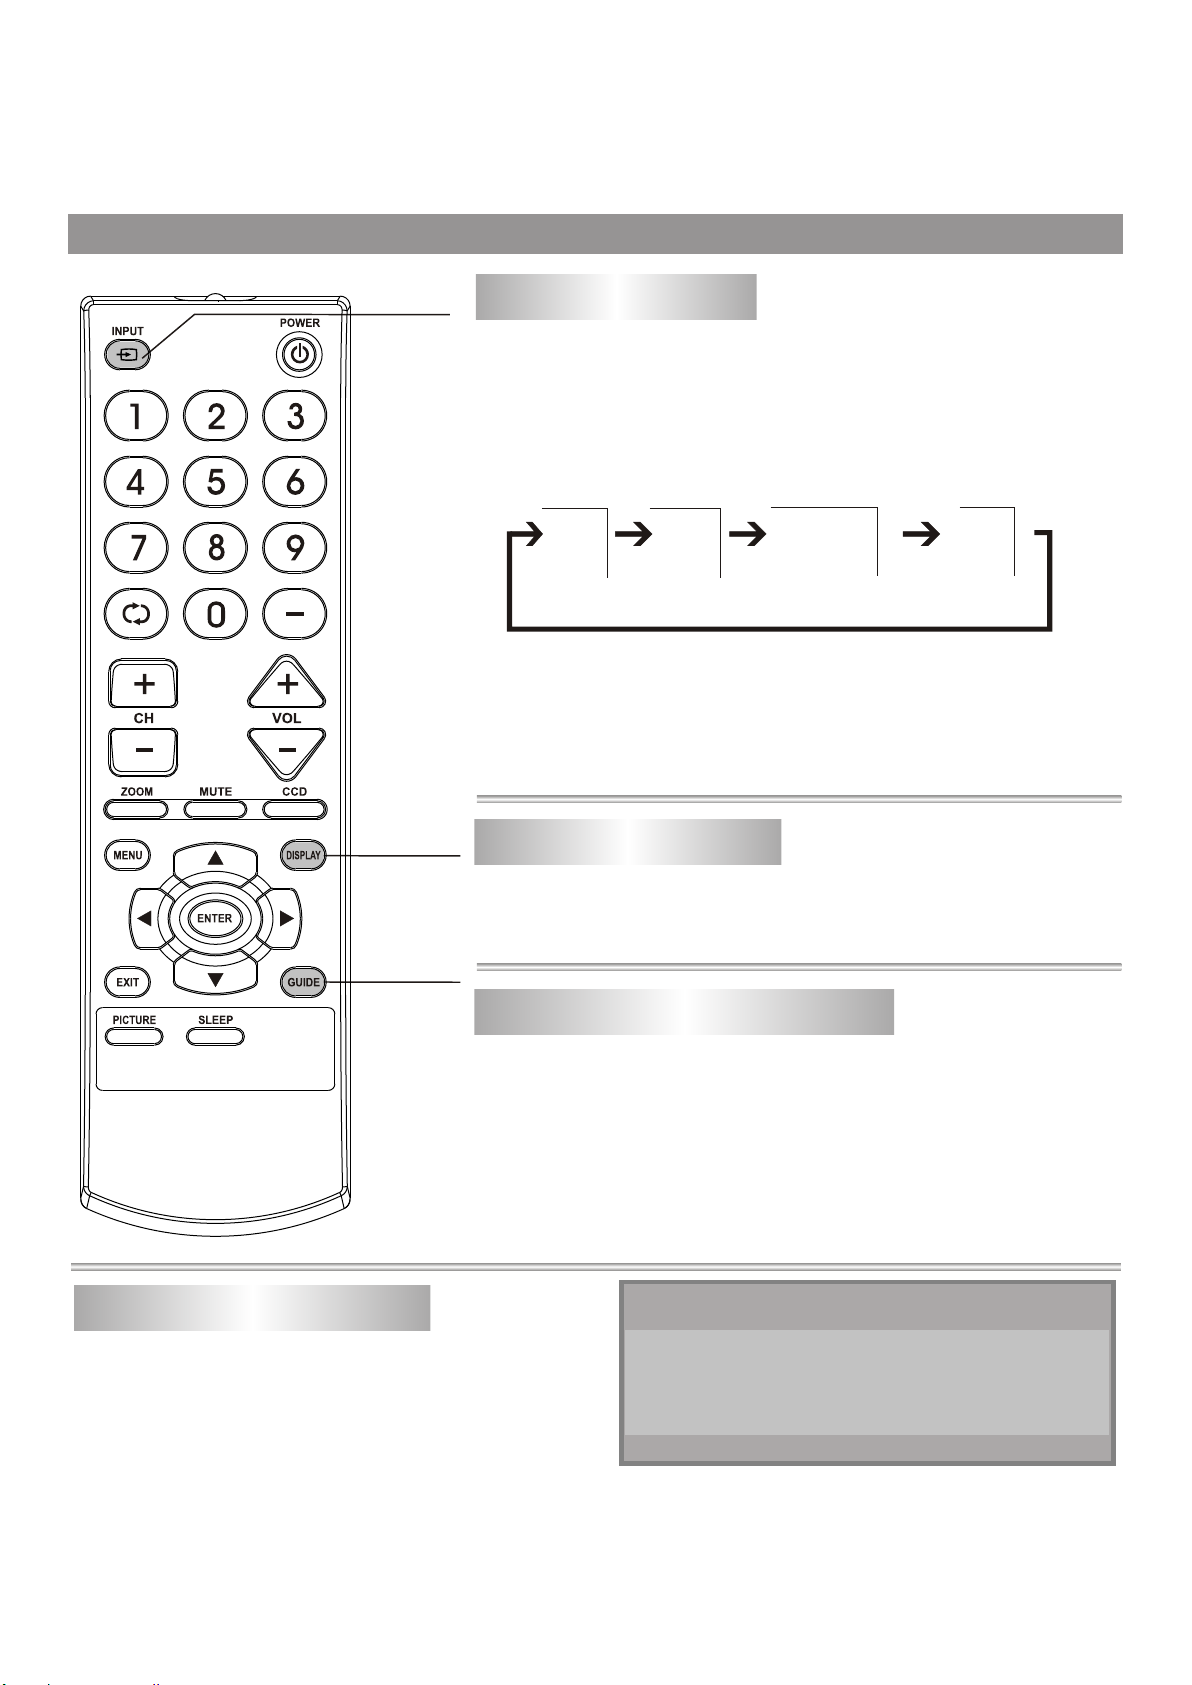
Select Input
Source
DISPLAY
button
Watching AV program
This TV set provides 2 groups of AV input terminals and one group of
COMPONENT input terminals for your convenient connection to
VCR, DVD or other video equipments.
To watch a video program from AV inputs, press INPUT button
repeatedly until you see the appropriate input indicator on the
screen.
AV1
Note: S-VIDEO input uses the same circuit as VIDEO1, and the S-
VIDEO terminal overrides the VIDEO1 terminal. When both S-video
and video1 signal are input, the S-video signal is selected and the OSD
is "SVIDEO". To view video1signal, disconnect the S-VIDEO
connection.
AV2
COMPONENT
8-0
MONO
Switching from AV to TV
Press INPUT button on the remote controller.
Press this button repeatedly until the picture of TV program appears.
GUIDE
button
Displaying the information banner
The information banner displays status information such as
channel number and signal source. Depending on the mode,
different information is displayed. In DTV mode, more information
(such as channel number and channel name, signal resolution,
etc.) can be displayed.
Press DISPLAY button and the information banner appears.
Using the program guide
You can press GUIDE button on the remote control
to display guide information if available. You can
obtain program broadcasting time and program
name from the guide.
GUIDE
07:00PM-08:00PM WGBH-S
WGBH DTV Broadcast Signal
08:10PM-10:00PM WGBH-S
WGBH DTV Broadcast Signal
1/1
Note:
The GUIDE works only with digital channels.
Press3or4 to scroll page if
there are two or more pages.
14
(Example)
Page 17
MAIN MENU
PICTURE
P.LOCK
CLOCK
PRESET
EXTRA
Tuning in
To enter the PRESET menu
Press MENU button.
Press5or 6 button to select
PRESET item.
Press 3or 4 button to enter
PRESET menu.
Auto program
When you turn on the TV for the first time, you should perform an
auto program to set up stations on your TV. Below is the steps.
Enter the PRESET menu, highlight AUTO PROGRAM
1
item.
PRESET
AUTO PROGRAM
CH SETUP
MENU
Menu navigation
button
Exit the menu
Press 3 or 4 button to enter AUTO PROGRAM sub
2
menu.
Highlight ANTENNA item, press 3 or 4 button to select
3
AIR or CABLE.
In AIR mode, the set receives antenna
signals. In CABLE mode the set receives
Cable TV programs. Please select:
AIR: If using VHF/UHF antenna.
CABLE: If using Cable TV.
Press6 button to select START item.
4
Press 3 or 4 button to start Auto Program.
The unit begins to search and memorize all available programs.
Please wait patiently since it will take some time to finish
searching.
Note:
The TV set will first memorize analog programs. After all
available analog programs have been memorized, it begins to
memorize DTV programs. During analog program memorizing,
you can press MENU button to stop it, then the TV turns to
memorize DTV programs. If you want to stop DTV program
memorizing, just press MENU button again.
AUTO PROGRAM
ANTENNA
START
AIR
15
Page 18
Tuning in (continued)
PRESET
AUTO PROGRAM
CH SETUP
Skipping an unnecessary channel
After saving channels into memory, you can skip unnecessary
channels so that only the channels you want to watch are selected
with the CH+/- buttons.
Enter the PRESET menu, press 5or 6 button to select CH
1
SETUP item.
Press 3 or 4 button to enter CH SETUP menu.
2
Press 5or 6button to select CH NO. item.
3
Press 3or4 button to select a channel number (for
4
example, channel 2-2).
Press 6 button to select SKIP item.
5
Press 3or 4button to set to ON.
6
Now channel 2-2 will be skipped when
you browse channels by CH+/- button.
To restore a skipped channel, please
use digit buttons to select the skipped
channel, then repeat the above steps
and set the SKIP item to OFF.
CH SETUP
CH NO
SKIP
LABEL
DIG SIGNAL
2-2
ON
WGBH-DX
25DB
MENU
Menu navigation
button
Exit the menu
Checking the DTV signal strength
You can check the strength of your DTV signal and determine
whether you need to adjust your antenna or digital cable input. The
stronger the signal strength, the less likely you are to experience
picture degradation.
CH SETUP
Enter the PRESET menu, press 5or
6 button to select CH SETUP item,
press 3 or 4 button to enter CH
SETUP menu. Now the menu bottom
line shows the signal strength for the
current DTV channel.
CH NO
SKIP
LABEL
DIG SIGNAL
2-2
ON
WGBH-DX
25DB
Viewing channel label (Only for DTV programs)
You can make use of the information banner to know the channel
label for the current DTV program. You can also open the CH
SETUP menu and view the channel label . Note that the channel
labels are automatically assigned and can not be changed by users.
16
Page 19
Channel Selection
Information about USA channel numbering
= ATSC PSIP channel has two part channel number:
— Major channel number
— Minor channel number
Direct
select
DASH button
Previous channel
Channel
up/down
ENTER button
For example:
=In US, in most situations the major channel number is same for both
analog and digital channels (It is equal to the NTSC channel number for
existing broadcasters.)
=In US, a minor channel number of zero is used for a broadcaster’s analog
channel.
Channel: 5-1
Major channel number
Minor channel number
Channel Numbering Example
= Original NTSC Channels for Des Moines:
— 5, 8, 11, 13, 17
= Possible NTSC + ATSC Channels for Des Moines:
— 5-0, 8-0, 11-0, 13-0, 17-0 (channel numbers for existing analog
channels)
— 5-1, 5-2, 8-1, 8-2, 8-3,8-4, 13-1 (channel numbers for digital
channels)
Channel selection
Using the number pad
1
Press the number buttons (0-9) and the dash (-) button, then wait for
some seconds (or press ENTER button) to go directly to that channel.
For example, if you want to select channel 8-3, press 8-3 on the remote
control. (Make sure that you press the buttons within three seconds of
each other, or the channel won’s be entered correctly.)
Note: In some situations, virtual channel numbers do not correspond
to physical frequencies.
Use CH+ or CH- button
2
Press CH+ button, the channel number increases;
Press CH- button, the channel number decreases.
Use previous channel button
3
Press this button to switch between the current channel and the
previous channel.
17
Page 20

Sound Control
Use VOL+ or VOL- button.
1
26VOLUME
Press VOL+ button, the volume increases;
Press VOL- button, the volume decreases.
Use MUTE button.
2
If you want to mute the sound, press
MUTE button on the remote.
To resume the sound, press this
button again.
26VOLUME
Notes:
4 You can also resume the sound by pressing VOL+ button.
4 If you mute the sound the color of VOLUME displayed on the screen
is red, after resuming the sound the color of VOLUME displayed on
the screen is green.
Volume up/down
Sound mute
18
Page 21
PICTURE
CONTRAST
BRIGHTNESS
COLOR
TINT
SHARPNESS
CONTRAST
20
50
40
40
0
40
Adjusting Picture
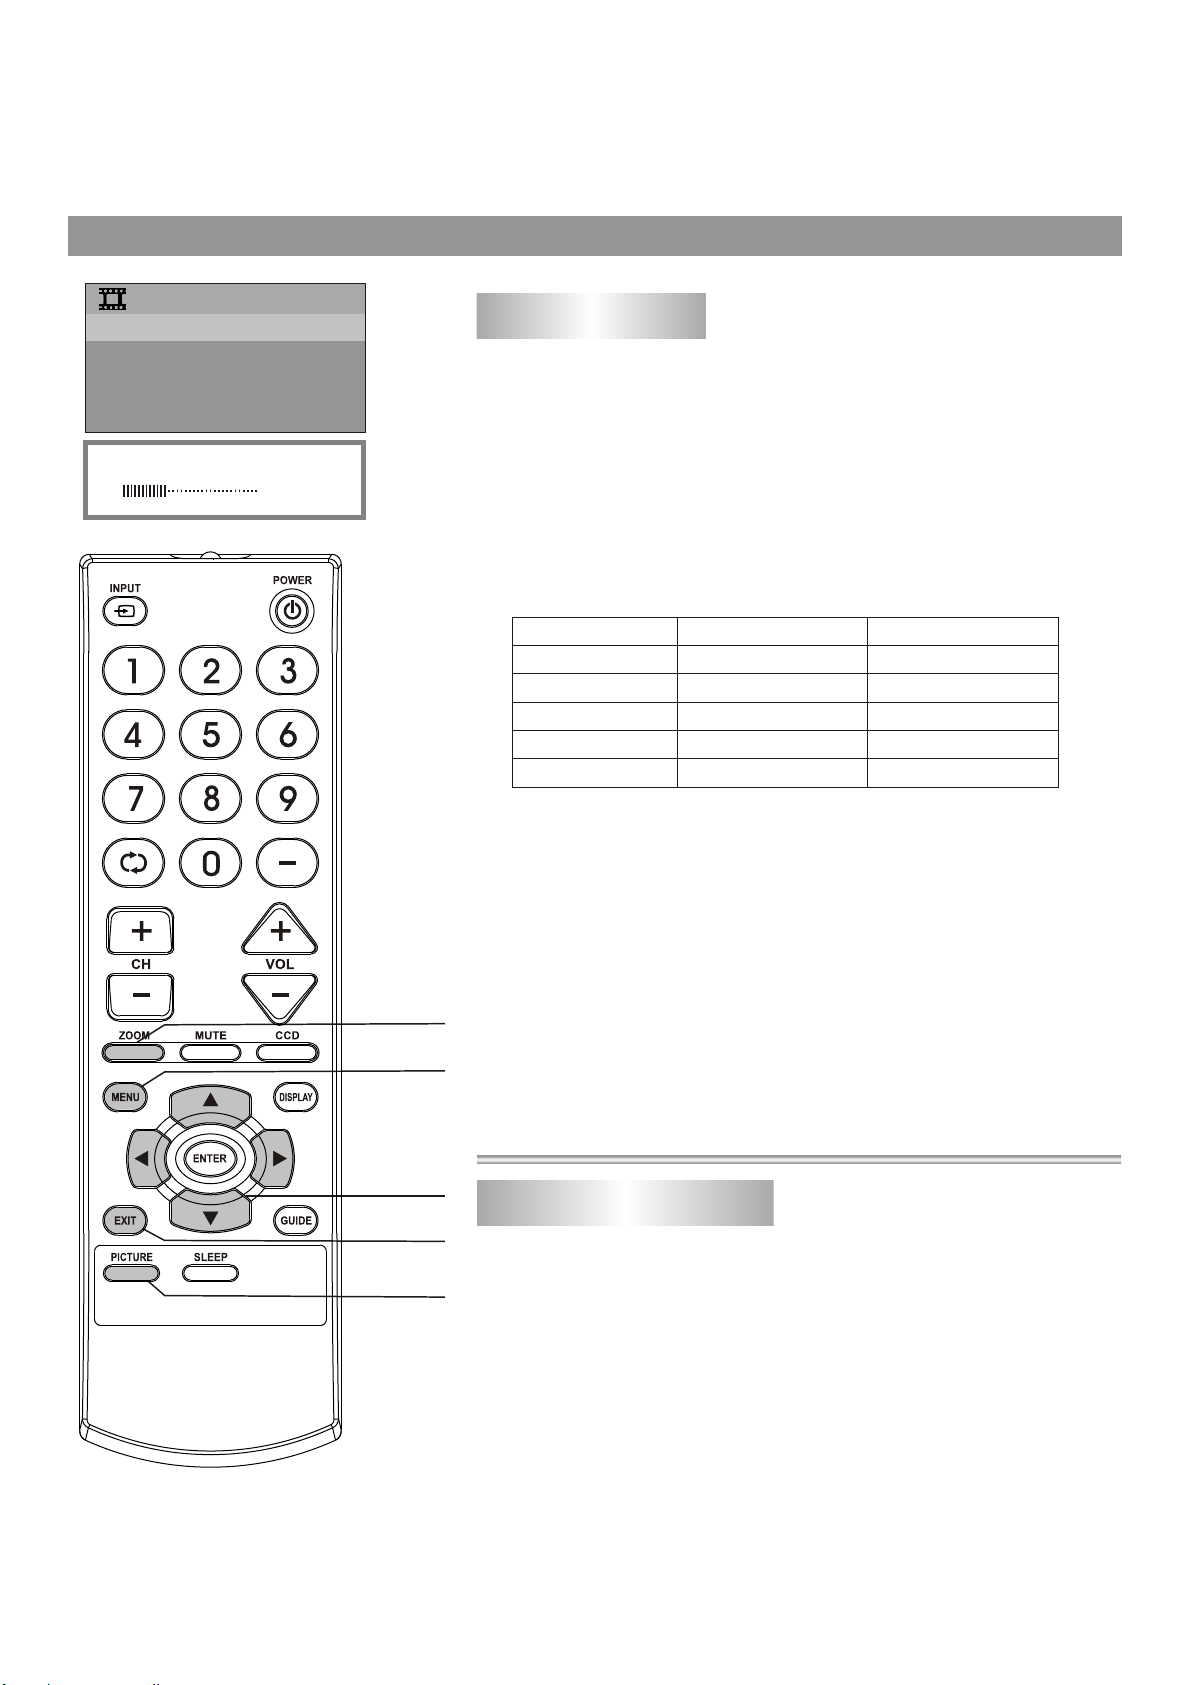
Adjusting picture
Press MENU button.
1
Now the PICTURE item is highlighted automatically.
Press3or4button to enter PICTURE menu.
2
Press 5or 6 button to select item.
3
Press 3or 4 button to adjust.
4
ZOOM
MENU
Menu navigation
button
Exit the menu
PICTURE
Item
Contrast
Brightness
Color
Tint
Sharpness
Press 3
weaker
darker
paler deeper
purplish
softer
Press 4
stronger
lighter
greenish
sharper
Press PICTURE button to select picture mode.
There are three preset picture modes (STANDARD, DYNAMIC and
SOFT) and one user-set picture mode (PERSONAL) .
You can quickly select Picture mode by pressing the PICTURE
button on the remote control.
STANDARD: Select for a normal picture.
DYNAMIC: Select for a bright and dynamic picture.
SOFT: Select for a finely detailed picture.
PERSONAL: The picture quality you set.
Changing picture size (only in DTV mode)
You can change picture size (aspect ratio) according to your
video signal type or personal preference.
When the video signal type is in16:9 format, press the ZOOM
button to select the desired picture size (aspect ratio). You can
select between NORMAL and ZOOM.
19
Page 22
Timer Setting
Auto search/Manual search/Channel skip/Fine tuning
CLOCK
ON TIMER
CLOCK
DST
AUTO CLOCK
ZONE
--:--AM
--:--AM
ON
OFF
PACIFIC
0-9
number button
VOL+
To enter the CLOCK menu
Press MENU button.
Press 5 or 6 button to select CLOCK item.
Press 3 or 4 button to enter CLOCK menu.
Auto Clock Setup
- With the Auto Clock function ON, the time is set automatically from a
digital channel signal.
- If the TV loses power, the clock setting you have made will be cleared.
CLOCK
Enter the CLOCK menu, press 5
1
or 6 button to select AUTO
C L O C K i t e m a n d t h e n
use3or4to turn the AUTO
CLOCK function ON.
Press 5 or 6 button to select ZONE item, use 3or4to
2
select your viewing area time zone.
ON TIMER
CLOCK
DST
AUTO CLOCK
ZONE
--:--AM
6:00AM
ON
ON
PACIFIC
MENU
Menu navigation
button
Exit the menu
If your viewing area uses DST(Daylight Saving Time), set
3
DST to ON in the menu, otherwise set it to OFF.
Manual Clock Setup
- If current time setting is wrong by the auto clock function, reset the clock
manually.
- If the TV loses power, the clock setting you have made will be cleared.
Enter the CLOCK menu, set
1
AUTO CLOCK item to OFF.
Press5 or 6button to select
2
CLOCK item.
Press VOL+ button to select
3
AM or PM.
Using 0-9 buttons to input the
4
current time.
CLOCK
ON TIMER
CLOCK
DST
AUTO CLOCK
ZONE
--:--AM
9:10AM
OFF
OFF
PACIFIC
20
Page 23

CLOCK
ON TIMER
CLOCK
DST
AUTO CLOCK
ZONE
Timer Setting (continued)
Auto search/Manual search/Channel skip/Fine tuning
7:00PM
11:00AM
OFF
OFF
PACIFIC
0-9
number button
On Timer Setup
- On timer function operates only if current time has been set.
- The TV must be in standby mode for the on timer to work.
- If the TV loses power, the timer setting will be cleared.
In CLOCK menu, highlight ON TIMER item.
1
Press VOL+ button to select AM or PM.
2
Use 0-9 buttons to input the TV ON time, for example,
3
7:00PM.
Press button to switch the TV to standby mode. At the
4
preset time, the TV will turn on automatically.
Setting Sleep timer
VOL+
MENU
Menu navigation
button
Exit the menu
Sleep timer
You can quickly set the sleep timer by using the SLEEP button on the
remote controller. With every press of this button the sleep time changes
as follows:
0 Minute
For example, you would like the TV to auto
turn off in 60 minutes, you can press the
SLEEP button repeatedly till the screen
displays as the right figure.
To cancel sleep timer, press the SLEEP
button repeatedly till "0 MINUTE"
appears.
5 Minutes
240 Minutes180 Minutes10 Minutes
60 MINUTE
21
Page 24

System Setting
EXTRA
CLOSED CAPTION
MENU LANGUAGE
AUDIO LANGUAGE
ENGLISH
ENGLISH
To enter the EXTRA menu
Press MENU button.
Press 5 or 6 button to select EXTRA item.
Press 3 or 4 button to enter EXTRA menu.
Selecting the OSD menu language
Enter the EXTRA menu, press
1
5 or 6 button to select MENU
LANGUAGE item.
Press 3 or 4 button to select
2
a proper OSD MENU language.
CLOSED CAPTION
MENU LANGUAGE
AUDIO LANGUAGE
EXTRA
ENGLISH
ENGLISH
MENU
Menu navigation
button
Exit the menu
Selecting AUDIO language (only in DTV mode)
DTV can simultaneously transmit many audio tracks (for example,
simultaneously translations of the program into foreign languages
). The availability of these optional audio tracks depends upon the
program.
EXTRA
In EXTRA menu, press 5 or 6
1
bu tt on t o s el ec t AU DI O
LANGUAGE item.
Press 3 or 4 button to select a
2
proper AUDIO language.
CLOSED CAPTION
MENU LANGUAGE
AUDIO LANGUAGE
ENGLISH
ENGLISH
22
Page 25
System Setting-Closed Captions
EXTRA
CLOSED CAPTION
MENU LANGUAGE
AUDIO LANGUAGE
ENGLISH
ENGLISH
CCD button
MENU
Setting up Closed Captioning
CLOSED CAPTION
Enter the EXTRA menu, highlight
1
CLOSED CAPTION menu item,
press the 3or 4 button to enter the
menu.
Highlight CC DISPLAY item, press 3or 4 button to select
2
Caption ON, CC MUTE or OFF.
CC MUTE shows the captions (if available on program) when
the TV sound is muted.
You can also press CCD button to select CCD ON, CCD OFF or
CCD MUTE.
CC DISPLAY
CC SETTING
Selecting the caption type
Captions and text, if provided by the broadcaster, are available for
both digital and analog channels.
Select a caption type for displaying captioning information. Analog
captions display information on the screen (usually the program
dialog). Text from digital modes displays information, usually at the
bottom of the screen, and is used for a data service (generally not
program related).
N a v ig a te t o th e C LO SE D
1
CAPTION menu, highlight CC
SETTING item, press 3or 4
button to enter the menu.
CC SETTING
CC TYPE
CC MODE
CC CUSTOMER
SERVICE1
CUSTOMER
ON
Menu navigation
button
Exit the menu
Highlight CC TYPE item, press
2
3or4button to select the caption
type.
23
(The above OSD is
illustrated as in DTV
mode)
Page 26

System Setting-Closed Captions
EXTRA
CLOSED CAPTION
MENU LANGUAGE
AUDIO LANGUAGE
ENGLISH
ENGLISH
MENU
Menu navigation
button
Exit the menu
Customizing digital Closed Captions
You can customize the digital closed captions that appear on your
screen.
N a v ig a te t o th e C LO SE D
1
CAPTION menu, highlight CC
SETTING item, press 3or 4
button to enter the menu.
Press 5 or 6 button to highlight CC MODE item, press
2
3or 4 button to select CUSTOMER. (If you do not want to
customize the digital closed captions, please select
BROADCAST, and the captions will be shown as broadcast.)
After CUSTOMER is selected,
3
press 6 button to highlight CC
CUSTOMER item, press 3or 4
button to enter the menu.
Within the menu, press 5 or 6
4
button to select the item you want
to change, then press 3or 4to
customize the setting to your
preference.
You may select OTHERS item,
then press 3or 4to enter the
next-level menu and customize
more settings.
You can change the following settings:
CC STYLE: Sets a style for the words.
CC SIZE: Sets the size of the words.
CC COLOR: Sets a color for the text.
CLOSED CAPTION
CC DISPLAY
CC SETTING
CC SETTING
CC TYPE
CC MODE
CC CUSTOMER
CC CUSTOMER
CC STYLE
CC SIZE
CC COLOR
BK COLOR
OTHERS
OTHERS
CC OPACITY
BK OPACITY
EDGE COLOR
EDGE TYPE
ON
SERVICE1
CUSTOMER
STYLE1
STANDARD
WHITE
BLACK
SOLID
SOLID
BLACK
NONE
BK COLOR: Sets a background color.
CC OPACITY: Sets the opacity of the text color.
BK OPACITY: Sets the opacity of the background color.
EDGE COLOR: Sets a color for the edges.
EDGE TYPE: Sets an edge type.
Press EXIT to return to TV viewing, or press MENU to
5
return to the previous menu.
24
Page 27

Parental Control
PARENTAL CONTROL enables parents to prevent their children from watching inappropriate material on TV.
PARENTAL CONTROL reads the ratings for programming (except for news, sports, unedited movies on premium
cable and Emergency System signals ), then denies access to programming if the program's rating meets the
limitations you select. In this case, the program will be blocked.
P.LOCK
ENTER CODE
0-9
number button
To enter the P.LOCK menu
Press MENU button.
Press 5or 6 button to select P.LOCK item, press 3or 4
button to enter.
Input the password to enter the P.LOCK menu.
The preset password to enter P.LOCK is "0000"and it can be
changed.
Setting up the P.LOCK password
To use Parental Controls, you must first set your password.
Use the password to enter the P.LOCK
1
menu (the preset password is 0000).
Press 5or 6 button to select
2
CHANGE PASSWORD item, press
3or 4 button to enter the menu.
Highlight NEW PASSWORD item, use
3
the number buttons to enter a new
password.
P.LOCK
PARENTAL LOCK
CHANGE PASSWORD
CHANGE PASSWORD
NEW PASSWORD
CONFIRM PASSWORD
MENU
Menu navigation
button
Exit the menu
Enter the password again to confirm. Now your new password
4
has been created.
Caution: write down your password and save it for future use.
What do I do if I forget my password?
When you forget the password and can not enter the P.LOCK menu,
the following steps can help you.
1. Press MENU button.
2. Press 5or 6 to select P.LOCK item.
3. Press 3or4.
4. Enter the super password "1, 3, 9, 7" in order.
After finish inputting the password, the “SET CODE” character
appears.
5. Enter a new password (four-digit).
Now the “SET CODE” character changes to “P.LOCK”,the old
password has been cleared and this new password has been
created.
Note: the super password “1397” always remain valid for resetting your
password.
25
Page 28
Parental Control(continued)
P.LOCK
ENTER CODE
P.LOCK
PARENTAL LOCK
CHANGE PASSWORD
0-9
number button
Enabling Parental Controls
To enable the blocking scheme you set up, you should set
PARENTAL LOCK to ON. Below is the steps.
Use the password to enter the P.LOCK menu.
1
PARENTAL LOCK
Highlight PARENTAL LOCK item,
2
press 3or 4 button to enter the
LOCK
RATINGS LOCKS
ON
menu.
Highlight LOCK item, press 3or 4 button to set ON to
3
enable the blocking scheme.
If you want to disable the blocking scheme, set the item to OFF.
Setting up MPAA ratings
Use the password to enter the P.LOCK menu.
1
Highlight PARENTAL LOCK item, press 3or 4 button to
enter PARENTAL LOCK menu.
MENU
Menu navigation
button
Exit the menu
Highlight RATINGS LOCKS item,
2
press 3or 4 button to enter the
menu.
Highlight MPAA RATING item, press
3
3or 4 button to enter its sub menu.
Press 5 or 6to select the desired
4
rating, press 3or 4 button to either
RATINGS LOCKS
MPAA RATING
TV RATING
CANADA ENGLISH
CANADA FRENCH
MPAA
G
PG
PG-13
R
NC-17
X
block the rating or unblock (VIEW
will be displayed) .
Movie Ratings:
* G and Above (general audience)
* PG and Above (parental guidance suggested)
* PG-13 and Above (13 years and up)
* R and Above (restricted)
* NC-17 and Above (18 years and up)
* X (adult)
If you set PG-13: G and PG movies will be available, PG-13, R,
NC-17 and X will be blocked.
VIEW
VIEW
VIEW
BLOCK
BLOCK
BLOCK
Press EXIT to return to TV viewing, or press MENU to
5
return to the previous menu.
26
Page 29

Parental Control (continued)
PARENTAL LOCK
LOCK
RATINGS LOCKS
ON
0-9
number button
Setting up TV ratings
TV ratings include two components: a general criteria (age-based)
and a detailed criteria (content-based).
Use the password to enter the P.LOCK menu, and then
1
navigate to RATINGS LOCKS sub menu.
RATINGS LOCKS
Press 5 or 6to select TV RATING
2
item, press 3or 4 button to enter
the menu.
Press 5 or 6to select the desired
3
rating, press 3or 4 button to either
block the rating or unblock (VIEW
will be displayed).
If the rating includes content-based ratings, highlight this
4
rating and then press 3or 4to enter its next-level menu.
Use 5 or 6to select item, use3or 4 button to either block
or unblock (VIEW will be displayed).
MPAA RATING
TV RATING
CANADA ENGLISH
CANADA FRENCH
TV
Y
Y7
G
PG
14
MA
BLOCK
BLOCK
MENU
Menu navigation
button
Exit the menu
TV Ratings:
* TV-Y (all children)
* TV-Y7 (7 years and up)
* TV-G (general audience)
* TV-PG (parental guidance suggested)
* TV-14 (14 years and up)
* TV-MA (mature audience)
Content-based ratings:
* F V: fantasy violence (applies only to TV-Y7)
* V: Violence (applies to TV-PG, TV- 14, TV-MA)
* S: Sex scenes (applies to TV-PG, TV-14 , TV-MA)
* L: adult language (applies to TV-PG, TV-14, TV-MA)
* D: sexual dialogue (applies to TV-PG, TV-14)
Press EXIT to return to TV viewing, or press MENU to
5
return to the previous menu.
27
Page 30

RATINGS LOCKS
MPAA RATING
TV RATING
CANADA ENGLISH
CANADA FRENCH
Parental Control (continued)
Setting up Canadian English ratings
Use the password to enter the P.LOCK menu, and then
1
navigate to RATINGS LOCKS menu.
Press 5 or 6to select CANADA ENGLISH item, press 3or
2
4 button to enter the menu.
Press 5 or 6to select the desired
3
rating, press 3or 4 button to either
block the rating or unblock (VIEW
0-9
number button
will be displayed).
Canadian English Ratings:
C: Children.
*
C8+: Children 8 years and older.
*
G: General programming, suitable for all audiences.
*
PG: Parental guidance.
*
14+: Viewers 14 years and older.
*
18+: Adult programming.
*
CAE
C
C8+
G
PG
14+
18+
BLOCK
BLOCK
BLOCK
BLOCK
BLOCK
BLOCK
MENU
Menu navigation
button
Exit the menu
Setting up Canadian French ratings
Use the password to enter the P.LOCK menu, and then
1
navigate to RATINGS LOCKS menu.
Press 5 or 6to select CANADA FRENCH item, press 3or
2
4 button to enter the menu.
Press 5 or 6to select the desired
3
rating, press 3or 4 button to either
block the rating or unblock (VIEW
will be displayed).
Canadian French Ratings:
: Children.
* G
8 ans+: Children 8 years and older.
*
* 13 ans+
* 16 ans+
18 ans+: Adult programming.
*
Press EXIT to return to TV viewing, or press MENU to return
4
to the previous menu.
: Children 13 years and older.
:Viewers 16 years and older.
CAF
G
8ans+
13ans+
16ans+
18ans+
BLOCK
BLOCK
BLOCK
BLOCK
BLOCK
28
Page 31
Parental Control (continued)
PARENTAL LOCK
LOCK
RATINGS LOCKS
D.L. RATINGS
ON
0-9
number button
Setting up RRT5 criteria ratings
If the broadcasting program uses RRT5 (Rating Region TableRegion 5) criteria rating in accordance with the FCC Rules, its rating
can be downloaded to this TV and can be used for parental controls.
Use the password to enter the P.LOCK menu, and then
1
navigate to PARENTAL LOCK menu.
Highlight the rating choice at the last line of the menu
2
screen, then press 3or 4 to enter the menu.
D.L. RATINGS
Press 5 or 6to select the desired
3
item, press 3or 4 button to enter
the menu.
Within the menu, press 5 or 6to
4
select the desired rating, press 3or
4 button to block the rating or
unblock. Press ENTER button to
scroll page if there are more than
one menu page.
HUMOR LEVEL
INTELLIGENCE
HUMOR LEVEL
[-]
DH
[-]
MH
[-]
H
[-]
VH
[-]
EH
(The above OSD is
shown as an example.)
1/1
MENU
ENTER
Menu navigation
button
Exit the menu
Press EXIT to return to TV viewing, or press MENU to return
5
to the previous menu.
29
Page 32

Troubleshooting
Please check the following if you are having trouble with your TV.
SYMPTOM
No power
PowerTV broadcast receptionRemote Control
Poor or no picture.
Picture wobbles
or drifts.
No Cable reception.
No reception above
CH13.
Poor or no sound.
POSSIBLE CAUSE POSSIBLE SOLUTION
The AC power cord is not connected.
TV station experiencing problems. Try another channel.
Picture control is not adjusted.
Possible local interference.
Antenna/Cable connector is not connected. Check Cable connection or VHF/UHF ant.
TV station experiencing problems. Try another channel.
Cable TV channel is scrambled.
Possible local interference.
Cable connected or not connected. Check all Cable connections.
AIR/Cable set to AIR. Set AIR/Cable to Cable
Cable TV service interrupted.
AIR/Cable set to AIR. Set AIR/Cable to Cable.
TV station experiencing problems. Try another channel.
MUTE button is pressed.
Possible local interference.
Connect the AC power cord
to the AC outlet
Check picture control adjustments.
Check for source of reception disturbance.
A Cable box needs to be used (if desired).
Check for source of reception disturbance.
Contact your Cable TV company.
Press MUTE button again.
Check for source of reception disturbance.
TV Shuts off.
Closed Captioning
not working.
Remote control
does not operate.
Parental Control not
Working properly.
Parental
Control
Antenna/Cable connector is not connected. Check Cable connection or VHF/UHF ant.
Volume is set to minimum. Increase volume.
Sleep Timer is set.
TV Signal is weak.
TV station experiencing problems or
program tuned is not closed captioned.
Closed Captioning not turned on.
The remote control is not aimed at the
sensor.
Distance is too far or too much light in the
room.
There is an obstacle in the path of the beam. Clear the path of the beam.
The batteries are weak.
The batteries are not inserted correctly. Insert correctly.
Parental Control is set to "Off". Set Parental Control to "On".
News or sports event being broadcast.
Ratings not set.
Set Sleep Timer to "Off".
Check Cable or VHF/UHF antenna.
Try another channel.
Press the CCD button.
Aim the remote control at the Remote
sensor.
Operate within 23 feet or reduce the
light in the room.
Replace the batteries.
Parental Control does not work with
News or sporting events.
Set ratings as desired.
30
Page 33

Troubleshooting (continued)
RECEPTION DISTURBANCES
Most types of television interference can be remedied by adjusting the height and position of the VHF/UHF antenna.
Outdoor antennas are recommended for best results if not using cable or a satellite. The most common types of
television interference are shown below. If one of these symptoms appear when the TV is connected to a Cable TV
system, the disturbance may be caused by the local cable company broadcast.
IGNITION:
Black spots or horizontal streaks may appear, picture may flutter or drift.
Usually caused by interference from automobile ignition systems, neon
lamps, electric drills and other electric appliances.
GHOSTS:
Ghosts are caused by the television signal following two paths. One is the
direct path and the other is reflected from tall buildings, hills or other
objects. Changing the direction or position of the antenna may improve the
reception.
SNOW:
If your receiver is located in the fringe area of a television station where the
signal is weak, your picture may be marred by the appearance of small
dots. When the signal is extremely weak, it maybe necessary to install an
external antenna to improve the picture.
RADIO FREQUENCY INTERFERENCE:
This interference produces moving ripples or diagonal streaks, and in some
cases, causes loss of contrast in the picture.
PICTURE SIZE VARIATION:
A slight picture size variation is normal when you adjust the CONTRAST or
BRIGHTNESS setting.
31
Page 34

Troubleshooting (continued)
CARE AND MAINTENANCE
To prevent fire or shock hazard, disconnect your unit from the AC power source when cleaning. The finish on the unit
may be cleaned with a dust cloth and cared for as other furniture. Use caution when cleaning and wiping the plastic
parts. Mild soap and a soft, damp cloth may be used.
FOR ADDITIONAL SET-UP OR OPERATING ASSISTANCE, PLEASE VISIT OUR WEBSITE AT
WWW.MEMOREXELECTRONICS.COM OR CONTACT CUSTOMER SERVICE AT (954) 660-7100.
PLEASE KEEP ALL PACKAGING MATERIAL FOR AT LEAST 90 DAYS IN CASE YOU NEED
TO RETURN THIS PRODUCT TO YOUR PLACE OF PURCHASE OR TO MEMOREX.
FOR CONSUMER REPLACEABLE PART(S), SEE PART NUMBER(S) ON PAGE 6 AND THEN
CONTACT FOX INTERNATIONAL AT 1-800-321-6993.
32
Page 35

Specifications
Power Supply: AC 120V, 60Hz
Power Consumption: 90 W
Dimensions (inch): 23.7(W) X 18.0(H) X15.2(D)
Weight(lbs): 48.5
CRT: 20"
Audio Output: 3W x 2
TV System: NTSC-M, ATSC
Channel Coverage: VHF 2-13, UHF 14-69, CATV 1-125, CADTV 1-135, DTV 2-69
Antenna Impedance: 75 ohm
Accessory: Remote controller x 1
Design and specifications are subject to change without notice.
33
Page 36

Contenido
Medidas de seguridad
importantes-------------------------1
Identificación de controles ----4
Frontal ----------------------------------------------------4
Posterior -------------------------------------------------5
Mando a distancia ------------------------------------6
Colocación de las pilas-------------------------------7
Campo de acción del mando a distancia -------7
Instalación --------------------------8
Instalación de la antena------------------------------8
Conexión de los equipos de vídeo y audio------9
Conexión de entradas de AV -----------------------9
Conexión de entradas posteriores de AV--------9
Conexión de entradas de componentes ---------10
Conexión de salidas de AV--------------------------11
Funciones básicas--------------12
Encendido -----------------------------------------------12
Controles de sonido ------------18
Ajuste de imagen ----------------19
Ajuste de imagen-------------------------------------19
Cambio del tamaño de la imagen----------------19
Ajuste del temporizador-------20
Para entrar al menú de RELOJ-------------------20
Programación automática del reloj --------------20
Programación manual del reloj -------------------20
Activar el temporizador -----------------------------21
Activar el temporizador para apagado----------21
Ajuste del sistema---------------22
Para entrar al menú de EXTRA ------------------22
Seleccionar el idioma del menú de OSD-------22
Seleccionar el idioma de AUDIO-----------------22
Programación de los subtítulos para sordos --23
Seleccionar el tipo de captura de subtítulos --23
Aprovechar las capturas digitales de subtítulos--24
Apagado -------------------------------------------------12
Vista del Menú principal------------------------------13
Navegación por el menú-----------------------------13
Ver programas de AV ---------------------------------14
Cambiar de AV a TV ----------------------------------14
Visualizar la información de estado---------------14
Utilizar la guía de programas -----------------------14
Sintonización----------------------15
Para entrar al menú de PRESET------------------15
Ajuste automático--------------------------------------15
Omitir un canal no necesario -----------------------16
Comprobar la intensidad de la señal de DT ----16
Ver la etiqueta del canal-----------------------------16
Selección de canales ----------17
Control paterno---------------------------25
Para entrar al menú de BLOQUEO PATERNO--25
Crear la contraseña de BLOQUEO PATERNO--25
Activar los controles paternos --------------------26
Ajuste de las calificaciones de la MPAA--------26
Ajuste de las calificaciones de TV ---------------27
Ajuste de las calificaciones de Inglés
Canadiense--------------------------------------------28
Ajuste de las calificaciones de Francés
Canadiense--------------------------------------------28
Ajuste de los criterios de calificación RRT5 ---29
Resolución de problemas ----30
Especificaciones-----------------33
Page 37

IMPORTANTES MEDIDAS DE SEGURIDAD
NOTIFICACIÓN DE FCC:
Este aparato cumple con la Parte 15 de las
normas de la FCC. El funcionamiento está
sujeto a las siguientes dos condiciones: (1) Este
aparato no debe causar interferencia dañina y
(2) este aparato debe aceptar cualquier
interferencia que reciba, incluso aquella
interferencia que pueda causar una operación
indeseada.
Advertencia: El usuario puede perder el
derecho a operar este equipo si efectuara un
cambio o modificación no autorizado por la parte
responsable del cumplimiento.
NOTA: Este equipo fue probado y se encontró
que cumple con las limitantes para aparatos
digitales de Clase B, de conformidad con el
apartado 15 de las Normas de la FCC. Dichas
limitantes fueron diseñadas con la intención de
brindar una protección razonable contra la
interferencia dañina en una instalación
residencial. Este equipo genera, usa y puede
irradiar energía de radiofrecuencia y, si no se
instala y usa conforme a las instrucciones,
puede generar interferencia dañina con las
radiocomunicaciones.
Sin embargo, no hay garantía de que no habrá
interferencia en una instalación particular. Si
este equipo llegara a causar interferencia dañina
con la recepción de radio o televisión, lo cual se
puede determinar encendiendo y apagando el
equipo, le pedimos que intente corregir la
interferencia con las siguientes medidas:
• Cambie la orientación o la ubicación de la
antena receptora.
• Incremente la distancia entre el equipo y el
receptor.
• Conecte el equipo a un contacto eléctrico
que esté en un circuito distinto al que está
conectado el receptor.
• Consulte al vendedor o a un técnico de radio
y televisión con experiencia.
ADVERTENCIA:
P ARAREDUCIR EL RIESGO DE INCENDIO O DESCARGA
ELÉCTRICA, NO EXPONGA ESTE PRODUCTO A LA
LLUVIA NI A LA HUMEDAD.
ADVERTENCIA:
PARA REDUCIR EL RIESGO DE INCENDIO O DE UNA
DESCARGA ELÉCTRICA Y LA INTERFERENCIA
MOLESTIA, USE SOLAMENTE LOS ACCESORIOS
RECOMENDADOS.
PROTECTORES DE VOLTAJE:
Se recomienda usar un protector de voltaje para la conexión
a corriente eléctrica. Los rayos y picos en la energía eléctrica
NO ESTÁN cubiertos por la garantía para este producto.
ATTENTION:
POUR ÉVITER LES CHOC ÉLECTRIQUES, INTRODUIRE
LA LAME LA PLUS LARGE DE LA FICHE DANS LA BORNE
CORRESPONDANTE DE LA PRISES ET POUSSER
JUSQU’AU FOND.
ADVERTENCIA DE LA FCC:
P ARAGARANTIZAR EL CUMPLIMIENTO CONTINUO, SIGA
LAS INSTRUCCIONES DE INSTALACIÓN ANEXAS Y USE
SÓLO CABLES PROTEGIDOS CUANDO SE CONECTA A
OTROS DISPOSITIVOS. EL USUARIO PUEDE PERDER EL
DERECHO AOPERAR ESTE EQUIPO SI EFECTUARA UNA
MODIFICACIÓN NO AUTORIZADA POR EL FABRICANTE.
Este aparato digital de Clase B cumple con la norma ICES003 de Canadá.
Cet appareil numérique de la classe B est conforme à la
norme NMB-003 du Canada.
Este televisor puede recibir programas digitales
descodificados para cable y una antena UHF/VHF
externa (ATSC) y también puede recibir programas
NTSC (cable y antena UHF/VHF externa).
1
Page 38

IMPORTANTES MEDIDAS DE SEGURIDAD
PORTABLE CART WARNING
(
symbol provided by RETAC)
El símbolo de la flecha con forma de rayo adentro
PRECAUCIÓN
RIESGO DE DESCARGA
ELÉCTRICA. NO ABRIR.
PRECAUCIÓN: PARA REDUCIR EL RIESGO DE DESCARGA ELÉCTRICA, NO QUITE LA
ADVERTENCIA: PARA REDUCIR EL RIESGO DE INCENDIO O DESCARGA ELÉCTRICA, NO EXPONGA ESTE PRODUCTO ALA LLUVIA NI A LA
HUMEDAD. PARA EVITAR UNA DESCARGA ELÉCTRICA, ALINEE LA CLAVIJA ANCHA DEL ENCHUFE CON LA RANURA ANCHA E
INTRODÚZCALA POR COMPLETO.
Antes de usar este aparato asegúrese de leer bien todos los puntos de este manual de operaciones. Una vez leído,
consérvelo a la mano para usarlo como referencia en el futuro. Tenga especial cuidado al seguir las advertencias
indicadas en la unidad, así como las que aparecen en el manual de instrucciones.
1. Lea el instructivo.
Usted deberá leer todo el instructivo de seguridad y funcionamiento antes de operar su equipo.
2. Conserve el instructivo
Conserve el instructivo para futura referencia.
3. Siga las medidas de seguridad
Las medidas de seguridad y funcionamiento deberán seguirse al pie de la letra.
4. Siga las instrucciones
Siga todas las instrucciones sobre el funcionamiento de la unidad.
5. Limpieza
Desenchufe la unidad antes de limpiarla. Nunca use líquidos de limpieza químicos, ni aerosoles. Use un paño
seco y suave.
6. Auxiliares
Nunca use ningún aparato auxiliar que no haya sido recomendado por el fabricante.
7. Evite lugares cerca del agua o muy húmedos.
Nunca use su unidad cerca del agua. Por ejemplo, cerca de una bañera o lavamanos, lavadero de cocina o lavandería,
en un sótano húmedo, cerca de una piscina o lugares similares.
8. Accesorios
Coloque la unidad en una mesa, soporte o repisa estables, donde no hay vibración. Cuando coloque la
unidad en un carro o estante, asegúrese de seguir las recomendaciones indicadas en este manual.
8A.La combinación de aparato y carro deberá ser movida con cuidado. Las paradas bruscas, fuerza
excesiva y las superficies irregulares podrán hacer que el aparato y el carro se vuelquen.
9. No permita la entrada de objetos o líquidos dentro de la unidad
Nunca introduzca un objeto metálico en la unidad, ni ponga nada que contenga líquidos cerca de ella. La
unidad no deberá ser instalada en un mueble empotrado, como una repisa para libros, un estante o donde la presencia
de cortinas o mobiliario obstruya las aberturas de ventilación.
10.Suministro de energía
Esta unidad solo deberá operarse con la electricidad que aparece en la etiqueta. Si no está seguro del tipo de energía
que hay en su casa, consulte a su distribuidor o compañía de electricidad de su localidad. Para aquellos productos que
funcionan con baterías, u otras fuentes, consulte el instructivo de funcionamiento.
11.Polarización
Esta unidad está equipada con un cable de electricidad polarizado (el enchufe cuenta con una clavija más ancha que la
otra). Dicho enchufe sólo puede ser insertado en el contacto eléctrico en una sola dirección. Eso se hace como medida
de seguridad. Si no pudiera insertar la clavija completamente en el contacto eléctrico, vuelva a intentarlo invirtiendo la
clavija. Si aun así no puede insertar el enchufe, comuníquese con un electricista para que reemplace su contacto
eléctrico obsoleto. No modifique las características de seguridad de la clavija polarizada.
12.Protección del cable de electricidad
Asegúrese de que el cable nunca se encuentre en el camino donde pasan las personas, y de no colocar nada sobre él
que lo pueda pinchar o recalentar (como puede suceder con un calentador, por ejemplo). Nunca agarre el cable con las
manos mojadas, y asegúrese de agarrar el cuerpo del enchufe (nunca tire del cable), tanto para conectarlo como
para desconectarlo.
13.Relámpagos
Para proteger su unidad de una tormenta eléctrica, o cuando no va a ser usada por un período largo de tiempo, es
CUBIERTA(O TAPA POSTERIOR). NO HAYPIEZAS EN EL INTERIOR QUE EL
USUARIO PUEDA REPARAR. REMITA LAS REPARACIONES AL PERSONAL
DE SERVICIO CALIFICADO. (Esta etiqueta con marca de alerta y clasificación se
encuentra en el gabinete inferior de la unidad.)
2
de un triángulo está hecho para alertar al usuario
de la presencia de cables sin aislar de “voltaje
peligroso” en el interior del gabinete, el cual puede
ser de magnitud suficiente para constituir un riesgo
de descarga eléctrica para las personas.
El signo de exclamación dentro de un
triángulo equilátero es para alertar al usuario
de la presencia de instrucciones importantes
de operación y mantenimiento en el manual
que acompaña al aparato.
Page 39

IMPORTANTES MEDIDAS DE SEGURIDAD
recomendable que desconecte la unidad de la pared, la antena o el cable. Así evitará daños producidos por
descargas eléctricas.
14.Líneas aéreas de energía eléctrica.
Como medida de precaución, cuando instale una antena exterior, hágalo lo más lejos posible de las líneas aéreas de
energía eléctrica, ya que la antena podría caer sobre dichas líneas y causar un cortocircuito. Asimismo, nunca deberá
tocarlas ya que podría ser fatal.
15.Sobrecarga
Nunca sobrecargue los enchufes ni extensiones, ya que podría resultar en un incendio o cortocircuito.
16.No permita la entrada de objetos o líquidos dentro de la unidad
Nunca introduzca un objeto metálico en la unidad, ni ponga nada que contenga líquidos cerca de ella.
La unidad no deberá ser instalada en un mueble empotrado, como una repisa para libros, un estante o donde la presencia
de cortinas o mobiliario obstruya las aberturas de ventilación.
17.Conexión a tierra de la antena exterior
Si se conecta una antena al receptor, asegúrese
de que el sistema de antena tenga una conexión a
tierra a fin de proveer cierta protección contra
sobrecargas de electricidad y acumulación de
estática. La Sección 810 del Código Eléctrico
Nacional, ANSI/NFPA No. 70-1984, provee
información sobre: la correcta instalación a tierra
del mástil así como la estructura de apoyo; la
conexión a tierra del cable de plomo a la unidad de
descarga de la antena; sobre el tamaño de los
conductores a tierra; la ubicación de la salida de la
antena; la conexión de los electrodos de tierra y
los requisitos para los mismos.
18.Reparaciones
Nunca intente darle servicio a su unidad usted
mismo, ya que abrir la unidad o quitar la tapa
puede exponerlo a circuitos de voltaje peligrosos. Lleve su unidad a un Centro de servicio autorizado.
19.Repuestos
Cuando tenga necesidad de ordenar piezas, asegúrese de que su centro de servicio use las piezas especificadas por el
fabricante, o aquéllas que tienen las mismas características que la pieza original. El uso de piezas no autorizadas pueden
causar descargas eléctricas u otros peligros.
20.Chequeo de seguridad
Cada vez que repare su unidad, solicite al técnico que hizo la reparación que haga un chequeo de seguridad para
determinar si el producto está funcionando correctamente.
21.Montaje en pared o techo
Este producto deberá montarse en el techo o pared siguiendo las instrucciones dadas por el fabricante.
22.Daños que requieren servicio:
Siempre desenchufe su unidad del contacto eléctrico y solicite el servicio de un técnico calificado cuando se presenten
las siguientes condiciones:
1. El cable eléctrico o el enchufe están dañados.
2. Ha derramado líquido dentro de la unidad.
3. Ha expuesto su equipo a la lluvia o al agua.
4. Su equipo no funciona correctamente a pesar de seguir las instrucciones de funcionamiento, como es el ajuste de
controles indicados en el manual de funcionamiento. El mal manipuleo de dichos controles puede resultar en un daño
mayor a los mismos.
5. Ha dejado caer su unidad y el gabinete se ha dañado.
6. Su equipo muestra señales diferentes en su funcionamiento; eso es una clara indicación de que su equipo necesita
servicio.
23.Calor
Esta unidad no deberá nunca colocarse cerca a artefactos tales como radiadores, estufas, cocinas u otros dispositivos
(incluyendo amplificadores) que produzcan calor.
24.NOTA ESPECIAL PARA EL INSTALADOR DEL SISTEMA DE CABLE CATV
Esta nota está hecha especialmente para llamar la atención del instalador de cable al Artículo 820-40 del NEC, el mismo
que imparte directrices para conectar a tierra el cable correctamente, así como al edificio y lo más cerca posible a la
entrada del cable.
EJEMPLO DE LA INSTALACIÓN A TIERRA SEGÚN EL CÓDIGO
NACIONAL DE ELECTRICIDAD NEC
3
Page 40

Frontal
Identificación de controles
2
3
1
4
MENU
5
VOL- VOL+
6
7 9
CH- CH+
8
INPUT
1. Interruptor de encendido.
2. Indicador.
3. Sensor remoto
4. Tecla de INPUT: Seleccione la señal de entrada de Vídeo
5. Tecla de MENU: Para entrar al menú de operaciones
6. Tecla de VOL- ajuste para bajar el volumen; ajuste de
elementos del menú.
7. Tecla de VOL+ ajuste para subir el volumen; ajuste de
elementos del menú.
8. Tecla de CH- ajuste para cambiar al canal anterior; selección
de elementos del menú.
9. Tecla de CH+ ajuste para cambiar al canal posterior; selección
de elementos del menú.
4
Page 41
Posterior
3
Identificación de controles (continuación)
( )
2
R
L/MONO
VIDEO
6
( )
2
L/MONO L
1
1
L/M ONO
4
1. S-VÍDEO input
2. Entradas de AV1 (VÍDEO, AUDIO L/MONO, R)
3. Salidas de AV (VÍDEO, AUDIO L, R)
4. COMPONENTES de entrada (Y, CB ,CR , Audio L/MONO, R)
5
5. Conexión de la antena
6. Entradas de AV2 (VÍDEO, AUDIO L/MONO, R)
5
Page 42

Identificación de controles (continuación)
Mando a distancia
1
2
3
5
6
8
9
11
13
14
16
4
7
10
12
15
17
1. POWER (Encendido)
Enciende o apaga el aparato.
2.INPUT
Para seleccionar rápidamente el origen de entrada
3. Selector directo de canales / teclas de números
Estos botones de números sirven para seleccionar
un canal o introducir una contraseña.
4. Dash (-)
Sirve para introducir un número de programa para
canales de múltiples programas como 2-1, 2-2, etc.
5. RETURN (Volver)
Para volver rápidamente al canal previo.
6. CH+/-
Para seleccionar el canal anterior o posterior
7. VOL+/-
Sirve para ajustar el volumen
8. ZOOM
Para cambiar el tamaño de la imagen en el modo DTV.
9. MUTE (Silencio)
Para silenciar el sonido
10. CCD
Enciende o apaga el CCD
11. MENU
Para acceder a la página principal del Menú
12. DISPLAY (Visualización)
Para visualizar el estado del canal o la información
de señal.
13. Tecla de navegación por el MENU: 5634
56 : Para desplazarse hacia arriba o hacia abajo
por el menú de operaciones;
34: Para desplazarse hacia la derecha o hacia la
izquierda por el menú de operaciones;
Para ajustar el elemento del menú seleccionado
dentro del menú de operaciones
14. EXIT (SALIDA)
Para salir del menú
15. GUÍA
Para visualizar la guía de programas
16. IMAGEN
Para seleccionar el modo de imagen.
17. SLEEP (Temporizador)
Para activar el apagado automático
6
Page 43

Colocación de las pilas
11
Abra la ta pa de l
Compar tim ent o
de las pilas.
22
Introduzca dos pilas
de tipo AAA.
<(Coloque las pilas con
los polos en la posición
correcta de acuerdo a
los signos (+) y (-) en el
compartimento de las
pilas.)
33
Campo de acción del mando a distancia
Coloque la tapa.
Notas:
/
No intente recargar pilas que no estén
diseñadas para ello.
/
Utilice únicamente pilas del tamaño y del tipo
especificados. No utilice pilas de tipos
diferentes ni mezcle pilas usadas con nuevas.
/
Si el mando a distancia no se usa durante un
largo periodo de tiempo, retire las pilas del
mismo.
/
No arroje las pilas al fuego. Deseche las pilas
usadas de la manera indicada.
/
No lance, no moje ni desmonte el mando a
distancia.
Notas:
/
Si hay un obstáculo entre el TV y el
transmisor, éste no funciona.
/
Si la luz directa del sol, una bombilla
incandescente, un fluorescente o cualquier
otra luz intensa incide en el SENSOR
REMOTO del TV, el funcionamiento remoto
será inestable.
7
Page 44

Instalación
Instalación de la antena
INSTALE la unidad en una habitación donde la luz directa no incida directamente en la pantalla. La
oscuridad total o un reflejo en la imagen de la pantalla pueden producir vista cansada. Una iluminación
suave e indirecta es lo ideal para una visión cómoda.
La recepción óptima del color requiere una buena señal y en general implica que debe usarse una antena
al aire libre. El tipo exacto y la posición de la antena dependerán de la zona de residencia.
Hilo de bronce
Enchufe de la antena
Cable Coaxial RF (75 ohmios)
Entrada de la antena
Notas:
/ Se recomienda que el cable coaxial de 75 ohmios se utilice para la eliminación de interferencias y
ruido que pueden suceder debido a las condiciones de ondas de radio.
/ El cable de la antena no debe enredarse con el cable de alimentación y similares.
/ Si la antena no está correctamente instalada, póngase en contacto con el vendedor a fin de solicitar
asistencia.
8
Page 45

Instalación (continuación)
Conexión de los equipos de vídeo y audio
Este equipo de TV incluye 2 grupos de entradas de AV y un grupo de entradas de COMPONENTES para
que pueda conectarse a VCR, DVD u otros equipos de video para disfrutar de la mejor calidad de imagen.
Del mismo modo, consulte el manual de instrucciones del equipo para conectarlo.
Conexión de entradas laterales de AV
( )
2
R
L/MONO
VIDEO
Para ver el programa de las entradas de AV2, pulse la tecla INPUT del mando a distancia repetidas veces
hasta que AV2 aparezca en pantalla.
RR
EQUIPO DE VÍDEO
WW
l da
YY
Señal
s
de ud o
A iSa i
RR
WW
YY
Salida de vídeo
Conexión de entradas posteriores de AV
Conecte el dispositivo de vídeo a las entradas de Audio (L/R) / Vídeo de la unidad mediante los cables de Audio/Vídeo.
Para una mejor calidad de vídeo, puede utilizar el terminal de S-Vídeo si es compatible con el origen.
Para ver el programa de las entradas de AV1, pulse la tecla INPUT del mando a distancia repetidas veces hasta que
AV1 aparezca en pantalla.
( )
1
Entrada de Vídeo
oali
e
d
Y
a
S d de ví
VIDE O OUT
Entr
w
Y
da de Audia s
Salida de Audio
R
L
R
AUDIO OUT
o
w
R
Entrada de S-Vídeo
o
íde
V
S-
de
a
d
li
a
S
S-VIDEO O UT
L/MONO L
Y
: Amarillo (VÍDEO)
w
: Blanco (AUDIO L/MONO)
R
: Rojo (AUDIO R)
EQUIPO DE VÍDEO
L/M ONO
Nota:
S-VÍDEO utiliza el mismo circuito que
VÍDEO1 y, por ello, el terminal de S-VÍDEO
anula el de VÍDEO1 Cuando ambas
señales, S-vídeo y Video1, tienen entrada,
la señal de S-video aparece seleccionada y
el OSD es "SVIDEO”. Para ver la señal de
VÍDEO1, desconecte el S-VÍDEO.
9
Page 46

Instalación (continuación)
Conexión de entradas de componentes
Conecte las entradas de Y,CB,CR de la unidad a las tomas de salida deY,CB,CR del reproductor de DVD mediante
el cable de video.
Conecte las tomas de entrada de audio de la unidad y los conectores de salida de audio del reproductor de DVD
con el cable de audio.
Para ver el programa de las entradas de COMPONENTES, pulse la tecla INPUT del mando a distancia repetidas
veces hasta que COMPONENTES aparezca en pantalla.
( )
1
L/M ONO
L/MONO L
Nota:
Este dispositivo puede recibir
únicamente señal YCbCr, pero no
YPbPr a través de la entrada de
COMPONENTE.
R
G
B
Cable de vídeo
G
B
R
W
:Blanco (AUDIO L/MONO)
w
:Rojo (audio R,CR)
R
G
:Verde (Y)
B
:Azul(CB)
Cable de audio
R
R
W
C
R
C
b
r
COM PONEN T OUTP UT
Y
L
AUD IO OUTP UT
Reproductor de DVD, etc.
10
Page 47

Instalación (continuación)
Conexión de salidas de AV
Puede conectar un sistema de audio a las salidas posteriores de AV del equipo de TV para disfrutar de un sonido
de alta calidad del sistema de audio, o conectar las salidas de AV al VCR para grabar el programa que desee.
( )
Salida de vídeo
Y
Salidas de Audio
w
R
L/MONO L
1
L/M ONO
w w
R R
Y
Entrada de Vídeo
VID EO IN
L
AUDIO IN
Entradas de Audio
R
VCR para grabación
Entradas de Audio
R
L
AUDIO IN
Sistema de Audio
Y
: Amarillo (VÍDEO)
w
: Blanco (AUDIO L)
R
: Rojo (AUDIO R)
11
Page 48

Funciones básicas
Encendido
Encendido
/Posición
de espera
Enchufe el aparato en una toma de corriente
1
convenientemente ubicada.
Si no hay imagen y el indicador de modo de espera está
encendido, entonces el equipo de TV está en modo de espera
(STANDBY). Ahora siga el paso nº 2.
Notas:
El enchufe de CA que viene con la unidad está polarizado para
ayudar a reducir el riesgo de descarga eléctrica. Si el enchufe no
encaja en una toma de corriente no polarizada, no lime ni corte la
clavija ancha. Es responsabilidad del usuario encargarle a un
electricista que cambie la toma de corriente antigua.
Para evitar descargas eléctricas, no use el
enchufe (polarizado) con cables alargadores u
otras tomas de corriente a menos que las
clavijas encajen por completo.
En el modo de ESPERA (STANDBY), pulse el
2
interruptor de Power del equipo de TV o del mando a
distancia y el equipo de TV se encenderá.
Apagado
Pulse el interruptor de Power en el mando a distancia
1
o en el equipo de TV para apagarlo.
Si no piensa utilizar el TV durante un largo periodo de
2
tiempo, desenchúfelo de la corriente.
Notas:
4 El equipo de TV puede apagarse automáticamente por
medio de la función del temporizador para apagado (Sleep
timer) que deberá haberse programado con antelación.
4 Si no hay señal de entrada durante 15 minutos, el equipo de
TV puede apagarse automáticamente.
4 Después de haber apagado el TV, debe esperar al menos 5
segundos si desea encenderlo de nuevo.
12
Page 49

Funciones básicas (continuación)
Navegación por los Menús
El equipo tiene un menú de sistema sencillo y fácil de usar que aparece en la pantalla. Este sistema resulta práctico
y rápido para disfrutar de las características del equipo. Puede visualizar también el estado de las características
del TV mientras ve un programa.
Visión del Menú Principal (Modo de TV)
MAIN MENU
PICTURE
P.LOCK
CLOCK
PRESET
EXTRA
PICTURE
CONTRAST
BRIGHTNESS
COLOR
TINT
SHARPNESS
P.LOCK
PARENTAL LOCK
CHANGE PASSWORD
CLOCK
ON TIMER
CLOCK
DST
AUTO CLOCK
ZONE
PRESET
AUTO PROGRAM
CH SETUP
EXTRA
CLOSED CAPTION
MENU LANGUAGE
AUDIO LANGUAGE
PARENTAL LOCK
LOCK
RATINGS LOCKS
AUTO PROGRAM
ANTENNA
STRAT
CH SETUP
CH NO
SKIP
LABEL*
DIG SIGNAL*
CLOSED CAPTION
CC DISPLAY
CC SETTING
RATINGS LOCKS
MPAA RATING
TV RATING
CANADA ENGLISH
CANADA FRENCH
CC SETTING
CC TYPE
CC MODE*
CC CUSTOMER*
Nota:
Los elementos marcados con un * no aparecen en todos los modelos.
Algunos elementos aparecen en gris y no se pueden seleccionar.
Navegación por el menú
Cuando el aparato esté encendido, pulse la tecla MENU para visualizar el menú principal.
1
Pulse para seleccionar el menú.5o6
2
Pulse para entrar en el menú.3o4
3
Dentro del menú, use para seleccionar y para ajustar o entrar en un submenú.5o6 3o4
4
Pulse la tecla MENU para volver al menú previo.
5
Pulse la tecla EXIT para salir del menú principal y volver a tu programa.
Nota:
lEste manual contiene una descripción basada en las funciones operativas del mando a distancia para presentar
con claridad las operaciones del menú.
lLos dibujos y las visualizaciones de pantalla del presente manual sirven a modo de ilustración explicativa
(algunos son mayores y otros menores) y pueden variar ligeramente con respecto a los modelos reales.
13
Page 50

Funciones básicas (continuación)
Seleccione
la señal
de entrada
Tecla
DISPLAY
Ver programas de AV
Este equipo de TV incluye 2 grupos de entradas de AV y un grupo de
entradas de COMPONENTES para que pueda conectarse a VCR,
DVD u otros equipos de video.
Para ver un programa de vídeo de entradas de AV. pulse la tecla
INPUT repetidas veces hasta que vea el indicador de adecuado
de entrada en la pantalla.
AV1
Nota: S-VÍDEO utiliza el mismo circuito que VÍDEO1 y, por ello, el
terminal de S-VÍDEO anula el de VÍDEO1 Cuando ambas señales, Svídeo y Video1, tienen entrada, la señal de S-video aparece
seleccionada y el OSD es "SVIDEO”. Para ver la señal de VÍDEO1,
desconecte el S-VÍDEO.
AV2
COMPONENT
8-0
MONO
Cambiar de AV a TV
Pulse la tecla INPUT (ENTRADA) en el mando a distancia.
Pulse esta tecla repetidas veces hasta que la imagen del programa de TV.
Tecla
GUÍA
Visualizar la información de estado
La información de estado ofrece información, por ejemplo, del
número de canal y la señal de origen. Se muestra información
diferente de acuerdo con el modo. En el modo de DTV, se puede
visualizar más información (como el número y el nombre del
canal, la resolución de la señal, etc.).
Pulse la tecla VISUALIZACIÓN (DISPLAY) y aparecerá la
información de estado.
Utilizar la guía de programas
Puede pulsar la tecla GUÍA (GUIDE) del mando a
distancia para visualizar la guía informativa si está
disponible. Por medio de la guía puede averiguar la
hora de emisión de un programa o su nombre.
GUIDE
07:00PM-08:00PM WGBH-S
WGBH DTV Broadcast Signal
08:10PM-10:00PM WGBH-S
WGBH DTV Broadcast Signal
1/1
Nota:
La función GUÍA sólo funciona en canales digitales.
Pulse 3o4para desplazarse
hacia arriba y abajo si hay dos o
más páginas.
14
(Ejemplo)
Page 51

MAIN MENU
PICTURE
P.LOCK
CLOCK
PRESET
EXTRA
Sintonización
Para entrar al menú de PRESET
Pulse la tecla de MENU.
Pulse 5o6 para seleccionar
el elemento PRESELECCIÓN
(PRESET).
Pulse 3o4 para entrar en el
menú de PRESET.
Ajuste automático
Cuando enciende el TV por primera vez, debe ejecutar un ajuste
automático para introducir canales en la memoria del TV. Siga
estos pasos.
PRESET
AUTO PROGRAM
CH SETUP
MENÚ
Tecla de navegación
por el Menú:
Salir del menú
Entre en el menú de PRESELECCIÓN, marque el elemento
1
de AUTO AJUSTE.
Pulse la tecla 3o4 para entrar en el submenú de AJUSTE
2
AUTOMÁTICO.
Marque el elemento ANTENA, pulse la tecla 3o4 para
3
seleccionar AIRE o CABLE.
En el modo de AIRE (AIR) el equipo recibe
señales de antena. En el modo de CABLE
(AIR) el equipo recibe señales de TV por
Cable . Seleccione:
AIRE: Si utiliza una antena de VHF/UHF.
CABLE: Si utiliza TV por Cable.
Pulse 6 para seleccionar el elemento START.
4
Pulse la tecla3o4 para iniciar el Ajuste automático.
La unidad empezará entonces a memorizar todos los canales
disponibles. Debe esperar con paciencia ya la búsqueda llevará
algún tiempo.
AUTO PROGRAM
ANTENNA
START
AIR
Nota:
El TV memorizará primero los programas analógicos. Una vez
que los programas analógicos disponibles se hayan
memorizado, empieza a memorizar los programas digitales
(DTV). Mientras dure el proceso de memorización de
programas analógicos, puede pulsar la tecla MENÚ para
detenerlo y empezará la memorización de programas digitales.
Si desea detener la memorización de programas digitales, pulse
la tecla MENÚ de nuevo.
15
Page 52

Sintonización (continuación)
PRESET
AUTO PROGRAM
CH SETUP
Omitir un canal no deseado
Después de haber guardado los canales en la memoria, podrá
omitir canales no necesarios, de manera que solo verá los canales
elegidos pulsando las teclas CH+/-
Entre en el menú de PRESELECCIÓN (PRESET) y pulse 5o6
1
para seleccionar el elemento de ajuste de canal (CH SETUP).
Pulse la tecla 3o4 para entrar en el submenú de ajuste de canal.
2
Pulse 5o6 repetidamente para seleccionar el elemento de
3
número del canal (CH NO).
Pulse 3o4 para seleccionar el número de canal (por
4
ejemplo, canal 2-2).
Pulse 6 para seleccionar el elemento OMITIR (SKIP).
5
Pulse 3o4 para seleccionar ON (activar).
6
Ahora el canal 2-2 se omitirá cuando se
desplace por los canales por medio de la
tecla CH+/-.
Para recuperar un canal omitido, use las
teclas de números para seleccionarlo y
repita los pasos previos, y ajuste el
elemento OMITIR a la posición OFF
(desactivar).
CH SETUP
CH NO
SKIP
LABEL
DIG SIGNAL
2-2
ON
WGBH-DX
25DB
MENÚ
Tecla de navegación
por el Menú:
Salir del menú
Comprobar la intensidad de la señal de DTV
Puede comprobar la intensidad de la señal digital y decidir si
necesita ajustar la antena o la entrada de cable digital. Cuanto más
fuerte sea la señal, menos problemas de imagen habrá.
Entre en el menú de PRESELECCIÓN
(P RES ET ) , p ul s e 5 o6 p ar a
seleccionar el elemento de ajuste de
canal (CH SETUP) y pulse 3o4 para
entrar en el menú de ajuste de canal.
Ahora la línea de la parte inferior
muestra la intensidad de la señal del
canal digital seleccionado.
CH SETUP
CH NO
SKIP
LABEL
DIG SIGNAL
2-2
ON
WGBH-DX
25DB
Ver la etiqueta del canal (Sólo en programas de DTV)
Puede utilizar la información de estado para averiguar la etiqueta
del canal del programa digital en emisión. Puede también abrir el
menú ajuste de canal (CH SETUP) y ver la etiqueta de canal. Tenga
en cuenta que las etiquetas de los canales se asignan
automáticamente y no puede cambiarlas.
16
Page 53

Selección de canales
Información acerca de la numeración de canales en EE.UU.
= El número de canal de ATSC PSIP tiene dos partes:
— Número del canal principal
— Número del canal secundario
Seleccione
directamente
Tecla de (DASH)
Canal previo
Canal posterior
/anterior
Tecla de
INTRO
Por ejemplo:
=En EE.UU. la mayor parte de las veces el canal analógico y el digital tienen
el mismo número en el canal principal (Es igual en el caso del número de
canal de NTSC en lo que respecta a las emisoras existentes).
=En EE.UU., un canal secundario cuyo número es 0 se destina al canal
analógico de una emisora.
Channel: 5-1
Número del canal principal
Número del canal secundario
Ejemplo de numeración de canales
= Canales NTSC originales para Des Moines :
— 5, 8, 11, 13, 17
= Posibles canales NTSC + ATSC originales para Des Moines:
— 5-0, 8-0, 11-0, 13-0, 17-0 (números de canales para canales
analógicos existentes)
— 5-1, 5-2, 8-1, 8-2, 8-3,8-4, 13-1 (números de canales para canales
digitales)
Selección de canales
Uso del teclado numérico
1
Pulse las teclas de números del 0 al 9 y la tecla menos (-), después
pulse ENTER (INTRO) o espere algunos segundos, para ir
automáticamente a ese canal.
Por ejemplo, si desea seleccionar el canal 8-3, pulse 8-3 en el mando a
distancia. (Pulse la segunda tecla antes de que pasen tres segundos a
fin de que el canal se seleccione correctamente).
Nota: Es posible que los números virtuales de los canales no
correspondan con las frecuencias físicas.
Tecla de CH+ o CH-
2
Al pulsar la tecla CH+ el número de canal aumenta;
Al pulsar la tecla CH- el número de canal disminuye;
Pulse la tecla de canal previo
3
Pulse esta tecla para pasar del canal que está en pantalla al que
estaba viendo justo antes.
17
Page 54
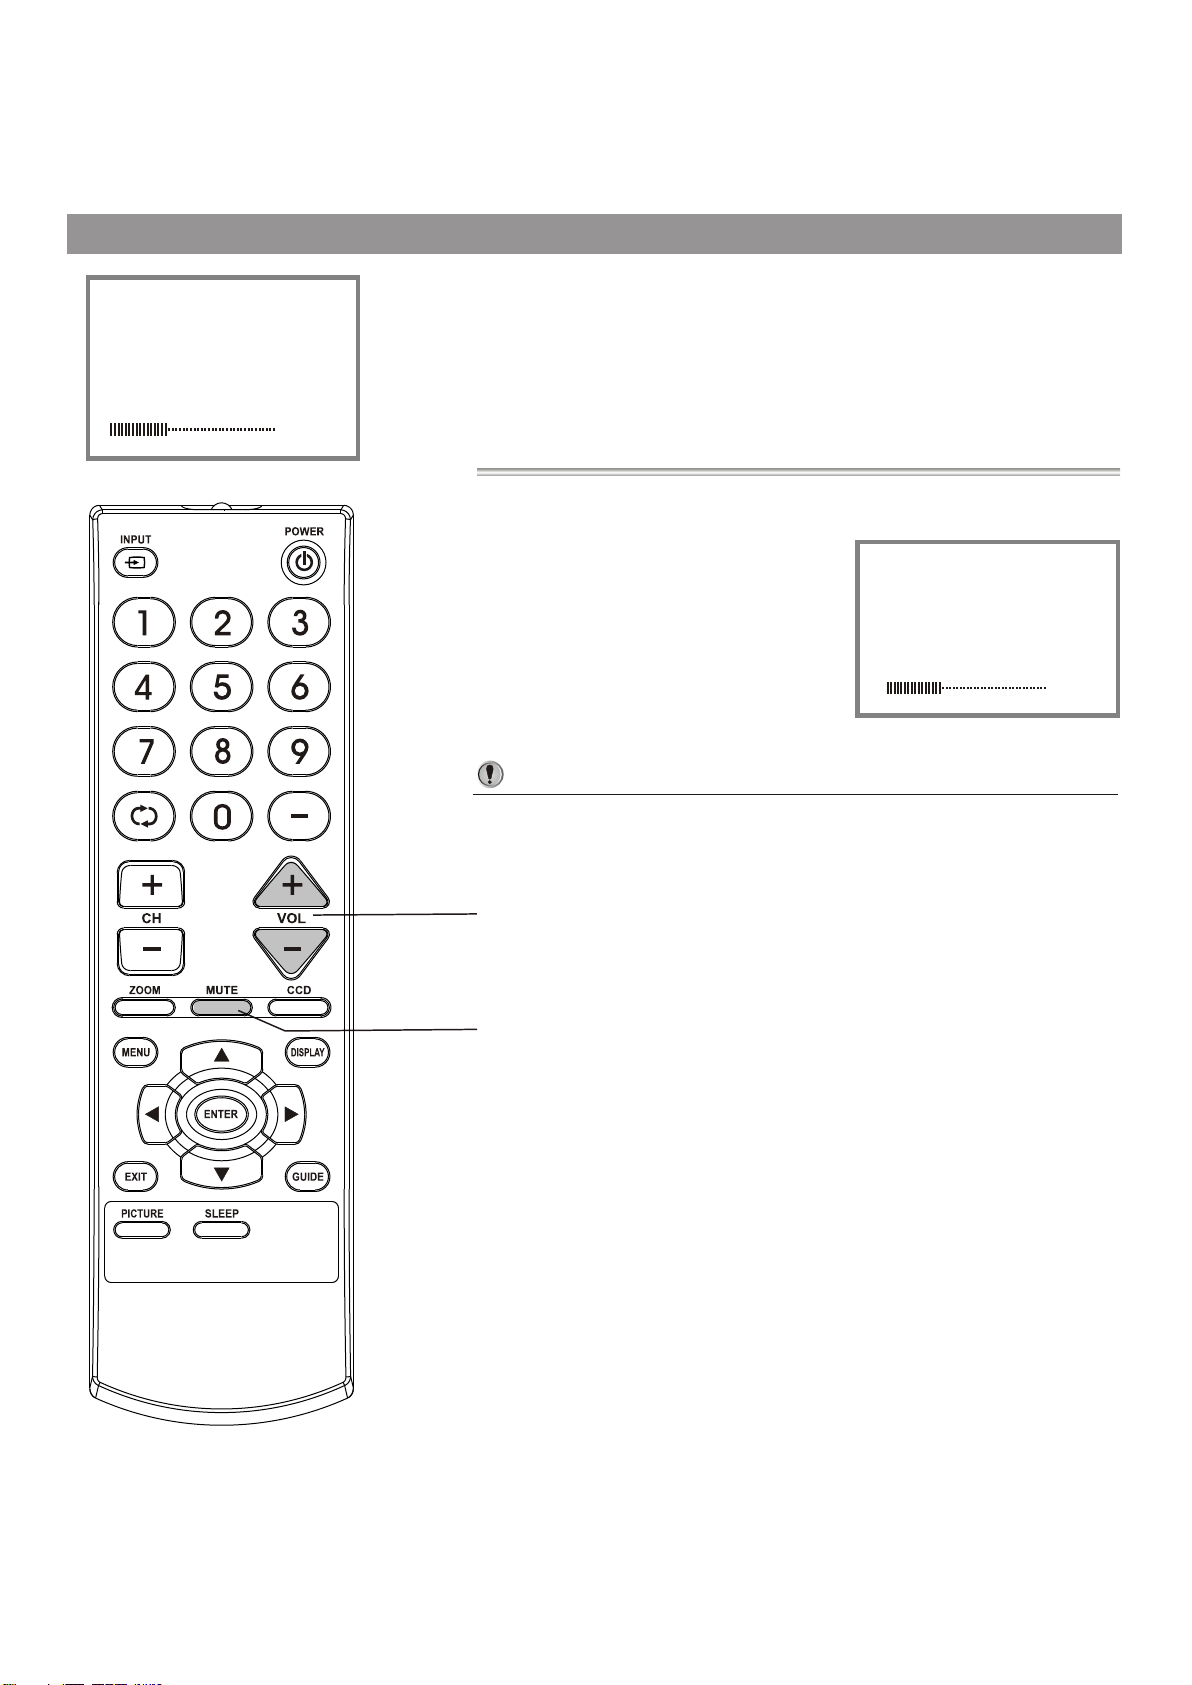
Controles de sonido
Tecla de VOL+ o VOL-
1
26VOLUME
Al pulsar la tecla VOL+ aumenta el volumen;
Al pulsar la tecla VOL- disminuye el volumen;
Uso de la tecla MUTE (Silencio)
2
Si quiere silenciar el sonido, pulse
MUTE en el mando a distancia.
Para recuperar el sonido, pulse la
misma tecla otra vez.
26VOLUME
Notas:
4 También puede recuperar el sonido pulsando la tecla VOL +.
4 Si el sonido está silenciado, el color del indicador de VOLUMEN
que se ve en pantalla se vuelve rojo, después de recuperar el sonido,
el indicador volverá a verse en verde.
Aumento/disminución
de volumen
Para silenciar el sonido
18
Page 55

PICTURE
CONTRAST
BRIGHTNESS
COLOR
TINT
SHARPNESS
CONTRAST
20
50
40
40
0
40
Ajuste de imagen
Ajuste de imagen
Pulse la tecla de MENU.
1
Now the PICTURE item is highlighted automatically.
Pulse 3o4 para entrar en el menú de IMAGEN.
2
Pulse 5o6 para seleccionar elemento.
3
Pulse las teclas 3o4 para ajustar.
4
ZOOM
MENÚ
Tecla de navegación
por el Menú:
Salir del menú
IMAGEN
Elemento
Contraste
Brillo
Color
Matiz
Nitidez
Pulse 3
Débil
Oscuro
Pálido
Purpúreo
Suave
Pulse 4
Intenso
Luminoso
Profundo
Verdoso
Nítido
Pulse PICTURE (IMAGEN) para seleccionar el modo de imagen.
Hay tres modos de imagen preseleccionados (ESTÁNDAR,
DINÁMICO Y SUAVE) y una opción de configuración por el propio
usuario (PERSONAL).
Puede seleccionar rápidamente el modo de imagen por medio de la
tecla PICTURE (IMAGEN) del mando a distancia.
ESTÁNDAR: Para imagen normal.
DINÁMICO: Para imagen brillante y dinámica.
SUAVE: Para imagen con detalle refinado.
PERSONAL: Calidad de imagen personalizada.
Para cambiar el tamaño de la imagen (sólo en el modo DTV)
Puede cambiar el tamaño de la imagen (el tamaño de
visualización de la pantalla) con arreglo al tipo de señal de vídeo
o preferencia personal.
Si el tipo de señal de vídeo es de formato 16:9, pulse la tecla
ZOOM para seleccionar el tamaño de imagen deseado (el
tamaño de visualización de la pantalla). Puede elegir entre
NORMAL y ZOOM.
19
Page 56

Ajuste del temporizador
Auto search/Manual search/Channel skip/Fine tuning
CLOCK
ON TIMER
CLOCK
DST
AUTO CLOCK
ZONE
--:--AM
--:--AM
ON
OFF
PACIFIC
Números del 0 al 9
VOL+
Para entrar al menú de RELOJ
Pulse la tecla de MENU.
Pulse 5o6 para seleccionar el elemento RELOJ.
Pulse la tecla 3o4 para entrar en el menú de RELOJ.
Programación automática del reloj
- Con la función de AJUSTE AUTOMÁTICO DEL RELOJ activada, la
hora se ajusta automáticamente con la señal de un canal digital.
- Si el TV se queda sin luz eléctrica, la programación del reloj se
borrará.
CLOCK
Entre el menú RELOJ, pulse 5o6
1
para seleccionar el elemento
AJU STE A UTOMÁ T ICO D EL
RELOJ y entonces use 3o4 para
activar la función de AJUSTE
AUTOMÁTICO DEL RELOJ.
Pulse 5o6 para seleccionar el elemento ZONA, use
2
3o4para seleccionar la zona horaria de su área de visión.
ON TIMER
CLOCK
DST
AUTO CLOCK
ZONE
--:--AM
6:00AM
ON
ON
PACIFIC
MENÚ
Tecla de navegación
por el Menú
Salir del menú
Si su zona de visión tiene DST (Modo de horario de verano),
3
active la función DST (ON) en el menú o desactívela si lo
prefiere (OFF).
Programación manual del reloj
- Si la programación de la hora falla con la función automática,
prográmela manualmente.
- Si el TV se queda sin luz eléctrica, la programación del reloj se borrará.
Entre en el menú de RELOJ, desactive el elemento de
1
AJUSTE AUTOMÁTICO DE RELOJ (OFF).
Pulse 5o6 para seleccionar el
2
elemento RELOJ.
Pulse VOL+ para seleccionar
3
el elemento AM o PM.
Use las teclas de números del 0
4
al 9 para introducir la hora.
CLOCK
ON TIMER
CLOCK
DST
AUTO CLOCK
ZONE
--:--AM
9:10AM
OFF
OFF
PACIFIC
20
Page 57

CLOCK
ON TIMER
CLOCK
DST
AUTO CLOCK
ZONE
Ajuste del temporizador (continuación)
Auto search/Manual search/Channel skip/Fine tuning
7:00PM
11:00AM
OFF
OFF
PACIFIC
Números del 0 al 9
Activar el temporizador
-El temporizador sólo funciona si la hora se ajustado correctamente.
- El TV debe en el modo de espera (STANDBY) para que funcione el temporizador.
- Si el TV se queda sin luz eléctrica, la programación del temporizador se borrará.
En el menú RELOJ, marque el elemento TEMPORIZADOR
1
ACTIVADO (TIMER ON).
Pulse VOL+ para seleccionar el elemento AM o PM.
2
Use las teclas de números del 0 al 9 para introducir la hora
3
de encendido del TV (TV ON), por ejemplo, las 7:00 PM.
Pulse la tecla para poner el TV en modo de espera. El TV
4
se encenderá automáticamente a la hora fijada.
Activar el temporizador para apagado
Puede seleccionar rápidamente el temporizador por medio de la tecla
SLEEP del mando a distancia. Con cada pulsación de esta tecla el
VOL+
MENÚ
Tecla de navegación
por el Menú
Salir del menú
Activar el temporizador
para apagado
temporizador de apagado cambia de esta manera:
0 Minutos
Por ejemplo, si desea que el TV se
apague automáticamente en 60 minutos,
puede pulsar SLEEP repetidas veces
hasta que en la pantalla aparezca ese
tiempo.
Para desactivar el temporizador, pulse
SLEEP repetidas veces hasta que
aparezca en la pantalla “0 minutos”
5 Minutos
240 Minutos180 Minutos10 Minutos
60 MINUTE
21
Page 58
Ajuste del sistema
EXTRA
CLOSED CAPTION
MENU LANGUAGE
AUDIO LANGUAGE
ENGLISH
ENGLISH
Para entrar al menú EXTRA
Pulse la tecla de MENU.
Pulse 5o6 para seleccionar el elemento EXTRA .
Pulse la tecla 3o4 para entrar en el menú de EXTRA .
Seleccionar el idioma del menú de OSD
Entre en el menú de EXTRA y
1
pulse 5o6 para seleccionar el
elemento de IDIOMA DE MENÚ.
Pulse 3o4 para seleccionar
2
el idioma deseado en el MENÚ
OSD (Menú en pantalla).
EXTRA
CLOSED CAPTION
MENU LANGUAGE
AUDIO LANGUAGE
ENGLISH
ENGLISH
MENÚ
Tecla de navegación
por el Menú
Salir del menú
Para cambiar el idioma de AUDIO (sólo en el modo DTV)
La televisión digital puede transmitir simultáneamente varias
pistas de audio (por ejemplo, traducciones simultáneas de un
programa en lenguas extranjeras). La disponibilidad de estas
pistas de audio opcionales depende del programa.
En el menú EXTRA, pulse 5o6
1
para seleccionar el elemento de
IDIOMA DE AUDIO.
Pulse 3o4 para seleccionar el
2
idioma deseado de AUDIO.
EXTRA
CLOSED CAPTION
MENU LANGUAGE
AUDIO LANGUAGE
ENGLISH
ENGLISH
22
Page 59

Programación de subtitulado para sordos
EXTRA
CLOSED CAPTION
MENU LANGUAGE
AUDIO LANGUAGE
ENGLISH
ENGLISH
Tecla de CCD
MENÚ
Programación de subtitulado para sordos
CLOSED CAPTION
Entre en el menú de EXTRA, marque
1
el menú de SUBTÍTULOS PARA
SORDOS, y pulse 3o4 para entrar
en el menú.
Marque el elemento CC DISPLAY (VISUALIZACIÓN DE
2
SUBTÍTULOS PARA SORDOS), pulse la tecla 3o4 para
seleccionar Subtitulado ON, CC SILENCIO u OFF.
CC MUTE (SILENCIO) muestra los subtítulos (si el programa
los ofrece) cuando el sonido del TV está silenciado.
También puede pulsar la tecla CCD para seleccionar CCD ON,
CCD OFF o CCD MUTE.
CC DISPLAY
CC SETTING
ON
Seleccionar el tipo de subtitulado
Las capturas de subtítulos y el texto, si los ofrece la emisora, están
disponibles tanto en canales digitales como analógicos.
Seleccionar el tipo de captura para la visualización de información
de subtitulado. Las capturas analógicas ofrecen información en la
pantalla (normalmente el diálogo de los programas). El texto de los
canales digitales aparece normalmente en la parte inferior de la
pantalla, y se usa para información de servicio, en general no
relacionada con los programas.
Tecla de navegación
por el Menú
Salir del menú
Entre en el menú de SUBTÍTULOS
1
PARA SORDOS, marque el menú de
C C S E TT I N G ( AJ U S T E D E
SUBTÍTULOS PARA SORDOS), y
pulse 3o4 para entrar en el menú.
Marque el elemento CC TYPE
2
(TIPO DE SUBTÍTULOS PARA
SORDOS) y pulse 3o4 para
seleccionar el tipo.
23
CC SETTING
CC TYPE
CC MODE
CC CUSTOMER
(La pantalla OSD de
arriba representa el
modo de DTV)
SERVICE1
CUSTOMER
Page 60

Programación de subtitulado para sordos
EXTRA
CLOSED CAPTION
MENU LANGUAGE
AUDIO LANGUAGE
ENGLISH
ENGLISH
MENÚ
Aprovechar las capturas digitales de subtítulos
Puede manipular las capturas digitales de subtítulos que aparecen en pantalla.
Entre en el menú de SUBTÍTULOS
1
PARA SORDOS, marque el menú de
C C S E T T I N G ( A J U S T E D E
SUBTÍTULOS PARA SORDOS), y
pulse 3o4 para entrar en el menú.
Pulse el botón 5o6 para marcar el elemento CC MODE
2
(MODO DE SUBTÍTULO PARA SORDOS), pulse 3o4 para
elegir USUARIO. (Si no desea programar los subtítulos
digitales para sordos, seleccione EMISORA y los subtítulos se
mostrarán como parte de la emisión).
Una vez que haya seleccionado
3
USUARIO, pulse el botón 6 para
marcar el elemento CC CUSTOMER
(MODO DE SUBTÍTULO PARA
SORDOS DEL USUARIO), pulse
3o4 para elegir USUARIO.
Dentro del menú, pulse 5o6 para
4
seleccionar el elemento que desea
cambiar, entonces pulse 3o4 para
ajustar las características.
Puede seleccionar el elemento
OTROS, pulse entonces 3o4 el
menú d e l nivel siguiente y
aprovechar otras características.
CLOSED CAPTION
CC DISPLAY
CC SETTING
CC SETTING
CC TYPE
CC MODE
CC CUSTOMER
CC CUSTOMER
CC STYLE
CC SIZE
CC COLOR
BK COLOR
OTHERS
OTHERS
CC OPACITY
BK OPACITY
EDGE COLOR
EDGE TYPE
ON
SERVICE1
CUSTOMER
STYLE1
STANDARD
WHITE
BLACK
SOLID
SOLID
BLACK
NONE
Tecla de navegación
por el Menú
Salir del menú
Puede cambiar los siguientes ajustes:
MODO DE SUBTÍTULOS PARA SORDOS: Configura el estilo de la letra.
TAMAÑO DE SUBTÍTULOS PARA SORDOS: Configura el tamaño de la letra.
COLOR DE SUBTÍTULOS PARA SORDOS: Configura el color del texto.
COLOR DE FONDO: Configura el color de fondo.
OPACIDAD DE SUBTÍTULOS PARA SORDOS: Configura la opacidad del color del texto.
OPACIDAD DE FONDO: Configura la opacidad del color de fondo.
COLOR DEL MARCO: Configura el color del marco.
TIPO DEL MARCO: Configura el tipo del marco.
Pulse la tecla EXIT para ver otra vez la TV o pulse la tecla
5
MENU para volver al menú anterior.
24
Page 61
Control paterno
La función de Control Paterno permite que los adultos eviten que los niños vean programas de TV inadecuados. El
CONTROL PATERNO lee las calificaciones de la programación (excepto de noticias, deportes, películas de estreno
en cable premium y emisiones de sistemas de emergencia), entonces deniega el acceso al programa cuya
calificación haya sido seleccionada. En ese caso, se bloqueará el programa.
P.LOCK
ENTER CODE
Números del 0 al 9
MENÚ
Para entrar al menú de BLOQUEO PATERNO
Pulse la tecla de MENU.
Pulse 5o6 para seleccionar el elemento BLOQUEO
PATERNO (P.LOCK).Pulse 3o4 para entrar.
Para introducir la contraseña en el menú de BLOQUEO PATERNO
La contraseña por defecto del BLOQUEO PATERNO ES
“0000” y puede cambiarse.
Crear la contraseña de BLOQUEO PATERNO
Para usar la función de Control Paterno, primero debe configurar una contraseña.
Para introducir la contraseña en el
1
menú de BLOQUEO PATERNO (la
contraseña por defecto es 0000)
Pulse 5o6 para seleccionar el
2
elemento CAMBIAR CONTRASEÑA,
pulse 3o4 para entrar en el menú.
M a r q u e e l e l em e n to N U EVA
3
CONTRASEÑA, use las teclas de
números para introducir nueva
contraseña.
P.LOCK
PARENTAL LOCK
CHANGE PASSWORD
CHANGE PASSWORD
NEW PASSWORD
CONFIRM PASSWORD
Tecla de navegación
por el Menú
Salir del menú
Introduzca de nuevo la contraseña para confirmar. Ahora ya
4
ha creado su nueva contraseña.
PRECAUCIÓN: anote la contraseña y guárdela por si la olvida.
¿Qué debo hacer si se me olvida la contraseña?
Si olvida la contraseña y no puede entrar en el menú de BLOQUEO
PATERNO, estos pasos le serán de utilidad:
1. Pulse la tecla de MENU.
2. Pulse 5o6 para seleccionar BLOQUEO PATERNO.
3. Pulse 3o4.
4. Introduzca la contraseña maestra en este orden “1, 3, 9, 7”.
Cuando haya terminado de introducir la contraseña, aparece el
mensaje “SET CODE”. (INTRODUZCA CÓDIGO).
5. Introduzca una nueva contraseña (de cuatro cifras).
Ahora el mensaje “SET CODE” cambia a “BLOQUEO PATERNO”, la
contraseña vieja se ha borrado y la nueva se ha creado.
Nota: la contraseña maestra “1397” siempre será válida para
reprogramar la contraseña.
25
Page 62

Control paterno (continuación)
P.LOCK
ENTER CODE
P.LOCK
PARENTAL LOCK
CHANGE PASSWORD
Números del 0 al 9
Activar los controles paternos
Para activar el esquema de bloqueo que haya elegido, debe activar
el BLOQUEO PATERNO (ON). Siga estos pasos.
Escriba la contraseña en el menú de BLOQUEO PATERNO.
1
PARENTAL LOCK
Marque el elemento BLOQUEO
2
PATERNO, pulse 3o4 para entrar
LOCK
RATINGS LOCKS
ON
en el menú.
Marque el elemento BLOQUEO, pulse 3o4 para activar
3
(ON) el esquema de bloqueo.
Si desea desactivar el esquema de bloqueo, seleccione OFF.
Ajuste de la clasificación de MPAA
Escriba la contraseña en el menú de BLOQUEO PATERNO.
1
Marque el elemento BLOQUEO PATERNO, pulse 3o4 para
entrar en el menú de BLOQUEO PATERNO.
MENÚ
Tecla de navegación
por el Menú
Salir del menú
Marque el elemento CALIFICACIÓN
2
DE BLOQUEO, pulse 3o4 para
entrar en el menú.
Marque el elemento CALIFICACIÓN
3
DE MPAA, pulse 3o4 para entrar
en el submenú.
Pulse 5o6 para seleccionar la
4
calificación deseada, pulse 3o4
tanto para bloquear como para
desbloquear (se visualizará VISIÓN).
Calificación de películas:
* G y superior (para todos los públicos)
* PG y superior (se sugiere el consejo paterno)
* PG-13 y superior ( a partir de 13 años)
* R y superior (limitado)
* NC-17 y superior ( a partir de 18 años)
* X (adultos)
RATINGS LOCKS
MPAA RATING
TV RATING
CANADA ENGLISH
CANADA FRENCH
MPAA
G
PG
PG-13
R
NC-17
X
Si elige PG-13: Las películas G y PG estarán disponibles, PG13, R, NC-17 y X quedarán bloqueadas.
Pulse la tecla EXIT para ver otra vez la TV o pulse la tecla
5
MENU para volver al menú anterior.
VIEW
VIEW
VIEW
BLOCK
BLOCK
BLOCK
26
Page 63
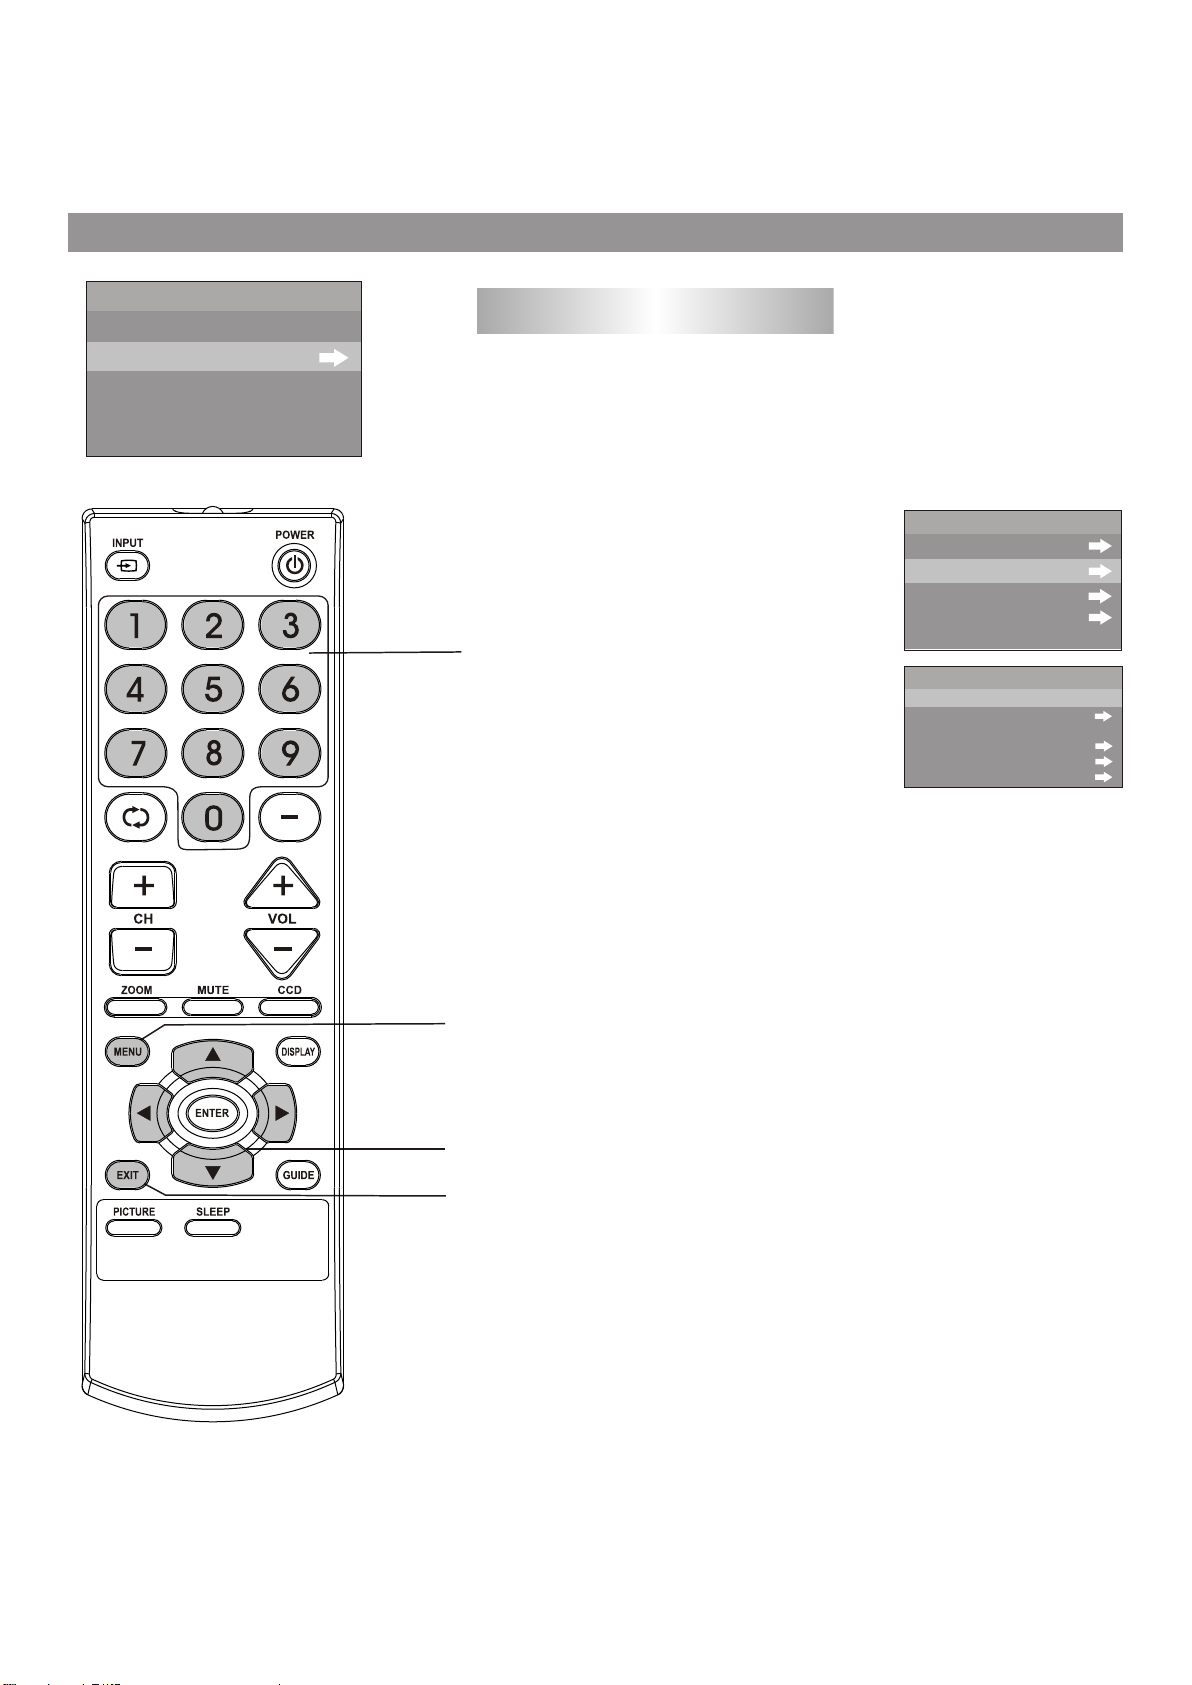
Control paterno (continuación)
PARENTAL LOCK
LOCK
RATINGS LOCKS
ON
Números del 0 al 9
Ajuste de la calificación de TV
Las calificaciones de TV incluyen dos componentes: un criterio
general (basado en la edad) y un criterio detallado (basado en los
contenidos).
Escriba la contraseña en el menú de BLOQUEO PATERNO y
1
vaya entonces al submenú de las CALIFICACIONES DE
BLOQUEOS.
RATINGS LOCKS
Pulse 5o6 para seleccionar el
2
elemento CALIFICACIÓN DE TV,
pulse 3o4 para entrar en el menú.
Pulse 5o6 para seleccionar la
3
calificación deseada, pulse 3o4
tanto para bloquear como para
de s blo que a r ( se v isu ali z ará
VISIÓN).
Si la calificación incluye calificaciones basadas en
4
contenidos, marque esta calificación y entonces pulse
3o4 para entrar en el siguiente nivel del menú. Pulse
5o6 para seleccionar el elemento, pulse 3o4 tanto para
bloquear como para desbloquear (se visualizará VISIÓN).
MPAA RATING
TV RATING
CANADA ENGLISH
CANADA FRENCH
TV
Y
Y7
G
PG
14
MA
BLOCK
BLOCK
MENÚ
Tecla de navegación
por el Menú
Salir del menú
CLASIFICACIÓN DE LA TV
* TV-Y (para todos los niños)
* TV-Y7 (a partir de 7 años)
* TV-G (para todos los públicos)
* TV-PG (se sugiere el consejo paterno)
* TV-14 (a partir de 14 años)
* TV-MA (público adulto)
Calificaciones basadas en contenidos:
* F V: violencia, fantasía (se aplica sólo a TV-Y7)
* V: Violencia (se aplica a TV-PG, TV- 14, TV-MA)
* S: Escenas de sexo (se aplica a TV-PG, TV-14, TV-MA)
* L lenguaje adulto (se aplica a TV-PG, TV-14, TV-MA)
* D: diálogo sexual (se aplica a TV-PG, TV-14, TV-MA)
Pulse la tecla EXIT para ver otra vez la TV o pulse la tecla
5
MENU para volver al menú anterior.
27
Page 64

RATINGS LOCKS
MPAA RATING
TV RATING
CANADA ENGLISH
CANADA FRENCH
Control paterno (continuación)
Ajuste de las calificaciones de Inglés Canadiense
Escriba la contraseña en el menú de BLOQUEO PATERNO y
1
vaya entonces al submenú de las CALIFICACIONES DE
BLOQUEOS.
Pulse 5o6 para seleccionar el elemento INGLÉS DE
2
CANADÁ, pulse 3o4 para entrar en el menú.
Pulse 5o6 para seleccionar la
3
calificación deseada, pulse 3o4
Números del 0 al 9
tanto para bloquear como para
desbloquear (se visualizará VISIÓN).
Calificaciones de Inglés Canadiense:
* C: Niños
* C8+: Niños a partir de 8 años.
* G: Programación general, para todos los públicos.
* PG: Control paterno.
* 14+: Espectadores a partir de 14 años de edad.
* 18+: Programación para adultos.
CAE
C
C8+
G
PG
14+
18+
BLOCK
BLOCK
BLOCK
BLOCK
BLOCK
BLOCK
MENÚ
Tecla de navegación
por el Menú
Salir del menú
Ajuste de las calificaciones de Francés Canadiense
Escriba la contraseña en el menú de BLOQUEO PATERNO y
1
vaya entonces al submenú de las CALIFICACIONES DE
BLOQUEOS.
Pulse 5o6 para seleccionar el elemento FRANCÉS DE
2
CANADÁ, pulse 3o4 para entrar en el menú.
Pulse 5o6 para seleccionar la
3
calificación deseada, pulse 3o4
tanto para bloquear como para
desbloquear (se visualizará VISIÓN).
Calificaciones de Francés Canadiense:
* G: Niños
* 8 ans+: Niños a partir de 8 años.
* 13 ans+: Niños a partir de 13 años.
* 16 ans+: Espectadores a partir de 16 años de edad.
* 18 ans+: Programación para adultos.
Pulse la tecla EXIT para ver otra vez la TV o pulse la tecla
4
MENU para volver al menú anterior.
CAF
G
8ans+
13ans+
16ans+
18ans+
BLOCK
BLOCK
BLOCK
BLOCK
BLOCK
28
Page 65

Control paterno (continuación)
PARENTAL LOCK
LOCK
RATINGS LOCKS
D.L. RATINGS
ON
Números del 0 al 9
Ajuste de los criterios de calificación de RRT5
Si el programa en emisión utiliza RRT5 (Calificación de la Región
5), cuyo criterio está de acuerdo con las reglas de FCC, su
calificación puede descargarse a este TV y puede utilizarse en los
controles paternos.
Escriba la contraseña en el menú de BLOQUEO PATERNO
1
y vaya entonces al submenú de las CALIFICACIONES DE
BLOQUEOS.
Marque la opción de calificación de la última línea del menú
2
de pantalla y pulse 3o4 para entrar en el menú.
Pulse 5o6 para seleccionar el
3
elemento deseado, pulse 3o4 para
entrar en el menú.
Dentro del menú, pulse 5o6 para
4
seleccionar la calificación deseada,
pulse 3 o4 para bloquear o
desbloquear la calificación. Pulse
INTRO para desplazarse hacia arriba
y abajo si hay dos o más páginas.
D.L. RATINGS
HUMOR LEVEL
INTELLIGENCE
HUMOR LEVEL
[-]
DH
[-]
MH
[-]
H
[-]
VH
[-]
EH
1/1
MENÚ
INTRO
Tecla de navegación
por el Menú
Salir del menú
(El menú de OSD de
arriba se muestra a
título de ejemplo).
Pulse la tecla EXIT para ver otra vez la TV o pulse la tecla
5
MENU para volver al menú anterior.
29
Page 66

Resolución de problemas
Si tiene problemas con el TV, pruebe lo siguiente.
SINTOMAS
Sin luz
Encendido
Mala imagen o
ausencia de imagen
Imagen temblorosa
o borrosa.
No se recibe
señal de cable.
No se recibe a
partir del canal 13.
Recepción de la emisión de TVMando a distancia
Mal sonido o
ausencia de sonido.
CAUSA PROBABLE SOLUCIÓN PROBABLE
El cable de corriente no está enchufado.
La emisora de TV tiene problemas. Pruebe con otro canal.
El control de imagen no está ajustado.
Probable interferencia local
La clavija de la Antena o Cable no está conectada.
La emisora de TV tiene problemas. Pruebe con otro canal.
El canal de TV por Cable está codificado.
Probable interferencia local
Cable conectado o desconectado.
AIRE/Cable en posición AIRE. Ponga AIR/Cable en posición Cable.
Servicio de TV por Cable interrumpido.
AIRE/Cable en posición AIRE. Ponga AIR/Cable en posición Cable.
La emisora de TV tiene problemas. Pruebe con otro canal.
La función de SILENCIO (MUTE) está activada.
Probable interferencia local.
La clavija de la Antena o Cable no está conectada.
El volumen está al mínimo.
Enchúfelo
Compruebe los ajustes del control de imagen.
Compruebe si hay interferencias en el
origen de la recepción.
Compruebe la conexión del Cable o de
la antena VHF/UHF.
Necesita un decodificador de cable (si lo desea)
Compruebe si hay interferencias en el
origen de la recepción.
Compruebe todas las conexiones de cable.
Diríjase a la compañía de TV por cable.
Pulse la tecla SILENCIO (MUTE) otra vez.
Compruebe si hay interferencias en el
origen de la recepción.
Compruebe la conexión del Cable o de
la antena VHF/UHF.
Aumente el volumen.
EL TV se apaga.
El subtitulado
para sordos
no funciona.
El mando a distancia
no funciona.
El control paterno no
funciona correctamente.
Control
paterno
El temporizador de apagado está activado.
La señal de TV es débil.
La emisora de TV tiene problemas o el
programa sintonizado no tiene subtítulos
para sordos.
El subtitulado para sordos no está activo.
El mando a distancia no apunta
hacia el sensor.
Hay demasiada distancia o mucha
luz en la habitación.
Hay un obstáculo en el trayecto del rayo. Despeje el trayecto del rayo.
Las pilas están gastadas.
Las pilas no están colocadas correctamente.
El Control Paterno está desactivado (OFF). Active el Control Paterno (ON).
Hay una emisión de noticias o deportes.
Calificaciones no programadas.
Desactive el apagado automático (OFF).
Compruebe el Cable o la antena VHF/UHF.
Pruebe con otro canal.
Pulse la tecla de CCD.
Apunte con el mando a distancia
hacia el sensor remoto.
Póngase a unos 7 metros o disminuya
la luz de la habitación.
Ponga unas nuevas.
Póngalas bien.
El Control Paterno no funciona con estos programas.
Noticias o acontecimientos deportivos.
Programe las calificaciones como desee.
30
Page 67

Resolución de problemas(continuación)
INTERFERENCIAS EN LA RECEPCIÓN
La mayoría de las interferencias de televisión pueden solucionarse si se ajusta la altura y la posición de la antena
VHF/UHF. Se recomiendan las antenas exteriores para obtener un mejor resultado si no se recibe por cable o satélite.
La mayoría de las interferencias de televisión se muestran a continuación. Si alguno de estos signos aparece cuando
el TV está conectado a un sistema de TV por Cable, las interferencias pueden deberse a la propia compañía de
televisión por cable.
ENCENDIDO:
Pueden aparecer puntos negros o rayas horizontales, la imagen puede temblar
o salir borrosa.Normalmente la causa es la interferencia del sistema de
arranque o encendido de un coche, bombillas de neón, taladros eléctricos y
otros aparatos eléctricos.
FANTASMAS:
Los fantasmas se originan en una señal de televisión que sigue dos
caminos. Uno es el camino directo y el otro es el reflejo de edificios altos,
colinas u otros objetos. Puede mejorar la recepción si cambia la dirección o
posición de la antena.
NIEVE:
Si su receptor está ubicado en el borde del área de la emisora de televisión
en el que la señal es débil, la imagen se verá afectada por la aparición de
pequeños puntos. Cuando la señal sea extremadamente débil, debe ser
necesario instalar una antena externa para mejorar la imagen.
INTERFERENCIAS DE RADIO FRECUENCIA:
La interferencia produce oscilaciones o rayas diagonales y, en algunos
casos, pérdida de contraste en la imagen.
CAMBIO DEL TAMAÑO DE LA IMAGEN
Es normal que al ajustar el CONTRASTE o el BRILLO, el tamaño de la
imagen varíe un poco.
31
Page 68

Resolución de problemas(continuación)
CUIDADO Y MANTENIMIENTO
Para evitar un incendio o descarga eléctrica, desconecte su unidad de la corriente eléctrica cuando la esté limpiando.
El acabado de su receptor puede limpiarse con un trapo seco como cuidaría cualquier otro mueble. Tenga cuidado al
limpiar y frotar las partes de plástico. Puede usar jabón neutro y un trapo húmedo.
PARA OBTENER AYUDA ADICIONAL CON RESPECTO A LOS AJUSTES O A LA OPERACIÓN,
VISITE NUESTRO SITIO WEB EN WWW.MEMOREXELECTRONICS.COM O COMUNÍQUESE
CON SERVICIO AL CLIENTE AL
(954) 660-7100
CONSERVE EL EMPAQUE AL MENOS DURANTE 90 DÍAS POR SI ACASO NECESITARA
REGRESAR EL PRODUCTO A SU DISTRIBUIDOR O A MEMOREX.
CONSULTE EL NÚMERO DE PIEZAS REMPLAZABLES EN LA PÁGINA 6, LUEGO
COMUNÍQUESE CON FOX INTERNATIONAL AL 1-800-321-6993.
32
Page 69

Especificaciones
Fuente de alimentación AC 120V, 60Hz
Consumo de energía: 90 W
Dimensiones (inch): 23,7 (W) X18,0 (H) X15,2 (D)
Peso (lbs): 48.5
CRT: 20"
AUDIO OUTPUT 3W x 2
Sistema de TV: NTSC-M, ATSC
Cobertura de Canales: VHF 2-13, UHF 14-69, CATV 1-125, CADTV 1-135, DTV 2-69
Impedancia de la antena: 75 ohmios
Accesorios: Mando a distancia x 1
El diseño y las características están sujetos a cambio sin previo aviso.
33
Page 70

Page 71

604.TQ20926-02
XHM Ver.1.0
 Loading...