

Page 1
@
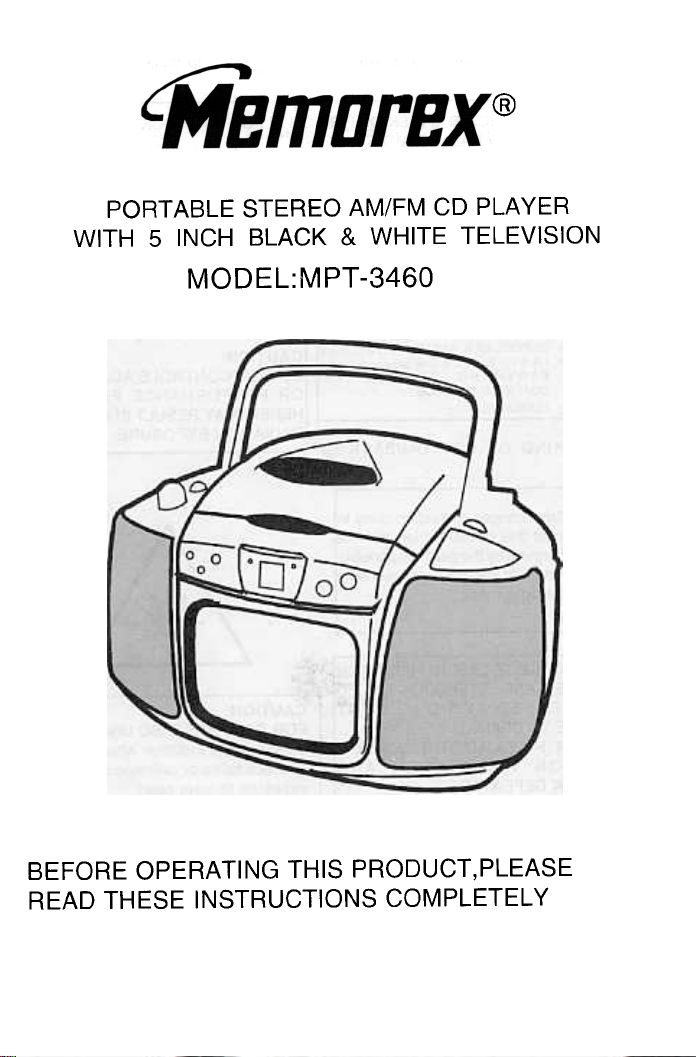
PORTABLE STEREO AM/FM CD PLAYER
WITH 5 INCH BLACK & WHITE TELEVISION
MODEL:MPT -3460
BEFORE OPERATING THIS PRODUCT,PLEASE
READ THESE INSTRUCTIONS COMPLETELY
Page 2

Dear Customer:
Please red this manual thoroughly before operating the unit so that you will be
informed of all the features and control operations. Also keep these instructions handy
for future refernce.
LASER SAFETY:
This unit employs a laser.Only qualified
Thelighiningflash CAUTION:TO REDUCE The exclamation
and arrowhead THE RISK OF ELECTRIC pointwithin
wilhin the lriengle S HOC K .DON 0 T the triangle is a
is a warning s~n REMOVE COVER (OR waningsignaJerting
alerting you of B A C K) N 0 USE R you of important
"dangerous SERVICEABLE PARTS instructions
voItage'lnsidethe INS IDE. REF E R aocompanying the
proc1Jd. S E R V I C I N G T 0 prtrlrt
OUALIFIED SERNICE
PERSONNEL.
SEE MARKING ON BOTTOM/BACK OF
Iservice personnel should attempt toIservice
this device due to possible eye
injury.
CAUTION:
USE OF CONTROLS,ADJUSTMENTS
OR PERFORMANCE PROCEDURE
HEREIN MAY RESULT IN HAZARDOUS
RADIATION EXPOSURE.
PRODUCT
DANGER:INVISIBLE LASER RADIATIONI
WHEN OPEN AND INTERLOCK FAILED'
OR DEFEATED.AVOID DIRECT
EXPOSURE TO BEAM.
CAUTION:HAZARDOUS LASER
RADJATION WHEN OPEN AND
INTERLOCK DEFEATED.
CAUTION:
FOR COMPACT DISC UNIT ONLY
Invisible laser radiation when open and
interlock failed or defeated.Avoid direct
exposure to laser beam.
FCC INFORMATION
This device copplies with part 15 of the FCC Rules. Operation is subject to the
following tow conditions:
1) This device may not cause harmful interference, and
2) This device must accept any interference received, including interference that may
cause undesired operation.
IMPORTANT SAFEGUARDS
1. Read Instructions -All the safety and operatiing instructions should be read before
the appliance is operated.
2. Retain instructions -The safety and operating instructions should be retained for
future reference.
E-l
.s;;-.A!J~O~
Page 3

3.Heed Warnings -All warnings on the
appliance and in the operating
instructions should be adhered to.
4.Follow Instructions -All operating and
use instructions should be followed.
5.Water and Moisture -The appliance
should not be used near water -for
example, near a bathtub, washbowl,
kitchen sink, laundry tub, in a wet
basement, or near a swimming pool,
etc.
6.Carts and Stands -The appliance
should be used only with a cart or
stand that is recommended by the
manufacturer. An appliance and cart
combination should be moved with
care. Quick stops, excessive force,
and uneven surfaces may cause the
appliance and cart combination to
overturn.
having a blade wider than the other).
This is a safety feature. If you are
unable to insert the plug fully into the
outlet, try reversing the plug.lf the
plug should still fail to fit, contact your
electrician to replace your obsolete
outlet. Do not defeat the safety
purpose of the polarized plug.1.
Power Cord Protection -Power
supply cords should be routed so
that they are not likely to be walked
on or pinched by items placed upon
or against them, paying particular
attention to cords at nlugs,
convenience receptacles, and the
points where they exit from the
appliance.2.
Cleaning -The appliance should be
cleaned only as recommended by the
manufacturer.3.
Power Lines -An outdoor antenna
should be located away from power
lines.4.
Non-use Periods-The power cord of
the appliance should be unplugged
from the outlet when left unused for a
long period of time.
7. Wall or Ceiling Mounting -The
appliance should be mounted to a
wall or ceiling only as recommended
by the manufacturer,
8. Ventilation -The appliance should be
situated so that its location or position
does not interfere with its proper
ventilation. For example, the appliance
should not be situated on a bed, sofa,
rug, or similar surface that may block
the ventilation openings; or, placed in
a built-in installation, such as a
bookcase or cabinet that may impede
the flow of air through the ventilation,
openings.
9.Power Sources -The appliances
should be connected to a power
wupply only of the type described in
the operating instructions or as
marked on the appliance.
10. Grounding or Polarization -This
product is equipped witha polarized
alternating-current line plug (a plug
EXAMPLE OF ANTENNA GROUNDING
AS PER NATIONAL ELECTRICALCODE
ANTENNA
cEADIN,""
"""""
~-"""
(IOCSEC1x.. 810 ""
-~
0EC~C1x..81""
GRQIIIDCw.IO
GLIE A .--~~,~~
ElECTOOr£SVS""
(NfCARI,",PARlfQ
15. Object and Liquid Entry -Care should
be taken so that objects do not fall
and liquids are not spilled into the
enclosure through openings.
16. Damage Requiring Service -The
appliance should be serviced by
qualified service personnel when:
a. The power supply cord or the plug has
been damaged; or
£-2
Page 4

b. Objects have fallen, or liquid has been spilled into the appliance; or
c. The appliance has been exposed to rain; or
d. The appliance does not appear to operate normally or exhibits a marked change in
performance; or
e. The appliance has been dropped, or the enclosure damaged.
17. Heat -The appliance should be situated away from heat sources such as
radiators, heat registers, stoves, or other appliances (including amplifiers) that
produce heat.
18. Outdoor Antenna Grounding -If an outside antenna is connected to the receiver, be
sure the antenna system is the National Electrical Code, ANSI/NFPA No. 70 -1984.
provides information whth respect to proper grounding of the mast and suppor1ing
structure, grounding of the lead-in wire to an antenna discharge unit, size of grounding
conductors. Location of antenna discharge unit, connection to grounding electrodes, and
requirements for the grounding electrode. See Figure A.
19. Servicing -The user should not attempt to service the appliance beyond that
described in the operating instructions. All other servicing should be referred to
E-3
Page 5

IINSTRUCTION MANUA~
Location of control
1. Picture Tube 16. Earphone Jack
2. Speaker 17. Band/Frequency Selector
3. Volume Control 18. Function Swtich
4. Dial Lens 19. Tuning Knob
5. Power On/Off 20. CD Door
6. DC Jack 21. CD Skip -/ Search Key
7. Charger Switch 22. CD Skip + / Search + ~ Key
8. V-hold Control 23. Repeat
9. Brightness Control 24. CD Play/Pause indicator
10. Contrast Control 25. CD LED Display
11. Audio IN 26. CD Repeat 1/ALL Indicator
12. Video IN 27. Play/Pause Key
13. TV/AV Switch Button 28. Stop Key
14. TV Ext Antenna Input Jack 29. Battery Compartment
15. Telescopic Ante.nna
E-4
20
21 23 242526 28
~~~
22 27
Page 6

CAUTION
"DO NOT CONNECT FM ANTENNA TO OUTSIDE ANTENNA."
USE OF CONTROLS OR ADJUSTMENTS OR PERFORMANCE OF PROCEDURES
OTHER THAN THOSE SPECIFIED HEREIN MAY RESULT IN HAZARDOUS
RADIATION EXPOSURE.
THIS UNIT SHOULD NOT BE ADJUSTED OR REPAIRED BY ANYONE
EXCEPT QUALIFIED SERVICE PERSONNEL.
IMPORTANT: Since movement of the CD mechanism and the sensitive circuitry
may cause interference to the radio turner nearby, switch this
unit off while operating other radio devices.
Preparation For Use
1. AC Operation
-Connect the AC adaptor into the DC jack on the back of the unit. (DC 15V)
-Connect the cord into household mains outlet. Be sure the voltage must be compatible.
NOTE: Only the cord supplied with the unit can be used. Cords other than specified
may damage the unit.
2. Battery Installation
-Remove Battery Compar1ment Cover.
-Put in 10 batteries (UM-1, "D" size,LR20 or equivalent) in correct polarity as indicated.
(Alkaline batteries are recommended)
-Replace the cover properly.
Use the Cigarette Lighter Adaptor for power when using the UNIT in a car.
1. Plug the adaptor into the car cigarette lighter.
2. Plug the pin into the DC jack on the unit.
Notes:The supplied DC car adaptor / cord is designed for use with vehicles equipped with
a 12 volt negative ground electricat system only. To DC Jack
,,-
~- ~
-
.\"' \ ---0...
I
C
--=
'"
'-
I '-~-
'=-=
ette Lighter
Note
Check your batteries regularly, old or discharged batteries
should be replaced. If the unit is not going to be used for some
time or is being run exclusively on alternative power, take away
the batteries to avoid leakage and damage.
* You must remove the AC adapter from the DC jack on the
back cabinet in order to operate the unit on batteries.
E-5
'~
, ,~'
+CJ CJ-
-00+
+CJCJ-
-00+
+00-
Page 7

Earphones
Be sure your headphones have 3.5mm diameter stereo plug. With an impedance of 32
ohms.
When headphones are connected, the speakers are disconnected automatically.
Adjust the volume control to desired level.
Listening To Radio
Manual Tuning
1. Set the Function Selector to the "RADIO" position.
2. Set the Band Selector to the desired band.
3. Turn the Tuning Control to set the Dial Pointer against the station frequency
desired.
4. Adjust Volume Controls for the desired volume level.
Antenna
For FM reception, use the Telescopic Antenna extend to its full length, adjust the
angle and direction for the best reception. However, AM signals are picked up through the bui~-
in fenite antenna. You may have to orientate the set to obtain the best reception.
FM/Stereo Reception
The Stereo Indicator lights up to show FM Stereo Program
1. Function
Stop Button.
Play/Pause Button ...11
Skip Button (+) ~ /Search +
Skip Button (-) 1'4'4 /Search-
.Getting start
1. Set the Function Selector to "CD" position. Open the CD compartment Open the CD
CD Display
Eg. Track 8
door.Put a CD into the compartment, and close the CD door.
2. The display will show the total number of track after a few second.
.To Play
1. Press the Play button. The display will show the first track, and the play indicator
will on.
2. Select a desired track by pressing the Skip button (forward or backward skip).
3. Press the Pause button if want to pause at any track when playing. The current track
will be blanking.
4. Stop the playing by simple pressing the stop button.
E.6
3.
Page 8

OPERATING THIS TV SET
Choice of antenna and connection
Connect the antenna to RF input terminal (Refer to the diagram below)
Antenna
~
~ 1.Q.='~_~~ooo9
300-750 adaptor
300-75Q adaptor
To get best picture and sound, a correct antenna (75,0, -axial cable) and a
correct terminal are needed. If a community antenna system is used, a correct
cable and jack is needed to connect the antenna and the TV set. Your local
community antenna dealer can help you to get the correct antenna system and
needed assisories.
If a TV Ext. Antenna Input Jack is used, you should connect a 300-75,0,
adaptor to the flat cable of the indoor antenna and then plug it into the RF input
terminal.
If there is no community antenna system or signal is weak. A set of outdoor
antenna and a signal booster is requested. If VHF antenna and flat cable are
used, then 300-75,0, adaptor is needed which is connected to the flat cable and
then inserted into RF input terminal. If UHF antenna is used, a 75,0, co-axial
cable and antenna jack are needed to connect to the TV set.
Note: (1) The outdoor antenna should be located in high position away from
electrical wires or neon.
(2) In areas with weak signal, if an outdoor antenna cannot get ideal picture
and sound, please consider to use a signal booster.
(3) During thundering and lighting, the outdoor antenna and power should be
unpluged to ensure safety.
E.8
Page 9

Characteristics of this unit:
.Portable 14cm high resolution black and white picture tube.
.Rechargeable battery
.AV input terminal.
Function Introduction
.AV 1 input terminal which can be connected to video record or VCD player or
game player.
.Rechargeable battery
Attention before installing this unit.
.Avoid placing your Television set in direct sunlight or under reflection to the
screen.
.This unit should be placed in a well-ventilated place away from source of heat.
.Please provide correct power supply to the television set. (Please refer to the
rated power on the label at the back of the unit)
Connection of other Audio Visual Equipment to the Television.
Page 10

Choice of antenna and connection:
1. Telescopic (Rod) Antenna
In most areas, you can get bright and clear picture and best sound effect by
adjusting the length, position and angle of the antenna.
EXT. Antenna Input Jack (75 ohm)
(1) In areas with weak signal or topographical interference, an outdoor antenna is
requested to improve the receiving effect.
(2) Connect the EXT. Antenna Input Jack (75 ohm) into the "antenna in" jack
(14) on the TV set connect to the EXT. Antenna Input Jack (14) 75 ohm
adaptor connect to 75 ohm antenna.
..:cjr,--rI-~~
EXT antenna Input 75 ohm adaptor 75 ohm antenna
Operation Instruction
1. Set the "Power Switch (5) to "ON" position to connect the power~~=;~~-
2. Set the Function Selector (18) to TV mode
3. Set the Band Switch (17)to VHF or UHF position. -~~~~~-
4. Turn the Tuning Knob (19) till you get the desired channel program.
5. Adjust the Volume Control (3) to a desired level.
Jack (14)
l.~~ l~-r-j ~ I"
OFF ON
UHF VH Vl
Adjust V-hold Control (8) clockwise or anticlockwise to a desired level.
7. Adjust Brightness Control (9) clockwise or anticlockwise to a desired level
Adjust Contrast Control (10) clockwise or anticlockwise to a desired level
9. Earphone Jack (16) is designed for personal enjoyment. Connect your earphone
into the earphone jack (16) to avoid voice to others.
10. DC Jack (6) : This unit is supplied with a transformer. Connect one end of the
transformer into the household AC 110V socket, the other end to the DC Jack
(6) onthe TV set. The DC Battery power will be auto switch off.
11. TV/AV switch Button (13) : Push in the button and th~ un.t is in AV mode (AV
mode is for viewing videocorder and VCD); release the button and the unit is in
TV mode.
12. If rechargeable batteries are used, set the normal/recharger Switch to recharge
position and you can recharge the batteries. (During recharging, other functions of
this unit do not work). If you want to watch TV or listen to the radio, please set
the normal/recharger button to use position.
E.I0
2.
Page 11

Specification: TV
Screen size : 13cm (5")
Power consumption: 25W
Receive system: RF
ANTENA : Rod ANT and 75 ohm unbalanced ANT required.
AV INPUT VIDEO 1.0 V P-P 750.
AUDIO 0.5 VRMS 10ko.
RADIO FREQUENCY COVERAGE:
FM: 88-108 MHz
AM: 530-1710KMz
SPEAKER: 8 OHMS
POWER OUTPUT: 1.5 WATT.AT 10% T.H.D. PERICH
CD PLAYER
PICK UP: 3 BEAM.SEMICONDUCTOR LASER
ENCODING: 1 BIT LINEAR 8X OVERSAMPLING
E-ll
Page 12

Safety instructions and maintenance
'
~:i:i::'::;: To avoid fire or electric shock, do not expose this
",::::' ' l,init to rain or moisture.
, ~I~~=i;~""~-
~\ 1 High Voltage:
Do not open back cabinet. Risk of dangerous high
.voltage.
~
l ~=- ~\
~1Irn
A place with good ventilation to prevent possible
damage to the components.
Avoid placing the unit in direct sunshine or near other
heat sources.
esill" i For a long period of non-usuage, please unplug the
'I t..i 4l power cord.
~t(i'S1:, When abnormal cases occurs, please turn off this unit.
~ ~ For example: Smoking, abnormal sound or smell. If
..~",~, any abnormal cases occurs, please turn off the power
..l!8~: ~PIY at once and pullout the plug of the television
Cleaness of the cabinet and screen:
Use dry soft cloth with moderate solvent
~
'vrrr
eO
, Ii] , petrol or chemical cloth.
-o,,)~ To ensure safety disconnect the AC power cord when
~ cleaning. Cleaness of the speaker grille:
outside. Do not use a solvent containing benzene,
Clean the grille with a brush fitted on a vaccum
cleaner. Do not let the pipe (without the brush) of
the vaccum cleaner touch the speaker directly.
-
Note: If the speaker grille is scratched (by fingernail or
other hard object). or striken against other objects, it
may become deformed. The speaker grille is easy to
be pricked through.
E.12
Page 13

Trouble Shooting
Before calling for service, please check the following symptoms and solutions
CUSTOMER SERVICE:1-800-919-3647
E -13
Page 14

LIMITED WARRANTY
We at MEMOREX believe you will be pleased with your new Product. Please read this
Warranty carefully. Memorex warrants this product to be free from manufacturing defects
including original parts and workmanship for a period of ninety (90) days from the date of
original purchase in, and if used in, the United States.
Should you find your unit is not operating properly during the terms of full coverage of
this warranty, ninety (90) days, you should contact your original place of purchase for an
exchange with a valid receipt. If necessary, Memorex will provide one of the following options
(at Memorex's discretion), providing the manufacturing defect is verified along with the date
of purchase.
Repair service for ninety (90) days from date of original purchase at no charge
for labor and parts at their avthorized warranty service facility, providing the
manufacturing defect is verified along with the date of purchase.
Replacement of defective unit with either a new, refurbished, or equivalent model
at no charge for ninety (90) days from date of original purchase.
This warranty is void if the product is:
A) Damaged through negligence, abuse, misuse, accident, or acts of God.
B) Used in commercial applications or rentals.
C) Modified or repaired by anyone other than Memorex or their expressly authorized
representative.
D) Damage resulting from the improper connection to equipment of other manufacturers.
AUDIO
This warranty does not cover:
A) Cost incurred in the shipping of the product to and from the Memorex authorized
repair facility listed.
B) Damage or improper operation caused by the failure to follow the operating
instructions provided with the product.
C) Routine adjustments to the product, which can be performed by the customer as
outlined in the owner's manual.
D) Signal reception problems caused by external factors.
E) Products not purchased in the United States.
F) Damage to the products used outside the United States.
G) Damage to audiocassette tapes.
H) Damage to Compact Discs.
In the event that service is required under this warranty, please contact CUSTOMER
SERVICE at 1-800-919-3647 or contact our website at www.memorex.com.
E -14
Page 15

THIS WARRANTY IS NON-TRANSFERABLE AND APPLIES SOLELY TO THE
ORIGINAL PURCHASER AND DOES NOT EXTEND TO SUBSEQUENT OWNERS OF
THE PRODUCT. ANY APPLICABLE IMPLIED WARRANTIES, INCLUDING THE WARRANTY OF MERCHANTABILITY, ARE LIMITED IN DURATION TO A PERIOD OF THE
EXPRESSED WARRANTY AS PROVIDED HEREIN BEGINNING WITH THE DATE OF
THE ORIGINAL PURCHASE AT RETAIL AND NO WARRANTIES, WHETHER EXPRESSED OR IMPLIED SHALL APPLY TO THE PRODUCT THEREAFTER. MEMOREX
MAKES NO WARRANTY AS TO THE FITNESS OF THE PRODUCT FOR ANY PARTICULAR PURPOSE OR USE.
THE EXTENT OF MEMOREX'S LIABILITY UNDER THIS LIMITED WARRANTY IS
THE REPAIR OR REPLACEMENT PROVIDED ABOVE AT THE SOLE DISCRETION OF
MEMOREX. IN NO EVENT SHALL MEMOREX'S LIABILITY EXCEED THE PURCHASE
PRICE PAID BY THE PURCHASER. UNDER NO CIRCUMSTANCES SHALL MEMCORP
BE LIABLE FOR ANY LOSS, DIRECT, INDIRECT, INCIDENTAL, FORESEEN,
UNFORESEEN, SPECIAL, OR CONSEQUENTIAL DAMAGE ARISING OUT OF OR IN
CONNECTION WITH THE USE OF THIS PRODUCT.
THIS WARRANTY IS VALID ONLY IN THE UNITED STATES. THIS WARRANTY
GIVES YOU SPECIFIC LEGAL RIGHTS, HOWEVER, YOU MAY HAVE OTHER RIGHTS
WHICH MAY VARY FROM STATE TO STATE. SOME STATES DO NOT ALLOW
LIMITATIONS ON IMPLIED WARRANTIES OR EXCLUSION OF CONSEQUENTIAL
DAMAGE, THEREFORE THESE RESTRICTIONS MAY NOT APPLY TO YOU.
@2000, Memorexisa registered trademark of MemorexTelex N.V.
E -15
 Loading...