

Page 1
MP8700
User’s Guide
Portable CD Player with
AM/FM Stereo Radio
Before operating this product,
please read these instructions completely.
Page 2
Dear Customer,
Please read this manual thoroughly before operating the unit to become more familiar with it and obtain the
performance that will bring you continued enjoyment for many years. Keep these instructions handy for
future reference.
PLEASE KEEP ALL PACKAGING MATERIAL FOR AT LEAST 90 DAYS IN CASE YOU
NEED TO RETURN THIS PRODUCT TO YOUR PLACE OF PURCHASE OR MEMOREX.
For future reference, record the serial number of the unit printed on the rear of the cabinet.
Serial Number _______________________________________
CAUTION
RISK OF ELECTRIC SHOCK
DO NOT OPEN
CAUTION: TO REDUCE THE RISK OF ELECTRIC SHOCK,
DO NOT REMOVE COVER (OR BACK). NO USERSERVICEABLE PARTS INSIDE. REFER SERVICING TO
QUALIFIED SERVICE PERSONNEL.
DANGEROUS VOLTAGE:
The lightning flash with arrowhead symbol,
within an equilateral triangle is intended to alert
the user to the presence of uninsulated
dangerous voltage within the product’s
enclosure that may be of sufficient magnitude to
constitute a risk of electric shock to persons.
ATTENTION:
The exclamation point within an equilateral
triangle is intended to alert the user to the
presence of important operating and
maintenance (servicing) instructions in the
literature accompanying the appliance.
DANGER:
Invisible and hazardous laser radiation
when open and interlock failed or defeated.
Avoid direct exposure to beam.
FCC WARNING:
This equipment may generate or use radio
frequency energy. Changes or modifications to
this equipment may cause harmful interference
unless the modifications are expressly
approved in the instruction manual. The user
could lose the authority to operate this
equipment if an unauthorized change or
modification is made.
LASER SAFETY: This unit employs a laser.
Only qualified service personnel should attempt
to service this device due to possible eye injury.
CAUTION: USE OF CONTROLS,
ADJUSTMENTS OR PERFORMANCE
PROCEDURE HEREIN MAY RESULT IN
HAZARDOUS RADIATION EXPOSURE.
INFORMATION:
This equipment has been tested and found to
comply with the limits for a Class B digital
device, pursuant to Part 15 of the FCC Rules.
These limits are designed to provide
reasonable protection against harmful
interference in a residential installation. This
equipment generates, uses and can radiate
radio frequency energy and, if not installed and
used in accordance with the instructions, may
cause harmful interference to radio
communications. However, there is no
guarantee that interference will not occur in a
particular installation. If this equipment does
cause harmful interference to radio or television
reception, which can be determined by turning
the equipment off and on, the user is
encouraged to try to correct the interference by
one or more of the following measures:
• Reorient or relocate the receiving antenna.
• Increase the separation between the
equipment and receiver.
• Connect the equipment into an outlet on a
circuit different from that to which the receiver
is connected.
• Consult the dealer or an experienced radio/TV
technician for help.
WARNING: TO PREVENT FIRE
OR SHOCK HAZARD, DO NOT
EXPOSE THIS UNIT TO RAIN
OR MOISTURE.
SURGE PROTECTORS:
It is recommended to use a surge protector for
AC connection. Lightning and power surges
ARE NOT covered under warranty for this
product.
1
Page 3

Dear Customer:
A
S
S
O
C
I
A
T
I
O
N
EST. 1924
E
L
E
C
T
R
O
N
I
C
I
N
D
U
S
T
R
I
E
S
EIA
We
LISTENING
For A Lifetime
Want You
Selecting fine audio equipment such as the unit you’ve just purchased is only the start of your musical
enjoyment. Now it’s time to consider how you can maximize the fun and excitement your equipment offers.
This manufacturer and the Electronic Industries Association’s Consumer Electronics Group want you to get
the most out of your equipment by playing it at a safe level. One that lets the sound come through loud and
clear without annoying blaring or distortion and, most importantly, without affecting your sensitive hearing.
Sound can be deceiving. Over time your hearing “comfort level” adapts to higher volumes of sound. So what
sounds “normal” can actually be loud and harmful to your hearing. Guard against this by setting your
equipment at a safe level BEFORE your hearing adapts.
To establish a safe level:
• Start your volume control at a low setting.
• Slowly increase the sound until you can hear it comfortably and clearly, and without distortion.
Once you have established a comfortable sound level:
• Set the dial and leave it there.
Taking a minute to do this now will help to prevent hearing damage or loss in the future. After all, we want
you listening for a lifetime.
We Want You Listening For A Lifetime
Used wisely, your new sound equipment will provide a lifetime of fun and enjoyment. Since hearing damage
from loud noise is often undetectable until it is too late, this manufacturer and the Electronic Industries
Association’s Consumer Electronics Group recommend you avoid prolonged exposure to excessive noise.
This list of sound levels is included for your protection.
Decibel
Level
Example
30 Quiet library, soft whispers
40 Living room, refrigerator, bedroom away from traffic
50 Light traffic, normal conversation, quiet office
60 Air conditioner at 20 feet, sewing machine
70 Vacuum cleaner, hair dryer, noisy restaurant
80 Average city traffic, garbage disposals, alarm clock at two feet
THE FOLLOWING NOISES CAN BE DANGEROUS UNDER CONSTANT EXPOSURE:
90 Subway, motorcycle, truck traffic, lawn mower
100 Garbage truck, chain saw, pneumatic drill
120 Rock band concert in front of speakers, thunderclap
140 Gunshot blast, jet engine
180 Rocket launching pad
Information courtesy of the Deafness Research Foundation.
2
Page 4
SAFETY INSTRUCTIONS
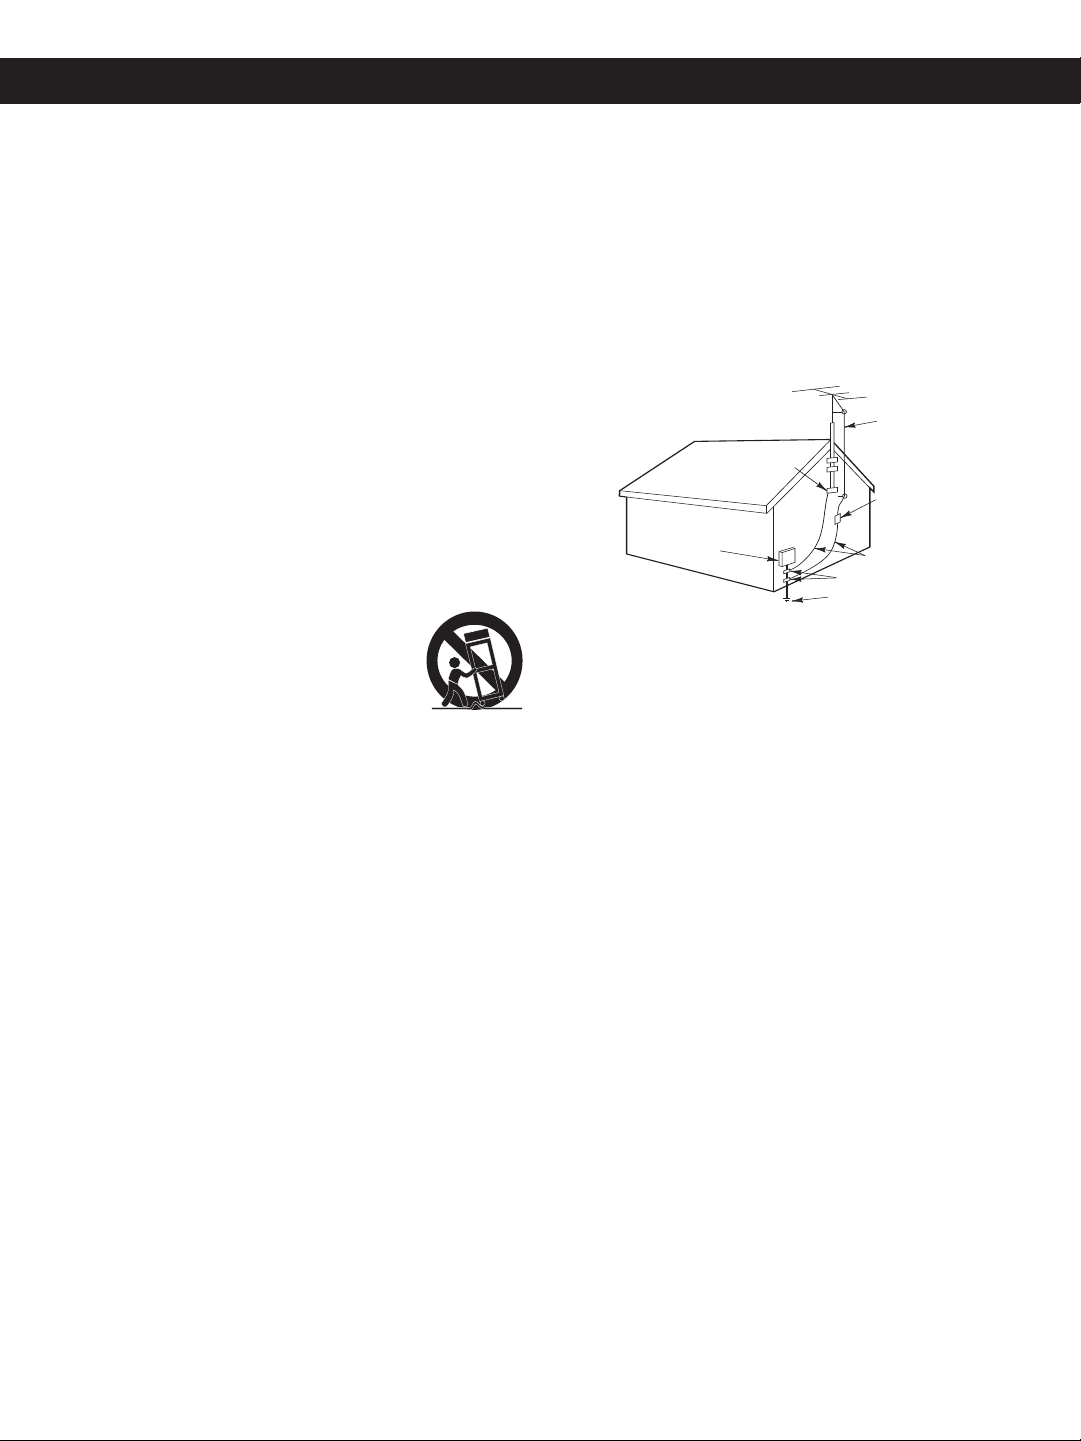
PORTABLE CART WARNING
(symbol provided by RETAC)
ANTENNA
LEAD IN
WIRE
ANTENNA
DISCHARGE UNIT
(NEC SECTION 810-20)
GROUNDING CONDUCTORS
(NEC SECTION 810-21)
GROUND CLAMPS
POWER SERVICE GROUNDING
ELECTRODE SYSTEM
(NEC ART 250, PART H)
NEC - NATIONAL ELECTRICAL CODE
ELECTRIC
SERVICE
EQUIPMENT
GROUND
CLAMP
S2898A
Before using the unit, be sure to read all operating instructions
carefully. Please note that these are general precautions and may not
pertain to your unit. For example, this unit may not have the capability
to be connected to an outdoor antenna.
READ INSTRUCTIONS
1.
All the safety and operating instructions should be read before the
product is operated.
RETAIN INSTRUCTIONS
2.
The safety and operating instructions should be retained for future reference.
HEED WARNINGS
3.
All warnings on the product and in the operating instructions should be
adhered to.
FOLLOW INSTRUCTIONS
4.
All operating and use instructions should be followed.
5. CLEANING
Unplug this product from the wall outlet before cleaning. Do not use
liquid cleaners or aerosol cleaners. Use a dry cloth for cleaning.
ATTACHMENTS
6.
Do not use attachments not recommended by the product's
manufacturer as they may cause hazards.
WATER AND MOISTURE
7.
Do not use this product near water- for example, near a bathtub,
washbowl, kitchen sink, or laundry tub, in a wet basement, or near a
swimming pool.
ACCESSORIES
8.
Do not place this product on an unstable cart, stand, tripod, bracket, or
table. The product may fall, causing serious injury and serious damage to
the product. Use only with a cart, stand, tripod, bracket, or table
recommended by the manufacturer or sold with the
product. Any mounting of the product should follow the
manufacturer’s instructions, and should use a mounting
accessory recommended by the manufacturer.
8A. An appliance and cart combination should be moved
with care. Quick stops, excessive force, and uneven
surfaces may cause the appliance and cart
combination to overturn.
9. VENTILATION
Slots and openings in the cabinet and in the back or bottom are
provided for ventilation and to ensure reliable operation of the product
and to protect it from overheating. These openings must not be blocked
or covered. The openings should never be blocked by placing the
product on a bed, sofa, rug, or other similar surface. This product
should never be placed near or over a radiator or heat source. This
product should not be placed in a built-in installation such as a
bookcase or rack unless proper ventilation is provided or the
manufacturer's instructions have been adhered to.
10. POWER SOURCES
This product should be operated only from the type of power source
indicated on the marking label. If you are not sure of the type of power
supply to your home, consult your appliance dealer or local power
company. For products intended to operate from battery power, or
other sources, refer to the operating instructions.
11. GROUNDING OR POLARIZATION
This product is equipped with a polarized alternating-current line plug
(a plug having one blade wider than the other). This plug will fit into the
power outlet only one way. This is a safety feature. If you are unable to
insert the plug fully into the outlet, try reversing the plug. If the plug
should still fail to fit, contact your electrician to replace your obsolete
outlet. Do not defeat the safety purpose of the polarized plug.
12. POWER-CORD PROTECTION
Power-supply cords should be routed so that they are not likely to be
walked on or pinched by items placed upon or against them, paying
particular attention to cords at plugs, convenience receptacles, and the
point where they exit from the appliance.
13. LIGHTNING
To protect your product from a lightning storm, or when it is left
14. POWER LINES
unattended and unused for long periods of time, unplug it from the wall
outlet and disconnect the antenna or cable system. This will prevent
damage to the product due to lightning and power-line surges.
An outside antenna system should not be located in the vicinity of
overhead power lines or other electric light or power circuits, or where it
can fall into such power lines or circuits. When installing an outside
antenna system, extreme care should be taken to keep from touching
such power lines or circuits as contact with them might be fatal.
15. OVERLOADING
Do not overload wall outlets and extension cords as this can result in a
risk of fire or electric shock.
OBJECT AND LIQUID ENTRY
16.
Never push objects of any kind into this product through openings as they
may touch dangerous voltage points or short out parts that could result in
fire or electric shock. Never spill or spray any type of liquid on the product.
OUTDOOR ANTENNA GROUNDING
17.
If an outside antenna is connected to the product, be sure the antenna
system is grounded so as to provide some protection against voltage
surges and built-up static charges. Section 810 of the National Electric
Code, ANSI/NFPA 70, provides information with respect to proper
grounding of the mast and supporting structure, grounding of the leadin wire to an antenna discharge product, size of grounding conductors,
location of antenna discharge product, connection to grounding
electrodes, and requirements for grounding electrode.
EXAMPLE OF ANTENNA GROUNDING AS PER
NATIONAL ELECTRICAL CODE
18. SERVICING
Do not attempt to service this product yourself as opening or removing
covers may expose you to dangerous voltage or other hazards. Refer
all servicing to qualified service personnel.
19. REPLACEMENT PARTS
When replacement parts are required, be sure the service technician
uses replacement parts specified by the manufacturer or those that
have the same characteristics as the original part. Unauthorized
substitutions may result in fire, electric shock or other hazards.
20. SAFETY CHECK
Upon completion of any service or repairs to this product, ask the
service technician to perform safety checks to determine that the
product is in proper operating condition.
21. WALL OR CEILING MOUNTING
The product should be mounted to a wall or ceiling only as
recommended by the manufacturer.
22. DAMAGE REQUIRING SERVICE
Unplug the product from the wall outlet and refer servicing to qualified
service personnel under the following conditions:
When the power-supply cord or plug is damaged.
a.
b. If liquid has been spilled, or objects have fallen into the product.
If the product has been exposed to rain or water.
c.
d. If the product does not operate normally by following the operating
instructions. Adjust only those controls that are covered by the
operating instructions, as an adjustment o other controls may result
in damage and will often require extensive work by a qualified
technician to restore the product to its normal operation.
e. If the product has been dropped or the cabinet has been damaged.
When the product exhibits a distinct change in performance - this
f.
indicates a need for service.
23. HEAT
The product should be situated away from heat sources such as
radiators, heat registers, stoves, or other products (including amplifiers)
that produce heat.
NOTE TO CATV SYSTEM INSTALLER
24.
This reminder is provided to call the CATV system installer's attention
to Article 820-40 of the NEC that provides guidelines for proper
grounding and, in particular, specifies that the cable ground shall be
connected to the grounding system of the building, as close to the point
of cable entry as practical.
3
Page 5
LOCATION OF CONTROLS
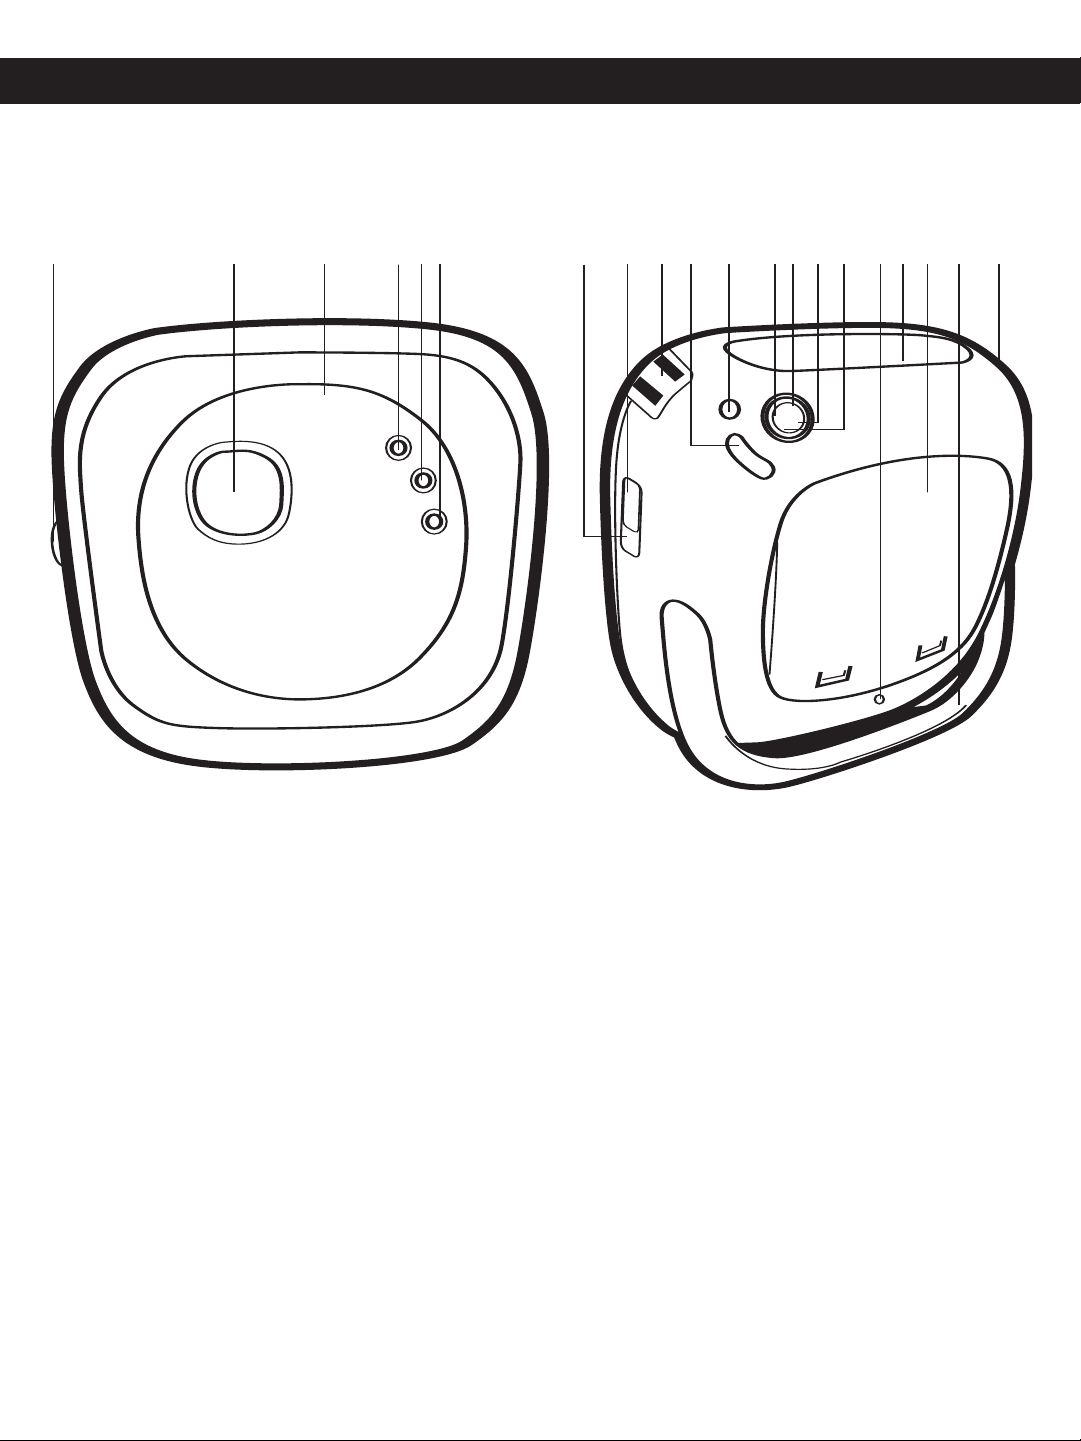
2 3145 6 8 9 97 11 121314 1510 19181716
FRONT REAR
1. VOLUME Control (Side of Unit)
2. Display
3. CD Door Open/Close Area
4. Power Button
MODE/CH+ Button
5.
6. PROG./CH SAVE Button
7. HOLD Switch
8. Headphones Jack
9. Strap Holder
BAND (AM/FM) Button
10.
BBS (Bass Boost) Button
1.
1
12. Tune/Skip/Search
13. PLAY/PAUSE (®p)/CD Button
14. Tune/Skip/Search n Button
15. Stop (
16. DC Jack
17. Carrying Handle
18. Battery Compartment
19. Stand
o Button
■) Button
4
Page 6
POWER SOURCES
+
+
+
+
+
+
This unit is designed to operate on AC household current or DC (batteries).
AC OPERATION
To operate the unit using AC power, connect an AC adapter (included) to an AC outlet having 120V, 60Hz
AC only. Plug the small end into the DC jack on the rear of the unit and connect the other end into the AC
outlet. The batteries are automatically disconnected when the AC adapter is used.
DC 9V
BATTERY INSTALLATION
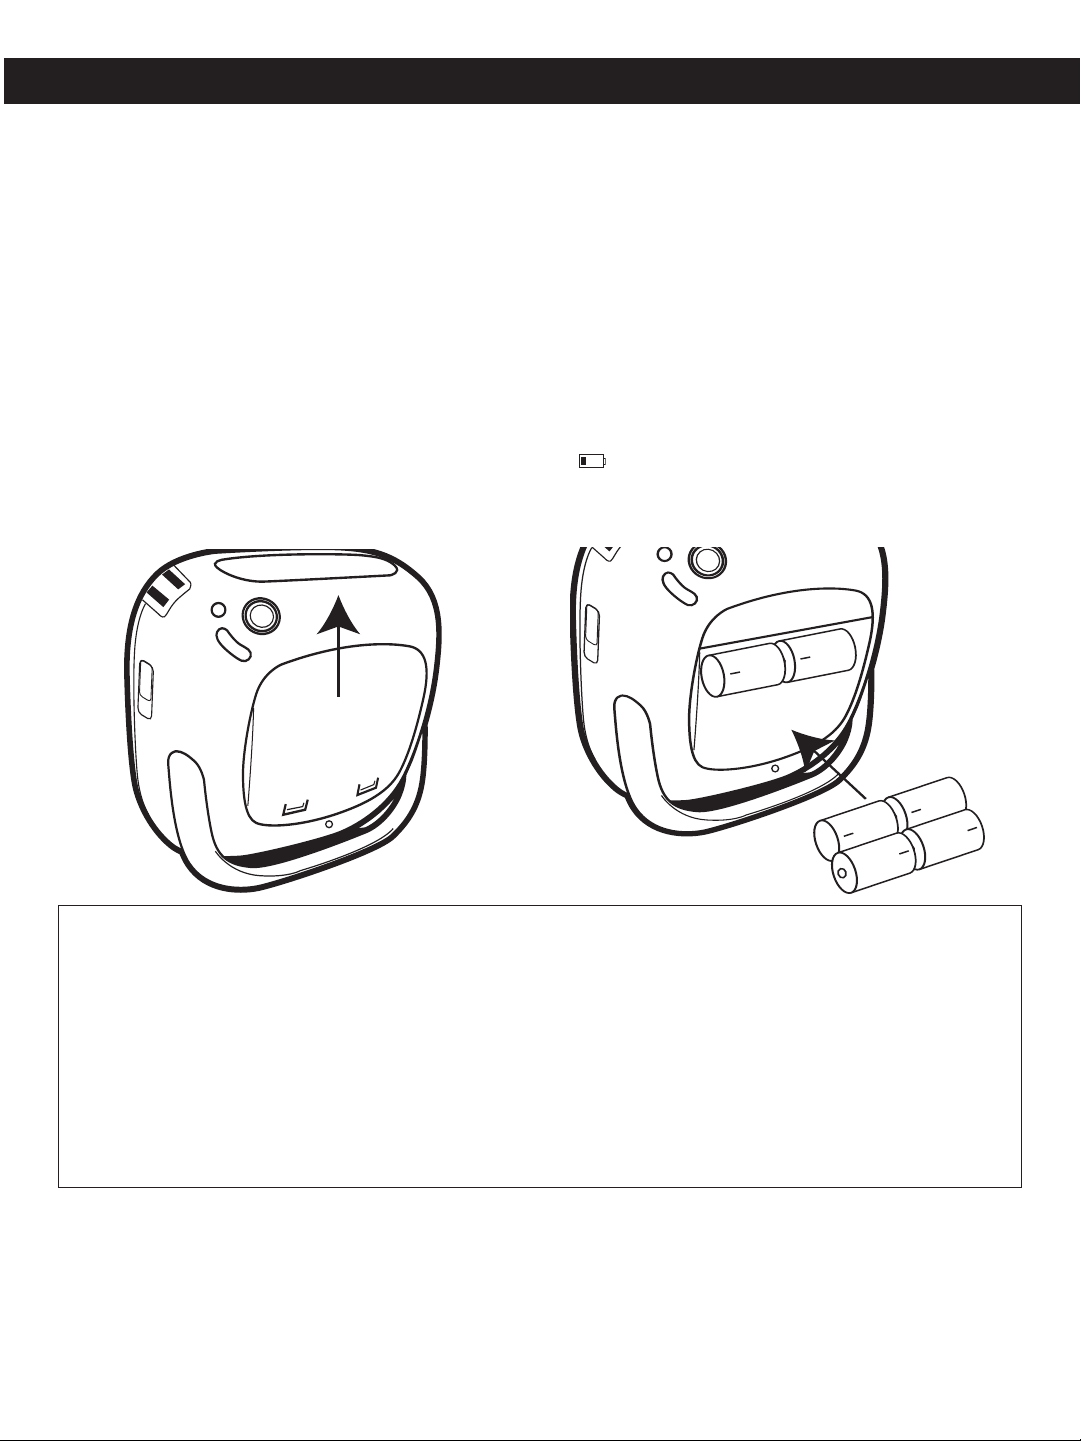
To use this unit with battery power, remove the battery door on the rear of the unit by sliding it towards the
arrows on the battery compartment. Insert six (6) ‘C’ size batteries following the diagram in the compartment.
When battery power is low and they need to be replaced, “ ” will appear in the display.
NOTE: The AC adapter must be disconnected from the AC power jack on the rear of the unit in order for the
unit to operate on battery power.
z
BATTERY PRECAUTIONS
Follow these precautions when using batteries in this device:
1. Use only the size and type of batteries specified.
2. Be sure to follow the correct polarity when installing the batteries as indicated in the battery compartment. Reversed
batteries may cause damage to the device.
3. Do not mix different types of batteries together (e.g. Alkaline, Rechargeable and Carbon-zinc) or old batteries with
fresh ones.
4. If the device is not to be used for a long period of time, remove the batteries to prevent damage or injury from possible
battery leakage.
Do not try to recharge batteries not intended to be recharged; they
5.
manufacturer’s directions.)
HEADPHONE JACK (SIDE OF UNIT)
For private listening, connect low impedance 3.5mm (32 ohm) stereo headphones (not included) to this jack.
The speakers are automatically disconnected when the headphone plug is inserted in the jack.
STAND (REAR OF UNIT)
Slide the Stand outward to use the Stand.
can overheat and rupture. (Follow battery
5
Page 7
CONNECTING THE STRAP
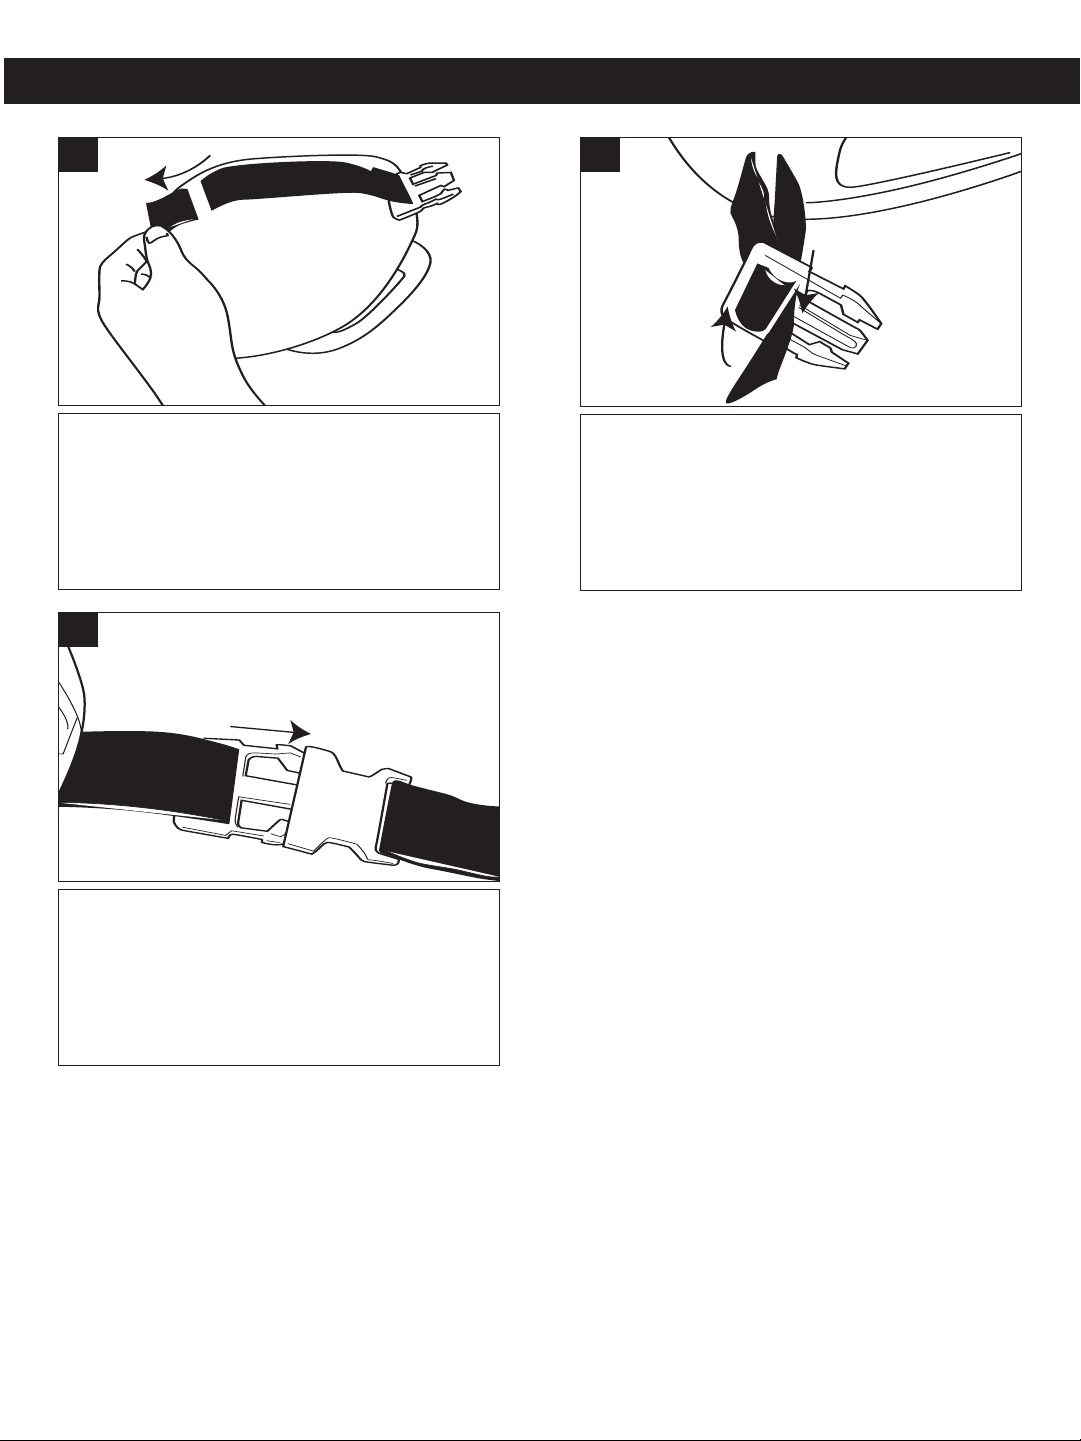
1
Insert the small arm straps into the slots on both
sides of the unit and pull through.
3
2
Insert the strap into the gap, pull through and
then insert into the other gap. Pull tight to
fasten.
Connect the larger strap to the connected
smaller straps.
6
Page 8
2
1
1
2
2
1
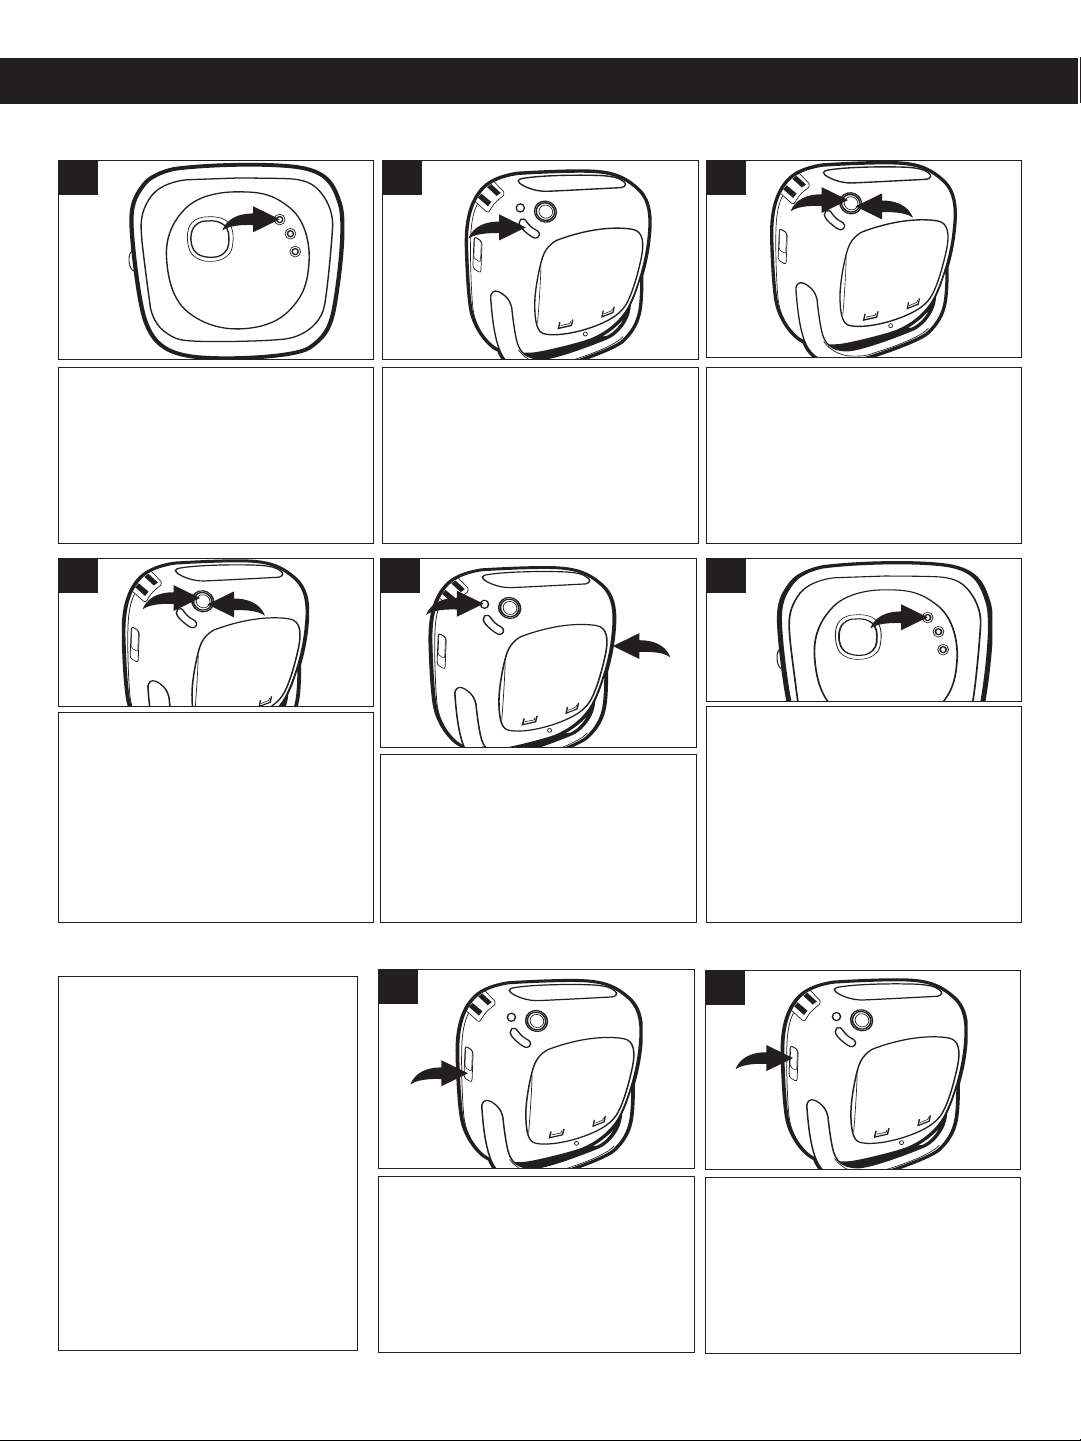
TO PLAY THE RADIO
RADIO OPERATION
1
Press the POWER button to turn
the unit on.
4
AUTOMATIC TUNING: Press and
hold the Tune/Skip/Search
button until the frequency in the
display starts to scan, and then
release the button; the tuner will
search and then stop on the next
strong station it finds. Repeat this
step until the desired frequency
appears in the display.
o 1 or n
2
Press the BAND button to select
radio. Repeatedly press the
BAND button to select AM or FM.
5
Adjust the VOLUME control 1
and BBS button 2 as desired.
Press the BBS button 2 to
enhance the bass sound; “BBS”
will light in the display.
3
MANUAL TUNING: Repeatedly
press the Tune/Skip/Search o 1
or n 2 button to manually
advance the frequency in the
display up or down until the
desired frequency appears.
6
To turn the radio off, press the
POWER button again.
The Stereo indicator "((ST))" will
appear on the display if a FM
station tuned in is in Stereo. If the
radio broadcast is not strong
enough or not in stereo, the Stereo
indicator "((ST))” will not appear in
the display.
ANTENNAS
AM–Turn the unit for better AM
reception.
FM–FM: Turn the unit for better
FM reception.
HOLD SWITCH
1
Slide the HOLD switch to the HOLD
(down) position to disable the
buttons. Slide the HOLD switch to
the OFF (up) position to enable the
buttons again.
7
HEADPHONES
1
To listen to the unit through
headphones, simply insert the
headphones (not included) into
the Headphones jack. The
speakers will be disconnected
when the headphones are
plugged in.
Page 9
RADIO OPERATION (CONTINUED)
1
2
2
1
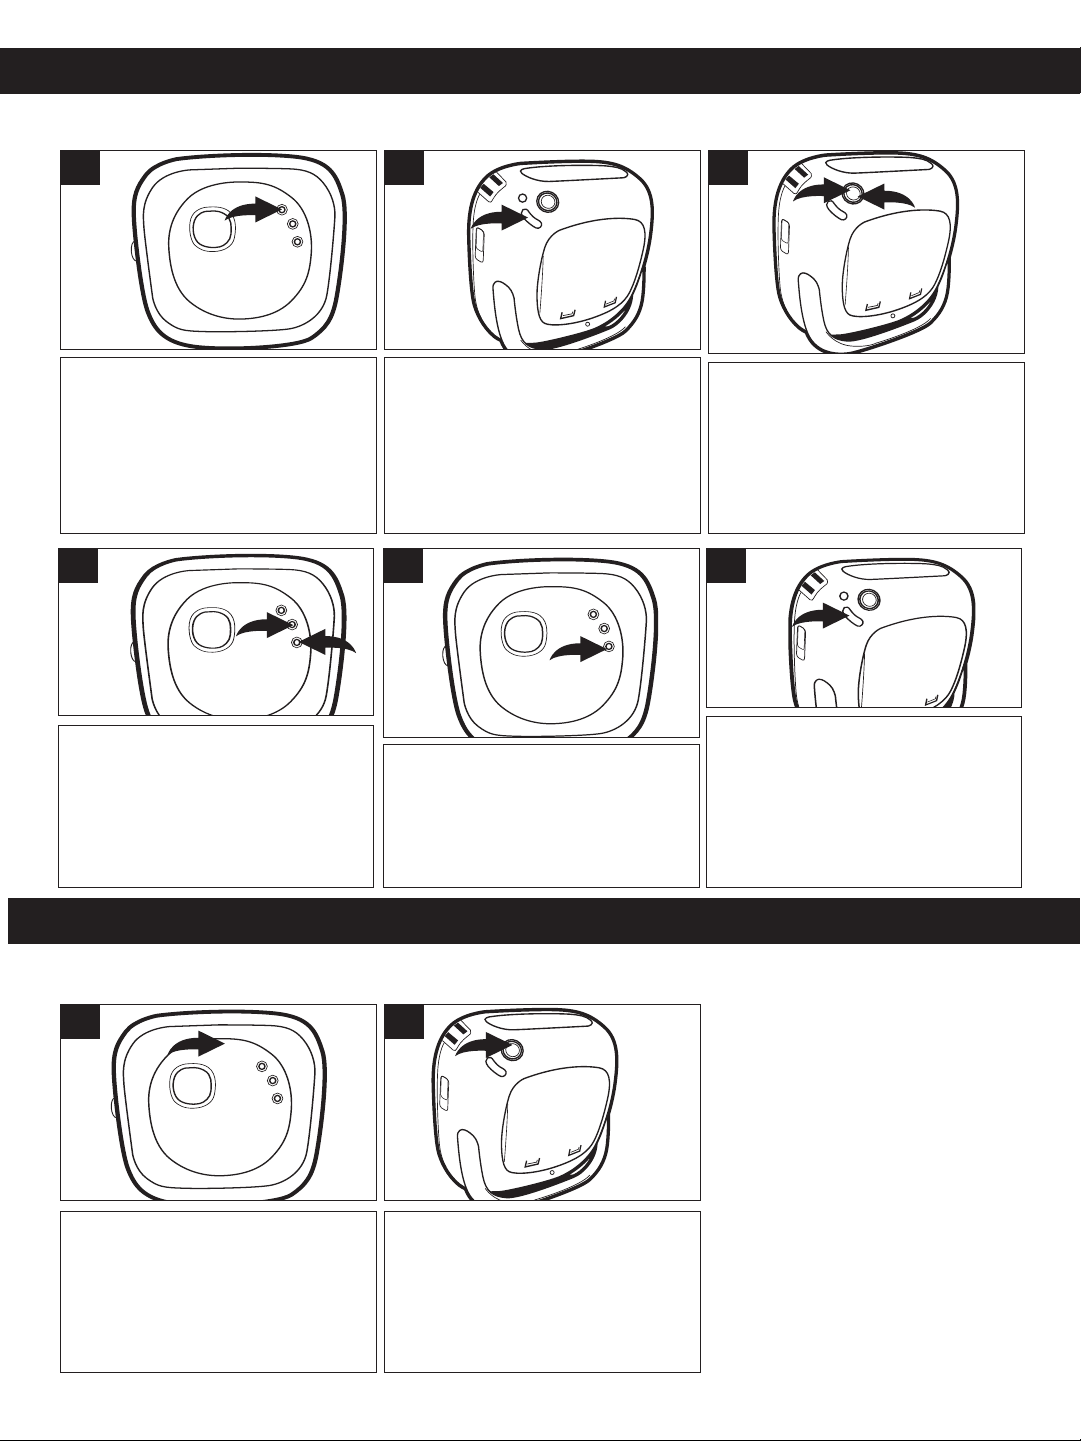
RADIO PRESETS - UP TO 5 AM AND 5 FM
1
Press the POWER button to turn
the unit on.
4
Press the PROG./CH SAVE button
1; the preset number will blink in
the display. Within three seconds,
press the MODE/CH+ button 2
repeatedly until the desired memory
number appears on the display.
2
Press the BAND button to select
radio. Repeatedly press the
BAND button to select AM or FM.
5
Press the PROG./CH SAVE
button again to set the station in
the selected memory.
3
Select a station using the
Tune/Skip/Search
button.
o 1 or n 2
6
Repeat steps 2 through 5 to
program up to 5 stations in each
band, if desired.
TO RECALL: Follow step 1 above.
Repeatedly press the MODE/CH+
button to select a preset; the station
will automatically be tuned in.
COMPACT DISC (CD) OPERATION
TO INSERT A CD
1
Open the CD compartment by
pressing the CD Door Open/Close
area. Gently insert a CD onto the
spindle (label side facing forward)
until it clicks. Close the CD
compartment.
2
Press the
CD button to select CD; playback
will start automatically.
PLAY/PAUSE (
8
®p)/
Page 10
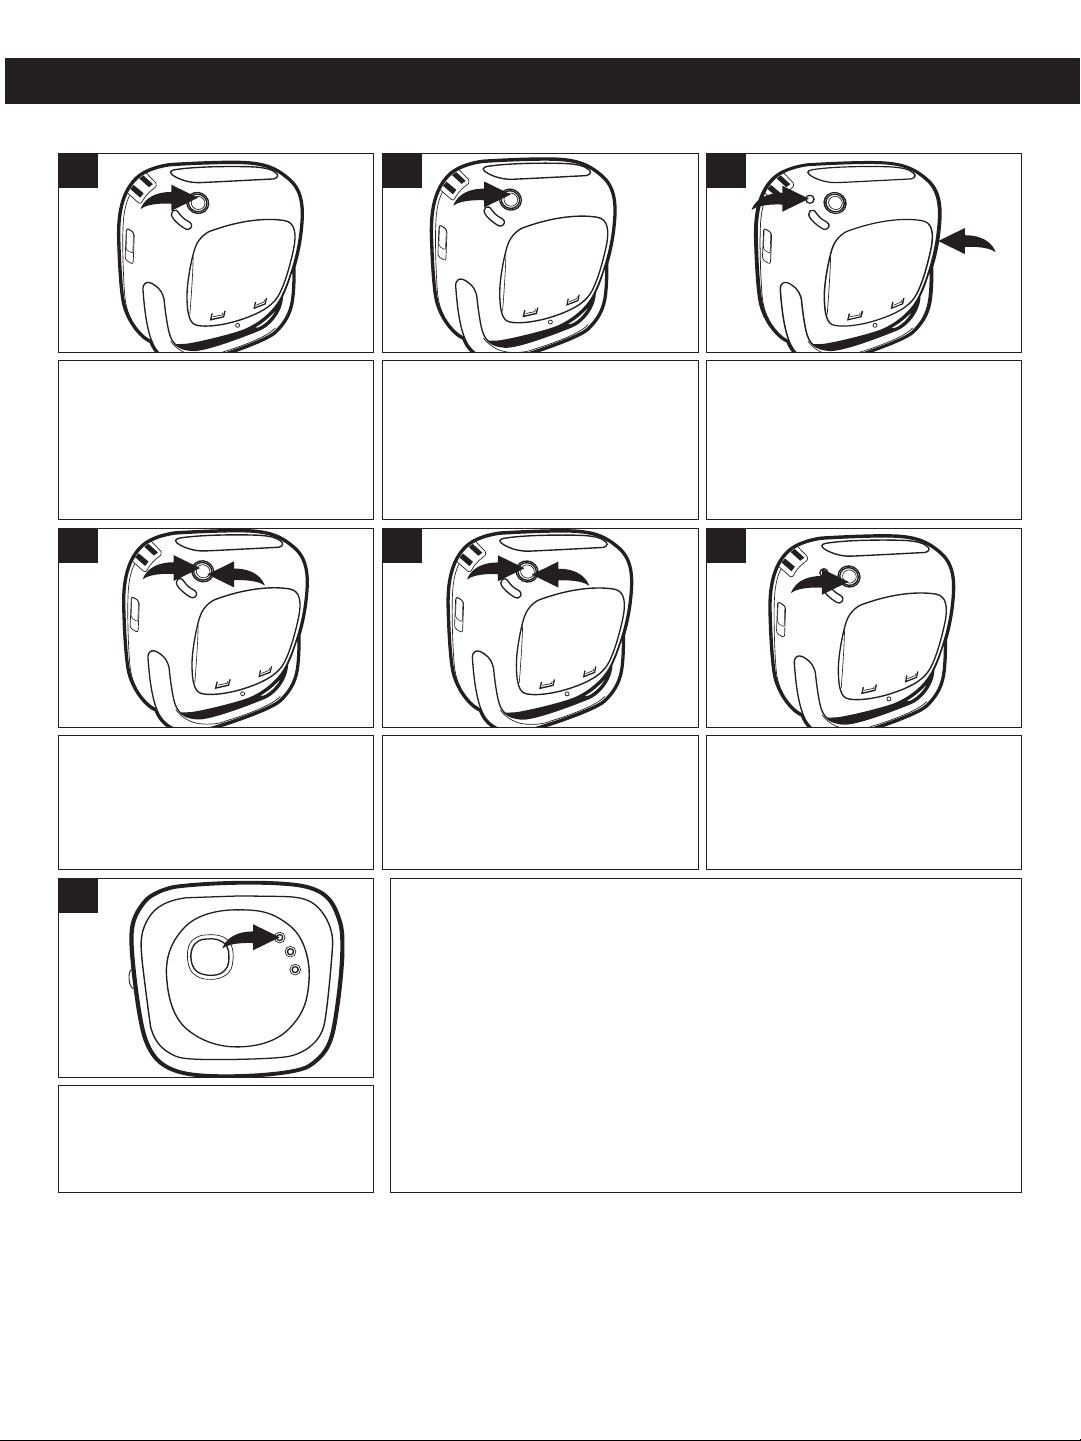
COMPACT DISC (CD) OPERATION (CONTINUED)
1
2
2
1
2
1
TO PLAY A CD (STANDARD CD, CD-R AND CD-RW CAN BE USED)
1
Insert a CD as described on
page 8. With the power on, press
the PLAY/PAUSE (
button to select CD; playback will
start automatically.
®p)/CD
4
To skip forward or backward
through the tracks on the disc,
press the Tune/Skip/Search o 1
or n 2 button.
2
If in the Stop mode, press the
PLAY/PAUSE (
Press the PLAY/PAUSE (
CD button again to pause
playback; the elapsed time will
blink in the display.
®p)/CD button.
®p)/
5
To search forward or backward
through the music on a disc, press
and hold the Tune/Skip/Search o
1 or n 2 button, a chattering
noise will be heard.
3
Adjust the VOLUME control 1
and BBS button 2 as desired.
Press the BBS button 2 to
enhance the bass sound; “BBS”
will light in the display.
6
When the disc is through playing,
it will stop rotating. Press the Stop
(■) button to stop the disc before
it is finished.
7
FAQS:
Do I need an adapter to play 3” singles?
No, simply insert the 3” single into the groove.
What is the maximum time for a CD in this unit?
The maximum time is 74 minutes.
To turn the unit off, press the
POWER button again.
NOTES:
• If a disc is inserted incorrectly, dirty, damaged or not present at all, “no DISC” will appear in the display.
• As each track is played, the track number is shown in the display.
• To prevent damage to the disc, never open the CD door while the disc is rotating. Wait for the disc to
stop before opening the CD door. Never touch the lens when the CD door is open.
What type of CDs can I play?
CD, CD-Rs and CD-RWs can be used.
9
Page 11
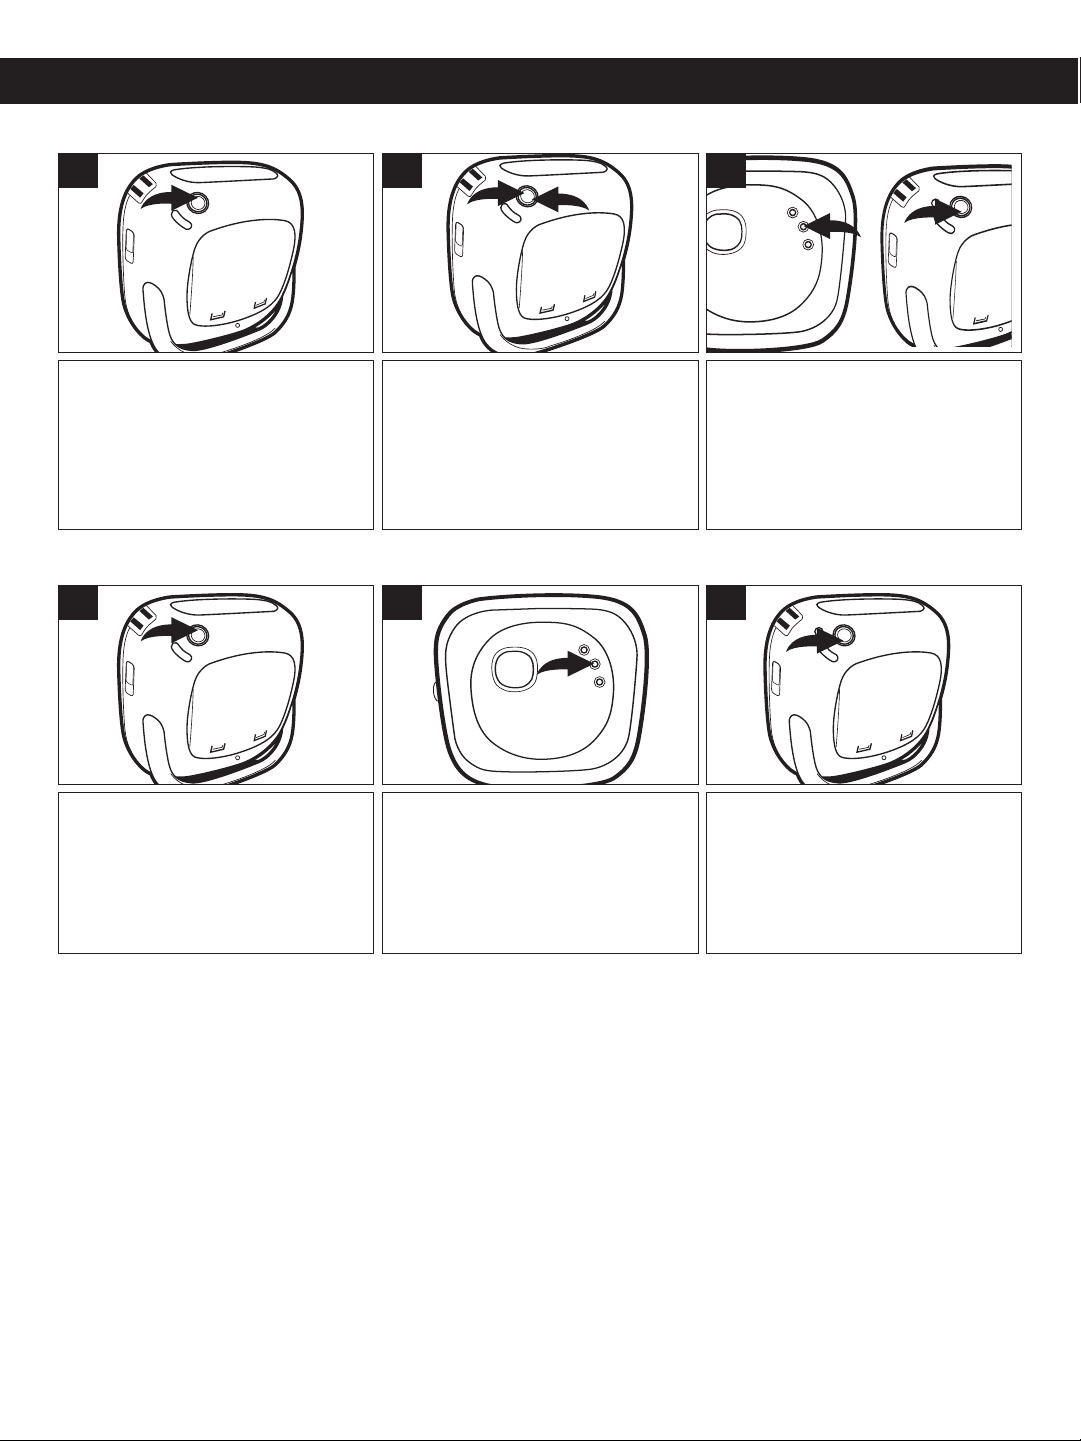
COMPACT DISC (CD) OPERATION (CONTINUED)
1
2
1
2
TO REPEATEDLY PLAY BACK ONE TRACK
1
Insert a CD as described on
page 8. With the power on, press
the PLAY/PAUSE (
button to select CD; playback will
start automatically.
®p)/CD
2
Press the Tune/Skip/Search o 1
or n 2 button to select a track to
repeat.
TO REPEATEDLY PLAY BACK ALL TRACKS
1
2
3
Press the MODE/CH+ button 1
once; “REPEAT 1” will appear in
the display and the unit will play
the same track over and over until
the Stop (■) button 2 is pressed.
3
Insert a CD as described on
page 8. With the power on, press
the PLAY/PAUSE (®p)/CD
button to select CD; playback will
start automatically.
NOTES:
• To stop and cancel Repeat playback, press the Stop (■) button.
• To activate repeat, during playback, press the MODE/CH+ button repeatedly to select "REPEAT 1" or
"REPEAT ALL”.
Press the MODE/CH+ button
twice; “REPEAT ALL” will appear
in the display.
The unit will play the entire disc
over and over until the Stop (■)
button is pressed.
10
Page 12
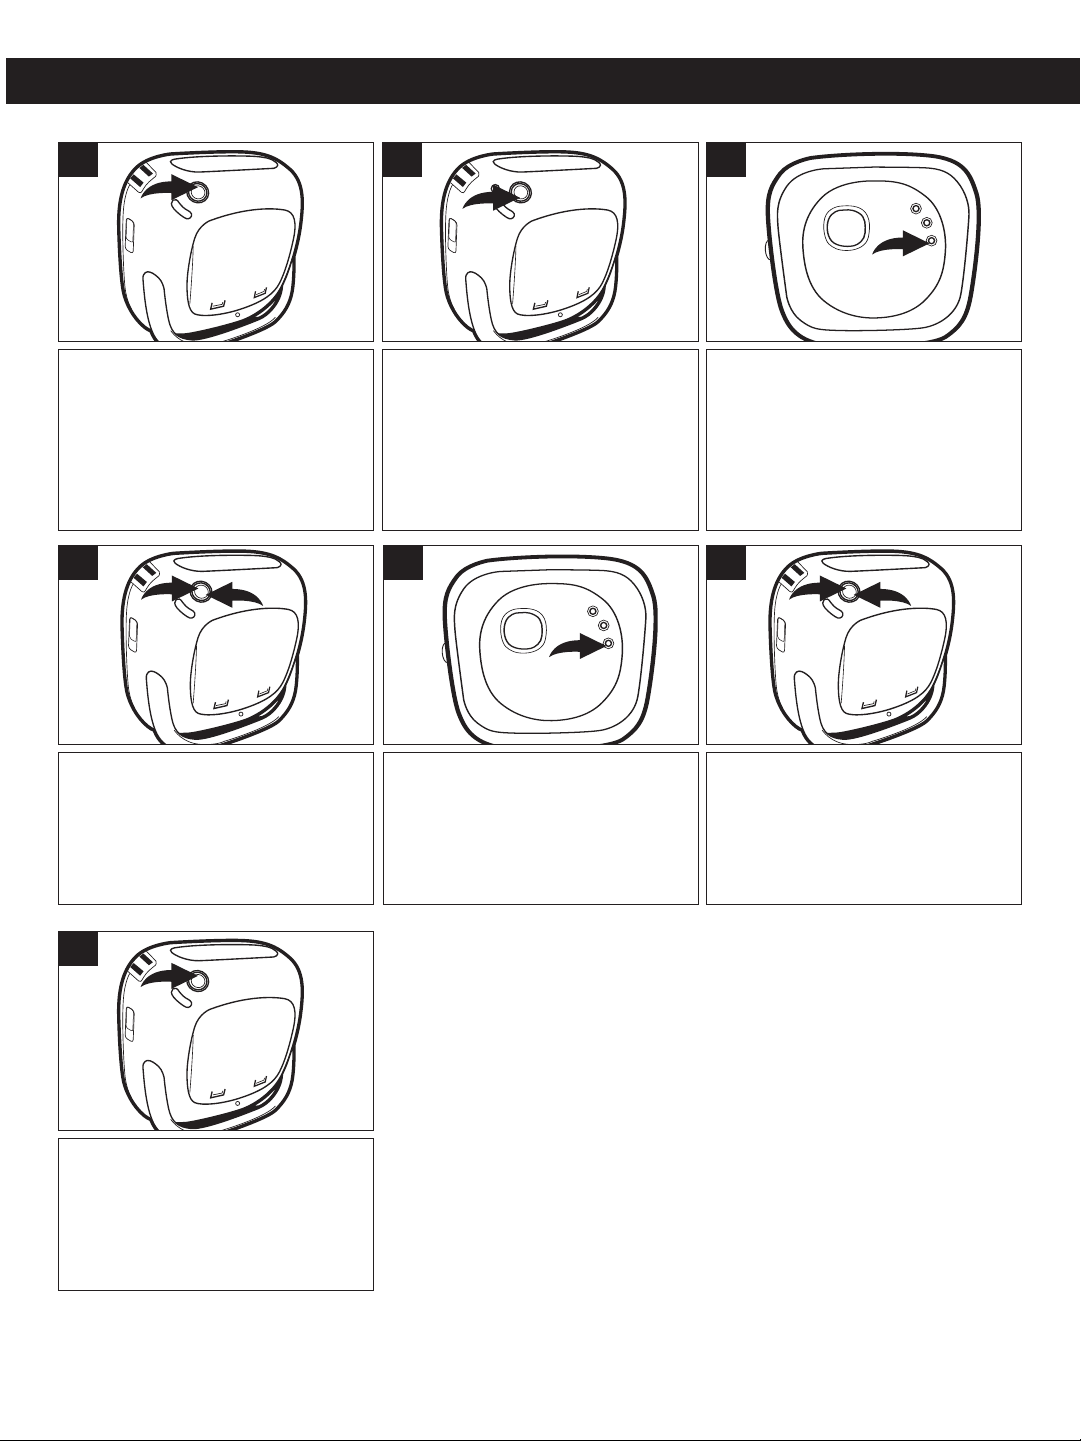
2
1
2
1
COMPACT DISC (CD) OPERATION (CONTINUED)
TO PROGRAM THE MEMORY (UP TO 20 TRACKS)
1
Insert a CD as described on
page 8. With the power on, press
the PLAY/PAUSE (
button to select CD; playback will
start automatically.
®p)/CD
4
2
Press the Stop (■) button to stop
playback.
5
3
Press the PROG./CH SAVE
button once; “P 01” (program
number), “00” track number and
the Program indicator will appear
in the display.
6
Select the first track to be played
back using the Tune/Skip/Search
o 1 or n 2 button.
7
Press the PLAY/PAUSE (®p)/CD
button to begin playback; “PROG”
will light and the tracks will play in
the order programmed.
Press the PROG./CH SAVE
button again.
NOTES:
• Programming is the ability to preselect the order in which a series
of tracks will be played.
• Each track may be stored in the program memory as many times
as desired (up to 20 tracks).
As each track is played, its track number will be displayed. You
•
can move forward or backward through the programmed tracks
with the Tune/Skip/Search
• The CD player will stop after all programmed tracks have been
played or the Stop (■) button is pressed.
To cancel programmed playback, press the Stop (■)button while
•
in the stop mode, or open the CD \door.
After you have selected 20 tracks (the last programmed memory)
•
and press the PROG./CH SAVE button to confirm, the display will
continue to show “P20”.
Repeat steps 3 to 5 to program
the other desired tracks in
sequence (up to 20 tracks).
n or o button.
11
Page 13
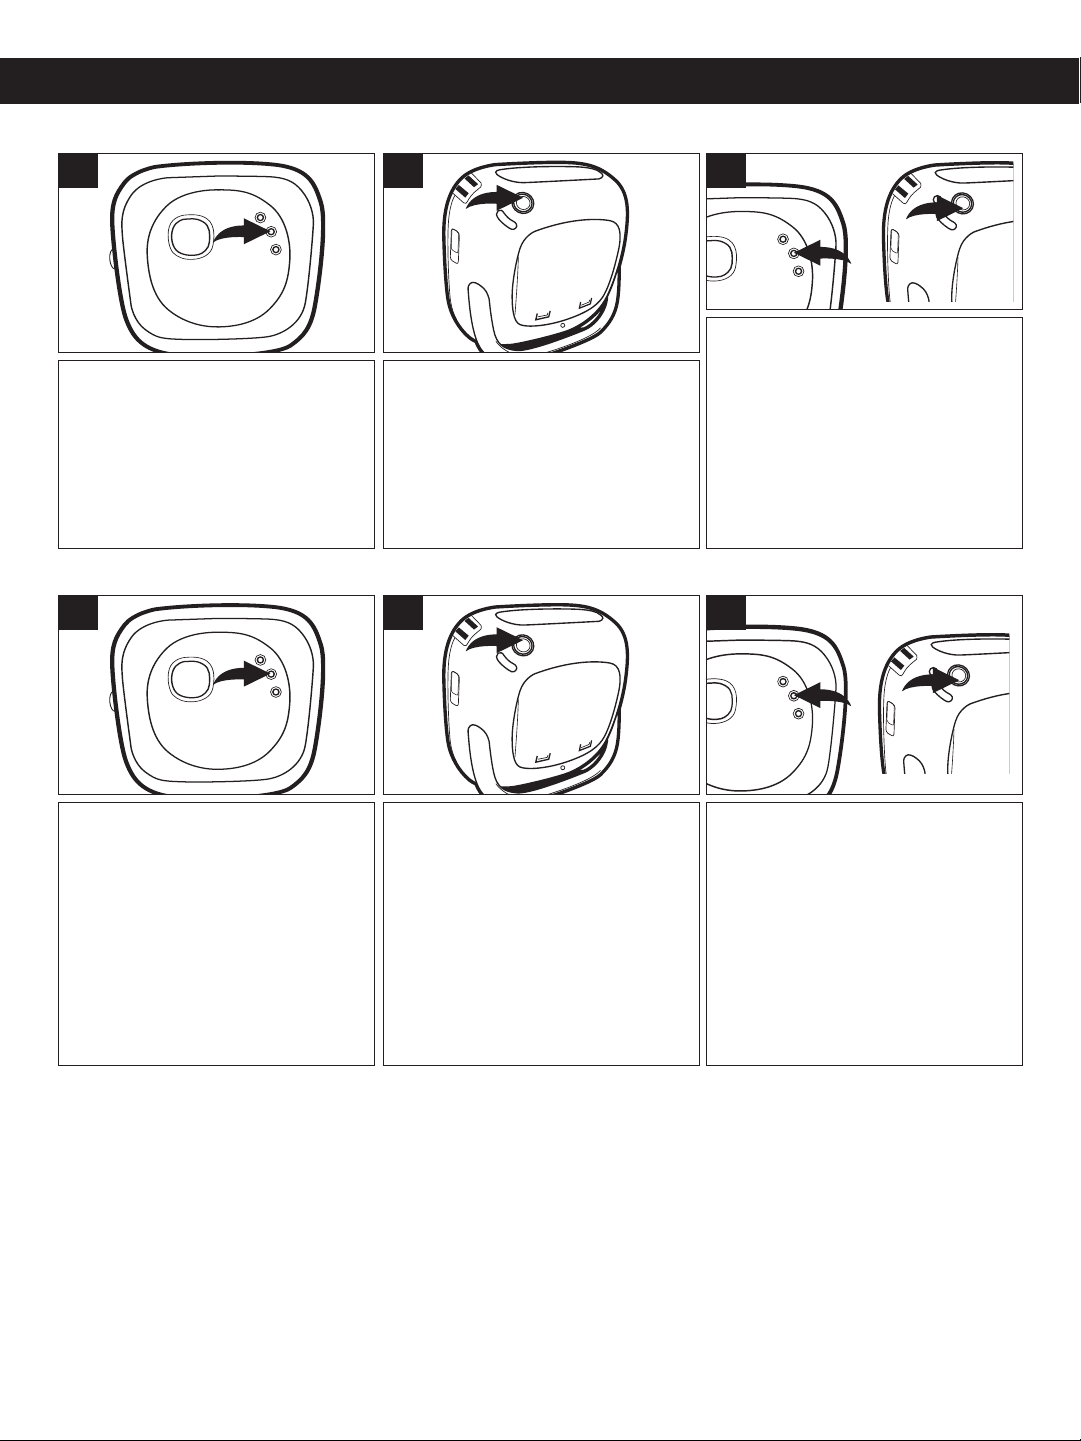
COMPACT DISC (CD) OPERATION (CONTINUED)
1
1
2
2
RANDOM PLAYBACK
1
While in the CD Stop mode, press
the MODE/CH+ button once, the
"RANDOM" indicator will appear
in the display.
INTRO PLAYBACK
1
2
Press the PLAY/PAUSE (®p)/CD
button to start playing the tracks
randomly.
2
3
During Random playback, press the
MODE/CH+ button
activate Random Repeat; both
"RANDOM" and "REPEAT ALL"
indicators will light . To Stop
Random or Random Repeat
playback, press the Stop (
2 once. Both indicators will
disappear from the display.
1 twice to
■) button
3
While in the CD Stop mode, press
the MODE/CH+ button twice, the
"INTRO" indicator will appear in
the display.
Press the PLAY/PAUSE (®p)/CD
button to start INTRO playback
the tracks; the unit will play the
first 10 seconds of each track.
12
During intro playback, press the
MODE/CH+ button 1 twice to
activate Intro Repeat; both
"INTRO" and "REPEAT ALL"
indicators will light . To Stop Intro
or Intro Repeat playback, press
the Stop (■) button 2 once. Both
indicators will disappear from the
display.
Page 14
B
E
N
Z
E
N
E
C
L
E
A
N
E
R
CARE AND MAINTENANCE
Caring for Compact Discs
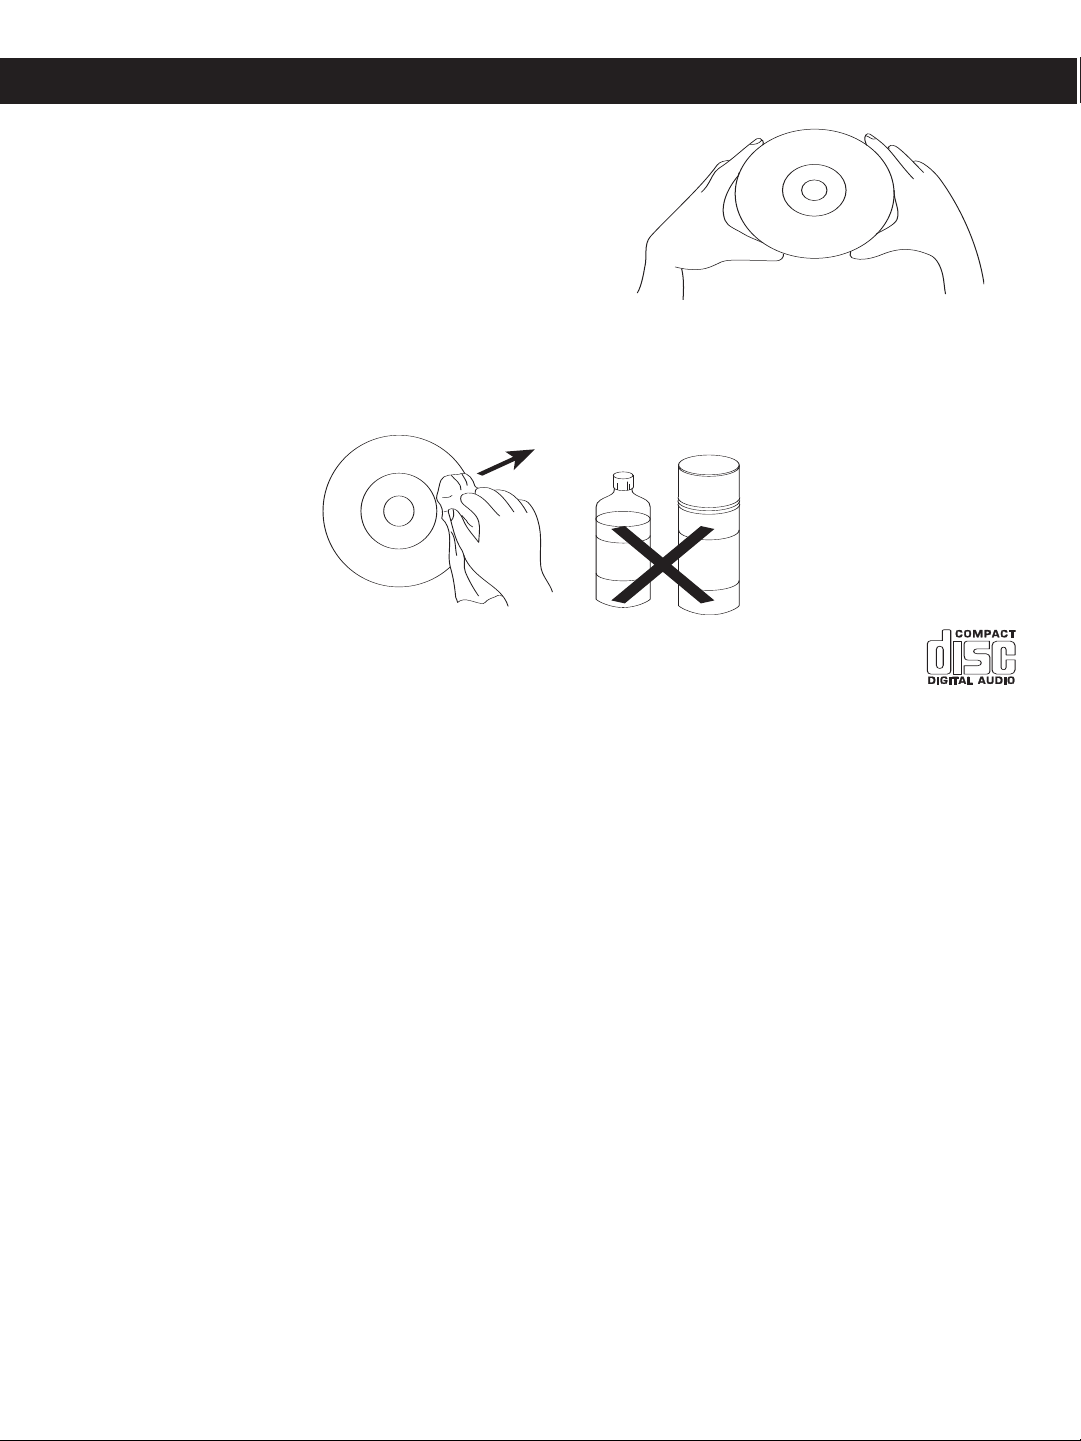
• Treat the compact disc carefully. Handle the compact disc
only by its edges. Never allow your fingers to come in contact
with the shiny, unprinted side of the compact disc.
• Do not attach adhesive tape, stickers, etc. to the disc label.
• Clean the compact disc periodically with a soft, lint-free,
dry cloth. Never use detergents or abrasive cleaners to
clean the compact disc. If necessary, use a CD cleaning
kit.
• If a disc skips or gets stuck on a section of the compact disc, it is probably dirty or damaged (scratched).
• When cleaning the compact disc, wipe in straight lines from the center of the compact disc to the outer
edge of the compact disc. Never wipe in circular motions.
• This unit is designed to play only compact discs bearing the identification logo as shown here.
Other discs may not conform to the CD standard and may not play properly.
• Compact Discs should be stored in their cases after each use to avoid damage.
• Do not expose compact discs to direct sunlight, high humidity, high temperatures or dust, etc. Prolonged
exposure or extreme temperatures can warp the compact disc.
• Do not stick or write anything on either side of the compact disc. Sharp writing instruments, or the ink may
damage the surface.
Cleaning the Unit
• To prevent fire or shock hazard, disconnect your unit from the AC power source when cleaning.
• The finish on your unit may be cleaned with a dust cloth and cared for as other furniture. Use caution
when cleaning and wiping the plastic parts.
• Mild soap and a damp cloth may be used on the front panel.
13
Page 15
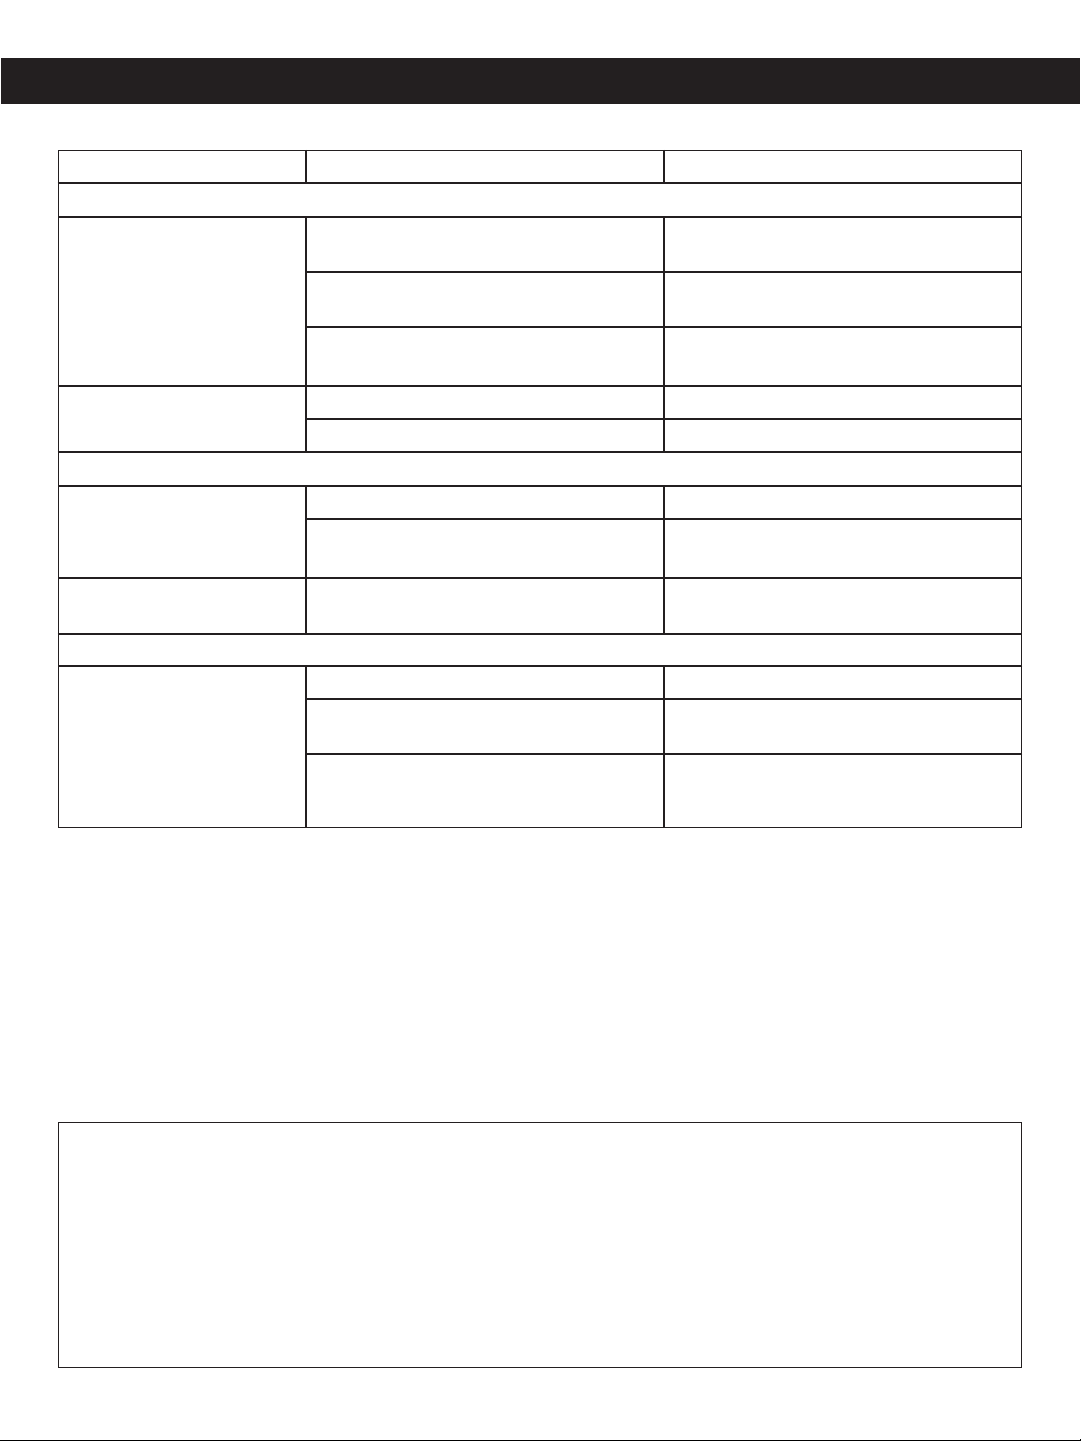
TROUBLESHOOTING GUIDE
Should this unit exhibit a problem, check the following before seeking service:
Symptom Possible Cause Solution
Radio
Noise or sound distorted Station not tuned properly for Retune the AM or FM broadcast
on radio broadcasts. AM or FM. station.
FM: AC adapter cord is not extended Fully extend AC adapter cord.
fully.
AM: Unit is not positioned Rotate unit until best reception is
correctly. obtained.
AM or FM, no sound. BAND button not pressed. Press BAND button to select the radio.
Volume at minimum. Increase volume.
Compact Disc Player
CD Player will not play. CD is not selected. Press the Play/Pause button to select CD.
CD is not installed or is installed Insert CD with label side facing forward.
upside-down.
CD skips while playing. Disc is dirty or scratched. Wipe disc with cloth or use
another disc.
General
No sound. AC adapter disconnected. Connect AC adapter.
No batteries, dead batteries or batteries Insert fresh batteries properly.
not installed properly.
Power is off. Press the POWER button to turn the
unit on.
FOR ADDITIONAL SET-UP OR OPERATING ASSISTANCE, PLEASE VISIT OUR WEBSITE
T WWW
A
.MEMOREXELECTRONICS.COM OR CONT
ACT CUSTOMER SERVICE AT
1-800-919-3647.
ACKAGING MATERIAL FOR AT LEAST 90 DAYS IN CASE YOU NEED
PLEASE KEEP ALL
TO RETURN THIS PRODUCT TO YOUR PLACE OF PURCHASE OR MEMOREX.
FOR PARTS AND ACCESSORIES, CONTACT FOX INTERNATIONAL AT 1-800-321-6993.
P
14
Page 16

SPECIFICATIONS
GENERAL:
Power Source............................................................................DC IN 9V, Center Positive
Battery ........................................................................9V DC (6 x 1.5V "C" size batteries)
Alkaline is recommended for longer life
Speaker. ....................................................................................................2 x 3W 4 Ohms
Output Power ...................................................................................................... 2 x 1.2W
RADIO SECTION:
Frequency Range (FM)..............................................................................87.5 - 108 MHz
Frequency Range (AM) .............................................................................520 -1710 KHz
CD SECTION:
Disc Diameter .............................................................................................4.72" (120mm)
3.15" (80mm) Single CD
Optical Source..................................................................................Semiconductor Laser
Specifications are subject to change without notice.
15
Page 17

Memcorp, Inc.
Weston, FL
Printed in Hong Kong
Visit our website at www.memorexelectronics.com
 Loading...