

Page 1
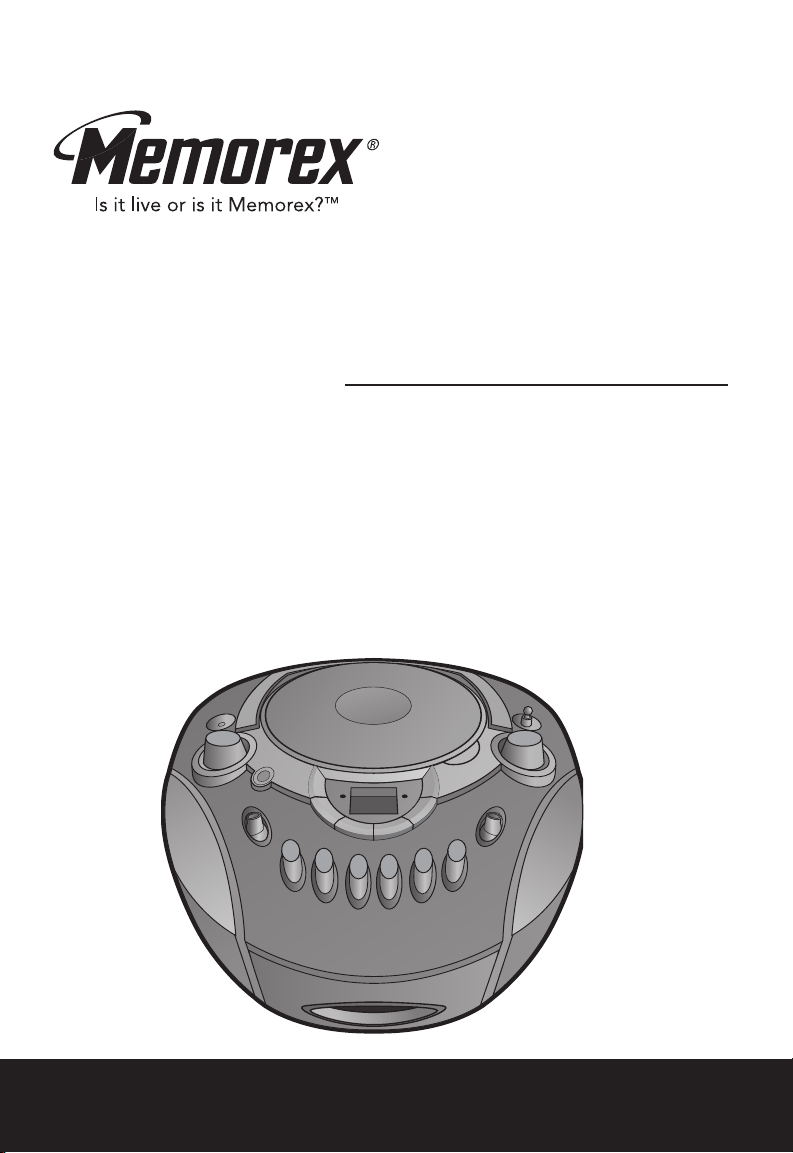
MP3134BLU
User’s Guide
Guía del Usario
Portable CD Player with
AM/FM Stereo Radio and
Cassette Recorder
Reproductor de CD Portátil
con Radio AM/FM Estéreo y
Grabadora de Casete
Before operating this product, please read these instructions completely.
Antes de operar este pr
oducto, sírvase leer este instructivo en su totalidad.
Page 2
Dear Customer,
Please read this manual thoroughly before operating the unit to become more familiar with it
and obtain the performance that will bring you continued enjoyment for many years. Keep
these instructions handy for future reference.
PLEASE KEEP ALL PACKAGING MATERIAL FOR AT LEAST 90 DAYS IN CASE YOU
NEED TO RETURN THIS PRODUCT TO YOUR PLACE OF PURCHASE OR MEMOREX.
For future reference, record the serial number of the unit printed on the rear of the cabinet.
Serial Number _______________________________________
SAFETY PRECAUTIONS
CAUTION
RISK OF ELECTRIC SHOCK
DO NOT OPEN
CAUTION: TO REDUCE THE RISK OF ELECTRIC SHOCK, DO NOT
REMOVE COVER (OR BACK). NO USER-SERVICEABLE PARTS INSIDE.
REFER SERVICING TO QUALIFIED SERVICE PERSONNEL.
This Caution Marking is located at the bottom enclosure of the unit.
DANGEROUS VOLTAGE:
The lightning flash with arrowhead symbol within an equilateral triangle is intended to alert the
user to the presence of uninsulated dangerous voltage within the product’s enclosure that may
be of sufficient magnitude to constitute a risk of electric shock to persons.
ATTENTION:
The exclamation point within an equilateral triangle is intended to alert the user to the
presence of important operating and maintenance (servicing) instructions in the literature
accompanying the appliance.
DANGER:
This product utilizes a Class 1 laser to read Compact Discs. This laser Compact Disc Player
is equipped with safety switches to avoid exposure when the CD door is open and the safety interlocks are defeated. Invisible and hazardous laser radiation when open and interlock
failed or defeated. Avoid direct exposure to beam. Please do not attempt to defeat or bypass
the safety switches.
FCC WARNING:
This equipment may generate or use radio frequency energy. Changes or
modifications to this equipment may cause harmful interference unless the
modifications are expressly approved in the instruction manual. The user could
lose the authority to operate this equipment if an unauthorized change or
modification is made.
1
Page 3
SAFETY PRECAUTIONS
INFORMATION:
This equipment has been tested and found to comply with the limits for a Class
B digital device, pursuant to Part 15 of the FCC Rules. These limits are
designed to provide reasonable protection against harmful interference in a
residential installation. This equipment generates, uses and can radiate radio
frequency energy and, if not installed and used in accordance with the
instructions, may cause harmful interference to radio communications.
However, there is no guarantee that interference will not occur in a particular
installation. If this equipment does cause harmful interference to radio or
television reception, which can be determined by turning the equipment off and
on, the user is encouraged to try to correct the interference by one or more of
the following measures:
• Reorient or relocate the receiving antenna.
• Increase the separation between the equipment and receiver.
• Connect the equipment into an outlet on a circuit different from that to which
the receiver is connected.
• Consult the dealer or an experienced radio/TV technician for help.
WARNING: TO PREVENT FIRE OR SHOCK HAZARD, DO NOT
EXPOSE THIS UNIT TO RAIN OR MOISTURE.
LASER SAFETY: This unit employs a laser. Only qualified service personnel
should attempt to service this device due to possible eye injury.
CAUTION: USE OF CONTROLS, ADJUSTMENTS OR PERFORMANCE
PROCEDURE HEREIN MAY RESULT IN HAZARDOUS RADIATION
EXPOSURE.
SURGE PROTECTORS:
It is recommended to use a surge protector for AC connection. Lightning and
power surges ARE NOT covered under warranty for this product.
ATTENTION:
POUR ÉVITER LES CHOC ÉLECTRIQUES, INTRODUIRE LA LAME LA PLUS
LARGE DE LA FICHE DANS LA BORNE CORRESPONDANTE DE LA PRISES
ET POUSSER JUSQU’AU FOND.
This Class B digital apparatus complies with Canadian ICES-003.
Cet appareil numérique de la classe B est conforme à la norme NMB-003
du Canada.
2
Page 4
Dear Customer:
A
S
S
O
C
I
A
T
I
O
N
EST. 1924
E
L
E
C
T
R
O
N
I
C
I
N
D
U
S
T
R
I
E
S
EIA
We
LISTENING
For A Lifetime
Want You
Selecting fine audio equipment such as the unit you’ve just purchased is only the start of
your musical enjoyment. Now it’s time to consider how you can maximize the fun and
excitement your equipment offers. This manufacturer and the Electronic Industries
Association’s Consumer Electronics Group want you to get the most out of your equipment by playing it at a safe level. One that lets the sound come through loud and clear
without annoying blaring or distortion and, most importantly, without affecting your sensitive hearing.
Sound can be deceiving. Over time your hearing “comfort level” adapts to higher volumes
of sound. So what sounds “normal” can actually be loud and harmful to your hearing. Guard
against this by setting your equipment at a safe level BEFORE your hearing adapts.
To establish a safe level:
• Start your volume control at a low setting.
• Slowly increase the sound until you can hear it comfortably and clearly, and without distortion.
Once you have established a comfortable sound level:
• Set the dial and leave it there.
Taking a minute to do this now will help to prevent hearing damage or loss in the future.
After all, we want you listening for a lifetime.
We Want You Listening For A Lifetime
Used wisely, your new sound equipment will provide a lifetime of fun and enjoyment. Since
hearing damage from loud noise is often undetectable until it is too late, this manufacturer
and the Electronic Industries Association’s Consumer Electronics Group recommend you
avoid prolonged exposure to excessive noise. This list of sound levels is included for your
protection.
Decibel
Level Example
30 Quiet library, soft whispers
40 Living room, refrigerator, bedroom away from traffic
50 Light traffic, normal conversation, quiet office
60 Air conditioner at 20 feet, sewing machine
70 Vacuum cleaner, hair dryer, noisy restaurant
80 Average city traffic, garbage disposals, alarm clock at two feet
THE FOLLOWING NOISES CAN BE DANGEROUS UNDER CONSTANT EXPOSURE:
90 Subway, motorcycle, truck traffic, lawn mower
100 Garbage truck, chain saw, pneumatic drill
120 Rock band concert in front of speakers, thunderclap
140 Gunshot blast, jet engine
180 Rocket launching pad
Information courtesy of the Deafness Research Foundation.
3
Page 5
SAFETY INSTRUCTIONS
Before using the unit, be sure to read all operating instructions carefully. Please note that these are
general precautions and may not pertain to your unit. For example, this unit may not have the capability to be connected to an outdoor antenna.
1. READ INSTRUCTIONS
All the safety and operating instructions should be read before the product is operated.
2. RETAIN INSTRUCTIONS
The safety and operating instructions should be retained for future reference.
3. HEED WARNINGS
All warnings on the product and in the operating instructions should be adhered to.
4. FOLLOW INSTRUCTIONS
All operating and use instructions should be followed.
5. CLEANING
Unplug this product from the wall outlet before cleaning. Do not use liquid cleaners or aerosol cleaners.
Use a dry cloth for cleaning.
6. ATTACHMENTS
Do not use attachments not recommended by the product's manufacturer as they may cause hazards.
7. WATER AND MOISTURE
Do not use this product near water–for example: near a bathtub, washbowl, kitchen sink or laundry tub; in
a wet basement; or near a swimming pool.
8. ACCESSORIES
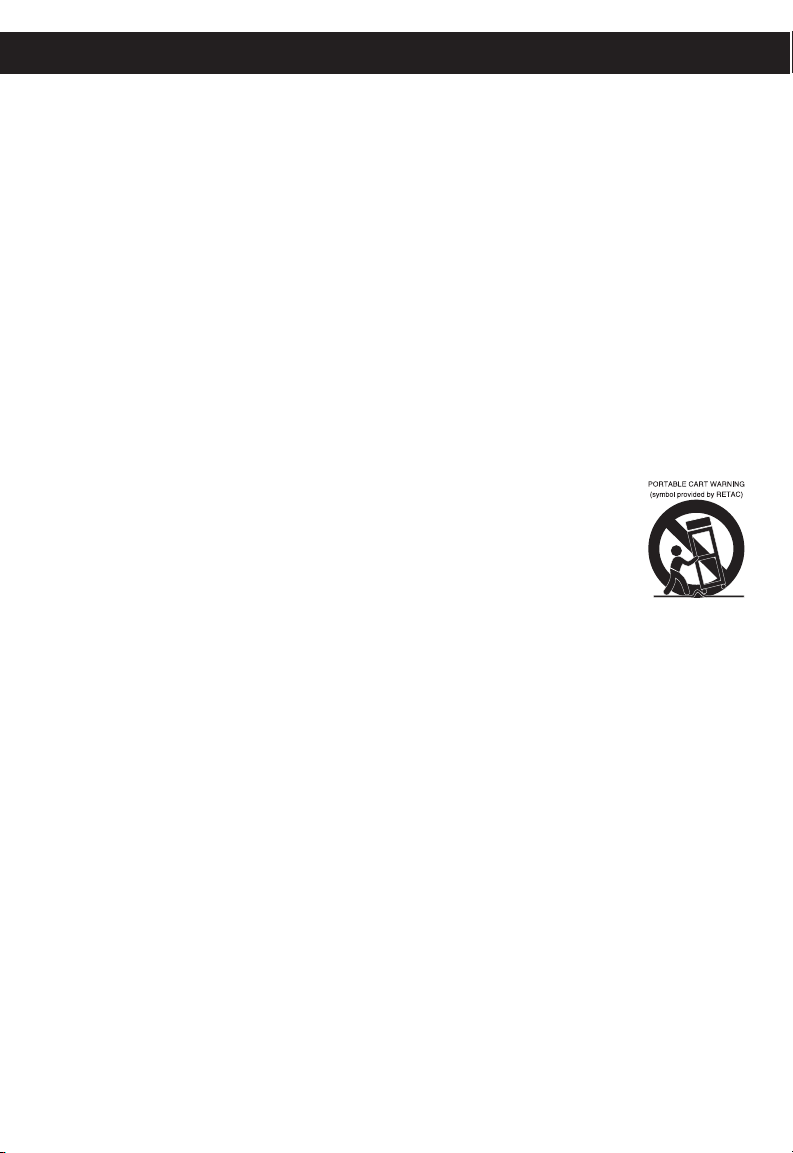
Do not place this product on an unstable cart, stand, tripod, bracket or table. The product may fall, causing
serious injury and serious damage to the product. Use only with a cart, stand, tripod, bracket or table recommended by the manufacturer or sold with the product. Any mounting of the product
should follow the manufacturer’s instructions, and should use a mounting accessory recommended by the manufacturer.
8A. An appliance and cart combination should be moved with care. Quick stops, excessive
force and uneven surfaces may cause the appliance and cart combination to overturn.
9. VENTILATION
Slots and openings in the cabinet and in the back or bottom are provided for ventilation,
to ensure reliable operation of the product and to protect it from overheating. These
openings must not be blocked or covered. The openings should never be blocked by
placing the product on a bed, sofa, rug or other similar surface. This product should never be placed near
or over a radiator or heat source. This product should not be placed in a built-in installation such as a
bookcase or rack unless proper ventilation is provided or the manufacturer's instructions have been
adhered to.
10. POWER SOURCES
This product should be operated only from the type of power source indicated on the marking label. If you
are not sure of the type of power supply to your home, consult your appliance dealer or local power company. For products intended to operate from battery power, or other sources, refer to the operating instructions.
11. GROUNDING OR POLARIZATION
This product is equipped with a polarized alternating-current line plug (a plug having one blade wider than
the other). This plug will fit into the power outlet only one way. This is a safety feature. If you are unable to
insert the plug fully into the outlet, try reversing the plug. If the plug should still fail to fit, contact your electrician to replace your obsolete outlet. Do not defeat the safety purpose of the polarized plug.
12. POWER-CORD PROTECTION Power-supply cords should be
routed so that they are not likely to be walked on or pinched by items placed upon or against them, paying
particular attention to cords at plugs, convenience receptacles, and the point where they exit from the
appliance.
13. LIGHTNING
To protect your product from a lightning storm, or when it is left unattended and unused for long periods of
time, unplug it from the wall outlet and disconnect the antenna or cable system. This will prevent damage
to the product due to lightning and power-line surges.
14. POWER LINES
An outside antenna system should not be located in the vicinity of overhead power lines or other electric
light or power circuits, or where it can fall into such power lines or circuits. When installing an outside
antenna system, extreme care should be taken to keep from touching such power lines or circuits as contact with them might be fatal.
4
Page 6
SAFETY INSTRUCTIONS (CONTINUED)
A
NTENNA
L
EAD IN
WIRE
ANTENNA
DISCHARGE UNIT
(NEC SECTION 810-20)
GROUNDING CONDUCTORS
(NEC SECTION 810-21)
GROUND CLAMPS
POWER SERVICE GROUNDING
ELECTRODE SYSTEM
(
NEC ART 250, PART H)
NEC - NATIONAL ELECTRICAL CODE
ELECTRIC
SERVICE
E
QUIPMENT
GROUND
CLAMP
S2898A
15. OVERLOADING
Do not overload wall outlets and extension cords as this can result in a risk of fire or electric shock.
16. OBJECT AND LIQUID ENTRY
Never push objects of any kind into this product through openings as they may touch dangerous voltage points
or short out parts that could result in fire or electric shock. Never spill or spray any type of liquid on the product.
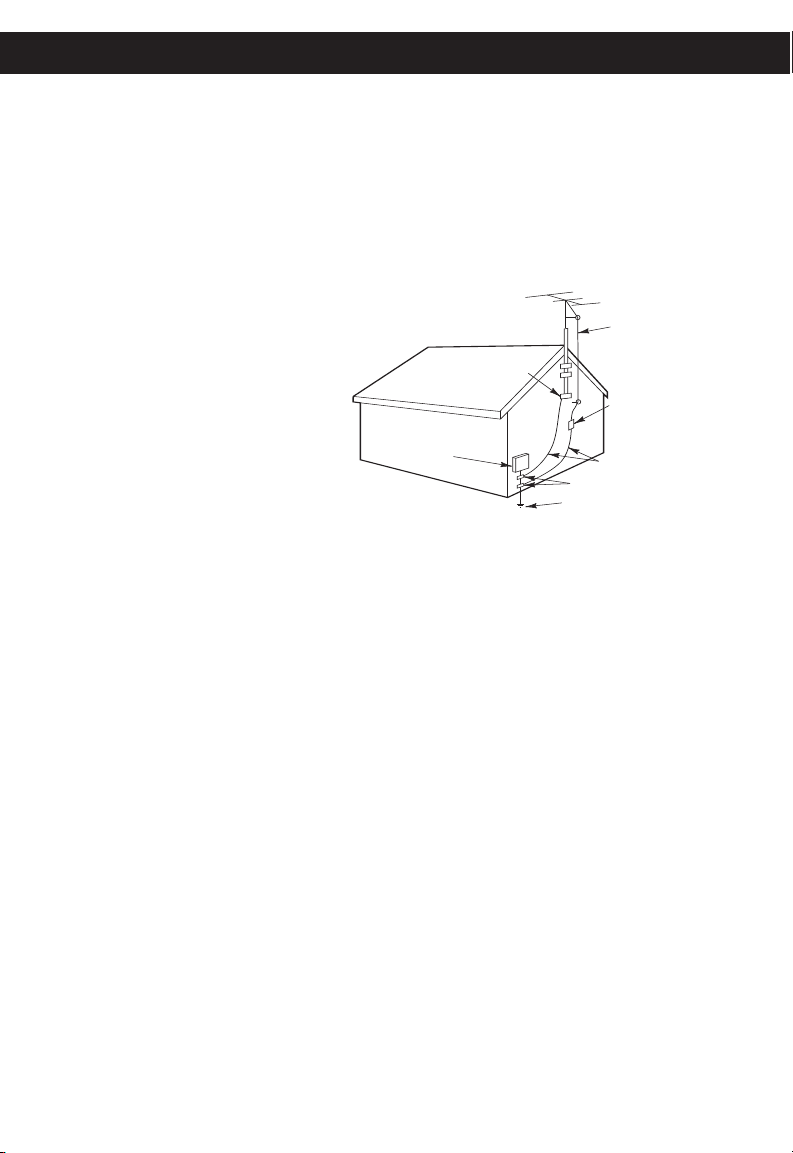
17. OUTDOOR ANTENNA GROUNDING
If an outside antenna is connected to the product, be sure the antenna system is grounded so as to provide some protection against voltage surges and built-up static charges. Section 810 of the National
Electric Code, ANSI/NFPA 70, provides information with respect to proper grounding of the mast and supporting structure, grounding of the lead-in wire to an antenna discharge product, size of grounding conductors, location of antenna discharge product, connection to grounding electrodes and requirements for
grounding electrode.
18. SERVICING
Do not attempt to service this
product yourself as opening or
removing covers may expose you
to dangerous voltage or other
hazards. Refer all servicing to
qualified service personnel.
19. REPLACEMENT PARTS
When replacement parts are
required, be sure the service technician uses replacement parts
specified by the manufacturer or
those that have the same characteristics as the original part.
Unauthorized substitutions may
result in fire, electric shock or
other hazards.
20. SAFETY CHECK
Upon completion of any service or repairs to this product, ask the service technician to perform safety
checks to determine that the product is in proper operating condition.
21. WALL OR CEILING MOUNTING
The product should be mounted to a wall or ceiling only as recommended by the manufacturer.
22. DAMAGE REQUIRING SERVICE
Unplug the product from the wall outlet and refer servicing to qualified service personnel under the following conditions:
a. When the power-supply cord or plug is damaged.
b. If liquid has been spilled or objects have fallen into the product.
c. If the product has been exposed to rain or water.
d. If the product does not operate normally by following the operating
instructions. Adjust only those controls that are covered by the
operating instructions, as an adjustment o other controls may result
in damage and will often require extensive work by a qualified
technician to restore the product to its normal operation.
e. If the product has been dropped or the cabinet has been damaged.
f. When the product exhibits a distinct change in performance–this
indicates a need for service.
23. HEAT
The product should be situated away from heat sources such as radiators, heat registers, stoves or other
products (including amplifiers) that produce heat.
24. NOTE TO CATV SYSTEM INSTALLER
This reminder is provided to call the CATV system installer's attention to Article 820-40 of the NEC that
provides guidelines for proper grounding and, in particular, specifies that the cable ground shall be connected to the grounding system of the building, as close to the point of cable entry as practical.
EXAMPLE OF ANTENNA GROUNDING AS PER
NATIONAL ELECTRICAL CODE
5
Page 7
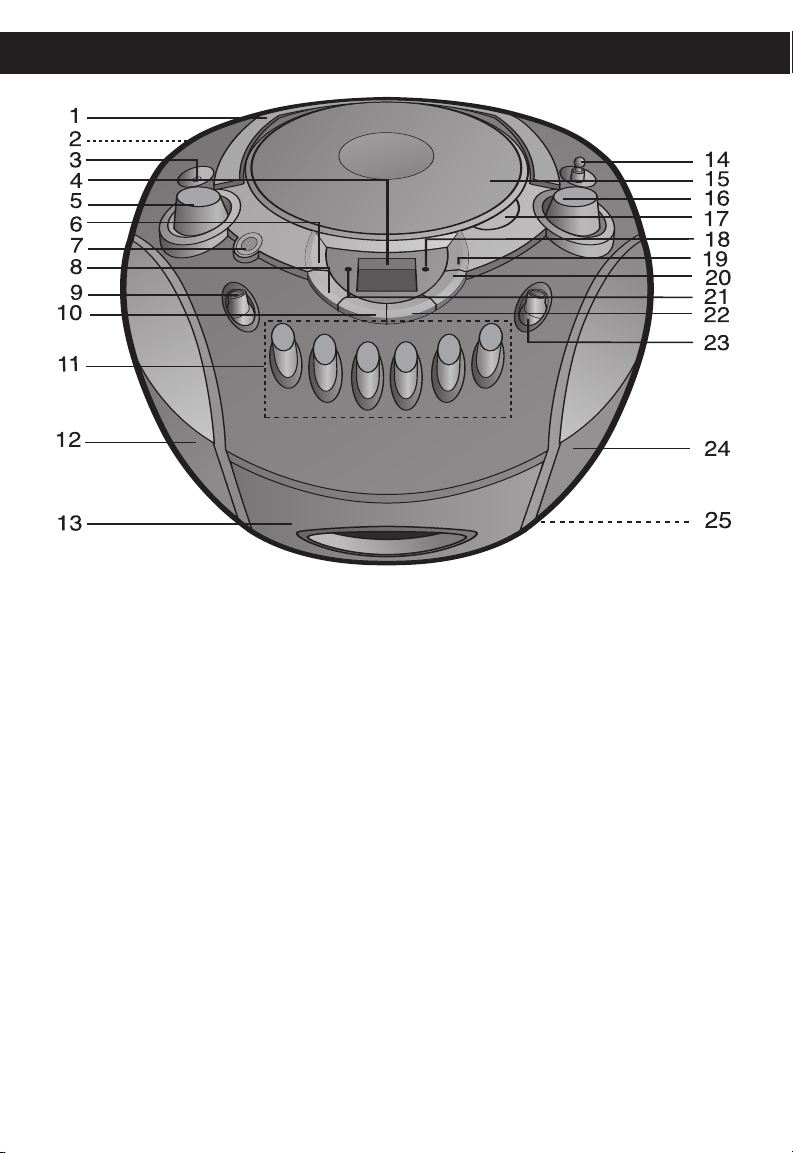
LOCATION OF CONTROLS
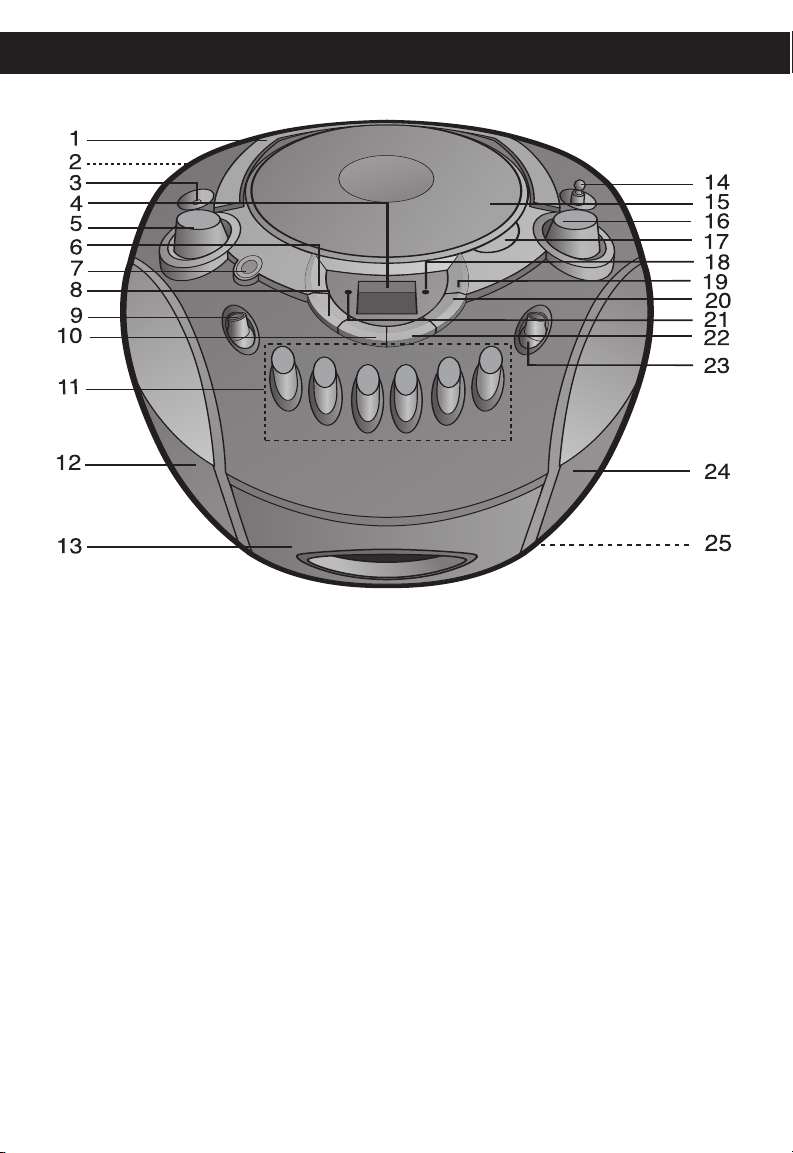
1. Carrying Handle
2. AC Power Jack (Rear of Unit)
3. PHONES (Headphones) Jack
4. Display with PLAY/PAUSE &
REPEAT Indicators
5. VOLUME Control
6. PROG. (PROGRAM) Button
7. BASS BOOST Button
8. Skip/Search
9. Function Switch (CD/TAPE
o Button
(OFF)/RADIO)
10. STOP (■) Button
11. Cassette Buttons (left to right):
PAUSE (p)
STOP/EJECT (
F.FWD (
REWIND (
PLAY (
RECORD (
√√)
√)
r)
®®)
q)
12. Left Speaker
13. Cassette Compartment
14. FM Antenna
15. CD Compartment
16. Tuning Control
17. CD OPEN Button
18. PROG. (PROGRAM) Indicator
19. REPEAT Button
20. Skip/Search
21. POWER Indicator
22. PLAY/PAUSE (®/p) Button
23. BAND Switch
24. Right Speaker
25. Battery Compartment
(Bottom of Unit)
6
n Button
Page 8
POWER SOURCES
AC Plug
AC Outlet
+
+
-
-
+
+
-
-
+
+
-
-
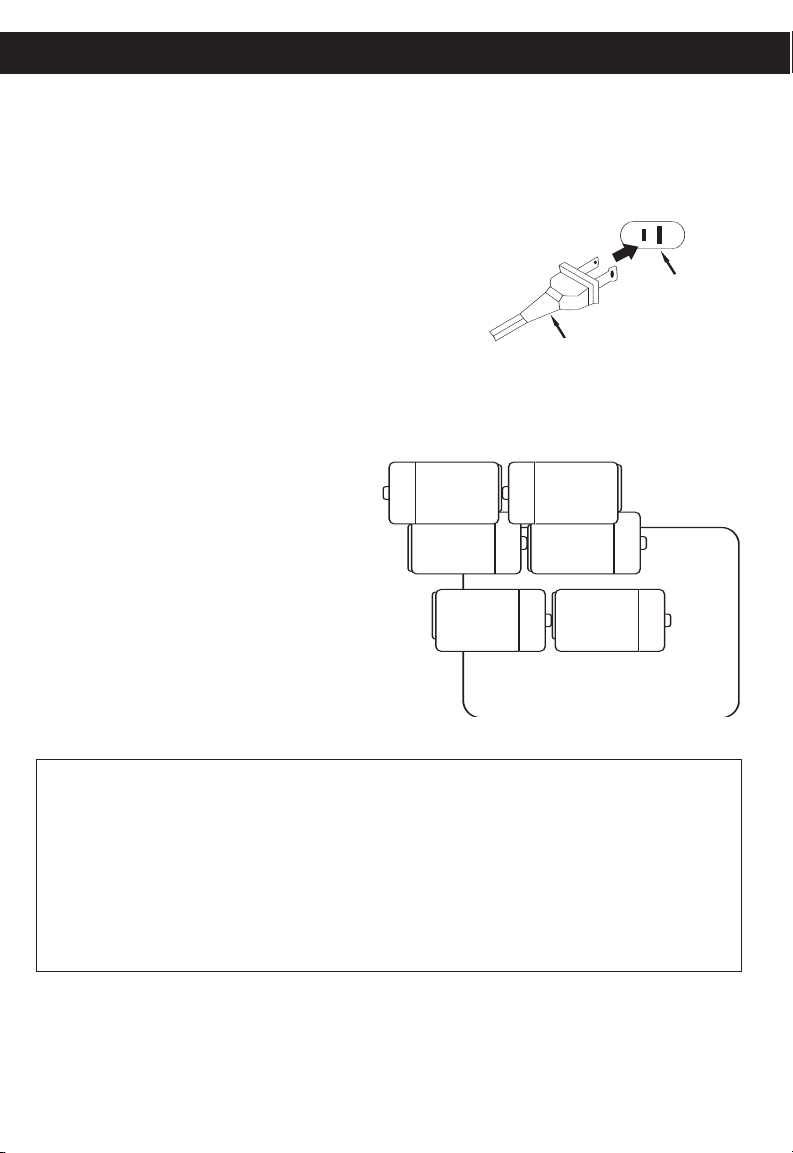
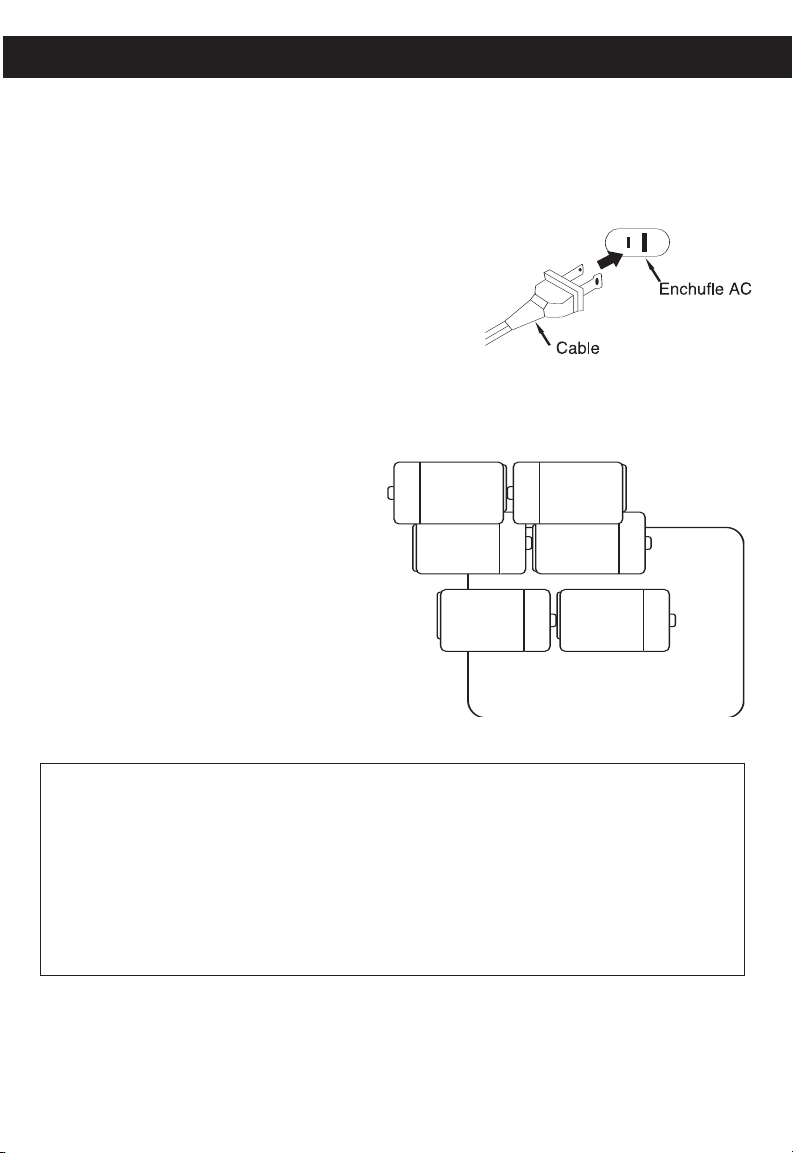
This unit is designed to operate on AC household current or DC (batteries).
AC
Use the AC polarized line cord included with the unit for operation on AC power.
Insert one end of the AC line cord into the AC power jack on the rear of the unit
and the other end (with the 2 blades) into a conveniently located AC outlet having 120V, 60Hz.
When the AC cord is plugged in, the batteries will
be disconnected.
NOTE: The AC plug supplied with the unit is polarized to help minimize the possibility of electric
shock. If the AC plug does not fit into a nonpolarized AC outlet, do not file or cut the wide blade. It is the user’s responsibility to have
an electrician replace the obsolete outlet.
BATTERY INSTALLATION
To use this unit with battery power,
remove the battery door on the
bottom of the unit by pressing in on
the tabs and then lifting the battery
door off. Insert six (6) ‘C’ size
batteries following the diagram in the
compartment.
NOTE: The AC power cord must be
disconnected from the AC power jack
on the rear of the unit in order for the
unit to operate on battery power.
BATTERY PRECAUTIONS
Follow these precautions when using batteries in this device:
1. Use only the size and type of batteries specified.
2. Be sure to follow the correct polarity when installing the batteries as indicated in the battery compartment.
Reversed batteries may cause damage to the device.
3. Do not mix different types of batteries together (e.g. Alkaline, Rechargeable and Carbon-zinc) or old batteries with fresh ones.
4. If the device is not to be used for a long period of time, remove the batteries to prevent damage or injury from
possible battery leakage.
5. Do not try to recharge batteries not intended to be recharged; they can overheat and rupture. (Follow battery
manufacturer’s directions.)
HEADPHONE JACK
For private listening, connect low impedance 3.5mm (32 ohm) stereo headphones
(not included) to this jack.
headphone plug is inserted in the jack.
The speakers are automatically
7
disconnected when the
Page 9
OPERATION
2
1
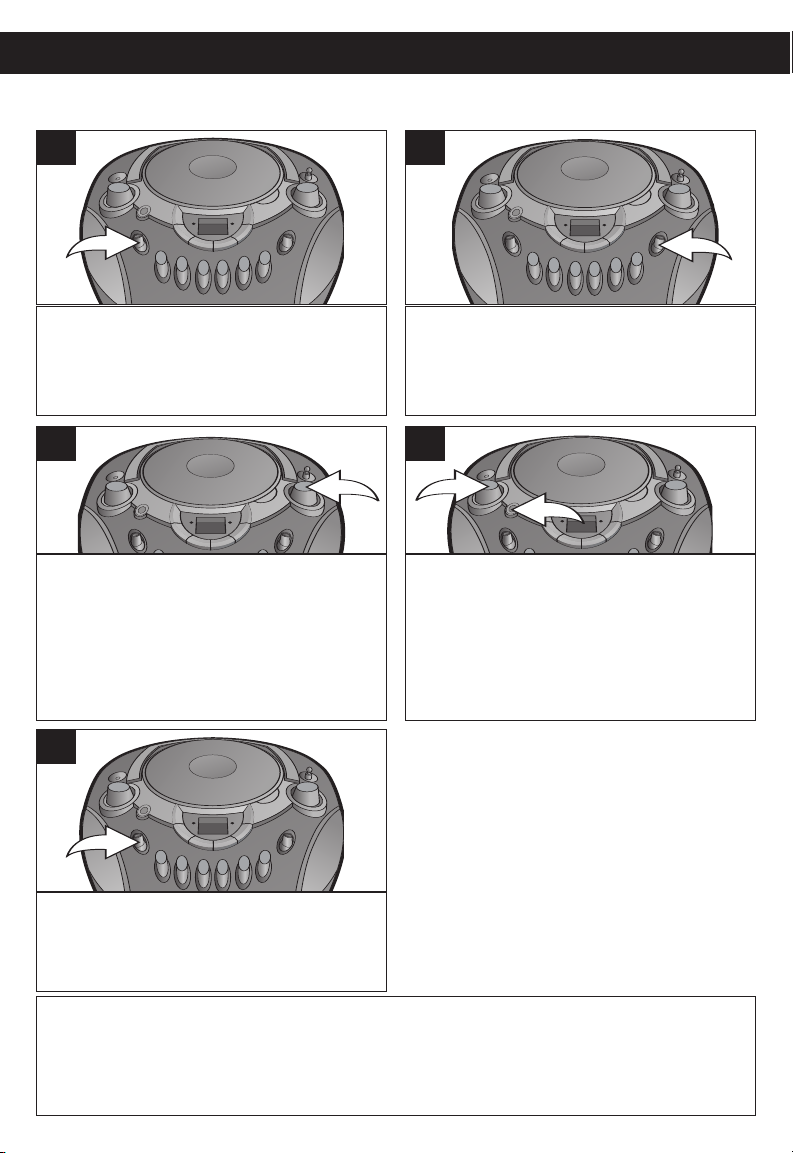
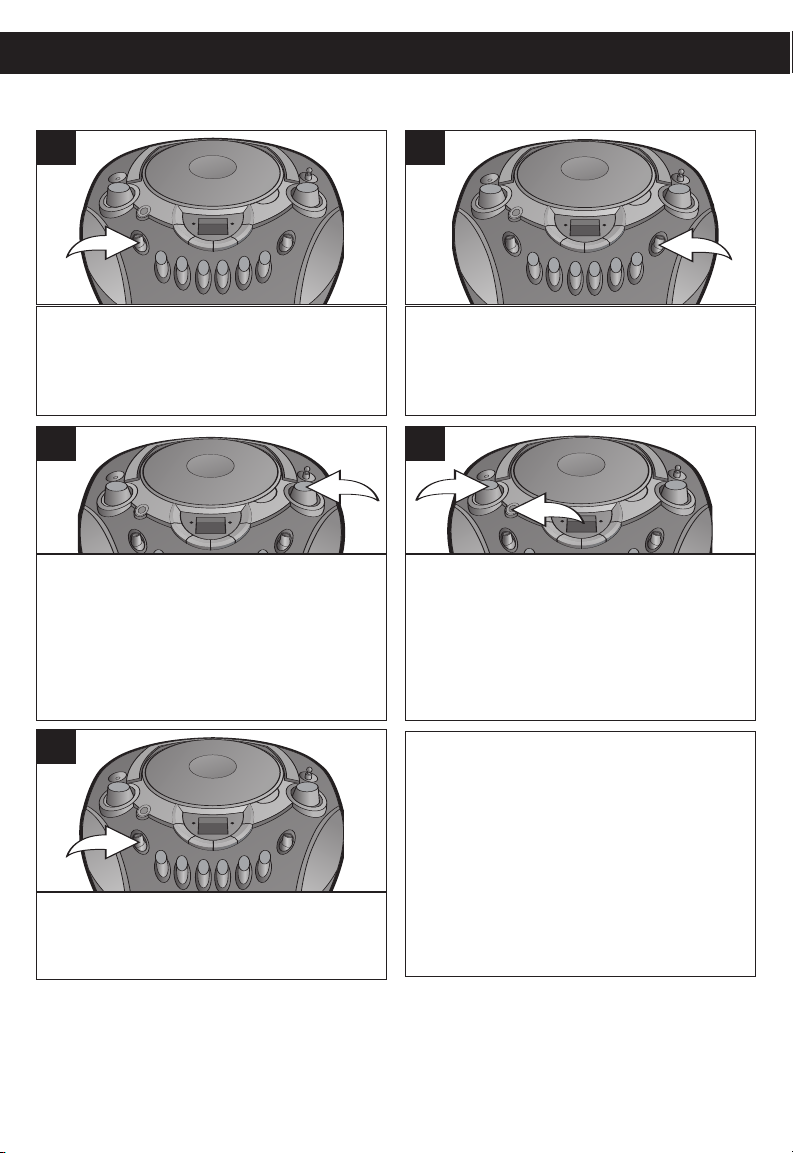
LISTENING TO THE RADIO
1
Slide the Function switch to the
RADIO position to turn the unit on
and select Radio mode; the POWER
indicator will light.
3
Tune a desired station by turning the
TUNING control. The frequencies are
located around the TUNING control.
2
Slide the BAND switch to select AM
or FM.
4
Adjust the VOLUME control 1 and
BASS BOOST button
Press the BASS BOOST button
“in” position to enhance the bass sound.
2 as desired.
2 to the
5
To turn the radio off, slide the Function
switch to the TAPE/OFF position.
ANTENNAS
–This unit has a built-in ferrite rod antenna, which provides adequate reception in most
AM
areas. If reception is weak, turn the unit to improve reception.
FM–The FM Antenna is for FM reception only. If reception is weak, adjust the length and the
angle of the antenna.
8
Page 10
2
1
3
2
1
2
1
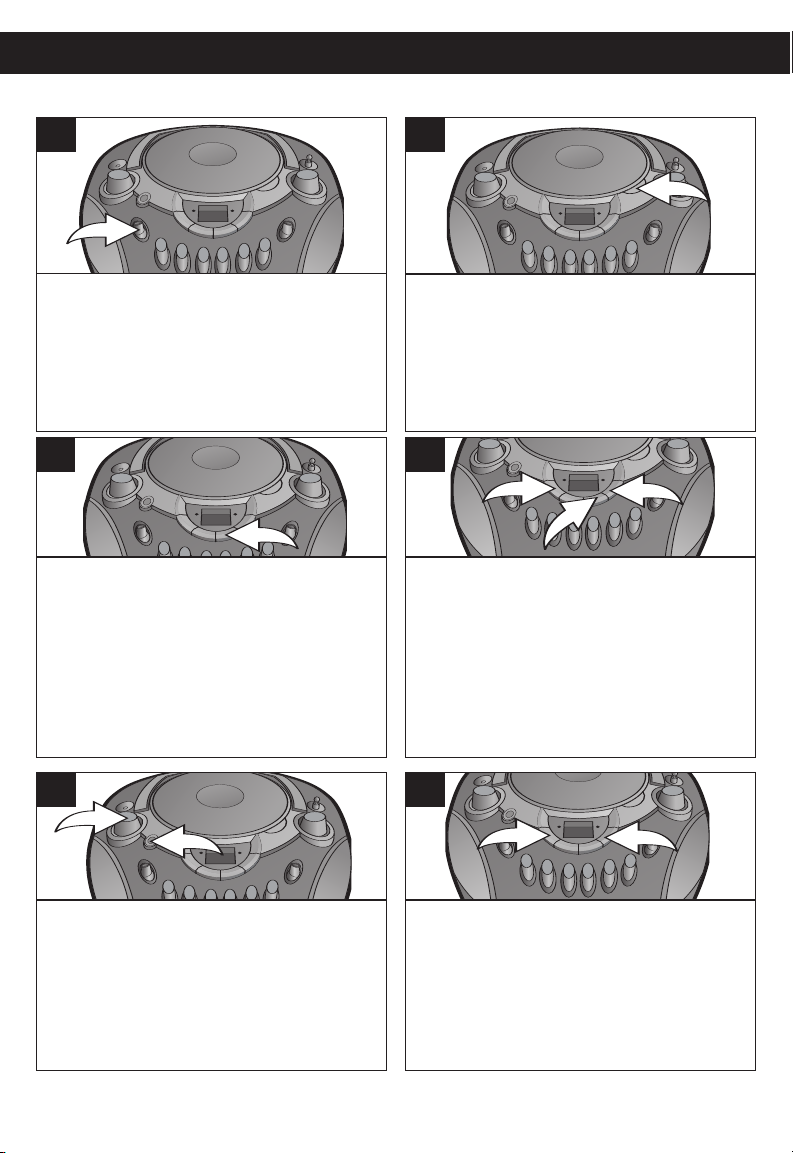
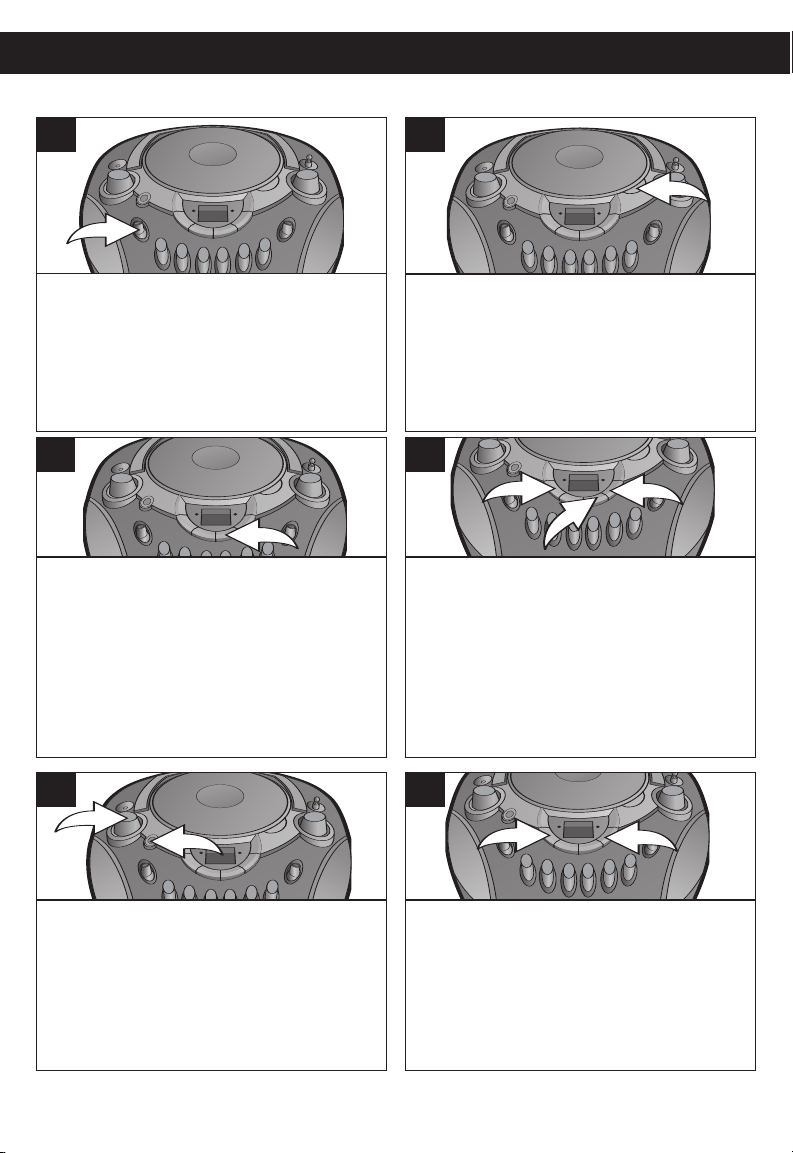
TO PLAY A CD
OPERATION (CONTINUED)
1
Slide the Function switch to the CD
position to turn the unit on and select
CD mode; the POWER indicator will
light.
3
To play a disc from the beginning, press
the PLAY/PAUSE (
Press the PLAY/PAUSE (
to pause playback; the track number and
PLAY/PAUSE indicator will blink. Press the
PLAY/PAUSE (
continue playback; the track number and the
PLAY/PAUSE indicator will stop blinking.
®/p) button.
®/p) button again
®/p) button once again to
2
Open the CD compartment door by
pressing the CD OPEN button. Place a
CD on the center spindle, with the
printed label side facing up. Close the
CD compartment door; the total tracks
will appear in the display.
4
To start from a specific track, locate the
track using the Skip/Search
button, then press the PLAY/PAUSE
(
®/p) button 3 to start playback from the
track selected. The PLAY/PAUSE indicator will light in the display.
o 1 or n 2
5
Adjust the VOLUME control 1 and
BASS BOOST button 2 as desired.
Press the BASS BOOST button 2 to the
“in” position to enhance the bass sound.
CONTINUED ON THE NEXT P
6
To skip forward or backward through the tracks
on the disc, press the Skip/Search
button.
search forward or backward through the play-
To
ing track, press and hold the Skip/Search
n 2 button, a chattering noise will be heard. Stop
pressing the button to return to normal playback.
AGE
9
o 1 or n 2
o 1 or
Page 11
OPERATION (CONTINUED)
3
2
4
1
2
1
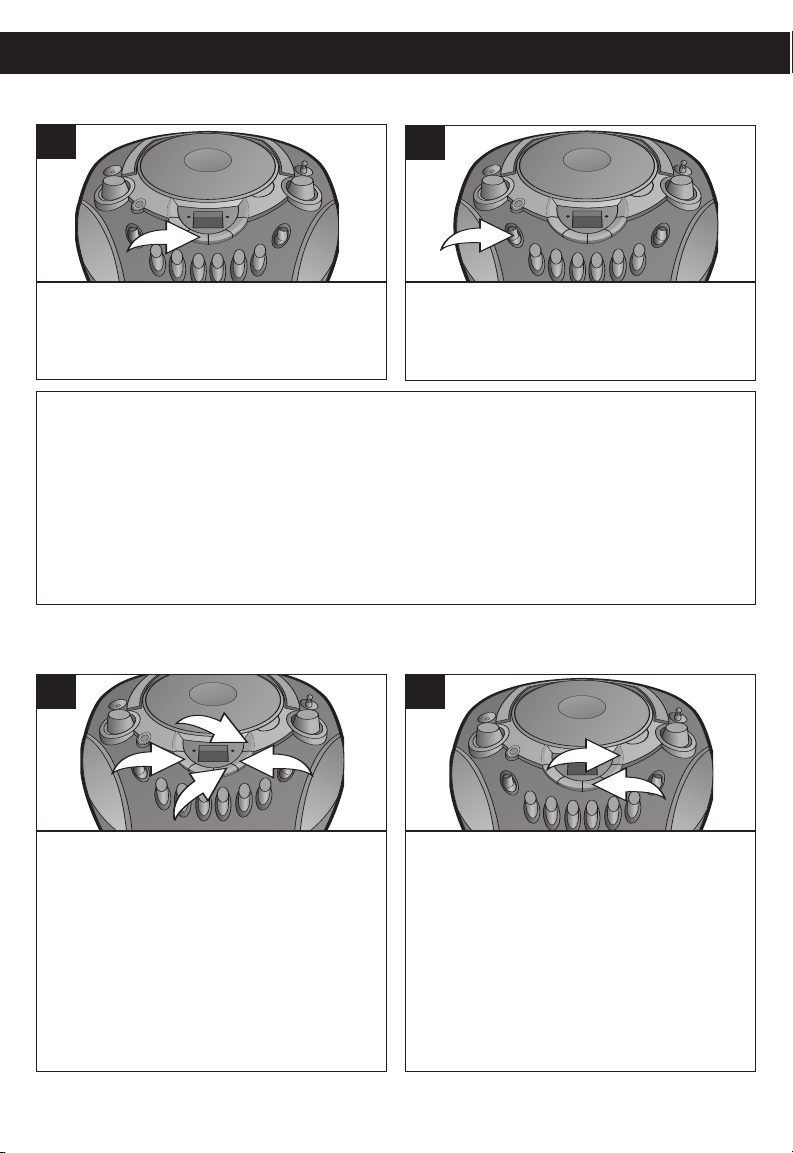
TO PLAY A CD (CONTINUED)
7
When the disc is through playing, it will
stop rotating. Press the STOP (■) button to stop the disc before it is finished.
NOTES:
• If there is no disc or a disc is inserted incorrectly, dirty or damaged, "Er" or "no" will
appear in the display.
• As each track is played, the track number is shown in the display.
• To prevent damage to the disc, never open the CD door while the disc is rotating. Wait
for the disc to stop before opening the CD door. Never touch the lens when the CD
door is open.
• DO NOT use the carrying handle when playing a CD. The CD should only be used
on a steady surface.
TO REPEATEDLY PLAY BACK ONE TRACK/ALL TRACKS
1
8
To turn the unit off, slide the Function
switch to the TAPE/OFF position.
2
To repeat a single track, press the REPEAT
button
1 once while in the Stop mode; the
Repeat indicator will blink. Press the
Skip/Search
specific track that you wish to repeat. When
the desired track number appears in the
display, press the PLAY/PAUSE (
4 to begin playback. The PLAY/PAUSE
indicator will light and the specific track you
selected will be repeated continuously.
To stop and cancel Repeat playback, press the STOP (■) button.
o 2 or n 3 button to select the
®/p) button
To repeat all of the tracks on a disc
continuously, press the REPEAT
1 twice while in the Stop mode;
button
the Repeat indicator will light. Press the
Y/PAUSE (
PLA
playback. The PLAY/PAUSE indicator
will light and all tracks will be repeated
continuously.
10
®/p) button 2 to begin
Page 12
OPERATION (CONTINUED)
2
1
2
1
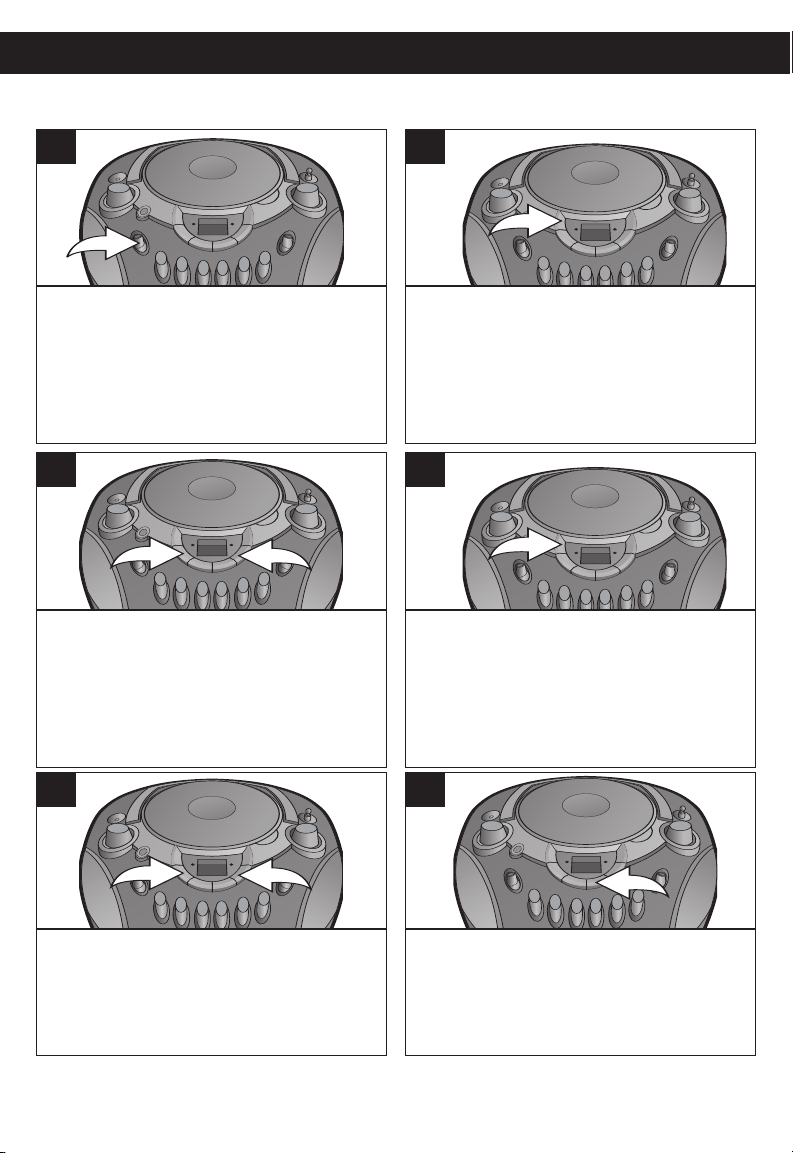
TO PROGRAM THE MEMORY (UP TO 20 TRACKS)
1
Slide the Function switch to the CD
position to turn the unit on and select
CD mode; the POWER indicator will
light. Insert a CD as described on
page 9.
3
Use the Skip/Search o 1 or n 2 button to select the first track to be programmed.
2
Press the PROGRAM button; the display and the PROGRAM indicator will
blink.
4
Press the PROGRAM button again;
the selected track has now been programmed and counted as program 1.
5
Repeat steps 3 and 4 to program the
other desired tracks in sequence.
When the program memory is full, it
will start over at memory 1.
6
Press the PLAY/PAUSE (®/p) button
to begin playback; the PROGRAM
indicator will light and the tracks will
play in the order programmed.
SEE NEXT PAGES FOR NOTES ON PROGRAMMED PLAY
11
Page 13
OPERATION (CONTINUED)
NOTES ON PROGRAMMED PLAY:
• Programming is the ability to preselect the order in which a series of tracks
will be played.
• Each track may be stored in the program memory as many times as desired.
• As each track is played, its track number will be displayed. You can move forward or backward through the programmed tracks with the Skip/Search o or
n button.
• The CD player will stop after all programmed tracks have been played or the
STOP (
• The Program memory will be cleared when the unit is turned off or changed
to another mode or when the CD door is opened.
• To check the program, while in the Stop mode, press the PROGRAM button
once, "01" will blink in the display, then the first selected track will blink in the
display. Press the PROGRAM button again, "02" will blink in the display, then
the second selected track will blink in the display. Press the PROGRAM button repeatedly to check the other programmed tracks.
PROGRAMMED REPEAT
■) button is pressed.
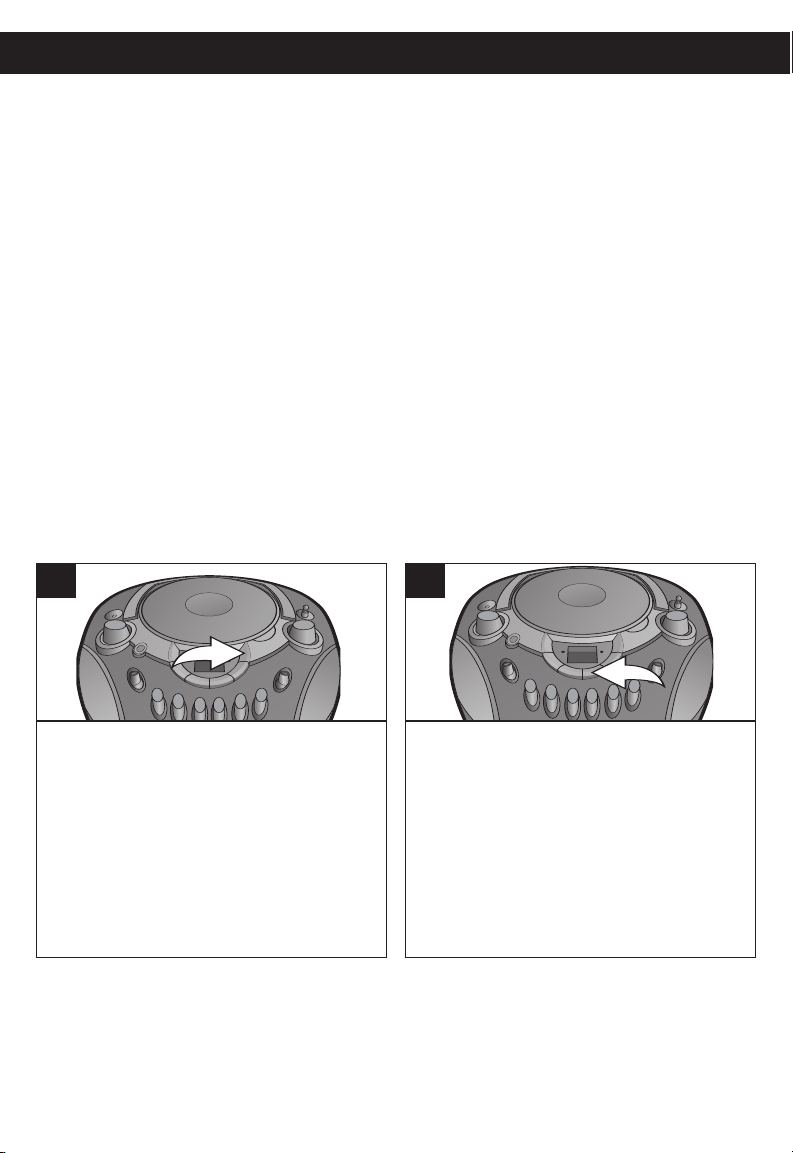
1
It is also possible to use the Program and
Repeat functions together to repeat a
specific program indefinitely. First,
program the tracks you wish to hear in the
order you wish to hear them, as described
on page 11. Then, press the REPEAT
button twice. The PROGRAM indicator
will blink and the REPEAT indicator will
light.
NOTE:
Program Repeat operation will continue indefinitely until you press the STOP (■)
button.
2
Press the PLAY/PAUSE (®/p) button
to begin programmed repeat
playback; both the PROGRAM and
REPEAT indicators will light. The
player will play the tracks you
selected in the order in which you
programmed them. When the last
track in the program has been played,
the entire program will begin again.
12
Page 14
OPERATION (CONTINUED)
2
1
3
1
2
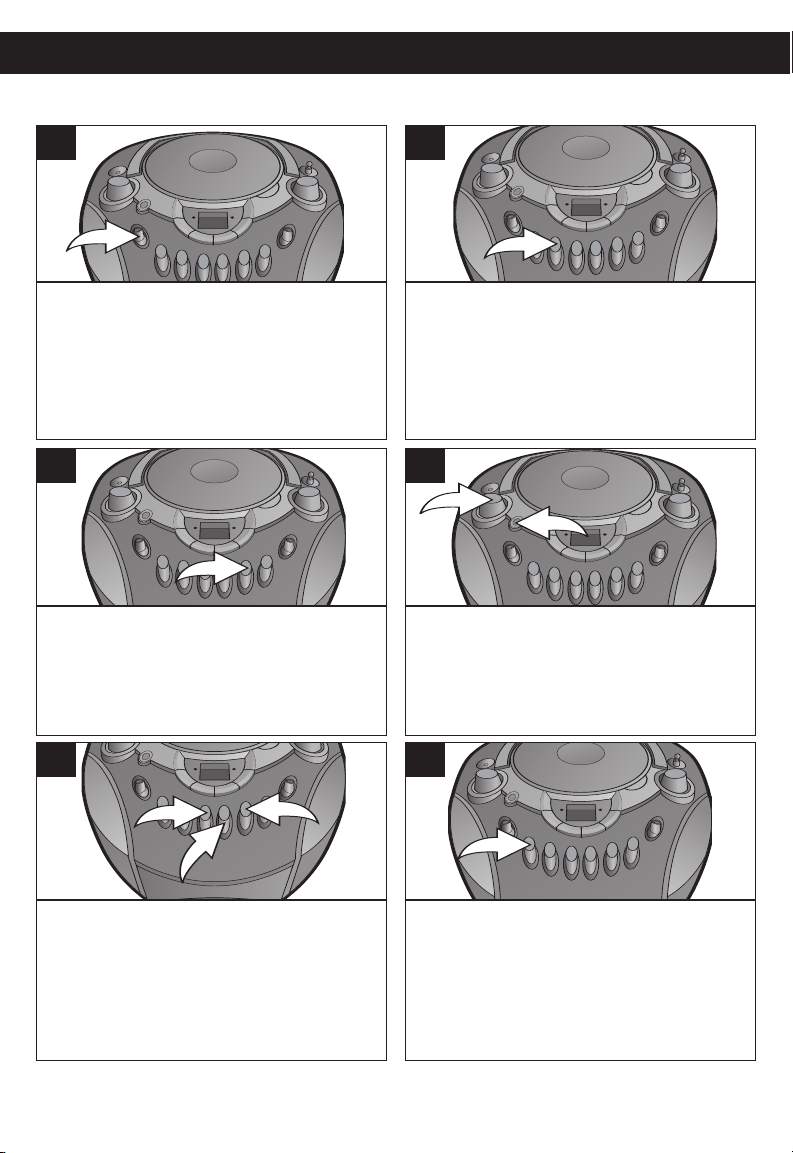
PLAYING CASSETTE TAPES
1
Slide the Function switch to the
TAPE/OFF position to select Tape.
3
Press the PLAY (√) button to begin
playback.
2
Press the STOP/EJECT (r) button to
open the cassette compartment. Insert
a pre-recorded cassette into the slots in
the cassette door with the open end
facing up and the full reel on the right
side. Close the cassette door.
4
Adjust the VOLUME control 1 and
BASS BOOST button 2 as desired.
Press the BASS BOOST button 2 to the
“in” position to enhance the bass sound.
5
To advance or rewind the tape rapidly,
press either the F.FWD (
REWIND (
reach the desired point, press the PLAY
(
√) button 3 to resume normal playback.
®®) 2 button. When you
CONTINUED ON THE NEXT PAGE
√√) 1 or
6
To pause playback momentarily,
press the PAUSE (p) button. The
tape movement stops but the tape
motor is still running. Press the
AUSE (p)button again to release
P
pause and resume normal playback.
13
Page 15
OPERATION (CONTINUED)
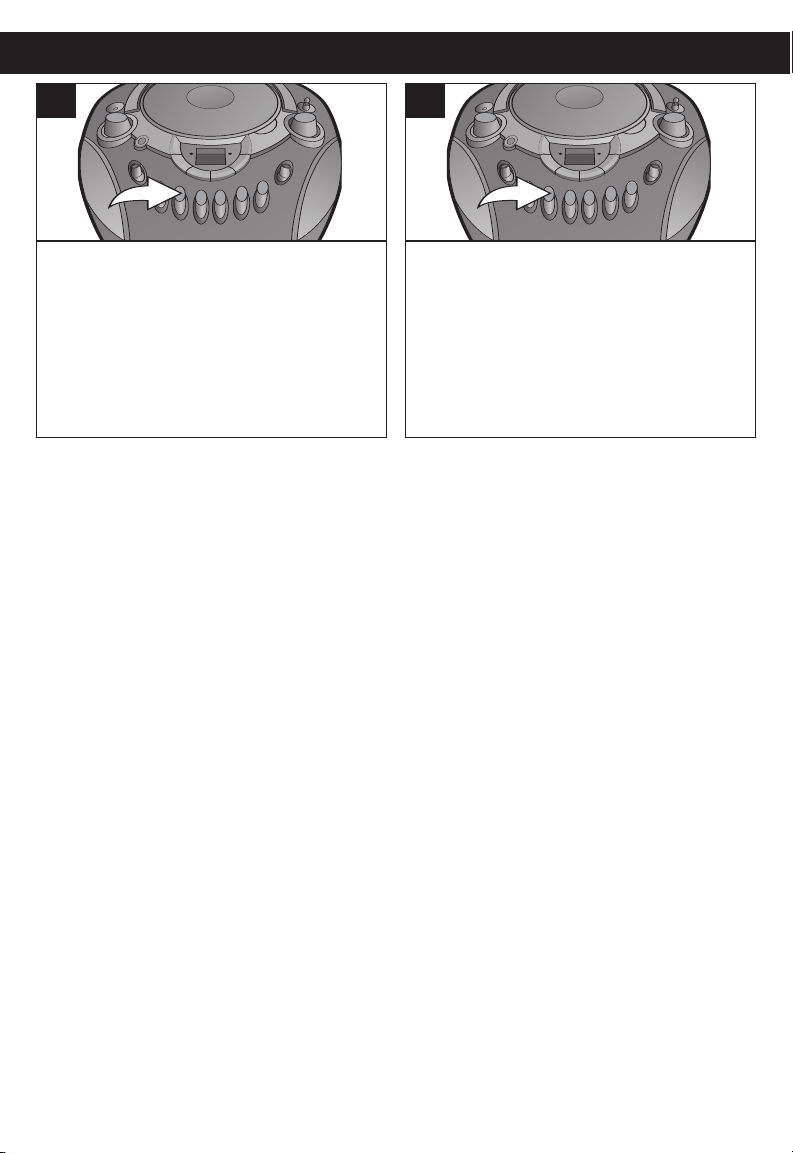
7
To stop playback before the tape
ends, press the STOP/EJECT (r)
button. The PLAY (√) button is
released and the tape motor shuts off.
8
When the tape reaches the end, the
auto-stop mechanism activates, the
PLAY (√) button is released and the
tape motor shuts off. Press the
STOP/EJECT (r) button to open the
cassette compartment and remove
the cassette.
14
Page 16
OPERATION (CONTINUED)
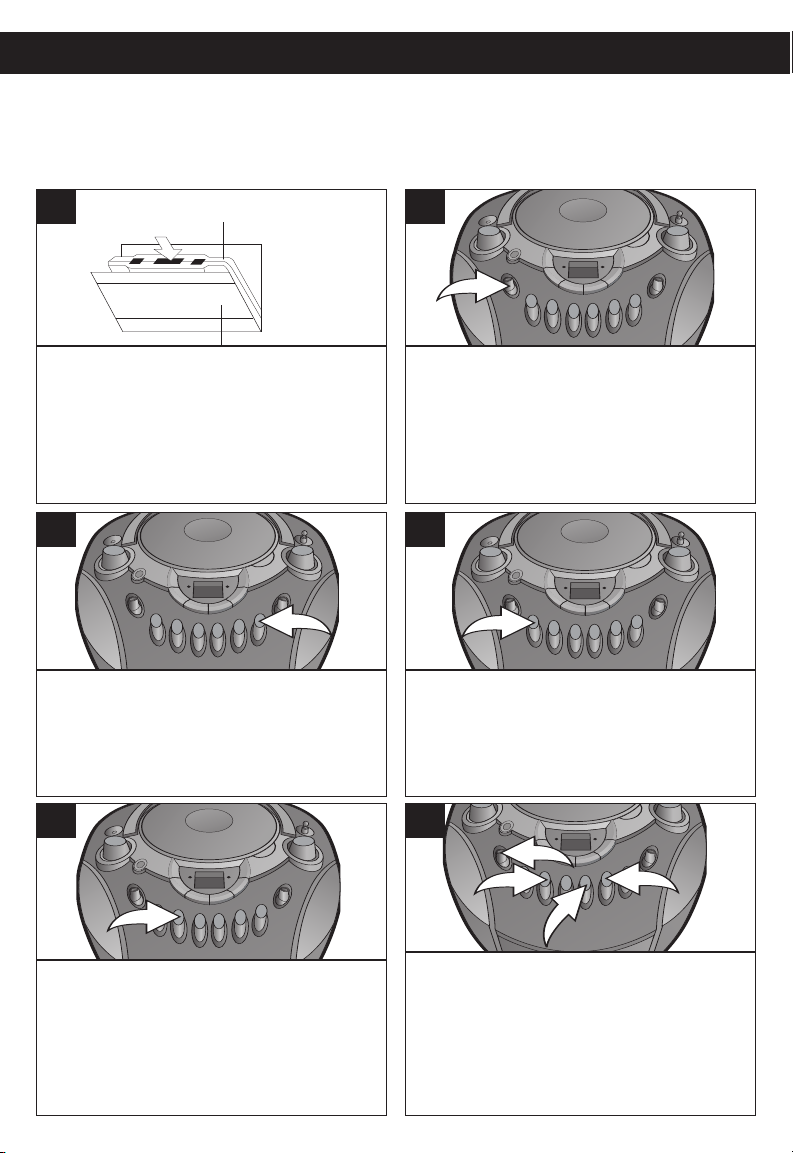
Open Surface Side
2
4
3
1
MAKING A TAPE RECORDING
This unit allows you to make direct recordings from the radio or CD player to a blank cassette. An automatic recording volume level control (ALC) circuit will automatically control
the volume level of your recordings to prevent distortion.
1
Open the cassette door and insert a
good quality blank cassette tape into
the slots on the door, with the open
end facing up and the full reel on the
right side. Close the cassette door.
3
When you are ready to begin recording,
(Q) b
press the RECORD
√) button will also engage. The tape will
(
begin moving and all of the material from your
selected source will be recorded on the tape.
utton. The PLAY
2
Slide the Function switch to select the
function you wish to record, either CD
or Radio, and operate that function
according to its own instructions.
4
To avoid recording unwanted material,
such as radio commercials, use the
PAUSE (
temporarily. Release the PAUSE (
button to begin recording again.
p) button to stop the recording
p)
5
When you are finished recording,
press the STOP/EJECT (r) button to
stop the tape.
6
If you wish to listen to your recording immediately, press the REWIND (
the tape rewinds to the beginning, then press
the STOP/EJECT (
FUNCTION switch
press the PLAY (
15
√) button 4 to begin playback.
®®) button 1 until
r) button 2. Slide the
3 to select TAPE/OFF then
Page 17
CARE AND MAINTENANCE
Tab
Cover with tape to record again
Break out the tab
to prevent recording
SIDE 1
Tab for side 1
T
ab for side 2
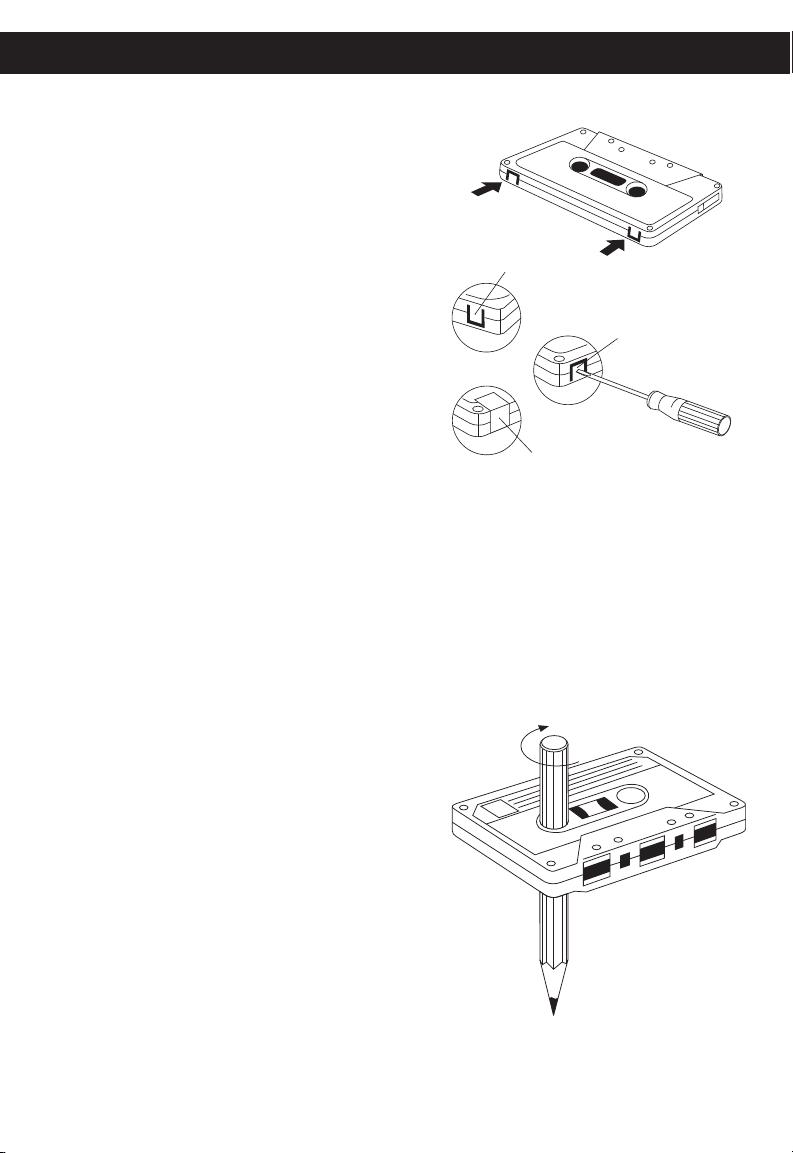
SAFEGUARD AGAINST ACCIDENTAL ERASURE
When a new recording is made, any program material previously recorded is automatically erased and only the new recording remains. To safeguard valuable recordings from being erased accidentally, the
cassette and the deck are equipped with a
special device.
On the back of the cassette there is an
erase prevention tab on each side. To prevent accidental erasing, break out these
tabs with a screwdriver. If only one side of
the tape is to be protected, break out the
tab on the left side with the side desired
facing you.
To record on a tape in which the tab has
been broken, place a piece of adhesive
tape over that area.
NOTE: When a tab is broken out, the record button cannot be depressed.
CASSETTE TAPE RECOMMENDATIONS
Standard tape lengths have 15 (C-30), 30 (C-60) and 45 (C-90) minutes of recording time on each side. Longer length tapes of 60 (C-120) minutes of recording time
on each side are not recommended. Use
only high quality tapes. If a problem develops, check the unit first with another cassette to determine if the problem is with the
cassette, and not with the unit.
If there is any slack in the tape in the cassette, it should be removed before inserting
the cassette. Place a pencil in one of the
hubs and rotate clockwise until all slack is
taken up.
16
Page 18
CARE AND MAINTENANCE (CONTINUED)
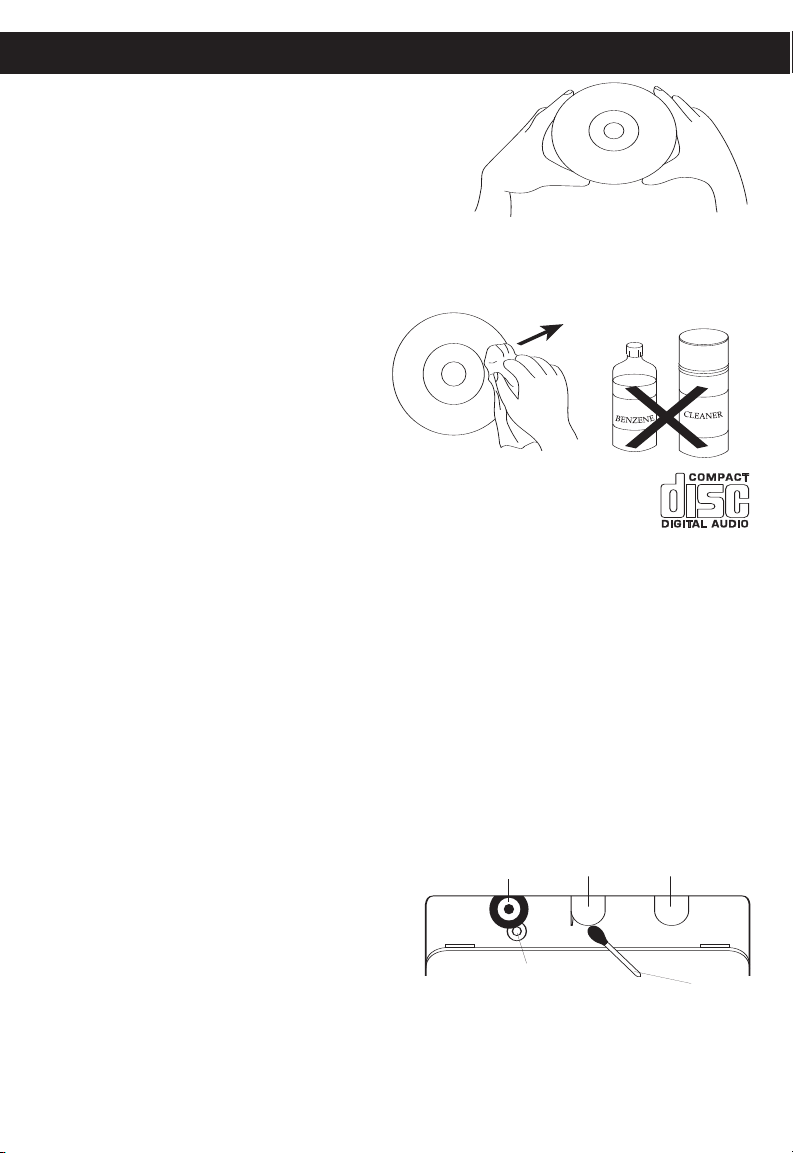
R/P
HeadPinch Roller
Capstan
Cotton Swab
Erase
Head
Caring for Compact Discs
• Treat the compact disc carefully. Handle the compact disc only by its edges. Never allow your
fingers to come in contact with the shiny, unprinted side of the compact disc.
• Do not attach adhesive tape, stickers, etc. to
the disc label.
• Clean the compact disc periodically with a soft, lint-free, dry cloth. Never use detergents or abrasive cleaners to clean the compact disc. If necessary, use a CD cleaning kit.
• If a disc skips or gets stuck on a section of the compact disc, it is probably
dirty or damaged (scratched).
• When cleaning the compact disc,
wipe in straight lines from the center
of the compact disc to the outer edge
of the compact disc. Never wipe in
circular motions.
• This unit is designed to play only compact discs bearing the identification logo as shown here. Other discs may not conform to the CD standard and may not play properly.
• Compact discs should be stored in their cases after each use to avoid damage.
• Do not expose compact discs to direct sunlight, high humidity, high temperatures or
dust, etc. Prolonged exposure or extreme temperatures can warp the compact disc.
• Do not stick or write anything on either side of the compact disc. Sharp writing
instruments, or the ink, may damage the surface.
Cleaning the Unit
• To prevent fire or shock hazard, disconnect your unit from the AC power source
when cleaning.
• The finish on your unit may be cleaned with a dust cloth and cared for as other furniture. Use caution when cleaning and wiping the plastic parts.
• Mild soap and a damp cloth may be used on the front panel.
• Periodic cleaning of the tape heads, capstan and pinch roller is necessary to maintain good sound reproduction. Clean them
after every 100 hours of use or less if playback has deteriorated. Use a cotton swab
moistened with head-cleaning solution or
isopropyl alcohol, then wipe dry with
another swab.
NOTE: Never use metal objects on or near the tape heads. Do not allow any cleaning
material to fall into the tape assembly
.
17
Page 19
TROUBLESHOOTING GUIDE
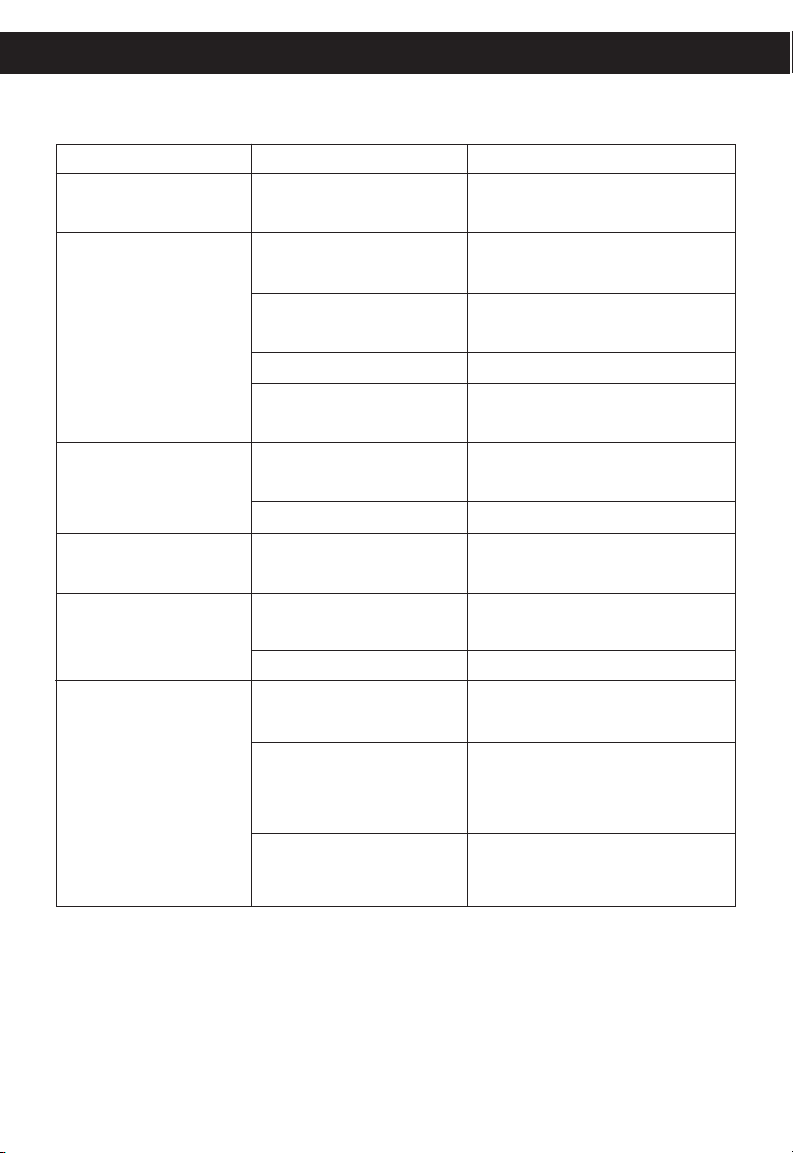
If you experience a problem with this unit, check the chart below before calling for
service.
SYMPTOM CAUSE SOLUTION
Unit will not AC cord not Check AC cord
turn on. connected. connection.
Disc will not play. CD compartment Close CD compartment
door not closed. door.
Disc inserted Reinsert disc correctly.
incorrectly.
Dirty or defective CD. Try another disc.
Moisture Wipe disc with soft cloth.
condensation on disc.
No sound. VOLUME control Increase volume.
set to minimum.
Defective disc. Try another disc.
Erratic playback. Dirty or defective Clean or replace disc.
disc.
AM or FM, no sound. Power is not on. Slide the FUNCTION con-
trol to RADIO.
Volume set too low. Increase volume.
AM/FM, poor sound. Station is not tuned Retune the AM or FM
properly. broadcast station.
FM: Telescopic Reorient FM telescopic
antenna is not antenna.
properly adjusted.
AM: Unit is not pos- Rotate unit until best
itioned correctly. reception is obtained.
18
Page 20

SPECIFICATIONS
GENERAL:
Power Source ..............................................................................120V, 60Hz AC
Battery......................................................... 9V DC (6 x 1.5V ‘C’ size batteries)
Alkaline is recommended for longer life
Speaker. .....................................................................................2 x 3W, 8 Ohms
Output Power.........................................................................................2 x 1.5W
RADIO SECTION:
Frequency Range (FM)....................................................................88–108 MHz
Frequency Range (AM) ...............................................................530–1710 KHz
CD SECTION:
Disc Diameter ...............................................................................4.72" (120mm)
3.15" (80mm) Single CD
Optical Source....................................................................Semiconductor Laser
CASSETTE SECTION:
Tape ..........................................................Standard Normal Bias Cassette Tape
Frequency Response.......................................................................125–6300Hz
Wow & Flutter ................................................................................0.35% WRMS
Specifications are subject to change without notice.
FOR ADDITIONAL SET-UP OR OPERATING ASSISTANCE, PLEASE
VISIT OUR WEBSITE AT WWW.MEMOREXELECTRONICS.COM OR CONTACT CUSTOMER SERVICE AT (954) 660-7100.
PLEASE KEEP ALL PACKAGING MATERIAL FOR AT LEAST 90 DAYS IN
CASE YOU NEED TO RETURN THIS PRODUCT TO YOUR PLACE OF
PURCHASE OR MEMOREX.
FOR PARTS AND ACCESSORIES, CONTACT FOX INTERNATIONAL AT
1-800-321-6993.
19
Page 21
Estimado Cliente:
Sírvase leer este manual detenidamente antes de operar la unidad para familiarizarse más con la misma y obtener el desempeño que le permitirá disfrutarla por
muchos años. Mantenga estas instrucciones a la mano para futura referencia.
SÍRVASE GUARDAR EL EMPAQUE DE CARTÓN AL MENOS POR 90
DÍAS POR SI ACASO NECESITARA REGRESAR EL PRODUCTO A SU
DISTRIBUIDOR O A MEMOREX.
Para futura referencia, registre el número de serie de la unidad impresa en la
parte trasera del gabinete.
Número de serie _______________________________________
MEDIDAS DE SEGURIDAD
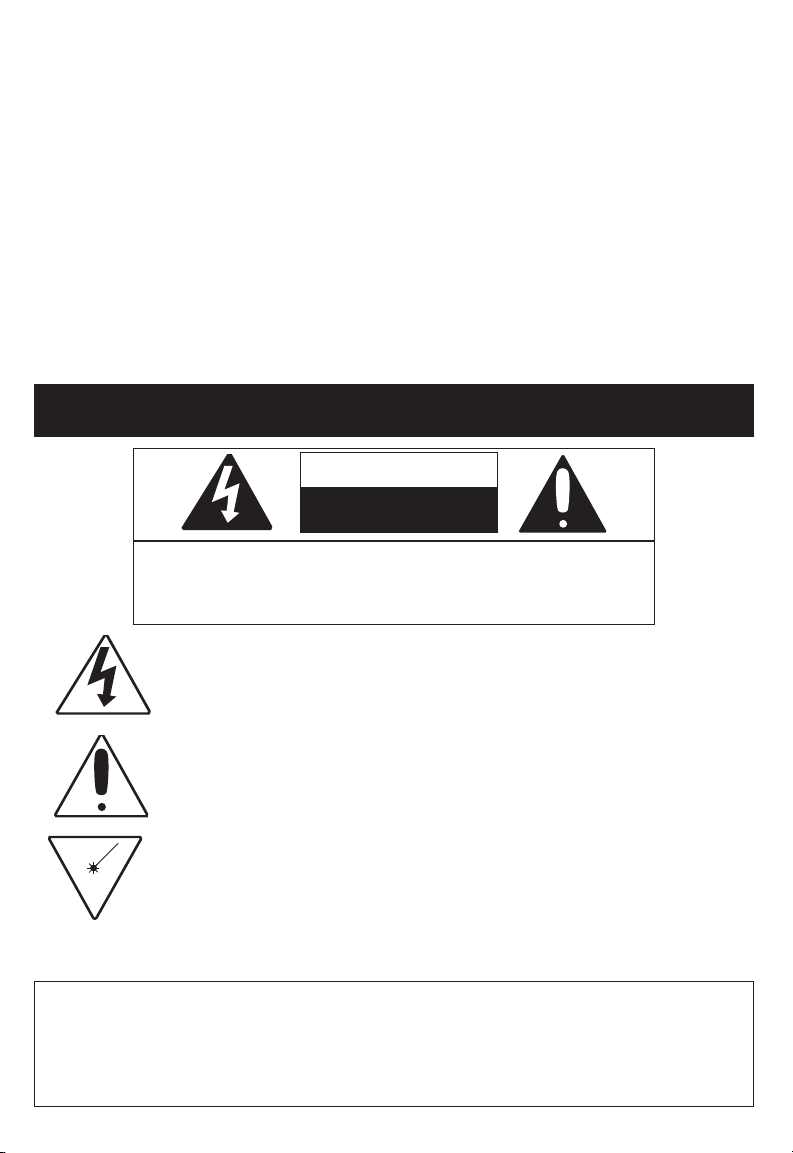
CUIDADO
RIESGO DE DESCARGA
ELÉCTRICA. NO ABRIR
ADVERTENCIA: Para reducir el riesgo de descargas eléctricas no saque la
cubierta o la tapa posterior. Allí no se encuentran partes que puedan ser
reparadas por el usuario. Lleve su unidad a un Centro de Servicio Autorizado.
Esta marca de precaución se ubica en el fondo del gabinete de la unidad.
ADVERTENCIA: La figura de la flecha con forma de rayo dentro de un triángulo
está hecho para alertar al usuario de la presencia de cables sin aislar de "voltaje
peligroso" dentro del gabinete, de tal magnitud que puede causar un riesgo de
descarga eléctrica a las personas.
ADVERTENCIA: El signo de exclamación dentro de un triángulo está hecho
para alertar al usuario de la existencia de instrucciones importantes tanto de
servicio como de funcionamiento y mantenimiento que vienen con la unidad.
PELIGRO:
Este producto utiliza un láser de Clase 1 para leer los discos compactos. Este reproductor de discos compactos con láser está equipado con interruptores de seguridad
para evitar el contacto cuando la puerta del CD está abierta y el intercierre de seguridad está vencido. Radiación láser invisible y riesgosa cuando está abierto y el
intercierre está averiado o vencido. Evite la exposición directa al haz de luz. No
intente vencer o circunvalar los interruptores de seguridad.
AVISO DE LA FCC:
Este equipo genera o puede usar energía de frecuencia radial. Cualquier cambio o
modificación al equipo, puede causar interferencia nociva, a menos que estas modificaciones
esten expresamente indicadas en el manual de instrucciones. El usuario puede perder el
derecho de operar este equipo si efectuara un cambio o modificación no autorizadas.
1
Page 22
MEDIDAS DE SEGURIDAD
AVISO DE LA FCC:
Este equipo genera o puede usar energía de frecuencia radial. Cualquier
cambio o modificación al equipo, puede causar interferencia nociva, a menos
que estas modificaciones esten expresamente indicadas en el manual de
instrucciones. El usuario puede perder el derecho de operar este equipo si
efectuara un cambio o modificación no autorizadas.
Este sistema está de acuerdo con los límites exigidos por la Clase B para
dispositivos electrónicos tal como se especifican en la Parte 15 del
Reglamento FCC. Estos límites ofrecen una protección razonable contra la
interferencia de radio o televisión, aún cuando esté operando correctamente.
Para eliminar cualquier interferencia, usted puede intentar una o más de las
siguientes medidas correctivas:
• Re-oriente o cambie de posición la antena receptora.
• Aumente la distancia existente entre el sistema y el radio o televisión.
• Use distintos toma-corrientes para el radio o la televisión.
• Si el problema subsiste, consulte a un técnico especializado en
radio/televisión.
ADVERTENCIA: PARA EVITAR LOS PELIGROS DE ELECTROCUTAMIENTO
O INCENDIO, NO EXPONGA ESTE APARATO A LA LLUVIA O HUMEDAD.
MEDIDAS DE SEGURIDAD CON EL RAYO LASER
Esta unidad usa un rayo laser. Sólo personal calificado deberá dar servicio a este
dispositivo a fín de evitar daño en los ojos.
ADVERTENCIA: El uso de los controles, o el procedimiento de funcionamiento
que no sean los especificados aquí, pueden dar como resultado una exposición a
radiación peligrosa.
PROTECTORES DE PICOS:
Se recomienda utilizar un protector de picos para la conexión de la CA. Los picos del
relámpago y de la energía no están amparados por la garantía de este producto.
ATTENTION:
POUR ÉVITER LES CHOC ÉLECTRIQUES, INTRODUIRE LA LAME LA PLUS
LARGE DE LA FICHE DANS LA BORNE CORRESPONDANTE DE LA PRISES
ET POUSSER JUSQU’AU FOND.
Este aparato digital de Clase B cumple con la norma ICES-003 de Canadá.
Cet appareil numérique de la classe B est conforme à la norme NMB-003
du Canada.
2
Page 23
Estimado cliente:
A
S
S
O
C
I
A
T
I
O
N
EST. 1924
E
L
E
C
T
R
O
N
I
C
I
N
D
U
S
T
R
I
E
S
EIA
We
LISTENING
For A Lifetime
Want You
El haber seleccionado un equipo de tan alta tecnología, como el que usted acaba de
comprar, es sólo el comienzo de su entretenimiento musical. Ahora es tiempo de tomar
en consideración como optimizar el entretenimiento que su equipo le ofrece. Este fabricante y la Asociación de Industrias Electrónicas del Grupo de Consumidores Electrónicos
desean que usted obtenga el mejor resultado de su equipo usándolo en un nivel seguro,
tal como el escuchar el sonido claro y sonoro, sin distorsión - sobre todo sin que afecte
su sentido auditivo. El sonido es engañoso, ya que con el tiempo su nivel de audición
puede adaptarse solo a escuchar en volumen alto, resultando en un serio daño a su sentido auditivo. Protéjase contra este daño innecesario ajustando el volumen de su equipo
a un nivel bajo antes de acostumbrarse a escuchar siempre la música a un volumen alto.
Para establecer un nivel auditivo seguro:
• Ponga el control de volumen en posición baja.
• Lentamente aumente el nivel hasta que usted pueda escuchar clara y confortablemente sin distorsión.
Una vez que establece el nivel de audición confortable:
• Deje fijo el control de Volumen en dicho nivel.
Esto sólo le tomará un minuto, y le ayudará a prevenir la pérdida del oído en el futuro.
Nosotros deseamos que usted pueda oir durante toda su vida
Si sabe usar su equipo, éste le proveerá mucho tiempo de satisfacción y entretenimiento.
Debido a que el daño causado al oido es imperceptible hasta que ya es muy tarde, este
fabricfante y la Asociación de Industrias Electrónicas le recomiendan evitar la exposición
prolongada a ruidos excesivos. La lista que le damos a continuación le servirá de guía:
Nivel de
decibeles
Ejemplo
30 Una biblioteca, susurros.
40 Sala, refrigeradora, dormitorio lejos del tráfico.
50 Semáforo, conversación no rmal, oficina tranquila.
60 Aire acondicionado a 20 pies, máquina de coser
70 Aspiradora de polvo, secadora de pelo, restaurant bullicioso.
80 Tráfico de la calle, destructores de basura, alarma de reloj a dos pies.
LOS SIGUIENTES RUIDOS PUEDEN SER PELIGROSOS SI SE SOMETE A ELLOS
EN FORMA CONSTANTE
90 Subterráneo, motocicletas, tráfico de camiones, podadora de pasto.
100 Camión de basura, sierra eléctrica, perforadora neumática.
120 Concierto rock delante de los parlante, ruido de truenos.
140 Sonido de disparo, motor de jet.
180 Lanzamiento de una nave espacial.
Esta información ha sido proporcionada gratuitamente por la
Fundación de Investigación de la Sordera.
3
Page 24
MEDIDAS DE SEGURIDAD
Antes de usar este aparato asegúrese de leer bien todos los puntos de este manual de operaciones. Una vez
leído guárdelo a la mano para usarlo como referencia en el futuro. Tenga especial cuidado al seguir las advertencias indicadas en la unidad, así como las que aparecen en el manual de instrucciones.
1. Lea las instrucciones
Usted deberá leer todas las instrucciones sobre seguridad y funcionamiento antes de operar su equipo.
2. Guarde las Instrucciones
Todas las instrucciones deberán guardarse como referencia futura.
3. Siga las Medidas de Seguridad
Todas las medidas de seguridad y funcionamiento deberán seguirse al pie de la letra.
4. Siga las Instrucciones
Todas las instrucciones sobre el funcionamiento de la unidad deberán seguirse.
5. Limpieza
Desenchufe la unidad antes de limpiarla. Nunca use líquidos de limpieza químicos, ni aerosoles. Use un
paño seco suave.
6. Auxiliares
Nunca use ningún aparato auxiliar que no haya sido recomendado por el fabricante.
7. Evite lugares cerca al agua o muy húmedos.
Nunca use su unidad cerca al agua. Por ejemplo, cerca de una bañera o lavamanos, lavadero de cocina
o lavandería, en un sótano húmedo, cerca de una piscina o lugares similares.
8. Accesorios
Coloque la unidad en una mesa, soporte o repisa estables, donde no haya vibración. Cuando coloque la
unidad en un carro, o estante, asegúrese de seguir las recomendaciones indicadas en este manual.
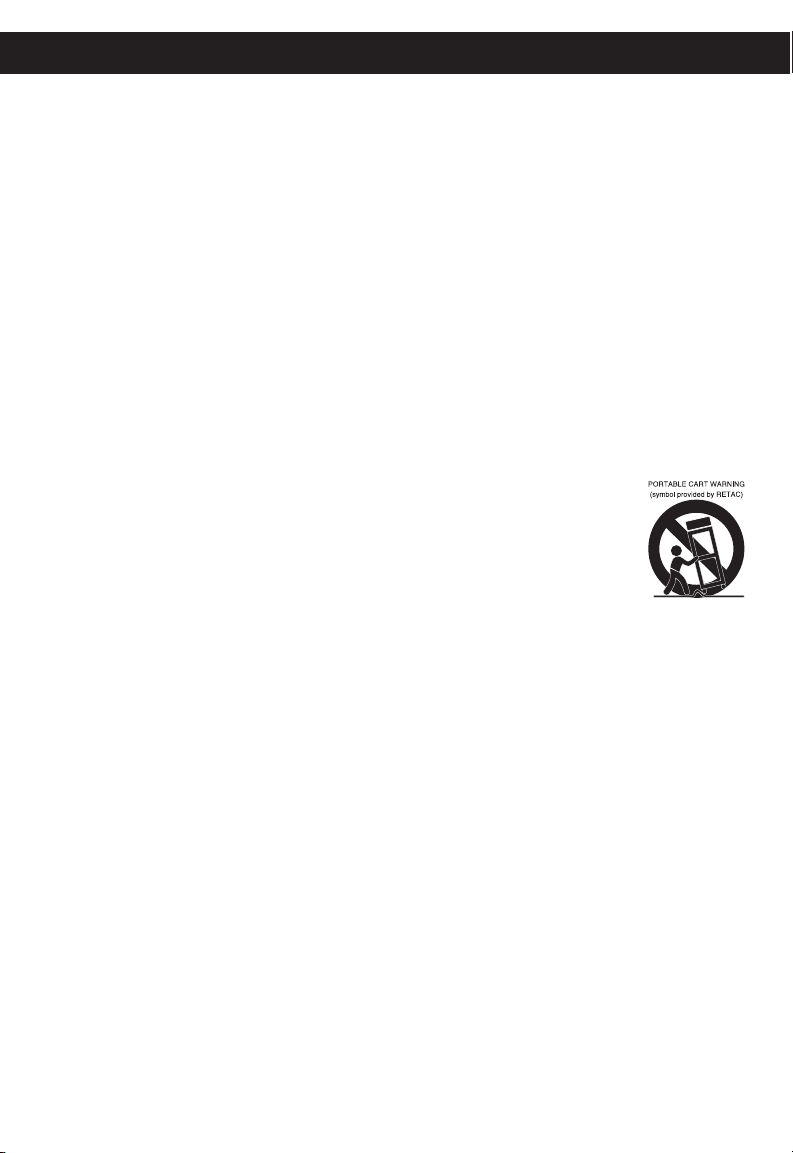
8A. La combinación de aparato y carro deberá ser movida con cuidado. Las paradas brus-
cas, fuerza excesiva y las superficies irregulares podrán hacer que el aparato y el carro
se vuelquen.
9. No permita la entrada de objetos o líquidos dentro de la unidad
Nunca introduzca ningún objeto metálico en la unidad, ni ponga nada que contenga líquidos cerca a ella. La unidad no deberá ser instalada en un mueble empotrado, como una
repisa para libros, un estante, o donde la existencia de cortinas o mobiliario obstruyan
las aberturas de ventilación.
10. Suministro de Energía
Esta unidad solo deberá operarse con la electricidad que aparece en la etiqueta. Si usted no está seguro
de que tipo de energía hay en su casa, consulte con su distribuidor o compañía de electricidad de su
localidad. Para aquellos productos que funcionan con baterías, u otras fuentes, refiérase a las instrucciones de funcionamiento.
11. Polarización
Esta unidad está equipada con un cordón de electricidad polarizado (el enchufe cuenta con una clavija
más ancha que la otra). Dicho enchufe sólo puede ser insertado en el toma-corriente en una sola dirección. Esto ha sido hecho como una medida de seguridad. Si no pudiera insertar la clavija completamente
en el toma-corriente, vuelva a intentarlo invirtiendo la clavija. Si aún no es posible insertar el enchufe,
póngase en contacto con un electricista para que reemplace su toma-corriente obsoleto. No modifique las
características de seguridad de la clavija polarizada.
12. Protección del Cordón de Electricidad
Asegúrese de que el cordón nunca se encuentre en el camino donde trafican las personas, y que nada
sea colocado sobre ellos que lo pueda pinchar, o recalentar (de existir una estufa cerca por ejemplo)
Nunca agarre el cordón con manos mojadas, y asegúrese de agarrar el cuerpo del enchufe (nunca tire del
cordón), tanto para conectarlo como cuando lo desconecte.
13. Rayos
Para protejer su unidad de una tormenta eléctrica, o cuando no va a ser usada por un tiempo largo es
recomendable que desconecte la unidad de la pared, desconecte la antena o cable. Esto le evitará daños
producidos por descargas eléctricas.
14. Líneas Aéreas de Energía Eléctrica
Como medida de precaución, cuando instale una antena exterior, hágalo lo más lejos posible de las líneas
aéreas de energía eléctrica, ya que esta podría caer sobre dichas líneas y causar corta circuitos.
Asímismo, nunca deberá tocarlas ya que podría ser fatal.
15. Sobrecarga
Nunca recargue los enchufes, ni extensiones, ya que podría resultar en un incendio o corta circuito.
16. No permita la entrada de objetos o líquidos dentro de la unidad.
Nunca introduzca ningún objeto metálico en la unidad, ni ponga nada que contenga líquidos cerca a ella.
4
Page 25
MEDIDAS DE SEGURIDAD
La unidad no deberá ser instalada en un mueble empotrado, como una repisa para libros, un estante, o
donde la existencia de cortinas o mobiliario obstruyan las aberturas de ventilación.
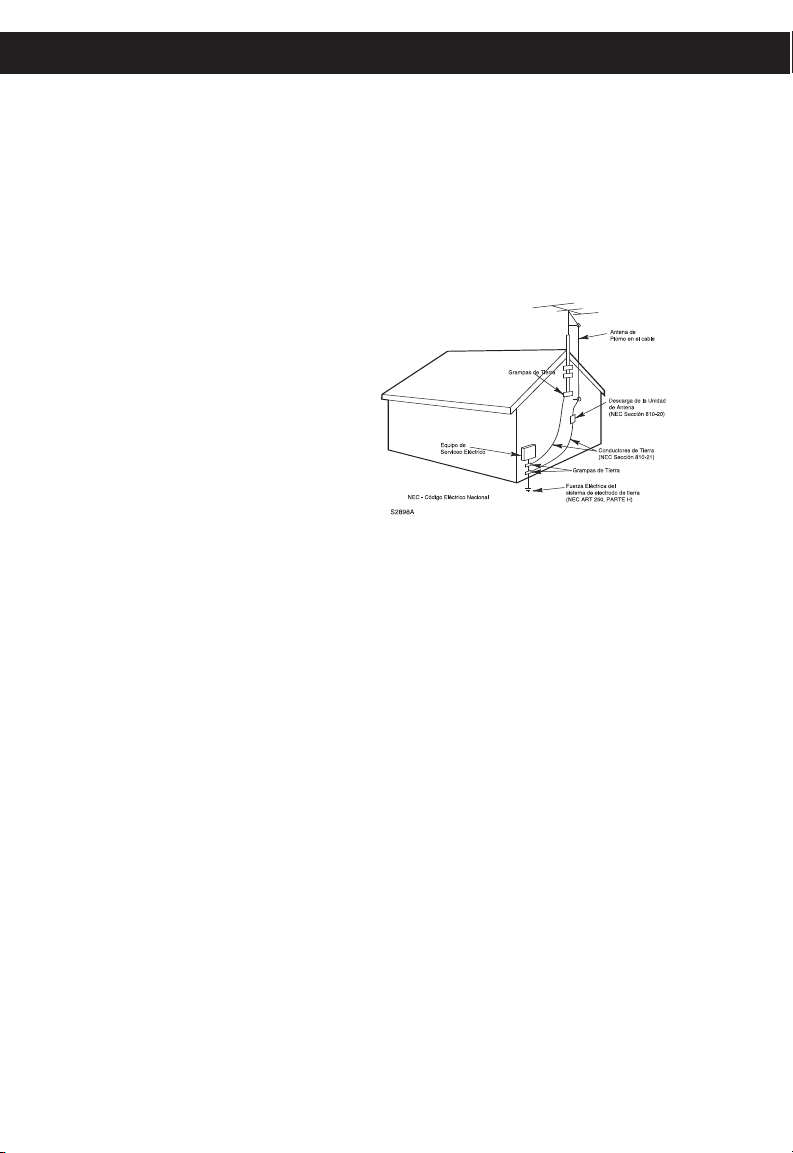
17. Conexión a tierra de la antena exterior
Si se conecta una antena al receptor, asegúrese de que el sistema de antena tiene una conexión a tierra
a fin de proveer cierta protección contra sobrecargas de electricidad, y acumulación de estática. La
Sección 810 del Código Eléctrico Nacional, ANSI/NFPA No. 70-1984, provee información sobre la correcta
instalación a tierra del mástil así como la estructura de apoyo; sobre la conexión a tierra del cable de
plomo a la unidad de descarga de la antena; sobre el tamaño de los conductores a tierra, la localización
de la salida de la antena; la conexión de los electrodos de tierra, y los requisitos para los mismos. Ver la
figura de abajo.
18. Dando Servicio
Nunca intente darle servicio a su unidad usted mismo, ya que el abrir la unidad o sacar la tapa, puede
exponerlo a circuitos de voltaje
peligrosos. Lleve su unidad a un
centro de servicio autorizado.
19. Repuestos
Cuando tenga necesidad de
ordenar partes, asegúrese de que
su centro de servicio use las
partes especificadas por el fabricante, o aquellas que tienen las
mismas características que la
pieza original. El uso de partes
no autorizadas pueden causar
descargas eléctricas u otros peligros.
20. Chequeo de Seguridad
Cada vez que haya reparado su
unidad solicite del técnico que
hizo la reparación que haga un
chequeo de seguridad para
determinar de que el producto está funcionando correctamente.
21. Montaje de Pared o Techo
Este producto deberá montarse en el techo o pared siguiendo las instrucciones dadas por el fabricante.
22. Daños que requieren de Servicio
Siempre desenchufe su unidad del tomacorriente y solicite el servicio de un técnico calificado cuando se
presenten las siguientes condiciones:
1. Cuando el cordón eléctrico o el enchufe están dañados.
2. Cuando ha derramado líquido dentro de la unidad.
3. Si ha expuesto su equipo a la lluvia o al agua.
4. Cuando su equipo no funciona correctamente a pesar de seguir las instrucciones de funcionamiento; tales
como el ajuste de controles indicados en el manual de funcionamiento. El mal manipuleo de dichos controles puede resultar en un daño mayor a los mismos.
5. Si ha dejado caer su unidad y el gabinete se ha dañado.
6. Cuando su equipo muestra señales diferentes en su funcionamiento, esto es una clara indicación de que
su equipo necesita servicio.
23. Calor
Esta unidad no deberá nunca colocarse cerca a artefactos tales como radiadores, estufas, cocinas, u
otros productos (incluyendo amplificadores) que producen calor.
24. NOTA ESPECIAL PARA EL INSTALADOR DEL SISTEMA DE CABLE CATV
Esta nota está hecha especialmente para llamar la atención del instalador de cable al Artículo 620-40 del
NEC, el mismo que imparte guías para conectar a tierra el cable correctamente, así como al edificio y lo
más cerca posible a la entrada del cable.
EJEMPLO DE LA INSTALACION A TEIRRA SEGUN EL CODIGO
NACIONAL DE ELECTRICIDAD NEC
5
Page 26
UBICACIÓN DE LOS CONTROLES
1. Asa
2. Enchufe AC (atrás en la unidad)
3. Enchufe de AUDÍFONOS
4. Pantalla con indicadores de
TOCAR/PAUSA y REPETIR
5. Control de VOLUMEN
6. Botón PROG (Programa)
7. Botón INCREMENTO DE BAJOS
8. Botón Brincar/Buscar
9. Interruptor de Función (CD/
o
CINTA (APAGADO)/RADIO)
10. Botón PARO (■)
11. Botones para el casete (de
izquierda a derecha):
PAUSA (
PARO/EXPULSAR (
F.FWD (
REWIND (
TOCAR (
GRABAR (
p)
r)
√√)
®®)
√)
q)
12. Bocina izquierda
13. Compartimiento del casete
14. Antena FM
15. Compartimiento del CD
16. Control de sintonía
17. Interruptor de ABRIR CD
18. Indicador de PROG (PROGRAMA)
19. Botón REPETIR
20. Botón Brincar/Buscar
21. Indicador de ENCENDIDO
22. Botón TOCAR/PAUSA (
23. Interruptor de BANDA
24. Bocina derecha
25. Compartimiento de pilas
(parte inferior de la unidad)
6
n
®/p)
Page 27
FUENTES DE ENERGÍA
+
+
-
-
+
+
-
-
+
+
-
-
Esta unidad fue diseñada para operar con corriente eléctrica o con pilas.
CORRIENTE ELÉCTRICA
Use el cable polarizado incluido con la unidad para operarla con corriente eléctrica. Inserte un extremo del cable eléctrico en el enchufe atrás de la unidad y el otro
extremo (con las dos clavijas) en la toma de corriente convenientemente ubicada y con 120V, 60
Hz. Cuando conecte el cable eléctrico, las pilas se
desconectarán automáticamente.
NOTA: La clavija incluida con la unidad está polarizada para ayudar a minimizar la posibilidad de
una descarga eléctrica. Si el enchufe no entra en
el contacto eléctrico no polarizado, no lime ni corte el lado ancho. Es responsabilidad del usuario hacer que un electricista cambie el contacto eléctrico obsoleto.
INSTALACIÓN DE LAS PILAS
Para usar esta unidad con pilas,
quite la puerta de pilas en la parte
inferior de la unidad deslizándola
hacia afuera. Introduzca ocho (8)
pilas tamaño 'C' siguiendo el
diagrama en el compartimiento.
NOTA: El cable eléctrico debe estar
desconectado del enchufe en la
parte trasera de la unidad para que
la unidad pueda operar con pilas.
Siga estas precauciones al usar pilas con este aparato:
1. Use sólo pilas del tamaño y tipo especificados.
2. Asegúrese de seguir la polaridad correcta cuando instale las pilas como se indica en el compartimiento de pilas. Si las pilas se colocan de manera inversa el aparato puede sufrir daños.
3. No mezcle tipos diferentes de pilas (ej. Alcalinas y Carbono-zinc) o pilas viejas con nuevas.
4. Si no va a usar el aparato por un periodo prolongado de tiempo, quite las pilas para prevenir
daños o lesiones por un posible derrame de pilas.
5. No intente recargar las pilas que no son recargables; pueden sobrecalentarse y reventar. (Siga las
indicaciones del fabricante de la pila).
PRECAUCIONES CON LA PILA
ENCHUFE DE AUDÍFONOS
Para escuchar en privado, conecte los audífonos de 3.5mm (32 ohmios) (no incluidos) a este enchufe. Las bocinas se desconectan automáticamente al conectar
los audífonos.
7
Page 28
2
1
ESCUCHAR LA RADIO
OPERACIÓN
1
Deslice el interruptor de Función a la
posición RADIO para encender la unidad
y seleccionar el modo de Radio; el
indicador de ENCENDIDO se iluminará.
3
Sintonice la estación deseada girando
el control de Sintonía. Las frecuencias
se ubican alrededor del control de
SINTONÍA.
2
Deslice el interruptor de BANDA para
seleccionar entre AM o FM.
4
Ajuste el control de VOLUMEN 1 y el
botón Incremento de bajos
desee. Presione el botón Incremento de
bajos
2 a la posición "in" (adentro) para
mejorar el sonido general de los bajos.
2 según
5
Para apagar la radio, deslice el interruptor de Función a la posición
CINTA/APAGADO.
ANTENAS
AM: Esta unidad tiene integrada una ante-
na de varilla de ferrita, la cual brinda una
recepción adecuada en la mayoría de las
áreas. Si la recepción es mala, gire la
unidad para mejorar la recepción.
FM: La antena de varilla para FM sólo es
para la recepción de FM. Si la recepción
es mala, ajuste la longitud y el ángulo de
la antena.
8
Page 29
2
1
3
2
1
2
1
TOCAR UN CD
OPERACIÓN (CONTINÚA)
1
Deslice el interruptor de Función a la
posición CD para encender la unidad
y seleccionar el modo de CD; el
indicador de ENCENDIDO se
iluminará.
3
Para reproducir un disco desde el inicio,
presione el botón TOCAR/PAUSA (®/p).
Presione de nuevo el botón TOCAR/PAUSA
(
®/p) para poner el CD en pausa; el
número de pista y el indicador de
TOCAR/PAUSA parpadearán. Presione el
botón TOCAR/PAUSA (
para continuar con la reproducción del CD;
el número de pista y el indicador de
TOCAR/PAUSA dejarán de parpadear.
®/p) una vez más
2
Abra el compartimiento del CD
presionando el botón de ABRIR CD.
Coloque un CD en el eje central, con el
lado de la etiqueta hacia arriba. Cierre
la puerta del compartimiento del CD; en
la pantalla aparecerá el total de pistas.
4
Para iniciar desde una pista en especial,
ubique la pista usando el botón
Brincar/Buscar
botón TOCAR/PAUSA (
empezar la reproducción de la pista
seleccionada. El indicador de TOCAR/
PAUSA se iluminará en la pantalla.
o 1 o n 2 y presione el
®/p) 3 para
5
Ajuste el control de VOLUMEN 1 y el
botón Incremento de bajos
desee. Presione el botón Incremento de
2 a la posición "in" (adentro) para
bajos
mejorar el sonido general de los bajos.
CONTINÚA
2 según
EN LA PRÓXIMA PÁGINA
6
Para brincar hacia la siguiente pista o la anterior
en el disco, presione el botón Brincar/Buscar
o n 2.
Para buscar hacia adelante o atrás por la pista que
se escucha, presione el botón Brincar/ Buscar o 1
o n 2 y manténgalo presionado y se escuchará un
ruido como un susurro. Suelte el botón para
reanudar la reproducción normal.
9
o 1
Page 30
OPERACIÓN (CONTINÚA)
3
2
4
1
2
1
REPRODUCIR UN CD (CONTINÚA)
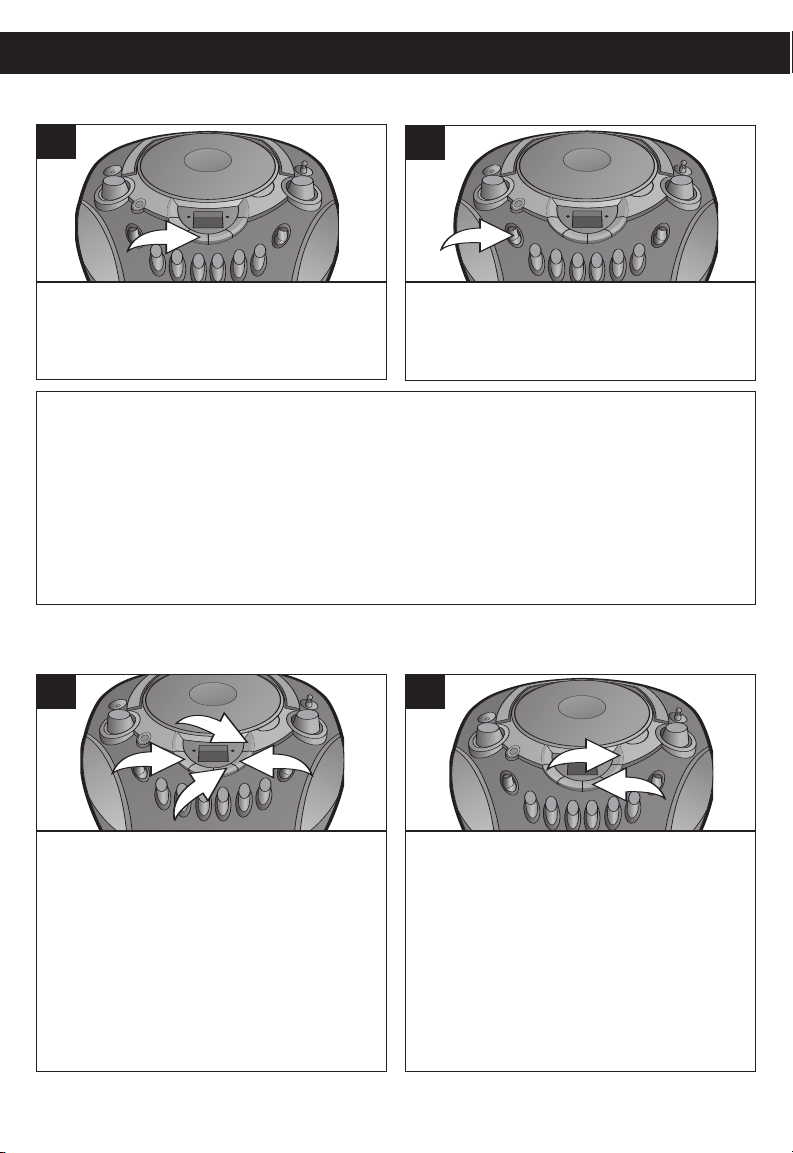
7
Cuando el disco termine, dejará de
girar. Presione el botón PARO (■) para
detener el disco antes de terminar.
NOTAS:
• Si no hay un disco presente, se introdujo incorrectamente, o está sucio o dañado,
aparecerá "Er" o "no" en la pantalla.
• A medida que se reproduce cada pista, se muestra el número de pista en la pantalla.
• Para evitar que se dañe el disco, nunca abra la puerta del CD mientras el disco esté
girando. Espere a que el disco se detenga antes de abrir la puerta del CD. Nunca
toque la lente mientras la puerta del CD está abierta.
• NO levante la unidad por el asa mientras se reproduce un CD. El CD sólo debe
usarse sobre una superficie firme.
TOCAR REPETIDAMENTE UNA MISMA PISTA O TODAS LAS PISTAS
1
8
Para apagar la unidad, deslice el
interruptor de Función a la posición
CINTA/APAGADO.
2
Para repetir una misma pista, presione una
vez el botón REPETIR
modo de Paro; el indicador de Repetir
parpadeará. Presione el botón Brincar/Buscar
o 2 o n 3 para seleccionar la pista
específica que desea que se repita. Cuando
aparezca el número de pista deseado en la
pantalla, presione el botón TOCAR/PAUSA
(
®/p) 4 para iniciar la reproducción. El
indicador de TOCAR/PAUSA se iluminará y la
pista específica que usted seleccionó se
repetirá continuamente.
Para detener y cancelar la reproducción repetida, presione el botón PARO (■).
1 mientras está en
Para repetir continuamente todas las
pistas en un disco, presione dos veces
el botón REPETIR
modo de Paro; el indicador de Repetir
se iluminará. Presione el botón
TOCAR/PAUSA (
reproducción. El indicador de
TOCAR/PAUSA se iluminará y las
pistas se repetirán continuamente
10
1 mientras está en
®/p) 2 para iniciar la
Page 31
OPERACIÓN (CONTINÚA)
2
1
2
1
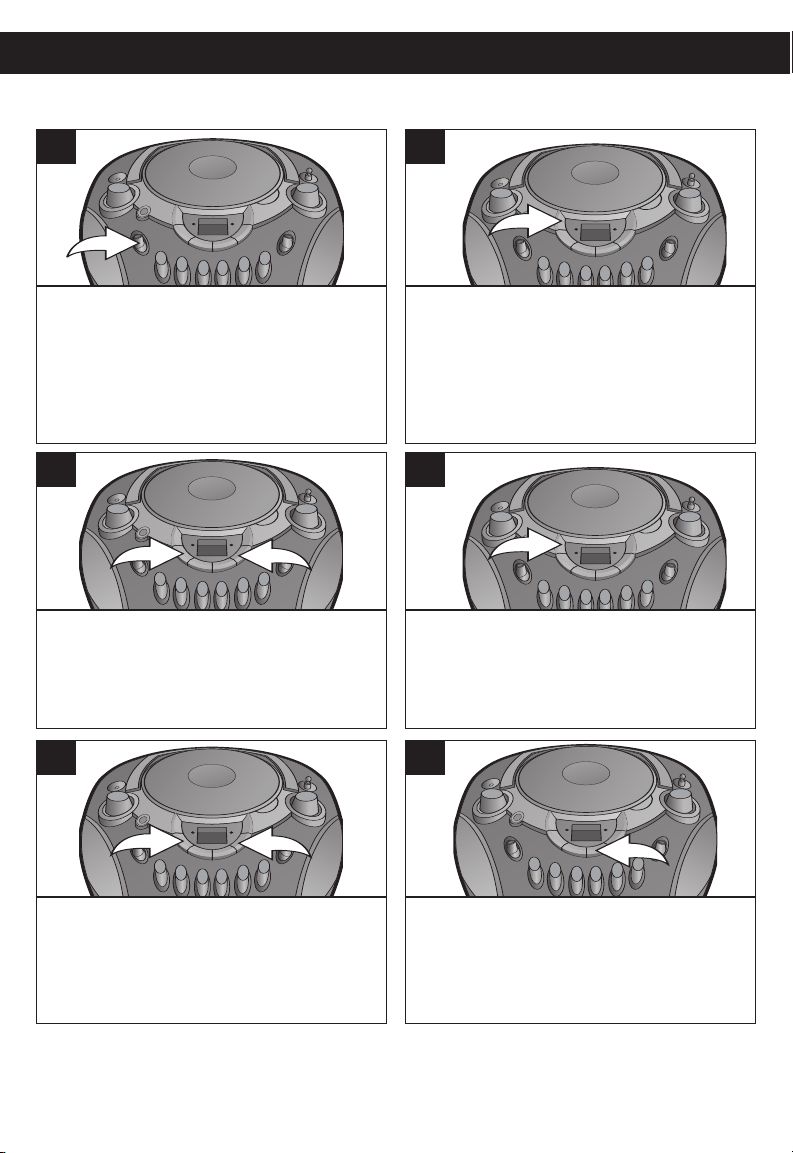
PROGRAMAR LA MEMORIA (HASTA 20 PISTAS)
1
Deslice el interruptor de Función a la
posición CD para encender la unidad
y seleccionar el modo de CD; el
indicador de ENCENDIDO se
iluminará. Introduzca un CD como se
describe en la página 9.
3
Use el botón Brincar/Buscar o 1 o n
2 para escoger la primera pista a pro-
gramar.
2
Presione el botón PROGRAMA; la
pantalla y el indicador de PROGRAMA parpadearán.
4
Presione nuevamente el botón PROGRAMA; con eso se programa la pista
seleccionada y se cuenta como el programa 1.
5
Repita los pasos 3 y 4 para programar
las demás pistas deseadas en secuencia. Cuando la memoria del programa
se llene, empezará nuevamente con la
memoria 1.
6
Presione el botón TOCAR/PAUSA
(
®/p) para empezar la reproducción; el
indicador de Programa se iluminará y
las pistas se reproducirán en el orden
programado.
CONSULTE LAS PRÓXIMAS PÁGINAS P
SOBRE LA REPRODUCCIÓN PROGRAMADA
11
ARA VER LAS NOT
AS
Page 32
OPERACIÓN (CONTINÚA)
NOTAS SOBRE LA REPRODUCCIÓN PROGRAMADA:
• Programar es la habilidad de seleccionar previamente el orden en el cual se
reproducirá una serie de pistas.
• Cada pista puede guardarse en la memoria del programa tantas veces como
desee.
• Mientras se toque cada pista, se mostrará el número de pista. Usted puede
moverse hacia adelante o atrás por las pistas programadas con el botón
Brincar/Buscar
• El reproductor de CD se detendrá después de tocar todas las pistas programadas o al presionar el botón PARO (
• La memoria programada se borrará cuando apague la unidad o cuando cambie
a otro modo o bien cuando abra el compartimiento del CD.
• Para revisar el programa, mientras está en modo de Paro, presione una vez el
botón PROGRAMA; "01" parpadeará en la pantalla, luego parpadeará en la pantalla la primera pista seleccionada. Presione de nuevo el botón PROGRAMA;
"02" parpadeará en la pantalla, luego parpadeará en la pantalla la segunda pista
seleccionada. Presione repetidamente el botón PROGRAMA para revisar las
demás pistas programadas.
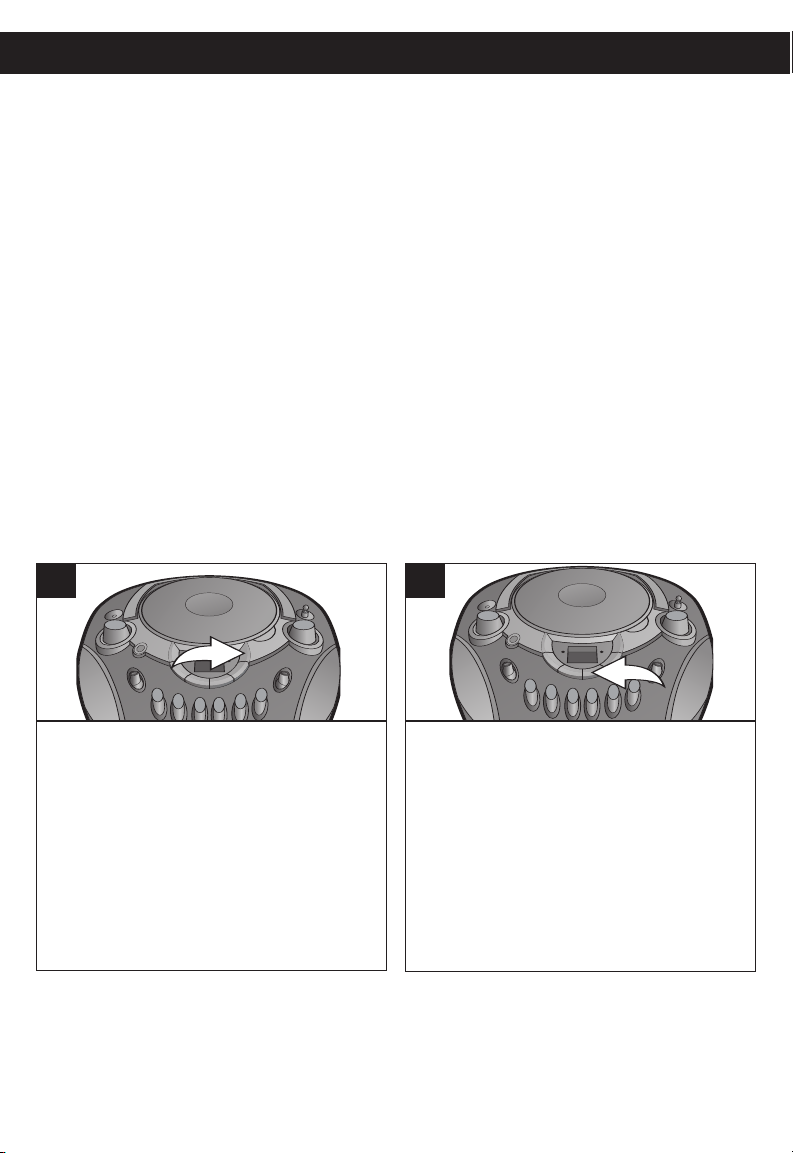
REPETICIÓN PROGRAMADA
o o n.
■).
1
También es posible usar juntas las
funciones de Programa y Repetir para
repetir indefinidamente un programa
específico. Primero, programe las pistas
que desee oír en el orden en que desee
oírlas, como se describió en la página 11.
Luego, presione dos veces el botón
REPETIR. El indicador de PROGRAMA
parpadeará y se iluminará el indicador de
REPETIR.
NOTA:
La operación de repetición del programa continuará indefinidamente hasta que
(
usted presione el botón P
ARO
■)
.
2
Presione el botón TOCAR/PAUSA
(®/p) para empezar a tocar la
repetición programada; se iluminarán
los indicadores de PROGRAMA y
REPETIR. El reproductor tocará las
pistas que usted escogió, en el orden
en que usted las programó. Cuando
se haya tocado la última pista en el
programa, el programa entero iniciará
de nuevo.
12
Page 33
OPERACIÓN (CONTINÚA)
2
1
3
1
2
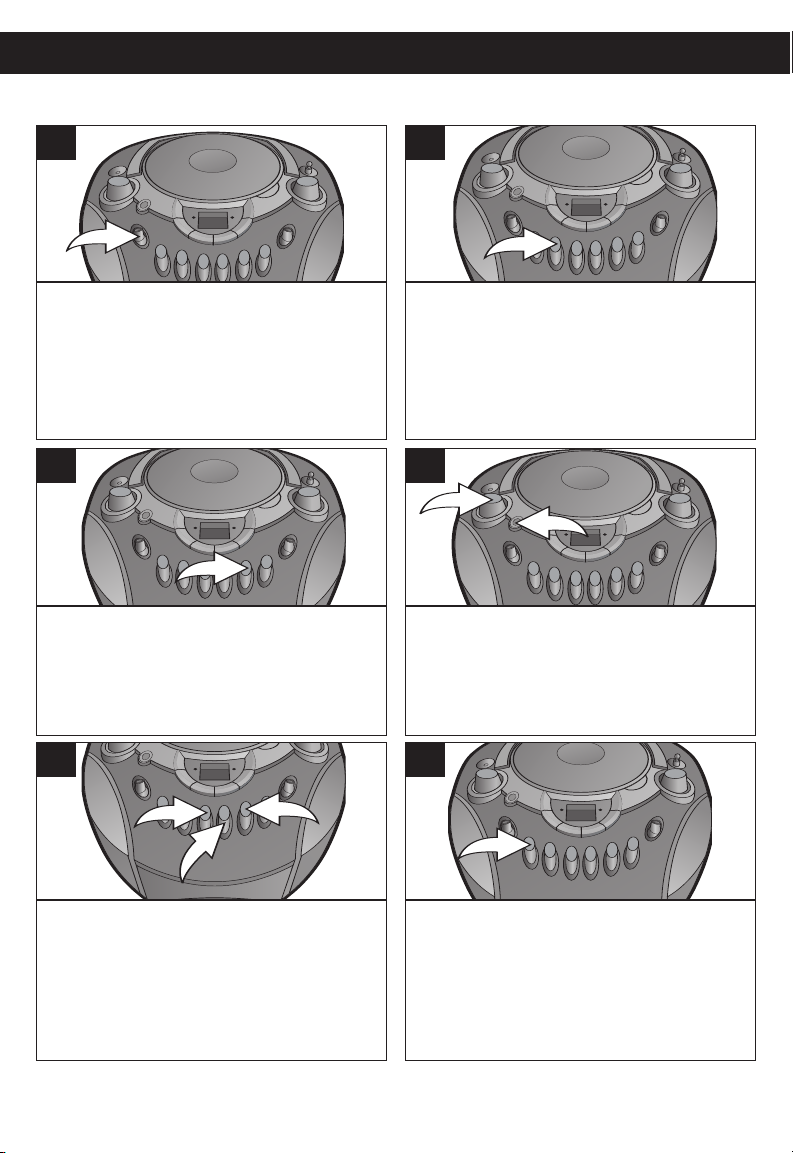
REPRODUCIR CINTAS DE CASETE
1
Deslice el interruptor de Función a la
posición de CINTA/APAGADO para
seleccionar Cinta.
3
Presione el botón TOCAR (√) para
iniciar la reproducción.
2
Presione el botón PARO/EXPULSAR (r)
para abrir el compartimiento del casete.
Introduzca un casete previamente
grabado en las ranuras de la puerta de
casete, con el lado abierto hacia arriba y
el carrete lleno a la derecha. Cierre la
puerta del casete.
4
Ajuste el control de VOLUMEN 1 y el
botón Incremento de bajos
desee. Presione el botón Incremento de
bajos
2 a la posición "in" (adentro) para
mejorar el sonido general de los bajos.
2 según
5
Para avanzar o regresar la cinta rápidamente, presione los botones F.FWD
(
√√) 1 o REWIND (®®) 2. Cuando
llegue al punto deseado, presione el
botón TOCAR (
reproducción normal.
√) 3 para reanudar la
CONTINÚA EN LA PRÓXIMA PÁGINA
6
Para poner la reproducción en pausa
por unos momentos, presione el botón
PAUSA (
el motor de la cinta sigue funcionando.
Presione de nuevo el botón PAUSA (
para quitar la pausa y reanudar la
reproducción normal.
13
p). La cinta deja de correr pero
p)
Page 34
OPERACIÓN (CONTINÚA)
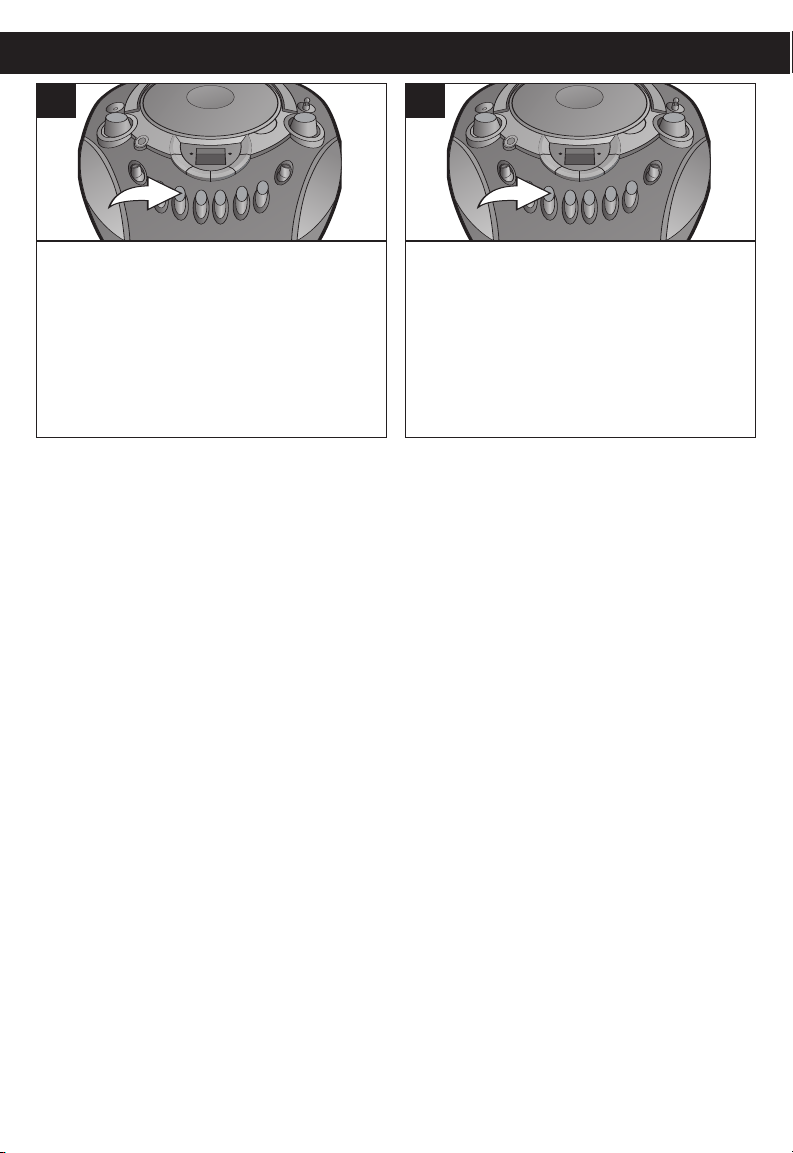
7
Para detener la reproducción antes
de que termine la cinta, presione el
botón PARO/EXPULSAR (r ). El
botón TOCAR (√) se libera y el motor
de la cinta se apaga.
8
Cuando la cinta llega a su fin, se activa el mecanismo de paro automático,
el botón TOCAR (√) se libera y el
motor de la cinta se apaga. Presione
el botón PARO/EXPULSAR (r) para
abrir la puerta del casete y sacar la
cinta.
14
Page 35
OPERACIÓN (CONTINÚA)
Full Reel on Right
Open Surface Side
2
4
3
1
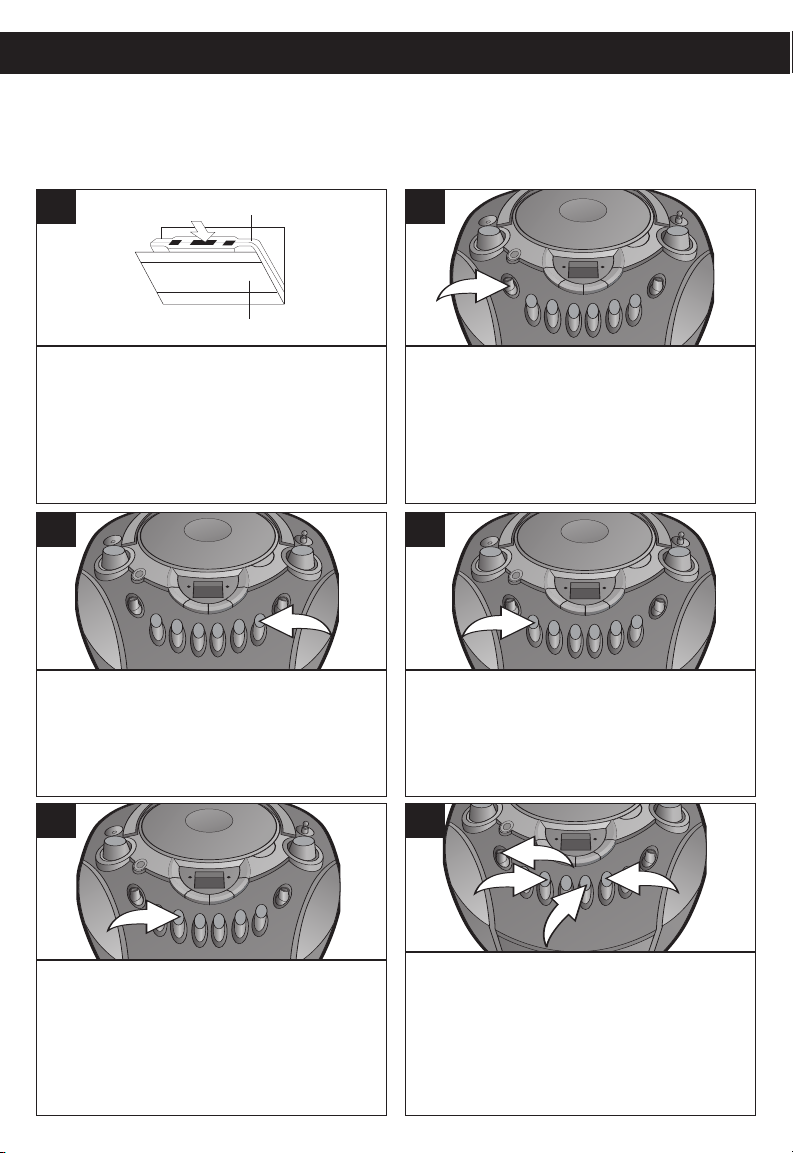
GRABAR UN CASETE
Esta unidad le permite hacer grabaciones directas de la radio o del reproductor de CD a un
casete en blanco. Un circuito de control automático para volumen de las grabaciones (ALC)
controlará automáticamente el nivel del volumen de sus grabaciones para evitar distorsión.
1
Lado de superficie abierta
Carrete lleno a la derecha
Abra la puerta del casete e introduzca
un casete en blanco de buena calidad
en las ranuras de la puerta, con el
lado abierto hacia arriba y el carrete
lleno a la derecha. Cierre la puerta
del casete.
3
Cuando esté listo para empezar a grabar,
(Q)
presione el botón GRABAR
TOCAR (
empezará a moverse y todo el material de su
fuente seleccionada se grabará en la cinta.
√) también se activará. La cinta
. El botón
2
Gire el interruptor de Función para
seleccionar la función que desee
grabar, ya sea radio o CD, y opere
esa función de acuerdo con sus
propias instrucciones.
4
Para evitar grabar material que no desee,
como por ejemplo comerciales, use el
botón PAUSA (
grabación temporalmente. Suelte el botón
PAUSA (
p) para reanudar la grabación.
p) para detener la
5
Cuando termine de grabar, presione
el botón PARO/EXPULSAR (r) para
detener la cinta.
6
Si desea escuchar su grabación inmediatamente,
presione el botón REWIND
cinta regrese a su inicio, luego presione el botón
PARO/EXUPLSAR (
de FUNCIÓN
DO y luego presione el botón TOCAR (
empezar la reproducción.
15
3 para seleccionar CINTA/APAGA-
(
®®) 1 hasta que la
r) 2. Deslice el interruptor
√) 4 para
Page 36
CUIDADO Y MANTENIMIENTO
La lengüeta
La portada con el adhesivo
Quitar la lengüeta
SIDE 1
La lengüeta para
el lado 1
La lengüeta para
el lado 2
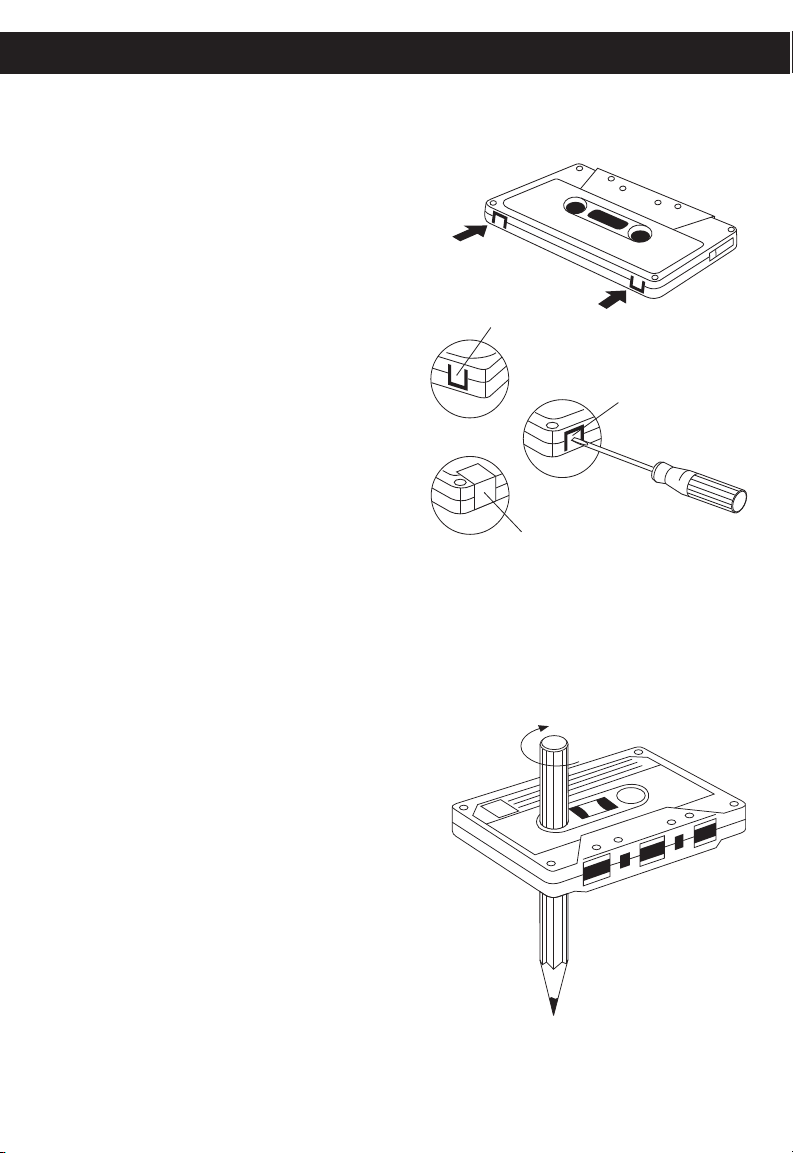
PROTECCIÓN CONTRA BORRADO ACCIDENTAL
Cuando realiza una grabación nueva,
se borra automáticamente cualquier
material anteriormente grabado y sólo
permanece la grabación nueva. Para
proteger grabaciones valiosas y evitar
borrarlas accidentalmente, el casete y el
modular están equipados con un dispositivo especial.
En el lomo del casete hay una lengüeta
en cada lado para prevenir el borrado.
Para evitar el borrado accidental,
quiebre dichas lengüetas con un desarmador. Si sólo desea proteger un lado
de la cinta, rompa la lengüeta del lado
izquierdo con el lado que desea proteger hacia usted.
Para grabar una cinta en la cual se ha
roto la lengüeta, coloque una tira de
cinta adhesiva sobre esa área.
NOTA: Cuando una lengüeta esté rota,
no se podrá oprimir el botón de grabar.
RECOMENDACIONES PARA CASETES
La longitud estándar de una cinta es de 15
(C-30), 30 (C-60) y 45 (C-90) minutos de
tiempo de grabación en cada lado. No se
recomienda el uso de cintas más largas de
60 (C-120) minutos. Use sólo cintas de alta
calidad. Si se desarrolla algún problema,
verifique primero la unidad con otro casete
para determinar si el problema es con el
casete y no con la unidad.
Si el casete tiene huelgo, debe ajustarla
antes de insertar el casete. Coloque un
lápiz en uno de los agujeros y gire a la
derecha hasta que no quede nada de huelgo.
16
Page 37
CUIDADO Y MANTENIMIENTO (CONTINUACIÓN)
Cabezal
para
Grabar y Tocar
Rodillo de
Jebe
Cabezal
Hisopo de Algodón
Cabezal
para Borrar
Cuidado a los discos compactos
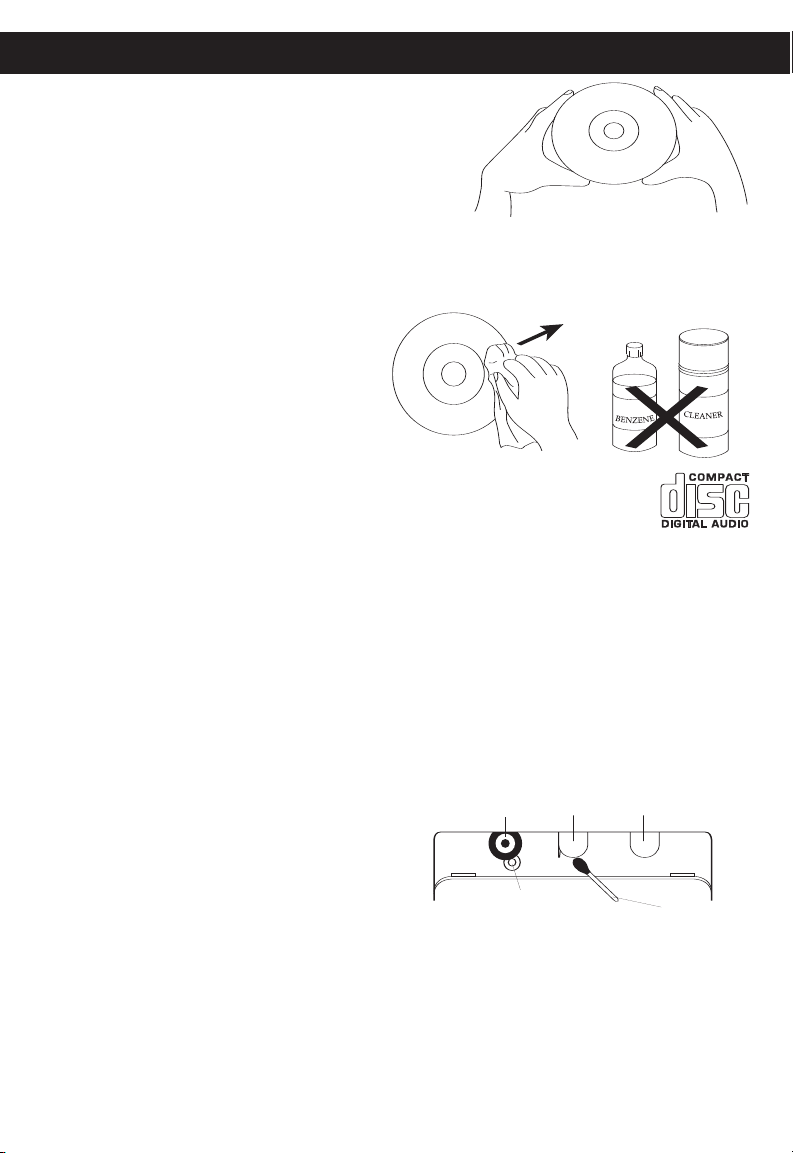
• Trate el disco con cuidado. Maneje el disco sólo
por sus orillas. Nunca permita que sus dedos
toquen el lado brilloso y sin impresión del disco.
• No pegue cinta adhesiva, calcomanías, etc.
sobre la etiqueta del disco compacto.
• Limpie el disco compacto periódicamente con
una tela suave, seca y sin pelusas. Nunca use detergentes ni limpiadores abrasivos
para limpiar el disco. Si es necesario, use un juego de limpieza para CD.
• Si el disco salta o se atora en una sección del disco, probablemente esté
sucio o dañado (rayado).
• Cuando limpie el disco, frote en línea
recta del centro hacia la orilla exterior
del disco compacto. Nunca frote con
movimientos circulares.
• Esta unidad fue diseñada sólo para
tocar discos compactos que lleven el logotipo que se muestra aquí. Es
posible que otros discos no cumplan con la norma de CD y no se
escuchen bien.
• Los discos compactos deben guardarse en sus cajas después de usarlos para evitar daños.
• No exponga los discos compactos a los rayos directos del sol, mucha humedad, altas
temperaturas o polvo, etc. La exposición prolongada o las temperaturas extremas
puede doblar el disco compacto.
• No pegue ni escriba nada sobre ninguno de los lados del disco compacto. Los instrumentos filosos o bien la tinta pueden dañar la superficie.
Limpieza de la unidad
• Para prevenir los riesgos de incendio o
choque eléctrico, desconecte su unidad de
la fuente de AC cuando la esté limpiando.
• El acabado de su unidad puede limpiarse
con un trapo seco como cuidaría cualquier
otro mueble. Tenga cuidado al limpiar y
restregar las partes de plástico.
• Puede usar un jabón neutro y un trapo
húmedo para limpiar el panel frontal.
• Es necesario limpiar periódicamente la cabeza magnética, el arrastre de la cinta y el
rodillo de presión para mantener una buena reproducción de sonido. Límpielos
después de cada 100 horas de uso o menos si la reproducción ha deteriorado. Use
un hisopo humedecido con solución para limpiar cabezas o alcohol isopropílico,
luego séquelo con otro hisopo.
NOTA: Nunca use objetos de metal sobre la cabeza magnética o cerca de ella. No permita que caiga limpiador en la unidad de la cinta.
17
Page 38
GUÍA DE DIAGNÓSTICO
Si experimenta problemas con esta unidad, revise la tabla a continuación antes de llamar
a servicio.
SÍNTOMA CAUSA SOLUCIÓN
La unidad no El cable no está Revise la conexión del
enciende. conectado. cable.
Disco no toca. Puerta del comparti- Cierre el compartimiento
miento del CD abierta. del CD.
Disco introducido Introduzca el disco
incorrectamente. correctamente.
CD sucio o defectuoso. Pruebe con otro disco.
Condensación en el Frote el disco con un trapo
disco. suave.
Sin sonido. El volumen está Suba el volumen.
al mínimo.
Disco defectuoso. Pruebe con otro disco.
Reproducción Disco sucio o Limpie o cambie el disco.
errática. defectuoso.
AM o FM, sin sonido. Unidad apagada. Encienda la unidad.
El volumen está al Suba el volumen.
mínimo.
Sonido deficiente Estación no sintoniza- Resintonice la estación
en AM/FM. da apropiadamente. AM o FM.
FM: La antena teles- Reoriente la antena
cópica no está apro- telescópica para FM.
piadamente ajustada.
AM: La unidad no está Gire unidad hasta obtener
colocada correctamente una mejor recepción.
18
Page 39

ESPECIFICACIONES
GENERAL:
Fuente de energía........................................................................120V, 60Hz AC
Pila................................................................. 9V DC (6 pilas 1.5V tamaño "C")
Se recomiendan las alcalinas por su larga duración
Bocina.......................................................................................2 x 3W, 8 ohmios
Energía de salida ...................................................................................2 x 1.5W
SECCIÓN DE RADIO:
Rango de frecuencia (FM)................................................................88-108 MHz
Rango de frecuencia (AM) ...........................................................530-1710 KHz
SECCIÓN DE CD:
Diámetro de disco.........................................................................4.72" (120mm)
3.15" (80mm) CD sencillo
Fuente óptica ......................................................................Láser semiconductor
SECCIÓN DE CASETE:
Cinta .................................................................Casete de polarización estándar
Frecuencia de respuesta ..................................................................125-6300Hz
Fluctuación y trémolo.....................................................................0.35% WRMS
Las especificaciones están sujetas a cambios sin previo aviso.
PARA OBTENER AYUDAADICIONAL CON RESPECTO A LOS AJUSTES O A LA
OPERACIÓN, SÍRVASE VISITAR NUESTRO SITIO WEB EN WWW.MEMOREXELECTRONICS.COM O COMUNÍQUESE CON SERVICIO AL CLIENTE AL
(954) 660-7100.
SÍRVASE GUARDAR LOS MATERIALES DEL EMPAQUE AL MENOS DURANTE 90
DÍAS POR SI ACASO NECESITARA REGRESAR EL PRODUCTO A SU DISTRIBUIDOR O A MEMOREX.
PARA OBTENER PARTES Y ACCESORIOS, COMUNÍQUESE CON FOX INTERNATIONAL AL 1-800-321-6993.
19
Page 40

Memcorp, Inc.
Weston, FL
Printed in Hong Kong
Visit our website at www.memorexelectronics.com
Memcorp, Inc.
Weston, FL
Impreso en Hong Kong
Visite nuestro sitio web en www.memorexelectronics.com
 Loading...