

Page 1

Memorex MM1920
19" Color Monitor
Operation Manual
1
Page 2

Please read the operation manual carefully before using
C o n t e n t s
Introduction
Preface……………………………………………………………………………………………..2
Features……………………………………………………………………………………………..2
Safety Specifications
Warning……………………………………………………………………………………………..2
Safety procedure…………………………………………………………………………………..3
Operation directory
Operation Instructions ……………………………………………………………………………..3
Introduction of Function Keys………………………………………………………………..4
Three-brightness-mode ………………………………………………………………..4
Main menu for customs adjustment ………………………………………………4
Menu Function and description ………………………………………………………….. 5
Control system of power supply (energy-saving) ……………………………………………..6
Other Specification and parameters …………………………………………………..7
Common Problems and Troubleshooting …………………………………………………..8
Appendix………………………………………………………………………………………….8
2
Page 3

Welcome to use the high-resolution monitor of our company. This manual includes matters
concerning usage and operation of the monitor. Please read this manual carefully so that your
monitor can work perfectly. After reading please keep the manual for future reference
You will find the following items in the packing box of the monitor:
* One monitor.
* One operation manual
* One warranty card
* One power cable
* One revolving base
Features
.* High performance CRT is adopted in our products which can prevent static
electricity.
* Compatible with many kinds of specifications. Including IBM.XGA VGA, SVGA, VESA
Scopes of automatic scan
Horizontal frequency:29~86KHz
Vertical frequency:46~160Hz
* .Support VESA flick-free mode with perfect and stable pictures。
* power supply works at 60/50Hz AC90-260V.60/50Hz, and suitable for worldwide。
Supports plug & play feature;
This monitor can be installed on any plug & play compatible system
* Adjustment function of OSD screen (multi-languages). Visual and convenient.。
.Safety Specifications:
.Warning:
Warning
High-voltage carefully。
No maintains accessory is attached inside the monitor。
To avoid electric shock .please do not open the rear cover at random
If services needed please contact the professional or authorized personals
3
Page 4

Statement::
This is product grade A, it maybe cause radio interference during work ambierce ? And user will
probably have to take some reasonable anti-interference measurements under this condition.
1. .Before connecting the power supply , you should confirm that the local ammeter meets the
requirements of monitor。
2. .In order to prevent electricity shock, do not touch the inner of the monitor .Only the
professional technical personals can open the cover of the monitor。
3. Please do not use the monitor if the wire has been damaged. Do not put any object on the
wire, and keep the power wire away from the place where people often pass
4. .When connecting the plug of wire, do hold the plug with your hand and do not pull the wire
directly。
5. .The holes on the cover are used to ventilate ,so in order to prevent the inner overheats, do
not jam these holes ,In addition do not use the monitor on bed ,sofa blanked or other soft
objects, so that the bottom holes will not be jammed and take the bad effect. If you put the
monitor in the bookshelf or other closed place, please enforce the ventilation。
6. .Never insert metal object into the ventilation holes in order to prevent electricity shock。
7. .Put the monitor at dry and no dust place: do not put it in damp basement or hall where there
is much dust, etc.
8. .Keep away from rain. Do not use the monitor in the places near water (i.e. ., kitchen,
swimming poor ,etc), If the monitor is dampened carelessly ,you should turn off the power
supply and contact with supplier .If necessary indeed, you can wipe the monitor with humid
wiping cloth ,which has been wrapping out, with the precondition that you have turned off
the power supply.
9. .Monitor should be putted on the solid flat, and being held and putted gently. because the
monitor is made of glass, it can be damaged if you hit it with sticks or clap it seriously
10.If the monitor cannot work normally, especially there is abnormal sound or burnt flavor in side
it ,you should turn off the power supply immediately and contact with the supplier。
11.High temperature can cause trouble, so do not use the monitor in the place there is sunshine
The monitor should be putted in the place being distant to the heater, the stove fireplace or
other heat source.
4
Page 5

12.Disconnect the plug if you will not use the monitor for a long eriod of time.
13.Disconnect the plug before removing the monitor。
14..AC power supply outlet should be putted near to the monitor, and in your reach, so that you
can cut off the power supply in time。
Operation instructions:
Connect with the power supply outlet;
一、Do turn off the pc and power supply when you connect system。
二、Please operate according to the following procedures when you connect monitor with your
system。
1. Connect the power cord for your monitor to the power port on the back of the monitor
plug the power cord for the monitor into a nearby outlet.。
2. .Connect your signal cable to the video port on your computer, fasten it,。
3. Press the power switch and open the monitor。
.Following is OSD operation of figure
function for press. Led for power switch for power
function for press Led for power switch for power . .
Introduction of function keys:
*“EXIT/H.B”. button is used to switch between three brightness modes (soft ,standard and rich
vibrant mode) and to exit the main menu,,“MENU/ENTER”button is to display the menu and
to confirm the selection or setting.“+/►”and“—/◄”is used to make selections and in operation
5
Page 6

menu and to make adjustment.。
*Three- brightness-mode:
Three-brightness-mode technology is adopted for optimum display performance with
multiple applications. use the handy hot key,“EXIT/H.B” button, to toggle quickly between
soft, standard and rich vibrant colour level for different needs and usage,
Step1:When there is no menu on the screen, press “EXIT/H.B” button to display
three-brightness selection menu, Default brightness mode is the value memorized from last time
setting
Step2:Press “EXIT/H.B”. button again to toggle between three brightness modes,
Step3: press “MENU/ENTER”button or wait for 10 seconds to confirm the setting and exit
three-brightness selection menu, The latest brightness mode is saved
Main Menu for customs Adjustment:
Step1:When there is no menu on the screen, you can enter the main menu for customs
adjustment by pressing the key “MENU/ENTER”
Step2:Choose the function icon which needs adjusting through the key“+/►”and “—/◄”,you
can move the red square to the relevant icon, relevant function tip and current
adjustment NUM
Step3:Press the key“MENU/ENTER”,and confirm the selected item, and the window between
the function tables will change from blue to red.
Step4:Adjust by pressing the key “+/►”and“—/◄”again and press the key,.“+/►”for
adding and the key .“—/◄”for reducing
Stup5:Press the key“MENU/ENTER”and confirm the adjustment of the fourth procedure, the
window will change from red to blue。
:Repeat the procedures of 2-5 and adjust other functions。
Step6
Step7:Exit the main menu by choosing the EXIT of the selected menu and confirm or press the
“EXIT/H.B”. The menu will exit automatically if you wait for 10 seconds after
key
exiting the menu, the adjustment will be stored automatically
6
Page 7

Menu function and description
To vary the difference between the display’s light and dark
Contrast
Brightness To adjust the overall intensity of the display。
elements
Zoom
H-position To center the image horizontally on the screen
V-position Centers the image vertically on the screen
H-size Makes the image wider or narrower
V-size . Makes the image taller or shorter
Pincushion Corrects the image for barrel distortion
Trapezoid Corrects the image for trapezoidal distortion
Parallelogram Corrects the image for parallelogram distortion
Pin Balance Adjust if distort occurs when menu is arc。
Corner Adjust if when four-angle of menu is distorted
Rotation Rotating the menu round the screen
Enlarge or reduce the picture
Selection among 9300K, 6500K, and colour
Color RGB
temperature of user mode
Adjust the degree of moiré cancellation until the
Moire
moiré is at a minimum, Normal value should be 0
. Setup the location of OSD and the exit time of
OSD. OSD
triggering, the actual time approximately equals to the
7
Page 8

shown time plus 5 with the unit is Second
Switch-over of language is indicated by menu,
Language
including English, Chinese and other 6 languages etc
Degauss Degauss manually
.Use this selection to return to the initial factory
.Recall RF
setting .but limited to the mode specified in appendix
.Exit OSD adjustment, memorize the value of the
Exit EXIT
current setup
Note:The vertical and horizontal moiré values in the menu are preset by factory. No
adjustment otherwise dithering and interference will show ,if so, adjust the line wave
and field wave till it get normal .(Both values are 0 in general conditions)
Control System of Power Supply (energy-saving)
The monitor is EPA ENERGY STAR® compliant when used with a computer equipped
with VESA DPMS functionality .If your computer does not support DPMS, to achieve
Energy-saving, Please install a DPMS supporting software in your computer Please consult
your local dealer for detail
Following is signal standard of power supply control.
Synchronization Stature Mode of power supply control
Signal Normal Mode of energy-saving
Horizontal
on On/off
Synchronization
Vertical
On Off/on
synchronization
8
Page 9
LED indicator Green/Blue Red
Power
100W(maximum) Less than 5W
consumption
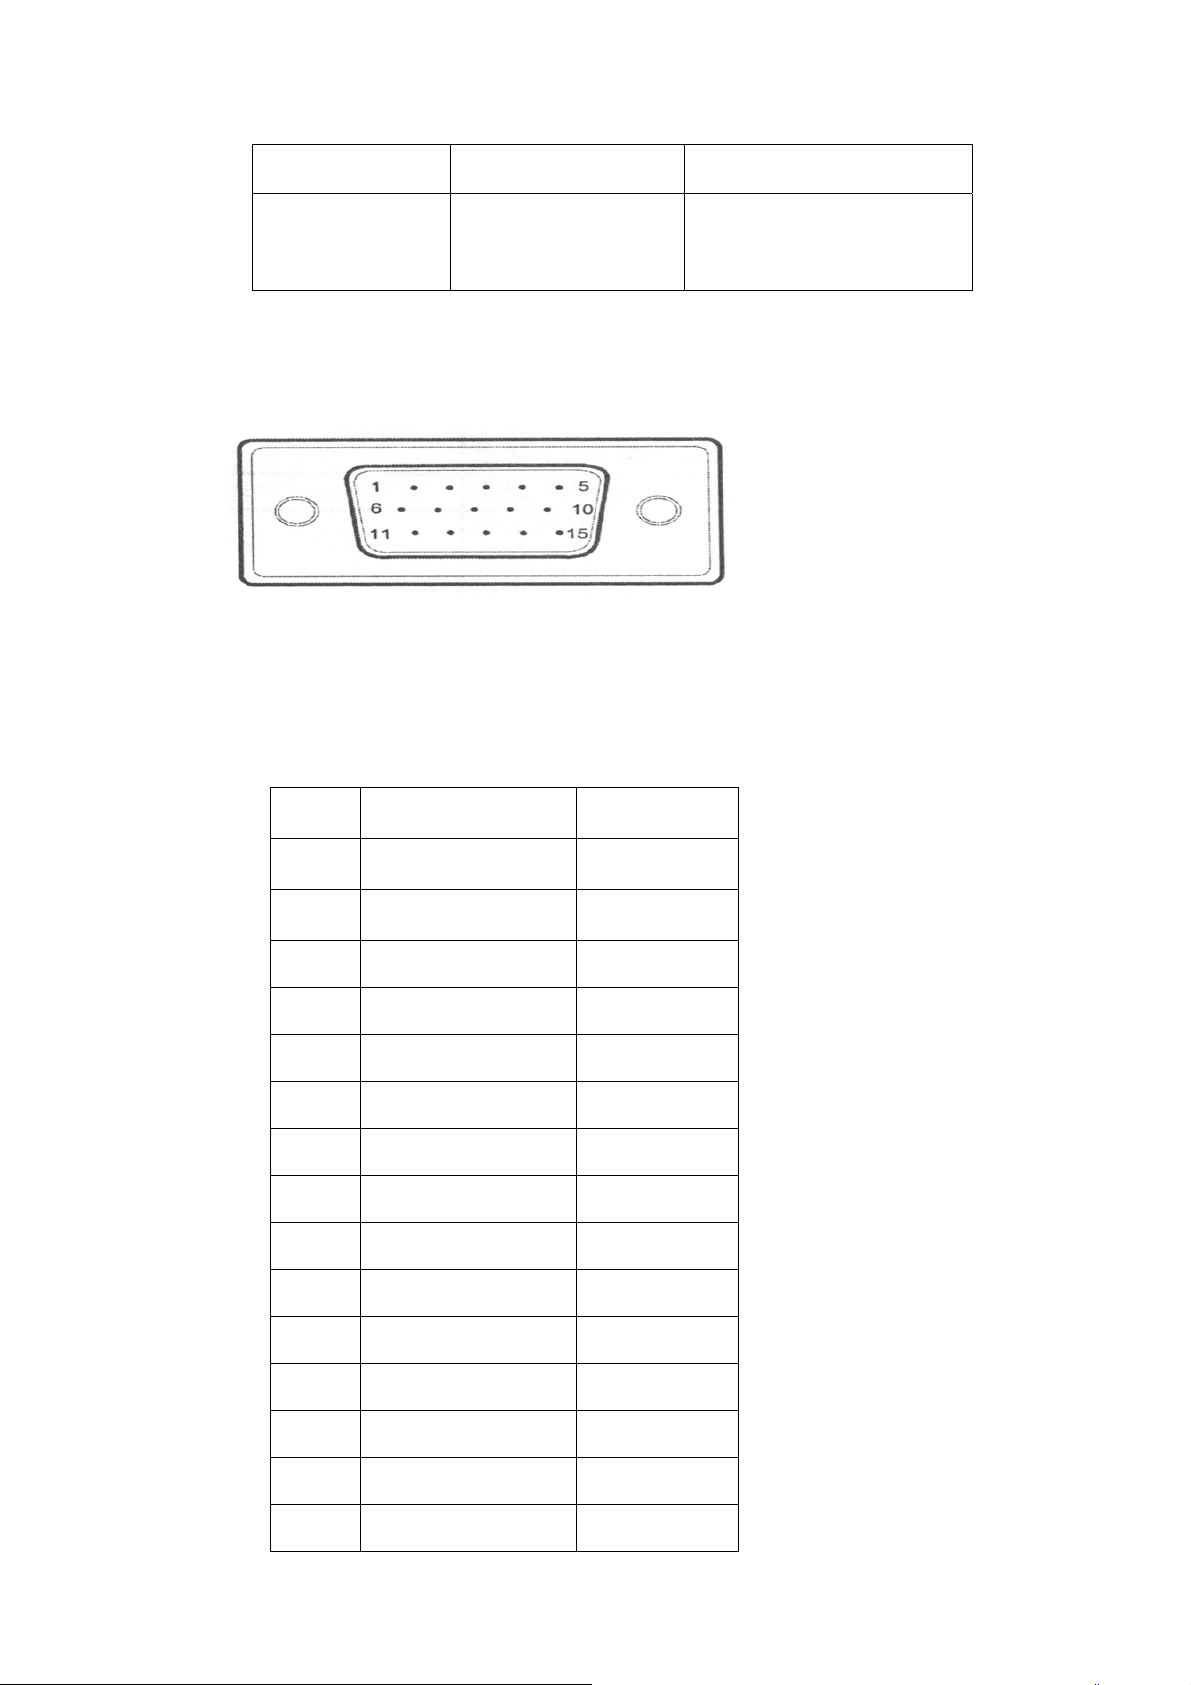
The following figure is the view looking into the pin end of video connector
The following table provides the pin numbers and corresponding pin assignments for
video connector with the DDC2B capability::
Number RGB Mode Signal Signal Pin
1 RED Pin# 1
2 Green Pin# 2
3 Blue Pin# 3
4 Ground Pin# 4
5 Ground Pin# 5
6 Red Ground Pin# 6
7 Green Ground Pin# 7
8 Blue Ground Pin# 8
9 Empty Pin# 9
10 Sync Ground Pin# 10
11 Empty Pin# 11
12 Bi-Directional Data(SDA) Pin# 12
13 Horizontal Sync Pin# 13
14 Vertical Sync Pin# 14
15 Data Clock (SCL). Pin# 15
9
Page 10

Other specification and Parameters:
Display color unlimited
.
Max resolution(PROGRESSIVE SCAN) 1600*1200(Refresh f requency65Hz)
Sync Input Signal Separate H/V sync. TTL level, positive or negative
Video input signal RGB, Analog(0.7v P-P)Positive at,75ohms
Video Broadband 185MHz
Power AC90~260V,60/50Hz
Operating temperature 0℃~40℃
Operating humidity 10%~80%
Storage Temperature -20℃~45℃
Storage humidity 5%~95%
Common Problems and Troubleshooting:
Please read this table first before asking for authorized service centers’ help
Problems Possible reasons TROUBLESHOOTING
No image .Connected to the Power supply or not
Switch of Power supply is off not Signal
cable connected correctly or not monitor
is on the condition of energy-saving or
not
The color
display is
abnormal
There is object with strong magnetic field
or not
The array of stitch on signal electrical
outlet is correct or not
Connection of signal cable is correct or
.Connect the Power supply
Close the switch
Connect the signal cable correctly
Press any key on the keyboard or
move the mouse
Move the object or the monitor
Use the signal electrical outlet
adopted to the array of stitch
Connect the signal cable correctly
not
.
10
Page 11

The image is
Signal wire connect to mainframe
Connect the signal wire
unstable or
rolling
The
monitored
menu is too
big, small, or
floating
The setting of
menu is not
ideal
solidly or not
The array of stitch on signal outlet
is correct or not
solidly Use the signal
electrical outlet adopted to
the array of stitch。
Adjusted improperly or not Adjust the image(see the
above)
Depart the appendix setting mode
or not
Choose the identical appendix
mode as follows again
Use the OSD menu to readjust the
setting required
Appendix:
.This product can automatically determine and display different kind of video display
standards. It can provide several factory-preset standards, which include normal video display
standards supported by most video adaptors, If the monitor recognizes that the current standard is
supported it will use this standard and save the values adjusted by the user.。
NO Standard Resolution Horizontal
Frequency
Vertical
Frequency
1 IBM/VGA 640x480 31.47KHz 60Hz
2 VESA/75 640X480 37.5KHz. 75Hz
3 VESA/75 .800x600 46.887KHz 75Hz
4 VESA/85 800x600 53.67KHz 85Hz
5 VESA/75 1024x768 60.02KHz 75Hz
6 VESA/85 1024x768 68.67KHz 85Hz
7 VESA/60 1600X1200 75.00KHz 60Hz
8 VESA/85 1280X960 85.93KHz 85Hz
Note:The design and specification subject to change without notice。
11
 Loading...