

Page 1
_/770/'eX _
Widescreen LCD/DVD HDTV
PantaJJa ancha de HDTV LCD/DVD
HII;3RFII|
.......................... MLTD2622
VIDEO
DD_
DIGITAL
Page 2

WEEE
This product contains electrical or electronic materials. The presence
of these materials may, if not disposed of properly, have potential
adverse effects on the environment and human health. Presence
of this label on the product means it should not be disposed of as
unsorted waste and must be collected separately. As a consumer, you
are responsible for ensuring that this product is disposed of prop=
erly.
I-I;::::i1"!1111"
This TV incorporates High-Definition Multimedia Interface (HDMITM) technology.
HDMI, the HDMI logo and High-Definition Multimedia Interface are trademarks or registered
trademarks of HDMI Licensing LLC.
DD _ Manufactured under license from Dolby Laboratories.
D | G | T A L Dolby and the double -D symbol are trademarks of Dolby Laboratories.
0Q0s
LISTED
46FC
E233207
This Class B Digital apparatus meets all requirements of the Canadian
Interference Causing Equipment Regulations.
Get apparell num6rique de la class B respecte routes les exigences du
R6glemnte sur le mat6rielbrouilleur du canada.
Page 3
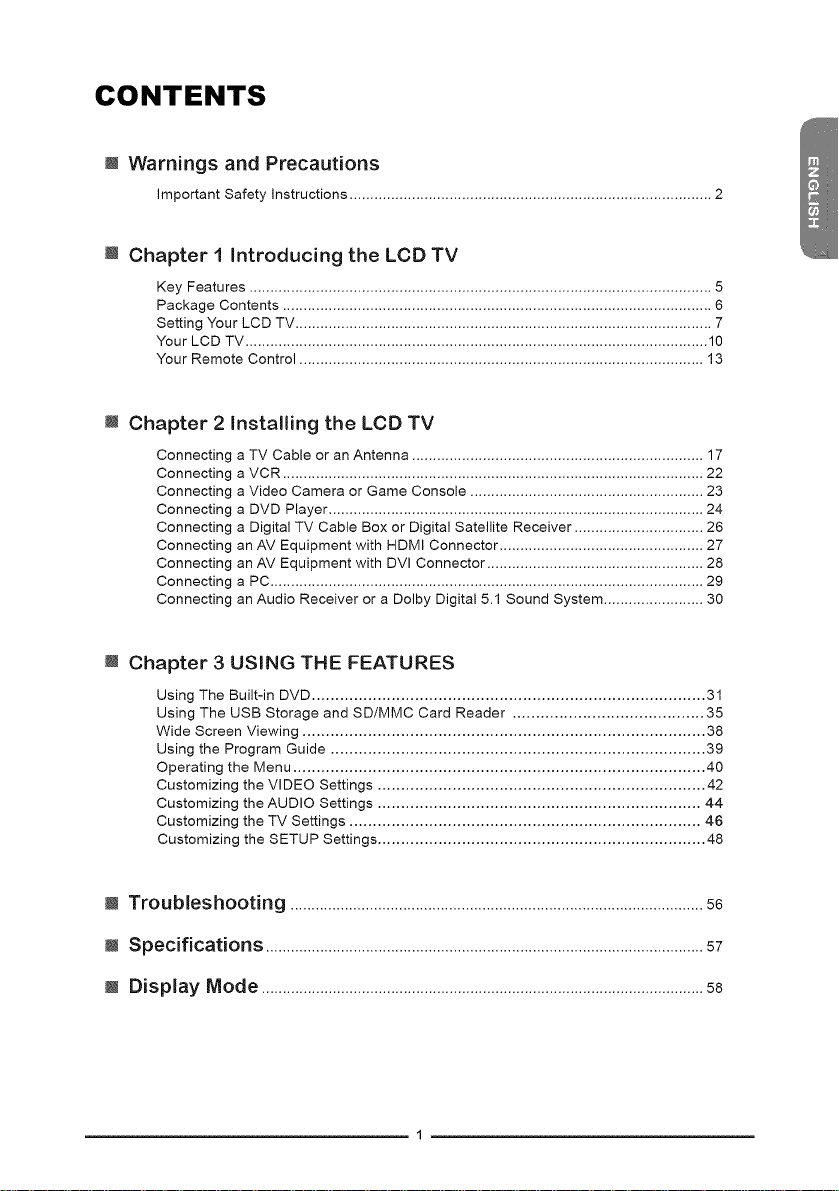
CONTENTS
m Warnings and Precautions
Important Safety Instructions ....................................................................................... 2
m Chapter 1 introducing the LCD TV
Key Features ............................................................................................................... 5
Package Contents ....................................................................................................... 6
Setting Your LCD TV .................................................................................................... 7
Your LCD TV ............................................................................................................... 10
Your Remote Control ................................................................................................. 13
m Chapter 2 Installing the LCD TV
Connecting a TV Cable or an Antenna ...................................................................... 17
Connecting a VCR ..................................................................................................... 22
Connecting a Video Camera or Game Console ........................................................ 23
Connecting a DVD Player .......................................................................................... 24
Connecting a Digital TV Cable Box or Digital Satellite Receiver ............................... 26
Connecting an AV Equipment with HDMI Connector ................................................. 27
Connecting an AV Equipment with DVI Connector .................................................... 28
Connecting a PC ........................................................................................................ 29
Connecting an Audio Receiver or a Dolby Digital 5.1 Sound System ........................ 30
m Chapter 3 USING THE FEATURES
Using The Built-in DVD .................................................................................... 31
Using The USB Storage and SD/MMC Card Reader ......................................... 35
Wide Screen Viewing ...................................................................................... 38
Using the Program Guide ................................................................................ 39
Operating the Menu ........................................................................................ 40
Customizing the VIDEO Settings ...................................................................... 42
Customizing the AUDIO Settings ..................................................................... 44
Customizing the TV Settings ........................................................................... 46
Customizing the SETUP Settings ...................................................................... 48
m Troubleshooting ...................................................................................................56
m Specifications .........................................................................................................57
m Display Mode ..........................................................................................................58
Page 4

Warnings and Precautions
FCC NOTICE:
This device complies with Part 15 of the FCC
Rules. Operation is subject to the following two
conditions: (1) this device may not cause harmful
interference, and (2) this device must accept any
interference received, including interference that
may cause undesired operation.
Warning: Changes or modifications to this unit
not expressly approved by the party responsible
for compliance could void the user's authority to
operate the equipment.
NOTE: This equipment has been tested and
found to comply with the limits for a Class B
digital device, pursuant to Part 15 of the FCC
Rules. These limits are designed to provide
reasonable protection against harmful
interference in a residential installation. This
equipment generates, uses and can radiate
radio frequency energy and, if not installed and
used in accordance with the instructions, may
cause harmful interference to radio
communications.
However, there is no guarantee that interference
will not occur in a particular installation, if this
equipment does cause harmful interference to
radio or television reception, which can be
determined by turning the equipment off and on,
the user is encouraged to try to correct the
interference by one or more of the
foflowing measures:
Reorient or relocate the receiving antenna.
increase the separation between the
equipment and receiver.
Connect the equipment into an outlet on a
circuit different from that to which the receiver
is connected.
Consult the dealer or an experienced
radio/TV technician for help.
WARNING:
TO REDUCE THE RISK OF FIRE OR ELECTRIC SHOCK,
DO NOT EXPOSE THIS PRODUCT TO RAIN
OR MOISTURE.
WARNING:
TO REDUCE THE RISK OF FIRE OR ELECTRIC SHOCK,
AND ANNOYING INTERFERENCE, USE THE
RECOMMENDED ACCESSORIES ONLY.
SURGE PROTECTORS:
It is recommended to use a surge protector for AC
connection. Lightning and power surges ARE NOT covered
under warrantyfor this product.
ATTENTION:
POUR EVJTERLES CHOC ELECTRIQUES, INTRODUIRE
LA LAME LAPLUS LARGE DE LA FICHE DANSLA BORNE
CORRESPONDANTE DE LA PRISES ET POUSSER
JUSQU'AU FOND.
ccwARN'"G: I
assure continued compliance, follow the attached I
_nstaflation instructions and use only shielded cables when
_onnecting to other devices. Modifications not authorized byI
the manufacturer may void user's authority to operate I
[thisdevice. I
This Class B digital apparatus complies with Canadian I
ICES-O03. I
Cet appareil numerique de la dasse Best conforme _ laI
norme NMB-003 du Canada. I
This TV is capable of receiving unscrambled digital I
programming for both cable and external UHF/VHF I
antenna (ATSC) and also can receive NTSC (cable I
and external UHF/VHF antenna) programs.
Page 5
Warnings and Precautions
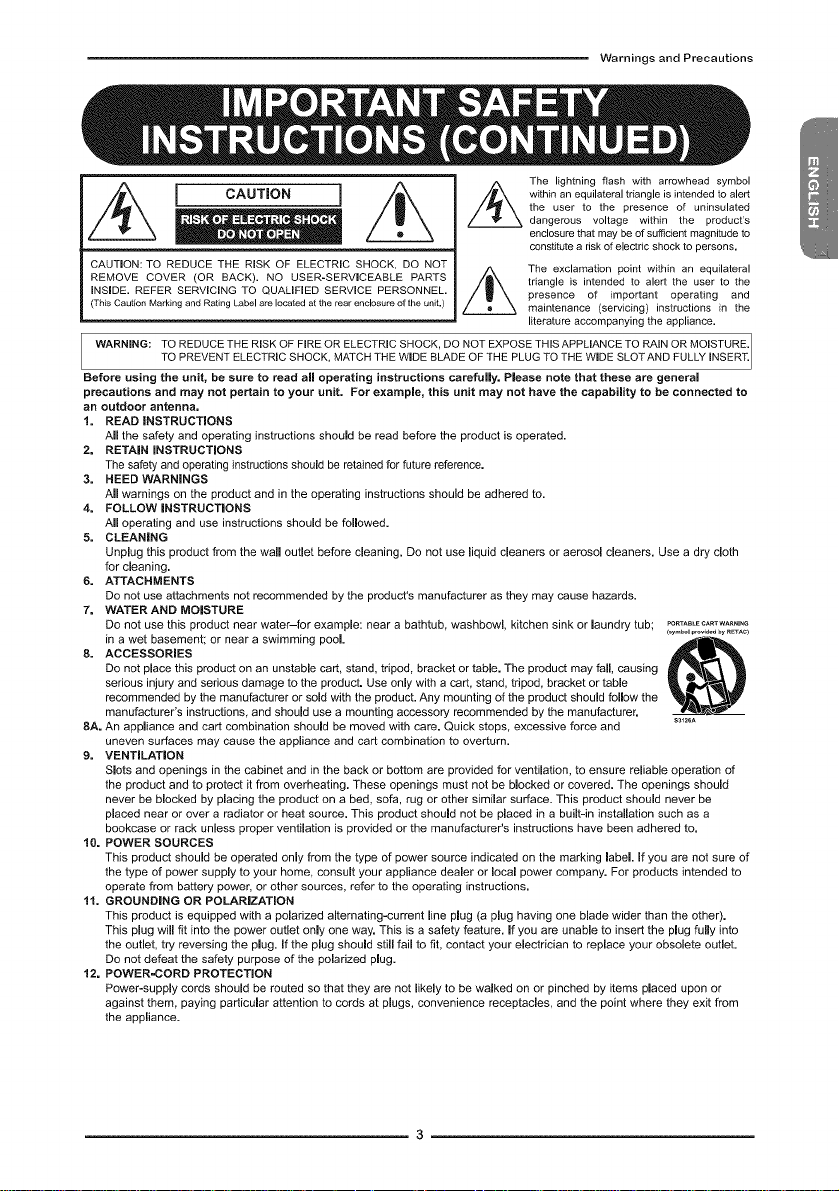
CAUTION
CAUTION: TO REDUCE THE RISK OF ELECTRIC SHOCK, DO NOT
REMOVE COVER (OR BACK). NO USER-SERVICEABLE PARTS
INSIDE. REFER SERVICING TO QUALIFIED SERVICE PERSONNEL.
(This Caution Marking and Rating Label are located at the rear enclosure of the unit.)
Z_ The exclamation point within an equilateral
within an equilateral triangle is intended to alert
the user to the presence of uninsulated
The lightning flash with arrowhead symbol
dangerous voltage within the product's
enclosure that may be of sufficient magnitude to
constitute a risk of electric shock to persons.
triangle is intended to alert the user to the
presence of important operating and
maintenance (servicing) instructions in the
literature accompanying the appliance.
WARNING: TO REDUCE THE RISK OF FIRE OR ELECTRIC SHOCK, DO NOT EXPOSE THIS APPLIANCE TO RAIN OR MOISTURE.
TO PREVENT ELECTR C SHOCK, MATCH THE W DE BLADE OF THE PLUG TO THE W DE SLOTAND FULLY NSERT.
Before using the unit, be sure to read aH operating instructions careful|y. Please note that these are general
precautions and may not pertain to your unit. For example, this unit may not have the capability to be connected to
an outdoor antenna,
1. READ iNSTRUCTiONS
Aft the safety and operating instructions should be read before the product is operated.
2. RETAIN iNSTRUCTiONS
The safety and operating instructions should be retained for future reference.
3. HEED WARNINGS
Aft warnings on the product and in the operating instructions should be adhered to.
4. FOLLOW |NSTRUCTIONS
All operating and use instructions should be foBowed.
5. CLEANING
Unplug this product from the waB outlet before cleaning. Do not use liquid cleaners or aerosol cleaners. Use a dry cloth
for cleaning.
6. ATTACHMENTS
Do not use attachments not recommended by the product's manufacturer as they may cause hazards.
7. WATERAND MO|STURE
Do not use this product near watel_for example: near a bathtub, washbowl, kitchen sink or laundry tub; _O"TA_LE_A"_WA"_"_
in a wet basement; or near a swimming pool
8. ACCESSORIES
Do not place this product on an unstable cart, stand, tripod, bracket or table. The product may fall, causing
serious injury and serious damage to the product. Use only with a cart, stand, tripod, bracket or table
recommended by the manufacturer or sold with the product. Any mounting of the product should follow the
manufacturer's instructions, and should use a mounting accessory recommended by the manufacturer.
8A. An appliance and cart combination should be moved with care. Quick stops, excessive force and
uneven surfaces may cause the appliance and cart combination to overturn.
9. VENTILAT|ON
Slots and openings in the cabinet and in the back or bottom are provided for ventilation, to ensure reliable operation of
the product and to protect it from overheating. These openings must not be blocked or covered. The openings should
never be blocked by placing the product on a bed, sofa, rug or other similar surface. This product should never be
placed near or over a radiator or heat source. This product should not be placed in a built-in installation such as a
bookcase or rack unless proper ventilation is provided or the manufacturer's instructions have been adhered to.
10. POWER SOURCES
(_ymbolp,ov_edby_ETA¢_
s3_2_A
This product should be operated only from the type of power source indicated on the marking label If you are not sure of
the type of power supply to your home, consult your appliance dealer or local power company. For products intended to
operate from battery power, or other sources, refer to the operating instructions.
11, GROUNDING OR POLARIZATION
This product is equipped with a polarized alternating-currant line plug (a plug having one blade wider than the other).
This plug will fit into the power outlet only one way. This is a safety feature. If you are unable to insert the plug fuBy into
the outlet, try reversing the plug. If the plug should still fail to fit, contact your electrician to replace your obsolete outlet.
Do not defeat the safety purpose of the polarized plug.
12. POWER=CORD PROTECTION
Power-supply cords should be routed so that they are not likely to be walked on or pinched by items placed upon or
against them, paying particular attention to cords at plugs, convenience receptacles, and the point where they exit from
the appliance.
Page 6
WarningsandPrecautions
13.LiGHTNiNG
Toprotectyourproductfromalightning storm, or when it is left unattended and unused for long periods of time, unplug it
from the wall outlet and disconnect the antenna or cable system. This will prevent damage to the product due to lightning
and power-line surges.
14. POWER LINES
An outside antenna system should not be located in the vicinity of overhead power lines or other electric light or power
circuits, or where it can fall into such power minesor circuits. When installing an outside antenna system, extreme care
should be taken to keep from touching such power lines or circuits as contact with them might be fatal.
15. OVERLOADING
Do not overload wall outlets and extension cords as this can resumt in a risk of fire or electric shock.
16. OBJECT AND LiQUiD ENTRY
Never push objects of any kind into this product through openings as they may touch dangerous voltage points or short out
parts that could result in fife or electric shock. Never spill or spray any type of liquid on the product.
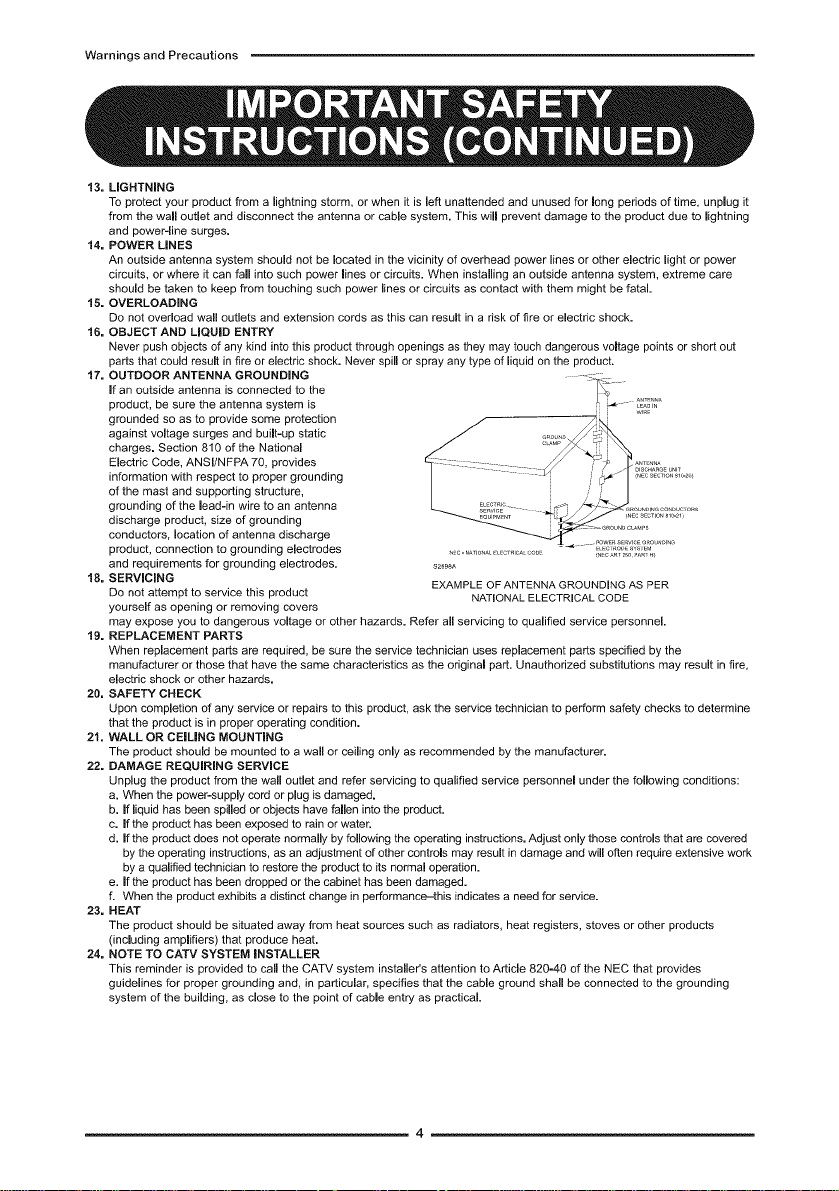
17. OUTDOOR ANTENNA GROUNDING
if an outside antenna is connected to the
product, be sure the antenna system is
grounded so as to provide some protection
against voltage surges and built-up static
charges. Section 810 of the National
Electric Code, ANSI/NFPA 70, provides
information with respect to proper grounding
of the mast and supporting structure,
grounding of the lead-in wire to an antenna
discharge product, size of grounding
conductors, location of antenna discharge
product, connection to grounding electrodes ................... ....... =...... i._,'_i_i' ......
and requirements for grounding electrodes, s2_98A
18. SERVICING EXAMPLE OF ANTENNA GROUNDING AS PER
Do not attempt to service this product NATIONAL ELECTRICAL CODE
yourself as opening or removing covers
may expose you to dangerous voltage or other hazards. Refer all servicing to qualified service personnel.
19. REPLACEMENT PARTS
When replacement parts are required, be sure the service technician uses replacement parts specified by the
manufacturer or those that have the same characteristics as the original part. Unauthorized substitutions may result in fire,
electric shock or other hazards.
20. SAFETY CHECK
Upon completion of any service or repairs to this product, ask the service technician to perform safety checks to determine
that the product is in proper operating condition.
21. WALL OR CEILING MOUNTING
The product should be mounted to a wall or ceiling only as recommended by the manufacturer.
22. DAMAGE REQUiRiNG SERVICE
Unplug the product from the wall outlet and refer servicing to qualified service personnel under the following conditions:
a. When the power-supply cord or plug is damaged.
b. if liquid has been spilled or objects have fallen into the product.
c. if the product has been exposed to rain or water.
d. if the product does not operate normally by following the operating instructions. Adjust only those controls that are covered
by the operating instructions, as an adjustment of other controls may result in damage and will often require extensive work
by a qualified technician to restore the product to its normal operation.
e. if the product has been dropped or the cabinet has been damaged.
f. When the product exhibits adistinct change in performance-this indicates a need for service.
23. HEAT
The product should be situated away from heat sources such as radiators, heat registers, stoves or other products
(including amplifiers) that produce heat.
24. NOTE TO CATV SYSTEM INSTALLER
This reminder is provided to call the CATV system installer's attention to Article 820-40 of the NEC that provides
guidelines for proper grounding and, in particular, specifies that the cable ground shall be connected to the grounding
system of the building, as close to the point of cable entry as practical.
Page 7
Chapter I Introducing the LCD TV
Chapter 1
Introducing the LCD TV
Key Features
Various Audio/Video terminals for external equipment connection
2 sots of composite A/V input terminals
1 sot of S-VIDEO terminals
2 sets of component Video input terminals
1 VGA/Audio input terminals
2 HDMI/Audio input terminals
1 sot of Audio(L/R) output terminals
2 SPDIF output terminals (Optical x 1 /Coaxial x 1)
1 Headphone terminal
Built-in Slot-type DVD Player
• Supports DVD/CD/CD-R/CD-RW/JPEG/KODAK PICTURE CD/DVD+R/RW/
DVD-R/RW compatibility,
Built-in SD/MMC Card Reader
• Allows access to digital content stored on a SD/MMC card.
Built-In USB Connector
The built-in TV tuner to receive HD ATSC
• This function allows the reception of HD broadcasting without the addition of a set top
box.
High Definition Multimedia Interface (HDMI)
• High Definition Multimedia Interface (HDMI) is a small, user-friendly interconnect that
can carry up to 5 Gbps of combined video and audio in a single cable. This system
eliminates the cost, complexity and confusion of multiple cables used to connect
current A/V systems.
HDTV Component Video Inputs
• Offers the best video quality for DVD(1080i, 720p) and digital set-top-box
(1080i, 720p) connections.
3D Digital Noise Reduction
• This function can digitally reduce image noise to provide better picture quality.
Film-Mode Detection (3:2 Reverse Pull Down)
• This function can automatically detect content derived from film and adjust the
interlacer's frame matching to provide a more natural-looking, clearer image of the
moving picture.
Page 8
Chapter1introducingtheLCDTV
Package Contents
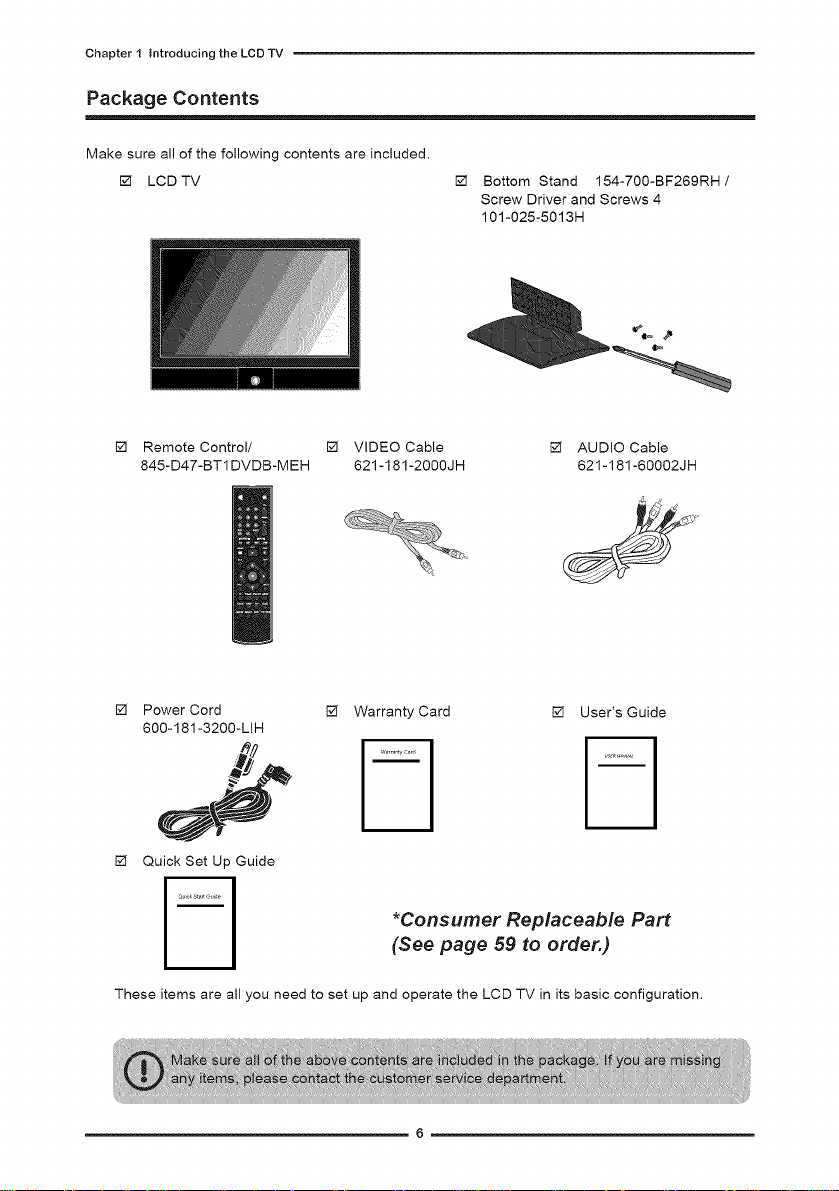
Make sure all of the following contents are included.
LCD TV Bottom Stand 154-700-BF269RH /
Screw Driver and Screws 4
101-025-5013H
I-v1 Remote Control/ I-v1 VIDEO Cable
845-D47-BT1DVDB-MEH 621-181-2000JH
F'vl Power Cord
600-181-3200-LIH
Warranty Card [_ User's Guide
[_ AUDIO Cable
621-181-60002JH
D
Quick Set Up Guide
*Consumer Replaceable Part
(See page 59 to order.)
These items are all you need to set up and operate the LCD TV in its basic configuration.
Page 9
Chapter1introducingtheLCDTV
Setting Up Your LCD TV
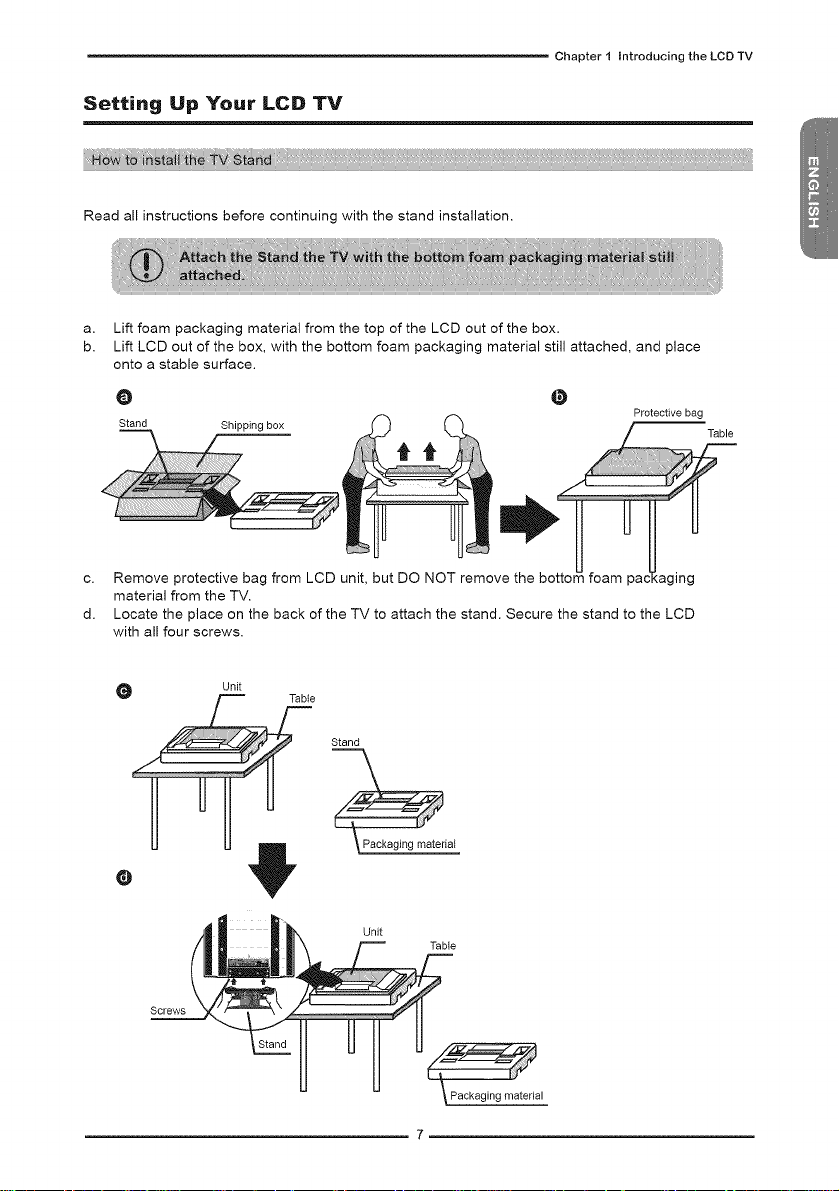
Read all instructions before continuing with the stand installation.
a. Lift foam packaging material from the top of the LCD out of the box.
b. Lift LCD out of the box, with the bottom foam packaging material still attached, and place
onto a stable surface.
O @
Stand Shippingbox
C.
Remove protective bag from LCD unit, but DO NOT remove the botton5 foam pacT_aging
material from the TV.
d.
Locate the place on the back of the TV to attach the stand. Secure the stand to the LCD
with all four screws.
O Unit
Stand
_riai
Unit Table
Protectivebag
Screws
°U°
Page 10
Chapter 1 Introducing the LCD TV
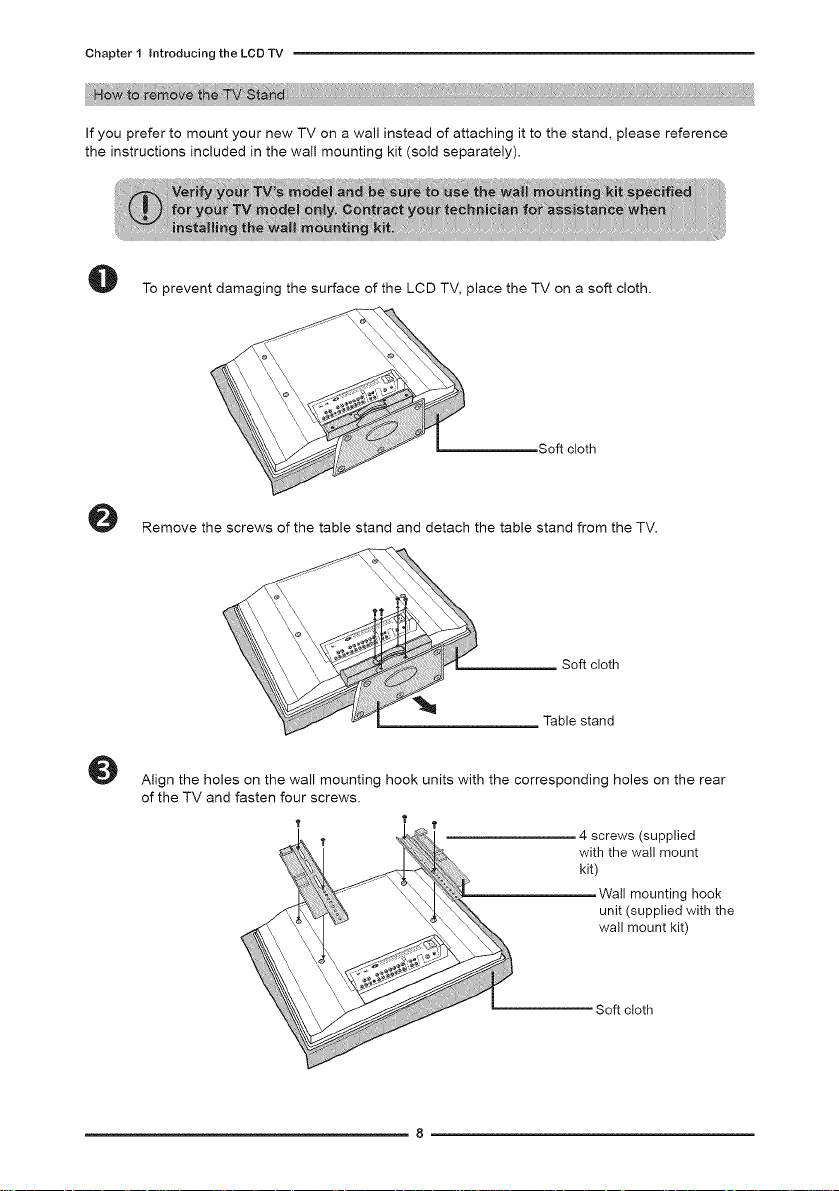
If you prefer to mount your new TV on a wall instead of attaching it to the stand, please reference
the instructions included in the wall mounting kit (sold separately).
O
To prevent damaging the surface of the LCD TV, place the TV on a soft cloth.
L Soft cloth
O
Remove the screws of the table stand and detach the table stand from the TV.
Soft cloth
Table stand
O
Align the holes on the wall mounting hook units with the corresponding holes on the rear
of the TV and fasten four screws.
4 screws (supplied
with the wall mount
Page 11
ChapterI introducing the LCDTV
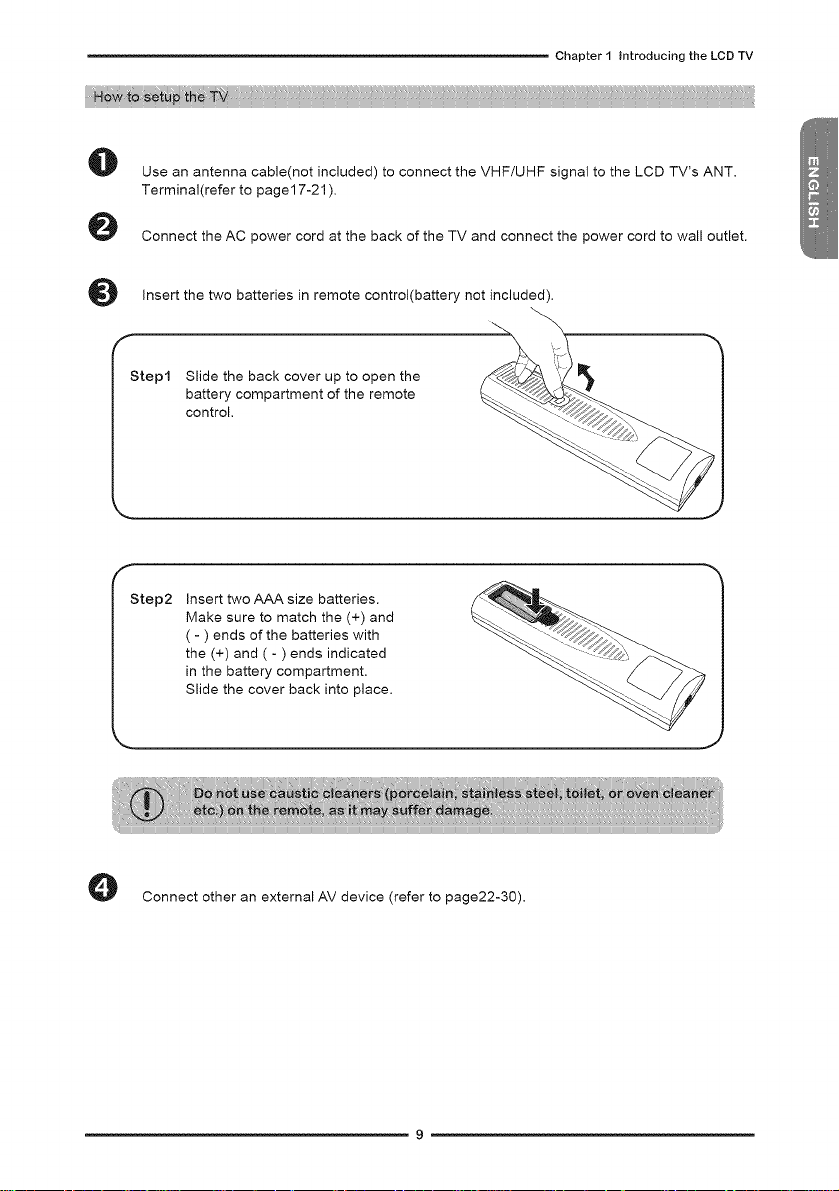
0
Use an antenna cable(not included) to connect the VHF/UHF signal to the LCD TV's ANT.
Terminal(refer to page17-21 ).
e
Connect the AC power cord at the back of the TV and connect the power cord to wall outlet.
O
Insert the two batteries in remote control(battery not included).
Step1 Slide the back cover up to open the
battery compartment of the remote
control.
Insert two AAA size batteries.
Step2
Make sure to match the (+) and
( - ) ends of the batteries with
the (+) and ( - ) ends indicated
in the battery compartment.
Slide the cover back into place.
O Connect other an external AV device (refer to page22-30).
Page 12
Chapter1IntroducingtheLCDTV
Your LCD TV
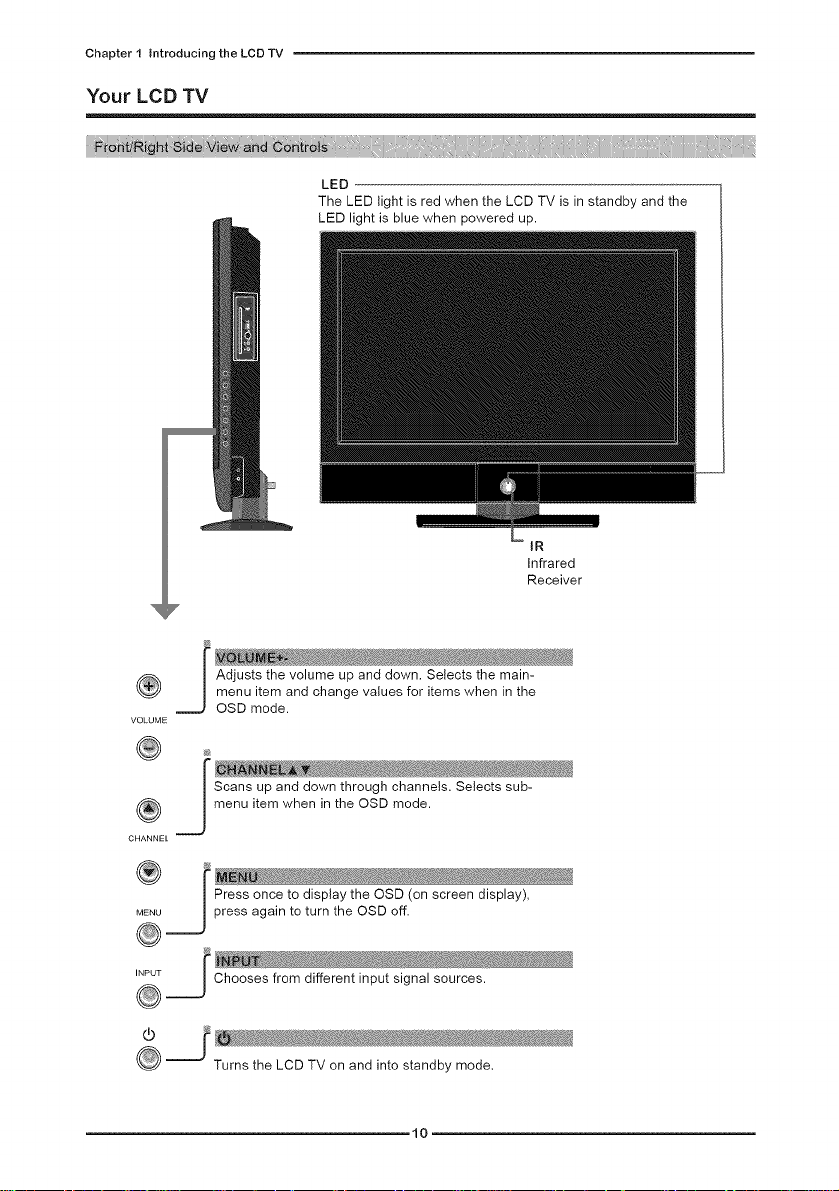
LED
The LED light is red when the LCD TV is in standby and the
LED light is blue when powered up.
IR
Infrared
Receiver
®
VOLUME
® f
| Scans up and down through channels, Selects sub-
® _menu item when in the OSD mode.
CHANNEL
| Press once to display the OSD (on screen display),
MENU J press again to turn the OSD off.
@
INPUT _
(!)
,10
Chooses from different input signal sources.
Turns the LCD TV on and into standby mode.
Page 13
Chapter I introducing the LCD TV
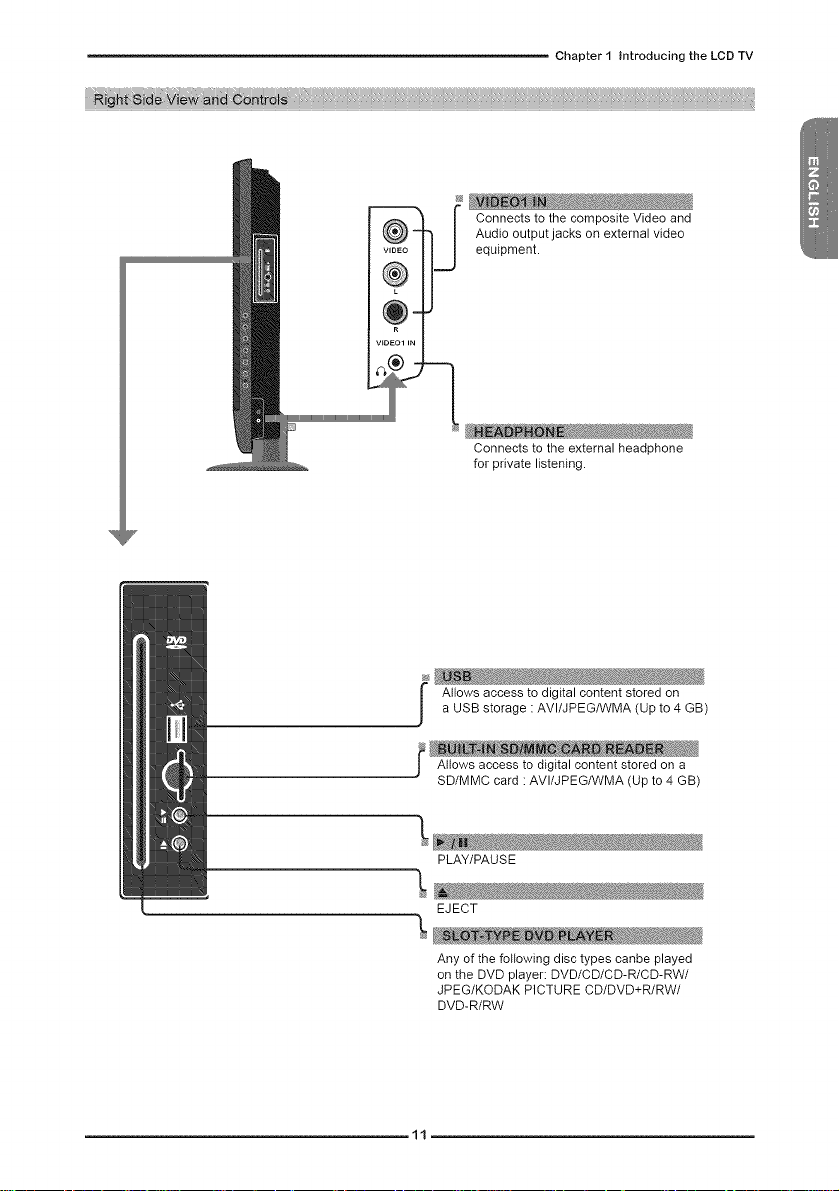
@
Connects to the composite Video and
Audio output jacks on external video
equipment.
Connects to the external headphone
for private listening.
,11
Allows access to digital content stored on
a USB storage : AVI/JPEG/WMA (Up to 4 GB)
SD/MMC card : AVI/JPEG/WMA (Up to 4 GB)
PLAY/PAUSE
EJECT
Any of the following disc types canbe played
on the DVD player: DVD/CD/CD-R/CD-RW/
JPEG/KODAK PICTURE CD/DVD+R/RW/
DVD-R/RW
Page 14
Chapter 1 introducing the LCD TV
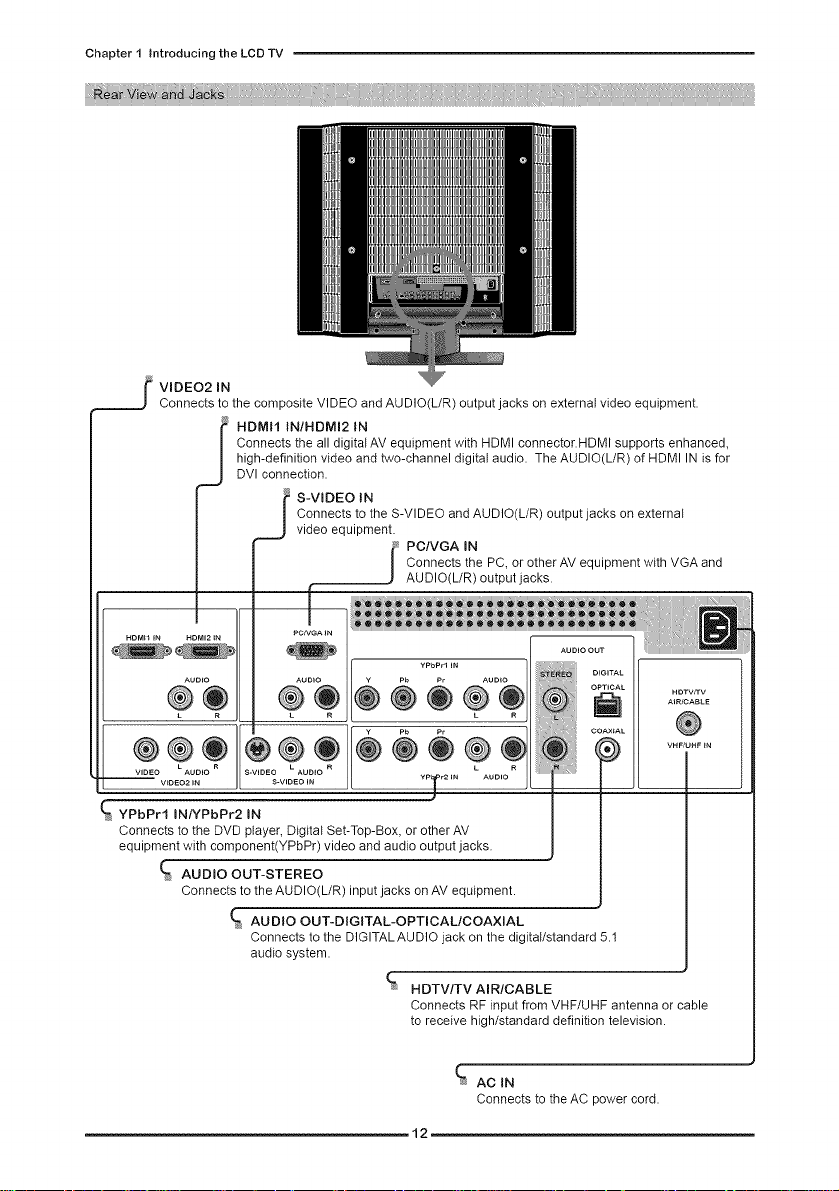
f VIDEO2 IN
Connects to the composite VIDEO and AUDIO(L/R) output jacks on external video equipment.
HDMI1 IN/HDMI2 IN
Connects the all digital AV equipment with HDMI connector.HDMI supports enhanced,
high-definition video and two-channel digital audio. The AUDIO(L/R) of HDMI IN is for
DVI connection.
S-VIDEO IN
Connects to the S-VIDEO and AUDIO(L/R) output jacks on external
video equipment.
Connects the PC, or other AV equipment with VGA and
__ AUDIO(L/R) output jacks.
_ C/VGA IN
H+M+t +N HDMI2+N PCNGA +N
I
1 r : COAX+AL {_
.....+,o+o1,+3........ o_+,o+,o_+o + o
YPbPrl iN/YPbPr2 IN
Connects to the DVD player, Digital Set-Top-Box, or other AV
equipment with component(YPbPr) video and audio output jacks.
AUDIO OUT-STEREO
Connects to tile AUDIO(L/R) input jacks on AV equipment.
_ AUDIO OUT-DIGITAL-OPTICAL/COAXIAL
Connects to tile DIGITAL AUDIO jack on tile digital/standard 5.1
audio system.
--12
YPbPrl IN DIGITAL
AUDIO OUT
A'R]CABLm
HDTV/TV AIR/CABLE
Connects RF input from VHF/UHF antenna or cable
to receive high/standard definition television.
% ACIN
Connects to the AC power cord.
Page 15
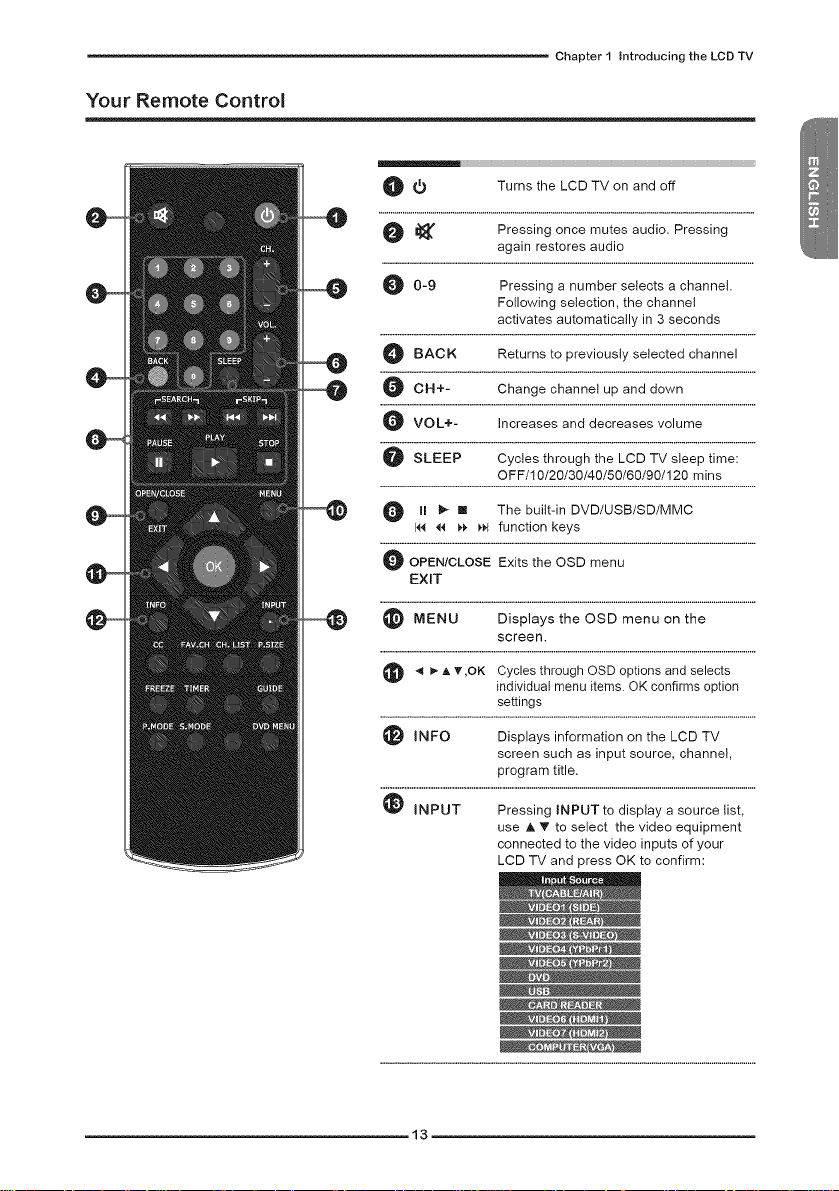
Your Remote Control
Chapter I Introducing the LCD TV
O _') Turns the LCD TV on and off
O I_ Pressing once mutes audio. Pressing
O 0-9 Pressing a number selects a channel.
O BACK Returns to previously selected channel
O OH+- Change channel up and down
O VOL÷- Increases and decreases volume
O SLEEP Cycles through the LCD TV sleep time:
O II _ I The built-in DVD/USB/SD/MMC
14444 _ _ function keys
O OPEN/CLOSE Exits the OSD menu
EXIT
MENU the OSD theDisplays
_ _-A _',OK Cycles through OSD options and selects
t_! INFO Displays information on the LCD TV
again restores audio
Following selection, the channel
activates automatically in 3 seconds
OFF/10/20/30/40/50/60/90/120 mins
menu on
screen.
individual menu items. OK confirms option
settings
screen such as input source, channel,
program title•
use A _' to select the video equipment
connected to the video inputs of your
LCD TV and press OK to confirm:
,13
Page 16
Chapter 1 Introducing the LCD TV
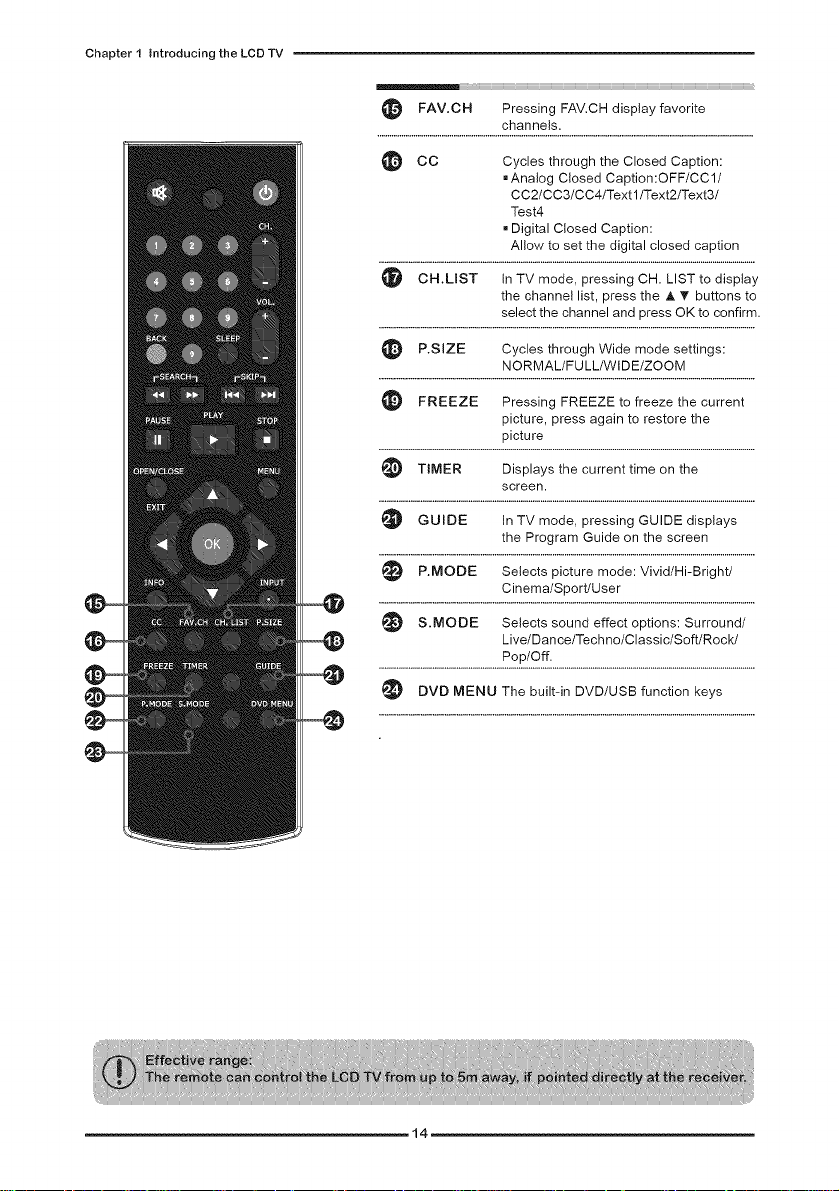
FAV.CH FAV.CH favoritePressing display
CC the Closed
channels.
Cycles through Caption:
• Analog Closed Caption:OFF/CC1/
CC2/CC3/CC4/Textl/Text2/Text3/
Testa,
• Digital Closed Caption:
Allow to set the digital closed caption
O CH.LIST In TV mode, pressing CH. LIST to display
the channel list, press the A T buttons to
select the channel and press OK to confirm.
P.SIZE Wide mode
Cycles through settings:
NORMAL/FU LL/WIDE/ZOOM
FREEZE Pressing FREEZE to freeze the current
picture, press again to restore the
picture
TIMER Displays the current time on the
screen.
GUIDE In TV mode, pressing GUIDE dispiays
the Program Guide on the screen
P.MODE
Selects picture mode: Vivid/Hi-Bright/
Cinema/Sport/User
S.MODE
Selects sound effect options: Surround/
Live/Dance/Techno/Classic/SoftiRock/
Pop/Off.
DVD MENU The built-in DVD/USB function keys
--14
Page 17
Chapter I Introducing the LCD TV
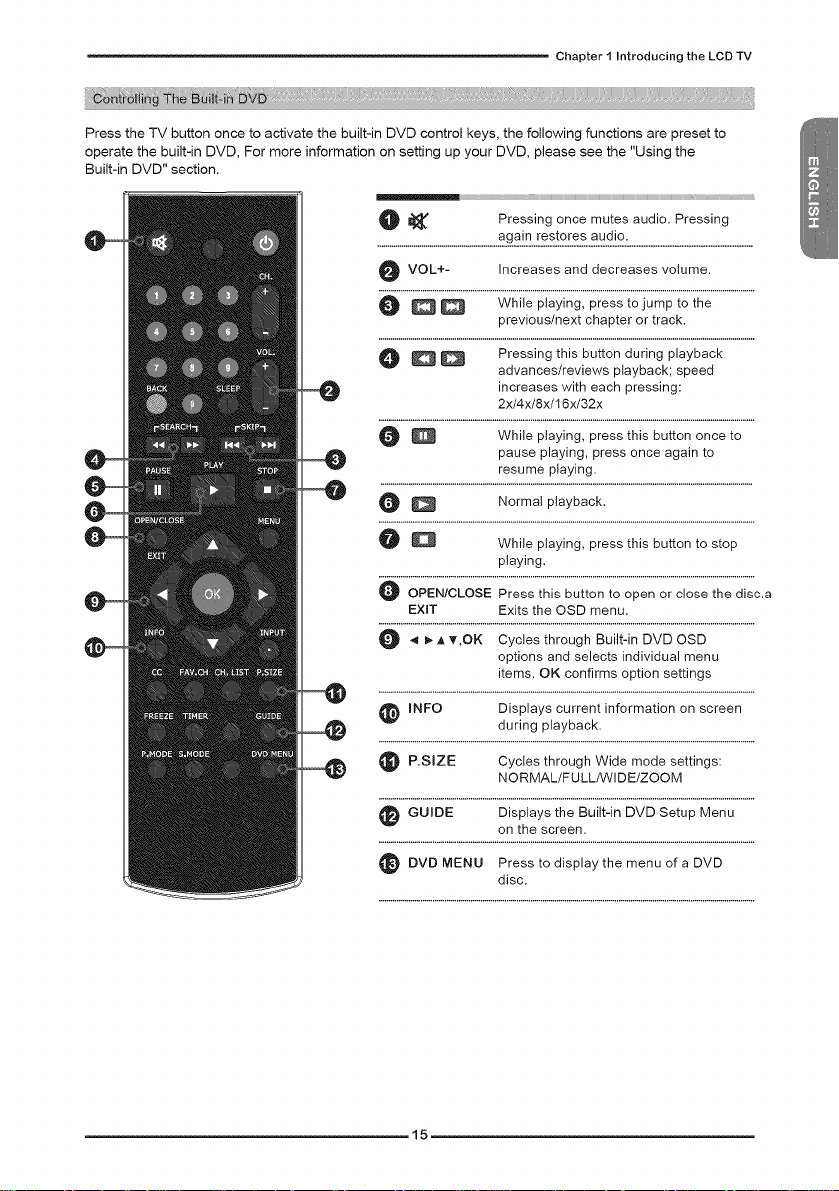
Press the TV button once to activate the built-in DVD control keys, the following functions are preset to
operate the built-in DVD, For more information on setting up your DVD, please see the "Using the
Built-in DVD" section.
@ I_ Pressing once mutes audio. Pressing
again restores audio.
VOL+- Increases and decreases volume.
@ _ _ While playing, press to jump to the
@ _ _ Pressing this button during playback
previous/next chapter or track.
advances/reviews playback; speed
increases with each pressing:
2x/4x/8x/16x/32x
Q While playing, press this button once to
pause playing, press once again to
resume playing.
@ Q Normal playback.
Q Q While playing, press this button to stop
playing.
OPEN/CLOSE Press this button to open or close the disc.a
EXiT Exits the OSD menu.
_1 _A v,OK Cycles through OSD
Built-in DVD
options and selects individual menu
items. OK confirms option settings
INFO Displays current information on screen
_ P.SIZE Cycles through settings:
during playback.
Wide mode
NORMAL/FU LL/WIDE/ZOOM
.15
_ GUIDE Displays the Built-in DVD Setup Menu
DVDMENU Press to the of DVDdisplay
on the screen.
menu a
disc.
Page 18
Chapter 1 Introducing the LCD TV
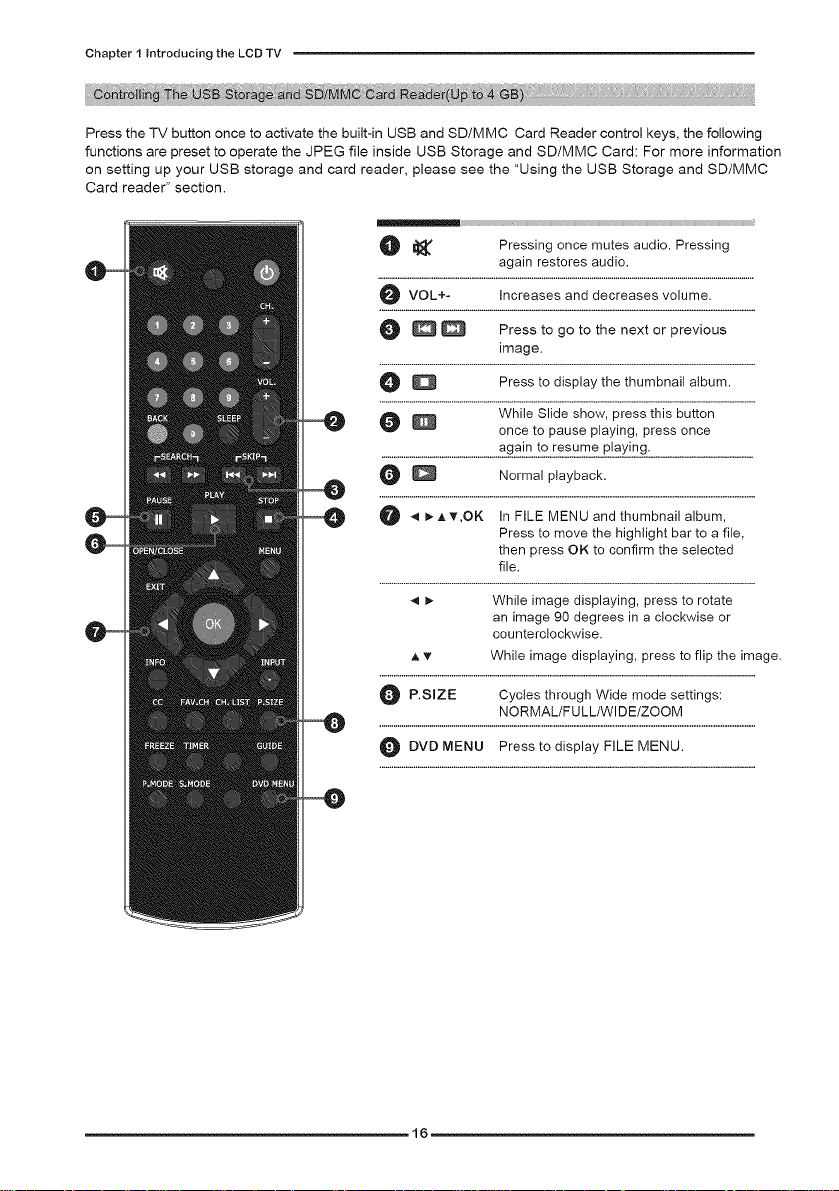
Press the TV button once to activate the built-in USB and SD/MMC Card Reader control keys, the following
functions are preset to operate the JPEG file inside USB Storage and SD/MMC Card: For more information
on setting up your USB storage and card reader, please see the "Using the USB Storage and SD/MMC
Card reader" section.
I_ Pressing once mutes audio. Pressing
again restores audio.
VOL+- Increases and decreases volume.
0 _ _ Press to go to the next or previous
image.
O _ Press to display the thumbnail album.
While Slide show, press this button
_w once to pause playing, press once
again to resume playing.
0 _ Normal playback.
4 I_A_',OK In FILE MENU and thumbnail album,
Press to move the highlight bar to a file,
then press OK to confirm the selected
file.
4 I_ While image displaying, press to rotate
an image 90 degrees in a clockwise or
counterclockwise.
A T While image displaying, press to flip the image.
P.SIZE Cycles through settings:
NORMAL/FU LL/WIDE/ZOOM
DVDMENU Press to FILEMENU.
Wide mode
display
Page 19
Chapter 2 Installing the LCD TV
Chapter 2
Installing the LCD TV
Refer to the owner's manual of any external equipment to be connected.
When connecting any external equipment, do not connect any AC power cords to wall outlets
until all other connections are completed.
Connecting a TV Cable or an Antenna
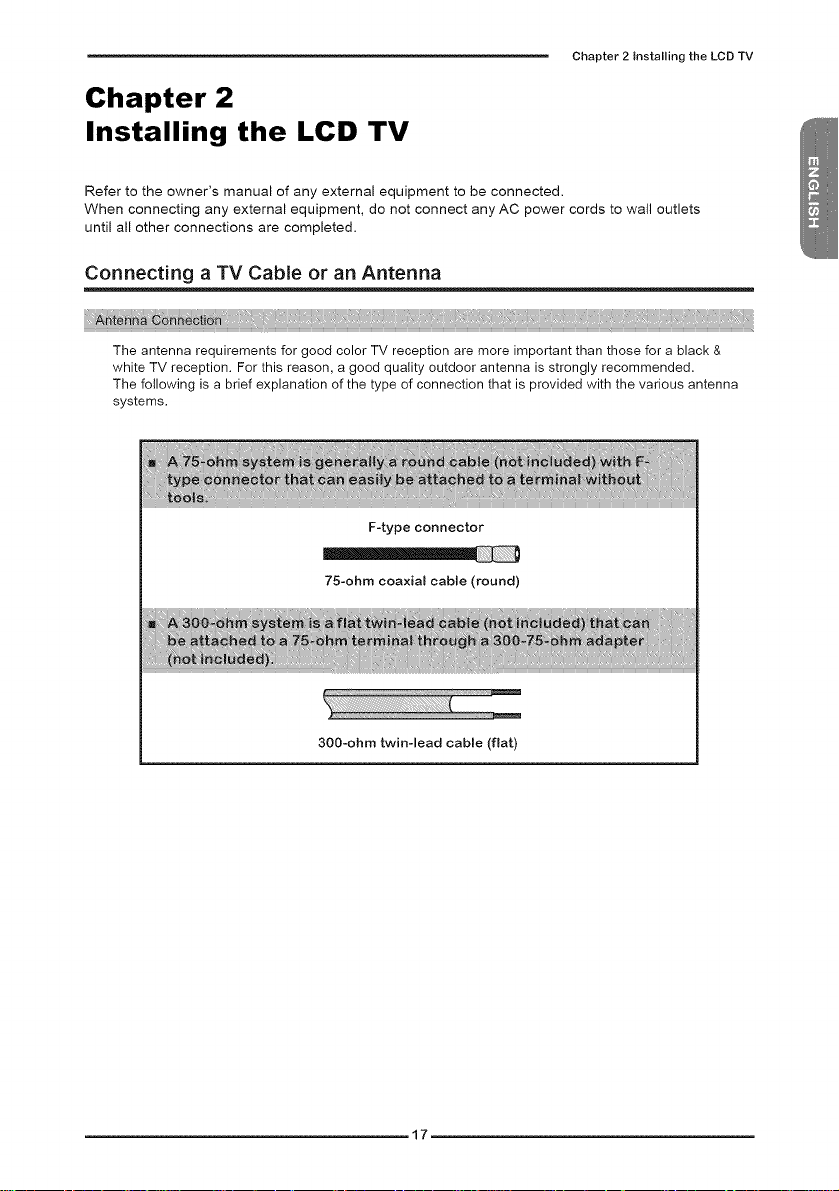
The antenna requirements for good color TV reception are more important than those for a black &
white TV reception. For this reason, a good quality outdoor antenna is strongly recommended.
The following is a brief explanation of the type of connection that is provided with the various antenna
systems.
F-type connector
75-ohm coaxial cable (round)
.17
300-ohm twin-lead cable (flat)
Page 20
Chapter 2 installing the LCD TV
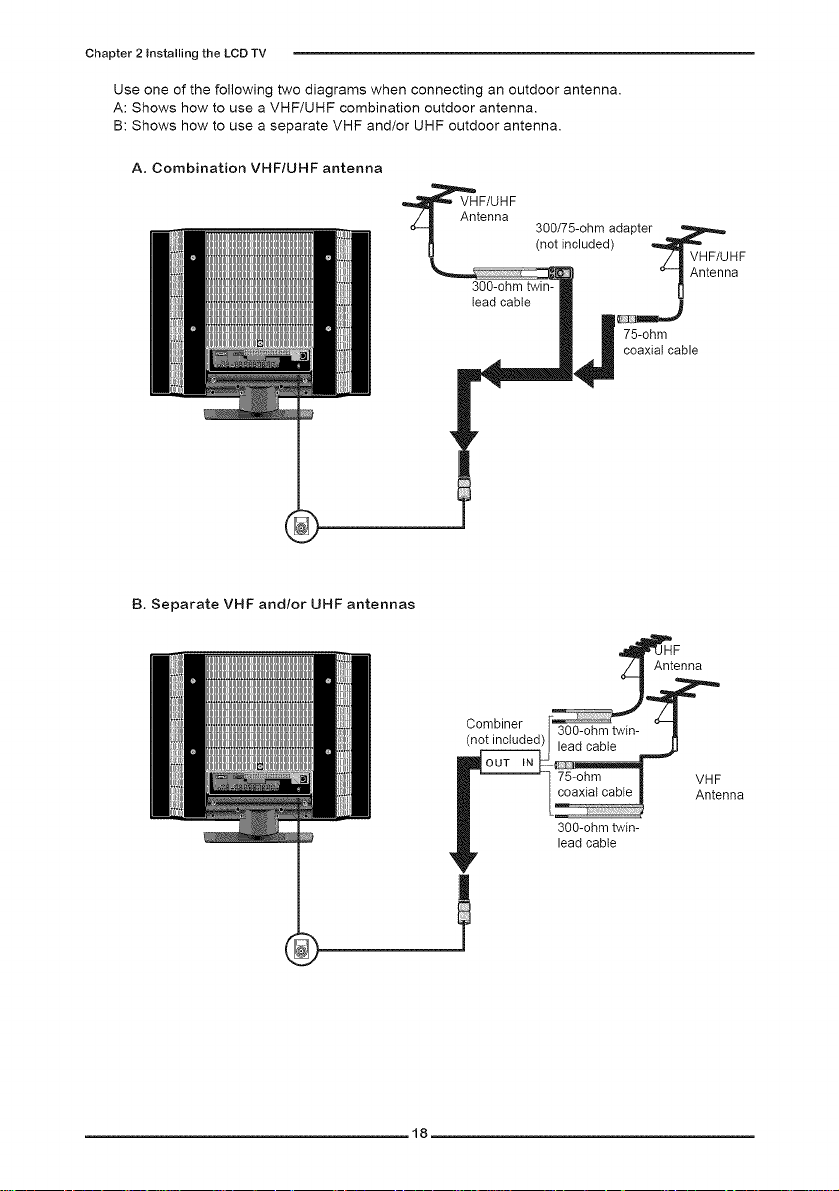
Use one of the following two diagrams when connecting an outdoor antenna.
A: Shows how to use a VHF/UHF combination outdoor antenna.
B: Shows how to use a separate VHF and/or UHF outdoor antenna.
A. Combination VHF/UHF antenna
,_F/UHF
tenna 300/75-ohm adapter _
300-ohm q Antenna
lead cable I_" J
B. Separate VHF and/or UHF antennas
(not included) _lr0,,H FlU HF
75-ohm
coaxial cable
._F
C°_l.bi_led d [_in- '_
| L nna
,_ lead cable
18
enna
Page 21
Chapter 2 Installing the LCD TV
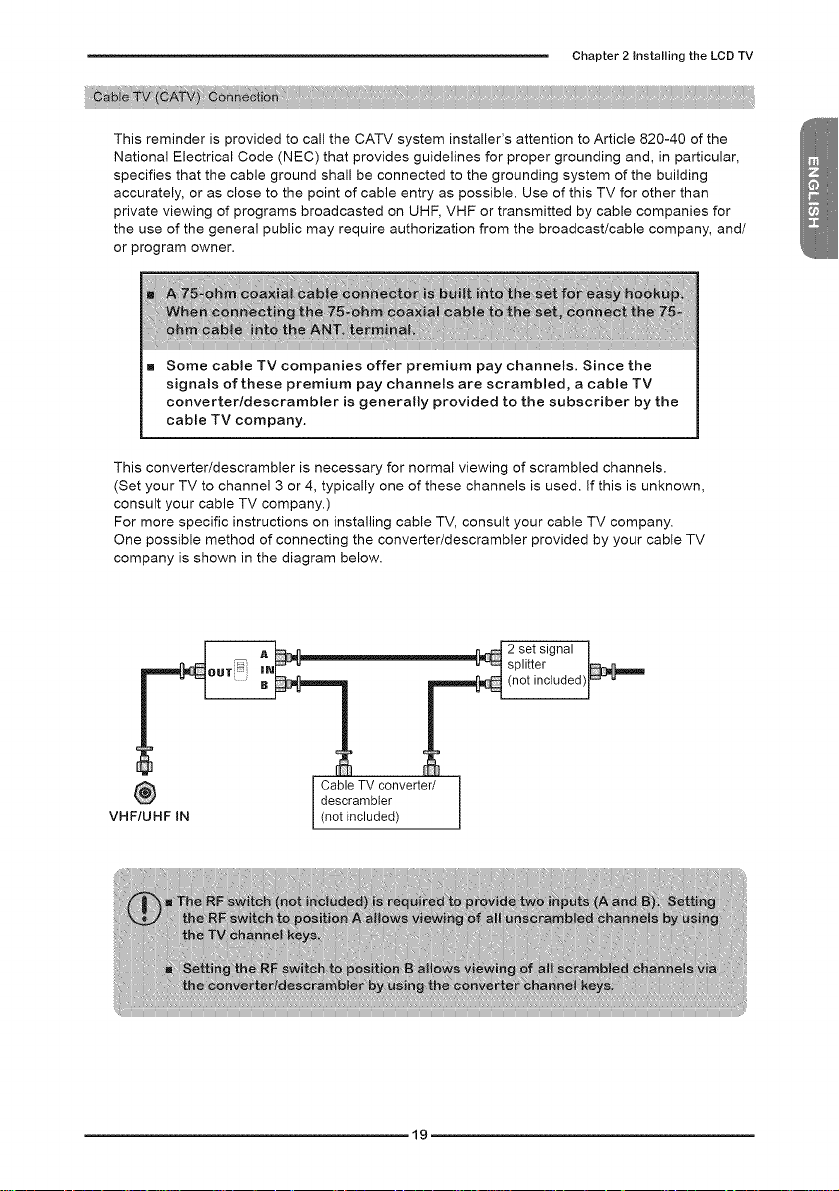
This reminder is provided to call the CATV system installer's attention to Article 820-40 of the
National Electrical Code (NEC) that provides guidelines for proper grounding and, in particular,
specifies that the cable ground shall be connected to the grounding system of the building
accurately, or as close to the point of cable entry as possible. Use of this TV for other than
private viewing of programs broadcasted on UHF, VHF or transmitted by cable companies for
the use of the general public may require authorization from the broadcast/cable company, and/
or program owner.
Some cable TV companies offer premium pay channels. Since the
signals of these premium pay channels are scrambled, a cable TV
converter/descrambler is generally provided to the subscriber by the
cable TV company.
This converter/descrambler is necessary for normal viewing of scrambled channels.
(Set your TV to channel 3 or 4, typically one of these channels is used. If this is unknown,
consult your cable TV company.)
For more specific instructions on installing cable TV, consult your cable TV company.
One possible method of connecting the converter/descrambler provided by your cable TV
company is shown in the diagram below.
v.F,o.F,, l netinolu e 1
.19
splitter
(not nc uded) ==-"
2 set signal I
Page 22
Chapter2installingtheLCDTV
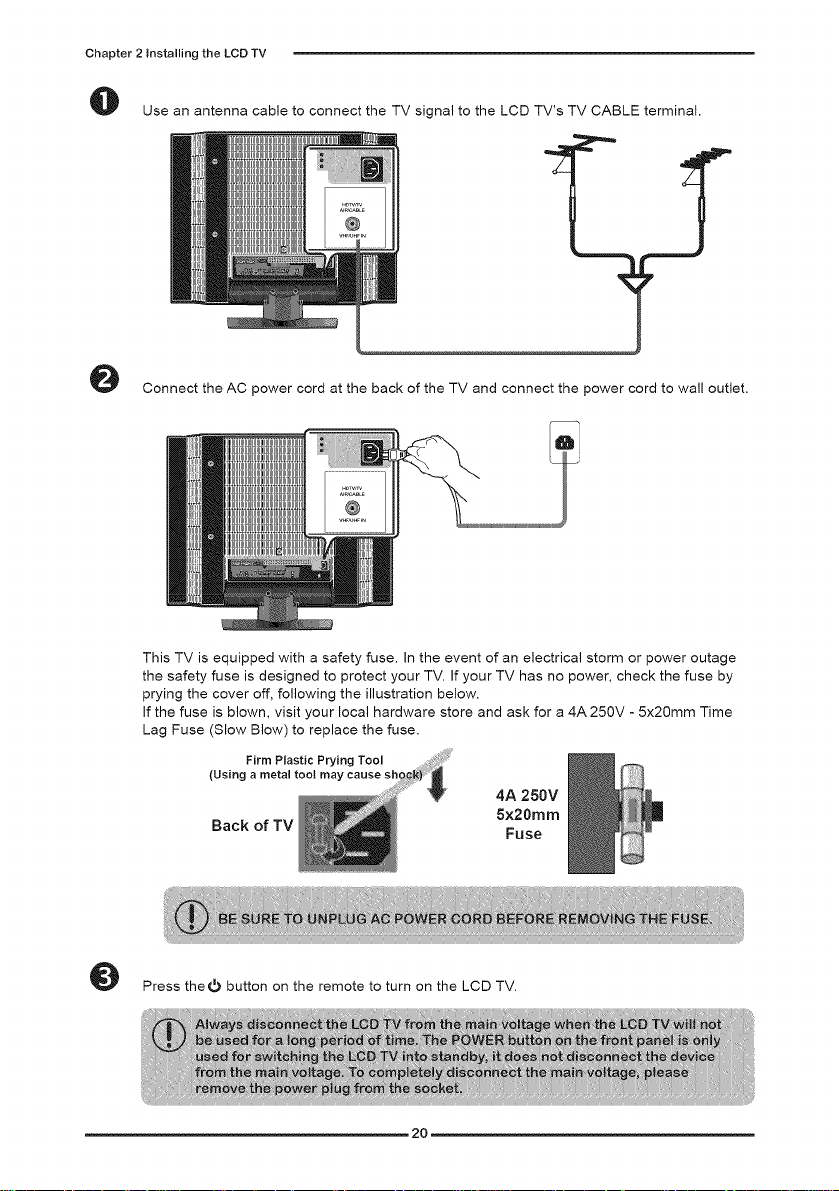
O Use an antenna cable to connect the TV signal to the LCD TV's TV CABLE terminal.
O Connect the AC power cord at the back of the TV and connect the power cord to wall outlet.
This TV is equipped with a safety fuse. In the event of an electrical storm or power outage
the safety fuse is designed to protect your TV. If your TV has no power, check the fuse by
prying the cover off, following the illustration below.
If the fuse is blown, visit your local hardware store and ask for a 4A 250V - 5x20mm Time
Lag Fuse (Slow Blow) to replace the fuse.
Firm Plastic Prying Tool
(Using ly cause
4A 250V
Back of TV
O Press theO button on the remote to turn on the LCD TV.
2O
5x20mm
Fuse
Page 23
Chapter 2 Installing the LCD TV
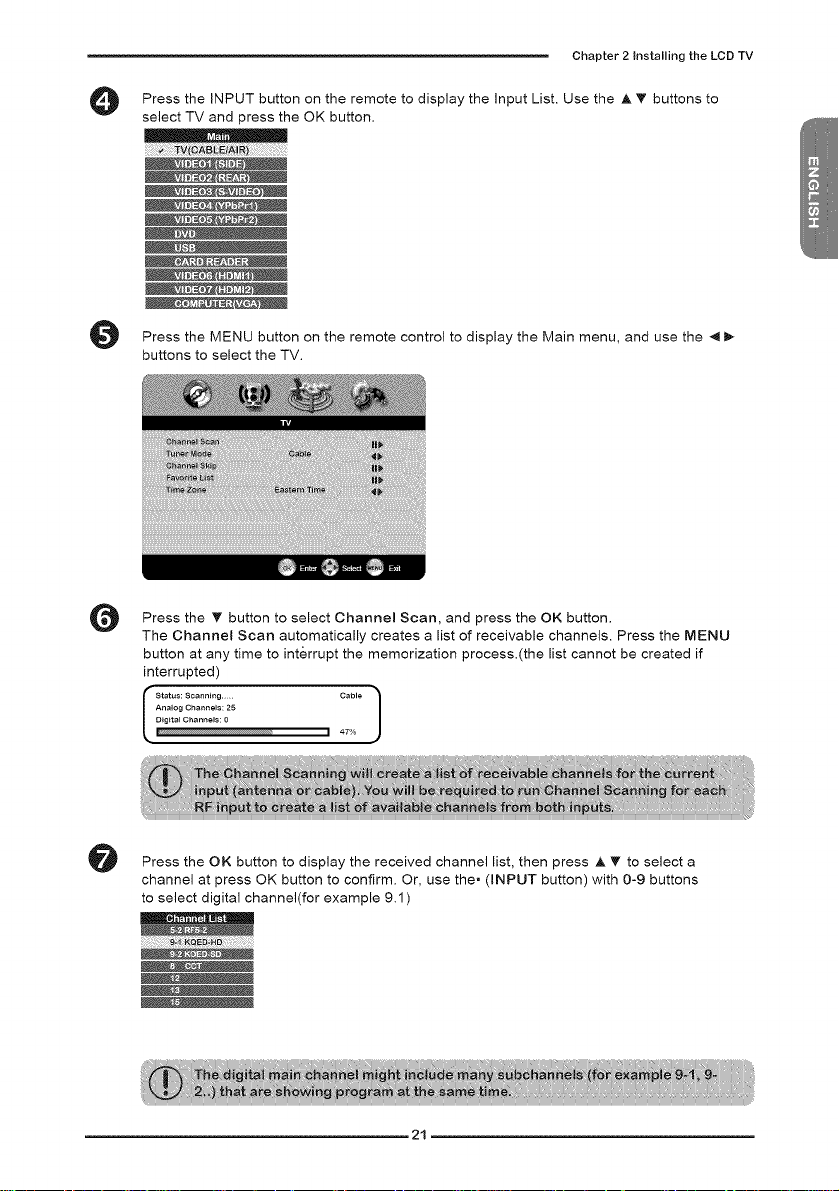
Press the INPUT button on the remote to display the input List. Use the A T buttons to
O
select TV and press the OK button•
O
Press the MENU button on the remote control to display the Main menu, and use the 4 1_
buttons to select the TV.
Press the T button to select Channel Scan, and press the OK button.
O
The Channel Scan automatically creates a list of receivable channels• Press the MENU
button at any time to int&rrupt the memorization process.(the list cannot be created if
interrupted)
Status: Scanning ..... Cable
Analog Channels: 25
I Digital Channels: 0 47%
J
@ Press the OK button to display the received channel list, then press A Y to select a
channel at press OK button to confirm. Or, use the. (INPUT button) with 0-9 buttons
to select digital channel(for example 9.1 )
21
Page 24
Chapter2installingtheLCDTV
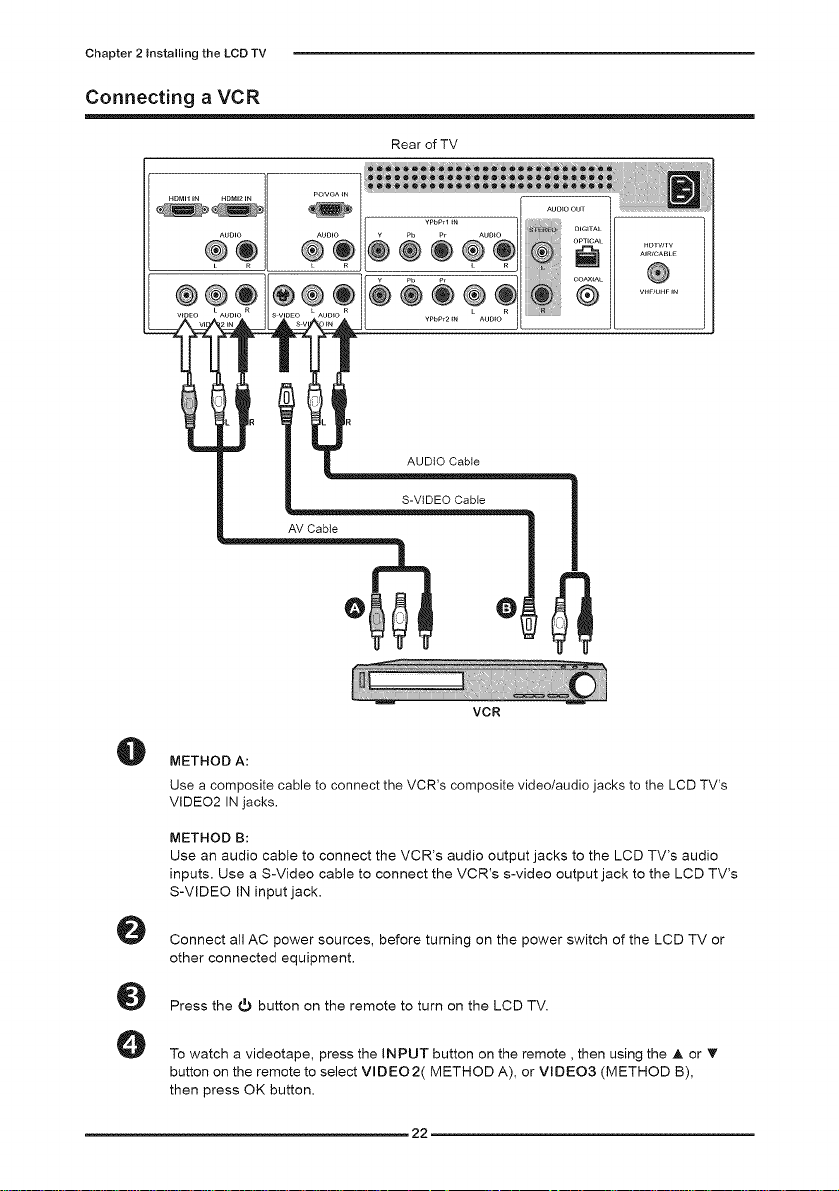
Connecting a VCR
Rear of TV
S-ViDEO Cable
VCR
0
METHOD A:
Use a composite cable to connect the VCR's composite video/audio jacks to the LCD TV's
VIDEO2 INjacks.
METHOD B:
Use an audio cable to connect the VCR's audio output jacks to the LCD TV's audio
inputs. Use a S-Video cable to connect the VCR's s-video output jack to the LCD TV's
S-VIDEO IN input jack.
e
Connect all AC power sources, before turning on the power switch of the LCD TV or
other connected equipment.
o
Press the t_ button on the remote to turn on the LCD TV.
o
To watch a videotape, press the INPUT button on the remote, then using the A or _'
button on the remote to select VIDEO2( METHOD A), or VIDEO3 (METHOD B),
then press OK button.
22
Page 25
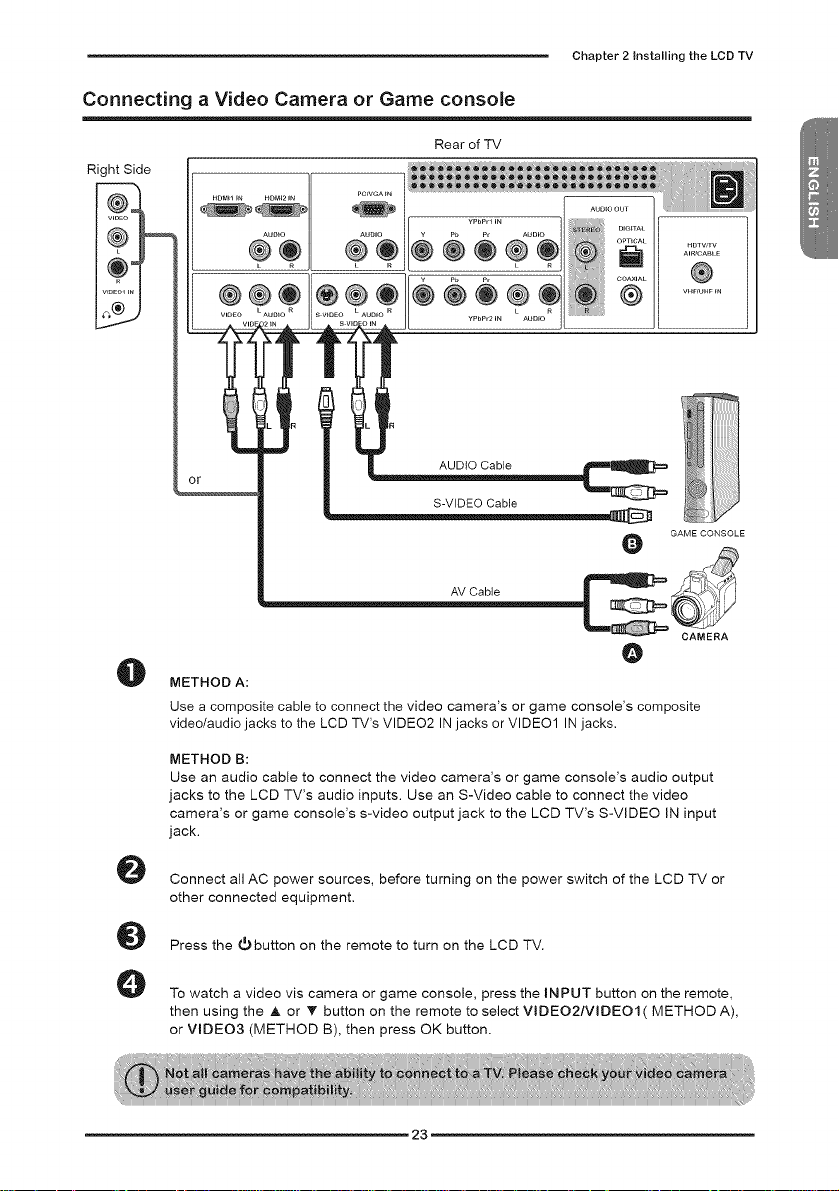
Connecting a Video Camera or Game console
Rear of TV
Right Side
@J
(e)l
wn_m ,N
Chapter 2 Installing the LCD TV
O
METHOD A:
Use a composite cable to connect the video camera's or game console's composite
video/audio jacks to the LCD TV's VIDEO2 IN jacks or VIDEO1 IN jacks.
METHOD B:
Use an audio cable to connect the video camera's or game console's audio output
jacks to the LCD TV's audio inputs. Use an S-Video cable to connect the video
camera's or game console's s-video output jack to the LCD TV's S-VIDEO IN input
jack.
0
Connect all AC power sources, before turning on the power switch of the LCD TV or
other connected equipment.
0
Press the t_button on the remote to turn on the LCD TV.
0
To watch a video vis camera or game console, press the INPUT button on the remote,
then using the A or T button on the remote to select VlDEO2/VlDEOI( METHOD A),
or VIDEO3 (METHOD B), then press OK button.
23
Page 26
Chapter2installingtheLCDTV
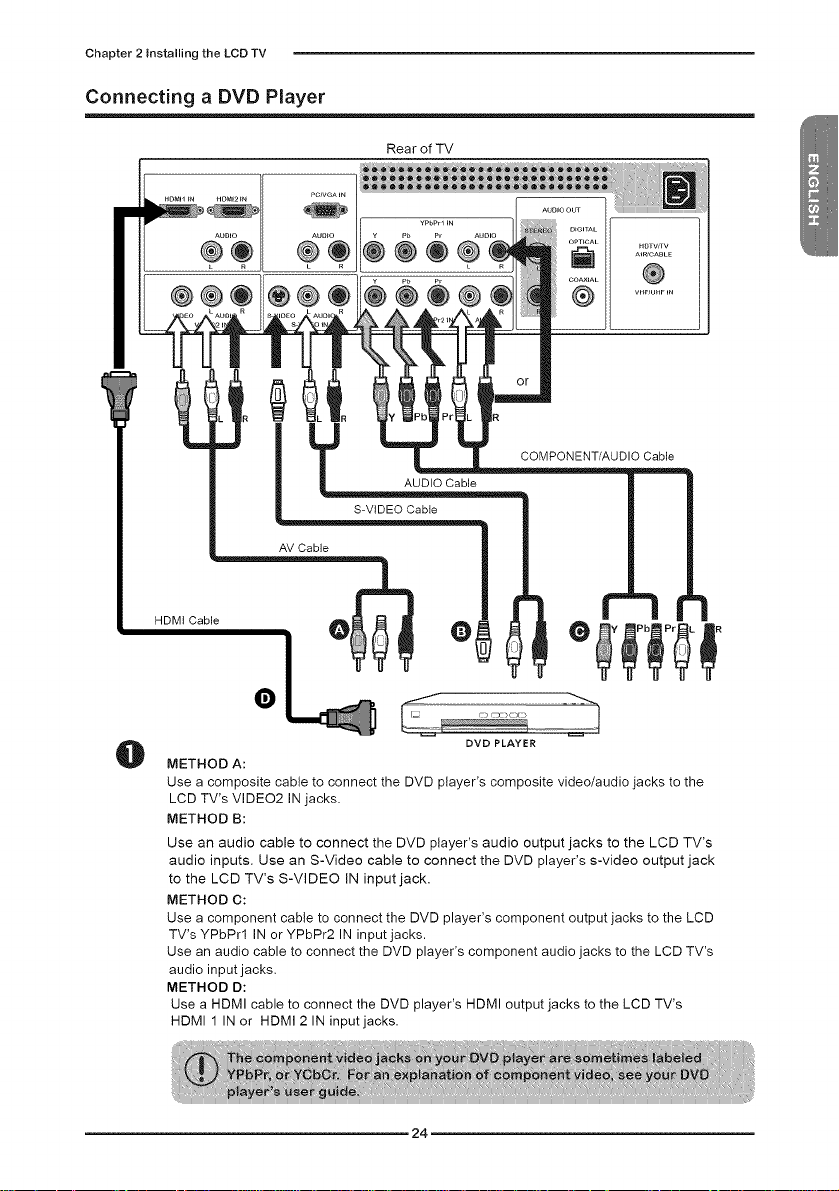
Connecting a DVD Player
!
AV Cable
HDMt Cable
Rear of TV
COMPONENT/AUDIO Cable
S-VIDEO Cabie
O
METHOD A:
Use a composite cable to connect the DVD player's composite video/audio jacks to the
LCD TV's VIDEO2 IN jacks.
METHOD B:
Use an audio cable to connect the DVD player's audio output jacks to the LCD TV's
audio inputs, Use an S-Video cable to connect the DVD player's s-video output jack
to the LCD TV's S-VIDEO IN input jack.
METHOD C:
Use a component cable to connect the DVD player's component output jacks to the LCD
TV's YPbPrl IN or YPbPr2 IN input jacks.
Use an audio cable to connect the DVD player's component audio jacks to the LCD TV's
audio input jacks.
METHOD D:
Use a HDMI cable to connect the DVD player's HDMI output jacks to the LCD TV's
HDMI 1 IN or HDMI 2 IN input jacks.
DVD PLAYER
24
Page 27
Chapter 2 Installing the LCD TV
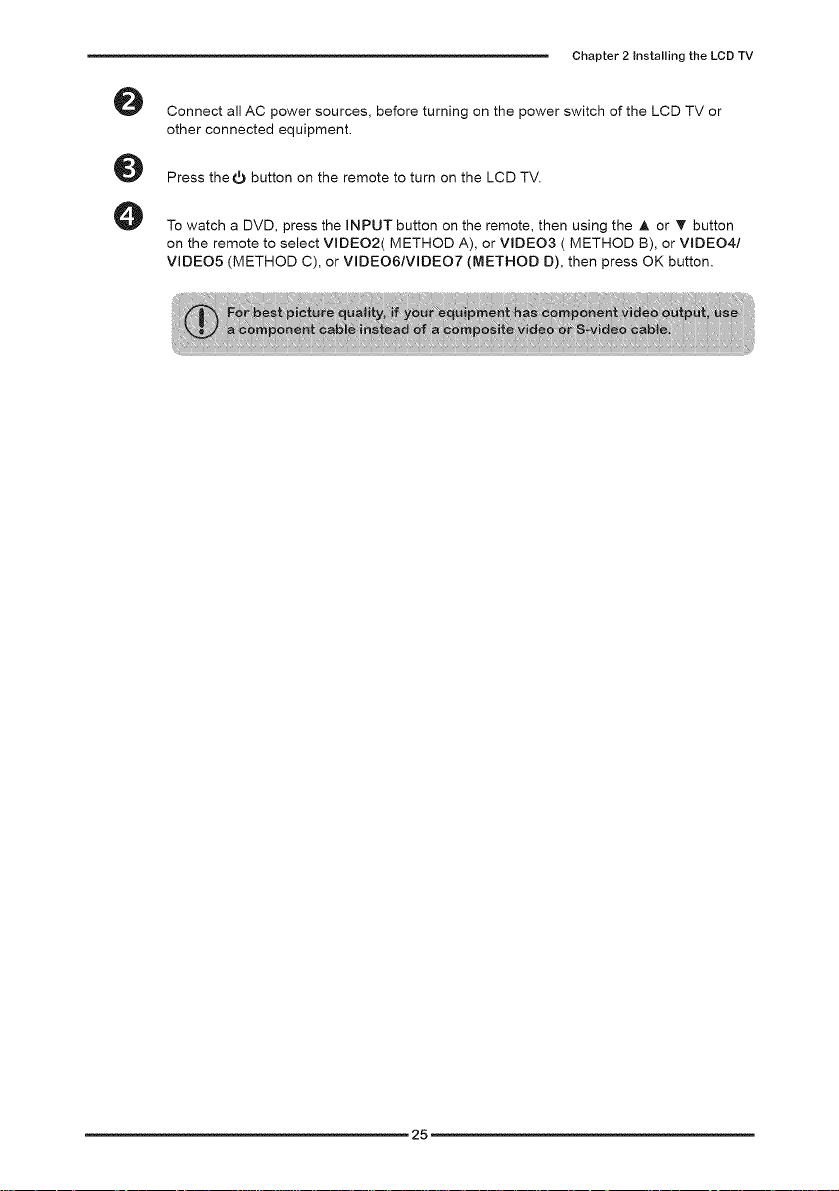
0
Connect all AC power sources, before turning on the power switch of the LCD TV or
other connected equipment.
0
Press thet_ button on the remote to turn on the LCD TV.
0
To watch a DVD, press the INPUT button on the remote, then using the J, or T button
on the remote to select VIDEO2( METHOD A), or VIDEO3 ( METHOD B), or VIDEO4/
VIDEO5 (METHOD C), or VlDEO6/VlDEO7 (METHOD D), then press OK button.
25
Page 28
Chapter2InstallingtheLCDTV
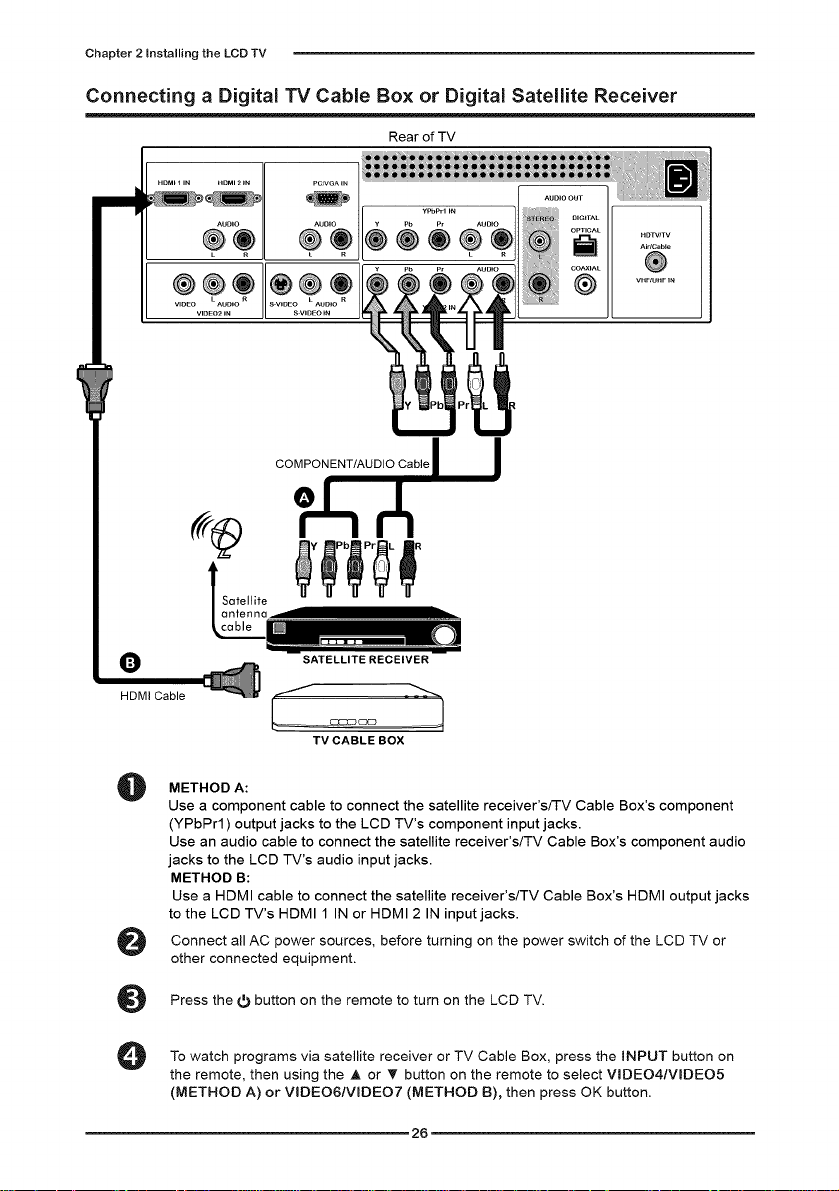
Connecting a Digital TV Cable Box or Digital Satellite Receiver
Rear of TV
NOTVSTV
®
VHFlUNFIN
COMPONENT/AUDIO Cable I
!
?A&
Satellite
O
HDMI Cable
METHOD A:
O
Use a component cable to connect the satellite receiver's/TV Cable Box's component
(YPbPrl) output jacks to the LCD TV's component input jacks.
Use an audio cable to connect the satellite receiver's/TV Cable Box's component audio
jacks to the LCD TV's audio input jacks.
METHOD B:
Use a HDMI cable to connect the satellite receiver's/TV Cable Box's HDMI output jacks
to the LCD TV's HDMI 1 IN or HDMI 2 IN input jacks.
Connect all AC power sources, before turning on the power switch of the LCD TV or
0
other connected equipment.
Press the _ button on the remote to turn on the LCD TV.
0
SATELLITE RECEIVER
TVCABLEBOX
To watch programs via satellite receiver or TV Cable Box, press the INPUT button on
0
the remote, then using the A or T button on the remote to select VIDEO4/VIDEO5
(METHOD A) or VIDEO6/VIDEO7 (METHOD B), then press OK button.
26
Page 29
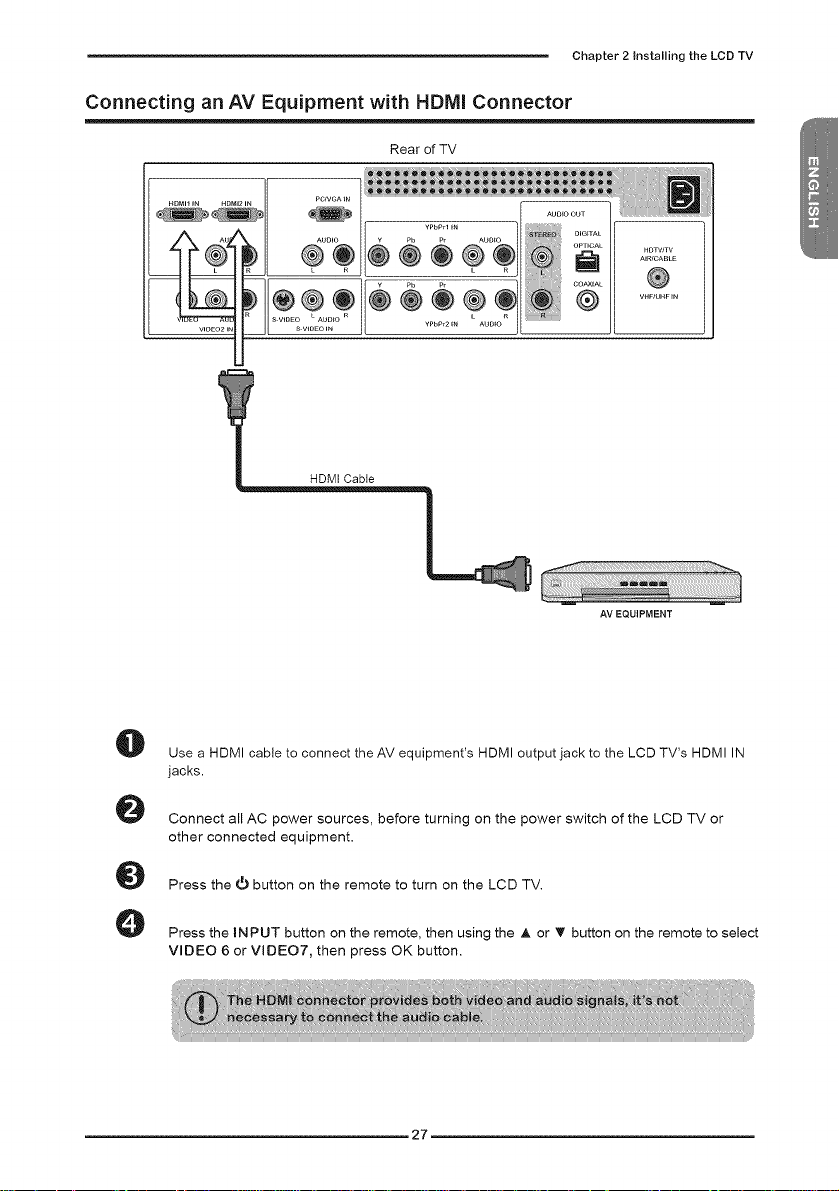
Connecting an AV Equipment with HDMI Connector
Rear of TV
HDmll IN _DMI2IN PClVGA_N
HDMi Cable
Chapter 2 Installing the LCD TV
AV EQUIPMENT
O
Use a HDMI cable to connect the AV equipment's HDMI output jack to the LCD TV's HDMI IN
jacks.
@
Connect all AC power sources, before turning on the power switch of the LCD TV or
other connected equipment.
O
Press the _ button on the remote to turn on the LCD TV.
0
Press the INPUT button on the remote, then using the _. or _' button on the remote to select
VIDEO 6 or VIDEO7, then press OK button.
27
Page 30
Chapter 2 installing the LCD TV
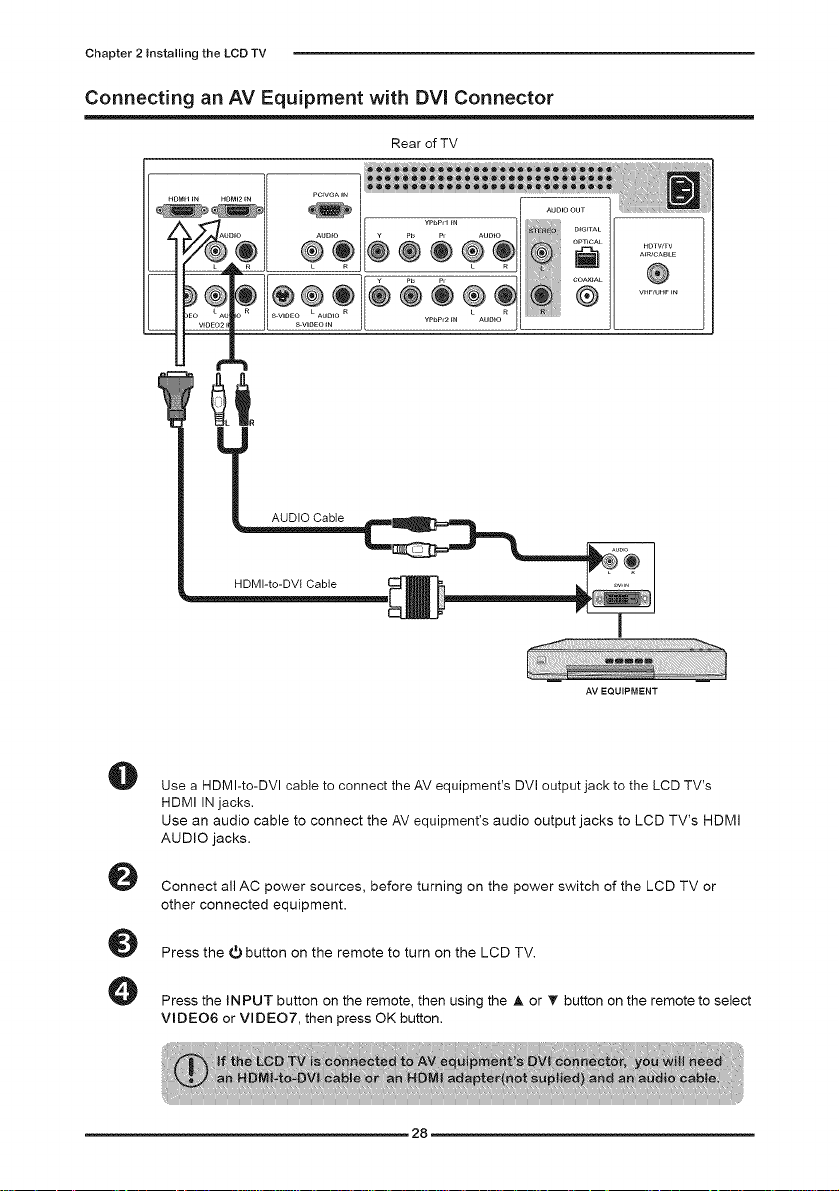
Connecting an AV Equipment with DVl Connector
Rear of TV
_oMJl IN HOMJ2IN PClVGAIN
_®_
÷¢¢®_
AUDIO Cable
O
Use a HDMI-to-DVl cable to connect the AV equipment's DVl output jack to the LCD TV's
HDMI INjacks.
Use an audio cable to connect the AV equipment's audio output jacks to LCD TV's HDMi
AUDIO jacks.
L R
YPbP_2_N AUe_O
i o_mCAL HDTWTV
l A_RICABLE
c°A'dv........
AV EQUIPMENT
0
Connect all AC power sources, before turning on the power switch of the LCD TV or
other connected equipment.
0
Press the _ button on the remote to turn on the LCD TV.
0
Press the INPUT button on the remote, then using the A or T button on the remote to select
VIDEO6 or VIDEO7, then press OK button.
28
Page 31

Connecting a PC
HDM__N HDM_2_N
AUOtO
®®
L R
VlOEO AUDtO
VlOEO2_N
Chapter 2 Installing the LCD TV
AUDIO Cable
VGA Cable
PC
O
Use a D-SUB cable to connect the PC's D-SUB output jack to the LCD TV's VGA input
jack. Use an audio cable to connect the PC's audio output jacks to LCD TV's.
e
Connect all AC power sources, before turning on the power switch of the LCD TV or
other connected equipment.
O
Press the _button on the remote to turn on the LCD TV.
0
Press the Input button on the remote, then using the A or T button on the remote to select
COMPUTER, then press OK button.
29
Page 32

Chapter2installingtheLCDTV
Connecting an Audio Receiver or a Dolby Digital 5.1 Sound System
For better sound quality, you may want to play the LCD monitor audio through your stereo system.
Audio Receiver
O
Connecting to Audio Receiver:
Use an audio cable to connect the audio receiver's audio LINE IN jacks to LCD TV's
AUDIO OUT jacks.
O
Connecting to Digital 5.1 Sound System:
METHOD A:
Use a optical cable to connect the audio amplifier's OPTICAL IN jacks to LCD TV's
OPTICAL OUT jacks.
METHOD B:
Use a coaxial cable to connect the audio amplifier's COAXIAL IN jacks to LCD TV's
COAXIAL OUT jacks.
Connect all AC power sources, before turning on the power switch of the LCD TV or
other connected equipment.
Press the _button on the remote to turn on the LCD TV.
30
Audio Amplifier
Page 33

Chapter 3
USING THE FEATURES
Using The Built=in DVD
O Turn your LCD TV on.
O
Insert a disc ( DVD/CD/CD-R/CD-RW/JPEG/KODAK PICTURE CD/DVD+R/
RW/DVD-R/RW•
• TO INSERT A DISC with the face label at front • TO REMOVE A DISC
Any above disc types can be played on the When removing the disc, do not
DVD player: attempt to pull it from its slot. Please
push the EJECT button as
illustrated below•
Chapter 3 Installing the LCD TV
O
Press the Input button
the OK button.
Insert
on the remote, use _, T to select DVD and press
6
31
Page 34

Chapter 3 Using the LCD TV
O
Press GUIDE button on the remote control to display the Built-in DVD Setup Menu:
• USING THE BUILT-IN DVD SETUP MENU
1. Use the A _' .,qI_ on the remote control to to move the light bar to the option you
want, press the OK button.
During playback, the following operations are available:
• ||_ Use for forward slow motion playback with one frame.
• PLAY _ Starts playback.
• _| |_' Get slow motion effect during playback (1/2, 1/4, 1/8, 1/16)
• F.FWD/NEXT _ _1_ Jumps to the previous/next chapter or track.
• REW./PREV.'_ _ Gets different playback forward/backward speeds
• PAUSE || While playing, pause playback temporarily
• AUDIO O))) Press to select the Audio effect and Language.
• SUBTITLE _ Changes DVD subtitle language.
• CAMERA ANGLE_ Press to select the desired camera angle disc.
O
The Built-in DVD player can playback JPEG format pictures, WMA audio files and AVl
files on a personally recorded CD-R/RW disc. After loading all files, the File Menu will
show the contents of the disc:
(x2, x4, x8, xt6, x32).
• Press _, _" to select a file and press the _button to play the file.
• If necessary, Press A T to select the folder and then press I_ to enter the folder.
Press 4 to back the File Menu.
• While an image is displayed, press the DVD MENU button to display the File Menu.
32
Page 35

O
• RUNNGING THE WMA & AVI
1. Press the DVD MENU button to display the File Menu.
2. Press • • on the remote control to move the light bar to the file you want to play,
and press the OK button to play the file.
3. The DVD player will playback all WMA and AVI files in sequence automatically
when it is loaded, you can pause the slide show by pressing O .
4. Press O O on the remote control to get different playback forward/backward
speeds (x2, x4, x8, x16, x32)
5. Press O to jump to next tracks or files, press O to jump to previous tracks or
files.
O
• RUNNGING A SLIDE SHOW
1. Press • • on the remote control to move the light bar to the file you want to play,
and press the OK button to play the file.
2. While an image is displayed full size, you can pause the slide show by pressing
O
3. Press O O on the remote control to go to the next or previous image.
• USING THE THUMBNAIL ALBUM
1. Press O button on the remote control to display the thumbnail album.
Chapter 3 Using the LCD TV
Slide Show _lPrev Nextl_
2. Press • • 411_ on the remote control to move the light bar to the image you
want to play, and press the OK button to play the file.
Slide Show 4Prey Nextl_
33
Page 36

Chapter 3 Using the LCD TV
3. • Slide Show: Press A T .,q _ to highlisht Slide Show and press the OK
button, to display all the images recorded on the SD/MMC card/USB storage.
• Prev/Next: Press A _' .,qI_ to highlisht Prev/Next and press the OK button,
to go to the previous or next page of the thumbnail album.
ROTATING PICTURES
1. Press _ _,- on the remote control to to rotate the picture clockwise or
counterclockwise in 90-degree increments.
2. Press _ _ on the remote control to go to the next or previous image.
3. While image displaying, press _. _' on the remote control to flip the image.
34
Page 37

Chapter3UsingtheLCDTV
Using The USB Storage and SD/NNC Card Reader(Up to 4 GB)
O Turn your LCD TV on.
O
Insert a USB device/SD/MMC card that contains JPG/JPEG//WMA/AVl files.
• TO INSERT A USB STORAGE
Allows the insertion of a USB storage.
You can view digital images, video or
music in a USB storage on your TV.
Insert
O
Press the Input button on the remote, use _, T to select a input source and
press the OK button.
• TO INSERT A SD/MMC CARD Reader
Allows the insertion of a SD/MMC card.
You can view digital images, video or music•
TO INSERT A USB STORAGE
TO INSERT A SD/MMC CARD Reader
35
Page 38

Chapter3UsingtheLCDTV
O After loading all files, the File Menu will show the contents of the USB device:
• Press A • to select a file and press the _ button to play the file.
• If necessary, Press A V to select the folder and then press _- to enter the folder.
Press 4 to back the File Menu.
• While an image is displayed, press the DVD MENU button to display the File Menu.
O
• RUNNGING THE WMA & AVI
1.
Press the DVD MENU button to display the File Menu.
2.
Press • • on the remote control to move the light bar to the file you want to play,
and press the OK button to play the file.
3.
It will playback all WMA and AVl files in sequence automatically when it is loaded,
you can pause the slide show by pressing _.
4.
Press _ _ on the remote control to get different playback forward/backward
speeds (x2, x4, x8, x16, x32)
5.
Press _ to jump to next tracks or files, press _ to jump to previous tracks or
files.
O
• RUNNGING A SLIDE SHOW
1. Press A • on the remote control to move the light bar to the file you want to play,
and press the OK button to play the file.
2. While an image is displayed full size, you can pause the slide show by pressing
3. Press _ _ on the remote control to go to the next or previous image.
36
Page 39

Chapter3UsingtheLCDTV
• USING THE THUMBNAfL ALBUM
1. Press O button on the remote control to display the thumbnail album.
Slide Show 4 Prey Nextl_
2. Press A T _ _ on the remote control to move the light bar to the image you
want to play, and press the OK button to play the file.
Slide Show _{ Prey Nextl_-
3. • Slide Show: Press A T _ _ to highlisht Slide Show and press the OK
button, to display all the images recorded on the SD/MMC card/USB storage.
• Prev/Next: Press A _' _ _ to highlisht Prey/Next and press the OK button,
to go to the previous or next page of the thumbnail album.
• ROTATING PICTURES
1. Press _ _ on the remote control to to rotate the picture clockwise or
counterclockwise in 90-degree increments.
2. Press 0 _ on the remote control to go to the next or previous image.
3. While image displaying, press A T on the remote control to flip the image.
37
Page 40

Chapter3UsingtheLCDTV
Wide Screen Viewing
Wide Screen function allows viewing of 4:3/16:9 images in wide screen mode, cycling through
the following wide screen settings. Press the P.SIZE button repeatedly to select the screen
format you want.
O , _ , ,
Displays at 4:3 aspect ratio
O
Stretches the image horizontally to
keeps the image size consistent in
the center of the screen and
stretches the sides
O
Stretches the image vertically and
horizontally to fill the screen at 1:1.85
aspect ratio
0
horizontally to fill the screen at 1:2.35
Stretchesthe,mogevert,ca,yondI !i/_iii__ i_ !ii_
aspect ratio
38
Page 41

Chapter3UsingtheLCDTV
Using the Program Guide
The Program Guide feature brings all sorts of information to your screen, such as program title,
program duration, time remaining, rating information, closed caption, availability, etc.
With the LCD TV connected to a television programming source, press the INPUT button
on the remote control and use the A _ buttons to TV and press the OK button.
Press the GUIDE button on the remote control, the Program Guide will appear on the
screen:
Press the _ _ button to select the channel.
Press the A _' button to select the program from a list, the Program Guide provides
introduction about the current program being shown on each channel.
The Program information in the guide is provided by the broadcasters. It may sometimes
include only the channel number, without a program title or description.
O Press the GUIDE button again on the remote control to exit the Program Guide
39
Page 42

Chapter 3 Using the LCD TV
Operating the Menu
O Press the _ button to turn the LCD TV on.
O Press the MENU button on the remote control, the on-screen menu will appear on the
screen. Use the _1_ buttons to select your main menu option.
Allows you to make adjustments to your picture settings.
- If the signal source is TV/VIDEO/S-VIDEO/YPbPr/ • If the signal source is VGA, the VIDEO MENU
HDMI, the VIDEO MENU appears as: appears as:
Allows you to customize the audio options and effects.
- If the signal source is VIDEO/S-VIDEO/YPbPr/ • If the signal source is TV, the AUDIO MENU
HDMI/VGA, the AUDIO MENU appears as: appears as:
4O
Page 43

Chapter 3 Using the LCD TV
Allows you to edit and label channels.
Allows you to set up a variety of features: Language, Closed Caption, factory reset, Parental Control, sleep
timer.
• If the signal source is TV/VIDEO/S-VIDEO/ • if the signal source is HDMI/VGA, the SETUP
YPbPr, the SETUP MENU appears as: MENU appears as:
O
Use the A T buttons to highlight the option of the sub-menu, and press the OK
button. While in adjustment mode, and use the _ buttons to change the value of
the item, press the MENU button to return to main menu option.
0
Press the EXIT button to exit the menu.
41
Page 44

Chapter3UsingtheLCDTV
Customizing the VIDEO Settings
Press the _ button to turn the LCD TV on.
Press the MENU button on the remote control to display the Main menu, and use the
I_ buttons to select the VIDEO.
O
Use the _, Tbuttons to highlight an individual VIDEO option, use the _ I_ buttons to
change the setting, and press the MENU to exit the menu
- If the signat source is TVNIDEO/S-VIDEO/YPbPr/ - Ifthe signal source isVGA, the VIDEO MENU
HDMI,the VIDEO MENU appears as: appears as:
O
The VIDEO menu includes the following options:
Picture Mode Cycles among display types: Vivid/Hi-Bright/Cinema/Sport/User
Contrast Controls the difference between the brightest and darkest regions of
Brightness Controls the overall brightness of the picture
Saturation Controls the color intensity
Hue Controls the difference between the green and red regions of the
Sharpness Increase this setting to see crisp edges in the picture; decrease it for
the picture
picture
soft edges
42
Page 45

Chapter 3 Using the LCD TV
Color temperature Adjusts color components independently to achieve a warm or cool
effect: Cool/Middle/Warm/User
• Warm: Increases red tint
• Nature : Increases natural tint
• Cool : Increases btue tint
• User : Allows the user to adjust red, green and blue color
component levels independently.
Noise Reduction Select to reduce the noise level of connected equipment: Off/Low/
Medium/Strong.
VGA If the signal source is VGA:
• Auto Adjust Press the OK button to automatically adjust
the display settings to optimize performance
based on the VGA mode
• H. Position
• V. Position
Adjusts the position of the picture left and right
in the window
Adjusts the position of the picture up and down
in the window
• Clock
Controls the width of the picture based on the
VGA mode
• Phase Controls the signal phase, which can improve
focus clarity and image stability based on the
VGA mode
43
Page 46

Chapter3UsingtheLCDTV
Customizing the AUDIO Settings
Press the _) button to turn the LCD TV on.
Press the MENU button on the remote control to display the Main menu, and use the
_1_ buttons to select the AUDIO,
O
Use the • Tbuttons to highlight an individual AUDIO option, use the _ I_ buttons to
change the setting, and press the MENU to exit the menu
= If the signal source isVIDEO/S-VIDEO/YPbPr/ • Ifthe signal source isTV,the AUDIO MENU
HDMI/VGA,the AUDIO MENU appears as: appears as:
O The AUDIO menu includes the following options:
Bass Controls the relative intensity of lower-pitched sounds
Treble Controls the relative intensity of higher pitched sounds
Balance Adjusts the relative volume of the speakers in a multiple speaker
Sound Effect
MTS
system
Allows selection of an audio-enhancement technique from among the
following options: Surround/LivelDance/TechnolClassiclSoftlRock/
POP/Off
Allows you to listen to high-fidelity stereo sound while watching TV
• Stereo:
Use separate audio tracks for left and right speakers, if available
• SAP:
You can enjoy a second audio program from the speakers while
watching a scene in the original program
• Mono:
Allows mono output (useful when stereo is noisy or inconsistent)
44
Page 47

Chapter 3 Using the LCD TV
SPDIF Type Allows to selection of the digital sound format: PCM/OFF/Dolby
Digital
• PCM:
The external audio system is connected to the AUDIO OUT (L/R)
of the LCD TV
• Dolby Digital:
The external audio system is connected to the AUDIO OUT
DIGITAL (OPTICAL or COAXIAL) ot the LCD TV
• OFF:
Select OFF to turn off the external audio system
Audio Language Allows to select the audio language: English/Spanish/French.
Speaker Allows to select to turn on or off the TV's internal speakers.
Audio Out This option can be set only when the Speaker option is set to OFF.
• Variable:
The Audio out from your external audio system can be controlled
by the TV's remote control.
Fixed:
The Audio out from your external audio system can be controlled
by the external audio system's remote control.
45
Page 48

Chapter3UsingtheLCDTV
Customizing the TV Settings
O Press the _ button to turn the LCD TV on.
O Press the MENU button on the remote control to display the Main menu, and use the
_11_ buttons to select the TV.
Use the _, T buttons to highlight an individual TV option, use the 4 I_ buttons
changes the setting, and press the MENU exits the menu.
0
The TV menu includes the following options:
Channel Scan Press the OK button, the Channel Scanning automatically
Tuner Mode Allows selection between CATV cable and antenna signal sources:
Channel Skip
creates a list of receivable channels.
• AIR
Choose this setting if you are receiving TV channels with an antenna
(over the air)
• Cable
Choose this setting if you are receiving TV channels with a CATV
(cable TV)
Allows addition/removal of channels on the channel list.
O Press the OK button to display the Channel Skip menu:
46
Page 49

Chapter 3 Using the LCD TV
Press the • button to select the desired channel, andpress the
OK button repeatedly to select show (D) or hide([])
Favorite Edit
Allows to set your favorite channels.
O Select Favorite Edit from the TV option and press the OK
button. The Favorite Channel list appears:
Press the T A buttons to highlight the channel, and press the
OK button to add the current channel to the list of Favorite
channels.
Time Zone Allows selection of regional TV systems of USA: Eastern Time/
Indiana/Central time/Mountain Time/Arizona/Pacific Time/Alaska/
Hawaii
47
Page 50

Chapter 3 Using the LCD TV
Customizing the SETUP Settings
O Press the _) button to turn the LCD TV on.
e Press the MENU button on the remote control to display the Main menu, and use the
I_ buttons to select the SETUP.
O
Use the _, Tbuttons to highlight an individual SETUP option, use the 4 I_ buttons to
change the setting, and press the MENU to exit the menu.
• If the signal source is TV,the SETUP MENU • if the signal source isVGA, the SETUPMENU
appears as: appears as:
0
The SETUP menu includes the following options:
OSD Language Selects to display all on-screen menus in your language of choice:
Time Setup Allows to set the current time.
English/French/Spanish
ON :Selects to display the system current time automatically if the
TV antenna is connected.
OFF :Selects to set the current time manually.
O Press the AT buttons to select the Date or Time.
Press the 4_- buttons to move each setting, and use 0-9 keys
to set the current time.
48
Page 51

Chapter 3 Using the LCD TV
Closed Caption
Atlows to select from analog or digital closed caption modes and press
the OK button. The closed caption list appears:
O Analog Closed Caption:
Press the _1_ buttons to select the basic analog closed caption
options Off/CCIICC2/CC3/CC41TIT21T3/T4:
• OO1 /OO2/OO3/OO4:
Display a printed version of the dialog and sound effects of the
program being viewed
• TILT2:
Display station information presented using either half or the whole
screen
• T3/T4:
Extended Data Services. For example: Network name, program
name, program length, etc.
O Digital Closed Caption:
Press the41_buttons to select the digital closed caption options:
Servicel/Service2/Service3/Service4/Service5/Service6/OFF
Note: The setting here will be applied to each DTV channel
O Caption Style:
Press OK button to enter the Digital Caption Style menu and press _1_
buttons to select Custom to customize the settings or As Broad Caster
for digital closed caption option:
49
Page 52

Chapter 3 Using the LCD TV
Parental
The Parental Control can be set up to the TV to block Channel,
Video Source and to change password.
O Use the T button to select the Parental, and press the OK
to display the Parental menu
Use the Program Block function, must enter a four-digit
password. The factory password is 0000
O The Parental list appears:
• Program Block
Allows to setup the TV and MPAA Rating Lock options (refer to
"Using the Program Block Setting").
Channel Block Allows to block digital channels.
O Press the AT buttons to select the channel.
O Press the OK button repeatedly to select BLOCK 1&3or
UNBLOOK r3.
50
Page 53

Chapter 3 Using the LeD TV
• Input Block
Selects to block a Input source signal
O Press the AT buttons to select the input source.
Press the OK button repeatedly to select BLOCK [] or
UNBLOOK r'l.
• Open V-Chip
Selects to block program based on downloadable ratings are
blocked from viewing.(this function is only available in U.S.A.
where the Open V-Chip ratings exist)
O Press the OK button to display the Open V-Chip options.
O Press the • • buttons to select the
downloadable rating system, and press OK
button.
_l Press the OK button repeatedly to select
BLOCK or UNBLOCK.
The Open V-Chip function is automatically downloaded
while watching DTV channels. It may take several
seconds. The rating name( for example: humor level,
intelligence level..etc) and rating level(for example:DH,
MH, H..etc) may differ depending on the information
from broadcasting station.
• Change Password Selects to change your password
Gamma Allows adjustment of the display's gamma correction, which fine tunes
both brightness and red/green/blue ratios: Bright/Middle/Dark.
Reset Default Press the OK button to restore factory settings
51
Page 54

Chapter 3 Using the LCD TV
The Parental block menu includes the following options:
_IIIIIIIIIIIIIIIIIIIIIIIIIIIIIIIIIIIIIIIIIIIIIIIIIIIIIIIIIIIIIIIIIIIIIIIIIIIIIIIIIIIIIIII_IIIIIIIIIIIIIIIIIIIIIIIIIIIIIIIIIIII___ _
U.S. TV Ratings Selects to activate the TV Rating programs.
U.S. Nlovie Ratings Selects to activate the MPAA Rating programs
Canadian English Ratings Selects to activate the English Rating programs of Canada,
Canadian French Ratings Selects to activate the French Rating programs of Canada
Block NIPAA Unrated • YES:
Block all movies that are broadcast without a MPAA rating,
• NO:
Allows all movies that are broadcast without a MPAA rating
BlockTV Unrated • YES:
Block all movies that are broadcast without a TV rating,
• NO:
Allows all movies that are broadcast without a TV rating,
52
Page 55

Chapter 3 Using the LCD TV
The U.S.TV Rating has 2 rating methods: Content-Based Rating and Age-Based Rating.
The U.S.TV Rating includes the following options:
AGE-BASED
RATING DESCRIPTION
TV-Y All children
TV-Y7 Directed to children age 7 and older
TV-G General Audience
TV-PG Parental Guidance suggested
TV-14 Parents strongly cautioned
TV-MA Mature Audience only
CONTENT-BASED
RATING DESCR{PTION
FV Fantasy violence
D Suggestive dialogue
L Strong language
S Sexual situations
V Violence
A All contents are blocked
CONTENT-BASED
....
,, : To block programs by both content and age.
Use the -_11_AT buttons to select the rating you want and press the OK button repeatedly to
select BLOCK [] or UNBLOCKr'I.
53
Page 56

Chapter3UsingtheLCDTV
TheCanadianEnglshRatingsincludesthefollowingoptions:
RATINGDESCRIPTION
G Allchildren
C8+ Children8yearsandolder
G Generalprogramming
PG Parentalguidance
14+ Viewers14andolder
18+ Adultprogramming
Usethe4_-ATbuttonstoselecttheratingyouwantandpresstheOKbuttonrepeatedlyto
selectBLOCK[]orUNBLOOKr'3.
TheCanadianFrenchRatingsincludesthefollowingoptions:
RATINGDESCRIPTION
G Generalprogramming
8arts+ Notrecommendedforagesunder8
13arts+ Notrecommendedforagesunder13
16arts+ Notrecommendedforagesunder16
18arts+ Programmingrestrictedtoadults.
Usethe4_-ATbuttonstoselecttheratingyouwantandpresstheOKbuttonrepeatedlyto
selectBLOCK[]orUNBLOCKr'3.
54
Page 57

Chapter 3 Using the LCD TV
The U.S. Movie Ratings is used for original movies rated by the Motion Picture Association of
America(MPAA) as broadcasted on cable TV and not edited for television.
The U.S. Movie Ratings includes the following options:
RATING DESCRIPTION
G General Audiences. Movie is appropriate for all ages
PG Parental Guidance Suggested. May contain material not suited for younger
viewers
PG-13
Contains content that may not be appropriate for viewers under the age of
13
R Restricted. Contains adult content, no one under 17 admitted without
parent
NC-17 No one 17 and under admitted
X No one 17 and under admitted
Use the _1_ AT buttons to select the rating you want and press the OK button repeatedly to
select BLOCK [] or UNBLOOK r3.
55
Page 58

Chapter3UsingtheLCDTV
TROUBLESHOOTING
O Make sure the power cord is plugged in, then press the '_' button on the remote.
The batteries in the remote control may be exhausted.
Replace the batteries.
O Check the interface cable between TV and antenna/cable TV.
Press the "O" button on the remote.
Press the INPUT button on the remote, then press - T button to select the
connected video.
O Check the interface cable between TV and antenna/cable TV.
Try another channel, the station may have broadcast difficulties.
Adjust the Brightness/Contrast options in the VIDEO ADJUST Menu.
56
Page 59

SPECIFICATIONS
Specifications
26" TFT LCD(measured diagonally)
500 cd/m 2
800:1
1366x768
2
1
2
1
2
1
1
1
1
1
1
AC100~240V, 50/60HZ, 2,2A
150W, standby< 1 W
26,7 w x 22,0 h x 7.9 d inch
27,3 LB
57
Page 60

Specifications
DISPLAY MODE
The screen resolution has been optimized during manufacture for the display modes listed below.
If the signal from the system equals the standard signal mode, the screen is adjusted automatically. If the
signal from the system does not equal the standard signal mode, adjusting the screen resolution by
referring to your video card user guide otherwise there may be no video,
Video signal: (VGA Standard)
Vertical Horizontal
Frequency(Hz) Frequency(kHz)
85 37.9
85 37.9
85 37.9
60 31.5
72 37.9
75 37.5
85 43.3
56 35.1
60 37.9
72 48.1
75 46.9
85 53.7
60 48.4
70 56.5
75 60.0
75 67.5
60 60.0
60 64.0
60 47.7
58
Page 61

CARE AND MAINTENANCE
To prevent fire or shock hazard, disconnect your unit from the AC power source when cleaning. The
finish on the unit may be cleaned with a dust cloth and cared for as other furniture. Use caution when
cleaning and wiping the plastic parts. Mild soap and a soft, damp cloth may be used.
FOR ADDITIONAL SET-UP OR OPERATING ASSISTANCE, PLEASE VISIT OUR
WEBSlTE AT WWW.MEMOREXELECTRONICS.COM OR CONTACT CUSTOMER
SERVICE:
For customers calling within US, call 1-888-636-5238.
For customers calling within Mexico, call 001-866-580-9454.
PLEASE KEEP ALL PACKAGING MATERIAL FOR AT LEAST 90 DAYS IN CASE YOU
NEED TO RETURN THIS PRODUCT TO YOUR PLACE OF PURCHASE OR TO IMATION
ELECTRONIC PRODUCTS.
FOR CONSUMER REPLACEABLE PART(S),SEE PART NUMBER(S)ON PAGE 6 AND
THEN CONTACT FOX INTERNATIONAL AT 1-800-321-6993.
59
Page 62

WEEE
*Este producto contiene materiales el_ctrico o electr6nico. La presencia
de dichos materiales puede resultar nociva para el medioambiente y la
salud si no se desechan adecuadamente. La presencia de esta etiqueta
en el producto implica que no se debe tirar con el resto de la basura,
sino que es necesario desecharlo por separado. Como consurnidor, es
usted responsable de asegurar que este producto se deseche adecua-
damente.
IIRII"
Este TV incorpora la tecnologia de Interfaz Multimedia de Alta Definici6n (HDMITM).
HDMI, el logo de HDMI y la Interfaz Multimedia de Alta Definici6n son marcas comerciales o
marcar comerciales registradas de HDMI Licensing LLC.
BD IDOLBYI Producido bajo licencia de Dolby Laboratories.
D rl G | T A L Dolby y el simbolo de la D doble son marcas comerciales de Dolby
LISTED
_u_to,',qd_*_l_pala_us
46FG
E233207
Laboratories.
This Class B Digital apparatus meets all requirements of the Canadian
Interference Causing Equipment Regulations.
Este aparato Digital Clase B cumple con todos los requisitos de las
Normativas Canadienses para Equipos que Causan Interferencias.
Page 63

CONTENIDO
m Advertencias y Precauciones
Medidas de Seguridad Importantes .................................................................................... 2
m Capitulo 1 Presentacion del TV de LCD
Caracteristicas Principales .......................................................................................... 6
Contenido del Paquete ................................................................................................ 7
Instalando su TV de LCD ............................................................................................. 8
Su TV de LCD ............................................................................................................ 10
Su control remoto ...................................................................................................... 12
m Capitulo 2 Instalacion del TV de LCD
Conectando un Cable de TV o una Antena ............................................................... 18
Conectando un VCR .................................................................................................. 23
Conectando una C&mara de Video o Consola de Juegos ......................................... 24
Conectando un Reproductor de DVD ........................................................................ 25
Conectando un Decodificador Digital para TV por Cable o un Receptor Digital
Satelital ..................................................................................................................... 27
Conectando un Equipo AV con Conector HDMI ........................................................ 28
Conectando un Equipo AV con Conector DVl ........................................................... 29
Conectando una PC .................................................................................................. 30
Conectando un Receptor de Audio o un Sistema de Sonido Dolby Digital 5.1 ......... 31
m Capitulo 3 Uso de las Caracteristicas
Uso del DVD Integrado ............................................................................................... 32
Uso del Dispositivo USB de Almacenamiento y el Lector de Tarjetas SD ............... 36
Visualizacion Panoramica ............................................................................................ 39
Utilizacion de la Guia de Programas .......................................................................... 40
Utilizacion de MenO ..................................................................................................... 41
Personalizacion de las Opciones de VIDEO .............................................................. 43
Personalizacion de las Opciones de AUDIO ............................................................. 45
Personalizacion de las Opciones de TV ...................................................................... 47
Personalizacion de las Opciones de SETUP ............................................................. 48
m Localizaci6n de averias ..........................................................................57
m Especificaci6n .......................................................................................................58
m Modo Visualizaci6n ...........................................................................................59
Page 64

Advertencias y Precauciones
AVISO FCC:
Este dispositivo cumple con la Secci6n 15 de
las Normativas FCC. Su use est& sujeto alas
dos condiciones siguientes: (1) este dispositivo
no puede causar interferencias daSinas, y (2)
este dispositivo debe aceptar cualquier
interferencia recibida, incluyendo interferencias
que puedan causar un funcionamiento no
deseado.
Advertencia: Los cambios o modificaciones a
esta unidad que no hayan side expresamente
aprobados per la parte responsable del
cumplimiento, podrian invalidar la auteridad
del usuario para usar el equipo.
NOTA: Este equipo ha side probado y se ha
comprobado que cumple con los limites para
un dispositivo digital Clase B, de acuerdo con
la Seccion 15 de las Normativas FCC. Estos
limites est&n diseSados para proporcionar una
_rotecci6n razonable contra interferencias
dafiinas en una instalacion residencial. Este
equipo genera, usa y puede irradiar energia en
frecuencias de radio y, si no es instalado y
usado siguiendo las instrucciones, puede
causar interferencias daSinas para las
comunicaciones de radio.
Sin embargo, no hay garantias de que las
interferencias no ocurran en una instalacion en
3articular. Si este equipo causa interferencias
dafiinas para la recepcion de radio o television,
Io cual puede determinarse encendiendo y
apagando el equipo, se anima al usuario a
intentar corregir las interferencias usando uno
o mas de estos metodos:
• Reorientar o recolocar la antena receptora.
• Aumentar la separacion entre el equipo y el
receptor.
• Conectar el equipo a una toma de un circuito
diferente al que este conectado el receptor.
• Consulte con el vendedor o con un tecnico
de radiolTV experimentado para obtener
ayuda.
ADVERTENClA:
PARAREDUCIR EL RIESGO DE FUEGO O
DESCARGA ELECTRICA, NO EXPONGA
ESTE PRODUCTO A LA LLUVIA O LA
HUMEDAD.
ADVERTENClA:
PARAREDUCIR EL RIESGO DE FUEGO O
DESCARGA ELECTRICA, Y DE
INTERFERENCIAS MOLESTAS, USE
0NICAMENTE LOS ACCESORIOS
RECOMENDADOS.
PROTECTORES CONTRA
SOBRETENSIONES:
Se recomienda usar un protector contra
sobretensiones para una conexion CA. Los
rel&mpagos y las sobretensiones NO est&n
cubiertos per la garantia de este producto.
ATENCION:
PARA EVITAR DESCARGAS ELECTRICAS,
INTRODUZCA LA CLAVIJA M/kS ANCHA DEL
ENCHUFE DENTRO DE LA RANURA
CORRESPONDIENTE DE LA TOMAY
PRESIONE HASTA EL FONDO.
ADVERTENClA FCC:
Para asegurar un cumplimiento continuado,
siga las instrucciones de instalacion adjuntas y
use Qnicamente cables blindados al conectar a
otros dispositivos. Las modificaciones no
autorizadas per el fabricante podrian invalidar
la autoridad del usuario para usar este
dispositivo.
Este aparato digital Clase B cumple con el
ICES-003 Canadiense.
Este aparato digital Clase B cumple con la
normativa NMB-003 Canadiense.
Este TV es capaz de recibir programacion
digital descodificada tanto para cable come
para una antena UHF/VHF externa (ATSC) y
tambien programas NTSC (cable y antena
UHF/VHF externa).
Page 65

Advertencias y Precauciones
El simbolo de relampago con punta de flecha
I PRECAUClON I
PRECAUCION: PARA REDUCIR EL RIESGO DE DESCARGAS ELECTRICAS,
NO EXTRAIGA LA TAPA (O PARTE POSTERIOR). NO HAY PARTES
REPARABLES POR EL USUARIO EN EL INTERIOR CONTACTE CON
PERSONAL DE MANTENIMIENTO CUALIFICADO PARA REALIZAR
LAS REPARACIONES.
(Esta Marca de Precauci6n y Etiqueta de Clasificaci6n esta situada en la cubierta
posterior de la unidad).
ADVERTENCIA: PARA REDUCIR EL RIESGO DE FUEGO O DESCARGA ELECTRICA. NO EXPONGA ESTE APARATO A LA LLUVIA O LA
HUMEDAD PARA PREVENIR DESCARGAS ELECTRICAS, INTRODUZCA COMPLETAMENTE LA CLAVIJA ANCHA DEL ENCHUFE EN LA
RANURA ANCHA.
funci6n alertar al usuario de la presencia de
un voltaje peligroso sin aislamiento dentro de
dentro de ur_ tr{angulo equil&tero tiene como
la caja del producto, que puede ser de suficiente
magnitud como para constituir un riesgo de
descargas electricas para las personas
El put,to de exclamacJdn dentro de un triangulo
equilatero tJene como funci6n alertar al usuar{o
de la presencia de instrucciones de uso y
mantenimiento (reparacidn) importantes en la
documentaci6n que acompa_a al dispositivo.
Antes de usar la unidad, aseg0rese de leer detenidamente todas las instrucciones de uso. Pot favor,
tenga en cuenta que estas son precauciones generales y puede que no correspondan a su unidad.
Pot ejemplo, puede que esta unidad no tenga capacidad para conectarse a una antena extema.
1. LEASE LAS INSTRUCClONES
Se deben leer todas las instrucciones de seguridad y uso antes de usar el producto.
2. GUARDE LAS INSTRUCClONES
Deben guardarse las instrucciones de seguridad y uso para futuras consultas.
3. PRESTE ATENClON A LAS ADVERTENClAS
Deben seguirse todas las advertencias del producto y de las instrucciones de uso.
4. SIGA LAS INSTRUCClONES
Deben seguirse todas las instrucciones de operacion y uso.
5. LIMPIEZA
Desenchufe este producto de la toma de corriente antes de limpiarlo. No use limpiadores
liquidos ni en aerosol. Use un paso seco para la limpieza.
6. DISPOSlTIVOS CONECTADOS
No use dispositivos no recomendados por el fabricante del producto, ya que podrian causar
algQn peligro.
7. AGUAY HUMEDAD
No use este producto cerca de agua - por ejemplo: cerca de una baSera, lavabo, fregadero o
lavadero; en un sotano h0medo; o cerca de una piscina.
8. ACCESORIOS _'°'_°'°P'°_......... _.......
ADWRTENClApARACARRITOSPORTA'r_LES
No ponga este producto sobre un carrito, soporte, tripode, montaje o
mesa inestable. El producto puede caer, causando heridas graves y
daSos graves al producto. 0selo 0nicamente con un carrito, soporte,
tripode, montaje o mesa recomendado por el fabricante o vendido
junto con el producto. Cualquier montaje del producto debe seguir ......
las instrucciones del fabricante, y debe usar un accesorio de montaje recomendado por el
fabricante. 8A. Una combinaci6n de carrito y aparato debe ser movida con cuidado. Los frenazos
bruscos, una fuerza excesiva y las superficies desiguales pueden hacer que vuelque la
combinaci6n de carrito y aparato.
9. VENTILACION
Las ranuras y aberturas de la caja en la parte posterior o inferior se proporcionan para la
ventilaci6n, para asegurar una operaci6n fiable del producto y para protegerlo del
sobrecalentamiento. Estas aberturas no deben ser bloqueadas ni cubiertas. Las aberturas no
deben ser bloqueadas poniendo el producto sobre una cama, sof& alfombra ni ninguna
superficie parecida. Este producto nunca debe situarse cerca de o sobre un radiador o fuente de
calor. Este producto no debe situarse en una instalaci6n integrada, como una estanteria o
bastidor, a menos que se proporcione una ventilaci6n apropiada o que se sigan las instrucciones
del fabricante.
Page 66

Advertencias y Precauciones
10.FUENTES DE ENERGiA
Este producto deberia ser usado solo con el tipo de fuente de alimentacion indicada en la
etiqueta de referencia. Si no esta seguro del tipo de fuente de alimentacion de su hogar, consulte
con el vendedor de su aparato o con la compaSia energetica local. En cuanto a productos que
esten pensados para funcionar con energia de baterias o de otras fuentes, consulte con las
instrucciones de uso.
11.TOMA DE TIERRA O POLARIZAClON
Este producto esta equipado con un enchufe de linea de corriente alterna polarizado (un enchufe
que tiene una clavija mas ancha que la otra). Este enchufe encajar& en la toma de corriente en
un solo sentido. Esto es una caracteristica de seguridad. Si no puede insertar el enchufe
completamente en la toma, intentelo d&ndole la vuelta al enchufe. Si el enchufe todavia no
encaja, pongase en contacto con su electricista para sustituir la toma obsoleta. No anule el
objetivo de seguridad del enchufe polarizado.
12.PROTECCION DEL CABLE DE ALIMENTAClON
Los cables de alimentacion deben estar dispuestos de forma que no sea probable que sean
pisados o doblados por elementos situados sobre o contra ellos, prestando especial atencion a
los cables cerca de los enchufes, tomas de corriente, yen el punto en el que salen del aparato.
13.REL_,M PAGOS
Para proteger su producto de una tormenta electrica, o cuando se deja sin atender y sin usar
durante largos periodos de tiempo, desenchQfelo de la toma de pared y desconecte el sistema
de antena o cable. Esto prevendra daSos al producto debido a rel&mpagos y sobretensiones en
la linea electrica.
14.LiNEAS ELECTRICAS
Un sistema de antena extema no deberia ser situado cerca de lineas electricas u otras luces
electricas o circuitos de alimentacion situados sobre ella, o en un lugar donde pueda caer sobre
tales lineas o circuitos electricos. AI instalar un sistema de antena externa, debe tenerse especial
cuidado de evitar tocar a tales lineas o circuitos electricos, ya que el contacto con ellos podria
resultar fatal.
15.SOBRECARGA
No sobrecargue las tomas de corriente y cables de prolongacion, ya que esto podria resultar en
un riesgo de fuego o descarga electrica.
16.ENTRADA DE OBJETOS Y LiQUIDOS
No introduzca nunca objetos de ningQn tipo en este producto a traves de las aberturas, ya que
podrian tocar puntos de voltaje peligrosos o cortocircuitar piezas, pudiendo provocar fuegos o
descargas electricas. No derrame ni rocie nunca ningQn tipo de liquido sobre el producto.
17.TOMA DE TIERRA DE LAANTENA EXTERNA
Si hay una antena extema conectada al producto,
asegQrese de que el sistema de la antena tiene
toma de tierra, de forma que proporcione alguna
proteccion contra sobretensiones y cargas
est&ticas acumuladas. La seccion 810 del Codigo
Electrico Nacional, ANSI/NFPA 70, proporciona
informacion con respecto a la toma de tierra
apropiada para el m&stil y la estructura de soporte,
la toma de tierra del cable de entrada a un
producto de descarga de la antena, el tamaSo
de los conductores de toma de tierra, la
Iocalizaci6n del producto de descarga de la
antena, la conexion a los electrodos de toma CODtGOELECTRICONACIONAL
S2898A
EJEMPLO DE TOMA DE TIERRA DE ANTENA SEGON EL
de tierra y los requisitos para los electrodos de la toma de tierra.
Page 67

Advertencias y Precauciones
18.REPARACIONES
No intente reparar el producto usted mismo, ya que abrir o extraer las tapas podria dejarle
expuesto a voltajes peligrosos u otros peligros. Deje cualquier reparacion en manos de personal
de servicio cualificado.
19.PIEZAS DE RECAMBIO
Cuando sean necesarias piezas de recambio, asegQrese de que el tecnico de reparaciones usa
piezas de recambio especificadas por el fabricante u otras que tengan las mismas caracteristicas
que la pieza original. Las sustituciones no autorizadas podrian provocar fuego, descargas
electricas u otros peligros.
20.COMPROBACION DE SEGURIDAD
Tras la finalizacion de cualquier servicio o reparacion a este producto, pidale al tecnico que
realice comprobaciones de seguridad para determinar si el producto esta en condiciones de
funcionamiento adecuadas.
21 .MONTAJE EN PARED O TECHO
El producto deberia montarse en una pared o techo solo si Io recomienda el fabricante.
22.DANOS QUE REQUIEREN REPARAClONES
Desenchufe el producto de la toma de pared y pida a personal de servicio cualificado que realice
las reparaciones cuando se den las siguientes circunstancias:
a. Cuando el cable o enchufe de alimentacion este da_ado.
b. Si se ha derramado liquido o han caido objetos dentro del producto.
c. Si el producto ha quedado expuesto a Iluvia o agua.
d. Si el producto no funciona normalmente siguiendo las instrucciones de uso. Ajuste solo
aquellos controles que tratados en las instrucciones de uso, ya que un ajuste de otros controles
podria resultar en daSos y podrian requerir un extenso trabajo por parte de un tecnico cualificado
para restablecer el funcionamiento normal del producto.
e.Si el producto ha caido o la caja ha sido daSada.
f.Cuando el producto muestra un cambio distintivo en su funcionamiento- esto indica que
necesita ser reparado.
23.CALOR
El producto deberia estar situado lejos de cualquier fuente de calor, como radiadores, rejillas de
calefaccion, estufas u otros productos (incluyendo amplificadores) que produzcan calor.
24.NOTA PARA EL INSTALADOR DEL SlSTEMA CATV
Este recordatorio se incluye para Ilamar la atencion del instalador del sistema CATV sobre el
Articulo 820-40 del NEC, que proporciona directrices para una toma de tierra adecuada y, en
particular, especifica que la toma de tierra del cable deber& estar conectada al sistema de toma
de tierra del edificio, tan cerca como sea posible del punto de entrada del cable.
Page 68

Capitulo I Presentaci6n de la TV LCD
Capitulo 1
Presentacion del TV de LCD
Caracteristicas Principales
Diversos terminales de Audio/Video para conexion del equipo externo
2 juegos de terminales de entrada A/V compuestos
1 juego de terminales de S-VIDEO
2 juegos de terminales de entrada de Video componente
1 terminal de entrada VGA/Audio
2 terminal de entrada HDMI/Audio
1 juego de terminales de salida Audio/L/R)
2 terminales de salida SPDIF (Optico x 1 / Coaxial x 1)
1 terminal para audifonos
Reproductor DVD tipo Ranura Integrado
• Permite la compatibflidad con DVD/CD/CD-R/CD-RW/JPEG/KODAK PICTURE CD/
DVD+R/RW/DVD-R/RW.
Lector de Tarjetas SD/MMC Integrado
• Permite el acceso al contenido digital almacenado en una tarjeta SD/MMC.
Conector USB Integrado
Sintonizador de TV integrado para recibir HD ATSC
• Esta funci6n permite la recepci6n de transmisi6n HD sin aSadir un decodificador
Interfaz Multimedia de Alta Definici6n (HDMI)
• El Interfaz Multimedia de Alta Definici6n (HDMI) es un interconector pequeSo, facil de
usar que puede transportar hasta 5 Gbps de video y audio combinados en un solo
cable. Este sistema elimina el costo, la complejidad y la confusi6n de cables multiples
usados para conectar los sistemas A/V actuales.
Entradas de Video Componentes HDTV
• Ofrece la mejor calidad de video para DVD (720p,HD1080i,1080p) y conexiones
digitales para el decodificador (720p,H D 1080i, 1080p).
Reducci6n del Ruido Digital en 3D
• Esta funci6n puede reducir el ruido de la imagen de manera digital para proveer una
mejor calidad de imagen.
Deteccion del Modo Pelicula (3:2 Reverse Pull down)
• Esta funci6n puede detectar autom&ticamente el contenido derivado de la pelicula y
ajustar el marco del entrelazado coincidente para brindar una apariencia mas natural,
y una imagen m&s clara de la imagen en movimiento.
Page 69

Capitulo 1 Presentacion de la TV LCD
Contenido del Paquete
S'assurer que tousles contenu suivants sont inclus.
[] LCD TV [] Parante inferior 154-700-BF269RH /
Destornillador y 4 Tornillos
101-025-5013H
P
[] Control Remoto [] Cable ViDEO
845-D47-BT1 DVDB-MEH 621-181-2000JH
[] Cable de Alimentacion [] Carta de Garantia [] Manual del Usuario
600-181-3200-LIH
Cable de AUDIO
621-181-60002JH
D
[] Guia de Inicio Veloz
*Pieza reemplazable por el consumidor
(consulte la pagina 60 para ordenar)
Estos articulos son todo Io que necesita para instalar y operar el TV de LCD en su
configuracion basica.
Page 70

CapituloIPresentaci6ndelaTVLCD
Instalacion de su TV de LCD
Lea todas las instrucciones antes de continuar con la instalaci6n del parante.
a. Levante el material de embalaje de espuma de la parte superior del LCD fuera de la caja.
b. Levante el LCD fuera de la caja, con el material de embalaje de espuma de la parte
inferior ann sujeto y coloquelo sobre una superficie estable.
O •
Soporte
c. Retire la bolsa protectora de la unidad de LCD, pero NO retire el material de embalaje de
espuma de la parte inferior del TV.
d. Ubique el lugar en la parte posterior del TV para fijar el parante. Asegure el parante al LCD
con los Cuatro tornillos.
Caja de Envio
Boisa de Protecci6n
O Unidad
O
tornitlos
Mesas
Soporte
Unidad
Mesas
Page 71

Capitulo 1 Presentaci6n de la TV LCD
Si prefiere montar su nuevo televisor en una pared en lugar de fijarlo en el soporte o base,
consulte las instrucciones que se incluyen en el kit de montaje en pared (se vende por separado).
@
Para evitar daSos en la superficie del televisor LCD, sitQelo sobre un paso suave.
\
@
Retire los tornillos del soporte de la mesa y separe el soporte de la mesa del televisor.
_ PaSo suave
O
Alinee los agujeros en las unidades de gancho de fijacion en la pared con los agujeros
correspondientes de la parte posterior del televisor y apriete los cuatro tornillos.
PaSo suave
po_e de mesa
So
4 tornillos (suministrados
con el kit de montaje en
pared)
Unidad de gancho de
montaje en pared
(suministrada con el kit
de montaje en pared)
PaSo suave
Page 72

Capitulo I Presentaci6n de la TV LCD
c N i
@
Utilice un cable antena (no incluido) para conectar la seSal VHF/UHF a la terminal ANT. del
televisor LCD (consulte la pagina 18-22).
@
Conecte el cable de alimentacion de CA en la parte posterior del TV y conecte el cable de
corriente a la salida de la pared.
O
Inserte 2 baterias suministradas en el control remoto(de baterias no incluido).
Paso1 Deslice la tapa posterior para abrir el
compartimento de baterias del control ,"_
remoto.
Paso2 Inserte dos baterias de tamaSo
AAA. AsegOrese de que
coinciden los extremos (+) y (-)
de las baterias con los extremos
(+) y (-) indicados en el
compartimento de bateria.
Vuelva a colocar la tapa en su
lugar.
O Conecte otto dispositivo AV externo (ver p&ginas 23-31 ).
10
Page 73

Su TV de LCD
Capitulo 1 Presentaci6n de la TV LCD
LED
La luz LED es roja cuando el TV LCD esta en standby y
la luz LED es azul cuando esta encendido.
IR
Receptor de
Infrarrojos
VOLUME
®
CHANNEL
®
MENU
INPUT
Ajusta el volumen. Selecciona el primer elemento del
ment3 principal y cambia los valores de los elementso
en el modo OSD.
Explora los canales. Selecciona un submen0 en el
modo OSD.
Pulse una vez este bot6n para abrir el OSD (men0
en pantalla). POlselo de nuevo para cerrarlo
Selecciona entre las distintas seSales de entrada.
e)
Enciende la TV LCD y la pasa al modo suspensi6n.
11
Page 74

Capitulo I Presentaci6n de la TV LCD
Conxi6n para conectores de
salida de Video y Sonido en
equipos de video extemos.
Conexi6n de auricutares
extemos para escucha
privada.
Permite et acceso a contenidos digitales en un
dispositivo de almacenamiento USB: AVl/
JPEG/WMA (Hasta 4GB)
f
Permite et acceso a contenidos digitales
atmacenados en una tarjeta SD/MMC: AVI/
JPEG/WMA (Hasta 4GB)
REPRODUCIR/PAUSA
\
EXPULSAR
Puede reproducirse cualquiera de tos
siguientes tipos de disco en el reproductor
DVD: DVDICDICD-RICD-RWIJPEGIKODAK
PICTURE CDIDVD+RIRWIDVD-RIRW
12
Page 75

Capitulo 1 Presentaci6n de la TV LCD
.____ VIDEO2 IN
Conecta a los conectores de salida de VIDEO compuesto yAUDIO (L/R) de equipos de video
externos.
Conecta el equipo AV totatmente digital con el conector HDMI. La HDMI permite
disfrutar de un video mejorado, de atta definici6n, y un audio digital de dos canates.
F DMII/HDMI2 IN
Et AUDIO (L/R) de HDMI IN es para ta conexi6n de DVI.
S-VIDEO IN
Conecta a los conectores de salida de S-VIDEO y AUDIO (L/R) de
equipos de video externos.
Conecta el PC u otro equipo audiovisual con conectores
_ C/VGA IN
de salida VGA y AUDIO (L/R).
I
PC/VGA _N
YPbP_I _N
®#..........
L R L R
VIDEO AUDIO S-VIDEO L AUDtO R L R
VIDEO2 IN I S-VIDEO IN
YPbPrl IN/YPbPr2 IN
Conecta at reproductor de DVD, receptor digitat u otro equipo audiovisual
con video por componentes (YPbPr) y conectores de salida de audio.
AUDIO OUT-STEREO
Conecta a los conectores de entrada de AUDIO (L/R) de equipos
audiovisuates.
_ AUDIO OUT-DIGITAL-OPTICAL/COAXIAL
Se conecta a la clavija DIGITAL AUDIO en et sistema de audio
digital/estSndar 5.1.
YPbPr2 IN
l
D_GITAL
OPTICAL
COAXIAL
@
HDTV/TV
AirlCab_e
®
VHFIt IF IN
AIR/CABLE IN
Conecta ta entrada de RF de una antena VHF/UHF o
cable para recibir televisi6n estandar o de alta definici6n.
ACIN
Conecta at cable de alimentaci6n de CA.
13
Page 76

CapituloIPresentaci6ndelaTVLCD
Su Control Remoto
@ (_) Enciende y apaga el TV LCD
@ I_ Pulsando una vez se silencia el audio.
0-9 Pulsando un nOmero, se selecciona un canal.
O BAOK Vuelve al canal seleccionado anteriormente
O OH+- Sube o baja el canal seleccionado
............................................................................................................................................................................................
O VOL+- Aumenta o disminuye el volumen
SLEEP Se mueve a traves de los tiempos de
Oil Los botones de funci6n DVD/USB/SD/MMC
_4 _ _ _1incorporados
O OPEN/CLOSESale del Menu OSD
EXIT
@MENU Muestra el menu OSD la pantalla
_i_ _ A_,OK Se mueve a traves de las opciones
_INFO Muestra informaci6n en la pantalla del TV
INPUT Pulse INPUT (Entrada) para mostrar una lista
Pulsandode nuevo se restablece el audio
individuales del menu
Tras la selecci6n, el canal se activa
automaticamente en 3 segundos.
suspensi6n del TV LCD:
APAGADO/10/20130/40/50160/901120 minutos
[]
en
selecciona elementos individuales del menU.
OK (Aceptar) confirma las configuraciones de
la opci6n
LCD, como la fuente de entrada, el canal o el
titulo del programa.
de las fuentes. Use • • para seleccionar el
equipo de video conectado alas entradas de
video de su TV LCD. Pulse OK (Aceptar) para
confirmar.
Y
14
Page 77

Capitulo 1 Presentaci6n de la TV LCD
_1 FAV.CH CH muestra los canales
_ICC Se traves de los de subtitulos:tipos
(Canales Favorites)
favoritos.
mueve a
- Subtitulos Anal6gicos: APAGADO (CC1)/
CC2/CC3/CC4iTextol/Texto2/Texto3/Texto4
-Subtitulos Digitales:
Permite configurar los subtitulos digitales
_1 CH.LIST En el modo CH LIST deTV, pulse (Lista
Canales) para mostrar la lista de canales.
Pulse los botones • • para seleccionar el
canal y pulse OK (Aceptar) para confirmar.
_I P.SlZE Se mueve a traves de las configuraciones de
modo Ancho: NORMAL/FULL (Complete)/
WIDE (Ancho)/ZOOM
_1 FREEZE Pulse Freeze (Congelar) para congelar la
imagen actuaI. Pt31selo de nuevo para
restabiecer la imagen.
en
_1 TIMER Muestra la hora actual la
_) GUIDE En modo TV, pulsar GUIDE (Guia) muestra la
_) P.MODE Selecciona el mode de imagen: Vivid (Vivido)/
Guia de Programas en la pantalla.
Hi-Bright(Muy BdIlante)/Cinema(Cine)/
pantaila.
Sport(Deportes)/User (Usuado)
) S.MODE Seleccione las opciones de efectos de sonido:
Surround (Envolvente)/Live (En Directo)/
Dance (Baile)/Techno (Tecno) / Classic
(Clasica)/Soft (Suave)/Rock / Pop / Off
(Apagado)
)DVD MENU Los botones de funci6n de DVD/USB
incorporados.
15
Page 78

Capitulo I Presentaci6n de la TV LCD
Pulse el bot6n de TV una vez para activar los botones de control del DVD incorporado. Las
siguientes funciones est&n preconfiguradas para usar el DVD incorporado. Para mas informaci6n
sobre la configuraci6n de su DVD, por favor, consulte la secci6n "Usar el DVD incorporado".
iiiiiiiiiiiiiiiiiiiiiiii_i_i_i_................................................................................................................................................................_ii_i_ _ii_iiiiiiiiiiiiiiiiiiiiiiiiiiiiiiiiiiiiiiiiiiiiiiiiiiiiiiiiii_
wO I_ Pulsando una vez, se silencia el audio.
Pulsando de nuevo, se restablece el audio.
VOL+- Aumenta y disminuye el volumen.
O _ _ Pulse este bot6n durante la reproducci6n para
saltar al capitulo o pista siguiente/anterior.
O _ Q Pulsar este bot6n durante la reproducci6n
hace avanzar/retroceder la reproducci6n; la
velocidad aumenta con cada pulsaci6n:
2x/4x/8x/16x/32x
O _ Pulse este bot6n una vez durante la
reproducci6n para pausar. PQIselo de nuevo
para restablecer la reproducci6n.
O Q Reproducci6n normal.
@ _ Pulse este bot6n durante la reproducci6n para
detener la reproducci6n.
O OPEN/CLOSEPulse este bot6n abrir el disco.para
EXIT Sale del menL_OSD.
_i _ J,_',OK Se mueve a traves de las opciones de la OSD
del DVD Incorporado y selecciona elementos
o cerrar
individuales del menO. OK (Aceptar) confirma
las configuraciones de las opciones.
INFO Muestra la informaci6n actual laenpantalla
durante la reproducci6n.
P.SlZE Se mueve a traves de las configuraciones de
............................................................................................................................................................................................
modo Ancho: NORMAL/FULL (Complete)/
WIDE (Ancho)/ZOOM
GUIDE Muestra el MenO de Configuraci6n del DVD
Incorporado en la pantalla.
DVDMENU Pulse mostrar el menO de disco DVD.para
un
16
Page 79

Capitulo 1 Presentaci6n de la TV LCD
Pulse el boton de TV una vez para activar los botones de control del USB y el Lector de Tarjetas
SD/MMC Incorporados. Las siguientes funciones est&n preconfiguradas para usar el archivo JPEG
dentro del Almacenamiento USB o la Tarjeta SD/MMC: Para mas informaci6n sobre la
configuracion de su almacenamiento USB y lector de tarjetas, por favor, consulte la seccion Usar
el Almacenamiento USB y el Lector de Tarjetas SD/MMC.
Q I_ Pulsar una vez silencia el audio Pulsar de
nuevo restablece el audio.
VOL+- Aumenta o disminuye el volumen.
O _ _ Pulse para ira la imagen siguiente o
anterior.
O _ Pulse para mostrar el album de miniaturas.
_ Mientras esta activada la presentaci6n de
diapositivas, pulse este bot6n una vez para
pausar la reproducci6n. PWselo de nuevo para
restablecer la reproducci6n.
O _ Reproduccidn normal
_AT,OK
@_1 . En FILE MENU (Men0 de Archivos) y el
album de miniaturas, pulse estos botones para
mover la barra resaltada a un archivo. Luego
pulse OK (Aceptar) para confirmar el archivo
seleccionado.
•" Mientras se muestra una imagen, pulse para
rotar la imagen 90 grados en el sentido de las
agujas del reloj o en sentido inverso.
_' _', Mientras se muestra una imagen, pulse para
invertir la imagen.
O RSlZE Se mueve a traves de las configuraciones de
modo Ancho:NORMAL/FULL (Completo)/
WIDE (Ancho)/ZOOM
O DVDMENU Pulse para mostrar FILE MENU
(MenL_de Archivos)
17
Page 80

Capitulo 2 Instalaci6n de su TV LCD
Capitulo 2
Instalacion del TV de LCD
Vea el manual de usuario de cualquier equipo externo que vaya a ser conectado.
Cuando conecte cualquier equipo externo, no conecte ningQn cable de alimentaci6n de CA a
salidas de la pared hasta que todas las dem&s conexiones se hayan completado.
Conectando un Cable de TV o una Antena
Los requerimientos de la antena para una buena recepci6n de la TV a colores son mas importantes
que para una recepci6n de TV en blanco y negro. Por tal motivo, es totalmente recomendado tener
una antena extema de buena calidad.
Lo que sigue a continuaci6n a una breve explicaci6n del tipo de conexi6n que se suministra con los
diversos sistemas de antenas.
Conector de Tipo F
Cable coaxial (redondo) de 75 ohms
Cable de linea doble (piano) de 300 ohms
18
Page 81

Capitulo 2 Instalacion de su TV LCD
Use uno de los siguientes diagramas cuando conecte una antena externa.
A: Muestra como usar una antena externa de combinacion VHF/UHF.
B: Muestra como usar una antena externa con VHF y/o UHF separados.
A. Combinacion de antena VHF/UHF
Antena
VHF/UHF
Adaptador 300/75 ohmios
(no suministrado) _1-_ntena
Par de cable r}
de 300 ohmios i
B. Antenas VHF y/o UHF separadas
cI I VHF/UHF
Cable coaxial
de 75 ohmios
__naC°mbinad°_d '_
I
19
U_tFna
Page 82

Capitulo 2 Instalacion de su TV LCD
Este recordatorio es proporcionado para Ilamar la atenci6n al instalador sobre el sistema de
CATV en relacion al Articulo 820-40 de la Norma de Electricidad Nacional (NEC) que brinda las
pautas para la correcta puesta a tierra y, en particular, especifica que el cable a tierra debe
conectarse al sistema de puesta a tierra del edificio con precisi6n, o tan cerca como sea posible
al punto de la entrada de cable. El uso de este TV para otras actividades que no sea la vista
privada de programas transmitidos por UHF, VHF o por las compaSias de cable para uso del
pQblico en general, puede requerir una autorizacion de la compa_ia de transmision/cable y/o del
dueSo del programa.
Algunas compaSias de TV por cable ofrecen canales de pago
Premium. Ya que las seRales de esfos canales de pago Premium esf&n
codificadas, generalmente la compahia de TV por cable incluye un
codificador/decodificador para el suscriptor.
Este codificador/decodificador es necesario para la vista normal de los canales codificados.
(Instale su TV al canal 3 6 4; generalmente se usa uno de estos canales Si esto lees
desconocido, consulte con su compaSia de TV por cable).
Para mayores instrucciones especificas sobre la instalacion de TV por cable, consulte con su
compaSia de TV por cable.
Un metodo posible de conectar el codificador/decodificador proporcionado por su compaSia de
TV por cable, se muestra en el diagrama que sigue a continuacion.
Conmutador RF
(no suministrado)
ENTRADA
VHF/UHF
_ Divisor de 2
Convertidor/
decodificador de TV por
cab e no sum n strado) J
20
se_ates (no
sum ns trado) ==""u
Linea de TV
pot cable
Page 83

Capitulo 2 Instalaci6n de su TV LCD
@
Use un cable de antena incluido para conectar la sei_al de TV al terminal de TV por CABLE
del TV de LCD.
@
Conecte el cable de alimentacion de CA en la parte posterior del TV y conecte el cable de
alimentaci6n a la salida de la pared.
Este televisor esta equipado con un fusible de seguridad. En caso de tormentas electricas o
cortes de electricidad, el fusible de seguridad esta dise_ado para proteger su televisor. Si el
televisor no se enciende, compruebe el estado del fusible quitando la tapa, siguiendo la
ilustraci6n a continuaci6n.
Si el fusible esta fundido, visite una ferreteria y pida un fusible temporizado (acci6n lenta)
de 4A 250V - 5x20mm para cambiarlo.
Herramienta de Apertura de Pl_stico Sblidc
(una herramienta metalica puede prov(
una electrocuci6n) 4A 250V
Parte Trasera Fusible
del TV
O Presione el boton _ en el control remoto para encender el TV de LCD.
21
5x20mm
Page 84

Capitulo 2 Instalacion de su TV LCD
O Presione el bot6n INPUT en el control remoto para mostrar la Lista de Fuentes de
Entrada. Use los botones • • para seleccionar TV y presione el bot6n OK.
O
Presione el boton MEN0 en el control remote para mostrar el MenO Principal, y use
los botones • I_ para seleccionar el TV.
O
Presione el boton • para seleccionar Channel Scan, y presione el boton OK.
Channel Scan crea autom&ticamente una lista de canales de recepcion. Presione el
boton MEN0 en cualquier momento para interrumpir el proceso de memorizacion (la lista
no puede crearse si se interrumpe).
Status: Scanning ..... Cable |
Analog Channels: 25
I l 4_/o
J
0
Presione el boton OK para mostrar la lista de canales de recepcion. Luego presione • •
para seleccionar un canal y presione nuevamente el boton OK para mostrar el detalle del
canal•
22
Page 85

Conectando un VCR
Capitulo 2 Instalaci6n de su TV LCD
Parte Posterior del TV
Cable de AUDIO
Cable S-VIDEO
Cable AV
VCR
O
MI_TODO A:
Use un cable cempueste para eenectar las clavijas de video/audio eempuestas del
VCR a las elavijas de VIDEO IN2 del "iV de LCD.
MI_TODO B:
Use un cable de audio para conectar las clavijas de salida de audio del VCR alas
entradas de audio del TV de LCD. Use un cable de S-Video para conectar la clavija de
salida de S-VIDEO del VCR a la clavija de entrada de S-VIDEO IN del TV de LCD.
0
Conecte todas las fuentes de alimentaci6n de CA, antes de encender el interruptor del
TV de LCD u otro equipo conectado.
0
Presione el botbn (._ en el control remoto para encender el TV de LCD.
0
Para mirar el videocasete oprima el botbn de ENTRADA (INPUT) en el control remoto.
Luego utilice los botones • o • del control remoto para seleccionar VIDEO2 (Metodo
A), o VIDEO3 (METODO B), luego oprima OK.
!
23
Page 86

Capitulo 2 Instalaci6n de su TV LCD
Conectando una C&mara de Video o Consola de Juegos
Lade
Derecho
@
Parte Posterior del TV
Cable de AUDIO
Cable S-ViDEO
ConsoladeJuegos
0
Cable AV
METODO A: O
Use un cable compuesto para conectar las clavijas de video/audio compuestas de la
videocamara o la consola de juegos a las clavijas de VIDEO 1IN o VIDEO2tN del TV
de LCD.
Camara
METODO B:
Use un cable de audio para conectar las clavijas de salida de audio de la videocamara
o la consola de juegos a las entradas de audio del TV de LCD. Use un
cable de S-Video para conectar la clavija de salida de S-VIDEO de la videoc&mara o
la consola de juegos a la clavija de entrada de S-VIDEO IN del TV de LCD.
@
Conecte todas las fuentes de alimentaci6n de CA, antes de encender el interruptor del
TV de LCD u otro equipo conectado.
0
Presione el bot6n (_ en el control remoto para encender el TV de LCD.
0
Para mirar un video a traves de una c&mara o consola de videojuego oprima el bot6n
de ENTRADA (INPUT) en el control remoto. Luego utilice los botones • o • del
control remoto para seleccionar VIDEO2/VIDEO1 (Metodo A), o VIDEO3 (METODO
B), luego oprima OK.
24
Page 87

Conectando un Reproductor de DVD
Parte Posterior del TV
®oo ,¢¢®uoo
Capitulo 2 Instalaci6n de su TV LCD
Cable AUDIOICOMPONENT
I _ Cable de AUDIO
Cable AV
Cable HDMI
@
MI_TODO A: Reproductor de DVD
Use un cable compuesto para conectar las clavijas de video/audio compuestas del
reproductor de DVD alas clavijas de VIDEO 2IN del TV de LCD.
METODO B:
Use un cable de audio para conectar las clavijas de salida de audio del reproductor de
DVD alas entradas de audio del TV de LCD. Use un cable de S-Video para conectar
la clavija de salida de S-VIDEO del reproductor de DVD a la clavija de entrada de S-
VIDEO IN del TV de LCD.
MI_TODO C:
Use un cable del componente para conectar las clavijas de salida del componente del
reproductor de DVD alas clavijas de entrada YPbPrl IN 6 YPbPr2 del TV de LCD. Use
un cable de audio para conectar las clavijas de audio del componente del reproductor
de DVD a las clavijas de entrada de audio del TV de LCD.
MI_TODO D:
Use un cable HDMI para conectar las clavijas de salida HDMI del receptordel DVD de
TV por cable alas tomas de entrada HDMI 1 IN o HDMI 2 IN del TV LCD.
Cable S-VIDEO
25
Page 88

Capitulo2Instalaci6ndesuTVLCD
O Conectetodaslasfuentesdealimentaci6ndeCA,antesdeencender el interruptor del
TV de LCD u otto equipo conectado.
Presione el bot6n _ en el control remoto para encender el TV de LCD.
Para vet un DVD, pulse el bot6n INPUT (Entrada) en el mando a distancia, luego use el
bot6n • o • del mando a distancia para seleccionar VIDEO2(METODOA), o VIDEO3
( MC:TODO B), o VJDEO4/VJDEO5 (MC:TODO C), o VJDEO6/VJDEO7 (MC:TODO D).
Luego pulse el bot6n OK (Aceptar).
26
Page 89

Capitulo2 Instalaci6n de su TV LCD
Conectando un decodificador digital para TV por Cable o un
Receptor Digital Satelital.
Parte Posterior del TV
@@®
WDEO • aumo r
[
WOEO2_N
Cable AUDIO/COMPONENTE
Receptor de Satelite
Cable HDMI
MI_TODO A:
Use un cable de componente para conectar las clavijas del cable para TV por Cable!
receptor de satelite (YPbPrl) alas clavijas de entrada del componente de la TV DE LCD.
Use un cable de audio para conectar la clavija de audio del receptor de satelite/
decodificador de TV por cable alas entradas de audio de la TV de LCD.
MI_TODO B:
Use un cable HDMI para conectar las clavijas de salida HDMI del receptor del sate'lite/
Decodificador de TV por cable alas tomas de entrada HDMI 1 IN o HDMI 2 IN del TV LCD.
O
Conecte todas los enchufes AC, antes de poner en encendido el interruptor de su TV de
LCD u otro equipo conectado.
O
Presione _ en el control remoto para encender su TV DE LCD.
O
Para mirar un programa a traves de un receptor satelital o decodificador de TV oprima el
bot6n de ENTRADA (INPUT) en el control remoto. Luego utilice los botones • o • del
control remoto para seleccionar VIDEO4!VIDEO5 (Metodo A), o VIDEO6/VIDEO7
(METODO B), luego oprima OK.
Decodificador de TV por Cable
I
I
27
Page 90

Capitulo 2 Instalaci6n de su TV LCD
Conectando un equipo AV con conector HDMI
Parte Posterior del "iV
NOMII_N NOMI2_N
L R
0
Use un cable HDMI para conectar la clavija de salida HDMI del equipo AV alas clavijas de
entrada HDMI de la "iV DE LCD.
pC/V_A_N
AUOtO
Cable HDMI
COAXIAL
® @ .........
ypbPr2 tN AtI°lO
HHHHHHH,_HHHHHHHH
r
A_RSCABLE
EQUIPO AV
0
Conecte todos los enchufes AC antes de poner el interruptor de su TV de LCD u otro
equipo conectado en encendido.
0
Presione _) en el control remoto para encender su TV de LCD.
0
Oprima el bot6n de ENTRADA (INPUT) en el control remoto. Luego utilice los botones
• o • del control remoto para seleccionar VIDEO6 or VIDEO7, luego oprima OK.
28
Page 91

Conectando un Equipo AV con Conector DVI
Parte Posterior del "iV
Capitulo 2 Instalaci6n de su TV LCD
AUOIO AUDtO
Cable de AUDIO
Cable HDMI a DVI
pClV_A_N
COAXIAL
® @ .........
ypbPr2 tN AtI°lO
HHHHHHH,_HHHHHHHH
r
A_RSCABLE
Equipo de AV
O
Use un cable de HDMI a DVI para conectar la clavija de salida del equipo AV alas clavijas de
entrada de la TV DE LCD. Use un cable de audio para conectar las clavijas de salida del
equipo AV alas clavijas de AUDIO HDMI de su TV DE LCD
0
Conecte todos los enchufes AC antes de poner en encendido el interruptor de la TV DE
LCD u otro equipo conectado.
0
Presione (_) en el control remoto para encender la TV DE LCD.
0
Oprima el botbn de ENTRADA (INPUT) en el control remoto. Luego utilice los botones
• o • del control remoto para seleccionar VIDEO6 or VIDEO7, luego oprima OK.
29
Page 92

Capitulo2 Instalaci6n de su TV LCD
Conectando una PC
Parte Posterior del TV
_R Cable deAUDIO
Cable VGA
PC
O
Use un cable D-SUB para conectar la clavija de salida D-SUB de la PC a la entrada
VGA de la TV DE LCD. Use un cable de audio para conectar las clavijas de salida
output alas de la TV de LCD.
0
Conecte todas las fuentes de energia AC antes de poner el interruptor de la TV de LCD
u otro equipo conectado en encendido.
0
Presione _ en el control remoto para encender la TV de LCD.
0
Optima el botbn de ENTRADA (INPUT) en el control remoto. Luego utilice los botones
• o • del control remoto para seleccionar COMPUTADORA, luego optima OK.
30
Page 93

Capitulo 2 Instalaci6n de su TV LCD
Conectando un Receptor de Audio o un Sistema de Sonido
Dolby Digital 5.1
Para una mejor calidad de sonido, puede conectar el audio de la TV de LCD a su sistema estereo.
NOMIItN NOel2tN PCNGA_N
@@® ®@®
vtoEo L AUOIOR SVIDEO • AUmO R
VtOEO2IN S VIDEO_N
Cable de AUDIO
0 0
i II
Receptor deAudio
O
Conectando a Receptor de Audio:
Use un cable de audio para las clavijas de Audio LINE IN del receptor de audio a las
clavijas AUDIO OUT de su TV de LCD.
O
Conectando a un sistema de sonido 5.1 Digital:
METODO A:
Use un cable bptico para conectar las clavijas OPTICAL IN del amplificador de audio a
las clavijas OPTICAL OUT de la TV de LCD.
MC:TODO B:
Use un cable coaxial para conectar las clavijas COAXIAL IN del amplificador alas
clavijas COAXIAL OUT de la TV de LCD.
Conecte todas las fuentes de energia AC antes de poner el interruptor de la TV de LCD
u otro material conectado en encendido.
Presione t_ en el control remoto para encender la TV de LCD.
31
Amplificador de Audio
Page 94

Capitulo 2 Instalaci6n de su TV LCD
Capitulo 3
USO DE LAS PRESTACIONES
Uso del DVD Integrado
O Encienda su Televisor LCD.
O Inserte un disco (DVD/CD/CD-R/CD-RW/JPEG/KODAK PICTURE CD/DVD+R/RW/DVD-R/
RW)
[] PARA INSERTAR UN DISCO con la cara
de la etiqueta hacia la parte frontal
Cualquiera de los tipos de disco
indicados anteriormente puede ser
reproducido en el reproductor DVD.
Insert
O
Pulse el bot6n INPUT (entrada) en el mando a distancia, use A T para
seleccionar DVD y pulse el bot6n OK.
[] PARA RETIRAR UN DISCO
Cuando retire el disco, no intente
arrastrarlo fuera de su ranura. PuJse
el bot6n EJECT como se indica a
continuaci6n.
32
Page 95

O
Pulse el bot6n GUIDE en el mando a distancia para visualizar el Menu Setup
(configurar) del DVD integrado:
[] USO DEL MENU SETUP DEL DVD INTEGRADO
Pulse A _I'411) en el mando a distancia para mover la barra de luz hasta la opci6n
que desee, y pulse el bot6n OK.
Capitulo 3 Uso de las Funciones
Durante la reproducci6n, tiene
[] liD,
[] PLAY (Reproducci6n) _1_
[] 41 |i_
[] F.FWDINEXT _
[] REW,IPREV,'_I
[] PAUSE IIII
[] AUDIO O)))
[] SUBTITLE
[] CAMERA ANGLE _ Presi6nelo para seleccionar el disco del angulo de la
O
El reproductor DVD integrado puede reproducir imagenes en formato JPEG y archivos de audio
en un disco CD-R!RW grabado personahente. Despu6s de cargar todos mosarchivos, el Men_
File mostrar& los contenidos del disco:
a su disposici6n las siguientes operaciones:
Uselo para reproducir a camara lenta hacia
adelante fotograma a fotograma.
Cemienza la repreducci6n.
Ofrece un efecto de movimiento lento durante la
reproducci6n(1/2, 1/4, 1/8, 1/16).
Salta la pista o capitulo siguiente/previo.
Obtiene diferentes velocidades de avance/retroceso de
repreducd6n(x2, x4, x8, x16, x32).
AI reproducir, aplique una pausa en la reproducci6n
temporalmente.
PQlselo para seleccionar el idioma y el efecto de audio.
Cambia el idioma de los subtitulos del DVD.
c_mara deseado.
[] Pulse A T para seleccionar una
imagen y pulse el bot6n_para
reproducir el archivo.
[] Pulse A T para seleccionar la
carpeta, y pulse I_ para entrar en
la carpeta. Pulse el bot6n ENTER
(intro) para activar y pulse A _' para
seleccionar un archive. Pulse 41
para volver al Menu File (archivos).
[] AI visualizar una imagen, pulse el
bot6n DVD MENU para visualizar
el Menu File.
33
Page 96

Capitulo 3 Uso de las Funciones
O
O
EJECUTAR WMA Y AVl
1. Pulse el boton DVD MENU (MenQ del DVD) para mostrar el MenQ de Archivos.
2. Pulse • • en el mando a distancia para mover la barra resaltada al archivo que
quiere reproducir, y pulse el boton OK (Aceptar) para reproducir el archivo.
3. El reproductor DVD reproducir& todos los archivos WMA y AVI automaticamente en
secuencia cuando este cargado. Puede pausar la presentacion de diapositivas
pulsandoD.
4. Pulse D _ en el mando a distancia para obtener diferentes velocidades de
reproduccion hacia delante/atras (x2, x4, x8, x16, x32)
5. Pulse_para saltar alas siguientes pistas o archivos. Pulse _ para saltar a
las pistas o archivos anteriores.
[] PRESENTACI6N DE DIAPOSITIVAS
1. Pulse A Ten el mando a distancia para mover la barra de luz al archivo que
desee reproducir, y pulse el bot6n OK.
2. AI visualizar una imagen a pantalla completa, puede aplicar una pausa en la
presentaci6n de diapositivas _.
3. Pumse D _ en emmando a distancia para ira map_gina anterior o siguiente.
[] USO DEL ,_LBUM DE MINIATURAS
1. Pulse el bot6n _ en el mando a distancia para visualizar el _lbum de miniaturas.
Presentaci6n de Diapositivas _Anterior Siguiente_
2. Pulse A T _ I_ en el mando a distancia para mover la barra de luz a la imagen
que desee reproducir, y pulse el bot6n OK para reproducir el archivo.
Presentaci6n de Diapositivas ,,_Anterior Siguiente_
34
Page 97

Capitulo 3 Uso de las Funciones
3. , Presentaci6n de diapositivas: Pulse A _r 4 1_ para marcar la Presentaci6n
de Diapositivas y pulse el bot6n OK para visualizar todas las imagenes
registradas en el dispositivo de almacenamiento USB/tarjeta SD/MMC.
[] Prev/Next (anterior/siguiente): Pulse A T 4 I_ para marcar Prev/Ne×t
y pulse el bot6n OK para ira mapagina anterior o siguiente del album
de miniaturas.
[] GIRAR IMAGENES
1. Pulse 4 I_ en el mando a distancia para girar la imagen en sentido horario
o antihorario en incrementos de 90 grados.
2. Pulse _ _ en el mando a distancia para ira la pagina anterior o siguiente.
3. Mientras se muestre una imagen, pulse • • en el mando a distancia para
invertir la imagen.
35
Page 98

Capitulo 3 Uso de las Funciones
Usar el Almacenamiento USB y el Lector de Tarjetas SD/MMC (Hasta 4 GB)
O Encienda su Televisor LCD.
O
Inserte un dispositivo USB o tarjeta SD que contiene archivos
JPG/JPEG/WMA/AVl.
[] INSERTAR UN DISPOSITIVO DE
ALMACENAMIENTO USB
Permite la insercion de un dispositivo de
almacenamiento USB. Puede ver las
imageries digitales, el video o escuchar la
mQsica de un dispositivo de almacenamiento
USB en su TV.
[] INSERTAR UN Lector de TARJETAS
SD/MMC
Permite la insercion de una tarjeta SD/
MMC. Puede ver imagenes digitales,
video o escuchar mOsica.
O
Pulse el bot6n INPUT (entrada) en el mando a distancia, use J, • para semeccionar
la fuente de entrada y pulse el bot6n OK.
[] PARAINSERTAR UN DISPOSITIVO
DE ALMACENAMIENTO USB
[] PARA INSERTAR UN LECTOR
DE TARJETAS SD/MMC
36
Page 99

O
Despu6s de cargar todos los arcMvos, el Mene File mostrara los contenidos del
dispositivo USB:
[] Pulse • • para seleccionar una imagen y pulse el bot6n_para reproducir
el archive.
[] Pulse • • para seleccionar la carpeta, y pulse I_ para entrar en la carpeta. Pulse el
bot6n ENTER (intro) para activar y pulse • • para seleccionar un archivo. Pulse 4 para
volver al MenQ File (archivos).
[] AI visualizar una imagen, pulse el bot6n DVD MENU para visualizar el MenQ File.
Capitulo 3 Uso de las Funciones
O
[] EJECUTAR WMA Y AVI
1.
Pulse el bot6n DVD MENU (MenQ del DVD) para mostrar el MenQ de Archivos.
2.
Pulse • • en el mando a distancia para mover la barra resaltada al archivo que
quiere reproducir, y pulse el boton OK (Aceptar) para reproducir el archivo.
3. El reproductor DVD reproducira todos los archivos WMA y AVl autom&ticamente en
secuencia cuando este cargado. Puede pausar la presentacion de diapositivas
pulsando_.
4. Pulse _ _ en el mando a distancia para obtener diferentes velocidades de
reproduccion hacia delante/atr&s (x2, x4, x8, x16, x32)
5. Pulse_ para saltar alas siguientes pistas o archivos. Pulse _ para saltar a
las pistas o archivos anteriores.
O
[] PRESENTACIC)N DE DIAPOSITIVAS
1. Pulse • • en el mando a distancia para mover la barra de luz al archivo que
desee reproducir, y pulse el bot6n OK.
2. AI visualizar una imagen a pantalla completa, puede aplicar una pausa en la
presentaci6n de diapositivas _.
3. Pulse _ _ en el mando a distancia para ira la p_gina anterior o siguiente.
37
Page 100

Capitulo3UsodelasFunciones
[] USO DEL ._LBUM DE MINIATURAS
1. Pulse el bot6n O en el mando a distancia para visualizar el _lbum de miniaturas.
Presentacibn de Diapositivas _Anterior Siguiente_
2. Pulse • • 41_ en el mando a distancia para mover la barra de luz a la imagen
que desee reproducir, y pulse el bot6n OK para reproducir el archivo.
3. , Presentaci6n de diapositivas: Pulse • • _1_ para marcar la Presentaci6n
[] GIRAR IMAGENES
1. Pulse _ _- en el mando a distancia para girar la imagen en sentido horario
o antihorario en incrementos de 90 grados.
2. Pulse O _ en el mando a distancia para ira la p&gina anterior o siguiente.
3. Mientras se muestre una imagen, pulse • • en el mando a distancia para
invertir la imagen.
Presentacibn de Diapositivas 4Anterior Siguiente_
de Diapositivas y pulse el bot6n OK para visualizar todas las im_genes
registradas en emdispositivo de ammacenamiento USB/tarjeta SD.
[] Prev/Next (anterior/siguiente): Pumse • • 4 _ para marcar Prey/Next
y pulse el bot6n OK para ira la p_gina anterior o siguiente del _lbum
de miniaturas.
38
 Loading...