


FEATURES
FEATURES
Your MKS 2450 Memorex Single Cassette Recorder Karaoke System lets you be the “star” as you
sing along with your favorite recordings and hear your voice through the speaker along with the
music. You can sing along with regular cassette tapes or use special karaoke cassette tapes that let
you select the prerecorded singer’s voice, your voice, and the music tracks.
The system’s compact design and convenient carrying handle let you take it almost anywhere. You
can also connect another audio source ( such as a CD player) to the system and sing along.
Your MKS 2450 Memorex’s features include:
1. Dual Microphone Jacks ---- let you use two microphones simultaneously to sing duets or for lead
and
background vocals. ( extra microphone not included.)
2. Vocal Changer Switch ---- temporarily mutes the prerecorded singer’s voice when you use a
karaoke tape
and sing into the microphone.
3. Tone ---- lets you set the tone to low , middle or high.
4. Echo ---- lets you add an echo to your voice for a concert hall effect.
5. Built-In Speaker ---- lets you share the music with friends.
6. Function Select
7. Master Volume
8. MIC Volume
9. Power ON/OFF Switch
10. Cassette Compartment
Remark:
• Supplied Karaoke Audio Tapes ---- lets you sing along with the music. Sing along to today’s
hottest songs.
• Supplied Microphone ---- lets you sing along with the music and hear your voice through the
speaker.
file:///G|/Private/Joe%20Tumminelli/Owner's%20Manuals/MKS2450/MKS2450.htm (1 of 16) [7/29/2002 4:07:34 PM]

FEATURES
CONTENTS
Connections………………………………………………………………………………………......
4
Connecting Another Audio Source………………………………………………………………………….. 4
Connecting Power…………………………………………………………………………………………… 4
Using the Cassette
Deck……………………………………………………………………………. 5
Loading a Cassette Tape……………………………………………………………………………………. 5
Playing a Cassette Tape……………………………………………………………………………………... 5
Listening to Another Audio
Source……………………………………………………………….. 6
Singing Along………………………………………………………………………………………...
7
Signing with a Cassette Tape
……………………………………………………………………………….. 7
Singing with Another Audio Source………………………………………………………………………… 8
Recording…………………………………………………………………………………………….
10
Recording Tips……………………………………………………………………………………………..... 10
Recording Your Voice with Music…………………………………………………………………………....
10
Recording from Another Audio Source……………………………………………………………………..
11
Maintenance ………………………………………………………………………………………...
12
Tape Care Tips ………………………………………………………………………………….…………. 13
Preventing Accidental Erasure ………………………………………………………………………. 13
Erasing a Cassette Tape ……………………………………………………………………………...
13
Cleaning the Tape-Handling Parts …………………………………………………………………… 13
Restoring Tape Tension and Sound Quality …………………………………………………………. 14
Specifications ……………………………………………………………………………………….
15
file:///G|/Private/Joe%20Tumminelli/Owner's%20Manuals/MKS2450/MKS2450.htm (2 of 16) [7/29/2002 4:07:34 PM]
FEATURES
CONNECTIONS
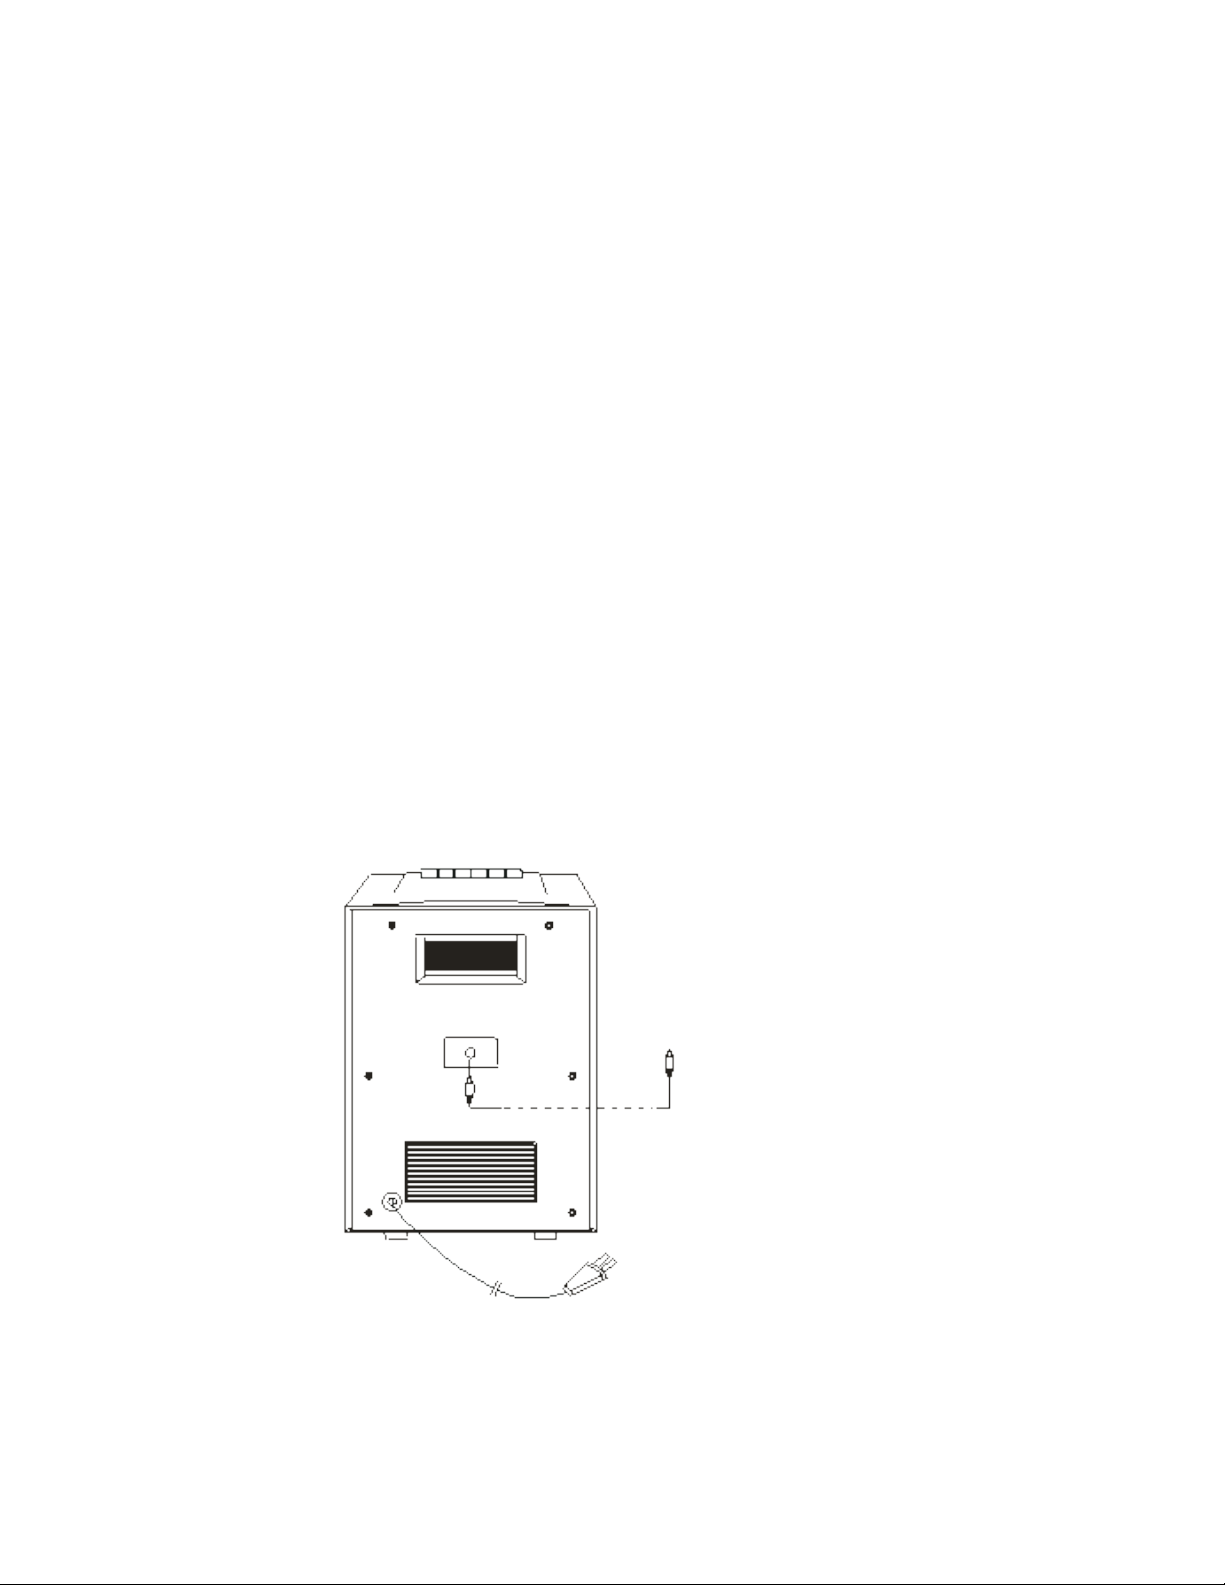
CONNECTING ANOTHER AUDIO SOURCE
You can connect another audio source (such as a CD player) to the system so you can sing along
with the audio source’s sound. Connect the source’s headphone output jack to the system’s AUX
INPUT jack.
Note: If your audio source has AUX OUT jacks (such as those found on a CD player), use a shielded
Y-adapter cord with phono plugs on each end. Connect the end with the single plug to the system’s
AUX INPUT jack and connect the other end’s two phono plugs to the AUX OUT jacks on the audio
source.
CONNECTING POWER
file:///G|/Private/Joe%20Tumminelli/Owner's%20Manuals/MKS2450/MKS2450.htm (3 of 16) [7/29/2002 4:07:34 PM]

FEATURES
When you have made all other connections, plug your system’s power cord into a standard AC
outlet. Make sure the supply voltage of your home corresponds with the voltage rating of this unit (AC
120V / 60 Hz).
Caution: The supplied power cord has a polarized plug that fits into the outlet only one way. If the
plug does not fit properly, turn it over and try again. Do not force it.
USING THE CASSETTE DECK
LOADING A CASSETTE TAPE
1.
Press STOP/EJECT to open the cassette compartment.
2.
Use a pencil to turn the cassette’s hub and take up any tape slack. Avoid touching the tape with
your fingers.
3. Load the cassette tape with its open edge facing down, the side you want to play or record on
facing you, and
the full reel to the left.
4. Close the compartment.
PLAYING A CASSETTE TAPE
Caution: To protect your hearing, set MASTER VOLUME to MIN before you play a cassette tape.
1.
Load a cassette tape in the cassette compartment.
2.
Press POWER to turn on the system. The POWER indicator lights.
3.
Set FUNCTION on the front of the system to TPAE.
4.
Press PLAY.
5.
Adjust MASTER VOLUME and set TONE to the desired listening level.
6.
Press STOP/EJECT to stop the tape. Press STOP/EJECT again to open the cassette the
file:///G|/Private/Joe%20Tumminelli/Owner's%20Manuals/MKS2450/MKS2450.htm (4 of 16) [7/29/2002 4:07:34 PM]

FEATURES
cassette tape.
To play the other side, turn the tape over, load it, and press PLAY.
Notes:
To temporarily stop play, press PAUSE. Press PAUSE again to resume play.
To rapidly wind the tape forward or backward while the tape is stopped, press FAST-F or
REWIND. Press STOP/EJECT when you reach the desired section.
LISTENING TO ANOTHER AUDIO SOURCE
If you connected another audio source to the system as described in “Connecting Another Audio
Source,” follow these steps to listen to that source.
Caution: To protect your hearing and prevent damage to the system, always set the source’s and
the system’s volume controls to their lowest settings before turning on the source and the system.
1.
Set FUNCTION on the front of the system to AUX.
2.
Turn on the audio source.
3.
Press POWER to turn on the system. The POWER indicator lights.
4.
Adjust MASTER VOLUME and set TONE to the desired listening level.
5.
To turn off the system, press POWER and the POWER indicator turns off. Then turn off the
audio source.
file:///G|/Private/Joe%20Tumminelli/Owner's%20Manuals/MKS2450/MKS2450.htm (5 of 16) [7/29/2002 4:07:34 PM]

FEATURES
SINGING ALONG
Now get ready for some fun! In this section, we tell you how to use your system’s karaoke features. First, set
the system’s and the source’s volume controls to their minimum settings. Then plug the supplied
microphone’s 1/4-inch plug into MIC1 or MIC2.
Note: Your friend can also sing along with the music if you connect a unidirectional 600-ohm
dynamic microphone with a 1/4-inch plug to the system’s other MIC jack. (Additional microphone not
included.)
You can use these controls to get the sound just right:
Echo ---- This adds an echo effect to your voice while you sing. Set ECHO to LOW, MID, or HIGH for
the desired
effect.
Note: The echo only affects the microphone’s sound, not the sound that comes from the audio input
source.
Vocal Changer –--- When you use a karaoke cassette tape, you can set VOCAL CHANGER to ON
file:///G|/Private/Joe%20Tumminelli/Owner's%20Manuals/MKS2450/MKS2450.htm (6 of 16) [7/29/2002 4:07:34 PM]

FEATURES
to mute the prerecorded singer’s voice when you sing into the microphone.
SINGING WITH A CASSETTE TAPE
Follow these steps to sing along with a regular or karaoke cassette tape (such as the tapes
supplied).
1.
Set MASTER VOLUME to MIN.
2.
Press POWER to turn on the system. The POWER indicator lights.
3.
Load a prerecorded cassette tape.
4.
Set FUNCTION on the front of the system to TAPE.
5.
Press PLAY to play the tape.
6.
Adjust MASTER VOLUME to the desired sound.
7.
Set TONE to LOW, MIDDLE, or HIGH.
8.
Set the microphone’s ON/OFF switch to ON.
9.
Sing directly into the microphone along with the music.
10. Adjust ECHO to add an echo to your voice.
11. When you finish, press STOP/EJECT to stop the tape, set the microphone’s ON/OFF switch to
OFF,
and press POWER to turn off the system. The POWER indicator turns off.
SINGING WITH ANOTHER AUDIO SOURCE
If you connected another audio source as described in “Connecting Another Audio Source,” follow
these steps to sing along with the sound from that audio source.
Caution: To protect your hearing, set the system’s and the source’s volume to their lowest settings
before you turn on the system and the audio source.
1.
Press POWER to turn on the system. The POWER indicator lights.
file:///G|/Private/Joe%20Tumminelli/Owner's%20Manuals/MKS2450/MKS2450.htm (7 of 16) [7/29/2002 4:07:34 PM]

FEATURES
2. Set FUNCTION on the front of the system to AUX.
3.
Turn on the audio source.
4.
Adjust MASTER VOLUME and set TONE to LOW, MIDDLE, or HIGH for the desired sound.
5.
Set the supplied microphone’s ON/OFF switch to ON. Sing directly into the microphone along
with the music.
Use MIC VOLUME to adjust your voice’s volume.
Note: If you are using a karaoke video cassette, adjust the system’s controls as described in Steps
9 and 10
of “Singing with a Cassette Tape.”
When you finish, turn off the audio source, set the microphone’s ON/OFF switch to OFF, and press
POWER to turn off the system. The POWER indicator turns off.
file:///G|/Private/Joe%20Tumminelli/Owner's%20Manuals/MKS2450/MKS2450.htm (8 of 16) [7/29/2002 4:07:34 PM]

FEATURES
RECORDING
You can record as you sing along with the music from another audio source. You can also record
only the sound from the external audio source.
RECORDING TIPS
Tape quality greatly affects the quality of the recording. We recommend Extended Range or LowNoise Type 1 tape. We do not recommend long-play cassette tapes, such as C-120s, because they
are thin and can easily tangle in the cassette mechanism. For low-noise, wide-range recordings, use
normal-bias tape.
Before recording, be sure the tape you are using has its erase-protection tabs in place. See
“Preventing Accidental Erasure”.
Recording automatically stops when the tape reaches the end. To record on the other side, turn over
the tape.
RECORDING YOUR VOICE WITH MUSIC
Follow these steps to record your voice along with music from an audio source connected to the
system’s AUX INPUT jack.
1.
Load a blank tape, or one that you want to record over into the system’s cassette
compartment, with the side you want to record on facing you, and the full reel to the left.
2. Follow Steps 1-5 under “Singing with Another Audio Source”.
3. Press RECORD on the system to begin recording. RECORD and PLAY will both locks down.
4. Press STOP/EJECT on the system to stop recording. RECORD and PLAY will release.
file:///G|/Private/Joe%20Tumminelli/Owner's%20Manuals/MKS2450/MKS2450.htm (9 of 16) [7/29/2002 4:07:34 PM]

FEATURES
5. Stop the audio source.
RECORDING FROM ANOTHER AUDIO SOURCE
Follow these steps to just record (without adding your voice) from an audio source connected to the
system’s AUX INPUT jack.
1.
Load a blank cassette tape, or one that you want to record over, into the cassette
compartment.
2.
Press POWER to turn on the system. The POWER indicator lights.
3.
Set FUNCTION on the front of the system to AUX.
4.
Press PAUSE, then RECORD on the system. Both RECORD and PLAY will be locked down.
5.
Start the audio source.
6.
Press PAUSE on the system to start recording.
Notes:
• Press PAUSE on the system to temporarily stop recording. Press PAUSE again to resume
recording.
• You can listen through the system to the audio source as you record it. Set MASTER
VOLUME to a
comfortable listening level. The volume setting does not affect the recording level.
7.
Press STOP/EJECT on the system to stop recording. RECORD and PLAY release.
8. Turn off the audio source.
file:///G|/Private/Joe%20Tumminelli/Owner's%20Manuals/MKS2450/MKS2450.htm (10 of 16) [7/29/2002 4:07:34 PM]

FEATURES
MAINTENANCE
Your MKS 2450 Memorex Single Cassette Recorder Karaoke System is an example of superior
design and craftsmanship. The following suggestions will help you care for the system, so you can
enjoy it for years.
• Keep the system dry. If it gets wet, wipe it dry immediately. Liquids might contain minerals that can
corrode
the electronic circuits.
• Use and store the karaoke system only in normal temperature environments. Temperature
extremes can
shorten the life of electronic devices and distort or melt plastic parts.
• Keep the karaoke system away from dust and dirt, which can cause premature wear of parts.
• Handle the karaoke system gently and carefully. Dropping it can damage circuit boards and
cabinet and
can cause the karaoke system to work improperly.
• Wipe the karaoke system with a cloth occasionally to keep it looking new. Do not use harsh
chemicals, cleaning solvents, or strong detergents to clean the karaoke system.
Modifying or tampering with the karaoke system’s internal components can cause a malfunction and
will invalidate its warranty.
file:///G|/Private/Joe%20Tumminelli/Owner's%20Manuals/MKS2450/MKS2450.htm (11 of 16) [7/29/2002 4:07:34 PM]

FEATURES
TAPE CARE TIPS
Preventing Accidental Erasure
file:///G|/Private/Joe%20Tumminelli/Owner's%20Manuals/MKS2450/MKS2450.htm (12 of 16) [7/29/2002 4:07:34 PM]

FEATURES
Cassette tapes have two erase-protection tabs ---- one for each side. To protect a recording from being
accidentally recorded over or erased, use a screwdriver to remove one or both of the cassette tape’s eraseprotection tabs.
If you want to record on a tape side after you have removed the erase-protection tab, place a piece
of strong plastic tape over that side’s erase-protection hole.
Notes:
•Be sure you cover only the hole originally covered by the erase-protection tab.
•Removing the erase-protection tabs does not prevent a bulk eraser from erasing a cassette tape.
Erasing a Cassette Tape
If you no longer want a recording, you can record over it or erase it.
To erase a previously recorded section of a tape, simply record over it.
To erase the entire cassette tape, record silence to the end with all controls set to their minimum
settings and the microphone(s) turned off.
You can quickly erase both sides of a cassette tape using a bulk tape eraser.
Cleaning the Tape-Handling Parts
Dirt, dust or particles of the tape’s coating can accumulate on the tape heads and other parts that the
tape touches. This can greatly reduce the performance of the cassette player. Use the following
cleaning procedure after every 20 hours of tape player operation.
file:///G|/Private/Joe%20Tumminelli/Owner's%20Manuals/MKS2450/MKS2450.htm (13 of 16) [7/29/2002 4:07:34 PM]

FEATURES
1.
Disconnect the AC power cord.
2.
Open the cassette compartment doors on the system.
3.
Press PLAY on the system to expose the tape-handling parts.
4.
Use a cotton swab dipped in denatured alcohol or tape head cleaning solution to clean the
record/play heads, pinch rollers, capstans, tape guides, and erase heads.
5.
When you finish cleaning, press STOP/EJECT on the system and close the cassette
compartment doors. Then reconnect power.
Restoring Tape Tension and Sound Quality
After you play a cassette tape several times, the tape might become tightly wound on the reels. This
can cause playback sound quality to deteriorate.
To restore the sound quality, fast-forward the tape from the beginning to the end of one side, then
completely rewind it. Then loosen the tape reels by gently tapping each side of the cassette’s outer
shell on a flat surface.
Caution: Be careful not to damage the cassette when tapping it. Do not touch the exposed tape or
file:///G|/Private/Joe%20Tumminelli/Owner's%20Manuals/MKS2450/MKS2450.htm (14 of 16) [7/29/2002 4:07:34 PM]

FEATURES
allow any sharp objects near the cassette.
SPECIFICATIONS
Power Output (at 10% THD) ………………………………………………………………... 1.5 Watts per
Channel
Track System ……………………………………………………………………….. 4 Track, Two Channel
Stereo
Tape Speed ..………………………………………………………………….……………..……………. 1
7/8 ips
Recording System ………………………………………………………………………………………… AC
Bias
Erasing System ………………………………………………………………………………………..…..
file:///G|/Private/Joe%20Tumminelli/Owner's%20Manuals/MKS2450/MKS2450.htm (15 of 16) [7/29/2002 4:07:34 PM]

FEATURES
Magnetic
Wow and Flutter (WRMS) ……………………………………………………………………..… Less Than
0.35%
Record/Play Frequency Response (at ±3 dB) ………………………………..…………………..… 1256300 Hz
Signal-To-Noise ………………………………………………………..……………………………….……..
40 dB
Speaker …………………………………………………………………………………………….. 4-inch (4
ohm)
Microphone (Monaural) Impedance ………………………………………………………………..….….
600 Ohm
Power Source …………………………………………………………………………. AC 120V, 60 Hz, 500
MW
Dimensions (HWD) ………………………………………………………………….…. 342.96 x 254 x
152.5mm
Weight ……………………………………………………………………………………….……………….
2.43 kg
Included Accessories …………………………………………………..……………………………….
Microphone
3 Karaoke Cassettes.
Specifications are typical; individual units might vary. Specifications are subject to change and
Improvement without notice.
file:///G|/Private/Joe%20Tumminelli/Owner's%20Manuals/MKS2450/MKS2450.htm (16 of 16) [7/29/2002 4:07:34 PM]
 Loading...