

Page 1

Before operating this product,
please read these instructions completely.
User’s Guide
22 Channel GMRS Radio
MK1996
MK1996.OM.QXD 5/19/03 12:03 PM Page 17
Page 2
Thank you for purchasing this Memorex product.
The serial number of your unit can be found on a label on the back of the cabinet. We
suggest that you record the serial number in the space provided below in case this
information is ever needed at a future date.
PLEASE KEEP ALL PACKAGING MATERIAL FOR AT LEAST 90 DAYS IN CASE
YOU NEED TO RETURN THIS PRODUCT TO YOUR PLACE OF PURCHASE OR
MEMOREX.
Model Number: MK1996
Serial Number: _______________________________________
1
SAFETY PRECAUTIONS
FCC WARNINGS:
This device complies with part 15 of the FCC rules. Operation is subject to the
condition that this device does not cause harmful interference.
Safety Training Information:
Your FM handheld transceiver generates RF electromagnetic energy during
Transmit mode. This radio is designed for and classified as “Controlled
Exposure/Occupation Environment”, meaning it must be used only during the
course of employment by individuals aware of the hazards and the ways to
minimize such hazards. This radio is NOT intended for use by the “General”
population/uncontrolled environment.
This radio complies with FCC RF radiation exposure limits set forth for a
controlled environment. This radio should be installed and operated with a
minimum distance of one inch (2.5 centimeters) between the radio and your body.
Therefore, to ensure that your exposure to RF electromagnetic energy is within
the FCC allowable limits for occupational use, always follow below information.
• Do not operate the radio without a proper antenna as this may damage the
radio and may also cause you to exceed FCC RF radiation exposure limits. A
proper antenna is the antenna supplied with this radio by the manufacturer or
an antenna specifically authorized by the manufacturer for use with this radio.
• Do not transmit for more than 50% of the total radio use time (“50% duty
cycle”). Transmitting for more than 50% of the time can cause FCC RF
exposure compliance requirements to be exceeded.
• Always use memcorp supplied antennas, batteries, belt clips, speaker, mic,
etc. Use of unauthorized accessories can cause the FCC RF compliance
requirements to be exceeded.
• Always keep the antenna at least one inch (2.5 centimeters) away from the
body when transmitting and only use the belt clip when attaching the radio to
your belt, etc to ensure that FCC RF exposure compliance requirements are
not exceeded.
ATTENTION:
This radio complies with the FCC RF exposure limits for
Occupational Use Only.
MK1996.OM.QXD 5/19/03 12:03 PM Page 1
Page 3

SAFETY INFORMATION:
• Do NOT hold the unit in such a manner that the antenna is next to, or
touching exposed parts of the body - especially the face or eyes, while
transmitting.
• Do NOT allow children to operate transmitter-equipped radio equipment.
• Do NOT operate the unit near unshielded electrical blasting caps or in an
explosive atmosphere, unless it is especially designed and qualified for
such use.
• Do NOT press and hold the PTT button when not actually transmitting.
• Do NOT tamper with the internal radio adjustments. Damage to the
equipment and/or improper operation may result. There are no userserviceable parts inside. It is recommended that you return the unit to a
qualified Memorex radio communications dealer for any service or parts.
• Do NOT carry the unit by the antenna.
•Avoid extremes in exposure to heat and cold.
• This unit is splash resistant to water. Do not submerge in water.
• Do NOT expose the transceiver to long periods of direct sunlight, nor
should the transceiver be placed close to heating appliances.
• Do NOT place the transceiver in excessively dusty areas, humid areas,
wet areas, or on unstable surfaces.
MAINTENANCE:
This unit is designed to be maintenance free, but can be kept in good
working condition by following these few recommendations:
• Clean all external surfaces with a clean cloth, dampened in a mild solution
of dishwasher detergent diluted in water. Apply the solution sparingly to
avoid any moisture leaking into the cracks. Dry the surface thoroughly with
a soft, lint-free cloth.
• Do NOT use solvents or spirits for cleaning, they may permanently
damage the unit.
• Clean the battery jack contacts with a lint-free cloth to remove dirt.
WARNING:
Do not operate this unit unless you are licensed to do so.
2
SAFETY PRECAUTIONS (CONTINUED)
IMPORTANT:
PLEASE KEEP ALL PACKAGING MATERIAL FOR AT LEAST 90 DAYS
IN CASE YOU NEED TO RETURN THIS PRODUCT TO YOUR PLACE OF
PURCHASE OR MEMOREX.
MK1996.OM.QXD 5/19/03 12:03 PM Page 2
Page 4
3
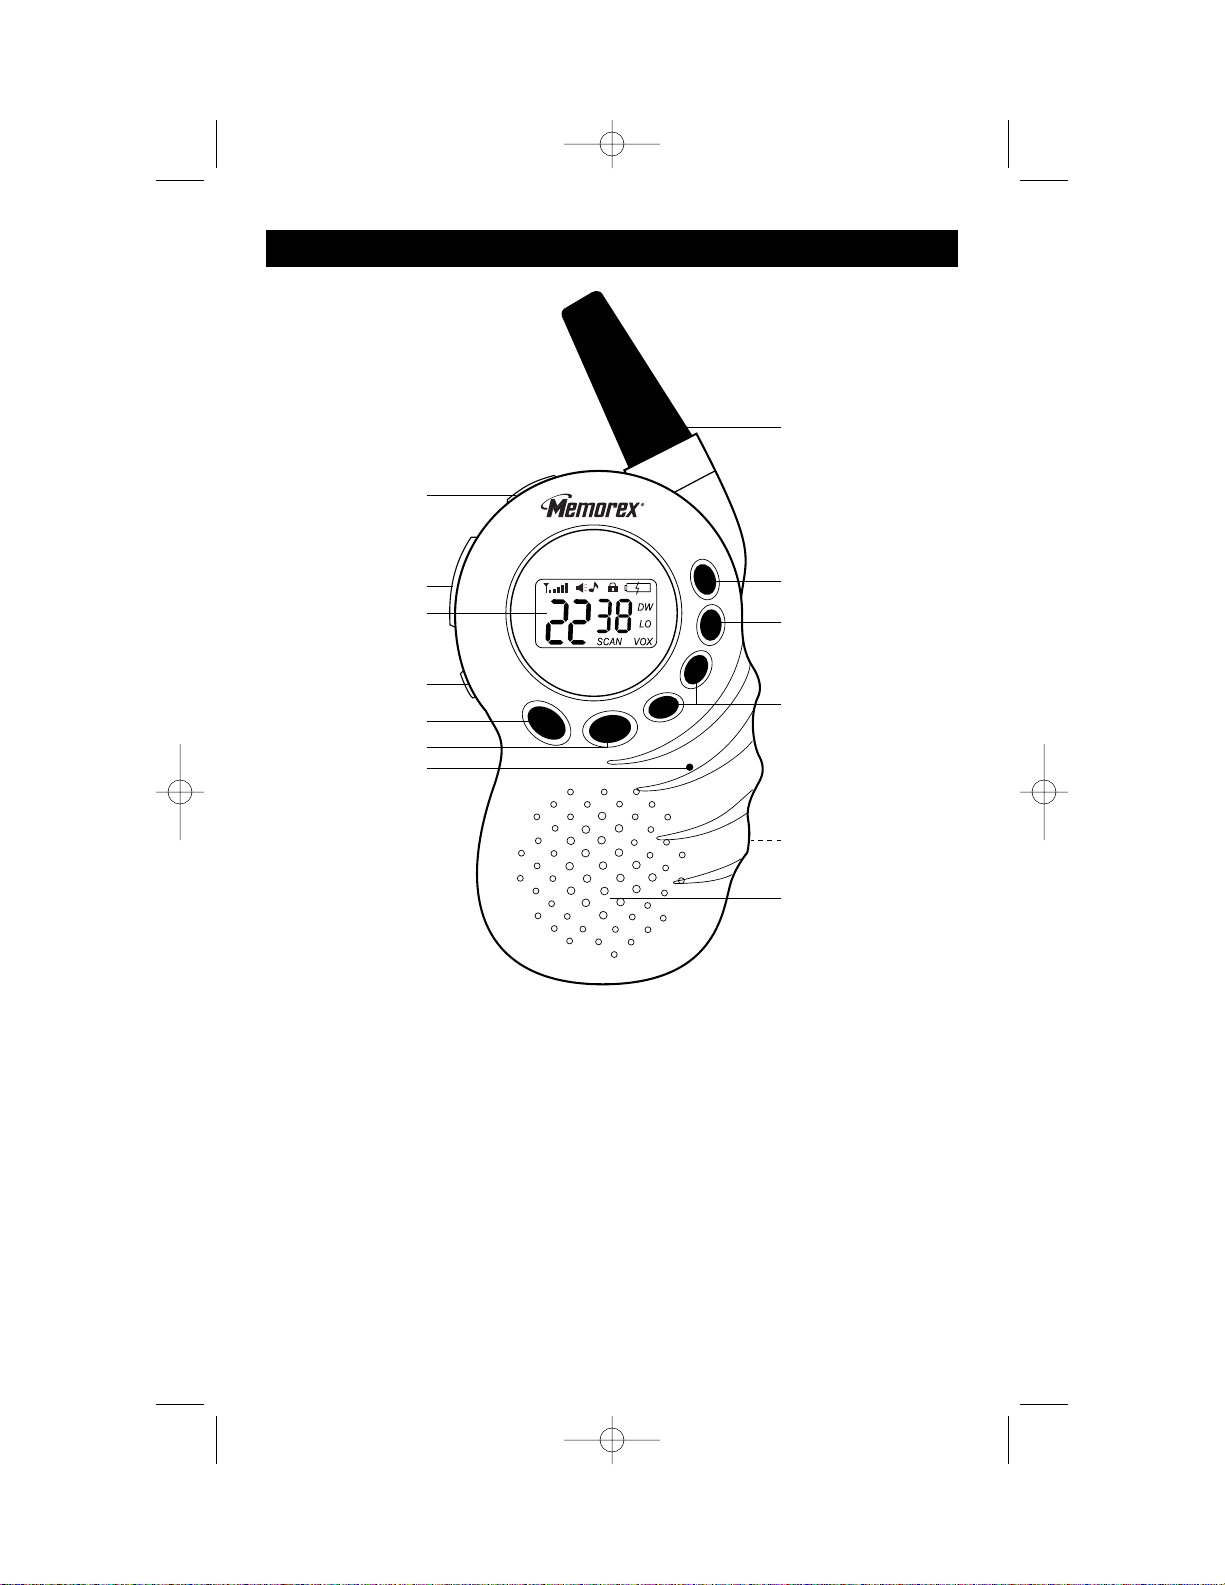
LOCATION OF CONTROLS
1. SPK (Speaker)/MIC
(Microphone)/CHG
(Charger) Jack
2. PTT (Push To Talk) Button
3. Display
4. MON (Monitor) Button
5. FUNC (Function) Button
6. CALL Button
7. Built-in Microphone
8. Antenna
9. Power Button
10. SCAN Button
11. CHANNEL/VOLUME
Up/Down Buttons
12. Battery Compartment
(Rear of Unit)
13. Speaker
FRONT
MK1996.OM.QXD 5/19/03 12:03 PM Page 3
1
2
3
4
5
6
7
8
9
10
11
12
13
Page 5

4
LOCATION OF CONTROLS (CONTINUED)
1. Signal Strength Indicators
2. Monitor Indicator
3. Roger Beep Indicator
4. Key Lock Indicator
5. Battery Status Indicator
6. DW (Dual Watch) Indicator
7. LO Indicator
8. VOX Indicator
9. CTCSS Sub Channel
Number
10. SCAN Indicator
11. Main Channel Number
INSTALLATION
TO INSERT, slide the Belt Clip
downward until it snaps in place.
1
TO REMOVE, push in on the tab, then
slide the Belt Clip out.
2
TO USE THE BELT CLIP
DISPLAY
MK1996.OM.QXD 5/19/03 12:03 PM Page 4
321
5
6
7
11 1049 8
Page 6
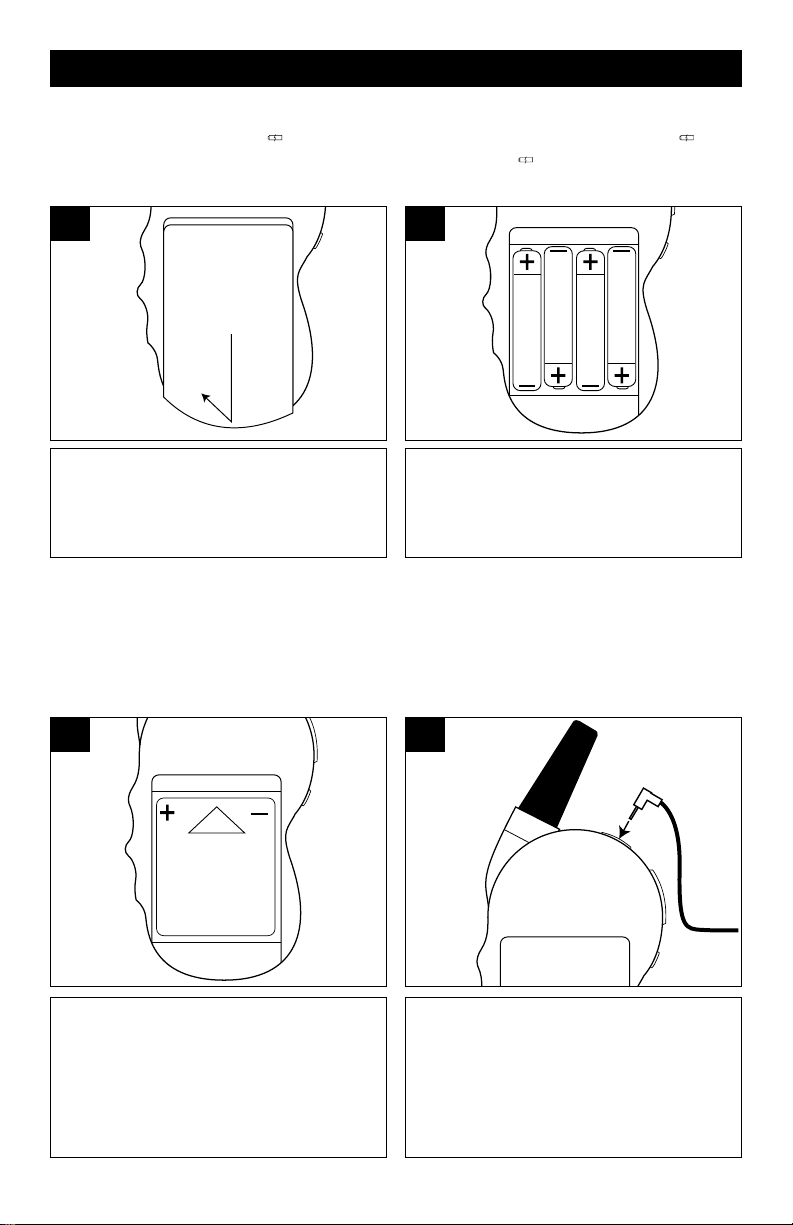
INSTALLATION (CONTINUED)
INSTALLING STANDARD BATTERIES
When battery power is full, will not be displayed. When battery power is low, will
appear in the display. When battery power is almost empty, will blink in the display.
When the Battery Status indicator is empty, it is time to replace your batteries as follows:
1
Slide the battery compartment out,
and then lift off to remove.
INSTALLING AND CHARGING THE RECHARGEABLE BATTERY PACK
When the Battery Status indicator is empty, it is time to replace your batteries or
recharge the battery pack.
IMPORTANT: Do not attempt to charge AAA Alkaline batteries, only use the 4 AAA NiMH rechargeable battery pack (included) and the adaptor (included).
1
2
Insert four (4) "AAA" size batteries
(not included) following the polarity
diagram. Put the battery compartment cover back into place.
2
Slide the battery compartment out,
and then lift off to remove as
described in figure 1 above. Insert
the battery pack (included) following
the polarity diagram. Put the battery
compartment cover back into place.
To charge, insert the adaptorís plug
into the SPK/MIC/CHG jack while
the unit is off; the LED on the
adapter will light.
5
Page 7

6
LISTENING TO TRANSMISSIONS:
When the unit is on, it will automatically broadcast the incoming signal when a
strong incoming signal is received on the selected channel.
NOTE: When transmitting, hold the unit in a vertical position with the
microphone one to two inches (2.5 to 5 cm) away from your mouth. Keep the
antenna at least one inch (2.5cm) from your head and body.
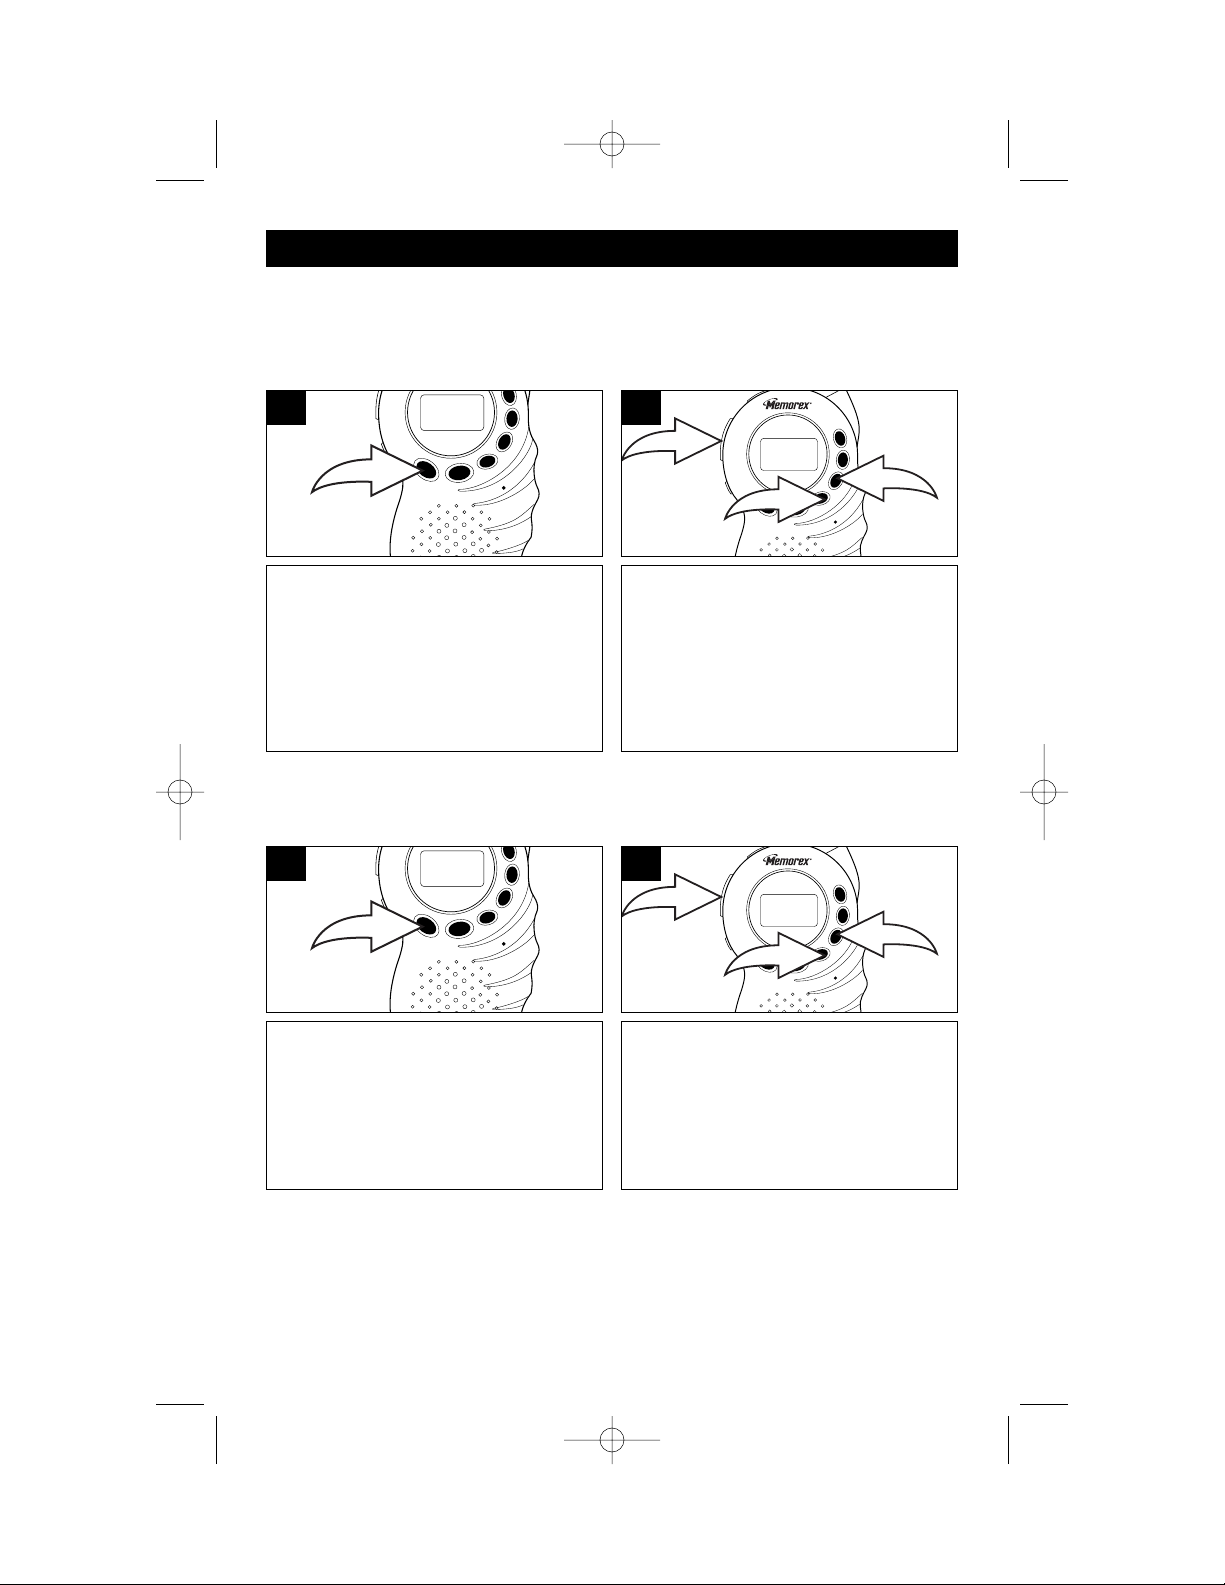
OPERATION
Press and hold the POWER button
for over one second; a confirmation
tone will sound.
Press and hold the POWER button
again for over two seconds to turn
the power off.
1
Press the CHANNEL/VOLUME Up ❶
or Down ❷ button to raise/lower the
volume. The number on the display
will indicate the volume level. If
necessary, press and hold the Monitor
button ❸ for two seconds so sound
will be heard through the speaker.
1
TURNING THE UNIT ON/OFF
ADJUSTING THE VOLUME
Press and hold the PTT button and
speak into the built-in microphone (or
the external microphone, if connected).
When the PTT button is pressed, the
Signal Strength indicators will light to
indicate the signal strength and the
speaker will be muted.
1
When the PTT button is released, you
can now listen to incoming
messages.
2
TALKING TO ANOTHER PARTY (TRANSMITTING)
To send your outgoing messages and to communicate with another party, see the
following:
MK1996.OM.QXD 5/19/03 12:03 PM Page 6
3
2
1
Page 8

7
OPERATION (CONTINUED)
Press the FUNC button; the main
channel number will blink.
1
Within eight seconds, press the
CHANNEL/VOLUME Up ❶ or Down
❷ button to raise/lower the main
channel number. Press the PTT
button ❸ or wait eight seconds to
confirm and exit.
2
SELECTING ONE OF THE 22 MAIN CHANNELS
Select one of the 22 main channels as follows:
Press the FUNC button twice; the
CTCSS code will blink.
1
Press the CHANNEL/VOLUME Up ❶
or Down ❷ button to raise/lower the
CTCSS code. To choose no CTCSS
code, select “oF”. Press the PTT
button ❸ or wait eight seconds to
confirm and exit.
2
SELECTING ONE OF THE 38 CTCSS SUB-CHANNEL CODES
This feature allows you to utilize the codes squelch tones (00-38) within one of the 22
main channels. This enables you to communicate with another party on the same
main channel using the same sub channel and filters out unwanted transmissions
without the same coded tone code. Select as follows:
MK1996.OM.QXD 5/19/03 12:03 PM Page 7
3
1
2
3
2
1
Page 9

8
OPERATION (CONTINUED)
Press the FUNC button three times;
“P” will appear and “H” or “L” will
blink.
1
Within eight seconds, press the
CHANNEL/VOLUME Up ❶ or Down
❷ button to select H” (High) or “L”
(Low). Press the PTT button ❸ or wait
eight seconds to confirm and exit.
2
SETTING THE TRANSMIT POWER
Set the transmit power to Hi (1.8W TX power) or Low (500mW TX power) as follows:
Press the FUNC button four times;
“DW” will appear and “d” and “oF” or
a number will blink.
1
Within eight seconds, press the
CHANNEL/VOLUME Up ❶ or Down
❷ button to select the desired
channel. (Select “d” and “oF” for
cancelling or turning off the Dual
Watch function.) Press the PTT
button ❸ or wait eight seconds to
confirm and exit.
2
SETTING THE DW (DUAL WATCH)
This feature allows you to monitor two channels at the same time. While in the Dual
Watch mode, the unit will continuously monitor both the primary and dual watch
channel. Received signals will be heard for five seconds, then the unit will resume
scanning the two channels. Pressing the PTT button during a received transmission
will set the unit to transmit on the same channel. Pressing the PTT button when no
signal is received will set the unit to transmit on the primary channel. Set as follows:
NOTE: If the battery is low, the TX power will be automatically switched to LO.
On FRS frequencies (8-14CH), the power goes to 0.5W automatically. FCC requires
that the transmitting power for FRS channel (8-14CH) must be less than 0.5W
TO CANCEL THE DUAL WATCH
To cancel, simply press the SCAN or FUNC button.
MK1996.OM.QXD 5/19/03 12:03 PM Page 8
3
2
1
3
2
1
Page 10
9
OPERATION (CONTINUED)
Press the FUNC button five times;
“U” will appear and the sensitivity
level and “VOX” will blink.
1
Within eight seconds, press the
CHANNEL/VOLUME Up ❶ or Down
❷ button to set the sensitivity level (3
is most sensitive and 1 is least
sensitive). To disable, select “oF”.
Press the PTT button ❸ or wait eight
seconds to confirm and exit.
2
SETTING THE VOX (VOICE OPERATED TRANSMISSION) SENSITIVITY
This feature will enable you to have hands-free conversation. Your voice or nearby
sounds are detected and the radio transmits without the need to press the PTT
button. Set the sensitivity as follows:
Press the FUNC button six times; “b”
will appear and the Roger Beep
indicator and “on” or “oF” will blink.
1
Within eight seconds, press the
CHANNEL/VOLUME Up ❶ or Down
❷ button to turn the Roger Beep on
(“on”) or off (“oF”). Press the PTT
button ❸ or wait eight seconds to
confirm and exit.
2
SETTING THE ROGER BEEP
This feature will give a tone signal to other parties when finished transmitting (when
the PTT button is released). Turn this feature On or Off as follows:
MK1996.OM.QXD 5/19/03 12:03 PM Page 9
3
3
2
1
1
2
Page 11

10
OPERATION (CONTINUED)
Press the FUNC button seven times;
“C” will appear and the call tone
number will blink.
1
Within eight seconds, press the
CHANNEL/VOLUME Up ❶ or Down
❷ button to set the call tone (1 to 3);
the selected call tone will sound.
Press the PTT button ❸ or wait eight
seconds to confirm and exit.
2
SETTING THE CALL TONES
This unit will provide three user selectable call ringer signals to alert you of an
incoming signal. Set the call tone as follows:
To start Scan mode, press and
release the SCAN button; “SCAN”
will appear in the display and the unit
will scan through the 22 main
channels. When an active channel is
found, it will be heard for five
seconds, and then scanning will
resume.
1
To exit the Scan mode, press the
SCAN ❶ or FUNC ❷ button; “SCAN”
will disappear from the display.
2
SCANNING CHANNELS
This feature will allow you to monitor all channels automatically for valid signals.
While scanning, you can transmit and receive. When a signal is received, scan is
interrupted and you will hear the channel for five seconds. After five seconds, the unit
will resume scanning unless the SCAN button is pressed again as follows:
MK1996.OM.QXD 5/19/03 12:03 PM Page 10
3
2
2
1
1
Page 12

11
Press the FUNC button ❶, then
select a desired channel using the
CHANNEL/VOLUME Up ❷ or Down
❸ buttons. Press the FUNC button ❶
again to confirm the channel.
1
Press the CALL button once and wait
for the party’s response.
2
CALLING ANOTHER PARTY
To alert another party that you wish to communicate with them, perform the following:
To activate, press and hold the
Monitor button for two seconds; the
Monitor indicator will appear.
1
To disable and return to normal
operation, press the Monitor button
again for two seconds; the Monitor
indicator will disappear.
2
MONITORING THE CHANNEL
This feature is used for listening to weak signals or to hear all activities on the
channel by manually overriding the channel sub-tone code setting as follows:
NOTES:
• Note that both the calling and receiving units must be on the same main
channel and sub-channel for the call function to work.
• When the CALL button is pressed, the Signal Strength indicators will appear
in the display.
OPERATION (CONTINUED)
MK1996.OM.QXD 5/19/03 12:03 PM Page 11
3
1
2
Page 13

12
OPERATION (CONTINUED)
To turn on the backlight, press and
release the Monitor button; the
backlight will come on for five
seconds.
1
To turn off the backlight, press and
release the Monitor button; the
backlight will turn off.
2
BACKLIGHT
To activate, press and hold the
SCAN button for two seconds; the
Key Lock indicator will appear in the
display and the Key Lock feature will
be activated.
1
To deactivate, press and hold the
SCAN button for two seconds; the
Key Lock indicator will disappear in
the display and the Key Lock feature
will be deactivated.
2
USING THE KEY LOCK
This feature prevents accidental channel change to the preferred settings of the unit.
The key lock feature will temporarily disable the CHANNEL/VOLUME, SCAN and
FUNC buttons. Activate/deactivate Key Lock as follows:
MK1996.OM.QXD 5/19/03 12:03 PM Page 12
Page 14

Low Battery Indicator
When the batteries are low and need to be replaced or recharged, the
Battery ( ) icon will blink and audible beep tones will sound. If using
standard batteries, replace them. If using rechargeable batteries, recharge
them.
NOTE: When the batteries are low, the unit may not work properly. Please
recharge battery pack or replace batteries in this case.
Auto Power Saver
This unit has a unique circuit designed to extend battery life. If there are no
transmissions within 15 seconds, the unit will automatically switch to Battery
Save mode.
NOTE: The Auto Battery Save Circuit does not affect the unit’s ability to
receive incoming transmissions.
13
OPERATION (CONTINUED)
MK1996.OM.QXD 5/19/03 12:03 PM Page 13
Page 15

CHANNEL CH FREQ (MHz)
1 462.5625
2 462.5875
3 462.6125
4 462.6375
5 462.6625
6 462.6875
7 462.7125
8 467.5625
9 467.5875
10 467.6125
11 467.6375
CHANNEL CH FREQ (MHz)
12 467.6625
13 467.6875
14 467.7125
15 462.5500
16 462.5750
17 462.6000
18 462.6250
19 462.6500
20 462.6750
21 462.7000
22 462.7250
14
SPECIFICATIONS
MAIN CHANNEL FREQUENCIES (MHz)
CTCSS CH FREQ (Hz)
1 67.0
2 71.9
3 74.4
4 77.0
5 79.7
6 82.5
7 85.4
8 88.5
9 91.5
10 94.8
11 97.4
12 100.0
13 103.5
14 107.2
15 110.9
16 114.8
17 118.8
18 123.0
19 127.3
20 131.8
CTCSS CH FREQ (Hz)
21 136.5
22 141.3
23 146.2
24 151.4
25 156.7
26 162.2
27 167.9
28 173.8
29 179.9
30 186.2
31 192.8
32 203.5
33 210.7
34 218.1
35 225.7
36 233.6
37 241.8
38 250.3
CTCSS (Continuous Tone Code Squelch System) Tone Frequencies (Hz)
MK1996.OM.QXD 5/19/03 12:03 PM Page 14
Page 16

1. General Specifications
Frequency Range (22CH GMRS) ...............462.5500-462.7250
467.5625-467.7125
Channel Spacing ..........................................................12.5KHz
Sub-Tone Code (CTCSS) ..................38 for each main channel
Dimensions w/o Antenna.....103.5mm (H) x 62mm (W) x 33mm (D)
Standard Batteries.................Alkaline 1200mA AAA (4), 6V DC
Rechargeable Batteries ......................Ni-MH AAA (4), 4.8V DC
Operation Time (5-5-90) ..............................................20 Hours
2. Receiver
Useable Sensitivity....................................................>-119 dBm
Maximum Audio Output Power............> 0.3 Watt Max (8 Ohm)
Modulation Distortion ............................................<10% (1KHz)
3. Transceiver
RE Output Power ............................1.8W (at Hi) 0.5W (at Low)
Max Deviation..............................................................± 2.5KHz
Modular Distortion ..........................................<5% (1KHz 70%)
Specifications subject to change without notice.
15
SPECIFICATIONS (CONTINUED)
FOR ADDITIONAL SET-UP OR OPERATING ASSISTANCE, PLEASE VISIT OUR
WEBSITE AT
WWW.MEMOREXELECTRONICS.COM
OR CONTACT CUSTOMER SERVICE AT 1-800-919-3647.
PLEASE KEEP ALL PACKAGING MATERIAL FOR AT LEAST 90 DAYS IN CASE
YOU NEED TO RETURN THIS PRODUCT TO YOUR PLACE OF PURCHASE OR
MEMOREX.
FOR PARTS AND ACCESSORIES, CONTACT FOX INTERNATIONAL AT
1-800-321-6993.
MK1996.OM.QXD 5/19/03 12:03 PM Page 15
Page 17

Memcorp, Inc.
Weston, FL
Printed in Hong Kong
Visit our website at www.memorexelectronics.com
MK1996.OM.QXD 5/19/03 12:03 PM Page 16
 Loading...