

Page 1
iFlip™8.4”portable video player for iPod®
Reproductor de video portátil iFlip™para iPod con pantalla de 8.4”
Mi8000-BLK
user guide
*Compatible with iPod devices with docking capability (iPod unit sold separately)
*Compatible con iPod con conector dock (la unidad de iPod se vende por separado)
Please read these instructions
completely, before operating
this product.
Por favor lear instruciones
completamente, antes de
usar este producto.
manual del
usuario
Page 2
SAFETY PRECAUTIONS
CAUTION
RISK OF ELECTRIC SHOCK
DO NOT OPEN
CAUTION: TO REDUCE THE RISK OF ELECTRIC SHOCK,
DO NOT REMOVE COVER (OR BACK). NO USERSERVICEABLE PARTS INSIDE. REFER SERVICING TO
QUALIFIED SERVICE PERSONNEL.
DANGEROUS VOLTAGE:
The lightning flash with arrowhead symbol within an
equilateral triangle is intended to alert the user to the
presence of uninsulated dangerous voltage within the
product’s enclosure that may be of sufficient magnitude to
constitute a risk of electric shock to persons.
ATTENTION:
The exclamation point within an equilateral triangle is
intended to alert the user to the presence of important
operating and maintenance (servicing) instructions in the
literature accompanying the appliance.
FCC WARNING:
This equipment may generate or use radio frequency energy. Changes or
modifications to this equipment may cause harmful interference unless
the modifications are expressly approved in the instruction manual. The
user could lose the authority to operate this equipment if an unauthorized
change or modification is made.
ATTENTION:
POUR ÉVITER LES CHOC ÉLECTRIQUES, INTRODUIRE LA LAME LA
PLUS LARGE DE LA FICHE DANS LA BORNE CORRESPONDANTE DE
LA PRISES ET POUSSER JUSQU’AU FOND.
iPod is a trademark of Apple Computer, Inc., registered in the U.S. and
other countries.
1
Page 3

SAFETY PRECAUTIONS
INFORMATION:
This equipment complies with Class B digital device regulations.
This equipment generates, uses and can radiate radio frequency
energy and, if not installed and used in accordance with the
instructions, may cause harmful interference to radio
communications. However, there is no guarantee that interference
will not occur in a particular installation. If this equipment does
cause harmful interference to radio or television reception, which
can be determined by turning the equipment off and on, the user is
encouraged to try to correct the interference by one or more of the
following measures:
• Reorient or relocate the receiving antenna.
• Increase the separation between the equipment and receiver.
• Connect the equipment into an outlet on a circuit different from
that to which the receiver is connected.
• Consult the dealer or an experienced radio/TV technician for help.
WARNING: TO PREVENT FIRE OR SHOCK
HAZARD, DO NOT EXPOSE THIS UNIT TO RAIN
OR MOISTURE.
SURGE PROTECTORS:
It is recommended to use a surge protector for AC connection.
Lightning and power surges ARE NOT covered under warranty
for this product.
This Class B digital apparatus complies with Canadian
ICES-003.
Cet appareil numérique de la classe B est conforme à la
norme NMB-003 du Canada.
2
Page 4

Dear Customer:
A
S
S
O
C
I
A
T
I
O
N
EST. 1924
E
L
E
C
T
R
O
N
I
C
I
N
D
U
S
T
R
I
E
S
EIA
We
LISTENING
For A Lifetime
Want You
Selecting fine audio and video equipment such as the unit you’ve just purchased
is only the start of your musical enjoyment. Now it’s time to consider how you
can maximize the fun and excitement your equipment offers. This manufacturer
and the Electronic Industries Association’s Consumer Electronics Group want
you to get the most out of your equipment by playing it at a safe level. One that
lets the sound come through loud and clear without annoying blaring or
distortion-and, most importantly, without affecting your sensitive hearing.
Sound can be deceiving. Over time your hearing “comfort level” adapts to higher
volumes of sound. So what sounds “normal” can actually be loud and harmful to
your hearing. Guard against this by setting your equipment at a safe level
BEFORE your hearing adapts.
To establish a safe level:
• Start your volume control at a low setting.
• Slowly increase the sound until you can hear it comfortably and clearly, and
without distortion.
Once you have established a comfortable sound level:
• Set the dial and leave it there.
Taking a minute to do this now will help to prevent hearing damage or loss in the
future. After all, we want you listening for a lifetime.
We Want You Listening For A Lifetime
Used wisely, your new sound equipment will provide a lifetime of fun and
enjoyment. Since hearing damage from loud noise is often undetectable until it is
too late, this manufacturer and the Electronic Industries Association’s Consumer
Electronics Group recommend you avoid prolonged exposure to excessive noise.
This list of sound levels is included for your protection.
Decibel
Level Example
30 Quiet library, soft whispers
40 Living room, refrigerator, bedroom away from traffic
50 Light traffic, normal conversation, quiet office
60 Air conditioner at 20 feet, sewing machine
70 Vacuum cleaner, hair dryer, noisy restaurant
80 Average city traffic, garbage disposals, alarm clock at
two feet
THE FOLLOWING NOISES CAN BE DANGEROUS UNDER
CONSTANT EXPOSURE:
90 Subway, motorcycle, truck traffic, lawn mower
100 Garbage truck, chain saw, pneumatic drill
120 Rock band concert in front of speakers, thunderclap
140 Gunshot blast, jet engine
180 Rocket launching pad
Information courtesy of the Deafness Research Foundation.
3
Page 5
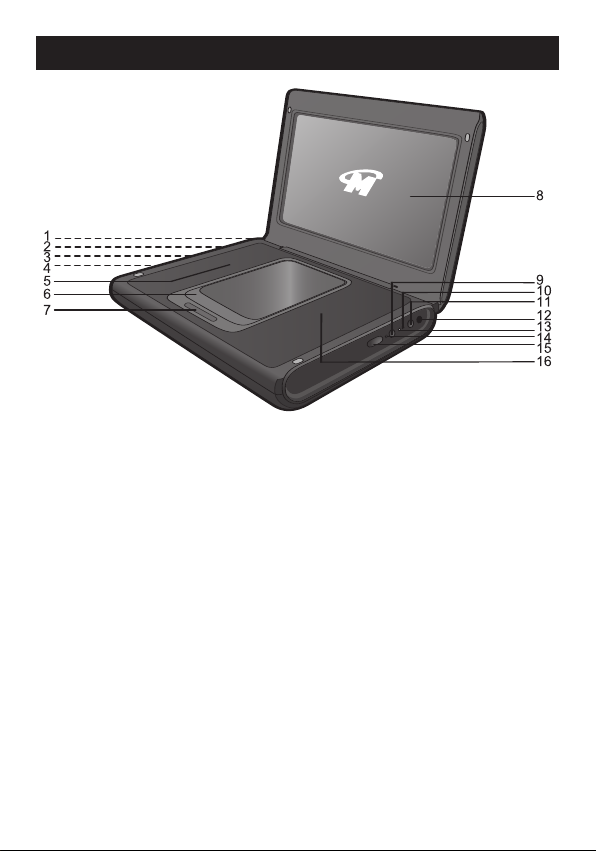
MAIN UNIT
LOCATION OF CONTROLS
1. S-VIDEO Jack
(Side of Unit)
2. LINE OUT Jack
(Side of Unit)
3. Headphones 1 Jack
(Side of Unit)
4. Headphones 2 Jack
(Side of Unit)
5. Left Speaker
6. Cradle Dock for use
with iPod
7. Dock Release Button
8. Screen
9. MENU Button
10.Battery (Charging)
Indicator
11.Power Button
12.POWER IN Jack
13.Fully Charged Indicator
14.Power On Indicator
15.- / + (Volume/Setting)
Button
16.Right Speaker
4
Page 6

POWER SOURCE
AC Plug
AC Outlet
AC CONNECTION
Insert the small end of the AC adapter into the POWER IN jack (located on the side of
the unit). Connect the AC cord to the adapter and connect the other end to a wall outlet
having 120V AC, 60 Hz. AC Adapter, DC 12V
NOTES:
• The AC adapter supplied with the unit is polarized to help minimize the possibility
of electric shock. If the AC plug does not fit into a nonpolarized AC outlet, do not
file or cut the wide blade. It is the user’s responsibility to have an electrician replace
the obsolete outlet.
• Remove both the DC plug and the AC-IN plug to disconnect the AC adapter when
not in use.
• Only use the supplied AC Adapter which has the following specs: DC 12V
CHARGING THE INTERNAL BATTERY PACK
When the Mi8000 is operating on AC power (as described above), it will also charge
the internal battery pack. While the battery pack is charging, the Battery (Charging)
indicator will light amber. When the battery pack is full, the Fully Charged indicator will
light green.
NOTES:
• When the battery is low, the Battery (Charging) indicator will flash amber.
• Fully charge the battery pack (6.5 hours) before using it for the first time.
• Make sure the battery packs is charged at least once a year.
• When fully charged, the unit can be used for up to 5 hours.
• For iPod charging, please refer to page 7 for details.
Z
Z
5
Page 7

OPTIONAL FEATURES
S-VIDEO JACK (Side of Unit)
If you are using an iPod with video (5th generation) or iPod photo, and your TV has
an S-Video input, you can connect the Mi8000 to the external TV with an S-Video
cable. You will then be able to view the photos/videos from the iPod on your external
TV.
NOTES:
• Set the TV’s TV/VIDEO button or switch to the VIDEO setting.
• When connecting the Mi8000, refer to the owner’s manual of the TV, as well as
this manual.
• When connecting the Mi8000 to the TV, make sure the power is off and both
units are unplugged before making any connections.
• Make sure to go into the Settings menu of your iPod and set the TV Out setting
to ON; otherwise, you may not be able to view the videos/photos on your
external TV.
LINE OUT JACK (Side of Unit)
By using a home audio connection cable, superb sound can be heard through your
home audio system. Before making any connections, turn off the power to all
equipment.
Plug a connection cable between the LINE OUT jack on the side of the Mi8000 and
the amplifier’s LINE or AUX IN jack. (Do not connect it to the amplifier’s
Headphones jacks.)
NOTE: If the Mi8000 interferes with TV or radio reception, move the Mi8000 away
from the TV or radio or turn off the power to the Mi8000.
6
Page 8
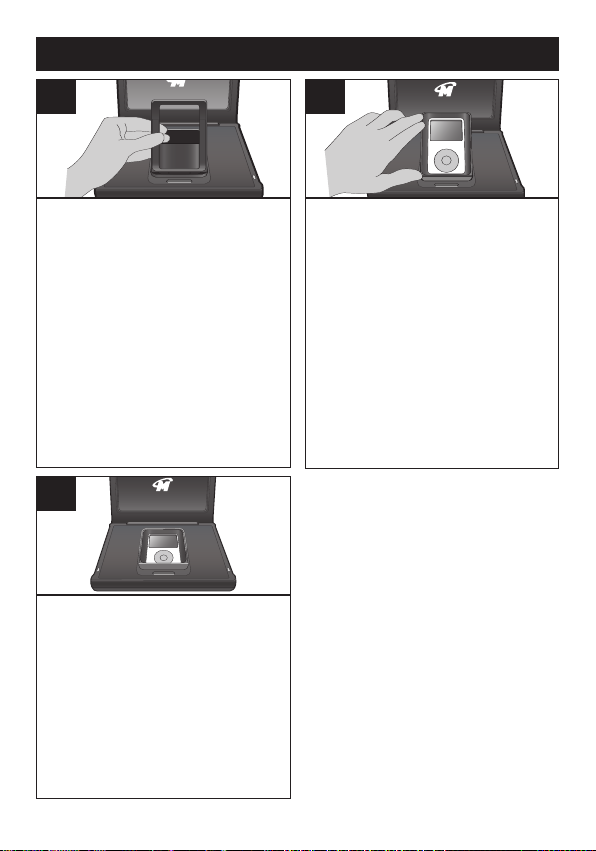
INSERTING AN iPod
1
Press the Dock Release button.
Locate the correct holder to use as
shown on page 10. Insert the
holder onto the dock (as shown)
and slip the side tabs into place.
IMPORTANT NOTE:
If you are using the holder marked
A compatible with any iPod with
“
dock connector”, please insert the
iPod universal dock (not included)
corresponding to your iPod model
onto the dock. Then, insert the
holder followed by the iPod.
3
Once you connect the iPod, it will
start charging the battery until it is
full. (The iPod can charge only
when the Mi8000 is connected with
the AC adapter.) When the iPod is
connected to the Mi8000, it will be
in Charging mode until the battery
is full. Please see the next page for
instructions on using an iPod with
this unit.
2
Insert the iPod onto the holder.
Gently push down so the
connector on the iPod slides onto
the connector on the Mi8000.
Press the edge area of the holder
down gently (as shown) until it
clicks into place.
NOTES:
• To remove, press the Dock
Release button again. Then,
remove the iPod first, followed
by the holder.
• Do not press the holder by
pushing the iPod.
7
Page 9

OPERATION
1
1
1
USING AN iPod WITH THIS UNIT
1
With an iPod connected (see
previous page), turn the Mi8000 on
by pressing and holding the Power
button (if it is not on already); the
Power On indicator will light green.
NOTES:
• Make sure to go into the Settings menu of your iPod and set the TV
Out setting to ON and set the TV Signal to NTSC; otherwise, you may
not be able to view the videos/ photos on your external TV.
• The photo and video selections are for iPod with video (5th
generation). The photo selection is also suitable for iPod photo.
3
Adjust the volume as desired by
pressing the - / + (Volume/Setting)
button.
For private listening, plug in
headphones into the Headphones
jack(s) on the side of the Mi8000.
The speakers will be disconnected
when headphones are plugged in.
2
Operate the iPod as per its
owner’s manual.
For music selections, the sound
will be heard through the Mi8000’s
speakers.
For photo selections, the image
will be seen on the Mi8000’s
screen.
For video selections, the sound
will be heard through the Mi8000’s
speakers and the image will be
seen on the Mi8000’s screen.
4
When done, press and hold the
Power button (the Power On
indicator will go out) and also turn
off the iPod.
8
Page 10

OPERATION (CONTINUED)
1
2
1
2
1
2
1
2
SETTING THE MENUS
1
With the Mi8000 on, press the
MENU button 1; the menu will
appear. To adjust the Brightness,
Contrast, Sharpness, Color or Hue,
select the desired option by
repeatedly pressing the MENU
button 1. Then adjust the option by
pressing the - / + (Volume/Setting)
button 2, followed by the MENU
button 1 again.
3
To reset the unit back to its factory
settings, select Default by
repeatedly pressing the MENU
button
1. Then press the - / +
(Volume/Setting) button
2.
2
To adjust the Screen Mode, select
Screen Mode by repeatedly
pressing the MENU button 1. Then
select between 16:9 (Wide Screen)
and 4:3 (Pan Scan: video material
formatted in this style is played back
with the left and right edges cut off)
by pressing the - / + (Volume/
Setting) button
MENU button
2, followed by the
1 again.
4
To exit the menu, select Exit by
repeatedly pressing the MENU
1. Then press the - / +
button
(Volume/Setting) button
2.
9
Page 11

OPERATION (CONTINUED)
iPod HOLDERS
Locate your iPod in the chart below and select the respective holder (the
Holder No. is marked at the back of the holders as shown below) to match
with your iPod. Insert the corresponding holder and your iPod into the unit as
described on page 7.
iPod Type Memory Holder No.
Fifth
Generation
iPod with
video
30GB
No. 9
iPod with video
30GB
60GB/
80GB
NOTE:
• For all other iPod models, please use the holder marked “A compatible
with any iPod with dock connector”.
No. 10
iPod with video
60GB/80GB
IMPORTANT!
The Holder No. is marked at the
back of the holders. Please refer
to the illustration to the left for the
location of the Holder No.
10
Page 12

TROUBLESHOOTING GUIDE
If you experience a problem with this unit, check the chart below before
calling for service.
SYMPTOM CAUSE SOLUTION
No sound from iPod. Volume is Increase volume using
set to minimum. - / + (Volume/Setting) button.
Incorrectly connected. Check the connection
(see pages 7-8).
No image from iPod. iPod has incorrect In the Settings menu of
settings selected. your iPod, set the TV
Out setting to ON.
Incorrectly connected. Check the connection
(see pages 7-8).
No video from iPod. Incorrect iPod model Only for iPod with video
connection. (5th generation) and iPod
photo.
iPod not charging. Mi8000 not connected The iPod can charge only
with the AC adapter. when the Mi8000 is
connected with the AC
adapter.
11
Page 13

SPECIFICATIONS
GENERAL:
Power Source ................DC 12V Adapter (Center Positive)
Battery Pack..................................................................7.2V
Speaker...............................................................2 x 8 ohms
Output Power .......................................................2 x 1.2 W
Weight.......................................................................2.5 Lbs
Dimensions............................1.7" (H) X 8.7" (W) X 6.7" (D)
Weight and dimensions are approximate.
Specifications are subject to change without notice.
This product has been designed specifically to work with iPod
and has been certified by the developer to meet Apple
performance standards. Includes iPod Universal Dock.
Compatible with any iPod with dock connector.
FOR ADDITIONAL SET-UP OR OPERATING ASSISTANCE,
PLEASE VISIT OUR WEBSITE AT:
OR CONTACT CUSTOMER SERVICE AT (954) 660-7100.
WWW.MEMOREXELECTRONICS.COM
PLEASE KEEP ALL PACKAGING MATERIAL FOR AT LEAST 90
DAYS IN CASE YOU NEED TO RETURN THIS PRODUCT TO YOUR
PLACE OF PURCHASE OR MEMOREX.
FOR PARTS AND ACCESSORIES, CONTACT FOX
INTERNATIONAL AT 1-800-321-6993.
12
Page 14

MEDIDAS DE SEGURIDAD
CUIDADO
RIESGO DE DESCARGA
ELÉCTRICA. NO ABRIR
ADVERTENCIA: Para reducir el riesgo de descargas
eléctricas no saque la cubierta o la tapa posterior. Allí no se
encuentran partes que puedan ser reparadas por el usuario.
Lleve su unidad a un Centro de Servicio Autorizado.
ADVERTENCIA: La figura de la flecha con forma de
rayo dentro de un triángulo está hecho para alertar al
usuario de la presencia de cables sin aislar de "voltaje
peligroso" dentro del gabinete, de tal magnitud que
puede causar un riesgo de descarga eléctrica a las
personas.
ADVERTENCIA: El signo de exclamación dentro de un
triángulo está hecho para alertar al usuario de la
existencia de instrucciones importantes tanto de
servicio como de funcionamiento y mantenimiento que
vienen con la unidad.
AVISO DE LA FCC:
Este equipo genera o puede usar energía de frecuencia radial. Cualquier
cambio o modificación al equipo, puede causar interferencia nociva, a
menos que estas modificaciones esten expresamente indicadas en el
manual de instrucciones. El usuario puede perder el derecho de operar
este equipo si efectuara un cambio o modificación no autorizadas.
ATTENTION:
POUR ÉVITER LES CHOC ÉLECTRIQUES, INTRODUIRE LA LAME LA
PLUS LARGE DE LA FICHE DANS LA BORNE CORRESPONDANTE DE
LA PRISES ET POUSSER JUSQU’AU FOND.
iPod es una marca comercial de Apple Computer, Inc., registrada en
los Estados Unidos y otros países.
1
Page 15

MEDIDAS DE SEGURIDAD
INFORMACIÓN:
Este equipo
Este equipo genera, usa y puede irradiar energía de radiofrecuencia
y, si no se instala y usa conforme a las instrucciones, puede generar
interferencia dañina con las radiocomunicaciones. Sin embargo, no
hay garantía de que no habrá interferencia en una instalación
particular. Si este equipo llegara a causar interferencia dañina con la
recepción de radio o televisión, lo cual se puede determinar
encendiendo y apagando el equipo, le pedimos que intente corregir
la interferencia con las siguientes medidas:
• Reoriente o reubique la antena receptora.
• Incremente la distancia entre el equipo y el receptor.
• Conecte el equipo a un contacto eléctrico que esté en un circuito
distinto al que está conectado el receptor.
• Consulte al vendedor o a un técnico de radio y televisión con
experiencia.
ELECTROCUTAMIENTO O INCENDIO, NO EXPONGA ESTE
PROTECTORES DE OLEADA:
Se recomienda para utilizar un protector de oleada para la
conexión de la CA. Las oleadas del relámpago y de la energía
no se cubren bajo garantía para este producto.
cumple con
ADVERTENCIA: PARA EVITAR LOS PELIGROS DE
APARATO A LA LLUVIA O HUMEDAD.
aparato digital de Clase B regulaciones.
Este aparato digital de Clase B cumple con la norma
ICES-003 de Canadá.
Cet appareil numérique de la classe B est conforme à la
norme NMB-003 du Canada.
2
Page 16

Estimado cliente:
A
S
S
O
C
I
A
T
I
O
N
EST. 1924
E
L
E
C
T
R
O
N
I
C
I
N
D
U
S
T
R
I
E
S
EIA
We
LISTENING
For A Lifetime
Want You
Haber seleccionado un equipo audio y vídeo de tan alta tecnología, como el que usted
recién compró, es sólo el comienzo de su entretenimiento musical. Ahora es tiempo de
tomar en consideración como optimizar el entretenimiento que su equipo le ofrece. Este
fabricante y la Asociación de Industrias Electrónicas del Grupo de Consumidores
Electrónicos desean que usted obtenga el mejor resultado de su equipo usándolo en un
nivel seguro, tal como el escuchar el sonido claro y sonoro, sin distorsión - sobre todo
sin que afecte su sentido auditivo. El sonido es engañoso, ya que con el tiempo su nivel
de audición puede adaptarse solo a escuchar en volumen alto, resultando en un serio
daño a su sentido auditivo. Protéjase contra este daño innecesario ajustando el volumen
de su equipo a un nivel bajo antes de acostumbrarse a escuchar siempre la música a un
volumen alto.
Para establecer un nivel auditivo seguro:
• Ponga el control de volumen en posición baja.
• Lentamente aumente el nivel hasta que usted pueda escuchar clara y
confortablemente sin distorsión.
Una vez que establece el nivel de audición confortable:
• Deje fijo el control de Volumen en dicho nivel.
Esto solo le tomará un minuto, y le ayudará a prevenir la pérdida del oído en el futuro.
Nosotros deseamos que usted pueda oir durante toda su vida
Si sabe usar su equipo, éste le proveerá mucho tiempo de satisfacción y entretenimiento.
Debido a que el daño causado al oido es imperceptible hasta que ya es muy tarde, este
fabricante y la Asociación de Industrias Electrónicas le recomiendan evitar la exposición
prolongada a ruidos excesivos. La lista que le damos a continuación le servirá de guía:
Nivel de Decibeles
30 Una biblioteca, susurros.
40 Sala, refrigeradora, dormitorio lejos del tráfico.
50 Semáforo, conversación no rmal, oficina tranquila.
60 Aire acondicionado a 20 pies, máquina de coser
70 Aspiradora de polvo, secadora de pelo, restaurant bullicioso.
80 Tráfico de la calle, destructores de basura,alarma de reloj a dos pies.
LOS SIGUIENTES RUIDOS PUEDEN SER PELIGROSOS SI SE SOMETE A ELLOS
EN FORMA CONSTANTE
90 Subterráneo, motocicletas, tráfico de camiones, podadora de pasto.
100 Camión de basura, sierra eléctrica, perforadora neumática.
120 Concierto rock delante de los parlante, ruido de truenos.
140 Sonido de disparo, motor de jet.
180 Lanzamiento de una nave espacial.
Esta información ha sido proporcionada gratuitamente por la Fundación de
Investigación de la Sordera.
Ejemplo
3
Page 17

UBICACIÓN DE LOS CONTROLES
UNIDAD PRINCIPAL
1. Enchufe de S-VIDEO
(en un lado de la unidad)
2. Enchufe de SALIDA DE
LÍNEA
(en un lado de la unidad)
3. Enchufe de Audífonos 1
(en un lado de la unidad)
4. Enchufe de Audífonos 2
(en un lado de la unidad)
5. Bocina izquierda
6. Puerto base para ser
usado con iPod
7. Botón de liberación del
puerto
8. Pantalla
9. Botón MENÚ
10.Indicador de pilas (carga)
11.Botón de encendido
12.Enchufe de ENERGÍA
13.Indicador de carga
completa
14.Indicador de encendido
15.Botón - / +
(Volumen/Configuración)
16.Bocina derecha
4
Page 18

FUENTE DE ENERGÍA
AC Plug
AC Outlet
CONEXIÓN A CORRIENTE ELÉCTRICA
Inserte el extremo pequeño del adaptador de corriente en el enchufe POWER IN
(ubicando en un lado de la unidad). Conecte el cable de corriente a un adaptador y
conecte el otro extremo a un contacto de pared de 120V AC, 60 Hz. Adaptador AC, DC 12V Z
Contacto de corriente
Enchufe de corriente
NOTAS:
• El adaptador de corriente incluido con la unidad está polarizado para ayudar a
minimizar la posibilidad de una descarga eléctrica. Si el enchufe no entra en el
contacto eléctrico no polarizado, no lime ni corte el lado ancho. Es responsabilidad
del usuario pedirle a un electricista que cambie el contacto eléctrico obsoleto.
• Cuando no vaya a utilizar la unidad, desconecte el adaptador de corriente alterna
de ambos lados.
• Use únicamente un adaptador de corriente incluido, que tenga las siguientes
especificaciones: DC 12V
CARGAR EL PAQUETE DE PILAS INTERNO
Cuando la unidad Mi8000 opera con corriente eléctrica (como se describe
anteriormente), también se carga el paquete de pilas interno. Mientras se carga el
paquete de pilas, el indicador de Pila (carga) se iluminará de color amarillo. Cuando
el paquete de pilas está completamente cargado, el indicador de carga completa se
iluminará de color verde.
NOTAS:
• Cuando la pila está baja, el indicador de Pila (carga) parpadeará de color amarillo.
• Cargue el paquete de pilas por completo (6.5 horas) antes de usar la unidad
por primera vez.
• Asegúrese de recargar los paquetes de pilas al menos una vez al año.
• Cuando la unidad está completamente cargada, puede utilizarla de 5 horas.
• Para cargar el iPod, consulte la página 7 para obtener los detalles.
Z
5
Page 19

FUNCIONES OPCIONALES
ENCHUFE DE S-VIDEO (por un lado de la unidad)
Si está usando un iPod con video (5a generación) o iPod photo, y su televisor tiene
una entrada de S-Video, puede conectar la unidad Mi8000 al televisor externo con
un cable de S-Video. Entonces podrá ver las fotos o videos que tiene en el iPod en
su televisor externo.
NOTAS:
• Ponga el botón o interruptor de TV/VIDEO del televisor en VIDEO.
• Cuando conecte la unidad Mi8000, consulte el manual del propietario del
televisor, así como este manual.
• Cuando conecte la unidad Mi8000 al televisor, asegúrese que las unidades
estén apagadas y desconectadas, antes de realizar la conexión.
• Asegúrese de entrar al menú de Configuraciones de su iPod y active la salida
a TV; de lo contrario, no podrá ver los videos o fotos en su televisor externo.
ENCHUFE DE LÍNEA DE SALIDA (en un lado de unidad)
Con un cable de conexión de audio, se puede escuchar el magnífico sonido a
través de su sistema de sonido. Antes de hacer cualquier conexión, apague todos
los equipos.
Conecte un cable de conexión entre el enchufe de LÍNEA DE SALIDA por el lado
de la unidad Mi8000 y el enchufe de entrada de LÍNEA o AUX del amplificador. (No
lo conecte en el enchufe de audífonos del amplificador).
NOTA: Si la unidad Mi8000 interfiere con la recepción de TV o radio, aléjela del
televisor o de la radio o apague la unidad Mi8000.
6
Page 20

CÓMO INTRODUCIR UN iPod
1
Presione el botón de liberación del
puerto. Ubique el portador correcto a
usar como se muestra en la página 10.
Introduzca el portador en el puerto
(como se muestra) y deslice las
pestañas laterales hasta que queden
fijas.
NOTA IMPORTANTE:
Si está utilizando el portador marcado
A compatible with any iPod with
como “
dock connector” (compatible con
cualquier iPod que tiene conector de
puerto), inserte el puerto universal para
iPod (no incluido) que corresponde con
su modelo de iPod en el puerto. Luego,
inserte el portador seguido del iPod.
3
Una vez que conecte el iPod, éste
empezará a cargar la pila hasta que
esté cargada. (El iPod solamente puede
cargarse cuando la unidad Mi8000 está
conectada con el adaptador de
corriente.) Cuando el iPod está
conectado a la unidad Mi8000, estará
en modo de carga hasta que la pila esté
cargada. Consulte la siguiente página
para obtener las instrucciones sobre
cómo usar un iPod con esta unidad.
2
Inserte el iPod en el portador. Empújelo
suavemente para que el conector en el
iPod se deslice por el conector en la
unidad Mi8000. Presione ligeramente la
zona del borde del portador hacia abajo
(como se muestra) hasta que quede fijo
en su lugar.
NOTAS:
• Para retirarlo, presione
nuevamente el botón de liberación
del puerto. Luego, retire primero el
iPod y acto seguido el portador.
• No presione el portador ejerciendo
presión sobre el iPod.
7
Page 21

OPERACIÓN
1
1
1
CÓMO USAR UN iPod CON ESTA UNIDAD
1
Con el iPod conectado (ver página
previa), presione el botón de
encendido (si no lo ha hecho) y
manténgalo presionado para
encender la unidad Mi8000; el
indicador de encendido se
iluminará de color verde.
NOTAS:
• Asegúrese de entrar al menú de Configuraciones de su iPod y active
la salida a TV y ajuste la señal de televisión en NTSC; de lo contrario,
no podrá ver los videos o fotos en su televisor externo.
• Las selecciones de foto y video son para iPod con video (5a
generación). La selección de fotos también sirve para iPod photo.
3
Ajuste el volumen según desee,
presionando los botones - / +
(Volumen/Configuración).
Para escuchar en privado, conecte
los audífonos al enchufe en la parte
posterior de la unidad Mi8000. Las
bocinas se desconectan al conectar
los audífonos.
2
Opere el iPod como indica el manual
del propietario del mismo.
Para las
sonido se escuchará a través de las
bocinas de la unidad Mi8000.
Para las
imagen se verá a través de la pantalla
de la unidad Mi8000.
Para las
sonido se escuchará a través de las
bocinas de la unidad Mi8000 y la
imagen se verá a través de la pantalla
de la misma.
selecciones de música, el
selecciones de foto, la
selecciones de video, el
4
Cuando termine, presione el botón
de encendido y manténgalo
presionado (el indicador de
encendido se apagará) y también
apague el iPod.
8
Page 22

OPERACIÓN (CONTINÚA)
1
2
1
2
1
2
1
2
CONFIGURAR LOS MENÚS
1
Con la unidad Mi8000 encendida,
presione el botón MENU
menú aparecerá. Para ajustar el
brillo, contraste, nitidez, color o
matiz, seleccione la opción
deseada presionando repetidamente el botón MENU
ajuste la opción presionando el
botón - / + (Volumen/ Configura-
2, seguido nuevamente del
ción)
botón MENU
1.
1; el
1. Luego
3
Para restablecer la unidad a la
configuración de fábrica,
seleccione Default [predeterminado] presionando repetidamente el botón MENU
presione el botón - / + (Volumen/
Configuración)
2.
1. Luego
2
Para ajustar el modo de pantalla,
seleccione el modo de pantalla
presionando repetidamente el botón
1. Luego seleccione entre
MENU
16:9 (pantalla ancha) y 4:3 (Pan
Scan: material de video formateado
en este estilo se reproduce con los
bordes izquierdo y derecho
recortados) presionando el botón - / +
(Volumen/Configuración)
nuevamente del botón MENU
2, seguido
1.
4
Para salir del menú, seleccione
Exit [salir] presionando repetidamente el botón MENU
presione el botón - / + (Volumen/
Configuración)
2.
1. Luego
9
Page 23

OPERACIÓN (CONTINÚA)
PORTADORES PARA iPod
Ubique su iPod en la tabla a continuación y seleccione el portador respectivo
(el número de portador está marcado en la parte posterior de los mismos,
como se muestra a continuación) para que corresponda con su iPod. Inserte
el portador correspondiente así como su iPod en la unidad como se describe
en la página 7.
iPod Tipo Memoria N° de portador
Fifth
Generation
iPod con
video
30GB
No. 9
iPod con video
30GB
60GB/
80GB
NOTA:
• Para todos los demás modelos de iPod, use el portador marcado “A
compatible with any iPod with dock connector” (compatible con
cualquier iPod que tiene conector de puerto).
No. 10
iPod con video
60GB/80GB
IMPORTANTE:
El número del portador está
marcado en la parte posterior de
los mismos. Consulte la
ilustración a la izquierda para
encontrar su número de portador.
10
Page 24

GUÍA DE DIAGNÓSTICO
Si tiene problemas con esta unidad, revise la tabla a continuación antes de
llamar a servicio.
SÍNTOMA CAUSA SOLUCIÓN
No hay sonido del El volumen está al Aumente el volumen con el
iPod. mínimo. botón - / + (Volumen/ Conf.)
Incorrectamente Revise la conexión
conectado. (véase las páginas 7 y 8).
No hay imagen del El iPod está configurado En el menú de configuración
iPod. incorrectamente. del iPod, active la salida
de TV.
Incorrectamente Revise la conexión
conectado. (véase las páginas 7 y 8).
No hay video del iPod. La conexión del modelo Sólo para iPod con video
iPod es incorrecta. (5a generación) y iPod
photo.
El iPod no se carga. La unidad Mi8000 no El iPod solamente
está conectada con el puede cargarse cuando la
adaptador de corriente. unidad Mi8000 está
conectada con el
adaptador de corriente.
11
Page 25

ESPECIFICACIONES
GENERAL:
Fuente de energía ......Adaptador DC 12V (centro positivo)
Paquete de pila. ............................................................7.2V
Bocina. .............................................................2 x 8 ohmios
Energía de salida .................................................2 x 1.2 W
Peso..........................................................................2.5 Lbs
Dimensiones...........1.7" (alto) X 8.7" (ancho) X 6.7" (largo)
El peso y las dimensiones son aproximados.
Las especificaciones están sujetas a cambios sin previo aviso.
Este producto está diseñado específicamente para operar
con un iPod y fue certificado por el creador para satisfacer las
normas de rendimiento de Apple. Incluye puerto universal
para iPod. Compatible con cualquier iPod con conector de
puerto.
PARA OBTENER AYUDA ADICIONAL CON RESPECTO A LOS
AJUSTES O A LA OPERACIÓN, VISITE NUESTRO SITIO
WEB EN WWW.MEMOREXELECTRONICS.COM O
COMUNÍQUESE CON SERVICIO AL CLIENTE AL
(954) 660-7100.
CONSERVE LOS MATERIALES DE EMPAQUE AL MENOS
DURANTE 90 DÍAS POR SI ACASO NECESITARA
REGRESAR EL PRODUCTO A SU DISTRIBUIDOR O A
MEMOREX.
PARA OBTENER PARTES Y ACCESORIOS, COMUNÍQUESE
CON FOX INTERNATIONAL AL 1-800-321-6993.
12
Page 26

Memcorp, Inc. Weston, FL Printed in Hong Kong
www.memorexelectronics.com
iPod is a trademark of Apple Computer, Inc., registered in the U.S.
and other countries. This product has been designed specically
to work with iPod and has been certied by the developer to
meet Apple performance standards. Includes iPod Universal
Dock. Compatible with any iPod with dock connector.
Memcorp, Inc. Weston, FL Impreso en Hong Kong
iPod es una marca registrada de Apple Computer, Inc. registrada
en EE. UU. y otros países. Este producto ha sido diseñado
especícamente para funcionar con los reproductores iPod. El
fabricante certica que cumple con las normas decalidad de
Apple. Incluye la base Dock universal compatible con cualquier
modelo de iPod apto para la base Dock.
 Loading...