


82-258-00171

1
SAFETY PRECAUTIONS
CAUTION: TO REDUCE THE RISK OF ELECTRIC SHOCK,
DO NOT REMOVE COVER (OR BACK). NO USERSERVICEABLE PARTS INSIDE. REFER SERVICING TO
QUALIFIED SERVICE PERSONNEL.
CAUTION
RISK OF ELECTRIC SHOCK
DO NOT OPEN
DANGEROUS VOLTAGE:
The lightning flash with arrowhead symbol within an
equilateral triangle is intended to alert the user to the
presence of uninsulated dangerous voltage within the
product’s enclosure that may be of sufficient magnitude to
constitute a risk of electric shock to persons.
ATTENTION:
The exclamation point within an equilateral triangle is
intended to alert the user to the presence of important
operating and maintenance (servicing) instructions in the
literature accompanying the appliance.
FCC WARNING:
This equipment may generate or use radio frequency energy. Changes or
modifications to this equipment may cause harmful interference unless
the modifications are expressly approved in the instruction manual. The
user could lose the authority to operate this equipment if an unauthorized
change or modification is made.
ATTENTION:
POUR ÉVITER LES CHOC ÉLECTRIQUES, INTRODUIRE LA LAME LA
PLUS LARGE DE LA FICHE DANS LA BORNE CORRESPONDANTE DE
LA PRISES ET POUSSER JUSQU’AU FOND.

INFORMATION:
This equipment complies with Class B digital device regulations.
This equipment generates, uses and can radiate radio frequency
energy and, if not installed and used in accordance with the
instructions, may cause harmful interference to radio
communications. However, there is no guarantee that interference
will not occur in a particular installation. If this equipment does
cause harmful interference to radio or television reception, which
can be determined by turning the equipment off and on, the user is
encouraged to try to correct the interference by one or more of the
following measures:
• Reorient or relocate the receiving antenna.
• Increase the separation between the equipment and receiver.
• Connect the equipment into an outlet on a circuit different from
that to which the receiver is connected.
• Consult the dealer or an experienced radio/TV technician for help.
2
SAFETY PRECAUTIONS
WARNING: TO PREVENT FIRE OR SHOCK
HAZARD, DO NOT EXPOSE THIS UNIT TO RAIN
OR MOISTURE.
SURGE PROTECTORS:
It is recommended to use a surge protector for AC connection.
Lightning and power surges ARE NOT covered under warranty
for this product.
This Class B digital apparatus complies with Canadian
ICES-003.
Cet appareil numérique de la classe B est conforme à la
norme NMB-003 du Canada.

3
LOCATION OF CONTROLS
1
2
3
4
5
6
7
8
9
10
11
1. Screen
2. SD/SDHC/MMC/MS/MS
Pro/xD Card Slot
(Side of Unit)
3. USB Flash Drive Jack
(Side of Unit)
4. Navigation Up/Rotate Button
5. MODE/Stop (I) Button
6. Select/Play/Pause (®p)
Button
7. Navigation Down/Brightness
Button
8. Navigation Right/Skip (n)
Button
9. Navigation Left/Skip (o)
Button
10. Stand
(PART NO. 60-258-C0201*)
11. DC 5V IN Jack
(Bottom of Unit)
(AC ADAPTER PART NO. 43-
111-00278*)
*Consumer Replaceable Part
(See page 11 to order.)

4
POWER SOURCE
AC CONNECTION
Insert the small end of the AC adapter into
the DC 5V IN jack (located on the bottom of
this unit). Connect the other end to a wall
outlet having 120V AC, 60 Hz.
AC Adapter, DC 5V Z
NOTES:
• Remove both the DC plug and the ACIN plug to disconnect the AC adapter
when not in use, because this unit will
always be ON when the DC plug and the AC-IN plug are connected.
• Only use the supplied AC adapter which has the following specs: DC 5V Z
USING THE STAND
STAND (REAR OF UNIT)
To use the stand, place the stand’s knob into the hole in the back of the
frame. Push the stand either to the left (for a vertical display) or to the
right (for a horizontal display) until the stand locks into place.

5
GETTING STARTED
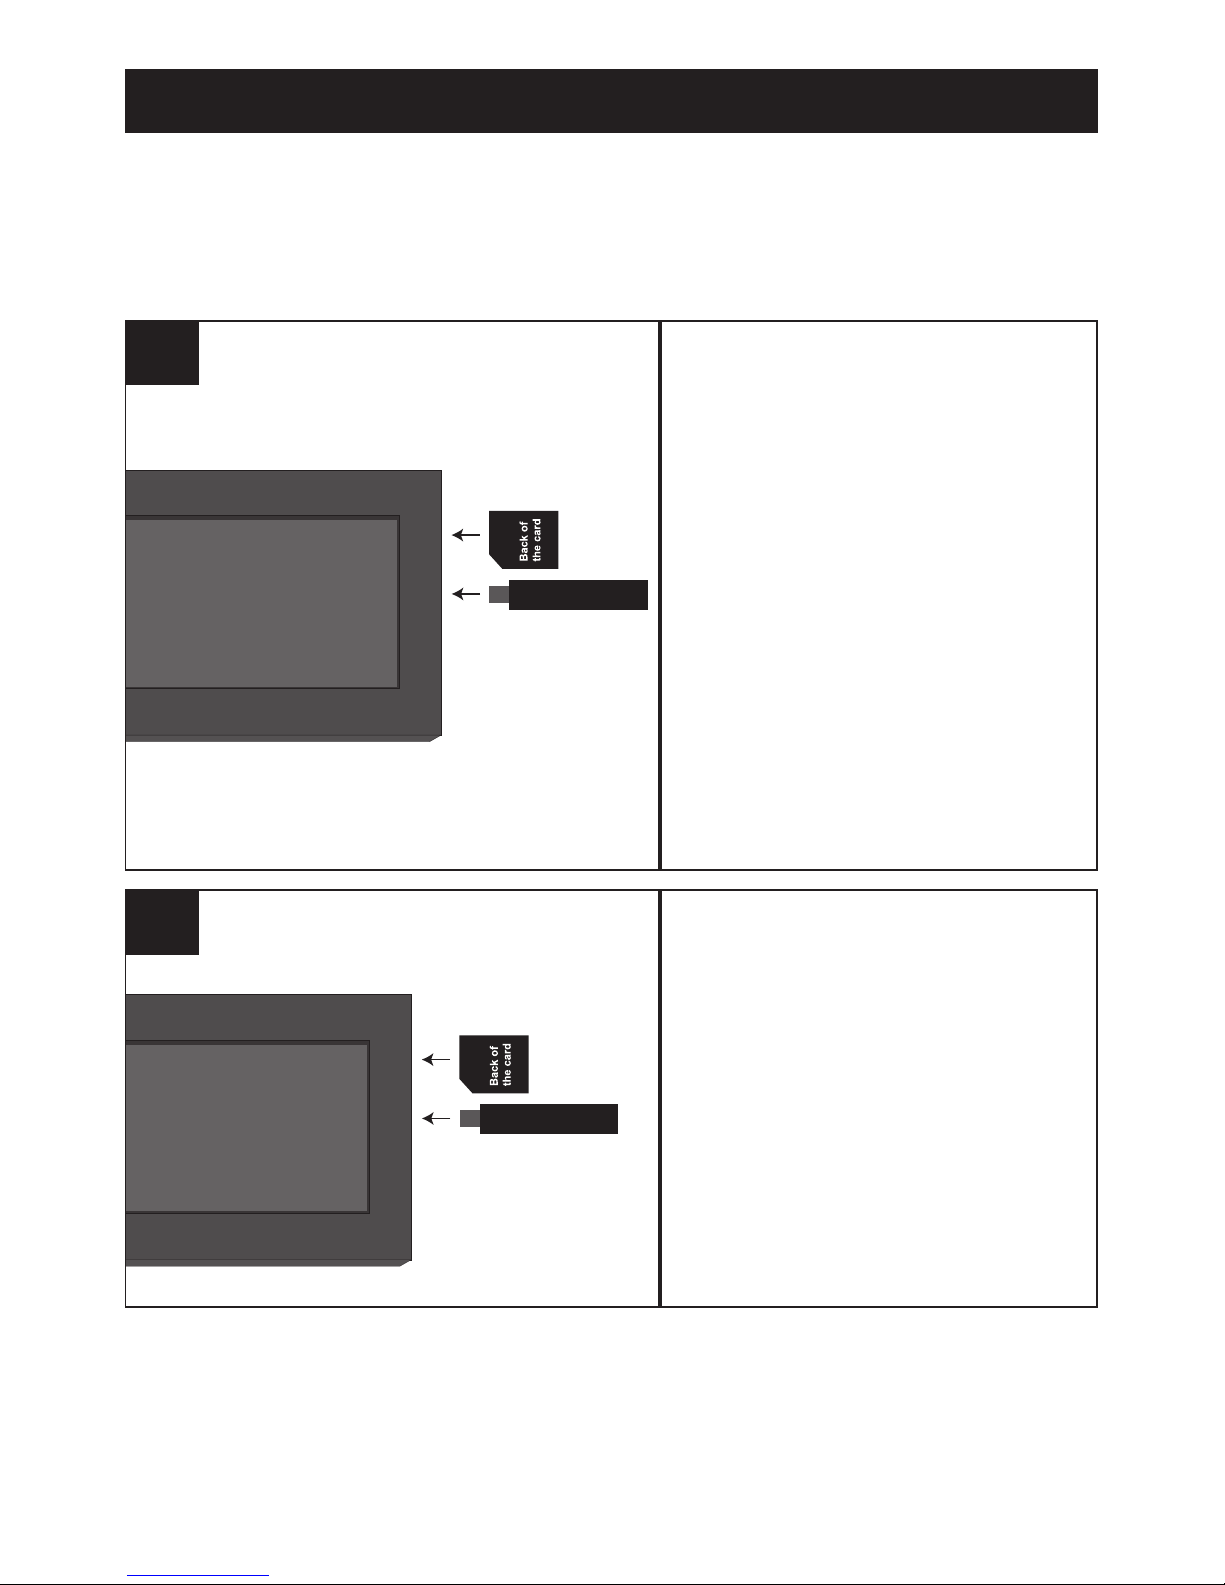
USING A MEMORY CARD AND/OR USB FLASH DRIVE
You can access media files from an external memory card and/or USB flash
drive as described below. This unit accepts memory cards and/or USB flash
drives up to 4GB.
TO INSERT A MEMORY CARD:
This unit can support SD (Secure
Digital), SDHC (Secure Digital
High Capacity), MMC (MultiMedia Card), MS (Memory
Stick), MS Pro (Memory Stick
Pro) or xD memory cards. Simply
insert the SD, MMC, MS or xD
card into the card slot located at
the right side of the unit, with the
card facing towards the rear of
the unit (as shown).
TO INSERT A USB FLASH
DRIVE: Simply insert the USB
flash drive into the USB Flash
Drive jack located at the right
side of the unit (as shown).
1
TO REMOVE A MEMORY
CARD: Remove the memory
card by pulling it out gently.
You may need to wiggle it
back and forth to dislodge it
from the frame.
TO REMOVE A USB FLASH
DRIVE: Remove the USB flash
drive by pulling it out gently.
2
NOTES:
• It is highly recommended to insert only a memory card OR a USB flash drive. If you
insert both a memory card and a USB flash drive, this unit will only read the photos
from the memory card.
• Please place under 1,000 photo files on the memory card, otherwise some photos
may not appear in the frame.

6
OPERATION
With a memory card or USB flash
drive inserted (as shown on the
previous page), connect the unit
to an AC power source (as
shown on page 4).
Select Photo using the
Navigation Left/Skip (o) 1 and/or
Right/Skip (n) 2 button; then
press the Select/Play/Pause
(®p) button 3 to enter the Photo
Slideshow mode.
1
3
2
1
Press the MODE/Stop (I) button
1 to stop the slideshow and
enter Photo Thumbnail mode.
Select the desired photo, or
page of photos, to view using the
Navigation Left/Skip (o) 2
and/or Right/Skip (n) 3 button.
To search through the photos
more quickly, press and hold the
Navigation Left/Skip (o) 2
and/or Right/Skip (n) 3 button.
Press the Select/Play/Pause
(®p) button 4 to enter the
Photo Slideshow mode; th e
slideshow will begin with the
photo you selected.
2
4
3
1
2
BASIC PHOTO PLAYBACK (Supported format: JPEG)
NOTES:
• A photo may take a longer time to load if the file resolution is high.
• See page 8 for how to adjust the slideshow settings.
• While in Photo Thumbnail mode, press the MODE/Stop (I) button
again to return to the Main menu.

7
OPERATION (Continued)
While viewing a slideshow (see
the previous page), press the
Select/Play/Pause (®p) button to
pause the slideshow. Press again
to resume the slideshow.
1
While viewing a slideshow or a
thumbnail (see the previous
page), press the Navigation Up/
Rotate button to rotate the
selected photo 90 degrees
counterclockwise. Repeat to
continue to rotate as desired.
2
PAUSE
ROTATE
While viewing a slideshow (see
the previous page), press the
Navigation Left/Skip (o) 1 and/or
Right/Skip (n) 2 button
to skip to
the previous or next picture.
1
2
1
SKIP
At any time (except while in the
Setup menu), press the
Navigation
Down/Brightness button to adjust
the brightness (0-6).
1
BRIGHTNESS

8
OPERATION (Continued)
SETUP MENU
The Setup menu lets you customize this digital frame by allowing you to
set the effects between your photos, adjust the speed of the slideshow
and more!
Use the following instructions to navigate and change the options which
are described on the following page.
1. Connect the unit to an AC
power source (as shown
on page 4). In the main
menu, select Setup using
the Navigation Left/Skip
(o) 1 and/or Right/Skip
(n) 2 button; then press
the Select/Play/Pause
(®p) button 3 to enter
the Setup menu.
2. Use the Navigation Up/
Rotate 4 and/or Down/Brightness 5 to select one of the Setup
options (i.e. “Interval Time”), then press the Select/Play/Pause (®p)
button 3 or Navigation Right/Skip (n) button 2 to select it; the Setup
option will change to gray from yellow.
3. Use the Navigation Up/Rotate 4 and/or Down/Brightness 5 to
change the desired option setting (i.e. choose between 5 Sec., 15
Sec., etc.), then press the Select/Play/Pause (®p) button 3 to make
the change.
4. Press the Navigation Left/Skip (o) button 1 to go back to the
previous Setup option. Exit by pressing the MODE/Stop (I) button 6.
(NOTE: You can also exit by selecting the Exit Setup Mode option.)
1
3
2
6
4
5
CONTINUED ON THE NEXT PAGE

9
Interval Time:
Use this Setup option to select the speed for your slideshow by setting the
interval time between photos. Choose from 5, 15 or 30 seconds; 1, 5 or
30 minutes; 1, 4 or 12 hours; or 1 day.
Transition:
Use this Setup option to select the transition effect between your slides.
Choose from No Effect, Random (will randomly select among the other
modes to transition between the photos), Cover Up, Cover Down,
Uncover Left, Push Right, Wipe Up or Wipe Down.
Contrast:
Use this Setup option to adjust the contrast of the screen. Choose from 4 to +4.
OSD Language:
Use this Setup option to select the desired language for the menus.
Choose from English, French, German, Italian, Spanish, Portuguese,
Dutch or Polish.
Panel:
Use this Setup option to select the mode in which the photos will be
displayed. Choose from Full Screen (which will stretch the picture to
fill the screen) or Original (which will display the photo with its
original proportions).
Reset:
Use this Setup option to reset the frame to the default settings.
OPERATION (Continued)
SETUP OPTIONS

10
TROUBLESHOOTING GUIDE
If you experience a problem with this unit, check the chart below before
calling for service.
SYMPTOM CAUSE SOLUTION
Main unit, no power. AC adapter is not Connect AC adapter
connected. as shown on page 4.
No photos in frame. External media source Insert external media
not inserted. source, see page 5.
The files on the ext. Resave the files on the
media source aren’t in ext. media source in
JPEG format. JPEG format.
Photo takes too long The file resolution is Use a lower resolution
to load. too high. file.

11
SPECIFICATIONS
GENERAL:
Power Source .............................AC Adapter, DC 5V Z
Weight.............................................................................1Lb
Dimensions ..............................5" (H) x 7.9" (W) x 4.75" (D)
Weight and dimensions are approximate.
LCD Display Size..........................7" (measured diagonally)
Resolution.............................................................480 x 234
Specifications are subject to change without notice.
FOR ADDITIONAL SET-UP OR OPERATING ASSISTANCE, PLEASE VISIT
OUR WEBSITE AT:
WWW.MEMOREXELECTRONICS.COM
OR CONTACT CUSTOMER SERVICE:
For customers calling within US, call 1-800-919-3647.
For customers calling within Mexico, call 001-866-580-8316.
For customers calling within Canada call 1-866-928-2349.
PLEASE KEEP ALL PACKAGING MATERIAL FOR AT LEAST 90 DAYS IN
CASE YOU NEED TO RETURN THIS PRODUCT TO YOUR PLACE OF
PURCHASE OR IMATION ELECTRONICS PRODUCTS.
FOR CONSUMER REPLACEABLE PART(S), SEE PART NUMBER(S) ON
PAGE 3 AND THEN CONTACT FOX INTERNATIONAL
AT 1-800-321-6993.

1
MEDIDAS DE SEGURIDAD
ADVERTENCIA: Para reducir el riesgo de descargas
eléctricas no saque la cubierta o la tapa posterior. Allí no se
encuentran partes que puedan ser reparadas por el usuario.
Lleve su unidad a un Centro de Servicio Autorizado.
CUIDADO
RIESGO DE DESCARGA
ELÉCTRICA. NO ABRIR
ADVERTENCIA: La figura de la flecha con forma de rayo
dentro de un triángulo está hecho para alertar al usuario
de la presencia de cables sin aislar de “voltaje peligroso”
dentro del gabinete, de tal magnitud que puede causar un
riesgo de descarga eléctrica a las personas.
ADVERTENCIA: El signo de exclamación dentro de un
triángulo está hecho para alertar al usuario de la
existencia de instrucciones importantes tanto de servicio
como de funcionamiento y mantenimiento que vienen
con la unidad.
AVISO DE LA FCC:
Este equipo genera o puede usar energía de frecuencia radial. Cualquier
cambio o modificación al equipo, puede causar interferencia nociva, a
menos que estas modificaciones esten expresamente indicadas en el
manual de instrucciones. El usuario puede perder el derecho de operar
este equipo si efectuara un cambio o modificación no autorizadas.
ATTENTION:
POUR ÉVITER LES CHOC ÉLECTRIQUES, INTRODUIRE LA LAME LA
PLUS LARGE DE LA FICHE DANS LA BORNE CORRESPONDANTE DE
LA PRISES ET POUSSER JUSQU’AU FOND.

2
INFORMACIÓN:
Este equipo
cumple con
aparato digital de Clase B regulaciones.
Este equipo genera, usa y puede irradiar energía de radiofrecuencia
y, si no se instala y usa conforme a las instrucciones, puede generar
interferencia dañina con las radiocomunicaciones. Sin embargo, no
hay garantía de que no habrá interferencia en una instalación
particular. Si este equipo llegara a causar interferencia dañina con la
recepción de radio o televisión, lo cual se puede determinar
encendiendo y apagando el equipo, le pedimos que intente corregir
la interferencia con las siguientes medidas:
• Reoriente o reubique la antena receptora.
• Incremente la distancia entre el equipo y el receptor.
• Conecte el equipo a un contacto eléctrico que esté en un circuito
distinto al que está conectado el receptor.
• Consulte al vendedor o a un técnico de radio y televisión
con experiencia.
MEDIDAS DE SEGURIDAD
ADVERTENCIA: PARA EVITAR LOS PELIGROS DE
ELECTROCUTAMIENTO O INCENDIO, NO EXPONGA ESTE
APARATO A LA LLUVIA O HUMEDAD.
PROTECTORES DE OLEADA:
Se recomienda para utilizar un protector de oleada para la
conexión de la CA. Las oleadas del relámpago y de la energía
no se cubren bajo garantía para este producto.
Este aparato digital de Clase B cumple con la norma
ICES-003 de Canadá.
Cet appareil numérique de la classe B est conforme à la
norme NMB-003 du Canada.

3
UBICACIÓN DE LOS CONTROLES
1
2
3
4
5
6
7
8
9
10
11
1. Pantalla
2. Ranura para Tarjeta SD/SDHC/
MMC/MS/MS Pro/xD
(Lateral de la unidad)
3. Entrada para la memoria USB
(USB Flash Drive)
(Lateral de la unidad)
4. Botón de navegación
arriba/rotar (Navigation
Up/Rotate)
5. Botón de MODO/Detener
(MODE/Stop) (I)
6. Botón Seleccionar/Reproducir/
Pausar (®p) (Select/Play/
Pause)
7. Botón de Navegación
abajo/brillo (Navigation
Down/Brightness)
8. Botón de navegación
derecha/salto (Navigation
Right/Skip) (n)
9. Botón de navegación
izquierda/salto (Navigation
Left/Skip) (o)
10. Soporte (PIEZA NO. 60-258-
C0201*)
11. Entrada de CC de 5V
(Parte inferior de la unidad)
(PIEZA DE ADAPTADOR DE CC
NO. 43-111-00278*)
*Pieza Reemplazable por el
Consumidor.
(Vea la página 11 para ordenar)

4
FUENTE DE ENERGÍA
CONEXIÓN A CORRIENTE ELÉCTRICA
Inserte el extremo pequeño del adaptador CA en
el conector de entrada de 5VCD (ubicada en la
parte izquierda de esta unidad). Conecte el otro
extremo al contacto eléctrico de 120VCA, 60 Hz.
Adaptador CA, 5VCD Z
NOTAS:
• Cuando no esté en uso, quite el enchufe de
CC y el enchufe de entrada de CA para
desconectar el adaptador de CA, ya que
esta unidad permanecerá siempre
ENCENDIDA cuando el enchufe de CC y el
enchufe de entrada de CA se encuentren conectados.
• Use únicamente un adaptador de corriente alterna incluido, que tenga las siguientes
especificaciones: 5VCD Z.
USO DEL SOPORTE
SOPORTE (PARTE TRASERA DE LA UNIDAD)
Para utilizar el soporte, coloque la perilla del mismo en el orificio ubicado
en la parte trasera del marco. Empuje el soporte hacia la izquierda (para
ubicarlo verticalmente) o hacia la derecha (para ubicarlo
horizontalmente) hasta que encaje en su lugar.
Contacto
eléctrico
Enchufe del
adaptador CA

5
INTRODUCCIÓN
UTILIZACIÓN DE LA TARJETA DE MEMORIA Y/O LA MEMORIA USB (USB
FLASH DRIVE) Podrá acceder a los archivos multimedia desde una tarjeta de
memoria externa y/o memoria USB (USB flash drive) según se explica a
continuación. Esta unidad admite tarjetas de memoria y/o memorias USB (USB
flash drives) de hasta 4GB.
PARA COLOCAR UNA TARJETA
DE MEMORIA: Esta unidad admite
las tarjetas de memoria SD (Secure
Digital), SDHC (Secure Digital High
Capacity), MMC (Multi-Media Card),
MS (Memory Stick), MS Pro
(Memory Stick Pro) o xD.
Simplemente introduzca la tarjeta
SD, MMC, MS o xD en la ranura
ubicada en el lado derecho de la
unidad, con la tarjeta mirando hacia
la parte trasera de la unidad (como
se indica en la ilustración).
PARA COLOCAR UNA MEMORIA
USB (USB FLASH DRIVE):
Simplemente introduzca la memoria
USB (USB flash drive) en la entrada
para USB ubicada en el lado
derecho de la unidad (según se
muestra en la ilustración).
Parte
posterior
de la
tarjeta
1
PARA QUITAR LA TARJETA DE
MEMORIA: Quite la tarjeta de
memoria tirando hacia afuera con
cuidado. Es posible que necesite
moverla hacia adelante y atrás
para sacarla del marco.
PARA QUITAR UNA MEMORIA
USB (USB FLASH DRIVE): Quite
la memoria USB (USB flash drive)
tirando hacia afuera con cuidado.
Parte
posterior
de la
tarjeta
2
NOTAS:
• Se recomienda colocar sólo una tarjeta de memoria O un dispositivo USB. Si
introduce una tarjeta de memoria y además una memoria USB (USB flash drive)
la unidad sólo leerá las fotograffías desde la tarjeta de memoria.
• Cargue menos de 1,000 archivos de fotos en la tarjeta de memoria, ya que
algunas fotografías podrían no aparecer en el marco.

6
FUNCIONAMIENTO
Con la tarjeta de memoria o
memoria USB colocada (USB
flash drive) (como se indica en la
página anterior), conecte la
unidad a una fuente de
alimentación de CA (como se
indica en la página 4).
Seleccione las fotos con los
botones de navegación izquierda/
salto (Left/Skip) (o) 1 y/o
derecha/salto (Right/Skip) (n) 2;
luego oprima seleccionar/
reproducir/pausar (Select/Play/
Pause) (®p) 3 para ingresar en
el modo de presentación de
diapositivas.
1
3
2
1
Oprima MODO/detener (MODE/
Stop) (I ) 1 para detener la
presentación de diapositivas e
ingresar en el modo de fotos en
miniatura.
Seleccione la foto deseada, o
página de fotos a visualizar con el
botón de navegación izquierda/salto
(Left/Skip) (o) 2 y/o derecha/salto
(Right/Skip) (n) 3. Para buscar
entre las fotos más rápidamente
oprima y mantenga presionado el
botón de navegación izquierda/salto
(Left/Skip) (o) 2 y/o derecha/salto
(Right/Skip) (n) 3. Oprima
seleccionar/reproducir/pausar
(Select/Play/Pause) (®p) 4 para
ingresar en el modo de
presentación de diapositivas. La
presentación se iniciará con la foto
que seleccionó.
2
4
3
1
2
REPRODUCCIÓN BÁSICA DE FOTOGRAFÍAS (Formato compatible: JPEG)
NOTAS:
• Una foto puede tardar más en cargarse si la resolución del archivo
es alta.
• Consulte la página 8 para saber cómo ajustar la configuración de la
presentación en diapositivas.
• Mientras se encuentra en el modo de fotos en miniatura, oprima
MODO/detener (MODE/Stop) (I) nuevamente para regresar al
menú principal.

7
FUNCIONAMIENTO (Continuación)
Mientras visualiza una
presentación en diapositivas
(vea la página anterior), oprima
seleccionar/reproducir/pausar
(Select/Play/Pause) (®p) para
pausar la presentación en
diapositivas. Oprima nuevamente
para reanudar la presentación.
1
Mientras visualiza una
presentación en diapositivas o
miniaturas (vea la página anterior)
oprima el botón de navegación
arriba/rotar (Navigation Up/
Rotate) para girar la foto
seleccionada en 90 grados hacia
la derecha. Repita para continuar
rotando según lo desee.
2
PAUSAR
ROTAR
Mientras visualiza una
presentación en diapositivas (vea
la página anterior), oprima
el
botón de navegación izquierdo
/salto (Navigation Left/Skip) (o)
1 y/o derecha/salto (Right/Skip)
(n) 2 para
saltar a la fotografía
anterior o siguiente.
1
2
1
SALTO
En cualquier momento (excepto en
el menú de Configuración (Setup
menu) oprima el botón de
navegación abajo/brillo (Navigation
Down/Brightness) para ajustar el
brillo (0-6).
1
BRILLO

8
FUNCIONAMIENTO (Continuación)
MENÚ DE CONFIGURACIÓN (SETUP MENU)
El Menú de configuración (Setup menu) le permite personalizar el marco
digital para que pueda configurar los efectos de sus fotos, ajustar la
velocidad de la presentación en diapositivas y mucho mas...
Utilice las siguientes instrucciones para navegar y cambiar las opciones
explicadas en la próxima página.
1. Conecte la unidad a una
fuente de alimentación de
CA (como se indica en la
página 4). Seleccione
Configuración (Setup) en el
menú principal con el botón
de Navegación izquierdo/
salto (Left/Skip) (o) 1 y/o
derecha/salto (Right/Skip)
(n) 2; luego oprima
seleccionar/reproducir/pausar
(Select/Play/Pause (®p) 3
para ingresar en el menú
de Configuración.
2. Utilice el botón de Navegación arriba/rotar (Navigation Up/Rotate) 4 y/o
abajo/brillo (Down/Brightness) 5 para seleccionar una de las opciones de
Configuración (por ejemplo “Tiempo de intervalo”), luego oprima
seleccionar/reproducir/pausar (Select/Play/Pause) (®p) 3 o el botón de
Navegación derecha/salto (Navigation Right/Skip) (n) 2 para confirmar dicha
opción. La opción de Configuración cambiará de amarillo a gris.
3. Utilice los botones de Navegación arriba/rotar (Navigation Up/Rotate) 4 y/o
abajo/brillo (Down/Brightness) 5 para cambiar la configuración de opción
deseada (por ejemplo elija entre 5 seg., 15 seg., etc.), luego oprima
seleccionar/reproducir/pausar (Select/Play/Pause) (®p) 3 para confirmar
los cambios.
4. Oprima el botón de Navegación izquierda/salto (Navigation Left/Skip) (o) 1
para regresar a la opción anterior de Configuración (Setup). Salga
presionando MODO/detener (MODE/Stop) (I) 6. (NOTA: También puede
hacerlo seleccionando la opción de Salir del modo de configuración (Exit
Setup Mode).
1
3
2
6
4
5
CONTINUA EN LA PRÓXIMA PAGINA

9
Tiempo de intervalo:
Utilice esta opción para seleccionar la velocidad de presentación de las
diapositivas al configurar el tiempo de intervalo entre las fotografías. Elija
entre 5, 15 o 30 segundos; 1,5 o 30 minutos, 1, 4 o 12 horas; o 1 día.
Transición:
Utilice esta opción para seleccionar el efecto de transición entre sus
diapositivas. Elija entre Sin efecto (No Effect), Orden aleatorio (Random)
(seleccionará al azar entre los otros modos para aplicar el efecto de
transición entre las fotografías), Cubrir arriba (Cover Up), Cubrir abajo
(Cover Down), Descubrir a la izquierda (Uncover Left), Empujar a la
derecha (Push Right), Barrido ascendente (Wipe Up), Barrido
descendente (Wipe Down).
Contraste:
Utilice esta opción para ajustar el contraste de la pantalla. Elija entre
-4 y +4.
Idioma en Pantalla:
Utilice esta opción para seleccionar el idioma deseado para los menús.
Elija entre inglés (English), francés (French), alemán (German), italiano
(Italiano), español (Spanish), portugués (Portuguese), holandés (dutch) o
polaco (Polish).
Panel:
Utilice esta opción para seleccionar el modo en que se mostrarán las
fotos. Elija entre Pantalla completa (Full Screen) (la foto se ampliará
para mostrarse en la pantalla completa) u Original (la foto se
mostrará con su tamaño original).
Reinicio:
Utilice esta opción para reiniciar el marco a la configuración
predeterminada.
FUNCIONAMIENTO (Continuación)
OPCIONES DE CONFIGURACIÓN

10
GUÍA DE RESOLUCIÓN DE PROBLEMAS
Si la unidad presentara cualquier inconveniente, lea el siguiente cuadro
antes de llamar al servicio técnico.
PROBLEMA CAUSA SOLUCIÓN
La unidad principal no El adaptador de CA no Conecte el adaptador de
enciende. está conectado. CA como se indica en la
página 4.
No hay fotografías en No se ha introducido un Introduzca un dispositivo de
el marco. dispositivo de origen externo. origen externo. Vea la pág. 5.
Los archivos del dispositivo Guarde nuevamente
de origen externo no están los archivos en el dispositivo
en formato JPG. de origen ext. en formato JPG.
Las fotos tardan La resolución del archivo es Utilice un archivo con
demasiado tiempo demasiada alta. menor resolución.
en cargarse.

11
ESPECIFICACIONES
GENERAL:
Fuente de Alimentación ..... .................... Adaptador de CA,
....................................................................CC de 5V Z
Peso...............................................................................1 Lb
Tamaño ....................................5” (H) x 7.9” (W) x 4.75” (D)
El peso y el tamaño son aproximados.
Pantalla LCD ...........................7" (Medidas diagonalmente)
Resolución ............................................................480 x 234
Las especificaciones están sujetas a
cambios sin previo aviso.
PARA ASISTENCIA ADICIONAL SOBRE LA CONFIGURACIÓN O EL
FUNCIONAMIENTO, INGRESE EN:
WWW.MEMOREXELECTRONICS.COM
O COMUNÍQUESE CON ATENCIÓN AL CLIENTE:
Si llama desde EE.UU. marque 1-800-919-3647.
Si llama desde México marque 001-866-580-8316.
Si llama desde Canadá marque 1-866-928-2349.
CONSERVE EL EMBALAJE AL MENOS 90 DÍAS EN CASO QUE
NECESITE DEVOLVER EL PRODUCTO AL LUGAR DE COMPRA O
IMATION ELECTRONICS PRODUCTS.
PARA OBTENER PIEZAS REEMPLAZABLES POR EL
CONSUMIDOR, CONSULTE EL NÚMERO DE PIEZA EN LA
PÁGINA 3 Y LUEGO COMUNÍQUESE CON FOX INTERNATIONAL
AL 1-800-321-6993.

1
TENSION DANGEREUSE :
Le symbole représentant un éclair dans un triangle
équilatéral a pour but d’avertir l’utilisateur du danger
présenté par des pièces non isolées à l’intérieur de
l’appareil et dont la tension est suffisante pour
provoquer des décharges électriques dangereuses.
ATTENTION :
Le point d’exclamation dans un triangle équilatéral
a pour but d’avertir l’utilisateur que des instructions
importantes relatives à l’utilisation et à l’entretien se
trouvent dans le manuel accompagnant l’appareil.
AVIS DE LAFCC :
Le présent appareil peut générer et/ou utiliser de l’énergie sous forme d’ondes radio. Tout
changement ou toute modification effectué sur cet appareil peut causer de l’interférence
nuisible à moins que lesdites modifications soient autorisées de façon explicite dans le
présent guide d’utilisation. Tout changement ou modification non autorisé à cet appareil
peut entraîner l’interdiction à l’utilisateur de se servir de cet appareil.
ATTENTION :
POUR ÉVITER LES CHOCS ÉLECTRIQUES, INTRODUISEZ LA LAME LA PLUS
LARGE DE LA FICHE DANS LA FENTE LA PLUS LARGE DE LA PRISE DE COURANT,
ET POUSSEZ JUSQU’AU FOND AFIN DE NE LAISSER AUCUNE PARTIE À
DÉCOUVERT.
CONSIGNES DE SÉCURITÉ
ATTENTION : POUR RÉDUIRE LE RISQUE DE CHOC ÉLECTRIQUE, NE
TENTEZ PAS D’OUVRIR LE BOÎTIER DE CET APPAREIL CAR IL NE
CONTIENT AUCUNE PIÈCE RÉUTILISABLE. CONFIEZ TOUTES LES
RÉPARATIONS À UN PERSONNEL QUALIFIÉ.
ATTENTION
RISQUE DE CHOC ÉLECTRIQUE
NE PAS OUVRIR

2
AVERTISSEMENT : Cet appareil a fait l’objet de tests qui ont déterminé qu’il est
en conformité avec les limites imposées pour les appareils numériques de la
classe B, selon le chapitre 15, sur les règles de la FCC. Ces limites sont
prescrites afin d’offrir une protection raisonnable contre toute interférence
préjudiciable dans une installation résidentielle. Cet appareil produit, emploie et
peut être la cause d’un rayonnement radioélectrique et, si l’installation et l’emploi
ne sont pas conformes aux instructions, risque de présenter un brouillage
nuisible aux radiocommunications.
Toutefois, il est impossible de garantir qu’aucune interférence ne sera produite
par une installation particulière. Si cet appareil est la source de brouillage
nuisible à la réception des émissions radiophoniques ou télévisuelles, déterminé
en allumant et en éteignant plusieurs fois de suite l’appareil, l’utilisateur pourra
tenter de résoudre ce problème de brouillage par une des mesures suivantes:
• Changer l’orientation ou l’installation de l’antenne de réception.
• Éloigner davantage l’appareil du récepteur.
• Brancher le cordon d’alimentation de l’appareil dans une prise ou sur un circuit
séparé du récepteur.
• Consulter le distributeur ou un technicien expérimenté en radio/TV pour
assistance.
CONSIGNES DE SÉCURITÉ
AVERTISSEMENT : POUR PRÉVENIR TOUT RISQUE
D’INCENDIE OU D’ÉLECTROCUTION, N’EXPOSEZ
PAS CET APPAREIL À LA PLUIE OU À L’HUMIDITÉ
EXCESSIVE.
LIMITEURS DE SURTENSION :
Nous vous recommandons d’utiliser un limiteur de surtension
sur votre raccordement au réseau de courant alternatif. Les
dommages causés par les éclairs et les sautes de puissance
NE SONT PAS couverts par la garantie offerte avec cet
appareil.
Cet appareil numérique de classe B est conforme à la norme
NMB-003 du Canada.

3
EMPLACEMENT DES RÉGLAGES
1
2
3
4
5
6
7
8
9
10
11
1. Écran
2. Fente pour carte mémoire
SD/SDHC/MMC/MS/MS
Pro/xD
(sur le côté)
3. Port pour clé USB à
mémoire Flash
(sur le côté)
4. Touche Navigation
Haut/Rotation (Rotate)
5. Touche MODE/Stop (I)
6. Touche
Sélection/Lecture/Pause
(®p)
7. Touche Navigation
Bas/Luminosité (Brightness)
8. Touche Navigation
Droite/Saut (n)
9. Touche Navigation
Gauche/Saut (o)
10. Support
(PIÈCE N° 60-258-C0201*)
11. Connecteur DC 5V IN
(en dessous)
(ADAPTATEUR CA -
PIÈCE Nº 43-111-00278*)
*Pièces de rechange disponibles
(voir page 11 pour commander).

4
COURANT ALTERNATIF
Branchez la petite extrémité de l’adaptateur CA
au connecteur 5 Vcc (DC 5V IN) situé sous
l’appareil. Branchez l’autre extrémité à une prise
de courant 120 Vca, 60 Hz.
Adaptateur CA, 5 Vcc Z
REMARQUES
• Débranchez toujours le cordon de la prise
d’alimentation CC se trouvant sur l’appareil et de
la prise de courant alternatif lorsque vous ne
l’utilisez pas.
• Utilisez uniquement le cordon d’alimentation
vendu avec cet appareil car il est doté des caractéristiques essentielles suivantes : une
prise d’alimentation CC de 5 volts
Z au centre positif.
UTILISATION DU SUPPORT
SUPPORT (À L’ARRIÈRE DE L’APPAREIL)
Pour utiliser le support, insérez son bouton dans l’ouverture située à
l’arrière du cadre. Tournez le support vers la gauche (pour placer le
cadre à la verticale) ou vers la droite (pour le placer à l’horizontale)
jusqu’à ce qu’il soit verrouillé.
SOURCE D’ALIMENTATION
Fiche du cordon
d’alimentation
Prise de courant
alternatif
5
POUR COMMENCER
UTILISATION D’UNE CARTE MÉMOIRE ET/OU
D’UNE CLÉ USB À MÉMOIRE FLASH
Vous pouvez accéder aux fichiers multimédia sur une carte mémoire et/ou une clé USB à
mémoire Flash externe en suivant la procédure ci-dessous. Cet appareil est compatible avec
les cartes mémoire et les clés USB à mémoire Flash offrant une capacité maximale de 4 Go.
POUR INSÉRER UNE CARTE
MÉMOIRE : Cet appareil est
compatible avec les cartes mémoire
SD (Secure Digital), SDHC (Secure
Digital High Capacity), MMC (MultiMedia Card), MS (Memory Stick), MS
Pro (Memory Stick Pro) et xD. Insérez
simplement la carte SD, MMC, MS ou
xD dans l’emplacement sur le côté
droit, avec la carte faisant face vers
l’arrière de l’appareil (tel qu’illustré).
POUR INSÉRER UNE CLÉ USB À
MÉMOIRE FLASH : Insérez
simplement la clé USB à mémoire
Flash dans le port USB sur le côté
droit de l’appareil (tel qu’illustré).
1
POUR RETIRER UNE CARTE
MÉMOIRE : Retirez la carte
en la tirant doucement. Vous
pouvez la déplacer d’un côté à
l’autre pour la sortir du
connecteur.
POUR RETIRER UNE CLÉ
USB À MÉMOIRE FLASH :
Retirez la clé USB en la tirant
doucement.
2
REMARQUES :
• Nous vous conseillons fortement d’utiliser uniquement une carte mémoire OU une
clé USB à mémoire Flash. Lorsque vous insérez une carte mémoire et une clé
USB, l’appareil n’affiche que les photos contenues sur la carte mémoire.
• Veuillez ne pas sauvegarder plus de 1 000 photos sur la carte mémoire, sinon,
certaines photos pourraient ne pas être affichées.

6
UTILISATION
Insérez une carte mémoire ou
une clé USB à mémoire Flash
(voir page précédente), puis
reliez l’appareil à une prise de
courant alternatif (voir page 4).
Sélectionnez Photo en utilisant la
touche Navigation Gauche/Saut
(o) 1 et/ou Droite/Saut (n) 2,
puis appuyez sur la touche
Sélection/Lecture/Pause (®p) 3
pour accéder au mode Photo
Slideshow (présentation de
photos).
1
3
2
1
Appuyez sur la touche MODE/Stop
(I) 1 pour arrêter la présentation
et accéder au mode Photo
Thumbnail (affichage réduit).
Sélectionnez la photo ou la page
de photos à afficher en utilisant la
touche Navigation Gauche/Saut
(o) 2 et/ou Droite/Saut (n) 3.
Pour faire défiler les photos plus
rapidement, maintenez enfoncée
la touche Navigation Gauche/Saut
(o) 2 et/ou Droite/Saut (n) 3.
Appuyez sur la touche Sélection/
Lectur e/Pause (®p) 4 p our
accéder au mode Photo Slideshow
(présentation de photos). La
présentation commence alors par
la photo sélectionnée.
1
3
2
2
AFFICHAGE D’UNE PHOTO (Format compatible : JPEG)
REMARQUES :
• Les photos peuvent prendre plus de temps à charger lorsque leur
résolution est élevée.
• Voir page 8 pour savoir comment régler les options de la présentation
de photos.
• En mode Photo Thumbnail (affichage réduit), appuyez à nouveau
sur la touche MODE/Stop (I) pour retourner au menu principal.

7
UTILISATION (Suite)
Pendant que vous visionnez une
présentation de photos (voir page
précédente), appuyez sur la
touche Sélection/Lecture/Pause
(®p) pour suspendre la
présentation. Appuyez à nouveau
pour poursuivre la présentation.
1
Pendant que vous visionnez une
présentation de photos ou une
image réduite (voir page
précédente), appuyez sur la
touche Navigation Haut/Rotation
(Rotate) pour faire tourner la photo
sélectionnée de 90 degrés vers la
gauche. Répétez cette étape pour
continuer à la faire tourner.
2
PAUSE
ROTATION
Pendant que vous visionnez une
présentation de photos (voir page
précédente), appuyez sur la
touche
Navigation Gauche/Saut
(o) 1 et/ou Droite/Saut (n) 2
pour accéder à la photo
précédente ou suivante.
1
2
1
SAUT
À n’importe quel moment (sauf à
partir du menu de réglage Setup),
vous pouvez appuyer sur la touche
Navigation Bas/Luminosité
(Brightness) pour régler la
luminosité (0-6).
1
LUMINOSITÉ

8
UTILISATION (Suite)
MENU DE RÉGLAGE (SETUP)
Le menu de réglage vous permet de personnaliser ce cadre numérique en
offrant la possibilité de régler les effets de transition entre les photos, de
déterminer la vitesse des présentations, et plus encore!
Suivez cette procédure pour naviguer et sélectionner les options décrites
à la page suivante.
1. Reliez l’appareil à une
prise de courant
alternatif (voir page 4). À
partir du menu principal,
sélectionnez Setup
(réglage) en utilisant la
touche Navigation
Gauche/Saut (o) 1 et/ou
Droite/Saut (n) 2, puis
appuyez sur la touche
Sélection/Lecture/Pause
(®p) 3 pour accéder au menu de réglage Setup.
2. Utilisez la touche Navigation Haut/Rotation 4 et/ou Bas/Luminosité
5 pour sélectionner une des options de réglage (exemple : “Interval
Time”), puis appuyez sur la touche Sélection/Lecture/Pause (®p) 3
ou Navigation Droite/Saut (n) 2 pour la sélectionner. L’option passe
alors du jaune au gris.
3. Utilisez la touche Navigation Haut/Rotation 4 et/ou Bas/Luminosité
5 pour modifier le réglage de l’option sélectionnée (exemple : 5
Sec., 15 Sec., etc.), puis appuyez sur la touche
Sélection/Lecture/Pause (®p) 3 pour confirmer la modification.
4. Appuyez sur la touche Navigation Gauche/Saut (o) 1 pour revenir à
l’option de réglage précédente. Quittez le menu en appuyant sur la
touche MODE/Stop (I) 6. (REMARQUE : Vous pouvez aussi quitter
en sélectionnant l’option Exit Setup Mode.)
1
3
2
6
4
5
SUITE À LA PAGE SUIVANTE

9
Interval Time :
Cette option permet de régler la vitesse de présentation des images en
déterminant l’intervalle de temps entre les photos. Sélectionnez 5, 15 ou
30 secondes; 1, 5 ou 30 minutes; 1, 4 ou 12 heures; ou 1 jour.
Transition :
Cette option permet de sélectionner l’effet de transition appliqué entre les
photos. Sélectionnez No Effect, Random (sélection aléatoire dans les
autres modes pour réaliser la transition entre les photos), Cover Up,
Cover Down, Uncover Left, Push Right, Wipe Up ou Wipe Down.
Contrast :
Cette option règle le contraste de l’écran. Choisissez une valeur de -4 à
+4.
OSD Language :
Cette option permet de sélectionner la langue affichée pour les menus.
Choisissez English, French, German, Italian, Spanish, Portuguese, Dutch
ou Polish (l’anglais, le français, l’allemand, l’italien, l’espagnol, le
portugais, le hollandais ou le polonais).
Panel :
Utilisez cette option pour sélectionner le mode d’affichage des
photos. Vous pouvez sélectionner Full Screen (pour étirer la photo
sur la totalité de l’écran) ou Original (pour afficher les photos avec
leurs proportions originales).
Reset :
Utilisez cette option pour rétablir les réglages du cadre sur leur valeur par
défaut.
UTILISATION (Suite)
OPTIONS DE RÉGLAGE

10
GUIDE DE DÉPANNAGE
Si votre appareil semble avoir un problème, vérifiez le tableau ci-dessous
avant de contacter un centre de réparation autorisé.
SYMPTÔME CAUSE SOLUTION
L’appareil principal L’adaptateur CA Branchez l’adaptateur
ne s’allume pas. n’est pas branché. (voir page 4).
Le cadre n’affiche La carte mémoire Insérez une carte
pas de photo. n’est pas insérée. mémoire (voir page 5).
Les fichiers sur la Sauvegardez les fichiers
carte mémoire ne sont sur la carte mémoire
pas au format JPEG. au format JPEG.
Le chargement des La résolution de fichier Utilisez une résolution
photos est trop lent. est trop élevée. moins élevée.

11
CARACTÉRISTIQUES TECHNIQUES
GÉNÉRALITÉS :
Source d’alimentation .............Adaptateur CA, 5 Vcc Z
Poids.........................................................................0,45 kg
Dimensions.................12,7 cm (H) x 20 cm (L) x 12 cm (P)
Les dimensions et le poids sont approximatifs.
Écran LCD..................................7" (Mesuré à la diagonale)
Résolution.............................................................480 x 234
Caractéristiques sujettes à modifications sans préavis.
POUR DES INSTRUCTIONS DE CONFIGURATION OU D’UTILISATION
SUPPLÉMENTAIRES, VEUILLEZ VISITER NOTRE SITE INTERNET :
WWW.MEMOREXELECTRONICS.COM
OU APPELEZ LE SERVICE À LA CLIENTÈLE:
Pour les clients des États-Unis, appelez au : 1-800-919-3647.
Pour les clients du Mexique, appelez au : 001-866-580-8316.
Pour les clients du Canada, appelez au : 1-866-928-2349.
VEUILLEZ CONSERVER LES MATÉRIAUX D’EMBALLAGE PENDANT AU
MOINS 90 JOURS, AU CAS OÙ VOUS DEVRIEZ RETOURNER CE
PRODUIT OÙ VOUS L’AVEZ ACHETÉ, OU À IMATION ELECTRONICS
PRODUCTS.
POUR OBTENIR DES PIÈCES DE REMPLACEMENT, CONSULTEZ LES
NUMÉROS DE PIÈCES À LA PAGE 3, PUIS APPELEZ FOX
INTERNATIONAL AU 1-800-321-6993.
 Loading...