

Page 1

User’s Guide
15 Hours Digital
Voice Recorder
MB2059A
Before operating this product,
please read these instructions completely.
Page 2

SAFETY
PRECAUTIONS
1
INFORMATION
This equipment has been tested and found to comply with
the limits for a Class B digital device, pursuant to Part 15 of
the FCC Rules. These limits are designed to provide
reasonable protection against harmful interference in a
residential installation. This equipment generates, uses and
can radiate radio frequency energy and, if not installed and
used in accordance with instructions, may cause harmful
interference to radio communications. However, there is no
guarantee that interference will not occur in a particular
installation. If this equipment does cause harmful
interference to radio or television reception, which can be
determined by turning the equipment off and on, the user is
encouraged to try to correct the interference by one or
more of the following measures:
• Reorient or relocate the receiving antenna.
• Increase the separation between the equipment and
receiver.
• Consult the dealer or an experienced radio/TV
technician for help.
Thank you for purchasing this Memorex audio system.
The serial number of your unit can be found on a label on
the rear of the cabinet. We suggest that you record the serial
number in the space provided below in case this information
is ever needed at a future date.
PLEASE KEEP ALL PACKAGING MATERIAL FOR AT
LEAST 90 DAYS IN CASE YOU NEED TO RETURN THIS
PRODUCT TO YOUR PLACE OF PURCHASE OR
MEMOREX.
Model Number: MB2059A
Serial Number: _________________________________
Page 3
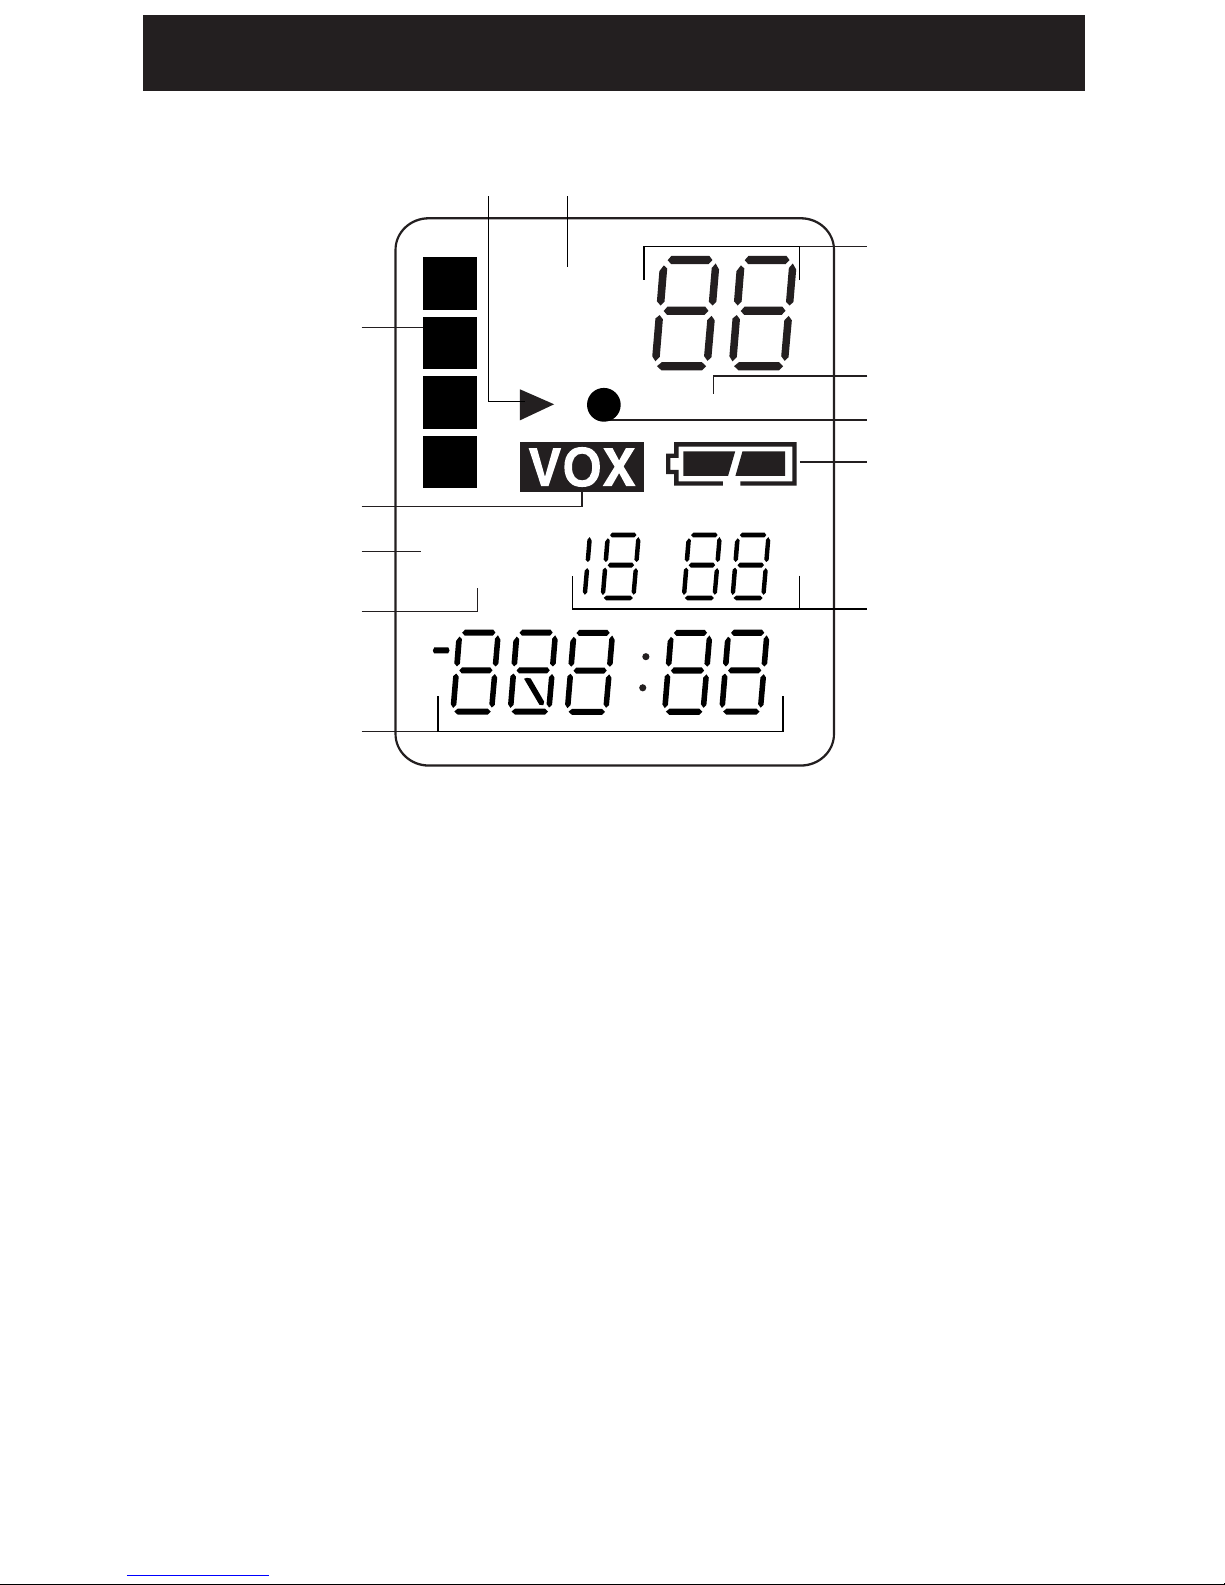
LOCATION OF INDICATORS
2
A. Play Indicator
B. Recording Quality Indicators
C. Message/Year Indicators
D. REPEAT 1/ALL Indicators
E. Record Indicator
F. Battery Indicator
G. Date/Volume Indicators
H. Minute/Second (Timer) Indicators
I. REMAIN Indicator
J. R (Record) DATE Indicator
K. VOX Indicator
L. Message File Folder Indicator
L
C
F
E
D
LP MP
SP HP
A
H
K
J
I
A
B
C
D
B
G
R DATE
REMAIN
REPEAT ALL
Page 4

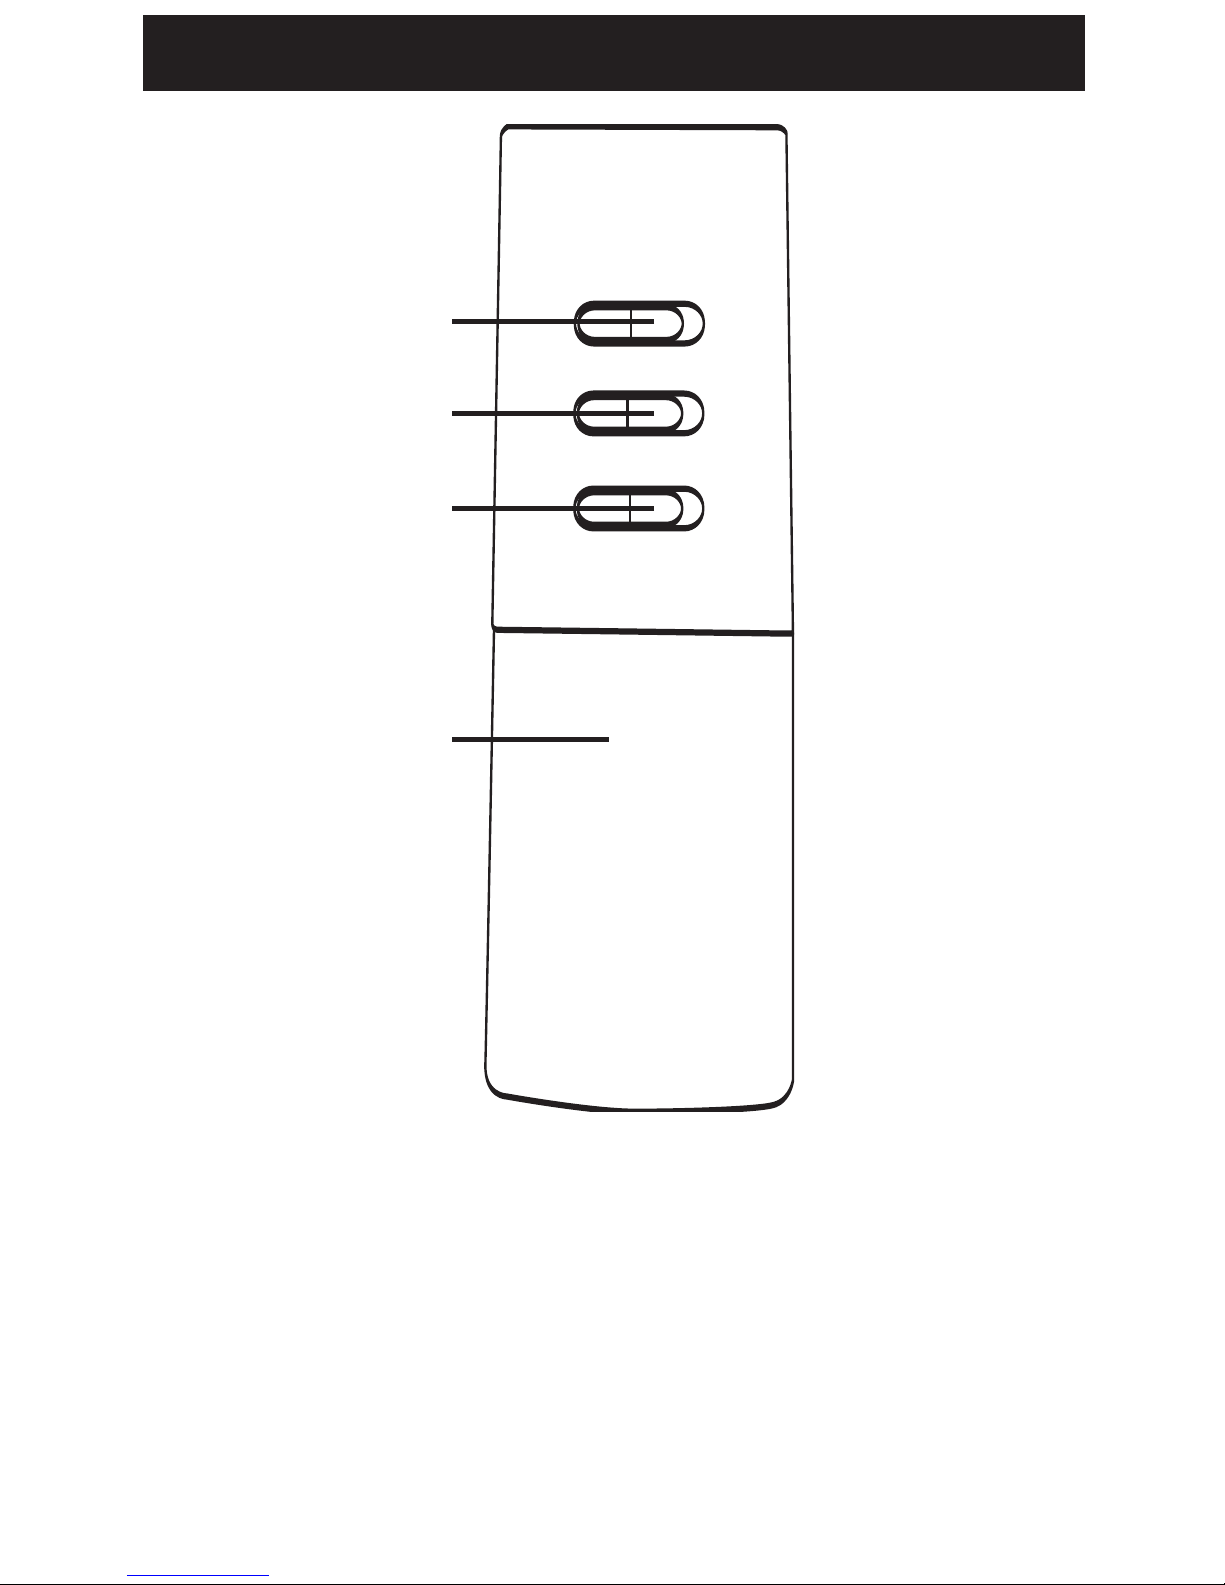
LOCATION OF CONTROLS
3
1
9
3
4
6
7
8
5
2
10
11
12
13
14
15
FRONT
1. MIC (Microphone)
Jack
2. Built-in Microphone
3. Display
4. REV Button
5. MODE/PAUSE Button
6. PLAY/STOP Button
7. REC/STOP Button
8. Speaker
9. EAR (Earphone) Jack
10. REC Indicator
11. VOLUME Up Button
12. VOLUME Down
Button
13. FWD Button
14. DEL/REPEAT Button
15. FILE/TIME Button
Page 5
LOCATION OF CONTROLS
4
1
3
2
4
REAR
1. MIC SENS (Microphone Sensitivity)
Switch
2. VOX Switch
3. HOLD Switch
4. Battery Compartment
Page 6
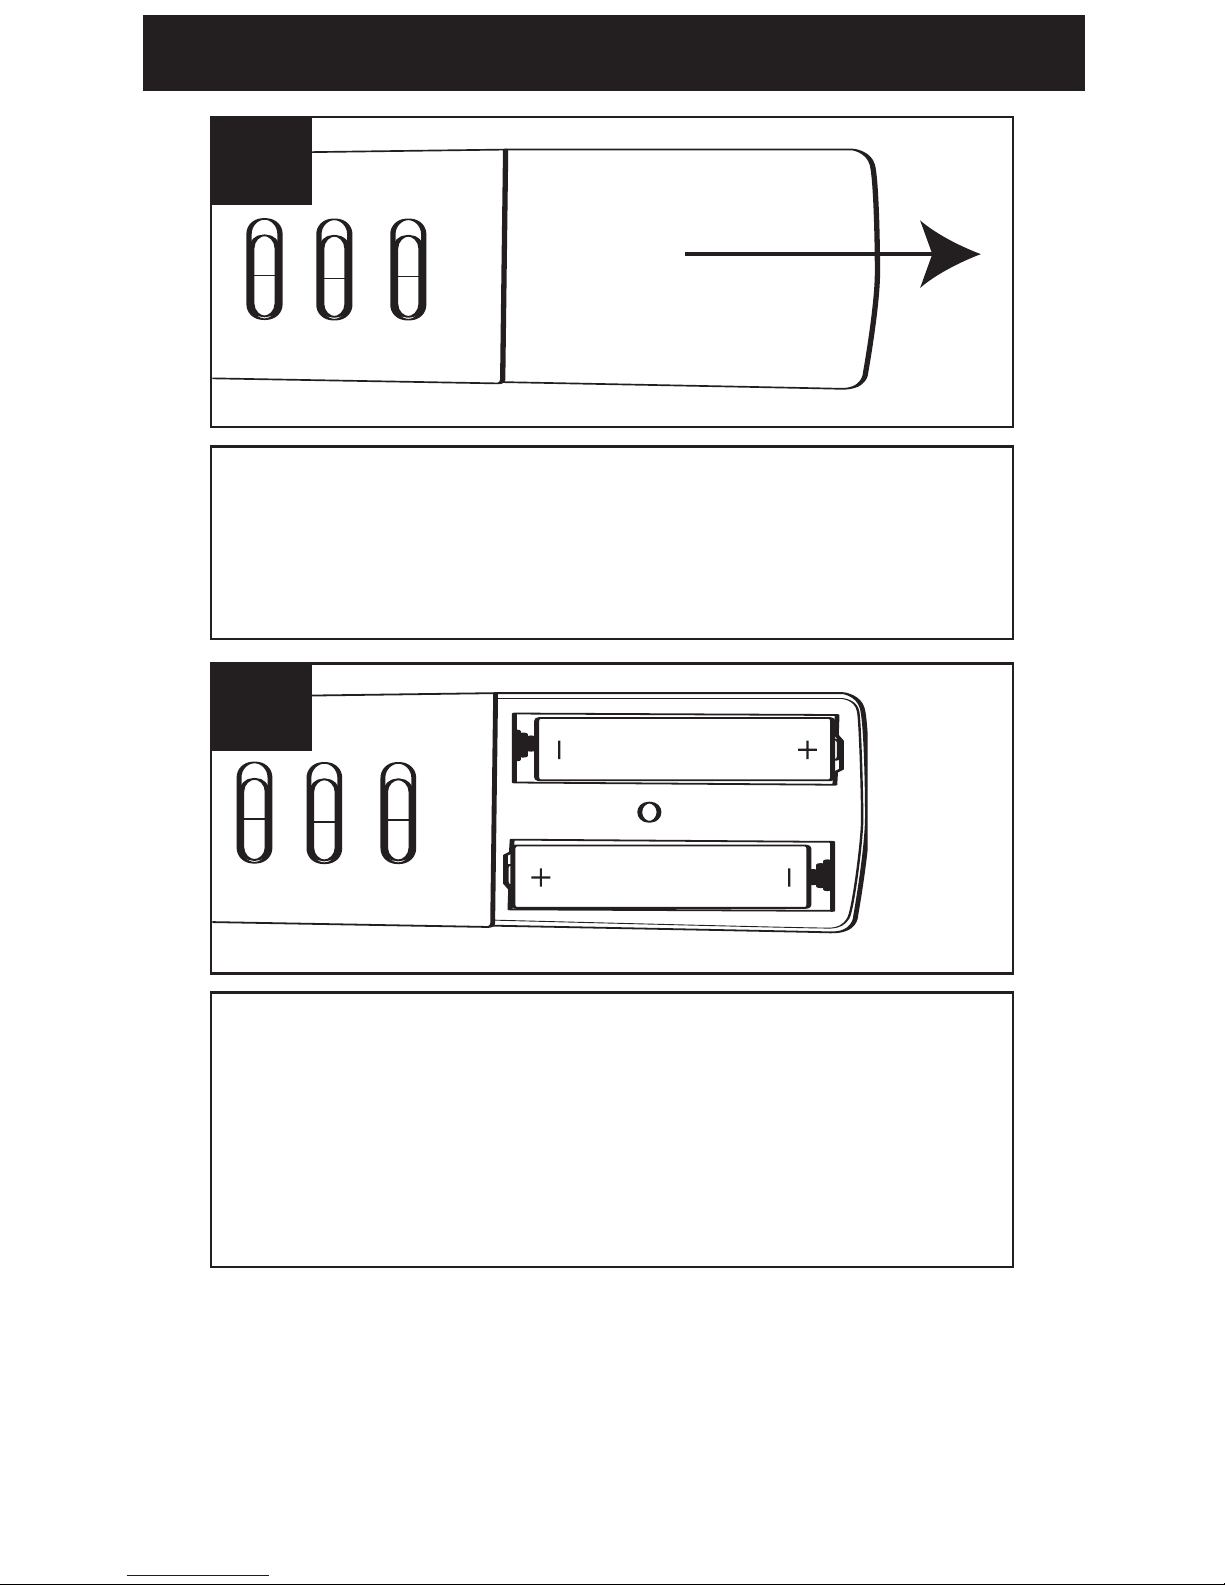
BATTERY INSTALLATION
5
Open the battery compartment by
sliding it towards the bottom of the
unit.
1
Insert two (2) "AAA" size batteries
(not included) following the polarity
diagram. Slide the battery
compartment back in place.
2
NOTE: When replacing the batteries,
the recorded messages will be saved,
but the time will have to be reset.
Page 7

BATTERY INSTALLATION
6
BATTERY PRECAUTIONS
Follow these precautions when using batteries in this
device:
1. Use only the size and type of batteries
specified.
2. Be sure to follow the correct polarity when
installing the batteries as indicated in the
battery compartment. Reversed batteries may
cause damage to the device.
3. Do not mix different types of batteries together
(e.g. Alkaline, Rechargeable and Carbon-zinc)
or old batteries with fresh ones.
4. If the device is not to be used for a long period of
time, remove the batteries to prevent damage or
injury from possible battery leakage.
5. Do not try to recharge batteries not intended to
be recharged; they can overheat and rupture.
(Follow battery manufacturer’s directions.)
BATTERY INDICATORS:
: The batteries are fresh.
: The batteries are weak or
dead; replace.
Page 8

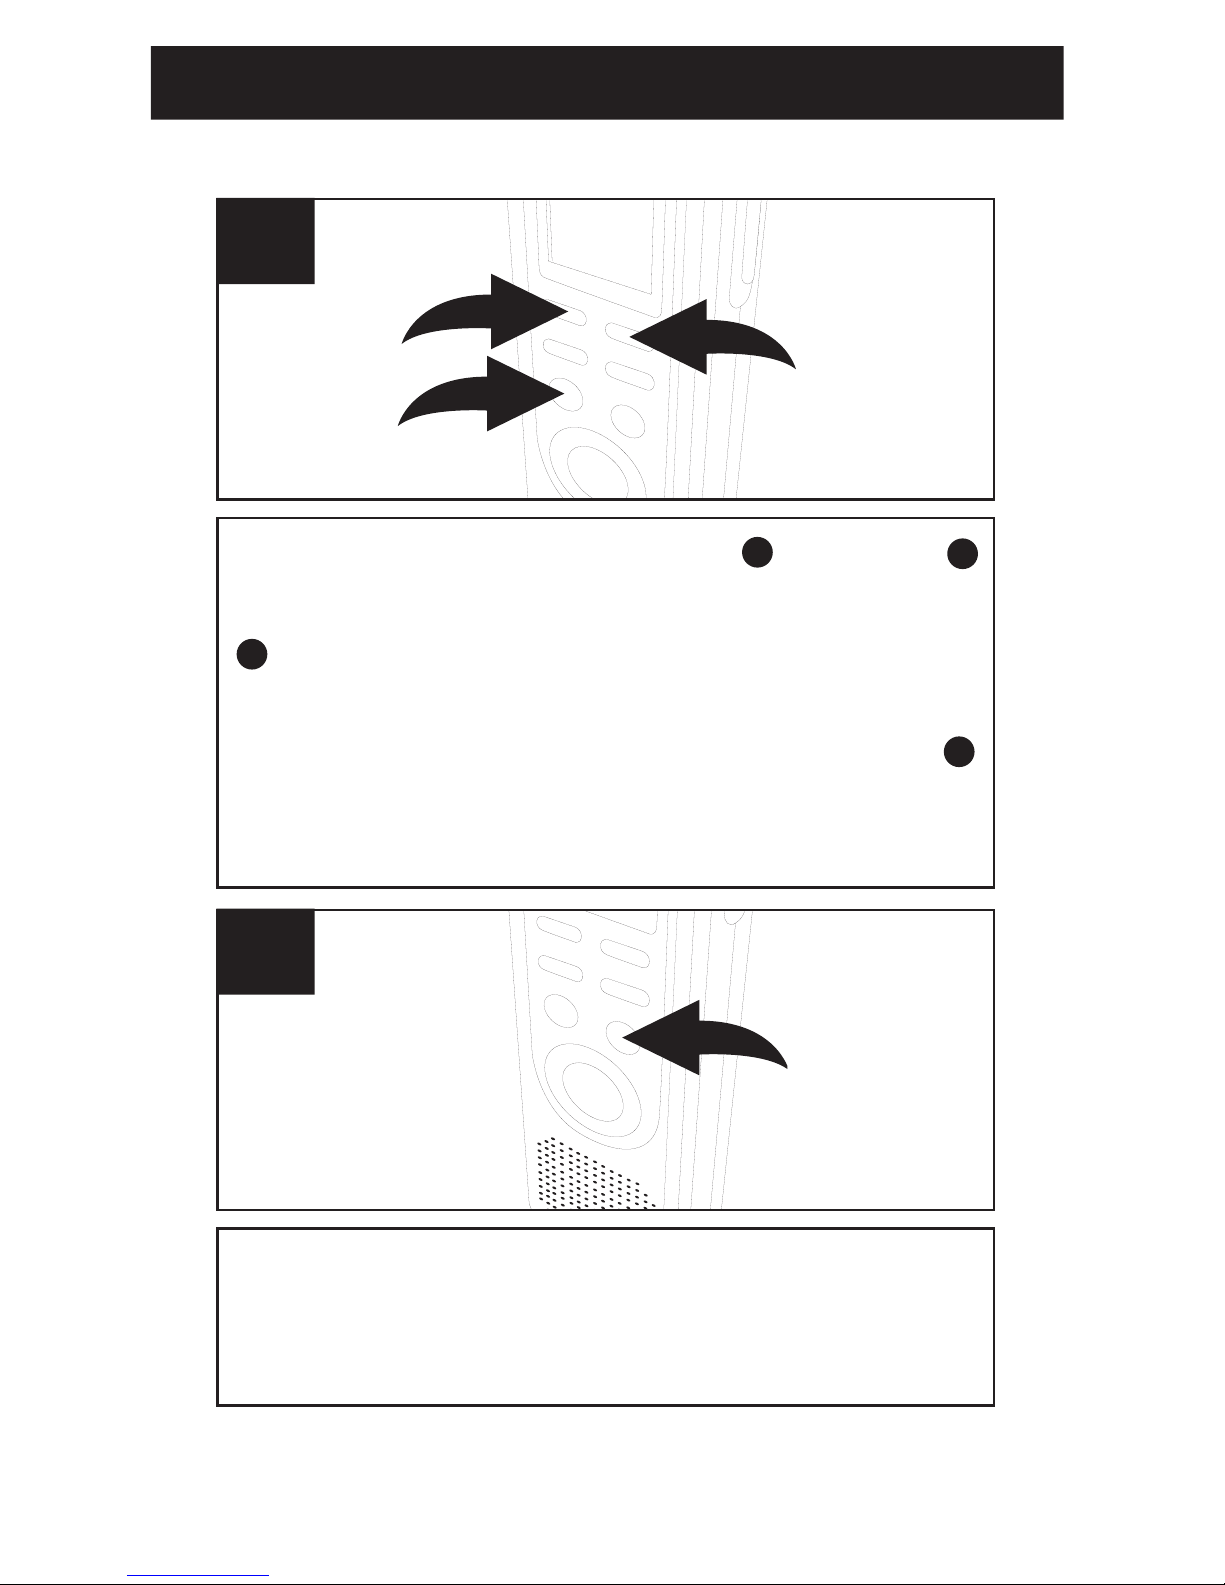
OPEROPERAATIONTION
7
Press the PLAY/STOP button to confirm
and the year will blink. Set the year using
the REV and FWD buttons, then press
the PL
AY/STOP button again to
confirm.
3
1
2
2
Press and hold the MODE/PAUSE button
for two seconds, then release; “SET” will
appear in the display. Press the MODE/
PAUSE button once again to enter the Set
Date mode.
1
1
2
3
1
1
SETTINGSETTING THETHE TIMETIME ANDAND DDAATETE
Page 9
OPEROPERAATIONTION
8
While the date/time appears in the display,
press the FILE/TIME button to select 12 or
24 hour time display.
1
4
Set the Month using the FWD and REV
buttons,
then press the PLAY/STOP button
again
to confirm. Repeat this step to set
the
Day, Hour and Minute. After setting the
minute,
press the PLAY/STOP button
again
and the date/time will be set.
1
3
2
3
2
1
3
3
Page 10

OPEROPERAATIONTION
9
To turn the unit on, press the REC/STOP or
PLAY/STOP button. To turn the unit off, simply
do not touch any button for 30 seconds, and the
unit will automatically turn off and show the time.
1
3
1
2
1
TTOO TURNTURN THETHE UNITUNIT ONON && OFFOFF
To enter the Standby mode, press the
REC/ST
OP button or PLAY/ STOP button
while
the unit is off (Time shows on display). To
turn off the unit, press the MODE/PAUSE button
once while in the standby mode.
1
3
3
2
1
TO SWITCH BETWEEN MODES
1
2
1
2
3
Page 11

OPEROPERAATIONTION
10
To adjust the volume, while in the Standby
mode or during playback of a file, press the
VOL+ or VOL– button ; the volume
number
will increase or decrease to
indicate
the volume level (i.e. “0” is
minimum and “15” is maximum).
1
2
1
ADJUSTINGADJUSTING THETHE VOLUMEVOLUME
EARPHONE JACK
For private listening, connect an earphone
(not included) to this jack. The speaker is
automatically
disconnected when the
earphone plug is inserted in the jack.
21
Page 12

OPERATION
11
Press and hold the MODE/PAUSE button
1 for two seconds; “SET” will appear and
the recording quality will blink. Press the
REV
2 or FWD 3 button to select the
desired recording quality.
1
3
2
1
RECORDING QUALITY
You can choose between four voice recording
quality modes. For best sound quality, select HP
(High Play), for very good sound quality, select
SP (Standard Play) and for good quality, select
MP (Medium Play). For longer recording time
(reasonable sound quality), select LP (Long
Play).
Page 13

1
2
12
When the desired recording quality
OPERAOPERATIONTION
appears, press the MODE/PAUSE button
twice to confirm and turn the unit off
(Time will show on the display) or the unit
will turn off automatically if no button is
High Play: .................................185 min.
Standard Play: ..........................275 min.
Medium Play:............................695 min.
Long Play:.................................925 min.
When the desired recording quality
pressed in 30 seconds.
Page 14

1
3
3
2
OPERAOPERATIONTION
13
Press the REC/STOP or PLAY/STOP button
to enter the Standby mode. Press the FILE/TIME
button to select the desired file folder
(A,B,C,D). The number at the top right of the
display indicates the total messages recorded.
The number at the bottom of the display will
indicate the time recorded for the selected
message.
1
SSEELLEECCTTIINNGG AA FFIILLEE FFOOLLDDEERR
This unit has four memory storage areas (file
folders) to choose from, labeled A, B, C and D. You
can store a total of 200 messages or 925 minutes
in LP mode (695 min. in MP, 275 min in SP, 185 min.
in HP) in all the file folders. 99 messages are the
limit for each file folder. To select a file folder:
NOTE:
Each time you record a message, the unit will assign
a number, counting up 1 from the last message
number, which will be shown on the display.
If the unit is full, FULL will appear in the display.
Delete messages in this case.
1
2
3
Page 15

OPERATION
14
Slide the MIC SENS switch to the LOW
position if recording sounds that are close.
Select the HIGH position if recording
sounds that are further away.
1
RECORDING SENSITIVITY
Slide the HOLD switch to the LOCK position to
disable the buttons; HOLD will appear in the
display if the unit is in the Standby mode. Slide
the HOLD switch to the OFF position to enable
the buttons again.
1
HOLD SWITCH
Page 16

OPERATION
15
Make sure the VOX switch on the rear of unit is
set to OFF. Turn the unit on (by pressing the
REC/STOP or PLAY/STOP button) and select the
desired sound quality as previously described.
1
Select a File Folder as described on page
13 by pressing the FILE/TIME button
1.
While in the Standby mode, press the
REC/STOP button
2 and the REC indicator
will light and the elapsed time will appear.
2
1
2
NORMAL RECORDING
This unit is capable of recording only when
sound is heard. To use this feature, see page
17. For normal recording, follow steps below.
Page 17

OPERATION
16
Speak into the built-in microphone or insert a
microphone into the MIC jack and speak into it in
a normal tone of voice. Press the REC/STOP
button again to stop recording.
3
Press and hold the PLAY/STOP button 1 to see
the remaining recording time during recording. To
pause recording, press the MODE/PAUSE button
2; PAUSE will blink in the display. To release
pause, press the MODE/PAUSE button
2 again.
2
1
4
NOTES:
• The built-in audio level automatically sets the
recording level.
• For normal voice levels, a distance of 5-9
inches is appropriate.
Page 18

OPERATION
17
Slide the VOX switch on the rear of the unit to
the ON position. Turn the unit on (by pressing
the REC/STOP or PLAY/STOP button), and
select the desired sound quality as described
on page 11.
1
Select a File Folder by pressing the
FILE/TIME button (see page 13).
2
VOICE ACTIVATED (VOX) RECORDING
Voice activated recording will allow dictation
only when you speak. When the unit detects
a pause of a few seconds, it will temporarily
stop recording until it detects sound again.
Page 19

OPEROPERAATIONTION
18
Press the REC/STOP button and the REC
indicator
will light and the elapsed time will
appea
r. Speak into the built-in microphone
or insert
a microphone into the MIC jack and
when
the unit picks up sound, it will record.
When
there is no sound, it will not recording,
the REC indicator will blink and PAUSE will
blink in the display until sound is detected.
Press the REC/STOP button again to stop
recording.
3
NOTES:
• The first few sounds activate the recorder and
may not be recorded.
• A variation in voice level during recording will not
stop the unit, two seconds of silence is required
to stop the recording.
• For constant recording, see page 15.
• To pause, press the MODE/PAUSE button.
• The built-in audio level automatically sets the
recording level.
• For normal voice levels, a distance of 5-9
inches is appropriate.
Page 20

OPERATION
19
Turn the unit on (by pressing the
REC/STOP or PLAY/STOP button) and
select a File Folder by pressing the
FILE/TIME button (see page 13).
1
Select the desired message number by
pressing the REV
1 or FWD 2 button; the
message number and the message length
will appear in the display.
1
2
2
TO PLAY BACK MESSAGES
Page 21

OPEROPERAATIONTION
20
Press the PLAY/STOP button ; the unit will play
the
currently selected message, then stop. During
playback,
the Play indicator and the elapsed time
of
the message will appear in the display. You can
check
the message recording time and date by
pressing the REC/S
TOP button . To return to
display the elapsed time, press the REC/STOP
button .
2
1
3
NOTES:
• To adjust the volume, simply press the VOL+
or VOL– button.
• To pause, press the MODE/PAUSE button;
PAUSE will blink in the display. To release pause,
press the MODE/PAUSE button again.
• For Cue and Review during playback, simply
press and hold the desired REV or FWD
button. A chattering sound will be heard.
Release the button when the desired point is
reached.
• To skip or go back to messages, simply press
and release the desired REV or FWD button
until the desired message number is reached.
1
2
2
Page 22

OPERATION
21
REPEAT MESSAGE: While playing back a
message, press the DEL/REPEAT button
1
once; “REPEAT” will appear in the display and
the message playing will repeat over and over
until the PLAY/STOP button
2 is pressed.
2
1
1
REPEAT ALL MESSAGES IN THE SELECTED
FILE FOLDER:
While playing back a message,
press the DEL/REPEAT button
1 twice; “REPEAT
ALL” will appear in the display and all messages in
the selected file folder will repeat over and over
until the PLAY/STOP button
2 is pressed.
2
1
2
TO REPEATEDLY PLAY BACK MESSAGES
You can set the unit to repeat 1 or repeat all
messages in the selected file folder as follows:
Page 23

OPERATION
22
To pause Recording or Playback, press the
MODE/PAUSE button; PAUSE will blink in
the display.
1
Press the MODE/PAUSE button again to
resume recording or playback.
2
TO PAUSE A MESSAGE
TO CANCEL REPEAT PLAYBACK:
To cancel repeat playback, press the
DEL/REPEAT button once or twice until the
REPEAT indicator disappears from the
display.
Page 24

OPERATION
23
While in the Standby mode, select the file folder
(A,B,C,D) using the FILE/TIME button
1. Press
and hold the PLAY/STOP button 2 for 2 seconds;
SCAN will appear in the display. The unit will
automatically scan and play the first five seconds
of each message in the selected file folder,
starting at message one.
2
1
1
The unit will automatically stop after all messages
have been played. To play back the message
during scanning, press the PLAY/STOP button
once to change to Playback mode. To stop Scan
Playback, press the PLAY/STOP button twice.
2
SCAN PLAYBACK
This unit can play back the first five seconds of
each recorded message as follows:
Page 25

OPERATION
24
While in the Standby mode, select the desired
file folder using the FILE/TIME button
1, and
the desired message to delete using the REV
2 or FWD 3 button; the message number and
the message length will appear in the display.
1
2
3
1
Press the DEL/REPEAT button; ERASE will
appear in the display and the first five seconds of
the message will play. To erase, press the
DEL/REPEAT button within the five seconds while
it is playing and the rest of the messages will be
renumbered. If you do not want to erase, do not
press the DEL/REPEAT button while it is playing.
(You can also press the PLAY/STOP button to
cancel and stop playback.)
2
ERASING A SINGLE MESSAGE
Page 26

OPERATION
25
While in the Standby mode, press and hold the
DEL/REPEAT button
1 first, then press and hold
the REC/STOP button 2 for two seconds; ALL
and ERASE will blink in the display.
2
1
1
To erase all the messages, press the DEL/REPEAT
button again within five seconds. If the
DEL/REPEAT button is not pressed again within
the five seconds, the messages will not erase.
2
ERASING ALL MESSAGES
IMPORTANT NOTES:
• Once message(s) are deleted, they cannot be
recovered.
• If the memory is full, FULL will appear in the
display when you press the REC/STOP button to
start recording. The recording will be disabled.
Page 27

CARE AND MAINTENANCE
26
RESETTING THE UNIT
If the unit is exposed to a strong static
electrical charge, the unit may lock up,
or the display may dim. This is very
rare, but if it does happen, remove the
batteries and then reinstall. All settings
will return to their preset values, but the
previous messages are saved.
TRAFFIC SAFETY
• Do not use while operating a
motorized vehicle. It may create a
traffic hazard and is illegal in many
areas.
• Even if your earphone is an open air
type designed to let you hear outside
sounds, do not turn the volume up so
high that you cannot hear what is
around you.
• Use extreme caution or temporarily
discontinue use in potentially
hazardous situations.
Page 28

CARE AND MAINTENANCE
27
CARE
• Keep the unit dry. If it gets wet, wipe it
immediately. Liquids may contain
minerals that can corrode the circuits.
• Use and store the unit only in normal
temperature environments. Extreme
temperatures can shorten the life of
electronic devices, damage batteries
and/or melt plastic parts.
• Keep the unit away from dirt and dust.
• Handle the unit gently and carefully.
Dropping it can cause damage and
may cause the unit to work
improperly.
• To clean, wipe the unit with a damp
cloth occasionally to keep it looking
new. Do not use harsh chemicals,
cleaning solvents or strong
detergents.
Page 29

SPECIFICATIONS
28
Recording System...........Built-in Flash Memory
Recording Time...........925 minutes in LP mode
Speaker.......................................0.2W (8 Ohm)
Output Power...........................................80mW
Power Source .......................3V, "AAA" size x 2
......................................batteries (not Included)
Battery Life ..............................Approx 10 hours
..............................................at recording mode
....................................Approx 6.5 hours at play
...........................mode at medium volume level
Dimensions.....4.4 (H) x 1.4 (W) x .7 (D) inches
Weight ............................46g (without batteries)
Specifications are subject to change without notice.
FOR ADDITIONAL SET-UP OR OPERATING
ASSISTANCE, PLEASE VISIT OUR WEBSITE
AT WWW.MEMOREXELECTRONICS.COM OR
CONTACT CUSTOMER SERVICE AT
(954) 660-7100.
PLEASE KEEP ALL PACKAGING MA TERIAL
FOR AT LEAST 90 DAYS IN CASE YOU NEED
TO RETURN THIS PRODUCT TO YOUR PLACE
OF PURCHASE OR MEMOREX.
FOR PARTS AND ACCESSORIES, CONTACT
FOX INTERNATIONAL AT 1-800-321-6993.
Page 30

Memcorp, Inc.
Weston, FL
Printed in China
Visit our website at
www.memorexelectronics.com
 Loading...