

Page 1

iWakeUp
User Guide
Please read these instructions
completely, before operating this product.
Guía del usario
Por favor lea toda las instruciones
antes de tratar de usar este producto.
memorexelectronics.com
Mi 4 014
TM
Page 2
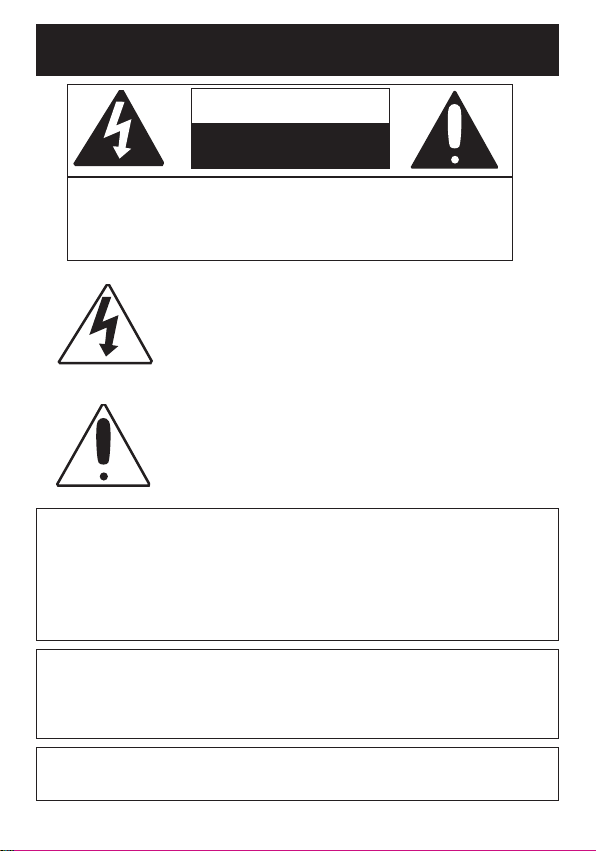
SAFETY PRECAUTIONS
CAUTION
RISK OF ELECTRIC SHOCK
DO NOT OPEN
CAUTION: TO REDUCE THE RISK OF ELECTRIC SHOCK,
DO NOT REMOVE COVER (OR BACK). NO USERSERVICEABLE PARTS INSIDE. REFER SERVICING TO
QUALIFIED SERVICE PERSONNEL.
DANGEROUS VOLTAGE:
The lightning flash with arrowhead symbol within an
equilateral triangle is intended to alert the user to the
presence of uninsulated dangerous voltage within the
product’s enclosure that may be of sufficient magnitude to
constitute a risk of electric shock to persons.
ATTENTION:
The exclamation point within an equilateral triangle is
intended to alert the user to the presence of important
operating and maintenance (servicing) instructions in the
literature accompanying the appliance.
FCC WARNING:
This equipment may generate or use radio frequency energy. Changes or
modifications to this equipment may cause harmful interference unless
the modifications are expressly approved in the instruction manual. The
user could lose the authority to operate this equipment if an unauthorized
change or modification is made.
ATTENTION:
POUR ÉVITER LES CHOC ÉLECTRIQUES, INTRODUIRE LA LAME LA
PLUS LARGE DE LA FICHE DANS LA BORNE CORRESPONDANTE DE
LA PRISES ET POUSSER JUSQU’AU FOND.
iPod is a trademark of Apple Computer, Inc., registered in the U.S. and
other countries.
1
Page 3

SAFETY PRECAUTIONS
INFORMATION:
This equipment complies with Class B digital device regulations.
This equipment generates, uses and can radiate radio frequency
energy and, if not installed and used in accordance with the
instructions, may cause harmful interference to radio
communications. However, there is no guarantee that interference
will not occur in a particular installation. If this equipment does
cause harmful interference to radio or television reception, which
can be determined by turning the equipment off and on, the user is
encouraged to try to correct the interference by one or more of the
following measures:
• Reorient or relocate the receiving antenna.
• Increase the separation between the equipment and receiver.
• Connect the equipment into an outlet on a circuit different from
that to which the receiver is connected.
• Consult the dealer or an experienced radio/TV technician for help.
WARNING: TO PREVENT FIRE OR SHOCK
HAZARD, DO NOT EXPOSE THIS UNIT TO RAIN
OR MOISTURE.
SURGE PROTECTORS:
It is recommended to use a surge protector for AC connection.
Lightning and power surges ARE NOT covered under warranty
for this product.
This Class B digital apparatus complies with Canadian
ICES-003.
Cet appareil numérique de la classe B est conforme à la
norme NMB-003 du Canada.
2
Page 4

Dear Customer:
A
S
S
O
C
I
A
T
I
O
N
EST. 1924
E
L
E
C
T
R
O
N
I
C
I
N
D
U
S
T
R
I
E
S
EIA
We
LISTENING
For ALifetime
Want You
Selecting fine audio equipment such as the unit you’ve just purchased is only the start of
your musical enjoyment. Now it’s time to consider how you can maximize the fun and
excitement your equipment offers. This manufacturer and the Electronic Industries
Association’s Consumer Electronics Group want you to get the most out of your equipment
by playing it at a safe level. One that lets the sound come through loud and clear without
annoying blaring or distortion and, most importantly, without affecting your
sensitive hearing.
Sound can be deceiving. Over time your hearing “comfort level” adapts to higher volumes
of sound. So what sounds “normal”can actually be loud and harmful to your hearing. Guard
against this by setting your equipment at a safe level BEFORE your hearing adapts.
To establish a safe level:
• Start your volume control at a low setting.
• Slowly increase the sound until you can hear it comfortably and clearly, and
without distortion.
Once you have established a comfortable sound level:
• Set the dial and leave it there.
Taking a minute to do this now will help to prevent hearing damage or loss in the future.
After all, we want you listening for a lifetime.
We Want You Listening For A Lifetime
Used wisely, your new sound equipment will provide a lifetime of fun and enjoyment. Since
hearing damage from loud noise is often undetectable until it is too late, this manufacturer
and the Electronic Industries Association’s Consumer Electronics Group recommend you
avoid prolonged exposure to excessive noise. This list of sound levels is included for
your protection.
Decibel
Level
30 Quiet library, soft whispers
40 Living room, refrigerator, bedroom away from traffic
50 Light traffic, normal conversation, quiet office
60 Air conditioner at 20 feet, sewing machine
70 Vacuum cleaner, hair dryer, noisy restaurant
80 Average city traffic, garbage disposals, alarm clock at two feet
THE FOLLOWING NOISES CAN BE DANGEROUS UNDER
CONSTANT EXPOSURE:
90 Subway, motorcycle, truck traffic, lawn mower
100 Garbage truck, chain saw, pneumatic drill
120 Rock band concert in front of speakers, thunderclap
140 Gunshot blast, jet engine
180 Rocket launching pad
Information courtesy of the Deafness Research Foundation.
Example
3
Page 5
S
NOOZE
1
2
3
4
5
6
7
8
9
10
11
12
13
14
15
16
17
18
19
20
FRONT
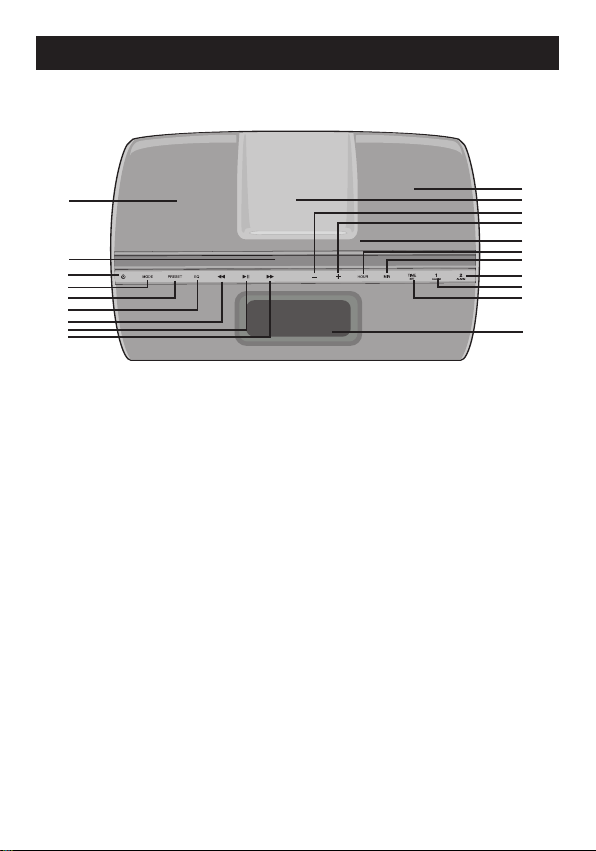
LOCATION OF CONTROLS
1. Left Speaker
2. SNOOZE/SLEEP Button
3. Power Button
4. MODE Button (AM/FM)
5. PRESET/SET Button
6. EQ Button
7. Tune/Skip/Search o
Button
8. PLAY/PAUSE (®p) Button
9. Tune/Skip/Search n
Button
10. Right Speaker
11. iPod Compartment with
Connector (for use with
Universal Docks)
12. Volume Down Button
13. Volume Up Button
14. Remote Sensor
15. HOUR Button
16. MIN (Minute) Button
17. ALARM 2 Button
18. ALARM 1 Button
19. TIME SET/Display Button
20. LCD Display
4
Page 6
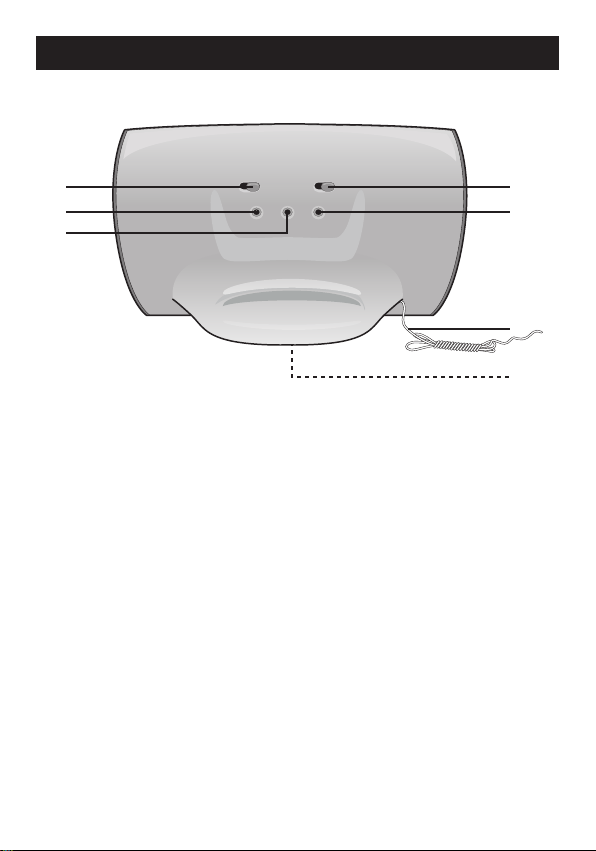
LOCATION OF CONTROLS (CONTINUED)
1
2
3
4
5
6
7
REAR
1. DIMMER Switch (OFF/L/M/H)
2. DC 12V Jack
(AC ADAPTER PART NO. 0251-207200-10103*)
3. LINE IN Jack
4. DST (Daylight Savings Time) Switch (-1/+1)
5. Headphones Jack
6. FM Wire Antenna
7. Battery Compartment (Bottom of Unit)
(BATTERY COVER PART NO. 3051-002206-10000*)
*Consumer Replaceable Part
(See page 20 to order.)
5
Page 7
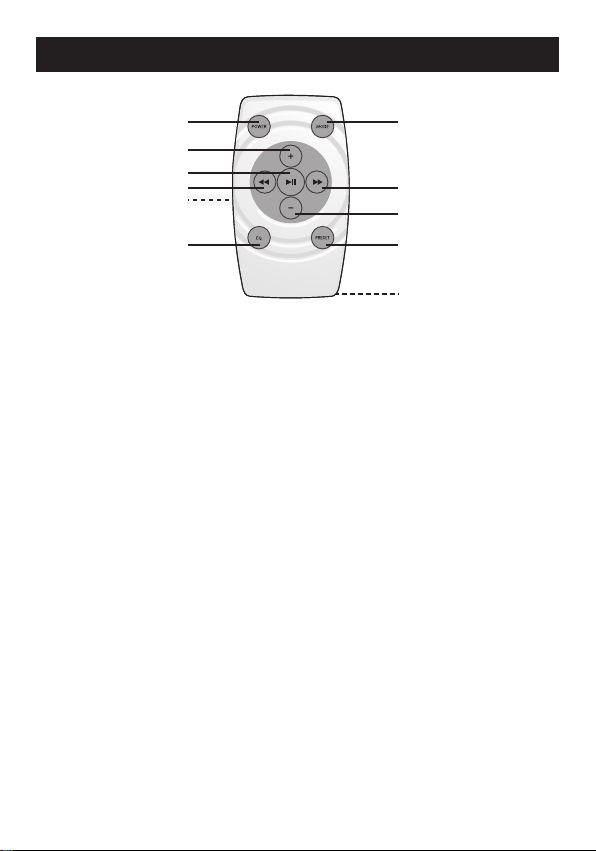
LOCATION OF CONTROLS (CONTINUED)
1
2
3
4
5
6
7
8
9
10
11
REMOTE
1. Power Button
2. Volume Up Button
3. PLAY/PAUSE (®p) Button
4. Tune/Skip/Search o
Button
5. Battery Compartment
(Side of Unit)
REMOTE CONTROL PART NO. RC-F00022001*
*Consumer Replaceable Part (See page 20 to order.)
6. EQ Button
7. MODE Button
8. Tune/Skip/Search n
Button
9. Volume Down Button
10. PRESET/SET Button
11. Strap Hole (Bottom of Unit)
NOTE:
• The remote buttons function in the same way as the buttons on
the main unit.
6
Page 8
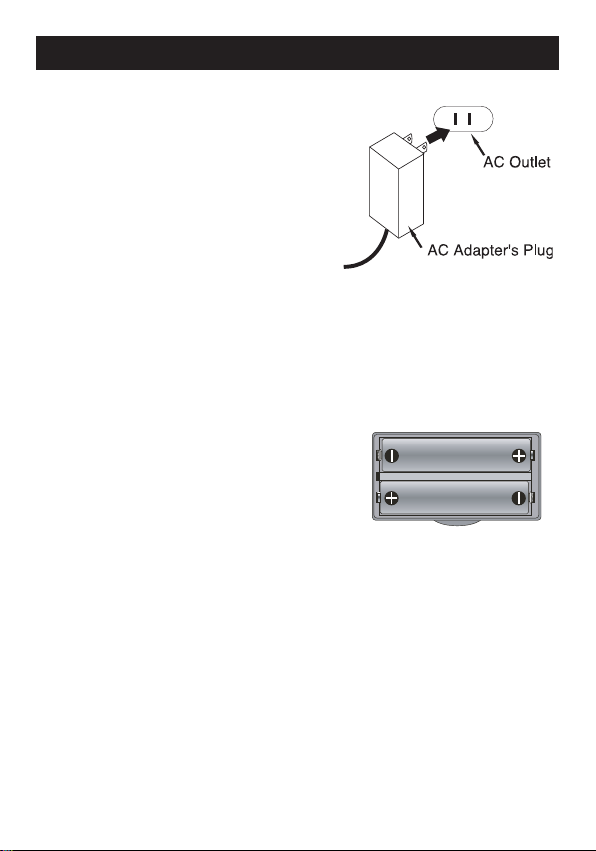
POWER SOURCE
front of unit
AC CONNECTION
Insert the small end of the AC adapter
into the DC IN 12V jack (located on the
rear of the unit). Connect the other end
to a wall outlet having 120V AC, 60 Hz.
AC Adapter, DC 12V Z
NOTES:
• Remove both the DC plug and the
AC-IN plug to disconnect the AC adapter when not in use.
• Only use the supplied AC adapter which has the following specs:
DC 12V Z
BATTERY INSTALLATION
Two (2) “AAA” size batteries can also be used to
power and/or to provide a backup for the clock
and alarm time for this unit as follows:
1. Open the battery door by pushing in on the
tab, then removing the door.
2. Insert two (2) “AAA” batteries as shown.
Alkaline batteries are recommended for the
longest playing time.
3. Place the battery door back on the
compartment.
NOTES:
• The batteries are used to back-up the clock and alarm times when the AC
adapter is disconnected or there is a power failure.
• The battery indicator will appear or blink in the display when there are no
batteries or the batteries are low and need replacing.
IMPORTANT! See BATTERY PRECAUTIONS on the next page.
7
Page 9

POWER SOURCE (CONTINUED)
C
R
2
0
2
5
C
R
2
0
2
5
REMOTE BATTERY INSTALLATION
1.
2. Install a CR2025 battery, by popping it in
3. Replace the Battery Compartment.
Remove the Battery Compartment by
pressing in on the tab and then sliding the
compartment out.
through the back of the compartment,
paying attention to the polarity diagram in
the compartment (positive side up).
Follow these precautions when using batteries in this device:
1. Warning–Danger of explosion if battery is incorrectly replaced. Replace only
with the same or equivalent type.
2. Use only the size and type of batteries specified.
3. Be sure to follow the correct polarity when installing the batteries as indicated
in the Battery Compartment. A reversed battery may cause damage to
the device.
4. Do not mix different types of batteries together (e.g. Alkaline, Rechargeable
and Carbon-zinc) or old batteries with fresh ones.
5. If the device is not to be used for a long period of time, remove the batteries
to prevent damage or injury from possible battery leakage.
6. Do not try to recharge a battery not intended to be recharged; it can overheat
and rupture. (Follow battery manufacturer’s directions.)
BATTERY PRECAUTIONS
OPTIONAL CONNECTION
LINE IN JACK (REAR OF UNIT)
Insert one end of the audio cable (not included) into the LINE OUT jack on your
external audio unit and the other end into the LINE IN jack on the rear of this unit.
To listen to the external audio unit, turn this unit on using the Power button, and
turn on the external unit as well. Repeatedly press the MODE button to select
LINE IN mode; “LINE IN” will appear in the display. The external audio unit’s
output sound will be heard through this unit’s speakers. If you wish to listen to the
iPod in the iPod compartment, repeatedly press the MODE button to select iPod
mode; iPod will appear in the display.
NOTE: If this unit is turned on and in FM/AM/iPod mode, once the external unit is
connected, this unit will change to LINE IN mode automatically. Then, if you
disconnect the
FM/AM/iPod mode.
external unit from the LINE IN jack, this unit will revert back to
8
Page 10
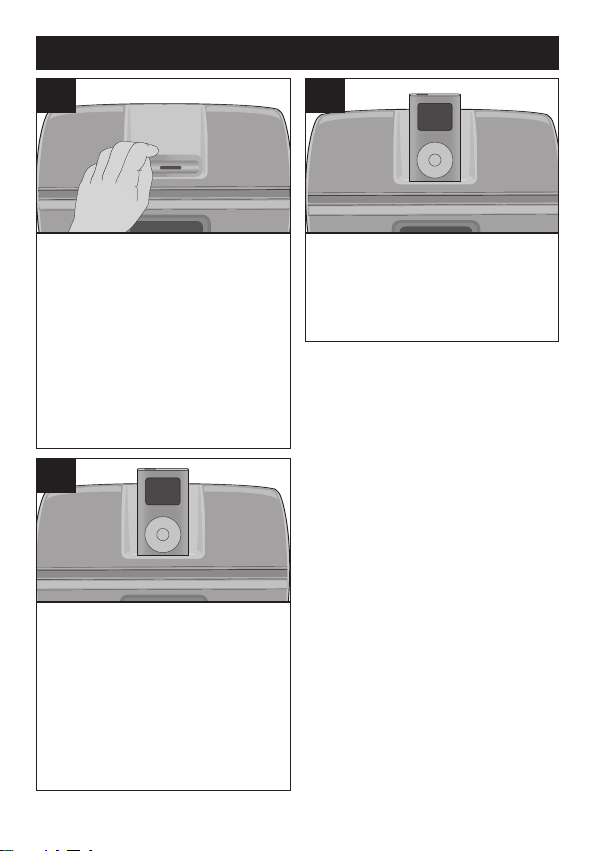
INSERTING AN iPod
(
A)
(B)
(
A)
(
B)
1
Insert the Universal Dock included
with your iPod (A) into the iPod
compartmen t (B) (as shown) ,
making sure the tabs are facing
front, and slip the tabs into place.
Press the rear side of the Universal
Dock until it is positioned inside the
iPod compartment.
3
The iPod will charge as long as
this unit is connected with the
AC adapter.
Please see t he ne xt pa ge for
instructions on using an iPod with
this unit.
2
Sl i de the i Pod (A) i nto th e
Universal Dock (B) (as shown).
Ge n tly pus h down so t h e
connector on the iPod slides onto
the connector on this unit.
NOTES:
• If this unit is turned on and in
FM/AM/LINE IN mode, once the
iPod is connected, this unit will
change to iPo d mode
automat icall y. Then, i f you
disconnect the iPod, this unit will
revert ba ck to FM/ AM/LINE
IN mode.
• When the iPod is connected to
this unit, i t will be in the
Pause mode.
• To remove the Universal Dock,
insert your finger (or other object)
into the gap in the Universal Dock,
then gently pull the Univers al
Dock out to remove it.
• CHARGING: When the iPod is
inserted into the dock, whether
this unit is on or off, the iPod’s
battery will charge until it is full.
• You will not be able to select iPod
or LINE IN mode, if there is no
device or iPod connected to the
LINE IN jack or the iPod dock.
9
Page 11
OPERATION
SNOOZE
1
2
SNOOZE
SNOOZE
SNOOZE
1
2
USING AN iPod WITH THIS UNIT
1
With an iPod connected (see
previous page), if this unit is not
already on, turn this unit on by
pressing the Power button 1.
Repeatedly press the MODE button
2 to select iPod mode; “iPod” will
appear in the display.
3
To play/pause the iPod:
Press the PLAY/PAUSE (®p)
button to start playback on your
iPod. Press again to pause
playback and press yet again to
resume playback.
NOTES:
• See the next page for how to adjust the volume.
• To turn this unit off, press the Power button. This unit will turn off
automatically if the iPod is disconnected while the unit was in
iPod mode.
2
You can operate the iPod using its
own controls, as per its owner’s
manual, or you can use the
controls on this unit to operate
the iPod.
4
To skip forward or backward on
the i Pod: P ress the Tune/
Skip/Search o 1 or n 2 button to
skip to the beginning of the current
track/previous or next track.
To search forward or backward
on the iPod: Press and hold the
Tune/Skip/Search o 1 or n 2
button to search wit hin the
currently-playing track.
10
Page 12
OPERATION (CONTINUED)
SNOOZE
1
2
SNOOZE
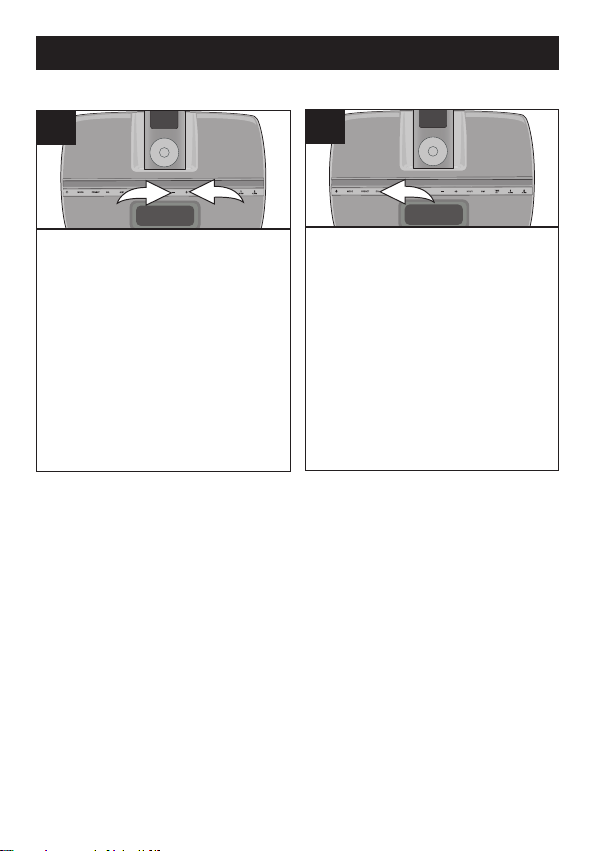
ADJUSTING THE VOLUME AND EQ (Equalizer)
1
To adjust the main volume:
Press the Volume Up 1 and/or
Down 2 button to increase and/or
decrease the volume.
NOTES:
• After you have adjusted the volume setting, if you turn the unit off and
then on again, the volume level will be set to the level you selected prior
to turning the unit off.
• For private listening, plug in headphones into the Headphones jack on
the rear of this unit. The speakers will be disconnected when
headphones are plugged in.
• To turn this unit off, press the Power button.
2
To adjust the EQ (Equalizer):
Press the EQ b utton to cycle
through the following options: EQ1,
EQ2, EQ3, EQ4 or Off (Normal).
11
Page 13
OPERATION (CONTINUED)
SNOOZE
SNOOZE
SNOOZE
1
2
USING THE RADIO
1
Turn this unit on by pressing the
Power button.
3
Repeate dly press th e Tu ne/
Skip/Search o 1 or n 2 button to
manually advance the frequency in
the display up or down until the
desired frequency appears.
For auto tuning, press and hold the
Tune/Skip/Search o 1 or n 2
button until the frequency in the
display starts to scan and then
release; the tuner will search and
then stop on the next strong station
it finds. Repeat this step until the
desired freq uency appe ars in
the display.
Antennas
FM: Unravel and extend the FM wire antenna for best reception.
AM: Turn the unit for better AM reception. Also, move the AC adapter 1.5ft. away from the
main unit to prevent interference to the AM signal.
2
Repeatedly press the MODE button
to select AM or FM mode; “AM” or
“FM” will appear in the display.
NOTES:
• When a station is tuned, after five
seconds, the radio frequency will
disappear and the actual time will
reappear in the display.
• See the previous page for how to
adjust the volume.
• To turn this unit off, press the
Power button.
12
Page 14

OPERATION (CONTINUED)
SNOOZE
SNOOZE
1
2
3
SNOOZE
SETTING THE RADIO PRESETS (10 for each band)
1
Follow Steps 1-3 on the previous
page to tune a station. Press and
hold the PRESET/SET button;
“P1”, will blink in the display.
2
Press the Tune/Skip/Search o 1
or n 2 button to select a desired
Preset (1-10). Press the PRESET/
SET button 3 again to confirm, the
station will be saved into memory.
Repeat to program up to 10
Presets, as desired.
RETRIEVING RADIO PRESETS (10 for each band)
1
Follow Steps 1-2 on the previous
page to turn the unit on and select
AM or FM mode.
2
Repeatedly press the PRESET/
SET button until the desired Preset
number appears in the display.
NOTE: The preset memories will be erased if the unit is without power (no
batteries/AC adapter isn't connected/power failure) for a long period of time.
13
Page 15

OPERATION (CONTINUED)
SNOOZE
SNOOZE
SNOOZE
1
2
TO SET OR RESET THE ACTUAL TIME
1
With the power off, press and hold
the TIME SET/DISPLAY button;
the time will blink.
3
Press the TIME SET/DISPLAY
button (or wait approx. 15
seconds) and the time will be set.
2
Within 15 seconds, press the MIN
(Minute) button 1 to set the
present minute and the HOUR
button 2 to set the present hour.
Make sure to set the correct
AM/PM setting.
DST (DAYLIGHT SAVINGS TIME)
1
For your convenience, there is a DST
(Daylight Savings Time) switch
located on the rear of the unit. Slide
the switch to +1 to add an hour to the
actual time or slide the switch to -1 to
subtract an hour from the actual time.
14
Page 16

OPERATION (CONTINUED)
SNOOZE
1
2
SNOOZE
1
2
SNOOZE
3
1
2
4
SNOOZE
1
2
3
TO SET OR RESET THE ALARM TIME
1
With the power off, press and hold
either theALARM1 button1 (to set
Alarm 1) or ALARM 2 button 2 (to
set Alarm 2); the Alarm time will
blink in the display.
3
If set to Radio (in Step 2), then
while the frequency is blinking,
set the frequency using the
Tune/Skip/Search o 1 or n
2 button.
NOTE: When the alarm time is
reached, the unit will turn on the
band (AM or FM) and the
frequency that you selected.
2
Within 15 seconds, press the MIN
(Minute) button 1 to set the alarm
minute and the HOUR button 2 to set
the alarm hour. Make sure to set the
correct AM/PM setting.
While the alarm time is blinking,
repeatedly press the MODE button 3 to
select alarm on for radio (FM or AM),
iPod or buzzer.
NOTE: Make sure the corresponding
indicator (RADIO [FM or AM], iPod,
BUZZ) appears in the display.
4
Press the ALARM 1 button 1 or
ALARM 2 button 2 again; the
maximum alarm volume level
will blink.
Press the Volume Up 3 and/or
Down 4 button to increase and/or
de crease th e maximum alarm
volume level.
Press the ALARM 1 button 1 or
ALARM 2 button 2 yet again.
CONTINUED ON THE NEXT PAGE
15
Page 17

OPERATION (CONTINUED)
SNOOZE
5
If set to iPod, select your desired track, insert
the iPod as shown on page 9 and turn off the
iPod. When the alarm time is reached,the unit
will start playback on the track that you
selected and the tracks following it in the
playlist. The unit will playback for 20 minutes
then turn off automatically or, if the remaining
playlist has less than 20 minutes of playback
time remaining, the unit will just playback the
remaining time of the playlist and then stop.
NOTES:
• When the alarm time is reached, the alarm volume level will be set to the
minimum and it will increaseone step every three seconds continuously until
the preset maximum alarm volume level is reached.
• When the actual time matches the selected preset alarm time(s), if set to
Radio or Buzzer, the unit will automatically turn on for 20 minutes and then
shut off. If set to iPod, the unit will start playback on the track that you
selected and the tracks following it in the playlist. The unit will playback for
20 minutes then turn off automatically or, if the remaining playlist has less
than 20 minutes of playback time remaining, the unit will just playback the
remaining time of the playlist and then stop.
• TO SHUT OFF THE ALARM, see TO SHUT THE ALARM OFF section on
the next page.
• While the alarm is sounding, if the other alarm reaches the alarm time, the
first alarm will stop sounding and the second alarm will start sounding.
• Make sure you have disconnected the headphones from the Headphones
jack (rear of the unit); otherwise, there will be no sound when the actual time
matches the preset alarm time.
16
Page 18

OPERATION (CONTINUED)
SNOOZE
1
2
SNOOZE
SNOOZE
TO SHUT THE ALARM OFF
1
Press the ALARM 1 1 or ALARM 2 2 button (which corresponds to the alarm that
was set) and the alarm will turn off and NOT be set for the next day. To set the
alarm for the next day, press any other buttons (except ALARM 1, ALARM 2 or
SNOOZE button).
NOTE: If set to iPod or Radio, while the alarm is on, if you press any button on the
unit (except the SNOOZE/SLEEP button or the Power button), the unit will change
from Alarm mode to normal Power On mode, so you can adjust any setting (i.e.,
volume level, radio frequency, etc.) as desired. Press the Power button to turn off
the unit if necessary. If set to Buzzer, while the alarm is on, if you press any button
on the unit, the unit will turn off.
SNOOZE
1
While the alarm is sounding, press the
SNOOZE/SLEEP button; the SNOOZE
indicator will appear in the display. Also,
"10" will appear in the display for five
seconds and then revert back to the
actual time. The alarm will turn back on
automatically ten minutes later.
NOTE:
• To cancel the SNOOZE function (the alarm will not turn back on), press the
ALARM 1 or ALARM 2 button (which corresponds to the alarm that was set);
the SNOOZE indicator will disappear from the display and the alarm will NOT
be set for the next day. To set the alarm for the next day, press any other
buttons (except ALARM 1, ALARM 2 or SNOOZE button).
2
To set the SNOOZE time to a time other
than 10 minutes, when “10” appears in the
display, press the SNOOZE/SLEEP button
again. Each press of the SNOOZE/SLEEP
button will increase the SNOOZE time by
five minutes (up to "60” for 60 minutes).
Once you stop pressing the button, the
display will show the SNOOZE time for five
seconds and then revert back to the actual
time. The alarm will turn back on according
to the SNOOZE time set.
17
Page 19

SNOOZE
OPERATION (CONTINUED)
SLEEP DIMMER SWITCH
1
With the unit in the Radio (FM or AM),
iPod or LINE IN mode, press the
SNOOZE/SLEEP button; the SLEEP
indicator and "10" will appear in the
display for five seconds which indicates
the unit will turn off after 10 minutes.
Repeatedly press the SNOOZE/SLEEP
button to select the SLEEP time, up to
60 minutes (i.e., "20"–turns off
automatically after 20 minutes,
"30"–turns off automatically after 30
minutes, etc.). After five seconds, the
SLEEP time will disappear from the
display. To view the remaining SLEEP
time, press the SNOOZE/SLEEP button
once. Repeatedly press the SNOOZE/
SLEEP button to increase the
SLEEP time.
NOTE: To cancel the SLEEP function,
repeatedly press the SNOOZE/SLEEP
button until the "SLEEP" indicator
disappears from the display.
1
Slide the DIMMER switch to adjust
the dimmer of the display. You can
select between OFF (to turn the
display’s backlight off), “L”, “M” or
“H”. “H” is the brightest display, “M”
is the middle display and “L” is the
least bright display.
18
Page 20

TROUBLESHOOTING GUIDE
If you experience a problem with this unit, checkthe chart belowbefore callingfor service.
SYMPTOM CAUSE SOLUTION
No sound. Volume is Increase volume.
set to minimum.
AM or FM, no sound. Power is not on or Press the Power button,
AM or FM mode is not then the MODE button to
selected. select AM or FM.
Volume is Increase volume.
set to minimum.
AM/FM, poor sound. Station is not tuned Retune the AM or FM
properly. broadcast station.
FM: Wire Extend FM wire
antenna is not antenna.
extended.
AM: Unit is not pos- Rotate unit until best
itioned correctly. reception is obtained.
iPod mode, no sound. Incorrectly connected. Check the connection.
Not in iPod mode.
Time reset to “12:00”. Batteries connected Check the batteries.
improperly, not con-
nected or dead.
Clock not set. Set the clock.
Alarm does not Alarm is not activated Set and activate alarm as
turn on. or set properly. described on page 15.
Clock is not set. Set the clock.
19
Press MODE button.
Page 21

SPECIFICATIONS
GENERAL:
Power Source ................DC 12V Adapter (Center Positive)
Battery Backup. .......................2 x 1.5V “AAA” size batteries
Speaker...............................................................2 x 3 ohms
Output Power .......................................................2 x 4.5 W
Weight......................................................................2.25 lbs
Dimensions ....................10.5 (L) x 4.5 (W) x 6.5 (H) inches
RADIO SECTION:
Frequency Range (FM) ................................87.5–108 MHz
Frequency Range (AM) ...............................520–1710 KHz
Specifications are subject to change without notice.
FOR ADDITIONAL SET-UP OR OPERATING ASSISTANCE,
PLEASE VISIT OUR WEBSITE AT:
OR CONTACT CUSTOMER SERVICE AT 1-800-919-3647.
WWW.MEMOREXELECTRONICS.COM
PLEASE KEEP ALL PACKAGING MATERIAL FOR AT LEAST 90
DAYS IN CASE YOU NEED TO RETURN THIS PRODUCT TO YOUR
PLACE OF PURCHASE OR IMATION ELECTRONICS PRODUCTS.
FOR CONSUMER REPLACEABLE PART(S), SEE PART NUMBER(S)
ON PAGES 5 AND 6 AND THEN CONTACT FOX INTERNATIONAL AT 1800-321-6993.
20
Page 22

MEDIDAS DE SEGURIDAD
CUIDADO
RIESGO DE DESCARGA
ELÉCTRICA. NO ABRIR
ADVERTENCIA: Para reducir el riesgo de descargas
eléctricas no abra la cubierta o tapa posterior. Allí no hay
partes que el usuario pueda reparar. Lleve su unidad a un
Centro de Servicio Autorizado.
ADVERTENCIA: La figura del rayo con punta de flecha
dentro de un triángulo está hecha para alertar al usuario
de la presencia de cables sin aislar con “voltaje peligroso”
dentro del gabinete, de tal magnitud que puede ocasionar
una descarga eléctrica a las personas.
ADVERTENCIA: El signo de exclamación dentro de un
triángulo está hecho para alertar al usuario de la
existencia de instrucciones importantes tanto de servicio
como de funcionamiento y mantenimiento que vienen
con la unidad.
AVISO DE LA FCC:
Este equipo genera o puede usar energía de frecuencia radial. Cualquier
cambio o modificación al equipo puede causar interferencia nociva, a
menos que estas modificaciones estén expresamente indicadas en el
manual de instrucciones. El usuario puede perder el derecho de operar
este equipo si efectuara un cambio o modificación no autorizados.
ATTENTION:
POUR ÉVITER LES CHOC ÉLECTRIQUES, INTRODUIRE LA LAME LA
PLUS LARGE DE LA FICHE DANS LA BORNE CORRESPONDANTE DE
LA PRISES ET POUSSER JUSQU’AU FOND.
iPod es una marca comercial de Apple Computer, Inc., registrada en
los Estados Unidos y en otros países.
1
Page 23

MEDIDAS DE SEGURIDAD
INFORMACIÓN:
Este equipo
Clase B.
radiofrecuencia y, si no se instala y usa conforme a las instrucciones,
puede generar interferencia dañina con las radiocomunicaciones. Sin
embargo, no hay garantía de que no habrá interferencia en una
instalación particular. Si este equipo llegara a causar interferencia
dañina con la recepción de radio o televisión, lo cual se puede
determinar encendiendo y apagando el equipo, le pedimos que
intente corregir la interferencia con las siguientes medidas:
• Cambie la orientación o ubicación de la antena receptora.
• Incremente la distancia entre el equipo y el receptor.
• Conecte el equipo a un contacto eléctrico que esté en un circuito
distinto al que está conectado el receptor.
• Consulte al vendedor o a un técnico de radio y televisión
con experiencia.
DESCARGA ELÉCTRICA O INCENDIO, NO EXPONGA ESTE
PROTECTORES DE VOLTAJE:
Se recomienda utilizar un protector de voltaje para la conexión a
corriente eléctrica. Los daños ocasionados por relámpagos y picos
de voltaje no están cubiertos por la garantía de este producto.
cumple con
Este equipo genera, usa y puede irradiar energía de
ADVERTENCIA: PARA EVITAR LOS RIESGOS DE
APARATO A LA LLUVIA NI A LA HUMEDAD.
los reglamentos de un aparato digital de
Este aparato digital de Clase B cumple con la norma
ICES-003 de Canadá.
Cet appareil numérique de la classe B est conforme à la
norme NMB-003 du Canada.
2
Page 24

Estimado Cliente:
A
S
S
O
C
I
A
T
I
O
N
EST. 1924
E
L
E
C
T
R
O
N
I
C
I
N
D
U
S
T
R
I
E
S
EIA
We
LISTENING
For A Lifetime
Want Y ou
En el momento en que seleccionó un equipo de tan alta tecnología como el que usted acaba
de comprar,su entretenimiento musical recién comenzó. Ahora es tiempo de pensaren cómo
puede optimizar el entretenimientoque su equipole ofrece. Este fabricante y laAsociación de
Industrias Electrónicas del Grupo de Consumidores Electrónicos desean que usted obtenga
el mejor resultado de su equipo, usándoloa un nivel seguro como es escuchar un sonidoclaro
y sonoro, sin distorsión y, sobre todo, sin que afecte su sentido auditivo. El sonido es
engañoso, ya que con el tiempo su nivel de audición puede adaptarse a escuchar sólo en
volumen alto, resultando en un serio daño a su sentido auditivo. Protéjase contra este daño
innecesario ajustando el volumen de su equipo a un nivel bajo antes de acostumbrarse a
escuchar siempre la música a un volumen alto.
Para establecer un nivel auditivo seguro:
• Ponga el control de volumen en posición baja.
• Lentamente aumente el nivel hasta que escuche el sonido de manera clara y
confortable, sin distorsión.
Una vez que establece el nivel de audición confortable:
• Deje fijo el control de volumen en dicho nivel.
Eso le tomará tan solo un minuto, y le ayudará a prevenir la pérdida del oído en el futuro.
Nosotros deseamos que usted pueda oír durante toda su vida
Si sabe usar su equipo, éste le proveerá mucho tiempo de satisfacción y entretenimiento.
Debido a que el daño causado al oído es imperceptible hasta que ya es muy tarde, este
fabricante y la Asociación de Industrias Electrónicas le recomiendan evitar la exposición
prolongada a ruidos excesivos. La lista que le damos a continuación le servirá de guía:
Nivel de decibeles Ejemplo
30 Una biblioteca, susurros.
40 Sala, refrigerador, dormitorio lejos del tráfico.
50 Semáforo, conversación normal, oficina tranquila.
60 Aire acondicionado a 20 pies, máquina de coser
70 Aspiradora, secadora de pelo, restaurante bullicioso.
80 Tráfico en la calle, triturador de basura, alarma de reloj a 60 cm.
LOS SIGUIENTES RUIDOS PUEDEN SER PELIGROSOS SI SE SOMETE A ELLOS EN
FORMA CONSTANTE:
90 Metro, motocicletas, tráfico de camiones,
100 Camión de basura, sierra eléctrica, perforadora
120 Concierto de rock frente a las bocinas, ruido
140 Sonido de disparo, motor de avión.
180 Lanzamiento de una nave espacial.
Esta información fue proporcionada gratuitamente por la Fundación de
Investigación de la Sordera. (sólo válido en Estados Unidos de América)
podadora de césped.
neumática.
de truenos.
3
Page 25

S
NOOZE
1
2
3
4
5
6
7
8
9
10
11
12
13
14
15
16
17
18
19
20
FRENTE
UBICACIÓN DE LOS CONTROLES
1. Altavoz izquierdo
2. Botón de REPETICIÓN DE
ALARMA/APAGADO
AUTOMÁTICO
(SNOOZE/SLEEP)
3. Botón de Encendido/Apagado
(Power)
4. Botón de MODO (MODE)
(AM/FM)
5. Botón de MEMORIA/
CONFIGURACIÓN
(PRESET/SET)
6. Botón de ECUALIZADOR (EQ)
7. Botón de Sintonía/
Salto/Búsqueda
o
(Tune/Skip/Search)
8. BOTÓN REPRODUCIR/
PAUSAR (Play/Pause) (®p)
9. Botón de Sintonía/
Salto/Búsqueda
n
(Tune/Skip/Search)
10. Altavoz derecho
11. Compartimiento de iPod con
conector (para utilizar con bases
dock universales)
12. Botón de disminución del
volumen (Volume Down)
13. Botón de aumento del volumen
(Volume Up)
14. Sensor Remoto
15. Botón de la HORA (HOUR)
16. Botón de MINUTOS (MIN)
17. Botón de ALARMA (ALARM) 2
18. Botón de ALARMA (ALARM) 1
19. Botón de AJUSTE DE LA HORA
(TIME)/Pantalla (Display)
20. LCD Pantalla
4
Page 26

UBICACIÓN DE LOS CONTROLES (CONTINÚA)
1
2
3
4
5
6
7
PARTE TRASERA
1. Selector de ATENUADOR DE LUZ (DIMMER)
(APAGADO/BAJO/MEDIO/ALTO) (OFF/L/M/H)
2. Conector de CC de 12V
(ADAPTADOR DE CA NO 0251-207200-10103*)
3. ENTRADA DE LA LÍNEA
4. Selector de DST (Ahorro de Energía) (-1/+1)
5. Entrada para Auriculares
6. Cable Antena FM
7. Compartimiento de la pila (parte inferior de la unidad)
(TAPA DE LA PILA Nº 3051-002206-10000*)
*Pieza reemplazable por el consumidor
(Vea la pág. 20 para ordenar)
5
Page 27

UBICACIÓN DE LOS CONTROLES (CONTINÚA)
1
2
3
4
5
6
7
8
9
10
11
CONTROL REMOTO
1. Botón de
Encendido/Apagado (Power)
2. Botón de aumento del
volumen (Volume Up)
3. Botón REPRODUCIR/
PAUSAR (Play/Pause) (®p)
4. Botón de
Sintonía/Salto/Búsqueda
(Tune/Skip/Search) o
5. Compartimiento de la pila
(Lateral de la unidad)
7. Botón de MODO (MODO)
8. Botón de
Sintonía/Salto/Búsqueda
(Tune/Skip/Search) n
9. Botón de disminución del
volumen (Volume Down)
10. Botón de MEMORIA/
CONFIGU RACIÓN
(PRESET/SET)
11. Orificio para la Correa
(Parte inferior de la unidad)
6. Botón de ECUALIZADOR
(EQ)
CONTROL REMOTO. PIEZA Nº RC-F00022001*
*Pieza reemplazable por el consumidor (Vea la página 20 para ordenar)
NOTA:
• Los botones del control remoto funcionan igual que los botones
de la unidad principal.
6
Page 28

front of unit
FUENTE DE ENERGÍA
CONEXIÓNA CORRIENTE ELÉCTRICA
Inserte el extremo pequeño del adaptador
CA en el conector de entrada de 12VCD
(Ubicado en la parte trasera de la unidad)
Conecte el otro extremo al contacto eléctrico
de 120VCA, 60 Hz.
Adaptador CA, 12VCD Z
NOTAS:
• Cuando no vaya a utilizar la unidad,
desconecte el adaptador de corriente alterna de ambos lados.
• Use únicamente un adaptador de corriente alterna incluido, que tenga las
siguientes especificaciones: 12VCD Z
INSTALACIÓN DE LA PILA
Pueden utilizarse dos (2) pilas “AAA” para el
encendido del reloj y la alarma de esta unidad y
para que ambos tengan un respaldo:
1. Abra la puerta del compartimiento de las
pilas presionando la pestaña hacia adentro,
luego quite la puerta.
2. Introduzca dos (2) pilas “AAA” como se
muestra. Se recomienda el uso de pilas
alcalinas, ya que el tiempo de
funcionamiento es mayor.
3. Ubique la puerta de las pilas nuevamente sobre el compartimiento.
NOTAS:
• Las pilas se usan como respaldo para el reloj y la alarma, cuando el adaptador
de CA está desconectado o hay un corte de energía.
• El indicador de la pila aparecerá o parpadeará en la pantalla cuando las pilas
no estén colocadas o se encuentren con poca carga y necesiten ser
reemplazadas.
Contacto
eléctrico
Enchufe del
adaptador CA
frente
IMPORTANTE: Consulte LAS PRECAUCIONES DE LA PILA en la próxima
página.
7
Page 29

FUENTE DE ENERGÍA (CONTINUACIÓN)
C
R
2
0
2
5
C
R
2
0
2
5
INSTALACIÓN DE LAS PILAS EN EL CONTROL REMOTO
1.
Quite la puerta del compartimiento
ejerciendo presión en la pestaña y
deslizándola.
2. Coloque una pila CR2025 pasándola por el
reverso del compartimiento y teniendo en
cuenta el diagrama de polaridad que se
encuentra en el mismo (lado positivo hacia
arriba).
3. Coloque nuevamente el compartimiento
de las pilas.
Cuando use pilas, tome las siguientes precauciones:
CUIDADO DE LAS PILAS
1. Advertencia: Existe riesgo de explosión si la pila se reemplaza de modo
incorrecto. Reemplácela sólo con una del mismo tipo o equivalente.
2. Use únicamente el tamaño de pila que indica el fabricante.
3. Asegúrese de seguir la polaridad indicada en el compartimiento cuando coloque
la misma. De no hacerlo, la unidad podría dañarse.
4. No mezcle diferentes tipos de pilas (por ejemplo alcalinas, recargables y de zinccarbono) o pilas viejas con nuevas.
5. Si no va a utilizar su unidad por un período de tiempo prolongado, saque la pila
para evitar que se oxide y se dañen las terminales.
6. Nunca intente recargar pilas que no han sido fabricadas para este fin, ya que
pueden recalentarse y reventar. (Siga las indicaciones del fabricante de las
pilas).
CONEXIONES OPCIONALES
CONECTOR DE ENTRADA DE LÍNEA (PARTE TRASERA DE LA UNIDAD)
Inserte uno de los extremos del cable de audio (no incluido) en el conector de LÍNEA
DE SALIDA (LINE OUT) en la unidad de audio externa y el otro extremo en la
ENTRADA DE LÍNEA (LINE IN) (en la parte trasera de la unidad) Para escuchar
desde la u ni da d de a udio externa, enc ie nda esta unidad con e l bo tó n de
ENCENDIDO/APAGADO (OFF/ON) y encienda también la unidad externa. Oprima
repetidamente MODO (MODE) para seleccionar el modo de ENTRADA DE LÍNEA ;
“LÍNEA DE ENTRADA” (“LINE IN”) aparecerá en la pantalla. El sonido de salida de la
unidad de audio externa se oirá a través de los altavoces de esta unidad. Si desea
escuchar el iPod en el compartimiento de iPod, oprima repetidamente el botón de
MODO (MODE) para seleccionar modo iPod; iPod aparecerá en la pantalla.
NOTA: Si se encuentra encendida y en modo FM/AM/iPod, una vez que la unidad
externa está conectada, esta unidad cambiará al modo de ENTRADA de LÍNEA
automáticamente. Luego, si desconecta la unidad externa de la ENTRADA de LÍNEA,
la unidad se revertirá al modo FM/AM/iPod.
8
Page 30

COLOCAR UN iPod
(
A)
(B)
(
A)
(
B)
1
Inserte el puerto universal incluido
con su iPod (A) en el compartimiento
de iPod (B) (como se mu estra),
aseguránd ose de q ue l as d os
pestañas del puerto apunten al frente
y deslícelas hasta que queden en su
lugar. Presione la parte posterior del
puerto universal hasta que quede
posiciona da den tro de l
compartimiento del iPod.
3
El iPod se cargará si empre y
cuando la unidad esté conectada
con el adaptador de CA.
Consulte la siguiente página para
obtener las instrucciones sobre
cómo us ar un iPod co n esta
unidad.
2
Deslice el iPod (A) en el puerto
universal (B) (como se muestra).
Empújelo suavemente para que
el conector en el iPod se deslice
por el conector en esta unidad.
NOTAS:
• Si se encuentra encendida y en
modo de ENTRADA FM/AM/LÍNEA,
una vez que el iPod está conectado,
esta unidad cambiará al modo iPod
auto máticam ente. Luego , si
desconecta el iPod, la unidad se
revertirá al modo de ENTRADA
FM/AM/LÍNEA.
• Cuando el iPod se conecta a esta
unidad, se encontrará bajo el modo
de pausa.
• Para quitar la base dock universal,
introduzca su dedo (u otro objeto) en
el orificio de la base dock y luego tire
con cuidado de ella hasta quitarla.
• CARGA : Cua ndo e l iPo d se
encuentra colocado en la base dock,
esté la unid ad enc endid a o
apag ada, la p ila del iPod se
recargará en su totalidad.
• Si no conecta un dispositivo o el
iPod a la ENTRADA DE LÍNEA o a
la base dock, no podrá seleccionar
el modo iP od o ENTRA DA DE
LÍNEA.
9
Page 31

FUNCIONAMIENTO
SNOOZE
1
2
SNOOZE
SNOOZE
SNOOZE
1
2
UTILIZACIÓN DE iPod CON ESTA UNIDAD
1
Con el iPod conectado (vea la página
anterior), si la unidad no está
encendida, enciéndala con el botón
de Encendido/Apagado (Power) 1.
Oprima repetidamente MODO
(MODE) 2 para seleccionar el modo
iPod; iPod aparecerá en la pantalla.
3
Para reproducir/pausar el iPod:
Oprima el botón de REPRODUCIR
PAUSAR (Play/Pause) (®p) para
inciar la reproducción en su iPod.
Oprima nuevamente para pausar
la reproducción y una vez más
para reanudar la reproducción.
NOTAS:
• Consulte la próxima página para saber cómo ajustar el volumen.
• Para apagar la unidad, oprima Encendido/Apagado (Power). La
unidad se apagará automáticamente si se desconecta el iPod
mientras ésta se encuentra en el modo iPod.
2
Podrá operar el iPod utilizando los
controles del mismo, según indica el
manual del usuario o u tilizar los
controles de esta unidad.
4
Para saltar hacia adelante o hacia
atrás en el ipod: Oprima Sintonizar/
Saltar/Buscar (Tune/ Skip/Search) o
1 o n 2 para saltar al comienzo de
la pista actual, anterior o próxima.
Para b uscar h acia adel ante o
hacia atrás en el ipod: Mantenga
presionado Sintonizar/Saltar/Buscar
(Tune/ Skip/Search) o 1 o n 2 para
buscar dentro de la pista actual.
10
Page 32

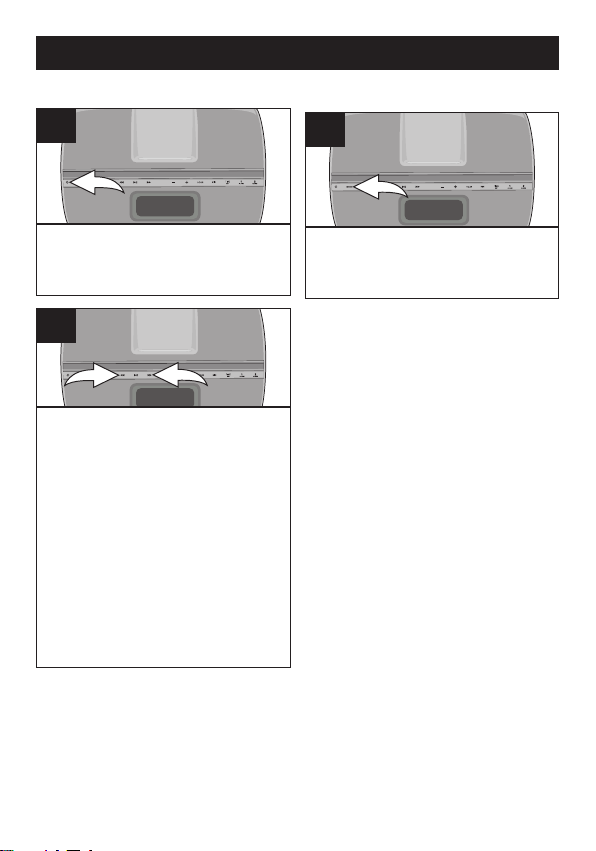
FUNCIONAMIENTO (CONTINÚA)
SNOOZE
1
2
SNOOZE
AJUSTAR EL VOLUMEN Y EL ECUALIZADOR (EQ) )(Ecualizador)
1
Pa r a ajus tar el v olume n
principal: Oprima los botones de
Aumento de volumen (Volume
Up) 1 y/ o D ismi nució n d e
volumen (Volume Down) 2 para
aumentar o disminuir el volumen.
NOTAS:
• Luego de ajustar el volumen, si apaga la unidad y luego la vuelve a
encender, el volumen quedará al mismo vivel que usted seleccionó
antes de apagar la unidad.
• Para escuchar el sonido de manera privada, conecte los auriculares
en la entrada para auriculares ubicada en la parte trasera de la
unidad. Los altavoces quedarán desactivados cuando conecte los
auriculares.
• Para apagar la unidad, oprima Encendido/Apagado (Power).
2
Pa r a ajus tar el E cuali zado r
(EQ):
Op r ima el botón de EQ para
nav egar p or l as s igui e ntes
opciones: EQ1, EQ2, EQ3, EQ4
o Apagado (Off) (Normal).
11
Page 33

FUNCIONAMIENTO (CONTINÚA)
SNOOZE
SNOOZE
SNOOZE
1
2
USAR LA RADIO
1
Para encender la unidad, oprima
Encendido/Apagado (Power).
3
Oprim a repetidamente Sintoniz ar/
Saltar/Buscar (Tune/ Skip/Search) o
1 o n 2 p ara su bir o baja r
manu almente la frec uencia en la
pa ntall a has ta qu e a parez ca la
frecuencia deseada.
Pa ra s inton iza ción a uto mátic a,
ma nteng a opr imi do el b otó n
Sintonizar/Saltar/Buscar (Tune/Skip/
Se arch) o 1 o n 2 ha sta que
comience la búsqueda de frecuencia
en la pantalla y luego suelte el botón;
el sintonizador buscará y se detendrá
en la próxima sintonía que encuentre
con buen alcance. Repita este paso
hasta que apare zc a la f recuencia
deseada en la pantalla.
2
Oprima repetidamente MODO (MODE)
para seleccionar el modo AM o FM;
“AM” o “FM” aparecerá en la pantalla.
NOTAS:
• Cuando se sintoniza una
estación, la frecuencia de
radio desaparecerá luego de
cinco segundos y la hora
actual reaparecerá en la
pantalla.
• Consulte la próxima página
para saber cómo ajustar el
volumen.
• Para apagar la unidad, oprima
Encendido/Apagado (Power).
Antenas
FM: Desenrrolle y extienda el cable antena FM para una mejor recepción.
AM: Gire la unidad para una buena recepción AM. También mueva el adaptador de CA a 1.5
pies de distancia de la unidad principal para evitar la interferencia con la señal AM.
12
Page 34

FUNCIONAMIENTO (CONTINÚA)
SNOOZE
SNOOZE
1
2
3
SNOOZE
CONFIGURACIÓN PARA ALMACENAR ESTACIONES DE RADIO (10 para cada banda)
1
Siga los pasos 1-3 explicados en
la página anterior para sintonizar
una estación de radio. Oprima y
mantenga presionado el botón
MEMORIA DE SINTONÍA/
CONFIGURACIÓN (PRESET/
SET) , “P1” parpadeará en la
pantalla.
RECUPERACIÓN DE LAS MEMORIAS DE ESTACIONES DE RADIO (10 para cada banda)
1
Siga los pasos 1-2 explicados en la
página anterior para encender la
unidad y seleccionar el modo AM
or FM.
2
Ma nte n ga p res ion a do e l b o tón
Si nto n iza r/S alt ar/B usc ar (Tun e /
Sk ip/ S ear ch) o 1 o n 2 par a
seleccionar la memoria deseada (1-
10). Presione el botón MEMORIA DE
SI NTO NÍA /C ONF IGU R ACI ÓN
(PRESET/SET) 3 nuevamente para
conf ir ma r, la es tación de radio se
guardará en la memoria. Repita para
programar hasta 10 memorias según
su preferencia.
2
Oprima repetidamente el botón
MEMORIA DE SINTONÍA
/CONFIGURACIÓN (PRESET/
SET) hasta que el número de
memoria deseado aparezca en la
pantalla.
NOTA: Si la unidad no tiene energía (no tiene pilas/el adaptador de CA no
está conectado/hay un corte de energía) por un período prolongado, las
memorias guardadas se borrarán.
13
Page 35

FUNCIONAMIENTO (CONTINÚA)
SNOOZE
SNOOZE
SNOOZE
1
2
AJUSTE O REAJUSTE DE LA HORA
1
Con la unidad apagada, oprima y
mantenga presionado el botón de
AJUSTE DE LA HORA/Pantalla; la
hora parpadeará.
3
Oprima el botón de Botón de
AJUSTE DE LA HORA/Pantalla (o
espere aproximadamente 15
segundos); la hora quedará
ajustada.
2
Dentro de los 15 segundos, oprima el
botón de MINUTOS (MIN) 1 para
ajustar los minutos actuales y el botón
de HORA (HOUR) para 2 ajustar la
hora actual. Asegúrese de ajustar
correctamente el formato horario de
AM/PM.
DST (AHORRO DE ENERGÍA)
1
Para su comodidad, encontrará EL
SELECTOR DE DST (Ahorro de
energía) en la parte trasera de la
unidad. Ubique el selector en +1 para
agregar una hora a la hora actual o
en -1 para restar una hora.
14
Page 36

FUNCIONAMIENTO (CONTINÚA)
SNOOZE
1
2
SNOOZE
1
2
SNOOZE
3
1
2
4
SNOOZE
1
2
3
AJUSTE O REAJUSTE DE LA HORA DE ALARMA
1
Con la unidad apagada, mantenga
oprimido el botón ALARMA
(ALARM) 1 1 (para ajustar la
alarma 1) o bien ALARMA
(ALARM) 2 2 (para ajustar la
alarma 2); la hora programada
como alarma parpadeará en la
pantalla.
3
Si se encuentra en el modo de
radio(en el paso 2), mientras la
frecuencia parpadea, ajuste la
misma con el botón de
Sintonía/Salto/Búsqueda o 1 o n
2 .
NOTA: Cuando la unidad marque
la hora de la alarma programada,
encenderá la banda (AM o FM) y
la frecuencia seleccionada.
2
Dentrode los 15 segundos,oprimael botón
de MINUTOS (MIN) 1 para ajustar los
minutos de la alarma y el botón de HORA
(HOUR) 2 paraajustarla hora de la alarma
Asegúrese de ajustar correctamente el
formato horario de AM/PM.
Mientras la alarma parpadea oprima varias
veces el botón de MODO (MODE) 3 para
seleccionar que la alarma encienda la radio
(FM o AM), el iPod o el timbre.
NOTA:Asegúrese que el indicador
correspondiente (RADIO [FM o AM], iPod,
TIMBRE (BUZZ)) aparezca en la pantalla.
4
Oprima ALARMA (ALARM) 1 1 o
ALARMA(ALARM) 2 2 nuevamente;
el nivel máximo de volumen de la
alarma parpadeará.
Oprima los botones de aumento de
vo l ume n (Vol u me U p) 3 y/ o
disminución de volumen (Volume
Do w n) 4 par a aum enta r y/o
di s min uir el nivel máximo de
volumen de la alarma.
Oprima ALARMA (ALARM) 1 1 o
ALARMA(ALARM) 2 2 nuevamente.
CONTINUA EN LA PRÓXIMA PAGINA
15
Page 37

FUNCIONAMIENTO (CONTINÚA)
SNOOZE
5
Si se encuentra en el modo de iPod,
seleccione su pista preferida, coloque el iPod
como se explica en la página 9 y apague el
mismo. Cuando la unidad marque la hora de
la alarma programada, comenzará a
reproducir la pista seleccionada y las
siguientes en la lista de reproducción. La
unidad se reproducirá durante 20 minutos y
luego se apagará automáticamente; o bien, si
el tiempo restante de la lista de reproducción
es menor a 20 minutos, la unidad sólo
reproducirá ese tiempo restante y luego se
detendrá.
NOTAS:
• Cuando la unidad marque la hora programada, el nivel de volumen de la
alarma estará ajustado a mínimo y se incrementará un nivel cada tres
segundos de manera continua hasta que se alcance el nivel máximo de
volumen de la alarma programada.
• Cuando la hora real coincida con la(s) hora(s) seleccionada(s) de alarma(s)
programada(s) , si la unidad está configurada en Radio o Timbre
(Buzzer), se activará automáticamente por 20 minutos y luego se apagará.
Si está en modoiPod, la unidad comenzará a reproducir la pista
seleccionada y las siguientes en la lista de reproducción. La unidad se
reproducirá durante 20 minutos y luego se apagará automáticamente; o
bien,si el tiempo restante de la lista de reproducción es menora 20 minutos,
la unidad sólo reproducirá ese tiempo restante y luego se detendrá.
• PARA APAGAR LA ALARMA, vea la sección COMO APAGAR LA
ALARMAen la siguiente página.
• Mientras suena la alarma, si llega el horario de alarma de la otra alarma, la
primera dejará de sonar y comenzará a sonar la segunda.
• Asegúrese de haber desconectado los auriculares del conector (parte
trasera de la unidad); de lo contrario no habrá sonido cuando la hora real
coincida con la hora fijada para la alarma.
16
Page 38

FUNCIONAMIENTO (CONTINÚA)
SNOOZE
1
2
SNOOZE
SNOOZE
COMO APAGAR LA ALARMA
1
Oprima ALARMA (ALARM) 1 1 o ALARM (ALARM) 2 2 (según la alarma que se haya
programado). La alarma se apagará y NO se programará para el día siguiente. Para
programar la alarma para el día siguiente, oprima un botón cualquiera (excepto ALARMA
(ALARM) 1, ALARM (ALARMA) 2 o REPETICIÓN DE LA ALARMA (SNOOZE))
NOTA: Si la unidad se encuentra en modo iPod o Radio mientras la alarma está
encendida y oprime cualquier botón (excepto REPETICIÓN DE ALARMA/APAGADO
AUTOMÁTICO (SNOOZE/SLEEP)o el botón de ENCENDIDO/APAGADO (POWER) la
alarma cambiará del modo Alarma (Alarm) al modo normal de Encendido(Power on). Así
podrá realizar cualquier ajuste deseado (por ej. Nivel de volumen, frecuencia de radio,
etc.). Oprima el botón de Encendido/Apagado (Power) para apagar la unidad en caso de
ser necesario. Si la unidad se encuentra configurada en timbre (Buzzer) mientras la
alarma está encendida y oprime cualquier botón, la unidad se apagará.
REPETICIÓN DE LA ALARMA (SNOOZE)
1
Mientras la alarma está sonando, oprima
REPETICIÓN DE ALARMA/APAGADO
AUTOMÁTICO (SNOOZE/SLEEP); el
indicador de REPETICIÓN DE ALARMA
(SNOOZE) aparecerá en la pantalla.
Asimismo, “10” aparecerá en la pantalla
durante cinco segundos y luego se
revertirá a la hora real. La alarma volverá
a activarse automáticamente diez
minutos después.
NOTA:
• Para cancelar la función de REPETICIÓN DE ALARMA (SNOOZE) (la alarma
no se volverá a activar), oprimaALARMA (ALARM) 1 o ALARMA (ALARM) 2
(según la alarma que haya programado); el indicador de REPETICIÓN DE
ALARMA (SNOOZE) desaparecerá de la pantalla y la alarma NO se
programará para día siguiente. Para programar la alarma para el día siguiente,
oprima un botón cualquiera (excepto ALARMA (ALARM) 1, ALARM
(ALARMA) 2 o REPETICIÓN DE LA ALARMA (SNOOZE))
2
Para configurar la hora de REPETICIÓN DE
ALARMA (SNOOZE) a otra repetición que
no sea de 10 minutos, cuando “10”aparezca
en la pantalla, oprima REPETICIÓN DE
ALARMA/ APAGADO AUTOMÁTICO
(SNOOZE/SLEEP) nuevamente. Cada vez
que oprima este botón, el tiempo de
repetición aumentará én cinco minutos
(hasta “60” para 60 minutos). Cuando deje
de presionar el botón, la pantalla mostrará
durante cinco segundos el TIEMPO de
repetición y luego se revertirá a la hora real.
La alarma volverá a activarse según la
configuración de REPETICIÓN programada.
17
Page 39

SNOOZE
FUNCIONAMIENTO (CONTINÚA)
APAGADO AUTOMÁTICO
(SLEEP)
1
Oprima el botón REPETICIÓN DE
ALARMA/ APAGADO AUTOMÁTICO
(SNOOZE/SLEEP) con la unidad en el
modo de Radio (FM o AM), iPod o
ENTRADA DE LÍNEA; el indicador de
APAGADO AUTOMÁTICO (SLEEP) y “10”
aparecerán en la pantalla durante cinco
segundos. Esto indica que la unidad se
apagará luego de 10 minutos. Oprima
varias veces REPETICIÓN DE ALARMA/
APAGADO AUTOMÁTICO (SNOOZE/
SLEEP) para seleccionar la hora en que la
unidad se apagará automáticamente. El
tiempo máximo es 60 minutos (por ej. “20”
se apagará automáticamente luego de 20
minutos, “30” luego de 30 minutos, etc.).
Luego de cinco segundos, el tiempo de
APAGADO AUTOMÁTICO desaparecerá
de la pantalla. Para visualizar en cuánto
tiempo la unidad se apagará
automáticamente, oprima REPETICIÓN
DE ALARMA/APAGADO AUTOMÁTICO
(SNOOZE/SLEEP) una vez. Oprima
REPETICIÓN DE ALARMA/APAGADO
AUTOMÁTICO (SNOOZE/ SLEEP) varias
veces para aumentar el tiempo de
APAGADO AUTOMÁTICO (SLEEP).
NOTA: Para cancelar la función de
APAGADO AUTOMÁTICO (SLEEP),
oprima REPETICIÓN DE ALARMA/
APAGADO AUTOMÁTICO (SNOOZE/
SLEEP) varias veces hasta que el
indicador de apagado automático
desaparezca de la pantalla.
SELECTOR DE ATENUADOR
DE LUZ (DIMMER)
1
Desplace el selector de
ATENUADOR DE LUZ (DIMMER)
para ajustar la intensidad de luz de
la pantalla. Podrá seleccionar entre
APAGADO (OFF) (para apagar la
luz de fondo de la pantalla), “L”
(Bajo), “M” (Medio) o “H” (Alto).
Con la opción “H” tendrá el nivel
máximo de brillo, con “M” un nivel
medio y con “L” obtendrá un nivel
de brillo bajo.
18
Page 40

GUÍA DE RESOLUCIÓN DE PROBLEMAS
Si la unidad presenta algún inconveniente, lea la siguiente tabla antesde llamaral servicio técnico.
PROBLEMA: CAUSA SOLUCIÓN
Sin sonido. El volumen está al Suba el volumen.
mínimo.
AM o FM, sin sonido.
Sonido deficiente Estación no sintonizada Resintonice la estación
en AM/FM. apropiadamente. de AM o FM.
Modo iPod sin Incorrectamente conectado. Revise la conexión.
sonido. No está en modo iPod. Oprima el botón de MODO
Lahora se pone Pilas conectadas Revise las pilas.
en “12:00”. inapropiadamente,
La alarma no se Alarma no activada o mal Ponga y active la alarma
activa. configurada. como se describe en p. 15.
La unidad no está encendida o Oprima el botón de Encendido
el modo AM o FM no está (Power), luego el botón de MODO
seleccionado. para seleccionar AM o FM.
El volumen está al Suba el volumen.
mínimo.
FM: El cable de antena Extienda el cable de
no está extendido. antena FM.
AM: La unidad no está Gire la unidad hasta
colocada correctamente. obtener la mejor recepción.
no conectadas o vacías.
Reloj no ajustado. Ajuste el reloj.
Reloj no ajustado. Ajuste el reloj.
19
Page 41

ESPECIFICACIONES
GENERAL:
Fuente de Alimentación .....Adaptador de CC de 12V (Centro ......
positivo)
Respaldo de la pila..........................2 Pilas tamaño “AAA” de 1,5 V
Altavoz..........................................................................2 x 3 Ohms
Potencia de Salida ..........................................................2 x 4,5 W
Peso ...............................................................................2,25 libras
Tamaño..............10,5 (Largo) x 4,5 (Ancho) x 6,5 (Alto) pulgadas.
SECCIÓN DE RADIO:
Rango de frecuencia (FM) ............................87.5-108 MHz
Rango de frecuencia (AM) ...........................520-1710 KHz
Las especificaciones están sujetas a cambios sin
previo aviso.
PARA OBTENER AYUDA ADICIONAL CON RESPECTO A LOS
AJUSTES O A LA OPERACIÓN, VISITE NUESTRO SITIO WEB EN
WWW.MEMOREXELECTRONICS.COM O COMUNÍQUESE CON
SERVICIO AL CLIENTE AL 1-800-919-3647.
CONSERVE LOS MATERIALES DE EMPAQUE AL MENOS DURANTE
90 DÍAS POR SI ACASO NECESITARA REGRESAR EL PRODUCTO A
SU DISTRIBUIDOR O IMATION ELECTRONICS PRODUCTS.
PARA OBTENER PIEZAS REEMPLAZABLES POR EL CONSUMIDOR,
CONSULTE EL NÚMERO DE PIEZA EN LAS PÁGINAS 5 Y 6 Y LUEGO
COMUNÍQUESE CON FOX INTERNATIONAL AL 1-800-321-6993.
20
Page 42

Imation Electronic Products,
A Division of Imation Enterprises Corp.,
Weston, Florida. Printed in China
www.memorexelectronics.com
iPod is a trademark of Apple Inc., registered in the
U.S. and other countries. This product has been
designed specically to work with iPod and has been
certied by the developer to meet Apple performance
standards. Includes iPod Universal Dock. Compatible
is it Memorex?", and iWakeUp are trademarks of the
with any iPod with dock connector.
Memorex, the Memorex logo, and "Is it live or
afliates of Memorex Products, Inc.
Imation Electronic Products,
A Division of Imation Enterprises Corp.,
Weston, Florida. Impreso en China
www.memorexelectronics.com
iPod es una marca registrada de Apple Inc. registrada
en EE. UU. y otros países. Este producto ha sido diseñado
especícamente para funcionar con los reproductores iPod.
El fabricante certica que cumple con las normas decalidad
de Apple. Incluye la base Dock universal compatible con
cualquier modelo de iPod apto para la base Dock.
Memorex, el logotipo de Memorex y la frase "Is it live
or is it Memorex?" y iWakeUp son marcas registradas
de las empresas aliadas a Memorex Products, Inc.
 Loading...