

Page 1

Mi4004 Suffix A
User’s Guide
iWake Clock Radio
with Dual Alarm
Before operating this product,
please read these instructions completely.
Page 2
SAFETY PRECAUTIONS
CAUTION
RISK OF ELECTRIC SHOCK
DO NOT OPEN
CAUTION: TO REDUCE THE RISK OF ELECTRIC SHOCK,
DO NOT REMOVE COVER (OR BACK). NO USERSERVICEABLE PARTS INSIDE. REFER SERVICING TO
QUALIFIED SERVICE PERSONNEL.
DANGEROUS VOLTAGE:
The lightning flash with arrowhead symbol within an
equilateral triangle is intended to alert the user to the
presence of uninsulated dangerous voltage within the
product’s enclosure that may be of sufficient magnitude to
constitute a risk of electric shock to persons.
ATTENTION:
The exclamation point within an equilateral triangle is
intended to alert the user to the presence of important
operating and maintenance (servicing) instructions in the
literature accompanying the appliance.
FCC WARNING:
This equipment may generate or use radio frequency energy. Changes or
modifications to this equipment may cause harmful interference unless
the modifications are expressly approved in the instruction manual. The
user could lose the authority to operate this equipment if an unauthorized
change or modification is made.
ATTENTION:
POUR ÉVITER LES CHOC ÉLECTRIQUES, INTRODUIRE LA LAME LA
PLUS LARGE DE LA FICHE DANS LA BORNE CORRESPONDANTE DE
LA PRISES ET POUSSER JUSQU’AU FOND.
1
Page 3

SAFETY PRECAUTIONS
INFORMATION:
This equipment complies with Class B digital device regulations.
This equipment generates, uses and can radiate radio frequency
energy and, if not installed and used in accordance with the
instructions, may cause harmful interference to radio
communications. However, there is no guarantee that interference
will not occur in a particular installation. If this equipment does
cause harmful interference to radio or television reception, which
can be determined by turning the equipment off and on, the user is
encouraged to try to correct the interference by one or more of the
following measures:
• Reorient or relocate the receiving antenna.
• Increase the separation between the equipment and receiver.
• Connect the equipment into an outlet on a circuit different from
that to which the receiver is connected.
• Consult the dealer or an experienced radio/TV technician for help.
WARNING: TO PREVENT FIRE OR SHOCK
HAZARD, DO NOT EXPOSE THIS UNIT TO RAIN
OR MOISTURE.
SURGE PROTECTORS:
It is recommended to use a surge protector for AC connection.
Lightning and power surges ARE NOT covered under warranty
for this product.
This Class B digital apparatus complies with Canadian
ICES-003.
Cet appareil numérique de la classe B est conforme à la
norme NMB-003 du Canada.
2
Page 4
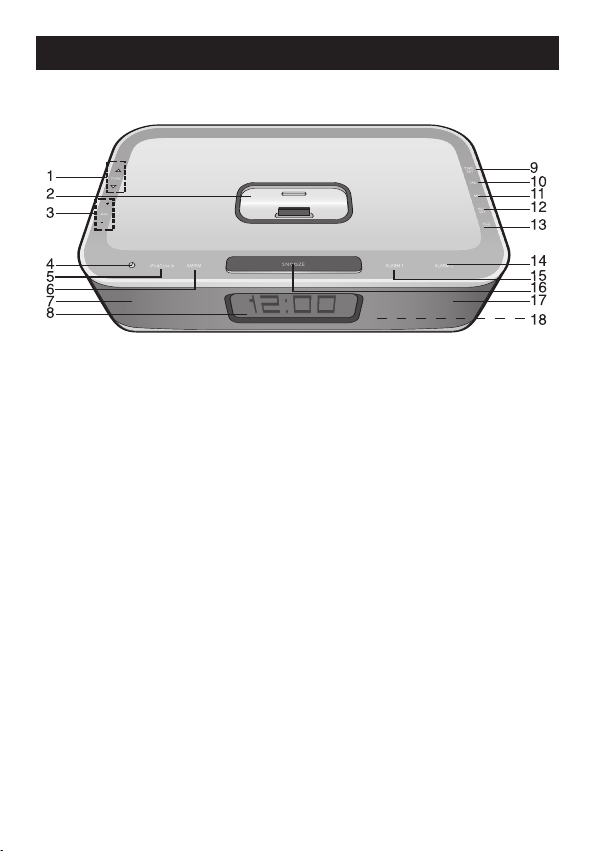
FRONT/TOP
LOCATION OF CONTROLS
1. TUNE Up/Down/Skip n / o
Buttons
2. iPod
®
Dock with
Connector &
Interchangeable Universal
Docks
3. VOLUME Up/Down
Buttons
4. Power Button
5. iPod
®
/LINE IN Button
6. AM/FM Button
7. Left Speaker
8. Display
9. TIME SET Button
10. HR (Hour) Button
11. MN (Minute) Button
12. AL1 SET Button
13. AL2 SET Button
14. ALARM 2 Button
15. ALARM 1 Button
16. SNOOZE/SLEEP Button
17. Right Speaker
18. Remote Sensor
3
Page 5
LOCATION OF CONTROLS (CONTINUED)
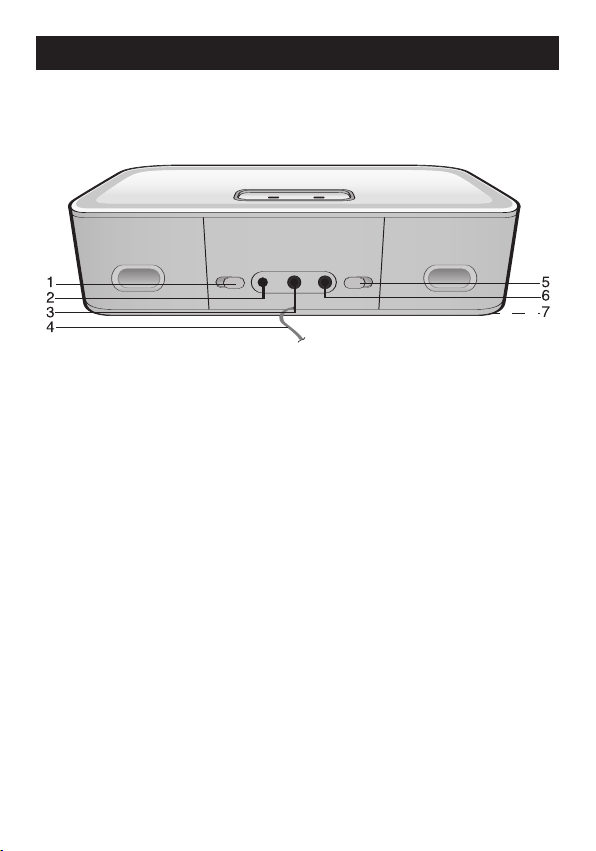
REAR
1. DIMMER Switch
2. DC 13.5V IN Jack
3. LINE IN Jack
4. FM Wire Antenna
5. DST (Daylight Savings
Time) Switch
6. Headphones Jack
7. Battery Compartment
(Bottom of Unit)
4
Page 6

LOCATION OF CONTROLS (CONTINUED)
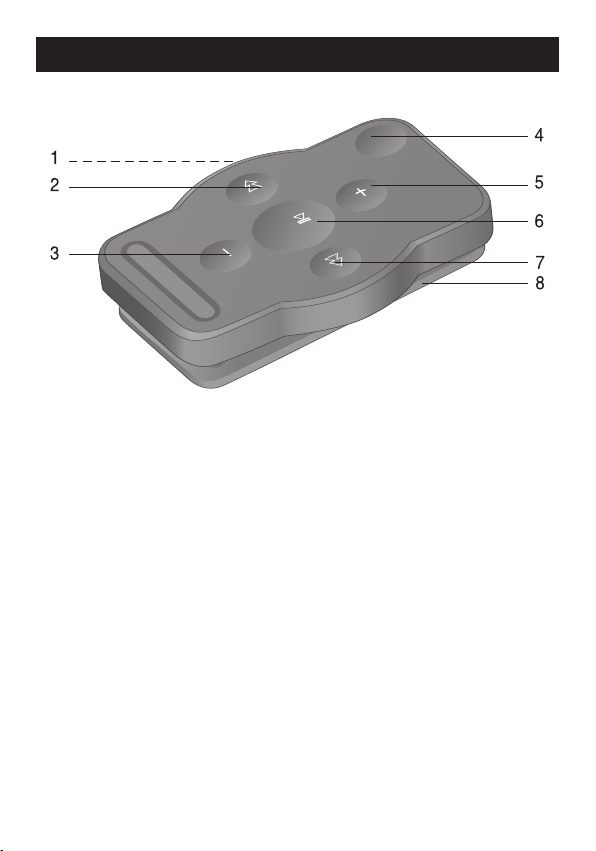
REMOTE
1. Battery Compartment
(Side of Unit)
2. TUNE Down/Skip o
Button
3. VOLUME Down Button
5. VOLUME Up Button
6. Power/PLAY/PAUSE
(®p) Button
7. TUNE Up/Skip n Button
8. Belt Clip
4. MODE Button
NOTES:
• The remote buttons function in the same way as the buttons on
the main unit.
• To switch between modes (AM/FM, LINE IN or iPod
MODE button.
• To turn on the unit, press the Power/PLAY/PAUSE (®p) button.
To turn the unit off, press and hold the Power/PLAY/PAUSE
®p) button until the unit turns off, then release the button.
(
• For the Belt Clip, simply clip it to a non-slip location such as
your belt, purse or backpack.
5
®
, use the
Page 7
POWER SOURCE
Receptacle
Receptacle
Box Cover
Grounding
Adapter
G
rounding Lead
S
crew
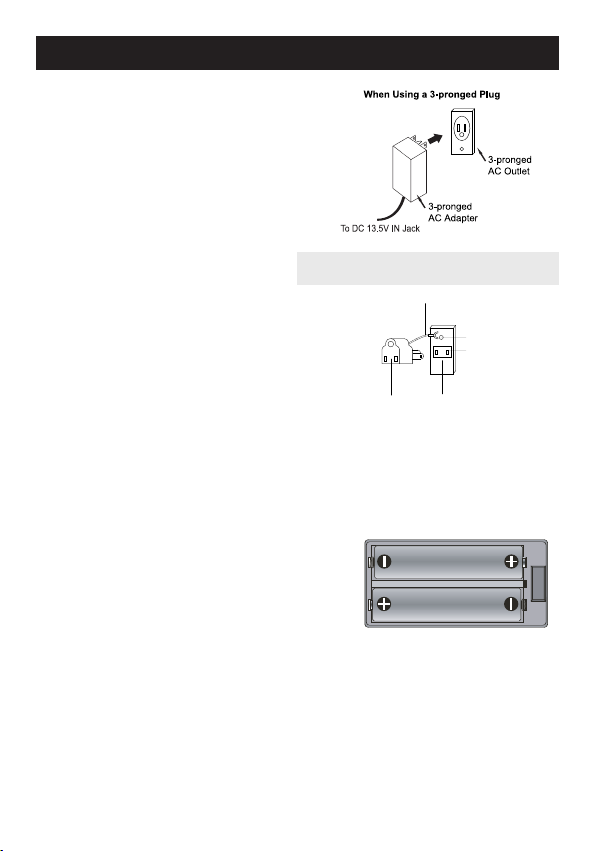
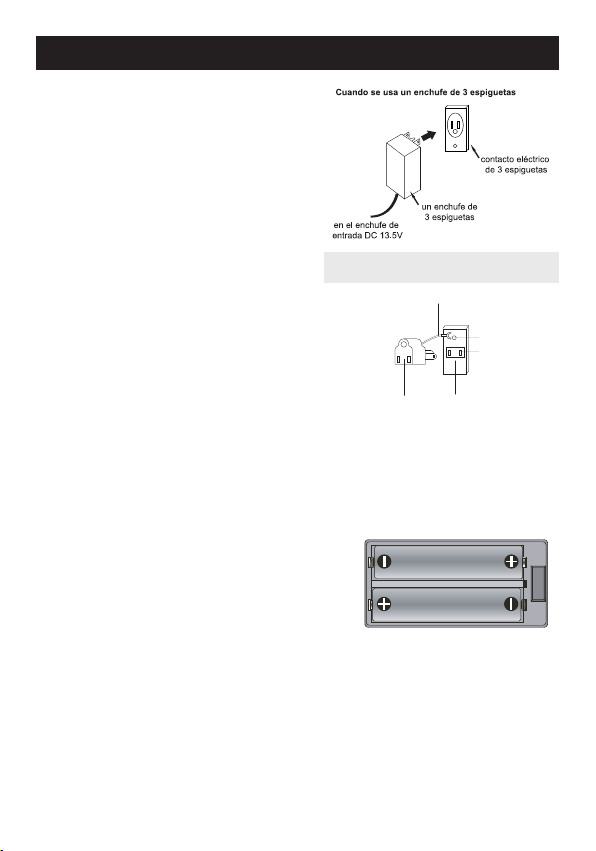
AC CONNECTION
Insert the small end of the AC adapter into
the DC 13.5V IN jack (located on the rear of
the unit). Connect the other end to a wall
outlet having 120V AC, 60 Hz. AC Adapter,
DC 13.5V
NOTES:
• The AC adapter supplied with the unit
• Remove both the DC plug and the AC-
• Only use the supplied AC Adapter
BACKLIGHT
When the AC adapter is connected to the unit, the LCD backlight will always be on.
BATTERY INSTALLATION
Two (2) “AAA” size batteries can also be used to
power and/or to provide a backup for the clock
and alarm time for this unit as follows:
1. Open the battery door by pushing in on the
2. Insert two (2) “AAA” batteries as shown.
3. Place the battery door back on the
NOTES:
• The batteries are used to back-up the clock and alarm times when the AC
• The battery indicator will appear or blink in the display when there are no
IMPORTANT! See BATTERY PRECAUTIONS on the next page.
Z
is polarized to help minimize the
possibility of electric shock. If the AC
plug does not fit into a nonpolarized
AC outlet, do not file or cut the wide
blade. It is the user’s responsibility to
have an electrician replace the
obsolete outlet.
IN plug to disconnect the AC adapter
when not in use.
which has the following specs:
DC 13.5V
Z
tab, then removing the door
When using a grounding adapter, make
sure the receptacle box is fully grounded.
.
Alkaline batteries are recommended for the
longest playing time.
compartment.
adapter is disconnected or there is a power failure.
batteries or the batteries are low and need replacing.
6
Page 8
POWER SOURCE (CONTINUED)
REMOTE BATTERY INSTALLATION
1.
2. Install a CR2025 battery, paying attention
3. Replace the Battery Compartment.
Remove the Battery Compartment by
pressing in on the tab and then sliding
the compartment out.
to the polarity diagram in the Battery
Compartment (positive side up).
Follow these precautions when using batteries in this device:
1. Use only the size and type of batteries specified.
2. Be sure to follow the correct polarity when installing the batteries as
indicated in the Battery Compartment. A reversed battery may cause
damage to the device.
3. If the device is not to be used for a long period of time, remove the
batteries to prevent damage or injury from possible battery leakage.
4. Do not try to recharge a battery not intended to be recharged; it can
overheat and rupture. (Follow battery manufacturer’s directions.)
BATTERY PRECAUTIONS
7
Page 9
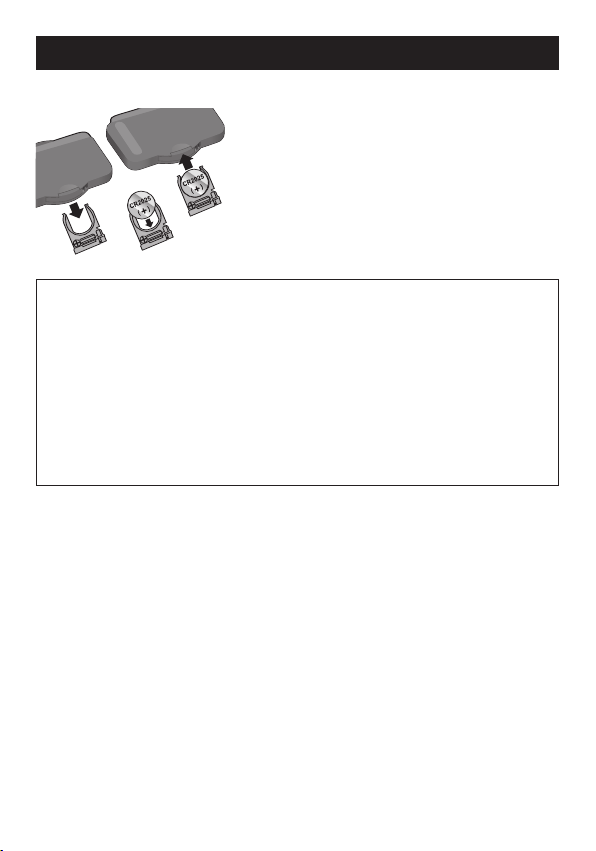
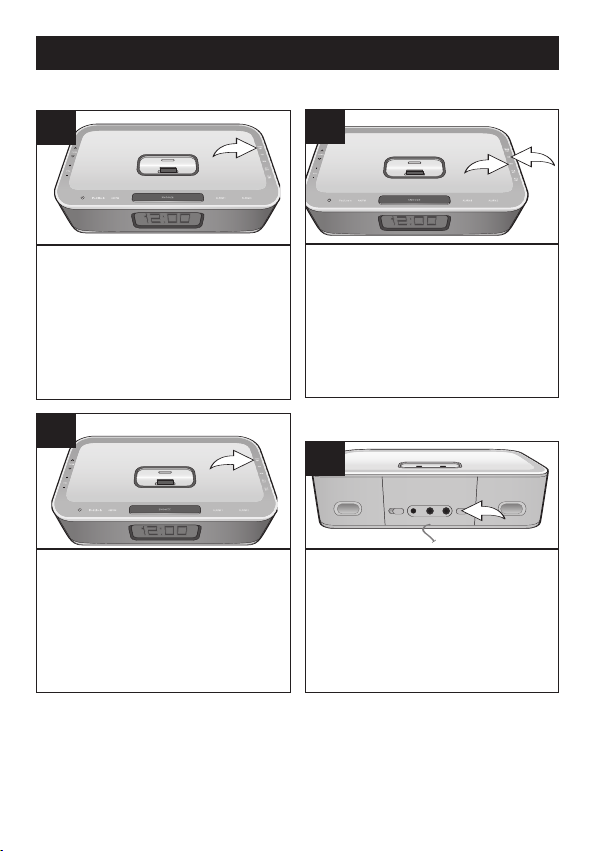
INSERTING AN IPOD
®
1
Locate the correct iPod®Universal Dock
to use as shown on pages 16-17. Insert
the dock into the cavity (as shown),
making sure the tabs are facing front,
and slip the tabs into place.
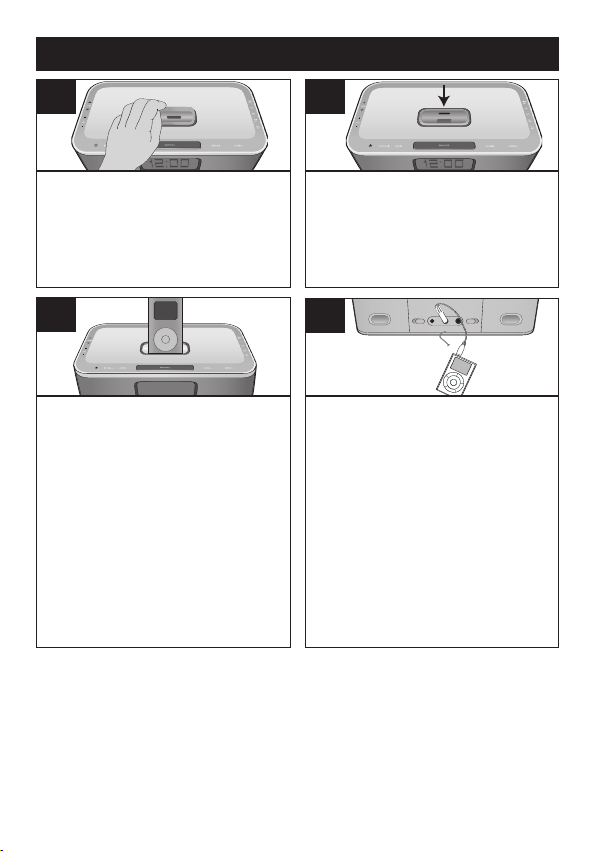
3
If using the dock: Insert the iPod®onto
the holder. Gently push down so the
connector on the iPod
connector on the Mi4004. If the Mi4004 is
turned off, once you connect the iPod
will start charging the battery until it is full.
If the Mi4004 is turned on and in
AM/FM/LINE IN mode, once the iPod
connected, the Mi4004 will change to
®
mode automatically. Then, if you
iPod
disconnect the iPod®, the Mi4004 will
revert back to the AM/FM/LINE IN mode.
When the iPod
Mi4004, it will be in the Pause mode.
NOTES:
• CHARGING: When the iPod®is inserted into the dock, whether the Mi4004 is on or
off, the iPod’s®battery will charge until it is full.
CHANGING THE MODE: If units are connected to the dock AND the LINE IN jack,
•
you can press the iPod®/LINE IN or AM/FM button repeatedly to select between iPod
(dock)/LINE IN/AM/FM mode as desired. (Y
iPod/LINE IN mode, if there is no device or
iPod®dock.) To turn off the unit, press the Power button.
®
slides onto the
®
is connected to the
2
Press the rear side of the holder until it
is positioned inside the cavity.
NOTE: To remove the holder, insert
your finger (or other object) into the gap
in the holder, then gently pull the holder
out to remove it.
4
If using the LINE IN jack: Insert an audio
cable (not included) into the LINE OUT
on your player and the other end into the
LINE IN jack on the rear of the Mi4004.
®
Press the Power button to turn this unit on,
, it
then press the iPod
select the LINE IN mode. The external
player’s output sound will be heard through
®
is
the Mi4004's speakers. If the Mi4004 is
already on, when you connect the external
unit to it, the Mi4004 will change to LINE IN
mode automatically. If you disconnect the
external unit from the LINE IN jack, the
Mi4004 will revert back to the AM/FM/iPod
mode.
ou will not be able to select between
®
iPod
connected to the LINE IN jack or the
®
/LINE IN button to
jack
®
8
Page 10
OPERATION
USING AN IPOD®WITH THIS UNIT
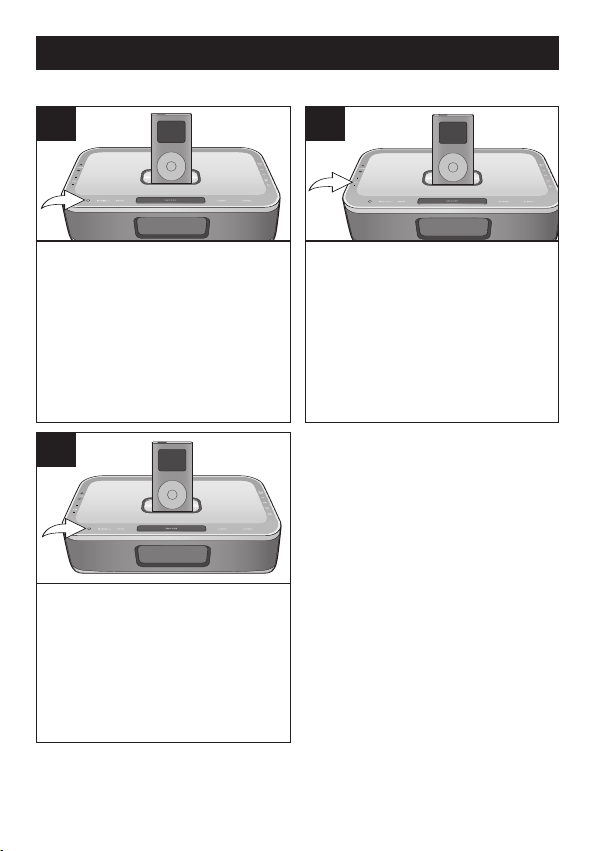
1
With an iPod®connected (see
previous page), turn the Mi4004 on by
pressing the Power button (if it is not
on already); “iPod” will appear in the
display.
NOTE: If the Mi4004 is in a mode
other than iPod®, press the
iPod®/LINE IN button to select iPod
mode.
3
For private listening, plug in
headphones into the Headphones
jack on the rear of the Mi4004. The
speakers will be disconnected
when headphones are plugged in.
When done, press the Power
button and also turn off the iPod
®
2
Operate the iPod®as per its
owner’s manual and the sound will
be heard through the Mi4004’s
speakers.
Adjust the volume as desired by
pressing the Volume Up/Down
buttons.
®
NOTES:
• When the iPod®is inserted
into the dock, you can press
the TUNE Up/Down/Skip
buttons to skip to the
beginning of the current
track/previous or next track.
• The default volume setting
level is 6. After you have
adjusted the volume setting, if
you turn the unit off and then
on again, the volume level will
be set back to the default level
.
of 6.
n / o
9
Page 11
OPERATION (CONTINUED)
USING THE RADIO
1
Turn the Mi4004 on by pressing the
Power button; "AM" or "FM" will
appear in the display.
3
Repeatedly press the TUNE
Up/Down/Skip
advance the frequency in the display up
or down until the desired frequency
appears.
For auto tuning, press
TUNE Up/Down/Skip
the frequency in the display starts to scan
and then release; the tuner will search
and then stop on the next strong station it
finds. Repeat this step until the desired
frequency appears in the display.
NOTE: When a station is tuned, after five
seconds, the radio frequency will
disappear and the actual time will
reappear in the display. If you press the
TUNE Up/Down/Skip
radio frequency will appear in the display
again.
Antennas
FM: Unravel and extend the FM wire antenna for best reception.
AM: Turn the unit for better AM reception. Also, move the AC adapter 1.5ft. away from the
main unit to prevent interference to the AM signal.
n / o buttons to manually
and hold the
n / o buttons until
n / o buttons, the
2
Press the AM/FM button
repeatedly to select the desired
band (AM or FM).
4
Adjust the volume as desired by
pressing the Volume Up/Down
buttons.
For private listening, plug in
headphones into the Headphones
jack on the rear of the Mi4004. The
speakers will be disconnected
when headphones are plugged in.
10
Page 12
OPERATION (CONTINUED)
2
1
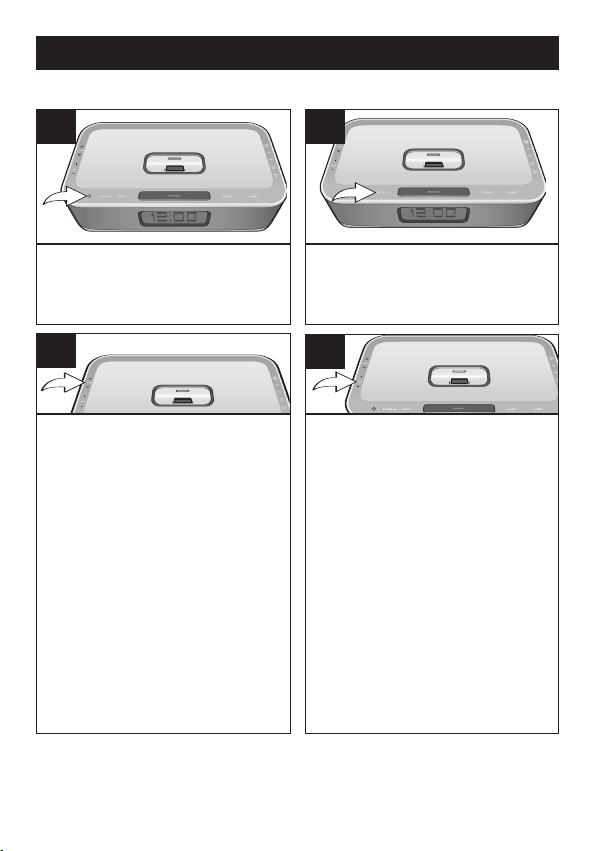
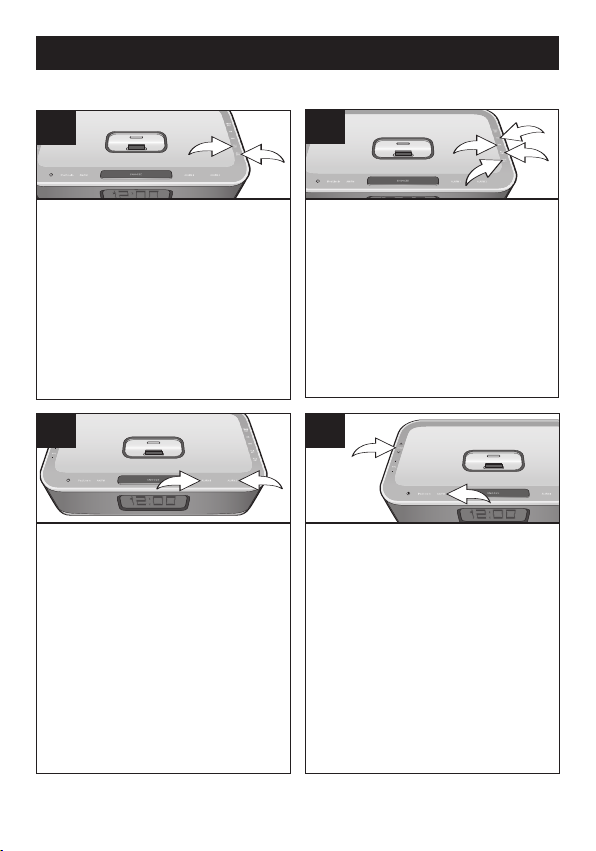
TO SET OR RESET THE ACTUAL TIME
1
With the power off, press the
TIME SET button; the time will
blink.
3
Press the TIME SET button (or
wait approx. 5 seconds) and the
time will be set.
2
Within 5 seconds, press the MN
(Minute) button
present minute and the HR (Hour)
button 2 to set the present hour.
Make sure to set the correct
AM/PM setting.
DST (DAYLIGHT SAVINGS TIME)
1 to set the
1
For your convenience, there is a
(Daylight Savings Time) switch
DST
located on the rear of the unit. Slide
the switch to +1 to add an hour to
the actual time or slide the switch to
-1 to subtract an hour from the actual
time.
11
Page 13
OPERATION (CONTINUED)
2
1
1
2
1
2
2
1
3
4
TO SET OR RESET THE ALARM TIME
1
With the power off, press either the
AL1 SET button 1 (to set Alarm 1)
or AL2 SET button
2) ; the Alarm time will blink in the
display.
2 (to set Alarm
3
Repeatedly press the ALARM 1 1
or ALARM 2 2 button to select
alarm off, alarm on for buzzer, radio
or iPod®.
NOTE: Make sure the
corresponding indicator (BUZZ/
RADIO/iPod) appears in the
display.
CONTINUED ON THE NEXT PAGE
2
Within 5 seconds, press the MN
(Minute) button
minute and the HR (Hour) button
to set the alarm hour. Make sure to
set the correct AM/PM setting.
Press the AL1 SET button 3 or AL2
SET button
approx. 5 seconds); the alarm time
will stop blinking.
1 to set the alarm
4 again (or wait
4
If set to Radio, within 5 seconds, set
the band (AM or FM) using the
AM/FM button
using the Tune/Skip/Search
button 2. When the alarm time is
reached, the unit will turn on the band
(AM or FM) and the frequency that
you selected.
NOTE: When you have selected the
radio band and frequency, after 5
seconds, the radio frequency will be
set and the actual time will appear in
the display again.
12
1 and the frequency
2
l or m
Page 14

OPERATION (CONTINUED)
5
If set to iPod®, insert the iPod®as shown on
page 8. Then, using the controls on the iPod®,
select the track that you would like to wake to
and put the iPod®into Pause mode. DO NOT
turn the iPod®off; let it go to sleep by itself.
When the alarm time is reached, the unit will
start playback on the track that you selected
and the tracks following it in the playlist. The
Mi4004 will playback for 20 minutes then turn
off automatically or, if the remaining playlist
has less than 20 minutes of playback time
remaining, the Mi4004 will just playback the
remaining time of the playlist and then stop.
NOTES:
• It is not necessary to set the volume level for the alarm. When the alarm
time is reached, the alarm volume level will be set to the minimum (Level
1) and it will increase one step every five seconds continuously until
Volume Level 12 is reached.
• When the actual time matches the selected preset alarm time(s),
Radio or Buzzer, the unit will automatically turn on for 20 minutes and
then shut off. If set to iPod®, the unit will start playback on the track that
you selected and the tracks following it in the playlist. The unit will
playback for 20 minutes then turn off automatically or, if the remaining
playlist has less than 20 minutes of playback time remaining, the unit will
just playback the remaining time of the playlist and then stop.
TO SHUT OFF THE ALARM, see TO SHUT THE ALARM OFF section on
•
the next page.
• While the alarm is sounding, if the other alarm reaches the alarm time, the
first alarm will stop sounding and the second alarm will start sounding.
• Make sure you have disconnected the headphones from the Headphones
jack (rear of the unit) and disconnected the audio cable from the LINE IN
jack (rear of the unit); otherwise, there will be no sound when the actual
time matches the preset alarm time.
13
if set to
Page 15

OPERATION (CONTINUED)
1
2
2
3
1
TO SHUT THE ALARM OFF
1
If the alarm was set to BUZZ, press the
ALARM 1
(which corresponds to the alarm that
was set) and the alarm will turn off and
NOT be set for the next day. To set the
alarm for the next day, press the ALARM
1 or ALARM 2 2 button repeatedly to
1
select between alarm on for buzzer,
radio or iPod®again.
1 or ALARM 2 2 button
2
If the alarm was set to Radio or iPod®, press
the Power button
the alarm will be set for the next day. To not
set the alarm for the next day, press the
ALARM 1
corresponds to the alarm that was set)
repeatedly until "ALARM 1" or "ALARM 2"
disappear from the display.
NOTE: While the alarm is on, if you press
any button on the unit (except the
SNOOZE/SLEEP button or the Power
button), the unit will change from Alarm
mode to normal Power On mode, so you can
adjust any setting (i.e., volume level, radio
frequency, etc.) as desired.
1 to turn off the alarm and
2 or ALARM 2 3 button (which
SNOOZE
1
While the alarm is sounding, press the
SNOOZE/SLEEP button; the SNOOZE
indicator will appear in the display. Also,
"10" will appear in the display for five
seconds and then revert back to the
actual time. The alarm will turn back on
automatically ten minutes later.
NOTE:
• To cancel the SNOOZE function (the alarm will not turn back on), press the ALARM
1 or ALARM 2 button (which corresponds to the alarm that was set)–the SNOOZE
indicator will disappear from the display–and repeatedly press to select between
alarm off (alarm will not be set for the next day) or alarm on for buzzer, radio or iPod
(alarm will be set for next day).
2
To set the SNOOZE time to a time other
than 10 minutes, when “10” appears in the
display, press the SNOOZE/SLEEP button
again. Each press of the SNOOZE/SLEEP
button will increase the SNOOZE time by
five minutes (up to "60” for 60 minutes).
Once you stop pressing the button, the
display will show the SNOOZE time for five
seconds and then revert back to the actual
time. The alarm will turn back on according
to the SNOOZE time set.
14
®
Page 16

OPERATION (CONTINUED)
SLEEP DIMMER SWITCH
1
With the unit in the LINE IN, iPod®or
Radio mode, press the SNOOZE/
SLEEP button; the SLEEP indicator and
"10" will appear in the display for five
seconds which indicates the unit will turn
off after 10 minutes. Repeatedly press
the SNOOZE/SLEEP button to select
the SLEEP
"20"–turns off automatically after 20
minutes, "30"–turns off automatically
after 30 minutes, etc.). After five
seconds, the SLEEP time will disappear
from the display. To view the remaining
SLEEP time, press the SNOOZE/
SLEEP button once. Repeatedly press
the SNOOZE/SLEEP button to increase
the SLEEP time; each press will
increase the SLEEP time by 10 minutes.
NOTE: To cancel the SLEEP function,
repeatedly press the SNOOZE/SLEEP
button until the "SLEEP" indicator
disappears from the display.
time, up to 60 minutes (i.e.,
1
Slide the DIMMER switch to adjust
the dimmer of the display. If the
display is too dim, slide the
DIMMER switch towards “H” for a
brighter display. Slide the DIMMER
switch towards “L” for a less bright
display.
15
Page 17

OPERATION (CONTINUED)
IPOD®UNIVERSAL DOCKS
Locate your iPod®in the chart on the next two pages and select the
respective Universal Dock (the Universal Dock No. is engraved at the front
of the Universal Docks as shown on the next page) to match with your iPod®.
Insert the corresponding Universal Dock and your iPod®into the unit as
described on page 8.
®
iPod
Type Memory Univ. Dock No.
Fourth
Generation
®
iPod
10 to
15GB
No. 4
iPod
Photo
iPod
mini
30GB
®
30GB
40 to
No. 5
No. 6
No. 7
60GB
®
4 to
No. 3
6GB
16
Page 18

OPERATION (CONTINUED)
®
iPod
NOTE:
• The 5 holders provided with this unit are Universal Docks.
IMPORTANT! The Universal Dock No. is engraved at the front of the
docks. Please refer to the illustration below for the location of the
Universal Dock No.
Type Memory Univ. Dock No.
®
iPod
nano
Fifth
Generation
®
iPod
(w/Video)
2 to
4GB
30GB
60GB
Please use
the Universal
Dock included
with your iPod®.
17
Page 19

TROUBLESHOOTING GUIDE
If you experience a problem with this unit, check the chart below before calling for service.
SYMPTOM CAUSE SOLUTION
No sound. Volume is Increase volume.
set to minimum.
AM or FM, no sound. Power is not on. Press the Power button,
then the AM/FM button to
select AM/FM.
Volume is Increase volume.
set to minimum.
AM/FM, poor sound. Station is not tuned Retune the AM or FM
properly. broadcast station.
FM: Wire Extend FM wire
antenna is not antenna.
extended.
AM: Unit is not pos- Rotate unit until best
itioned correctly. reception is obtained.
®
mode, no sound. Incorrectly connected. Check the connection.
iPod
®
Not in iPod
Time reset to “12:00”. Batteries connected Check the batteries.
improperly, not con-
nected or dead.
Clock not set. Set the clock.
Alarm does not Alarm is not activated Set and activate alarm as
turn on. or set properly. described on page 12.
Clock is not set. Set the clock.
mode. Press iPod
18
®
/LINE IN button.
Page 20

SPECIFICATIONS
GENERAL:
Power Source .............DC 13.5V Adapter (Center Positive)
Battery Backup.......................2 x 1.5V “AAA” size batteries
Speaker...............................................................2 x 4 ohms
Output Power ...........................................................2 x 5W
RADIO SECTION:
Frequency Range (FM) ................................87.5–108 MHz
Frequency Range (AM) ...............................520–1710 KHz
Specifications are subject to change without notice.
FOR ADDITIONAL SET-UP OR OPERATING ASSISTANCE,
PLEASE VISIT OUR WEBSITE AT:
OR CONTACT CUSTOMER SERVICE AT (954) 660-7100.
WWW.MEMOREXELECTRONICS.COM
PLEASE KEEP ALL PACKAGING MATERIAL FOR AT LEAST 90
DAYS IN CASE YOU NEED TO RETURN THIS PRODUCT TO YOUR
PLACE OF PURCHASE OR MEMOREX.
FOR PARTS AND ACCESSORIES, CONTACT FOX
INTERNATIONAL AT 1-800-321-6993.
19
Page 21

Memcorp, Inc.
Weston, FL
Printed in Hong Kong
Visit our website at www.memorexelectronics.com
Page 22

Mi4004 Suffix/Sujijo A
User’s Guide
Guía del Usario
iWake Clock Radio with Dual Alarm
Radio Reloj iWake con Alarma Dual
Before operating this product, please read these instructions completely.
Antes de operar este producto, sírvase leer este instructivo en su totalidad.
Page 23

MEDIDAS DE SEGURIDAD
CUIDADO
RIESGO DE DESCARGA
ELÉCTRICA. NO ABRIR
ADVERTENCIA: Para reducir el riesgo de descargas
eléctricas no saque la cubierta o la tapa posterior. Allí no se
encuentran partes que puedan ser reparadas por el usuario.
Lleve su unidad a un Centro de Servicio Autorizado.
ADVERTENCIA: La figura de la flecha con forma de
rayo dentro de un triángulo está hecho para alertar al
usuario de la presencia de cables sin aislar de "voltaje
peligroso" dentro del gabinete, de tal magnitud que
puede causar un riesgo de descarga eléctrica a las
personas.
ADVERTENCIA: El signo de exclamación dentro de un
triángulo está hecho para alertar al usuario de la
existencia de instrucciones importantes tanto de
servicio como de funcionamiento y mantenimiento que
vienen con la unidad.
AVISO DE LA FCC:
Este equipo genera o puede usar energía de frecuencia radial. Cualquier
cambio o modificación al equipo, puede causar interferencia nociva, a
menos que estas modificaciones esten expresamente indicadas en el
manual de instrucciones. El usuario puede perder el derecho de operar
este equipo si efectuara un cambio o modificación no autorizadas.
ATTENTION:
POUR ÉVITER LES CHOC ÉLECTRIQUES, INTRODUIRE LA LAME LA
PLUS LARGE DE LA FICHE DANS LA BORNE CORRESPONDANTE DE
LA PRISES ET POUSSER JUSQU’AU FOND.
Este símbolo es marca registrada de SRS Labs,
Inc. La tecnología WOW está incorporada bajo
licencia de SRS Labs, Inc.
1
Page 24

MEDIDAS DE SEGURIDAD
INFORMACIÓN:
Este equipo
Este equipo genera, usa y puede irradiar energía de radiofrecuencia
y, si no se instala y usa conforme a las instrucciones, puede generar
interferencia dañina con las radiocomunicaciones. Sin embargo, no
hay garantía de que no habrá interferencia en una instalación
particular. Si este equipo llegara a causar interferencia dañina con la
recepción de radio o televisión, lo cual se puede determinar
encendiendo y apagando el equipo, le pedimos que intente corregir
la interferencia con las siguientes medidas:
• Reoriente o reubique la antena receptora.
• Incremente la distancia entre el equipo y el receptor.
• Conecte el equipo a un contacto eléctrico que esté en un circuito
distinto al que está conectado el receptor.
• Consulte al vendedor o a un técnico de radio y televisión con
experiencia.
ELECTROCUTAMIENTO O INCENDIO, NO EXPONGA ESTE
PROTECTORES DE OLEADA:
Se recomienda para utilizar un protector de oleada para la
conexión de la CA. Las oleadas del relámpago y de la energía
no se cubren bajo garantía para este producto.
cumple con
ADVERTENCIA: PARA EVITAR LOS PELIGROS DE
APARATO A LA LLUVIA O HUMEDAD.
aparato digital de Clase B regulaciones.
Este aparato digital de Clase B cumple con la norma
ICES-003 de Canadá.
Cet appareil numérique de la classe B est conforme à la
norme NMB-003 du Canada.
2
Page 25

UBICACIÓN DE LOS CONTROLES
FRENTE/ARRIBA
1. Botones de Sintonizar
Arriba/Abajo/Brincar
2. Puerto para iPod®con
conector y puertos
universales
intercambiables
3. Botones de aumentar/
disminuir volumen
4. Botón de encendido
5. Botón iPod
DE LÍNEA
6. Botón AM/FM
7. Bocina izquierda
8. Display
®
/ENTRADA
n / o
9. Botón AJUSTAR RELOJ
10. Botón HR (hora)
11. Botón MN (minuto)
12. Botón AJUSTAR AL1
13. Botón AJUSTAR AL2
14. Botón ALARMA 2
15. Botón ALARMA 1
16. Botón
DORMITAR/DORMIR
17. Bocina derecha
18. Sensor del remoto
3
Page 26

UBICACIÓN DE LOS CONTROLES (CONTINÚA)
ATRÁS
1. Interruptor del
ATENUADOR
2. Enchufe de entrada de DC
13.5V
3. Enchufe de ENTRADA DE
LÍNEA
4. Cable de Antena FM
5. Interruptor DST (horario de
verano)
6. Enchufe de audífonos
7. Compartimiento de pilas
(parte inferior de la unidad)
4
Page 27
UBICACIÓN DE LOS CONTROLES (CONTINÚA)
CONTROL REMOTO
1. Compartimiento de pilas
(lado de unidad)
2. Botón Sintonizar
Abajo/Brincar
o
3. Botón de Aumentar
volumen
4. Botón de Modo
NOTAS:
• Los botones del control remoto funcionan de la misma manera que
los botones en la unidad principal.
• Para cambiar de un modo a otro (AM/FM, ENTRADA DE lÏNEA o
• Para encender la unidad, presione el botón de Encendido/
• Para el clip de cinturón, simplemente sujételo en un lugar donde no
®
, use el botón MODO.
iPod
REPRODUCIR/PAUSA (
botón de Encendido/REPRODUCIR/PAUSA (
presionado hasta que se apague y entonces suelte el botón.
se pueda deslizar como por ejemplo su cinturón, bolsa o mochila.
5. Botón de Disminuir
volumen
6. Botón Encendido/
Reproducir/ Pausa (
®p)
7. Botón Sintonizar
Arriba/Brincar
n
8. Clip para cinturón
®p). Para apagar la unidad, presione el
®p) y manténgalo
5
Page 28
FUENTE DE ENERGÍA
Tomacorriente
T
apa de
tomacorriente
A
daptador
de Tierra
Cable de Tierra
Tornillo
CONEXIÓN A CORRIENTE ELÉCTRICA
Inserte el extremo pequeño del cable para
adaptador en el enchufe de entrada DC 13.5V
(ubicando atrás en la unidad). Conecte el otro
extremo a un contacto de pared de 120V AC,
60 Hz. Adaptador AC, DC 13.5V
NOTAS:
• El adaptador de corriente alterna incluido
con la unidad está polarizado para ayudar
a minimizar la posibilidad de una descarga
eléctrica. Si el enchufe no entra en el
contacto eléctrico no polarizado, no lime ni
corte el lado ancho. Es responsabilidad del
usuario pedirle a un electricista que
cambie el contacto eléctrico obsoleto.
• Cuando no vaya a utilizar la unidad,
desconecte el adaptador de corriente
alterna de ambos lados.
• Use únicamente un adaptador de corriente
alterna incluido, que tenga las siguientes
especificaciones: DC 13.5V
LUZ DE FONDO
Cuando el adaptador está conectado a la unidad, la luz de fondo siempre está encendida.
INSTALACIÓN DE LAS PILAS
También puede utilizar dos (2) pilas tamaño "AAA"
para operar la unidad y/o para proporcionar un
respaldo para el reloj y el tiempo de alarma del
siguiente modo:
1. Abra la puerta del compartimiento ejerciendo
presión sobre la lengüeta y quitando la puerta.
2. Introduzca dos (2) pilas "AAA", como se
muestra. Se recomienda el uso de pilas
alcalinas para una mayor duración.
3. Coloque nuevamente la puerta del
compartimiento.
NOTAS:
• Las pilas se usan como respaldo para el reloj y tiempo de la alarma cuando el
adaptador de corriente está desconectado o hay un apagón.
• El indicador de la pila aparecerá o parpadea en la pantalla cuando no hay pilas o
las pilas estén bajas y sea necesario reemplazarlas.
IMPORTANTE: Consulte el Cuidado de las baterías en la próxima página.
Z
Z
Cuando usa un adaptador que ha sido
debidamente preparado para hacer tierra.
6
Page 29

FUENTES DE ENERGÍA (CONTINÚA)
INSTALACIÓN DE LAS PILAS EN EL CONTROL REMOTO
1.
Quite la puerta del compartimiento ejerciendo
presión en la lengüeta y deslizándola.
2. Introduzca una pila CR2025, poniendo
atención al diagrama de polaridad en el
compartimiento de pila (el lado positivo
hacia arriba).
3. Coloque nuevamente el compartimiento de
pilas.
Cuando use baterías tome las siguientes precauciones:
1. Use únicamente el tamaño de batería que indica el fabricante.
2. Asegúrese de seguir la polaridad indicada en el compartimiento cuando
instale su batería. De no hacerlo, usted puede dañar su unidad.
3. No mezcle tipos de batería diferentes, por ejemplo alcalinas, con Carbono de
Cinc, así como tampoco debe mezclar baterías usadas con nuevas.
4. Si no va a usar su unidad por un largo período de tiempo, saque la batería
para evitar que vaya a oxidarse y dañar los terminales.
5. Nunca intente recargar baterías que no han sido hechas para este fín, ya que
pueden recalentarse y explotar. (Siga las instrucciones del fabricante de las
baterías).
CUIDADO DE LAS BATERIAS
7
Page 30

CÓMO INTRODUCIR UN IPOD
®
1
Ubique el puerto universal correcto para
®
a ser usado como se muestra
el iPod
en las páginas 16-17. Introduzca el
puerto en la cavidad (como se
muestra), asegurándose de que las
lengüetas apunten al frente y deslícelas
hasta que queden en su lugar.
3
Si utiliza el puerto: Inserte el iPod®en el
portador. Empújelo suavemente para que
el conector en el iPod
conector en el Mi4004. Si la unidad
Mi4004 está apagada, ya que conecte el
®
, se empezará a cargar la pila hasta
iPod
que esté llena. Si la unidad Mi4004 está
encendida y en modo AM/FM/ENTRADA
DE LÍNEA, ya que conecte el iPod
unidad Mi4004 cambiará automáticamente al modo iPod
desconecta el iPod
cambiará de nuevo al modo
AM/FM/ENTRADA DE LÍNEA. Cuando el
®
está conectado a la unidad Mi4004
iPod
estará en modo de Pausa.
NOTAS:
• CARGA: Cuando el iPod®es insertado en el puerto, ya sea que la unidad Mi4004
esté encendida o apagada, la pila del iPod’s®cargará hasta estar llena.
CAMBIAR EL MODO: Si las unidades están conectadas al puerto Y al enchufe de
•
ENTRADA DE LÍNEA, presione el botó iPod®/ENTRADA DE LÍNEA o el botón AM/FM
repetidamente para seleccionar entre el modo iPod (puerto)/ENTRADA
AM/FM, según desee. (Usted no podrá seleccionar entre el modo iPod/ENTRADA
LÍNEA, si no hay un dispositivo o
LÍNEA o al puerto iPod
®
se deslice sobre el
®
. Luego, si
®
, la unidad Mi4004
®
.) Para apagar la unidad, presione el botón de encendido.
2
Presione la parte posterior del portador
hasta que quede posicionado dentro de la
cavidad.
NOTA: Para quitar el portador, inserte el
dedo (u otro objeto) en la abertura del
portador, luego jálelo suavemente para
retirarlo.
4
Si utiliza un enchufe de ENTRADA DE
LÍNEA
: Inserte un cable de audio (no incluido)
en el enchufe de SALIDA DE LÍNEA en el
reproductor e inserte el otro extremo en el
enchufe de ENTRADA DE LÍNEA en la parte
posterior del Mi4004. Presione el botón de
encendido para encender la unidad, y luego el
botón iPod
seleccionar el modo de ENTRADA DE LÍNEA.
El sonido de salida del reproductor externo se
®
, la
escuchará a través de las bocinas del Mi4004.
Si la unidad Mi4004 ya está encendida cuando
conecte la unidad externa a ella, la unidad
Mi4004 cambiará automáticamente a modo de
ENTRADA DE LÍNEA. Si usted desconecta la
unidad externa del enchufe de ENTRADA DE
LÍNEA, la unidad Mi4004 regresará al modo de
AM/FM/iPod
®
iPod
conectado al enchufe de ENTRADA
®
/ENTRADA DE LÍNEA para
®
.
DE LÍNEA/
DE
DE
8
Page 31

OPERACIÓN
USAR UN IPOD®CON ESTA UNIDAD
1
Con el iPod®conectado (ver página
previa), encienda la unidad Mi4004
presionando el botón de encendido
(si no lo ha hecho); "iPod" aparecerá
en el display.
NOTA: Si la unidad Mi4004 está en
un modo que no sea iPod
el botón iPod
para seleccionar el modo iPod
®
/ENTRADA DE LÍNEA
®
, presione
®
.
3
Para escuchar en privado, conecte
los audífonos al enchufe de los
audífonos en la parte posterior del
Mi4004. Las bocinas se
desconectan al conectar los
audífonos.
Cuando termine, presione el botón
de encendido y apague también el
®
.
iPod
2
Opere el iPod®como indica el
manual del propietario y escuchará
el sonido a través de las bocinas
del Mi4004.
Ajuste el volumen según desee,
presionando los botones de
Aumentar/Disminuir Volumen.
NOTAS:
• Cuando el iPod®está
insertado en el puerto,
presione los botones
Sintonizar Arriba/Abajo/Brincar
n / o para brincar al inicio de
la pista actual o de la pista
previa o siguiente.
• El nivel de volumen
predeterminado es 6. Después
de que ajuste el volumen, si
usted apaga y enciende
nuevamente la unidad, el nivel
de volumen regresará al nivel
predeterminado de 6.
9
Page 32

OPERACIÓN (CONTINÚA)
USAR LA RADIO
1
Para encender la unidad Mi4004,
presione el botón de encendido;
"AM" o "FM" aparecerá en el
display.
3
Presione repetidamente los botones
Sintonizar Arriba/Abajo/Brincar
avanzar manualmente la frecuencia en el
display hacia arriba o abajo hasta que
aparezca la frecuencia deseada.
Para la sintonización automática, presione los
botones Sintonizar
y manténgalo presionado hasta que la
frecuencia en el display empiece a buscar, y
luego suelte el botón; el sintonizador buscará
y se detendrá en la siguiente estación fuerte
que encuentre. Repita este paso hasta que
aparezca la frecuencia deseada en el display.
NOTA: Cuando sintoniza una estación,
después de cinco segundos la frecuencia de
radio desaparecerá y la hora real reaparecerá
en el display. Si usted presiona los Sintonizar
Arriba/Abajo/Brincar
radio aparecerá nuevamente en el display.
Arriba/Abajo/Brincar
n / o, la frecuencia de
n / o para
n / o
2
Presione el botón AM/FM
repetidamente para escoger la
banda deseada (FM o AM).
4
Ajuste el volumen según desee,
presionando los botones de
Aumentar/Disminuir Volumen.
Para escuchar en privado, conecte
los audífonos al enchufe de los
audífonos en la parte posterior del
Mi4004. Las bocinas se
desconectan al conectar los
audífonos.
Antenas
FM: Desenrede y extienda la antena FM para una mejor recepción.
AM: Gire la unidad para una mejor recepción de AM. Asimismo, mueva el adaptador de
corriente a 1.5 pies de la unidad principal para evitar que haga interferencia con la señal de AM.
10
Page 33

OPERACIÓN (CONTINÚA)
2
1
AJUSTAR O REAJUSTAR LA HORA ACTUAL
1
Con la unidad apagada, presione
el botón de TIME SET [ajustar
reloj]; la hora parpadeará.
3
Presione el botón TIME SET
[ajustar reloj] (o espere unos 5
segundos) y la hora estará fijada.
2
En menos de 5 segundos,
presione el botón MN (minuto)
para fijar los minutos presentes y
el botón HR (hora) 2 para fijar la
hora presente. Asegúrese de
ajustar correctamente la
configuración AM/PM.
INTERRUPTOR DST
(HORARIO DE VERANO)
1
Para su conveniencia, en la parte
posterior de la unidad se encuentra
un interruptor DST (horario de
verano). Deslice el interruptor a +1
para sumar una hora a la hora actual
o deslice el interruptor a -1 para
restar una hora a la hora actual.
1
11
Page 34

OPERACIÓN (CONTINÚA)
2
1
1
2
1
2
2
1
3
4
FIJAR LA HORA DE LA ALARMA
1
Con la unidad apagada, presione el
botón AL1 SET 1 (para ajustar la
Alarma 1) o AL2 SET
ajustar la Alarma 2); la hora de la
Alarma parpadeará en el display.
2 (para
3
Presione repetidamente el botón
ALARMA 1 1 o ALARMA 2 2 para
seleccionar entre alarm off
[apagar], alarm on [encender] para
zumbador, radio o iPod®.
NOTA: Asegúrese de que el
indicador correspondiente (BUZZ/
RADIO/iPod) aparezca en el
display.
2
En menos de 5 segundos, presione el
botón MN (minuto) 1 para fijar los
minutos de la alarma y el botón HR
(hora)
2 para fijar la hora de la
alarma. Asegúrese de ajustar
correctamente la configuración
AM/PM. Presione nuevamente el
botón AL1 SET 3 o AL2 SET 4 (o
espere unos 5 segundos); la hora de
la alarma dejará de parpadear.
4
Si está en Radio, en menos de 5
segundos ajuste la banda (AM o FM)
usando el botón AM/FM
frecuencia usando el botón
Sintonizar/Brincar/Buscar l o m 2.
Cuando llega la hora de la alarma, la
unidad se encenderá en la banda (AM o
FM) y la frecuencia que usted
seleccionó.
NOTA: Cuando haya seleccionado la
banda y frecuencia de radio, después de
5 segundos la frecuencia de radio estará
configurada y la hora real aparecerá
nuevamente en el display.
1 y la
CONTINÚA EN LA PRÓXIMA PÁGINA
12
Page 35

OPERACIÓN (CONTINÚA)
5
Si está en iPod®, inserte el iPod®como se
muestra en la página 8. Luego, use los
controles en el iPod®, seleccione la pista con
la que desea despertar y ponga el iPod®en
modo de Pausa. NO apague el iPod®; deje
que se apague solo. Cuando llegue la hora de
la alarma, la unidad empezará a reproducir la
pista que seleccionó y las que siguen en la
lista. La unidad Mi4004 se reproducirá
durante 20 minutos y luego se apagará
automáticamente o, si a la lista de
remanentes le quedan menos de 20 minutos,
entonces la unidad Mi4004 sólo reproducirá
el tiempo remanente de la lista y luego se
detendrá.
NOTAS:
• No es necesario ajustar el nivel de volumen para la alarma. Cuando llegue
el tiempo de la alarma, el nivel de volumen se fijará en el mínimo (Nivel 1)
y aumentará un paso cada cinco segundos continuamente hasta que
alcance el nivel de volumen 12.
• Cuando la hora actual corresponda con la hora de la alarma seleccionada,
si está en Radio o Zumbador, la unidad se activará automáticamente por
20 minutos y luego se apagará. Si está en iPod®, la unidad empezará a
reproducir la pista que seleccionó y las que siguen en la lista. La unidad
se reproducirá durante 20 minutos y luego se apagará automáticamente o,
si a la lista de remanentes le quedan menos de 20 minutos, entonces la
unidad sólo reproducirá el tiempo remanente de la lista y luego se detendrá.
PARA APAGAR LAALARMA, vea la sección APAGAR LAALARMA en la
•
próxima página.
• Mientras está sonando la alarma, si la otra alarma llega a su tiempo de alarma,
la primera alarma dejará de sonar y empezará a sonar la segunda alarma.
• Asegúrese de desconectar los audífonos del enchufe (atrás en la unidad)
y desconecte el cable de audio del enchufe de ENTRADA DE LÍNEA
(atrás en la unidad); de lo contrario, no habrá sonido cuando la hora real
corresponda con la hora de la alarma.
13
Page 36

OPERACIÓN (CONTINÚA)
1
2
2
3
1
APAGAR LA ALARMA
1
Si la alarma está en BUZZ [zumbador],
presione el botón ALARMA 1
ALARMA 2
alarma que se puso) y la alarma se
apagará y NO se pondrá para el día
siguiente. Para poner la alarma para el
día siguiente, presione repetidamente el
botón ALARMA 1
seleccionar entre alarm on [encender]
para zumbador, radio o iPod®.
2 (que corresponde con la
1 o ALARMA 2 2 para
2
Si la alarma se puso en Radio o iPod®, presione
el botón de encendido 1 para apagar la alarma
y la alarma estará puesta para el siguiente día.
Para no poner la alarma para el día siguiente,
1 o
presione repetidamente el botón ALARMA 1 2 o
ALARMA 2
que está puesta) hasta que desaparezca
"ALARMA 1" o "ALARMA 2" del display.
NOTA: Mientras la alarma está encendida, si
usted presiona algún botón en la unidad
(excepto el botón SNOOZE/SLEEP
[dormitar/dormir] o el botón de encendido), la
unidad cambiará del modo de Alarma al modo
normal de encendido, de manera que podrá
ajustar cualquier función (p.ej. nivel de volumen,
frecuencia de radio, etc.) según desee.
3 (el que corresponda con la alarma
REPETICIÓN DE ALARMA
1
Mientras suena la alarma, presione el
botón SNOOZE/SLEEP [dormitar/
dormir]; el indicador SNOOZE
[dormitando] aparecerá en el display.
Asimismo, "10" aparecerá en el display
durante cinco segundos y luego
regresará a la hora actual. La alarma se
activará automáticamente después de
diez minutos.
NOTA:
• Para cancelar la función de DORMITAR (la alarma no se activará nuevamente), presione el
botón ALARMA 1 o ALARMA 2 (el que corresponda con la alarma que se puso), el
indicador SNOOZE [dormitar] desaparecerá del display, y presiónelo repetidamente para
seleccionar entre alarma apagada (la alarma no estará puesta para el día siguiente) o alarma
encendida para zumbador, radio o iPod
2
Para configurar el tiempo de DORMITAR a más
de 10 minutos, cuando aparezca "10" en el
display, presione nuevamente el botón
SNOOZE/SLEEP [dormitar/dormir]. Cada vez
que presione este botón el tiempo de
DORMITAR aumentará en cinco minutos (hasta
"60" para 60 minutos). Cuando deje de presionar
el botón, el display mostrará el tiempo de
dormitar por cinco segundos y luego regresará a
la hora actual. La alarma se activará
nuevamente de acuerdo con el tiempo de
dormitar establecido.
®
(la alarma estará puesta para el día siguiente).
14
Page 37

OPERACIÓN (CONTINÚA)
DORMIR INTERRUPTOR DE ATENUADOR
1
Con la unidad en modo de ENTRADA
DE LÍNEA, iPod
botón SNOOZE/ SLEEP
[dormitar/dormir]; el indicador SLEEP
[dormir] y "10" aparecerán en el display
durante cinco segundos lo cual indica
que la unidad se apagará después de
10 minutos. Presione repetidamente el
botón SNOOZE/SLEEP
[dormitar/dormir] para seleccionar el
tiempo de DORMIR, hasta 60 minutos
(p.ej. "20", se apaga automáticamente
después de 20 minutos; "30", después
de 30 minutos, etc.). Después de cinco
segundos, el tiempo de DORMIR se
desaparecerá del display. Para ver el
tiempo que resta de DORMIR, presiona
una vez el botón SNOOZE/ SLEEP.
Presione repetidamente el botón
SNOOZE/SLEEP [dormitar/dormir] para
aumentar el tiempo de DORMIR; cada
vez que lo presione se incrementará en
10 minutos.
NOTA: Para cancelar la función de
DORMIR, presione repetidamente el
botón SNOOZE/SLEEP hasta que
desaparezca el indicador "SLEEP" del
display.
®
o Radio, presione el
1
Deslice el interruptor del
ATENUADOR para ajustar la luz
del display. Si el display está
demasiado oscuro, deslícelo hacia
la "H" para que esté más
iluminado. Deslícelo hacia la "L"
para que esté más oscuro.
15
Page 38

OPERACIÓN (CONTINÚA)
PUERTOS UNIVERSALES DE IPOD
Ubique su iPod®en la tabla en las siguientes dos páginas y seleccione el
puerto universal respectivo (el número del puerto universal está grabado
en la parte delantera de éstos como se muestra en la siguiente página)
que corresponde con su iPod®. Inserte el puerto universal correspondiente
así como su iPod®en la unidad como se describe en la página 8.
®
iPod
Tipo Memoria N° puerto univ.
Fourth
Generation
iPod
®
10 a
®
15GB
No. 4
iPod
Photo
iPod
mini
30GB
®
30GB
40 a
No. 5
No. 6
No. 7
60GB
®
4 a
No. 3
6GB
16
Page 39

OPERACIÓN (CONTINÚA)
®
iPod
NOTA:
• Los 5 portadores provistos con esta unidad son Puertos universales.
IMPORTANTE! El número del puerto universal está grabado en la
parte delantera del puerto universal. Consulte la ilustración a
continuación para ver la ubicación del número del puerto universal.
Tipo Memoria N° puerto univ.
®
iPod
nano
Fifth
Generation
®
iPod
(c/Video)
2 a
4GB
30GB
60GB
Use el puerto
universal incluido
con su iPod®.
17
Page 40

GUÍA DE DIAGNÓSTICO
Si tiene problemas con esta unidad, revise la tabla a continuación antes de llamar a servicio.
SÍNTOMA CAUSA SOLUCIÓN
Sin sonido. El volumen está al Suba el volumen.
mínimo.
AM o FM, sin sonido. Energía apagada. Presione el botón de
El volumen está al Suba el volumen.
mínimo.
Sonido deficiente Estación no sintonizada Resintonice la estación
en AM/FM. apropiadamente. de AM o FM.
FM: El cable de antena Extienda el cable de
no está extendido. antena FM.
AM: La unidad no está Gire la unidad hasta
colocada correctamente. obtener la mejor recepción.
®
Modo iPod
sonido. No en modo iPod
Hora se pone Pilas conectadas Revise las pilas.
en "12:00". inapropiadamente,
La alarma no se Alarma no activada o mal Ponga y active la alarma
activa. configurada. como se describe en p. 12.
sin Incorrectamente conectado. Revise la conexión.
®
. Presione botón iPod®/LINE IN
no conectadas o vacías.
Reloj no ajustado. Ajuste el reloj.
Reloj no ajustado. Ajuste el reloj.
18
encendido, luego el botón
AM/FM para seleccionar
AM o FM.
Page 41

ESPECIFICACIONES
GENERAL:
Fuente de energía ...Adaptador DC 13.5V (centro positivo)
Respaldo con pila. .....................2 pilas 1.5V tamaño "AAA"
Bocina............................................................2 de 4 ohmios
Energía de salida .....................................................2 x 5W
SECCIÓN DE RADIO:
Rango de frecuencia (FM) ............................87.5-108 MHz
Rango de frecuencia (AM) ...........................520-1710 KHz
Las especificaciones están sujetas a cambios sin previo
aviso.
PARA OBTENER AYUDA ADICIONAL CON RESPECTO A LOS
AJUSTES O A LA OPERACIÓN, VISITE NUESTRO SITIO
WEB EN WWW.MEMOREXELECTRONICS.COM O
COMUNÍQUESE CON SERVICIO AL CLIENTE AL
(954) 660-7100.
CONSERVE LOS MATERIALES DE EMPAQUE AL MENOS
DURANTE 90 DÍAS POR SI ACASO NECESITARA
REGRESAR EL PRODUCTO A SU DISTRIBUIDOR O A
MEMOREX.
PARA OBTENER PARTES Y ACCESORIOS, COMUNÍQUESE
CON FOX INTERNATIONAL AL 1-800-321-6993.
19
Page 42

Memcorp, Inc.
Weston, FL
Impreso en Hong Kong
Visite nuestro sitio web en www.memorexelectronics.com
 Loading...