

Page 1
Network (JPEG2000+H.264)
AUDIO/SEQ
NETWORK
User’s Manual
Ver1.0
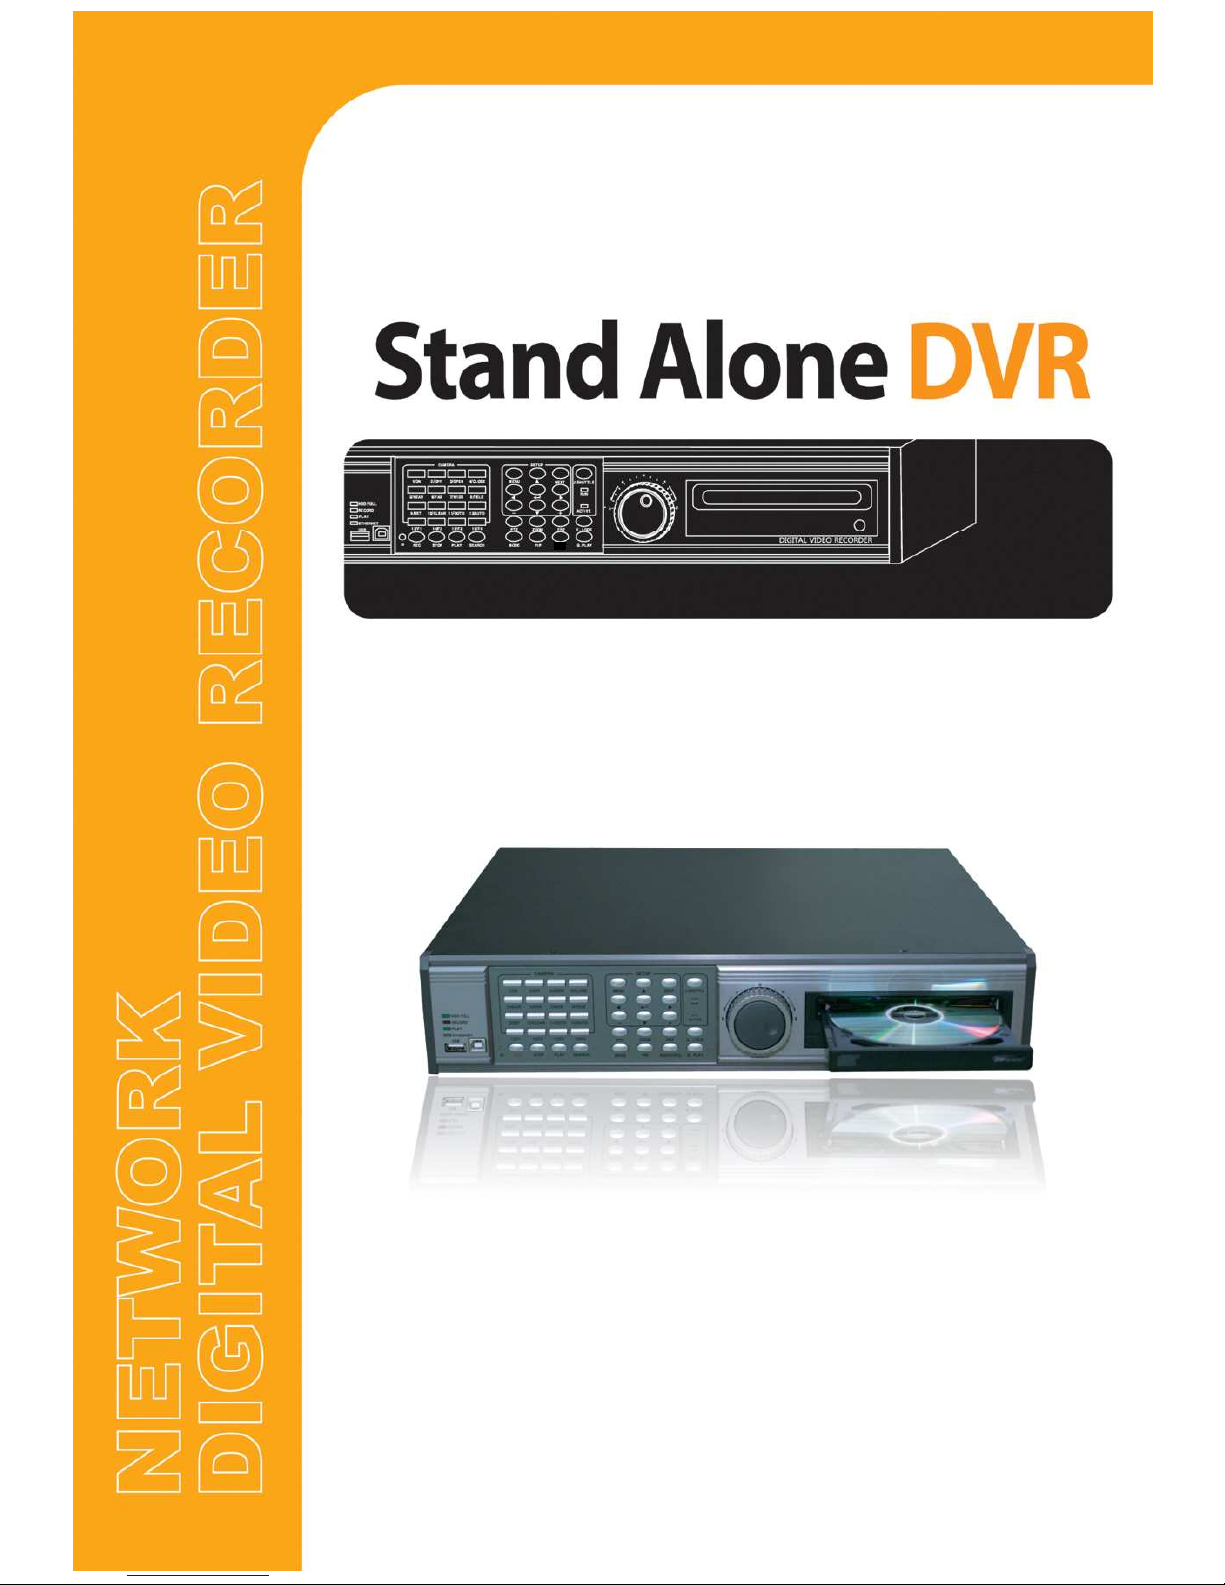
The most stable and reliable real stand-alone Digital Video Multiplex Recorder
16Channel Network Stand Alone DVR
Audio, USB Backup available
Page 2

Network (JPEG2000+H.264)
Network (JPEG2000+H.264)
Network (JPEG2000+H.264)Network (JPEG2000+H.264)
Network Stand Alone DVR
Network Stand Alone DVR
Network Stand Alone DVRNetwork Stand Alone DVR
INSTALLATION & SAFEGUARDS
All the safety and operating instructions should be read before the unit is operated.
Environment Condition for Installation
- To prevent electric shock or other hazard, do not expose units to rain, moisture, or dust.
- This unit should be located in an area with low humidity and a minimum of dust..
- Place this unit in a well-ventilated place and do not place heat-generating objects on this unit.
- This unit should not be located in an area where it is likely to be subjected to mechanical shocks.
Before You Start
- Ensure the power switch is in the OFF position prior to starting.
- Do not attempt to service this unit yourself as opening or removing covers may expose you to
dangerous voltage or other hazards.
- Installation should be performed by qualified service personnel only.
- This unit should be operated only from the type of power source indicated on the manufacturer’s
label and with the power supply included with the unit.
Installation & Safeguards
Notice
- Be aware thoroughly about the power connection before installation of the unit.
- Before initial configuration or operation you must first set the TIME/DATE, followed by setting
the unit to the FACTORY DEFAULT settings, lastly clearing the HDD. Please follow these steps
in order.
- Pull the unit out of record mode prior to cutting power to the unit. Do this by entering the setup
menu, followed by switching the unit off. Powering off the unit while writing to the disks can
cause critical malfunctions. (ex: Recording Error, Playback Error, System Error)
- When you set the record type, you have to set the Record Configuration and also Schedule
Setup. This unit records as per the Record type & Schedule setup.
- The [REC] button on the front panel is for emergency record using highest image quality.
The lightning flash with arrowhead symbol within an equilateral triangle is intended to alert the
user of this equipment that there are dangerous voltages within the enclosure which may be of
sufficient magnitude to constitute a risk of electric shock.
The exclamation point within an equilateral triangle is intended to alert the user to presence of
important operating and maintenance(Servicing) instructions in the literature accompanying the
appliance.
1
Page 3

Network (JPEG2000+H.264)
Network (JPEG2000+H.264)
Network (JPEG2000+H.264)Network (JPEG2000+H.264)
Network Stand Alone DVR
Network Stand Alone DVR
Network Stand Alone DVRNetwork Stand Alone DVR
Contents
Contents
CHAP. 1 Features & Package Contents ---------------------------------------------------------------- 4
1-1. Features ---------------------------------------------------------------- 4
1-2. Package Contents ---------------------------------------------------------------- 5
CHAP. 2 Function of Each Button ---------------------------------------------------------------- 6
2-1. Front ---------------------------------------------------------------- 6
2-2. Rear ---------------------------------------------------------------- 8
CHAP. 3 Installation ---------------------------------------------------------------- 9
3-1. Installation Configuration ---------------------------------------------------------------- 9
3-2. Detailed Installation ---------------------------------------------------------------- 10
1) Rack Mount ---------------------------------------------------------------- 10
2) HDD (Hard Disk Drive) ---------------------------------------------------------------- 10
3) Camera ---------------------------------------------------------------- 11
4) Monitor ---------------------------------------------------------------- 11
5) Power ---------------------------------------------------------------- 11
6) SPOT, Video Printer ---------------------------------------------------------------- 12
7) Other External Device ---------------------------------------------------------------- 12
CHAP. 4 Operation ---------------------------------------------------------------- 13
4-1. System Log-in ---------------------------------------------------------------- 13
4-2. Factory Default ---------------------------------------------------------------- 13
4-3. Display Configuration ---------------------------------------------------------------- 14
4-4. Live View Setup ---------------------------------------------------------------- 14
1) Full / Multiple View ---------------------------------------------------------------- 14
2) View in Sequence ---------------------------------------------------------------- 15
3) PIP View ---------------------------------------------------------------- 15
4) Freeze View ---------------------------------------------------------------- 15
5) Zoom View ---------------------------------------------------------------- 15
4-5. Record ---------------------------------------------------------------- 16
4-6. Playback ---------------------------------------------------------------- 16
4-7. Search ---------------------------------------------------------------- 17
4-8. PTZ Camera Operation ---------------------------------------------------------------- 17
4-9. Data Back-Up ---------------------------------------------------------------- 18
4-10. Audio Operation ---------------------------------------------------------------- 19
4-11. Mouse Operation ---------------------------------------------------------------- 19
CHAP. 5 Set Up ---------------------------------------------------------------- 22
5-1. Entering the Menu ---------------------------------------------------------------- 22
5-2. Display Setup ---------------------------------------------------------------- 23
1) Screen Display ---------------------------------------------------------------- 23
2) Monitor Setup ---------------------------------------------------------------- 23
5-3. Configuration ---------------------------------------------------------------- 24
1) HDD Management ---------------------------------------------------------------- 24
2) TIME/DATE Setup ---------------------------------------------------------------- 26
3) Camera Setup ---------------------------------------------------------------- 26
4) Interval Setup ---------------------------------------------------------------- 28
5) Alarm Setup ---------------------------------------------------------------- 28
2
Page 4

Network (JPEG2000+H.264)
Network (JPEG2000+H.264)
Network (JPEG2000+H.264)Network (JPEG2000+H.264)
Network Stand Alone DVR
Network Stand Alone DVR
Network Stand Alone DVRNetwork Stand Alone DVR
6) Event Popup Setup ---------------------------------------------------------------- 28
7) Buzzer Setup ---------------------------------------------------------------- 29
8) Password Setup ---------------------------------------------------------------- 29
9) System Information ---------------------------------------------------------------- 29
5-4. Record Setup ---------------------------------------------------------------- 30
1) Record Configuration ---------------------------------------------------------------- 30
2) Schedule Setup ---------------------------------------------------------------- 31
3) Holiday Setup ---------------------------------------------------------------- 31
5-5. Back-Up (CD-R, USB) ---------------------------------------------------------------- 32
5-6. External Device ---------------------------------------------------------------- 33
1) TCP/IP Setup ---------------------------------------------------------------- 33
2) RS-232C Setup ---------------------------------------------------------------- 36
3) Pan Tilt Zoom Setup ---------------------------------------------------------------- 36
4) Spot Monitor Setup ---------------------------------------------------------------- 36
5) Audio Setup ---------------------------------------------------------------- 37
6) Audio Volume Setup ---------------------------------------------------------------- 37
7) Remocon Setup ---------------------------------------------------------------- 37
5-7. Factory Default ---------------------------------------------------------------- 38
5-8. Language Setup ---------------------------------------------------------------- 38
CHAP. 6 Network Setup ---------------------------------------------------------------- 39
6-1. DVR Network Configuration ---------------------------------------------------------------- 39
CHAP. 7 IRS ---------------------------------------------------------------- 43
7-1. IRS SETUP ---------------------------------------------------------------- 44
7-2. DVR SETUP ---------------------------------------------------------------- 45
7-3. VIEWER ---------------------------------------------------------------- 46
7-4. BACKUP ---------------------------------------------------------------- 47
7-5. PLAYER ---------------------------------------------------------------- 49
7-6. TRANSMITTER ---------------------------------------------------------------- 52
7-7. CLIENT ---------------------------------------------------------------- 54
7-8. CMS ---------------------------------------------------------------- 56
CHAP. 8 DDNS Web Server ---------------------------------------------------------------- 59
8-1. Register DVR to DDNS Server
8-2. DDNS Setup in DVR
8-3. Web Program
CHAP. 9 Programmers Reference ---------------------------------------------------------------- 66
1) Connector Pin Assignment ---------------------------------------------------------------- 66
2) RS232 ASCII-CODE ---------------------------------------------------------------- 66
CHAP.10 Specification ---------------------------------------------------------------- 68
CHAP.11 Remocon Key Definition ---------------------------------------------------------------- 69
----------------------------------------------------------------
----------------------------------------------------------------
----------------------------------------------------------------
Contents
59
61
65
3
Page 5

Network (JPEG2000+H.264)
Network (JPEG2000+H.264)
Network (JPEG2000+H.264)Network (JPEG2000+H.264)
Network Stand Alone DVR
Network Stand Alone DVR
Network Stand Alone DVRNetwork Stand Alone DVR
CHAP. 1 Features & Package Contents
1-1. Features
Live View
Real time display per camera
Auto Sequence
PIP (Picture in picture)
Event Popup
Digital Zoom
Display Freeze
Simple Playback mode
Simple PTZ camera control
Record
Variable Record resolution (For higher picture quality or higher recording speed)
Efficient Image Quality setup in 5 steps
Schedule Record / Holiday Record
Event Record (Alarm / Motion)
Emergency Record
CHAP. 1 Features & Package
Contents
Network
View Live and Playback images across IP network
Copy images across the network
Network Video Server
Playback
Search & Playback by Date/Time, Event and Camera
Outstanding picture quality by JPEG 2000 compression algorithm (No mosaic effect)
Suitable for recording not only images but also text
Various steps in Forward Playback Speed
Various steps in Backward Playback Speed
Easy and convenient search by Jog Shuttle & Remote Controller
Data Back-Up
Simple Back-Up using built-in CD Recorder (Back-up CD Player included in the package)
Network Back-Up using Remote Viewer program (Remote Viewer included in the package)
Supports bigger capacity of SATA HDD
USB Device Back-Up available
Others
Multi-Language
VGA option board supports both TFT LCD monitor and CRT monitor
Lock the system by Password
JOG / SHUTTLE
PAL/NTSC Auto detection
Control the unit by using Remote Controller [Normal, Single, Universal]
Audio recording : IN-4ch, OUT-1ch (mono)
4
Page 6
Network (JPEG2000+H.264)
Network (JPEG2000+H.264)
Network (JPEG2000+H.264)Network (JPEG2000+H.264)
Network Stand Alone DVR
Network Stand Alone DVR
Network Stand Alone DVRNetwork Stand Alone DVR
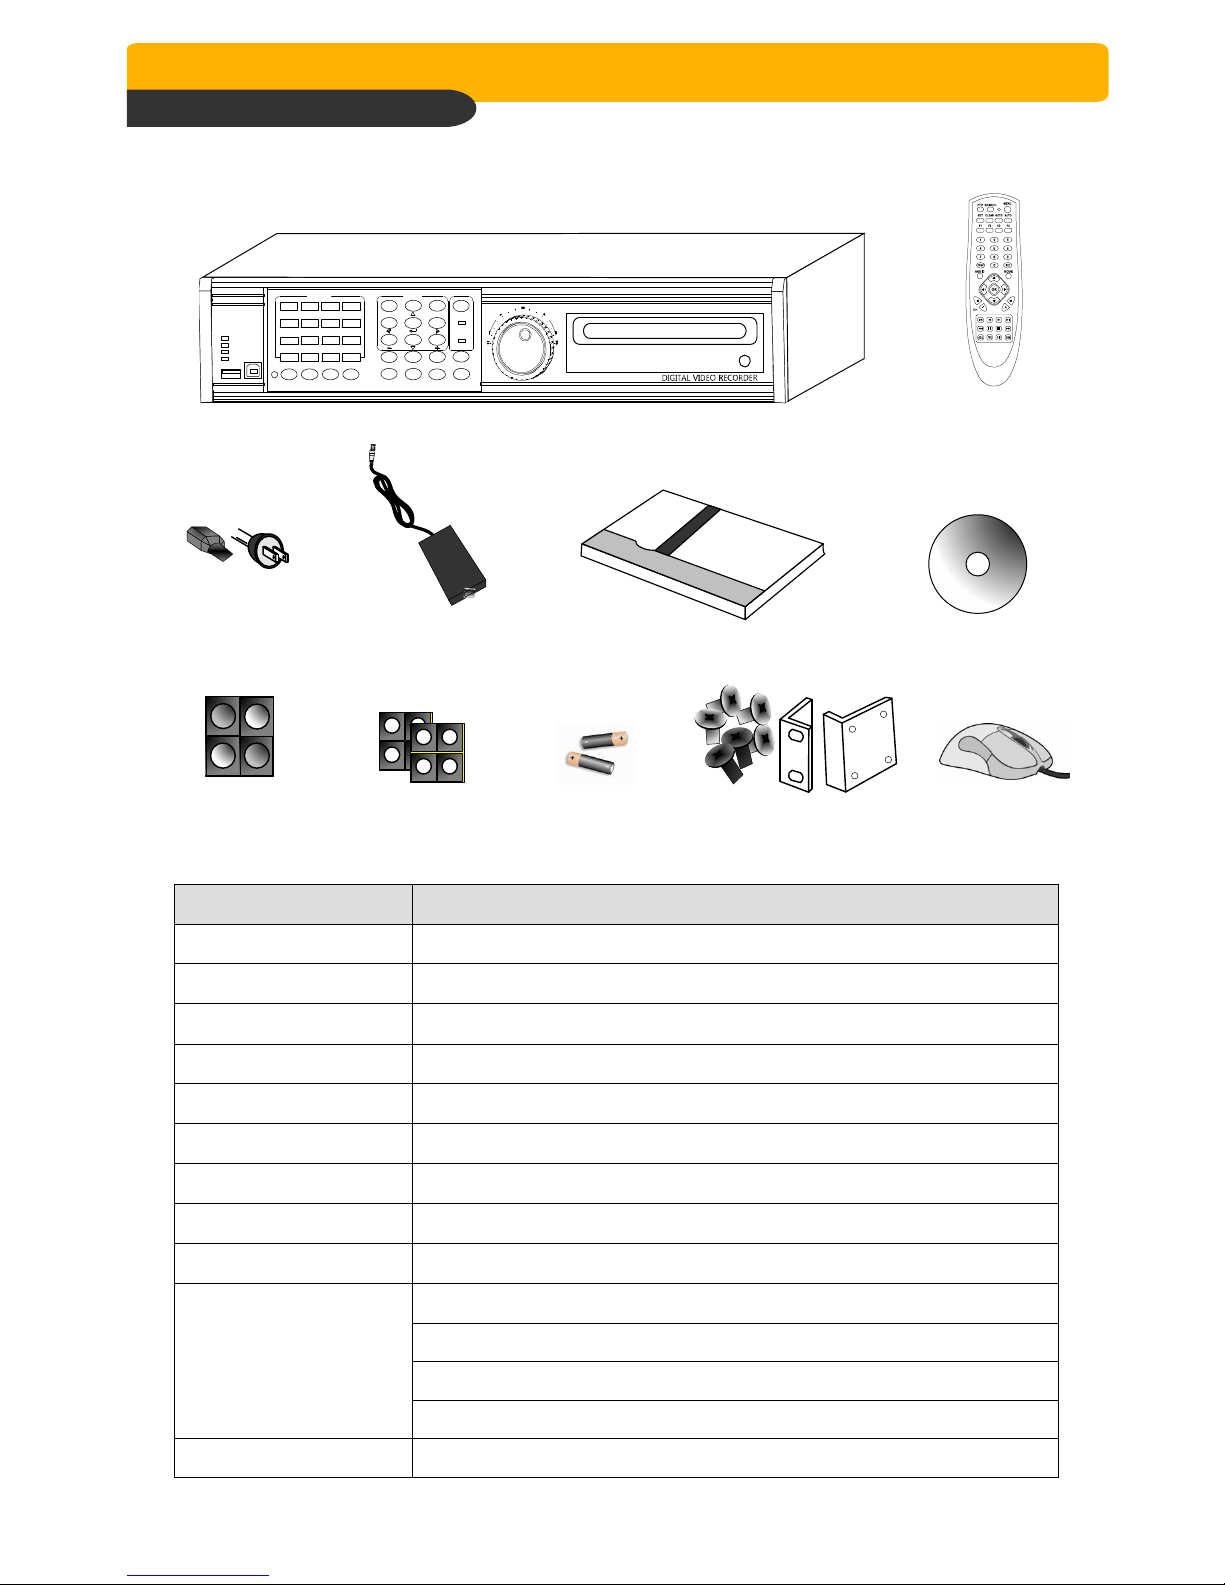
1-2. Package Contents
CHAP. 1 Features & Package Contents
CAMERA SETUP
1/ON 2/OFF 3/OPEN 4/CLOSE
5/NEAR 6/FAR 7/WIDE 8/TELE
HDDFULL
RECORD
9/SET 10/CLEAR 1 1/GOTO 12/AUTO
PLAY
ETHERNET
USB
IR
REC PLAYSTOP SE Q
MENU
16/F415/F31 4/F213/F1
PTZ
MODE
SEARCH
J.SHUTTLE
NEXT
RUN
ACTIV
E
FRZZOOM
K. LOCK
AUDIO/SEQ
PIP
Q. PLAY
1. DVR Main Unit
NETWORK
2. Remote Controller
3. Power Cable 4. Power Adapter 5. User’s Manual 6. Software CD
7. Rubber Pad 8. HDD absorber
9. Battery for
10. Bolts
11. Mouse
remote controller
Package Contents Description
1. DVR Main Unit STAND-ALONE DIGITAL VIDEO RECORDER
2. Remote Controller DVR control
3. Power Cable AC power supply to adapters for 12 V DC power
4. Power Adapter 12 V DC power supply
5. User’s Manual User’s Manual
6. Software CD Remote Viewer Software & Back up CD player
7. Rubber Pad Prevent DVR from slipping. Attach it to the bottom of main unit
8. HDD absorber Absorbing the mechanical shock of HDD against the case bottom
9. Battery Battery for remote controller
10. Rack mount
bracket / Bolts
Rack mount bracket
For fixing Rack Mount bracket to DVR (6ea)
For fixing DVR with Rack Mount bracket to 19” Rack (4ea)
For fixing Hard Disk Drive into DVR (8ea)
11. Mouse PS/2 Mouse
5
Page 7
Network (JPEG2000+H.264)
Network (JPEG2000+H.264)
Network (JPEG2000+H.264)Network (JPEG2000+H.264)
Network Stand Alone DVR
Network Stand Alone DVR
Network Stand Alone DVRNetwork Stand Alone DVR
CHAP. 2 Function of Each
Button
CHAP. 2 Function of Each Button
AUDIO/SEQ
2-1 FRONT
NETWORK
Name Function
① LED Lamps Shows status of operation
②-1 USB HOST Back-Up by connecting USB Media to USB HOST
②-2 USB Device Firmware upgrade by connecting PC with latest firmware to USB port
③ IR IR receiver
④ Camera
selection
1. Pressing this button will display a full screen image of that camera
2. Control PTZ camera (Each button is assigned for each PTZ command)
&
PTZ camera
control
• ON : LIGHT ON • SET : SET PRESET
• OFF : LIGHT OFF • CLEAR : CLEAR PRESET
• OPEN : IRIS OPEN • GOTO : GOTO PRESET
• CLOSE: IRIS CLOSE • AUTO : AUTO SCAN
• NEAR : FOCUS NEAR • F1 : USER 1
• FAR : FOCUS FAR • F2 : USER 2
• WIDE : ZOOM IN • F3 : USER 3
• TELE : ZOOM OUT • F4 : No Functions
⑤ Record /
Playback
REC Emergency Record at continuous, 120ips, SUPER FINE size
STOP
Stop of Emergency Record and return to Schedule Record
from Emergency Record. Playback stop.
PLAY Playback of recorded data on HDD
SEARCH Search recorded data on HDD
⑥ SETUP MENU Set up for SYSTEM MENU or Use to exit the menu
Press MENU button before powering off the unit.
ENTER Selects each menu option
NEXT Move to next step
▲▼◀▶
Navigate in the menu
+ - Reduce or increase the option value in the menu
6
Page 8

Network (JPEG2000+H.264)
Network (JPEG2000+H.264)
Network (JPEG2000+H.264)Network (JPEG2000+H.264)
Network Stand Alone DVR
Network Stand Alone DVR
Network Stand Alone DVRNetwork Stand Alone DVR
Name Function
CHAP. 2 Function of Each Button
⑦ LIVE View
Control
⑧ Jog Shuttle
Control
PTZ On/Off for PAN/TILT/ZOOM control mode
Press this button first to control PTZ camera connected to
DVR unit via RS-485
ZOOM Zooming an image
FRZ Freezing an image
MODE Switch to split display
MODE button changes screen-division from (to) full screen
to (from) 16-split screen.
PIP Display in PIP (Picture in Picture) mode
AUDIO / SEQ Press Once, Select audio channel.
Press Longer, Auto camera image sequencing in full screen
mode.
K.LOCK Lock the key function.
To unlock, press longer time (for several seconds) and then
input the password.
Q. Play
(Quick Play)
J/SHUTTLE Pressing Jog Shuttle button (Ready for use Jog/Shuttle)
Play from image recorded 180ips ago in forward direction.
(in case recorded in continuous mode).
: In playback mode, pressing J. SHUTTLE button make
images frozen.
RUN LED on : While you operate Jog or Shuttle
ACTIVE LED on : When J. SHUTTLE button is pressed
⑨ Jog Shuttle Very easy and convenient search : Press J. Shuttle button, and images in
playback pause, and then Jog and Shuttle makes it very easy and convenient
to search, forward or backward, fast and slow, as user want.
⑩ CD Recorder
(DVD Recorder)
Data Back-up and Firmware Upgrade using built-in CD Recorder
7
Page 9
Network (JPEG2000+H.264)
Network (JPEG2000+H.264)
Network (JPEG2000+H.264)Network (JPEG2000+H.264)
Network Stand Alone DVR
Network Stand Alone DVR
Network Stand Alone DVRNetwork Stand Alone DVR
CHAP. 2 Function of Each Button
2-2. REAR
Name Function
1 RS 485 Connection with PTZ Camera or other external device using RS 485
interface
RELAY Output Relay out terminal
SENSOR Input Sensor input terminal
2 VGA Connection to VGA Monitor (CRT type or TFT LCD monitor)
Just in case you purchased DVR with VGA option board fixed on the main
board of DVR, you can connect VGA Monitor to DVR unit.
3 ETHERNET Connection to ETHERNET device
4 RS-232C Connection to external device as PC using RS-232C to control the DVR
5 CAMERA Input Connection with camera
6 LOOP Output Camera loop out
7 MONITOR
Output
8 SPOT Connection with additional composite monitor
9 DC Power DC 12V 6.67A Adaptor
10 POWER
SWITCH
Connection with Composite Monitor
Power ON/OFF switch for adapters
To avoid accidental deletion of HDD data, please make sure to press
MENU button and enter into setup menu before powering off the unit.
This takes the unit out of record mode for safe shutdown.
11 Audio Input Microphone Input (4ch)
Audio Output Speaker Output (1ch)
12 Mouse A mouse controlling all functions of DVR
8
Page 10
Network (JPEG2000+H.264)
Network (JPEG2000+H.264)
Network (JPEG2000+H.264)Network (JPEG2000+H.264)
Network Stand Alone DVR
Network Stand Alone DVR
Network Stand Alone DVRNetwork Stand Alone DVR
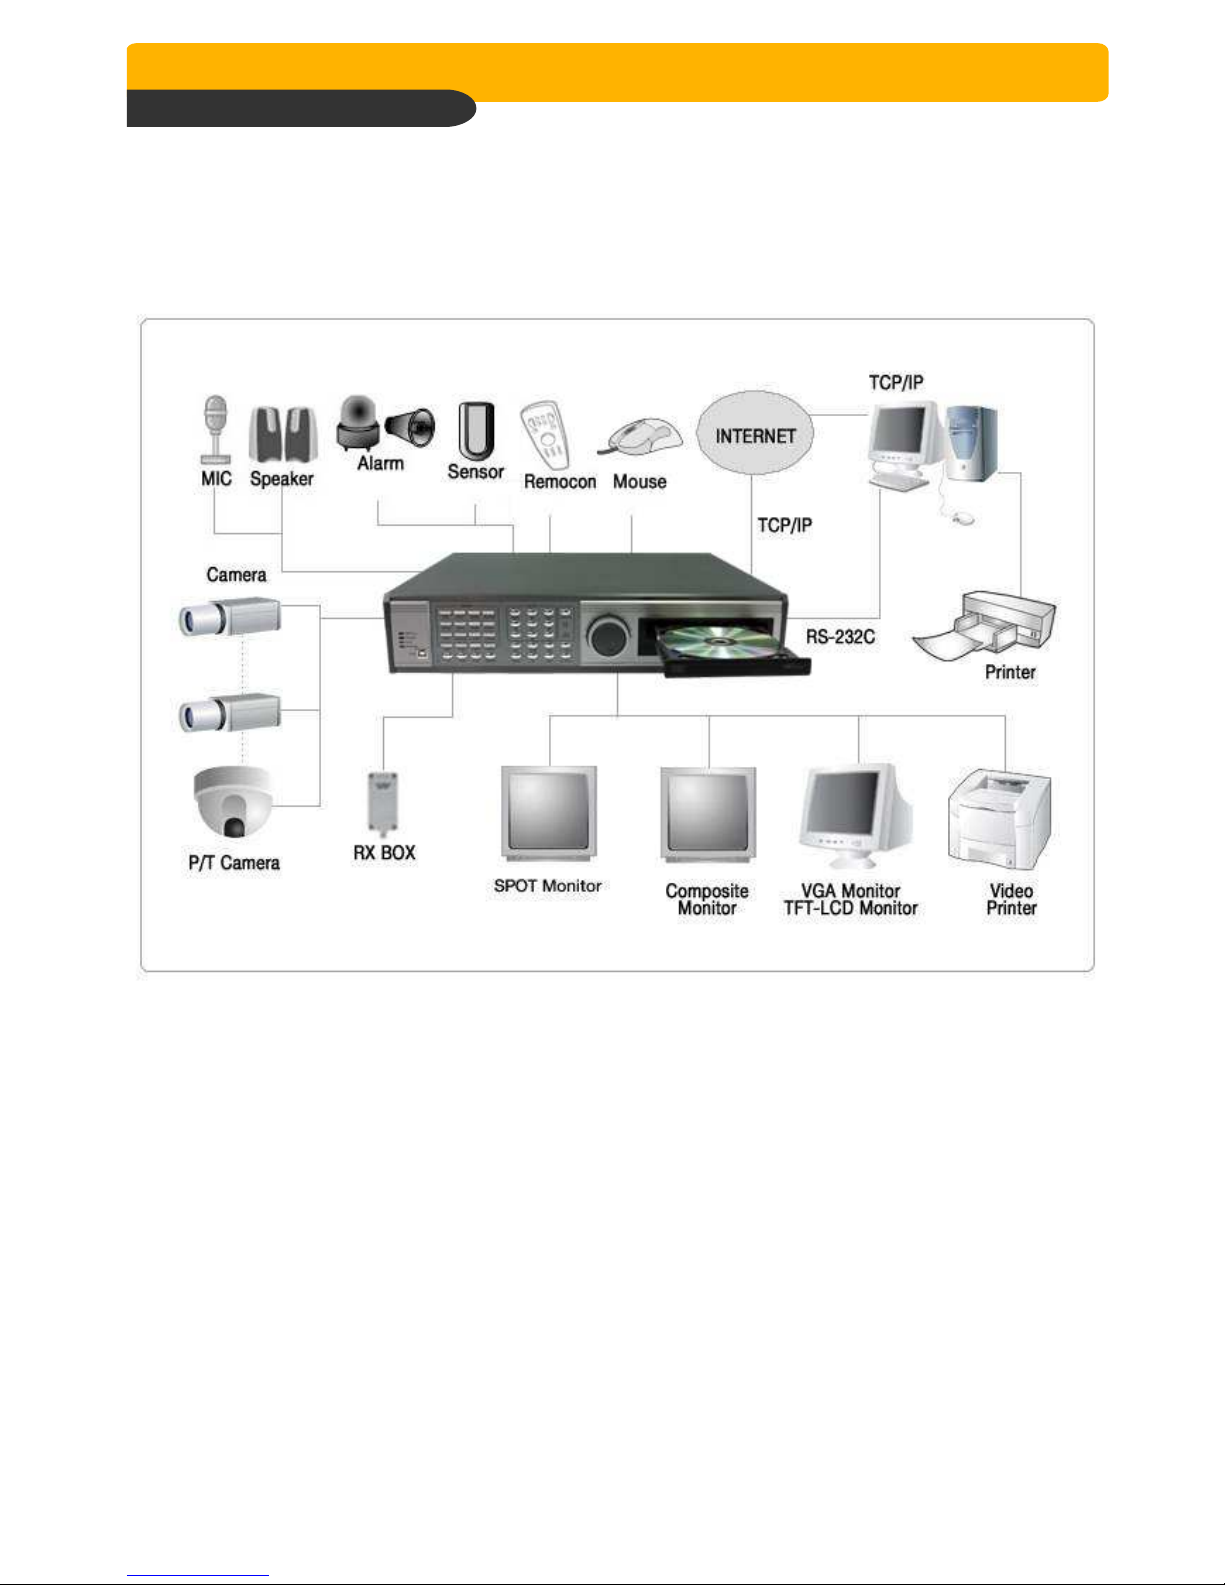
CHAP.3 Installation
3-1. Installation Configuration
CHAP. 3 Installation
9
Page 11
Network (JPEG2000+H.264)
Network (JPEG2000+H.264)
Network (JPEG2000+H.264)Network (JPEG2000+H.264)
Network Stand Alone DVR
Network Stand Alone DVR
Network Stand Alone DVRNetwork Stand Alone DVR
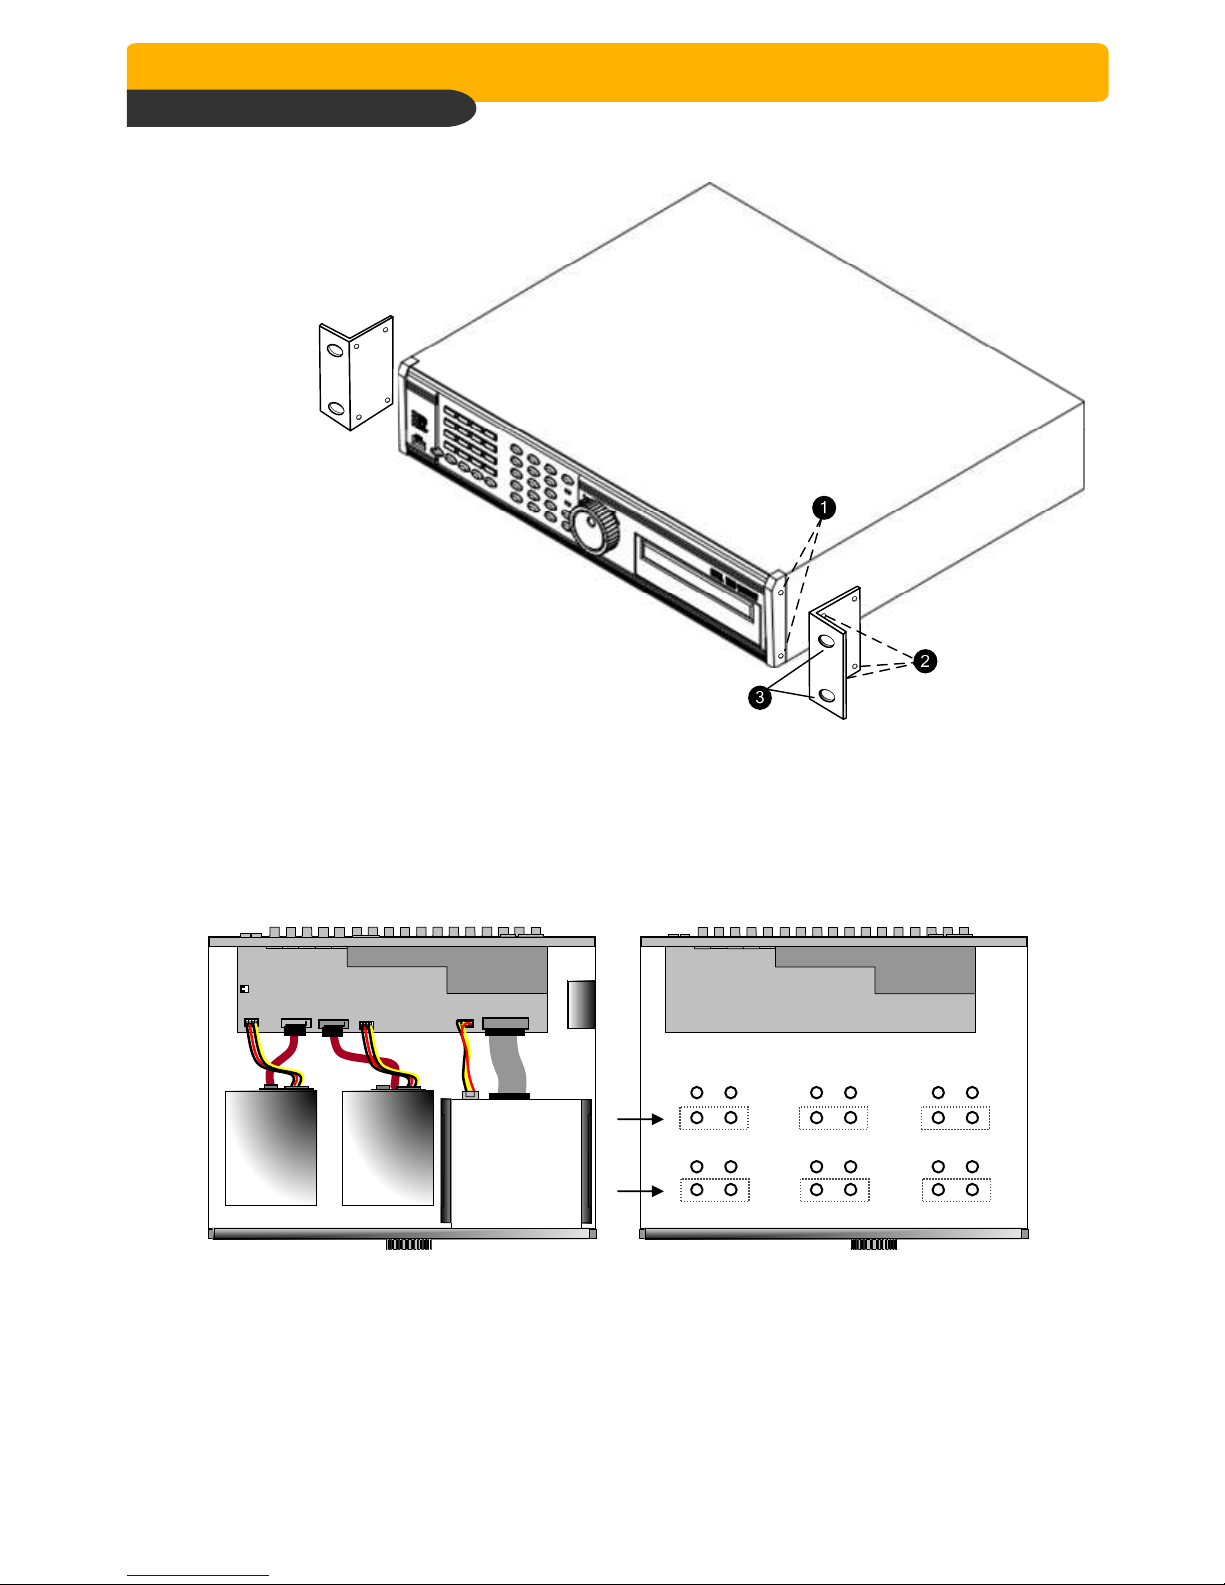
3-2. Detailed Installation
1) Rack mount
CHAP. 3 Installation
1. Remove 4 bolts on each side cap to
install rack mount.
2. Attach rack mount bracket to DVR.
3. Attach DVR with rack mount bracket to 19” rack.
2) HDD
Connection of HDD Cable
I/O BOARD I/O BOARD
2)
CD-RW
(
MASTER
)
HDD1
(
MASTER
MAIN BOARD
HDD1 HDD2
1)
HDD2
(
MASTER
HDD fix
x
x
MAIN BOARD
x
x
x
x
x
x
x
x
x
x
1. Connect Main Board and HDD using SATA DATA cable and HDD power cable.
2. When you use just 1 HDD, install the HDD onto HDD1 location.
3. When you use 2 HDDs, install the first HDD onto HDD1 location and then install the second HDD
onto HDD2 location in order.
4. Stick the HDD absorber (included in package) on the bottom of case and then install the HDD
on top of them by using the bolts (included in package).
5. Screws must be inserted from outside of the case bottom.
10
Page 12

Network (JPEG2000+H.264)
Network (JPEG2000+H.264)
Network (JPEG2000+H.264)Network (JPEG2000+H.264)
Network Stand Alone DVR
Network Stand Alone DVR
Network Stand Alone DVRNetwork Stand Alone DVR
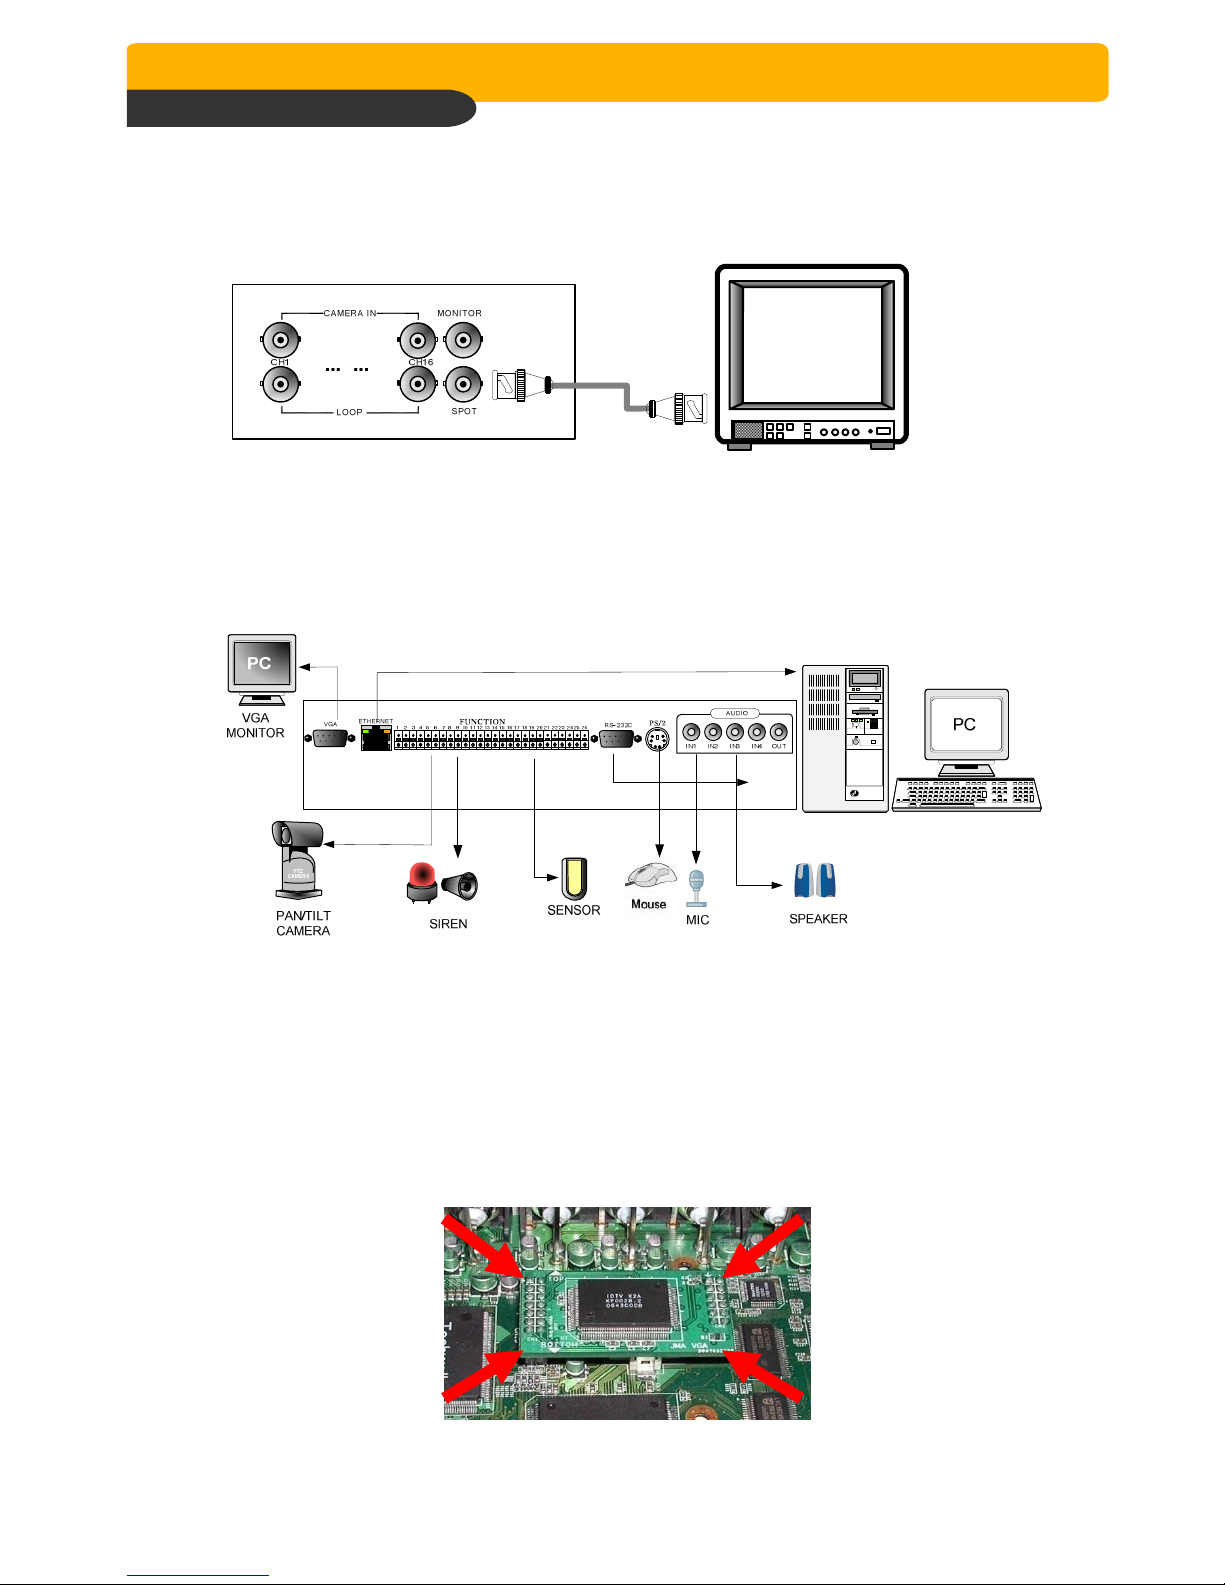
3) Camera
Connect cameras to the camera input on rear panel of DVR marked CAMERA IN.
4) Monitor
CHAP. 3 Installation
Connect the video output marked MONITOR to Video-In of Main monitor.
5) Power
VIDEO A
IN OUT
VIDEO B
IN OUT
VIDEO C
IN OUT
Connect one DC 12V, 6.67 A Adaptor to the back side of Power Jack for right operation of
2HDDs and CD Recorder.
Before you turn on the Power switch, be sure all necessary devices such as Power
adaptor, cameras and Monitor are connected properly to DVR!
Notice
To avoid accidental deletion of HDD data, please make sure to press MENU button
before powering off the unit. This takes the unit out of record mode for safe shutdown.
11
Page 13
Network (JPEG2000+H.264)
Network (JPEG2000+H.264)
Network (JPEG2000+H.264)Network (JPEG2000+H.264)
Network Stand Alone DVR
Network Stand Alone DVR
Network Stand Alone DVRNetwork Stand Alone DVR
6) SPOT, VIDEO PRINTER
Connection with additional composite monitor
7) Other External Device
CHAP. 3 Installation
RS-232C : Control DVR through RS-232C port by using PC.
RS-485 : Control external device like PTZ Camera. (Pin No.1 & No.2 at Terminal Block).
RELAY Output : Relay Output. (Pin No.3 ~No.5 at Terminal Block)
SENSOR Input : SENSOR Input (Alarm connection) – (Pin No.6 ~ No.26 at Terminal Block)
ETHERNET : Connection to LAN, WAN, Internet.
VGA : Connection to a VGA monitor(CRT,TFT LCD) if optional VGA board is fixed
on the main board as shown in the following figure.
Resolution set by manufacturer is 800x600 60 Hz, and user can set resolution
in MONITOR SETUP / VGA SETUP / VGA RESOLUTION.
Audio Input : Microphone Input (IN1~IN4)
Audio Output : Speaker Output (OUT)
12
Page 14
Network (JPEG2000+H.264)
Network (JPEG2000+H.264)
Network (JPEG2000+H.264)Network (JPEG2000+H.264)
Network Stand Alone DVR
Network Stand Alone DVR
Network Stand Alone DVRNetwork Stand Alone DVR
CHAP. 4 Operation
4-1. System Log-In
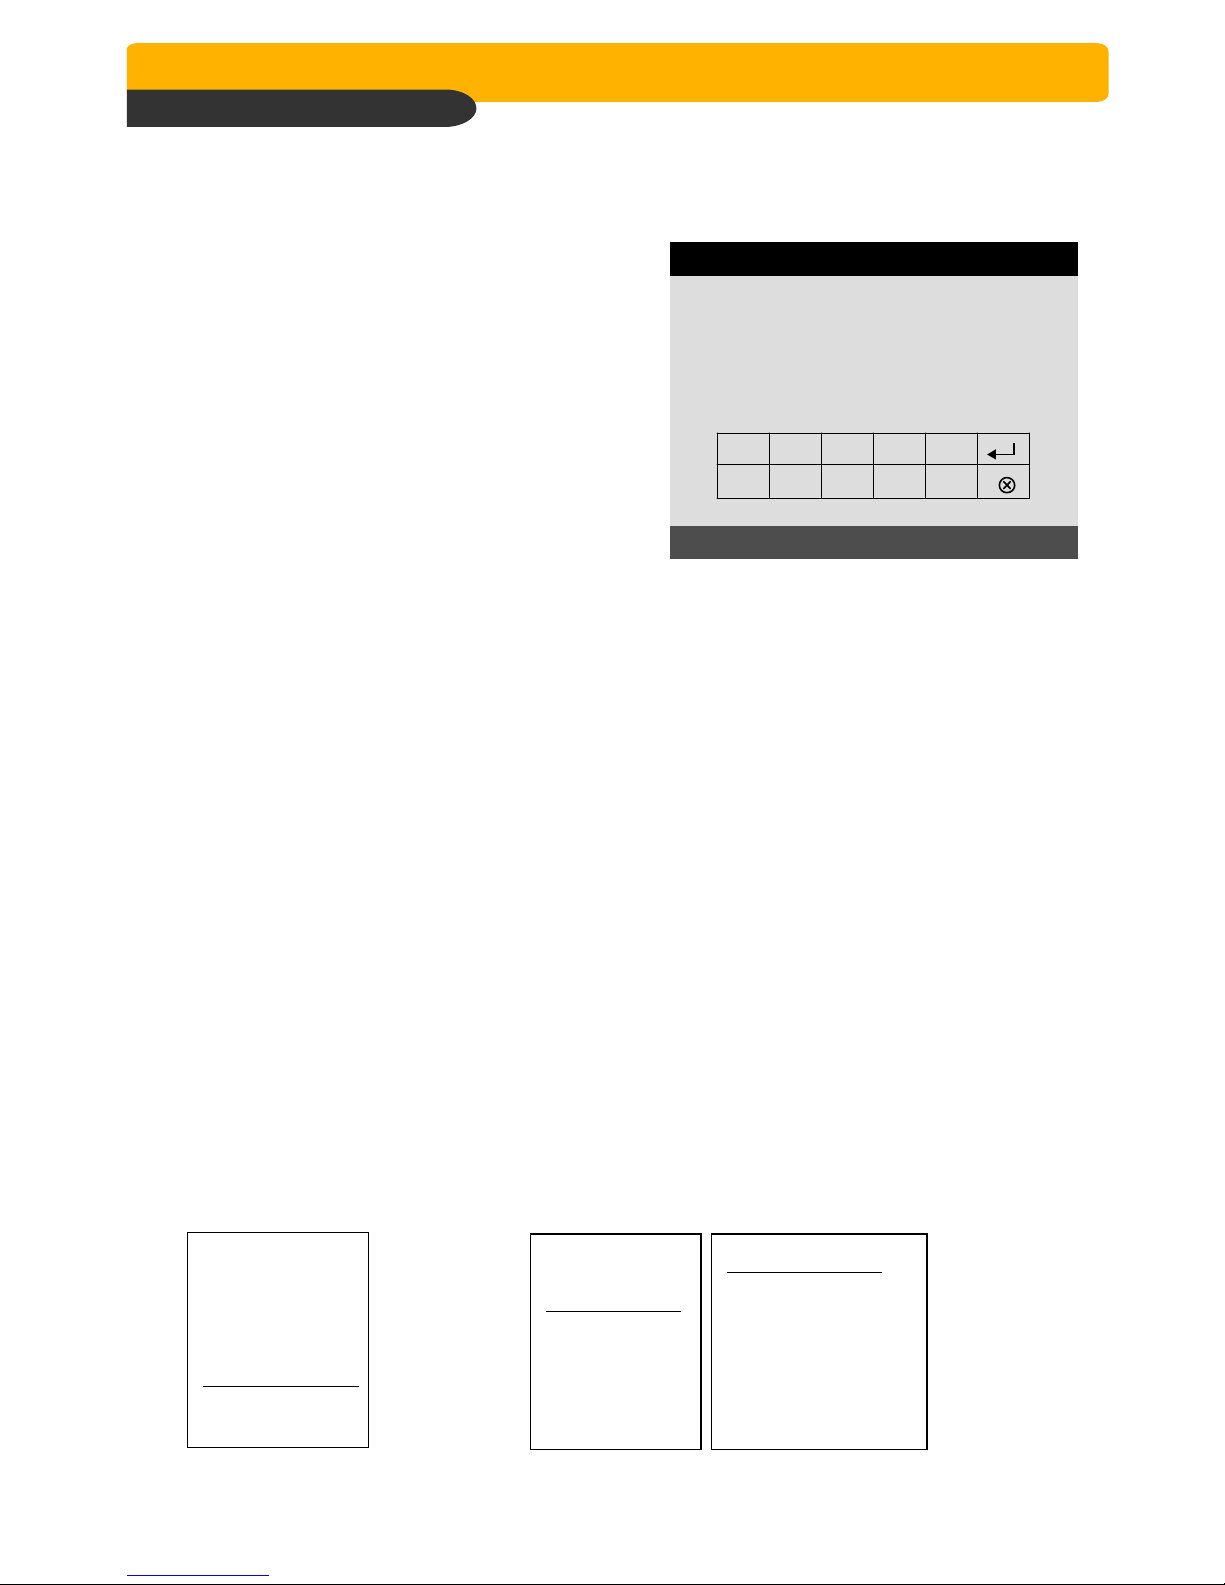
1) To enter into the setup menu, press the [MENU]
button.
CHAP. 4 Operation
DVR LOG-IN
2) Enter password with channel number button
from No.1 to No.10 on the front of the DVR unit.
(Maximum of 8 digits are available)
3) After inputting the password, press the [ENTER]
button.
ENTER PASSWORD : _ _ _ _ _ _ _ _
INPUT YOUR OWN PASSWORD
TO EXIT, PRESS [MENU]
1 2 3 4 5
6 7 8 9 10
Administrator :
If the password entered matches previously set password, “ LOGIN ADMIN” message appears and
you can enter into SYSTEM SETUP.
If the password entered does not match previously set password, the DVR unit goes back to live
display mode.
Factory default password is blank. For log-in, just press [MENU] button and then [ENTER] button.
-Factory default password
ADMIN : (Blank)
MANAGER : ‘ 1 ’
USER 1~USER8 : ‘ 2 ’ ~ ’ 9 ’
※ We recommend configuring a unique password as per the procedure in
SYSTEM MENU - CONFIGURATION - PASSWORD SETUP.
※ For security reasons, be sure to make note of your own password.
4-2. Factory Default
Before first operation, you must check first if all connected camera images are displayed properly,
and then login to the SYSTEM MENU. And you also need to set Time/Date, Factory Default, and
then clear HDD. Even though it is brand new one. it is to make DVMR system and HDD ready for
proper operation. Starting recording without FACTORY DEFAULT setting and HDD clear will cause
malfunction.
1. FACTORY DEFAULT 2. HDD CLEAR
DISPLAY SETUP
CONFIGURATION
REOCRD SETUP
BACK-UP
EXTERNAL DEVICE
FACTORY DEFAULT
LANGUAGE
Refer to page 34.
DISPLAY SETUP
CONFIGURATION
REOCRD SETUP
BACK-UP
EXTERNAL DEVICE
FACTORY DEFAULT
LANGUAGE
Refer to page 21.
HDD MANAGEMENT
TIME/DATE SETUP
CAMERA SETUP
INTERVAL SETUP
ALARM SETUP
EVENT POPUP SETUP
BUZZER SETUP
PASSWORD SETUP
SYSTEM IMFORMATION
13
Page 15
Network (JPEG2000+H.264)
Network (JPEG2000+H.264)
Network (JPEG2000+H.264)Network (JPEG2000+H.264)
Network Stand Alone DVR
Network Stand Alone DVR
Network Stand Alone DVRNetwork Stand Alone DVR
4-3. Display Configuration
CHAP 4. Operation
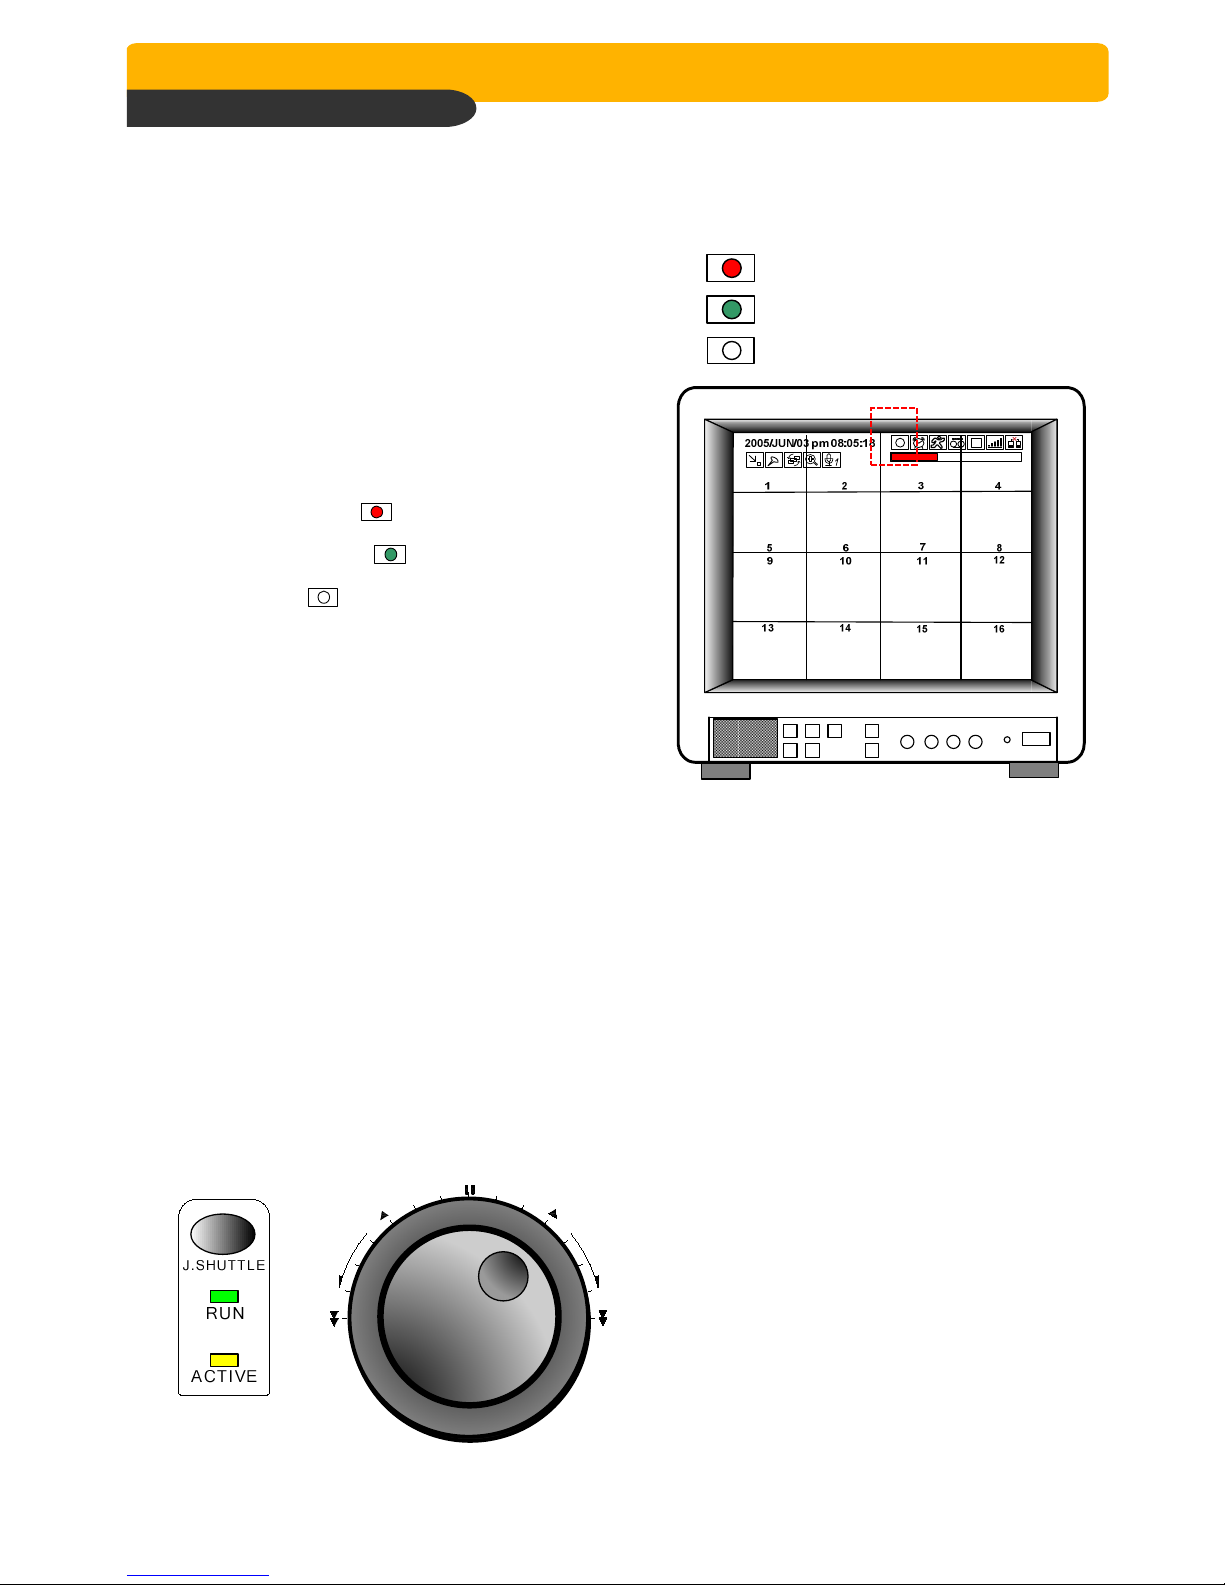
Current Time & Date
PIP
FREEZE
SEQUENCE
ZOOM
AUDIO
ALARM Record
MOTION Record
CONTINUOUS Record
120(100) IPS @ 720x240(720x288)
240(200) IPS @360x240(360x288)
480(400) IPS @360x120(360x144)
HDD Status
In live mode : Amount of data recorded
In Playback mode : Amount of data played
LIVE Display
Camera Title
ETHERNET status
Connected
Disconnect
Status of DVR system
Emergency Record (Red)
Schedule Record (Green)
Record Stop (White)
Stop
Forward Playback
Backward Playback
Pause
1/16~1/2x forward playback
1/16~1/2x backward playback
2~64x forward playback
2~64x backward playback
Picture Quality
BASIC
NORMAL
ENHANCED
FINE
SUPER FINE
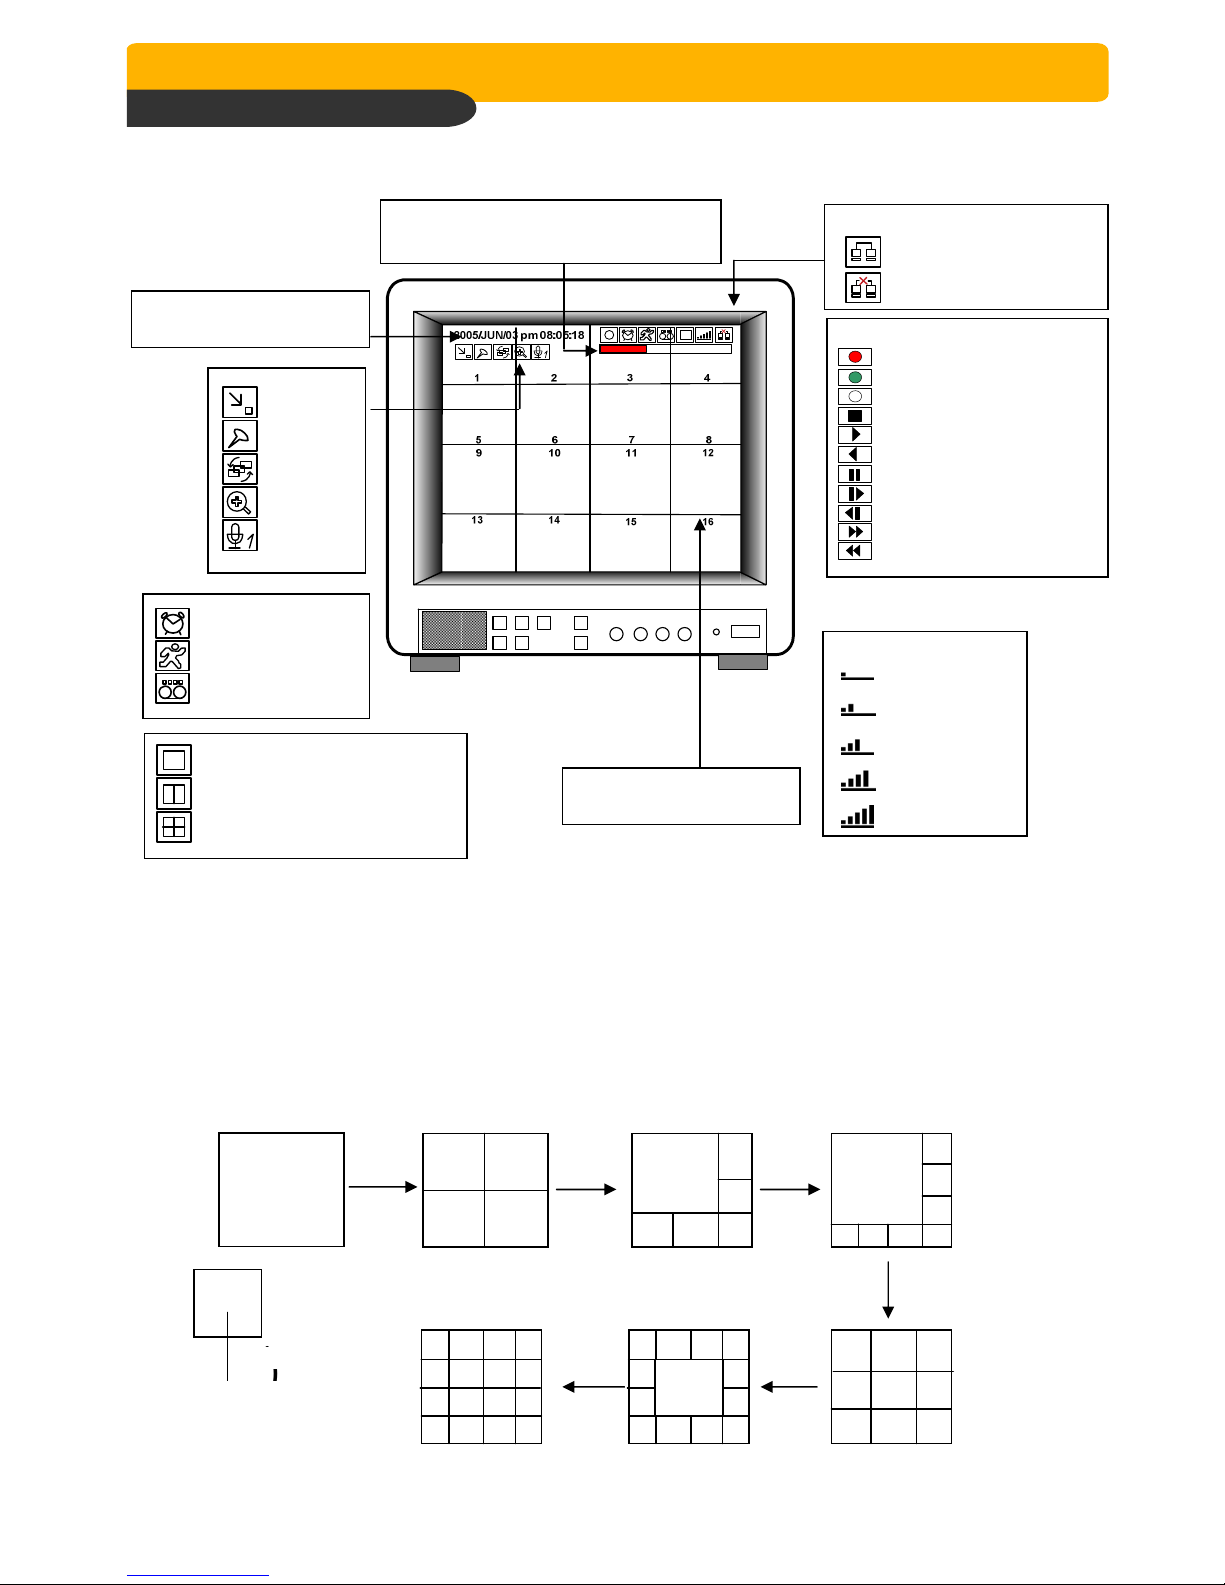
4-4. Live View Setup
1) Full / Multiple View
Switch to multi-screen display by pressing [MODE]. For full image display, just press the channel button
which you want or continue to press [MODE] button until you see full screen.
When you playback images which recorded in 360X240(360X288) resolution, only 1, 4, 9, 13 & 16 split
screens are available. When you playback images which recorded in 360X120(360X144) resolution,
only 1, 4 & 16 split screens are available.
Full screen
360x240
(
¼ Full Screen
360x120
<During Playback>
)
Multiple screen changes
14
Page 16

Network (JPEG2000+H.264)
Network (JPEG2000+H.264)
Network (JPEG2000+H.264)Network (JPEG2000+H.264)
Network Stand Alone DVR
Network Stand Alone DVR
Network Stand Alone DVRNetwork Stand Alone DVR
2) View in Sequence
Press [SEQ] button. It automatically displays full screen images in sequence.
CH16
……
CH02
CH01
●●●●
●●●●
●●●●
3) Picture in Picture(PIP View)
CHAP. 4 Operation
When it is in full screen display mode, you can see other camera in a small
window by pressing [PIP].The other camera in small window is rotating in
sequence to next number of camera and you can set the rotating time
interval as per the procedure in SYSTEM MENU-CONFIGURATIONINTERVAL SETUP.
CAM-01
2
4) Freeze View
Full display mode : If you press the [FRZ] button, the FRZ icon will be activated on the
screen and “F” character will be shown beside camera title, and
live image will be frozen.
Split display mode : If you press the [FRZ] button, the FRZ icon will be activated on the
screen. press the channel button which you want to freeze.
To release frozen image, press channel number of frozen image again
and press [FRZ] button to exit FRZ mode.
5) Zoom View
In full screen, press the [ZOOM] button and move the Selection Frame using J.SHUTTLE or Direction
keys to the area which you want to enlarge. And then press the [ENTER] button for 2-times enlarged
picture. To exit Zoom mode, just press [ZOOM] button again.
Horizontal Movement : J.SHUTTLE
Vertical Movement : Hold [UP or DOWN] button and turn J/SHUTTLE
15
Page 17
Network (JPEG2000+H.264)
Network (JPEG2000+H.264)
Network (JPEG2000+H.264)Network (JPEG2000+H.264)
Network Stand Alone DVR
Network Stand Alone DVR
Network Stand Alone DVRNetwork Stand Alone DVR
4-5. Record
Recording mode set before delivery by manufacturer (Default recording mode) is Schedule Recording.
In this default recording mode, it records 24 hours/day continuously in weekday and on the weekend.
Once you press the [REC] button while you see live view, the record type is changed to Emergency Record mode.
CHAP. 4 Operation
- Emergency Record : at full resolution/in best quality
Record type : CONTINUOUS, SUPER FINE quality,
120 (100) ips at 720X240 (720x288)
- Schedule Record
Record and stop as set (time interval and
record type) in RECORD-SCHEDULE SETUP menu.
- Stop Record
Recording stopped as set in
RECORD-SCHEDULE SETUP menu.
On the screen
- Emergency Record
: Red Record Icon ( ) and Record LED is lit
- Schedule Record
: Green Record Icon ( ) and Record LED is lit
- Record Stop
: White Icon ( ) and Record LED is off
- Motion Record, Alarm Record, Alarm + Motion Record
: Record standby LED blinks
: Record LED is lit
※ While in Emergency Record mode, press [STOP],
[PLAY], [MENU], or [SEARCH] button to exit from
Emergency Recording mode and return to Schedule
Record mode.
※ For details, refer to the SYSTEM MENU – RECORD
SETUP (Page 30)
Emergency Record [RED]
Schedule Record [GREEN]
Stop Record [WHITE]
- This DVR unit does not record in following conditions ;
※ While entered in the Menu.
※ No camera is connected
※ Overwriting is off in the Record Setup menu. ( HDD full )
4-6. Playback
On record mode or stop mode, press [PLAY] button to play the recorded data in 1x speed.
For backward playback, press [PLAY] button again.
Use Jog/Shuttle to pause and control playback speed. To stop playback, press the [STOP] button.
Using Jog/Shuttle
The [ACTIVE] LED will be lit, and Jog/Shuttle is ready for use. The [RUN] LED will blink whenever you
operate the Jog/Shuttle.
For forward playback, turn the Shuttle right and turn Shuttle left for backward playback.
Turn Jog using your index figure to see picture by picture in forward or backward direction.
Operation of Shuttle is as follows.
1/4 x : 4 times slower than normal playback speed
1/2 x : 2 times slower than normal playback speed
1 x : Normal playback speed
2 x : 2 times faster than normal playback speed
4 x : 4 times faster than normal playback speed
16 x : 16 times faster than normal playback speed
64 x : 64 times faster than normal playback speed
Backward Playback 32x supportable.
If you want to keep the playback speed you selected using Shuttle, just hold the shuttle at that location for a few
seconds, and playback in speed you selected continues until you rotate Shuttle again.
16
Page 18

Network (JPEG2000+H.264)
Network (JPEG2000+H.264)
Network (JPEG2000+H.264)Network (JPEG2000+H.264)
Network Stand Alone DVR
Network Stand Alone DVR
Network Stand Alone DVRNetwork Stand Alone DVR
4-7. Search
Press [SEARCH] button, and 3 different methods for searching recorded data are available as shown
in following SEARCH window. For selecting searching method, use direction key or Jog/Shuttle.
After selecting each search method, press [ENTER] button for playback. exit, press [MENU] button.
1) SEARCH BAR
Search by percentage of total recorded data. It starts from image corresponding to set % of data
on the search bar.
2) TIME/DATE
Search by time & date. Playback starts from the time & date selected.
3) EVENT LIST
Search by event list (Motion, Alarm, Video Loss).
CHAP. 4 Operation
SEARCH
SEARCH BAR
TIME/DATE
EVENT LIST
SELECT MENU : ▲▼, & [ENTER]
RECORD SEARCH BAR
[START] 2007/JUN/15 AM11:34:34
[ END ] 2007/JUN/15 PM02:50:45
[TARGET DATE/TIME]
SELECT: JOG, SHUTTLE
SEARCH : [ENTER], EXIT : [MENU]
SEARCH page SEARCH BAR page
TIME/DATE
[START] 2007/JUN/20 AM04:04:12
[ END ] 2007/JUN/20 PM08:12:23
INPUT TIME/DATE
2005/JUN/07 AM04:04:12
CH EVENT TIME/DATE 001/001
--
--
--
--
--
--
--
----
----
----
----
----
----
----
EVENT LIST
020 %
---- / - -/ --
---- / - -/ --
---- / - -/ --
---- / - -/ --
---- / - -/ --
---- / - -/ --
---- / - -/ --
-- : -- : --
-- : -- : --
-- : -- : --
-- : -- : --
-- : -- : --
-- : -- : --
-- : -- : --
SEARCH : [ENTER], EXIT : [MENU]
TIME/DATE page EVENT LIST page
4-8. PAN/TILT/ZOOM Camera Operation
Press [PTZ] button first for PTZ control mode. Numeric buttons from 1 to 16 and direction buttons are
assigned for each PTZ command, and user can control PTZ camera connected to DVR unit by
pressing any one of those 20 buttons, one after the other, as needed, and it is just like control by
separate PTZ controller.
SELECT: ▲▼, PAGE:+-
SEARCH : [ENTER] , EXIT : [MENU]
17
Page 19
Network (JPEG2000+H.264)
Network (JPEG2000+H.264)
Network (JPEG2000+H.264)Network (JPEG2000+H.264)
Network Stand Alone DVR
Network Stand Alone DVR
Network Stand Alone DVRNetwork Stand Alone DVR
CHAP. 4 Operation
Button PTZ command Button PTZ command
1/ON POWER ON 10/CLEAR PRESET CLEAR
2/OFF POWER OFF 11/GOTO PRESET GOTO
3/OPEN IRIS OPEN 12/AUTO AUTO SCAN
4/CLOSE IRIS CLOSE 13/F1 ~ 16/F4 FUNCTION
5/NEAR FOCUS NEAR UP BUTTON TILT UP
6/FAR FOCUS FAR DOWN BUTTON TILT DOWN
7/WIDE ZOOM IN LEFT BUTTON PAN LEFT
8/TELE ZOOM OUT RIGHT BUTTON PAN RIGHT
9/SET PRESET SET
4-9. Data Back-Up
Enter into SYSTEM MENU-BACKUP-CD-R SETUP.
1) Insert empty CD Recorder media into CD Recorder and select the start time & date from which you want
to back up.
※ The START & END time / date in HDD sub-menu only shows start and end of recording.
This is not selectable and editable.
※ 700MB on CD Recorder sub-menu represent size of CD Recorder media inserted.
2) To set start time of back-up and back-up data size, press the [ENTER] button first on [START] or [SIZE]
sub-menu and adjust using [+] or [-] button and move using [LEFT] and [RIGHT] button for next change.
After setting the time & date and back-up data size, press the [ENTER] button again to exit.
※ End of back-up time will be calculated automatically as per start time & date and the back-up
data size you set.
※ User can select the back-up data size (size of back-up data from start of back-up) on [SIZE] item but
END of back-up time is automatically determined by DVR system.
3) Press [ENTER] button on BURN sub-menu. DVR system starts burning CD.
4) When burning is completed, CD Recorder media will come out automatically. In the next CD back-up,
start
time of CD Recorder shall be the end time of previous CD-back-up, and you can back-up from that for
continuous data back-up. If you need another backup, repeat the above procedure. To stop backup,
press the [MENU] button.
※ During burning CD, it’s impossible to cancel burning process.
5) User can verify the back-up CD on PC with BACK-UP CD PLAYER (Included in Package).
CD- R SETUP
HDD
[START] 2005/AUG/07 AM04:04:12
[ END ] 2005/AUG/08 PM08:12:23
CD-R
[START] 2005/AUG/07 AM04:04:12
[ END ] 2005/AUG/08 PM08:12:23
[ SIZE ] 000MB
BACKUP
EXIT : [MENU]
CD-R SETUP
HDD
[START] 2005/AUG/07 AM04:04:12
[ END ] 2005/AUG/08 PM08:12:23
CD-R 700 MB
[START] 2005/AUG/07 AM04:04:12
[ END ] 2005/AUG/08 PM08:12:23
[ SIZE ] 700 MB - > 700MB
BACKUP
CD-RW BURNING : IMAGE DATA.
EXIT : [MENU]
18
Page 20

Network (JPEG2000+H.264)
Network (JPEG2000+H.264)
Network (JPEG2000+H.264)Network (JPEG2000+H.264)
Network Stand Alone DVR
Network Stand Alone DVR
Network Stand Alone DVRNetwork Stand Alone DVR
4-10. Audio Operation
Press [AUDIO] button to select audio channel..Ch1, Ch2, Ch3, Ch4 or silence in due sequence.
※Sound of the selected audio channel comes out in Live display.
Recorded sound comes out in Playback.
4-11. Mouse Operation
1) Basic Operation
There are 11 keys that work by Mouse.
LEFT, RIGHT, WHEEL button Click once, double Click, Click longer.
And WHEEL UP/DOWN.
2) Status that MOUSE ICON is not appreared
- LEFT button double click : The assigned channel is sequencing to FULL Screen → Left button
duble click, it reverts to previous split screen.
If user selects FREEZE, the assigned channel FREEZE.
CHAP. 4 Operation
- RIGHT button double click : The MOUSE ICON will be on.
Depending on the place of Mouse, it shows Width,Length and BOT.
- WHELL button click longer : Delete MOUSE ICON
- LEFT button click longer : In ZOOM mode, holding this button will change the icon.
If User moves the MOUSE, ZOOM area also moves.
3) Working Status in SETUP MENU
- LEFT button click once : ENTER
- LEFT button double click : NEXT
- LEFT button click longer : MINUS
- WHEEL button click once : MODE (Schedule Recording, MASK SETUP)
- WHEEL button double click : LEFT (For deleting password)
- WHEEL button click longer : None
- WHEEL button upper : PLUS
- WHEEL button lower : MINUS
- RIGHT button click once : MENU
- RIGHT button click longer : PLUS
Basically by Left button to select Menu, and by Right button to exit Menu.
Move mouse up and down, left arrow moving and indicate selected menu items.
WHEEL : to plus/minus Left button : to press enter
And Left key (Wheel button double click) : password deletes one by one (Login).
19
Page 21
Network (JPEG2000+H.264)
Network (JPEG2000+H.264)
Network (JPEG2000+H.264)Network (JPEG2000+H.264)
Network Stand Alone DVR
Network Stand Alone DVR
Network Stand Alone DVRNetwork Stand Alone DVR
4) Working Status in LIVE MOUSE ICON
4) Working Status in LIVE MOUSE ICON
4) Working Status in LIVE MOUSE ICON4) Working Status in LIVE MOUSE ICON
To work command in ICON, user click Left button once.
In case ICON is divided, upper part of button : Mouse Left button click once
Lower part of button : Mouse Right button click once
Following is the assigned KEY by each ICON.
ICON Left Click Right Click ICON Left Click Right Click
MENU NEXT ENTER
PLUS MINUS MODE
REC STOP PLAY QPLAY
SEARCH PTZ
ZOOM FRZ
PIP SEQ
CHAP. 4 Operation
AUDIO KLOCK
5) Working Status in PLAY MOUSE ICON
Mouse working is the same as above LIVE ICON.
Place mouse ICON and by Wheel Up/Down buton, PLAY SPEED can be controlled.
And In Pause condition, place mouse ICON and by Wheel Up/Down, STEP PLAY can be
controlled.
Following is the assigned KEY by each ICON.
ICON Left Click Right
Click
STOP
BACKWARD
FAST
BACKWARD
FAST
FORWARD
WEEL ICON Left Click Right
Click
Step play SLOW
BACKWARD
PLAY PLAYBACK
SLOW
FORWARD
WEEL
SPEED
STOP PLAY Step play PAUSE
REC STOP ZOOM
MENU AUDIO
MODE
20
Page 22

Network (JPEG2000+H.264)
Network (JPEG2000+H.264)
Network (JPEG2000+H.264)Network (JPEG2000+H.264)
Network Stand Alone DVR
Network Stand Alone DVR
Network Stand Alone DVRNetwork Stand Alone DVR
CHAP. 4 Operation
6) Working Status in PTZ MOUSE ICON
Mouse working is the same as LIVE ICON.
Place Mouse ICON , and by Wheel Up/Down, User can change value PRESET,TOUR, GOTO and
etc.
For other ICONs, user can change channel by Wheel Up/Down.
Following is the assigned KEY by each ICON.
ICON Left Click Right Click WEEL ICON Left Click Right Click WEEL
LEFTUP
RIGHTUP LEFT
ENTER RIGHT
LEFTDOWN DOWN
RIGHTDOWN ZOOM IN OUT ZOOM IN/OUT
FOCUS NEAR FAR
SET PRESET
CLEAR PRESET AUTO SCAN Change Channel
PTZ MENU/EIXT MENU NEXT Change Command
Change
Channel
FOCUS
FAR/NEAR
Change
Channel
UP
GOTO PRESET Change Channel
PLUS MINUS PRESET NUM +/-
7) Working Status in SPLIT MOUSE ICON.
To change assigned screen division, click left button of mouse once.
Please note that specific division can not be supported such as QUAD record/playback.
And,according to DVR channel, screen division can be different.
Change Channel
8) Working Status in NUMBER MOUSE ICON.
User can use it for KLOCK or LOGIN and change PASSWORD.
21
Page 23

Network (JPEG2000+H.264)
Network (JPEG2000+H.264)
Network (JPEG2000+H.264)Network (JPEG2000+H.264)
Network Stand Alone DVR
Network Stand Alone DVR
Network Stand Alone DVRNetwork Stand Alone DVR
CHAP. 5 Set Up
5-1. Entering into the Menu
Enter into SYSTEM MENU by pressing [MENU] button.
Button Function
MENU Enter into SYSTEM MENU, Move to previous menu, ESC
ENTER Selection key, Move to sub-menu, change status (ON or OFF)
NEXT Move to next page
UP Move to upper side
DOWN Move down side
LEFT Move to the left
RIGHT Move to the right
MINUS [-] Decrease the option value
CHAP. 5 Set Up
PLUS [+] Increase the option value
Jog Shuttle Jog left turning : Move backward to next image / Decrease value
SCREEN DISPLAY
MONITOR SETUP
HDD MANAGEMENT
TIME/DATE SETUP
CAMERA SETUP
INTERVAL SETUP
ALARM SETUP
EVENT POPUP SETUP
BUZZER SETUP
PASSWORD SETUP
SYSTEM INFORMATION
Jog right turning : Move forward to next image / Increase value
Shuttle left turning : Decrease playback speed / Decrease value
Shuttle right turning : Increase playback speed / Increase value
SYSTEM MENU
DISPLAY SETUP
CONFIGURATION
RECORD SETUP
BACK-UP
EXTERNAL DEVICE
FACTORY DEFAULT
LANGUAGE ENGLISH
SELECT MENU : ▲▼, & [ENTER]
RECORD CONFIGURATION
SCHEDULE SETUP
HOLIDAY SETUP
CD-R SETUP
USB SETUP
TCP/IP SETUP
RS-232C SETUP
PAN/TILT SETUP
SPOT MONITOR SETUP
AUDIO SETUP
AUDIO VOLUME SETUP
REMOCON SETUP
SYSTEM MENU
22
Page 24

Network (JPEG2000+H.264)
Network (JPEG2000+H.264)
Network (JPEG2000+H.264)Network (JPEG2000+H.264)
Network Stand Alone DVR
Network Stand Alone DVR
Network Stand Alone DVRNetwork Stand Alone DVR
5-2. DISPLAY SETUP
Setting up parameters for monitor and display on screen.
Enter into SYSTEM MENU-DISPLAY SETUP.
DISPLAY SETUP
CHAP. 5 Set Up
SCREEN DISPLAY
MONITOR SETUP
SELECT MENU : ▲▼, & [ENTER]
1) SCREEN DISPLAY
1
3
5
LIVE
PLAYBACK
VGA SETUP
COLOR BAR TEST
2
Setting up the screen display in LIVE mode
and PLAYBACK mode.
Select the sub-menu which you would like to set using
4
direction buttons and then change ON/OFF with
[ENTER] button.
1. TIME/DATE : Display time & date
2. DVR STATUS : Display system setting status
3. ICON DISPLAY : Display function setting status
4. REC/PLAY BAR : Display record / playback status
5. CAMERA TITLE : Display camera title
2) MONITOR SETUP
VGA SETUP : VGA option card enables to connect TFT LCD monitor or CRT type PC monitor to
DVR unit. To connect TFT LCD monitor or CRT type PC monitor to DVR unit, select
resolution as follows using [+] or [
[ENTER] button then the DVR unit will set VGA resolution automatically.
VGA option card supports following resolution, and choose best resolution that
match TFT LCD monitor or CRT type PC monitor to be connected to DVR unit.
- 640X480 / 60Hz - 640X480 / 75Hz ※※※※ NOTICE : In the booting process,
X
- 800
- 1024X768 / 60Hz - 1024X768 / 75Hz card takes some seconds
- 1280X1024 / 60Hz - 1280X1024 / 75Hz more to set parameters.
COLOR BAR TEST : Adjust color tone of monitor.
(Color bar test is Not available for monitor through VGA)
−
] button. After setting the below option, press
600 / 60Hz - 800X600 / 75Hz DVR unit with VGA option
23
Page 25

Network (JPEG2000+H.264)
Network (JPEG2000+H.264)
Network (JPEG2000+H.264)Network (JPEG2000+H.264)
Network Stand Alone DVR
Network Stand Alone DVR
Network Stand Alone DVRNetwork Stand Alone DVR
5-3. CONFIGURATION
Various parameters for system can be set in CONFIGURATION menu.
Enter into SYSTEM MENU-CONFIGURATION and press the [ENTER] button.
CONFIGURATION
CHAP. 5 Set Up
HDD MANAGEMENT
TIME/DATE SETUP
CAMERA SETUP
INTERVAL SETUP
ALARM SETUP
EVENT POPUP SETUP
BUZZER SETUP
PASSWORD SETUP
SYSTEM INFORMATION
SELECT MENU : ▲▼, & [ENTER]
HDD SETUP
HDD INFORMATION
HDD CHANGE SETUP
CAMERA TITLE
CAMERA SETTING
CAMERA ACTIVE SETUP
MOTION SETUP
1) HDD MANAGEMENT
Enter into SYSTEM MENU-CONFIGURATION-HDD MANAGEMENT and press the [ENTER] button.
(1) HDD SETUP
This page includes information about start and end of recording, location of recorded data, or location
of last playback on HDD. In addition, users can delete all the data on HDD.
HDD SETUP
On the [HDD CLEAR] sub-menu, press the [ENTER]
STATUS HDD DATE/TIME
---------------------------------------------------------------------BEGIN MASTER-1 2005/04/08
12:12:05
RECORD MASTER-1 2005/04/09
15:09:58
PLAY MASTER-1 2005/04/08
19:44:31
HDD STATUS IN USE
HDD CLEAR IN USE
button to delete all image data on HDD.
The system will ask password for verification.
After you clear all data on HDD, status of HDD CLEAR
changes from IN USE to EMPTY.
※ When you clear HDD, event list is deleted, too.
ENTER PASSWORD : ________
OK
INPUT YOUR OWN PASSWORD.
TO EXIT, PRESS [MENU]
EMPTY
HDD CLEAR [ENTER], EXIT [MENU]
If you selected OVERWRITE in Record Setup, the HDD STATUS presented as OVERWRITE.
(2) HDD INFORMATION
This menu will show the physical information
of HDD in DVR.
24
[MASTER-1]
MODEL
SPEED
SIZE
START
END
[MASTER-2]
MODEL
SPEED
SIZE
START
END
HDD INFORMATION
Maxtor 6Y080L0
PIO-4
81,964,302,336 BYTES
2005/04/08 12:08:56
2005/04/08 12:08:56
Maxtor 6Y080L0
PIO-4
81,964,302,336 BYTES
2005/04/08 12:08:56
2005/04/08 12:08:56
TO EXIT, PRESS [MENU]
Page 26

Network (JPEG2000+H.264)
Network (JPEG2000+H.264)
Network (JPEG2000+H.264)Network (JPEG2000+H.264)
Network Stand Alone DVR
Network Stand Alone DVR
Network Stand Alone DVRNetwork Stand Alone DVR
CHAP. 5 Set Up
(3) HDD CHANGE SETUP
Without losing data, user can use HDD from other DVRs, and HDD installed current DVR can be used
to other DVRs.
HDD CHANGE SETUP
SAVE DVR INFO
LOAD DVR INFO
SELECT MENU : ▲▼, & [ENTER]
1) SAVE DVR INFO
Once you press ENTER button on "SAVE DVR INFO" , the DVR information will be saved on HDD.
If the DVR information is saved properly, you can see "NOW CHANGE HDDDISK" message on DVR.
Then power off the DVR and change with new HDD.
※ NOTICE : Be sure to write down the DVR information as like NTSC/PAL, MODEL name, Channel,
HDD location(PORT 1, PORT2). When you want to retrieve the HDD(old), you must do based on this
DVR information.
2) LOAD DVR INFO
"LOAD DVR INFO " : it retrieves recorded HDD from other DVR set.
- HDD retrieval procedure
1. Install HDD with new DVR and power on.
2. Press [STOP] button when the DVR is booting.
(Then, User can see “HDD CHANGE MODE-ON“ message.)
3. It retrieves when user executes “LOAD DVR INFO” in Menu.
Please note that if the HDD conditions are changed between backup and retrieval. There are some
possibilities losing DATA. So, please remember the condition during backup.
25
Page 27

Network (JPEG2000+H.264)
Network (JPEG2000+H.264)
Network (JPEG2000+H.264)Network (JPEG2000+H.264)
Network Stand Alone DVR
Network Stand Alone DVR
Network Stand Alone DVRNetwork Stand Alone DVR
2) TIME/DATE SETUP
CHAP. 5 Set Up
Set time and date of DVR system which is very
important for search with time and date of the event.
Time and date set by manufacturer is different from
local time of user, and user must set time and date
exactly in the first operation. Set time & date using
direction buttons and [-][+] button or Jog shuttle
2.Change the date, time and month format for
user’s convenient
3) CAMERA SETUP
CAMERA SETUP
CAMERA TITLE
CAMERA SETUP
CAMERA ACTIVE SETUP
MOTION SETUP
SELECT MENU : ▲▼, & [ENTER]
TIME/DATE SETUP
YEAR
MONTH
DAY
HOUR
MINUTE
SECOND
DATE FORMAT
TIME FORMAT
MONTH FORMAT
SELECT : ▲▼, CHANGE VALUE : - +
CAMERA TITLE SETUP
0123456789 .ABCDEFGHIJKLMNOPQ
RSTUVWXYZ ! #-[ ]*+ -,./ :<=>?@◀▶
CAMERA01 CAM -1
CAMERA02 CAM -2
CAMERA03 CAM -3
CAMERA04 CAM -4
CAMERA05 CAM -5
CAMERA06 CAM -6
CAMERA07 CAM -7
CAMERA08 CAM -8
[ENTER] SELECT MODE
[▲/▼] select CAMERA
2006 / JUN /11
PM14:06:45
ASIA
12 HOUR
ENGLISH
(1) TITLE : Input Title of each camera. Move to channel you want to change using [LEFT] or [RIGHT]
direction button and then change the title using [-] [+] button. When modification is finished,
press the [ENTER] button. To exit to previous menu, press the [MENU] button.
(2) COLOR : Adjust image color
Move to each element using
[UP][DOWN] button and adjust using
-
] [+] button or Jog shuttle.
[
CHANNEL : Select camera
BRIGHTNESS : Adjust image brightness (-32~ 31)
CONTRAST : Adjust color contrast ( -32 ~ 31)
CHANNEL
BRIGHTNESS
CONTRAST
SATURATION
HUE
CAMERA POSITION
CAMERA COLOR SETUP
+0
+0
+0
+0
32
1
SATURATION : Adjust color saturation ( -32 ~ 31)
HUE : Adjust color hue ( -32 ~ 31)
CAMERA POSITION : Adjust camera image
To the center. If value is lower : Left value is
SELECT : ▲▼, CHANGE VALUE : + -
higher : Right (0~80)
26
Page 28

Network (JPEG2000+H.264)
Network (JPEG2000+H.264)
Network (JPEG2000+H.264)Network (JPEG2000+H.264)
Network Stand Alone DVR
Network Stand Alone DVR
Network Stand Alone DVRNetwork Stand Alone DVR
CHAP. 5 Set Up
CAMERA ACTIVE SETUP
CH STATUS LIVE REC
---------------------------------------------------------------------------
01
02
03
04
05
06
07
08
ACTIVE
ACTIVE
LOSS
ACTIVE
ACTIVE
ACTIVE
LOSS
ACTIVE
SELECT : ▲▼ ◀▶, & [ENTER]
ON
ON
OFF
ON
ON
ON
OFF
ON
ON
ON
OFF
ON
ON
ON
OFF
ON
CHANNEL
SENSITIVITY GRADE
MOTION DISPLAY TYPE
RECORD DURATION
NUMBER OF CELL OT DETECT
MOTION CONFIGURATION
01
01
OFF
05 SEC
02
SELECT ▲▼, CHANGE VALUE : + -
(3) CAMERA ACTIVE SETUP : With direction button, move to option to be changed, and press [ENTER]
button to select [ON/OFF]. If it is set at LIVE [OFF] and REC [ON], DVR
system records, but does not show live image of set channel.
- STATUS : Shows if image from a specific channel is coming for live display and recording. In normal
camera condition, it is ACTIVE, but LOSS is displayed when the cable is disconnected or
camera is not working.
- LIVE : Decides whether to show LIVE screen image or not.
- REC : Decides whether to record relevant channel or not.
(4) MOTION SETUP: You can set sensitive of motion detection in 4 steps, motion detection area and others
in relation to motion recording in this menu.
(4)-1. MOTION CONFIGURATION
- SENSITIVITY GRADE : Adjusts motion detection sensitivity. (LOW, MEDIUM, HIGH, VERY HIGH)
- MOTION DISPLAY TYPE : Showing cells with motion detected differently from cells with no motion .
- RECORD DURATION : Whenever motion is detected and it is set at Motion Recording mode, DVR
system records for RECORD DURATION from time motion is detected.
(1sec. ~ 99 sec.) (Default duration : 5 sec.)
(4)-2. MOTION MASK SETUP: Set motion detection area. Direction button is for moving and [ENTER]
button is for selection, and [MODE] button is for changing mode of MASK SETUP.
- CELL : Move to the location which you want to detect and then press the [ENTER] button.
Highlighted cell area means motion detection area.
- ALL ON : Set all cells as detection area. Use [ENTER] button to set.
- ALL OFF : Set all cells as no-detection area. Use [ENTER] button to set.
- BLOCK ON : Select detection area by block. Use [MODE] button and press [ENTER] button to set ON.
- BLOCK OFF : Select un-detection area by block. Use [MODE] button and press [ENTER] button to set ON.
Highlighted Area
(Motion Detection Area)
Non-highlighted Area
(No Motion Detection Area)
27
Page 29

Network (JPEG2000+H.264)
Network (JPEG2000+H.264)
Network (JPEG2000+H.264)Network (JPEG2000+H.264)
Network Stand Alone DVR
Network Stand Alone DVR
Network Stand Alone DVRNetwork Stand Alone DVR
4) INTERVAL SETUP
Set the switching time interval for SEQ or PIP
INTERVAL SETUP
SWICHING INTERVAL
FULL SCREEN
PIP SCREEN
CHAP. 5 Set Up
function.(1 sec. ~ 99 sec.)
EVENT RECORD
(1)FULL SCREEN : set the sequencing switch time interval
EVENT UPDATE TIME 600 SEC
in live full screen.
(2)PIP SCREEN : set the sequencing switch time interval
of PIP window.
SELECT ▲▼◀▶, CHANGE VALUE : - +
(3)EVENT UPDATE TIME : Set the minimum time interval of event to be listed in EVENT LIST.
If EVENT UPDATE TIME is set at 20 sec, only following event happened
20 sec or more than 20 sec later previous event shall be listed in EVENT LIST.
01 SEC
01 SEC
5) ALARM SETUP
Set type of alarm sensors connected to DVR unit.
N.O represents Normal Open type and N.C Normal
Close type.
(1) ALARM INPUT : Select type of alarm sensor
connected to DVR unit (N.O or N.C).
Use direction button and [-] [+] button
to set.
DISABLE represents not to use alarm
sensor connected to DVR.
(2) DURATION : Set the duration of alarm when an
alarm is activated. (0 sec. ~ 300 sec.)
6) EVENT POPUP SETUP
When event is activated, the full image will pop up
as user set.
(1)CHANNEL : Choose a channel
(2)POPUP ON/OFF : Set a popup function at ON/OFF
(3)EVENT : Set event mode which ‘popup’ function is
applied to.
*A : ALARM event. M : MOTION event.
ALARM SETUP
CHANNEL
ALARM INPUT
DURATION
N.O ................................ NORMAL OPEN
N.C ................................ NORMAL CLOSE
___ .................................. DISABLE
SELECT : ▲▼, CHANGE VALUE : - +
EVENT POPUP SETUP
CHANNEL
POPUP ON / OFF
EVENT
DURATION
CH1
N.O
005
CH01
OFF
--
0 3
(4)DURATION : Set the duration how long the popup
Image is shown.(0 sec. ~ 60 sec.)
※If more than 2 channels pop up at the same time,
the first channel out of them will be shown.
(For e.g. Ch1 and CH3 pop up at the same time,
CH1 will be shown)
SELECT : ▲▼, CHANGE VALUE : - +
28
Page 30

Network (JPEG2000+H.264)
Network (JPEG2000+H.264)
Network (JPEG2000+H.264)Network (JPEG2000+H.264)
Network Stand Alone DVR
Network Stand Alone DVR
Network Stand Alone DVRNetwork Stand Alone DVR
7) BUZZER SETUP
Set parameters for buzzer (On or Off).
Use direction button and [ENTER] button.
KEY BEEP : buzz when button is pressed.
VIDEO LOSS : buzz when video signal is lost.
ALARM ACTIVE : buzz when alarm is activated.
MOTION DETECT : buzz when motion is detected.
User can set all buzzers at On/Off at once
by set ALL at ON/OFF.
8) PASSWORD SETUP
Set user ID and password.
-Use [UP] and [DOWN] button to move to option
and [LEFT] and [RIGHT] button to set user ID.
ALL
KEY BEEP
VIDEO LOSS
ALARM ACTIVE
MOTION DETECT
SELECT : ▲▼, & [ENTER]
CHAP. 5 Set Up
BUZZER SETUP
--
ON
ON
ON
OFF
The password must be consist of 1 to 8 digit
number. Just use numbers button from 1 to 10
on the front panel of DVR unit.
-To change password, user must input current
password and then input new password.
USER I D
USER PW
NEW PW
CONFIRM
PASSWORD SETUP
ADMIN
---------------------
---------------------
---------------------
And input again new password to confirm.
- Default value
ADMIN : ‘ ‘ (Blank)
MANAGER : ‘1’
[K1-K10] INPUT PASSWORD
[ENTER] CHANGE PASSWORD
USER 1 : ‘2”
:
:
TO EXIT, PRESS [MENU]
USER 8 : ‘9’
※ Change the user PASSWORD in the first operation is recommended.
※ In case you forgot PASSWORD, contact dealer of DVR to get instruction to enter into menu to
set new PASSWORD.
SYSTEM INFORMATION
9) SYSTEM INFORMATION
DVR system information including firmware
version, hardware version, product ID, etc….
S/W VERSION VER 1.0
H/W VERSION REV-B. / ES518
PRODUCT ID
01S-2039-001008-AR-01
MASTER-1
WDC WD2000JS-00NCB1
MASTER-2
WDC WD2000JS-00NCB1
CD-R
SAMSUNG CD-R/RW SW-256B
TO EXIT, PRESS [MENU]
29
Page 31

Network (JPEG2000+H.264)
Network (JPEG2000+H.264)
Network (JPEG2000+H.264)Network (JPEG2000+H.264)
Network Stand Alone DVR
Network Stand Alone DVR
Network Stand Alone DVRNetwork Stand Alone DVR
5-4. RECORD SETUP
This is the most important configuration of the DVR.
Enter into SYSTEM MENU-RECORD SETUP
and press the [ENTER] button.
1) RECORD CONFIGURATION
-
Use direction button to move and [
] [+] button to set value.
(1) OVERWRITE : Set overwrite or stop recording when
the HDD is full.
(2) MULTIPLEX
- DUPLEX : Playback & Ethernet
- TRIPLEX : Playback & Recording & Ethernet
※ Note: DUPLEX MODE is recommended to playback
the images at a maximum frame rate.
But, it makes DVR not to record during search.
(3) QUALITY : Set recording picture quality.
Actually it is fixing maximum data size of
image for each picture quality in 5 steps
as follows.
- BASIC
- NORMAL
- ENHANCED
- FINE
- SUPER FINE: Default quality set by manufacturer
RECORD SETUP
RECORD CONFIGURATION
SCHEDULE SETUP
HOLIDAY SETUP
SELECT MENU : ▲▼, & [ENTER]
RECORD CONFIGURATION
OVERWRITE
MULTIPLEX
QUALITY
RESOLUTION
RECORD IN ALARM
RECORD IN MOTION
CONTINUOUS RECORD
CHAP. 5 Set Up
ON
DUPLEX
SUPER FINE
120IPS 720*240
1/1X
1/1X
1/1X
In Emergency recording mode, recording quality is
SUPER FINE.
SELECT MENU : ▲▼, CHANGE VALUE : + -
To send more images via IP network and longer recording
time, set QUALITY at NORMAL or ENHANCED and
record at 360x240(360x288).
※ Data size of image in PAL system is a little bigger than NTSC system, but the total recording time
is same as in NTSC system.
(4) RESOLUTION : Set recording resolution.
- 120 ips at 720x240(NTSC) , 100 ips at 720x288(PAL)
- 240 ips at 360x240(NTSC) , 200 ips at 360x288(PAL)
- 480 ips at 360x120(NTSC) , 400 ips at 360x144(PAL)
※ It is not possible to see those images in full screen mode in playback.
Recording in Dual resolution is recommended for higher recoding speed, and also to send
more images via IP network.
(5) RECORD IN ALARM : Set record speed (skip rate) in ALARM record mode.
(6) RECORD IN MOTION : Set record speed (skip rate) in MOTION record mode.
(7) CONTINUOUS RECORD : Set record speed (skip rate) in CONTINUOUS record mode.
Set record speed (skip rate)
- 1/1x, 1/2x, ………. 1/999x record speed
- ex: 1/2x ) R->S->R->S… - ex: 1/3x ) R->S->S->R->S->S->R…
- ex: 1/4x ) R->S->S->S->R->S->S… ( R : RECORD S : SKIP )
- ex : If record resolution is set at 360x240, 1/1x = 240 ips, 1/2x = 120 ips, 1/3x = 80 ips, etc.
30
Page 32

Network (JPEG2000+H.264)
Network (JPEG2000+H.264)
Network (JPEG2000+H.264)Network (JPEG2000+H.264)
Network Stand Alone DVR
Network Stand Alone DVR
Network Stand Alone DVRNetwork Stand Alone DVR
CHAP. 5 Set Up
2) SCHEDULE SETUP
Unless you selected other recording mode, DVR system records in Schedule Recording mode.
In SCHEDULE REC SETUP, you set type of recording for every time interval of 2 hours in each day of
the week. Schedule Recording set by manufacturer is recording continuously at its full recording
speed, and it means DVR system record continuously at 120 ips in total at 720x240 resolution.
To set Schedule Recording parameters, enter into SYSTEM MENU-RECORD SETUP-SCHEDULE SETUP
and Press the [ENTER] button.
(1) SCHEDULE SETUP
Set recording type for each recording time interval for a day of the week (2 hours interval).
SCHEDULE REC SETUP
SUN
MON
TUE
WED
THU
FRI
00-02
02-04
04-06
-M-
-M -
- M -
AM -
AM -
AM-
- -C
- -C
- -C
- -C-
- - C
- - C
- -C-
- - C
- - C
- -C
- -C
- -C
SAT
- -C
- - C
- - C
Use [MODE] button to select edit type and move to
the time interval of a day of the week you want to change.
−
Press [ENTER] button to select and use [+] or [
] button,
to change the record type. To go next page, use [NEXT]
button.
06-08
08-10
10-12
MODE: CELL BY CELL
-M -
AM-
-- C
-- C
- - C
-- C
- - -
AM-
- -C-
- - C
- - C
- -C
-- -
AM-
- - C
- - C
- - C
- -C
▲▼◀▶ & [NEXT], EDIT:+ -&[MODE]
A:ALARM M:MOTION C:CONTINUES
-- C
※ MODE (Edit type)
- - C
-- C
TIME CELL : Set each time interval of a day of the week
WEEK : Set a day of the week at once
TIME ZONE : Set a time slot at once
ALL : Set page by page at once
1 / 2
CLEAR ALL: Clear page by page
※ Unless user press [REC] button to record at full resolution and in SUPER FINE picture quality,
DVR system records in SCHEDULE Record mode.
※ DEFAULT record mode for each time interval of a day of the week set by manufacturer is
CONTINUOUS recording.
※ Record type :
After power on Schedule record
Exit from menu Schedule record
End of search or playback Schedule record
After pressing [STOP] button Schedule record
After pressing [REC] button Emergency record (Continuous recording in full performance)
[120(100) ips at 720x240(720x288)]
3) HOLIDAY SETUP
HOLIDAY SETUP
Users can set national holiday or holidays on
calendar to record just as setting for Sunday in
SCHEDULE REC SETUP.
Use [MODE] button to select a month and direction
button to move to a day, and press [ENTER] button to
set a holiday. Then color of date shall be changed to
red, as Sunday.
EDIT HOLIDAY : Set as holiday
CLEAR MON DATA : Cancel the holiday set per month
CLEAR ALL DATA : Cancel all holiday set
※ The maximum holidays is 100 days.
31
< APR > 001/100
SUN MON TUE WED THU FRI SAT
01 02
03 04 05 06 07 08 09
10 11 12 13 14 15 16
17 18 19 20 21 22 23
24 25 26 27 28 29 30
MODE : EDIT HOLIDAY
SELECT ▲▼◀▶, EDIT [ENTER]&[MODE]
Page 33

Network (JPEG2000+H.264)
Network (JPEG2000+H.264)
Network (JPEG2000+H.264)Network (JPEG2000+H.264)
Network Stand Alone DVR
Network Stand Alone DVR
Network Stand Alone DVRNetwork Stand Alone DVR
CHAP. 5 Set Up
5-5. BACK-UP
1) CD-R SETUP
User can back up the recorded data to CD using CD writer installed in DVR.
Refer to [START] and [END] of data on HDD and set copy from time, [START], and size of data
copied, [SIZE], and move to BURN and press [ENTER] button to start copy.
CD- R SETUP
HDD
[START] 2005/AUG/07 AM04:04:12
[ END ] 2005/AUG/08 PM08:12:23
CD-R
[START] 2005/AUG/07 AM04:04:12
[ END ] 2005/AUG/08 PM08:12:23
[ SIZE ] 000MB
BACKUP
EXIT : [MENU]
HDD
[START] 2005/AUG/07 AM04:04:12
[ END ] 2005/AUG/08 PM08:12:23
CD-R 700 MB
[START] 2005/AUG/07 AM04:04:12
[ END ] 2005/AUG/08 PM08:12:23
[ SIZE ] 700 MB - > 700MB
BACKUP
CD-RW BURNING : IMAGE DATA.
EXIT : [MENU]
CD-R SETUP
System Status Messages :
- CD-RW DOOR CLOSE. CHECKING CD Recorder : Blank CD check
- INPUT BLANK CD : CD Recorder has no blank CD.
- CD-RW DOOR OPEN : Open CD Recorder and insert blank CD Recorder media into CD drive.
- CD-R MEDIA IS DETECTED : Blank CD Recorder media has been inserted and detected.
DVR system will display size of blank CD Recorder .
After you set [START] time and [SIZE] in CD Recorder sub-menu and then select BURN, DVR system
starts
copying images to CD and shows following message.
CD-RW BURINING START
CD-RW BURNING : LEAD-IN
CD-RW BURNING : IMAGE DATA
CD-RW BURING : CLOSE TRACK
CD-RW DOOR OPEN
When burning is completed, CD Recorder media will be ejected automatically.
To copy more images, repeat above process. In the next back-up process, [START] time in
CD Recorder sub-menu shall be [END] time in previous back-up, and you can copy images in series
to many CDs as many as you want.
※ SIZE Change
+ , - : Change per 10MB unit LEFT , RIGHT : Change per 100MB unit
2) USB SETUP
User can back up the recorded data to USB Media using USB (HOST) port on front panel of DVR.
Refer to [START] and [END] of data on HDD and set start and end time of data to USB Media
( USB Memory Stick ). Select backup file size, and move to BACKUP and press [ENTER] Button
to start copy.
32
Page 34

Network (JPEG2000+H.264)
Network (JPEG2000+H.264)
Network (JPEG2000+H.264)Network (JPEG2000+H.264)
Network Stand Alone DVR
Network Stand Alone DVR
Network Stand Alone DVRNetwork Stand Alone DVR
CHAP. 5 Set Up
Status message
System Status Messages
(1) If USB MEMORY STICK is not inserted :
- USB STORAGE IS CHECKING
- USB STORAGE IS NOT AVAILABLE
- RE-CONNECT THE USB STORAGE
- CONECT THE OTHER USB STORAGE
(2) When USB MEMORY STICK is recognized
- USB STORAGE IS CHECKING
- THERE IS A FREE SPACE ON STORAGE
- USB STORAGE IS AVAILABLE
(3) During Back-Up
- CHANGE WRITE PROTECT MODE (Only WRITE PROTECT is caught, it can be seen)
- START WRITING IN USB STORAGE
- FINISH WRITING IN USB STORAGE
(4) Error Message
- THERE IS A PROBLEM ON USB PORT (If USB PORT fails to work properly)
- USB STORAGE IS FULL (When USB is full)
- FILE SYSTEM IS NOT SUPPORTED (If File System is not supported)
- SIZE IS LARGER THAN FREE SIZE (If back-up size is larger than free space)
※ Back-Up procedure is the same as CDR Back-Up.
※ If Back-Up size is larger than 2GB, it creates several files. (It saves by 2GB).
USB SETUP
HDD
START 2005/AUG/07 AM04:04:12
END 2005/AUG/08 PM08:12:23
USB MEDIA
START 2005/AUG/07 AM04:04:12
END 2005/AUG/08 PM08:12:23
SIZE 00000MB
BACKUP
USB STORAGE IS CHECKING
EXIT : [MENU]
USB SETUP
HDD
START 2005/AUG/07 AM04:04:12
END 2005/AUG/08 PM08:12:23
USB MEDIA
START 2005/AUG/07 AM04:04:12
END 2005/AUG/08 PM08:12:23
SIZE 28 MB - > 28MB
BACKUP
START WRITING IN USB STORAGE
EXIT : [MENU]
5-6. EXTERNAL DEVICE
Set parameters of external devices connected to DVR, like Ethernet, PTZ camera, RS-232C, etc.
Use direction button to move to sub-menu and Press [ENTER] button to set.
1) TCP/IP SETUP
TCP/IP function enables user to see live pictures and
recorded pictures via the internet.
(1) IP CONFIG SETUP :
Show the network information assigned to the DVR
unit. If the DHCP setup status is AUTOMATIC, user
can set the IP port only and if the DHCP setup status
is MANUAL, user must set all parameters.
For detail procedure of Remote viewer program
installation, refer to CHAP. 6 Software program.
(Remote viewer software).
33
IP CONFIG SETUP
MAC ADDRESS
IP ADDRESS
IP PORT
GATEWAY
SUBNET MASK
DHCP SETUP
SELECT MENU : ▲▼, & [ENTER]
_ _ _ _ _ _ _ _ _ _ _
00-0A-A2-00-00-00
_ _ _ _ _ _ _ _ _ _ _
192.168.001.160
_ _ _ _ _ _ _ _ _ _ _
50000
_ _ _ _ _ _ _ _ _ _ _
192.168.001.001
_ _ _ _ _ _ _ _ _ _ _
255.255.255.000
AUTOMATIC
Page 35

Network (JPEG2000+H.264)
Network (JPEG2000+H.264)
Network (JPEG2000+H.264)Network (JPEG2000+H.264)
Network Stand Alone DVR
Network Stand Alone DVR
Network Stand Alone DVRNetwork Stand Alone DVR
(2) DDNS SETUP :
- DDNS ON/OFF : Select if DDNS Function use
CHAP. 5 Set Up
DDNS SETUP
- DDNS SERVERS : IP Address of DDNS SERVER.
- INTERVAL : Registered time period to DDNS SERVER.
Per D (Day) H (Hour) M (Minute)
- REGISTER : Once press [ENTER],
It automatically registered.
- DDNS STATUS : present current status by
"REGISTER OK“
"REGISTER ERROR", "NOT REGISTER"
- IP ADDRESS : IP of last registered DVR
- IP PORT : Port of last registered DVR
- REMAIN TIME : Remain time to next registration
- LAST REG... DATA : Last registered time
(3) CONNECTION SETUP :
- TIME OUT :
Adjust TIMEOUT value properly to
successfully access to DVMR unit via Internet
line. If data transmission speed is high enough,
leave TIMEOUT value as set by manufacturer
(200 msec), and increase it if data ansmission
via Internet line is relatively slow. Execute
tracert (Tracing Route) in your PC for IP
assigned to DVMR unit, and you can figure
out how much TIMEOUT value increased.
- RETRY COUNT :
Set the retry number of times for network
connection.
DDNS ON/OFF OFF
DDNS SERVER 211.062.253.087
INTERVAL D-00 H-00 M-20
REGISTER
-------------------------------------------------------------------------DDNS STATUS
IP ADDRESS ---.---.---.---.--IP PORT ----REMAIN TIME D-00 H-00 M-00
LAST REGISTERATION DATE
>
SELECT MENU : ▲▼, & [ENTER]
CONNECTION SETUP
TIMEOUT 200 MSEC
RETRY COUNT 08
SELECT MENU : ▲▼, & [ENTER]
(4) DHCP SETUP :
- DHCP MODE : If user selects AUTOMATIC,
IP automatically assigned.
If user selects MANUAL, in IP CONFIG SETUP
User selects it manually.
- DETECT IP : It only appears for AUTOMATIC.
Once press [ENTER], it automatically starts IP
Assignment.
34
DHCP SETUP
DHCP MODE
DNS SERVER
IP ADDRESS
SUBNET MASK
GATEWAY
SELECT : ▲▼, CHANGE VALUE : + -
AUTOMATAIC
168.126.063.001
192.168.001.086
255.255.255.000
192.168.001.001
Page 36

Network (JPEG2000+H.264)
FRAMERATE
Network (JPEG2000+H.264)
Network (JPEG2000+H.264)Network (JPEG2000+H.264)
Network Stand Alone DVR
Network Stand Alone DVR
Network Stand Alone DVRNetwork Stand Alone DVR
(5) EVENT SERVER SETUP :
IP ADDRESS : IP Address of PC that executes
EVENT SERVER PROGRAM.
IP PORT : PORT of PC that executes
EVENT SERVER PROGRAM
EVENT SERVER TYPE :
It is the way to transmit data to SERVER
By "OFF", "EVENT", "MINUTE“,
In case Event happens from DVR.
"EVENT“: It transmits by the number of EVENT.
"MINUTE“: It transmits each scheduled time.
CHAP. 5 Set Up
EVENT SERVER SETUP
IP ADDRESS 192.168.001.072
IP PORT 09988
EVENT SERVER TYPE OFF
INTERVAL --EVENT GMT TYPE GMT+00:00
INTERVAL: If EVENT SERVER TYPE is "EVENT"
SELECT : ▲▼, CHANGE VALUE : + -
User can select from 1~512.
If EVENT SERVER TYPE is "MINUTE“, User can select from 1 ~ 60 mins.
EVENT GMT TYPE : User can set currently installed location (DVR) of GMT.
(6) NVS SETUP :
NVS SETUP
BITRATE :
DATA SIZE from NVS. The bigger it set, the better its
quality, but sometimes motion is not smooth.
BITRATE
0500 Kb
GROUP OF PICTURES
010
(Set Value : 100K ~ 2500K, can be adjusted by 50K)
10
GROUP OF PICTURES :
Image (I frame, P frame) from NVS. The bigger it set,
RESOLUTION
640*480
the better its quality.
SELECT : ▲▼, CHANGE VALUE : + -
FRAMERATE :
DATA RATE from NVS. The bigger it set, the better its quality, but image quality is not good.
RESOLUTION :
DATA RESOLUTION from NVS. Such as 160*120, 320*240, 640*240, 640*480.
* In order to work NVS properly, above value should be adjusted according to Network Condition.
35
Page 37

Network (JPEG2000+H.264)
Network (JPEG2000+H.264)
Network (JPEG2000+H.264)Network (JPEG2000+H.264)
Network Stand Alone DVR
Network Stand Alone DVR
Network Stand Alone DVRNetwork Stand Alone DVR
CHAP. 5 Set Up
2) RS-232C SETUP
User can control the DVR via RS-232C port.
Connect DVR to PC via RS-232C port and control
DVR using keyboard of PC.
This function is mainly for programmer who
SPEED
LENGTH
STOP BIT
PARITY
RS-232C SETUP
wants to control DVR as part of many devices
connected to PC system, as in SI project.
SELECT : ▲▼, CHANGE VALUE : + -
3) PANTILT SETUP
It is to set parameters for PTZ camera connected to DVR unit. DVR unit already includes all
protocols of well-known PTZ cameras like PELCO D type PTZ camera, and user just select MODEL
and set other parameters to control this PTZ cameras, using operation buttons on the front panel of
DVR.
PANTILT SETUP
COMMAND SETTING PTZ camera set
SPEED SETTING PTZ speed set
CHANNEL
MODEL
PTZ ID
BAUDRATE
CMD DELAY
COMMAND
LENGTH
CODE
COMMAND SETTING
01
PELCO-D
000
2400 BPS
1 MSEC
PAN/TILT STOP
07
FF 00 00 00
00 00 00 00
115200
8
1
NONE
SELECT : ▲▼, & [ENTER]
SELECT : ▲▼, CHANGE VALUE : + -
(1) CHANNEL : Select channel
(2) MODEL : Select camera model (protocol type) per each channel
(3) PTZ ID : Select ID
(4) BAUDRATE : Select data transmission speed
(5) CMD DELAY : Select command delay time
4) SPOT MONITOR SETUP
SPOT MONITOR SETUP
SPOT MONITOR SETUP
SPOT MONITOR SETUPSPOT MONITOR SETUP
(1) SWITCHING INTERVAL
Channel switching time (01 sec. ~ 99 sec.)
SWITCH INTERVAL
03 SEC
ALARM POP UP
ON
MOTION POP UP
ON
EVENT POP UP DURATION 01
SEC
(2) ALARM POP-UP
When ALARM is detected, the image of channel
connected with Alarm sensor pops up.
Set ALARM detection pop-up (ON/OFF)
(3) MOTION POP-UP
Set MOTION detection pop-up (ON/OFF)
※
EVENT POP-UP DURATION
SELECT: ▲▼, CHANGE VALUE : + -
Set EVENT POP-UP DURATION
36
Page 38

Network (JPEG2000+H.264)
Network (JPEG2000+H.264)
Network (JPEG2000+H.264)Network (JPEG2000+H.264)
Network Stand Alone DVR
Network Stand Alone DVR
Network Stand Alone DVRNetwork Stand Alone DVR
CHAP. 5 Set Up
If events (MOTION or ALARM) happen on several channel at the same time, channel No. 1 has the
first priority to pop up. For example, if events happen on channel No. 1, channel No. 2, and channel
No. 4 at the same time, channel No. 1 pops up. If the motion disappears on channel No. 1, then channel
No. 2 pops up for the duration that you set. However, even though motion happens on channel No. 1
again within the duration, channel No. 2 still displays. If motion on channel No.1 keeps on going even after
the duration, channel No. 1 pops up again.
5) AUDIO SETUP
Use direction button to move to channel and Press [ENTER] button to set (ON/ OFF).
AUDIO SETUP
AUDIO SETUP
AUDIO SETUPAUDIO SETUP
1) REC
CH REC
01 ON
PLAY
ON
02 ON
ON
03 ON
ON
04 ON
ON
SELECT: ▲▼◀▶, & [ENTER]
6) AUDIO VOLUME SETUP
INPUT VOLUME: Adjust VOLUME of Recorded
AUDIO
LIVE VOLUME1~4: Adjust VOLUME of LIVE per
channel.
PLAY VOLUME1~4: Adjust VOLUME of PLAY per
channel.
(1) ON : Record images with AUDIO
(2) OFF : Record images without AUDIO
2) PLAY
(1) ON : Recorded sound comes out during
playback
(2) OFF : Recorded images only play back
AUDIO VOLUME SETUP
INPUT VOLUME 32
LIVE VOLUME1 32
LIVE VOLUME2 32
LIVE VOLUME3 32
LIVE VOLUME4 32
PLAY VOLUME1 32
PLAY VOLUME2 32
PLAY VOLUME3 32
PLAY VOLUME4 32
SELECT : ▲▼, CHANGE VALUE : + -
7) REMOCON SETUP
REMOCON TYPE: User use it to operate many
DVRs installed at the same site and select each
different TYPE.
N TYPE, S TYPE, U TYPE 1 ~ U TYPE 6: Total 8
TYPE Selectable.
REMOCON SETUP
REMOCON TYPE S TYPE
SELECT : ▲▼, CHANGE VALUE : + -
37
Page 39

Network (JPEG2000+H.264)
Network (JPEG2000+H.264)
Network (JPEG2000+H.264)Network (JPEG2000+H.264)
Network Stand Alone DVR
Network Stand Alone DVR
Network Stand Alone DVRNetwork Stand Alone DVR
CHAP. 5 Set Up
5-7. FACTORY DEFAULT
Set the all system parameters as manufacturer first
set before delivery. It is a kind of system
initialization, and manufacturer recommends to do it
when you add new HDD or other changes in
system to make all system ready for normal
operation.
Use direction button to move and Press [ENTER]
button to change parameters. After move to RUN,
Press [ENTER] button for actual Factory Default
setting.
5-8. LANGUAGE SETUP
The menu can be displayed in a number of languages.
Press [ENTER] button to select your language.
SYSTEM MENU
DISPLAY SETUP
FACTORY DEFAULT
ALL
SCREEN DISPLAY
CAMERA SETTING
MOTION SETUP
PANTILT SERUP
SCHEDULE SETUP
CONFIGURATION
RUN
SELECT MENU : ▲ ▼, & [ENTER]
OFF
OFF
OFF
OFF
OFF
OFF
OFF
CONFIGURATION
RECORD SETUP
EXTERNAL DEVICE
FACTORY DEFAULT
LANGUAGE ENGLISH
SELECT MENU : ▲▼, & [ENTER]
38
Page 40

Network (JPEG2000+H.264)
Network (JPEG2000+H.264)
Network (JPEG2000+H.264)Network (JPEG2000+H.264)
Network Stand Alone DVR
Network Stand Alone DVR
Network Stand Alone DVRNetwork Stand Alone DVR
CHAP. 6 Network Setup
CHAP. 6 Network Setup
6-1. DVR Network Configuration
Please call your provider to identify what type of service they are providing you.
You will need to know following ;
Upload speed – For your own knowledge for expected frame rates
Download speed – For your own knowledge for expected frame rates
Addressing – For determining what scenario you should follow
Router On Site or Just a Modem – For determining what scenario you should follow
※NOTE : If your provider is using PPPOE (usually DSL providers), you MUST have a IP Share
installed on site and follow 3) Dynamic IP of PPPOE (DSL) for DVR setup and access.
※PLEASE verify Internet access after installing any new equipment (routers, switches, modems, etc.).
PC’s TCP/IP Setting
Before configuring the DVR, please fill out the information below if applicable ;
Choose any PC on your network and determine its TCP/IP settings;
IP Address :
Subnet Mask :
Default Gateway :
Next pages are several network scenarios. Please identify which scenario your current network
falls within and follow the instructions for configuring and accessing your DVR via TCP/IP.
(ex.192.168.1.5)
(ex. 255.255.255.0)
(ex.192.168.1.1)
39
Page 41
Network (JPEG2000+H.264)
Network (JPEG2000+H.264)
Network (JPEG2000+H.264)Network (JPEG2000+H.264)
Network Stand Alone DVR
Network Stand Alone DVR
Network Stand Alone DVRNetwork Stand Alone DVR
1) Static IP
User input IP address in IP CONFIG SETUP which is assigned from ISP company.
1. Verify if IP address is OK or not with PC before connecting DVR.
2. Connect LAN cable to DVR after confirmation.
3. DVR : MENU EXTERNAL DEVICE TCP/IP
4. Set DHCP to MANUAL and go into TCP/IP SETUP.
5. Verify if MAC ADDRESS starts from 00-0A-A2….
6. Input IP address which is assigned from ISP company.
7. Set IP PORT. (50000 recommended)
8. Input GATEWAY which is assigned from ISP company.
9. Input SUBNET MASK which is assigned from ISP company.
10. Go out of MENU SETUP.
11. Turn off and on Modem (Router) which is provided by ISP company.
This is to reset client of MAC from ISP company.
User have to wait for 30 seconds after turning on.
12. Access DVR with Remote Viewer software.
CHAP. 6 Network Setup
Internet
Internet (Static IP)
Remote Viewer
InternetInternet
(Client)
* If user fail to access, please verify 1, 6, 7, 8, 9, 11 again.
* When speed is too slow and connection fails after access : MENU EXTERNAL
DEVICE TCP/IP SETUP CONNECTION SETUP
Increase value of Timeout to find the most suitable speed.
DVMR
(Server)
40
Page 42
Network (JPEG2000+H.264)
Network (JPEG2000+H.264)
Network (JPEG2000+H.264)Network (JPEG2000+H.264)
Network Stand Alone DVR
Network Stand Alone DVR
Network Stand Alone DVRNetwork Stand Alone DVR
2) Dynamic IP
1. Verify if IP address is OK or not with PC before connecting DVR.
2. Connect LAN cable to DVR after confirmation.
3. Turn off and on Modem (Router) which is provided by ISP company.
This is to reset client of MAC from ISP company.
User have to wait for 30 seconds after turning on.
4. Turn off and on DVR.
5. DVR : MENU EXTERNAL DEVICE TCP/IP
6. Verify if MAC ADDRESS starts from 00-0A-A2….
7. Set DHCP to AUTOMATIC and detect IP to get Dynamic IP.
8. Go out of MENU SETUP after getting IP successfully.
9. Access DVR with Remote Viewer software.
CHAP. 6 Network Setup
Internet
Internet
Remote Viewer
(Client)
* If user fail to access, please verify 1, 3, 4 again.
* When speed is too slow and connection fails after access : MENU EXTERNAL
DEVICE TCP/IP SETUP CONNECTION SETUP
Increase value of Timeout to find the most suitable speed.
InternetInternet
Cable Modem
(Dynamic IP)
LAN
LAN
LANLAN
DVMR
(Server)
41
Page 43
Network (JPEG2000+H.264)
Network (JPEG2000+H.264)
Network (JPEG2000+H.264)Network (JPEG2000+H.264)
Network Stand Alone DVR
Network Stand Alone DVR
Network Stand Alone DVRNetwork Stand Alone DVR
3) Dynamic IP of PPPoE (DSL)
DVR doesn’t support DSL (PPPoE), user have to set NETWORK with IP SHARE if
user need to access DVR remotely. At this time, User have to port forward on DVR.
Please contact IP SHARE Manufacturer if you need to know how to forward port.
Even though user have Static/Dynamic IP, if user want to use another device
(PC) through IP SHARE, user can set NETWORK as follows,
1. Verify if IP address is OK or not with PC before connecting DVR.
2. Connect Router (IP SHARE) to DSL modem as shown the following picture.
3. Set the internet connection on Router (IP SHARE). (Refer to the Router Manual.)
4. Verify if sub-group of network in Router is OK or not.
5. Connect DVR to Router.
6. DVR : MENU EXTERNAL DEVICE TCP/IP
7. Set DHCP to MANUAL and go into TCP/IP SETUP.
8. Verify if MAC ADDRESS starts from 00-0A-A2….
9. Input internal IP address which user assigned from Router.
10. Set IP PORT. (50000 recommended)
11. Input GATEWAY of Router.
12. Input SUBNET MASK of Router.
13. Go out of MENU SETUP.
14. Forward port from Router. (Refer to the Router Manual.)
15. Access DVR with external IP and Port (Port forwarded).
CHAP. 6 Network Setup
* If Router support DDNS, user can access Remote Viewer using Domain Information.
Remote Viewer
(Client)
* If user fail to access, please verify 1, 4, 15 again.
* When speed is too slow and connection fails after access : MENU EXTERNAL
DEVICE TCP/IP SETUP CONNECTION SETUP
Increase value of Timeout to find the most suitable speed.
Internet
Internet
InternetInternet
DSL Modem
(Dynamic IP)
LAN
LAN LAN
LANLAN
Router
or Gateway
(IP Share)
LAN
LANLAN
DVMR
(Server)
42
Page 44

Network (JPEG2000+H.264)
Network (JPEG2000+H.264)
Network (JPEG2000+H.264)Network (JPEG2000+H.264)
Network Stand Alone DVR
Network Stand Alone DVR
Network Stand Alone DVRNetwork Stand Alone DVR
CHAP 7. IRS(Integrated Remote Station)
CHAP 7. IRS(Integrated Remote Station)
CHAP 7. IRS(Integrated Remote Station)CHAP 7. IRS(Integrated Remote Station)
MAIN INTERFACE
MAIN INTERFACE
MAIN INTERFACEMAIN INTERFACE
CHAP. 7 IRS
Exit
IRS SETUP
IRS SETUP Inputs Information for IRS network connection.
IRS SETUPIRS SETUP
DVR SETUP
DVR SETUP Changes DVR setting over a network.
DVR SETUPDVR SETUP
VIEWER Enables to show live image display.
BACKUP Enables to back up recorded images in DVR to your PC.
PLAYER Enables to back up recorded images on your PC. (AJP file)
TRANSMITER
TRANSMITER Enables to control DVR using virtual key like controlling actual DVR remotely.
TRANSMITERTRANSMITER
CLIENT Enables to control LIVE, PTZ control, Playback in DVR remotely.
CMS Enables to have multi access for showing live images of many DVRs.
(Additionally, enables to search and show recorded image display for one DVR.)
43
Page 45

Network (JPEG2000+H.264)
Network (JPEG2000+H.264)
Network (JPEG2000+H.264)Network (JPEG2000+H.264)
Network Stand Alone DVR
Network Stand Alone DVR
Network Stand Alone DVRNetwork Stand Alone DVR
7777----1. IRS SETUP
1. IRS SETUP
1. IRS SETUP1. IRS SETUP
CHAP. 7 IRS
MANUAL
MANUAL Select “Manual” to input IP address and port number manually.
MANUAL MANUAL
DDNS
DDNS Select “DDNS” to use IP address and port number that you already registered in
DDNS DDNS
DDNS Server.
MEMBER ID
MEMBER ID
MEMBER IDMEMBER ID
NAME
NAME Input DVR name that you registered in DDNS Server.
NAMENAME
ADDRESS
ADDRESS Input IP address manually.
ADDRESSADDRESS
PORT
PORT Input Port number manually.
PORTPORT
LOGIN
LOGIN
LOGINLOGIN
ID
ID Input DVR ID which has been set in DVR already. (Input ‘admin’.)
IDID
Password
Password Input password of DVR.
PasswordPassword
Input member ID that you registered in DDNS Server.
44
Page 46

Network (JPEG2000+H.264)
Network (JPEG2000+H.264)
Network (JPEG2000+H.264)Network (JPEG2000+H.264)
Network Stand Alone DVR
Network Stand Alone DVR
Network Stand Alone DVRNetwork Stand Alone DVR
7777----2. DVR SETUP
2. DVR SETUP
2. DVR SETUP2. DVR SETUP
CHAP. 7 IRS
User can change some settings of DVR listed below over a network.
(Active Camera, Alarm, Buzzer, Interval, Password, Record Configuration, Record Schedule)
MANUAL
MANUAL Input IP address and port number of DVR manually.
MANUAL MANUAL
ADDRESS
ADDRESS Input IP address of DVR manually.
ADDRESSADDRESS
PORT NUMBER
PORT NUMBER Input port number of DVR manually.
PORT NUMBERPORT NUMBER
LOGIN
LOGIN
LOGINLOGIN
ID
ID Input DVR ID which has been set in DVR already. (Input ‘admin’.)
IDID
PASSWORD
PASSWORD Input password of DVR.
PASSWORDPASSWORD
CLOSE
CLOSE Click “CLOSE” to exit.
CLOSECLOSE
45
Page 47

Network (JPEG2000+H.264)
Network (JPEG2000+H.264)
Network (JPEG2000+H.264)Network (JPEG2000+H.264)
Network Stand Alone DVR
Network Stand Alone DVR
Network Stand Alone DVRNetwork Stand Alone DVR
7777----3. VIEWER
3. VIEWER
3. VIEWER3. VIEWER
CHAP. 7 IRS
1
2
3
4
6
1
DVR connection setup
DVR connection setup : Input network information to connect.
DVR connection setupDVR connection setup
5
(IP / PORT / ID / PW)
2
Network Connection
Network Connection
Network Connection Network Connection
a) CONNECT : Click this button to connect to DVR & see live view over a network.
b) DISCONNECT : Click this button to disconnect.
3
System Information
System Information : Displays connection status and operating Information.
System Information System Information
4
PTZ Control
PTZ Control : Command PTZ Camera connected to DVR remotely.
PTZ ControlPTZ Control
( To command PTZ remotely, User must complete PTZ setting in DVR)
Channel button
Channel button : Selects ch that displays in full screen.
Channel buttonChannel button
5
6
Screen division
Screen division : User can select screen division.
Screen division Screen division
46
Page 48
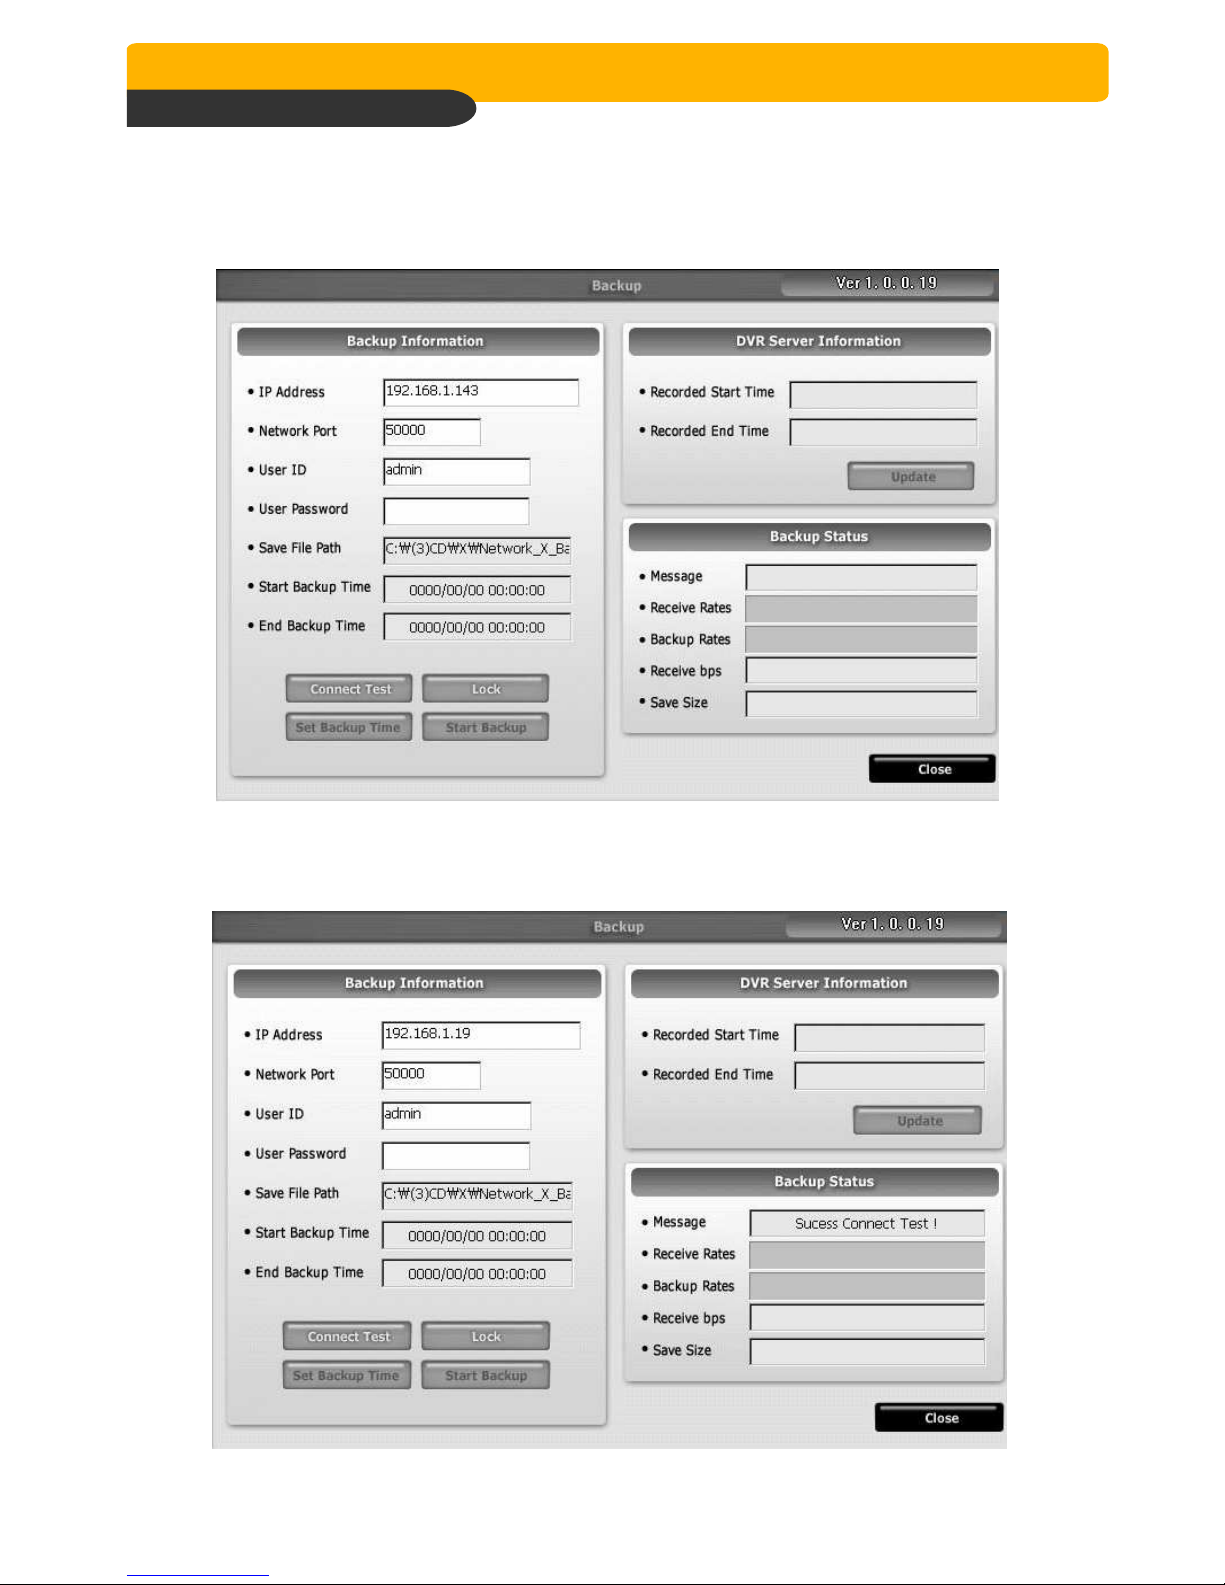
Network (JPEG2000+H.264)
Network (JPEG2000+H.264)
Network (JPEG2000+H.264)Network (JPEG2000+H.264)
Network Stand Alone DVR
Network Stand Alone DVR
Network Stand Alone DVRNetwork Stand Alone DVR
7777----4. BACKUP
4. BACKUP
4. BACKUP4. BACKUP
1) To execute BACKUP, input IP Address & Port and click ‘Connect Test’ button.
CHAP. 7 IRS
2) After Connect Test is done, you can see ‘Success Connect Test!’ message. Then,click
‘lock’ button and click ‘Set Backup Time’ button.
47
Page 49

Network (JPEG2000+H.264)
Network (JPEG2000+H.264)
Network (JPEG2000+H.264)Network (JPEG2000+H.264)
Network Stand Alone DVR
Network Stand Alone DVR
Network Stand Alone DVRNetwork Stand Alone DVR
3) Now you set ‘Start Time’, ‘End Time’, ‘Save File Path’, ‘File Size’ and click ‘Apply’.
CHAP. 7 IRS
4) After finishing time setting, click ‘Start Backup’ to start backup. Then, you can see the
backup on the path that you chose.
48
Page 50

Network (JPEG2000+H.264)
Network (JPEG2000+H.264)
Network (JPEG2000+H.264)Network (JPEG2000+H.264)
Network Stand Alone DVR
Network Stand Alone DVR
Network Stand Alone DVRNetwork Stand Alone DVR
7777----5. PLAYER
5. PLAYER
5. PLAYER5. PLAYER
CHAP. 7 IRS
1
2
3
4
a b c d
7
1
Time Display
Time Display : Displays current time.
Time Display Time Display
2
Recorded data display
Recorded data display : Displays start time & end time of recorded data.
Recorded data display Recorded data display
68
f
ge
Also, displays operating status during playback.
Screen display
Screen display : Selects full screen mode or split mode and displays full screen for each ch.
Screen displayScreen display
3
4
Audio
Audio : Set Audio On/Off.
AudioAudio
5
Function buttons
Function buttons
Function buttonsFunction buttons
a) OPEN : Selects bakuped file.( AJP File )
b) EDIT : Enables to edit backup image,save and print.
d) AVI SAVE : Save backup images in AVI file format.
c) EXIT : Ends backup player.
Operation buttons
Operation buttons : Search for recorded data.
Operation buttons Operation buttons
6
a) Go to the beginning of recorded data and play.
b) Fast backward playback.
c) Backward playback.
d) Pause.
e) Forward playback.
f) Fast forward playback.
g) Go to the end of recorded data and play.
5
Playback speed setting button : Able to adjust playback spped by using upper/ lower buttons.
7
a) SPEED : decides playback speed.(1/4X,1/2X,1X,2X,4X,8X,16X)
b) DELAY : adjusts playback interval. The higher, the slower.(1, 2, 4, 8, 16, 32)
8
Play bar :
Play bar : Enables to search recorded data by using this bar.
Play bar :Play bar :
49
Page 51

Network (JPEG2000+H.264)
Network (JPEG2000+H.264)
Network (JPEG2000+H.264)Network (JPEG2000+H.264)
Network Stand Alone DVR
Network Stand Alone DVR
Network Stand Alone DVRNetwork Stand Alone DVR
Image EDIT
Image EDIT
Image EDITImage EDIT
CHAP. 7 IRS
1
2
1
EDIT TOOL :
EDIT TOOL : User can adjust color tone of copied images using this buttons.
EDIT TOOL :EDIT TOOL :
- Contrast
: make bright part of image brighter and dark part of image darker
: To reduce light and shade, lower contrast a little
- Brightness
: make an image brighter
: make an image darker
- Sharpness
: gives sharp-edge effect
- Blur
: make an image soft.
- Operation buttons
: saves data in JPEG file format.
It is saved in the folder where player is installed.
: User can print current image selected.
EDIT :
EDIT : Return to player mode.
EDIT :EDIT :
2
50
Page 52

Network (JPEG2000+H.264)
Network (JPEG2000+H.264)
Network (JPEG2000+H.264)Network (JPEG2000+H.264)
Network Stand Alone DVR
Network Stand Alone DVR
Network Stand Alone DVRNetwork Stand Alone DVR
AVI SAVE
AVI SAVE
AVI SAVEAVI SAVE
CHAP. 7 IRS
1
1
OPTION :
OPTION : Used to save data in AVI file format.
OPTION :OPTION :
- CHANNEL : Selects channel.
- FRAMERATE : Decides frames per second of data to be saved.
- SIZE : Decides the size of data to be saved automatically.
- START : Starts saving.
- STOP : Stops saving. Once stopped, ‘C:\WEB_BACKUP’ folder is opened automatically.
2
AVI SAVE :
AVI SAVE : Opens ‘option’ setting to start AVI saving. Closes ‘option’ setting after
AVI SAVE :AVI SAVE :
finishing AVI saving and go back to player mode.
2
51
Page 53

Network (JPEG2000+H.264)
Network (JPEG2000+H.264)
Network (JPEG2000+H.264)Network (JPEG2000+H.264)
Network Stand Alone DVR
Network Stand Alone DVR
Network Stand Alone DVRNetwork Stand Alone DVR
7777----6. TRANSMITTER
6. TRANSMITTER
6. TRANSMITTER6. TRANSMITTER
CHAP. 7 IRS
1
2
3
4
a
b
5
1
DVR Connection Setting : Inputs information for DVR Network connection .
Check ‘IP / PORT / ID / PW’ information.
2
Network Connection
a) CONNECT : Network connection to DVR. ( User can see live image of DVR. )
b) DISCONNECT : Network disconnection from DVR.
c) SETUP : User can change or set ‘NVS Setup’ of DVR System Menu.
3
System Information : Displays DVR Connection and System Operation Information.
4
PTZ Control
PTZ Control : User can control PTZ camera connected to DVR remotely.
PTZ ControlPTZ Control
( To control PTZ remotely, user must set PTZ setting in DVR in advance.)
5
DVR Virtual Key
DVR Virtual Key : To use Virtual Key that works the same function as DVR to control DVR
DVR Virtual KeyDVR Virtual Key
remotely.
a) Bitrate: shows received data from network. Please refer to “set up” in Network Connection.
b) AUDIO: it currently does not support. It will be supported soon.
52
Page 54

Network (JPEG2000+H.264)
Network (JPEG2000+H.264)
Network (JPEG2000+H.264)Network (JPEG2000+H.264)
Network Stand Alone DVR
Network Stand Alone DVR
Network Stand Alone DVRNetwork Stand Alone DVR
SETUP (NVS Setup)
SETUP (NVS Setup)
SETUP (NVS Setup)SETUP (NVS Setup)
CHAP. 7 IRS
Bitrate(Kb/s)
DATA SIZE from NVS. The bigger it set, the better its quality. But sometimes image is not smooth.
(Set Value : 100Kb ~ 2500Kb, can be adjusted by 50K)
GOP
Image (I frame, P frame) from NVS. The bigger it set, the better its quality.
Frame Rate
DATA RATE from NVS. The bigger it set, the better its movement. But sometimes image is not
smooth.
Resolution
DATA RESOLUTION from NVS. Such as 160*120, 320*240, 640*240, 640*480.
* In order to work NVS properly, above value should be adjusted according to Network Condition.
* Please refer to ‘bitrate’ displayed in TRANSMITTER when user set.
53
Page 55
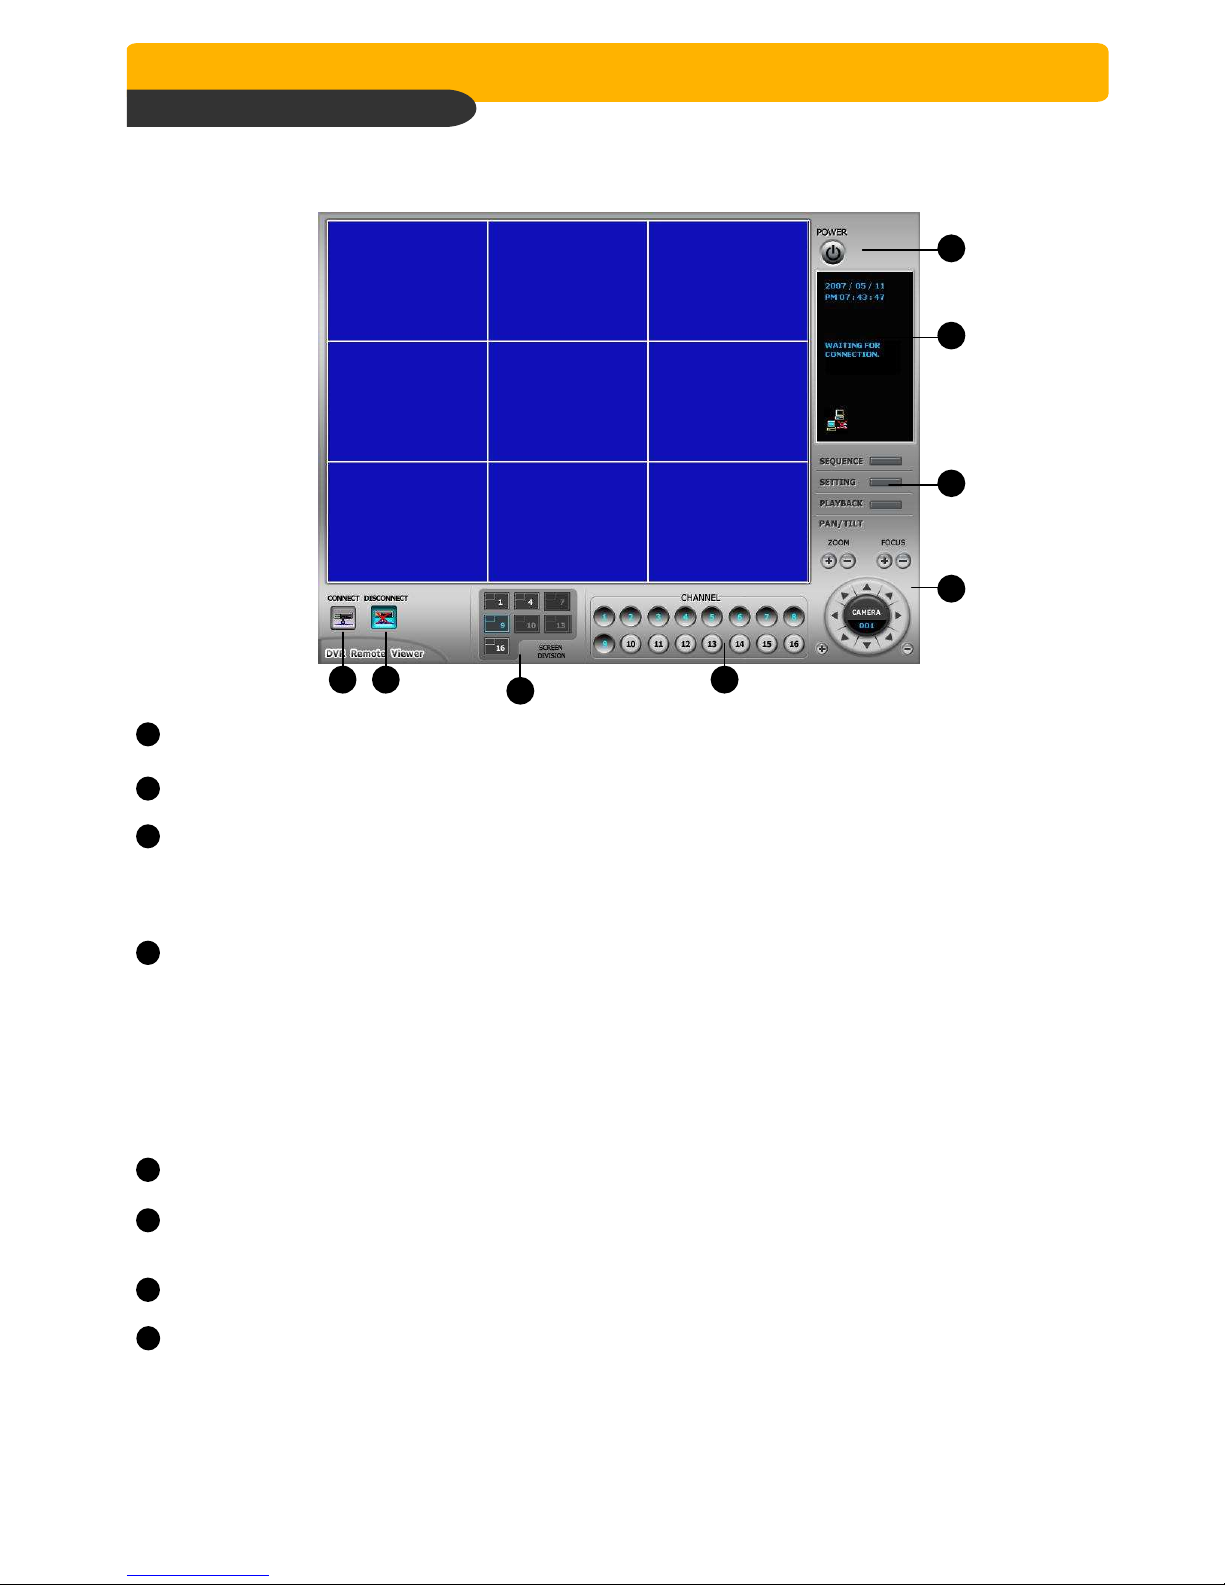
Network (JPEG2000+H.264)
Network (JPEG2000+H.264)
Network (JPEG2000+H.264)Network (JPEG2000+H.264)
Network Stand Alone DVR
Network Stand Alone DVR
Network Stand Alone DVRNetwork Stand Alone DVR
7777----7. CLIENT
7. CLIENT
7. CLIENT7. CLIENT
MAIN INTERFACE
CHAP. 7 IRS
1
2
3
4
8
1
Power button : Press the Power switch to exit the program. Please disconnect the live feed before
6
57
powering off the software
Status window : Display’s the current time and date based. The date is in the format : Year/Month/Day.
2
You will also see the status of your connection.
Setting, Playback, and Sequence buttons :
3
a) Setting : Enables the software configuration screen.
b) Playback : Enables the remote playback screen.
c) Sequence : When in single channel view, hitting the sequence button will sequence
through all active channels at a speed specified in the settings menu.
4
PTZ control : You can control a PTZ camera via the software with these controls.
( To command PTZ remotely, User must complete PTZ setting in DVR)
a) When you press any of the controls for the PTZ, please press and hold the button
for 1-2 seconds per instance to compensate for the data transmission rate. If you
do not and instead simply click the PTZ buttons, you may get undesired results
(having the requested operation transmitted repeatedly, regardless of your intention).
b) The plus and minus buttons send the PTZ commands to the corresponding PTZ
camera ID.
Channel number button : Select the channel that you want to view based on what Screen Division
5
view is enabled.
Screen Division button : Select how many channels to view simultaneously(single,4-split,9-split,
6
or 16-split). When you select a view you will see the Channel Numbers highlighted
which determine what channels are currently being viewed.
Disconnect button : Press this button to disconnect from the DVR unit. Then you may power off the
7
software.
Connect button : Press the Connect button to view the live images from the DVR. These are the same
8
images being displayed on the monitor of the DVR, with a delay depending on your
internet connection at both the DVR location and from where you’re currently accessing.
54
Page 56

Network (JPEG2000+H.264)
Network (JPEG2000+H.264)
Network (JPEG2000+H.264)Network (JPEG2000+H.264)
Network Stand Alone DVR
Network Stand Alone DVR
Network Stand Alone DVRNetwork Stand Alone DVR
IP/PORT Setting Screen
CHAP. 7 IRS
IP List
MANUAL Input IP address and PORT manually
DDNS Receive IP address and PORT from DDNS Server.
For further information of DDNS, please contact your vendor.
Name Name of IP address on the list.
Address Input IP address which is set on DVR
PORT Input PORT which is set on DVR
ID Input ID which is set on DVR. (Please input ‘admin’.)
Password Input password which is set on DVR
IP List It shows IP list which user input manually.
Select Button Select IP and PORT on the list.
Save Button Save IP and PORT on the list.
Delete Button Delete IP and PORT on the list.
55
Page 57

Network (JPEG2000+H.264)
Network (JPEG2000+H.264)
Network (JPEG2000+H.264)Network (JPEG2000+H.264)
Network Stand Alone DVR
Network Stand Alone DVR
Network Stand Alone DVRNetwork Stand Alone DVR
7777----7. CMS
7. CMS
7. CMS7. CMS
1 2 3 4 5 6
11
CHAP. 7 IRS
7 8 9 10
12 13
1
CMS Setting
CMS Setting : CMS Setting. (User can set DVR Registration here for multi-access.)
CMS SettingCMS Setting
2
Group Setup
Group Setup : Among multi-access DVRs, User can make group at specific chs to live monitor.
Group SetupGroup Setup
3
Search
Search : Playback and search recorded image of one DVR.
Search Search
4
View Tree
View Tree : If No11 is not displayed,it will be displayed again.
View TreeView Tree
5
View Event
View Event : If No 12 & 13 is not displayed, it will be displayed again.
View EventView Event
6
Exit
Exit : Exit from CMS.
Exit Exit
7
Screen Division
Screen Division : Set number of channel displayed in CMS.
Screen DivisionScreen Division
8
Rotation
Rotation : Sequence images.
Rotation Rotation
9
Auto Rotation
Auto Rotation : Automatic image sequence (In ‘CMS Setup’, adjust Auto Change Value.)
Auto RotationAuto Rotation
10
PTZ Control
PTZ Control : PTZ control.
PTZ ControlPTZ Control
11
DVR Information
DVR Information : Displays multi-access DVR camera at Site or Group.
DVR InformationDVR Information
12
Network Condition
Network Condition : Displays network information of multi-access DVR.
Network ConditionNetwork Condition
13
DVR Event Information
DVR Event Information : Displays event information of DVR.
DVR Event InformationDVR Event Information
56
Page 58
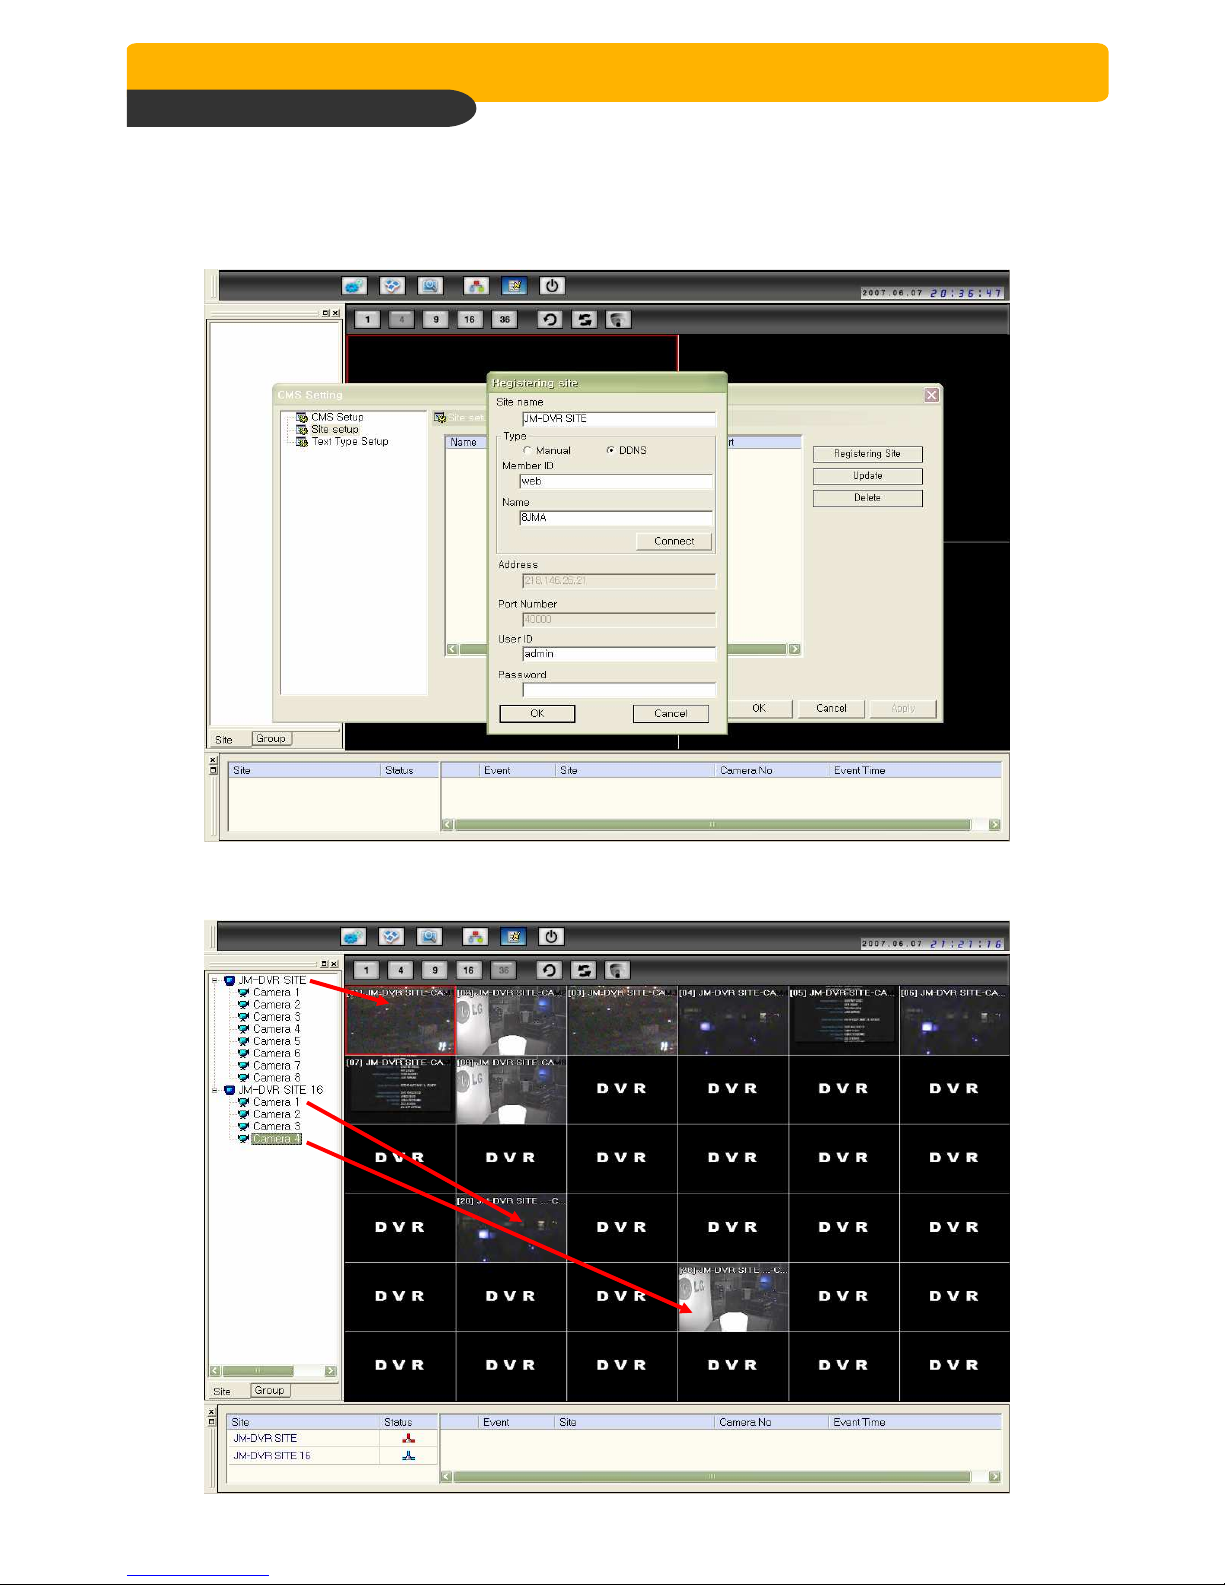
Network (JPEG2000+H.264)
Network (JPEG2000+H.264)
Network (JPEG2000+H.264)Network (JPEG2000+H.264)
Network Stand Alone DVR
Network Stand Alone DVR
Network Stand Alone DVRNetwork Stand Alone DVR
DVR Registration and Screen Display
DVR Registration and Screen Display
DVR Registration and Screen DisplayDVR Registration and Screen Display
1) To connect DVR,from main screen to proceed ‘CMS Setting > Site setup > ‘Registering Site’,
and then, register neccesary information for DVR connection as below,
(Registration is the same as ‘IRS SETUP’.)
CHAP. 7 IRS
2) After registration, user can display specific channel and whole channel by Mouse Drag as shown
below,
57
Page 59
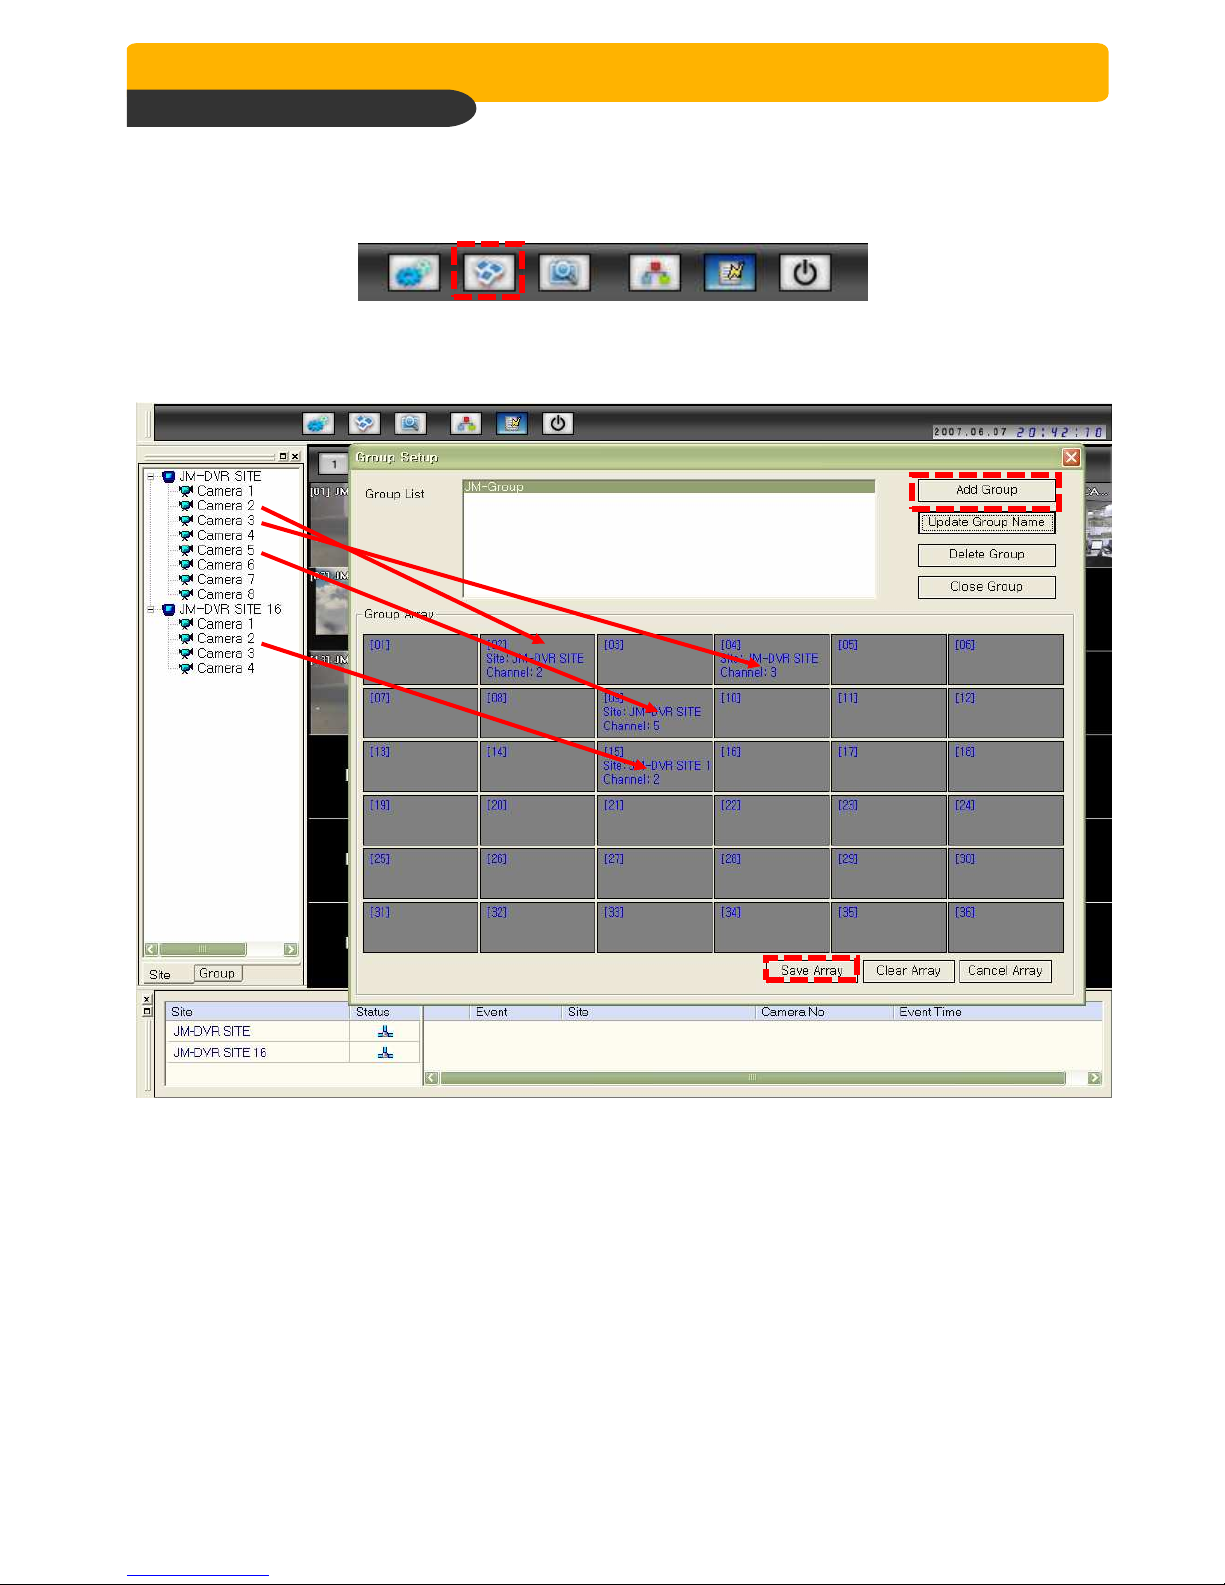
Network (JPEG2000+H.264)
Network (JPEG2000+H.264)
Network (JPEG2000+H.264)Network (JPEG2000+H.264)
Network Stand Alone DVR
Network Stand Alone DVR
Network Stand Alone DVRNetwork Stand Alone DVR
DVR Group Setup
DVR Group Setup
DVR Group SetupDVR Group Setup
1) After finishing DVR registration, click ‘Group Setup’ in Main Screen.
2) Click ‘Add Group’and input group name. Drag camera ch user wants as shown below, and set
ch displays in Group and click ‘Save Array’ to set up group.
CHAP. 7 IRS
58
Page 60

Network (JPEG2000+H.264)
Network (JPEG2000+H.264)
Network (JPEG2000+H.264)Network (JPEG2000+H.264)
Network Stand Alone DVR
Network Stand Alone DVR
Network Stand Alone DVRNetwork Stand Alone DVR
CHAP. 8 DDNS Web Server
CHAP. 8 DDNS Web Server
CHAP. 8 DDNS Web ServerCHAP. 8 DDNS Web Server
* Register DVR for DDNS Web-server and set DVR as shown below,
8888----1. Registering DVR for DDNS (DDNS Web
1. Registering DVR for DDNS (DDNS Web----server)
1. Registering DVR for DDNS (DDNS Web1. Registering DVR for DDNS (DDNS Web
server)
server)server)
CHAP 8. DDNS Web Server
1) Please access
2) Please click DVR Add to register DVR.
www.j2kip.com and Register Member ID.
59
Page 61

Network (JPEG2000+H.264)
Network (JPEG2000+H.264)
Network (JPEG2000+H.264)Network (JPEG2000+H.264)
Network Stand Alone DVR
Network Stand Alone DVR
Network Stand Alone DVRNetwork Stand Alone DVR
3) Please click confirm after inputting DVR Name & Mac Address.
CHAP 8. DDNS Web Server
4) Now, DVR is listed on DDNS Web Server without IP and Port number.
60
Page 62

Network (JPEG2000+H.264)
Network (JPEG2000+H.264)
Network (JPEG2000+H.264)Network (JPEG2000+H.264)
Network Stand Alone DVR
Network Stand Alone DVR
Network Stand Alone DVRNetwork Stand Alone DVR
8888----2.
2. DDDDDNS Set Up in DVR
DNS Set Up in DVR
2. 2.
DNS Set Up in DVRDNS Set Up in DVR
* The following setting is a sample for a cable modem connected to DVR directly.
1) Click Menu and Enter into ‘LOGIN -> EXTERNAL DEVICE -> TCP/IP SETUP’
2) Go to IP Config Setup, if user set DHCP ‘Automatic’, it detects IP address automatically.
CHAP 8. DDNS Web Server
IP CONFIG SETUP
MAC ADDRESS
_ _ _ _ _ _ _ _ _ _ _
00-0A-A2-00-00-00
IP ADDRESS
IP PORT
GATEWAY
SUBNET MASK
_ _ _ _ _ _ _ _ _ _ _
_ _ _ _ _ _ _ _ _ _ _
_ _ _ _ _ _ _ _ _ _ _
_ _ _ _ _ _ _ _ _ _ _
DHCP SETUP
SELECT MENU : ▲▼, & [ENTER]
3) Go to the previous menu and enter into DDNS Setup.
192.168.001.160
50000
192.168.001.001
255.255.255.000
AUTOMATIC
IP CONFIG SETUP
DDNS SETUP
CONNECTION SETUP
DHCP SETUP
EVENT SERVER SETUP
NVS SETUP
TCP/IP SETUP
61
Page 63

Network (JPEG2000+H.264)
Network (JPEG2000+H.264)
Network (JPEG2000+H.264)Network (JPEG2000+H.264)
Network Stand Alone DVR
Network Stand Alone DVR
Network Stand Alone DVRNetwork Stand Alone DVR
4) Set DDNS ON/OFF “ON”.
IP address which is assigned from DHCP Server is automatically input on DNS Server.
CHAP 8. DDNS Web Server
DDNS SETUP
DDNS ON/OFF OFF
DDNS SERVER 211.062.253.087
INTERVAL D-00 H-00 M-20
REGISTER
-------------------------------------------------------------------------DDNS STATUS
IP ADDRESS
---.---.---.---
IP PORT ----REMAIN TIME D-00 H-00 M-00
LAST REGISTERATION DATE
>
SELECT : ▲▼, CHANGE VALUE : + -
5) Go down to REGISTER and push ENTER button to renew IP and Port resistered on DDNS
Sever(www.j2kip.com)
( Interval : connection interval time between DVR and DDNS Server)
D = Day, H = Hour, M = Minute
DDNS SETUP
DDNS ON/OFF ON
DDNS SERVER 211.062.253.087
INTERVAL D-00 H-00 M-20
REGISTER
-------------------------------------------------------------------------DDNS STATUS REGISTER OK
IP ADDRESS
IP PORT 5000
REMAIN TIME D-00 H-00 M-20
LAST REGISTERATION DATE
> WED. 12 JUL 2006 09 : 21 : 36 GMT
SUCCESS TO REGISTER DVR INFO
SELECT : ▲▼, CHANGE VALUE : + -
192.168.001.160
62
Page 64
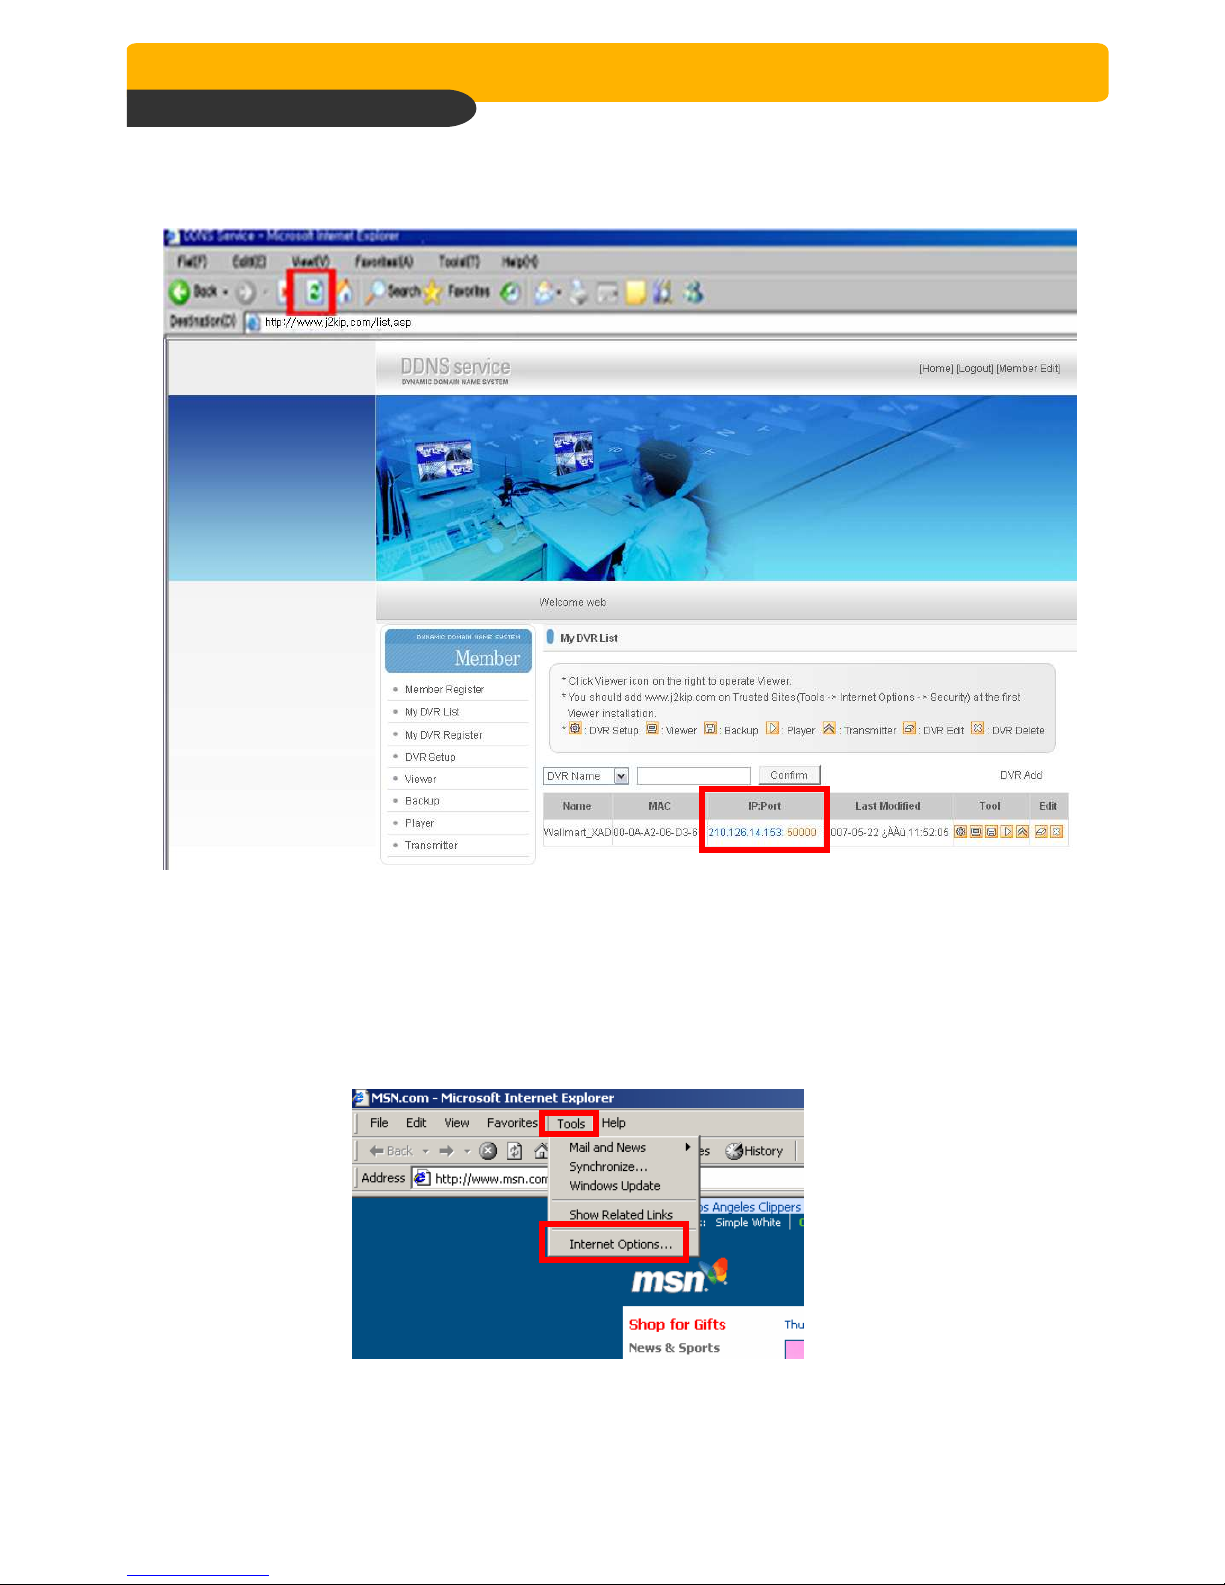
Network (JPEG2000+H.264)
Network (JPEG2000+H.264)
Network (JPEG2000+H.264)Network (JPEG2000+H.264)
Network Stand Alone DVR
Network Stand Alone DVR
Network Stand Alone DVRNetwork Stand Alone DVR
6) Go to your PC again after you see “SUCCESS TO REGISTER DVR INFO.” and then Click ‘refresh’
button. Then, DDNS Server automatically catches your DVR’s IP address and Port number.
CHAP 8. DDNS Web Server
Note.
Note.
Note.Note.
Before using Web-Viewer, please add www.j2kip.com on Trusted Sites at first installation as
follows.
(Tools -> Internet Options -> Security -> Trusted Sites)
①①①①
②②②②
63
Page 65

Network (JPEG2000+H.264)
Network (JPEG2000+H.264)
Network (JPEG2000+H.264)Network (JPEG2000+H.264)
Network Stand Alone DVR
Network Stand Alone DVR
Network Stand Alone DVRNetwork Stand Alone DVR
③③③③
④④④④
CHAP 8. DDNS Web Server
⑤⑤⑤⑤
⑥⑥⑥⑥
⑦⑦⑦⑦
Click
Click
ClickClick
Leave this check box empty
64
Page 66

Network (JPEG2000+H.264)
Network (JPEG2000+H.264)
Network (JPEG2000+H.264)Network (JPEG2000+H.264)
Network Stand Alone DVR
Network Stand Alone DVR
Network Stand Alone DVRNetwork Stand Alone DVR
8888----3. Web Program
3. Web Program
3. Web Program3. Web Program
Some functions of IRS (Integrated Remote Station) such as Viewer,Backup and Player are
also available on the web.
*If ActiveX control installation is required for the first time access,please click ‘Yes’.
Click these icons, then it connects to DVR
Input information needed for network
connection to DVR manually.
automatically via DDNS Server.
CHAP 8. DDNS Web Server
These functions are the same as the one in IRS But, IRS ‘CLIENT’and‘CMS’ only be availble
through IRS.
(Please refer to ‘Chap 7. IRS’ section from page 43~58.)
DVR SETUP Changes DVR setting over a network.
VIEWER Enables to show live image display.
BACKUP Enables to back up recorded images in DVR to your PC.
PLAYER Enables to back up recorded images on your PC. (AJP file)
TRANSMITER Enables to control DVR using virtual key like controlloing actual DVR remotely.
65
Page 67

Network (JPEG2000+H.264)
Network (JPEG2000+H.264)
Network (JPEG2000+H.264)Network (JPEG2000+H.264)
Network Stand Alone DVR
Network Stand Alone DVR
Network Stand Alone DVRNetwork Stand Alone DVR
CHAP.9 Programmer reference
1) Connector Pin Assignment
No Description NO Description
1 DCD Data Carrier Detect 6 DSR Data Set Ready
2 RxD Receive data 7 RTS RS232C: Rx/Tx data
3 TxD Transmit data 8 CTS RS232C: Rx/Tx data
4 DTR Data Terminal data 9
5 GND Signal Ground
2) RS232 ASCII-CODE
We qualify that the ASCII information is provided only as reference material for programmers
to aid them in using these RS-232 ASCII primitive commands for integration into user
developed software and applications
CHAP. 9 Programmer reference
(The following table is based on 16ch DVR.) All ASCII-Code is 1 Byte.
REC ‘R’ DOWN ‘J’ PTZ ‘T’ KLOCK ‘C’ CH5 ‘5’ CH12 ’@’
STOP ‘S’ LEFT ‘H’ ZOOM ‘Z’ ULOCK ‘O’ CH6 ‘6’ CH13 ’#’
PLAY ‘P’ RIGHT ‘K’ FRZ ‘F’ QPLAY ‘Y’ CH7 ‘7’ CH14 ’$’
Pause ‘A’ NEXT ‘N’ MODE ‘D’ CH1 ‘1’ CH8 ‘8’ CH15 ’%’
SERCH ‘E’ ENTER 0x0d PIP ‘I’ CH2 ‘2’ CH9 ‘9’ CH16 ’^’
MENU ‘M’ - ‘<‘ SEQ ‘Q’ CH3 ‘3’ CH10 ’0’
UP ‘U’ + ‘>’ J.SHU ‘L’ CH4 ‘4’ CH11 ’!’
Jog / Shuttle
Jog / Shuttle
Jog / ShuttleJog / Shuttle
Please input ‘L’ command to activate J/SHUTTLE function using keyboard of PC.
Shuttle 0 degree
Shuttle Right 10
degree
Shuttle Right 20
degree
Shuttle Right 30
degree
Shuttle Right 40
degree
Shuttle Right 50
degree
Shuttle Right 60
degree
Shuttle Right 70
degree
Jog Minus "&-"[enter] Jog Plus "&+"[enter]
“&>0”[enter]
"&>1"[enter] Shuttle Left 20 degree "&<2"[enter]
"&>2"[enter] Shuttle Left 30 degree "&<3"[enter]
"&>3"[enter] Shuttle Left 40 degree "&<4"[enter]
"&>4"[enter] Shuttle Left 50 degree "&<5"[enter]
"&>5"[enter] Shuttle Left 60 degree "&<6"[enter]
"&>6"[enter] Shuttle Left 70 degree "&<7"[enter]
"&>7"[enter] Shuttle Left 80 degree "&<8"[enter]
Shuttle Left 10 degree "&<1"[enter]
Shuttle : After inputting a command once, it will keep performing the command until
next
command.
Jog : It makes the stage staying after one time operation by command input like
Button
operation.
66
Page 68

Network (JPEG2000+H.264)
Network (JPEG2000+H.264)
Network (JPEG2000+H.264)Network (JPEG2000+H.264)
Network Stand Alone DVR
Network Stand Alone DVR
Network Stand Alone DVRNetwork Stand Alone DVR
CHAP. 9 Programmer reference
•Key Release for PTZ function
p o w er o n , lig h t o n
p o w er o n , ligh t o n "1"
p o w er o n , lig h t o npo w e r o n , lig h t o n
p o w er o ff , ligh t o ff
p o w er o ff , ligh t o ff "2"
p o w er o ff , ligh t o ffp o w er o ff , ligh t o ff
iris o p e n
iris o p e n "3"
iris o p e niris o p e n
iris c lo se
iris c lo se "4"
iris c lo seiris close
fo c u s n e a r
fo c u s n e a r "5"
fo c u s n e a rfo c u s n ea r
fo c u s far
fo c u s far "6"
fo c u s farfo c u s far
zo o m in
zo o m in "7"
zo o m inzo o m in
zo o m o u t
zo o m o u t "8"
zo o m o u tzo o m o u t
se t p reset
se t p reset "9"
se t p resetset p re se t
clea r p re se t
clea r p re se t "0"
clea r p re se tc le a r p re se t
g o to p reset
g o to p reset "!"
g o to p resetg o to p re se t
au to sc a n
au to sc a n "@ "
au to sc a na u to sc a n
tilt u p
tilt u p "u"
tilt u ptilt u p
tilt d o w n
tilt d o w n "j"
tilt d o w ntilt d o w n
p an le ft
p an le ft "h"
p an le ftp an le ft
p an righ t
p an righ t "k"
p an righ tp a n rig h t
PTZ function
PTZ functionPTZ function
"& Z "
"& Z "
"& Z ""& Z "
”Enter”
•To stop transmitting the signal to DVRs via RS232
1) Set preset
"T“ → “U”, "J", "H", "K" (To move where you want to see) → "9"( set preset ) → "&Z“ ”Enter”
→ "&+“ ”Enter”, ”&-“ ”Enter” (To set other preset point)
2) Clear preset
"T“ → "0" → "&Z“ ”Enter” → "&+", "&-" (To choose which you want to delete ) → “Enter"
3) Goto preset
"T" → "!“ → "&Z” ”Enter" → "&+“, "&-“ ( To choose where you want to see ) →
“Enter"
※※※※ Reference
1.Funtions where the OSD [xx] to the right of the function is not seen pressing "1" or "2" will bring
it up.
2.Operations such as 'clear preset' take affect upon pressing the ‘0’ key causing the last preset to
be deleted even though that may not be the desired action. Instead use the next key 'N' until 'clear
preset' is up then choose the preset to be deleted followed by enter.
3.For units lacking a front panel jog shuttle the '15/F3' and '16/F4' ASCII front panel equivalent can
be used.
67
Page 69

Network (JPEG2000+H.264)
Network (JPEG2000+H.264)
Network (JPEG2000+H.264)Network (JPEG2000+H.264)
Network Stand Alone DVR
Network Stand Alone DVR
Network Stand Alone DVRNetwork Stand Alone DVR
CHAP. 10 Specifications
CHAP. 10 Specifications
• The best picture quality in Playback(JPEG-2000)
• Real time live display in all channels
• 16 channel video 480(400)ips recording capability
• Triplex (Playback/Recording/Ethernet)
• Multi-language menu
• Remote monitoring and download through network
• Convenient search function with Jog/shuttle
• VGA option available (Supporting TFT LCD Monitor)
• USB (Device) port for firmware upgrade
• Easy PTZ camera control by pre-assigned buttons
• Password Protection
• Remote Controller
• User-Friendly Environment by MOUSE
Multiplex function Triplex (Playback/Recording/Ethernet)
Storage Internal HDD Up to 2 HDDs with no limitation in capacity
Capacity CD Recorder For Backup
Video Inputs Composite 16Ch
Outputs Composite 2Ch (Monitor / SPOT)
VGA 1Ch (Supporting TFT LCD Monitor/Option)
Loop out 16Ch
Compression JPEG-2000(Record), H.264(Network)
Compression Rate Basic
(Image size fixed) Normal
Enhanced
Fine
Super Fine
Display Speed Real Time display
Recording Recording Mode Schedule (Time, Motion, Alarm), Emergency
/Search Search Event Search, Date/Time Search, Search Bar (Jog/Shuttle)
Recording Speed (NTSC/PAL) Full (120/100), Dual (240/200)
Recording Resolution (NTSC/PAL) Full (720x240/720x288), Dual (360x240/360x288)
Multi-language English, Spanish, German, Italy, France, to be added more
Switching Interval 1~99 sec selectable
Live Division Screen 1 / 4/ 6/ 8/ 9/ 13/ 16 Split
Digital Zoom, Freeze function available in Live mode, PIP, SEQ
Alarm Inputs 16 Alarms (NO/NC selectable in SETUP menu)
Outputs 1 (NO/NC)
Post Alarm Duration of alarm output : 1 sec ~ 300 sec selectable
Motion Detection Area division : 16 x12 / Detection Division : 32 x 24
Network Ethernet (TCP/IP), Remote viewer program included
Backup VCR, CD Recorder back-up, USB backup, Download via IP Network
PTZ Control RS-485, Key Control( Key assigned for each PTZ command)
Firmware upgrade USB port for firmware upgrade, CD Recorder
Serial I/F RS-485 For PTZ camera control
RS-232C For operation using keyboard of PC
AUDIO
Power Requirements DC 12V 6.67A Adaptor
Weight 8.5kg
Dimensions (WXHXD) mm 436 X 396 X 88
Packing 600 X 520 X 180
Input
Output
4CH Microphone Input
1CH Speaker Output
Design and specifications are subjected to changes without notice
68
Page 70

Network (JPEG2000+H.264)
Network (JPEG2000+H.264)
Network (JPEG2000+H.264)Network (JPEG2000+H.264)
Network Stand Alone DVR
Network Stand Alone DVR
Network Stand Alone DVRNetwork Stand Alone DVR
CHAP. 11 Remocon Key Definition
CHAP. 11 Remocon Key Definition
NORMAL Type Remote Controller Key Definition
Search Menu
Decrease Value/Change PTZ Ch
Increase Value / Change PTZ Ch
Change Ch / Change PTZ Command
Move menu items & Change Value
Move menu items & Change Value
Move menu items & Change Value
Move menu items & Change Value
Enter Menu & Select
4-SPILT
9-SPILT
16-SPILT
Change Audio Ch
SEARCH
-
+
NEXT
▲▲▲▲
◀◀◀◀
▶▶▶▶
▼▼▼▼
ENTER
4-SPLIT
9-SPLIT
16-SPLIT
AUDIO
NORMAL Type
MENU
MODE
FRZ
SEQ
ZOOM
PIP
PTZ
◀◀◀◀I
I▶▶▶▶
◀◀◀◀II
II▶▶▶▶
◀◀
◀◀
◀◀◀◀
▶▶
▶▶
▶▶▶▶
●●●●
■■■■
▶▶▶▶
II
Menu /Exit Menu
Screen Division / Change Mode
Freeze
SEQ
ZOOM
PIP (Picture in Picture)
PTZ
Slow Backward Playback
Slow Forward Playback
1 frame rewind
1 frame forward
Fast Backward Playback
Fast Forward Playback
Emergency Recording
Stop Play / Exit
PLAY
PAUSE
69
1~9, 0
+10
Q.Play
Select Ch / Set Number
For selecting Ch10~16
Quick Play
Page 71

Network (JPEG2000+H.264)
Network (JPEG2000+H.264)
Network (JPEG2000+H.264)Network (JPEG2000+H.264)
Network Stand Alone DVR
Network Stand Alone DVR
Network Stand Alone DVRNetwork Stand Alone DVR
CHAP. 11 Remocon Key Definition
CHAP. 11 Remocon Key Definition
Single Type Remote Controller Key Definition
PTZ On/Off
Search Menu
Menu
MODE
▲◀▶▼
▲◀▶▼
▲◀▶▼▲◀▶▼
OK
CH + / -
+ / -
AUDIO
PTZ
SEARCH
MENU
F1
F2
F3
F4
Screen Division / Change Mode
Move menu items & Change Value
Enter Menu & Select
Change Channel
Change Value
Change Audio Ch
OSD DISPLAY On/Off
4-SPLIT
9-SPLIT
16-SPLIT
Single Type
PTZ CONTOL
SET
CLEAR
GOTO
AUTO
1~9
0
REC
FUNC
I◀◀◀◀
◀◀◀◀
▶▶▶▶
▶▶▶▶I
◀◀
◀◀
◀◀◀◀
II
■■■■
▶▶
▶▶
▶▶▶▶
SEQ
FRZ
PIP
ZOOM
SET PRESET
CLEAR PRESET
GOTO PRESET
AUTO PAN
Select Ch / Input Number
Indicates 2 digits
‘0’ + ‘0’ = ’10’
‘0’ + ‘0’ = ’11’
Emergency Recording
<No functions>
Playback location
Backward Playback
Start Playback / Fast Forward
Go back to the end
Decrease Playback Speed
Pause
Stop
Increase Playback Speed
SEQUENCE
FREEZE
Picture In Picture
ZOOM
70
Page 72

Network (JPEG2000+H.264)
Network (JPEG2000+H.264)
Network (JPEG2000+H.264)Network (JPEG2000+H.264)
Network Stand Alone DVR
Network Stand Alone DVR
Network Stand Alone DVRNetwork Stand Alone DVR
CHAP. 11 Remocon Key Definition
CHAP. 11 Remocon Key Definition
Universal Type Remote Controller Key Definition
DVR ID
(For controlling many DVRs)
DVR1
~
DVR6
Universal Type
REC
MENU
1~9
0
+ -
Emergency Recording
Menu
Select Ch / Input No
Indicates 2 digits
‘0’ + ‘0’ = ’10’
‘0’ + ‘0’ = ’11’
Change Value
Move Menu items & Change Value
Enter Menu & Select
PTZ On/Off
<No functions>
▲◀▶▼
▲◀▶▼
▲◀▶▼▲◀▶▼
OK
PTZ
BACKUP
SEARCH
AUDIO
MODE
ESC
FUNC
I◀◀◀◀
◀◀◀◀
▶▶▶▶
▶▶▶▶I
◀◀
◀◀
◀◀◀◀
II
■■■■
▶▶
▶▶
▶▶▶▶
SEQ
FRZ
PIP
ZOOM
Search Menu
Change Audio Ch
Screen Division / Change Mode
<No functions>
<No functions>
Go back to the beginning
Backward Playback
Start Playback / Fast Forward
Go back to the end
Decrease Playback Speed
Pause
Stop
Increase Playback Speed
SEQUENCE
FREEZE
Picture In Picture
ZOOM
71
Page 73

Network (JPEG2000+H.264)
Network (JPEG2000+H.264)
Network (JPEG2000+H.264)Network (JPEG2000+H.264)
Network Stand Alone DVR
Network Stand Alone DVR
Network Stand Alone DVRNetwork Stand Alone DVR
Record & Playback : JPEG2000 / Transmission via IP network : H.264
16Channel Network Stand Alone DVR
Audio, USB Backup available
 Loading...