

Page 1
Page 2
1
QUICK REFERENCE
Disney Elements © Disney
The Quick Reference is given to provide basic operation of the unit.
Please completely read the user’s guide to take advantage of all the
features this unit has to offer.
DR1000.O/M.QXD 1/21/03 7:26 AM Page 1
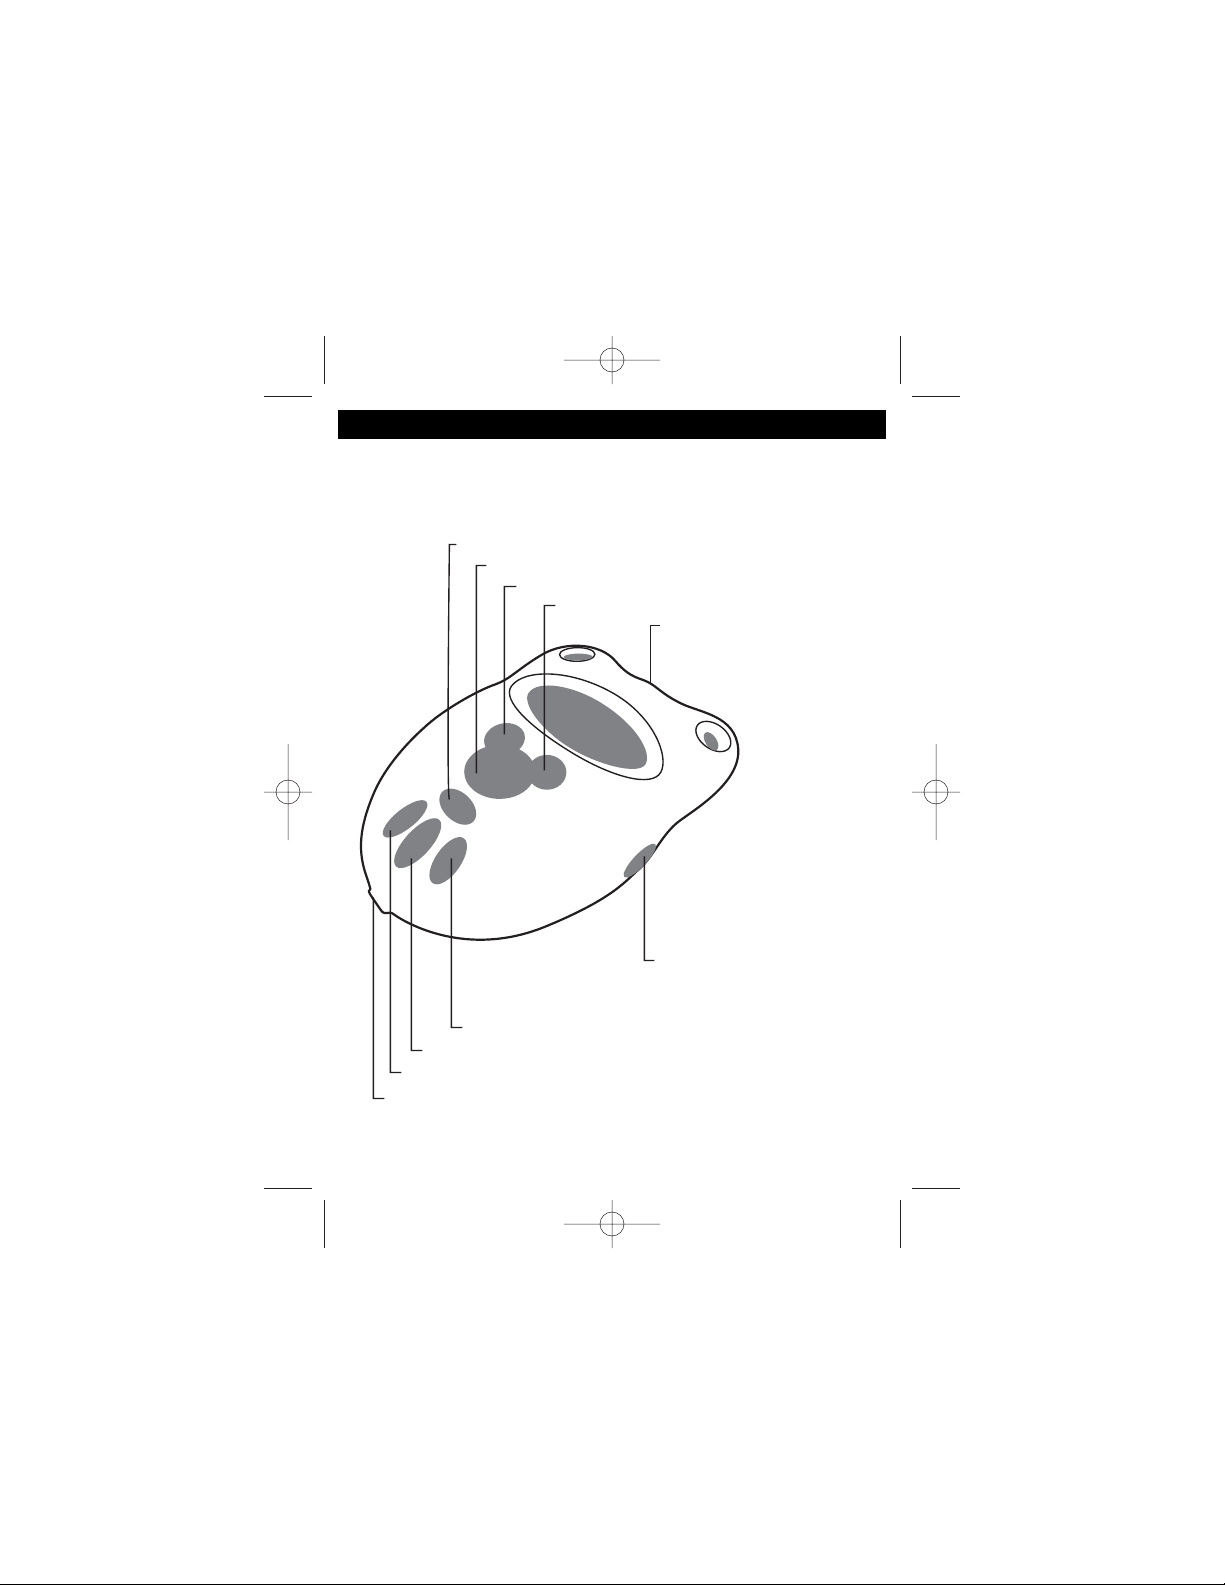
Turn Bass Boost on or off
Increase the radio preset
Change the station/Set the hour
Change the station/Set the minute
Adjust the Volume
Select AM or FM band
Turn the power on or off
Set the radio preset/Set the time
Plug headphones into this jack
Lock position will
disable buttons
from being pressed
Page 3
2
SAFETY PRECAUTIONS
DANGEROUS VOLTAGE:
The lightning flash with arrowhead symbol, within an equilateral
triangle is intended to alert the user to the presence of uninsulated
dangerous voltage within the product’s enclosure that may be of
sufficient magnitude to constitute a risk of electric shock to persons.
ATTENTION:
The exclamation point within an equilateral triangle is intended to
alert the user to the presence of important operating and
maintenance (servicing) instructions in the literature accompanying
the appliance.
CAUTION: TO REDUCE THE RISK OF ELECTRIC SHOCK, DO NOT
REMOVE COVER (OR BACK). NO USER-SERVICEABLE PARTS INSIDE.
REFER SERVICING TO QUALIFIED SERVICE PERSONNEL.
CAUTION
RISK OF ELECTRIC SHOCK
DO NOT OPEN
• Place the unit on a stable surface.
• Avoid placing the unit in locations described below:
• Places exposed to direct sunlight or close to heat radiating
appliances such as electric heaters.
• On top of other stereo equipment that radiates too much heat.
• Places lacking ventilation or dusty places.
• Places subject to constant vibration.
• Humid or moist places.
DR1000.O/M.QXD 1/21/03 7:26 AM Page 2
Page 4
3
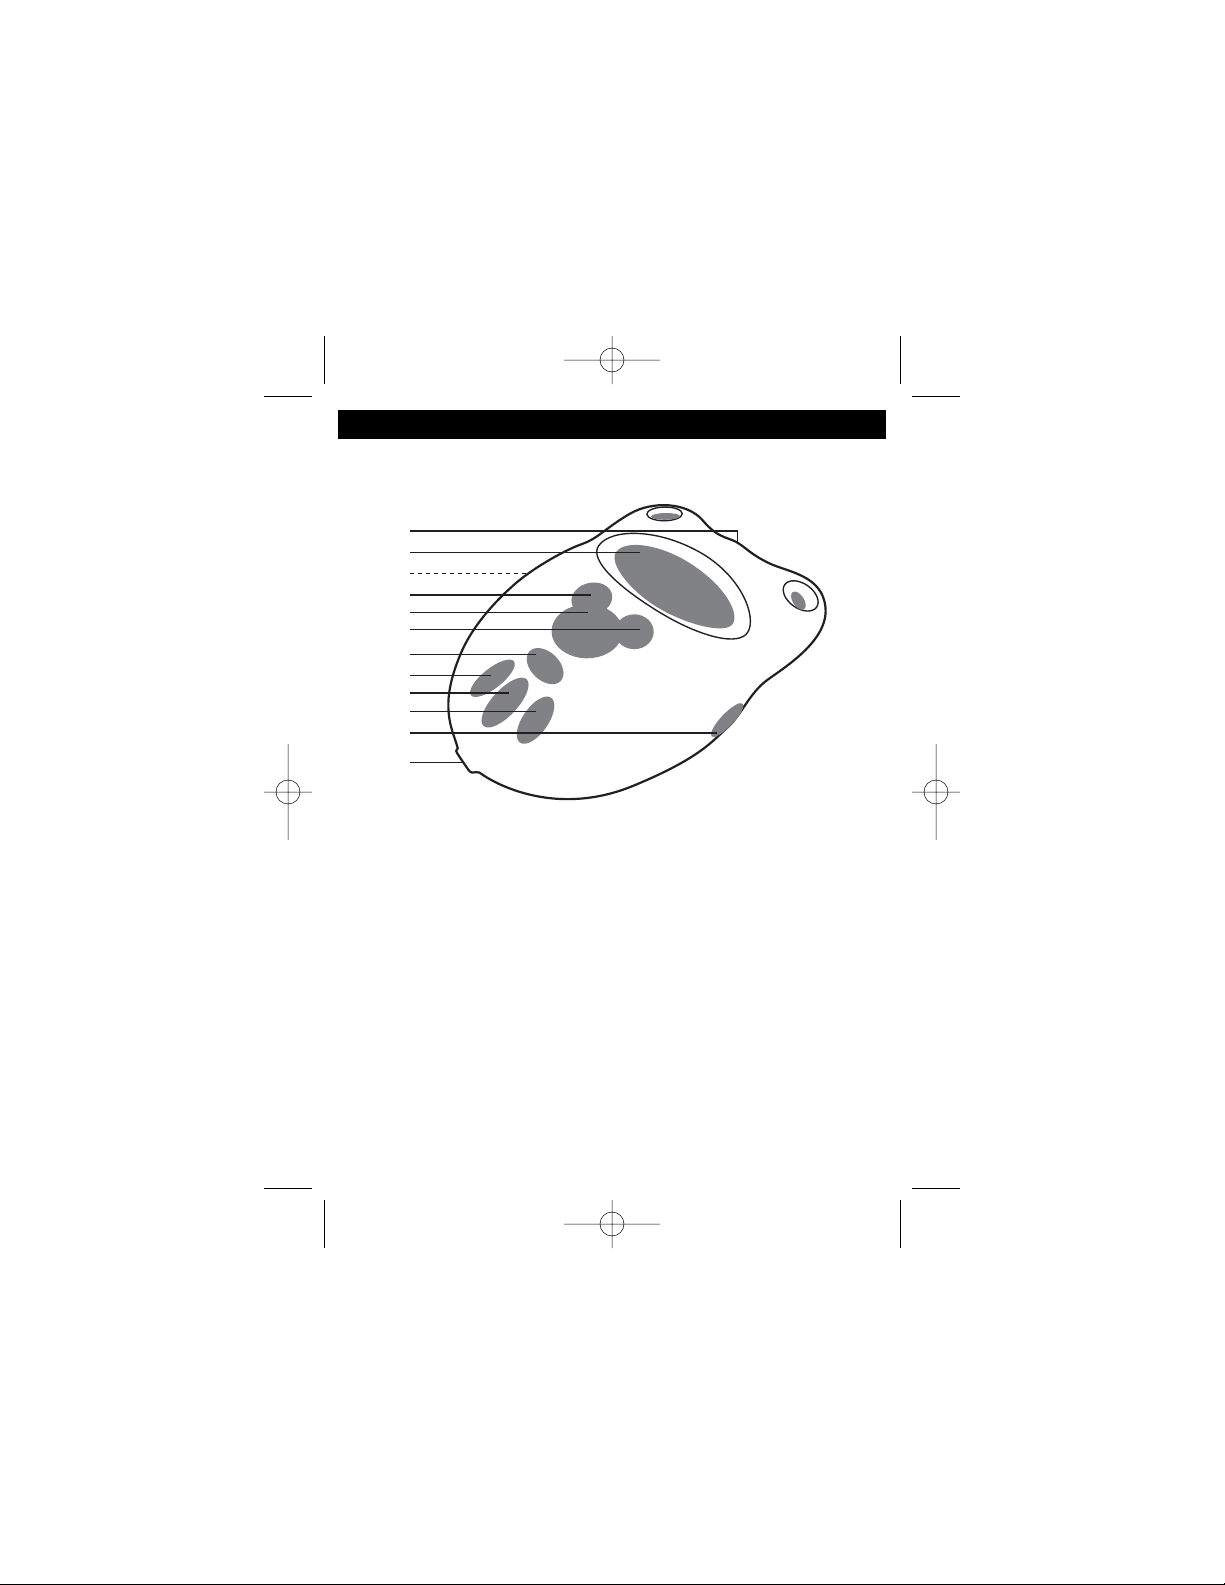
LOCATION OF CONTROLS
1. Volume Control
2. Display
3. Battery Compartment (Rear of Unit)
4. Tuning Down/Hour Button
5. Preset Button
6. Tuning Up/Minute Button
7. Bass Boost Button
8. Preset/Clock Set Button
9. Power Button
10. AM/FM Band Button
11. Hold Switch
12. Headphone Jack
DR1000.O/M.QXD 1/21/03 7:26 AM Page 3
1
2
3
4
5
6
7
8
9
10
11
12
Page 5

4
INSTALLATION
To Install/Remove the Belt Clip
To install, place belt clip into hole in the rear of the unit and slide up until it
locks in place.
To remove, press in the top part of the belt clip and slide downward.
Battery Installation
Batteries need to be replaced when stations are difficult to tune in. Make
sure the Belt Clip is removed first.
1. Open the battery compartment door on the rear of the unit by inserting a
small screwdriver, paper clip or similar item into the tab while gently
pushing to remove.(see figure below).
2. Insert two (2) “AAA” batteries (not included) according to the polarity
diagram. Alkaline
batteries are recommended for longer
playing time.
BATTERY PRECAUTIONS
Follow these precautions when using batteries in this device:
1. Use only the size and type of batteries specified.
2. Be sure to follow the correct polarity when installing the batteries as indicated next
to the battery compartment. Reversed batteries may cause damage to the device.
3. Do not mix different types of batteries together (e.g. Alkaline and Carbon-zinc) or
old batteries with fresh ones.
4. If the device is not to be used for a long period of time, remove the batteries to
prevent damage or injury from possible battery leakage.
5. Do not try to recharge batteries not intended to be recharged; they can overheat
and rupture. (Follow battery manufacturer’s directions.)
DR1000.O/M.QXD 1/21/03 7:26 AM Page 4
+
+
Page 6

5
INSTALLATION (CONTINUED)
TO USE THE NECK STRAP
Follow the instructions below to use the hand strap:
1. Insert the neck strap through the hole and shown in figures 1 and 2 for
each strap.
2. Loop the strap through the buckle as shown in figures 3 and 4.
3. Put around neck and insert A into B until as snap is heard, as shown in
figure 5. To remove neck strap, simply pull the A from B.
Figure 1 Figure 2
Figure 3 Figure 4
Figure 5
DR1000.O/M.QXD 1/21/03 7:26 AM Page 5
AB
Page 7

6
OPERATION
Press the Power button ❶ to
turn the unit on. Set the Volume
control ❷ to minimum and plug
the headphone into the
Headphone jack.
1
Press the AM/FM Band button to
select a band (AM or FM).
2
TO LISTEN TO THE RADIO
Headphones
Insert the supplied headphones into the Headphones jack.
Use your common sense when using headphones:
• Hearing Safety: Do not play your unit at high volume. Hearing experts
advise against continuous extended play. If you experience a ringing in
your ears, reduce the volume or discontinue use.
• Traffic Safety: Do not use while operating a motor vehicle. It may create a
traffic hazard and it is illegal in many areas. You should use extreme
caution or temporarily discontinue use in potentially hazardous situations.
Even if your headset is an open-air type designed to let you hear outside
sounds, do not turn up the volume so high that you can’t hear what’s
around you.
Bass Boost Button
Press to turn bass boost on, which will enhance the overall bass sound.
CONTINUED ON THE NEXT PAGE
DR1000.O/M.QXD 1/21/03 7:26 AM Page 6
1
2
Page 8

7
OPERATION (CONTINUED)
Tune a station by pressing the
Tuning Up/Minute ❶ or Down/Hour
❷ button. Press and hold for
approx 1 second, then release the
Up/Minute ❶ or Down/Hour ❷
button and the unit will scan and
stop on the next strong station.
3
Adjust the Volume control ❶ and
Bass Boost button ❷ as desired.
To turn the radio off, press the
Power button ❸.
4
ANTENNAS
AM – This unit has a built-in ferrite bar antenna, which provides adequate
reception in most areas. If reception is weak, turn the unit to improve
reception.
FM – The headphones act as an antenna for FM. Extend the headphone
wire for best FM reception.
Tune a station as described in
the previous section, then press
the Preset/Clock Set button ❶
once; the Preset number will
blink. Press the Preset button ❷
repeatedly to select a radio
preset number, then press the
Preset/Clock Set button ❶
again to confirm and the radio
preset will be set.
1
SETTING RADIO PRESETS (5 FOR EACH BAND)
DR1000.O/M.QXD 1/21/03 7:26 AM Page 7
2
1
1
2
3
2
1
Page 9

8
OPERATION (CONTINUED)
To recall a Radio Preset, press
the Preset button repeatedly
until the desired Radio Preset
appears in the display.
1
TO RECALL RADIO PRESETS
To avoid any buttons being
pressed, slide the Hold switch to the
Lock position (the Lock indicator will
appear in the display) and no
buttons will operate. To unlock,
slide back to the Unlock position.
1
HOLD SWITCH
With the unit off, press the
Preset/Clock Set button once
and the display will blink.
1
Press the Tuning Up/Minute ❶
button repeatedly to set the
minute. Press the Tuning
Down/Hour ❷ button repeatedly to
set the hour. Make sure the PM
indicator is lit if you are setting to
PM, and make sure it is not lit if
setting to AM. Wait 10 seconds, or
press the Preset/Clock Set button
❸ again and the time will be set.
2
TO SET OR RESET THE TIME
DR1000.O/M.QXD 1/21/03 7:26 AM Page 8
2
1
3
Page 10

9
TROUBLESHOOTING GUIDE
Should this unit exhibit a problem, check the following before seeking service:
SYMPTOM
POSSIBLE POSSIBLE
CAUSE SOLUTION
GENERAL
Power does Batteries connected Check the batteries
not come on. improperly, not con- and replace if
nected or dead. necessary.
RADIO
No sound. Power button was Press the Power button
not pressed. to turn the unit on.
Volume control at Increase the volume.
minimum position.
Headphone plug Make sure headphone
not inserted correctly. plug is fully inserted.
Noise or sound AM - Interference from Turn the radio for
distorted on AM traffic. better AM reception.
or FM. FM - Headphone wire Extend Headphone
is not extended. wire.
CLOCK
Flashing time. Batteries connected Check the batteries
improperly, not con- and replace if
nected or dead. necessary.
Clock not set. Set the clock.
DR1000.O/M.QXD 1/21/03 7:26 AM Page 9
Page 11

FOR ADDITIONAL SET-UP OR OPERATING ASSISTANCE,
PLEASE VISIT OUR WEBSITE AT
WWW.MEMOREXELECTRONICS.COM
OR CONTACT CUSTOMER SERVICE AT 1-877-DISNYCE
( 1-877-347-6923).
PLEASE KEEP ALL PACKAGING MATERIAL FOR AT LEAST
90 DAYS IN CASE YOU NEED TO RETURN THIS PRODUCT
TO YOUR PLACE OF PURCHASE OR MEMOREX.
FOR PARTS AND ACCESSORIES, CONTACT FOX
INTERNATIONAL AT 1-800-321-6993.
10
Power Supply..........................................Two (2) AAA size batteries
Power Output ..........................................................................20mW
Frequency Range (FM)............................................87.5 to 108MHz
Frequency Range (AM) ...........................................520 to 1710KHz
SPECIFICATIONS
DR1000.O/M.QXD 1/21/03 7:26 AM Page 10
 Loading...