

Page 1
MODEL: DCD6011-MER
“A”
OWNER'S MANUAL
SAFETY PRECAUTIONS
L
OCATION OF CONTROLS
POWER SOURCES
OPERATION
C
AUTION: TO REDUCE THE RISK OF ELECTRIC SHOCK, DO
N
OT REMOVE COVER (OR BACK). NO USER-SERVICEABLE
PARTS INSIDE. REFER SERVICING TO QUALIFIED SERVICE
PERSONNEL.
C
AUTION
RISK OF ELECTRIC SHOCK
DO NOT OPEN
DANGEROUS VOLTAGE:
T
he lightning flash with arrowhead symbol within
a
n equilateral triangle is intended to alert the
u
ser to the presence of uninsulated dangerous
v
oltage within the product’s enclosure that may
b
e of sufficient magnitude to constitute a risk of electric shock
t
o persons.
ATTENTION:
The exclamation point within an equilateral
triangle is intended to alert the user to the
presence of important operating and
maintenance (servicing) instructions in the
literature accompanying the appliance.
DANGER:
This product utilizes a Class 1 laser to read
Compact Discs. This laser Compact Disc player
is equipped with safety switches to avoid
exposure when the CD door is open and the
safety interlocks are defeated. Invisible and hazardous laser
radiation when open and interlock failed or defeated. Avoid
direct exposure to beam. Please do not attempt to defeat or
bypass the safety switches.
FCC WARNING:
This equipment may generate or use radio frequency
energy. Changes or modifications to this equipment may
cause harmful interference unless the modifications are
expressly approved in the instruction manual. The user
could lose the authority to operate this equipment if an
unauthorized change or modification is made.
INFORMATION:
This equipment has been tested and found to comply with the
limits for a Class B digital device, pursuant to Part 15 of the
FCC Rules. These limits are designed to provide reasonable
protection against harmful interference in a residential installa
tion. This equipment generates, uses and can radiate radio frequency energy and, if not installed and used in accordance with
the instructions, may cause harmful interference to radio com
munications. However, there is no guarantee that interference
will not occur in a particular installation. If this equipment does
cause harmful interference to radio or television reception,
which can be determined by turning the equipment off and on,
the user is encouraged to try to correct the interference by one
or more of the following measures:
• Reorient or relocate the receiving antenna.
• Increase the separation between the equipment and receiver.
•
Connect the equipment into an outlet on a circuit different
from that to which the receiver is connected.
• Consult the dealer or an experienced radio/TV technician for
help.
•
Do not open the CD compartment while the CD is rotating.
•
Always keep the CD compartment closed when not in use.
• Keep all foreign objects out of the CD compartment.
•
Place the unit on a stable surface.
• Avoid installing the unit in locations described below:
• Places exposed to direct sunlight or close to heat radiating
appliances such as electric heaters.
• On top of other stereo equipment that radiates too much
heat.
•
Places lacking ventilation or dusty places.
•
Places subject to constant vibration.
• Humid or moist places.
SURGE PROTECTORS:
It is recommended to use a surge protector for AC connection.
Lightning and power surges ARE NOT covered under warranty
for this product.
ATTENTION:
POUR ÉVITER LES CHOC ÉLECTRIQUES, INTRODUIRE LA
LAME LA PLUS LARGE DE LA FICHE DANS LA BORNE CORRE
-
SPONDANTE DE LA PRISES ET POUSSER JUSQU’AU FOND.
This Class B digital apparatus complies with Canadian ICES-
003. / Cet appareil numérique de la classe B est conforme à la
norme NMB-003 du Canada.
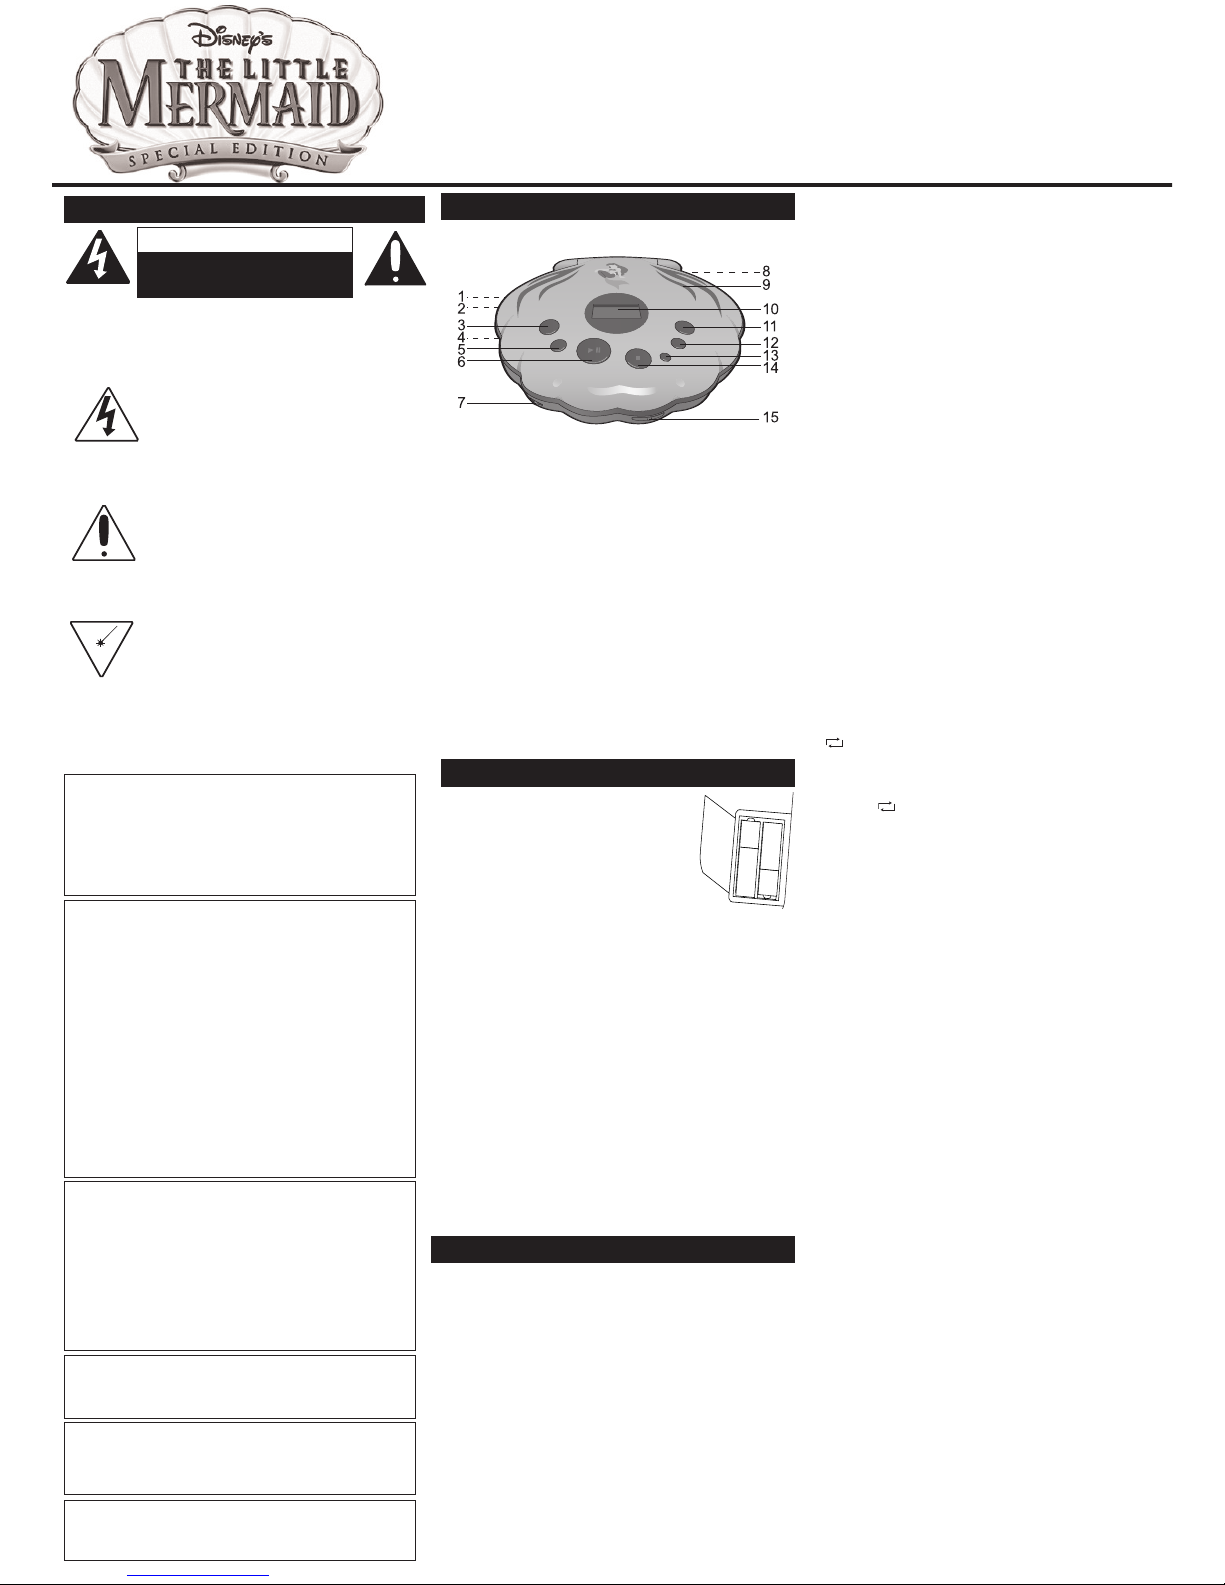
1. Headphones 1 Jack
(
Side of Unit)
2. Headphones 2 Jack
(Side of Unit)
3. SKIP/SEARCH (
o)
Button
4. VOLUME Control
5. SKIP/SEARCH (
n)
Button
6. PLAY/PAUSE
(
®p)/POWER ON
Button
7. DBBS Switch
8. DC 4.5V Jack
(
Rear of Unit) Z
9. CD Compartment with
Battery Compartment
(
inside)
10.Display
11.MODE Button
12.PROG (Program)
Button
1
3.ESP (Anti-Skip
Protection) Button
14.STOP (
■)/POWER
OFF Button
15.CD OPEN Switch
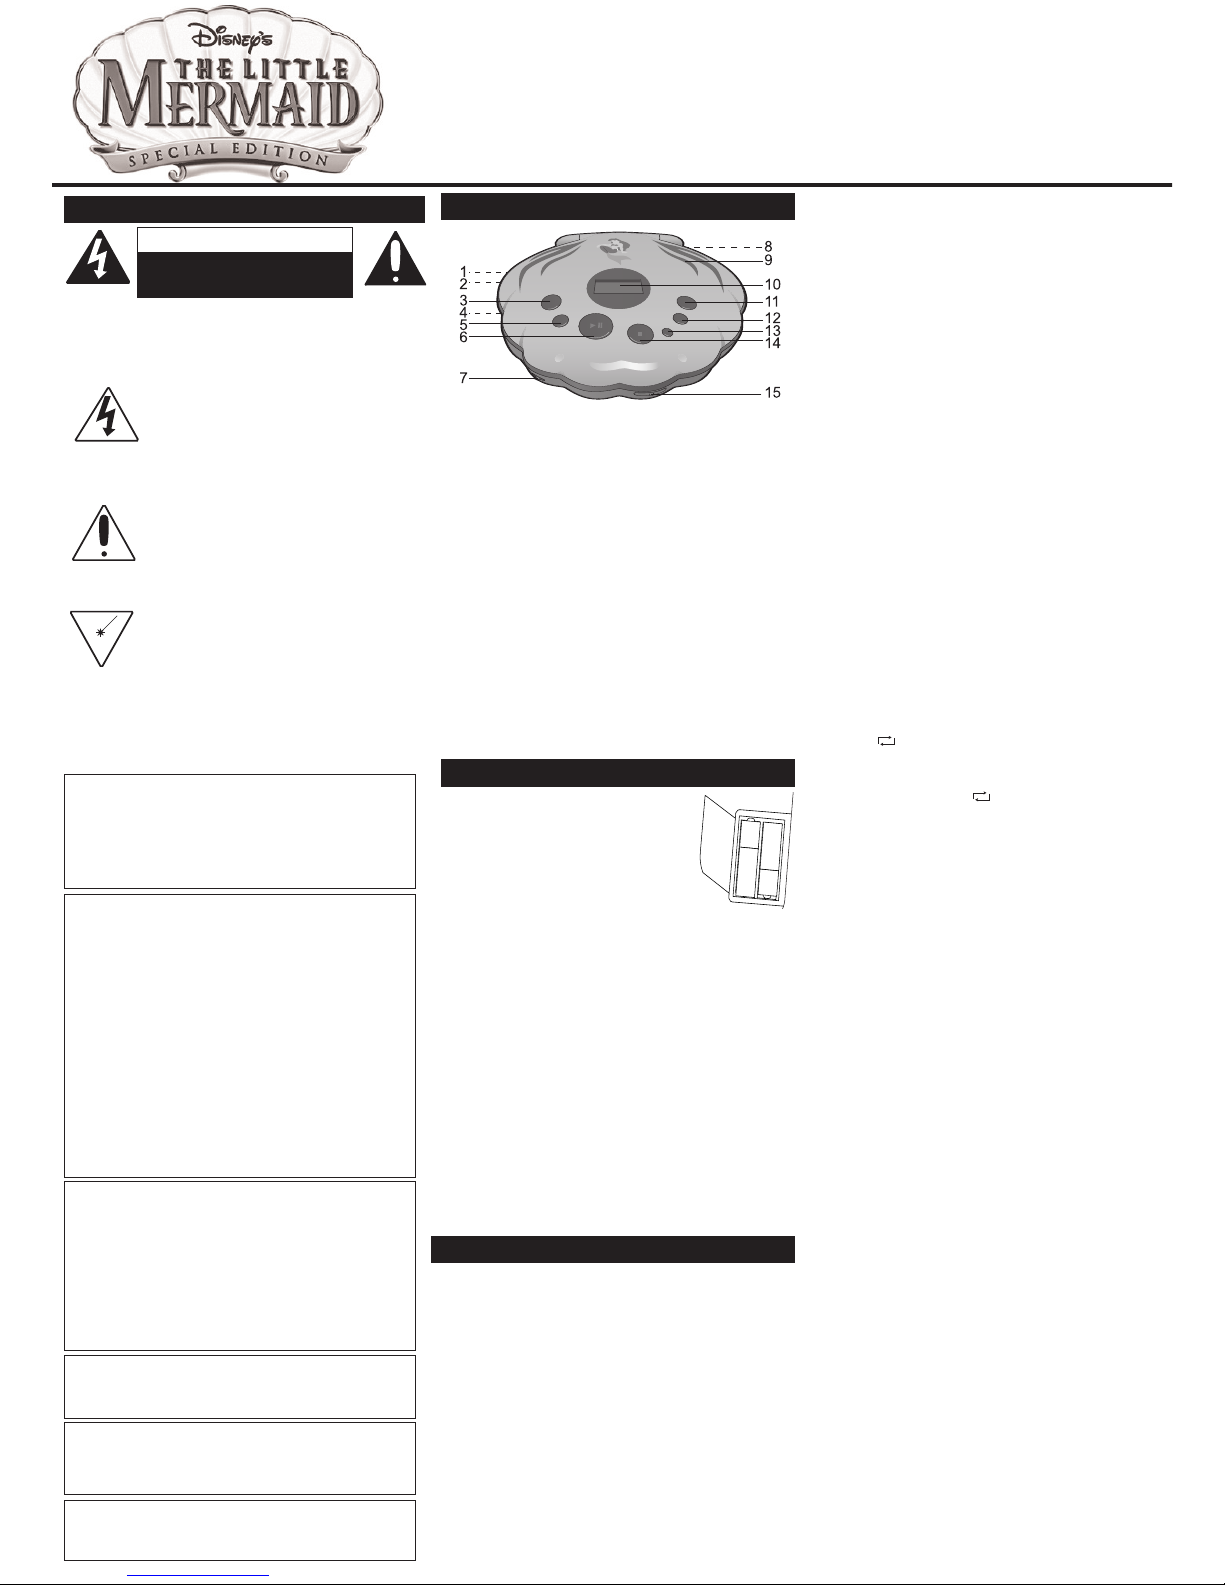
BATTERY INSTALLATION
The battery low indicator will blink in the
display when the batteries need replacing.
1. Open the Battery Compartment door
(inside the CD compartment) by
pressing in on the tab and then lifting
up.
To prevent the possibility of
losing the cover, it cannot be removed.
2. Insert two (2) “AA” batteries (not included) according to
the polarity diagram inside the Battery Compartment.
Alkaline batteries are recommended for the longest
playing time.
AC OPERATION
To operate the unit using AC power, connect an AC
adapter (not included) to an AC outlet having 120V, 60Hz
AC only. Plug the small end into the DC 4.5V jack on the
rear of the unit and connect the other end into an AC outlet.
The batteries are automatically disconnected when an AC
adapter is used.
CAUTION: When not using AC power,
disconnect the AC adapter from the wall outlet by pulling
the plug (not the cord). Do not touch the AC adapter with
wet hands. Fully insert the plug without exposing any part
of the blade.
–
+
–
+
–
+
–
+
60 SECOND MOTION PROOF ELECTRONIC
ANTI-SHOCK SYSTEM
This CD player has a built-in Anti-Shock System that cuts down
on CD skipping, which is useful when using the CD player in
the car or while jogging/walking. Anti-Shock is automatically
activated when the unit is turned on. To turn the Anti-Shock
System off, press the ESP button once; the ESP indicator will
disappear.
HEADPHONE JACKS
There are two Headphones jacks. Plug headphones in one jack
for private listening or both jacks for sharing.
TO PLAY A CD (Standard, CD-R and CD-RW)
1. Open the CD compartment door by sliding the CD OPEN
switch to the right. Gently press a disc, label side up, onto
the spindle until it locks in place. Close the CD compartment
door
. Insert headphones into the Headphones jack.
2. While the unit is off, press the PLAY/PAUSE (
®p)/ POWER
O
N button to start playback. To pause playback,press
t
he PLAY/PAUSE (
®p)
/POWER ON button again, the
elapsed time will blink. Press once again to resume
p
layback.
3
. Adjust the VOLUME control and DBBS switch (to
enhance the bass) as desired. To
skip forward or
b
ackward through the tracks on the disc, press the
S
KIP/SEARCH
O orN b
utton. To searchforward or
backward through the tracks on the disc, press and hold
t
he SKIP/SEARCH
O orN b
utton.
4
. When the disc is through playing, it will stop. Press the
STOP (
■)/POWER OFF button to stop the disc before it is
fi
nished; the total number of tracks will appear. Press the
S
TOP (■)/POWER OFF button again while in the Stop
mode to turn the unit off or wait approximately 30 seconds
and the unit will automatically turn off.
N
OTES:
• This unit is capable of playing standard CDs or 3” singles;
no adapter is required.
•
If a disc is inserted incorrectly, dirty, damaged or not
present at all, the display will show “disc”.
• As each track is played, the track number and elapsed
t
ime are shown in the display.
• To remove the disc, open the CD compartment while the
unit is in the Stop mode or off, then hold the edge of the
C
D, gently press the center pivot and lift the CD.
• The display will show "OPEN" when the CD compartment
door is open.
M
ODE PLAYBACK
1. With a CD inserted, press the PLAY/PAUSE (®p)/
POWER ON button to turn the unit on, then select a track
u
sing the SKIP/SEARCH
O orN b
utton (if desired).
2. Press the MODE button once; the Repeat 1 indicator
1 will appear in the display. The unit will then play the
same track over and over until the STOP (■)/POWER
OFF button is pressed.
3. Press the MODE button a second time; the Repeat All
indicator
will appear in the display. The unit will
then play all the tracks on the CD over and over until the
STOP (
■)/POWER OFF button is pressed.
4. While in the Stop mode, press the MODE button three
times; the INTRO indicator will appear in the display.
Press the PLAY/PAUSE (®p)/POWER ON button and
the unit will play the first 10 seconds of each track. Press
the STOP (■)/POWER OFF button to stop Intro playback.
5. While in the Stop mode, press the MODE button four
times; the RAND indicator will appear in the display. The
unit will play all the tracks in random order. When all the
tracks have been played, the unit will stop. Press the
STOP (
■)/POWER OFF button
to stop Random playback.
6. Adjust the VOLUME control and DBBS switch as desired.
TO CANCEL Mode Play, press the Mode button until the
indicators disappear.
TO PROGRAM THE MEMORY (UP TO 20 TRACKS)
1. While in the Stop mode, press the PROG button. The
track number will blink and “01” will appear in the display.
2. Select a track to be programmed using the Skip/
SEARCH
O or N button.
3. Press the PROG button to memorize the track. Repeat
Steps 1 and 2 to program additional tracks up to a
maximum of 20 tracks.
4. Press the PLAY/PAUSE (
®p)/POWER ON button to
begin Program playback.
NOTES:
• You can review the program by pressing the PROG
button repeatedly while in the Stop mode.
•
Press the STOP (
■)/POWER OFF button to stop the
program before it is finished (the program memory will be
kept). Press the STOP (
■)/POWER OFF button to turn
the unit off and clear the Program memory.
• Each track may be stored in the program memory as
many times as desired (up to 20 files).
• You can scroll through the program while it is playing
using the Skip/Search
O or N button.
WARRANTY: 90 days parts and labor. For additional warranty
information or operating assistance, please visit
www.disneyelectronics.com or contact customer service at (954)
660-7026
. Please keep all packaging material for at least 90 days in
case you need to return this product to your place of purchase or
Memcorp. For parts and accessories, contact Fox International at
1-800-321-6993. Distributed by Memcorp Inc., Weston, FL, Disney
Elements © Disney 2006.
ALL
ALL
English
Page 2
MODÈLE: DCD6011-MER
“A”
GUIDE D'UTILISATION
CONSIGNES DE SÉCURITÉ
EMPLACEMENT DES CONTRÔLES
SOURCES D'ALIMENTATION
FONCTIONNEMENT
MISE EN GARDE : POUR RÉDUIRE LES RISQUES DE CHOCS
É
LECTRIQUES, N’OUVREZ JAMAIS LE BOÎTIER DE L’APPAREIL (NI LE
COUVERCLE ARRIÈRE). AUCUNE PIÈCE À L’USAGE DE L’UTILISATEUR
NE SE TROUVE À L’INTÉRIEUR. CONFIEZ LA RÉPARATION À UN
T
ECHNICIEN QUALIFIÉ.
M
ISE EN GARDE
R
ISQUE DE CHOC ÉLECTRIQUE
N
E PAS OUVRIR
TENSIONS DANGEREUSES :
L
e symbole d'éclair avec une flèche, à l'intérieur
d
'un triangle équilatéral, alerte l'utilisateur de la
p
résence de « tensions dangereuses » non
i
solées à l'intérieur du boîtier de l'appareil, d'une
v
aleur suffisante pour constituer un risque d'électrocution.
ATTENTION :
Le point d'exclamation à l'intérieur d'un triangle
équilatéral est destiné à attirer l'attention de
l'utilisateur sur la présence d'instructions
d'exploitation et d'entretien dans le manuel
fourni avec l'appareil.
D
ANGER :
C
e produit utilise un laser de classe 1 pour lire les
disques compacts. Ce lecteur laser de disques
compacts est équipé d'un interrupteur de sûreté pour
é
viter les risques d'exposition lorsque le couvercle du
compartiment CD est ouvert et que les interrupteurs de verrouillage
sont déconnectés. Le rayonnement laser émis lorsque le couvercle est
o
uvert et que les interrupteurs de verrouillage sont défectueux ou
déconnectés, est invisible et dangereux. Évitez tout contact direct avec
le faisceau. N'essayez pas de déconnecter les interrupteurs de sûreté.
M
ISE EN GARDE DE LA CFC
:
Cet appareil peut émettre ou utiliser de l’énergie par radiofréquence. Tout changement à cet appareil peut occasionner
de l’interférence dommageable, à moins que les modifications
ne soit explicitement approuvées dans le présent manuel.
L’utilisateur pourrait perdre son droit d’utiliser cet appareil s’il y
effectue un changement non autorisé.
CFC INFORMATION:
Cet appareil a subi des tests et s’est avéré conforme aux limites
déterminées pour un appareil numérique de classe B, selon la partie
15 des règlements de la Commission Fédérale des Communications
(É.-U.). Ces limites sont déterminées pour offrir une protection
raisonnable contre une interférence dommageable dans une
résidence. Cet appareil produit, utilise et peut émettre de l’énergie par
radio-fréquence et, s’il n’est pas installé et utilisé selon les instructions,
peut causer de l’interférence à d’autres appareils de communication
radio. Cependant, il n’est pas garanti qu’une telle interférence ne se
produira pas dans une installation particulière. Si cet appareil cause
de l’interférence nuisible à la réception radio ou télévision (qu’on peut
déterminer en allumant et en éteignant l’appareil), l’utilisateur est
encouragé à essayer d’y remédier en prenant une ou plusieurs des
mesures suivantes:
• réorienter ou déplacer l’antenne de réception;
• augmenter l’espace entre l’appareil et le récepteur;
•
brancher l’appareil dans une prise reliée à un autre circuit que celui
auquel le récepteur est branché;
• consulter le détaillant ou un technicien expérimenté en
radio/télévision.
• N'ouvrez pas le compartiment CD lors de la lecture du CD.
• Tenez toujours le compartiment CD fermé lorsque vous
n'utilisez pas le lecteur.
• Préservez le compartiment CD de tout corps étranger.
•
Placez l'appareil sur une surface plane.
•
Évitez d'installer l'appareil dans les endroits
• Directement exposés à la lumière du soleil ou près d'une
source de chaleur telle qu'un radiateur électrique.
•
Au-dessus d'autres dispositifs stéréo qui dégagent trop
de chaleur.
• Peu ventilés ou poussiéreux.
• Soumis à de fréquentes vibrations.
• Humides.
PARASURTENSEURS: Il est recommandé d’utiliser un para
surtenseur lorsque l’appareil est branché à une prise murale c.a. La
garantie de ce produit NE couvre PAS les dommages causés par
les orages électriques et les surtensions.
ATTENTION:
POUR ÉVITER LES CHOC ÉLECTRIQUES, INTRODUIRE LA
LAME LA PLUS LARGE DE LA FICHE DANS LA BORNE CORRESPONDANTE DE LA PRISES ET POUSSER JUSQU’AU FOND.
This Class B digital apparatus complies with Canadian ICES-
003. / Cet appareil numérique de la classe B est conforme à la
norme NMB-003 du Canada.
1. Prise pour casque
d'écoute (Partie
latérale de l'appareil)
2. 2 prises pour casque
d'écoute (Partie
latérale de l'appareil)
3. Bouton SKIP/SEARCH
(
o) (Recherche/Saut)
4. Réglage du VOLUME
5. Bouton SKIP/SEARCH
(
n) (Recherche/Saut)
6. Bouton PLAY/PAUSE
(
®p)/POWER ON
(Lecture/Pause)
7. Interrupteur DBBS
8. Prise d'alimentation CC
4,5 V (DC 4.5 V)–à
l'endos
Z
9. Compartiment CD avec
compartiment à piles (à
l'intérieur)
10. Affichage
11. Bouton MODE (Mode)
12. Bouton PROG
(Programmation)
13. Bouton ESP (Circuit
antichoc)
14. Bouton STOP
(
X)/POWER OFF
(
Stop/Arrêt)
15. Interrupteur CD OPEN
(Ouverture/Fermeture
du compartiment CD)
MISE EN PLACE DES PILES
Le voyant de pile s'affiche et clignote lorsque
les piles doivent être changées.
1. Ouvrez le compartiment à piles (à
l'intérieur du compartiment CD) en
appuyant sur la languette du couvercle
puis en soulevant ce dernier.
Le
couvercle est fixé pour éviter de le
perdre.
2. Insérer (2) piles AA (non fournies) en respectant les
polarités indiquées à l'intérieur du compartiment à piles. Il
est recommandé d'utiliser des piles alcalines pour une plus
longue durée.
FONCTIONNEMENT À PARTIR DU COURANT ALTERNATIF
Pour faire fonctionner l'appareil à partir du réseau électrique,
raccordez un adaptateur d'alimentation (non inclus) à une prise
de courant d'une tension de 120 V, 60 Hz seulement. Branchez
la petite extrémité du cordon de l'adaptateur d'alimentation
(non inclus) que vous utilisez sur la prise d'alimentation CC
4,5V (DC 4.5V) qui se trouve à l'arrière de l'appareil et
branchez l'autre extrémité à une prise de courant. Lorsque
l'appareil est branché sur une prise de courant, les piles sont
automatiquement déconnectées.
ATTENTION: Débranchez
l'adaptateur d'alimentation de la prise de courant en tirant sur la
prise (pas sur le cordon), lorsque vous ne désirez pas
alimenter l'appareil via le réseau électrique. Ne touchez pas
l'adaptateur si vous avez les mains humides. Insérez la prise
jusqu'au fond.
–
+
–
+
–
+
–
+
SYSTÈME ÉLECTRONIQUE ANTICHOC DE 60 SECONDES
Ce lecteur CD possède un système antichoc qui empêche le CD de
sauter. Cette fonction s'avère utile lorsque vous utilisez l'appareil dans
la voiture ou lorsque vous courez/marchez. Cette fonction est activée
automatiquement lorsque l'appareil est allumé. Pour désactiver le
système antichoc, appuyez une fois sur le bouton ESP (Circuit
antichoc). L'indicateur ESP disparaîtra.
PRISES POUR CASQUE D'ÉCOUTE
L'appareil dispose de deux prises pour casque d'écoute. Branchez le
casque sur une prise pour une écoute individuelle ou sur les deux
pour partager l'écoute.
POUR LIRE UN CD (Standard, CD-R ET CD-RW)
1. Ouvrez le couvercle du compartiment CD en faisant glisser
l'interrupteur OPEN (Ouverture/Fermeture du compartiment CD)
vers la droite. Déposez un disque dans l'appareil et appuyez
doucement dessus, l'étiquette vers le haut, dans le pivot jusqu'à ce
qu'il s'enclenche. Fermez le couvercle du compartiment CD.
Branchez le casque d'écoute.
2. Si l'appareil est éteint, appuyez sur le bouton PLAY/PAUSE
(
®p)
/ POWER ON (Lecture/Pause) pour lire le CD. Pour mettre
sur pause, appuyez à nouveau sur le bouton PLAY/PAUSE
(
®p)
/POWER ON (Lecture/Pause), le temps écoulé clignote.
Appuyez une seconde fois pour redémarrer la lecture.
3. Réglez la commande du VOLUME et l'interrupteur DBBS (pour
a
ugmenter la basse) jusqu'à obtenir le son désiré. Pour sauter
en avant ou en arrière entre les pistes du disque, appuyez sur le
b
outon SKIP/SEARCH
O ouN (
Recherche/Saut). Pour chercher
en avant ou en arrière entre les pistes du disque, appuyez sur le
b
outon SKIP/SEARCH
O ouN (
Recherche/Saut).
4
. La lecture du disque s'arrête. Appuyez sur le bouton STOP
(
X)/POWER OFF (Stop/Arrêt) pour arrêter la lecture du disque
a
vant la fin de celui-ci, le nombre total de pistes apparaît. En
mode arrêt, appuyez à nouveau sur le bouton STOP
(X)/
POWER OFF (Stop/Arrêt) pour éteindre l'appareil ou
patientez environ 30 secondes et l'appareil s'éteint
a
utomatiquement.
REMARQUES :
• Cet appareil est conçu pour lire des CD standard ou des disques
n
e contenant qu'une pièce musicale et de 3 ", aucun adaptateur
n
'est requis.
•
Si le disque est mal inséré, sale, endommagé ou qu'il n'y a pas
d
e disque dans l'appareil, la mention « disc » (disque) s'affiche.
• En mode lecture, le numéro de la piste et le temps écoulé
s
'affiche pour chaque piste.
• Pour retirer le disque, ouvrez le compartiment CD lorsque
l
'appareil est sur mode arrêt ou éteint, puis en saisissant le bord
du CD appuyez légèrement sur le pivot central et soulevez le
CD.
• Lorsque le couvercle du compartiment CD est ouvert la mention
« OPEN » (OUVERT) s’affiche.
M
ODE LECTURE
1
. Lorsqu'un CD est à l'intérieur, appuyez sur le bouton
P
LAY/PAUSE (
®p)
(Lecture/Pause) pour allumer l'appareil,
p
uis sélectionnez une piste au moyen du bouton SKIP/SEARCH
O ou N (Recherche/Saut) le cas échéant.
2. Appuyez une fois sur le bouton MODE; l'indicateur « Repeat »
(Répéter) 1 s'affiche. L'appareil lit la même piste jusqu'à ce
q
ue vous ayez appuyé sur le bouton STOP
(X)/
POWER OFF
(Stop/Arrêt).
3
. Appuyez une deuxième fois sur le bouton MODE; l'indicateur
«
Repeat all » (Répéter tout)
s'affiche. L'appareil lit
toutes les pistes du CD jusqu'à ce que vous ayez appuyé sur le
bouton STOP
(X)/POWER OFF (Stop/Arrêt).
4. En mode arrêt, appuyez une troisième fois sur le bouton MODE,
l'indicateur « INTRO » (Introduction) s'affiche. Appuyez sur le
bouton PLAY/PAUSE (
®p)/POWER ON (Lecture/Pause) pour
que l'appareil lise les dix premières secondes de chaque piste.
Appuyez sur le bouton STOP
(X)/POWER OFF (Stop/Arrêt)
pour mettre fin à la lecture Intro.
5. En mode arrêt, appuyez une troisième fois sur le bouton MODE,
l'indicateur « RAND » (Au hasard) s'affiche. Pour que l'appareil
lise toutes les pistes dans n'importe quel ordre. L'appareil
s'arrête une fois la lecture de toutes les pistes terminée.
Appuyez sur le bouton STOP
(X)/POWER OFF (Stop/Arrêt)
pour mettre fin à la lecture Intro.
6. Réglez la commande du VOLUME et l'interrupteur DBBS jusqu'à
obtenir le son désiré. POUR ANNULER En mode lecture,
appuyez sur le bouton Mode jusqu'à ce que l'indicateur de la
fonction que vous voulez annuler disparaisse.
POUR PROGRAMMER LA MÉMOIRE (JUSQU'À 20 PISTES)
1. En mode arrêt, appuyez sur le bouton PROG (Programmation).
Le numéro de la piste clignote et la mention « 01 » s'affiche.
2. Sélectionnez la piste à programmer au moyen du bouton Skip/
SEARCH
O ou N (Recherche/Saut).
3. Appuyez sur le bouton PROG (Programmation) pour enregistrer
la piste. Répétez les étapes 1 et 2 pour programmer des pistes
supplémentaires jusqu'à un maximum de 20 pistes.
4. Appuyez sur le bouton PLAY/PAUSE (
®p)/POWER ON
(Lecture/Pause) pour lancer la lecture programmée.
REMARQUES :
• Vous pouvez modifier la programmation en appuyant plusieurs
fois sur le bouton PROG (Programmation) en mode arrêt.
•
Appuyez sur le bouton STOP
(X)/POWER OFF (Stop/Arrêt)
pour mettre fin à la programmation avant la fin de celle-ci (la
programmation reste en mémoire). Appuyez sur le bouton
STOP (
■)/POWER OFF (arrêter/éteindre) pour éteindre
l'appareil et effacer la mémoire du programme.
• Chaque piste peut être programmée dans la mémoire de
programmation autant de fois que désiré (jusqu'à 20 fois).
• Vous pouvez faire défiler la programmation lors de la lecture au
moyen du bouton Skip/Search
O ou N (Recherche/Saut).
Garantie
90 jours, pièces et main d'œuvre. Pour plus d'informations
concernant la garantie ou joindre le service d'assistance, visitez
www.disneyelectronics.com ou contactez le service clientèle au
numéro suivant : (954) 660-7026.
Veuillez conserver tous les emballages pendant au moins 90 jours
si vous devez renvoyer ce produit au lieu d'achat ou à Memcorp.
Pour les pièces détachées et les accessoires, contactez Fox
International au numéro suivant : 1-800-321-6993.
Distribué par Memcorp Inc., Weston, FL
Disney Elements © Disney 2006.
ALL
ALL
French
Page 3

MODELO: DCD6011-MER
“A”
Guía del Usuario
U
BICACIÓN DE LOS CONTROLES
FUENTES DE ENERGÍA
OPERACIÓN
AVISO DE LA FCC:
Este equipo genera o puede usar energía de frecuencia radial. Cualquier cambio o modificación al equipo,
puede causar interferencia nociva, a menos que estas
modificaciones esten expresamente indicadas en el
manual de instrucciones. El usuario puede perder el
derecho de operar este equipo si efectuara un cambio
o modificación no autorizadas.
INFORMACIÓN:
Este equipo cumple con aparato digital de Clase B regulaciones. Este equipo genera, usa y puede irradiar energía
de radiofrecuencia y, si no se instala y usa conforme a las
instrucciones, puede generar interferencia dañina con las
radiocomunicaciones. Sin embargo, no hay garantía de
que no habrá interferencia en una instalación particular. Si
este equipo llegara a causar interferencia dañina con la
recepción de radio o televisión, lo cual se puede determinar encendiendo y apagando el equipo, le pedimos que
intente corregir la interferencia con las siguientes medidas:
• Reoriente o reubique la antena receptora.
• Incremente la distancia entre el equipo y el receptor.
• Conecte el equipo a un contacto eléctrico que esté en un
circuito distinto al que está conectado el receptor.
• Consulte al vendedor o a un técnico de radio y televisión
con experiencia.
• No abra el compartimiento del CD mientras el CD esté girando.
•
Siempre mantenga el compartimiento del CD cerrado cuando
no se esté usando.
• No meta objetos extraños en el compartimiento del CD.
•
Coloque la unidad sobre una superficie estable.
•
Evite instalar la unidad en los lugares descritos a continuación:
• Lugares expuestos a la luz directa del sol o cerca de
aparatos
que irradian calor como calentadores eléctricos.
•
Arriba de otros equipos estereofónicos que irradian demasia
do calor.
•
Lugares con poca ventilación o polvorientos.
•
Lugares sujetos a una vibración constante.
• Lugares húmedos.
PROTECTORES DE OLEADA: Se recomienda para utilizar un
protector de oleada para la conexión de la CA. Las oleadas del
relámpago y de la energía no se cubren bajo garantía para
este producto.
ATTENTION:
POUR ÉVITER LES CHOC ÉLECTRIQUES, INTRODUIRE LA
LAME LA PLUS LARGE DE LA FICHE DANS LA BORNE CORRE
-
SPONDANTE DE LA PRISES ET POUSSER JUSQU’AU FOND.
Este aparato digital de Clase B cumple con la norma ICES-003 de
Canadá. / Cet appareil numérique de la classe B est conforme à la
norme NMB-003 du Canada.
1. Enchufe de audífonos
1
(lado de la unidad)
2. Enchufe de audífonos
2 (lado de la unidad)
3. Botón BRINCAR/
BUSCAR (
o)
4. Control de VOLUMEN
5. Botón BRINCAR/
BUSCAR (
n)
6. Botón REPRODUCIR/
PAUSA (
®p)/
ENCENDIDO
7. Interruptor DBBS
8. Enchufe DC 4.5V
(atrás de la unidad)
Z
9. Compartimiento de
C
D con
compartimiento de
pilas (adentro)
10. Display
11. Botón MODO
1
2. Botón PROG
(Programa)
13. Botón ESP
(protección antisaltos)
14. Botón DETENER
(
■)/APAGADO
15. Interruptor de Abrir
CD
INSTALACION DE PILAS
El indicador de pila baja parpadeará en el
display cuando sea necesario reemplazar
las pilas.
1. Abra la puerta del compartimiento de pilas
(dentro del compartimiento del CD)
presionando y levantando la pestaña.
Para evitar la posibilidad de perder la
tapa, ésta no puede quitarse.
2. Introduzca dos (2) pilas "AA" (no incluidas) de acuerdo
con el diagrama de polaridad adentro del compartimiento
de pilas. Se recomienda el uso de pilas alcalinas para una
mayor duración.
OPERACION CON CORRIENTE ELÉCTRICA
Para operar la unidad usando corriente eléctrica, conecte un
adaptador de corriente alterna (no incluido) a un contacto
eléctrico de 120V, 60Hz. Enchufe el extremo angosto en el
enchufe de 4.5V en atrás en la unidad y conecte el otro
extremo en un contacto eléctrico. Las pilas se desconectan
automáticamente cuando se utiliza un adaptador de corriente
alterna.
PRECAUCIÓN: Cuando no use energía eléctrica,
desconecte el adaptador del contacto eléctrico jalando del
enchufe (pero no del cable). No toque el adaptador con las
manos mojadas. Introduzca la clavija por completo sin que
quede expuesta parte de la clavija.
–
+
–
+
–
+
–
+
SISTEMA ELECTRÓNICO ANTI-SALTOS A PRUEBA DE
MOVIMIENTOS POR 60 SEGUNDOS
Este reproductor de CD tiene integrado un sistema anti-saltos que
elimina los saltos en el CD, lo cual es útil cuando se usa el reproductor
en el automóvil o mientras trota o corre. El sistema anti-saltos se activa
automáticamente al encender la unidad. Para desactivar el sistema
anti-saltos, presione una vez el botón ESP; el indicador ESP
desaparecerá.
ENCHUFES DE AUDÍFONOS
Hay dos juegos de enchufes para audífonos. Conecte los audífonos en
un enchufe para escuchar en privado o en ambos enchufes para
compartir.
TO PLAY A CD (Standard, CD-R and CD-RW)
REPRODUCIR UN CD (Estándar, CD-R y CD-RW)
1. Abra la tapa del compartimiento del CD deslizando el botón para
abrir puerta de CD a la derecha. Presione suavemente un disco
sobre el eje, con la etiqueta hacia arriba, hasta que quede fijo en su
lugar. Cierre la tapa del compartimiento del CD. Inserte los
audífonos en el enchufe para AUDÍFONOS.
2. Con la unidad apagada, presione el botón REPRODUCIR
/
PAUSA (
®p)
/ENCENDIDO para iniciar la reproducción. Para
p
ausar la reproducción
,
presione nuevamente el botón
R
EPRODUCIR/PAUSA (
®p)
/ENCENDIDO y el tiempo
transcurrido parpadeará. Presione una vez más para reanudar la
reproducción.
3. Ajuste el control de VOLUMEN y el interruptor DBBS (para
m
ejorar los bajos), según desee. Para
b
rincarhacia la siguiente
p
ista o a la anterior en el disco, presione el botón
B
RINCAR/BUSCAR
O o N .
Para buscarhacia adelante o atrás
en una misma pista en el disco, presione el botón
BRINCAR/BUSCAR
O o N y manténgalo presionado.
4. Cuando el disco termine de reproducir, se detendrá. Presione el
b
otón DETENER (
■)
/APAGADO para detener el disco antes de
t
erminar; aparecerá el número total de pistas. Presione
n
uevamente el botón DETENER (
■)
/APAGADO mientras está
en modo de paro o espere 30 segundos y la unidad se apagará
automáticamente.
NOTAS:
•Esta unidad puede reproducir discos de tamaño estándar o
s
encillos de 3"; no se requiere un adaptador.
•
Si el disco se inserta incorrectamente, o está sucio, dañado o no
hay ninguno presente, la pantalla mostrará "disco".
• A medida que se reproduce cada pista, se muestra en la pantalla
el número de pista y el tiempo transcurrido.
•
Para quitar el disco, abra el compartimiento del CD con la unidad
e
n modo de Paro o apagada, luego sostenga la orilla del CD y
p
resione suavemente el pivote central y levante el CD.
•
"OPEN" [abierto] aparecerá en la pantalla cuando la puerta del
C
D esté abierta.
M
ODO DE REPRODUCIR
1. Con un CD insertado, presione el botón de REPRODUCIR
/PAUSA (
®p)/ENCENDIDO para encender la unidad y luego
seleccione una pista utilizando el botón BRINCAR /BUSCAR
O o
N (
si así lo desea).
2. P
resione una vez el botón de MODO; en la pantalla aparecerá el
i
ndicador "Repeat 1"
1. La unidad reproducirá entonces la
misma pista una y otra vez hasta que presione el botón
DETENER (
■)/APAGADO.
3. P
resione el botón de MODO una segunda vez; en la pantalla
aparecerá el indicador "Repeat All" [repetir todo] . La
unidad reproducirá entonces todas las pistas en el CD una y otra
vez hasta que presione el botón DETENER (■)/APAGADO.
4. Mientras está en modo de Paro, presione el botón MODO una
tercera vez; en la pantalla aparecerá el indicador de INTRO. La
unidad reproducirá los primeros 10 segundos de cada pista.
Presione el botón DETENER (
■)/APAGADO para detener la
reproducción de la introducción.
5. Mientras está en modo de Paro, presione el botón MODO cuatro
veces; en la pantalla aparecerá el indicador de RAND [aleatorio].
La unidad reproducirá todas las pistas en orden aleatorio.
Después de reproducir todas las pistas, la unidad se detendrá.
Presione el botón DETENER (
■)/APAGADO para detener la
reproducción aleatoria.
6.
Ajuste el control de VOLUMEN y el interruptor DBBS, según
desee. Para
CANCELAR el modo de reproducir, presione el
botón Modo hasta que desaparezcan los indicadores.
PROGRAMAR LA MEMORIA (HASTA 20 PISTAS)
1. Estando en modo de Paro, presione el botón PROG. El número
de pista parpadeará y "01" aparecerá en el display.
2. Escoja la pista a programar usando el botón Brincar/Buscar
O o N.
3. Presione el botón PROG para memorizar la pista. Repita los
pasos 1 y 2 para programar pistas adicionales, hasta un máximo
de 20 pistas.
4. Presione el botón REPRODUCIR/PAUSA (®p)/ENCENDIDO
para empezar la reproducción del programa.
NOTAS:
• Usted puede revisar el programa presionando repetidamente el
botón PROG mientras está en modo de Paro.
• Presione el botón DETENER (
■)/APAGADO para detener el
programa antes de que termine (la memoria del programa se
guardará). Presione el botón DETENER (
■)/APAGADO para
apagar la unidad y
borrar la
memoria del Programa.
• Cada pista puede guardarse en la memoria del programa tantas
veces como desee (hasta 20 archivos).
• Usted puede desplazarse por el programa mientras se está
reproduciendo si usa el botón Brincar/Buscar
O o N.
GARANTIA: de 90 días para material y mano de obra. Para obtener
información adicional acerca de la garantía u obtener ayuda con la
operación, visite
www.disneyelectronics.com o comuníquese con
servicio al cliente al
(954) 660-7026. Conserve el material de
embalaje al menos durante 90 días por si acaso necesitara regresar
el producto a su lugar de compra o a Memcorp. Para obtener piezas
y accesorios, comuníquese con Fox International al 1-800-321-
6993. Distribuido por Memcorp Inc., Weston, FL, Disney Elements ©
Disney 2006.
ALL
ALL
M
EDIDAS DE SEGURIDAD
A
DVERTENCIA:Para reducir el riesgo de descargas eléctricas
n
o saque la cubierta o la tapa posterior. Allí no se encuentran
p
artes que puedan ser reparadas por el usuario. Lleve su unidad
a
un Centro de Servicio Autorizado.
CUIDADO
RIESGO DE DESCARGA
ELÉCTRICA. NO ABRIR
ADVERTENCIA: La figura de la flecha con forma
de rayo dentro de un triángulo está hecho para
alertar al usuario de la presencia de cables sin
aislar de "voltaje peligroso" dentro del gabinete,
de tal magnitud que puede causar un riesgo de
descarga eléctrica a las personas.
ADVERTENCIA: El signo de exclamación
dentro de un triángulo está hecho para alertar al
usuario de la existencia de instrucciones
importantes tanto de servicio como de
funcionamiento y mantenimiento que vienen
con la unidad.
PELIGRO: Este producto utiliza un láser de Clase
1 para leer los discos compactos. Este reproductor
de discos compactos con láser está equipado con
interruptores de seguridad para evitar el contacto
c
uando la puerta del CD está abierta y el
intercierre de seguridad está vencido. Radiación láser invisible y
riesgosa cuando está abierto y el intercierre está averiado o
vencido. Evite la exposición directa al haz de luz. Le rogamos que
n
o intente vencer o circunvalar los interruptores de seguridad.
Spanish
 Loading...