

Memorex DCD6006-PIROM, DCD6006-PIR-A Owner's Manual

OWNER'S MANUAL
MODEL
DCD6006-PIR-A
4 513 6 7 8 9 1
1
1
0
1
4
131
2
2
SAFETY PRECAUTIONS
L
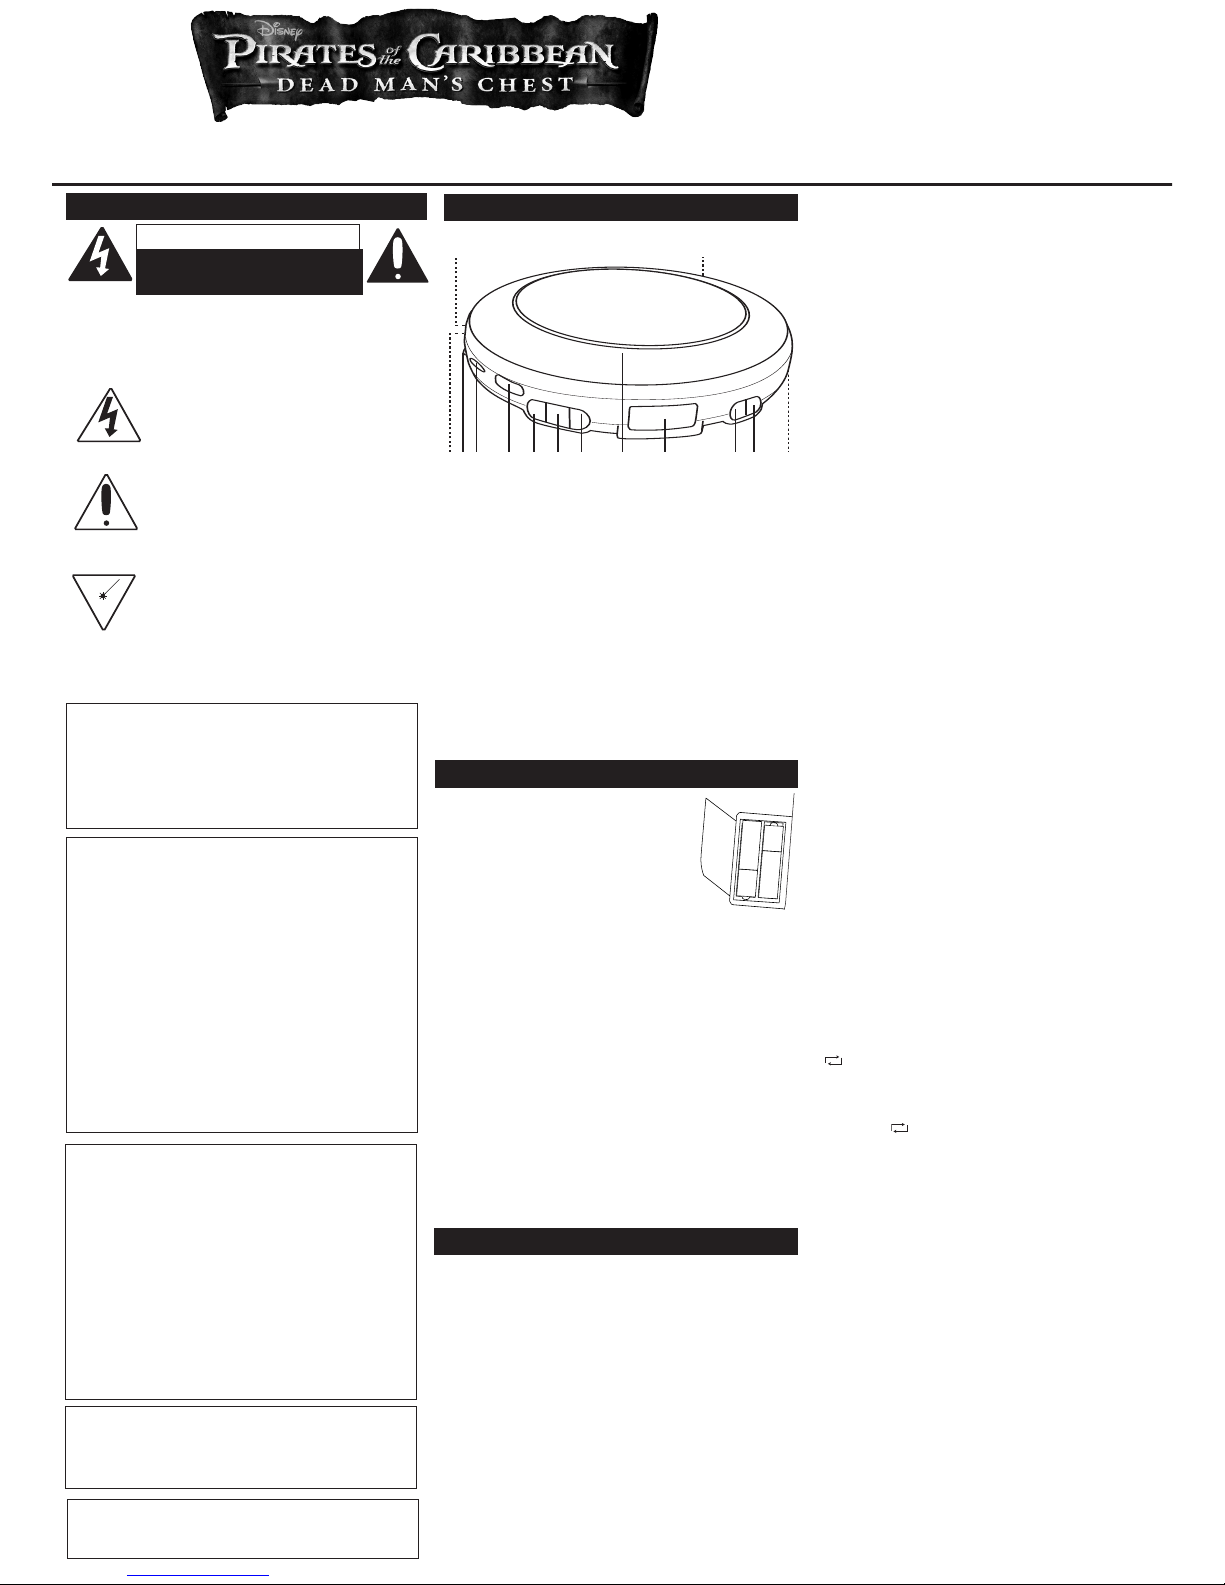
OCATION OF CONTROLS
POWER SOURCES
OPERATION
C
AUTION: TO REDUCE THE RISK OF ELECTRIC SHOCK, DO
N
OT REMOVE COVER (OR BACK). NO USER-SERVICEABLE
PARTS INSIDE. REFER SERVICING TO QUALIFIED SERVICE
PERSONNEL.
C
AUTION
RISK OF ELECTRIC SHOCK
DO NOT OPEN
DANGEROUS VOLTAGE:
T
he lightning flash with arrowhead symbol,
w
ithin an equilateral triangle is intended to alert
t
he user to the presence of uninsulated
d
angerous voltage within the product’s
e
nclosure that may be of sufficient magnitude to constitute a
r
isk of electric shock to persons.
ATTENTION:
The exclamation point within an equilateral
triangle is intended to alert the user to the
presence of important operating and
maintenance (servicing) instructions in the
literature accompanying the appliance.
DANGER:
This product utilizes a Class 1 laser to read
Compact Discs. This laser Compact Disc Player
is equipped with safety switches to avoid
exposure when the CD door is open and the
safety interlocks are defeated. Invisible and hazardous laser
radiation when open and interlock failed or defeated. Avoid
direct exposure to beam. Please do not attempt to defeat or
bypass the safety switches.
FCC WARNING:
This equipment may generate or use radio frequency
energy. Changes or modifications to this equipment
may cause harmful interference unless the
modifications are expressly approved in the instruction
manual. The user could lose the authority to operate
this equipment if an unauthorized change or
modification is made.
INFORMATION:
This equipment has been tested and found to comply with the
limits for a Class B digital device, pursuant to Part 15 of the
FCC Rules. These limits are designed to provide reasonable
protection against harmful interference in a residential installa
tion. This equipment generates, uses and can radiate radio frequency energy and, if not installed and used in accordance with
the instructions, may cause harmful interference to radio com
munications. However, there is no guarantee that interference
will not occur in a particular installation. If this equipment does
cause harmful interference to radio or television reception,
which can be determined by turning the equipment off and on,
the user is encouraged to try to correct the interference by one
or more of the following measures:
• Reorient or relocate the receiving antenna.
• Increase the separation between the equipment and receiver.
•
Connect the equipment into an outlet on a circuit different
from that to which the receiver is connected.
• Consult the dealer or an experienced radio/TV technician for
help.
•
Do not open the CD compartment while the CD is rotating.
•
Always keep the CD compartment closed when not in use.
• Keep all foreign objects out of the CD compartment.
• Place the unit on a stable surface.
•
Avoid installing the unit in locations described below:
• Places exposed to direct sunlight or close to heat radiating
appliances such as electric heaters.
•
On top of other stereo equipment that radiates too much
heat.
•
Places lacking ventilation or dusty places.
• Places subject to constant vibration.
• Humid or moist places.
SURGE PROTECTORS:
It is recommended to use a surge protector for AC connection. Lightning and power surges ARE NOT covered under
warranty for this product.
This Class B digital apparatus complies with Canadian ICES-003.
Cet appareil numérique de la classe B est conforme à la norme
NMB-003 du Canada."
1. PHONES Jack (Side
of Unit)
2. DC 4.5V Jack (Rear of
U
nit)
Z
3.
PHONES Jack (Side
of Unit)
4. VOLUME Control
5. DBBS Switch
6. CD Door OPEN
Switch
7. SKIP/SEARCH (
o)
Button
8. SKIP/SEARCH (
n)
Button
9. MODE Button
10.CD Compartment,
F
aceplate and
Transparent Lid
11.Display
12.STOP (
■)/POWER
O
FF Button
1
3.PLAY/PAUSE
(
®p)/POWER ON
Button
14.Battery Compartment
(Bottom of Unit)
BATTERY INSTALLATION
The battery low indicator will blink in the
display when the batteries need
replacing
1. Open the battery compartment door
by pressing out and then lifting up.
To prevent the possibility of losing
the cover, it cannot be removed.
2. Insert two (2) “AA” batteries (not included) according
to the polarity diagram inside the battery
compartment. Alkaline batteries are recommended for
the longest playing time.
AC OPERATION
To operate the unit using AC power, connect an AC
adapter (not included) to an AC outlet having 120V, 60Hz
AC only. Plug the small end into the DC 4.5V jack on the
rear of the unit and connect the other end into an AC
outlet. The batteries are automatically disconnected when
an AC adapter is used.
CAUTION: When not using AC
power, disconnect the AC adapter from the wall outlet by
pulling the plug (not the cord). Do not touch the AC
adapter with wet hands. Fully insert the plug without
exposing any part of the blade.
–
+
–
+
–
+
–
+
60 SECOND MOTION PROOF ELECTRONIC
ANTI-SHOCK SYSTEM
This CD player has a built-in Anti-Shock System that cuts down
on CD skipping, which is useful when using the CD player in the
car or while jogging/walking. Anti-Shock is automatically
activated when the unit is turned on.
HEADPHONE JACKS
There are two sets of headphone jacks. Plug headphones in
one jack for private listening or both jacks for sharing.
CHANGING THE FACEPLATE
1. At the top of the CD door, there is a transparent lid. Rotate
the lid clockwise to remove it.
2.
Change the Faceplate with another, or insert your own
photo as desired. Make sure the tab on the Faceplate is
c
orrectly positioned to the tab cavity on the CD door.
3
. To replace the transparent lid on top of the CD door,
make sure the logo on the lid is at the correct position,
t
hen rotate the lid counter-clockwise.
T
O PLAY A CD (Standard, CD-R and CD-RW)
1
. Open the CD compartment lid by sliding the CD OPEN
switch to the right. Gently press a disc, label side up,
o
nto the spindle until it locks in place. Close the CD
c
ompartment lid. Insert headphones into the PHONES
jack.
2
. While the unit is off, press the PLAY/PAUSE
(
®p)
/POWER ON button to start playback. To pause
playback
, press the PLAY/PAUSE (®p)/POWER ON
b
utton again, the elapsed time will blink. Press once
again to resume playback.
3
. Adjust the VOLUME control and DBBS switch (to
e
nhance the bass) as desired. To
s
kipforward or
backward through the tracks on the disc, press the
S
KIP/SEARCH
O or N b
utton. To searchforward or
backward through the tracks on the disc, press and hold
the SKIP/SEARCH
O or N button.
4
. W
hen the disc is through playing, it will stop. Press the
STOP (
■)/POWER OFF button to stop the disc before it
i
s finished; the total number of tracks will appear. Press
t
he STOP (
■)
/POWER OFF button again while in the
Stop mode to turn the unit off or wait approximately 30
seconds and the unit will automatically turn off.
NOTES:
•
This unit is capable of playing standard CDs or” singles;
no adapter is required.
• If a disc is inserted incorrectly, dirty, damaged or not
present at all, the display will show “disc”.
• As each track is played, the track number and elapsed
time are shown in the display.
• To remove the disc, open the CD compartment while the
unit is in the Stop mode or off, then hold the edge of the
CD, gently press the center pivot and lift the CD.
• The maximum time of a CD is 74 minutes for this unit.
• “OPEN” will appear in the display when the CD door is
open.
MODE PLAYBACK
1. With a CD inserted, press the PLAY/PAUSE
(
®p)/POWER ON button to turn the unit on, then select
a track using the SKIP/SEARCH
O or N button (if
desired).
2.
Press the MODE button once; the Repeat 1 indicator
1 will appear in the display. The unit will then play
the same track over and over until the STOP
(
■)/POWER OFF button is pressed.
3. Press the MODE button a second time; the Repeat All
indicator
will appear in the display. The unit will
then play all the tracks on the CD over and over until the
STOP (
■)/POWER OFF button is pressed.
4. While in the Stop mode, press the MODE button a third
time; the INTRO indicator will appear in the display. The
unit will play the first 10 seconds of each track. Press the
STOP (
■)/POWER OFF button
to stop Intro playback.
5. While in the Stop mode, press the MODE button four
times; the RAND indicator will appear in the display. The
unit will play all the tracks in random order. When all the
tracks have been played, the unit will stop. Press the
STOP (
■)/POWER OFF button
to stop Random
playback.
6. Adjust the VOLUME control and DBBS switch as
desired.
TO CANCEL Mode Play, press the Mode
button until the indicators disappear.
WARRANTY: 90 days parts and labor. For additional warranty
information or operating assistance, please visit
www.disneyelectronics.com or contact customer service at
(954) 660-7026. Please keep all packaging material for at least 90
days in case you need to return this product to your place of
purchase or Memcorp. For parts and accessories, contact Fox
International at 1-800-321-6993. Distributed by Memcorp Inc.,
Weston, FL, Disney Elements © Disney 2006.
ALL
ALL
English
4 513 6 7 8 9 1
1
1
0
1
4
131
2
2
C
ONSIGNES DE SÉCURITÉ
EMPLACEMENT DES CONTRÔLES
SOURCES D’ALIMENTATION
FONCTIONNEMENT
MISE EN GARDE : POUR RÉDUIRE LES RISQUES DE CHOCS
ÉLECTRIQUES, N’OUVREZ JAMAIS LE BOÎTIER DE L’APPAREIL
(NI LE COUVERCLE ARRIÈRE). AUCUNE PIÈCE À L’USAGE DE
L’UTILISATEUR NE SE TROUVE À L’INTÉRIEUR. CONFIEZ LA
RÉPARATION À UN TECHNICIEN QUALIFIÉ.
MISE EN GARDE
RISQUES DE CHOCS ÉLECTRIQUES
NE PAS OUVRIR
TENSION DANGEREUSE
Le symbole de l'éclair à l'intérieur du triangle prévient
l'utilisa teur de la présence, à l'intérieur de l'appareil,
de tension dan gereuse d'une importance suffisante
p
our constituer un risque de choc électrique.
ATTENTION
Le symbole du point d'exclamation à l'intérieur du
triangle informe l'utilisateur de la présence de
d
irectives importantes sur le fonctionnement et
l'entretien de l'appareil dans le manuel
accompagnant ce produit.
DANGER :
Ce produit utilise un laser de catégorie 1 pour lire les
disques compacts.Ce lecteur laser de disque
compact est doté de commutateurs pour éviter
l'exposition lorsque la porte du compartiment à CD
est ouverte et que les dispositifs de sécurité sont arrêtés. Radiations
laser invisibles et dangereuses lorsque ouvert avec dispositif de
sécurité arrêté. Évitez une exposition directe au faisceau. N'essayez
pas d'arrêter ou de contourner les commutateurs de sûreté.
MISE EN GARDE DE LA CFC :
Cet appareil peut émettre ou utiliser de l’énergie par radiofréquence. Tout changement à cet appareil peut occasionner
d
e l’interférence dommageable, à moins que les modifications
ne soit explicitement approuvées dans le présent manuel.
L’utilisateur pourrait perdre son droit d’utiliser cet appareil s’il y
effectue un changement non autorisé.
INFORMATION
Cet appareil a subi des tests et s’est avéré conforme aux limites
déterminées pour un appareil numérique de classe B, selon la
partie 15 des règlements de la Commission Fédérale des
Communications (É.-U.). Ces limites sont déterminées pour offrir
une protection raisonnable contre une interférence dommageable
dans une résidence. Cet appareil produit, utilise et peut émettre
de l’énergie par radio-fréquence et, s’il n’est pas installé et utilisé
selon les instructions, peut causer de l’interférence à d’autres
appareils de communication radio. Cependant, il n’est pas
garanti qu’une telle interférence ne se produira pas dans une
installation particulière. Si cet appareil cause de l’interférence
nuisible à la réception radio ou télévision (qu’on peut déterminer
en allumant et en éteignant l’appareil), l’utilisateur est encouragé
à essayer d’y remédier en prenant une ou plusieurs des mesures
suivantes :
• réorienter ou déplacer l’antenne de réception;
• augmenter l’espace entre l’appareil et le récepteur;
• brancher l’appareil dans une prise reliée à un autre circuit que
celui auquel le récepteur est branché;
• consulter le détaillant ou un technicien radio/télé expérimenté.
1
. Prise PHONES (écouteurs)
(coté de l'appareil)
2
. Prise CC 4.5V (arrière de
l
'appareil)
Z
3. Prise PHONES (écouteurs)
(
coté de l'appareil)
4
. Contrôle du VOLUME
5. Commutateur DBBS
(système d'augmentation
d
es basses)
6.Bouton OPEN/CLOSE
(ouverture/fermeture) du
couvercle du CD
7.Bouton SKIP/SEARCH
(
sauter/rechercher) (
o)
8
. Bouton SKIP/SEARCH
(sauter/rechercher) (
n)
9
. Bouton MODE
1
0. Compartiment à CD,
plaque illustrée Disney et
c
ouvercle transparent
1
1. Afficheur
12. STOP (arrêt) (
■)//POWER
OFF (éteint) Bouton
13. PLAY/PAUSE
(lecture/pause)
(
®p)
/POWER ON (en
marche)
14. Compartiment à piles (Bas
de l'appareil)
INSTALLATION DES PILES
L’indicateur de piles clignotera dans
l’afficheur CD lorsque les piles devront être
remplacées.
1. Ouvrez le couvercle du compartiment à
piles en appuyant dessus puis en le
soulevant.
Dans le but d’éviter que
vous ne perdiez le couvercle, il est
impossible de le retirer complètement.
2. Insérez deux (2) piles “AA” (non comprises) selon le
diagramme de polarité qui se trouve dans le logement à
piles. Les piles alcalines sont les plus recommandées
pour un temps de lecture longue durée.
FONCTIONNEMENT C.A.
Pour faire fonctionner l’appareil sur courant alternatif,
branchez l’adaptateur c.a. (non compris) à une sortie c.a. de
120V, 60Hz seulement. Branchez la petite extrémité à la
prise C.C. sur le côté de l’appareil et branchez l’autre
extrémité à la sortie c.a. Les piles sont automatiquement
désactivées lorsqu’un adaptateur c.a. entre en fonction.
ATTENTION: lorsque l’alimentation c.a. n’est pas utilisée,
débranchez l’adaptateur de la sortie murale en tirant sur la
prise et non sur le cordon. Ne touchez pas l’adaptateur c.a. si
vos mains sont mouillées. Insérez la prise à fond sans
exposer aucune partie de la lame.
–
+
–
+
–
+
–
+
SYSTÈME ANTI-CHOC ÉLECTRONIQUE ÉPROUVÉ DE
60 SECONDES
Ce lecteur CD possède un système anti-choc qui élimine les sauts de
CD ; il vous sera utile quand vous utiliserez le lecteur CD dans une
voiture ou lorsque vous joggez/marchez. L'anti-choc est
automatiquement activé lorsque l'appareil est en marche.
PRISES POUR ÉCOUTEURS :
Il y a trois ensembles de prises pour écouteurs. Branchez un seul
écouteur pour une écoute individuelle ou les deux prises pour partager.
CHANGER LA PLAQUE ILLUSTRÉE
1.
Sur le dessus de la porte du CD il y a un couvercle transparent.
Faites pivoter le couvercle dans le sens des aiguilles d'une montre
afin de le retirer.
2. Changez la plaque illustrée Disney pour une autre, ou insérez votre
propre photo si vous le désirez. Assurez-vous que la languette de la
plaque est correctement placée dans la cavité prévue à cet effet sur
la porte du compartiment à CD.
3. Pour replacer le couvercle transparent sur le dessus de la porte
du compartiment à CD, assurez-vous que le logo de Disney sur le
couvercle est correctement positionné, et faites pivoter le
couvercle dans le sens contraire des aiguilles d'une montre.
POUR LIRE UN CD (Standard, CD-R and CD-RW)
1. Ouvrez le couvercle du compartiment du CD en faisant glisser le
bouton CD OPEN vers la droite. Installez un CD, côté étiquette
vers le haut, en poussant délicatement sur l'axe et verrouillez-le
en place. Fermez la porte du compartiment à CD. Insérez les
écouteurs dans la prise PHONES (écouteurs).
2. Lorsque l'appareil est éteint, appuyez sur le bouton PLAY/PAUSE
(lecture/pause) (
®p)/POWER ON (en marche) pour commencer
la lecture. Pour arrêter temporairement la lecture, appuyez de
nouveau sur le bouton PLAY/PAUSE (lecture/pause)
(
®p)/POWER ON (en marche) et le temps écoulé clignotera.
Appuyez de nouveau pour redémarrer la lecture.
3. Ajustez le contrôle du VOLUME et le commutateur DBBS
(système d'augmentation des basses) tel que désiré. Pour sauter
vers l'avant ou vers l'arrière à travers les pistes présentes sur le
disque, appuyez sur le bouton SKIP/SEARCH (sauter/rechercher)
O ou N. Pour effectuer une recherche vers l'avant ou vers l'arrière
à travers les pistes du CD, appuyez et maintenez enfoncé le
bouton SKIP/SEARCH (sauter/rechercher)
O ou N.
4. Une fois le disque terminé, il s'arrêtera. Appuyez sur le bouton
STOP (arrêt) (
■)/POWER OFF (éteint) pour arrêter la lecture du
disque avant qu'elle ne soit terminée; le nombre total de pistes
apparaîtra. Appuyez de nouveau sur le bouton STOP (arrêt)
(
■)/POWER OFF (éteint) lorsque vous êtes en mode STOP
(arrêt) pour éteindre l'appareil ou attendez approximativement 30
secondes et l'appareil s'éteindra de lui-même.
REMARQUES :
• Cet appareil vous offre la possibilité de lire des CD standards ou
des simples de format 3 po. ; sans avoir recours à un adaptateur.
• Si un disque est incorrectement inséré, sale, endommagé ou
qu’aucun disque n'est présent, l'afficheur montrera "disc" (pas de
disque).
• À mesure qu'une piste est lue, le numéro de la piste et le temps
écoulé apparaissent sur l'afficheur.
• Pour retirer le disque, ouvrez le compartiment du CD lorsque
l'appareil est en mode STOP (arrêt) ou OFF puis, en tenant le CD
par le rebord, pressez délicatement sur l'axe central et soulevez
le CD.
• Avec cet appareil, le temps maximal disponible sur un CD est de
74 minutes.
• “OPEN” apparaîtra sur l'afficheur si la porte du compartiment à
CD est ouverte.
LECTURE DE MODO
1. Avec un CD inséré, appuyez sur le bouton PLAY/PAUSE
(lecture/pause) (
®p)/POWER ON (en marche) pour mettre
l'appareil en marche et sélectionnez une piste en utilisant le bouton
SKIP/SEARCH (sauter/ rechercher)
O ou N (que désiré).
2. Appuyez sur le bouton MODE une fois ; l'indicateur REPEAT 1
1 (répéter 1) apparaîtra sur l'afficheur.. L'appareil fera alors
jouer la même piste en boucle jusqu'à ce que le bouton STOP
(arrêter) (
■)/POWER OFF
soit appuyé.
3. Appuyez sur le bouton MODE deux fois ; l'indicateur REPEAT ALL
(répéter tout) apparaîtra sur l'afficheur. L'appareil fera
alors jouer toutes les pistes du CD en boucle jusqu'à ce que le
bouton STOP (arrêter) (
■)/POWER OFF
soit appuyé.
4.
Lorsque vous êtes en mode d’arrêt, appuyez trois fois sur le
bouton MODE; l'indicateur INTRO apparaîtra sur l'afficheur.
L'appareil fera jouer les 10 premières secondes de chaque piste.
Appuyez sur le bouton STOP (arrêt) (
■)/POWER OFF (éteint) pour
arrêter la lecture des intros.
5.
Lorsque vous êtes en mode d’arrêt, apuyez quatre fois sur le
bouton MODE ; l'indicateur RAND apparaîtra sur l'afficheur.
L'appareil fera alors jouer toutes les pistes dans un ordre aléatoire.
Lorsque toutes les pistes auront été lues,l'appareil s'arrêtera.
Appuyez sur le bouton STOP (arrêt) (
■)/POWER OFF (éteint) pour
arrêter la lecture aléatoire.
6. Ajustez le contrôle du VOLUME et le commutateur DBBS (système
d'augmentation des basses) au besoin. POUR ANNULER le mode
Lecture, appuyez sur le bouton Mode jusqu'à ce que le témoin
indicateur disparaisser.
GARANTIE : 90 jours pièces et main d'oeuvre. Pour une aide
supplémentaire relativement à l'installation et à l'utilisation de ce
produit, visitez le site www.disneyelectronics.com ou contactez le
service à la clientèle au (954) 660-7026. Conservez tout le matériel
d'emballage pendant au moins 90 jours au cas où vous devriez
retourner ce produit chez le détaillant ou chez Memcorp. Pour les
pièces et accessoires, contactez Fox International au 1-800-321-
6993. Distribué par Memcorp Inc., Weston, FL, Disney Elements
© Disney 2006.
ALL
ALL
• Ne fermez pas le compartiment à CD lorsque le CD est en
rotation.
•
Conservez toujours le compartiment à CD fermé lorsqu’il n’est
pas en utilisation.
• Gardez tout corps étranger à l'extérieur du compartiment à
CD.
•
Placez l'appareil sur une surface stable.
• Évitez d'installer l'appareil dans les endroits décrits ci-dessous:
• Endroits exposés à la lumière directe du soleil ou près d'un
appareil dégageant de la chaleur comme un radiateur électrique.
•
Sur le dessus d'un autre équipement stéréo qui irradie trop
de chaleur.
• Endroits sans ventilation ou poussiéreux.
•
Endroits sujets à des vibrations constantes.
• Endroits humides ou mouillés.
LES LIMITEURS DE SURTENSION :
Il est recommandé d'utiliser un limiteur de surtension pour con
nexion c.a. La foudre et les surtensions électriques NE SONT
PAS couvertes par la garantie de ce produit.
This Class B digital apparatus complies with Canadian ICES-003.
Cet appareil numérique de la classe B est conforme à la norme
NMB-003 du Canada."
GUIDE D’UTILISATION
MODELE
DCD6006-PIR-A
French
 Loading...