

Page 1

GUIDE & SOFTWARE MANUAL
dual
FORMAT
DVD RECORDER
For DVD+& DVD-Recording
EXTERNAL
USB 2.0 / IEEE-1394a
DOUBLE LAYER
16
DVD-ROM
read speed
x
DVD+RW/-RW
re-write speed
4
x
8
D
VD-R
write speed
x
D
VD+R
9
write speed
CD-R
write speed
x
48
CD-RW
re-write speed
x
24
CD-ROM
read speed
x
48
DVD+R
write speed
16
x
2.4
x
D
OUBLE-LAYER
Supports Windows® 98SE+/Me/2000/XP
+
USB drivers required for use with Windows 98SE.
/
Page 2

FCC INFORMATION (U.S.A.)
1. IMPORTANT NOTICE: DO NOT MODIFY THIS UNIT!
This product, when installed as indicated in the instructions contained in this manual, meets FCC requirements.
Modifications not expressly approved by Memorex may void your authority, granted by the FCC, to use the product.
2. IMPORTANT: When connecting this product to accessories and/or another product use only high quality shielded cables.
Cable/s supplied with this product MUST be used. Follow all installation instructions. Failure to follow instructions could void
your FCC authorization to use this product in the USA.
3. NOTE: This product has been tested and found to comply with the requirements listed in FCC Regulations, Part 15 for Class
B digital devices. Compliance with these requirements provides a reasonable level of assurance that your use of this product
in a residential environment will not result in harmful interference with other electronic devices. This equipment
generates/uses radio frequencies and, if not installed and used according to the instructions found in the users manual, may
cause interference harmful to the operation of other electronic devices. Compliance with FCC regulations does not guarantee
that interference will not occur in all installations. If this product is found to be the source of interference, which can be
determined by turning the product OFF and ON, please try to eliminate the problem by using one of the following
measures:
Relocate either this product or the device that is being affected by the interference.
Utilize power outlets that are on different branch (circuit breaker or fuse) circuits or install AC line filter/s.
In the case of radio or TV interference, relocate/reorient the antenna. If the antenna lead-in is 300 ohm ribbon lead, change
the lead-in to coaxial type cable.
If these corrective measures do not produce satisfactory results, please contact the local retailer authorized to distribute this
type of product. If you can not locate the appropriate retailer, please contact Memorex Products, Inc. 17777 Center Court Dr.
#800, Cerritos, CA 90703.
Page 3
Table of Contents
1. INTRODUCTION
1.1. Congratulations
1.2. About your new Memorex DVD Recorder
2. HARDWARE INSTALLATION
2.1. Setting up your Memorex DVD Recorder for use
2.2. About USB 2.0/1.1 and IEEE-1394/iLink
3. OPERATING YOUR NEW DRIVE
3.1. Front Panel
3.2. Loading a Disc
3.3. Ejecting a Disc
3.4. Removing the exernal drive from yo u r s ys t em
3.5. Troubleshooting
4. INCLUDED SOFTWARE
4.1. Nero StartSmart
4.2. Nero Express 6
4.3. NeroVision Express 2
4.4. InCD 4
4.5. Nero BackItUp
4.6. Nero ShowTim e
4.7. Nero Cover Designer
4.8. Nero Recode 2
4.9. Nero Media Player
4.10. Nero ToolKit
4.11. InCD EasyWrite Reader 4
4.12. DVD-Video Plug-in
4.13. HE-AAC Plug-in
®
/FireWire
6
8
12
14
5. CREATING CDs AND DVDs
5.1. Software Installation
5.2. Uninstalling the Software
5.3. Using StartSmart - the Command Center
5.4. U se r I nt er face and Navigation
6. BURNING - THE BASICS
6.1. Make a Data Disc
6.2. Make an Audio Disc
6.3. Make a Video Disc
6.4 Copy a Disc
6.5. Upgrade Options
6.6. FAQs
7. TROUBLESHOOTING
8. APPENDIX
16
25
43
46
Page 4
1. INTRODUCTION
1.2. About your new Memorex DVD Recorder
1.1. Congratulations!
Thank you for purchasing a Memorex External DVD recorder.
Mem orex's DVD recorder brings a new dimension to your PC's capabilities and performance
by al l o w ing yo u to record, re-write, and play both CD's and DVD's of several formats , all wi th
a single drive.
Mem orex makes award-winning optical drives to which many other drives are compared.
Memorex q ua li ty, reliabi l i t y, features, bundled software, and reputation are the reasons why
you have made the right choice in choosing Memorex.
Before you can start enjoying all the features and benefits of your new Memorex drive, please
read t h i s m a n u a l t h o roug hly. It is also a good idea to keep this manual in a safe place for
future reference.
1.1.1. System Requirements
Your new Memorex drive is a high-performance DVD recording device. For optimum
performance, Memorex recommends installing our new drive in a high-performance
PC. While complying with the minimum requirements highlighted below will ensure
proper installation and operation of the drive, Memorex's recommended components
are essential for high-speed record in g .
Minimum Requirements:
IBM PC and compatibles PCs –
• Intel Pentium III 800MHz (Pentium 4 1.8GHz or higher is recommended for better
results) or equivalent
• 128 MB of me mo ry ( 51 2M B o f m em ory is recommended for better resul ts)
• Fast hard disk drive with 15 ms or faster speed and DMA set (A/V Rated hard disk
drives are recommended for better results and ensured high quality when capturing
video)
• USB 2.0 port or IEEE-1394/iLink/FireWire port
• Windows 98SE, Me, 2000, or XP operating system
• Internal CD-ROM or DVD-ROM drive (to install driver software) with DMA set (if it is a
DVD-ROM drive and you are planning to use it as a source drive when backing up your
DVD's). Please see Section 3.1 below for more information on DMA (page 12).
1.1.2. Package Contents
In addition t o the item s list ed be low, this package may contain additional software (see
product box for details*) and optional items such as promotional offers.
1 . Exte r nal DVD Recor der
2. Quick Setup Map
3. Quick Install Guide
4. Software Installation CD
5. AC Power Cord and Adapter
* Specifications are subject to change without notice
6. One USB 1.1/2.0 Cable
One IEEE-1394/iLink/Fir
7.
8 . One Blank DVD+R Disc
9 .
Late Breaking News
(if applicable)
eW
e Cable
ir
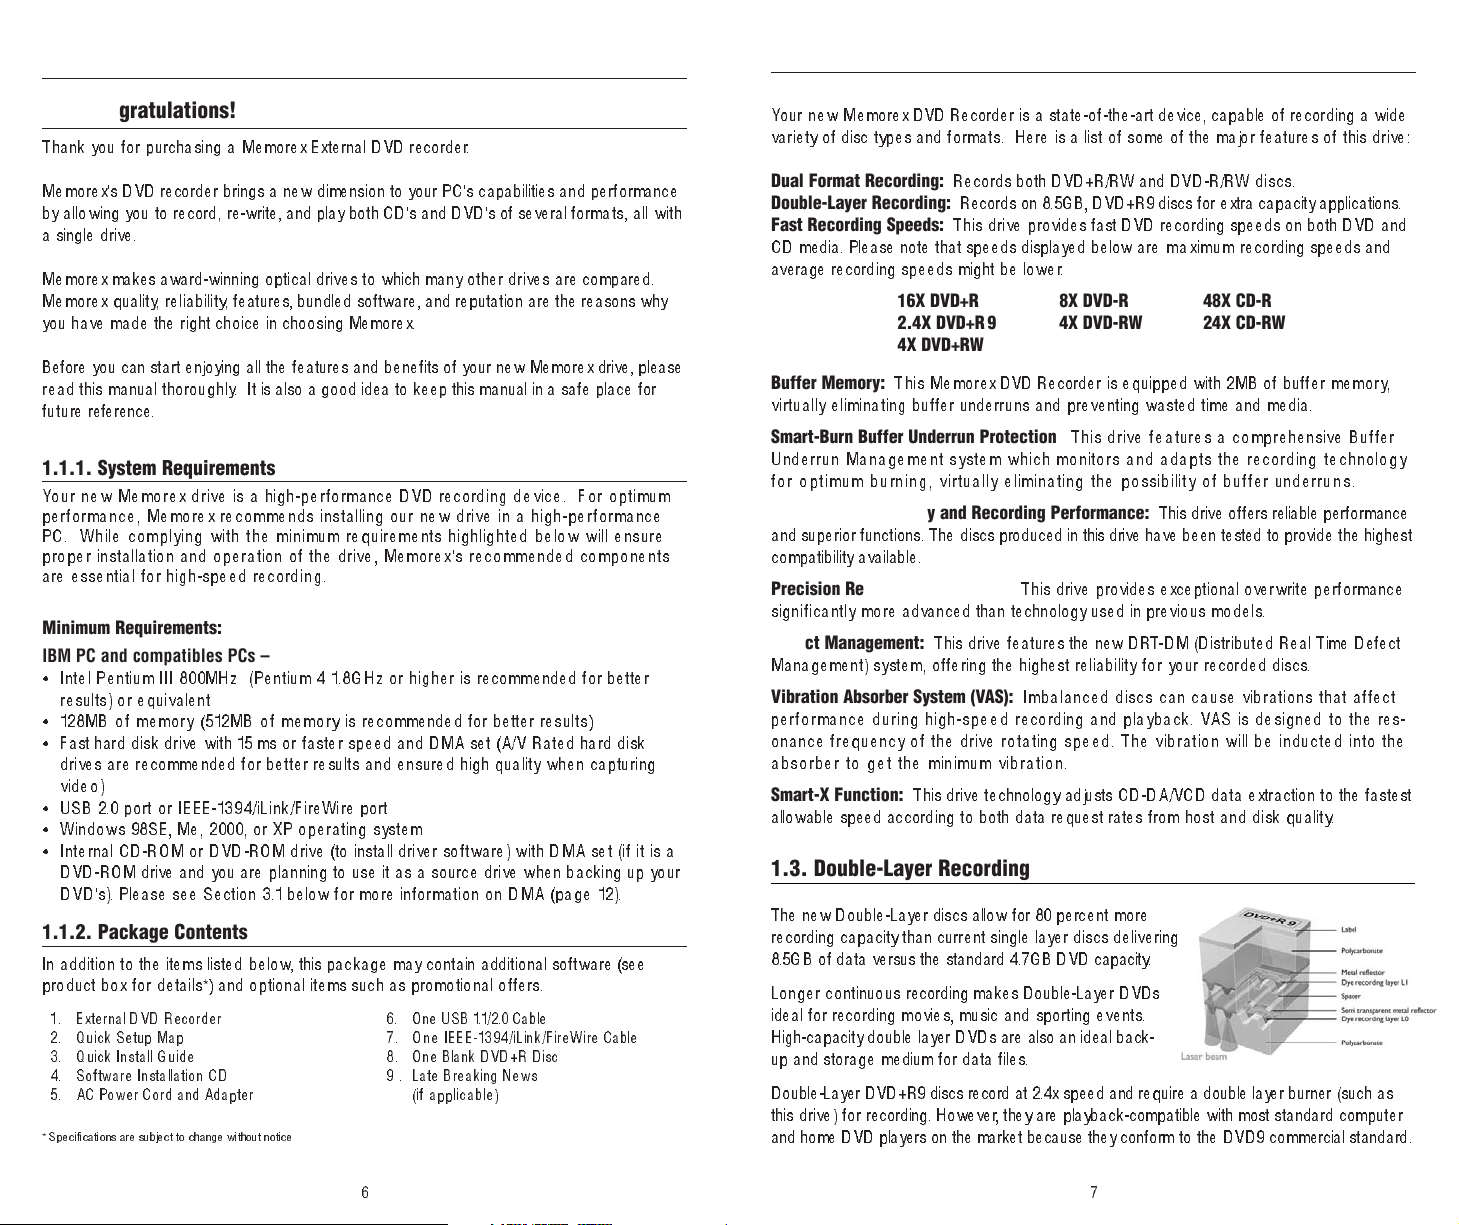
You r n e w M em o rex DVD Recorder is a state-of-the-art device, capable of recording a wide
variety of disc types and formats. Here is a list of some of the major features of this drive:
Dual Format Recording:
Double-Layer Recording:
Fast Recording Speeds:
Records both DVD+R/RW and DVD-R/RW dis cs.
Records on 8.5GB, DVD+R9 discs for extra capacity applications.
This d ri v e provides fast DVD recording speeds on both DVD and
CD media. Please note that speeds displayed below are maximum recording speeds and
average recording speeds might be lower.
16X DVD+R 8X DVD-R 48X CD-R
2.4X DVD+R9 4X DVD-RW 24X CD-RW
4X DVD+RW
Buffer Memory:
This M e mo rex DVD Recorder is equipped with 2MB of buffer me mo ry,
virtual ly e l im in at i ng b uffer underrun s an d preventing wasted time and media.
Smart-Burn Buffer Underrun Protection:
This drive features a comprehensive Buffer
Underrun Management system which monitors and adapts the recording technology
for opt imum b urning, virtually eliminating the possibility of buffer underrun s.
Superior Compatibility and Recording Performance:
This drive offers reliable performance
and superior functio ns. The dis cs produced in this drive have been tested to provide the h i g h e st
compatibility available.
Precision Recording Technology:
This drive provides exceptional overwrite performance
sign i f i c a n t l y m o re advanced than technology used in pre vi o u s m od e l s.
Defect Management:
This drive features the new DRT-DM (Distributed Real Time Defect
Management) system, offering the highest reliability for your recorded discs.
Vibration Absorber System (VAS):
Imbalanced discs can cause vibrations that affect
performance during high-speed recording and playback. VAS is designed to the res-
onance frequency of the drive rotating speed. The vibration will be inducted into the
absorber to get the minimum vibration.
Smart-X Function:
This drive technology adjusts CD-DA/VCD data extraction to the fastest
allowable speed according to both data request rates from host and disk quality.
1.3. Double-Layer Recording
The new Double-Layer discs allow for 80 percent m o re
recording capacity than current single layer discs delivering
8.5GB of data versus the standard 4.7GB DVD capacity.
Long er contin uous recording makes Double-Layer DVDs
ideal for recording movies, music and sporting events.
High-capacity double layer DVDs are also an ideal back-
up and storage medium for data files.
d at 2.4x speed and r
Double-Layer DVD+R9 discs r
ecor
this d r i ve) for recording. However, they are playback-compatible with most standard co m pu t e r
and home DVD players on the market because they conform to the DVD9 commercial st andard.
equire a double layer burner (such as
6
7
Page 5
2. HARDWARE INSTALLATION
AUDIO OUT
USB2.0
IEEE1394
DC IN
POWER ON
OFF
L
R
AUDIO OUT
USB2.0
IEEE1394
DC IN
POWER ON
OFF
L
R
USB
AUDIO OUT
POWER ON
AUDIO OUT
USB2.0
IEEE1394
DC IN
POWER ON
OFF
L
R
1394
USB
USB
On-Board
USB 1.1/2.0
Ports
USB 2.0
Host Controller
Card Ports
1394
IEEE-1394a
Host Controller
Card Ports
USB
PC Front Panel
USB Ports
PC Front Panel
IEEE-1394a Ports
1394
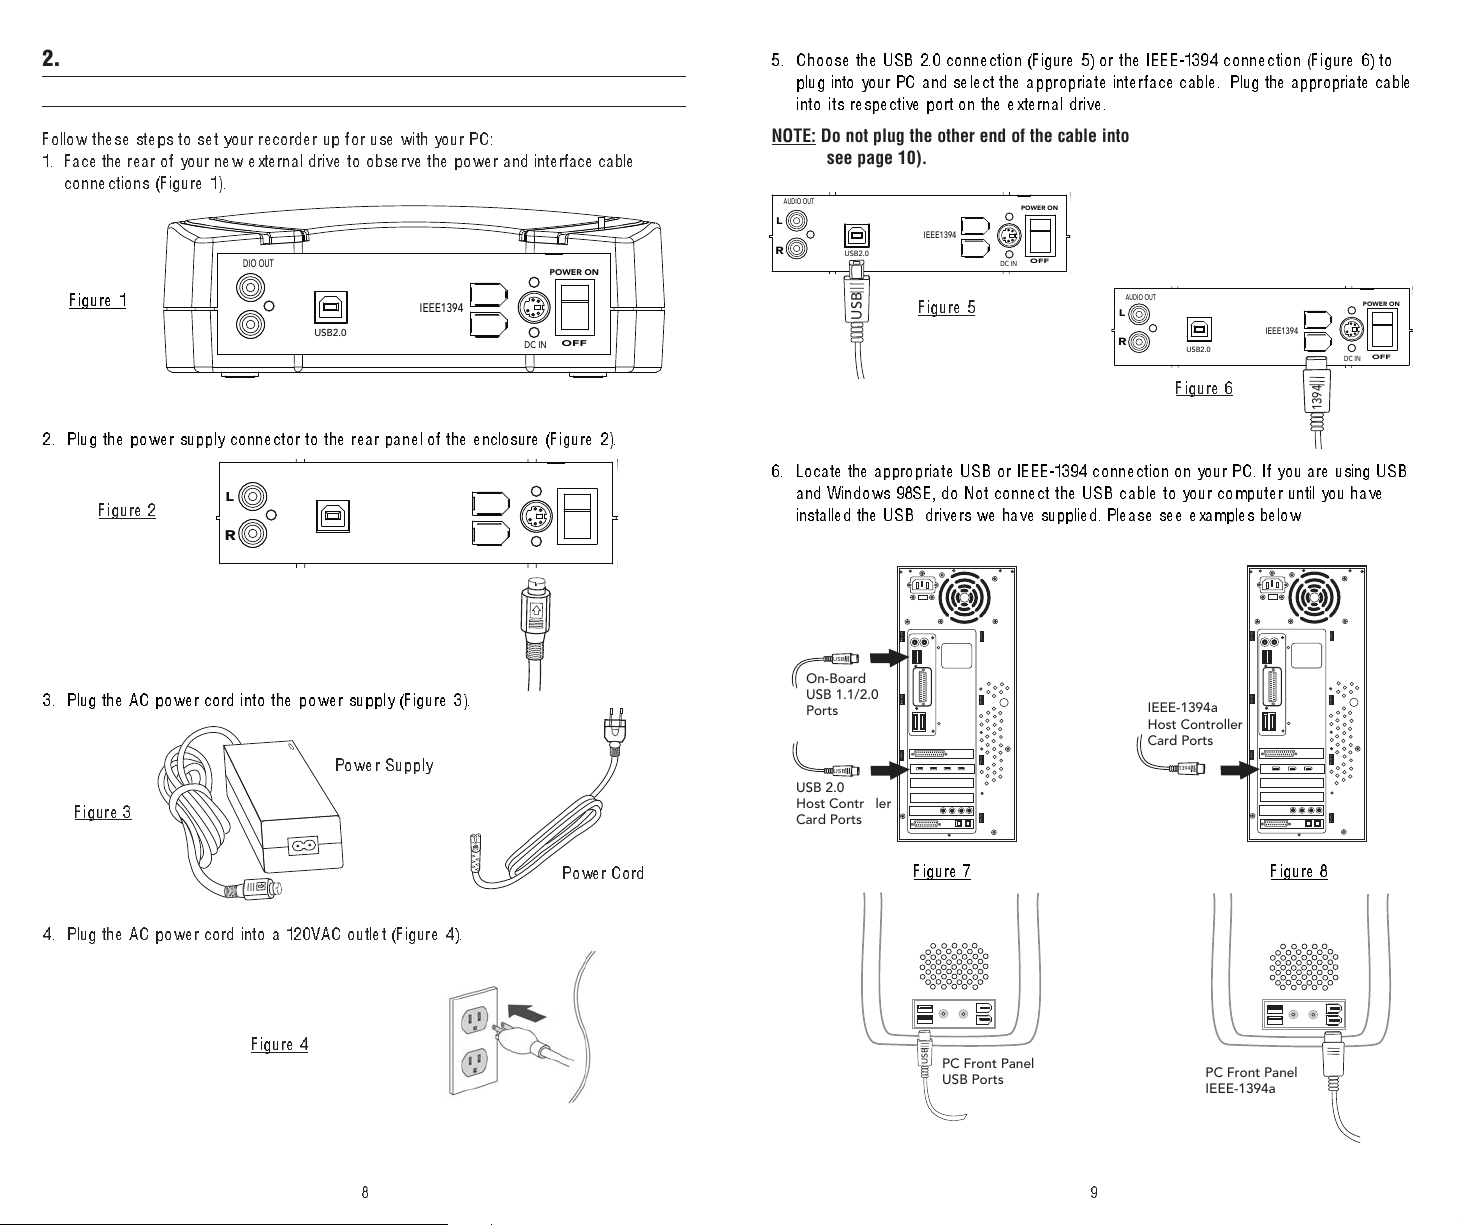
2.1. Setting up your recorder for use
Follow these steps to set your recorder up for use with your PC:
1 . Face the rear of your new external dri ve t o obs er ve the po wer an d inter face cable
connections (Figure 1).
5. Choose the USB 2.0 connection (Figure 5) or the IEEE-1394 connection (Figure 6) to
plug into your PC and select the appropriate interface cable. Plug the appropriate cable
int o it s respective port on t he ext erna l d r iv e .
NOTE: Do not plug the other end of the cable into your PC yet, this step will come later
(see page 10).
Figure 1
2. Plug the power supply connector to the rear panel of the enclosure (Figure 2 ).
Figure 2
3. Plug the AC power cord into the power supply (Figure 3).
Figure 3
Power Supply
Power Cord
Figure 5
Figure 6
6. Locate the appropriate USB or IEEE-1394 connection on your PC. If you are using USB
and Windows 98SE, do Not connect the USB cable to your computer until you have
installed the USB drivers we have supplied. Please see examples below
e 7 Figure 8
Figur
4. Plug the AC power cord in t o a 1 2 0 VAC outl et ( Fig ure 4 ) .
Figur
e 4
98
Page 6
2.1.1 Installing the Windows 98SE USB 2.0 Drivers
Follow these steps to install the USB drivers for your External drive only if you are using
the Windows 98SE operating system:
1. Turn your computer on.
2. Once your computer has finished loading the Operating System and any programs
that launch when you start up, Insert yo ur M em orex Software and Driver CD from
your new Memorex External DVD recorder kit.
Note:
If the program does not start automatically, select your existing internal CD/DVD
drive containing the Memorex CD in Windows Explorer. Double click on the
"setup.exe" program in the main directory.
3. Once the program has launched, click on the Install Win98SE USB Drivers button
(Shown below) in the main splash screen.
4. If you have been prompted to locate the drivers, use the Browse button to locate the
drive rs o n t he Me m orex Software and Drivers CD. When the OK button becomes
highlighted, you have found the drivers. The drivers are located in the main directory
of the disc.
5. Follow the on-screen instructions to complete the process of installing your External
DVD Recorder drive.
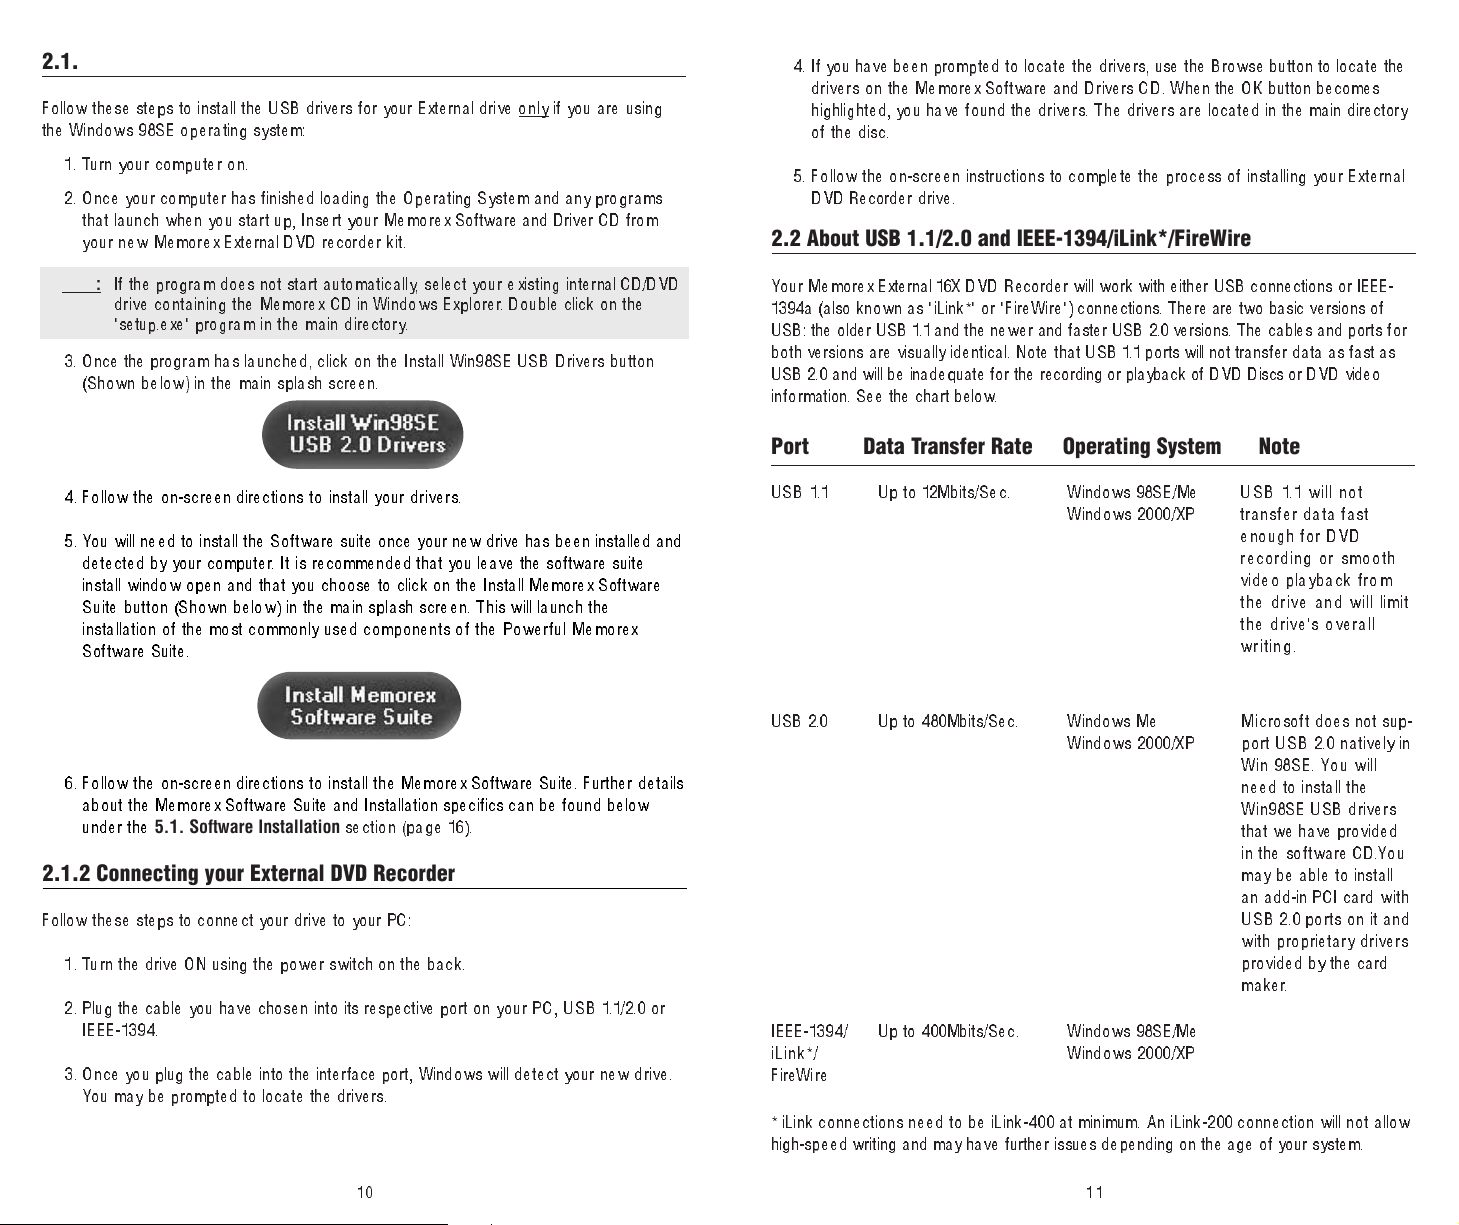
2.2 About USB 1.1/2.0 and IEEE-1394/iLink*/FireWire
You r M e m o rex External 16X DVD Recorder will work with either USB connections or IEEE-
1394a (also known as "iLink*" or "FireWire") connections. There are two basic versions of
USB: the older USB 1.1 and the newer and faster USB 2.0 versions. The cables and ports for
both versions are visually identical. Note that USB 1.1 ports will not transfer data as fast as
USB 2.0 and wi ll be in ad eq ua te fo r t he recording or playback of DVD Discs or DVD video
inf o rmation. See the chart below.
Port Data Transfer Rate Operating System Note
4. Follow the on-screen directions to install your drivers.
5 . You will need to ins tall the S oftwa re suite once your new drive has been installed and
detected by your computer. It i s recommended that you leave the software suite
install window open and that you choose to click on the Install Memorex Software
Suite button (Shown below) in the main splash screen. This will launch the
installation of the most commonly used components of the Powerful M emo rex
Software Suite.
6. Follow the on-screen directions to install the Memorex Software Suite. Further details
about the Me mo rex Software Suite and Installation specifics can be found below
under the
5.1. Software Installation
section (page 16).
2.1.2 Connecting your External DVD Recorder
Follow these steps to connect your drive to your PC:
1. Turn the drive ON using the power switch on the back.
2. Plug the cable you have chosen into its respective port on yo ur PC, U SB 1.1 /2 .0 or
IEEE-1394.
3. Once you plug the cable into the interface port , Window s wil l det ect yo ur ne w driv e.
You may be prompted to locate the drivers.
USB 1 .1 Up to 12Mbits/Sec. Windows 98SE/Me
Windows 2000/XP
USB 2.0 Up to 480Mbits/Sec. Windows Me
Windows 2000/XP
IEEE-1394/
iLink*/
FireWire
* iLink connections need to be iLink-400 at minimum. An iLink-200 connection will not allow
high-speed writing and may have further issues depending on the age of your system.
Up to 400Mbits/Sec. Windows 98SE/Me
Windows 2000/XP
USB 1.1 will not
transfer data fast
enough for DVD
recording or smooth
video playback fro m
the drive and will limit
the drive's overall
writing.
Microsoft does not sup-
port USB 2.0 natively in
Win 98SE. You will
need to install the
Win98SE USB drivers
that we have provided
in the software CD.You
may be able to install
an add-in PCI card wi t h
USB 2.0 ports on it and
with proprietary dr ivers
provided by the car
maker.
d
1110
Page 7
3. OPERATING YOUR NEW DRIVE
1
6
x
DOUBLE
LAYER
3.1. Front Panel
1
2
3 4 5 6
3.2. Loading a Disc
1. Press the open/eject button to open the tray.
2 . Carefully place the disc, label side up, on the disc tray. There is an indentation for
Pocket CD-R's in the tray.
Important Note:
Not all cut disc or shaped media is appropriate for use with this drive. Please check
with Me m orex Technical Support for a current list of cut disc or shaped media that
may be used in this drive.
3. P ress the eject button again to close the disc tray.
3.3. Ejecting a Disc
If the drive is powered on, press the open/eject button to open the loading tray.
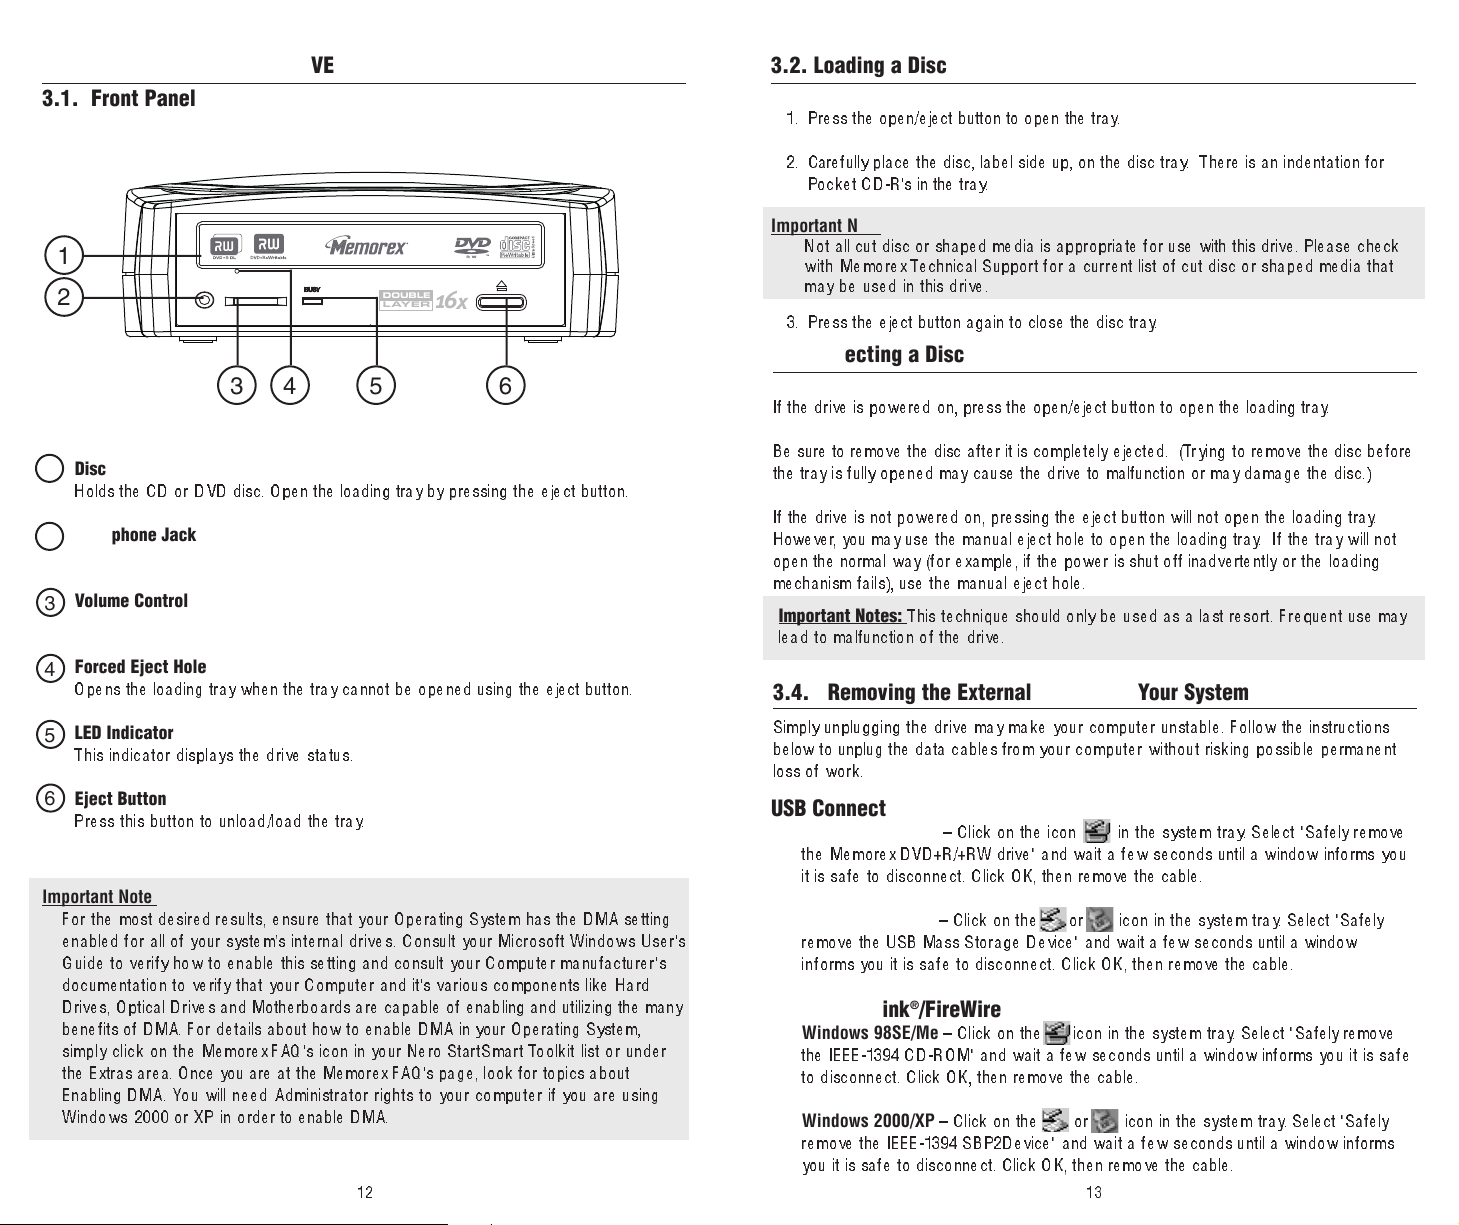
Disc Loading Tray
1
Holds the CD or DVD disc. Open the loading tray by pressing th e e jec t b utt on.
Headphone Jack
2
Volume Control
3
Forced Eject Hole
4
Opens the loading tray when the tray cannot be opened using the eject button.
LED Indicator
5
This indicator displays the drive status.
Eject Button
6
Press this button to unload/load the tray.
Important Note:
For the most desired results, ensure that your Operating System has the DMA setting
enabled for all of your system’s internal drives. Consult your Microsoft Windows User's
Guide to verify how to enable this setting and consult your Computer manufacturer's
documentation to verify that your Computer and it's various components like Hard
Drives, Optical Drives and Motherboards are capable of enabling and utilizing the many
benefits of DMA. For details about how to enable DMA in your Operating System,
simply click on the Memorex FAQ's icon in your Nero StartSmart Toolkit list or under
the Extras area. Once you are at the Memorex FAQ's page, look for topics about
Enabling DMA. You will need Administrator rights to your computer if you are using
Windows 2000 or XP in order to enable DMA.
Be sure to remove the disc after it is completely ejected. (Try i ng to remove the disc before
the tray is fully opened may cause the drive to malfunction or may damage the disc.)
If the drive is not powered on, pressing the eject button will not open the loading tray.
However, you may use the manual eject hole to open the loading tray. If t he tr ay w ill not
open the normal way (for example, if the power is shut off inadvertently or the loadi ng
mechanism fails), use the manual eject hole.
Important Notes:
lead to malfunction of the drive.
This technique should only be used as a last resort. Frequent use may
3.4. Removing the External Drive from Your System
Simply unplugging the drive may make your computer unstable. Follow the instructions
below to unplug the data cables from your computer without risking possible permanent
loss of work.
USB Connection
Windows 98SE/Me
the M emo rex DVD+R/+RW drive" and wait a few seconds until a window informs yo u
it is safe to disconnect. Click OK, then remove the cable.
Windows 2000/XP
remove the USB Mass Storage Device" and wait a few seconds until a window
informs you it is safe to disconnect. Click OK, then r
– Click on the icon in the system tray. Select "Safely remove
– Click on the or icon in the system tray. Select "Safely
emove the cable.
IEEE-1394/iLink®/FireWire
Windows 98SE/Me
the IEEE-1394 CD-ROM" and wait a few seconds until a window infor
to disconnect. Click OK, then remove the cable.
Windows 2000/XP
remove the IEEE-1394 SBP2Device" and wait a few seconds until a window inform s
you it is safe to disconnect. Click OK, then remove the cable.
– Click on the icon in the system tray. Select "Safely remove
ms you it is safe
– Click on the or icon in the system tray. Select "Safely
1312
Page 8
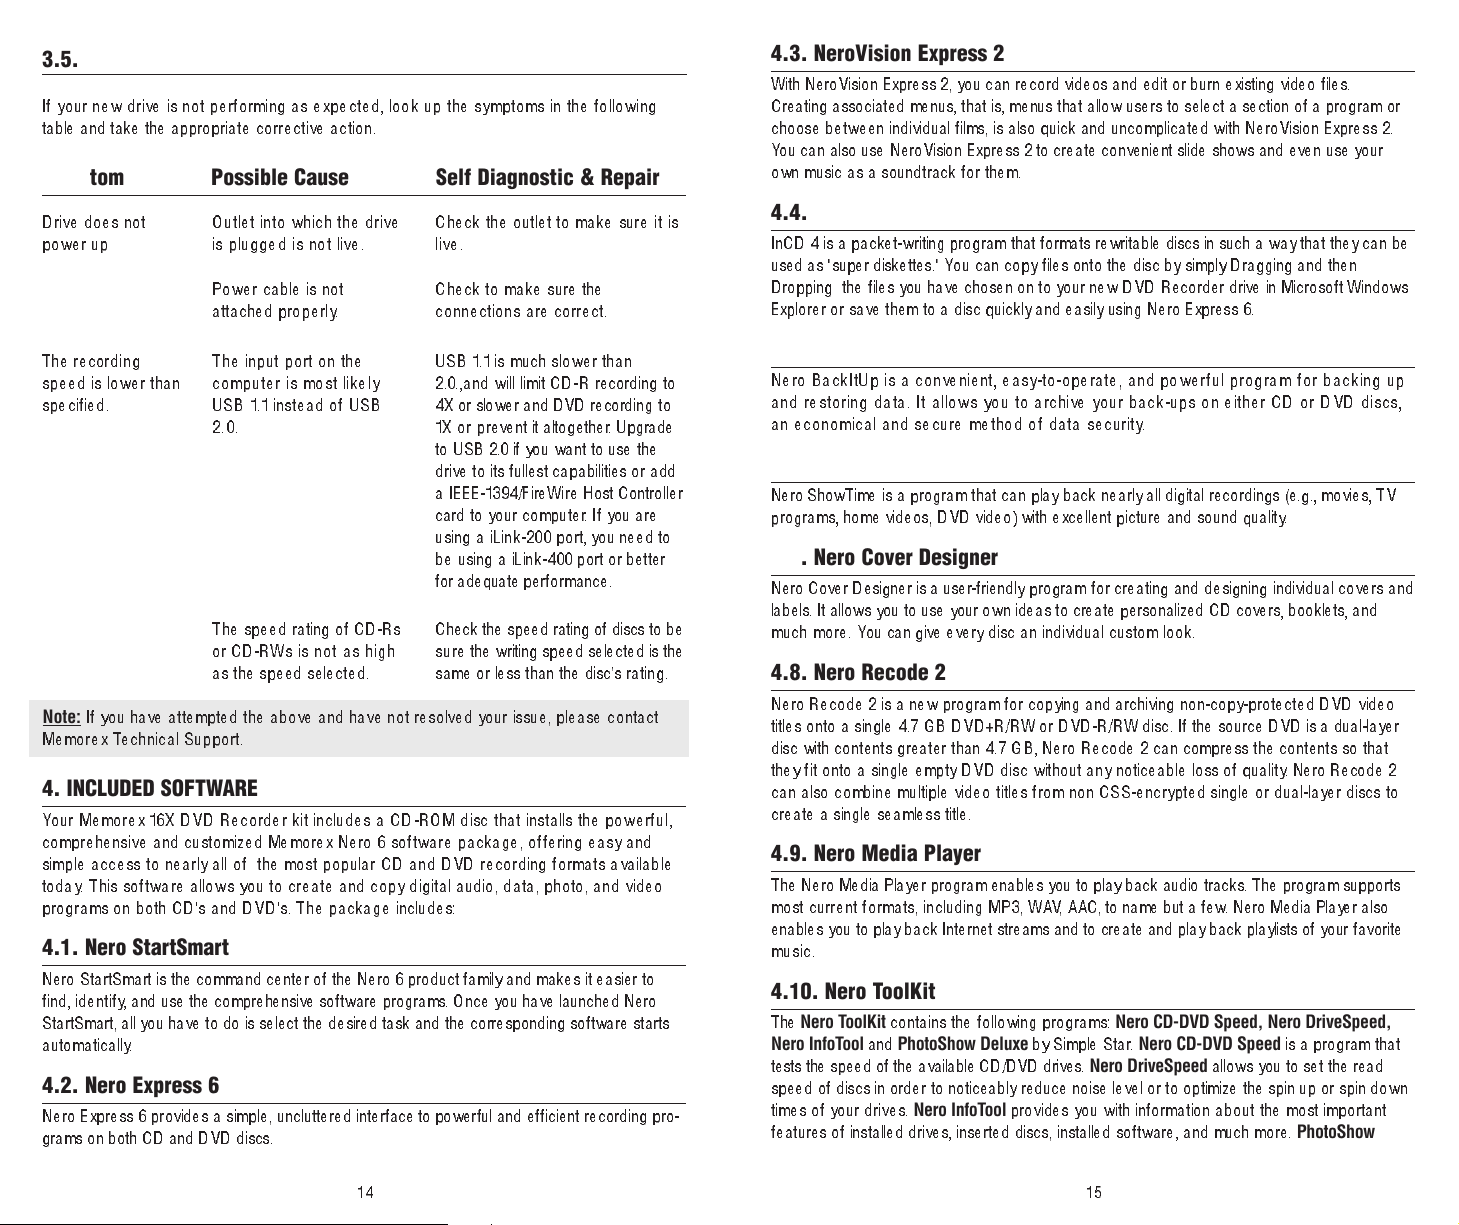
3.5. Troubleshooting
If your new drive is not performing as expected, look up the symptoms in the following
table and take the appropriate c o rrect i v e a c t i o n .
Symptom Possible Cause Self Diagnostic & Repair
4.3. NeroVision Express 2
With NeroVision Express 2, you can record videos and edit or burn existing video files.
Creating associated menus, that is, menus that allow users to select a section of a program or
choose between individual films, is also quick and uncomplicated with NeroVision Express 2.
You can also use NeroVision Express 2 to create convenient slide shows and even use your
own music as a soundtrack for them.
Drive does not
power up
The recording
speed is lower than
specified.
Note:
If you have attempted the above and have not resolved your issue, please contact
Memorex Technical Support.
Outlet into which the drive
is plugged is not live.
Power cable is not
attached properl y.
The input port on the
computer is most likely
USB 1.1 instead of USB
2.0.
The speed rating of CD-Rs
or CD-RWs is not as high
as the speed selected.
Check the outlet to make sure it i s
live.
Check to make sure the
connections are corr ect.
USB 1.1 is much slower than
2.0.,and will limit CD-R recording to
4X or slower and DVD recording to
1X o r prevent it altogether. Upgrade
to USB 2.0 if you want to use the
drive to its fullest capabilities or add
a IEEE-1394/FireWire Host Controller
card to your computer. If you are
using a iLink-200 port, you need to
be using a iLink-400 port or better
for adequate performance.
Check the speed rating of discs to be
sure the writing speed selected is the
same or less than the disc’s rating.
4. INCLUDED SOFTWARE
Your Memorex 16X DVD Recorder kit includes a CD-ROM disc that installs the powerful,
comprehensive and customized Memorex Nero 6 software package, offering easy and
simple access to nearly all of the most popular CD and DVD recording formats available
today. This software allows you to create and copy digital audio, data, photo, and video
programs on both CD's and DVD's. The package includes:
4.1. Nero StartSmart
Nero StartSmart is the command center of the Nero 6 product family and makes it easier to
find, ident ify, and use the comprehensive software programs. Once you have launched Nero
StartSmart, all you have to do is select the desired task and the corresponding software starts
automatically.
4.2. Nero Express 6
Nero Express 6 provides a simple, uncluttered inter
grams on both CD and DVD discs.
face to power
ful and efficient recording pro
4.4. InCD 4
InCD 4 is a packet-writing program that formats rewritable discs in such a way that they can be
used as "super diskettes." You can copy files onto the disc by simply Dragging and then
Dropping the files you have chosen on to your new DVD Recorder drive in Microsoft Windows
Explorer or save them to a disc quickly and easily using Nero Express 6.
4.5. Nero BackItUp
Nero BackItUp is a convenient, easy-to-operate, and powerful pr ogr am f or b ack ing up
and restoring d ata. It a llows you to archive your back-ups on either CD or DVD discs,
an economical and secure method of data security.
4.6. Nero ShowTime
Nero ShowTime is a program that can play back nearly all digital recordings (e.g., movies, TV
programs, home videos, DVD video) with excellent picture and sound quality.
4.7. Nero Cover Designer
Nero Cover Designer is a user-friendly program for creating and designing individual covers and
labels. It allows you to use your own ideas to create personalized CD covers, booklets, and
much more. You can give every disc an individual custom look.
4.8. Nero Recode 2
Nero Recode 2 is a new program for copying and archiving non-copy-protecte d D VD vid eo
titles onto a single 4.7 GB DVD+R/RW or DVD-R/RW disc. If the source DVD is a dual-layer
disc with contents greater than 4.7 GB, Nero Recode 2 can compress the contents so that
they fit onto a single empty DVD disc without any noticeable loss of quality. Nero Recode 2
can also combine multiple video titles from non CSS-encrypted single or dual-layer discs to
create a single seamless title.
4.9. Nero Media Player
The Nero Media Player program enables you to play back audio tracks. The program supports
most current formats, including MP3, WAV, AAC, to name but a few. Nero Media Player also
enables you to play back Internet streams and to create and play back playlists of your favorite
music.
4.10. Nero ToolKit
The
Nero ToolKit
Nero InfoT
tests the speed of the available CD/DVD drives.
speed of discs in order to noticeably reduce noise level or to optimize the spin up or spin down
-
times of your drives.
features of installed drives, inserted discs, installed software, and much more.
contains the following programs:
ool
and
PhotoShow Deluxe
Nero InfoTool
Nero CD-DVD Speed, Nero DriveSpeed,
by Simple Star. Nero CD-DVD Speed
Nero DriveSpeed
provides you with information about the most important
allows you to set the read
is a program that
PhotoShow
1514
Page 9
Deluxe
is included exclusively in this bundle, this award winning software allows you to store
and edit all your digital photos and images with professional quality tools and ease.
Note:
This area also has two New and special links to the Memorex website.
One is a link to the Memorex Tech Support form page, where you can
request assistance with an issue you may be experiencing.
The other link takes you to the Memorex FAQ's page for you to gain
immediate access to Frequently Asked Questions.
4.11. InCD EasyWrite Reader 4
InCD EasyWrite Reader 4 is a program that allows you to read discs written in MRW ("Mount
Rainier ReWritable") format on systems that do not support MRW.
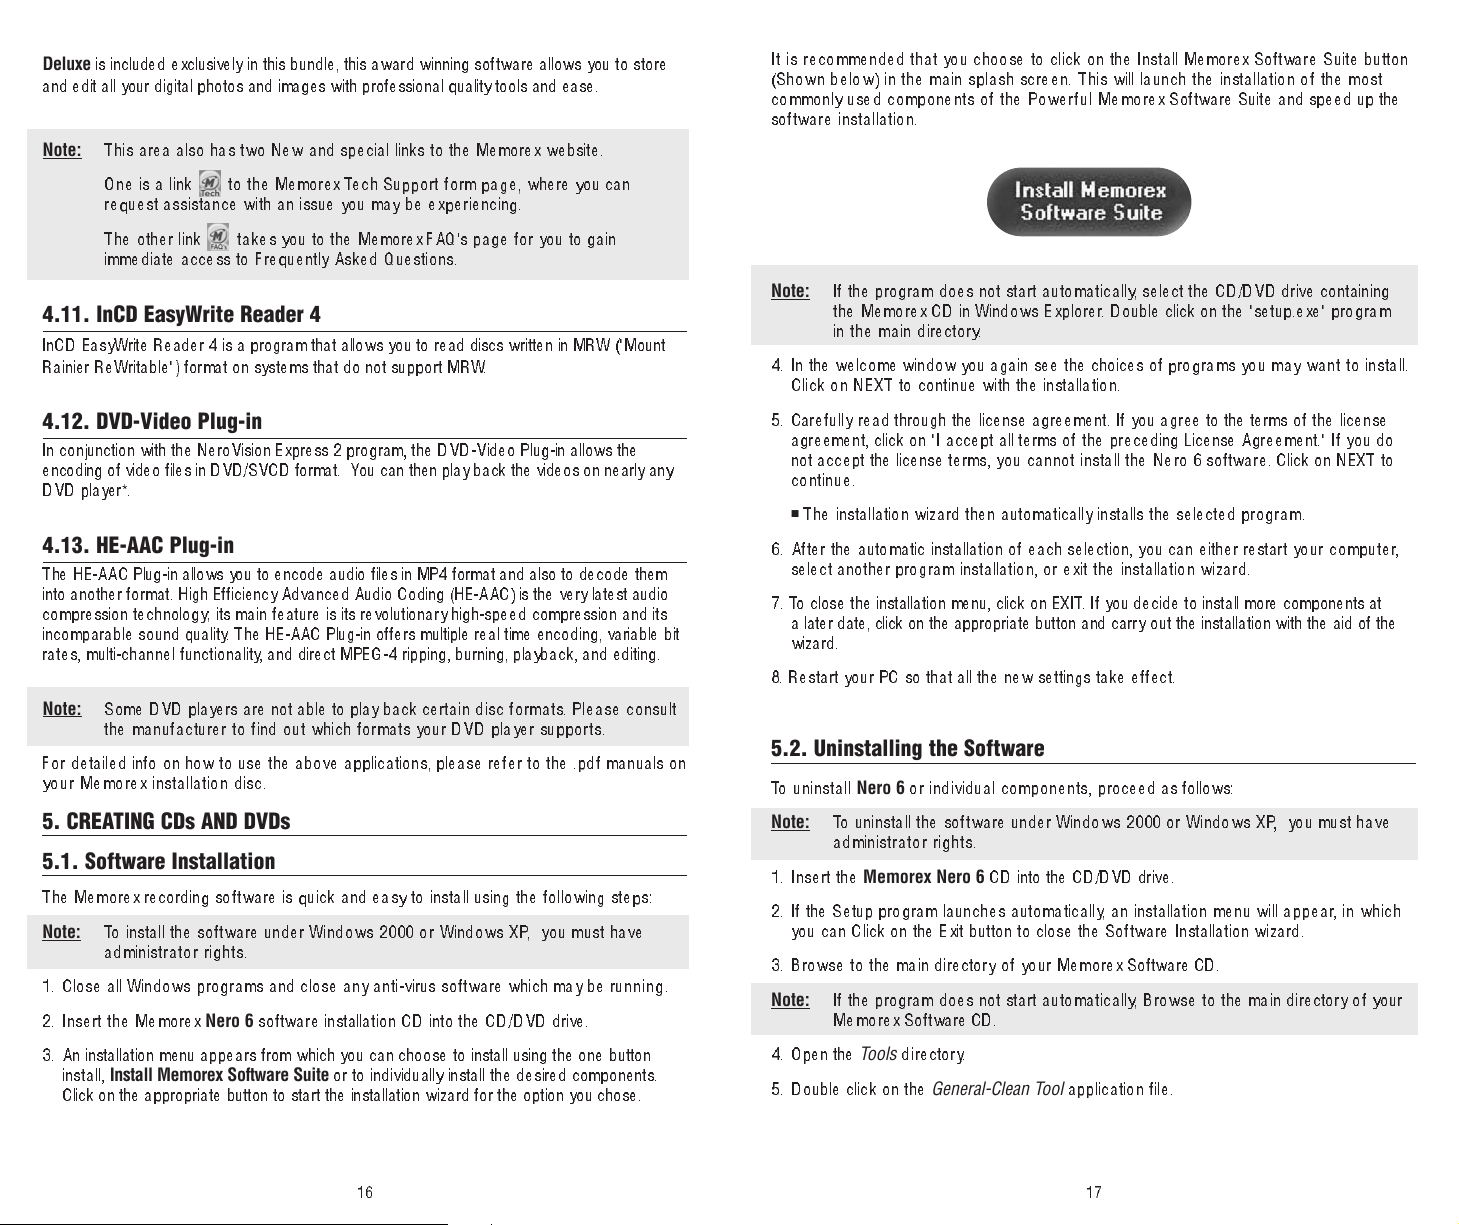
It is recommended that you choose to click on the Install Memorex Software Suite button
(Shown below) in the main splash screen. This will launch the installation of the most
commonly used components of the Powerful M em orex Software Suite and speed up the
software installation.
Note:
4. In the welcome window you again see the choices of prog ra m s yo u ma y w an t to in st al l .
If the progr am doe s not st art au t om a t ic a l ly, select the CD/DVD drive containing
the Me m o rex CD in Windo w s E x pl o rer. Double click on the "setup.exe" program
in the main directory.
Click on NEXT to continue with the installation.
4.12. DVD-Video Plug-in
In conjunction with the NeroVision Express 2 program, the DVD-Video Plug-in allows the
encoding of video files in DVD/SVCD format. You can then play back the videos on nearly any
DVD player*.
4.13. HE-AAC Plug-in
The HE-AAC Plug-in allows you to encode audio files in MP4 format and also to decode them
into another format. High Efficiency Advanced Audio Coding (HE-AAC) is the very latest audio
compression technology; its main feature is its revolutionary high-speed compression and its
incomparable sound qua lit y. The HE-AAC Plug-in offers multiple real time encoding, variable bit
rates, multi-channel functionality, and direct MPEG-4 ripping, burning, playback, and editing.
Note:
For detailed info on how to use the above applications, please refer to the .pdf manuals o n
your Memorex installation disc.
Some DVD players are not able to play back certain d is c f o rm a ts . P le a s e c o n s u lt
the manufacturer to find out which formats your DVD player supports.
5. CREATING CDs AND DVDs
5.1. Software Installation
The Memorex recording software is quick and easy to install using the following steps:
Note:
1. Close all Windows p rograms and close any anti-virus software which may be ru n n i n g .
2. Insert the Memorex
3. An installation menu appears fr
To install the software under Windows 2000 o r Wind ows XP, you must have
administrator rights.
Nero 6
install,
Install Memorex Software Suite
Click on the appropriate button to start the installati on wi zard for the option you chose.
e installation CD into the CD/DVD drive.
softwar
om which you can choose to install using the one button
or to individually install the desired components.
5. Caref ul ly read through the license agreement. If you agree to the terms of the license
agreement, click on "I accept all terms of th e preceding License Agreement." If you do
not accept the license terms, y ou c a nn o t i n s ta l l t h e N e ro 6 so ftw are. Click on NEXT to
continue.
■
The installation wizard then automatically installs the selected program.
6. After the automatic installation of each selection, you can either restart your c om put er,
select another program installation, or exit the installation wizard.
7. To close the installation menu, click on EXIT. If you decide to install more components at
a later date, click on the appropriate button and carry out the installation with the aid of the
wizard.
8. Restart your PC so that all the new settings take effect.
5.2. Uninstalling the Software
To uninstall
Note:
1. Insert the
2. If the Setup program launches automatically, an installation menu will appear, in whi ch
you can Click on the Exit button to close the Software Installation wizard.
3. Browse to the main directory of your Memorex Software CD.
Note:
4. Open the
5 . Double click on the
Nero 6
or individual components, proceed as follows:
To uninstall the software under Windows 2000 or Windows XP, you must have
administrator rights.
Memorex Nero 6
If the program does not start automatically, Browse to the main directory of your
Memorex Software CD.
Tools
directory.
CD into the CD/DVD drive.
General-Clean Tool
application file.
16
17
Page 10
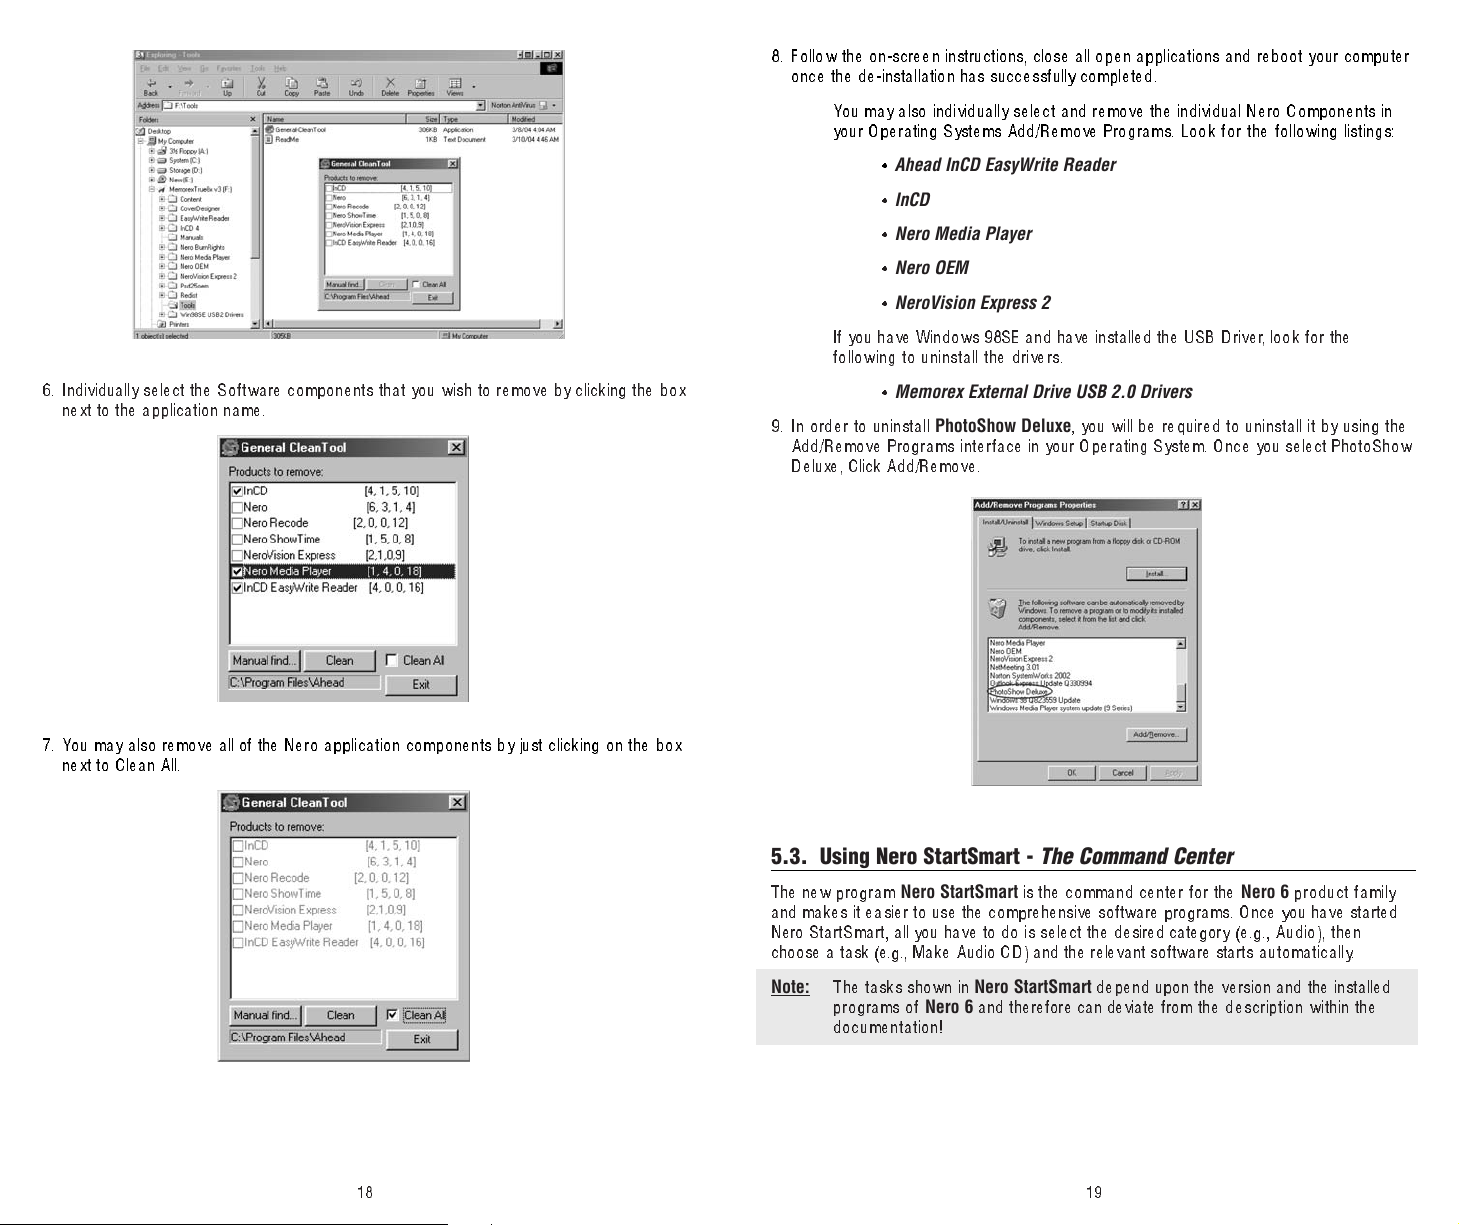
6. Individually select the Software components that you wish to remove by clicking the box
next to the application name.
8. Follow the on-screen instructions, close all open applications and reboot your computer
once the de-installation has successfully completed.
You may also individually select and remove the individual Nero Components in
your Operating Systems Add/Remove Programs. Look for the following listings:
Ahead InCD EasyWrite Reader
•
•
InCD
•
Nero Media Player
•
Nero OEM
•
NeroVision Express 2
If you have Windows 98SE and have installed the USB Driver, look for the
following to uninstall the drivers.
•
Memorex External Drive USB 2.0 Drivers
9. I n order to uninstall
Add/Remove Program s i n te rface in your Operating System. Once you select PhotoShow
Deluxe, Click Add/Remove.
PhotoShow Deluxe
, you will be required to uninstall it by using the
7. You may also remove all of the Nero application components by just clicking on the box
next to Clean All.
5.3. Using Nero StartSmart - The Command Center
The new program
and makes it easier to use the comprehensive software programs. Once you have started
Nero StartSm art, all you have to do is select the desired category (e. g., A ud io ), t hen
choose a task (e.g., Make Audio CD) and the relevant softwar
Note:
The tasks shown in
programs of
documentation!
Nero StartSmart
Nero StartSmart
Nero 6
and therefore can deviate from the description within the
is the command center for the
e starts automatically.
depend upon the version and the installed
1918
Nero 6
product family
Page 11
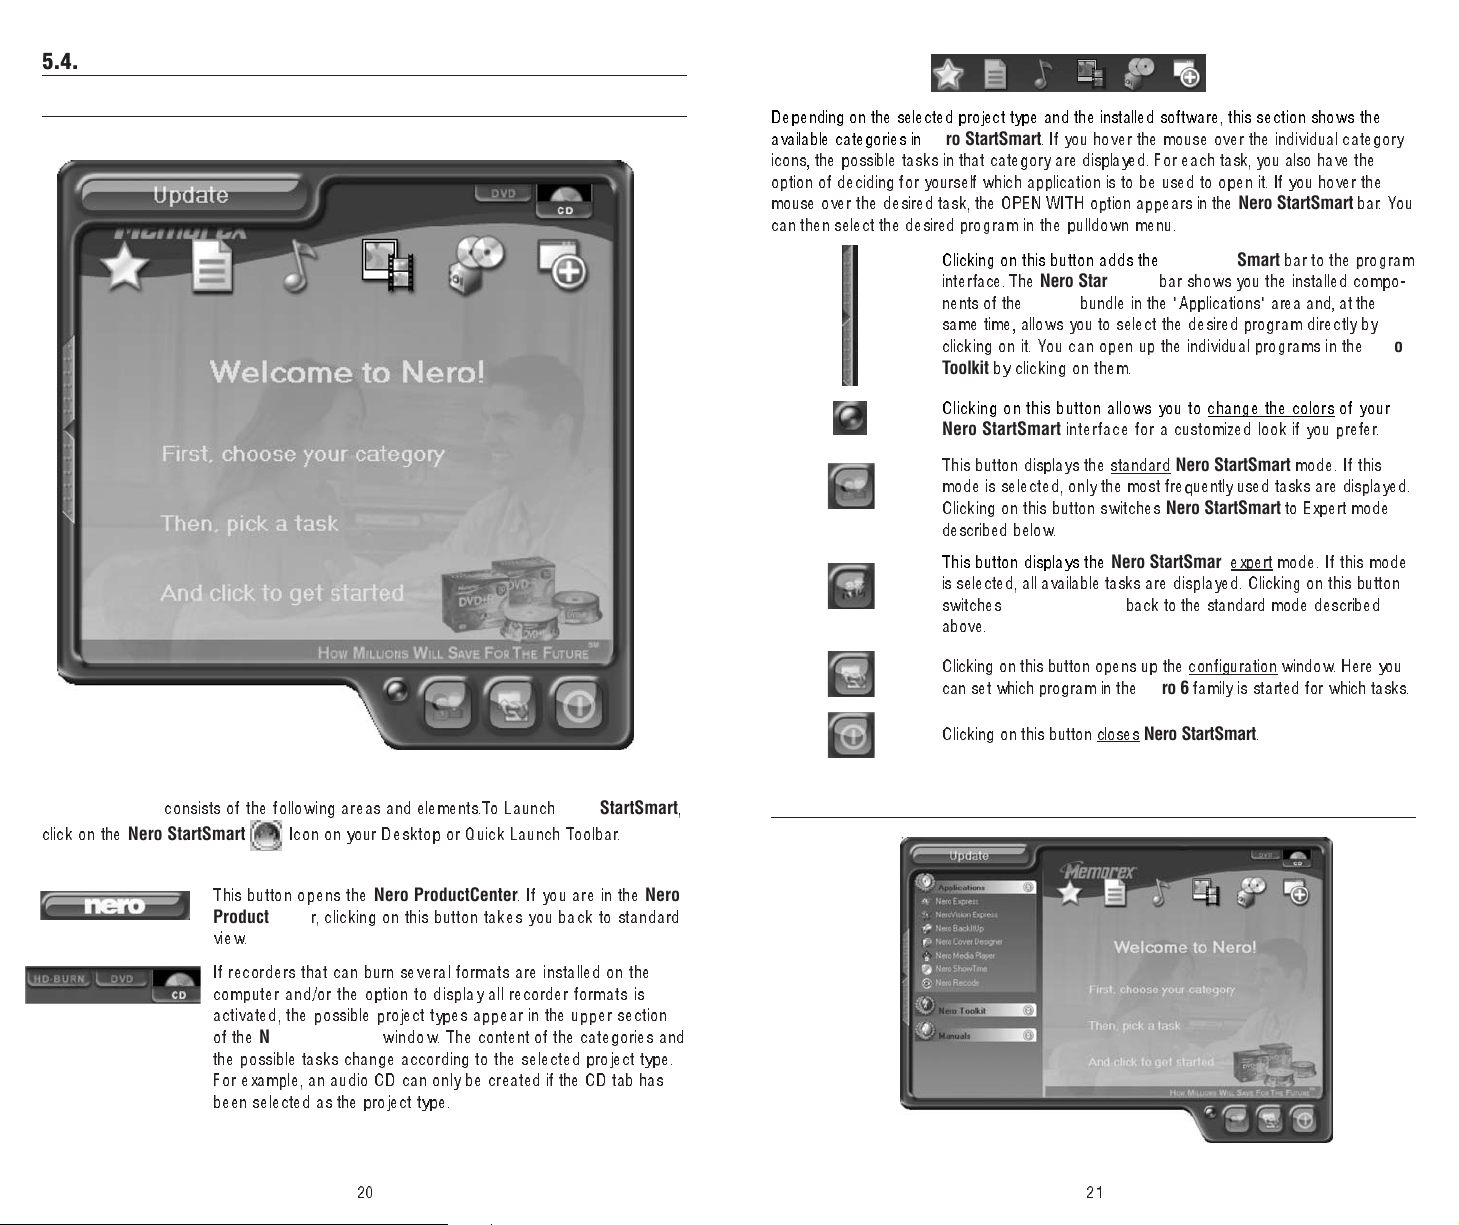
5.4. User Interface and Navigation
5.4.1 Standard view
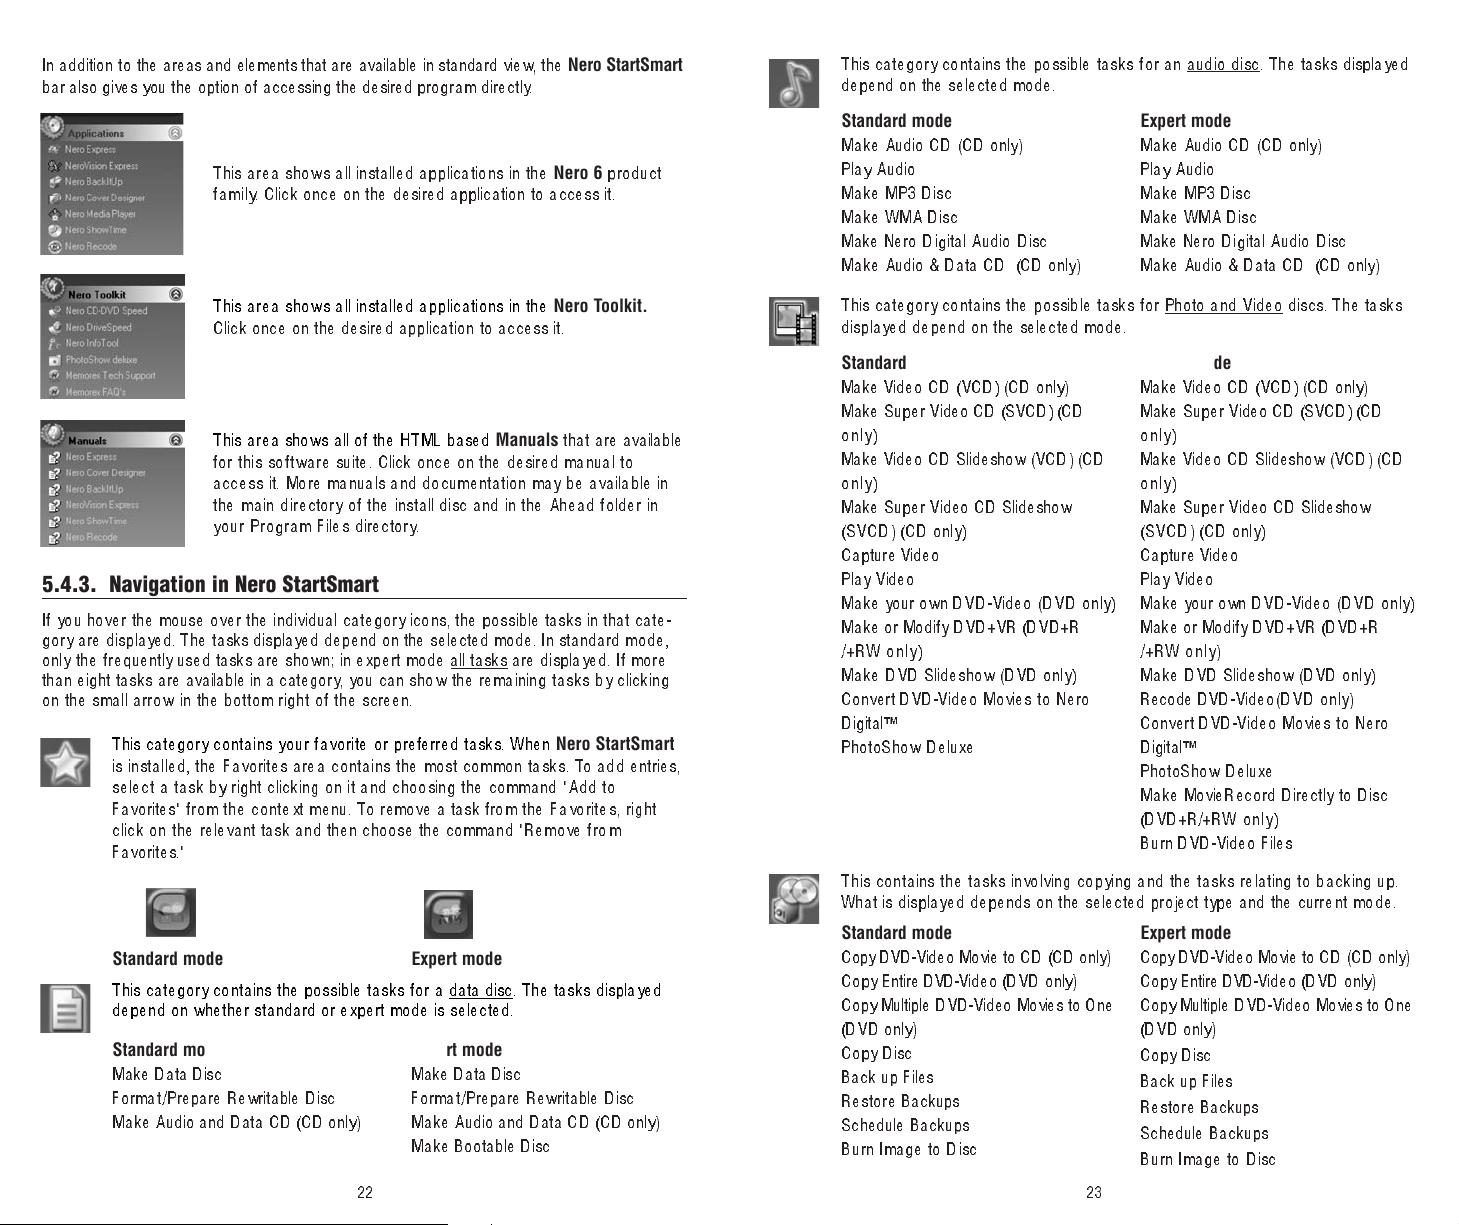
Depending on the selected project type and the installed software, this s ec t io n s ho ws th e
available categories in
icons, the po s s ib l e t a sk s in t ha t c a t eg o r y are displayed. For each task, you also have the
option of deciding for yourself which application is to be used to open it. If you hover the
mouse ove r th e de s i red task, the OPEN WITH option appears in the
can then select the desired program in the pulldown menu.
Nero StartSmart
Clicking on this button adds the
interface. The
nents of the
same time, allows you to select the desired pro gr am di rectly by
clicking on it . You can open up the individual programs in the
Toolkit
Clicking on this button allows you to change the colors of your
Nero StartSmart
This button displays the standard
mode is selected, only the most frequently used tasks are displayed.
Clicking on this button switches
described below.
This button displays the
is selected, all available tasks are displayed. Clicking on this button
switches
above.
Clicking on this button opens up the configuration
can set which program in th e
. If you hover the mouse over the individual category
Nero StartSmart
Nero StartSmart
Nero 6
bundle in the "Applications" area and, at the
by clicking on them.
inte rface for a customized look if you prefer.
Nero StartSmart
Nero StartSmart
Nero StartSmart
bar shows you the installed compo-
Nero StartSmart
Nero StartSmart
back to the standard mode described
Nero 6
family is started for which tasks.
bar to the program
to Expert mode
expert mode. If this mode
window. Here you
bar. You
mode. If this
Nero
Nero StartSmart
click on the
Nero StartSmart
consists of the following areas and elements.To Launch
Icon on your Desktop or Quick Launch Toolbar.
This button opens the
ProductCente
view.
If recorders that can burn several formats are installed on the
computer and/or the option to display all recorder formats is
activated, the possible p roject types appear in the upper section
of the
the possible tasks change according to the selected project type.
For example, an audio CD can only be cr
been selected as the pr
r, clicking on this button takes you back to standard
Nero StartSmart
Nero ProductCenter
wind o w. The content of the categories and
oject type.
Nero StartSmart
. If you are in the
eated if the CD tab has
Nero
Clicking on this button closes
,
5.4.2 The Nero StartSmart Bar
Nero StartSmart
2120
.
Page 12
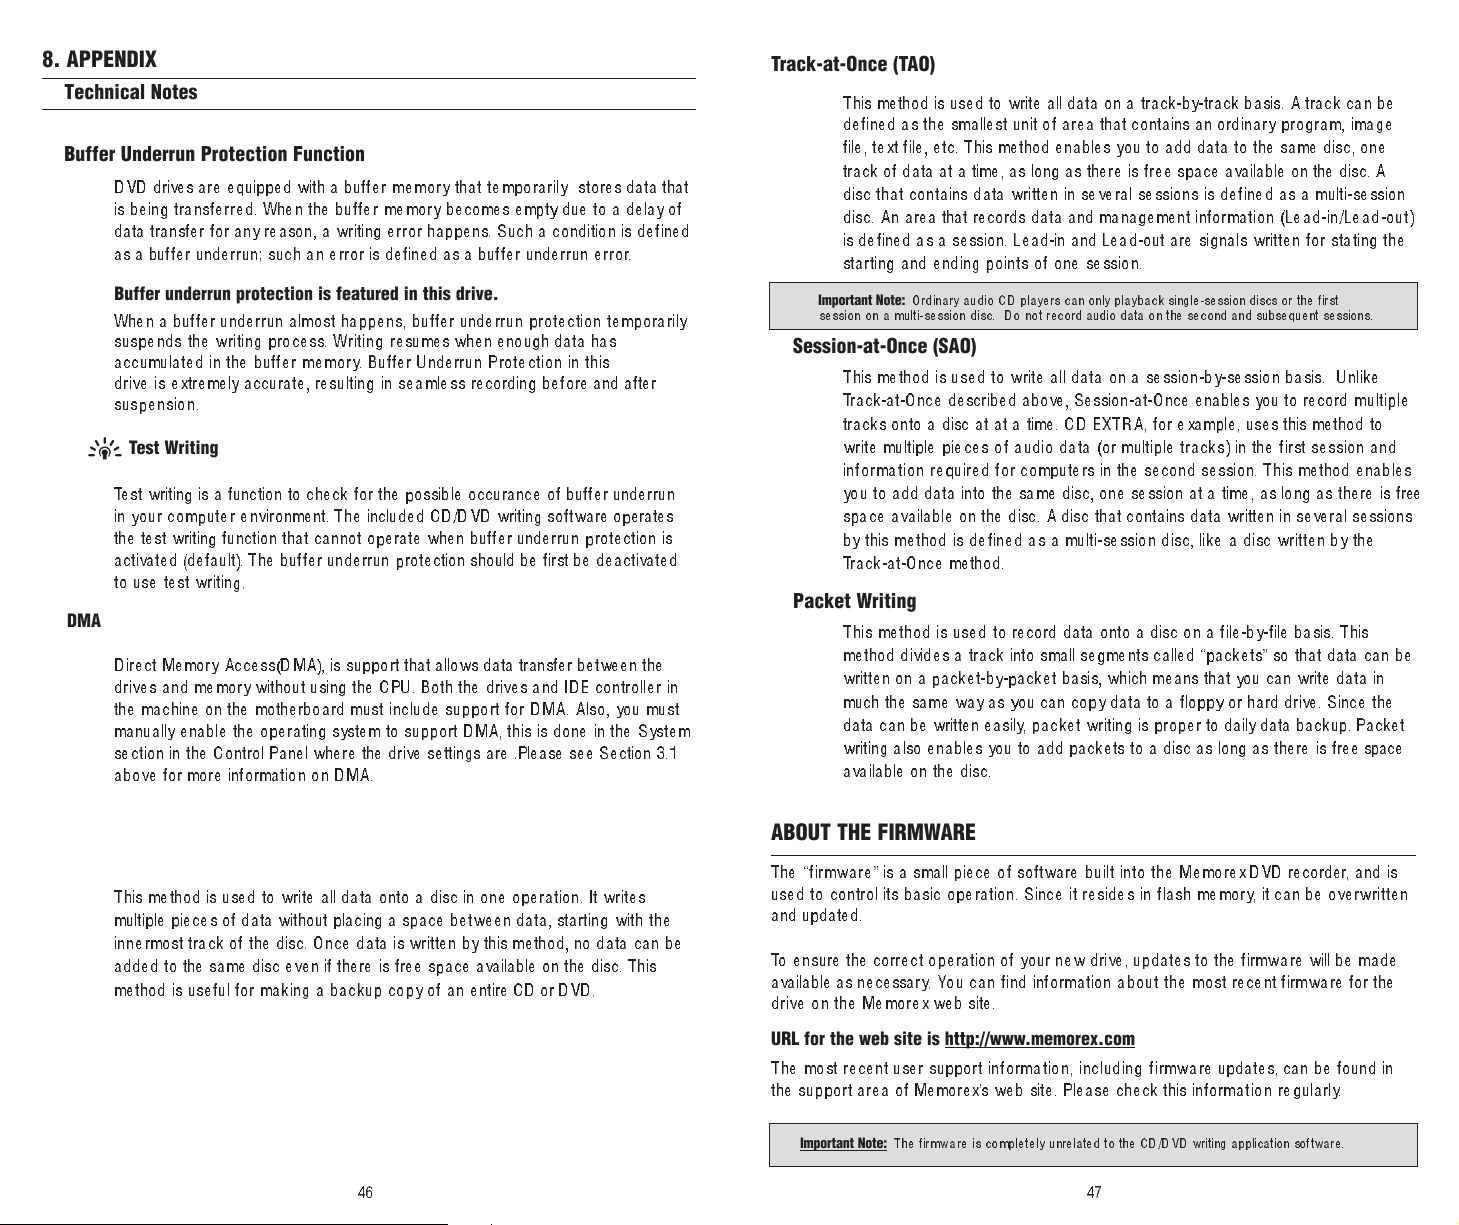
In addition to the areas and elements that are available in standard view, the
bar also gives you the option of accessing the desired program di rectly.
Nero StartSmart
This category contains the possible tasks for an audio disc
depend on the selected mode.
. The tasks displayed
This area shows all installed applications in the
fam i l y. Click once on the desired application to access it.
This area shows all installed applications in the
Click once on the desired application to access it.
This area shows all of the HTML based
for this s oftw are suite. Click once on the desired manua l to
access it. More manuals and documentation may be available in
the main directory of the install disc and in the Ahead folder in
your Program Files directory.
Manuals
Nero 6
product
Nero Toolkit.
that are available
5.4.3. Navigation in Nero StartSmart
If you hover the mouse over the individual category icons, the possible tasks in that cate-
gory are displayed. The tasks displayed depend on the selected mode. In standard m od e,
only th e frequently used tasks are s hown; in expert mo de all ta sks
than eight tasks are available in a category, you can show the remaining tasks by clicking
on the small arrow in the bottom right of the screen.
This category contains your favorite or preferred tasks. When
is installed, the Favorites area contains the most common tasks. To add entries,
select a task by right clicking on it and choosing the command "Add to
Favorites" from the context menu. To remove a task from the Favorites, right
click on the relevant task and then choose the command "Remove from
Favorites."
Standard mode Expert mode
This category contains the possible tasks for a data disc. The tasks displayed
depend on whether standard or expert mode is selected.
Standard mode
Make Data Disc
Format/P r epare Rewritable Disc
Make Audio and Data CD (CD only)
Expert mode
Make Data Disc
Format/P r epare Rewritable Disc
Make Audio and Data CD (CD only)
Make Bootable Disc
22
are displayed. If more
Nero StartSmart
Standard mode
Make Audio CD (CD only)
Play Audio
Make MP3 Disc
Make WMA Disc
Make Nero Digital Audio Disc
Make Audio & Data CD (CD only)
This categor y contains the possible tasks for Photo and V
displayed depend on the selected mode.
Standard mode
Make Video CD (VCD) (CD only)
Make Super Video CD (SVCD) (CD
only)
Make Video CD Slideshow (VCD) (CD
only)
Make Super Video CD Slideshow
(SVCD) (CD only)
Capture Video
Play Video
Make your own DVD-Video ( D VD on l y )
Make or Modify DVD+VR (DVD+R
/+RW only)
Make DVD Slideshow (DVD only)
Convert DVD-Video Movies to Nero
Digital™
PhotoShow Deluxe
This contains the tasks involving copying and the tasks relating to backing up.
What is displayed depends on the selected project type and the current m ode .
Standard mode
Copy DVD-Video Movie to CD (CD only)
Copy Entire DVD-Video (DVD only)
Copy Multiple DVD-V
(DVD only)
Copy Disc
Back up Files
Restore Backups
Schedule Backups
n Image to Disc
Bur
ideo Movies to One
Expert mode
Make Audio CD (CD only)
Play Audio
Make MP3 Disc
Make WMA Disc
Make Nero Digital Audio Disc
Make Audio & Data CD (CD only)
ideo discs. The tasks
Expert mode
Make Video CD (VCD) (CD only)
Make Super Video CD (SVCD) (CD
only)
Make Video CD Slideshow (VCD) (CD
only)
Make Super Video CD Slideshow
(SVCD) (CD only)
Capture Video
Play Video
Make your own DVD-Video ( D VD on l y )
Make or Modify DVD+VR (DVD+R
/+RW only)
Make DVD Slideshow (DVD only)
Recode DVD-Video(DVD only)
Convert DVD-Video Movies to Nero
Digital™
PhotoShow Deluxe
Make MovieRecord Directly to Disc
(DVD+R/+RW o n l y)
Burn DVD-Video Files
Expert mode
Copy DVD-Video Movie to CD (CD only)
Copy Entire DVD-Video (DVD only)
Copy Multiple DVD-V
(DVD only)
Copy Disc
Back up Files
Restor
Schedule Backups
Burn Image to Disc
23
e Backups
ideo Movies to One
Page 13

This section contains the additional tasks relating to discs. What is displayed
depends on the selected disc type and the current mo de .
Standard mode
Get System Info
Test Drive
Erase Disc
Make Label or Cover
Control Drive's Speed
Memorex Tech Support*
Memorex FAQ’ s*
5.4.4. Assigning Programs
Expert mode
Get System Info
Test Drive
Erase Disc
Make Label or Cover
Control Drive's Speed
Disc Info
Memorex Tech Support*
Memorex FAQ’s *
5.4.5. Nero ProductCenter
Clicking on the button opens the
first column contains the version number of the installed products from Ahead
Software, while the other column shows the currently available version numbers.
As a result you are always able to keep your prog rams up to date . To update, if
you are currently connected to the Internet, you can connect directly to the home-
page and start the download.
Nero ProductCenter
. The
Clicking on a task in
for executing that task. Many tasks, such as creating an audio CD, can be perform ed w it h
more than one program; and you can change the program assignment if you like. For
example , i f yo u we re t o pu rchase the Retail upgrade of
Burning ROM 6
you wo ul d proceed as follows:
1 . Click on the button on the left-hand side of the program wind ow to d isplay the
StartSmart
2. Hover the mouse pointer above the desired task and the application that will open
when you click on the task appears on the left.
3. Cl ick on the drop down butto n next to th e program names and select the application
you want to start.
4. Check the "Use as standard application" check box if you always want this program to
open in the future.
5. C li ck o n th e b ut to n wi th t he g reen arrow to save the change and open the desired
program.
Nero StartSmart
rather than the default application
bar if it is not already displayed.
automatically opens a program that is well su ited
Nero 6
and preferred to use
Nero Express 6
Nero
to create an audio CD,
Nero
6. BURNING - THE BASICS
In this section, the QuickStart guide only deals with the default combinations. If you have
already changed the program assignment, the programs opened differ from those in the
QuickStart. For m ore details, please refer to the Html Help guides under the Nero
StartSmart
\Program Files\Ahead\ directory on your com puter. These documents cover mostly all of
the details you should need to become an expert.
Manuals
section or to the PDF manuals found in Manuals folder under the
6.1. Make a Data Disc
1. Click on the
Data Disc."
Nero StartSmart
Icon; select the "Data" category and click on "Make
If you are not happy with the changes you have made, you can always revert to the
original default settings by clicking on the "Configure" button and choosing "Restore
Defaults."
24
25
Page 14

■
Nero Express 6
starts automatically and the compilation window for data opens.
4. Once you have finished adding files, click on the "Finished" button to close the window and
return to the
Nero Express 6
screen.
2. In the window, click on the "Add" button to open the window for selecting files.
3. Select the desired files and click on the "Add" button to transfer them to the compilation.
5. All the files you have added appear in the compilation window. Click on the "Next" button
to advance to the burning window.
6. Before burning the disc, make the final settings.
26
27
Page 15

Current Recorder
Disc name
Select the Memorex 16X DVD recorder from the list of connected
recorders.
Give the disc a title if you like.
■
Once the burning p rocess is complete, you can print a label by opening Cover Designer or
save a project file of the disc compilation. To do this, click on the appropriate button.
8 . Click on the "Next" button to advance to the selection window.
Writing Speed
Number of copies
Multisession disc
Select the speed for the burning process.
Select the number of copies to be burned.
If this checkbox is selected, a multi-session disc is created, allowing
you to add further session s lat er. If the checkbox is not selected, the
disc is finalized and no more burning is possibl e.
Verify data
If this checkbox is selected, the program verifies th at the burned data
on the disc is identical to the original data once the disc is recorded.
This guarantees that the burned data will function as desired, but t his
step adds time to the full recordi ng p rocess.
Note:
Clicking on the "More" button expands the burning window and offers additional
setting options such as selection of the burning method and sim ula tion of the
burning process.
7. Click on the "Burn" button to s tart burni n g t h e d i s c.
9 . Select the desired option or close
Nero Express 6
.
■
The burning process starts and you will see information about the curr ent sta tus.
28
29
Page 16

6.2. Make an Audio Disc
An audio disc(CD) contains music files that can be played back in any CD player and
many DVD players.
1 . Start
Nero StartSmart Icon
CD."
■
Nero Express 6
starts automatically and the compilation window for audio discs opens.
; select the "Audio" category and click on "Make Audio
3. Select the desired files and click on the "Add" button to transfer them to the compilation.
4. Once you have finished adding files, click on the "Finished" button to close the window
and return to the
Nero Express 6
screen.
2. In the w indow, click on the "Add" button to open the window for selecting files.
30
5 . All the files you have added appear in the compilation window. Click on the "Next" button
to advance to the burning window.
6. Before burning the disc, make the final settings.
31
Page 17

■
The burning process starts and you will see information about the curr ent sta tus.
Current Recorder
Select the Memorex 16X DVD recorder from the list of connected
recorders.
Title (CD TEXT)
If the recorder supports the writing of CD TEXT, you can enter the title
of the CD here. The title may not be longer than 64 characters.
Artist (CD TEXT)
If the recorder suppo rts the writing of CD TEXT, you can enter the
artist's name for the CD here. The name may not be longer than 64
characters.
Writing Speed
Number of copies
Note:
Clicking on the "More" button expands the burning window and offers additional
Select the speed for the burning process.
Select the number of copies to be burned.
setting options, such as selection of the burning method and sim ula tion of the
burning process.
7. Click on the "Burn" button to st art burni n g t h e d i s c .
■
Once the burn i n g process is complete, you can print or save a log of the burni n g process.
To do this, click on the appropriate button.
8 . Click on the "Next" button to advance to the selection window.
9 . Select the desired option or close
Nero Express 6
3332
.
Page 18

6.3. Make a CD or DVD Video Disc
A video disc contains video files that you can burn in a variety of formats (VCD / SVCD
or DVD-Video) that you can record on yo ur Mem orex 16X DVD drive. This QuickStart
Guide describes the creation of a DVD video disc. The procedure for a VCD or SVCD is
essentially the same.
Click on "Add Video Files" to open the window for selecting the files.
2.
Nero StartSmart Icon
1 . Start
"Make your own DVD-Video."
■
NeroVision Express 2
opens.
; select the "Photo and Video" category and cli ck o n
3. Select the desired files and click on the "Open" button to transfer them to the compilation.
starts automatically and the selection window for video discs
4. Repeat steps 2 and 3 to add more video files.
5. All selected files appear in the compilation window. Click on the "Next" button to create
the menu.
34
35
Page 19

6. Make the desired changes to the DVD menu by highlighting the individual menu items
with the mouse and selectin g the de sired option. Click on the "Next" button to proceed
to the next window.
Note:
With the Left Mouse button, click on the video thumbnail of your choice while
holding the button down, you may drag the selected thumbnail around your
project work area to avoid key or special areas (like peoples faces or various
items) of your custom background pictu re if you have chosen one.
7. You can use the remote control to move around the menu, e.g., to view the videos
again. Click on the "Next" button to proceed to the next window.
Burn to
Select the Memorex 16X DVD recorder from the list of connected
recorders.
Write to Hard
Disc Folder
If you do not want to burn the project (yet) but you want to save it to
the hard disc instead, click on this button to open up a window where
you can select the location you to which you can save it.
Volume Name
Recording Settings
Change the name of the disc if you wish to do so.
Depending on the selected destination recorder, you can adju st th e
recording settings, e.g., to select the burn speed.
Note:
Clicking on the "More" button expands the burning window and offers additional
setting options, such as selection of the coding quality and the aspect ratio of the
video.
■
The burning process starts and you will see information about the current status.
Before burning the disc, make the final settings then click Burn to continue.
36
37
Page 20

9 . Once the burni n g p rocess is compl ete, a corresponding message appears. Click on the
"OK" button to close the window.
10. Select the desired option or close
6.4. Copy a Disc
Unless you own the copyright or have the permission o f t he c opy rig ht h old er, the
unauthorized copying of discs represents a violation of national or international
laws and may result in serious penalties.
t
Star
1.
Nero StartSmart Icon
"Copy Disc."
; select the "Copy and Backup" categor
NeroVision Express 2
.
■
NeroVision Express 2
starts automatically and the selection window for the drives and
the final burning settings opens up.
2 . Select the drive containing the disc to be copied as the source drive.
3. Select the Memorex DVD+/-RW 16X DVD recorder as your destination drive.
4. In the "Quick Copy" section, you can determin e h ow t he disc is to be cop ied .
• If the Quick Copy option is selected, the copy is made directly, i .e. , from dr iv e t o
drive. This method is quick but is susceptible to errors.
y and click on
• If the Quick Copy option is not selected, a temporary ima ge fi le fo r the origi nal d isc
is fi rst recorded on the hard drive, and the image file is then burned from th e
temporar
y image file. This method takes longer; and the size of the image file,
and therefore the required hard disc space, corresponds to the quantity of data to be
copied from the original disc.
38
In addition, you can also make the following settings:
Writing Speed
Number of copies
Select the speed for the burning process.
Select the number of copies to be burned.
39
Page 21

5 . Once you have made all your settings, click on the "Burn" button to start b u rni n g t he di s c.
7. Select the desired option or close Nero E x p res s 6 .
■
The burning process starts and you will see information about the curr ent sta tus.
■
Once the burning process is complete, you can print or save a log of the burning process.
6 . Click on the "Next" button to advance to the selection window.
6.5. Upgrade Options
You have the option of upgrading to the full retail version of Nero Burning-ROM if yo u
would like to add more features and options to your recording software. Vi sit Ne ro at
http://www
.nero.com to find out what extra features are available and to purchase the full
version if you choose.
6.5.1. Updates (free downloads)
At http://www.nero.com, you w ill f ind regular updates for all programs, wit h new
functions integrated and/or errors eliminated. You can either retrieve these updates
via your
Nero ProductCenter
or just look at the
Nero
website from time to time. In
order to optimize the functionality of your programs, we recommend that you keep
them up to date. On occasion Memo rex may post a special update on the Memorex
website. Click on the Memorex FAQ's button in yo ur StartSm art Toolkit or S tartSmart
Extras area to check o n the Memorex FAQ's page or brow se th e Me morex website to
http://www
.memorex.com/service_support/software.php to check for any available
downloads related to your kit.
6.6. FAQ
1) Where can I find step by step directions for using, Nero Express 6,
NeroVision Express 2, and Nero BackItUp?
In addition to this Guide, the Nero Start Smart bar has a Manuals section with
Html versions of the Nero manuals and the :\Program Files\Ahead\Manuals
directory on your hard drive has PDF* versions of the manuals containing
detailed instructions for using the Nero software.
*Adobe Acrobat Reader is required in order to access any supplied PDF files. It
can be downloaded for free at: www.adob e.com
2) One of my encoders has expired! What should I do?
For licensing reasons, Memorex and Nero are only permitted to integrate demonstration
versions into Ner
o 6 for some for
mats. This gives you the chance to test out the
encoder functions for a limited time. To activate the demo version, you must purchase
the corresponding encoder plug-in. You can do this at http:/ /w w w
.nero.com i n the online
shop . We decided to do take this step so that only those users who actually want to use
these functions would have to pay the license fees due.
4140
Page 22

3) Why do I not have a Help file?
If for som e reason you do not have access to any Help files, please download
the latest update and the language package to enable you to access the help
files again. You can download them fro m :
http://www
4) Where can I download an update?
All updates and demo versions of other products from the Ahead Nero fa mily
can be found at htt p: // ww w
PhotoShow Deluxe application by SimpleStar can be found at
http://www
.nero.com/us/index.html#download
.nero.com. Any updates that may b available for the
.simplestar.com.
7. TROUBLESHOOTING
A su m m a ry of common questions and their answers are listed below to help you
troubleshoot your new drive before calling f or cust omer s ervice.You may also refer to the
Memorex web site at http://www.memorex.com for more information.
7.1. The drive is not recognized.
• Make certain the power cable and power supply is attached to the wall plug and drive correctly.
• Make certain that the US B 2 . 0 o r I E EE -1 3 94 in t er face cable is connected to your computer
and your drive.
5) Where can I get assistance with technical problems?
For all technical problems, we recommend visiting the Nero help system at
http://englishsuppor
PhotoShow Deluxe FAQ's page at
http://simplestar
Me m orex FAQ's page at http : // w w w
If you cannot find an an swer to your problem at either of the locations above,
you can contact the Memorex Technical Support th rough e-mail at
techsuppor
techsuppor
support form which can be found on their FAQ's page.
If all of the above electronic assistance is not resolving your issue or answering
your inquiries, please call Toll Free at (877) is it live [474-8548]. Technicians are
available M-F 9-6 p.m. P.S.T. .
t@memorex.com or the Nero support team through e-mail at
t@nero.com or the PhotoShow Deluxe support team t hrough their
t.nero.com or for PhotoShow Deluxe by visiting the
.com/site_html/_support_psd.php or finally by visiting the
.memorex.com/service_support/faq.php.
7.2. The drive is turned ON but the front panel LED does not light.
• Is the computer turned ON?
Tu rn the computer ON.
• Is the power cable connected prop erly to t h e d r ive?
Check that the connector of the power supply is connected to the wall plug in the correct
di rection and that the power cable is fully connected to the drive.
• If the drives power supply is connected to another power source like a power strip that
properly conducts power from another power source, is the powe r stri p turned on ?
7.3. The drive is not recognized by the operating system.
• Is the USB 2.0 or IEEE-1394 interface cable connected?
Check that the connectors are fully connected to your computer and your drive.
7.4. The disc tray does not open when you press the eject button.
• Is t he dr ive t urned on? (Does the LED light on the front pa n el li g ht ? )
Refer to "The drive is turned on but the front panel LED does not light" (Troubles ho ot in g
Item 2)
• Is any CD/DVD writing software being used?
Some CD/DVD writing software prohibits ejecting while accessing. (If you are using such a
software program, the disc tray does not open even if the eject button is pressed.) In
such a case, follow the steps in the software window to eject the disc or quit the CD/DVD
writing software prior to pressing the eject button.
42
• Is the disc tray opened when the computer is started?
Quit all running application software, restart your computer and press the eject button
of the drive.
urn off the compute r, and remove the disc following "Manually Ejecting a Disc".
T
•
If the disc tray is caught in the drive and does not come out, or if it cannot be opened
or closed using the eject button after it is pulled out manually, contact the store of
purchase.
43
Page 23

7.5. The disc is ejected without order (or it comes out spontaneously)
• Is the disc set properly (horizontally) on the disc tray?
Set the disc properly and close the disc tray.
• Is the disc dusty or dirty ?
Remove dust or dirt from the disc using an air spray or a dry soft cloth. To avoid
damaging yo u r di s c s, w ip e t he d is c ge n t l y f rom the center perpendicular to the edge of the
disc.
• Does the drive accept other discs (audio CD, CD-ROM, blank CD-R disc, etc.)?
If a specific disc is ejected, the disc itself may be damaged or deformed. If a ll di s cs are
ejected, contact the store of purchase.
7.6. No data can be read from a disc.
• Is the disc ejected without order?
Refer to Troubleshooting Item 8.5.
• Is the disc useable with the drive?
Be sure that the disc is compatible with the drive.
7.9. The drive does not operate correctly.
• Is the disc compatible with the drive?
Important Note:
• Is th ere dust on the disc tray or on the disc itself?
• Does your computer have several different CD/DVD writing applications installed?
If you u se m ore than one CD/DVD writing application simultaneously, the behavior of the
drive can become unpredictable.
• Do you have DMA enabled on all of your Internal Dr iv e s?
DMA being enabled is essential to obtain the high-speed performance of this drive. All
Int ernal Hard Drives and CD/DVD types drives need to have DMA enabled.
Even if the disc is a type compatible with the drive, some varieties can
sti ll b e u n readable on it.
7.10. The drive ejects or fails to read the disc, or the LED continues to blink
after the disc has been loaded.
You may b e tr ying to write to an unstable disc. Replace the disc with another blank disc. If
the drive fails to write to a variety of different discs, it may be f aul ty and yo u sho uld
contact Memorex Tech Support.
• Is the disc dusty or dirty?
Remove dust or dirt from the disc using an air spray or a dry soft cloth. To avoid
damage discs, wipe the disc gently from the center perpendicular to the edge of the
disc. The Memorex Air Duster and OptiCloth products work great for this application.
• Can data be read from other discs (audio CD, CD-ROM, etc.)?
If no data can be read from a specific disc, data may be written in a format that the
drive canno t recognize, or the disc itself may be damaged or deformed. No te tha t n o
data can be read from blank discs.
7.7. The playback of an audio CD (CD-DA) is inaudible.
• Check that the system volume is not set to the minimum level.
• Check that the drive volume is not set to the minimum level.
• If the playback audio from he a d ph o n e s o r e x t e rnal speakers connected to the
computer is inaudible, be sure that the sound card is co n f igured properly. Cons u lt your
sound card manufacturers documentation or your computer manufacturers documentation
for detailed instructions on how to do this.
7.8. Is more than one CD/DVD writing software installed on your computer?
Installing more than one writing software on a computer may cause overall instability of
operation. (The wri tin g so ftw are that comes with the drive can be used together without
proble m s). Wri t i ng s o ft w a re mu s t s u p p ort t he dr iv e i n orde r to recognize the drive. Contact
the man u fa c t u rer of your CD/DVD writing software to see whether the software supports
the drive.
NOTE: Before you co ntact Memorex Tech Support, verify that the blank media you have
purchased is of a format that your drive supports. Example: This drive does Not support
writing to DVD-RAM media. If you insert a blank DVD-RAM disc, you will have the results
detailed in this issue.
7.11. When I copy data or music, why can't my CD-ROM drive or CD players
see the information or play music?
It might be because you are using a CD-RW disc. Most older CD-ROM drives and CD
players do not recognize the new rewritable media, so they won't be able to read the
information.
In case of difficulties or to find answers to your questions, please:
1 .Carefully read this Quick Start Guide.
2. Visit our Customer Support web site at http://www
3. E-mail our Tech Support at techsuppor
4. Call Toll Free at (877) is it live [474-8548]. Technicians are available M-F 9-6 p.m. P.S.T..
t@memorex.com.
.memorex.com.
44
45
Page 24
8. APPENDIX
Technical Notes
Buffer Underrun Protection Function
DVD drives are equipped with a buffer memory that temporarily stores data that
is being tra nsf err e d. When the b uffe r me m o ry becomes empty due to a delay of
data transfer for any reason, a writing error happens. Such a condition is defined
as a buffer underrun; suc h an e rr or is defined as a buffer un derr u n error.
Buffer underrun protection is featured in this drive.
When a buffer underrun almost happens, buffer underrun protection temporarily
suspen ds th e wr it ing p rocess . Wr i t i n g resumes when enough data has
accumulated in the buffer memory. Buffer Underrun P rotection in this
drive is extremely accurate, resulting in seamless recording before and after
suspension.
Test Writing
Test writing is a function to check for the possible occurance of buffer underru n
in yo ur c om pu t er e nv ironment. The included CD/DVD writing software operates
the test writing function that cannot operate when buffer underrun prote ction is
activated (default). The buffer underru n protection should be first be deactivated
to use test writing.
DMA
Direct M e mo r y A cc e ss ( DM A ), is su p po rt that allows data transfer between the
drives and memory without using the CPU. Both the drives and IDE controller in
the machine on the motherboard must include support for DMA. Also, you must
manually enable the operating system to support DMA, this is done in the System
section in the Control Panel where the drive settings are .Please see Section 3.1
above for more information on DMA.
Track-at-Once (TAO)
This method is used to write all data on a track-by-track basis. A track can be
defined as the smallest unit of area that contains an ordinary p rogram, ima ge
file, text file, etc. This method enables you to add data to the same disc, one
track of data at a time, as long as there is free space available on the disc. A
disc that contains data written in several sessions is defined as a multi-session
disc. An area that records data and management informat io n (L ead -i n/ Le ad- ou t)
is defined as a session. Lead-in and Lead-out are signals writ ten for sta tin g th e
starting and ending points of one session.
Important Note:
session on a multi-session disc. Do not r
Ordinary audio CD players can only playback single-session discs or the first
Session-at-Once (SAO)
This method is used to write all data on a session-by-session basis. Unlike
Track-at-Once described above, Session-at-Once enables you to record m ult i p le
tracks onto a disc at at a time. CD EXTRA, for example, uses this method to
write multiple pieces of audio data (or multiple tracks) in the first session and
info rma ti o n requi red for computers in the second session. This method enables
you to add data into the same disc, one session at a time, as long as there is free
space available on the disc. A disc that contains data written in several sessions
by this method is defined as a multi-session disc, like a disc written by the
Track-at-Once method.
Packet Writing
This meth od is u sed to record data onto a disc on a file-by-file basis. This
method divides a track into small segments called “packets” so that data can be
written on a packet-by-packet basis, which means that you can write data in
much the same way as you can copy data to a floppy or hard drive. Since the
data can be written easil y, pac k et w ri t in g is p roper to daily data backup. Packet
writing also enables you to add packets to a disc as long as there is free space
available on the disc.
ecord audio data on the second and subsequent sessions.
Writing Methods
Disc-at-Once (DAO)
This method is used to write all data onto a disc in one operation. It writes
multiple pieces of data without placing a space between data, starting wi t h th e
inne rmost track of the disc. Once data is written by this method, no data can be
added to the same disc even if there is free space available on the disc. This
method is useful for making a backup copy of an entire CD or DVD.
46
ABOUT THE FIRMWARE
The “fi rmw a re” is a small piece of software b uil t int o the M emo rex DVD recorder, and is
used to control its basic operation. Since it resides in flash memory, it can be overwritten
and updated.
To ensu re the correct operation of your new drive, updates to the firmwa re will be made
available as necessary. You can fi nd inf orm at io n ab ou t t he mo s t rec ent firm w a re for the
drive on the Memorex web site.
URL for the web site is http://www.memorex.com
The m os t recent user suppo rt i n f o rm a t i o n , i n c l u d i n g f i rm w a re updates, can be found in
the support area of Memorex’s web site. Please check this information regul arl y.
e is co mp l et el y un related to the CD/DVD writing application software.
Important Note:
The fir
mwar
47
Page 25
SAFETY PRECAUTIONS
PLEASE READ CAREFULLY BEFORE PROCEEDING
These precautions explain how to use the device corr ectly and safely, thereby preventing
in j ury to yourself or to others. This section has been sub-divided into a WARNING section
and a CAUTION section, according to the likelihood and nature of any potential injuries or
damage inflicted. The relate to your personal safety, and also help you minimize the risk
of damaging the device. Please read these sections careful ly bef ore proceeding.
WARNING
Always follow the basic precautions listed below to avoid the possibility of serious
injury or even death from electrical shock, short-circuiting, damages, fire or other
hazards. These precautions include, but are not limited to, the following:
• Do not open the device or attempt to disassemble or modify it. Otherwise, the re is an
increased risk of electrical shock or fire. The device contains no user-serviceable parts.
If it appears to be malfunctioning, have it inspected by qualified service personnel.
Opening the drive enclosure will also void your warranty on thi s prod uct.
• Do not look inside the device. If you expose your eyes to the laser inside the device,
you risk damage or loss of your vision.
• Do not ins ert fin gers or foreign objects into the device. Otherwi se, there is an increased
risk o f p er so na l i nj ur y, electrical shock, damage to the device or fire. Please take
particular care if small children are present.
CAUTION
Always follow the basic precautions listed below to avoid the possibility of physical
injury to yourself or others, or damage to the device or other property. these precautions include, but are not limited to, the following:
• Always unplug all compu ter equip tment from the electrical outlet if it will not be used
for a prolonged period of time or if there is a risk of lightning. Otherwise, there is an
increased risk of electrical shock, short- c i rcui t in g o r f i re.
• Do not expose the device to excessive heat or vibrations such as in direct s un li ght o r
near a heater. Also avoid placing it in extreme cold or in a dusty environment.
Otherwise, the front panel may become disfigured or the internal components may be
damaged.
• Do not use the device near other electrical produc ts su ch a s tel ev is io ns, r ad io s o r
speakers. Otherwise, this may cause interference which can affect the proper operation
of those other products.
• Do not place the device in an unstable position. Otherwise, i t may a cciden tally fall d own
and be damaged or cause personal injury.
• Mount the device horizontally. Otherwise, written data may be destroyed. Set the device
up according to the instructions in this Quick Install Guide.
• Always remove the disc from the tray before transporting the device. Otherwise, written
data may be destroyed.
• Do not expose the device to rain, use it near water or in damp or wet conditions, or
place containers on it that contain liquids which might spill into an openings.
Otherwise, there is an increased risk of electrical shock, fire or personal injury.
• Follow the Owner’s Manual carefully. Othe rwi se , th ere i s an inc reased risk of personal
injury, electric al shock , fire or damage to the unit. Follow the corr ect procedure when
setting up the device.
• If unusual smells, sounds, or smoke emanate from the device or if liquids enter the device,
switch the computer and drive off immediate ly an d un plug it f rom the power outlet.
Otherwise, there is an in creased risk of electrical shock, fire or damage to the device.
Please contact Memorex Tech Support (877) is it live [474-8548] to obtain an RMA.
• Make sure the computer is electrically grounded. Otherwi se, there is an increased risk
of electrical shock.
• When opening up the computer, always unplug the computer from the electrical outlet.
Do not touch the plug with wet hands, Otherwise, there is an increased risk of electrical
shock.
48
• When cleaning the device, never use benzene, paint thinners, detergents or chemical
im pregnated wiping cloths. Also, do not place vinyl, plastic or rubber objects on the
device. Otherwise, the device may be damaged or its front panel and case may become
disco lo red. Use a soft, dry cloth to wipe the device.
• Do not rest your weight on or place heavy objects on the device and do not use
excessive force on buttons, switches or connectors. Otherwise, there is an increased
risk of damage to the device or personal injury.
• Do not place the device near sources of m agn eti c i nte rference, s uch a s a c omput er
displa y. Magneti c i nte rference can affect the operation and stability of the device.
• Have the device serviced regularly. Otherwise, dust can built up inside the device,
inc reasing the risk of fire or damage. For information a bout ser vici ng ch arges, contact
the s to re at wh ich the devi ce was purchased. The device should be serviced about once
.
a year
49
Page 26
■
About CD/DVD discs
Please read the following regarding the handling of CD/DVD discs.
1. Do not expose discs to excessive heat such as in direct sunlight of near a heater.
Also avoid keeping them in a humid place.
2. Do not touch disc, surfaces.
When handling a disc, hold it by its edges.
3. Remove dust and dirt from d is c su rfaces.
Use air-based dust remo ver s. T he s ur faces may be scratched if wiped with a dry c l o t h .
4. Do not label your DVD discs.
5. Do not write o n disc surfaces except where indicated. If you do, use Memorex CD
Markers. Do not use pencil or ball point pens.
6 . Do not clean discs with generic chemicals or detergents. Use the appropriate type of
Mem orex cleaning product s.
7. Do not bend or drop di sc s.
* Check discs for defects before putting them in your drives. Defects include chips or cracks
that can cause discs to come apart in high speed drives.
1. The information contained in this Quick Install Guide is subject to change
without prior notice.
2. All trademarks contained in this Quick Install Guide belong to their
respective owners.
3. Memorex does not bear any responsibility for any outcome as a result of
using this device.
4. Reproduction of this manual, either in part or in full, is expressly
forbidden.
■
Precautions for Transportation
Before transporting the device, always put it in its original box. If the device is transported without adequate
packing, the internal components may be damaged and cause the device to malfunction.
■
Copyrights
When writing to CD or DVD, make sure that you are not infringing any copyrights. It is illegal to copy audio CDs for
non-personal use. When backing up software, please make sure that you are not infringing any software copyri ghts
for that product.
■
Warranty
Mem o rex Produc ts , I nc . ("M em orex") warrants th is product (excludes the bundled software, any connected device
and data recorded in any form) against defects in materials and workmanship for one year from the date of original
reta i l p u rchase. PURCHASER'S REMEDY IS LIMITED TO REPAIR OR REPLACEMENT (AT MEMOREX's OPTION) OF
ANY DEFECTIVE PRODUCT. THIS WARRANTY AND REMEDY IS EXCLUSIVE AND WE SPECIFICALLY DISCLAIM
ANY AND ALL OTHER EXPRESS OR IMPLIED WARRANTIES. IN NO EVENT SHALL MEMOREX OR ANY SUPPLIER
OR SELLER BE RESPONSIBLE FOR ANY DIRECT
AGES OF ANY KIND. For furthe r in form ation regarding warranty s e rvice pleas e go t o w w w
No part of this publication may be reproduced, transmitted, transcribed, stored in a retrieval system, or translated into any language in
any term by any means without the written permission of Me morex Products, In c.. M emorex reserve the right to make any changes or
improvements in the products described in this document at any time without prior notice.
, SPECIAL, INCIDENT
50
AL, CONSEQUENTIAL OR ANY OTHER DAM
.memorex.com.
-
51
Page 27

Copyright © 2004 Memorex Products, Inc. Cerritos, CA 90703
5395 7110
 Loading...