

Page 1

Benutzerhandbuch "CELSIUS 2007 FDA-Edition"
USER MANUAL
CELSIUS 10
Control software for MEMMERT appliances – FDA Edition
Validatable in according to 21 CFR Part 11
U. S. Food and Drug Administration
Page 2

Willi-Memmert-Straße 90–96
We reserve the right to make changes
Page 3
About this manual
This user manual describes the installation and use of the MEMMERT control software CEL-
who have the task of programming/operating MEMMERT ovens.
The representation of the programme windows in this manual is based on the operating
Explanation of terms
Term Meaning
Tempering
a time sequence of physical values/combinations
vacuum, CO
and O
), that the oven should perform
vacuum, CO
and O
), that the oven should create during
the execution of a tempering profile (measuring values)
ated, edited or stored by a computer system.
Audit Trail
Any editing of an Electronic Record must be protocolled
with time, user name and type of alteration and must be
aid of the
Audit Trail it is possible to follow the history of
any document.
that he has edited an Electronic Record. For this it is nec-
authority can be tested. “Electronic Signatures“ are not
Description
on/from page
Page 4

4
and familiarise yourself with it.
This manual should always be kept in a place where those working with the software have
access to it. It is the responsibility of the operator to ensure that persons who work with or
will work with the software are informed as to the whereabouts of this user manual. We rec-
An electronic version of this manual in
).
Page 5

................................................................................
4. Programme description 16
4.1 Starting CELSIUS
................................................................................................................
4.2 Start screen and licence file
...............................................................................................
4.2.1 Language
4.2.2 Menu bar
4.2.3 Toolbar
..................................................................................
.............................................................................................................
..................................................................................
.............................................................................................
.............................................................................................................
........................................................................................
...........................................................................................
........................................................................................
41
..........................................................................
42
............................................................................................
43
Page 6

.............................................................................................................................
43
...........................................................................................................
43
...................................................................................
44
......................................................................
46
..............................
46
46
........................................................................
48
...............................................................................................
................................................................
...........................................................................................................
..................................................................
...........................................................................................................
...............................................................................................
....................................................................................................................
......................................................
.................................................................................................................
..............................................................................................................
..............................................................................................
............................................................................................................................
........................................................................................................
.............................................................................................................
................................................................................
..................................
......................................................................................................
Page 7

This end user licence agreement forms a legally binding agreement between you, whether a
This licence agreement bindingly regulates the use of software licences of MEMMERT GmbH
as in online or electronic format (“software licence“). Included are also all updates and sup-
agreement without requiring any separate agreement.
your legally binding agreement that you accept the conditions of this licence agreement and
are bound by it. If you do not agree to the conditions of this licence agreement you are not
The software is protected by copyright laws, international copyright agreements, as well as by
The software product is licenced, not sold. All property and user rights remain with MEMMERT
accompanying printed material and of any copy of the software product are and remain with
are however not authorised to duplicate or distribute the printed material accompanying the
The software product is licenced as follows:
As customer you must use the software only for the MEMMERT equipment entered in the
You are not entitled to hire out, lease, loan or otherwise dispose of the software product. You
are also not authorised to amend, back-develop, decompile, disassemble etc. the software
technological development. The user hereby notes this situation.
All warranty lapses if the user modifies programmes or programme parts or has such changes
Page 8

from incorrect operation, use of unsuitable operating material, or unusual operating condi-
tions.
The user must employ the SOFTWARE PRODUCT only for his own purpose unless expressly
agreed otherwise.
The user must notify MEMMERT GmbH & Co.KG without delay of any faults which occur,
together with a brief description of the fault.
the SOFTWARE PRODUCT is supplied, is free from material faults and manufacturing faults.
The software has been carefully developed and tested by MEMMERT GmbH & Co.KG. There
the use of this software product or any inability to use this software product.
This applies also in case MEMMERT GmbH & Co.KG has been advised of the possibility of such
This exclusion does not apply to damage which has been wilfully caused by MEMMERT GmbH
agreement if you contravene in any form the terms and conditions of this licence agreement.
from such contravention.
The agreement is concluded exclusively on the basis of the General Utilization Conditions of
Page 9

All legal relations between the parties, including delict law, are subject to the law of the Ger-
as possible realizes the intended commercial purpose This also applies in case of a gap in the
agreement.
Description
With CELSIUS, you can
form.
values. up to eight ovens can be controlled via RS-232 or USB, and if RS-485 or Ethernet
and protocols from a
type, temperature, humidity, vacuum, CO
2
2
) including
Page 10

Advanced FDA Edition functions
Within a closed system this specially developed software meets the FDA requirements. The
►
trail
thority management, user and password management, user authentification)
21 CFR Part 11
The regulation 21 CFR (Code of Federal Regulation) Part 11 came into force in 1997. It
tion) in respect of electronic data sets and signatures so that they can be used as replacement
for extensive paper documents and manual signatures. The initiative for their development
The regulation applies to all production and quality assurance documents which previously
They are filed in:
Audit Trails
)
The FDA conform software “CELSIUS FDA-Edition“ meets the requirements for the use of elec-
tronically stored data sets and electronic signatures as laid down in the directive 21 CFR Part
Authenticity: user and administrator of Electronic Records must be uniquely identifiable
and authentic.
vation period.
Automatically operating audit trail with time stamp, signature, and type of alteration
►
►
►
►
►
►
►
Page 11
Category Minimum system reqirements
Available free space on hard
yes
VGA graphics and colour monitor
an unused RS-232 or
Windows XP, Vista, 7
Windows® NT security concept of software manufacturer Microsoft. The core operating sys-
tem of Windows NT was successfully tested by NCSC ito security level C2 of the orange book
Page 12
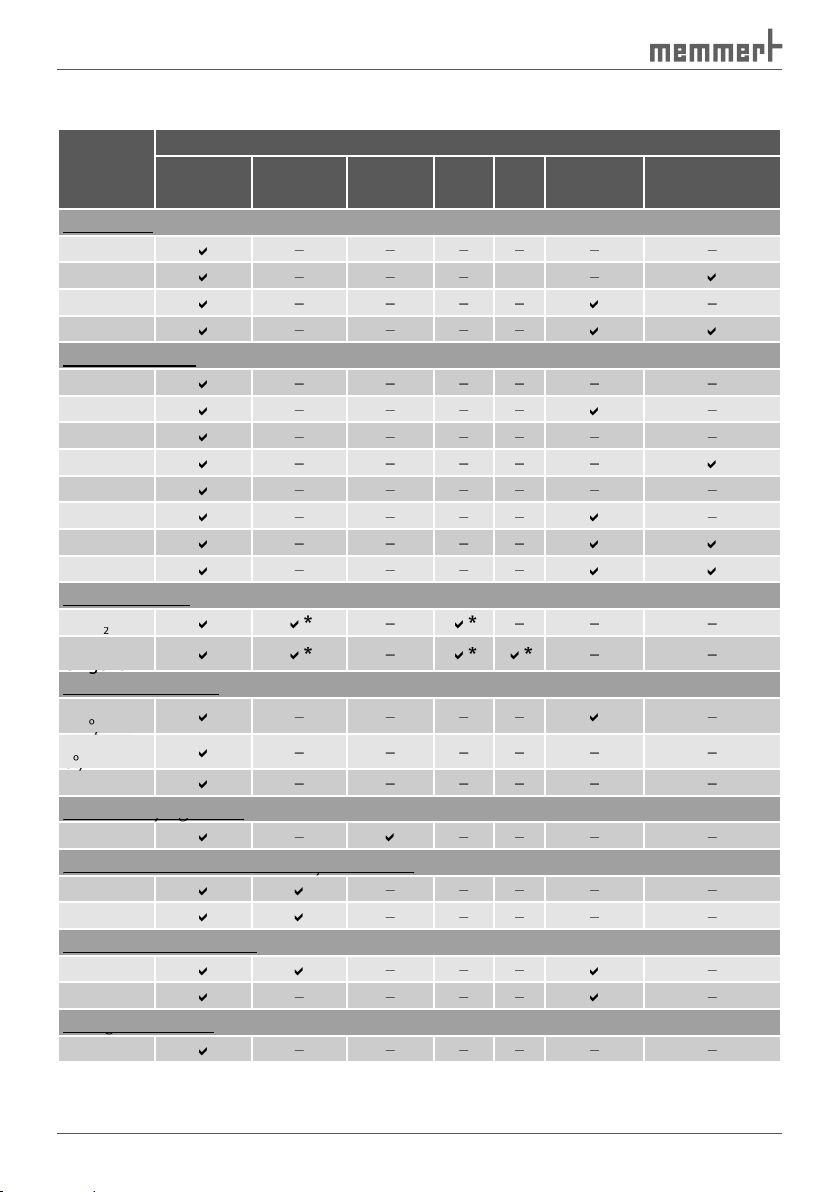
Oven type Parameters
Incubators
CO2 incubator
2
2
Cooled incubators
)
)
)
)
)
)
)
)
Vacuum drying ovens
Vacuum drying ovens
Vacuum drying ovens
VO
Constant climate and humidity chambers
Constant climate and humidity chambers
Constant climate and humidity chambers
Climatic test chambers
TTC
Storage chambers
Storage chambers
Storage chambers
Tempera-
ture
Humidity Vacuum CO
2
O2Fan speed Servo air flap
Page 13
Always first install CELSIUS before you connect an oven to your
The installation of CELSIUS FDA-Edition must be performed by the Windows system ad-
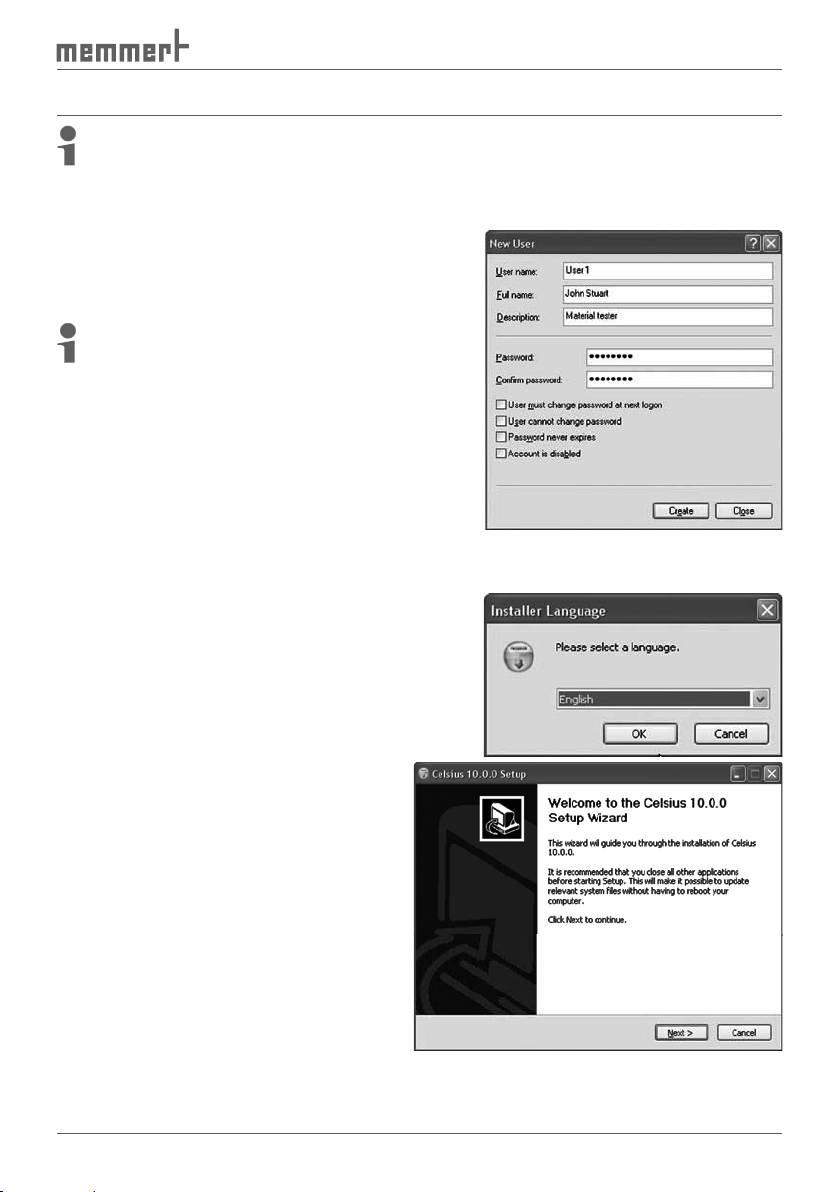
Windows users and assigning
All users of CELSIUS FDA-Edition must be established
their own user passwords.
):
assign restricted account rights to all users.
Assign restricted user rights.
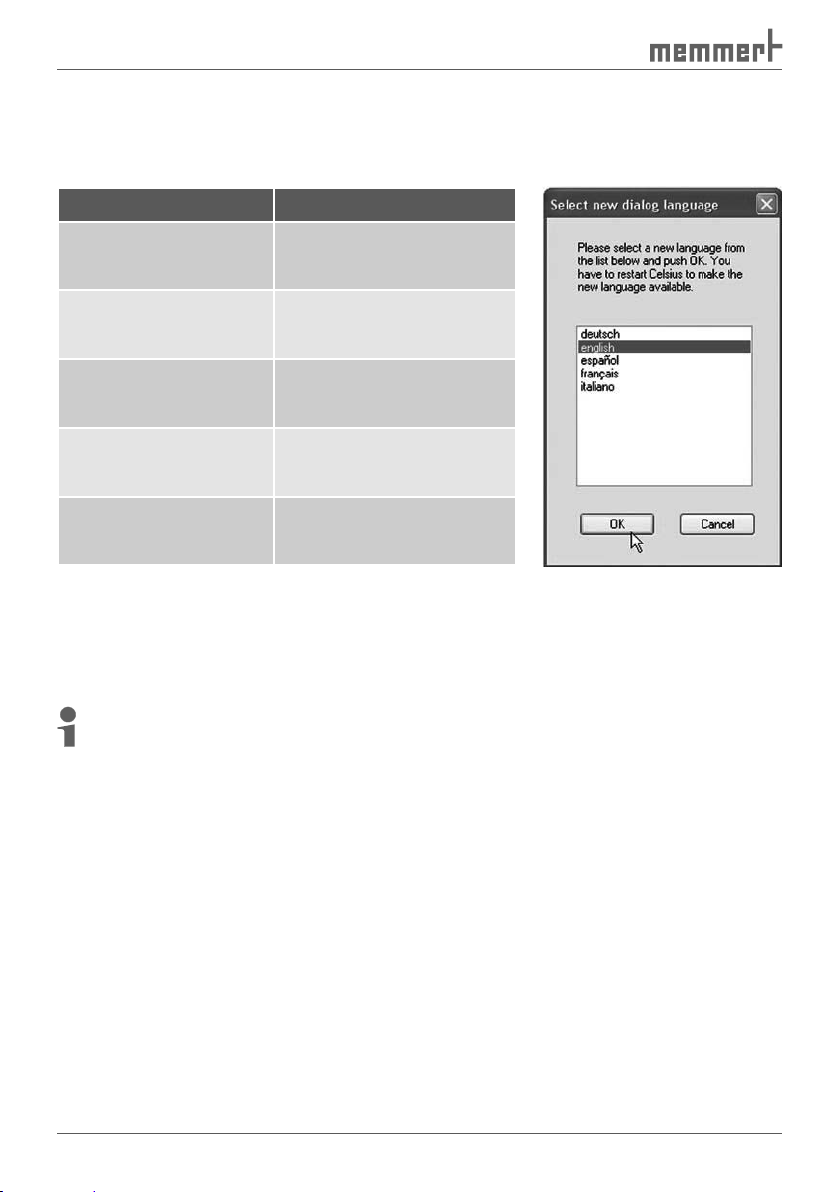
You
are first requested to select the language
for the installation. Select the desired language
and confirm with OK.
The
throught the installation procedure.
Page 14
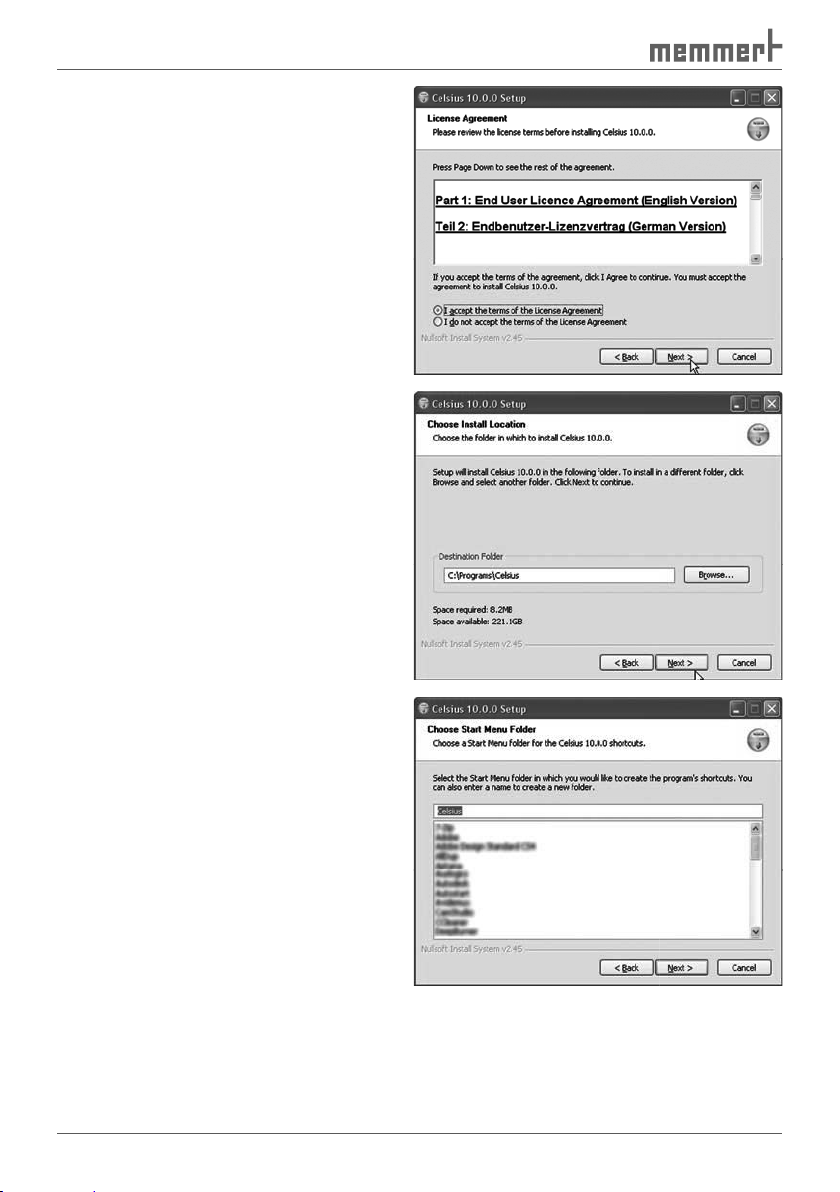
You are shown the
the use of the software in German and
the installation. If you reject the license
agreement, the installation procedure is
terminated; but it can be restarted at any
time.
terms of the license, and then click on
Then you must choose the
target
the name of a folder that should be
Page 15
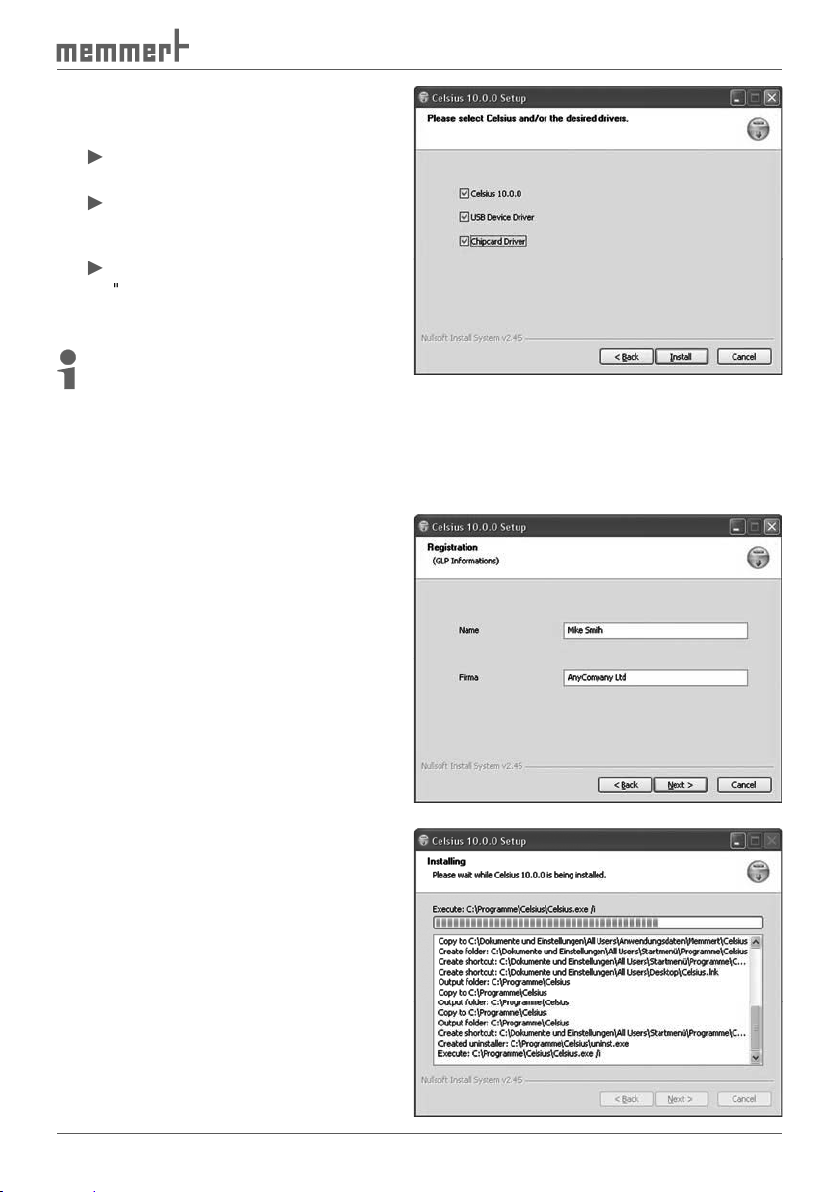
want to install the programme itself.
Also select "
want to connect ovens via the USB
a
).
You can also install USB and chip card
additionally.
You now have the option of registering
with GLP data (GLP =
also skip this step and enter
a later date (see page
45
).
way, carry out steps 2 to 4. Click on
Page 16
4.1
the desktop:
and
):
Programs
Documents
Settings
Search
Help and Support
Run
Shut down
File Edit View Favorites Extras
Back
Search
Page 17
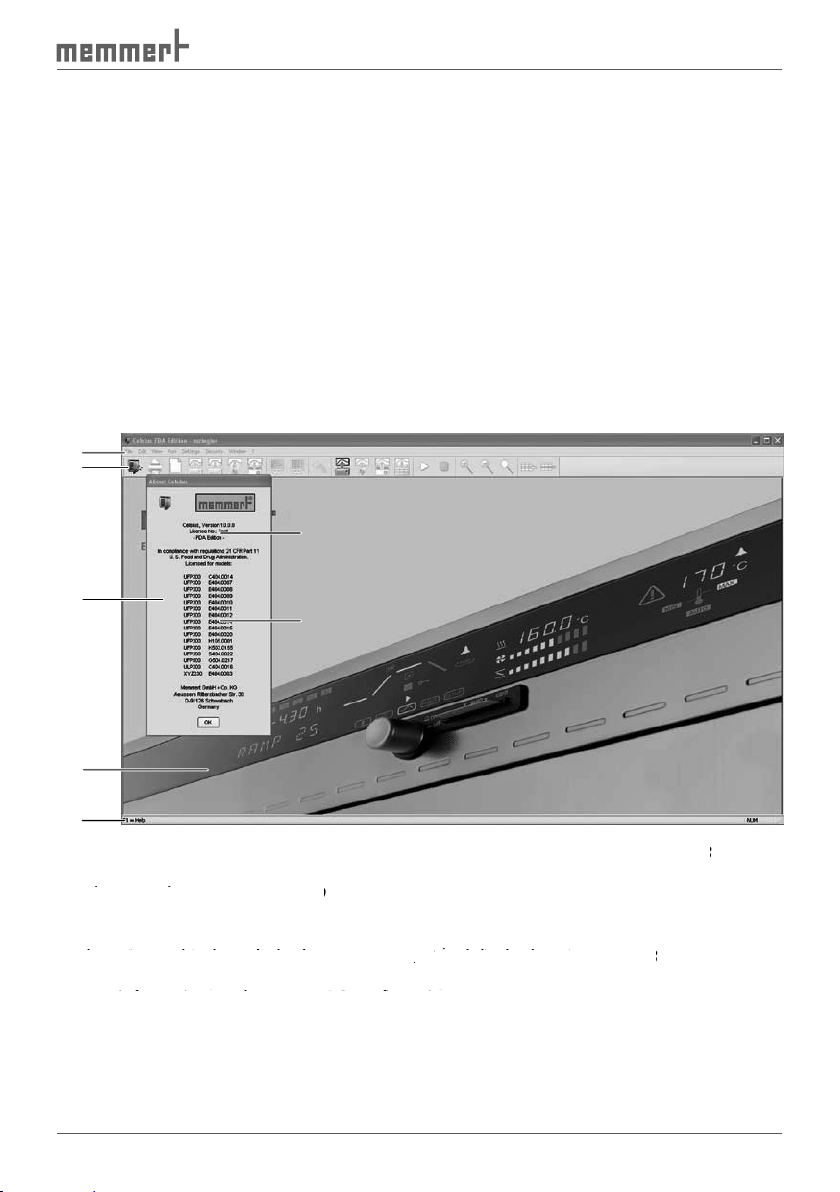
Start screen and
alteration.
The
The licence number remains unchanged if the entity name is altered or if additional equip-
The digital signature ensures that CELSIUS refuses to operate if the
tered. Without a valid
version (not FDA-version) .
The
1
Menu bar: The various processing options are given here (description from page
).
(for an explanation, see page
).
3 Information box
4 Main window: When functions have been run, you can create and edit tempering profiles
here (in graphical or tabular form, see page
27
and display logs (see page
38
).
5
Status line: A help text for the function currently chosen is displayed here, along with vari-
ous information on the current PC configuration.
Status line: A help text for the function currently chosen is displayed here, along with vari-
Status line: A help text for the function currently chosen is displayed here, along with vari-
6 Licence number under which the software is registered
2
6
3
7
4
5
Page 18
4.2.1
Preset language Can be changed via ...
Ajustes
Menu bar
All programme functions can be run from the menu bar. The most important programme
functions can also be run quickly via the icons of the tool bar (see page
). The individual
functions and how they are run are described below.
As long as no oven is logged in, only general programme parameters can be changed and
Page 19
call via
A possible existing profile will be
a profile that
file
Save Tempering
To File
to a file
To Device
to the internal memory of the oven
To Internal
To External
which has been transferred from
the ring protocol memory of the
Page 20

call via
Save Protocol
To File
a tempering profile
was started,
the log file
this after the sequence has been
41
The tempering profile in the active
window is printed. Depending on
the display type currently selected
a graphic (including possible log
values) or as a table (without log
values). The exact screen contents
are printed here. The printout is
The printout is done as in
tempering profile,
tempering profile is printed out –
time axis is selected according to
the current screen display.
45
Show GLP Data
45
Transmit GLP
troller of the oven. The
appear in the GLP header on each
45
Page 21

call via
a prompt appears for security
Menu "Edit"
call via
Adds a new line to the table. The current ramp is
Wrap-Up Profi le
Allows a tempering profile to be edited after a pro-
far are deleted and the tempering profile can now be
Menu "View"
call via
Graphics
Table
tabular form
Zoom In
Zooms into the time range displayed in the
Page 22

call via
Zoom Out
Zooms out of the time range displayed in the
Zoom all
Menu "Run"
call via
Start
Stop
file prematurely. Continuation not possible.
Continue
Menu "
Settings"
Settings"
access
via
Save Settings
when the programme ends
44
Page 23

access
via
Save Settings on
When this function is enabled, the allocation of
automatically saved when the programme ends.
The next time the programme starts, CELSIUS
tries to log on the ovens exactly as before. If an
44
Options
This assigns default settings to the
45
,
Show Color Leg-
ends
and off
Auto-Update Ring
at regular intervals
43
43
Open CELSIUS
Working Directory
43
Open Common
CELSIUS Directory
and logs are saved for all users, in Windows
43
Toolbar
Menu „Security“
Menu „Security“
Allocate user authorisations for different Win-
Audit Trail
Signatures ...
with a digital signature
Page 24

Cascade
Arranges windows in overlapping form
Tile
Arranges windows next to each other
Arrange Icons
Menu "?"
4.2.3
Toolbar
Via the toolbar, you have quick access to the most important and most frequently used pro-
The toolbar can be switched on and off via the "
1 2 3 4 5 6 7 8 9 10 11 12 13 14 15 16 17 18 19 20 21
The tempering profile in the active window is
a graphic (including possible measured values)
a tempering profile that has not yet
4
Page 25

to file
to oven
to
Tabular View
tabular form
file
tocol memory of the oven
41
file prematurely. Continuation not possible.
Zoom In
Zooms into the time range displayed in the
Zoom out
Zooms out of the time range displayed in the
Zoom all
Adds a new line to the table. The current ramp
able in tabular view).
Page 26

Establish
The FDA version of CELSIUS has its own user management. CELSIUS users must however
already be Windows users. After the installation of CELSIUS-FDA the standard procedure is to
The CELSIUS user administration is called via
Quit User Rights Administration
without saving
Save settings and quit
User Rights Administration
Delete selected Celsius user
Designate new Celsius user
Page 27

User right Description
This authorization permits a Windows user to start the CELSIUS
thermostating profile.
and to edit a new or existing profile.
the administrator of CELSIUS FDA . All other users of CELSIUS FDA
are assigned their individual rights by the CELSIUS administrator.
an information window and logged in the audit
trail (see page
).
Page 28

Always install the software and necessary drivers (e.g. USB) first before connecting an oven
to the
) can be con-
When connecting an oven, read the information and notes concerning this in the
To control an oven from the PC and – if it is equipped accordingly – to be able to access the
the "I" operating mode. In addition, the address
with which you want to access the oven from
the CELSIUS software must be set (see also page
and the user manual for the oven).
The correct installation and configuration of the PC interfaces is in general dependent on the
type and manufacturer, which is why we refer you to the appropriate system documentation.
face must be available on the
≤ 5 m
≤ 5 m
Page 29
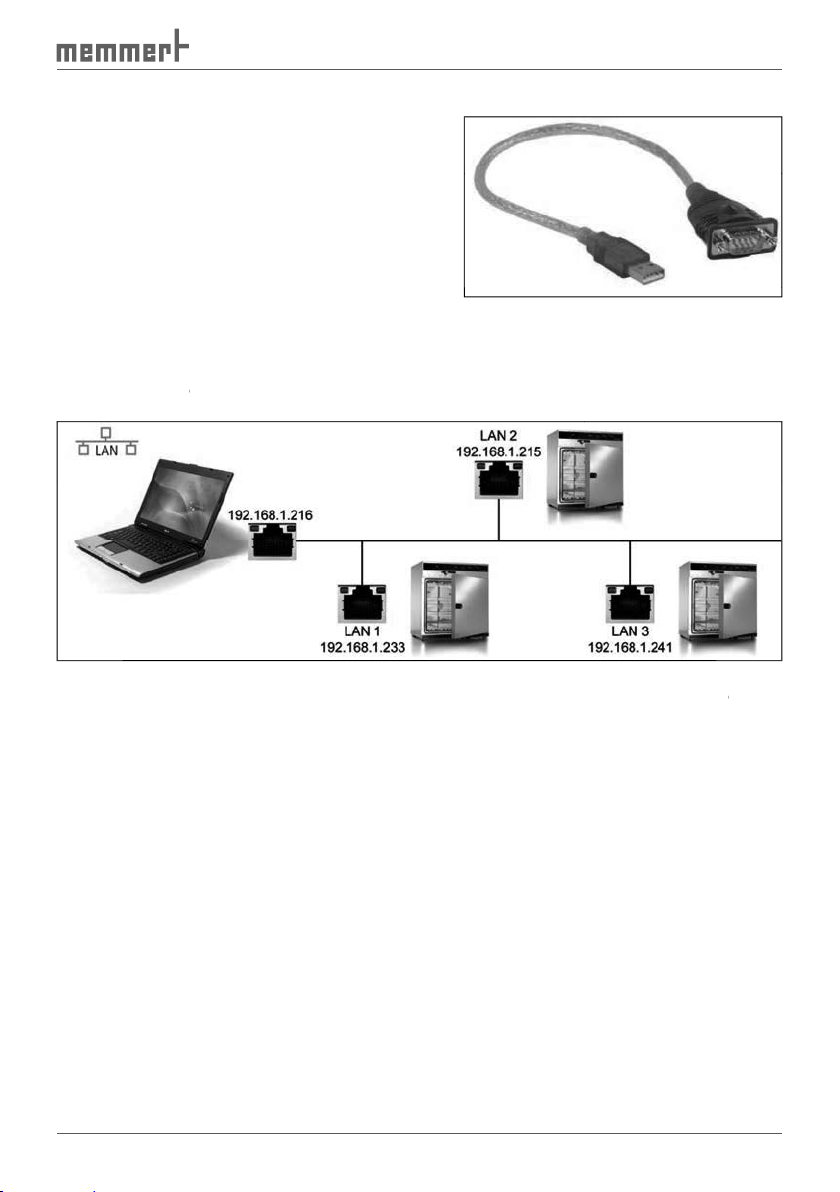
To connect an oven with an RS-232 interface, a
twisted RS-232 connection cable in accordance
with DIN 12900 part 1 is required (see also page
48
). If the computer has no nine-pin
ally required (available in specialist shops, see
figure on the right).
Connect ovens
with an Ethernet interface to
or DNS address (e.g. firmxyz.dyndns.org). Schematic example:
address 192.168.100.100. The programme
ad-
Page 30

address of the oven with
XTADMIN
a free network socket and switch it on.
window of XTADMIN appears.
4.
address you want to change and highlight the lowest entry ("XT-NANO
xxx", the name may deviate from this) (2). In the XTIP window, the preset IP address and
the name of the oven must now appear (3).
address which you want to assign to the oven (4). Make a note of the
ad-
address entered.
1
the item "
address or DNS of the oven
XTADMIN and confirm this with "OK":
You can now log on the oven in CELSIUS, as described
from page
.
5
XT-NANO
192.168.100.100
XT-NANO xxx
192.168.100.100
3
XT-NANO-xxx
2
4
Page 31

acquired separately as an accessory) to your computer
the card reader (USB or COM) and close the
tions and
When logging an oven on, read the infor-
An oven can be logged on that is switched on and connected to an interface of the PC.
As an alternative to logging on online,
a virtual oven can also be logged on, which does
the tempering profile is created initially on a notebook computer that is to be con-
a new tempering profile is to be created while the oven is controlled from the same PC
with a different tempering profile;
the tempering profile is created on the PC and is to be stored afterwards on a
Page 32

Logging on an oven
The dialog box "
What device address is preset can be found out in
the setup menu for the oven (see accompanying
address. No ovens may have an identical device
address.
You can adjust the preset or altered device address
):
(see above)
to 16 ovens can be connected and controlled
via USB ports. In the selection of the interface for logging on the oven, "
). In
the selection of the interface for logging on the oven, "
LAN1
Page 33

the desired device
was logged on offline.
available later when you are creating a tempering
and
).
warning is displayed when the oven is logged on. In this case, you should set the oven to
the time displayed by the computer (see user manual for the oven).
Working with CELSIUS
Tempering profiles
Creating a new
tempering profile
A new, empty tempering profile can be created in three ways:
via "File"
in the toolbar
in the toolbar
Graphical and
tabular view
Tempering profiles can be created and edited in graphical (see page
) and tabular form (see
).
You can switch between the two views at at any time:
with the icons
( ( ( (tabular view) in the toolbar
via "View"
Time
hh:mm
Period
hh:mm
Vacuum
mBar
Type
Page 34

What setting options are available depends on what oven type is used for a tempering profile.
The setting options for individual oven types are listed from page
.
With "Edit"
The
tabular views while a tempering
Controller active
Controller status, e.g.:
temperature curve, nothing can be changed.
menu.
To edit the tempering profile, the menu item "Wrap-Up
Profile" in the "Edit" menu must be selected.
The corresponding error text is displayed.
COM interface of oven or "offline"
3 Actual temperature value
4 Physical properties of the oven at the mouse position while a tempering profile is being
run (e. g. temperature, humidity, vacuum) or the temperature at the mouse cursor position
while the temperature profile is being entered
run (e. g. temperature, humidity, vacuum) or the temperature at the mouse cursor position
run (e. g. temperature, humidity, vacuum) or the temperature at the mouse cursor position
5 Current runtime or the time coordinates at the mouse cursor position while the tempera-
ture profile is being entered
The
Working in the graphical view
The
with the
icon in the toolbar
icon in the toolbar
via "View"
The
top segment (1), a tempering profile can be created, and the temperature is logged when a
tempering profile is executed. In the lower segment (2), other oven-specific parameters (e.g.
the table on page
COM3 IST: 24.1 °C 40.1 °C 0:02h
1 2 3 4 5
Page 35

are available at the bot-
tom of the
adjusted via drop-down menus. These functions are shown in the tabular view as additional
table columns (see page
).
File Edit View Run Settings Window ?
and temperature or time and air pressure (in the example
VO).
To create a new
).
arrows. If you hold the mouse button down, you can then
1
2
3
Page 36

when you switch to the tabular view, and vice versa.
Ramp close statements
Ramp close statements
To run the selection dialog, move the
the next ramp segment. If this is the final ramp segment, the
tempering profile is stopped and the connected oven is reset to
The oven waits for the end of the ramp seg-
Which setpoint is involved depends on the oven, and can be
Temperature for incubators (Ixx, INCO 2, IPP, ICP) and HCP humid-
Temperature for incubators (Ixx, INCO 2, IPP, ICP) and HCP humid-
Temperature for universal ovens, sterilisers and
Temperature for universal ovens, sterilisers and
vacuum ovens:
Vacuum for
VO
vacuum ovens:
VO
vacuum ovens, the SPWT function can be enabled sepa-
the setpoint humidity has been reached with a tolerance of
loop count
delete
Page 37

►
The tempering profile is repeated endlessly from the beginning,
The tempering profile is repeated from the beginning n-times
At the end of the tempering profile, the parameters of the last
applied.
Zooming
Zooming
You can zoom in and out of the display in the various graphics windows. There are different
ways of doing this:
via the tool and menu bar:
extend
extend
Zoom in)
squashe
squashe
Zoom out)
(menu bar: View
Zoom all)
Page 38

temperature, humidity, pressure, CO
2
or O
2
windows. The
area is now shown in a full window:
Page 39

vacuum ovens VO
in the graphical view
in the graphical view
With
vacuum ovens VO,
the temperature and vacuum profiles are displayed in the graphi-
Switch contact a off: IN1 (fresh air)
Working in the tabular view
The
tabular view of a tempering profile can be displayed
with the
icon in the toolbar
icon in the toolbar
via "View"
table window, the tempering profile is shown as a table. The individual adjustment
table window.
Switch contact a on: IN2 (inert gas)
Page 40

40
Edit Profile
Ramp segment No. ...
2 Beginning of ramp segment after programme start
3 Duration of the ramp segment
4 Temperature in the
ramp segment
5 Ramp close statement (see page
30
)
6
Flap position
Fan speed
8 Position of switching contact a
9 Position of switching contact b
Inserting and deleting lines
Inserting and deleting lines
table window is active, the commands for
available in the view menu and toolbar:
Insert a line at the position marked
Insert a line at the position marked
to the line above.
hh:mm
21 3 4 5 6 7
Time
Period
hh:mm
FlapType
8 9
Fan
Page 41

41
Executing
)
the relevant oven must be connected and logged on to the computer and be in operating
applies for saving to a MEMory Card (XL).
A tempering profile can be started
via the
button in the toolbar
button in the toolbar
via "Run"
When a tempering profile is started, the
1 2 3 4 5 6 7 89 10
data (automatically enabed if GLP
data were preset, see page
9
)
2
Select the storage location of the
log file if "
Create Log File" was clicked
3 Click on this if a
log file is to be generated
4 GLP description of the procedure
5 GLP value company
6 Starting time; the default is "today" and the current time; both values can be changed. The
tempering profile then starts at the set time.
8 If "Protocol only" is clicked, no setpoint values are sent to the oven and only the actual val-
ues are logged. The setpoint values must be set on the oven. The "Protocol only" operating
mode is possible both in the main switch position "I" and in the "clock" position of the oven.
ues are logged. The setpoint values must be set on the oven. The "Protocol only" operating
ues are logged. The setpoint values must be set on the oven. The "Protocol only" operating
9
Starting time
Page 42

42
files. Encryption employs a key which is specified in the
A tempering protocol can be saved
To File (
or
or
there is a folder
With "File"
you can open saved tempering
you can open saved tempering
►
or
or
file is saved in the
To Internal MemoryCard
or
or
the tempering profile on the MEMoryCard can be stored
You may enter a name for the tempering profile saved on
the card (max. 8 characters, no spaces) or use the name
To External MemoryCard
45
).
With "File"
tempering profiles stored internally
Page 43

43
Printing
or select "File
or select "File
The Windows
The default setting is the
The print command prints out the
time range displayed on the screen is
the screen, the current tempering
Multipage Printout
Multipage Printout
the printout is done as in "
according to the current screen display.
A protocol is the recording of the actual physical values that prevail in the oven while a
tempering profile is running (e.g. temperature, humidity, air pressure and CO
content). This
allows a comparison to be made between the desired (set) and the actual values.
Types of Protocols
actual values of up to several months. If the memory is full, the oldest entries are overwrit-
ten. These protocol data can be read out with CELSIUS, transferred to the PC, saved in
).
When a tempering profile is run via CELSIUS, the protocol data (actual values) are dis-
Print
Printer
Location
Comment
Print Range
All
Pages
Selection
Cancel
►
Page 44
44
Recording the actual progression
When a tempering profile is run, the actual values of the oven are displayed in the graphical
view as colour curves (1) which follow the tempering profile (2). Each colour represents a dif-
ferent value (e.g. temperature, humidity), explained in a colour legend at the top right of the
window:
Temp. Set
The display of the colour legend can be switched on and off in the in the menu via
Temperature
2
1
Page 45

45
Logging with
Logging with
vacuum ovens VO
The logged measured values for temperature and vacuum for
vacuum ovens VO
are entered
as a red curve. In online operation (oven must be registered), the actual temperatures of a
Red: Temperature of lowest shelf
Green: Temperature of second shelf from the bottom
Page 46

46
), the
value curve with the corresponding tempering profile later on to a
The
To create a file for the
the
).
with "File"
tocol Data"
The unique device number of the
with each protocol, with protection against alteration.
files. Encryption employs a key which is specified in the
yCard, protocol data are stored on it. They can be read
via
Loading protocol data (*.bin) from the
The oven saves all values measured over a long period automatically in its
(
).
).
When they are first read out, the entire ring protocol memory is read out and saved as a file in
the format *.bin. This file is write-protected. The preset directory for ring protocol files varies
according to the operating system. This can be displayed via "Settings"
Page 47

47
After data have been read in, a
which you would like to display a
the
transferred by the oven, and which is
able by the computer, a warning
appears. In this case, you should
With "Browse", you can open
Adding
Adding
comments to the ring protocol
comments to the ring protocol
You can add comments later on to the
the protocol window for the corresponding point in time:
Start Test #4
a comment (max. 30 characters). Press the right mouse button. In the window that opens,
you can enter the comment and save it with OK.
An added comment can also be changed later. To do this, right click on the comment. It is
Page 48

48
Export log data in tabular form (Report)
With the
format (.xls) for processing in a
Types of Protocols
” on page
). The report
function is available if a log or ring protocol is displayed in the window, and this window is
active.
You can run the report function
via the tool panel
via “File”
→
→
Page 49

49
A dialog window appears in which you can specify what is to be included in the report:
1
Report options and presentation as spreadsheet
Period presented in protocol window (can be changed by zooming [see page 32] and/or the
horizontal scroll bar)
Period presented in protocol window (can be changed by zooming [see page 32] and/or the
Period presented in protocol window (can be changed by zooming [see page 32] and/or the
Period to be included in the report
3
Interval of individual datasets, recordings are taken at one-minute intervals. To reduce the
Period to be included in the report
Period to be included in the report
amount of datasets, a larger interval (e.g. 5 minutes) may be chosen.
Interval of individual datasets, recordings are taken at one-minute intervals. To reduce the
Interval of individual datasets, recordings are taken at one-minute intervals. To reduce the
GLP data (see page 44) are also included if selected.
amount of datasets, a larger interval (e.g. 5 minutes) may be chosen.
amount of datasets, a larger interval (e.g. 5 minutes) may be chosen.
5
If selected, a short statistic (minimum, maximum and average value of displayed data) is
GLP data (see page 44) are also included if selected.
GLP data (see page 44) are also included if selected.
generated at the end of the report for the setting “Print Report”.
If selected, a short statistic (minimum, maximum and average value of displayed data) is
If selected, a short statistic (minimum, maximum and average value of displayed data) is
6
Selection whether the report is to be printed or saved as a file in the .xls format.
generated at the end of the report for the setting “Print Report”.
generated at the end of the report for the setting “Print Report”.
Selection of the columns to be included in the report. The left window shows the available
Selection whether the report is to be printed or saved as a file in the .xls format.
Selection whether the report is to be printed or saved as a file in the .xls format.
device dependent columns, the right window shows the columns that will appear in the
Selection of the columns to be included in the report. The left window shows the available
Selection of the columns to be included in the report. The left window shows the available
report. With > or <, columns can be added or removed, with >> or <<, all columns are
device dependent columns, the right window shows the columns that will appear in the
device dependent columns, the right window shows the columns that will appear in the
included or removed.
2
3
4
5
6
7
Page 50

You can end work with CELSIUS
via "File"
with the key combination Alt + F4
) and log off
45
).
) is enabled, the assignment of the inter-
faces to the ovens and their configurations are saved automatically if the programme is
Traceability through a protected audit trail file
The audit trail data are stored in an
The time period to be exported can
to indicate the activities of a particu-
The audit trail function can be called
via Menu „Security“
Audit Trail“:
All essential functions and activities
are stored in the audit trail. These
Actions in CELSIUS which must only be performed with assigned authority.
Actions performed via the operating system can not be recognised here, such as deleting
files if the user has the required authority (e.g. system administrator).
Audit trail files can be exported in
trail displays are stored as copy in
the “AuditTrails“ folder.
Yes No
Page 51

Type Time stamp
Forms of audit trail entries:
Audit OK
Audit trail entries of authority tests:
Warnings of certain (uncritical) user activities, e.g. that an alteration of
the profile file has not been saved.
Examples of entries during saving and programme run:
Examples of entries during saving and programme run:
Examples of info entries:
Examples of info entries:
Example of warnings:
Example of warnings:
Report type Description
Fehler
Info
Warnung
User
name
Device
adress
Device
number
Filename
Page 52

Examples of successful authorization tests:
Examples of successful authorization tests:
Examples of denied authorization test and error entries:
Examples of denied authorization test and error entries:
Electronic signature
An electronic signature is applied
when the reported Windows user
Authored
Approved
The date and name fields are then
automatically completed with the
Example:
Example:
Page 53

altered. If a signed profile is altered (menu: Wrap-Up profile) or an existing profile is saved
Protection against
While CELSIUS FDA is running to control a MEMMERT
the current user through applying a password. The user
the same password which has been used to lock it.
The password makes a distinction between upper
tion CTL+ALT+DEL). Warning: data loss possible.
To protect the MEMMERT equipment against readjust-
the USER-ID card is documented in the internal proto-
Working directories
Tempering profile and protocol files are saved in a predetermined directory if no other path is
and
)
Auto-Update Ring Protocol
Via the menu item "Settings"
Auto-Update Ring Protocol", CELSIUS can reload all online ring
ately displayed. This function should only be enabled if there is little activity in CELSIUS or in
the operating system in general, since it could overload system resources. If the data are not
Page 54

to the temperature profiles and
and store these in a separate,
write-protected
with write permission.
files are to be deleted, the "Read only" property of the directory must be changed.
A copy of the following file types is saved automatically in the
the appropriate date is created. All the backup copies for
added to the file name each time. In this way, it is
file name on the same day.
Example:
Example:
The tempering profile file "Test 08-2010.cel" is
the folder
File Edit View Favorites Extras
Back
File Edit View Favorites Extras
Back
Search
Search
Page 55

Automatic backup of versions in the backup folder
As evidence for all alterations of temperature profiles and protocol data, CELSIUS FDA-Edition
A separate folder, marked with the date, is produced for each date. The folder contains all
Example:
Example:
The protocol file GLP 30.pro was altered twice on 2005-06-28 and saved under the same
filename:
Version status
Through the automatic generation of backup copies the storage remains transparent to the
again.
With "
for confirmation. "Log-off all Devices" - logs off all devices.
Version status
Page 56

Working with
ovens with P fittings are equipped
with an integrated card reader for MEMoryCard
XL (32
tempering
tempering profile is then processed by the oven
the profile sequence, the MEMoryCard
actual data that are accumulated in electronic
form. For
vacuum ovens or humidity chambers,
the vacuum or humidity actual values are saved
a
transportable and interchangeable storage medium for tempering profiles and protocols.
GLP
that is always to be used (e.g. company name and
Tested by), can be specified via "
This data can be modified and/or oven-specific details
when running a tempering profile in the
)
)
at any time via "File
With
Page 57

The programme and the menus can be displayed in five different languages. How you can
.
Connection details
Pin assignment RS-
4
8
Pin contacts (male)
9
Screening
Spring contacts (female)
Screening
Screening
A standard-compliant connecting cable can be purchased from the company MEMMERT
232
Pin assignment
RS-485
1
2
5
3
4
6
7
9
8
1
3
2
RxD 2
TxD 3
GND 5
2 RxD
3 TxD
5 GND
Page 58

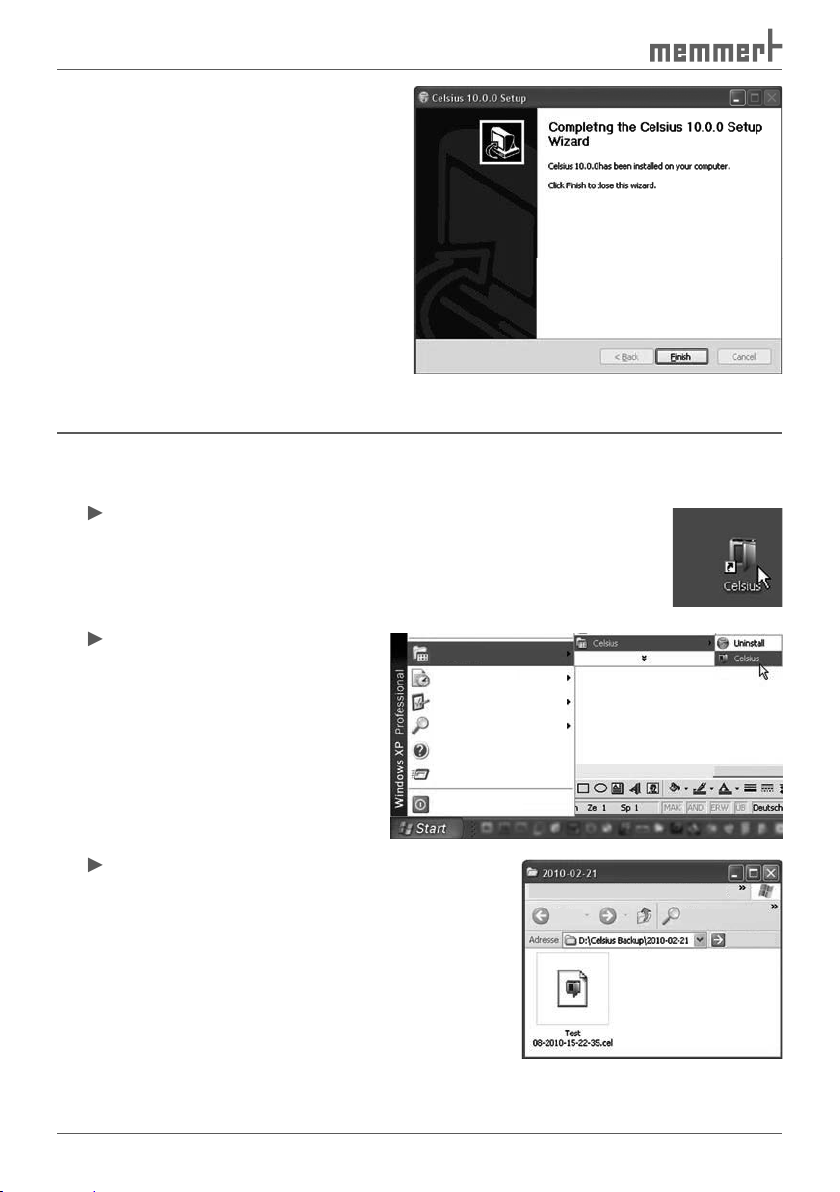
You must have administrator rights to be able to deinstall CELSIUS.
your computer, you can run the
Programs
Documents
Settings
Search
Help and Support
Run
Shut down
Page 59

,
,
, , ,
, 43, 46,
A
Additional functions 35
Address 28
,
,
All deviceslog off 22
Arrange icons 24
Audit Trail 3
,
,
Automatic backup 55
,
,
,
, , , , ,
,
,
, 40,
,
40
,
,
file 41
, , ,
, 41,
46
,
, , , , ,
, 43,
46
40
,
,
,
,
, 42, 46, 46,
47
file 25
,
fline 31
,
, , , , ,
, 42, 46,
, , ,
,
43
,
tory 23
, , , , ,
,
,
43
43
,
,
43
Page 60

,
, 43, 46, 47, , ,
, 41, 46, 47,
,
,
40
,
, 46,
,
, 46,
,
file 25
, , , , , , , , , , , , , , ,
, 46, , , 42,
,
Table columns 35
Table window 34
,
,
40
Tabular view 25
,
,
Target directory 14
Toolbar 17
,
Traceability 50
, , ,
V
Vacuum ovens 36
,
, 45,
,
VO 12
, , ,
,
45
Windows users 13
Working directories 53
Working with MEMoryCard
X
XTADMIN 29
,
Zoom in 21
Zoom In 25
,
Zooming 37
Zoom out 25
,
Zoom Out 22
Page 61

Page 62

Page 63

Page 64

Memmert GmbH + Co KG | PO Box 1720 | D-91107 Schwabach, Germany | Tel. +49 (0) 9122-925-0 | Fax +49 (0) 9122-145-85 | Email: service@memmert.com | www.memmert.com
18.09.2013
CELSIUS 10 FDA englisch
D23629
 Loading...