

Page 1

Memjet SFP
Windows User Guide
23-9-1-5-4-4_Win v4.2
28 July 2011
Page 2
28 July 2011 - v4.2
Confidential.
Page 2 of 110
Read this before you go any further
The following symbols are used in this document to highlight warnings, potential hazards, or
best practice procedures, and have the following meanings:
Danger – potential risk of personal injury, including electrical shock, burns etc.
Warning – potential risk of damage to printer and/or surroundings.
Important – what you need to know to get the best from your printer.
Page 3
Safety
28 July 2011 - v4.2
Confidential.
Page 3 of 110
• Safety
Risk to personal safety
Do not disassemble any part of your printer. Electrical shock hazard.
There are no user-repairable parts inside your printer. Disassembly of any part of your printer
will void all warranties.
Keep your printer well away from all heat sources and flammable substances. Fire hazard.
Switch your printer off immediately and unplug the power cord from the wall socket if:
• you see smoke rising from your printer
• you notice an acrid smell coming from your printer
• you see any sparks being emitted from your printer.
Contact your supplier as soon as possible.
Risk of damage to printer or surroundings
Install your printer on a flat, level surface
Your printer must remain level at all times. Tilting the printer may cause undue leakage of ink
and may damage your printer.
Use the Power button on your printer to power it down
Removal of power to your printer in any other manner may damage your printer.
Switching off your printer
Do not switch off your printer if any of your ink tanks have been removed. Always ensure all
the ink tanks are installed before doing so. Failure to do so may compromise ink delivery in
your printer.
Ensure adequate ventilation to your printer
Blocking ventilation openings around the printer may cause your printer to overheat and
become damaged.
Keep liquids and heavy objects away from your printer
The outer shell is plastic. Heavy objects may warp it, damaging your printer. Liquids may
discolor or damage the skin and, if they penetrate it, may damage your printer beyond repair.
Use only the supplied power supply and cord
Use of any other power supplies or cords may damage your printer and void your warranty.
Use only authorised consumables
Use of any printhead other than those authorised Memjet technology printheads will damage
your printer and void your warranty.
Use of unauthorised inks or ink tanks may damage your printer and will void your warranty.
Use only appropriate paper
Inappropriate paper may cause damage to your printer. In particular, you should not use:
• transparencies
• kinked, curled or cockled paper
• paper which is too thick
Page 4

Safety
28 July 2011 - v4.2
Confidential.
Page 4 of 110
• paper with any staples or pins in it.
Clear paper jams promptly
To avoid further problems, attend to all paper jams and any other cause of printer failure
promptly.
Avoid large temperature variations
Install your printer in a protected location away from direct sunlight, open windows or any
other places subject to temperature extremes. If you are moving the printer, allow sufficient
time after installation for the temperature and humidity of the internals of your printer to
arrive at equilibrium with the surroundings.
Avoid shaking or bumping the printer
Your printer is a complex piece of equipment. Heavy shaking or bumping may damage it.
Page 5

Getting the best out of your printer
28 July 2011 - v4.2
Confidential.
Page 5 of 110
Getting the best out of your printer
Turning off power to your printer
Your printer is best left powered on when you are not using it. However, if the printer will not
be used over an extended period of time (e.g. a couple of weeks), it should be turned off using
the Power On/Off button. All ink tanks and printhead must be installed before you turn off
your printer.
Do not remove consumables unless replacing them
Printheads and ink tanks should remain in the printer once installed. Their removal and reinsertion is not recommended unless replacement is necessary.
Your printer works best on a firm, vibration-free surface
Undue vibration may cause print problems on your documents.
Use paper appropriate to the task
Use plain paper for all documents where possible. Use presentation paper for higher print
quality demands.
Store paper appropriately
Paper quality is vital to ensure printout quality. When not in use, store your paper flat, in a
clean, dry and shady place. If the paper came in resealable packaging it is recommended that
you store it in that package.
Keep the paper tray clean for optimum printer performance
Paper always sheds particles, and these accumulate in the print tray over time. These particles
may get carried under the printhead and cause print quality problems. Regular cleaning of the
paper tray and removal of obvious loose particles from paper before loading the paper tray
will minimise these problems.
Page 6

Table of Contents
28 July 2011 - v4.2
Confidential.
Page 6 of 110
• Contents
Getting to know your Memjet printer 10
What is in the Box 10
Main components 11
Printer 11
Printhead cartridge 14
Ink tanks 15
Features 16
Control Panel 16
Connector bay 17
Setting up your printer 18
Unpacking your new printer 18
Locating the printer 20
20
Installing the ink tanks 20
Installing the printhead 23
Loading paper 28
Loading A4/Letter size paper 28
Loading US Legal size paper 29
Using intermediate paper sizes 30
Installing printer drivers 32
Installing a USB driver 33
Installing a network driver 40
Installing a network driver on a Server 45
Assigning a static IP address 45
Installing additional printers 47
Updating your printer drivers 48
Updating printer firmware 49
Repairing printer drivers 51
Page 7

Table of Contents
28 July 2011 - v4.2
Confidential.
Page 7 of 110
Uninstalling older printer drivers 53
Printing with Memjet 56
Getting ready to print 56
Choosing your paper 57
Print options dialog box 57
Printing a test page 57
Cancelling a print job 59
Using print properties 60
Printer properties Help 60
Print settings profiles 61
Borderless prints 62
Page orientation 62
Custom paper sizes 62
Multi-page (N-up) 64
Manual duplex 65
Booklets 66
About resizing 68
Using the manual feed tray 68
Common printer messages and alerts 72
Paper Out 72
Ink low 73
Out of ink 74
Paper jam 74
Managing your printer 79
Accessing the Toolbox application 79
Toolbox information screens 80
Supplies information 80
Printhead details 81
Ink details 81
Usage information 82
Toolbox settings screens 82
General Settings 82
Page 8

Table of Contents
28 July 2011 - v4.2
Confidential.
Page 8 of 110
Network Settings 83
IP Configuration settings 83
Toolbox Troubleshooting screens 84
Event Log 84
Maintenance 85
Memjet maintenance 86
Extended maintenance activity 86
Restoring print quality 86
Printhead cleaning via the User Maintenance button 86
Printhead cleaning using Printer Properties Services tab 87
Printhead cleaning using the Toolbox 88
Resetting original configuration settings 88
Factory default printer settings 88
Factory default printer driver settings 89
Supplies and accessories 90
Paper 90
Recommended paper 90
Choosing the right paper 91
Paper storage and handling 91
Ink 92
Sourcing new ink 92
Ink storage and handling 92
Replacing ink tanks 92
Printhead cartridge 92
Sourcing new printhead cartridges 92
Printhead cartridge storage and handling 93
Replacing the printhead cartridge 93
Troubleshooting 96
Initial checks 96
Printer installation problems 96
Cannot install USB printer 97
Excessive tilting of printer 97
Rear door open 97
Page 9

Table of Contents
28 July 2011 - v4.2
Confidential.
Page 9 of 110
Test page does not print 97
Printing problems 98
Paper picking problems 98
Paper jams due to paper curl 99
Attention lamp is lit 99
Can no longer print to a networked printer 100
Print options greyed out 100
Cannot access Toolbox Home Page 100
Toolbox links are not working 100
Printer slows down between pages 100
Error/operational status messages 102
Control Panel status messages 102
Alert windows status messages 103
Specifications 105
Appendices 106
Relocating your Memjet printer 106
Local relocation 106
Remote relocation 106
Unpacking your printer 108
Repackaging your printer 109
Notices and Regulatory statements 110
Page 10
Getting to know your Memjet printer
28 July 2011 - v4.2
Confidential.
Page 10 of 110
• Getting to know your Memjet printer
• What is in the Box
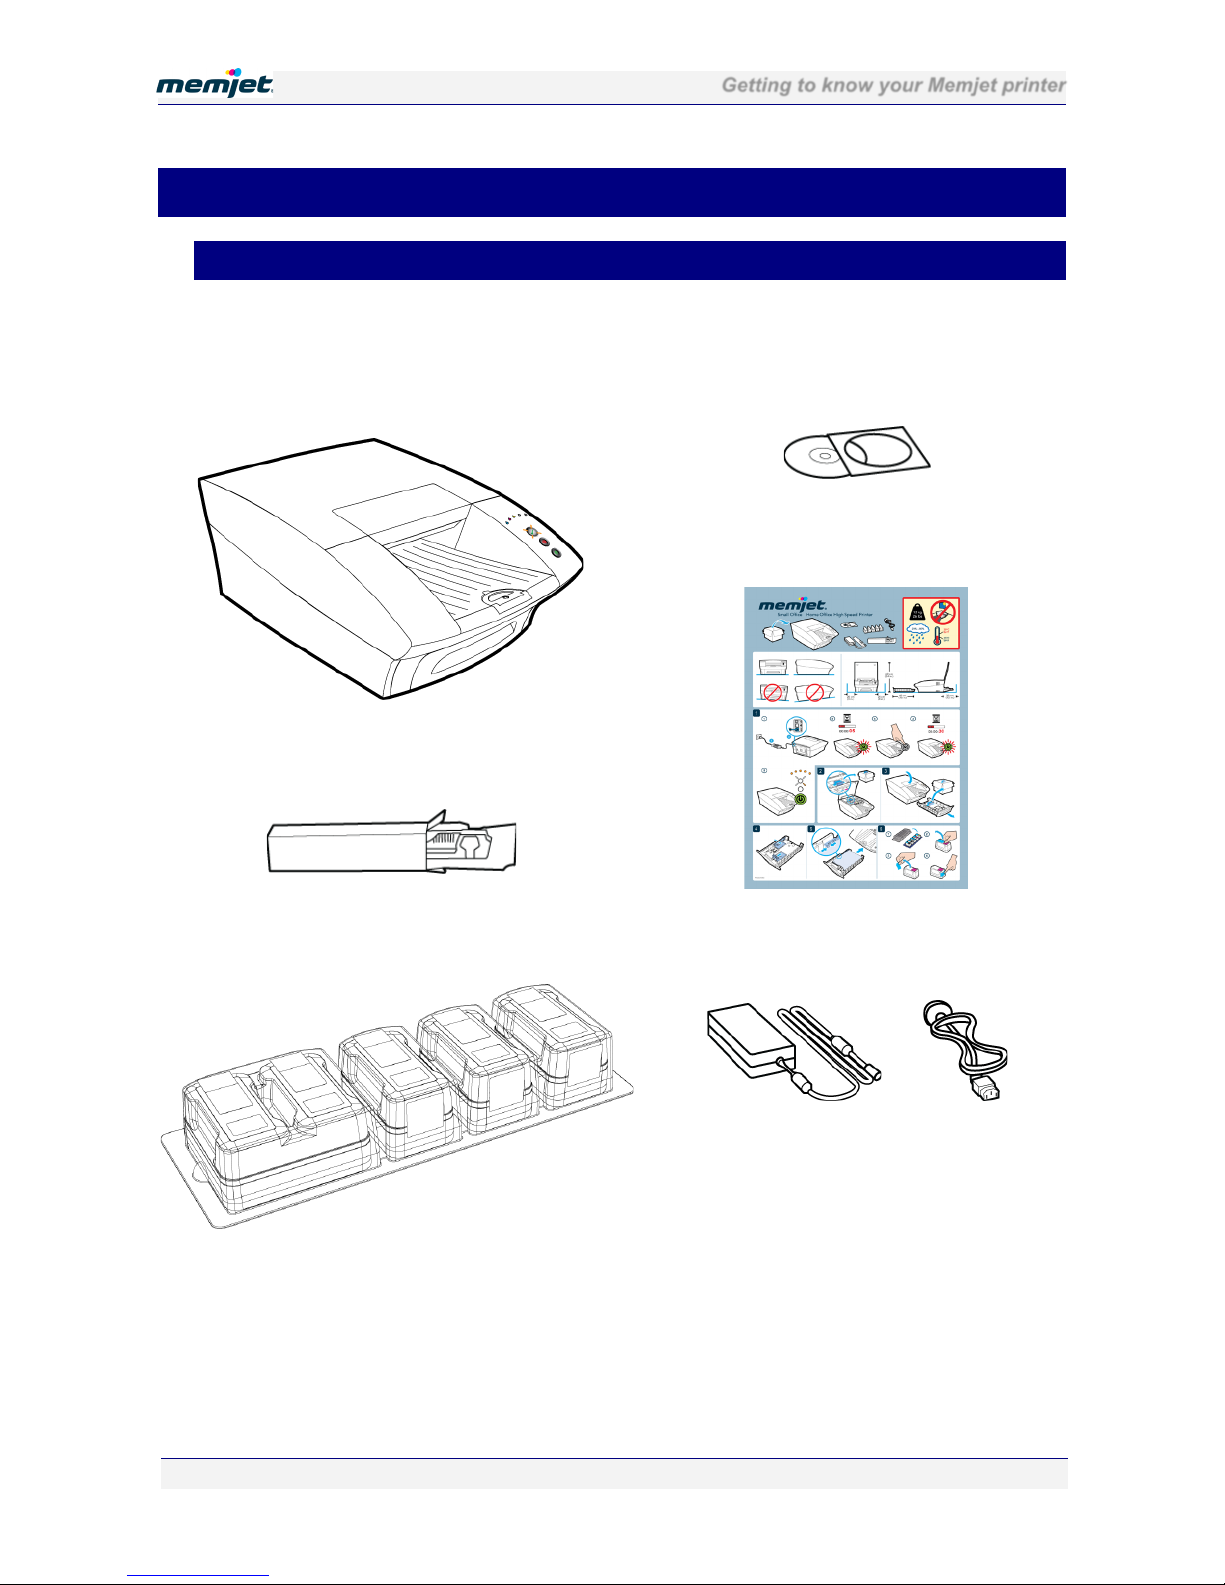
When you open the box containing your new Memjet printer, you will find the following:
The Memjet printer
A Memjet printhead cartridge
Ink Tanks in their Blister Pack.
A software and documentation CD
A Quick Start guide
A power supply and power cord
Page 11
Getting to know your Memjet printer
28 July 2011 - v4.2
Confidential.
Page 11 of 110
• Main components
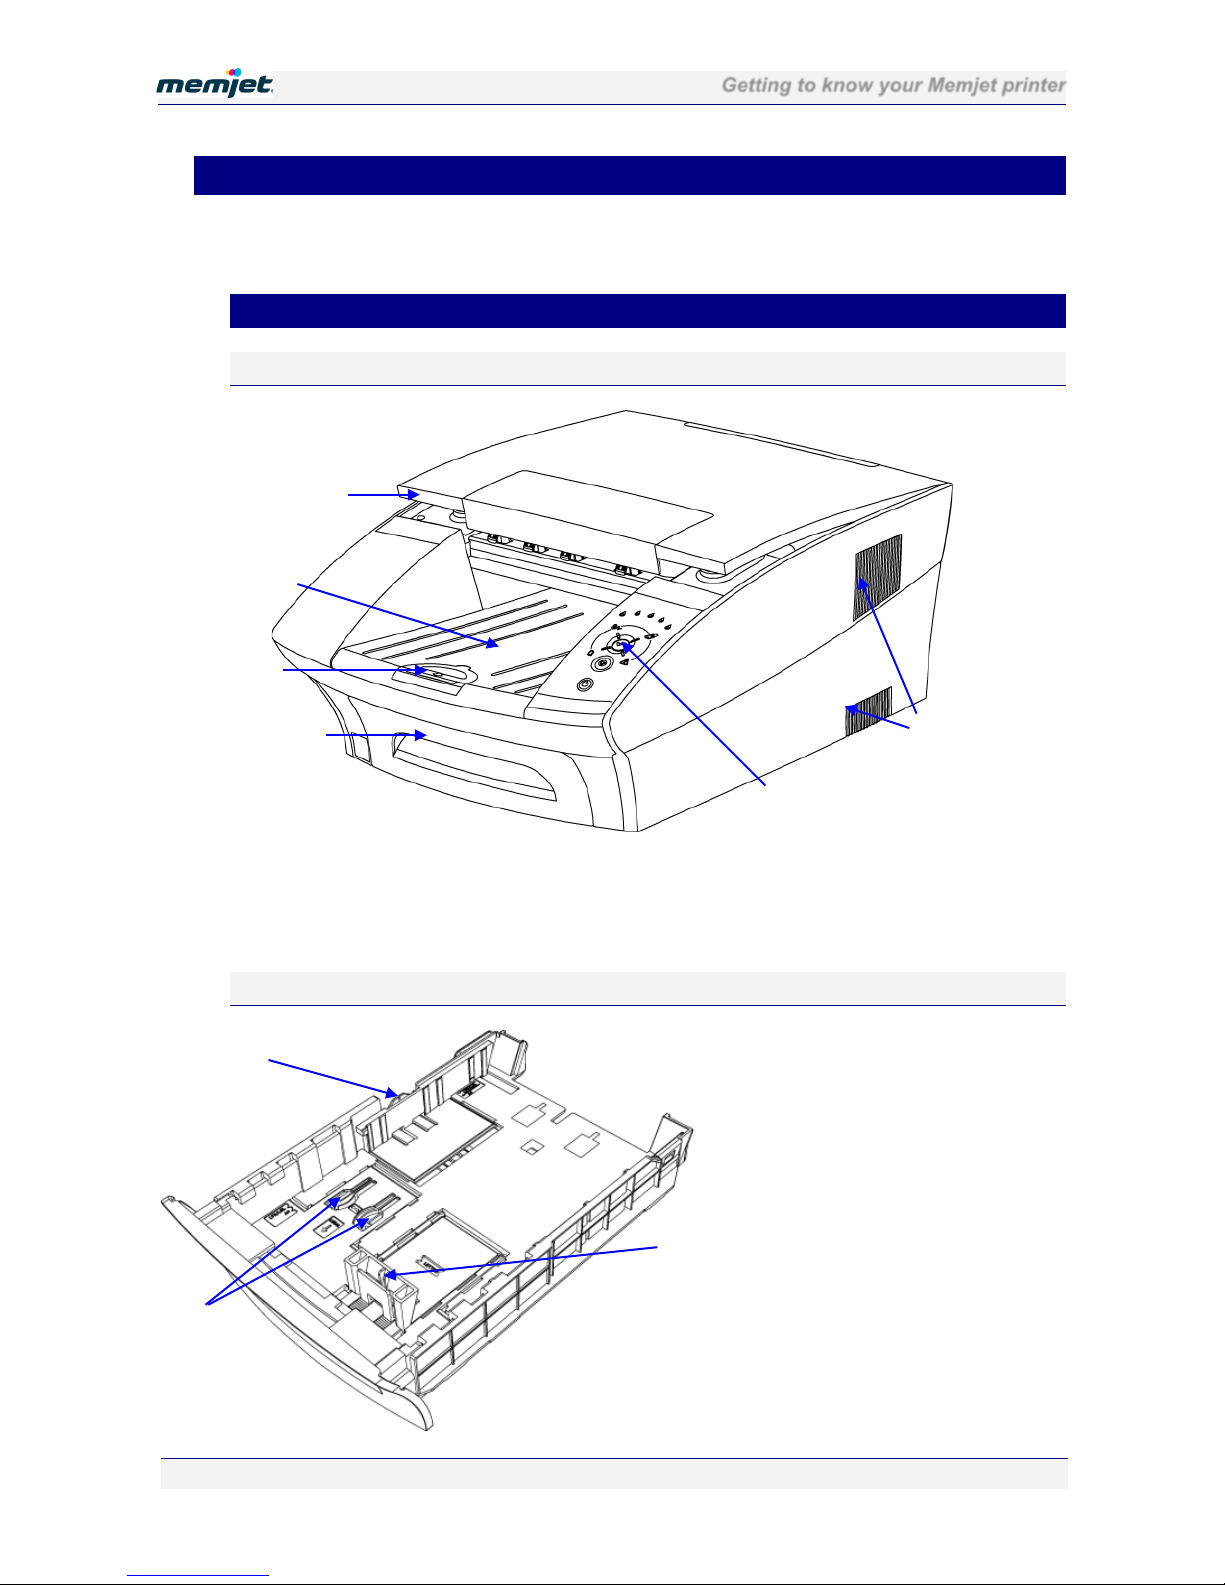
Use this section as a reference when reading this document. It identifies and locates the
components that will be mentioned throughout the rest of this document.
• Printer
Front view
1
Printer cover
4 Paper tray
2
Output tray
5 Control panel
3
Paper stop
6 Cooling vents
Paper tray
1
2
3
4 5 6 1 2
3
1
Paper width guide
2
Tray extension release clips
3
Paper length guide
Page 12
Getting to know your Memjet printer
28 July 2011 - v4.2
Confidential.
Page 12 of 110
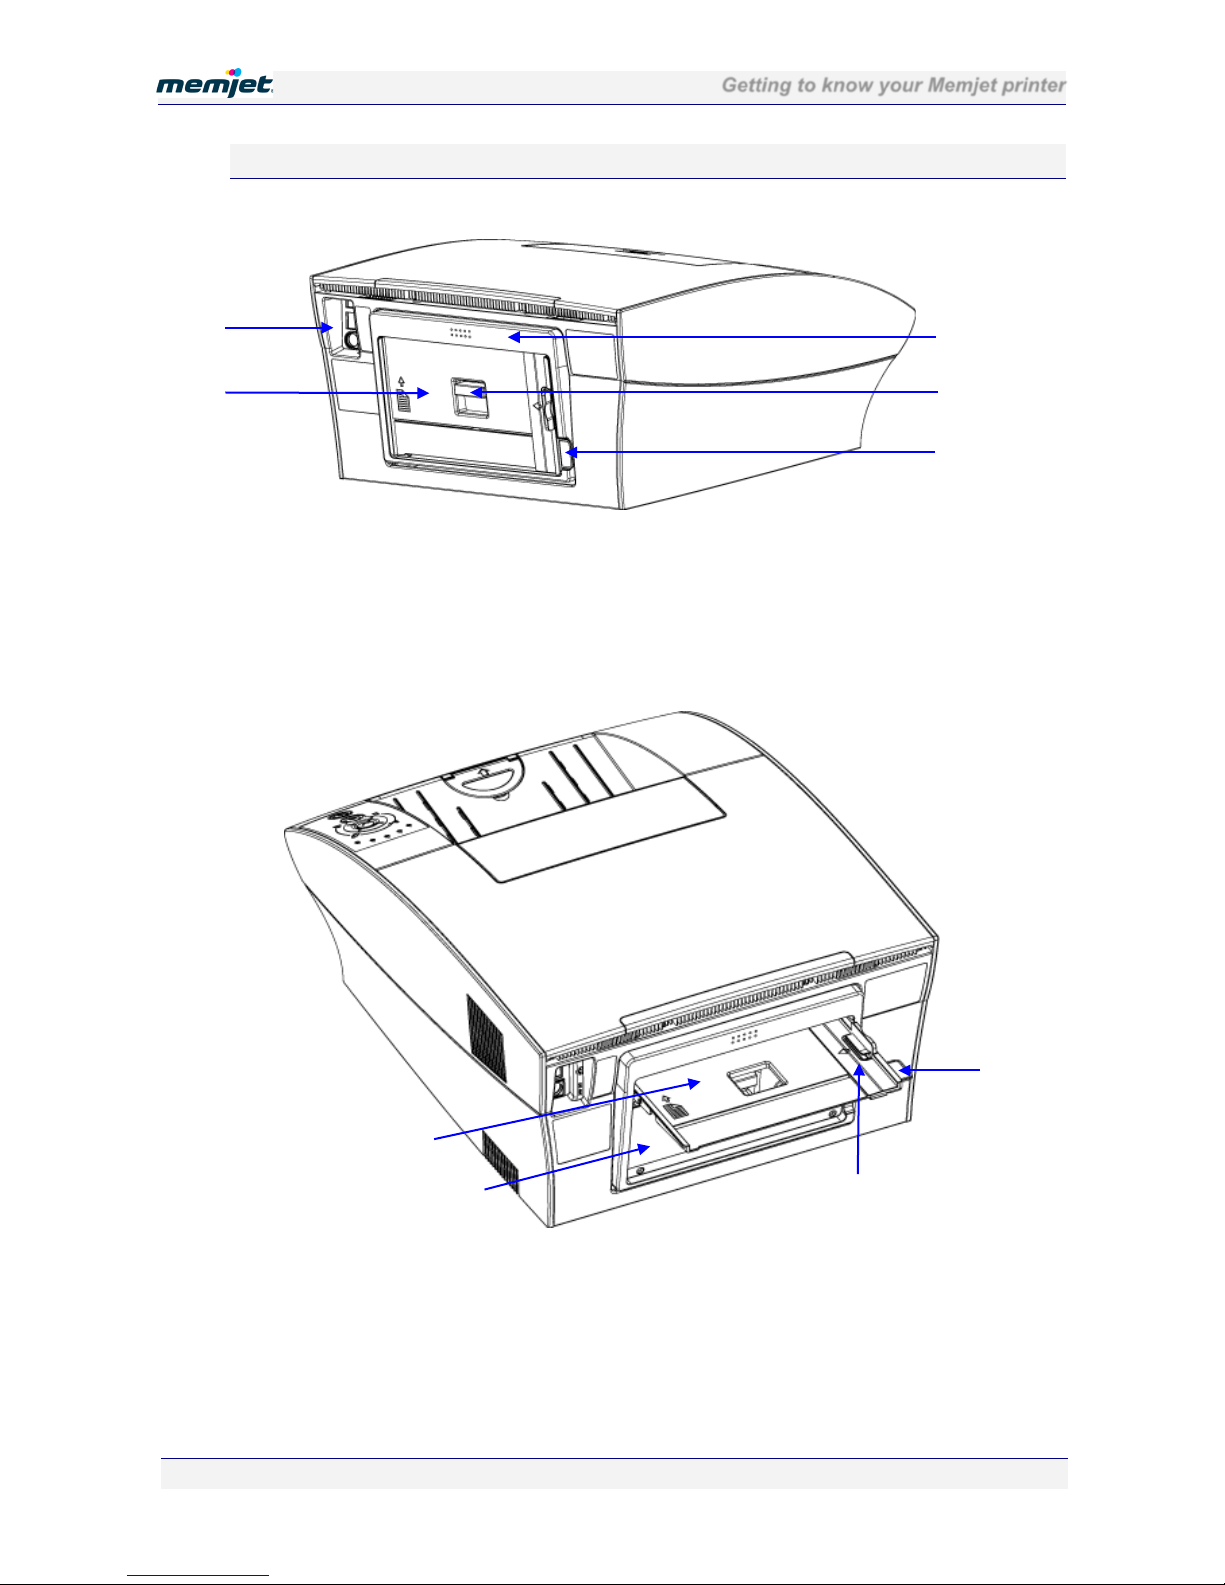
Rear views
Manual feed tray closed
1
Recessed connector bay
4 Rear access door latch
2
Manual paper feed tray
5 Rear access door
3
Paper feed Open tab
Manual feed tray open
1
Manual paper feed tray
3
Paper guide
2
Rear access door
4
Paper feed Open tab
1
3
2 4 3 1 2 3 4
Page 13
Getting to know your Memjet printer
28 July 2011 - v4.2
Confidential.
Page 13 of 110
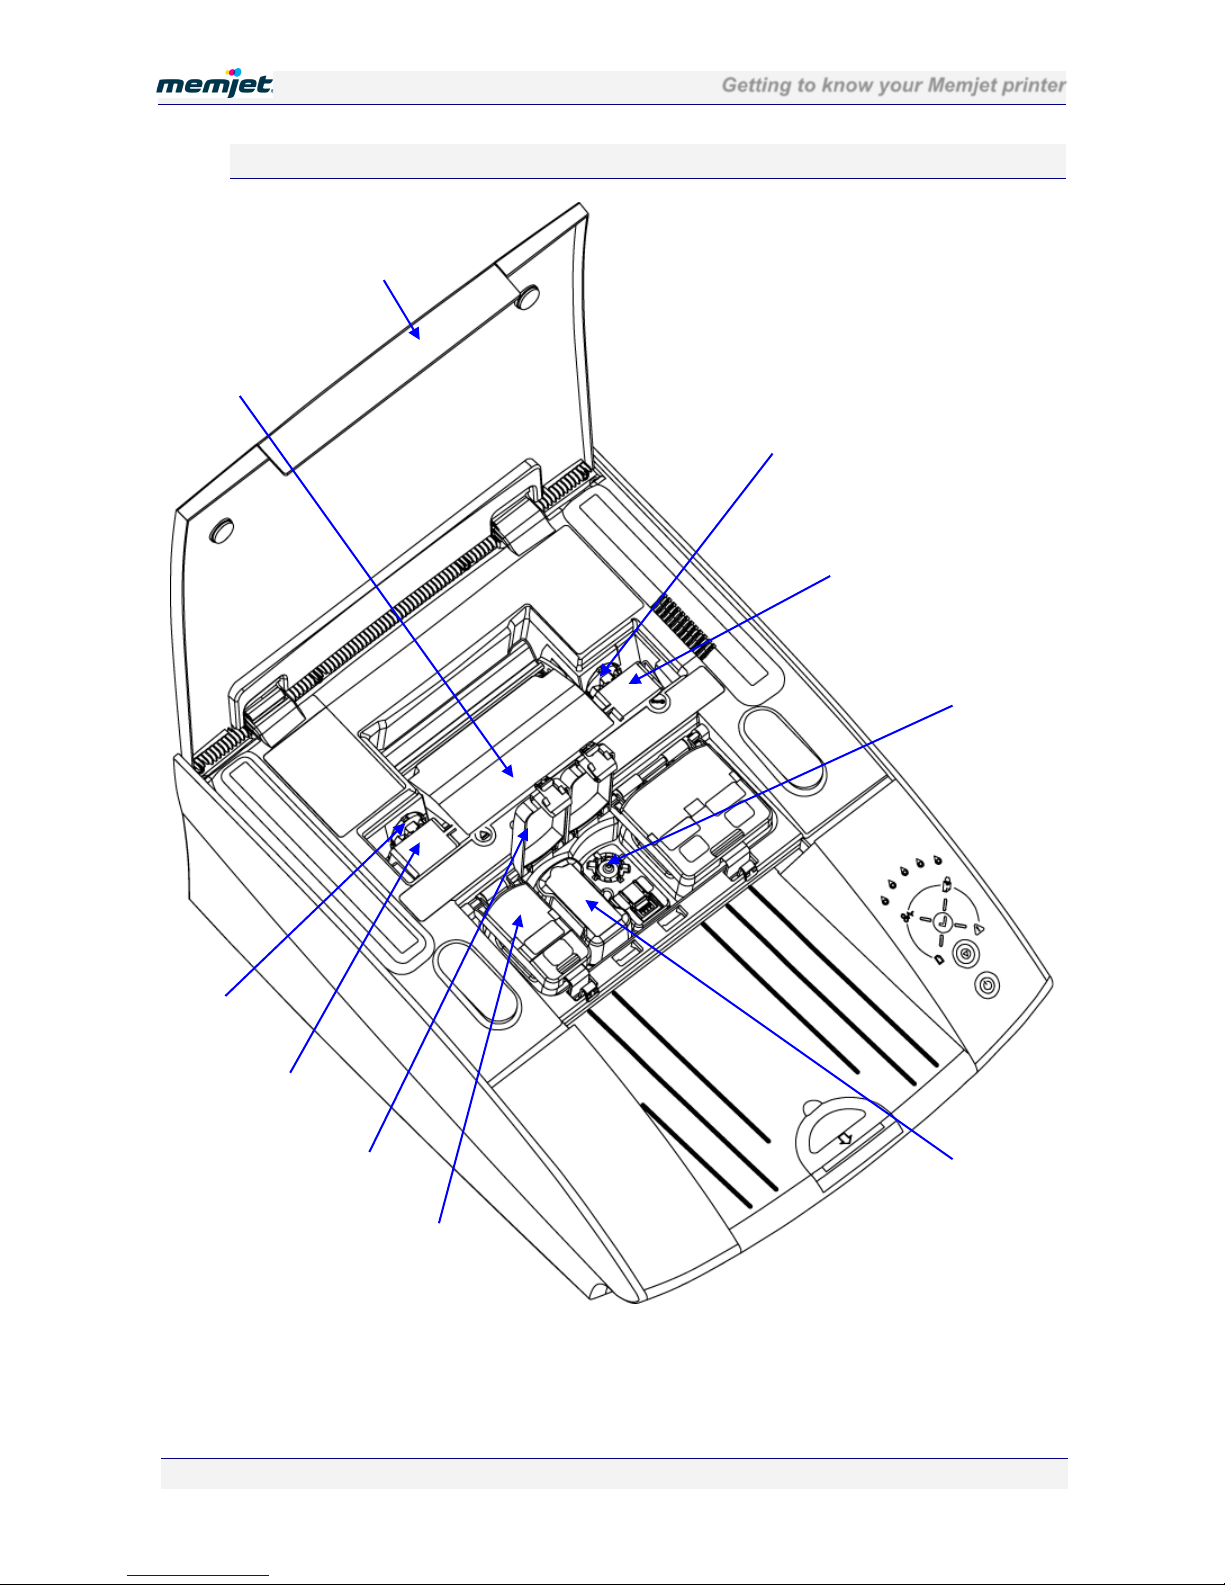
Internal view
1
Printer cover
4 Printhead
7 Ink tank (in slot)
2
Printhead latch
5 Ink tank slot lid (open)
8
Ink tank slot
(showing coupling)
3
Fluidic couplings
6 Ink tank slot lid (closed)
1
2 3 3 4 4 5 6 7 8
Page 14
Getting to know your Memjet printer
28 July 2011 - v4.2
Confidential.
Page 14 of 110
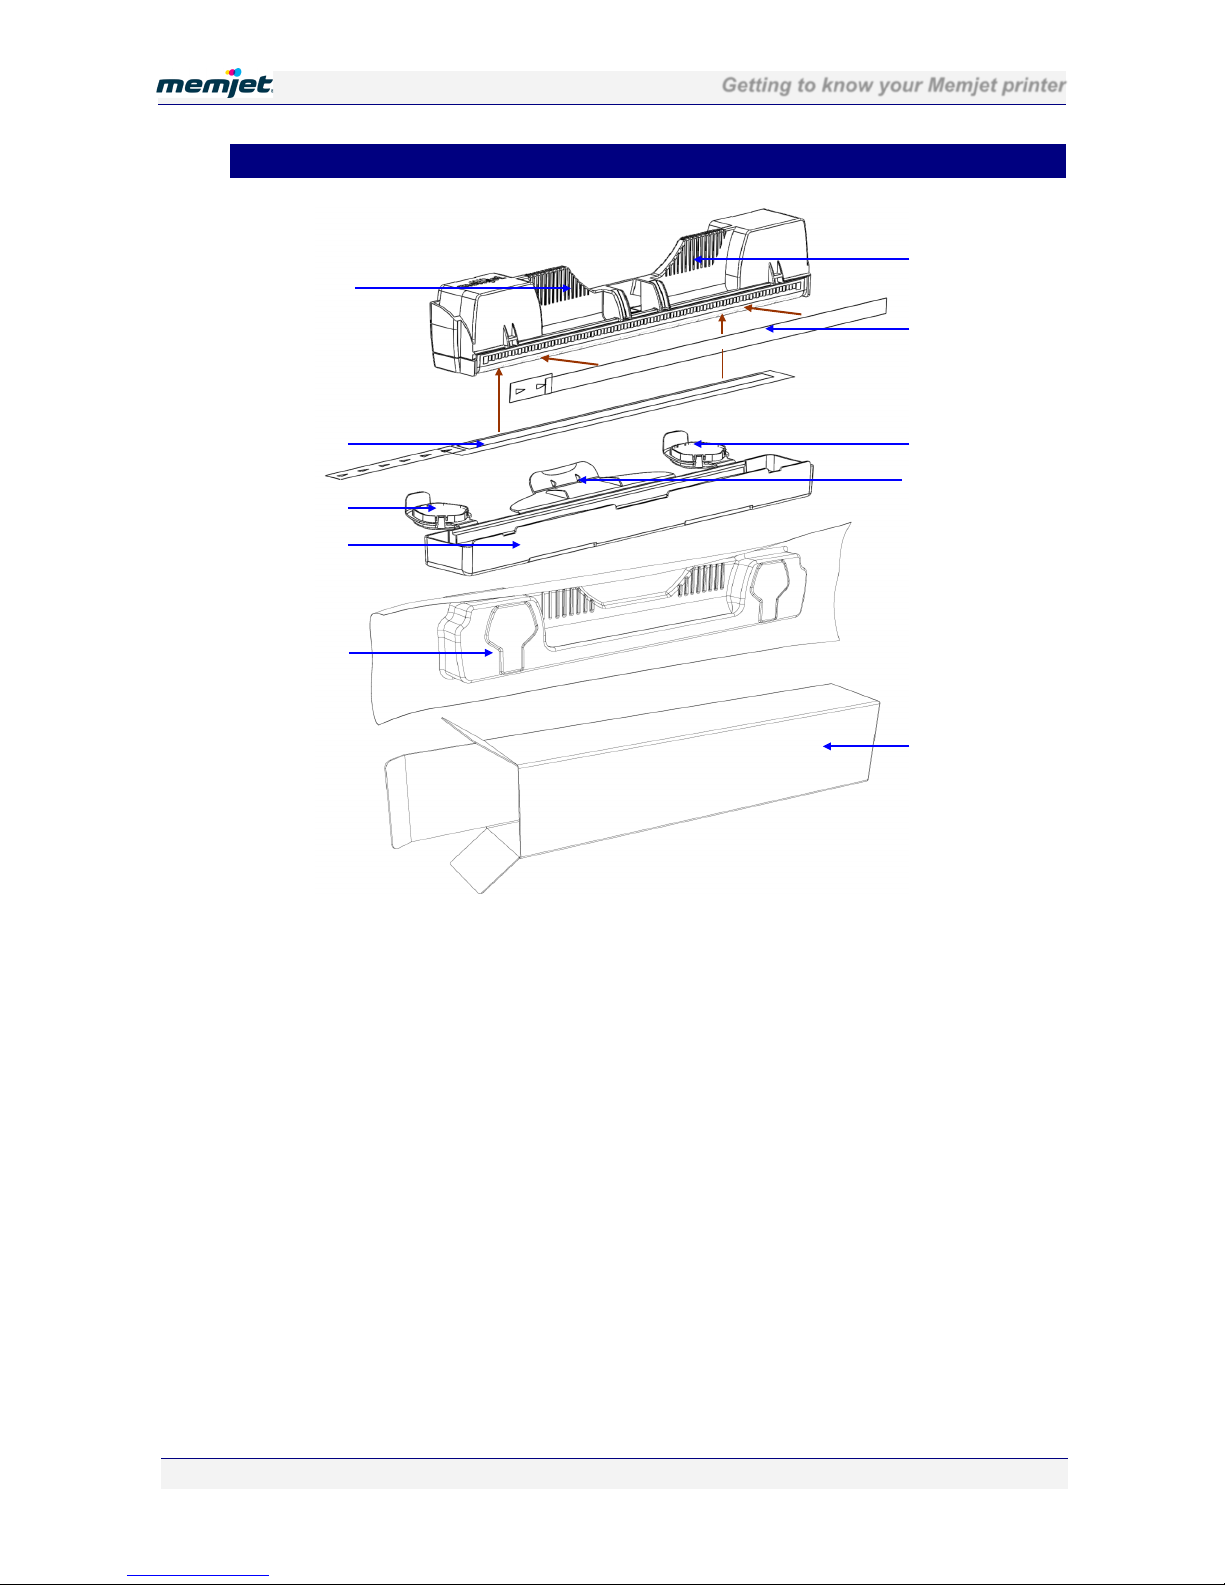
• Printhead cartridge
1 & 10
Handles
5 Foil vacuum bag
2
Nozzles protective tape
6 Cardboard packing box
3 & 8
Protective cover Flaps
7 Cover retaining clip
4
Protective cover
9 Electrical contacts tape
1
10
2 3 8 4 5 6 7
9
Page 15
Getting to know your Memjet printer
28 July 2011 - v4.2
Confidential.
Page 15 of 110
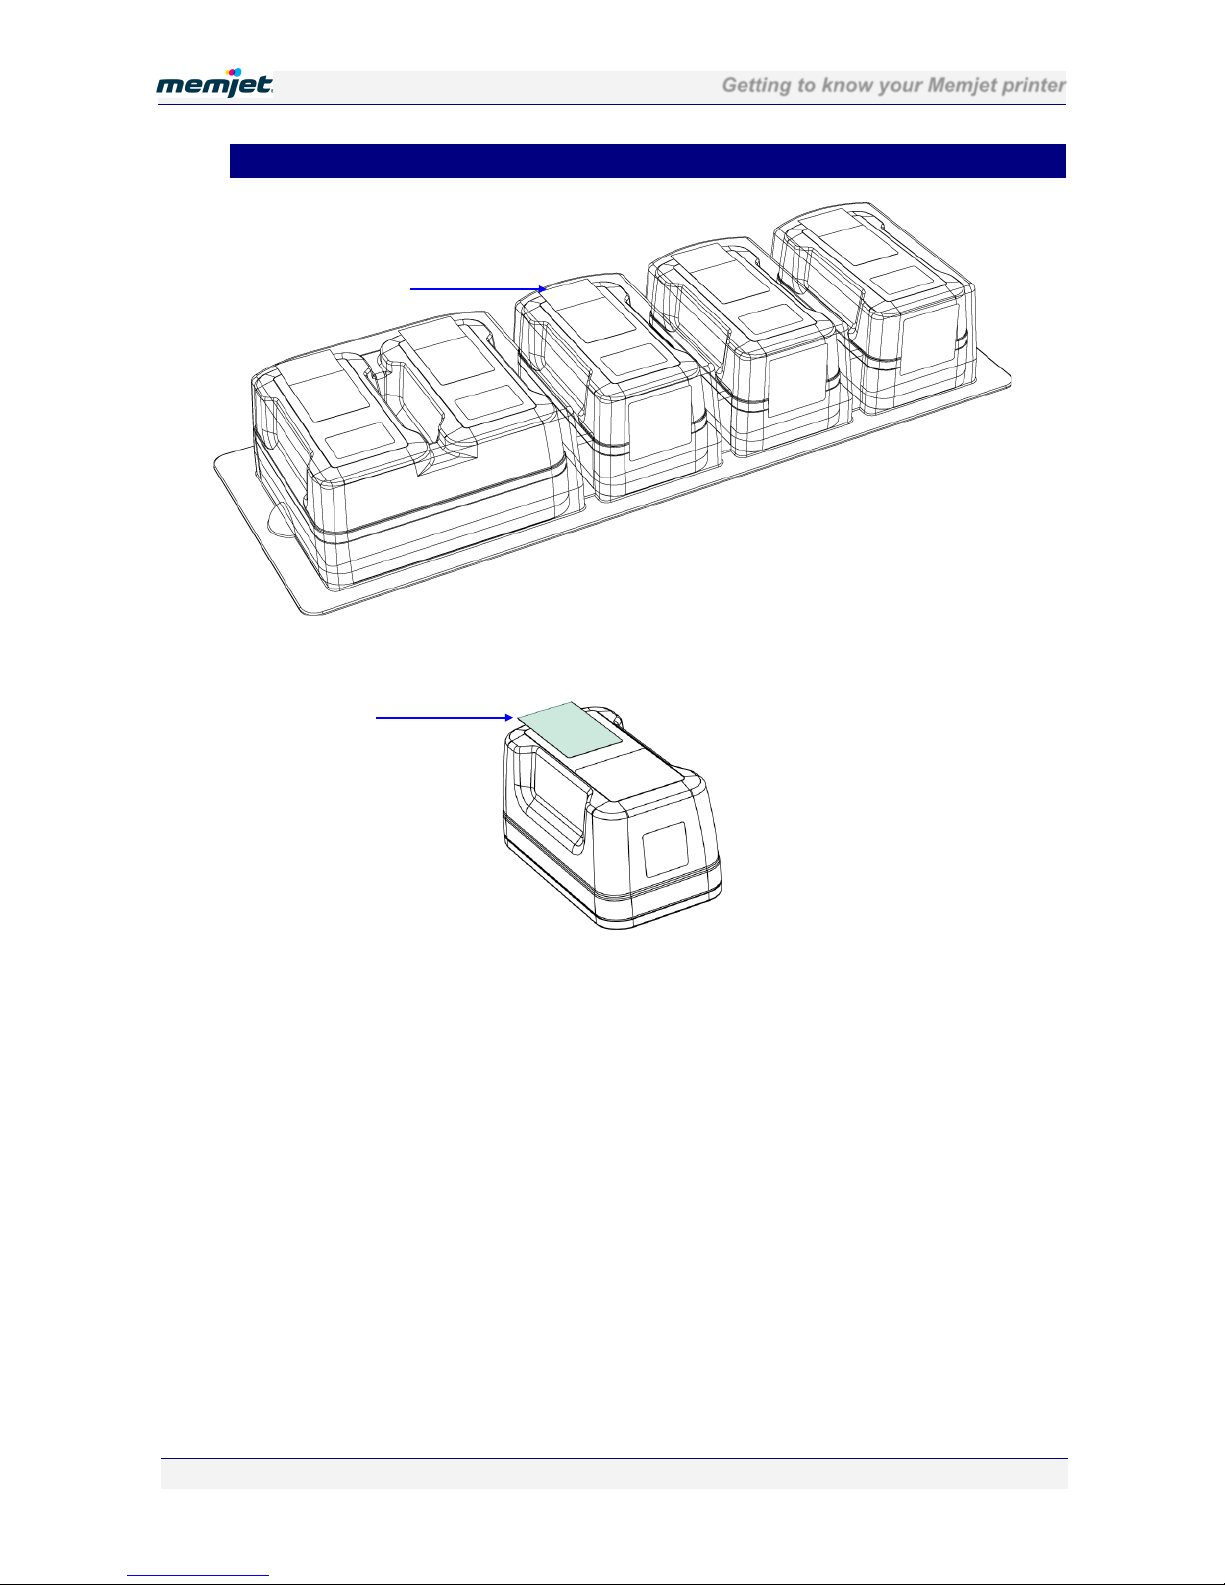
• Ink tanks
1
Ink tank blister pack
2
Pull tab
1
2
Page 16
Getting to know your Memjet printer
28 July 2011 - v4.2
Confidential.
Page 16 of 110
• Features
The features of the printer that you will use most frequently are highlighted in this section.
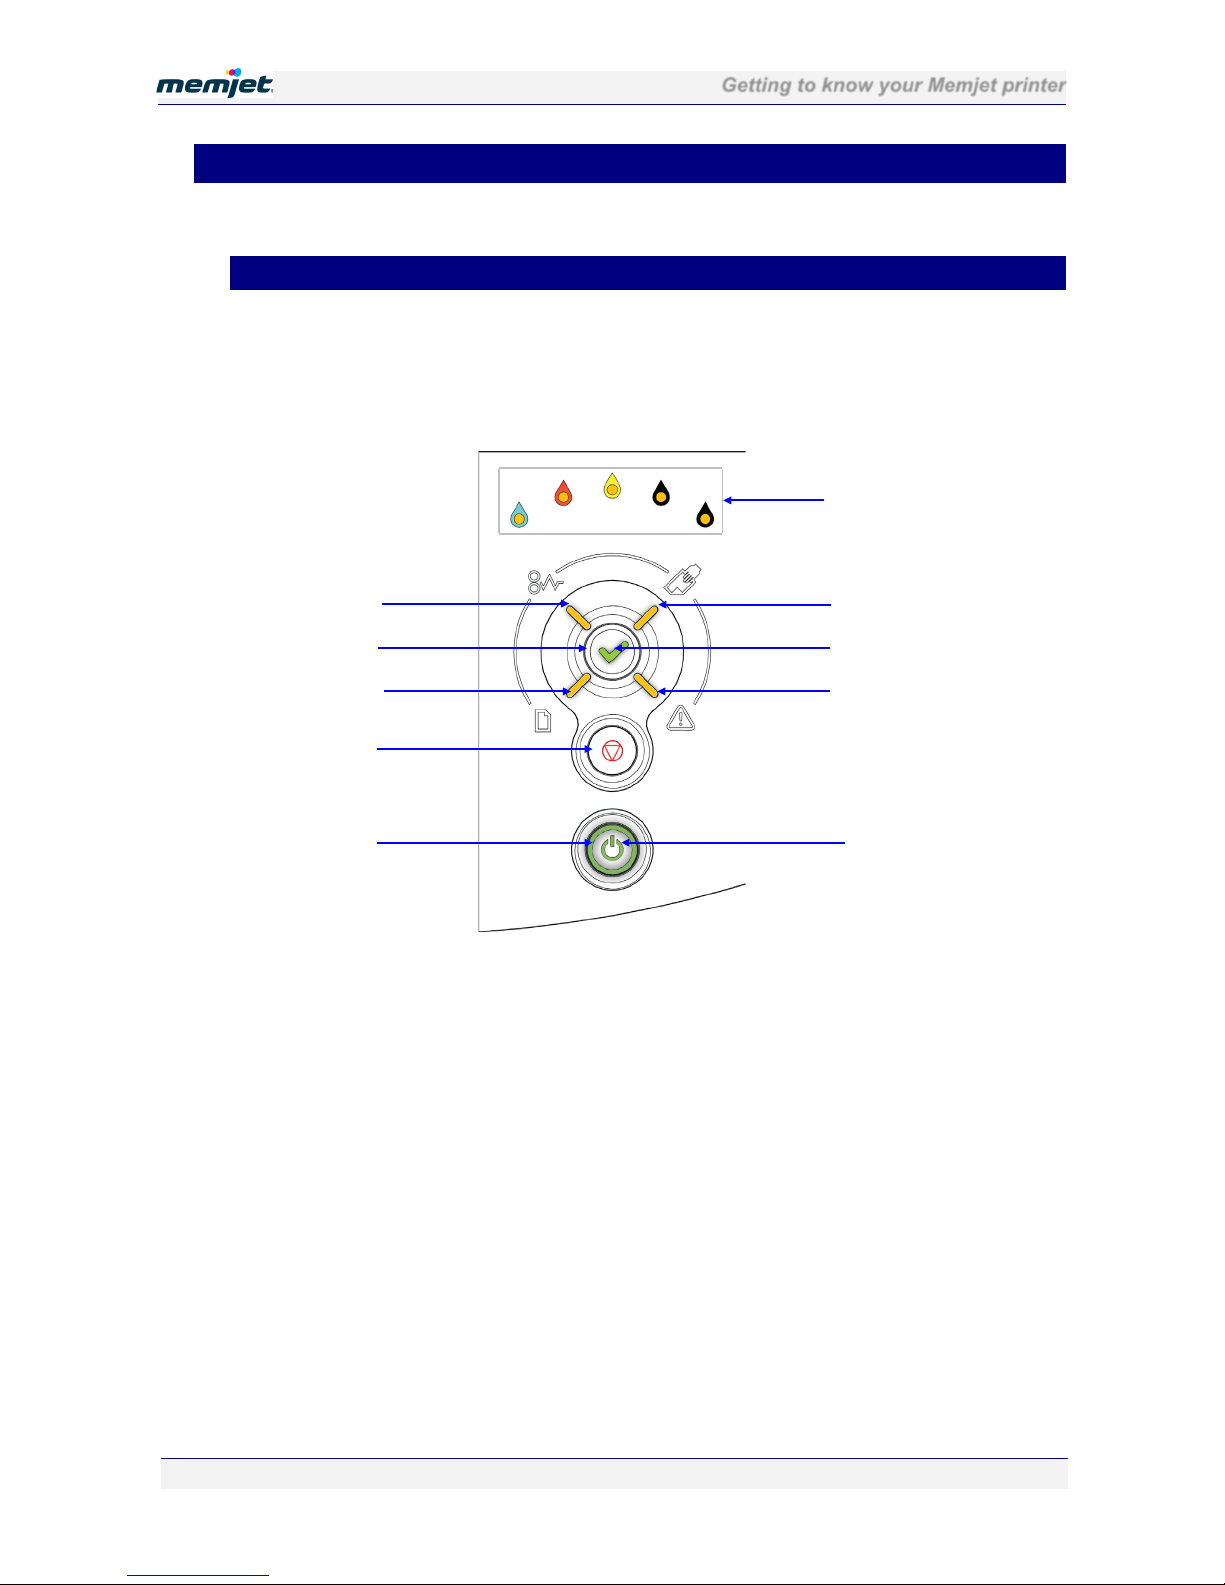
• Control Panel
The Control Panel has three control buttons along with nine indicator lamps to communicate
printer status information.
The Power On/Off and OK/Resume buttons are also backlit, as shown below.
1
Paper Jam lamp
6 Power lamp
2
OK/Resume button
7 Attention lamp
3
Paper Out lamp
8 OK/Resume lamp
4
Stop/Cancel button
9 Manual Feed lamp
5
Power On/Off button
10
Color Ink Supply lamps
2 4 5
6
10
9
1
7 3 8
Page 17
Getting to know your Memjet printer
28 July 2011 - v4.2
Confidential.
Page 17 of 110
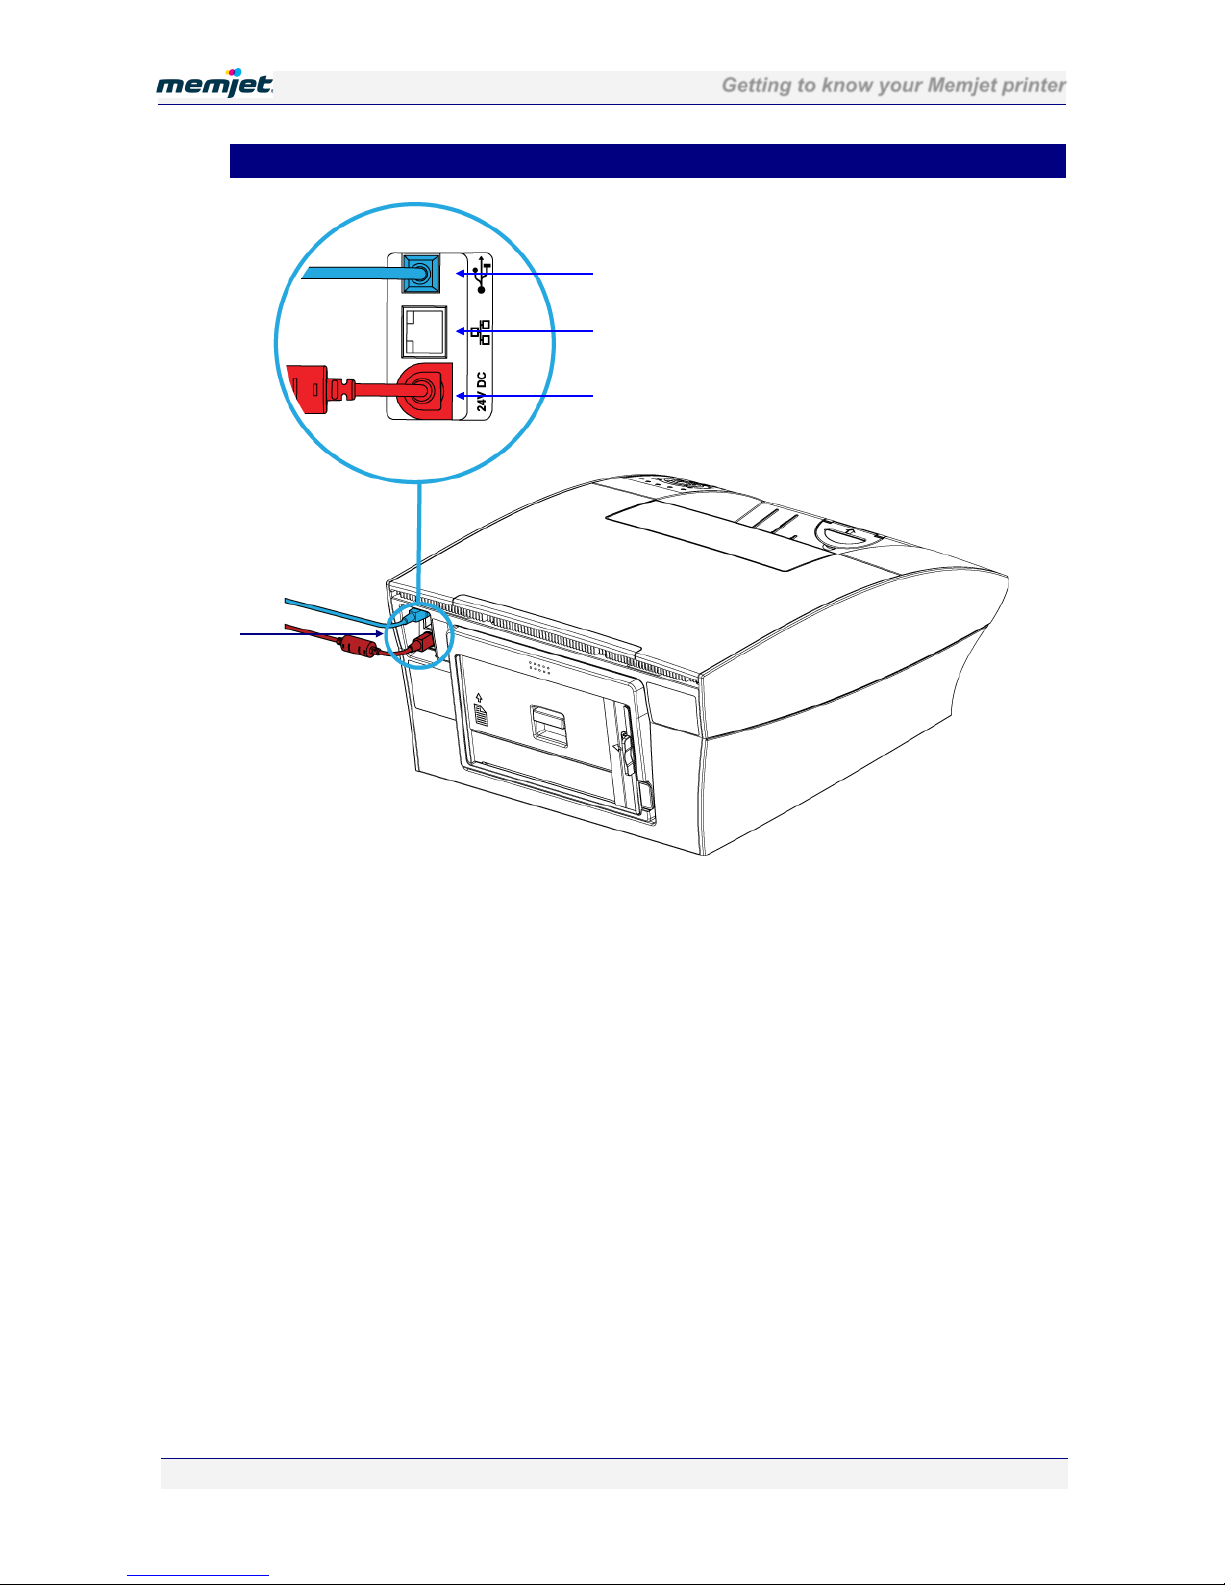
• Connector bay
1
Recessed connector bay
3 Ethernet port
2
Power socket and cable
4 USB port and cable
1 4 3
2
Page 18
Setting up your printer
28 July 2011 - v4.2
Confidential.
Page 18 of 110
• Setting up your printer
Printer installation consists of :
• Removing your printer from its packaging
.
• Installing it on a desktop (see page 20).
• Powering up your printer (see page 20).
• Installing the ink tanks (see page 20).
• Installing the printhead (see page 23).
• Loading paper in the front paper tray (see page 28).
• Installing the printer driver (see page 32).
The included Quick Start Guide provides a quick reference to the process described here.
Refer to that document for a pictorial overview.
• Unpacking your new printer
Take care when unpacking your new printer and try not to destroy the packaging materials.
The packaging materials should be retained in case you ever need to transport your printer to a
remote location. See Remote relocation on page 106.
To unpack your new printer:
1. Ensure the printer box is upright and on a level surface.
2. Open the box and identify the Shipping Checklist (see page 10).
3. Carefully extract all the contents of the box and check the contents against those shown in
the Shipping Checklist. See Unpacking your printer in the Appendices on page 108
.
If there is any variation between what has been delivered and what is described in the Shipping
Checklist contact your supplier before proceeding.
4. Check for any physical damage to the packaging or any of its contents prior to
installation.
DO NOT use any damaged components – bring them to the attention of your supplier.
5. Remove any obvious packing material in or around the printer and any external transport
stays or tapes on the components.
Page 19
Setting up your printer
28 July 2011 - v4.2
Confidential.
Page 19 of 110
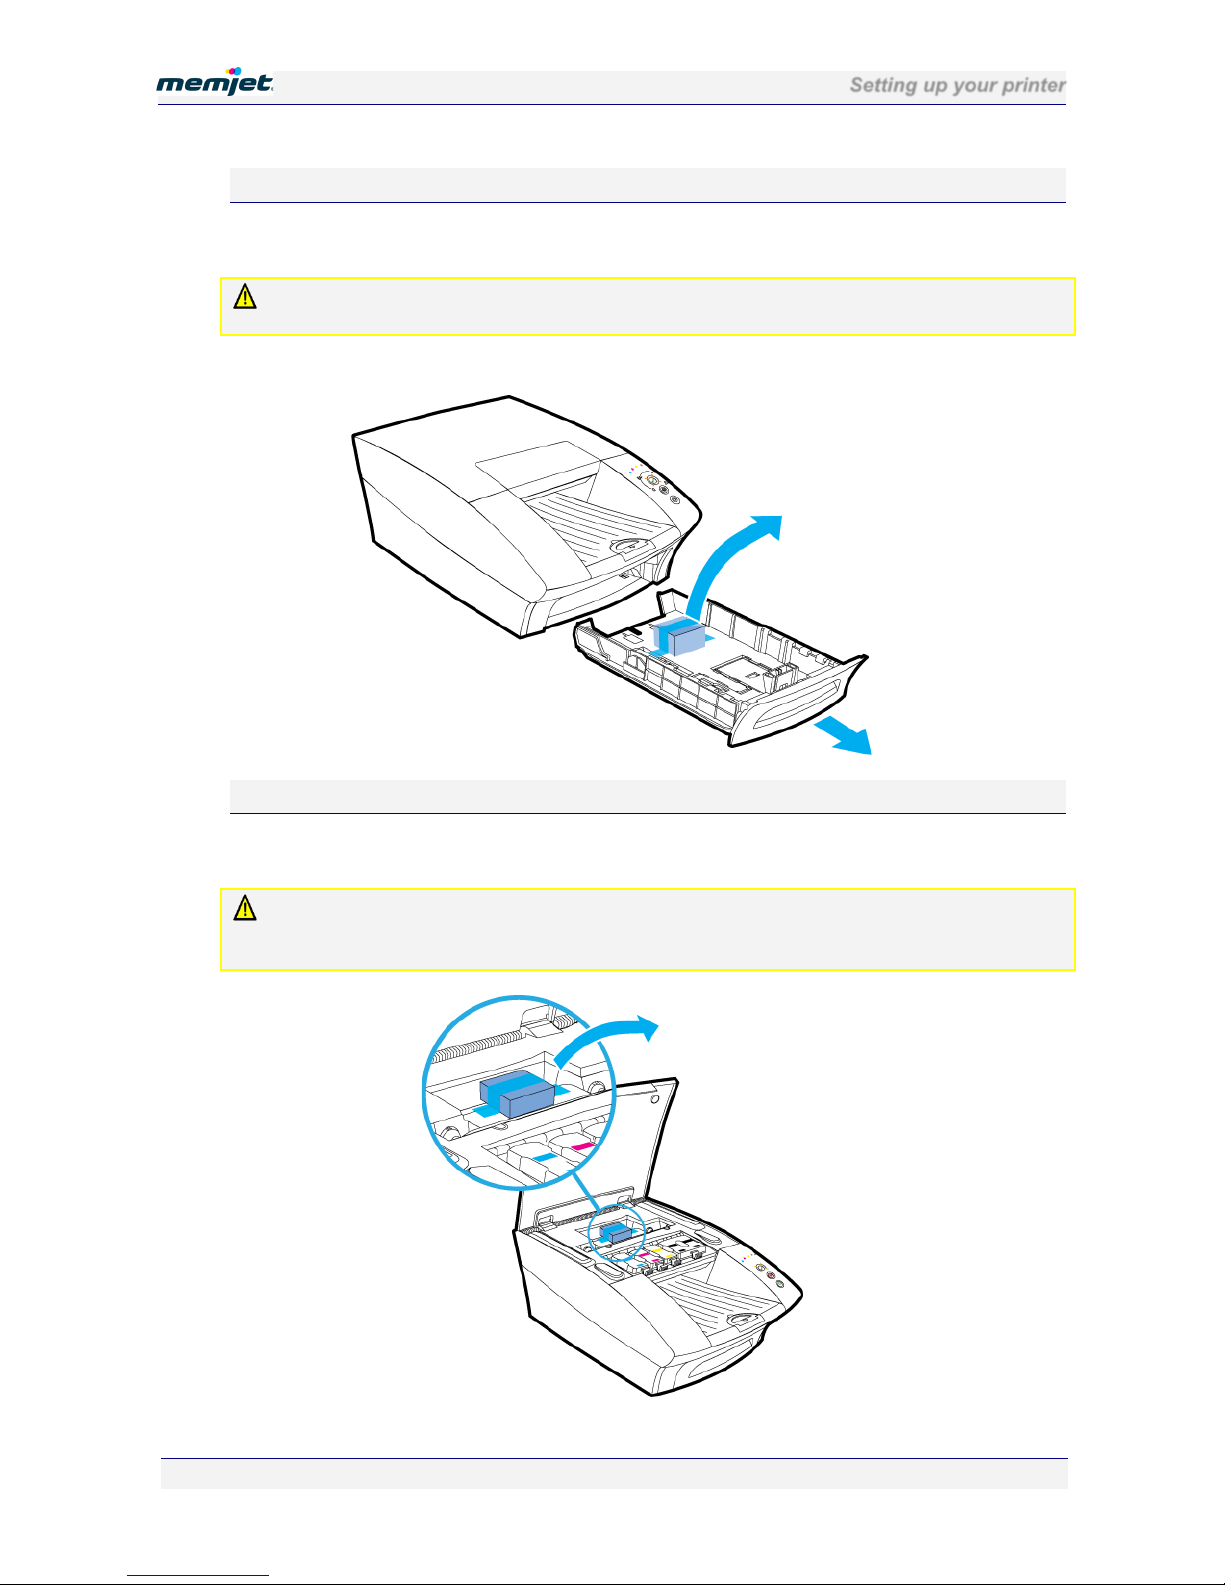
Removing the paper picker stay
Before loading any paper into the paper tray for the first time, remove the packing material
used to lock the paper picker during transport.
DO NOT dispose of this packing material. Should you need to repackage the printer for
transportation to a remote site you will need to re-use this to avoid damage to the paper picker.
Figure 1 Paper tray and packaging material
Removing the printhead latch stay
Before you can open the printhead latch you will need to remove the printhead latch stay,
used to ensure the printhead latch remains closed during transport.
DO NOT dispose of this packing material. Should you need to repackage the printer for
transportation to a remote site you will need to re-use this to ensure the printhead latch remains
closed during transport.
Page 20
Setting up your printer
28 July 2011 - v4.2
Confidential.
Page 20 of 110
• Locating your printer
Your printer must be located on a firm, flat level surface. Failure to do so may cause leaking of
ink in the printer and onto surroundings, possibly resulting in a damaged and unusable printer.
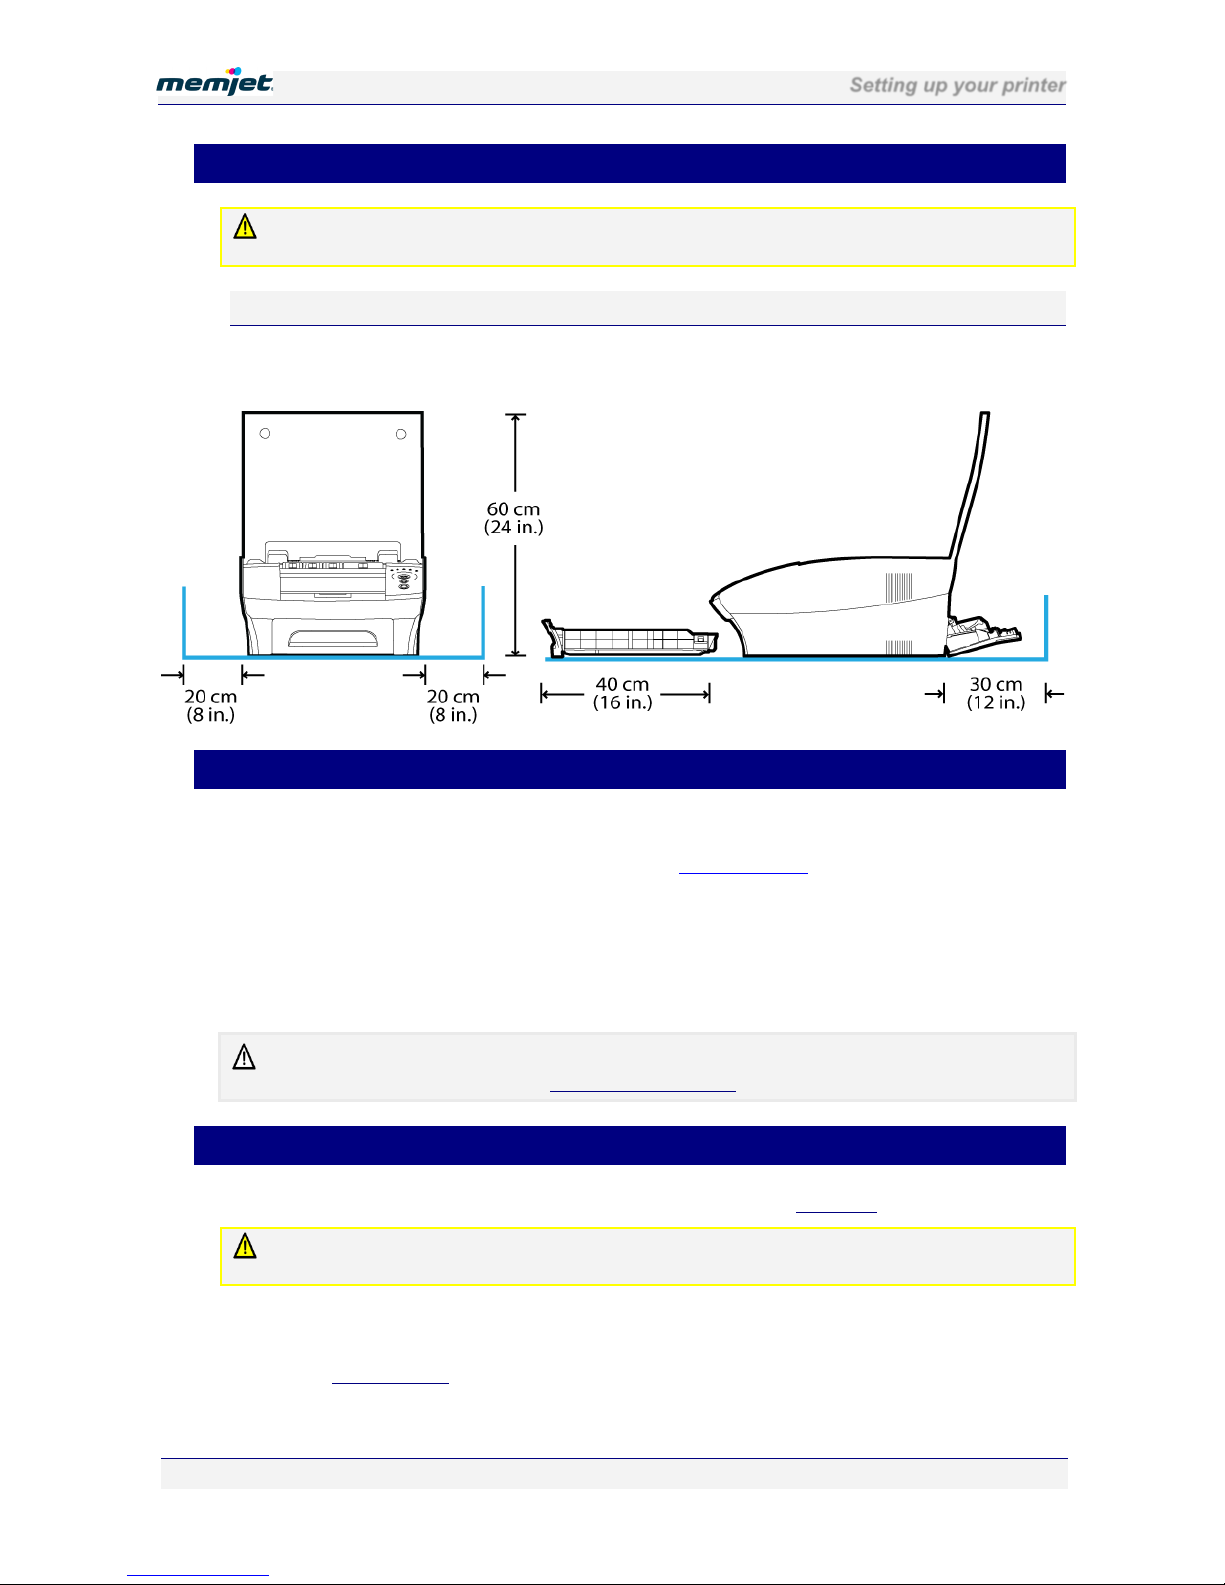
Space requirements
To ensure proper access to the printer and adequate ventilation during use, refer to the figure
below for the various clearances required on each side of the printer.
• Powering up your printer
To power up your printer:
1. Connect your printer to the power supply. See Connector bay on page 17
for the location.
2. Connect the power supply to the mains power.
Your Memjet printer power supply is auto-sensing, there is nothing to adjust. For
specifications see page 105.
3. Press your printer Power On/Off button. When first installing your new printer, all the
color ink supply lamps will be blinking, as well as the On/Off button.
DO NOT connect the USB cable provided with the printer now. You will be asked to do so when
you install the printer drivers. See Installing a USB driver point 1 on page 33.
• Installing the ink tanks
Original ink tanks are supplied in a blister pack as shown in the Ink tanks section on page 15.
When installing a new Memjet printer, use ONLY the ink tanks provided in the packaging.
Specifically, DO NOT install a USED ink tank.
To install the ink tanks in your printer:
1. Lift the printer cover and the four ink tank slot covers to reveal the ink tank slots (see the
printer Internal view on page 13
).
Page 21
Setting up your printer
28 July 2011 - v4.2
Confidential.
Page 21 of 110
2. Carefully remove the ink tanks from the blister pack, ensuring you do not drop or
otherwise damage them.
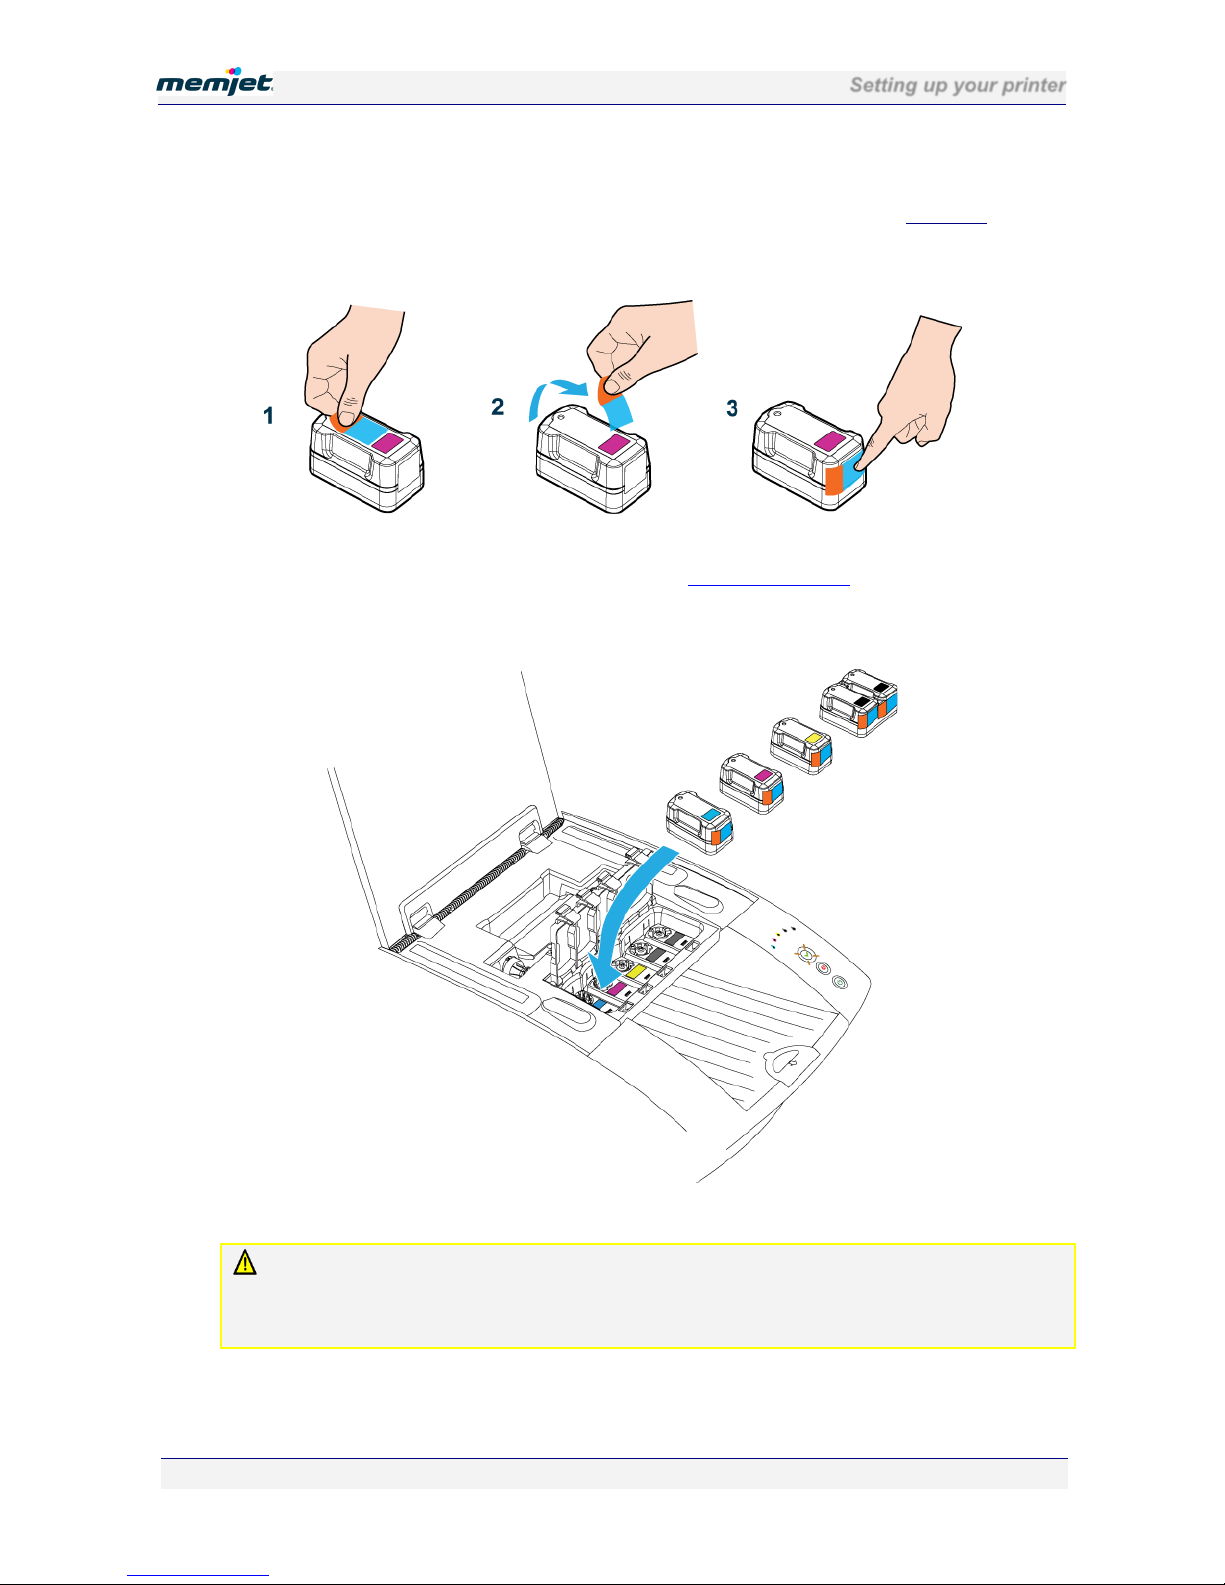
3. Remove the upper and lower pull tabs attached to each ink tank (see the Ink tanks
section
on page 15) before inserting it into its slot on the printer. Save the upper pull tab by
sticking it on the front of the corresponding ink tank as shown.
This will be used to re-seal the ink tank vantilation hole on the top of the ink tank when
you remove the ink tank for transportation (see Remote relocation on page 106
).
4. There is a specific ink tank slot for each color. Check the color coding on the ink tank and
the slot and insert each ink tank into its respective ink tank slot, as shown.
Note the double black ink tank fits into the rightmost slot.
DO NOT apply excessive force when inserting each ink tank in its slot.
There is a mechanical key on each ink tank that prevents it being inserted into the wrong slot in
the printer. Each slot is color-coded. If you have any difficulty inserting any ink tank, check its
color and try another slot.
5. Close the ink tank slot lids, ensuring they snap down firmly.
Page 22

Setting up your printer
28 July 2011 - v4.2
Confidential.
Page 22 of 110
6. Close the printer cover and allow at least two minutes for the ink to fill the ink channels
in the printer.
The color ink supply lamps on the control panel will continue to blink throughout this process.
This is normal.
You can now proceed with the installation of the printhead cartridge.
Page 23
Setting up your printer
28 July 2011 - v4.2
Confidential.
Page 23 of 110
• Installing the printhead cartridge
Your Memjet printer cartridge is a delicate micro-electrical-mechanical device and should be
treated with due care to avoid degradation of print quality.
DO NOT touch the printhead cartridge ink couplings, nozzle surface or the electrical contacts
when installing the printhead cartridge. Hold the printhead cartridge ONLY by the handles. See
Printhead cartridge on page 14 for the location of these features.
Do not place the unprotected printhead cartridge on any surface prior to installation in the
printer. Protect the printhead cartridge at all times from contamination by air-borne
contaminants such as dust or fibres.
DO NOT unpack the printhead cartridge until the printer has been prepared for installation. Delay
in installation of the printhead after unpacking can compromise print quality due to dehydration.
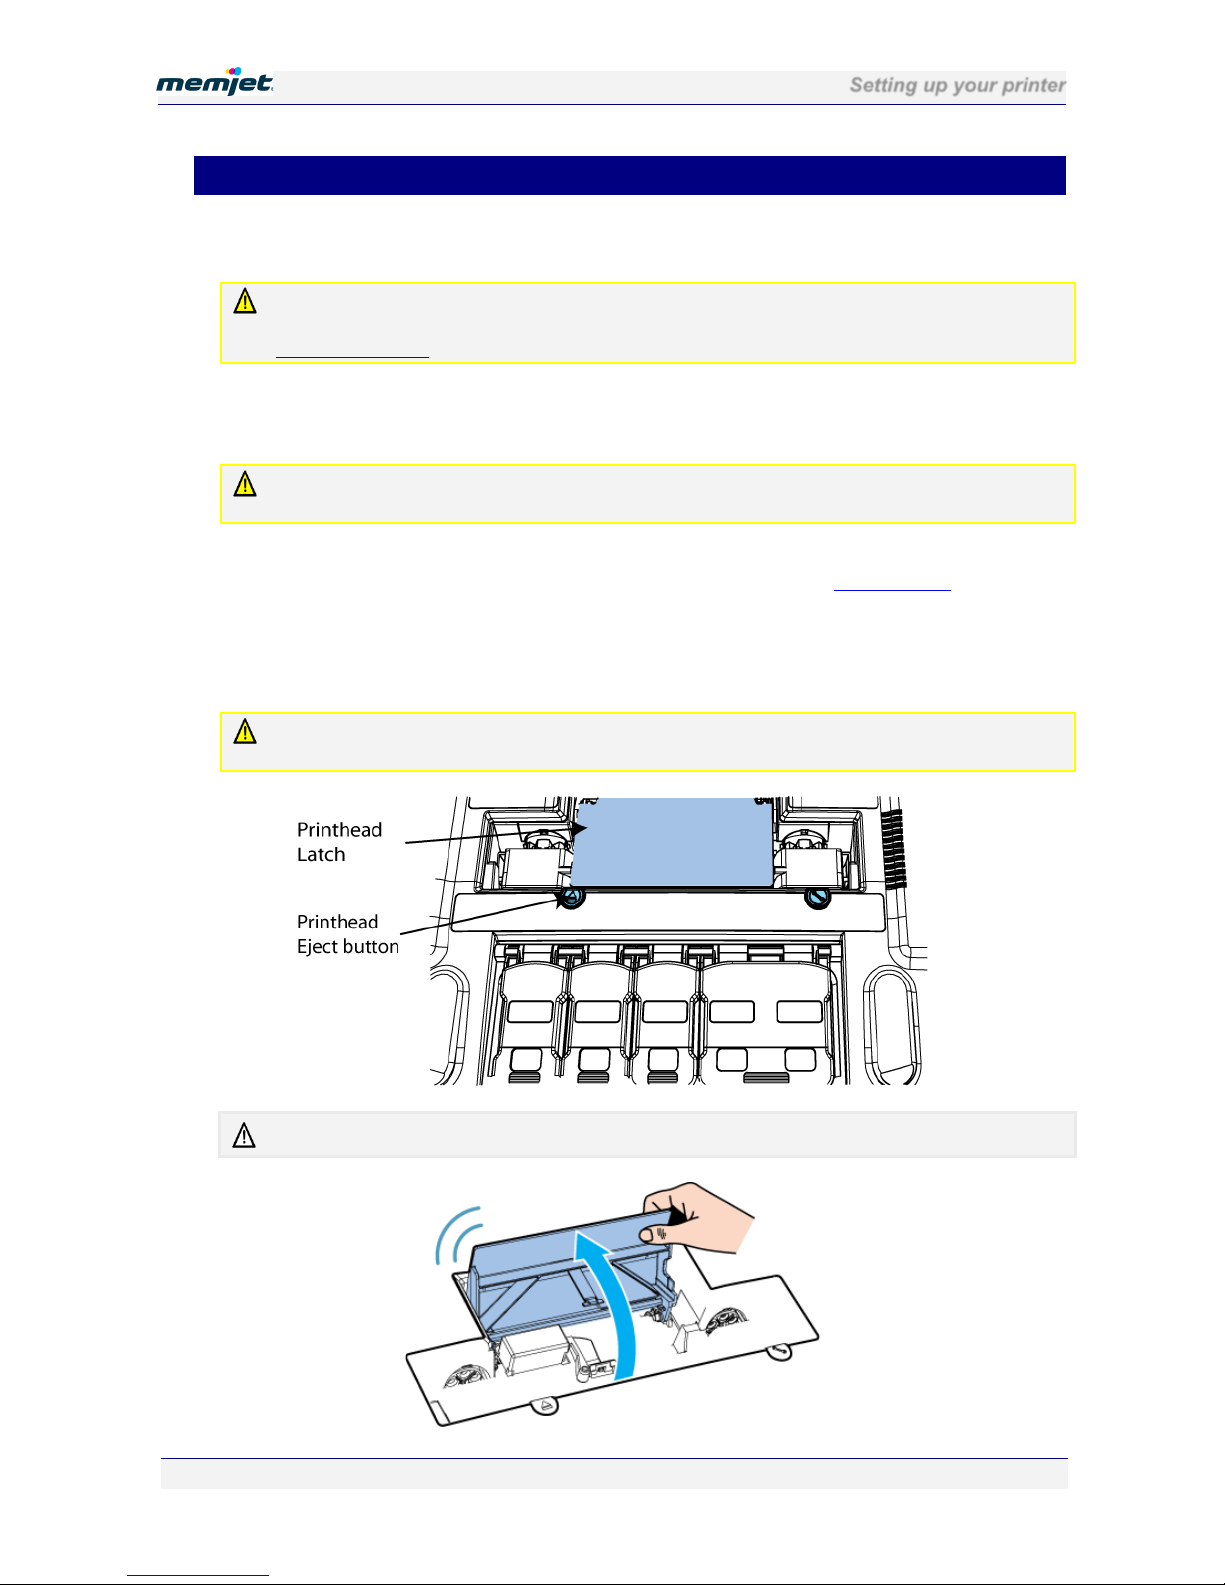
1. Ensure your printer is switched on and the Power button is lit and steady.
2. Open the cover of your printer to reveal the printhead latch (see Internal view
on page
13).
3. If the printhead latch is not raised, press the Printhead Eject button for at least three
seconds. This will automatically initiate printhead latch opening. The Attention lamp will
bink when latch opening is under way. This process may take several seconds.
If the Printhead Eject button fails to release the printhead latch as described, contact support
personnel. DO NOT attempt to release the printhead latch in any other manner by yourself.
Always lift the printhead latch as far as possible. It should be vertical when fully opened.
Page 24
Setting up your printer
28 July 2011 - v4.2
Confidential.
Page 24 of 110
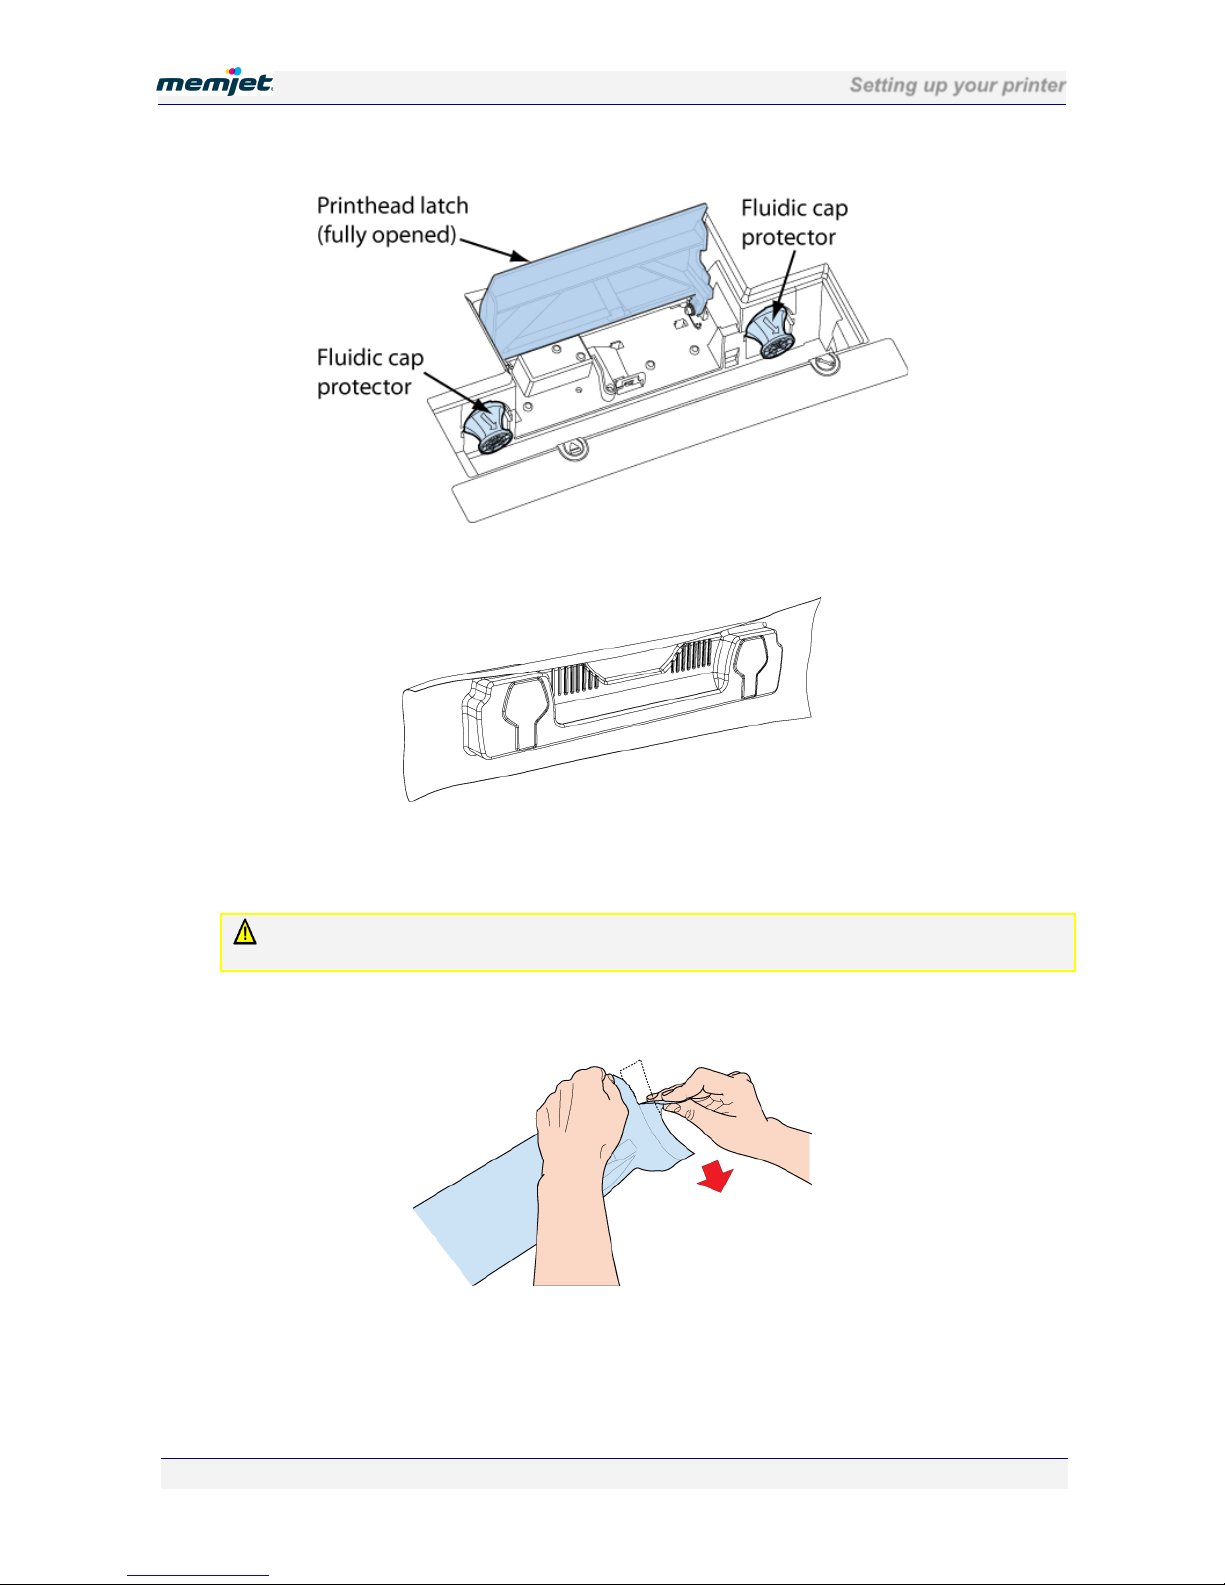
4. Remove the fluidic cap protectors from the two fluidic couplings.
5. Open the end of the printhead package outer box and slide out the foil bag.
6. Inspect the integrity of the foil vacuum sealing. The foil bag should be formed tightly to
the contours of the printhead cartridge as shown above. If the foil is loose to any degree
then the seal has been compromised.
If a poor seal is suspected, DO NOT USE the printhead cartridge. Report the issue to your
supplier.
7. Carefully rip the foil packaging open at the notch. Use scissors if your foil bag does not
have a notch or if you are finding it difficult to tear the bag.
8. Remove the printhead cartridge from the foil bag.
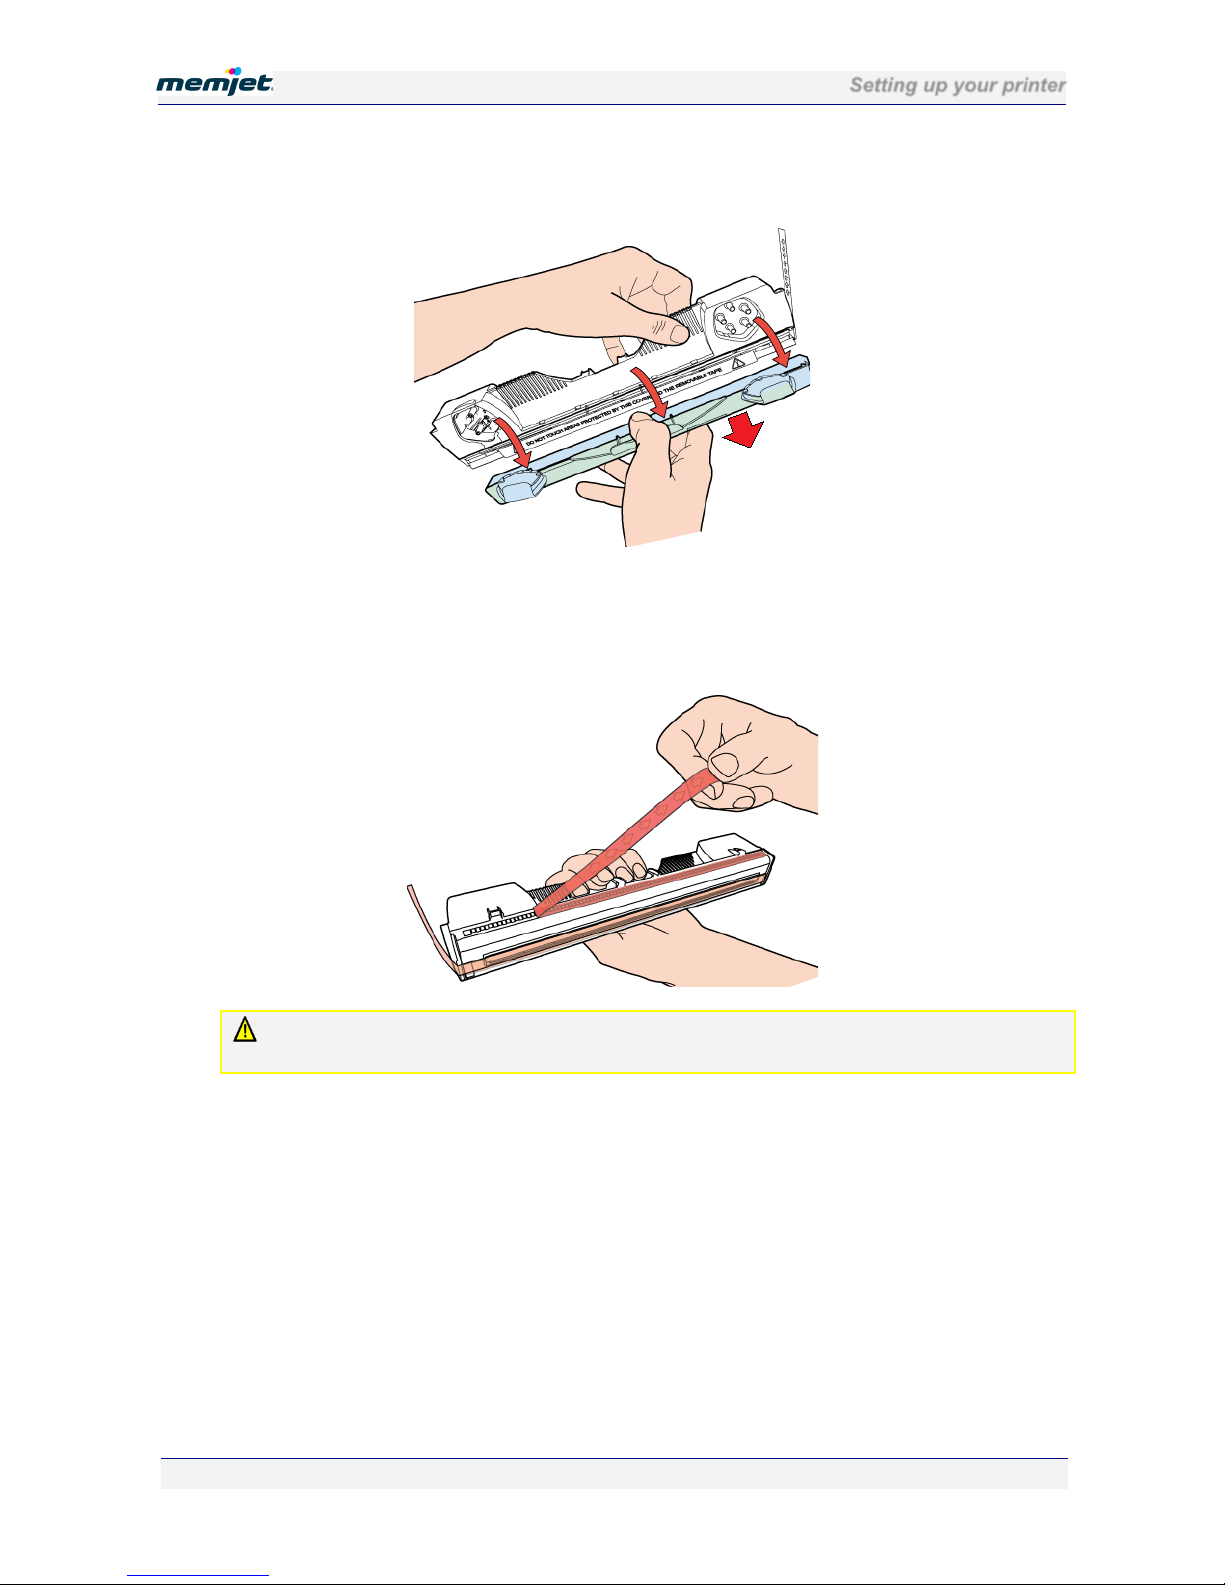
9. Remove the orange protective plastic cover from the printhead cartridge. Holding the
printhead cartridge by the handle:
• Release the flaps covering the ink ports (1 and 2).
Page 25
Setting up your printer
28 July 2011 - v4.2
Confidential.
Page 25 of 110
• Release the clip retaining the cover near the centre of the printhead cartridge (3).
• Carefully remove the protective cover (4).
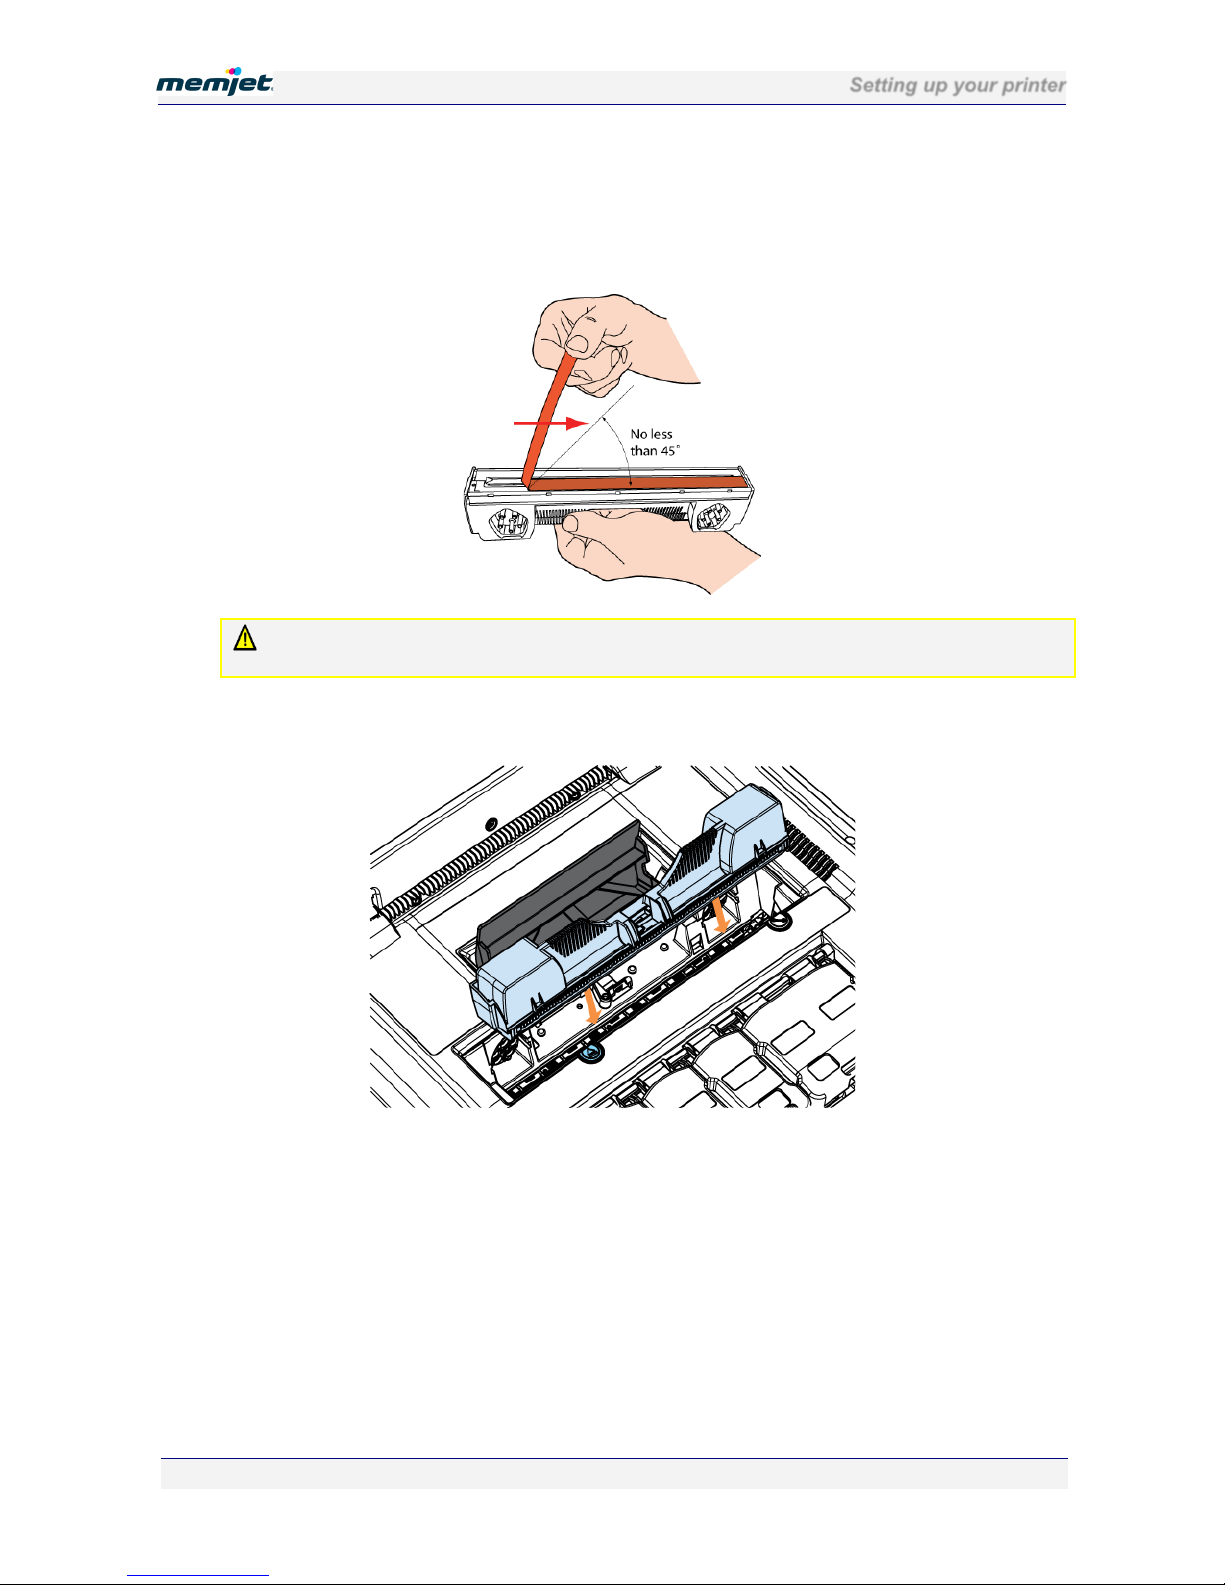
10. Remove the protective strip from the electrical contacts.
While holding the printhead cartridge by the handle with one hand, grasp the pull tab with
the other hand and, slowly and carefully, peel back the plastic strip covering the electrical
contacts.
Dispose of the removed strip immediately and do not allow the removed strip to contact the
electrical contacts.
1
2
3
4
Page 26
Setting up your printer
28 July 2011 - v4.2
Confidential.
Page 26 of 110
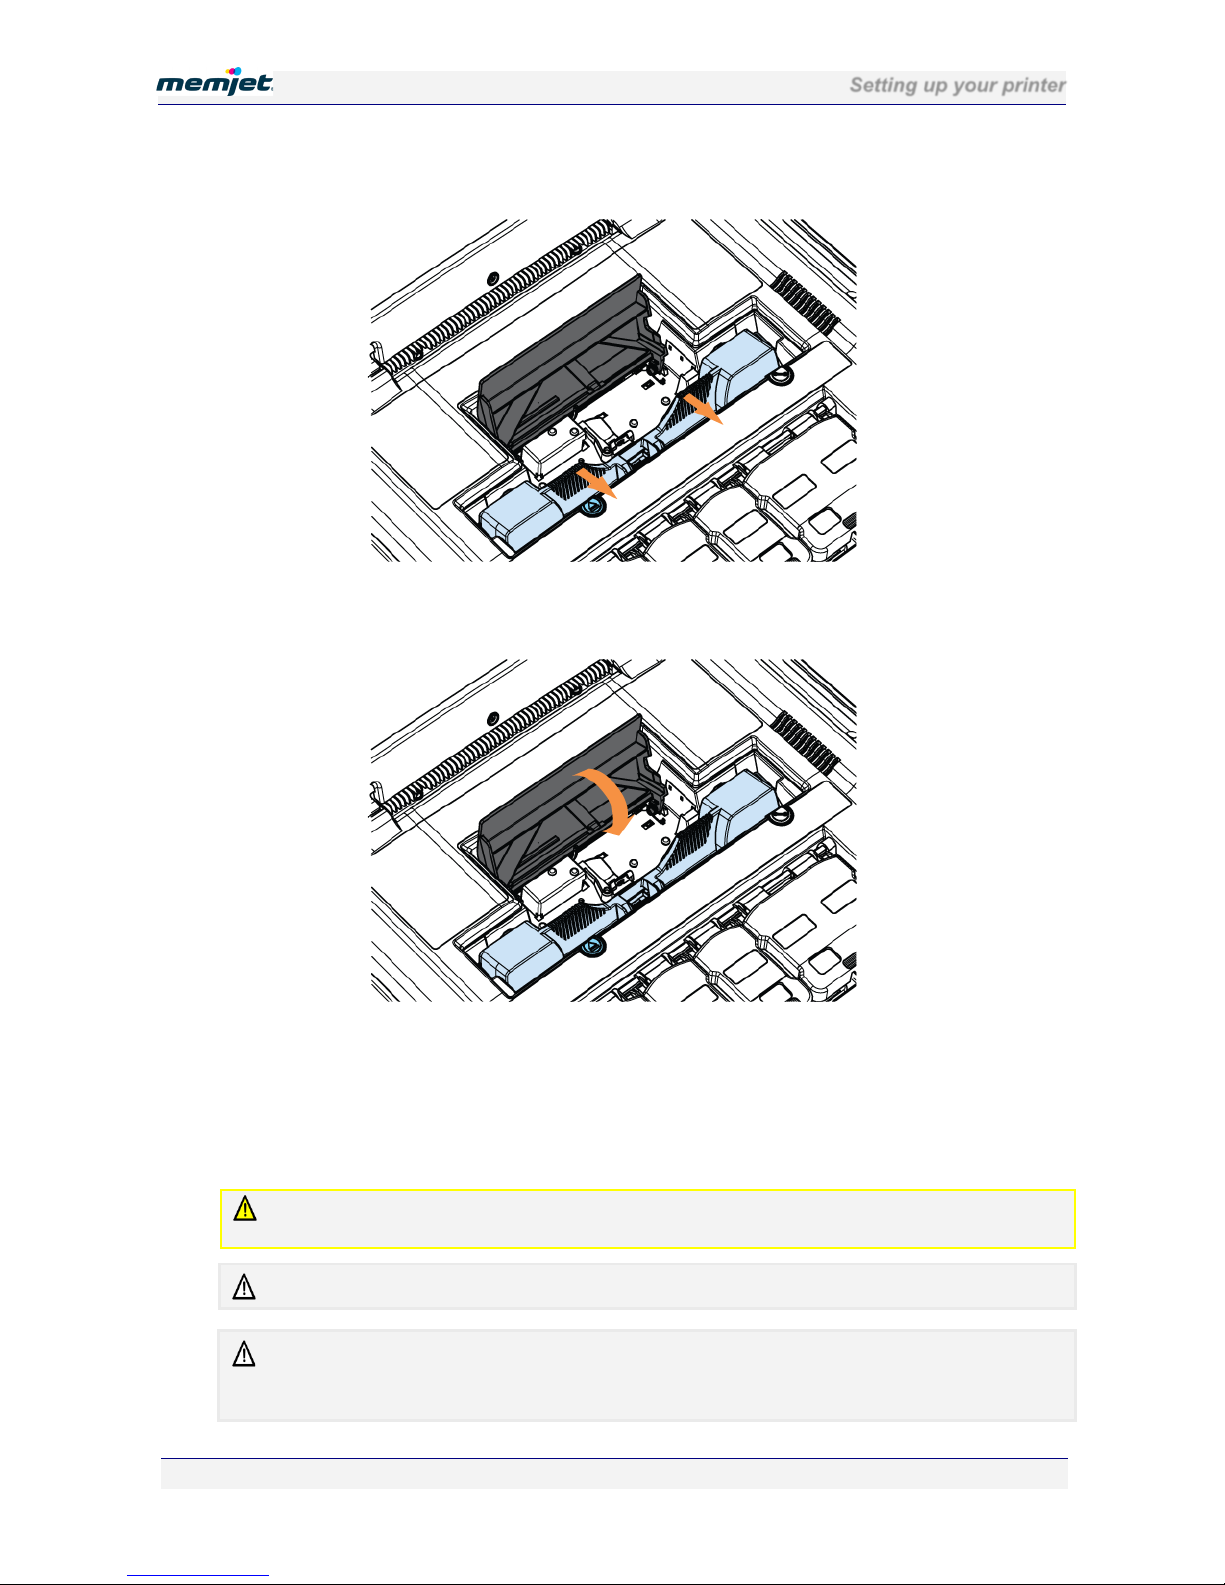
11. Remove the protective strip from the printhead nozzles.
While holding the printhead cartridge by the handle with one hand, grasp the pull tab with
the other hand and slowly and carefully peel back the plastic strip covering the printhead
nozzles. Maintain an angle of no less than 45° with the printhead surface when pulling on
the strip.
Dispose of the removed strip immediately and do not allow the removed strip to contact the
electrical contacts or the printhead nozzles.
12. Raise the printhead latch fully until it is upright so you can insert the printhead into the
printer at an angle.
Page 27
Setting up your printer
28 July 2011 - v4.2
Confidential.
Page 27 of 110
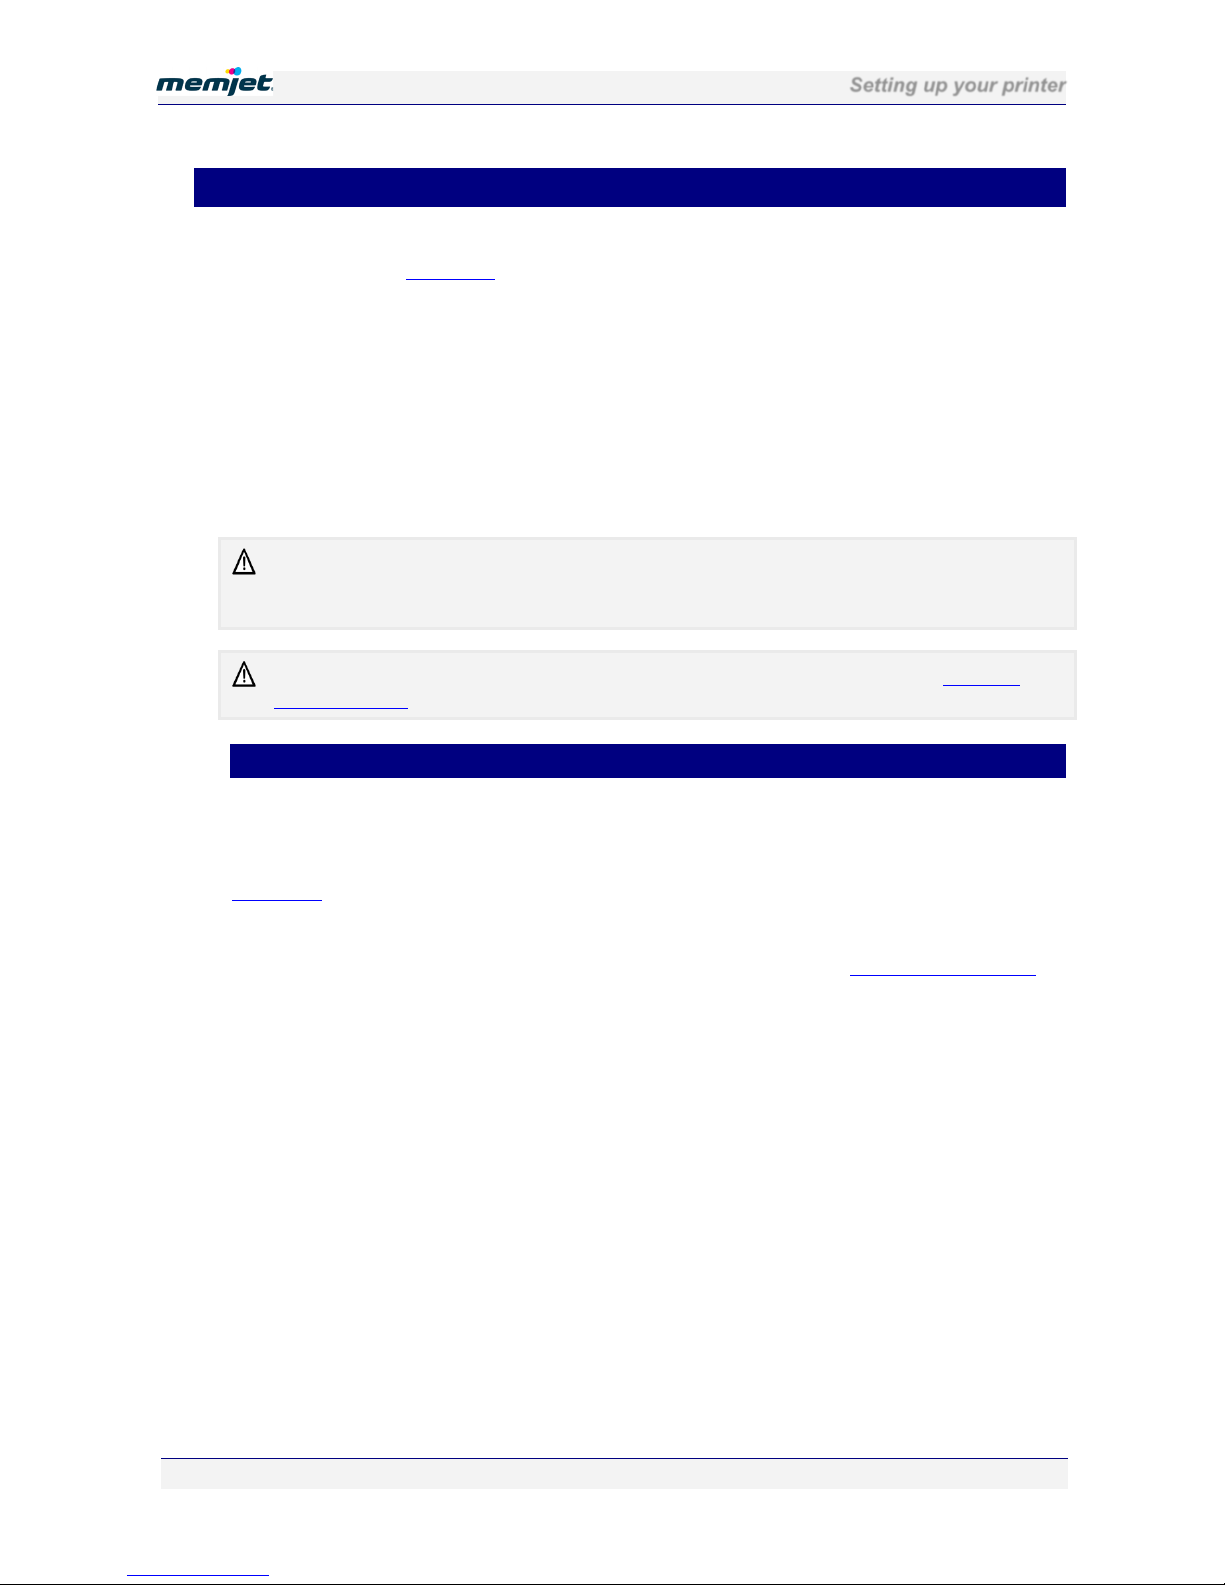
13. When the printhead cartridge is fully inserted into the printer rotate it to a vertical position
as shown.
14. Slowly close the printhead latch. The fluidic couplings should advance and seal to the
printhead cartridge.
15. Close the printhead latch.
When the printhead latch is closed, the printer will prime, clean and cap the printhead
automatically. This operation will generally take a minute or two, and will be obvious
from sounds emanating from the printer.
The Power On/Off button will be blinking during this process. When the button stops
blinking your printhead cartridge has been installed.
If the printer does not seem to be priming after closing the printhead latch contact support
personnel as there may be a hardware problem.
All the blinking color ink supply lamps should cease to blink during printhead priming.
There may be a continuing low-level sound issued by the printer after printhead installation, even
with the Power On/Off button lit and steady. You can ignore this.
This is due to printer maintenance operation which will not interfere with your printing.
Page 28
Setting up your printer
28 July 2011 - v4.2
Confidential.
Page 28 of 110
• Loading paper
Your Memjet printer has one paper tray, which may be removed from the main body of the
printer as shown in Paper tray on page 11Figure 1
.
The paper tray is designed to hold only the following paper sizes:
• ISO A4 (210mm × 297mm)
• US Letter (8½” × 11”)
• US Legal (8½” × 14”).
Do not feed any other paper sizes from the paper tray.
Intermediate size paper, such as Executive (7¼” × 10½,”) and Statement (5½” × 8½”) should
be fed into the printer from the manual feed tray at the rear of your printer.
Some paper may be single-sided. This means the manufacturer applies special processing to one
side of such paper, to achieve best results. When loading such paper into the paper tray, remember
to always load it with the recommended print side facing down.
For information on use of the manual feed tray to print intermediate size paper, see Using the
manual feed tray on page 68.
• Loading A4/Letter size paper
The paper tray has been designed to hold up to 250 sheets of A4/US Letter paper (at 80 gsm/
22 lbs). If you use heavier paper you may need to reduce the number of sheets.
The paper tray has two adjustable guides, one for length and one for width, as shown in the
Paper tray picture on page 11
.
To load the paper:
1. Select your paper from one of the recommended paper types (See Recommended paper
on page 90 for recommended paper types).
2. Remove the paper tray from the printer ensuring that any packing material has been
removed (see Figure 1).
3. Move the Paper Width and Paper Length guides to make space for the paper size you
have chosen.
4. Prepare a stack of up to 250 sheets of paper (all of the same size) for insertion into the
paper tray as follows:
• Flex the sheets back and forth to loosen them, then fan them a few times (do not
crease the paper).
• Remove any obvious loose paper dust from the surface or edges of the paper.
• Align the edges of the sheets on a level surface.
5. Load the paper stack into the paper tray, with the recommended print side facing
down.
Page 29

Setting up your printer
28 July 2011 - v4.2
Confidential.
Page 29 of 110
6. Ensure the maximum number of sheets in the paper tray does not reach any higher than
the protruding lip on the Paper Width guide as shown here.
Figure 2 Paper tray loaded to its maximum capacity
7. Grip the top of the Paper Length guide with thumb and forefinger and squeeze the two
tabs together to unlock it.
8. Slide the guide until it rests gently against the edge of the paper stack, ensuring that it is
aligned with the A4 or Letter mark on the label on the bottom of the paper tray
(depending on the length of the paper you are loading).
9. Gently push the Paper Width guide in until it pushes the paper stack against the opposite
side of the paper tray.
10. Re-insert the paper tray into the printer until the face is flush with the body of the printer.
• Loading US Legal size paper
US Legal paper, at 8½” × 14” is considerably longer than US Letter or ISO A4 and to
accommodate it your paper tray incorporates a sliding section which can be extended to
increase its total length.
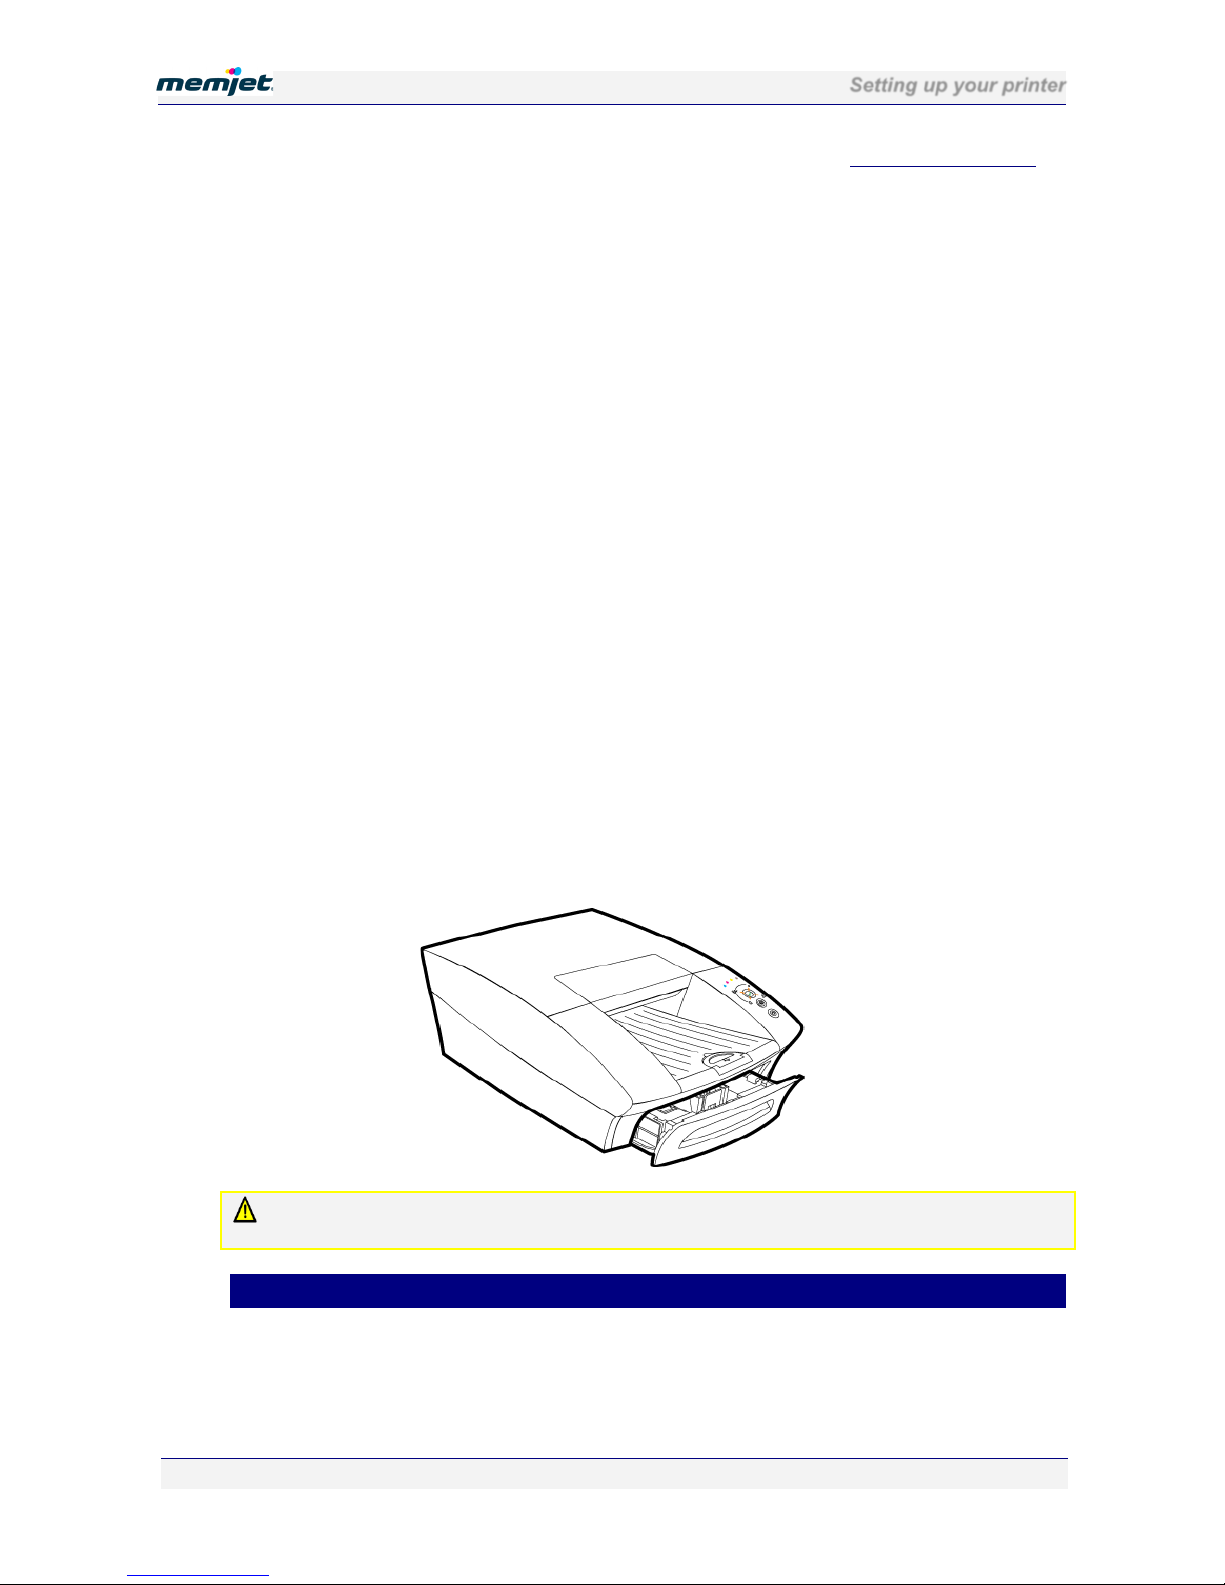
Figure 3 Paper tray showing extendable section and release clips
To load US Legal-sized paper:
Page 30
Setting up your printer
28 July 2011 - v4.2
Confidential.
Page 30 of 110
1. Select your paper from one of the recommended paper types (See Recommended paper
on page 90).
2. Remove the paper tray from the printer ensuring that any packing material has been
removed (see Figure 1).
3. Extend the length of the paper tray by pinching the release clips (see Figure 3) and pulling
out the paper tray extender section.
4. Move the width and length guides to make space for the paper size you have chosen.
5. Prepare a stack of up to 250 sheets of paper (all of the same size) for insertion into the
paper tray as follows:
• Flex the sheets back and forth to loosen them, then fan them a few times (do not
crease the paper).
• Remove any obvious loose paper dust from the surface or edges of the paper.
• Align the edges of the sheets on a level surface.
6. Load the paper stack into the paper tray, with the recommended print side facing
down.
7. Ensure the maximum number of sheets in the paper tray does not reach any higher than
the protruding lip on the Paper Width guide (see Figure 2).
8. Grip the top of the Paper Length guide with thumb and forefinger and squeeze the two
tabs together to unlock it.
9. Slide the guide until it rests gently against the edge of the paper stack, ensuring that it is
aligned with the Legal mark on the label on the bottom of the paper tray.
10. Gently push the Paper Width guide in until it pushes the stack against the opposite side of
the paper tray.
11. Re-insert the paper tray into the printer and push it gently until it comes to a firm stop.
The extended paper tray will protrude from the body of the printer, as shown. This is a
design feature, not a fault.
DO NOT try to force the paper tray further into the printer.
When using the printer in this manner take care not to injure yourself on the protruding section.
• Using intermediate paper sizes
The paper tray should be loaded only with ISO A4, US Letter or US Legal paper sizes and is
designed to take paper from 70 gsm (18 lb Bond) to 120 gsm (32 lb Bond) weight. However
paper properties can vary widely between manufacturers, so if the heavier weight paper you
Page 31

Setting up your printer
28 July 2011 - v4.2
Confidential.
Page 31 of 110
have chosen does not feed well from the paper tray use the manual feed tray, at the rear of the
printer.
Intermediate size paper up to US Legal size that cannot be loaded in the paper tray should be
printed via the manual feed at the rear of the printer. See Using the manual feed tray
on page
68 for instructions.
Page 32
Setting up your printer
28 July 2011 - v4.2
Confidential.
Page 32 of 110
• Installing printer drivers
This section describes the installation of the latest Memjet printer drivers on your PC.
The installation steps described below assume you are running the Windows 7, 32-bit operating
system on your PC. Where another version of Windows differs significantly from the behaviour
described, specific reference will be made to such differences.
To install the latest printer drivers for your Memjet printer use the latest Memjet printer
drivers CD and ensure you have an active connection to the Internet.
• For a locally connected printer, see: Installing a USB driver on page 33
.
• For a networked printer see: Installing a network driver on page 40.
You will normally not need to uninstall an older Memjet printer driver, as the installation
sequence recognises the existence of an older driver and offers to update it.
If, however, you need to uninstall a Memjet printer driver, see
Uninstalling older printer
drivers on page 53.
Using previous versions of software on current printers is not recommended.
Unless otherwise directed, always ensure you are using the latest available version.
Page 33
Setting up your printer
28 July 2011 - v4.2
Confidential.
Page 33 of 110
• Installing a USB driver
This section covers installation of the latest Memjet printer driver for a locally-connected
printer.
Before you install a Memjet printer driver, ensure you have powered up your printer
(see page
20) and that you have obtained a CD containing the latest printer driver for your Memjet
printer.
If you have an older USB printer driver installed, you will not need to uninstall it as this
installation utility will give you the option of upgrading its software.
If you wish uninstall your older Memjet printer drivers see Uninstalling older printer drivers
on page 53.
DO NOT use the Windows ‘Add Printer’ Wizard to install your Memjet printer driver. Doing so
will result in an incomplete software installation and limited printer functionality. To experience
all the documented features use ONLY the procedure set out here.
To install a Memjet printer driver for a locally-connected printer:
1. If the USB cable is already connected, unplug the printer USB cable from your PC.
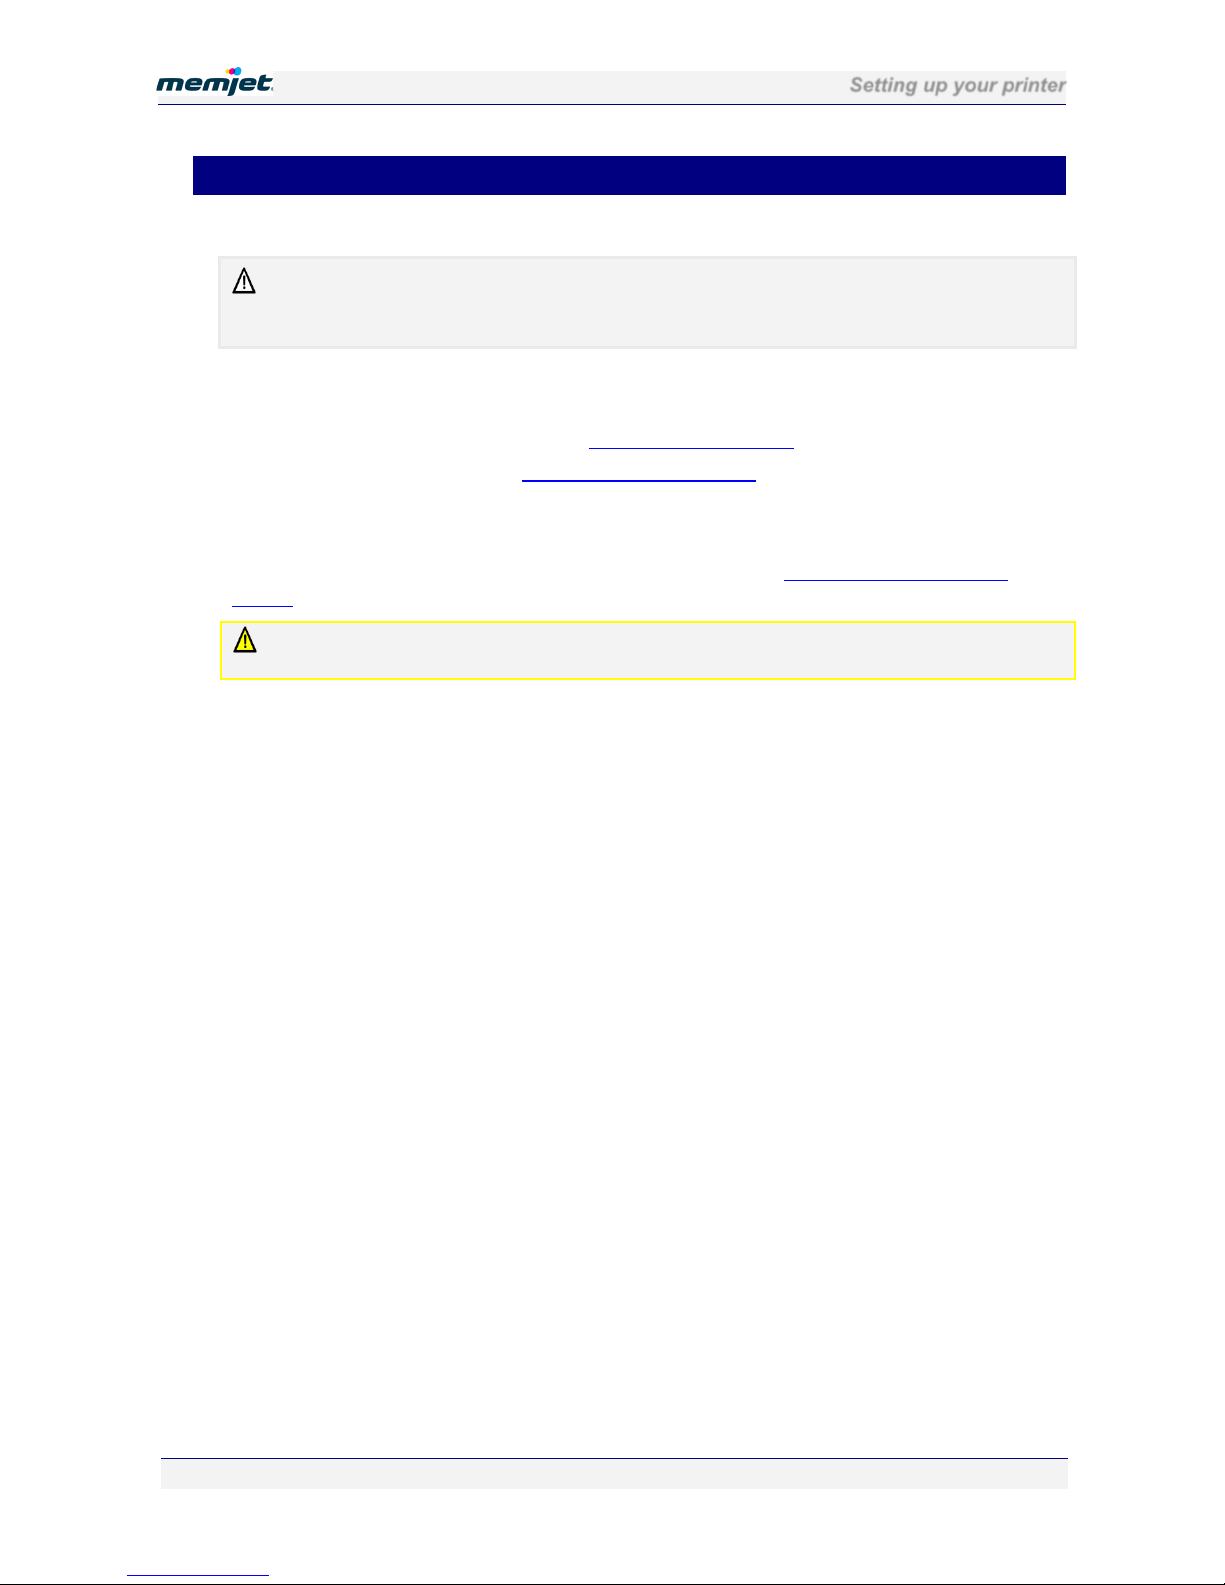
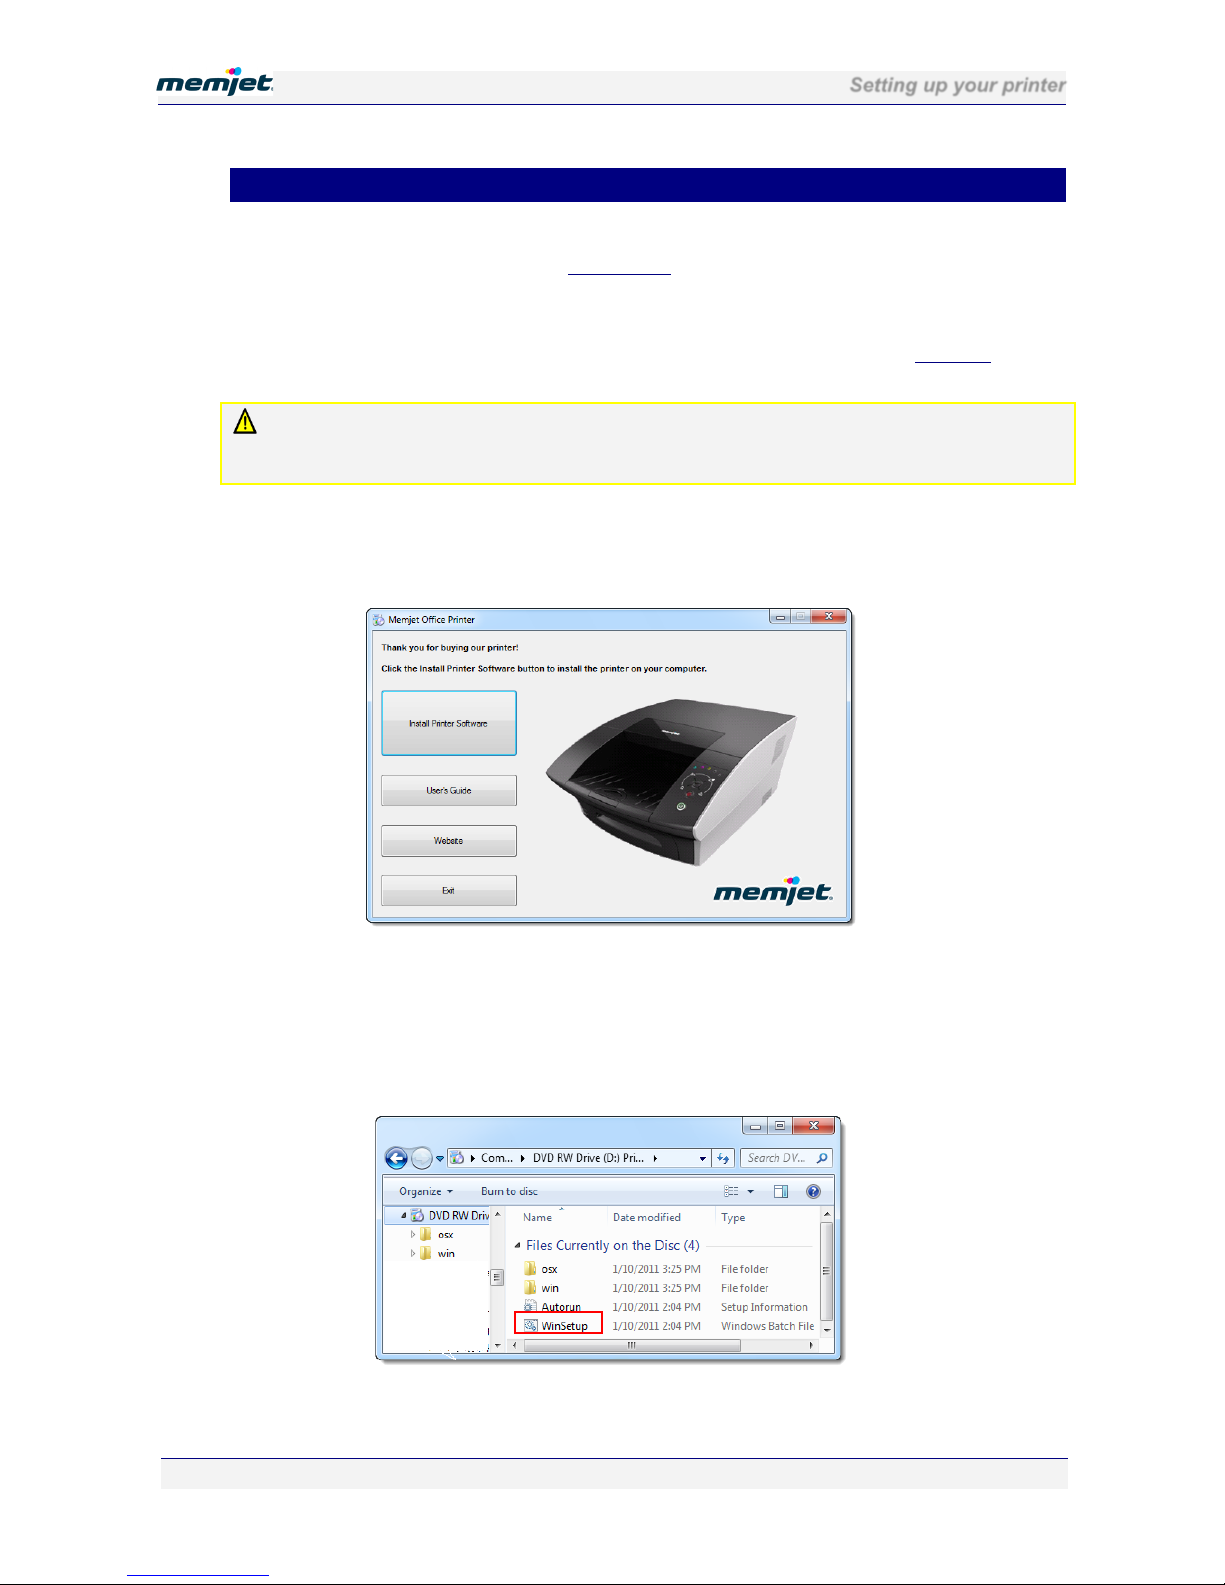
2. Insert the installation CD in your PC CDROM/DVD drive. You should see the Welcome
window.
IF the above window is not displayed, start a copy of Windows Explorer and navigate to
the CDROM/DVD drive where you inserted the installation CD.
Double click on WinSetup to bring up the Welcome window.
Page 34
Setting up your printer
28 July 2011 - v4.2
Confidential.
Page 34 of 110
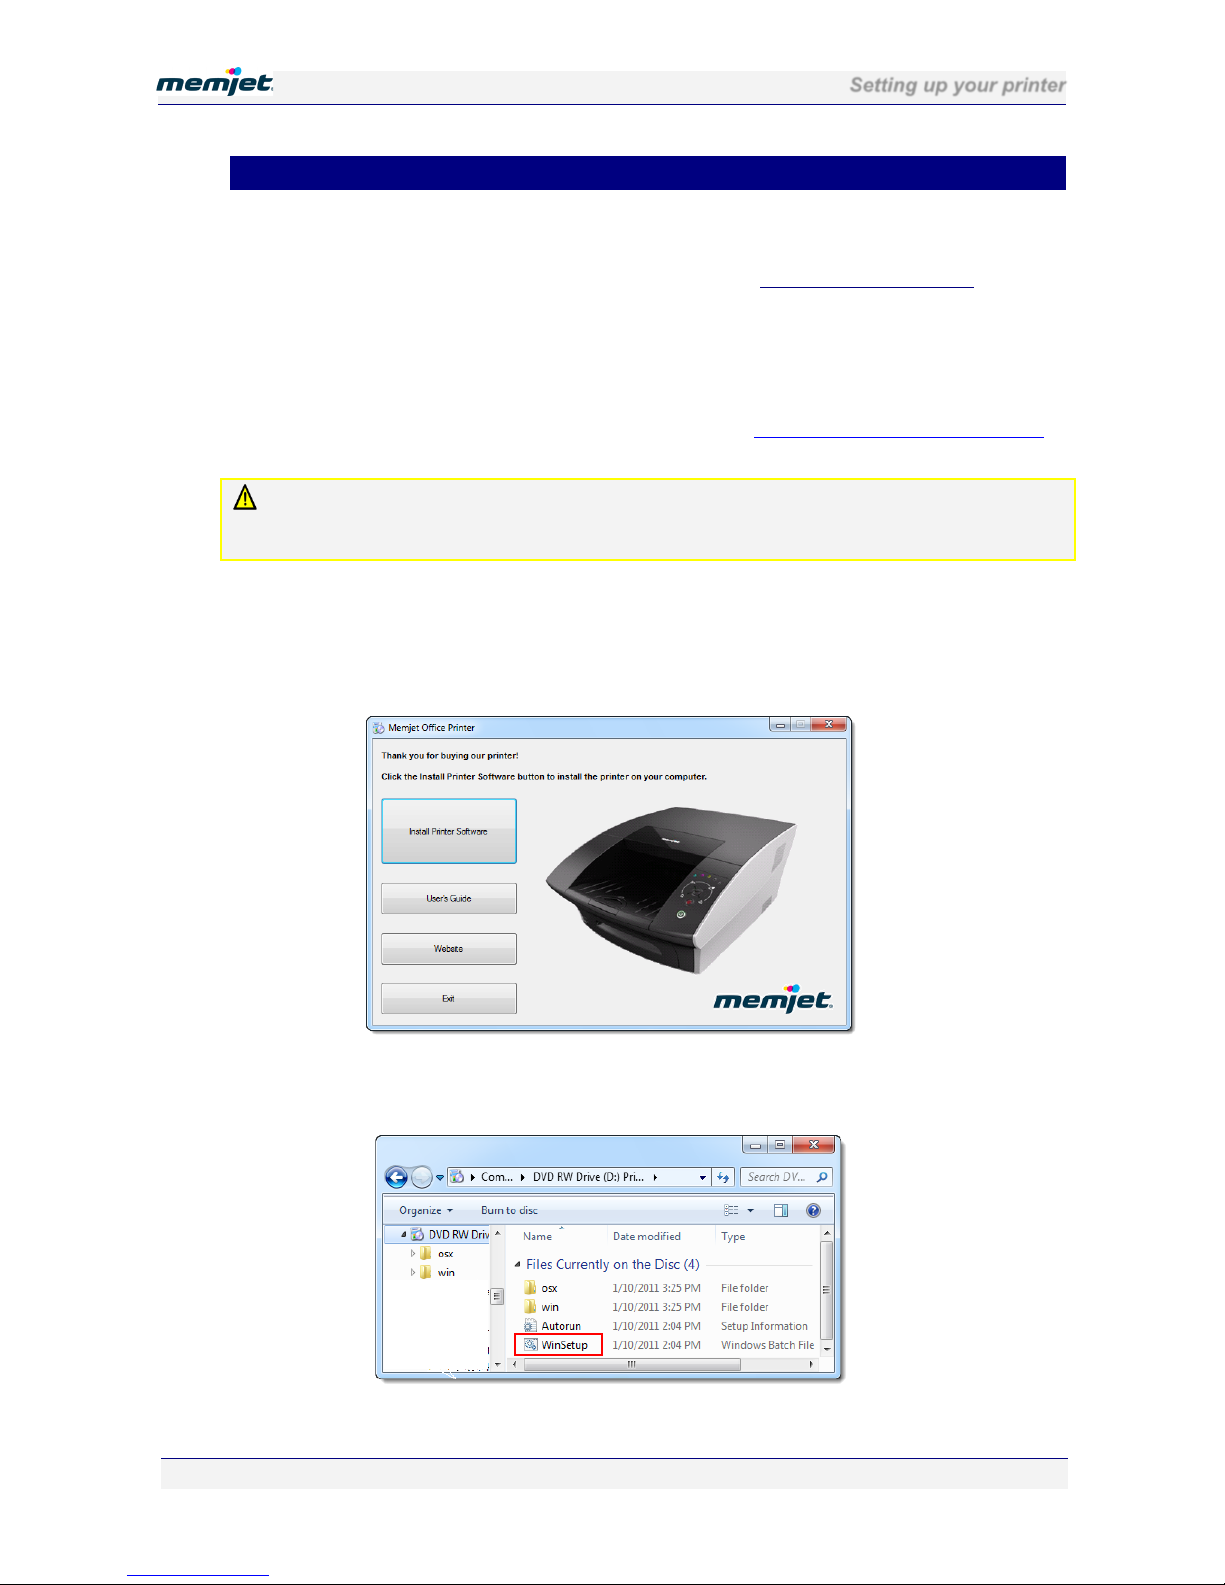
3. Click Install Printer Software.
If your PC is connected to the Internet, a check will now be made that the Memjet SFP
printer drivers on your CD are the latest available. If a later version of driver is available
on your supplier Web site, you will see the following dialog box.
4. Click Yes to download the latest drivers.
You will not see the above dialog box if:
• the CD contains the latest version of Memjet SFP drivers
• your PC is not connected to the Internet
• your supplier has not implemented this check.
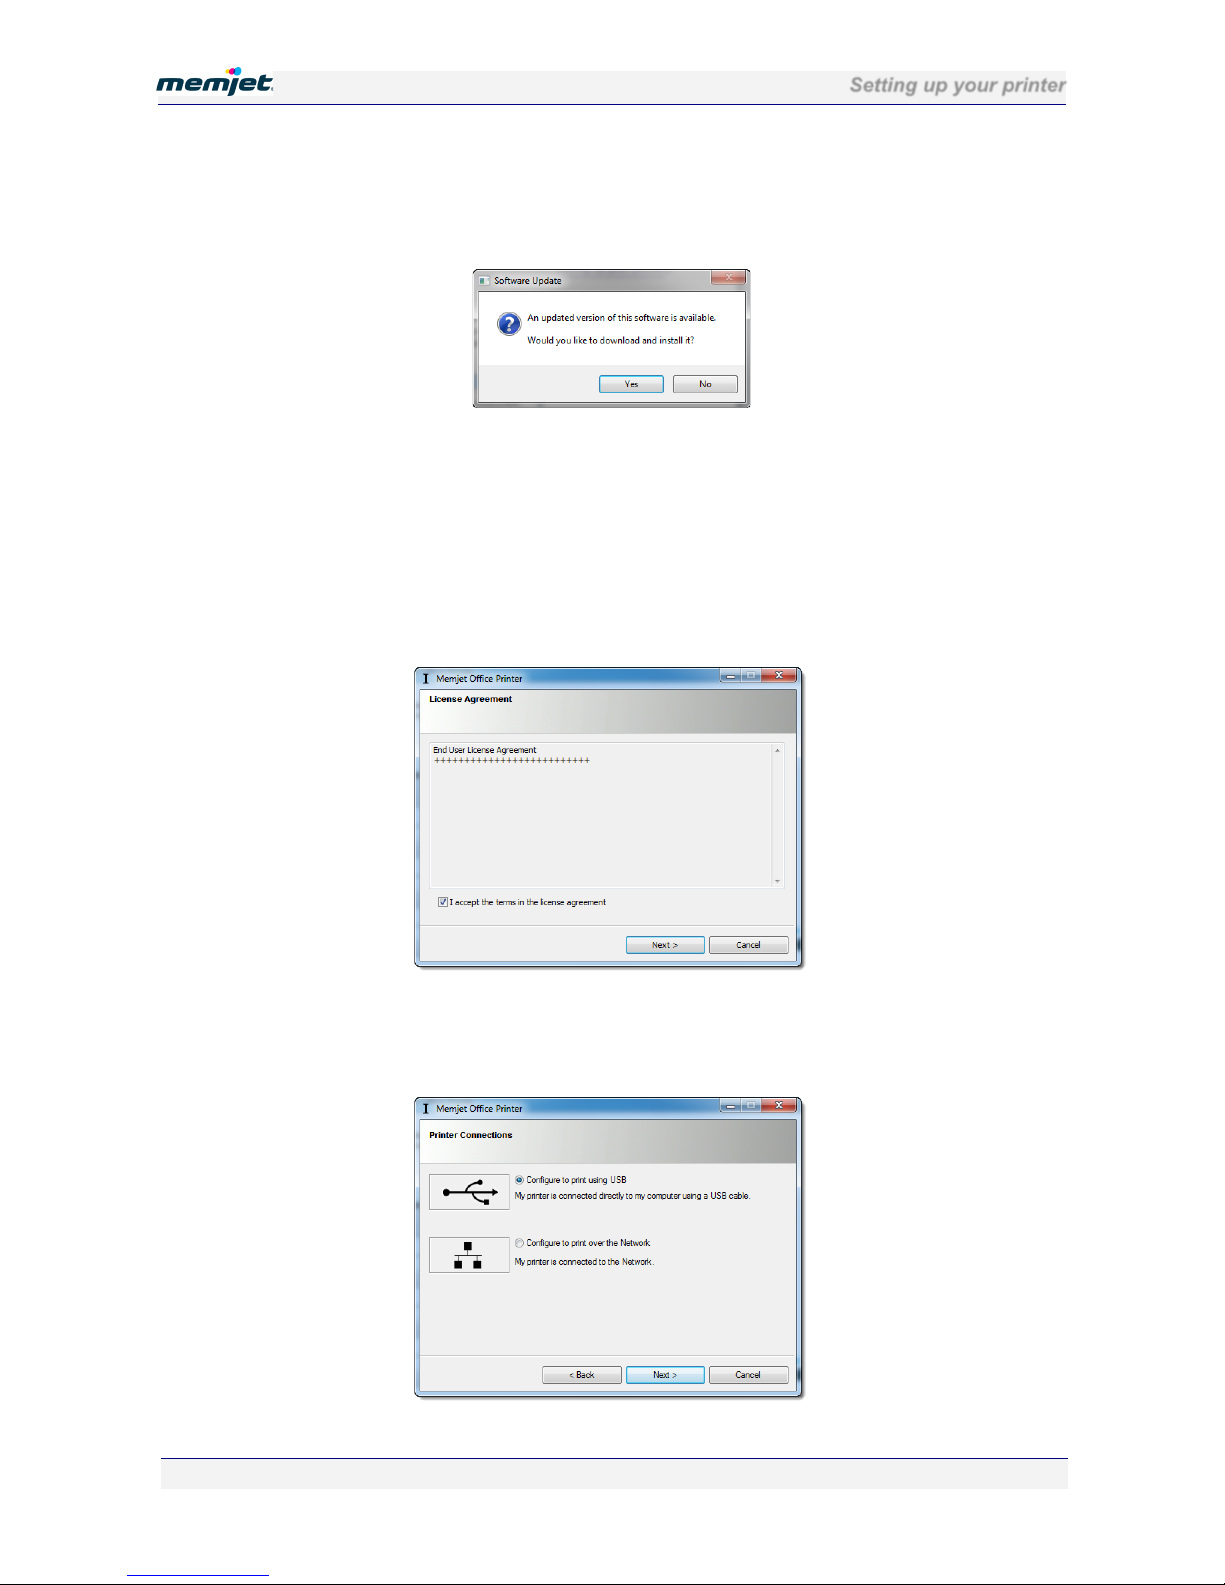
5. If you have not installed any other Memjet printer driver the License Agreement dialog
box should be displayed. Select I accept… and click Next.
6. IF this is the first time you are installing a Memjet printer OR you have uninstalled all
Memjet printer drivers the Printer Connections dialog box will appear. Select Configure
to print using USB, then click Next.
Page 35
Setting up your printer
28 July 2011 - v4.2
Confidential.
Page 35 of 110
IF you have previous versions of Memjet printer drivers installed, the following selection
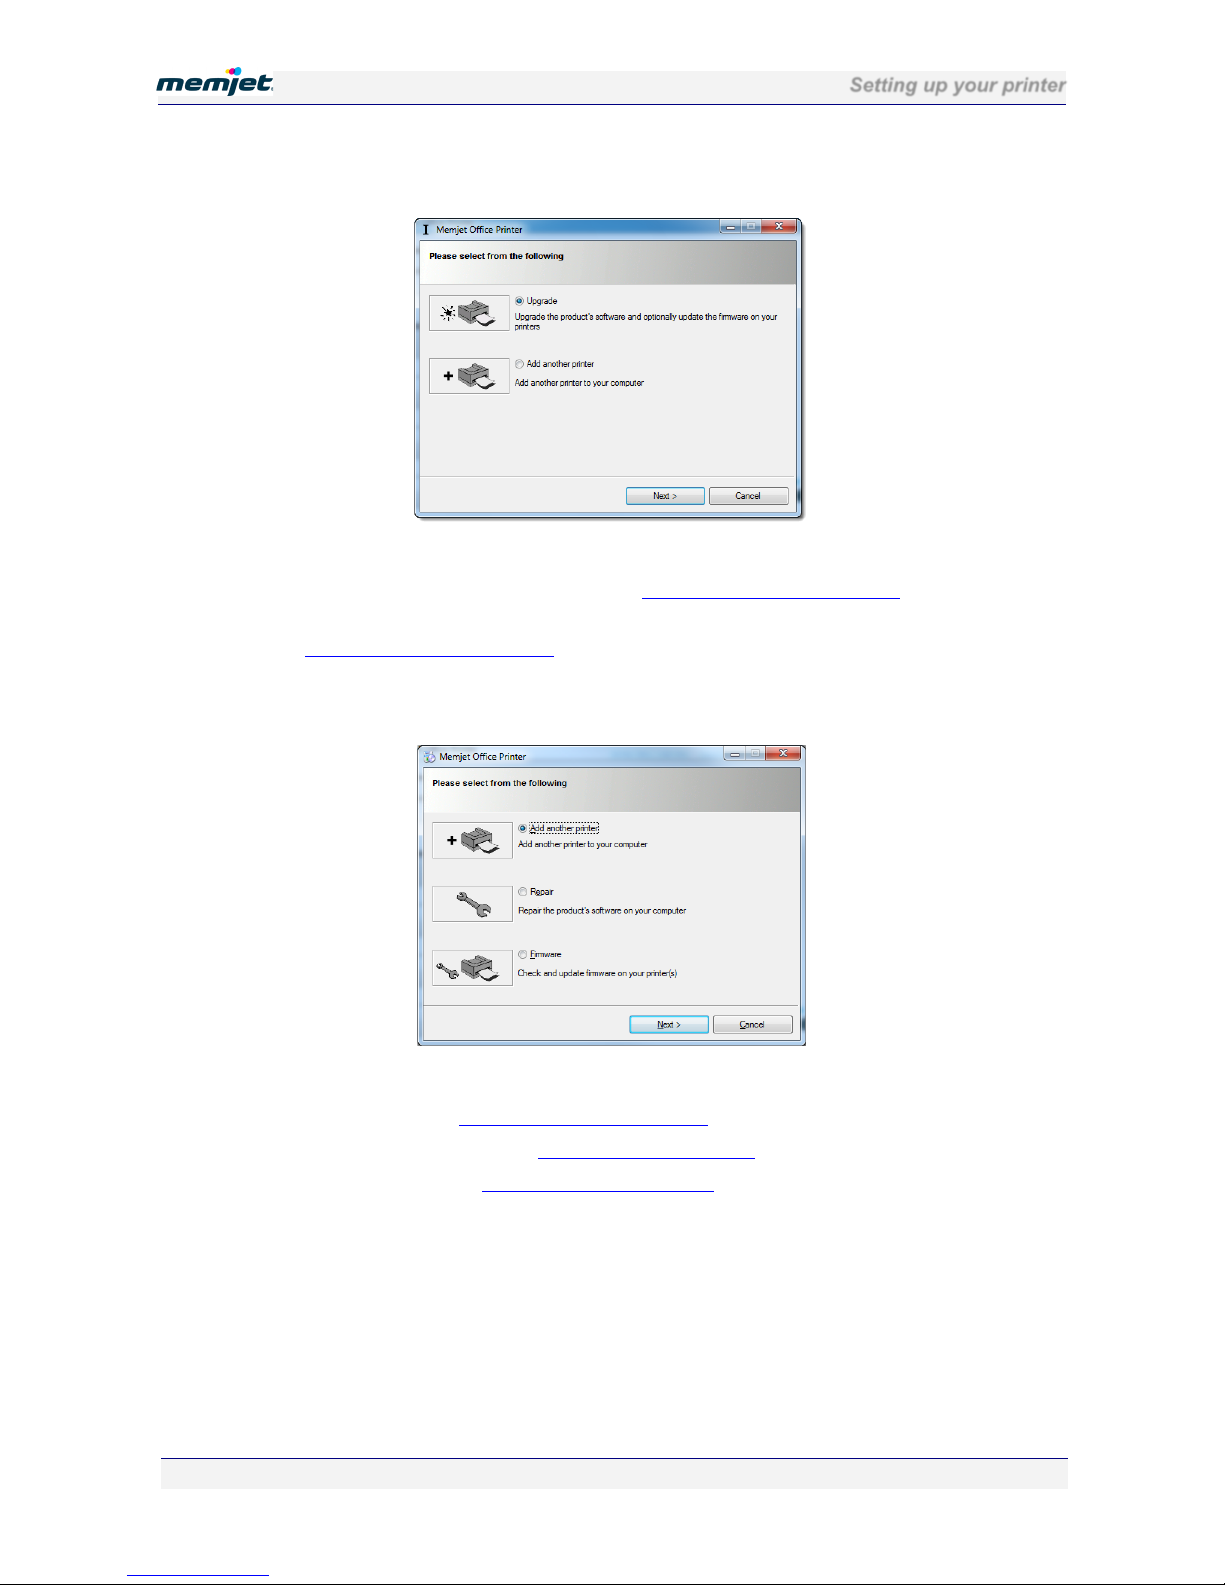
dialog box will appear.
• To upgrade your existing Memjet printer drivers to the current version select
Upgrade. For further information see Updating your printer drivers on page 48
.
• To add another printer select Add another printer. For further information see
Installing additional printers on page 47
.
IF you have a current versions of Memjet printer drivers already installed, the following
selection dialog box will appear.
For further information on:
• Adding a printer: see Installing additional printers on page 47
.
• Repairing a printer driver: see Repairing printer drivers on page 51.
• Updating firmware: see Updating printer firmware on page 49.
Page 36
Setting up your printer
28 July 2011 - v4.2
Confidential.
Page 36 of 110
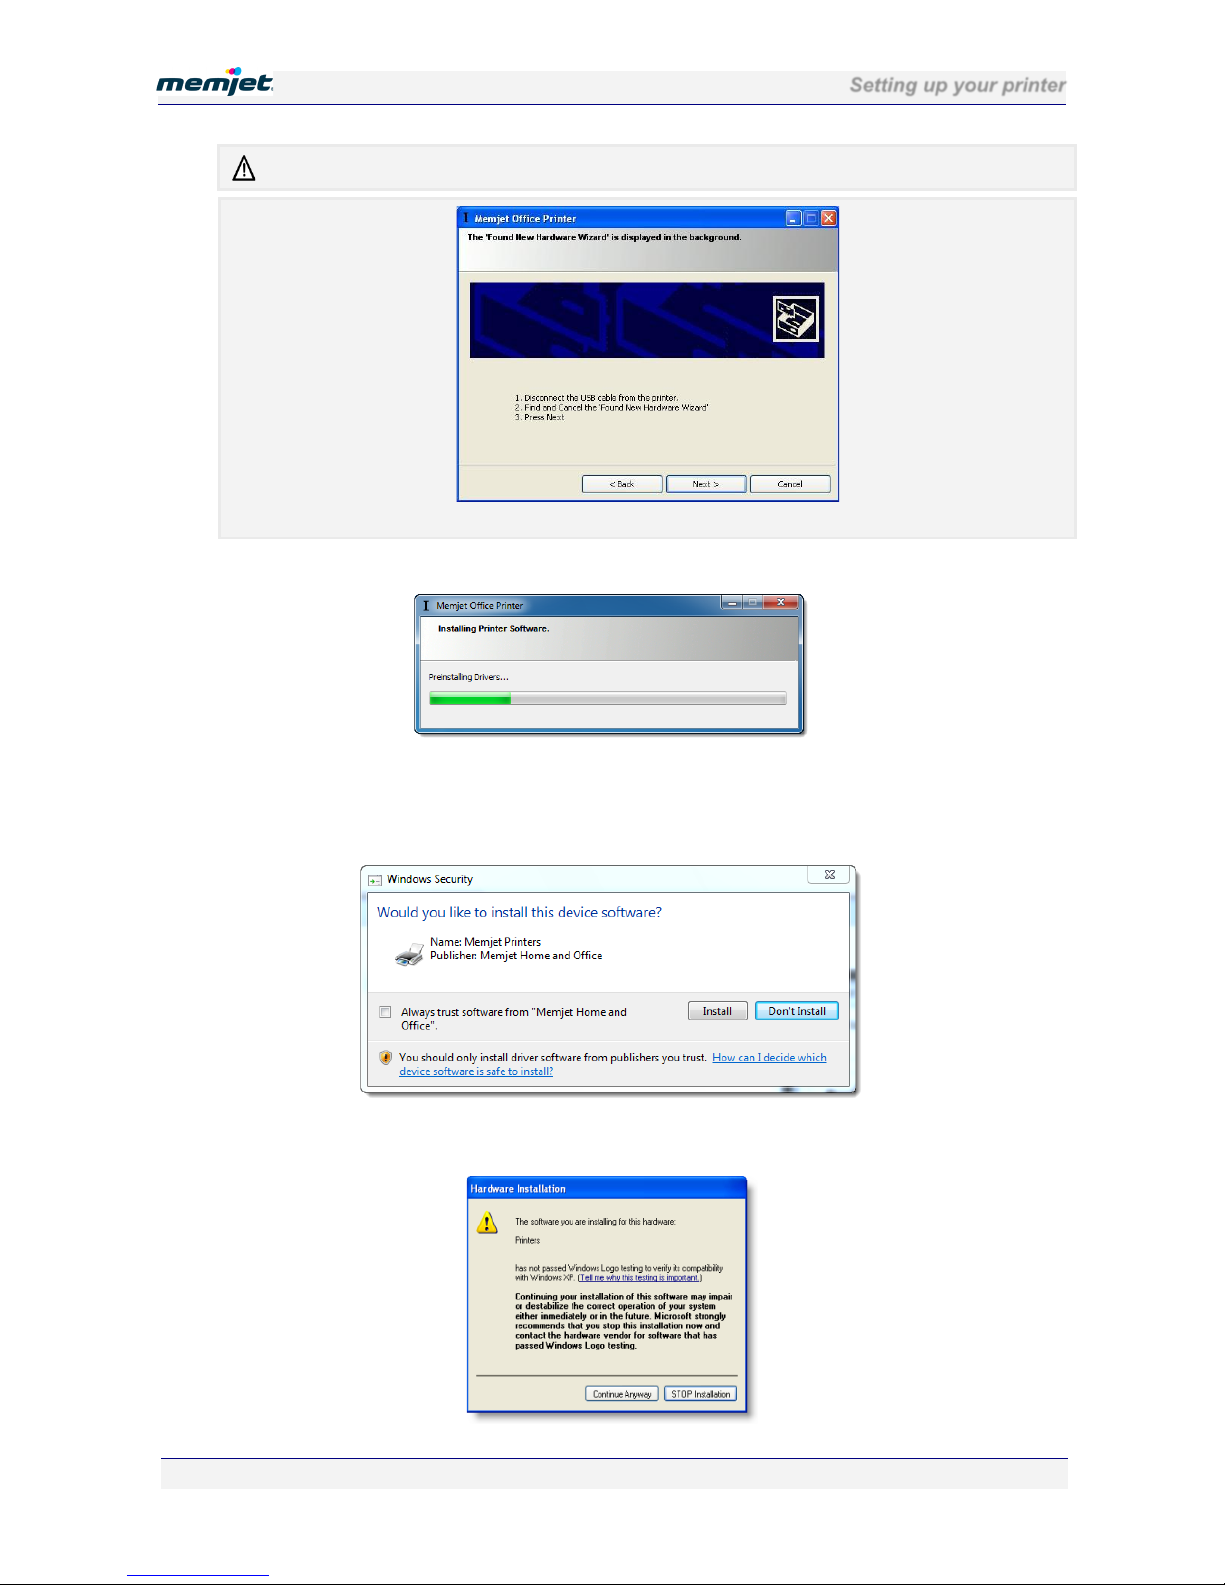
In Windows XP another window may pop up at this point:
If the above windows is displayed follow the instructions and click Next to continue.
7. The Pre-installing Drivers window opens:
Depending on the exact version of software you are installing, you may see a number of
warning windows as shown here. In Windows 7 the following warning is displayed. Click
Install to continue.
In Windows XP the following window is displayed instead. Click Continue Anyway.
Page 37
Setting up your printer
28 July 2011 - v4.2
Confidential.
Page 37 of 110
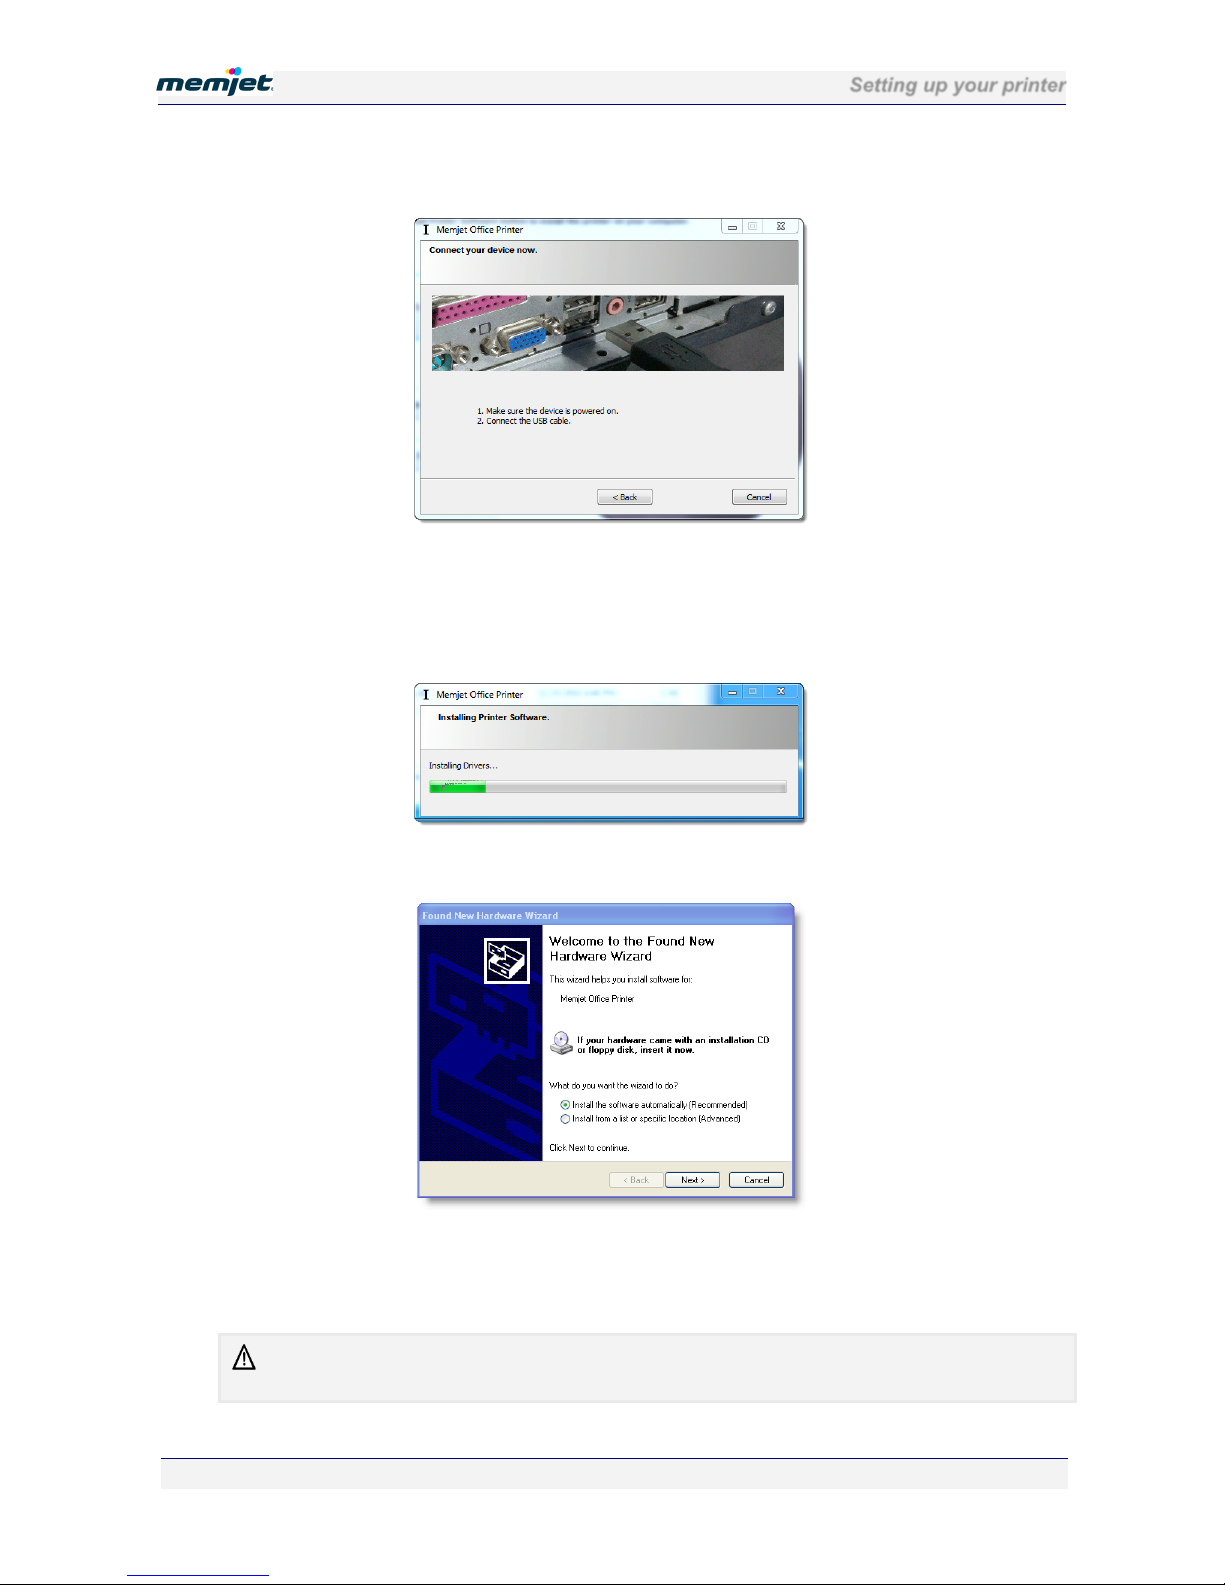
8. A dialog box also opens asking you to power on the device and connect the USB cable.
Follow the directions and the window will close automatically.
IF you are upgrading a local printer driver and the printer is attached, this window will
not be displayed.
9. The Installing Drivers window is then displayed and the installation of the printer drivers
proceeds in the background.
In Windows XP the following window will be displayed instead.
Ensure Install the software automatically is selected and click Next.
More warning windows similar to those displayed in point 5 above above may appear. Follow
the directions in point 6, disregard the warnings and continue the installation.
A small message window may appear informing you that the driver has been installed. Ignore this.
DO NOT attempt to print until you see the final window, shown in the next step.
Page 38
Setting up your printer
28 July 2011 - v4.2
Confidential.
Page 38 of 110
Click Finish. If more warning windows are displayed, simply ignore and continue as set
out in point 5 above.
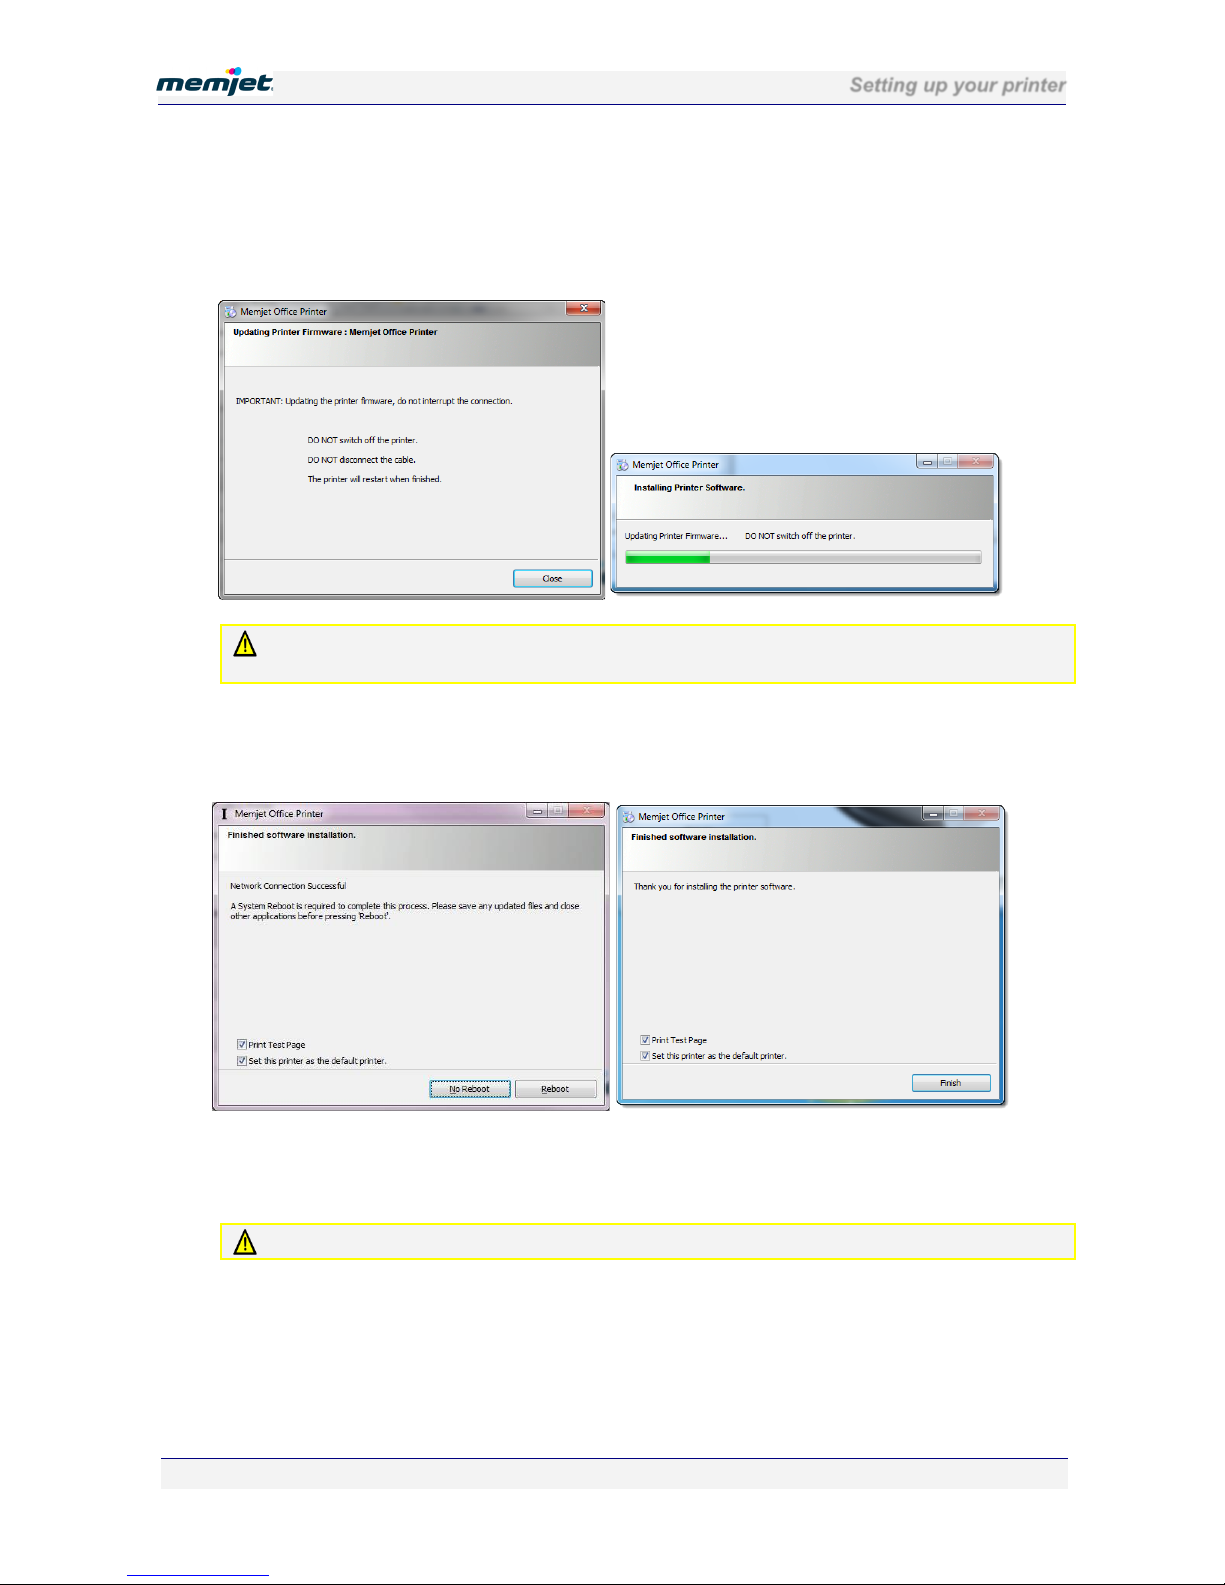
10. If required, your printer firmware will now be updated.
Firmware updating is indicated by a progress bar and a warning window being displayed,
as shown here.
DO NOT interrupt the firmware update under any circumstances. Doing so may damage your
printer. Should the firmware update be interrupted for any reason contact support personnel.
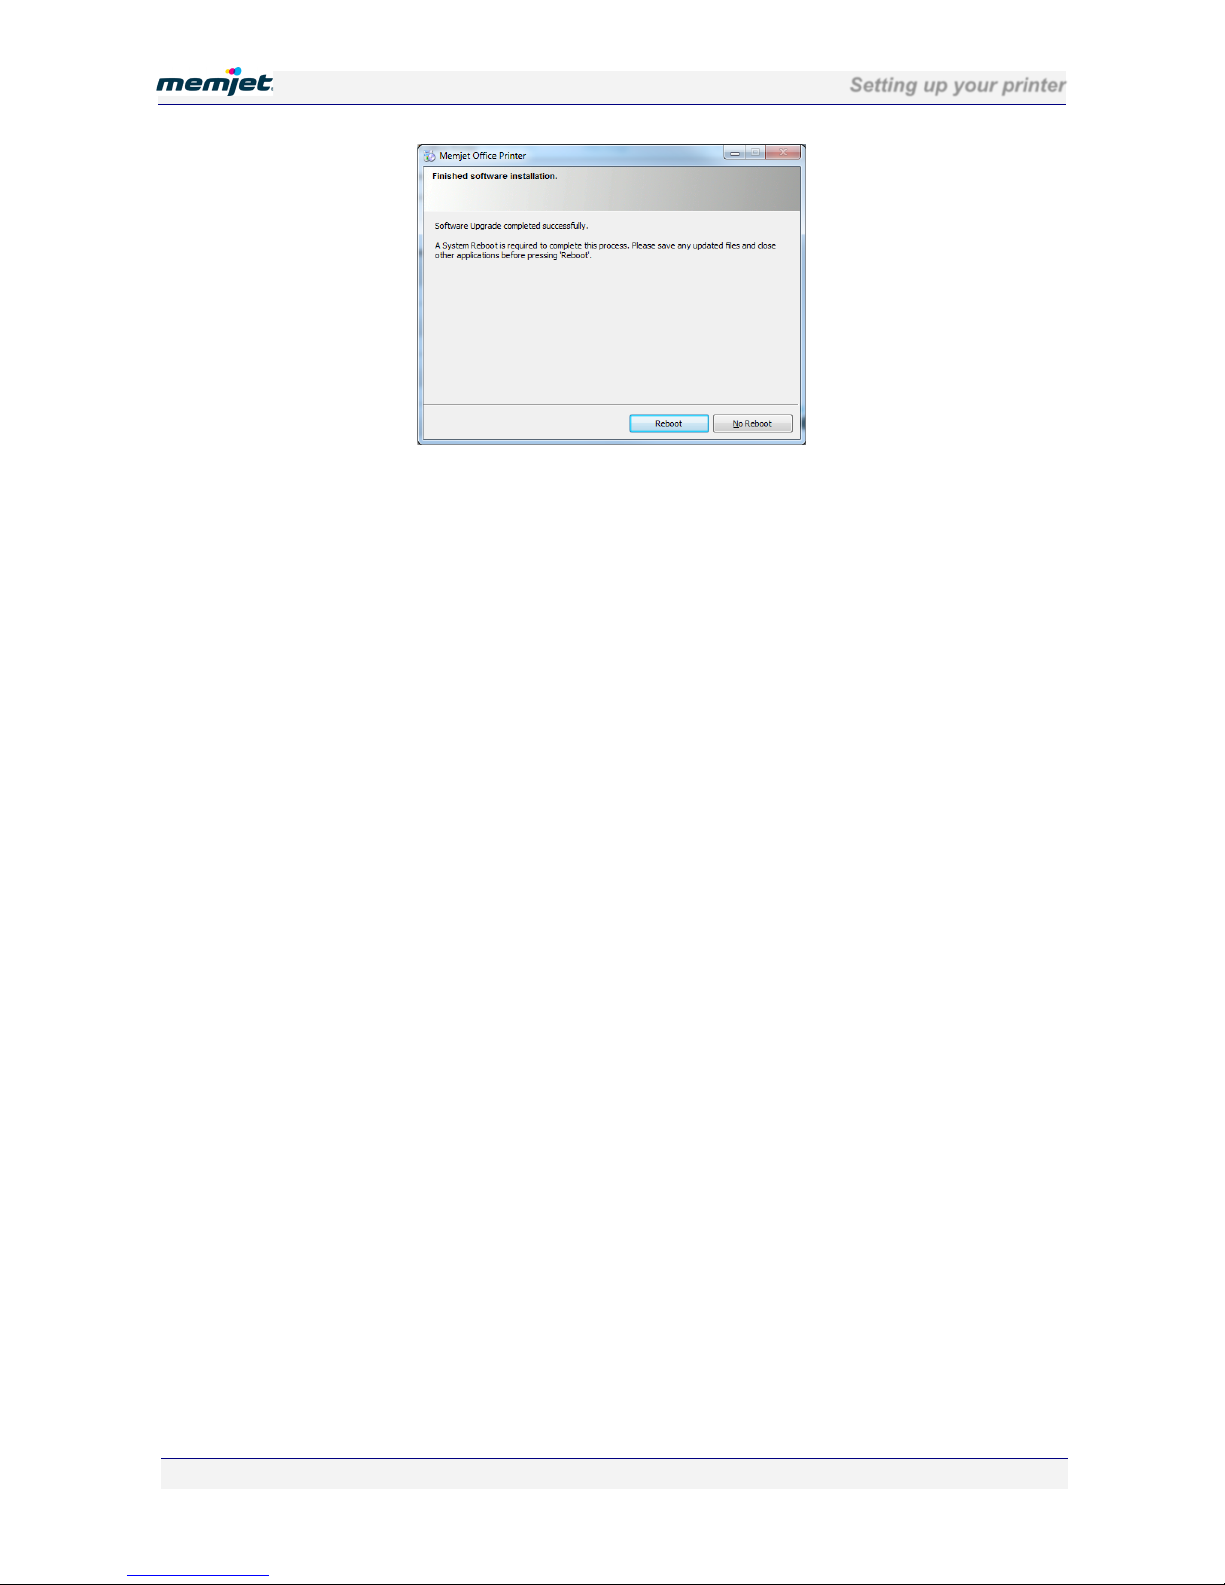
11. A final dialog box is displayed informing you that software installation has finished.
This dialog box may take two forms as shown below. Which one is displayed will depend
on whether you are required to reboot or otherwise.
As you can see, both contain two check boxes. It is suggested you leave the Print Test Page
check box as is. If the Test page is printed, you have successfully installed a USB driver for
your Memjet printer.
If you have chosen to print a Test page and one is not printed, inform support personnel.
IF you have upgraded your drivers, the following window will be displayed instead.
Page 39
Setting up your printer
28 July 2011 - v4.2
Confidential.
Page 39 of 110
12. If you are asked to reboot, save all work, close all applications and reboot.
Page 40
Setting up your printer
28 July 2011 - v4.2
Confidential.
Page 40 of 110
• Installing a network driver
This section covers installation of the latest Memjet printer driver on a networked printer.
Before starting, ensure your printer is powered on (see page 20
) and connected to your
network, and that you have obtained a CD containing the latest printer drivers for your
Memjet printer.
If you are updating the printer driver of a networked printer, you will need to uninstall the
older driver first (see page 53).
DO NOT use the Windows ‘Add Printer’ Wizard to install your Memjet printer driver. Doing so
will result in an incomplete software installation and limited printer functionality. To experience
all the documented features use ONLY the procedure set out here.
To install a Memjet printer driver for a networked printer:
1. Insert the installation CD in your PC CDROM/DVD drive. You should see the Welcome
window.:
If the above window is not displayed:
1. Start a copy of Windows Explorer and navigate to the CDROM/DVD drive where
you inserted the installation CD.
You should see something similar to the following in your Windows Explorer
window:
2. Double click on WinSetup to bring up the required window.
Page 41
Setting up your printer
28 July 2011 - v4.2
Confidential.
Page 41 of 110
2. Click Install Printer Software.
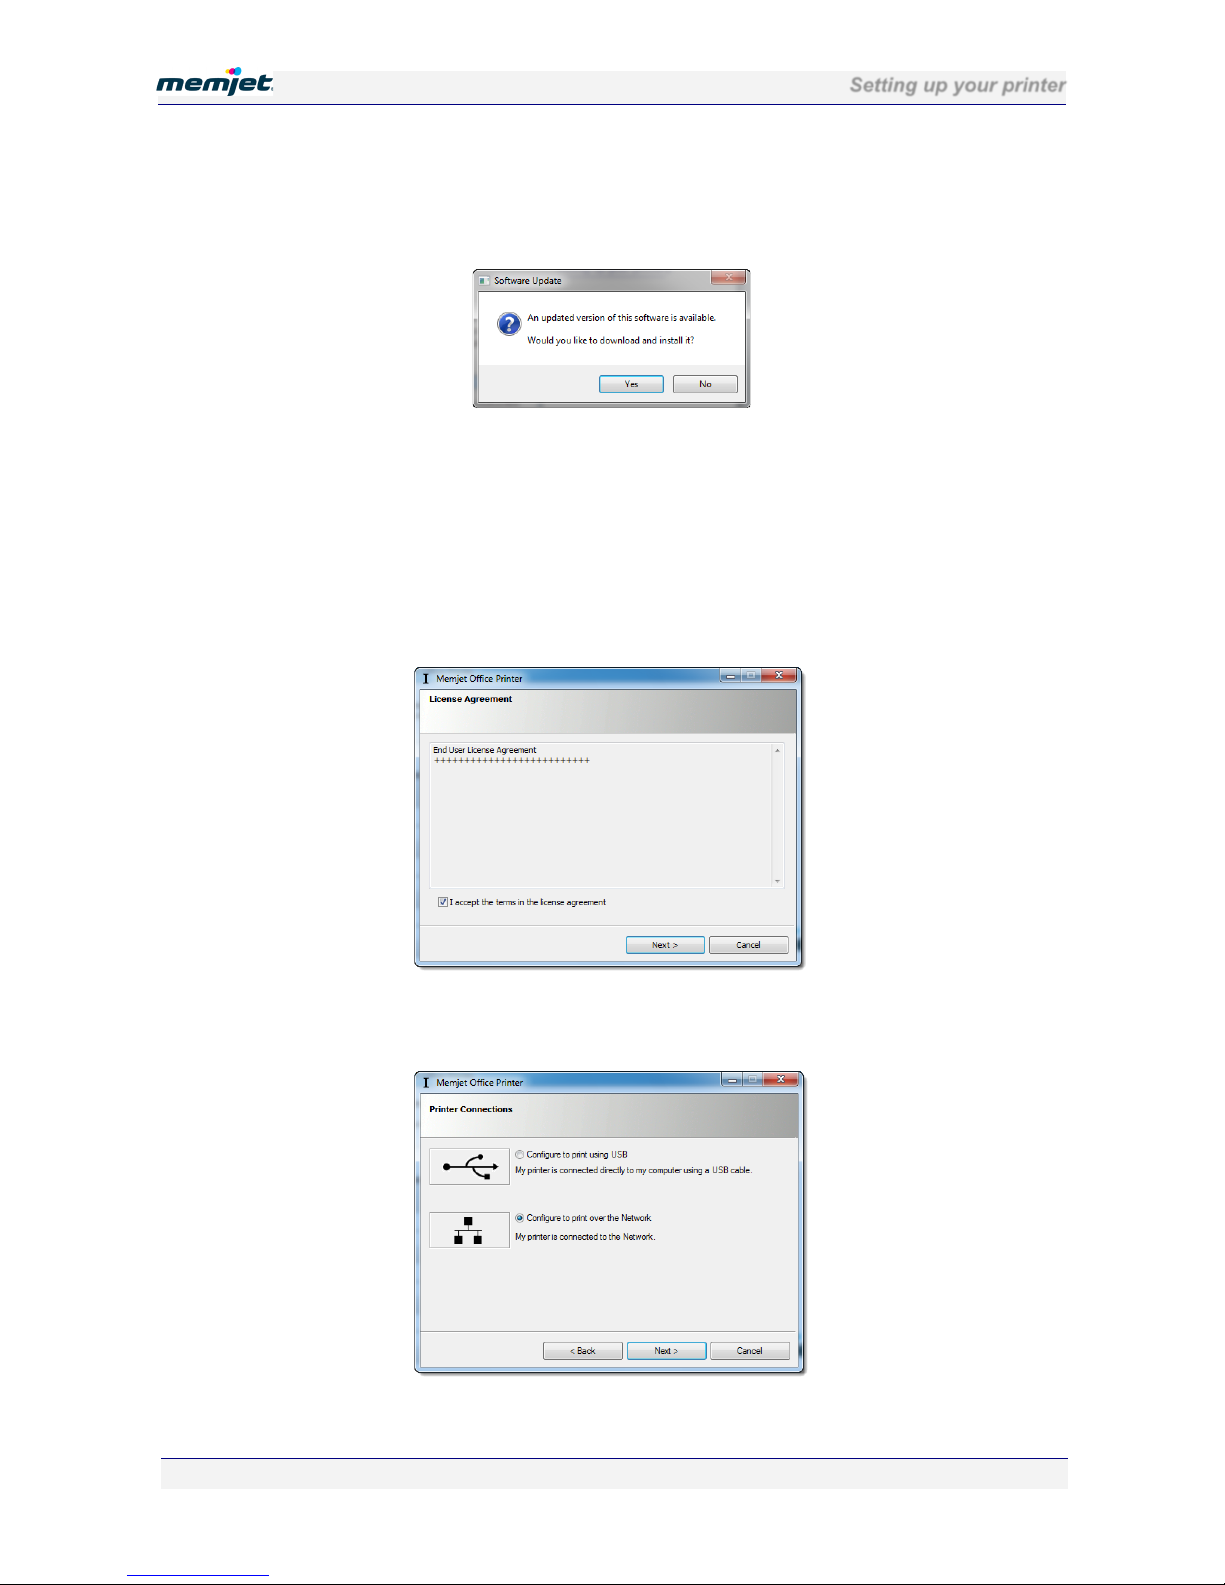
If your PC is connected to the Internet, a check will now be made that the Memjet SFP
printer drivers on your CD are the latest available. If a later version of driver is available
on your supplier Web site, you will see the following dialog box.
Click Yes to download the latest drivers.
You will not see the above dialog box if:
• the CD contains the latest version of Memjet SFP drivers
• your PC is not connected to the Internet
• your supplier has not implemented this check.
3. If you have not installed any other Memjet printer driver the License Agreement dialog
box should be displayed. Select I accept… and click Next.
4. In the Printer Connections dialog box select Configure to print over the Network, then
click Next.
Page 42
Setting up your printer
28 July 2011 - v4.2
Confidential.
Page 42 of 110
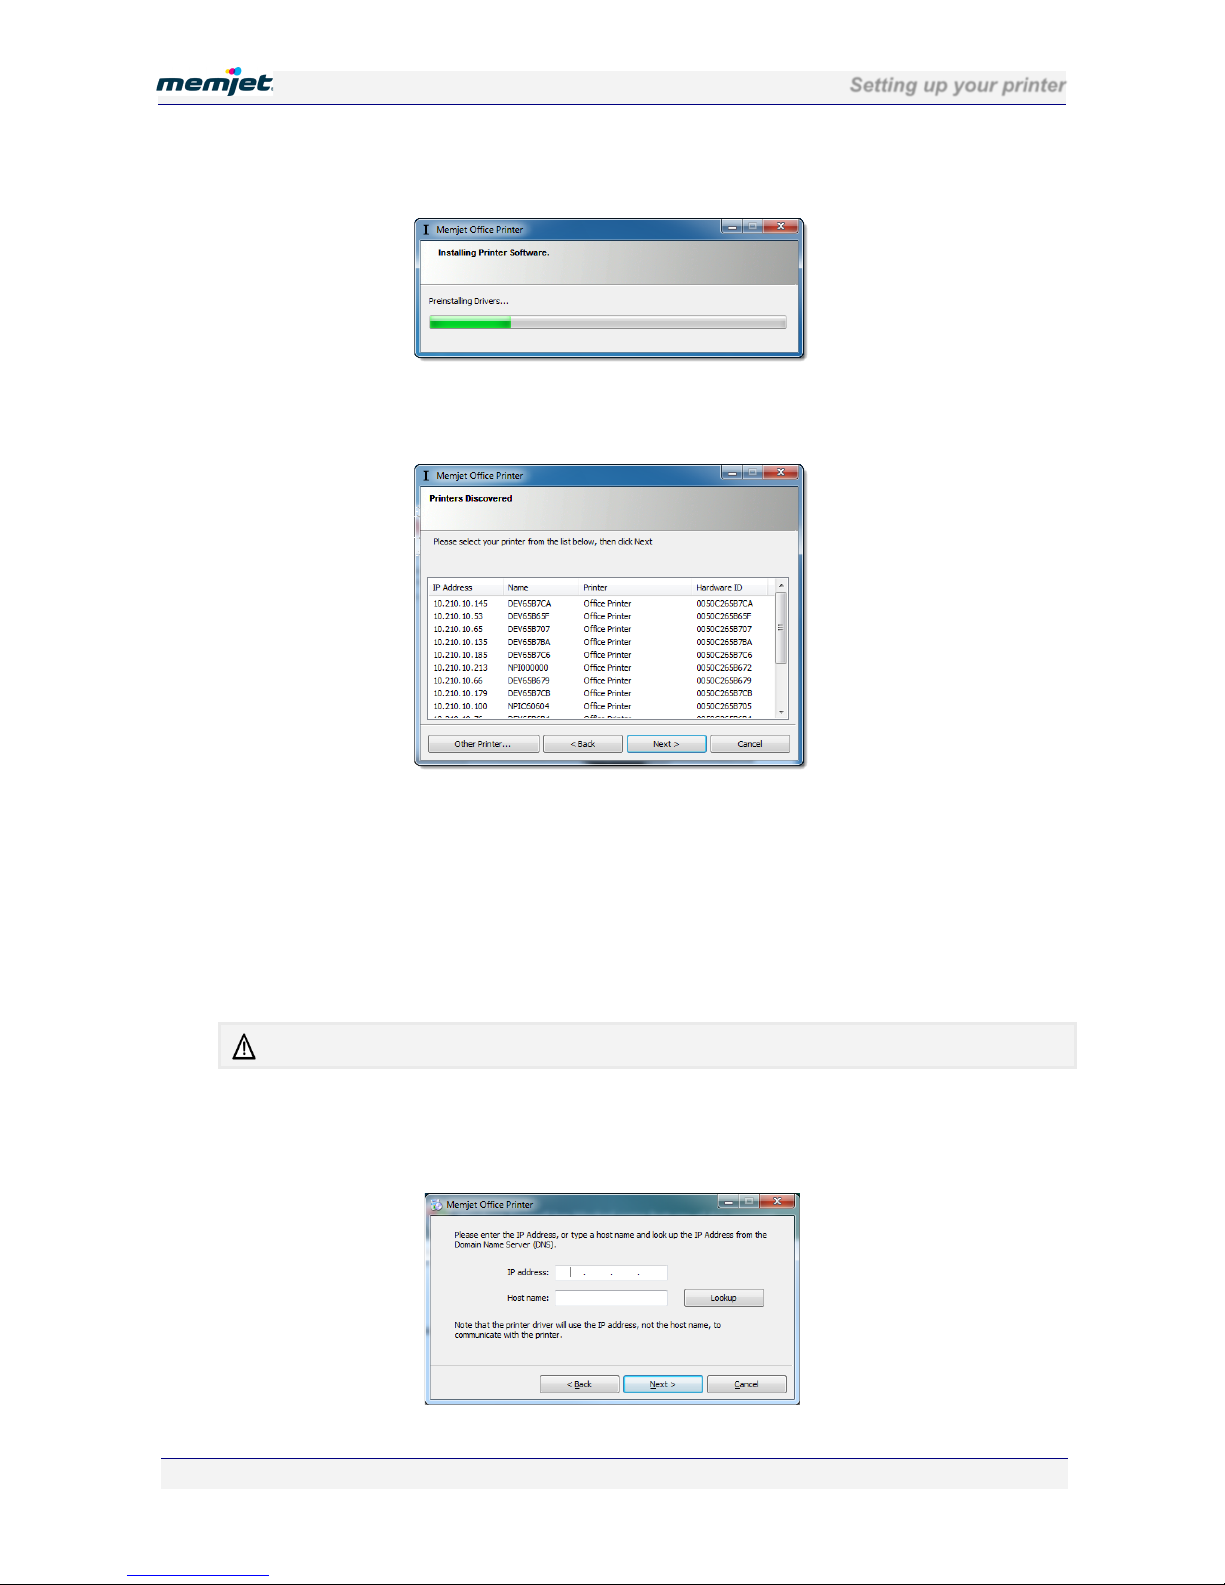
5. The installation utility pre-installs some software and searches for compatible printers on
your network.
6. A dialog box appears displaying a list of networked printers. Select the printer you wish
to use and click Next.
IF your printer is not listed:
1. Click Back
2. Check that:
your printer is connected to the network
it is turned on
the Power On/Off light is lit and steady.
1. Continue from step 4 above.
If you still can’t see your printer listed, contact support personnel.
IF your Network Administrator has given you an IP address, Click Other Printer.
When you do so another dialog box will appear, asking you to enter the IP address of the
printer you wish to install.
Page 43
Setting up your printer
28 July 2011 - v4.2
Confidential.
Page 43 of 110
Enter the IP address in the appropriate field and click Next.
If you don’t know the IP address but know the printer name, type that in the Host name:
field and click Lookup.
If the printer is found its IP address will appear in the IP address field. Click Next to
continue. If the printer is not found contact support personnel.
To get a printout of the IP address of your printer, keep the OK/Resume button depressed for over
five seconds. The first page that is printed will contain the IP address in the following format:
nnn.nnn.nnn.nnn.
If the following window is displayed:
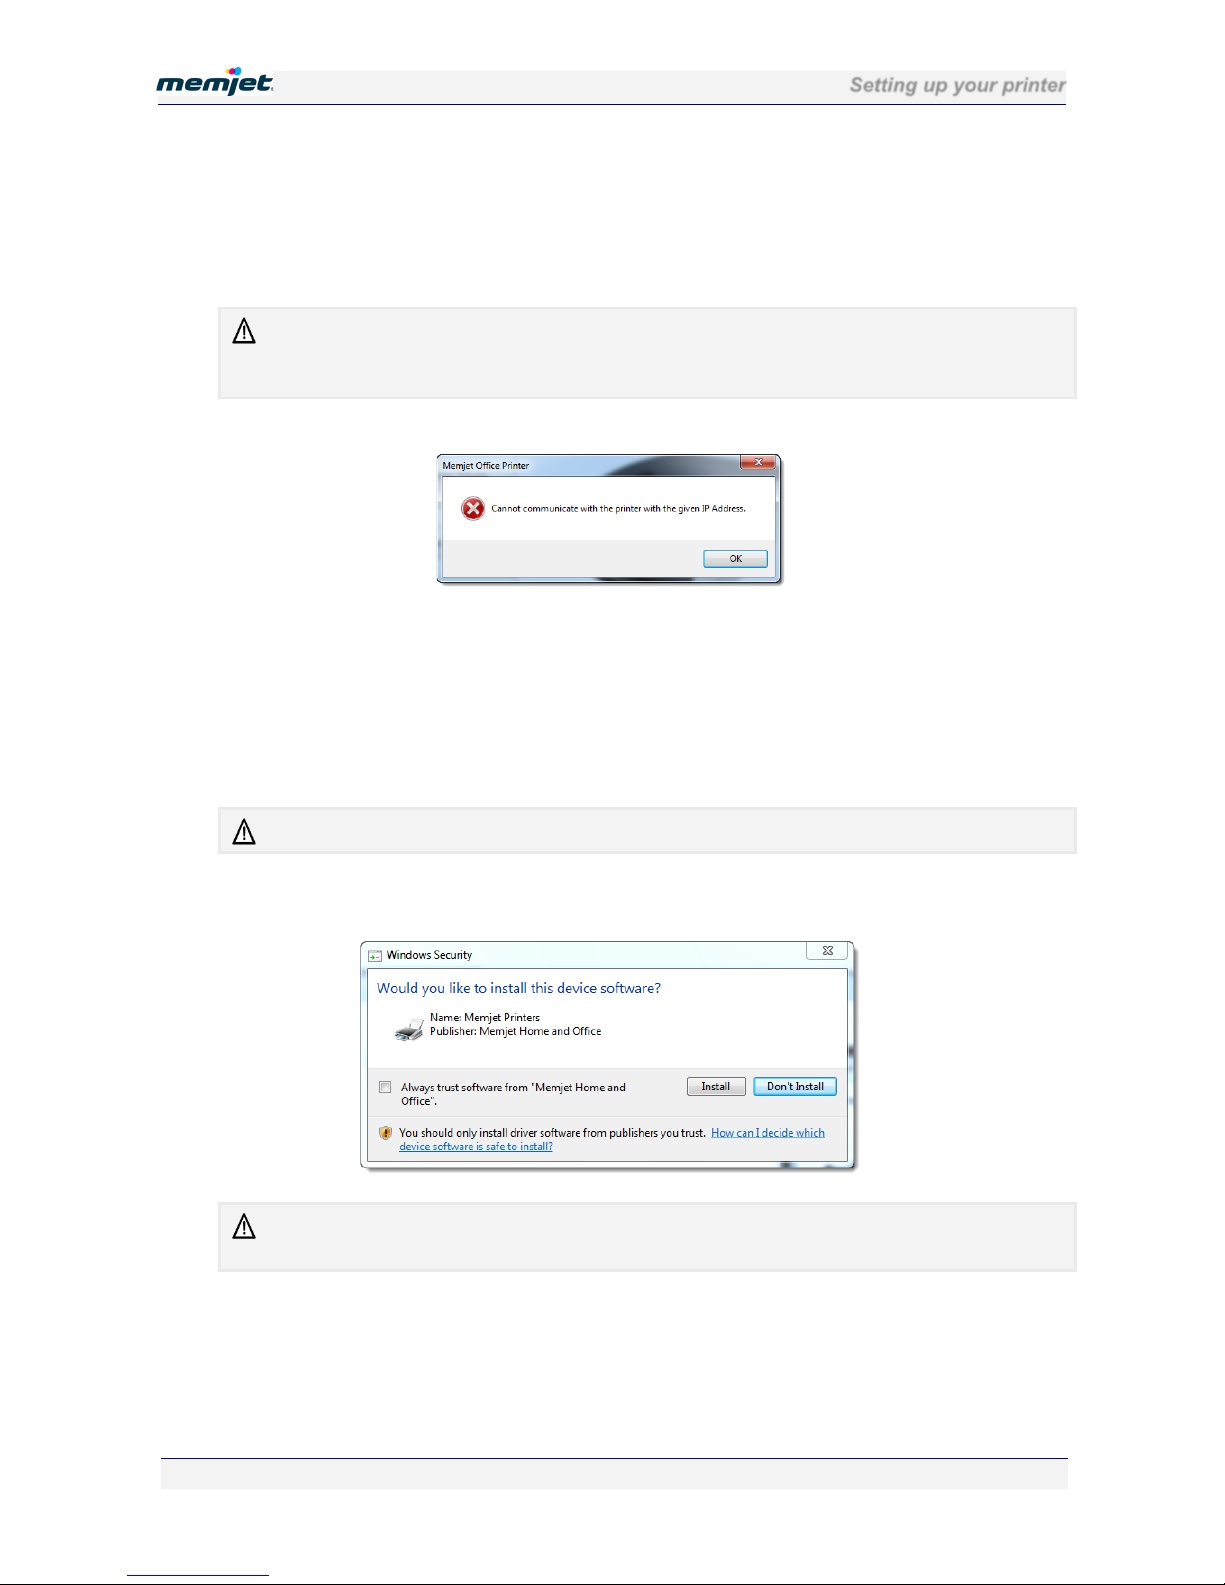
1. Click OK. The Enter IP address dialog box will be displayed again.
2. Check that:
your printer is connected to the network
it is turned on
the Power On/Off light is lit and steady.
3. Enter the IP address again and click Next.
If you still can’t communicate with your printer, contact support personnel.
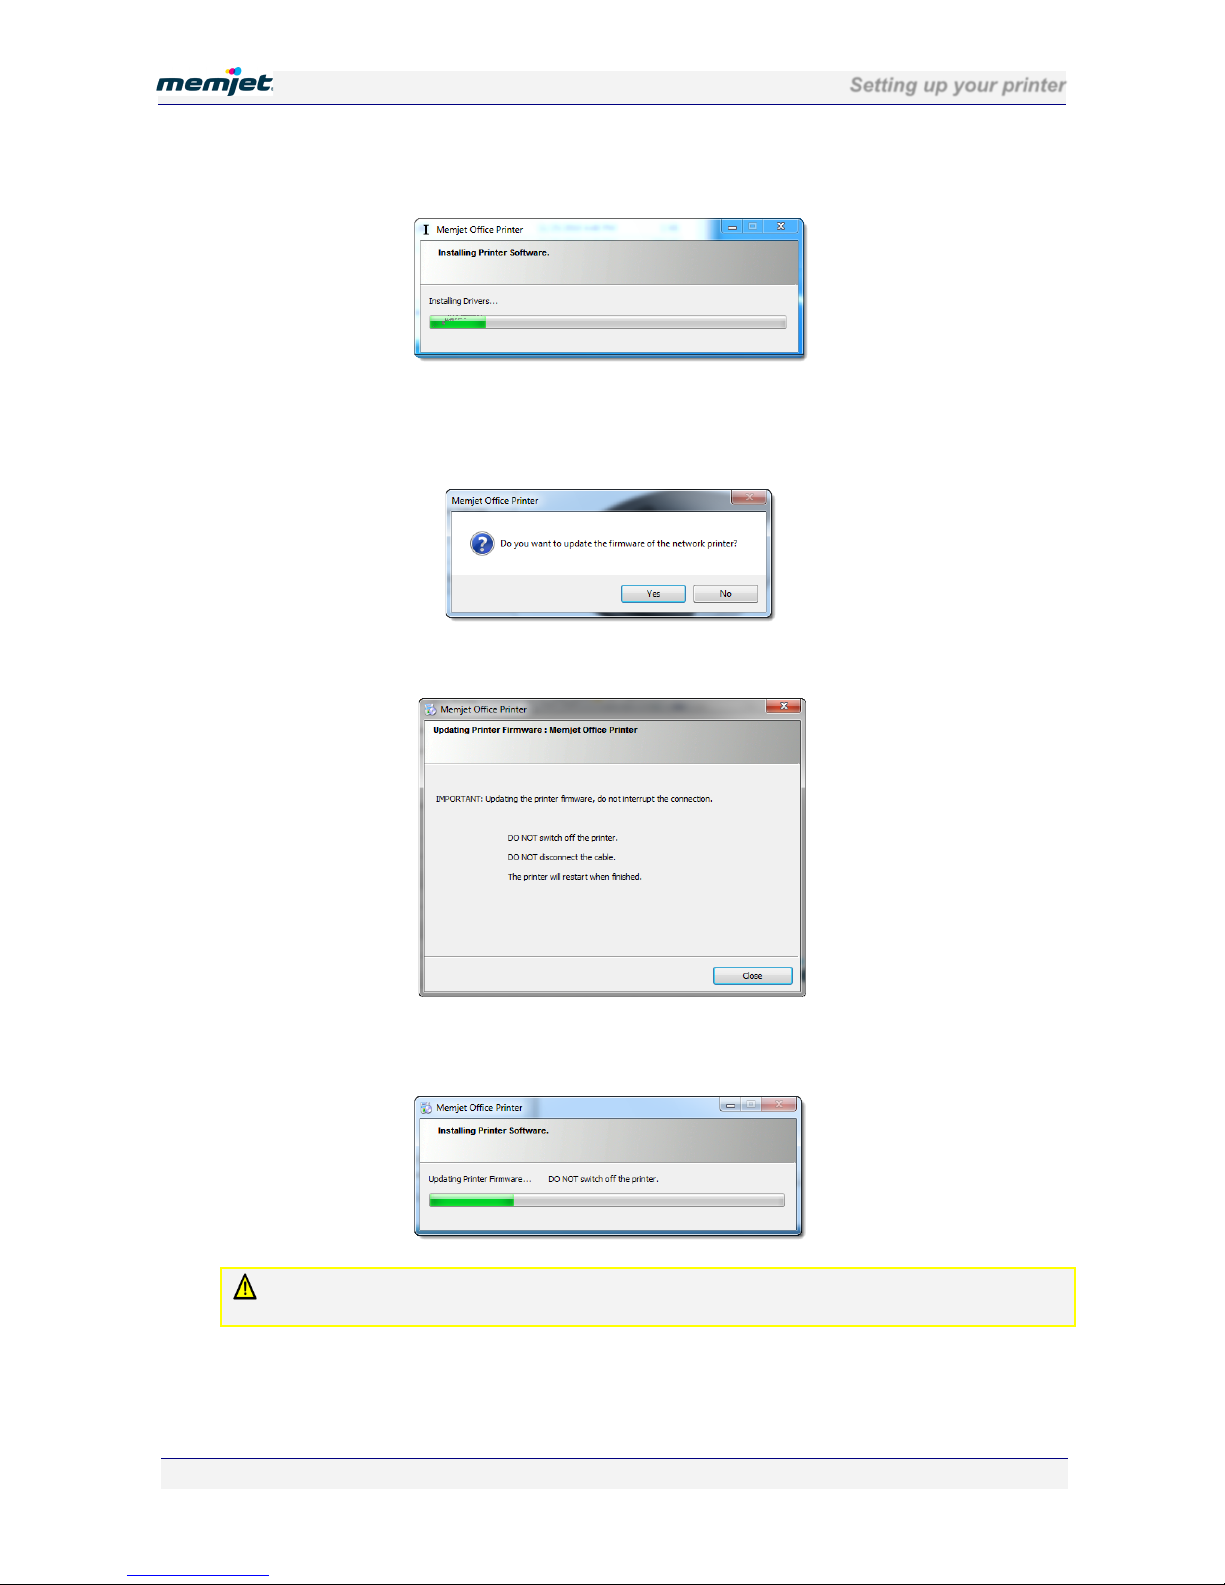
7. Any time the Windows Security warning window is displayed, click Install. This window
may appear a number of times.
In Windows XP this warning is replaced by one saying: “the software has not passed Windows
Logo testing”. You should accept the software by clicking Continue Anyway.
Page 44
Setting up your printer
28 July 2011 - v4.2
Confidential.
Page 44 of 110
8. The installer will then load the drivers into your PC, then check and update the printer
firmware if necessary.
9. The firmware in the selected printer is now checked. If the firmware is older than the one
that came with your driver software, you will be given the option to update it. Check with
Support personnel before doing so.
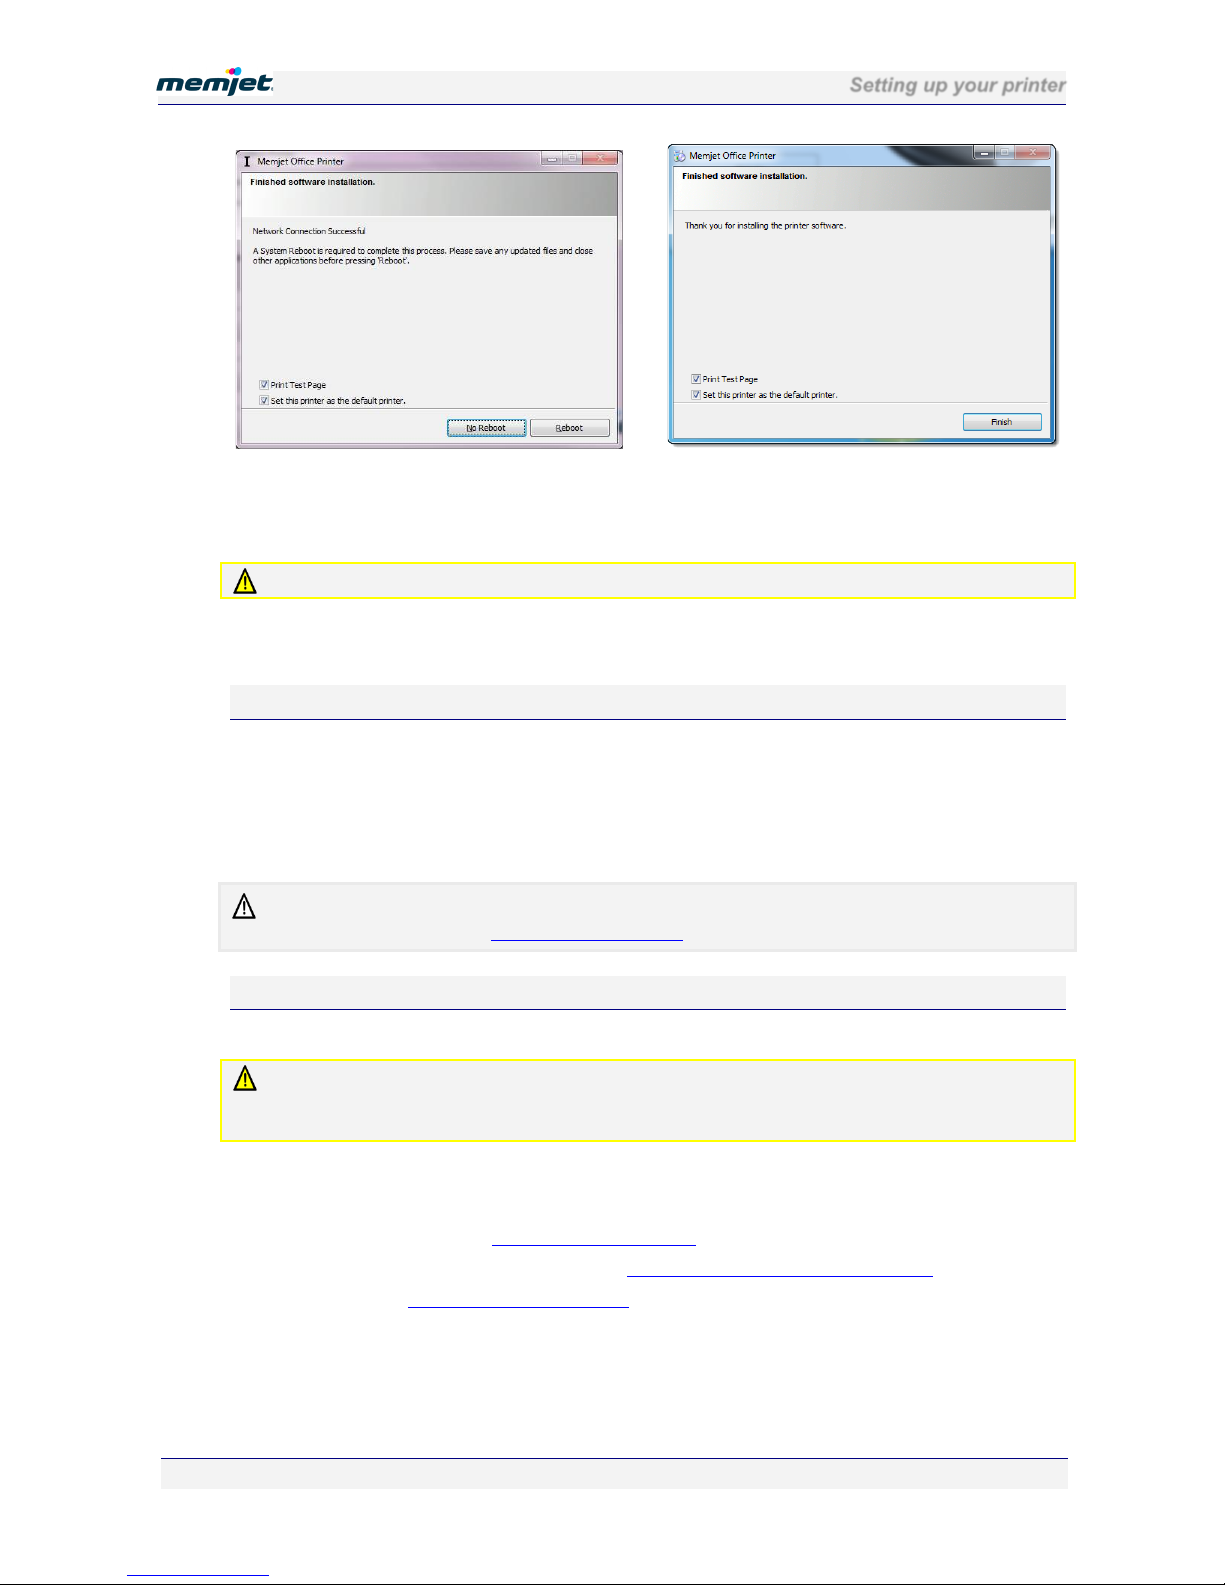
10. If you decided to update the printer firmware the following window will be displayed:
Follow the directions. This process may take a few minutes. A progress bar is displayed
to keep you informed, as shown here.
DO NOT interrupt the firmware update under any circumstances. Doing so may damage your
printer. Should the firmware update be interrupted for any reason contact support personnel.
11. A final dialog box is displayed informing you that software installation has finished.
This dialog box may take two forms as shown below. Which one is displayed will depend
on whether you are required to reboot or otherwise.
Page 45
Setting up your printer
28 July 2011 - v4.2
Confidential.
Page 45 of 110
As you can see, both contain two check boxes. It is suggested you leave the Print Test Page
check box selected. If the Test page is printed, you have successfully installed a USB driver
for your Memjet printer.
If you have chosen to print a Test page and one is not printed, inform support personnel.
12. If you are asked to reboot, save all work, close all applications and reboot at your earliest
convenience before printing on your Memjet printer.
Installing a network driver on a Server
Networked Memjet printers may be connected from a service running on a networked server
that has been set up by your support personnel, or directly by installing the networking driver
on your current PC.
For information on setting up your printer driver as a service on a server PC, see your network
support personnel.
Not all Memjet printer driver options may be available to you when using a networked printer
connected to a Server. See Print options greyed out on page 100.
Assigning a static IP address
In some networks you may need to set a static IP address on your printer.
Before making any of the changes discussed in this section ensure you have all the information
required to correctly connect your Memjet printer to your network.
Incorrect settings may cause a printer connection failure.
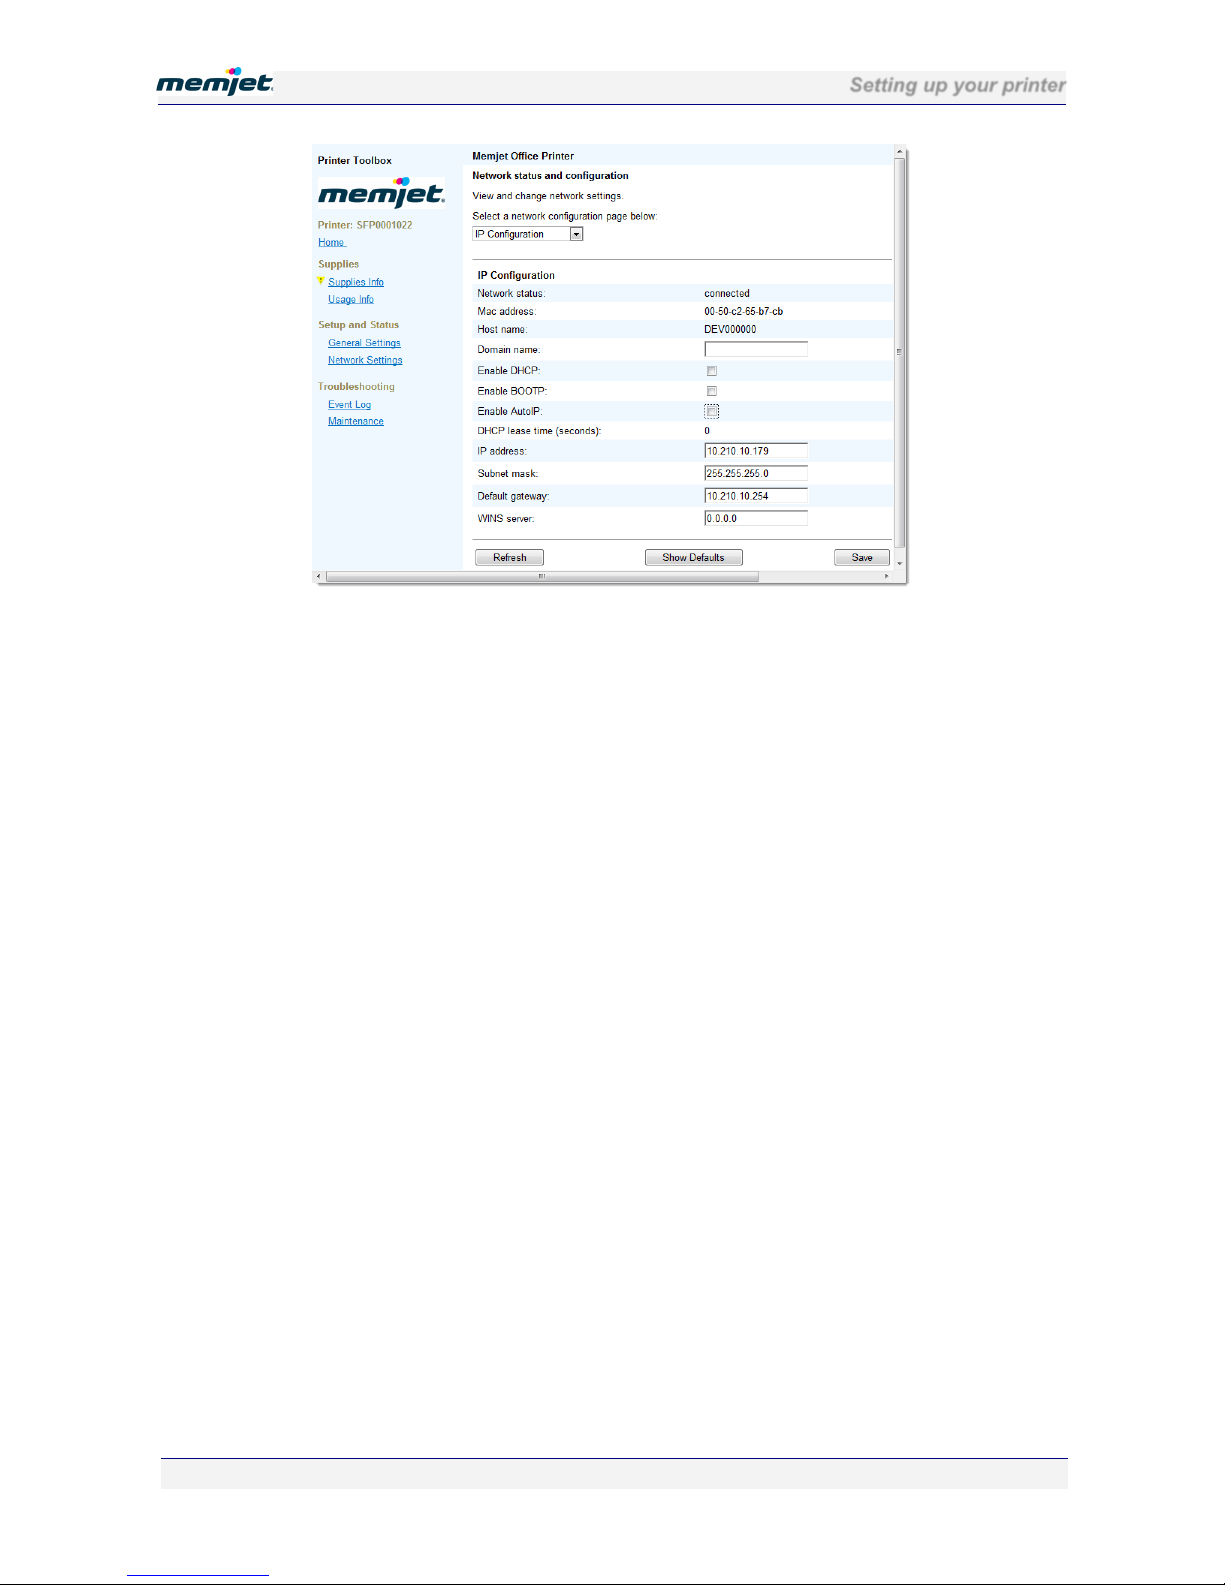
To assign a static address to your printer:
1. Connect your printer to a PC via a USB cable.
2. Follow the directions for Installing a USB driver on page 33
.
3. Access the Toolbox on your printer (see Accessing the Toolbox application on page 79).
4. Navigate to the IP Configuration settings screen (see page 83).
Page 46
Setting up your printer
28 July 2011 - v4.2
Confidential.
Page 46 of 110
5. Clear the Enable DHCP, Enable AutoIP and Enable BOOTP check boxes, as shown. All
available fields in that Toolbox page may now be altered.
6. Make the required changes in the appropriate fields. You will need to assign at least the
IP address and the Subnet mask fields and, most likely, the Default gateway field as well.
If you are unsure speak to your Network Supervisor before making any changes.
7. Click Save to store the changes on your printer.
Page 47
Setting up your printer
28 July 2011 - v4.2
Confidential.
Page 47 of 110
• Installing additional printers
Before installing any additional Memjet printers, ensure your additional printer is powered on
(see page 20) and (in the case of a networked printer) connected to your network, and that you
have obtained a CD containing the latest printer drivers for your Memjet printer.
DO NOT use the Windows ‘Add Printer’ Wizard to install your Memjet printer driver. Doing so
will result in an incomplete software installation and limited printer functionality. To experience
all the documented features use ONLY the procedure set out here.
To install additional Memjet printer driverss:
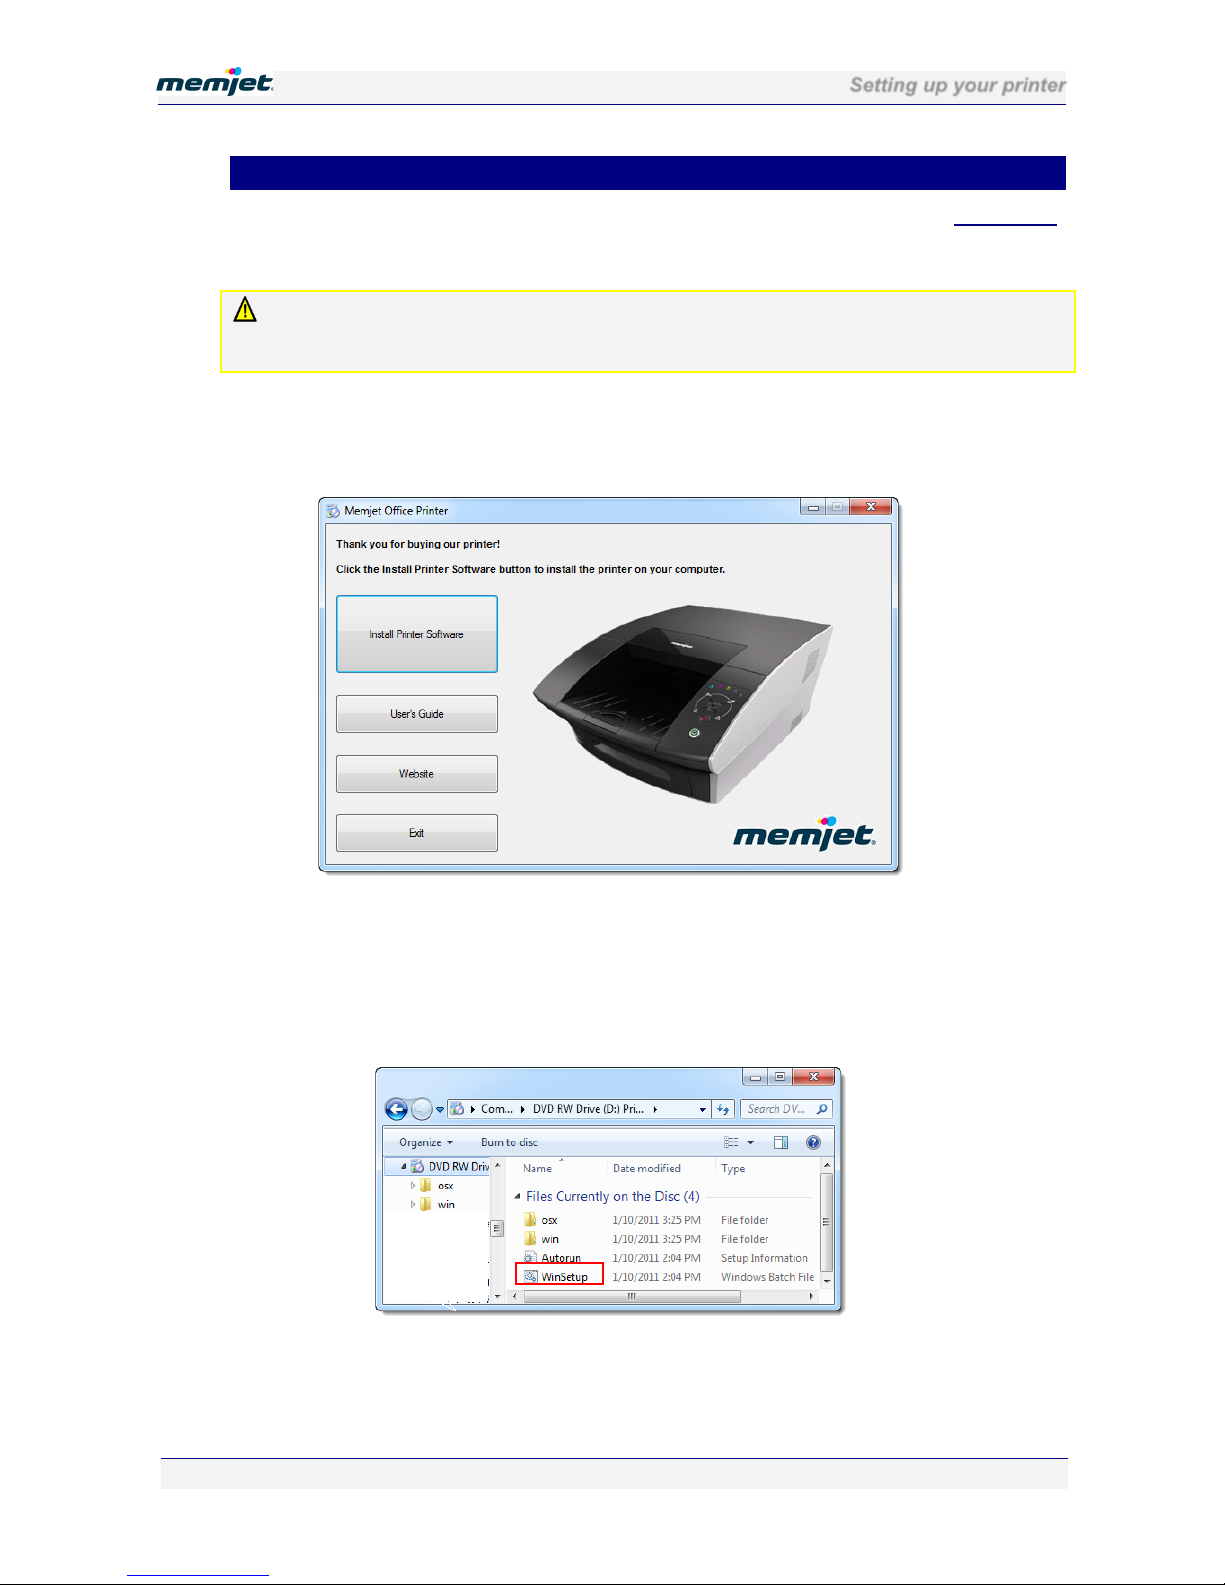
8. Insert the installation CD in your PC CDROM/DVD drive. You should see the Welcome
window.:
If the above window is not displayed:
1. Launch a copy of Windows Explorer and navigate to the CDROM/DVD drive where
you inserted the installation CD.
You should see something similar to the following in your Windows Explorer
window:
2. Double click on WinSetup to bring up the required window.
9. If a current driver is found on your PC, the following dialog box will be displayed:
Page 48
Setting up your printer
28 July 2011 - v4.2
Confidential.
Page 48 of 110
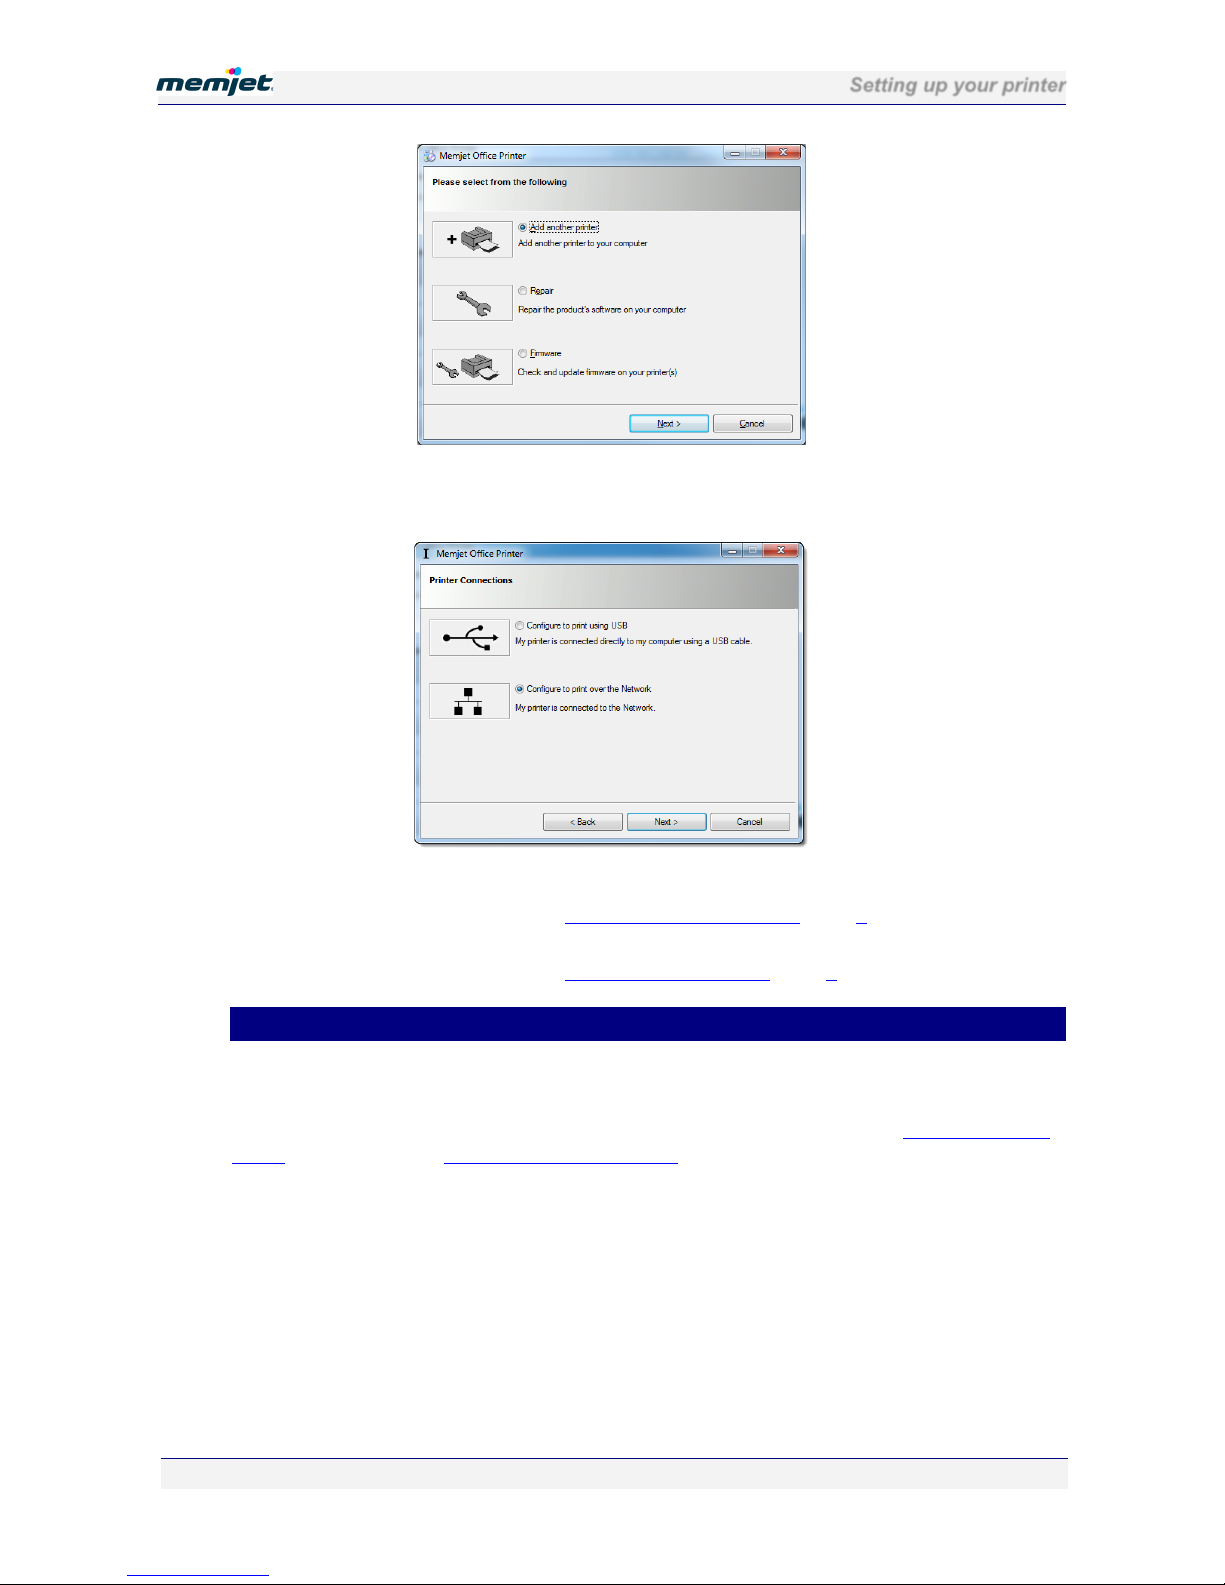
10. Select Add another printer and click Next.
You will then be asked to choose the type of printer connection.
For a networked printer, select Configure to print over the Network and click Next,
then continue at the section titled Installing a network driver point 5 on page 42
.
For a USB-connected printer, select Configure to print using USB and click Next,
then continue at the section titled Installing a USB driver point 0 on page 35
.
• Updating your printer drivers
Where an older version of Memjet drivers is found on your PC, the installer sequence will
offer an option to update such a driver.
Updating your Memjet printer driver follows similar sequences as found in:
Installing a USB
driver on page 33, or in Installing a network driver on page 40.
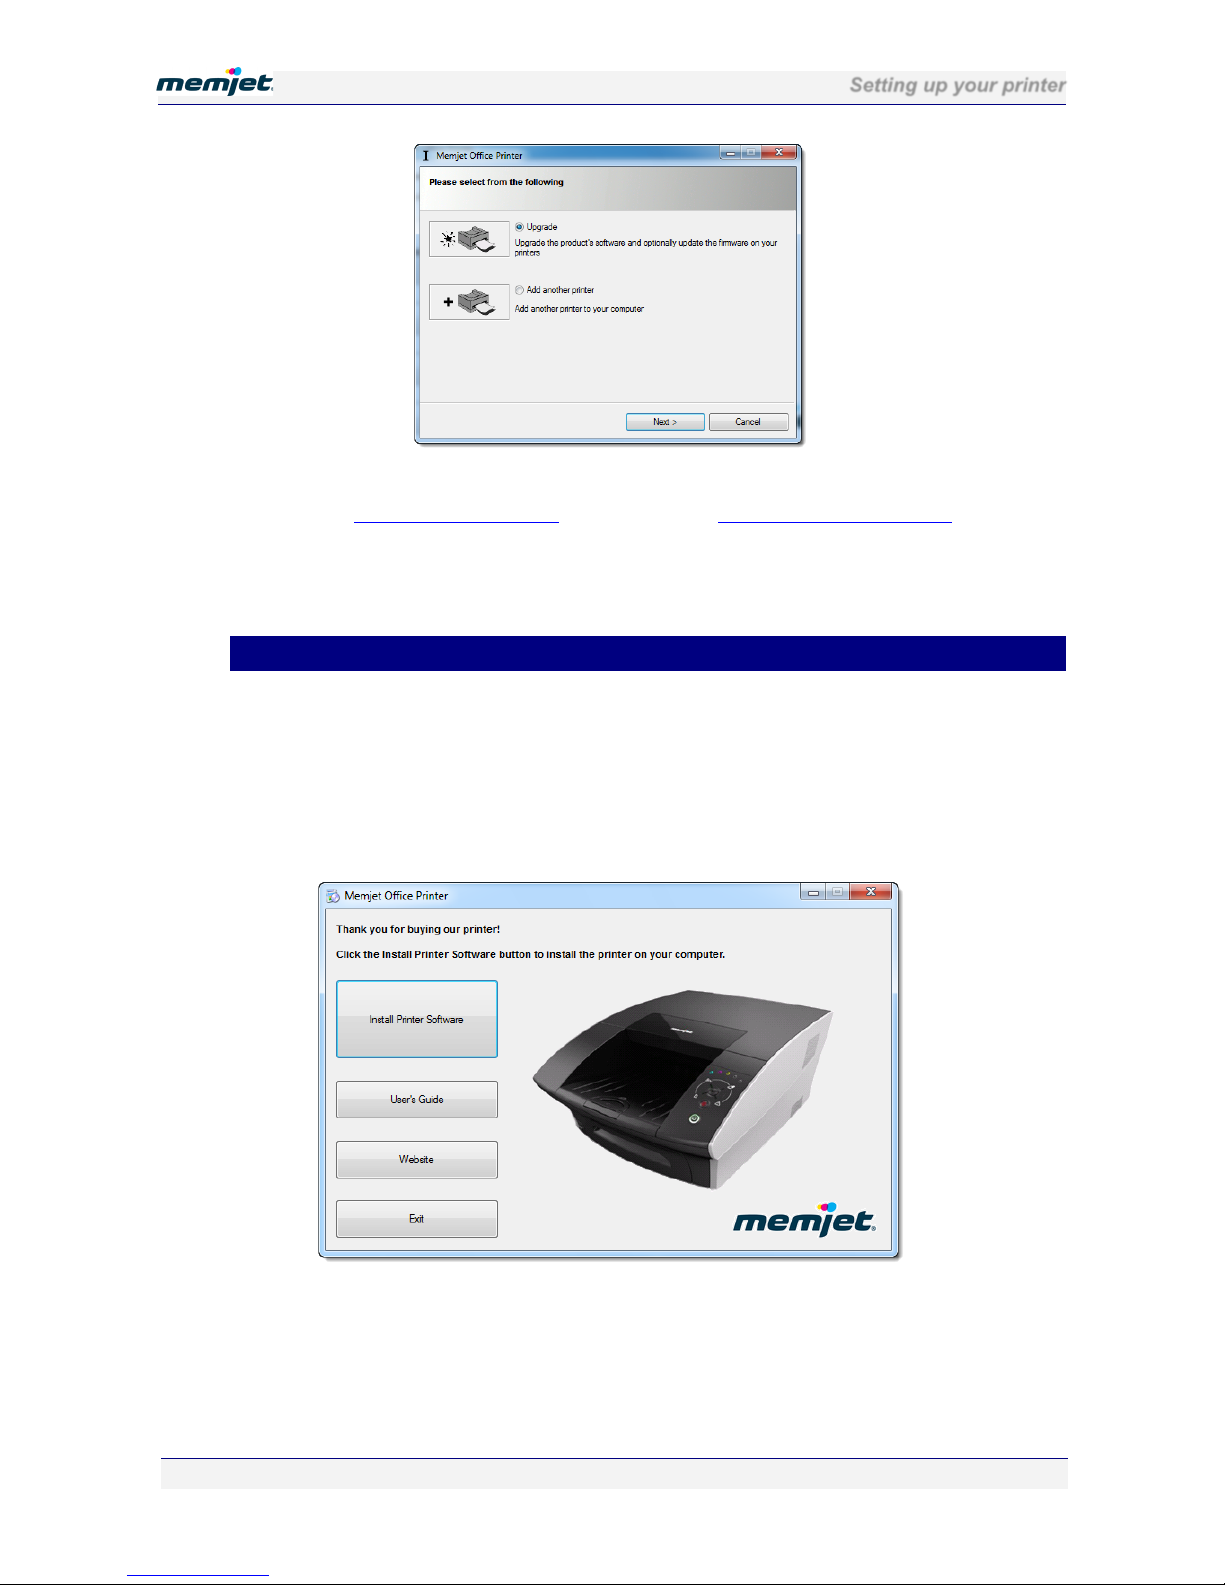
The difference will be found after you click Install Printer Software (and after any updated
software has been downloaded).
1. If the window shown here is displayed, select Upgrade if you wish to upgrade the
Memjet printer driver previously installed on your PC. Then click Next.
Page 49
Setting up your printer
28 July 2011 - v4.2
Confidential.
Page 49 of 110
2. Follow the sequence of steps for installing your local or networked Memjet printer as
found in: Installing a USB driver on page 33, or in Installing a network driver on page 40
.
You may not be asked to confirm the License agreement, but this may vary between
brands.
All other steps will remain the same.
• Updating printer firmware
Memjet printer firmware resides in each printer and not all networked printers may need to
have their firmware updated each time you load a new printer driver on your PC. In such
cases you may need to update the firmware of a particular printer at a later date.
To do so:
1. Insert the installation CD in your PC CDROM/DVD drive. You should see the Welcome
window.:
If the above window is not displayed:
1. Launch a copy of Windows Explorer and navigate to the CDROM/DVD drive where
you inserted the installation CD.
You should see something similar to the following in your Windows Explorer
window:
Page 50

Setting up your printer
28 July 2011 - v4.2
Confidential.
Page 50 of 110
2. Double click on WinSetup to bring up the required window.
2. If a current driver is found on your PC, the following dialog box will be displayed:
3. Select Firmware and click Next. The installation software will search for printers that
have older firmware.
4. IF no printers with older firmware are found, you will be informed.
Page 51
Setting up your printer
28 July 2011 - v4.2
Confidential.
Page 51 of 110
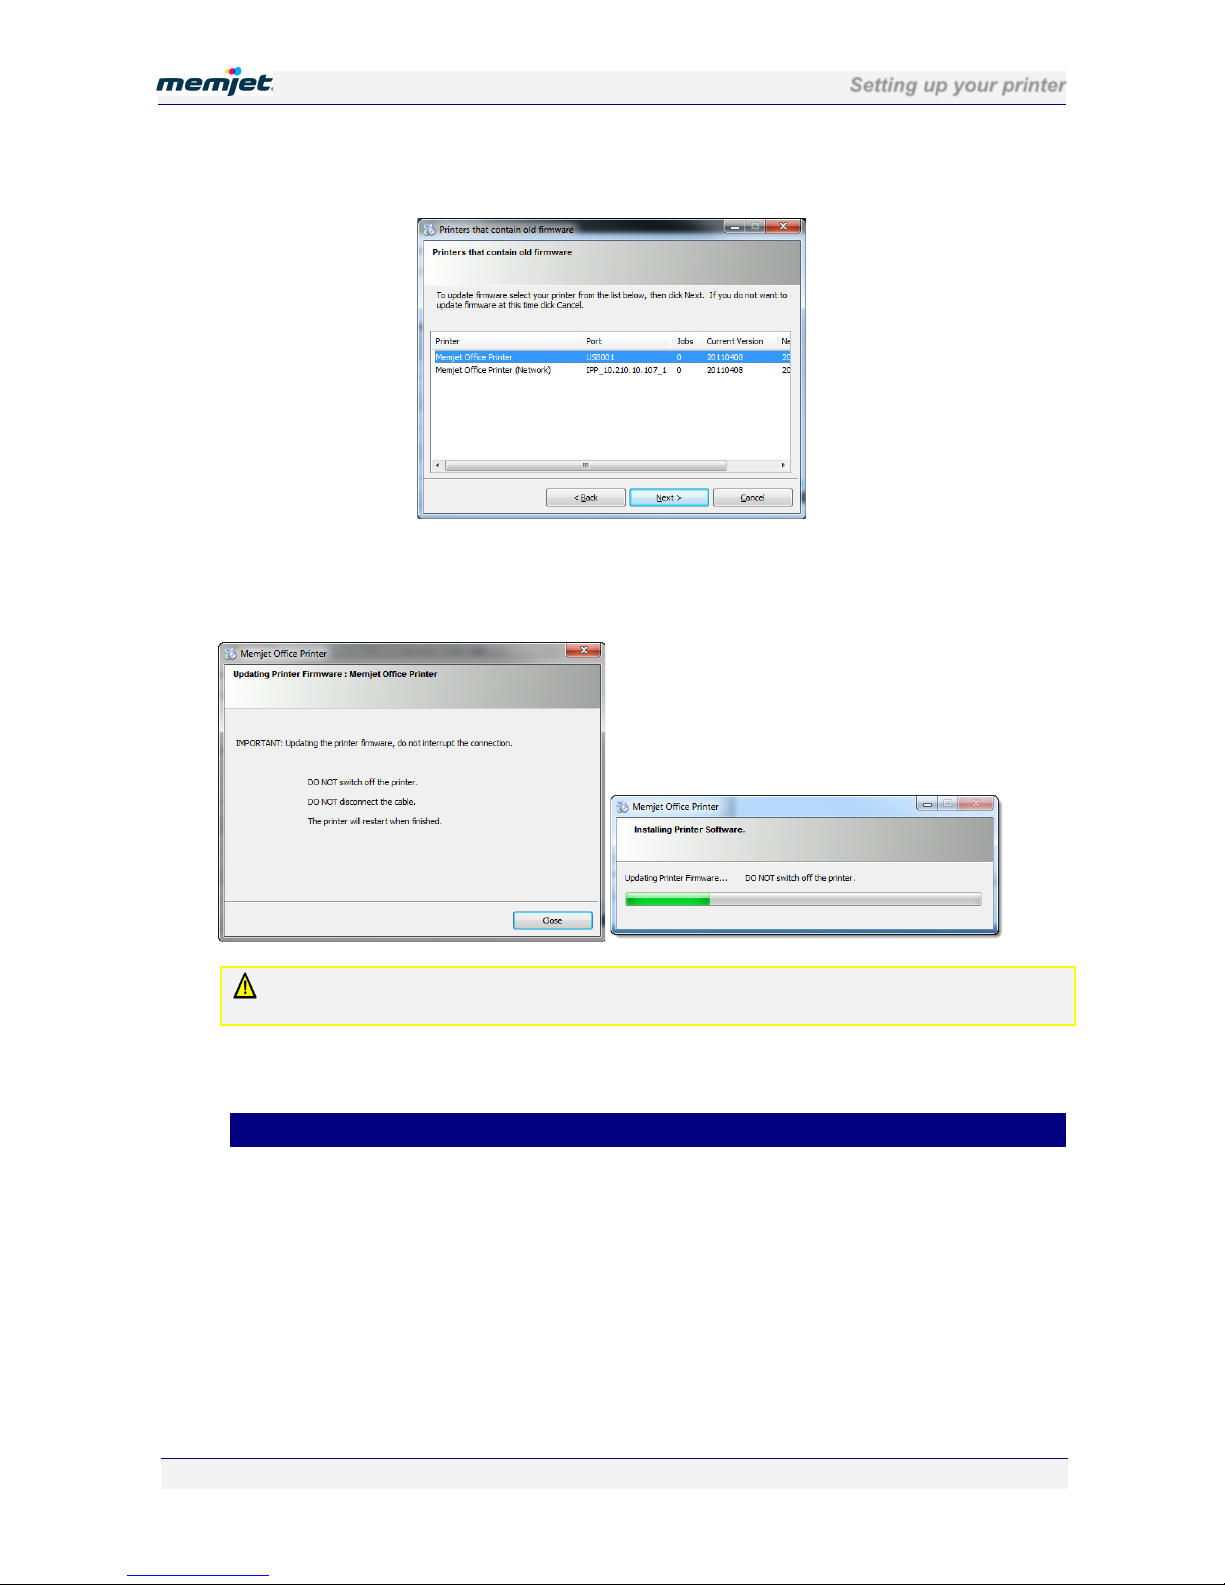
5. If some printers are found to have older firmware you will be asked to select which one(s)
to update. Select the printer and click Next.
6. Your printer firmware will now be updated.
Firmware updating is indicated by a progress bar and a warning window being displayed,
as shown here.
DO NOT interrupt the firmware update under any circumstances. Doing so may damage your
printer. Should the firmware update be interrupted for any reason contact support personnel.
7. A final dialog box is displayed informing you that firmware update has completed. The
dialog box shown in Step 2 above will be re-displayed.
• Repairing printer drivers
Where your support personnel directs you to do so or when you feel there may be something
wrong with your printer driver, you may repair the printer drivers you have installed on your
PC.
To to so:
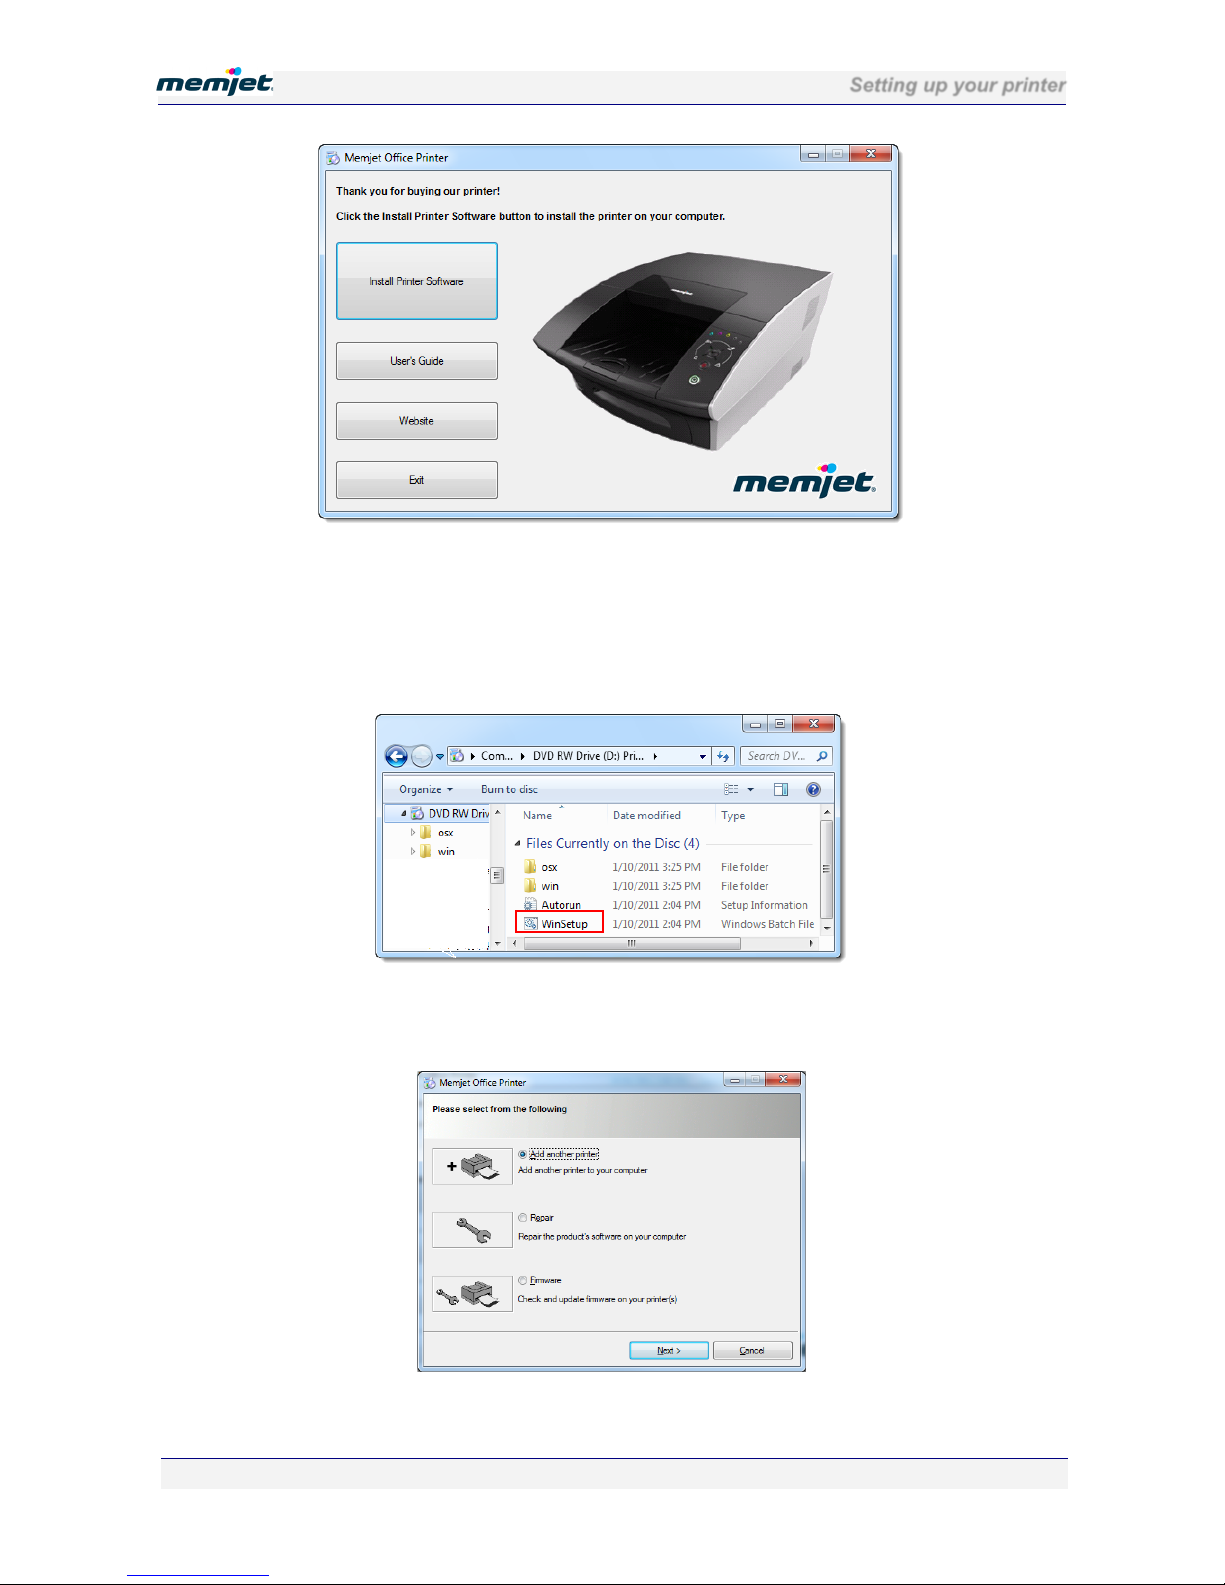
1. Insert the installation CD in your PC CDROM/DVD drive. You should see the Welcome
window.:
Page 52
Setting up your printer
28 July 2011 - v4.2
Confidential.
Page 52 of 110
If the above window is not displayed:
1. Launch a copy of Windows Explorer and navigate to the CDROM/DVD drive where
you inserted the installation CD.
You should see something similar to the following in your Windows Explorer
window:
2. Double click on WinSetup to bring up the required window.
2. If a current driver is found on your PC, the following dialog box will be displayed:
Page 53
Setting up your printer
28 July 2011 - v4.2
Confidential.
Page 53 of 110
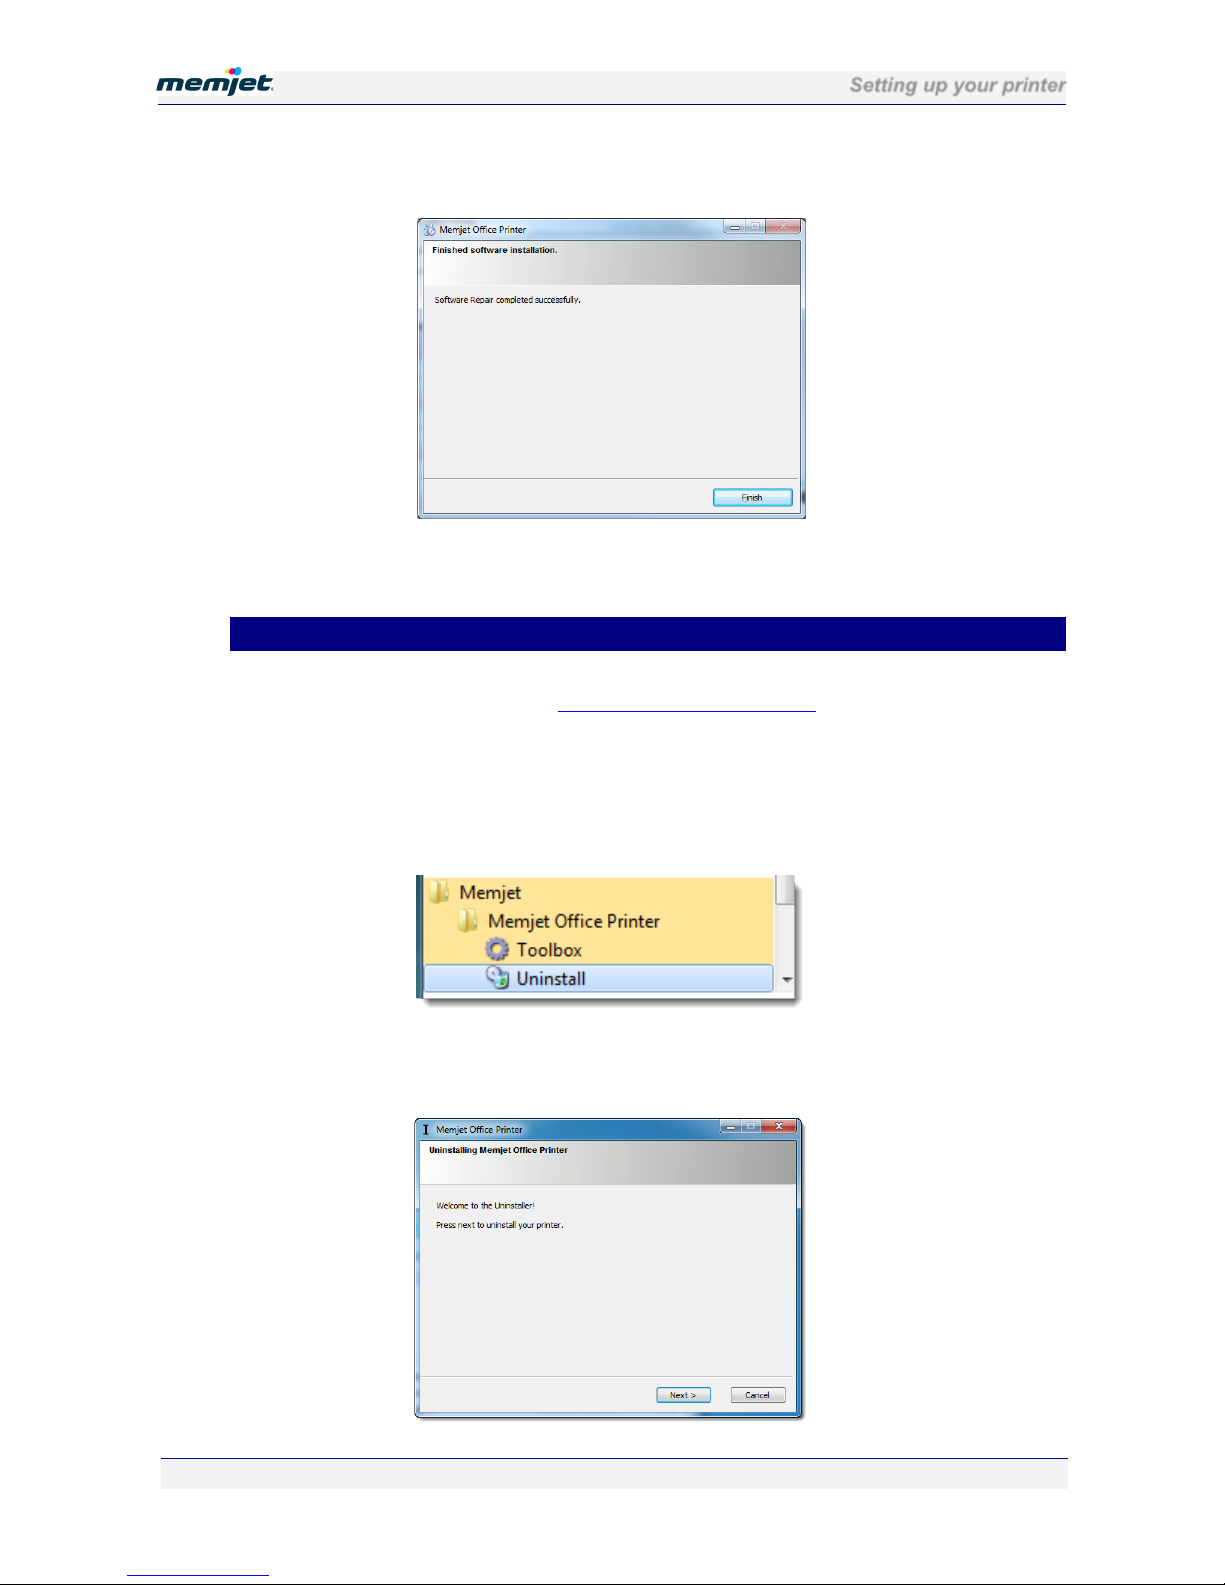
3. Select Repair. The installed software will be refreshed and on successful conclusion you
will see the following window:
If you are asked to reboot your printer close off all applications and reboot at your earliest
convenience. You must reboot before printing on your Memjet printer again.
• Uninstalling older printer drivers
You will generally not need to uninstall older Memjet printer drivers on your PC, as you are
given the option to update them (see Updating your printer drivers on page 48
).
If however, you are asked to remove older Memjet printer drivers from you PC:
1. Ensure your printer is switched on and the Power button is lit and steady.
2. Click Windows Start, then All Programs.
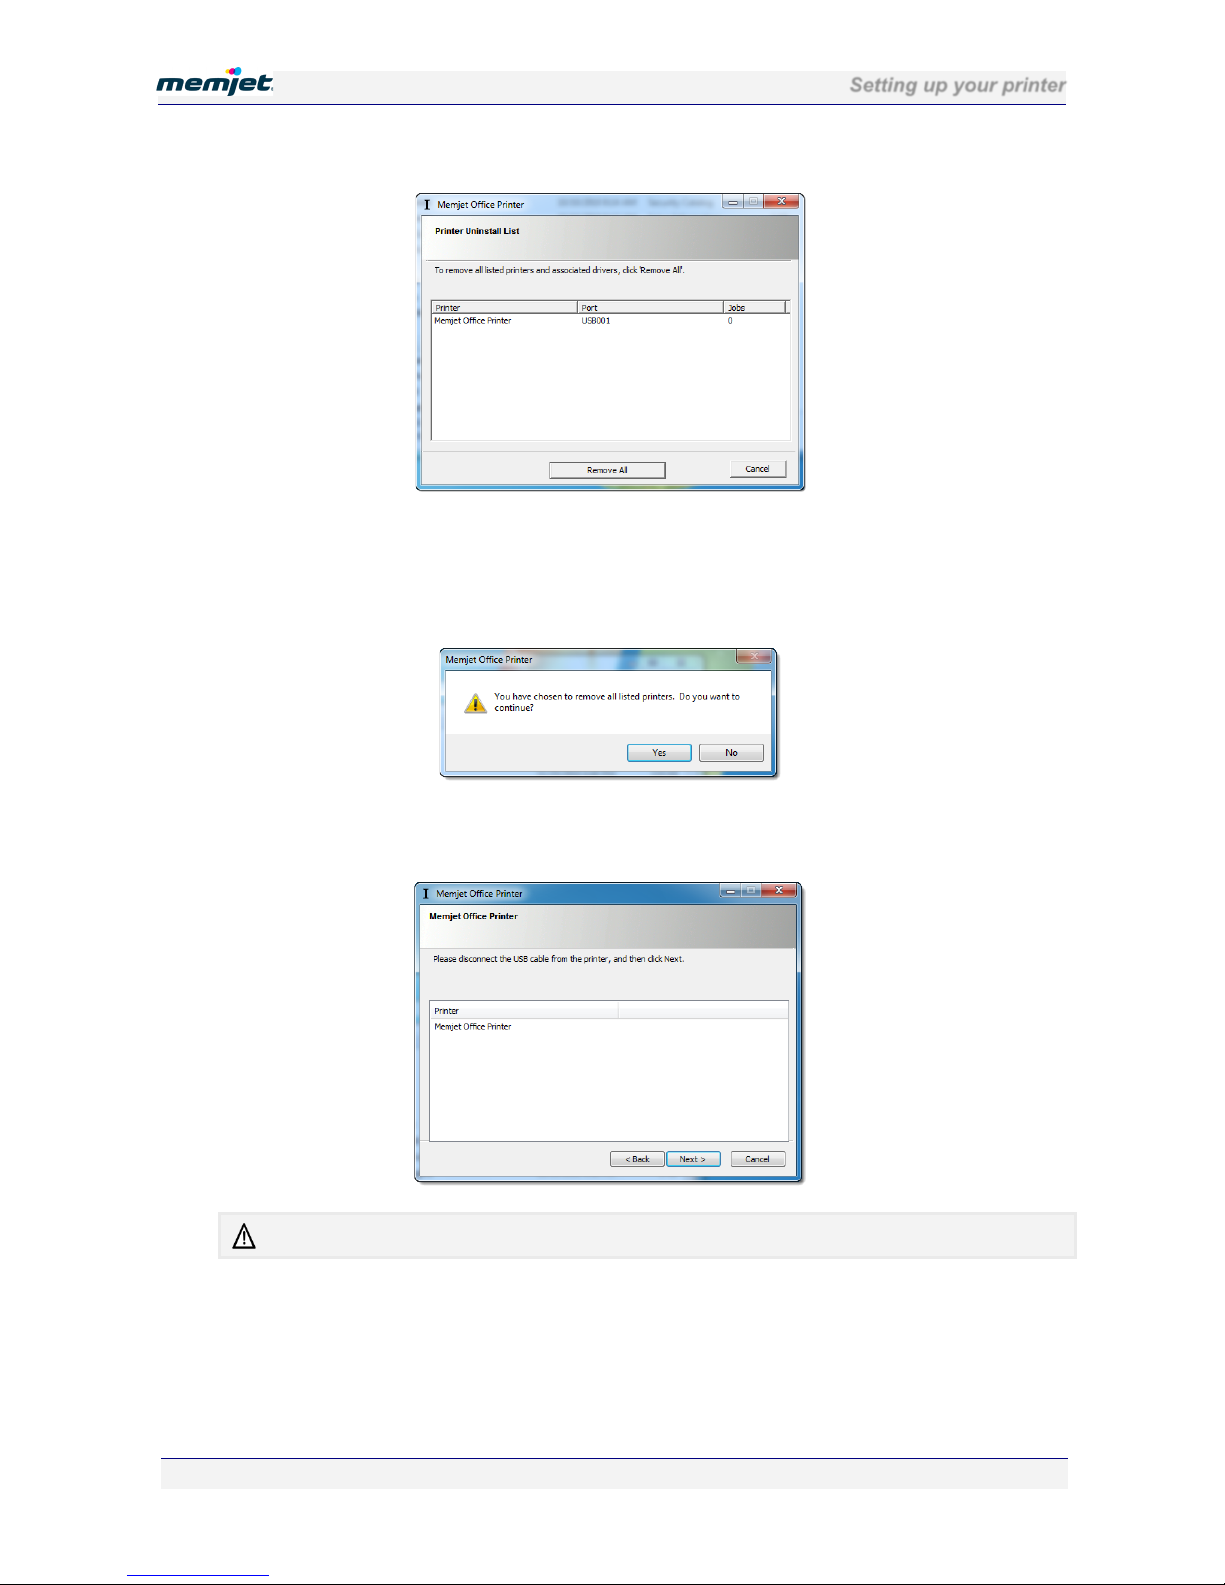
3. Select Memjet and navigate to Uninstall as shown here:
4. Click Uninstall.
5. A welcome page will be displayed. Click Next.
Page 54
Setting up your printer
28 July 2011 - v4.2
Confidential.
Page 54 of 110
6. Previously installed drivers will be displayed in the dialog box, as shown here:
Select the appropriate one and click Remove One or, if more than one printer driver is
listed you may use the Remove All button.
7. If you select Remove All a confirmation window will be displayed. Click Yes to
continue.
8. If your USB cable is still connected you will be asked to disconnect the printer USB
cable. When you have done so click Next.
Always disconnect the USB cable. DO NOT continue without disconnecting.
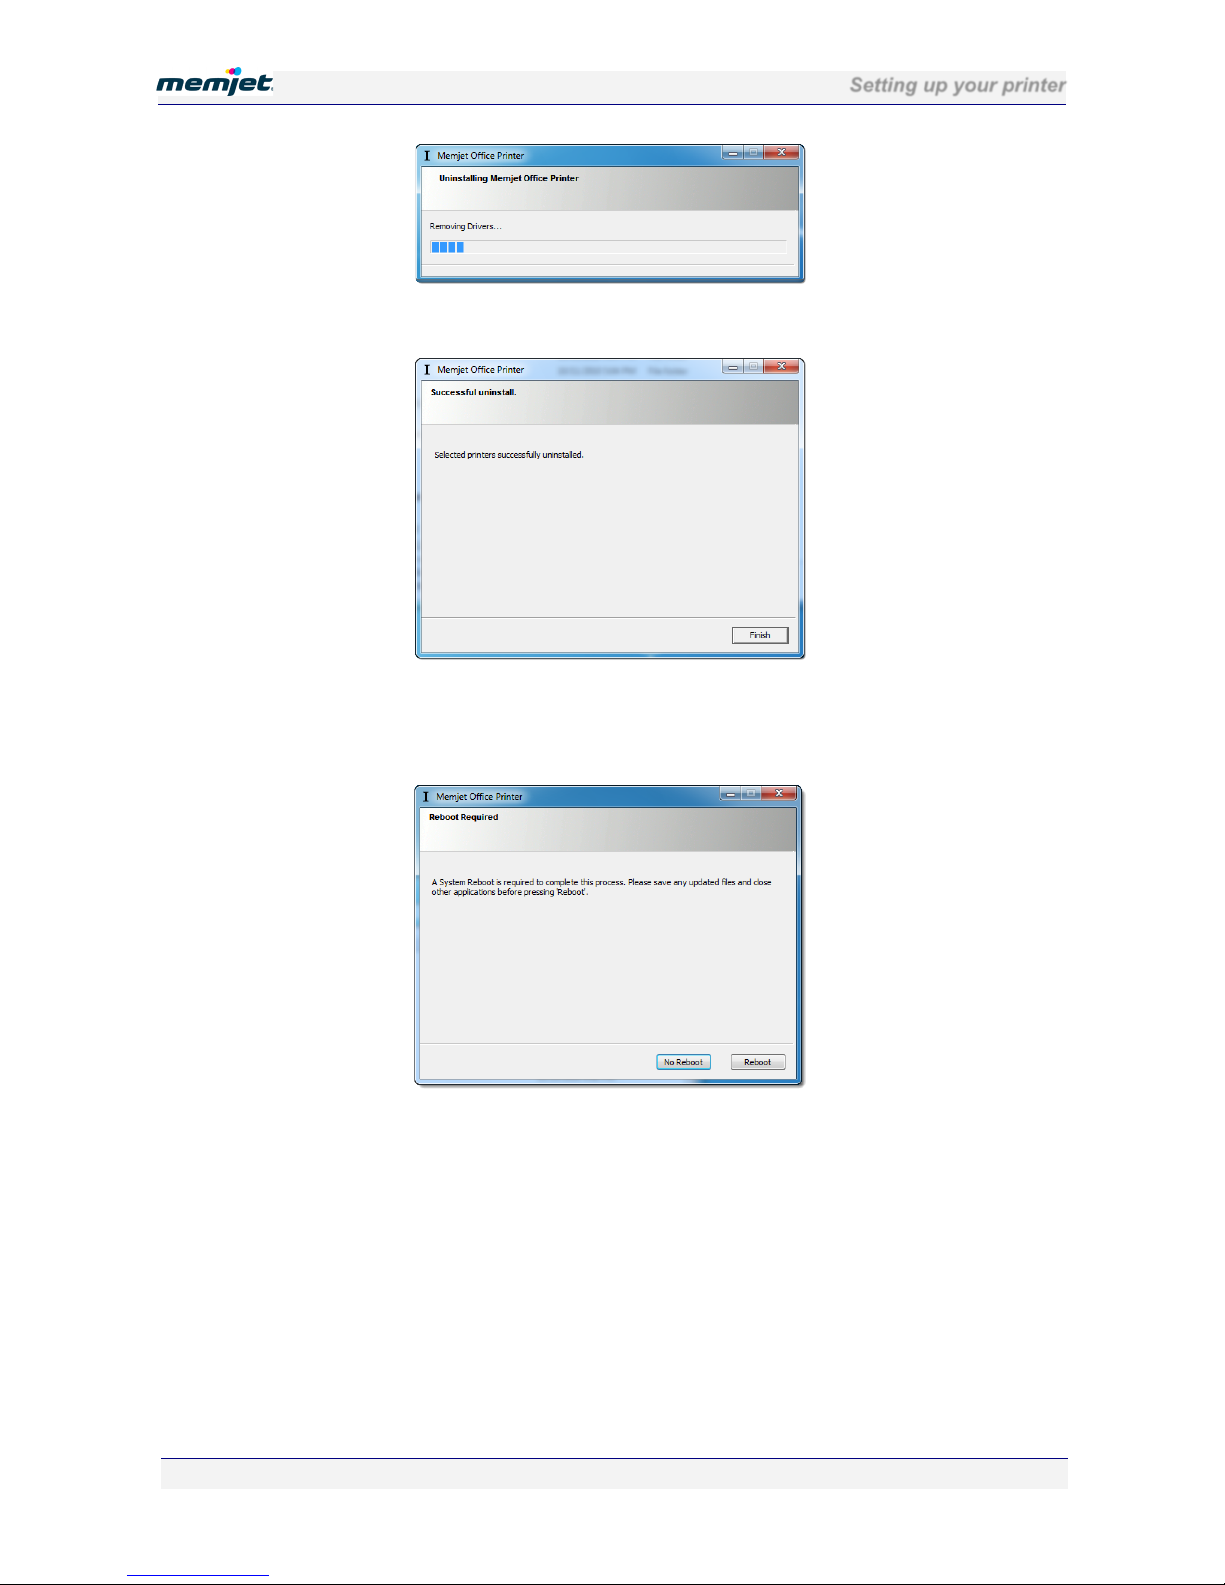
9. A progress bar may be displayed as shown below in a separate dialog box.
Wait for the removal operation to finish.
Page 55
Setting up your printer
28 July 2011 - v4.2
Confidential.
Page 55 of 110
10. When the Successful uninstall dialog is displayed, click Finish.
11. You may be asked to reboot your computer to complete the uninstall procedure. You need
not reboot at this point, but you must do so before installing a new version of Memjet
printer driver.
Page 56
Printing with a Memjet printer
28 July 2011 - v4.2
Confidential.
Page 56 of 110
• Printing with Memjet
This section contains all the information you need to obtain an optimum printout, including
detailed information on the printing process.
Once you have set up your Memjet printer (see Setting up your printer on page 18
), you may
print from any Windows application that uses the standard Windows printing system.
All examples in this section have been obtained using Windows 7 operating system. In other
Windows operating systems screens may look different and options documented here may not be
available or may be labelled differently to what is described here.
• Getting ready to print
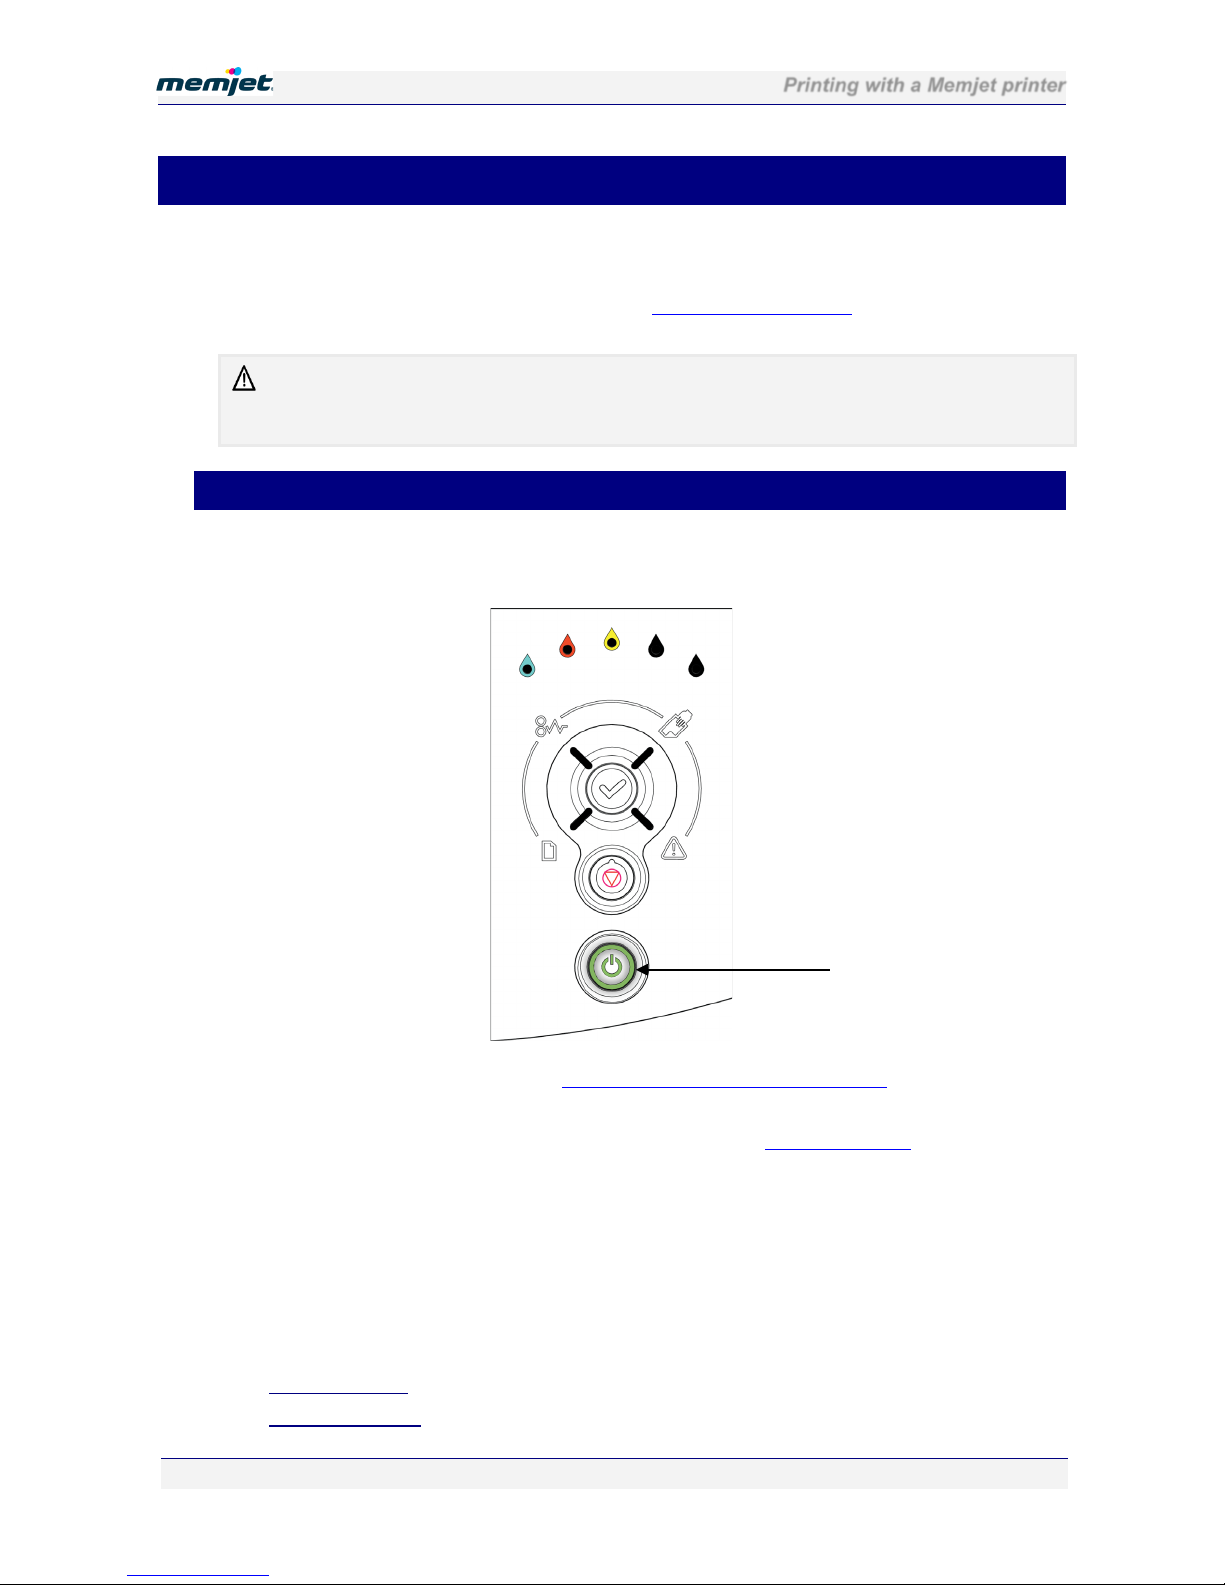
Before you start to print with your Memjet printer check that only the Power (On/Off) button
is lit on the Control Panel, shown here ([1] below).
If any other lamps are lit, refer to the Common printer messages and alerts section on page 72
to ensure the printer is ready to print.
If you can not fix the problem, follow the instructions in the Troubleshooting section on page
96 until those lights are off.
Once you are ready to print:
• choose your paper
• launch the Print command from your application
• select your print options.
Before launching a Print command you may find it useful to know how to:
• print a test page (see page 57
)
• cancel a print job (see page 59)
1
Page 57

Printing with a Memjet printer
28 July 2011 - v4.2
Confidential.
Page 57 of 110
Choosing your paper
Check that you have the appropriate paper for the task.
The Memjet printer has been designed to print on plain paper but more demanding documents
may require higher grade paper.
Always test your paper first to see if it meets your expectations.
To find out more about paper selection, see the Paper section on page 90
.
To find out more about how to feed your selected paper into the printer see Loading paper on
page 28.
Print options dialog box
You may issue a Print command from any Windows application. Most Print commands will
bring up a Print options dialog box, which will allow you to choose the printer and customise
the printout.
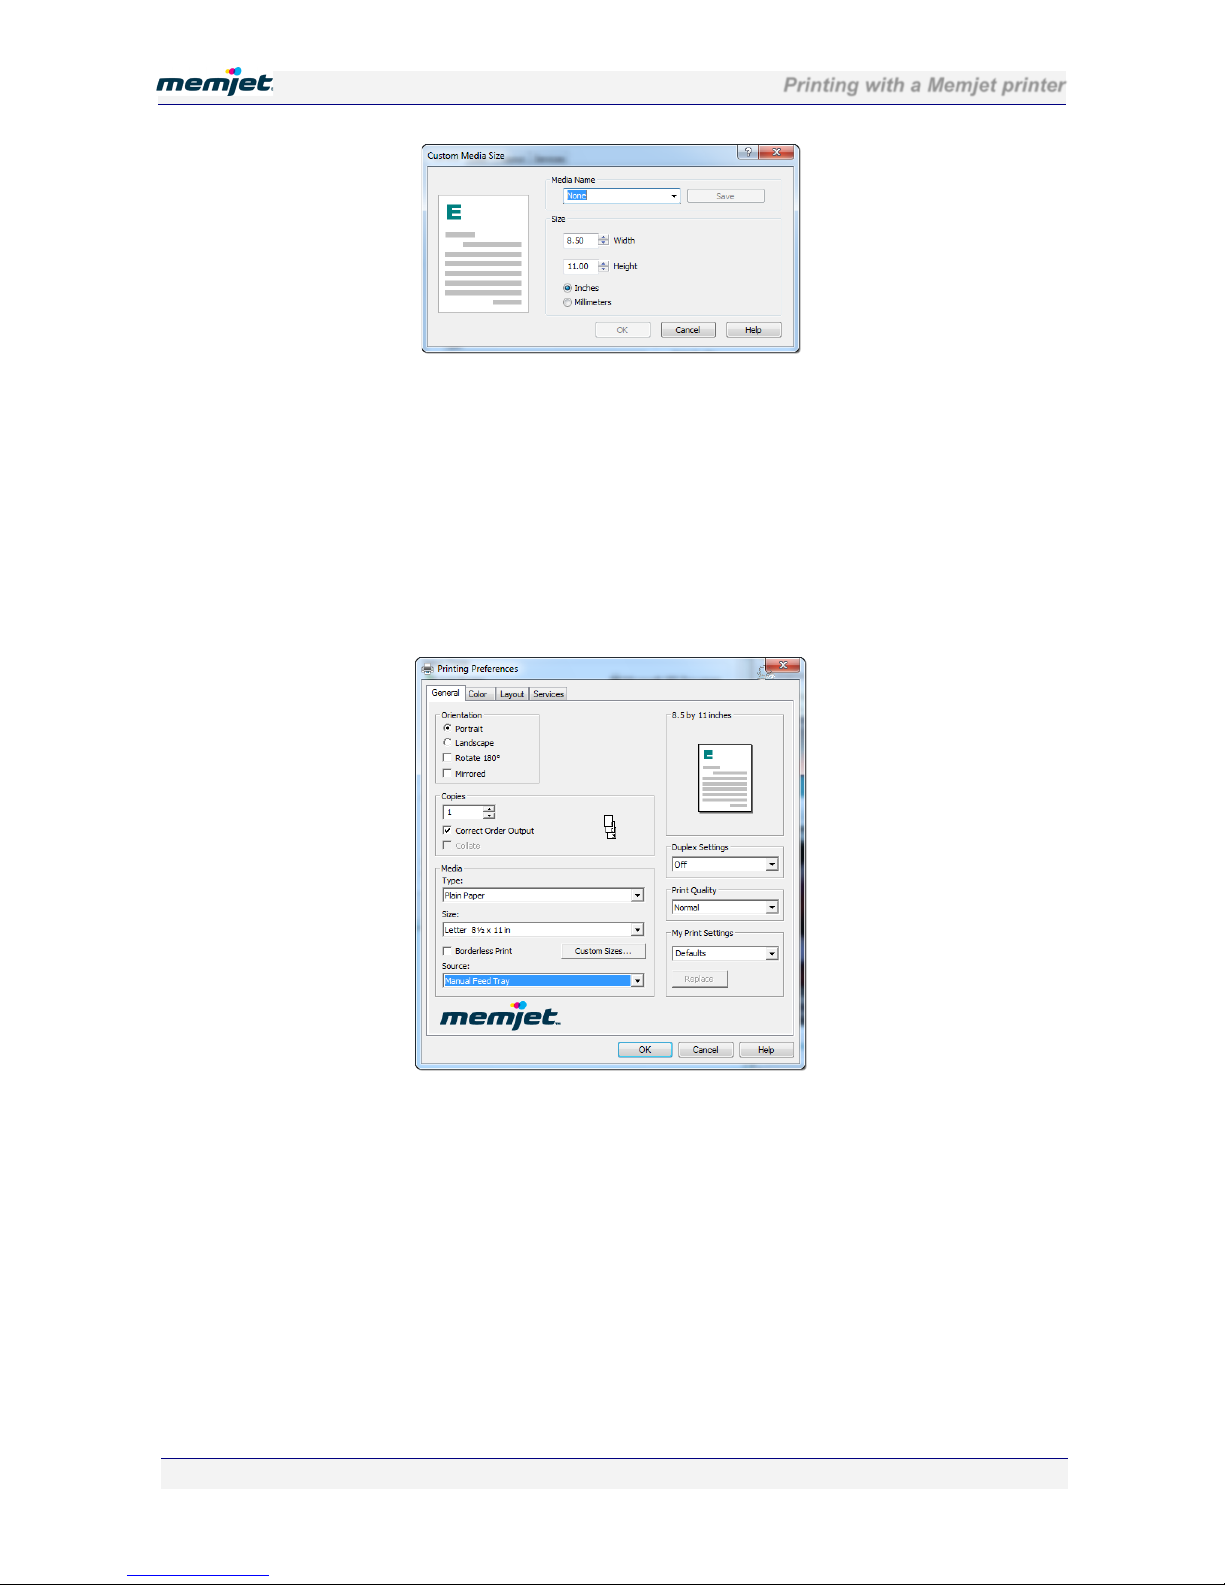
Figure 4 shows the Print options dialog box associated with Word for Windows 2003, and is
typical of Print dialog boxes for Microsoft applications.
Figure 4 Typical Windows Print options dialog box
From this dialog box you may select your Memjet printer and bring up the Properties dialog
box as shown in Using print properties
below.
Some applications will not bring up a Print dialog box as shown in Figure 4. See your application
Help Guide for more information.
• Printing a test page
To test your printer is working, you may print a test page at any time. There are three ways in
which you can print a test page:
• using the buttons on your printer Control Panel
• using the built-in Print Test Page button on the printer driver on your PC
• using the Print Demonstration button from the Toolbox.
Page 58
Printing with a Memjet printer
28 July 2011 - v4.2
Confidential.
Page 58 of 110
On the printer
You can print a test page without installing a printer driver by using the buttons on your
printer Control Panel. This is useful in case you suspect your connection to the PC is not
working.
To print a test page, simply press both Stop/Cancel and OK/Resume buttons together for more
than two seconds (see Control Panel on page 16
).
On your PC
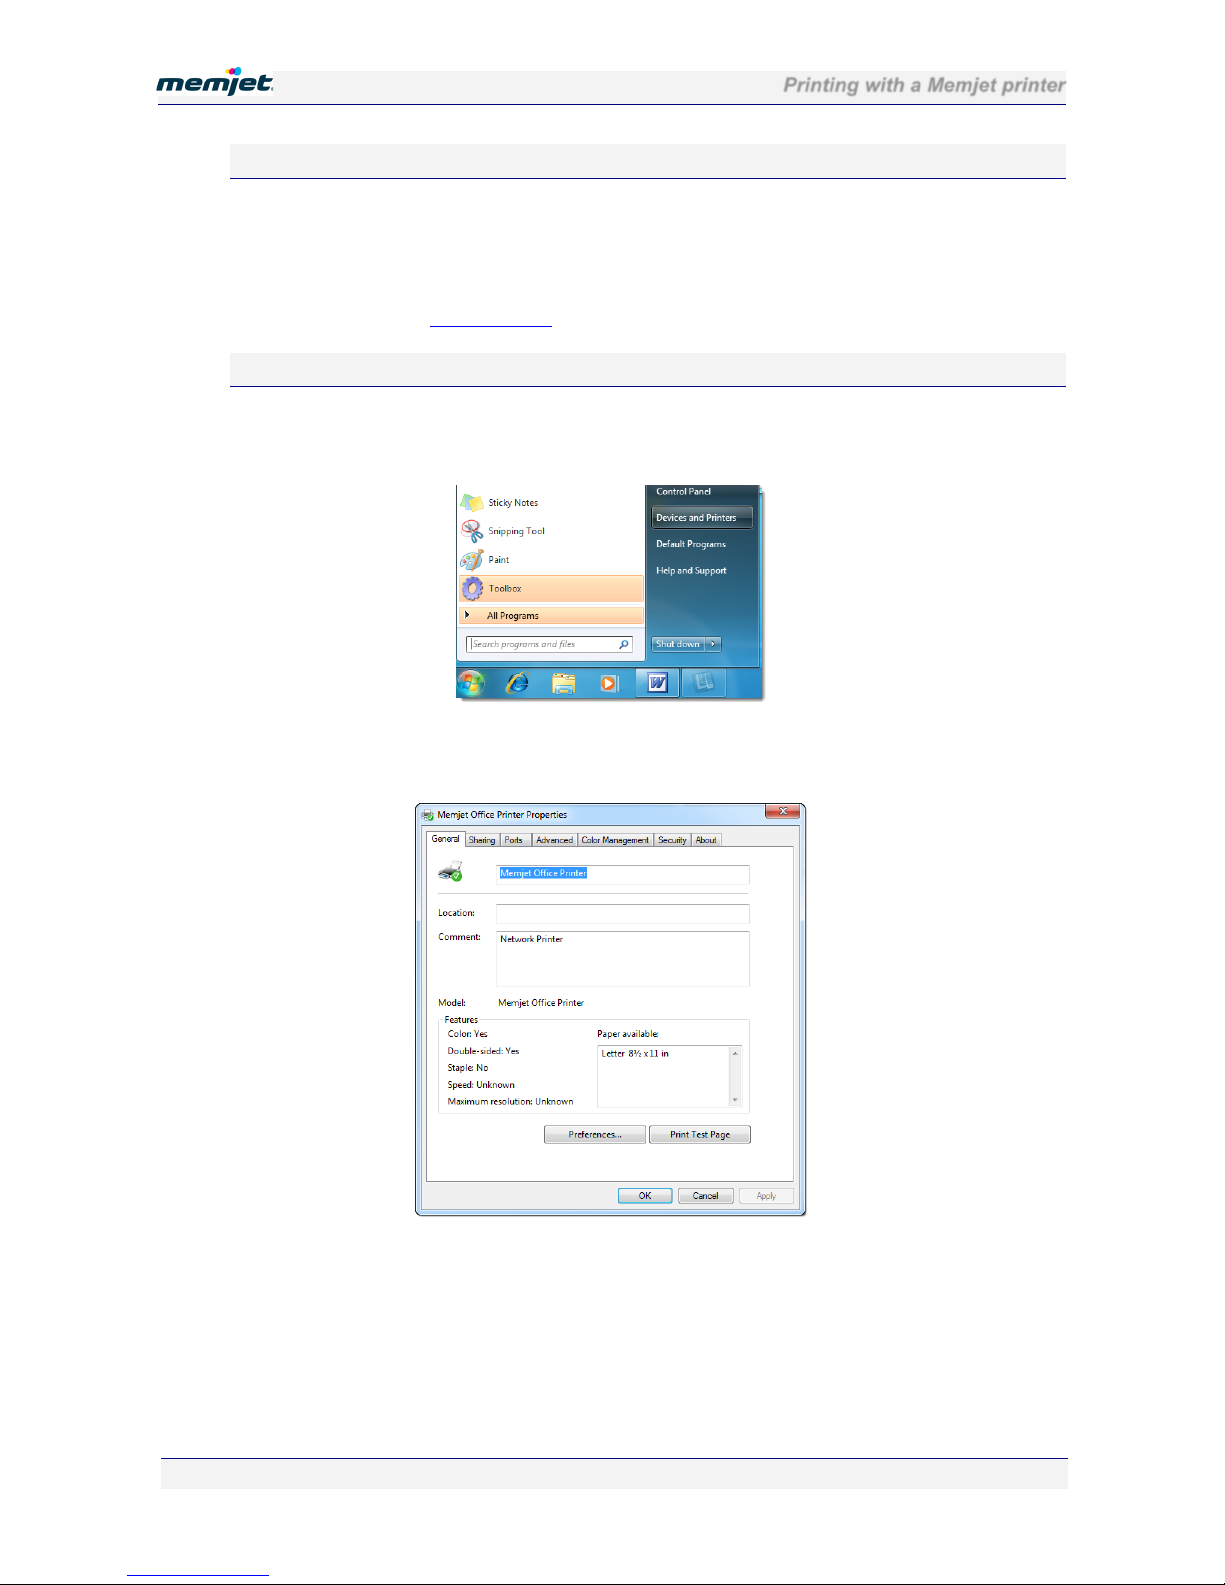
From your PC, you can access the Print Test Page button as follows:
1. Click the Windows icon and then click Devices and Printers.
2. In the window that is displayed, right-click the icon for your printer, and then click
Printer Properties.
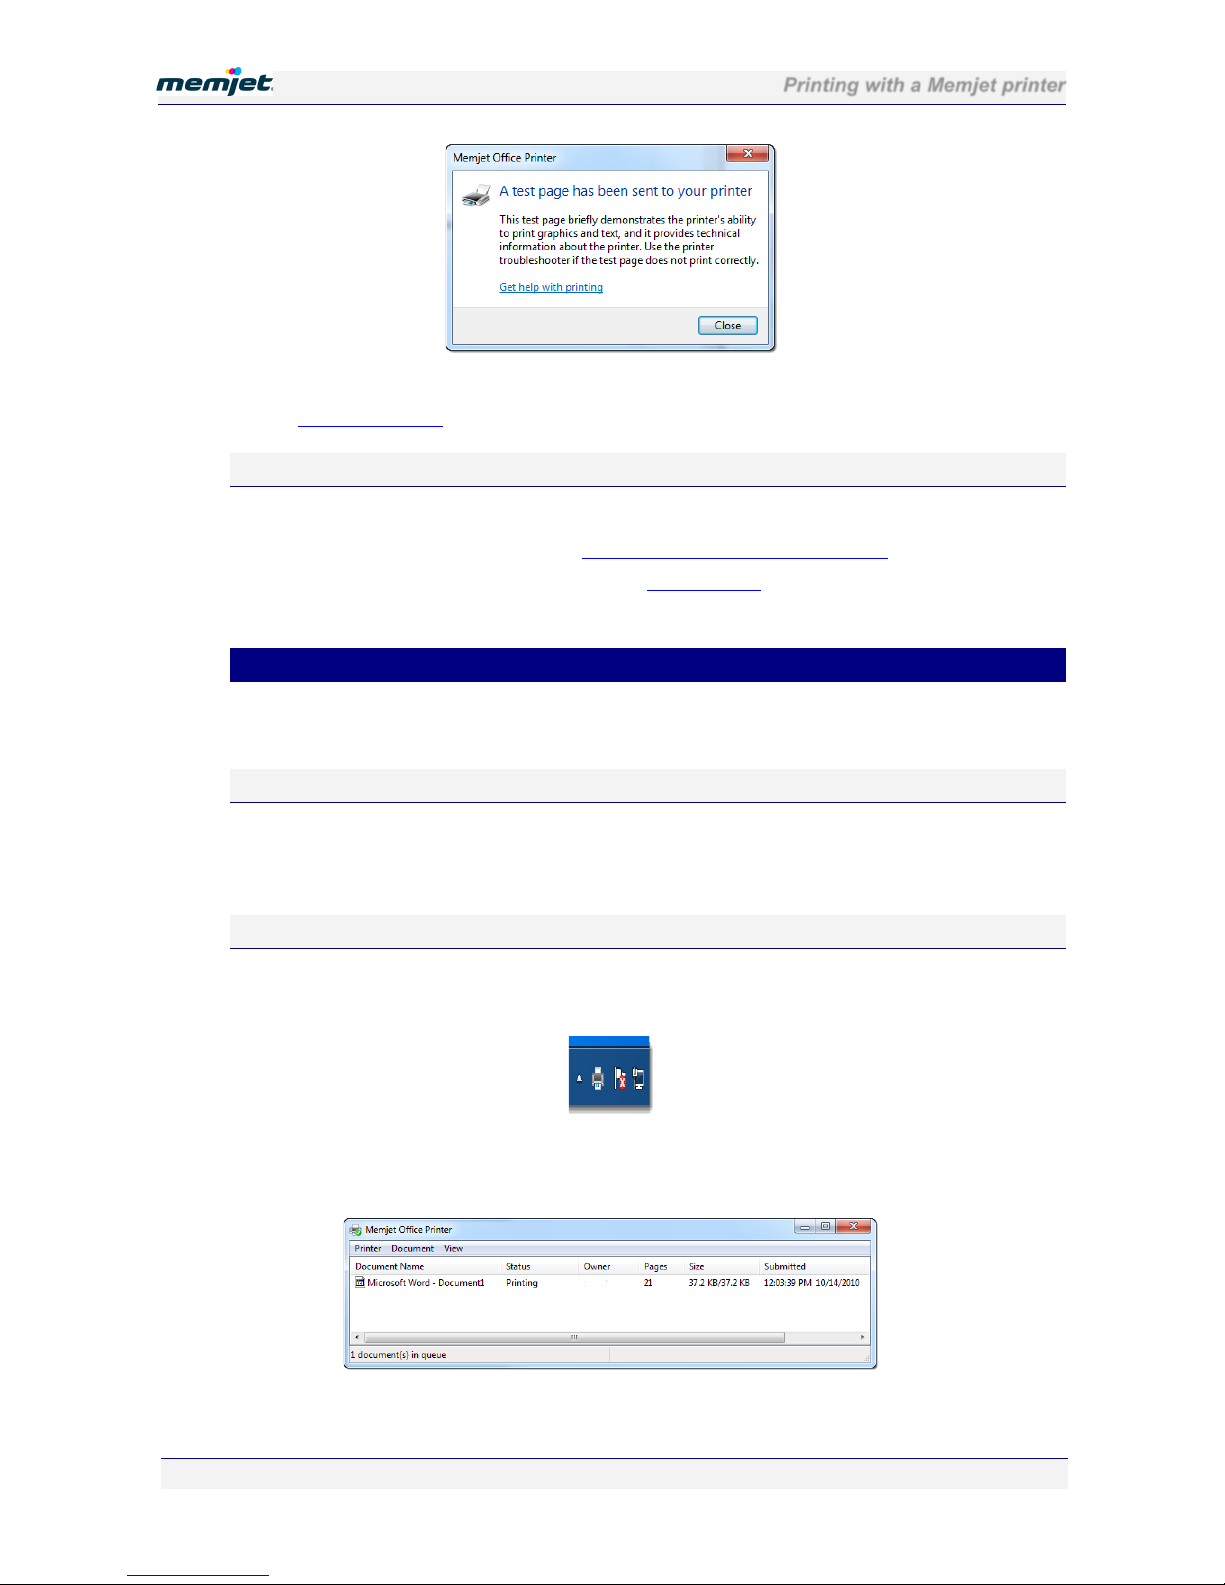
3. In the General tab, click the Print Test Page button. A message window should be
displayed, as shown below.
Page 59
Printing with a Memjet printer
28 July 2011 - v4.2
Confidential.
Page 59 of 110
A test page should be printed on your Memjet printer. Check that the test page prints. If not
see the Troubleshooting section on page 96
for help.
Using the Toolbox
You may also print a test page from the Toolbox application as follows:
1. Open the Toolbox Home Page (see Accessing the Toolbox application on page 79
).
2. Navigate to the Maintenance page (see the Maintenance section on page 85).
3. Click the Print Demonstration button.
• Cancelling a print job
You can cancel one or more print jobs that you have sent to your Memjet printer by any of the
following methods:
On the printer
Press the Stop/Cancel button on the printer Control Panel. This will cancel only the job
currently being processed. It will not cancel any other jobs that may have been sent to the
printer.
On your PC
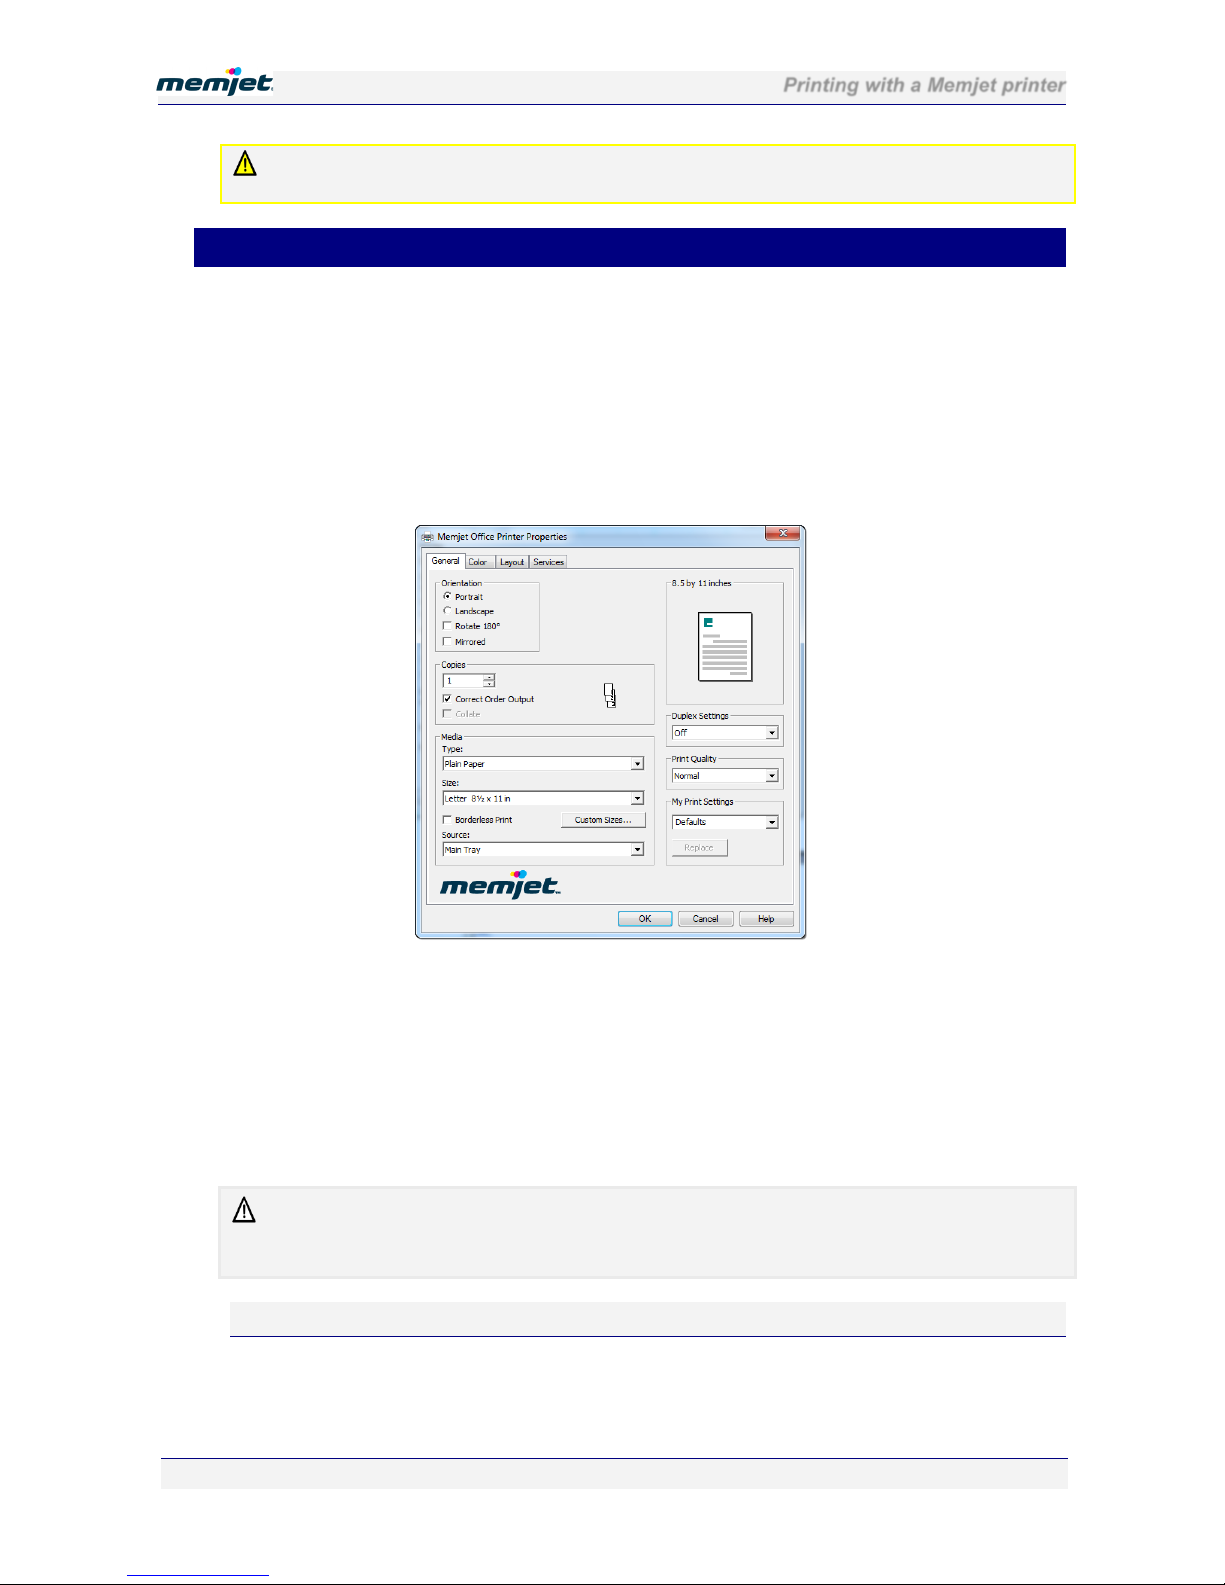
In Windows: double click the printer icon in the Taskbar Notification Area (usually on the
bottom right of corner of your PC screen).
In the Memjet Office Printer dialog box select the print job and press Delete on your
keyboard.
Page 60
Printing with a Memjet printer
28 July 2011 - v4.2
Confidential.
Page 60 of 110
Note that cancelling a Duplex or a Booklet print job in this way after the first side has been
printed may not prevent the second side from being printed.
• Using print properties
To select a Memjet printer, click the Name arrow in the Printer pane of your print options in
Figure 4 and select the Memjet printer you wish to print on.
Current Memjet printer drivers default to the name Memjet Office Printer or some variation
of those words.
Once you have selected your Memjet printer, click Options to bring up your Memjet printer
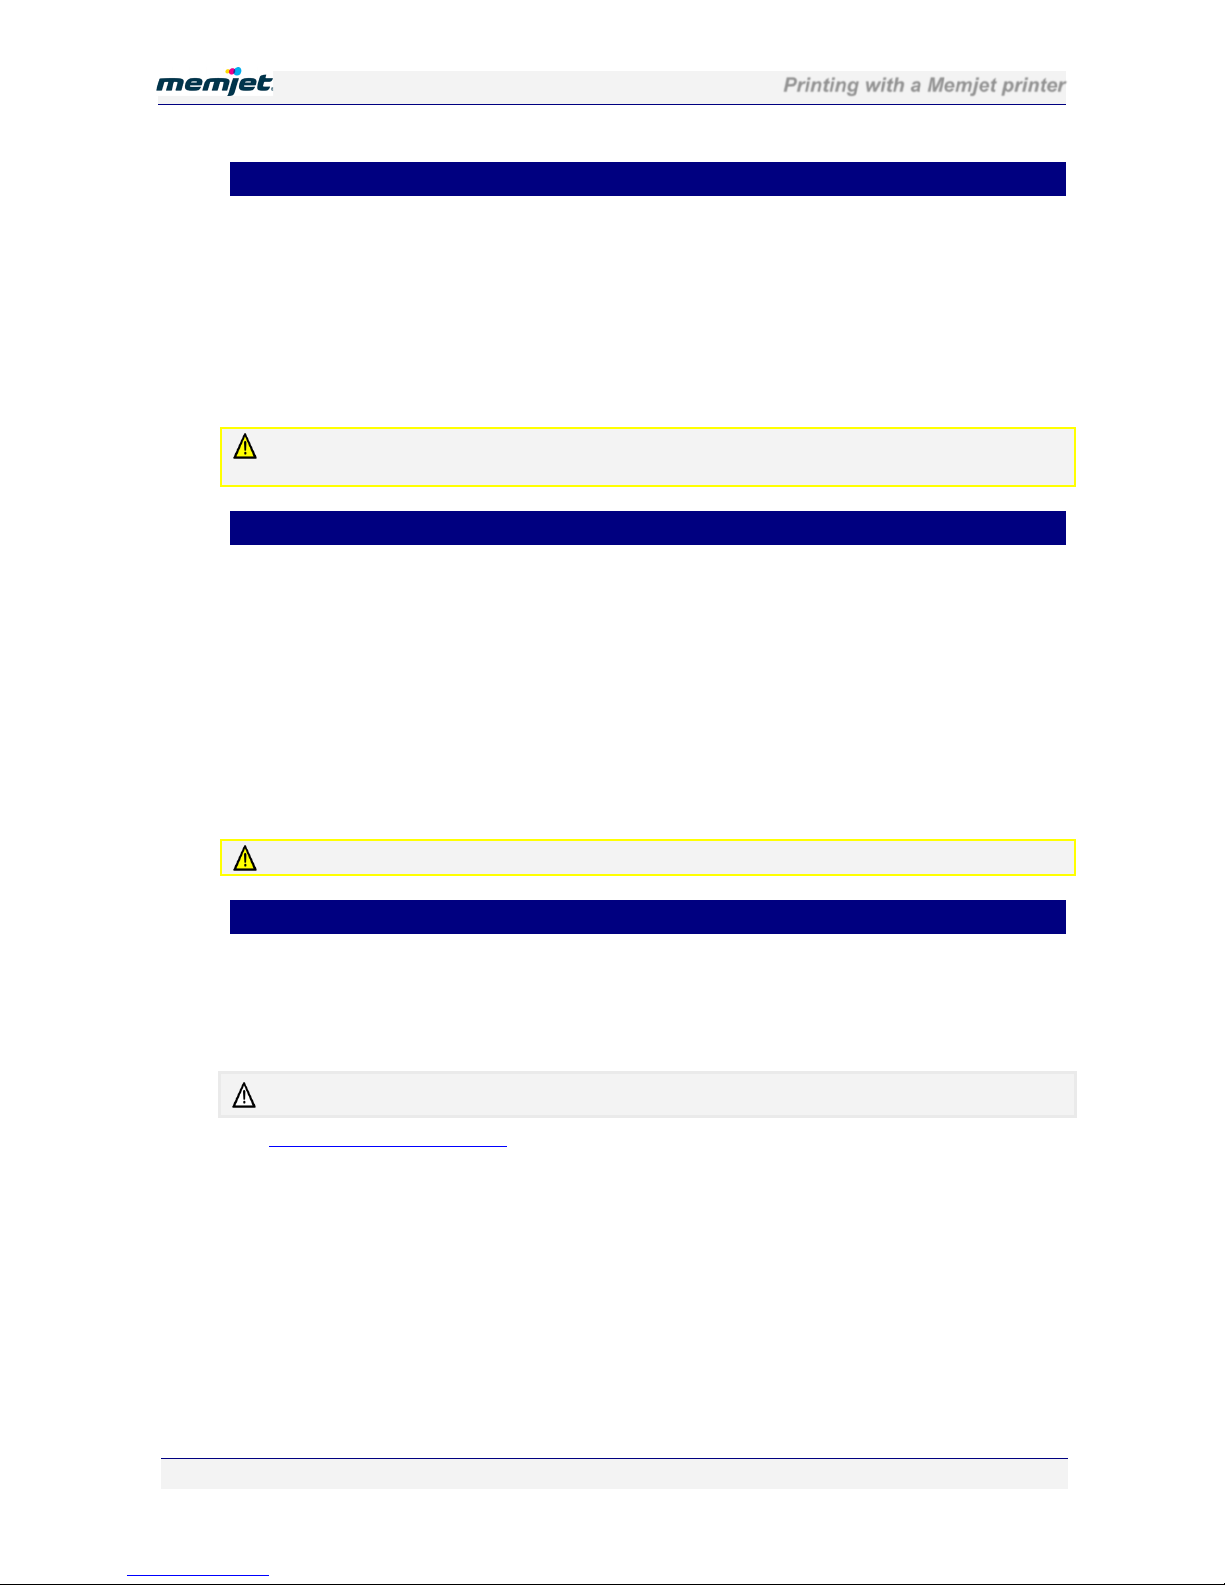
driver Properties dialog box, as shown in Figure 5.
Figure 5 Memjet printer driver Preferences dialog box
From here you can configure a wide variety of layouts for the finished, printed product.
Once you have set up the options you will need for your printout:
1. Click OK to exit Printer Properties.
2. In Print options (see Figure 4) select the page range, number of copies and document
content you wish to print and click OK.
The following sections describe a selection of the most common print Properties and their
effects on the output.
Note that Printer Properties dialog box settings are retained and used for all following prints of
your current document(s). These settings will not revert to the default settings until you close the
document(s) or restore the default settings manually.
Printer properties Help
Help is available for most configurable properties in your Memjet printer driver.
To bring up this help you have two options.
Page 61
Printing with a Memjet printer
28 July 2011 - v4.2
Confidential.
Page 61 of 110
In any tab of the Properties dialog box (see Figure 5):
1. Click the option for which you require help and press the F1 key on your PC.
OR
2. Right click a control and click What’s This?
A text box should appear with specific information on the option you clicked. This is known
as context-sensitive help.
If you click the Help button in any tab a window will be displayed containing information on
how to access context-sensitive Help.
The following information is additional to any that may be contained in the above mentioned
Help files and, where appropriate, may direct you to access such help.
Print settings profiles
When you first bring up the Printer Properties dialog box, a default configuration is displayed
where common printer settings have been chosen for you.
If these do not meet your requirements, you can change any or all configurable print settings
in the Memjet printer driver and save them to a profile which you can name.
You can then quickly restore any saved profile, to avoid needless repetition in printer driver
setup.
To set up, save and restore print settings profiles, follow the instructions shown in the
context-sensitive Help.
To see the context-sensitive instructions for creating, saving and restoring print settings, in the
General tab of the Properties dialog box (see Figure 5):
1. Perform one of the following:
• Click My Print Settings and press the key F1 on your PC
OR
• Right click My Print Settings and click What’s This?
2. Follow the instructions for creating, saving and restoring print settings shown in the
popup window.
3. Once you have finished configuring and saving your printer settings click OK to save
your work and exit the Properties dialog box.
Some applications will not bring up a Print dialog box at all. In those cases any print command
you launch will use the defaut printer settings you have selected
See your application Help Guide for more information.
Page 62
Printing with a Memjet printer
28 July 2011 - v4.2
Confidential.
Page 62 of 110
• Borderless prints
Your Memjet printer uses a page wide printhead that allows you to print borderless prints.
To accomplish borderless printing:
1. In the General tab of the Properties dialog box (see Figure 5 on page 60) select
Borderless Print.
2. Click OK to save your selection and exit the Properties dialog box.
All printouts that are large enough will print to the edge of your paper. This is also known as
“full bleed” printing.
Borderless printing is subject to limits imposed by the application you use to launch the print
command. You may not be able to achieve borderless printouts in some cases.
• Page orientation
Page orientation in your Memjet printer can be set up in a variety of ways.
In the General tab of the Properties dialog box (see Figure 5 on page 60):
1. Select either Portrait or Landscape orientation in the Orientation pane.
2. You may combine that with either or both of the Rotate 180 or Mirrored check boxes to
obtain the orientation you require for your printout.
3. As you select the various combinations of options, the graphic on the right pane of the
Properties dialog box will display the orientation you have chosen.
4. Once you have finished click OK to save your selection and exit the Properties dialog
box.
Some applications may override page orientation set up in this manner.
• Custom paper sizes
If you are printing from the paper tray you can select only from US Letter, ISO A4 and US
Legal sizes.
Paper sizes other than those listed above can be printed only from the manual feed (rear)
paper tray and can only be fed manually, one sheet at a time.
The largest paper size you can print on is US Legal.
See Using the manual feed tray on page 68 for instructions on setting up and feeding paper
into the manual feed tray.
To print on custom sized paper:
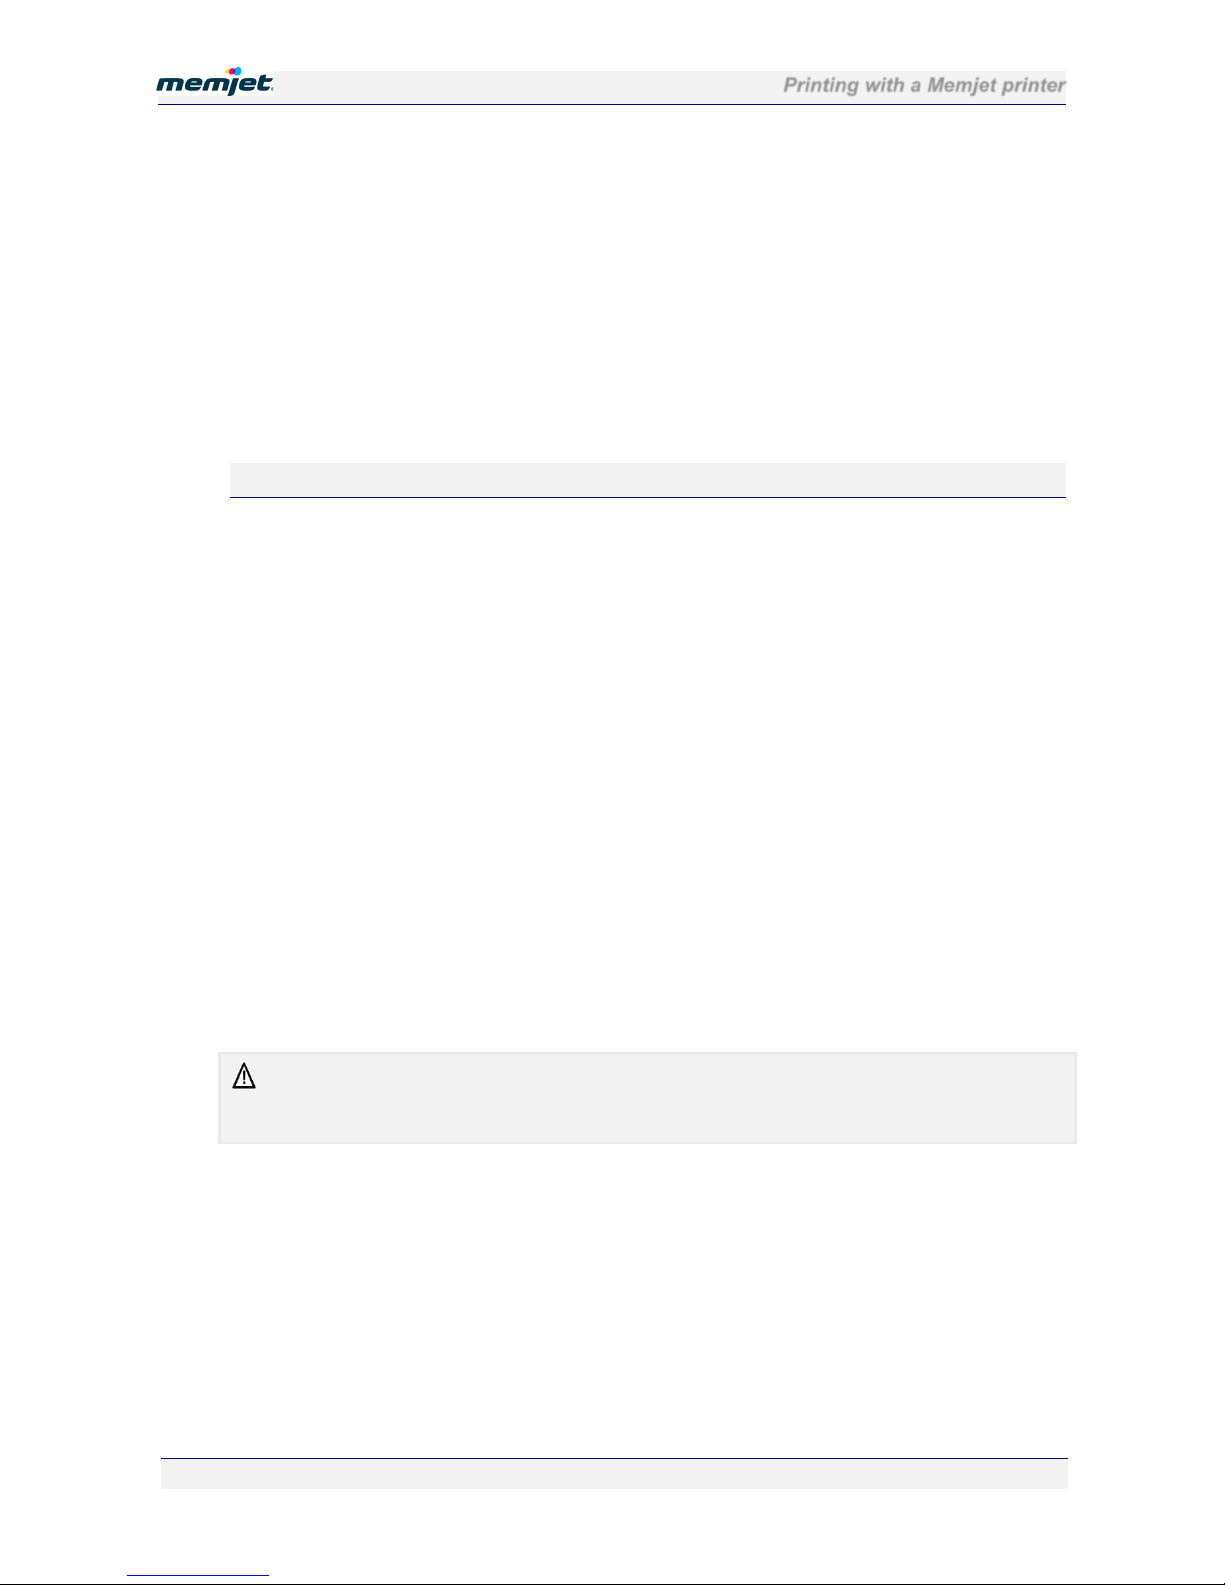
1. Click the Custom Sizes button in the General tab of the Properties dialog box (see Figure
5 on page 60). The Custom Paper Size dialog box will appear.
Page 63
Printing with a Memjet printer
28 July 2011 - v4.2
Confidential.
Page 63 of 110
2. Fill in the Media Name with a new media size name that identifies the size uniquely.
3. Set the values of the Width and Height fields to match the dimensions of the paper size
you wish to use, remembering to select the appropriate measurement type (Inches or
millimetres). The graphic in the left pane will change as you vary the size.
4. Click Save. This will ensure that this new size will be available in your application Print
Options scaling field.
5. Click OK to save this size and exit the Custom Media Size dialog box.
6. In the Media pane of the General tab in the Memjet Printer Properties dialog box, ensure
that you have selected Manual Feed Tray.
7. Click OK again to save your selection and exit the Properties dialog box.
8. Select this new size in the scaling option in your application Print Options screen. For
example, in Windows Word, in its Print Options screen:
Page 64
Printing with a Memjet printer
28 July 2011 - v4.2
Confidential.
Page 64 of 110
Ensure that you have selected the appropriate paper size option in the Scale to paper size
field:
Once you have issued the Print command, the printer will light the manual feed lamp, and
wait on you to manually feed the appropriate size paper into the manual feed tray at the rear
of the printer. See Using the manual feed tray on page 68
for details.
• Multi-page (N-up)
You can print up to 16 pages of your document on one sheet on your Memjet printer. This
option is sometimes called N-up printing and can be accessed as follows:
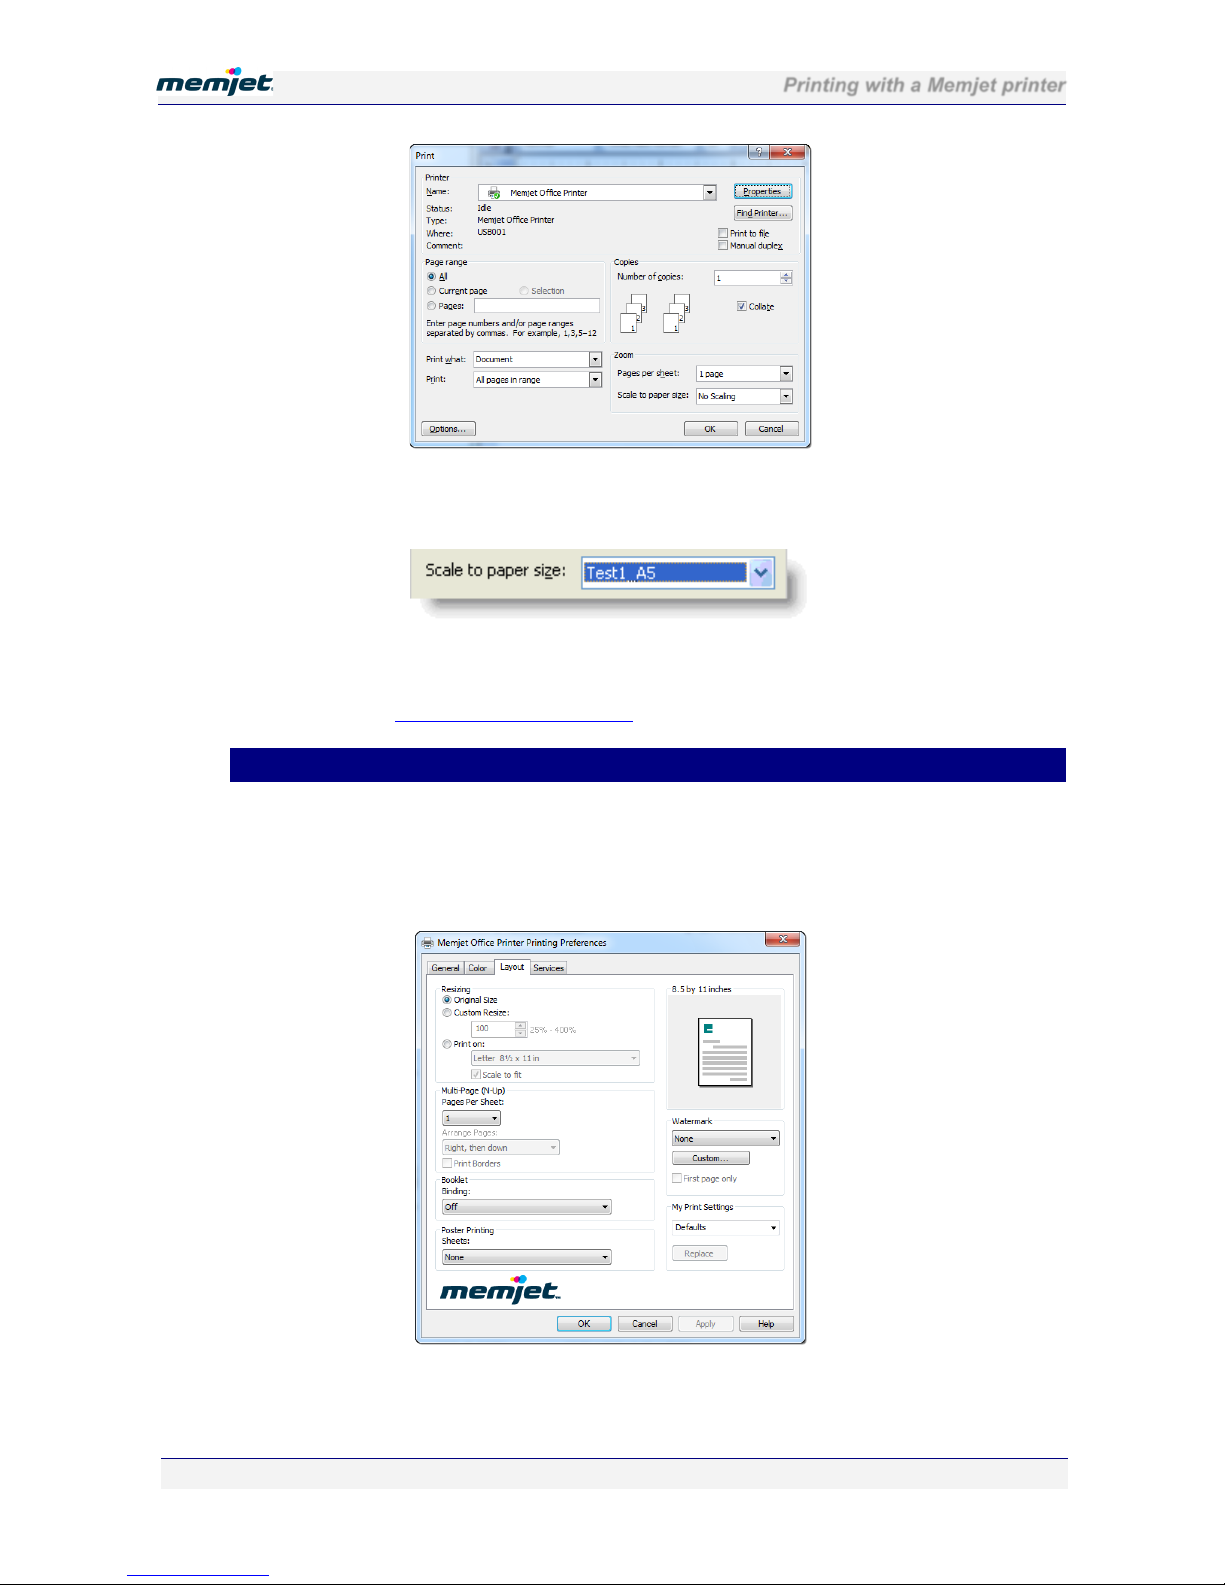
1. In the Properties dialog box (see Figure 5), click Layout to display the Layout tab, as
shown here.
2. Click the Multi-page (N-up) arrow and select the number of pages of your document you
wish to print on one sheet.
Page 65
Printing with a Memjet printer
28 July 2011 - v4.2
Confidential.
Page 65 of 110
3. Save your selection by clicking OK until you are back at the print options dialog box (see
Figure 4 on page 57).
• Manual duplex
Duplex or two-sided printing produces a more compact document, allowing you to cut down
the amount of paper you use.
Although your Memjet printer is not equipped with an automatic duplexing mechanism, you
can still print on both sides of each sheet by manually re-inserting a batch of single-sided
printed sheets into the paper tray. This is called Manual duplexing and your Memjet printer
driver provides an option to allow for manual duplexing.
Manual duplexing is best used with text and light color applications.
Not all paper can be used for double-sided printing. Specifically, paper that has a preferred or
specially prepared side will generally be unsuitable. Also check that the paper is within the
specifications of supported paper in Recommended paper on page 90.
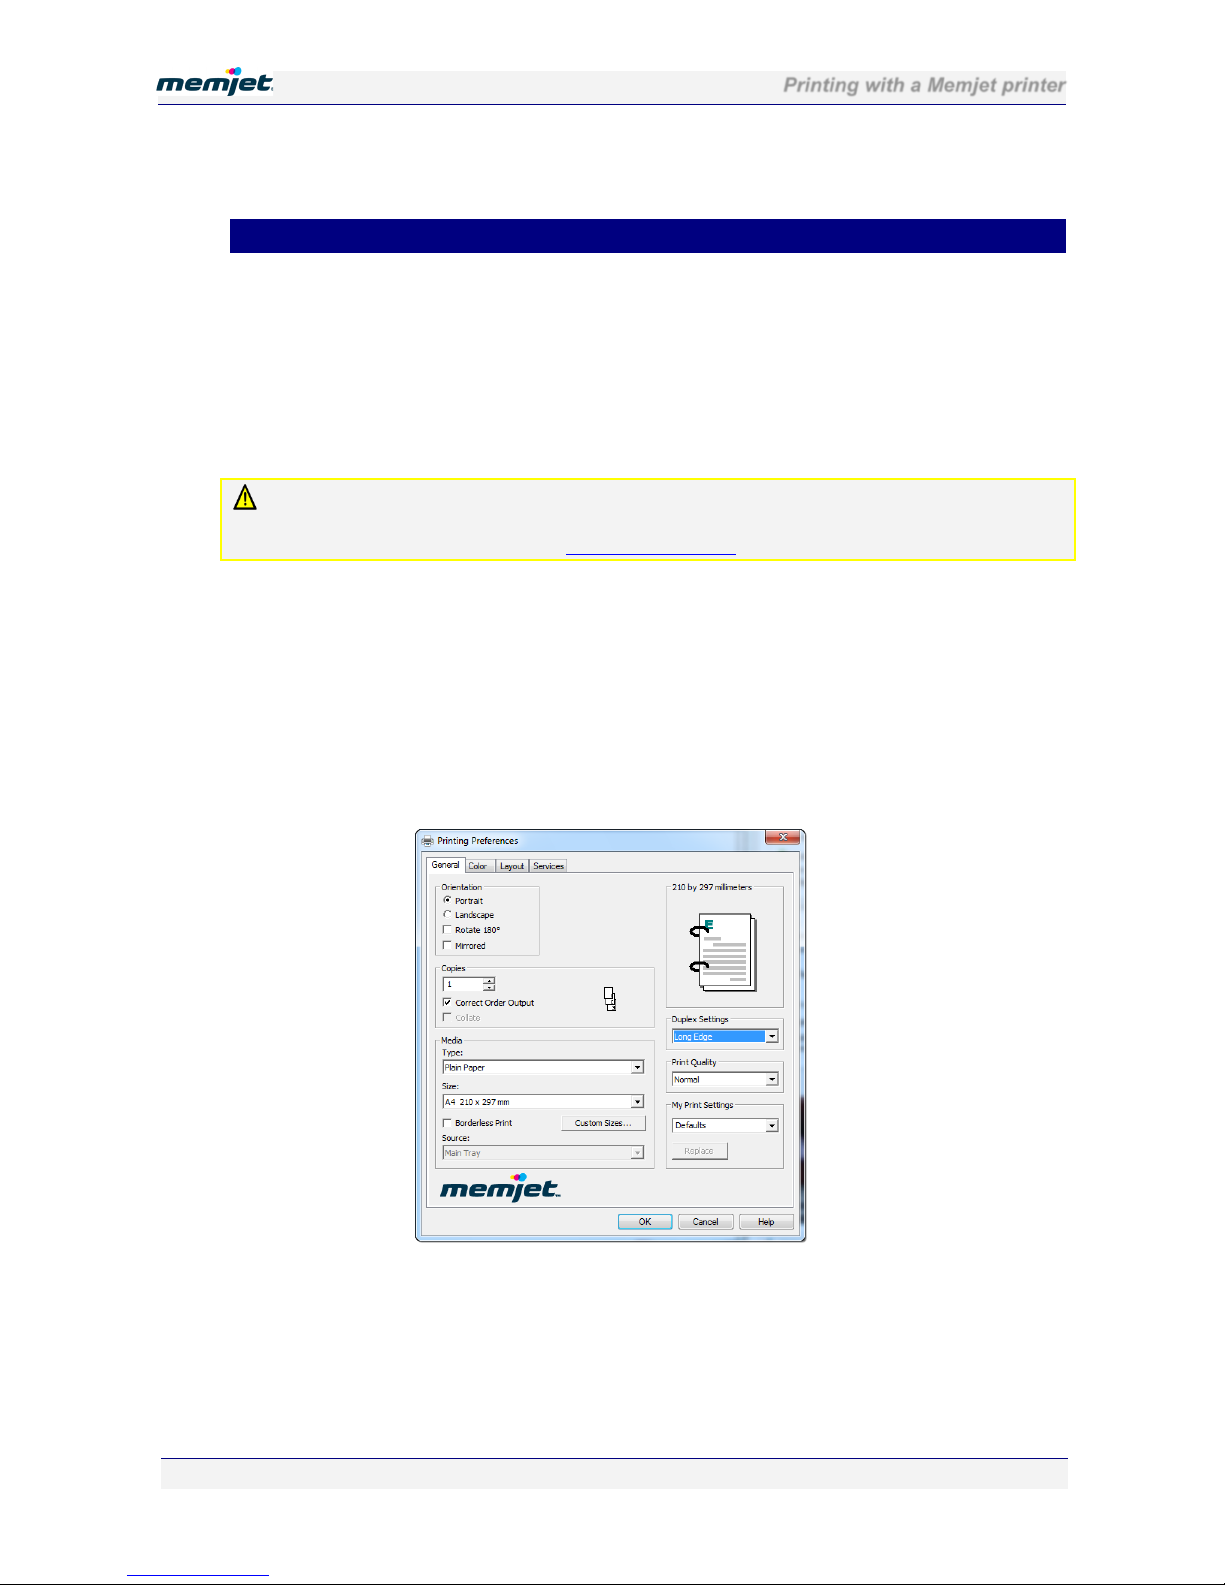
For example, try this:
1. Open a Word document of at least four pages.
2. Select File > Print from the Word menu (or press [Ctrl] [P]).
3. Select your Memjet printer and click Properties to open up the Memjet printer Properties
dialog box.
4. Click the Duplex Settings arrow and select either Long Edge or Short Edge.
Notice where the binding rings appear in the Page Preview image (top right in the
following figure) as you change from one to the other.
5. When you have selected the orientation that suits you click OK to save your settings and
exit.
6. Print exactly four document pages.
You will see that:
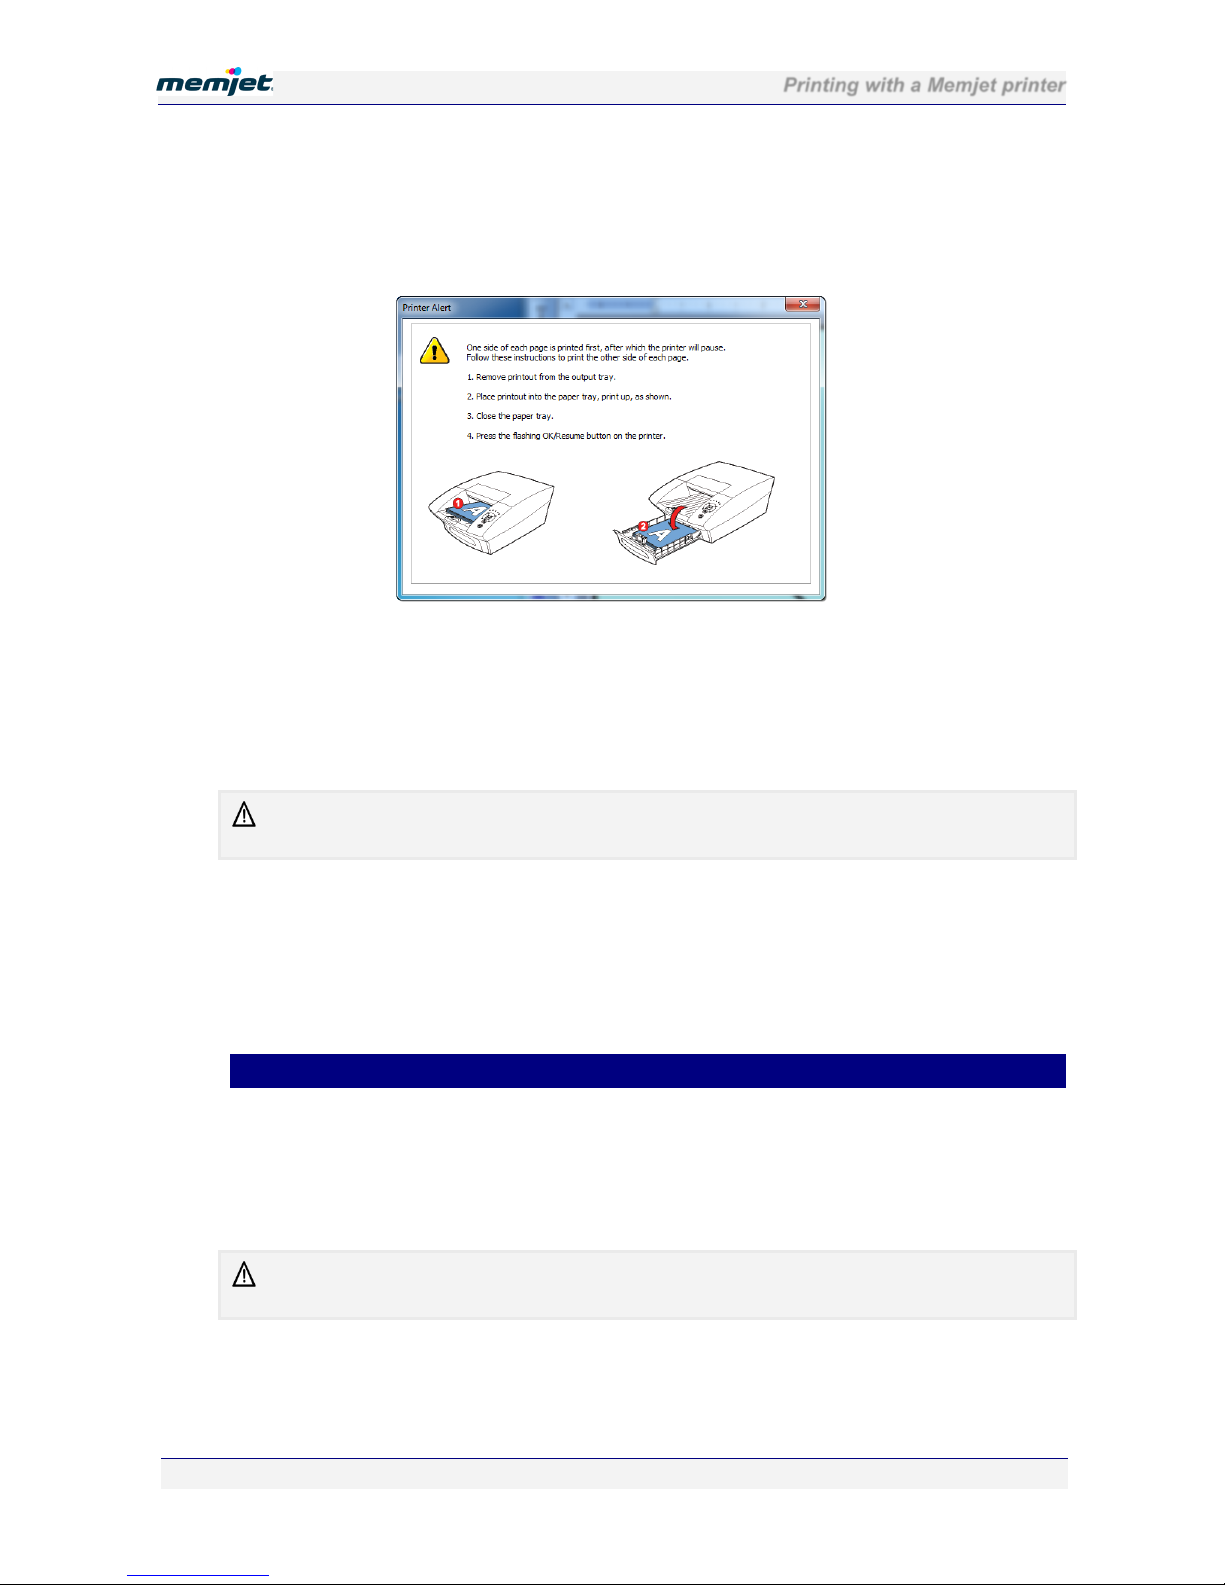
• A message window such as Figure 6 will be displayed with instructions.
Page 66
Printing with a Memjet printer
28 July 2011 - v4.2
Confidential.
Page 66 of 110
• Two sheets will be printed.
• The OK/Resume button will flash.
• The Manual Duplex lamp will be lit.
Figure 6 Double-sided printing instructions
7. Follow the instructions in the message window (Figure 6).
• Remove the printed sheets from the output tray
• open the paper tray
• insert the printed pages back on top of any other paper in the paper tray. DO NOT
change the orientation of the paper as you do so.
For best results ensure the printed pages are dry and very flat before re-inserting them into the
paper tray.
8. Close the paper tray and press the OK/Resume button.
The same two sheets will be printed, on the reverse side.
Examine your printout to ensure it matches your needs, otherwise repeat this operation using
the other Duplex Settings selection in step 4 above.
You may combine duplex printing with other allowable options to achieve just the sort of
printout you require.
• Booklets
Booklets are generated by folding in half sheets which have been printed on both sides, so
when you choose to print a Booklet, the number of pages per sheet will be fixed to 2 and the
Duplex option will be selected for you automatically.
As a result. the Multi-Page (N-Up) option will automatically be set to the value 2 and both it
and the Duplex option will be greyed out, so you cannot change them.
You cannot print booklets from the manual feed tray. If you attempt this the printer driver will
pop up an error message.
Booklet printing is best used for text and light color applications.
For best results when printing booklets, ensure the first side of the printed sheets are dry and
the sheets very flat before re-loading into the paper tray.
Page 67
Printing with a Memjet printer
28 July 2011 - v4.2
Confidential.
Page 67 of 110
For example, try this:
1. Open a Word document of at least eight pages.
2. Select File > Print from the Word menu (or press [Ctrl] [P]).
3. Select your Memjet printer and click Properties to open up the Memjet printer Properties
dialog box.
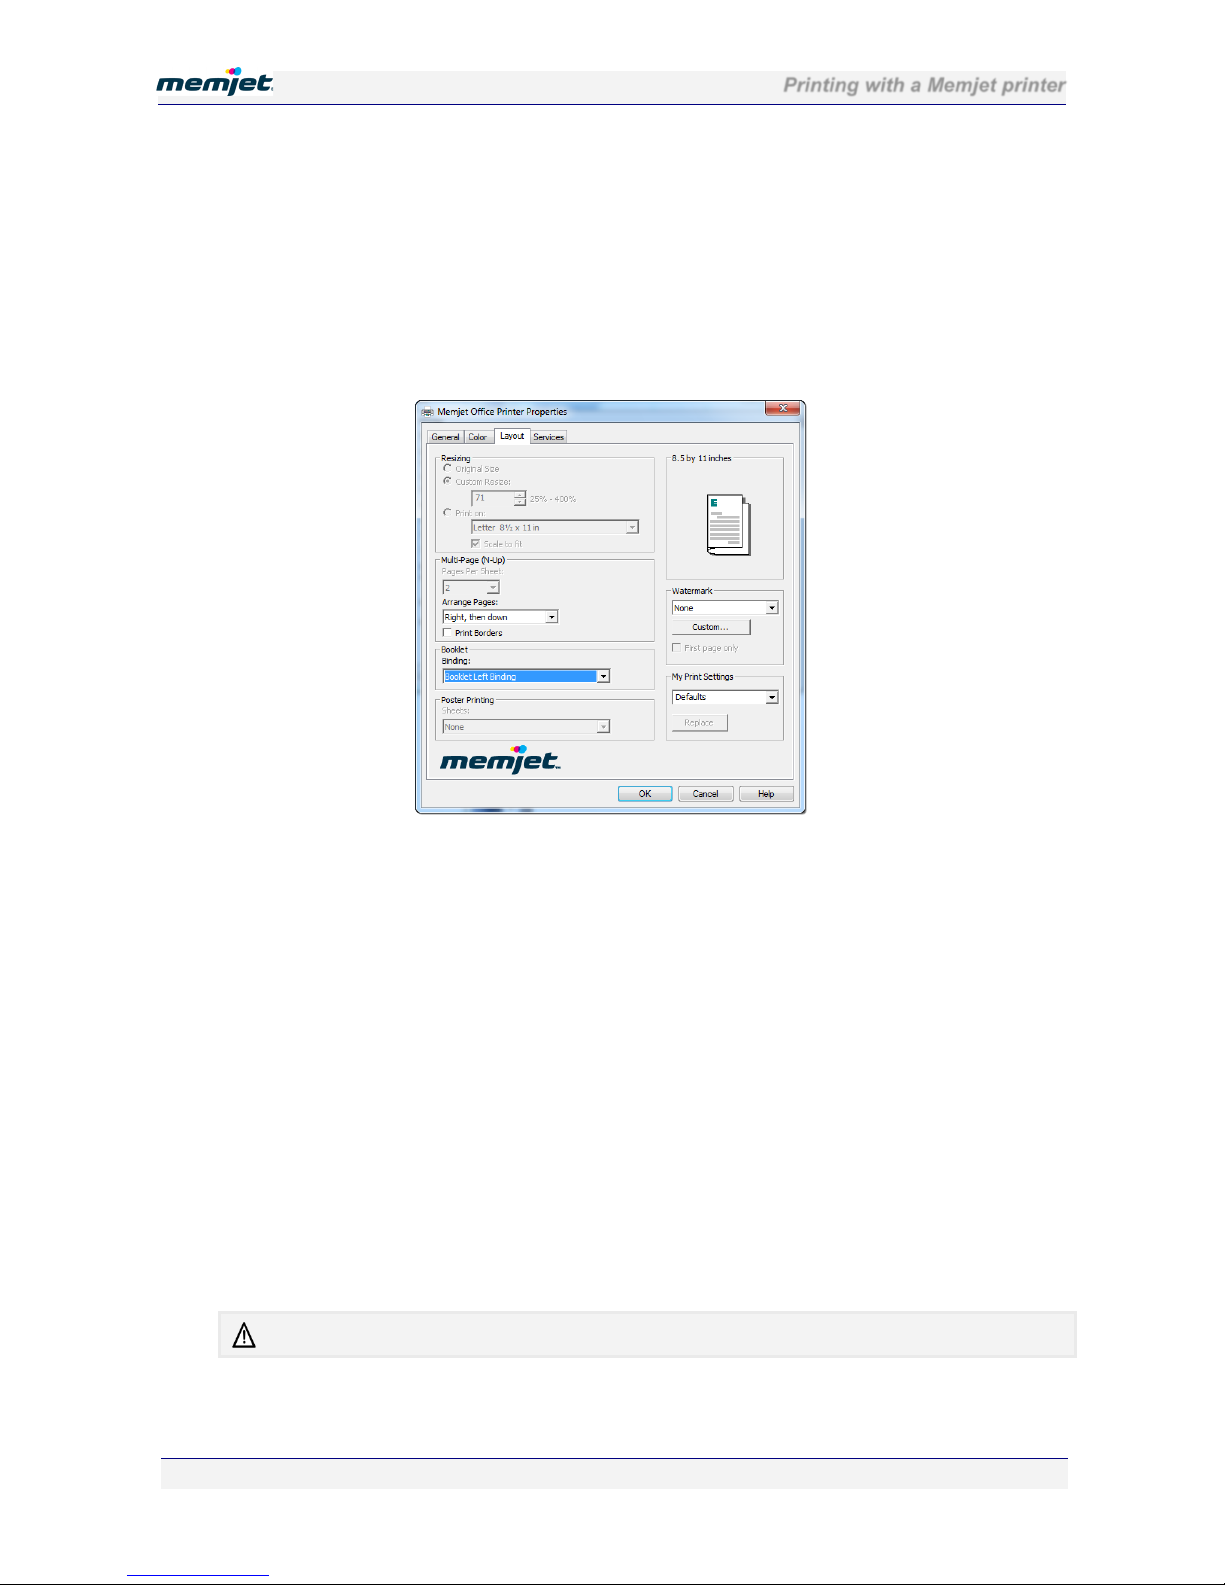
4. In the Layout tab, as shown below, click the Booklet arrow and select Booklet Left
Binding or Booklet Right Binding. See how your binding selection changes the booklet
layout picture in the top right of the dialog box.
5. When you have selected the binding orientation that suits you click OK to save your
settings and exit.
6. Print exactly eight document pages you will see that:
• Two sheets will be printed.
• The OK/Resume button will flash.
• A message window such as Figure 6 will be displayed with instructions.
7. Follow the instructions in the message window. Remove the printed sheets from the
output tray, open the paper tray and insert the printed pages back on top of any other
paper in the tray. DO NOT change the orientation of the paper as you do so.
8. Close the paper tray and press the OK/Resume button
The same two sheets will be printed, on the reverse side.
Fold the two sheets according to the binding orientation you selected in point 5 and examine
your booklet. If it does not match your needs repeat this procedure changing the booklet
binding orientation.
You may combine duplex printing with other allowable options to achieve just the sort of
printout you require.
Remember never to change orientation of the pages when re-inserting them into the paper tray.
Page 68
Printing with a Memjet printer
28 July 2011 - v4.2
Confidential.
Page 68 of 110
• About resizing
When the paper size in your printer does not match the size of your document page, you may
need to use the resizing option.
When resizing, the document page size and the target paper size need to be communicated to
the Memjet printer driver.
To do so you will need to set the appropriate document scaling option in your application
print options dialog box.
For example in Word for Windows (2003) print options dialog box:
Set the Scale to paper size option to the size of the paper in your Memjet printer.
Each application will have a different way of setting this option. Refer to your application
Help documentation for further information.
To print your document on custom size paper see Custom paper sizes on page 62
.
• Using the manual feed tray
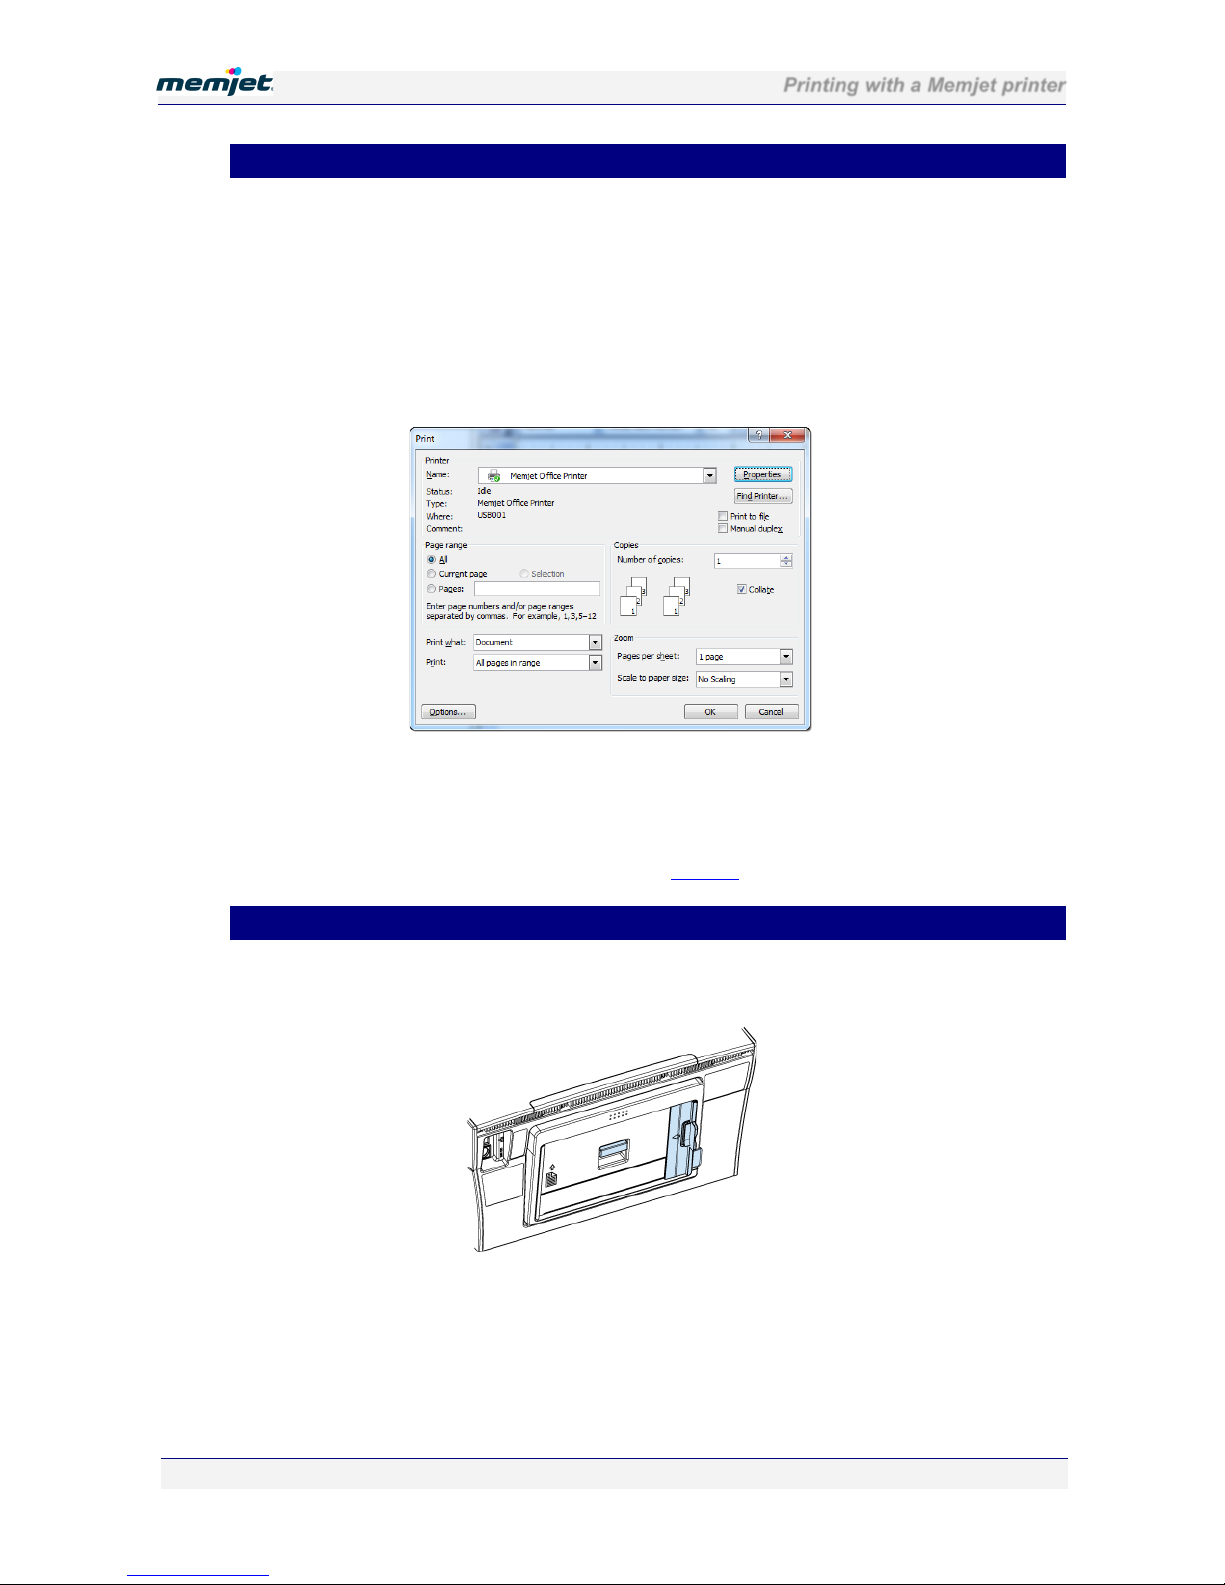
The manual feed tray, found at the rear of the printer as shown here, is intended to handle
paper which cannot be fed from the main input tray.
This generally includes all paper of weight up to 280 gsm (47 lbs coated) and all intermediate
sizes smaller than US Legal.
These must be introduced into the printer one sheet at a time through the manual feed (rear)
tray.
To print from the manual feed tray:
Page 69

Printing with a Memjet printer
28 July 2011 - v4.2
Confidential.
Page 69 of 110
1. Issue a print command from your application.
When the Print dialog box appears, fill out the Page range and other information required
to print your selection and click Properties.
2. Click the Source arrow and select Manual Feed in the Media pane.
3. If you are using custom paper sizes, refer to Custom paper sizes on page 62
.
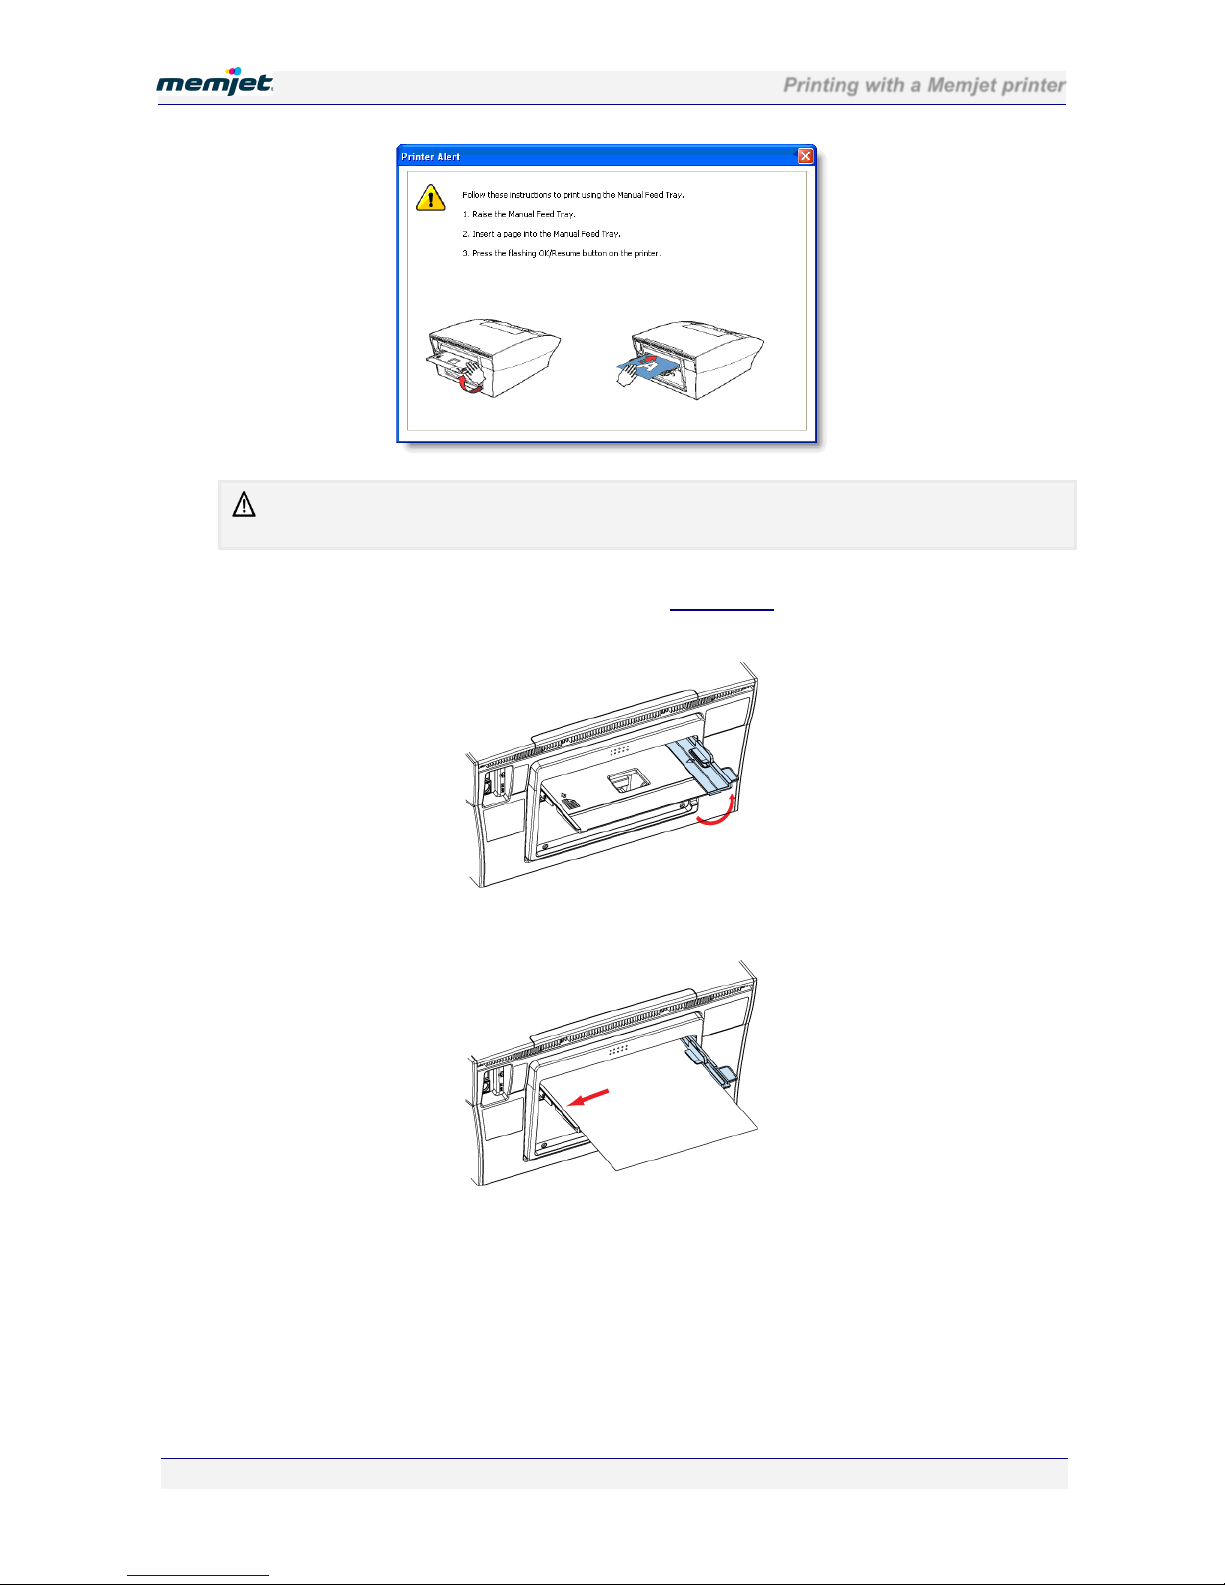
4. The Manual Feed lamp on the Control Panel will flash, waiting for you to insert the
appropriate paper. (See Control Panel on page 16
) and a message with instructions on
how to perform a manual feed will be displayed on your screen, as shown here.
Page 70
Printing with a Memjet printer
28 July 2011 - v4.2
Confidential.
Page 70 of 110
The printer will accept paper from the manual feed tray for a limited period of time. If the Manual
Feed lamp stops flashing you will need to re-send the document to the printer.
5. Follow the instructions outlined in that message. Raise the manual feed tray into position
as shown, using the paper feed Open tab (see Rear Views
– Manual feed tray closed
view on page 12). The tray should lock into place.
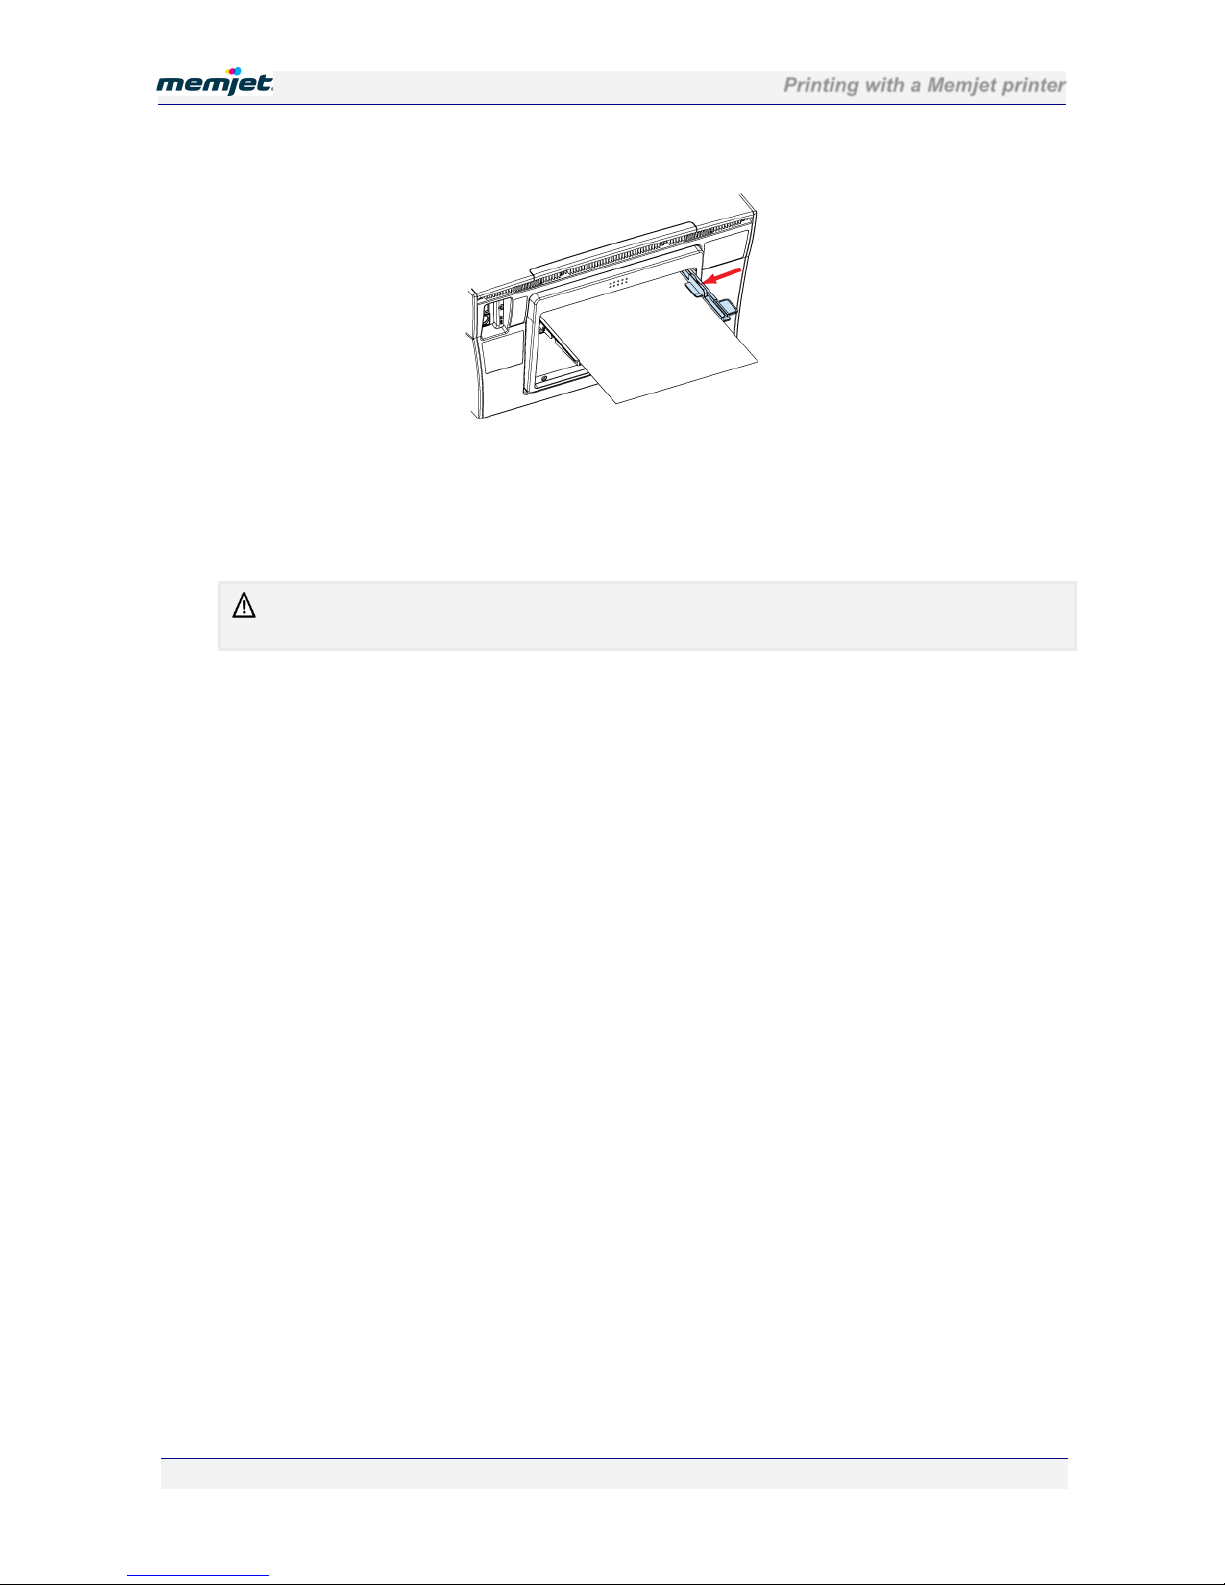
6. Place a single sheet onto the manual feed tray holding it against the left side.
Page 71
Printing with a Memjet printer
28 July 2011 - v4.2
Confidential.
Page 71 of 110
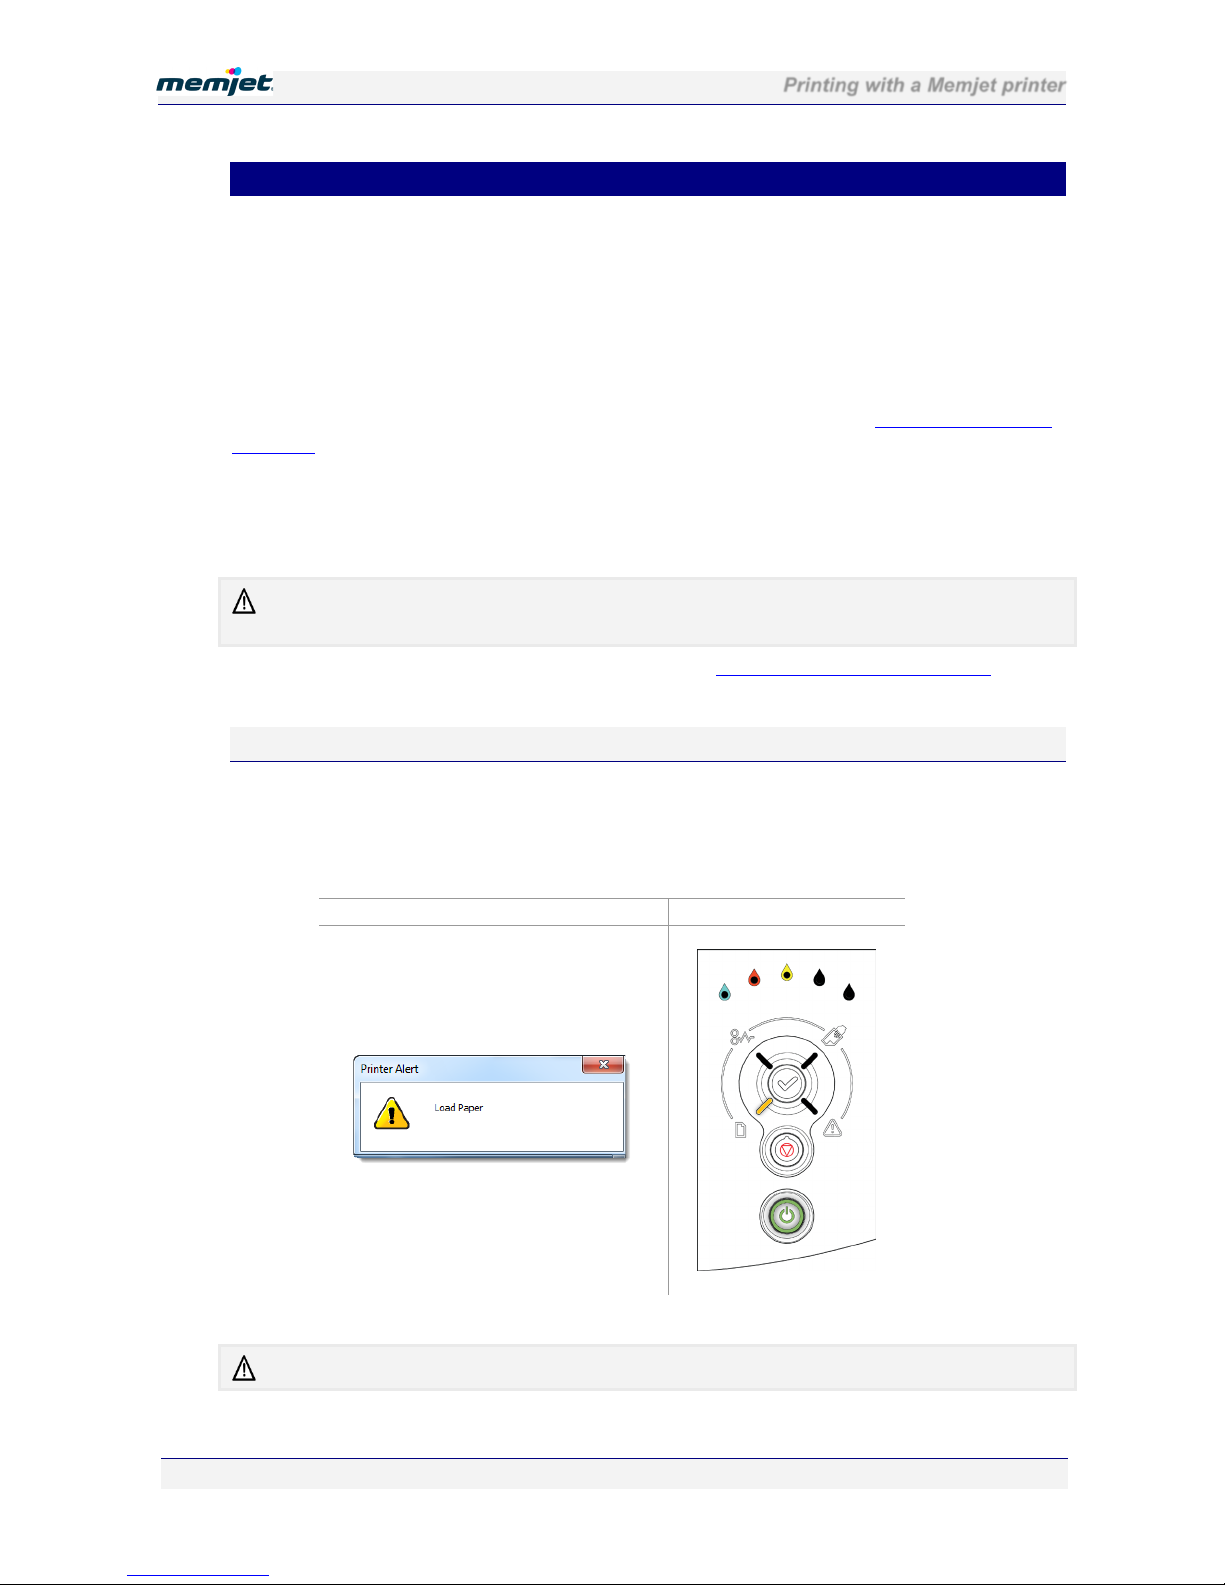
7. Slide the the Width Adjustment guide until it rests against the right side of the sheet.
8. Feed the sheet all the way into the printer and press the OK/Resume button. Release the
sheet when the paper feed picks the sheet and drags it forward.
If your printout requires more sheets, the manual feed lamp will light on the Control Panel
again and the OK/Resume button will blink. Keep feeding sheets until you have finished
printing.
You may lower the manual feed tray flush with the rear of the printer by pushing down on it.
The supporting arms are designed to give way to pressure.
Page 72
Printing with a Memjet printer
28 July 2011 - v4.2
Confidential.
Page 72 of 110
• Common printer messages and alerts
This section covers some of the most common messages and alerts you will encounter in the
course of printing and indicates normal user responses required.
There are two ways in which common printer messages and alerts are communicated:
• Through the Control Panel.
• Through an Alert window on your PC screen.
The Control Panel features a number of lamps which will light when you need to take some
action. You will find the full set of Control Panel lamp configurations in
Control Panel status
messages on page 102.
Alert windows will appear on your PC screen:
• In the lower right corner.
• Always on-top (visible over any other window).
Alert windows carrying critical alerts will not close until you choose to close them and, if closed,
may re-appear at the next print action if the error has not been fixed.
You will find the full set of Alert window messages in Alert windows status messages on
page 103.
Paper Out
Perhaps the most common of the set of conditions you will be encountering, the Paper Out
alert usually indicates your paper tray is empty.
If you attempt to print when there is no paper in the paper tray an Alert window informing
you of that fact will appear, asking you to load paper.
Alert window
Control Panel
On the Control Panel the Paper Out lamp will flash.
Your Memjet printer will not signal an empty paper tray until it is asked to print.
Page 73
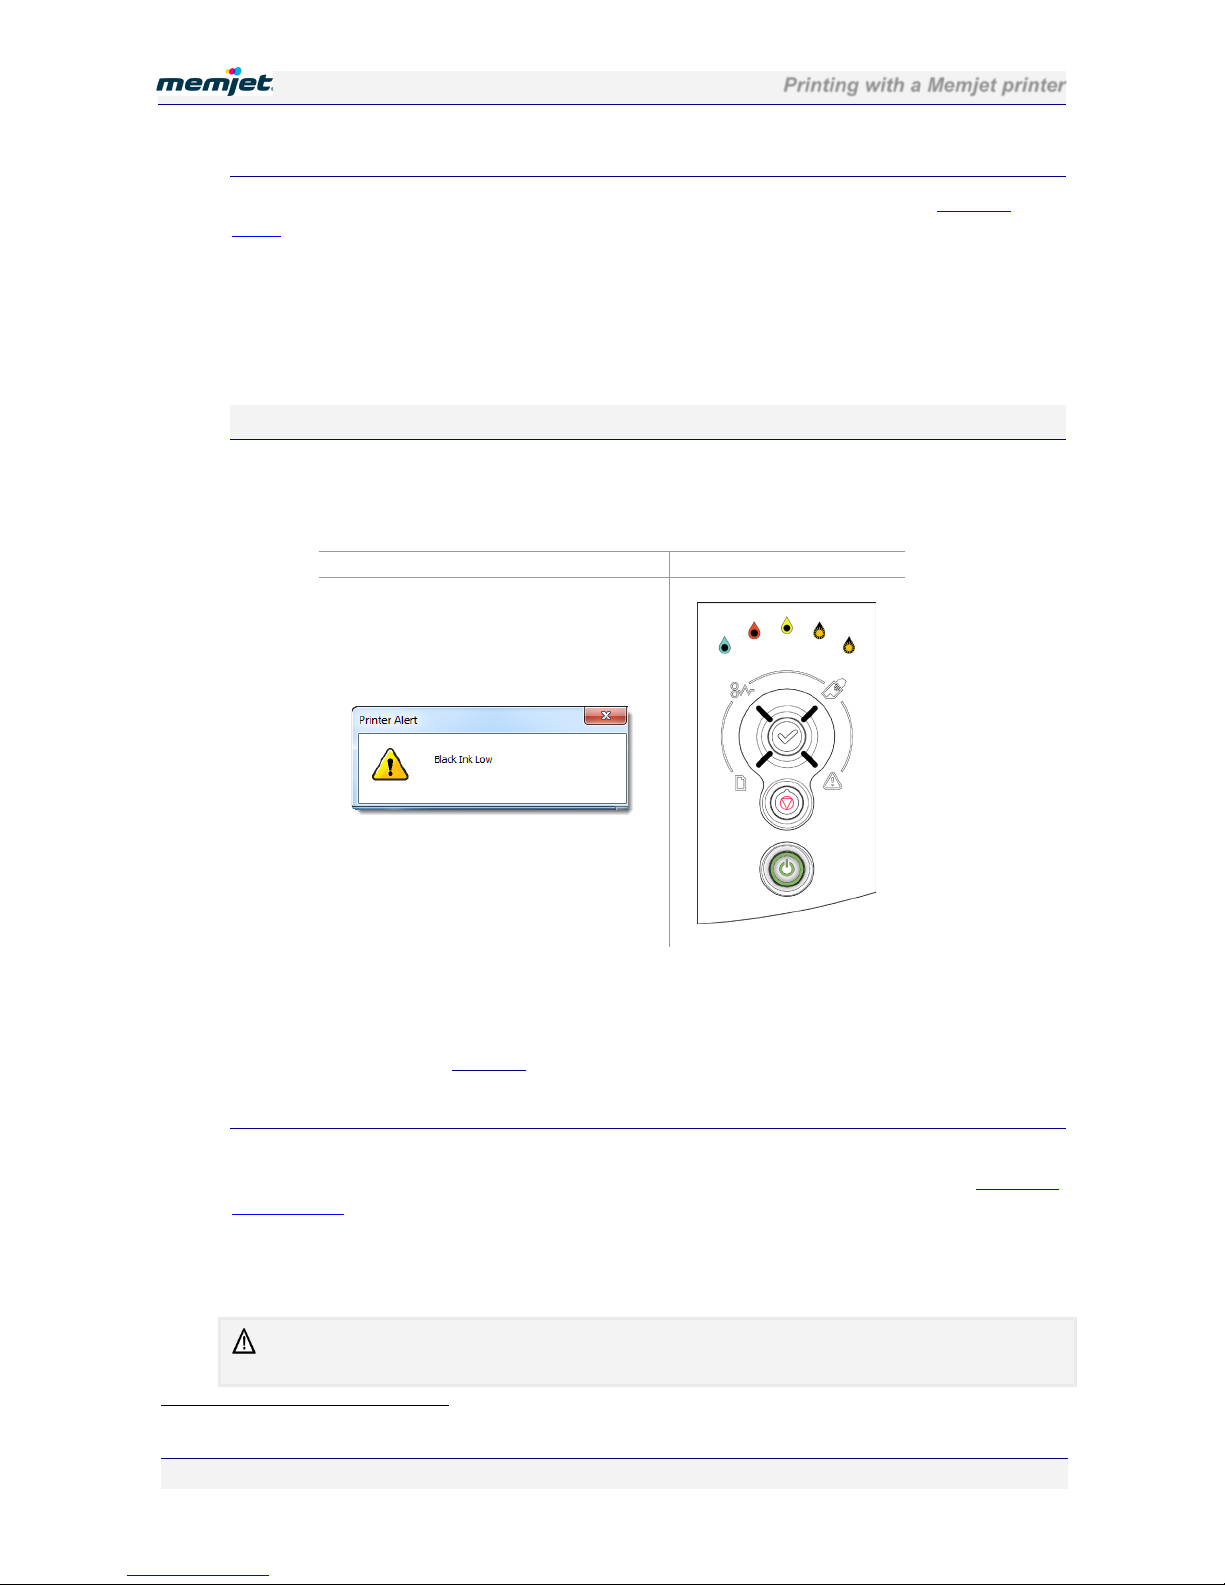
Printing with a Memjet printer
28 July 2011 - v4.2
Confidential.
Page 73 of 110
Action Required:
To remove these alerts, simply refill the paper tray following the instructions in Loading
paper on page 28.
When you re-insert a paper tray containing some paper back into the printer:
• The Paper Out lamp will automatically extinguish.
• The Alert window will disappear.
• the printer will resume printing any print jobs in its print queue.
Ink low
Your Memjet printer uses separate ink tanks for each color.
Whenever you are running low on ink, an alert message will show indicating which color is
running low.
Alert window
Control Panel
On the Control Panel the appropriate ink supply lamp will light (two for Black ink, as shown
here).
If your printer is networked and not within view, you can see the same information from the
Supplies screens in your Toolbox application. See page 80
.
Action Required:
On a Memjet printer this message is only issued when an ink tank is completely empty.
Whenever you see an Ink Low message you should replace ink tanks as needed (see
Installing
the ink tanks on page 20).
You can continue to print for the moment utilising ink still in the printer1, but if the ink runs
out altogether your printer will halt and you will not be able to print until you have replaced
the empty ink tank(s).
When you replace the ink tank, the ink supply lamp on the Control Panel may not be extinguished
for up to 30 seconds.
1
Up to 4% of an ink tank’s volume may be available for emergency printing, held in the ink delivery system.
Page 74
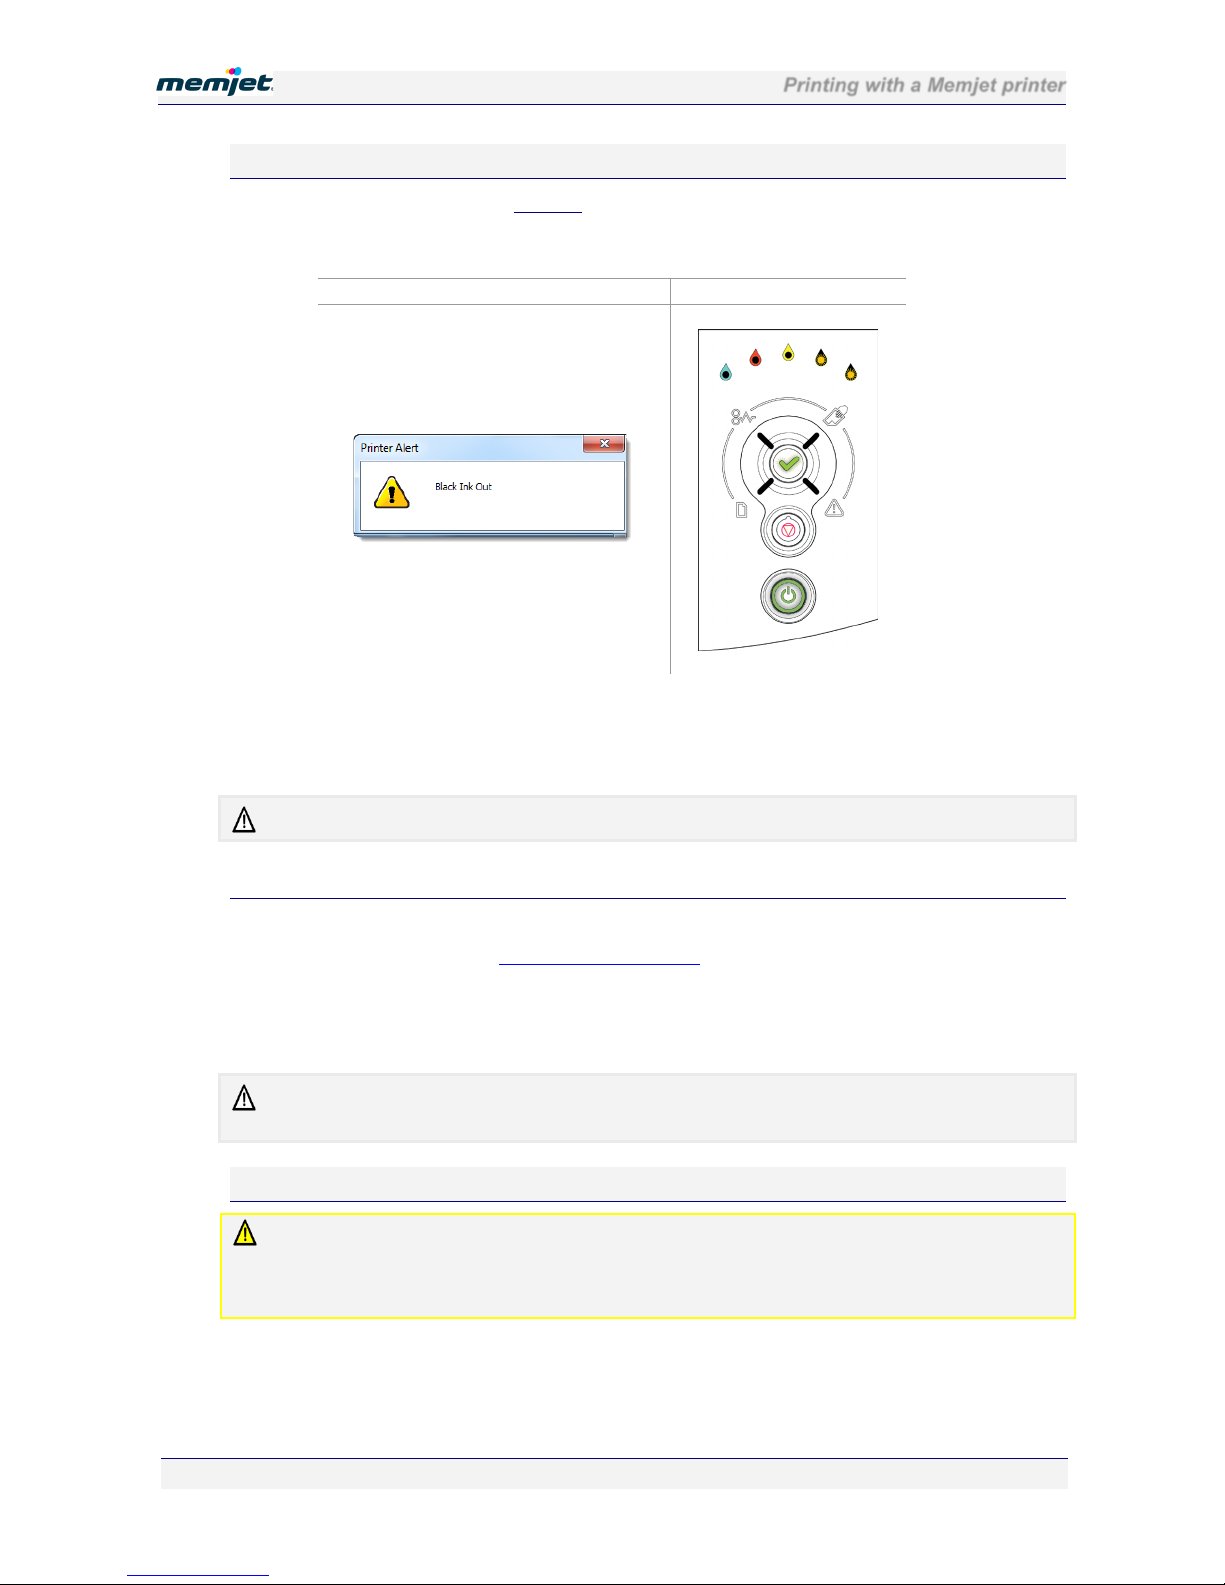
Printing with a Memjet printer
28 July 2011 - v4.2
Confidential.
Page 74 of 110
Out of ink
If you continue to print after an Ink low message, you will eventually run out of ink
altogether, whereupon an Alert message similar to the following will be displayed, and your
printer will stop printing.
Alert window
Control Panel
On the Control Panel:
• one or more color ink supply lamp(s) will be lit and blinking (flashing)
• the OK/Resume button will be flashing.
Once you run out of ink, the printer will not print any longer.
Action Required:
1. Remove the empty ink tanks.
2. Install new ink tanks. See Installing the ink tanks on page 20
.
3. Press the flashing OK/Resume button on your printer.
After a while the ink supply color lamp(s) stop blinking and are extinguished. The printer
then executes a quick flush and any pending print jobs are automatically resumed.
It may take up to one minute for the color lamp(s) and the OK/Resume lamp to stop flashing , as
ink is distributed through the ink delivery structures in your printer.
Paper jam
It is imperative that paper jams and any other cause of printer failure be attended to promptly.
This is to ensure the printhead does not remain uncapped when not printing.
An uncapped printhead may become dehydrated, and even unusable if left in that state for too
long.
When the feed mechanism determines that a sheet has not completed its travel through the
printer and exited correctly, you will be notified and the printer will stop printing until the
error is cleared.
Page 75
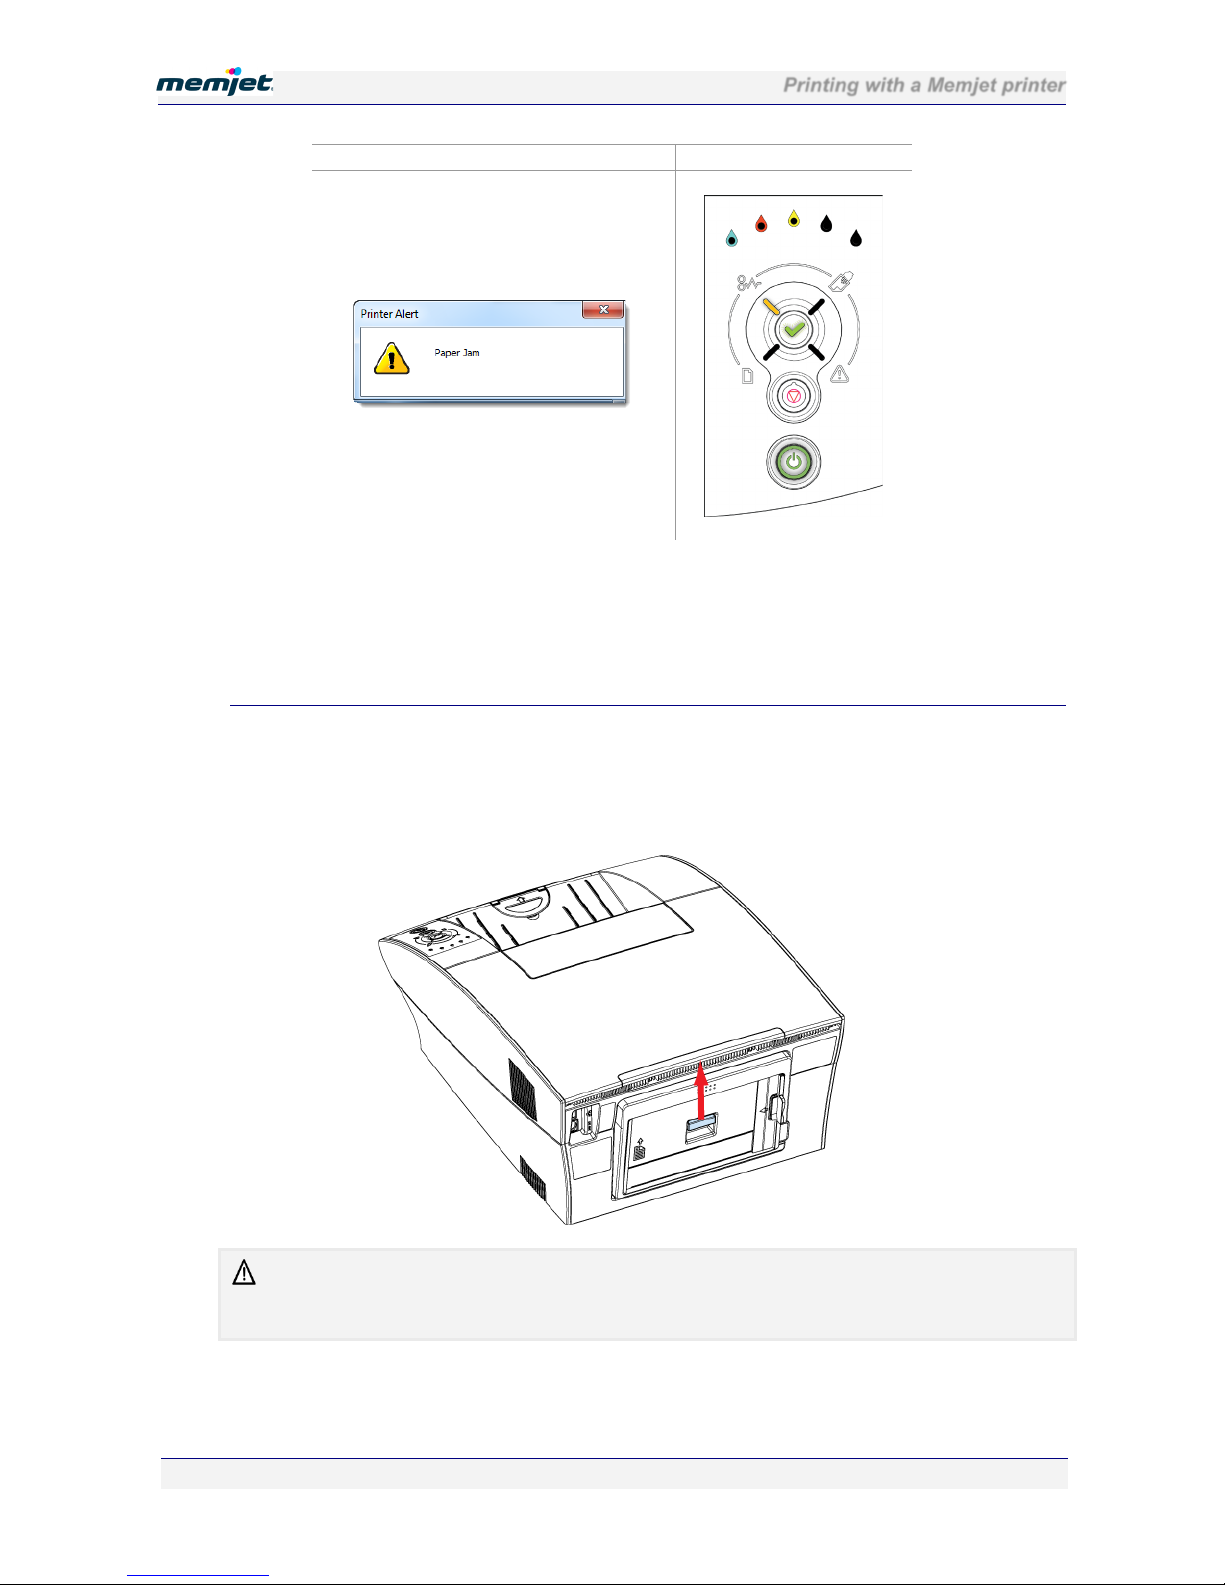
Printing with a Memjet printer
28 July 2011 - v4.2
Confidential.
Page 75 of 110
Alert window
Control Panel
On the Control Panel:
• the Paper Jam lamp will be lit
• the OK/Resume button will be blinking.
Action Required:
1. Look in the output tray, for a jammed sheet of paper.
2. Remove the jammed sheet carefully if found.
3. If the above does not yield results, open the rear access door by pushing up on the door
latch as shown.
You DO NOT need to switch off the printer before opening the rear door. It is quite safe to access
the rear of the printer as there are NO HOT OR ELECTRICALLY CHARGED AREAS
EXPOSED when the rear door is open.
Page 76
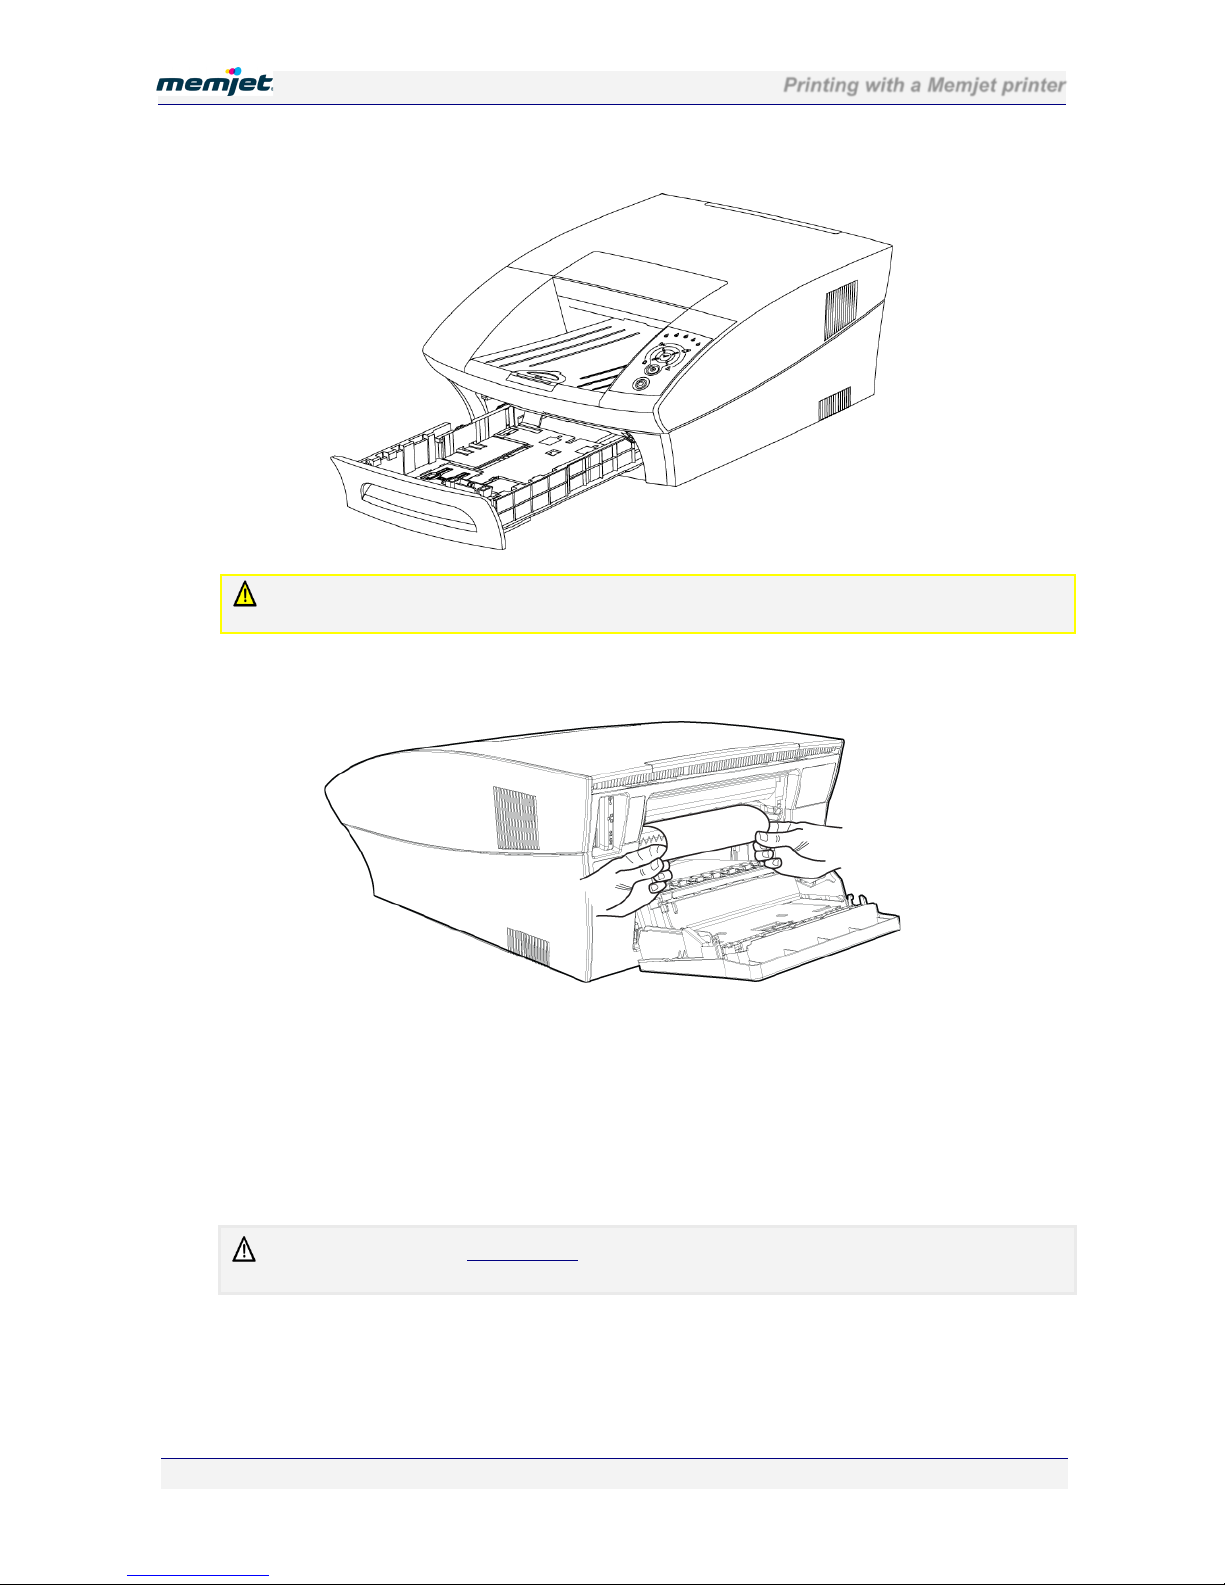
Printing with a Memjet printer
28 July 2011 - v4.2
Confidential.
Page 76 of 110
4. Open the paper tray.
DO NOT re-insert the paper tray until you have finished. Re-inserting the paper tray beforehand
may cause the jammed paper to rip and leave paper scraps in the printer.
5. From the rear opening, grab the paper with both hands and slowly remove it from the
printer, taking care not to tear it.
6. If you cannot see or grab the paper from the rear opening, look for a jammed sheet of
paper in the paper tray area.
7. Remove the jammed sheet carefully from the paper tray if found, taking care not to tear it.
8. Slide the paper tray back into position.
9. Close the Rear Access Door and then press the OK/Resume button to continue printing.
At this point the printer may go through a cycle of printhead cleaning. When ready, all lamps
on the Control Panel, except the Power button, should be extinguished.
If the Alert lamp on the Control Panel comes on, check that you have closed the rear access door
properly. See page 16.
The printer will resume printing your document from the last page printed before the paper
jam..
Page 77
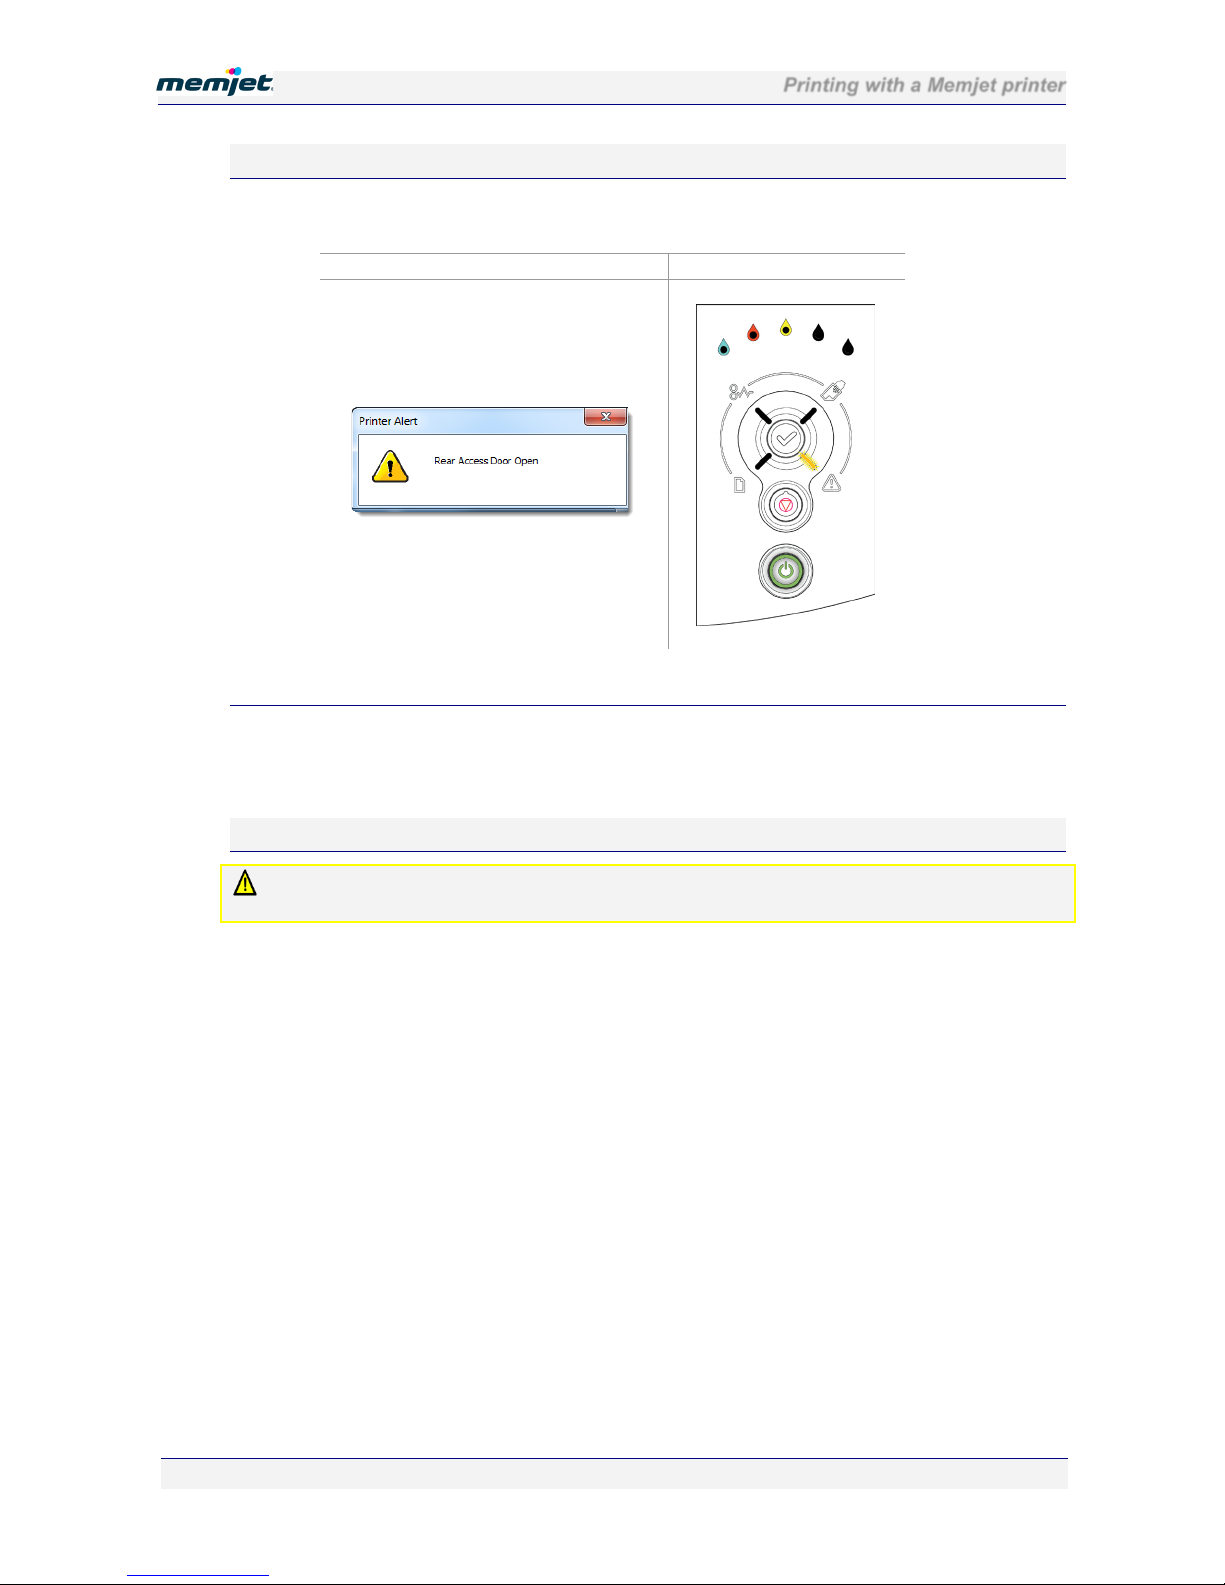
Printing with a Memjet printer
28 July 2011 - v4.2
Confidential.
Page 77 of 110
Rear door open
After removing a paper jam you may notice the Attention lamp may be lit. This is generally
an indication that your rear access door has not closed properly.
Alert window
Control Panel
Action Required:
Close the rear door, ensuring both upper corners of the door are properly shut. This shouls
clear the Control panel error. Any printouts queued to the printer will resume printing and the
Alert window will ce cleared.
Excessive Tilt warning
Do not ignore an Excessive Tilt warning!
Prolonged excessive tilt can cause the printhead to deprime, giving rise to print quality problems.
Your Memjet printer must be located on a level surface. Should this not be the case you will
be notified and the printer will stop printing until the error is cleared. The Attention lamp will
flash and the next time you issue a print command an Alert window will be displayed as
shown below.
Page 78
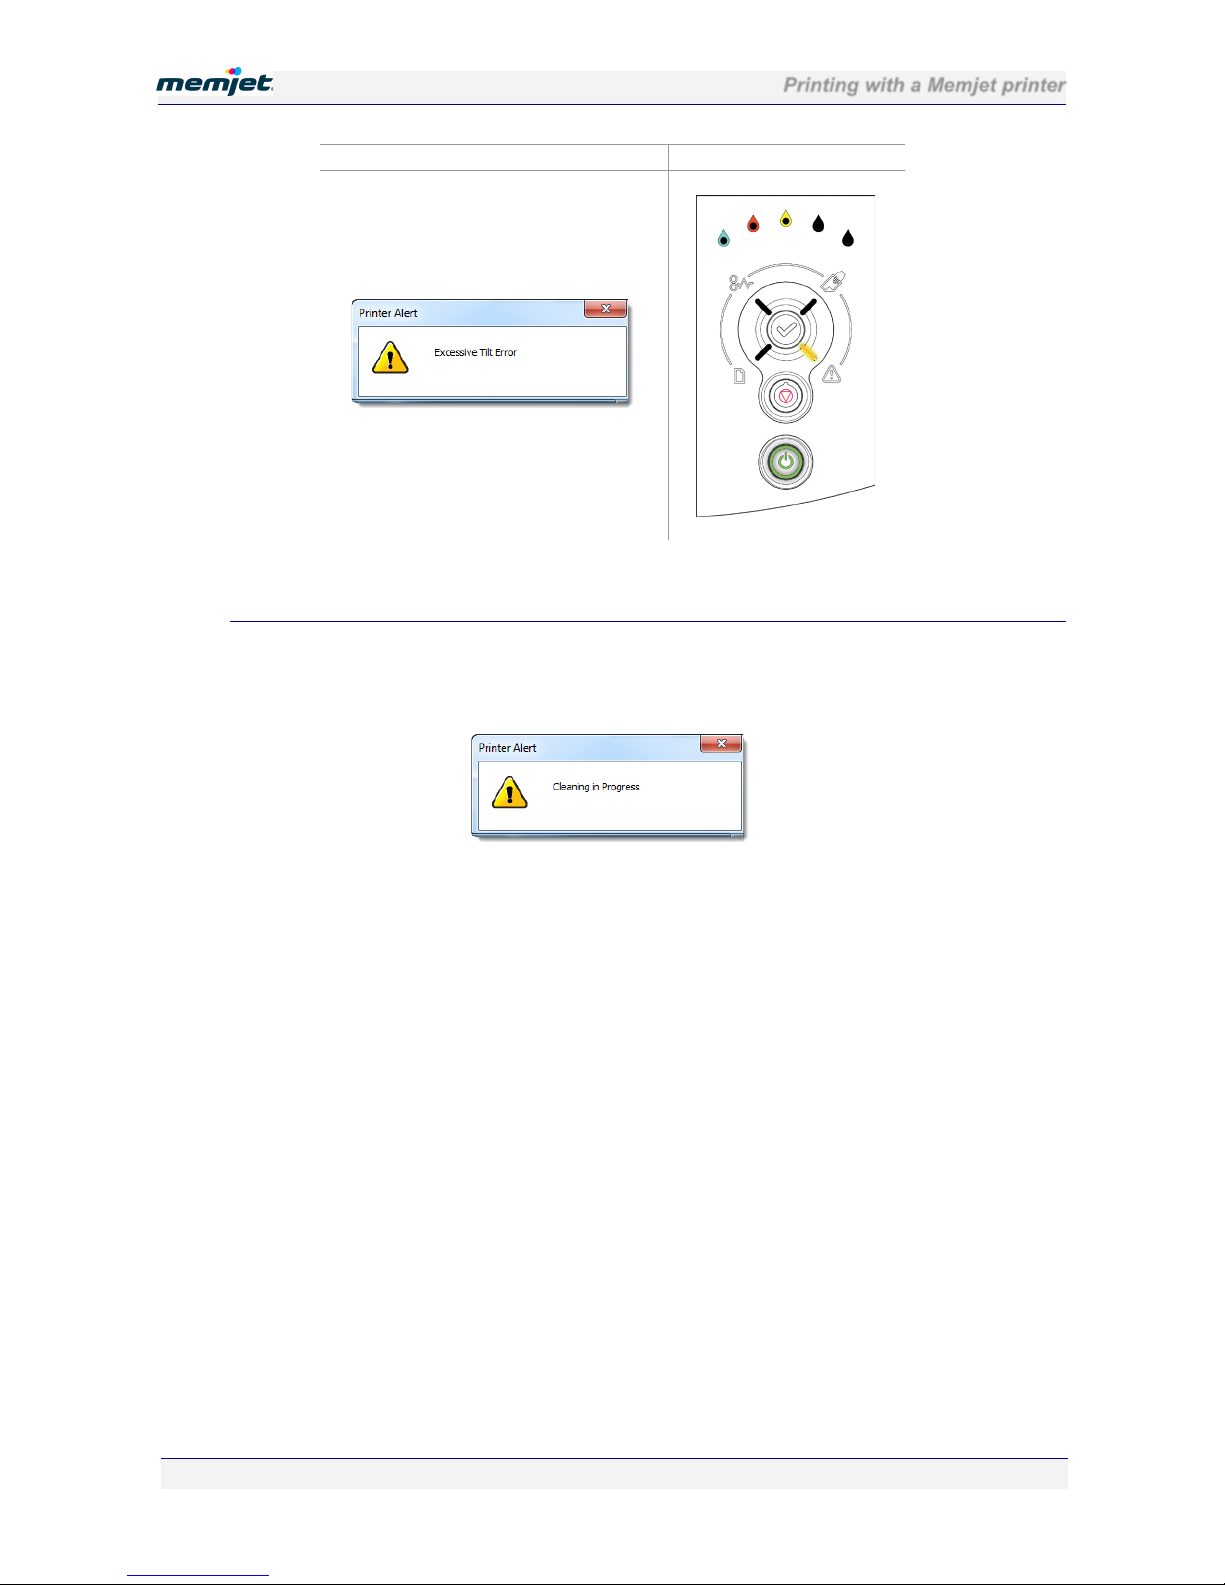
Printing with a Memjet printer
28 July 2011 - v4.2
Confidential.
Page 78 of 110
Alert window
Control Panel
On the Control Panel the Attention lamp will blink.
Action Required:
Your printout will not proceed until the printer is sitting level. Once you have corrected the
tilt of your printer, it will undergo a quick printhead flush and clean, displaying another alert
window as shown here:
Any print command sent when the printer was not level will be ignored. You will need to reissue those print commands after the printer is level.
Page 79
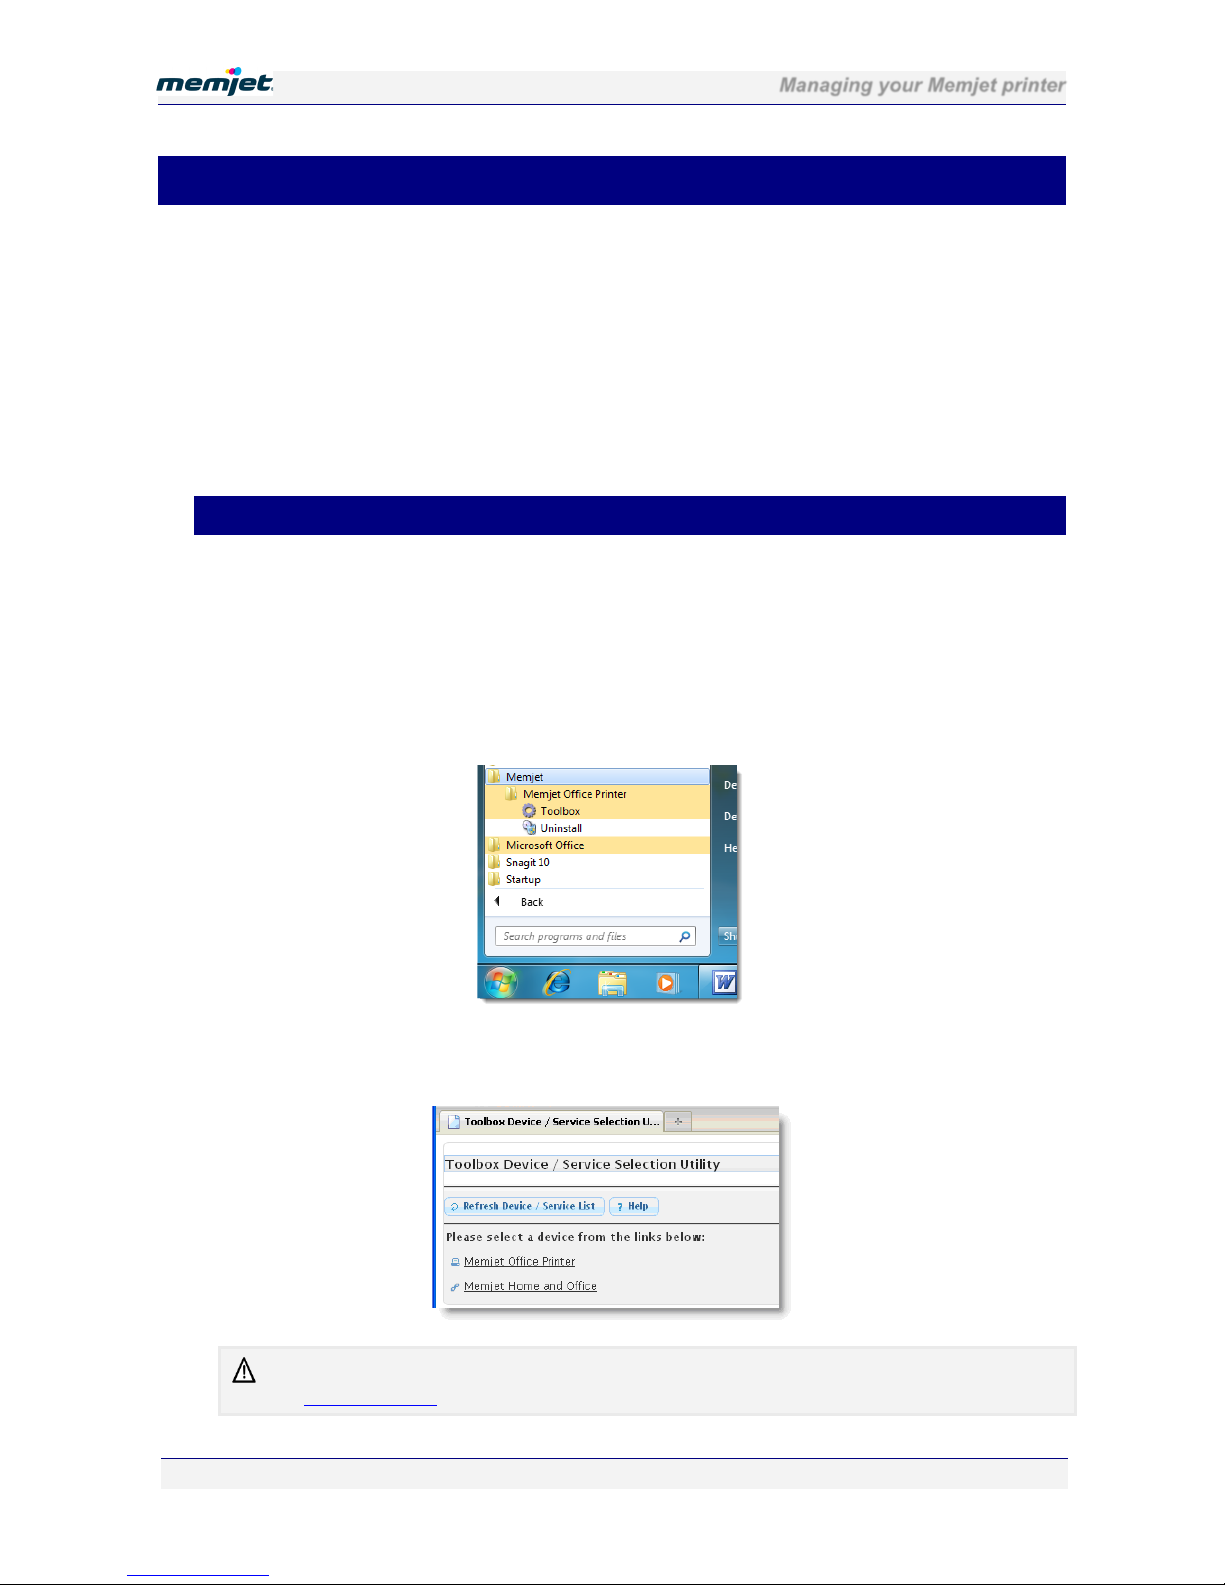
Managing your Memjet printer
28 July 2011 - v4.2
Confidential.
Page 79 of 110
• Managing your Memjet printer
Your Memjet printer comes with an embedded Web Server application, which will allow you
to use your Web browser to query the printer for information and to change some printer
settings.
The application which furnishes these facilities is called the Toolbox application. Toolbox
information pages allow you to:
• view information on printer supplies and usage
• view and change current printer settings
• perform some simple troubleshooting.
• Accessing the Toolbox application
You may use the Toolbox application on both local printers (connected via a USB cable) and
network-connected Memjet printers.
To access the Toolbox application from your PC:
1. Click the Windows Icon on your toolbar.
2. Starting from All Programs if necessary, navigate to the Toolbox application as shown
here:
3. The Toolbox Device/Service Selection Utility Page is displayed in your default Web
browser.
If the Web page displays the following message: "Internet Explorer cannot display the webpage"
see Troubleshooting on page 96.
Page 80
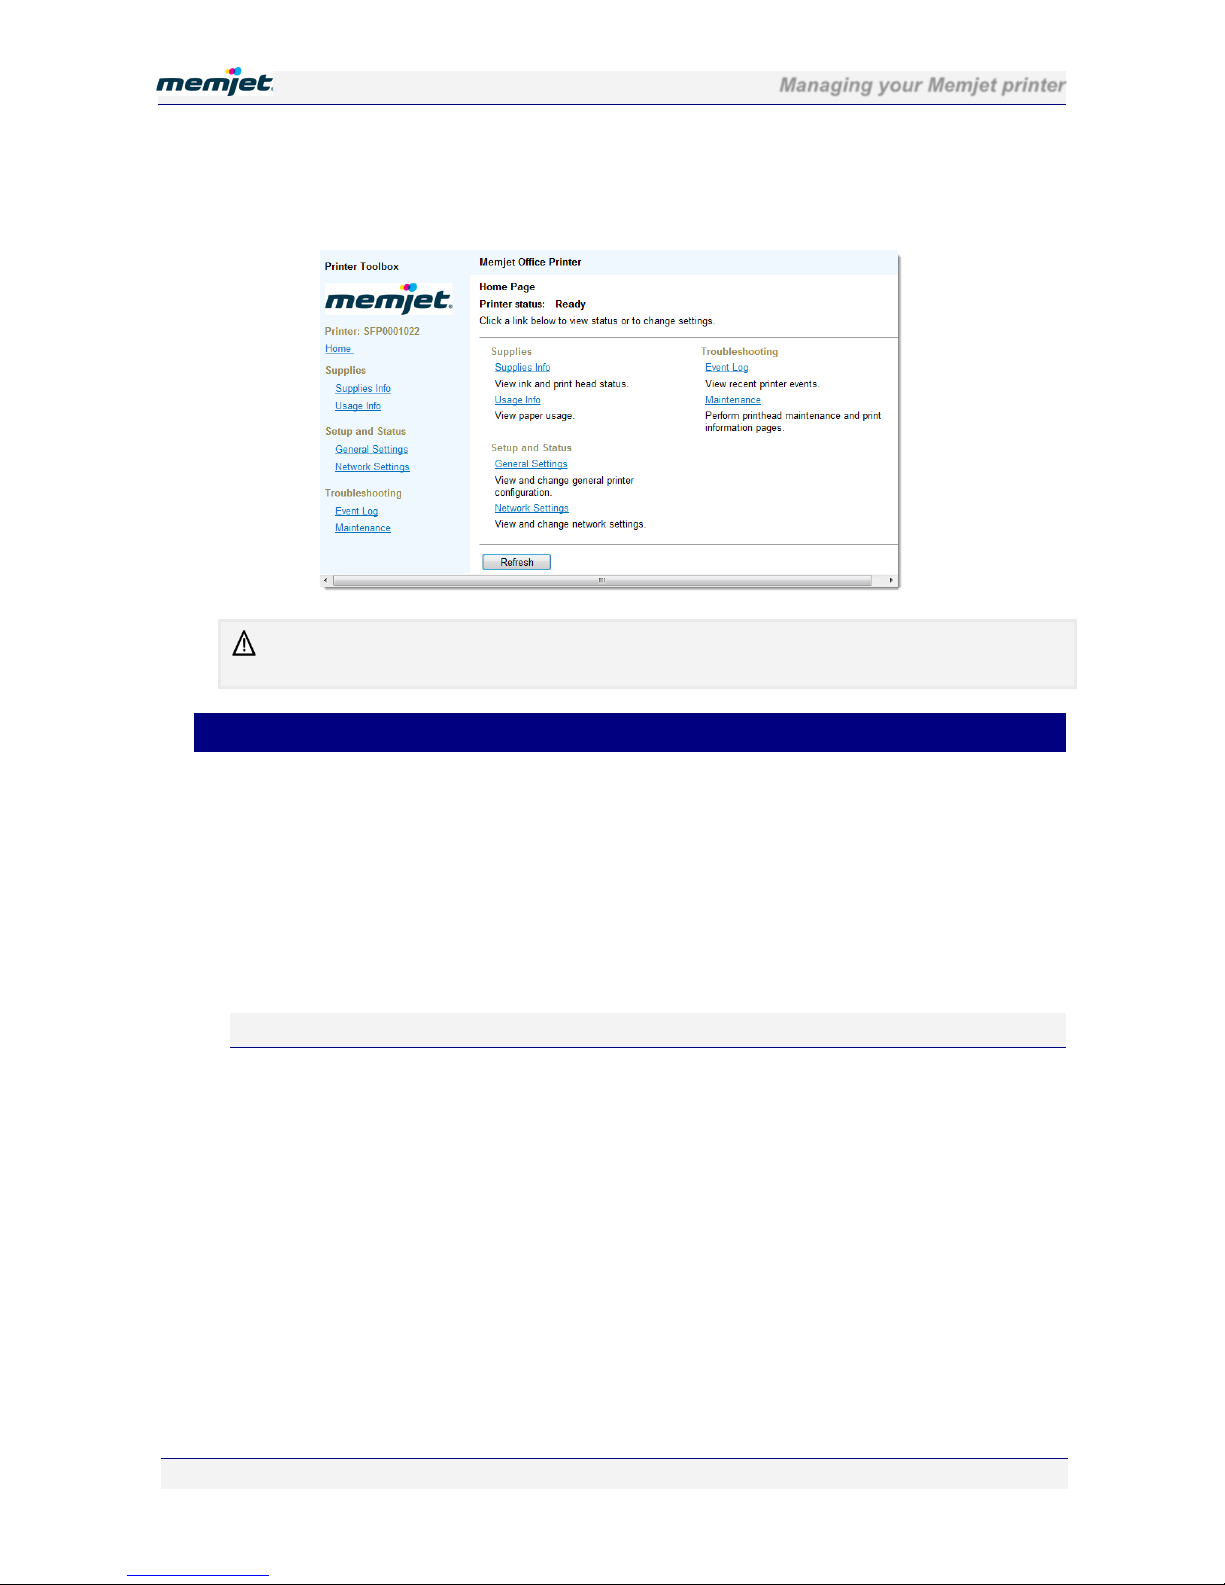
Managing your Memjet printer
28 July 2011 - v4.2
Confidential.
Page 80 of 110
4. Select your printer from the set of attached devices listed on that page and click it. In the
above screen the Memjet printer is listed as Memjet Office Printer as shown above.
5. The Home Page will be displayed, similar to that shown below.
There may be minor variations in layout depending on your supplier and the browser you are
using.
• Toolbox information screens
Toolbox information screens are accessed through hyperlinks found in the Home page. For
these hyperlonks to work, ensure you have Javascript enabled.
Specifically, if you cannot access information screens in Internet Explorer (IE) under
Windows 2003/2008 you will need to lower the Security setting in IE to allow Javascript to
run. See the Help documentation for details on how to do so in your version of IE.
The following information is currently available through the Toolbox information screens.
Navigation instructions all commence from the Toolbox Home Page.
Supplies information
The Supplies Information page shows a summary of your current ink and printhead pages.
To access the Supplies page from the Home Page click Supplies Info.
Page 81
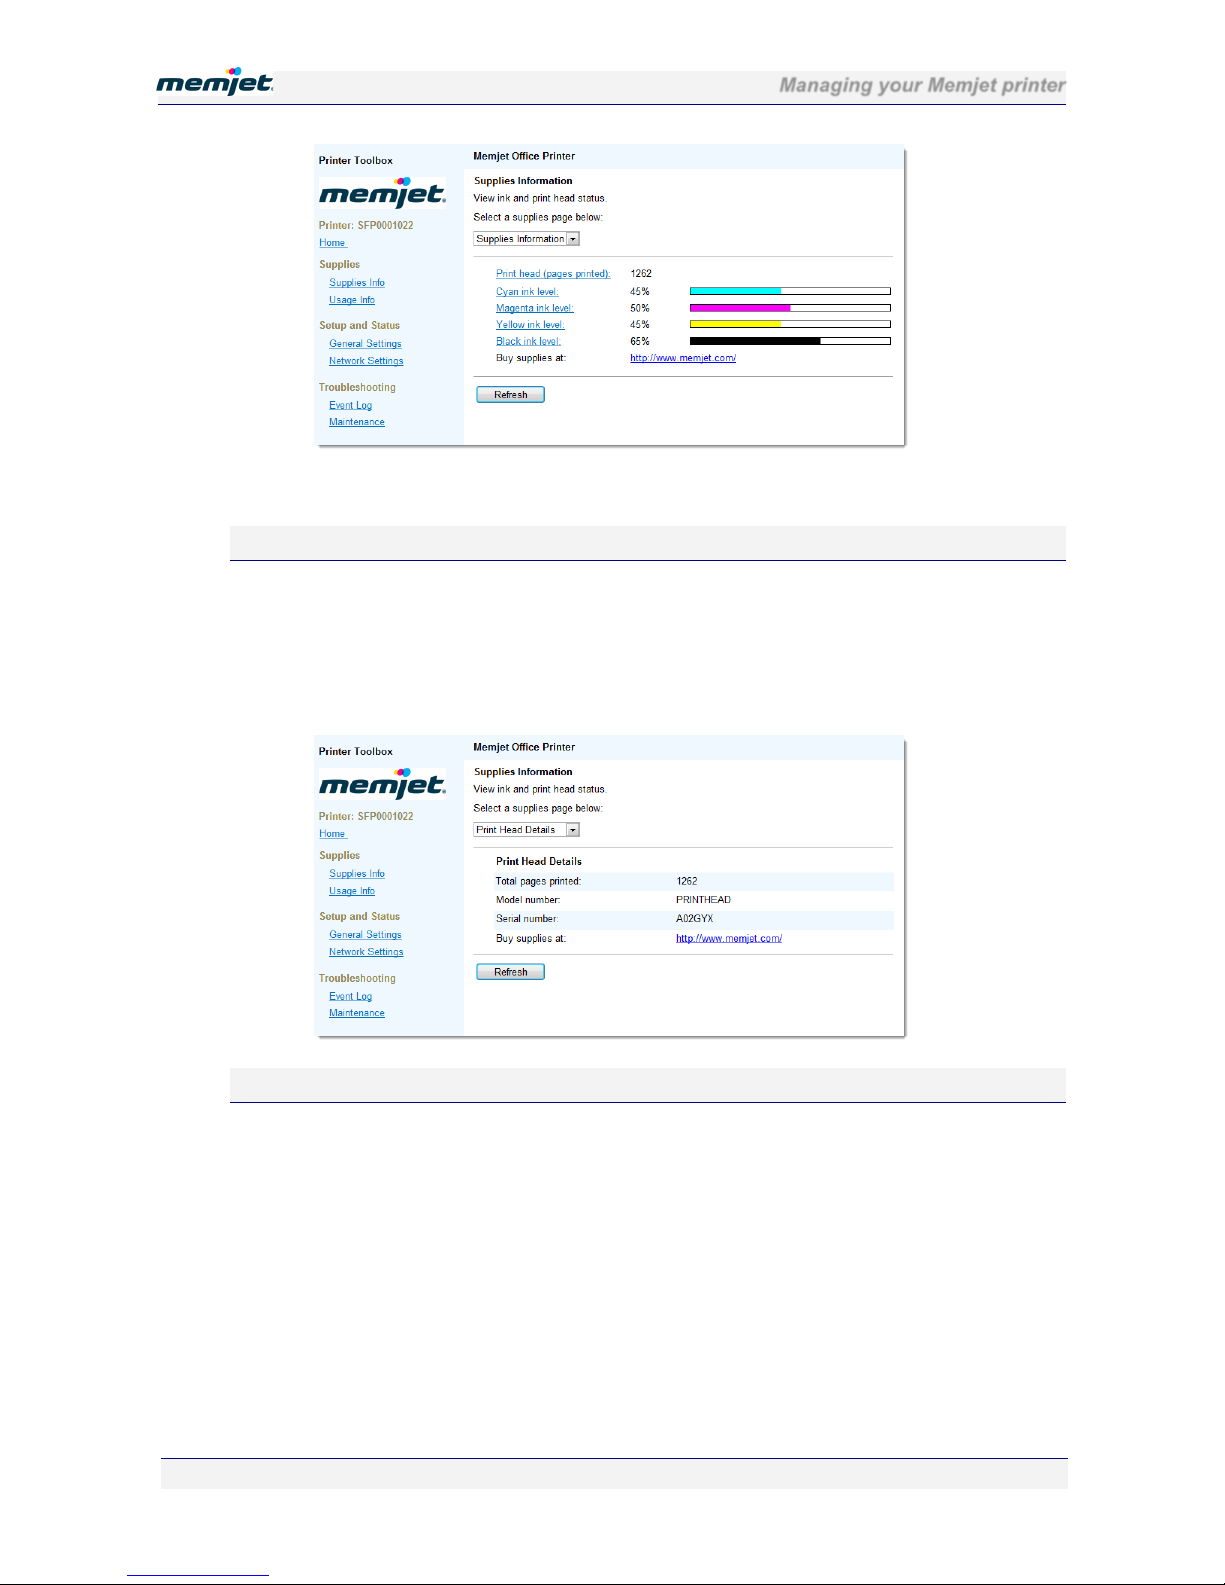
Managing your Memjet printer
28 July 2011 - v4.2
Confidential.
Page 81 of 110
The percentages displayed on this page are accurate to the nearest five percent.
Printhead details
The Printhead Details information page shows usage and identification details as well as a
link to your printhead supplier’s Web page, as shown below.
To access the Printhead Details page from the Home Page navigate to the Supplies page then
either click Print head (pages printed) or select Print Head Details from the Select a
Supplies Page arrow.
Ink details
An information page for each ink color is provided. Each page shows the amount of ink
remaining (accurate to about 5%), ink tank information and your ink tank supplier’s Web
page.
To access an Ink detail information page from the Home Page, navigate to the Supplies page,
then click one of the Ink Level links or select one of the Ink Details color from the Select a
Supplies Page arrow. The Black Ink Information page is shown below.
Page 82
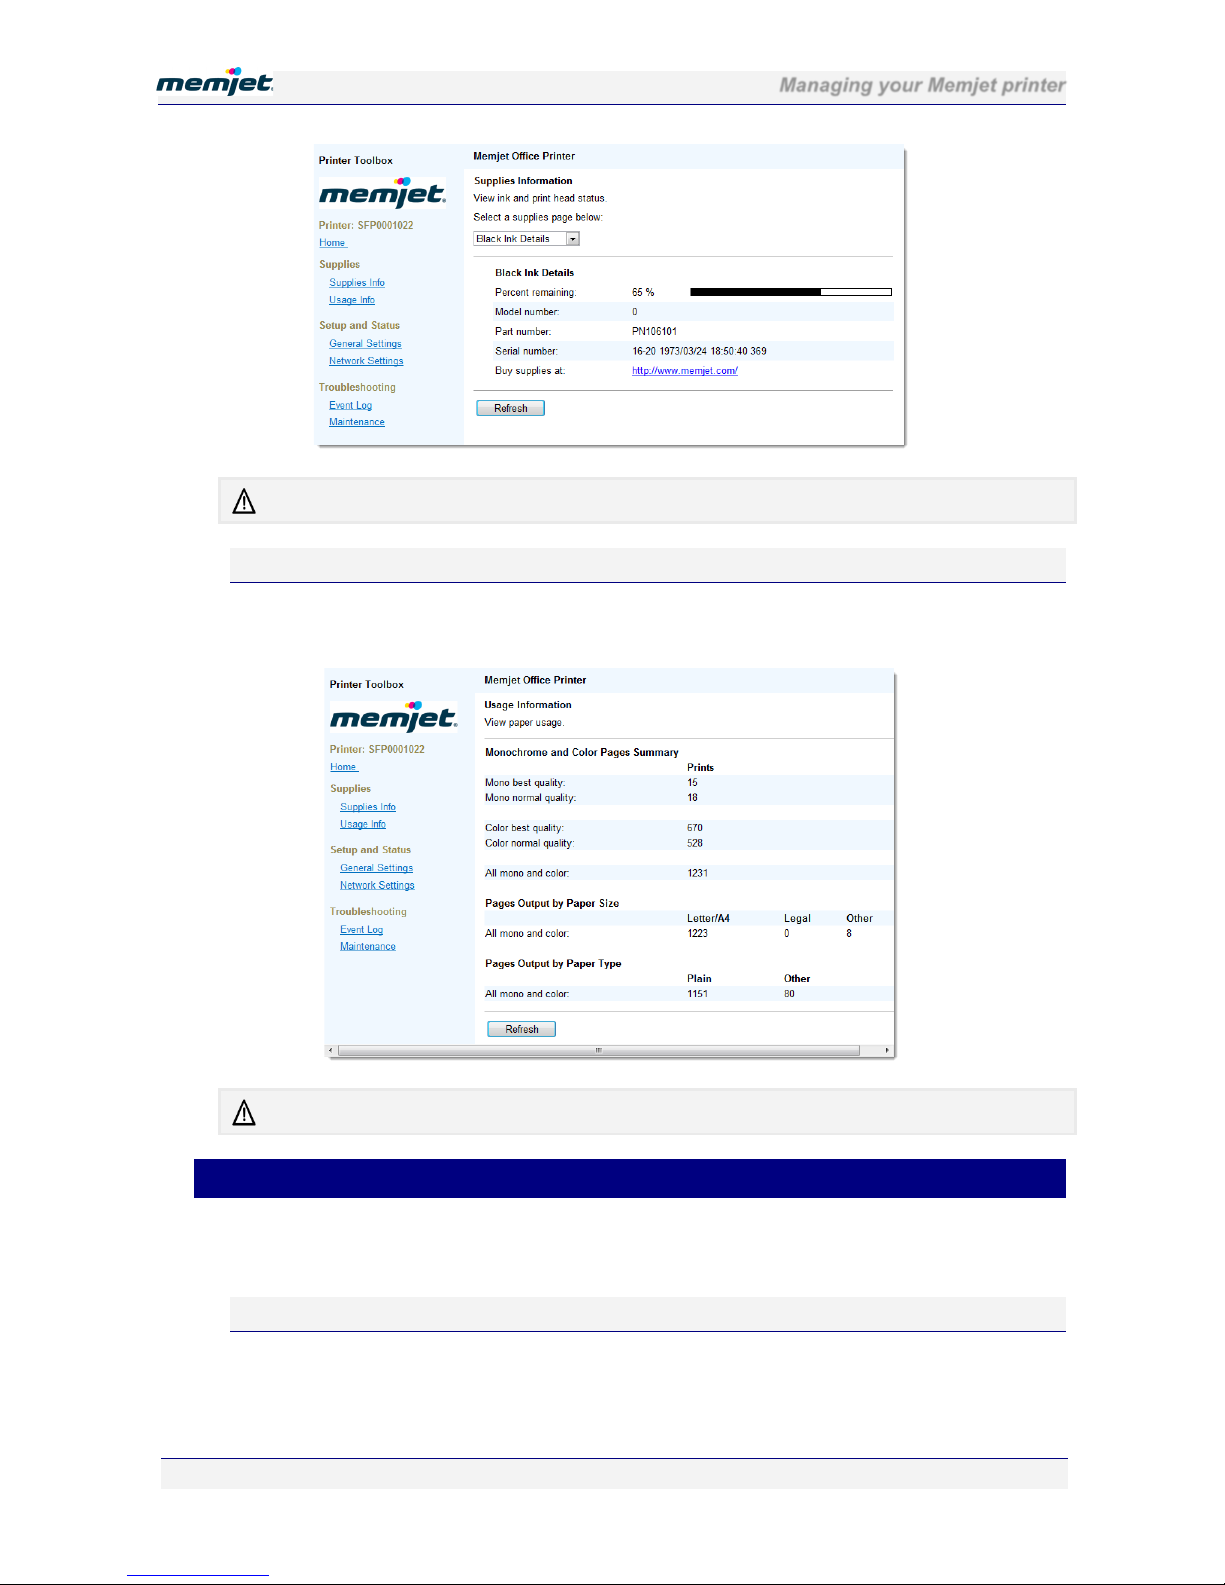
Managing your Memjet printer
28 July 2011 - v4.2
Confidential.
Page 82 of 110
Information displayed on this page may vary depending on your supplier.
Usage information
Information on the number and type of pages printed is displayed in the Usage Information
page. To access the Usage Information page from the Home Page select Usage Info.
Information displayed on this page may vary depending on your supplier.
• Toolbox settings screens
Using these screens, various printer and network settings may be viewed, and some settings
changed.
General Settings
The printer configuration settings information provided on this screen may be required when
you are seeking support.
Page 83
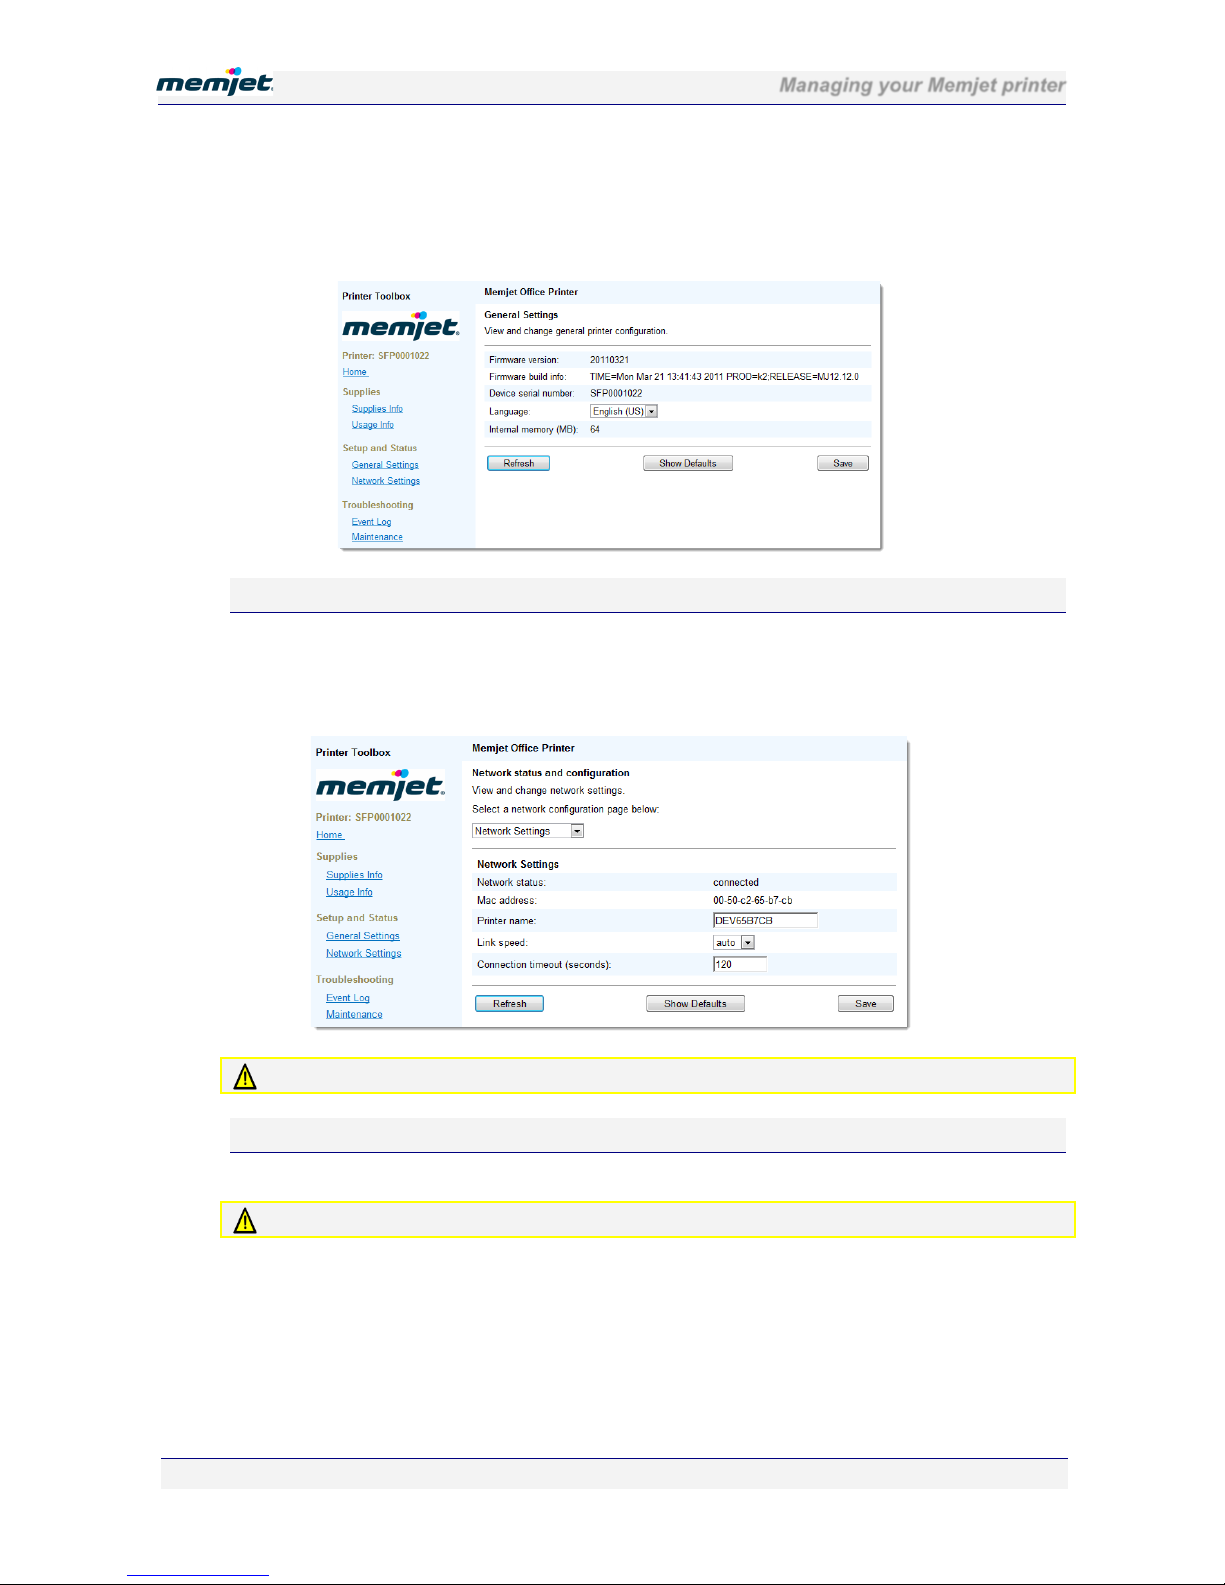
Managing your Memjet printer
28 July 2011 - v4.2
Confidential.
Page 83 of 110
Using this screen you may also change the language used in all Toolbox screens. To do this
click the Language arrow and select your language, then click Save. Your printer driver
language will not be affected by this change.
To access the General Settings page from the Home Page select General Settings.
Network Settings
This screen allows you to view and change basic network status and configuration settings of
your printer.
To access the Network Settings page from the Home Page select Network Settings.
Do not change these settings.
IP Configuration settings
This screen allows you to view and change IP configuration settings on your printer.
Changing printer settings through this screen may cause your printer to become unusable.
To access the IP Configuration settings page from the Home Page select Network Settings,
then click the Select a Network Configuration Page arrow and select IP Configuration.
Page 84
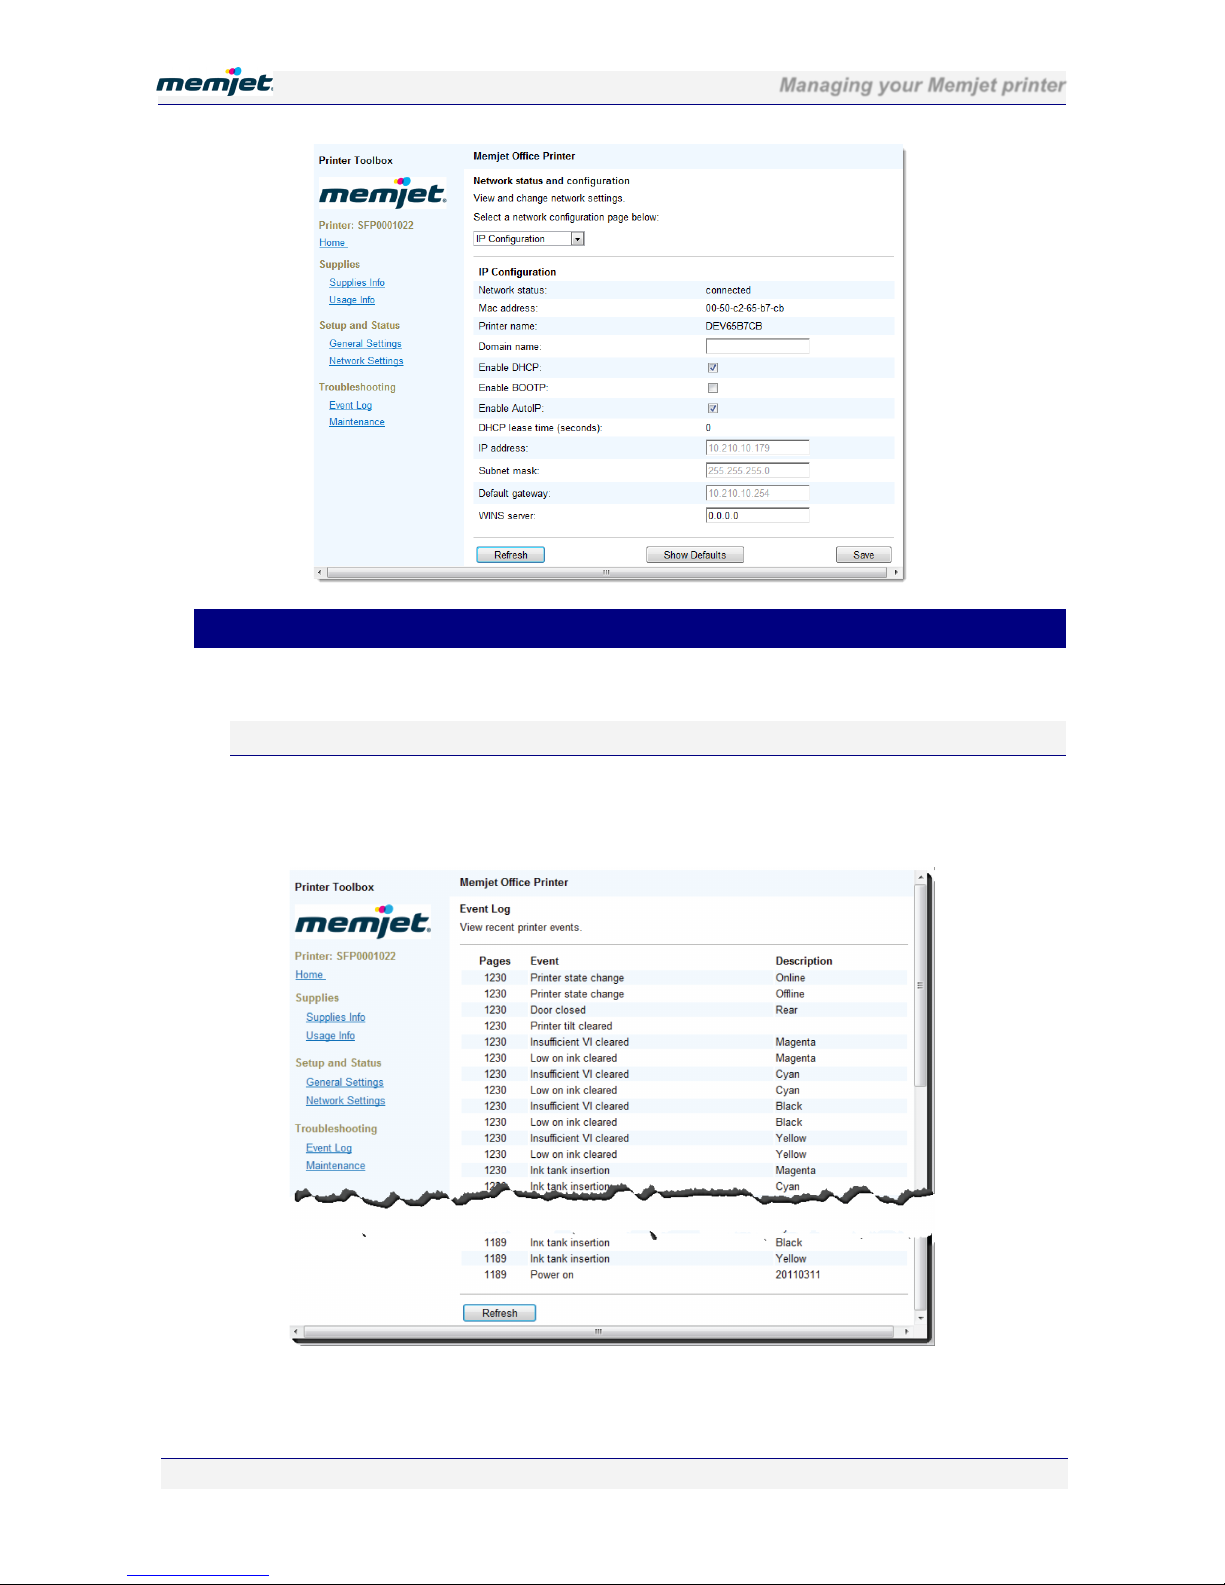
Managing your Memjet printer
28 July 2011 - v4.2
Confidential.
Page 84 of 110
• Toolbox Troubleshooting screens
The following screens may help in troubleshooting problems with your Memjet printer.
Event Log
Your Memjet printer logs errors into a special buffer in printer memory. The Event Log
screen displays any errors that have beeen logged by the printer as it responds to your
commands, or performs maintenance functions.
This window will list the last 100 events that have occurred. If you need to contact support
personnel, you may be asked to open this windows on your PC.
Page 85
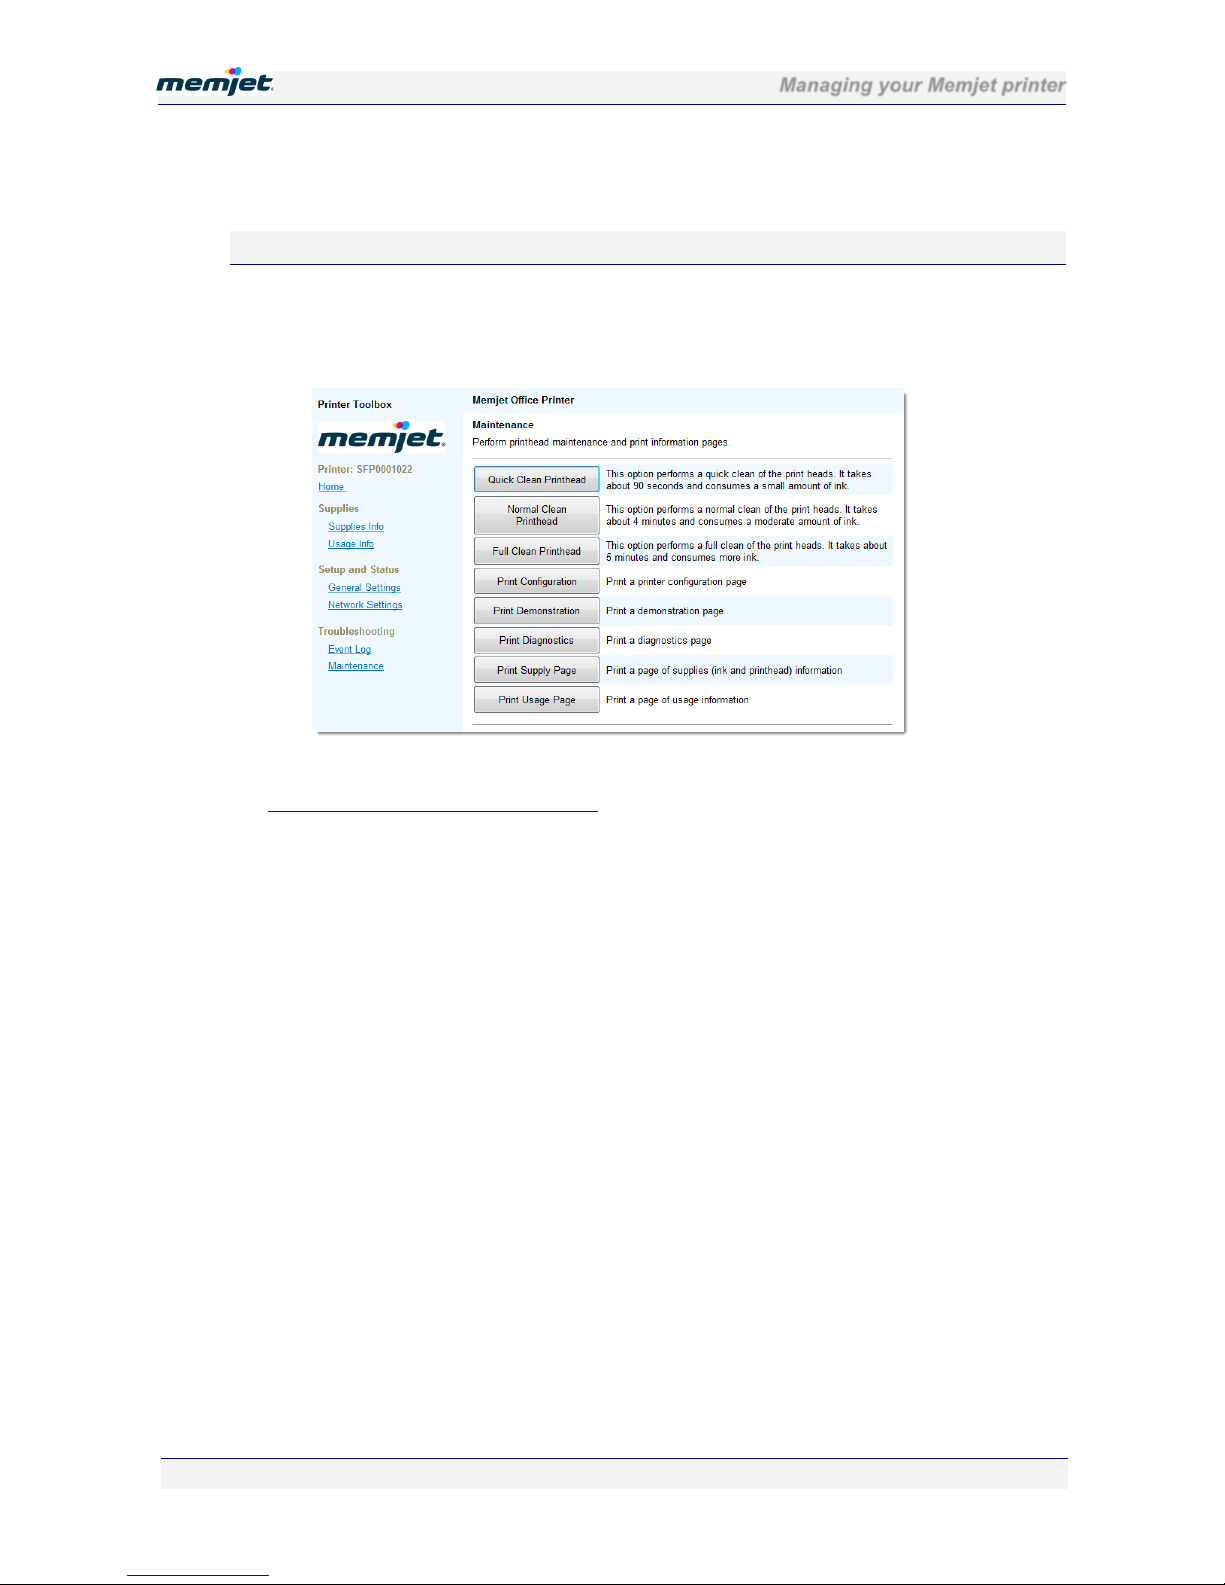
Managing your Memjet printer
28 July 2011 - v4.2
Confidential.
Page 85 of 110
To access the Event Log page from the Home Page, select Event Log.
Maintenance
The Maintenance page allows you to clean the printhead and print various diagnostic pages
that can be useful in determining printer problems and helping to solve them.
To access the Maintenance page from the Home Page select Maintenance.
For information on how and when to use the various Clean Printhead buttons refer to
Printhead cleaning using the Toolbox on page 88
.
The remaining buttons shown above allow you to print much of the information contained
in the previous screens.
Page 86
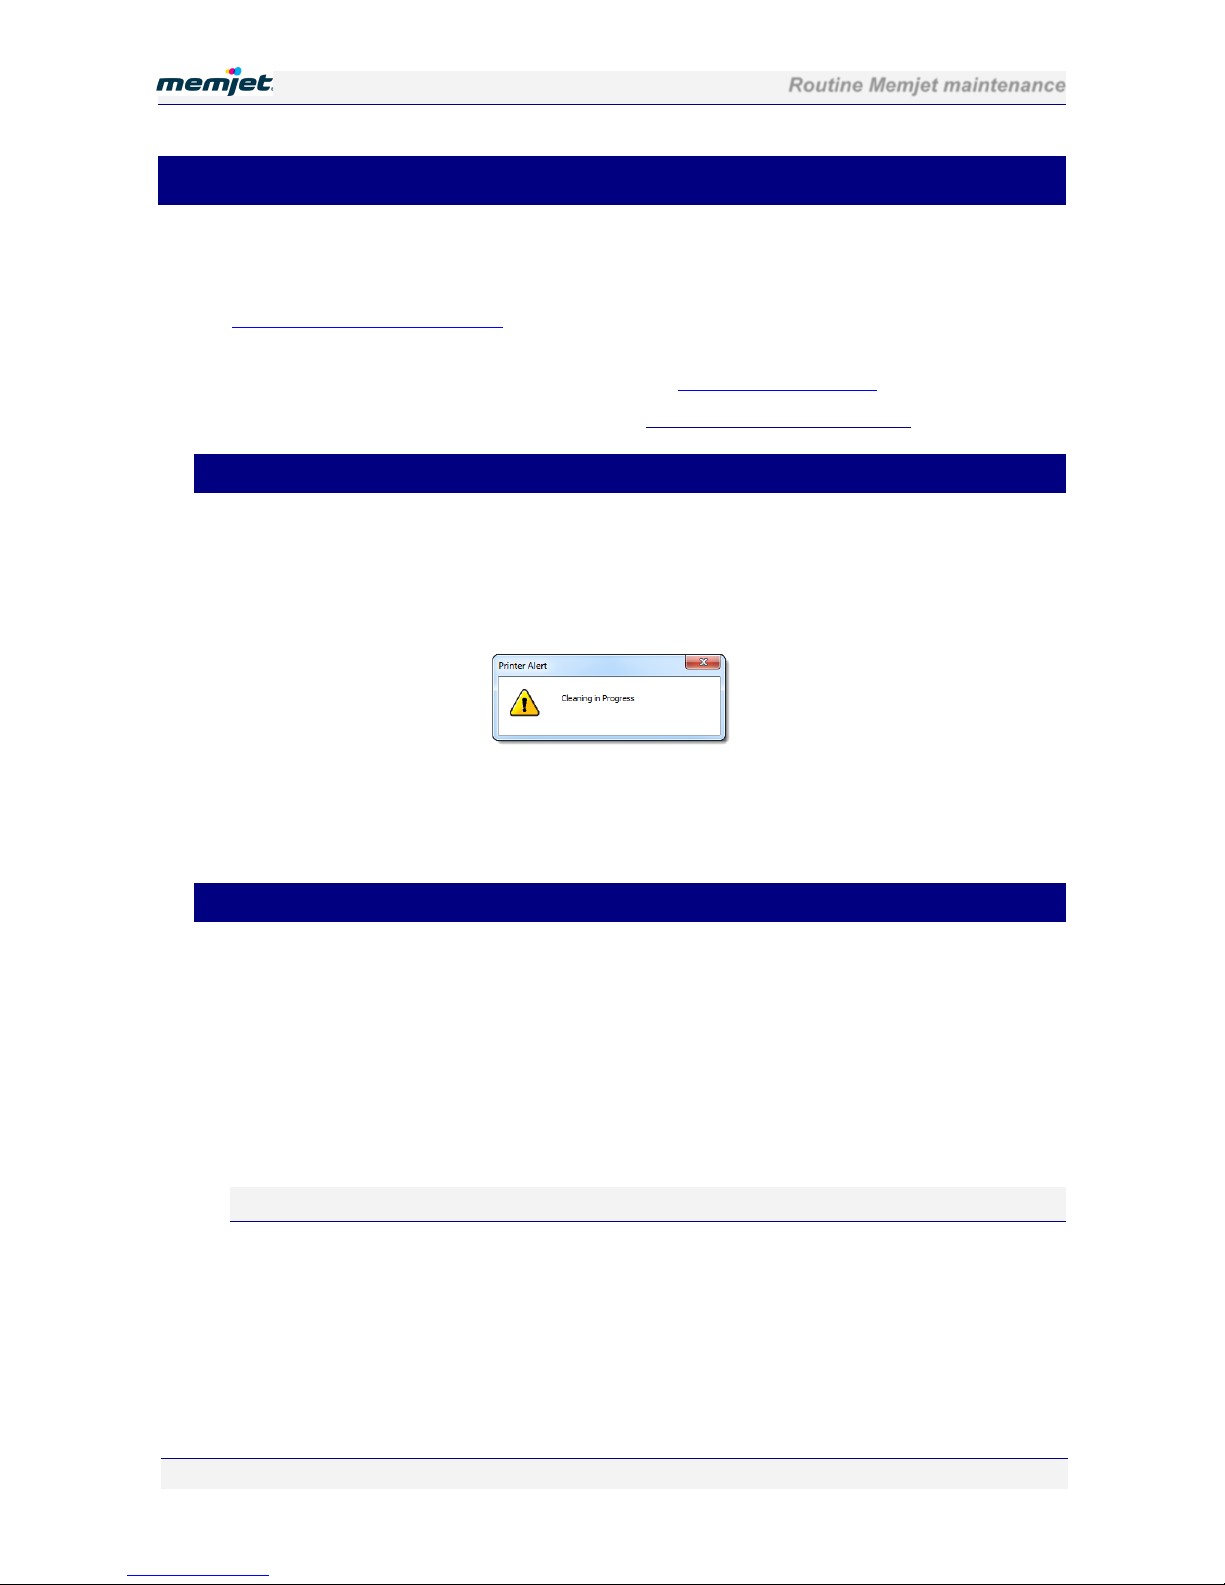
Routine Memjet maintenance
28 July 2011 - v4.2
Confidential.
Page 86 of 110
• Memjet maintenance
Your Memjet printer does not require any user intervention for routine maintenance.
Maintenance is generally carried out in the background and is interrupted when printing.
There is only one exception to this, when the printer enters an extended cleaning function. See
Extended maintenance activity
below.
If you find your printouts no longer match your expectations or do not look as good as they
did when the printer was new, the section labelled Restoring print quality
may be of help.
If necessary, you can set the printer back to its original configuration settings.
• Extended maintenance activity
Not all automatic maintenance operations can be interrupted.
If your printer seemingly refuses to print and the On/Off button is blinking, it may have
entered an extended maintenance activity. Check your PC screen for further information.
When undergoing extended maintenance the following Alert window will be displayed:
While this window is displayed your printer will not acknowledge any print commands. This
may take a few minutes.
Printing will resume when maintenance is complete.
• Restoring print quality
If your printouts start to display streaks or similar problems, your printhead may have
accumulated paper dust, fibres or other contaminants from the paper during printing.
In this case you may need to carry out one or more printhead cleaning steps. There are three
ways you can perform printhead cleaning:
• Using the User Maintenance button on the printer.
• Using the printer driver Printer Properties Services tab.
• Using the Toolbox application.
Printhead cleaning via the User Maintenance button
If you are next to the printer you can clean the printhead using the User Maintenance button.
To perform a manual printhead clean:
1. Lift the printer cover.
2. Press the User Maintenance button as shown, and hold it down until you hear
maintenance operation start.
Page 87
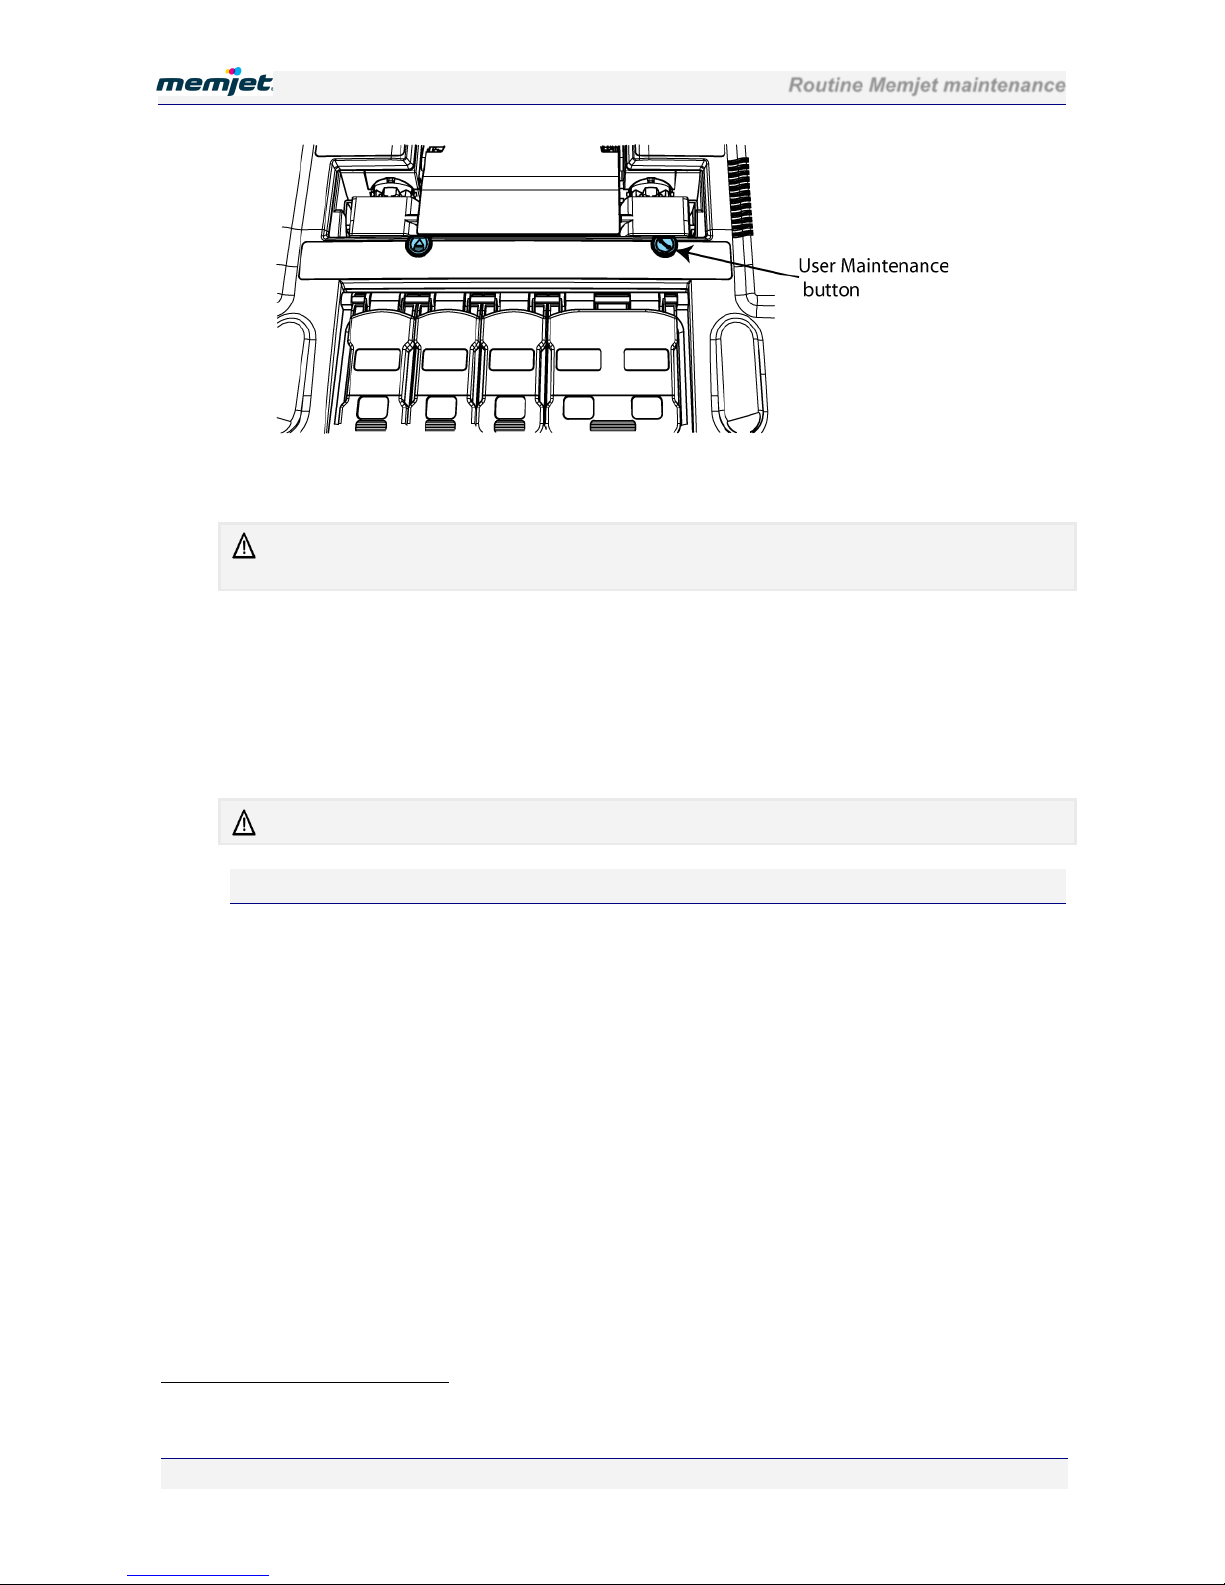
Routine Memjet maintenance
28 July 2011 - v4.2
Confidential.
Page 87 of 110
3. The printer will execute an initial printhead wipe sequence which should remove the
cause of any streaking. Wait until the Power On/Off button stops blinking.
All cleaning operations consume ink. The more thorough the cleaning operation, the more ink is
consumed. It is recommended you always print one or more test pages at this point.2
4. If the problem persists, repeat step 1 within 10 minutes to initiate a more thorough
printhead cleaning sequence. Again, wait until the Power On/Off button stops blinking.
5. Print a test page to determine whether the problem has been resolved.
6. If the second press of the User Maintenance button has not removed the problem, you
may repeat step 1 a final time (within 10 minutes) to initiate the most thorough cleaning
operation available. Before issuing a test print, again wait until the Power On/Off button
stops blinking.
If the problem persists, contact support personnel.
Printhead cleaning using Printer Properties Services tab
The printer driver Services tab is furnished with a Clean Printheads button which, when
clicked brings up the Clean Printheads dialog box with three buttons:
• Quick Clean Printhead.
• Normal Clean Printhead.
• Full Clean Printhead.
Each of these buttons performs a printhead cleaning operation as explained in the
accompanying text in the Dialog box (see above).
2
A quick way of obtaining a printout if you are near the printer is to keep the Stop/Cancel and OK/Resume
buttons depressed until the printer starts to print a demo page (for more than 2 seconds).
Page 88
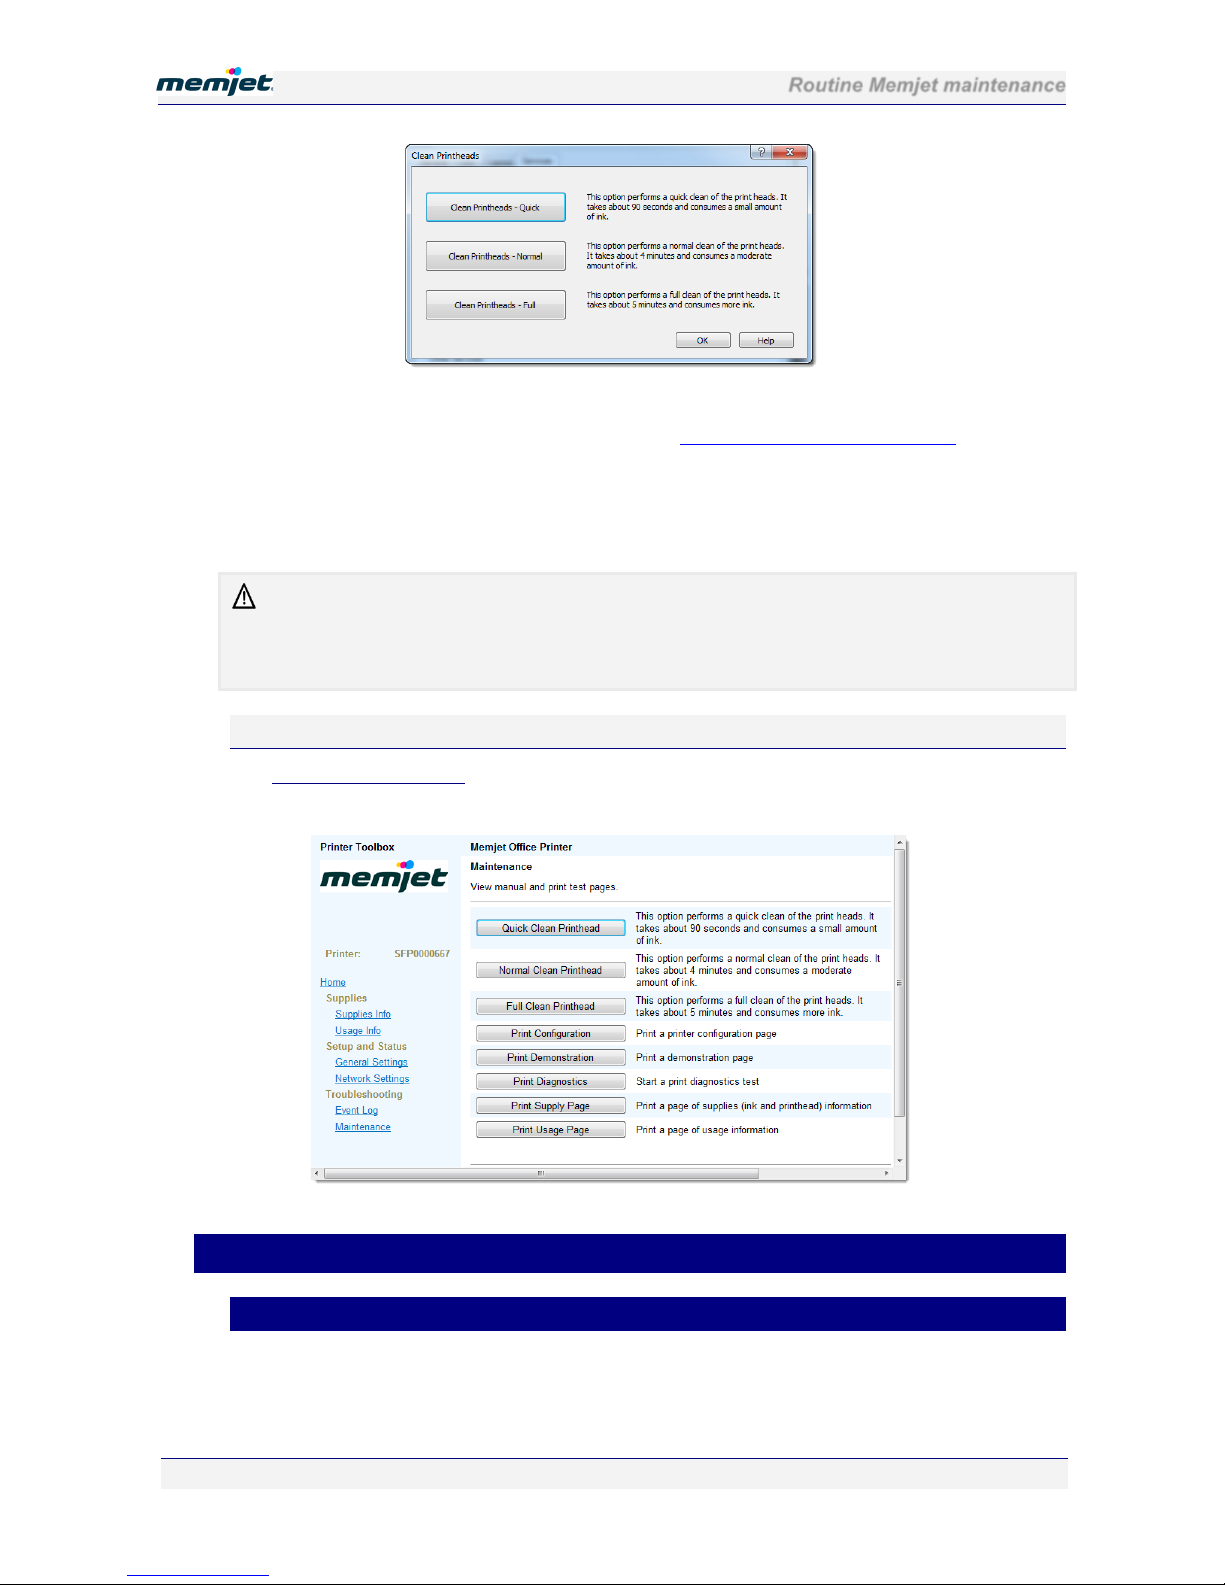
Routine Memjet maintenance
28 July 2011 - v4.2
Confidential.
Page 88 of 110
These cleaning operations are analogous to those carried out by pressing the User
Maintenance button on the printer, as explained in
Printhead cleaning via the User
Maintenance button on page 86.
The Clean Printhead – Quick button corresponds to a single depression of the User
Maintenance button on the printer, The Clean Printhead – Full button corresponds to three
depressions of the User Maintenance button.
All cleaning operations consume ink. The more thorough the cleaning operation, the more ink is
consumed. When you need to clean the printhead it is recommended that you:
∗ Always start with a Quick clean and progress from there
∗ Always print one or more test pages after each cleaning operation.
Printhead cleaning using the Toolbox
The Toolbox Maintenance page also provides three Clean Printhead buttons which are
analogous in their operation to those appearing in the printer driver Services tab.
• Resetting original configuration settings
• Factory default printer settings
If, for any reason, you need to reset the printer settings back to their factory defaults, press the
Cancel button on your printer’s Control Console until the Attention lamp flashes once.
This should take 30 seconds. Keep the Cancel button pressed for the whole time.
Page 89

Routine Memjet maintenance
28 July 2011 - v4.2
Confidential.
Page 89 of 110
A number of setup parameters in your printer will change, including:
• Language
• IP Configuration.
• Factory default printer driver settings
If the layout of your printouts do not match your expectations, resetting the print options on
your printer driver back to their original, default settings may solve the problem.
To reset your printer driver to the original, factory default setting installed when you first set
up your printer:
1. Click Windows Start on your toolbar.
2. Select Devices and Printers.
3. Right click the Memjet Office Printer in the Printers and Faxes pane and select Printer
Properties.
4. Click Preferences.
5. In the General tab, click the arrow in the My Print Settings pane and select Defaults.
6. Click Apply then click OK until you have exited all dialog boxes.
The next time you issue a print command to your Memjet printer the original setting
configured during initial setup will be used.
Page 90
Supplies and accessories
28 July 2011 - v4.2
Confidential.
Page 90 of 110
• Supplies and accessories
This section contains information about:
• paper, inks and other consumables that are suitable for your Memjet printer
• how to replace consumables
• how to care for them to get the best out of your printer.
For information on sourcing new ink tanks or printheads contact your supplier.
• Paper
Your Memjet printer is a plain-paper printer. The paper that you print on directly affects the
quality of the output. Choosing paper that is compatible with your Memjet printer and using
the right paper for each job, are key to achieving the best quality results.
For good results paper should always be in good condition when used in your printer. Do not
use the paper if the sheets are in poor condition. Do not use the paper if it is:
• moist
• dusty (has surface or edge dust)
• folded, curled or wrinkled to any extent
• out of shape
• perforated, torn or hole-punched
• has staples in it.
Some types of paper must not be used on your Memjet printer, as their use may damage the
printhead and render your printer unusable. See Choosing the right paper on page 91.
• Recommended paper
Placeholder.
This section to be added by Brand Partner(s).
Page 91

Supplies and accessories
28 July 2011 - v4.2
Confidential.
Page 91 of 110
• Choosing the right paper
Use one of the recommended paper types listed above. If you need to use different paper
contact the supplier of your Memjet printer.
Paper types not recommended
Treated paper is not recommended for use in your printer. Do not use paper that is:
• carbon backed
• textured
• used for iron-on or cold-water transfer
• pressure or heat sensitive
• covered with adhesive.
Specific types of paper that must not be used are:
• envelopes
• non-microporous photo papers
• coated laser paper
• transparencies.
If in doubt, contact the supplier of your Memjet printer.
Paper for two-sided printing and Booklets
Manual duplexing or Booklet printing is best used with text and light color applications.
Not all paper can be used for double-sided printing. Specifically, paper that has a preferred or
specially prepared side will generally be unsuitable.
For successful duplex printing the first side of the printed sheet should be dry, and the sheet
must be very flat when re-loaded into the paper tray to ensure the second side is printed
correctly. Curled or cockled paper will cause misfeeds.
Try printing a small sample. If the result is not up to expectations, try printing on heavier
grade or higher quality paper.
• Paper storage and handling
Storage and handling are very important in maintaining your paper in top condition to
produce the best quality output. Common recommendations are listed below, but your
particular location may require further considerations.
• Store all paper flat. Curled or bent paper can cause misfeeds.
• Store paper in a cool, dark location with low humidity. Light and UV radiation can
damage paper.
• Keep paper wrapped prior to installing in printer to prevent dust from contaminating the
surface. If paper came in a re-sealable container reinsert unused paper it the container
when you have finished, and seal it, for protection.
Page 92
Supplies and accessories
28 July 2011 - v4.2
Confidential.
Page 92 of 110
• Ink
You must use only Memjet-compatible ink in your Memjet printer. Memjet ink cartridges
carry information about the ink they hold. This information is used by the printer to optimise
printing on various paper types.
• Sourcing new ink
Contact your supplier to source new ink tanks.
• Ink storage and handling
Memjet inks do not require special storage and handling. Common recommendations are
listed below, but your particular location may require further considerations.
• Do not expose ink to freezing 0 ºC (32 ºF) temperatures.
• Do not expose ink to temperatures higher than 60 ºC (140 ºF).
• Do not drop ink tanks.
• Allow ink to acclimatise to ambient temperature before using in your printer.
• Replacing ink tanks
New ink tanks may be supplied in a blister pack as shown in the Ink tanks section on page 15
or in individual ink tank packaging.
You do not need to switch off your printer to replace ink cartridges.
To replace the ink tanks in your printer:
1. Ensure all print commands have terminated and the printer is idle.
2. Lift the printer cover and the four ink tank slot covers to reveal the ink tanks in their slots
(see the printer Internal view on page 13
).
3. Carefully remove the ink tanks from their slots.
DO NOT switch off your printer if any of your ink tanks have been removed. Doing so may
compromise ink delivery in your printer.
4. Follow the instructions in Installing the ink tanks on page 20 from step 2.
Always consider the environment when disposing of ink tanks. Follow your supplier instructions
to ensure you are conforming to local regulations.
• Printhead cartridge
Your Memjet printhead cartridge is a delicate micro-electrical-mechanical device and should
be treated with due care to avoid degradation of print quality.
• Sourcing new printhead cartridges
Contact your supplier to source new printhead cartridges.
Page 93
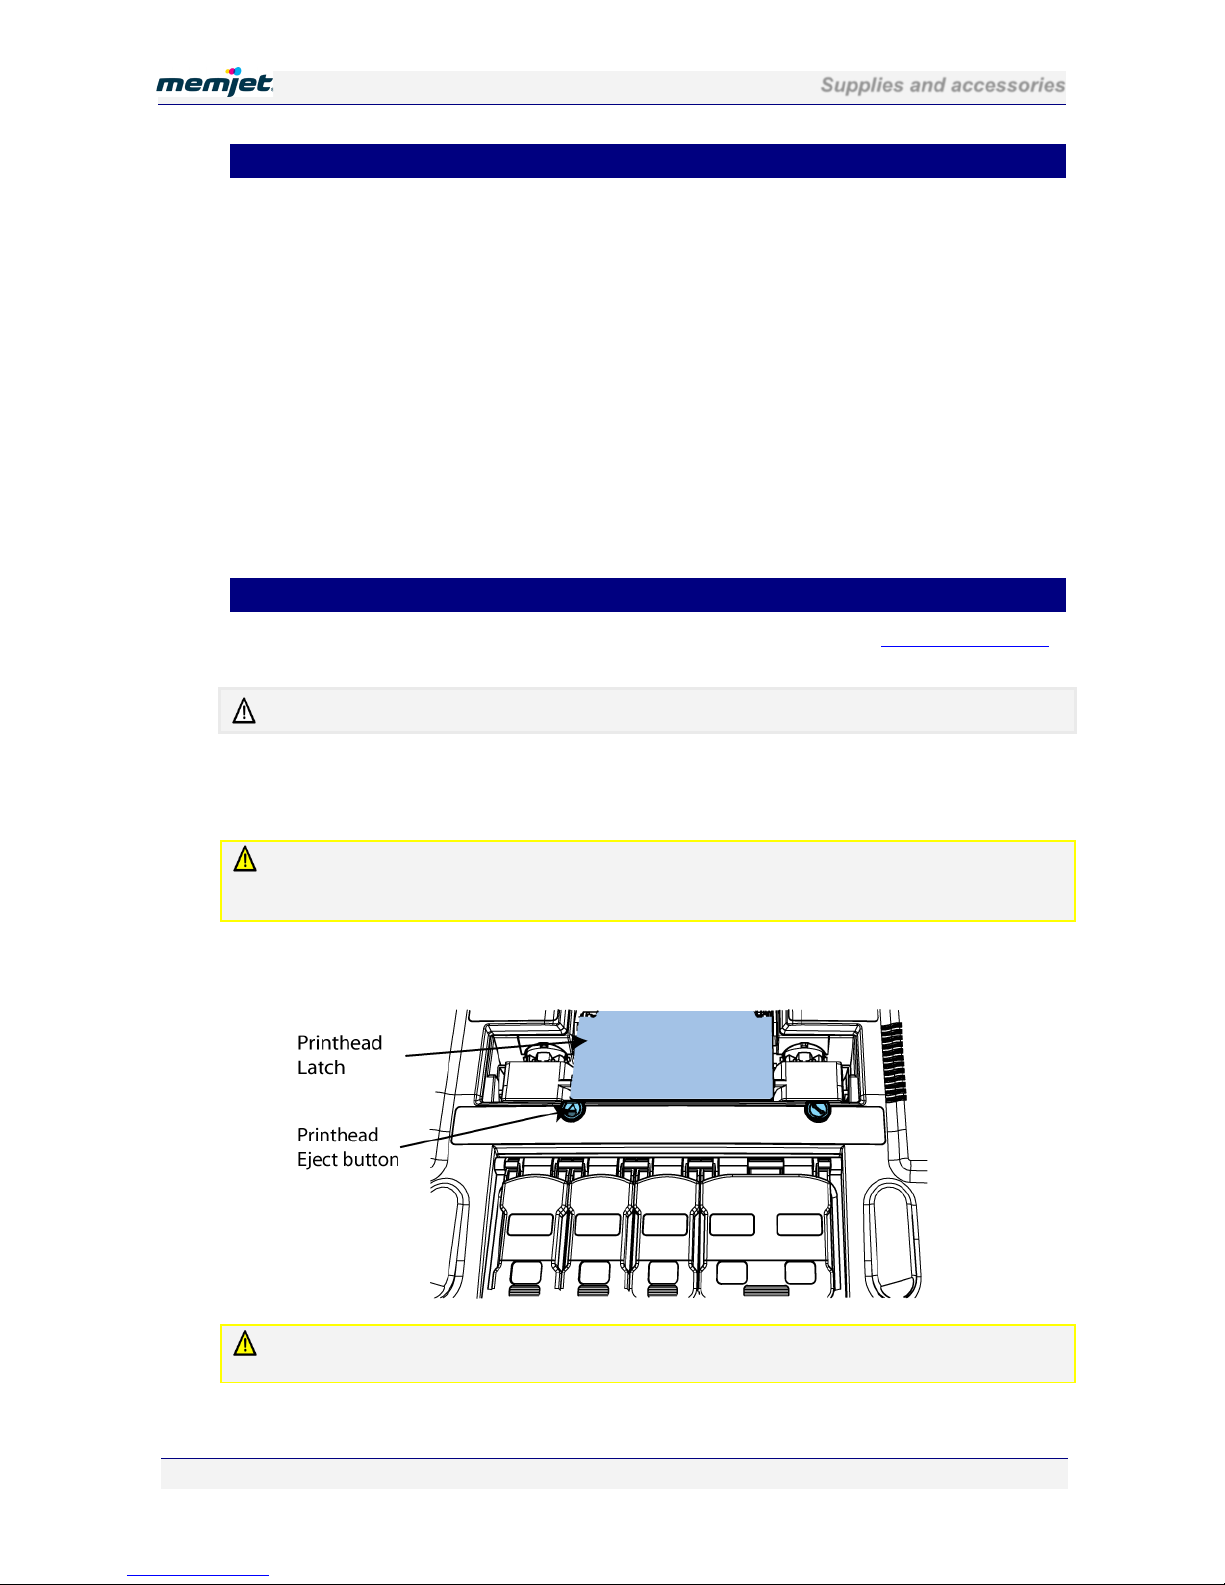
Supplies and accessories
28 July 2011 - v4.2
Confidential.
Page 93 of 110
• Printhead cartridge storage and handling
Once installed, your printhead cartridge should remain in the printer. Removing the printhead
cartridge is not recommended, even while transporting the printer.
If you need to remove the printhead cartridge and store it for any specific reason, protect the
printhead cartridge at all times from contamination by air-borne or surface contaminants such
as dust or fibres.
When handling a printhead cartridge, hold the printhead cartridge only by the handles and do
not touch the ink couplings, the printhead nozzle surface or the electrical contacts.
• Always store printhead cartridges horizontally, never on end.
• Do not expose printhead cartridges to freezing (0 ºC – 32 ºF) temperatures.
• Do not expose printhead cartridges to temperatures higher than 60 ºC (140 ºF).
• Allow printhead cartridges to acclimatise to ambient temperature before using in your
printer.
• Replacing the printhead cartridge
Your new printhead cartridge will be delivered packaged as shown in the Printhead cartridge
section on page 14.
You do not need to switch off your printer to replace the printhead cartridge.
To replace the printhead cartridge in your printer:
1. Ensure all print commands have terminated and the printer is switched on and idle and
your ink tanks are installed properly.
DO NOT Replace the prithead cartridge when any of the ink tanks have been removed. Always
ensure all the ink tanks are installed before doing so. Failure to do so may compromise ink
delivery in your printer.
2. Press the Printhead eject button shown below, until the Attention lamp blinks. This
should take about 5 seconds. This will open the printhead latch automatically.
If the Printhead Eject button fails to release the printhead latch as described, contact support
personnel. DO NOT attempt to release the printhead latch in any other manner on your own.
3. Rotate and lift the printhead latch as shown to reveal the printhead cartridge.
Page 94
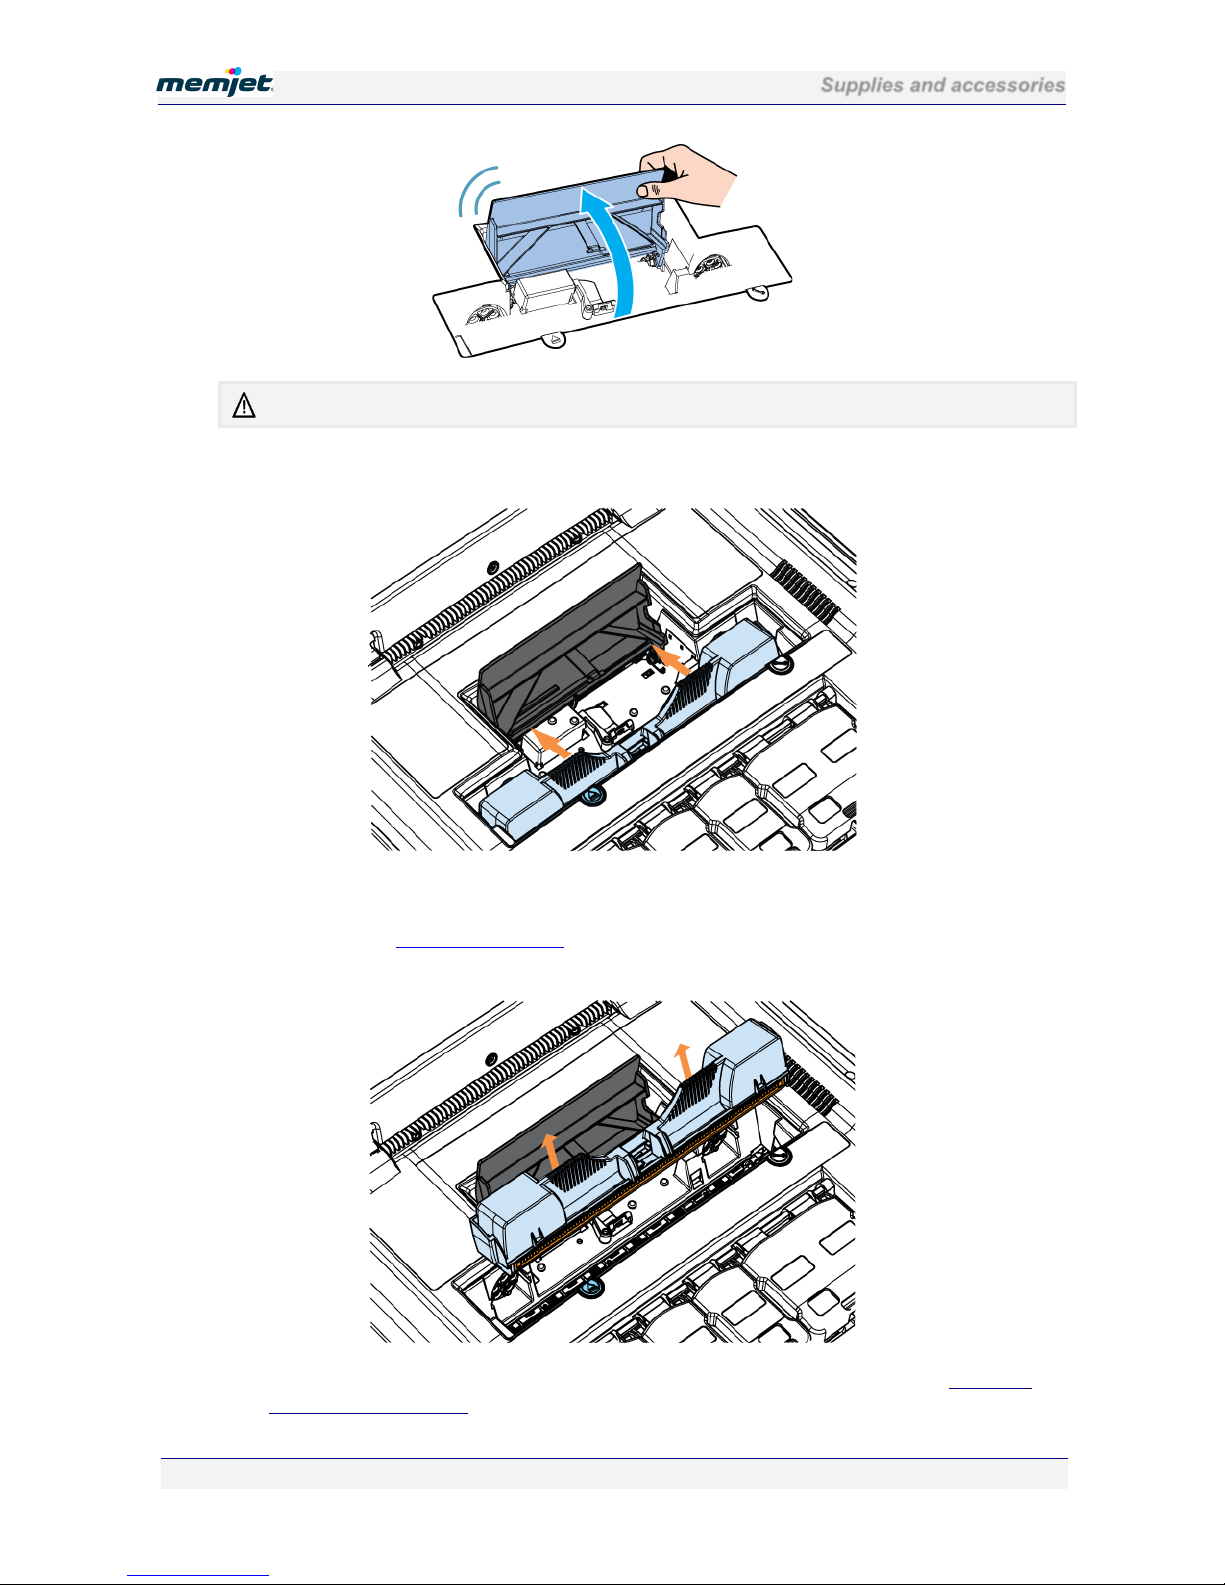
Supplies and accessories
28 July 2011 - v4.2
Confidential.
Page 94 of 110
Always lift the printhead latch as far as possible. It should be vertical when fully opened.
4. Grasp the printhead cartridge by the handles and rotate the printhead cartridge towards the
latch to disengage it, as shown.
5. Gently lift the printhead cartridge away from the printer as shown.
Lift until the old printhead cartridge is clear of the printer. If you have kept the protective
cover (see the Printhead cartridge section on page 14
) use it to cover the old printhead
cartridge, as there is always a chance some ink will remain in the printhead cartridge.
6. Insert the new printhead cartridge following the instructions contained in the
Installing
the printhead cartridge section on page 23.
Page 95

Supplies and accessories
28 July 2011 - v4.2
Confidential.
Page 95 of 110
Always consider the environment when disposing of printhead cartridges. Follow your supplier
instructions to ensure you are conforming to local regulations.
• Accessories
There are currently no accessories for the Memjet printer.
Page 96

Troubleshooting
28 July 2011 - v4.2
Confidential.
Page 96 of 110
• Troubleshooting
This section contains a set of error conditions you may experience in various situations, and
suggestions for how to deal with such errors.
Should the suggestions found in this section not fix the problems you may be encountering,
contact support personnel.
• Initial checks
You should always attempt to fix any problems that may arise. This section lays out a
suggested checklist you should perform before contacting support personnel. Check that:
• The power cord is connected to the power supply, the power supply is properly connected
to the printer and the printer is switched on.
• There should be a blue lamp lit on the power supply to indicate it is receiving power.
• The printer Power On/Off button should be lit and steady.
• The interface cable (USB or Ethernet) is inserted properly in the printer.
• For a USB cable, also check that it is connected securely to your PC.
• For an Ethernet cable, check that the two lamps next to the cable are lit. The orange
lamp should be steady and the green lamp is likely to be flashing.
• There are no lamps lit on the Control Panel other than the On/Off button, and the On/Off
button is lit and steady.
• If the On/Off button is blinking the printer may be busy. Check your PC screen for a
message explaining what it is doing.
• One or more ink supply lamps lit but steady indicate low ink levels. You may
continue to print but you should replace relevant ink tanks, as they are empty.
• One or more ink supply lamps lit and flashing indicate out-of-ink conditions or
missing ink tanks. The printer will not function until you replace those ink tanks.
• The Attention lamp generally indicates the rear door is open see Attention lamp is lit
on page 99.
• Paper Jam lamp indicates a paper jam. See Paper jam on page 74.
• There is paper in the paper tray; it is clean and inserted with the print side facing down.
If the above checks did not solve your problem see below.
• Printer installation problems
Installation of your Memjet printer should be trouble-free and simple if you follow the
directions given in section Setting up your printer on page 18
.
The few issues listed below comprise some simple errors that may arise which you can fix on
your own.
For all other errors, contact support personnel.
Page 97
Troubleshooting
28 July 2011 - v4.2
Confidential.
Page 97 of 110
Cannot install USB printer
If you cannot get past Step 8 of Installing a USB driver on page 37, try backing out of that
installation (Click Cancel then Yes) and uninstall the current driver as explained in
Uninstalling older printer drivers on page 53.
Excessive tilting of printer
Your printer is meant to be installed on a flat, level surface. Should the surface on which the
printer is sitting not be level, the Attention lamp on the Control Console will be flashing ( see
Control Panel on page 16
) and the following window will appear on your screen when you
attempt to print:
You must clear this error before you can do any more printing.
To clear this error re-locate your printer onto a firm, level surface and wait for the recovery
operations to take place automatically. Once the printer has recovered, the above window will
disappear, the Attention lamp will be extinguished and your print job will be carried out.
Rear door open
If the Attention lamp is lit, it may indicate the rear door is not closed properly.
Looking at the printer from a rear view, press the rear door at the top left corner to ensure the
door closes properly. See the Manual feed tray closed view in the Rear views
section on page
12.
Test page does not print
This applies specifically to networked printers.
If you have set up your Memjet printer using a specific IP address (see
Installing a network
driver on page 40), and your Test page does not print, the most likely cause is an incorrect IP
address during installation.
Uninstall the printer (see Uninstalling older printer drivers on page 53) then re-install it using
the correct IP address.
Check that your Test Page prints correctly.
Installing older software
Installing an earlier version of the Memjet printer driver on your PC is not recommended. If you
need to install an olderversion of the Memjet printer driver contact support personnel.
You will be prevented from installing an earlier version of the Memjet printer driver software.
If you attept to do so, the following dialog box will be displayed.
Page 98
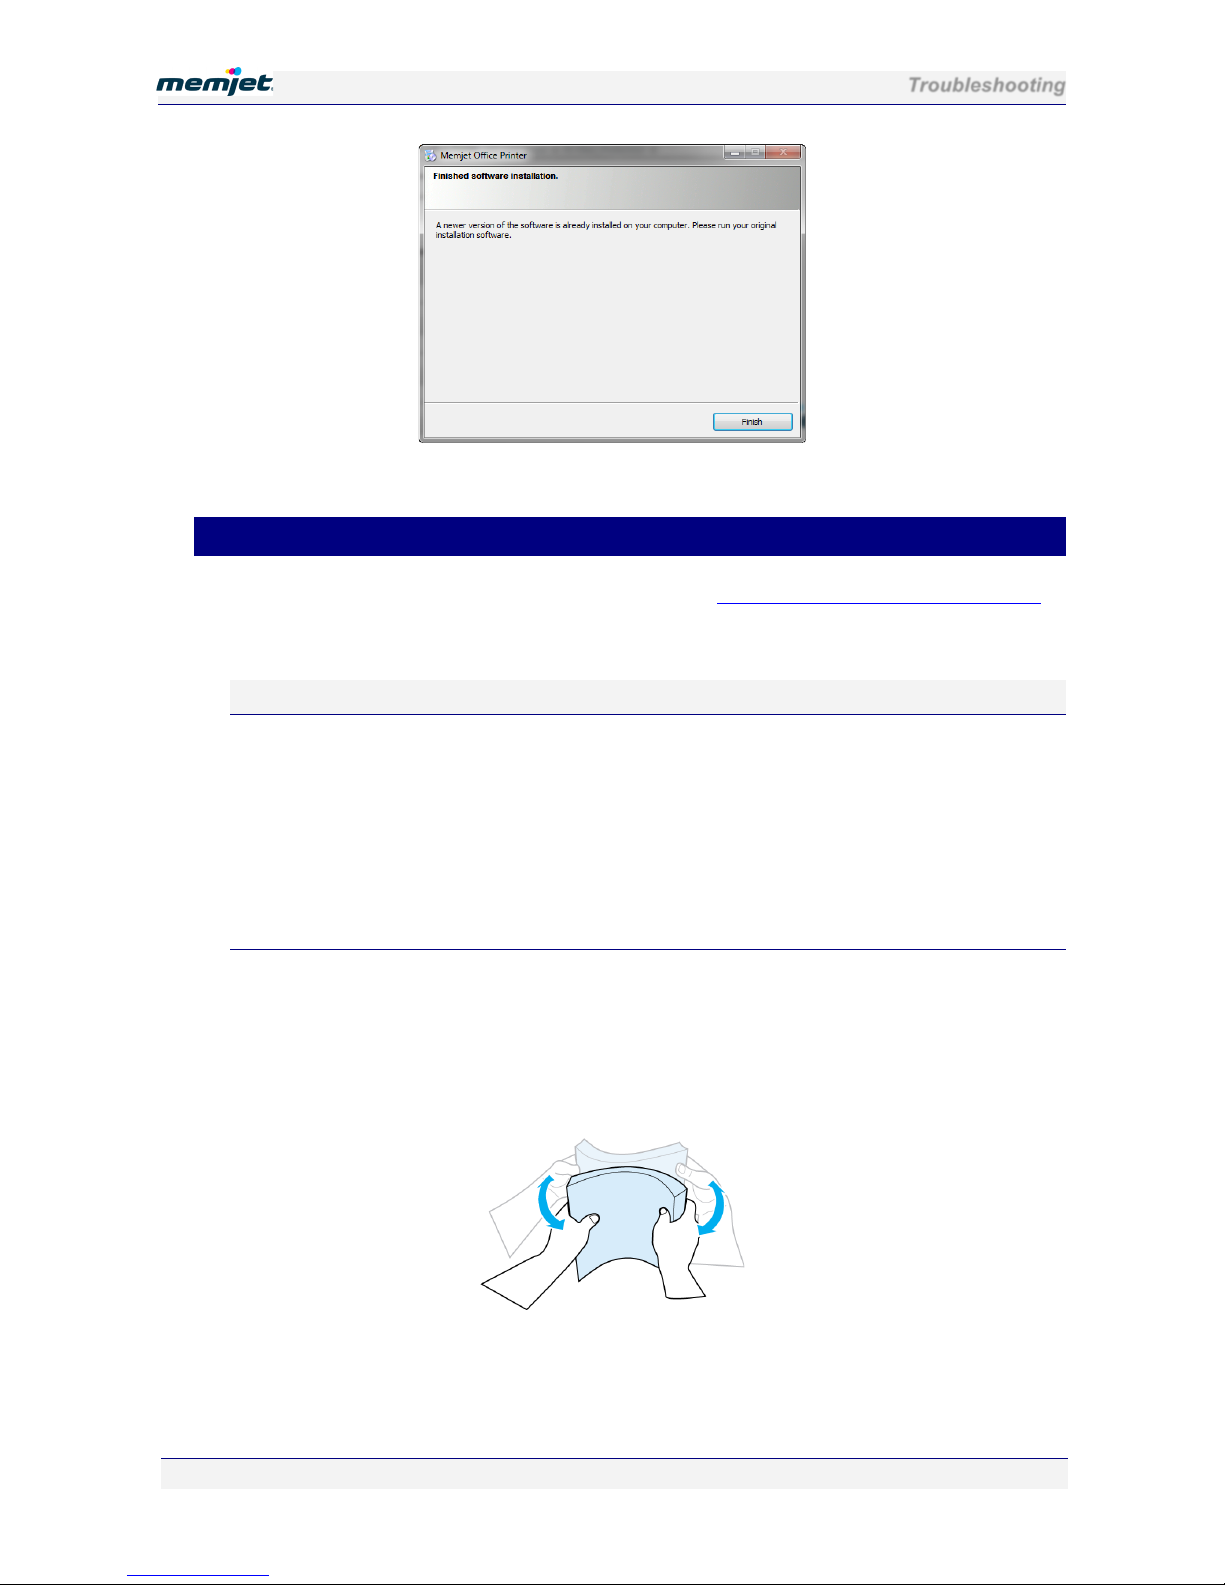
Troubleshooting
28 July 2011 - v4.2
Confidential.
Page 98 of 110
Clicking on Finish will return you to the initial installation dialog box.
• Printing problems
The most common printer problems are covered in the Common printer messages and alerts
section on page 72. This section covers other issues that may arise in the course of operating
your Memjet printer.
Paper picking problems
The most common causes of paper picking problems are:
• Paper sheets sticking together
• Paper dust
• Single-sided paper loaded into the printer tray the wrong way up.
In all cases you will need to re-load you paper tray.
Re-loading paper
Paper reams can sometimes have adjacent sheets sticking together at the edges. Similarly,
paper dust may be present and noticeable on sheet edges or surfaces. These issues may give
rise to mis-picking.
To minimise mis-picking re-load the paper tray, following these directions:
• Flex the sheets back and forth to loosen them and break any sheet bonding
• Fan them a few times to ensure sheets are free(do not crease the paper)
Page 99
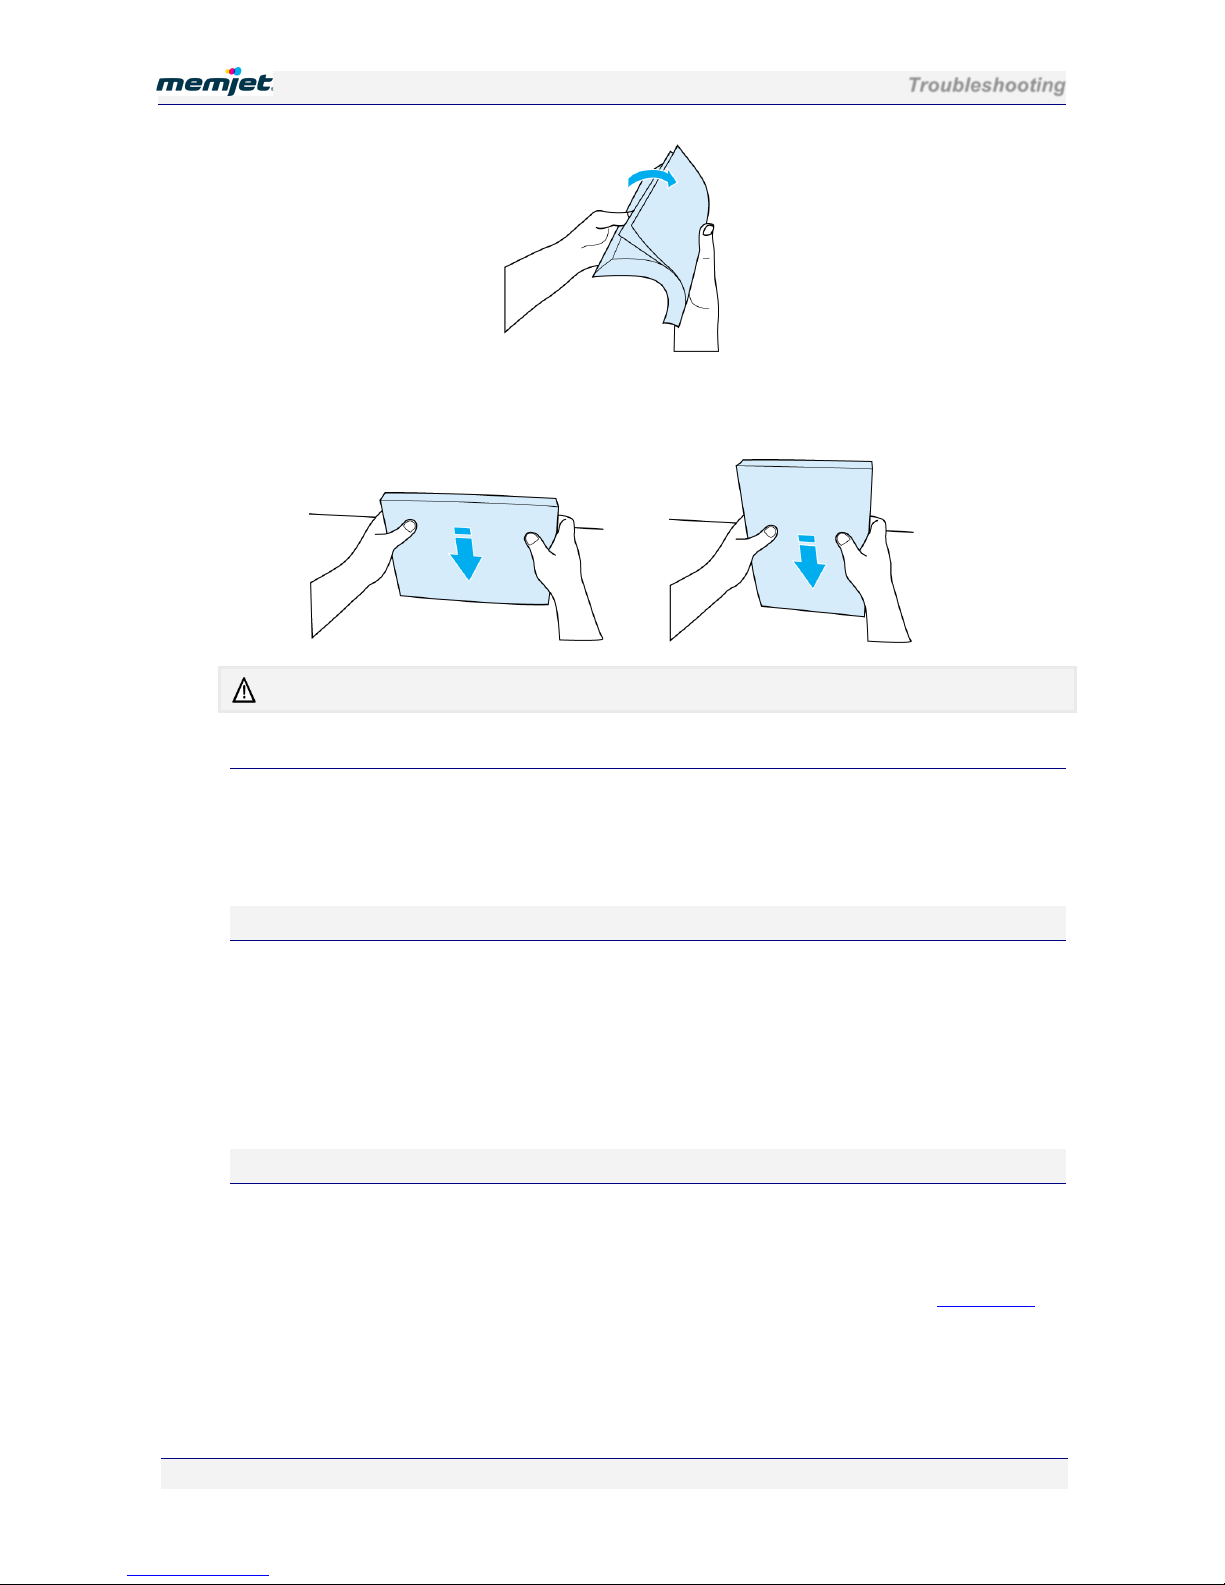
Troubleshooting
28 July 2011 - v4.2
Confidential.
Page 99 of 110
• Remove any obvious loose paper dust from surfaces or edges of the sheets
• Align the edges of the sheets on a level surface before insertion into the paper tray.
The paper tray should be kept clean for optimum printer performance.
Loading single-sided paper
Single-sided paper has a specially treated side, to improve print quality. These specially
preared single-sided papers must be inserted into the paper tray with the treated (or printready) side facing down. If you are using this type of paper, check that the paper tray is
loaded correctly. Incorrect loading is a common cause of mis-picking.
Paper jams due to paper curl
When printing heavy graphics, the speed of your Memjet printer may cause the paper to curl
in the output tray of your printer. This curl may cause a paper jam in the output tray. To
minimise the chance of this occurring:
• Use recommended paper types to minimise curl. Heavy graphics usually requires higher
quality paper.
• Remove the sheets from the output tray more often if curl is still a problem.
Attention lamp is lit
The Attention lamp is lit when the printer is unable to continue because of some condition.
If the OK/Resume button is not flashing then the most probable cause is the rear door
remaining open. Looking at the printer from the rear, press the rear door at the top left corner
to ensure the door closes properly. See the Manual feed tray closed view in the Rear views
section on page 12.
If the OK/Resume button is flashing, then press it to resume printing. If this fails:
1. Press the Power button to turn the printer off.
1. Turn it back on again.
Page 100

Troubleshooting
28 July 2011 - v4.2
Confidential.
Page 100 of 110
If the problem remains contact support personnel.
Can no longer print to a networked printer
If you can no longer print to a networked printer the most probable cause is that the IP address
of the printer cannot be reached by the printer driver.
See your Network Administrator to resolve the issue in accordance with your network’s
access and security policies.
Print options greyed out
If your networked printer has been installed to run as a Service from a print Server in your
organization, all the following features will be greyed out:
• My print Settings.
• Custom Sizes.
• Custom Watermark.
These features require the user to have write access to the host system’s Windows Registry,
and this is generally not available to clients on Servers.
Cannot access Toolbox Home Page
If you have tried to access the Toolbox Home page and failed, the most common reason is
that the printer is switched off.
To fix this problem switch the printer back on and try again.
If you are still having problems, and you are using a networked printer, contact support
personnel and inform them of the problem.
Toolbox links are not working
The Toolbox pages contain several hyperlinks, all of which require Javascript to be enabled
on your default browser. Generally most Web browsers are set up with Javascript enabled.
If you have linked to a Memjet printer as a service from a Windows 2003 or 2008 Server, and
you find you cannot jump to other Toolbox pages other than the Home page, a likely cause is
that the Server has restricted access to Javascript.
Contact support personnel and inform them of the problem.
Printer slows down between pages
Your Memjet printer will always print a page at its rated speed, from start of page to end of
page. If you see your printer slowing down between pages the most likely cause is slow
delivery of data to your printer.
For some documents your computer may not be able to generate the data stream quickly
enough to drive your Memjet printer at its rated speed. Some applications render documents
in such a way that even simple-looking documents may generate a large amount of data. Lowend PCs may be particularly subject to this isse.
Similarly, delivering that data stream to your Memjet printer can require considerable
bandwidth, and a slow or overloaded network connection may give rise to similar symptoms.
 Loading...