

Page 1
Electronic Aqua Timer™Model 3020
Operating Instructions
Battery Installation
1. Open rear battery door by removing the three screws using a Phillips head screwdriver.
2. Install two new AA alkaline batteries (not included) in the position indicated in the battery compartment.
3. Replace the battery door and secure with screws. The motor may activate to reset the unit.
Additional Battery Information:
■
Good quality, fresh alkaline batteries should last one watering season.
■
Replace the batteries at the beginning of each watering season.
■
Remove the batteries when the timer is not in use for an extended period of time.
Programming
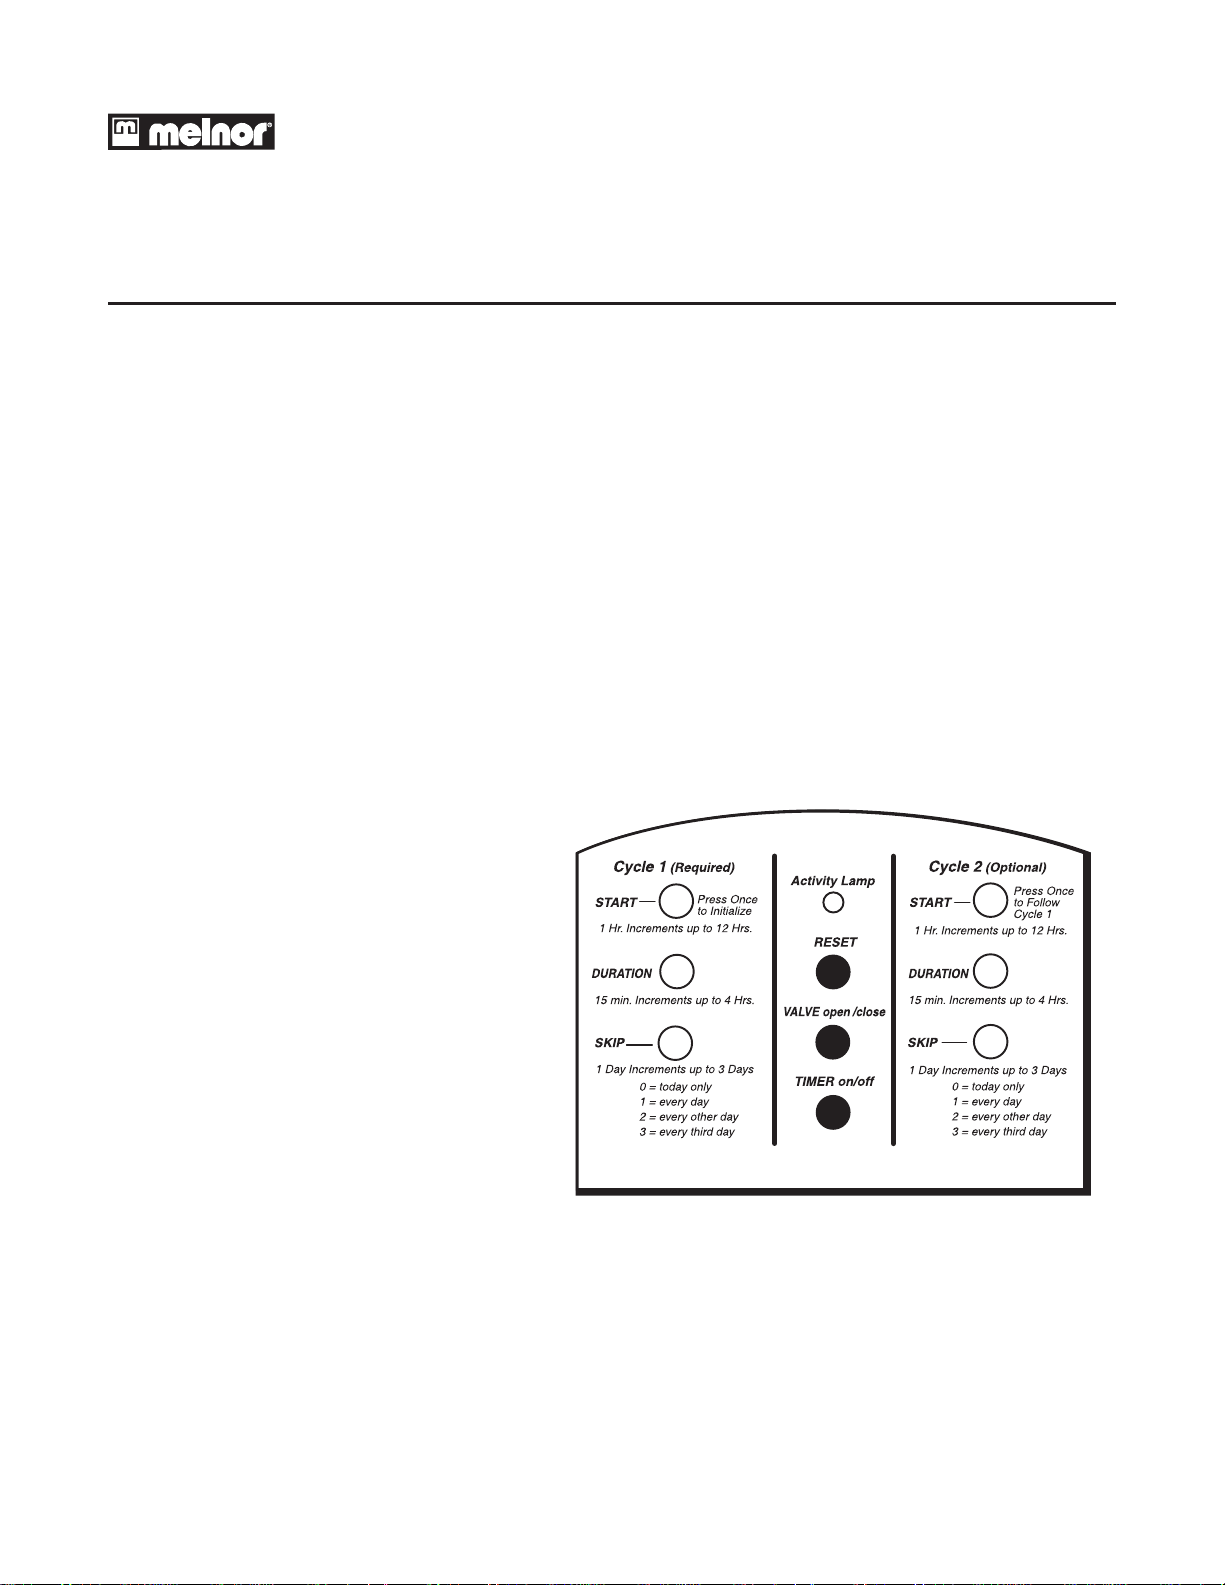
Your Melnor 3020 Electronic Aqua Timer™ offers two independently programmable cycles. They are each programmed in the same manner. However, you must always program Cycle 1 before Cycle 2.
Before you begin the program process, determine what you want to program. Reading through the program
steps may help you determine this. You also will need to know the current time.
Programming Cycle 1 is a very simple four-step process. If you make a mistake during programming, simply
press reset and begin again.
Step 1.Press the RESET button to begin.
Step 2.Set the start time by pressing the START
button. If you press it only once, the
timer will begin the first watering cycle
immediately. (15 seconds after you finish
the final programming step)
To delay the start time by one hour,
press the start button twice. Pressing
three times will delay the start time by
two hours. By repeatedly pressing the
start button, you can delay the start time
by up to 12 hours.
Remember, the amount of delay is one
less than the number of times you press
the START button.
Step 3.Set the watering duration with the DURATION button. Press the button once for every 15 minutes you want
to water, up to four hours. So, if you press the button three times, you will be watering for 45 minutes.
Step 4.The SKIP button allows you to skip watering days. Press the button once to water every day, twice for
every other day, and three times for every third day.
With the completion of Step 4, the timer is programmed. If you wish to program a second cycle, proceed
immediately to Cycle 2. Otherwise, make certain the timer is on the faucet securely, the hose and watering
attachments are in place and the faucet is open.
Page 2

Programming a Second Cycle
If you wish to program a second cycle, simply follow steps 2-4 again using the Cycle 2 buttons. The start time
for Cycle 2 is set from the end of Cycle 1.
If you make a mistake you can press the RESET button and begin again. You will need to reprogram Cycle 1 as well.
Manual Watering
If you wish to turn the water on manually, either to water or use the hose for another purpose, there is no need
to remove the timer from the faucet. Just follow these steps.
1. Press the TIMER ON/OFF key. The unit will beep twice and go to manual mode. If the valve is open, it will
close and the program currently running will be temporarily disabled.
2. To turn the water on, simply press the VALVE OPEN/CLOSE key. Pressing the key a second time will turn off the water.
To return to auto mode, press the TIME ON/OFF key. The disabled program will resume but the valve will not
open again until the next scheduled start time.
The Melnor Aqua Timer™ Model 3020 has a built in safety feature to prevent the valve from being left open,
either accidentally or intentionally. If the timer is placed in manual mode and the valve is opened, it will close
automatically after 30 minutes.
Beeps and Flashes
One short beep and flash indicates a programming button has been pressed. This is to aid in the programming process.
Two short beeps and flashes indicate an action by the timer.
When you press the RESET button, the timer will emit three short beeps and flashes indicating the timer is
ready to be programmed.
One long beep and a sustained light indicates an error.
Twenty short beeps and flashes indicates a fault condition such as a low battery or a stuck valve. Once such a
condition is detected, the timer will attempt to close the valve and then emit one short beep and flash every
five seconds. If the valve is jammed, the timer will repeatedly pause and re-attempt to close the valve. While in
this condition, the timer will not run any watering programs. Replacing the batteries may reset the unit. The
most common cause is low batteries.
Operating Tips
■
Use only fresh alkaline batteries. They should last one watering season.
■
Replace batteries at the beginning of each watering season.
■
Make certain you have recently installed new batteries before leaving for an extended period.
■
Do not use rechargeable batteries.
■
Do not expose the timer to temperatures below 32° F (0° C).
■
Be careful when moving the hose. Too much pulling may damage either the faucet or hose connections.
■
Clean the filter washer regularly to prevent clogging.
■
The timer may be used with water pressures from 5 - 125 psi (0.3 - 8.6 Bar).
■
The timer may be programmed before being attached to the faucet and/or hose.
Frequently Asked Questions
Q If it’s going to rain, can I prevent the timer from watering?
A Yes. Press the TIMER ON/OFF key to place the timer in manual mode. No schedules will be run until you
press the TIMER ON/OFF key again. This will place the timer back in auto mode. The unit will begin watering
with the next scheduled start time.
Q Why do my pipes bang when the water shuts off?
A This is called a “water hammer.” The addition of a short piece of hose between the timer and the faucet
should eliminate this problem.
Q When I use the manual on/off, why does the timer turn the water off after 30 minutes?
A Turning the water off after 30 minutes is a built-in safety feature designed to prevent the water from being left running.
Page 3

SAMPLE PROGRAM #1:
Waters every other day for 15 minutes starting two hours from now.
1. Press the RESET button.
2. Press the START button three times. Remember that the first press sets the timer to begin watering immediately,
the second sets a one-hour delay and the third a two-hour delay.
3. Press the DURATION button once.
4. Press the SKIP button two times.
SAMPLE PROGRAM #2:
Waters twice a day. Once every morning at 6:00 a.m. for 60 minutes and once every third evening at 5:00 p.m.
for 30 minutes.
Assume you are programming the timer at
8:00 p.m. the evening before the first desired
watering cycle.
1. Press the RESET button.
2. Press the Cycle 1 START button 11 times.
3. Press the DURATION button four times to
set 60 minutes.
4. Press the SKIP button once to water every day.
Move to the Cycle 2 buttons.
5. Press the START button 11 times.
Cycle two begins timing from the end of
Cycle one.
Cycle one is complete at 7:00 a.m. 5:00
p.m. is 10 hours later.
6. Press the DURATION button twice to set
30 minutes.
7. Press the SKIP button three times to water every third day.
Two Year Limited Warranty
The Melnor Electronic Aqua Timer™ (Model 3020) carries a TWO YEAR (2) LIMITED WARRANTY. Melnor Inc.
warrants the Product against defective material, workmanship, or design for a period of two years from the date
of purchase. Its liability under this warranty shall be LIMITED TO the REPLACEMENT or REPAIR of the product
as provided herein. NO OTHER REMEDY (including, but not limited to, incidental or consequential damages and
injuries to person or property) shall be available to the purchaser. This warranty does not cover damages or malfunctions which result from abuse, neglect, normal wear and tear, accidents, or improper installation or use.
THE WARRANTY DESCRIBED IN THIS PARAGRAPH SHALL BE IN LIEU OF ANY OTHER WARRANTY, EXPRESSED OR IMPLIED,
INCLUDING BUT NOT LIMITED TO, ANY IMPLIED WARRANTY OF MERCHANTABILITY OR FITNESS FOR A PARTICULAR PURPOSE.
Please complete the warranty card. Using scissors, cut out the completed warranty and mail it, along with a
photocopy of the sales receipt to:
Melnor Inc.
E.T. Warranty Department
3085 Shawnee Drive
P. O. Box 2840
Winchester, VA 22604
Parts & Service Telephone: (540) 722-5600
If defect arises during the TWO YEAR LIMITED WARRANTY PERIOD, in order to make your warranty claim, please send the Timer
to the address above and include a note of explanation about the problem(s) with the Product. Please allow 6-7 weeks for return of
the Product. If it is replaced, the warranty will only continue for the period remaining on the original two-year limited warranty.
No response when buttons are Batteries installed incorrectly Re-Install batteries
pressed Weak batteries Install new alkaline batteries
Unit won’t let me set up a Weak batteries Install new alkaline batteries
watering schedule
Watering schedule did not run Weak batteries Install new alkaline batteries
Timer is in manual mode Press TIMER on/off button
The battery is low after a very A non-alkaline or weak battery Install new alkaline batteries
short time was used
The valve jammed Check valve for blockage
Low water pressure Clogged filter Clean filter on the timer and
any watering device
Water faucet is only partially Open faucet fully
open
Hose is pinched or damaged Check hose
Water is diverted to too many Limit the number of devices
devices being used at once
Unit beeps 20 times when I Low battery Install new alkaline batteries
press a button
Unit beeps every few seconds Low battery Install new alkaline batteries
Problem Possible Cause Solution
 Loading...