


TIMER
GB Operating Instructions
ON/OFF
CALC
1
3
4
2
6
TIMER
5
2 3
7

Read operating and safety instructions carefully!
Safety instructions
• Make sure that energy supply in your household
corresponds with the information on the type label
(see bottom of the appliance).
• Some parts (e.g. the warming plate) become hot
while operating. Do not touch these parts.
• Never place the appliance on or beside hot
surfaces.
• Keep the appliance out of the reach of children.
• Make sure that the cord never comes into contact
with the hot warming plate.
• Pull the plug out of the socket before cleaning or in
case of absence for a longer time. Clock and Timer
have to be re-programmed afterwards.
• Never immerse the appliance in water.
• The glass jug is not microwave safe.
• Do not fill in hot water. Only fresh, cold water
should be used.
• Do not open the filter during the brewing process.
• Do not remove the watertank during the brewing
process.
• This appliance is not designed to be used by persons (incl. children) with restricted physical, sensory
or mental capabilities or with lack of experience
or/and knowledge unless they are supervised by a
person who is responsible for their safety or received instructions from this person in how to use the
appliance.
• This appliance is designed to be used in households
and similar applications as e.g. in kitchens for staff in
shops, offices and other commercial fields, in agricultural properties, by clients in hotels, motels and
other residence facilities and in breakfast guesthouses.
• The replacement of the cord and all other repairs
must be carried out by authorized Melitta
Customer Centres only or by persons of similar
qualification.
Before preparing the first cup of coffee
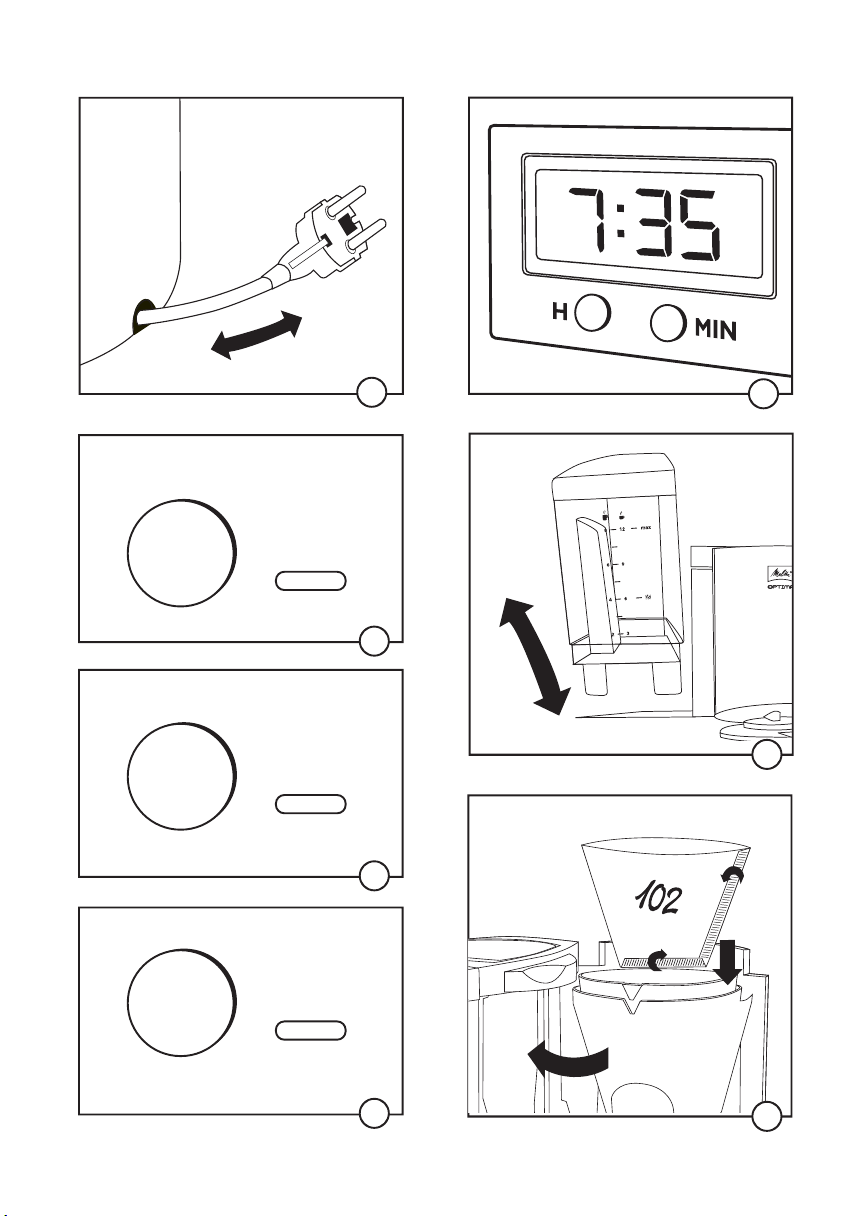
• Connect appliance to socket. Cord can be lengh tend or shortened by using the cable storage (1)
• The display (LCD) is illuminated and flashes.
• Set the time by using the buttons „H“ and „MIN“
(2). A quick run is possible by pressing the
buttons constantly.
• To save energy, the LCD-light switches off 2
seconds after last use of one of the buttons. If you
want to have a constant lighting of the display press
the buttons “H” and “MIN” together for longer
than 1 second. Switching off the light can be done
the same way.
• For cleaning the appliance before first use, fill the
watertank with clear, cold water. Press button
“ON/OFF” (3) to start the cleaning process.
Switch off the appliance with “ON/OFF” button
after the end of the brewing process. Repeat this
once.
Adjusting the water hardness
To maintain value and function of the appliance it has
an integrated descaling programme. The appliance can
be programmed with 4 degrees of water hardness. It
is set to high water hardness in factory. We recommend an individual adjustment based on your local
degree of hardness. You can ask your local water supplier or use a special control strip for determining.
To adjust degree of hardness press button „CALC“
(4) and keep it pressed. The display shows the factory
provided presetting. For adjustment press button
„MIN“ as long as the display shows your desired
degree of hardness. 2 seconds after releasing the
“CALC” button, the display shows the time again.
Your choosen water hardness is programmed. Last
adjustment maintains even when the appliance will be
disconnected from socket.
Coffee preparation
To maintain the best aroma of your coffee keep the
coffee packaging always closed and store it in a refridgerator. We recommend to use 6g ground coffee per
cup for best taste. To secure an optimal brewing
result fold the filterbag 102
packaging.
• Fill the removable water tank (6) with fresh, cold
water. The needed amount of water based on cups
to prepare can be read off the cup scale on the
water tank.
• Insert the water tank again.
• Swivel out the filter (7). Place a filterbag into the
filtercone and fill in your desired quantity of ground
coffee into the filterbag. Swivel filter back until it
snaps in.
• Press „ON/OFF“ button (3). The green LED is illuminated and the brewing process starts.
• After end of brewing you can remove the jug from
the appliance. The drip stop avoids dripping.
• Let the appliance cool down for 5 minutes between
2 brewing cycles.
®
as described on the
Timer function
The appliance is equipped with a timer function. With
this function, the brewing process can be started
automatically at a pre-programmed time.
• Press the button „TIMER“ (5) and keep it pressed.
When programming first time 00:00 is flashing in
the display.
GB
54

• Set the desired starting time by using the buttons
„H“ and „MIN“ (2). A quick run is possible by
pressing the buttons constantly.
• After releasing the button „TIMER“, the current
time appears again after 2 seconds. The choosen
starting time for brewing process is programmed. It
remains until a new starting time will be programmed
or when the applian
• By pressing the “TIMER” button again shortly, the
function is activated for the next brewing cycle. Blue
LED light shows activation and the programmed
starting time is visible in the display for a few
seconds.
• The timer-function can be de-activated by a further
press on the “TIMER” button. The blue LED light
expires.
• The brewing process can be started independently
from timer-function by pressing the “ON/OFF”
button.
ce disconnected from socket.
ning time is shown in the display.
• The red LED expires after the descaling process has
finished. The appliance switches off automatically and
display shows the current time again.
• Clean the appliance after descaling by 2 brewing
cycles with clear water without coffee to remove
descaler residues.
Cleaning and maintenance
• Remove cord from socket before you clean the
appliance.
• Never immerse the appliance or cord in water.
• Clean the surface with a soft, damp cloth.
• Clean the parts which are in contact with coffee
after each use. Filter cone and glass jug are dishwasher safe.
• Water tank can be cleaned under running water.
Do not use harsh and abrasive brushes.
Adjustable warmkeeping time
Longterm warmkeeping of the coffee on the warmingplate leads to loss of taste. Therefore we recommend
a warmkeeping time for not longer than 30 minutes.
This time is presetted for securing an optimal coffee
quality and also to avoid unneeded energy consumption.
If you want to keep your coffee warm for a longer
time, you can set the time in 4 steps until appliance
switches off automatically.
• For setting the warmkeeping time keep the
“ON/OFF” button pressed. 0:30 appears in the
display.
• Set the needed warmkeeping time by pressing the
“MIN” button in 30 minutes steps (up to 2 hours
max.)
• After releasing the “ON/OFF” button, the current
time appears again after 2 seconds. Last setting
maintains even when the appliance will be disconnected from socket.
Descaling programme
To secure a proper function of the appliance, it has to
be descaled regularly. We recommend to use Swirl
Oxy-Power or Swirl®Citrus-Clean. To simplify this
necessary process, the appliance is equipped with a
descaling programme.
• Once the number of brewing cycles, based on the
individual adjustment of water hardness, is reached,
the red LED (4) lights up permanently. This shows
that descaling should be done shortterm.
• To start descaling, fill the watertank with descaling
agent according to the information on its packaging.
• Press “CALC” button (4). The red LED flashes.
• The descaling process takes 25 minutes. The remai-
®
Hints for disposal
• Please inform yourself about disposal rules for
electrical appliances at your dealer or community.
• Packaging materials are resources and therefore
reusable. Please give it back to the renewable
resource cycle.
6

GB
uarantee
G

Terms of guarantee
In addition to the legal guarantee claims, to which the
end user is entitled relative to the seller, for this device,
if it was purchased from a dealer authorized by Melitta
due to his consulting competence, we grant a manu facturer´s guarantee under the following conditions:
1. The guarantee period begins with the day the product was sold to the end user. The guarantee is 24
months. The purchase date of the device must be
verified by a purchase receipt.
The device was designed and built for household use
only. It is not dedicated for a commercial use.
Guarantee performances lead neither to an extension of the guarantee period nor to a new beginning
of the guarantee period for the device or installed
spare parts.
2. Within the guarantee period we will correct all device defects that are based on material or manufac turing errors, through repair or replacement of the
device at our discretion. Replace parts become the
property of Melitta®.
3. Defects that occurred due to improper connection,
improper handling or repair attempts by non authorized persons are not covered by the guarantee. The same applies for failure to comply with the
use, care, and maintenance instructions as well for
the use of consumables (e.g. cleaning and decalcifying
agents or waterfilters) that do not correspond to
the original specifications. Wear parts (e.g. seals and
valves) and fragile parts like glass are excluded from
the guarantee.
4. Guarantee performances are processed via the
Service Hotlines for the respective country (see
information below).
5. These guarantee conditions apply for devices purchased and used in UK. If devices are purchased in
foreign countries or brought into foreign countries,
then guarantee performances will only be provided
as specified in the guarantee conditions applicable for
this country.
®
Melitta Haushaltsprodukte GmbH & Co. KG
Ringstraße 99
D-32427 Minden
Germany

1100067
 Loading...