

Page 1
®
741-047
UK Steam Iron ................................................................................................2
DE Dampfbügelsein ......................................................................................5
PL ˚elazko parowe .........................................................................................9
SK Pokyny....................................................................................................12
CZ Napařovací žehlička.............................................................................15
HU Gőzölős vasaló .....................................................................................18
Page 2
UK
INTRODUCTION:
To get the best out of your new
steam iron, please read through these
instructions carefully before using it for the
first time. We also recommend that you
keep the instructions for future reference,
so that you can remind yourself of the
functions of your steam iron.
SAFETY MEASURES
• Incorrect use of the steam iron may
cause personal injury and damage to
the kettle.
• Use the steam iron for its intended
purpose only. The manufacturer is not
responsible for any damage resulting
from incorrect use or handling (see
also Guarantee Terms).
• The steam iron may only be connected
to 230 V, 50 Hz.
• The steam iron or cord must not be
submerged in water or any other liquid.
• Never leave the steam iron unattended
when in use and keep an eye on
children.
• Allow the steam iron to cool down
completely before putting it away.
Always keep the steam iron out of the
reach of children.
• Protect the solepate, and NEVER run it
over metal or similar surfaces, as this
will damage it.
• This steam iron is not suitable for
commercial or outdoor use.
• Always keep the steam iron at a safe
distance from combustible objects
when in use.
• Never leave the steam iron in a place
where the temperature might drop
below freezing point.
• Do not cover the steam iron.
• Do not allow the cord to hang over the
table edge, and keep it away from hot
objects and naked flames.
• Check regularly that neither the cord
nor plug is damaged and do not use
the steam iron if it is, or if it has been
dropped or damaged in any other way.
• If the steam iron, cord or plug is
damaged, it must be inspected and, if
necessary, repaired by an authorised
repair engineer, otherwise there is
a risk of electric shock. Never try to
repair the appliance yourself.
• Remove the plug from the socket after
use, when cleaning, and when filling
the water reservoir.
• Avoid pulling the cord when removing
the plug from the socket. Instead, hold
the plug.
• Make sure that it is not possible to pull
or trip over the steam iron cord or any
extension cord.
• Do not put more than 120 ml of water
in the reservoir. Do not add anything to
the water. Ordinary tap water can be
used.
KEY
5.
4.
3.
2.
1.
10.
11.
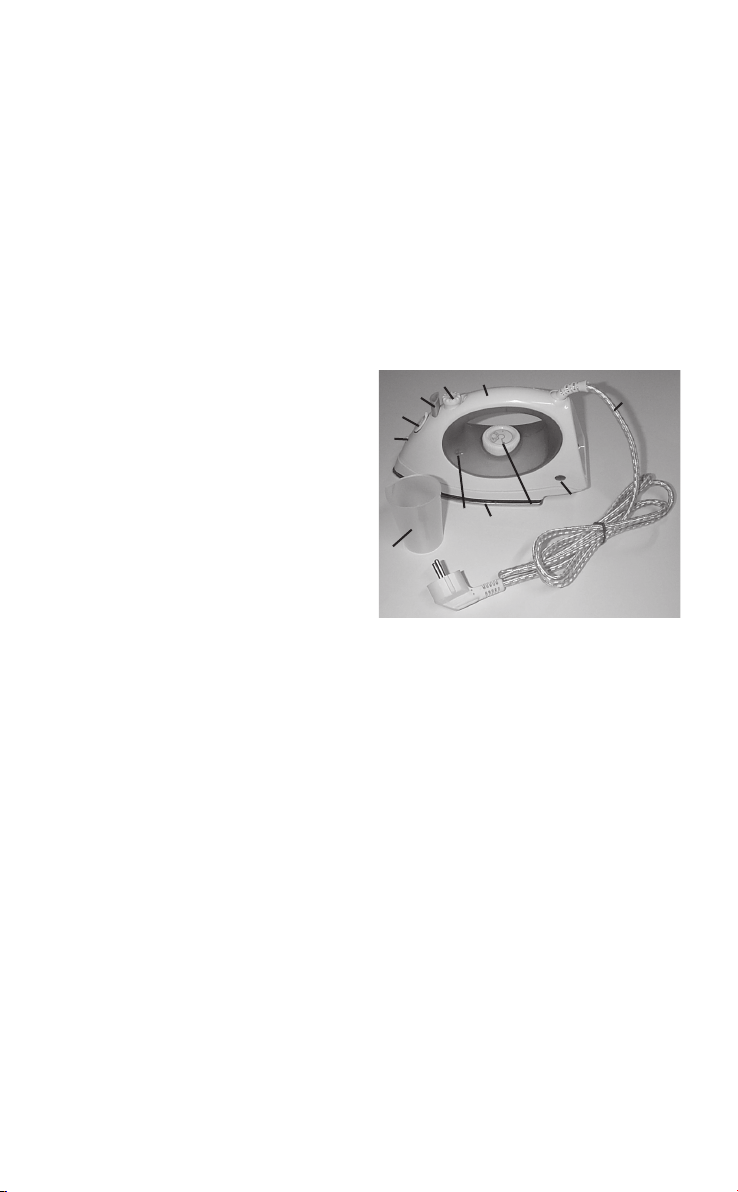
1. Spray nozzle
2. Cover for water reservoir
3. Button for spray function
4. Knob for selecting the steam setting
5. Handle
6. Cord
7. Indicator light
8. Thermostat knob
9. Soleplate
10. Mark for maximum water level
11. Refilling container
8.
9.
6.
7.
PRIOR TO FIRST USE
• Remove the protective film from the
soleplate (9).
• Some parts of the steam iron were
oiled during manufacture and these
will therefore smoke slightly when the
iron is first used. This is entirely safe,
and the smoke will disappear once the
steam iron has been used a few times.
Test it on a piece of material or similar
before using it on clothes.
2
Page 3

USE
Filling with water (for steam ironing)
• Set the thermostat knob (8) to 0 position.
• Remove the plug from the socket.
• Lift the water reservoir lid (2), and fill
with water (max. 120 ml), using the
refilling container (11) if you wish.
• Close the water reservoir lid.
Setting the temperature
• Select the required iron temperature
using the thermostat knob:
• Synthetic fabrics (nylon,
polyester,
acrylic, etc.)
•• Wool, silk or blends
••• Cotton or linen
• Place the steam iron on its end, so it
stands upright. Plug in and switch the
power on.
• Do not start ironing until the indicator
light (7) goes out. The indicator light
switches on and off during ironing,
as the thermostat regulates the
temperature of the steam iron.
• If you turn the temperature up using
the thermostat button, you should not
start to iron until the indicator light
goes out.
Steam ironing
Steam ironing is only possible at high
temperatures. Do not use steam ironing
when the thermostat knob is at position
•. If you do, water runs out from the
soleplate, because the steam iron is not
hot enough to convert all the water to
steam.
• Check that there is sufficient water in
the reservoir.
• Set the thermostat knob to the
required position (at least ••).
• Plug in. Start ironing when the
thermostat light goes out.
• Turn the steam setting selection knob
(4) to select the steam setting. You can
choose between the following settings:
0 No steam
Minimum steam
Maximum steam
Cleaning (see ‘Cleaning’
section)
• The steam iron gives off continuous
steam from the soleplate in settings 2
and 3. Begin steam ironing.
• Turn the steam setting selection knob
to 0 to stop continuous steam.
Spray function
This function moistens the item you are
ironing when you want to remove creases. The function cannot be used unless
there is water in the reservoir, or when the
indicator light is on.
• Press the button for the spray function
(3). The steam iron gives off spray from
the spray nozzle (1).
Dry ironing
You dry iron in the same way as you
steam iron, except the steam setting
selection knob must be in position 0.
Tips!
• Always stand the iron upright if you
take a break from ironing!
• Always iron synthetic fabrics and silk
on the reverse. This avoids shiny spots
on the fabric.
• The steam function can also be used
when the steam iron is held upright.
This is useful if you want to remove
marks or creases from hanging
garments, curtains, etc.
• Wool products (100% wool) may be
pressed when the steam iron is set to
steam position. We recommend using
the setting for maximum steam, with a
layer of dry fabric between the steam
iron and the item to be ironed.
CLEANING
• Remove the plug from the socket
before cleaning.
• Pour any excess water from the water
reservoir.
• Stand the steam iron upright, and
allow it to cool completely.
• Remove starch etc. from the soleplate
using a damp cloth with a little
detergent. Wipe off with a dry cloth.
• Never use a scouring sponge or
abrasive cleaning agents on the
soleplate.
• We recommend that you clean the
steam iron thoroughly once a month as
follows:
o Fill the water reservoir half full and
stand the steam iron upright.
o Set the thermostat knob to position
•••, plug the iron in and switch on
the power.
o Wait until the indicator light goes
off. Unplug the iron and hold it
horizontal above a sink.
o Turn the steam setting selection
knob to the cleaning setting and lift
it.
3
Page 4
o Hot water and steam will now run
out of the steam iron, and any
calcium deposits will be washed
out. Shake the steam iron from side
to side until the water reservoir is
empty.
o Turn the steam setting selection
knob to position 0. Plug the iron in,
stand it upright, turn the thermostat
knob to position •••, and let the
steam iron heat up again. Any
residual water in the reservoir will
turn into steam.
INFORMATION ON DISPOSAL
AND RECYCLING OF THIS
PRODUCT
Please note that this Adexi product is
marked with this symbol:
This means that this product must not be
disposed of together with ordinary household waste, as electrical and electronic
waste must be disposed of separately.
In accordance with the WEEE directive,
every member state must ensure correct
collection, recovery, handling and recycling of electrical and electronic waste.
Private households in the EU can take
used equipment to special recycling stations free of charge. In some member states you can, in certain cases, return the
used equipment to the retailer from whom
you purchased it, if you are purchasing
new equipment. Contact your retailer,
distributor or the municipal authorities for
further information on what you should do
with electrical and electronic waste.
GUARANTEE TERMS
The guarantee does not apply:
• if the above instructions are not
followed
• if the appliance has been interfered
with
• if the appliance has been mishandled,
subjected to rough treatment, or has
suffered any other form of damage
• if faults have arisen as a result of faults
in your electricity supply.
Due to the constant development of our
products in terms of function and design,
we reserve the right to make changes to
the product without prior warning.
IMPORTER
Adexi Group
We cannot be held responsible for any
printing errors
4
Page 5

DE
EINLEITUNG
Bevor Sie Ihr neues Dampfbügeleisen
erstmals in Gebrauch nehmen, sollten
Sie diese Anleitung sorgfältig durchlesen. Wir empfehlen Ihnen außerdem, die
Bedienungsanleitung aufzuheben. So
können Sie die Funktionen des Geräts
jederzeit nachlesen.
SICHERHEITSHINWEISE
• Der unsachgemäße Gebrauch
des Dampfbügeleisens kann zu
Verletzungen und zu Beschädigungen
des Dampfbügeleisens führen.
• Das Dampfbügeleisen darf nur zu dem
ihm zugedachten Zweck eingesetzt
werden. Der Hersteller ist nicht für
Schäden verantwortlich, die durch
den unsachgemäßen Gebrauch oder
die unsachgemäße Handhabung des
Dampfbügeleisens verursacht werden
(siehe auch die Garantiebedingungen).
• Das Dampfbügeleisen darf nur an 230
V, 50 Hz angeschlossen werden.
• Das Dampfbügeleisen oder das Kabel
dürfen nicht in Wasser oder sonstige
Flüssigkeiten eingetaucht werden.
• Lassen Sie das eingeschaltete
Dampfbügeleisen niemals
unbeaufsichtigt und achten Sie auf
Kinder.
• Stellen Sie das Dampfbügeleisen erst
weg, wenn es völlig abgekühlt ist.
Das Dampfbügeleisen stets außer
Reichweite von Kindern halten
• Schützen Sie stets die Bügelsohle.
Die Sohle niemals gegen Metall oder
ähnliches reiben. Dies könnte sie
zerstören.
• Das Dampfbügeleisen eignet sich nicht
für den gewerblichen Gebrauch oder
den Gebrauch im Freien.
• Sorgen Sie beim Gebrauch des
Dampfbügeleisens für einen
Sicherheitsabstand zu entzündlichen
Gegenständen.
• Lassen Sie das Dampfbügeleisen nie
in einem Raum zurück, in dem die
Temperatur unter den Gefrierpunkt
sinken kann.
• Das Dampfbügeleisen niemals
zudecken.
• Lassen Sie das Kabel nicht über
eine Tischkante hängen, und lassen
Sie es nicht in die Nähe von heißen
Gegenständen oder offenem Feuer
kommen.
• Überprüfen Sie regelmäßig,
ob das Kabel oder der Stecker
beschädigt ist, und verwenden Sie
das Dampfbügeleisen nicht, wenn
dies der Fall ist, oder wenn das
Dampfbügeleisen fallen gelassen oder
auf andere Weise beschädigt wurde.
• Wenn das Dampfbügeleisen, das
Kabel oder der Stecker beschädigt ist,
muss das Dampfbügeleisen untersucht
und, falls notwendig, durch einen
autorisierten Reparaturfachmann
repariert werden, da sonst die Gefahr
von Stromschlägen besteht. Versuchen
Sie niemals, das Gerät selbst zu
reparieren.
• Nach dem Gebrauch des Geräts,
beim Reinigen und beim Füllen des
Wassertanks den Stecker ziehen.
• Ziehen Sie nicht am Kabel, um den
Stecker aus der Steckdose zu ziehen.
Ziehen Sie stattdessen am Stecker.
• Prüfen Sie, ob gewährleistet,
dass niemand an dem Kabel des
Dampfbügeleisens oder an einem
Verlängerungskabel ziehen oder
darüber stolpern kann.
• Nicht mehr als 120 ml Wasser in den
Wassertank füllen. Keine Zusatzstoffe
ins Wasser geben. Es kann normales
Leitungswasser verwendet werden.
5
Page 6
PRODUKTBESCHREIBUNG
3.
2.
1.
10.
11.
1. Sprühdüse
2. Abdeckung für Wassertank
3. Taste für Sprühfunktion
4. Dampfregler
5. Handgriff
6. Kabel
7. Kontrolllampe
8. Thermostatregler
9. Sohle
10. Marke für maximalen Wasserpegel
11. Nachfüllbehälter
8.
9.
6.
7.
5.
4.
VOR DEM ERSTMALIGEN
GEBRAUCH
• Entfernen Sie die Schutzfolie von der
Sohle (9),
• Teile des Dampfbügeleisens sind
werkseitig eingeölt worden und geben
deshalb anfangs etwas Rauch ab. Dies
ist völlig ungefährlich und hört nach
einigen Einsätzen auf. Probieren Sie es
zuerst an einem Stück Stoff o. Ä. aus,
bevor Sie es für Kleider verwenden.
ANWENDUNG
Wasser einfüllen (Dampfbügeln)
• Stellen Sie den Thermostatregler (8) auf
0.
• Ziehen Sie den Stecker aus der
Steckdose.
• Heben Sie die Tankabdeckung (2)
an, und füllen Sie den Tank mit dem
Nachfüllbehälter mit Wasser (max. 120
ml).
• Schließen Sie die Abdeckung des
Wassertanks.
Temperatur einstellen
• Stellen Sie die gewünschte
Bügeltemperatur am Thermostatregler
ein.
• Synthetische Faser (Nylon,
Polyester, Acryl usw.)
•• Wolle, Seide oder Mischungen
••• Baumwolle oder Leinen
• Stellen Sie das Dampfbügeleisen
aufrecht hin. Stecken Sie das Gerät ein
und schalten Sie es an.
• Beginnen Sie erst mit dem Bügeln,
wenn die Kontrolllampe (7) erloschen
ist. Die Kontrolllampe schaltet
sich während des Bügelns ein und
aus, während der Thermostat die
Temperatur des Dampfbügeleisens
regelt.
• Wenn Sie die Temperatur am
Thermostatregler hochdrehen, sollten
Sie erst mit dem Bügeln beginnen,
wenn die Kontrolllampe erloschen ist.
Bügeln mit Dampf
Das Bügeln mit Dampf ist nur bei hohen
Temperaturen möglich. Verwenden
Sie die Dampfbügelfunktion niemals,
wenn sich der Thermostatregler in der
Position • befindet. Andernfalls tropft
Wasser aus der Bügelsohle, weil das
Dampfbügeleisen nicht heiß genug ist,
um Wasser in Dampf umzuwandeln.
• Prüfen Sie, ob genügend Wasser im
Tank ist.
• Stellen Sie den Thermostatregler auf
die gewünschte Position (mindestens
••).
• Stecken Sie das Gerät ein. Beginnen
Sie mit dem Bügeln, wenn die
Thermostatanzeige erlischt.
• Drehen Sie den Dampfregler (4) auf
die gewünschte Dampfeinstellung. Sie
haben die Wahl zwischen folgenden
Einstellungen:
0 Ohne Dampf
Dampfminimum
Dampfmaximum
Reinigen (siehe Abschnitt
'Reinigen')
• In den Einstellungen 2 und 3 gibt das
Dampfbügeleisen ständig Dampf aus
der Sohle ab. Beginnen Sie mit dem
Dampfbügeln.
• Drehen Sie den Dampfregler auf 0,
um die ständige Dampfabgabe zu
stoppen.
6
Page 7

Sprühfunktion
Durch diese Funktion wird der Artikel, den
sie bügeln, befeuchtet, wenn sie Falten
entfernen wollen. Diese Funktion kann nur
mit Wasser im Tank und eingeschalteter
Kontrollleuchte benutzt werden.
• Drücken Sie die Taste für
die Sprühfunktion (3). Das
Dampfbügeleisen gibt über die
Sprühdüse (1) einen Sprühnebel ab.
Trockenbügeln
Das Trockenbügeln erfolgt auf die gleiche
Weise wie das Dampfbügeln, nur muss
der Dampfregler dabei auf 0 gestellt sein.
Tipps!
• Stellen Sie das Bügeleisen immer
aufrecht hin, wenn Sie beim Bügeln
eine Pause machen!
• Synthetische Fasern und Seide
immer auf der Rückseite bügeln. So
vermeiden Sie glänzende Flecken auf
dem Gewebe.
• Die Dampffunktion kann auch
verwendet werden, wenn das
Dampfbügeleisen aufrecht gehalten
wird. Dies ist besonders praktisch,
wenn Sie Flecken oder Falten aus
hängenden Kleidern, Vorhängen usw.
entfernen wollen.
• Wollprodukte (100% Wolle) können
gebügelt werden, wenn das
Dampfbügeleisen auf Dampfbügeln
eingestellt ist. Wir empfehlen, das
Bügeleisen auf das Dampfmaximum
einzustellen und eine Lage trockenen
Stoff zwischen das Dampfbügeleisen
und den zu bügelnden Artikel zu legen.
REINIGUNG
• Ziehen Sie vor dem Reinigen den
Stecker aus der Steckdose.
• Leeren Sie das verbliebene Wasser aus
dem Tank.
• Stellen Sie das Dampfbügeleisen
aufrecht, und lassen Sie es vollständig
abkühlen.
• Entfernen Sie Wäschestärke usw. von
der Bügelsohle, indem Sie ein feuchtes
Tuch mit etwas Reinigungsmittel
verwenden. Wischen Sie sie mit einem
trockenen Tuch wieder ab.
• Verwenden Sie keine
Scheuerschwämme oder schleifenden
Reinigungsmittel für die Bügelsohle.
• Wir empfehlen Ihnen, das
Dampfbügeleisen einmal pro Woche
wie folgt gründlich zu reinigen:
o Füllen Sie den Wassertank bis zur
Hälfte und stellen Sie das
Dampfbügeleisen aufrecht hin.
o Stellen Sie den Thermostatregler
auf •••, stecken Sie das
Bügeleisen ein und schalten Sie es
an.
o Warten Sie, bis die Kontrolllampe
erlischt. Stecken Sie das
Bügeleisen aus und halten Sie es
waagerecht über ein Spülbecken.
o Stellen Sie den Dampfregler auf die
Reinigungsstellung und heben Sie
ihn an.
oJetzt strömt heißes Wasser und
Dampf aus dem Dampfbügeleisen,
wobei Kalkrückstände
herausgespült werden. Schütteln
Sie das Dampfbügeleisen, bis der
Wassertank leer ist.
o Stellen Sie den Dampfregler auf 0.
Stecken Sie das Bügeleisen ein,
stellen Sie es aufrecht, drehen Sie
den Thermostatregler auf •••, und
lassen Sie das Dampfbügeleisen
wieder aufheizen. Sämtliche
Wasserrückstände im Tank werden
zu Dampf.
INFORMATION ÜBER DIE
ENTSORGUNG UND DAS
RECYCLING DIESES PRODUKTS
Dieses Adexi-Produkt trägt dieses
Zeichen:
Das heißt, dass es nicht zusammen mit
normalem Haushaltsmüll sondern als
Sondermüll zu entsorgen ist.
Gemäß der WEEE-Richtlinie muss
jeder Mitgliedstaat für das ordnungsgemäße Sammeln, die Verwertung, die
Handhabung und das Recycling von
Elektro- und Elektronikmüll sorgen.
Private Haushalte im Bereich der EU können ihre gebrauchten Geräte kostenfrei an
speziellen Recyclingstationen abgeben. In
einigen Mitgliedstaaten können gebrauchte Geräte bei dem Einzelhändler, bei
dem sie gekauft wurden, kostenfrei wieder abgegeben werden, sofern ein neues
Gerät gekauft wird. Bitte nehmen Sie
mit der Verkaufsstelle oder den örtlichen
Behörden Kontakt auf, wenn Sie Näheres
über den Umgang mit Elektro- und
Elektronikmüll erfahren möchten.
7
Page 8

GARANTIEBEDINGUNGEN
Diese Garantie gilt nicht,
• falls die vorstehenden Hinweise nicht
beachtet werden;
• falls unbefugte Eingriffe am Gerät
vorgenommen wurden;
• falls das Gerät unsachgemäß
behandelt, Gewalt ausgesetzt oder
anderweitig beschädigt worden ist;
• bei Schäden, die aufgrund von Fehlern
im Leitungsnetz entstanden sind.
Aufgrund der ständigen Weiterentwicklung
von Funktion und Design unserer
Produkte behalten wir uns das Recht auf
Änderung des Produkts ohne vorherige
Ankündigung vor.
IMPORTEUR
Adexi Group
Für etwaige Druckfehler wird keine
Haftung übernommen.
8
Page 9

PL
3.
2.
1.
5.
4.
6.
11.
10.
9.
7.
8.
9
Page 10

10
Page 11

11
Page 12

SK
ÚVOD
Aby ste dosiahli maximum z vašej novej
naparovacej žehličky, pred prvým použitím
si pozorne prečítajte tieto pokyny. Tiež
odporúčame, aby ste si ich uschovali pre
použitie do budúcnosti, aby ste si mohli
pripomenúť funkcie naparovacej žehličky.
BEZPEČNOSTNÉ OPATRENIA
• Nesprávne používanie naparovacej žehličky
môže mať za následok fyzické zranenie a
poškodenie nádržky.
• Naparovaciu žehličku používajte iba na
určené použitie. Výrobca nie je zodpovedný
za akékoľvek poškodenie spôsobené
nesprávnym používaním alebo narábaním
(pozrite si tiež záručné podmienky).
• Naparovacia žehlička môže byť pripojená
len k 230 V, 50 Hz.
• Naparovacia žehlička alebo kábel nemôžu
byť ponorené vo vode alebo akejkoľvek
kvapaline.
• Pri používaní nikdy nenechávajte
naparovaciu žehličku bez dozoru a dávajte
pozor na deti.
• Pred odložením nechajte žehličku úplne
vychladnúť. Naparovaciu žehličku vždy
uchovajte z dosahu detí.
• Chráňte žehliacu plochu a NIKDY s ňou
neprechádzajte cez kovový alebo podobný
povrch, pretože by sa poškodila.
• Táto naparovacia žehlička nie je vhodná pre
komerčné alebo exteriérové použitie.
• Naparovaciu žehličku pri používaní vždy
uchovajte v bezpečnej vzdialenosti od
horľavých materiálov.
• Naparovaciu žehličku nikdy nenechávajte na
mieste, kde môže klesnúť teplota pod bod
mrazu.
• Naparovaciu žehličku nezakrývajte.
• Nedovoľte, aby kábel prevísal cez okraj stola
a uchovajte ho z dosahu horúcich objektov
a otvoreného plameňa.
• Pravidelne kontrolujte, aby nebol
poškodený kábel alebo zástrčka a v
prípade poškodenia naparovaciu žehličku
nepoužívajte. Nepoužívajte ju vtedy,
ak spadla alebo sa akýmkoľvek iným
spôsobom poškodila.
• Ak je naparovacia žehlička, kábel alebo
zástrčka poškodená, musí sa vymeniť a v
prípade potreby ju musí opraviť autorizovaný
opravár, pretože v opačnom prípade hrozí
nebezpečenstvo zásahu elektrickým
prúdom. Zariadenie sa nikdy nepokúšajte
opravovať svojpomocne.
• Po použití, pri čistení a pri dopĺňaní vody do
nádržky vytiahnite zástrčku zo zásuvky.
• Pri odpájaní zástrčky zo zásuvky neťahajte
za kábel. Namiesto toho držte zástrčku.
• Uistite sa, že nie je možné vytiahnuť alebo
sa potknúť o kábel naparovacej žehličky
alebo akýkoľvek predlžovací kábel.
• Do nádržky nedávajte viac ako 120 ml vody.
Do vody nič nepridávajte. Môžete použiť
bežnú vodu z vodovodného kohútika.
LEGENDA
3.
2.
6.
5.
4.
1.
7.
10.
8.
9.
11.
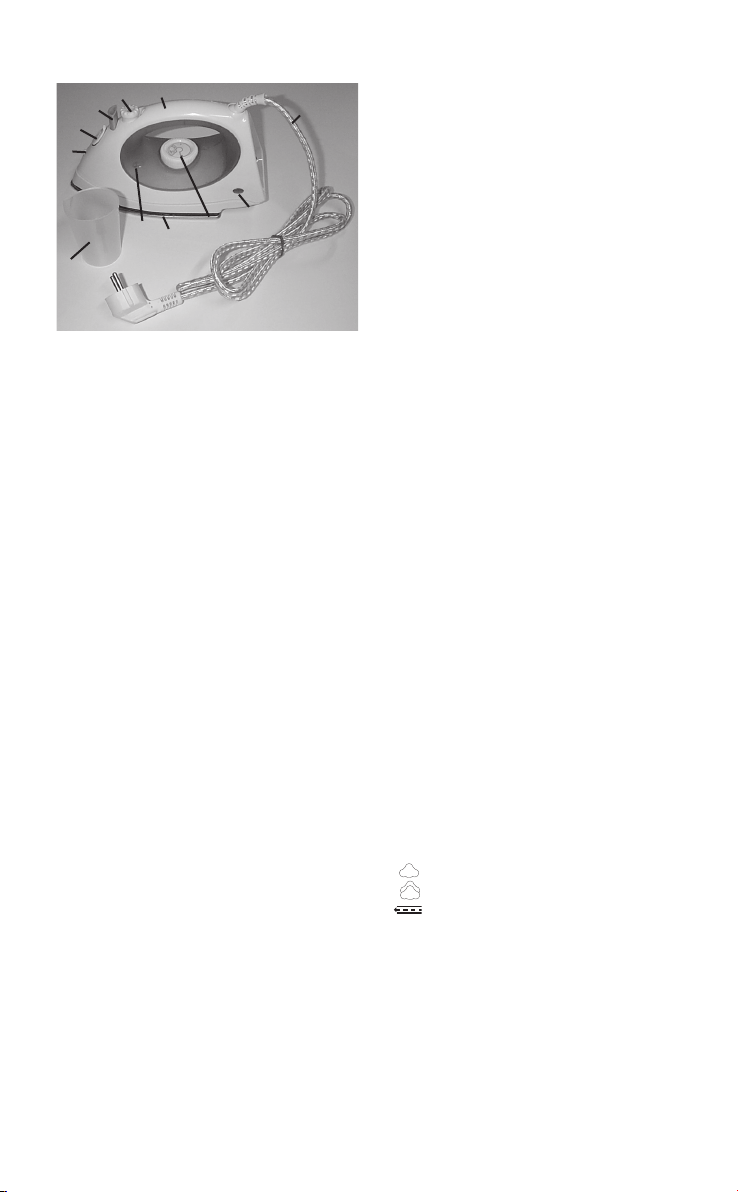
1. Kropiaca tryska
2. Kryt pre nádržku na vodu
3. Tlačidlo pre funkciu kropenia
4. Gombík pre výber nastavenia pary
5. Rukoväť
6. Kábel
7. Kontrolka
8. Gombík termostatu
9. Žehliaca plocha
10. Značka pre maximálnu úroveň vody
11. Dopĺňacia nádobka
PRED PRVÝM POUŽITÍM
• Zo žehliacej plochy stiahnite ochrannú fóliu
(9).
• Niektoré diely naparovacej žehličky sa
počas výroby nao lej ov ali a pri pr vom
použití budú kvôli tomu trošku dymiť. Je to
úplne bezpečné a dym sa po niekoľkých
použitiach naparovacej žehličky stratí. Pred
použitím na oblečení ju odskúšajte na kúsku
materiálu alebo podobnom predmete.
12
Page 13

POUŽÍVANIE
Naplnenie vodou (pre žehlenie s naparovaním)
• Gombík termostatu (8) nastavte do polohy
0.
• Zástrčku vytiahnite zo zásuvky.
• Nadvihnite kryt nád ržky na vodu (2) a
naplňte ju vodou (max. 120 ml) s použitím
dopĺňacej nádobky (11), ak si to želáte.
• Zatvorte kryt nádržky na vodu.
Nastavenie teploty
• Pomocou gombíku termostatu vyberte
požadovanú teplotu žehlenia:
• Syntetické látky (nylón, polyester, akryl
atď.)
•• Vlna, hodváb alebo zmiešané
••• Bavlna alebo ľan
• Naparovaciu žehličku postavte na koniec,
aby stála vzpriamene. Zapojte ju a zapnite
napájanie.
• Nez ačín ajte žehli ť, ký m sa nevyp ne
kontrolka (7). Indikátor sa počas žehlenia
zapne a vypne, keď termostat reguluje
teplotu naparovacej žehličky.
• Ak pomocou tlačidla termostatu zvýšite
teplotu, nemali by ste začať žehliť, kým sa
kontrolka nevypne.
Žehlenie s naparovaním
Žehlenie s naparovaním je možné len pri
vysokých teplotách. Nepoužívajte žehlenie
s naparovaním, keď je gombík termostatu v
polohe •. Ak tak vykonáte, zo žehliacej plochy
vytečie voda, pretože naparovacia žehlička nie je
dostatočne horúca, aby všetku vodu premenila
na paru.
• Skontrolujte, či je v nádobe dostatočné
množstvo vody.
• Gombík termostatu nastavte do
požadovanej polohy (aspoň ••).
• Žehličku zapojte. Začnite žehliť, keď sa
vypne kontrolka termostatu.
• Otočte gombík výberu nastavenia
naparovania (4), aby ste vybrali nastavenie
naparovania. Môžete si vybrať spomedzi
nasledujúcich nastavení:
0 Bez pary
Minimálna para
Maximálna para
Čistenie (pozrite si časť „Čistenie“)
• Naparovacia žehlička produkuje nepretržitú
paru zo žehliacej plochy pri nastaveniach 2
a 3. Začnite žehlenie s naparovaním.
• Otočte gombík výberu nastavenia pary do
polohy 0, aby ste zastavili nepretržitú paru.
Funkcia kropenia
Táto funkcia zvlhčuje žehlené predmety, keď
chcete odstrániť záhyby. Funkcia sa nedá použiť,
pokiaľ nie je v nádržke voda, prípadne keď svieti
kontrolka.
• St lačt e tlači dlo fun kcie krope n ia (3) .
Na p aro vac i a žehl i čka zač n e kropi ť z
kropiacej trysky (1).
Suché žehlenie
Nasucho žehlíte rovnakým spôsobom, ako
žehlíte s naparovaním, s výnimkou, že gombík
výberu nastavenia naparovania musí byť v
polohe 0.
Tipy!
• Žehličku vždy postavte kolmo, keď prerušíte
žehlenie!
• Syntetické látky a hodváb vždy žehlite
prevrátené. Týmto sa zabráni vo vytvorení
lesklých bodov na látke.
• Funkcia naparovania sa môže tiež použiť,
keď sa žehlička s naparovaním drží kolmo.
Je to užitočné, keď chcete odstrániť stopy
alebo záhyby z visiaceho oblečenia, záclon
atď.
• Tlačidlo Vlnené produkty (100%
vlna) môžete stlačiť, keď sa žehlička
s naparovaním nastaví do polohy
naparovania. Odporúčame používanie
nastavenia pre maximálnu paru s vrstvou
suchej látky medzi žehličkou s naparovaním
a predmetom, ktorý idete žehliť.
ČISTENIE
• Zástrčku pred čistením vytiahnite zo
zásuvky.
• Z nádoby na vodu vylejte akúkoľvek
zvyškovú vodu.
• Naparovaciu žehličku postavte kolmo a
nechajte ju úplne vychladnúť.
• Zo žehliacej plochy odstráňte škrob atď.
s použitím vlhkej handričky a malého
množstva čistiaceho prostriedku. Utrite
suchou handričkou.
• Na žehliacu plochu nikdy nepoužívaj te
drôtenku alebo drsné čistiace prostriedky.
• Odp o r úč a m e , aby ste na p a r o v a c iu
žehličku poriadne raz za mesiac vyčistili
nasledujúcim spôsobom:
o Nádrž na vodu nap lňte do pol ov ice a
naparovaciu žehličku nechajte kolmo stáť.
o Gombík termostatu nastavte do polohy •••,
zapojte žehličku a zapnite napájanie.
o Po čka jte , kým sa nevy pne kont rol ka.
Odpojte žehličku a podržte ju horizontálne
nad odtokom.
o Otočte gombík výberu nastavenia pary na
nastavenie čistenia a nadvihnite ho.
13
Page 14

o Zo žehličky s naparovaním začne teraz
vytekať horúca voda a para a vyplavia
sa akékoľvek zvyšky vodného kameňa.
Zatraste žehličkou s naparovaním zo strany
na stranu, kým nebude nádržka na vodu
prázdna.
o Otočte gombík výberu nastavenia pary
do polohy 0. Zapojte žehličku, postavte ju
kolmo, otočte gombík termostatu do polohy
••• a žehličku s naparovaním nechajte
znova zahriať. Akákoľvek zvyšková voda v
nádržke sa zmení na paru.
TIPY NA OCHRANU ŽIVOTNÉHO
PROSTREDIA
Potom, čo už akýkoľvek elektrický produkt
nefunguje, mal by sa likvidovať takým
spôsobom, aby spôsobil minimálny dopad na
životné prostredie, a to v súlade s nariadeniami
vašich miestnych úradov. Vo väčšine prípadov
môžete takéto produkty odniesť do miestneho
recyklačného strediska.
ZÁRUČNÉ PODMIENKY
Záruka sa nevzťahuje, ak:
• sa nedodržia vyššie uvedené pokyny,
• sa do zariadenia zasahovalo,
• sa zariadenie zneužilo, vystavilo sa drsnému
zaobchádzaniu, prípadne sa akýmkoľvek
iným spôsobom poškodilo,
• sa vyskytli chyby ako výsledok chýb v
elektrickom napájaní.
TECHNICKÉ ÚDAJE
Prevádzkové napätie: 230 V - 50 Hz
Spotreba napájania: 1600 W (max.)
Objem nádržky na vodu: 120 ml
Farba: biela
Hmotnost’: 900 g
Kvôli nepretržitému vývoju našich
produktov v oblasti fungovania a dizajnu si
vyhradzujeme právo na vykonanie zmien bez
predchádzajúceho upozornenia.
DOVOZCA
Adexi Group
Nie sme zodpovední za akékoľvek tlačové chyby
14
Page 15

CZ
ÚVOD
Než svoji novou napařovací žehličku použijete
poprvé, přečtěte si prosím pozorně tento návod,
abyste žehličku mohli používat co nejúčinněji.
Dopo ruč ujeme vám také, abyste si návo d
ponechali a měli jej v budoucnu k dispozici,
abyst e si mohli př ipo meno u t funkc e své
napařovací žehličky.
BEZPEČNOSTNÍ OPATŘENÍ
• Nesprávné používání napařovací žehličky
mů že vé s t k o so b n ím u p o ra n ě ní a
poškození žehličky.
• Napařovací žehličku používejte pouze k
účelu, pro který byla vyrobena. Výrobce
nenese žádnou zodpovědnost za škody
vyplýva jí cí z nesprávného pou ží vání či
manipulace (viz také Záruční podmínky).
• Napařovací žehličku je možné připojit pouze
k přívodu 230 V, 50 Hz.
• Napařovací žehličku ani přívodní šňůru není
možné ponořit do vody ani jiné kapaliny.
• Nikdy nenechávejte zapnutou žehličku bez
dozoru a sledujte děti.
• Než napařovací žehličku uklidíte, nechte
ji úplně vychladnout. Napařovací žehličku
vždy dávejte mimo dosah dětí.
• Dávejte pozor na žehlicí plochu a NIKDY s ní
nepřejíždějte přes kovové ani jiné podobné
povrchy, protože tak byste ji mohli poškodit.
• Tato napařovací žehlička není vhodná pro
komerční ani pro venkovní použití.
• Zapnutou napařovací žehličku vždy mějte
v bezpečné vzdálenosti od hořlavý ch
předmětů.
• Napařovací žehličku nikdy nenechávejte na
místě, kde by teplota mohla klesnout pod
bod mrazu.
• Napařovací žehličku nezakrývejte.
• Nenechávejte přívodní šňůr u viset přes
hranu stolu a uchovávejte ji stranou od
horkých předmětů a otevřeného ohně.
• Pr avidel ně kontr o l ujte, zda šň ůra či
zástrčka nejsou poškozeny, a nepoužívejte
napařovací žehličku, pokud vám upadla
nebo se jinak poškodila.
• Pokud je napařovací žehlička, přívodní
šňůra nebo zástrčka poškozena, je nutné,
aby autorizovaný servisní technik spotřebič
prohlédl a – pokud je to nezbytné – opravil,
jinak hrozí úraz elektrickým proudem. Nikdy
se nepokoušejte opravit spotřebič sami.
• Po použití, při čištění a při naplňování
nádr ž ky na vodu vy jměte zást rč ku ze
zásuvky.
• Při tom, když vyjímáte zástrčku ze zásuvky,
netahejte za šňůru. Uchopte zástrčku.
• Ujistěte se, že není možné zakopnout o
šňůru napařovací žehličky nebo případné
prodlužovací šňůry.
• Do nádržky nedávejte více než 120 ml
vody. Do vody nic nepřidávejte. Je možné
používat obyčejnou vodu z kohoutku.
LEGENDA
5.
4.
3.
2.
1.
7.
10.
8.
9.
11.
1. Tryska přístřiku
2. Víčko nádržky na vodu
3. Tlačítko pro přístřik
4. Ovládací kolečko pro nastavení páry
5. Držadlo
6. Šňůra
7. Kontrolka
8. Ovládací kolečko termostatu
9. Žehlicí plocha
10. Značka maximální hladiny vody
11. Nádoba pro doplnění vody
PŘED PRVNÍM POUŽITÍM
• Odstraňte z žehlicí plochy ochranný film (9).
• Některé části napařovací žehličky byly při
výrobě naolejovány a z těchto částí se při
prvním použití bude mírně kouřit. Je to
naprosto bezpečné a po několika použitích
kouření přestane. Předtím, než žehličku
použijete na oblečení, vyzkoušejte ji na
kousek látky nebo něco podobného.
POUŽITÍ
Naplnění vodou (pro napařování)
• Nastavte ovládací kolečko termostatu (8) do
polohy 0.Vyjměte zástrčku ze zásuvky.
• Zve dněte víčko nádržk y na vodu (2) a
na plň te vod ou (ma x. 120 ml) pomoc í
nádoby pro doplnění vody (11), pokud si tak
přejete.
• Zavřete víčko nádržky na vodu.
15
6.
Page 16

Nastavení teploty
• Vyberte požadova nou teplotu žehličky
pomocí ovládacího kolečka termostatu:
• Syntetické materiály (nylon, polyester,
akryl atd.)
•• Vlna, hedvábí nebo směsi
••• Bavlna nebo len
• Postavte napařovací žehličku na její zadní
část tak, aby stála vzpřímeně. Zapojte ji do
zásuvky a zapněte napájení.
• Se žehlením nezačínejte, dokud kontrolka
(7) nezhasne . Kontrolka se při žehl ení
rozsvěcí a zhasíná podle toho, jak termostat
reguluje teplotu napařovací žehličky.
• Pokud pomocí tlačítka termostatu zvýšíte
teplotu, měli byste začít žehlit až po té, co
kontrolka zhasne.
Napařování
Napařování je možné jen ve vysokých teplotách.
Nepoužívejte napařování, pokud je ovládací
kolečko termostatu v poloze ?. Pokud byste tak
učinili, poteče z žehlicí plochy voda, protože
žehlička nebude horká natolik, aby všechnu
vodu přeměnila na páru.
• Zkontrolujte, zda je v nádržce dostatek
vody.
• Nastavte ovládací kolečko termostatu do
požadované polohy (přinejmenším ••).
• Zastrčte do zásuvky. Po zhasnutí kontrolky
termostatu můžete začít žehlit.
• Pomocí ovládacího kolečka pro nastavení
páry (4) vyberte nastavení páry. Můžete si
vybrat z následujících nastavení:
0 Bez napařování
Minimální napařování
Maximální napařování
Čištění (viz oddíl „Čištění“)
• Při nastavení 2 a 3 vychází z žehlicí plochy
napařovací žehličky trvale pára. Začněte
napařovat.
• Chcete-li trvalý přívod páry vypnout, otočte
ovládací kolečko pro nastavení páry na 0.
Přístřik
Tato funkce slouží k navlhčení žehleného kusu
prádla, když chcete odstranit pomačkání. Funkci
není možné použít, když není voda v nádržce
nebo když svítí kontrolka.
• Když chcete přístřik aktivovat, stiskněte
tlačítko(3). Napařovací žehlička vystříkne z
trysky přístřiku (1).
Suché žehlení
Suché žehlení probíhá stejně jako žehlení s
napařováním, jen ovládací kolečko pro nastavení
páry je v poloze 0.
Tipy!
• Vždy, když si chcete od žehlení odpočinout,
postavte žehličku vzpřímeně!
• Syntetické látky a hedvábí vždy žehlete
po vnitř ní straně. Tak zame zíte vzniku
vyleštěných ploch na látce.
• Pá r u můžete po užít i v případě, že
napařovací žehličku držíte ve vzpřímené
poloze. To se hodí, když z visících oděvů,
záclon atd. chcete odstranit skvrny nebo
pomačkání.
• Vlněné výrobky (100% vlna) je možné žehlit,
když je napařovací žehlička nastavena do
polohy pro napařování. Dopor uč ujeme
použít nastavení pro maximální napařování
a také vrstvu suché látky mezi žehličkou a
oděvem, který chcete žehlit.
ČIŠTĚNÍ
• Před čištěním vyjměte zástrčku ze zásuvky.
• Vylijte přebytečnou vodu z nádržky na vodu.
• Postavte napařovací žehličku tak, aby stála
vzpřímeně, a nechte ji úplně vychladnout.
• Pomocí vlhkého hadříku a malého množství
čistícího prostředku vyčistěte žehlicí plochu
od škrobu atd. Otřete suchým hadříkem.
• Nikdy na žehlicí plochu nepoužívejte houbu
s drsným povrchem ani abrasivní čistící
prostředky.
• Doporučujeme, abyste napařovací žehličku
důkladně vyčistili jednou za měsíc, a to
následovně:
o Nap lňt e nádr žku na vodu do půlk y a
postavte napařovací žehličku vzpřímeně.
o Nastavte ovládací kolečko termostatu do
polohy •••, zapojte žehličku do zásuvky a
zapněte napájení.
o Po čkejte , doku d kon tro lka ne zhas ne.
Odpojte žehličku ze zásuvky a podržte ji ve
vodorovné poloze nad umývadlem.
o Otočte ovládací kolečko pro nastavení páry
do nastavení pro čištění a zvedněte jej.
o Z napařovací žehličky začne vytékat horká
voda, unikat pára a spláchnou se veškeré
usazeniny vápníku. Zatřeste napařovací
žehlič ko u ze str any na stra nu, abyste
nádržku na vodu vyprázdnili.
o Otočte ovládací kolečko pro nastavení páry
do polohy 0. Zapojte žehličku do zásuvky,
postavte ji do vzpřímené polohy, otočte
ovládací kolečko termostatu do polohy
••• a nechte napařovací žehličku znovu
ohřát. Jakákoli zbývající voda v nádržce se
přemění na páru.
16
Page 17

TIPY S OHLEDEM NA ŽIVOTNÍ
PROSTŘEDÍ
Když jak ýkoli ele ktr ický výrobe k přestan e
fungovat, měl by se zlikvidovat v souladu se
směrnicemi místních úřadů tak, aby způsobil co
nejmenší škody na životním prostředí. Většinou
takové výrobky můžete odevzdat společnosti
zabývající se recyklací.
ZÁRUČNÍ PODMÍNKY
Záruka neplatí:
• pokud není dodržen výše uvedený návod
• pokud někdo do spotřebiče zasahoval
• po k u d se se spo t řebi č e m za cház e lo
nesprávně, hrubě nebo pokud na něm
vznikla jiná forma škody
• pokud k závadě došlo vlivem poruchy na
vašem přívodu elektřiny.
TECHNICKÉ ÚDAJE
Provozní napětí: 230 V - 50 Hz
Příkon: 1600 W (max.)
Objem nádržky na vodu: 120 ml
Barva: bílá
Hmotnost: 900 g
S ohledem na trvalý vývoj našich výrobků, pokud
jde o funkci a design, si vyhrazujeme právo
provádět na výrobku změny bez předchozího
varování.
DOVOZCE
Adexi Group
Neneseme zodpovědnost za tiskové chyby
17
Page 18

HU
BEVEZETÉS
A készülék első használata előtt figyelmesen
olvassa el ezeket az utasításokat, hogy a
legjobbat hozhassa ki vasalójából. Továbbá
javasoljuk, hogy őrizze meg az utasításokat,
mert később is szüksége lehet rájuk, és segíthet
felidézni a gőzölős vasaló funkcióit.
BIZTONSÁGI ELŐÍRÁSOK
• A gőzölős vasaló helytelen használata
személyi sérüléshez vezethet, és kárt
okozhat a tartályban.
• A vasalót csak rendeltetésszerűen
használja. A gyártó nem felelős a helytelen
használatból vagy kezelésből eredő károkért
(lásd még Jótállási feltételek).
• A gőzölős vasaló csak 230 V, 50 Hz
tápforráshoz csatlakoztatható.
• A gőzölős vasalót tilos vízbe vagy egyéb
folyadékba meríteni.
• Használat közben soha ne hagyja felügyelet
nélkül a gőzölős vasalót, és figyeljen a
gyerekekre is.
• Elpakolás előtt hagyja teljesen lehűlni
a vasalót. A gőzölős vasalót mindig
gyermekek által nem hozzáférhető helyen
tartsa.
• Védje a talpat és SOHA ne húzza végig
fém vagy egyéb felületeken, mert ez kárt
okozhat benne.
• Ez a gőzölős vasaló nem használható ipari
célokra vagy kültéri használatra.
• A használat során a gőzölős vasalót mindig
tartsa távol a gyúlékony tárgyaktól.
• Soha se hagyja a gőzölős vasalót olyan
helyen, ahol a hőmérséklet fagypont alá
süllyedhet.
• Ne fedje le a gőzölős vasalót.
• Ne engedje, hogy a vezeték a munkalap
szélén lógjon, és tartsa távol a forró
tárgyaktól valamint a nyílt lángtól.
• Szabályos időközönként ellenőrizze,
hogy nem sérült-e meg a vezeték vagy
a csatlakozó és ne használja a gőzölős
vasalót, ha leesett vagy más módon sérült
meg.
• Ha a gőzölős vasaló, a vezeték vagy a
csatlakozó megsérült, ellenőriztetni kell
és szükség esetén meg kell javíttatni egy
jóváhagyott szerelővel, ellenkező esetben
áramütés kockázata áll fenn. Soha ne
próbálja meg önállóan megjavítani a
készüléket.
• Használat után, valamint tisztításkor és
a víztartály megtöltésekor húzza ki a
csatlakozót az aljzatból.
• A csatlakozó aljzatból történő eltávolításakor
ne a vezetéket húzza meg, hanem a
csatlakozót tartsa.
• Ellenőrizze, hogy a gőzölős vasaló vezetékét
vagy a hosszabbítót nem lehet-e kihúzni és
nem lehet-e megbotolni bennük.
• Ne töltsön 120 ml-nél több vizet a tartályba.
A vízhez nem szükséges adalékot adnia, és
közönséges csapvizet is használhat.
GOMBOK
3.
2.
6.
5.
4.
1.
7.
10.
8.
9.
11.
1. Fecskendező fej
2. Víztartály fedele
3. Spay funkció gombja
4. Gőzbeállítás kiválasztása gomb
5. Fogantyú
6. Vezeték
7. Jelzőfény
8. Termosztát gomb
9. Talp
10. Maximális vízszint jelzés
11. Újratöltő tartály
AZ ELSŐ HASZNÁLAT ELŐTT
• Távolítsa el a talpról a védőfóliát (9).
• A gyártás során a gőzölős vasaló néhány
alkatrészét megkenték, ezek a vasaló
első használatakor enyhén füstölhetnek.
Ez teljesen biztonságos, a füstképződés
a vasaló néhány alkalommal történő
használata után megszűnik. A ruhákon
történő használat előtt próbálja ki egy
anyagdarabon vagy hasonlón.
HASZNÁLAT
Megtöltés vízzel (gőzölős vasaláshoz)
• Állítsa a termosztát gombot (8) 0 helyzetbe.
• Vegye ki a csatlakozót az aljzatból.
• Emelje fel a víztartály fedelét (2) és töltse
meg vízzel (max. 120 ml), kívánság szerint
használhatja az újratöltő tartályt is.
• Zárja be a víztartály fedelét.
18
Page 19

A hőmérséklet beállítása
• A termosztát gomb segítségével állítsa be a
kívánt vasalóhőmérsékletet:
• Szintetikus anyagok (nejlon, poliészter,
akril, stb.)
•• Gyapjú, selyem vagy keverék
••• Pamut vagy vászon
• Állítsa a gőzölős vasalót a végére, hogy
felfele álljon. Csatlakoztassa és kapcsolja be
a készüléket.
• Addig ne kezdje meg a vasalást, amíg
a jelzőfény (7) nem alszik ki. A jelzőfény
bekapcsol és kikapcsol a vasalás közben,
mivel a gőzölős vasaló hőmérsékletét a
termosztát szabályozza.
• Ha a termosztát gombbal csavarja fel a
hőmérsékletet, akkor a jelzőfény kialvásáig
nem kezdheti meg a vasalást.
Gőzölős vasalás
Csak magas hőmérsékleten lehet gőzzel vasalni.
Ne használja a gőzölős vasalást, ha a termosztát
gomb a ? helyzetben van. Ekkor ugyanis víz
jön ki a vasaló talpából, mert a gőzölős vasaló
még nem elég forró ahhoz, hogy a vizet gőzzé
alakítsa.
• Ellenőrizze, hogy elegendő víz van-e a
víztartályban.
• Állítsa a termosztát gombot a kívánt
helyzetbe (legalább: ••).
• Csatlakoztassa a tápforráshoz. A vasalást a
termosztát jelzőfény kialvásakor kezdje meg.
• A gőzbeállítás kiválasztásához forgassa el
a gőzbeállítás kiválasztása gombot (4). A
következő beállítások közül választhat:
0 Nincs gőz
Minimális gőz
Maximális gőz
Tisztítás (ld. a „Tisztítás” részt)
• A 2. és 3. beállításnál a gőzölős vasaló talpa
folyamatosan bocsát ki gőzt. Kezdje meg a
gőzölős vasalást.
• A gőzbeállítás kiválasztása gombot
forgassa el 0 helyzetbe a folyamatos gőz
leállításához.
Spray funkció
Ez a funkció vasalás közben megnedvesíti a
ruhát, ha a gyűrődéseket kívánja eltávolítani.
Csak abban az esetben használható, ha a
tartályban van víz, és a jelzőfény bekapcsolt
állapotú.
• Nyomja meg a gombot a spray funkcióhoz
(3). A gőzölős vasaló permetet bocsát ki a
fecskendező fejből (1).
Száraz vasalás
A gőzölős vasalással megegyező módon
történik, egyetlen kivétel az, hogy a gőzbeállítás
kiválasztása gombnak a 0 helyzetben kell állnia.
Ötletek
• Ha szünetet tart a vasalásában mindig
állítsa fel a vasalót!
• A szintetikus anyagokat és a selymet mindig
kifordítva vasalja! Ezzel elkerülheti, hogy
kifényesedett foltok jelenjenek meg az
anyagon.
• A gőzölés funkciót a vasaló álló helyzetében
is használhatja. Ez abban az esetben
hasznos, ha a felakasztott öltözékről vagy
függönyökről stb. kívánja eltávolítani a
foltokat, ráncokat.
• A gyapjútermékek (100% gyapjú) abban az
esetben vasalhatók, ha a gőzölős vasalót
a gőzölés pozícióba állította. Javasoljuk,
hogy a maximális gőz beállítást használja,
és helyezzen száraz ruharéteget a gőzölős
vasaló és a vasalandó anyag közé.
TISZTÍTÁS
• Tisztítás előtt húzza ki a csatlakozót az
aljzatból.
• Öntse ki a felesleges vizet a víztartályból.
• Állítsa függőleges helyzetbe a gőzölős
vasalót és hagyja teljesen lehűlni.
• Nedves, enyhén tisztítószeres ruhával
távolítsa el a keményítőt stb. a talpról.
Száraz ruhával törölje le.
• A talpon soha ne használjon dörzsszivacsot
vagy maró hatású tisztítószereket.
• Javasoljuk, hogy havonta egy alkalommal
alaposan tisztítsa meg a gőzölős vasalót a
következőképpen:
o Töltse félig tele a víztartályt és állítsa
függőleges helyzetbe a vasalót.
o Állítsa a termosztát gombot a ••• helyzetbe,
csatlakoztassa a vasalót és kapcsolja be.
o Várjon amíg a jelzőfény kialszik. Húzza ki a
vasalót és tartsa merőlegesen a mosogató
fölött.
o Forgassa a gőzbeállítás kiválasztása
gombot a tisztítás beállításra és emelje fel.
o A gőzölős vasalóból forró víz és gőz távozik,
és kimosódik az összes kalcium-lerakódás.
Addig rázza oldalirányba a gőzölős vasalót,
amíg a víztartály ki nem ürül.
o A gőzbeállítás kiválasztása gombot
forgassa el 0 helyzetbe. Csatlakoztassa a
vasalót, állítsa a termosztát gombot a •••
helyzetbe, és hagyja ismét felmelegedni a
vasalót. A tartályban lévő összes maradék
víz gőzzé válik.
19
Page 20

KÖRNYEZETVÉDELMI TANÁCSOK
Ha bármely elektronikus termék többé nem
vehető használatba, akkor olyan módon kell
hulladékba helyezni, hogy a hely i hatóság
sz a bály o zása i nak megf elel ő e n minim á l is
környezeti hatással bírjon. A legtöbb esetben az
ilyen termékeket elviheti a helyi újrahasznosító
állomásra.
JÓTÁLLÁSI FELTÉTELEK
A jótállás érvényét veszti:
• ha a fenti utasításokat nem tartják be
• ha a készüléket megváltoztatták
• ha a készüléket nem megfelelően kezelték,
durva bánásmódnak tették ki, vagy más
formában szenvedett károsodást.
• ha a hibák az Ön elektromos rendszerében
bekövetkezett meghibásodás
következményei.
MŰSZAKI ADATOK
Működési feszültség: 230 V - 50 Hz
Energiafogyasztás: 1600 W (max.)
Víztartály térfogata: 120 ml
Szín: fehér
Súly: 900 g
Mivel termékeinket a funkció és formaterv
tekintetében folyamatosan fejlesztjük, ezért
fenntartjuk magunknak a jogot, hogy a terméket
előzetes figyelmeztetés nélkül módosítsuk.
IMPORTŐR
Adexi Group
Cégünk nem tehető felelőssé a nyomtatási
hibákért
20
 Loading...