

Page 1
IAN 103581
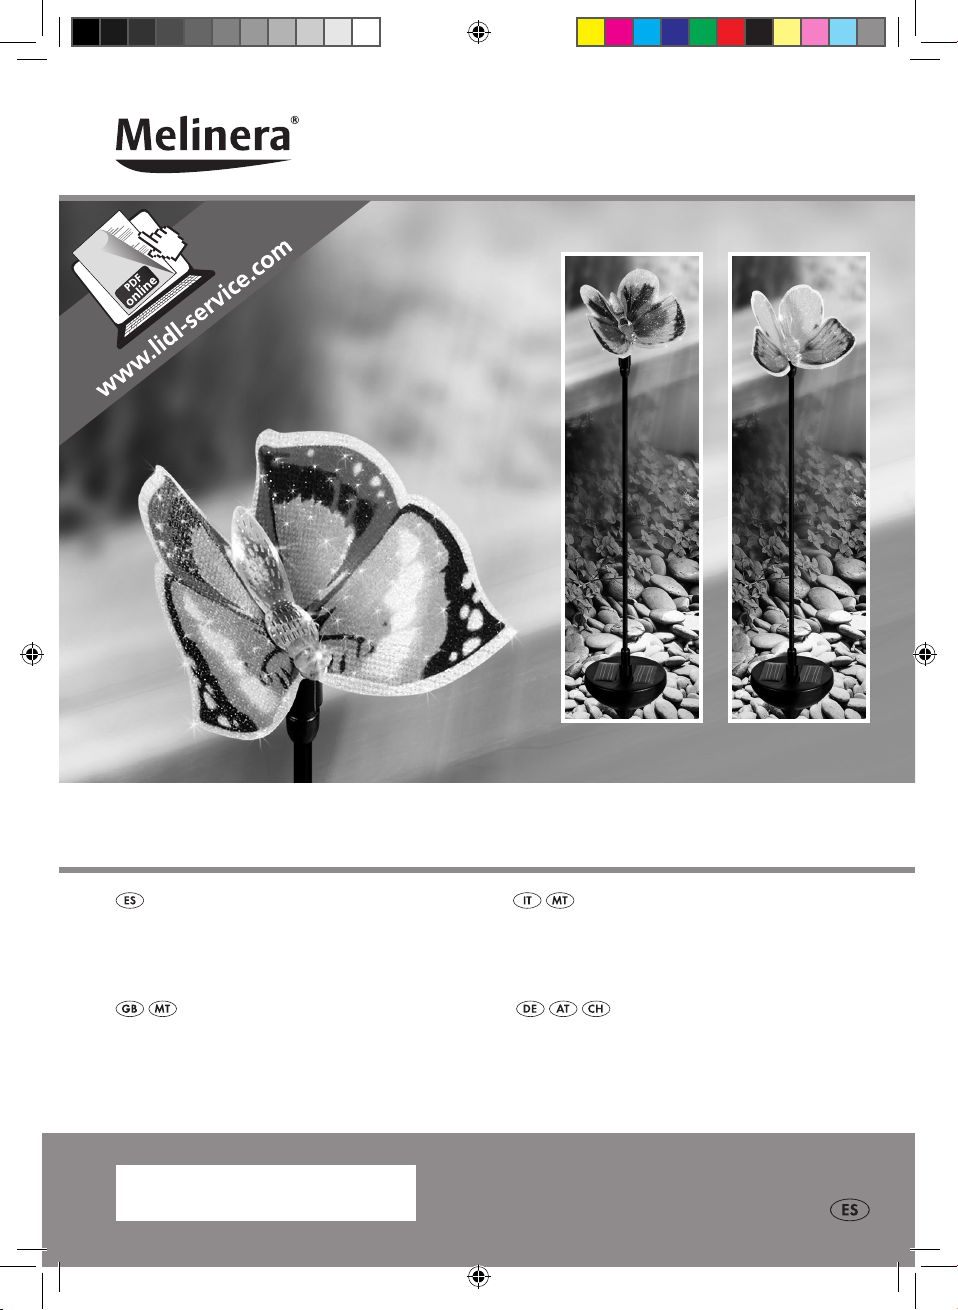
LáMpara sOLar deCOratIva
LaMpada deCOratIva ad enerGIa sOLare
LáMpara sOLar deCOratIva
Instrucciones de utilización y de seguridad
deCOratIve sOLar pOWered LIGHt
Operation and Safety Notes
LaMpada deCOratIv a
ad enerGIa sOLare
Indicazioni per l’uso e per la sicurezza
deKO-sOLarLeuCHte
Bedienungs- und Sicherheitshinweise
103581_mel_Deko-Solarleuchte_cover_ES.indd 2 10.10.14 08:22
Page 2

ES Instrucciones de utilización y de seguridad Página 4
IT / MT Indicazioni per l’uso e per la sicurezza Pagina 8
GB / MT Operation and Safety Notes Page 12
DE / AT / CH Bedienungs- und Sicherheitshinweise Seite 16
103581_mel_Deko-Solarleuchte_cover_ES.indd 3 10.10.14 08:22
Page 3
A
B
1
6
2
6
6
7
3
3
4
5
C
8
7
3
103581_mel_Deko-Solarleuchte_content_ES.indd 3 10.10.14 08:23
Page 4
Lámpara solar decorativa
Indicaciones de seguridad
Uso adecuado
Este producto está diseñado para la decoración luminosa. El producto está pensado únicamente
para el uso privado y en ningún caso para el uso
comercial.
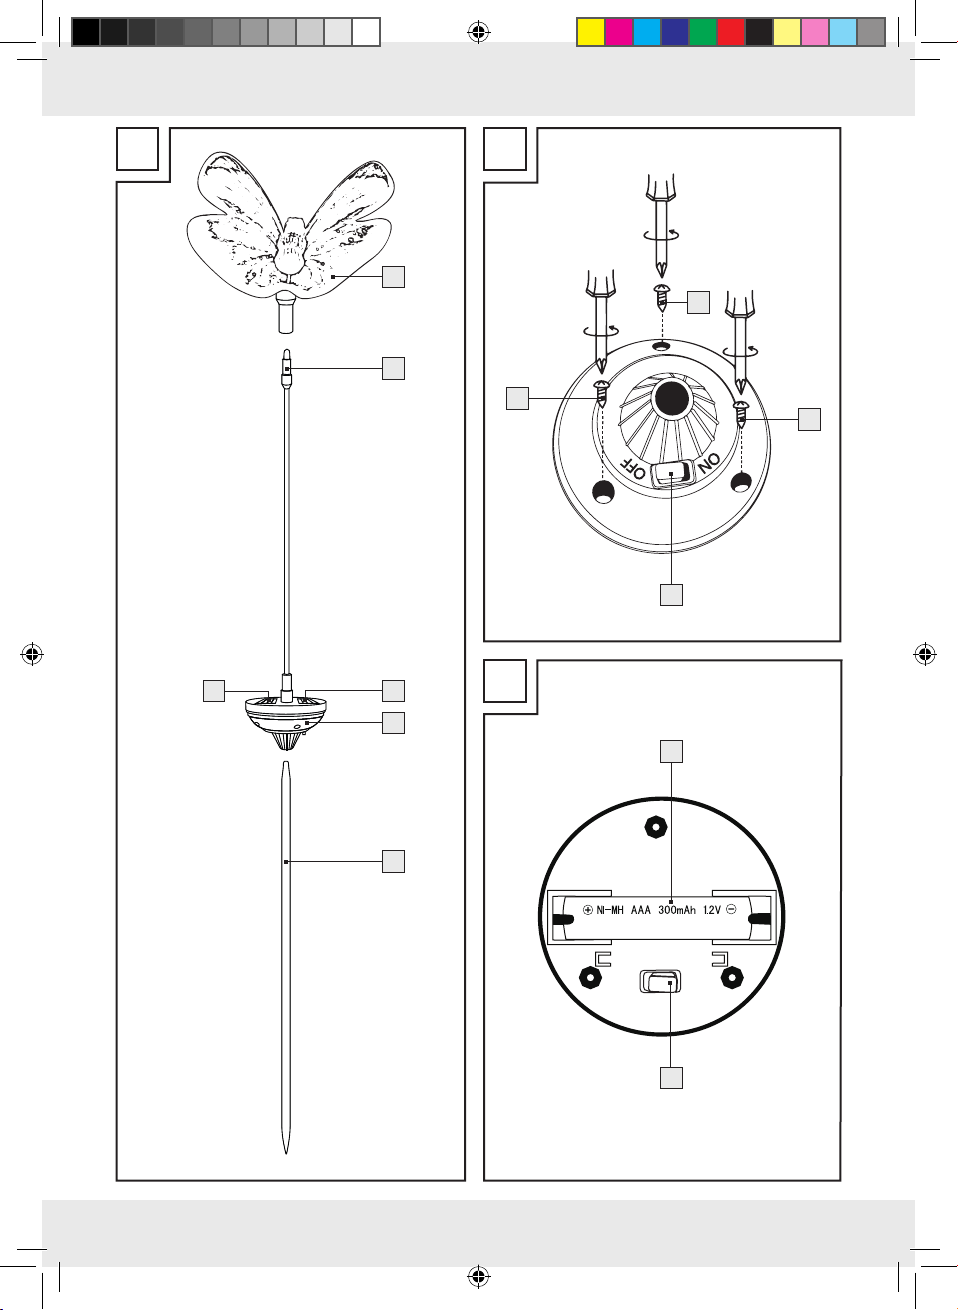
Descripción de las piezas
1
Elemento de decoración
2
Tubo vertical superior (con LED)
3
Placa solar
4
Carcasa solar
5
Tubo vertical inferior
6
Tornillos
7
Interruptor ON / OFF
8
Compartimento de las pilas
Características técnicas
Tensión de servicio: 1,2 V
Pilas: 1 x pila (NiMH, AAA,
1,2 V
/ 300 mAh)
Bombilla: 1 x LED RGB
(LED no reemplazable)
Placa solar: aprox. 15 x 30 mm
Tipo de protección: IP44 (protección contra salpi-
caduras de agua)
Número de modelo: 103581-14-01 mariposa azul
103581-14-02 mariposa
amarilla anaranjada
103581-14-03 mariposa
verde-roja
Contenido
1 elemento de decoración
1 tubo vertical superior (con LED)
1 tubo vertical inferior
1 pila (NiMH, AAA, 1,2 V
ya incorporada
1 manual de instrucciones
/ 300 mAh) –
¡CONSERVE CUIDADOSAMENTE LAS INSTRUCCIONES DE USO! ADJUNTE IGUALMENTE
TODA LA DOCUMENTACIÓN EN CASO DE
ENTREGAR EL PRODUCTO A TERCEROS.
Este producto puede ser utilizado por niños
mayores de 8 años, así como por personas
con capacidades físicas, sensoriales o mentales reducidas o que cuenten con poca experiencia y/o falta de conocimientos, siempre y
cuando se les haya enseñado cómo utilizar el
aparato de forma segura y hayan comprendido los peligros que pueden resultar de un
mal uso del mismo. No permita que los niños
jueguen con el producto. La limpieza y mantenimiento no deben llevarse a cabo por niños
sin la vigilancia de un adulto.
Nunca utilice la lámpara si ha detectado algún
tipo de daño.
No fije ningún objeto al producto.
Indicaciones de seguridad
sobre las pilas
¡PELIGRO DE MUERTE!
No deje las pilas al alcance de los niños. ¡En
caso de ingesta, acuda inmediatamente a un
médico!
¡CUIDADO! ¡PELIGRO DE EXPLOSIÓN!
¡Nunca recargue pilas no recargables, no las
ponga en cortocircuito y/o las abra!
¡Nunca arroje las pilas al fuego o al agua!
¡No aplique cargas mecánicas sobre las pilas!
Peligro de sulfatación de la pila
En caso de que las pilas se sulfaten, ¡retírelas
inmediatamente del aparato para evitar daños!
¡Evite el contacto con la piel, ojos y mucosas!
En caso de que se produzca un contacto con
el ácido de las pilas, ¡lave las zonas afectadas
y póngase inmediatamente en contacto con un
médico!
4 ES
103581_mel_Deko-Solarleuchte_content_ES.indd 4 10.10.14 08:23
Page 5
¡Evite condiciones y temperaturas extremas
que puedan influir en el funcionamiento de las
pilas, por ejemplo, acercarlas a un radiador!
¡Retire las pilas del aparato si no piensa utili-
zarlo durante un período de tiempo prolongado!
Peligro de daños materiales
¡Utilice exclusivamente el tipo de pila indicado!
¡Cuando coloque la pila preste atención a la
polaridad correcta! ¡Esta se indica en el compartimento de las pilas!
En caso necesario, ¡limpie los contactos de las
pilas y del aparato antes de colocar las pilas!
¡Retire enseguida las pilas gastadas del apa-
rato!
Nota: Para obtener un buen resultado, colo-
que la lámpara en un lugar donde la placa
3
solar
quede expuesta el máximo tiempo
posible a la luz solar. No coloque la lámpara
bajo arbustos, árboles, aleros, etc., ya que
impiden la incidencia directa de la luz solar
sobre la placa solar. Oriente la lámpara de
forma que la placa solar no quede cubierta o
en la zona sombreada.
Nota: Asegúrese de que la placa solar no
recibe la luz de otra fuente de iluminación, p.
ej. iluminación del porche o del alumbrado público. Esto impide que la lámpara se encienda
al anochecer.
Manejo
Antes del montaje
La placa solar 3 del producto transforma la luz
solar en energía eléctrica y la guarda en el acumulador NiMH. Al anochecer se activa la luz. Los
LED de la lámpara tienen una vida útil muy larga y
un consumo de energía mínimo. La duración de la
luz depende de la radiación solar, del ángulo de
incidencia de la luz sobre la placa solar y de la
temperatura (a causa de la dependencia de temperatura de la capacidad de la pila). La incidencia
ideal de los rayos del sol es de 90 grados. En condiciones óptimas, la duración de la iluminación
puede alcanzar las 6-8 horas. El acumulador de la
pila alcanza su máxima capacidad tras varios ciclos de carga y descarga.
Montaje
Meta el tubo vertical inferior 5 en el tubo
vertical superior
en el elemento de decoración
Introduzca la lámpara con el tubo vertical infe-
rior en el suelo (hierba, parterre, etc.).
Nota: Asegúrese de que el producto se encuentra firmemente insertado. No aplique
fuerza excesiva al montar la lámpara (por ej.
martillazos). Esto puede dañar el producto.
2
. A continuación, insértelo
1
(ver fig. A).
Cómo encender / apagar la
lámpara
Coloque el interruptor ON/OFF 7 en el lado
inferior de la carcasa 4 en la posición ON / OFF
para encender o apagar la lámpara.
Nota: Cuando el interruptor ON/OFF está
en posición ON, la lámpara se enciende automáticamente al anochecer. El LED RGB en el
extremo del tubo vertical superior
un efecto luminoso con un flujo de colores, que
se dirige desde el conductor de luz del elemento de decoración
la mariposa.
Desconecte la lámpara (posición OFF) si la
lámpara pasa un tiempo prolongado en oscuridad (p. ej. durante el transporte con el acumulador montado).
En la posición „OFF“ la lámpara está apagada,
así como la función de carga.
1
hasta el extremo de
2
produce
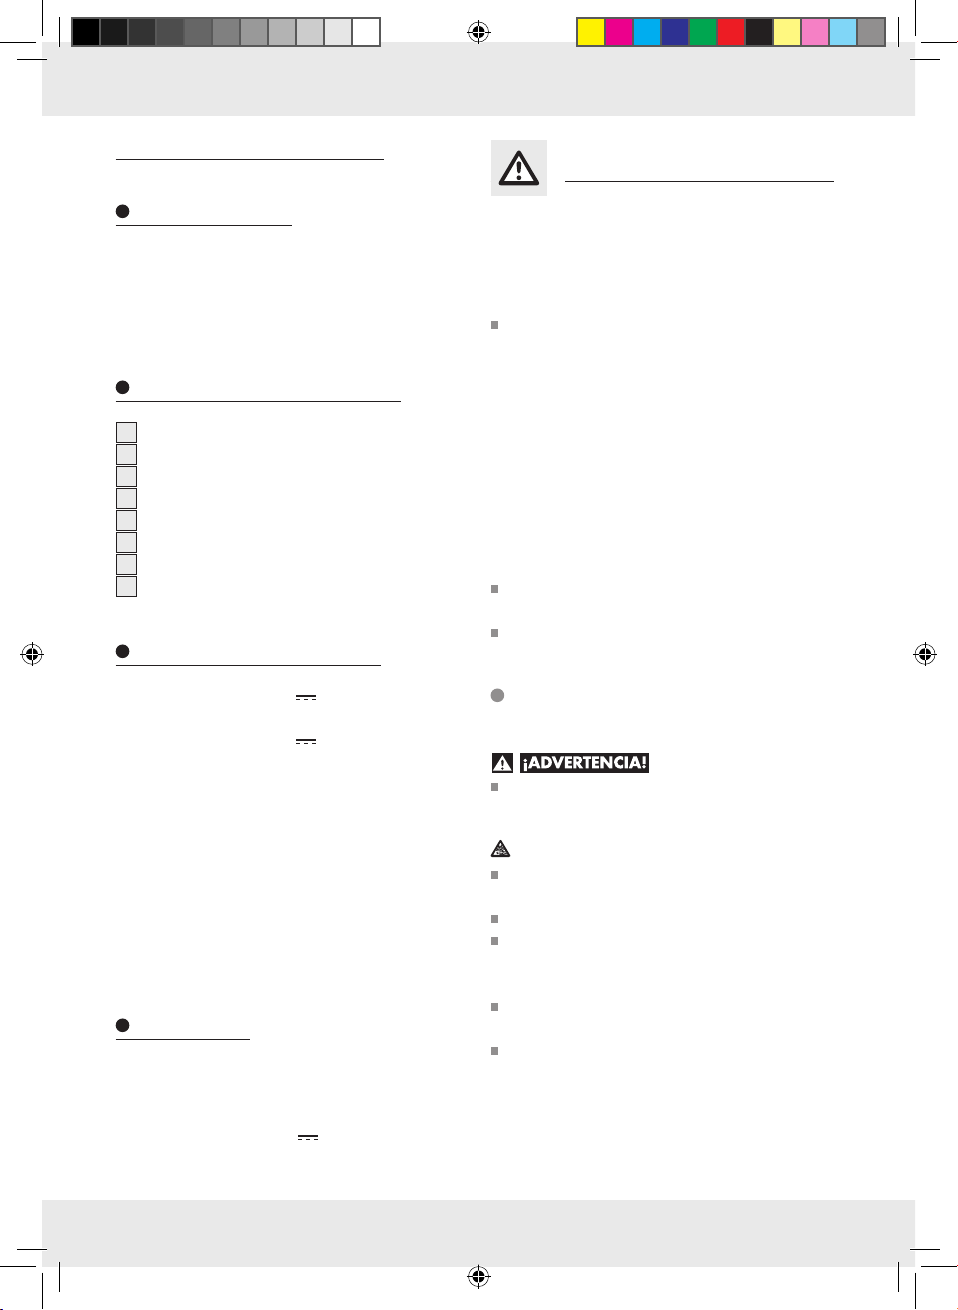
Cambiar la batería (fig. B y C)
La pila es una pieza de desgaste y debe cambiarse regularmente (aprox. cada 1–2 años).
La lámpara debe guardarse en los meses de invierno cuando en los países de Europa central no
5 ES
103581_mel_Deko-Solarleuchte_content_ES.indd 5 10.10.14 08:23
Page 6

se puede cargar suficiente energía debido a la
falta de luz solar. Extraiga la pila por motivos de
seguridad.
Nota: Para este paso del trabajo necesita un destornillador de estrella.
Gire hacia fuera ambos tornillos en sentido
contrario al de las agujas del reloj con ayuda
de un destornillador de estrella (fig. B).
Retire con cuidado la tapa de la carcasa.
Preste atención para no dañar el cable.
Retire a continuación la pila gastada.
Desconecte el producto con la tecla ON/ OFF
7
antes de colocar o retirar la pila.
Extraiga el tubo vertical inferior 5 del tubo
vertical superior
2
.
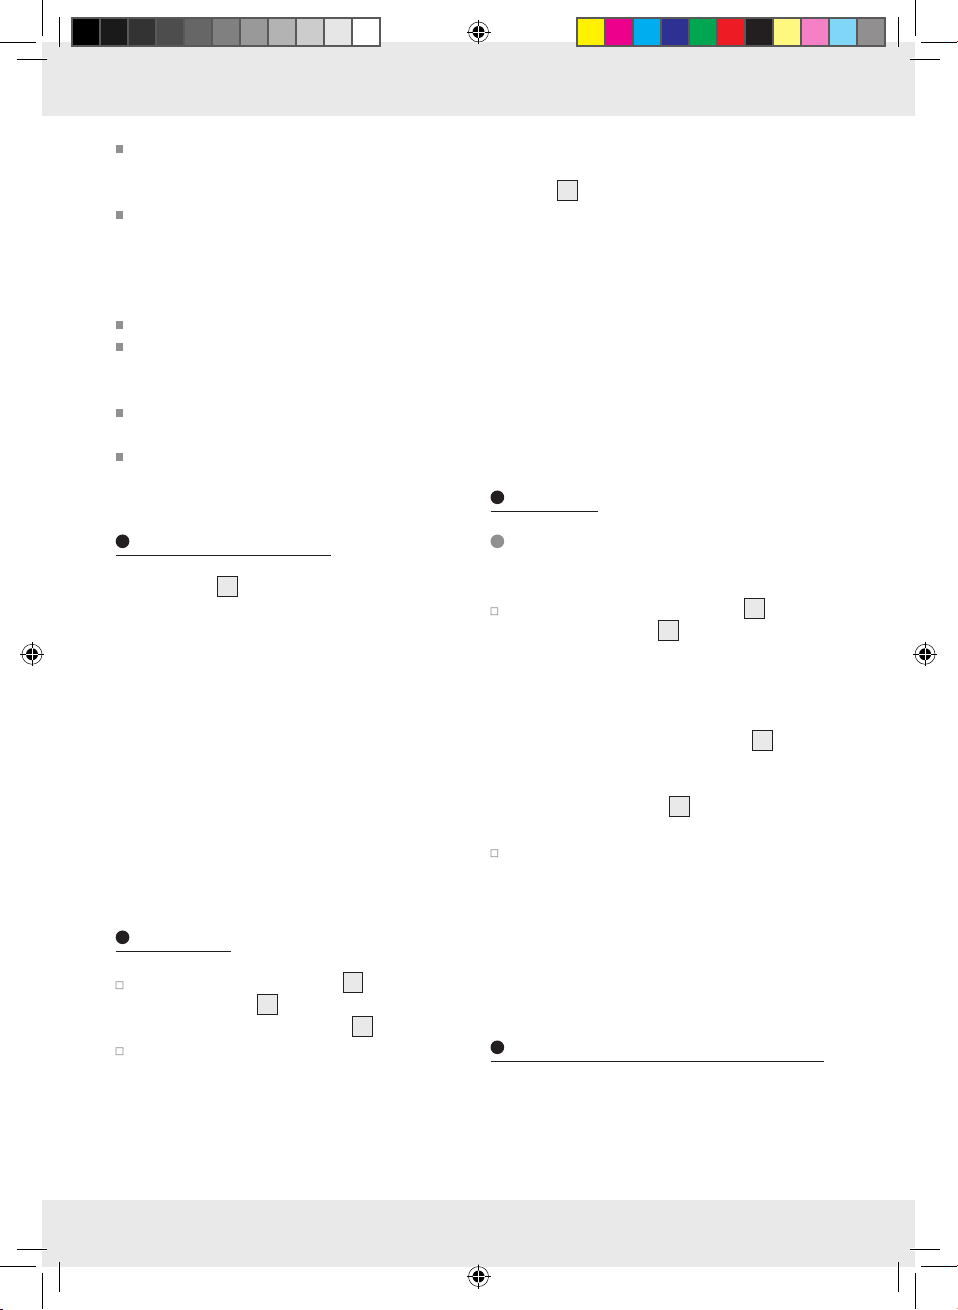
Abra el compartimento de la pila 8 ubicado
en la parte inferior de la carcasa solar
4
.
Coloque una nueva pila (NiMH, AAA,
1,2 V
/ 300 mAh) en el compartimento de
8
la pila
. Tenga en cuenta la polaridad del
compartimento de las pilas.
Cierre el compartimento de las pilas como se
ha indicado anteriormente.
Solucionar problemas
Problema Causa Solución
La lámpara no se enciende al anochecer a pesar de haber estado
expuesta a la luz del sol durante
todo el día.
La lámpara se enciende sólo brevemente o no se enciende.
Las fuentes de luz artificial
como el alumbrado público
pueden contribuir a una
iluminación que el sensor fotoeléctrico
identif
ica como diurno.
La pila está agotada. ¡Cambie la pila!
La luz diurna no ha sido sufi-
ciente para cargar el acumulador de la pila.
La placa solar está sucia. ¡Limpie la placa solar!
Coloque la lámpara en un lugar donde no reciba la luz de
otras fuentes de iluminación artificial.
¡Coloque la lámpara en un lugar donde incida más el sol
durante el día!
Este producto posee algunos componentes eléctri-
Limpieza y conservación
cos muy sensibles. Puede ocurrir que en determinadas circunstancias se produzcan averías si el
producto se coloca cerca de dispositivos emisores
de señales de radio. En caso de que esto ocurra,
aleje dichos aparatos de la lámpara.
Las descargas electroestáticas pueden provocar
averías. En caso de avería, extraiga el acumular
durante unos segundos y vuelva a colocarlo (véase
Limpie la placa solar 3 de manera regular. Si la
placa solar está sucia puede disminuir considerablemente el rendimiento del producto.
Limpie la lámpara únicamente con un paño
seco y sin pelusas.
En caso de fuerte suciedad, utilice un trapo li-
geramente humedecido y un detergente suave.
“cambiar la batería“).
6 ES
103581_mel_Deko-Solarleuchte_content_ES.indd 6 10.10.14 08:23
Page 7

Desecho del producto
El embalaje está compuesto por materiales no contaminantes que pueden ser
eliminados en el centro de reciclaje local.
Para deshacerse del producto una vez terminada
su vida útil, pregunte a las autoridades locales o
municipales.
Nunca deseche el aparato /
artículo o la bombilla junto
con la basura doméstica.
Deshágase del aparato/artículo y la bombilla a
través de un servicio de recogida de basuras autorizado o en el centro de reciclaje de su municipio.
Cumpla siempre con la normativa vigente. Si tiene
dudas, póngase en contacto con el centro de reciclaje de su municipio.
Las baterías defectuosas o usadas deben ser
recicladas según lo indicado en la directiva
2006 / 66 / CE. Recicle las pilas y/o el aparato en
los puntos de reciclaje disponibles.
¡Pueden producirse daños
medioambientales por un reci-
Pb
claje incorrecto de las pilas!
Las pilas usadas no deben desecharse en la
basura doméstica. Estas pueden contener metales
pesados tóxicos que deben tratarse conforme a la
normativa aplicable a los residuos especiales. Los
símbolos químicos de los metales pesados son:
Cd = cadmio, Hg = mercurio, Pb = plomo. Por ello,
las pilas deben reciclarse en uno de los puntos de
reciclaje de su municipio.
7 ES
103581_mel_Deko-Solarleuchte_content_ES.indd 7 10.10.14 08:23
Page 8

Lampada decorativa
ad energia solare
Utilizzo secondo la
destinazione d’uso
Questo prodotto è adatto come decorazione luminosa. Il prodotto è destinato all‘utilizzo in ambito
privato e non per scopi commerciali.
Descrizione dei componenti
1
Accessorio decorativo
2
Stelo superiore (con LED)
3
Cella fotovoltaica
4
Custodia a ricarica solare
5
Stelo inferiore
6
Viti
7
Interruttore ON/OFF
8
Vano portabatterie
Dati tecnici
Tensione di esercizio: 1,2 V
Batterie: 1 batteria (NiMH, AAA,
1,2 V
/ 300 mAh)
Lampadina: 1 LED RGB (il LED non
è sostituibile.)
Cella fotovoltaica: ca. 15 x 30 mm
Classe di protezione: IP44 (resistente agli spruzzi
d’acqua)
Numero modello: 103581-14-01 farfalla blu
103581-14-02 farfalla
giallo / arancio
103581-14-03 farfalla
verde / rosso
Contenuto della confezione
1 Batteria (NiMH, AAA, 1,2 V / 300 mAh) –
già inclusa
1 Manuale di istruzioni
Indicazioni per
la sicurezza
CONSERVARE ACCURATAMENTE LE ISTRUZIONI PER L‘USO! CONSEGNARE L‘INTERA
DOCUMENTAZIONE RIGUARDANTE QUESTO
PRODOTTO IN CASO DI CESSIONE A TERZI
DELLO STESSO.
Questo dispositivo può essere utilizzato da
bambini di età superiore agli 8 anni, da persone con capacità fisiche, sensoriali o mentali
ridotte o da persone inesperte solo se supervisionate o preventivamente istruite sull’utilizzo in
sicurezza del prodotto e solo se informate dei
pericoli legati al prodotto stesso. Non lasciare
che i bambini giochino con l‘apparecchio. La
pulizia e la manutenzione non devono essere
eseguite da bambini senza supervisione.
Non utilizzate mai la lampada se danneggiata.
Non fissare ulteriori oggetti sul prodotto.
Avvertenze di sicurezza per
le batterie
PERICOLO DI MORTE!
Le batterie vanno tenute fuori dalla portata dei
bambini. In caso di ingerimento consultare subito
un medico!
ATTENZIONE! PERICOLO DI ESPLOSIONE!
Non ricaricare mai batterie non ricaricabili,
non cortocircuitarle e / o aprirle!
Non gettare mai le batterie nel fuoco o in ac-
qua!
Non esercitare alcuna pressione meccanica
sulle batterie!
1 Accessorio decorativo
1 Stelo superiore (con LED)
1 Stelo inferiore
8 IT/MT
103581_mel_Deko-Solarleuchte_content_ES.indd 8 10.10.14 08:23
Pericolo di perdite delle batterie
Nel caso di perdite delle batterie, rimuoverle
subito dall‘apparecchio per evitare danni!
Page 9

Evitare il contatto con pelle, occhi e mucose! In
caso di contatto con gli acidi delle batterie risciacquare le aree affette con acqua corrente
e chiedere immediatamente l’intervento di un
medico!
Evitare condizioni e temperature estreme che
potrebbero avere influenza sulle batterie, per
es. su caloriferi!
Rimuovere le batterie dall’apparecchio qualora
non venissero utilizzate per lungo tempo!
Pericolo di danni materiali
Utilizzare esclusivamente il tipo di batterie
indicato!
Prestare attenzione alla polarità corretta
quando vengono inserite le batterie! Questa
viene indicata nel vano batterie!
Se necessario, pulire i contatti della batteria e
dell’apparecchio prima di inserire le batterie!
Rimuovere immediatamente dall‘apparecchio
le batterie esaurite!
Inserire la lampada con lo stelo inferiore nel
terreno (prato, aiuola, ecc.).
Nota: assicurarsi che la lampada si trovi in
una posizione sicura. Eseguendo il montaggio
e l’installazione non usare violenza, evitando
di inserire il faretto, ad esempio, con colpi di
martello. Un tale modo di procedere danneg-
gia il prodotto.
Nota: per ottenere un risultato ottimale instal-
lare la lampada in un luogo dove la cella so-
3
lare
sia possibilmente esposta il più a lungo
possibile alla luce diretta del sole. Non porre
la lampada sotto cespugli, alberi, pensiline
ecc. poiché ciò riduce l’assorbimento di luce
solare. Posizionare la lampada in modo tale
che la cella solare non sia coperta o all’ombra.
Nota: assicurarsi che la cella solare non
venga influenzata da un’altra fonte di illuminazione, quale ad esempio di cortile o di strada,
poiché in questo caso la luce della lampada
non si accenderebbe al crepuscolo.
Prima di eseguire il montaggio
In presenza di raggi solari, la cella solare 3 installata nel prodotto trasforma la luce in energia
elettrica e la incamera in una batteria NiMH. La
luce viene avviata quando l’oscurità inizia a manifestarsi. Il LED incorporato è una lampadina a lunga
durata e a risparmio energetico. La durata dell’illuminazione dipende dall’irraggiamento solare,
dall’angolo di incidenza della luce sulla cella solare
e dalla temperatura (a motivo della dipendenza
dalla temperatura della capacità dell’accumulatore).
L’angolo di incidenza ideale è quello verticale. In
condizioni ottimali può essere raggiunta una durata
di illuminazione di 6-8 ore. La batteria raggiunge la
sua capacità massima solamente dopo l‘esecuzione
di diversi cicli di caricamento e scaricamento.
Montaggio
Infilare lo stelo inferiore 5 nello stelo
superiore
decorativo
2
. Inserirlo adesso nell‘accessorio
1
(vedi fig. A).
Uso
Accensione e spegnimento
della lampada
Porre l’interruttore ON / OFF 7 posto sul lato
inferiore della centralina
ON o OFF per accendere o spegnere la lampada.
Nota: se l‘interruttore ON/OFF si trova in po-
sizione ON, la lampada si accende automaticamente in presenza di buio. I LED alla fine
dello stelo superiore
luminoso con flusso di colori che viene trasmesso
dal cavo dell‘accessorio decorativo
all‘estremità delle ali della farfalla.
Spegnere la lampada (posizione OFF) quando
questa per lungo tempo si trova al buio (ad
esempio in caso di trasporto con accumulatore
inserito).
Sulla posizione OFF sia le funzioni della lampada
che quelle di caricamento sono disattive.
4
solare in posizione
2
producono poi un effetto
1
fino
9 IT/MT
103581_mel_Deko-Solarleuchte_content_ES.indd 9 10.10.14 08:23
Page 10

Sostituzione delle batterie
(fig. B+C)
La batteria è soggetta a usura e pertanto deve essere regolarmente sostituita (circa ogni 1–2 anni).
Dato che l‘articolo non può immagazzinare abbastanza energia durante i mesi invernali nell‘Europa
centrale, a causa dell‘irraggiamento solare ridotto,
in questo periodo l‘articolo deve essere conservato.
In questo caso rimuovere la batteria per motivi di
sicurezza.
Nota: per svolgere le operazioni di seguito descritte
è necessario utilizzare un cacciavite a stella.
Spegnere il prodotto dall‘interruttore ON/OFF
7
prima di rimuovere o inserire le batterie.
Rimuovere lo stelo inferiore 5 dallo stelo
superiore
Aprire il vano portabatteria 8 posto sul lato
inferiore della centralina solare
perciò tutte le viti in senso antiorario con un
cacciavite a stella (vedi fig. B).
Rimuovere con attenzione il coperchio dell’al-
loggiamento. Fare attenzione a non danneggiare il cavo.
In seguito rimuovere l‘accumulatore usato.
Inserire una batteria di tipo NI-MH, AAA,
1,2 V
Prestare attenzione alla polarità indicata nel
vano portabatteria.
Chiudere il vano portabatterie come descritto
in precedenza.
2
.
/ 300 mAh) nel vano portabatterie 8.
Eliminazione degli errori
Problema Causa Soluzione
Al buio la lampada non illumina,
sebbene sia stata esposta alla
luce del sole per tutto il giorno.
La lampada illumina solo brevemente o non illumina del tutto.
Fonti di illuminazione artificiali,
quali ad esempio
stradale o alt
del giorno al fotosensore.
La batteria è scarica. Cambiare la batteria!
La luce del giorno non è
sufficiente per caricare
l’accumulatore.
La cella fotovoltaica è sporca. Pulire la cella fotovoltaica!
illuminazione
ro, simulano la luce
Porre la lampada in un punto
dove essa è protetta da fonti di
illuminazione artificiali.
Porre la lampada in un punto
più soleggiato!
4
. Ruotare
Questo prodotto consiste in parte in componenti
elettrici estremamente sensibili. Possono verificarsi
disturbi al funzionamento se il prodotto è posto nelle
vicinanze di apparecchi ricetrasmittenti. In caso di
disturbi, allontanare questi apparecchi.
In particolari circostanze scariche elettrostatiche
possono disturbare il prodotto. In caso di disturbi rimuovere la batteria per alcuni secondi e inserirla di
nuovo (vedi „Sostituzione delle batterie”).
10 IT/MT
103581_mel_Deko-Solarleuchte_content_ES.indd 10 10.10.14 08:23
Pulizia e cura
Pulire regolarmente la cella fotovoltaica 3. Una
cella fotovoltaica sporca può ridurre le capacità
dell‘articolo.
Per la pulizia utilizzare solamente un panno
asciutto e privo di peli.
In caso di sporco più ostinato, utilizzare un panno
leggermente inumidito oppure un detergente
delicato.
Page 11

Smaltimento
L’imballaggio è composto da materiali
ecologici che possono essere smaltiti
presso i siti di riciclaggio locali.
Informarsi presso l’amministrazione cittadina o
comunale sulle possibilità di smaltimento del
prodotto usato.
Non smaltire in nessun caso l’ap-
parecchio / l’articolo e le lampadine nei normali rifiuti domestici.
Smaltire l’apparecchio / l’articolo e le lampadine
presso un punto di smaltimento autorizzato oppure
attraverso un punto di smaltimento comunale.
Attenersi al regolamento vigente. In caso di dubbi
mettersi in contatto con il punto di raccolta e smaltimento rifiuti più vicino.
Accumulatori difettosi o usati devono essere riciclati
ai sensi della Direttiva 2006 / 66 / CE. Restituire le
batterie e/o l‘apparecchio tramite i punti di raccolta indicati.
Uno smaltimento scorretto delle
batterie può arrecare danni
Pb
all‘ambiente!
Le batterie non devono essere smaltite nella spazzatura domestica. Esse possono contenere metalli
pesanti nocivi e sono soggette a smaltimento come
rifiuti tossici. I simboli chimici dei metalli pesanti
sono i seguenti: Cd = cadmio, Hg = mercurio,
Pb = piombo. Smaltire quindi le batterie usate
presso un punto di raccolta comunale.
11 IT/MT
103581_mel_Deko-Solarleuchte_content_ES.indd 11 10.10.14 08:23
Page 12

Decorative Solar-Powered Light
Safety notices
Intended use
This product is suitable as decorative lighting. The
product is only intended for private and not for
commercial use.
Parts description
1
Decorative trim
2
Upper stake (with LED)
3
Solar cell
4
Solar housing
5
Lower stake
6
Screws
7
ON/ OFF switch
8
Battery compartment
Technical Data
Operating voltage: 1.2 V
Rechargeable battery: 1 x rechargeable battery
(NiMH, AAA, 1.2 V
300 mAh)
Light bulb: 1 x RGB LED
(LED not replaceable.)
Solar cell: approx. 15 x 30 mm
Protection type: IP44 (splash-proof)
Model number: 103581-14-01 blue butterfly
103581-14-02 orange-yellow
butterfly
103581-14-03 green-red
butterfly
/
Scope of delivery
1 Decorative trim
1 Upper stake (with LED)
1 Lower stake
1 Rechargeable battery (NiMH, AAA,
1.2 V
1 Set of instructions for use
/ 300 mAh) – preinstalled
PLEASE KEEP THE INSTRUCTIONS IN A SAFE
PLACE! IF PASSING THIS PRODUCT ON TO A
THIRD PARTY, INCLUDE ALL DOCUMENTS.
This product may be used by children age
8 years and up, as well as by persons with reduced physical, sensory or mental capacities,
or lacking experience and knowledge, so long
as they are supervised or instructed in the safe
use of the appliance and understand the associated risks. Children should not be allowed to
play with the device. Cleaning and user maintenance should not be performed by children
without supervision.
Never use the light if any defects have been
identified.
Do not attach objects to the product.
Battery safety information
DANGER TO LIFE!
Batteries are not intended for children. If acci-
dentally swallowed seek immediate medical
attention!
CAUTION! EXPLOSION HAZARD!
Never recharge non-rechargeable batteries,
do not short-circuit and / or open batteries!
Never throw batteries into fire or water!
Do not exert mechanical loads to batteries!
Risk of battery leaking
In the event of a battery leak, immediately re-
move it from the device to prevent damage!
Avoid contact with the skin, eyes and mucous
membranes! In the event of contact with bat-
tery acid, thoroughly flush the affected area
with plenty of clean water and seek immediate
medical attention!
Avoid extreme conditions and temperatures
which may impact batteries, e.g. on radiators!
Remove the batteries from the device if they
have not been used for a long period!
12 GB/MT
103581_mel_Deko-Solarleuchte_content_ES.indd 12 10.10.14 08:23
Page 13

Risk of property damage
Only use the specified battery type!
When inserting the battery ensure the correct
polarity! This is shown in the battery compartment!
If necessary, clean the battery- and product
contacts before inserting them.
Promptly remove dead batteries from the
product!
Before installation
The integrated solar cell 3 of the product converts
solar radiation into electrical energy and stores it in
the NiMH rechargeable battery. The light switches
itself on when it starts to get dark. The integrated
LED is an energy-saving illuminant with a very long
life. The light duration depends on the amount of
sunlight, the angle of light on the solar panel and
the temperature (the battery capacity is temperature-dependent). The ideal situation is a vertical angle. Given the best conditions, a burn time of 6-8
hours can be achieved. The rechargeable battery
will only achieve its maximum capacity after several charging and discharging cycles.
Note: Make sure the solar cell is not im-
pacted by other light sources, e.g. yard- or
street lighting, or the light will not switch on at
twilight.
Operation
Switching the light on and off
Set the ON / OFF switch 7 on the underside
of the solar housing
switch the light on or off.
Note: If the ON / OFF switch is set to ON,
the light will automatically switch on at dusk.
The RGB LED at the end of the top stake
will then produce a colour flow lighting effect
which flows from the fibre optics of the decora-
tive trim
1
to the tips of the buttlerfly‘s wings.
Switch the light off (OFF position) if the light
will be in the dark for extended periods (e.g.
when transporting with the battery inserted).
Setting the switch to OFF will disable the light and
charging.
4
to ON or OFF to
2
Replacing the battery
Installation
Insert the lower stake 5 into the top stake 2.
Now guide it into the decorative trim
Fig. A).
Push the stake of the into the ground (lawn,
flower bed, etc.).
Note: Ensure the product is stable. Do not use
force when assembling or setting up the product, e.g. hammer blows. This will damage the
product.
Note: For the best results, put the light in a
place where the solar cell
3
rect sunlight for as long as possible. Do not put
the light under bushes, trees, canopies etc. as
this reduces the incidence of incoming sunlight.
Position the lamp in such a way that the solar
cell is not covered or in the shade.
103581_mel_Deko-Solarleuchte_content_ES.indd 13 10.10.14 08:23
1
(see
is exposed to di-
(Fig. B + C)
The battery is a wear part and should be replaced
regularly (about every 1–2 years).
Since in central Europe the product is unable to absorb sufficient energy during the winter months due
to poor sunlight, the product should be stored
away during this time. When doing so, remove the
battery for safety purposes.
Note: For this step you will need a Phillips screwdriver.
Switch the product off using the ON/ OFF
7
switch
rechargeable battery.
Disconnect the lower stake 5 from the upper
stake
Open the battery compartment 8 on the
underside of the solar housing
before removing or inserting the
2
.
4
. To do so,
13 GB/MT
Page 14

unscrew all screws with a cross-tip screwdriver,
turning counter-clockwise (Fig. B).
Carefully remove the housing cover. Ensure that
you do not damage the wiring.
Then remove the used battery.
Insert a rechargeable battery type NI-MH,
AAA, 1.2 V
partment
indicated in the battery compartment.
Close the battery compartment as described
above.
/ 300 mAh into the battery com-
8
. When doing so, note the polarity
Troubleshooting
Problem Cause Solution
The light does not come on in the
dark, even after being exposed to
sunlight all day.
The light only comes on for a short
time or not at all.
Artificial sources of light such as
street lights, etc. are
daylight to the photosensor.
The battery is drained. Replace the rechargeable bat-
There is not enough daylight to
recharge the battery.
The solar cell is dirty. Clean the solar cell!
simulating
Place the light in a location
where it is shielded from artificial sources of light.
tery!
Place the light in a sunnier lo-
cation!
This product has some very sensitive electrical
parts. That is why interference may occur if the
product is set up near devices that transmit radio
signals. Remove these devices if interference occurs.
Electrostatic discharge may possibly cause disturbances to the product. If such disturbances occur,
remove the rechargeable battery for a few seconds, then reinsert it (see “Replacing the battery”).
Cleaning and Care
Clean the solar cell 3 regularly. A dirty solar cell
can significantly reduce the product‘s performance.
Only use a dry, lint-free cloth for cleaning.
If the product is more severely soiled, you may
have to use a slightly damp cloth and a mild
detergent.
14 GB/MT
Disposal
The packaging is made of environmentally friendly materials, which may be
disposed of through your local recycling
facilities.
Contact your local authorities for information on
how to dispose of the product at the end of the
product‘s life.
Never dispose of the product
and the bulb in your regular
household rubbish.
Dispose of the product and light bulb through an
authorised waste management company or your
municipal disposal facilities.
Observe the applicable regulations. In case of
doubt, please contact your waste disposal centre.
Faulty or used rechargeable batteries must be recycled in accordance with Directive 2006/66/EC.
103581_mel_Deko-Solarleuchte_content_ES.indd 14 10.10.14 08:23
Page 15

Return rechargeable batteries and / or the appliance using the recycling facilities provided.
Environmental damage due to
improper disposal of the re-
Pb
chargeable batteries!
Rechargeable batteries may not be disposed of
with the usual domestic waste. They may contain
toxic heavy metals and are subject to hazardous
waste regulations. The chemical symbols of the
heavy metals are: Cd = cadmium, Hg = mercury,
Pb = lead. For this reason, dispose of used rechargeable batteries at a local collection point.
15 GB/MT
103581_mel_Deko-Solarleuchte_content_ES.indd 15 10.10.14 08:23
Page 16

Deko-Solarleuchte
Sicherheitshinweise
Bestimmungsgemäße
Verwendung
Dieses Produkt ist zur Lichtdekoration geeignet. Das
Produkt ist nur für den privaten Einsatz und nicht für
den gewerblichen Gebrauch vorgesehen.
Teilebeschreibung
1
Dekorationsaufsatz
2
Oberes Standrohr (mit LED)
3
Solarzelle
4
Solargehäuse
5
Unteres Standrohr
6
Schrauben
7
ON- / OFF-Schalter
8
Akkufach
Technische Daten
Betriebsspannung: 1,2 V
Akku: 1 x Akku (NiMH, AAA,
1,2 V
/ 300 mAh)
Leuchtmittel: 1 x RGB-LED (Die LED ist nicht
austauschbar.)
Solarzelle: ca. 15 x 30 mm
Schutzart: IP44 (spritzwassergeschützt)
Modell-Nummer: 103581-14-01
blauer Schmetterling
103581-14-02
orange-gelber Schmetterling
103581-14-03
grün-roter Schmetterling
Lieferumfang
1 Dekorationsaufsatz
1 Oberes Standrohr (mit LED)
1 Unteres Standrohr
1 Akku (NiMH, AAA, 1,2 V
bereits eingebaut
1 Bedienungsanleitung
/ 300 mAh) –
BEDIENUNGSANLEITUNG SORGFÄLTIG AUFBEWAHREN! HÄNDIGEN SIE ALLE UNTERLAGEN
BEI WEITERGABE DES PRODUKTES AN DRITTE
EBENFALLS MIT AUS.
Dieses Gerät kann von Kindern ab 8 Jahren und
darüber sowie von Personen mit verringerten
physischen, sensorischen oder mentalen Fähigkeiten oder Mangel an Erfahrung und Wissen
benutzt werden, wenn sie beaufsichtigt oder
bezüglich des sicheren Gebrauchs des Gerätes
unterwiesen wurden und die daraus resultierenden Gefahren verstehen. Kinder dürfen nicht mit
dem Gerät spielen. Reinigung und Benutzerwartung dürfen nicht von Kindern ohne Beaufsichtigung durchgeführt werden.
Benutzen Sie Ihre Leuchte niemals, wenn Sie
irgendwelche Beschädigungen feststellen.
Befestigen Sie keine zusätzlichen Gegenstände
am Produkt.
Sicherheitshinweise für
Batterien
LEBENSGEFAHR!
Batterien gehören nicht in Kinderhände. Suchen
Sie im Falle eines Verschluckens sofort einen
Arzt auf!
VORSICHT! EXPLOSIONSGEFAHR!
Laden Sie nicht aufladbare Batterien niemals
wieder auf, schließen Sie sie nicht kurz und /
oder öffnen Sie sie nicht!
Werfen Sie Batterien niemals in Feuer oder
Wasser!
Setzen Sie Batterien keiner mechanischen
Belastung aus!
Gefahr des Auslaufens der Batterie
Im Falle eines Auslaufens der Batterien entfernen
Sie diese sofort aus dem Gerät, um Beschädigungen zu vermeiden!
Vermeiden Sie den Kontakt mit Haut, Augen
und Schleimhäuten! Spülen Sie bei Kontakt mit
Batteriesäure die betroffenen Stellen sofort mit
16 DE/AT/CH
103581_mel_Deko-Solarleuchte_content_ES.indd 16 10.10.14 08:23
Page 17

klarem Wasser und suchen Sie umgehend einen
Arzt auf!
Vermeiden Sie extreme Bedingungen und Tem-
peraturen, die auf Batterien einwirken können
z. B. auf Heizkörpern!
Entfernen Sie die Batterien, wenn sie längere Zeit
nicht verwendet worden sind, aus dem Gerät!
Gefahr der Sachbeschädigung
Ausschließlich den angegebenen Batterietyp
verwenden!
Achten Sie beim Einlegen auf die richtige Pola-
rität! Diese wird im Batteriefach angezeigt!
R
einigen Sie Batterie- und Gerätekontakt vor de
Einlegen, falls erforderlich!
Entfernen Sie verbrauchte Batterien umgehend
aus dem Gerät!
Hinweis: Um ein optimales Ergebnis zu erzielen, stellen Sie die Leuchte an einem Ort auf, an
dem die Solarzelle
3
möglichst lange direktem Sonnenlicht ausgesetzt ist. Stellen Sie die
Leuchte nicht unter Büsche, Bäume, Vordächer
etc., dies vermindert den Einfall von Sonnenlicht.
Positionieren Sie die Leuchte so, dass die Solarzelle nicht bedeckt oder beschattet wird.
Hinweis: Stellen Sie sicher, dass die Solarzelle
nicht von einer anderen Lichtquelle, wie z. B.
Hof- oder Straßenbeleuchtung beeinflusst wird,
da sich das Licht sonst in der Dämmerung nicht
einschaltet.
m
Bedienung
Leuchte ein- und ausschalten
Vor der Montage
Die eingebaute Solarzelle 3 des Artikels wandelt
bei Sonneneinstrahlung das Licht in elektrische Energie um und speichert diese in einem NiMH-Akku.
Bei beginnender Dunkelheit schaltet sich das Licht
ein. Die eingebaute LED ist ein sehr langlebiges und
energiesparendes Leuchtmittel. Die Leuchtdauer ist
von der Sonneneinstrahlung, dem Einfallwinkel des
Lichts auf die Solarzelle und der Temperatur (wegen
der Temperaturabhängigkeit der Akkukapazität) abhängig. Ideal ist ein senkrechter Lichteinfallwinkel.
Unter optimalen Bedingungen kann eine Leuchtdauer von 6–8 Stunden erreicht werden. Der Akku
erreicht erst nach mehreren Lade- und Entladezyklen
seine maximale Kapazität.
Montage
Stecken Sie das untere Standrohr 5 in das
obere Standrohr
den Dekorationsaufsatz
Stecken Sie die Leuchte mit dem unteren Stand-
rohr in den Boden (Rasen, Blumenbeet etc.).
Hinweis: Achten Sie auf einen sicheren Stand.
Wenden Sie bei der Montage bzw. beim Aufstellen keine Gewalt an, z. B. durch Hammerschläge. Dies beschädigt das Produkt.
2
. Führen Sie dieses nun in
1
(siehe Abb. A).
Stellen Sie den ON- / OFF-Schalter 7 an der
Unterseite des Solargehäuses
4
auf die Position
ON bzw. OFF, um die Leuchte ein- bzw. auszuschalten.
Hinweis: Steht der ON- / OFF-Schalter auf der
Position ON, schaltet sich die Leuchte bei Dunkelheit automatisch ein. Die RGB-LED am Ende
des oberen Standrohrs
2
produziert dann einen
Leuchteffekt mit Farbfluss, welcher von den Lichtleitern des Dekorationsaufsatzes
1
bis an die
Flügelenden der Schmetterlingsfigur geleitet wird.
S
chalten Sie die Leuchte aus (Position OFF), w
enn
sich die Leuchte für längere Zeit in Dunkelheit befindet (z. B. bei Transport mit eingelegtem Akku).
In der Schalterstellung OFF ist sowohl die Leuchtfunktion als auch die Ladefunktion ausgeschaltet.
Akku austauschen (Abb. B + C)
Der Akku ist ein Verschleißteil und sollte regelmäßig
ausgetauscht werden (etwa alle 1–2 Jahre).
Da der Artikel in den Wintermonaten in Mitteleuropa
aufgrund mangelnder Sonneneinstrahlung keine
zufriedenstellende Energie aufnehmen kann, sollte
der Artikel in dieser Zeit eingelagert werden. Entnehmen Sie dazu den Akku sicherheitshalber.
17 DE/AT/CH
103581_mel_Deko-Solarleuchte_content_ES.indd 17 10.10.14 08:23
Page 18

Hinweis: Für diesen Arbeitsschritt benötigen Sie
einen Kreuzschlitzschraubendreher.
Schrauben mittels eines Kreuzschlitzschraubendrehers gegen den Uhrzeigersinn heraus (Abb. B).
Entfernen Sie vorsichtig die Abdeckung des
Schalten Sie das Produkt mit dem ON- / OFF-
Schalter
7
aus, bevor Sie den Akku entfernen
oder einlegen.
Ziehen Sie das untere Standrohr 5 vom obere
Standrohr
2
ab.
Öffnen Sie das Akkufach 8 an der Unterseite
des Solargehäuses
4
. Drehen Sie dazu alle
n
Gehäuses. Achten Sie darauf, das Kabel nicht
zu beschädigen.
Entnehmen Sie dann den verbrauchten Akku.
Setzen Sie einen Akku vom Typ NI-MH, AAA,
1,2 V
/ 300 mAh in das Akkufach 8 ein.
Beachten Sie hierbei die im Akkufach angegebene Polarität.
Schließen Sie das Akkufach wie zuvor beschrieben.
Fehler beheben
Problem Ursache Lösung
Die Leuchte leuchtet bei Dunkelheit
nicht, obwohl sie den ganzen Tag
dem Sonnenlicht ausgesetzt war.
Die Leuchte leuchtet nur kurz oder
gar nicht.
Künstliche Lichtquellen wie
Straßenbeleuchtung o.ä. täusch
dem Photosensor Tag vor.
Platzieren Sie die Leuchte an
en
einer Stelle, wo sie vor künstli-
chen Lichtquellen geschützt ist.
Der Akku ist verbraucht. Wechseln Sie den Akku!
Das Tageslicht reicht nicht aus,
um den Akku aufzuladen.
Platzieren Sie die Leuchte an
einer sonnigeren Stelle!
Die Solarzelle ist verschmutzt. Reinigen Sie die Solarzelle!
Dieses Produkt besteht zum Teil aus sehr empfindlichen elektrischen Bauteilen. Daher kann es unter
Umständen zu Störungen kommen, wenn das Produkt
Verwenden Sie bei stärkeren Verschmutzungen
ggf. ein leicht angefeuchtetes Tuch und ein mildes
Reinigungsmittel.
in der Nähe von Geräten aufgestellt wird, die Funksignale übertragen. Entfernen Sie diese Geräte, wenn
Störungen auftreten.
Entsorgung
Durch elektrostatische Entladungen kann es unter
Umständen zu Störungen am Produkt kommen.
Entnehmen Sie bei Störungen den Akku für einige
Sekunden und setzen Sie diesen wieder neu ein
(siehe „Akku austauschen“).
Die Verpackung besteht aus umweltfreundlichen Materialien, die Sie über
die örtlichen Recyclingstellen entsorgen
können.
Möglichkeiten zur Entsorgung des ausgedienten
Reinigung und Pflege
Produktes erfahren Sie bei Ihrer Gemeinde- oder
Stadtverwaltung.
Reinigen Sie die Solarzelle 3 regelmäßig. Eine verschmutzte Solarzelle kann die Leistungsfähigkeit des
Artikels erheblich verringern.
Verwenden Sie zur Reinigung nur ein trockenes,
Entsorgen Sie das Gerät / den
Artikel und Leuchtmittel keinesfalls in den normalen Hausmüll.
fusselfreies Tuch.
18 DE/AT/CH
103581_mel_Deko-Solarleuchte_content_ES.indd 18 10.10.14 08:23
Page 19

Das Gerät / Den Artikel und Leuchtmittel über einen
zugelassenen Entsorgungsbetrieb oder über Ihre
kommunale Entsorgungseinrichtung entsorgen.
Beachten Sie die gültigen Vorschriften. Setzen Sie
sich im Zweifelsfall mit Ihrer Entsorgungseinrichtung
in Verbindung.
Defekte oder verbrauchte Akkus müssen gemäß
Richtlinie 2006 / 66 / EC recycelt werden. Geben
Sie Akkus und / oder das Gerät über die angebotenen Sammeleinrichtungen zurück.
Umweltschäden durch falsche
Entsorgung der Akkus!
Pb
Akkus dürfen nicht über den Hausmüll entsorgt werden. Sie können giftige Schwermetalle enthalten und
unterliegen der Sondermüllbehandlung. Die chemischen Symbole der Schwermetalle sind wie folgt:
Cd = Cadmium, Hg = Quecksilber, Pb = Blei. Geben
Sie deshalb verbrauchte Akkus bei einer kommunalen
Sammelstelle ab.
19 DE/AT/CH
103581_mel_Deko-Solarleuchte_content_ES.indd 19 10.10.14 08:23
Page 20

IAN 103581
OWIM GmbH & Co. KG
Stiftsbergstraße 1
D-74167 Neckarsulm
Model-No.: 103581-14-01 / 103581-14-02 /
103581-14-03
Version: 11 / 2014
Estado de las informaciones · Versione
delle informazioni · Last Information Update
Stand der Informationen: 10 / 2014
Ident.-No.: 103581-14-01 / 02 / 03102014-ES
103581_mel_Deko-Solarleuchte_cover_ES.indd 1 10.10.14 08:22
 Loading...