

Page 1
1
2
DC IN 6V
PAIR
R AUDIO IN L
DC IN 6V
PAIR
R AUDIO IN L
SIGNAL CHARGE
A
B
D
C
Page 2
13
EN
This unit must be used only with rechargeable batteries.
In order to reduce the risk of re or electric shocks, do not expose the device to water drops or sprays, nor place liquids
on its surfaces, e.g. vases or similar containers. Do not open the external casing in order to avoid electric shocks. Any
repair must be performed only by qualied technicians. Since the main plug of the AC power unit is used to disconnect
the AC power unit from the main switch, connect it to an AC socket that can be easily reached. If anything unusual is
noticed on the AC power unit, disconnect it immediately from the socket. Do not install the device in an enclosed space,
such as a bookcase or cabinet. Do not expose the batteries or device with installed batteries to excessive heat, for
example under direct sunlight, near re or similar situations. Excessive audio pressure from earplugs and headphones
can cause loss of hearing.
HP500
Thank you for buying a Meliconi product!
The Meliconi HP500 stereo digital wireless headphones system uses an advanced wireless transmission technology in
order to allow you to listen to your audio devices up to 50m away,offering maximum freedom of movement. The signal
can pass through walls and ceilings. The transmitter can be connected to the TV or any other audio source, from DVD
and Blu-ray players to CD players, HiFi systems or radios, or PCs and notebooks.
Warnings
To avoid damage to hearing, do not use the headphones at an excessive volume for long periods of
time.
The product complies with the R&TTE 1995/05/EC directive and has been tested according to the
following Technical Standards:
EN60065 / A1:2006
EN 301489-1 V1.8.1:2008
EN 301489-9 V1.4.1:2007
EN 301357-2 V1.4.1:2008
EN 50371:2002
Furthermore, it meets the provisions of ErP 2009/125/EC directive on energy saving.
The EC declaration of conformity is available from the Manufacturer and on the website
www.meliconi.com/HP500.
The symbol of a bin crossed out on the appliance or the packaging indicates that the product at the
end of its life cycle should be disposed of separately from other refuse. The user will, therefore, have
to hand over the appliance at the end of its life cycle to a proper recycling centre for electronic and
electrotechnical refuse, or give it over to the seller each time a new, similar appliance is purchased.
Proper separate refuse collecting for the later initiation of the appliance sent for recycling, treatment and
environmentally friendly disposal, contributes to reducing negative effects on the environment and on
our health and encourages the recycling of the material used to make it. Illegal disposal of the product
by the user will result in the application of sanctions imposed by the Legislative Decree 22/1997 (article
50 and those following to the Legislative Decree 22/1997).
WARNING: When inserting the batteries, check that their polarity is correct. Do not disassemble nor
throw the batteries into re. Do not mix new and used batteries, nor batteries of different brands or types.
Do not dispose of them in the environment. Improper use can damage the environment and health. The
symbol of the bin, also shown on the battery, indicates that the battery must be disposed of according
to existing regulations (EC 2006/66): make yourself familiar with depleted battery and accumulator
disposal methods current for your country.
Page 3

14
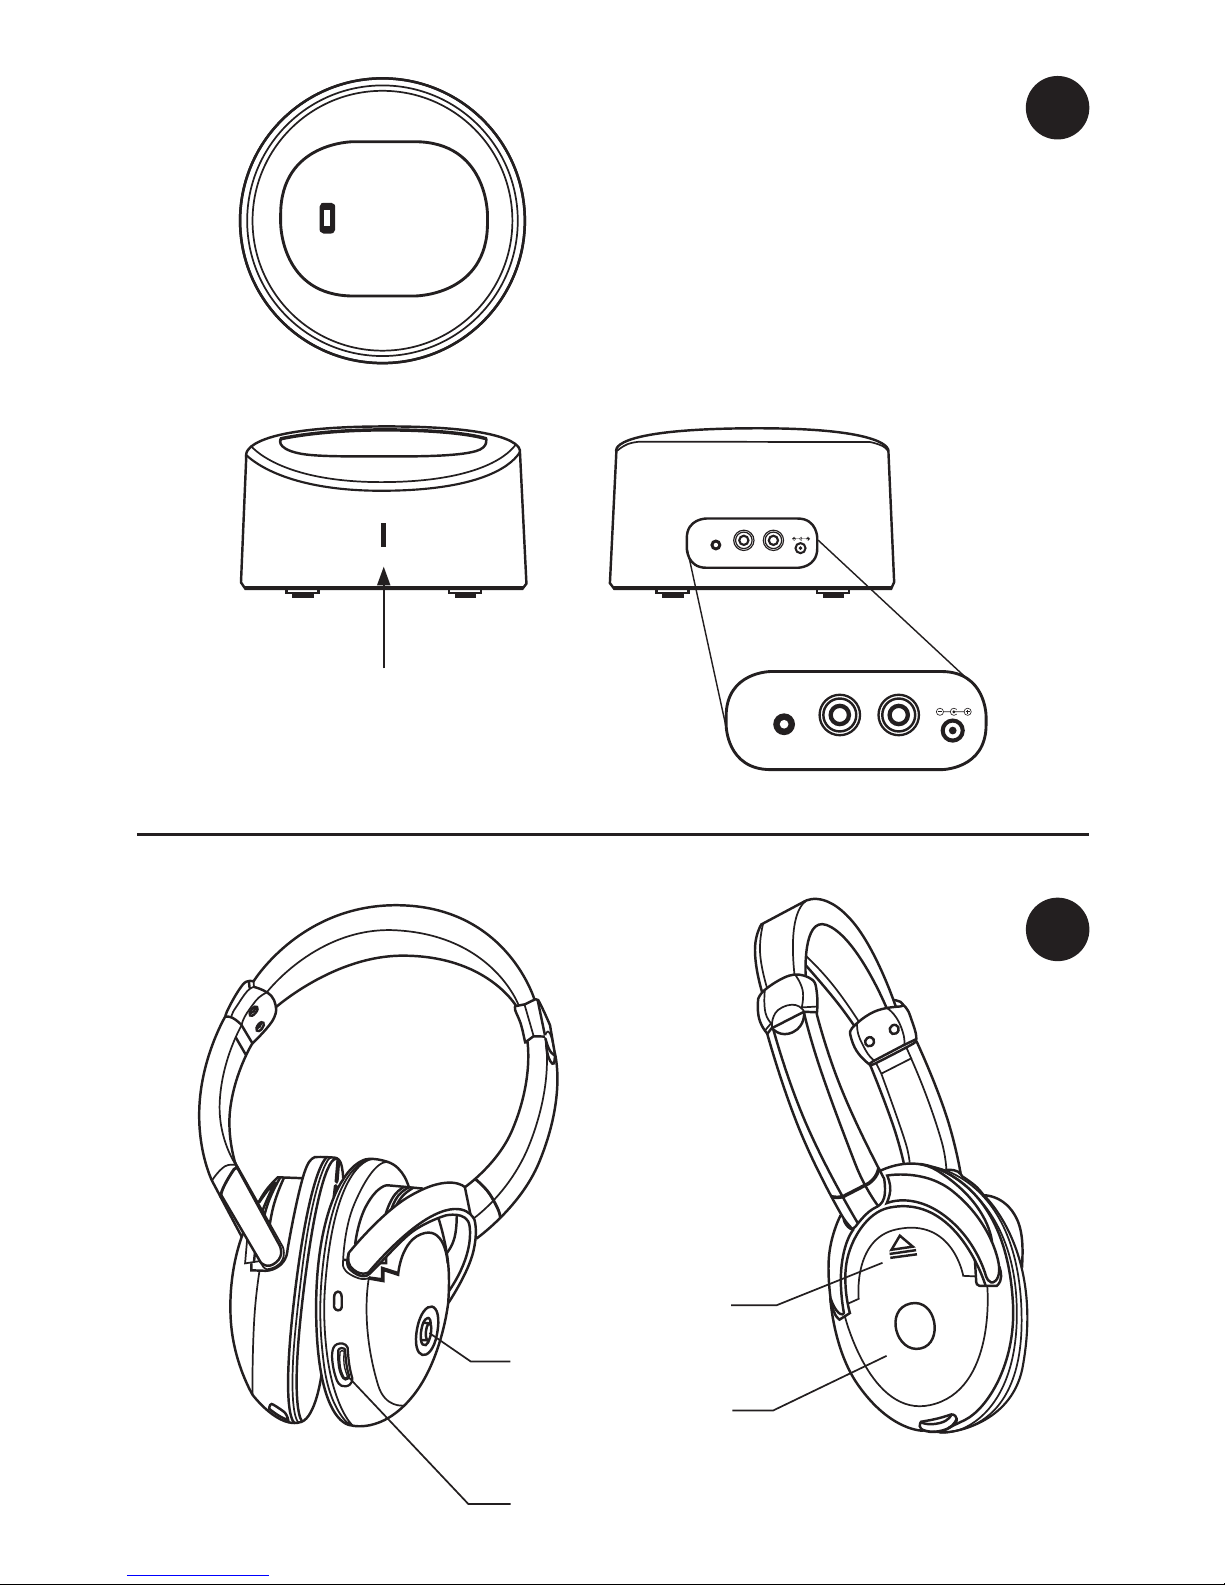
1. Headphones with RF receiver
2. RF transmitter (recharging base)
3. AC power unit, 6 V 300 mA for the transmitter
4. Audio cable from 3.5mm jack to RCA
5. 2 x AA rechargeable batteries
6. Instructions
Package content
Installation
1. TRASMITTER (FIG. 1)
Before connecting the cables, unplug the devices from the electric grid.
- Connect the supplied AC power unit to an electric socket.
- Connect the AC power cord to the DC IN input connector located on the rear panel of the transmitter.
- Use the cable to connect the audio jack on the rear panel of the transmitter to the audio output located on a TV or other
audio video device.
- Reconnect the devices to the electric power.
- The front LED of the transmitter will turn on automatically when an audio signal is received from the source.
The front LED will become GREEN when the level of the input audio signal is sufcient. If the LED remains RED, turn
on the audio source and increase its output level until the LED becomes green.
2. HEADPHONES WITH RECEIVER (FIG. 2)
Headphones parts
A. ON/OFF
B. Volume + , Pair, Volume –
C. Battery cover
D. Battery cover opening
- Remove the battery cover on the left (L) pad.
- Insert two rechargeable AA batteries (supplied). Ensure that the batteries are inserted with the correct polarity.
- Close the battery cover.
- Ensure that the headphones are off and place them on the recharging base so that the batteries can be recharged for
16 hours prior to rst use.
Use
To start the system and listen to the signal from the audio source, observe the following steps:
- Ensure that the installation procedure has been performed as described above.
- Turn on the headphones receiver with the ON/OFF switch, the headphones red LED will turn on.
- After the audio link is established, the LEDs will become green and sound is transmitted.
- The headphones LED blinks in red if the batteries are low.
- If the headphones LED turns off immediately, it means that the batteries are empty. Place the headphones back onto
the base to recharge the batteries.
- After listening, turn off the headphones.
NOTE:
If the headphones LED remains red and the headphones are not working, restart the pairing process by pressing the
Pair button for 3 seconds at the same time on the transmitter and headphones until the green LED blinks. The LED
remains on in green when the pairing process is complete.
Auto shut-off function (energy saving)
The transmitter will automatically turn off after approximately four minutes if there is no audio signal or if the signal
received from the audio source is too weak for suitable reception. This will protect the transmitter and save energy.
However, if the signal returns to an acceptable level, the transmitter will turn on again automatically.
The headphones receiver will turn off automatically if no signal is received by the transmitter for 15 minutes. To restart
the signal after this period, press the ON/OFF button.
Page 4

15
Battery recharge
To recharge the batteries, turn off the headphones and place them on the transmitter, taking care that the recharging
contacts match the recharging pins of the transmitter. Initially the red LED will blink to indicate the initial quick recharge.
Following the quick recharge, a slower recharging process will start and the red LED will remain on. During the slower
recharging process (red LED on), the user can already use the headphones, although with limited autonomy due to the
fact that the recharge has not been completed. Charge the new batteries for 16 hours before using them for the rst time.
Ensure that the red LED is on when recharging the batteries.
WARNINGS:
- Never try to recharge conventional alkaline batteries.
- Never use another type of batteries or non-rechargeable batteries to replace the supplied AA rechargeable batteries.
When headphones are not used, turn them off to avoid damaging the batteries.
- The batteries must be completely charged prior to rst use. An initial 16 hour recharge is required to ensure acceptable
life of rechargeable batteries. Always ensure that the headphones are off when recharging the batteries.
- Do not expose the batteries to excessive heat sources such as sunlight, re or similar.
NO SOUND
- Ensure that the power unit is fully plugged into the electric socket and the cable is properly connected to the DC IN 6V
connector of the transmitter. Ensure the green LED on the transmitter is on.
- Ensure that the headphones switch is on and the headphones LED is on.
- If the headphones LED does not turn on, the battery charge of the headphones may be insufcient.
Recharge the batteries or replace them with fully charged batteries.
- Ensure the audio source is on and set it on a channel transmitting an audio signal.
- Use the volume selector on the headphones to increase the volume.
- The audio/video device may be in pause/stop mode. Start playback on the device.
- Restart the pairing process. Press the "Pair" button for 3 seconds on the transmitter and headphones. The procedure
is complete when both LEDs are green.
- If the transmitter LED remains red, increase the input signal level until the LED becomes green.
SOUND DISTORTION
- The headphones battery charge may be low. Recharge the batteries or replace them with fully charged batteries.
- Ensure that the volume wheel is set correctly.
- The headphones may be too far from the transmitter. Get closer to the transmitter.
- The input level of the audio signal is too low or too high. Adjust the audio source volume.
TROUBLESHOOTING
Technical specication
Transmission mode : Digital FHSS stereo
Carrier frequency : 2.4 GHz
Operating voltage : Transmitter 6 V 300 mA
Receiver – 2.4 V
(2 X rechargeable batteries, AA format)
Response in frequency : 20 Hz – 20 KHz
Distortion : 0.5 %
Signal/Noise Ratio : 75 dB
Channel separation : 60 dB
Maximum transmission distance : 50 m (open eld)
Page 5

16
Help line
If you have any queries about HP500:
• read this instruction manual carefully, which will help you nd a solution to most of your problems.
• see our website www.meliconi.com.
In case of need, you can write to cufe@meliconi.it.
 Loading...