

Page 1
Digital Music Library
N1 EX/N10/N100 Series
User Manual
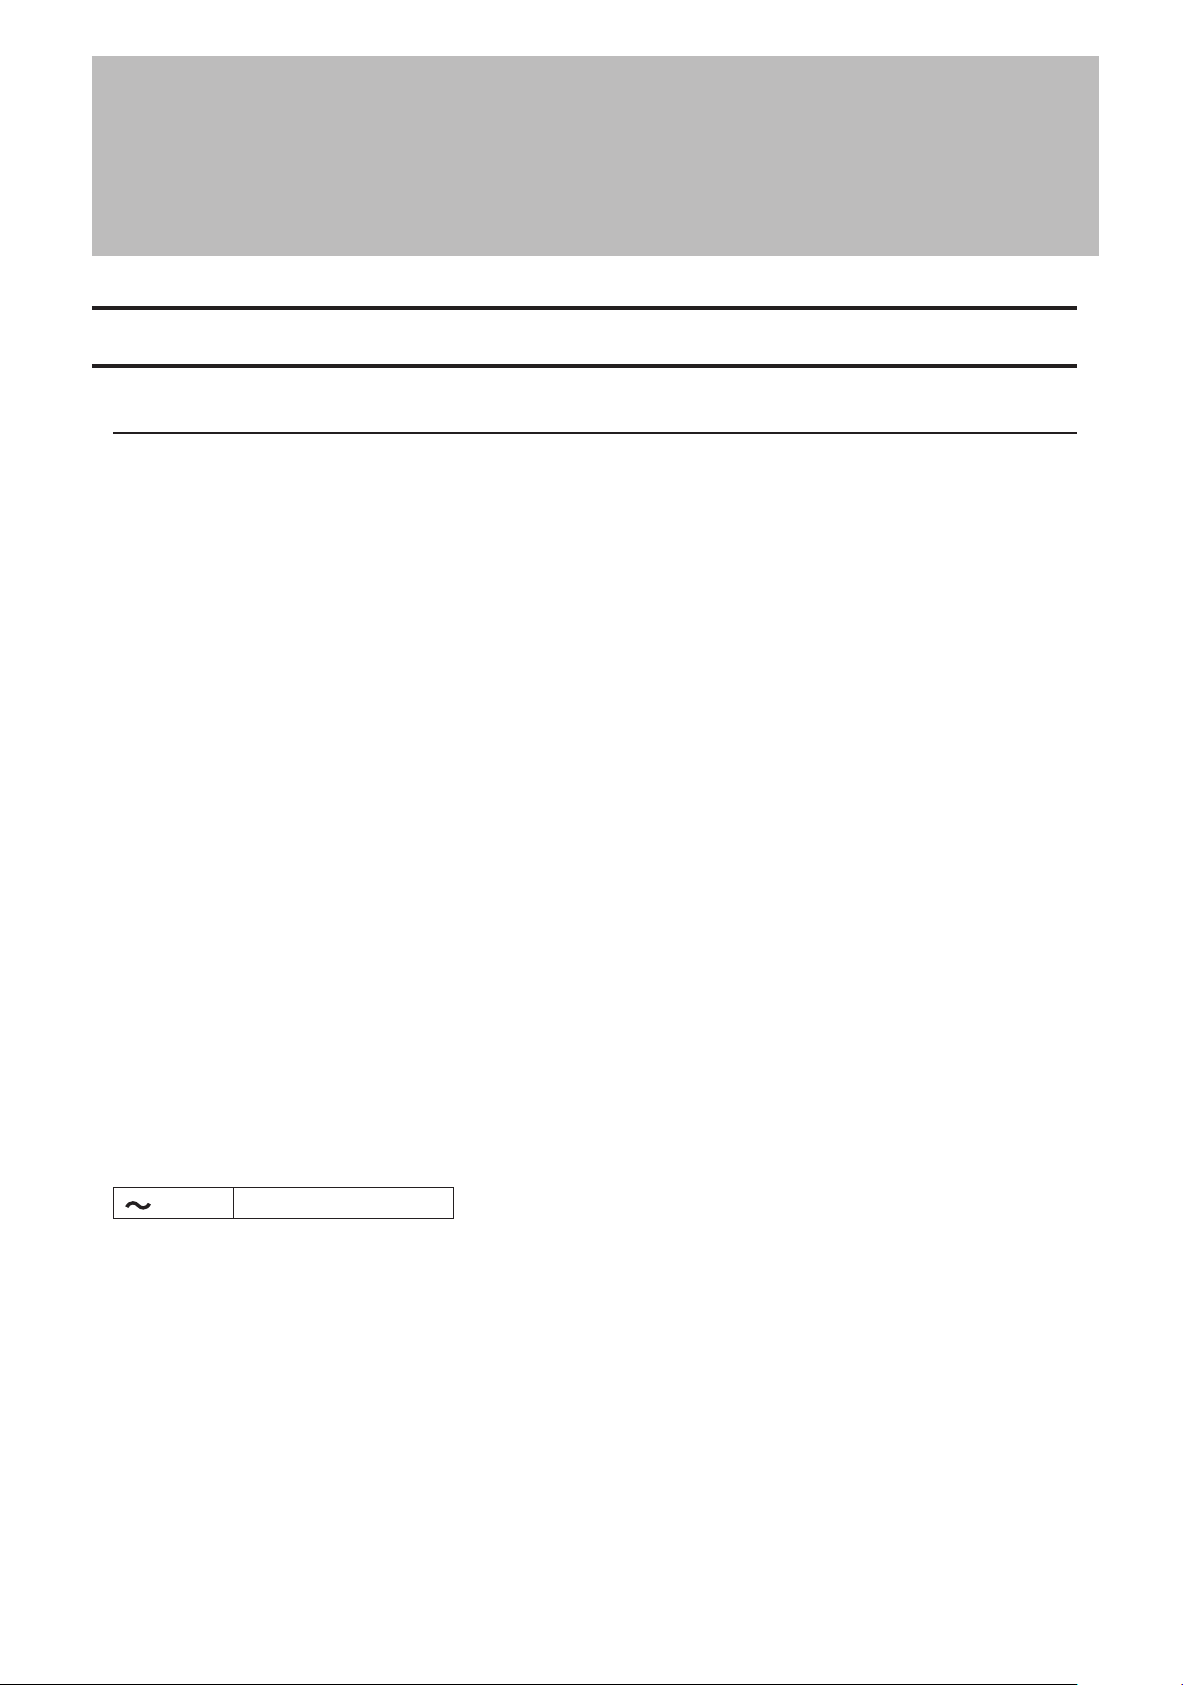
This manual uses sample screenshots captured on firmware version 4.01. Depending on the firmware version that
is installed on your Digital Music Library, functions described and screenshots contained in the manual may appear
differently, so functions on your product may not work as described in the manual. Always update the firmware to
the latest version. The version of the firmware installed will show up during startup, or you can check it by opening
the main menu and scrolling to the “System Update” option.
For the procedure of updating the firmware to the latest version, refer to the “Updating the Firmware” section in
chapter 3.
Please make sure to read this manual before using and follow the procedures. If you have any inquiries about
the product, contact us via the website on the warranty statement. Do not discard any included documents, the
warranty statement, or the packing box.
35021899-01
December 2019
Page 2
Notice
Notice
N1 EX
Regulatory Compliance Information
For Customers in the United States
This equipment has been tested and found to comply with the limits for a Class B digital device, pursuant to Part
15 of the FCC Rules. These limits are designed to provide reasonable protection against harmful interference in a
residential installation. This equipment generates, uses and can radiate radio frequency energy and, if not installed
and used in accordance with the instructions, may cause harmful interference to radio communications. However,
there is no guarantee that interference will not occur in a particular installation. If this equipment does cause
harmful interference to radio or television reception, which can be determined by turning the equipment off and
on, the user is encouraged to try to correct the interference by one or more of the following measures:
• Reorient or relocate the receiving antenna.
• Increase the separation between the equipment and receiver.
• Connect the equipment into an outlet on a circuit different from that to which the receiver is connected.
• Consult the dealer or an experienced radio/TV technician for help.
This device complies with Part 15 of the FCC Rules. Operation is subject to the following two conditions: (1) this
device may not cause harmful interference, and (2) this device must accept any interference received, including
interference that may cause undesired operation.
Only use the cables and accessories that are included in the package. Don’t use other accessories or cables unless
specifically instructed to in the documentation.
MET
The socket-outlet shall be installed near the equipment and shall be easily accessible.
Label Information
Alternating current
Proposition 65
WARNING:
This product and its components contain chemicals known to the State of California to cause cancer and birth
defects, or reproductive harm. Wash hands after handling.
1
Page 3
Notice
For Customers in Europe
CB
Norsk
Utstyr som er koplet til beskyttelsesjord via nettplugg og/eller via annet jordtilkoplet utstyr – og er tilkoplet et
kabel-TV nett, kan forårsake brannfare.
For å unngå dette skal det ved tilkopling av utstyret til kabel-TV nettet installeres en galvanisk isolator mellom
utstyret og kabel- TV nettet.
Svenska
Utrustning som är kopplad till skyddsjord via jordat vägguttag och/eller via annan utrustning och samtidigt
är kopplad till kabel-TV nät kan i vissa fall medföra risk för brand. För att undvika detta skall vid anslutning av
utrustningen till kabel-TV nät galvanisk isolator finnas mellan utrusningen och kabel-TV nätet.
Label Information
Alternating current
The socket-outlet shall be installed near the equipment and shall be easily accessible.
CE
Deutsch
Verwenden Sie ausschließlich die Kabel und Zubehörteile, die im Lieferumfang enthalten sind. Andere Zubehörteile
oder Kabel dürfen nur dann verwendet werden, wenn dies in der Dokumentation ausdrücklich vorgeschrieben ist.
Verwenden Sie keine USB-Kabel, die 3 Meter lang oder länger sind, um USB-Geräte.
English
Only use the cables and accessories that are included in the package. Don’t use other accessories or cables unless
specifically instructed to in the documentation.
Do not use USB cables that are 3 meters or longer to connect USB devices.
Français
Utilisez uniquement les câbles et accessoires inclus dans ce package. N’utilisez aucun autre accessoire ou câble sauf
instruction spécifique de la documentation.
Utilisez des câbles d’une longueur de moins 3 mètres pour connecter les périphériques USB à.
Norsk
Bruk kun kabler og tilbehør som er inkludert i pakken. Ikke bruk annet tilbehør eller kabler med mindre spesielt
instruert til å gjøre det i dokumentasjonen.
Bruk ikke USB-kabler på tre meter eller mer for å koble USB-enheter til denne TeraStation-serien.
Svenska
Använd bara kablar och tillbehör som ingår i förpackningen. Använd inte andra tillbehör eller kablar om du inte får
uttryckliga instruktioner om det i dokumentationen.
Använd inte USB-kablar som är 3 meter eller längre för att ansluta USB-enheter till den här TeraStation-serien.
2
Page 4
Notice
N10/N100
Regulatory Compliance Information
For Customers in the United States
This device complies with Part 15 of the FCC Rules. Operation is subject to the following two conditions: (1) this
device may not cause harmful interference, and (2) this device must accept any interference received, including
interference that may cause undesired operation.
This equipment has been tested and found to comply with the limits for a Class B digital device, pursuant to Part
15 of the FCC Rules. These limits are designed to provide reasonable protection against harmful interference in a
residential installation.
This equipment generates, uses and can radiate radio frequency energy and, if not installed and used in accordance
with the instructions, may cause harmful interference to radio communications. However, there is no guarantee that
interference will not occur in a particular installation.
If this equipment does cause harmful interference to radio or television reception, which can be determined by
turning the equipment off and on, the user is encouraged to try to correct the interference by one or more of the
following measures:
• Reorient or relocate the receiving antenna.
• Increase the separation between the equipment and receiver.
• Connect the equipment into an outlet on a circuit different from that to which the receiver is connected.
• Consult the dealer or an experienced radio/TV technician for help.
For Customers in Canada
CAN ICES-3 (B)/NMB-3 (B)
For Customers in Europe
Environmental Information
• The equipment that you have purchased has required the extraction and use of natural resources for its
production.
• The equipment may contain hazardous substances that could impact health and the environment.
• In order to avoid the dissemination of those substances in our environment and to diminish the pressure on the
natural resources, we encourage you to use the appropriate take-back systems.
• The take-back systems will reuse or recycle most of the materials of end life equipment in a sound way.
• The crossed-out wheeled bin symbol invites you to use those systems.
• If you need more information on the collection, reuse and recycling systems, please contact your local or
regional waste administration.
Safety Precautions
Before using your device, basic safety instructions should always be followed.
(1) Follow all warnings and instructions marked on the product.
(2) Do not discard the included documentations, the warranty statement, or the packing box.
3
Page 5
Notice
(3) The socket-outlet shall be installed near the equipment and shall be easily accessible.
(4) Only use the cables and accessories that are included in the package. Don’t use other accessories or cables
unless specifically instructed to in the documentation. Also, do not use USB cables that are 3 meters or longer to
connect USB devices.
If you have any inquiries about the product, contact the number on the warranty statement or the packing box.
Warning Symbols and Graphical Icons on the Product Label
Warning symbols are used on the product label for the safety operation and prevention of injury to you and damage
to the unit. This explains the meanings of symbols and icons used on the product label.
Indicates a potentially hazardous situation, which could result in death or serious injury if not
careful.
Indicates a potentially hazardous situation, which could result in minor or moderate injury if not
careful.
Alternating current
Direct current
Polarity of DC connector
4
Page 6

Contents
Notice ..............................................................................1
N1 EX .................................................................................................1
Regulatory Compliance Information ........................................................1
N10/N100 ..........................................................................................3
Regulatory Compliance Information ........................................................3
Safety Precautions ..................................................................................... 3
Warning Symbols and Graphical Icons on the Product Label ................4
Chapter 1 Getting Started .............................................9
Summary of Manual .........................................................................9
Chapter 2 Basic Usage ................................................. 10
Diagrams ........................................................................................ 10
N1 EX ......................................................................................................... 10
N10/N100 ..................................................................................................13
Display ........................................................................................... 16
Home Screen ............................................................................................16
Menu ......................................................................................................... 17
Dialog ........................................................................................................18
Streaming Screen ..................................................................................... 18
Remotely Operating the Digital Music Library ......................................20
Importing Music Files ................................................................... 21
Importing from USB Drives ..................................................................... 21
Importing from a Music CD ..................................................................... 23
Importing Files from a Computer ...........................................................24
5
Page 7

Confirming Imported Files ...................................................................... 27
Downloading Music Files from Streaming Sites ......................... 27
Adding Accounts ...................................................................................... 27
Enabling or Disabling Periodic Downloads ...........................................30
Deleting Accounts ....................................................................................31
Playing Music Files on a Network Audio Player .......................... 32
Streaming Imported Music Files ............................................................. 33
Streaming Music Files from USB Drives .................................................33
Playing Music Files on USB-DAC Devices .................................... 34
Playing Music Files on the Digital Music Library or USB Drive ............. 34
Playing a CD Using an Optical Drive ....................................................... 36
Operation While Playing Music Files ......................................................36
Configuring the Mode for Managing USB-DAC Using Controller App 37
Changing the DSD Playback Mode ......................................................... 38
Backing Up and Restoring ............................................................ 40
Backup Operations ..................................................................................40
Backing Up ...............................................................................................40
Restoring ..................................................................................................42
Deleting the Imported Music Files ............................................... 44
Deleting All Files ......................................................................................44
Deleting Each File One by One ................................................................ 44
Chapter 3 Advanced Usage ......................................... 45
Connecting a Network Audio Player Without Connecting to the
Internet .......................................................................................... 45
Changing the RAID Mode on the N1 EX....................................... 47
Formatting Drives ......................................................................... 48
Formatting Internal Drives ......................................................................49
6
Page 8

Formatting Connected USB Drives ......................................................... 50
Erasing Data on the Digital Music Library Completely .............. 52
Changing the IP Address .............................................................. 53
Changing the Friendly Name (Hostname) ................................... 55
Configuring the Date and Time .................................................... 56
Changing the Time Zone .............................................................. 58
Configuring Display and LED Settings ........................................ 59
Changing the Display Brightness ...........................................................59
Changing the Power LED Brightness on the N1 EX ...............................60
Turning Off the Rear-Side LED on the N1 EX ..........................................61
Configuring Automatic Power-Off ............................................... 62
Changing the Display Language .................................................. 63
Updating the Firmware ................................................................. 64
Updating via the Network ....................................................................... 64
Updating from the USB Device ...............................................................65
Checking for Updates Automatically .....................................................66
Restoring Factory Defaults ........................................................... 67
MELCO Intelligent Music Library .................................................. 68
SongKong for Melco Lite Music Tagger .................................................. 69
MinimServer 2 .......................................................................................... 70
Chapter 4 Appendix .................................................... 71
Menu List ....................................................................................... 71
Status ........................................................................................................71
Browse Songs/Play Songs .......................................................................71
Backup ......................................................................................................71
Settings .....................................................................................................72
7
Page 9

Dismount USB Drive ................................................................................75
System Update .........................................................................................75
Language .................................................................................................. 75
Support .....................................................................................................76
Error Codes .................................................................................... 76
Default Settings ............................................................................ 78
8
Page 10
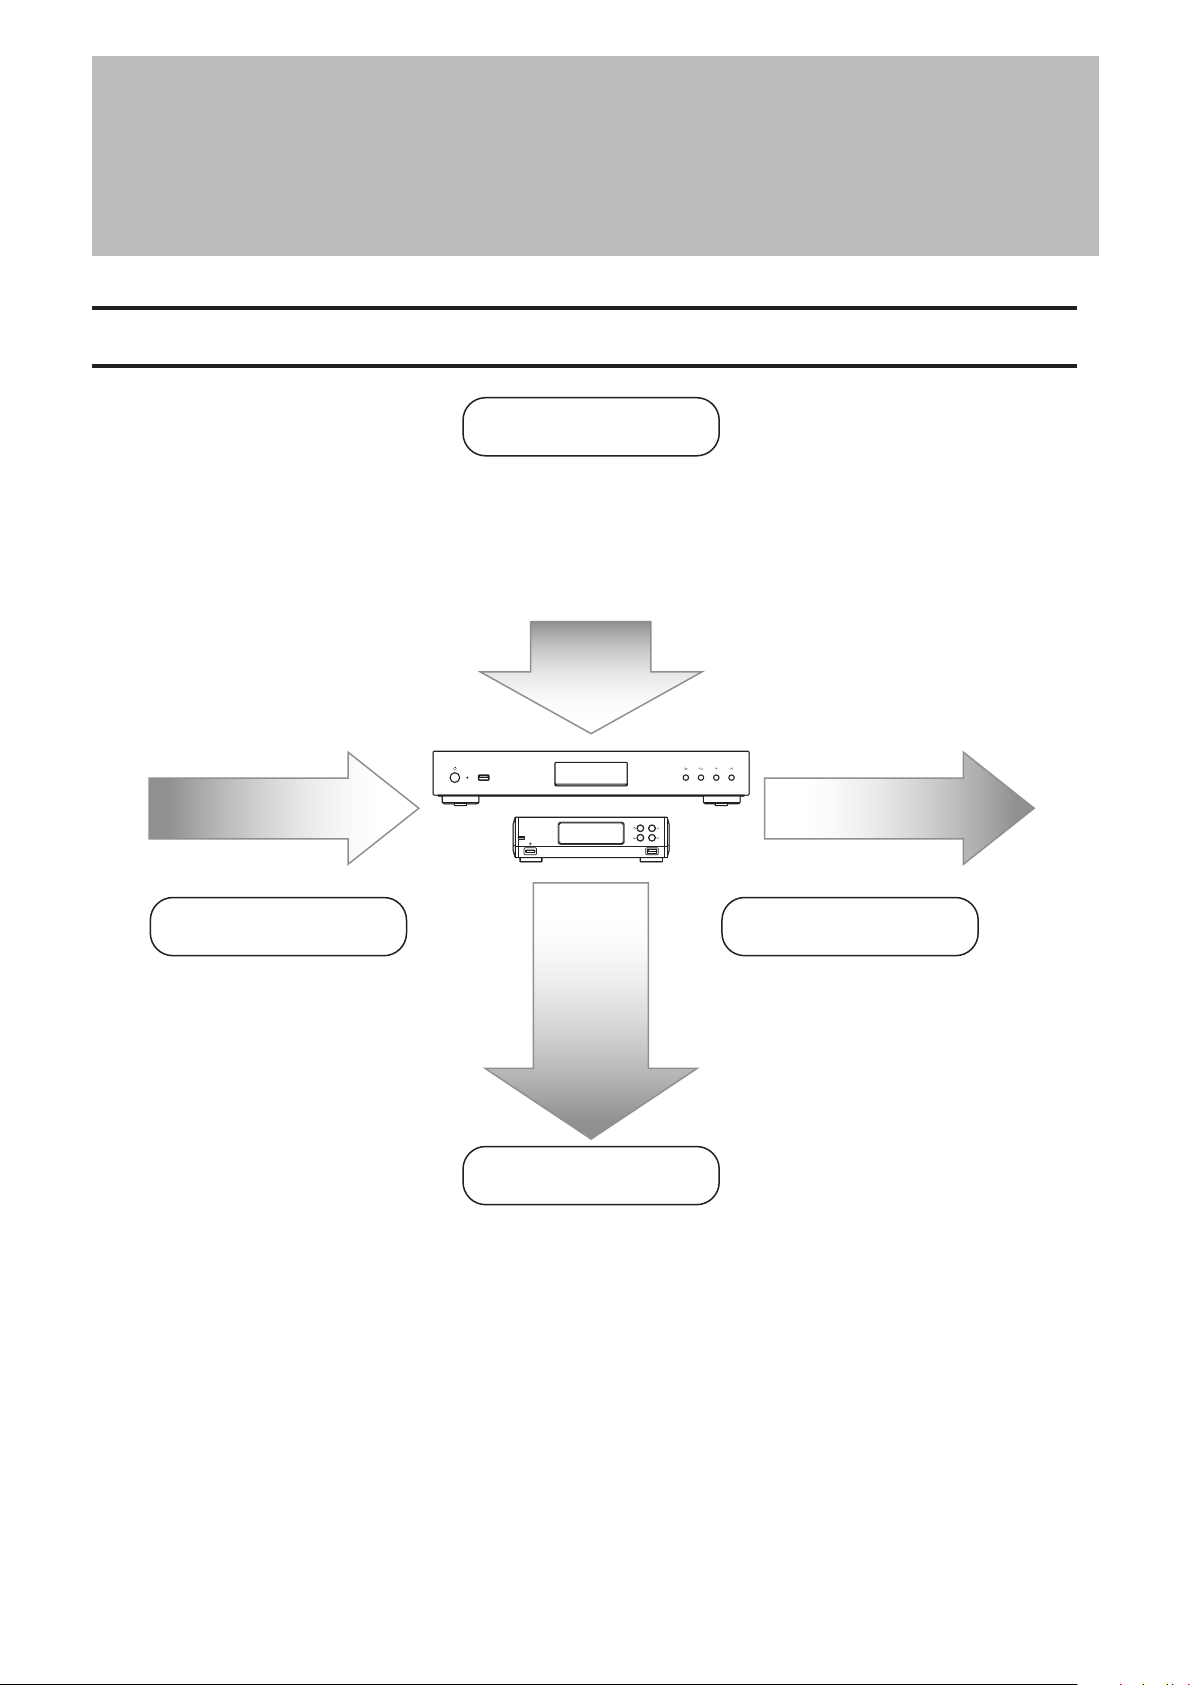
Chapter 1 Getting Started
Firmware Update - Chapter 3 “Updating the Firmware”
Chapter 1 Getting Started
Summary of Manual
Display Panel
Display Panel Details
- Chapter 2 “Display”
Display Settings
- Chapter 3 “Configuring Display and LED Settings”
Display Language
- Chapter 3 “Changing the Display Language”
Import Playback
Importing from a USB Device
- Chapter 2 “Importing Music Files”
Importing from a CD
- Chapter 2 “Importing Music Files”
Checking If the Import Finished
Successfully
- Chapter 2 “Confirming Imported Files”
Importing from a Computer
- Chapter 2 “Importing Music Files”
Downloading
- Chapter 2 “Downloading Music Files
from Streaming Sites”
Playback on a Network Audio Player
- Chapter 2 “Playing Music Files on a
Network Audio Player”
Playback on USB-DAC Devices
- Chapter 2 “Playing Music Files on
USB-DAC Devices”
Backup, Format, and
Advanced Usage
Backing Up Music Files and Settings
- Chapter 2 “Backing Up and Restoring”
Deleting Imported Files
- Chapter 2 “Deleting the Imported Music Files”
Drive Settings and Formatting
- Chapter 3 “Changing the RAID Mode on the N1 EX”, “Formatting Drives”
Changing the IP Address and Hostname
-
Chapter 3 “Changing the IP Address”, “Changing the Friendly Name (Hostname)”
Date, Time, and Time Zone Settings
- Chapter 3 “Configuring the Date and Time”, “Changing the Time Zone”
9
Page 11
Chapter 2 Basic Usage
1089 11 12 13 14 15
Chapter 2 Basic Usage
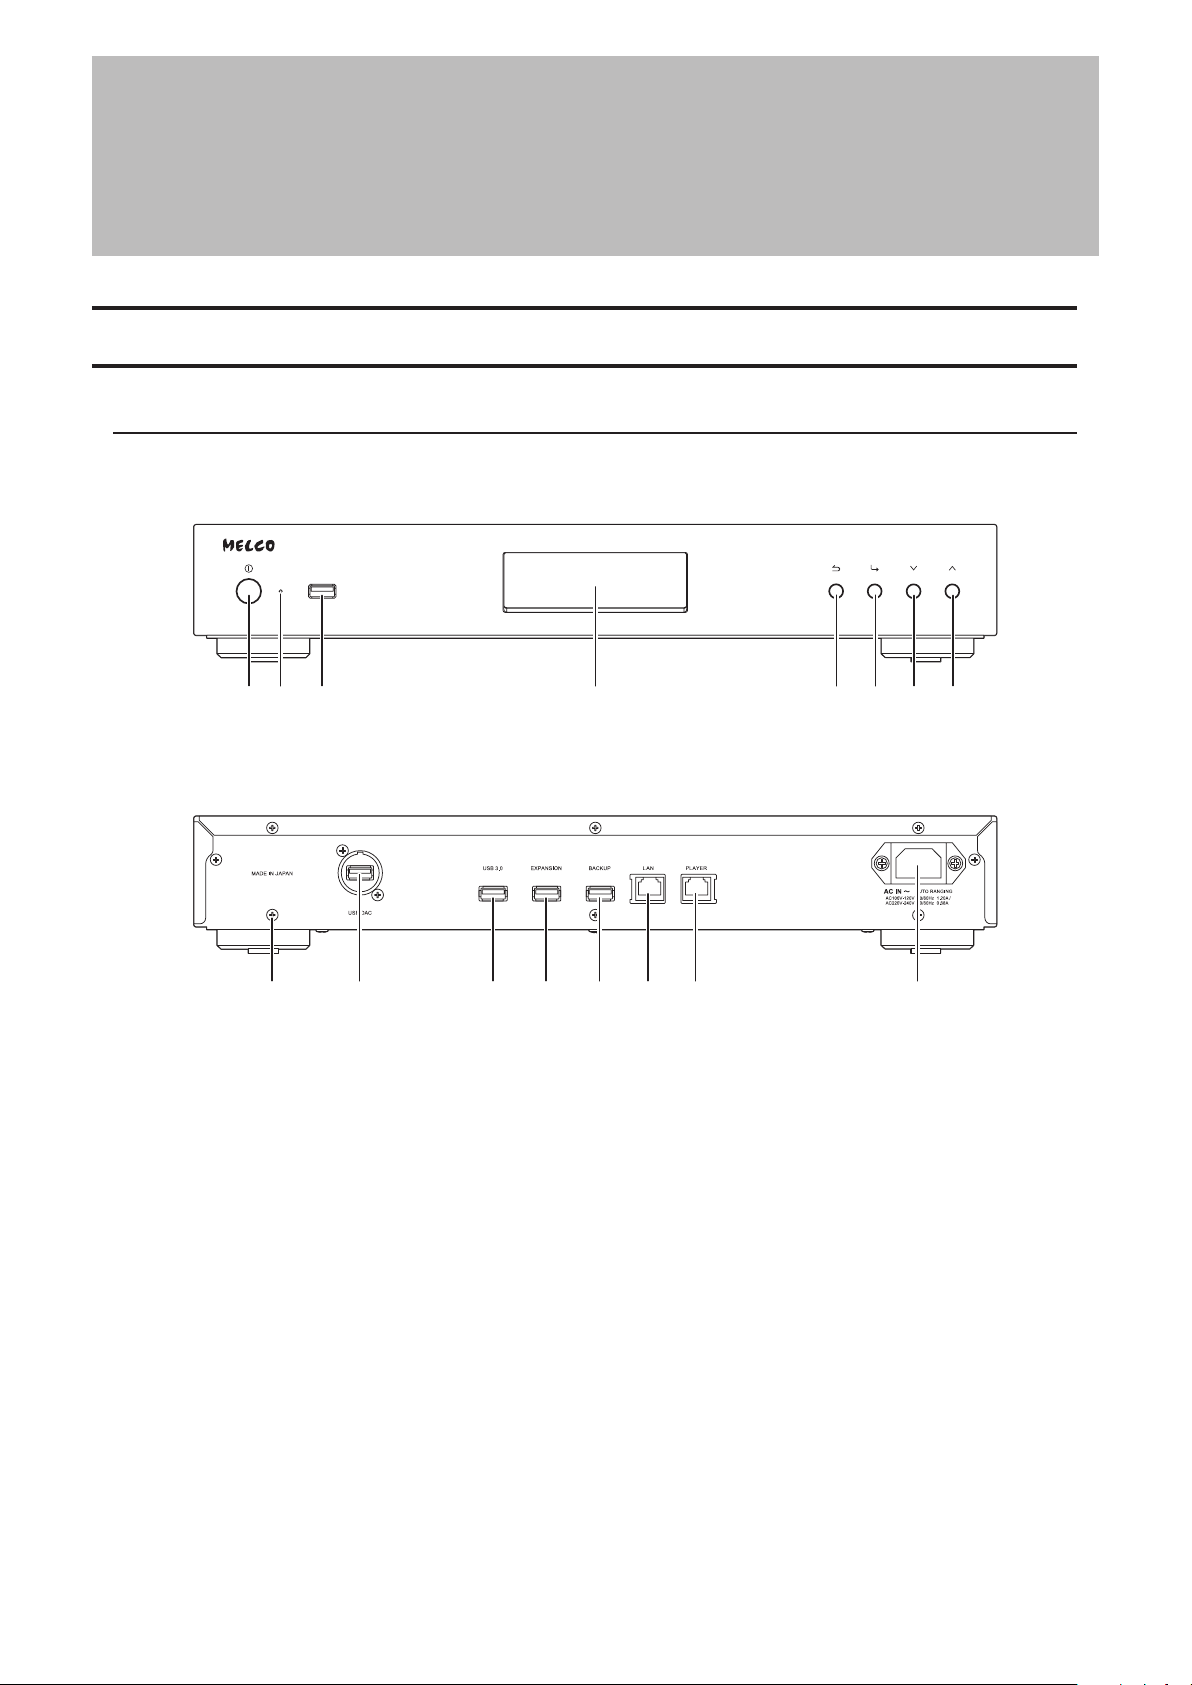
Diagrams
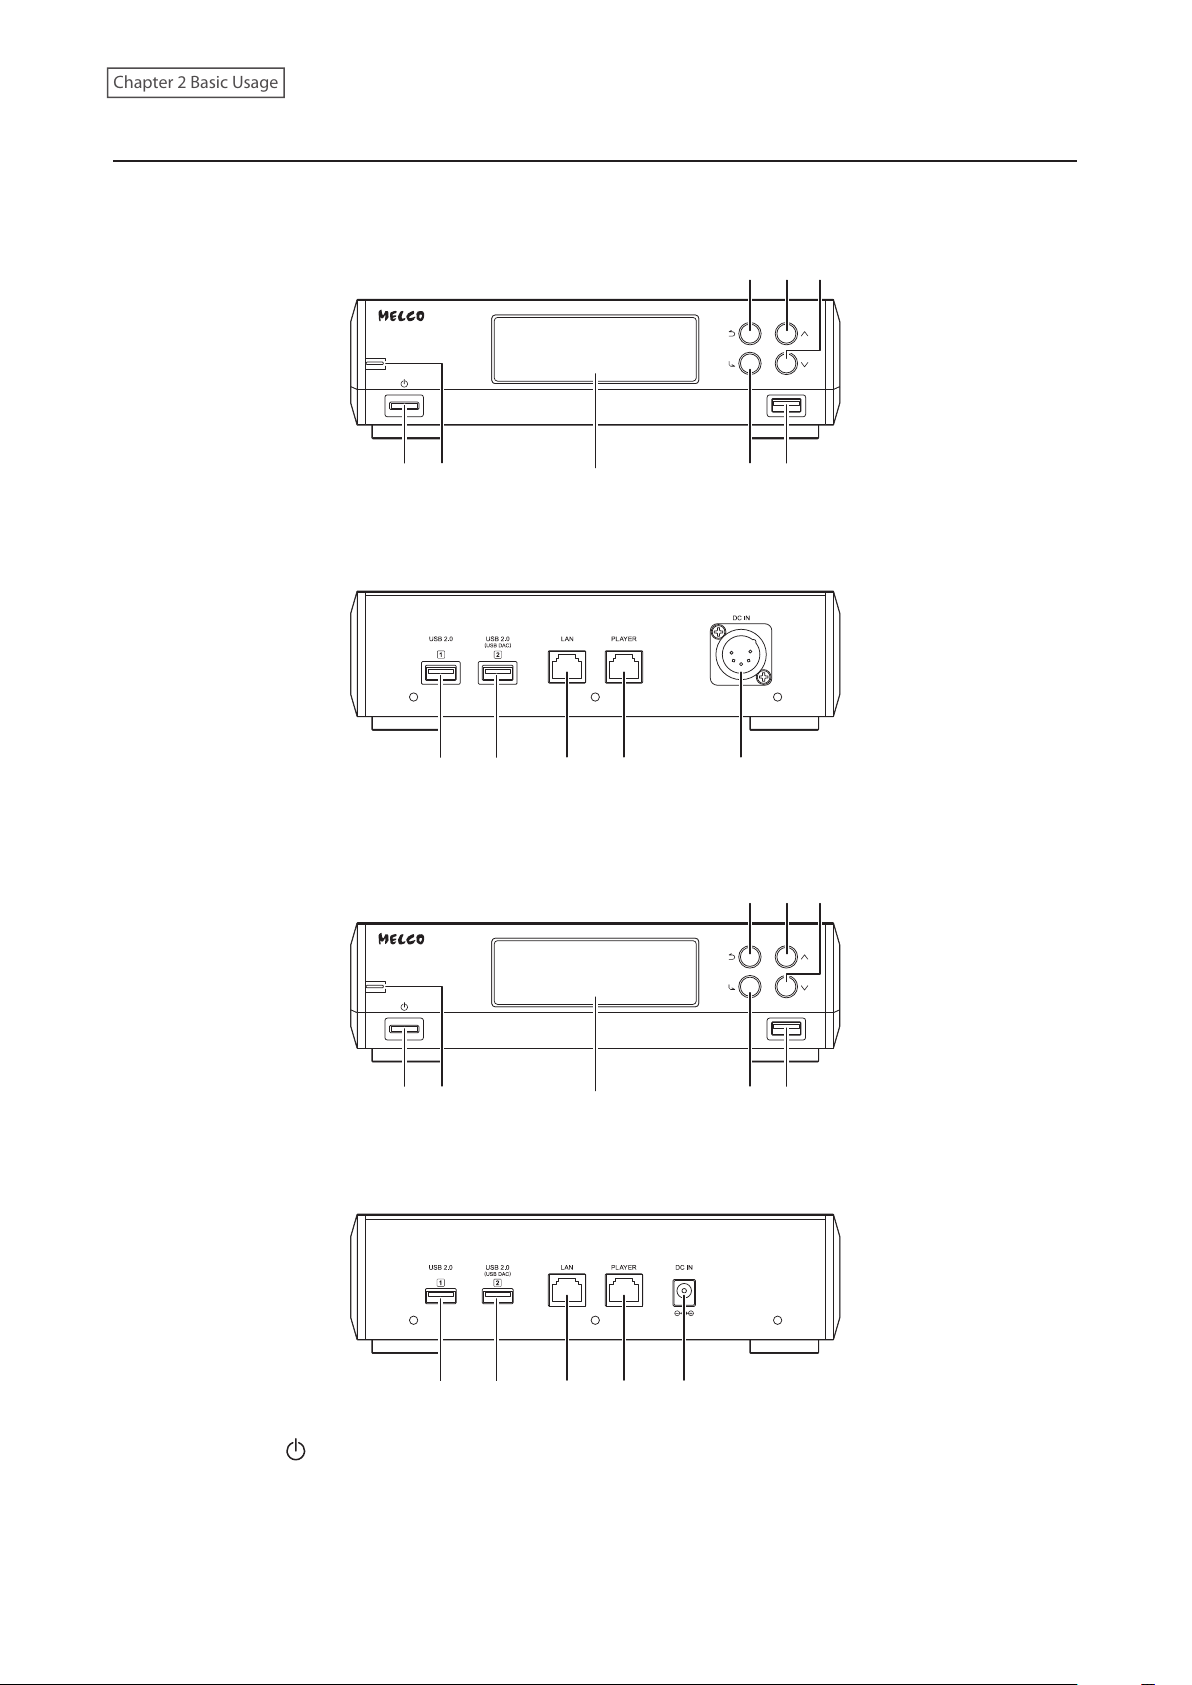
N1 EX
N1A EX
1 2 10 3 4 5 6 7
10
Page 12
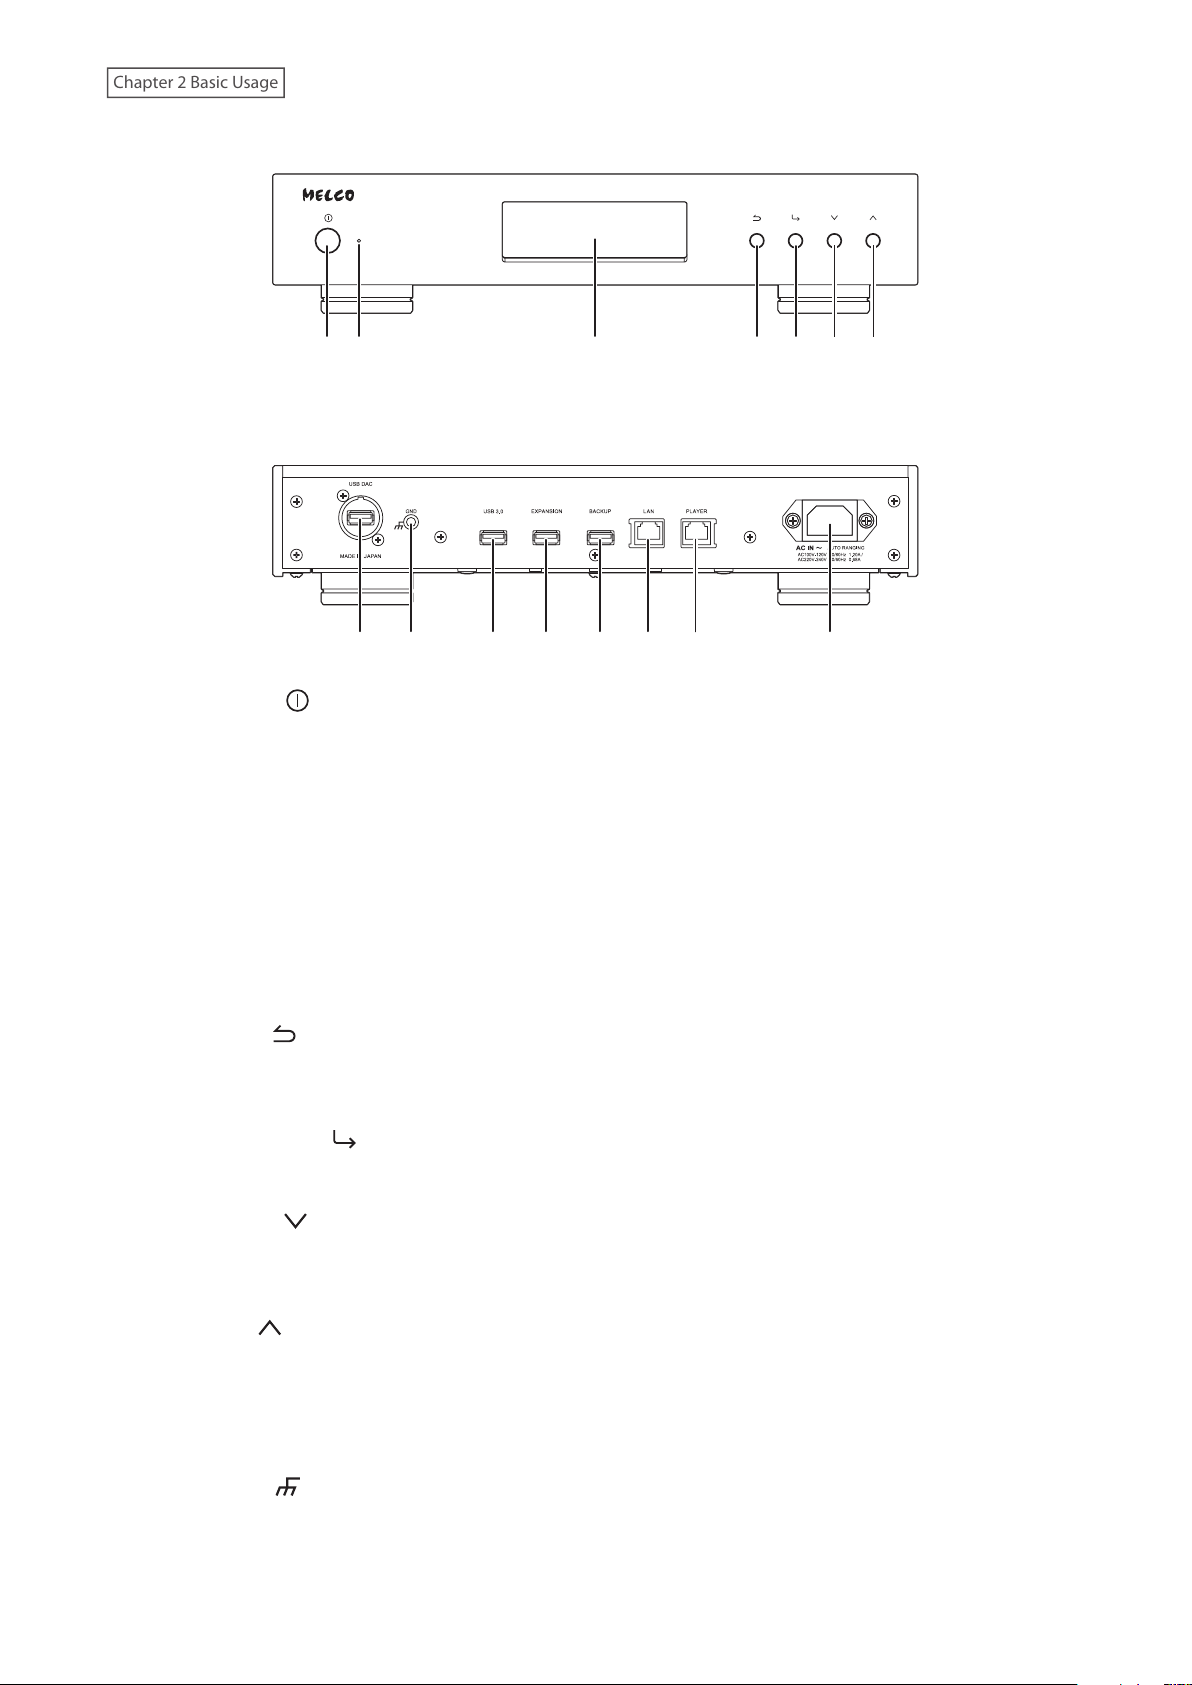
Chapter 2 Basic Usage
N1Z EX
8 9 10 11 12 13 14 15
1 2 3 4 5 6 7
1 Power Button ( )
Press to turn the power on and off.
2 Power LED
While the N1 EX is powered on, the LED will glow blue. It will extinguish when powering off.
Note: The brightness of the power LED can be changed from Settings - Display - Power LED Brightness.
3 Display
Displays the device’s status and settings menu. In case of an error, displays the error code and message.
Note: The brightness of the display panel can be changed from Settings - Display - Brightness. If the display
brightness is set to Dark Mode, the display panel will be turned off.
4 Back Button ( )
Press this button to return the menu to the previous screen. If you press and hold this button for 2 seconds
while at the home screen, the display panel will be turned off.
5 Menu/Enter Button ( )
Press to make a selection on the display panel.
6 Down Button ( )
Press this button to scroll down.
To initialize settings, press the power button while holding down this button.
7 Up Button ( )
Press this button to scroll up.
8 USB Port for USB-DAC
Use this port to connect a USB-DAC device.
9 Ground Port ( )
Use this port to connect a grounding cable (sold separately).
11
Page 13

Chapter 2 Basic Usage
10 USB 3.0 Port
LINK ACT
Connect a compatible USB hard drive or optical drive for music playback, or a USB flash drive for updating the
firmware.
*
11 USB Port for Expansion USB Drive
Connect a compatible USB hard drive to expand the N1 EX’s storage capacity.
12 USB Port for Backup USB Drive
Connect a compatible USB hard drive to back up or restore the data or settings of the N1 EX.
13 Ethernet Port for Router or Hub
Use an Ethernet cable to connect a wireless router, hub, or switch on your network to this port. Then you will
be able to access the N1 EX from computers and mobile devices on your network.
14 Ethernet Port for Player
This is a dedicated port for Network Audio Players. Use an Ethernet cable to connect a Network Audio Player or
AV receiver directly to this port.
Note: If your Network Audio Player is directly connected to the Player port, it will not be visible on the network
when the N1 EX is powered off. If this is an issue, connect your Network Audio Player to the router or switch
instead.
**
*
*
**
15 Power Connector
Use the included power cable.
*Only the first partition of a connected USB drive is mounted. Additional partitions are not recognized. To utilize the
capacity of the whole drive, connect the USB device to the Expansion or Backup port; navigate to Settings - Drive,
select Format USB Drive, then select Erase All Data to format all partitions. Please note that all data currently on the
drive will be deleted with this operation.
**When the Ethernet cable is connected to the network, the link LED will glow. The act LED shows network activity.
To extinguish both LEDs, go to Settings - Network - Rear Side LED and set it to “Off”.
12
Page 14
Chapter 2 Basic Usage
N10/N100
4
67
89 10 11 12
4
67
89 10 11 12
N10
N100
12 3
58
1 Power Button ( )
Press to turn the power on and off.
12 3
58
13
Page 15
Chapter 2 Basic Usage
2 Power LED
While the N10/N100 is powered on, the LED will glow blue. It will extinguish when powering off.
3 Display
Displays the device’s status and settings menu. In case of an error, displays the error code and message.
Note: The brightness of the display panel can be changed from Settings - Display - Brightness. If the display
brightness is set to Dark Mode, the display panel will be turned off.
4 Back Button ( )
Press this button to return the menu to the previous screen. If you press and hold this button for 2 seconds
while at the home screen, the display panel will be turned off.
5 Menu/Enter Button ( )
Press to make a selection on the display panel.
6 Up Button ( )
Press this button to scroll up.
7 Down Button ( )
Press this button to scroll down.
To initialize settings, press the power button while holding down this button.
8 USB 2.0 Port
Connect a compatible USB hard drive or optical drive for music playback, or a USB flash drive for updating the
firmware.
Note: Only the first partition of a connected USB drive is mounted. Additional partitions are not recognized. To
utilize the capacity of the whole drive, connect the USB device, then navigate to Settings - Drive; select Format
USB Drive, then select Erase All Data to format all partitions. Please note that all data currently on the drive will
be deleted with this operation.
9 USB 2.0 Port for USB-DAC
Use this port to connect a USB-DAC device.
10 Ethernet Port for Router or Hub
Use an Ethernet cable to connect a wireless router, hub, or switch on your network to this port. Then you will
be able to access the N10/N100 from computers and mobile devices on your network.
11 Ethernet Port for Player
This is a dedicated port for Network Audio Players. Use an Ethernet cable to connect a Network Audio Player or
AV receiver directly to this port.
Note: If your Network Audio Player is directly connected to the Player port, it will not be visible on the network
when the N10/N100 is powered off. If this is an issue, connect your Network Audio Player to the router or
switch instead.
12 DC Power Connector
Use the included power cable.
14
Page 16
Chapter 2 Basic Usage
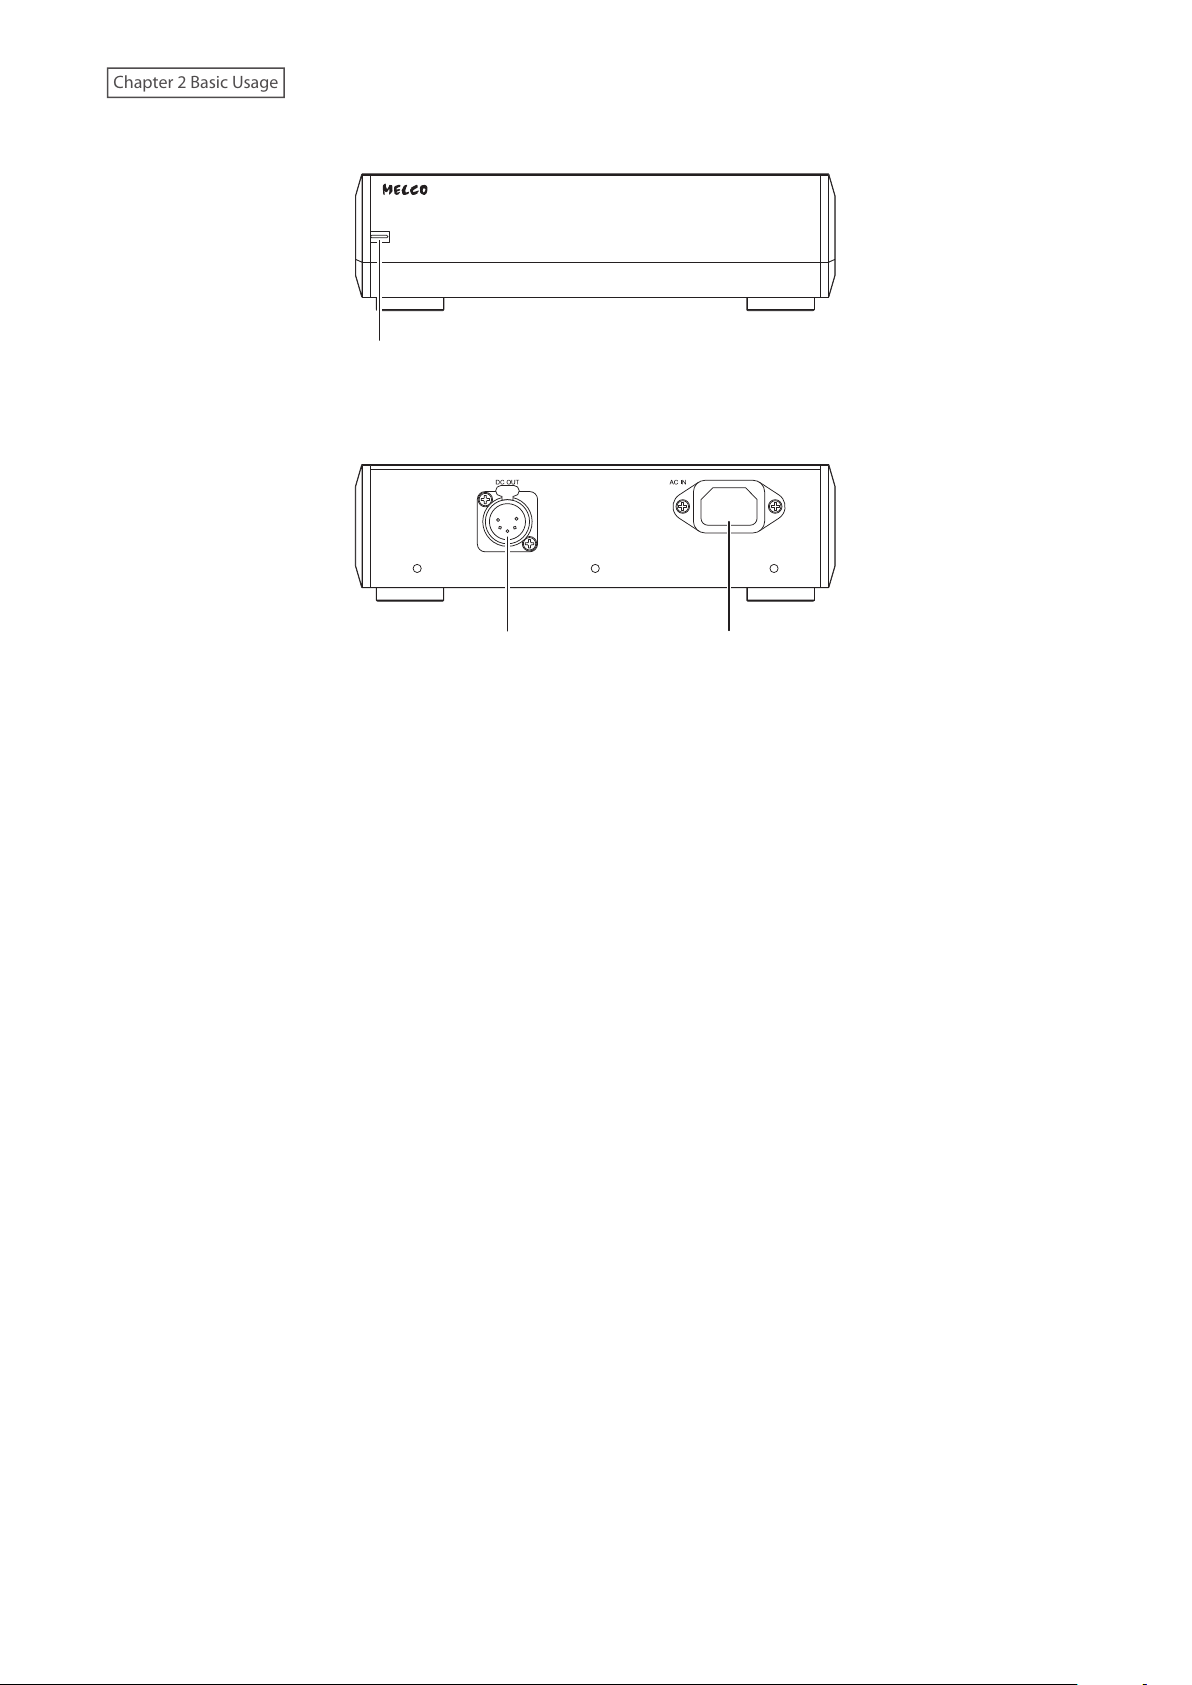
Power Unit for N10
23
1
1 Power LED
While the main unit and the power unit are powered on, the LED will glow light blue. While the main unit is
powered off and the power unit is in standby, the LED will glow red.
2 DC Power Connector
Use the included 5pin DC cable to connect the main unit.
3 AC Power Connector
Use the included power cable.
15
Page 17
Chapter 2 Basic Usage
Display
12
1 2 11
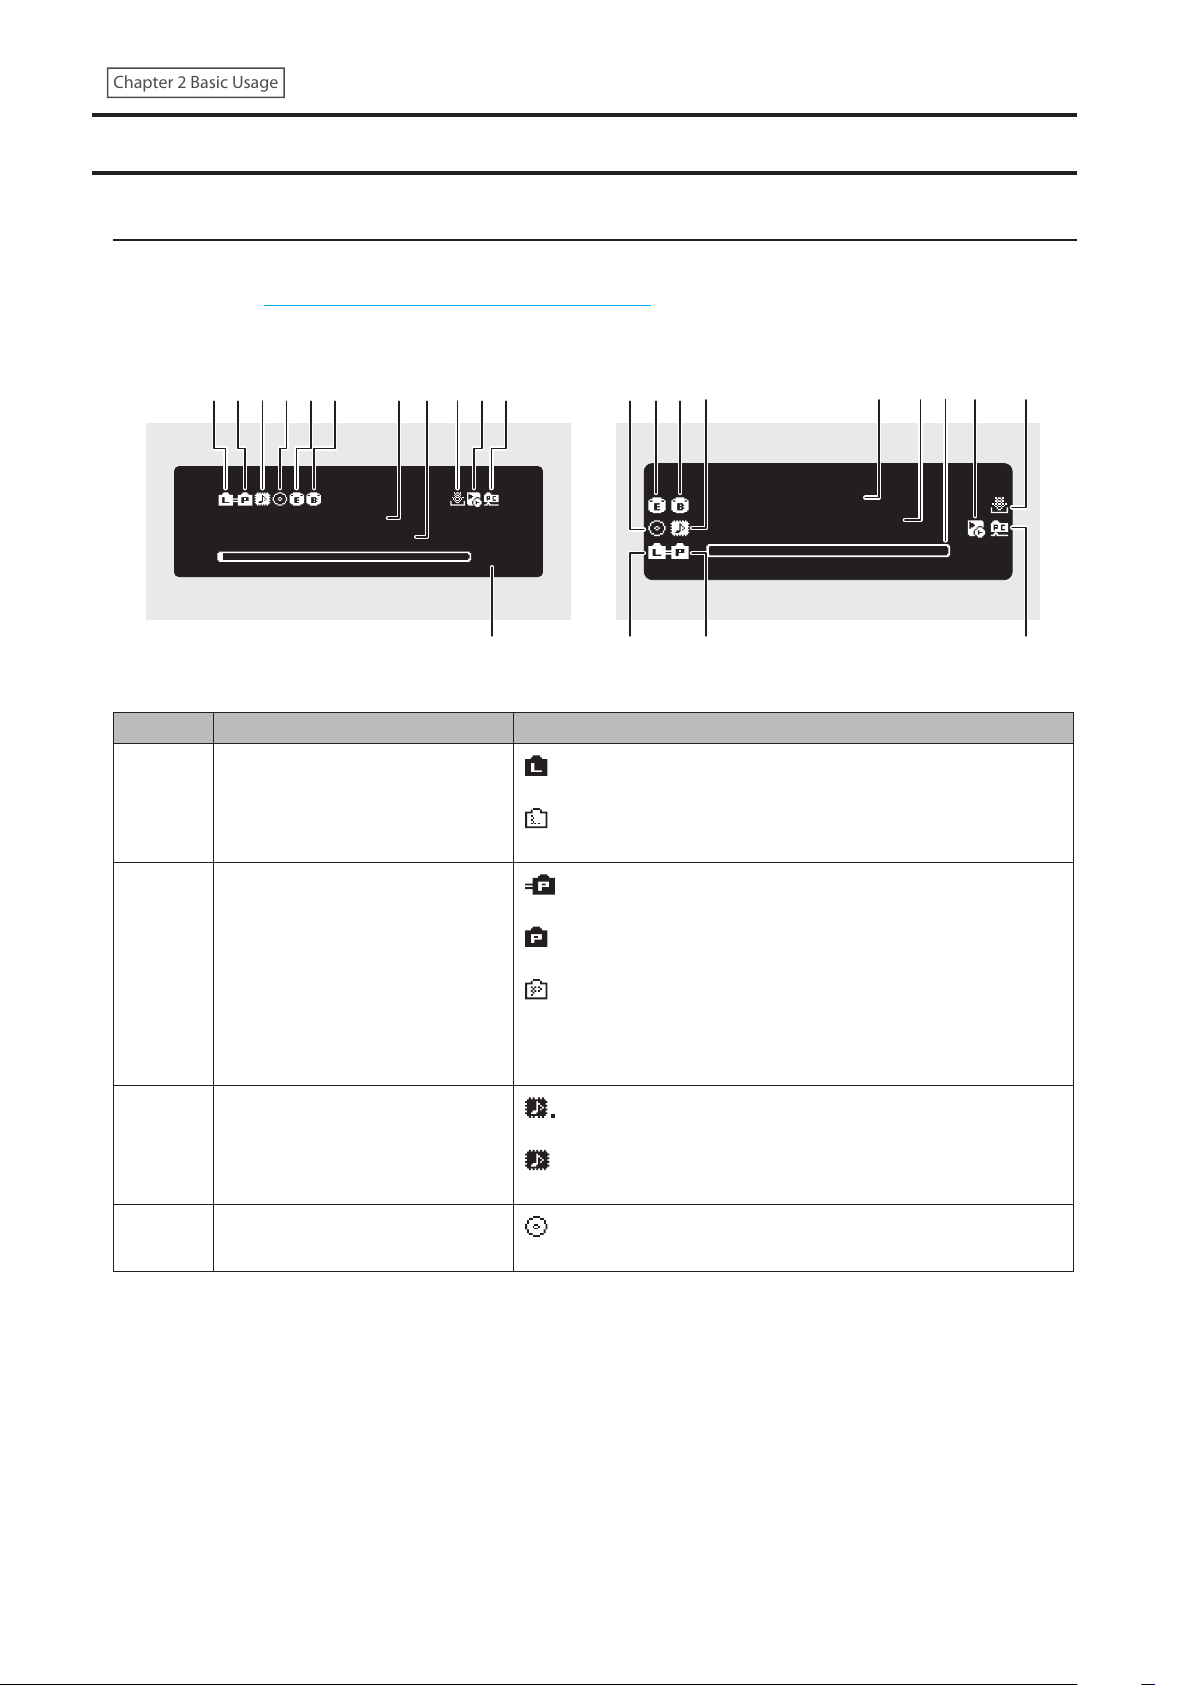
Home Screen
Turn on the Digital Music Library. After it boots, the home screen will be displayed.
Note: Refer to the “Remotely Operating the Digital Music Library” section in chapter 2 to remotely operate the
Digital Music Library using a web browser on a mobile device or a computer.
N1 EX N10/N100
1 2 3 4 5 6 9 101187 7
фУЦЦиз
ЧЯШФЧЬЮФЧЦФЪЧ
The home screen displays the following information:
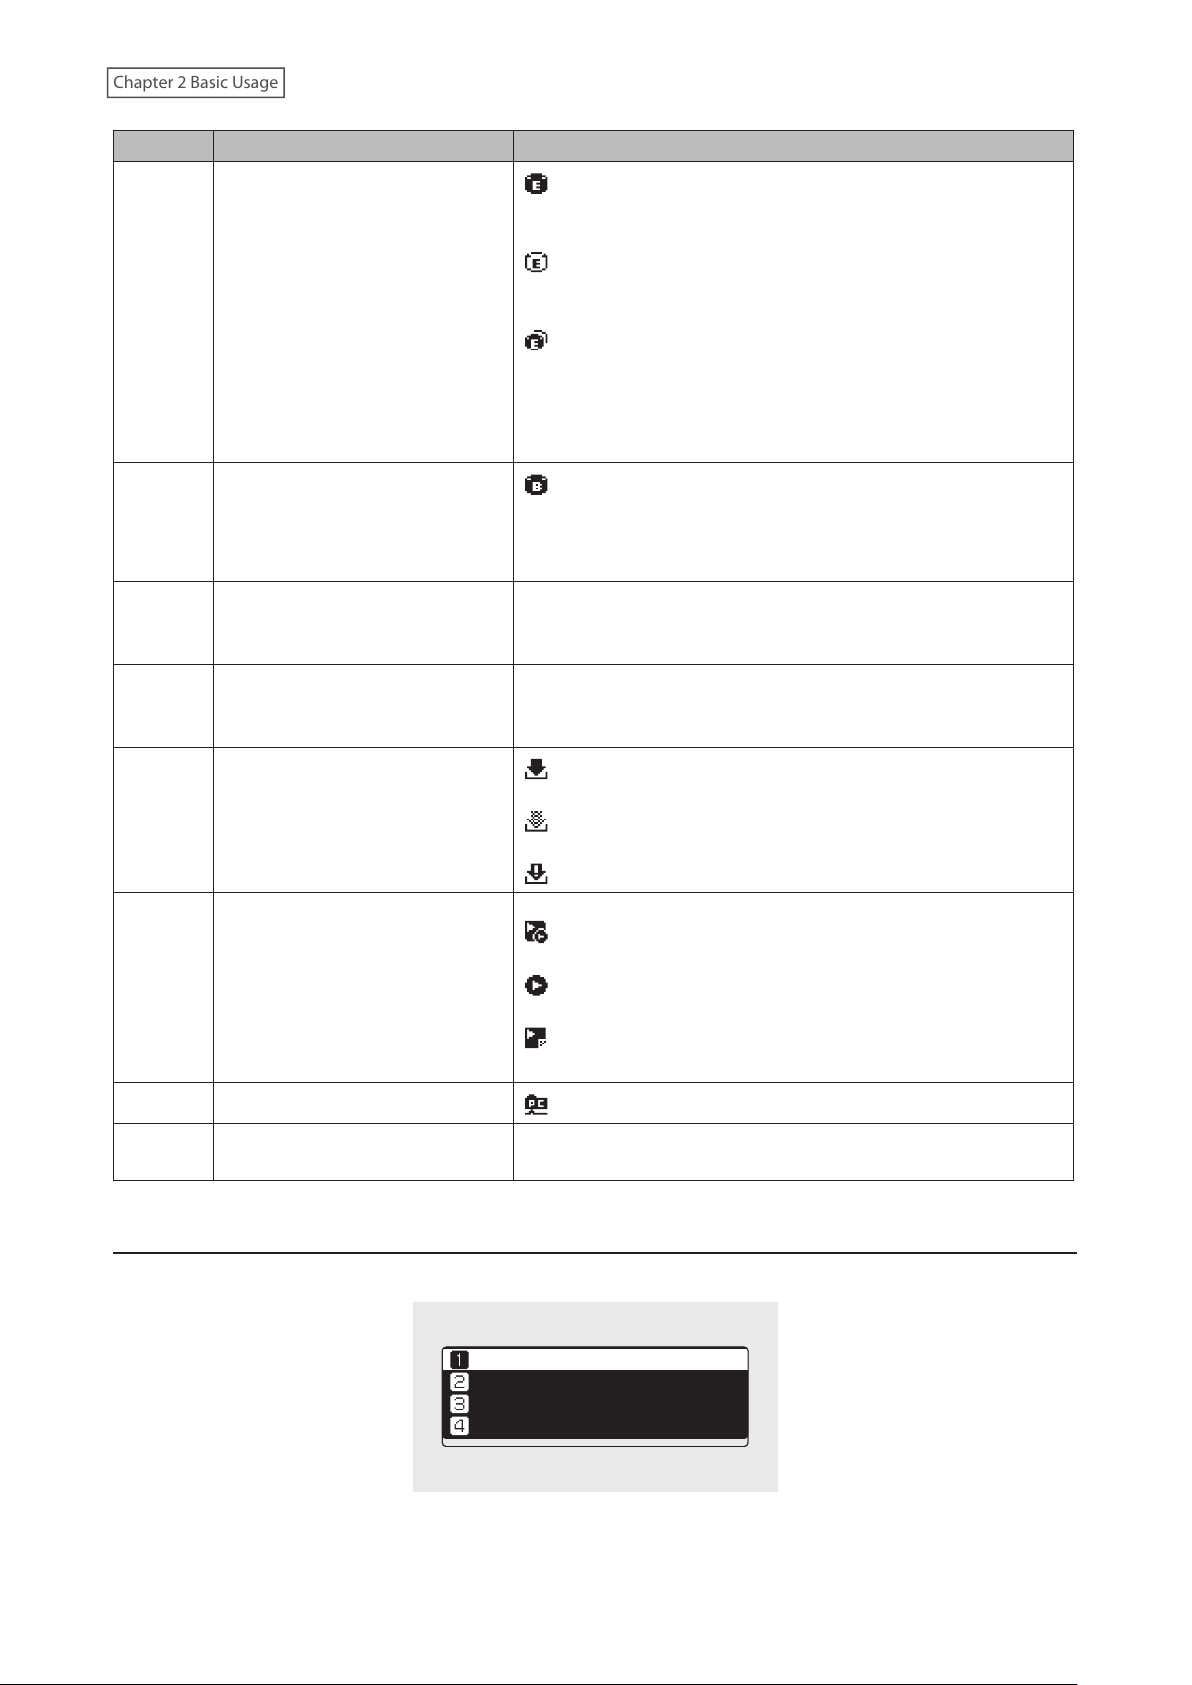
Number Item Description
1
2 Status of Connected Player
Status of Connected Router or
Hub
ØË
: Displays when a router or switch that is connected to the
Digital Music Library’s LAN port is on.
: Displays when no Ethernet cable is connected to the LAN
port or a router or switch is off.
: Displays when the Player port is configured to bridged
mode and a connected Network Audio Player is on.
: Displays when the Player port is configured to isolated
mode and a connected Network Audio Player is on.
: Displays when no Ethernet cable is not connected to the
Player port or a connected Network Audio Player is off.
When the Player port is disabled by the settings, the icon will
disappear.
4 5 6 3
фУШЬзЦ
ЧЯШФЧЬЮФЧЦФШЯ
8 12 10
9
×Ë
3
4 Optical Drive Indicator
Markerless DSD Compatibility for
USB-DAC
: Displays when a USB-DAC that is compatible with
Markerless DSD is connected.
: Displays when a USB-DAC that is not compatible with
Markerless DSD is connected.
: Displays if an optical drive is connected. The icon will be
extinguished if no optical drives are connected.
16
Page 18
Chapter 2 Basic Usage
Number Item Description
: Displays when a USB drive is connected to the Expansion
port of the N1 EX, or when a USB drive is connected to the N10/
N100 and “Mount and Scan” is selected as an action for the drive.
: Displays when “Mount and Scan” is selected as an action for
the USB drive that is connected to the front port on the N1A EX
5 Expansion Drive Indicator
6 Backup Drive Indicator
7 Friendly Name (Hostname)
8 IP Address
model.
: Displays when USB drives are connected to the front and
Expansion ports on the N1A EX model.
On the N1 EX, the icon will blink while the device searches for
music files. When the icon stops blinking, playback is ready.
: Displays when a USB drive is connected to the Backup port
on the N1 EX, or when a USB drive is connected to the N10/
N100 or the front USB port on the N1A EX model and “Backup or
Restore” is selected as an action for the drive.
Displays the friendly name (hostname) of the Digital Music
Library. The friendly name is used when accessing the Digital
Music Library from an app or computer.
Displays the IP address. The IP address is used when accessing
the Digital Music Library from a computer. If no IP address is
displayed, the Player port is set to isolated mode.
: Displays when an account was added and periodic
downloads is enabled.
9 Status of Downloader
10
11 File Sharing Indicator
12 Usage Capacity of Internal Drive
Controller Settings
: Displays when an account was added but periodic
downloads is disabled.
: Displays when an error occurs and downloading fails.
The icon will appear when a USB-DAC is connected.
: Displays when controller mode is configured to “Hybrid
Mode”.
: Displays when controller mode is configured to “UPnP/DLNA
compatible Mode”.
: Displays when controller mode is configured to “Playlist
Mode”.
: Displays when file sharing is enabled.
Displays the used capacity of the internal drive in the Digital
Music Library, using a bar chart and a percentage (%).
Menu
Press the Menu/Enter button while the home screen is displayed.
Move the cursor by pressing the Up button or the Down button, then press the Menu/Enter button to make a
selection.
ùęĆęĚĘ
èėĔĜĘĊÆùĔēČĘÆ Ö
èĆĈĐĚĕ
ùĊęęĎēČĘ
17
Page 19
Chapter 2 Basic Usage
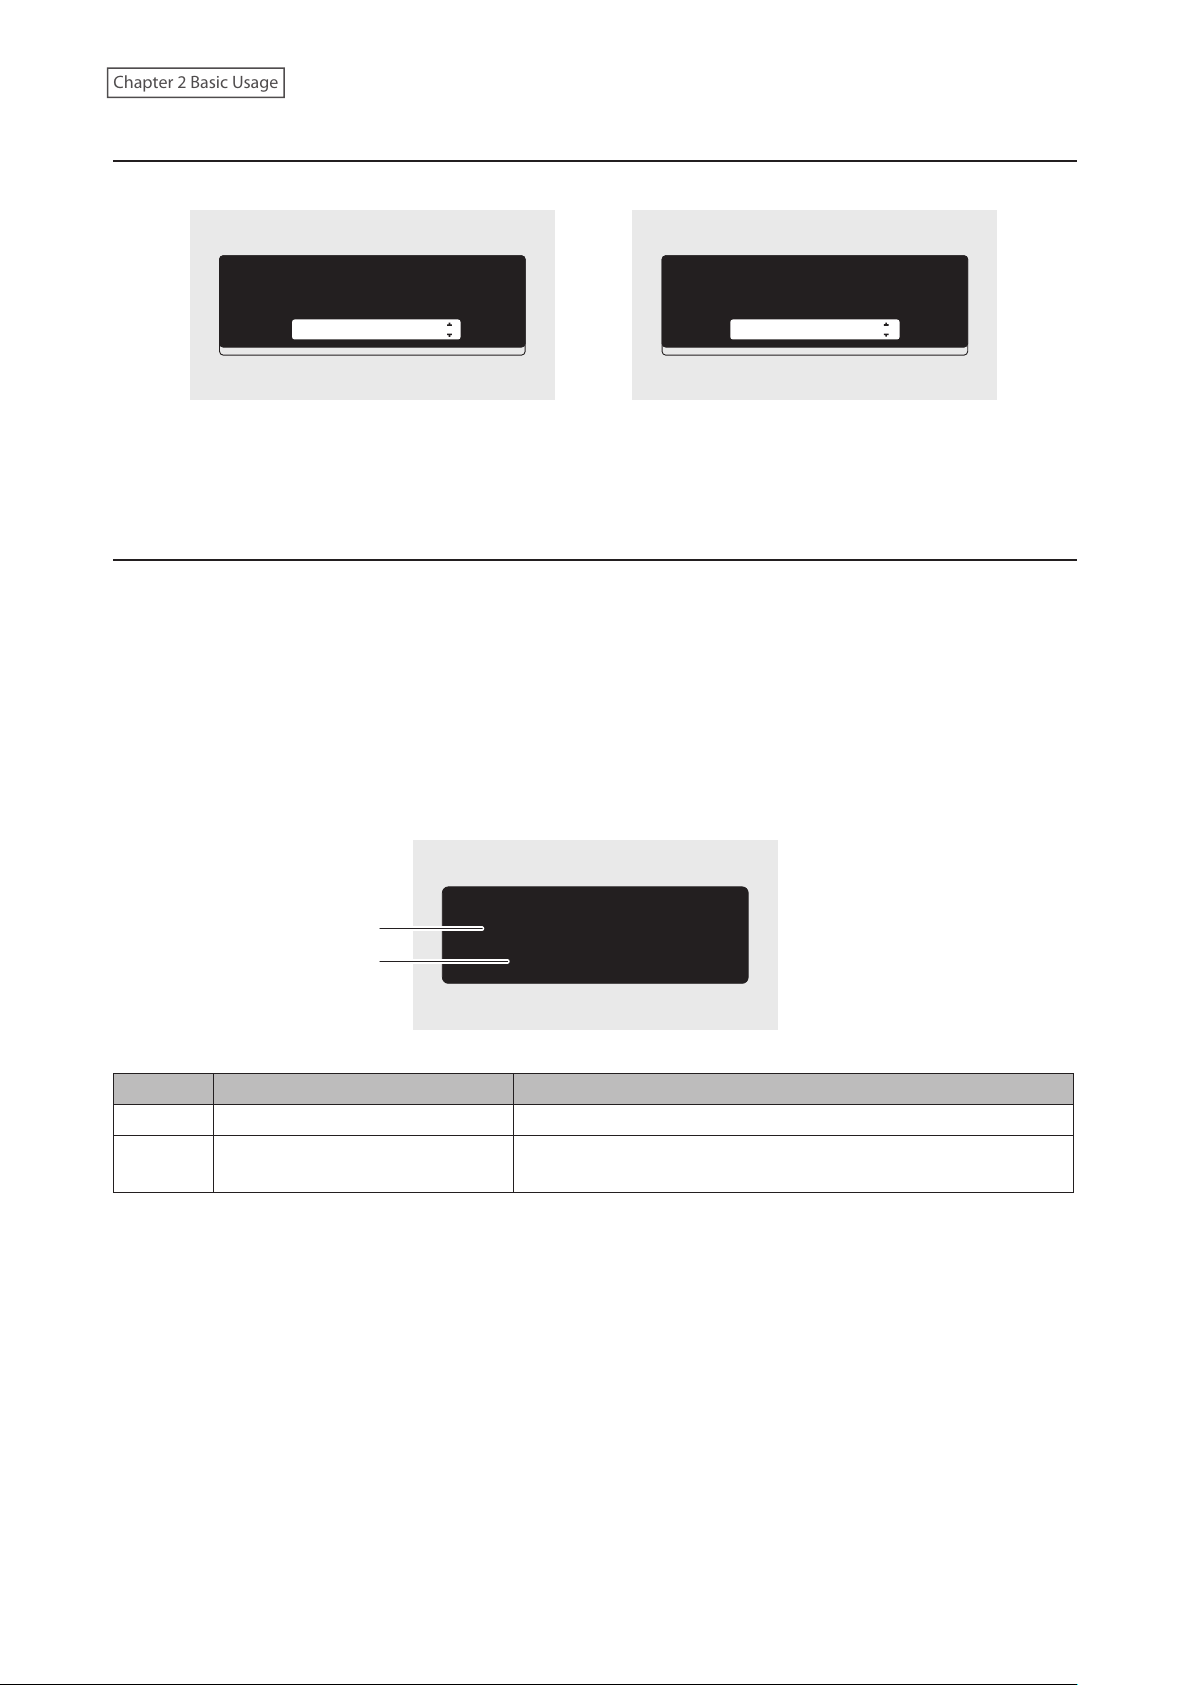
Dialog
When confirming the operation, the dialog screen will be displayed.
ùĊđĊĈęÆęčĊÆĆĈęĎĔēÆęĔÆęĆĐĊÆċĔėÆęčĊ
ûùèÆĉėĎěĊÆĈĔēēĊĈęĊĉÆęĔÆęčĊÆċėĔēę
ûùèÆĕĔėęÔ
ïĒĕĔėę
Move the cursor by pressing the Up button or the Down button, then press the Menu/Enter button to make a
selection.
ùĊđĊĈęÆęčĊÆĆĈęĎĔēÆęĔÆęĆĐĊÆċĔėÆęčĊ
ûùèÆĉėĎěĊÆĈĔēēĊĈęĊĉÆęĔÆęčĊÆċėĔēę
ûùèÆĕĔėęÔ
óĔĚēęÆĆēĉÆùĈĆē
Streaming Screen
When the Digital Music Library starts streaming music files, the display panel will show the streaming music
information.
Notes:
• If the music file is playing on a computer, the music information will not be displayed on the display panel.
• Depending on the streaming player, file format, or file tag information, music information may not always be
displayed properly on the display panel.
Streaming to a Network Audio Player
1
2
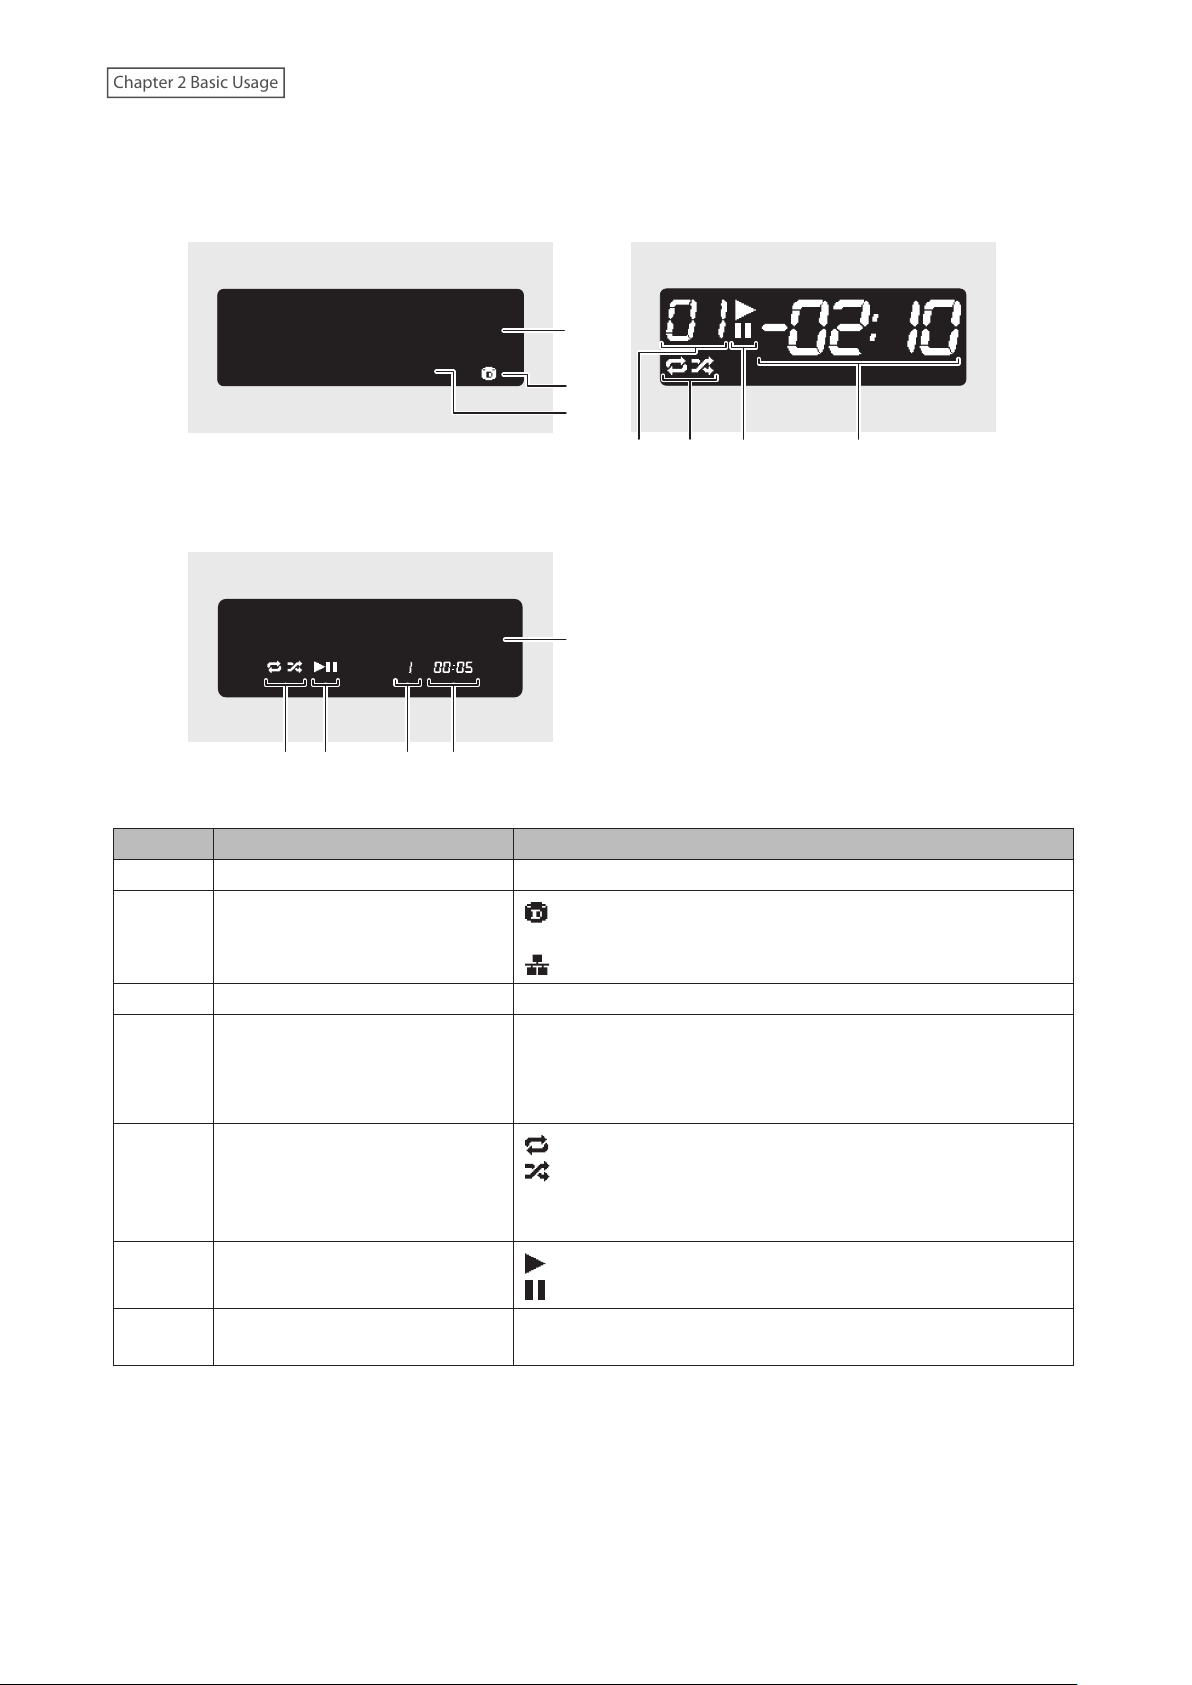
The display panel displays the following information:
Number Item Description
1 Title Display the title of the music file.
2
Player Information and Music File
Information
ултйхЖузф
ЯЬФЦсоğЖмтзйЖĔēЖфĊęĜĔėĐЖцđĆĞĊė
Displays the sampling rate, file format, and the player
information during file playback.
18
Page 20
Chapter 2 Basic Usage
Streaming to a USB-DAC
56 74
Selecting a Music File on the USB-DAC
ултйхЖузф
ÚÚÔ×đîğÕ×ÜćĎęÆýçü
Selecting a Music File Using Buttons on the Digital
Music Library
ултйхЖузфЖХЖуФуФ
Selecting a CD Using Buttons on the Digital Music
Library
1
2
3
4567
1
The display panel displays the following information:
Number Item Description
1 Title Display the title of the music file.
: Displays when streaming music files over the Digital Music
2 Music File Source
3 Music File Information Displays file format and sampling rate.
4 Track Number
5 Repeat/Shuffle
6 Playback/Suspension
7
Remaining Time/Song Time
Passed
Library or USB drives.
: Displays when streaming music files on the network.
Displays the number of the track currently playing. Regardless
of how many music files are available, only the last two digits of
the track number will be displayed. For example, if track 121 is
playing, this will show “21”.
: Repeats playback of all music files while this is displayed.
: Shuffles playback of all music files while this is displayed.
You can switch between repeat or shuffle by pressing the Up
button while playback is suspended.
: Appears while playing a music file.
: Appears while playback is suspended.
You can switch the display option by pressing the Down button
while playback is suspended.
19
Page 21

Chapter 2 Basic Usage
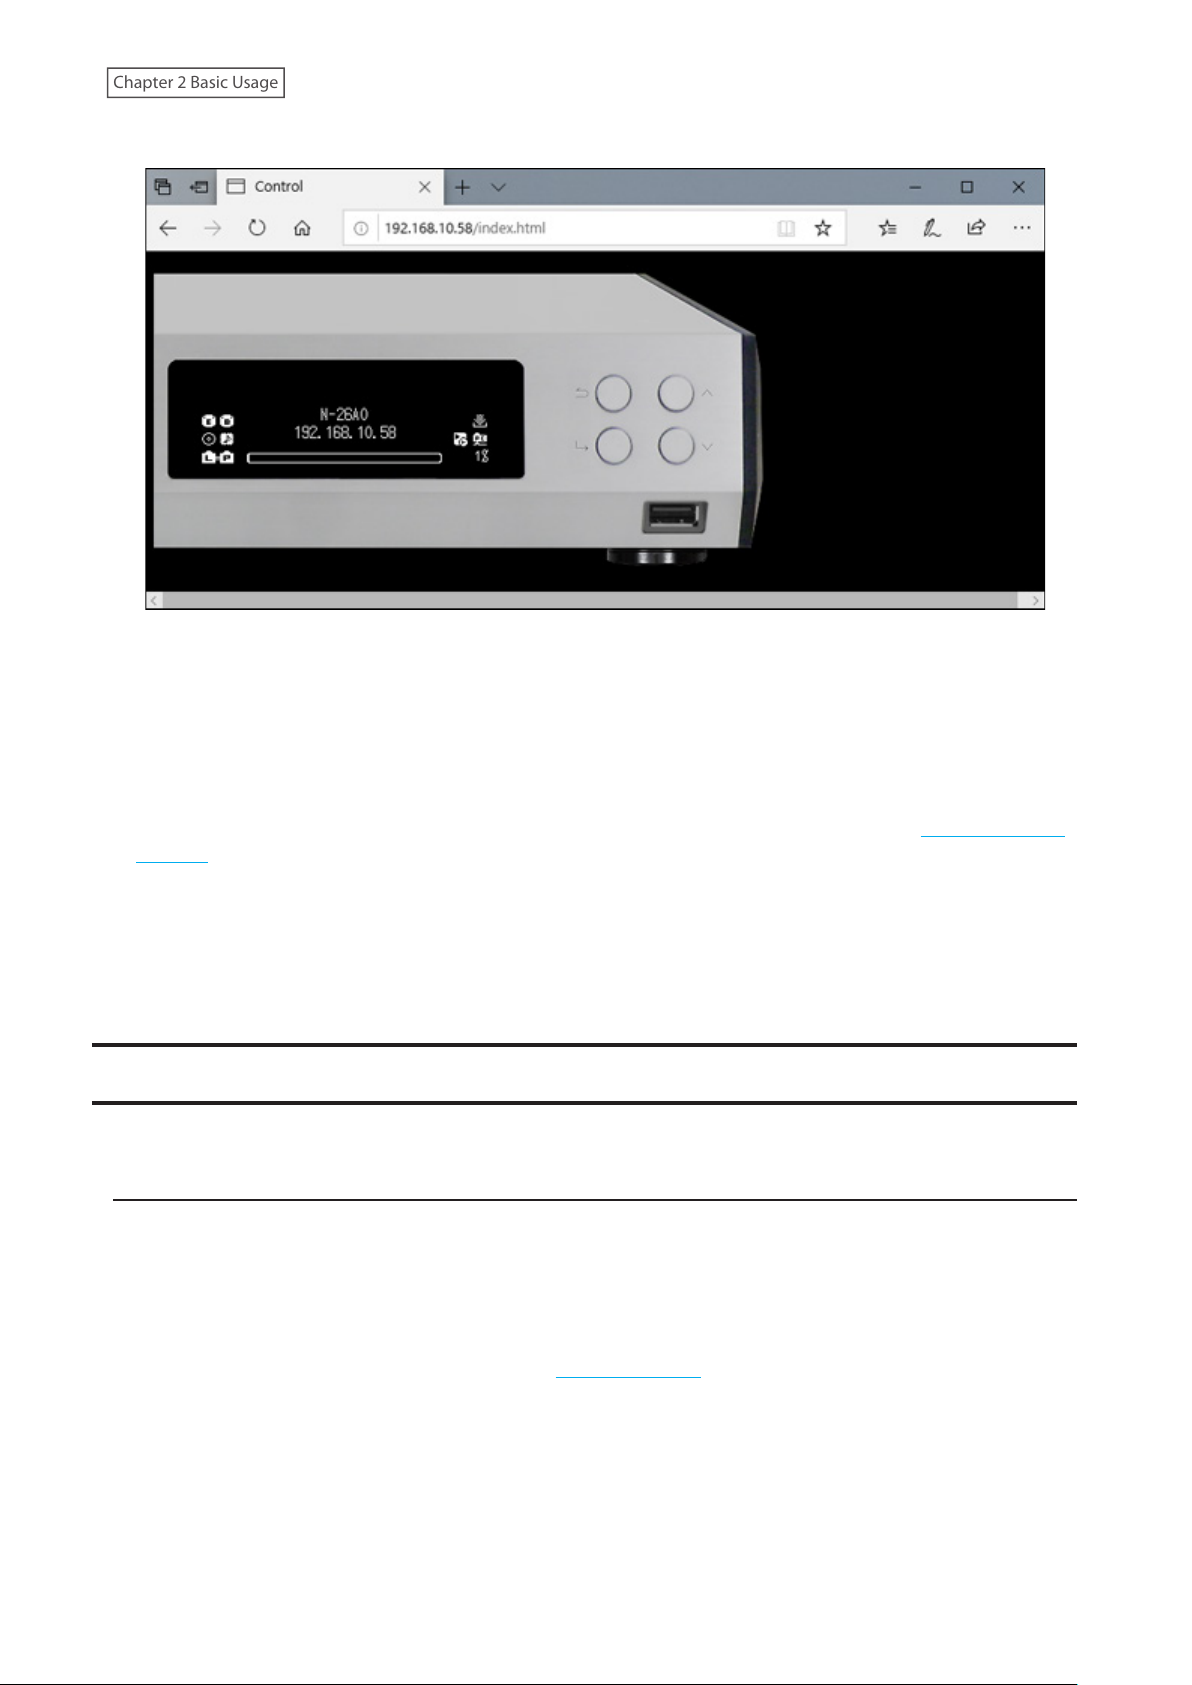
Remotely Operating the Digital Music Library
To remotely operate the Digital Music Library using a web browser, go to Settings > Support and select “On” for
“WebRemote”; enter the Digital Music Library’s IP address into the browser’s address bar and press the Enter key. The
page below will open. You can operate the Digital Music Library remotely by clicking or tapping the buttons on the
web page. As the display changes on the web browser, the Digital Music Library’s display will change accordingly
to match. You can still manually operate the Digital Music Library using its physical buttons while WebRemote is
enabled.
While “WebRemote” is set to “On”, the “Settings” page will not show “Network”, “Drive”, and “Initialize Settings” so
that no one other than you can change, configure, or execute these settings. To display these settings, disable
“WebRemote”.
Please note that not all features of the Digital Music Library will be available from a web browser.
N1 EX
20
Page 22
Chapter 2 Basic Usage
N10/N100
Notes:
• To easily access the Digital Music Library via a web browser for remote operation, we recommend creating a
bookmark or a shortcut on the home screen. On a mobile device, opening the shortcut allows you to remotely
operate the Digital Music Library in full screen.
• If the Digital Music Library’s IP address changes, you will not be able to remotely operate the Digital Music Library
through the bookmark or the home screen shortcut. In such a case, access the Digital Music Library through the
web browser via its new IP address and create the bookmark or shortcut again. To keep using the same bookmark
or shortcut, we recommend setting a static IP address for the Digital Music Library. Refer to the “Changing the IP
Address” section in chapter 3 for the procedure to configure a static IP address for the Digital Music Library.
• When you click or tap the Digital Music Library's display on the web browser, the display will be in full screen.
Click or tap the screen again to exit the full screen display.
• WebRemote will be automatically disabled once the Digital Music Library is powered off.
Importing Music Files
Music files can be imported from a USB drive or a CD to the Digital Music Library.
Importing from USB Drives
To import music files from a connected USB drive, follow the procedure below.
1 Connect the USB drive that contains music files to the USB 3.0 port on the N1 EX, or the USB 2.0 port on the
N10/N100.
Notes:
• Use only the compatible USB drives listed on melco-audio.com.
• Connect only USB drives formatted using NTFS, FAT32, HFS Plus, or exFAT.
21
Page 23
Chapter 2 Basic Usage
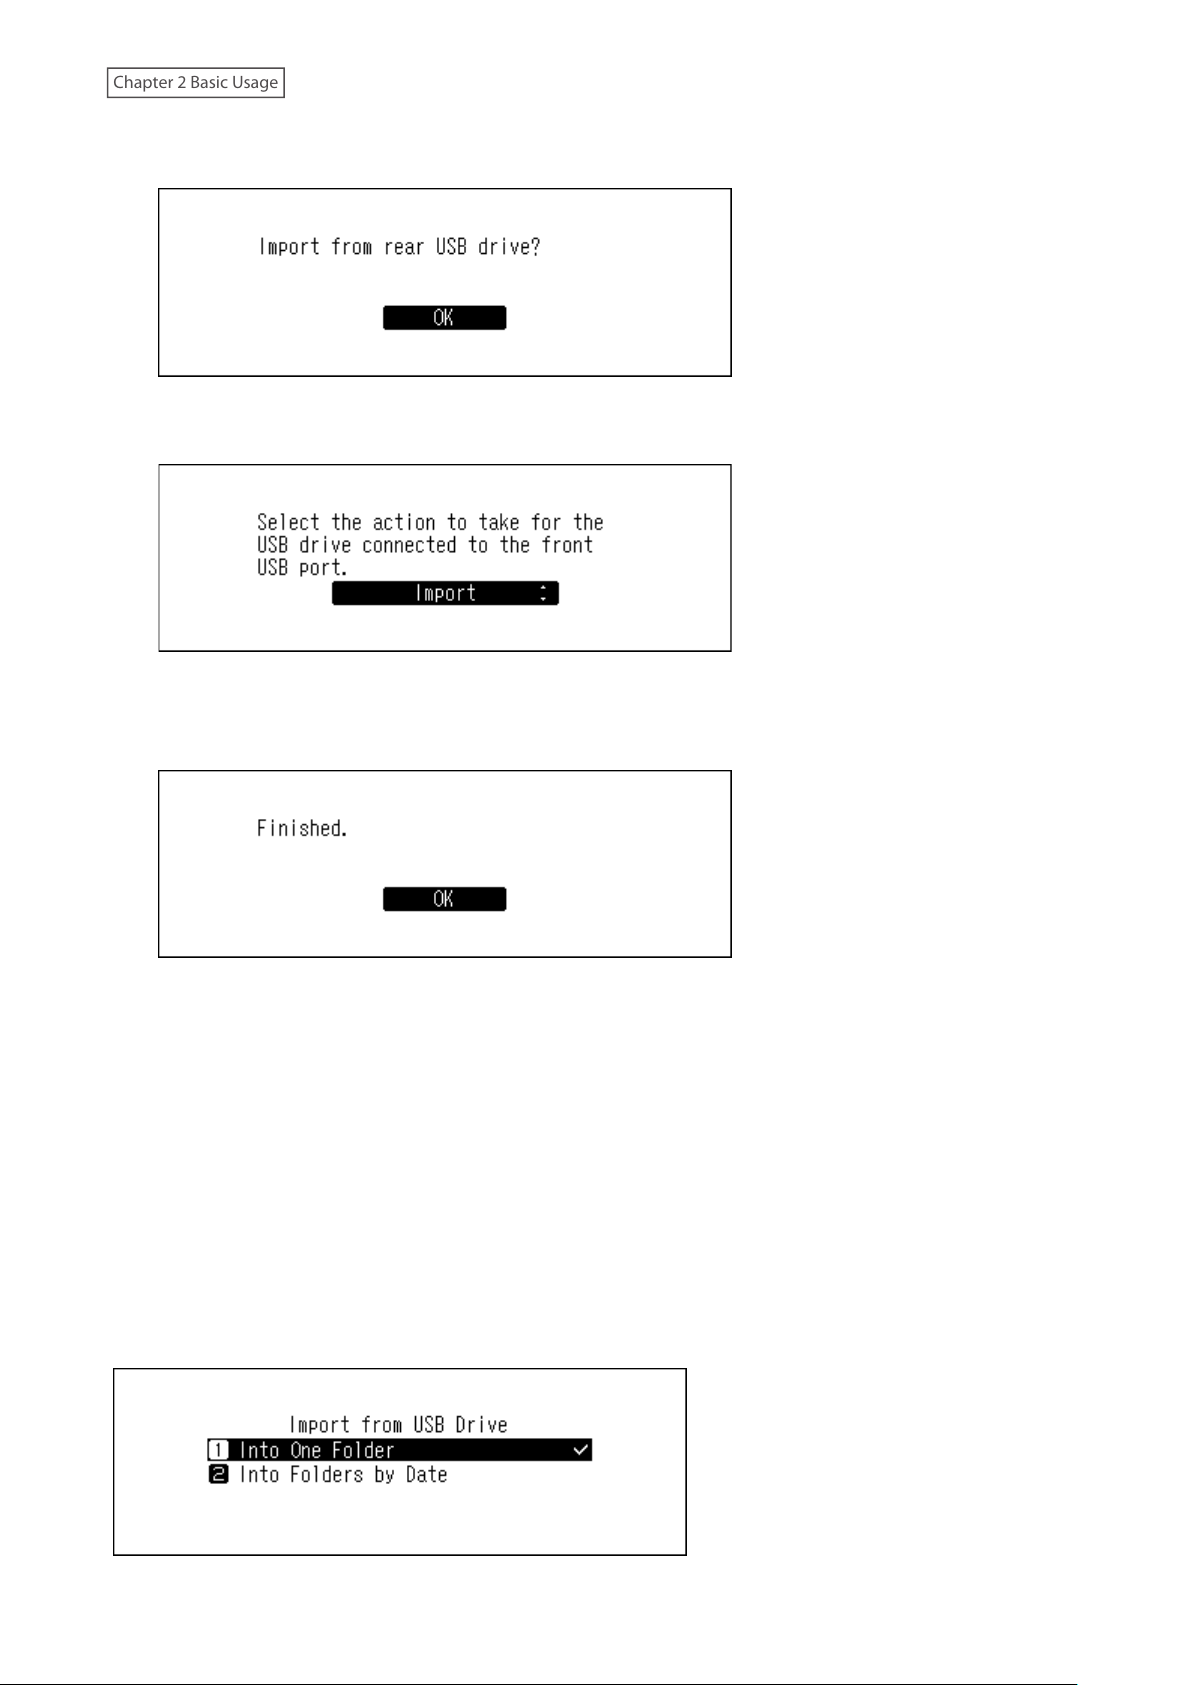
2 When the USB drive is connected to the rear USB 3.0 port on the N1 EX, the following screen will be displayed.
Press the Menu/Enter button.
When the USB drive is connected to the front USB port on the N1A EX model, or the USB 2.0 port on the N10/
N100, the following screen will be displayed. Press the Up/Down buttons and select “Import”, then press the
Menu/Enter button.
3 Wait until music importing is finished.
4 Press the Menu/Enter button.
5 Disconnect the USB drive.
Notes:
• If a filename or folder name starts with a period (.), the file or folder cannot be imported.
• If the Back button is pressed while importing, the import process will be cancelled after the Digital Music Library
finishes importing the current file. If the imported file size is large, the cancellation process may take a few
minutes to finish.
Import Destination Details
Imported music files will be stored in the “import” folder. There are two options to store the imported data in the
Digital Music Library. To change these options, go to Settings > Import from USB Drive and select “Into One Folder” or
“Into Folders by Date”.
22
Page 24
Chapter 2 Basic Usage
• Into One Folder: If you select this option, data will be imported into the “all” folder within the “import” folder.
With this option, only files with changes will be imported to the Digital Music Library. Files with no changes from
the previous import will not be imported.
• Into Folders by Date: If you select this option, a folder that contains the import date in the folder name will
be created within the “import” folder and all imported files will be stored in that folder. Even if the same data is
included in the USB drive, it will be copied to the Digital Music Library.
Importing from a Music CD
To import tracks from a music CD, follow the procedure below.
Note: Importing tracks from a music CD requires an optical drive (not included). Use only the compatible optical
drives listed on melco-audio.com. Depending on the manufacture date, circumstances, and specifications of a
connected optical drive, it may not work even if the optical drive is listed under our compatible devices.
1 Connect an optical drive to the N1 EX, or the USB 2.0 port on the N10/N100.
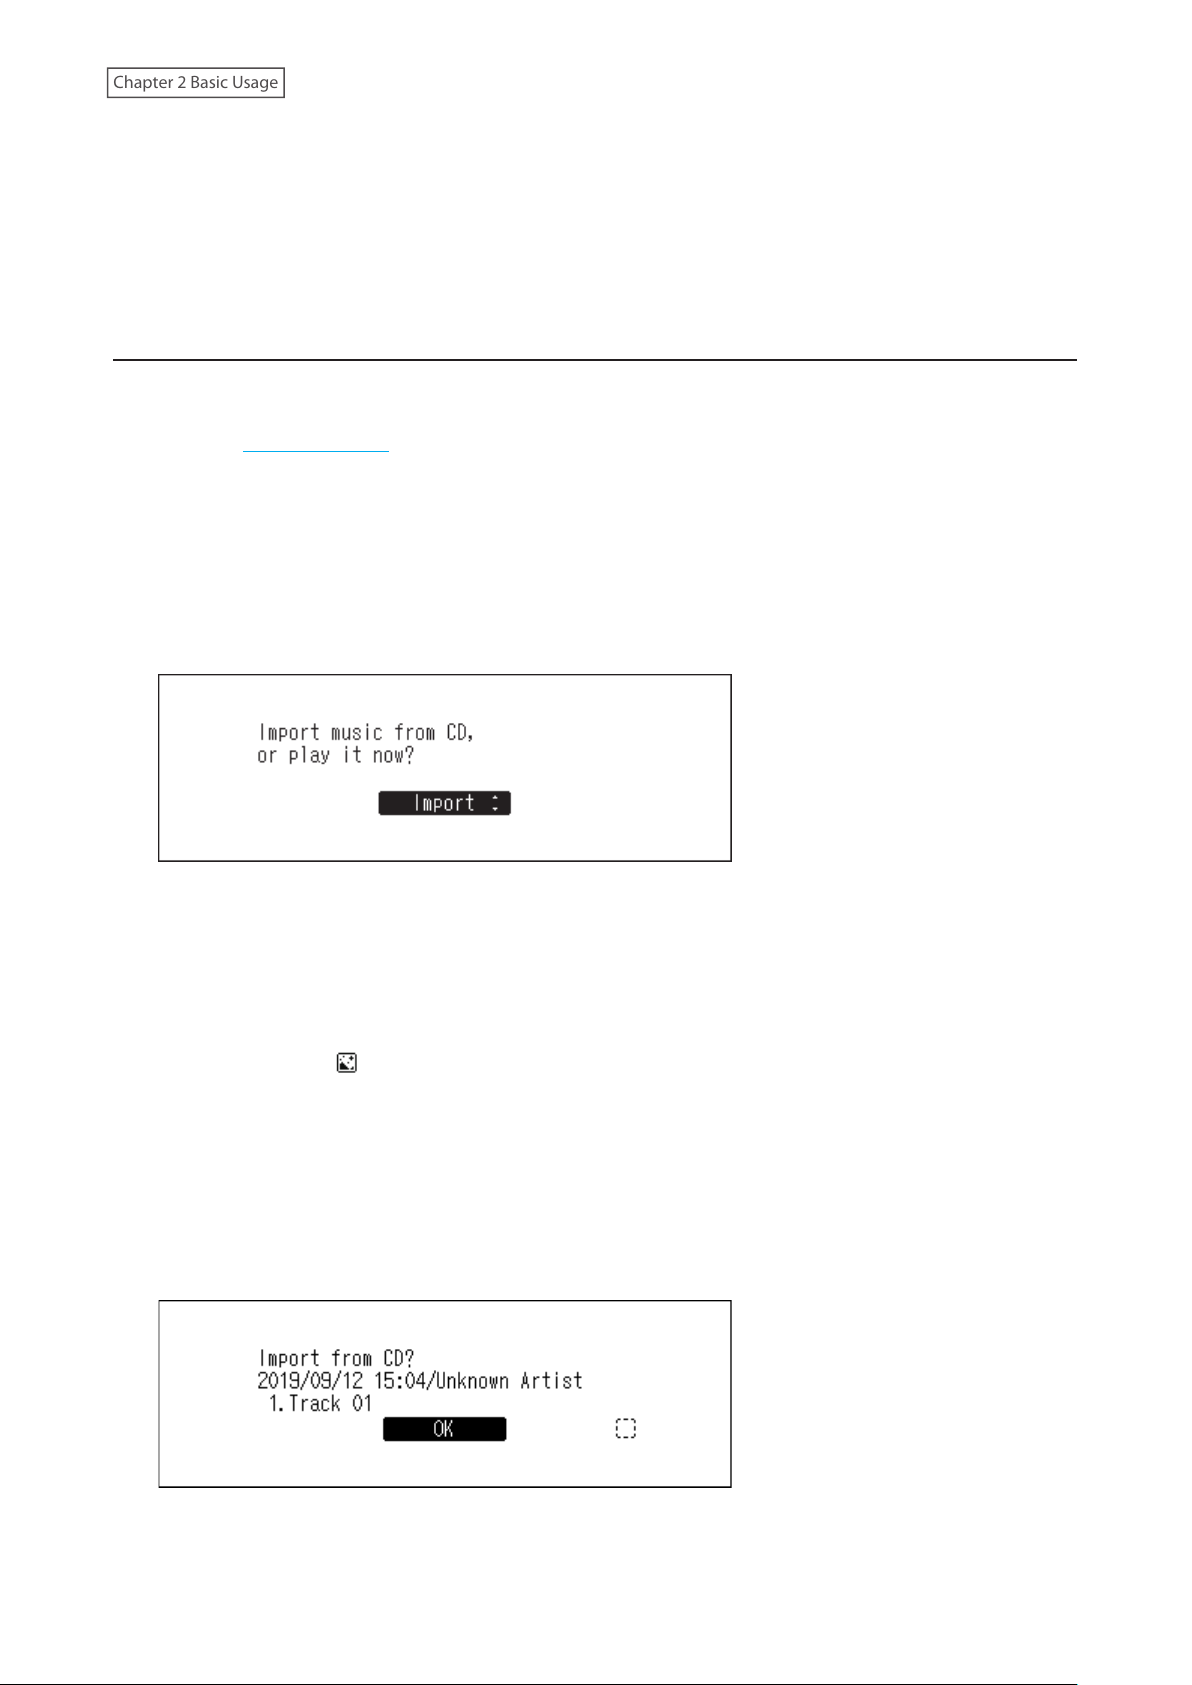
2 Insert a music CD into the optical drive to import its tracks.
3 If the USB-DAC device is connected to the Digital Music Library, the following screen will be displayed. Press
the Up/Down buttons and select “Import”, then press the Menu/Enter button.
4 When the CD is detected, the Digital Music Library will try to get the album information automatically. When
the display changes from getting the music album information, press the Menu/Enter button.
If the Digital Music Library is connected to the Internet, music tracks will be imported using the acquired
album information.
If multiple titles are found, select the appropriate album title on the displayed window. Once you have selected
the album title, you can return to the previous window and select it again by pressing the Back button. The
album title with the “ ” symbol will contain the cover art.
If the Digital Music Library is not connected to the Internet, or if the CD information is not available from the
online music database, the album name and music title information will not be acquired. In such a case, the
import date will be used as the album name and the track number as the filename.
Note: If the Digital Music Library cannot get the music album information while connected to the Internet,
check your device’s security settings or security software to make sure that the Digital Music Library has
permission to access the Internet.
5 Check the imported tracks using the Up/Down buttons and press the Menu/Enter button.
23
Page 25

Chapter 2 Basic Usage
6 The import process will start. The album title, artist, title of the music file, and format information will be
displayed.
After importing, the disc tray of the optical drive will open automatically.
7 Press the Menu/Enter button.
To import tracks from another CD, repeat the process from step 2 above. If you have finished importing, press the
Down button or the Back button.
Import Destination Details
Imported tracks will be stored in the “import_CD” folder. If importing from a non-music CD, the imported data will
be stored in the “import” folder, not the “import_CD” folder.
Imported tracks can be moved, copied, and shared on a network, but the cover art file (folder.jpg) cannot be viewed
by another device or copied to another location outside the “Internal” folder. If you want to move or copy the
“import_CD” folder to another device and it contains a cover art file, remove the file first.
File Format of Imported Music Files
When importing music files from a CD, they will be saved as WAV files by default. They can be changed to FLAC files,
and FLAC compression levels are changeable as well. Available compression levels are described in the “Menu List”
section in chapter 4.
Changing the Cover Art
The cover art file (folder.jpg) is stored in the “import_CD” folder. To change the cover art, replace the current cover
art file with a new one. If the old cover art is displayed on a controller app, refresh the content on the controller app
to apply any changes. If the old cover art is still displayed, rescan the music database by navigating to Settings >
Music Database > Rescan Songs and Playlists on the Digital Music Library.
Importing Files from a Computer
To import music files from a computer, follow the procedure below.
1 Enter “\\” and the Digital Music Library’s IP address or friendly name (hostname) into the address bar of
Windows Explorer, then press the Enter key. For macOS, click Connect to Server and enter “smb://” and the
Digital Music Library’s IP address or friendly name.
24
Page 26

Chapter 2 Basic Usage
2 If the credential window appears on a Windows computer, enter “nobody” for both the username and
password, then click OK.
3 The shared folders on the Digital Music Library will be displayed. Double-click the “Internal” folder. If no folders
are displayed, wait for about 30 seconds and try it from step 1 again.
25
Page 27

Chapter 2 Basic Usage
4 Copy music files into the displayed folder.
Note: The USB drive will appear as the “Expansion” folder.
If Unable to Access from a Computer
If the file sharing status icon, number 11 in the “Home Screen” section, is not displayed on the home screen, enable
the file sharing service. To enable the file sharing service, follow the procedure below.
1 Press the Menu/Enter button to display the menu list at the home screen.
Note: The screenshot above shows the N1 EX.
2 Press the Up/Down buttons and select “Settings”, then press the Menu/Enter button.
3 Press the Up/Down buttons and select “SMB File Sharing”, then press the Menu/Enter button.
4 Press the Up/Down buttons and select “On”, then press the Menu/Enter button.
26
Page 28

Chapter 2 Basic Usage
5 Press the Menu/Enter button.
Confirming Imported Files
Imported files can be accessed from mobile devices or computers that are connected to the same router as the
Digital Music Library. Follow the appropriate procedure below.
Using Mobile Devices
To confirm the imported files using a mobile device, install a UPnP/DLNA-compatible app onto it.
Using Computers
To confirm imported music files using a computer, follow the steps 1–3 on the “Importing Files from a Computer”
section above to open the shared folder. If the imported files are displayed, importing was finished properly.
Downloading Music Files from Streaming Sites
Downloader can download music files from streaming sites automatically. Once you purchase the music files from a
mobile device or computer, the Digital Music Library can download the files from the streaming site, even if you’re
not at home.
Supported streaming sites are listed below:
• HIGHRESAUDIO
• OTOTOY
• e-onkyo music
• mora
*These streaming sites are available only in Japan. “e-onkyo music” is not the same as “Onkyo Music”, which is no
longer in service.
Notes:
• Create an account on one of the streaming sites above before using downloader. Also, make sure the Digital
Music Library is connected to the Internet. You can verify if the Digital Music Library is connected to the Internet
from Status > Network > LAN.
• To use this function, the time settings should be acquired from the NTP server automatically.
• Do not move the folder under the “download” folder that contains the account name in its folder name to another
folder. If the folder is moved, the Digital Music Library may download the same music files again.
*
*
*
Adding Accounts
To add an account from a streaming site to the Digital Music Library, follow the procedure below.
1 Create an account on the streaming site.
27
Page 29

Chapter 2 Basic Usage
2 Press the Menu/Enter button to display the menu list at the home screen.
Note: The screenshot above shows the N1 EX.
3 Press the Up/Down buttons and select “Settings”, then press the Menu/Enter button.
4 Press the Up/Down buttons and select “Downloader”, then press the Menu/Enter button.
5 Press the Up/Down buttons and select “Account Settings”, then press the Menu/Enter button.
6 Press the Up/Down buttons and select “Add/Edit Account”, then press the Menu/Enter button.
28
Page 30

Chapter 2 Basic Usage
7 Press the Up/Down buttons and select “Add Account”, then press the Menu/Enter button.
8 Press the Up/Down buttons and select the streaming site to add an account, then press the Menu/Enter
button.
9 Press the Up/Down buttons and enter the account ID, then press the Menu/Enter button.
10 Press the Up/Down buttons and enter the account password, then press the Menu/Enter button.
11 When the credentials are authenticated, the following message will be displayed. Press the Menu/Enter
button.
After an account has been added, periodic downloads will be automatically enabled.
Note: If you want to download files immediately, go to Settings > Downloader > Periodic Downloads. Make sure “On”
is selected, then press the Menu/Enter button.
29
Page 31

Chapter 2 Basic Usage
Enabling or Disabling Periodic Downloads
After adding an account of a streaming site to the Digital Music Library, the downloader will check the streaming
site periodically for the purchased files. To disable this periodic check, follow the procedure below.
1 Press the Menu/Enter button to display the menu list at the home screen.
Note: The screenshot above shows the N1 EX.
2 Press the Up/Down buttons and select “Settings”, then press the Menu/Enter button.
3 Press the Up/Down buttons and select “Downloader”, then press the Menu/Enter button.
4 Press the Up/Down buttons and select “Periodic Downloads”, then press the Menu/Enter button.
5 Press the Up/Down buttons and select either “Off” or “On”, then press the Menu/Enter button.
30
Page 32

Chapter 2 Basic Usage
6 Press the Menu/Enter button.
Deleting Accounts
To delete an existing account on the Digital Music Library, follow the procedure below.
1 Press the Menu/Enter button to display the menu list at the home screen.
Note: The screenshot above shows the N1 EX.
2 Press the Up/Down buttons and select “Settings”, then press the Menu/Enter button.
3 Press the Up/Down buttons and select “Downloader”, then press the Menu/Enter button.
4 Press the Up/Down buttons and select “Account Settings”, then press the Menu/Enter button.
31
Page 33

Chapter 2 Basic Usage
5 Press the Up/Down buttons and select “Remove Account”, then press the Menu/Enter button.
6 Press the Up/Down buttons and select the account to be deleted, then press the Menu/Enter button.
7 Press the Up/Down buttons and select “OK”, then press the Menu/Enter button.
8 Press the Menu/Enter button.
Note: If you remove all accounts with periodic downloads enabled, it will be disabled automatically.
Playing Music Files on a Network Audio Player
Imported music files can be played using the Network Audio Player. The procedure to play music files is different
depending on the Network Audio Player, so refer to your Network Audio Player’s manual for more detailed
information on how to play music.
32
Page 34

Chapter 2 Basic Usage
Digital Music Library
Network Audio Player
Streaming Imported Music Files
The Digital Music Library supports streaming of files with the extensions below.
Supported File Types for Streaming
Extensions
mp3, wma, wav, lpcm, pcm, ogg, m4a, mp4, 3gp, flac, m3u, mpa, aac, apl,
ac3, aif, aiff, mp2, mp1, dsf, dff
Streaming Music Files from USB Drives
Even if music files are not imported from the expansion drive, your Network Audio Player can play music files from
the USB drive that is connected to the Expansion port on the N1 EX, or the USB 2.0 port on the N10/N100.
When a USB drive is connected to the front USB port on the N1A EX model, or the USB 2.0 port on the N10/N100, the
following screen will be displayed. Press the Up/Down buttons and select “Mount and Scan”, then press the Menu/
Enter button.
On the controller app for the Network Audio Player, select folder view from the index tree, and open the “Expansion”
folder of the Digital Music Library. You can select music files in the “Expansion” folder for playback. If the “Expansion”
folder cannot be found, rescan the music database by navigating to Settings > Music Database > Rescan Songs and
Playlists on the Digital Music Library.
Notes:
• Use only the compatible USB drives listed on melco-audio.com.
• If you want to disconnect the USB drive while the Digital Music Library is on, press the Menu/Enter button on the
home screen and select “Dismount USB Drive” to dismount the USB drive. The menu name will vary depending on
which USB port you have inserted the USB drive into.
33
Page 35

Chapter 2 Basic Usage
Playing Music Files on USB-DAC Devices
The Digital Music Library supports USB-DAC, short for “USB digital-to-analog converter”. If using buttons on the unit
or a mobile device with a controller app installed, you can directly connect a USB-DAC to the Digital Music Library to
stream music and enjoy high-quality sound without using a computer.
Digital Music Library
USB-DAC
Playing Music Files on the Digital Music Library or USB Drive
To stream music files on the Digital Music Library or USB drive to a USB-DAC, use buttons on the unit or a controller
app on the mobile device. For more detailed information about how to use controller apps, refer to the apps’ user
guides.
If the media server app is set to “TwonkyServer”, you can play music files using buttons on the Digital Music Library
using the procedure below.
Note: To check the setting of the media server app, go to Settings > Music Database > Media Server App.
1 Connect a USB-DAC device to the USB-DAC port.
2 Press the Menu/Enter button to display the menu list at the home screen.
Note: The screenshot above shows the N1 EX.
34
Page 36

Chapter 2 Basic Usage
3 Press the Up/Down buttons and select “Play Songs”, then press the Menu/Enter button.
Note: The number shown to the right of “Play Songs” means the number of available music files to play.
4 Press the Up/Down buttons and select the category, then press the Menu/Enter button.
5 Press the Up/Down buttons and select the music file to play, then press the Menu/Enter button.
6 Press the Menu/Enter button.
The Digital Music Library’s USB-DAC supports streaming for the following file types and sampling rates.
Supported File Types
File Types Extensions
FLAC .flac
ALAC (Apple Lossless)/AAC .m4a
AIFF .aiff, .aif
WAV .wav
DSDIFF .dff
DSF .dsf
35
Page 37

Chapter 2 Basic Usage
Supported Sampling Rates
• PCM: 44.1 kHz, 48 kHz, 88.2 kHz, 96 kHz, 176.4 kHz, 192 kHz, 352.8 kHz, 384 kHz, 705.6 kHz, 768 kHz
• DSD: 2.8 MHz, 5.6 MHz, 11.3 MHz, 22.6 MHz
Playing a CD Using an Optical Drive
CD Transport will allow you to play music tracks from the optical drive that is connected to the Digital Music Library
using USB-DAC. To play music tracks using an optical drive, follow the procedure below.
1 Connect a USB-DAC device to the USB-DAC port and an optical drive to the USB 3.0 port on the N1 EX, or the
USB 2.0 port on the N10/N100.
2 Insert a music CD into the optical drive. The following screen will be displayed. Press the Up/Down buttons to
select “Play”, then press the Menu/Enter button. The CD will start playing.
Notes:
• To play another music CD, stop the current CD and remove it from the drive, then repeat step 2.
• Do not disconnect the optical drives or USB-DAC while playing music tracks.
• While playing music tracks using CD Transport, the music files on the Digital Music Library cannot be played by
another Network Audio Player.
Operation While Playing Music Files
You can use the following operations using buttons on the Digital Music Library while playing or suspending music
files.
Playing
Back button Stop playback.
Menu/Enter button Suspend or resume playback.
Up button Play the previous track on the album.
Down button Play the next track on the album.
Up button - press and hold Force stop playback while tracks are played using a controller app.
Suspending
Up button
Down button
Switch to repeat and shuffle. When the button is pressed once, playback
will switch to repeat. When the button is pressed twice, playback will switch
to shuffle. When the button is pressed three times, playback will switch to
both repeat and shuffle. When the button is pressed four times, playback will
revert to normal.
The display panel will switch to the time passed on a song or the remaining
time of a song.
36
Page 38

Chapter 2 Basic Usage
Configuring the Mode for Managing USB-DAC Using Controller App
“Hybrid Mode” is configured by default and it supports using many types of controller apps. However, it is
recommended to change the controller settings to “UPnP/DLNA compatible Mode” or “Playlist Mode” that is
compatible with your controller app. It will optimize communication between the Digital Music Library and the
controller app.
• UPnP/DLNA compatible Mode: Select when your controller app is UPnP/DLNA-compatible.
• Playlist Mode: Select when your controller app is not UPnP/DLNA-compatible.
To change the controller settings, follow the procedure below.
1 Press the Menu/Enter button to display the menu list at the home screen.
Note: The screenshot above shows the N1 EX.
2 Press the Up/Down buttons and select “Settings”, then press the Menu/Enter button.
3 Press the Up/Down buttons and select “USB-DAC”, then press the Menu/Enter button.
4 Press the Up/Down buttons and select “Controller Mode”, then press the Menu/Enter button.
37
Page 39

Chapter 2 Basic Usage
5 Press the Up/Down buttons and select either “UPnP/DLNA compatible Mode” or “Playlist Mode”, then press the
Menu/Enter button.
6 Press the Menu/Enter button.
The controller mode will be changed.
Note: If the controller mode is not set to “Hybrid Mode” and the mode is different from the one on the controller
app, the Digital Music Library may not appear as a player on the app.
Changing the DSD Playback Mode
The Digital Music Library supports three different playback modes for DSD files (.dsf, .dff). You can select from the
following modes:
• Standard: The default and recommended playback mode. If a connected USB-DAC supports Melco Markerless
DSD, the DSD file will be played by the Markerless DSD playback; otherwise, the DSD file will be played by DSD
over PCM.
• DSD over PCM Priority Mode: This mode applies DSD over PCM even if a connected USB-DAC supports
Markerless DSD playback. Except for this aspect, this mode is the same as standard mode.
• PCM Mode: This mode will convert DSD files to PCM files. If connecting a USB-DAC that only supports playing
PCM files, selecting this mode is recommended. Except for this behavior, this mode is the same as standard
mode.
To configure USB-DAC on your Digital Music Library, follow the procedure below.
1 Press the Menu/Enter button to display the menu list at the home screen.
Note: The screenshot above shows the N1 EX.
38
Page 40

Chapter 2 Basic Usage
2 Press the Up/Down buttons and select “Settings”, then press the Menu/Enter button.
3 Press the Up/Down buttons and select “USB-DAC”, then press the Menu/Enter button.
4 Press the Up/Down buttons and select “DSD Playback Mode”, then press the Menu/Enter button.
5 Press the Up/Down buttons and select the playback mode, then press the Menu/Enter button.
6 Press the Menu/Enter button.
Note: By default, a gap time of 3 seconds will be added to the first track of the playlist because the beginning of a
music file does not count as initial playback if the sampling rate has changed between music files or if playing DSD
files on some USB-DAC devices. A 3-second gap time is the longest possible gap time. If you want to start the next
music file faster, go to Settings > USB-DAC > Precision Start Latency and set a shorter gap time.
39
Page 41

Chapter 2 Basic Usage
Backing Up and Restoring
Backup Operations
With this operation, both music files and settings are backed up. Backed up music files can be restored if the files are
deleted.
Backup operations will vary depending on the file system of the connected USB drive. Differences between backup
modes are below:
File System Mode Files Included
NTFS
HFS Plus without Journaling
FAT32
exFAT
Notes:
• Use only the compatible USB drives listed on melco-audio.com.
• The data will be kept even if the USB drive already contains the backup data in it and a backup job runs.
• To use differential backup for FAT32- or exFAT-formatted USB drives, format it using the Digital Music Library. All
data will be erased and the file system will change to NTFS after formatting.
• The Digital Music Library can format the connected USB drive into the backup drive, and we recommend
using the Digital Music Library to format it. Refer to the “Formatting Drives” section in chapter 3 to format the
connected USB drive. Formatting should be done before using the USB drive as the backup drive. If there are files
on the USB drive, formatting will erase all data on it.
• Before backing up imported music files, make sure the date and time is configured correctly from Settings >
Date and Time. Date and time settings will be used to create differential backups, or to maintain version control
between multiple backups.
Differential backup
Full backup All files will be backed up.
Only files with different sizes and times since the
previous backup will be saved. If the file content and
location (path) remain the same since the previous
backup job, these files will not be backed up. If the
file location changes, that file will be backed up
even if the contents have not changed.
Backing Up
To back up imported music files, follow the procedure below.
1 Connect the USB drive to the Backup port on the N1 EX, or the USB 2.0 port on the N10/N100. If you connect
the USB drive that contains the Digital Music Library’s backup data, you can also use it for the differential
backups.
When the USB drive is connected to the front USB port on the N1A EX model, or the USB 2.0 port on the N10/
N100, the following screen will be displayed. Press the Up/Down buttons and select “Backup or Restore”, then
press the Menu/Enter button.
40
Page 42

Chapter 2 Basic Usage
If “Finished.” is displayed, press the Menu/Enter button.
2 Press the Menu/Enter button to display the menu list at the home screen.
Note: The screenshot above shows the N1 EX.
3 Press the Up/Down buttons and select “Backup”, then press the Menu/Enter button.
4 Press the Up/Down buttons and select “Start Backup”, then press the Menu/Enter button.
Notes:
• If the following message is displayed, the full backup will run if you press the Menu/Enter button. If you
want to run a differential backup, press the Back button to stop the backup process.
41
Page 43

Chapter 2 Basic Usage
• If the following message is displayed, press the Menu/Enter button to go back to the previous screen and
configure the date and time correctly from Settings > Date and Time.
5 Press the Menu/Enter button.
6 Disconnect the USB drive.
Note: Backed up data will be saved in the following folder:
“.Anas.bak” - MAC address - backup date and time - “disk1”
Normally, a folder that contains a period in its name is treated as a hidden folder. Hidden folders cannot be
displayed unless a specific setting on a computer is changed. To access the “.Anas.bak” folder from a computer,
change its hidden folder settings beforehand.
Restoring
To restore the backup data, follow the procedure below.
Restoring from backup will delete all current data on the Digital Music Library. If needed, back up any data
before continuing.
1 Connect the backup drive that contains the backup data to the Backup port on the N1 EX, or the USB 2.0 port
on the N10/N100.
When the USB drive is connected to the front USB port on the N1A EX model, or the USB 2.0 port on the N10/
N100, the following screen will be displayed. Press the Up/Down buttons and select “Backup or Restore”, then
press the Menu/Enter button.
If “Finished.” is displayed, press the Menu/Enter button.
42
Page 44

Chapter 2 Basic Usage
2 Press the Menu/Enter button to display the menu list at the home screen.
Note: The screenshot above shows the N1 EX.
3 Press the Up/Down buttons and select “Backup”, then press the Menu/Enter button.
4 Press the Up/Down buttons and select “Restore from Backup”, then press the Menu/Enter button.
Note: To display the backup history, navigate to Backup > Backup History.
5 Press the Up/Down buttons and select the date of backup, then press the Menu/Enter button.
6 Press the Up/Down buttons and select “Restore Data”, then press the Menu/Enter button. If selecting “Restore
Settings”, settings other than the hostname can also be restored from the backup settings.
43
Page 45

Chapter 2 Basic Usage
7 Make sure that all files on the drive can be erased before proceeding. To continue formatting, press the Up/
Down buttons and select “OK”, then press the Menu/Enter button.
8 Press the Menu/Enter button.
9 Press the Menu/Enter button.
10 The Digital Music Library will restart. Wait until the home screen is displayed.
11 When the home screen is displayed, disconnect the USB drive.
Deleting the Imported Music Files
There are two ways to delete the imported music files. Follow either procedure below.
Deleting All Files
Format the drive, referring the “Formatting Drives” section in chapter 3. Formatting will delete all data on the drive. If
needed, back up any data before continuing.
Deleting Each File One by One
Open the Digital Music Library shared folder from the computer, referring to the “Confirming Imported Files” section
above, and delete each file one by one.
44
Page 46

Chapter 3 Advanced Usage
Chapter 3 Advanced Usage
Connecting a Network Audio Player Without Connecting to the Internet
To connect a Network Audio Player to the Digital Music Library without connecting to the Internet, set the Digital
Music Library to isolated mode. If using this mode, you won’t be able to be control the Digital Music Library using
the app. For playback, use the Network Audio Player’s display panel and remote controller to select a music file. If
you cannot operate a Network Audio Player, it will not be able to select a music file.
To configure isolated mode, follow the procedure below.
Note: Give the Digital Music Library plenty of space for airflow. Do not stack it with other devices that may give off
heat.
N1 EX (Rear) Network Audio Player
N10/N100 (Rear) Network Audio Player
1 Connect the Digital Music Library’s Player port and a Network Audio Player with the provided Ethernet cable.
Do not connect the Ethernet cable to the Ethernet port for a router or hub.
2 Turn on the Network Audio Player.
3 Press the Menu/Enter button to display the menu list at the home screen.
Note: The screenshot above shows the N1 EX.
45
Page 47

Chapter 3 Advanced Usage
4 Press the Up/Down buttons and select “Settings”, then press the Menu/Enter button.
5 Press the Up/Down buttons and select “Network”, then press the Menu/Enter button.
6 Press the Up/Down buttons and select “Player Port”, then press the Menu/Enter button.
7 Press the Up/Down buttons and select “Isolated Mode”, then press the Menu/Enter button.
8 Press the Menu/Enter button.
Note: To connect the Digital Music Library and the Network Audio Player to the network via the router or hub, use
network mode instead. Select “Bridged Mode” at step 7 above to use network mode.
46
Page 48

Chapter 3 Advanced Usage
Changing the RAID Mode on the N1 EX
The N1 EX is configured with a RAID array by default. To change the RAID mode from the default, follow the
procedure below. Changing the RAID mode will delete all data on the drive. If needed, back up any data
before continuing.
Spanned
Combines 2 drives in the N1 EX into a single array. The usable drive space is the total space of all drives used. Data
is written to the first drive, then the second drive once the first drive becomes full. If a single drive in the array fails,
then all data on the array is lost.
RAID 0
Combines 2 drives in the N1 EX into a single array. The usable drive space is the total space of all drives used. This
simple RAID mode offers faster performance than a spanned array. If a single drive in the array fails, then all data
on the array is lost. Amongst the three RAID modes, RAID 0 does not offer any redundancy. If secure data storage is
critical, using RAID 0 is not recommended.
RAID 1
Combines 2 drives in the N1 EX into a mirrored array. The usable drive space on the array is the capacity of a single
drive. Identical data is written to each drive. If a drive is damaged, data can be recovered by replacing the damaged
drive. As long as one drive in the array remains undamaged, all data on the array can be recovered.
1 Press the Menu/Enter button to display the menu list at the home screen.
2 Press the Up/Down buttons and select “Settings”, then press the Menu/Enter button.
3 Press the Up/Down buttons and select “Drive”, then press the Menu/Enter button.
47
Page 49

Chapter 3 Advanced Usage
4 Press the Up/Down buttons and select “Format Internal Drive”, then press the Menu/Enter button.
5 Press the Up/Down buttons and select the RAID mode to configure, then press the Menu/Enter button.
6 Make sure that all files on the drive can be erased before proceeding. To continue changing the RAID mode,
press the Up/Down buttons and select “OK”, then press the Menu/Enter button.
7 Press the Menu/Enter button.
Formatting Drives
To format internal drives in the Digital Music Library or connected USB drives, follow the procedure below.
Formatting will delete all data on the drive. If needed, back up any data before continuing.
48
Page 50

Chapter 3 Advanced Usage
Formatting Internal Drives
1 Press the Menu/Enter button to display the menu list at the home screen.
Note: The screenshot above shows the N1 EX.
2 Press the Up/Down buttons and select “Settings”, then press the Menu/Enter button.
3 Press the Up/Down buttons and select “Drive”, then press the Menu/Enter button.
4 Press the Up/Down buttons and select “Format Internal Drive”, then press the Menu/Enter button.
5 If using the N1 EX, press the Up/Down buttons and select the current RAID mode, then press the Menu/Enter
button.
49
Page 51

Chapter 3 Advanced Usage
If using the N10/N100, press the Up/Down buttons and select “Format”, then press the Menu/Enter button.
6 Make sure that all files on the drive can be erased before proceeding. To continue formatting, press the Up/
Down buttons and select “OK”, then press the Menu/Enter button.
7 Press the Menu/Enter button.
Note: If the screen below is displayed, press the Menu/Enter button.
The Digital Music Library will restart. Wait until the home screen is displayed.
Formatting Connected USB Drives
This will format the USB drive to NTFS. Be aware that a USB drive formatted to NTFS will become read-only when
connected to a macOS device.
Note: Connect only one USB drive at a time when formatting it.
1 Press the Menu/Enter button to display the menu list at the home screen.
Note: The screenshot above shows the N1 EX.
50
Page 52

Chapter 3 Advanced Usage
2 Press the Up/Down buttons and select “Settings”, then press the Menu/Enter button.
3 Press the Up/Down buttons and select “Drive”, then press the Menu/Enter button.
4 Press the Up/Down buttons and select “Format USB Drive”, then press the Menu/Enter button.
5 Press the Up/Down buttons and select “Format”, then press the Menu/Enter button.
Note: If multiple USB drives are connected to the Digital Music Library and an error message is displayed when
formatting a drive, disconnect the drives other than the drive you want to format, and try again.
6 Make sure that all files on the drive can be erased before proceeding. To continue formatting, press the Up/
Down buttons and select “OK”, then press the Menu/Enter button.
Note: The screenshot above shows the N1 EX. On the N10/N100, “All USB drive data will be lost. Continue?” will
be displayed.
51
Page 53

Chapter 3 Advanced Usage
7 Press the Menu/Enter button.
Erasing Data on the Digital Music Library Completely
Under some circumstances, data from formatted drives can be recovered. The drive erasure process mentioned in
this section does a much more thorough job of erasing data by removing all data from a drive in a way that makes
it nearly impossible to recover with current tools. After completing the procedure, all data on the drive will be
completely erased.
This section explains the procedure for erasing data on the internal drive as an example.
Note: This erasure process will take several days to complete. Make sure the Digital Music Library is powered on
during the process. Other functions will become unavailable while the erasure process is running.
Typically, follow the procedure in the “Formatting Internal Drives” section above to delete all data on a drive. This
procedure below is not recommended for typical use.
1 Press the Menu/Enter button to display the menu list at the home screen.
Note: The screenshot above shows the N1 EX.
2 Press the Up/Down buttons and select “Settings”, then press the Menu/Enter button.
3 Press the Up/Down buttons and select “Drive”, then press the Menu/Enter button.
52
Page 54

Chapter 3 Advanced Usage
4 Press the Up/Down buttons and select “Format Internal Drive”, then press the Menu/Enter button.
5 Press the Up/Down buttons and select “Erase All Data”, then press the Menu/Enter button.
N1 EX
N10/N100
6 Make sure that all files on the drive can be erased before proceeding. To continue formatting, press the Up/
Down buttons and select “OK”, then press the Menu/Enter button.
7 Press the Menu/Enter button.
Changing the IP Address
To change the IP address of the Digital Music Library, follow the procedure below. After the procedure is finished,
the Digital Music Library will automatically restart and stop any importing or playback operations. We recommend
finishing any file importing or playback before changing the Digital Music Library’s IP address.
53
Page 55

Chapter 3 Advanced Usage
1 Press the Menu/Enter button to display the menu list at the home screen.
Note: The screenshot above shows the N1 EX.
2 Press the Up/Down buttons and select “Settings”, then press the Menu/Enter button.
3 Press the Up/Down buttons and select “Network”, then press the Menu/Enter button.
4 Press the Up/Down buttons and select “LAN Port”, then press the Menu/Enter button.
5 Press the Up/Down buttons and select whether to automatically acquire the IP address from the DHCP server
or configure a fixed IP address, then press the Menu/Enter button.
54
Page 56

Chapter 3 Advanced Usage
6 Press the Menu/Enter button.
Notes:
• To obtain the IP address from the DHCP server automatically, the DHCP server on the router should also be
enabled.
• If “Fixed IP” is selected, enter the desired IP address, subnet mask, default gateway, and DNS server in the
displayed screen.
Changing the Friendly Name (Hostname)
To change the friendly name of the Digital Music Library, follow the procedure below. After the procedure is
finished, the Digital Music Library needs to be restarted, as well as stopping any current import or playback
operations. We recommend finishing any file importing or playback before changing the friendly name.
1 Press the Menu/Enter button to display the menu list at the home screen.
Note: The screenshot above shows the N1 EX.
2 Press the Up/Down buttons and select “Settings”, then press the Menu/Enter button.
3 Press the Up/Down buttons and select “Network”, then press the Menu/Enter button.
55
Page 57

Chapter 3 Advanced Usage
4 Press the Up/Down buttons and select “Friendly Name”, then press the Menu/Enter button.
5 Press the Up/Down buttons and enter the new friendly name, then press the Menu/Enter button.
6 Press the Menu/Enter button.
7 Press the Menu/Enter button.
8 The Digital Music Library will restart. Wait until the home screen is displayed.
Notes:
• Friendly name may contain 0–9, A–Z, and hyphens (-).
• When you press the Back button, the entered characters are deleted from the right side. To change the friendly
name, press the Back button and delete all characters except for the first, then enter the new friendly name.
• When you press the Menu/Enter button, the entered character is saved and another character can be selected.
Press the Menu/Enter button twice to stop configuring the friendly name.
• If you delete all the characters, the display will go back to the previous screen.
Configuring the Date and Time
To configure the time settings, follow the procedure below.
56
Page 58

Chapter 3 Advanced Usage
Note: To use features that require an Internet connection such as downloading files from the streaming sites,
configure the time settings so that they are acquired from the NTP server.
1 Press the Menu/Enter button to display the menu list at the home screen.
Note: The screenshot above shows the N1 EX.
2 Press the Up/Down buttons and select “Settings”, then press the Menu/Enter button.
3 Press the Up/Down buttons and select “Date and Time”, then press the Menu/Enter button.
4 Press the Up/Down buttons and select whether to configure the time settings so that they are either
automatically acquired from the NTP server or manually configured, then press the Menu/Enter button.
Note: To configure the time settings so that they are acquired from the NTP server, the Digital Music Library
should be able to connect the Internet.
5 If you have selected “Manual” from the previous step, press the Up/Down buttons and configure the date and
time, then press the Menu/Enter button.
57
Page 59

Chapter 3 Advanced Usage
6 Press the Menu/Enter button.
Changing the Time Zone
1 Press the Menu/Enter button to display the menu list at the home screen.
Note: The screenshot above shows the N1 EX.
2 Press the Up/Down buttons and select “Settings”, then press the Menu/Enter button.
3 Press the Up/Down buttons and select “Time Zone”, then press the Menu/Enter button.
4 Press the Up/Down buttons and select the time zone to configure, then press the Menu/Enter button.
58
Page 60

Chapter 3 Advanced Usage
5 Press the Menu/Enter button.
Configuring Display and LED Settings
Changing the Display Brightness
1 Press the Menu/Enter button to display the menu list at the home screen.
Note: The screenshot above shows the N1 EX.
2 Press the Up/Down buttons and select “Settings”, then press the Menu/Enter button.
3 Press the Up/Down buttons and select “Display”, then press the Menu/Enter button.
4 Press the Up/Down buttons and select “Brightness”, then press the Menu/Enter button.
59
Page 61

Chapter 3 Advanced Usage
5 Press the Up/Down buttons and change the brightness, then press the Menu/Enter button.
Changing the Power LED Brightness on the N1 EX
1 Press the Menu/Enter button to display the menu list at the home screen.
2 Press the Up/Down buttons and select “Settings”, then press the Menu/Enter button.
3 Press the Up/Down buttons and select “Display”, then press the Menu/Enter button.
4 Press the Up/Down buttons and select “Power LED Brightness”, then press the Menu/Enter button.
60
Page 62

Chapter 3 Advanced Usage
5 Press the Up/Down buttons and select either “Bright” or “Dim”, then press the Menu/Enter button.
6 Press the Menu/Enter button.
Turning Off the Rear-Side LED on the N1 EX
The rear-side LED is located at the back of the N1 EX, near the LAN and Player ports. The LED shows the network
activity, so you will not be able to check for network activity if the rear-side LED is turned off. Verify any network
activity by checking that the N1 EX is connected to the network properly beforehand.
1 Press the Menu/Enter button to display the menu list at the home screen.
2 Press the Up/Down buttons and select “Settings”, then press the Menu/Enter button.
3 Press the Up/Down buttons and select “Network”, then press the Menu/Enter button.
61
Page 63

Chapter 3 Advanced Usage
4 Press the Up/Down buttons and select “Rear Side LED”, then press the Menu/Enter button.
5 Press the Up/Down buttons and select “Off”, then press the Menu/Enter button.
6 Press the Menu/Enter button.
Configuring Automatic Power-Off
If auto power save is enabled, the Digital Music Library will automatically power off after music stops playing and a
specific amount of time passes. Auto power save will not shut off the Digital Music Library while the Network Audio
Player that is connected to the Player port is on or while a USB-DAC or an optical drive is connected. To change the
time settings for auto power save or to turn it off, follow the procedure below.
1 Press the Menu/Enter button to display the menu list at the home screen.
Note: The screenshot above shows the N1 EX.
62
Page 64

Chapter 3 Advanced Usage
2 Press the Up/Down buttons and select “Settings”, then press the Menu/Enter button.
3 Press the Up/Down buttons and select “Auto Power Save”, then press the Menu/Enter button.
4 Press the Up/Down buttons and select the desired time setting, then press the Menu/Enter button.
5 Press the Menu/Enter button.
If the Digital Music Library is powered off by auto power save, the power button will not automatically revert to the
off position. To turn the Digital Music Library on, press the power button to return it to the off position, and then
press it again to power on the Digital Music Library.
Changing the Display Language
To change the display language, follow the procedure below. After the procedure is finished, the Digital Music
Library will stop any file playback. We recommend finishing any file playback before changing the display language.
63
Page 65

Chapter 3 Advanced Usage
1 Press the Menu/Enter button to display the menu list at the home screen.
Note: The screenshot above shows the N1 EX.
2 Press the Up/Down buttons and select “Language”, then press the Menu/Enter button.
3 Press the Up/Down buttons and select the display language, then press the Menu/Enter button.
Updating the Firmware
To update the Digital Music Library’s firmware version to the latest one, follow the procedure below.
Updating via the Network
Note: To update the firmware via the network, the Digital Music Library should be connected to the Internet. If the
Digital Music Library is in isolated mode, use another Ethernet cable and connect it to the LAN port and the router.
1 Press the Menu/Enter button to display the menu list at the home screen.
Note: The screenshot above shows the N1 EX.
64
Page 66

Chapter 3 Advanced Usage
2 Press the Up/Down buttons and select “System Update”, then press the Menu/Enter button.
3 Press the Up/Down buttons and select “Internet”, then press the Menu/Enter button.
4 Press the Menu/Enter button.
5 The Digital Music Library will restart. Wait until the home screen is displayed.
Updating from the USB Device
1 Download the latest firmware from melco-audio.com.
2 Extract the downloaded file and copy the “melco_musiclibrary_updater.bin” file from the extracted folder to
the USB drive (root directory).
3 Connect the USB drive to the USB 3.0 port on the N1 EX, or the front USB 2.0 port on the N10/N100.
When the USB drive is connected to the front USB port on the Digital Music Library and the following screen is
displayed, press the Back button.
Note: On the N10/N100, USB ports other than the front USB 2.0 cannot be used to update the firmware.
65
Page 67

Chapter 3 Advanced Usage
4 Press the Menu/Enter button to display the menu list at the home screen.
Note: The screenshot above shows the N1 EX.
5 Press the Up/Down buttons and select “System Update”, then press the Menu/Enter button.
6 Press the Up/Down buttons and select “USB”, then press the Menu/Enter button.
7 Press the Menu/Enter button.
8 The Digital Music Library will restart. Wait until the home screen is displayed.
9 When the home screen is displayed, disconnect the USB drive.
Checking for Updates Automatically
The Digital Music Library can check if newer firmware has been released when turning on the Digital Music Library. If
new firmware is detected, you can continue to update the firmware. It is enabled by default. To disable checking for
firmware releases automatically, follow the procedure below.
66
Page 68

Chapter 3 Advanced Usage
1 Press the Menu/Enter button to display the menu list at the home screen.
Note: The screenshot above shows the N1 EX.
2 Press the Up/Down buttons and select “System Update”, then press the Menu/Enter button.
3 Press the Up/Down buttons and select “Check for Updates at Start-Up”, then press the Menu/Enter button.
4 Press the Up/Down buttons and select “No”, then press the Menu/Enter button.
5 Press the Menu/Enter button.
Restoring Factory Defaults
To initialize the Digital Music Library to its factory default settings, follow the procedure below. The operation above
only initializes the settings. Data will not be affected.
67
Page 69

Chapter 3 Advanced Usage
1 Turn off the Digital Music Library.
2 Turn on the Digital Music Library while pressing and holding the Down button. After the “MELCO” logo
disappears, let go of the Down button.
3 The message, “All settings will be initialized. Continue?” will be displayed.
If using the N1 EX, press the Menu/Enter button. If using the N10/N100, press the Up/Down buttons and select
“OK”, then press the Menu/Enter button.
4 Press the Menu/Enter button.
5 If the screen below is displayed, press the Menu/Enter button.
6 The Digital Music Library will restart. Wait until the home screen is displayed.
7 After the restart process is completed, press the Up/Down buttons and set the display language and time
zone, then press the Menu/Enter button.
If you go to Settings > Initialize Settings on the display panel, you can initialize the settings by selecting “OK”, then
pressing the Menu/Enter button.
MELCO Intelligent Music Library
The Digital Music Library now supports apps that allow you to build your personal intelligent music library. These
apps provide richer metadata for your files, and introduce smarter methods to browse your collection with minimal
effort. You can install these apps directly onto the Digital Music Library.
SongKong is an application that scans your music collection and adds detailed information to each file as tags.
68
Page 70

Chapter 3 Advanced Usage
MinimServer is an application that scans and organizes your music collection by utilizing embedded tags on each
file.
SongKong for Melco Lite Music Tagger
SongKong is an intelligent music tagger app designed to help you easily organize and manage your digital music
collection. By distributing tags to each music file, you can resolve common issues such as missing song tags or
album cover art, duplicate tracks, or unnamed songs, and catalogue and organize your music the way you want.
By default, SongKong - Melco Lite version will be installed. This version of SongKong is provided and supported
by JThink. To access the full application, you will need to purchase a Melco license. For more information on full
features and purchasing a license, please visit http://songkongformelco.net.
How to install
1 From the main menu, navigate to Settings > Music Database > SongKong.
2 Select Install SongKong.
3 The latest available application version will be displayed. Select OK.
4 Wait a few minutes for installation to finish. When the display shows that SongKong has been successfully
installed, select OK.
5 If you now select Configure SongKong you can see the URL that you should use for controlling SongKong, enter
this into the web browser of any device on your network.
How to update
The SongKong application can be updated independently of the Digital Music Library firmware.
1 From the main menu, navigate to Settings > Music Database > SongKong.
2 Select Version Check.
3 The display will show either there are no updates or that a recent update is available. If this is the case, select
OK.
4 Wait a few minutes for installation to finish. When the display shows that SongKong update has been
successfully installed, select OK.
5 If you now select Configure SongKong you can see the URL that you should use for controlling SongKong, enter
this into the web browser of any device on your network.
How to operate
You can operate SongKong using a web browser. Enter “(Digital Music Library’s IP Address):4567” into your web
browser to explore through SongKong’s dedicated web user interface.
69
Page 71

Chapter 3 Advanced Usage
MinimServer 2
MinimServer is a UPnP media server application that offers an “intelligent browsing” mechanism so you can easily
browse your music collection through granulated searches. MinimServer is provided and supported by MinimWorld.
For more detailed information on its features, visit minimserver.com/minimserver2/melco.
How to install
1 From the main menu, navigate to Settings > Music Database > Media Server App.
2 Select MinimServer.
3 The version of MinimServer to be installed will be shown.
4 Select OK to download and install MinimServer.
5 Once MinimServer is installed, it will stop TwonkyServer and then perform a full scan of your music library. This
scan might take some time.
6 When the scan has finished, MinimServer will appear in your UPnP control app.
7 You can use your UPnP control app to browse your library and select music for playback.
How to update
The MinimServer application can be updated independently of the Digital Music Library firmware.
1 From the main menu, navigate to Settings > Music Database > Version Check.
2 If there is a newer version of MinimServer available, it will be shown.
3 Select OK to download and install the new version.
How to operate
You can rescan your collection or select index trees from the Digital Music Library the same way you would for
TwonkyServer.
You can operate MinimServer using a web browser. Enter “(Digital Music Library's IP Address):9790” into your web
browser to explore MinimServer’s dedicated web user interface. For Windows and Mac, the MinimWatch application
also can be used for server maintenance and configuration. Please visit minimserver.com/minimserver2/melco for
details.
70
Page 72

Chapter 4 Appendix
Chapter 4 Appendix
Menu List
From the front display panel, the following options are available.
Status
Internal Drives
USB Drives
Songs Displays the number of imported music files.
Music Database
Date and Time Displays current time and date.
Network
System Software Displays the version of the firmware installed on the Digital Music Library.
Media Server Displays the media server’s version.
Downloader
Displays the total capacity, used capacity, and usage percentage of the
internal drives.
Displays the total capacity, used capacity, and usage percentage of the
connected drives.
Displays the current status of the imported music file database after it is
scanned.
LAN: Displays the network settings of the LAN port labelled “LAN”, such as IP
address, MAC address, link speed, and the Internet connection status.
Player: Displays the network settings of the LAN port labelled “PLAYER”, such
as IP address, MAC address, and link speed.
Displays whether downloader is enabled. When downloader is configured,
it will show either the account of a streaming site or the connection status
between the streaming site and the Digital Music Library unit.
Browse Songs/Play Songs
Displays music lists that have been imported to the Digital Music Library, or are currently on a drive connected to
either the N1 EX’s Expansion port or front USB port or the N10/N100's USB 2.0 port. When you connect a USB-DAC
device to the Digital Music Library, the menu will change to “Play Songs”. After selecting a music file and then “Play”,
you can play the music file on a USB-DAC.
The number of available music files to play on a USB-DAC will be displayed to the right of the menu.
Backup
Start Backup
Restore from Backup
Backup History Displays the backup history of any previous backups.
Backs up music files on the Digital Music Library to the backup drive that is
connected to the Backup port on the N1 EX, the front USB port on the N1A
model, or the USB 2.0 port on the N10/N100.
Restore Settings: Restores the settings from the USB drive.
Restore Data: Restores the backup music files in the USB drive to the Digital
Music Library.
71
Page 73

Chapter 4 Appendix
Settings
Display
Turns off the display panel. You can also turn off the display panel from the
Dark Mode
Brightness Changes the brightness of the display panel.
Power LED Brightness
*
*This setting is only available on the N1 EX.
Music Database
Note: For more details about “MinimServer” and “SongKong”, refer to the “MELCO Intelligent Music Library” section.
Media Server App
Rescan Songs and Playlists
home screen by pressing and holding the Back button for two seconds.
While the display panel is off, press any button on the front to relight the
display.
Changes the brightness of the power LED at the front.
Selects either “TwonkyServer” or “MinimServer” as the media server. If you
selected “MinimServer” as the media server, “Install MinimServer” will be
displayed. Execute it to enable “MinimServer”.
Rescans the music database of the imported music files. If the music files are
not listed properly on the Network Audio Player, update the music database.
Customizes navigation trees.
Tree Indexes
Integrate Duplicate Files
*
Clear and Rebuild Database
Configure MinimServer
Version Check
**
**
If you selected “TwonkyServer” as the media server, make a selection from
the options below.
Standard: This is the default setting when shipped.
Indexed Mode: This is the best option for when there are many files on the
Digital Music Library or playing music files via smartphones or a USB-DAC
device using the front panel of the Digital Music Library. Artist, album, and
composer information will be hidden.
Standard + Indexes: All index folders and all artist, album, and composer
information will be displayed.
If you selected “MinimServer” as the media server, make a selection from the
options below.
For Classical Music: The indexes will be optimized for classical music.
“Conductor” and “Ensemble” folders will be displayed.
For Jazz Music: The indexes will be optimized for jazz music. A “Performer”
folder will be displayed.
For Rock/Pop Music: This setting is for rock or pop music.
Default/Generic: This is the default setting when shipped.
If enabled, and files that have the same title, artist, size, and format
information are found, these files are considered to be the same file so only
one file will appear on the file list. If disabled, even files that are considered
exactly the same will appear on the file list, so you may see multiple files
with the same song title.
*
Rebuilds the music database of the imported music files.
The URL for the configuration page for MinimServer will be displayed. Access
the URL to configure the MinimServer app’s settings.
Displays the current version of MinimServer. Select it to check for the latest
updates.
72
Page 74

Chapter 4 Appendix
Execute “Install SongKong” to select “SongKong” as the media server. After
installing, the settings below will be displayed here.
SongKong
*This setting is only available if you select “TwonkyServer” for “Media Server App”.
**This setting is only available if you select “MinimServer” for “Media Server App”.
SongKong Service: Enable or disable SongKong.
Configure SongKong: The URL of the configuration page for SongKong will
be displayed. Access the URL to configure the SongKong app’s settings.
Version Check: Displays the current version of SongKong. Select it to check
for the latest updates.
SMB File Sharing
Shares all music files on the Digital Music Library with the network. For files
On
Off
in the “import_CD” folder, tracks can be shared but not the cover art file
(folder.jpg).
If disabled, the Digital Music Library will become invisible from other devices
on the network and music files on the Digital Music Library cannot be
accessed by another device.
Downloader
Enable or disable periodic downloads, and add or remove a streaming site account for downloading music files.
Adds, edits, or removes a streaming site account for the downloader.
Currently, the Digital Music Library supports accounts from HIGHRESAUDIO,
Account Settings
Periodic Downloads Enables or disables periodic downloads.
OTOTOY, e-onkyo music, and mora. After adding the account, music files
purchased at the streaming site will be downloaded to the Digital Music
Library automatically.
Import from USB Drive
Configure whether to create a folder that contains the import date in the folder name when importing.
Imports all updated files to the “all” folder within the “import” folder on the
Into One Folder
Into Folders by Date
Digital Music Library. If a file has no updated information, that file will not be
imported.
Creates a folder within the “import” folder to store the imported files from
the connected USB drive. The folder name will contain the import date.
Imported files may contain duplicates in the Digital Music Library if the same
files are on the USB drive.
USB-DAC
Configure settings to convert DSD files using a USB-DAC.
Controller Mode Configures the mode to stream music using controller apps.
73
Page 75

Chapter 4 Appendix
Configures the playback mode if playing DSD files on the Digital Music
Library using a USB-DAC.
If playing DSD files without converting them, select “Standard”. This mode
DSD Playback Mode
Precision Start Latency
will select the playback mode between Markerless DSD playback or DoP
(DSD over PCM) playback for the DSD files automatically. Use this mode
normally. If you prefer the DoP playback, select “DSD over PCM Priority
Mode”. If the connected USB-DAC only supports PCM, select “PCM Mode”.
Configures a gap time that precedes a playlist track. This also solves an issue
that occurs with specific USB-DAC devices.
USB-CD Drive
Configure settings to import music files from a music CD using an optical drive.
Selects import file formats from either “FLAC” or “WAV”. If you select “FLAC”,
configure the compression level used when importing music files as well.
Available compression levels are below.
No Compression: The music files will not be compressed during importing.
Low Compression: Compression time is less than standard compression.
CD-DA Import File Format
Maximum Read Count
Advanced Drive Optimization
The resulting file quality corresponds to FLAC 0.
Standard Compression: Compression time is not as long and the size
remains average. This is the same as common FLAC file format. The resulting
file quality corresponds to FLAC 5.
High Compression: Compression time is longer but the resulting file size is
smaller. The resulting file quality corresponds to FLAC 8.
Configures the number of times a CD will be read when inserted into the
Digital Music Library.
Configures the read sample offset correction values between “-2000” to
“+2000”. This value will vary depending on what type of CD drive you use. It
is configured to “±0” by default. This doesn’t need to be changed normally.
Date and Time
Configure the time settings of the Digital Music Library.
Auto Configures the time settings acquired from the NTP server via the Internet.
Manual Configures the time settings manually.
Time Zone
Configure the time zone for date and time settings.
Auto Power Save
Configure whether to shut down the Digital Music Library automatically if the music stops playing and a specific
amount of time passes. You can select from off, 1 minute, 5 minutes, 15 minutes, and 20 minutes.
Notes:
• The Digital Music Library will not be powered down while playing music.
• If the Digital Music Library is accessed from a Network Audio Player or computer, it will not be powered down
even after the specified time passes.
74
Page 76

Chapter 4 Appendix
Network
Configures whether to automatically acquire the IP address from a DHCP
LAN Port
Player Port
Rear Side LED
Friendly Name Changes the friendly name (hostname) of the Digital Music Library.
*This setting is only available on the N1 EX.
*
server or enter it manually. If “Fixed IP” is selected, enter the IP address,
subnet mask, default gateway, and DNS server.
Selects “Bridged Mode” if the Digital Music Library’s LAN port is connected to
the router.
If connecting the Network Audio Player to the Digital Music Library without
connecting it to the Internet,, select “Isolated Mode”. If you select “Off”, the
Player port will be disabled.
Configure whether to turn off the rear LAN and Player port LEDs.
Drive
Formats the internal drives of the Digital Music Library. When formatting on
the N1 EX, you can change the current RAID mode to a spanned, RAID 0, or
Format Internal Drive
Format USB Drive
RAID 1 array.
If you select “Erase All Data”, all data on the drives will be completely erased.
Data removed this way will be nearly impossible to recover with the current
tools.
Formats the USB drive.
If you select “Erase All Data”, all data on the drives will be completely erased.
Data removed this way will be nearly impossible to recover with the current
tools.
Initialize Settings
Restores the Digital Music Library settings to the factory default.
Dismount USB Drive
Dismounts a USB drive connected to the front USB 3.0 port on the N1 EX, or a USB drive connected to the USB 2.0
port on the N10/N100 and for which “Mount and Scan” had been selected as an action. This menu will show which
USB port a USB drive is connected to (either front or rear), and allows you to disconnect a USB drive while the Digital
Music Library is on.
System Update
Updates the Digital Music Library’s firmware to the latest version via the
Internet
USB
Check for Updates at Start-Up
Internet. Refer to the “Updating via the Network” section in chapter 3 for the
procedure to update the firmware.
Updates the Digital Music Library’s firmware to the latest version using a USB
device that contains the firmware file. Refer to the “Updating from the USB
Device” section in chapter 3 for the procedure to update the firmware.
Enables or disables checking for a new firmware release when turning on the
Digital Music Library.
Language
English Changes the display language to English.
75
Page 77

Chapter 4 Appendix
日本語
Deutsch Changes the display language to German.
Français Changes the display language to French.
簡体中文
繁體中文
Changes the display language to Japanese.
Changes the display language to Simplified Chinese.
Changes the display language to Traditional Chinese.
Support
This menu is used for user assistance.
Web Service Availability Displays the connection availability for services that will require the Internet.
PC-incompatible characters
WebRemote
Internal Drive Check
Create Archive
If invalid characters are used for the names of files and folders, they will be
automatically changed to underscores (_).
WebRemote allows you to remotely operate the Digital Music Library from a
web browser with the exception of formatting drives. To enable WebRemote,
select “On”, then enter the Digital Music Library’s IP address into the
address bar of a web browser and press the Enter key. WebRemote will be
automatically disabled once the Digital Music Library is powered off.
Checks the file system being used for the internal drive of the Digital Music
Library.
Analyzes the Digital Music Library’s operating environment and archives the
data to a file with the “.sendme” file extension. The archived file will be saved
into the shared folder on the Digital Music Library. We may ask you to send it
to us it when contacting us.
We recommend not creating archives during playback.
Error Codes
If any of the following error codes are displayed on the Digital Music Library’s display panel, try the respective
corrective actions.
Error Corrective Actions
010–012
No backup found.
020
Friendly name is too short.
021
Friendly name is too long.
030
Not enough space on drive.
031
Some files not copied.
033
I/O error.
034
Could not erase data.
040, 041
Updater not found.
042–044
Update error.
Make sure the USB drive that contains backup data is connected
to the Backup port on the N1 EX, or the USB 2.0 port on the N10/
N100.
The friendly name has not been configured. Enter the friendly
name. The friendly name should be between 1–15 characters.
The entered friendly name must not exceed 15 characters.
Delete extra files on the copy target drive.
Files on the copy source drive may be corrupted.
The connected USB drive may be malfunctioning. Connect it to a
computer and run a drive check.
The drive to be formatted may be malfunctioning.
Make sure the Digital Music Library is connected to the Internet
or the updater is saved on the connected USB drive.
The updater file may be corrupted. Try the update again, or
download a new updater file from melco-audio.com.
76
Page 78

Chapter 4 Appendix
Error Corrective Actions
091
No external drive available.
094
No response from NTP server.
101
Could not mount drive.
102
Could not dismount drive.
103
Could not format drive.
104
Could not form partition.
110
Internal drive not found.
Make sure the USB drive is connected to the Digital Music
Library.
Put the Digital Music Library on a network that can access the
Internet.
The USB drive may be malfunctioning or the drive format is not
supported.
The USB drive is possibly being accessed at this time.
The formatted USB drive may be malfunctioning.
The drive may be malfunctioning or is not supported.
Try restarting the Digital Music Library. If the message is still
displayed, contact our technical support for assistance.
If using the N1 EX, run “Try repair of unrecognised disk” that will
111
Usable internal drive not found.
be displayed with this error message. If using the N10/N100, try
restarting. If the message is still displayed, contact our technical
support for assistance.
112
Internal drive not found.
113
Internal drive 1 not found.
Try restarting the Digital Music Library. If the message is still
displayed, contact our technical support for assistance.
114
Internal drive 2 not found.
*
120
USB drive not found.
121
The connected USB drive may be malfunctioning. Try another
USB drive.
USB drive not mounted.
122
Only one USB drive can be initialized.
Remove 2nd/3rd USB drive first.
**
130
No expansion drive available.
*
140
No backup drive found.
141
Backup drive not mounted.
Make sure only one USB drive is connected to the N10/N100 at a
time when formatting drives.
Make sure the USB drive that contains backup data is connected
to the Expansion port.
Make sure the backup drive that contains backup data is
connected to the Backup port on the N1 EX, or the USB 2.0 port
on the N10/N100.
150
Could not create RAID.
*
151
Could not rebuild RAID.
153
Could not rebuild system.
*
If this message appears, contact our technical support for
assistance from melco-audio.com.
*
154
Could not rebuild data.
*
77
Page 79

Chapter 4 Appendix
Error Corrective Actions
160
Error during drive checking.
161
Could not repair of drive.
*
Back up the data on the internal drive and contact our technical
*
support for assistance from melco-audio.com.
162
Error during drive checking.
200
No accounts found.
203
Could not connect to the site.
204
Authentication error.
300
This CD's music data is currently unavailable.
*
Add an account.
Put the Digital Music Library on a network that can access the
Internet.
Make sure that the username and password are correct.
The music database server may be under maintenance. Please
wait for a while and try again later.
*This error code is only displayed on the N1 EX.
**This error code is only displayed on the N10/N100.
Default Settings
Display Brightest
SMB File Sharing On
Power LED Brightness
Rear Side LED
*
*
Bright
On
Periodic Downloads Off
Import from USB Drive Into One Folder
Controller Mode Hybrid Mode
DSD Playback Mode Standard
Precision Start Latency 3 seconds
CD-DA Import File Format WAV
Maximum Read Count 1
Advanced Drive Optimization ±0
Auto Power Save
15 minutes
Note: This setting may be configured to “Off” for some units.
LAN Port DHCP
Player Port Bridged Mode
Friendly Name N-XXXX (“XXXX” is the last four digits of the MAC address)
Check for Updates at Start-Up Yes
*This setting is only available on the N1 EX.
78
 Loading...