

Page 1
High-Res Digital Music Library
N1 Series
Software Manual
This manual uses sample screenshots captured on firmware version 3.50. Depending on the firmware version that
is installed on your N1, functions described and screenshots contained in the manual may appear differently, so
functions on your product may not work as described the manual. Always update the firmware to the latest version.
The firmware version installed will show up during startup, or you can check it by opening the main menu and
scrolling to option 5, "System Update".
For the procedure of updating the firmware to the latest version, refer to the "Updating the Firmware" section in
chapter 3.
Please make sure to read this manual before using and follow the procedures. If you have any inquiries about the
product, contact the number on the warranty statement or the packing box. Do not discard the warranty statement
or the packing box.
35021285-03
2017.06
Page 2

Contents
Chapter 1 Getting Started .............................................4
Summary of Manual .........................................................................4
Chapter 2 Basic Usage ....................................................5
Display ..............................................................................................5
Home Screen .............................................................................................. 5
Menu ........................................................................................................... 6
Dialog .......................................................................................................... 6
Streaming Screen .......................................................................................6
Importing Music Files ......................................................................7
Importing from USB Devices ..................................................................... 7
Importing from a Music CD ....................................................................... 9
Confirming Imported Files ...................................................................... 10
Downloading Music Files from Streaming Sites ......................... 12
Adding Accounts ...................................................................................... 13
Enabling or Disabling Auto Download ..................................................14
Deleting Accounts ....................................................................................16
Playing Music Files on a Network Audio Player .......................... 17
Streaming Imported Music Files ............................................................. 18
Streaming Music Files from USB Devices ............................................... 18
Playing Music Files on USB-DAC Devices .................................... 18
Configuring for USB-DAC ........................................................................19
Playing Imported Music Files .................................................................. 21
Selecting the Controller Mode ................................................................ 22
Playing a CD Using an Optical Drive ....................................................... 23
Backing Up and Restoring ............................................................ 24
1
Page 3

Backup Operations ..................................................................................24
Backing Up ...............................................................................................25
Restoring ..................................................................................................26
Deleting the Imported Music Files ............................................... 28
Formatting the Drive ...............................................................................28
Deleting Each File Manually .................................................................... 28
Chapter 3 Advanced Usage ......................................... 29
Using Direct Mode ........................................................................ 29
Changing the RAID Mode ............................................................. 30
Formatting Drives ......................................................................... 32
Formatting Internal Drives ......................................................................32
Formatting Connected USB Devices .......................................................33
Erasing Data on the N1 Completely ............................................. 35
Changing the IP Address .............................................................. 37
Changing the Friendly Name (Hostname) ................................... 38
Configuring the Date and Time .................................................... 39
Changing the Time Zone .............................................................. 41
Configuring Display and LED Settings ........................................ 42
Changing the Display Brightness ...........................................................42
Changing the Power LED Brightness ...................................................... 43
Turning Off the Rear-Side LED ................................................................ 43
Configuring Automatic Power-Off ............................................... 44
Changing the Display Language .................................................. 46
Updating the Firmware ................................................................. 46
Updating via the Network ....................................................................... 46
Updating from the USB Device ...............................................................47
2
Page 4

Checking for Updates Automatically .....................................................48
Restoring Factory Defaults ........................................................... 49
Chapter 4 Appendix .................................................... 51
Menu List ....................................................................................... 51
Status ........................................................................................................51
Browse Songs ...........................................................................................51
Backup ......................................................................................................51
Settings .....................................................................................................51
System Update .........................................................................................54
Display ......................................................................................................54
Language .................................................................................................. 54
Error Codes .................................................................................... 54
3
Page 5
Chapter 1 Getting Started
This manual is intended to be used with firmware version 3.50. Functions described and sample screenshots used by
the manual may appear differently from the product if it is using an older version firmware. Always using the latest
firmware is recommended.
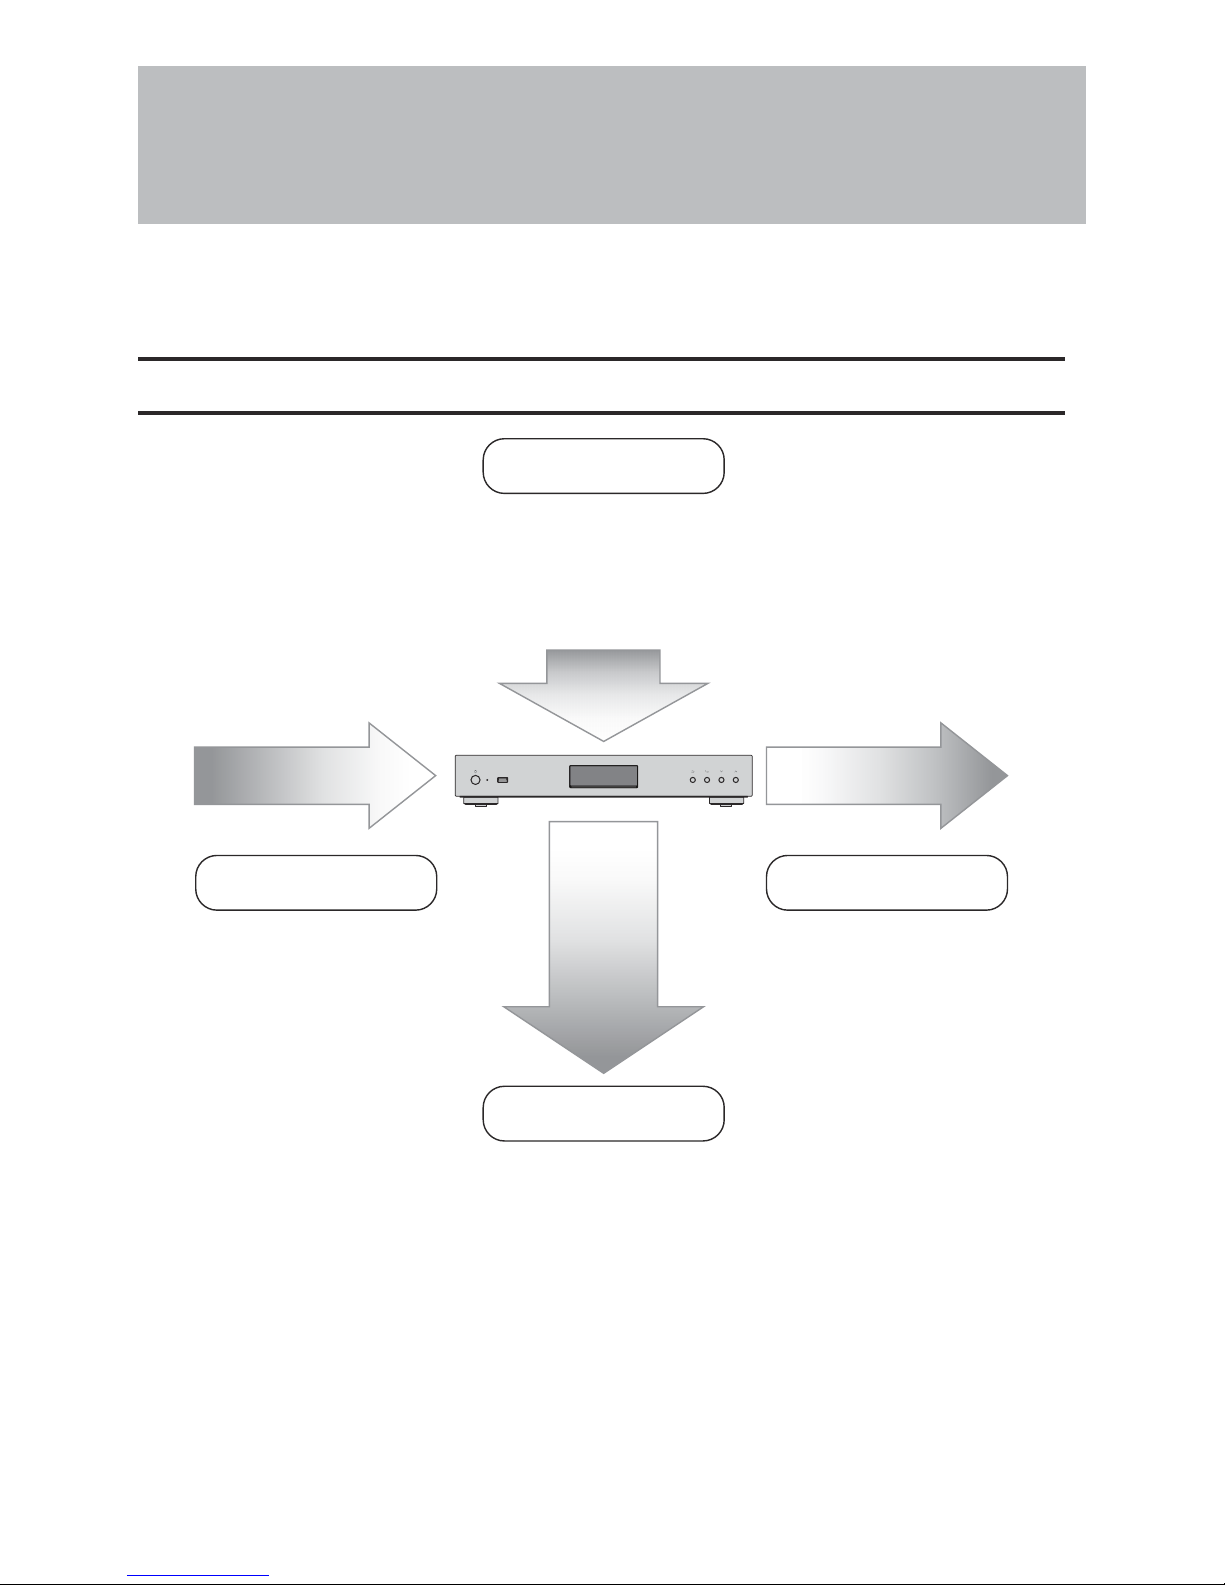
Summary of Manual
Display Panel
Import Playback
Backup, Format, and
Advanced Usage
Display Panel Details
- Chapter 2 "Display"
Display Settings
- Chapter 3 "Conguring Display and LED Settings"
Display Language
- Chapter 3 "Changing the Display Language"
Playback on a Network Audio Player
- Chapter 2 "Playing Music Files on a
Network Audio Player"
Playback on USB-DAC Devices
- Chapter 2 "Playing Music Files on
USB-DAC Devices"
Backing Up Music Files and Settings
- Chapter 2 "Backing Up and Restoring"
Deleting Imported Files
- Chapter 2 "Deleting the Imported Music Files"
Drive Settings and Formatting
- Chapter 3 "Changing the RAID Mode", "Formatting Drives"
Changing the IP Address and Hostname
- Chapter 3 "Changing the IP Address", "Changing the Friendly Name
(Hostname)"
Date, Time, and Time Zone Settings
- Chapter 3 "Conguring the Date and Time", "Changing the Time Zone"
Firmware Update - Chapter 3 "Updating the Firmware"
Importing from a USB Device
- Chapter 2 "Importing Music Files"
Importing from a CD
- Chapter 2 "Importing Music Files"
Checking If the Import Finished
Successfully
- Chapter 2 "Conrming Imported Files"
Importing from a Computer
- Chapter 2 "Importing Music Files"
Downloading
- Chapter 2 "Downloading Music Files
from Streaming Sites"
4
Page 6
Chapter 2 Basic Usage
Display
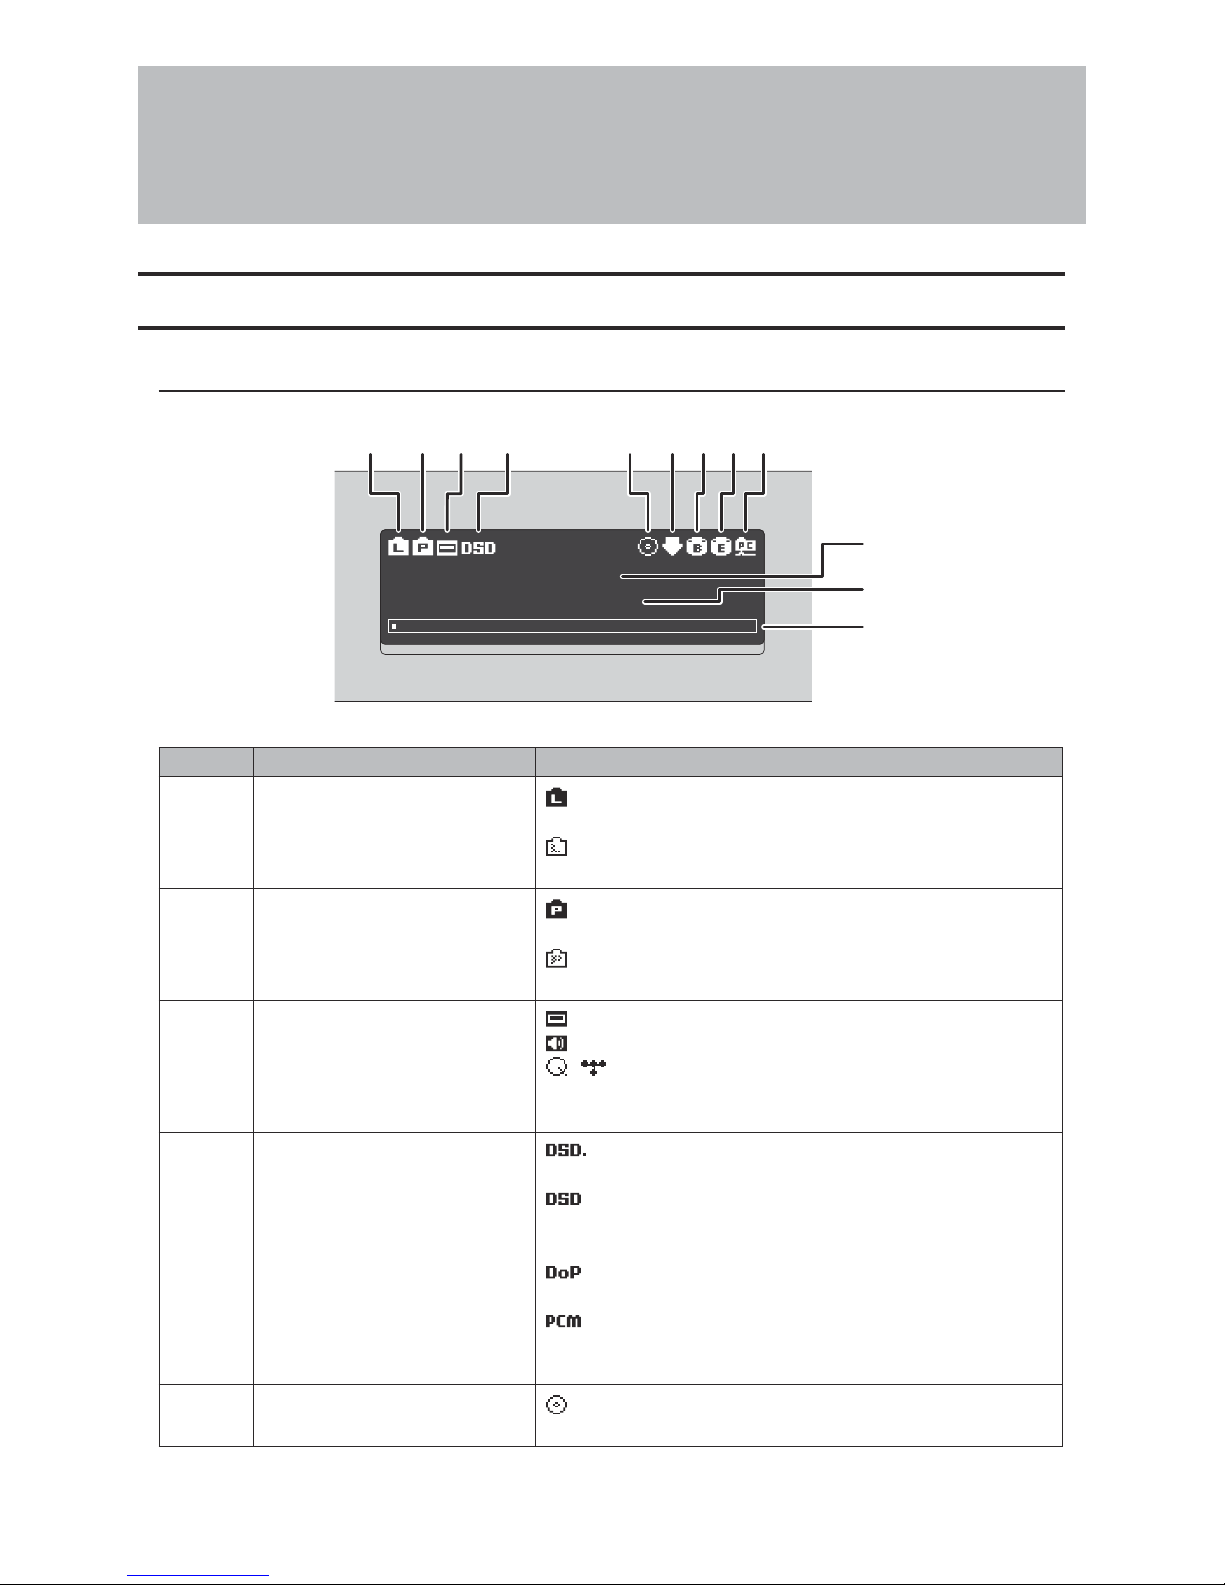
Home Screen
Turn on the N1. After it boots, the home screen will be displayed.
ЧЯШФЧЬЮФЧЦФЭЩ
×Ë
фЧУЦЦиз
123456789
10
11
12
The home screen displays the following information:
Number Item Description
1
Status of Connected Router or
Hub
- Displays when a router or switch is connected to the N1's
LAN port.
- Displays when a router or switch is not connected to the
N1's LAN port or they are turned off.
2 Status of Connected Player
- Displays when a Network Audio Player that is connected to
the N1's player port is on.
- Displays when no Ethernet cable is connected to the player
port or a connected Network Audio Player is off.
3 Status of Connected USB-DAC
- Displays if a USB-DAC is connected.
- Displays if playing a music file on a connected USB-DAC.
/ - Displays if playing songs from a streaming service on
a connected USB-DAC. The available streaming services vary
depending on your controller app and country.
4 DSD Playback Mode
- Displays when the playback mode is set to "Standard" and
a connected USB-DAC supports Melco Markerless DSD playback.
- Displays when the playback mode is set to "Standard"
and a connected USB-DAC does not support Markerless DSD
playback.
- Displays when the playback mode is set to "DSD over PCM
priority mode".
- Displays when the playback mode is set to "PCM only".
Note: If none of the above icons are displayed, the playback
mode is set to "Legacy".
5
Status of Connected Optical
Drive
- Displays if an optical drive is connected. The icon will be
extinguished if no optical drives are connected.
5
Page 7
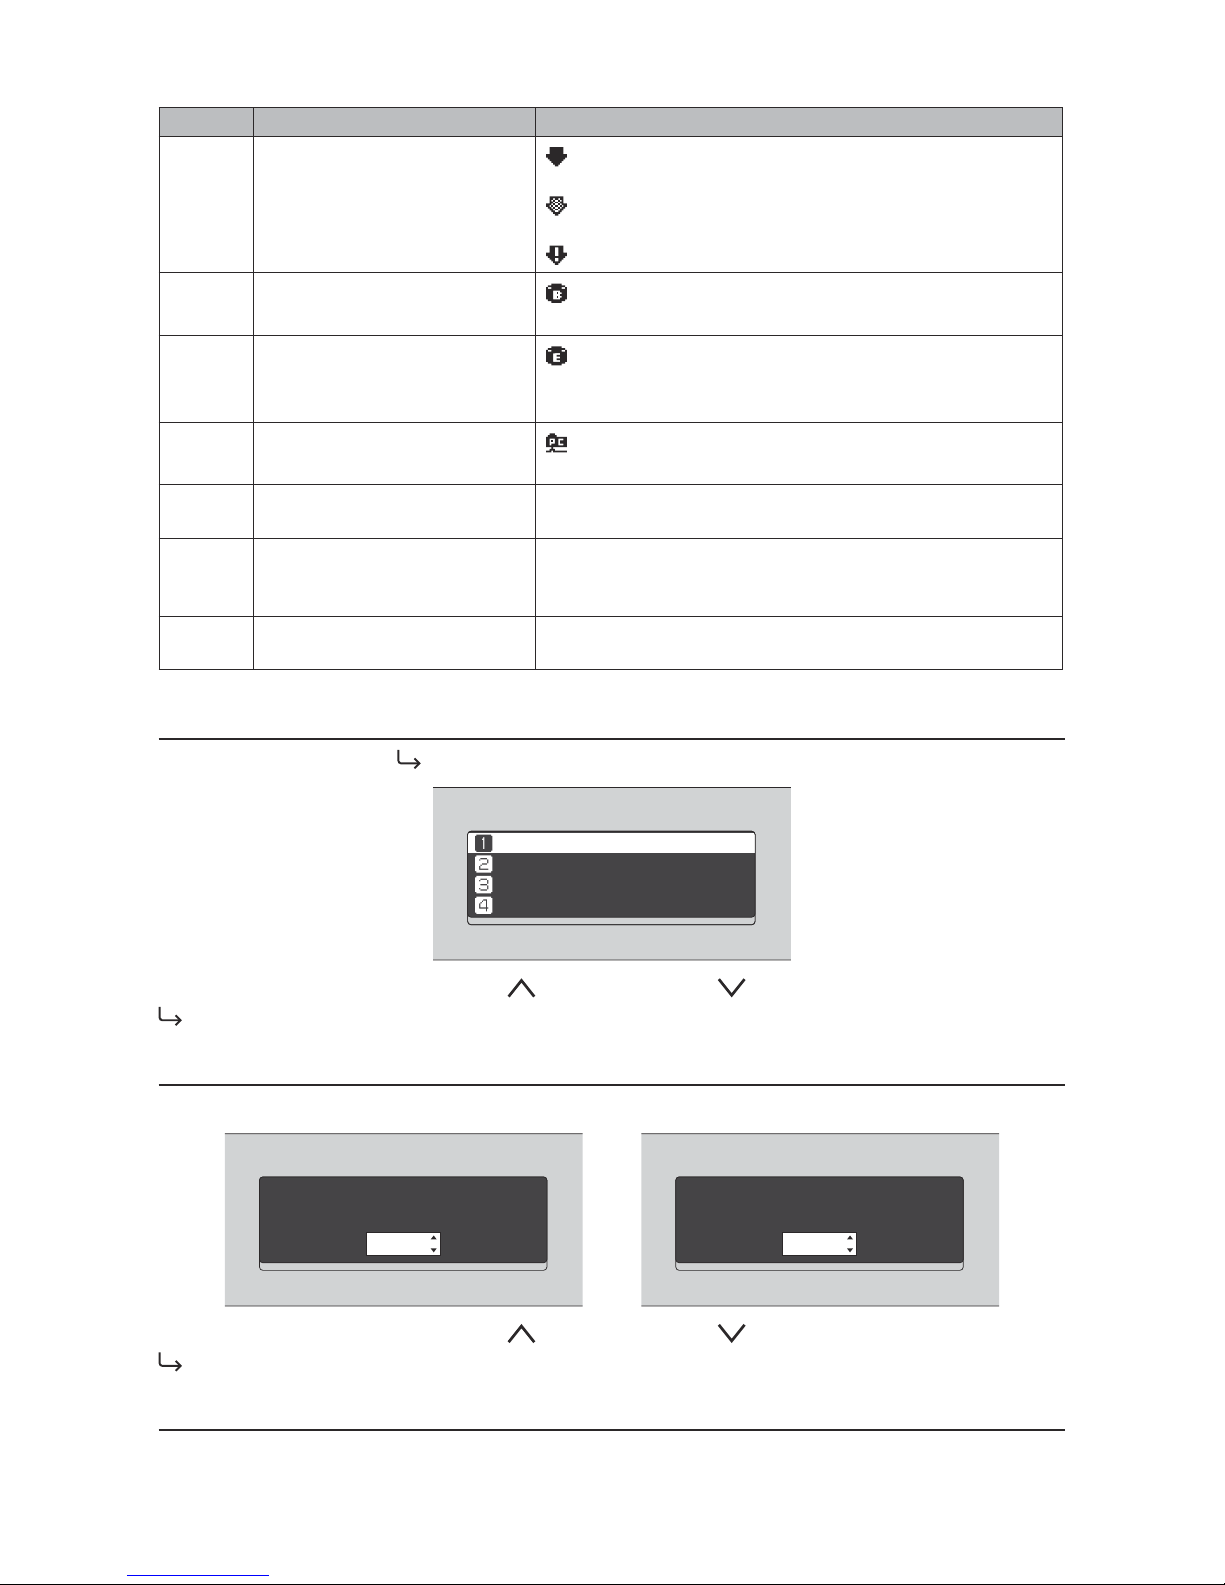
Number Item Description
6 Status of Downloader
- Displays when an account was added and auto download is
enabled.
- Displays when an account was added but auto download is
disabled.
- Displays when an error occurs and downloading failed.
7 USB Port for Backup USB Drive
- Displays when a USB device is connected to the backup
port.
8 USB Port for Expansion USB Drive
- Displays when a USB device is connected to the expansion
port. While the icon is blinking, the N1 is searching for music
files. When the icon stops blinking, music file playback is ready.
9 Status of File Sharing
- Displays when the setting is enabled in navigating to
"Settings" - "SMB File Sharing".
10 Friendly Name (Hostname)
Displays the friendly name (hostname) of the N1. The friendly
name is used when accessing the N1 from an app or computer.
11 IP Address
Displays the IP address. The IP address is used when accessing
the N1 from a computer. If no IP address is displayed, the player
port is set to "Direct Mode".
12 Usage Capacity of Internal Drive
Displays the used capacity of the internal hard drive in the N1,
using a bar chart and a percentage (%).
Menu
Press the Menu/Enter button (
) while the home screen is displayed.
ùęĆęĚĘ
èėĔĜĘĊÆùĔēČĘÆÆÆÖ
èĆĈĐĚĕ
ùĊęęĎēČĘ
Move the cursor by pressing the Up button ( ) or the Down button ( ), then press the Menu/Enter button (
) to make a selection.
Dialog
When confirming the operation, the dialog screen will be displayed.
пĒĕĔėęЖċėĔĒЖėĊĆėЖыщиЖĉėĎěĊе
õñ
пĒĕĔėęЖċėĔĒЖėĊĆėЖыщиЖĉėĎěĊе
éĆēĈĊđ
Move the cursor by pressing the Up button ( ) or the Down button ( ), then press the Menu/Enter button (
) to make a selection.
Streaming Screen
When the N1 starts streaming music files, the display panel will show the streaming music information.
6
Page 8
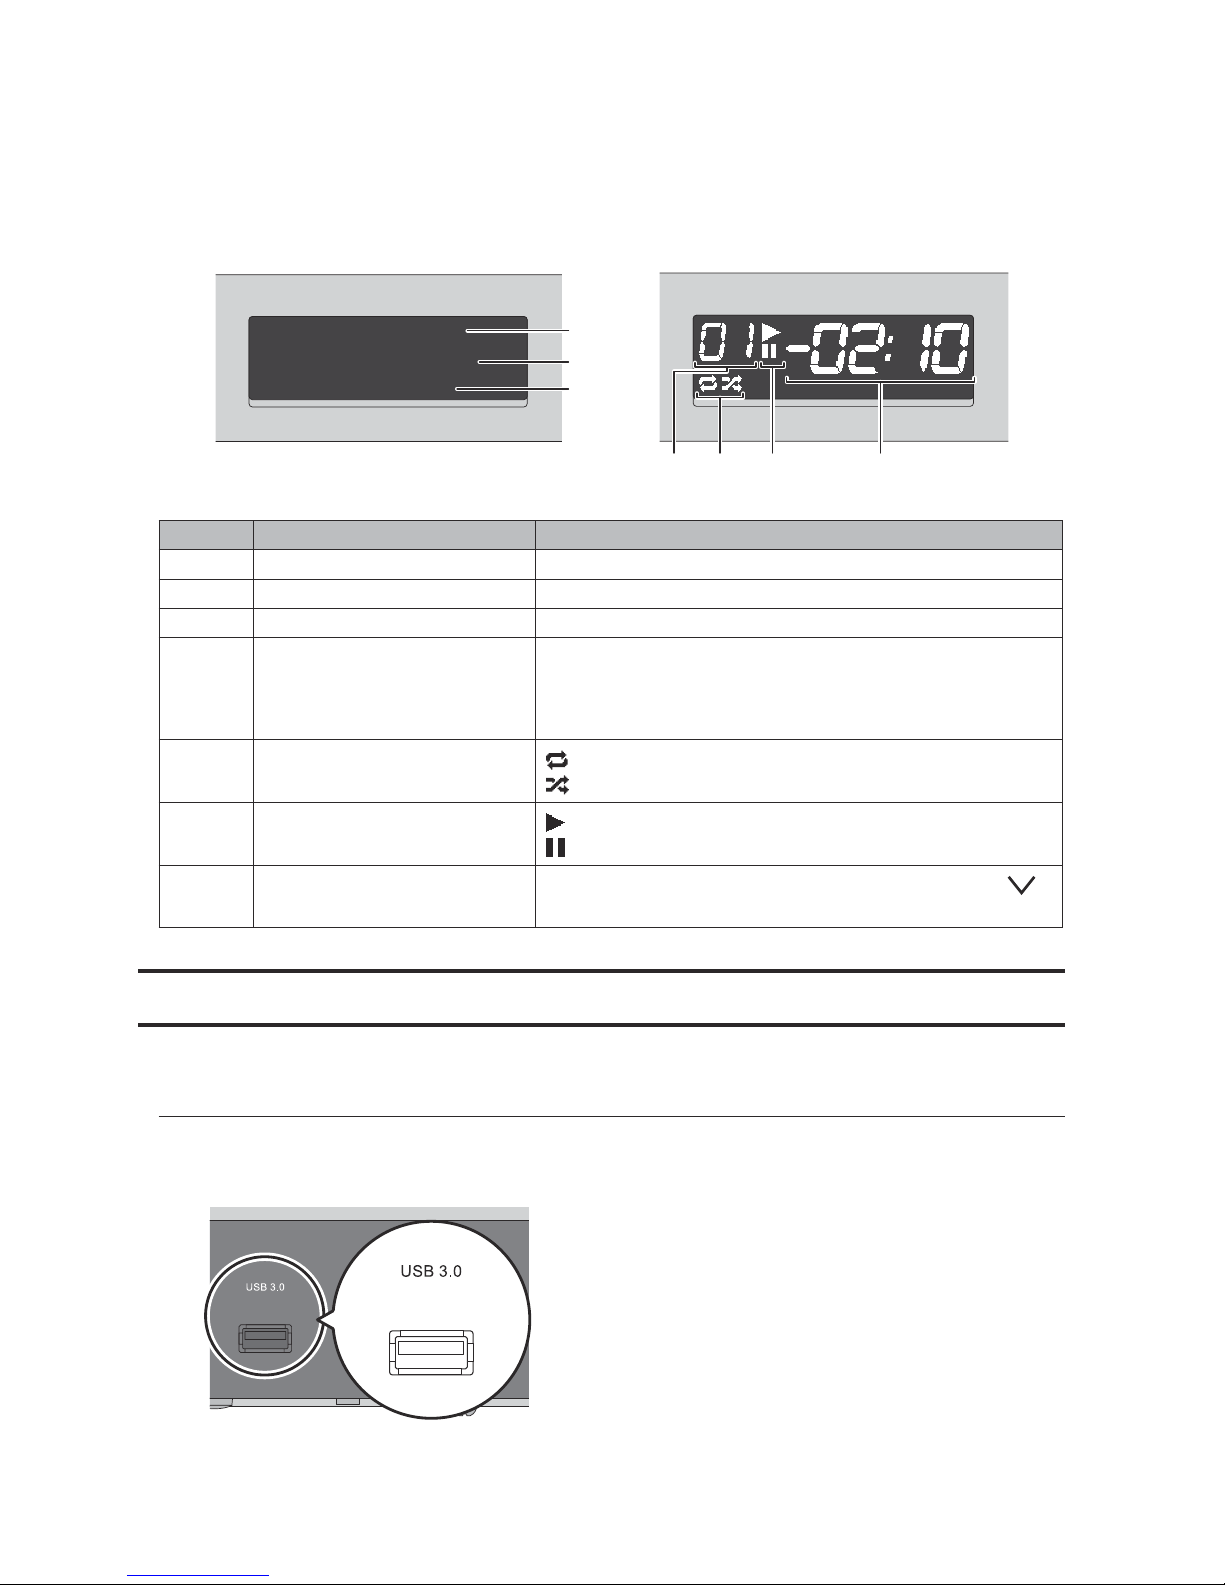
Notes:
•If the music file is playing on a computer, the music information will not be displayed on the display panel.
•Depending on the streaming player, file format, or file tag information, music information may not always be
displayed properly on the display panel.
ыщиЖщĔĚēĉЖкĊěĎĈĊ
ултйхЖузф
ЪЮФЦĐоğЖуцлн
1
2
3
4567
Streaming to USB-DAC or Network Audio Player Streaming a Music File to USB-DAC
The display panel displays the following information:
Number Item Description
1 Player Information Displays the player information that playing a music file.
2 Title Display the title of a music file.
3 Music File Information Displays file format and sampling rate.
4 Track Number
Displays the number of the track currently playing. Regardless
of how many music files are available, only the last two digits of
the track number will be displayed. For example, if track 121 is
playing, this will show "21".
5 Repeat/Shuffle
- Repeats playback of all music files while this is displayed.
- Shuffles playback of all music files while this is displayed.
6 Playback/Suspension
- Appears while playing a music file.
- Appears while playback is suspended.
7
Remaining Time/Song Time
Passed
Switches the display option by pressing the Down button (
)
while playback is suspended.
Importing Music Files
Music files can be imported from a USB device or a CD to the N1.
Importing from USB Devices
To import music files from a connected USB device, follow the procedure below.
1 Connect the USB device that contains music files to the USB 3.0 port.
7
Page 9
Notes:
•Use only the compatible USB devices listed on melco-audio.com.
•Connect only NTFS-formatted, FAT32-formatted, or HFS Plus-formatted USB devices.
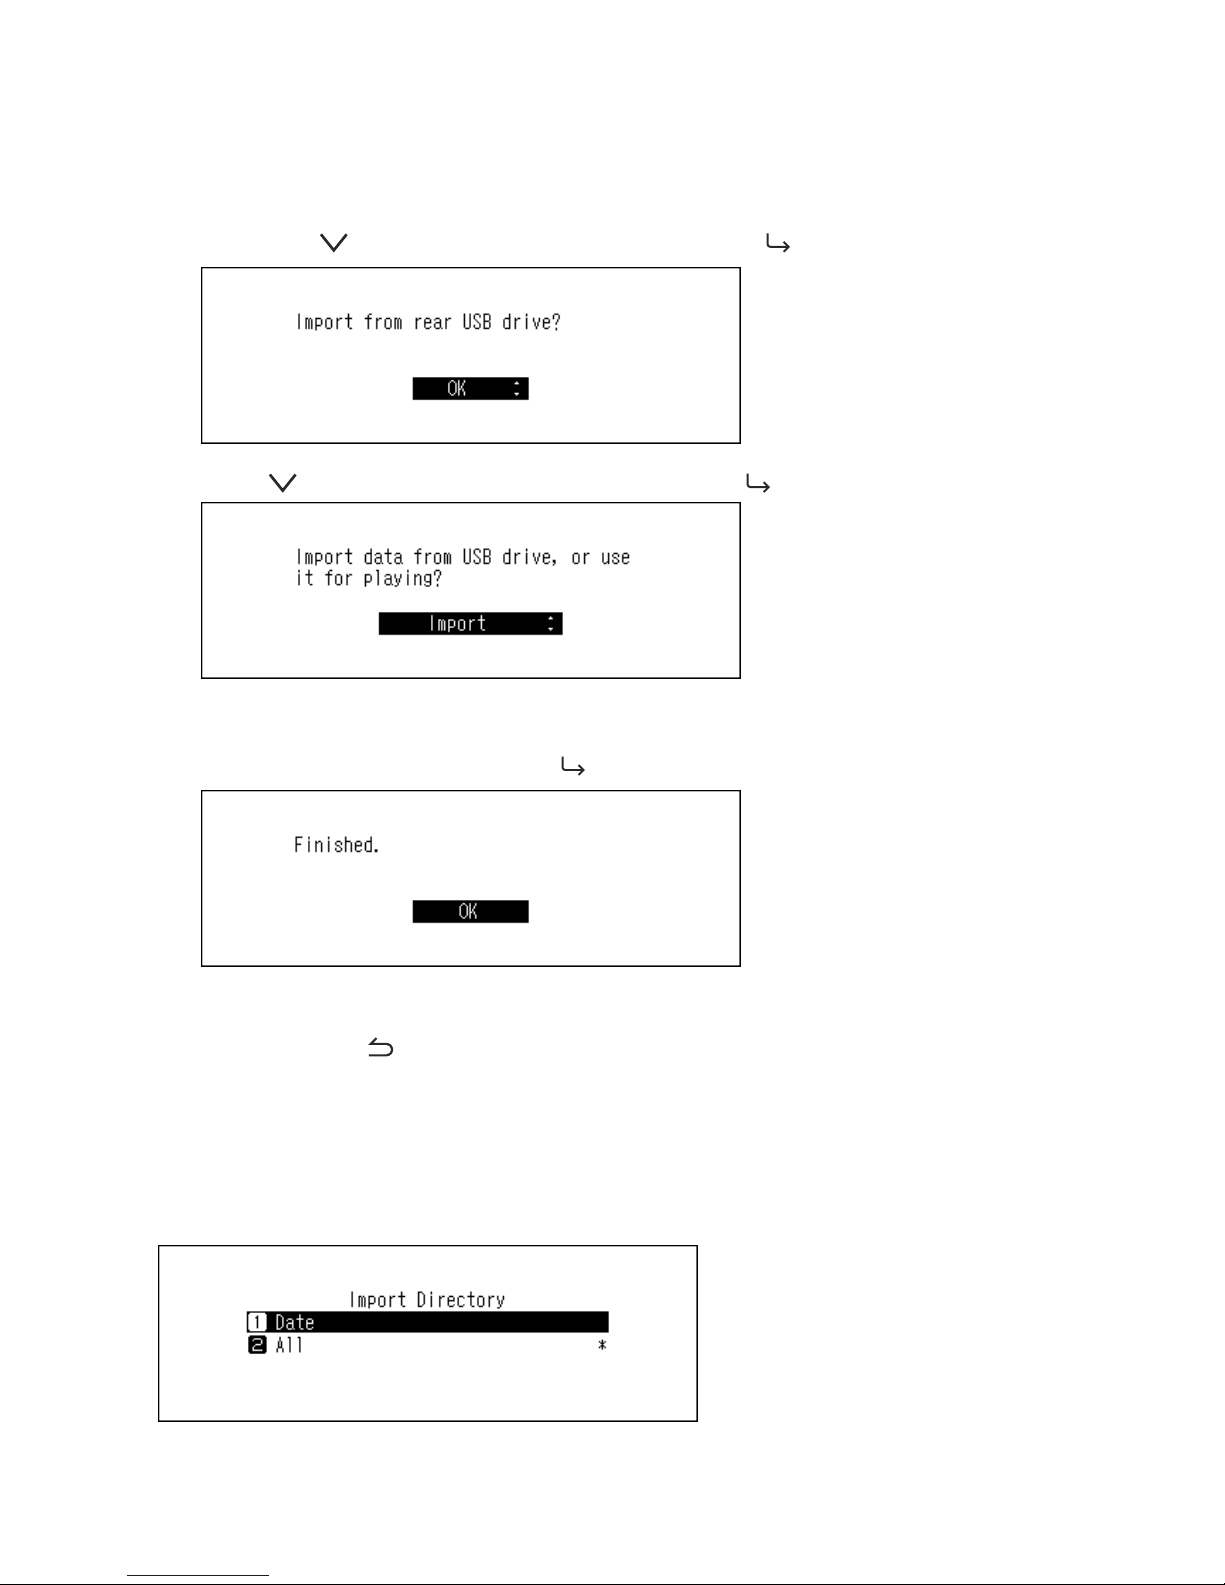
2 When the USB drive is connected to the rear USB 3.0 port, the following screen will be displayed. Press the
Down button (
) and select "OK", then press the Menu/Enter button ( ).
When the USB drive is connected to the front USB port, the following screen will be displayed. Press the Down
button ( ) and select "Import", then press the Menu/Enter button ( ).
3 Wait until music importing is finished.
4 When finished, press the Menu/Enter button ( ).
Notes:
•If a filename or folder name starts with a period (.), the file or folder cannot be imported.
•When the Back button (
) is pressed while importing, the import process will be cancelled after the N1 finishes
importing the current file. If the imported file size is large, the cancellation process may take a few minutes to
finish.
Import Destination Details
Imported music files will be stored in the "import" folder. There are two options to store the imported data in the N1.
To change these options, go to Settings - Import Directory and select from "Date" or "All".
8
Page 10
•"Date" - If you select this option, a folder that contains the import date in the folder name will be created within
the "import" folder and all imported files will be stored in that folder. Even if the same data is included in the USB
device, it will be copied to the N1.
•"All" - If you select this option, data will be imported into the "all" folder within the "import" folder. With this
option, only files with changes will be imported to the N1. Files with no changes from the previous import will
not be imported.
Importing from a Music CD
To import tracks from a music CD, follow the procedure below.
Note: Importing tracks from a music CD requires an optical drive (not included). Use only the compatible optical
drive(s) listed on melco-audio.com. Depending on the manufacture date, circumstances, and specifications of a
connected optical drive, it may not work even if the optical drive is listed in our compatible devices.
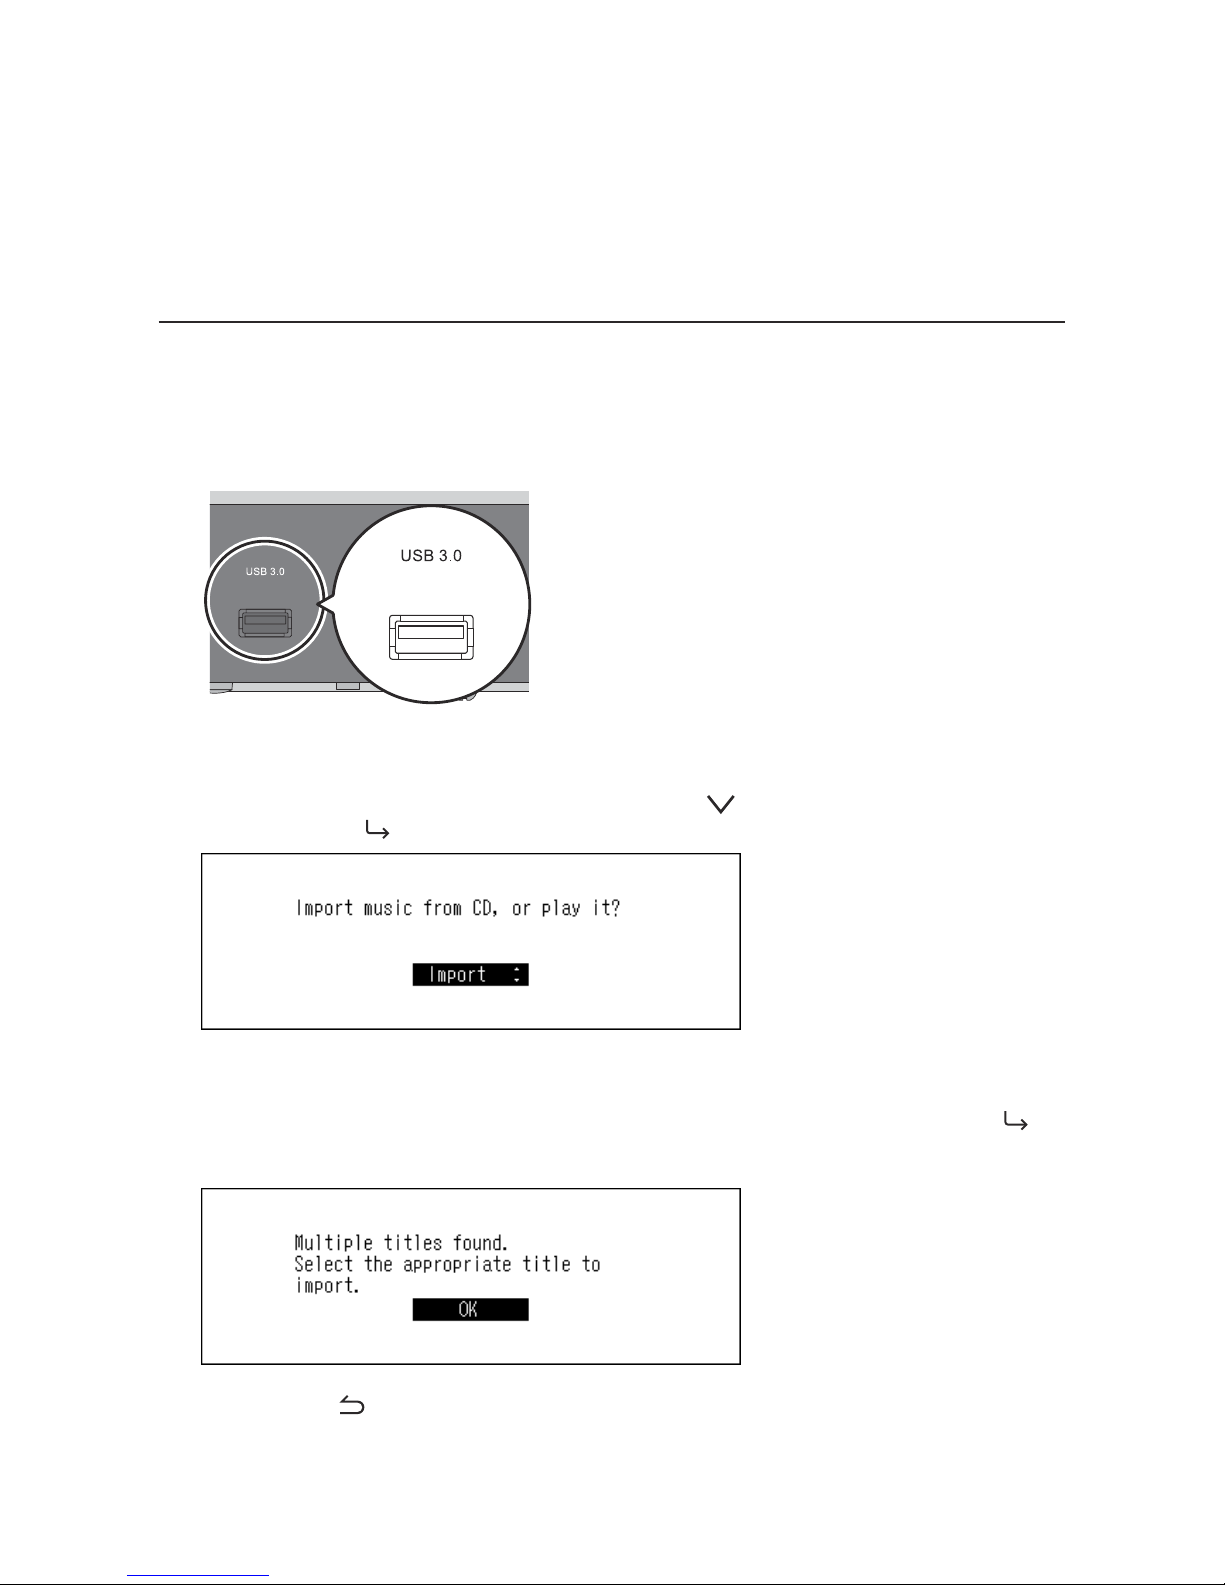
1 Connect an optical drive to the USB 3.0 port.
2 Insert a music CD to import its tracks.
3 When the following screen is displayed, press the Down button ( ) and select "Import", then press the
Menu/Enter button ( ).
4 When the CD is detected, the N1 will try to get the album information automatically. If the N1 is connected to
the Internet, music tracks will be imported using the acquired album information.
When multiple titles are found, the following message will be displayed. Press the Menu/Enter button (
) and select the appropriate album title on the displayed window. The album title with the "*" symbol will
contain the cover art.
Once you have selected the album title, you can return to the previous window and select it again by pressing
the Back button (
).
9
Page 11
Note: If the N1 is not connected to the Internet, or if the CD information is not available from the online music
database, the album name and music title information will not be acquired. In such a case, the import date will
be used as the album name and the track number as the filename.
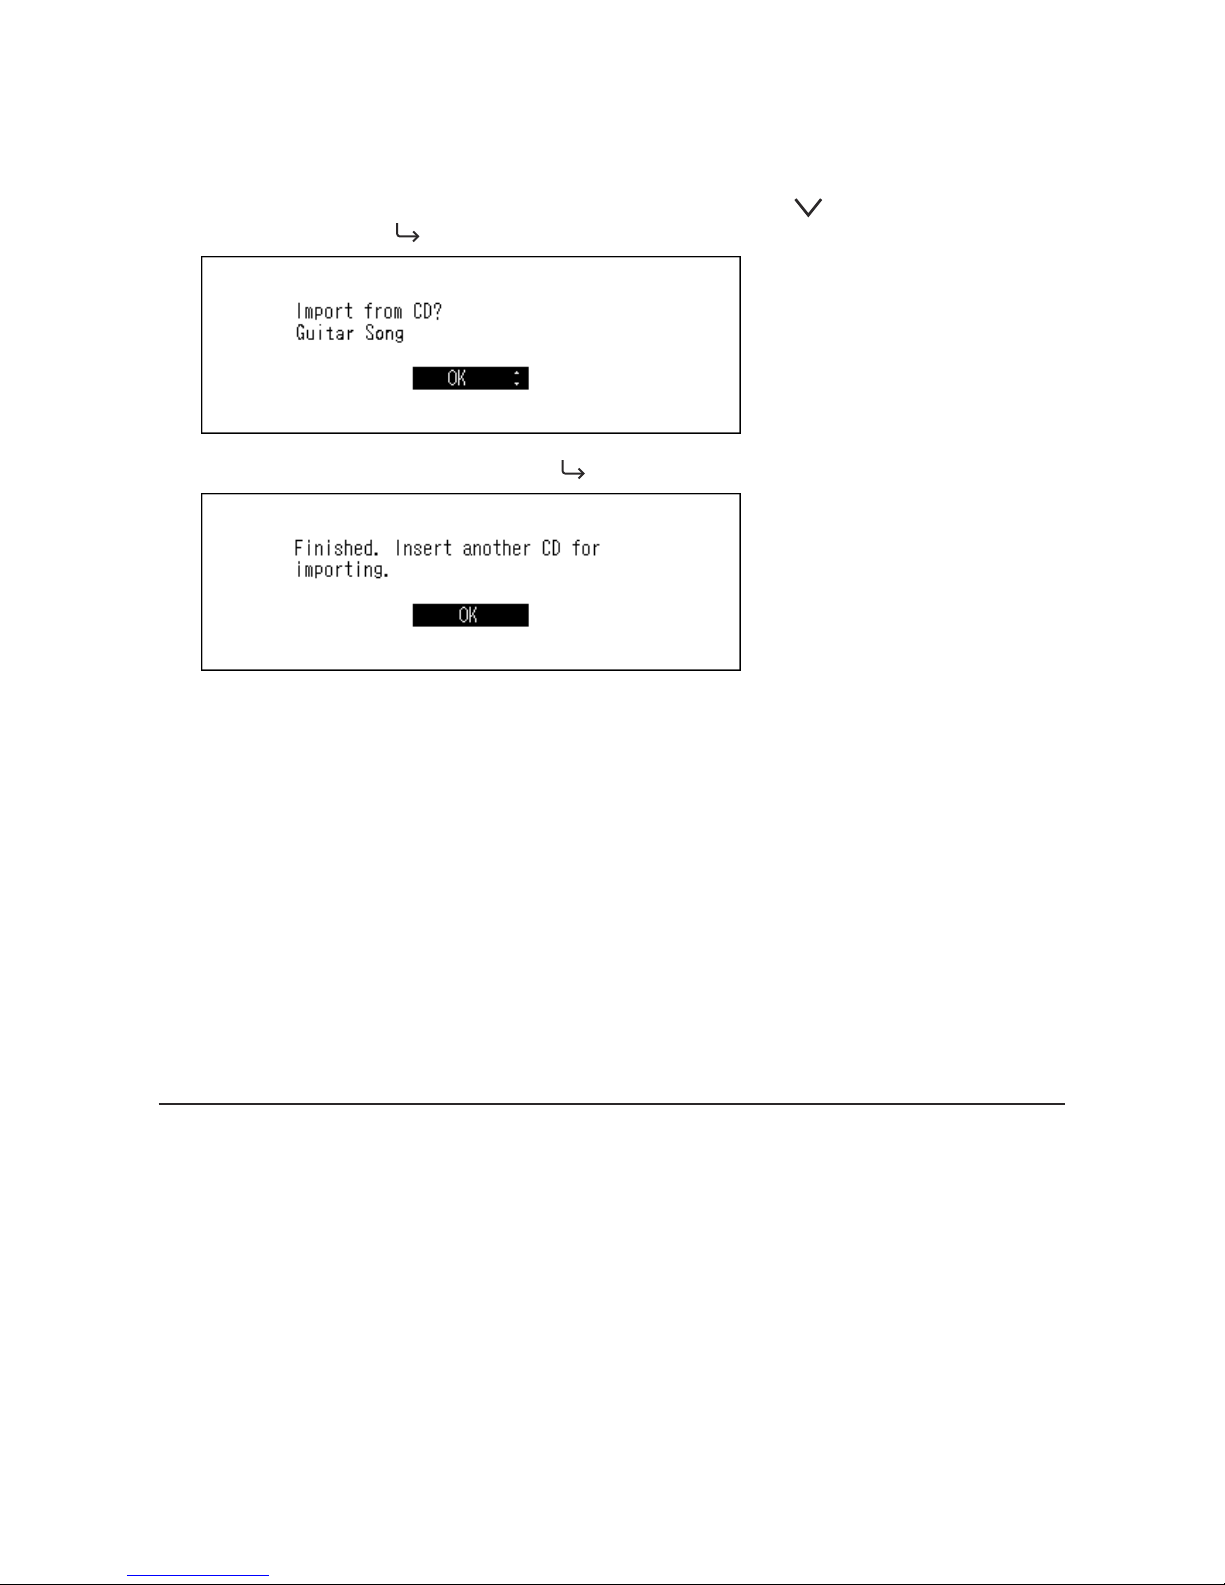
5 When the "Import from CD?" message is displayed, press the Down button (
) and select "OK", then press
the Menu/Enter button ( ).
6 When finished, press the Menu/Enter button ( ).
To import tracks from another CD, repeat the process from step 2 above.
Import Destination Details
Imported tracks will be stored in the "import_CD" folder. If importing from a non-music CD, the imported data will
be stored in the "import" folder, not the "import_CD" folder.
Imported tracks that contain cover art (folder.jpg) cannot be moved or copied unless the cover art file is removed.
Tracks that don't contain cover art can be moved or copied.
File Format of Imported Music Files
When importing music files from a CD, they will be saved as non-compressed FLAC files by default. They can
be changed to WAV files, and FLAC compression levels are changeable as well. Available compression levels are
described in the "Menu List" section in chapter 4.
Confirming Imported Files
Imported files can be accessed from mobile devices or computers which are connected to the same router with the
N1. Follow the procedure below.
For Mobile Devices
To confirm imported music files from a mobile device, a UPnP/DLNA-compatible app is required. Install the app to a
mobile device.
For Computers
To confirm imported music files from computers, follow the procedure below.
10
Page 12
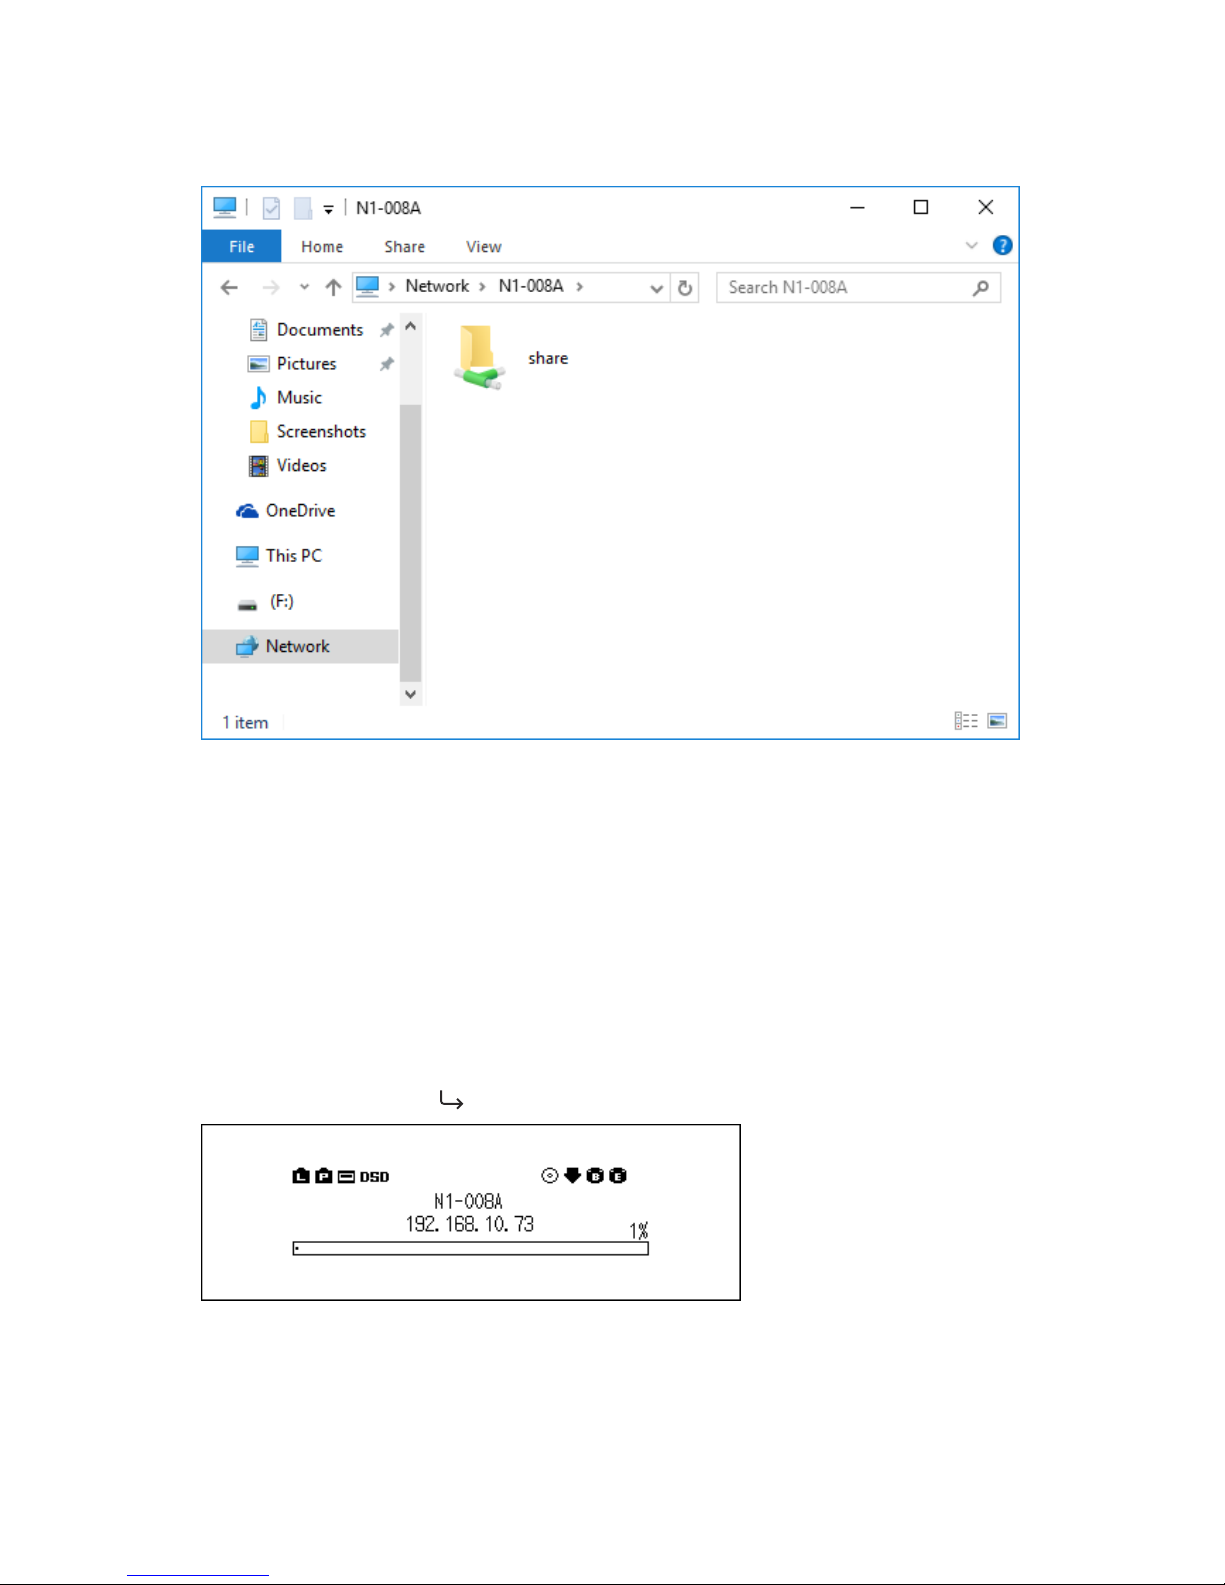
1 Enter "\\" and the N1's IP address or friendly name (hostname) into the address bar of Windows Explorer, then
press the Enter key. For macOS, click Connect to Server and enter "cifs://" and the N1's IP address or friendly
name.
2 The "share" folder will be displayed. Double-click the "share" folder and if the imported files are displayed,
import was finished properly.
You can also import files from the computer to the displayed window mentioned in the step above.
Notes:
•On a computer, you can also check the imported files by installing a UPnP/DLNA-compatible app.
•If the "share" folder is not displayed, wait for about 30 seconds and try again.
If Unable to Access from a Computer
If the file sharing status icon, number 9 in the "Home Screen" section, is not displayed at the home screen, enable
the file sharing service. To enable the file sharing service, follow the procedure below.
1 Press the Menu/Enter button (
) to display the menu list at the home screen.
11
Page 13
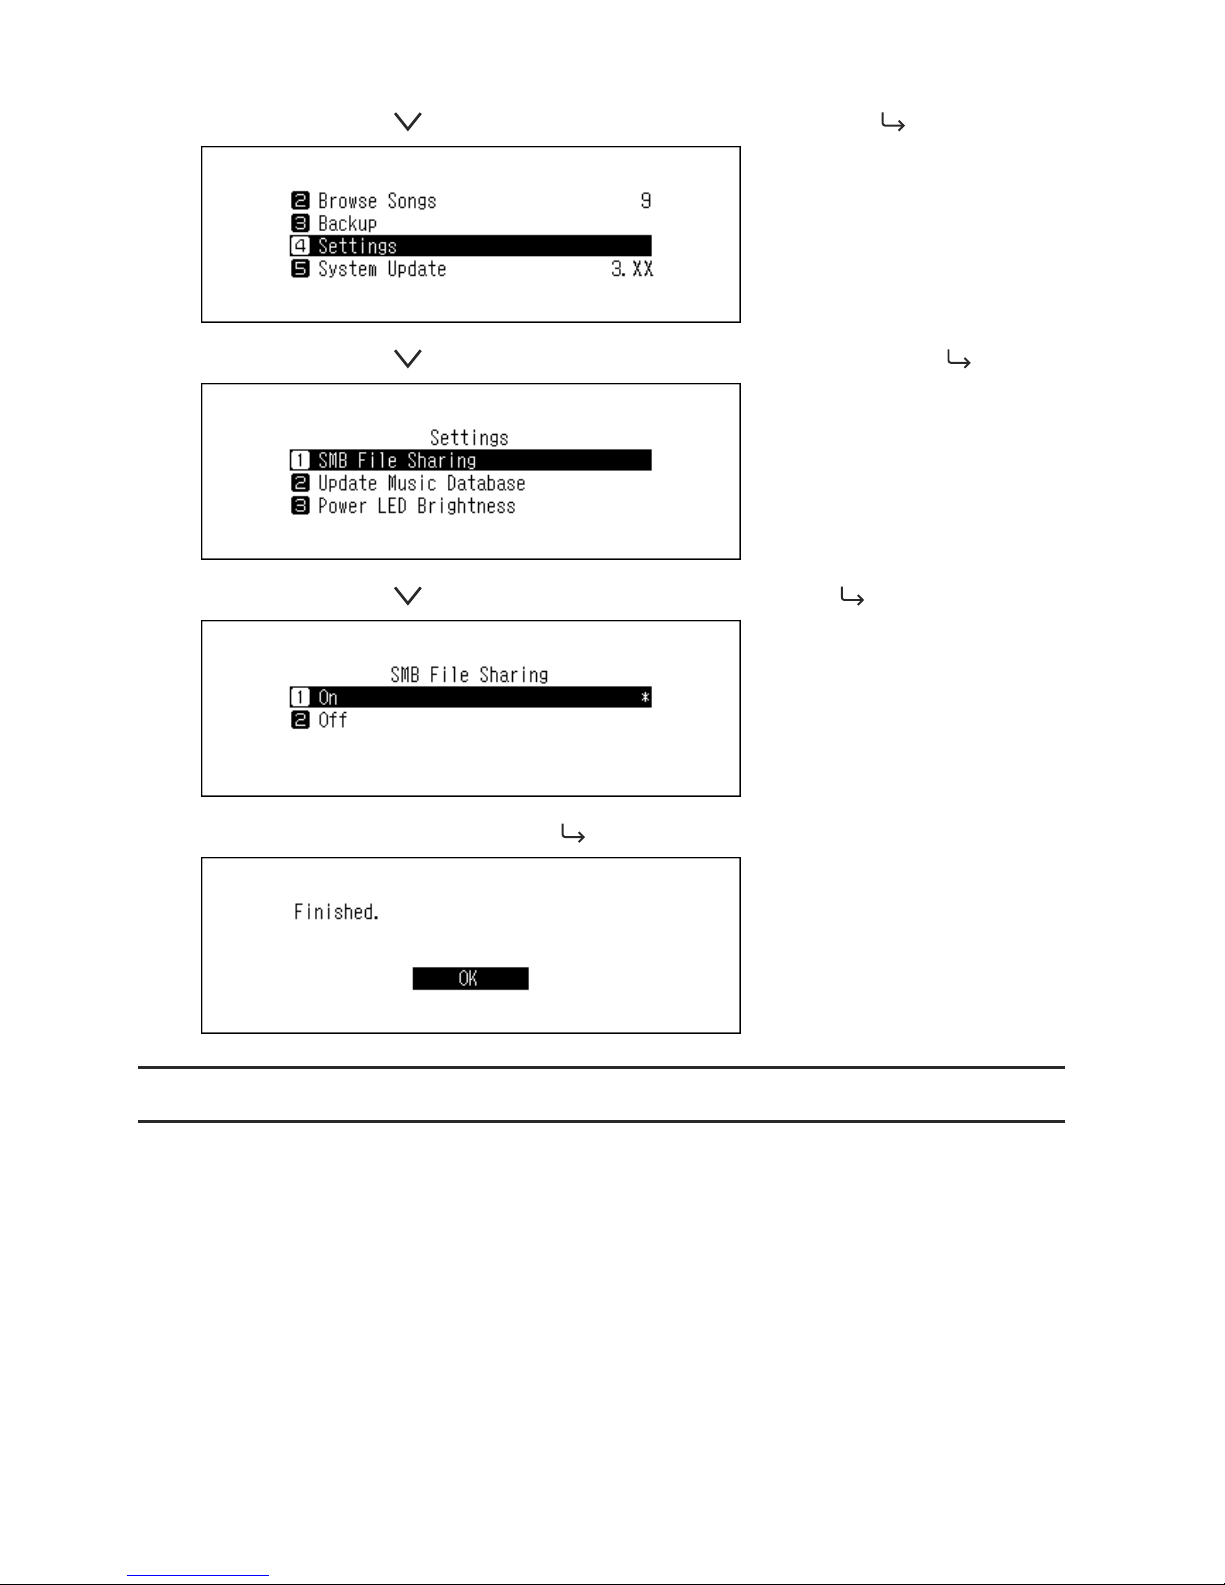
2 Press the Down button ( ) and select "Settings", then press the Menu/Enter button ( ).
3 Press the Down button ( ) and select "SMB File Sharing", then press the Menu/Enter button ( ).
4 Press the Down button ( ) and select "On", then press the Menu/Enter button ( ).
5 When finished, press the Menu/Enter button ( ).
Downloading Music Files from Streaming Sites
Downloader can download music files from streaming sites automatically. Once you purchase the music files from a
mobile device or computer, the N1 can download the files from the streaming site, even if you're not at home.
Supported streaming sites are listed below:
•HIGHRESAUDIO
•OTOTOY
•e-onkyo music
*
* "e-onkyo music" is not the same as "Onkyo Music". "e-onkyo music" is only for Japanese consumers and "Onkyo
Music" is for overseas consumers.
Notes:
•Create an account on one of the streaming sites above before using downloader. Also, make sure the N1 is
connected to the Internet. You can verify if the N1 is connected to the Internet from Status - Network - LAN.
12
Page 14

•Do not move the folder under the "download" folder that contains the account name in its folder name to
another folder. If the folder is moved, the N1 may download the same music file(s) again.
Adding Accounts
To add an account from a streaming site to the N1, follow the procedure below.
1 Create an account on the streaming site.
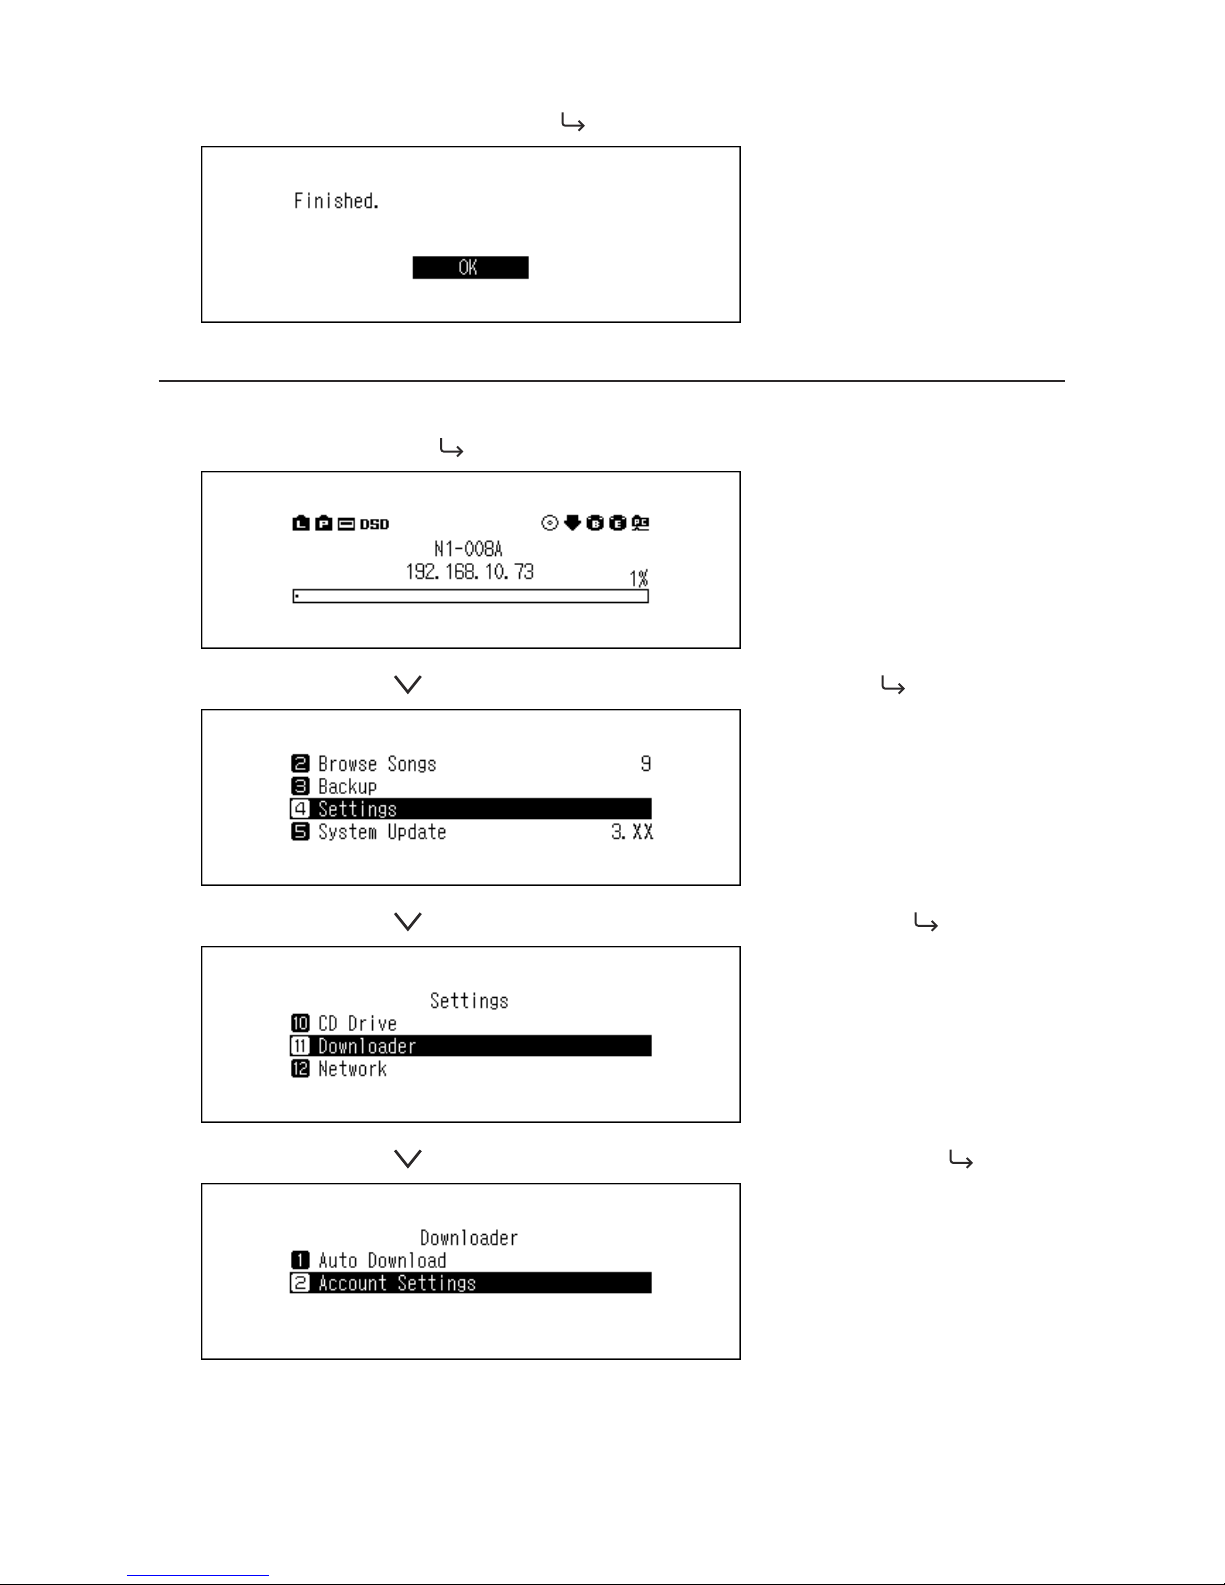
2 Press the Menu/Enter button (
) to display the menu list at the home screen.
3 Press the Down button ( ) and select "Settings", then press the Menu/Enter button ( ).
4 Press the Down button ( ) and select "Downloader", then press the Menu/Enter button ( ).
5 Press the Down button ( ) and select "Account Settings", then press the Menu/Enter button ( ).
6 Press the Down button ( ) and select "Add/Edit Account", then press the Menu/Enter button ( ).
13
Page 15
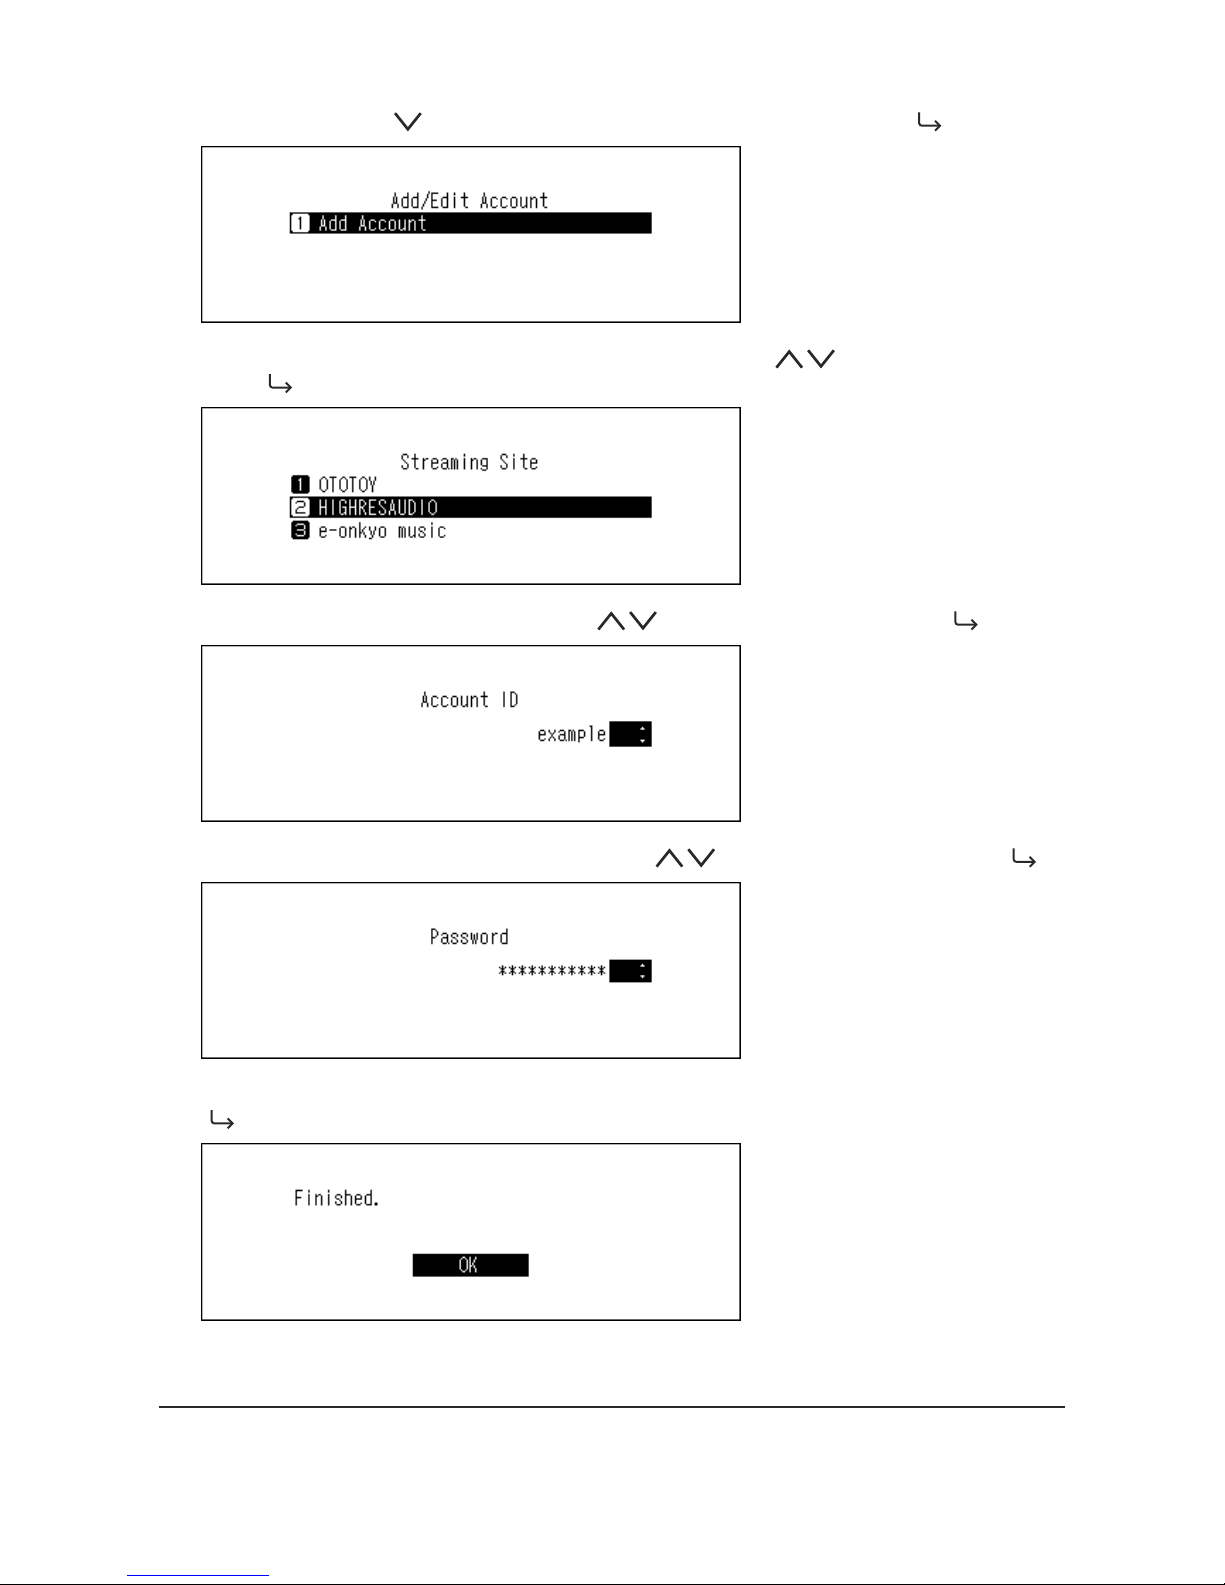
7 Press the Down button ( ) and select "Add Account", then press the Menu/Enter button ( ).
8 Select the streaming site to add an account using the Up/Down buttons ( ) and press the Menu/Enter
button ( ).
9 Enter the account ID using the Up/Down buttons ( ), then press the Menu/Enter button ( ).
10 Enter the account password using the Up/Down buttons ( ), then press the Menu/Enter button ( ).
11 When the credentials are authenticated, the following message will be displayed. Press the Menu/Enter button
( ).
After an account has been added, auto download will be automatically enabled.
Enabling or Disabling Auto Download
To disable or enable auto download, follow the procedure below.
14
Page 16
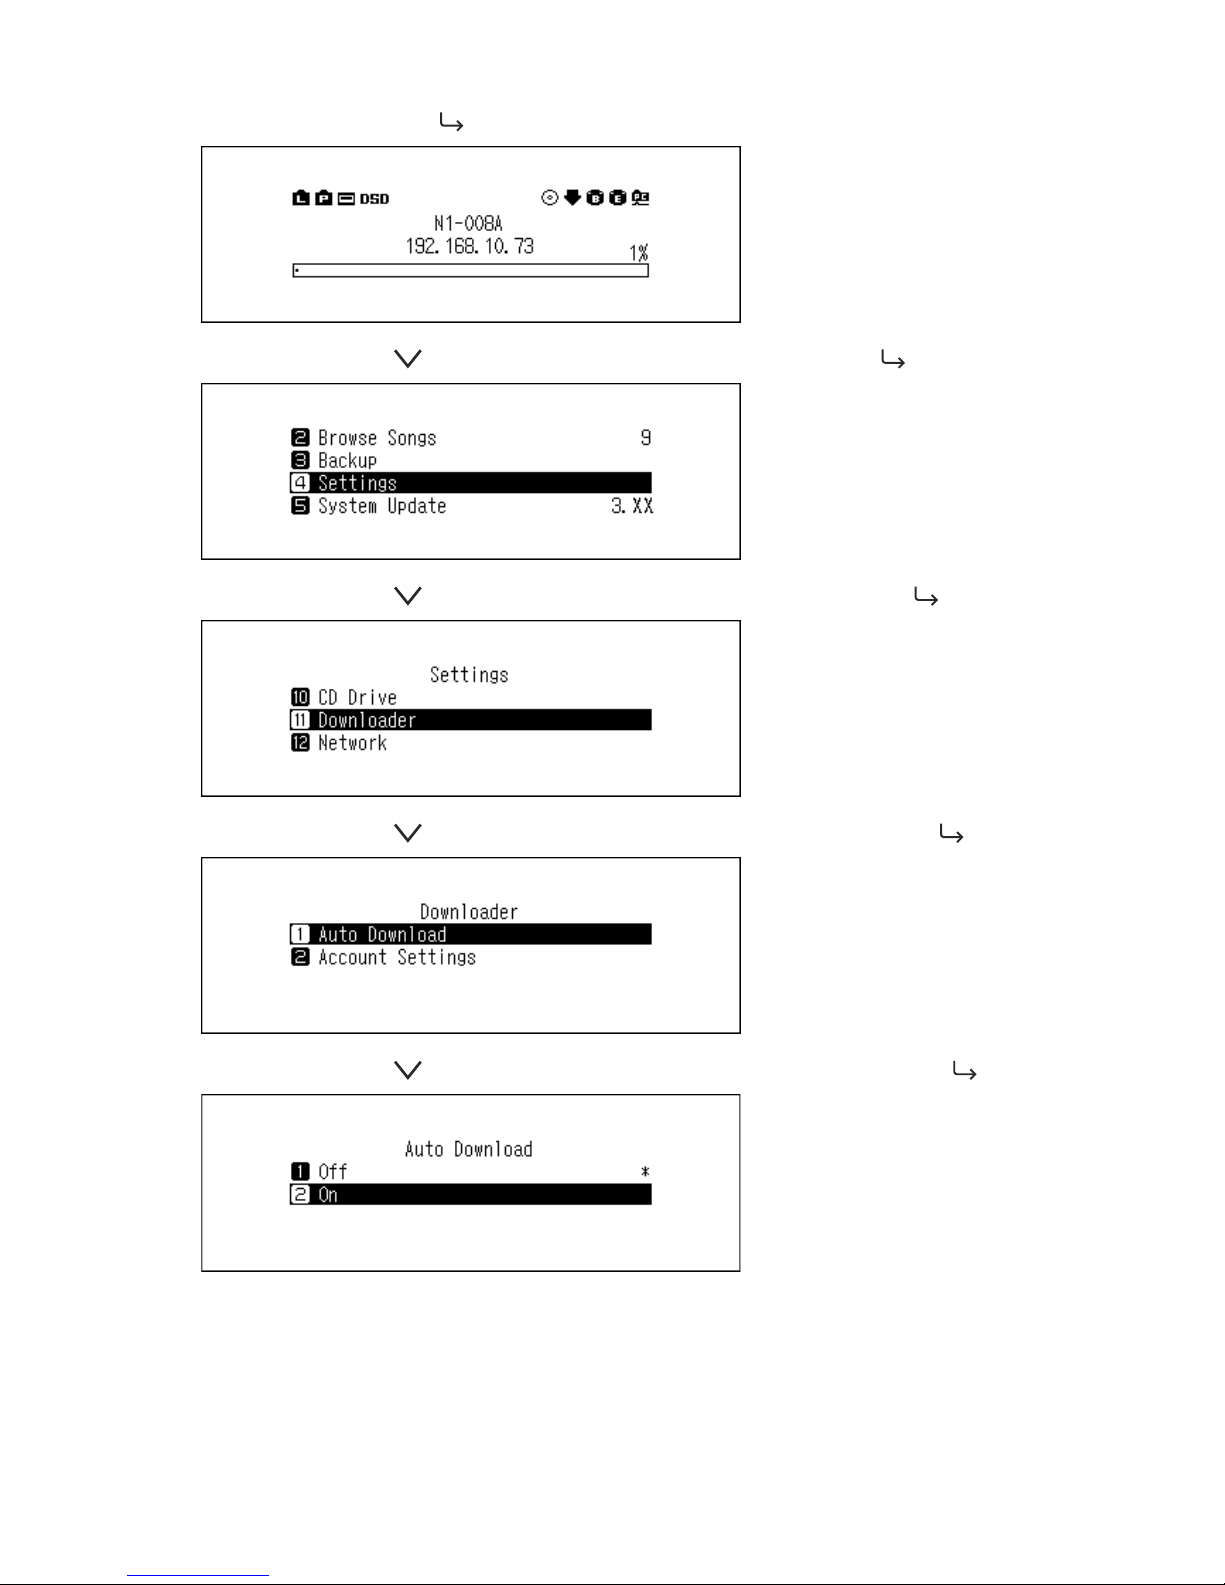
1 Press the Menu/Enter button ( ) to display the menu list at the home screen.
2 Press the Down button ( ) and select "Settings", then press the Menu/Enter button ( ).
3 Press the Down button ( ) and select "Downloader", then press the Menu/Enter button ( ).
4 Press the Down button ( ) and select "Auto Download", then press the Menu/Enter button ( ).
5 Press the Down button ( ) and select either "Off" or "On", then press the Menu/Enter button ( ).
15
Page 17
6 When finished, press the Menu/Enter button ( ).
Deleting Accounts
To delete an existing account on the N1, follow the procedure below.
1 Press the Menu/Enter button (
) to display the menu list at the home screen.
2 Press the Down button ( ) and select "Settings", then press the Menu/Enter button ( ).
3 Press the Down button ( ) and select "Downloader", then press the Menu/Enter button ( ).
4 Press the Down button ( ) and select "Account Settings", then press the Menu/Enter button ( ).
16
Page 18
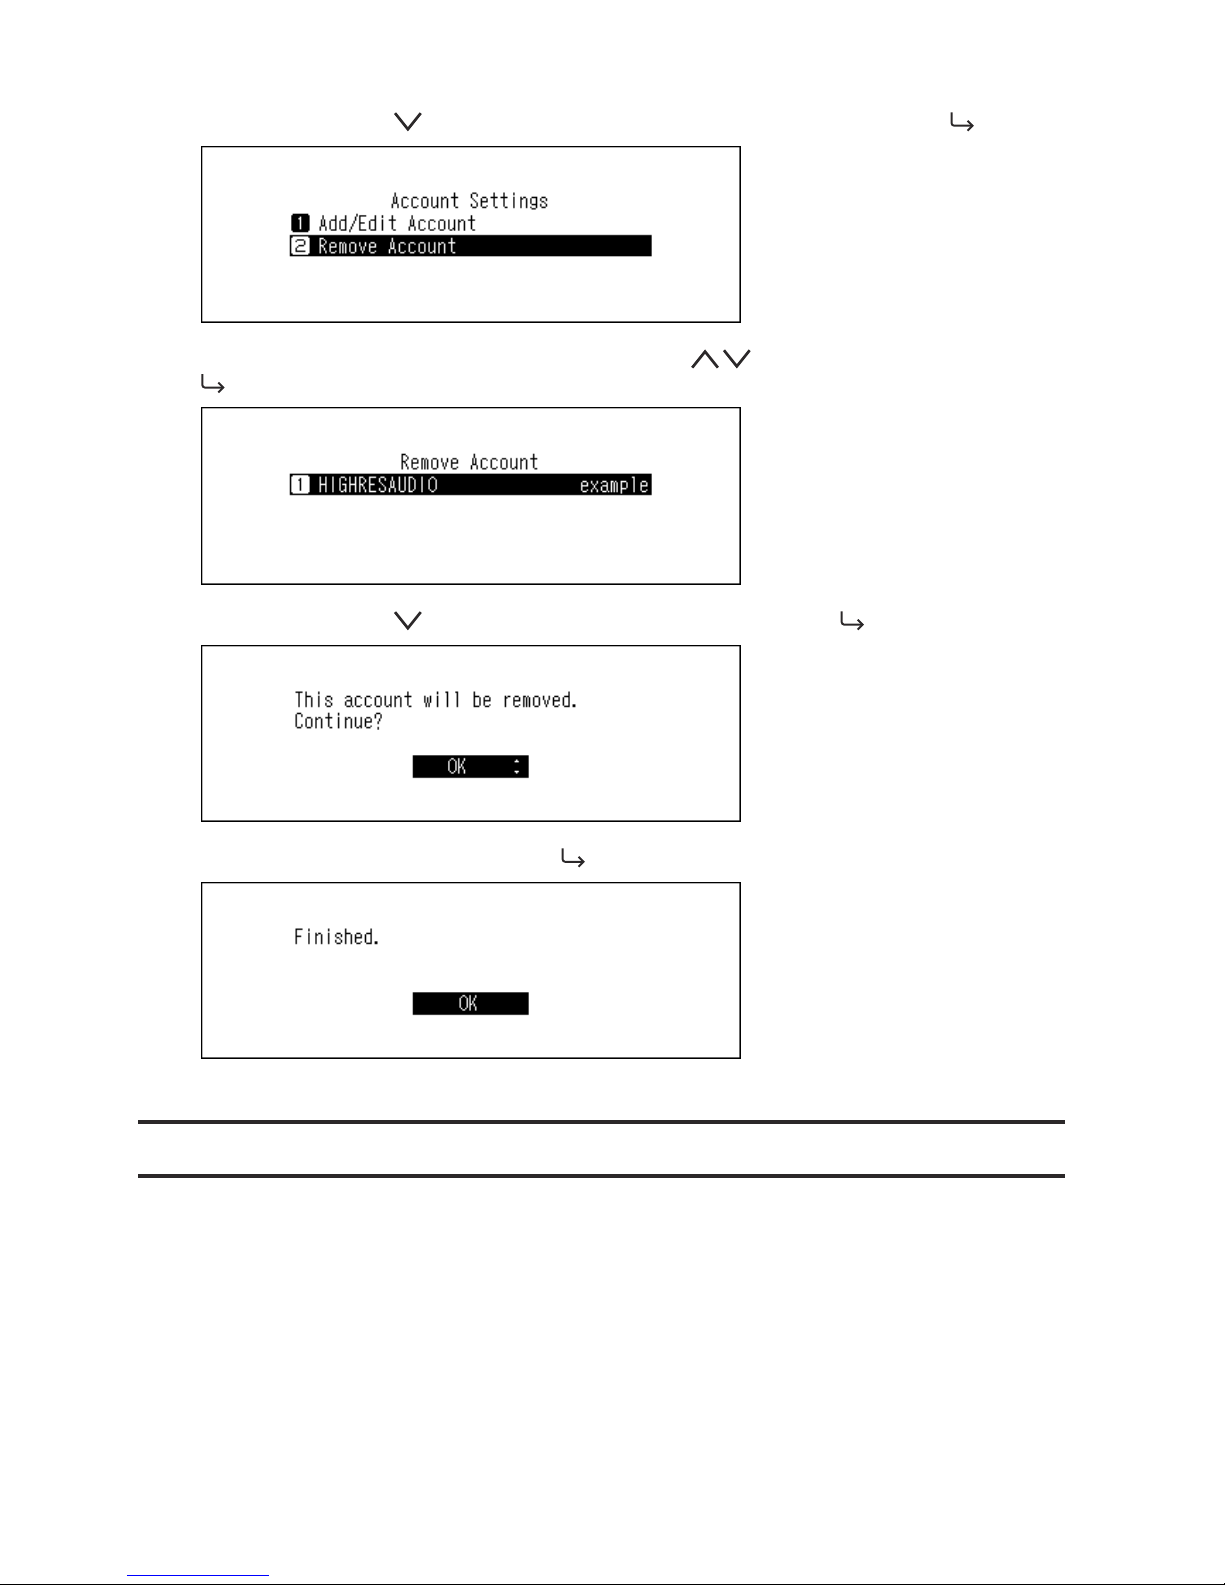
5 Press the Down button ( ) and select "Remove Account", then press the Menu/Enter button ( ).
6 Select the account to be deleted using the Up/Down buttons ( ), then press the Menu/Enter button (
).
7 Press the Down button ( ) and select "OK", then press the Menu/Enter button ( ).
8 When finished, press the Menu/Enter button ( ).
Note: If you remove all accounts with auto download enabled, it will be disabled automatically.
Playing Music Files on a Network Audio Player
Imported music files can be played using the Network Audio Player. The procedure to play music files is different
depending on the Network Audio Player, so refer to your Network Audio Player's manual for more detailed
information on how to play music.
17
Page 19

Network Audio Player
N1
Streaming Imported Music Files
The N1 supports streaming of files with the extensions below.
Supported File Types for Streaming
Extensions
mp3, wma, wav, lpcm, pcm, ogg, m4a, mp4, 3gp, flac, m3u, mpa, aac,
apl, ac3, aif, aiff, mp2, mp1, dsf, dff
Streaming Music Files from USB Devices
Even if music files are not imported from the USB device that is connected to the expansion port of the N1, your
Network Audio Player can play music files from the USB device.
Note: Use only the compatible USB devices listed on melco-audio.com.
Playing Music Files on USB-DAC Devices
The N1 supports USB-DAC, short for "USB digital-to-analog converter". If using buttons on the unit or a mobile
device with a controller app installed, you can directly connect a USB-DAC to the N1 to stream music and enjoy
high-quality sound without using a computer.
18
Page 20

USB-DAC
N1
Configuring for USB-DAC
The N1 supports four different playback modes for DSD files (.dsf, .dff). You can select from the following modes:
•"Standard" - The default and recommended playback mode. If a connected USB-DAC supports Melco Markerless
DSD, the DSD file will be played by the Markerless DSD playback; otherwise, the DSD file will be played by DSD
over PCM.
When this mode is configured, the
or icon will appear on the home screen.
•"DSD over PCM priority mode" - This mode applies DSD over PCM even if a connected USB-DAC supports
Markerless DSD playback. Except for this behavior, this mode is the same as standard mode.
When this mode is configured, the icon will appear on the home screen.
•"PCM only" - This mode will convert DSD files to PCM files. If connecting a USB-DAC that only supports playing
PCM files, selecting this mode is recommended. Except for this behavior, this mode is the same as standard
mode.
When this mode is configured, the icon will appear on the home screen.
•"Legacy" - This mode will be applied on playback. This mode is provided for compatibility for firmware version
3.00 to 3.21 and it is different from standard mode. This mode always play the DSD files by DSD over PCM.
When this mode is configured, no icon will appear on the home screen.
To configure USB-DAC on your N1, follow the procedure below.
1 Press the Menu/Enter button (
) to display the menu list at the home screen.
2 Press the Down button ( ) and select "Settings", then press the Menu/Enter button ( ).
19
Page 21

3 Press the Down button ( ) and select "USB-DAC", then press the Menu/Enter button ( ).
4 Press the Down button ( ) and select "Playback Mode", then press the Menu/Enter button ( ).
5 Select the playback mode using the Up/Down buttons ( ), then press the Menu/Enter button ( ).
6 When finished, press the Menu/Enter button ( ).
Note: Depending on your USB-DAC, the beginning of a music file may not count as initial playback if the sampling
rate has changed between music files or if playing DSD files. In such a case, go to Settings - USB-DAC - PrecisionStart
Latency and set a gap time. This gap time will be added to the first track of the playlist. The default gap time is 0.75
seconds.
•If the beginning of a music file is not played correctly with the default value, make the gap time longer.
•If the default value works correctly, the switch to the next music file will become faster when you make the gap
time shorter.
20
Page 22

Playing Imported Music Files
To stream music files in the N1 or USB drive to a USB-DAC, use buttons on the unit or a controller app on the mobile
device. For more detailed information about how to use controller apps, refer to the apps' user guides.
To play music files using buttons on the N1, follow the procedure below.
1 Press the Menu/Enter button (
) to display the menu list at the home screen.
2 Press the Down button ( ) and select "Browse Songs", then press the Menu/Enter button ( ).
Note: The number shown to the right of "Browse Songs" means the number of available music files to play.
3 Select the category using the Up/Down buttons (
), then press the Menu/Enter button ( ).
4 Select the music file to play using the Up/Down buttons ( ), then press the Menu/Enter button ( ).
5 Press the Down button ( ) and select "Play", then press the Menu/Enter button ( ).
The N1's USB-DAC supports streaming for the following file types and sampling rates.
21
Page 23

Supported File Types
File Types Extensions
FLAC .flac
ALAC (Apple Lossless) /
AAC
.m4a
AIFF .aiff, .aif
WAV .wav
DSDIFF .dff
DSF .dsf
Supported Sampling Rates
•PCM - 44.1 kHz, 48 kHz, 88.2 kHz, 96 kHz, 176.4 kHz, 192 kHz, 352.8 kHz, 384 kHz, 705.6 kHz, 768 kHz
•DSD - 2.8 MHz, 5.6 MHz, 11.3 MHz, 22.6 MHz
Selecting the Controller Mode
"HybridMode" is configured by default and it supports using many types of controller apps. However, it is
recommended to change the controller settings to "Mode 0 Only" or "Mode 1 Only" that is compatible with your
controller app. It will optimise communication between the N1 and the controller app. For more information about
each mode and compatible apps, refer to the melco-audio.com site. To change the controller settings, follow the
procedure below.
1 Press the Menu/Enter button (
) to display the menu list at the home screen.
2 Press the Down button ( ) and select "Settings", then press the Menu/Enter button ( ).
3 Press the Down button ( ) and select "USB-DAC", then press the Menu/Enter button ( ).
22
Page 24

4 Press the Down button ( ) and select "Controller", then press the Menu/Enter button ( ).
5 Press the Down button ( ) and select "Mode 1 Only", then press the Menu/Enter button ( ).
6 When finished, press the Menu/Enter button ( ).
Playing a CD Using an Optical Drive
CD Transport will allow you to play music tracks from the optical drive that is connected to the N1 using USB-DAC.
To play music tracks using an optical drive, follow the procedure below.
1 Connect an optical drive to the USB 3.0 port.
2 Insert a music CD to play music tracks.
23
Page 25

3 Press the Down button ( ) and select "Play", then press the Menu/Enter button ( ). The CD will start
playing.
Notes:
•To play another music CD, stop the current CD and remove it from the drive, then repeat from step 5.
•Do not disconnect the optical drives or USB-DAC while playing music tracks.
•While playing music tracks using CD Transport, the music files on the N1 cannot be played by another Network
Audio Player.
Operation While Playing a Music CD
You can work with the following operations using buttons on the N1.
•Playback will be stopped by pressing the Back button (
) while playing music.
•Playback will be suspended or resumed by pressing the Menu/Enter button ( ) while playing music.
•The next track will be played by pressing the Up button (
) while playing music.
•The previous track will be played by pressing the Down button ( ) while playing music.
•Playback will switch to repeat and shuffle by pressing the Up button (
) while playback is suspended. When
the button is pressed once, playback will switch to repeat. When the button is pressed twice, playback will switch
to shuffle. When the button is pressed three times, playback will switch to both repeat and shuffle. When the
button is pressed four times, playback will revert to normal.
•The display panel will switch to the song time passed or remaining time by pressing the Down button ( )
while playback is suspended.
Backing Up and Restoring
Backup Operations
With this operation, both music files and settings are backed up. Backed up music files can be restored if the files are
deleted.
Backup operations will vary depending on the file system of the connected USB device. Differences between backup
modes are below:
File System Mode Files Included
NTFS-Formatted Device
Differential backup
Only files with different sizes and times from on the
previous backup will be saved.
HFS Plus-Formatted Device
without Journaling
FAT32-Formatted Device Full backup All files will be backed up.
Notes:
•Use only the compatible USB devices listed on melco-audio.com.
•The data will be kept even if the USB device already contain the backup data in it and a backup job runs.
24
Page 26

•To use differential backup for FAT32 or HFS Plus-formatted device, format the USB device by selecting "Format" in
the window below. All data will be erased when formatting.
Backing Up
To back up imported music files, follow the procedure below.
1 Connect the USB device (sold separately) to the backup port. If you connect the USB device that contains the
N1's backup data, you can also use it for the differential backups.
2 Press the Menu/Enter button ( ) to display the menu list at the home screen.
3 Press the Down button ( ) and select "Backup", then press the Menu/Enter button ( ).
4 Select "Start Backup" and press the Menu/Enter button ( ).
25
Page 27

5 When the following message is selected, the full backup will run if you select "OK". If you want to run the
differential backup, press the Down button ( ) and select "Cancel" to stop the backup process, then press
the Menu/Enter button ( ).
6 When finished, press the Menu/Enter button ( ).
Note: Backed up data will be saved in the following folder:
".Anas.bak" - MAC address - backup date and time - "disk1"
Normally, a folder that contains a period in its name is treated as a hidden folder. Hidden folders cannot be
displayed unless a specific setting on a computer is changed. To access the ".Anas.bak" folder from a computer,
change its hidden folder settings beforehand.
Restoring
To restore the backup data, follow the procedure below. Restoring from backup will delete all current data on
the drive. If needed, back up any data before continuing.
1 Connect the USB device that contains the backup data to the backup port.
2 Press the Menu/Enter button ( ) to display the menu list at the home screen.
26
Page 28

3 Press the Down button ( ) and select "Backup", then press the Menu/Enter button ( ).
4 Press the Down button ( ) and select "Restore from Backup", then press the Menu/Enter button ( ).
5 Press the Down button ( ) and select the date of backup, then press the Menu/Enter button ( ).
6 Press the Down button ( ) and select "Restore Data", then press the Menu/Enter button ( ). To restore
settings, select "Restore Settings".
7 The message "All data will be lost. Continue?" will be displayed. Make sure that all files on the drive can be
erased before proceeding. To continue formatting, press the Down button ( ) and select "OK", then press
the Menu/Enter button ( ).
27
Page 29

8 When finished, press the Menu/Enter button ( ). The N1 will restart.
Note: To display the backup history, navigate to Backup - Backup History.
Deleting the Imported Music Files
There are two ways to delete the imported music files. Follow the procedure below.
Formatting the Drive
Format the drive, referring the "Formatting Drives" section in chapter 3. Formatting will delete all data on the drive.
If needed, back up any data before continuing.
Deleting Each File Manually
Open the N1 shared folder from the computer, referring to the "Confirming Imported Files" section above, and
delete each file manually.
28
Page 30

Chapter 3 Advanced Usage
Using Direct Mode
Set the N1 to direct mode if it is directly connected to the Network Audio Player with an Ethernet cable and no other
devices are on the network. If using this mode, the N1 will not be connected to the router so it won't be able to
controlled using the app. For playback, use the Network Audio Player's display panel and remote controller to select
a music file. If a Network Audio Player is not available, it will not be able to select a music file.
To configure direct mode, follow the procedure below.
Note: Give the N1 plenty of space for airflow. Do not stack it with other devices that may give off heat.
Network Audio Player
N1(Rear)
1 Connect the N1's player port and a Network Audio Player with the provided Ethernet cable. Do not connect
the Ethernet cable to the Ethernet port for a router or hub.
2 Turn on the Network Audio Player.
3 Press the Menu/Enter button (
) to display the menu list at the home screen.
4 Press the Down button ( ) and select "Settings", then press the Menu/Enter button ( ).
29
Page 31

5 Press the Down button ( ) and select "Network", then press the Menu/Enter button ( ).
6 Select "Player" and press the Menu/Enter button ( ).
7 Press the Down button ( ) and select "Direct Mode", then press the Menu/Enter button ( ).
Note: To connect the N1 and the Network Audio Player to the network via the router or hub, use network mode
instead. Select "Network Mode" at step 7 above to use network mode.
Changing the RAID Mode
The N1 is configured with a RAID array by default.
To change the RAID mode from the default, follow the procedure below. Changing the RAID mode will delete all
data on the drive. If needed, back up any data before continuing.
Spanned
Combines 2 drives in the N1 into a single array. The usable drive space is the total space of all drives used. Data is
written to the first drive, then the second drive once the first drive becomes full. If a single drive on the array fails,
then all data on the array is lost.
RAID 0
Combines 2 drives in the N1 into a single array. The usable drive space is the total space of all drives used. This
simple RAID mode offers faster performance than a spanned array. If a single drive on the array fails, then all data
on the array is lost. Amongst the three RAID modes, RAID 0 does not offer any redundancy. If secure data storage is
critical, using RAID 0 is not recommended.
30
Page 32

RAID 1
Combines 2 drives in the N1 into a mirrored array. The usable drive space on the array is the capacity of a single
drive. Identical data is written to each drive. If a drive is damaged, data can be recovered by replacing the damaged
drive. As long as one drive on the array remains undamaged, all data on the array can be recovered.
1 Press the Menu/Enter button (
) to display the menu list at the home screen.
2 Press the Down button ( ) and select "Settings", then press the Menu/Enter button ( ).
3 Press the Down button ( ) and select "Drive", then press the Menu/Enter button ( ).
4 Press the Down button ( ) and select "Format Internal Drives", then press the Menu/Enter button ( ).
5 Press the Up/Down buttons ( ) and select the RAID mode to configure, then press the Menu/Enter
button ( ).
31
Page 33

6 The message "All data will be lost. Continue?" will be displayed. Make sure that all files on the drive can be
erased before proceeding. To continue changing the RAID mode, press the Down button ( ) and select
"OK", then press the Menu/Enter button ( ).
7 When finished, press the Menu/Enter button ( ).
Formatting Drives
To format internal drives in the N1 or connected USB devices, follow the procedure below. Formatting will delete
all data on the drive. If needed, back up any data before continuing.
Formatting Internal Drives
1 Press the Menu/Enter button (
) to display the menu list at the home screen.
2 Press the Down button ( ) and select "Settings", then press the Menu/Enter button ( ).
32
Page 34

3 Press the Down button ( ) and select "Drive", then press the Menu/Enter button ( ).
4 Press the Down button ( ) and select "Format Internal Drives", then press the Menu/Enter button ( ).
5 Select the current RAID mode and press the Menu/Enter button ( ).
6 The message "All data will be lost. Continue?" will be displayed. Make sure that all files on the drive can be
erased before proceeding. To continue formatting, press the Down button ( ) and select "OK", then press
the Menu/Enter button ( ).
7 When finished, press the Menu/Enter button ( ).
Formatting Connected USB Devices
Formats the USB device connected to the backup port or expansion port. This will format the USB device to NTFS. Be
aware that a USB device formatted to NTFS will become read-only when connected to macOS.
33
Page 35

1 Press the Menu/Enter button ( ) to display the menu list at the home screen.
2 Press the Down button ( ) and select "Settings", then press the Menu/Enter button ( ).
3 Press the Down button ( ) and select "Drive", then press the Menu/Enter button ( ).
4 Press the Down button ( ) and select either the backup or expansion drive, then press the Menu/Enter
button ( ).
5 Press the Down button ( ) and select "Format", then press the Menu/Enter button ( ).
34
Page 36

6 The message "All (backup/expansion drive) data will be lost. Continue?" will be displayed. Make sure that all
files on the drive can be erased before proceeding. To continue formatting, press the Down button ( ) and
select "OK", then press the Menu/Enter button ( ).
7 When finished, press the Menu/Enter button ( ).
Erasing Data on the N1 Completely
Under some circumstances, data from formatted drives can be recovered. The drive erasure process mentioned in
this section does a much more thorough job of erasing data by removing all data from a drive in a way that makes it
nearly impossible to recover with current tools. All data on the drives is completely erased.
Note: This erasure process will take a few hours to complete. Make sure the N1 is powered on during the process.
Other functions will become unavailable while the erasure process is running.
Typically, follow the procedure in the "Formatting Internal Drives" section above to delete all data off a drive. This
procedure below is not recommended for common use.
1 Press the Menu/Enter button (
) to display the menu list at the home screen.
2 Press the Down button ( ) and select "Settings", then press the Menu/Enter button ( ).
35
Page 37

3 Press the Down button ( ) and select "Drive", then press the Menu/Enter button ( ).
4 Press the Down button ( ) and select the drive for complete for the Menu/Enter button ( ).
5 Press the Down button ( ) and select "Erase All Data", then press the Menu/Enter button ( ).
6 The message "All (backup/expansion drive) data will be lost. Continue?" will be displayed. Make sure that all
files on the drive can be erased before proceeding. To continue formatting, press the Down button ( ) and
select "OK", then press the Menu/Enter button ( ).
7 When finished, press the Menu/Enter button ( ).
36
Page 38

Changing the IP Address
To change the IP address of the N1, follow the procedure below. After the procedure is finished, the N1 will
automatically restart and stop any importing or playback operations. We recommend finishing any file import or
playback before changing the N1's IP address.
1 Press the Menu/Enter button (
) to display the menu list at the home screen.
2 Press the Down button ( ) and select "Settings", then press the Menu/Enter button ( ).
3 Press the Down button ( ) and select "Network", then press the Menu/Enter button ( ).
4 Press the Down button ( ) and select "LAN Port", then press the Menu/Enter button ( ).
5 Select whether to automatically acquire the IP address from the DHCP server or configure a fixed IP address
using the Up/Down buttons ( ) and press the Menu/Enter button.
37
Page 39

6 When finished, press the Menu/Enter button ( ).
Notes:
•To obtain the IP address from the DHCP server automatically, the DHCP server on the router should also be
enabled.
•If "Fixed IP" is selected, enter the desired IP address, subnet mask, default gateway, and DNS server in the
displayed screen.
Changing the Friendly Name (Hostname)
To change the friendly name of the N1, follow the procedure below. After the procedure is finished, the N1 needs
restarting and stop any importing or playback operations. We recommend finishing any file import or playback
before changing the friendly name.
1 Press the Menu/Enter button (
) to display the menu list at the home screen.
2 Press the Down button ( ) and select "Settings", then press the Menu/Enter button ( ).
3 Press the Down button ( ) and select "Network", then press the Menu/Enter button ( ).
38
Page 40

4 Press the Down button ( ) and select "Friendly Name", then press the Menu/Enter button ( ).
5 Enter the new friendly name using the Up/Down buttons ( ), then press the Menu/Enter button ( ).
6 When finished, press the Menu/Enter button ( ).
7 When "Restarting..." is displayed, press the Menu/Enter button ( ). The N1 will restart.
Notes:
•Friendly name may contain 0–9, A–Z, and hyphens (-).
•When you press the Back button (
), the entered characters are deleted from the right side. To change the
friendly name, press the Back button ( ) and delete all characters except for the first, then enter the new
friendly name.
•When you press the Menu/Enter (
), the entered character is saved and another character can be selected.
Press the Menu/Enter button ( ) twice to stop configuring the friendly name.
•If you delete all the characters, the display will go back to the previous screen.
Configuring the Date and Time
To configure the time settings, follow the procedure below.
39
Page 41

1 Press the Menu/Enter button ( ) to display the menu list at the home screen.
2 Press the Down button ( ) and select "Settings", then press the Menu/Enter button ( ).
3 Press the Down button ( ) and select "Time & Date", then press the Menu/Enter button ( ).
4 Select whether to configure the time settings automatically or manually using the Up/Down buttons (
), then press the Menu/Enter
button.
Note: To automatically configure the time settings, the N1 should be able to connect to the Internet.
5 When finished, press the Menu/Enter button (
).
40
Page 42

Changing the Time Zone
1 Press the Menu/Enter button (
) to display the menu list at the home screen.
2 Press the Down button ( ) and select "Settings", then press the Menu/Enter button ( ).
3 Press the Down button ( ) and select "Time Zone", then press the Menu/Enter button ( ).
4 Select the time zone to configure using the Up/Down buttons ( ), then press the Menu/Enter button (
).
5 When finished, press the Menu/Enter button ( ).
41
Page 43

Configuring Display and LED Settings
Changing the Display Brightness
1 Press the Menu/Enter button (
) to display the menu list at the home screen.
2 Press the Down button ( ) and select "Display", then press the Menu/Enter button ( ).
3 Press the Down button ( ) and select "Brightness", then press the Menu/Enter button ( ). If you select
"Dark Mode" on the screen, the display panel turns off. You can also turn off the display panel by pressing and
holding the Back button ( ) for 2 seconds while at the home screen. While the display panel is off, press any
button on the front to relight the display.
4 Change the brightness using the Up/Down buttons ( ), then press the Menu/Enter button ( ).
42
Page 44

Changing the Power LED Brightness
1 Press the Menu/Enter button ( ) to display the menu list at the home screen.
2 Press the Down button ( ) and select "Settings", then press the Menu/Enter button ( ).
3 Press the Down button ( ) and select "Power LED Brightness", then press the Menu/Enter button ( ).
4 Select "Bright" or "Dim" using the Up/Down buttons ( ), then press the Menu/Enter button ( ).
5 When finished, press the Menu/Enter button ( ).
Turning Off the Rear-Side LED
The rear-side LED is located at the back of the N1, the LAN and player ports. The LED shows the network activity,
so you will not be able to check for network activity if the rear-side LED is turned off. Verify any network activity by
checking that the N1 is connected to the network properly beforehand.
43
Page 45

1 Press the Menu/Enter button ( ) to display the menu list at the home screen.
2 Press the Down button ( ) and select "Settings", then press the Menu/Enter button ( ).
3 Press the Down button ( ) and select "Rear Side LED", then press the Menu/Enter button ( ).
4 Press the Down button ( ) and select "Off", then press the Menu/Enter button ( ).
5 When finished, press the Menu/Enter button ( ).
Configuring Automatic Power-Off
If auto power save is enabled, the N1 will automatically power off after music stops playing and a specific amount of
time passes. Auto power save will not shut off the N1 while the Network Audio Player that is connected to the player
port is on or while a USB-DAC or an optical drive is connected. To change the time settings for auto power save or to
turn it off, follow the procedure below.
44
Page 46

1 Press the Menu/Enter button ( ) to display the menu list at the home screen.
2 Press the Down button ( ) and select "Settings", then press the Menu/Enter button ( ).
3 Press the Down button ( ) and select "Auto Power Save", then press the Menu/Enter button ( ).
4 Select the desired time setting using the Up/Down buttons ( ), then press the Menu/Enter button (
).
5 When finished, press the Menu/Enter button ( ).
If the N1 is powered off by auto power save, the power button will not automatically revert to the "off" position.
To turn the N1 on, press the power button to return it to the "off" position, and then press it again to power on the
device.
45
Page 47

Changing the Display Language
To change the display language, follow the procedure below. After the procedure is finished, the N1 will stop any file
playback. We recommend finishing any file playback before changing the display language.
1 Press the Menu/Enter button (
) to display the menu list at the home screen.
2 Press the Down button ( ) and select "Language", then press the Menu/Enter button ( ).
3 Select the language using the Up/Down buttons ( ), then press the Menu/Enter button ( ).
Updating the Firmware
To update the N1's firmware version to the latest one, follow the procedure below.
Updating via the Network
Note: To update the firmware via the network, the N1 should be connected to the Internet. If the N1 is in direct
mode, use another Ethernet cable and connect it to the LAN port and the router.
1 Press the Menu/Enter button (
) to display the menu list at the home screen.
46
Page 48

2 Press the Down button ( ) and select "System Update", then press the Menu/Enter button ( ).
3 Press the Down button ( ) and select "Internet", then press the Menu/Enter button ( ).
4 Press the Down button ( ) and select "OK", then press the Menu/Enter button ( ).
5 The N1 will restart. Wait until the home screen is displayed.
Updating from the USB Device
1 Download the latest firmware from melco-audio.com.
2 Extract the downloaded file and copy "audionas_ha_n1_updater.bin" file from the extracted folder to the USB
device (root directory).
3 Connect the USB device to the USB 3.0 port.
4 If the importing from USB port screen is displayed, press the Back button ( ).
47
Page 49

5 Press the Menu/Enter button ( ) to display the menu list at the home screen.
6 Press the Down button ( ) and select "System Update", then press the Menu/Enter button ( ).
7 Press the Down button ( ) and select "USB", then press the Menu/Enter button ( ).
8 Press the Down button ( ) and select "OK", then press the Menu/Enter button ( ).
9 The N1 will restart. Wait until the home screen is displayed.
Checking for Updates Automatically
The N1 can check if newer firmware is released when turning on the N1. If new firmware is detected, you can
continue to update the firmware. To enable checking for firmware releases automatically, follow the procedure
below.
1 Press the Menu/Enter button (
) to display the menu list at the home screen.
48
Page 50

2 Press the Down button ( ) and select "System Update", then press the Menu/Enter button ( ).
3 Press the Down button ( ) and select "Check for Updates at Start-Up", then press the Menu/Enter button (
).
4 Press the Down button ( ) and select "Yes", then press the Menu/Enter button ( ).
Enabling the firmware check is finished. The unit will check for new firmware releases on the next startup.
Restoring Factory Defaults
To initialize the N1 to its factory default settings, follow the procedure below. The operation above only initializes
the settings. Data will not be affected.
1 Turn off the N1.
2 Turn on the N1 while pressing the Down button (
). After the "MELCO" logo disappears, let go of the Down
button ( ). The setting initialization screen will be displayed.
If you go to Settings - Initialize Settings on the display panel, the same screen will be displayed.
49
Page 51

3 Press the Down button ( ) and select "OK", then press the Menu/Enter button ( ).
The device settings will revert to the factory defaults.
50
Page 52

Chapter 4 Appendix
Menu List
From the front display panel, the following options are available.
Status
Internal Drives
Displays the total capacity, used capacity, and usage percentage of the
internal drives.
External Drives
Displays the total capacity, used capacity, and usage percentage of the
connected external drive.
Songs Displays the number of imported music files.
Music Database
Displays the current status of the imported music file database after it is
scanned.
Time & Date Displays current time and date.
Network
LAN - Displays the network settings of the LAN port labelled "LAN", such as
IP address, MAC address, link speed, and the Internet connection status.
Player - Displays the network settings of the LAN port labelled "PLAYER",
such as IP address, MAC address, and link speed.
System Software Displays the version of the firmware installed on the N1.
Media Server Displays the media server's version.
Browse Songs
Displays music lists that have been imported to the N1 or are currently on the expansion USB drive. After selecting a
music file and then "Play", you can play the music file on a USB-DAC.
The number of available music files to play on a USB-DAC will be displayed on the menu list, to the right of "Browse
Songs".
Backup
Start Backup
Backs up music files on the N1 to the USB device that is connected to the
port labelled "BACKUP".
Restore from Backup
Restore Settings - Restores the settings from the USB device.
Restore Data - Restores the backup music files in the USB device to the N1.
Backup History Displays the backup history of any previous backups.
Format Formats the USB device that is connected to the backup port.
Settings
SMB File Sharing
Sets to "On" when copying music from the computer.
51
Page 53

Update Music Database
Updates the music database of the imported music files. If the music files are not listed properly on the Network
Audio Player, update the music database.
Power LED Brightness
Changes the brightness of the power LED at the front.
Rear Side LED
Configure whether to turn off the rear LAN and player port LEDs.
Time & Date
Configure the time settings of the N1.
Auto Configures the time settings automatically from the Internet.
Manual Configures the time settings manually.
Time Zone
Configure the time zone for date and time settings.
Auto Power Save
Configure whether to shut down the N1 automatically if the music stops playing and a specific amount of time
passes. You can select from off, 1 minute, 5 minutes, 15 minutes, and 20 minutes.
Notes:
•The N1 will not be powered down while playing music.
•If the N1 is accessed from a Network Audio Player or computer, it will not be powered down even after the
specified time passes.
Import Directory
Configure whether to create a folder that contains the import date in the folder name when importing.
Date
Creates a folder within the "import" folder to store the imported files from
the connected USB device. The folder name will contain the import date.
Imported files may contain duplicates in the N1 if the same files are on the
USB device.
All
Imports all updated files to the "all" folder within the "import" folder on the
N1. If a file has no updated information, that file will not be imported.
USB-DAC
Configure settings to convert DSD files using a USB-DAC.
Controller Configures the mode to stream music using controller apps.
52
Page 54

Playback Mode
Configures the playback mode if playing DSD files on the N1 using a USBDAC.
If playing DSD files without converting them, select "Standard". This mode
will select the playback mode between Markerless DSD playback or DoP
(DSD over PCM) playback for the DSD files automatically. Use this mode
normally. If you prefer the DoP playback, select "DSD over PCM priority
mode". If the connected USB-DAC only supports PCM, select "PCM only". If
you want to use the render engine that was installed on firmware version
3.21 or earlier, select "Legacy".
PrecisionStart Latency
Configures a gap time that precedes a playlist track. This also solves an
issue that occurs with specific USB-DAC devices.
CD Drive
Configure settings to import music files from a music CD using an optical drive.
Import File Format
Selects import file formats from either "FLAC" or "WAV". If you select "FLAC",
configure the compression level used when importing music files as well.
Available compression levels are below.
•Low Compression - Compression time is less than standard
compression. The resulting file quality corresponds to FLAC 0.
•Standard Compression - Compression time is not as long and the size
remains average. This is the same as common FLAC file format. The
resulting file quality corresponds to FLAC 5.
•High Compression - Compression time is longer but the resulting file
size is smaller. The resulting file quality corresponds to FLAC 8.
Read Retry Count Configures the retry count if an read error occurs when reading from a CD.
Advanced Drive Optimization
Configures the read sample offset correction values between "-2000" to
"+2000". This value will vary depending on what type of CD drive you use. It
is configured to "±0" by default. This doesn't need to be changed normally.
Downloader
Enable or disable auto download, and add or remove a streaming site account for downloading music files.
Auto Download Enables or disables auto download.
Account Settings
Adds, edits, or deletes a streaming site account for auto download.
Currently the N1 supports accounts from HIGHRESAUDIO, OTOTOY, and
e-onkyo music. After adding the account, music files purchased at the
streaming site will be downloaded to the N1 automatically.
Network
Player
Selects "Network Mode" if the N1's LAN port is connected to the router.
If directly connecting the N1 and the Network Audio Player, select "Direct
Mode".
LAN Port
Configures whether to automatically acquire the IP address from a DHCP
server or enter it manually.
If "Fixed IP" is selected, enter the IP address, subnet mask, default gateway,
and DNS server.
Friendly Name Changes the friendly name (hostname) of the N1.
53
Page 55

Drive
Format Internal Drives
Formats the internal drives of the N1. When formatting, you can change the
current RAID mode to a spanned, RAID 0, or RAID 1 array.
If you select "Erase All Data", all data on the drives will be completely
erased. Data removed this way will be nearly impossible to recover with the
current tools.
Format Backup Drive
Formats the USB device connected to the backup port.
If you select "Erase All Data", all data on the drives will be completely
erased. Data removed this way will be nearly impossible to recover with the
current tools.
Format Expansion Drive
Formats the USB device connected to the expansion port.
If you select "Erase All Data", all data on the drives will be completely
erased. Data removed this way will be nearly impossible to recover with the
current tools.
Initialize Settings
Restores the N1 settings to the factory default.
System Update
Internet
Updates the N1's firmware to the latest version via the Internet. Refer to
the "Updating via the Network" section in chapter 3 for the procedure to
update the firmware.
USB
Updates the N1's firmware to the latest version using a USB device that
contains the firmware file. Refer to the "Updating from the USB Device"
section in chapter 3 for the procedure to update the firmware.
Check for Updates at Start-Up
Enables or disables checking for a new firmware release when turning on
the N1.
Display
Dark Mode
Turns off the display panel. If you press any buttons on the N1 while the
display panel is off, the display panel turns on.
Brightness Changes the brightness of the display panel.
Language
English Changes the display language to English.
日本語
Changes the display language to Japanese.
Deutsch Changes the display language to German.
Français Changes the display language to French.
Italiano Changes the display language to Italian.
Español Changes the display language to Spanish.
Error Codes
If the following error codes are displayed on the N1's display panel, try the corrective actions.
54
Page 56

Error Corrective Action
010–012
No backup found.
Make sure the USB device that contains backup data is
connected to the backup port.
020
Friendly name is too short.
The friendly name has not been configured. Enter the friendly
name.
021
Friendly name is too long.
The entered friendly name must be shorter than 20 characters.
030
Not enough space on drive.
Delete extra files in the copy target device.
031
Some files not copied.
Files in the copy source device may be corrupted.
033
I/O error.
The connected USB device may be malfunctioning. If connecting
a USB drive, connect it to a computer and run a drive check.
034
Could not erase data.
The drive to be formatted may be malfunctioning.
040, 041
Updater not found.
Make sure the N1 is connected to the Internet or the updater is
saved on the connected USB device.
042–044
Update error.
The updater file may be corrupted. Try the update again, or
download a new updater file from melco-audio.com.
091
No external drive available.
Make sure the USB device is connected to the N1.
094
No response from NTP server.
Put the N1 on a network that can access the Internet.
101
Could not mount drive.
The USB device may be malfunctioning or the drive format is not
supported.
102
Could not dismount drive.
The USB device is possibly being accessed at this time.
103
Could not format drive.
The formatted device may be malfunctioning.
104
Could not form partition.
Device may be malfunctioning or is not supported.
110
Internal drive not found.
Try restarting the N1. If the message is still displayed, contact our
technical support for assistance.
111
Usable internal drive not found.
112
Internal drive not found.
113
Internal drive 1 not found.
114
Internal drive 2 not found.
120
USB drive not found.
The connected USB device may be malfunctioning. Try another
USB device.
121
USB drive not mounted.
130
No expansion drive available.
Make sure the USB device that contains backup data is
connected to the expansion port.
140
No backup drive found.
Make sure the USB device that contains backup data is
connected to the backup port.
141
Backup drive not mounted.
55
Page 57

Error Corrective Action
150
Could not create RAID.
If this message appears, contact our technical support for
assistance.
151
Could not rebuild RAID.
153
Could not rebuild system.
154
Could not rebuild data.
200
No accounts found.
Add an account.
203
Could not connect to the site.
Put the N1 on a network that can access the Internet.
204
Authentication error.
Make sure that the username and password are correct.
300
This CD's music data is currently unavailable.
The music database server may be under maintenance. Please
wait for a while and try again later.
56
 Loading...