

Page 1
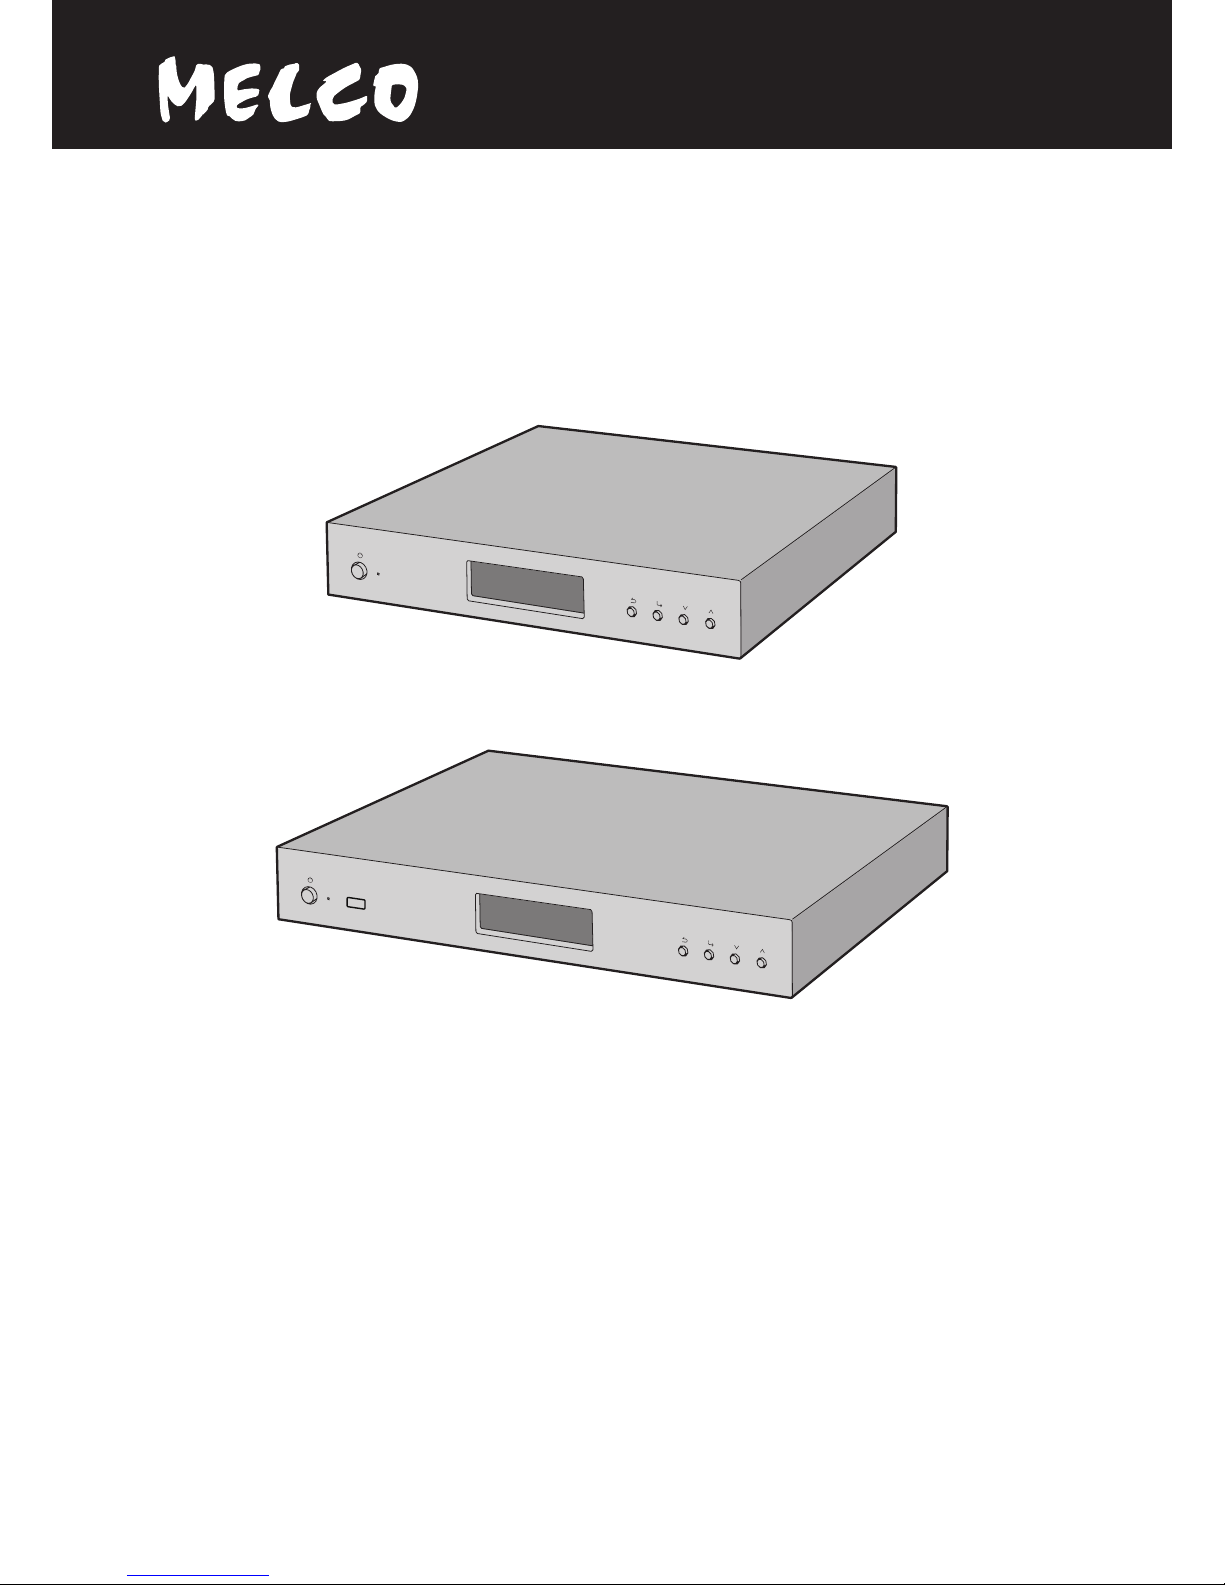
HA-N1
User Manual
HA-N1Z
HA-N1A
www.melco-audio.com
35020638-01
2014.10
Page 2

1
Contents
Chapter 1 Getting Started .............................................4
About MELCO ....................................................................................4
Diagrams ...........................................................................................4
Installation ........................................................................................7
Turning the HA-N1 On and Off ........................................................8
Chapter 2 Basic Usage ....................................................9
Displaying the Home Screen ...........................................................9
Importing ..........................................................................................9
Importing Music Files from USB Devices .................................................9
Importing Music Files from a Computer ................................................10
Streaming Music............................................................................ 12
Backing Up and Restoring ............................................................ 12
Backing Up ...............................................................................................12
Restoring ..................................................................................................14
Deleting the Imported Music Files ............................................... 15
Formatting the Drive ...............................................................................15
Deleting Each File Manually .................................................................... 15
Chapter 3 Advanced Usage ......................................... 16
Using Direct Mode ........................................................................ 16
Playing Music Files from USB Devices ......................................... 18
Changing RAID Mode ................................................................... 18
Formatting Drives ......................................................................... 19
Page 3

2
Erase Data on the HA-N1 Completely .......................................... 20
Changing the IP Address .............................................................. 21
Changing Friendly Name (Hostname) ......................................... 22
Configuring Date and Time .......................................................... 23
Time Zone Settings ....................................................................... 24
Display and LED Settings.............................................................. 24
Changing Display Brightness ..................................................................24
Changing Power LED Brightness ............................................................25
Turning Off Rear-Side LED ......................................................................25
Auto Power Save ........................................................................... 26
Changing Display Language ........................................................ 27
Updating the Firmware ................................................................. 27
Updating via the Network ....................................................................... 27
Updating from USB Device......................................................................28
Restoring Factory Defaults ........................................................... 29
Chapter 4 Appendix .................................................... 30
Menu List ....................................................................................... 30
Status ........................................................................................................30
Display ......................................................................................................30
Backup ......................................................................................................30
Settings .....................................................................................................30
System Update .........................................................................................32
Language .................................................................................................. 32
Error Codes .................................................................................... 32
Default Settings ............................................................................ 34
Specifications ................................................................................ 34
Page 4

3
Chapter 5 Regulatory Compliance Information ........ 35
For Customers in Europe .............................................................. 35
EU Declaration of Conformity .................................................................35
CB ..............................................................................................................35
Page 5
4
Chapter 1 Getting Started
About MELCO
Melco was established by Makoto Maki in 1975 in Japan. Maki, an enthusiastic audiophile, established the company
to design and manufacture the finest audio components of the time - the undoubted masterpiece of the Melco line
being the turntable, introduced into the UK in 1980, which set new standards in music reproduction.
From those early beginnings Melco developed into the largest computer peripherals manufacturer in Japan,
offering advanced products based on rigorous R&D, including wireless routers, Ethernet data switches and storage
devices such as NAS drives.
Now the company is proud to revive the highly-respected Melco brand, offering discerning audiophiles high
technology networked audio components in the spirit of those much revered early Melco products, while
incorporating the very latest research into reliable high performance networked devices and storage.
'MELCO' stands for Maki Engineering Laboratory Company.
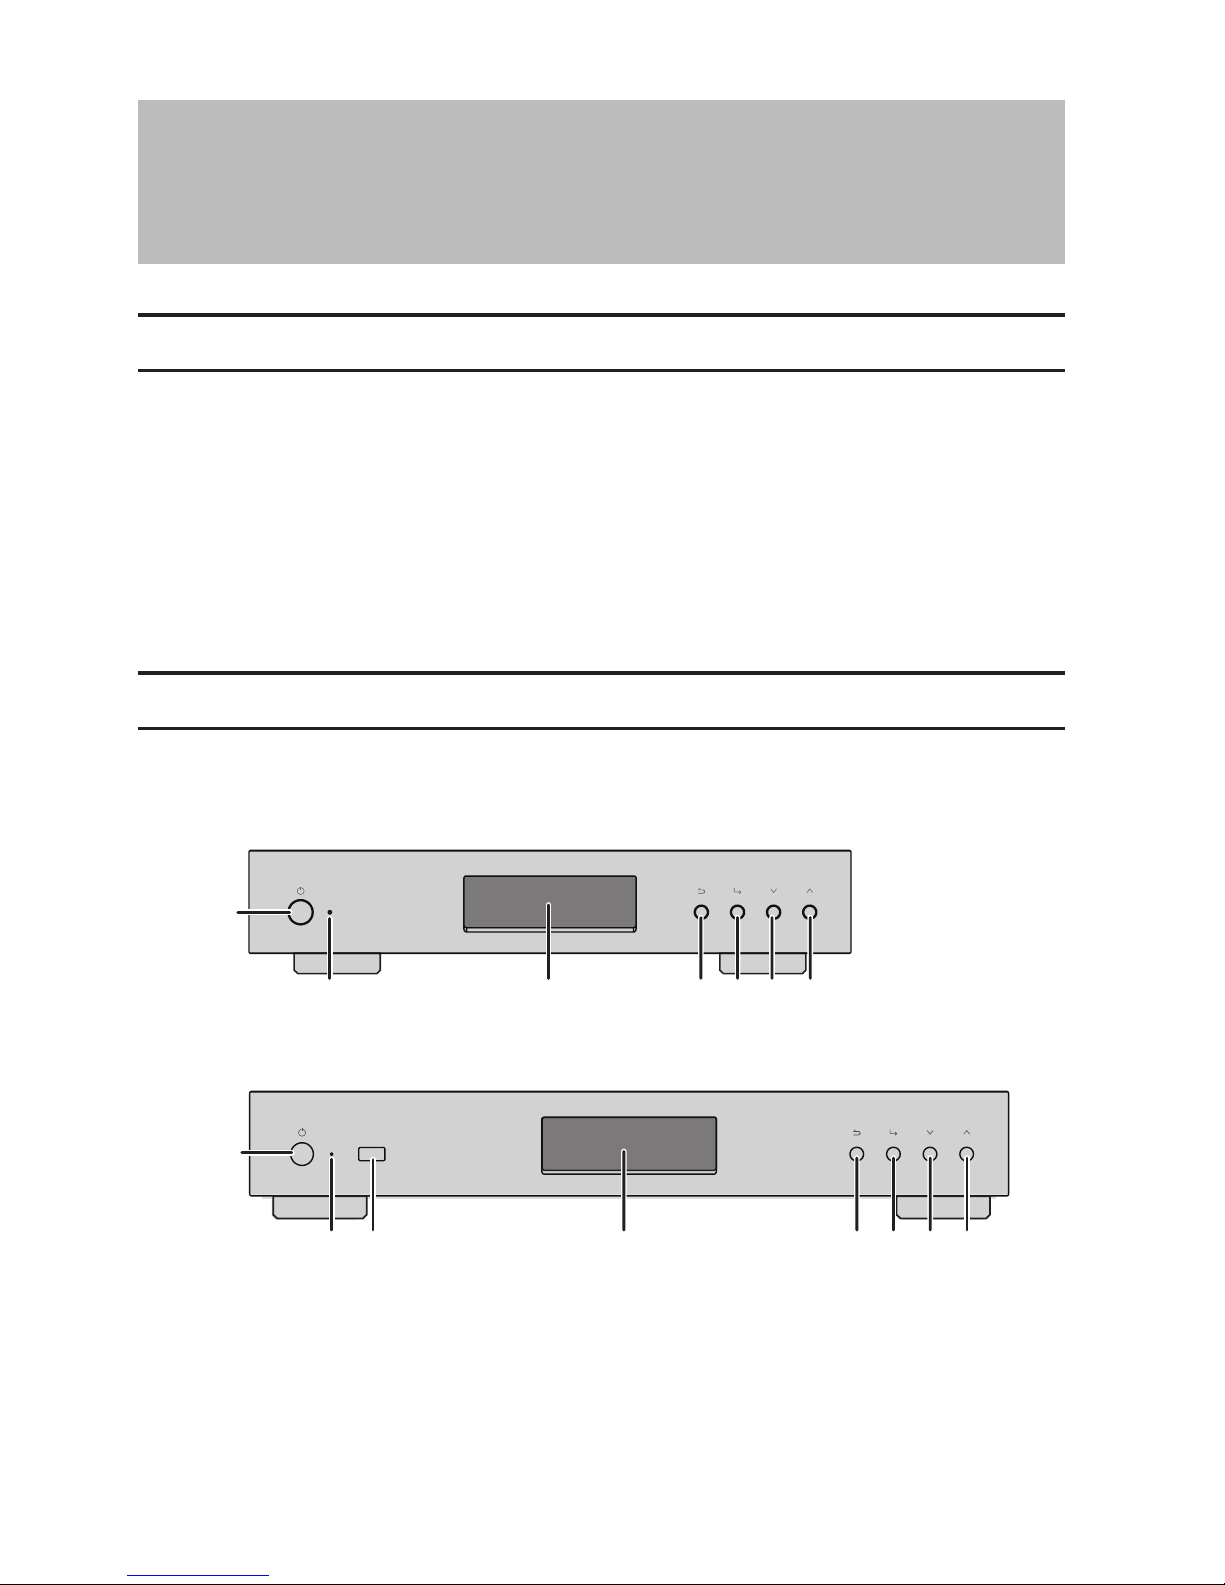
Diagrams
Front
HA-N1A
HA-N1Z
1
2 45673
1
2 4567
38
Page 6
5
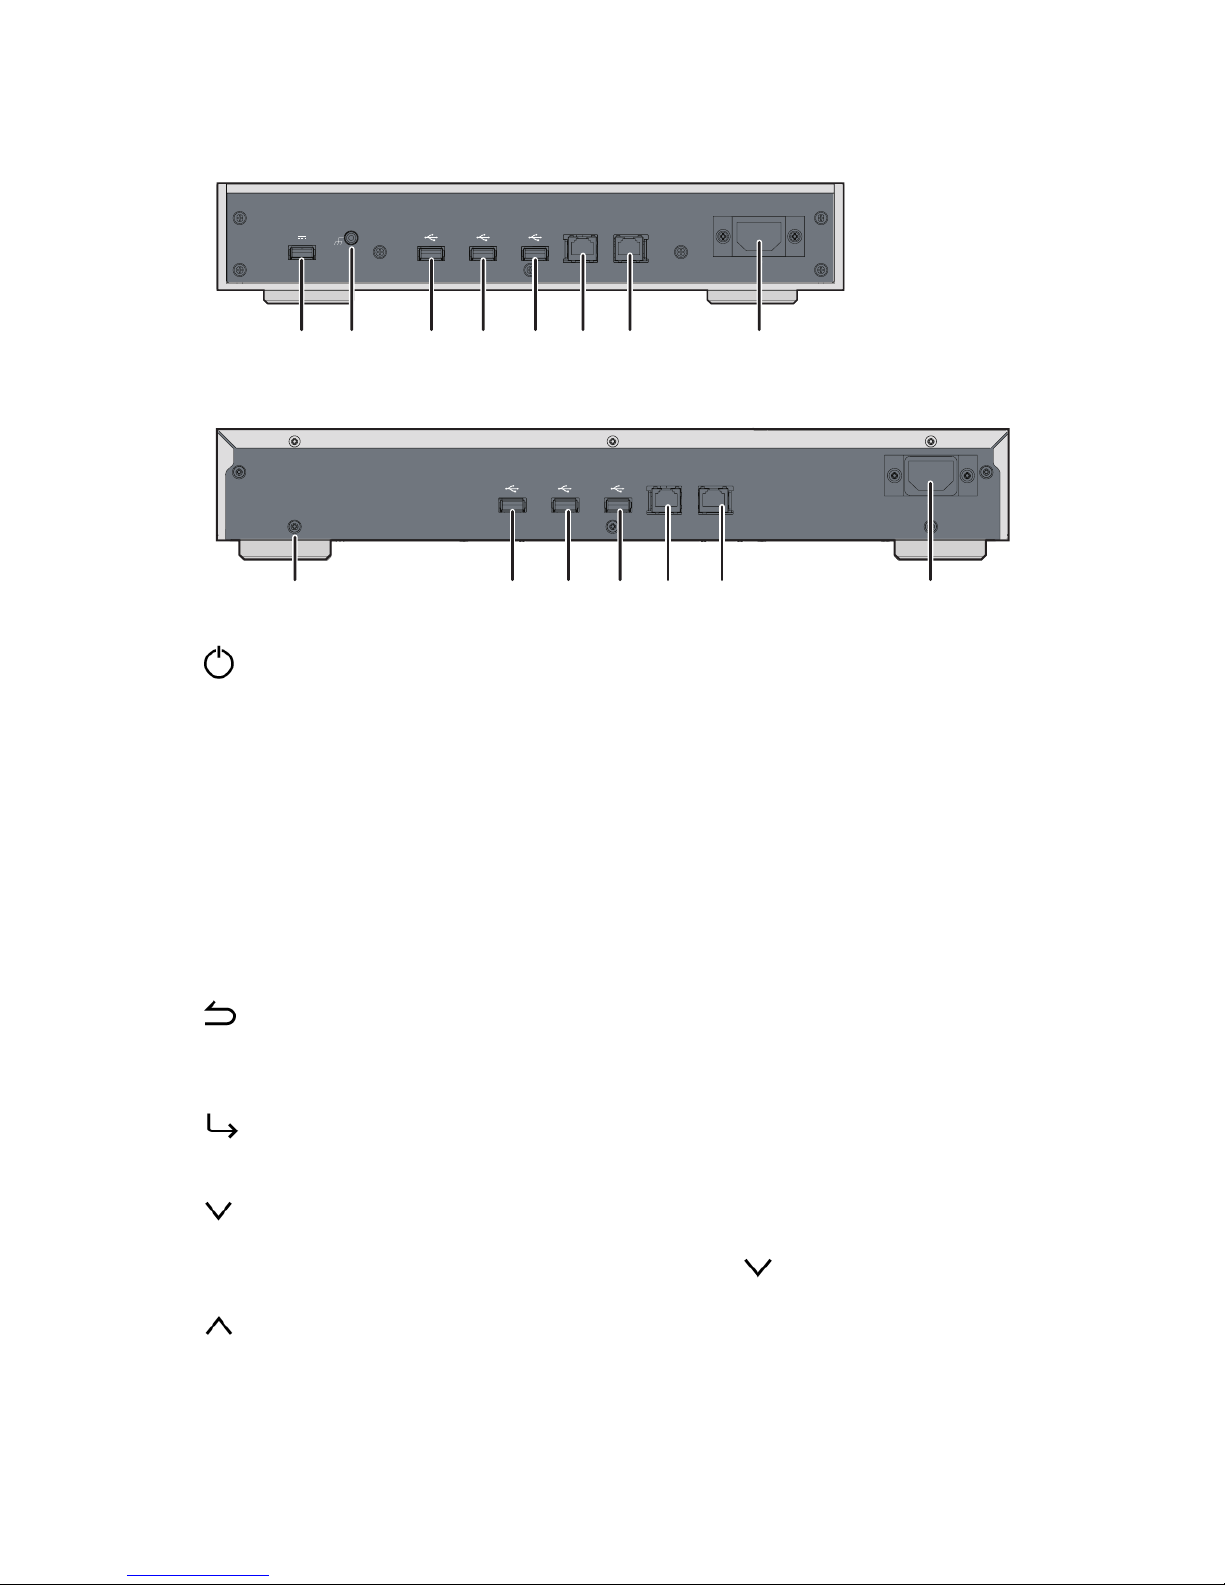
Rear
USB3.0 EXPANSION BACKUP PLAYERLAN
AUTO RANGING
AC IN
〜
AC100V-120V〜 50/60Hz1.20A
AC220V-240V
〜
50/60Hz 0.68A
AC100V-120V
〜
50/60Hz1.20A
AC220V-240V
〜
50/60Hz 0.68A
USB3.0EXPANSION BACKUP PLAYERLAN
DC 5V OUT
AUTO RANGING
AC IN
〜
GND
HA-N1A
HA-N1Z
16 91011121314
15
91011121314
15
1
Press to turn the power on and off.
2 Power Indicator
The LED will light up while the HA-N1 is on.
Note: The brightness of the power indicator can be changed from Settings - Power LED Brightness.
3 Display Panel
Displays the device's status and settings. In case of an error, displays the error message and code.
Note: The brightness of the display panel can be changed from Settings - Brightness. If the display is set to Dark
Mode, the display panel will be turned off. If the display is turned off this way, you can press any button in front
to relight it.
4
Back
If you press and hold this button for 2 seconds while at the home screen, the display panel will be turned off.
5
Enter
6
Scroll down.
To initialize settings, press the power button while holding down the button.
7
Scroll up.
8 USB 2.0
*
For importing music files from compatible USB devices.
Page 7

6
9 GND
Grounding terminal.
10 USB 3.0
*
For importing music files from compatible USB devices.
11 EXPANSION
*, **
Connect a compatible USB hard drive or USB flash drive to expand the storage capacity for audio streaming.
12 BACKUP
*, **
Connect a compatible USB hard drive here to back up or restore the contents or settings of the HA-N1.
13 LAN
***
Use an Ethernet cable to connect this port to a wireless router, hub, or switch on your network. Then you will
be able to access the HA-N1 from computers and mobile devices on your network.
14 PLAYER
***
This is a dedicated port for Network Audio Players. Use an Ethernet cable to connect this port directly to a
Network Audio Player or AV receiver.
Note: If your Network Audio Player is directly connected to the player port, it will not be visible on the network
when the HA-N1 is powered off. If this is an issue, connect your Network Audio Player to the router or switch
instead.
15 AC IN
Use the power cable.
16 DC 5V OUT
USB power port (500 mA). Not for data transfer.
Notes:
*The first partition of a connected USB device is mounted. Additional partitions are not recognized.
To recognize the whole capacity, connect the USB device to "EXPANSION" or "BACKUP" port, navigate to Settings
- Drive, select Format Expansion Drive or Format Backup Drive, and select Erase All Data to format all partitions.
Please note that all data will be removed with this operation.
**Do not disconnect the external USB drive while the HA-N1 is on. You must turn off the HA-N1 first, then
disconnect the drive.
***When the Ethernet cable is connected to the network, the link LED will glow. The act LED shows network
activity. On the front display panel, go to Settings - Rear Side LED and set to "Off" to extinguish both LEDs.
Page 8

7
Installation
HA-N1Z
USB3.0 EXPANSION
BACKUP
PLAYERLAN
DC 5V OUT
AUTO RANGIN G
AC IN
〜
GND
Network Audio Player
PLAYER
2. On
3. On
Router
1. On
LAN
HA-N1A
USB3.0 EXPANSION BACKUP
PLAYERL
AN
AUTO RANGING
AC IN
〜
AC100V
-120V
〜
50/60Hz
1.20A
AC220V
-240V
〜
50/60Hz 0.68A
AC100V
-120V
〜
50/60Hz
1.20A
AC220V
-240V
〜
50/60Hz 0.68A
Network Audio Player
PLAYER
2. On
2. On
3. On
Router
1. On
LAN
Note: Give the HA-N1 plenty of space for airflow. Do not stack it with other devices that get hot.
1 Connect the HA-N1's "PLAYER" port and a Network Audio Player with the provided Ethernet cable.
2 Connect the HA-N1's "LAN" port and the routers with another Ethernet cable (sold separately).
Note: If directly connecting the Network Audio Player to the HA-N1 without connecting to the router, see the
"Direct Mode" section in chapter 3.
3 Connect the provided power cable to the outlet.
Page 9
8
4 Turn on the router or hub first.
5 Then, power on the HA-N1.
Note: When the HA-N1 is powered down, the device connected to "PLAYER" port will not be recognized.
6 Finally, turn on the Network Audio Player.
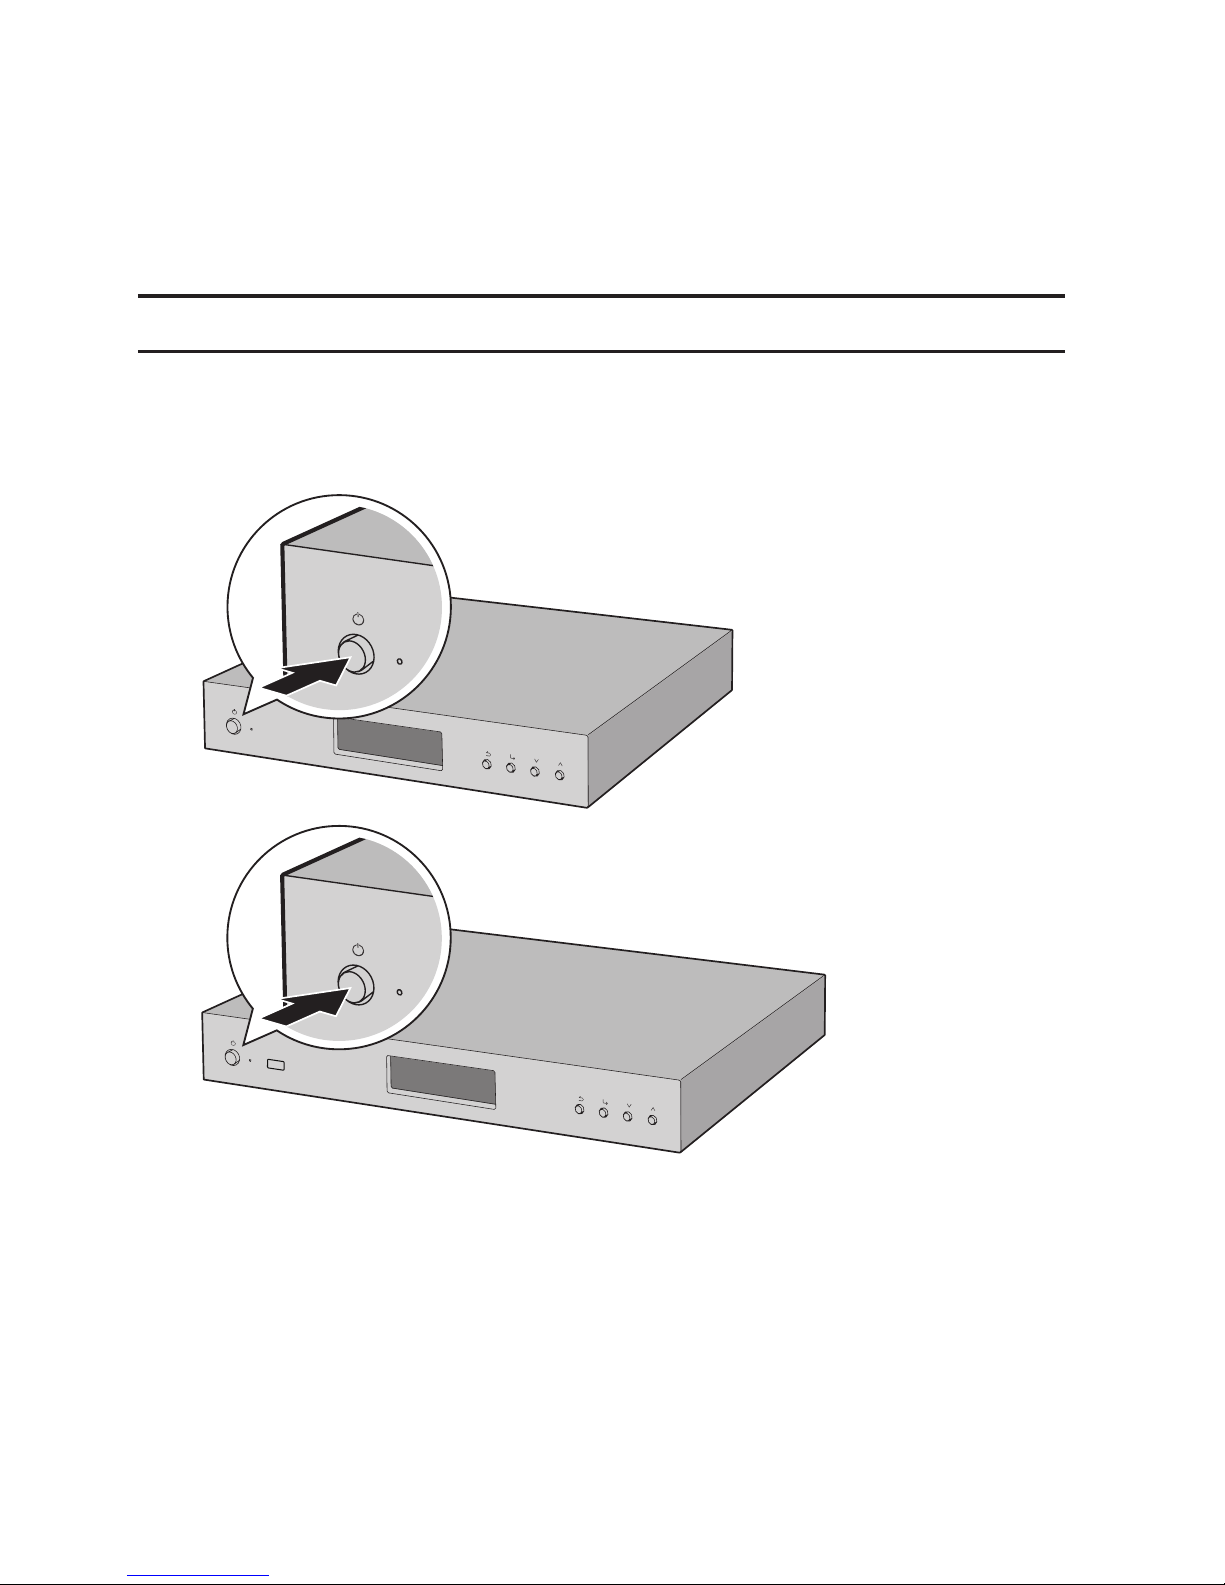
Turning the HA-N1 On and Off
Connect the power cable and press the power button on the front panel to power on the HA-N1. When the home
screen (explained in the "Displaying the Home Screen" section in chapter 2) is displayed, the boot process is
complete. It will take about 20 seconds to complete.
To power off the HA-N1, press the power button. After 10 seconds, the power indicator will extinguish and the
device will be powered off.
HA-N1A
HA-N1Z
Notes:
• Do not disconnect the power cable without properly powering the device off first. You may lose music files or
the HA-N1 may malfunction.
• If connecting the HA-N1 to an amplifier's AC outlet, do not configure the amplifier's power settings to shut
down the HA-N1 when the amplifier is powered down.
• To power on again, wait 3 seconds after the power indicator extinguishes, then press the power button.
Page 10
9
Chapter 2 Basic Usage
Displaying the Home Screen
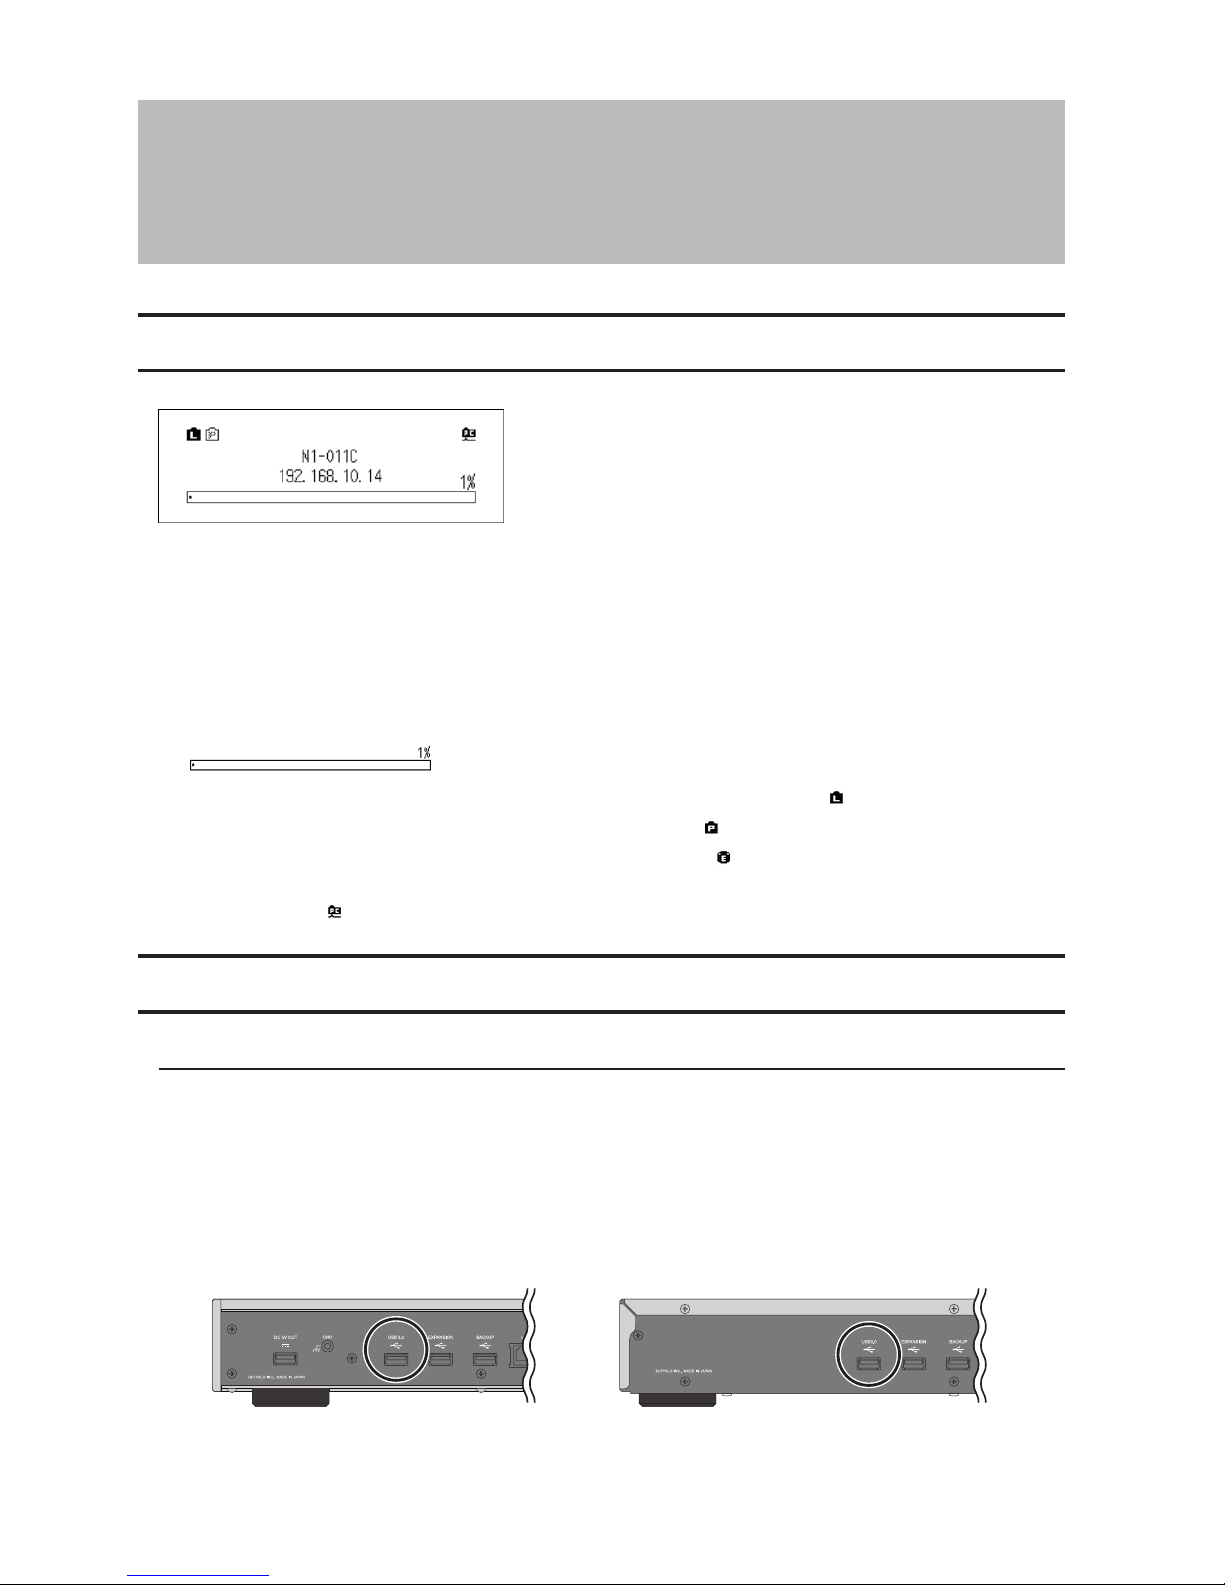
Turn on the HA-N1. After it boots, the home screen will be displayed.
The home screen displays the following information:
• Friendly name
Displays the friendly name (hostname) of the HA-N1.
• IP address
Displays the IP address.
• Internal drive usage
Displays the used capacity of the internal hard drive in the HA-N1.
• If the "LAN" port is connected to the router or switch using the Ethernet cable, the icon will be displayed.
• If the Network Audio Player is connected to the "PLAYER" port, the icon will be displayed.
• If an external USB device is connected to the "EXPANSION" port, the icon will be displayed.
• If the shared folders on the HA-N1 are shared for computers (the file sharing is set to "On" from "Settings" - "SMB
File Sharing"), the icon will be displayed.
Importing
Importing Music Files from USB Devices
To import music files from a connected USB devices, follow the procedure below.
1 Turn on the HA-N1. The home screen is displayed when the HA-N1 is booted.
2 Connect the USB device which contains the music files to the port that is not labelled "BACKUP" or
"EXPANSION".
HA-N1Z HA-N1A
Notes:
• Use only the compatible USB devices listed at www.melco-audio.com.
Page 11
10
• Connect only NTFS-formatted or FAT32-formatted USB devices.
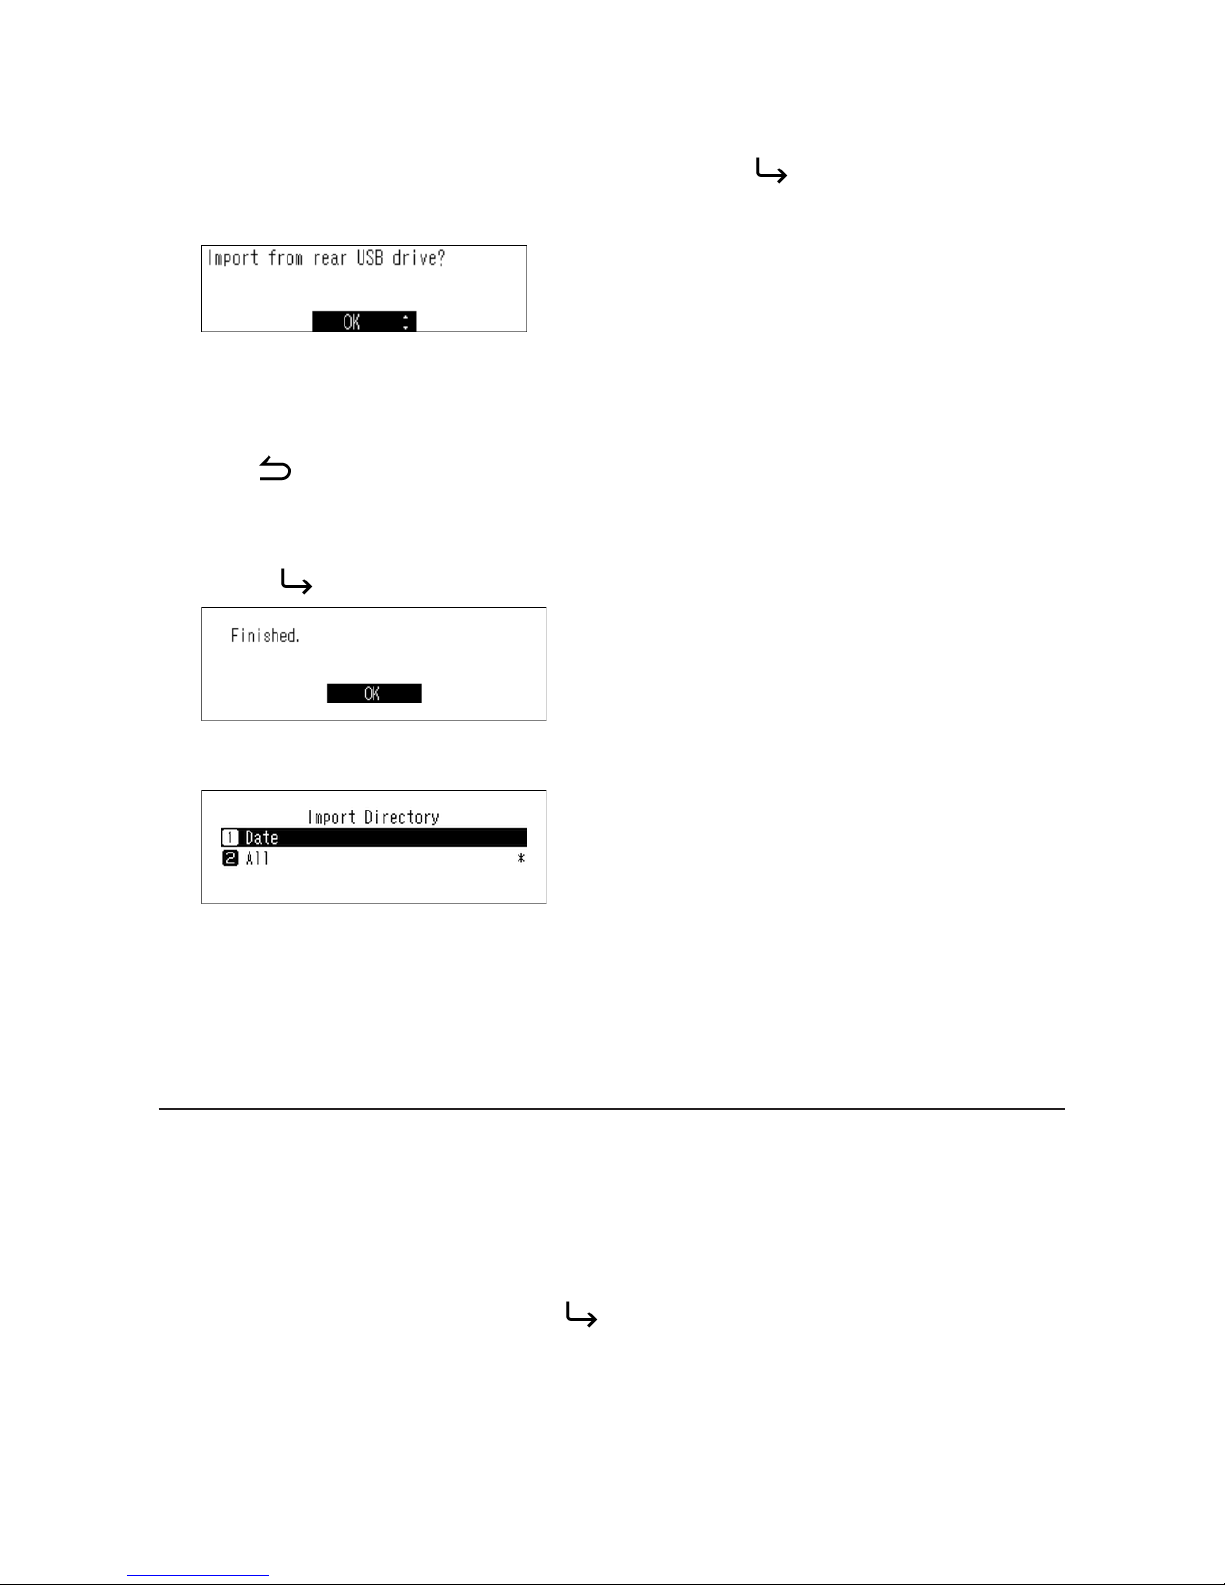
3 When the following screen is displayed on the display panel, press the button on the front. If you connect
the USB device to the front USB port (HA-N1A only), the message will change to indicate importing from the
front USB device.
4 Wait until music importing is finished.
Notes:
• If a filename or folder name starts with a period (.), the file or folder cannot be imported.
• If the button is pressed while importing, the import process will be canceled after the HA-N1 finishes
importing the current file. If the imported file size is large, the cancellation process may take a few minutes to
finish.
5 Press the button after importing finishes.
File importing is now finished.
Note: There are two options to store the imported data in the HA-N1:
"Date" - If you select this option, imported data will be stored in a newly-created folder. The folder name will
include the import date. Even if the same data is included in the USB device, it will be copied to the HA-N1.
"All" - If you select this option, data will be imported in the selected shared folder's root directory on the HAN1. With this option, only files with changes will be imported to the HA-N1. Files with no changes from the
previous import will not be imported.
To change these options, go to Settings - Import Directory and select from "Date" or "All".
Importing Music Files from a Computer
To import music files from the computer, follow the procedure below.
Enabling File Sharing
1 Turn on the HA-N1.
2 When the home screen is displayed, press the button on the front.
Page 12

11
3 Press and select "Settings", then press the button.
Note: This manual describes using the HA-N1 firmware version 1.05. Depending on the firmware version, the
screen layout may be different.
4 Press and select "SMB File Sharing", then press the button.
5 Press and select "On", then press the button.
6 When "Finished." is displayed, press the button.
7 Press the button three times to return to the home screen.
Enabling file sharing is finished. Go to "Windows" or "Mac" section below for how to import from the computer.
Windows
1 Make a note of the hostname of the HA-N1 displayed in the home screen.
2 In Explorer, enter "\\(the HA-N1 hostname)" into the address bar.
3 Copy files into the "Share" folder in the HA-N1.
Note: If no shared folder is displayed, wait for 30 seconds and try again.
Importing from Windows PC is finished.
Mac
1 Make a note of the IP address of the HA-N1 displayed in the home screen.
2 On the Mac, click Go - Connect to Server....
Page 13

12
3 Enter "smb://(the HA-N1 IP address" into the server address bar and click Connect.
4 Copy files into the "Share" folder in the HA-N1.
Note: If no shared folder is displayed, wait for 30 seconds and try again.
Importing from Mac computer is finished.
Streaming Music
Imported music files can play from the Network Audio Player. Refer to your Network Audio Player's manual for
detailed information on how to play music.
Network Audio Player
HA-N1A
HA-N1Z
Display Panel While Streaming
When the HA-N1 starts streaming the music files, the display panel will show the music information.
Notes:
• If the music file is playing on a computer, the music information will not be displayed on the display panel.
• Depending on the Network Audio Player, file format, or file tag information, music information may not
always be displayed on the display panel.
Backing Up and Restoring
Backing Up
To back up imported music files, follow the procedure below. With this operation, both music files and settings are
backed up. Backed up music files can be restored if the files are deleted.
1 Turn on the HA-N1.
Page 14

13
2 Connect the USB device (sold separately) to the "BACKUP" port.
HA-N1Z
HA-N1A
BACKUP
BACKUP
3 When the home screen is displayed, press the button.
4 Press and select "Backup", then press the button.
5 Select "Start Backup" and press the button.
Note: To format the USB device, select "Format".
6 When "Finished." is displayed, press the button.
The backup is now finished.
Notes:
• Use only the compatible USB devices listed at www.melco-audio.com.
• Connect only NTFS-formatted or FAT32-formatted USB devices.
• Do not disconnect the USB device connected to "BACKUP" port until the HA-N1 is powered down.
• Backed up data will be saved without deleting the existing data in the USB device.
• Backed up data will be saved in the following folder:
Page 15

14
".Anas.bak"-"MAC address"-"backup date and time"-"disk1"
Restoring
To restore the backup data, follow the procedure below. Restroring from backup will delete all current data on
the drive. If needed, back up any data before continuing.
1 Turn on the HA-N1.
2 When the home screen is displayed, press the button.
3 Press and select "Backup", then press the button.
4 Press and select "Restore from Backup", then press the button.
5 Press and select the date of backup, then press the button.
6 Press and select "Restore Data", then press the button.
7 The message "All data will be erased. Continue?" will be displayed. Make sure that all files on the drive can be
erased before proceeding. To continue restoring the backup data, press and select "OK", then press the
button.
Page 16

15
8 When "Finished." is displayed, press the button. The HA-N1 will automatically restart.
The restoration is finished.
Notes:
• To display the backup history, navigate to Backup - Backup History.
• To restore settings, select "Restore Settings" from step 6 above. "All settings will be initialized. Continue?"
message will be displayed. Select "OK".
Deleting the Imported Music Files
There are two ways to delete the imported music files. Follow the procedure below.
Formatting the Drive
Format the drive referring the "Formatting Drives" section in chapter 3.
Note: Formatting will delete all data on the drive. If needed, back up any data before continuing.
Deleting Each File Manually
Open the the HA-N1 shared folder from the computer, referring to the "Importing Music Files from a Computer"
section above, and delete each file manually.
Page 17

16
Chapter 3 Advanced Usage
Using Direct Mode
Set the HA-N1 to direct mode if it is directly connected to the Network Audio Player with an Ethernet cable and no
other devices are connected to the network. By default, network mode is configured. To configure direct mode,
follow the procedure below.
Notes:
• Direct mode is not suitable if your Network Audio Player is operated only via a remote control app on mobile
devices.
• In direct mode, the HA-N1 will be the DHCP server that assigns an IP address to the Network Audio Player.
Routers cannot be used.
• Files cannot be copied to the HA-N1 from the computer via the network in direct mode. Use USB devices for
file copying instead.
HA-N1Z
USB3.0 EXPANSION BACKUP
PLAYERLAN
DC 5V OUT
AUTO RANGI NG
AC IN
〜
GND
Network Audio Player
PLAYER
1. On
2. On
Page 18

17
HA-N1A
USB3.0 EXPANSION BACKUP
PLAYERLAN
AUTO RANGI NG
AC IN
〜
AC100V-120V
〜
50/60Hz
1.20A
AC220V-240V
〜
50/60Hz 0.68A
AC100V-120V
〜
50/60Hz
1.20A
AC220V-240V
〜
50/60Hz 0.68A
Network Audio Player
PLAYER
1. On
2. On
Note: Give the HA-N1 plenty of space for airflow. Do not stack it with other devices that get hot.
1 Connect the Network Audio Player to the HA-N1's "PLAYER" port (not "LAN" port) using an Ethernet cable.
2 Connect the power cable.
3 Turn on the HA-N1 first.
4 Turn on the Network Audio Player.
5 When the home screen is displayed, press the button at the front.
6 Press and select "Settings, then press the button.
7 Press and select "Network", then press the button.
Page 19

18
8 Select "Player" and press the button.
9 Press and select "Direct Mode", then press the button.
Direct mode is now configured.
Note: To connect the HA-N1 and the Network Audio Player to the network via the router or hub, use network
mode instead. Select "Network Mode" at step 9 above to use network mode.
Playing Music Files from USB Devices
Even if music files are not imported from the USB device that is connected to the "EXPANSION" port of the HA-N1,
your Network Audio Player can play music files from the USB device.
HA-N1Z
HA-N1A
EXPANSION
EXPANSION
Notes:
• Use only the compatible USB devices listed at www.melco-audio.com.
• Do not disconnect the USB device connected to "EXPANSION" port until the HA-N1 is powered down.
Changing RAID Mode
The HA-N1 series are configured with a spanned array by default.
To change the RAID mode from the default, follow the procedure below. Changing the RAID mode will delete all
data on the drive. If needed, back up any data before continuing.
1 Turn on the HA-N1.
2 When the home screen is displayed, press the button.
Page 20

19
3 Press and select "Settings", then press the button.
4 Press and select "Drive", then press the button.
5 Press and select "Format Internal Drives", then press the button.
6 Select the RAID mode to configure and press the button.
Notes:
• Spanned
Combines 2 drives in the HA-N1 into a single array. The usable disk space is the total space of all drives used.
Data is written to the first drive, then the second drive once the first drive becomes full. If a single drive in the
array fails, then all data in the array is lost.
• RAID 0
Combines 2 drives in the HA-N1 into a single array. The usable disk space is the total space of all drives used.
This simple RAID mode offers faster performance than a spanned array. If a single drive in the array fails, then
all data in the array lost. RAID 0 offers the least redundancy among the three RAID modes. In terms of saving
your data safely, using RAID 0 is not recommended.
• RAID 1
Combines 2 drives in the HA-N1 into a mirrored array. The available space in the array is the capacity of a
single drive. Identical data is written to each drive. If a drive is damaged, data can be recovered by replacing
the damaged drive. As long as one drive in the array remains undamaged, all data in the array can be
recovered.
7 The message "All data will be lost. Continue?" will be displayed. Make sure that all files on the drive can be
erased before proceeding. To continue changing the RAID mode, press and select "OK", then press the
button.
Formatting Drives
To format internal drives in the HA-N1 or connected USB devices, follow the procedure below. Formatting will
Page 21

20
delete all data on the drive. If needed, back up any data before continuing.
1 Turn on the HA-N1.
2 When the home screen is displayed, press the button.
3 Press and select "Settings", then press the button.
4 Press and select "Drive", then press the button.
5 Press and select the drive to format from internal, backup, or expansion then press the button.
Note: If "Format Internal Drive" is selected, the current RAID mode and all data will be deleted.
6 Press and select "Format", then press the button.
7 The message "All (backup/expansion drive) data will be lost. Continue?" will be displayed. Make sure that all
files on the drive can be erased before proceeding. To continue formatting, press and select "OK", then
press the button.
Erase Data on the HA-N1 Completely
Under some circumstances, data from formatted drives can be recovered. This disk erasure process in this section
does a much more thorough job of erasing data. This procedure is recommended for removing all data from a drive
in a way that makes it nearly impossible to recover with current tools. All data on the drives is completely erased.
1 Turn on the HA-N1.
2 When the home screen is displayed, press the button at the front.
Page 22

21
3 Press and select "Settings", then press the button.
4 Press and select "Drive", then select the button.
5 Press and select the drive for complete format, then press the button.
6 Press and select "Erase All Data", then press the button.
7 The message "All (backup/expansion drive) data will be lost. Continue?" will be displayed. Make sure that all
files on the drive can be erased before proceeding. To continue formatting, press and select "OK", then
press the button.
All data on the HA-N1 will be permanently erased.
Changing the IP Address
To change the IP address of the HA-N1, follow the procedure below.
1 Turn on the HA-N1.
2 When the home screen is displayed, press the button at the front.
3 Press and select "Settings", then press the button.
4 Press and select "Network", then press the button.
Page 23

22
5 Press and select "LAN Port", then press the button.
6 Select whether to automatically acquire the IP address from the DHCP server or manually configure it and
press the button.
Notes:
• To obtain the IP address from the DHCP server automatically, the DHCP server on the router should also be
enabled.
• If "Manual" is selected, enter the desired IP address, subnet mask, default gateway, and DNS server in the
displayed screen.
IP address is now configured properly.
Changing Friendly Name (Hostname)
To change the friendly name (hostname) of the HA-N1, follow the steps below.
1 Turn on the HA-N1.
2 When the home screen is displayed, press the button at the front.
3 Press and select "Settings", then press the button.
4 Press and select "Network", then press the button.
5 Press and select "Friendly Name", then press the button.
Page 24

23
6 Enter the new friendly name (hostname) using the and buttons, then press the button.
Notes:
• Friendly name may contain 0–9, A–Z, and hyphens (-).
• When you press the button, the entered characters are deleted from the right side. To change the
friendly name, press the button and delete all characters except for the first, then enter the new friendly
name. If you delete all the characters, the display will go back to the previous screen.
7 When you press the button, the entered character is determined and another character can be selected.
Press the button twice to stop configuring the friendly name.
8 If "Finished." is displayed, press the button.
9 If "Restarting..." is displayed, press the button. The HA-N1 will restart.
New friendly name (hostname) is configured.
Configuring Date and Time
To configure the time settings, follow the procedure below.
1 Turn on the HA-N1.
2 When the home screen is displayed, press the button at the front.
3 Press and select "Settings", then press the button.
4 Press and select "Time & Date", then press the button.
5 Select whether to configure the time settings automatically or manually, then press the button. To
Page 25

24
automatically configure the time settings, the HA-N1 should be able to connect to the Internet.
6 Follow the instructions on the display.
Time Zone Settings
1 Turn on the HA-N1.
2 When the home screen is displayed, press the button at the front.
3 Press and select "Settings", then press the button.
4 Press and select "Time Zone", then press the button.
5 Select the time zone to configure and press the button.
The time zone setting is changed.
Display and LED Settings
Changing Display Brightness
1 Turn on the HA-N1.
2 When the home screen is displayed, press the button at the front.
3 Press and select "Display", then press the button.
4 Press and select "Brightness", then press the button. If you select "Dark Mode" on the screen, the
display panel turns off. You can also turn off the display panel by pressing and holding the button for 2
seconds while at the home screen. While the display panel is off, press any button on the front to relight the
Page 26

25
display.
5 Press the or button to change the brightness. Press if it's done.
The display settings is finished.
Changing Power LED Brightness
1 Turn on the HA-N1.
2 When the home screen is displayed, press the button at the front.
3 Press and select "Settings", then press the button.
4 Press and select "Power LED Brightness", then press the button.
5 Select "Bright" or "Dim", then press the button.
The power LED brightness is now changed.
Turning Off Rear-Side LED
1 Turn on the HA-N1.
2 When the home screen is displayed, press the button at the front.
Page 27

26
3 Press and select "Settings", then press the button.
4 Press and select "Rear Side LED", then press the button.
5 Select "Off", then press the button.
The rear-side LED will extinguish.
Auto Power Save
If auto power save is enabled, the HA-N1 will automatically power off after music stops playing and a specific
amount of time passes. Auto power save is enabled by default, and it helps you save power in case you forget to
turn off the device. Auto power save will not shut off the HA-N1 while streaming music, but it may cause the device
to power off unexpectedly when idle, depending on the Network Audio Player or music file format. To disable auto
power save, follow the procedure below.
1 Turn on the HA-N1.
2 When the home screen is displayed, press the button at the front.
3 Press and select "Settings", then press the button.
4 Press and select "Auto Power Save", then press the button.
Page 28

27
5 Select "Off", then press the button.
Auto power save is now disabled.
Changing Display Language
To change the display language, follow the procedure below.
1 Turn on the HA-N1.
2 When the home screen is displayed, press the button at the front.
3 Press and select "Language", then press the button.
4 Select the language, then press the button.
The display language is now changed.
Updating the Firmware
To update the HA-N1's firmware version to the latest one, follow the procedure below.
Updating via the Network
Note: To update the firmware via the network, the HA-N1 should be connected to the Internet. If the HA-N1 is in
direct mode, use another Ethernet cable and connect it to the LAN port and the router.
1 Turn on the HA-N1.
2 When the home screen is displayed, press the button at the front.
3 Press and select "System Update", then press the button.
Page 29

28
4 Press and select "Internet", then press the button.
5 Follow the instructions on the display.
The system version is now updated.
Updating from USB Device
1 Download the latest firmware from www.melco-audio.com.
2 Extract the downloaded file and copy "audionas_ha_n1_updater.bin" file from the extracted folder to USB
device (root directory).
3 Connect the USB device to the USB 3.0 port at the rear.
HA-N1Z HA-N1A
4 Turn on the HA-N1.
5 If the importing from USB port screen is displayed, press the button at the front.
6 When the home screen is displayed, press the button at the front.
7 Press and select "System Software", then press the button.
8 Press and select "USB", then press the button.
9 Follow the instructions on the display.
The system version is now updated.
Page 30

29
Restoring Factory Defaults
To initialize the HA-N1 to its factory default settings, follow the procedure below.
1 Turn on the HA-N1 while pressing the button. After the "MELCO" logo disappears, let go of the
button. The setting initialization screen will be displayed.
Note: If you go to Settings - Initialize Settings on the display panel, the same screen will be displayed.
2 Press and select "OK", then press the button.
The device will be initialized. The operation above only initializes the settings. Data will not be affected.
Page 31

30
Chapter 4 Appendix
Menu List
From the front display panel, the following options are available.
Status
Internal Drives
Displays the total capacity, used capacity, and usage percentage of the
internal drives.
External Drives
Displays the total capacity, used capacity, and usage percentage of the
connected external drive.
Songs Displays the number of imported music files.
Music Database
Displays the current status of the imported music file database after it is
scanned.
Time & Date Displays current time and date.
Network
LAN: Displays the network settings of the LAN port labelled "LAN", such as
IP address, MAC address, link speed, and the Internet connection status.
Player: Displays the network settings of the LAN port labelled "PLAYER",
such as IP address, MAC address, and link speed.
System Software Displays the version of the firmware installed on the HA-N1.
Media Server Displays the media server's version.
Display
Dark Mode
Turns off the display panel. If you press any button on the HA-N1 while the
display panel is off, the display panel turns on.
Brightness Changes the brightness of the display panel.
Backup
Start Backup
Backs up the music files in the HA-N1 to the USB device that is connected
to the port labelled "BACKUP".
Restore from Backup
Restore Settings: Restores the settings from the USB device.
Restore Data: Restores the backup music files in the USB device to the HA-
N1.
Backup History Displays the backup history of any previous backups.
Format Formats the USB device that is connected to the "BACKUP" port.
Settings
SMB File Sharing
Sets to "On" when copying music from the computer.
Page 32

31
Update Music Database
Updates the music database of the imported music files. If the music files are not listed properly on the Network
Audio Player, update the music database.
Power LED Brightness
Changes the brightness of the power LED at the front.
Rear Side LED
Configure whether to turn off the rear "LAN" and "PLAYER" port LEDs.
Time & Date
Configure the time settings of the HA-N1.
Auto Configure the time settings automatically from the Internet.
Manual Configure the time settings manually.
Time Zone
Configure the time zone for date and time settings.
Auto Power Save
Configure whether to shut down the HA-N1 automatically if the music stops playing and a specific time passes. You
can select from "Off", "1 minute", "5 minutes", and "15 minutes".
Notes:
• The HA-N1 will not be powered down while playing music.
• If the HA-N1 is accessed from Network Audio Players or computers, it will not be powered down even after
the specified time passes.
Import Directory
Configure whether to create a folder that contains the import date in the folder name when importing. The default
setting is "Date".
Date
Creates a folder to store the imported files from the connected USB device.
The folder name will contain the import date. Imported files may contain
duplicates in the HA-N1 if the same files are on the USB device.
All
Imports all updated files to the root directory of the shared folder on the
HA-N1. If a file has no updated information, that file will not be imported.
Network
Player
Select "Network Mode" if the HA-N1's "LAN" port is connected to the router.
If directly connecting the HA-N1 and the Network Audio Player, select
"Direct Mode".
LAN
Configure whether to automatically acquire the IP address from a DHCP
server or enter manually.
If "Manual" is selected, enter the IP address, subnet mask, default gateway,
and DNS server.
Friendly Name Change the friendly name (hostname) of the HA-N1.
Page 33

32
Drive
Format Internal Drives
Formats the internal drives of the HA-N1. When formatting, you can change
the current RAID mode to a spanned, RAID 0, or RAID 1 array.
If you select "Erase All Data", all data on the drives will be completely
erased. Data removed this way will be nearly impossible to recover with the
current tools.
Format Backup Drive
Formats the USB device connected to the "BACKUP" port.
If you select "Erase All Data", all data on the drives will be completely
erased. Data removed this way will be nearly impossible to recover with the
current tools.
Format Expansion Drive
Formats the USB device connected to the "EXPANSION" port.
If you select "Erase All Data", all data on the drives will be completely
erased. Data removed this way will be nearly impossible to recover with the
current tools.
Initialize Settings
Restores the HA-N1 settings to the factory default.
System Update
Internet
Updates the HA-N1's firmware to the latest version via the Internet. Refer
to the "Updating via the Network" section in chapter 3 for instructions to
update the firmware.
USB
Updates the HA-N1's firmware to the latest version using a USB device that
contains the firmware file. Refer to the "Updating from USB Device" section
in chapter 3 for instructions to update the firmware.
Language
English Changes the display language to English.
日本語
Changes the display language to Japanese.
Deutsch Changes the display language to German.
Français Changes the display language to French.
Error Codes
If the following error codes are display on the HA-N1's display panel, try the corrective actions.
Error Corrective Action
010–012
No backup found.
Make sure the USB device that contains backup data is connected to the
"BACKUP" port.
020
Friendly name is too short.
The friendly name has not been configured. Enter the friendly name.
021
Friendly name is too long.
The entered friendly name (hostname) must be shorter than 20 characters.
030
Not enough space on drive.
Delete extra files in the copy target device.
031
Some files not copied.
Files in the copy source device may be corrupted.
033
I/O error.
The connected USB device may be malfunctioning. Connect the USB
device to a computer and run a disk scan.
Page 34

33
034
Could not erase data.
The drive to be formatted may be malfunctioning.
040, 041
Updater not found.
Make sure the HA-N1 is connected to the Internet or the updater is saved
on the connected USB device.
042–044
Update error.
The updater file may be corrupted. Try the update again, or download a
new updater file from www.melco-audio.com.
091
No external drive available.
Make sure the USB device is connected to the HA-N1.
094
No response from NTP server.
Put the HA-N1 on the network that can access the Internet.
101
Failed to mount.
The USB device may be malfunctioning or the disk format is not supported.
102
Failed to dismount.
The USB device is possibly being accessed at this time.
103
Could not format drive.
The formatted device may be malfunctioning.
104
Could not form partition.
Device may be malfunctioning or is not supported.
110
Internal drive not found.
Try rebooting the HA-N1. If the message is still displayed, contact Buffalo
technical support for assistance.
111
Usable internal drive not found.
112
Internal drive not found.
113
Internal drive 1 not found.
114
Internal drive 2 not found.
120
USB drive not found.
The connected USB device may be malfunctioning. Try another USB device.
121
USB drive not mounted.
130
No expansion drive available.
Make sure the USB device that contains backup data is connected to the
"EXPANSION" port.
140
No backup drive found.
Make sure the USB device that contains backup data is connected to the
"BACKUP" port.
141
Backup drive not mounted.
150
Could not create RAID.
If the message appears, contact Buffalo technical support for assistance.
151
Could not rebuild RAID.
153
Could not rebuild system.
154
Could not rebuild data.
Page 35

34
Default Settings
The HA-N1 is configured with the following default settings.
Display Panel Brightest
SMB File Sharing On
Power LED Brightness Bright
Rear Side LED On
Auto Power Save 5 minutes
Player Network Mode
LAN DHCP
Friendly name (hostname) N1-XXXX (X stands for the last four digits of MAC address)
RAID Mode Spanned
Specifications
Check www.melco-audio.com for information about the latest products and their specifications.
LAN Port
Interface
IEEE 802.3ab (1000BASE-T)
IEEE 802.3u (100BASE-TX)
IEEE 802.3 (10BASE-T)
Transfer Speed
1000 Mbps Full duplex (autonegotiation)
100 Mbps Full duplex/Half duplex
(auto-negotiation)
10 Mbps Full duplex/Half duplex (auto-
negotiation)
Number of Ports 2 ports (supports auto-MDIX)
Connector Type RJ-45 8-pin
Protocol TCP/IP
Access Method CSMA/CD
USB Port
HA-N1Z: USB 3.0 port (Series A) x 3
HA-N1A: USB 2.0 port (Series A) x 1 (front), USB 3.0 port (Series A) x 3 (rear)
Internal Hard Drive
If a hard drive in the HA-N1 malfunctions, contact Buffalo technical support
for assistance.
Dimensions (W x H x D)
HA-N1Z: 350 x 65 x 370 mm; 13.8 x 2.4 x 14.6 in
HA-N1A: 435 x 62 × 352 mm; 17.1 x 2.4 x 13.8 in
Weight Approx. 7.0 kg; 15.4 lb
Power Supply AC 100–240 V 50/60 Hz
Power Consumption (Max.) 60 W
Operating Environment
Temperature: 5–35°C; 41–95°F
Humidity: 20–80% (no condensation)
Page 36

35
Chapter 5 Regulatory Compliance
Information
For Customers in Europe
EU Declaration of Conformity
Deutsch
Verwenden Sie ausschließlich die Kabel und Zubehörteile, die im Lieferumfang enthalten sind. Andere Zubehörteile
oder Kabel dürfen nur dann verwendet werden, wenn dies in der Dokumentation ausdrücklich vorgeschrieben ist.
English
Only use the cables and accessories that are included in the package. Don't use other accessories or cables unless
specifically instructed to in the documentation.
Français
Utilisez uniquement les câbles et accessoires inclus dans ce package. N’utilisez aucun autre accessoire ou câble sauf
instruction spécifique de la documentation.
CB
Norsk
Utstyr som er koplet til beskyttelsesjord via nettplugg og/eller via annet jordtilkoplet utstyr – og er tilkoplet et
kabel-TV nett, kan forårsake brannfare.
For å unngå dette skal det ved tilkopling av utstyret til kabel-TV nettet installeres en galvanisk isolator mellom
utstyret og kabel- TV nettet.
Svenska
Utrustning som är kopplad till skyddsjord via jordat vägguttag och/eller via annan utrustning och samtidigt
är kopplad till kabel-TV nät kan i vissa fall medföra risk för brand. För att undvika detta skall vid anslutning av
utrustningen till kabel-TV nät galvanisk isolator finnas mellan utrusningen och kabel-TV nätet.
 Loading...