

Meizu Electronic Technology Portable Media Player User Manual

Portable Media Player
User's Manual
Meizu Electronic Technology Limited
Add.: 3F, No.7, PingXi 5th Road, NanPing Technology & Industrial
Park, Zhuhai 519060, Guangdong, China
(06_02en)
Portable Media Player
Welcome to visit Meizu's website!
The Meizu's home page provides the overview of company and products, other
related information, and answers to common questions. Firmware and software
updates are also available as well as the most recent information about your
Meizu product.
In order for customers who purchased the product to receive specialized services,
we recommend that they accomplish customer registration at Meizu's website.
You may get useful information from "User's Forum" and FAQ. Register your ID
and get any appropriate online customer support.
Thank you for purchasing the product.
Please read the manual carefully before use.
We recommend you to keep it for future reference.
Welcome
1
Getting Started
3
Table of Contents
1. Getting Started
3. Quick Start
Table of Contents
1
Getting Started
Important Cautions
Copyright Notice
Product Features
Package Contents / Parts and Names
Protection Film on the Player
Touch Keypad
LCD Display
2. Basic Operation
Connecting Mini Player
Using for the First Time
Installation CD
Downloading from the PC
Saving Files & Disconnecting to Your PC
476
10-11
12
13
14-16
17-19
20
21
22-23
24
7
8
9
Using Buttons / Menu Controls
Using Browser / Listening to Music
Update the Music Library / Assorting the Music Library
Playback Mode / Sound Effect
Equalizer + Displaying Lyric
Photo Library / Slideshow Settings
Converting Video Files
Play Video / Video Settings
Listening to FM Radio / Update List of Radio Stations
Delecting the Memorized Channels
Listening to the Memorized FM Radio
Edit Exterior FM Station Lists
Listen to Exterior FM Station Lists
25-27
28-29
30-31
32-33
34-35
36-37
38-43
44-45
46-47
48
49
50
51
5
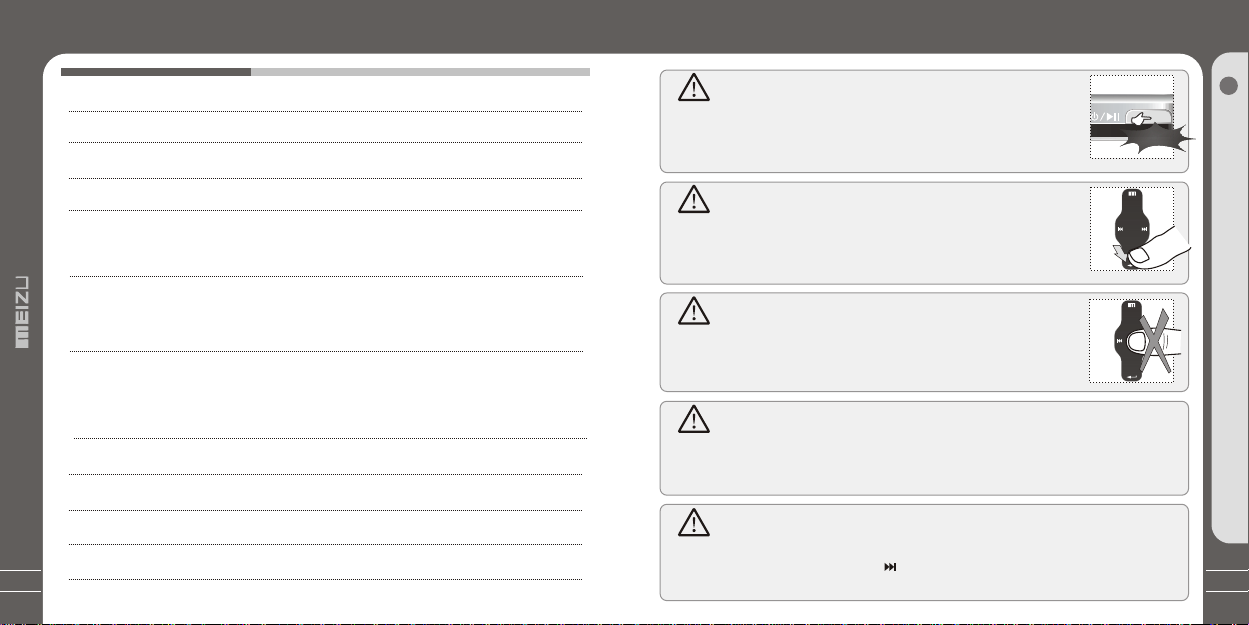
Table of Contents
Important Cautions
FM Recording / Voice Recorder
¡ñ
¡ñ
Play Recording Files
¡ñ
Text View
¡ñ
Games & Tools
¡ñ
4. Menu
¡ñ
5. Mini Player Operating System
DetailedFeaturesbyMenu
Upgrade Operating System
6. Additional Information
Format
¡ñ
Handling Instructions
¡ñ
Precautions for Using the Product/Trouble Shooting
Product Specifications
Memo
52-53
56-57
58-64
65-67
68-70
72-73
75-78
Turn On / Auto Power Off
To prevent unwanted power on caused by accidental pressing, you need
54
55
to long click the Power On/Off button to start the player. Click it again,
start to play. When there is no button operation for about 3 minutes while
the player is stopped, it is automatically turned off.
Long Click
1
Getting Started
Reset Mini Player
When it is dead caused by improper operation, you have to reset your
mini player. Disconnect it to a USB cable or AC Adapter, press and hold
on the Enter key for over 10sec until it flashes on the screen, it resets
and shuts down automatically. Then you can restart it for proper function.
Sliding Touch Operation Errors
When the player is started up, system will check power level of touch
keypad first. Do not put your fingers on touch keypad during the system
checking, otherwise it will possibly cause checking error and losing
control. Please restart it for proper function.
Update Music Library
After finish copying the music, using Main Menu-Music-Update Music Library on the player
71
74
before your listening music so that you can organize and assort them by artist, album or
genre. Otherwise, you can only browse the new copied songs from All Songs on the player.
Initialize OS to the Original Factory Settings
When it is not able to turn on and disable connecting the player to your PC after resets,
please click and hold the Next key ( ) for about 8 seconds to initialize the OS to the
original factory settings. All data will be deleted in the player.
Copyright Notice
Product Features
General
Copyrights/Trademarks
This product is the registered trademark of Meizu Limited.
Meizu Limited, Has the exclusive copyright for this User Manual. It is prohibited
to distribute this User Manual in part or in whole without permission.
Meizu Limited, Has the copyright for the product software.
It is prohibited to distribute or commercially use them without written
permission from Meizu Limited.
The various examples, drawings and pictures and included in this User Manual
are subject to change without prior notice when new product enhancements
become available.
Do not change or modify the product without permission or authority of manufacturer.
It may cause undesirable operations, permanent damages or
harmful interferences.
Windows 2000, Windows XP and Windows Media Player are the registered
trademarks of Microsoft Corp.
SRS WOW is the registered trademark of SRS Labs, Inc.
Certifications
CE, FCC, CCC
8
Stylish and Luxurious Design with High Portability
Mini Player has a super mini size with high portability, and boasts a stylish and luxurious
design with aluminum surface.
Large & Vibrant LCD with Dynamic GUI; Human User Sliding-touch Keypads
2.4 Inch 260,000 Color QVGA 320*240 TFT-LCD
Various and Adjustable EQ modes
Including: User adjustable POP, Classical, Rock, Jazz, Live, Bass Booster, User.
Supports WMA, 355KbpsWMA VBR, OGG,FLAC, WAV, MP3 Playback
Movie Player(AVI video files), Game, Calculator, Calendar and Stopwatch
Alarm with Real-time Clock Setting
Photo Album + Slide Show: JPG, BMP, GIF Formats
Supports Microsoft MTP
Supports Key Song
Supports OTG (USB Host)
Music Sortation, Class Setting, Easier and Faster to Search Music
Plays Up to 20 Hours (Based on our company's test)
High Speed USB2.0 Ultra Fast Data Transfer
High Capacity USB Flash Storage for Mobile Disk
FM Radio with FM EQ and FM Recording Reservation
Built-in Microphone Supports High Quality Recording
Synchronized Song Lyric show
TEXT View
Multiple Language Supported
ID3 Supported
Resume Function, Auto Power OFF, Hold Function
Firmware Download
1
Getting Started
9
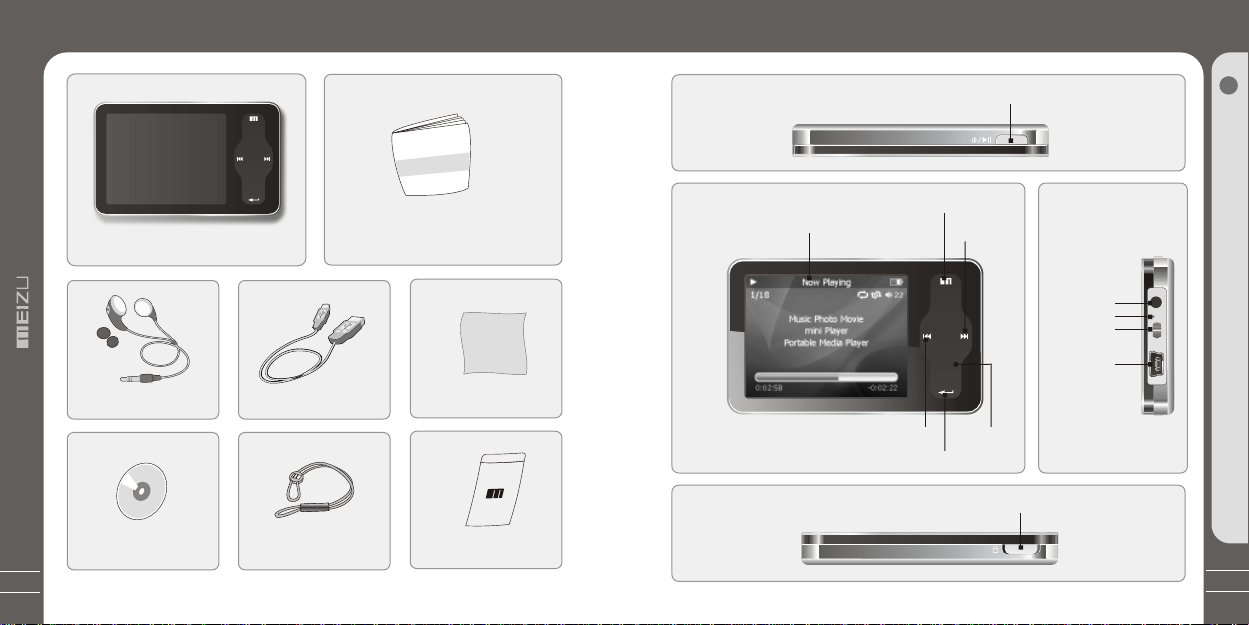
Package Contents
Parts and Names
10
User's Manual
Mini Player Main Body
Earphones
Installation CD
Note: Design and specifications are subject to change without notice.
USB Cable
Strap
User's Manual
Carrying Pouch
Clearing Cloth
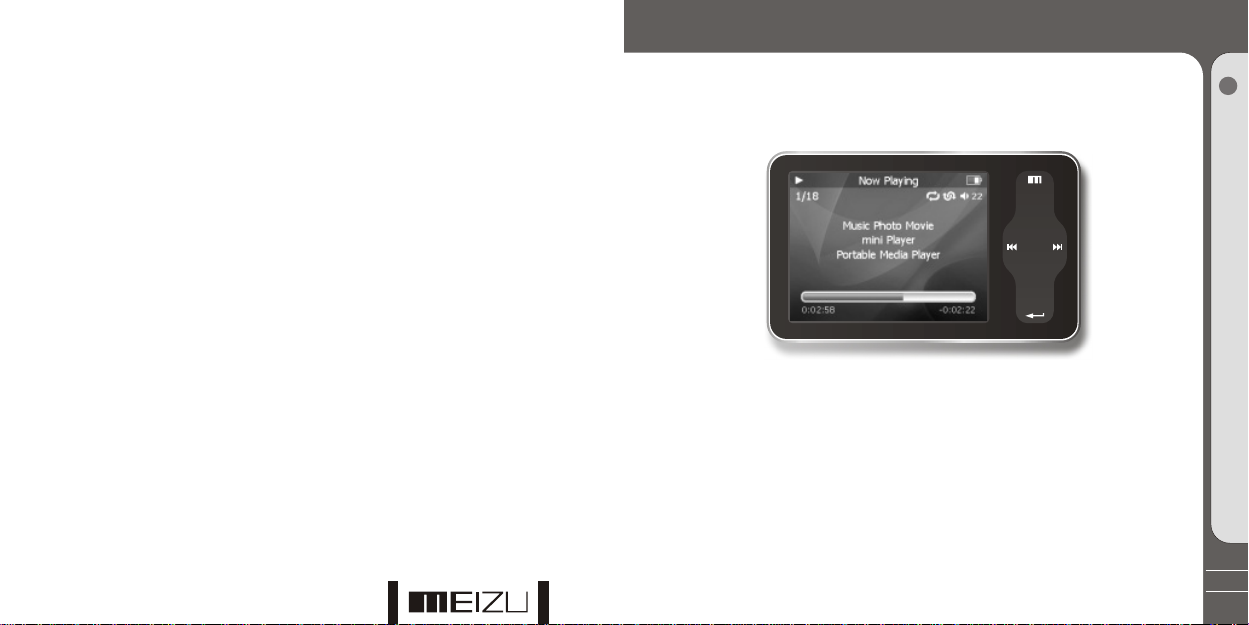
1. Top
2. Front Side
LCD Window
4. Bottom Side
MENU
PREVIOUS
ENTER
POWER/PLAY/STOP
NEXT
Sliding-touch
Keypad
HOLD
3. Right Side
Earphone
MIC
Strap
USB Port
11
1
Getting Started
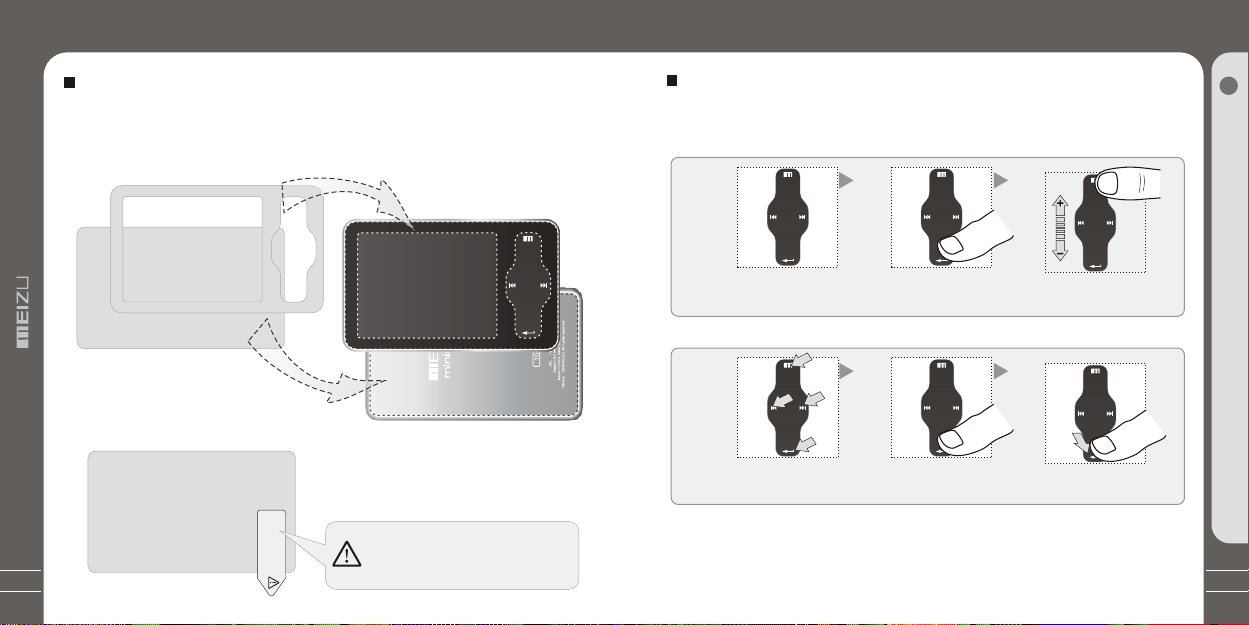
Protection Film on the Player
Touch Keypad
12
Protection Film on the Front Panel
The surface of player is easy to be contacted with other objects during use. To protect
the player from scratches, the front and rear plate surfaces of the player are attached
the transparent protection films. The films are featuring high light transmittance, antireflection and abrasion-resistance. Please keep the films on the player, do not remove it.
V1
The surfaces of the player are
attached with the protection films
before leaving factory.
Do not remove the protection film!
There is another layer of film covering the
protection film on the back of player.
Do not peel them off!
Please tear it out before use.
been attached transparent protection films.
The front and rear surfaces of the player have
Please peel off the label paster with the Mask
Please peel off the label paster with the Mask
The front and rear surfaces of the player have
been attached high-performance transparent
protection films. Do not peel them off!
MN
Touch Keypad
Touch keypad is an important part of the player, including sliding touch control and key
operations, which used for controlling operations of all kinds of functions of the player.
Sliding touch keypad:
Touch keypad Lay your finger on one Sliding lightly on keypad
end of keypad
Clicking Key:
Key positions Lay your finger on key Press lightly
positions of keypad
1. While HOLD is locked, any operation will be invalid.
2. Too fast operation will be easy to cause error.
3. When click keys, click the right positions to apply.
4. Clicking on Enter key can also be accomplished by clicking the center of keypad.
5. Clicking the top and bottom of keypad can accomplish the previous and next operation menu or lists.
13
1
Getting Started

LCD Display
LCD Display
14
1. Play Music
Radom Playback
HOLD
Play Status
Track Number
Song Total
Song Info
Elapsed Time
The playback progress bar shows the elapsed and remaining time of current
song. Click Enter key on keypad to display the sliding bar, then a diamond
slider appears and shows the current playback position. Slide your finger on
touch keypad up and down to move playback position forward or backward.
Click Enter key again, it shows the song's detailed information.
Click the key once again and return to playback mode.
Repeat Playback
5 6
Remaining Battery
Charge
Volume
Playback Progress
/Status Bar
Remaining Playing
Time
2. Video Playback
Video Name
Play Status
Elapsed Time
4
3. Photo View
Photo File Info
Current Number
LCD Display
5
Playback Progress
/Status Bar
Remaining
Playing Time
Browsing Progress/
Status Bar
Total Numbers
1
Getting Started
15

LCD Display
Connecting Mini Player
MONO/STEREO
Channel Frequency
Record Status
16
4. FM Radio
Station Signal
Station Name
Saved Channel
5. MIC Record
File Content
Record File
RecordTime
Elapsed Time
HOLD
FM Music Radio
Bit Rate
Loading the Battery
Sampling Rate
Remaining Battery
Charge
Volume
+
Remain Battery
Charge
Channel
Record Progress
/Status Bar
T otal Available Time
Click
Long Click
Connecting Mini Player
Connecting to a Computer
Connect the small end to player, large end to PC.
USB Cable
USB port on the player
USB port on the PC
1. During Power Off
Connect it to the computer using the USB cable supplied in the package during the player
powered off. It will be charged using the power supply from the PC.
Connecting to a computer during it power off,
it will charge its built-in battery and appears as
the left figure.
Installation CD
* Large End
* Small End
2
Basic Operation
17

Connecting Mini Player
Connecting Mini Player
18
2. During Power On
Connect it to the computer using the USB cable supplied in the package during
the player powered on. It will charge its built-in battery and appears as the figure.
In the normal Windows environment, as soon as the
cable or simple USB jack is connected, the message
"Searching for new device" appears and USB driver is
installed automatically. For Windows 98SE, put the
included CD-ROM in your disk drive, then follow the
instructions on your PC screen to install the USB drive.
Note: While connecting to PC, tracks and operations cannot be applied. Pulling out the
PC connection cable from the player before your listening to music / viewing a picture
and so on.
Charging the Battery
* Charging the Battery before using your player.
* While the player is connected to the computer via USB cable, it will charge its built-in
battery. The battery is fully charged in about 3 hours.
* Check if the player is connected to a high-power USB2.0 port. Some low-power USB
ports available in keyboards and other USB hubs may not provide enough power to
charge or sync the player.
* If the computer is in sleep mode, the player may not be charged.
The Remaining Battery Charge icon indicates the remaining time the battery can be
used. The more the battery is used, the fewer the number of segments in the icon.
Using for the First Time
Full Charged
Partially Discharged
Fully Discharged
To Charge the Player with AC Adapter
Power Supply Jack
USB Chargeable Cable
USB port on the player
1. Connect the AC adapter (not provided) and the player.
To charge the player with AC adapter, USB-DC adapter is required.
Connect the USB end to the player and another end to the power supply jack.
The AC adapter for the player uses input voltage of 100~240V and 50/60 Hz.
2. While connecting the player and power
supply, it will power on automatically.
The battery is fully charged in about 2.5 hours.
2
Basic Operation
19
Using for the First Time
Installation CD
20
Using for the First Time
Loading the Battery
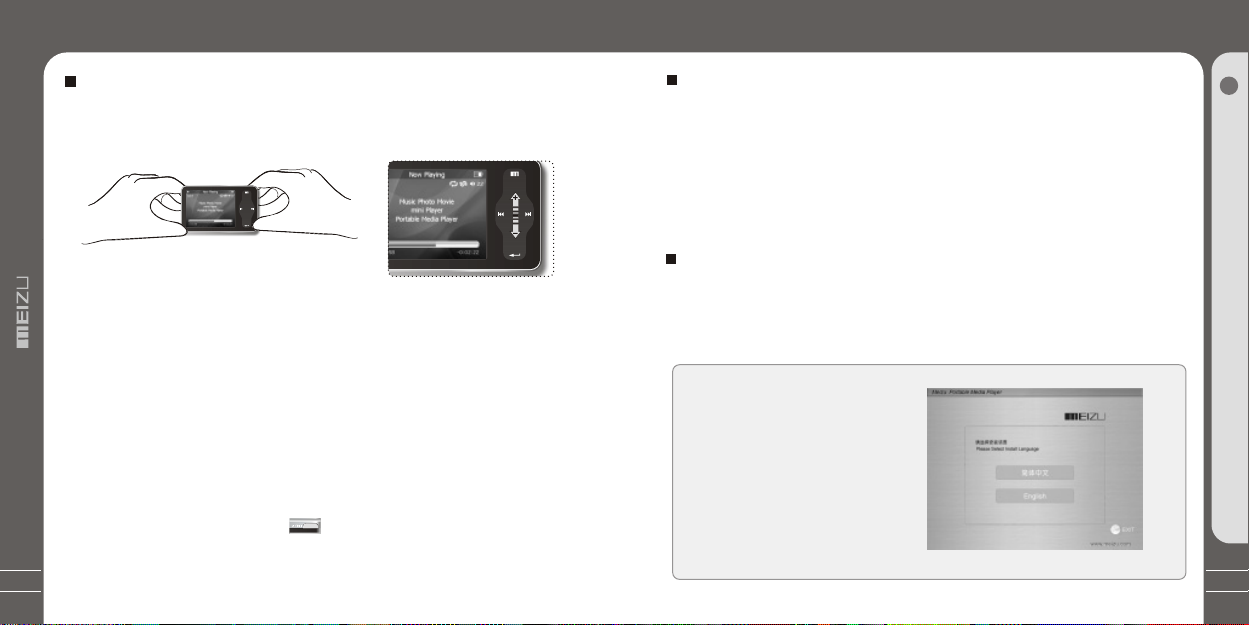
Handling
If you grab the player as picture, it is
easier to handle them.
The procedures of using for the first time
1. Insert the installation CD in your computer and install the manager software.
2. Install USB driver program (Only for Windows98 system or lower).
3. Connect the player to the computer using the USB cable supplied in th e
package. It will charges its built-in battery in the meantime.
4. Operate and manage [Removable Disk] on My Computer.
5. Disconnect the USB cable to the player.
(All keys of the player can not be operated during connecting to PC.)
6. Connect the earphone to the player.
7. Long press the power ON key to start the player.
8. You can use the player to play music, video, view your favorite photographs,
listen to FM radio and a lot of other features.
+
System Requirement
Pentium 133MHz or Higher
32MB Main Memory or Higher
40MB Hard Disk Space or More
CD-ROM Drive
USB Port (2.0)
Windows 98SE/ ME / 2000 / XP
Install Software
Insert the installation CD into the CD-ROM drive. The following screen appears
after inserting the CD.
When installation is automatically not started, execute the setup.exe in the
installation CD, and then the Manager program is automatically setup.
The installation CD contains the
following contents:
- Device Driver for Windows98
- VirtualDub for MEIZU Mini Player
Video Converting Tools
Using for the First Time
Long Click
3S
2
Basic Operation
21
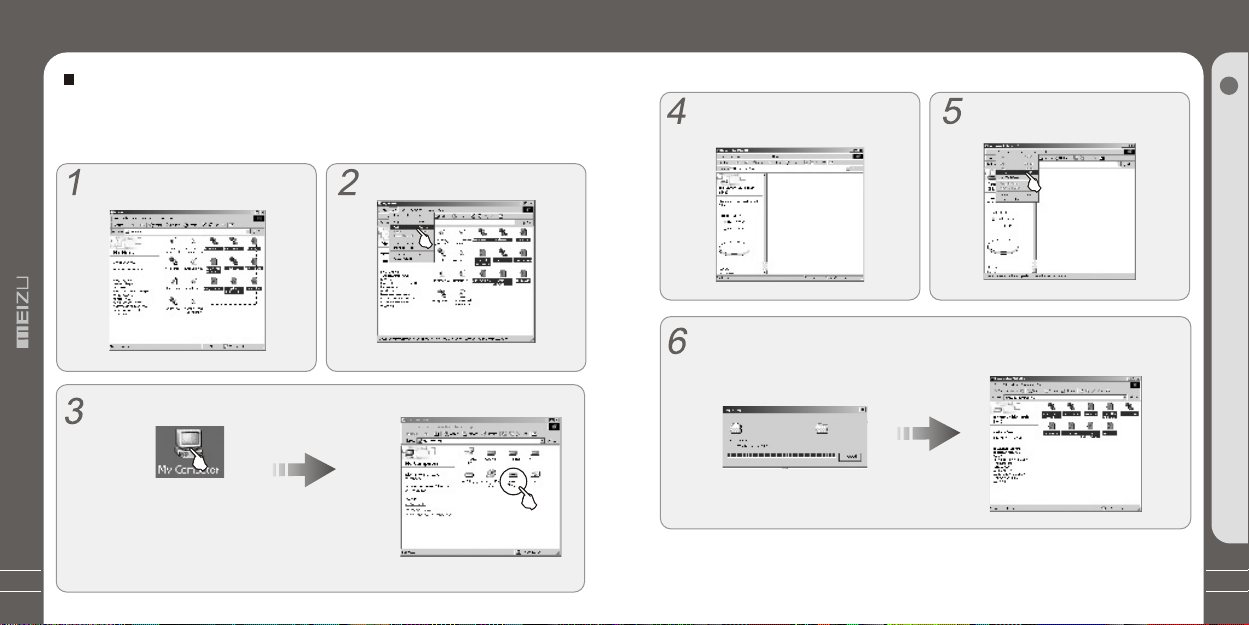
Downloading from the PC
Downloading from the PC
22
MP3 files can be downloaded to player using
Downloading from the PC
the following steps.
Download music, video or picture files from internet or access them from a CD, then copy
them to Removable Disk. Take example for copying songs as below,
Select the desired music to download
to the player from the computer.
Double click [My Computer], then [Removable Disk] again.
The player is shown as the
Removable Disk on your PC.
Note: you can also drag and drop the selected files
from your PC into the [Removable Disk] window.
Click the [Edit] - [Copy] Menu.
It appears on your PC as shown in the
figure as follows(while finish formatting).
After finishing copying, it appears the music files on the Removable Disk. Disconnect
the player to your PC, then you can start listening to the music.
When copy files, you should save the video and photo files to specified directories of
the player, video files into Movie directory, photo files into Picture directory. Otherwise,
they won't be identified by Mini Player.
Select [Edit] - [Paste].
2
Basic Operation
23
 Loading...