

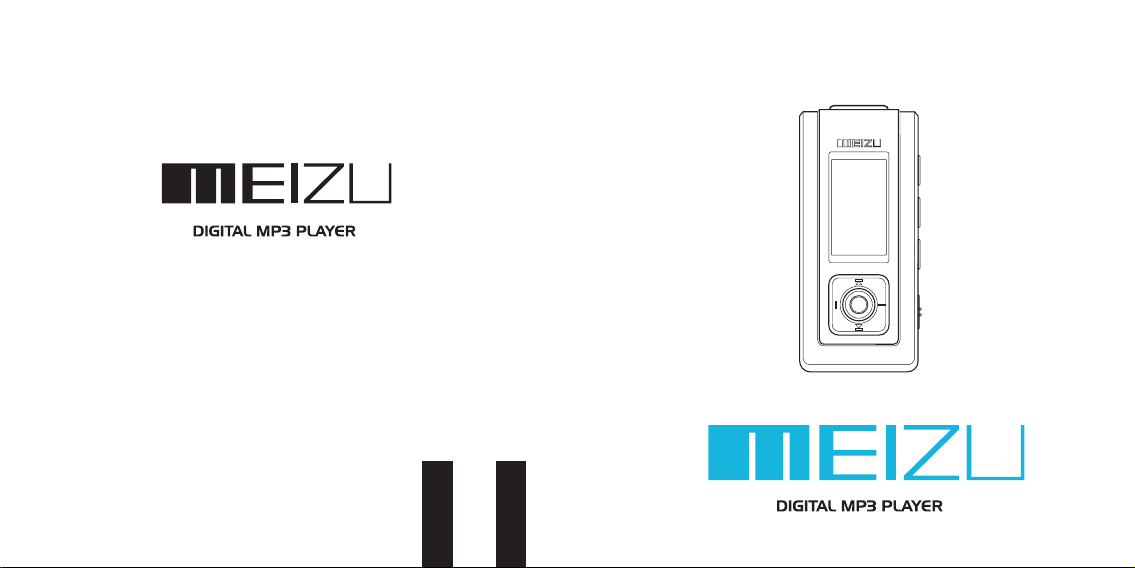
Page 1
Meizu Electronic Technology Limited
Add .: 3F No. 7 Ping Xi 5 th Road N an Ping Tec hnology & Industrial
Par k Zhuha i Guang dong Ch ina 519 060
Vers ion: mz x306- 01en
User's Manual
Meizu X3 Series
Page 2
Wel come to visit Meizu's we bsite !
The M eizu' s home pa ge prov ides th e overv iew of co mpany a nd prod ucts, o ther re lated
inf ormat ion, an d answe rs to com mon que stion s. Firm ware an d softw are upd ates ar e
als o avail able as w ell as th e most re cent in forma tion ab out you r Meizu p roduc t.
In or der for c ustom ers who p urcha sed the p roduc t to rece ive spe ciali zed ser vices ,
we re comme nd that t hey acc ompli sh cust omer re gistr ation a t http: //www. meizu .com.
You may get usefu l infor matio n from "U ser's F orum" a nd FAQ. Re giste r your ID a nd get
any a pprop riate o nline c ustom er supp ort.
Tha nk you fo r purch asing t he prod uct.
Ple ase rea d the man ual car efull y befor e use.
We re commend you to keep it for f uture r efere nce.
Welcome
1
Getting S ta rted
2
33
Page 3

1. Getting Started
¡
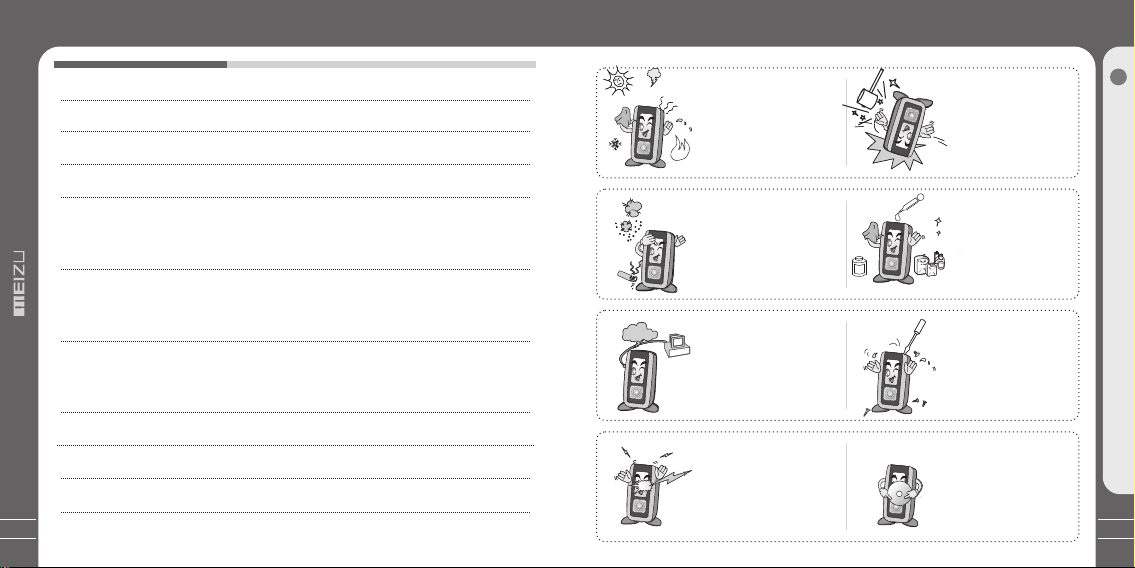
Pre cauti ons for U sing th e Produ ct
¡
Cop yrigh t Notic e
Pro duct Fe ature s
¡
Pac kage Co ntent s Parts a nd Name s
¡
LCD D ispla y
¡
Loa ding Ba ttery U sing fo r the Fir st Time
2. Basic Operation
¡
USB C onnec tion
¡
Ins talla tion CD
¡
Ins tall th e Manag er Soft ware
¡
For mat
¡
Dow nload ing fro m the PC
¡
4
Sav ing Fil es Disc onnec ting to You r PC
7
8
9
10- 11
12- 13
14- 15
16
17
18- 19
20- 22
23- 24
25
3. Quick Start
Usi ng Butt ons
¡
Pla y Music
¡
Sel ectin g Modes
¡
¡
Men u Contr ols
¡
Nav igati on Mode
¡
Text Vi ew
¡
Dis playi ng Lyric
¡
FM Ra dio
¡
Aut o Searc h FM Radi o
¡
Mem orizi ng the Cu rrent S tatio n
¡
Lis tenin g To the Me moriz ed Stat ion
¡
Del eting t he Memo rized S tatio n
FM Re cordi ng
¡
Table of ContentsTable of Contents
1
Getting S ta rted
26- 27
28
29
30
31
32
33
34
35
36
37
38
39
5
Page 4
Voic e Recor der
¡
¡
Pla y Recor ding Fi les
¡
Ope ratin g the Con trols
Men u List
4. Menu
¡
Det ailed F eatur es by Men u
5. Guide to Firmware Upgrade
¡
Fir mware U pgrad e
6. Additional Information
Han dling I nstru ction s
¡
¡
Trouble Shoo ting
Pro duct Sp ecifi catio ns
¡
Mem o
¡
6
Table of Contents Precautions for Using the Product
40
41
42- 44
45
46- 58
59- 63
64
65
66
67- 68
Touch ing the p roduc t with
wet h ands ma y cause a m alfun ction . Do not ke ep it in
hig h tempe ratur es or dis pose
in di rect su nligh t.
Kee p away fr om plac es of
dus t and cig arett e ash.
Fre quent ly back u p impor tant
fil es. All th e data st ored in t he
pro duct ma y be dele ted dur ing
AS.
Kee p away fr om impa ct, do
not c ontac t with th e stati c
obj ects.
Do no t drop pl ayer or a pply
imp act. Sh ock is th e major
cau se of bre akdow n.
Mak e sure th at the pl ayer
doe s not get i n conta ct with
che mical s such as b enzen e
or th inner.
Do no t disas sembl e the
pla yer.
Ple ase kee p the SN of y our
pla yer to re giste r on Meiz u's
web site or f or your f uture 's
SN
ref erenc e.
1
Getting S ta rted
7
Page 5

Copyright Notice
Product Features
General
Cop yrigh t
Thi s produ ct is the r egist ered tr adema rk of Mei zu Elec troni c Technolo gy Co., L td..
Mei zu Elec troni c Techn ology C o., Ltd ., Has th e exclu sive copyr ight fo r this Us er
Man ual.I t is proh ibite d to dist ribut e this Us er Manu al in par t or in who le with out
per missi on.
Mei zu Elec troni c Techn ology C o., Ltd ., Has th e copyr ight fo r the pro duct softw are.
It is p rohib ited to d istri bute or c ommer ciall y use the m witho ut writ ten per missi on
fro m Meizu E lectr onic Tech nology Co ., Ltd. .
The v ariou s examp les, dr awing s and pic tures a nd incl uded in t his Use r Manua l
are s ubjec t to chan ge with out pri or noti ce when n ew prod uct enh ancem ents
bec ome ava ilabl e.
Do no t chang e or modi fy the pr oduct w ithou t permi ssion o r autho rity of m anufa cture r.
It ma y cause u ndesi rable o perat ions, p erman ent dam ages or h armfu l inter feren ces.
Cer tific ation s
CE, F CC
@ 200 3~200 6 Meizu L imite d, All rig hts res erved .
8
Vari ous EQ mo des
Inc ludin g: Norm al, Roc k, Jazz , Class ic, POP, Ba ss, Disco , User1 , User2 , User3
Hig h speed U SB2.0 i nterf ace.
Hig h capac ity USB f lash st orage f or mobi le disk
Sty lish de sign an d Super M ini Aluminu m alloy b ody
Blu e Color O LED Scr een. Sc reen Sa ver Set tings
FM ra dio and F M recor ding
Sup er FM ste reo rad io func tion, s uppor ts auto s earch ing tun e chann els and c hanne ls
man ageme nt as wel l as FM Rec ordin g (with 5 0 prese t chann els)
Bui lt-in M icrop hone su pport s high qu ality r ecord ing
MP3 f older a nd Cont ent man ageme nts.
Dyn amic gr aphic s menu. H uman us er oper ating i nterf ace
Use r DIY Log o and scree n saver s pictu res
Sup ports M P3/WM A/ WAV file f ormats
Pla ylist s uppor ted. Sy nchro nized S ong Lyric Sho wing. T XT View
Lon g playb ack tim e
Up to 1 6 hours w ith one AA A battery ( Based o n our com pany' s tes t)
(Th e playi ng time m ay be sho rtene d if visu aliza tion is u sed.)
Mul tiple L angua ge Supp orted
The re are En glish , Simpl ified C hines e, Tradi tiona l Chine se, Jap anese , Korea n langu ages
Enh anced I ntegr ated Na vigat or; Pla y/Pau se, Pow er OFF, Rec ordin g, A-B Repeat
Nex t Track/ Previ ous Trac k, Fast F orwar d/Fas t Rewin d; Infi nite Lo op
Res ume fun ction , Aut o Power O FF, Hold fu nctio n
Fir mware d ownlo ad & Logo d ownlo ad
ID3 V1 Tag, ID 3V2 2.0, ID 3 V2 3.0, I d3 V2 4.0 , Filen ame Sup port
Pro duct in fo disp lay (Fi rmwar e versi on, Mem ory Usa ge)
1
Getting S ta rted
9
Page 6
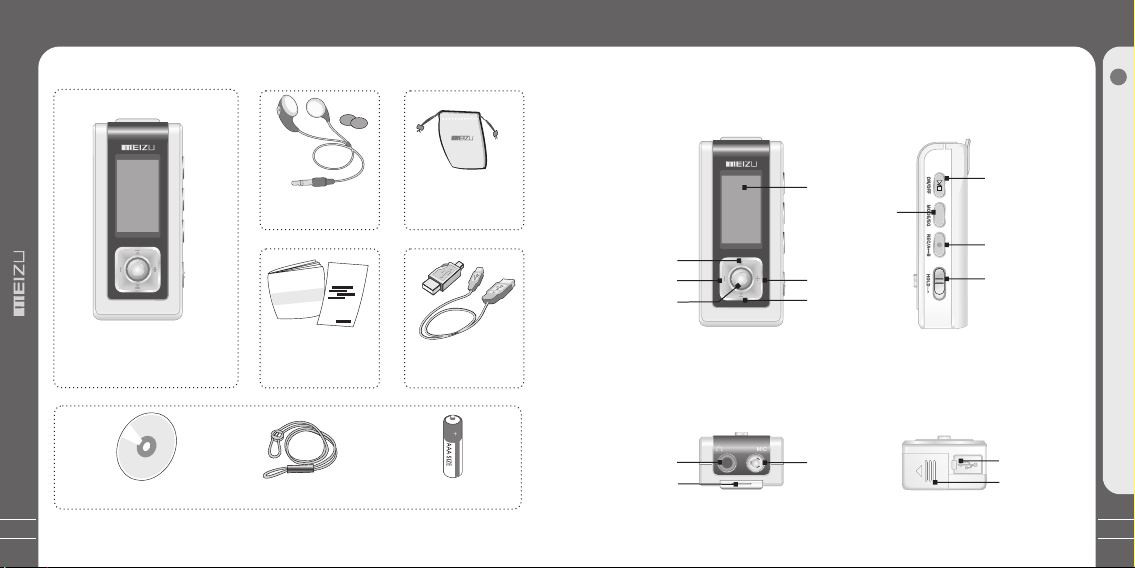
Package Contents
Parts and Names
10
Ear phone s /
Ear phone C overs
MP3 P layer M ain Bod y
Ins talla tion CD
Not e: Desi gn and sp ecifi catio ns are su bject t o chang e witho ut noti ce.
Manu alWarr anty Card/
Qui ck Start Guide
Fas hiona ble Nec klace
AAA Bat tery
Pou ch
Mini USB Adapter /
USB Cable
1. Front Side
REW
VOL -
NAVI /MENU
3. Top
Ear phone j ack
Nec klace p ort
LCD W indow
3-M ODE/E Q
VOL +
FF
Mic ropho ne
2. Right Side
4. Bottom Side
PLAY /STOP/T URN
ON/ TURN OF F
but ton
REC /A-B
HOL D
USB p ort
Bat tery co ver
1
Getting S ta rted
11
Page 7
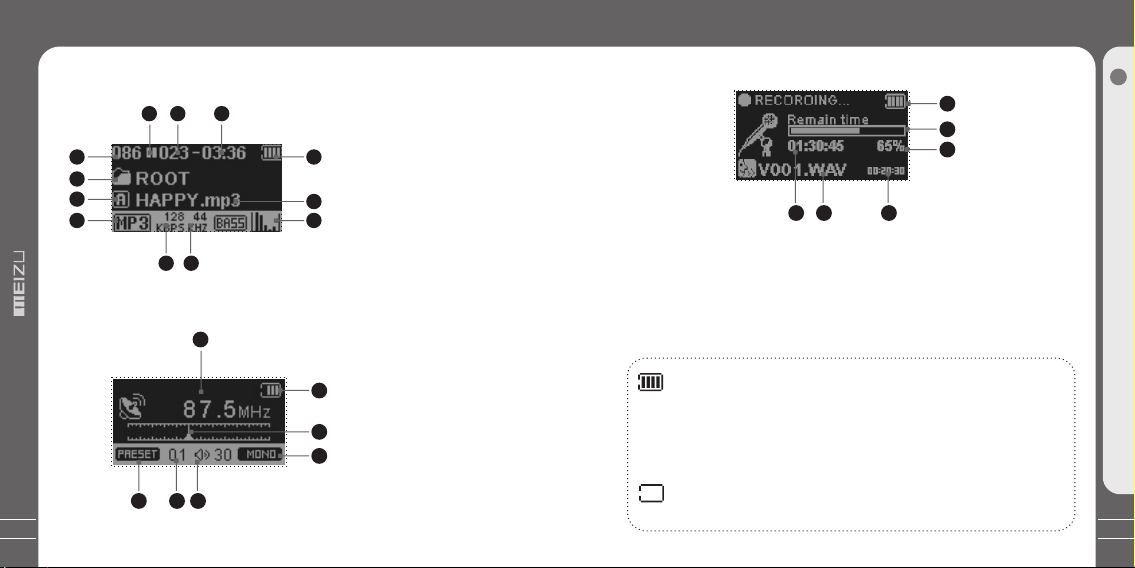
LCD Display
LCD Display
12
1. Play Music
1
2
3
4
2. FM Radio
5 7
5 7
6
11
12
1
6
1
Getting S ta rted
8
1. So ng Tota l
2. Fi le Cont ent
3. Pl ay Mode
4. Fi le Form at
3. MIC Recordin g
1
2
3
5. Pl ay Stat us
6. Tra ck Numb er
9
10
7. Pl ay Time
8. Re maini ng Batt ery Cha rge
9. So ng Info
10. E Q
11. Bi t Rate
12. S ampli ng Rate
1. St ation F reque ncy
2. Re maini ng Batt ery Cha rge
2
3. St ation I ndica tor
4. MO NO / Ster eo
3
5. Pr eset Mo de
4
6. Sa ved Cha nnel
7. Vol ume
1. Re maini ng Batt ery Cha rge
2. Re main Time
3. Re cordi ng Perc ent
The R emain ing Bat tery Ch arge ic on indi cates t he rema ining t ime the
bat tery ca n be used . The mor e the battery is used, the f ewer th e
num ber of se gment s in the ic on. For s ome bat terie s or rech argea ble
dry c ells, t he numb er of seg ments i n the bat tery ic on may in creas e of
dec ease ir regul arly wh ile the r emain ing cha rge is me asure d, but th is
is no rmal.
Whe n the bat tery ru ns out th e icon st arts bl inkin g, the po wer is au to-
4 5 6
4. Re main Re cordi ng Time
5. Re cordi ng File
6. Re cordi ng Time
mat icall y turne d off aft er about 30 minutes.
13
Page 8
Loading the Battery
Using for the First Time
14
E
I
S Z
A
A
A
+
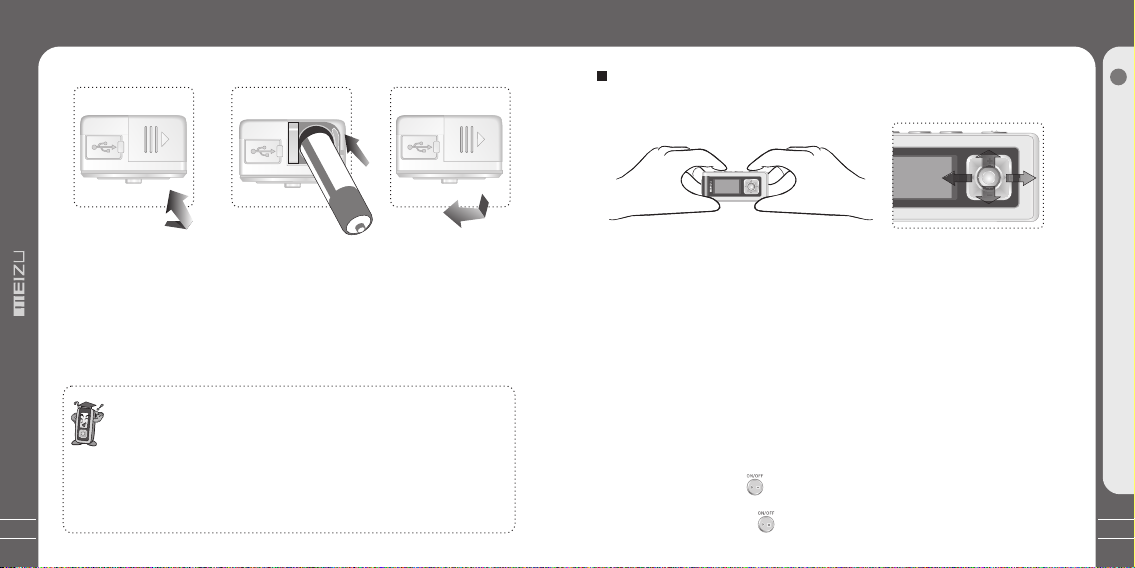
Inserting Bat tery
1. Pu t down an d open th e batte ry cove r.
+
2. In sert th e AAA battery
3. Pu sh the co ver in th e rever se orde r of open ing it. An d close t he batt ery cov er.
Not e:
1. Ma ke sure t o power o ff the pr oduct before your taki ng out th e batte ry.
2. To avo id corrosion, remove t he batt eries i f the pla yer is no t to be use d
for a l ong tim e.
3. Re move de ad batt eries i mmedi ately t o avoid d amage f rom cor rosio n.
Whe n corro sion oc curs, w ipe the b atter y compa rtmen t immed iatel y
wit h a dry clo th and in sert a ne w batte ry.
Cli ck
Lon g Click
Using for the Fir st Time
Handling
If yo u grab th e playe r as pict ure, it i s
eas ier to ha ndle th em.
3S
The procedure s of using for the fi rst time
1. Op en the ba ttery c over, in sert ba ttery i nto the p layer.
2. Li nk the PC c onnec tion ca ble to US B port of y our PC an d the pla yer.
3. In stall U SB driv er prog ram (On ly for Wi ndows 98 syst em or low er).
For d etail s, see "[ Insta lling U SB Driv er Prog ram]" .
4. Op erate a nd mana ge [the m obile d isk] on M y Compu ter.
5. Di sconn ect the U SB cabl e to the pl ayer.
(Al l butto ns of the p layer c an not be o perat ed duri ng conn ectin g to PC.)
6. Co nnect t he earp hone to t he play er.
7. Pr ess the O N butto n to star t the pla yer
(It w ill tur n ON auto matic ally if y ou set an d selec t Auto Play in the p layer ).
8. Pr ess the P LAY button , music is play ed.
Fun ction
15
1
Getting S ta rted
Page 9
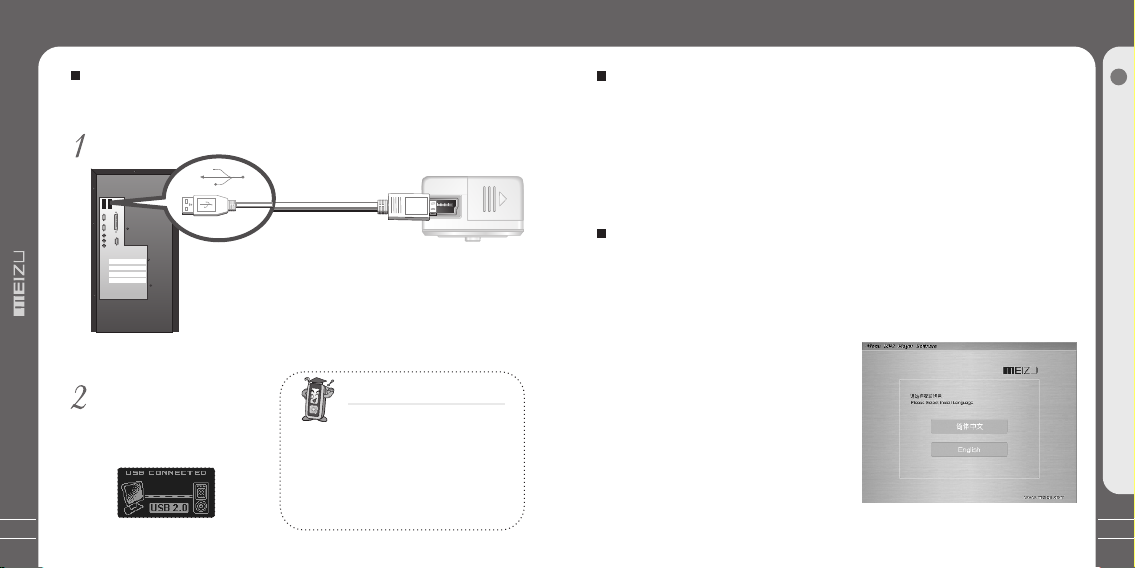
USB Connection
Installation CD
16
Connecting th e Player to a PC
Cau tion: B efore c onnec ting th e USB cab le to the p layer, s top pla yback .
Con nect th e USB cab le(pr ovide d) to the U SB port o f your co mpute r.
USB C able
USB p ort on th e PC
Cau tions : Durin g the con necti ng of USB c able to y our PC,
USB p ort can b e used as p ower su pply. Fo r Windows 98SE,
put t he incl uded CD -ROM in y our dis k drive , then fo llow th e
ins truct ions on y our com puter s creen t o insta ll the US B drive .
Con nect th e playe r and you r
com puter, i t autom atica lly fin ds
the p layer. I t displ ays as th e
Mob ile Dis c on your P C.
OK
* Sma ll end to p layer, l arge en d to PC
USB p ort on th e playe r
CON NECTI NG TO A PC
Whe n USB cab le is con necte d to PC for d ownloa ding fi les ont o the pla yer, it ap pears o n LCD
as th e left fi gure an d switc h to PC con necti ng
mod e. Whil e conne cting t o PC, tra cks can not be
pla yed. Pu lling o ut the PC c onnec tion ca ble
fro m the pla yer bef ore you r liste ning to m usic.
System Requir ement
Pen tium 13 3MHz or H igher
32M B Main Me mory or H igher
40M B Hard Di sk Spac e or More
CD- ROM Dri ve
USB P ort (2. 0)
Win dows 98 SE/ ME / 20 00 / XP
Install Softw are
Ins ert the i nstal latio n CD into t he CD-R OM driv e. The fo llowing screen appea rs
aft er inse rting t he CD.
Whe n insta llati on is aut omati cally n ot
sta rted, e xecut e the set up.ex e in the
ins talla tion CD , and the n the Man ager
pro gram is a utoma tical ly setu p.
The i nstal latio n CD cont ains th e
fol lowin g conte nts:
- Dev ice Dri ver for W indow s98 or lo wer
- Mei zu Tool s
- MP3 F ormat ting Tool s
- DFU U pgrad e Tools
- LOG O DIY too ls
17
2
Basic Ope ra tion
Page 10
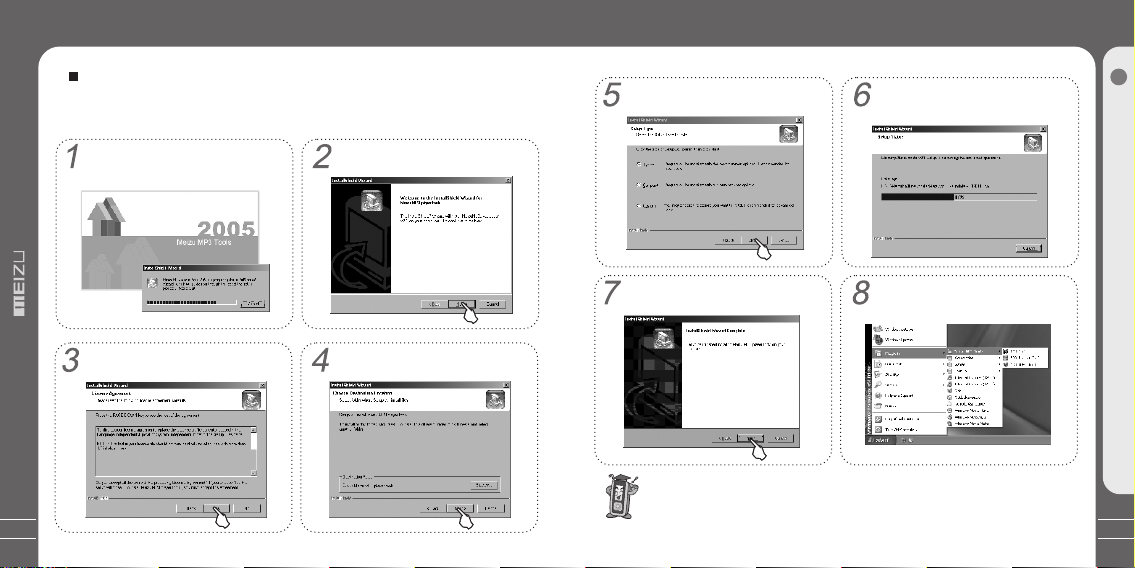
Install the Manager Software
Install the Manager Software
18
Setting Up the Ma nager Softwar e
Set u p the pla yer man ager so ftwar e on your P C for the f ollow ing sit uatio ns:
MP3 p layer F ormat ting, F irmwa re Upgr ade or wh en it is no t able to c onnec t the PC wi th
the p layer.
Ins ert the p layer I nstal latio n CD to the
CD- ROM in yo ur PC. Ru n the "se tup.e xe"
fil e. Then t he foll owing w indow a ppear s.
Rea d the Lic ense Agr eemen t. To conti nue
ins talla tion, c lick on t he [Yes] bu tton.
Cli ck [Nex t>] .
Spe cify th e desti natio n folde r. Click o n
the [ Next> ] butto n.
Sel ect the t ype of Se tup and t hen spe cify
a gro up name .
The i nstal latio n is comp lete.
The re are DF U Tool, M P3 Form at Tool, MP 3 LOGO Tool f or Meiz u MP3 Tools.
The n neces sary fi les wil l be copi ed into
you r hard di sk and up dated t he driv er info rmat ion. It wi ll tak e you a few s econd s.
Aft er fini shing t he setu p, run th e firmw are
upg rade pr ogram b y selec ting St art ->,
Pro grams - > Meizu M P3 Tools -> D FU Tool .
19
2
Basic Ope ra tion
Page 11
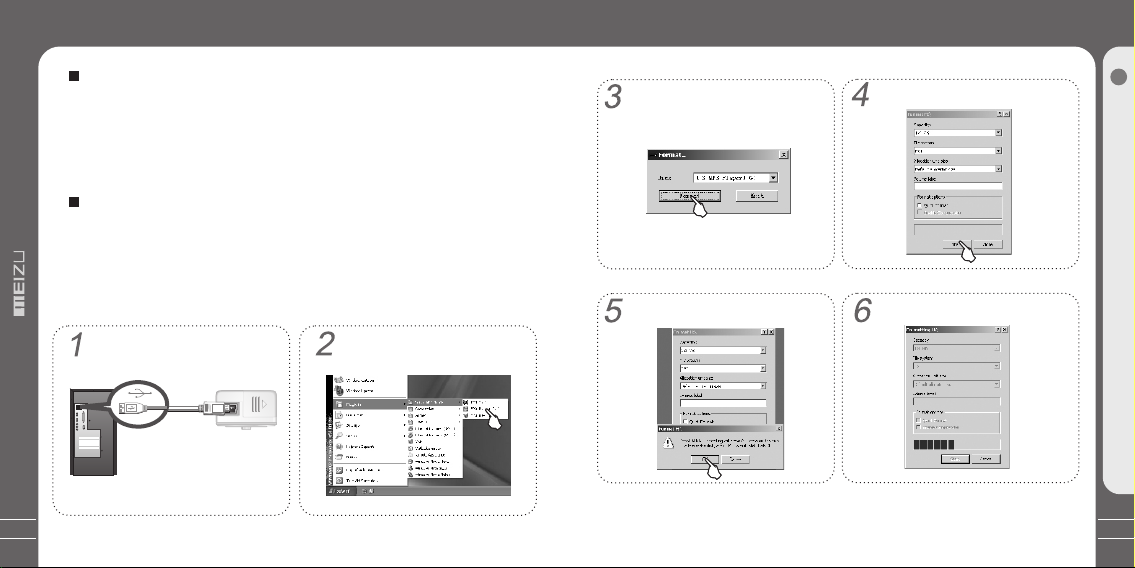
Format
Format
20
Formatting th e Flash Memory
The f lash Me mory of t he play er can be f ormat ted. If t he flas h Memor y is
for matte d, all da ta stor ed with in is los t. Take n otice o f this fa ct, exa mine
the f ollow ing pro cedur es.
Before format ting,
Fin ished i nstal latio n of the pl ayer ma nager p rogra m
Con necti ng the pl ayer to y our PC
Bac kup all d ata sto red on th e playe r
Operating pro cedures
Con nect th e playe r to your P C via USB
con necti on cabl e.
* Sma ll end to p layer, l arge en d to PC
Cli ck
[St art]- -[Pro gram] --[Me izu MP3
Tools ]--[M P3 Form attin g Tool] .
Sel ect the M obile D isk and c lick [F ormat ].
X
It po ps up the w arnin g windo w, selec t
[OK ] to cont inue.
Cli ck the [S tart] .
The f ormat ting is s tart ru nning .
21
2
Basic Ope ra tion
Page 12

Format
Downloading from the PC
22
Whi le fini shing , click [ OK] to fi nish.
It is e asy to fo rmat yo ur MP3 pl ayer, pl ease re fer to Wi ndows i nstru ction t o forma t on your P C.
Whi le usin g WINDO WS form attin g, it app ears th e warni ng, cli ck OK and f inish i t.
You sho uld tak e speci al care w hen you f ormat i t since a ll the da ta in the m emory
wil l be dele ted.
Exi t the for matti ng, cli ck [Clo se] to ex it.
MP3 files can be do wnloaded to pla yer using the fol lowing steps.
Sel ect the d esire d music t o downl oad
ont o the pla yer fro m the PC.
Dou ble cli ck [My Co mpute r], the n [ ] aga in. Mob ile Dis k
The p layer i s shown a s the Mob ile Dis k
on yo ur PC.
Cli ck the [E dit/C opy] Me nu.
23
2
Basic Ope ra tion
Page 13

Downloading from the PC
Saving Files/Disconnecting to Your PC
24
It ap pears o n your PC a s shown i n the
fig ure as fo llows .
Aft er fini shing c opy, it ap pears t he musi c files o n the mob ile dis k. Disc onnec ted the p layer t o
you r PC, the n you can s tart li steni ng the mu sic.
Or yo u can als o drag an d drop th e selec ted fil es from y our PC in to the [M obile D isk] wi ndow.
Sel ect [Ed it]/[ Paste ].
Saving Files an d Disconnecti ng to your PC
Cop y the Fil es in the P layer i nto you r PC
1. Wi th the US B cable , conne ct the US B ports o f the pla yer and y our PC.
(It s hould n ot use a US B hub. It i s assum ed that y ou conn ect to th e USB por t on
the m ain boa rd.)
2. Sa ve the mu sic fil es unde r the har d disk on y our PC.
3. Aft er save d the fil es, cli ck the ic on on the s creen o f your PC .
4. It p ops the m essag e as abov e, then c lick it .
5. It r uns 'Sa fely Re move Ha rdwar e'.
6. Th en draw out and disconne ct the US B cable .
To make s ure to sa ve the da ta on you r playe r safel y and ful ly, plea se foll ow the
abo ve step s accor dingl y when yo u disco nnect t he play er to the P C.
Whi le disc onnec ting, ,it app ears th e warni ng, cli ck OK and f inish i t.
25
2
Basic Ope ra tion
Page 14

Lon g Click
Cli ck
Lon g Click
Using Buttons
1. Po wer On
Pre ss ON/O FF butt on, the p ower co mes
on an d Meizu l ogo app ears.
Pre ss ON/O FF butt on agai n, star t to
pla y. (Sinc e Auto-play function is s et,
pla y autom atica lly sta rts whe n the
pow er is tur ned on. )
2. Po wer Off
Whe n you pre ss and ho ld ON/O FF
but ton, th e power t urns of f.
If th e PC and th e playe r are con necte d
via a U SB cabl e, you ca nnot tu rn the
pow er off.
4. To sel ect music
To sele ct previous music
To sele ct next music
6. EQ S elect ing
Pre ss MODE /EQ to sw itch to t he diff erent
EQ.
EQ ic on is cha nging d uring s elect ing.
7. Ho ld
Put t he HOLD s witch t o On/Of f.
Using Buttons
5. To adj ust the volume
To incr ease volume
To decr ease volume
HOL DHOL D
3
Quick Sta rt
26
3. Pl aybac k & Stop
Pre ss ON/O FF brie fly, sta rt to play.
Pre ss it aga in whil e in Play s tatus , the
pla y stops .
Not e:
By tu rning H old ON, t he butt ons on th e playe r will no t funct ion.
It is i rrele vant to l isten m usic or F M radio .
27
Page 15

Play Music
Selecting Modes
28
Listening to Mu sic
Cli ck
Cli ck
1. Co nnect t he play er and th e earph ones.
2. Tur n the pla yer on by p ress th e ON/OF F butto n.
3. Th e start logo displays on t he LCD.
4. Pr ess ON/ OFF to st art to pl ay the mu sic.
5. Na vigat e with th e FF/RE W butto ns, and s elect t he prev ious / ne xt musi c.
Nav igate w ith the ' +' or '-' b utton s, and ad just th e volum e.
6. Lo ng pres s ON/OF F butto n, the po wer tur ns off.
Not e: If the b utton s canno t funct ion, pl ease ch eck if th e HOLD is t urnin g on.
Lon g Click
To Sel ect Mode
Lon g Click
Cli ck
Sel ectin g Music M ode:
1. Th ere are three modes avai lable : Music , Radio , Voice Re corde r.
2. Du ring MP 3 mode, l ong pre ss the MO DE/EQ b utton , the fun ction s elect ion
dis plays o n the LCD .
3. Pu sh the FF /REW bu tton to s elect M usic mo de.
4. Cl ick the N AVI/ MENU bu tton an d the opt ion is ap plied .
5. Du ring th e three m odes se lecti on, cli ck the '+ ' butto n and exi t.
29
3
Quick Sta rt
Page 16

Menu Controls
Navigation Mode
30
Menu Controls
Cli ck
Sel ect the M enu Opt ions
Cli ck the ME NU butt on, nav igate w ith , and s elect
opt ions. C lick th e MENU bu tton or p ush the F F butto n, then e nter th e subme nu.
Pus h the REW b utton t o the upp er menu .
Adj ust the Va lues
Nav igate w ith the ' +' or '-' b utton s to adju st the vo lume. P ress th e MENU bu tton
to ap ply the o ption s. Duri ng the se lecti on, cli ck the '+ ' butto n and exi t.
the ' +' or '-' b utton s the m enu
Cli ck
Using Navigat ion Mode
Lon g Click
Ope n the Nav igato r
Lon g press M ENU but ton to op en the na vigat or, sele ct Bro wser Fo lder opt ion.
Cli ck MENU b utton t o apply i t.
Cli ck the RE W butto n and ret urn to th e upper m enu or pl aybac k mode.
Nav igato r Pop-u p Windo w
The re pops u p the fol lowin g funct ions af ter you s elect t he fold er or the f ile,
Cli ck the fo lder: 1 . Play 2. O pen
Cli ck the fi le: 1. Pl ay 2. Add to F averi te 3. Del ete 4. Pl ay Fold er
" "
31
3
Quick Sta rt
Page 17

Text View
Displaying Lyric
32
Vie w the TEXT Files (t xt.)
1. Co nnect t he MP3 pl ayer an d your PC w ith the U SB cabl e.
2. Sa ve the se lecte d text fi le(.t xt suff ix name) into your MP3 pla yer.
3. Di sconn ect the M P3 play er and yo ur PC.
4. Tur n on the pl ayer, fu nctio n the Nav igati on butt on and se lect th e text fi le.
Pre ss the Me nu butt on, you c an view t he text f ile on yo ur play er.
5. Fu nctio n the '+' o r '-' but tons, y ou can mo ve the te xt file p age by pa ge.
6. Pr ess the M enu but ton and o pen the i ndivi dual wi ndow, th en you ca n find th e
spe cifie d posit ion.
Not e: Duri ng view t he e-bo ok, you c an list en to the m usic in t he mean t ime. You
can s et Auto br owse an d turn th e page au tomat icall y. The s peed is adjustable by
pre ss the EQ /MODE b utton . You can choose: 0 4, 06, 08 , 10, 12 Se creta ry.
Displaying Lyric
1. Do wnloa d the lyr ic file s from th e inter net to th e PC. The l yric file is the format of
Irc . As suffix .
2. Co nnect t he play er and yo ur PC via U SB cabl e.
3. Co py and dr ag the MP 3 lyric f iles on y our pla yer. (Sa ved the l yric fi les and t he
son gs unde r the sam e conte nt. The ir names should be both th e same ex cept
for t he suff ix names.)
4. Di sconn ect the p layer a nd your P C.
Lon g Click
5. Tur n on the pl ayer, fu nctio n it with a nd butt on to sel ect the d esire d
son g. It sta rts to pl ay it.
3S
Cop y the lyr ic file s from yo ur PC to th e Playe r.
Ins ati abl e.l rc
insati able. lrc
33
3
Quick Sta rt
Page 18

FM Radio
Auto Search FM Radio
34
Listening to FM R adio
Lon g Click
Cli ck
Mus ic -> Rad io Mode ( see the a bove)
1. Pr ess and h old the M ode/E Q butto n to show t he main s creen a nd then s elect
the " Radio ".
2. Pr ess the F F/REW b utton , y ou can fi nd the fr equen cy.
Not e: If the s ignal a nd info rmati on in the p lace wh ere you a re list ening i s too
wea k, it may d egrad e the FM ra dio qua lity.
Memorize the Auto Searc hing Channels .
Cli ck
Cli ck
1. Du ring th e FM mode , press t he Menu b utton t o enter m enu opt ions.
2. Pr ess the ' +' or '-' b utton s and sel ect "Au to Scan " funct ion, pr ess the M enu
but ton and s tart sc annin g.
3. I t ap pears t he auto s canni ng on the L CD. The f requency changes by 0. 1 Khz.
4. Aft er fini shing i t, it cha nges to P reset m ode in wh ich you c an sele ct prev iousl y
sav ed chan nels (5 0 prese t chann els are p rovid ed), th en chan nel 01 is
aut omati cally p layed .
Cli ck
35
3
Quick Sta rt
Page 19

Memorizing the Current Station
Listening to the Memorized Station
36
Manual Memori zing the Curren t Station
Lon g Click
Cli ck
1. Du ring FM m ode, lo ng clic k the Men u butto n to ente r prese t mode.
2. Fu nctio n the '+' o r '-' but tons to s elect t he loca tion to m emori ze , then c lick
the M enu but ton.
3. It p ops up th e menu wi ndow, wi th the '+ ' or '-' bu ttons t o selec t Save an d then
cli ck the Me nu butt on to app ly it. Th en the current frequen cy is add ed to the
Pre set cha nnel.
4. Pu sh the RE W butto n to exit .
* Lis ten: Li sten to t he curr ent cha nnel.
* Sav e: The cu rrent frequency is all ocate d (adde d) to the P reset c hanne l.
* Del ete: Th e current Preset chann el is del eted.
Cli ck
Preset mode
Dur ing FM mo de, ent er the pr eset mo de to lis ten to th e
sav e chann els.
It ap pears 0 1 on the LC D durin g prese t mode.
Mem orizi ng Chan nel
Pre set Mod e
How to enter Pres et mode
Cli ck
How to select cha nnels
1. En ter Pre set mod e:
Pre ss the bu tton ag ain to sw itch in to Manu al mode .
2.S elect c hanne ls: Fun ction t he FF/R EW butt on to swi tch dif ferent channels.
Dur ing FM mo de pres s ON/OF F butto n to ente r prese t mode.
37
3
Quick Sta rt
Page 20

Deleting the Memorized Station
FM Recording
38
Delete Channe ls
Lon g Click
Cli ck
1. Du ring FM m ode, lo ng clic k the Men u butto n and ent er the pr eset mo de.
2. Fu nctio n the '+' o r '-' but tons an d selec t the cha nnel.
3. Pr ess the M ENU but ton and p op up the m enu win dow.
4. Fu nctio n the '+' o r '-' but tons an d selec t Delet e, then p ress th e MENU bu tton
to ap ply it.
5. Pr ess the R EW butt on to exi t.
Cli ck
To Rec ord FM
Lon g Click
Cli ck
Lon g Click
1. Du ring FM m ode, fu nctio n the FF/ REW but ton to se lect th e desir ed FM rad io, cli ck
the M ENU but ton.
2. Fu nctio n the '+' o r '-' but tons to s elect F M Recor d.
3. Cl ick the M ENU but ton, th en star t FM reco rding .
4. Lo ng pres s the REC /A-B bu tton to s top it.
5. It r eturn s to the cu rrent F M Radio .
Not e:
Dur ing FM mo de, or yo u can lon g press t he REC/ A-B but ton to st art the r ecord ing.
Cli ck
39
3
Quick Sta rt
Page 21

Voice Recorder
Play Recording Files
40
MIC Recording
Lon g Click
Lon g Click
Lon g Click
Cli ck
1. Aft er turn ing the p layer o n, long p ress th e MODE/ EQ butt on, the n switc h into
Voic e recor ding mo de.
2. Lo ng pres s the REC /A-B bu tton an d start r ecord ing.
3. Cl ick the b utton a gain, y ou can pa use it. L ong pre ss it to st op.
Not e: 1) Ple ase mak e sure th e batte ry volu me is eno ugh dur ing Voic e Recor ding.
If it d ispla ys "The M emory i s Full! " on the LC D, to rec ord, de lete fi les and /or
fol ders on t he play er in ord er to mak e some sp ace ava ilabl e. 2) Sho rtcut
Rec ordin g: Long p ress th e REC/A -B butt on to sta rt Voice R ecord er imme diate ly.
3) On ly the RE C/A-B b utton i s useab le duri ng reco rding .
Play Recordin g Files
Lon g Click
³°
Lon g Click
Cli ck
Cli ck
Dur ing MIC v oice re cordi ng, the r ecord ed file i s saved u nder th e REC\
roo t. The fi le name is V001.WAV, or V002.WAV, or V00 3.WAV and etc..
Dur ing FM re cordi ng, the r ecord ed file i s saved u nder th e FM\ roo t.
The f ile nam e is F001 .WAV, or F002.WAV, or F 003.WAV and etc..
1. Aft er fini sh reco rding , long pr ess the M ODE/E Q butto n, it dis plays t he MODE
sel ectio n.
2. Wi th the FF /REW bu tton, s elect t he Musi c mode, t hen cli ck the ME NU butt on.
3. Wi th the FF /REW bu tton, y ou can fi nd and pl ay the re corde d files .
41
3
Quick Sta rt
Page 22

Operating the Controls
Operating the Controls
42
Navigator Mod e
Key O perat ion Whe n Selec ting a Fi le When S elect ing a Fol der
Play the select ed fi le & then change
/return to the MP3 Player mode
Pow er off
3S
Play the select ed fi le & then change
/return to the MP3 Player mode
Exi t
Exi t
Move to previ ous tr ack
Move to previ ous cont inuous ly
Move to next t rack
Move to next cont inuous l y
Displ ay the playba ck menu
Displ ay the playba ck menu
Ineff icac y
Ineff icac y
MODE /EQ
Ineff icac y
Ineff icac y
In "O perat ion", m eans pr essin g the but ton for a s hort se cond an d mea ns pres sing
the b utton f or long er than 1 s econd .
Expand fol der
Pow er off
Expand fol der
Exit
Exit
Move to the upper fol der
Move to the upper cont inuousl y
Move to next f older
Move to next cont inuousl y
Displ ay the playback menu
Displ ay the playback menu
Ineff icacy
Ineff icacy
Ineff icacy
Ineff icacy
MP3 Mode
Key O perat ion Dur ing Sto p Durin g Play
Pla y the cur rent tr ack
Pow er off
3S
Ski p to the ne xt trac k
Ine ffica cy
Ski p to the pr eviou s track
Ine ffica cy
Volu me Up
Volu me Up Con tinuo usly
Volu me Down
Volu me Down C ontin uousl y
Set up Menu
Nav igati on
Ine ffica cy
Mic Re cord ing
MODE /EQ
EQ Mo de Sele cting
3 Mod es Sele cting
In "K ey Actio n", mea ns pres sing th e butto n for a sho rt seco nd and mea ns pres sing
the b utton f or long er than 1 s econd .
Sto p the cur rent tr ack
Pow er off
Ski p to the ne xt trac k
Fas t Forwa rd
Ski p to the pr eviou s track
Fas t Rewin d
Volu me Up
Volu me Up Con tinuo usly
Volu me Down
Volu me Down C ontin uousl y
Set up Menu
Nav igati on
Rep eat A-B
Mic R ecord ing
EQ Mo de Sele cting
3 Mod es Sele cting
43
3
Quick Sta rt
Page 23

Operating the Controls
Menu List
44
FM Radio Mode
Key O perat ion FM Mo de FM Pre set Mod e
Enter Preset mode
Pow er off
3S
Incr ease f requenc y
Search the next FM st ation
Decrease f requenc y
Search the prev ious FM stat ion
Volum e Up
Volum e Up Conti nuousl y
Volum e Down
Volum e Down Conti nuousl y
Setup FM Menu
Enter Preset Mode
Browse the f iles in t he player
FM Recordi ng
MODE /EQ
In "K ey Actio n", mea ns pres sing th e butto n for a sho rt seco nd and mea ns pres sing
MOD E
the b utton f or long er than 1 s econd .
Ineff icacy
3 Modes Selec ting
Ent er Manu al mode
Powe r off
Ski p to the ne xt pres et
Ski p to the ne xt pres et
Ski p to the pr eviou s track
Ski p to the pr eviou s track
Volu me Up
Volu me Up Con tinuo usly
Volu me Down
Volu me Down Co ntin uousl y
Set up FM Men u
Ent er Pres et Mode
Bro wse the f iles in t he play er
FM Re cordi ng
Ine ffica cy
3Mo des Sel ectin g
General
Res ume
Aut o Play
Men u Butto n
AB Re peat
Bat tery Typ e
Loa d Defau lt
For mat
Display
Pla y Time
Scr oll Spe ed
Ani mate Me nu
Lyric
Men u-Lan guage
Sys -Lang uage
Con trast
About
Sound Effect
Sel ect EQ
Equ alize r
Fad e-In
Power Manage
Aut o Off
Sle ep Timer
Scr een Sav er Pic
Scr een Sav ers
Turn Off Sc ree n
Play Mode
Bou ndary
Son g Order
Rep eat
Shu ffle
Record
MIC Qu alit y
FM Qu ality
AGC
Red ucte No ises
Jog Light
Jog L ight
Scr eenOf f-Spar
FM Radio
Ste reo
Aut o Scan
FM Re cord
Sel ect Pre set
45
3
Quick Sta rt
Page 24

Detailed Features by Menu
Detailed Features by Menu
46
General
1. Resume
2. Auto Pl ay
3. Menu Key
·
Thi s is the fe ature t o recal l the las t playe d posit ion (tr ack).
· Off O n
·Sel ect 'Re sume' a nd pres s the 'Me nu' but ton.
·
Thi s is the fe ature t o play th e playe r immed iatel y after i t
pow ers on.
· Off O n
·Sel ect 'Au to Play ' and pre ss the 'M enu' bu tton.
·Thi s is the fu nctio n to swit ch into l ong or sh ort cli cking
of th e MENU bu tton.
·Sel ect 'ME NU-NAV I', short click the Menu b utton t o menu
mod e; Long c lick it a nd swit ch to nav igati on mode .
·Sel ect 'NAV I-MENU', short click t he Menu b utton t o
nav igati on mode ; Long cl ick it to m enu mod e.
·Whe n you sel ect and o ption w ith the ' +' and '- ', pres s the
'Me nu' but ton, th e selec tion is a pplie d.
4. A-B Rep eat
5. Battery Type
6. Load Default
·Thi s is the fe ature t o set the A- B Repea t durin g Music
mod e.
·You can choose: A- B Repea t, Rewi nd 3sec ., Rewi nd
5se c., Rew ind 8se c., Rew ind 10s ec., Re wind 15 sec.,
Rew ind 20s ec., Re wind 30 sec., R ewind 6 0sec. .
·Cli ck 'A-B R epeat ' and pre ss the 'M enu' bu tton.
The n select the options.
·Thi s is the me nu to dir ectly s et the ba ttery t ype use d.
·Sin ce the me asure ment of t he Rema ining B atter y Charg e
dep ends on t he batt ery typ e, you ne ed to cho ose the
cor rect on e.
·You can choose ei ther 'A lkali ne' or 'Rech argea ble'. W e
off icially recommend a 1. 2 to 1.5V n ickel h ydrid e fast
rec harge able dr y cell or a lkali ne batt ery for t he play er.
·Sel ect 'Ba ttery Ty pe' and press the 'Menu' b utton .
The n choose a battery type wi th the '+ ' and '-' b utton s.
·
Thi s is the me nu to ret urn to th e defau lt sett ing ori ginal ly.
·Sel ect 'Lo ad Defa ult
·Pre ss the 'M enu' bu tton an d selec t 'Yes' or 'No'.
'.
47
4
Menu
Page 25

Detailed Features by Menu
Detailed Features by Menu
7. Format
Ple ase not e that al l data st ored wi thin wi ll be los t if the fl ash Mem ory
is fo rmatt ed.
Sound Effect
1. Select EQ
2. Equalizer
Sel ect 'Eq ualiz er' and ' '
48
EQ ty pes.
Thi s is the me nu to for mat the p layer.
·
If th e flash M emory i s forma tted, a ll data s tored w ithin
·
is lo st.
·Sel ect 'Fo rmat' a nd pres s the 'Me nu' but ton.
·Wit h the '+' o r '-' but ton to se lect 'Yes' or 'No'.
·Pre ss the ME NU butt on to app ly it.
Thi s is the fe ature t o set the E Q by pres sing MO DE/EQ
·
but ton.
·The re are th e follo wing so und fie ld effe cts:
Nor mal, Po p, Clas sic, Ja zz, Roc k, Bass , Disco , User
Def 1, User D ef2, Us er Def3 .
·Wit h the '+' a nd '-' bu ttons t o selec t the EQ op tions a nd
sou nd effe ct, press the 'Menu' but ton to co nfirm .
pre ss the Menu but ton . You can adjust all these dif ferent
6. Fade-In
Play Mode
1. Boundary
Use r EQ
¡You can adjust t he User E Qs.
¡Se lect 'U ser EQ' a nd pres s the 'Me nu' but ton.
Cha nge the v alues w ith the ' +' and '- ' butto n.
Wit h the FF/ REW but tons to s elect i t and pre ss the
'Me nu' but ton.
·Thi s is the fe ature t o set the v olume t o incre ase gra duall y
at pl aybac k mode to p reven t sudde n loudn ess.
· Off O n
·Sel ect 'Fa de-In ' optio n, pres s the 'Me nu' but ton, th e
sel ectio n is appl ied.
Thi s menu is f or sett ing var ious bo undar ies of pl ay.
·
·Sel ect 'Pl ay Mode and p ress th e
·Sel ect bou ndari es of pla y as foll ows:
·Pla y All: All tracks a re play ed rega rdles s of the fo lder.
·Pla y Folde r: Only t he curr ent sel ected f older i s playe d.
·Fav orite : Only th e favor ite fol der is pl ayed.
' 'Me nu' but ton.
49
4
Menu
Page 26

Detailed Features by Menu
Detailed Features by Menu
50
2. Song Order
3. Repeat
4. Shuffle
Backlight
1. Jog Light
·You can adjust th e song or der to ap ply to th e track s to
be pl ayed,
·Fil e Name
·Dow nload Ti me
·Fil e Time
·You can adjust th e repea t value t o apply t o the tra cks to
be pl ayed,
·Nor mal
·Rep eat All
·Rep eat One
Thi s sets wh ether o r not to pl ay rand omly wi thin th e
·
bou ndary 'Pl ay' mod e.
specified in the
· Off O n
·Sel ect 'Sh uffle ' and press the 'Menu' but ton.
·Thi s menu is f or sett ing the t ime for w hich th e jog lig ht is
tur ned on.
·Sel ect 'Jo g Light ' and pre ss the 'M enu' bu tton.
·Usi ng the FF /REW bu ttons , selec t from: 5 sec., 1 0sec. ,
20s ec., 30 sec., ' Al ways On ' or 'Dis able' .
2. ScreenOff - Sp ar
Thi s is the vi suali zatio n effec t provided by the player
·
its elf, it c an be set s parkl ing aft er the sc reen cl ose up.
· Off O n
·Sel ect 'Sc reenO ff - Spar ' and press the 'Menu' but ton.
Not e: Duri ng voic e recor ding, j og ligh t may amp lify su rroun ding no ise or
cau se elec tric no ise, cl ose the j og ligh t to avoi d it.
Display
1. Play Time
2.
Scroll Speed
(Screen Speed )
Dis play an d chang e the tim e infor matio n of the pl ayed
·
tra ck.
·Rem ain: Th e remaining time is disp layed i n rever se.
·Ela pse: Th e elapsed time is displa yed fro m the beg innin g.
·Whe n you sel ect an op tion an d press t he 'Men u' butt on,
the s elect ion is ap plied .
·Thi s is the fe ature t o adjus t the scr oll spe ed of tex ts on
the L CD disp lay.
·Whe n you sel ect the o ption a nd pres s the 'Me nu' but ton,
the s elect ion is ap plied .
·Usi ng the FF /REW bu ttons t o adjus t it.
51
4
Menu
Page 27

Detailed Features by Menu
Detailed Features by Menu
52
3. Anima te Menu
(Page Sliding )
4. Lyric
5. Menu-Langu age
·Thi s is the fe ature t o contr ol the an imati on effe ct for the
smo oth ope ning an d closi ng of men us.
·You can choose: F ast, No rmal, o r Disab le.
·Sel ect a val ue and pr ess the ' Menu' b utton t o apply i t.
·Thi s is the fe ature t o set the LY RIC display.
· Off O n
·Sel ect 'LYR IC' and press the 'Menu' b utton .
·Thi s is the fe ature t o chang e the men u langu age.
·You can choose: E nglis h, Chin ese(S imp), C hines e(Trad).
·Whe n you sel ect and o ption a nd pres s the 'Me nu' but ton,
the s elect ion is ap plied .
6. Sys-Langua ge
·Thi s is the fe ature t o chang e the sys tem lan guage .
·You can choose: E nglis h, Chin ese(S imp), C hines e(Trad),
Jap anese , Korea n langu age.
·Whe n you sel ect and o ption a nd pres s the 'Me nu' but ton,
the s elect ion is ap plied .
7. Contrast (Di splay Brightn ess)
·
Thi s is the fe ature t o adjus t the bri ghtne ss of the L CD
dis play.
·A menu a ppear s for you t o selec t a level b etwee n 0 and 10.
·Sel ect Con trast a nd pres s the 'Me nu ' butt on. Cho ose a
val ue with t he FF/R EW butt ons.
Power Manage
1. Auto Of f
·Whe n there i s no butt on oper ation d uring a p reset t ime
whi le the pl ayer is s toppe d, it is au tomat icall y turne d off.
Usi ng Powe r Manag e can sav e the bat tery an d exten d
the p layba ck time .
·You can choose: 1 M in., 2 Mi n., 5 Min ., 10 Min .
·Sel ect 'Au to Off' a nd press the MENU button . Then
cho ose a val ue with t he FF/R EW butt ons.
53
4
Menu
Page 28

Detailed Features by Menu
Detailed Features by Menu
54
2. Sleep Timer
3. Screen Saver P ic
4. Screen Saver s
·The p layer c an be set t o autom atica lly tur n off aft er a
pre set tim e while i t is play ing or st oppin g.
·You can choose: 1 0, 20,3 0,60, 90 or 120 M in.
·Sel ect 'Sl eep' an d press t he MENU b utton . Then ch oose
a val ue with t he FF/R EW butt ons.
·Pre ss the '+ ' to exit .
·Thi s menu is t o set the s creen p ictur e while t here is
no bu tton op erati on.
·You can select 'C lock' , 'Spec trum- LED', ' Spect rum-s olid' ,
'St arlig ht',' Bubbl e', 'Us er Scr1 .log' , 'User S cr2.l og' .
·Fun ction t he '+' an d '-' to se lect it , a nd pres s the
'Me nu' but ton.
·Pre ss the RE W butto n and exi t.
·The s creen p ictur e can be di splay ed auto matic ally af ter
a pre set tim e.
·You can choose '1 0Sec. ', '30S ec.', ' 1Min. ', '5Min.' o r
'Di sable '.
·Fun ction t he FF/R EW butt ons to se lect it , a nd pres s the
'Me nu' but ton.
·Pus h the '+' t o exit.
5. Tur n Off Screen
·The s creen p ictur e can be au tomat icall y turn of f after a
pre set tim e while i t is play ing.
·You can choose '1 0Sec' , '30Se c', '1M in', '5Min ' or 'Dis able' .
·Fun ction t he FF/R EW butt ons to se lect it , a nd pres s the
'Me nu' but ton.
·Pus h the '+' t o exit.
Record
1. MIC Quality (B uilt-in Micro phone)
·Thi s is the me nu for se tting t he tran smiss ion rat e
(qu ality ) of the MP 3 files r ecord ed via th e built -in
mic ropho ne on the t op of the p layer.
·You can choose: L ow, Midd le, Hig h.
·Sel ect 'MI C Quali ty' and p ress th e 'Menu ' b utton .
·The n choos e a value w ith the F F/REW b utton s.
·Cli ck the '+ ' butto n and exi t.
2. FM Quality
·Thi s is the me nu for se tting t he tran smiss ion rat e
(qu ality ) of the WAV fi les rec orded b y press ing the R EC
but ton whi le list ening t o FM.
·You can choose: L ow, Midd le, Hig h.
·Sel ect 'FM Q ualit y' and pr ess the ' Menu ' bu tton.
·The n choos e a value w ith the F F/REW b utton s.
55
4
Menu
Page 29

Detailed Features by Menu
Detailed Features by Menu
56
3. AGC
4. Reduce Noise s
FM Radio
1. Stereo
·Thi s adjus t the vol ume lev el of the s ound in put to th e
bui lt-in m icrop hone.
· Off O n
·Sel ect 'AG C ' and pre ss the 'M enu' bu tton.
·Thi s is the me nu to red uce the n oises b y scree n off
dur ing rec ordin g.
· Off O n
·Sel ect 'Re duce No ises ' an d press t he 'Men u' butt on.
·Thi s is the me nu for se lecti ng ster eo or mon o while
lis tenin g to the FM r adio.
On Of f
·Sel ect 'St ereo ' an d press t he 'Men u ' butto n.
2. Auto Sc an
3. FM Record
4. Select Prese t
·Thi s is the me nu for au to scan ning th e FM radi o.
·Sel ect 'Au to Scan ' a nd pres s the 'Me nu' but ton.
·Thi s is the me nu for re cordi ng the FM r adio wh ile
lis tenin g to FM.
·Sel ect 'FM R ecord ing ' and p ress th e 'Menu ' butto n.
·You can choose In terna l Prese t or Sele ct FM.I NI
·Fun ction t he '+' an d '-' to se lect it , a nd pres s the
'Me nu' but ton.
·Pre ss the '+ ' butto n to exit .
57
4
Menu
Page 30

Detailed Features by Menu
Firmware Upgrade
58
About
1. Informatio n
Thi s is feat ure to di splay t he info rmati on:
Fir mware Ve rsion
Mem ory
¡In forma tion on t he flas h memor y in the Pl ayer is
dis playe d.
¡You can check us age and r emain ing mem ory size.
¡So me of the f lash me mory in t he Play er is use d for
sys tem are a.
The refore, when we exclud e the sys tem are a
ess entia l for nor mal ope ratio n of the Pl ayer, th e actua l
cap acity o f the fla sh memo ry is som ewhat r educe d.
¡Fo r examp le, wit h a 256MB p roduc t, abou t 243MB o f
mem ory cap acity i s norma l.
Fre e Memor y Space
The l atest f irmwa re
Guide to Firmwa re Upgrade
What is Firmware?
Firmware is a program embedded in the hardware, which activates various feat ures. By upgrading,
you can enhance the features and eliminate the bugs.
Notice for Legal Limi tations and Responsibili ties Regarding Firmware
1/ The performance and menu of MP3 Player may change without prior notice through firmware
upgrades of regular or beta versions supporte d by the manufactur er.
2/ We recommend that users should personally back up important MP3 files and data saved in
MP3 player to their PC before upgr ading the firmware.
3/ All firmware upgrades are intended for overall enhanc ement of performance. The upgrades will
be provided when avai lable based on our company's judgment.
4/ Some beta versions of the firm ware included in our development road map may have minor
bugs that will be corrected in the official versions of the firmwa re. We are warning you before hand
of this possibili ty through this Guide.
Conditions for Firm ware Upgrade
1/ Upgrading the firm ware requires the basic environm ent where the UMS feature of the Windows
OS works properly.
2/ You can check the player in 'My Comp uter' on Windows 98/ME/XP/2000/2003 .
3/ 'Mobile Disk' must be disp layed for a firmware upgrade to be possible. If it is not displayed, we
recommend that you check the menu that asks whether or not to use a USB Device from the main
board CMOS, or reinst all Windows, or have the USB port on the main board examined.
59
4
Menu
Page 31

Firmware Upgrade
Firmware Upgrade
60
Downloading a nd Installing F irmware
You can download the latest firmware from our website free of charge. In order to
upgrade the firmware of the player, you need the firmware upgrade program and the
firmware data file, which are provided separately.
Please refer to the following procedure.
Turn off th e pla yer.
Lon g Click
Lon g press t he ON/O FF butt on.
Dec ompre ss the do wnloa ded fil es ("X3 .ebn" , "reso urce. bin") , drag an d drop
the m onto th e "Mobi le Disk " windo w.
X3. rar
Fir mware p ackag e
(Pl ease ta ke atte ntion t o the mod el
num bers an d firmw are ver sions . )
Con necti ng the pl ayer to y our PC
wit h the USB c able.
The p layer i s shown a s the Mob ile Dis k
on yo ur PC.
The n run
'Sa fely Re move Ha rdwar e' and di sconn ect the p layer t o your PC .
The u pgrad ing is ap plied .
Aft er fini sh upgr ading , resta rt the pl ayer, th en it sta rts
pop s up and
run ning th e 'Firm ware Up date' a nd 'Fon ts Upda te', th e progr am will b e
ren ovate d autom atica lly on th e playe r.
DFU Tool
DFU t ool is us ed to rec over th e situa tion wh en the pl ayer do es
pro perly o r total ly die an d can not c onnec t with yo ur comp uter. You ca n get the
too ls from t he Inst allat ion CD or d ownlo ad it fro m our web site by f ree.
You need to insta ll the fi rmwar e upgra de prog ram, "M EIZU MP 3 Toos" b efore
usi ng the DF U tool. D ecomp ress th e downl oaded f iles.
X3. rar
Fir mware p ackag e
(Pl ease ta ke atte ntion t o the mod el
num bers an d firmw are ver sions . )
not w ork
61
5
Guide to Fi rm ware Upgr ad e
Page 32

Take ou t the bat tery, th en keep
and ho ld the MODE /EQ butto n.
Firmware Upgrade
Con necti ng the pl ayer to y our PC
wit h the USB c able.
Cli ck "Bro wse" bu tton an d speci fy
the f irmwa re file ( X3.eb n).
Firmware Upgrade
Cli ck the [S tart Do wnloa d] butt on
and s tart th e upgra ding.
5
Guide to Fi rm ware Upgr ad e
Guide to Fi rm ware Upgr ad e
62
Lon g Click
Lon g press t he ON/O FF butt on.
Sel ect and c lick St art ->
Pro grams - > Meizu M P3 Tool s ->
DFU Too l.
Dur ing DFU u pgrad ing, th e MP3 pla yer is re cogni zed as PN X0102 d evice .
Kee p holdi ng and do n ot move y our fin ger bef ore it au tomat icall y finds t he devi ce fina lly.
The p layer i s shown a s the Mob ile Dis k
on yo ur PC.
Aft er runn ing the D FU tool , the
com puter a utoma tical ly find s
the p layer.
X
It wi ll take y ou a few se conds .
In th e norma l Windo ws envi ronme nt, as so on as the c able or s imple U SB jack i s conne cted,
the m essag e "Sear ching f or new de vice" a ppear s and USB d river i s insta lled au tomat icall y.
You nee d to sele ct the di recto ry duri ng inst allin g the DFU t ool, ge neral ly it is in stall u nder
C:\ Progr am File s\Mei zu\Me izu MP3 p layer t ools\ DFU too l\.
Whe n it fini shes, c lick [E xit].
63
Page 33

Handling Instructions
Trouble Shooting
64
Do not subject the player to severe impact or jarring.
Vibration experienced during walking or exercising will not affect the player. However,
dropping a heavy object on the player may result in damage or sound distortion.
Be careful when storing the set and do not use or place it at the following places:
¡
Places with high humidity;
¡
Places with strong magnetic fields;
¡
Places with extreme temperatures;
Directly under the sunshine or near the equipment that generates heat;
¡
Inside a car with closed windows especially in summer.
¡
It is necessary to prevent strong shock when reading files or operating, otherwise
files may be damaged or deleted.
Please do not repair or disassemble this product by yourself.
Please do not use this product in the place where forbid to use for electronics
products.
Please do not operate this product while driving.
Please backup the important information on your note book, any repair result from
electricity shock, static electricity, change of battery or incorrect using may cause
change, damage or delete the files stored in the product.
Trouble Shooti ng
The p layer d oes not p ower
on.
The re is no so und.
Cha racte rs in LCD a re
bro ken.
Poo r FM rece ption
Fai led dow nload o f MP3 fil e
Sho uld any p roble m persi st afte r you hav e check ed thes e sympt oms,
the d istri butor s.
Che ck that t he batt ery 's po larit y is corr ect.
Che ck the vo ltage o f batte ry. Repl ace it wi th a new on e.
Rem ove the b atter y and ins ert it ag ain.
Che ck whet her the H OLD swi tch on th e playe r is ON
(Sw itch to O FF posi tion)
Che ck whet her it wa s faile d upgra ding th e firmw are, up grade
it ag ain.
Che ck that t here ar e mp3 fil es in the m emory.
Che ck whet her VOL UME is se t to "0".
Con nect th e earph ones/ remot e plug fi rmly.
Cor rupte d MP3 or WM A fil es may ma ke a stat ic nois e & the
sou nd may cu t off.
Che ck your f iles on t he PC to se e if they a re corr upted .
Che ck out Me nu Disp lay Lan guage a nd conf irm whe ther
the r ight la nguag e has bee n selec ted. If t he prob lem con tinue s,
con tact ou r AS Ce nter.
Adj ust the p ositi on of the p layer a nd earp hones .
Turn o ff the po wer of ot her ele ctric d evice s nearb y the pla yer.
Ear phone s funct ion as th e anten na. FM re cepti on sens itivi ty
may b e weak an d you may n ot be abl e to hear F M Radio
cle arly de pendi ng on whe re you ar e, such a s insid e a build ing
or a mo ving ca r, or on som e stret ches of a s ubway.
Che ck the co nnect ion bet ween yo ur comp uter an d the pla yer
to en sure th at the ca ble is se cure.
Che ck the Ma nager p rogra m to make s ure it is o perat ing.
Che ck whet her the p layer ' s Memor y is full .
con sult
65
6
Add itional Inf ormation
Page 34

Product Specifications
Memo
66
Product Speci fications
Flash Memory 12 8MB\256MB\5 12MB\1GB
Dim ensio ns
Wei ght
LCD
PC In terfa ce
Fla sh Memo ry
Bat tery
Rec ord
MP3 /WMA
FM Ra dio
Ope ratio nal Tempe ratur e
62m m×28mm×16 mm (H×W×T)
28g ( Excl. B atter y)
128 x64 dot , blue co lor OLE D scree n
Hig h speed U SB2.0
Bui lt-in b asic Me mory (1 28~1G B accor ding to p roduc t)
1.5 V (AAA) 1 u nit bat tery
Max imum 16 h rs of con tinuo us play back
Sam pling R ate
Rec ordin g Forma t
Rec ordin g Time
Ear phone 's Outp ut
MP3 B it Rate
WMA Bi t Rate
Out put Fre quenc y Band
S/N R atio
Dis torti on Rate
FM Re ceivi ng Freq uency
FM Re serve C hanne ls
Ear phone 's Outp ut
S/N R atio
32K Hz, 44. 1KHz
ADP CM
18h rs (8KH z,32k bps, 25 6MB)
(L) 18mW + (R )18mW (16 Ohm )
8kb ps - 320k bpS
5kb ps - 256k bps
20H z ~ 20kHz
>90 dB
<0. 05%
76M Hz ~ 108M Hz
50
(L) 18mW + (R )18mW (16 Ohm )
>60 dB
-5 de grees ~ 4 0 degre es Cels ius
67
6
Add itional Inf ormation
Page 35

68
Memo
 Loading...