

Page 1

2017-08-28
魅族机密,未经许可不得扩散
Confidential Document
@MEIZU
M1721 After Sale Maintenance Manual
(version:V1.0)
Edit by:ShiFeng Huang
Review by:ZhiFeng Zhong
Approved by:ChuanSan Wang
Issue date:Aug 28th,2017 Implementation:Aug 28th, 2017
Page 2
2017-08-22
魅族机密,未经许可不得扩散
第 32页,共 52页
Contents
Confidential Document
@MEIZU
Page 3
2017-08-22
魅族机密,未经许可不得扩散
第 32页,共 52页
Chapter 1 Caution of Maintenance
Confidential Document
@MEIZU
1. Only authorized technicians can do maintenance and calibration.
2. Make sure that engineers wear antistatic wrist strap repair phones in antistatic station.
3. Make sure that maintenance room is covered with antistatic mat, and the maintenance
table is covered with antistatic material.
4. Make sure that all necessary screws and parts are installed in correct location of phone
after maintenance and adjustment.
5. After maintenance, clean the PCBA.
6. As static electricity is the main reason for electronics damages, engineers shall repair
phones in an anti-static environment and shall take effective antistatic protection
measures.
7. For an occurrence of NG test, engineers should check if the test point is dirty or test point
contact is poor.
8. Check if water penetrates to mainboard. If yes, check all the components to see if there is
oxidation.
9. Make sure that maintenance room is bright and has natural ventilation.
10. Ventilation: When do maintenance or soldering, some equipment can emit hazardous gas.
So the maintenance room should have good natural ventilation. If there are no windows in
maintenance room, the room should be equipped with electric air regenerating equipment.
11. There should be obvious antistatic labels in Electrostatic Sensitive area, such as in
maintenance area and spare part warehouse.
Page 4
2017-08-22
魅族机密,未经许可不得扩散
第 32页,共 52页
Confidential Document
@MEIZU
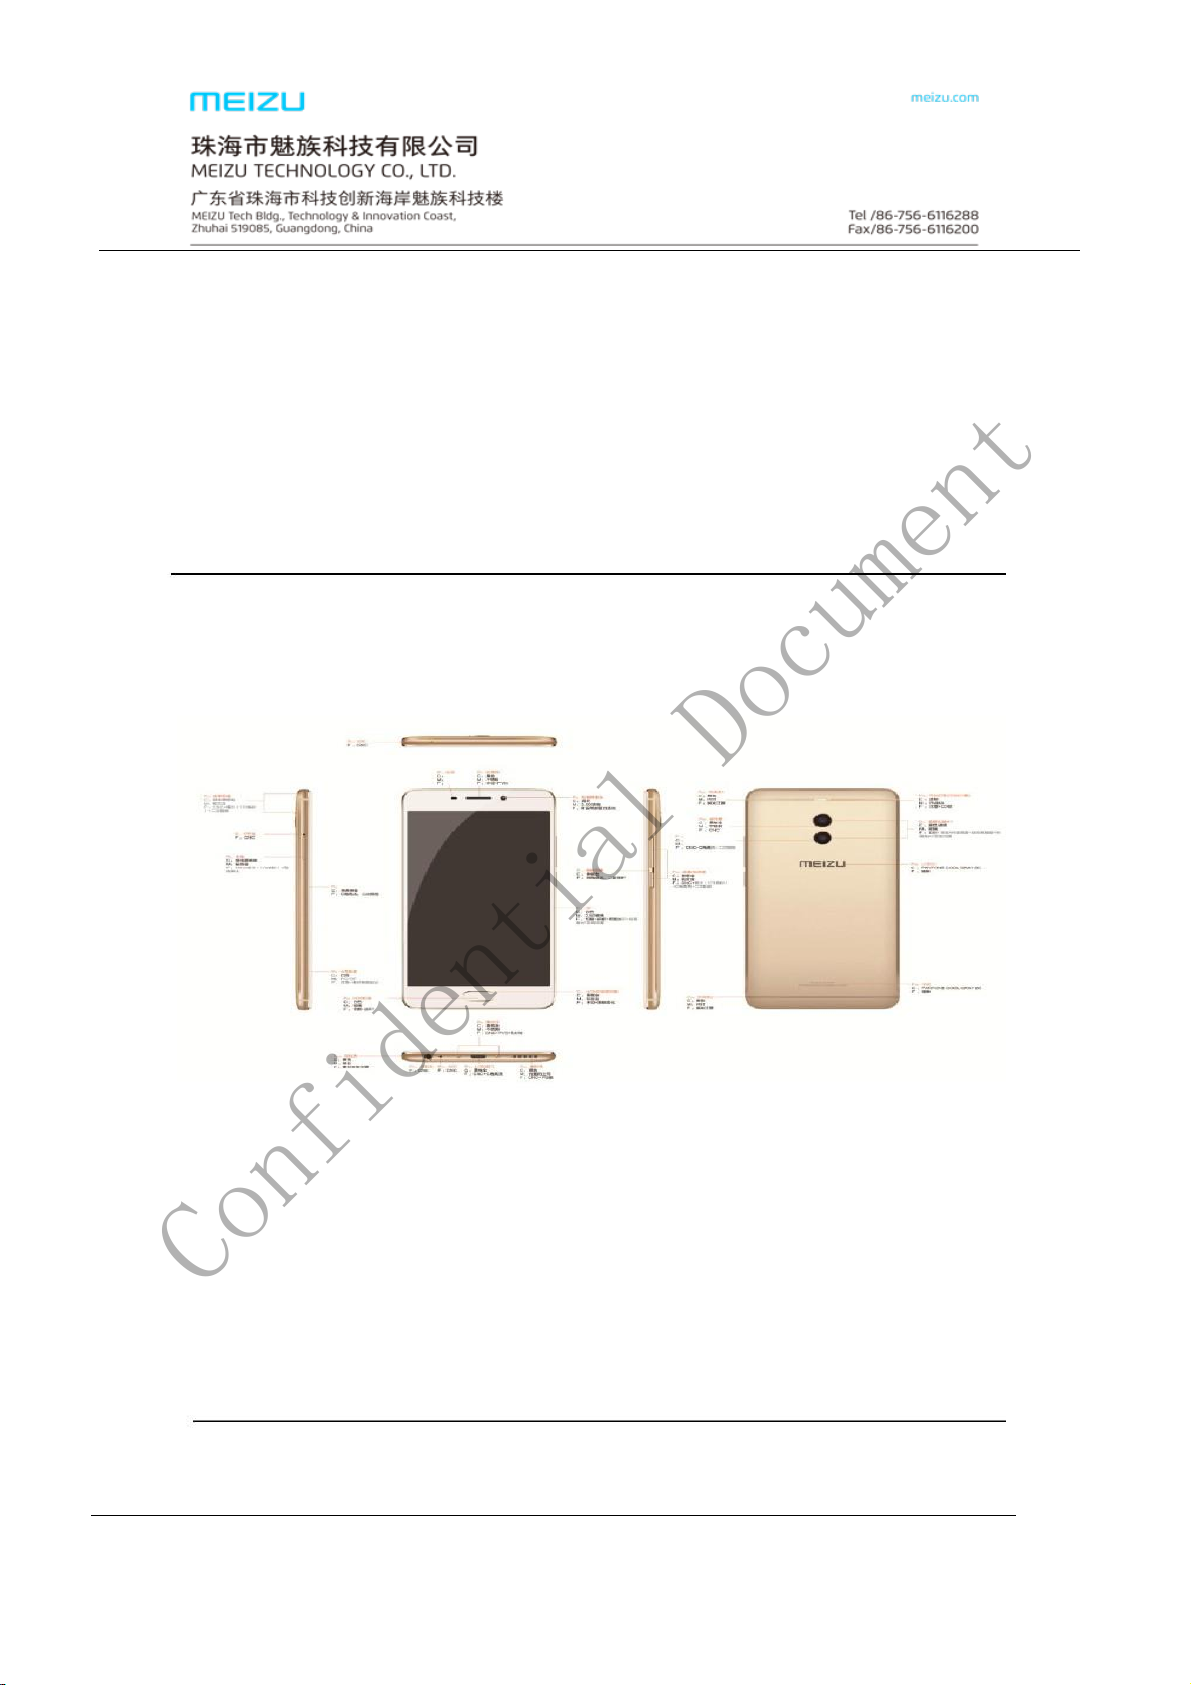
Chapter 2 M1721 product Introductions
1. M1721 brief introduction
M1721 Appearance view:
Page 5
2017-08-22
魅族机密,未经许可不得扩散
第 32页,共 52页
Confidential Document
@MEIZU
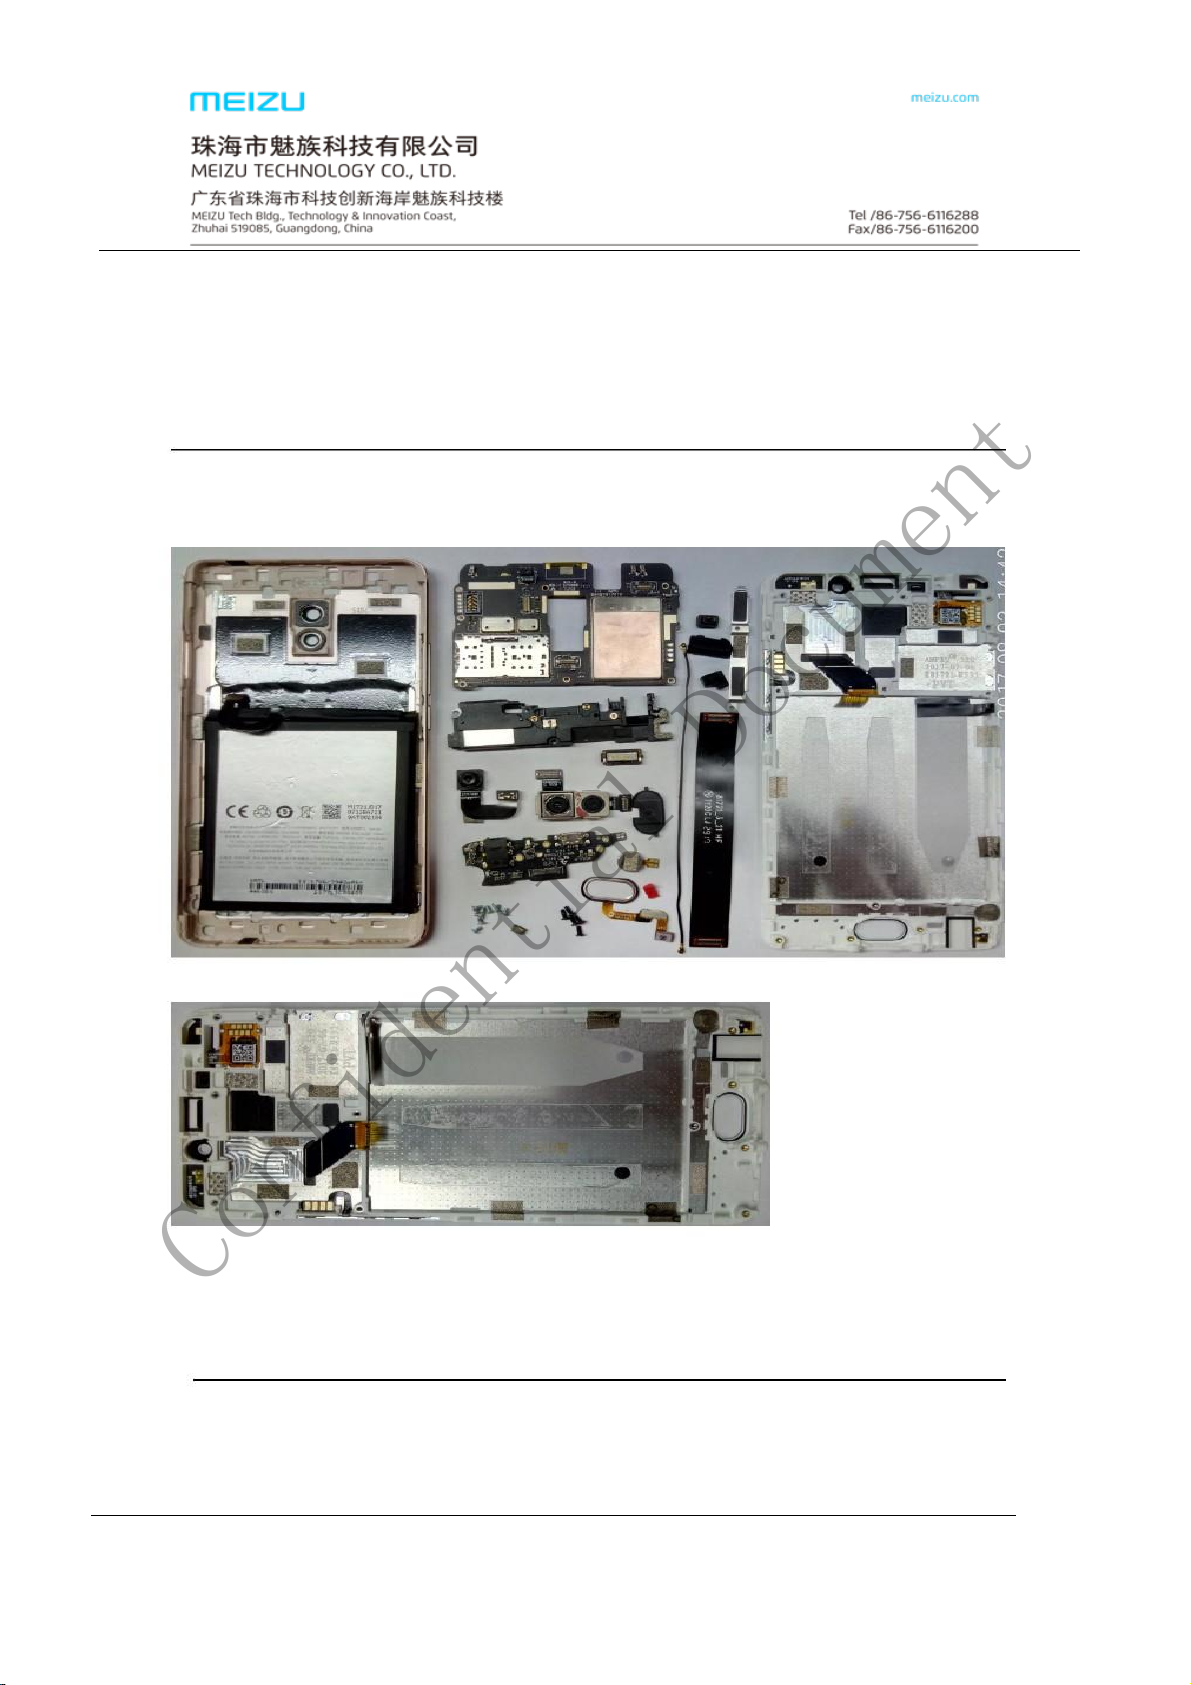
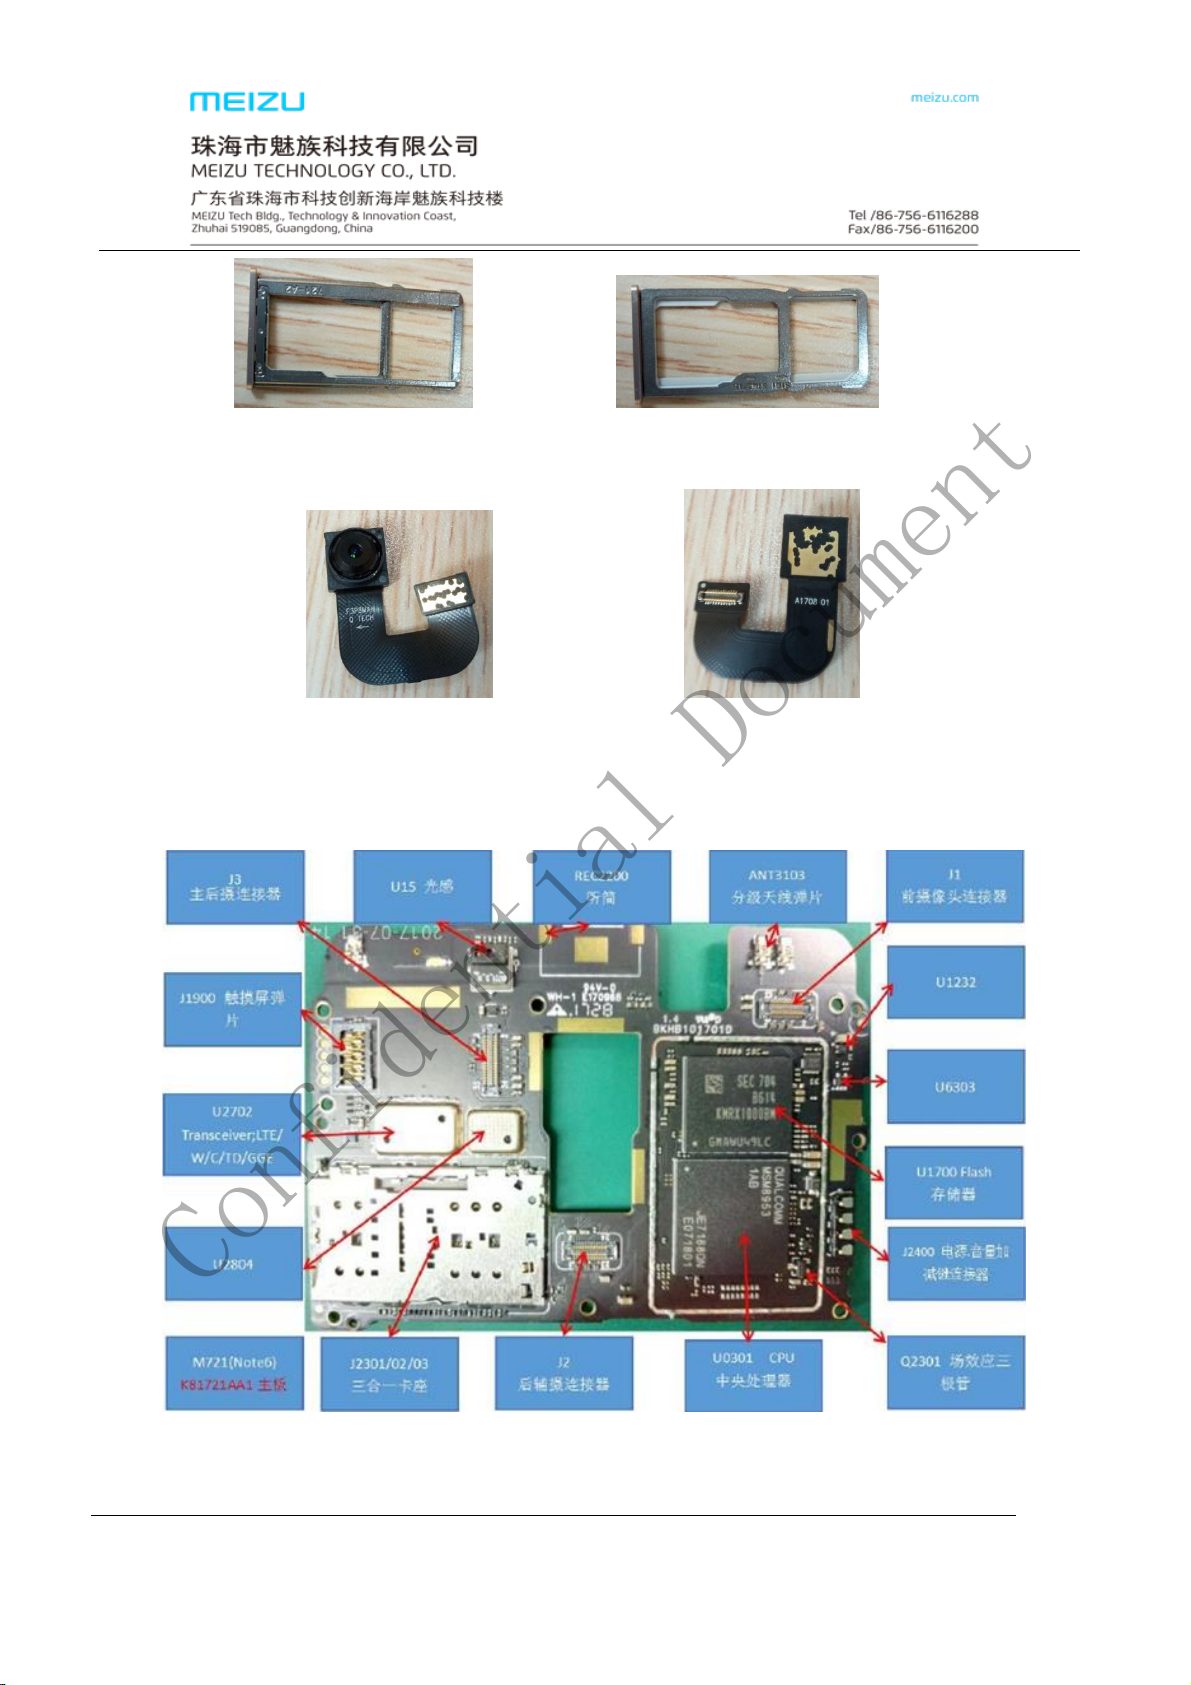
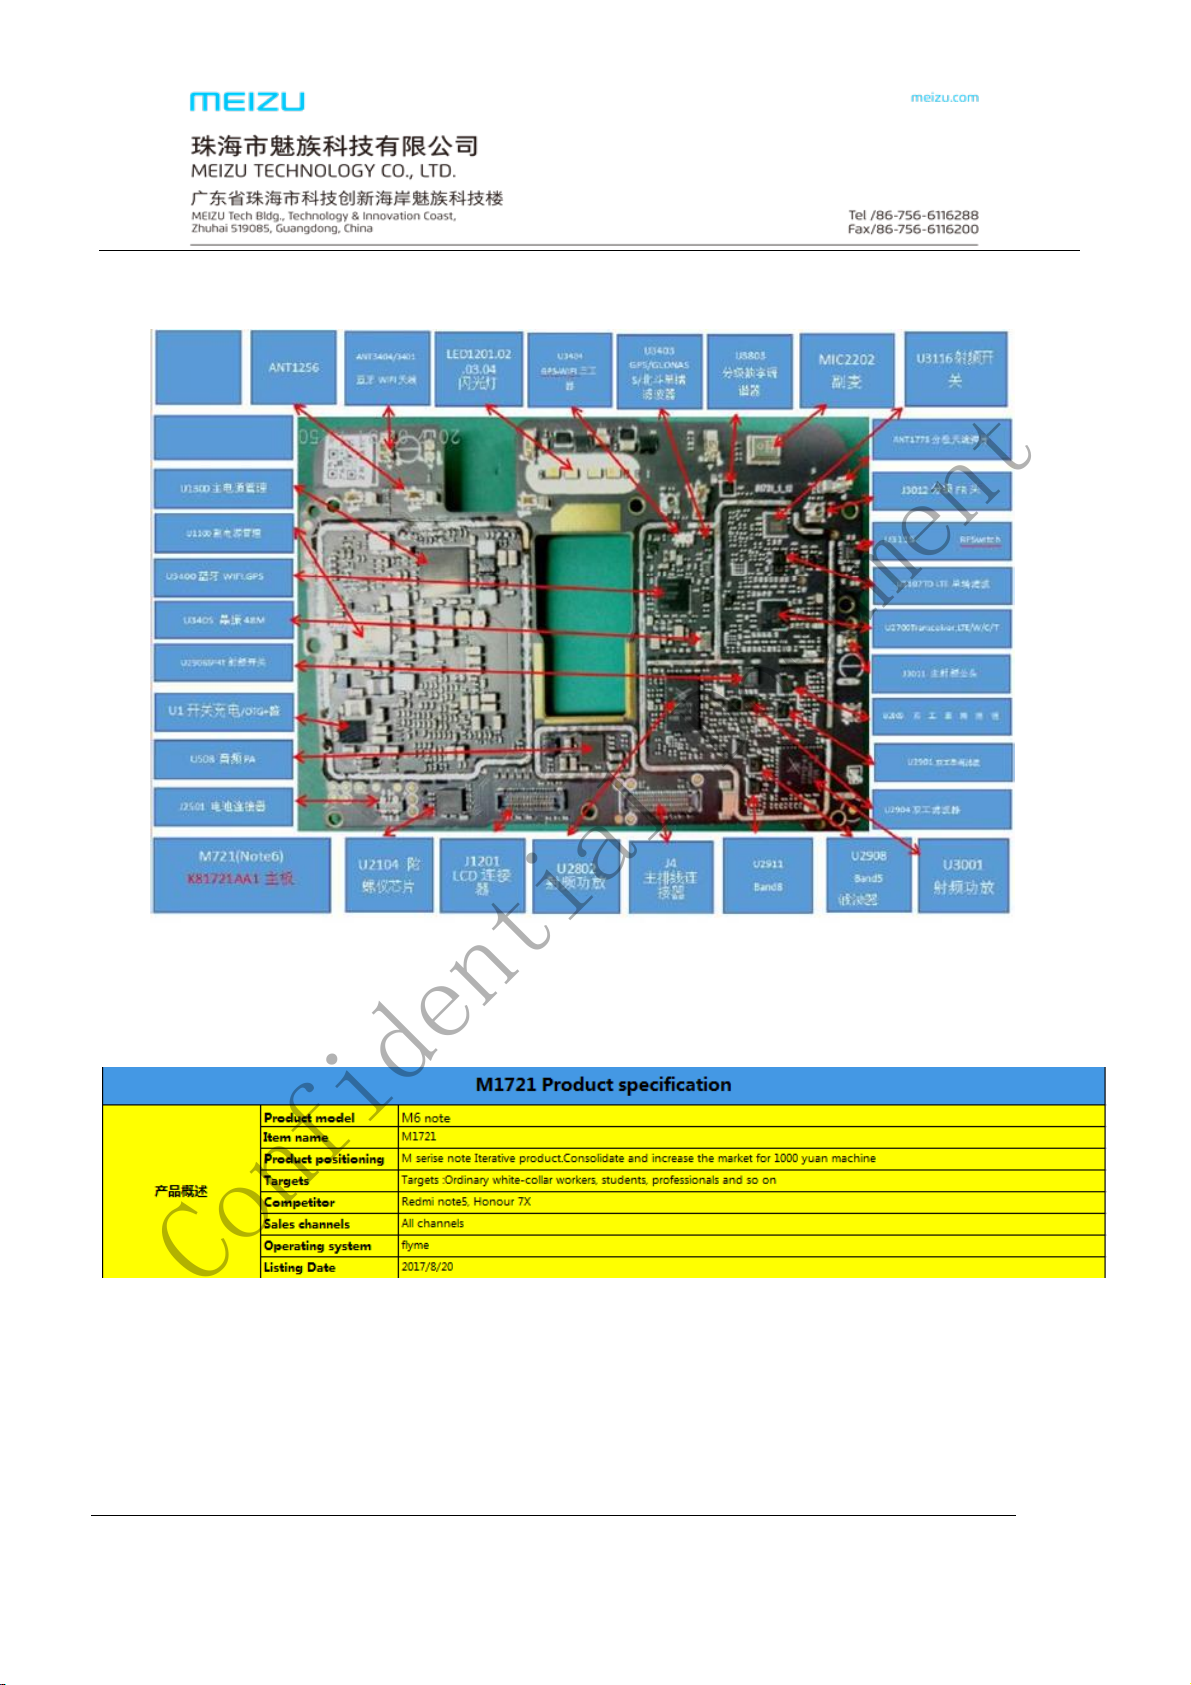
2. Introduction of M1721 main components
Page 6
2017-08-22
魅族机密,未经许可不得扩散
第 32页,共 52页
Confidential Document
@MEIZU
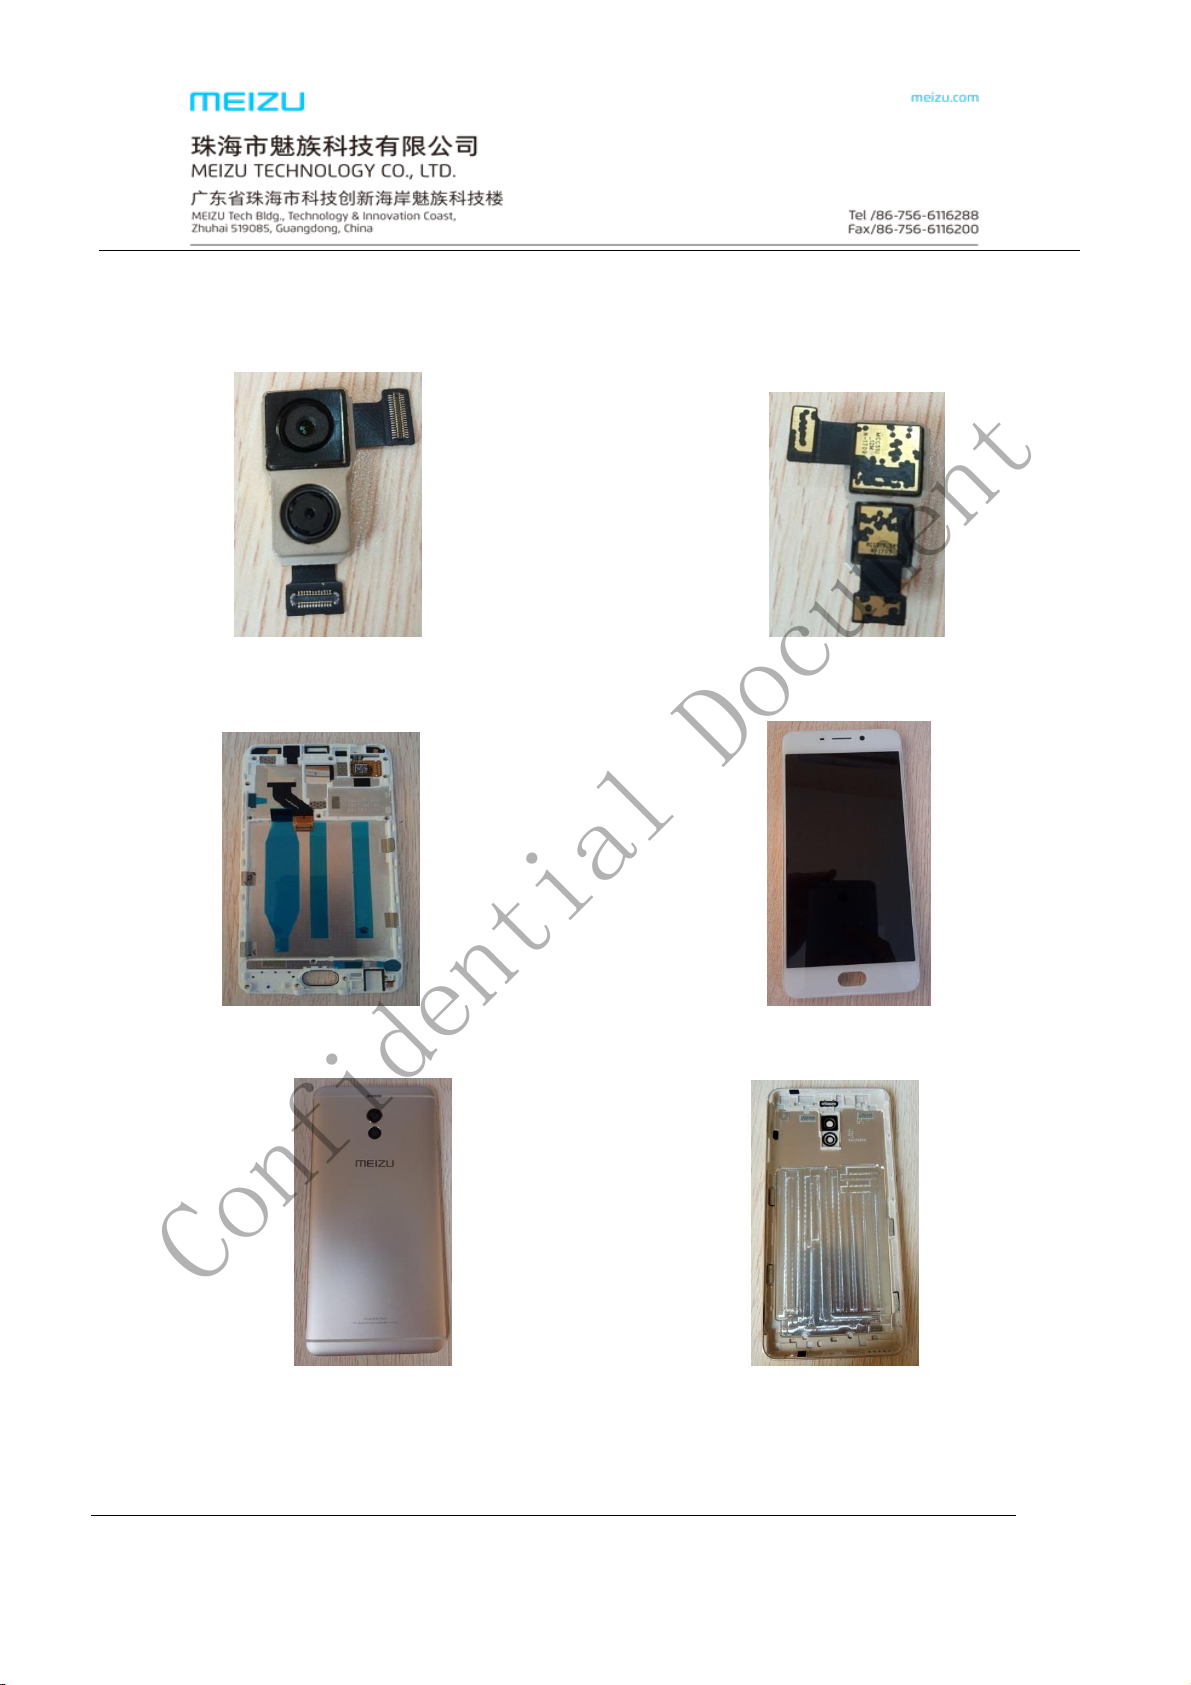
M1721 Back camera assembly
M1721 LCD touch screen assembly
M1721 Battery cover assembly
Page 7
2017-08-22
魅族机密,未经许可不得扩散
第 32页,共 52页
Confidential Document
@MEIZU
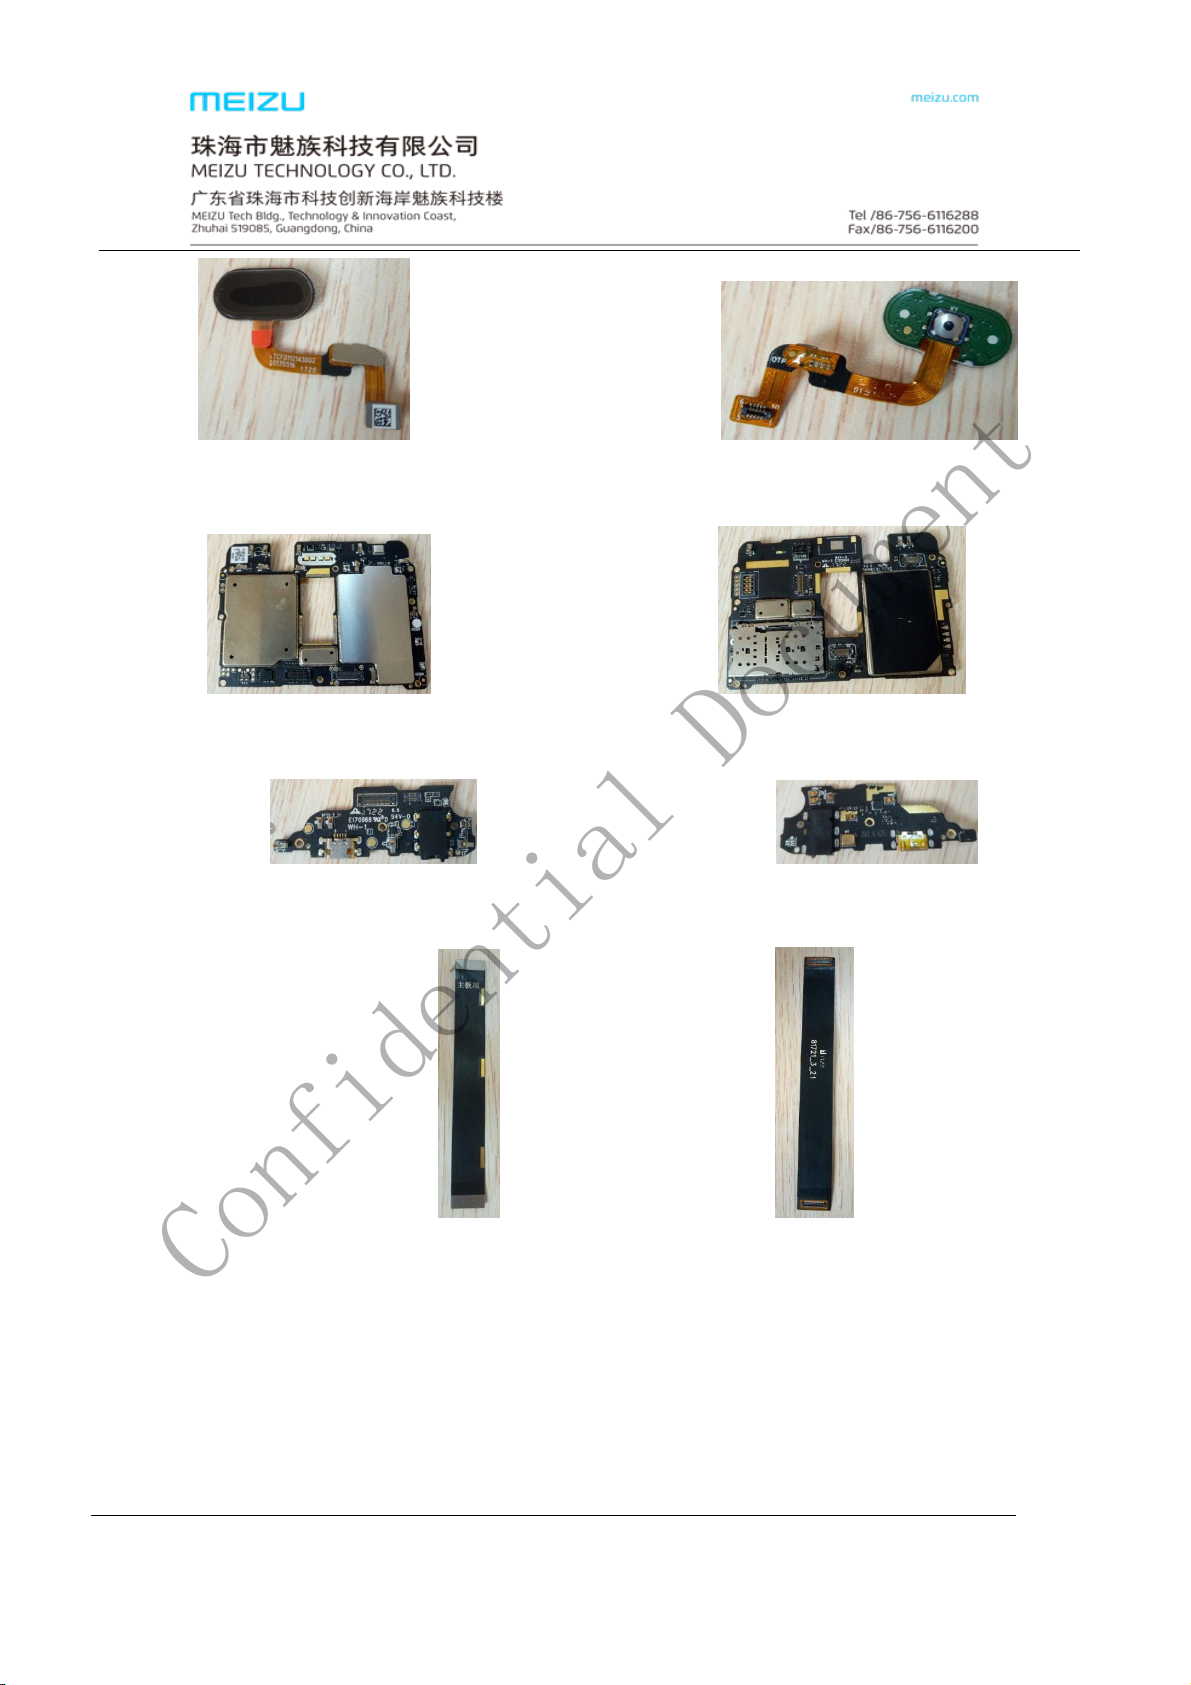
M1721 Fingerprint module assembly
M1721 mainboard
M1721 USB board
M1721 Main FPC
Page 8
2017-08-22
魅族机密,未经许可不得扩散
第 32页,共 52页
Confidential Document
@MEIZU
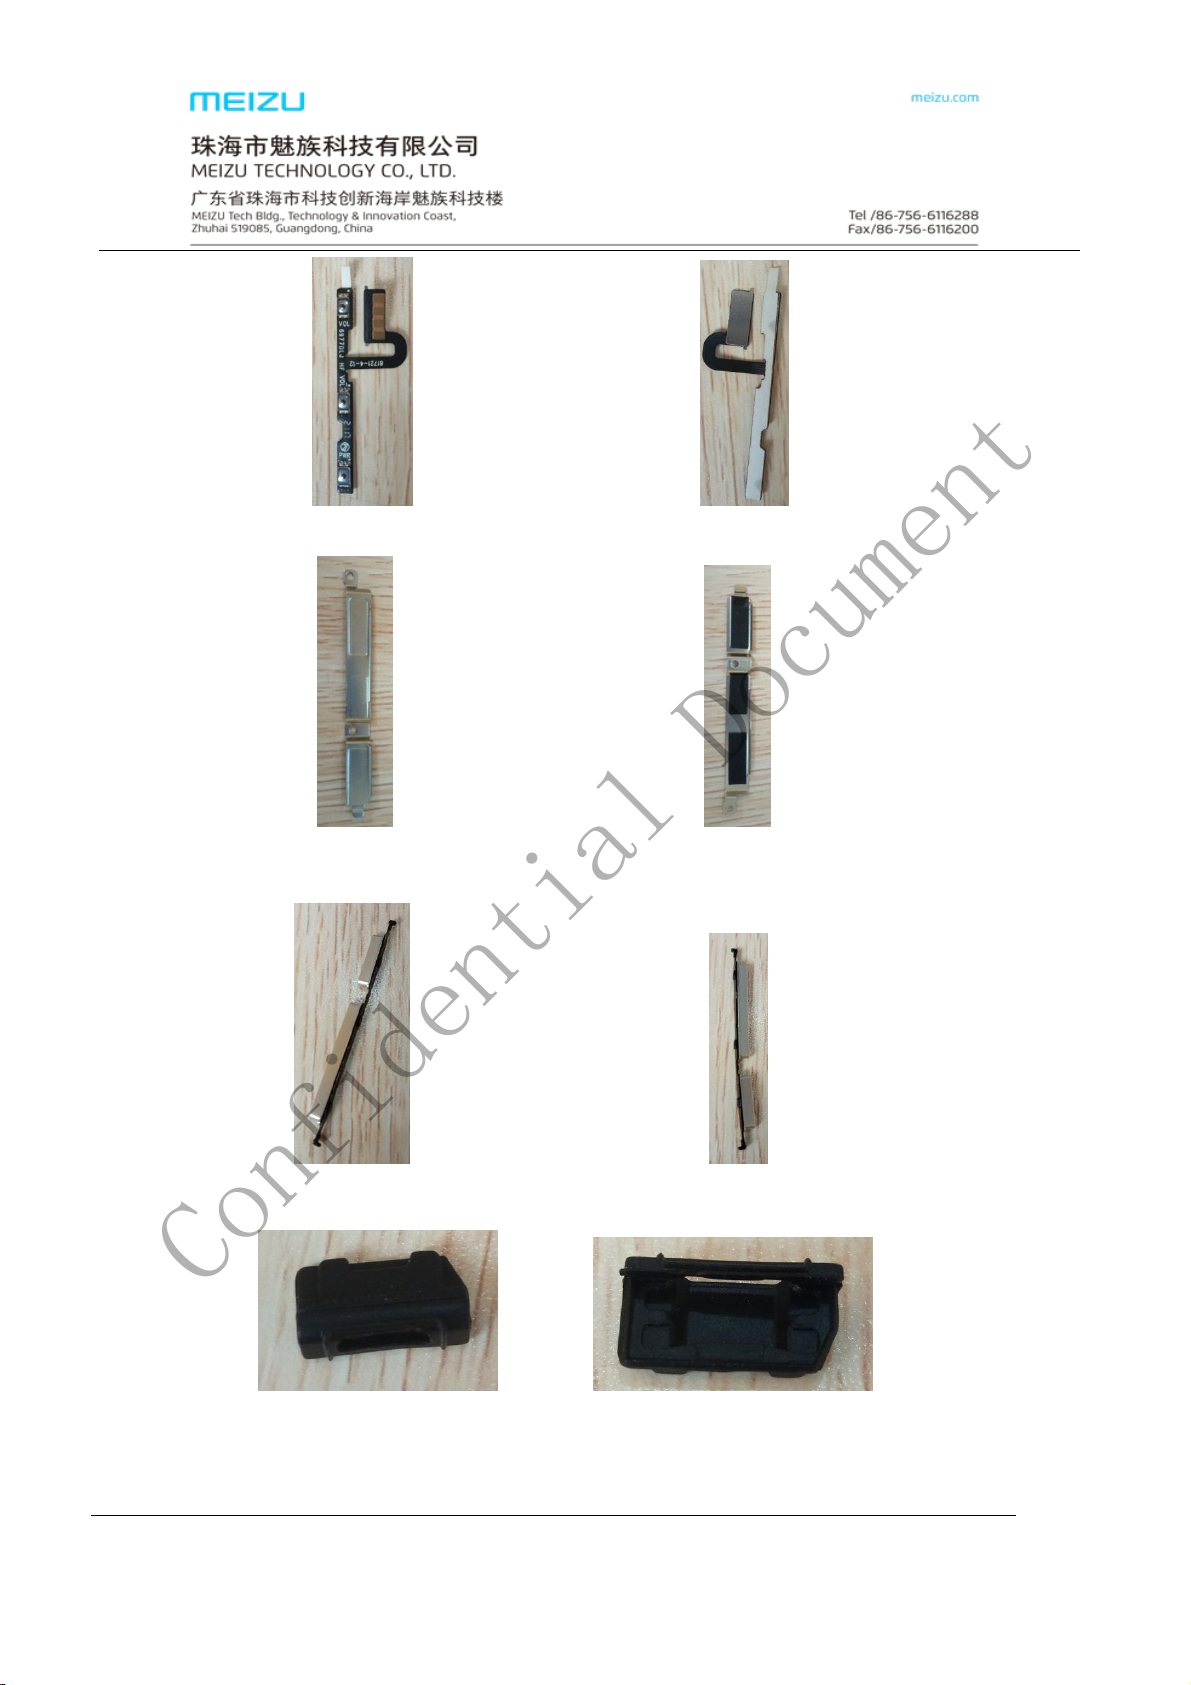
M1721 Side button FPC
M1721 BTB holder
M1721 side button assembly
M1721 USB silicone rubber case
Page 9
2017-08-22
魅族机密,未经许可不得扩散
第 32页,共 52页
Confidential Document
@MEIZU
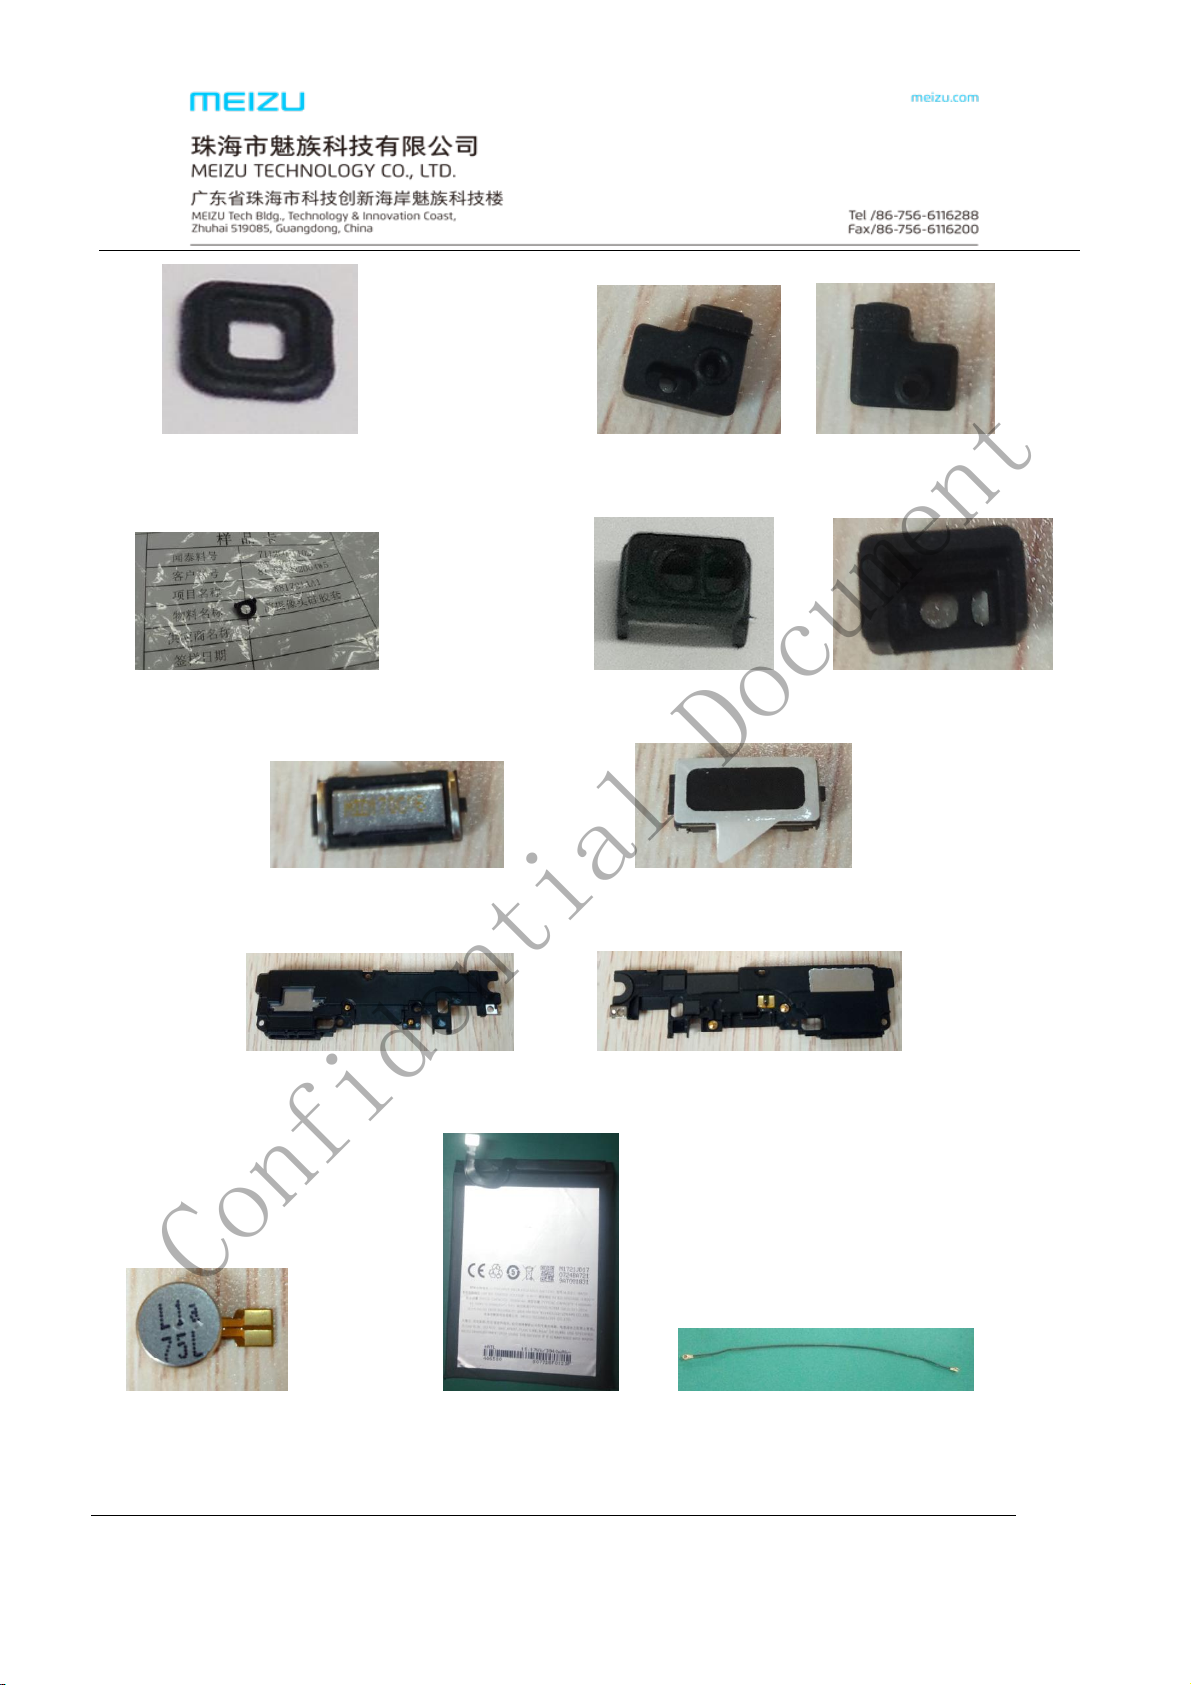
M1721 Main Mic silicone rubber case M1721 Vice Mic silicone rubber case
M1721 front camera silicone rubber case M1721 light sensor rubber case
M1741 Receiver
M1721 BOX speaker assembly
M1721 Motor M1721 battery M1721 coaxial wire
Page 10
2017-08-22
魅族机密,未经许可不得扩散
第 32页,共 52页
M1721 the three choose two SIM card tray
Confidential Document
@MEIZU
Front view of mainboard :
M1721 Front camera
Page 11
2017-08-22
魅族机密,未经许可不得扩散
第 32页,共 52页
The back view of mainboard:
Confidential Document
@MEIZU
3. Technical specification parameter
Page 12
2017-08-22
魅族机密,未经许可不得扩散
第 32页,共 52页
Confidential Document
@MEIZU
Page 13

2017-08-22
魅族机密,未经许可不得扩散
第 32页,共 52页
Confidential Document
@MEIZU
Page 14

2017-08-22
魅族机密,未经许可不得扩散
第 32页,共 52页
Confidential Document
@MEIZU
Page 15

2017-08-22
魅族机密,未经许可不得扩散
第 32页,共 52页
Confidential Document
@MEIZU
Chapter 3 M1721 Functional test and standards
M1721 functional test item and standards
Test condition Tested under photometric 800~2000Lux, using firmware supplied by Meizu as well as test
software
Test Item standards Reference basis
Button test The power key, volume key, and primary key all work. The reaction is not dull and cannot
be show Non corresponding key function
Sensor test All the test item show green, it mean pass; if it show white , it mean skip this
item; if it show red, it mean failed.
Charging test battery state is charging, the external power and charging were green.
headset test headset can be detect, headset button(volume button is work),Headset sound clear,
no noise、The headset sounds the same、The pause key is work
LCD test no black block,、black dot、home button LED light uniform brightness
Gravity test Turn the screen counter clockwise and display the arrow in four directions
Gyroscope Test Rotate the phone in YXZ order, and the screen corresponds to the coordinate scale
Vibration test Motors can vibrate, it cannot without vibration, it cannot have noise or vibration
so week.
Sensor calibration Flat cellphone,if the interface is show pass.it is normally;if the cellphone
is show red. We should click the accelerate calibration button
Front camera test Preview clear, adjust the normal, clear photos
Back camera test The preview is clear, the calibration is normal, the photos are clear and the focus
is normal
Flash light test White and yellow double color flash lamp is opened normally, brightness is even
Bluetooth test You can find Bluetooth hotspots
WIFI test WIFI hotspots can be searched, you must have more than one hot spot, the
sensitivity value is greater than -60dBm, such as no strong signal, the interface
does not display PASS
Light sensor test When the light sensor is blocked, the screen backlight is turned off and the light
sensor is switched on, and the screen backlight is turned on, and the brightness
of the screen is changed evenly at 20%, 50%, and 80% backlight
Audio test The sound of the ear, the receiver and the horn is normal, and there is no noise.
The recording can be recorded and played, and the sound is normal
Screen lineation test Touch sensitive, lineation normal, it cannot show serration line, broken line,
multi-line when our touch to lineation
Multi touch test Touch the line with at least three points
Finger print test Use the fingerprint test APK, open the first two items of self-test display,
through the finger defense Home key 3rd item display PASS, then release finger,
until to all the test pass
Calling test SIM card can be detected, the sound is clear in call, the signal is stable, Headset
mode / Headset mode / speaker mode can be switching normally, the infrared can
Page 16

2017-08-22
魅族机密,未经许可不得扩散
第 32页,共 52页
Serial number
Material name
1
TP+LCM assembly
2
LCD touch screen assembly
3
Front camera silicone sleeve
4
Vice Mic silicone rubber case
5
Receiver
6 front camera
7
Rear camera
8
BB Shield cap
9
Light sensitive silicone rubber
case
10
Side key Vic-plate
Confidential Document
@MEIZU
be extinguished screen, it cannot have a single pass and noise, the infrared
no effect
Chapter 4 Exploded view
Chapter 5 Maintenance assembly and materials BOM
1. Maintenance assembly BOM
Page 17

2017-08-22
魅族机密,未经许可不得扩散
第 32页,共 52页
11
12
Screw
13
Fingerprint module
14
Fingerprint module silicone
rubber case
15
Fingerprint module holder
assembly
16
Vice-board assembly
17
USB board
18
Main MIC silicone rubber case
19
Main FPC
20
Speaker BOX
21
Screw
22
Motor ground conductive foam
23
coaxial wire
24
Battery
25
Floodlight white Mylar
26
Receiver grounding conductive cloth
27
28
29
BTB holder
30
31
Side button holder
32
SIM tray
33
34
Battery cover assembly
35
Rear camera lens
36
Rear camera lens
37
Screws
38
Confidential Document
@MEIZU
1. Block diagram
Chapter 6 Block diagram and PCB Screen Printing
Page 18

2017-08-22
魅族机密,未经许可不得扩散
第 32页,共 52页
Confidential Document
@MEIZU
2. PCB Location number scheme
Page 19

2017-08-22
魅族机密,未经许可不得扩散
第 32页,共 52页
Confidential Document
@MEIZU
Page 20

2017-08-22
魅族机密,未经许可不得扩散
第 32页,共 52页
Confidential Document
@MEIZU
Chapter 7 The common fault detect and maintenance
For dysfunctional machines, software problems should be ruled out first.Then step
out troubleshooting hardware
Software upgrade, please follow the following process
Firmware upgrade
Page 21

2017-08-22
魅族机密,未经许可不得扩散
第 32页,共 52页
Confidential Document
@MEIZU
If the phone is flashed to Flyme firmware once again and the current problem still can’t
be solved, Please flash the phone to Engineer firmware (Refer to M1721 Upgrade Guide).
Then use the test software carried by phone to do further tests to troubleshoot.
1. No boot
Page 22

2017-08-22
魅族机密,未经许可不得扩散
第 32页,共 52页
Confidential Document
@MEIZU
2. SIM card no recognizable
Page 23

2017-08-22
魅族机密,未经许可不得扩散
第 32页,共 52页
Confidential Document
@MEIZU
Note:
A.M1721 is Dual SIM card dual standby, include: mobile, Unicom, Telecom, Three
CNC. Flash Flyme firmware.
Please note that please make a distinguish
B. Card 1 support SIM and SD card,Card 2 hot-plugging。
3. Volume button Fault
Page 24

2017-08-22
魅族机密,未经许可不得扩散
第 32页,共 52页
Confidential Document
@MEIZU
4.Touch Screen Fault
Page 25

2017-08-22
魅族机密,未经许可不得扩散
第 32页,共 52页
Confidential Document
@MEIZU
5.LCD display abnormal
Page 26

2017-08-22
魅族机密,未经许可不得扩散
第 32页,共 52页
Confidential Document
@MEIZU
6. Speaker abnormal
Page 27

2017-08-22
魅族机密,未经许可不得扩散
第 32页,共 52页
Confidential Document
@MEIZU
7.Headphone abnormal
Page 28

2017-08-22
魅族机密,未经许可不得扩散
第 32页,共 52页
Confidential Document
@MEIZU
8 Earphone abnormal
Page 29

2017-08-22
魅族机密,未经许可不得扩散
第 32页,共 52页
Confidential Document
@MEIZU
9. Main MIC abnormal
Page 30

2017-08-22
魅族机密,未经许可不得扩散
第 32页,共 52页
Confidential Document
@MEIZU
10. Vice MIC abnormal
Page 31

2017-08-22
魅族机密,未经许可不得扩散
第 32页,共 52页
Confidential Document
@MEIZU
11. Main camera and front camera abnormal
Page 32

2017-08-22
魅族机密,未经许可不得扩散
第 32页,共 52页
Confidential Document
@MEIZU
12. Flash light abnormal
Page 33

2017-08-22
魅族机密,未经许可不得扩散
第 32页,共 52页
Confidential Document
@MEIZU
13. Signal abnormal
Page 34

2017-08-22
魅族机密,未经许可不得扩散
第 32页,共 52页
Confidential Document
@MEIZU
14. Home button abnormal
Page 35

2017-08-22
魅族机密,未经许可不得扩散
第 32页,共 52页
Confidential Document
@MEIZU
15. WIFI / Bluetooth/ GPS abnormal
Antenna is used to emit and receive signal for Wi-Fi, Bluetooth or GPS, When Wi-Fi,
Bluetooth or GPS fault happened, check if it’s an issue of mainboard or an issue of
antenna on battery cover. Below is the process to deal with the problem:
Page 36

2017-08-22
魅族机密,未经许可不得扩散
第 32页,共 52页
Confidential Document
@MEIZU
16.Infrared sensor abnormal
Page 37

2017-08-22
魅族机密,未经许可不得扩散
第 32页,共 52页
Confidential Document
@MEIZU
17.Motor abnormal
Page 38

2017-08-22
魅族机密,未经许可不得扩散
第 32页,共 52页
Confidential Document
@MEIZU
18.Charge abnormal
Page 39

2017-08-22
魅族机密,未经许可不得扩散
第 32页,共 52页
Confidential Document
@MEIZU
19. Note:
If you encounter one of the following problems, change the motherboard
directly when the Flyme firmware is not work.
Fault item Maintenance step 1 Maintenance step 2
Gyroscope Re-flash Flyme Replace Mainboard
Gravity induction Re-flash Flyme Replace Mainboard
Compass Re-flash Flyme Replace Mainboard
 Loading...