

Page 1
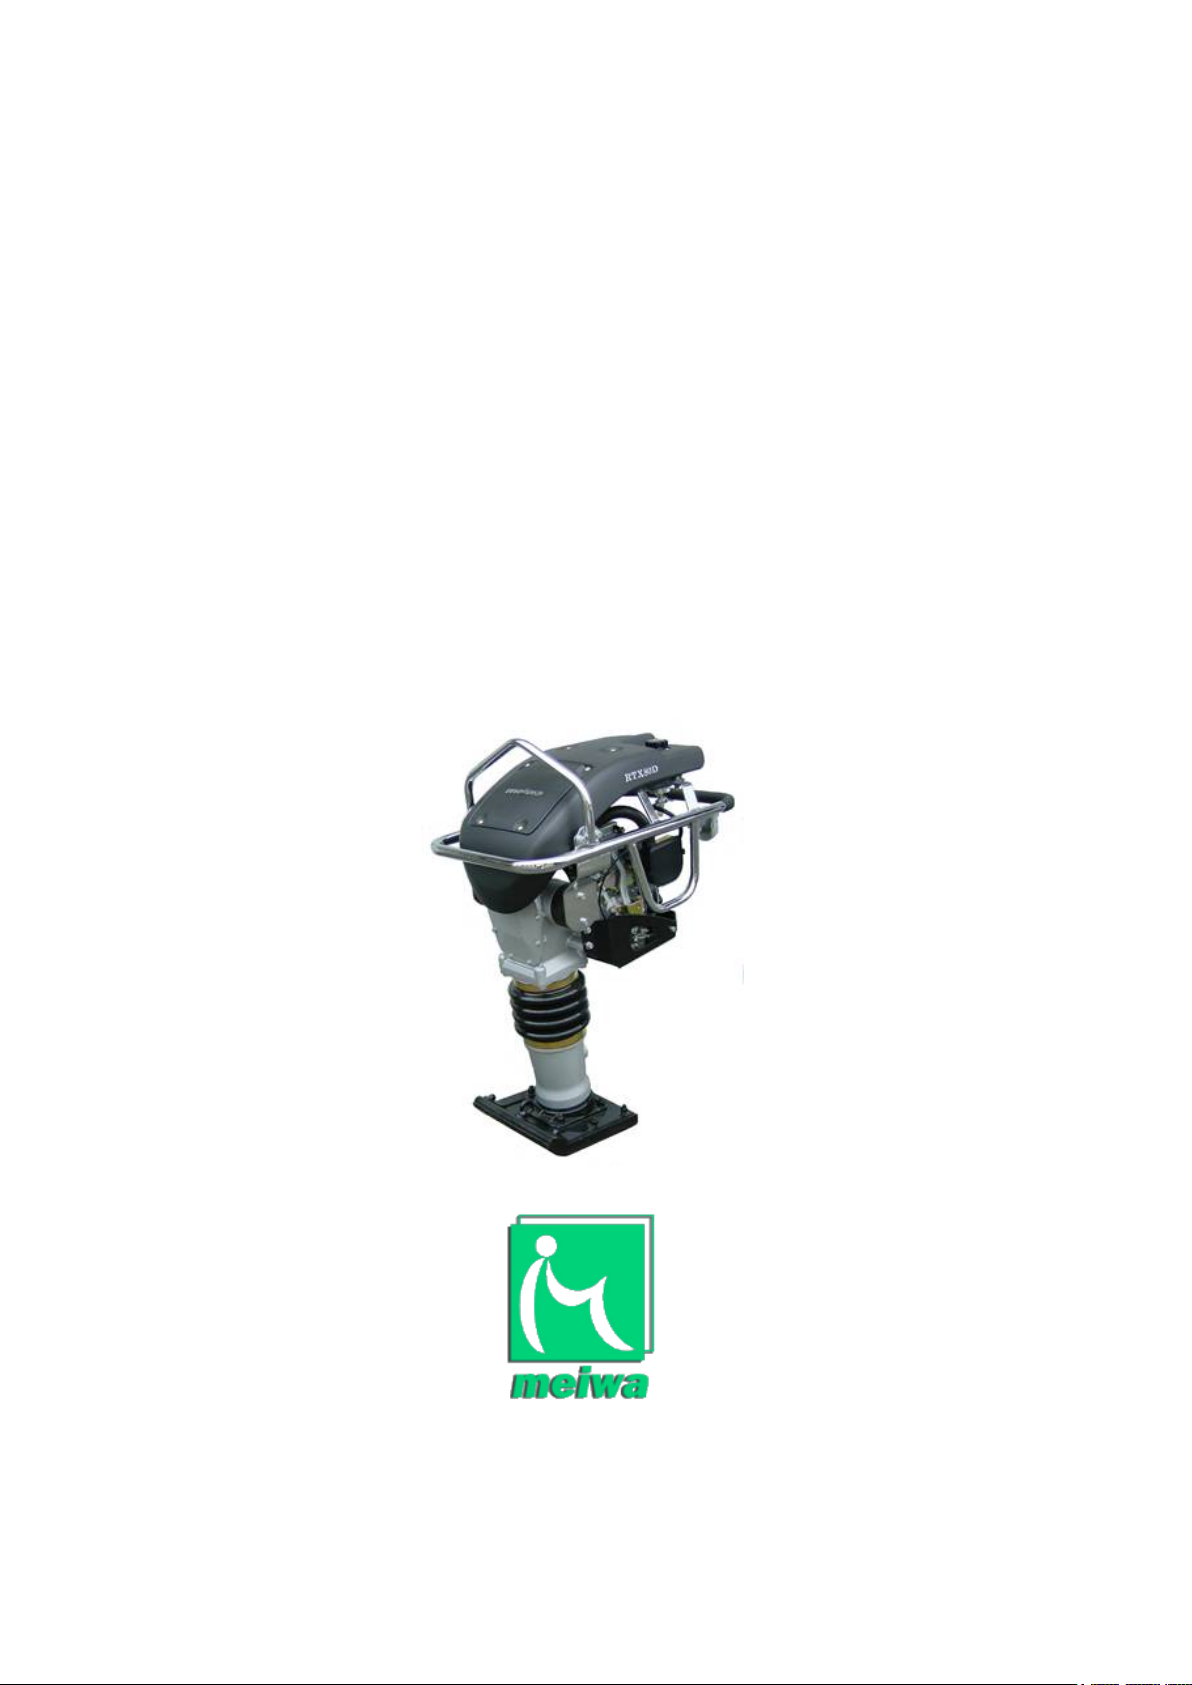
OPERATION / MAINTENANCE
AND PARTS MANUAL
RTX-55D(U) /RTX-60D(U)
RTX-75D(U) /RTX-80D(U)
TAMPING RAMMER
( NEW ZEALAND MODEL )
Read this instruction manual before operating this equipment
DEC. 01, 2011
Page 2

SECTION 1 -
SAFETY PRECAUTIONS AND GUIDELINES
Contents .......................................................................................................................................................................... Page
OVERVIEW ......................................................................................................................................................................... 1
PRE-START INSPECTION................................................................................................................................................. 1
OPERATING ....................................................................................................................................................................... 1
MAINTENANCE ................................................................................................................................................................. 2
OERATING PROCEDURES ..............................................................................................................................………….. 2
OVERVIEW
BEFORE YOU OPERATE, MAINTAIN OR IN ANY OTHER WAY, OPERATE THIS MACHINE:
READ and STUDY this manual. KNOW how to safely use the unit’s controls and what you must do for safe maintenance.
The machine has been built in accordance with state-of-the-art standards and the recognized safety rules. Nevertheless,
its use may constitute a risk to life and limb of the user or of third parties, or cause damage to the machine and to other
material property.
ALWAYS wear or use the proper safety items required for your personal protection.
For reasons of security, long hair must be tied back or otherwise secured, garments must be close fitting and no jewelry –
such as rings or watches - may be worn. Injury may result from being caught up in the machinery or from rings catching
on moving parts.
If you have ANY QUESTIONS about the safe use or maintenance of this unit, ASK YOUR SUPERVISOR OR CONTACT
ANY DISTRIBUTOR. NEVER GUESS - ALWAYS CHECK.
Never make any modifications, additions or conversions which might affect safety without the supplier’s approval. This
also applies to the installation and adjustment of safety devices and valves as well as to welding work on load-bearing
elements. Observe all fire-warning and fire-fighting procedures.
PRE-START INSPECTION
INSPECT your machine. Have any malfunctioning, broken or missing parts corrected or replaced before use.
Check the machine at least once per working shift for obvious damage and defects. Report any changes (incl. changes in
the machine’s working behavior) to the competent organization/person immediately. If necessary, stop the machine
immediately and lock it.
Take the necessary precautions to ensure that the machine is used only when in a safe and reliable state.
Operate the machine only if all protective and safety oriented devices, such as removable safety devices, emergency
shut-off equipment, sound-proofing elements and exhausts, are in place and fully functional.
The electrical equipment of machines is to be inspected and checked at regular intervals. Defects such as loose
connections or scorched cables must be rectified immediately.
VERIFY that all the instruction and safety labels are in place and readable. These are as important as any other
equipment on the compactor.
NEVER fill the fuel tank, with the engine running, while near an open flame, or while smoking. ALWAYS wipe up any
spilled fuel immediately.
1-1
Page 3

SECTION 1 -
SAFETY PRECAUTIONS AND GUIDELINES
CHECK for WARNING tags placed on the machine. DO NOT operate the equipment until repairs have been made and
the WARNING tags have been removed by authorized personnel.
KNOW the location of the Emergency Shut-Down Control if the machine is so equipped.
OPERATING
In the event of safety-relevant modifications or changes in the behavior of the machine during operation, stop the
machine immediately and report the malfunction to the competent authority/person.
Always wear the prescribed ear protectors.
Always make sure that no person or obstruction is in your line of travel. Watch your step to avoid tripping.
USE extreme caution and be observant when working in close quarters or congested areas.
Before beginning work, familiarize yourself with the surroundings and circumstances of the site, such as obstacles in the
working and traveling area, the soil bearing capacity and any barriers separating the construction site from public
roads.
When traveling on public roads, ways and places always observe the valid traffic regulations and, if necessary, make
sure beforehand that the machine is in a condition compatible with these regulations
Always keep at a distance from the edges of building pits and slopes.
DO NOT run the engine in a closed building for an extended length of time. EXHAUST FUMES CAN KILL.
DO NOT operate the compactor on non-compactable material, such as concrete or hardened asphalt.
MAINTENANCE
Observe the adjusting, maintenance and inspection activities and intervals set out in the operating instructions,
including information on the replacement of parts and equipment. These activities must be executed by skilled
personnel only.
Ensure that the maintenance area is adequately secured.
After cleaning, examine all fuel, lubricant, and hydraulic fluid lines for leaks, loose connections, chafe marks and
damage.
Any defects found must be rectified without delay.
Always tighten any screwed connections that have been loosened during maintenance and repair.
1-2
Page 4

SECTION 1 -
SAFETY PRECAUTIONS AND GUIDELINES
Any safety devices removed for set-up, maintenance or repair purposes must be refitted and checked immediately upon
completion of the maintenance and repair work.
Ensure that all consumables and replaced parts are disposed of safely and with minimum environmental impact.
AVOID, whenever possible, servicing, cleaning or examining the unit with the engine running.
NEVER fill the fuel tank, with the engine running, while near an open flame, or while smoking. ALWAYS wipe up any
spilled fuel immediately.
ALWAYS disconnect the spark plug before performing any work on the unit.
DO NOT alter the engine governor settings from those indicated in the engine manual.
ALWAYS replace damaged or lost decals. Refer to the Parts Manual for the proper location and part number of all
decals.
Carry out welding, flame-cutting and grinding work on the machine only if this has been expressly authorized, as there
may be a risk of explosion and fire.
Before carrying out welding, flame-cutting and grinding operations, clean the machine and its surroundings from dust
and other inflammable substances and make sure that the premises are adequately ventilated (risk of explosion).
1-3
Page 5

SECTION 2 - INTRODUCTION
EXCELLENT CHOICE! MEIWA Tamping Rammer you have chosen will give you many hours of maintenance free
operation resulting in a faster return of your investment.
Safe operation depends on reliable equipment and the use of proper operating procedures. Performing the checks and
services described in this manual will help keep your machine in good condition. These recommended operation
procedures will help you to avoid unsafe practices.
Safety notes have been included throughout this manual to help you avoid injury and prevent damage to the equipment.
These notes are not intended to cover all eventualities; it is impossible to anticipate and evaluate all possible methods of
operation. Therefore, you are the only person who can guarantee safe operation and maintenance. It is important that
any procedure not specifically recommended in this manual be thoroughly evaluated from the standpoint of safety before
it is implemented.
Continuing improvement and advancement of product design may cause changes to your machine which may not be
included in this publication. Each publication is reviewed and revised, as required, to update and include these changes
in later editions. MEIWA reserves the right to modify or make changes within a specific model group without notice and
without incurring any liability to retrofit units previously shipped from the factory. Contact your MEIWA Distributor for
non-routine maintenance information that is not covered in this publication.
2-1
Page 6
SECTION 3 - SYMBOL IDENTIFICATION AND METRIC CONVERSION
Contents Page
INTERNATIONAL MACHINE SYMBOLS ________________________ ______________________________________1
INTERNATIONAL HIGHWAY SYMBOLS ____________ __________________________________________________2
METRIC CONVERSIONS _____________________________________ _____________________ ________________ 4
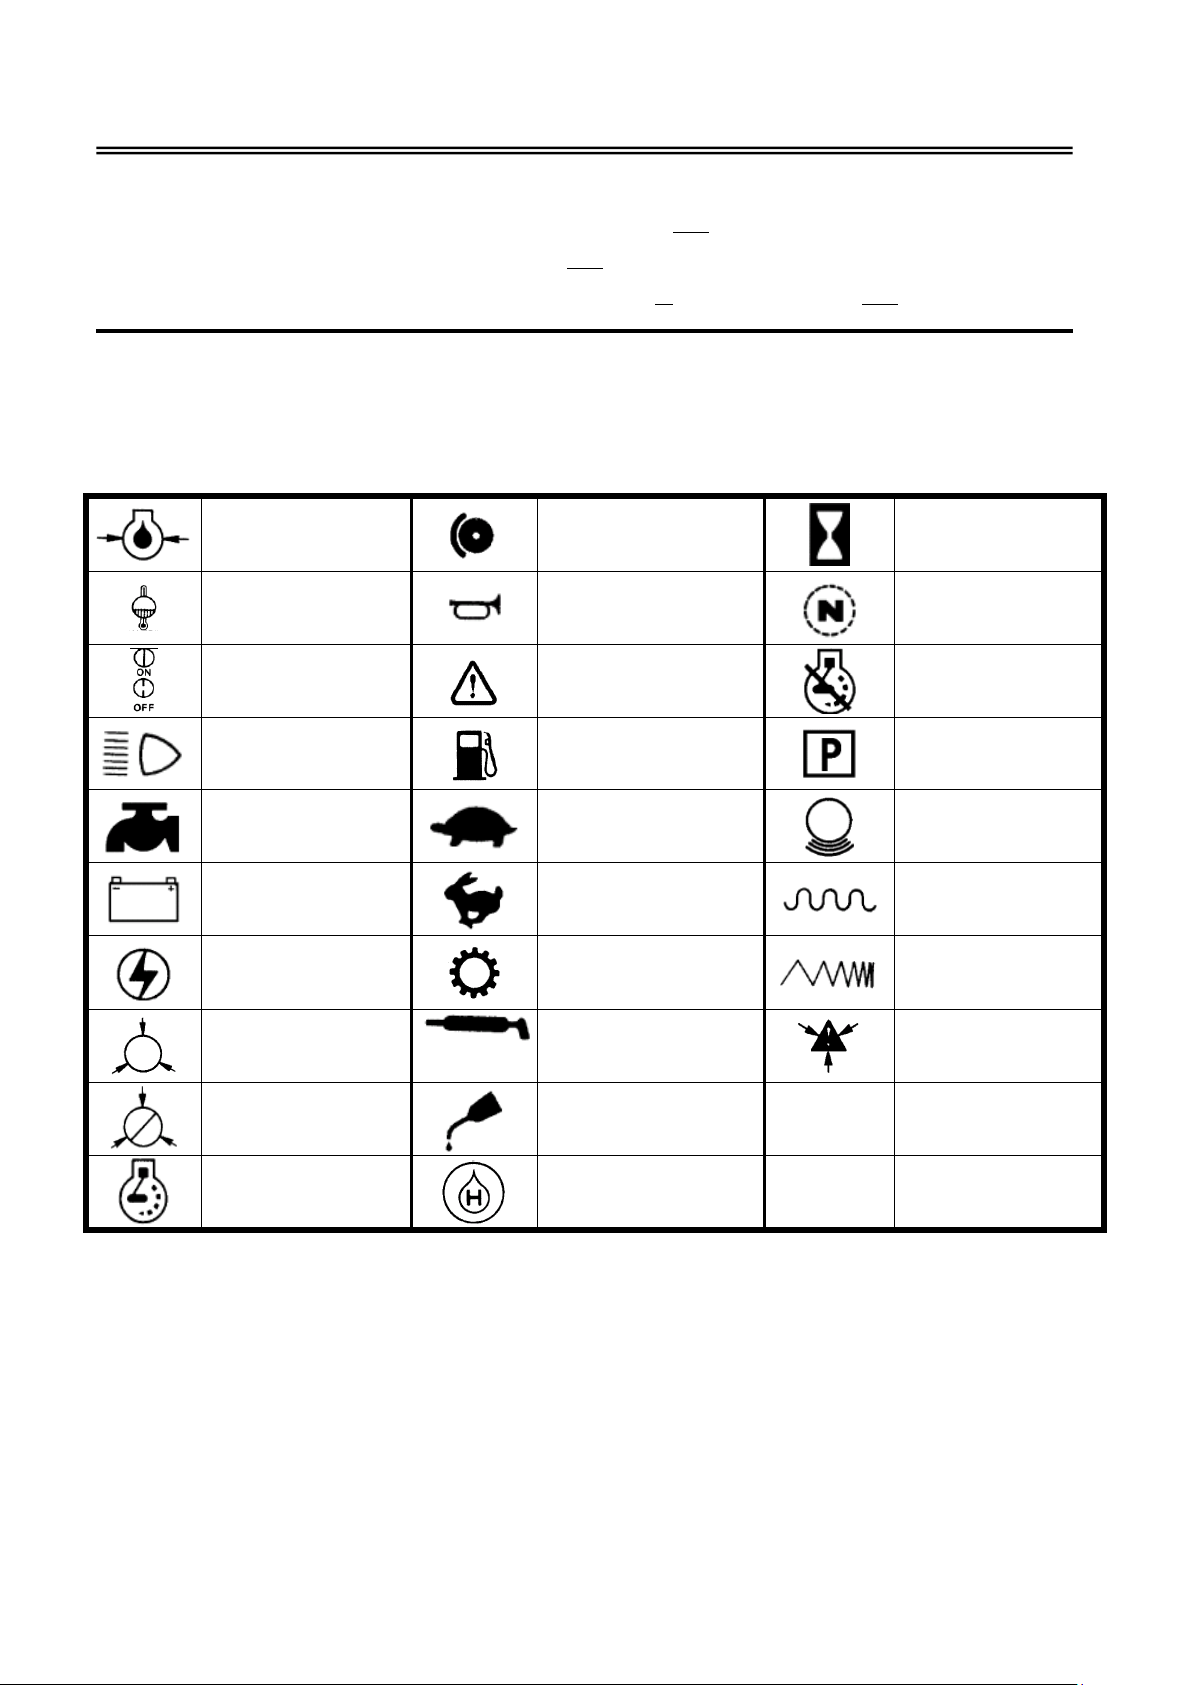
INTERNATIONAL MACHINE SYMBOLS
The following explains the meaning of international symbols that may appear on your machine
OIL PRESSURE BRAKE HOURS
WATER
HORN NEUTRAL
TEMPERATURE
ON / OFF CAUTION LOW ENGINE
RPM.
LIGHTS FUEL BRAKE-PARK
WATER SLOW VIBRATION
BATTERY FAST AMPLITUDE
AMMETE OR
TRANSMISSION FREQUENCY
VOLTMETER
AIR PRESSURE GREASE CAUTION-
PRESSURIZED
LOW AIR
OIL
PRESSURE
ENGINE RPM HYDRAULIC OIL
3-1
Page 7
SECTION 3 - SYMBOL IDENTIFICATION AND METRIC CONVERSION
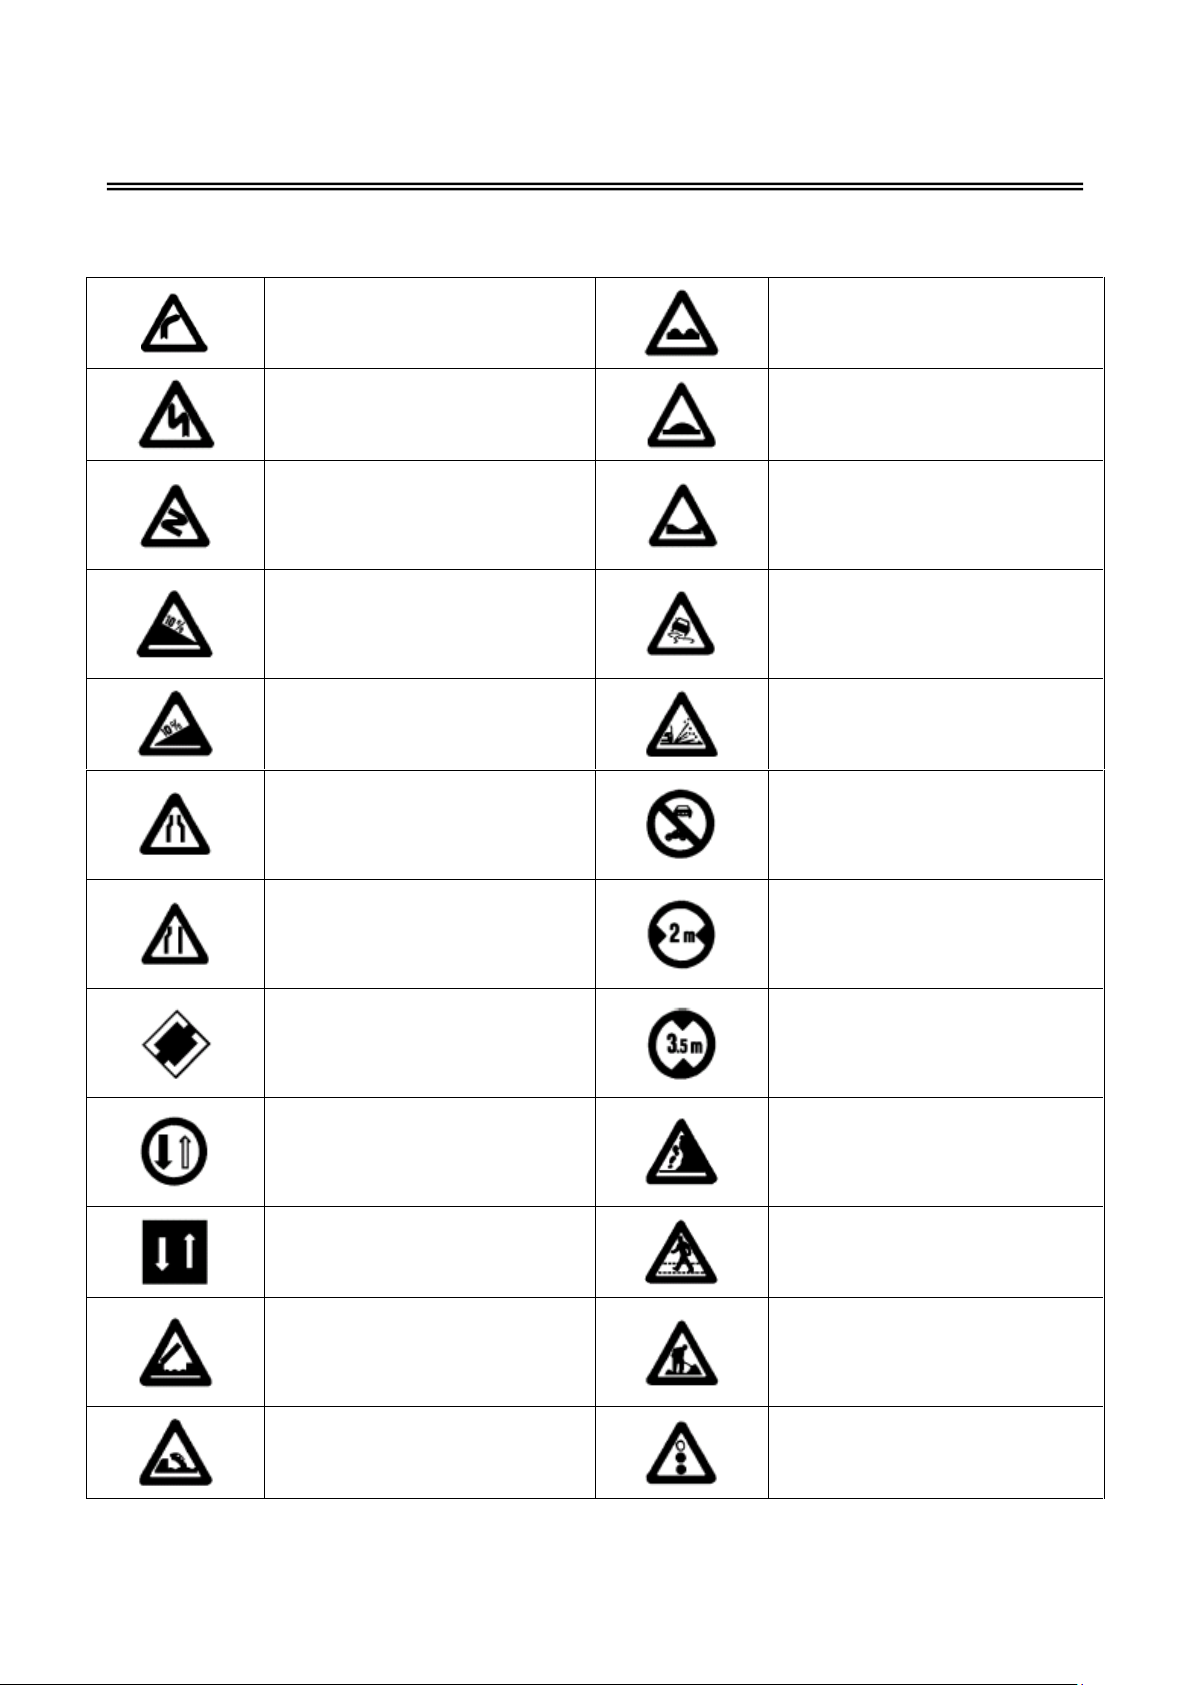
INTERNATIONAL HIGHWAY SYMBOLS
The following symbols may also appear in a yellow square instead of a red triangle.
Road bends Uneven road
Dangerous bend Ridge
Double bend Dip
Dangerous descent Slippery road
Steep ascent Loose gravel
No entry for power driven
Carriageway narrows
vehicles
No entry for vehicles exceeding
Carriageway narrows
length
No entry for vehicles exceeding
“end of priority” sign
length
Oncoming traffic has priority Falling rocks
Priority over oncoming traffic Pedestrian crossing
Swing bridge Road work
Road leads onto quay or river
Light signals
bank
3-2
Page 8
SECTION 3 - SYMBOL IDENTIFICATION AND METRIC CONVERSION
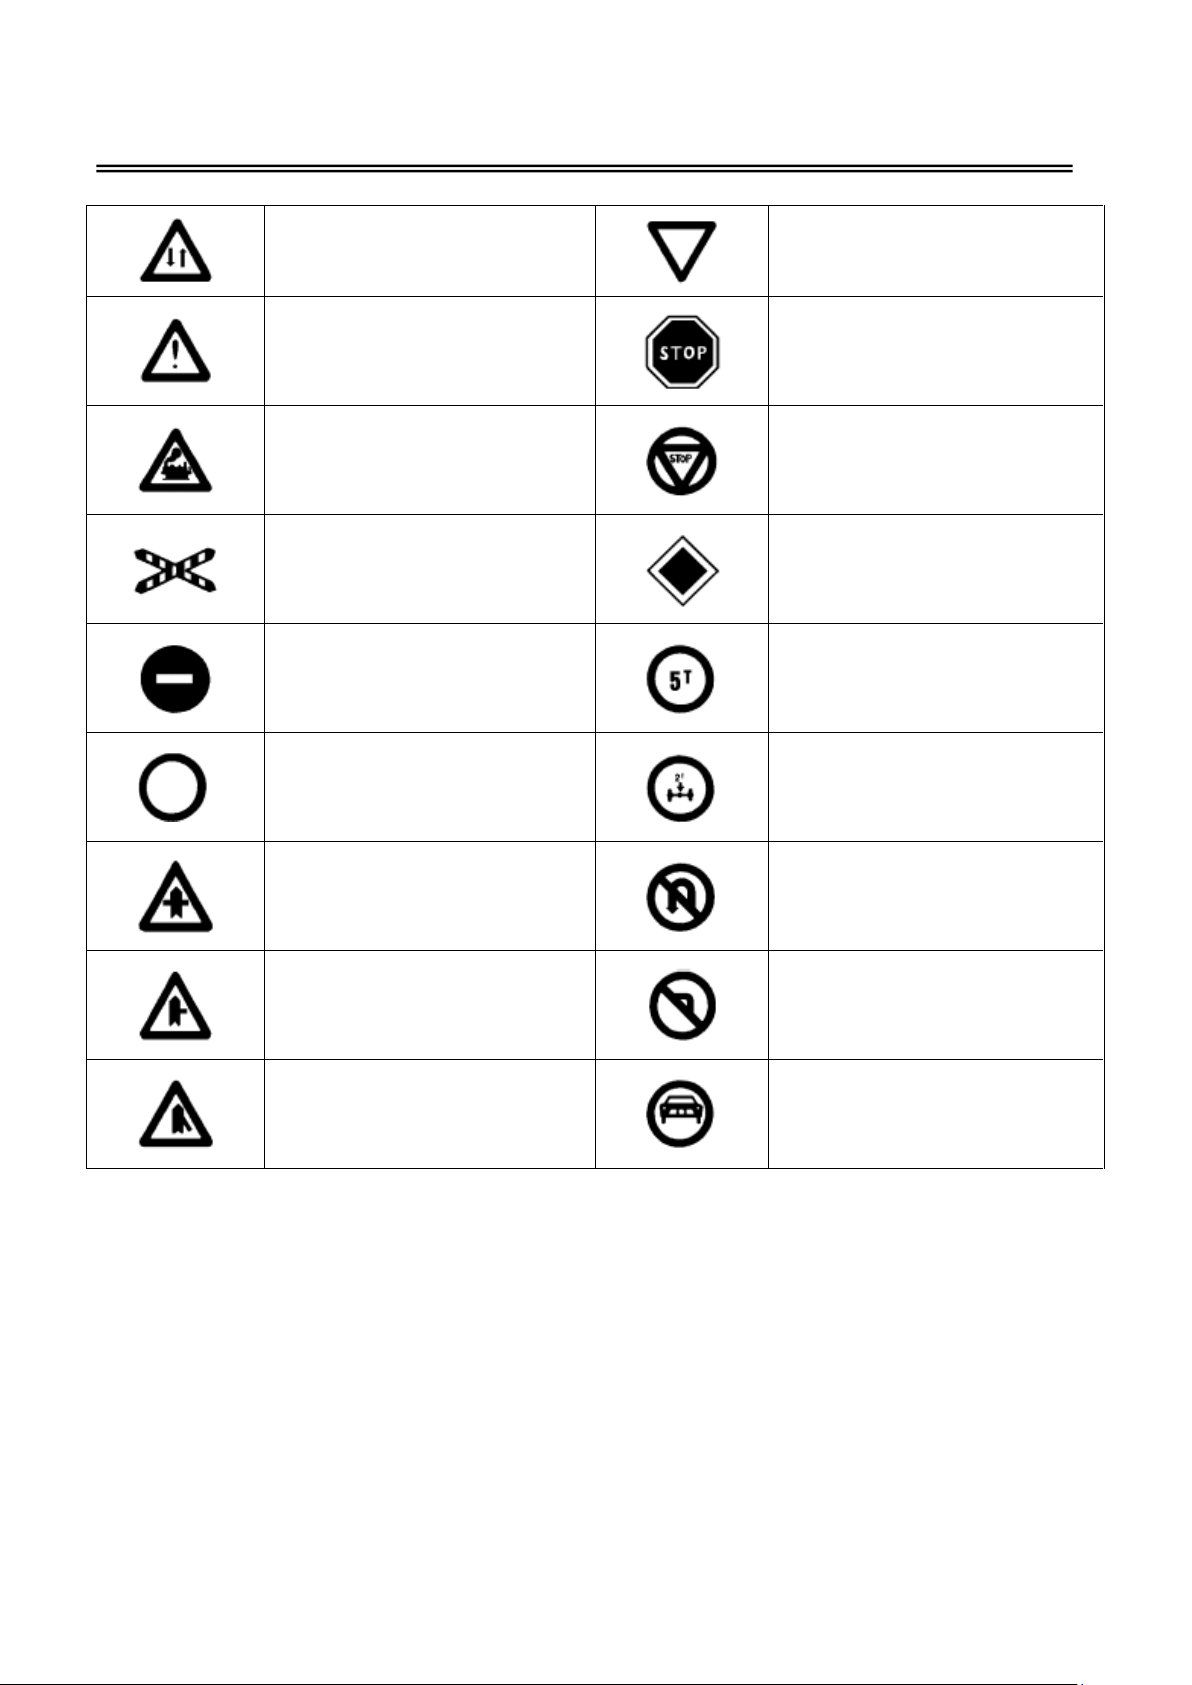
Two-way traffic “give way” sign
Other dangers Stop sign (new)
Level crossing Stop sign (old)
Level crossing “priority road” sign
No entry
Closed to all vehicles in both
directions
Intersection, user must give
way
Intersection, user must give
way
Intersection, user must give
way
No entry for vehicles exceeding
weight
No entry for vehicles axle
weight exceeding
No u-turn
No turn direction shown
No entry for power driven
vehicles
3-3
Page 9

SECTION 3 - SYMBOL IDENTIFICATION AND METRIC CONVERSION
TO CONVERT
OMREGNET FRA
Bar Pound/sq.in 14.50
Bar Kilopascals 100.
Centigrade Fahrenheit (C° x 9/5) + 32
Centimeters Inches 0.3937
Centimeters Millimeters 10.0
Circumference Radians 6.283
Cubic centimeters cu.inches 0.06102
Degrees (angle) Radians 0.01745
Degrees/sec. Revolutions/min 0.1667
Feet Meters 0.3048
Feet/min Meters/min. 0.3048
Foot-pounds Kg-meters 0.1383
Gallons Liters 3.785
Hertz Vibrations/min. 60.
Horsepower Kilowatts 0.7457
Inches Centimeters 2.540
Inches Millimeters 25.40
Kilograms Pounds .250
Kilogram meters -Pounds 7.233
Kilopascal Pounds/sq.in 0.1450
Kilopascal Bars 0.01
Kilowatts Horsepower 1.341
Liters Gallons (U.S. liq) 0.2642
Liters Pints (U.S. liq) 2.113
Liters Quarts (U.S. liq) 1.057
Meters Feet 3.281
Meters Inches 39.37
Meters/min Feet/sec 0.05468
Miles/hr kms/hr 1.609
Millimeters Inches 0.03937
Newtons Pounds 4.448
Newton-meter Pound-feet 0.737
Pounds Kilograms 0.4536
Pounds Newtons 0.225
Pound feet Newton-meter 1.356
Pounds/ft. kgs/meter 1.488
Pounds/sq in Bars 0.06895
Pounds/sq in Kilopascals 6.895
Quarts (liq) Liters 0.9463
Radians Degrees 57.30
Radians/sec Revolutions/min 9.549
Revolutions/min Degrees/sec 6.0
Revolutions/min Radians/sec 0.1047
Temperature (°C) + 17.78 Temperature (°F) 1.8
Temperature (°F) - 32 Temperature (°C) 5/9
Tons (short) Tons (metric) 0.9078
Vibrations/min Hertz 0.0167
INTO
TIL
MULTIPLY BY
MULTIPLICERES MED
3-4
Page 10

SECTION 4 - OPERATING INSTRUCTIONS
Contents Page
SAFETY CHECKS - PRE-STARTING __________________________________________________________________1
INSPECTION PRIOR TO OPERATION ________________________________________________________________2
OPERATION ________________________________________________________________________________________2
STORAGE ___________________________________________________________________________________________6
Improper maintenance can be hazardous.
Read and understand SECTION 1 - SAFETY PRECAUTIONS AND GUIDELINES before you perform any maintenance,
service or repairs.
SAFETY CHECKS - PRE-STARTING
Before starting each day, in addition to the 10 hour daily routine maintenance, check or inspect the following items to
ensure trouble free performance.
1. Check fluid lines, hoses, fittings, filler openings, drain plugs, pressure cap, muffler, safety shrouds and the area
underneath.
2. The unit for signs of leakage or damage. Fix any leaks and correct any damage before operating.
3. Inspect the entire unit for damaged or missing parts and repair or replace them as needed.
4. Check the fuel level. If necessary, fill the fuel tank with the proper fuel.
5. Check all fastening hardware to ensure it is adequately tightened and that none is missing or broken.
6. Do not operate faulty equipment.
7. Be observant of people and obstructions within the work area.
Please read “INSTRUCTIONS FOR USE” for ROBIN engine and this instruction manual for correct use and care.
4-1
Page 11
SECTION 4 - OPERATING INSTRUCTIONS
Please check if the unit is correctly maintained in good operating condition.
INSPECTION PRIOR TO OPERATION
CHECK ENGINE OIL
Before checking or refilling engine oil, be sure the compactor is located on a stable level surface.
Do not thread the gauge into oil filler to check oil level. If the oil level is below the lower level line on the dipstick, refill
with the proper oil to the upper level (to the neck of oil filler). See section 9.
CHECK ENGINE FUEL
Do not refuel while smoking, near an open flame or other potential hazards.
CLEANING AIR CLEANER
Check Air Cleaner to be sure it is clean and not contaminated. If it needs cleaning perform the following steps:
Remove the outer urethane foam and inner element. Wash the element in fuel. Saturate it in a mixture of 3 parts
kerosene or diesel fuel and 1 part engine oil. Shake off excessive oil and reinstall. Wash the air cleaner case using
kerosene. After cleaning it up, apply engine oil on the inner part of the case.
If the air cleaner element is seriously contaminated, engine start up failure, poor output or engine malfunction may
result.
CHECK EACH PART FOR LOSE OR BROKEN BOLTS AND NUTS
Tighten loose bolts and nuts, if any. Check each part for fuel or oil leak. Replace broken or damaged parts, if any, with
new ones.
LUBRICATION OF MAIN BODY
Check the Main Body oil level with the oil gauge before each operation. Change oil after the first 50 hours and every 200
hours. See Section 11.
OPERATION
STARTING
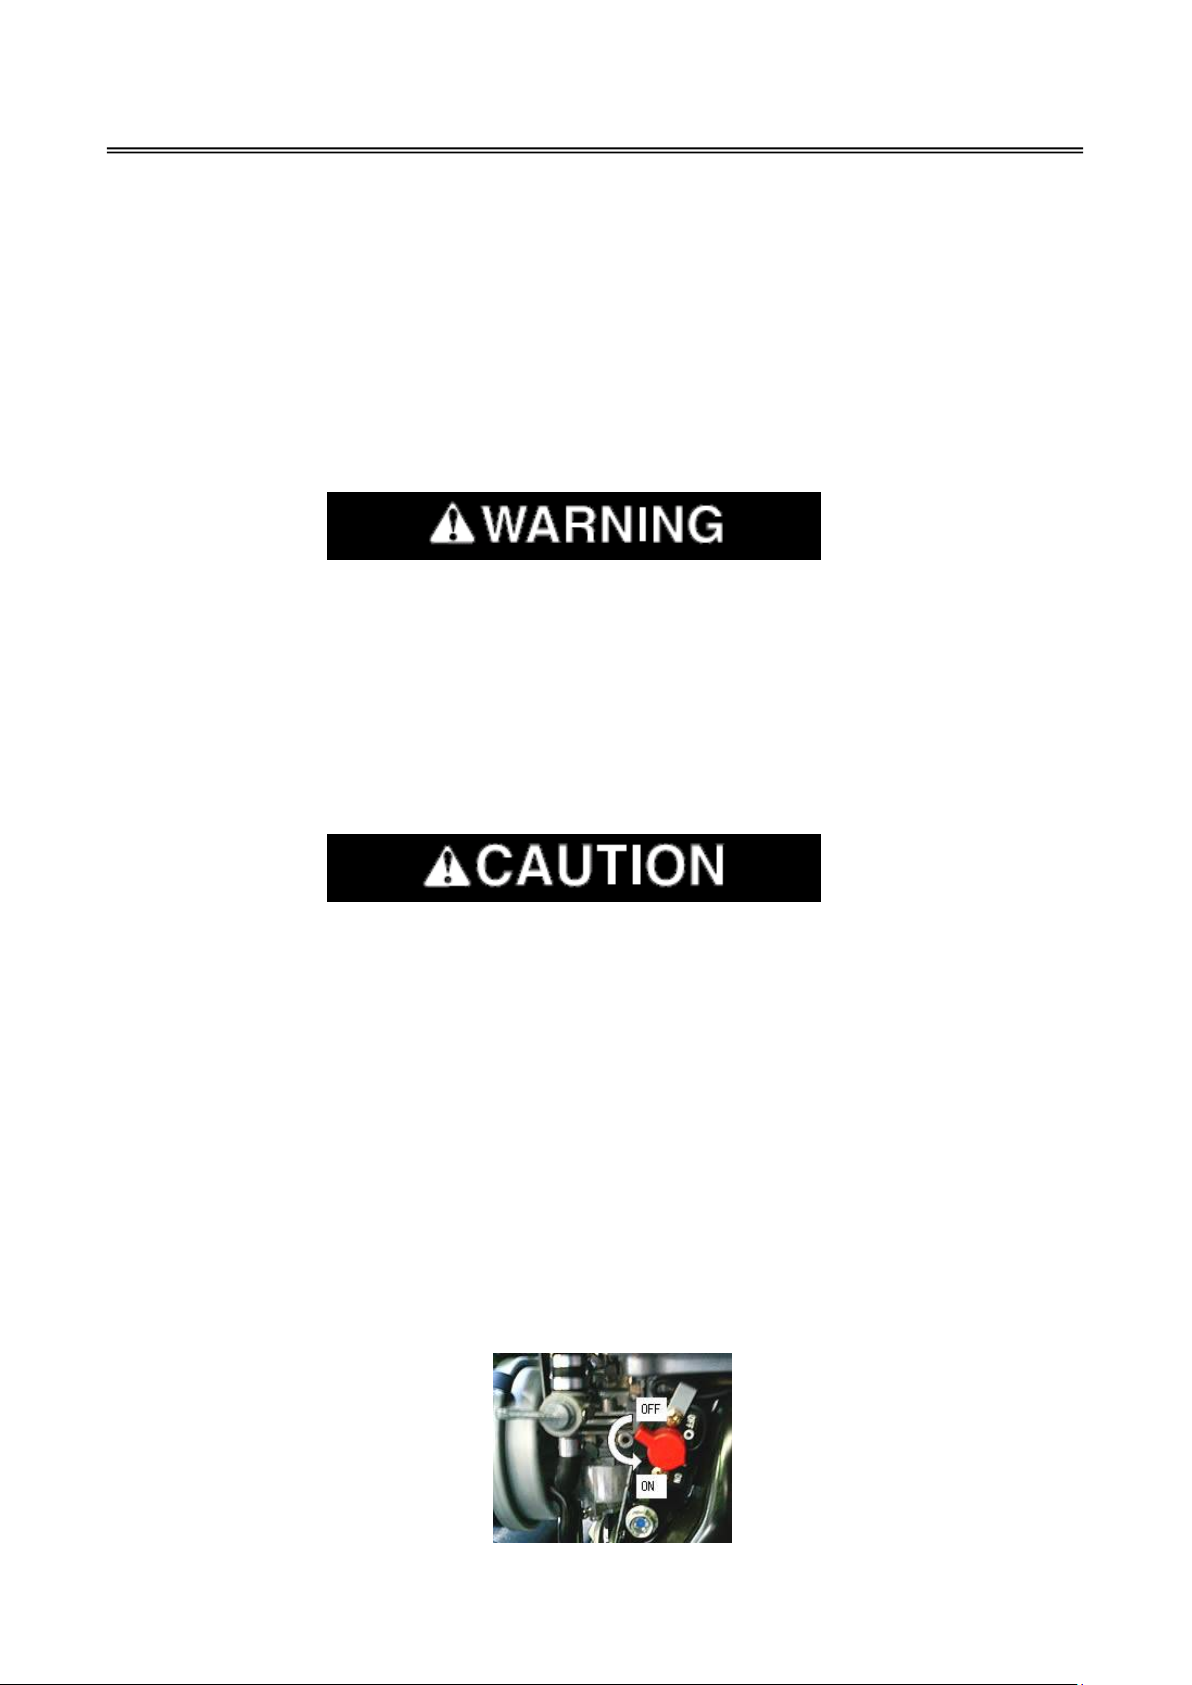
1. Turn the STOP SWITCH (Figure 4-1) clockwise to the position “I” (ON).
Figure 4-1
4-2
Page 12
SECTION 4 - OPERATING INSTRUCTIONS
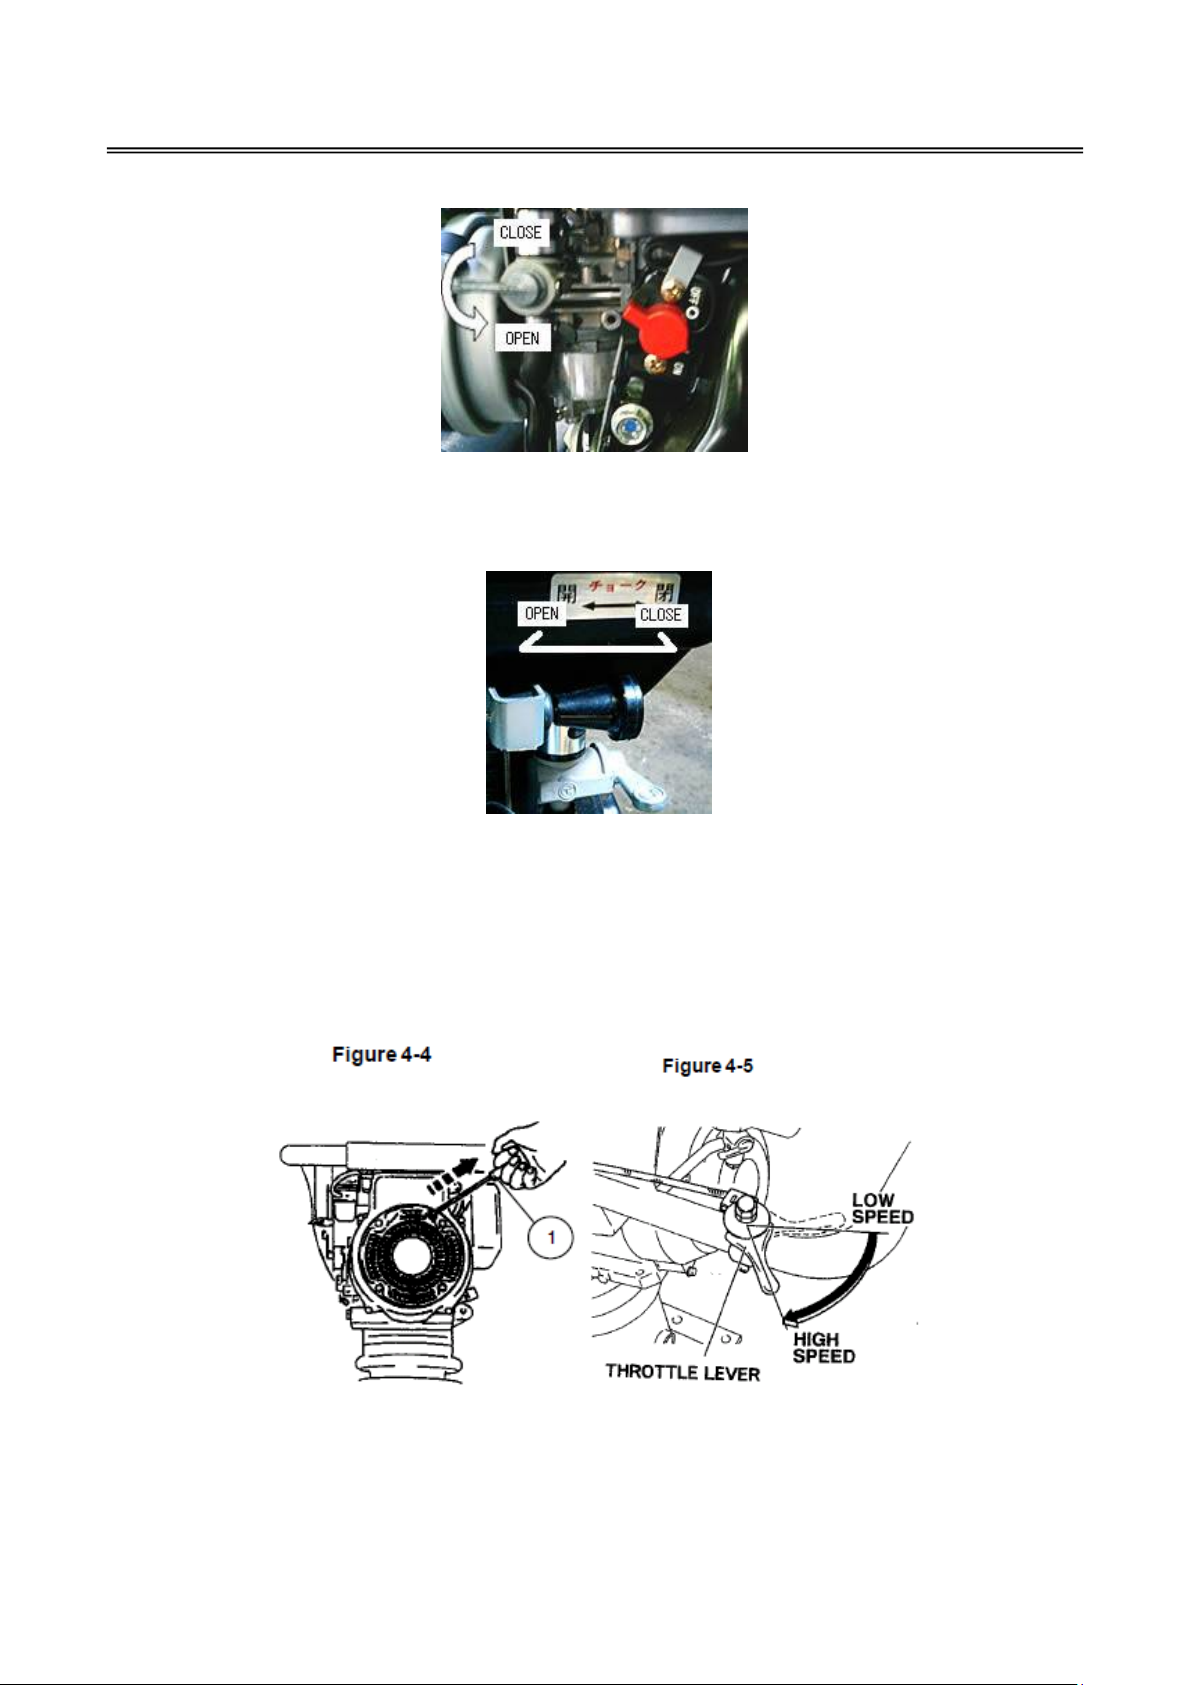
2. Open the FUEL COCK (Figure 4-2) located under the fuel tank.
Figure 4-2
3. Close the CHOKE LEVER (Figure 4-3). If the engine is cold or the ambient temperature is low, close the Choke Lever
fully. If the engine is warm or the ambient temperature is high, open the Choke Lever half-way, or keep it fully open.
Figure 4-3
4. Position THROTTLE LEVER (Figure 4-5) to “LOW” speed position.
5.Pull the STARTER HANDLE (1, Figure 4-4) of RECOIL STARTER slowly until resistance is felt. This is the
“COMPRESSION” point. Return the Handle to its original position and pull swiftly. After starting the engine, allow the
Starter Handle to return to its original position while still holding the Handle.
4-3
Page 13
SECTION 4 - OPERATING INSTRUCTIONS
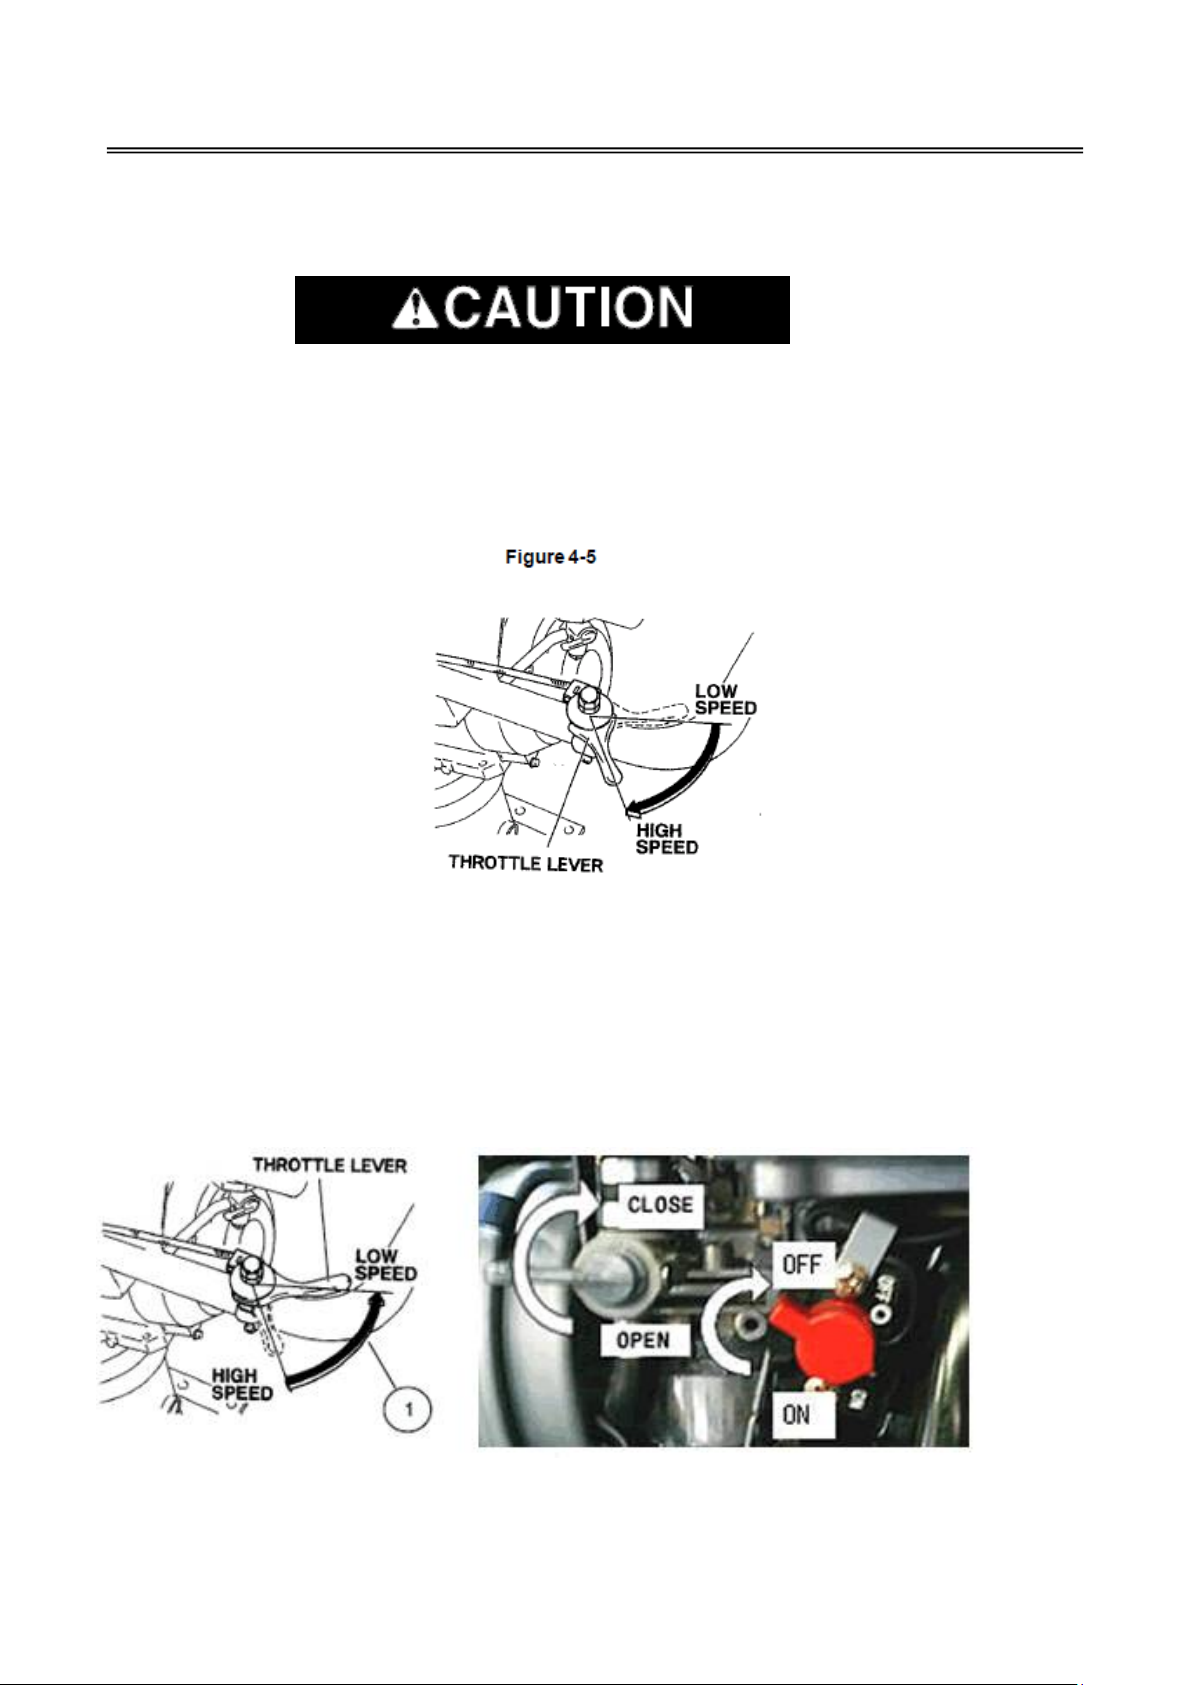
After the engine starts, set the Throttle Lever (Figure 4-5) at the low speed position “LOW” and warm it up without load
for a few minutes. Fully open CHOKE LEVER (1, Figure 4-3) gradually.
Avoid fully pulling out the rope. Return the Handle to its original position.
RUNNING
1. Shift the Throttle Lever (Figure 4-5) to “HIGH” speed position quickly. The rammer starts to vibrate and move
forward.
STOPPING
1. Shift the throttle lever (1, Figure 4-6) to “LOW” speed position.
2. Allow the engine to run at low speed for 2-3 minutes before stopping.
3. Turn the STOP SWITCH (2, Figure 4-6) counterclockwise to the position “O”(OFF).
4. Close the fuel cock (3, Figure 4-6).
Figure 4-6
4-4
Page 14

SECTION 4 - OPERATING INSTRUCTIONS
Do not stop engine suddenly while running at high speed.
LONG TERM STORAGE
Discharge fuel (No Smoking!)
1. Remove the strainer cup of the fuel cock, place the strainer over a container and open the fuel cock to discharge fuel
from the fuel tank. Remove the carburetor float chamber bolt from the bottom and discharge fuel from the
carburetor.
2. Close the fuel cock.
3. Change the engine oil with fresh oil.
4. Remove the spark plug, pour about 5 cc of the engine oil into the cylinder, slowly pull the starter handle of the recoil
starter 2 or 3 times, and re-install the spark plug.
5. Slowly pull the recoil starter handle until resistance is felt and leave it in that position.
6. Clean the unit and engine.
7. Store the unit and engine indoors in a well-ventilated, low humidity area. Use the cover to avoid dirt, etc. if storage
will be for a long time.
Always stop the engine and allow cooling down before covering the unit.
4-5
Page 15
SECTION 5 - FUEL AND LUBRICATION SPECIFICATIONS
Contents Page
GENERAL INFORMATION ________________________________________________________ ________________ 1
FLUID CAPACITIES ___________________________________ ____________________________________________ 1
GENERAL INFORMATION
Lubrication is an essential part of preventive maintenance, affecting to a great extent the useful life of the unit.
Different lubricants are needed and some components in the unit require more frequent lubrication than others.
Specific recommendations of brand and grade of lubricants are not made here due to regional availability, operating
conditions, and the continual development of improved products. Where questions arise, refer to the requirements and
specifications in the manufacturer's manual.
All oil levels are to be checked with the machine parked on a level surface, and while the oil is cold, unless otherwise
specified.
TABLE 5-1 FLUID CAPACITIES
FUEL/OIL APPROXIMATE CAPACITY
RT70R / RD
ENGINE FUEL (Unleaded Gasoline) ______________________________________ 2.5 liters
VIBRATORY SHAFT CASE (SE 10W30) ________________ __ 0.9 litters
ENGINE OIL (SE 10W30) ________________________ _______________________ _ 0.4 liters
Fuel is flammable. May cause injury and property damage.
Shut down the engine, extinguish all open flames and do not smoke while filling the fuel tank.
Always wipe up any spilled fuel.
CHECK FUEL
1. Stop the engine and open the fuel tank cap.
2. Use the automobile unleaded gasoline only.
3. Close the fuel cock before filling the fuel tank.
4. When filling the fuel tank, always use the fuel filter.
5. Wipe off any spilled fuel before starting the engine.
5-1
Page 16
SECTION 6 - INITIAL BREAK-IN MAINTENANCE
Contents Page
ENGINE OIL __________________________ _________________________________________________ __ 1
LUBRICATION OF MAIN BODY ____________________________________________________ ______________ 1
GENERAL INFORMATION ____________________________________ ______________________________ 2
Improper maintenance can be hazardous.
Read and understand SECTION 1 - SAFETY PRECAUTIONS AND GUIDELINES before you perform any maintenance,
service or repairs.
ENGINE OIL
Drain the engine oil after the first 20 hours of operation. Fill with the correct amount of the recommended oil. Check the
oil level with the oil filler cap/dip stick. See Section 9.
Hot oil and/or components can burn.
Oil must be at normal operating temperature when draining.
Avoid contact with hot oil or components.
LUBRICATION OF MAIN BODY
Check the Main Body oil level with the oil gauge before each operation. Change oil after the first 50 hours and every 200
hours. See Section 11.
CHECK EACH PART FOR LOSE OR BROKEN BOLTS AND NUTS
Tighten loose Bolts and Nuts, if any. Check each part for fuel or oil leak. Replace broken or damaged parts, if any, with
new ones.
6-1
Page 17

SECTION 6 - INITIAL BREAK-IN MAINTENANCE
GENERAL MAINTENANCE
Perform the following maintenance checks after the initial break in peroid.
1. Engine RPM is adjusted to: (3700 - 3800 rpm (With load ).
2. Check Bolts and Nuts for looseness. Tighten it if necessary.
3. Check for fuel and oil leak.
4. Keep the RUBBER BUFFER away from oil and fuel.
5. Please refer to “INSTRUCTION FOR USE” for ROBIN engine EH09D regarding the how-to maintenance for engine.
6-2
Page 18

SECTION 7 - TOUBLE SHOOTING - GENERAL MAINTENANCE
Contents Page
TROUBLE SHOOTING ____________________________________________ _________________________ 1
GENERAL MAINTENANCE ______________________ ___ ________________________________________ 2
TROUBLESHOOTING
1) Engine fails to start.
a) Spark plug is defective Clean or replace.
b) Air in the fuel system. Bleed air completely.
c) Fuel tank is empty. Refuel
d) Fuel Strainer is clogged. Clean or replace.
e) Carburetor is clogged. Clean or replace, if necessary.
f) Excessive fuel. Open fuel drain cock and excess fuel.
2) Engine runs irregularly.
a) Fuel line sucks air. Retighten the fuel pipe joints and bleed air.
b) Air cleaner is clogged. Clean air cleaner or replace element.
c) Engine stalls during operation. Clean fuel system and retighten the fuel pipe joints.
d) Low compression. Replace head gasket or retighten spark plug.
3) Machine fails to jump.
a) Incorrect setting RPM of engine. Adjust
b) Throttle cable is slacked. Adjust
c) Centrifugal clutch is slipped. Overhaul or replace If necessary.
4) The traveling is bad or the vibration is diffuse.
a) Centrifugal clutch is slipped. Overhaul or replace if necessary.
b) Coil spring is fatigued. Replace
c) Excessive oil level. Correct
d) Improper oil viscosity. Check oil viscosity, change if
7-1
Page 19
SECTION 7 - TOUBLE SHOOTING - GENERAL MAINTENANCE
GENERAL MAINTENANCE
1. Engine RPM is adjusted to: 4,000 - 4,100 min-1 (4,000 - 4,100 rpm ) (With load ).
2. Check Bolts and Nuts for looseness. Tighten it if necessary.
3. Check for fuel and oil leak.
4. Keep the RUBBER BUFFER away from oil and fuel.
5. Check the V-Belt for wear, damage and cracks. If necessary, replace with a new belt.
AIR CLEANER
Keep the Air Cleaner Element clean. Take out the outer urethane foam and inner element. Wash the element in
kerosene or diesel fuel. Saturate it in a mixture of 3 parts kerosene or diesel fuel and 1 part engine oil. Shake off
excessive oil and reinstall. Wash the air cleaner case using kerosene. After cleaning it up, apply the engine oil on the
inner part of the case.
If the air cleaner element is seriously contaminated, start-up failure, poor output and engine malfunction of the engine
may result. Never run the engine without the air cleaner. Rapid engine wear will result.
7-2
Page 20
SECTION 8 - 10 HOUR OR DAILY ROUTINE MAINTENANCE
Contents Page
ENGINE OIL ____________________________________________________________________________________ 1
AIR CLEANER __________________________________________________________________________________ 1
FASTENING HARDWARE_________________________________________________________________________ 1
LUBRICATION MAIN BODY _______________________________________________________________________ 1
Improper maintenance can be hazardous.
Read and understand SECTION 1 - SAFETY PRECAUTIONS AND GUIDELINES before you perform any maintenance,
service or repairs.
It is recommended that the following steps be performed at the beginning and end of each 8 to 10 hour shift or daily,
whichever comes first.
ENGINE OIL
Check the engine's oil level at the start of each day and maintain it to the full mark on the dipstick. Insert the dipstick
and check the full mark on the dipstick. See Section 9.
AIR CLEANER
If the machine is operating in a dusty environment check the air cleaner daily. Keep the Air Cleaner Element clean.
Take out the outer urethane foam and inner element. Wash the element in kerosene or diesel fuel. Saturate it in a
mixture of 3 parts kerosene or diesel fuel and 1 part engine oil. Shake off excessive oil and reinstall. Wash the air cleaner
case using kerosene. After cleaning it up, apply the engine oil on the inner part of the case.
If the air cleaner element is seriously contaminated, the start-up failure, poor output and malfunctions of the engine
may result.
FASTENING HARDWARE
Check all fastening hardware to ensure it is all adequately tightened and that none is missing or broken.
LUBRICATION OF MAIN BODY
Check the Main Body oil level with the oil gauge before each operation. Change after the first 50 hours and every 200
hours. See Section 11.
8-1
Page 21

-
Page 22
SECTION 9 - 50 HOUR OR WEEKLY ROUTINE MAINTENANCE
Contents Page
ENGINE OIL _____________________________________________________ _______________________________ 1
LUBRICATION OF MAIN BODY ____________________________________ ________________________________ 1
CHECK AND CHANGE ENGINE OIL
Before checking or refilling engine oil, be sure the machine is located on a stable level surface and stopped.
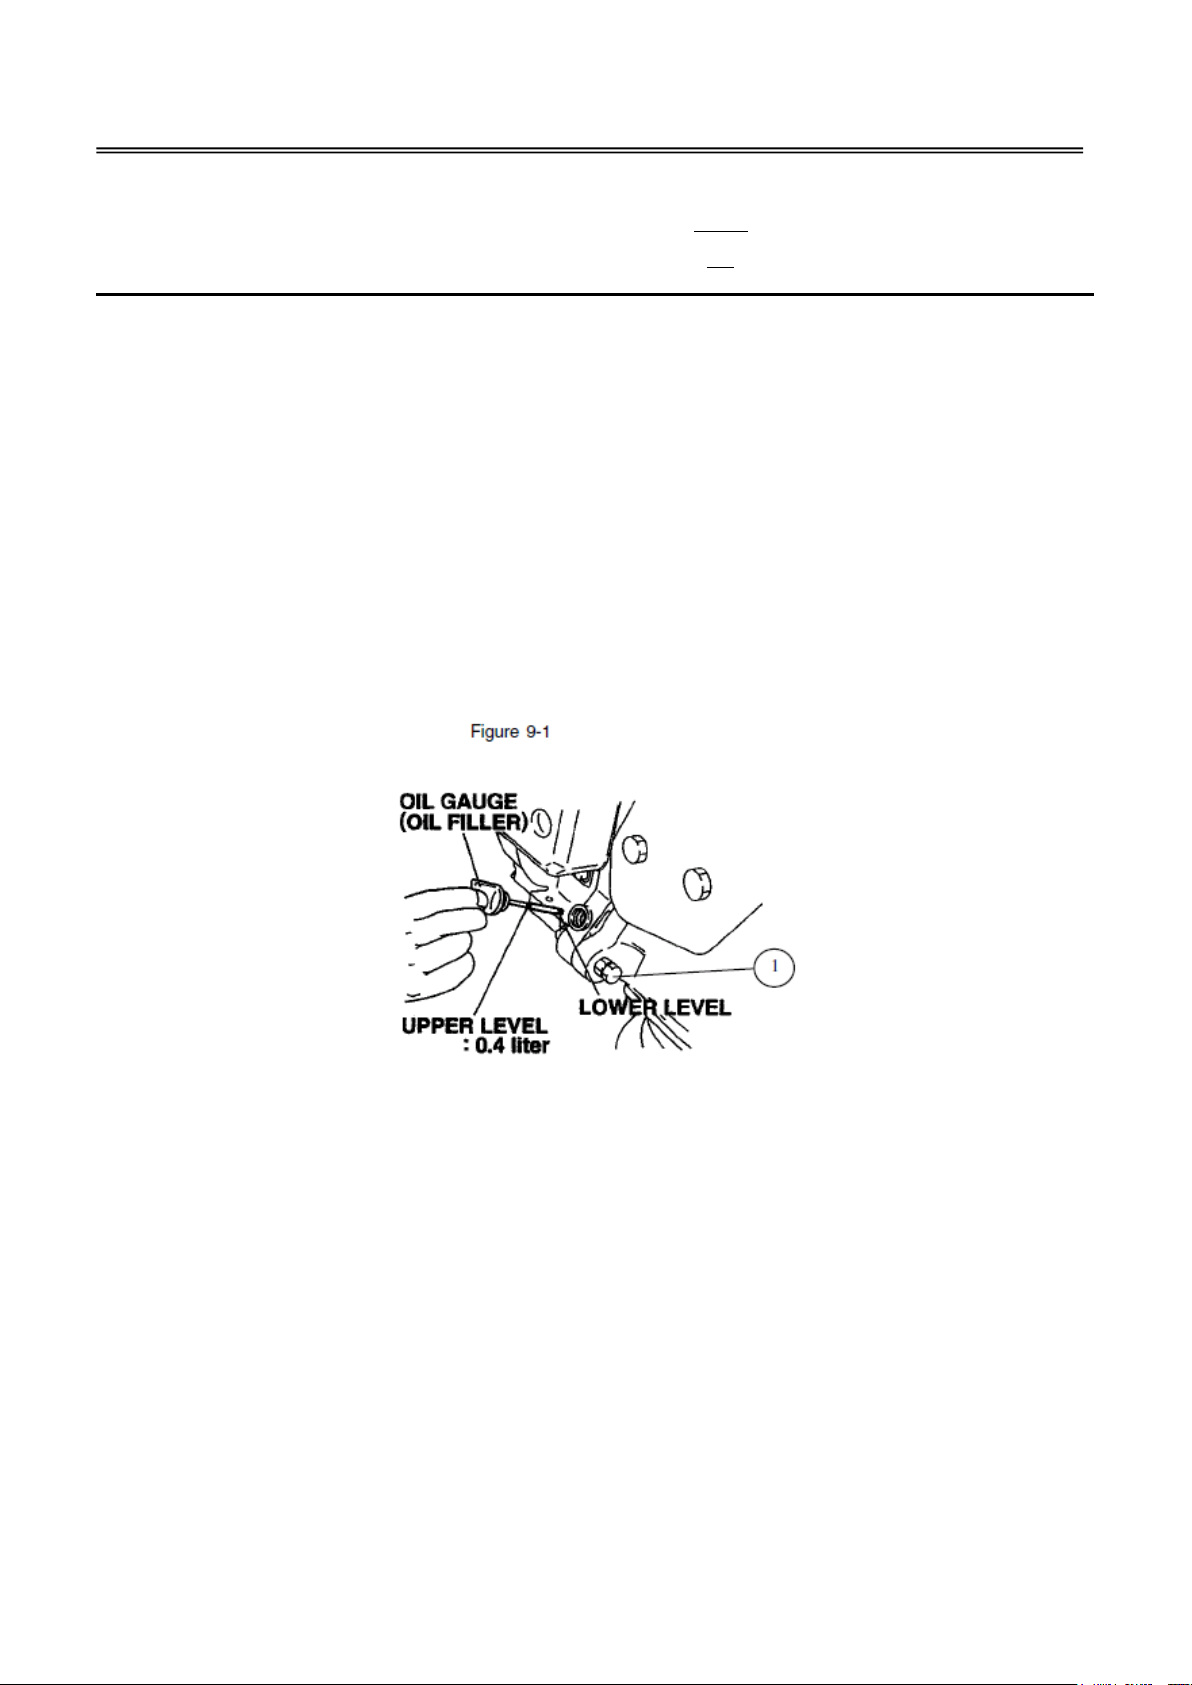
When check oil do not thread the oil gauge (Figure 9-1) into oil filler to check oil level. If the oil level is below the lower
level (Figure 9-1) line on the dipstick oil gauge, refill with the proper oil to the upper level (Figure 9-1)(to the neck of oil
filler).
When changing oil stop the engine, loosen the drain plug (1, Figure 9-1), reinstall the drain plug before refilling oil.
Add new oil at the oil gauge (Figure 9-1) port.
Always use the best grade and clean oil. Contaminated oil, poor quality oil and shortage of oil cause damage to engine or
shorten the engine life.
Changing and filling:
Capacity of engine oil ............. 0.3 liters(RTX55,60), 0.4litters(RTX75,80)
Recommend engine oil .......... SAE 10W30
Use class SE, SF (API classification ) or higher grade oil.
Initial oil change .......... After 20 hours of operation.
Thereafter ................... Every 50 hours of operation.
LUBRICATION OF MAIN BODY
Check the Main Body oil level with the oil gauge before operation. Change oil after the first 50 hours and every 200
hours.
See Section 11.
9-1
Page 23

-
Page 24

SECTION 10 - 100 HOUR OR MONTHLY ROUTINE MAINTENANCE
NOTE
* No 100 Hour or Semi-Annual Routine Maintenance is required.*
10-1
Page 25
SECTION 11 - 200 HOUR OR QUARTERLY ROUTINE MAINTENANCE
Contents Page
LUBRICATION OF MAIN BODY _________________________________________________________ ___________ 1
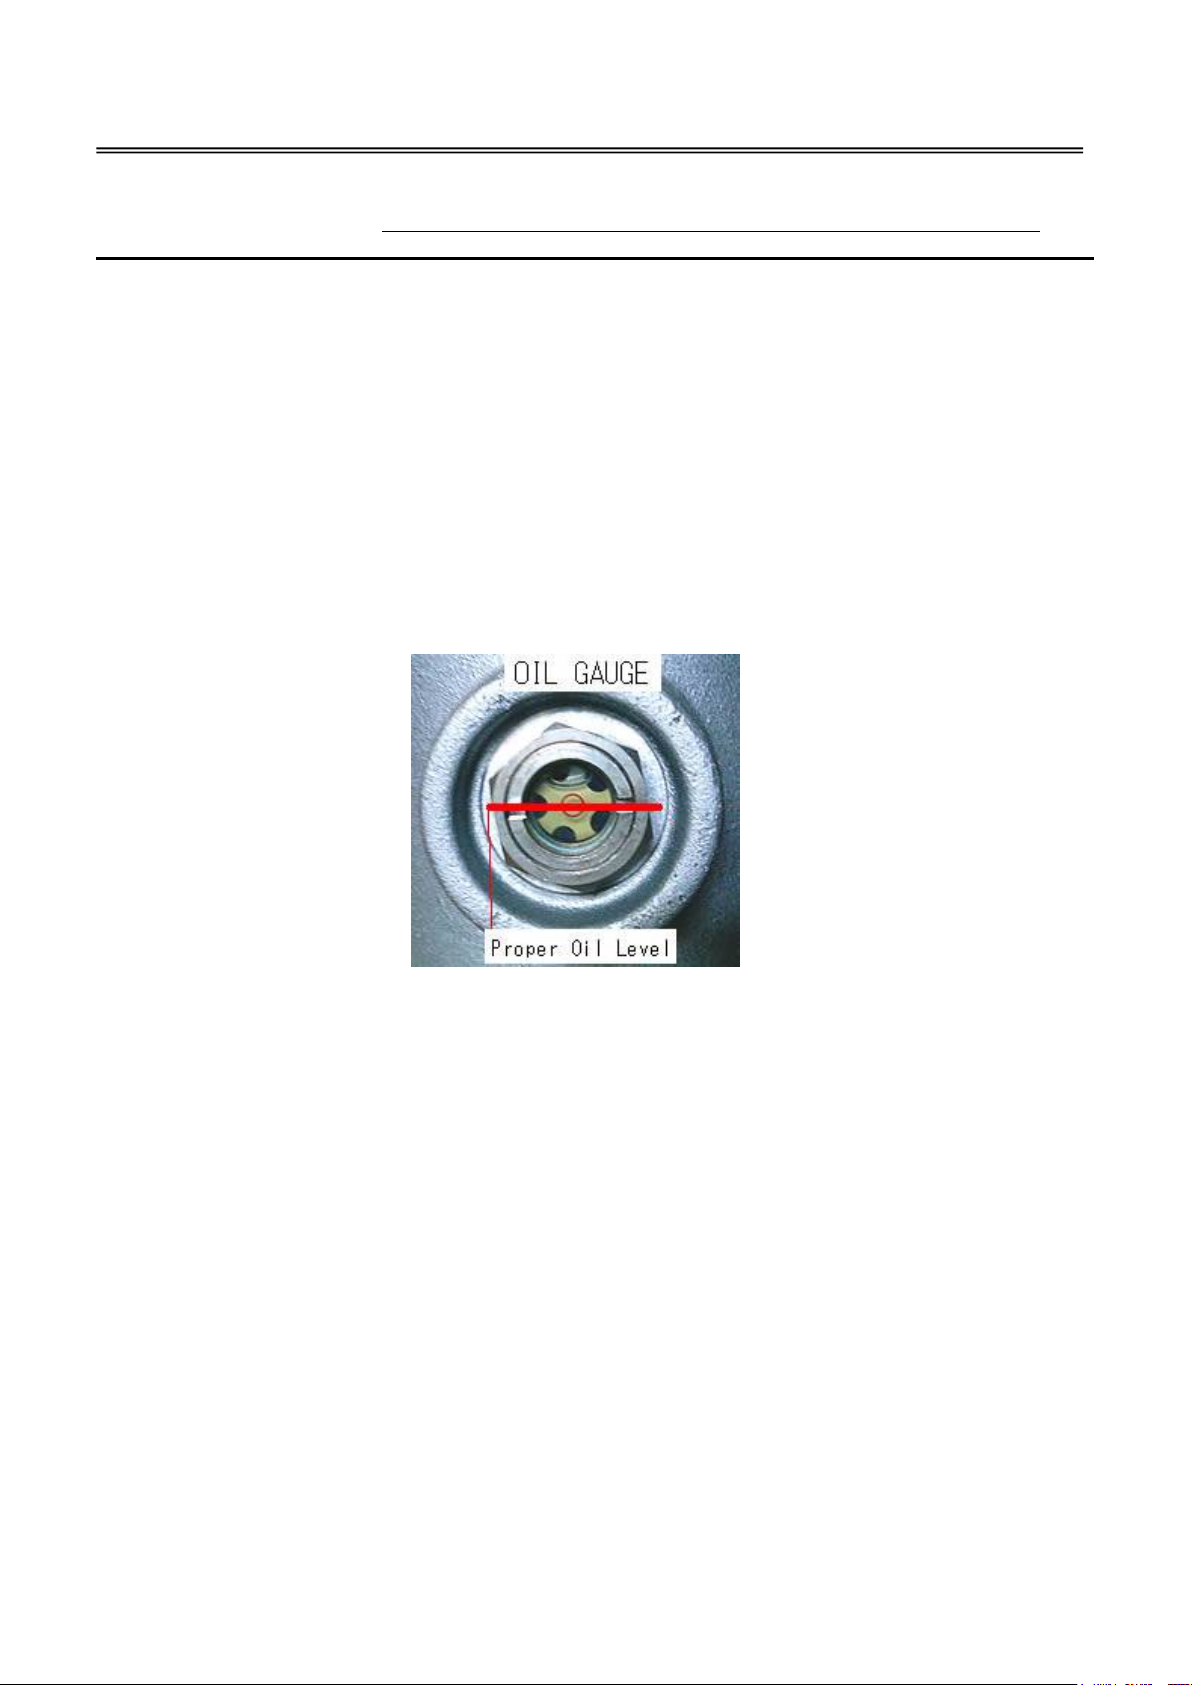
LUBRICATION OF MAIN BODY
Check:: Check the oil level with the oil gauge before each operation.
Capacity of oil ............. 0.7 liters (RTX55/60) 1.0litters(RTX75/80)
Recommended oil ....... SAE 10W30
Initial change ...............After first 50 hours of operation.
Regular change ............Every 200 hours of operation.
To change oil ..............Remove the plug. Drain out the oil and fill with the fresh oil. After fill with the fresh oil,
check each part for the oil leak.
11-1
Page 26

-
Page 27

SECTION 12- 500 HOUR OR SEMI-ANNUAL ROUTINE MAINTENANCE
NOTE
* No 500 Hour or Semi-Annual Routine Maintenance is required.
12-1
Page 28

-
Page 29

SECTION 13 - 1000 HOUR OR ANNUAL ROUTINE MAINTENANCE
NOTE
* No 1000 Hour or Annual Routine Maintenance is required. *
13-1
Page 30

-
Page 31

SECTION 14 - ROUTINE ADJUSTMENTS
NOTE
* No Routine Adjustments required.*
14-1
Page 32

-
Page 33

SECTION 15 - MISCELLANEOUS AND OPTIONAL EQUIPMENT
NOTE
* No Miscellaneous or Optional Equipment *
15-1
Page 34

-
Page 35

SECTION 16 - SCHEMATICS
NOTE
* No Schematics are necessary for this unit. *
16-1
Page 36

 Loading...