

Page 1
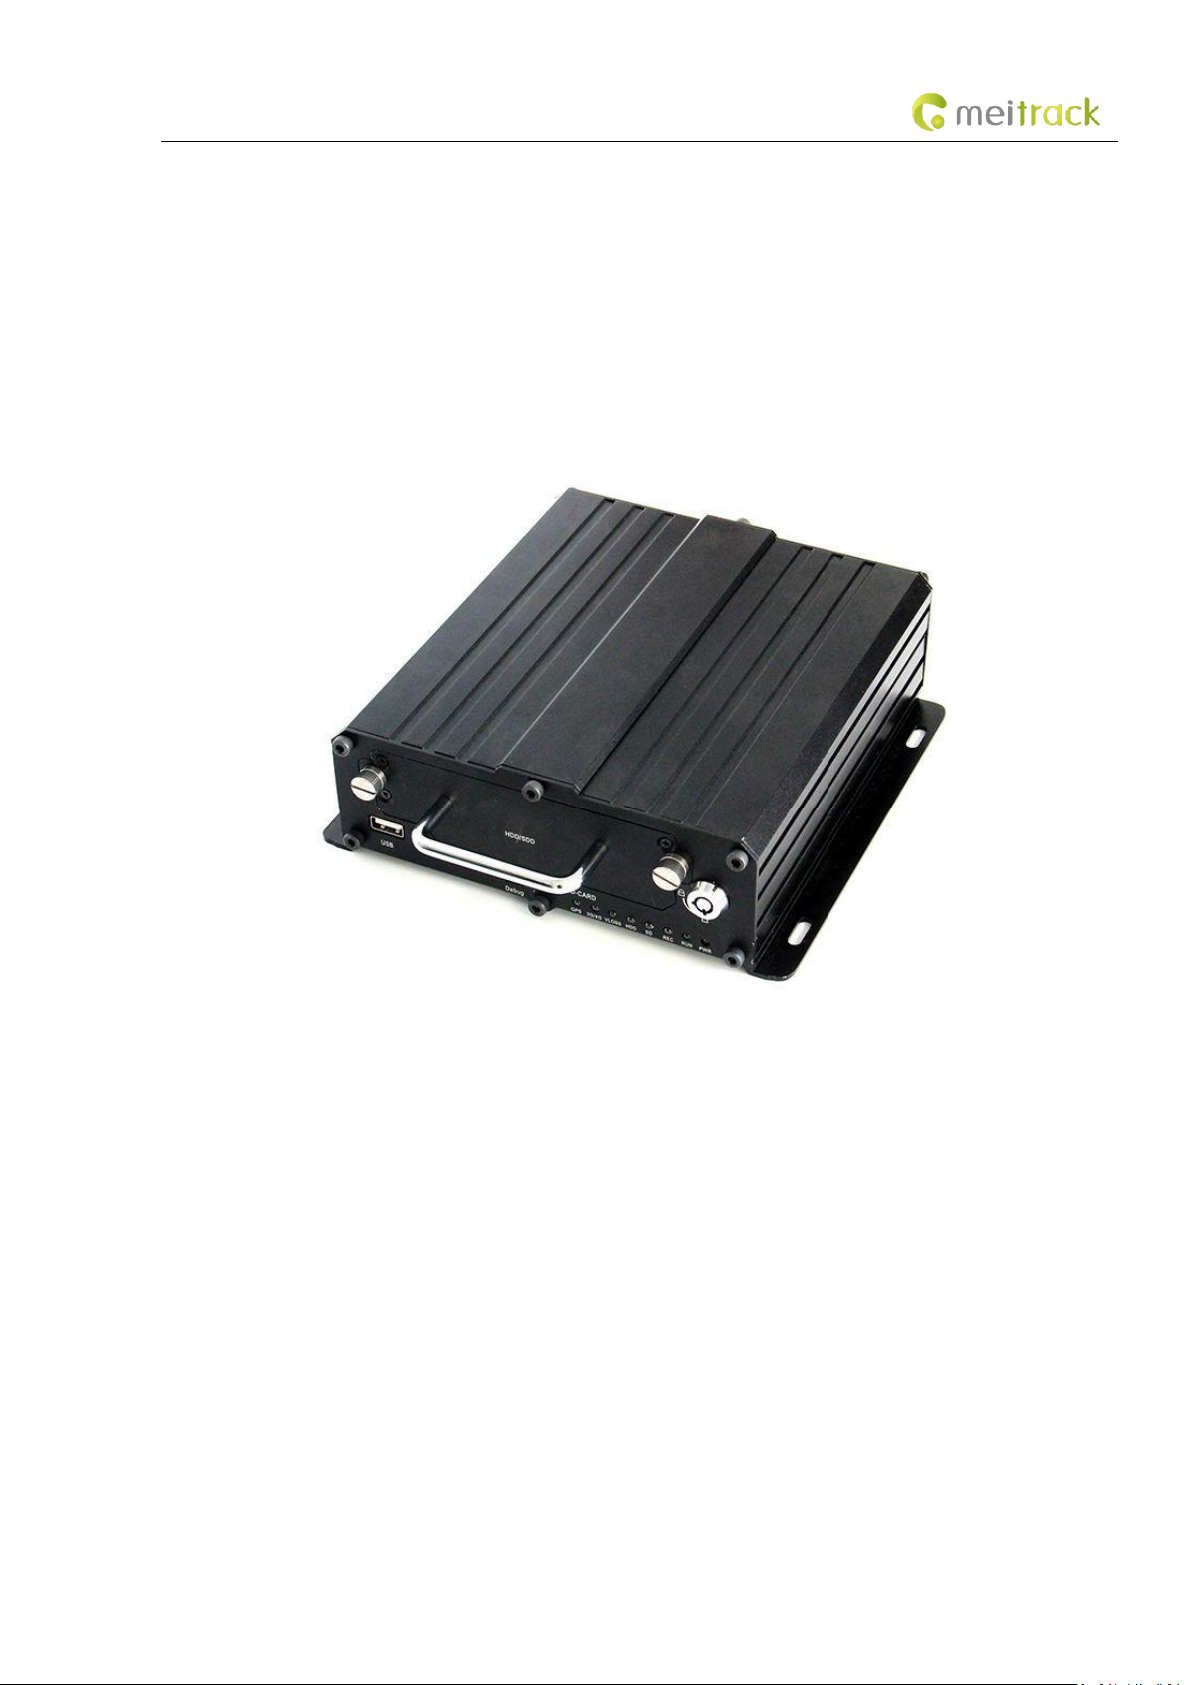
MEITRACK MD511H User Guide
MEITRACK MD511H MDVR
User Guide
Page 2

MEITRACK MD511H User Guide
Copyright © 2019 Meitrack Group All rights reserved. - 2 -
Change History
File Name
MEITRACK MD511H User Guide
Project
MD511H
Creation Date
2019-03-29
Subproject
User Guide
Total Pages
52
Version
V1.0
Confidential
External Documentation
Page 3

MEITRACK MD511H User Guide
Copyright © 2019 Meitrack Group All rights reserved. - 3 -
Contents
1 Copyright and Disclaimer ...............................................................................................................................................................- 5 -
2 Product Introduction .....................................................................................................................................................................- 5 -
2.1 Product Overview .............................................................................................................................................................- 5 -
2.2 Product Functions .............................................................................................................................................................- 5 -
2.2.1 DVR Functions ..........................................................................................................................................................- 5 -
2.2.2 Position Tracking ......................................................................................................................................................- 5 -
2.2.3 Alerts........................................................................................................................................................................- 6 -
2.2.4 Other Functions .......................................................................................................................................................- 6 -
2.2.5 Function Accessories ...............................................................................................................................................- 6 -
2.3 Product Specifications ......................................................................................................................................................- 6 -
2.4 Main Device and Accessories ............................................................................................................................................- 8 -
2.5 About the MDVR .............................................................................................................................................................- 10 -
2.5.1 Appearance ............................................................................................................................................................- 10 -
2.5.2 Interface Definition ................................................................................................................................................- 10 -
2.5.3 LED indicator ..........................................................................................................................................................- 11 -
2.5.4 I/O Port ..................................................................................................................................................................- 12 -
3 How it Works ...............................................................................................................................................................................- 14 -
3.1 Working Diagram ............................................................................................................................................................- 14 -
3.2 Working Mode ................................................................................................................................................................- 15 -
3.3 Peripheral Wiring Diagram..............................................................................................................................................- 16 -
4 Fast Installing and Using the MDVR .............................................................................................................................................- 17 -
4.1 Installing the MDVR ........................................................................................................................................................- 17 -
4.2 Configuring the MDVR by Using Meitrack Manager .......................................................................................................- 22 -
4.3 Logging In to the Platform ..............................................................................................................................................- 23 -
5 Configuring the MDVR by Using the LAN Web Page ....................................................................................................................- 30 -
6 MS03 Web Platform ....................................................................................................................................................................- 32 -
6.1 Real-time Monitoring .....................................................................................................................................................- 33 -
6.2 Video Playback ................................................................................................................................................................- 34 -
6.3 Two-Way Calling .............................................................................................................................................................- 35 -
7 MS03 App ....................................................................................................................................................................................- 38 -
7.1 Logging In to the App ......................................................................................................................................................- 38 -
7.2 Checking MDVR Online Status ........................................................................................................................................- 38 -
7.3 Video Surveillance ..........................................................................................................................................................- 39 -
8 Playing MDVR Videos by Using MT Player Software ....................................................................................................................- 41 -
8.1 Installing MT Player ........................................................................................................................................................- 41 -
8.2 MT Player Functions .......................................................................................................................................................- 42 -
8.2.1 Querying GPS Positioning Data ..............................................................................................................................- 42 -
8.2.2 Playing Videos ........................................................................................................................................................- 43 -
9 FAQs .............................................................................................................................................................................................- 46 -
9.1 MDVR Abnormal .............................................................................................................................................................- 46 -
9.2 Data Usage Consumption ...............................................................................................................................................- 46 -
9.3 Power Consumption .......................................................................................................................................................- 47 -
9.4 Video Storage .................................................................................................................................................................- 47 -
Page 4

MEITRACK MD511H User Guide
Copyright © 2019 Meitrack Group All rights reserved. - 4 -
9.5 Camera Installation .........................................................................................................................................................- 48 -
Page 5

MEITRACK MD511H User Guide
Copyright © 2019 Meitrack Group All rights reserved. - 5 -
1 Copyright and Disclaimer
Copyright © 2019 MEITRACK. All rights reserved.
, and are trademarks that belong to Meitrack Group and its subsidiary.
The user manual may be changed without notice.
Without prior written consent of Meitrack Group, this user manual, or any part thereof, may not be reproduced for any purpose
whatsoever, or transmitted in any form, either electronically or mechanically, including photocopying and recording.
Meitrack Group shall not be liable for direct, indirect, special, incidental, or consequential damages (including but not limited to
economic losses, personal injuries, and loss of assets and property) caused by the use, inability, or illegality to use the product or
documentation.
2 Product Introduction
2.1 Product Overview
The MD511H is a 4-channel HD mobile digital video recorder (MDVR). Adopting the high-performance processor and Linux
operating system, it is a core product of new-generation wireless vehicle video surveillance solutions that uses H.264 video
compression/decompression, GPS positioning and wireless data transmission technologies. The device is specially designed for
mobile video surveillance for different types of vehicles, such as buses, long-distance coaches, taxis, logistics vehicles, armored
cars, private cars, etc.
2.2 Product Functions
2.2.1 DVR Functions
4-channel 720P live video recording
Automatic video overlaying
Video search and playback via the platform or software
Video downloading via the platform
OSD overlay for video recording
SOS alert recording
Alert photo capturing
Image quality settings
2.2.2 Position Tracking
GPS + LBS positioning
Real-time location query
Tracking by time interval
Tracking by distance
Tracking by mobile phone
Speeding alert
Cornering report
Braking alert and turning left/right alert
Page 6

MEITRACK MD511H User Guide
Copyright © 2019 Meitrack Group All rights reserved. - 6 -
2.2.3 Alerts
SOS alert
GPS antenna cut-off alert
External power supply cut-off alert
GPS blind spot alert
Engine or vehicle door status alert
Geo-fence
Video signal lost alert
2.2.4 Other Functions
Support a CAN bus interface
Support the speedometer RPM
Support a RFID reader
Support multiple types of fuel level sensors
Support a LED display
Support two-way calling
Upload data via WiFi or Ethernet
Configure the MDVR by using the local area network (LAN) web page
Play videos by using MT Player software
2.2.5 Function Accessories
Accessory
Function
4 cameras
Audio and video sensing equipment
Disk & SD card
Store audio and video data.
Display
Display and play back local videos in real time and read parameter settings.
Two-way radio
Real-time communication
Disk lock key
Open or close the disk lock.
USB cable
Configure parameters.
2.3 Product Specifications
Item
Parameter
Specifications
Audio and video
Video input
4-channel 720P live video recording and playing
Video output
1-channel CVBS
Compression standard
H.264
Image display
Support one-image and four-image display
Audio compression
G.726
Audio input
5-channel audio input; 4-channel AV-IN interface; 1-channel voice
intercom interface; 1-channel handle interface
Audio output
1-channel independent audio DC blocking output (CVBS aviation
connector); 1-channel handle interface
Page 7

MEITRACK MD511H User Guide
Copyright © 2019 Meitrack Group All rights reserved. - 7 -
Video search and playback
Search and play back videos based on the channel, recording type, or
time.
Recording method
Simultaneously record the ACC, alert, sound, and video.
Storage medium
1 SD card and 1 SATA hard drive/SSD hard drive
Communication
and positioning
3G/4G
MD511H-E
2G GSM: B3(1800)/B8(900)
3G WCDMA: B1(2100)/B5(850)/B8(900)
4G FDD: B1(2100)/B3(1800)/B5(850)/B7(2600)/B8(900)/B20(800)
4G TDD: B38(2600)/B40(2300)/B41(2500)
MD511H-A
3G WCDMA: B2(1900)/B4(1700/2100)/B5(850)
4G FDD: B2(1900)/B4(2300)/B12(700)
MD511H-AU
2G GSM: B2(1900)/B3(1800)/B5(850)/B8(900)
3G WCDMA: B1(2100)/B2(1900)/B5(850)/B8(900)
4G FDD: B1(2100)/B2(1900)/B3(1800)/B4(2300)/B5(850)/B7(2600)/
B8(900)/B28(700)
4G TDD: B40(2300)
WiFi
802.11 b/g/n; frequency: 2.4 GHz
GPS/GLONASS
Detect the insertion, pull-out, and short circuit of the antenna.
Interface
AV input
4-channel aviation connector
AV output
AV-OUT of 1-channel aviation connector
Voice intercom
1-channel aviation connector
Sensor interface
1 sensor interface. Used to connect a fuel level sensor, a temperature
sensor, or an A61 sensor box.
Disk interface
1 SATA interface; up to 2T; support hard disk automatic heating.
USB port
1 USB 2.0 port (support USB flash drive/keyboard and mouse)
Internet interface
RJ45; 10 MB / 100 MB adaptive network interface
Ignition input
1 ACC signal interface
RS232
2 RS232 interfaces
RS485
1 RS485 interface
CAN
1 CAN bus interface
Infrared interface
Reserved; 1 built-in infrared receiver
LED indicator
8 LED indicators (SYS/GPS/3G&4G/VLOSS/SD1/SD2/PWR/WiFi)
Disk lock
1 disk lock
G-sensor
Start to Move / Stop Moving detection
Alert input
8 digital inputs
SOS, door side 1, door side 2, turning left, turning right, reversing,
braking, and vehicle speed line
Alert output
3 outputs
AD
Reserved; 2 AD interfaces; detect 0–6.6V inputs.
Debug and upgrade interface
System debugging and firmware upgrade through a serial port
Protocol
Protocol supported
Meitrack protocol
Page 8
MEITRACK MD511H User Guide
Copyright © 2019 Meitrack Group All rights reserved. - 8 -
Software
upgrade
Upgrade mode
Manual upgrade
Upgrade method
(1) Plug the USB flash drive with the firmware into the USB port, connect
the MDVR through the debug interface, and start Meitrack Manager
software to upgrade the MDVR.
(2) Use the LAN web page to upgrade the firmware (WiFi or Ethernet).
Others
Power input
DC: 8V–36V/A
Power consumption
Start the host audio and video: about 6.6 W
Single MCU: 45 mA
Connect a single camera: 120–200 mA (day); 400–600 mA (night)
Operating temperature
-20°C to 70°C
Weight
1750g (including the disk)
Dimension
177 mm x 162 mm x 63mm
2.4 Main Device and Accessories
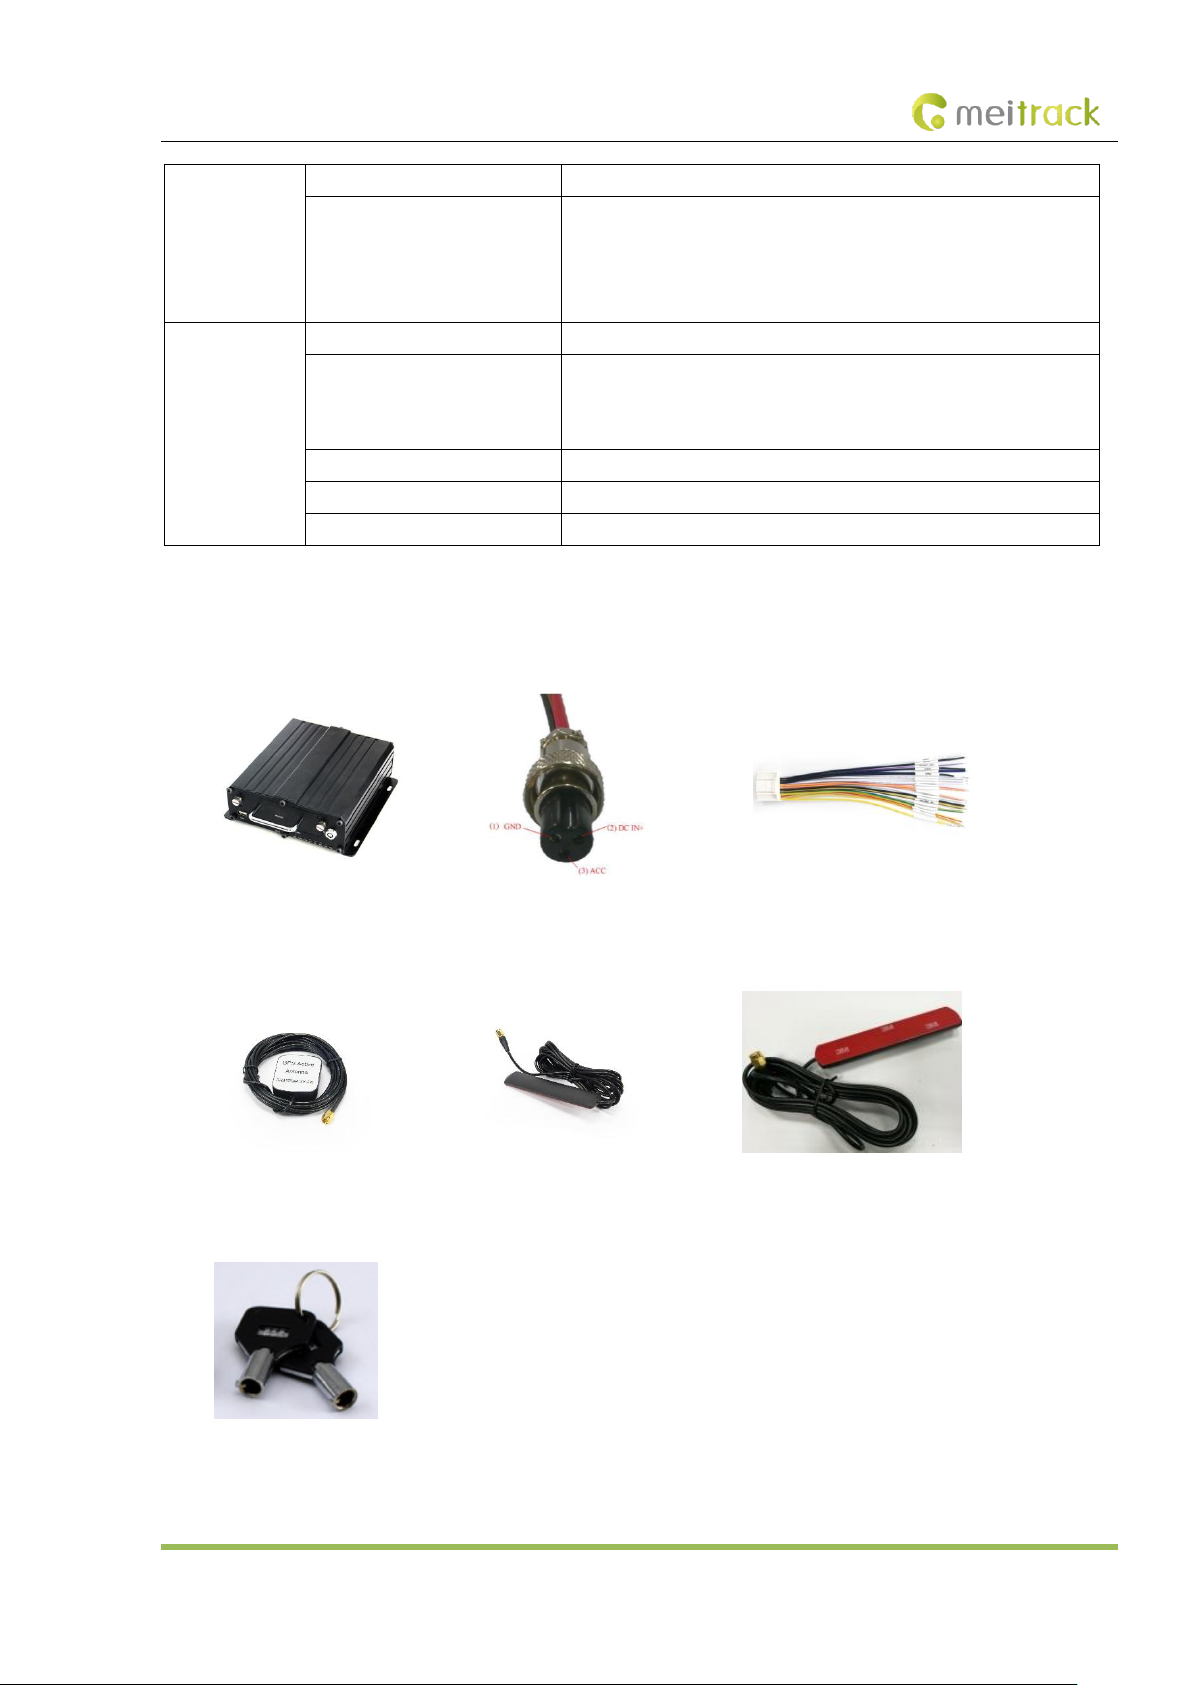
Standard accessories:
MD511H MDVR
Power & ACC cable
I/O cable
GPS antenna
GSM antenna
WiFi antenna
Disk lock key
Page 9
MEITRACK MD511H User Guide
Copyright © 2019 Meitrack Group All rights reserved. - 9 -
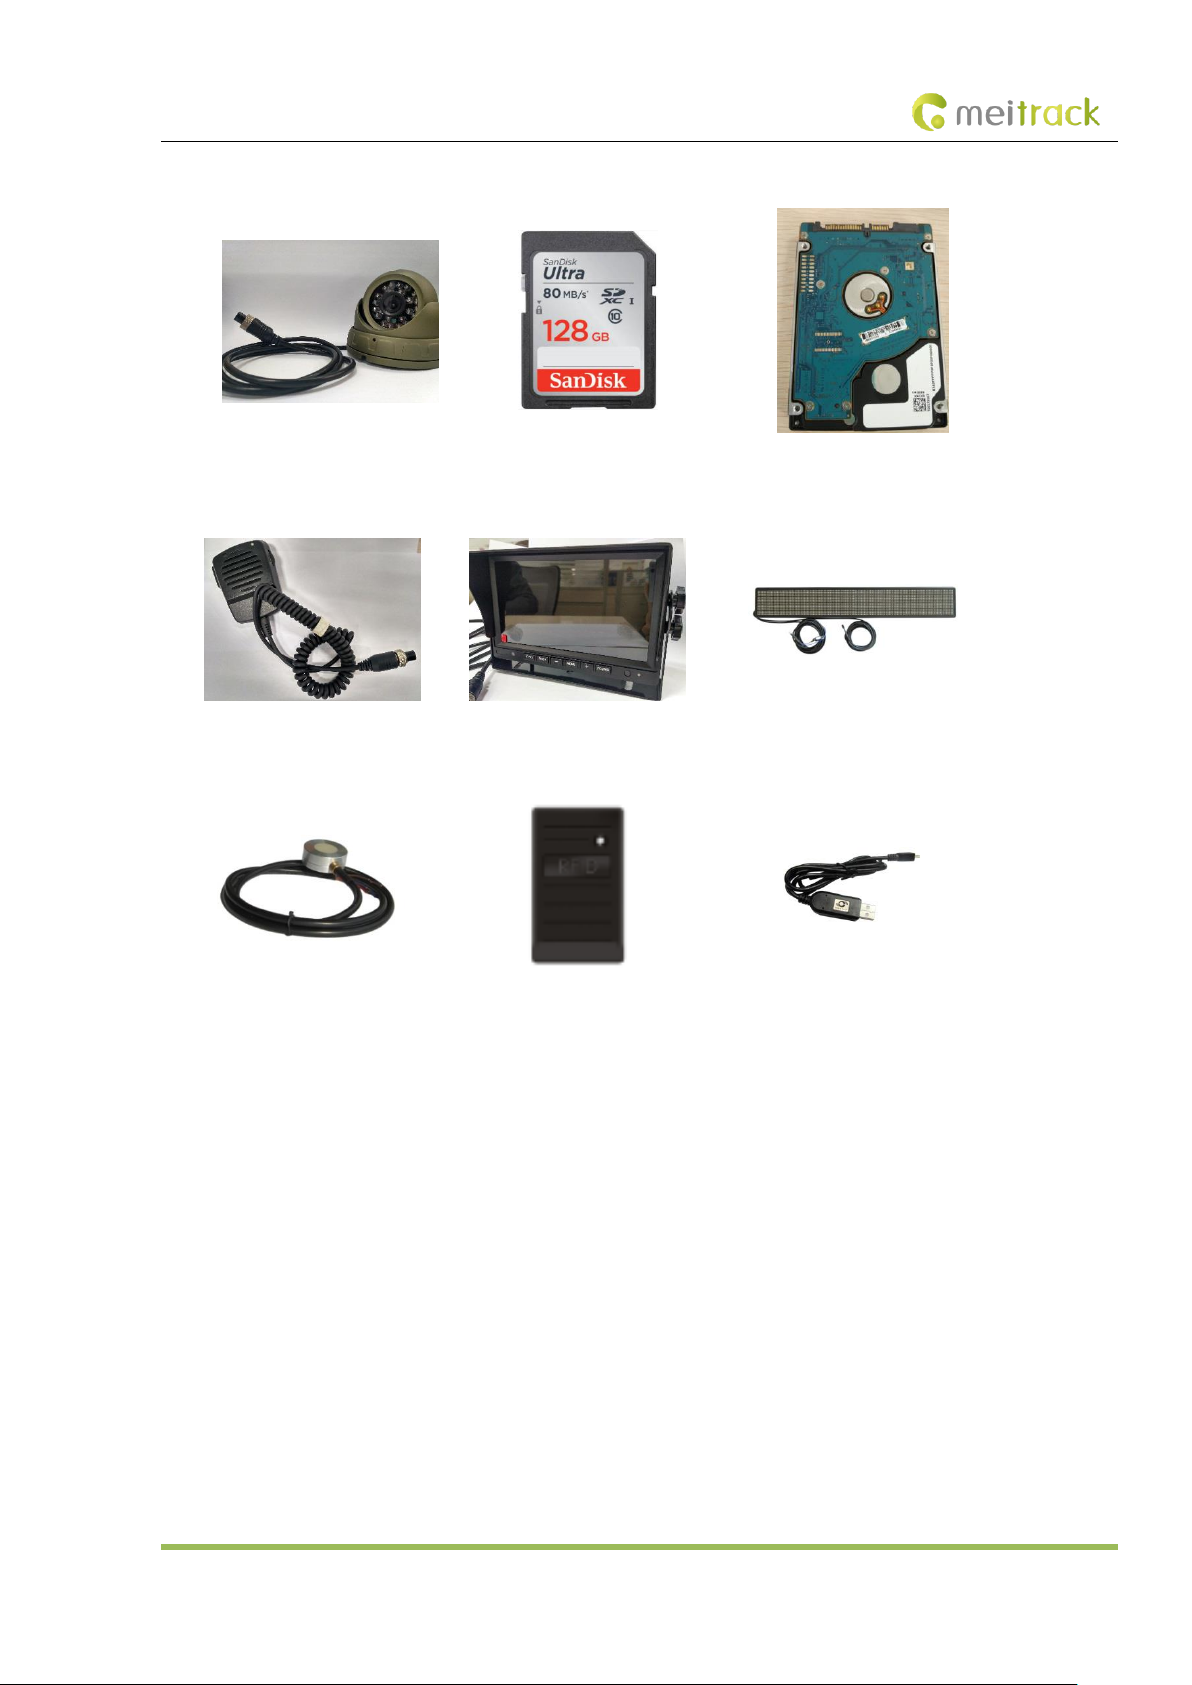
Optional accessories:
4 cameras
SD card
SSD/HDD (2.5 inches)
Microphone & speaker
Display
LED display
Ultrasonic fuel level sensor
RFID reader
USB cable
Page 10
MEITRACK MD511H User Guide
Copyright © 2019 Meitrack Group All rights reserved. - 10 -
2.5 About the MDVR
2.5.1 Appearance
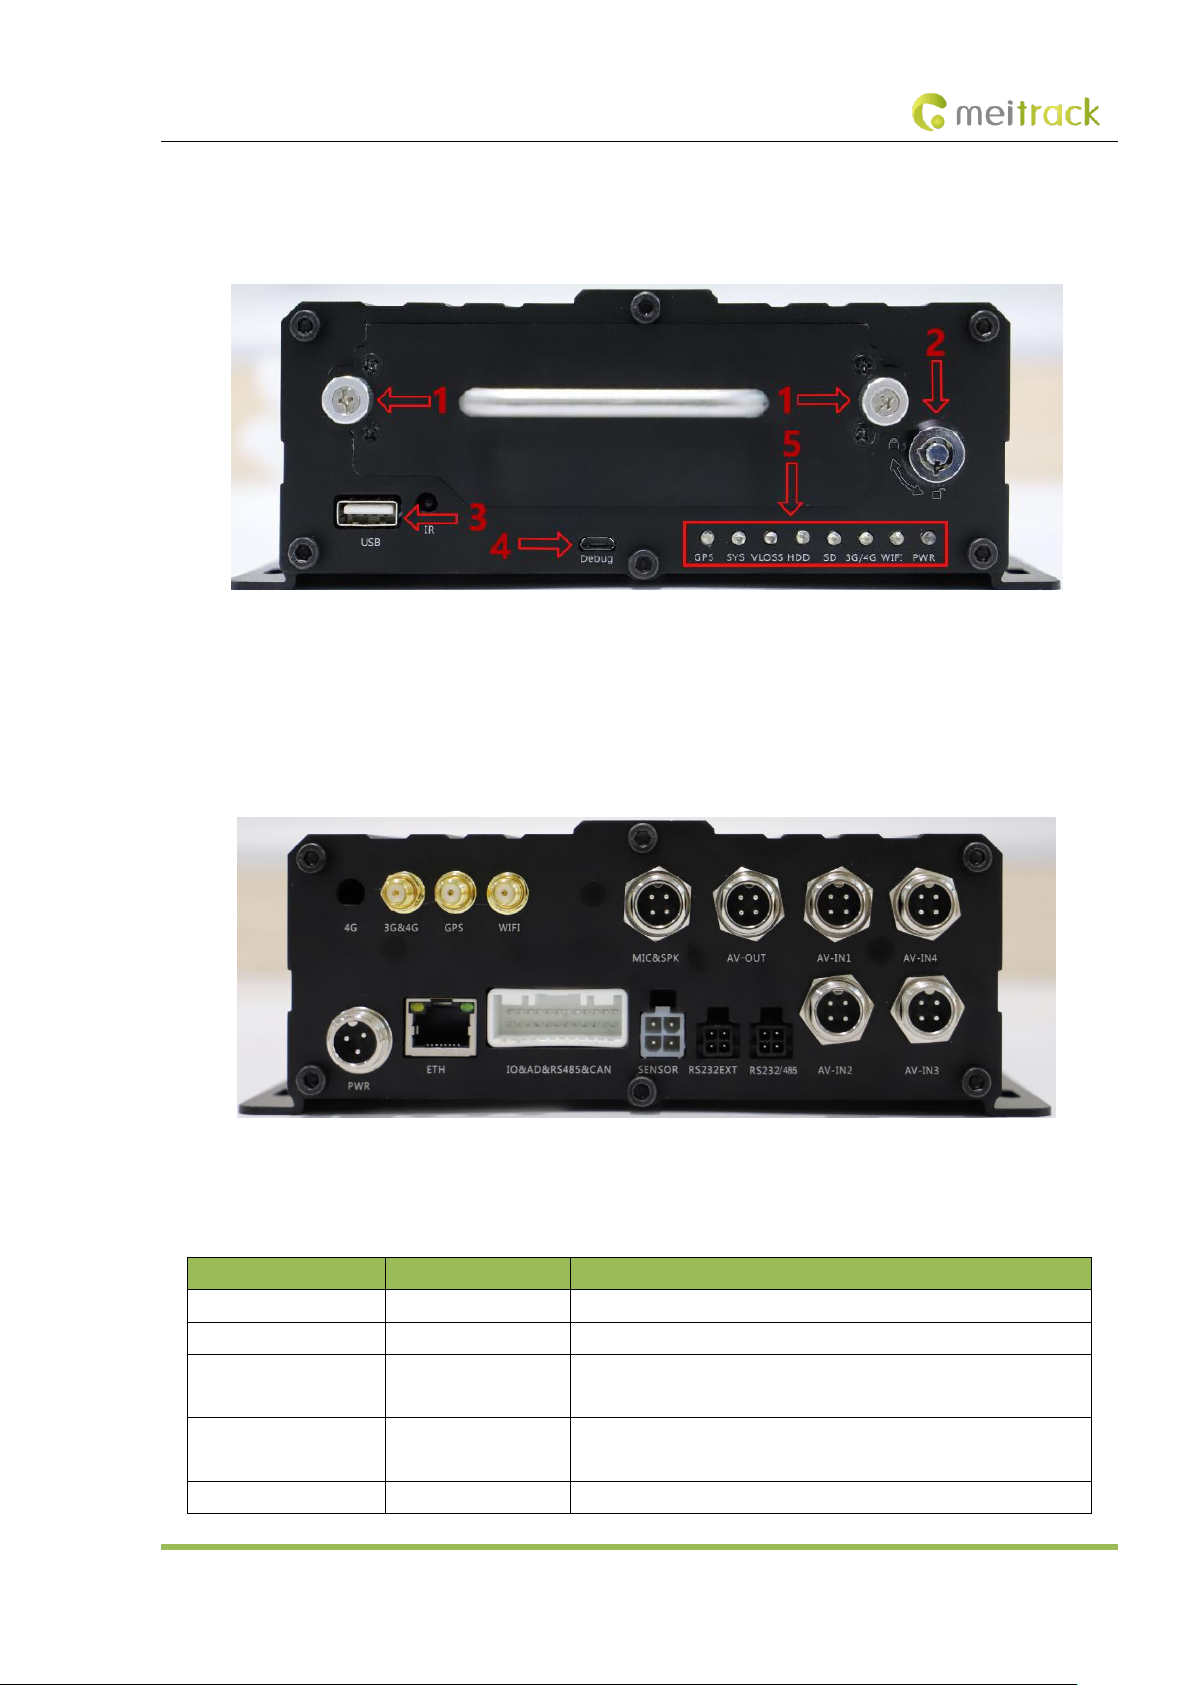
Figure 2.5.1 Front Panel
1. Screws for fastening the disk enclosure
2. Disk lock (To enable the recording function, ensure that the disk is locked after the disk enclosure is installed properly.)
3. USB port
4. Debug interface
5. LED indicator
Figure 2.5.2 Rear Panel
2.5.2 Interface Definition
Interface
Label
Description
Infrared interface
IR
Infrared receiver (reserved function)
USB port
USB
Standard USB port
4G auxiliary antenna
connector
4G
SMA connector; 4G auxiliary antenna
3G/4G main antenna
connector
3G/4G
SMA connector; 3G/4G main antenna
GPS antenna connector
GPS
GPS antenna connector
Page 11
MEITRACK MD511H User Guide
Copyright © 2019 Meitrack Group All rights reserved. - 11 -
Interface
Label
Description
WiFi antenna connector
WiFi
WiFi antenna connector
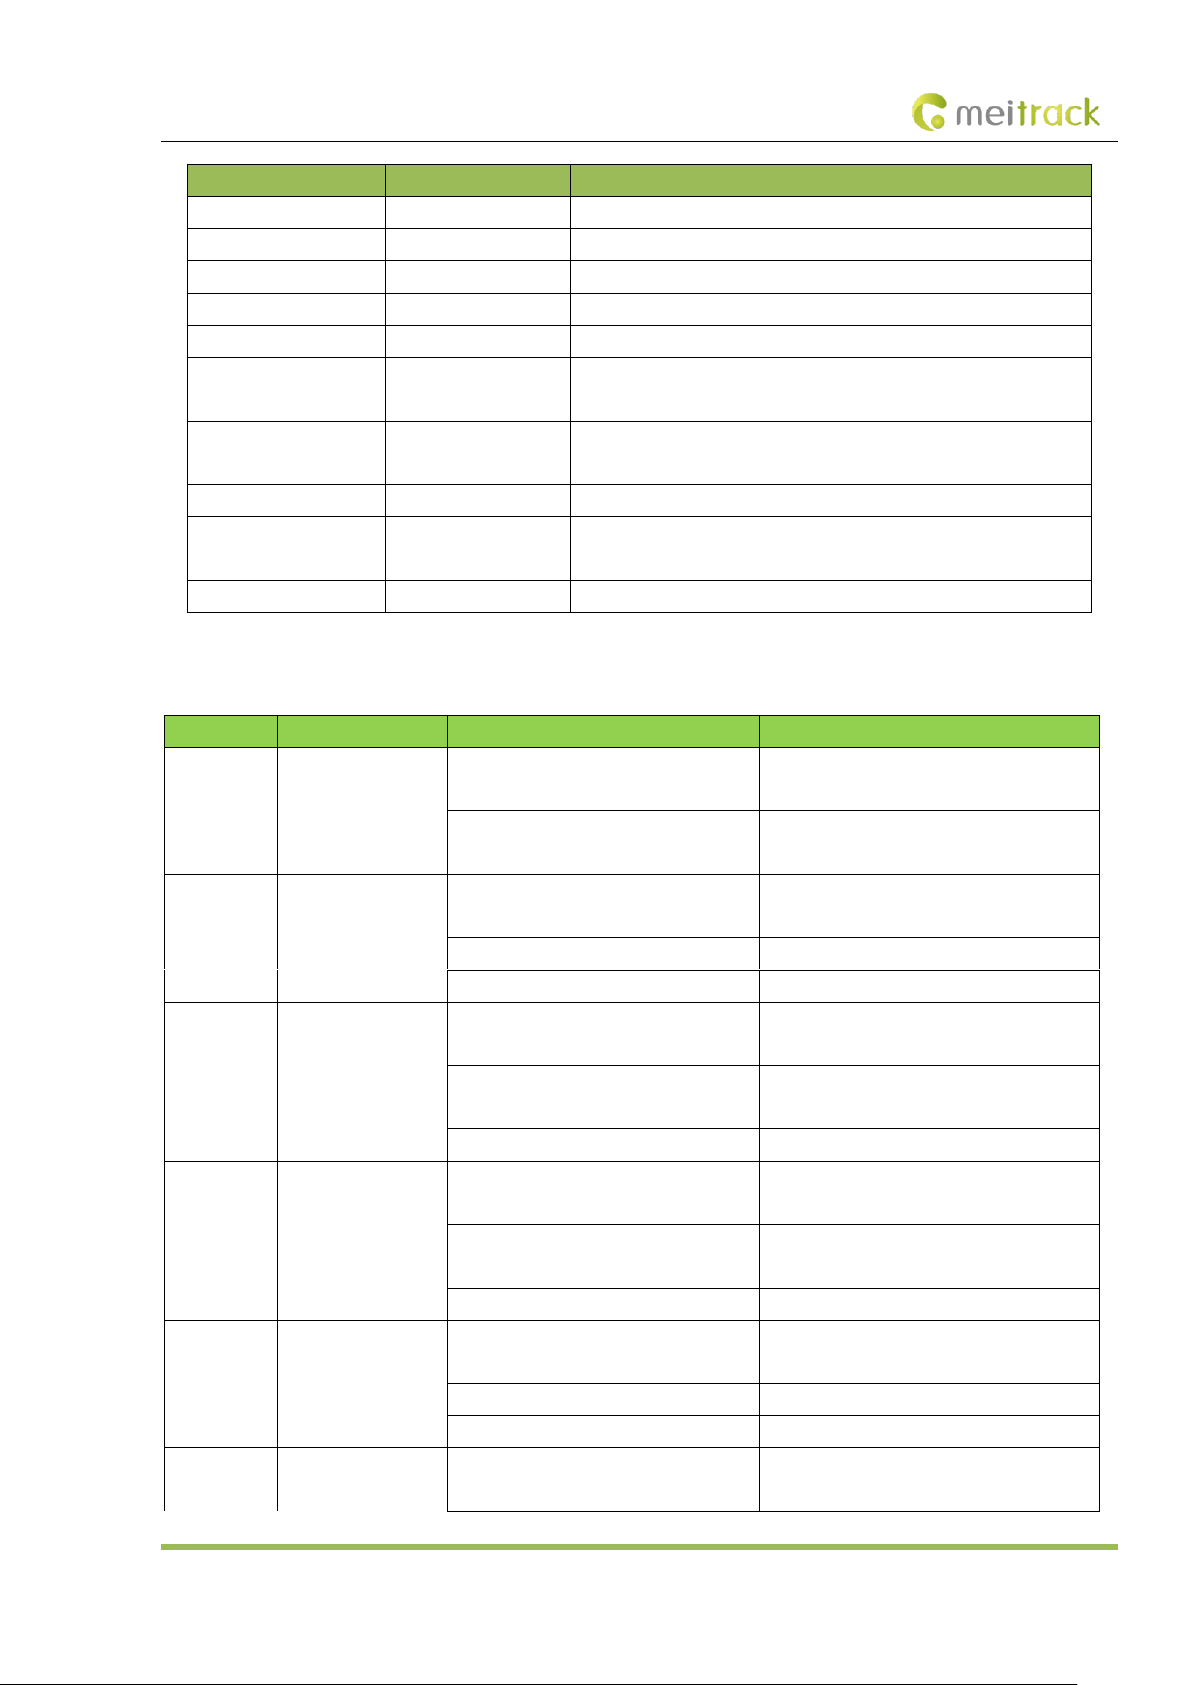
Voice intercom I/O port
MIC&SPK
Connect the voice intercom.
AV output
AV-OUT
Connect the display to show the UI and play audio and video files.
AV input
CAM1–CAM4
AV input port, used to connect a 4-channel AHD 720P camera.
Ethernet interface
ETH
10Mbps/100Mbps self-adaptive Ethernet interface
Main line interface
IO&AD&RS485&CAN
8 GPIO inputs, 3GPIO outputs, 1 RS485J interface, 1 AD interface,
and 1 CAN bus interface
Sensor interface
SENSOR
Used to connect a fuel level sensor, temperature sensor, iButton
reader or A61 sensor box.
RS232 interface
RS232 EXT
Used to connect a RFID reader.
Serial communication
interface
RS232/RS485
RS232 interface by default, used to connect related devices.
Power & ACC interface
PWR
Input voltage: 11–36 V. The yellow cable is the ACC detection cable.
2.5.3 LED indicator
Label
LED Indicator
Status
Description
PWR
Power LED indicator
Steady on
The MDVR is connected to an external
power supply.
Steady off
The MDVR is not connected to an external
power supply.
WIFI
WiFi LED indicator
Blink suddenly (once every 5 seconds;
indicator on: 100 ms)
There is a WiFi module, but no data is sent.
Blink fast
WiFi data is sent and received normally.
Steady off
There is no WiFi module.
HDD
Disk LED indicator
Blink fast (frequency for writing data)
A storage disk is detected, and audio and
video data is written into the disk.
Blink suddenly (once every 5 seconds;
indicator on: 100 ms)
A storage disk is detected, but no data is
written into the disk.
Steady off
No storage disk is detected.
SD
SD card LED
indicator
Blink fast (frequency for writing data)
An SD card is detected and there is written
audio and video data in the SD card.
Blink suddenly (once every 5 seconds;
indicator on: 100 ms)
An SD card is detected and no data is written
into the SD card.
Steady off
No SD card is detected.
3G/4G
3G/4G LED indicator
Blink suddenly (once every 5 seconds;
indicator on: 100 ms)
There is a 3G/4G module, but no data is
sent.
Blink fast
3G/4G data is sent and received normally.
Steady off
There is no 3G/4G module.
SYS
Network status LED
indicator
Steady on
There is an incoming call, or the subscriber
you dialed is busy now.
Page 12
MEITRACK MD511H User Guide
Copyright © 2019 Meitrack Group All rights reserved. - 12 -
Blink fast (once every 0.1 seconds)
The MDVR is being initialized.
Blink fast (0.1 seconds on and 2.9
seconds off)
A signal is received from a base station
(connected to a mobile network).
Blink slowly (1 second on and 2 seconds
off)
No signal is received from a base station
(not connected to a mobile network).
GPS
GPS LED indicator
Steady on
A button or an input is triggered.
Blink fast (once every 0.1 seconds)
The MDVR is being initialized, or the battery
power is low.
Blink fast (0.1 seconds on and 2.9
seconds off)
A GPS signal is received.
Blink slowly (1 second on and 2 seconds
off)
No GPS signal is received.
VLOSS
Video lost LED
indicator
Steady on
All AV inputs are not connected to cameras.
Blink suddenly (once every 5 seconds;
indicator on: 100 ms)
One AV input is not connected to a camera.
Blink suddenly (twice every 5 seconds;
indicator on: 100 ms; interval: 300 ms)
Two AV inputs are not connected to
cameras.
Blink suddenly (3 times every 5 seconds;
indicator on: 100 ms; interval: 300 ms)
Three AV inputs are not connected to
cameras.
Steady off
All AV inputs are connected to cameras.
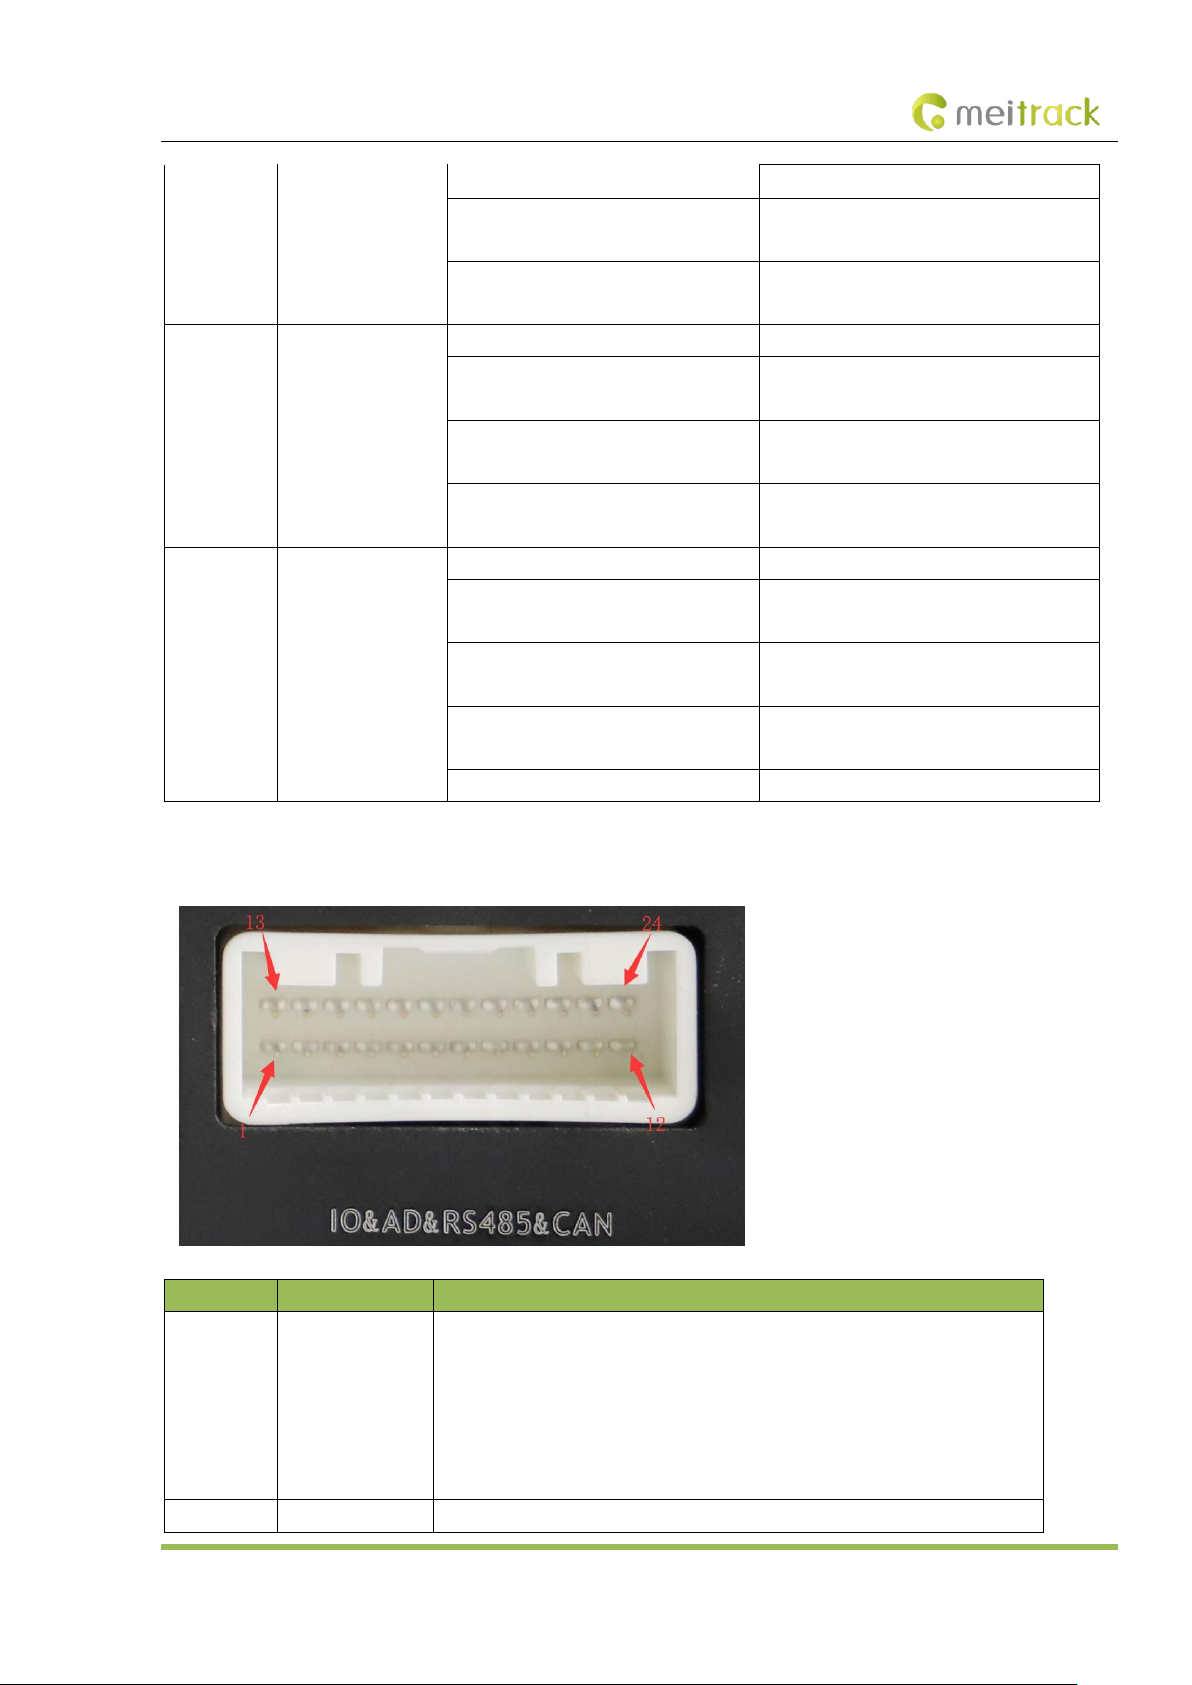
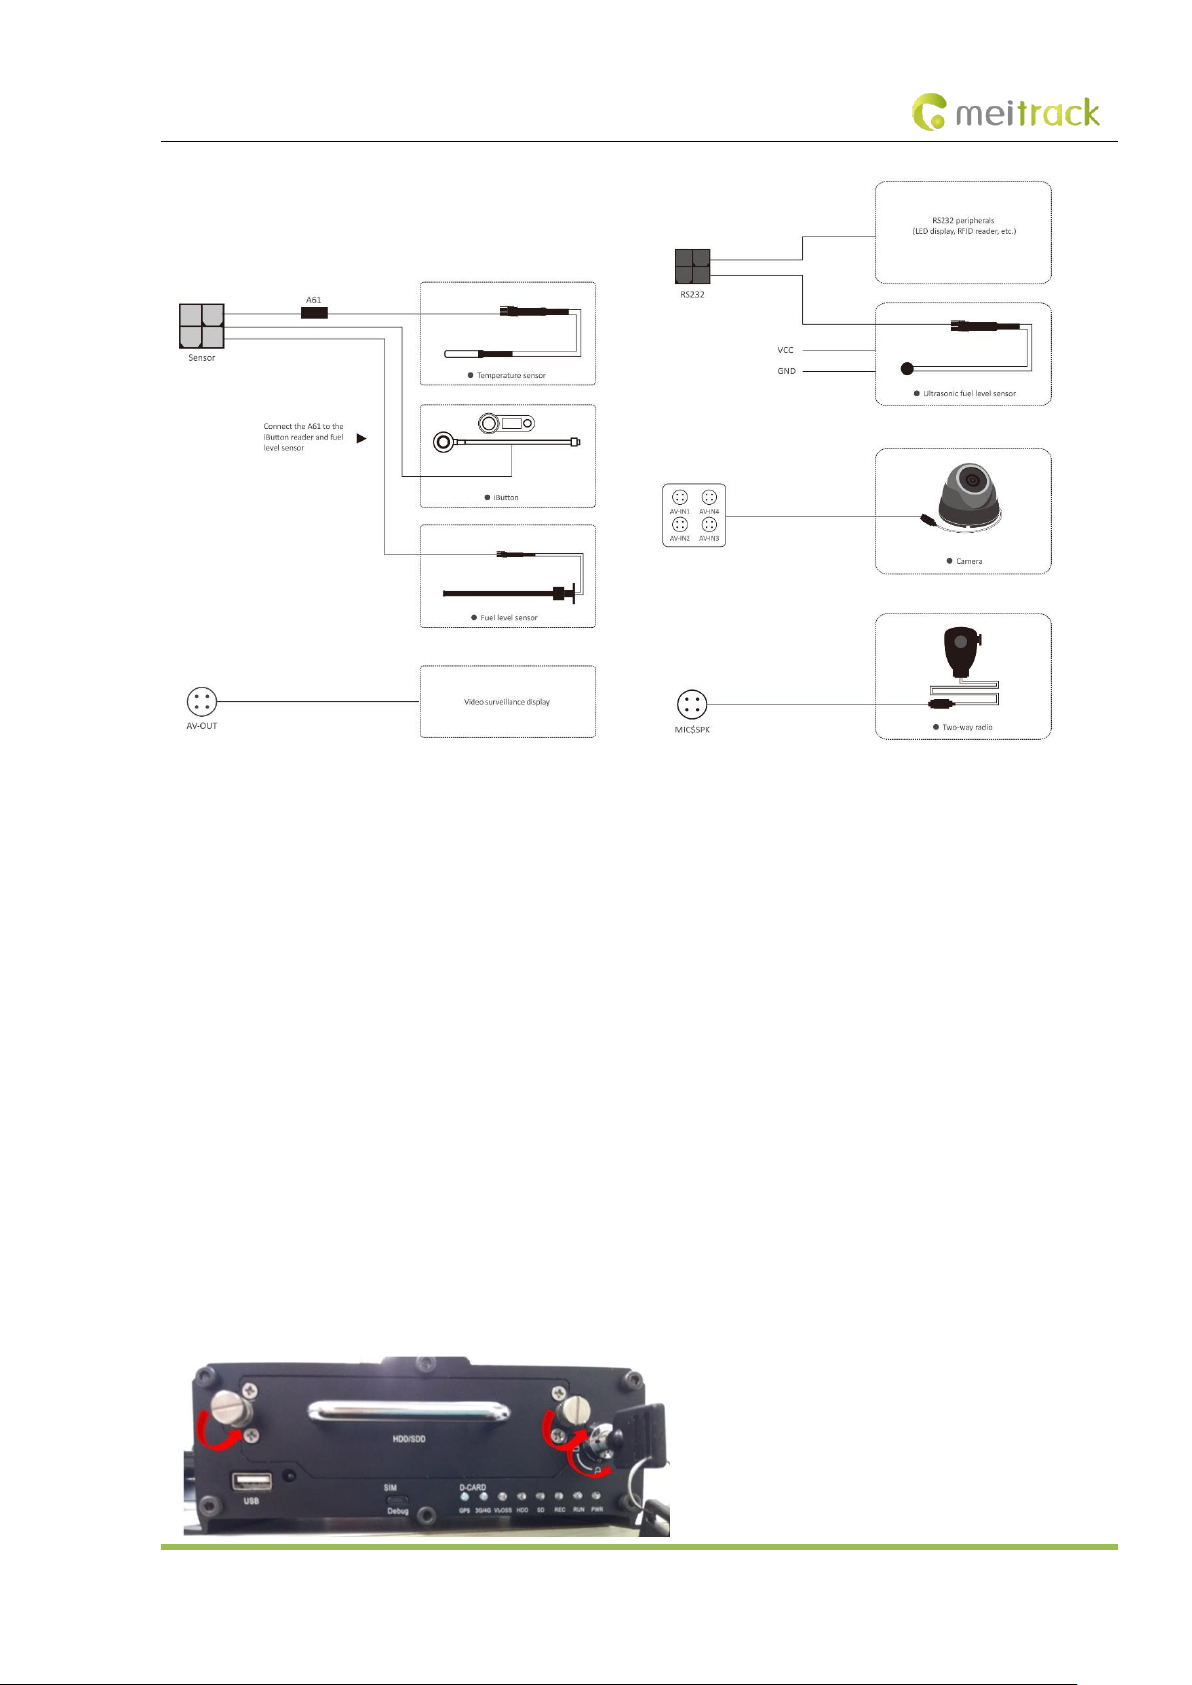
2.5.4 I/O Port
Pin Number
Label
Function Description
1
OUT3
Output 3; low level triggering by default (0 V); invalid: open collector
Maximum voltage for output open collector (invalid): 40 V. Maximum current:
400 mA.
Allow to set the high level triggering mode and PWM triggering mode.
Connect an external relay to remotely cut off the vehicle fuel or engine power
supply.
2
OUT2
Output 2; low level triggering by default (0 V); invalid: open collector
Page 13

MEITRACK MD511H User Guide
Copyright © 2019 Meitrack Group All rights reserved. - 13 -
Maximum voltage for output open collector (invalid): 40 V. Maximum current:
400 mA.
Allow to set the high level triggering mode and PWM triggering mode.
Connect an external relay to remotely cut off the vehicle fuel or engine power
supply.
3
TLEFT_DET
Connect the turning left signal cable.
4
TRIGHT_DET
Connect the turning right signal cable.
5
BRAKING_DET
Connect the braking signal cable.
6
DOOR2_DET
Connect the vehicle door side signal cable.
7
TBACK_DET
Connect the reversing signal cable.
8
SPEED_IN
Connect the vehicle speed signal cable.
9
DOOR1_DET
Connect the vehicle door side signal cable.
10
AD1
Analog input 1 with 12-bit resolution; valid voltage: 0–6.6 V
Connect an external sensor, such as the fuel level sensor.
11
None (reserved)
None (reserved)
12
None (reserved)
None (reserved)
13
OUT1
Output 1; low level triggering by default (0 V); invalid: open collector
Maximum voltage for output open collector (invalid): 40 V. Maximum current:
400 mA.
Allow to set the high level triggering mode and PWM triggering mode.
Connect an external relay to remotely cut off the vehicle fuel or engine power
supply.
14
None (reserved)
None (reserved)
15
RS485_B-
RS485 B- signal cable (RS485 interface)
Connect the negative terminal of the camera cradle head.
16
RS485_A+
RS485 A+ signal cable (RS485 interface)
Connect the positive terminal of the camera cradle head.
17
GND
Ground wire
18
CAN_L
Connect a CAN bus peripheral.
19
CAN_H
Connect a CAN bus peripheral.
20
GND
Ground wire
21
GND
Ground wire
22
GND
Ground wire
23
SOS
SOS alert input cable
24
None (reserved)
None (reserved)
Page 14
MEITRACK MD511H User Guide
Copyright © 2019 Meitrack Group All rights reserved. - 14 -
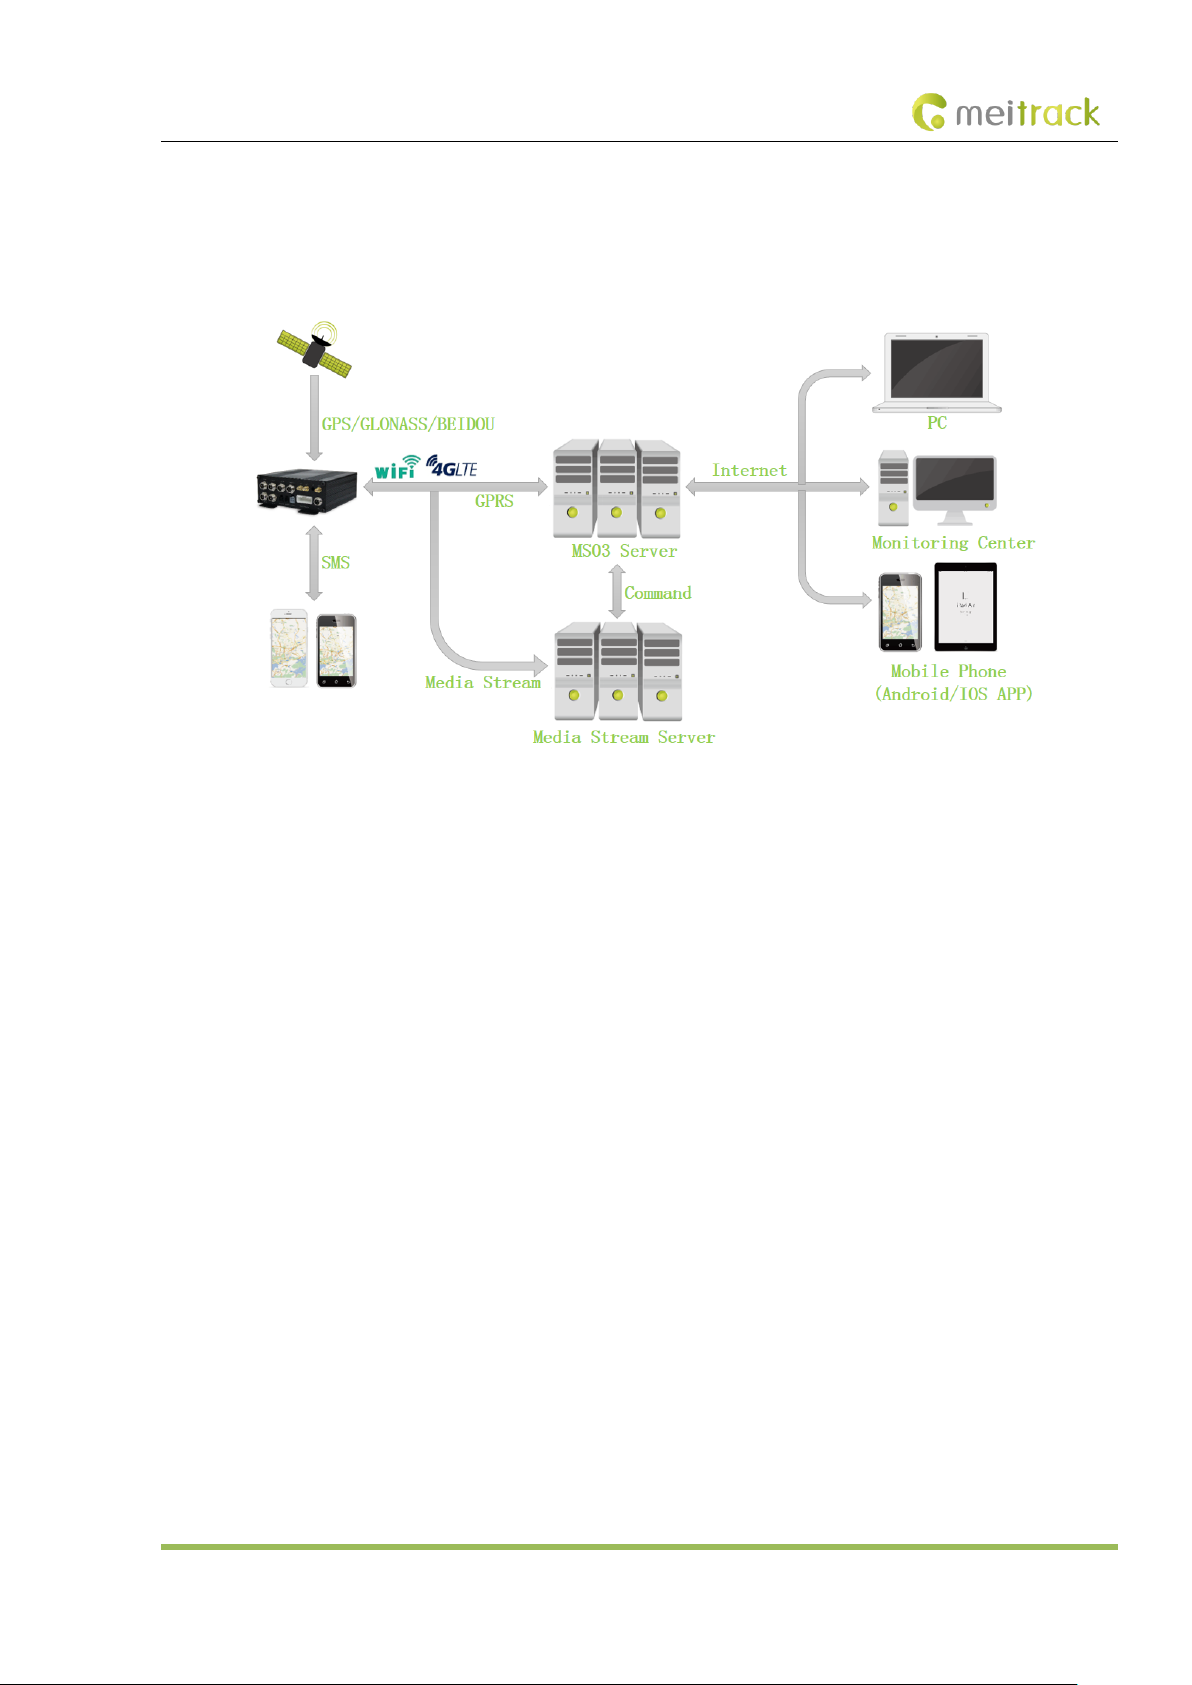
3 How it Works
3.1 Working Diagram
MD511H Working Diagram
Page 15
MEITRACK MD511H User Guide
Copyright © 2019 Meitrack Group All rights reserved. - 15 -
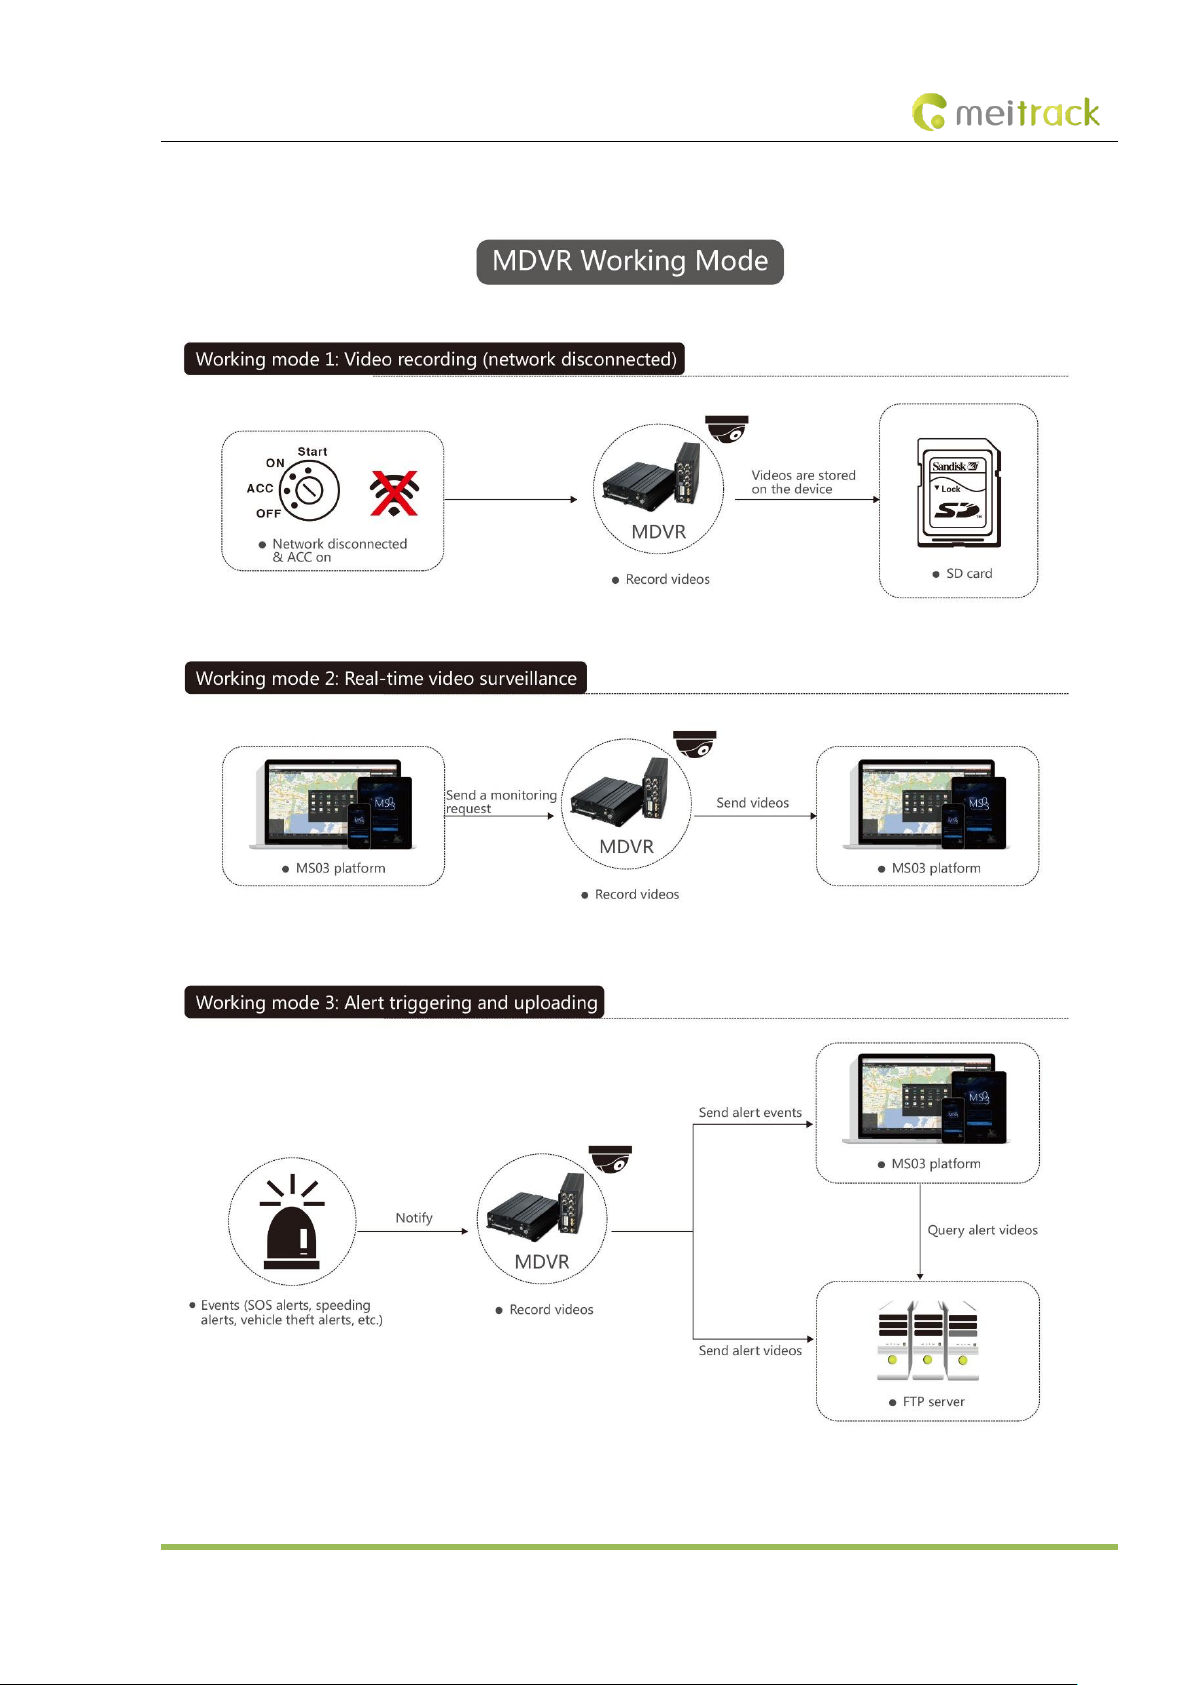
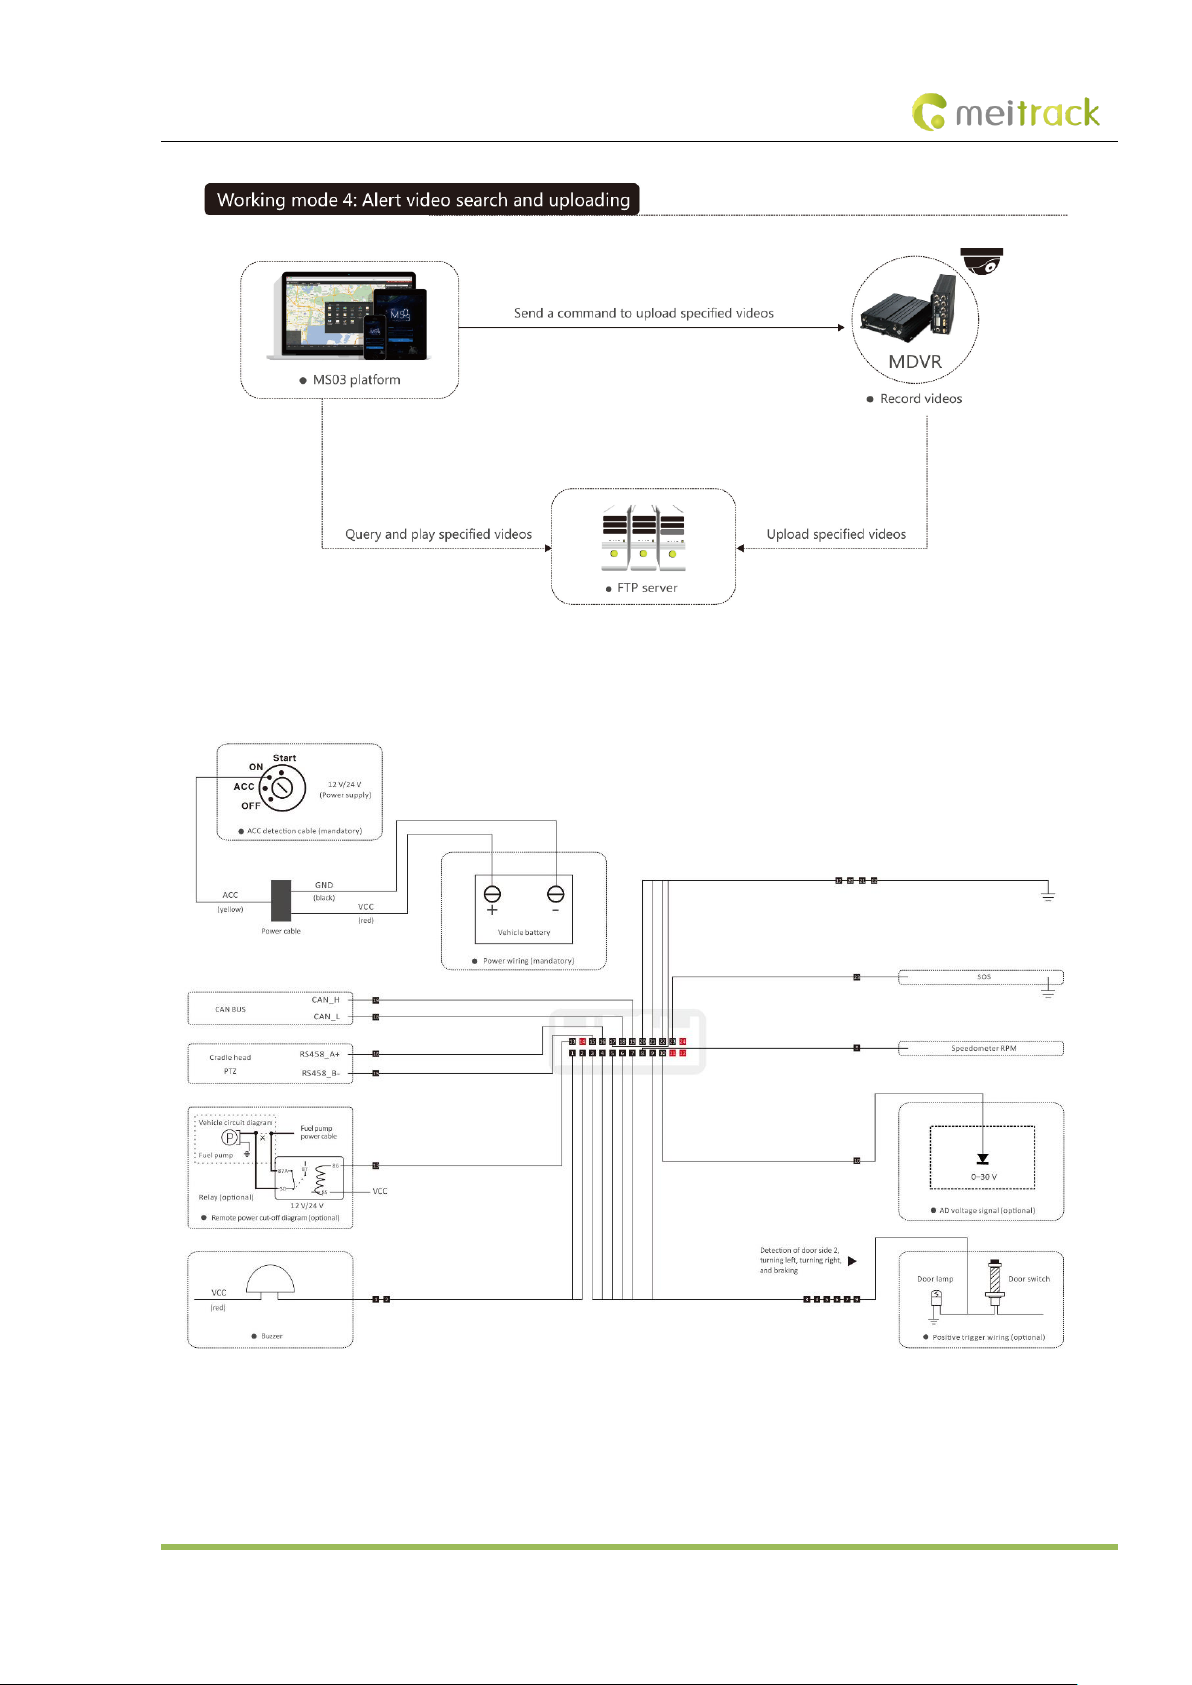
3.2 Working Mode
Page 16
MEITRACK MD511H User Guide
Copyright © 2019 Meitrack Group All rights reserved. - 16 -
3.3 Peripheral Wiring Diagram
Page 17
MEITRACK MD511H User Guide
Copyright © 2019 Meitrack Group All rights reserved. - 17 -
4 Fast Installing and Using the MDVR
Perform the following nine steps to fast install and use the MDVR:
1) Loosen the screws, insert the key to open the disk lock, pull out the disk enclosure, and install a disk.
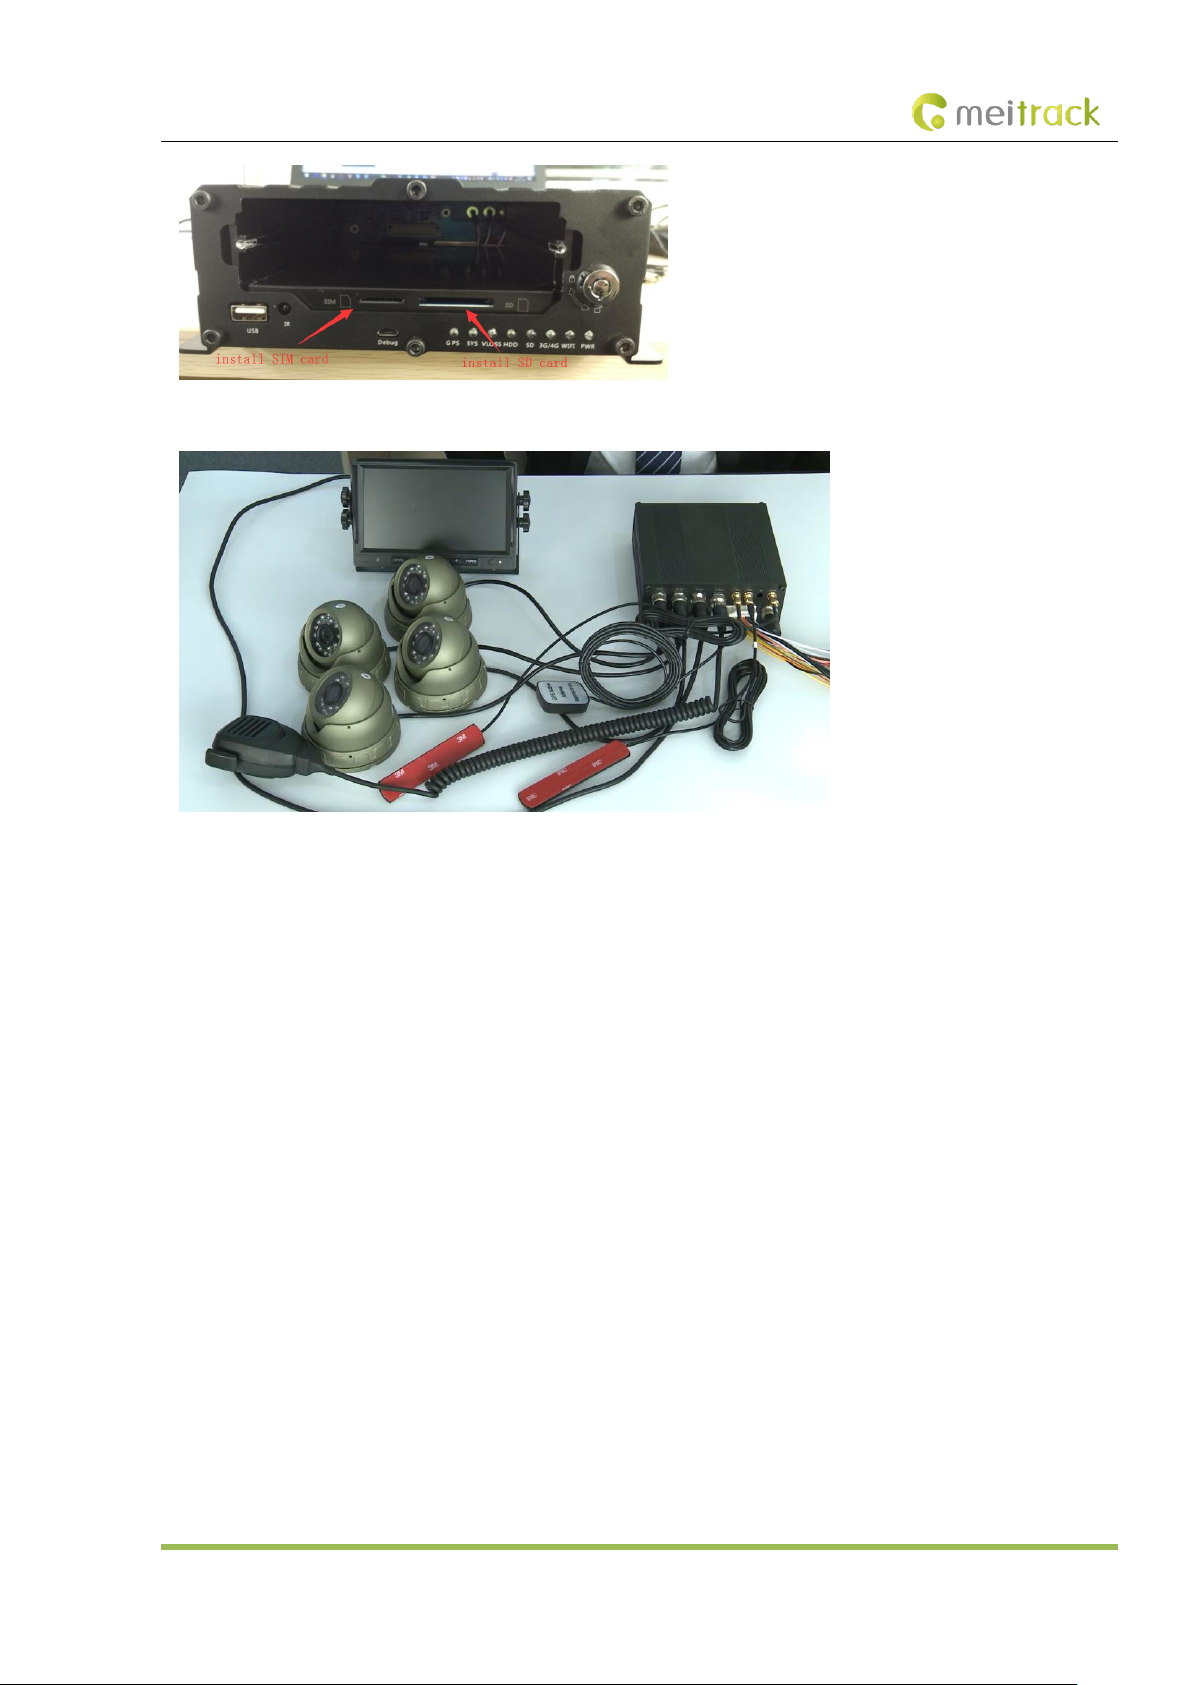
2) Insert the SIM card into the SIM card slot. (You will see the card slot after pulling out the disk.)
3) Install an SD card as required.
4) Connect four cameras, the display, handset, GSM antenna, WiFi antenna and GPS antenna.
5) Connect the power cable (including the VCC, GND and ACC cables) to the external power supply. (The ACC cable must be
connected to the positive terminal of the external power supply. Otherwise, the MDVR cannot be started.)
6) Set the IP address and port of the platform.
7) Set the data transmission network.
8) Set the login user name and password.
9) After logging in to the platform, you can implement video surveillance, search videos, and make a call.
4.1 Installing the MDVR
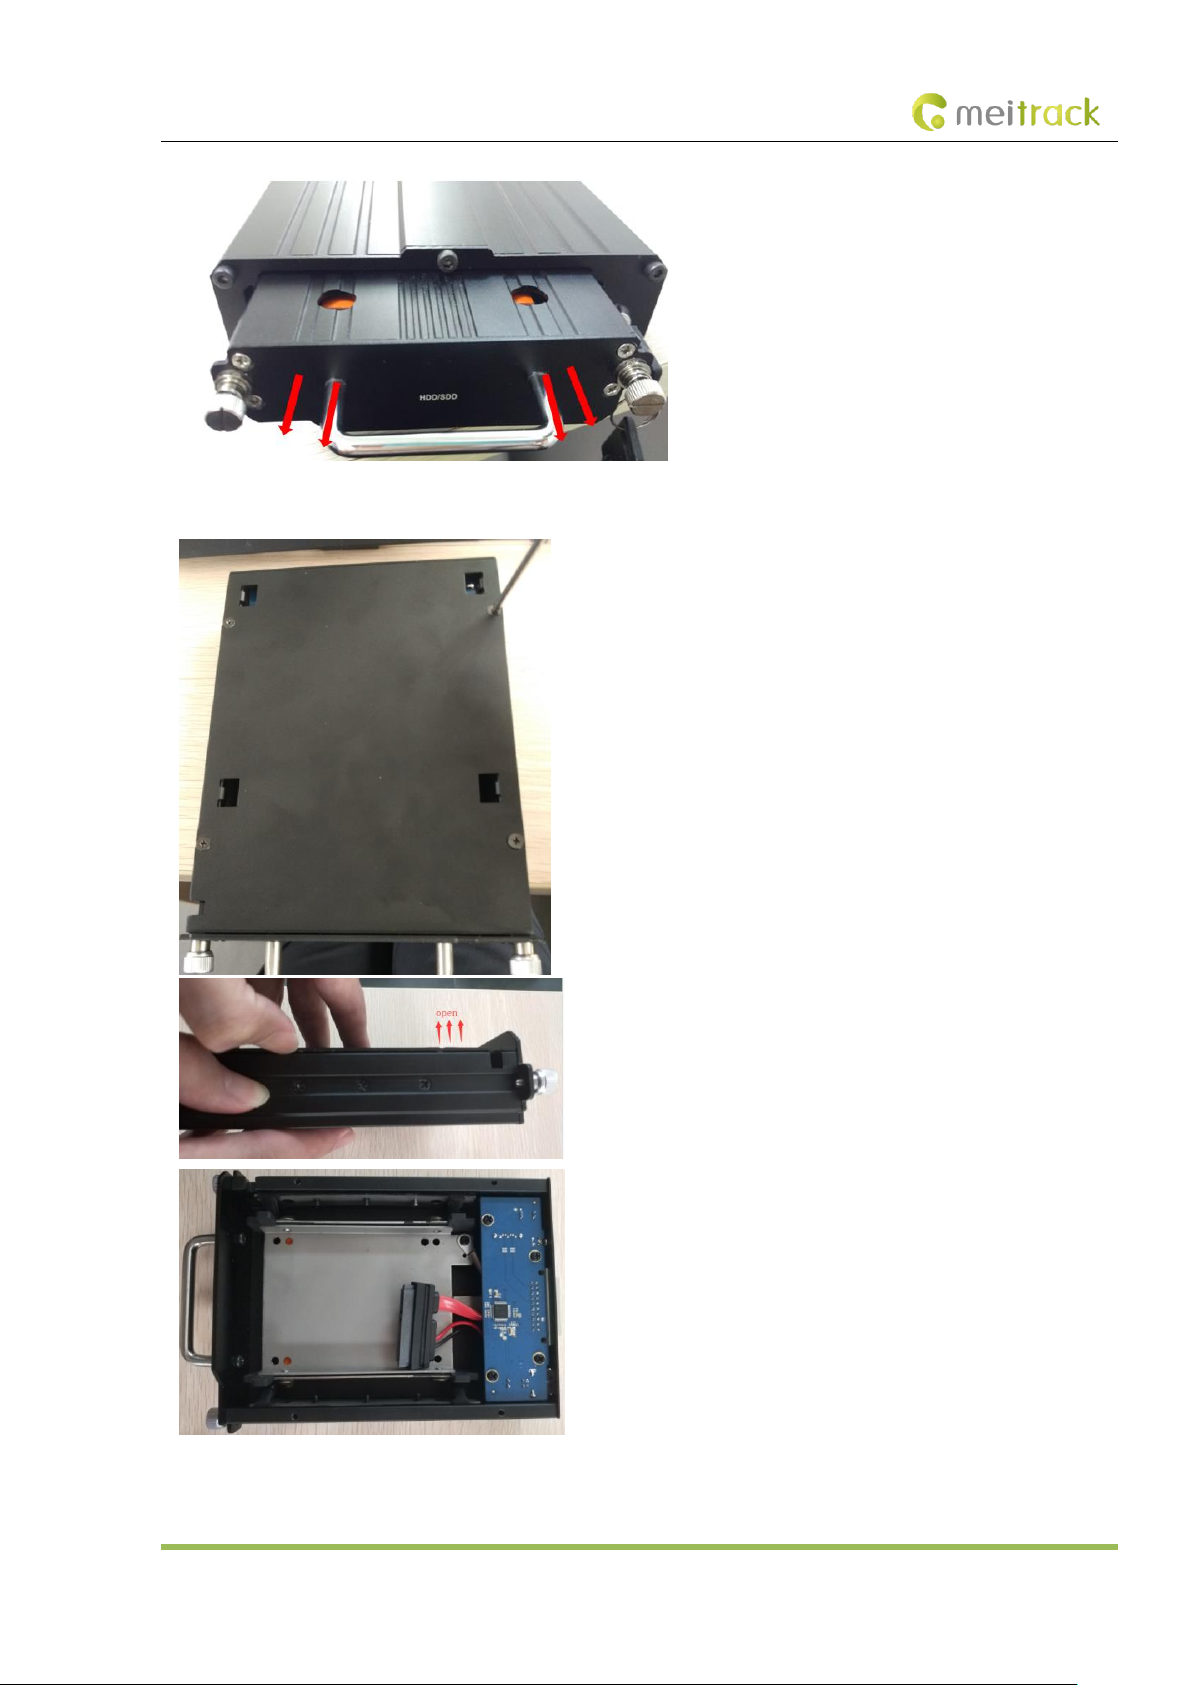
(1) Loosen the screws, insert the key to open the disk lock, and pull out the disk. (If no disk is installed into the MDVR, install a
disk by yourself.)
Page 18
MEITRACK MD511H User Guide
Copyright © 2019 Meitrack Group All rights reserved. - 18 -
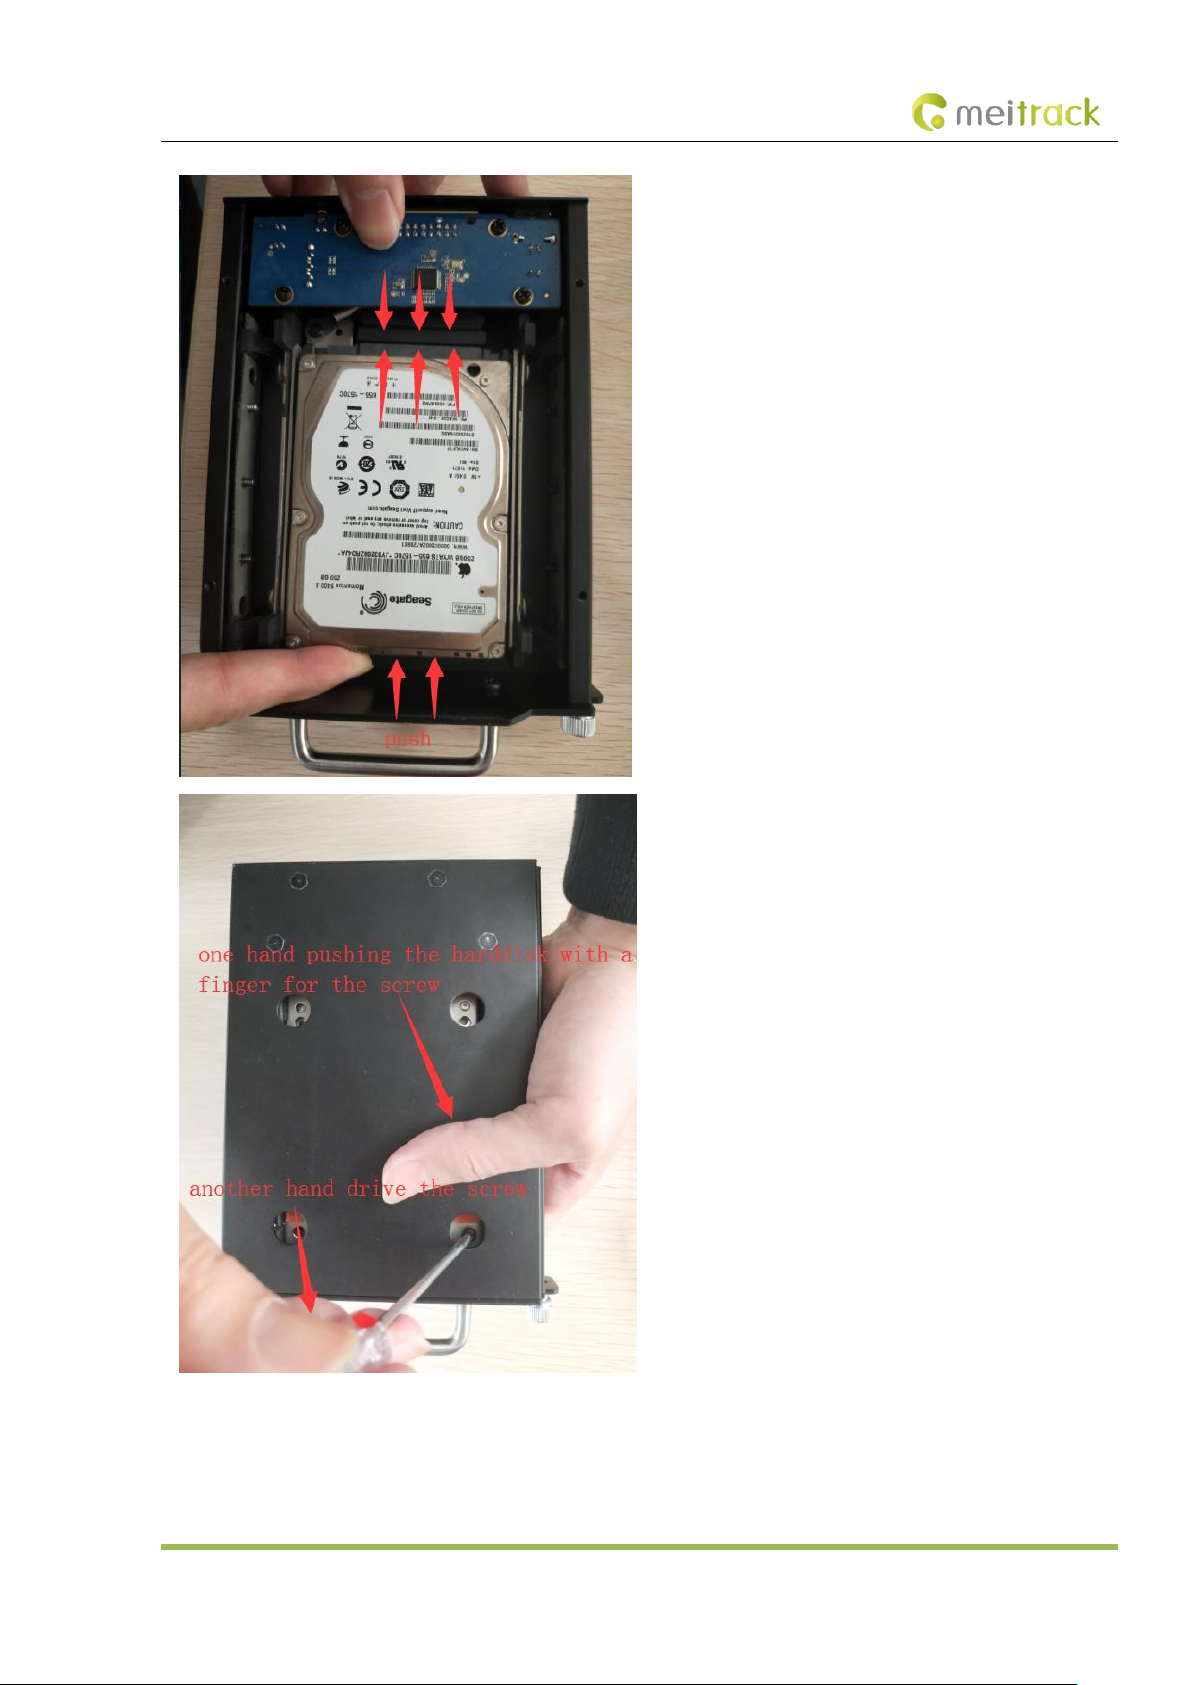
(2) Open the disk cover by using a screwdriver, and then install a disk.
After installing the disk, you need to push the disk up with your fingers, turn the disk enclosure over, and tighten the screws
firmly.
Page 19
MEITRACK MD511H User Guide
Copyright © 2019 Meitrack Group All rights reserved. - 19 -
Tighten the eight screws on both sides of the disk enclosure, and install the disk enclosure.
(3) Install a SIM card and a SD card, and then lock the disk. (Note: You must use the key to lock the disk after putting the disk
back. Otherwise, the MDVR cannot be started.)
Page 20
MEITRACK MD511H User Guide
Copyright © 2019 Meitrack Group All rights reserved. - 20 -
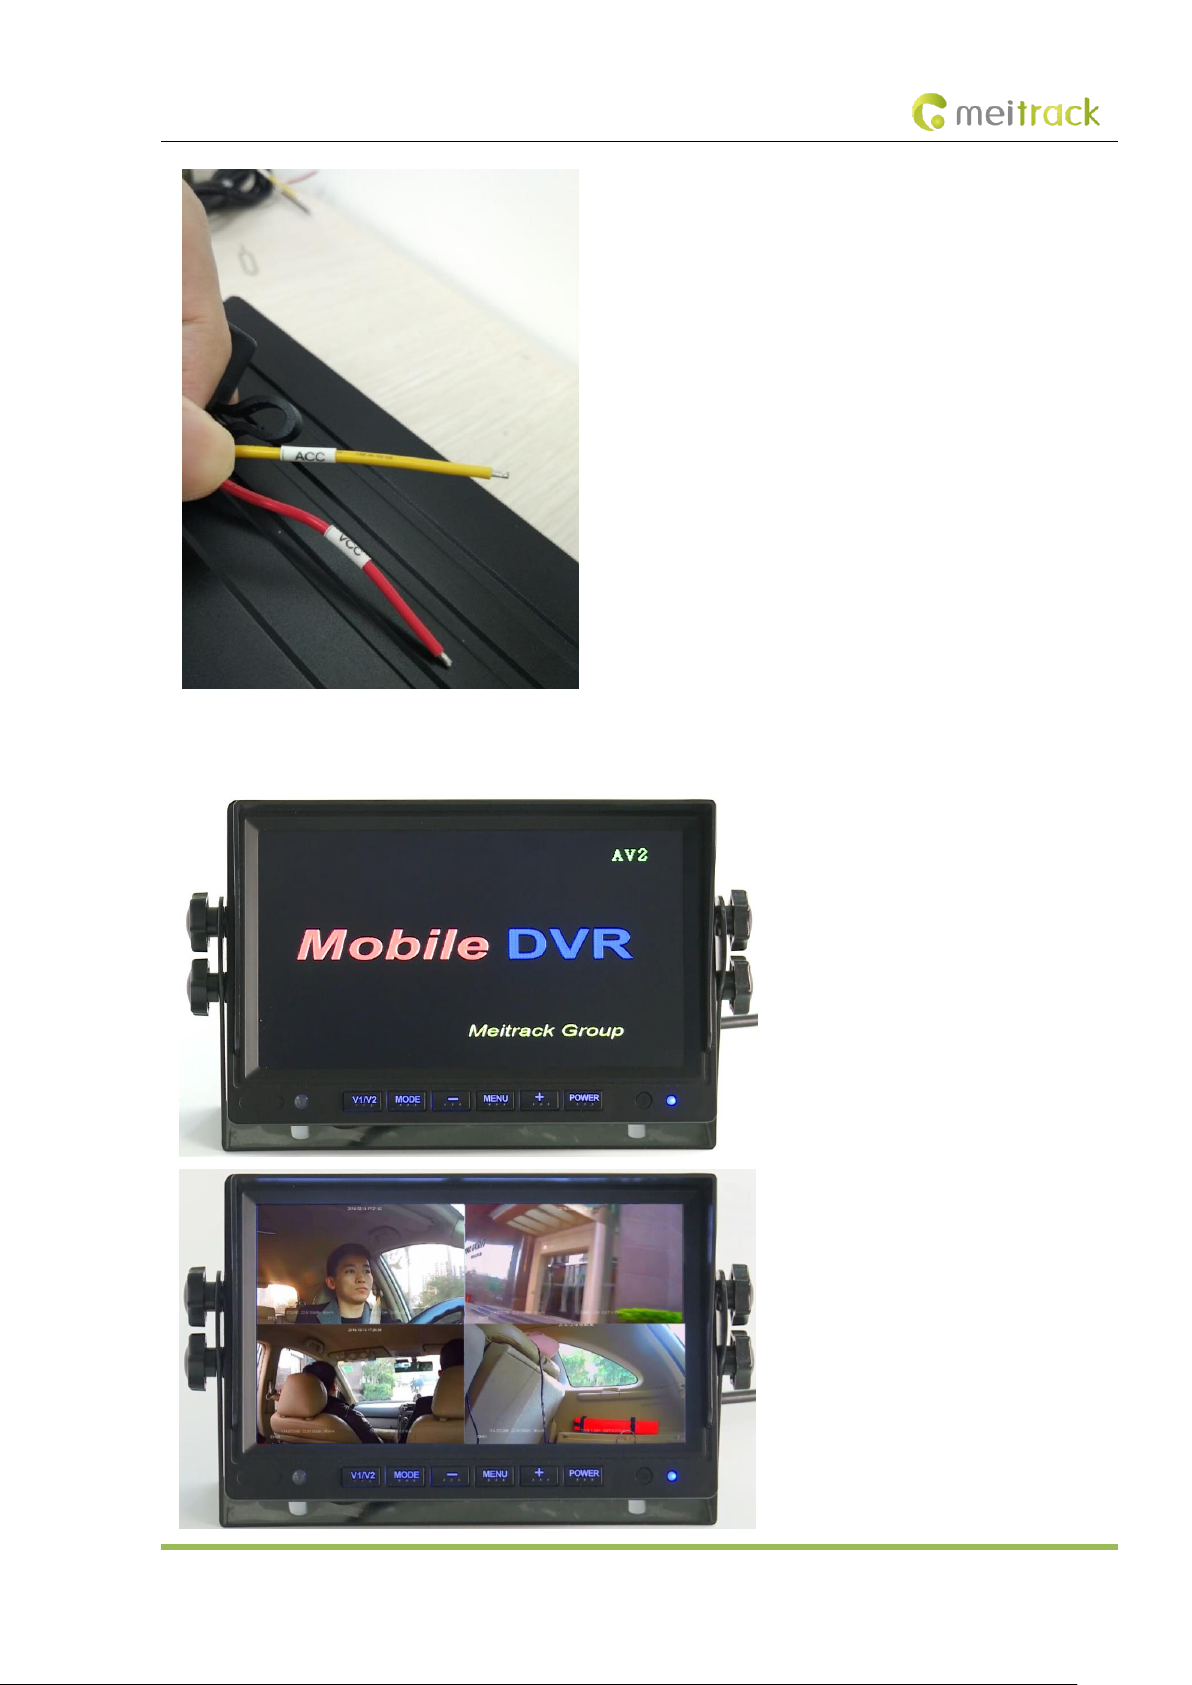
(4) Connect four cameras, the display, handset, GPS antenna, GSM antenna, WiFi antenna, and power cable.
Plug the power cable in the PWR interface.
Plug the four cameras in the AV-IN1, AV-IN2, AV-IN3, and AV-IN4 interfaces.
Plug the display in the AV-OUT interface.
Plug the handset in the MIC&SPK interface.
Connect the WiFi antenna, GPS antenna, and 3G/4G antenna to the MDVR. (If the WiFi antenna is not connected, the WiFi
function will be unavailable.)
(5) Supply power to the MDVR and connect the external power supply to the ACC cable. (Note: To enable the recording function,
ensure that the ACC cable is connected to the positive terminal of the power supply and the disk is locked.)
Page 21
MEITRACK MD511H User Guide
Copyright © 2019 Meitrack Group All rights reserved. - 21 -
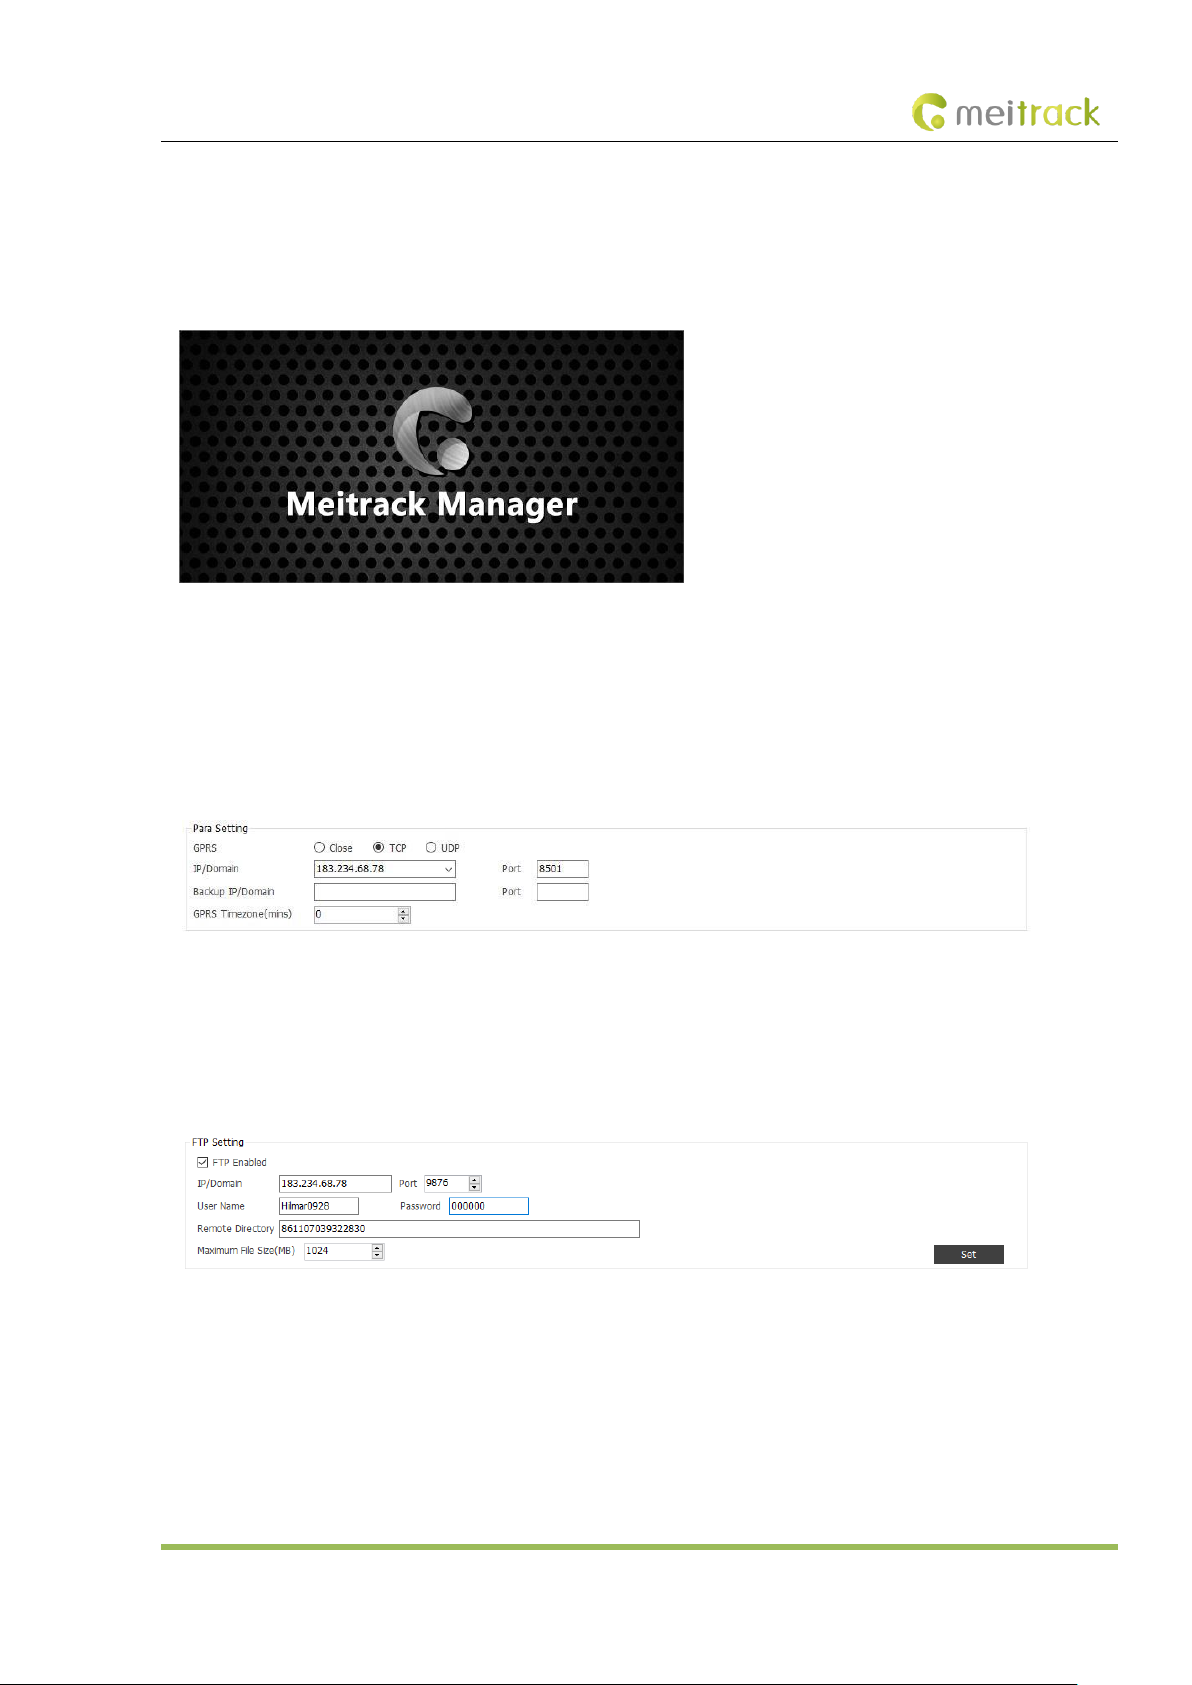
(6) After the external power supply is connected, the initialized MDVR will automatically record videos, and the display will be
turned on automatically and play live videos.
Page 22
MEITRACK MD511H User Guide
Copyright © 2019 Meitrack Group All rights reserved. - 22 -
4.2 Configuring the MDVR by Using Meitrack Manager
After the MDVR is installed, connect it to a network and server. You can configure the MDVR by using any of the following
methods: Meitrack Manager software, SMS, and platform. In this section, I will show you how to use the Meitrack Manager
software to fast configure the MDVR.
You need to install Meitrack Manager first. (Visit www.meitrack.com to download the software). After the installation is
completed, connect the USB cable to a computer, and then perform the following steps to configure the MDVR.
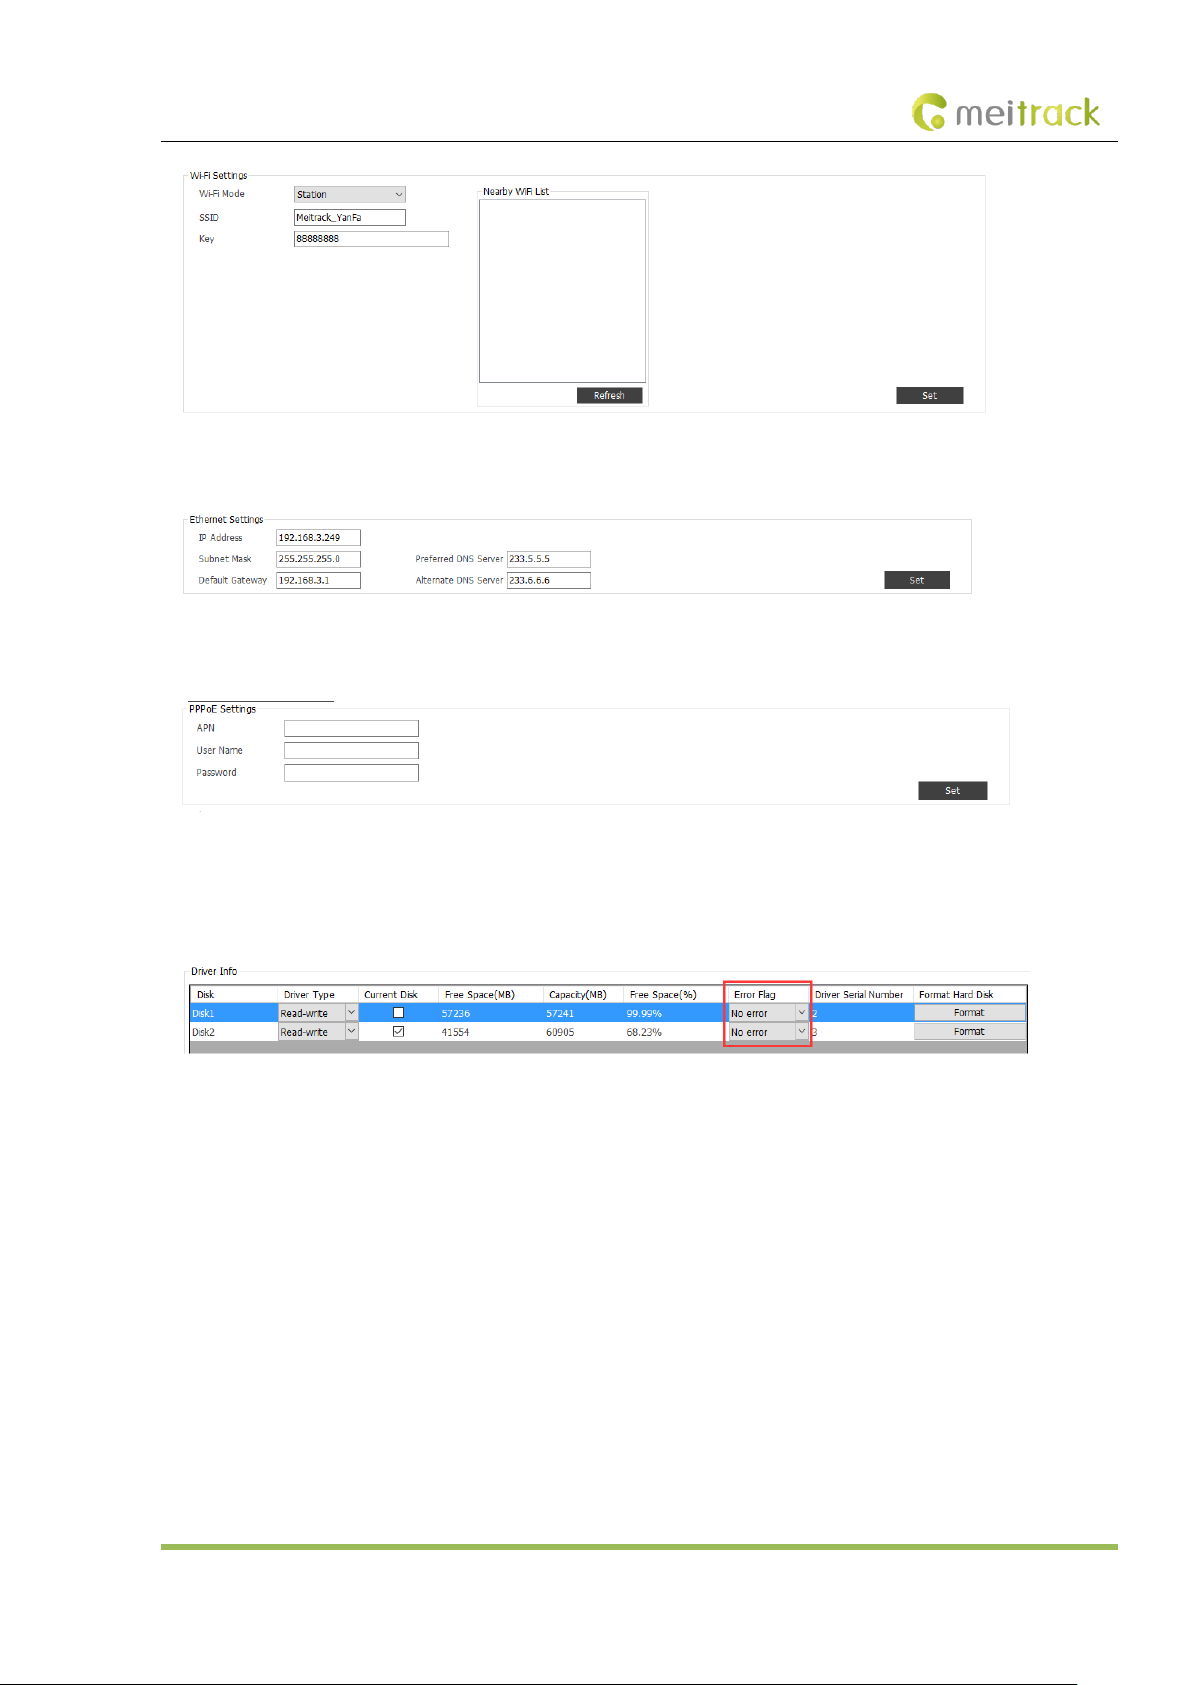
(1) After the MDVR is installed, connect it to the network and server. You can configure the MDVR by using any of the following
methods: Meitrack Manager software, SMS, and platform.
Set the IP address and port for uploading positioning data, IP address and port for uploading video data, and the user name and
password of the FTP server:
SMS configuration:
Send the following command to set the IP address and port for uploading positioning data:
0000,A21,1,183.234.68.78,8501,APN(for example, internet),APN_USER,APN_PASSWORD.
(2) Set the IP address of the FTP server. Video data will be uploaded to the specified FTP server.
(3) Set the network.
There are three network connections: cellular network (3G/4G), WiFi, and Ethernet. Ethernet is the best choice, WiFi is the second
choice, and a cellular network is the last choice. It means that if the MDVR is connected to Ethernet, the WiFi and cellular network
will be disabled.
WiFi configuration:
As shown in the following figure, enter the WiFi SSID and password and click Set. The WiFi network connection is set successfully.
You can click Refresh to search the WiFi list nearby.
Page 23
MEITRACK MD511H User Guide
Copyright © 2019 Meitrack Group All rights reserved. - 23 -
Ethernet configuration:
Enter the IP address, subnet mask, gateway, active DNS server and standby DNS server.
Cellular network configuration:
Enter the APN, APN user name and APN password, and click Set to save the settings.
(4) Check whether the disk or SD card is installed properly. When you use the MDVR for the first time, if the system detects
format errors, the SD card or disk will be initialized automatically. If "no error" is displayed as follows, it means that the SD card
or disk is initialized successfully.
4.3 Logging In to the Platform
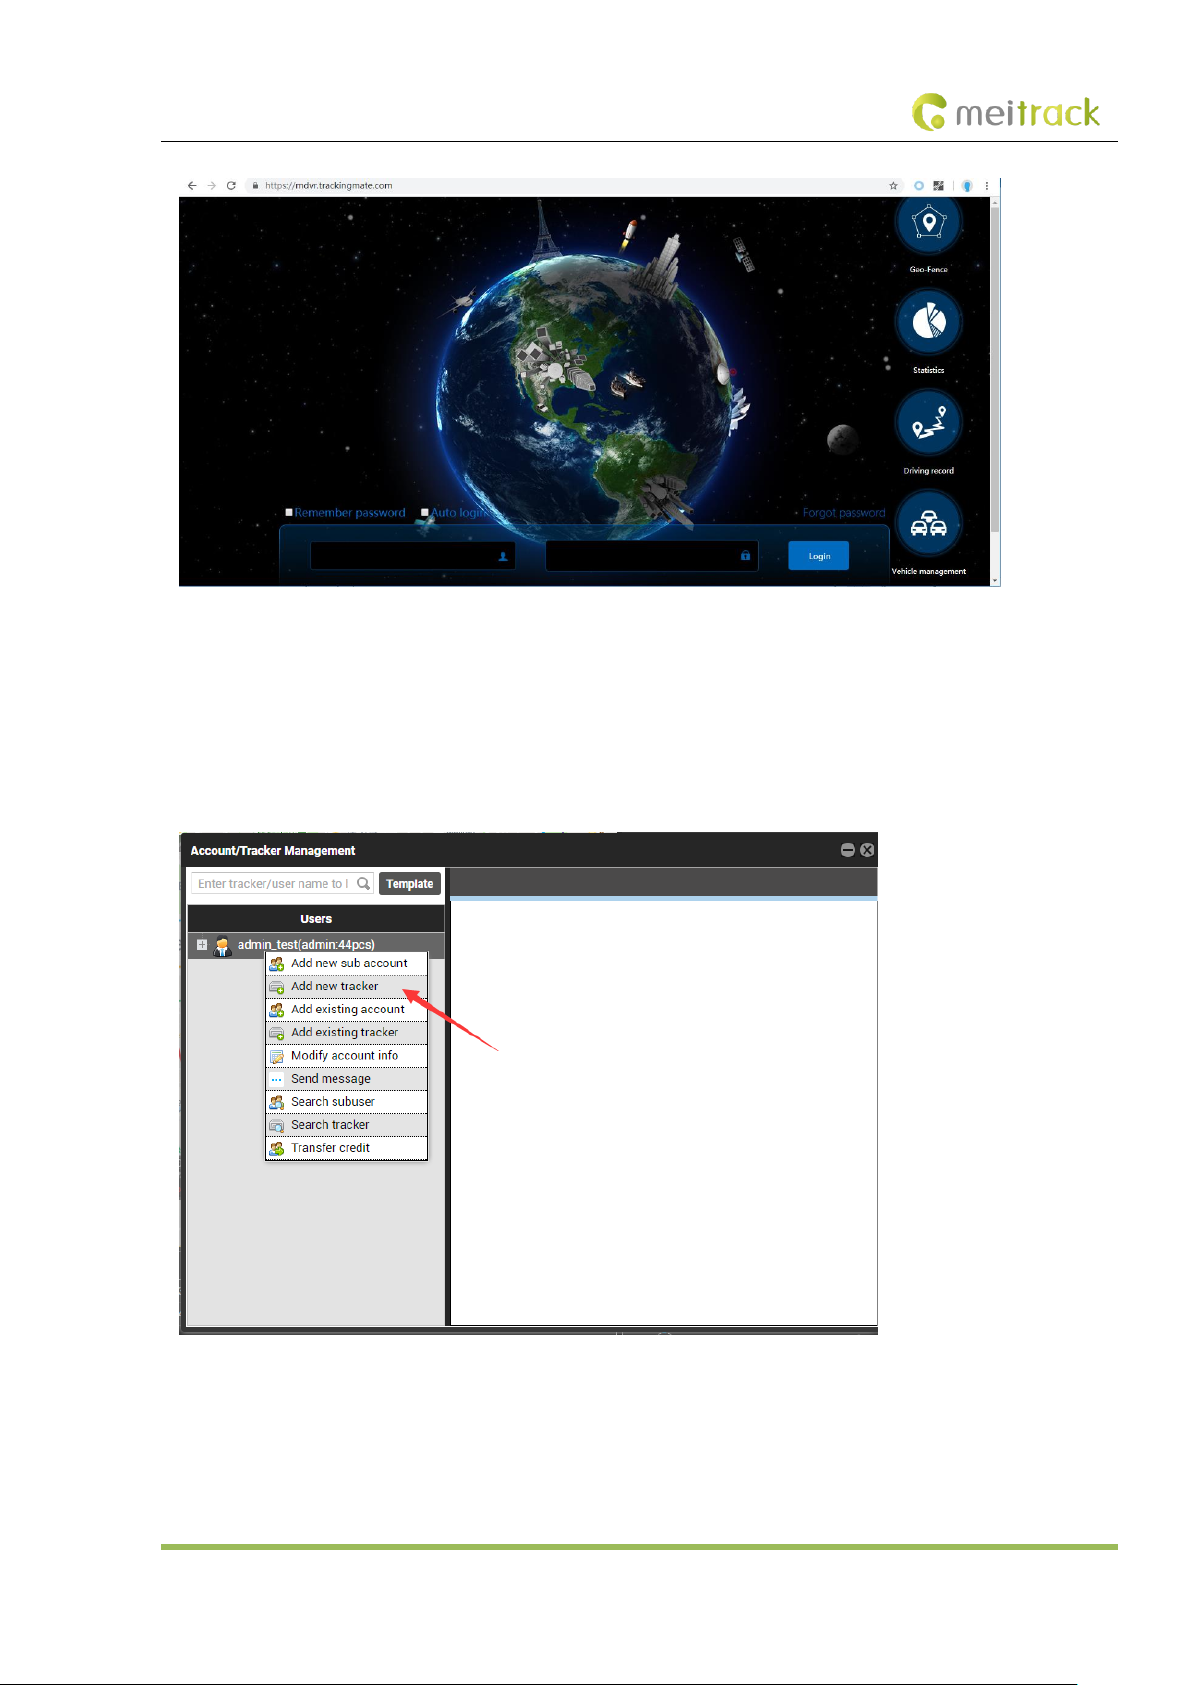
Visit https://mdvr.trackingmate.com/, enter the user name and password, and log in to the platform.
Page 24
MEITRACK MD511H User Guide
Copyright © 2019 Meitrack Group All rights reserved. - 24 -
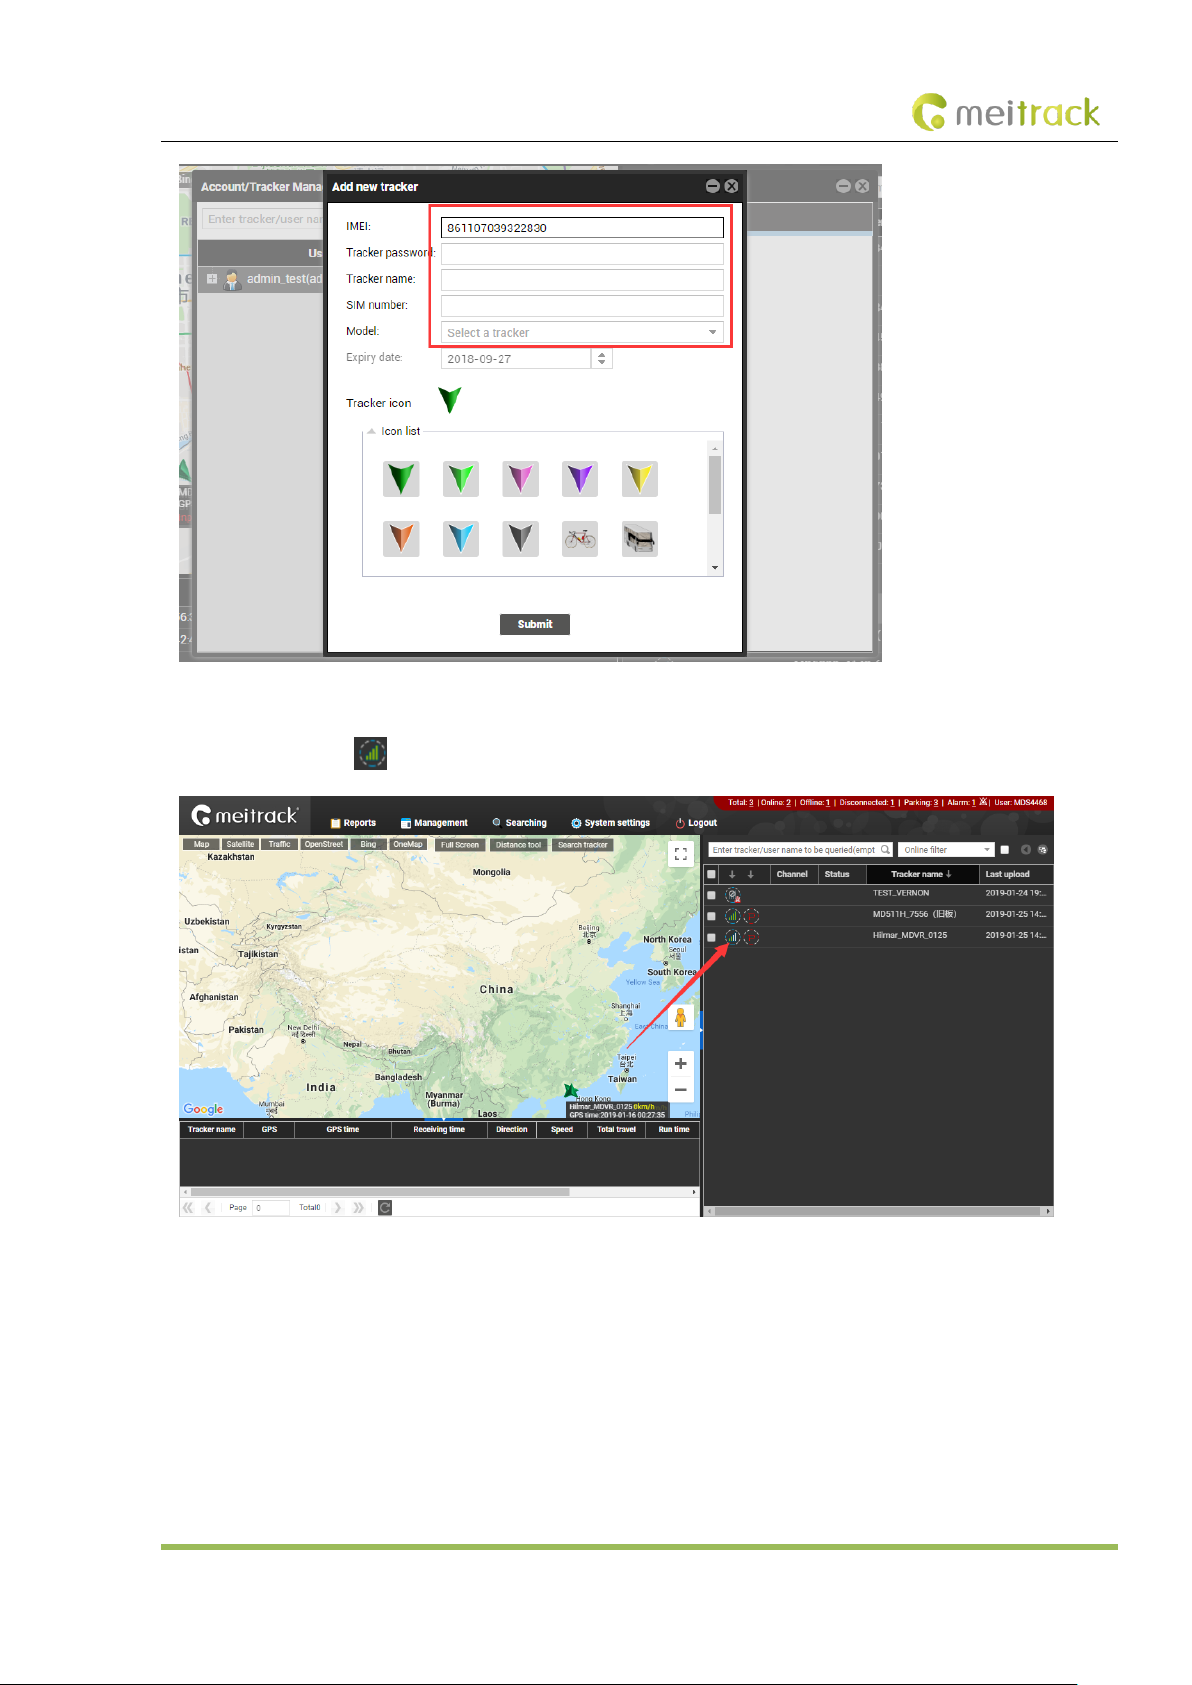
Add a MDVR:
1. On the main interface, choose Management. On the page that is displayed, select Account & Tracker from Use Normal.
2. On the Account/Tracker Management window, right-click a user, and select Add new tracker.
3. On the Add new tracker window, enter related information, modify the expiry date, and click Submit.
Note: The IMEI number must be consistent with that printed on the MDVR. Otherwise, the MDVR cannot be detected by the
system.
Page 25
MEITRACK MD511H User Guide
Copyright © 2019 Meitrack Group All rights reserved. - 25 -
Check whether the MDVR is online:
If the green signal icon is displayed, it means that the MDVR is online.
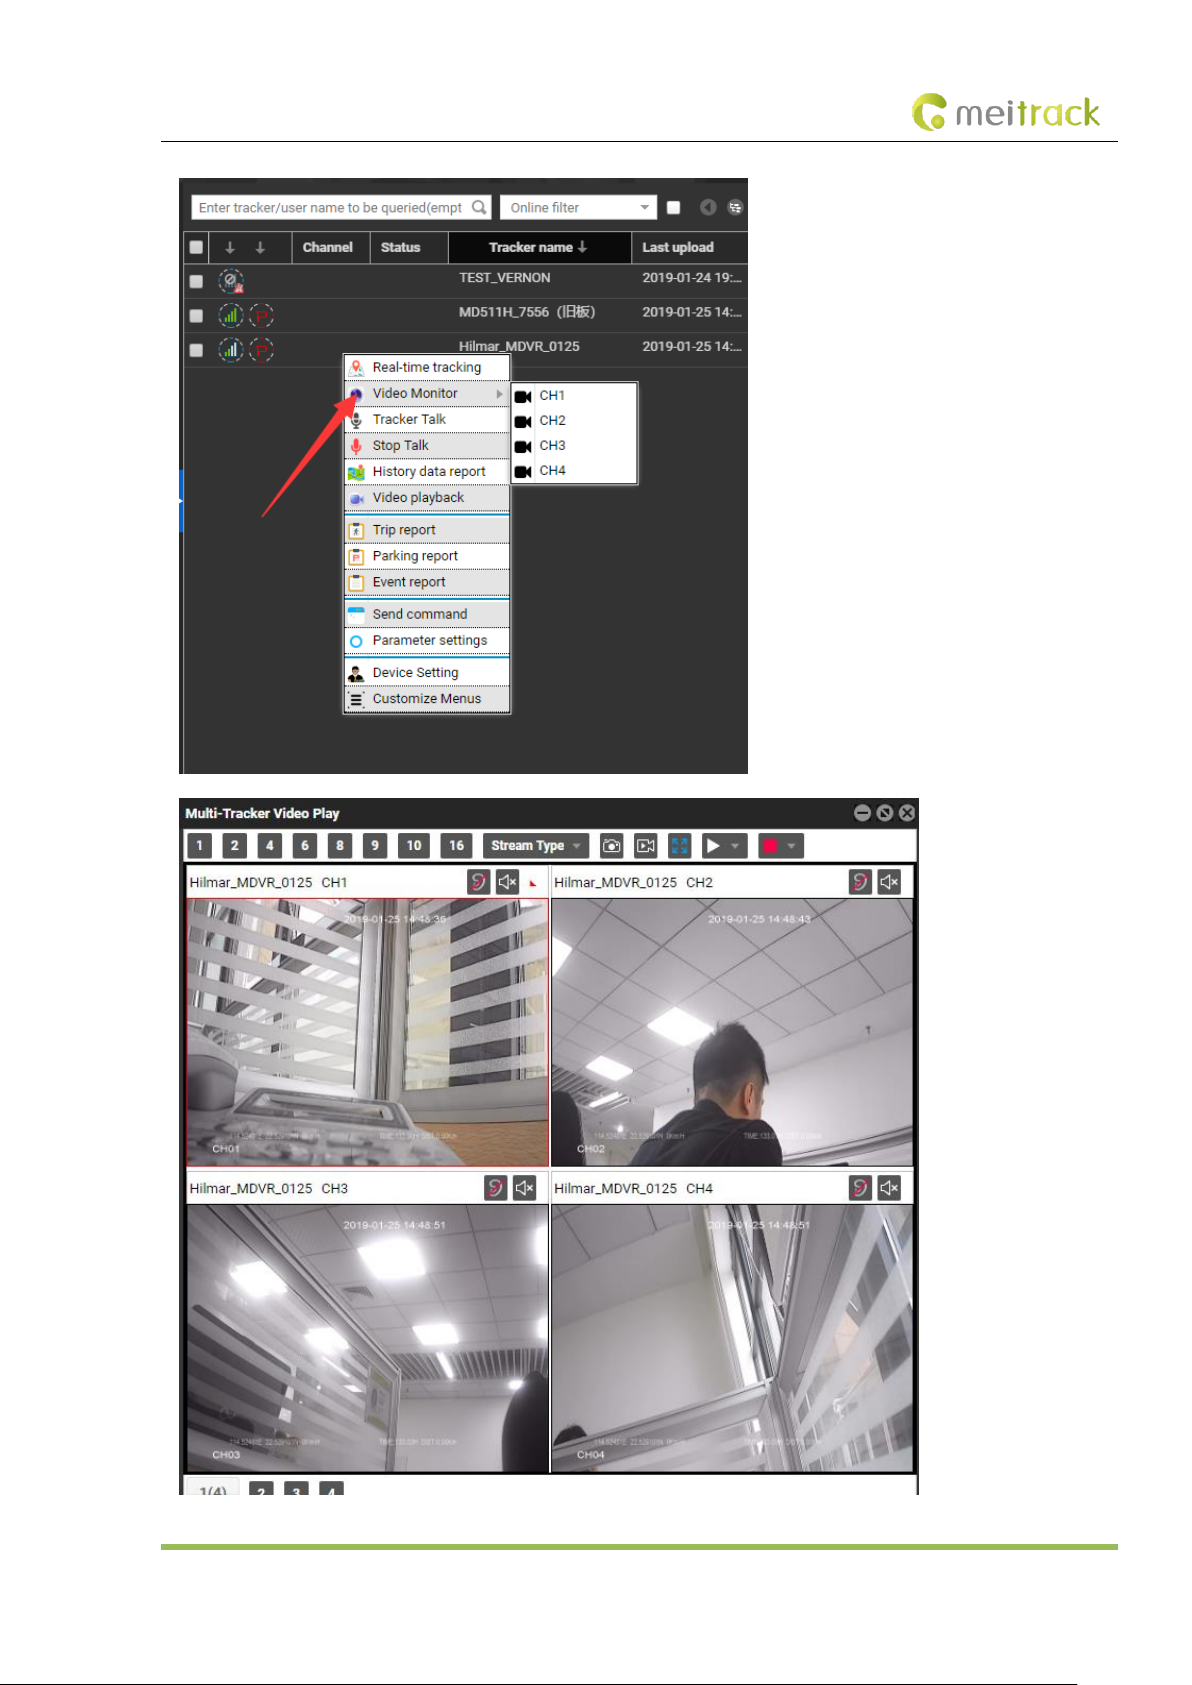
Video surveillance:
Right-click a MDVR and select Video Monitor to start four-channel surveillance.
Page 26
MEITRACK MD511H User Guide
Copyright © 2019 Meitrack Group All rights reserved. - 26 -
Page 27
MEITRACK MD511H User Guide
Copyright © 2019 Meitrack Group All rights reserved. - 27 -
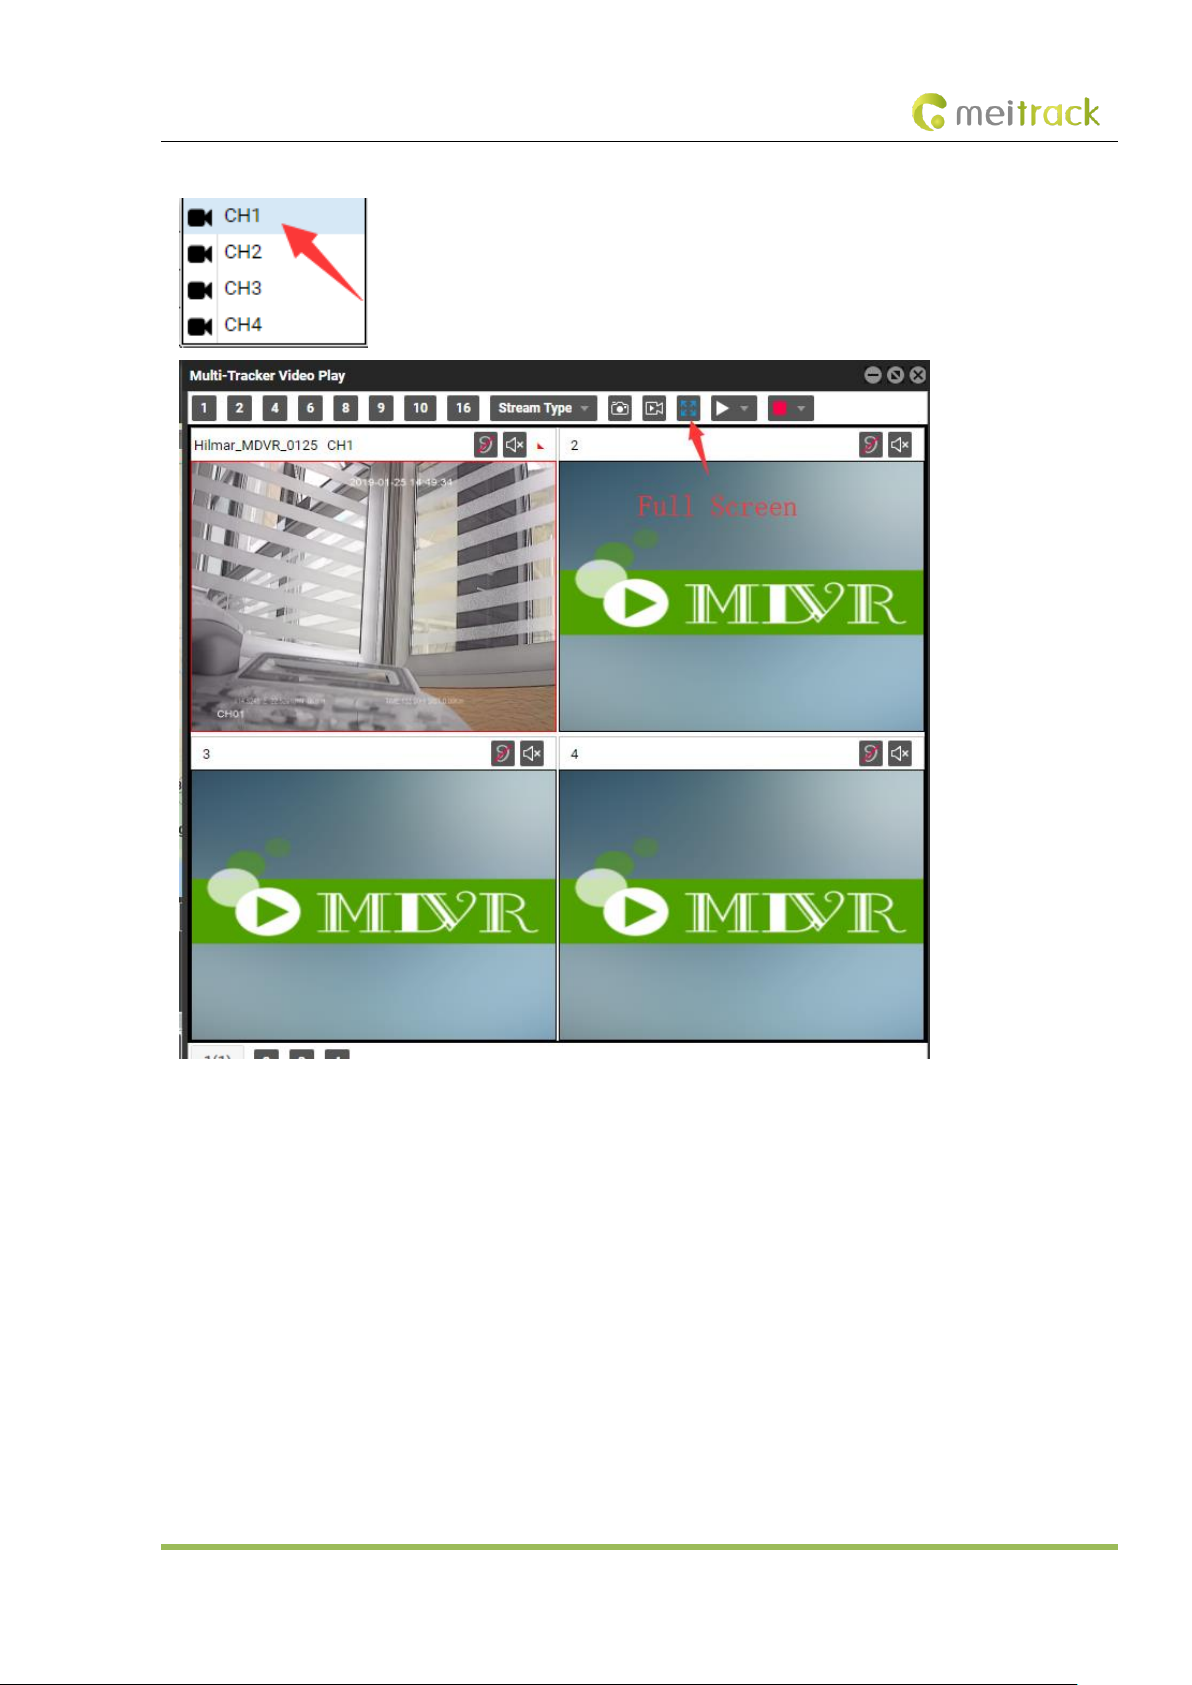
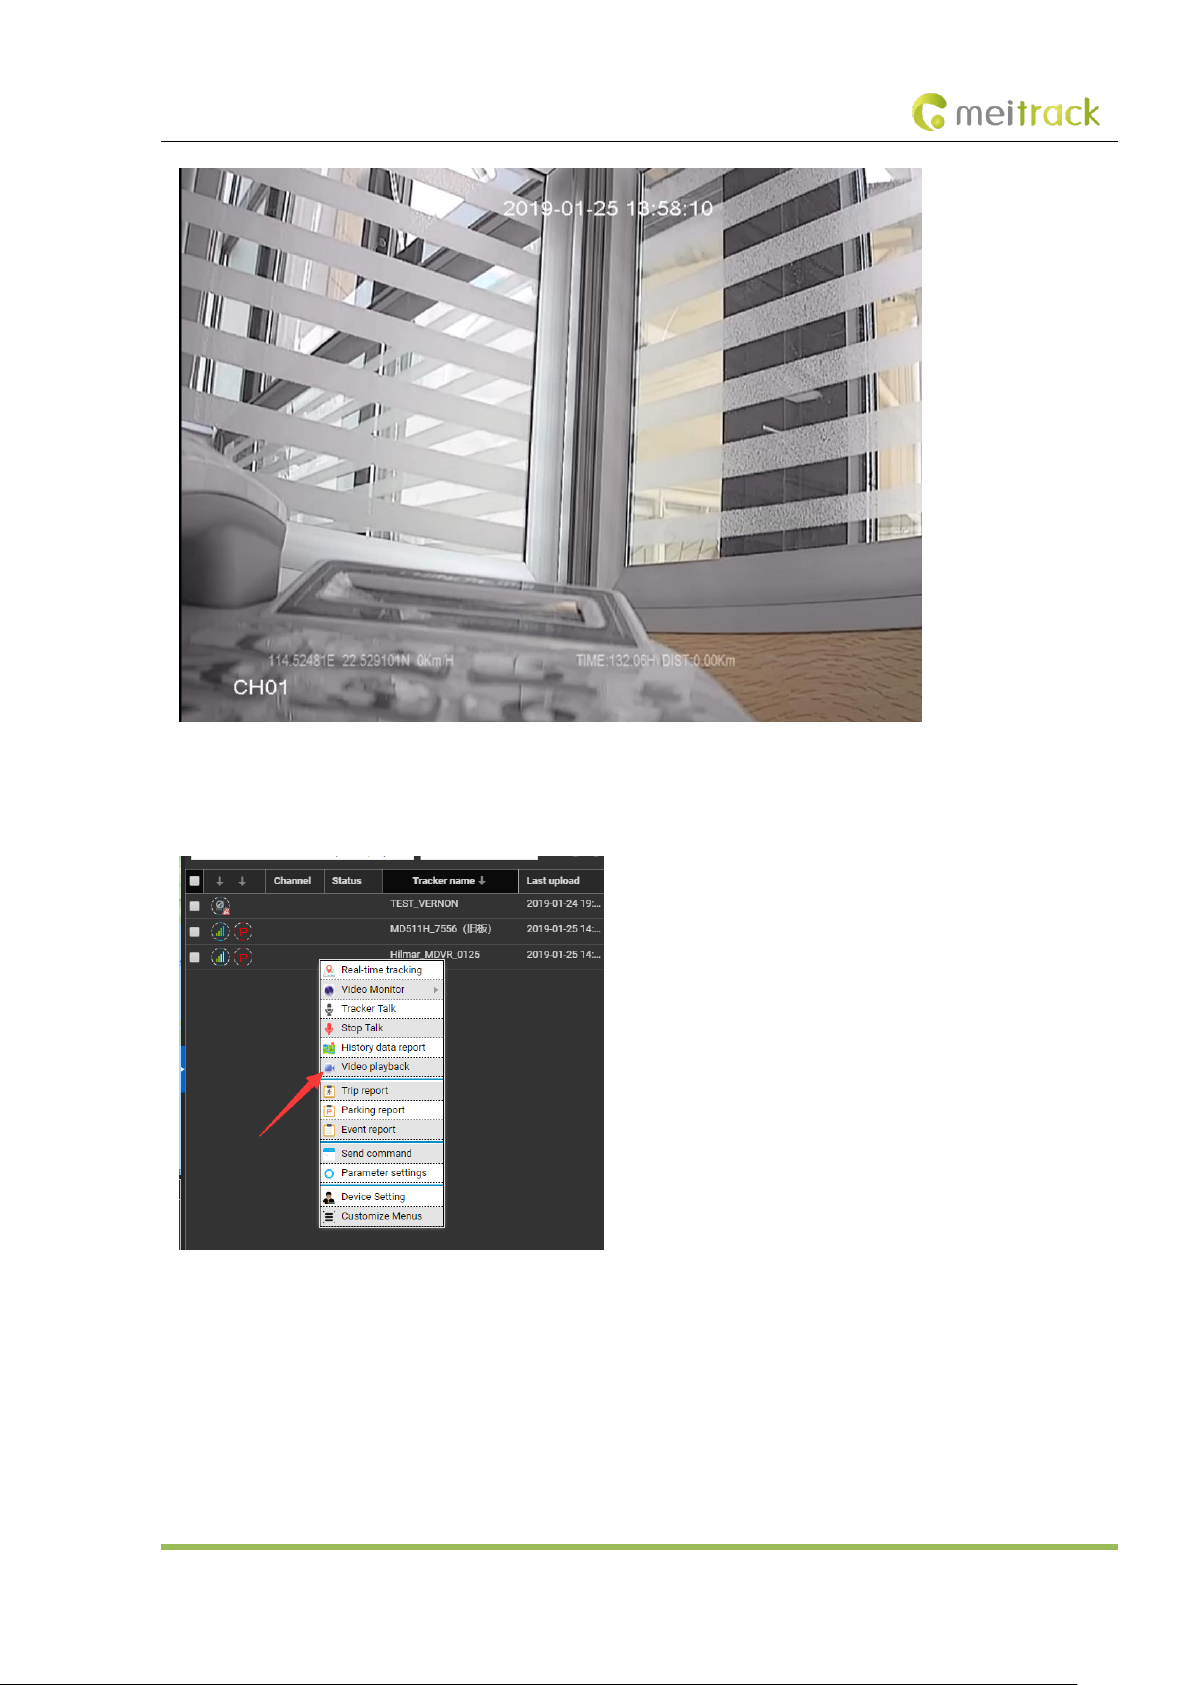
If you select a single channel, such as CH1, videos in this channel will be played.
Page 28
MEITRACK MD511H User Guide
Copyright © 2019 Meitrack Group All rights reserved. - 28 -
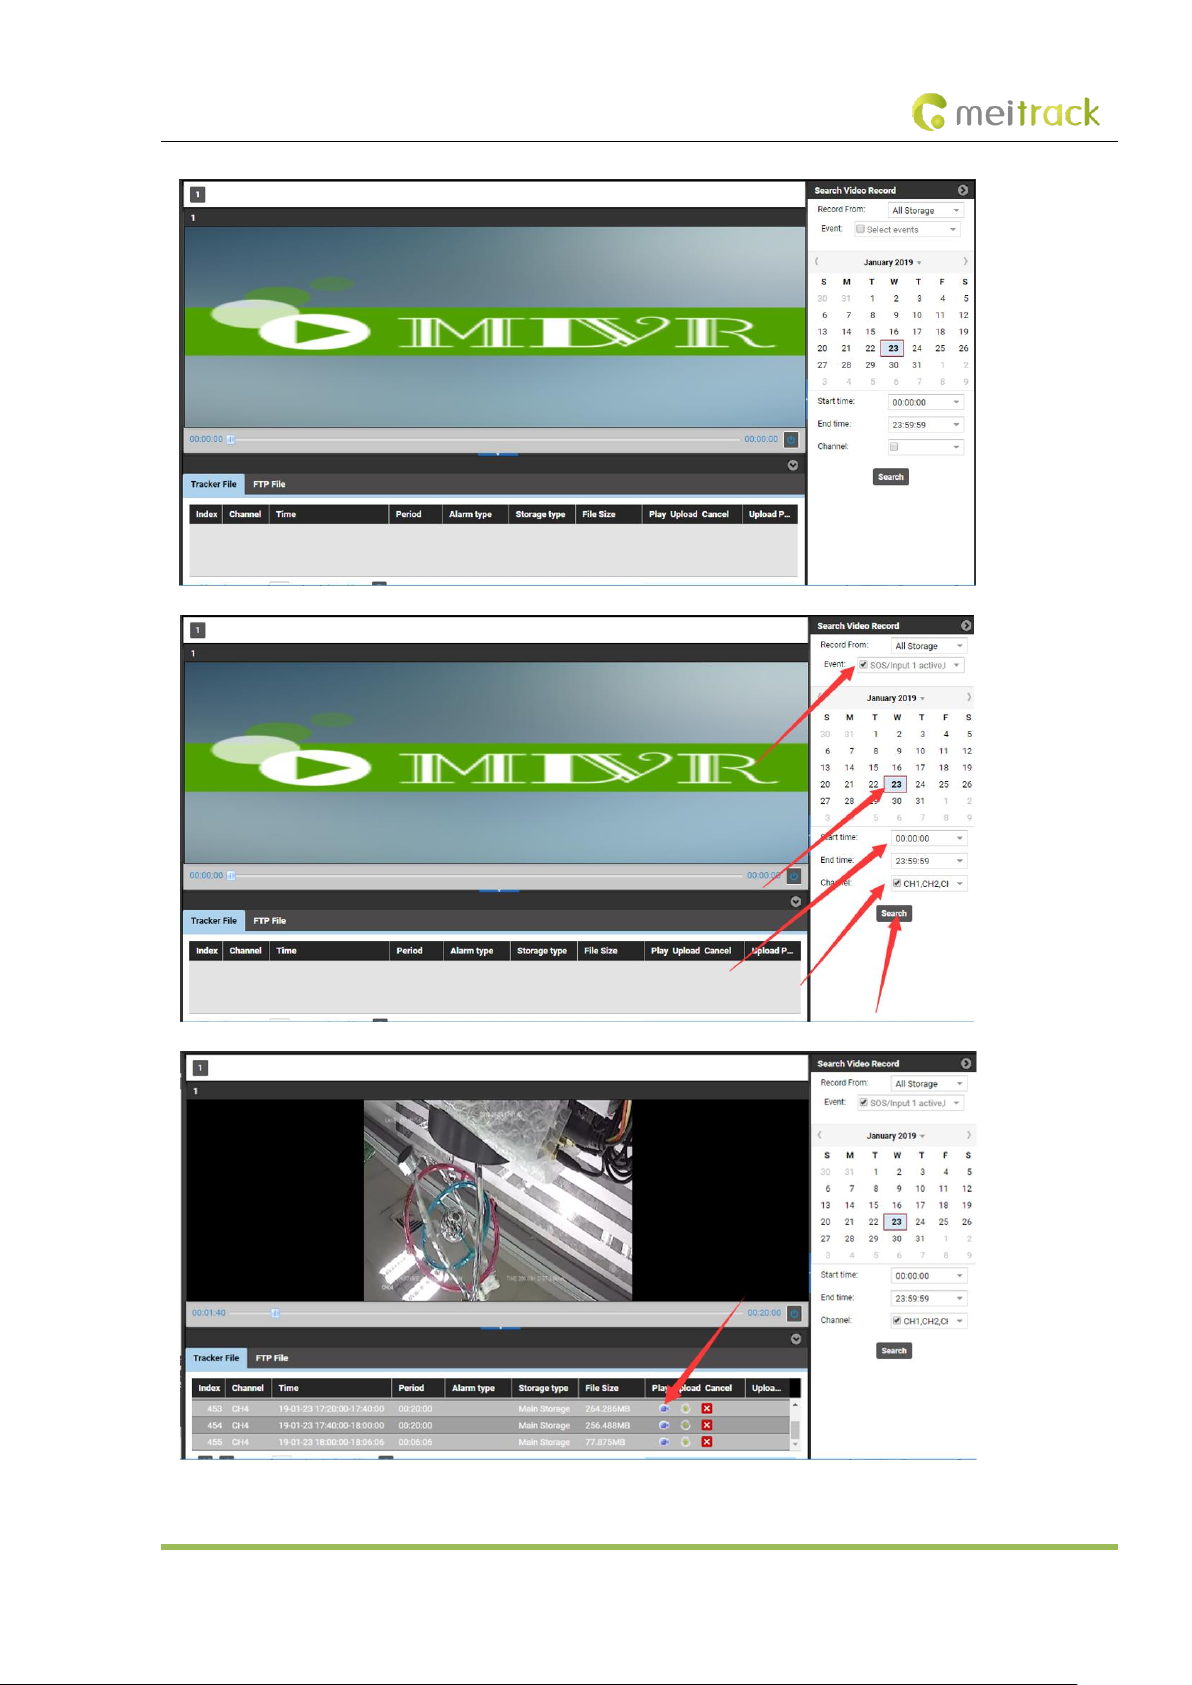
Video playback and searching:
Right-click a MDVR and select Video playback. On the page that is displayed, set Start time, End time and Channel, and click
Search. The video playback will start.
Page 29
MEITRACK MD511H User Guide
Copyright © 2019 Meitrack Group All rights reserved. - 29 -
As shown in the previous figure, the icon in the Play column is used to play the current video, and the icon in the Upload column
Page 30
MEITRACK MD511H User Guide
Copyright © 2019 Meitrack Group All rights reserved. - 30 -
is used to play the video and upload it to the FTP server.
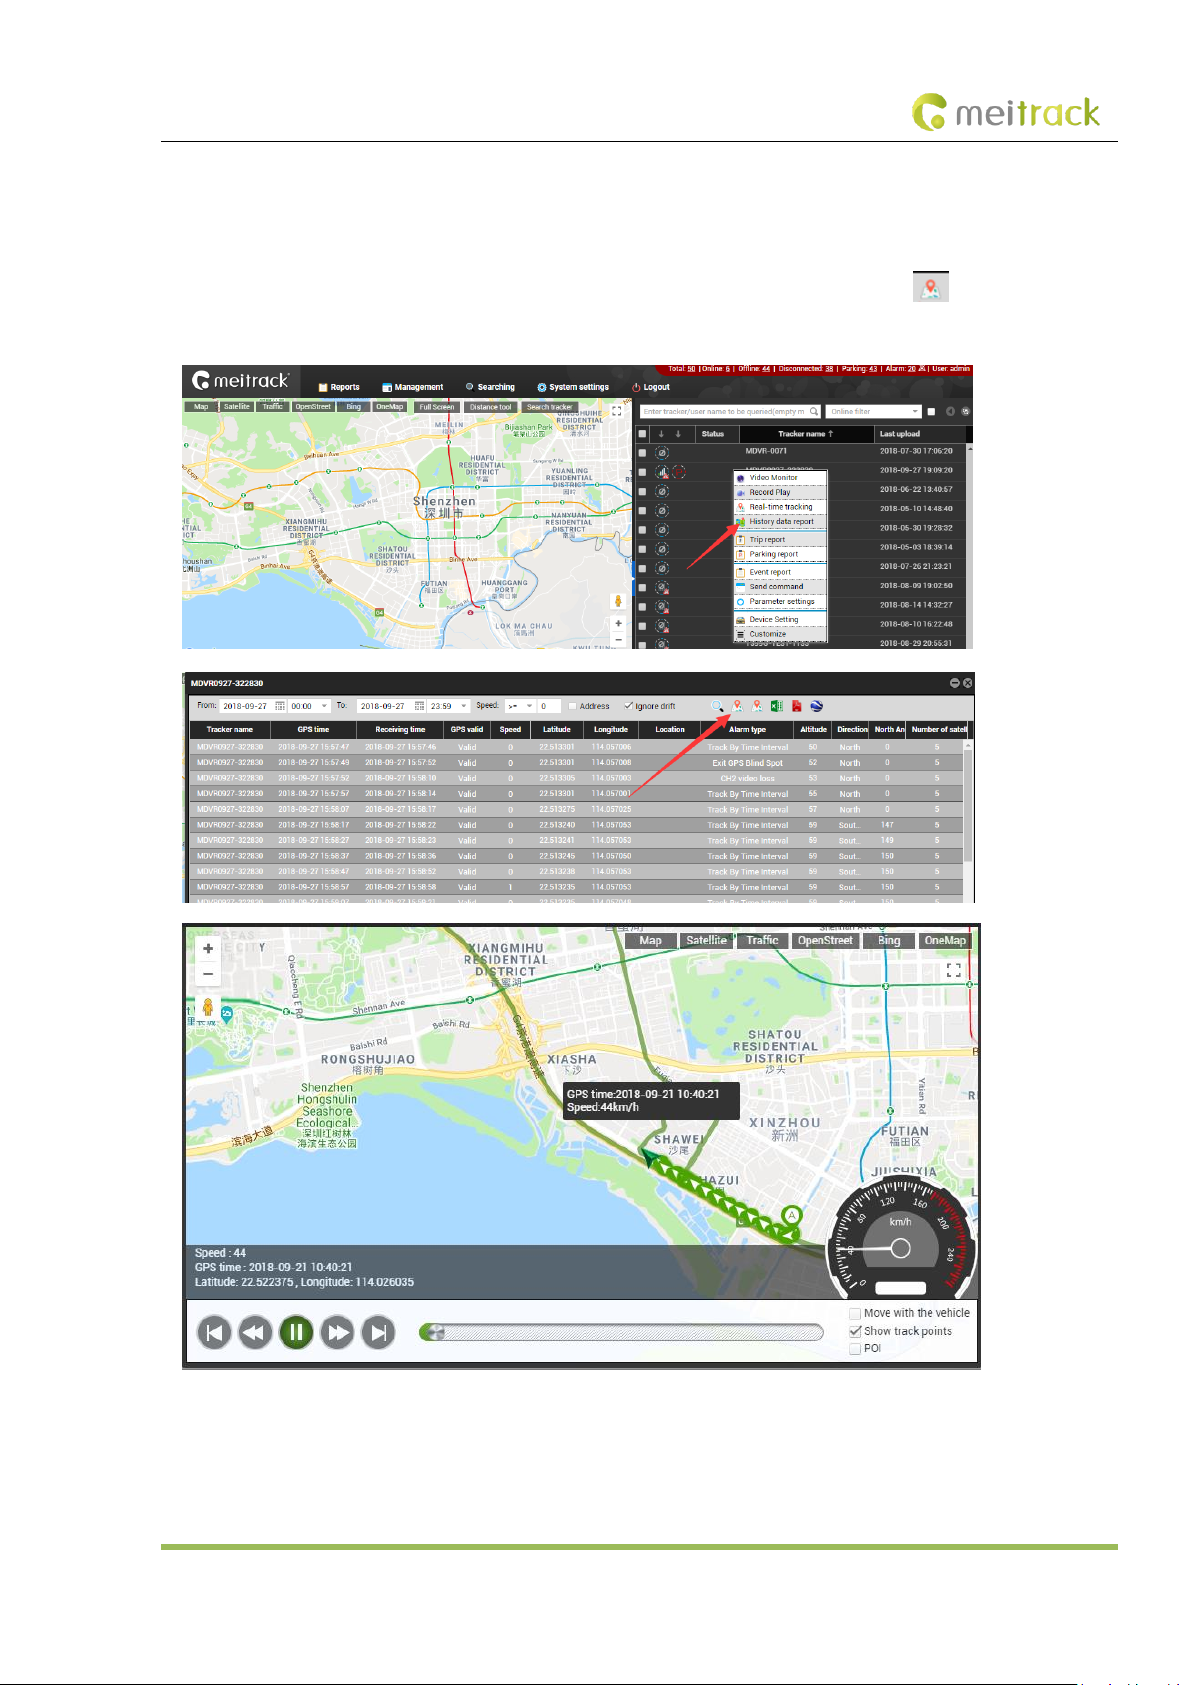
Query historical positioning data:
Right-click a MDVR and select History data report. On the page that is displayed, click the map icon . The device's trips will
be displayed.
5 Configuring the MDVR by Using the LAN Web Page
(If you want to know how to use the function, please see the MD522S & MD511H Operation and Function Manual.)
Page 31
MEITRACK MD511H User Guide
Copyright © 2019 Meitrack Group All rights reserved. - 31 -
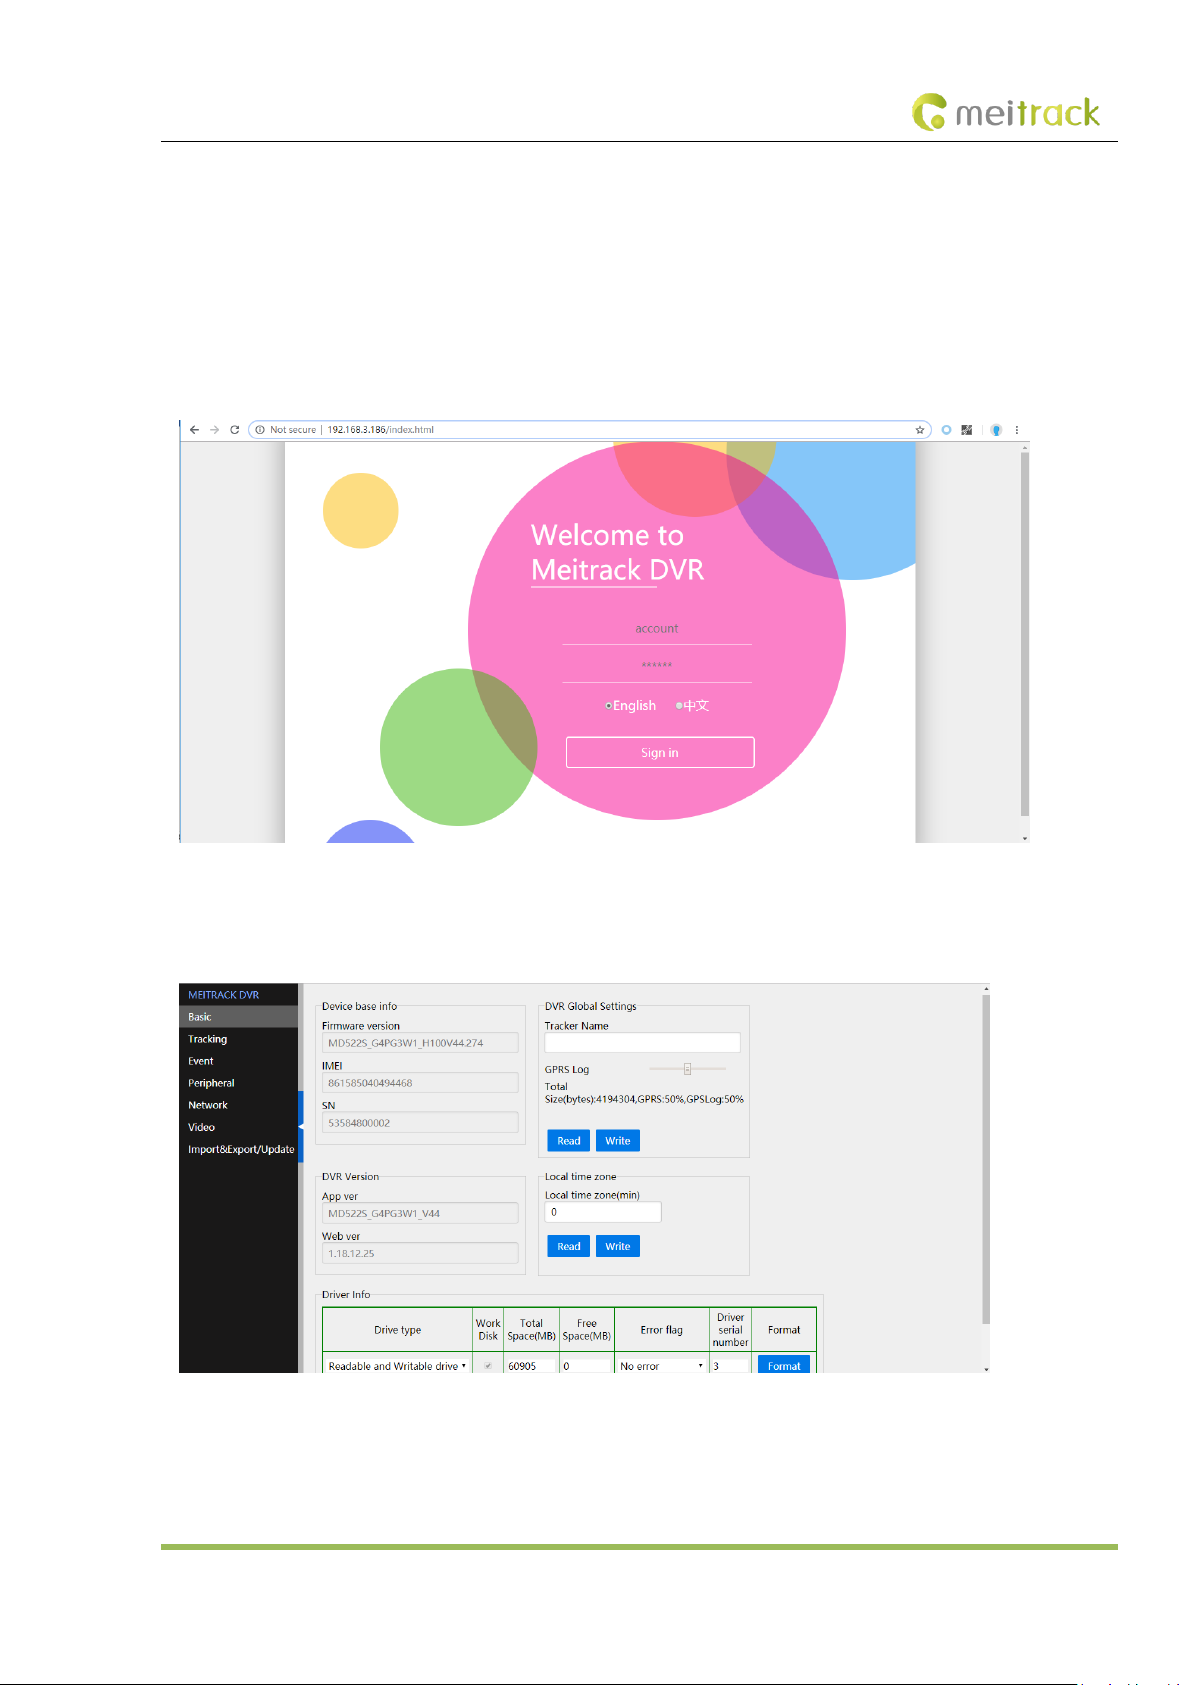
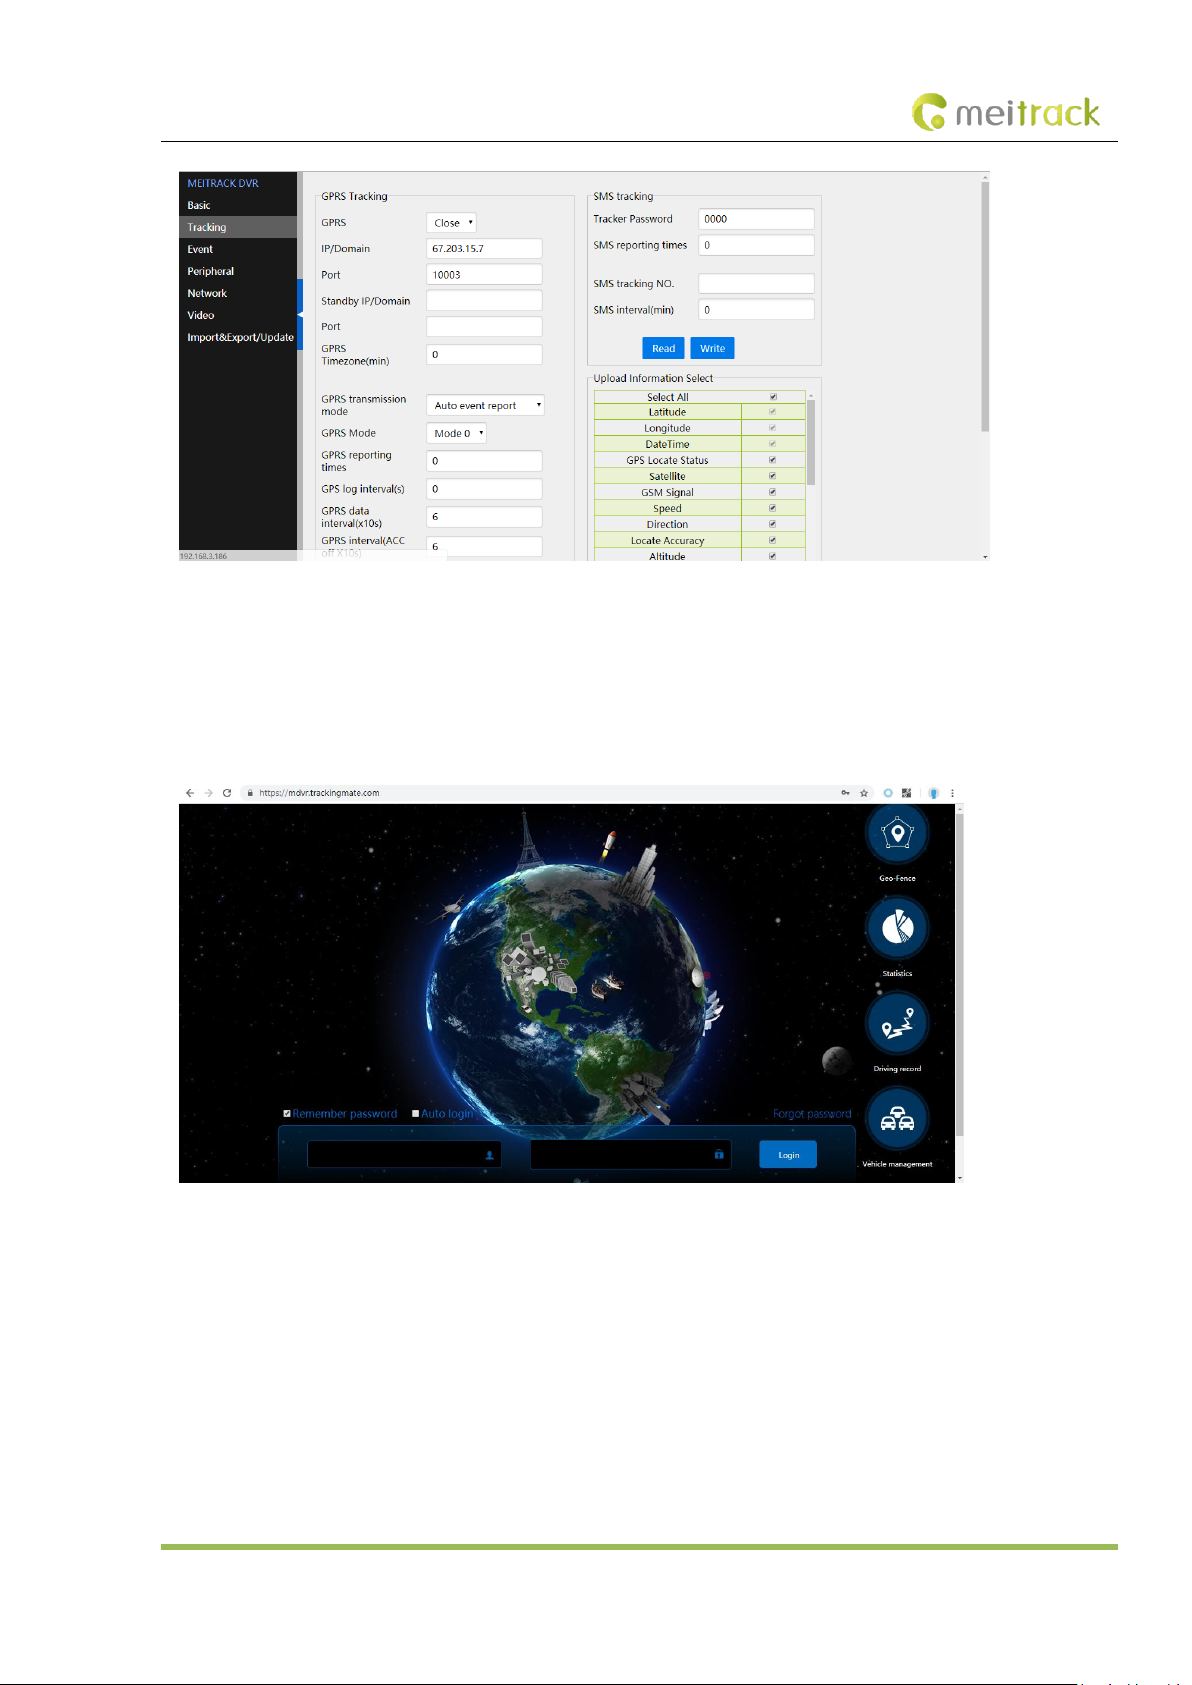
You can use the LAN to configure the MDVR. There are two methods as follows:
1) Connect the computer and MDVR to the same WiFi hotspot, and then configure the MDVR on the web page.
2) Connect the MDVR to the Ethernet, ensure that the computer and MDVR are in the same LAN, and then configure the
MDVR on the web page.
You need to obtain the IP address of the LAN connected to the MDVR. (To obtain the IP address, you can connect the MDVR to
Meitrack Manager to check the network status, send a command to query the network status, or contact the LAN administrator.)
After entering the MDVR IP address in the address bar of your web browser, you can configure the MDVR on the web page.
On the web page that is displayed, enter the user name and password (default user name: admin; default password: 000000),
and log in to the system. Then configure the MDVR on the web page. The configuration method is similar to that of Meitrack
Manager.
Page 32
MEITRACK MD511H User Guide
Copyright © 2019 Meitrack Group All rights reserved. - 32 -
6 MS03 Web Platform
(If you want to know how to use the platform, please see the MD522S & MD511H Operation and Function Manual.)
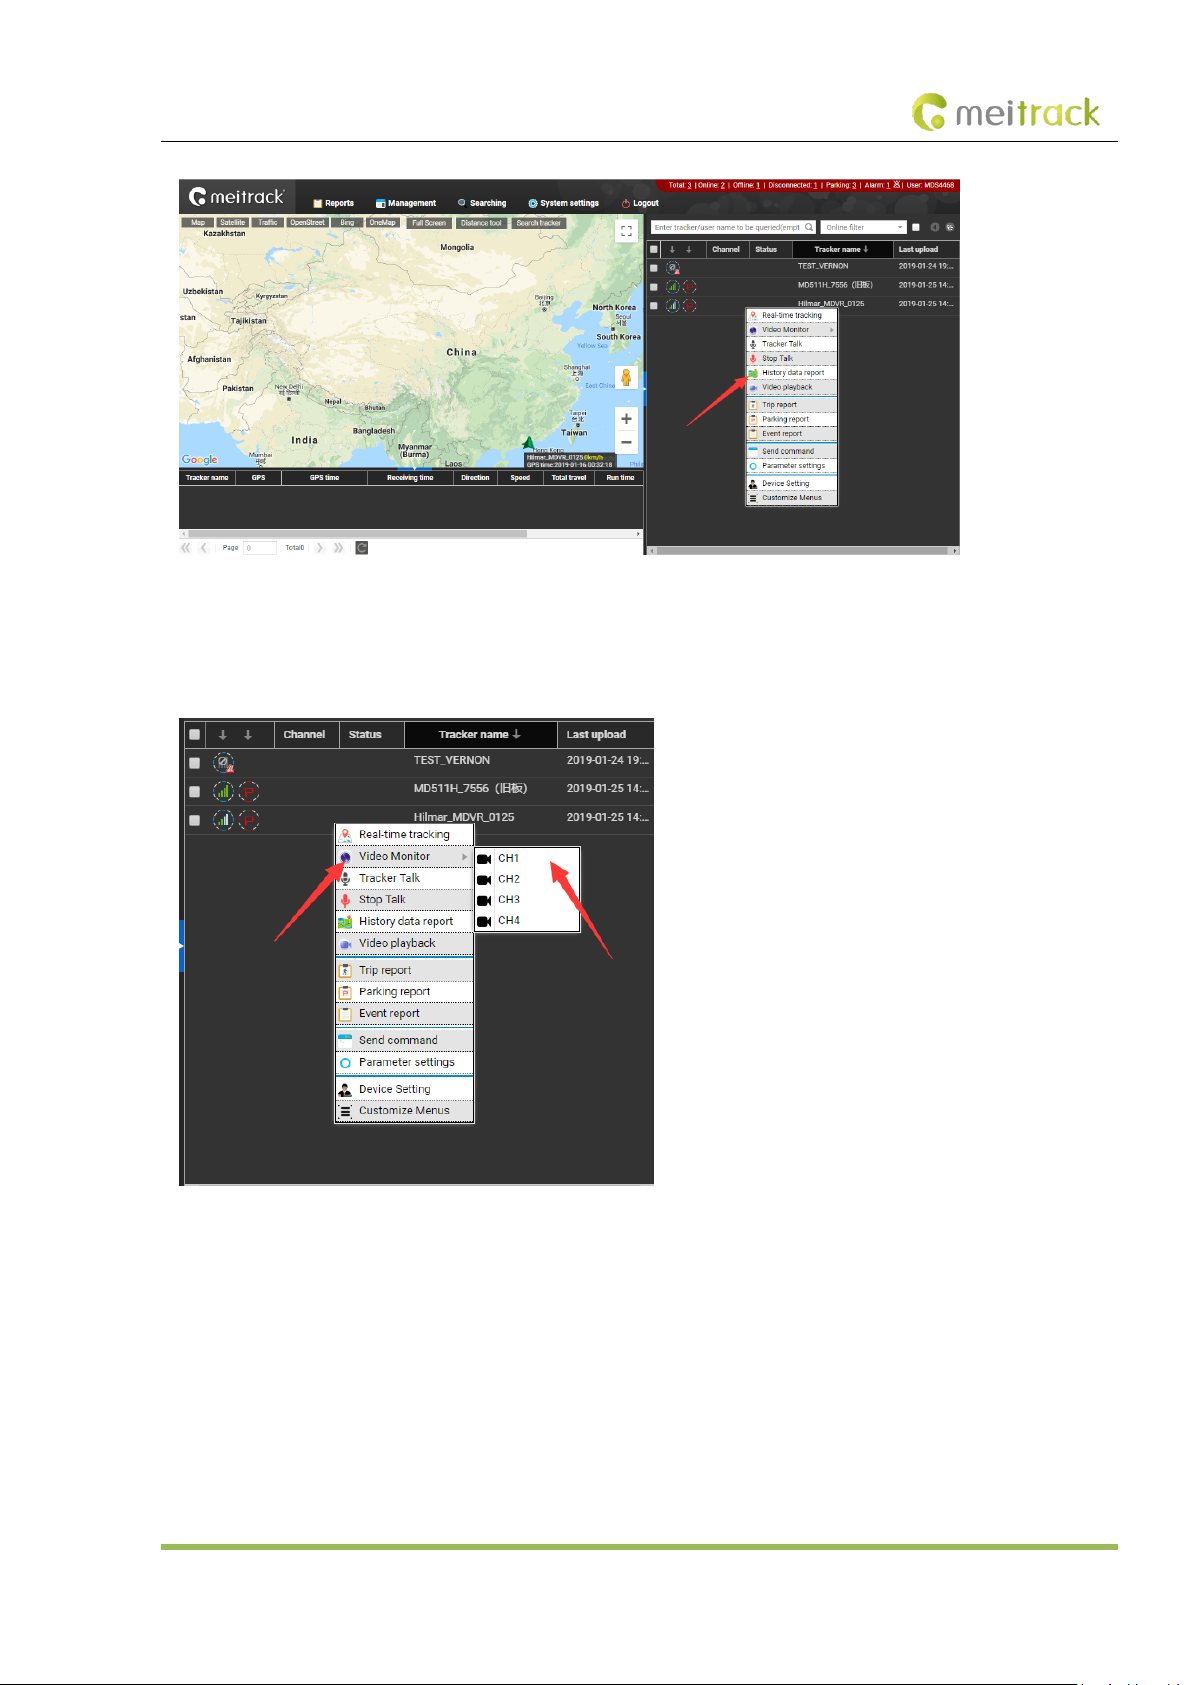
You can visit mdvr.trackingmate.com and log in to the MS03 platform. On the platform, live streams of the MDVR can be loaded
(real-time monitoring), and recording files can be stored (large files are stored on the FTP server).
After logging in to the platform and adding the MDVR, you can use the positioning function, monitor the MDVR in real time, play
back videos, query alert videos, and make a call.
Page 33
MEITRACK MD511H User Guide
Copyright © 2019 Meitrack Group All rights reserved. - 33 -
6.1 Real-time Monitoring
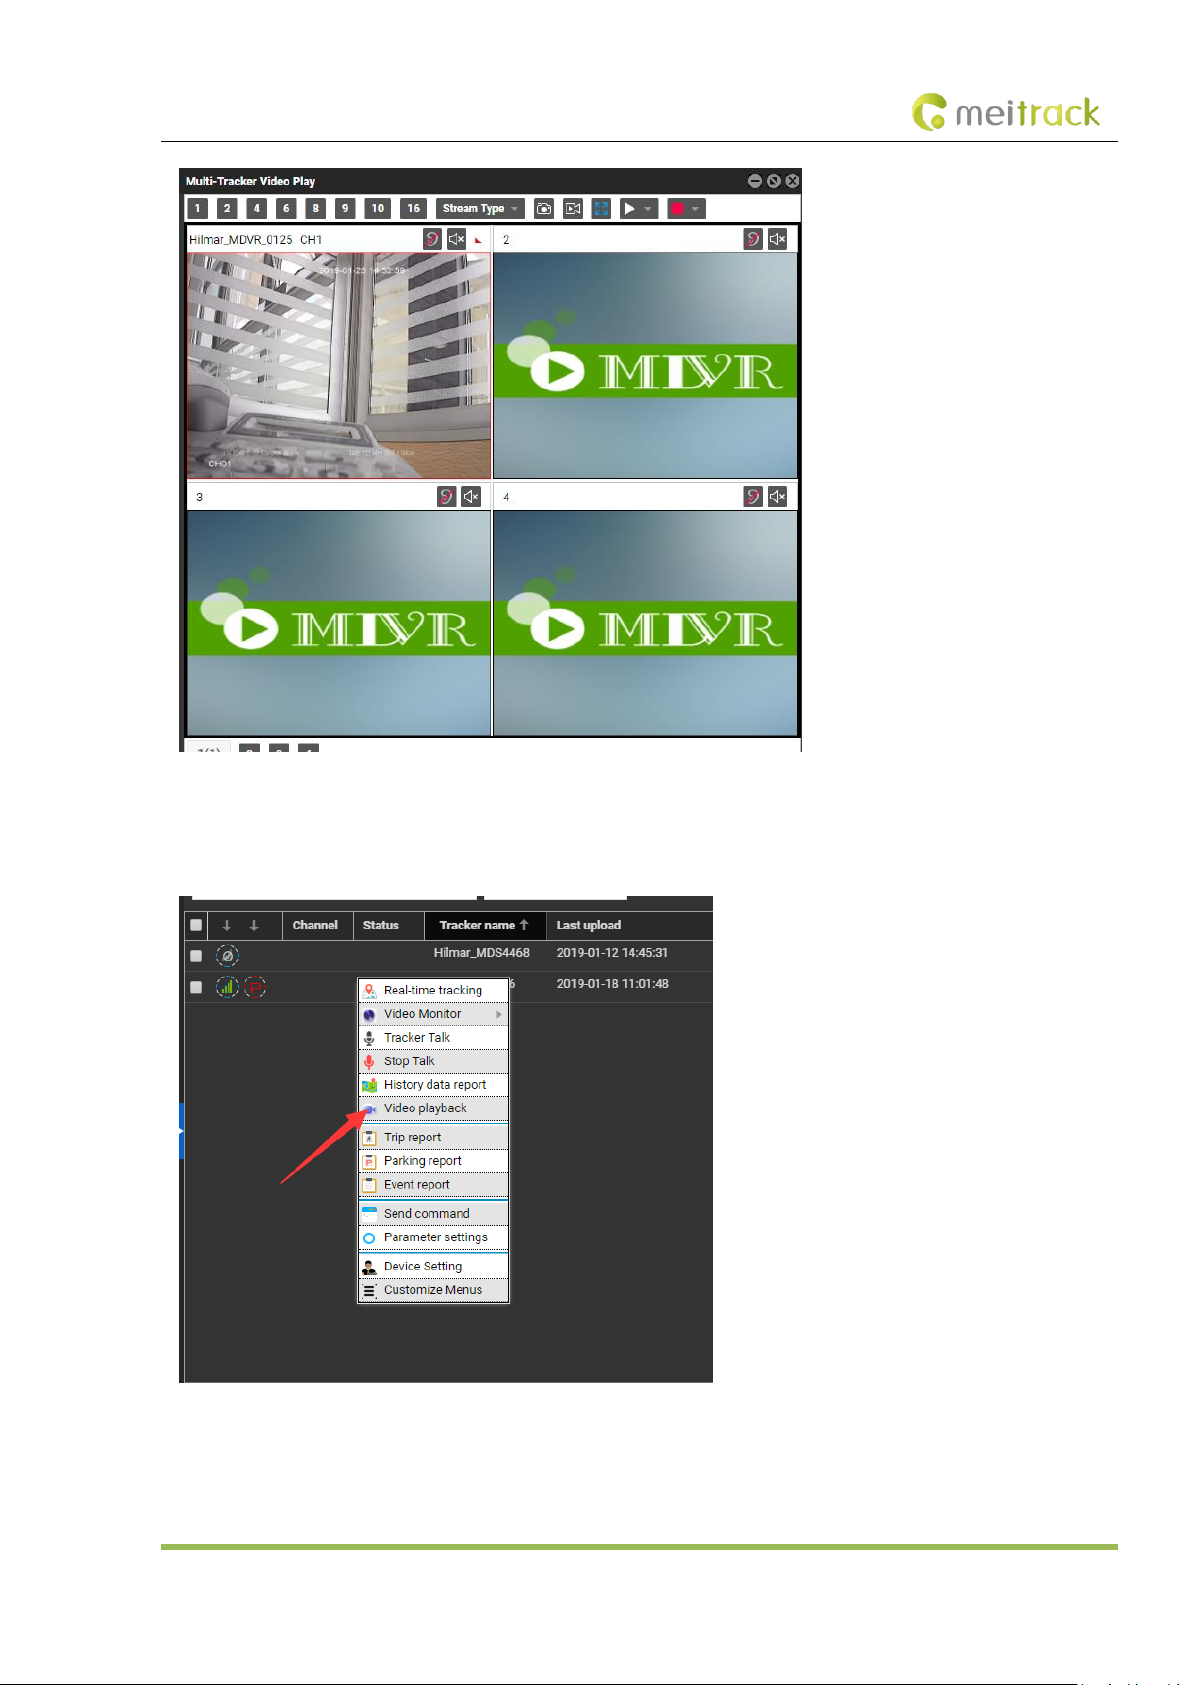
Right-click the MDVR, and select Video Monitor and a camera surveillance channel to play videos.
Page 34
MEITRACK MD511H User Guide
Copyright © 2019 Meitrack Group All rights reserved. - 34 -
6.2 Video Playback
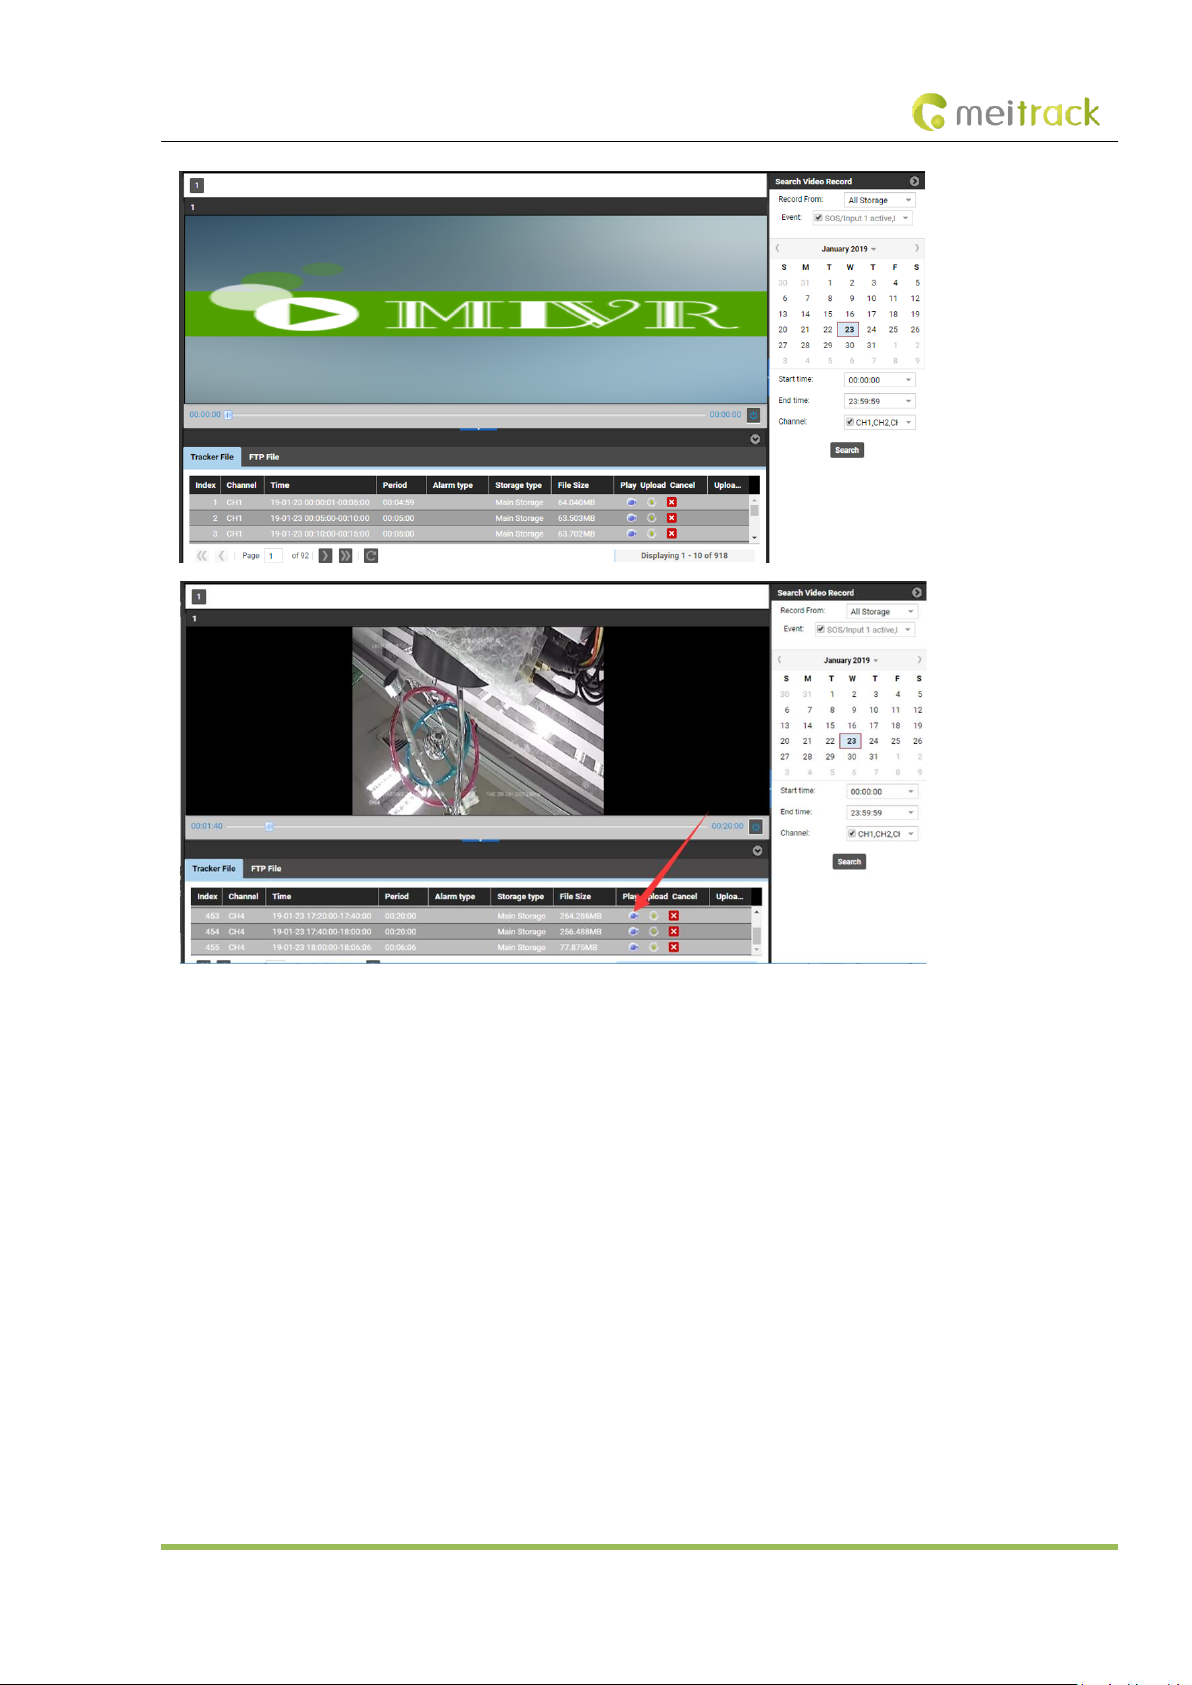
Right-click the MDVR and select Video playback.
Select related videos based on events.
Page 35
MEITRACK MD511H User Guide
Copyright © 2019 Meitrack Group All rights reserved. - 35 -
6.3 Two-Way Calling
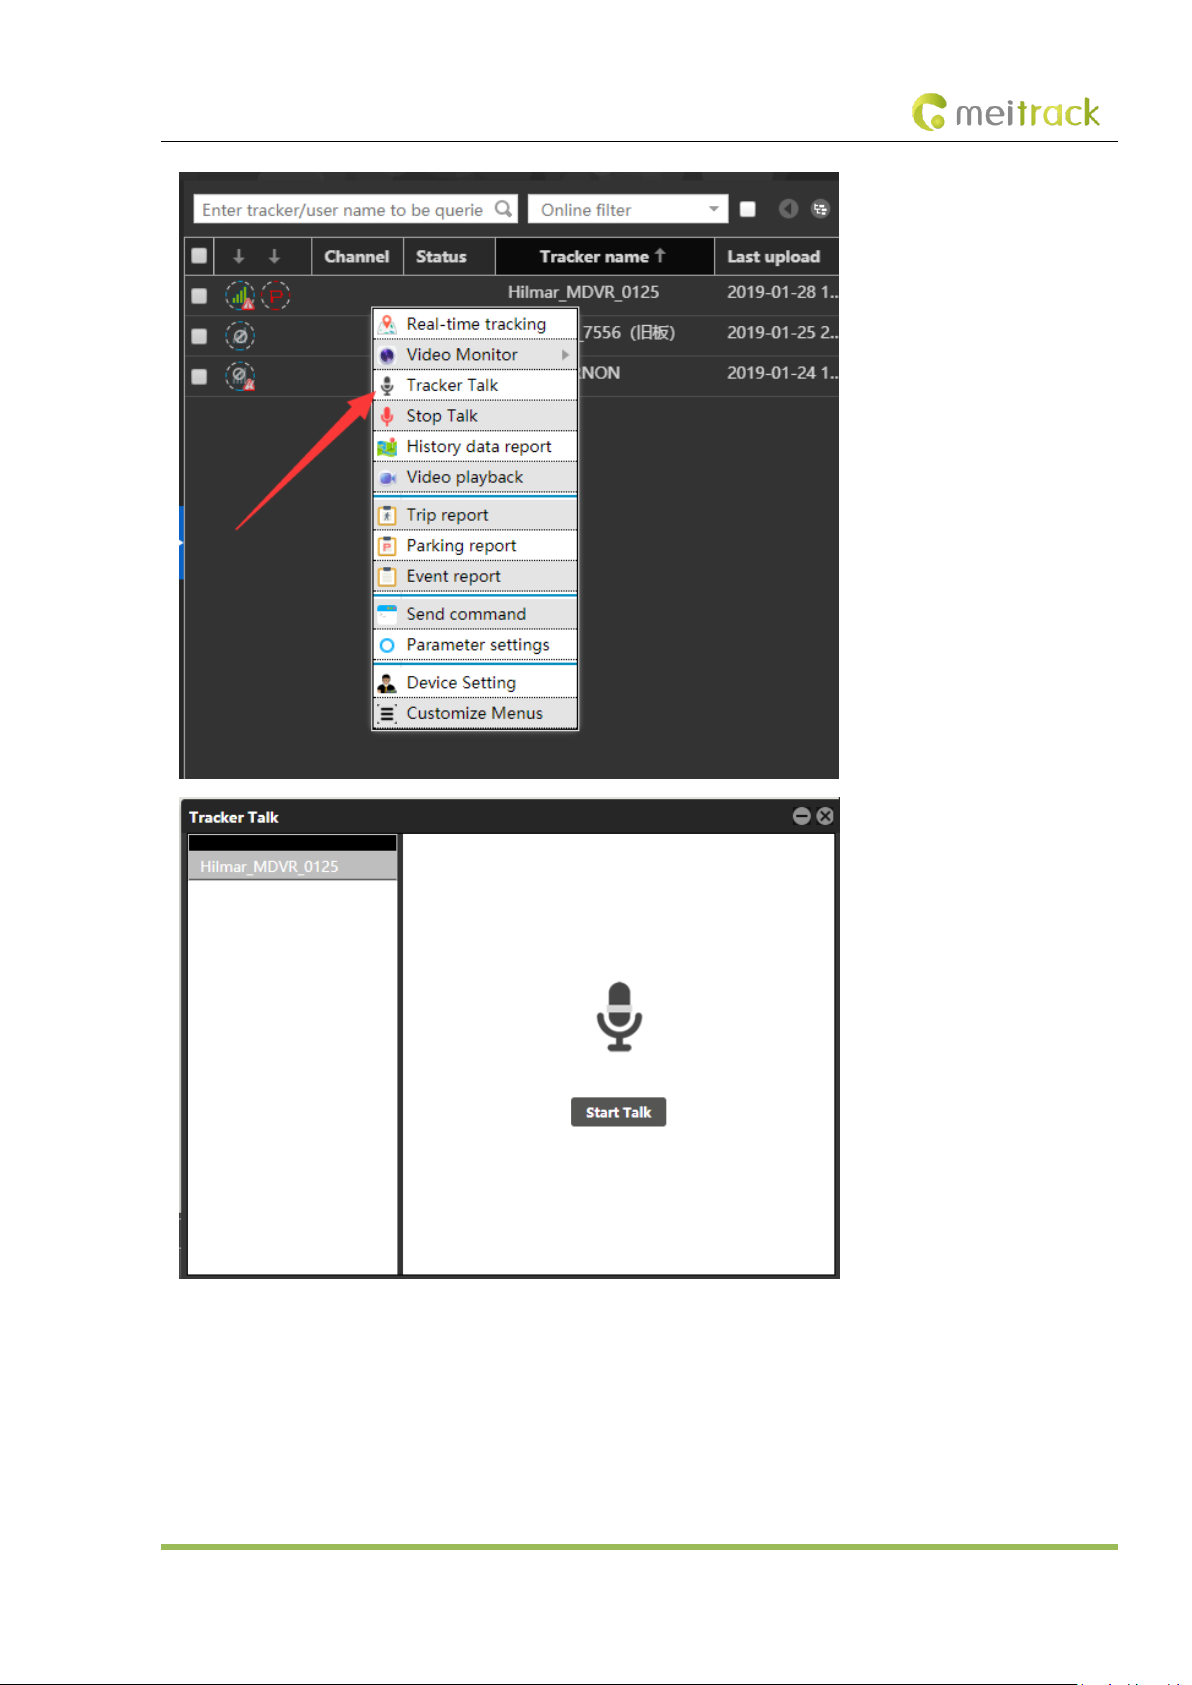
Right-click the MDVR and select Tracker Talk.
Page 36
MEITRACK MD511H User Guide
Copyright © 2019 Meitrack Group All rights reserved. - 36 -
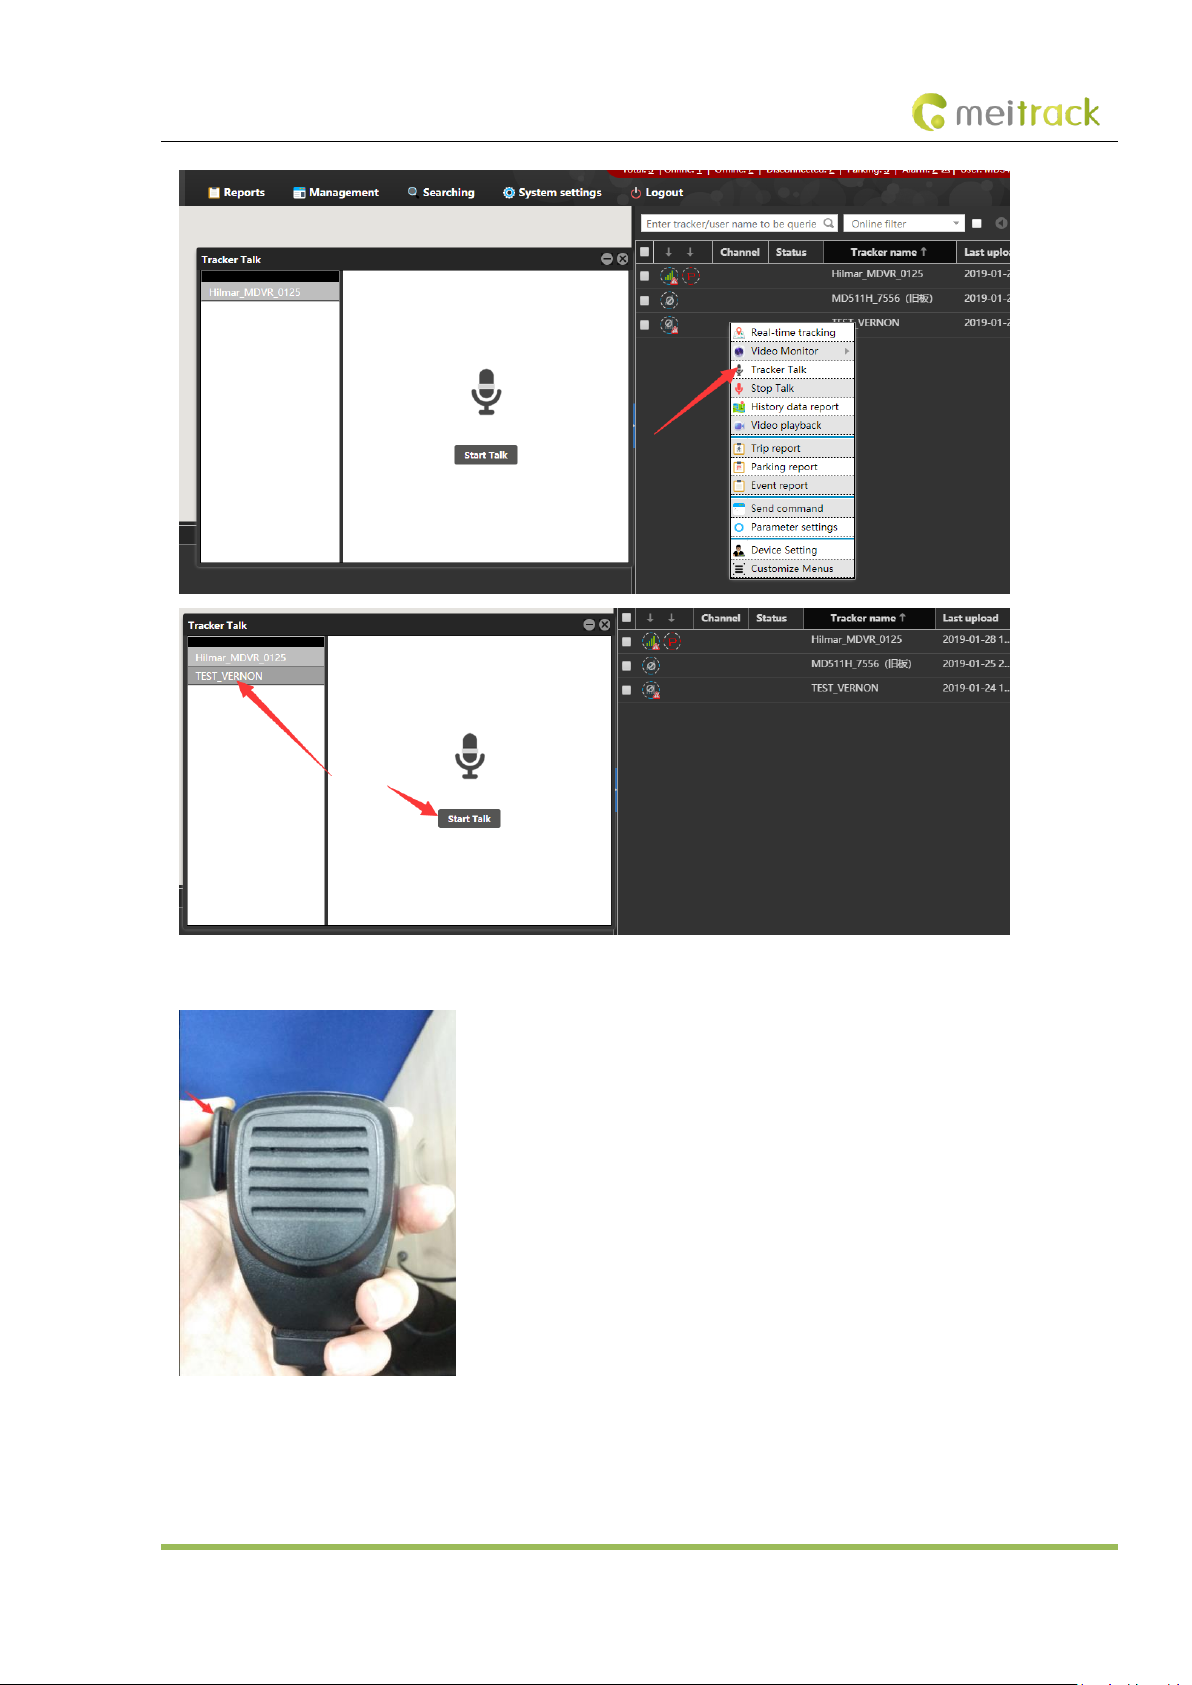
You can talk with multiple users.
Page 37
MEITRACK MD511H User Guide
Copyright © 2019 Meitrack Group All rights reserved. - 37 -
Select the users to call, and click Start Talk to start broadcasting.
Before a talk starts, MDVR users need to press and hold down the talk button at the left side of the MDVR. During broadcasting,
a call can be made between platform users and MDVR users, while MDVR users cannot talk with each other.
Page 38
MEITRACK MD511H User Guide
Copyright © 2019 Meitrack Group All rights reserved. - 38 -
7 MS03 App
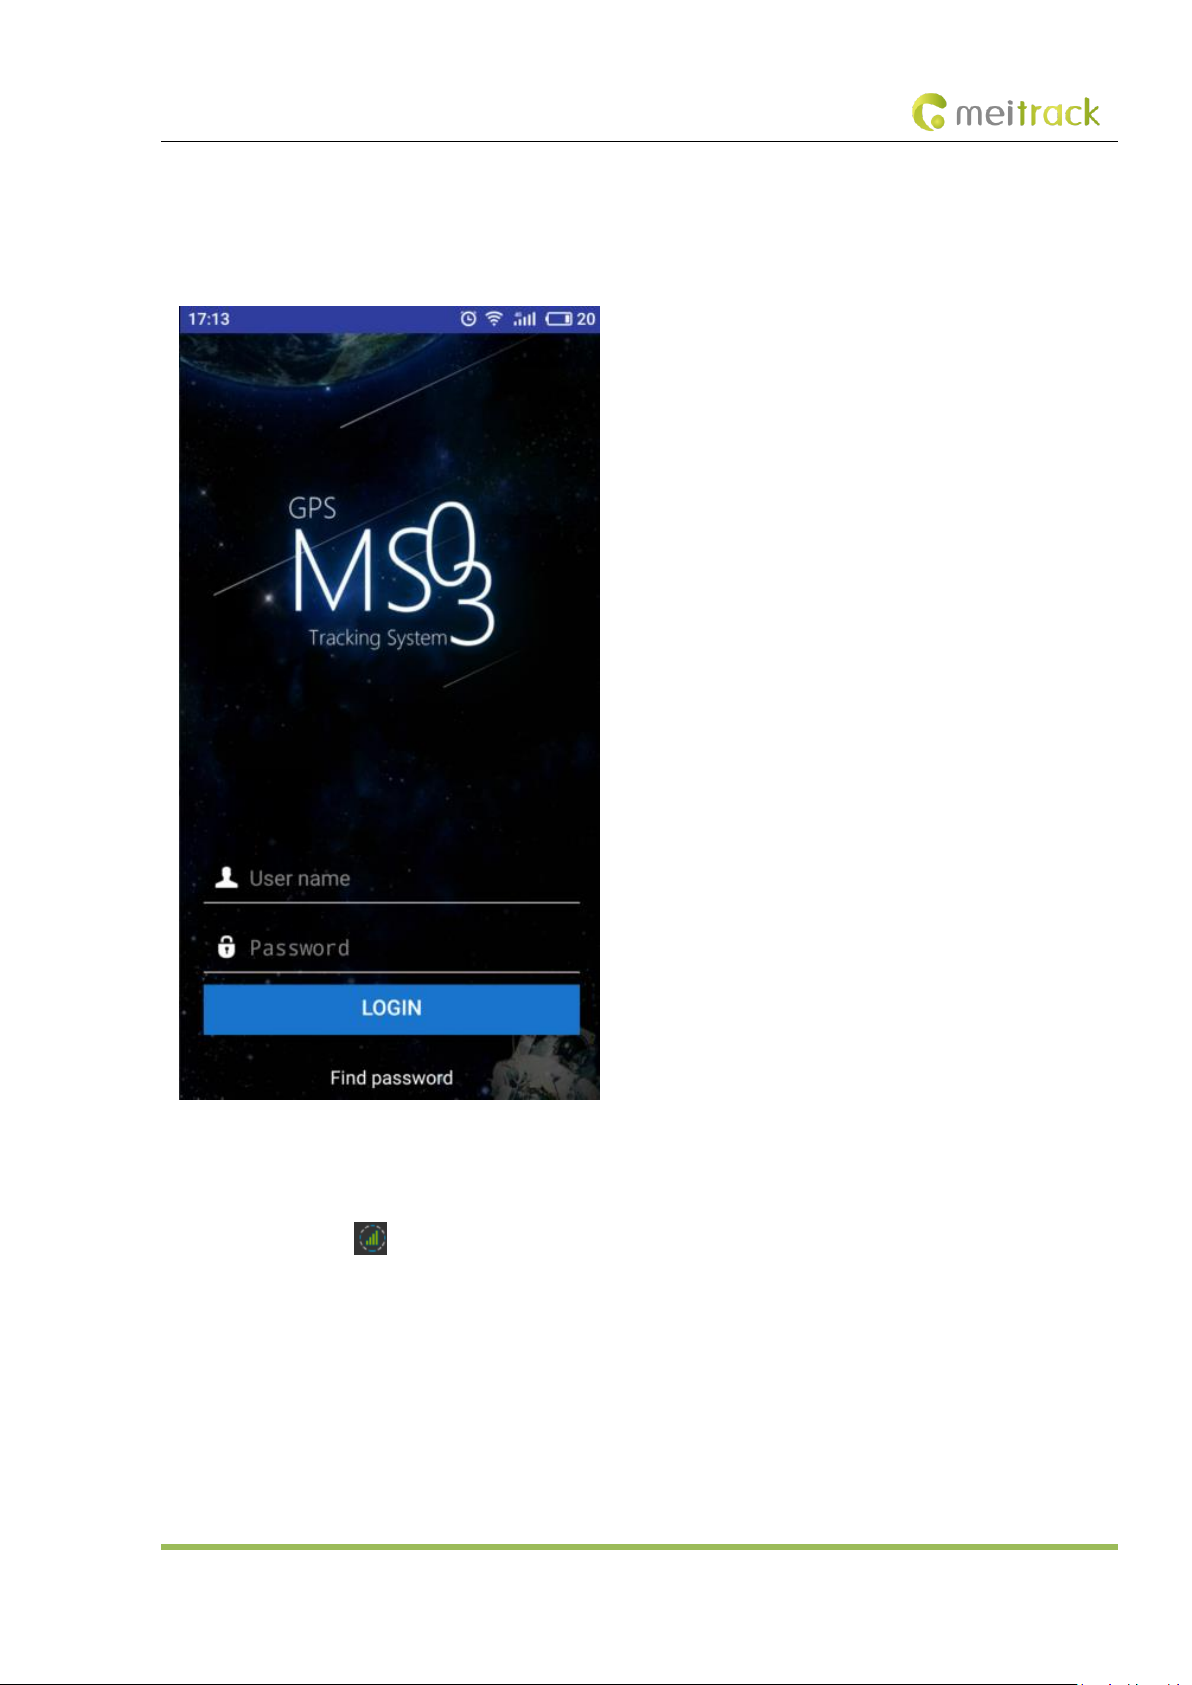
7.1 Logging In to the App
7.2 Checking MDVR Online Status
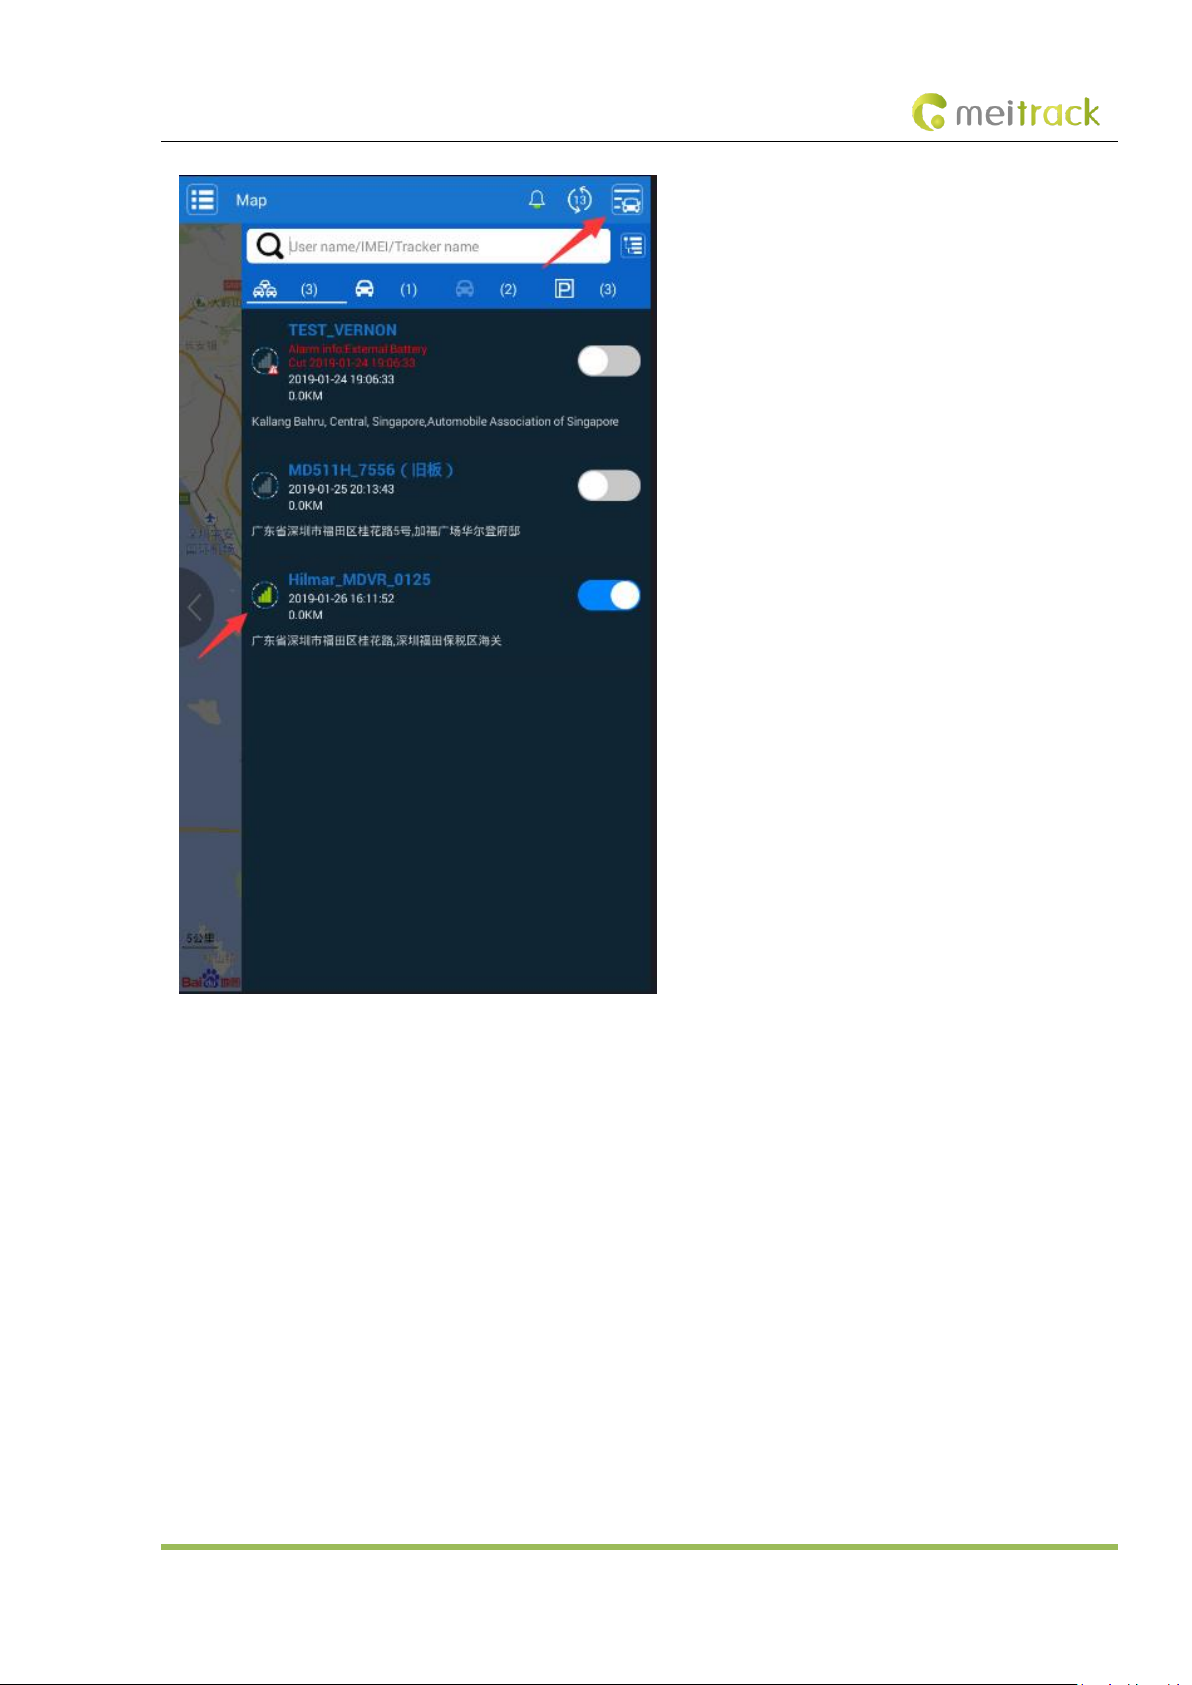
If the green signal icon is displayed, it means that the MDVR is online.
Page 39
MEITRACK MD511H User Guide
Copyright © 2019 Meitrack Group All rights reserved. - 39 -
7.3 Video Surveillance
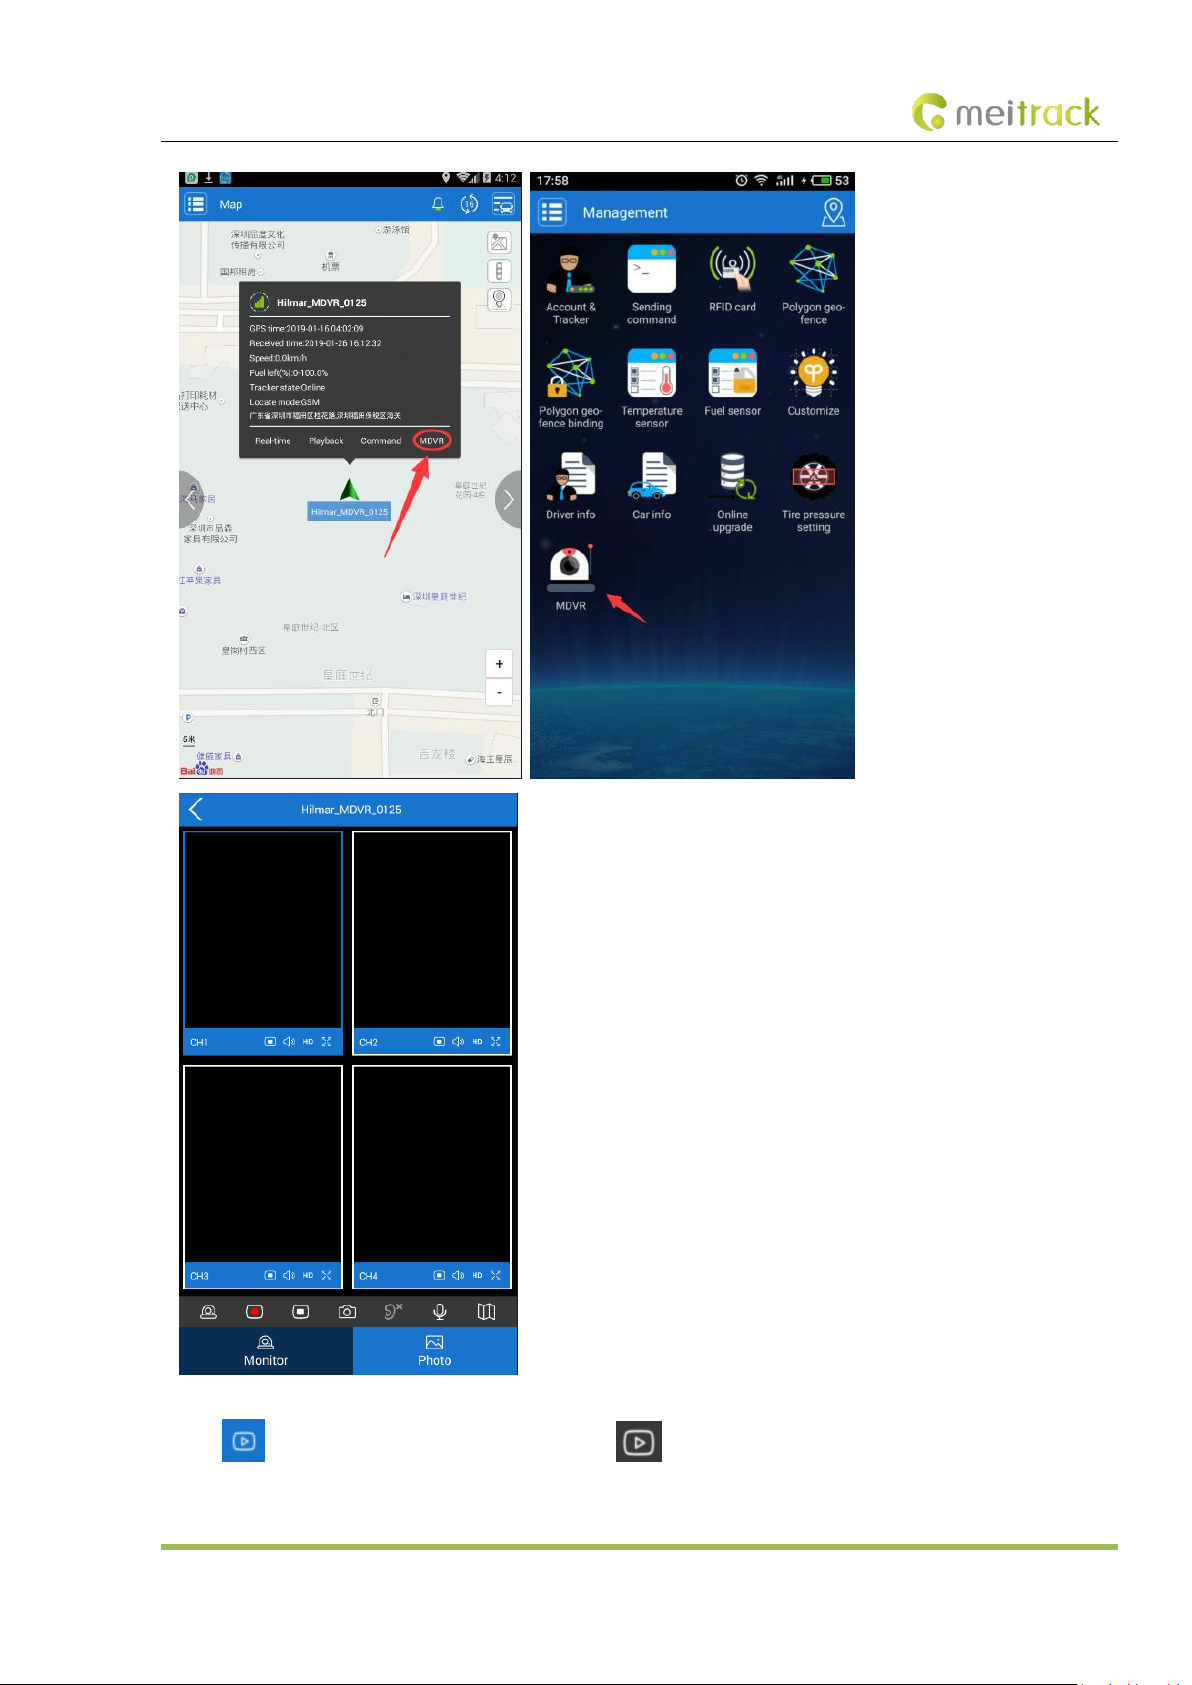
Click MDVR on the map, or choose MDVR on the Management page. Then the video surveillance page will be displayed.
Page 40
MEITRACK MD511H User Guide
Copyright © 2019 Meitrack Group All rights reserved. - 40 -
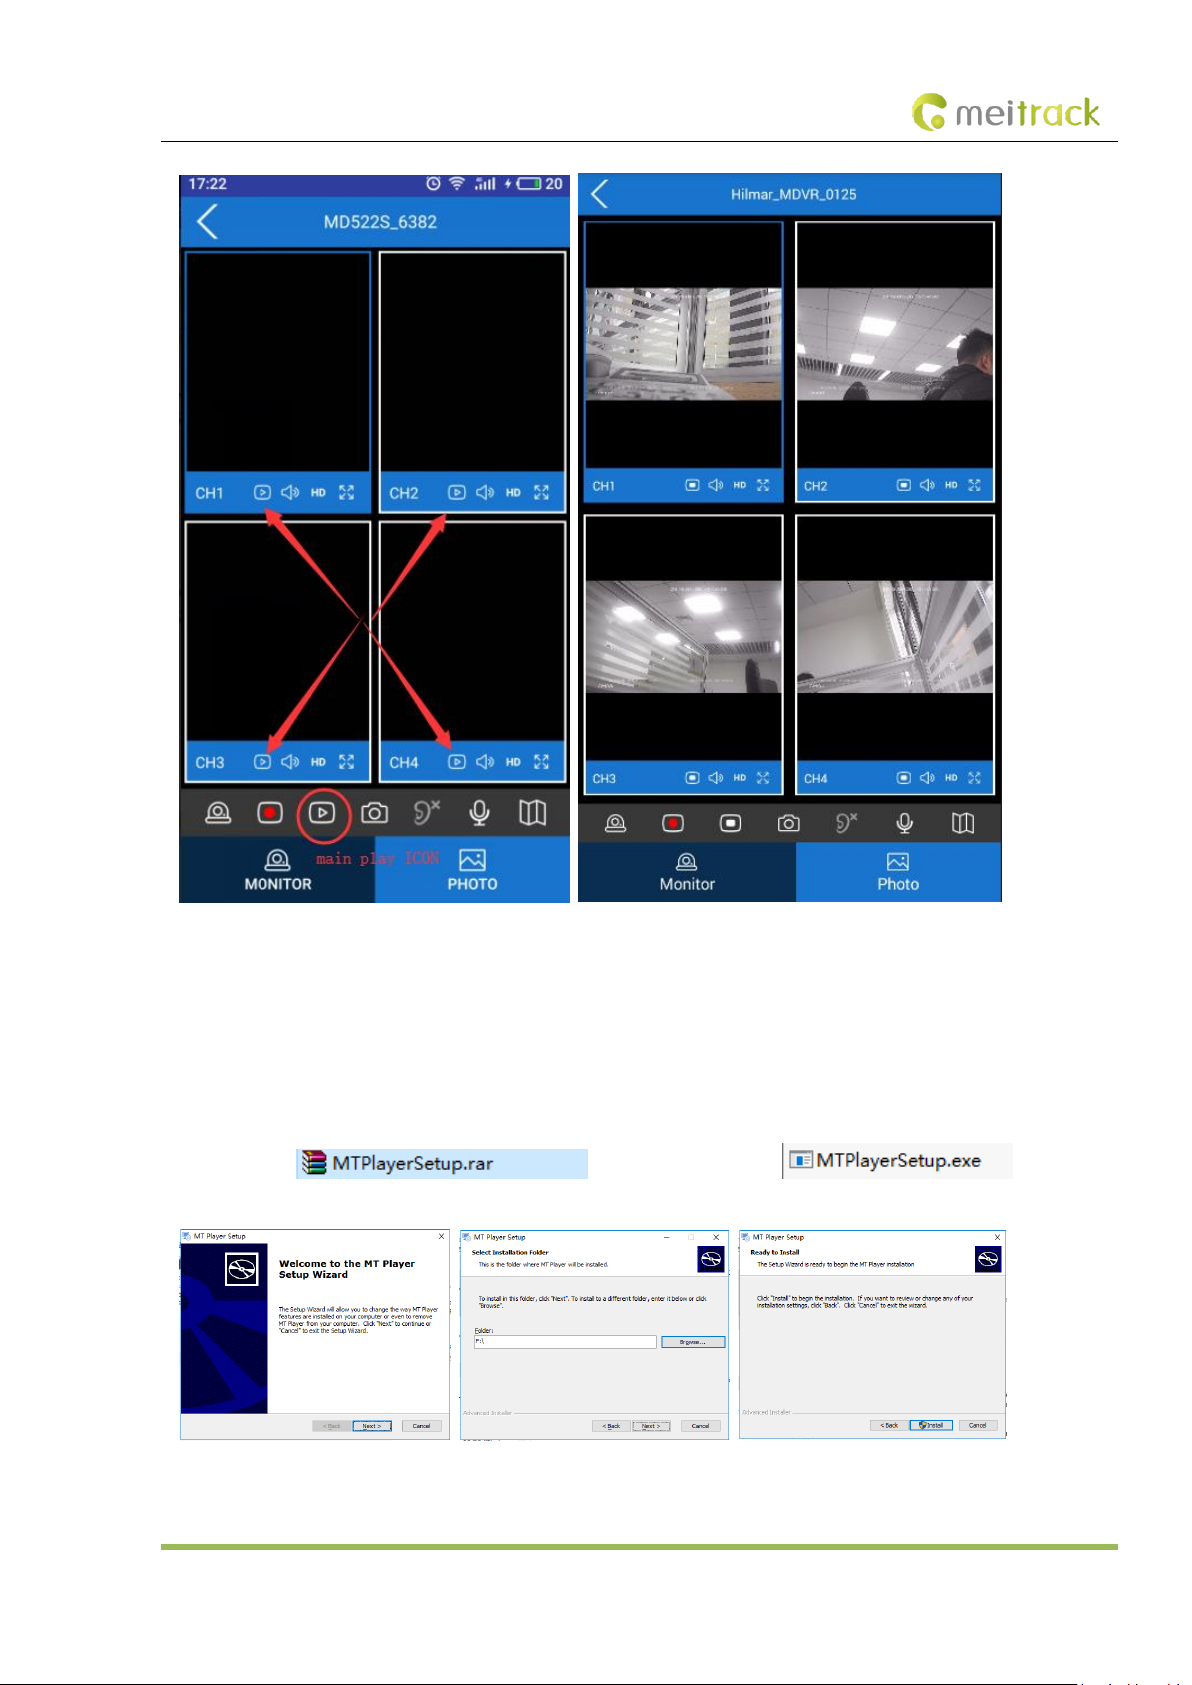
Click to play videos of corresponding channel. Click to start four-channel surveillance.
Page 41
MEITRACK MD511H User Guide
Copyright © 2019 Meitrack Group All rights reserved. - 41 -
8 Playing MDVR Videos by Using MT Player Software
(If you want to know how to use the function, please see the MD522S & MD511H Operation and Function Manual.)
8.1 Installing MT Player
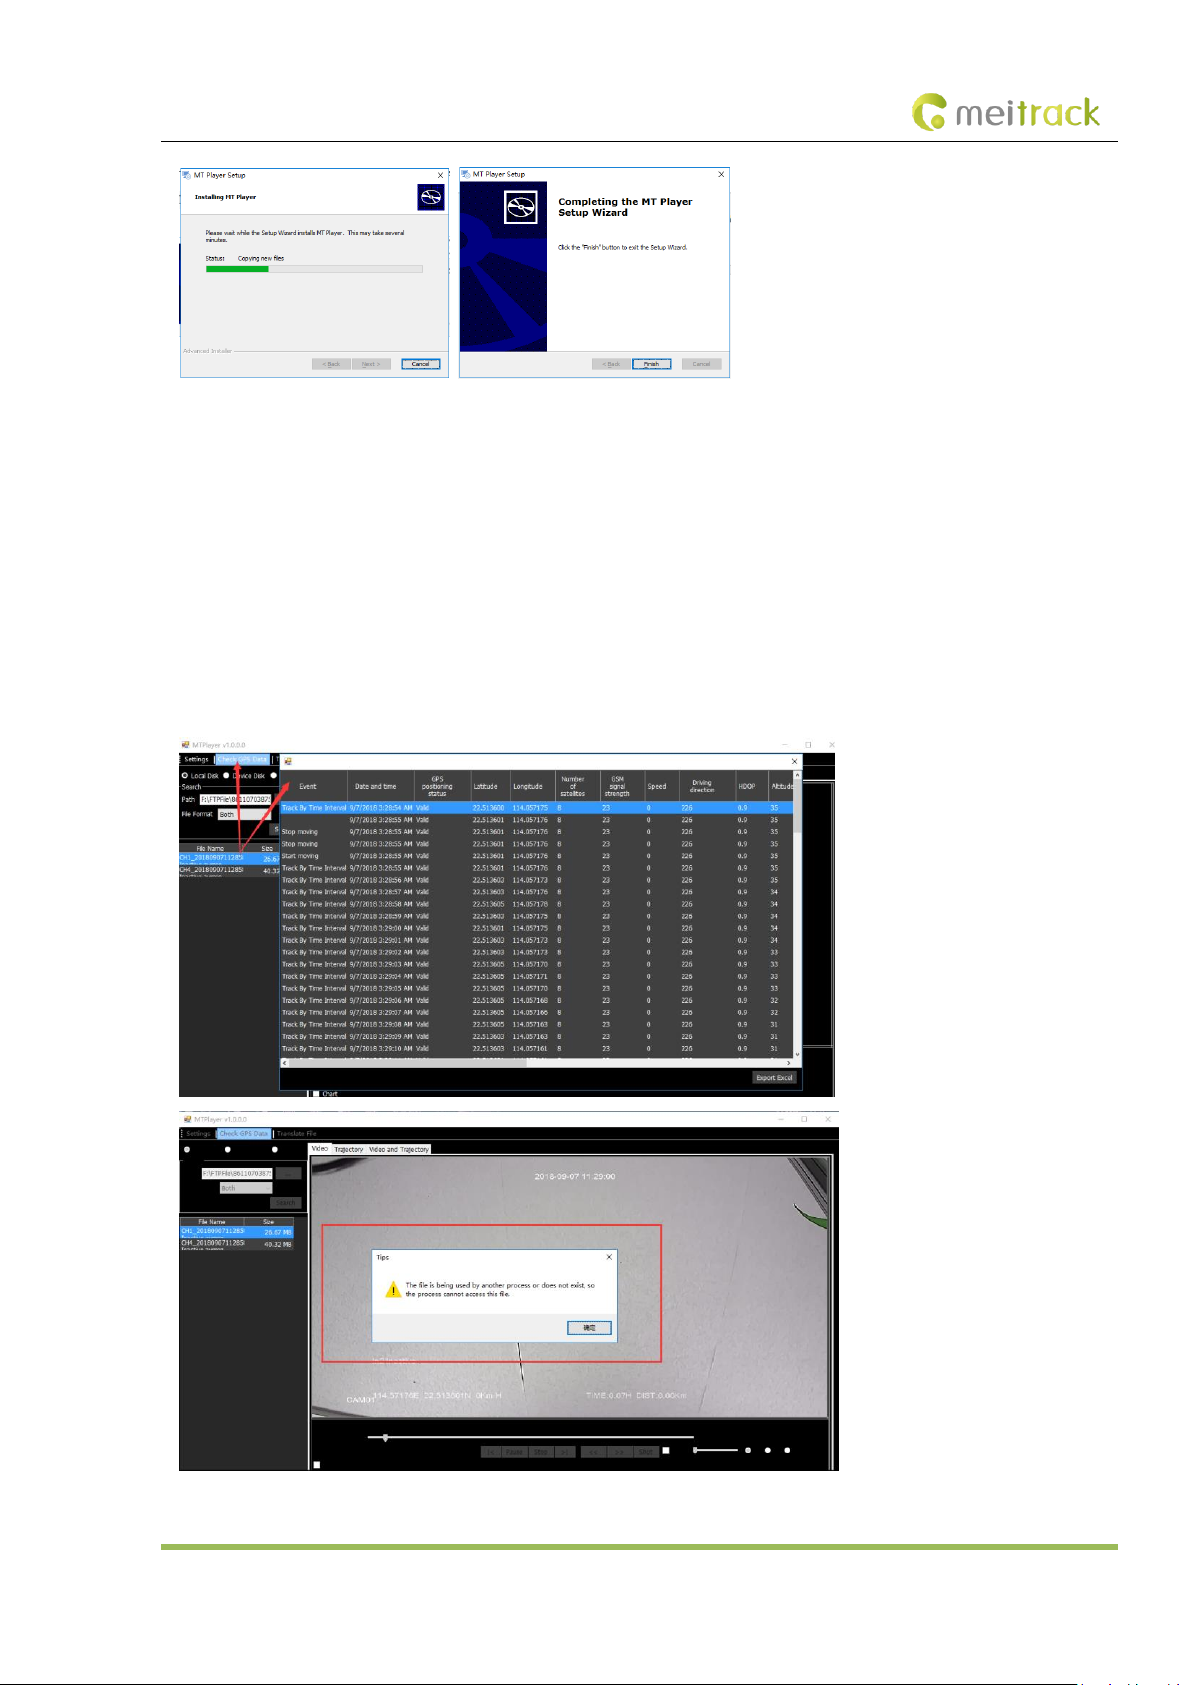
Unzip the file , and double-click the file to install the
software according to the setup wizard.
Page 42
MEITRACK MD511H User Guide
Copyright © 2019 Meitrack Group All rights reserved. - 42 -
8.2 MT Player Functions
8.2.1 Querying GPS Positioning Data
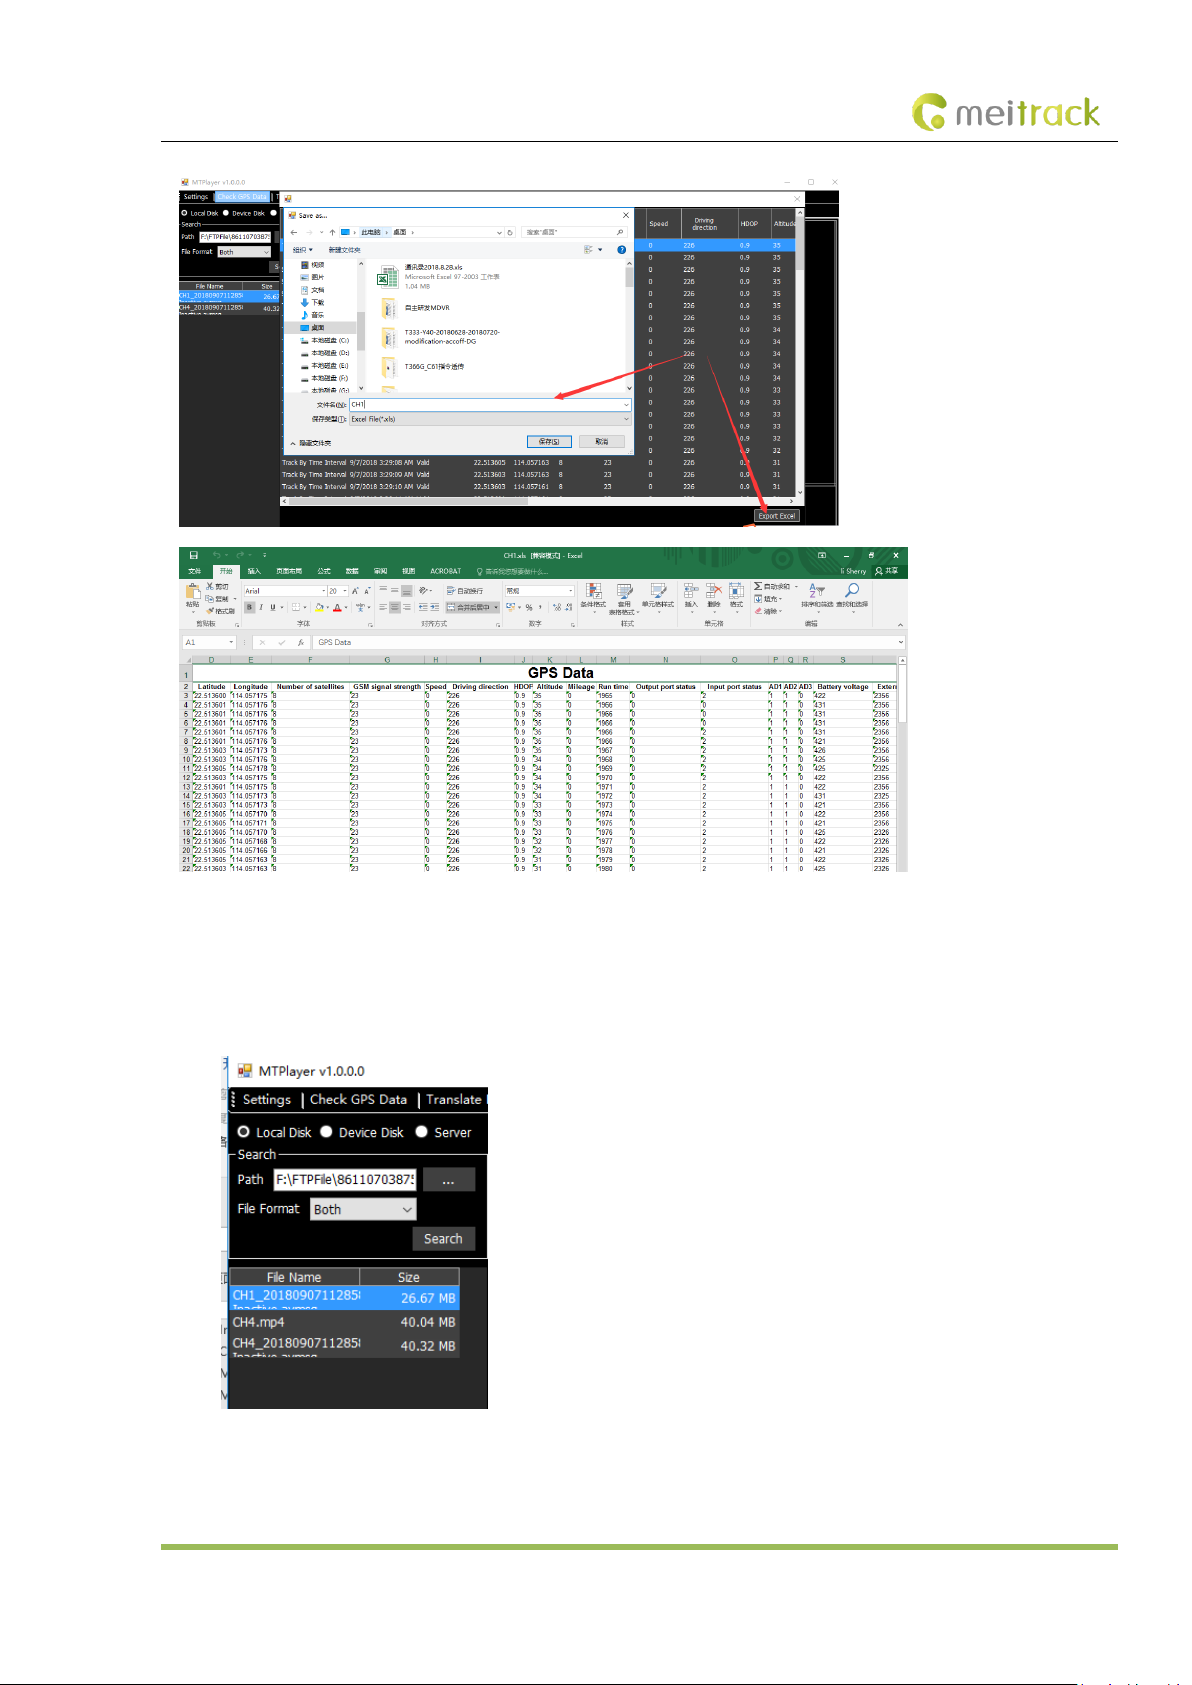
After selecting a video on the following page, you can obtain the GPS positioning data generated during the video recording and
export these data to an Excel file.
Note:
GPS positioning data cannot be queried while videos are being played. Otherwise, an error warning will pop up.
Recorded videos support two formats: .avmsg and .mp4. If you want to read GPS positioning data, you must select a video
in .avmsg format.
Page 43
MEITRACK MD511H User Guide
Copyright © 2019 Meitrack Group All rights reserved. - 43 -
8.2.2 Playing Videos
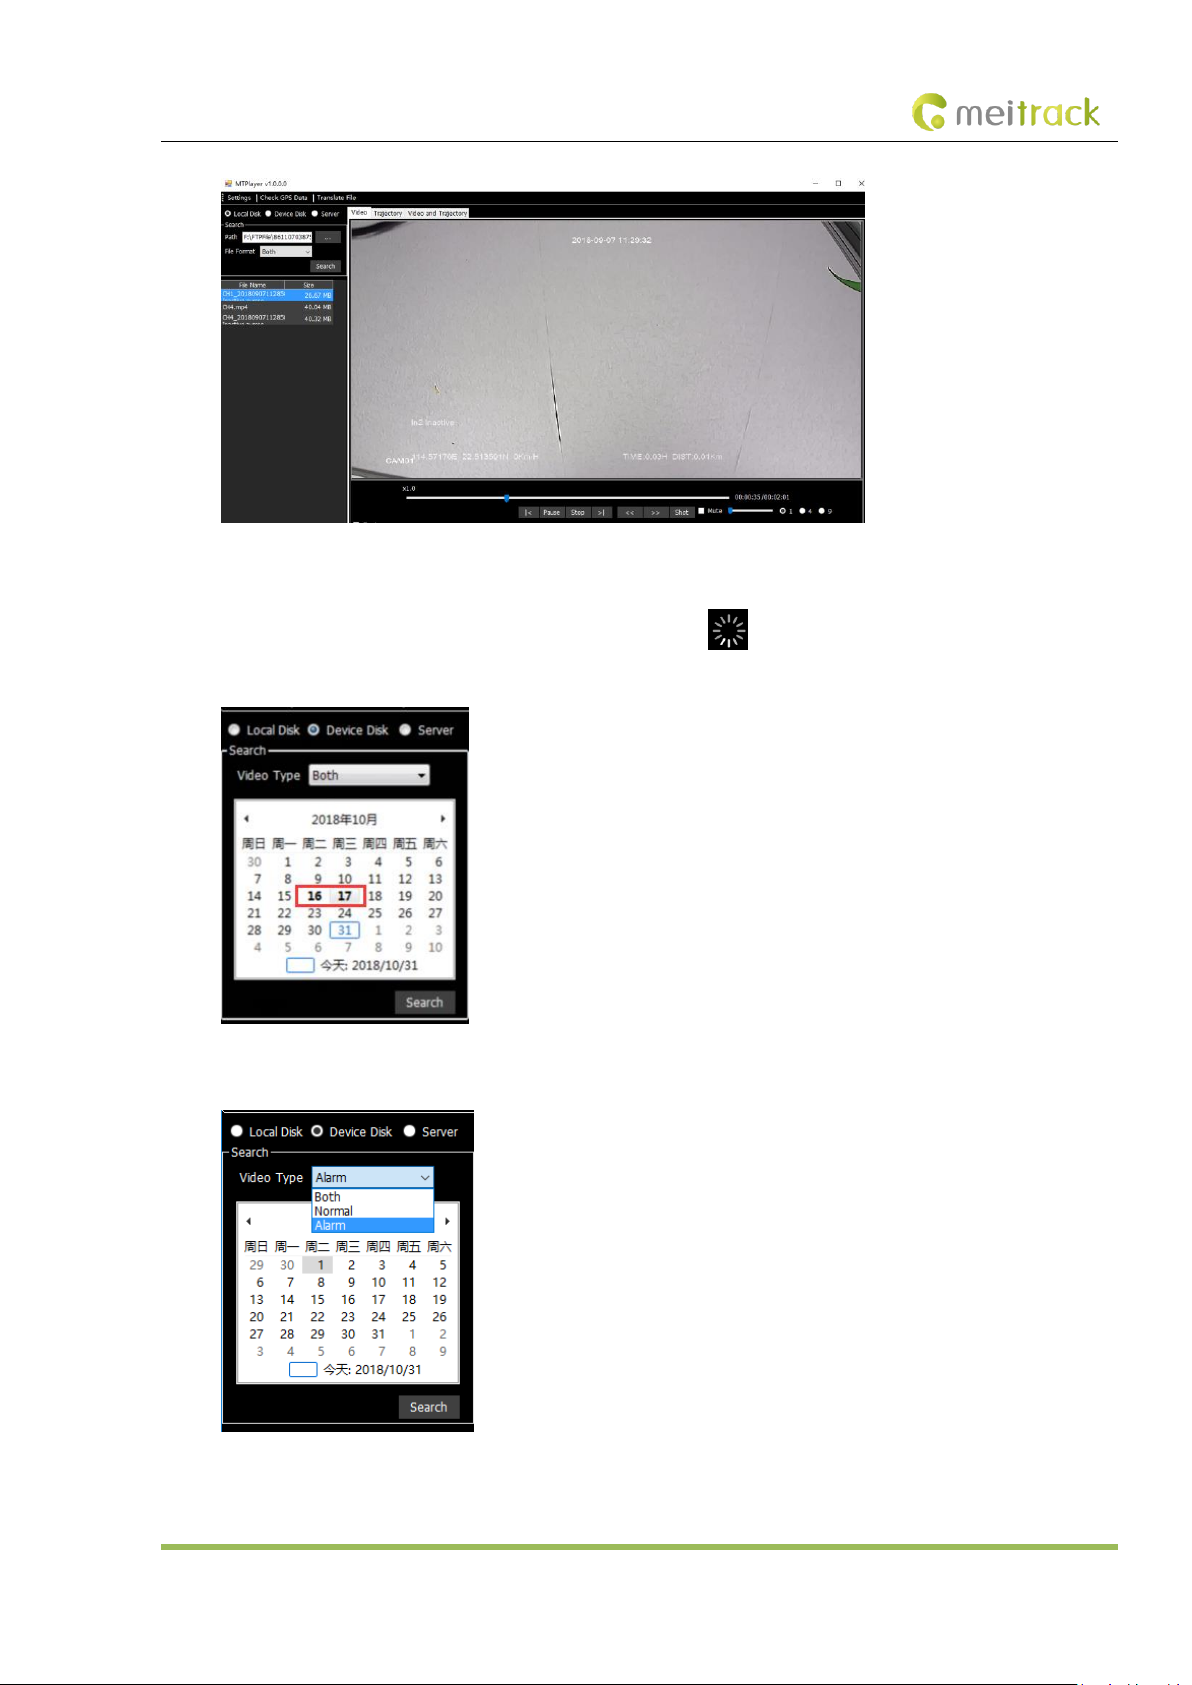
1. Play videos in local disks.
Locate a video in .avmsg or .mp4 format on local disks of your computer.
Page 44
MEITRACK MD511H User Guide
Copyright © 2019 Meitrack Group All rights reserved. - 44 -
2. Play videos in MDVR disks.
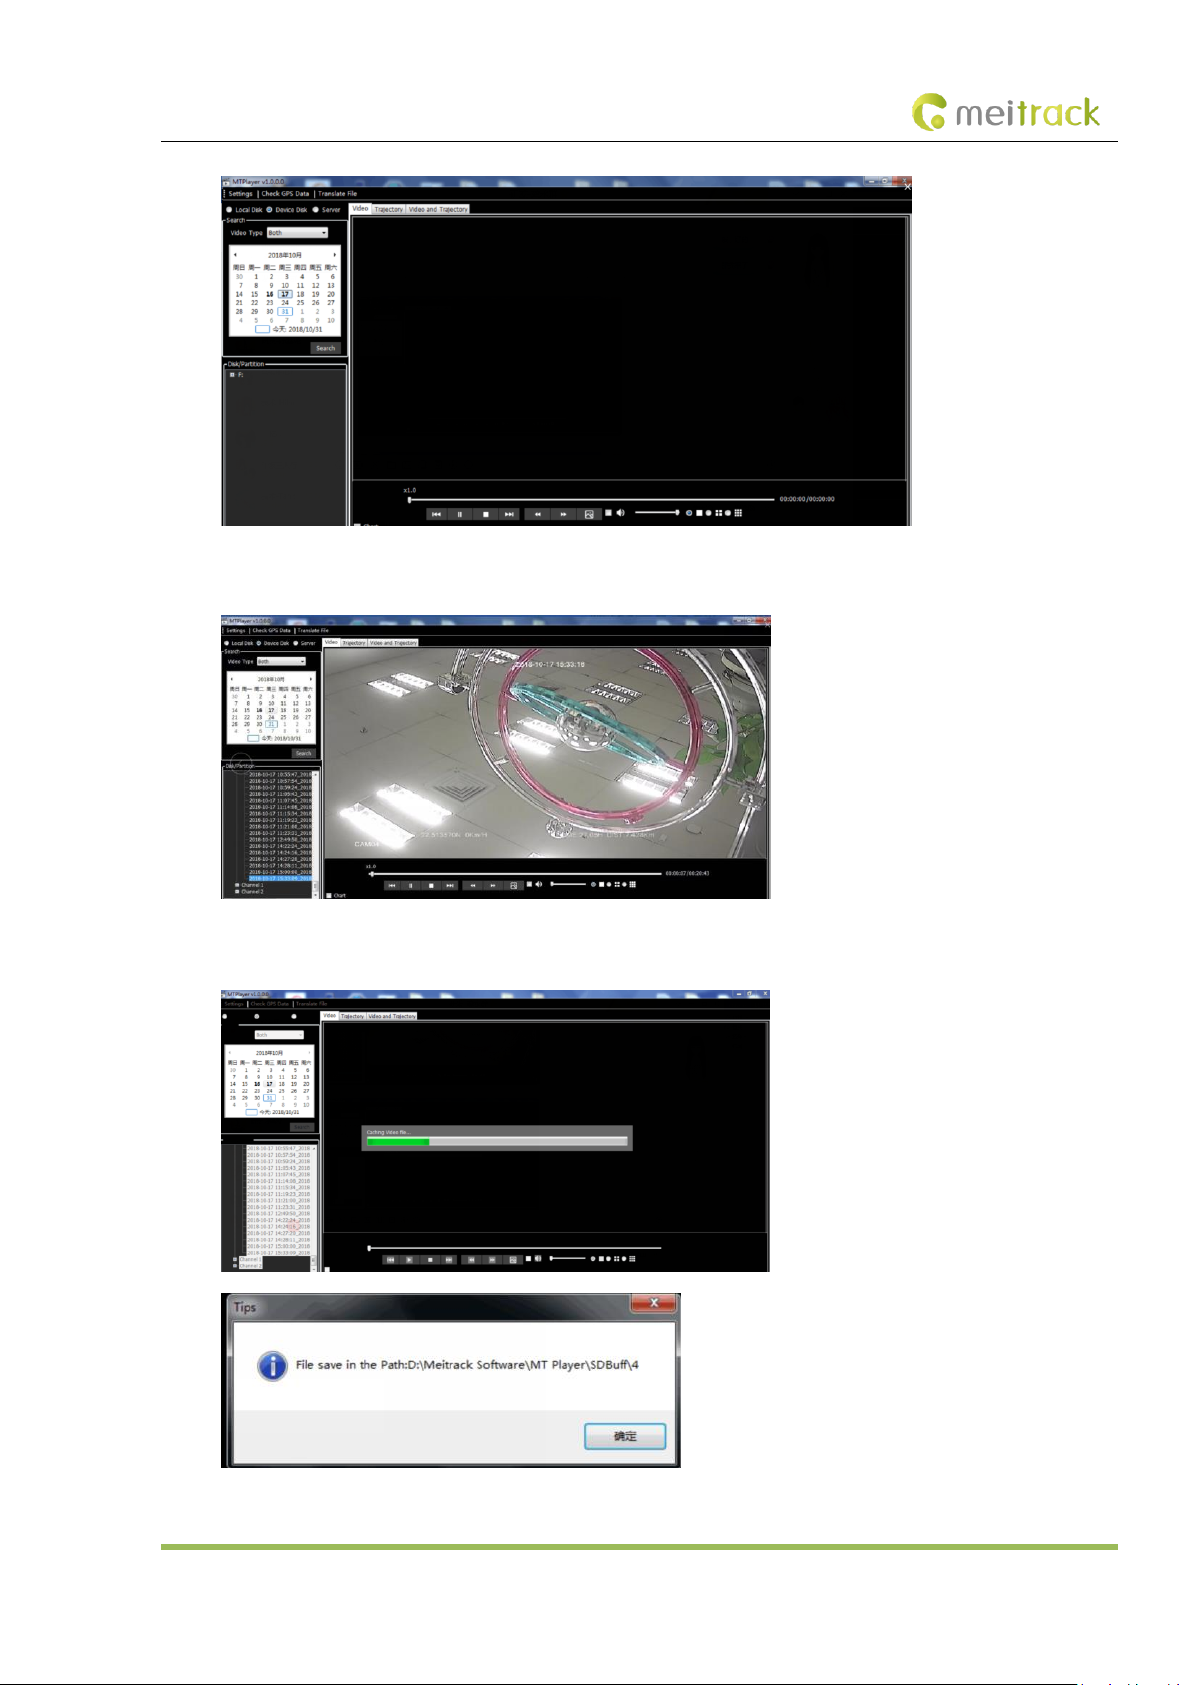
Once any video on MDVR disks is detected by MT Player, the icon will be displayed.
If a black bold date appears on the calendar, it means that there are videos recorded on that day.
You can select Normal to play a complete video or Alarm to play an alert video.
Page 45
MEITRACK MD511H User Guide
Copyright © 2019 Meitrack Group All rights reserved. - 45 -
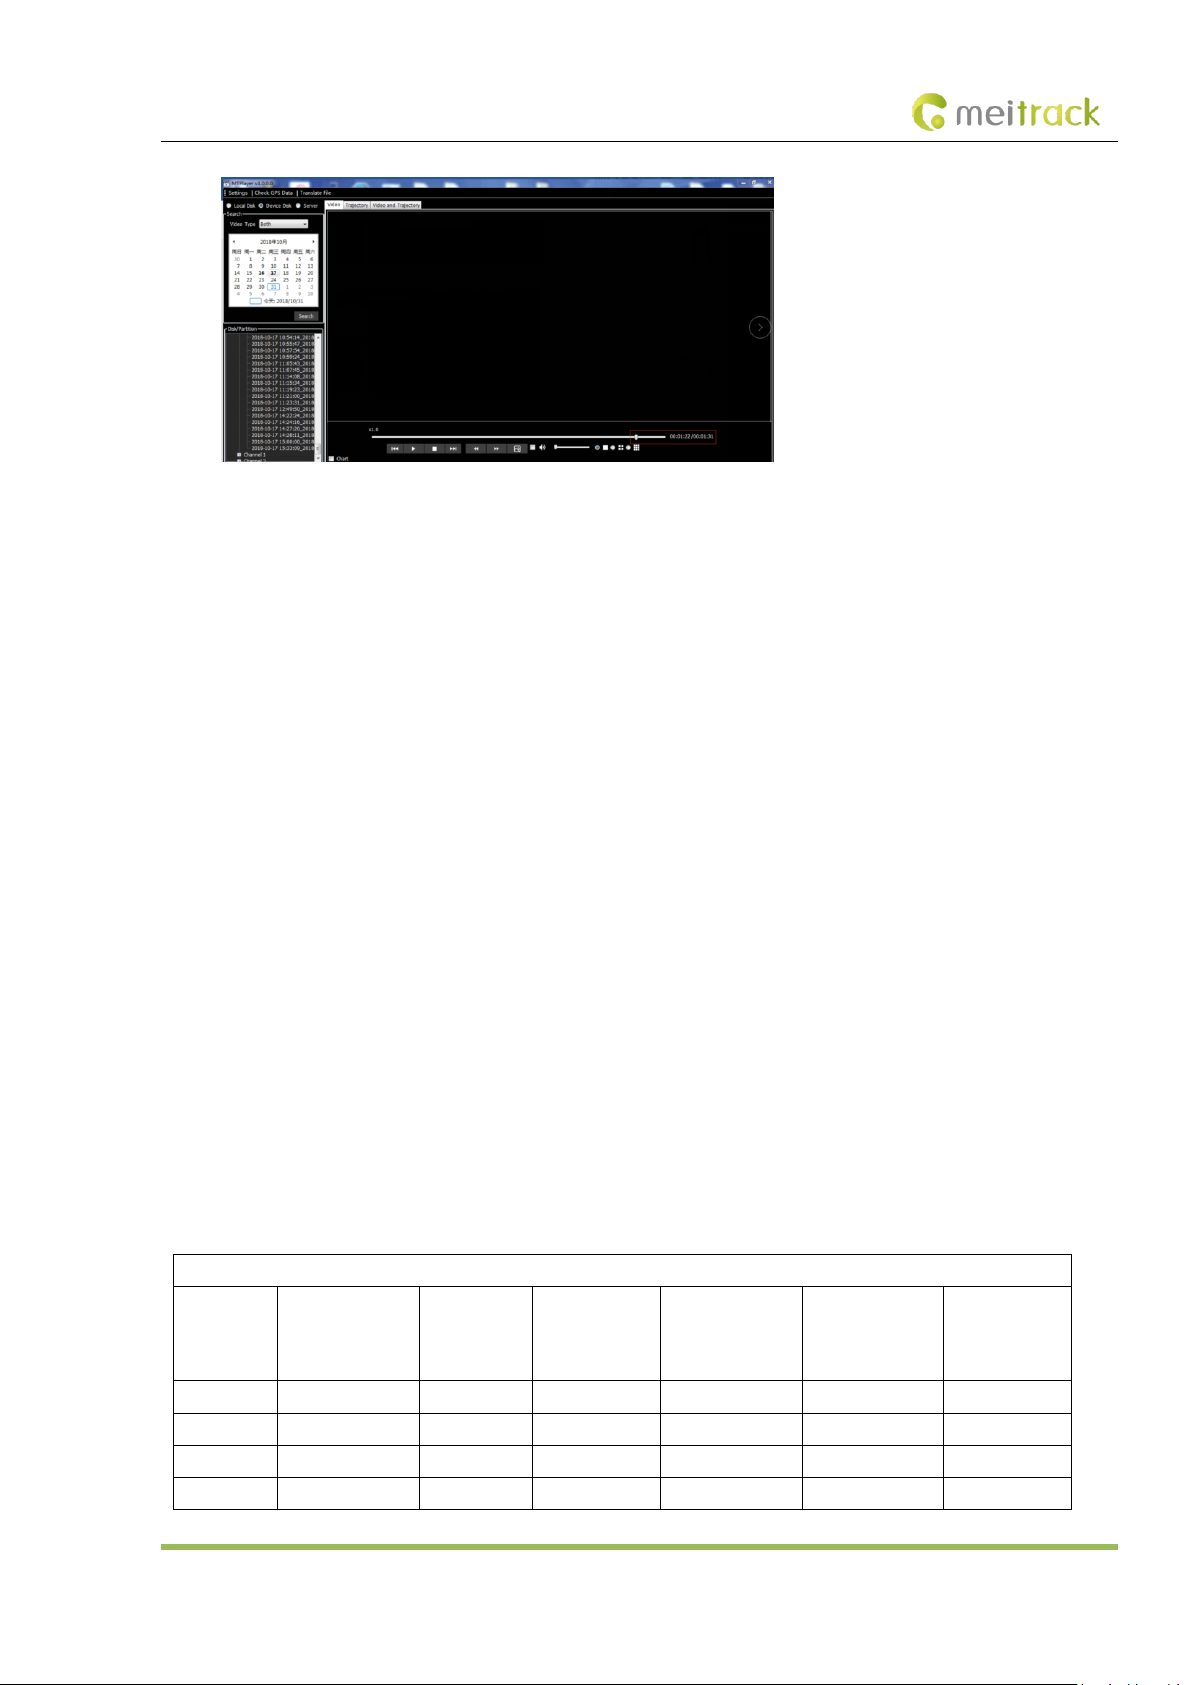
Double-click the name of a video file. Then the video will be played automatically.
You can also download the video, and then play it.
Page 46
MEITRACK MD511H User Guide
Copyright © 2019 Meitrack Group All rights reserved. - 46 -
9 FAQs
9.1 MDVR Abnormal
a) Only SYS and GPS LED indicators are on, and the MDVR does not record videos. Why?
A: Check whether the ACC cable is connected to the positive terminal of the external power supply (or the ACC is on), and
whether the disk is locked by using the key.
b) Q: The blinking of the disk (SD card/HDD) LED indicator is abnormal, and the MDVR does not record videos. Why?
A: Maybe the disk initialization is not completed. Please wait for a moment. If the problem still exists, please restart the
MDVR.
c) Q: Available WiFi networks cannot be searched, or searched WiFi signal values are low.
A: Please install the WiFi antenna to improve WiFi signal strength.
9.2 Data Usage Consumption
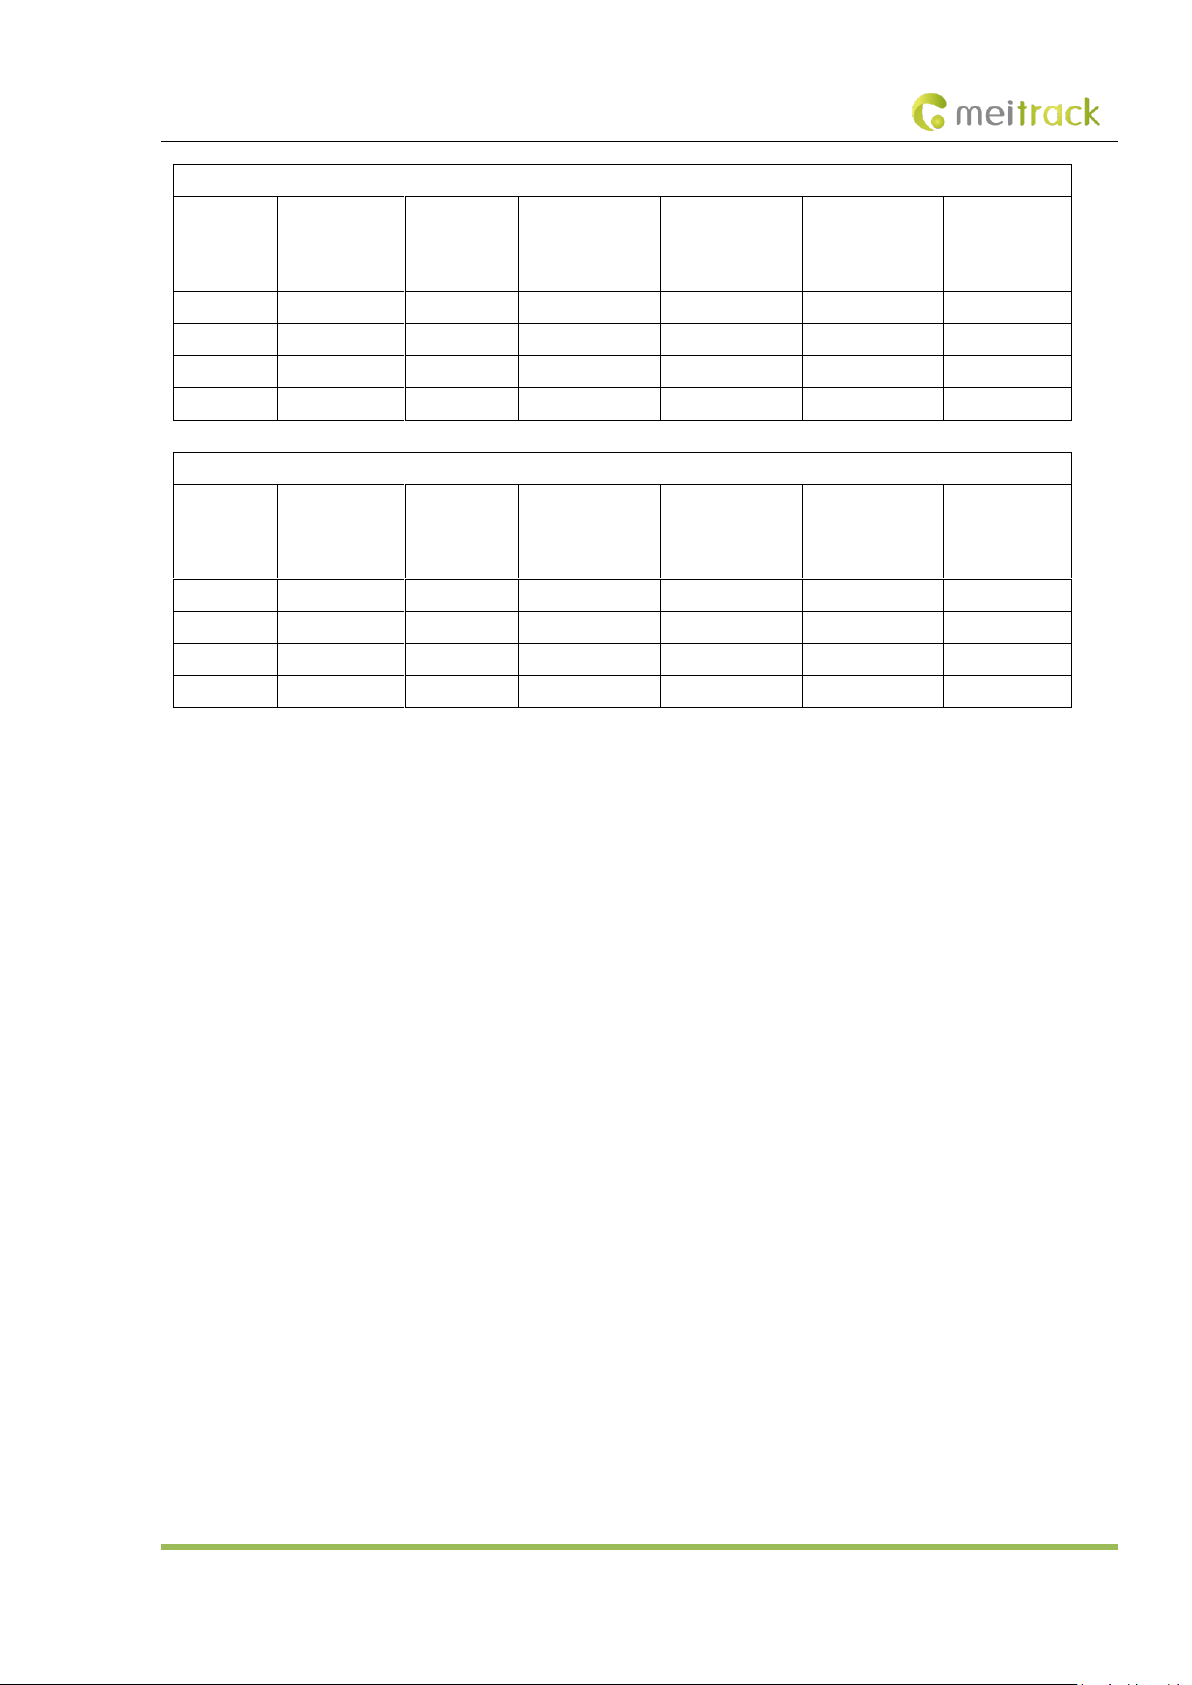
Data usage depends on the size of data uploaded from the device. Uploaded data contains video data and positioning data.
Video data calculation formula: Bitrate (Kbs)/8 x Number of channels /1024 = Data usage consumption per second (MB)
(Note: The formula is applicable to scenarios that the device is monitored continuously via the platform or uploads video files
continuously. It will become unavailable when functions of monitoring and FTP uploading are enabled at the same time or
operators have special data usage calculation methods.)
Positioning data calculation formula: 0.2KB x 3600/GPRS interval x 24/1024 = Data usage consumption per hour (MB)
(Note: The formula is applicable to general use scenarios. It will become unavailable when commands are frequently sent to
read and write, photos are frequently uploaded, or operators have special data usage calculation methods.)
Under normal circumstances, data usage of the device is as follows:
Average image quality: 720p(1280 X 720); Bitrate: 2,048 Kbs; Frame Rate: 25 FPS
Data Usage
Within 10
Minutes (GB)
Data Usage
Within 1
Hour (GB)
Data Usage
Within 1 Day
(GB)
Data Usage
Within 1 Week
(GB)
Data Usage
Within 1 Month
(GB)
Data Usage
Within 1 Year
(GB)
1 channel
0.15
0.9
21.6
151.2
604.8
7257.6
2 channels
0.3
1.8
43.2
302.4
1209.6
14515.2
3 channels
0.45
2.7
64.8
453.6
1814.4
21772.8
4 channels
0.6
3.6
86.4
604.8
2419.2
29030.4
Page 47
MEITRACK MD511H User Guide
Copyright © 2019 Meitrack Group All rights reserved. - 47 -
Bad image quality: DA(704 X 576); Bitrate: 512 Kbs; Frame Rate: 25 FPS
Data Usage
Within 10
Minutes (GB)
Data Usage
Within 1
Hour (GB)
Data Usage
Within 1 Day
(GB)
Data Usage
Within 1 Week
(GB)
Data Usage
Within 1 Month
(GB)
Data Usage
Within 1 Year
(GB)
1 channel
0.0375
0.225
5.4
37.8
151.2
1814.4
2 channels
0.075
0.45
10.8
75.6
302.4
3628.8
3 channels
0.1125
0.675
16.2
113.4
453.6
5443.2
4 channels
0.15
0.9
21.6
151.2
604.8
7257.6
Best image quality: 720p(1280 X 720); Bitrate: 4,096 Kbs; Frame Rate: 25 FPS
Data Usage
Within 10
Minutes (GB)
Data Usage
Within 1
Hour (GB)
Data Usage
Within 1 Day
(GB)
Data Usage
Within 1 Week
(GB)
Data Usage
Within 1 Month
(GB)
Data Usage
Within 1 Year
(GB)
1 channel
0.3
1.8
43.2
302.4
1209.6
14515.2
2 channels
0.6
3.6
86.4
604.8
2419.2
29030.4
3 channels
0.9
5.4
129.6
907.2
3628.8
43545.6
4 channels
1.2
7.2
172.8
1209.6
4838.4
58060.8
1) Q: If I monitor the device occasionally via the platform and don't need to upload all video files, how much data usage does
it consume?
A: The data usage depends on the number of alerts. Each alert video is about 80 MB. Under normal circumstances, if the
monitoring frequency is not high (1 hour per day) and the number of alerts is few (10 alerts per day), data usage
consumption per day is about 2 GB.
2) Q: What is the difference between the data usage generated during monitoring and the data usage generated by files
uploaded to the FTP server?
A: The data usage generated during monitoring is calculated based on live stream, while the data usage generated by files
uploaded to the FTP server is calculated based on storage stream.
9.3 Power Consumption
The device's power consumption varies depending on the following three conditions:
Sleep mode: 65 mA
Four cameras: 1.6–2.5 A
A single camera: 100–400 mA (The light in the daytime is strong, so the power consumption is low. The light in the night is weak,
so the power consumption is high.)
1) Q: If the engine is not started, will the vehicle battery be quickly consumed by the device?
A: If the engine is not started, the recording function of the device is disabled. So the power consumption will be lower than
100 mA and excessive consumption of the vehicle battery will not happen.
2) How to reduce the power consumption?
A: You can reduce the number of peripherals, alert event uploading times and camera channels.
9.4 Video Storage
The maximum storage capacity of the MDVR varies depending on the capacity of SD cards on the market. (At present, the
maximum capacity of SD cards is 1 TB.) The MDVR supports a SD card with a capacity of 64 GB, 128 GB, or 256 GB. So users can
Page 48
MEITRACK MD511H User Guide
Copyright © 2019 Meitrack Group All rights reserved. - 48 -
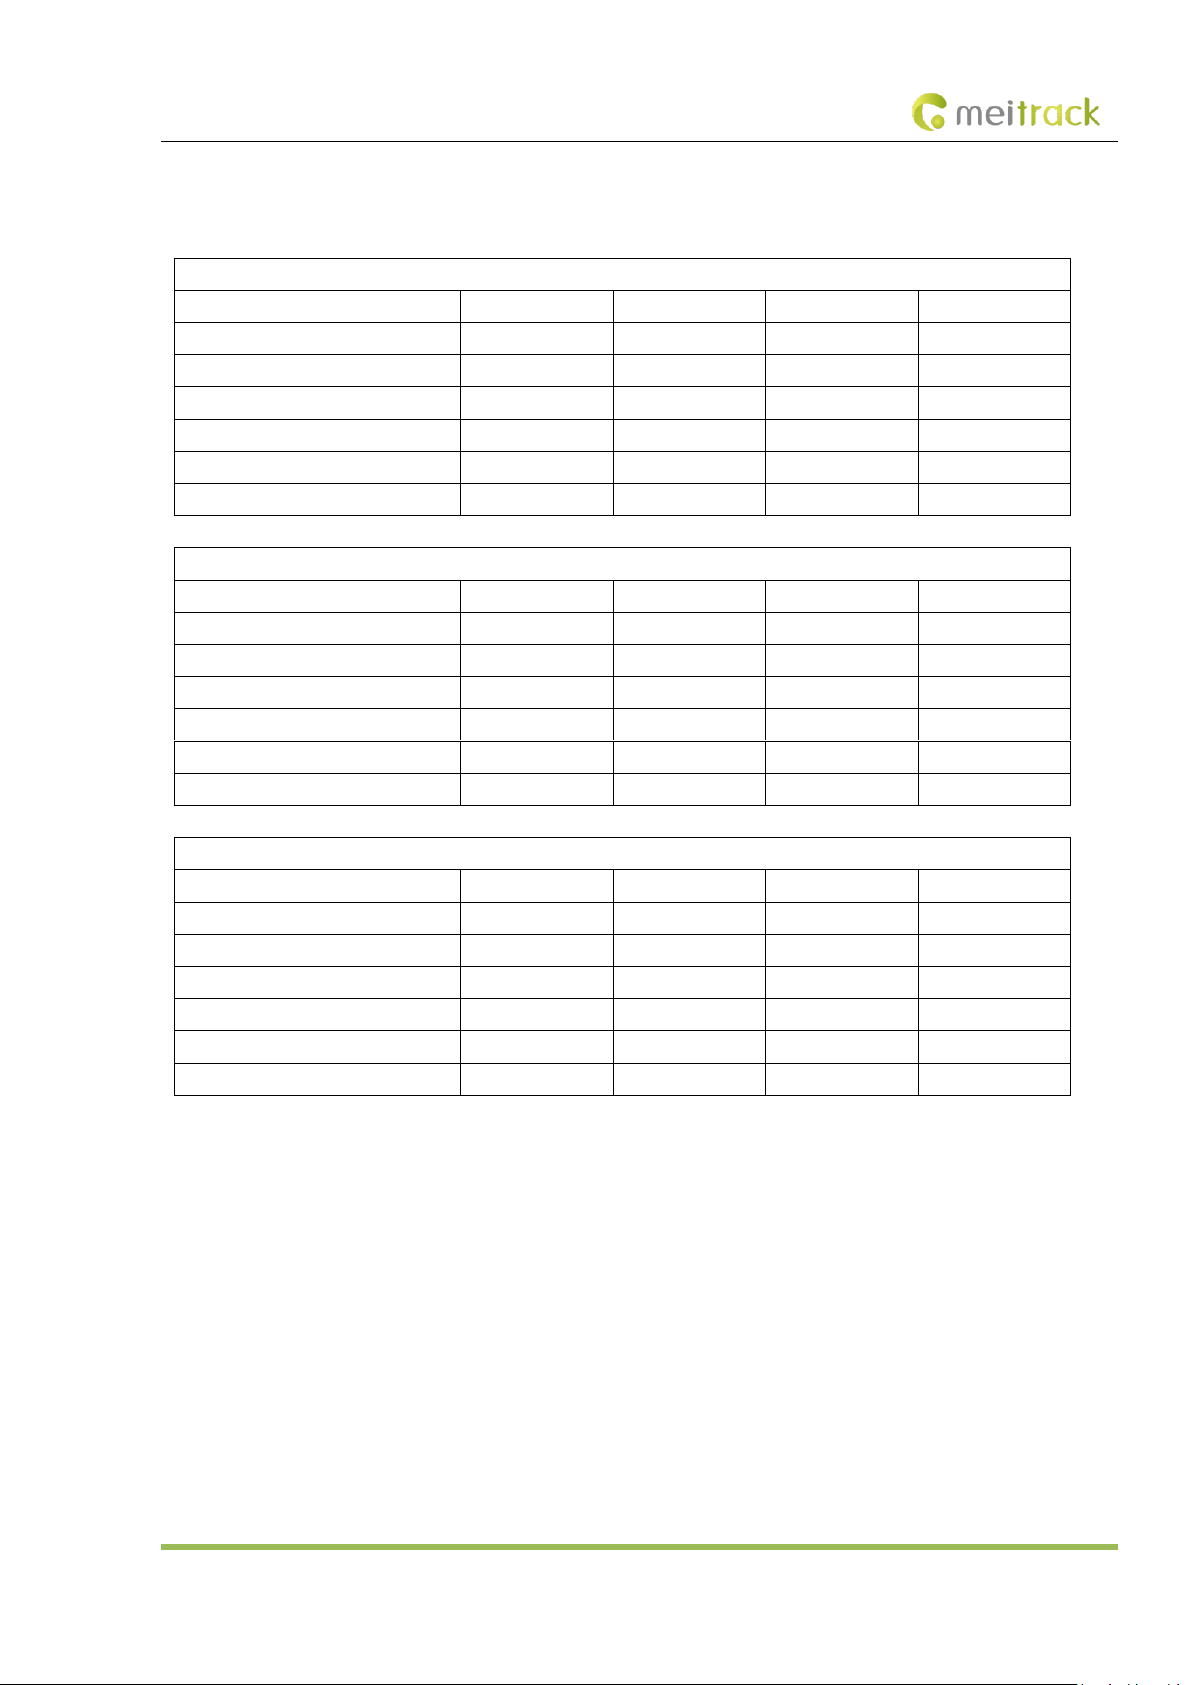
choose a proper SD card as needed. For details about the storage time of the device with different capacity, see the following
table. As shown in the following table, the storage time of the disk with the largest capacity ranges from 10 days to 320 days due
to the image quality and the number of channels.
Average image quality: 720p (1280 X 720); Bitrate: 2,048 Kbs; Frame Rate: 25 FPS
1-channel camera
2-channel camera
3-channel camera
4-channel camera
Storage time of a 64 GB disk (hour)
60
30
20
15
Storage time of a 128 GB disk (hour)
120
60
40
30
Storage time of a 256 GB disk (hour)
240
120
80
60
Storage time of a 512 GB disk (hour)
480
240
160
120
Storage time of a 1 TB disk (day)
40
20
13
10
Storage time of a 2 TB disk (day)
80
40
27
20
Bad image quality: DA (704 X 576); Bitrate: 512 Kbs; Frame Rate: 25 FPS
1-channel camera
2-channel camera
3-channel camera
4-channel camera
Storage time of a 64 GB disk (hour)
240
120
80
60
Storage time of a 128 GB disk (hour)
480
240
160
120
Storage time of a 256 GB disk (hour)
960
480
320
240
Storage time of a 512 GB disk (hour)
1920
960
640
480
Storage time of a 1 TB disk (day)
160
80
53
40
Storage time of a 2 TB disk (day)
320
160
107
80
Best image quality: 720p (1280 X 720); Bitrate: 4,096 Kbs; Frame Rate: 25 FPS
1-channel camera
2-channel camera
3-channel camera
4-channel camera
Storage time of a 64 GB disk (hour)
30
15
10
8
Storage time of a 128 GB disk (hour)
60
30
20
15
Storage time of a 256 GB disk (hour)
120
60
40
30
Storage time of a 512 GB disk (hour)
240
120
80
60
Storage time of a 1 TB disk (day)
20
10
7
5
Storage time of a 2 TB disk (day)
40
20
13
10
1) What will happen if the SD card are full?
A: If the SD card is full, original video recordings will be automatically replaced with new ones by default. So you need to
upload or back up video files regularly. If you don't want data to be replaced, set the function of "stopping recording after
the disk is full" by Meitrack Manager software.
2) Q: Can I extend the storage time of the disk by reducing the frame rate?
A: Yes. The reduction of the frame rate will affect the smoothness of video images while extending the storage time by 10%
to 50%. But it is recommended that the frame rate should be greater than 15 FPS. Otherwise, images will be discontinuous.
9.5 Camera Installation
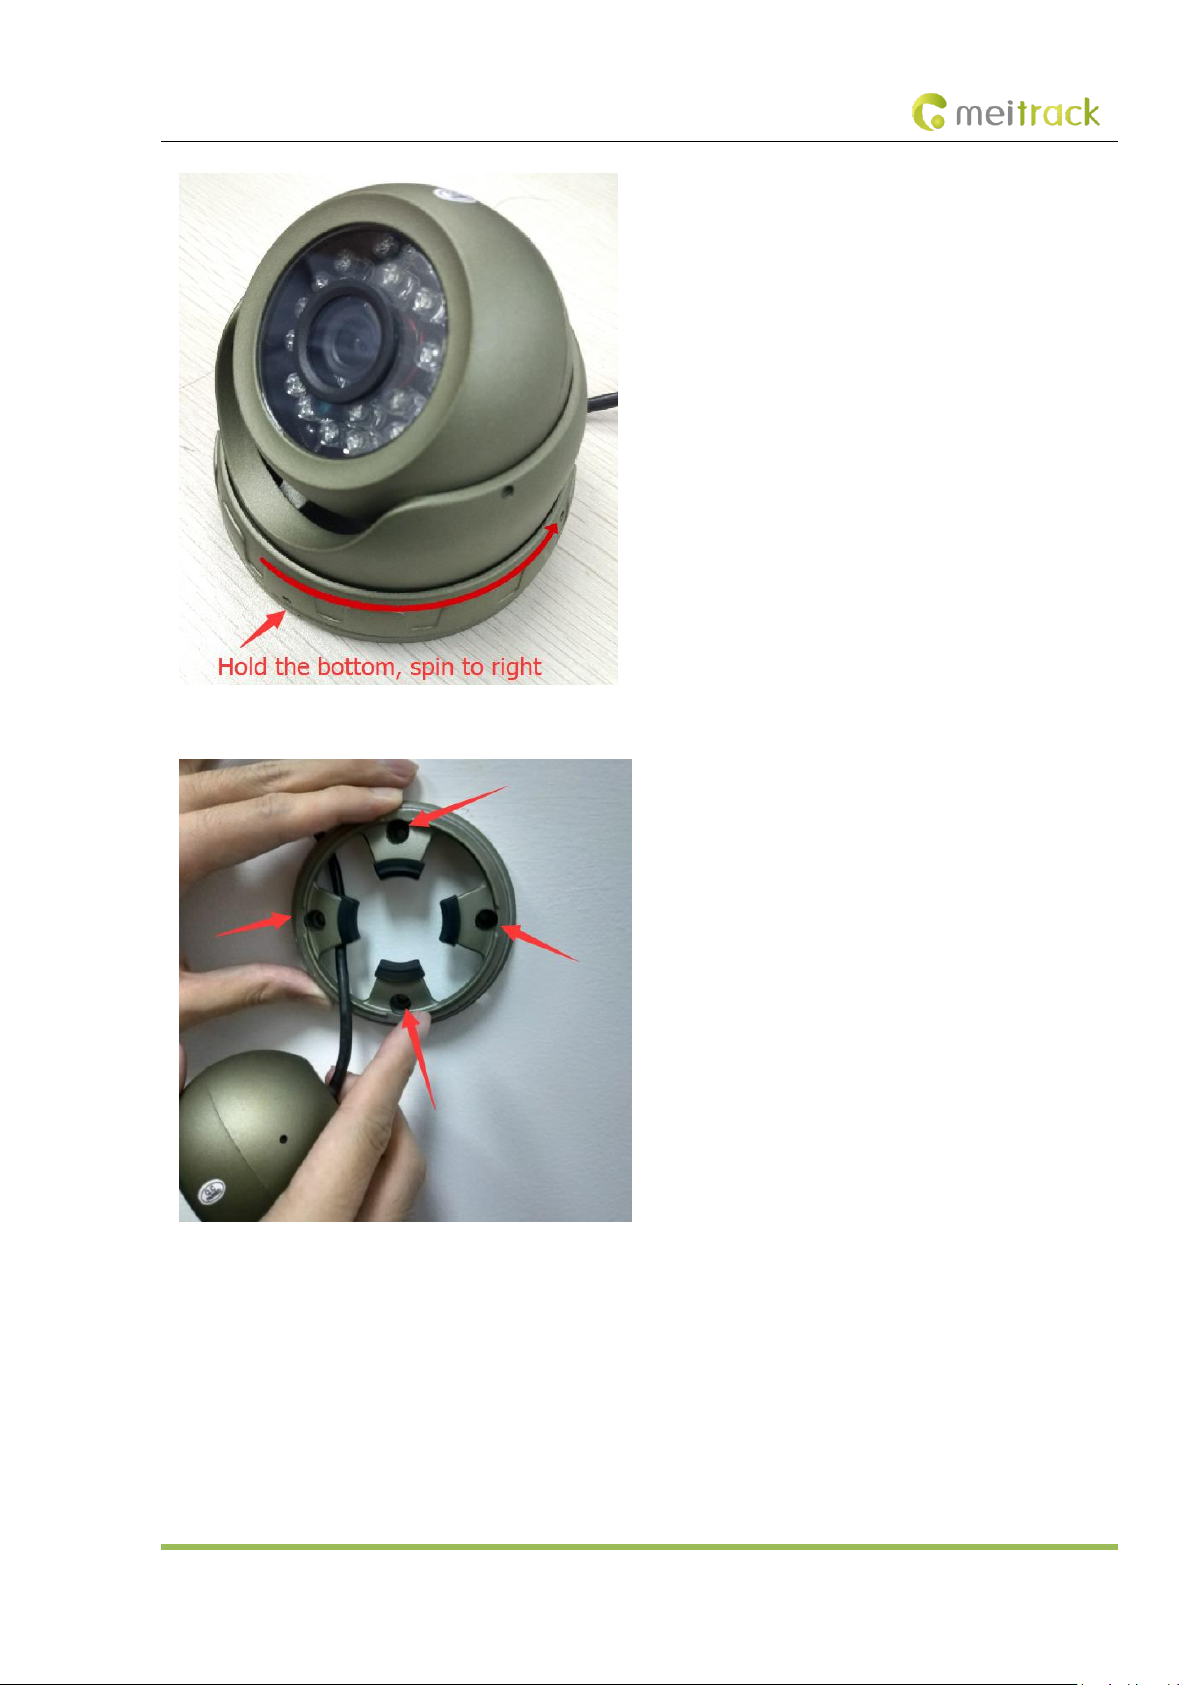
Cameras are installed horizontally by default. If cameras need to be installed in an inverted position or on the side, perform the
following steps:
(1) Rotate the camera and take it apart.
Page 49
MEITRACK MD511H User Guide
Copyright © 2019 Meitrack Group All rights reserved. - 49 -
(2) Confirm the installation location and nail holes.
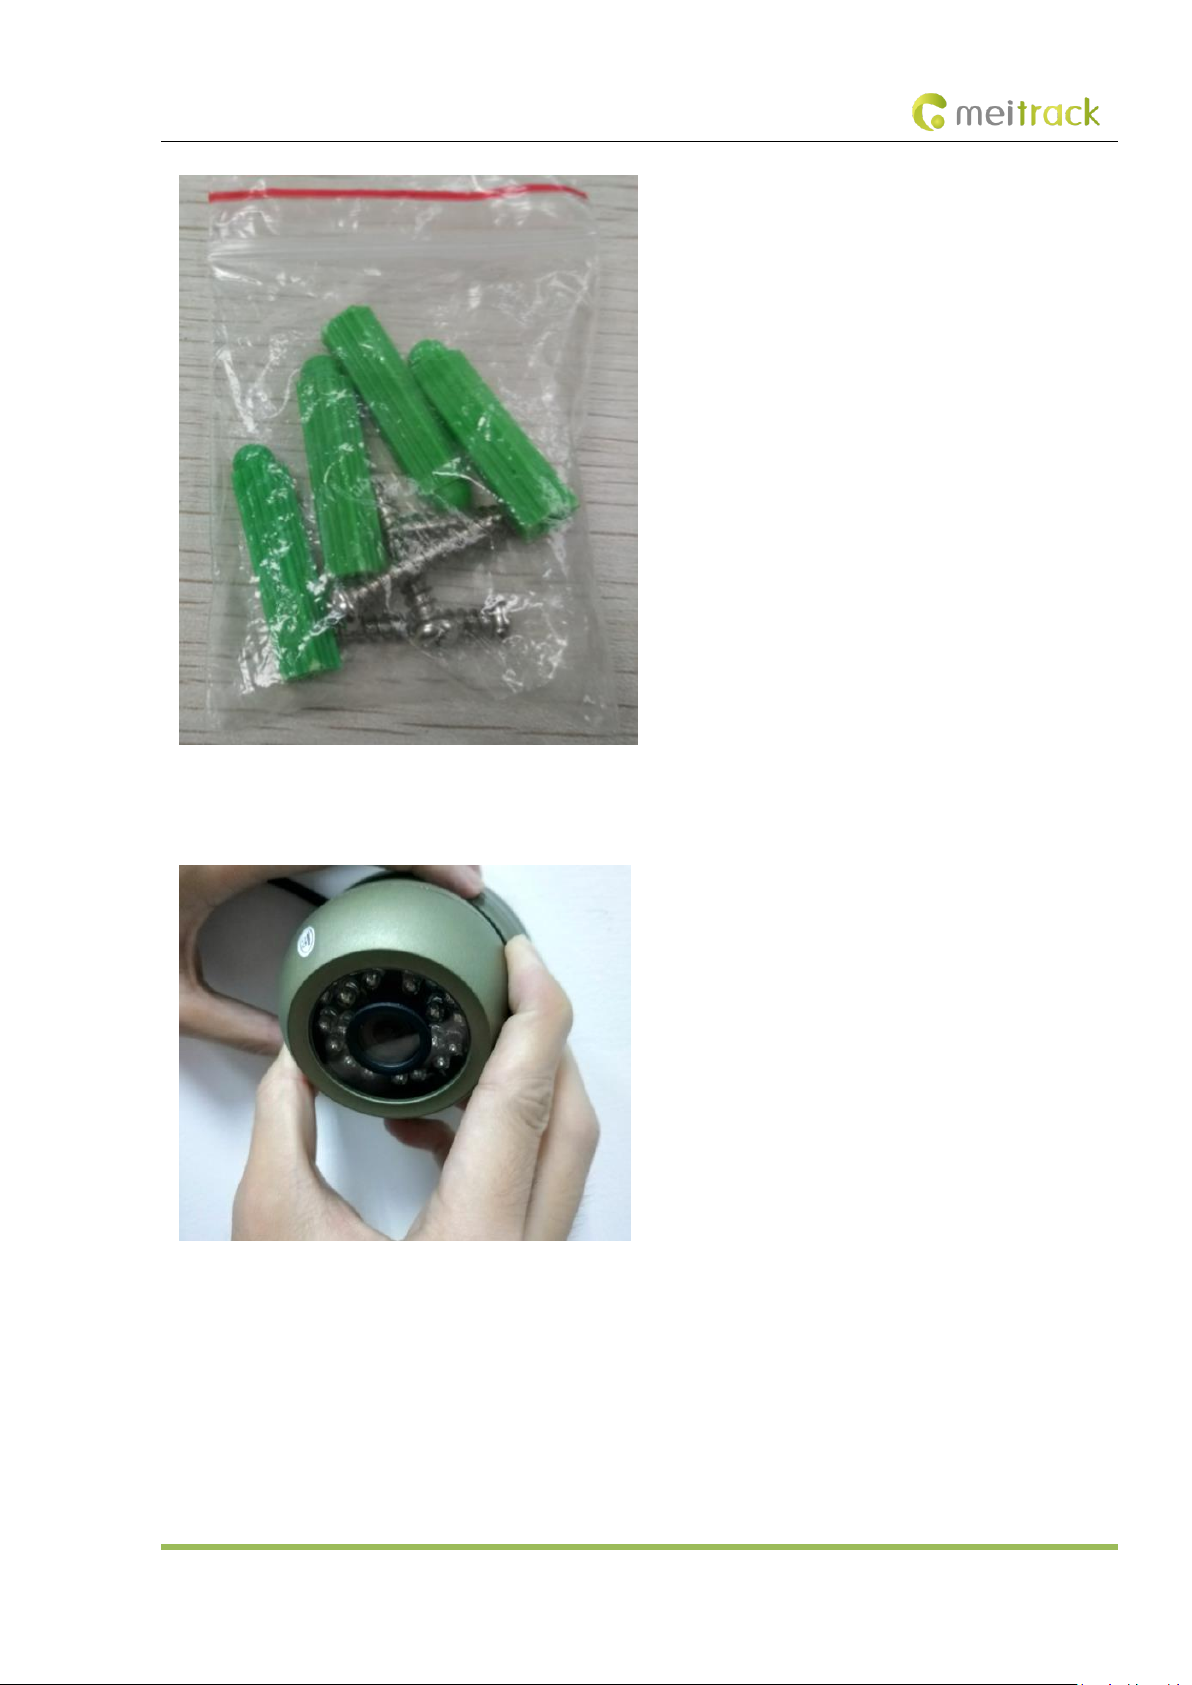
(3) Drill holes in nail holes by using provided nails, hammer the nails into the holes, and install the bottom part of the camera.
Page 50
MEITRACK MD511H User Guide
Copyright © 2019 Meitrack Group All rights reserved. - 50 -
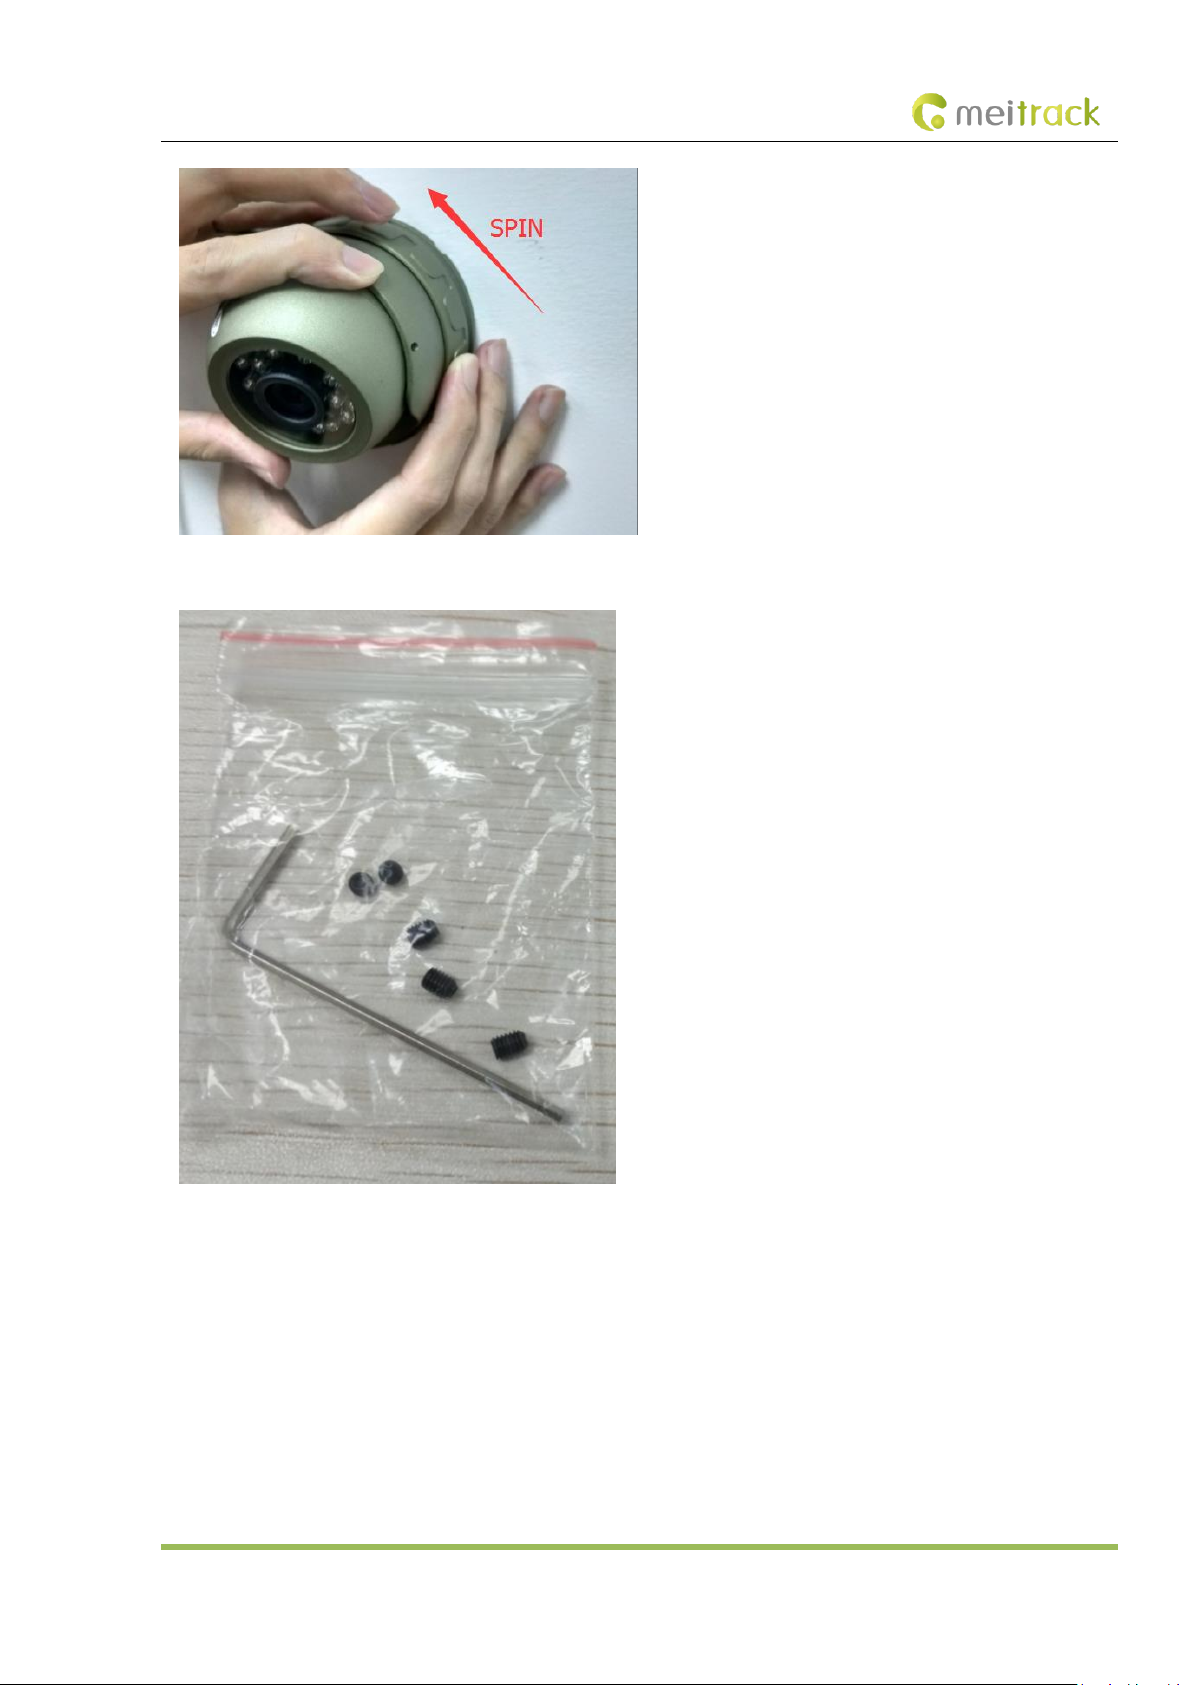
(4) Rotate the camera to adjust its angle. To ensure images do not display upside down or are misplaced, you can use the
platform or display to check the camera angle.
(5) Rotate the iron ring to fix the camera.
Page 51
MEITRACK MD511H User Guide
Copyright © 2019 Meitrack Group All rights reserved. - 51 -
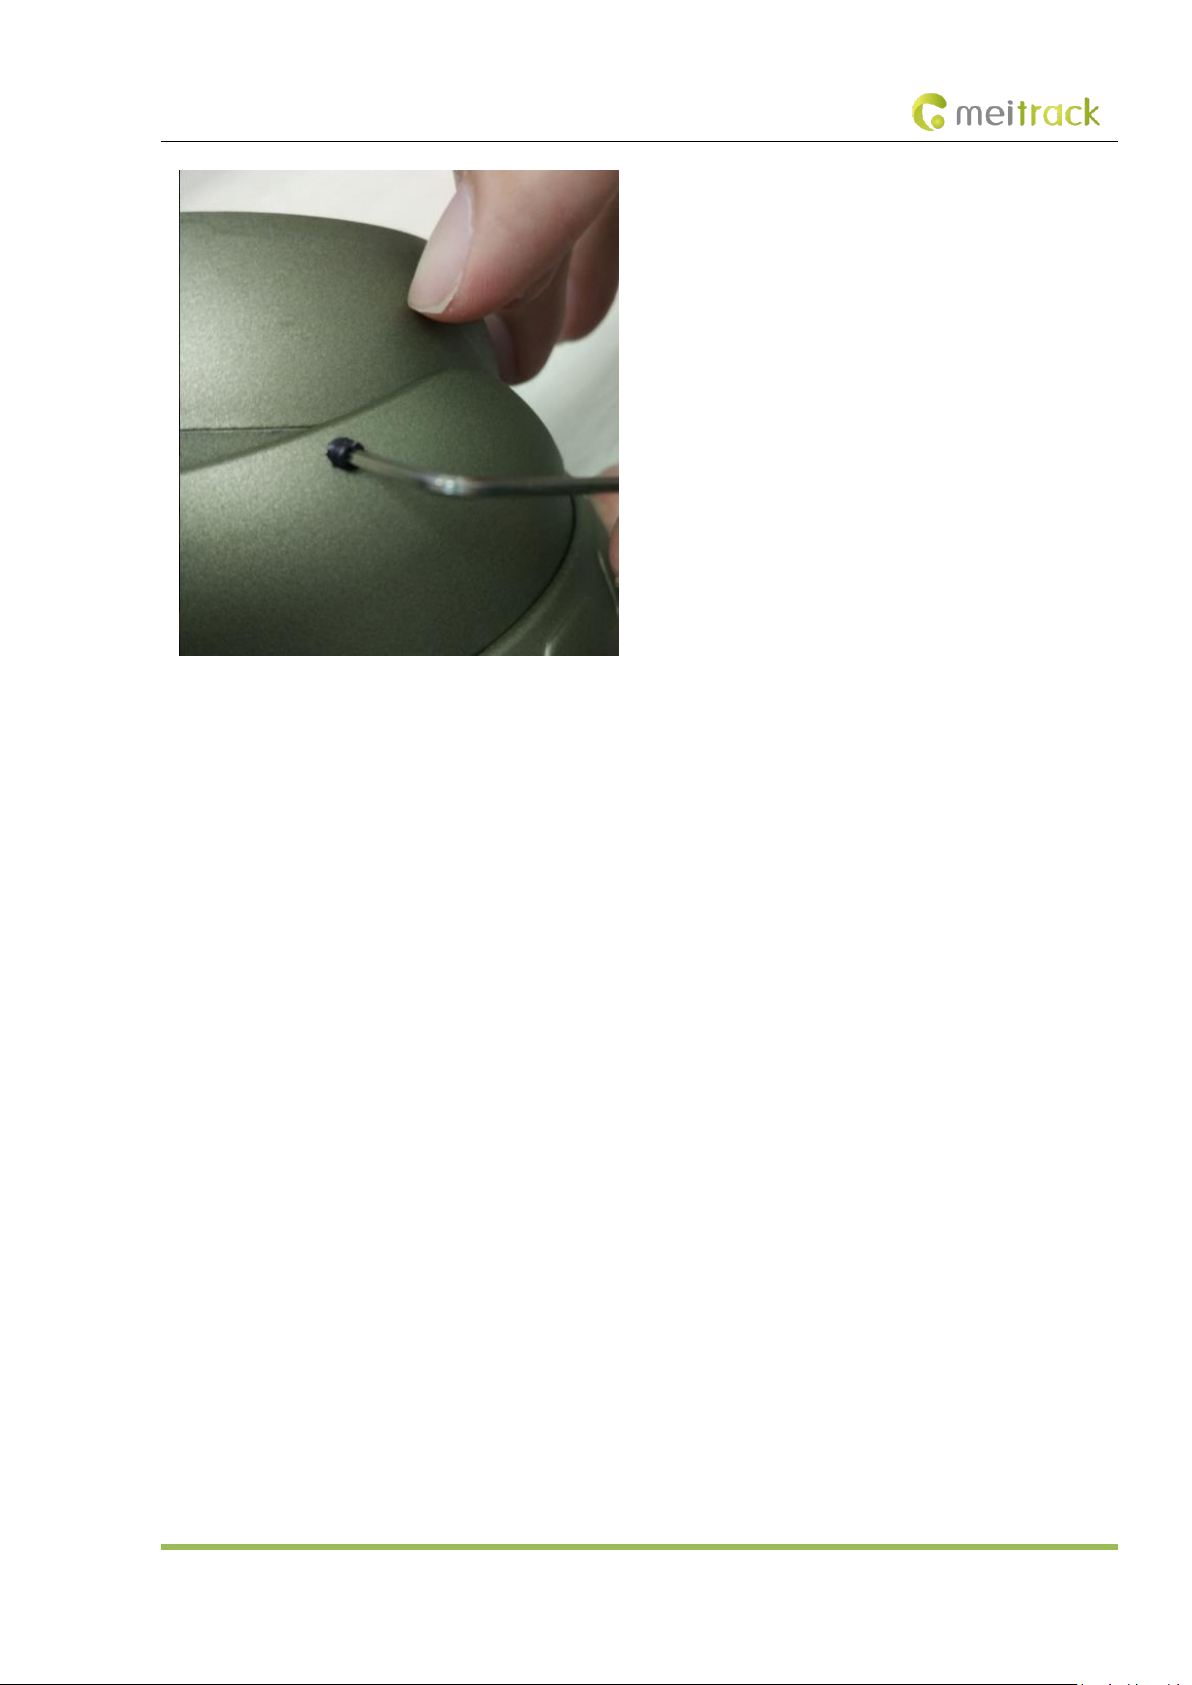
(6) Install shockproof screws to fasten the camera lens.
Page 52
MEITRACK MD511H User Guide
Copyright © 2019 Meitrack Group All rights reserved. - 52 -
If you have any questions, do not hesitate to email us at [email protected].
 Loading...