

Page 1

Installation
General points to follow:
- Disconnect power to the main board before installing the unit.
- The unit should not be installed on an outside wall or where there is an air draft.
- The unit must not be exposed to a direct sunlight.
- The standard height to install this unit is 1.5 meter (5 feet) from the floor.
Installation procedure:
Separate the front panel from back panel by pressing the tongue located in the top of the unit and pull the
back panel out.
Line the back panel up against the wall or flat surface. In stall three screws as required.
Make electrical connections as shown on enclosed electrical wiring diagram.
Install the cover to the back panel; first the two tabs on the bottom and then the top tongue.
Push until tight against the wall.
The ETN24 is designed for wall mounting in the room to be controlled. It
should be located where the occupant can easily read the LCD display and
use the controls. If the built in temperature sensor is being used to measure
room temperature, the module should be placed where the temperature is
representative of the general room conditions. Cold or warm air draughts;
radiant heat and direct sunlight should be avoided.
o
SelectOn/Off Prog
ºF
ON
Cool
Heat
Su
Program: Wake
Tel: (856) 2882882
Tel: +972-3-9626462
Fax: +972-3-9626620
ETN24-SUPER-FP-PROG-F
Owner’s manual & Technnician Settings
Page 2
Before connecting or disconnecting any wires, ensure that all power supplies have been switched off and
all wires are potential-free to prevent equipment damage and avoid electrical shock.
Do not run wiring close to transformers or high frequency generating equipment. Complete and verify all
wiring connections before applying power to the controller to which the module is connected.
Wiring
Notes:
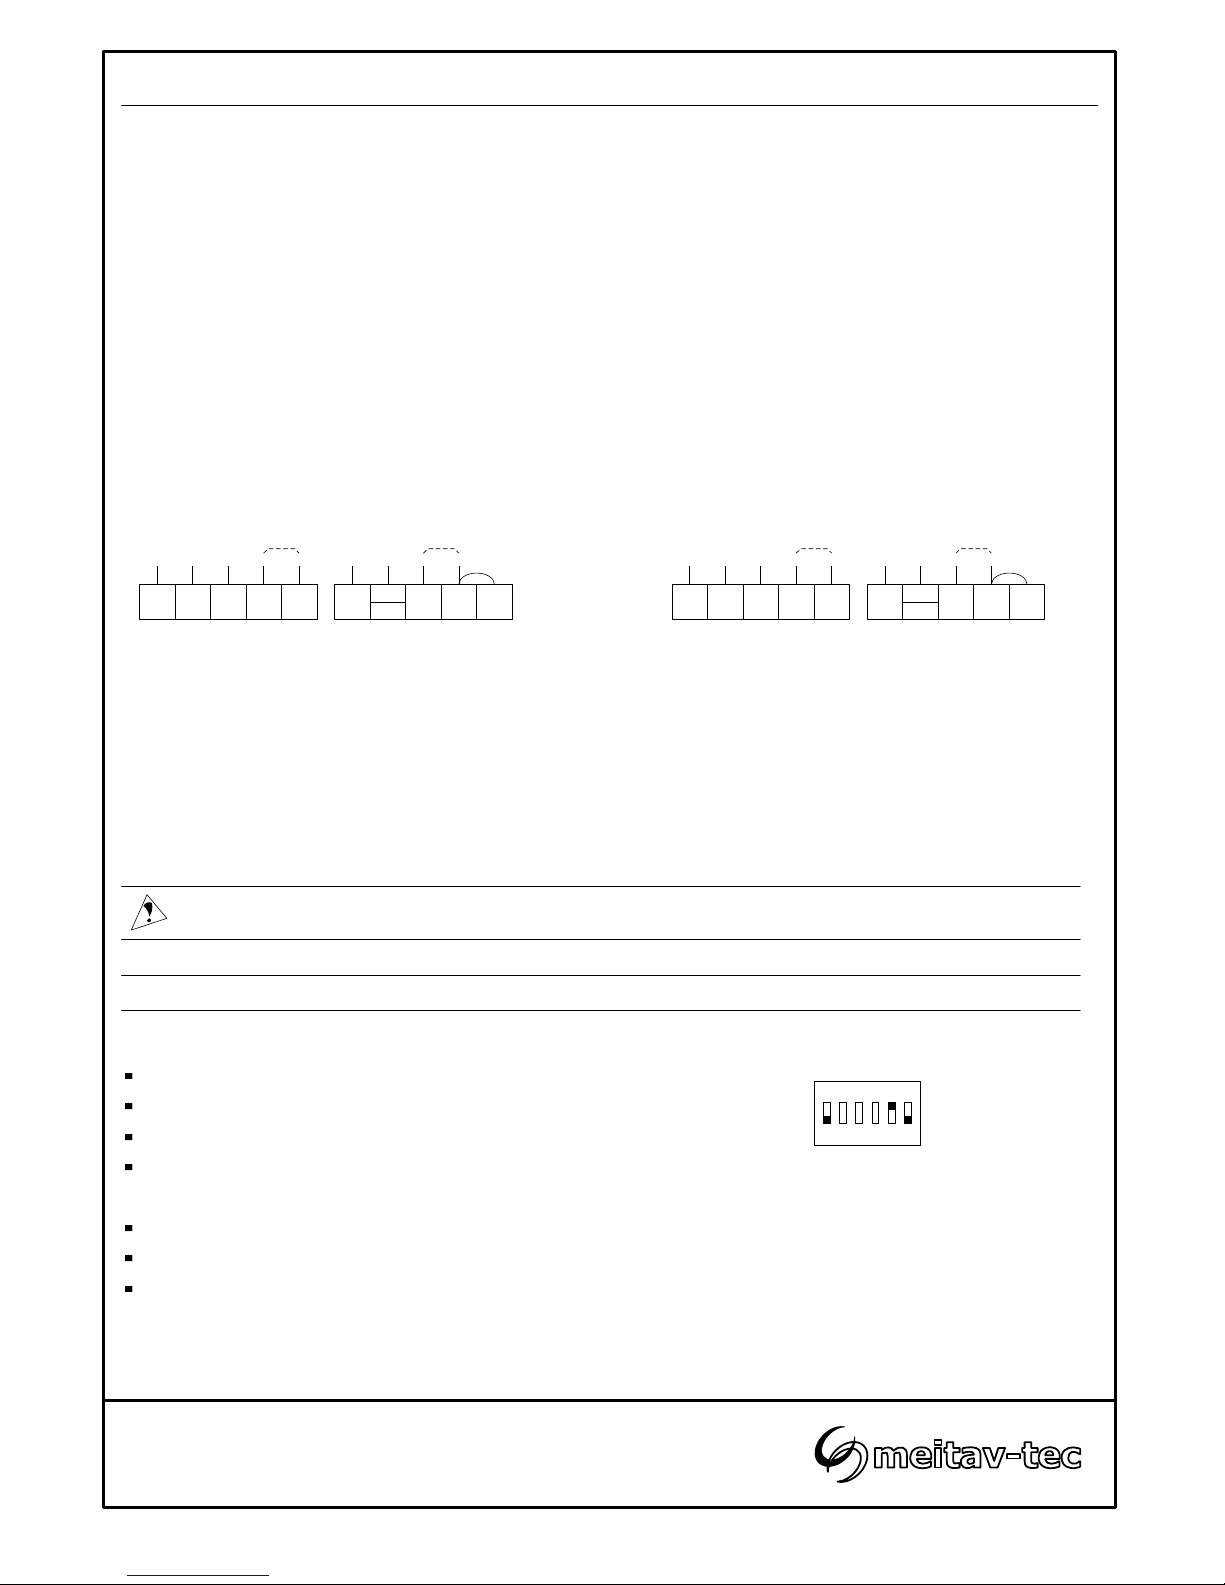
For a heat pump system with no heat elements, leave terminals “W1” and “W2” free.
For a heat pump system with one heat element, leave terminal “W2” free.
For system with one compressor, leave terminal “Y2” free.
RC-RH, - When using one transformer, RC,RH terminals must be shorted.
RCRHC
W1
B/O
W2TTGY1
Fan (0.5A)
Heat element 2 (0.5A)
Heat element 1 (0.5A)
External sensor (option)
Main supply 24VAC
External sensor Connection (option)
Important: The external sensor must be Meitav-tec type only!
Res. KΩ 115.8 100.9 88.1 77.1 67.7 59.6 52.5 46.4 41.2 36.6
Connecting the external sensor
Disconnect power to the thermostat.
Move switch 5 to ON position and switches 1 and 6 to OFF position.
Connect the temperature sensor to the T-T terminals.
Reconnect power to the thermostat.
Notes:
The wire length for the external sensor can be up to 100 feet (30 meters) with standard cable.
If the distance is greater than 100 feet the wire MUST be shielded.
The external sensor must be Meitav-tec type.
There is a wide range of sensors for different applications, duct, rooms, etc. There are also options for
averaging the temperature. For details please contact our technical line or visit our web site.
ON
123456
Temp °F 45 50 55 60 65 70 75 80 85 90
Tel: (856) 2882882
Tel: +972-3-9626462
Fax: +972-3-9626620
ETN24-SUPER-FP-PROG-F
Owner’s manual & Technnician Settings
RCRHC
W1
B/O
W2TTGY1
Compressor 1 (0.5A)
Fan (0.5A)
Heat element (0.5A)
Heat pump (0.5A)
External sensor (option)
Main supply 24VAC
System without heat pump
(heat elements only)
System with heat pump
Y2 Y2
Compressor 2 (0.5A)
Compressor 1 (0.5A)
Compressor 2 (0.5A)
Page 3
Freeze Protection
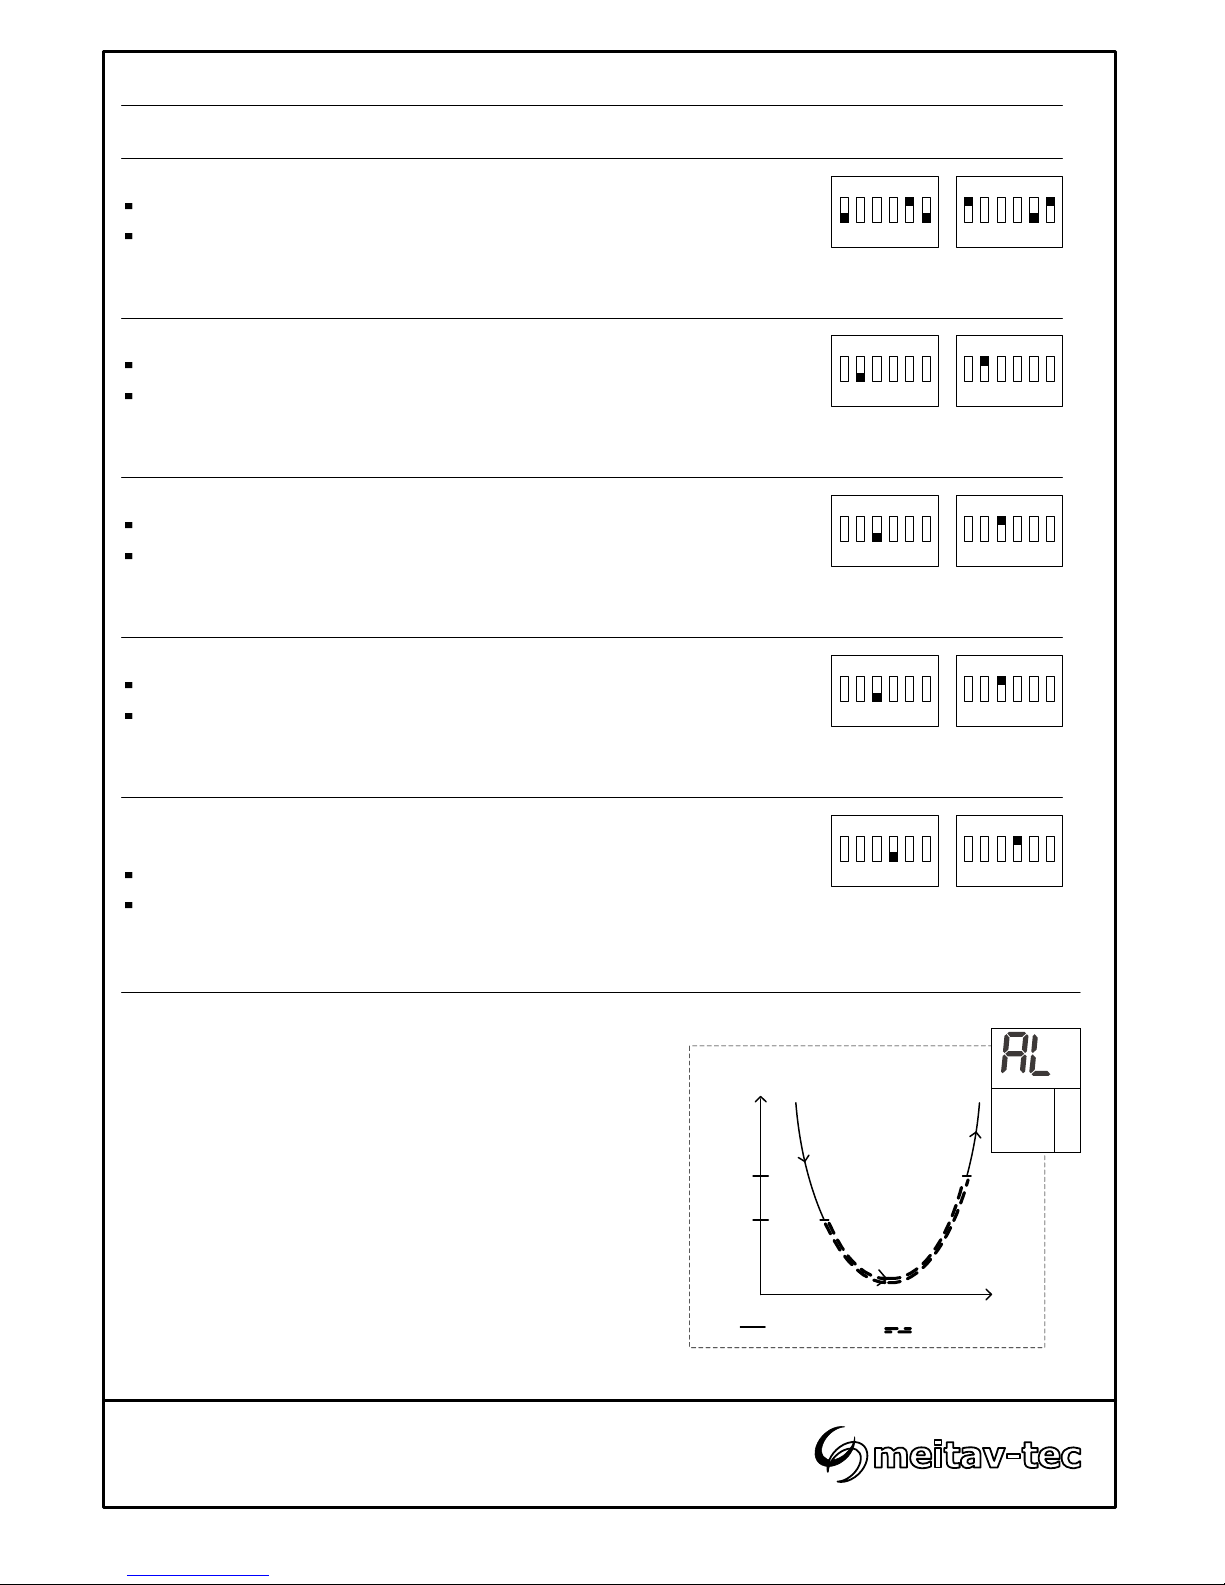
When the temperature drops below the freeze protection cutin temperature*, the thermostat will turn on the Heat and Fan
outputs in order to protect the system from freezing.
This function will be activated when the thermostat is either in
On or Off position.
The display will alternate between "AL" and the room
temperature.
The thermostat will return to normal mode when the
temperature rises above the freeze protection cut-off
temperature*.
*adjustable – please refer to the technician settings section of
the operating manual.
Cut-in
Cut-off
Temperature
Time
Normal work
Freeze protection
Tel: (856) 2882882
Tel: +972-3-9626462
Fax: +972-3-9626620
ETN24-SUPER-FP-PROG-F
Owner’s manual & Technnician Settings
DIP switch settings
Internal/External sensor
Use DIP Switches S1, S5 and S6 to select Internal/External sensor
Internal sensor.………………………..S1, S6 – ON S5 – OFF
External sensor………………..………S1, S6 – OFF S5 – ON
ON
123456
Internal
sensor
External
sensor
ON
123456
Heat pump or non heat pump (heat elements only) system
Use DIP Switch S2 to select heat pump or non heat pump system
Heat pump system…………………….S2 – ON
Non heat pump system………..……… S2 – OFF
ON
123456
Heat pump
system
Non heat
pump system
ON
123456
Compressor time delay
Use DIP Switches S4 to enable/disable the 3 minutes
compressor time delay as follows:
3 Minutes delay………………………..S4 – OFF
No delay………………………………..S4 – ON
Heater type – electric or oil/gas (for non heat pump systems)
Use DIP Switch S3 to select heater type
Oil/Gas heaters………………….…….S3 – ON
Electric heaters………………...……...S3 – OFF
ON
123456
Oil/Gas
heaters
Electric
heaters
ON
123456
Heat pump configuration (for heat pump systems)
Use DIP Switch S3 to select heat pump configuration
Heat pump energized in heat.…….....S3 – ON
Heat pump energized in cool.……..... S3 – OFF
ON
123456
Heat pump
energized in
heat
Heat pump
energized in
cool
ON
123456
ON
123456
No
compressor
delay
3 Minutes
compressor
delay
ON
123456
Page 4
Operating instructions
On/Off
Press the [On/Off] button to turn the thermostat ON.
Press and hold the [On/Off] button (4 sec.) to turn the thermostat OFF.
Set point
o
SelectOn/Off Prog
ºF
ON
Cool
Heat
Su
Program: Wake
Tel: (856) 2882882
Tel: +972-3-9626462
Fax: +972-3-9626620
ETN24-SUPER-FP-PROG-F
Owner’s manual & Technnician Settings
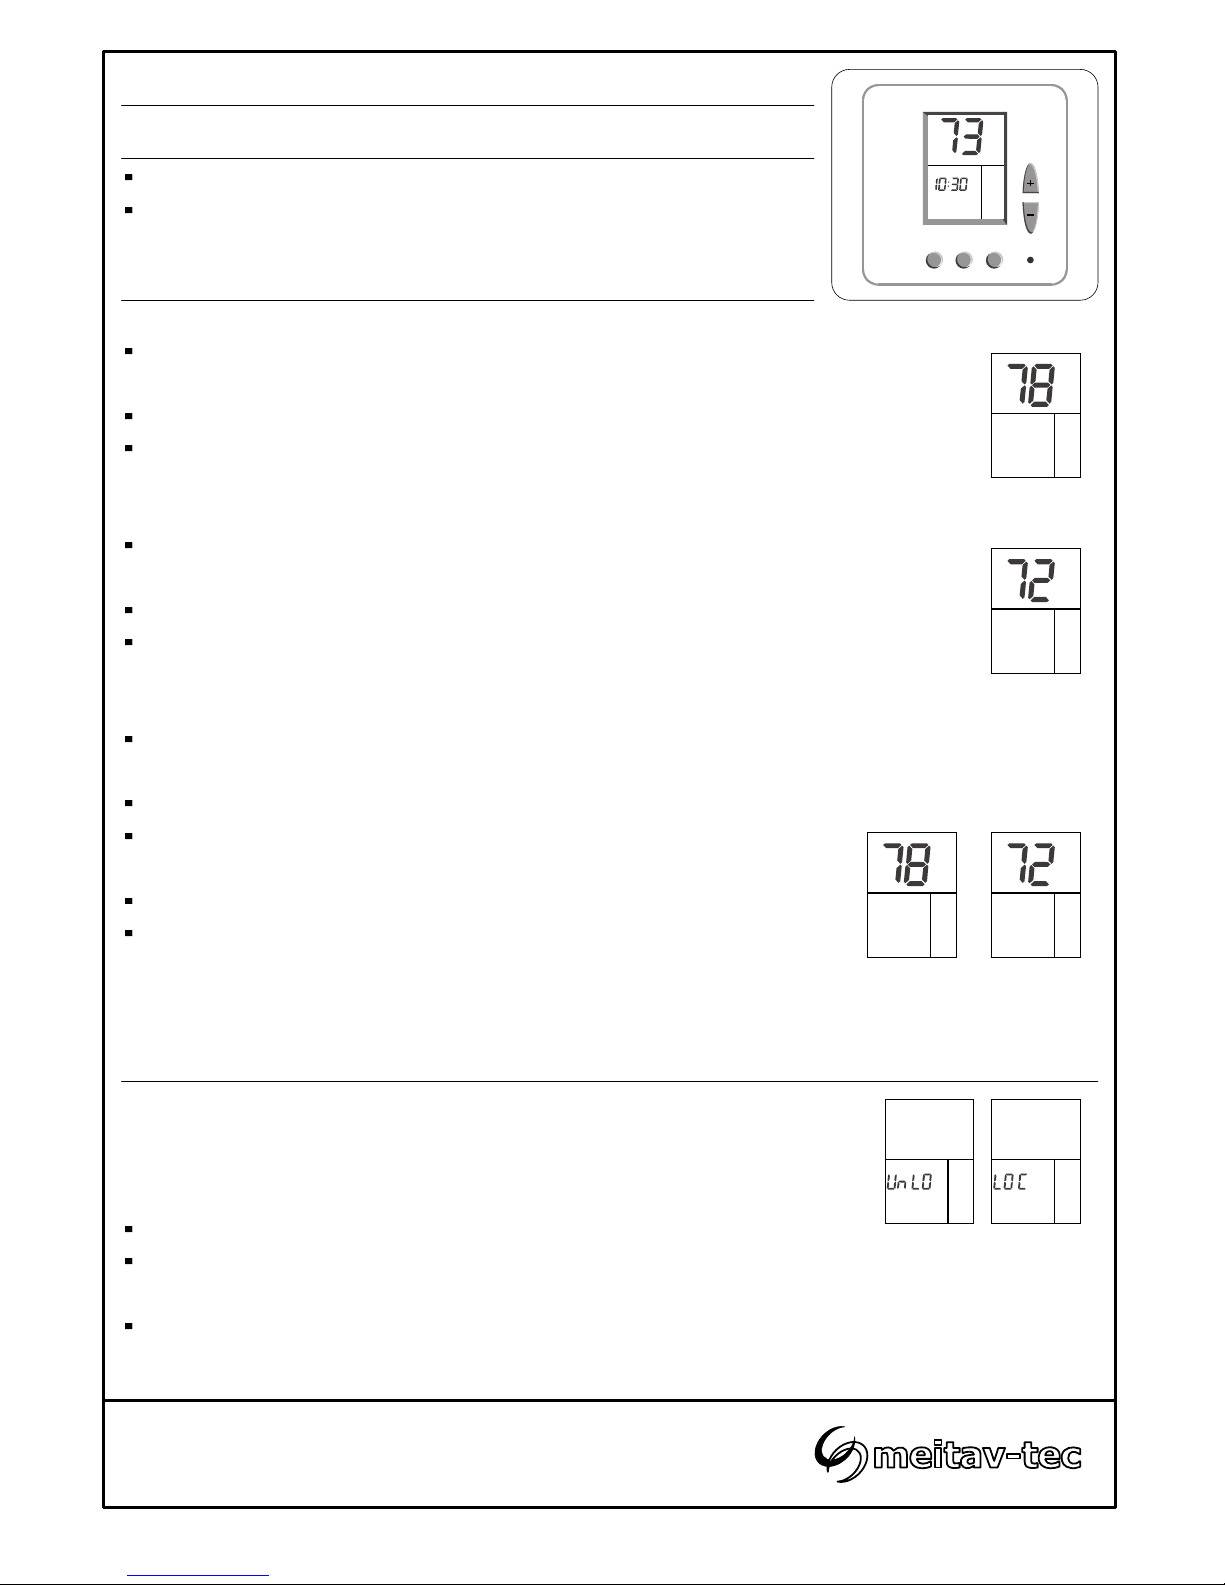
In Cool mode:
Press the [+] or [-] buttons - "COOL" will appear on display and the
set-point temperature for cooling will flash.
Adjust the set-point temperature for cooling using the [+] or [-] buttons.
Press the [Select] button or wait to return to normal display.
In Heat mode:
Press the [+] or [-] buttons - "Heat" will appear on display and the setpoint temperature for heating will flash.
Adjust the set-point temperature for heating using the [+] or [-] buttons.
Press the [Select] button or wait to return to normal display.
In Fan mode or in auto change-over mode (2 set-points):
Press the [+] or [-] buttons - "COOL" will appear on display and the
set-point temperature for cooling will flash.
Adjust the set-point temperature for cooling using the [+] or [-] buttons.
Press the [Select] button or wait 3 seconds - "HEAT" will appear on
display and the set-point temperature for heating will flash.
Adjust the set-point temperature for heating using the [+] or [-] buttons.
Wait until display returns to normal.
Note: the cooling set point temperature must be higher than the heating
set point temperature
Cool
Heat
°F
°F
Cool
°F
Heat
°F
Lock Buttons
Use the Lock option to prevent users from making unwanted changes.
When the thermostat is locked, the [Select], [+] and [-] buttons are disabled,
however, the users can turn the thermostat ON or OFF. The display will alternate
between "Loc" and real time clock.
Make sure both temperature set points are different than 50°F.
Lock the thermostat - Press and hold the [Select] button (20 seconds) until "Loc"
appears on display.
Unlock the thermostat - Press and hold the [Select] button again (20 seconds)
until "UnLo" appears on display.
LockedUnlocked
Page 5

Operating instructions (Cont’)
Tel: (856) 2882882
Tel: +972-3-9626462
Fax: +972-3-9626620
ETN24-SUPER-FP-PROG-F
Owner’s manual & Technnician Settings
Press the [Select] button once to enter Modes selection:
Use the [+] and [-] buttons to switch between modes:
“Cool”………………… Cooling
“Heat”…………………Heating
“Cool” & “Heat”………*Auto mode
“Fan”…………………. Fan only
Press the [Select] button again to enter Auto fan
selection:
Use the [+] and [-] buttons to switch between:
“Fan”…………….…… Fan is on continuously
“Auto Fan”……………*Fan cycles on with demand
*Auto Fan is not available in "Fan only" mode.
* In Heat mode, with Oil/Gas heat configuration (i.e.,
furnace):
Auto Fan – The fan will never be activated.
Fan – The Fan will work continuously.
Press the [Select] button again to return to normal display
Note: The Auto mode can be disabled by technician – please
refer to technician settings section in this manual.
Modes / Auto fan
Cool Heat Auto mode Fan only
Always ON
On with
demand
Cool
Heat
Cool
Heat
Fan
Fan
Auto
Fan
Page 6
Weekly Program
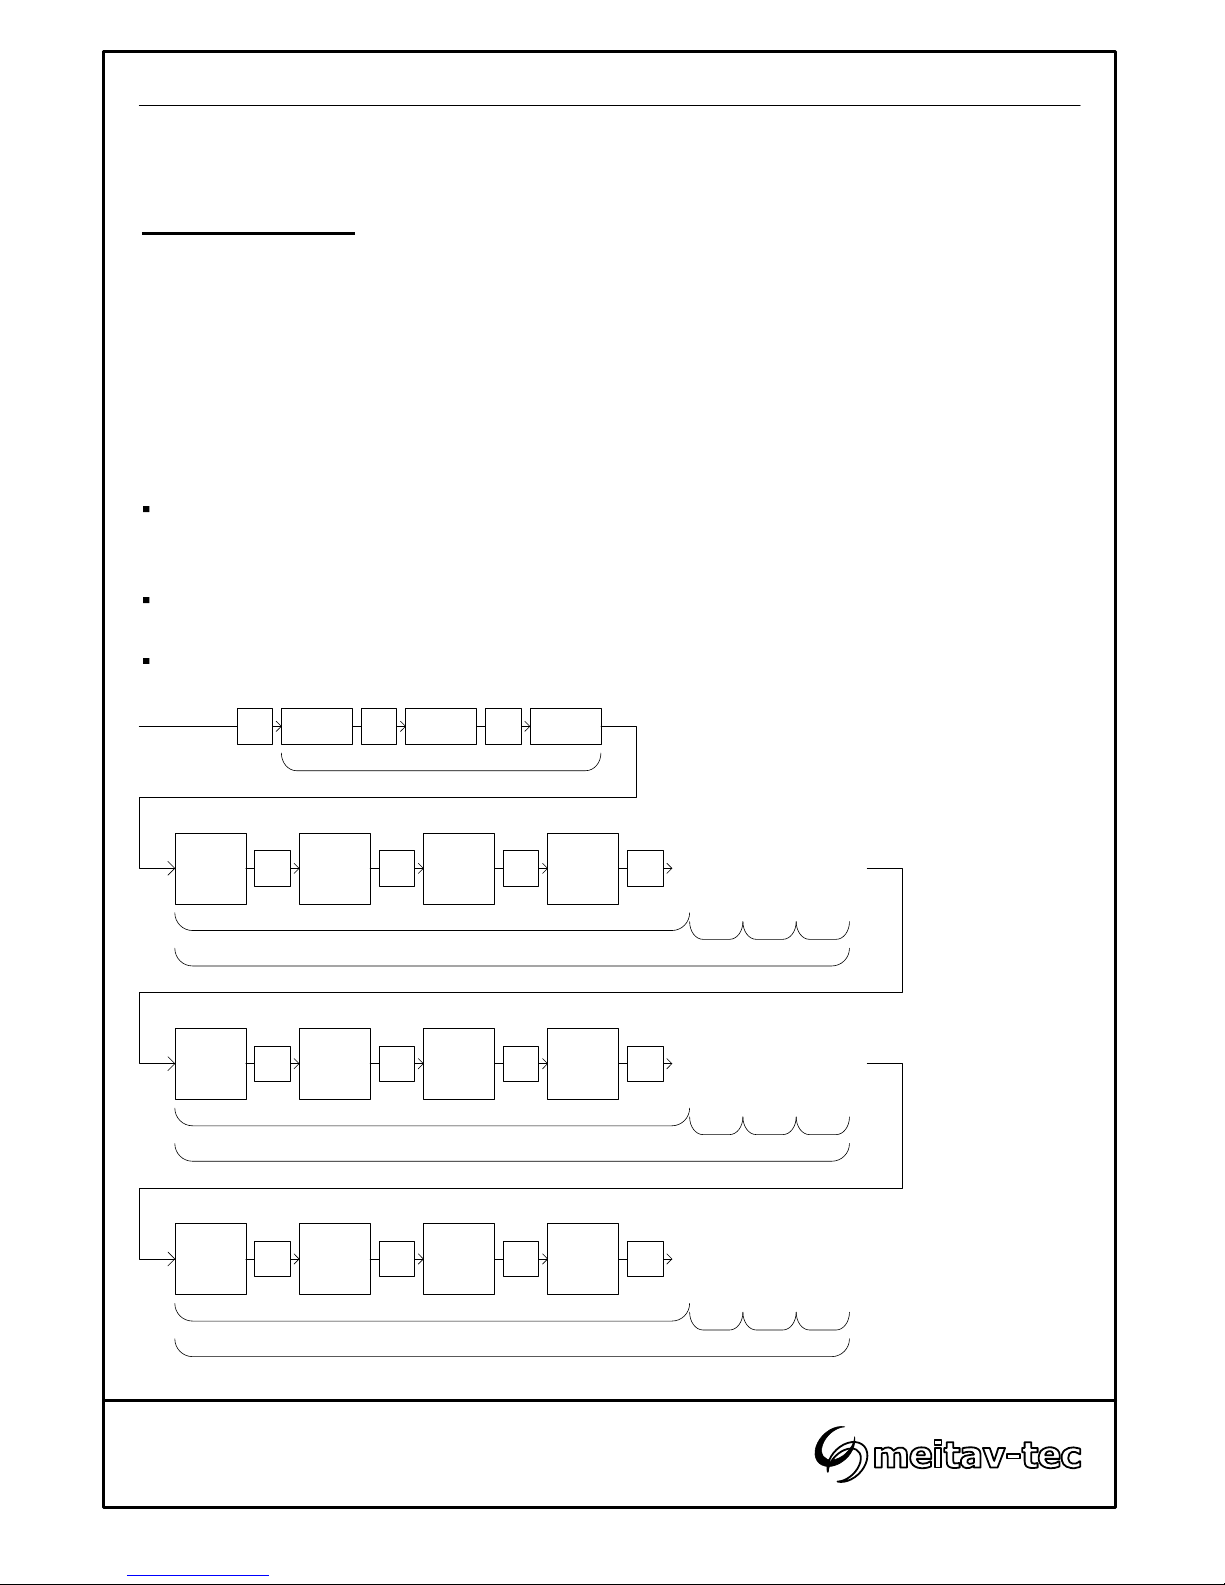
The thermostat can be programmed with up to 12 different programs: 4 different programs for the weekdays
(Monday to Friday); 4 different programs for Saturday and 4 different programs for Sunday. The daily
programs are named: Wake, Day, Return and Sleep.
Programming defaults
1 (Wake) 2 (Day) 3 (Return) 4 (Sleep)
Monday to Friday Start time: 6:30 AM 8:00 AM 5:30 PM 10:00 PM
Cool Set Point / Heat Set Point: 78°F/70°F 85°F/62°F 78°F/70°F 82°F/62°F
Saturday Start time: 7:30 AM 12:30 PM 6:00 PM 11:30 PM
Cool Set Point / Heat Set Point: 76°F/70°F 74°F/70°F 72°F/70°F 78°F/65°F
Sunday Start time: 7:30 AM 12:30 PM 6:00 PM 11:30 PM
Cool Set Point / Heat Set Point: 76°F/70°F 74°F/70°F 72°F/70°F 78°F/65°F
Enable/Disable/Override the weekly program
Press & Hold the [Prog] button (10 sec.) to enable/disable the program. When the word “Program” appears
on display, the weekly program is enabled and can be modified. When the word “Program” does not
appear on display, the weekly program is disabled and cannot be modified.
The occupant can temporarily change the set point temperature to be different than the set point
temperature specified by the program. Changes will be affective until the next program event begins.
To exit programming mode, press the [Select] button until normal display is reached or wait 30 seconds.
Prog
Hours
Prog
Minutes
Prog
Day
Start
time
Hours
Start
time
Minutes
Set
Point
cool
Set
Point
heat
Prog Prog Prog
Real time clock
Wake
Prog
Repeat for
Weekdays
“Day”, “Return” &
“Sleep”
SleepReturnDay
Weekdays program
Start
time
Hours
Start
time
Minutes
Set
Point
cool
Set
Point
heat
Prog Prog Prog
Wake
Prog
Repeat for
Saturday
“Day”, “Return” &
“Sleep”
SleepReturnDay
Saturday program
Start
time
Hours
Start
time
Minutes
Set
Point
cool
Set
Point
heat
Prog Prog Prog
Wake
Prog
Repeat for
Sunday
“Day”, “Return” &
“Sleep”
SleepReturnDay
Sunday program
Tel: (856) 2882882
Tel: +972-3-9626462
Fax: +972-3-9626620
ETN24-SUPER-FP-PROG-F
Owner’s manual & Technnician Settings
Page 7
Tel: (856) 2882882
Tel: +972-3-9626462
Fax: +972-3-9626620
ETN24-SUPER-FP-PROG-F
Owner’s manual & Technnician Settings
Technician Settings
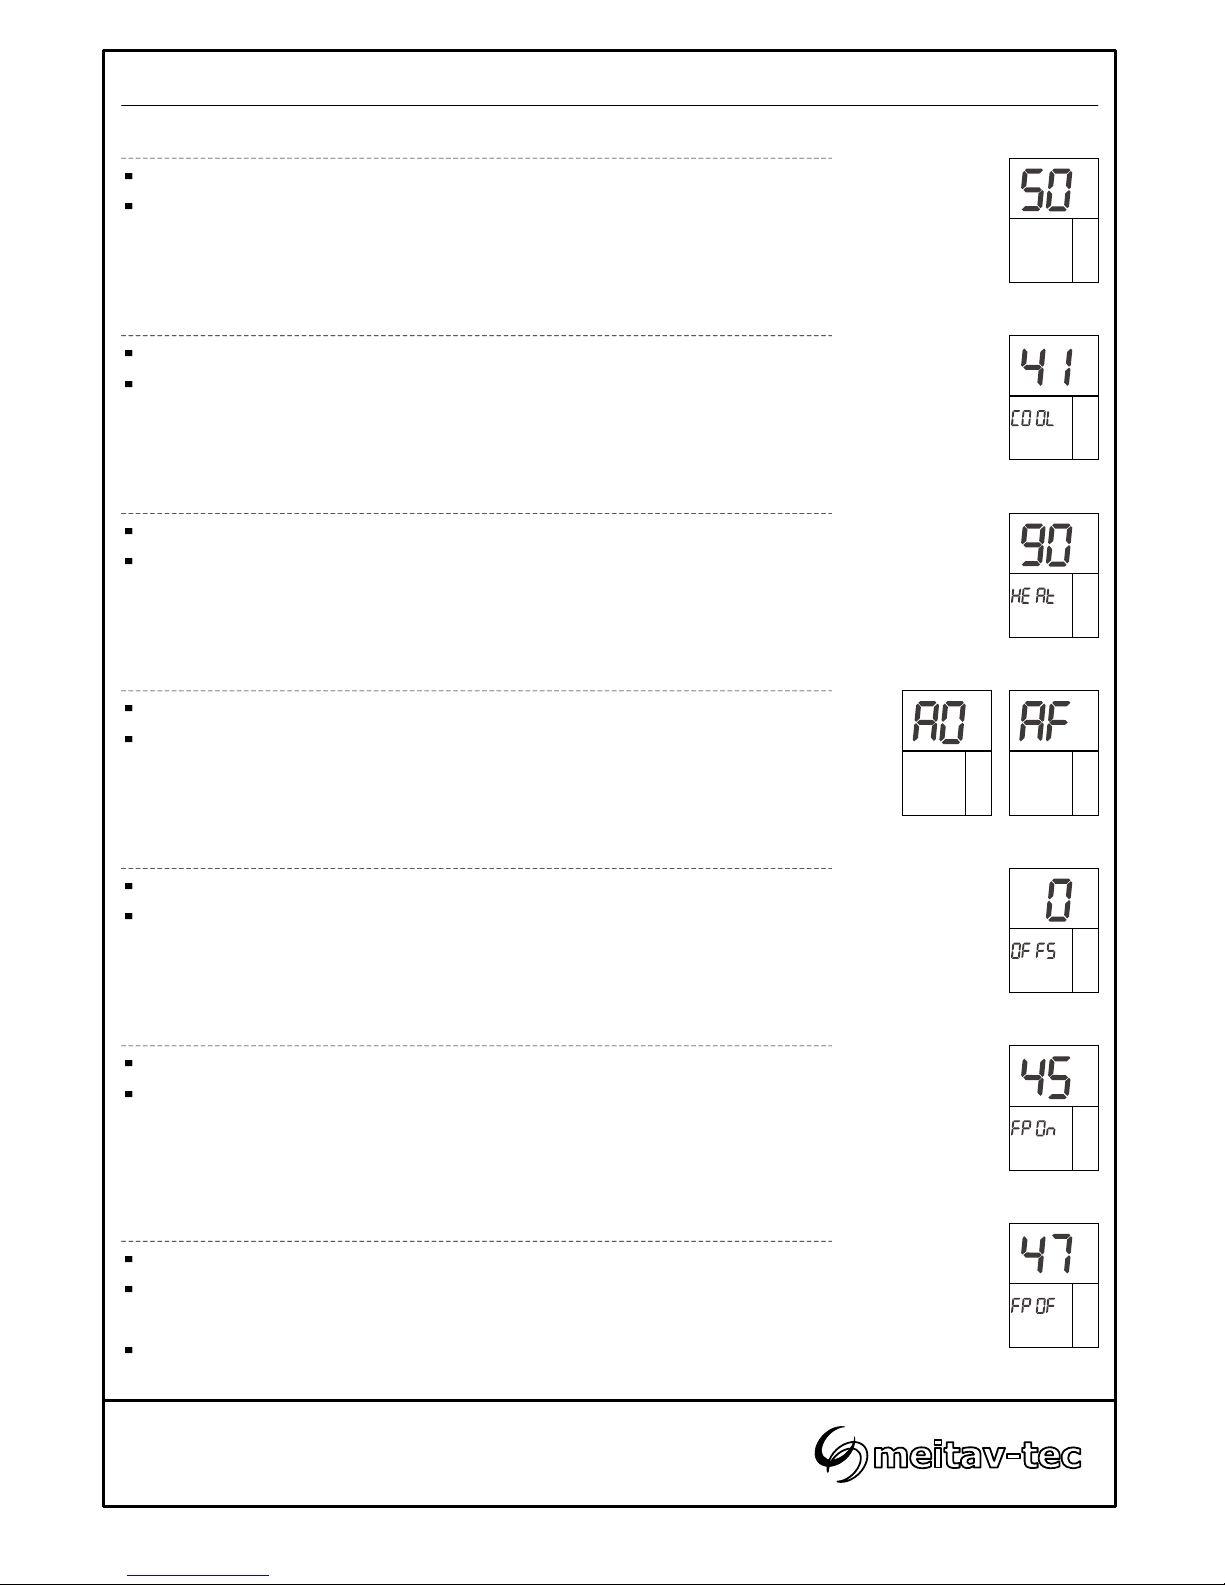
Enter technician settings mode
Adjust the set point temperature to 50°F
Press and hold the [Select] button for 5 seconds to enter technician settings mode.
Temperature limit for cooling
“Cool” will flash.
Use the [+] and [-] buttons to adjust the temperature limit for cooling.
Range: 41...90°F, Default 41°F.
Temperature limit for heating
Press the [Select] button again – “heat” will flash.
Use the [+] and [-] buttons to adjust the temperature limit for heating.
Range: 41...90°F, Default 90°F.
Offset for calibration of measured temperature
Press the [Select] button again – the offset will appear on display.
Use the [+] and [-] buttons to adjust the offset.
Range: -6…+6°F, Default 0°F.
Enter tech.
settings
ºF
Set
ON
Set point
limit cool
Set point
limit heat
Disable/Enable Auto change over mode
Press the [Select] button again – “AO” or “AF” will appear on display.
Use the [+] and [-] buttons to select between:
“AO”……………..With Auto change over mode.
“AF”……………..Without Auto change over mode
Without
Auto mode
With
Auto mode
Calibration
Offset
Freeze protection cut-in temperature
Press the [Select] button again – “FPOn” will appear on display.
Use the [+] and [-] buttons to adjust the freeze protection cut-in temperature.
Range: 41…65°F, Default 45°F.
Note: For more information about the freeze protection functionallity, please refer to the
“Freeze protection” section in this manual.
Cut-in
temperature
Cut-off
temperature
Freeze protection cut-off temperature
Press the [Select] button again – “FPOf” will appear on display.
Use the [+] and [-] buttons to adjust the freeze protection cut-in temperature.
Range: 43…67°F, Default 47°F.
Press the [Select] button again to return to normal display.
Page 8

 Loading...