

Page 1

FCC ID: XAT-MN4310
ATTACHMENT H.
- Hardware Manual -
HCT CO., LT D.
SAN 136-1, AMI-RI, BUBAL-EUP, ICHEON-SI, KYOUNGKI-DO, 467-701, KOREA
TEL:+82 31 639 8517 FAX:+82 31 639 8525 www.hct.co.kr
Report No. : HCT-RF09-0427 1/1
Page 2

Table of Contents
■
■ Safety notes for handling the PND
■■
■
■ Before using
■■
1) Scope of delivery ····································································· 5
2) Device overview ······································································ 6
3) Switching ON/OFF ··································································· 7
4) Initial startup of the PND ···························································· 8
■
■ Menus
■■
································································································ 9
1) Main Menu ············································································· 9
2) BLUETOOTH ·········································································· 16
3) Entertainment ········································································· 25
Audio Player ····································································· 26
Picture Viewer ··································································· 29
·······················································2
················································································· 5
Video Player ····································································· 31
4) Settings ················································································· 32
■
■ Troubleshooting Table
■■
■
■ Technical Data
■■
■
■ Warranty
■■
································································································· 36
······················································································· 35
·········································································· 34
1
Page 3

■
■ Safety notes for handling the PND
■■
For your personal benefit, carefully read the following safety notes and warnings before operating your PND for the first time
Caution:
Do not operate the PND while driving to protect yourself and others against accidents!
View the display only if you are in a safe travel situation!
The street routing and traffic signs have priority over the instructions of the navigation system.
Follow the instruction of the PND only if circumstances and traffic regulations allow! PND will bring you to your destination even if you
have to deviate from the planned route.
Notes:
· Routes are best planned before starting your trip. If you want to enter a new route while on the road, head for the next parking or rest
area.
· If you did not understand the voice information or if you are not sure what to do at the next intersection, use the map or arrow display
for quick orientation.
Caution:
Protect the device against moisture since it is not waterproof and not splash proof.
Do not open or modify the device. Do not expose the device to extreme temperatures (e.g. in a parked car with direct sun exposure) to
avoid condensation or overheating inside the device
Otherwise, the device or the battery could be deformed, ignite or explode.
Notes:
· Remove the power supply connector of the PND if you switch off the engine for more than 3 days since the GPS receiver constantly
uses electricity and could discharge the vehicle battery.
· Do not unplug the connector by pulling on the wire. The wire could be damaged.
· Do not use harsh solvents to clean the device; use only a damp, lint-free cloth.
Use as directed
The device is designed for mobile use in vehicles.
The device can also be used by pedestrians.
Special information about the navigation of trucks, buses and campers, such as altitude and width limitations or maximum permissible
road load, is not included in the navigation data!
Navigation off the roads (off-road) is only possible to a limited extent with the PND.
2
Page 4

■
■ Safety notes for handling the PND
■■
GPS Reception
GPS (Global Positioning System) is a satellite-based system that supports geographical and time-related information all around the
world. The system is operated and controlled by the United States of America. The USA is also responsible for the availability and
accuracy of this system. All changes to the GPS availability and accuracy, as well as other factors from the surrounding environment can
influence the operation of the navigation system. The supplier of this system does not accept any liability whatsoever for the availability
and accuracy of GPS data.
When you switch on the PND for the first time, it can take several minutes for the GPS reception to reach a sufficient level and to
determine your current position.
Always hold the navigation system vertically.
If you are using the navigation system in an inner city-area, it may take longer to refresh the map details.
3
Page 5

■
■ Safety notes for handling the PND
■■
WEEE Compliance
All electronical and electronic equipment must be disposed of separately from general household waste using the sites designed
by local authorities. If a product displays this symbol of a crossed-out rubbish bin, the product is subject to European Directive
2002/96/EC. The appropriate disposal and separate collection of used equipment serve to prevent potential harm to the
environment and to health. They are a requirement for the re-use and recycling of used electrical and electronic equipment for
the re-use and recycling of used electrical and electronic equipment. For further information on disposing of your used equipment,
please contact your local authority, your re-use collection service or the dealer you purchased the product from.
In many countries it is forbidden to dispose of flat batteries and rechargeable batteries with normal household waste. Please find
out the regulations that apply in your area regarding the disposal of used batteries/rechargeable batteries. Please also dispose of
damaged batteries or batteries that are past their expiry date in a safe and suitable way.
Use the return and collection systems available to dispose of the old device.
Do not discard any batteries in the household trash; instead, return them to the corresponding collection sites.
4
Page 6
■
■ Before using
■■
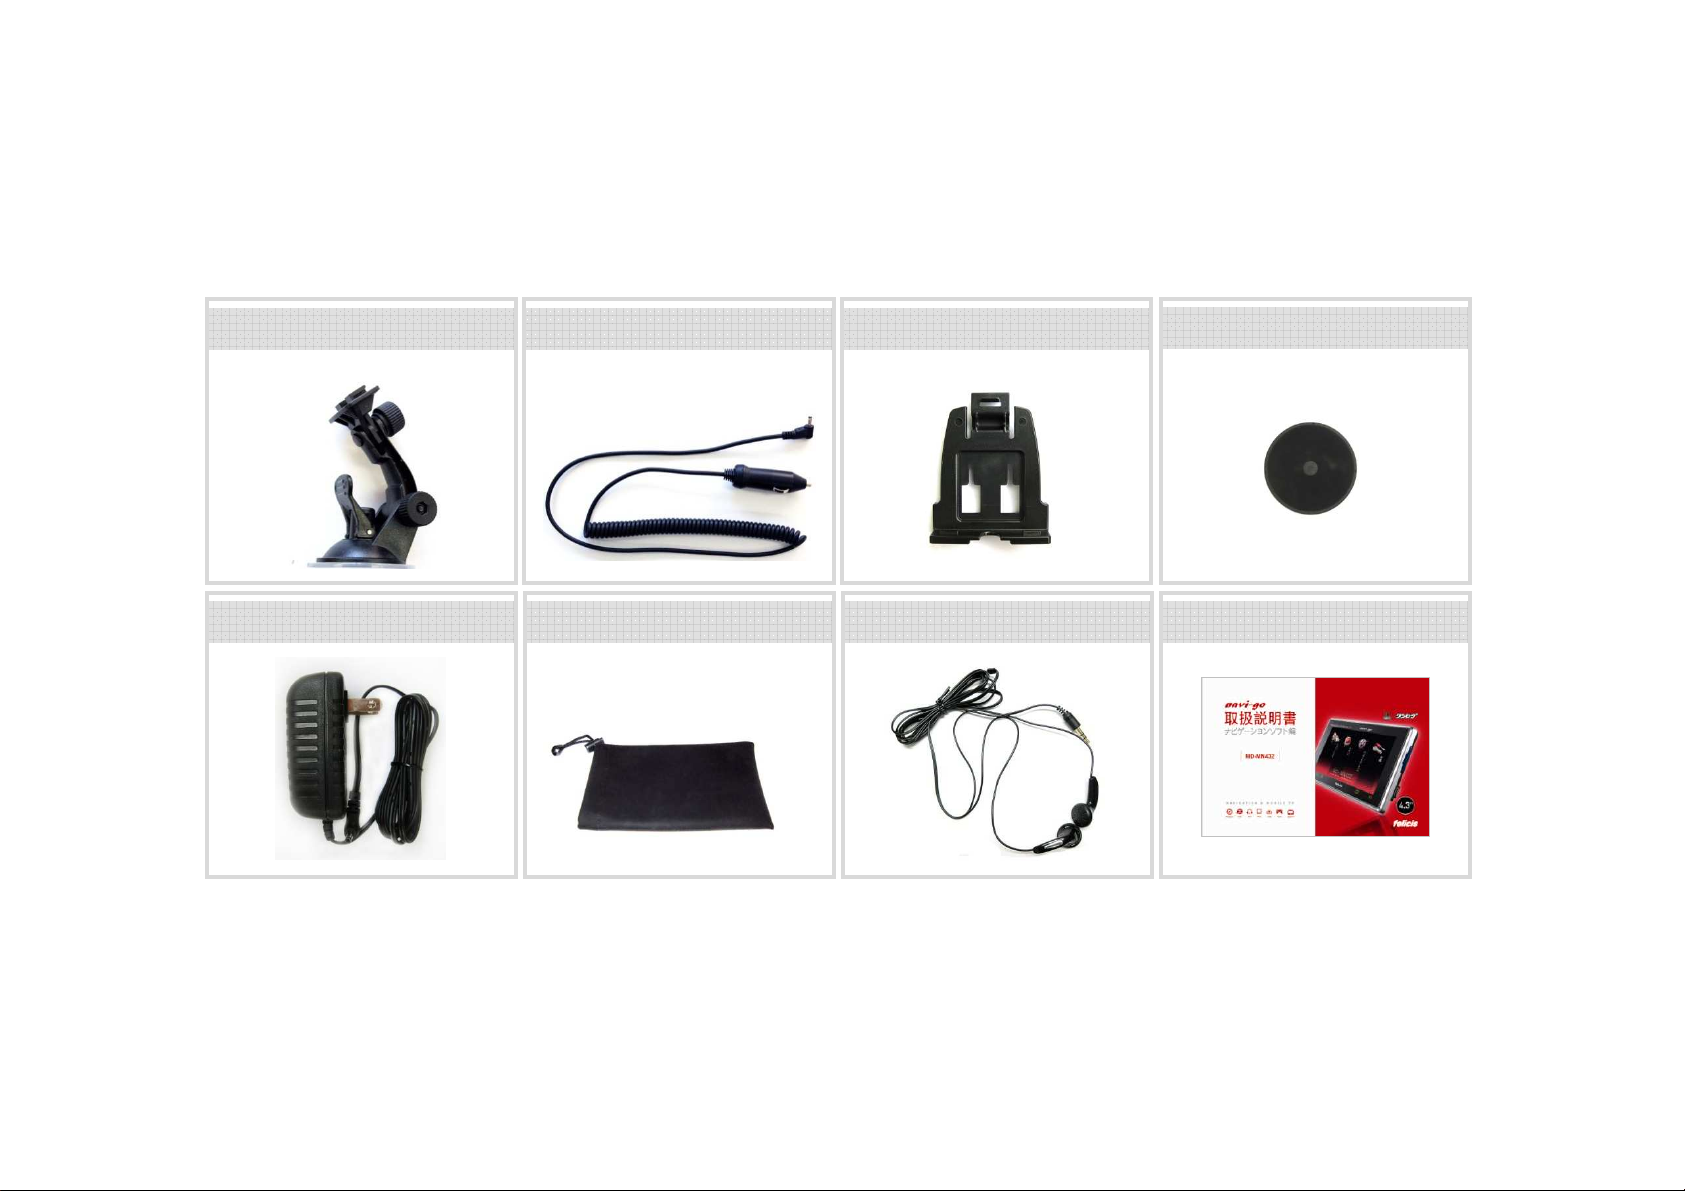
Scope of delivery
The scope of delivery contains the following components:
①
① Suction Cup Holder ②②②② Cigar Power charger ③③③③ Dummy Cradle
①①
⑦
⑦ Earphone⑤⑤⑤⑤ AC/DC Adapter ⑥⑥⑥⑥ Pouch ⑧⑧⑧⑧ Manual
⑦⑦
④
④ Dashboard Plate
④④
Note:
We recommend using original accessories.
5
Page 7
■
■ Before using
■■
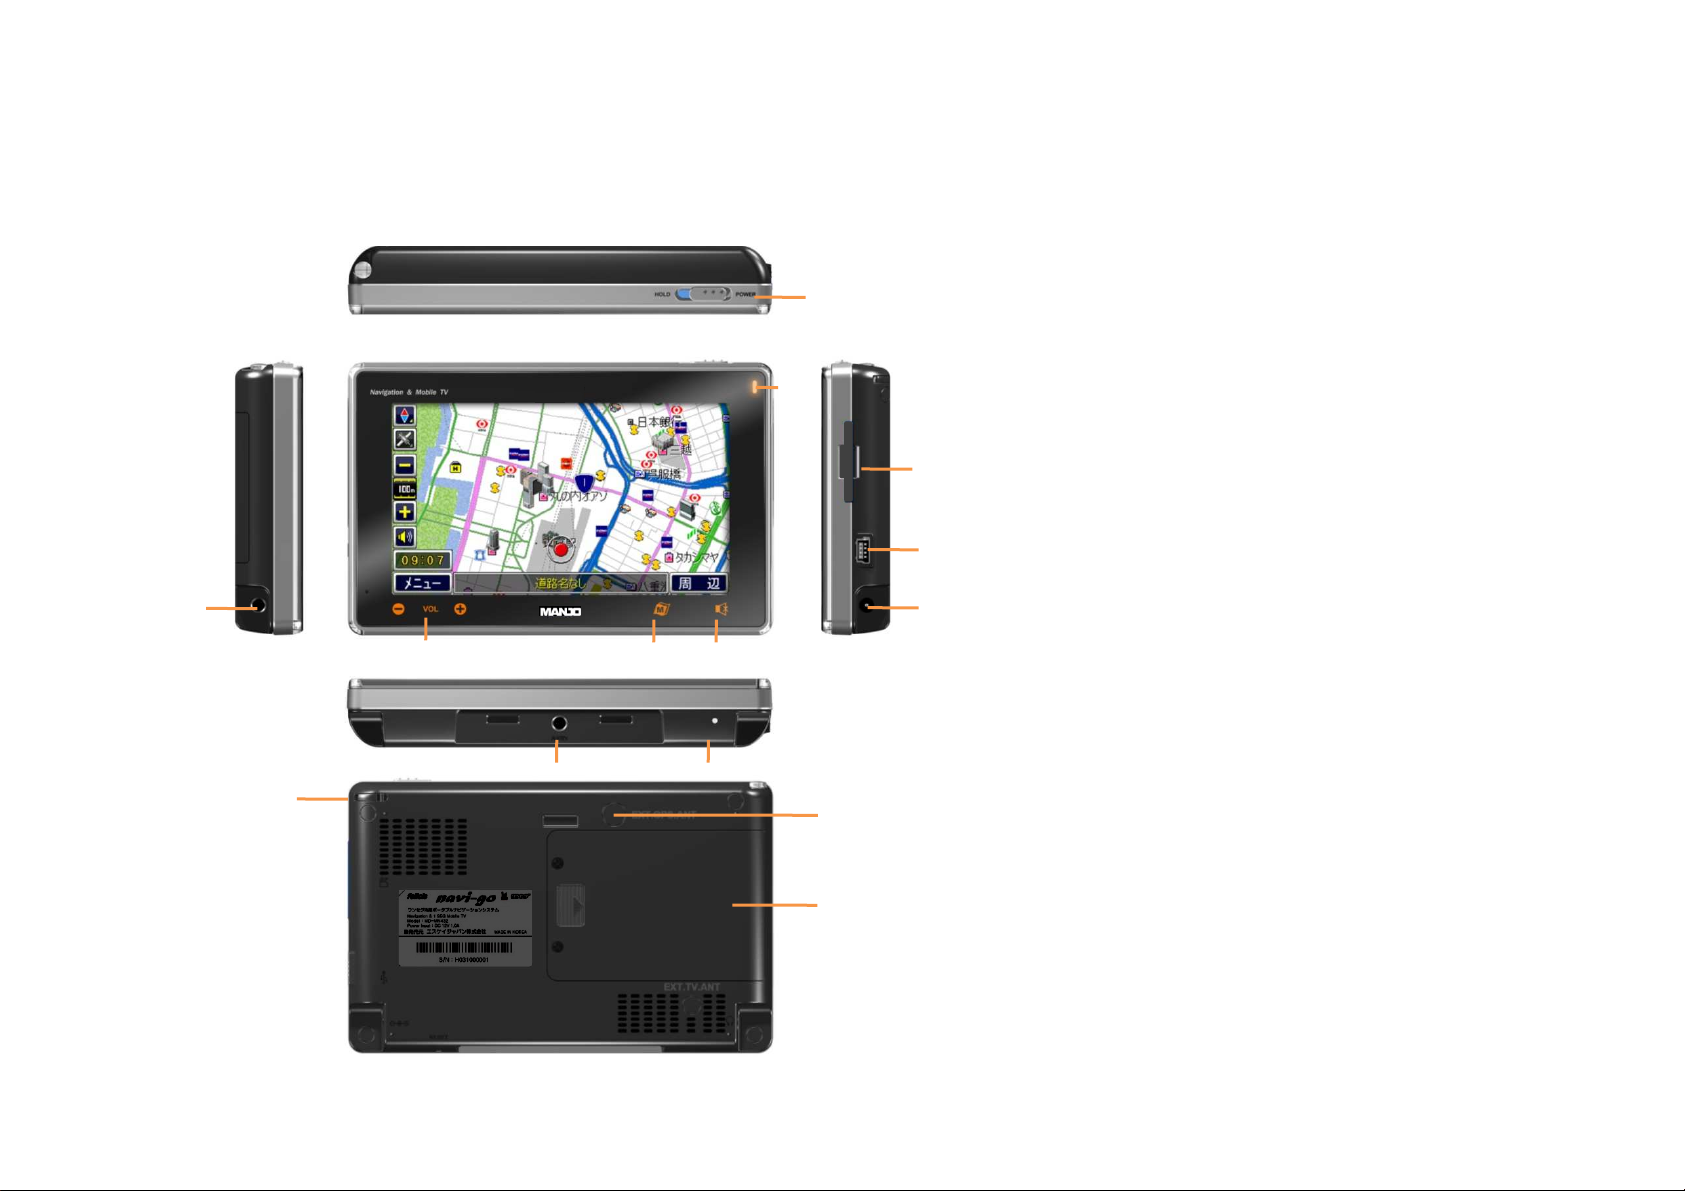
Device overview
ⓐ
ⓝ
ⓗ
ⓓ
ⓛ
ⓘ
ⓙ
ⓜ
ⓚ
ⓒ
ⓞ
ⓐ Earphone Jack (3.5mm)
ⓒ Power ON/OFF and HOLD Switch Button
ⓓ 4.3 inch LCD Panel with Window Touch Screen
ⓔ SD Card Slot
ⓕ USB Connector
ⓔ
ⓖ DC Power Jack
ⓗ Volume Key (up & down)
ⓕ
ⓘ Menu Key
ⓖ
ⓙ Mute Key
ⓚ Status LED
ⓛ Audio /Video Input Jack (3.5φ)
ⓜ Reset Button
ⓝ Stylus Pen
ⓞ External GPS Antenna Port
ⓟ Battery Cover
ⓟ
6
Page 8

■
■ Before using
■■
Switching on/off
Initial switch-on
During the initial switch-on of the PND, the software is loaded into the system. For this reason, the switch-on process may last up to one minute. The
initial destination guidance also requires a longer time than usual.
Switch-on
* To switch on the PND, slide and hold the switch to ‘power’ position more than 3 seconds.
The PND is switched on. (If the device is in the sleep mode, the previously active display is shown again).
Switch-off
* Slide and hold the switch for longer than 3 seconds to switch off the device.
The PND will be switched off.
Back to main menu
* To go back to the main menu, while
The main menu will be shown.
Reset Button
* When the system is not responding to touch the screen or any keys, please push the reset switch on bottom side of the device.
you are in other sub-menus or using other applications, touch the menu key on the window touch screen.
7
Page 9

■
■ Before using
■■
Initial startup of the PND
Protective film and covers
Prior to the initial use, remove the protective film from the display.
The battery
The built-in battery allows for operating the PND battery-operated for up to 3.5 hours. The exact usage time is dependent upon the type
of operation.
The charge state indicator of the battery is located at the top in the centre of the display in the map view. The number of bright block
segments on the battery symbol indicates the charge state of the battery (0 to 3 segments). The symbols have the following meaning:
• The device is supplied by an external power source.
• The device is supplied by its internal battery. The charge state of the battery is sufficient.
• The device is supplied by its internal battery. The charge state of the battery is low.
If the charge state of the battery is very low, a warning message is displayed.
• To charge the battery, attach the supplied battery charger or the charger cable for the cigarette lighter to the charging socket.
Notes:
* Use only original chargers for operating and charging the battery.
* The battery is equipped with a protection to prevent overheating. For this reason, the battery stops charging at an ambient temperature
above 45 °C.
8
Page 10
■
■ Menu
■■
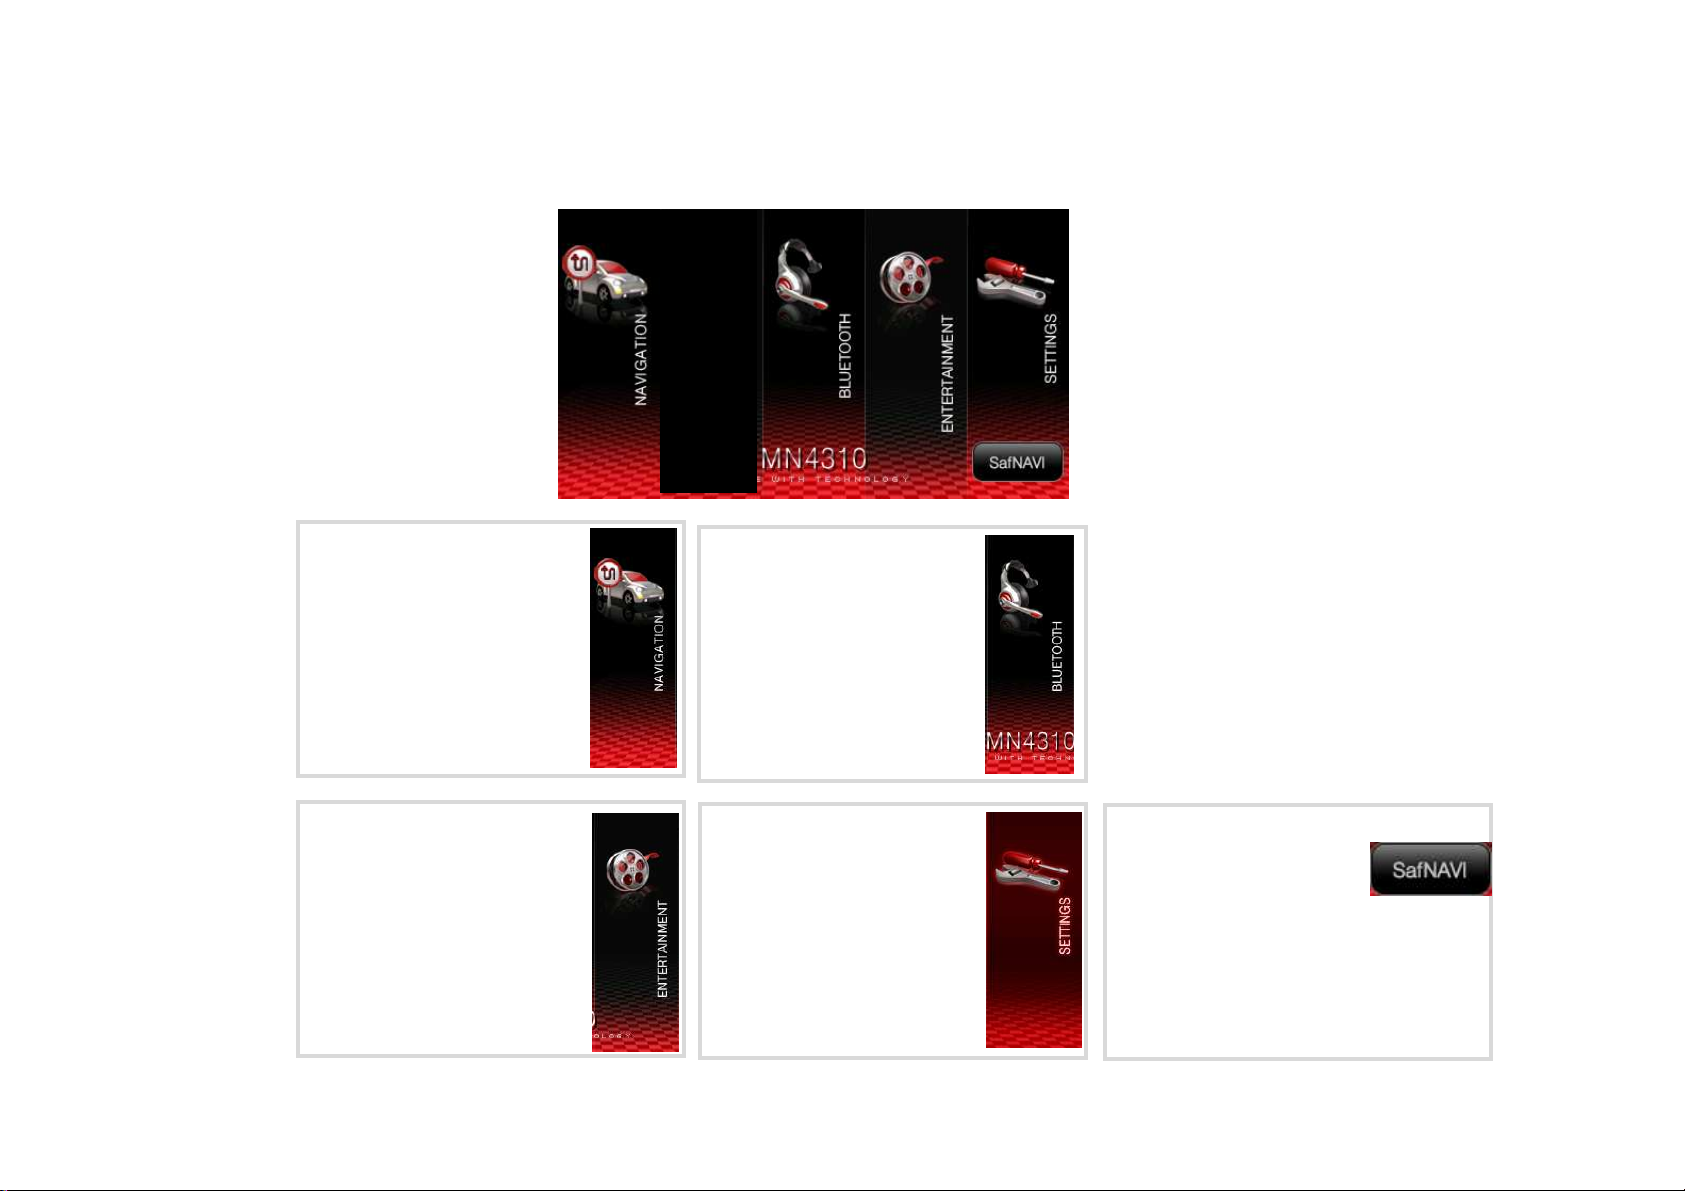
After switching on the Navigation System, you will see the main menu as below.
Main Menu
Navigation program
To start navigation software,
click this icon, then designed
navigation software will be started.
Entertainment
You can play audio and
video files and enjoy various
games.
BLUETOOTH
With this BLUETOOTH feature,
You can talk, listen music through
this Navigation system.
Setting
To set display, sound, volume
and change menu language.
SafNAVI
Cutting edge technology LDWS
(Line Detect Warning System)
can help you to stay in the lane.
Also, additional feature BLACKBOX record
video images in certain situation like
accident.
* Camera module sold separately.
9
Page 11

BLUETOOTH
Bluetooth function
Bluetooth is a wireless radio connection over a short distance. Hence, a Bluetooth-capable cell phone allows using the navigation device
as a hands-free system. In addition, music tracks stored on the cell phone can be played and navigated.
Prerequisite:
Compatible Bluetooth cell phone.
Bluetooth function and cell phone visibility are activated.
Note:
The Bluetooth connection can be established only to one cell phone. If more registered cell phones are available, the Bluetooth
connection is established to the one that was registered last.
16
Page 12

BLUETOOTH
Starting the Bluetooth application
Touch the Bluetooth symbol in the main menu.
The Bluetooth Menu will be displayed Also the Bluetooth function is being activated.
For the Bluetooth connection, the device must be registered with the cell phone.
Registering the devices
Registering is the first contact between an unknown cell phone and the navigation device. The devices "become acquainted".
When you start the Bluetooth application for the first time, you have to search and paired with your cell phone.
17
Page 13

BLUETOOTH
Registering the devices
Registering is the first contact between an unknown cell phone and the navigation device. The devices "become acquainted".
When you start the Bluetooth application for the first time, thequery “Bluetooth is not connected. Do you want to connect?"
appears.
► Touch the Yes button to register the cell phone.
► Touch the Stop button to end the search for Bluetooth-capable
devices.
► Touch the cell phone in the list to register it.
► Touch the Connect button.
A PIN query is displayed.
► Enter the PIN "0000" in your cell phone.
The devices are registered and a Bluetooth connection is established.
You have the following options:
Using the hands-free system ("Calling")
Using audio transmission if your cell phone supports this function with the device ("Audio transmission")
Notes:
Every cell phone uses different ways to register and establish a Bluetooth connection.
For this purpose, please read the instructions of your cell phone.
After you switched off the device or physically separated the cell phone and the device, the Bluetooth connection must be re-established.
(Ch. "Performing Bluetooth settings", "Paired devices")
18
Page 14

BLUETOOTH
Calling
If a Bluetooth connection exists, you can use the navigation device with the cell phone as hands-free system.
Prerequisite:
Bluetooth connection to cell phone.
Touch the Call symbol in the Bluetooth Menu.
The Call menu is displayed.
Making a call
► Enter a phone number of your choice via the keyboard.
► Touch the Send button.
► The call is made.
► Touch the Cancel button to end the call.
During the phone call, you have the option of redirecting the phone call to the cell phone:
► Touch the Transfer button.
Note:
The phone numbers dialed are stored and displayed in the Call menu next to the keyboard.
Selecting stored phone numbers
► Touch the phone number in the list.
► Touch the Send button.
Deleting stored phone numbers
► Touch the phone number in the list.
► Touch the Options button.
► Touch the Delete symbol to delete the entry.
- or -
► Touch the Delete all symbol to delete all entries.
19
Page 15

BLUETOOTH
Answering or rejecting a call
If a call comes in, the "Incoming Call" message and the phone number of the caller are displayed:
► Touch the Yes button to answer the call.
► Touch the No button to end a call or to reject a call.
Using the phone book
If you loaded the phone book from your cell phone, you can use
the phone numbers with the navigation device.
► Touch the Phonebook symbol in the Bluetooth Menu.
► The Phonebook menu is displayed.
► Touch the phone number in the list.
► Touch the Options button.
► Touch the symbol to place the call.
► Touch the symbol to delete the entry.
- or -
► Touch the symbol to delete all entries.
Audio transmission
If a Bluetooth connection exists, you can use the navigation device to listen to music that is stored on your cell phone.
Prerequisite:
Your cell phone supports this function.
Note:
Every cell phone supports the audio transmission in a different way. For this purpose, please read the instructions of your cell phone.
► Touch the Music Player symbol in the Bluetooth Menu.
► The Music Player menu is displayed.
► Touch the button to start the playback.
► Press the VOL - or VOL + button to adjust the volume.
Note:
The maximum volume depends on the adjusted volume in the cell phone.
► Touch the button to play the next track.
► Touch the button repeatedly to play the current or the previous track.
► Touch the button to end the playback.
20
Page 16

BLUETOOTH
Performing Bluetooth settings
Settings in the Bluetooth Settings menu:
• Activating/deactivating the Bluetooth function.
• Switching visibility on/off
• Paired devices
• Search for devices
• Ringtone
The second page of the menu also contains the following settings:
• Establishing the connection automatically
• Resetting Bluetooth
• Automatic call answering
• Loading the phone book
Touch the Setting symbol in the Bluetooth Menu. The Bluetooth Settings menu is displayed.
Touch the button to scroll in this menu.
If you performed changes to the settings:
Touch the button to exit the menu.
Activating/deactivating the Bluetooth
function
Touch the Bluetooth on/off symbol to activate (check mark) or deactivate (no check mark) Bluetooth.
Switching visibility on/off
The navigation device can be visible or invisible to other Bluetooth-ready devices.
Touch the Discoverable symbol to switch the visibility on (check mark) or off (no check mark).
21
Page 17

BLUETOOTH
Paired devices
You can call up the list of already registered cell phones and edit it.
Touch Paired Devices the symbol.
The Paired Devices menu is displayed.
► Touch a cell phone in the list.
► Touch the Options button to display additional functions.
Note:
If you want to pair a cell phone with the device, first unpair an existing Bluetooth connection.
► Touch the Connect symbol to establish the Bluetooth connection.
► Touch the Disconnect symbol to disconnect the Bluetooth connection.
► Touch the Rename symbol to rename the cell phone in the list.
Note:
If you delete a cell phone from the list, it is unpaired. That is, a Bluetooth connection can no longer be established to this cell phone.
► Touch the Delete symbol to delete the cell phone from the list.
► Touch the Delete all symbol to delete all cell phones.
Search for devices
If you want to pair additional Bluetooth-ready devices, you can start the search.
Note:
You can register up to 10 cell phones. If you register an eleventh one, the oldest cell phone is deleted.
► Touch Inquiry the symbol.
The Inquiring menu is displayed.
The search for Bluetooth-ready devices starts.
Devices found are listed. If the desired device is listed:
► Touch the Stop button to end the search.
► Touch the Refresh button to continue the search.
► Touch the cell phone in the list to register it.
► Touch the Connect button.
A PIN query is displayed.
► Enter the PIN "0000" in your cell phone.
22
Page 18

BLUETOOTH
Ringtone
► Touch the User Ringtone symbol.
The Ring Tone menu is displayed.
► Touch the desired ringtone.
► Press the VOL - or VOL + button to adjust the volume.
Establishing the connection automatically
After switching off the device, the Bluetooth connection can be re-established automatically.
Prerequisite:
• Cell phone is registered ("Search for Bluetooth-ready devices")
► On the second page of the Bluetooth Settings menu, touch the symbol to switch on the automatic connection(check mark) or to switch
it off (no check mark).
Resetting Bluetooth
If the Bluetooth connection does not work properly, a simple reset may help.
Note:
An existing Bluetooth connection is disconnected with a reset. All registered cell phones are unregistered. The cell phones must then
be reregistered with the device.
► Touch the Reset Bluetooth symbol on the second page of the Bluetooth Settings menu.
A confirmation is displayed.
► Touch the Yes button to perform the reset.
- or -
► Touch the No button to cancel the procedure.
Automatic call answering
An incoming call can be answered automatically:
► On the second page of the Bluetooth Settings menu, touch the symbol to switch on automatic answering (check mark) or to switch
it off (no check mark).
23
Page 19

BLUETOOTH
Loading the phone book
The phone book in your cell phone can be loaded into the navigation device and used with it.
Prerequisite:
Your cell phone supports this function.
Note:
For entries with several phone numbers in the cell phone, the first phone number is transferred to the phone book.
► Touch the Get Phonebook symbol on the second page of the Bluetooth Settings menu.
A confirmation is displayed.
► Touch Yes to load the phone book.
- or -
► Touch No to cancel the procedure
24
Page 20

Entertainment
①
②
③
④
① Audio Player
② Picture Viewer
③ Video Player
④ Game
- Sudoku, Freecell, Solitaire, PictureFind, PictureChange
25
Page 21

Entertainment
Audio Player
①
⑬
② ③
⑫
① Previous Track
② Next Track
④
⑤
⑥
⑦
⑧
⑩ ⑨⑪
⑧ Option
⑨ Stop
③ Song Title
④ Current played time
⑤ Track Duration
⑥ Equalizer
Normal – Classical – Jazz - Rock
⑦ Album Art
⑩ Play / Pause
⑪ Volume
⑫ Fast forward
⑬ Rewind
26
Page 22

Entertainment
Audio Player - Option
①
②
③
④
① MIX – Activate/deactivate random playback order.
② Repeat – Turn on/off repeat all track.
③ ID3 Tag – Turn on/off display track information
④ Browse – Browse audio files in internal and external memory.
27
Page 23

Entertainment
Audio Player - Browse
①
②
③
④
⑤
① Album – Switch to the list and the album selection.
② Artist – Switch to the list and the artist selection.
③ Genre – Switch to the list and the genre selection.
④ Play list
⑤ Browse – Browse audio files in internal and external memory.
28
Page 24

Entertainment
Picture viewer
①
⑧
② ③
⑦
① Previous Picture
④
⑤
⑥
⑤ Option
② Next Picture
③ File name
④ Picture Screen
- Touch this area for expanding to full screen.
⑥ Slide show
⑦ Next Folder
⑧ Previous Folder
29
Page 25

Entertainment
Picture viewer - Option
①
②
③
④
① Slide Time – Set time to display a picture. (5-10-15-20-25 seconds)
② Rotation – Rotate a picture. (Left-Right-Auto-No)
③ File name – Show picture file name.
④ Browse – Browse files in internal and external memory.
30
Page 26

Entertainment
Video Player
①
① Audio/Video Input – Switch to external A/V input
② Navigation Bar
③ Play/Pause
Note:
This video player supports encoded files by WMV, Xvid and Mpeg4 format. Otherwise, you should convert your video file to suitable format.
③②
31
Page 27

Setting
①
① Display setting
- Change Screen Brightness
② Sound setting
- Change Volume and turn on/off click sound
③ Language Selection
- Change menu languages (Japanese-English)
④ Time setting
- Set Time Zone and Display time format (12-24H)
②
③
④
⑤
⑥
⑦ Factory setting
- Back to factory Setting
⑧ Touchscreen Calibration
- Calibrate Touchscreen
⑨ FM Transmitter
- Send out sound through FM frequency
⑦
⑧
⑨
⑤ Product Information
- Check Software Version
⑥ Auto On
- To set Auto Power ON/OFF, Start Mode and Setup.
32
Page 28

Setting
Auto on
* Power on/off: To set Auto Power ON/OFF function.
* Start Mode: Choose the program which you want to start automatically
when you turn on the device.
* Setup: Turn on or off this function.
Auto on
* When out-source power is disconnected, the above pop-up message
will be displayed.
If you want to switch to battery mode, please touch the screen.
FMT Setting
You can turn the FMT function on or off and also set the preset the
frequencies.
Factory Setting
When you reset the PND, following saved setting values will be reset.
My music
Mix(Off), Repeat(Off), ID3(On)
My Pictures
Slide Time(5), Rotation(No), File name(Off)
FMT
Reset the preset frequencies
Others
Brightness(10), Volume(8), Key Click(On), Time Zone(GMT +01:00),
Time Format(24), Auto Power(On), Auto Mode(Navigation),
Auto Setup(Off) , FMT On/Off(Off)
33
Page 29

■
■ Troubleshooting
■■
Problems Solutions
No GPS signal in vehicle
No GPS signal
GPS signal poor Attempt to adjust the navigation system.
The navigation system no longer responds
to finger taps or does not switch off.
System fails to start, screen remains blank.
The voice alerts for navigation cannot be
heard.
Navigation is not accurate
The GPS signal can be blocked by heated windscreen or tinted windscreens with vacuummetalized coating. In this case, you will need an external GPS antenna.
Ensure that the navigation system is placed properly and is not obstructed by other
objects.
If the navigation system stops responding to your entries you can press the reset button
on the bottom side of the device. The data you have saved will NOT be lost. Restart the
navigation system by pressing the power button.
Ensure that the battery is fully charged and/or that the device is connected to a power
source. If you are using the DC cable, check that the plug is securely and correctly
connected to the cigarette lighter.
Check whether the volume is set to an audible level in the basic setting.
An inaccuracy level of 50m is within acceptable limits. If an inaccuracy level occurs
repeatedly, please contact an authorized specialized dealer.
No sound The device may be set to mute, or the volume is set too low.
34
Page 30

■
■ Technical Data
■■
TFT display
Active color matrix, 4.3 inch, 480 x 272 pixels
Audio
Built-in loudspeaker: Mono, 8 Ohm, Max 1.4 Wrms
Battery (lithium ion)
Voltage: 3.7 V Capacity: 2200 mAh
Dimensions (W x H x D)
approx. 128 x 79 x 21mm
Weight
approx. 235 g
Charger cable for cigarette lighter
Input voltage: 12 V
Battery charger
Input voltage: 90 V to 240 V, 50/60 Hz Output voltage: 12 V Output current: max. 1 A
GPS receiver
QuickFind Technology on Centrality Processor 20 channel
Multimedia
Video
File Format File Information Performance(FPS)
Xvid 720x480_2Mbps 30 FPS
MPEG4+MP3 720x480_2Mbps 30 FPS
WMV7,8 720x480_1Mbps 22 FPS
WMV9SP+WMA 720x480_600Kbps 21 FPS
WMV9MP+WMA 720x480_600Kbps 20 FPS
MPEG2 720x480_5Mbps 25 FPS
Audio
File Format File Information
MP3 8-48Khz, 32~320Kbps
WMA 8-192Khz, 32~320Kbps
OGG 8-48Khz, 48~320Kbps; Up to Q10
Image
File Format Support size
JPEG 3648 x 2736
BMP 3200 x 2400
TIF 1280 x 960
GIF (No-animation support) 1600 x 1200
Notes:
* Above specifications are subjected to change without prior notice.
35
Page 31

■ FCC INFORMATION
Part 15.105 statement
Page 32

Part 15.21 statement
“Change or Modifications that are not expressly approved by the manufacturer could void the user’s authority to operate the equipment.”
FCC RF Radiation Exposure St atement
1. This Transmitter must not be co-located or operating in conjunction with any other antenna or transmitter.
2. This equipment complies with FCC RF radiation exposure limits set forth for an uncontrolled environment. This equipment should be
installed and operated with a minimum distance of 20 centimeters between the radiator and your body.
Page 33

■
■ Warranty
■■
36
Page 34

 Loading...