

MEINL CAJON KIT User Manual
make your own
cajon
cajon bausatz
cajon kit
cajon kit DE MontajE
kit DE MontaGE Du cajon
kit Di MontaGGio cajon
CAJONキット
卡宏套件
Deutsch
Bauanleitung
Bevor Sie mit der Montage beginnen, sollten Sie sich die Bauanleitung gründlich und komplett durchlesen, sowie alle benötigten
Werkzeuge bereitlegen und alle Bauteile sortieren. Weiterhin möchten wir darauf hinweisen, dass eine plane Arbeitsäche die
folgenden Arbeitsschritte wesentlich erleichtern wird.
Lieferumfang
1 x Montageanleitung
1 2 x Seitenelement
2 1 x Bodenelement
3 1 x Deckenelement
4 1 x Rückwand
5 1 x Schlagäche
(mit MEINL Logo)
6 2 x Seitenleiste
1
2 3
1 4 5
8
9
6
7
12
11
10
13
7 1 x Boden- und
1 x Deckenleiste
8 1 x Befestigungsleiste
für Snare
9 1 x Snare
10
4 x Gummifüße
11
15 x Schrauben 3 x 20 mm
(für Schlagäche)
12
4 x Schrauben 4 x 15 mm
(für Gummifüße)
13
2 x Schrauben 3 x 12 mm
(für Snare)
Benötigte Werkzeuge
› Holzleim
› 4 x Schraubzwingen 600 mm oder 2 x Spannbänder
› 2 bis 6 x kleine Schraubzwingen, alternativ Leimzwingen
› Akkuschrauber, Bohrmaschine oder Handbohrer
› Holzbohrer 3 mm und 10 mm
› Kreuzschlitzschraubendreher
› Senker
1
3 4
2
› Verschieden gekörntes Schleifpapier
› Schleifklotz
› Laubsäge
› Bleistift, Zirkel, Winkel, Lineal
› Klebeband
› 2 x Montagehölzer, ca. 25 x 25 x 300 mm
› Multiplexplatte (oder ähnliches) mind. 310 x 455 mm
Korpus verleimen
Beim ersten Arbeitsschritt werden die vier Korpus-Elemente zusammengesteckt
und verleimt. Den Leim bitte in die Nut und auf die äußere Leiste anbringen, siehe
Bild 1. Es empehlt sich, diese vier Elemente vor dem Verleimen kurz zusammen-
zustecken, um eventuelle Verwechslungen zu vermeiden. Um den nötigen Druck für
das Verleimen aufzubauen, werden die 600 mm Schraubzwingen oder die beiden
Spannbänder benötigt, siehe Bild 2. Es ist auf die Bündigkeit der Elemente und auf
den Winkel wie im Bild 2 zu achten. Überschüssiger Leim kann mit einem feuchten
Tuch entfernt werden. Der Leim sollte mindestens 120 Minuten trocknen, bevor die
Pressverspannung gelöst werden kann.
Leisten verleimen
Im nächsten Arbeitsschritt werden die vier Seitenleisten bündig an der Vorderseite
der Cajon verleimt. Hierzu werden die Schraubzwingen oder Leimzwingen wie auf
Bild 3 benötigt. Das Trocknen des Leimes wird ca. 60 bis 80 Minuten betragen.
Zwischenzeitlich kann das Schallloch auf der Rückwand (Platte ohne MEINL Logo)
ausgesägt werden. Hierzu werden der Zirkel, das Lineal, die Laubsäge, der 10 mm
Bohrer im Akkuschrauber oder Handbohrer benötigt. Um die Mitte der Rückwand
zu nden, können Hilfslinien wie auf Bild 4 aufgezeichnet werden. Anschließend
wird das Loch im Inneren des Kreises gebohrt, welches für das Heraussägen des
Schalllochs mit der Laubsäge benötigt wird. Das Verschleifen des ausgesägten
Schalllochs kann mit Hilfe eines Schleifschwamms oder einem feinen Schleifpapier
erfolgen. Die Größe des Schalllochs wirkt sich auch auf den Klang der Cajon aus.
Je kleiner das Schallloch, desto mehr Bassanteil hat die Cajon. Optimal ist ein
Durchmesser zwischen 110 mm und 130 mm.

Korpus verschleifen
Die Montage der Snare erfolgt, wie auf Bild 5 zu sehen, mittig auf der Hypotenuse
der Dreiecksleiste. Zur Montage werden die beiden Schrauben 3 x 12 mm benötigt.
Die Snare wie auf Bild 5 mit der Lötseite nach oben montieren. Nun werden die
Übergänge auf der Front und Rückseite des Korpus verschliffen. Hier ist es wichtig
die Übergänge plan zu schleifen, um eine ideale Auageäche für die Front und
Rückwand zu schaffen. Anschließend wird die Dreiecksleiste mit der bereits vormontierten Snare mittig, wie auf Bild 6 zu sehen, verklebt. Zum Fixieren wird eine
kleine Schraubzwinge oder Leimklemme benötigt. Die Trockenzeit des Leimes
5
6
beträgt hier ca. 60 Minuten.
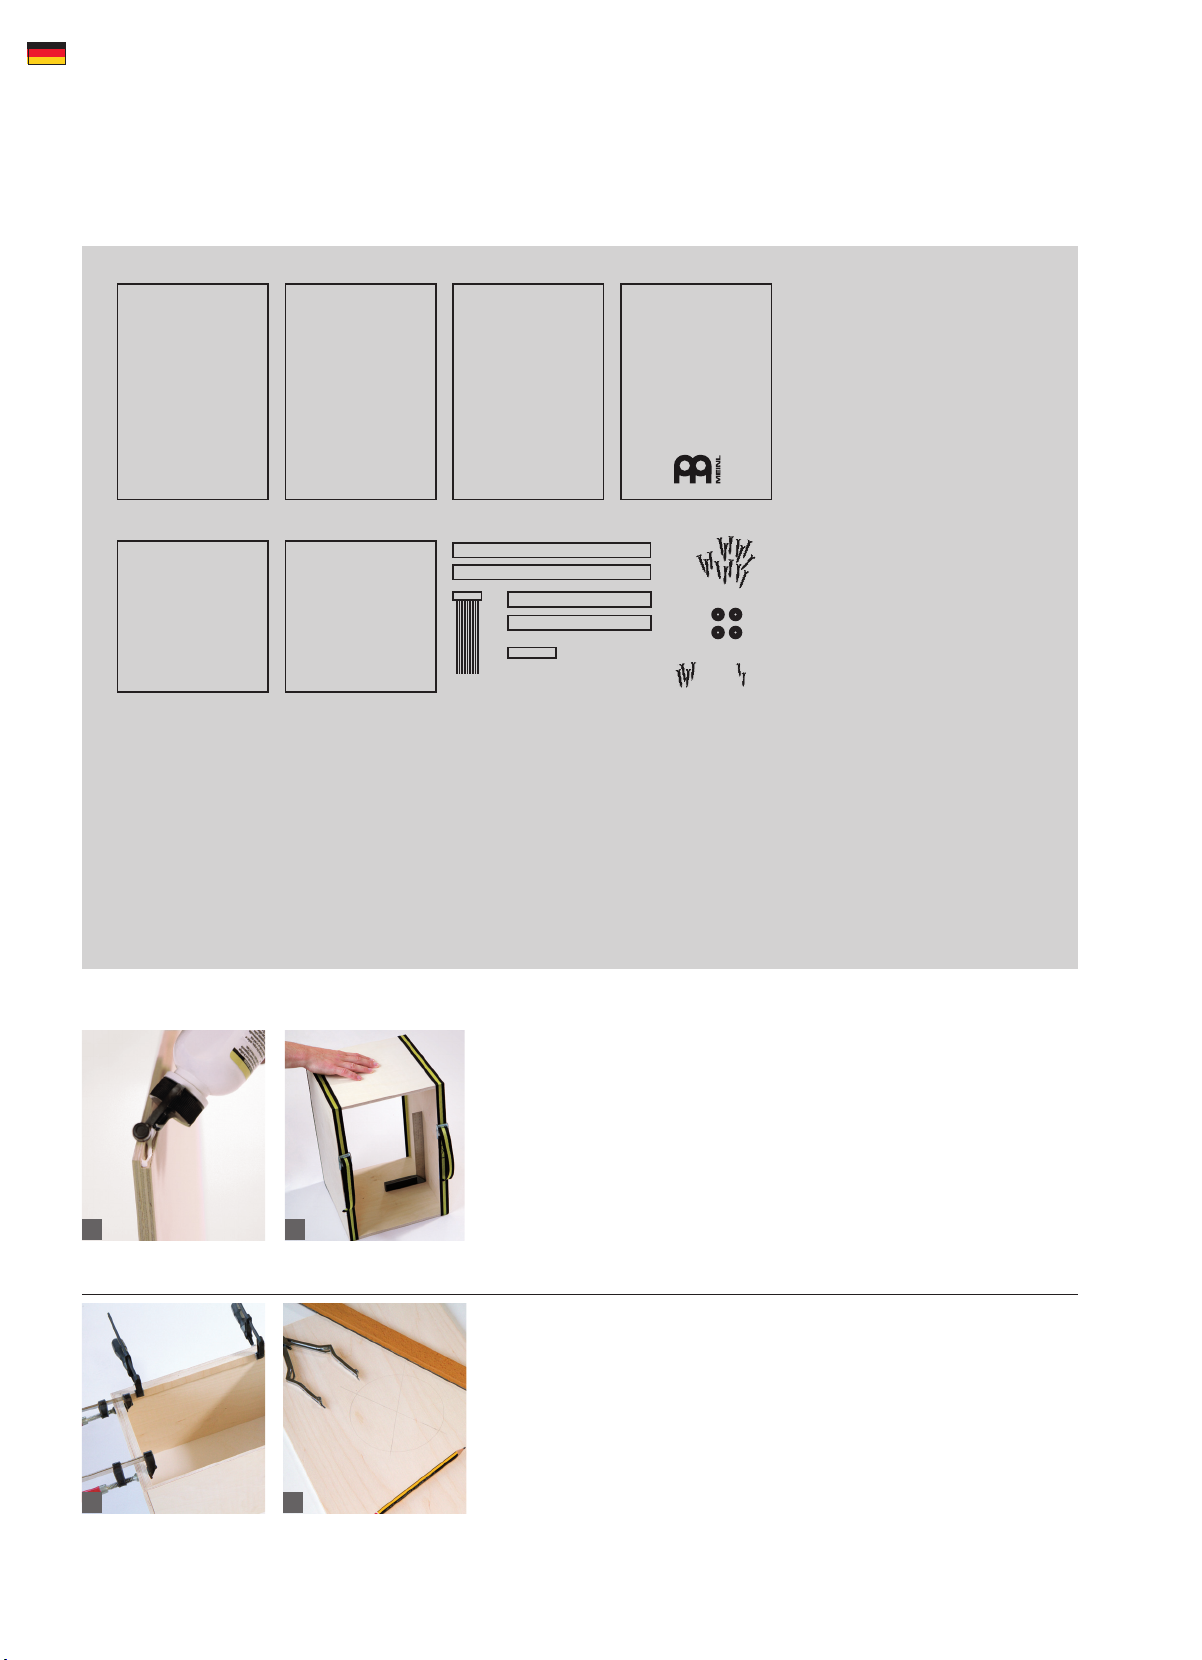
Rückwand verleimen
Um ein ideales Verleimen der Rückwand zu garantieren, empfehlen wir eine
Multiplexplatte (oder etwas ähnliches), welche ca. je 10 bis 20 mm größer ist als
die Rückwand, zu verwenden. Die beiden Holzleisten (ca. 25 x 25 x 300 mm)
erleichtern die Verspannung mit den Schraubzwingen oder Spannbändern. Auf
der kompletten Rückseite des Korpus wird nun Leim aufgebracht. Achtung: Die
Rückseite ist die Seite ohne die bereits angebrachten Leisten. Die Rückwand
wird auf die Multiplexplatte gelegt und diese dann auf die zwei Leisten (Bild 7),
welche als Montagehilfe verwendet werden. Die Rückwand wird mit Hilfe eines
Klebebandes xiert, sodass die sie an jeder Seite etwas Überstand zum Korpus
hat. Anschließend wird mit Hilfe der Schraubzwingen oder Spannbänder die
Rückwand angepresst, wie auf Bild 7 zu sehen ist. Nun nochmals die Positionie-
7
rung der Rückwand prüfen und den Leim für ca. 120 Minuten trocknen lassen.
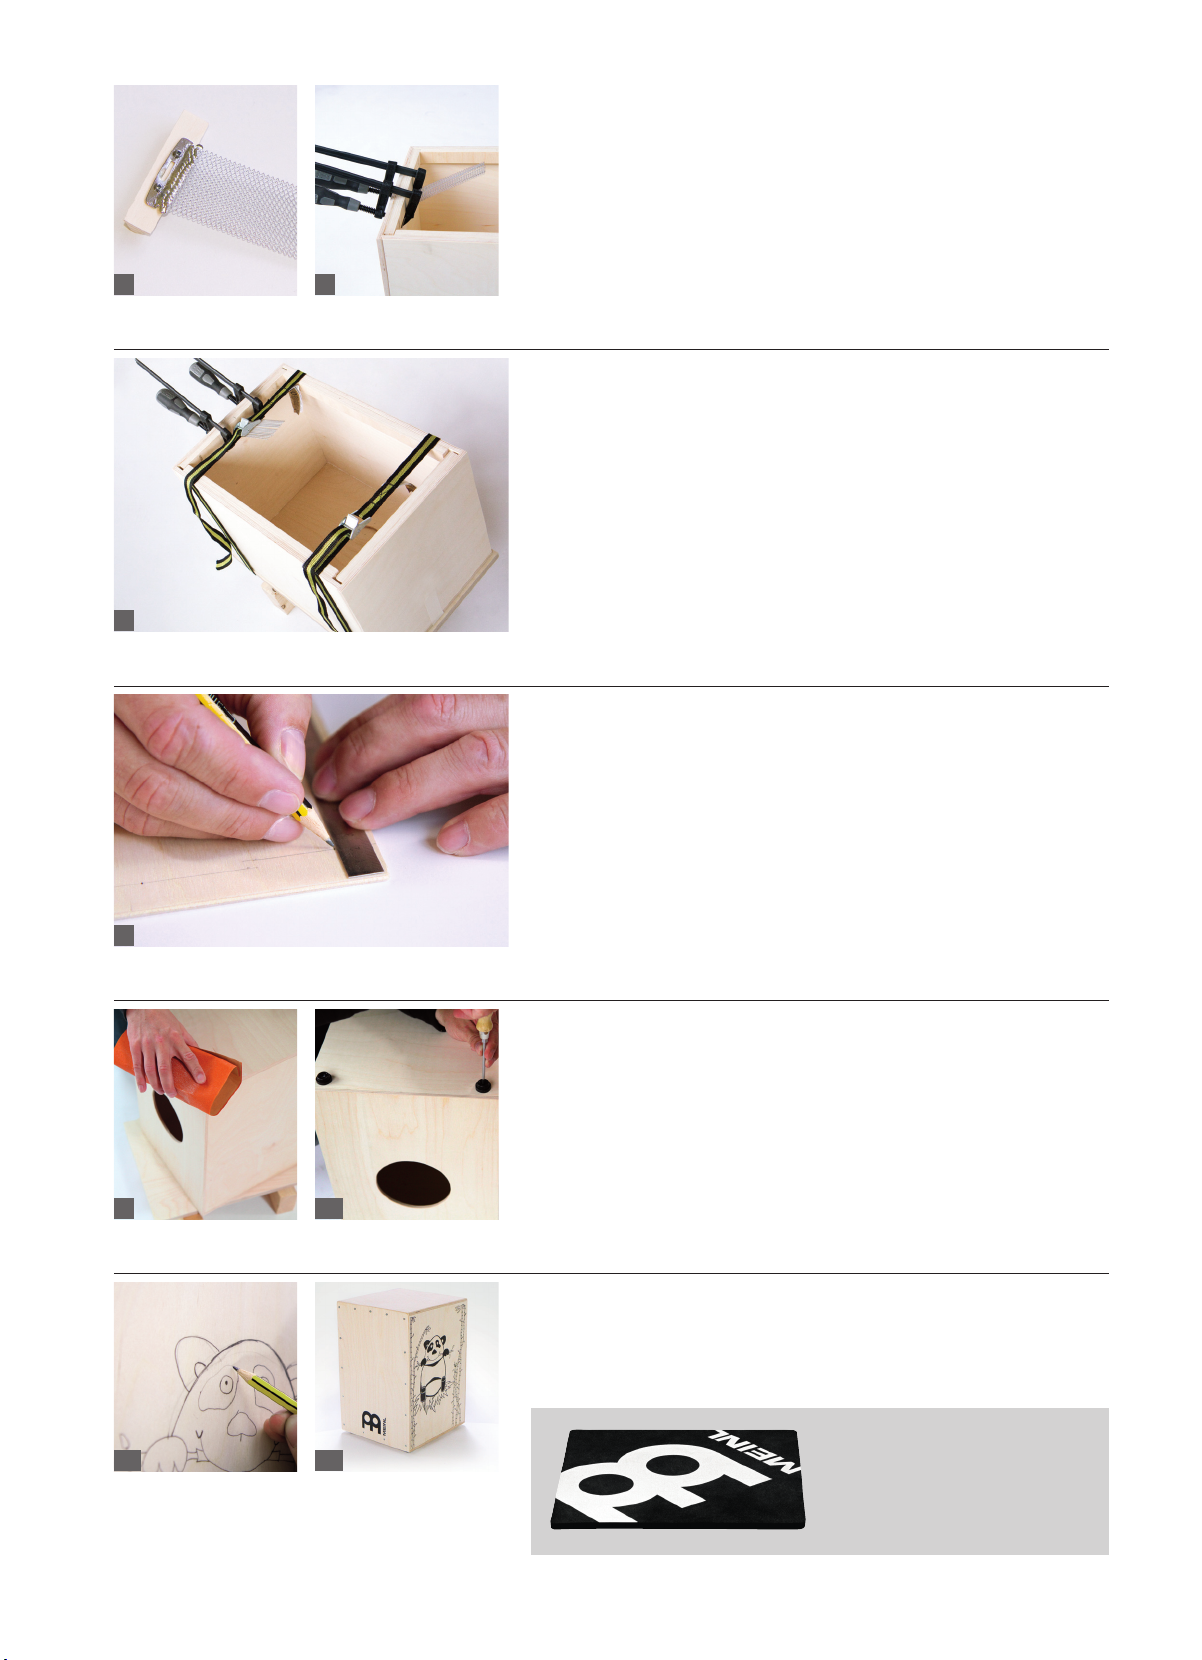
Frontplatte verschrauben
Auf der Rückseite dieser Bauanleitung ist ein Plan für die 15 Bohrlöcher zum
Fixieren der Frontplatte abgebildet. Wir empfehlen diese genau auf der Frontplatte
abzumessen, siehe Bild 8. Die Bohrung der 15 Löcher erfolgt mit dem 3 mm Bohrer. Achtung: Um Schäden auf der Arbeitsäche zu vermeiden, werden wiederholt die Montageleisten benötigt. Mit Hilfe des Handsenkers oder eines 12 mm
Stahlbohrers werden die Bohrlöcher nun so eingesenkt, dass die Schraubenköpfe
nach der Montage plan eingedreht sind. Die Frontplatte wird mit 15 Stück 3 x 20
mm Schrauben auf dem Korpus xiert. Achtung: Hier auch auf den gleichmäßigen
Überstand achten (wie auch bei der Rückwand) und mit Hilfe des Klebebandes
vorxieren. Verschraubt wird die Frontplatte am besten über die vier Ecken und
8
durch Vorbohren der Löcher mit dem 3 mm Holzbohrer, ca. 6 bis 8 mm tief.
Verschleifen, Montage der Gummifüße
Das Verschleifen der Überstände der Front- und Rückwand ist der nächste Arbeitsschritt. Hierzu empfehlen wir anfangs ein grobes und dann ein feines Schleifpapier
zu verwenden. Mit dem feinen Schleifpapier wird dann auch der komplette Korpus
der Cajon verschliffen. Für einen besseren Spiel- und Sitzkomfort empfehlen wir
alle Kanten so zu verschleifen, dass diese komfortabel abgerundet sind. Die Befestigung der Gummifüße erfolgt mit den 4 x 15 mm Schrauben. Wir empfehlen für
einen guten Stand der Cajon die Gummifüße mit einem Abstand von ca. 25 mm
nach innen von der Front- und Seitenplatte entfernt zu befestigen. Das Anbringen
9
10
erfolgt nach der Endbehandlung der Cajon.
Cajon Finish
Dem Finish der Cajon sind keine Grenzen gesetzt. Ölen, lackieren, wachsen oder
warum nicht auch nach eigenen Vorstellungen ganz individuell bemalen.
1211
Reklamationen werden nur anerkannt, wenn mit der Montage des Bausatzes noch nicht begonnen wurde. Weiterhin übernimmt die Firma Roland Meinl Musikinstrumente GmbH & Co. KG
keine Haftung für Schäden, welche bei oder durch die Montage entstehen oder entstehen könnten. Irrtum und Änderungen vorbehalten. Version Juli 2012.
Für ein komfortableres Sitzen auf der
nun fertig gestellten Cajon empfehlen wir
unser MEINL Cajon Pad (CAJ-PAD).

English
assemBly instructions
Before starting to assemble your bongo cajon, you should carefully read through all the assembly instructions, gather together all the
requisite tools and organise all the components. It should also be noted that a good, level work surface will make the various steps of
the assembly process considerably easier.
Kit comprises
1 x assembly instructions
1 2 x side panels
2 1 x base panel
3 1 x top panel
4 1 x rear panel
5 1 x playing surface
(with MEINL logo)
6 2 x side battens
1
2 3
1 4 5
8
9
6
7
12
11
10
13
7 1 x base & 1 x top batten
8 1 x securing batten
for the snare
9 1 x snare
10
4 x rubber feet
11
15 x screws 3 x 20 mm
(for playing surface)
12
4 x screws 4 x 15 mm
(for rubber feet)
13
2 x screws 3 x 12 mm
(for snare)
Tools required
› Wood glue
› 4 x screw clamps 600 mm or 2 x belt clamps
› 2 to 6 x small screw clamps, or alternatively glue clamps
› Cordless screwdriver, drill or hand drill
› Wood drill bits 3 mm and 10 mm
› Cross-head screwdriver
› Countersink
1
3 4
2
› Sandpaper, various grades
› Sanding block
› Fretsaw
› Pencil, pair of compasses, square, ruler
› Adhesive tape
› 2 x assembly blocks, approx. 25 x 25 x 300 mm
› Multiplex board (or similar) min. 310 x 455 mm
Gluing the body
The rst step is to t and glue together the four panels making up the main body
of the cajon. The glue should be applied within the groove and on the outer
batten, see Fig. 1. It is advisable to t these four panels together briey before
the adhesive is applied to ensure that they are joined in the right order. To create the
necessary pressure for adhesion, the 600 mm screw clamps or the two belt clamps
must be used, see Fig. 2. Make sure that the panels t together ush and at the
correct angle, see Fig. 2. Any excess glue can be removed with a damp cloth. The
glue must be allowed to dry for at least 120 minutes before the compressive force
is released.
Gluing the battens
The next step is to glue the four side battens on ush with the cajon‘s front surface. You will need the screw clamps or glue clamps at this point, see Fig. 3. The
glue must be left for around 60 to 80 minutes to dry. In the meantime, the sound
hole can be sawn in the rear panel (the panel without the MEINL logo). You will
need to use the pair of compasses, the ruler, the fretsaw and the 10 mm wood
drill bit in the cordless drill or hand drill. You might nd that drawing guide lines
as shown in Fig. 4 will help you to nd the centre of the rear panel. The hole is
then drilled in the centre of the circle and will be used when sawing out the sound
hole with the fretsaw. Once the sound hole has been sawn out, it can be sanded
smooth with the aid of an abrasive sponge or ne sandpaper. The size of the
sound hole will determine the sound of the cajon. The smaller the sound hole, the
greater the bass component of the sound that the cajon will produce. The ideal
diameter is between 110 mm and 130 mm.
Sanding the body
The snare is tted as shown in Fig. 5, in the middle of the hypotenuse of the
triangular batten. The snare should be mounted using the two 3 x 12 mm screws.
Mount the snare with its soldered side facing up as illustrated in Fig. 5. Next, the
surfaces for joining the front and rear panels of the cajon body should be sanded.
It is important that the joining surfaces should be sanded smooth in order to create
a perfect seat for the front and rear panels. Next, the triangular batten, to which
the snare has already been attached, is glued centrally as shown in Fig. 6. A small
screw clamp or glue clamp will be needed here to secure the batten. For this step,
5
6
the glue must be allowed to dry for approx. 60 minutes.
Gluing the rear panel
To ensure that the rear panel will be securely bonded, we recommend the use of a
multiplex board or similar; this should be approximately 10 - 20 mm larger than the
rear panel. The two wooden battens (approx. 25 x 25 x 300 mm) make it easier to
apply the necessary pressure with the screw clamps or belt clamps. Glue is now
applied all over the rear side of the cajon body. Important: the rear side is the side
that has no battens already attached. The rear panel is laid down on the multiplex
board, which in turn is laid on the two battens, see Fig. 7, which are used as an
assembly aid. The rear panel is secured using adhesive tape with a slight overhang
beyond the cajon body on all four sides. Next, the screw clamps or belt clamps are
used to apply pressure to the rear panel as shown in Fig. 7. The positioning of the
rear panel should now be checked again, and then the glue should be allowed to
7
dry for approx. 120 minutes.
Screwing the front panel on
A diagram showing the positions of the 15 holes for securing the front panel can be
found overleaf. We recommend that the holes are measured out accurately on the
front panel, see Fig. 8. The 15 holes are drilled using the 3 mm drill bit. Important:
the assembly battens should be used when each hole is drilled to avoid damage
to the work surface. Using either the manual countersink or a 12 mm metal drill bit,
the holes should now be countersunk to allow the screw heads to end up ush with
the surface. The front panel is screwed to the body using 15 screws (3 x 20 mm).
Important: again make sure that the overhang is even (as for the rear panel) and use
adhesive tape to initially secure the panel. The best way to screw the front panel on
is to use the four corners and pre-drill the holes with the 3 mm wood drill bit to a
8
depth of approx. 6 to 8 mm.
Sanding, then tting the rubber feet
The next step is to sand down the overhangs on the front and rear panels. For this
purpose, we recommend using coarse sandpaper rst followed by ne sandpaper.
The ne sandpaper can then be used to sand the entire body of the cajon. In order
to make the instrument more comfortable to play and to sit on, we recommend
sanding all the edges until they are nicely rounded. The rubber feet are secured
with the 4 x 15 screws. To ensure that the cajon will stand securely on its feet, we
recommend attaching the rubber feet approx. 25 mm inside the front and side
panels. The feet are attached after the cajon has been given its nish.
9
10
Cajon nish
When it comes to applying a nish to your cajon, the sky‘s the limit. It can be oiled,
lacquered, waxed, or why not even paint it with an entirely original design?
1211
Warranty claims will only be considered if the assembly process has not been started. Furthermore, Roland Meinl Musikinstrumente GmbH & Co. KG will not accept liability for any damage
incurred or possibly incurred in the course of or as a result of the assembly process. Subject to corrections and changes. Version dated July 2012.
Now that you have nished constructing
your cajon, you can add to the comfort
when sitting on it with our MEINL cajon
pad (CAJ-PAD).
 Loading...