


Meijer EO2058 User Manual
ELECTRIC OVEN
FOUR ÉLECTRIQUE
HORNO ELÉCTRICO
FORNO ELETTRICO
EO2058/EO2060/RO2050/RO2058
Register this product on-line and receive a free trial issue of Cook's Illustrated.
Visit www.delonghiregistration.com.
Visit www.delonghi.com for a list of service centers near you. (U.S. and
Canada Only)
Enregistrez ce produit en ligne et recevez un numéro gratuit de Cook's
Illustrated. Visitez www.delonghiregistration.com.
Visitez www.delonghi.com pour y voir une liste des centres de réparation
proches de chez vous. (É.-U. et Canada uniquement)
Registre este producto en línea y reciba un ejemplar gratis de Cook's
Illustrated. Visite www.delonghiregistration.com.
Visite www.delonghi.com para ver la lista de centros de servicios cercanos
a usted. (Solamente en los Estados Unidos y Canada)
Registra questo prodotto "on-line" per ricevere una copia omaggio della rivista Cook's Illustrated. Visita www.delonghiregistration.com.
Visita www.delonghi.com per una lista dei centri di servizio a te piu vicini.
(Solo negli Stati Uniti e Canada)
Instructions for use
Keep these instructions
Mode d'emploi
Conservez cette notice
Instrucciones para el uso
Repase y guarde estas instrucciones
Lea cuidadosamente este instructivo antes de usar su aparato.
Istruzioni per l’uso
Leggere e conservare queste istruzioni
ELECTRONIC CHARACTERISTICS: CARACTÉRISTIQUES ÉLECTRIQUES:
CARACTERISTICAS ELECTRICAS: CARATTERISTICHE ELETTRICHE:
120V~60Hz - 1300 W
Meijer.com

2
ELECTRICAL CONNECTION
• Your product is equipped with a polarized alternating current line plug (a plug having one blade wider
than the other). This plug will fit into the power outlet only one way. This is a safety feature. If you are
unable to insert the plug fully into the outlet, try reversing the plug. If the plug should still fail to fit, contact your electrician to replace your obsolete outlet. Do not defeat the safety purpose of the polarized
plug.
• Plug the cord into a 120 volt AC outlet.
• The cord length of this product has been selected to reduce the possibility of tangling in or tripping over
a longer cord. If more cord length is needed, an extension cord may be used. It should be rated no less
than 15 amps., 120 volts, and have Underwriters Laboratories/CSA listing.
• A six feet long, 15 amp. extension cord may be purchased from your local authorized service facility.
When using a longer cord, be sure not to let it drape over the working area or dangle where someone
could accidentally pull or trip over it.
• Handle the cord carefully for longer life; avoid jerking or straining the cord at the plug and appliance
connections.
CONVERSION TABLE
°C °F
95. . . . . . . . . . . . . . . 200
107. . . . . . . . . . . . . . 225
120. . . . . . . . . . . . . . 250
135. . . . . . . . . . . . . . 275
150. . . . . . . . . . . . . . 300
163. . . . . . . . . . . . . . 325
177. . . . . . . . . . . . . . 350
190. . . . . . . . . . . . . . 375
205. . . . . . . . . . . . . . 400
218. . . . . . . . . . . . . . 425
233. . . . . . . . . . . . . . 450
246. . . . . . . . . . . . . . 475
260 . . . . . . . . . . . . . 500
Meijer.com
3
DESCRIPTION OF THE APPLIANCE
A Thermostat knob
B Timer knob
C Indicator light
D Function selector knob
E Glass door
F Bottom heating element
G Wire rack
H Bake pan
I Spit (if supplied)
L Crumb tray
M Top heating element
N Interior light (if supplied)
O Turnspit mount (if supplied)
P Broil rack
Q Spit handle (if supplied)
guide 1
guide 2
guide 3
crumb tray
The crumb tray (L) should always
be inserted as shown for perfect
results.
Meijer.com
NMO
A
Q
P
H
D
B
C
E
L
I
F
G

4
IMPORTANT WARNINGS
When using electrical appliances, a number of fundamental safety rules must be observed, including the following:
1. READ ALL THE INSTRUCTIONS
2. Do not touch the hot surfaces. Only use the knobs or handles to operate the appliance.
3. Before using the appliance, move it 5/10 cm (2”) away from the wall and any other object that is on the
same surface. Remove any objects located above the appliance. Do not use on surfaces that may be
damaged by the heat.
4. To avoid electric shock, do not immerse the appliance in water or other liquid. See the instructions for
cleaning.
5. If the appliance is used when children are around, pay careful attention to the metal walls of the oven
and the door, which become very hot. The appliance must not be used by children without supervision.
Make sure that children do not play with the appliance.
6. Unplug the appliance from the power outlet when this is not being used or before cleaning it. Always
place the Timer knob in the “OFF” position and the thermostat knob in the “•” position before unplugging the appliance. Wait for the appliance to cool down before fitting or removing any parts.
7. Never operate the appliance with the cable or the plug damaged, if any malfunctions have occurred, or
if the appliance has been damaged in any way. Take the appliance to the nearest authorized service center, which will inspect it and, if necessary, will adjust or repair it.
8. The use of accessories that are not recommended by the manufacturer may cause injuries.
9. Do not use outdoors.
10.Do not let the power cable hang from the counter or come into contact with hot surfaces.
11.Do not place the appliance above or near a gas or electric cooker.
12.Use maximum care when moving the appliance if it contains hot oil or other hot liquids.
13.If the plug heats up, contact a qualified electrician.
14.Do not use this appliance for purposes other than those it has been designed for.
15.Use maximum care when removing the bake pan or throwing out the hot fat.
16.Do not use metal sponges to clean the appliance, small particles may be detached that cause electric
shocks.
17. To ensure the safe operation of the appliance, never introduce foods or utensils that are too large for the oven.
18.If the appliance, when operating, is covered by or comes into contact with flammable materials, such as
curtains, fabrics or wall coverings etc., these may catch fire.
19.WARNING: Never leave the appliance unattended when operating (especially when broiling or toa-
sting).
20. When broiling, the bake pan and the wire racks must be used as described in the instructions.
21.Extreme care must be taken when using containers made from materials other than glass, metal or ovenproof ceramics.
22.Do not place any objects in the oven when this is not being used, apart from the accessories recommended by the manufacturer.
23. Do not place any of the following materials into or on top of the oven: paper, cardboard, plastic and the like.
24.Do not cover parts of the oven with metal foil, to avoid overheating.
25.To switch the appliance off, turn the Timer knob to the “OFF” position and the thermostat knob to "•".
This product is designed exclusively for household use
KEEP THESE INSTRUCTIONS
WARNING: After having removed the appliance from its packaging, check that the door is intact.
The door is made from glass and is therefore fragile. If it is visibly chipped, scored or scratched, it should be
replaced.
While using, cleaning or moving the appliance, avoid slamming or knocking the door. Do not pour cold
liquid onto the glass while the appliance is hot.
Meijer.com
5
SUMMARY TABLE
Program
Function selector
knob position
Thermostat knob
position
Wire rack and
accessory position
Notes/Tips
Defrost (
only on
some models
)
•
Place the food directly on the wire rack
inserted in the guide
2.
Keeping warm
KEEP WARM
Convection oven
cooking
(
only on some
models
)
250°F -
TOAST/BROIL
Ideal for lasagna, meat,
pizza, cakes in general,
foods that should be
crunchy on the surface
(“au gratin”) and bread.
For details on how to use
the accessories, refer to
the tips in the table on
pages 7-8.
Traditional oven
cooking
250°F -
TOAST/BROIL
Ideal for cooking stuffed vegetables, fish,
plum cakes and small
poultry. For details on
how to use the accessories, refer to the
table on page 8.
Grilling
Put the broil rack (P) on
the bake pan (H); place
the food on the pan and
insert into guide 1. Ideal
for broiling
meat, fish and vegetables.
Delicate cooking
250°F -
TOAST/BROIL
Use the bake pan
inserted directly in
the guide 3.
DEFROST
SLOW BAKE
BAKE
FAN & BAKE
BAKE
BROIL
or
BROIL & ROTIS.
TOAST/BROIL
Toa st
TOAST/BROIL
Ideal for toasting slices of bread.
BAKE
or
Select this function to
keep hot food warm.
Do not hold food for
longer than one hour
or rewarm cold food
at this setting. If food
is not hot enough for
serving turn temperature dial up.
P
or
Grilling with the
turnspit (
only on
some models
)
BROIL & ROTIS. TOAST/BROIL
Insert the spit in the
turn-
spit mount
(O) as
described on page 10.
Insert the bake pan in
guide 3. Ideal for
poultry, beef, etc.
1
2
3
1
2
3
1
2
3
1
2
3
1
2
3
1
2
3
1
2
3
1
2
3
1
2
3
1
2
3
Meijer.com
6
USING THE CONTROLS
Thermostat knob (A)
Select the desired temperature, as follows:
• To defrost (
only on some models
) (see page 7): . . . .Thermostat knob in the “•” position.
• To keep food warm (see page 7): . . . . . . . . . . . . . .Thermostat knob in the “KEEP WARM” position.
• For convection oven cooking (
only on some models
)
or traditional oven cooking (see page 7-8): . . . . . . .Thermostat knob from “250F-TOAST/BROIL.”.
• To toast (see page 9): . . . . . . . . . . . . . . . . . . . . . . . .Thermostat knob in the “TOAST/BROIL” position.
• For all types of grilling (see page 10): . . . . . . . . . . . .Thermostat knob in the “TOAST/BROIL” position.
Timer knob (B)
• To switch the oven on: . . . . . . . . . . . . . . . . . . . . . .Turn the knob to the “ON” position
• To set the toasting function: . . . . . . . . . . . . . . . . . . .Select “LIGHT”, “MEDIUM” or “DARK”
• To switch the oven off: . . . . . . . . . . . . . . . . . . . . . .Return the knob to the “OFF” position.
Function selector knob (D)
This knob is used to select the cooking functions available, which are:
DEFROST (
only on some
models
)
(ventilation only)
BAKE/TOAST
(only top heating element
and bottom heating element
on)
FAN & BAKE (
only on some
models
)
(top heating element, bottom heating element and ventilation on)
BROIL & ROTIS.
(only top heating element on
at maximum power)
SLOW BAKE
(only bottom heating element
on)
Interior light (N) (
only on some models
) and Indicator light (C)
• When the oven is in function, the indicator light (C) and the interior light (N) (
only on some models
) stay
on.
Meijer.com

7
USING THE OVEN
General tips
• When cooking with the convection oven, traditional oven and grilling, always preheat the oven for 5
minutes to the set temperature.
• The cooking times depend on the quality of the products, on the temperature of the food and on personal tastes. The times indicated in the table are subject to variation, and do not include the time required
to preheat the oven.
• To cook frozen foods refer to the recommended times on the product packaging.
Defrost (
only on some models
)
For proper defrosting in a short time, proceed as follows:
• Turn the function selector knob (D) to the “DEFROST” position.
• Turn the thermostat knob (A) to the “•” position.
• Turn the Timer knob (B) to the “ON” position.
• Place the bake pan (H) in guide 3, the wire rack (G) in the guide 2 and rest the food to be defrosted, then
close the door.
• When defrosting is completed, turn the Timer knob (B) manually to the “OFF” position.
Example of defrosting: 1 kg/2.2 lbs. of meat, 80-90 minutes without turning it over.
Slow bake
Ideal for pastry and cakes. Good results are also achieved when completing the cooking of the bottom of the
foods or for cooking that requires heat above all at the bottom.
• Place the bake pan (H) in guide 3, as shown in the figure on page 5.
• Turn the function selector knob (D) to the “SLOW BAKE” position.
• Select the required temperature using the thermostat knob (A).
• Turn the Timer knob (B) to the “ON” position; when cooking is completed turn the Timer knob (B) manually to the “OFF” position.
Keep warm
• Turn the thermostat knob (A) to the “KEEP WARM” position.
• Turn the function selector knob (D) to the “BAKE” position.
• Turn the Timer knob (B) to the “ON” position.
• Place the bake pan (H) in guide 3 and rest the food on the bake pan.
• To terminate the operation, turn the Timer knob (B) manually to the “OFF” position.
It is recommended not to leave the foods in the oven for too long, as these may dry out.
Fan & bake (
only on some models
)
This function is ideal for baking excellent pizzas, lasagna, “au gratin” dishes, all types of meat dishes (apart
from small poultry), roast potatoes, cakes in general and bread.
Proceed as follows:
• Place the wire rack (G) or the bake pan (H) in the position shown in the table on page 5.
• Turn the function selector knob (D) to the “FAN & BAKE” position.
• Select the required temperature by turning the thermostat knob (A).
• Turn the Timer knob (B) to the “ON” position.
• After having pre-heated the oven for 5 minutes, place the food to be cooked inside.
• When cooking is completed, turn the Timer knob (B) manually to the “OFF” position.
Meijer.com

8
Quiche 700 g/1.5 lb.
Chicken 1 kg/2.2 lb
Roast pork 900 g/2 lb
Meatballs 650 g/1.4 lb
Roast potatoes 500 g/1.1 lb
Jam tarts 700 g/1.5 lb
Strudel 1 kg/2.2 lb
Margherita cakes 800 g/1.8 lb
Biscuits (shortbread) 100 g/0.2 lb
Bread 500 g/1.1 lb
Use the bake pan.
Use the bake pan, turn after around
38 min.
Use the bake pan, turn after around
30 min.
Use the bake pan, turn after around
20 min.
Use the bake pan, mix twice.
Use a cake dish.
Use the bake pan.
Use a cake dish.
Use the bake pan.
Use the bake pan greased with oil.
400°F
400°F
400°F
400°F
400°F
350°F
400°F
350°F
350°F
400°F
30-35 min.
60-70 min.
50-60 min.
35-40 min.
40-50 min.
35-40 min.
35-40 min.
25-30 min.
15-20 min.
20-25 min.
3
3
3
3
2
3
2
3
2
3
Thermostat
knob
Times
wire rack/
bake pan
position
Comments and tips
Bake
This function is ideal for all types of fish, stuffed vegetables, cakes with whipped egg-whites and cakes that
require long cooking times (over 60 min.).
Proceed as follows:
• Place the wire rack or the bake pan in the position shown in the table.
• Turn the function selector knob (D) to the “BAKE” position.
• Select the required temperature by turning the thermostat knob (A).
• Turn the Timer knob (B) to the “ON” position.
• After having pre-heated the oven for 5 minutes, place the food inside.
• When cooking is completed, turn the Timer knob (B) manually to the “OFF” position.
Macaroni “au gratin” 1 kg/2.2 lb
Lasagna 1 kg/2.2 lb
Pizza 500 g/1.1 lb
Trout 500 g/1.1 lb
Stuffed calamari 450 g/1 lb
Tomatoes “au gratin” 550
g/1.2 lb
Zucchini with tuna 750 g/1.6
lb
Plum cakes 1 kg/2.2 lb
Use an ovenproof dish.
Use an ovenproof dish.
Use the bake pan.
Use the bake pan, turn after 16 minutes.
Use an ovenproof dish, turn halfway
through cooking.
Use the bake pan greased with oil and
turn after 20 min.
Use the bake pan; add oil, the tomatoes and water; turn the bake pan
after 20 min.
Use a mold and turn halfway through
cooking.
400°F
400°F
400°F
350°F
350°F
350°F
350°F
350°F
25-30 min.
25-30 min.
30-35 min.
30-35 min.
35-30 min.
35-40 min.
35-40 min.
65-75 min.
2
2
3
3
3
2
2
3
Program
Thermostat
knob
Times
wire rack/
bake pan
position
Comments and tips
Program
Meijer.com

9
Toast
• The dimensions of the wire rack (G) allow six slices of bread to be toasted at the same time. Best results
are achieved, however, with four slices at a time.
• To toast the bread, place the slices as shown below:
Toasting one slice Toasting two slices Toasting four slices Toasting six slices
For consecutive uses, reduce the set toasting time.
Instructions for toasting bread
To automatically toast frozen bread, sandwiches, muffins and waffles, always use the wire rack.
1. Place the wire rack in the guide 2.
2. Place the food to be toasted in the center of the wire rack. Close the door.
3. Turn the thermostat knob (A) to the “TOAST/BROIL” position and the function selector (D) to the “BAKE”
position.
4. The Timer knob (B) should be turned clockwise. When using the appliance for the first time, turn the
Timer knob (B) to a medium value. Toast a few pieces of bread to check the set level. If necessary, adjust
the knob as desired.
5. When toasting bread, both the top and bottom heating elements are on to toast both sides at the same
time. A little condensation may form on the inside of the glass door. This is normal. It will disappear
during toasting.
6. An audible signal indicates the end of the set time. The toasting is complete and the heating elements
automatically switch off. Turn the thermostat knob (A) to the “•” position.
Note:
This appliance can automatically perform various degrees of toasting.
If, however, lighter toasting is preferred, simply stop the automatic cycle by turning the Timer knob (B) to the
“OFF” position, to switch the oven off, without the risk of damaging it.
For darker toasting re-start the cycle by turning the Timer (B) clockwise until reaching the desired level.
Then manually turn the thermostat knob and the toast timer knob off, as described previously.
The best positions for each type of bread can be identified when using the oven regularly.
Tips for good toasting:
Larger pieces of bread and frozen bread take longer to toast. Just one slice of bread requires a lower setting
than for multiple slices.
Meijer.com
10
Broil
• Place the food to be grilled on the broil rack (P) inserted on
the bake pan (H), and place them together in the guide 1.
• Close the door until you hear a “click” (see figure 1).
• Turn the function selector knob (D) to the BROIL or BROIL &
ROTIS position.
• Turn the Timer knob (B) to the “ON” position.
• When cooking is completed, turn the Timer knob (B) manually to the “OFF” position.
• Turn halfway through cooking.
Pork chops (2)
Hot dogs (3)
Hamburgers (2)
Sausages (4)
Kebabs 500 g/1.1 lb
Turn after 16 minutes.
Turn after 11 minutes.
Turn after 13 minutes.
Turn after 14 minutes.
Turn after 8, 15 and 21 minutes.
BROIL
“
“
“
“
30 min.
20 min.
25 min.
26 min.
26 min.
Program
Thermostat
knob
Times Comments and tips
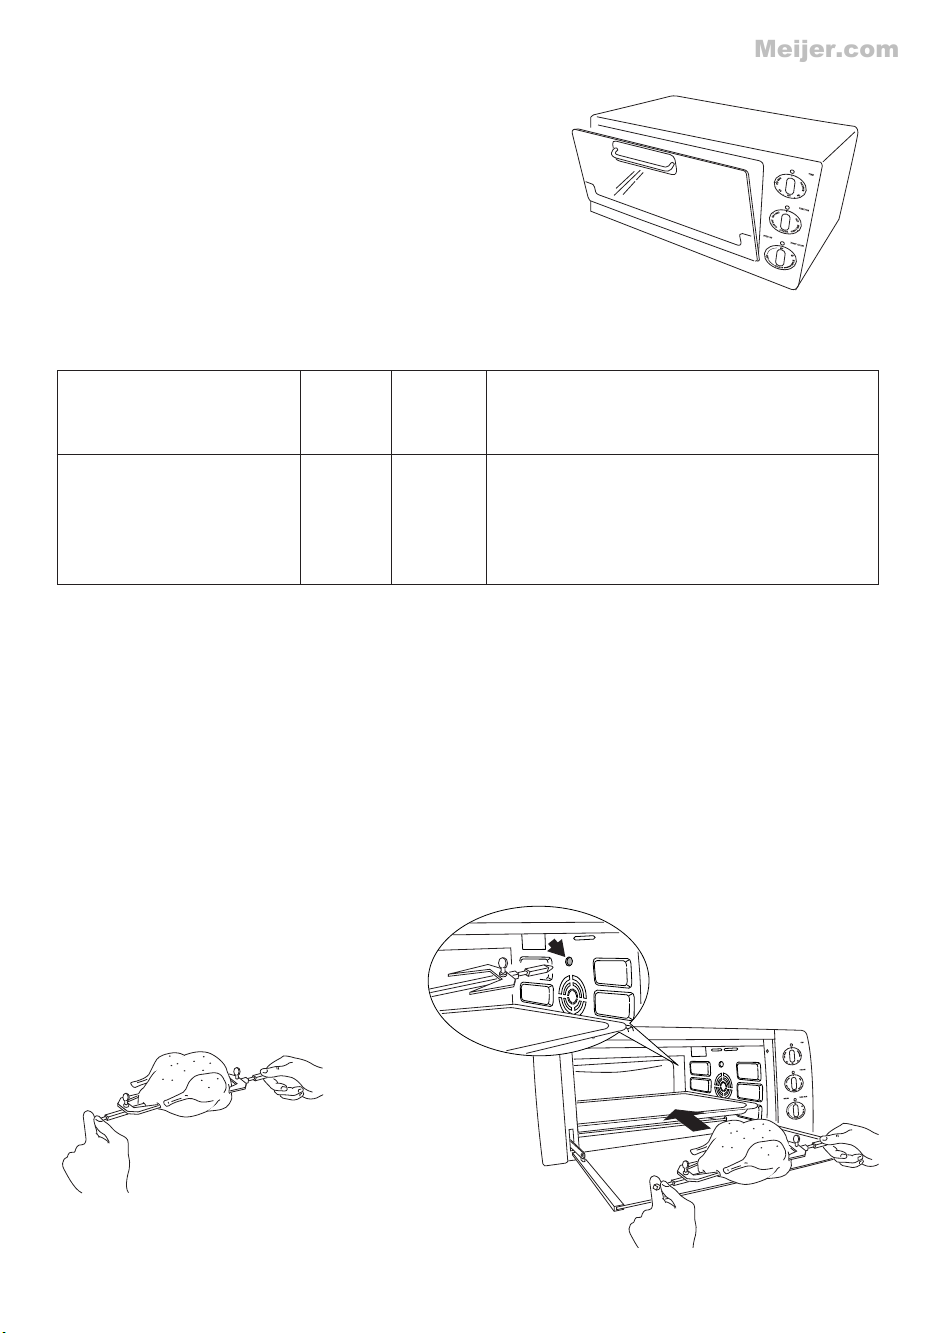
Grilling with the turnspit (
only on some models
)
This function is ideal for cooking chickens on the spit, fowl in general, roast pork and veal.
The rotisserie function can be used for a load up to 4.5 pounds.
• Place the food on the spit (I) and hold it firm using forks (fig. 2) (for best results, tie the meat using kitchen
string).
• Insert the bake pan (H) in the guide 3 and the spit (I) in the turnspit mount (O) (fig. 3).
• Close the door until you hear a “click” (see figure 1).
• Turn the thermostat knob (A) to position TOAST/BROIL.
• Turn the function knob (D) to position BROIL & ROTIS.
• Turn the timer knob (B) to the “ON” position.
fig. 2
fig. 3
fig. 1
Meijer.com
11
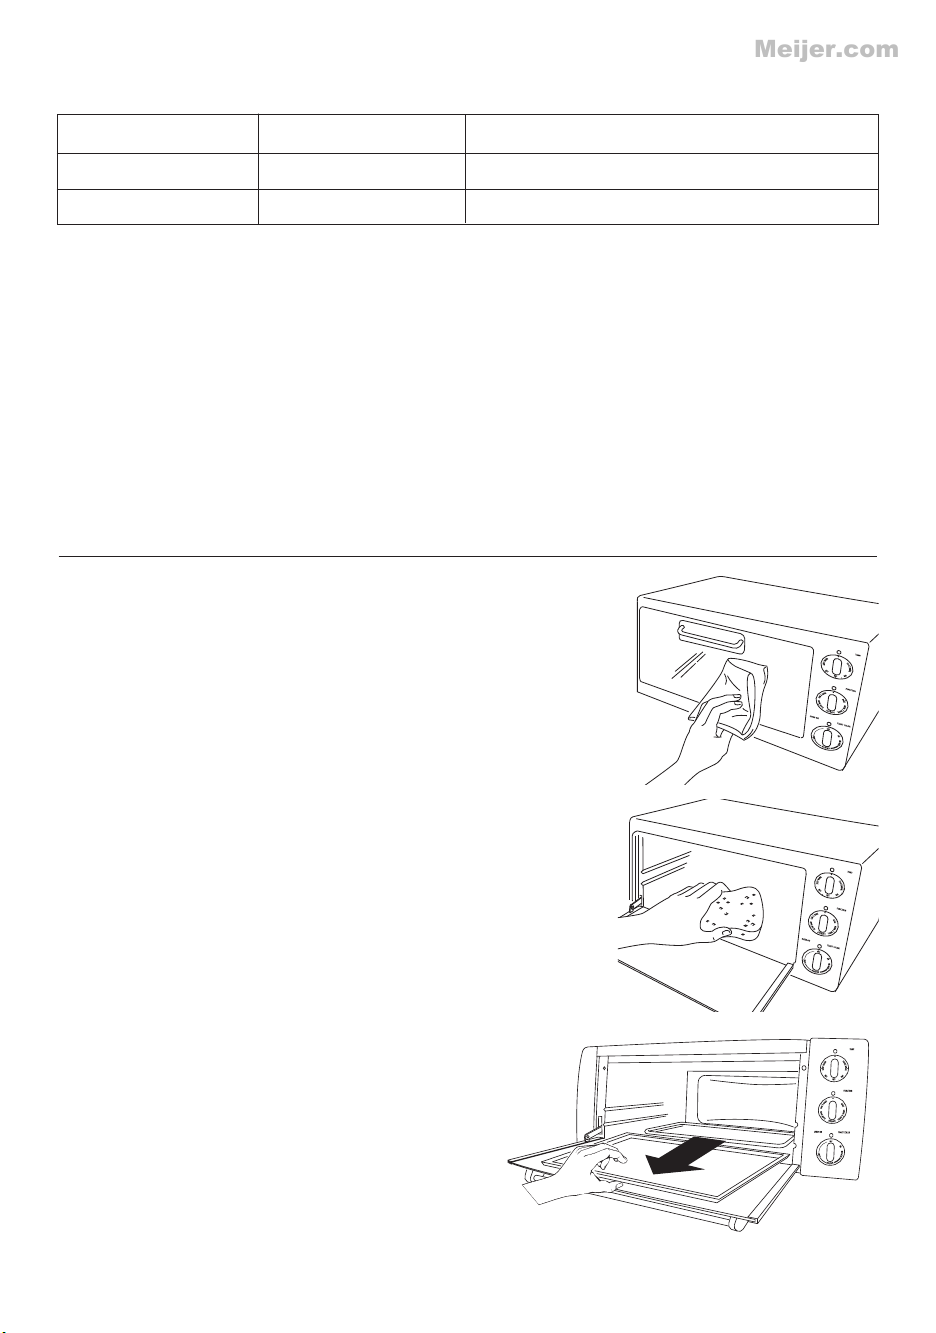
CLEANING AND MAINTENANCE
Frequent cleaning prevents the formation of smoke and bad odors
during cooking. Do not let fat accumulate inside the appliance.
Before any maintenance or cleaning operation, unplug the oven and
wait for it to cool down.
Clean the door, the inside walls and the enamel or painted surfaces of
the oven with a soap and water solution; dry thoroughly.
To clean the surfaces on the inside of the oven, never use products that
corrode aluminum (detergents in spray cans) and never scrape the
walls with sharp objects to avoid damage to the non-stick coat.
To clean the outside surface always use a damp sponge.
Avoid using abrasive products that may damage the exterior.
Make sure water or liquid soap does not seep into the vents on the top
of the oven.
Never immerse the appliance in water; never wash it under a jet of
water.
All the accessories are washed like normal dishes, either by hand or in
the dishwasher.
Slide the crumb tray out from under the bottom of your oven. Wash by
hand. Should the soilage be difficult to remove, rinse the crumb tray with
hot soapy water and if necessary, scour it delicately,
without scratching it.
FOOD
WEIGHT
APPROX. TIME
Chicken
3-4 lbs.
120 min.
Rost pork
2-3 lbs.
90 min.
For larger foods, we recommend the FAN & BAKE mode.
For information on the cooking times, refer to the instructions in the table below.
Meijer.com