

Page 1
1
Quick Start Guide
Thank you for purchasing the Digital Camera.
The Quick Start Guide to help with basic operations.
For more details on the different functions and operations,
please refer to the User’s Manual.
P ACKAGE CONTENTS
* Digital camera
* Installation CD
* Bundled AP
* User manual
* USB cable
* A V Cable
* Strap
* Pouch
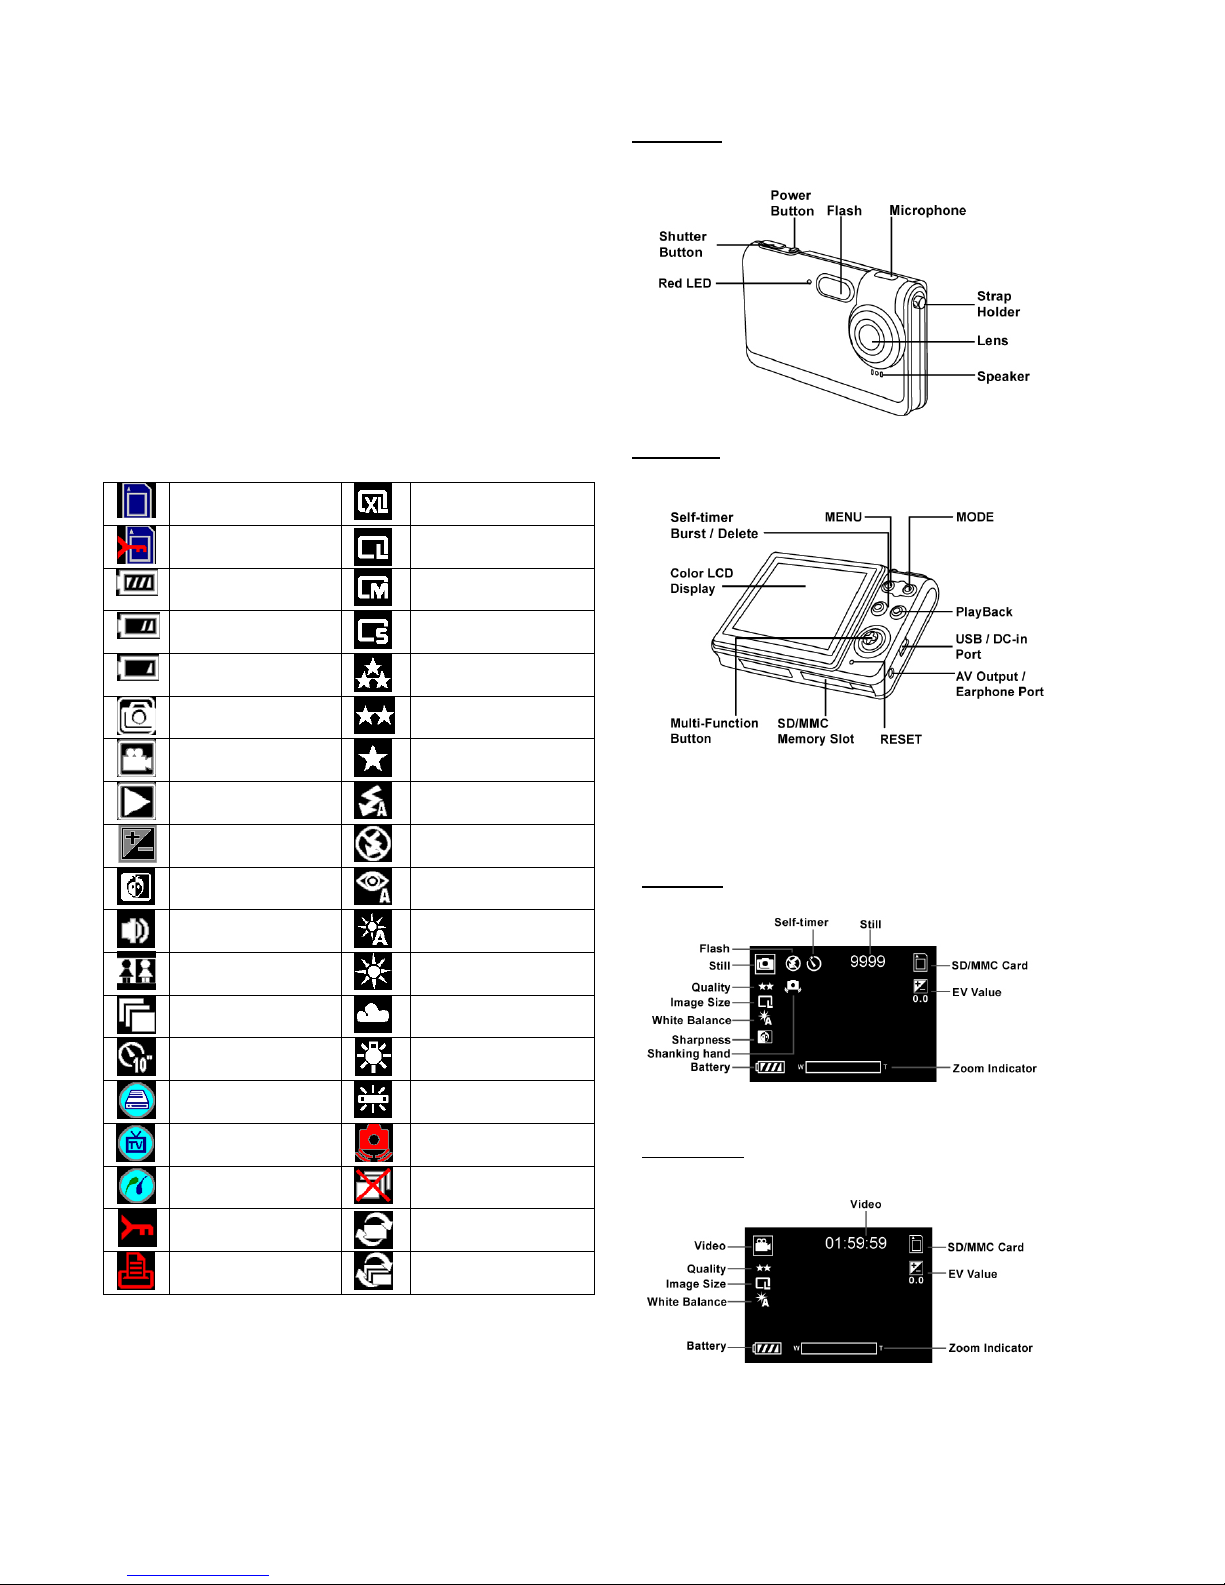
ICONS & INDICATORS
With Card Resolution- XL
Card lock Resolution- L
Battery Full Resolution- M
Battery Half Resolution- S
Battery Empty Quality- high
Still Mode Quality- Medium
Movie Mode Quality- Low
Playback Auto Flash
Exposure Flash Off
Sharpness Red-eye with Flash
Sound Auto White
Balance
2 N 1 Sun light
Burst Cloudy
Self-timer Tungsten
MSDC Fluorescent
TV output Sharking hand
PictBridge No images
Image/ movie
p
rotect
Play single
PDOF Play all
1) IDENTIFYING THE P ARTS
Front View
Back View
2) COLOR LCD MONITOR ICONS
Still Mode
Movie Mode
Page 2
2
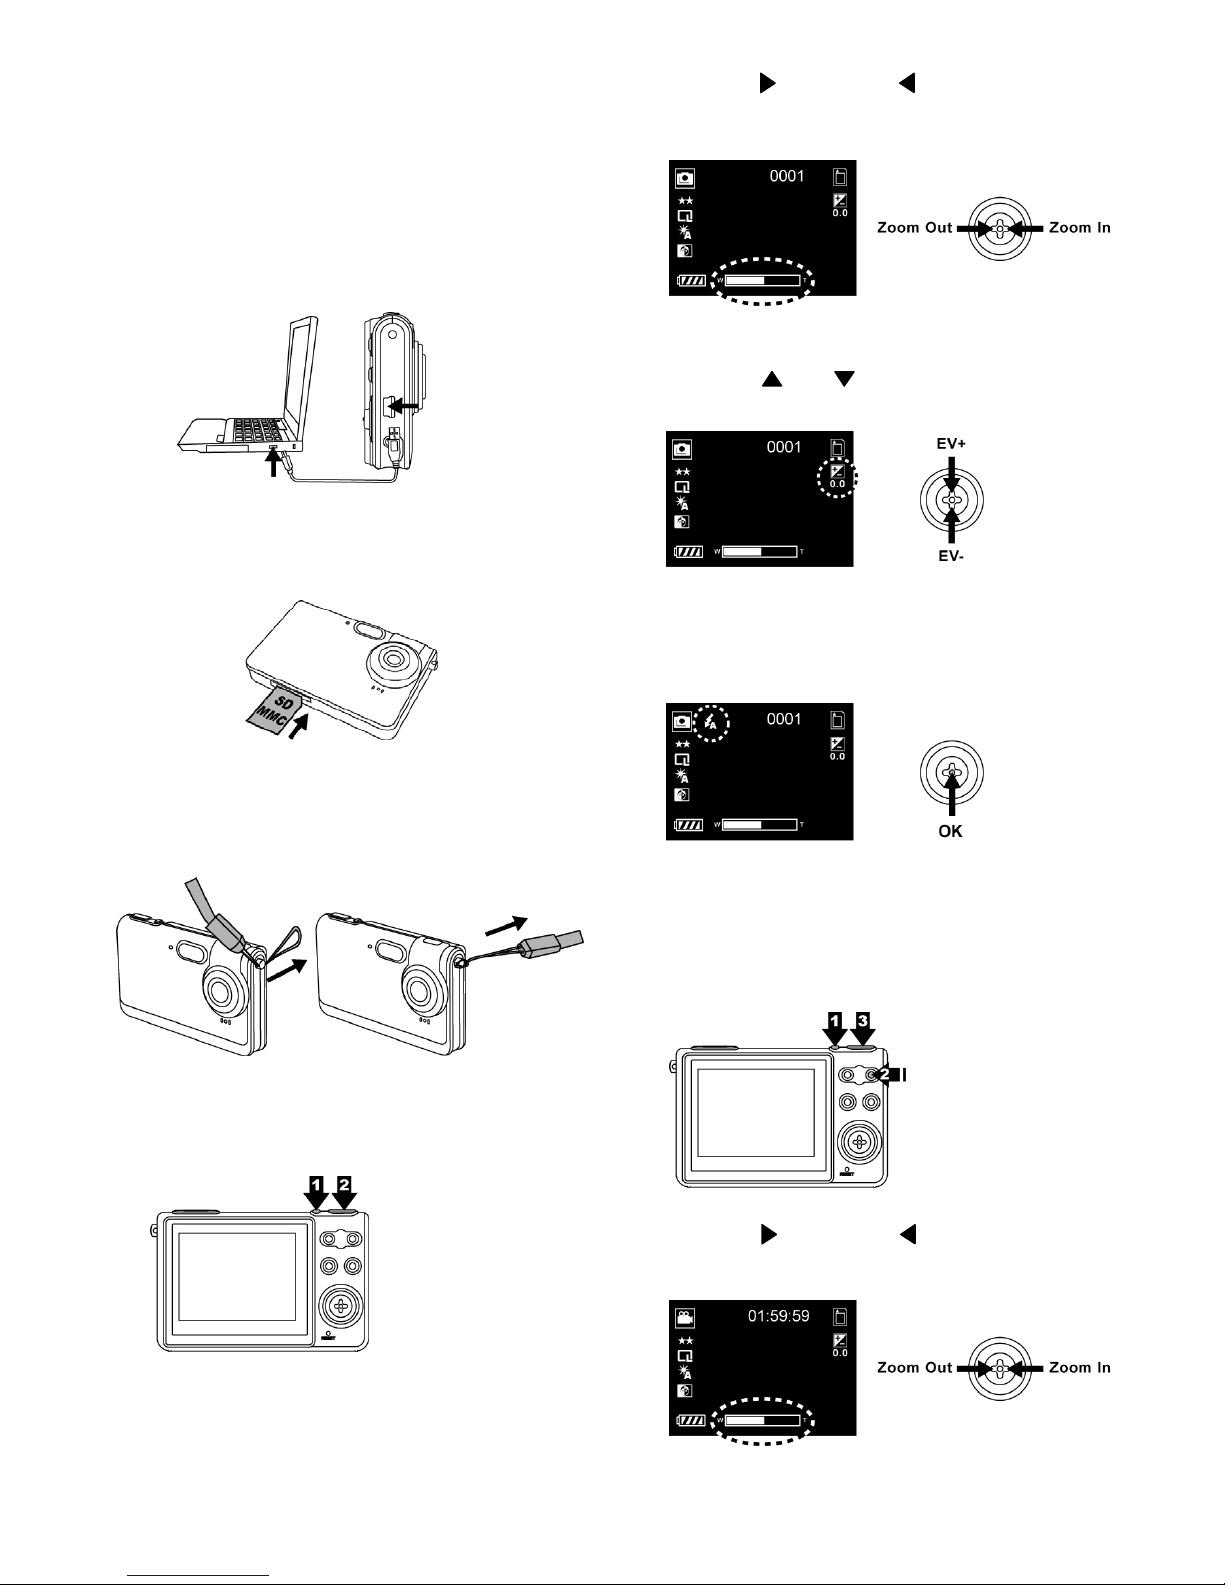
3) CHARGING THE BATTERY
Your camera battery has already been charged prior to
shipment, you should be able to take pictures without
recharging it. However, just to be safe, you may want to
follow the instructions below to make sure that your
camera is fully charged before leaving home.
The lithium ion battery used in the camera recharges
automatically when the camera is plugged into a PC via
the USB cable. When the battery is charging, the red
LED will light up. When charging is complete, the red
LED will be off.
4) LOADING SD/MMC CARD
Insert SD/ MMC card into memory card slot and push it
all the way in.
5) ATTACHING THE STRAP
1. The small loop goes through the strap holder.
2. Then the small loop goes through one clutch of the
loop again and pulls tightly.
6) TAKING PICTURES
1. Power on the camera.
Press the Shutter Button to take a picture.
2. Press the
zoom in and zoom out to frame
your picture.
3. Press the
and to adjust the exposure
compensation.
4. Press Multi Function Button directly for select the
Flash mode.
7) RECORDING VIDEOS
1. Power on the camera.
Press the Mode Button to switch to Movie Mode.
Press the Shutter Button to start recording.
2. Press the
zoom in and zoom out to frame your
subject.
Page 3
3
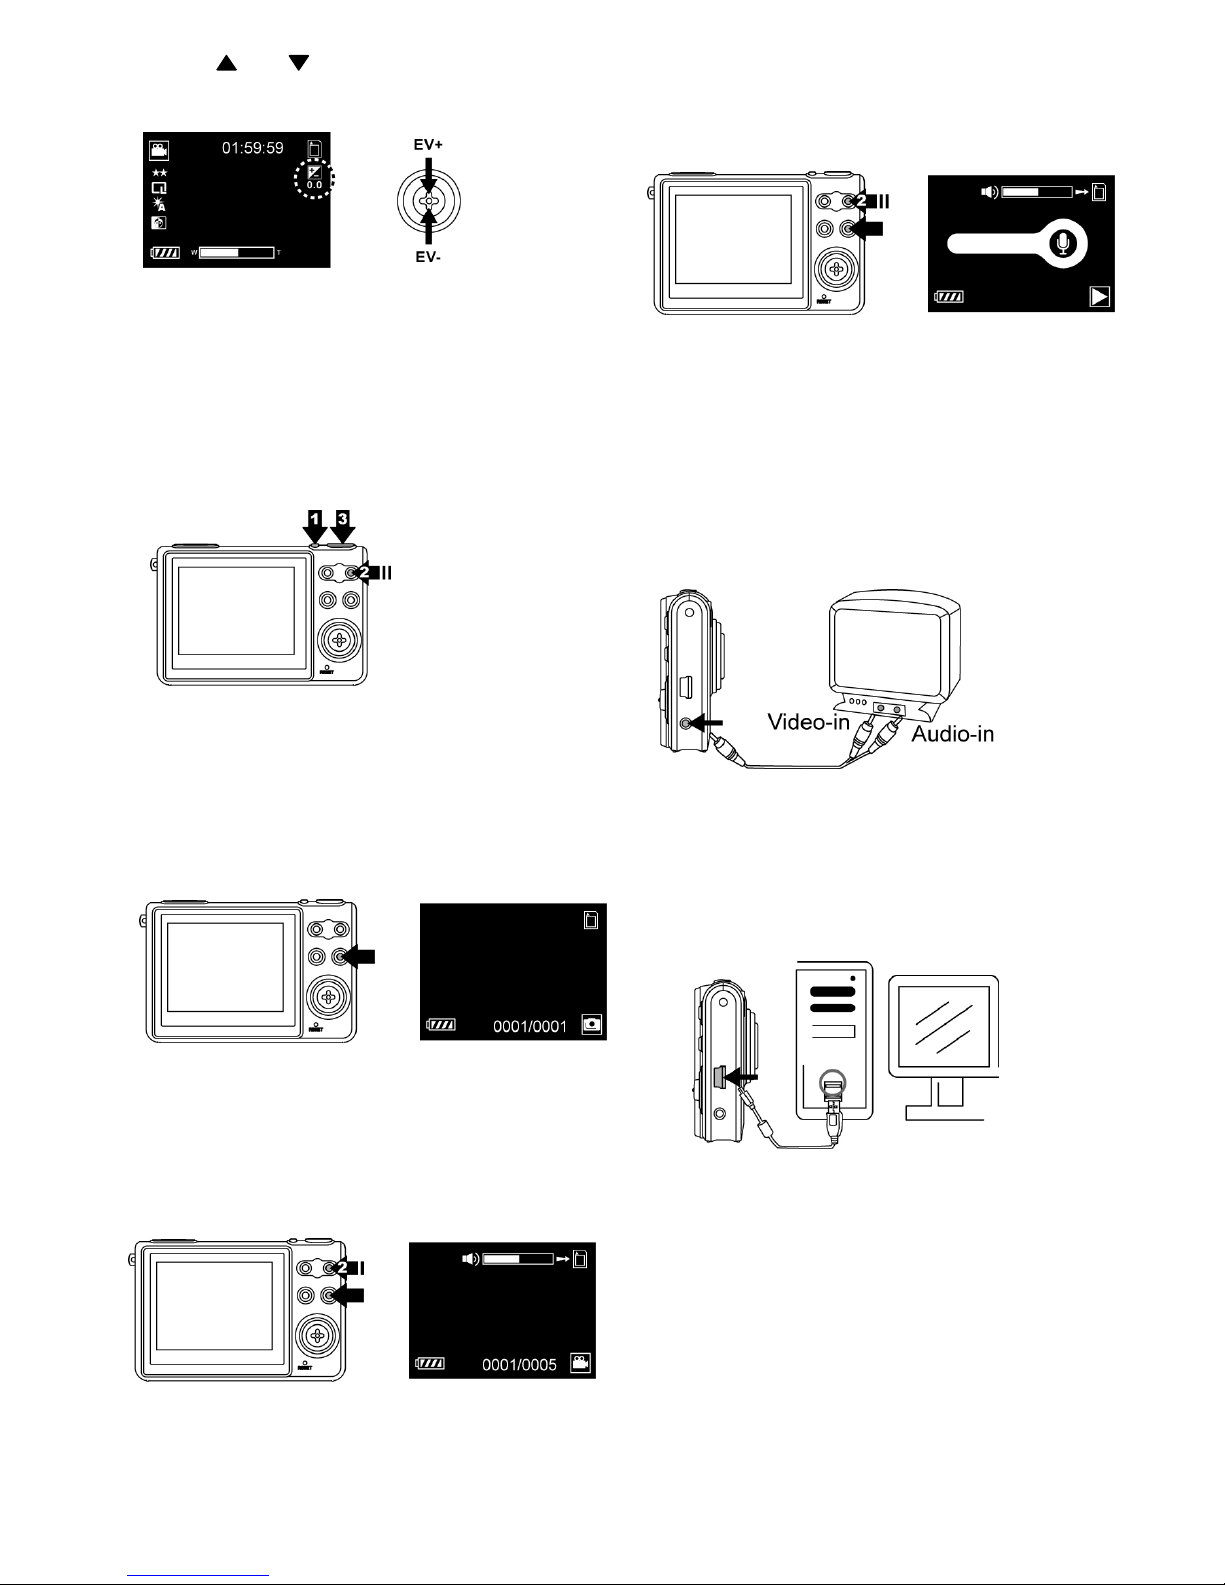
3. Press the and to adjust the exposure
compensation.
4. Press the Shutter Button again to stop recording.
8) RECORDING VOICE MESSAGES
1. Power on the camera.
Press the Mode Button twice to switch to the Voice
Mode.
Press the Shutter Button to start recording.
2. Press the Shutter Release again to stop recording.
9) BASIC PLAYBACK
1. Press Playback Mode, first enter to Still mode, you
can review the still images.
2. Under Playback Mode, press Mode button once to
enter Movie Mode for playback.
Press OK Button to play movie.
3. Under Playback Mode, press Mode button twice to
enter Voice Mode for playback.
Press OK Button to play voice message.
10) CONNECTING TO TV
1. Before you connect to TV, please make sure the
correct video signal standard (NTSC or PAL) first.
2. Plug TV cable (the black end) into the AV port of DV.
Connect TV cable to your TV.
Red to red (audio-in), yellow to yellow (video-in).
3. Turn on DV and TV.
11) CONNECTING TO PC
Window ME/ 2000/ XP- No Driver Required:
1. Power on the camera first.
2. Plug the USB cable to the camera and computer
properly.
Window 98SE/ PC camera mode- Driver Required:
1. Put the installation CD in your CD-Rom driver
2. Follow the On-screen instructions for installation.
3. Reboot the PC.
4. Power on the camera.
5. Plug the USB cable to the camera and computer
properly.
Page 4

4
When camera connect to PC via USB cable, there are
three function for select
1. Removable disk
2. PictBridge
12) Down Load Videos, Pictures, Voice Messages
1. Power on the camera and plug in USB cable
2. For Windows 98SE/ ME/ 2000:
Double click “My Computer” icon on the Windows
Desktop.
For Windows XP:
Select “Open Folder view files using Windows
Explorer” and click “OK”
3. Double click on the MEDIA device to open.
4. Double click on the DCIM folder to open.
5. Double click on the
100PHOTO folder for pictures
200MOVIE folder for movies
300VOICE folder for voice messages to open.
6. You can copy the videos, pictures and voice
messages to your designated folder or album.
 Loading...