

Page 1

Preface
Thank you for purchasing this camera. This camera will help you
fulfill all your digital picture processing needs.
The camera is equipped with four modes (Capture Mode, Playback
Mode, DSC Setup Mode, and Movie Mode) for your exploration. In
combination with all the above mode function, not only will this
camera serve as a digital camera, but it can also be used in recording short movies, PC connection and TV-out output functions, which
will allow pictures and movie viewing on either your PC or TV. With
a fixed focus, the camera offers 4x digital zoom. The fixed focus
control has macro and a normal focus. The macro focus has a distance of 50 to 70 cm, while as the normal focus has a distance of
160 cm to an infinite range.
To make the best out of this camera, we strongly suggest that you
read through this manual prior to operating this camera.
Page 2

Table of Contents 1
English
TABLE OF CONTENTS
Quick Start ...................................................................5
BASIC SHOOTING ........................................................5
Macro Function .............................................................6
ZOOMING IN/OUT......................................................6
Flash Setting..................................................................7
Playback....................................................................... 7
BEFORE SHOOTING ....................................................9
Unpacking the camera ...................................................9
Identifying components.................................................10
Loading the batteries and SD Memory Card..................11
Basic Settings...............................................................12
Formatting the SD Card.................................................12
Connecting to your Docking station (optional)..................13
Changing the Optional Face Plate..................................14
Turning the Camera ON/OFF.......................................14
Camera Mode and Instructions..............................13
CAPTURE MODE.........................................................14
Shooting images...........................................................15
FLASH Setting...............................................................15
Self Timer....................................................................15
Shooting Continuously Setting........................................16
To set Color Effect.........................................................17
To set White Balance.................................................... 18
To set Resolution..........................................................18
16 M SD Card Estimated Capacity..................................18
To set Image Quality.....................................................19
To set EV Adjust............................................................19
PLAYBACK MODE........................................................20
To set File Protection.....................................................21
To set Erase..................................................................21
Page 3

2
To set Slide Show...........................................................22
To set DPOF.................................................................22
Displaying Thumbnails...................................................23
DIGITAL ZOOM DISPLAY.............................................23
MOVIE MODE..............................................................24
DSC SETUP MODE.......................................................25
To set the DATE and TIME.............................................25
To set Auto Power Off...................................................26
To set slide show order..................................................26
To set the SOUND EFFECT...........................................27
To set LANGUAGES......................................................27
To set the TV OUT: (Optional).......................................27
To set the PC MODE (PC cam).....................................28
To set the frequency.....................................................28
Restoring......................................................................28
Making Connections........................................31
Installing software in autorun CD( Driver/ Direct X /Arcsoft
photo impression)........................................................31
Viewing images on your TV (optional)..........................32
Downloading images to your PC.................................33
Appendix..........................................................35
Specifications...............................................................35
Battery Power Status.....................................................37
Page 4
Quick Start 5
English
Quick Start
This Quick Start provides simple and basic directions to get you started with
your camera. From this section, you will learn how to turn the camera ON
and OFF, shoot pictures, Zooming In and Out, set your Flash, and Playback
your pictures.
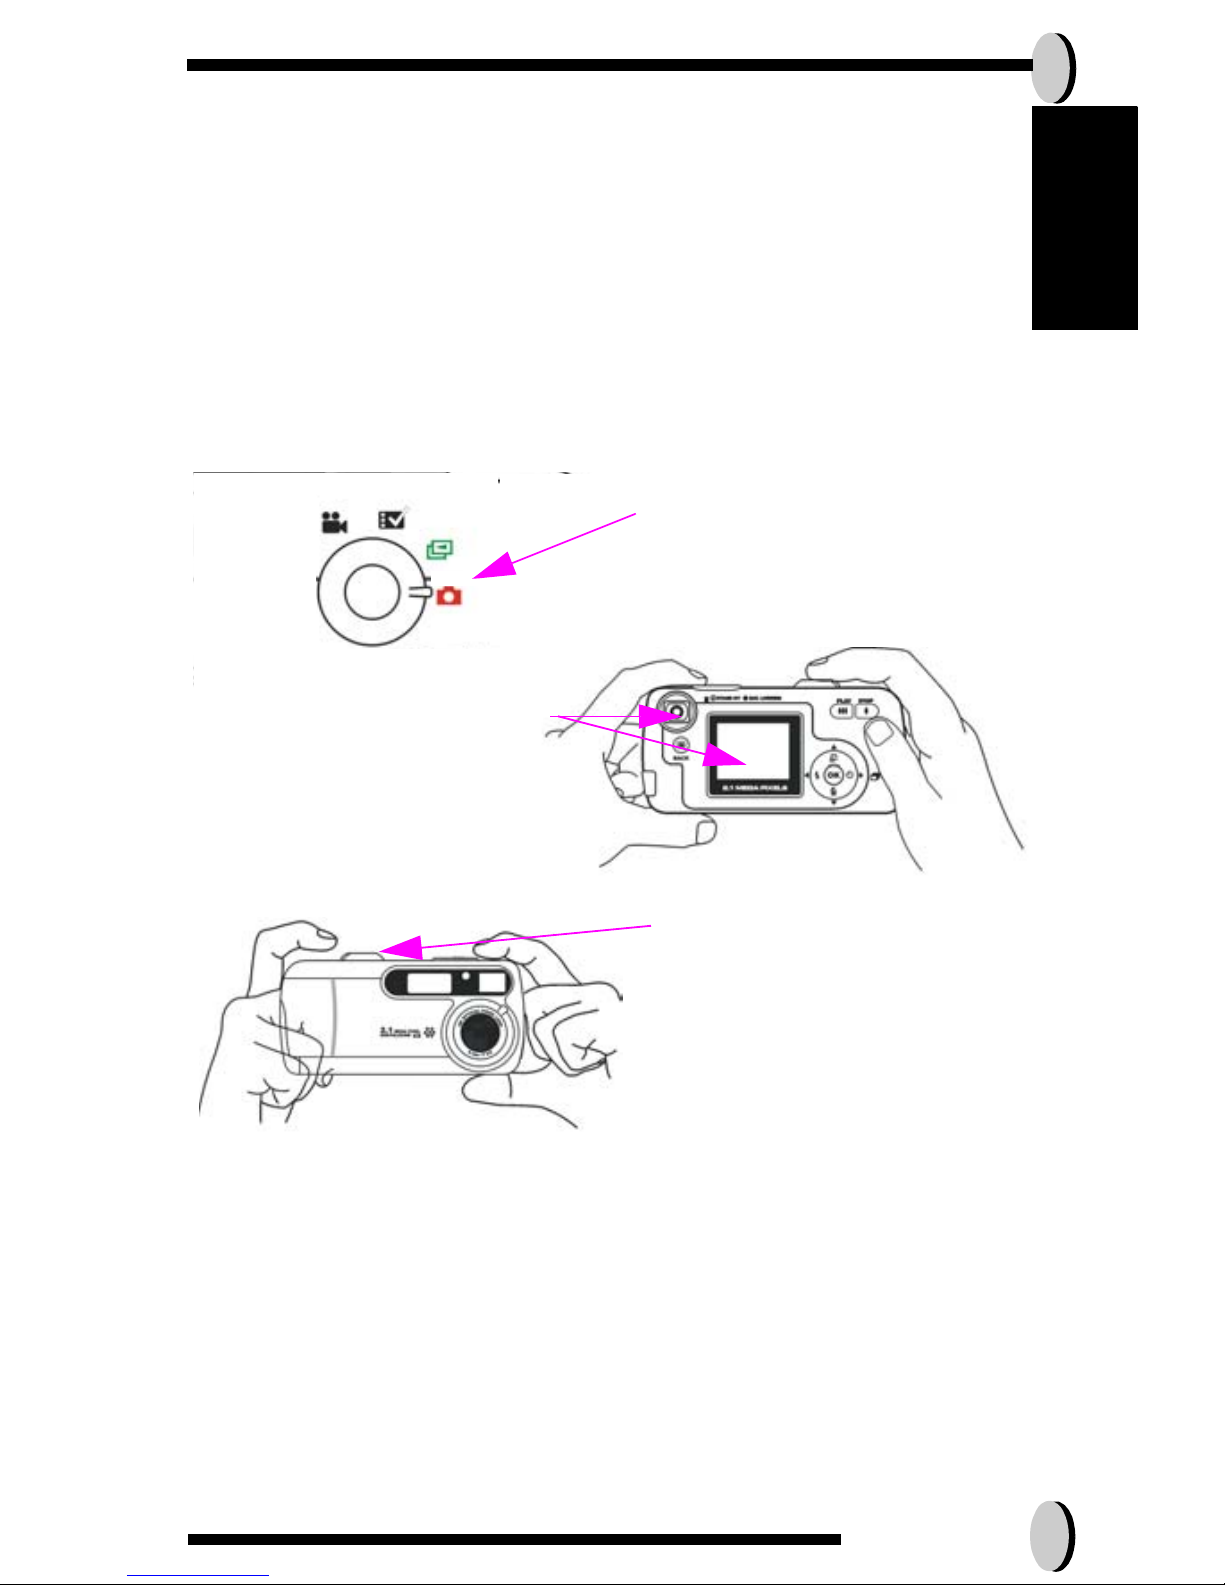
BASIC SHOOTING
1.Turn the mode dial
3.)When you are set, press the
shutter button once.
to the capture mode
2.)Look into the viewfinder/LCD
and try to align your subject
in the box.
Page 5
6
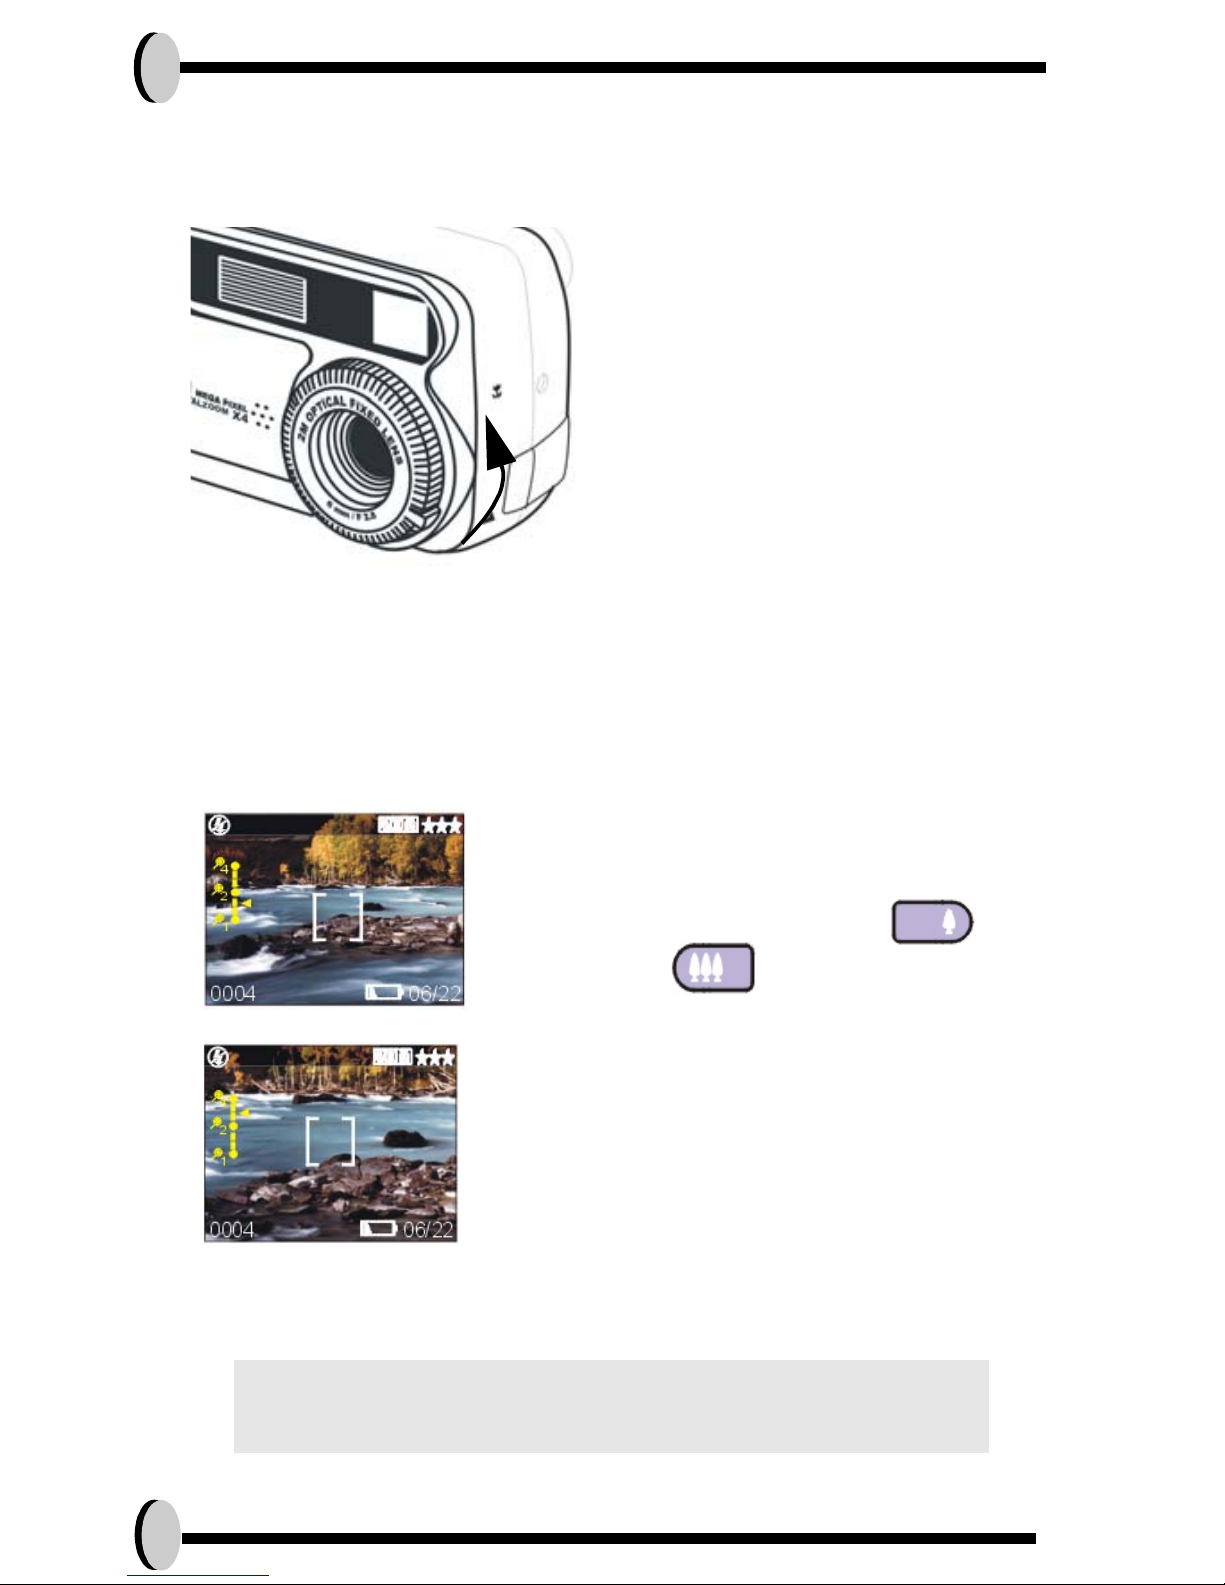
Macro Function
Macro function is best used for taking up-close images with ranges from 50 to
70 cm
ZOOMING IN/OUT
This camera has 4 x digital zoom. The zoom bar located on the left side of the
LCD display, informs users of the zoom status while the zoom in or out button
is pressed.
NOTE: 4 x digital zoom are all supported In PLAYBACK
Mode..
1.Slide the rim of the lens to the
direction of the macro icon.
2.Proceed as you would when
SHOOTING IMAGES, page 15)
taking a regular picture.
(Please refer back to
1.Once you have aligned your subject in the
or out button to select your
LCD display, press the zoom in
preferred distance.
2. The picture can be zoomed in up to four
times the orginal size.
Page 6
Quick Start 7
English
Flash Setting
Please Refer to CAPTURE MODE, page 14.
Playback
Please Refer back to Playback Mode, page 20.
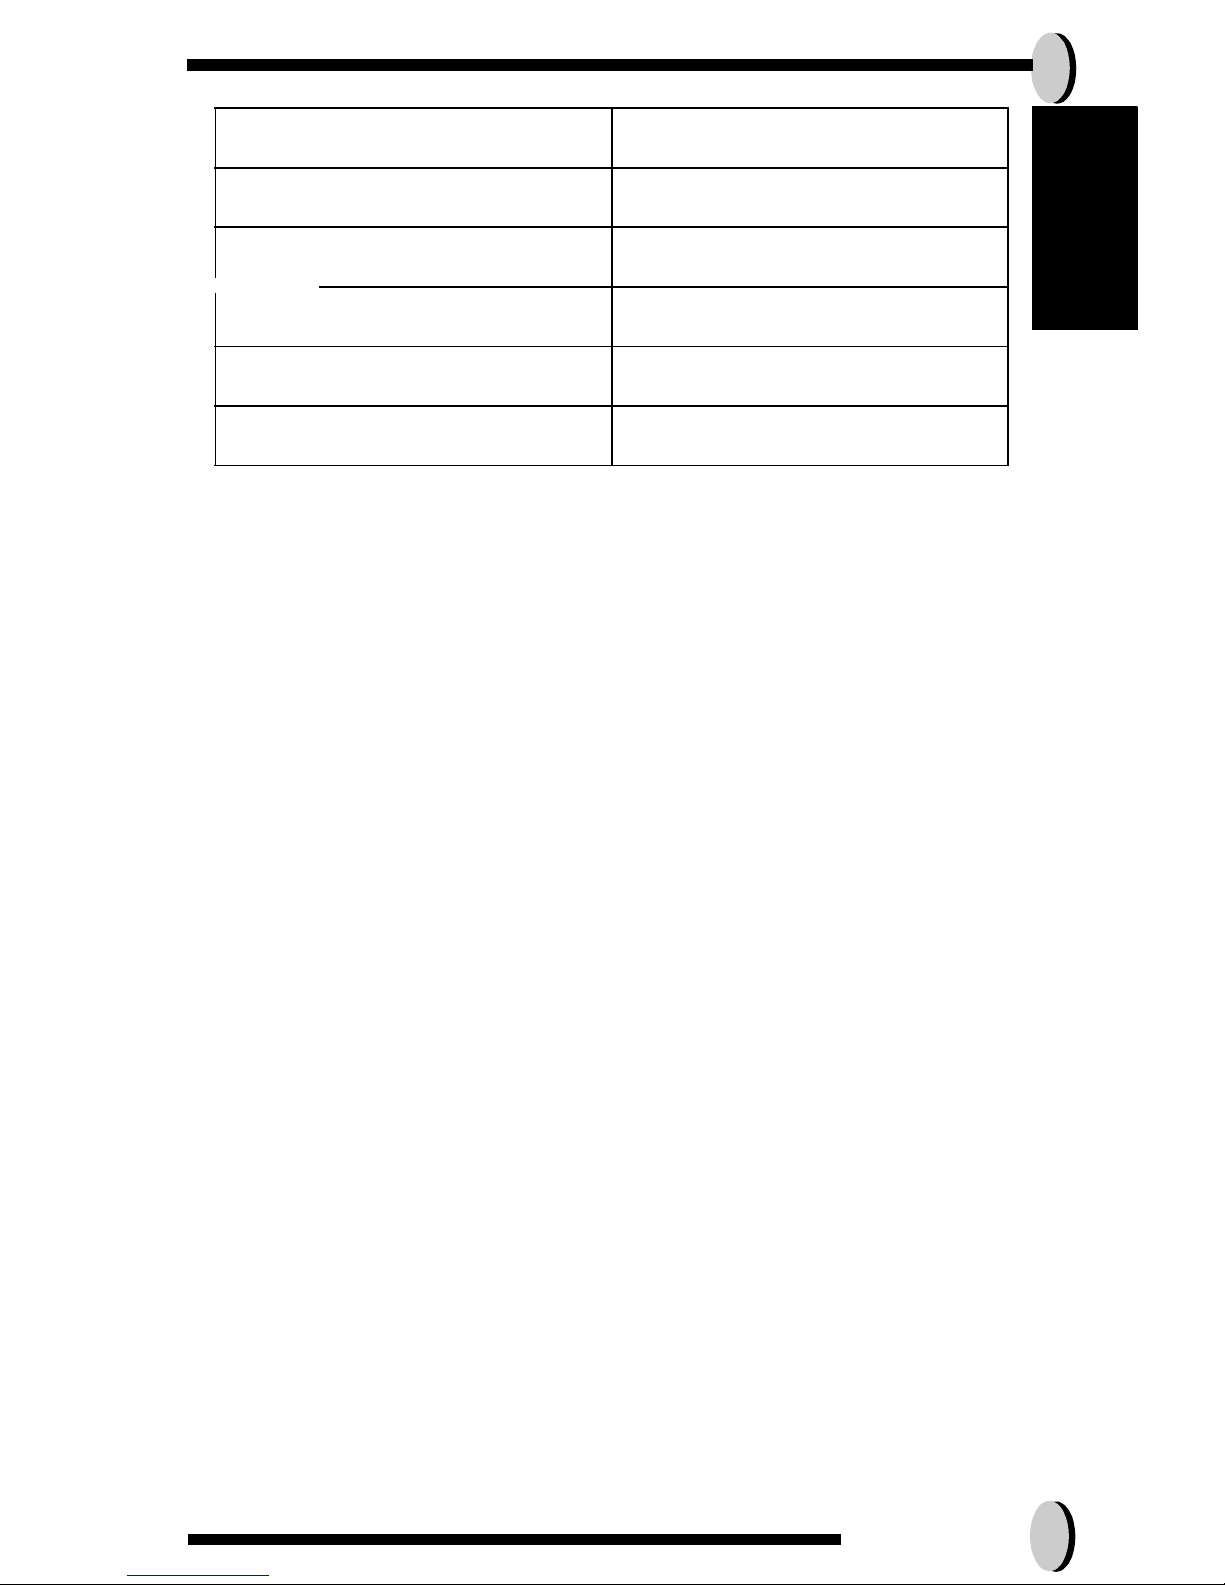
Resolution Digital Zoom
4.0 M 2 x
3.1 M 2 x
2.0 M 2 x
1.3 M 2 x
VGA 4 x
Page 7
Before Shooting 9
English
BEFORE SHOOTING
Setting up this digital camera is quick and simple. Follow these steps, and
you’ll be on your way to infinite boundaries.
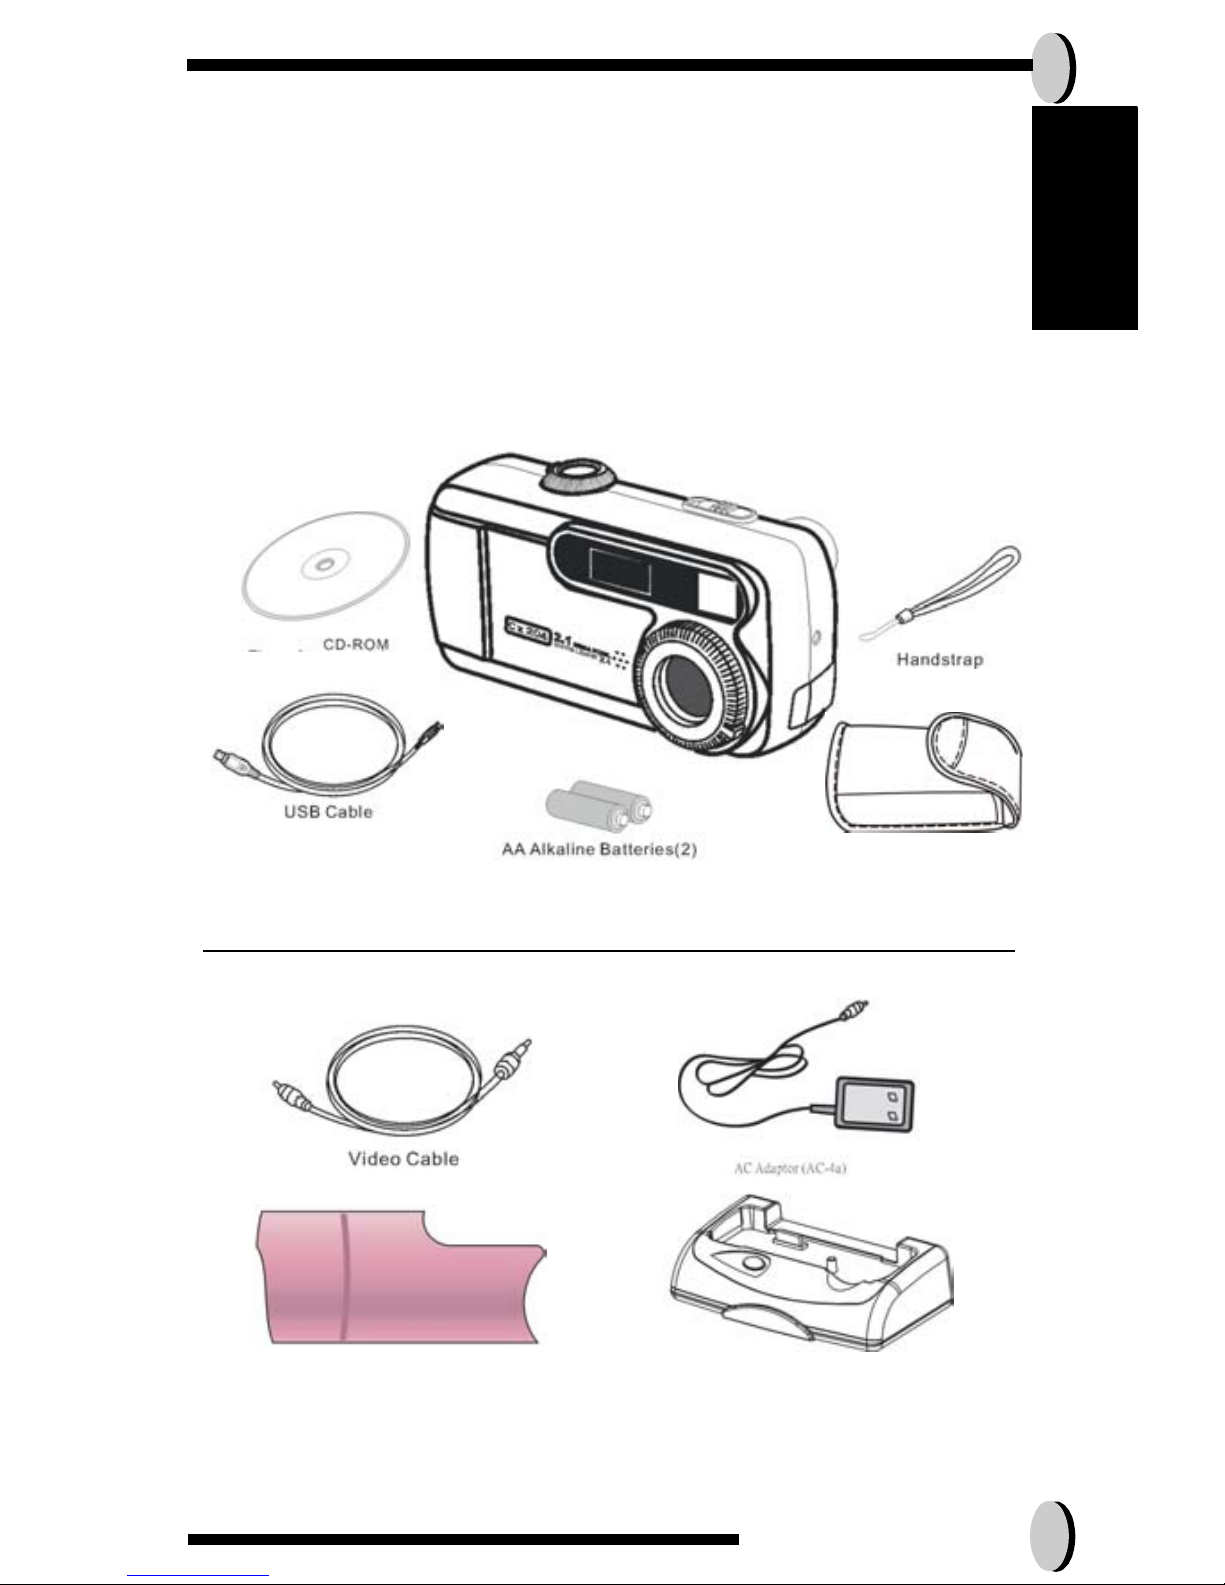
Unpacking the camera
1.Clear all items from the box. (It is highly recommended that the box and
wrappings are kept for future usage)
2.Double check for the following items:
Optional Items:
Interchangeable Face Plate Docking Station
Mini
Pouch
Camera
Page 8
10
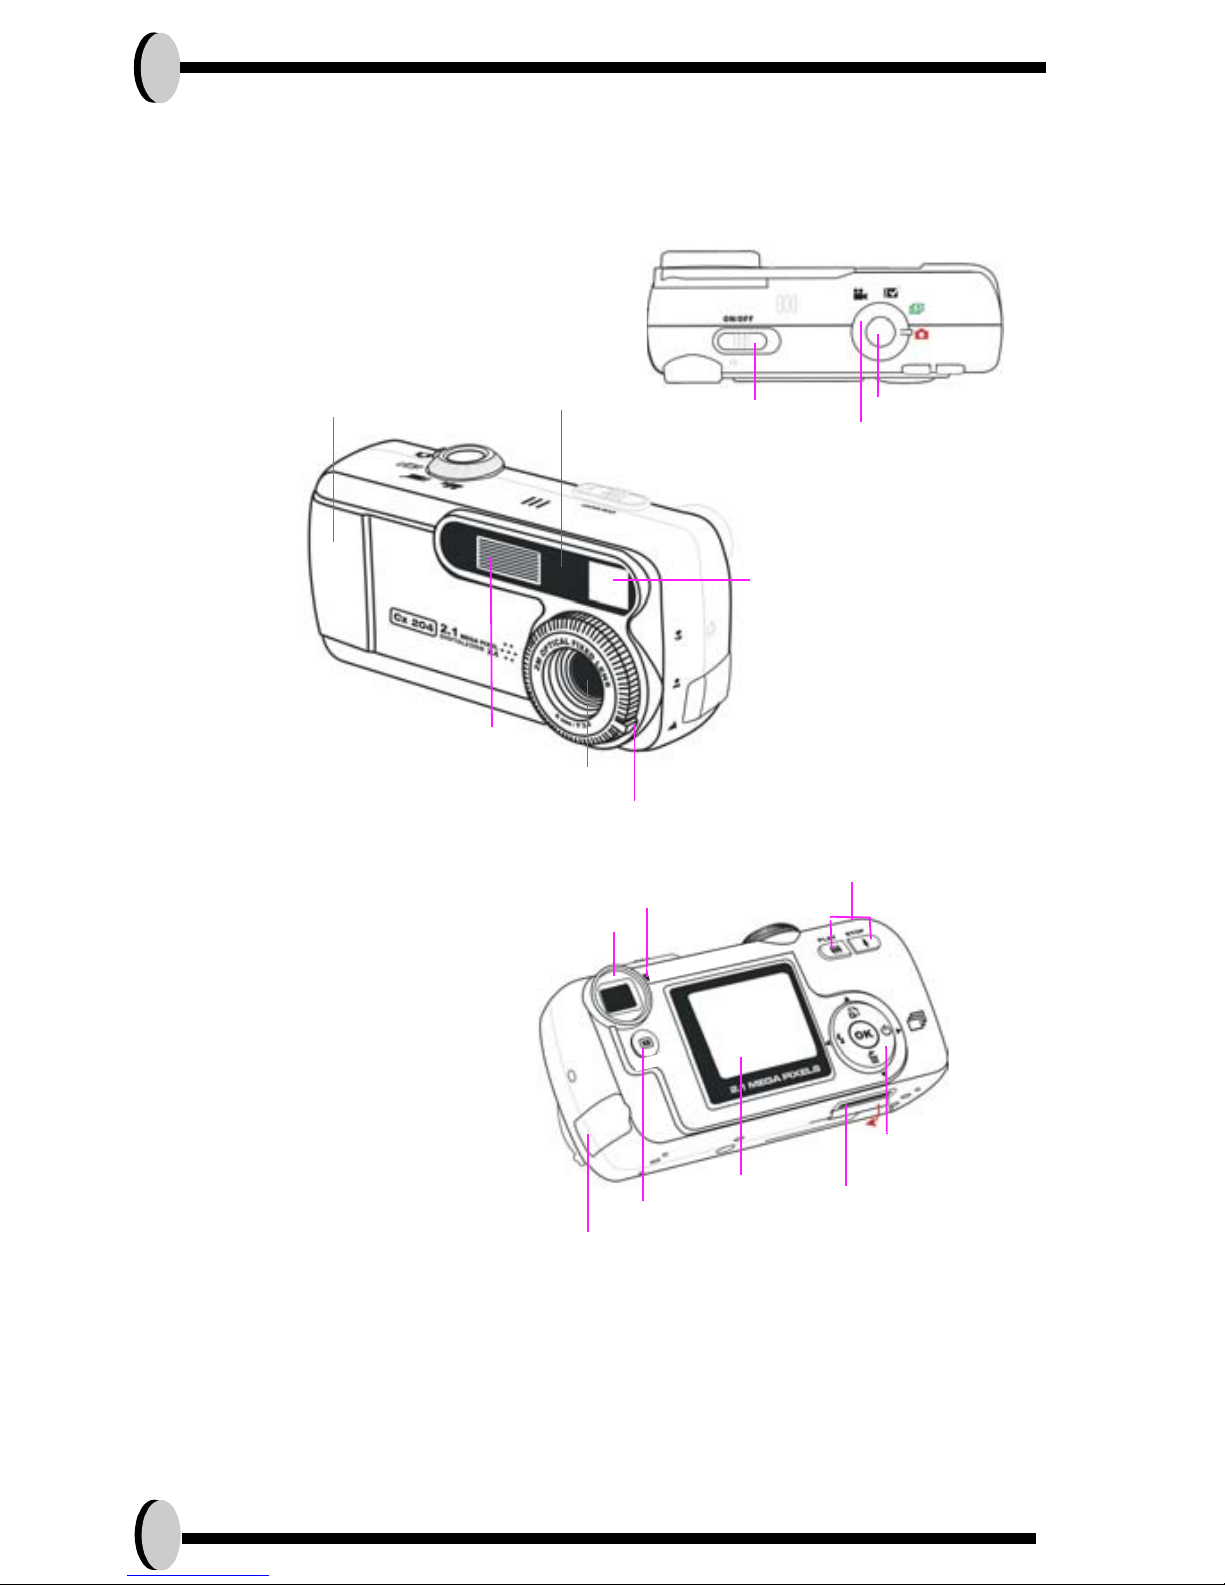
Identifying components
Viewfinder
Power/Flash LED
Zoom Button
Five-way Switch
Docking Connector
TFT LCD
Display Button
USB Connector
Shutter
Mode Dial
Interchangeable
Face Plate
Power Switch
Flash
Lens
Viewfinder
Two-steps focus ring.
.
Self timer LED
.
Page 9
Before Shooting 11
English
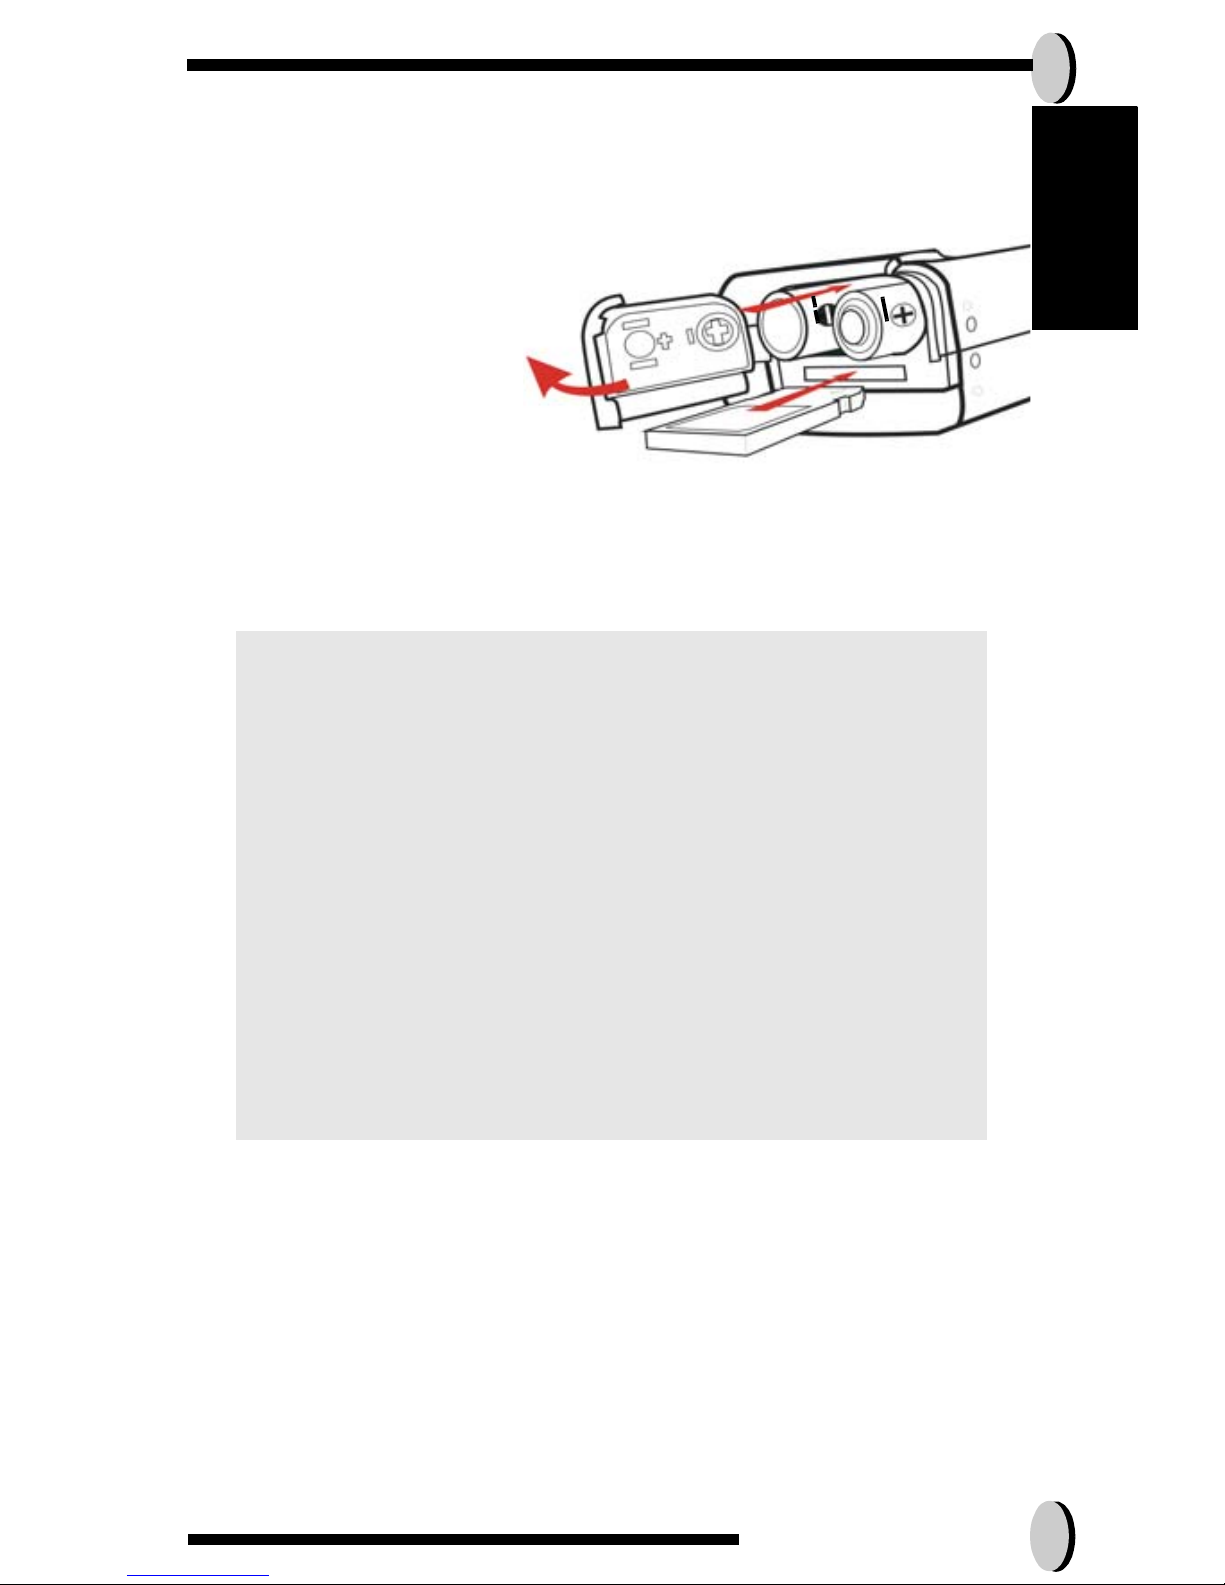
Loading the batteries and SD Memory Card
This camera uses 2 AA alkaline or NiMH batteries. The batteries and SD card
share the same compartment and door.
CAUTION! 1. Use the rechargeable NiMH for docking
only. do not use alkaline batteries while docking.
2. Do not attempt to charge the non-rechargeable batteries
3.To improve battery performance, replace all
installed batteries at the same time and keep
batter way from heat.
4.To abandon batteries, please refer to index
of battery manufacturer.
6. Do not mix battery types or it may cause a
fire or explosion. Use only one battery type at
one time
7. Batteries should be inserted in the battery
compartment with the "+" and "-" sides facing
correctly.
1.Slide the battery/SD Memory Card cover
then lift to open.
in the direction of the arrow,
2. Load the included batteries
into the battery compartment.
4. Close the battery/SD Memory Card cover.
3. Insert the SD Memory card into the slot.
Page 10

12
Basic Settings
Upon turning the camera ON, a “welcome image” will appear on the LCD
display. Turn the mode dial to the DSC Setup Mode. Please proceed with the
following settings:
Language Preference Setting
There are a total of nine languages to choose from to interact with this camera. English will be the default language. Please refer to DSC Setup Mode.
(Page 25)
Date and Time Setting
Please refer to the Date and Time setting under DSC Setup Mode. (Page 25)
Formatting the SD Card
To take more pictures effectively, delete the content of the SD Card. To format
the internal memory, withdraw the SD Card from the camera. To format, proceed with the following steps:
1.Turn the Mode Dial to Playback Mode.
2.Press the OK button to enter Playback Function Mode.
3.Press the five-way switch button, to select “Erase” and then “Format”
4. You will then be asked "Format SD card?" on the LCD Display.
5.Press the OK button to confirm and proceed with formatting.
6.Push the Display button to exit Playback Function Mode.
NOTE: 1. Upon loading new batteries, users will need to
reset their Basic Settings
2. Do not open the battery/SD card cover or
remove the batteries when the camera is in its
ON status. Only remove the batteries and SD
card when the camera is not in use, or in its
OFF status.
3. If you do not plan on using the camera for a
long period of time, please remove the batteries and SD card.
Page 11
Before Shooting 13
English
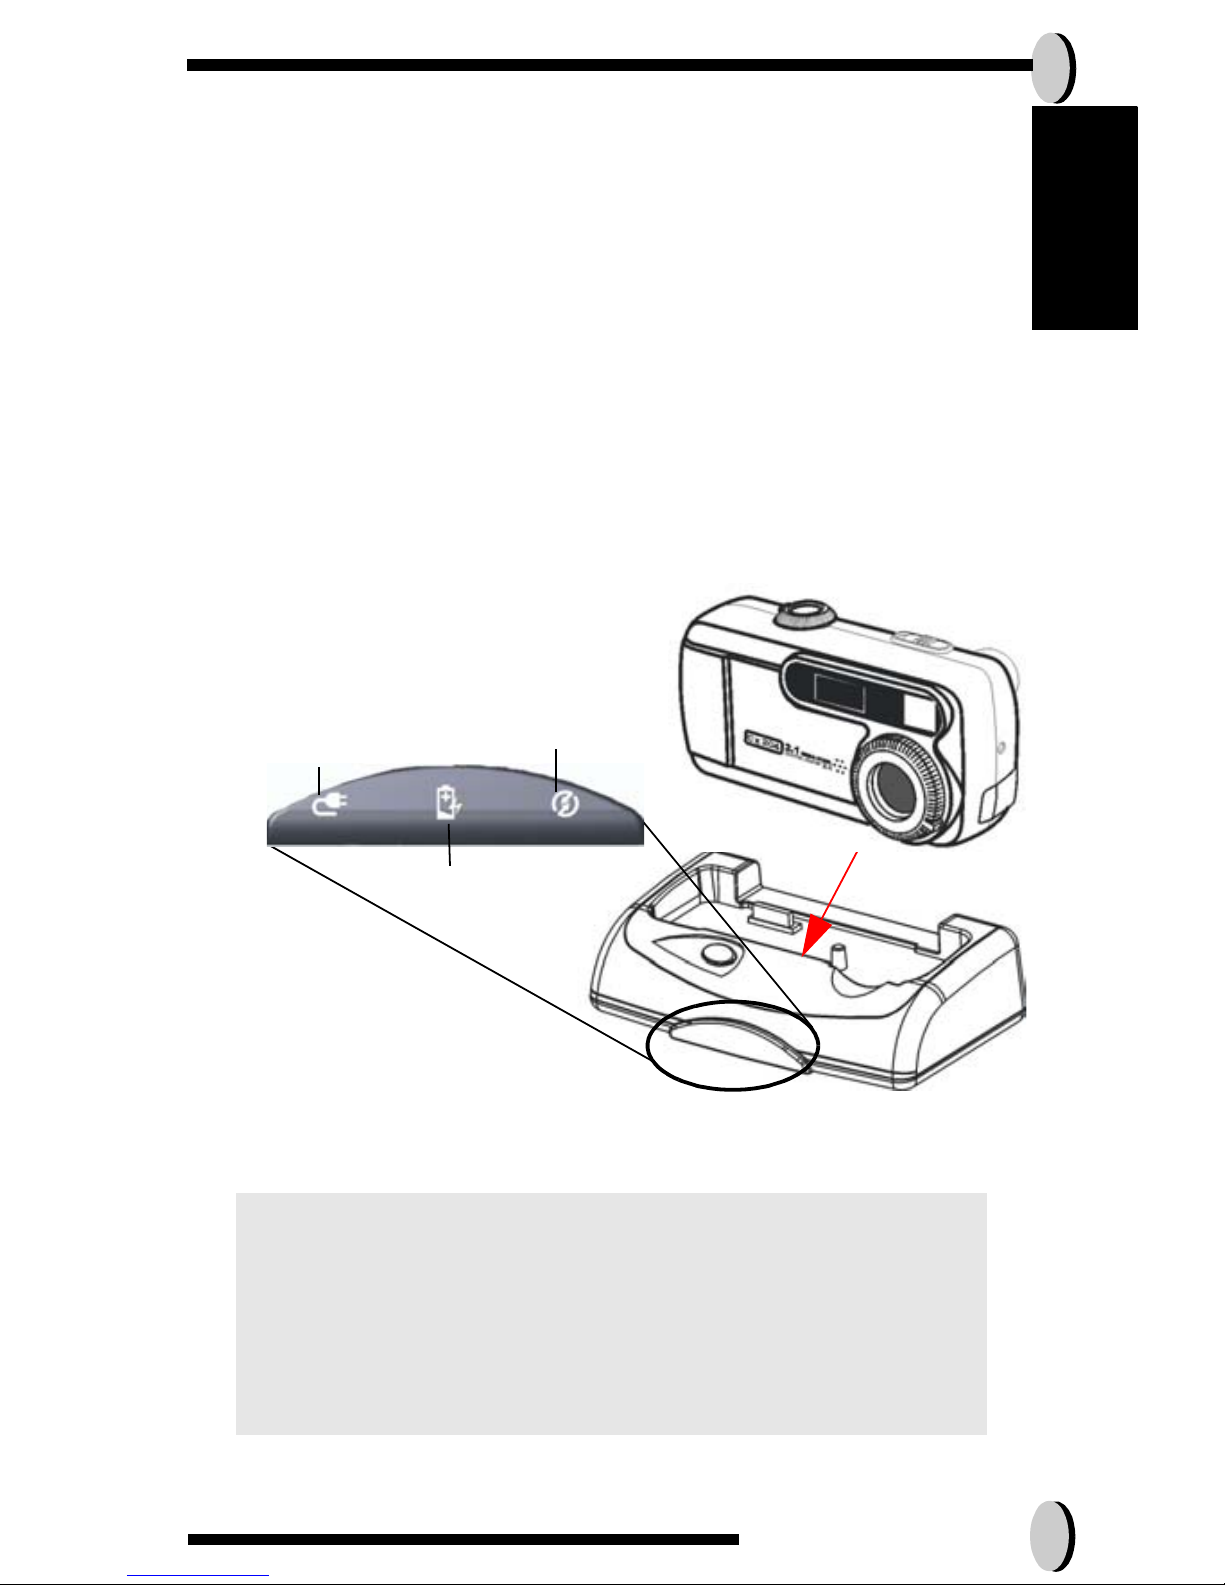
Connecting to your Docking station
(optional)
The optional docking station will serve as a battery charger. While the station
is connected through an USB port, it will download pictures and movies from
the camera to the PC. The docking station includes a TV-out port for easy
transfer of images or movie(s) to the TV screen. The USB cable can be connected while the power is on.
When you dock the camera into the docking station, the camera will automatically turn OFF. The docking station will detect the battery status. If the battery
is in its low state, docking will start charging by drawing the DC-in power.
The red LED will remain turned ON until the battery is fully charged.
CAUTION! 1.Use the rechargeable NiMH for docking
only. do not use non-rechargeable batteries
while docking.
2.Use only the specified batteries or AC power
adapter specified (5V 2A) for use with this
camera. The use of other power sources
may cause a fire.
.
.
.
AC Adapter
Charger Notice
TV-out or USB Port in use
Page 12
14
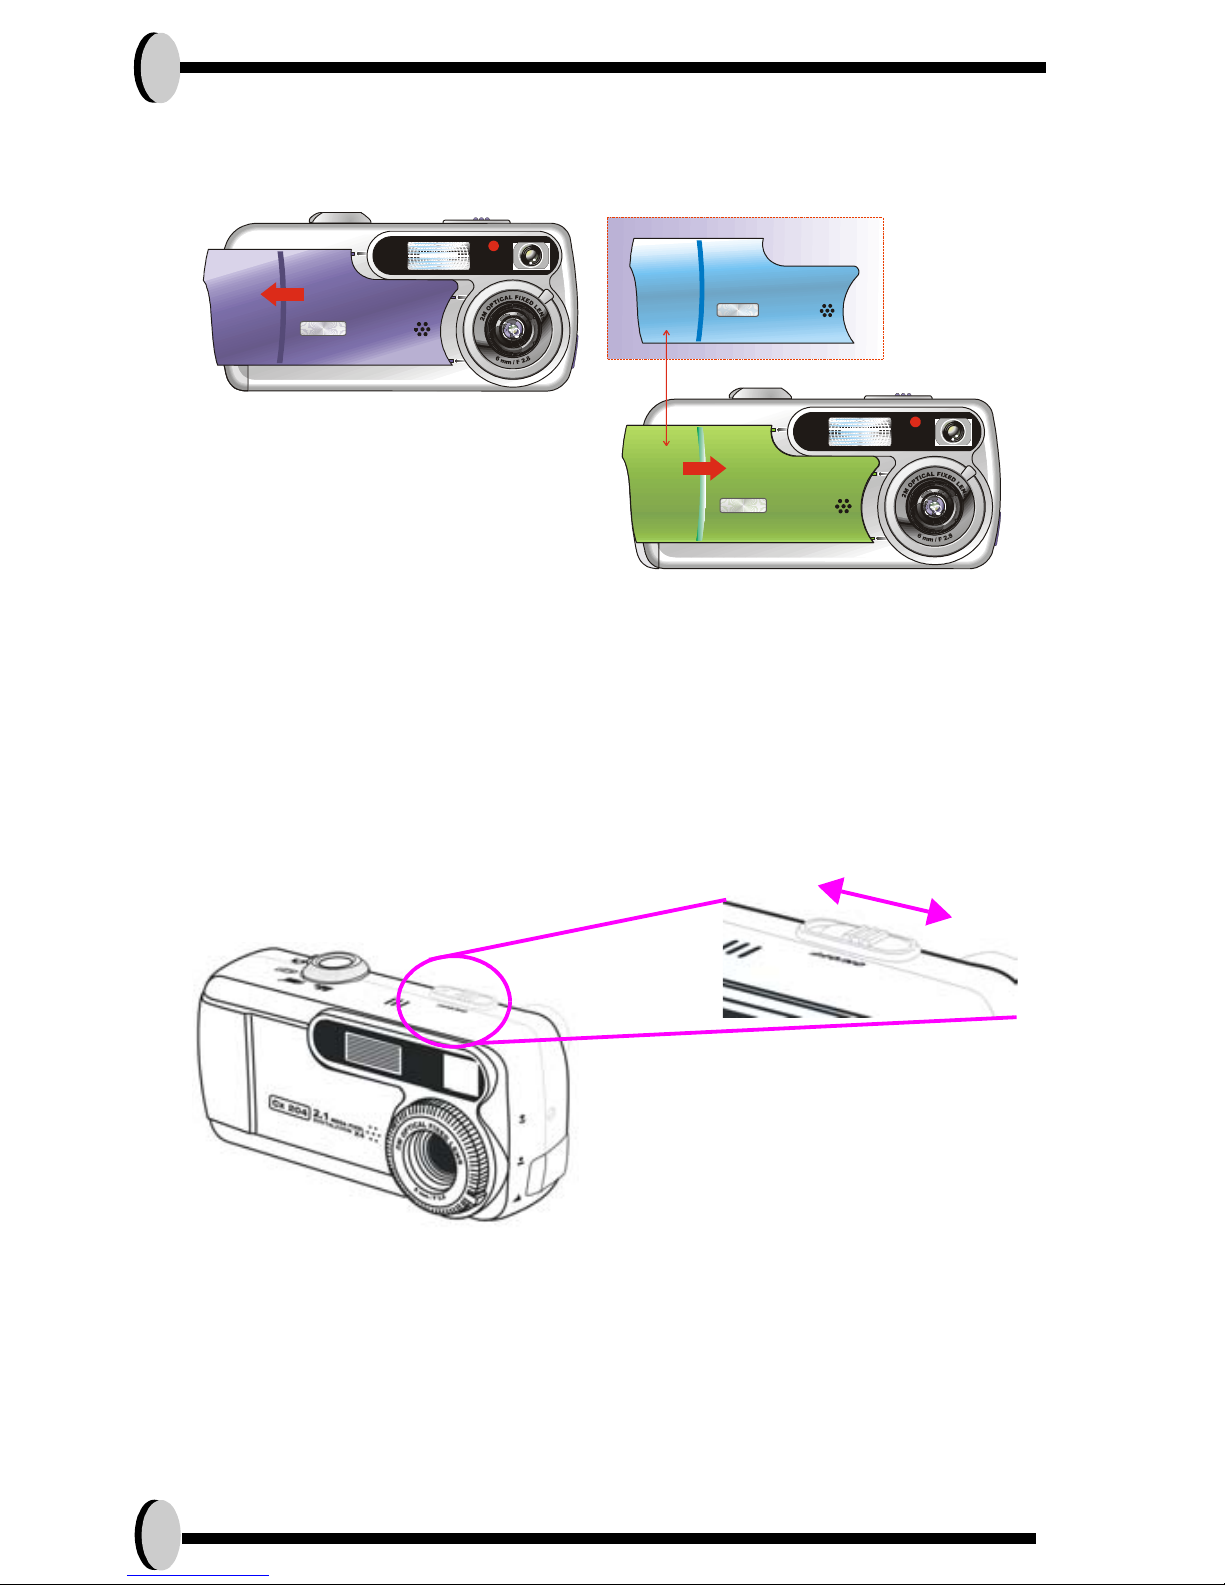
Changing the Optional Face Plate
This camera gives you the option of changing the face plates.
Turning the Camera ON/OFF
1.Slide and remove the face plate.
2.Affix the new face plate and slide it
back until you hear a click.
1.Locate the power slide switch on top of the camera.
2. To turn the camera ON or OFF, slide the retractable
OFF/ON
* The backside LED indicator will
switch to the right.
remain green while the power is turned
ON
Page 13
Camera Mode and Instructions 13
English
Camera Mode and Instructions
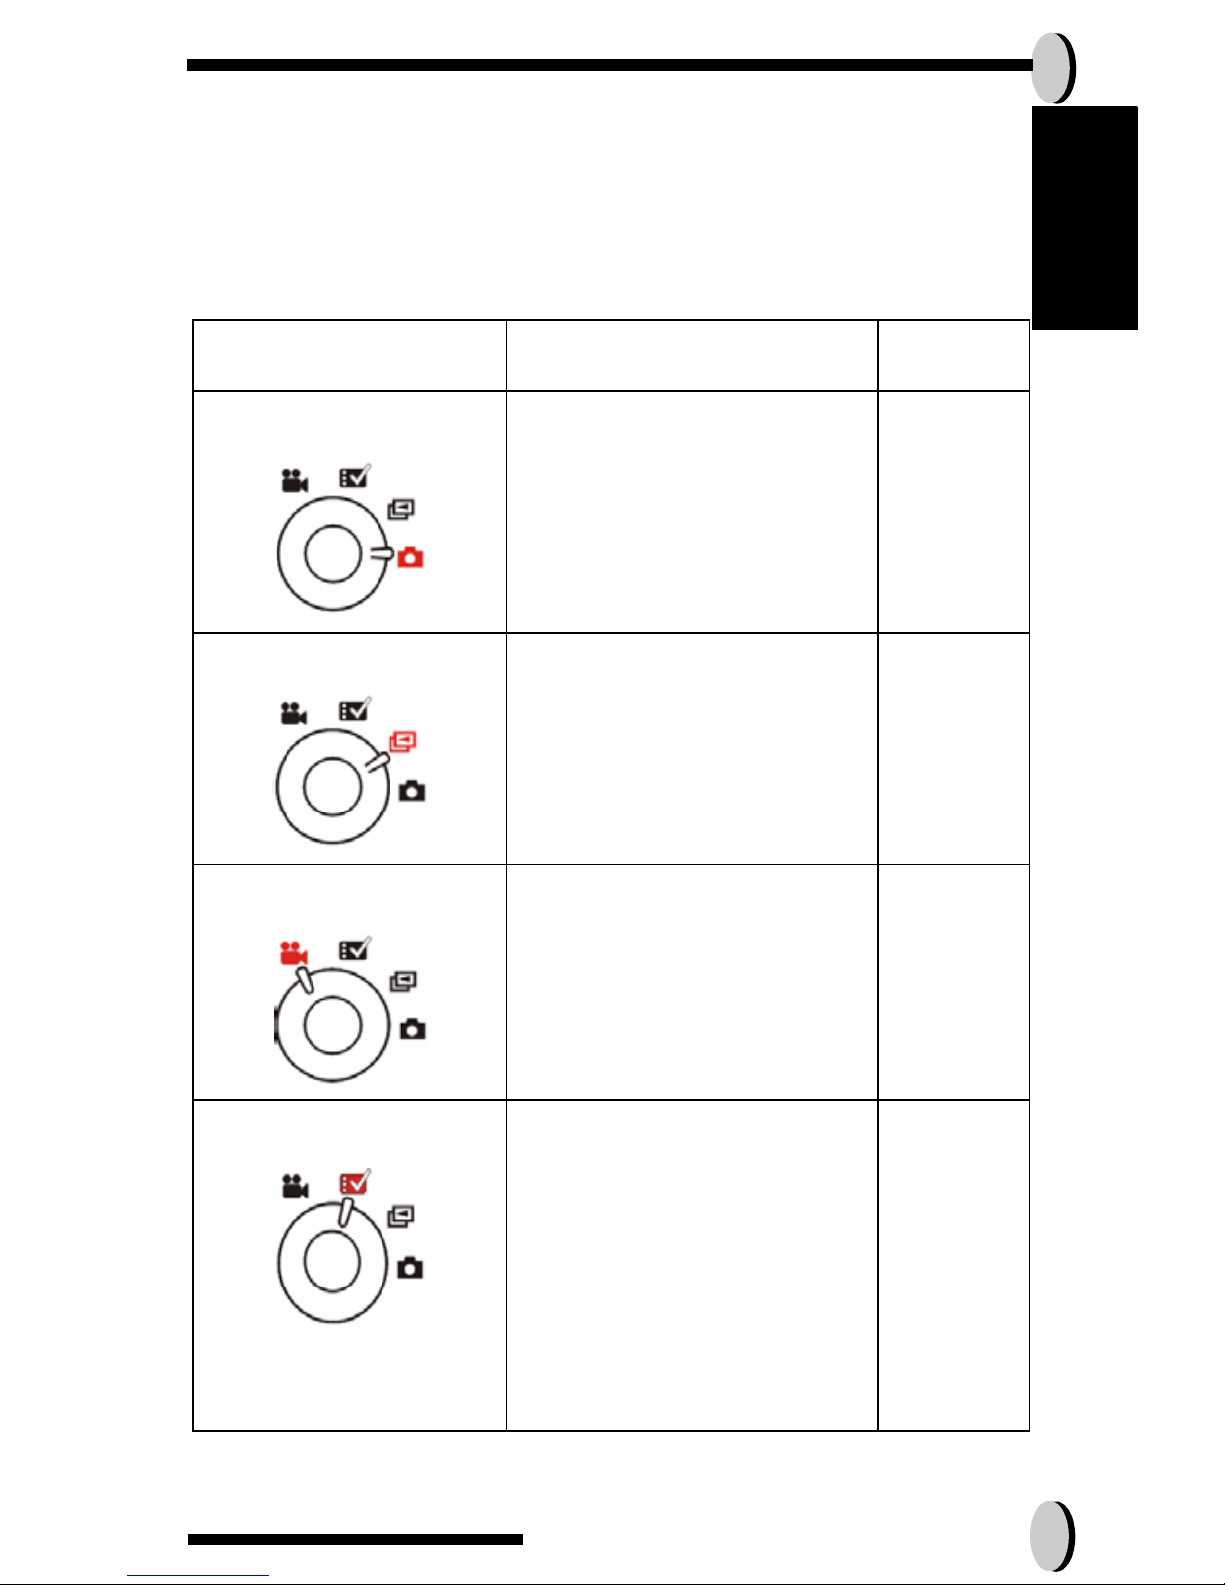
This section will describe the four modes included in this camera. An in-depth
coverage of these modes will be further described. There are four main functions in this camera:
Camera Mode Function Setting Page
Capture Mode
1. Color effect setting
2. White Balance setting
3. Resolution setting
4. Image quality setting
5. EV adjust setting
Page 14
Playback Mode
1. File protection setting
2. File erase setting
3. Slide show setting
4. DPOF (Digital Print Order
Format)
Page 20
Movie Mode
1. Record movies Page 24
DSC Setup Mode
DSC Setup Mode
1. Date and Time
2. Auto Power Off
3. Slide show order
4. Sound Effect
5. Languages (Choice of nine)
6. TV-out
7. PC Mode
8. Frequency
9. Restoring
Page 25
Page 14
14
Capture Mode
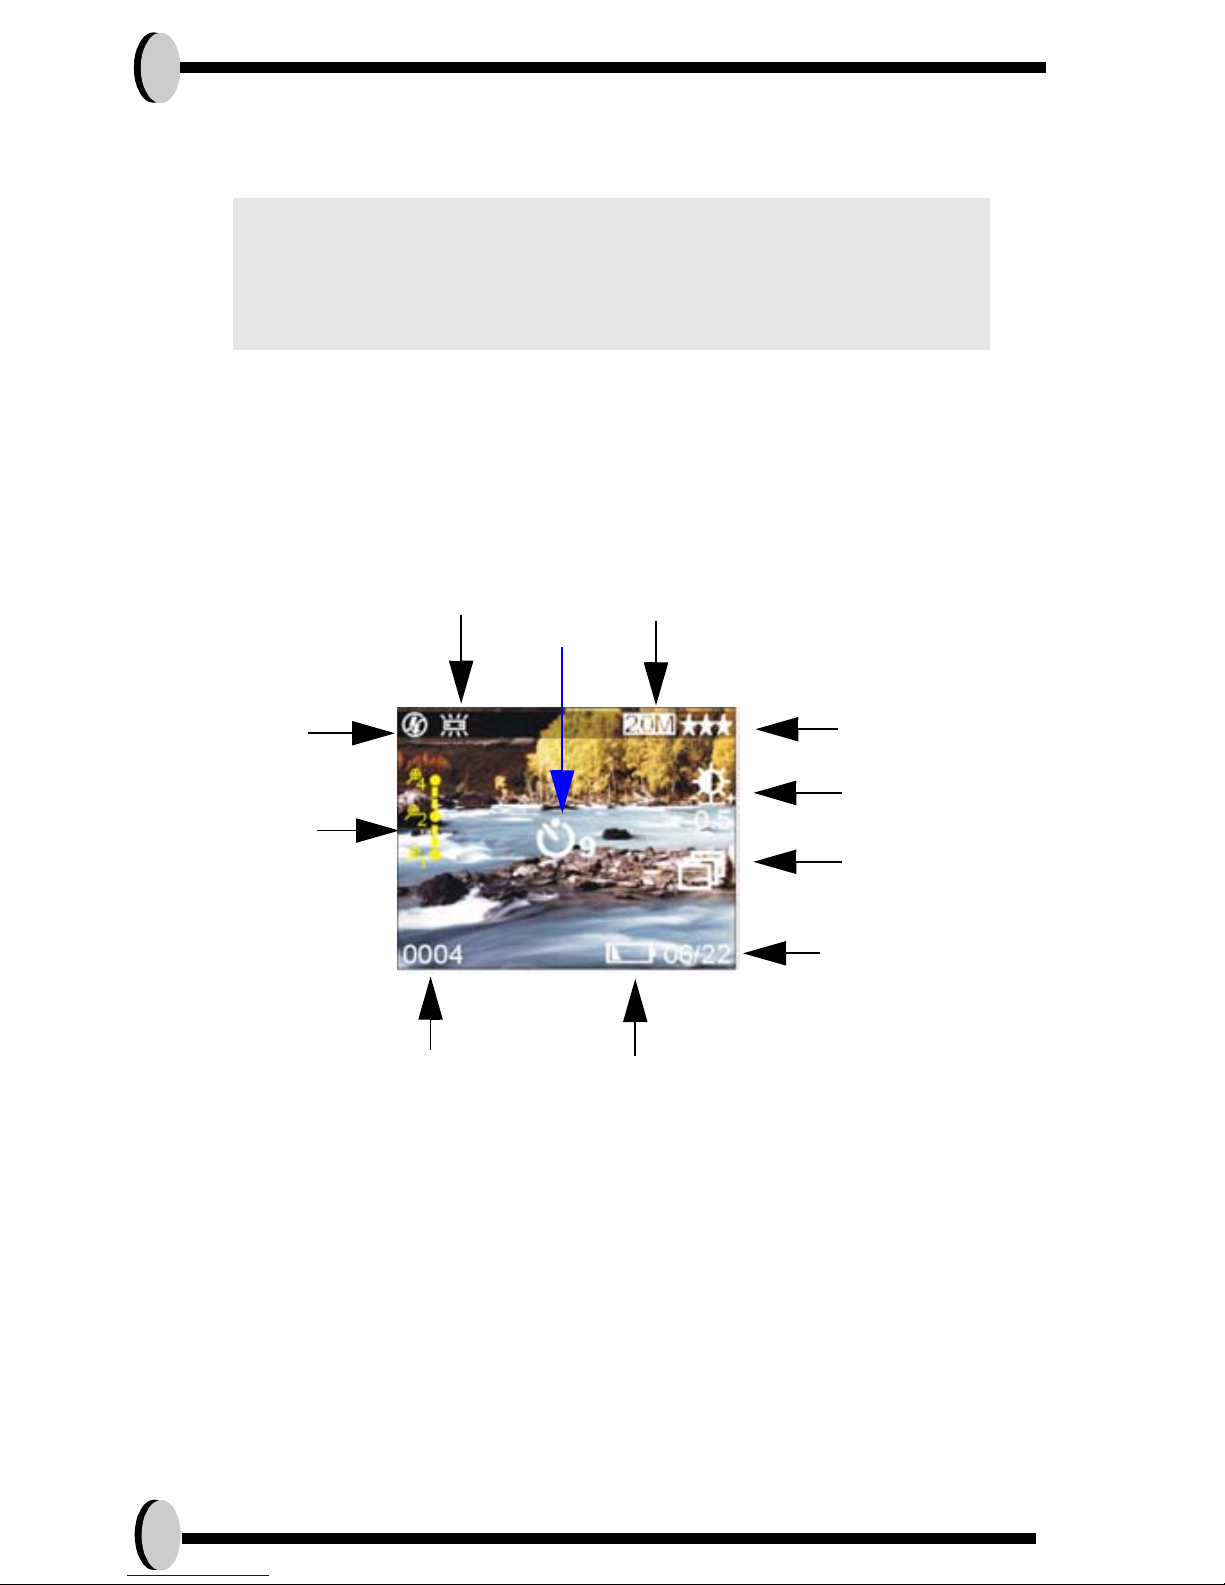
This mode will allow you to shoot single and continuous images, and set your
flash and self-timer. This mode will allow you to shoot in different environment
and adjust the camera’s settings accordingly.
NOTE: 1.To turn on the LCD Display simply press the
Display Button. To save your batteries, it is
best to not leave your display ON for a long
period of time.
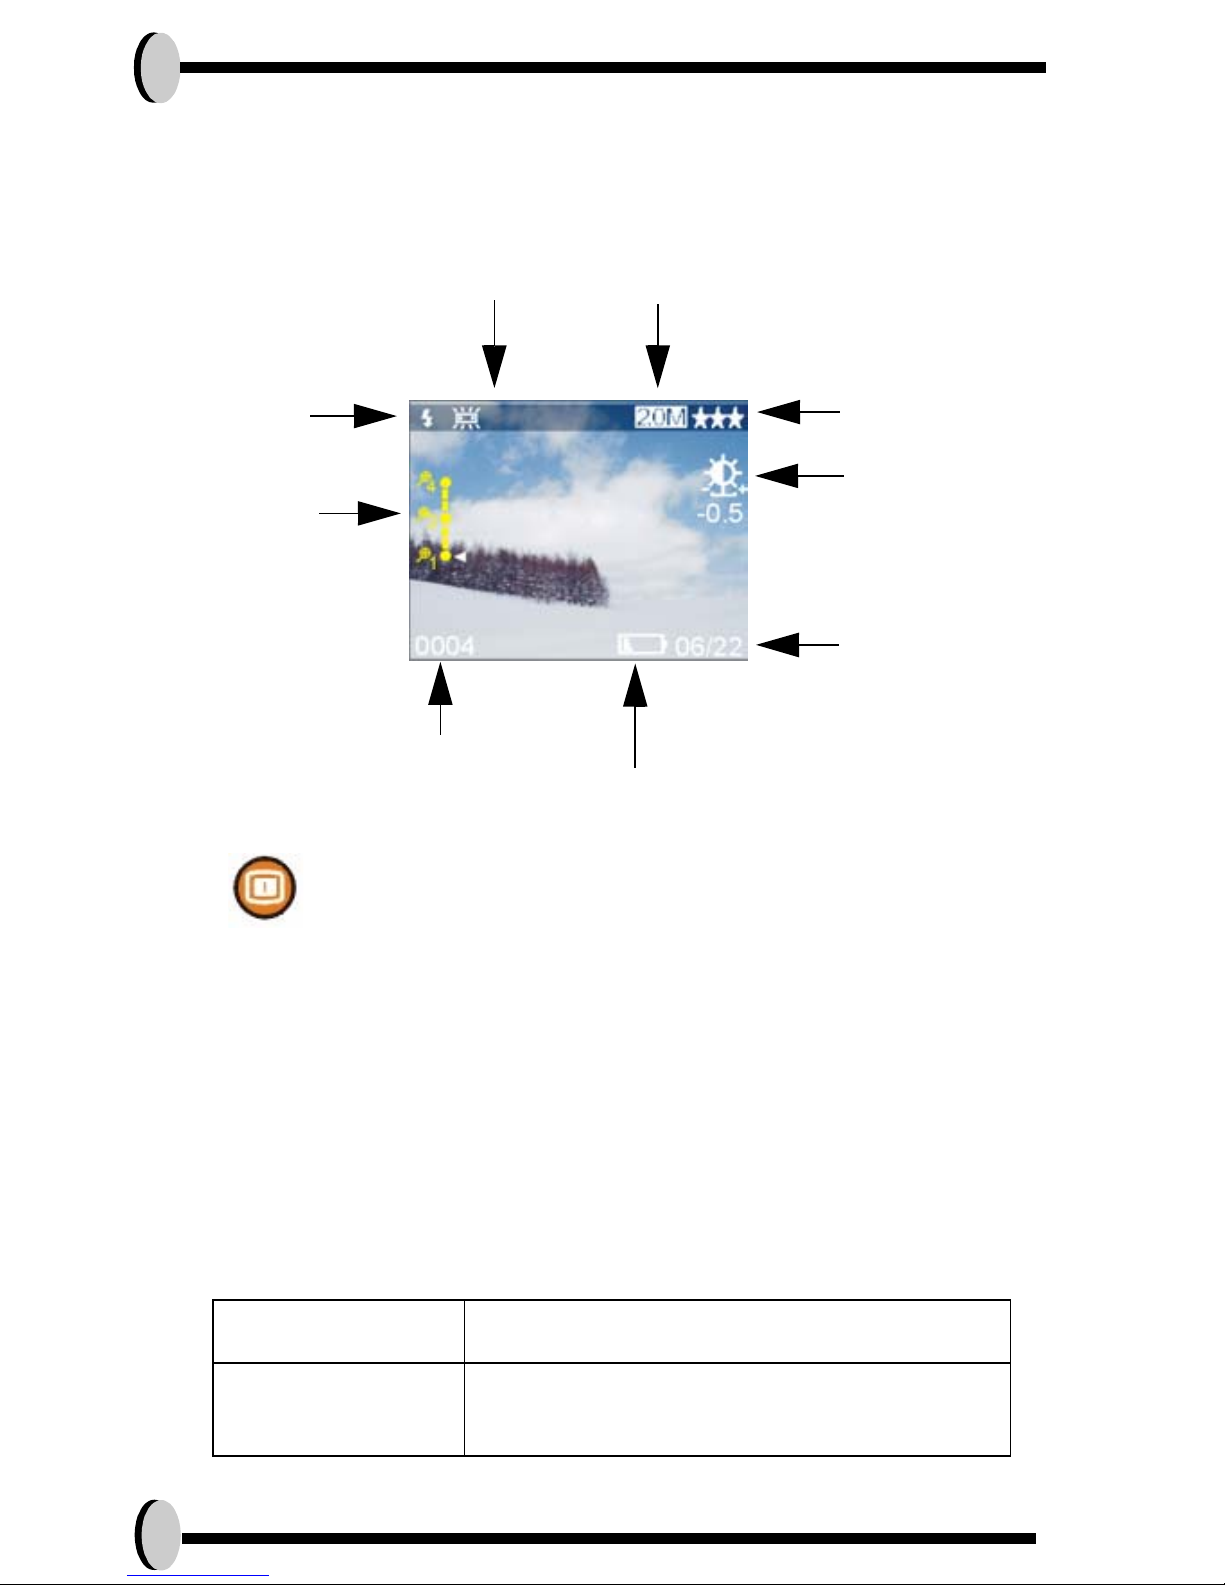
Resolution
Picture Quality
EV Adjust
Continuous
Shot
Self Timer
Date or Time
Battery Status
Remaining Number
of Pictures
Zoom Bar
Flash
W
h
ite Balance
* The icons can be removed from the display by pressing
the display button once.
Page 15
Camera Mode and Instructions 15
English
• Shooting images
1. Under the Capture Mode, press the shutter button. The camera will start
checking whether the memory is sufficient to store the image. If it is full, a
warning “Memory Full” icon will display on the LCD.
2. Once the picture is taken, you can either erase/protect the image under
instant review.
3. If you decide to erase this image, press the down and OK button. Or press
the display button to return to the shooting mode.
4. If you want to avoid deleting this image, press the UP button to protect it. A
protect image icon will appear on the LCD, press OK to achieve this function.
If not, press the display button to exit.
6. Self-timer can be combined with Capture mode, simply set it before you
press the shutter button.
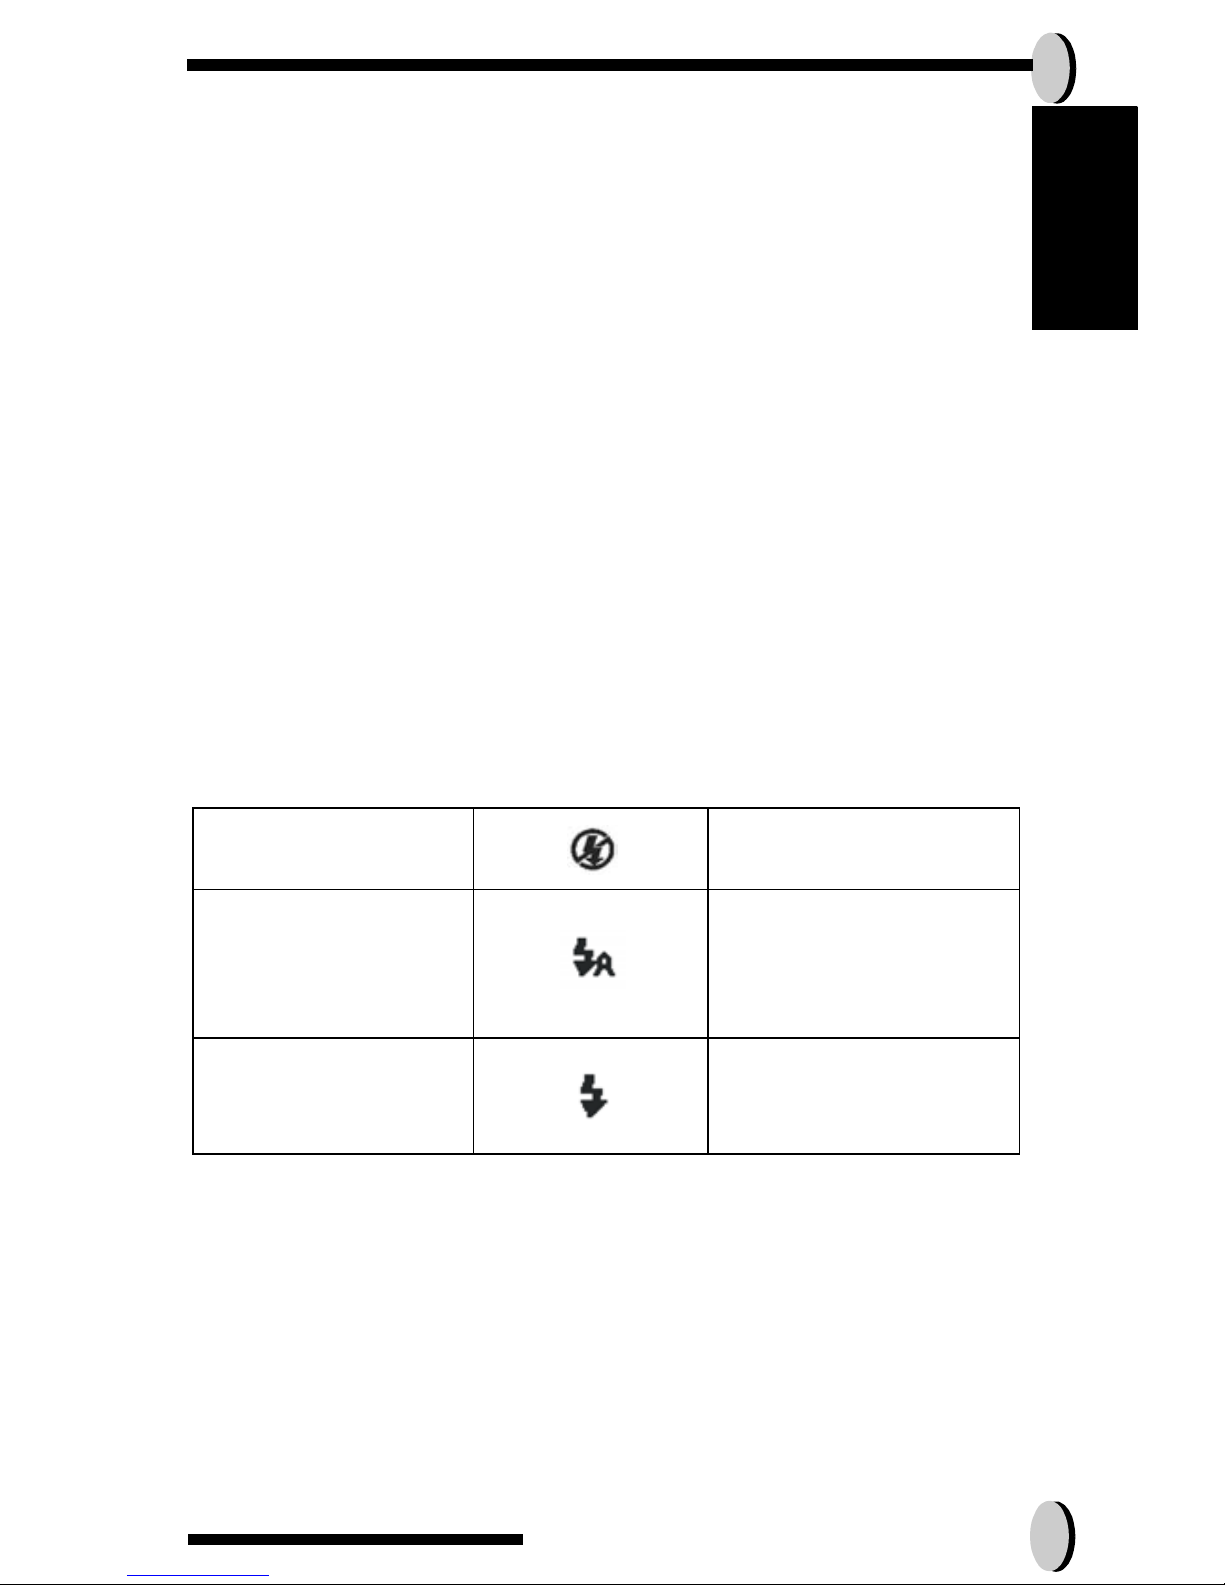
• FLASH Setting
1.To use or set the Flash, press the left button to select the desired Flash setting. You will have the three type of Flash settings: Flash Off, Flash Auto, Flash
Force On. Once you’ve set your Flash setting, proceed with your picture tak-
ing.
•Self Timer
To set the self timer under the capture mode, please press the right button
once to activate the self timer. You will have ten seconds to get ready for your
pose. The countdown number will be displayed on the LCD as well followed
by a beep sound.
Flash Off
The Flash will not fire
Flash Auto
The Flash will fire as
required by the light
source
Flash Force On
The Flash always fire
with every shot
Page 16
16
• Shooting Continuously Setting
Pictures can be shoot in successive orders.
1.Keep pressing the right button twice until Shooting Continuously
appears on the LCD Display.
2.Press the shutter button to activate Shooting Continuously.
3.Three sequence images only exist under a certain resolution.
Capture Mode Setup
1.Turn the MODE DIAL to Capture Mode.
2.To enter Capture Mode Setup, press the OK button. To exit Capture Mode
Setup, press the display button.
3.Once you are in the Capture Mode Setup, you will be able to adjust the following settings.
NOTE: 1.To exit the setting menu, simply press the
display button.
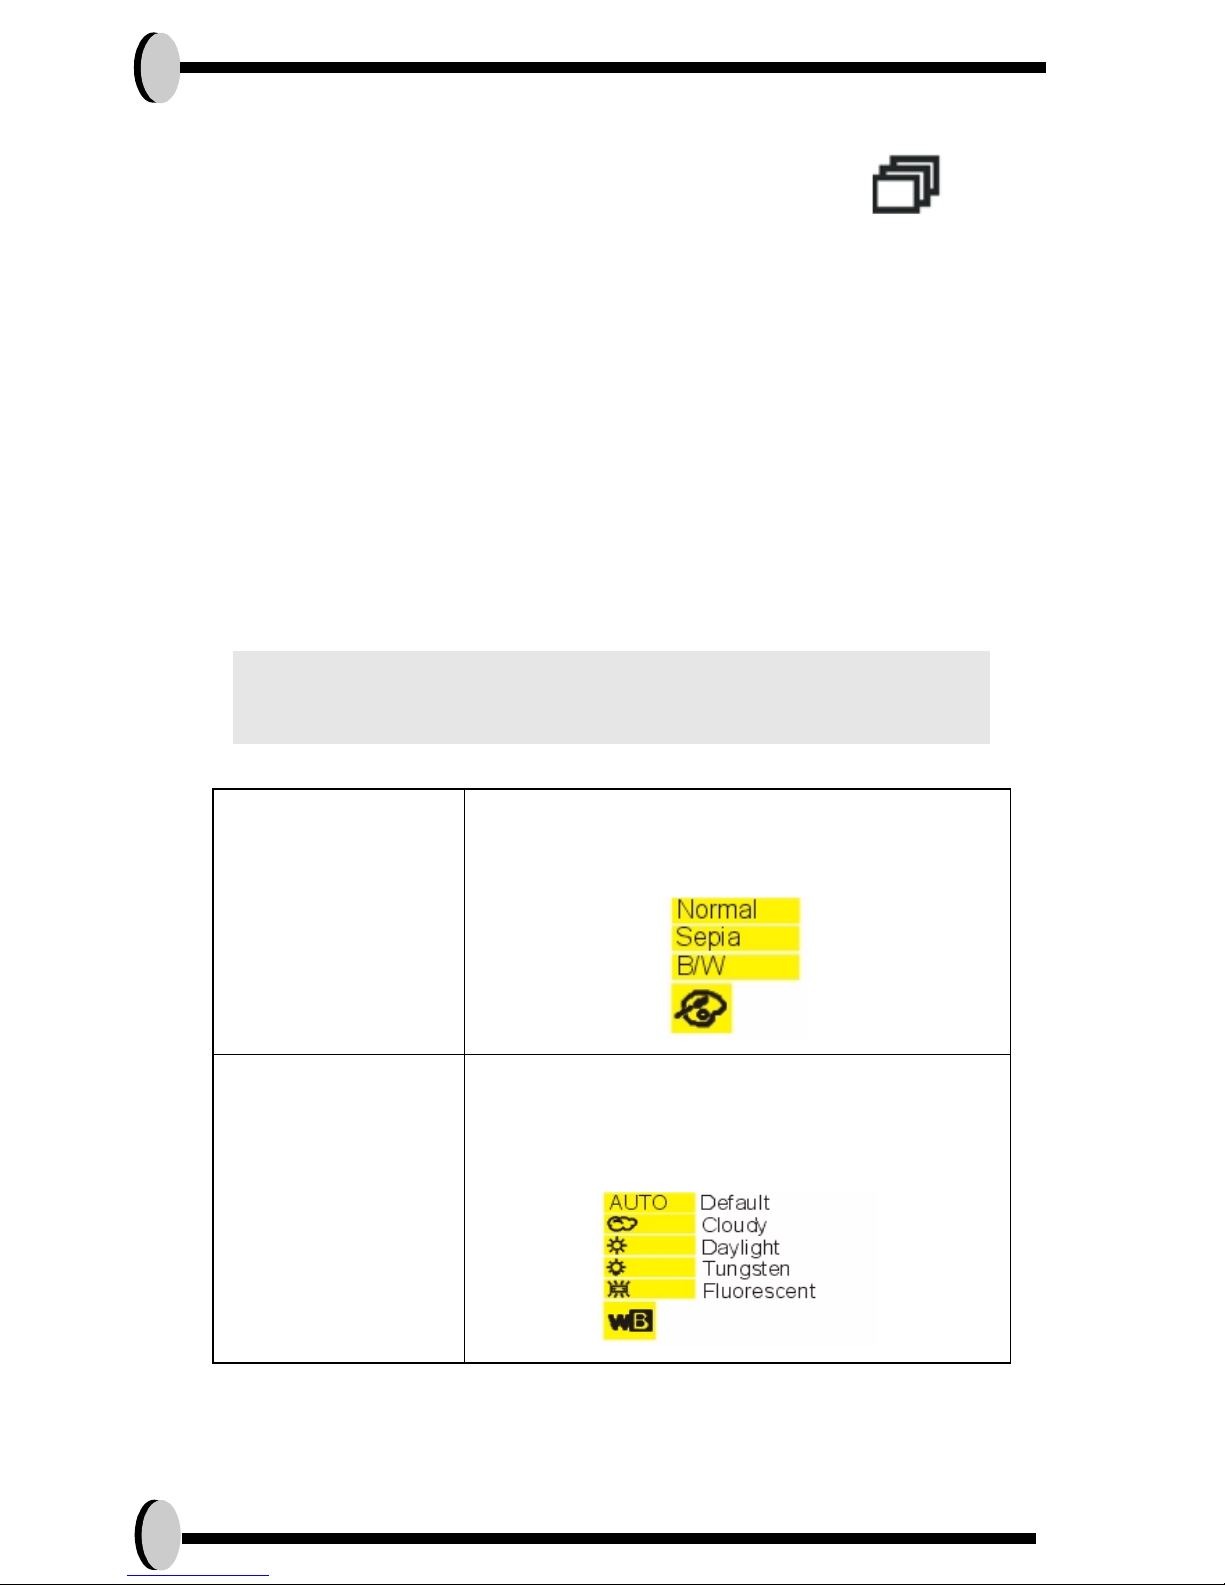
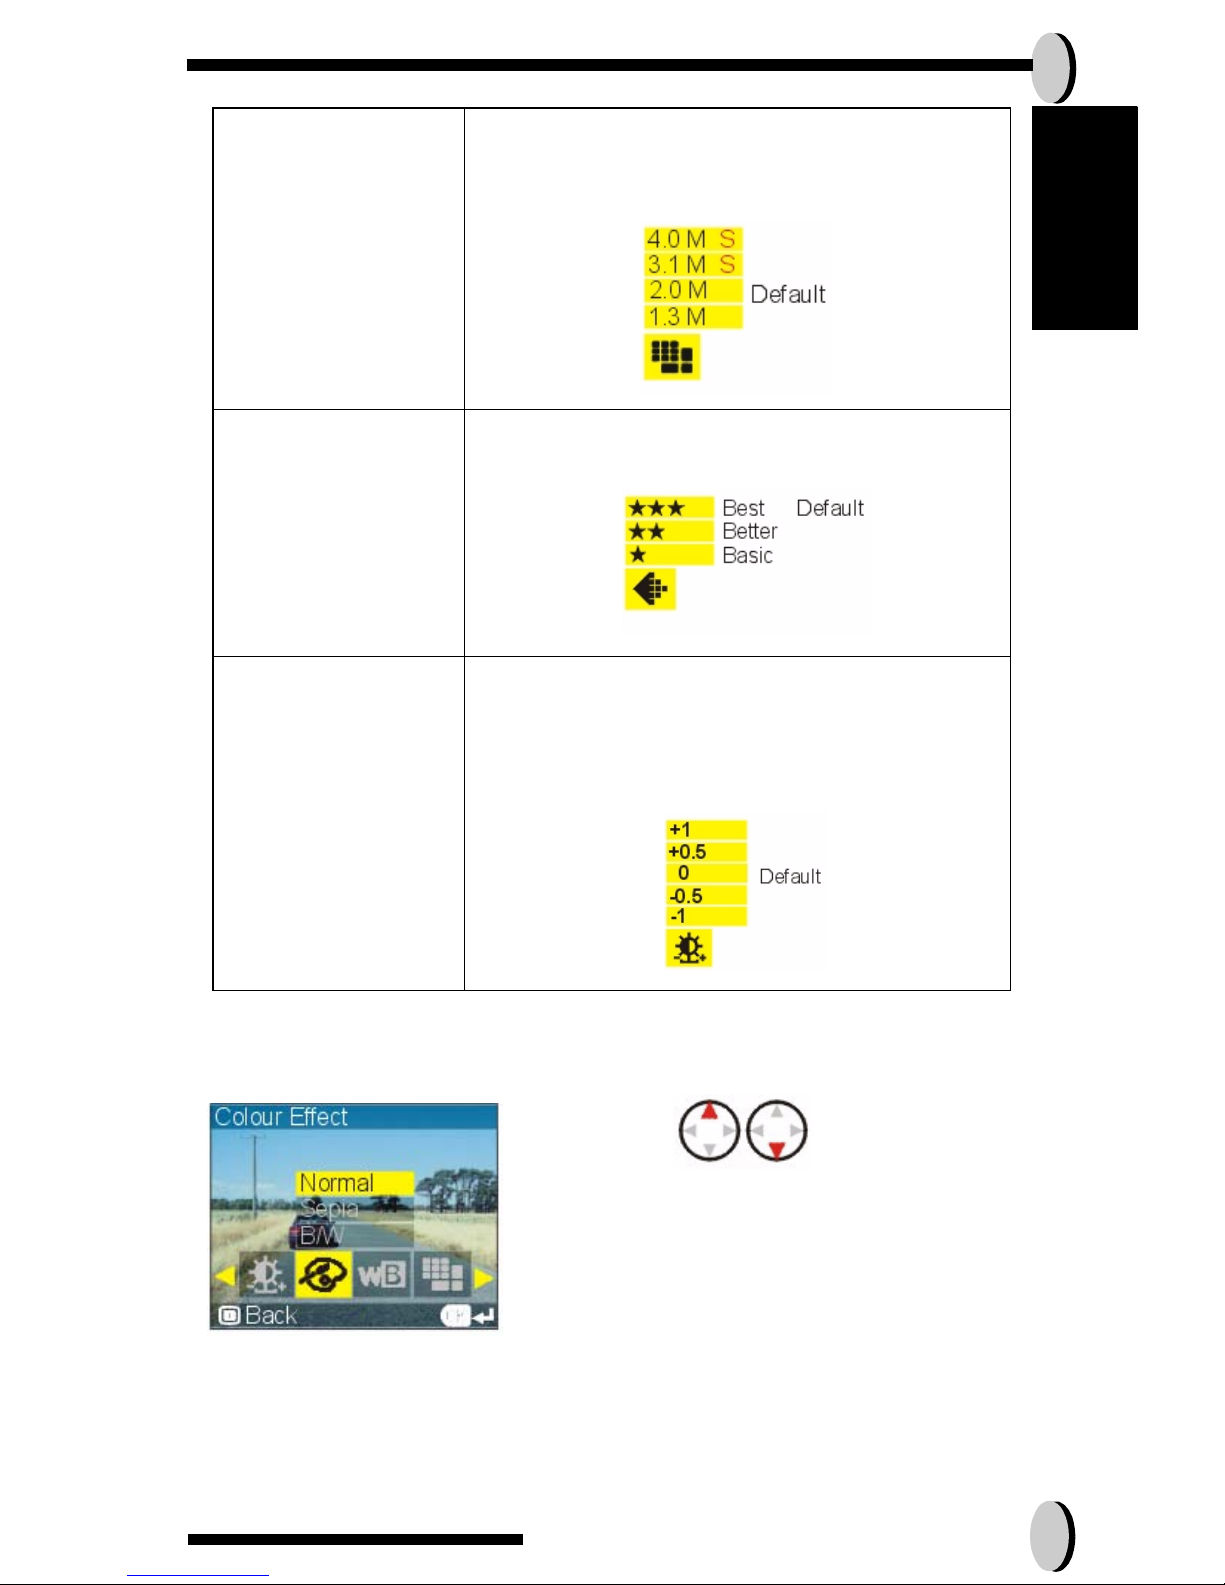
Color Effect It is the tone that will be applied in the pic-
ture. User can select from the following
color tones:.
White Balance White balance is a name given to a system
of colour. The camera looks at the overall
colour of the image and calculates the bestfit white balance.
Page 17
Camera Mode and Instructions 17
English
• To set Color Effect
CHANGE PICTURE
Resolution The size of the picture. The default size is
2.0 M, but users will have the option of
choosing VGA 1.3 M, 2.0 M, 3.1 M, or 4.0 M
Image Quality The quality of the picture. Users can select
from Best (Default), Better, and Basic.
EV Adjust The exposure is the actual exposure of the
digital cameras sensor to light when taking
a photograph. EV adjust ranges from -2 to
+2, Default being 0..
1. Press the up or down button to select
your desired color tone.
2. Press the right button to exit Color Effect.
Page 18
18
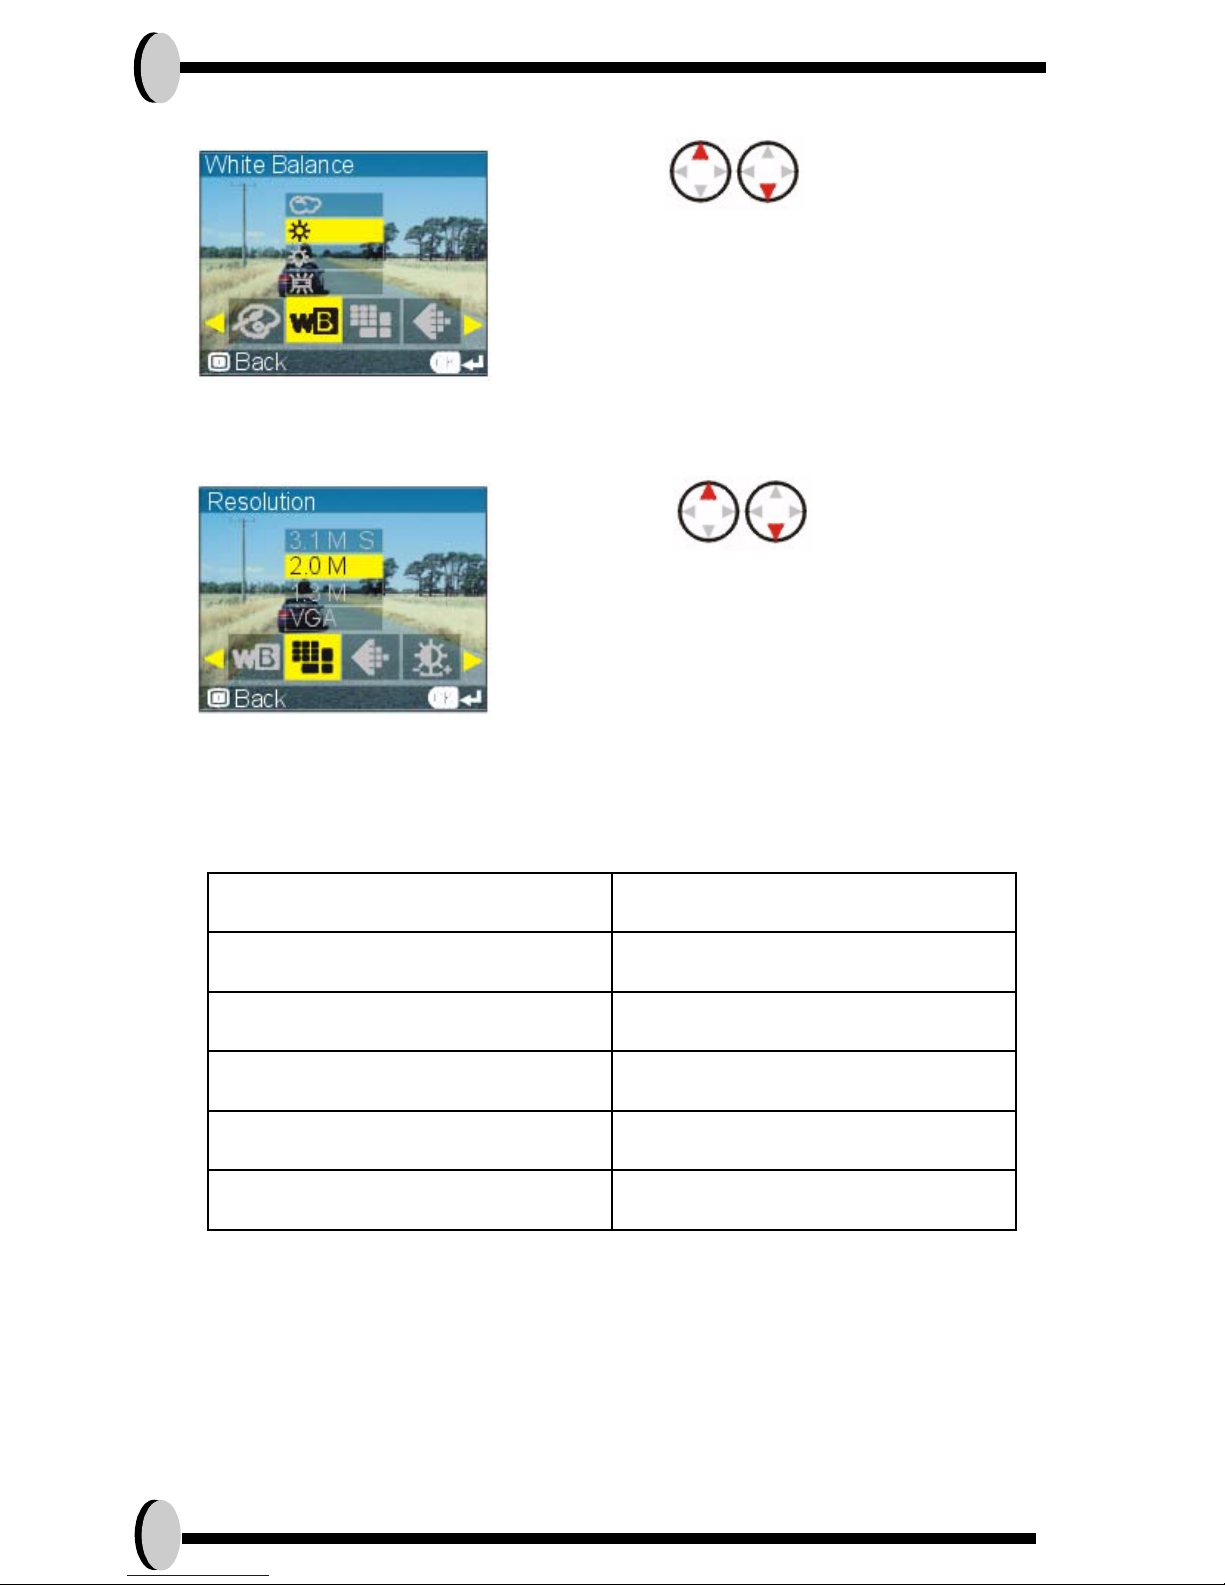
• To set White Balance:
• To set Resolution:
• 16 M SD Card Estimated Capacity
Resolution Storage Mode
4.0 M (S) About 10 pictures
3.1 M (S) About 14 pictures
2.0 M About 20 pictures
1.3 M About 30 pictures
VGA About 140 pictures
1. Press the up or button to select
your desired light source.
2. Press the right button to exit
White Balance.
1. Press the up or down button to select
your desired picture size.
2. Press the right button to exit Resolution.
Page 19
Camera Mode and Instructions 19
English
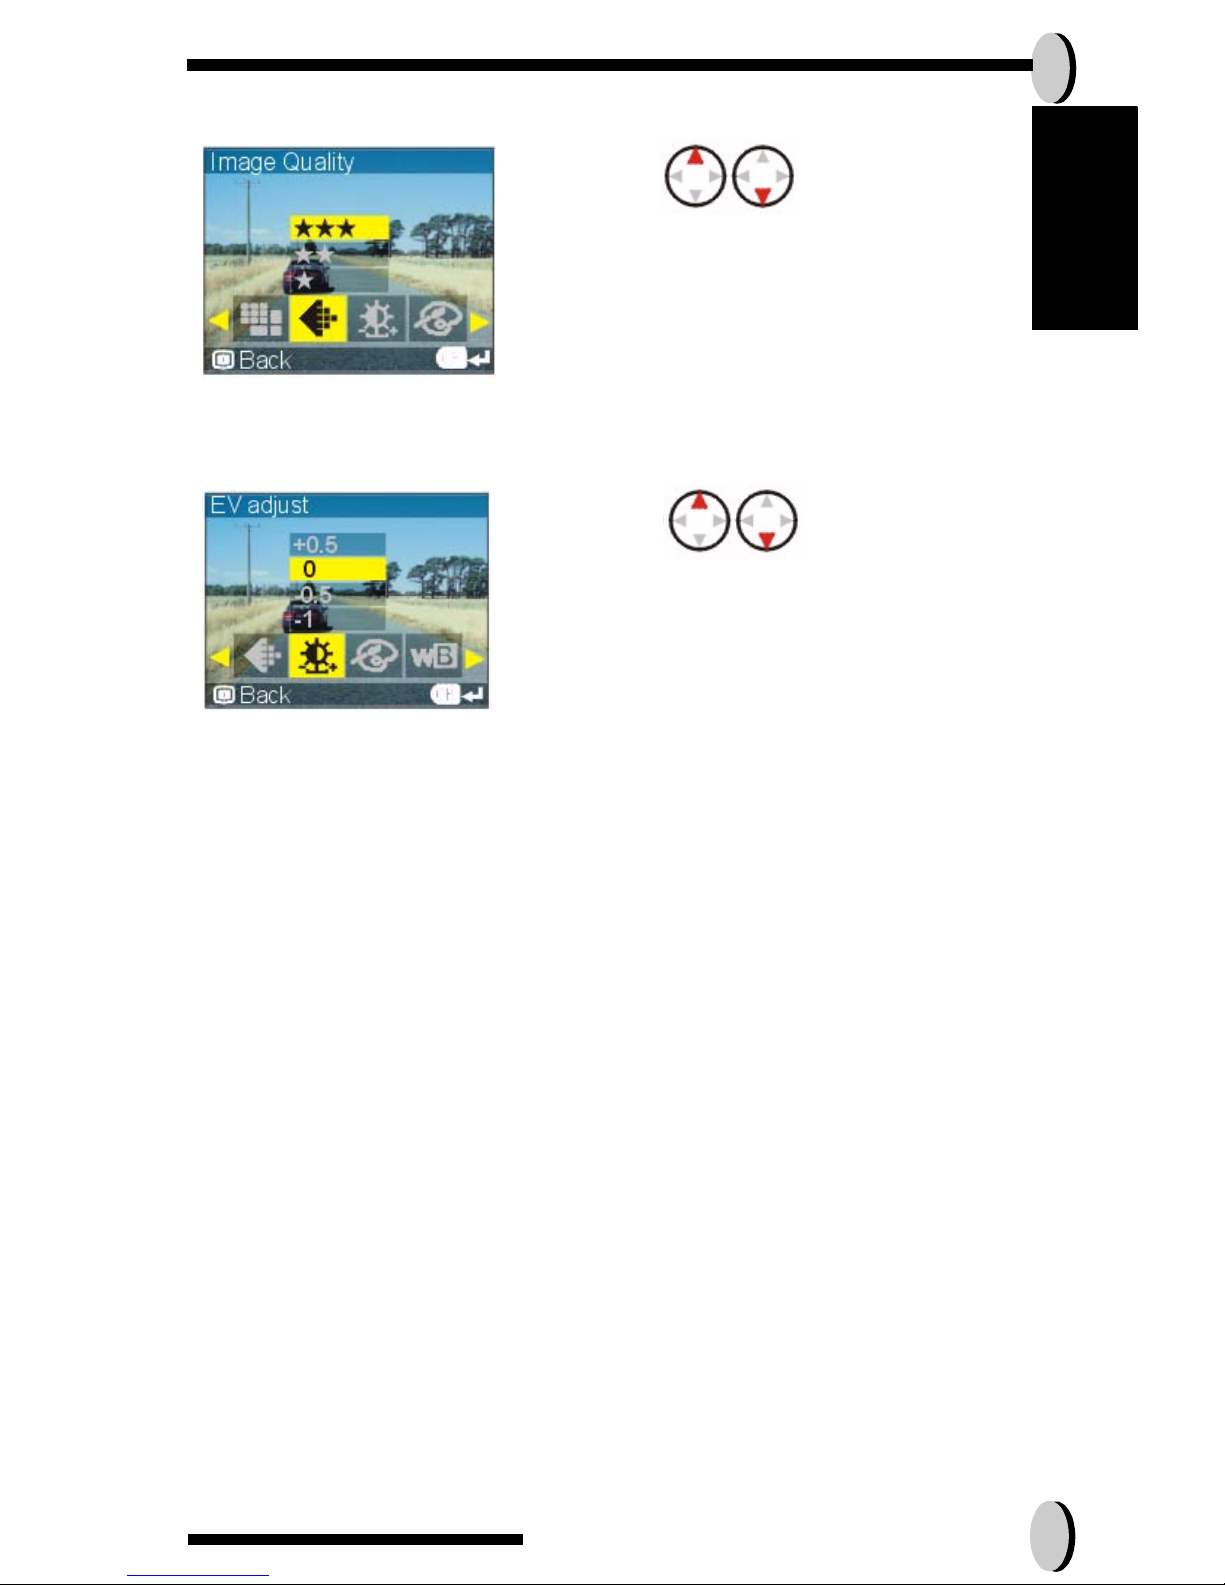
• To set Image Quality:
• To set EV Adjust:
1. Press the up or down button to select
your desired image quality.
2. Press the right button to exit Image Quality
1. Press the up or down button to select
your desired brightness.
2. Press the right button to exit EV adjust
Page 20
20
PLAYBACK MODE
This mode will allow you to Replay/View your images. It can also protect your
desired images, set your DPOF and slide show.
1.Turn the MODE DIAL to Playback Mode.
2.To enter Playback Mode Setup, press the OK button. To exit Playback Mode
Setup, press the display button.
3.While you are in the Playback Mode Setup, use the left and right button to
select the following settings:
4.Press display button to exit the setting menu.
File Erase Erasing options for your pictures
File Protection Protection setting for your pictures against
accidental erasure.
Resolution
Picture Quality
EV Adjust
Date or Time
Battery Status
Remaining
Number of
Pictures
Zoom Bar
Strobe
Status
White Balance
* The icons can be removed from the display by pressing
the display button once.
** Thumbnail can be viewed after the display button twice.
*** To turn off the LCD, press the display button three times
Page 21
Camera Mode and Instructions 21
English
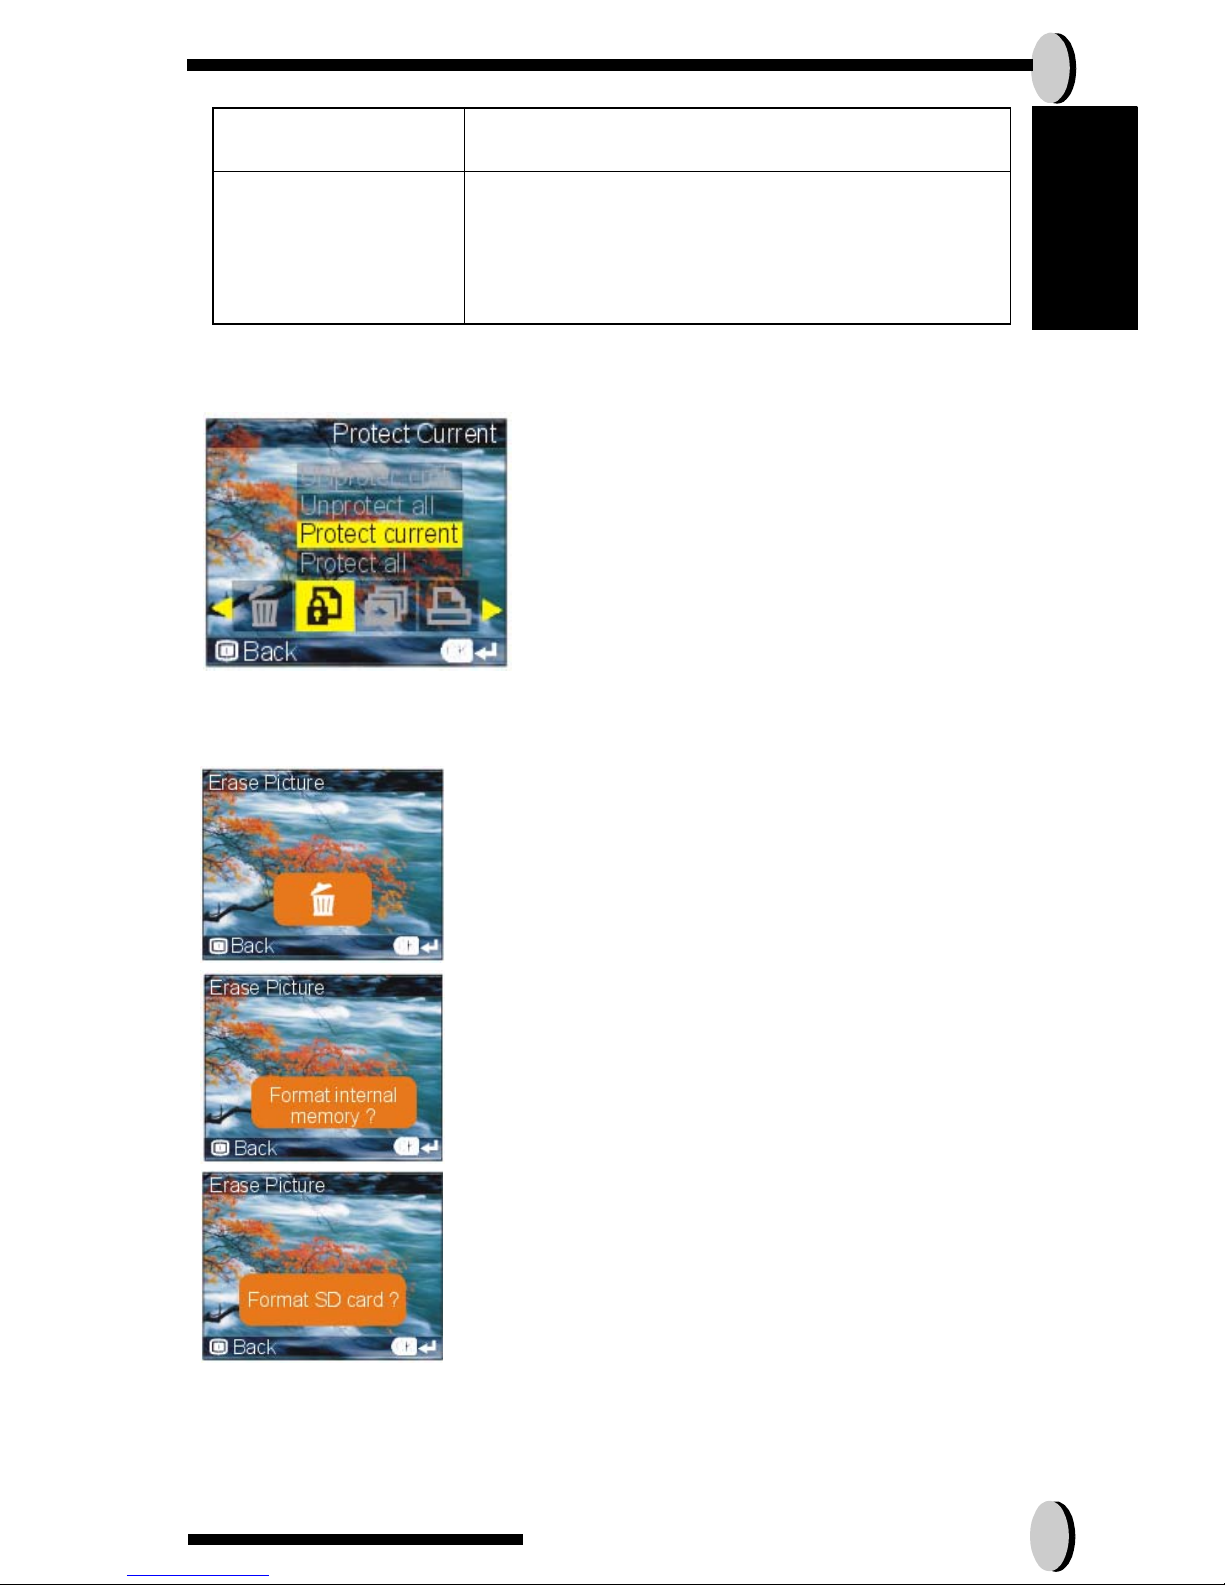
• To set File Protection:
• To set Erase:
Slide Show Pictures will be displayed in an orderly way
Digital Print Order
Format or DPOF
It is a standard for printing the pictures
directly from the SD card. Pictures can be
printed on printers compatible with the SD
card.
1. Press the up or down button to select the
following File Protection Setting.
2. Once you are set, press the OK button,
and a confirmation icon will appear on the
LCD.
3. Press OK to confirm.
1. Press the up or down button to select if you
want to erase: current, All, or Format memory.
2. When you are formatting, warning messages
(such as “Format SD Card?/ with Memory Card”
and “Format Internal Memory/without
memory card.)
3. Press OK to confirm.
Page 22
22
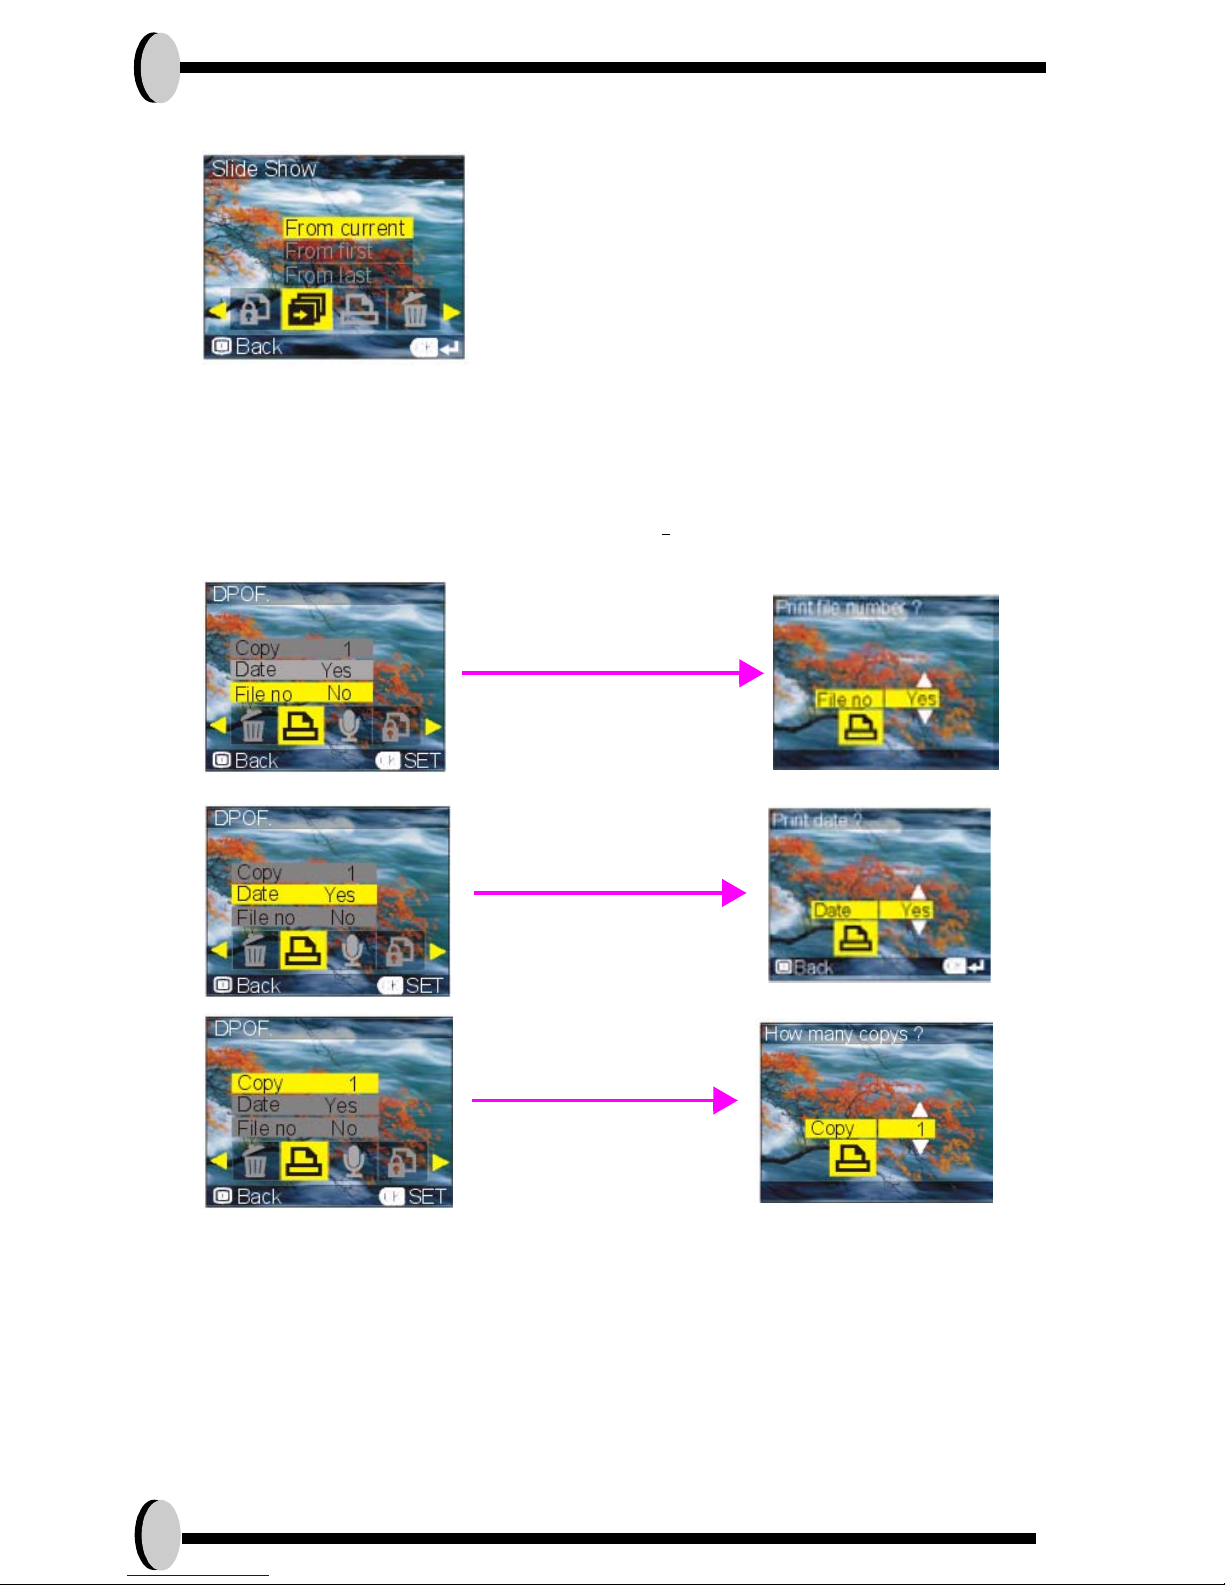
• To set Slide Show:
• To set DPOF:
This function allows the images to be selected and printed Compatible with
Digital Print Order Format (DPOF) standard,
the images can be printed on
DPOF-compliant printers.
1.Press the up and down button to select the following options within DPOF:
Copy, Date, and File No.
2.Once you’ve selected Copy, press OK to enter the Copy setting.
3.Press the up and down button to select the number of copies (from 0 to 99)
4.Press OK to exit the DPOF setup.
5.Repeat steps 2 through 4 for Date and File No. settings.
1. While you are in the Slide Show setting,
2. Press OK to exit slide show.
press the OK button to start slide show.
Page 23
Camera Mode and Instructions 23
English
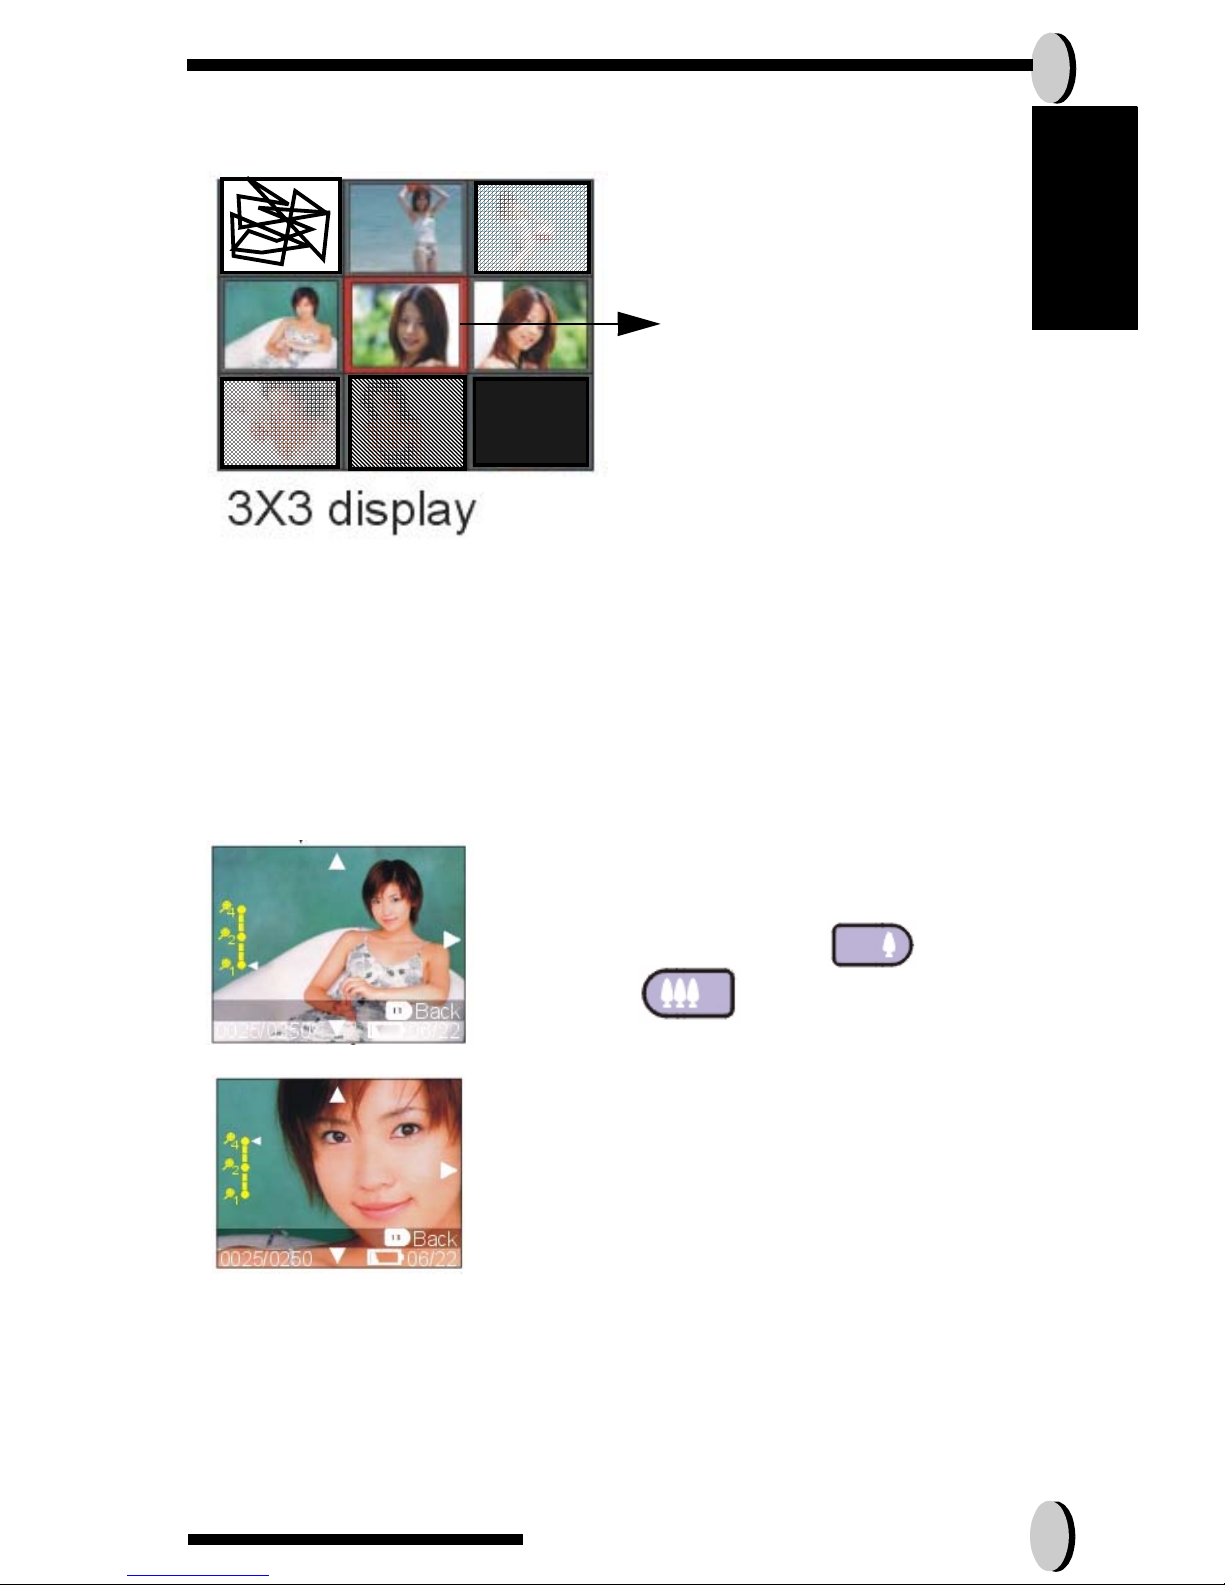
• Displaying Thumbnails
1. Turn the Mode Dial to Playback Mode.
2. Press the display button two times to thumbnails in sets of nine.
3. Use the four-way arrows to change the image selection.
4. Press OK button to magnify images to standard size.
5. Press the left or right button to view other images.
• DIGITAL ZOOM DISPLAY
The camera has 4x digital zoom.
** Press the display button to quit Digital Zoom Display.
selected image
1.Once you have aligned your subject in the
or out button to select your
viewfinder, press the zoom in
preferred distance.
2. The picture can be zoomed in up to four
times the orginal size.
3. The five-way key controls left, right, up, and
down of the image.
Page 24
24
Movie Mode
This mode will allow you to record movies. The length is based on the capacity
of your SD card and internal memory.
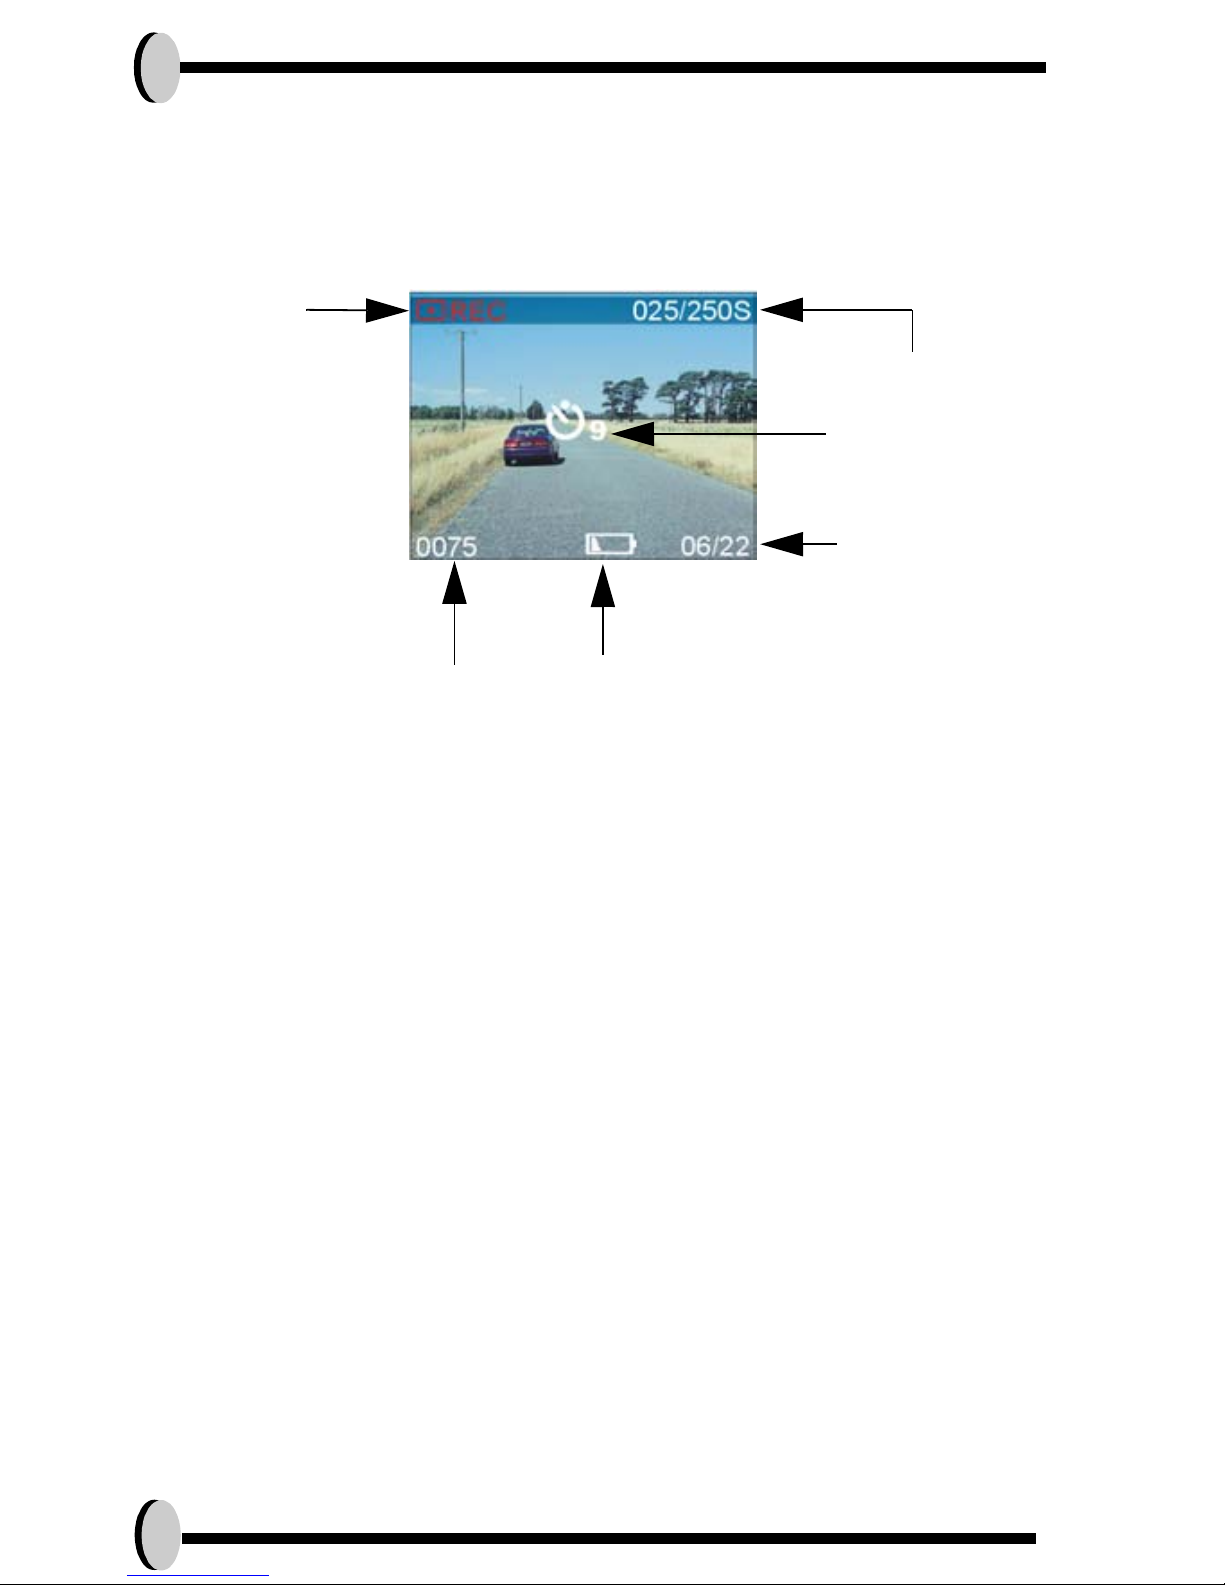
• Movie Mode allows you to use the camera as a movie recorder, and set
the self-timer for recording purpose. The amount of time to make a movie is
dependent on the internal memory and the SD Card.
1.Turn the Mode Dial to the Movie Mode
2.To start recording a movie, press the shutter button. The camera will start
checking whether the memory is sufficient to record a movie. If the memory is
full, a warning sign will display on the LCD, and will automatically exit the
movie recording state.
3.If the camera does not show any message about memory problems, the
camera will start recording itself.
4. To set the self timer under the movie mode, press the right button once to
activate the self timer. You will have ten seconds to get ready. The countdown
will be displayed on the LCD and followed by a beep sound.
5. You can press the display button to exit.
* The icons can be removed from the display by pressing
the display button once.
Battery StatusTotal File
Date or Time
Self Timer
Recording Time
Status
Page 25
Camera Mode and Instructions 25
English
DSC setup mode
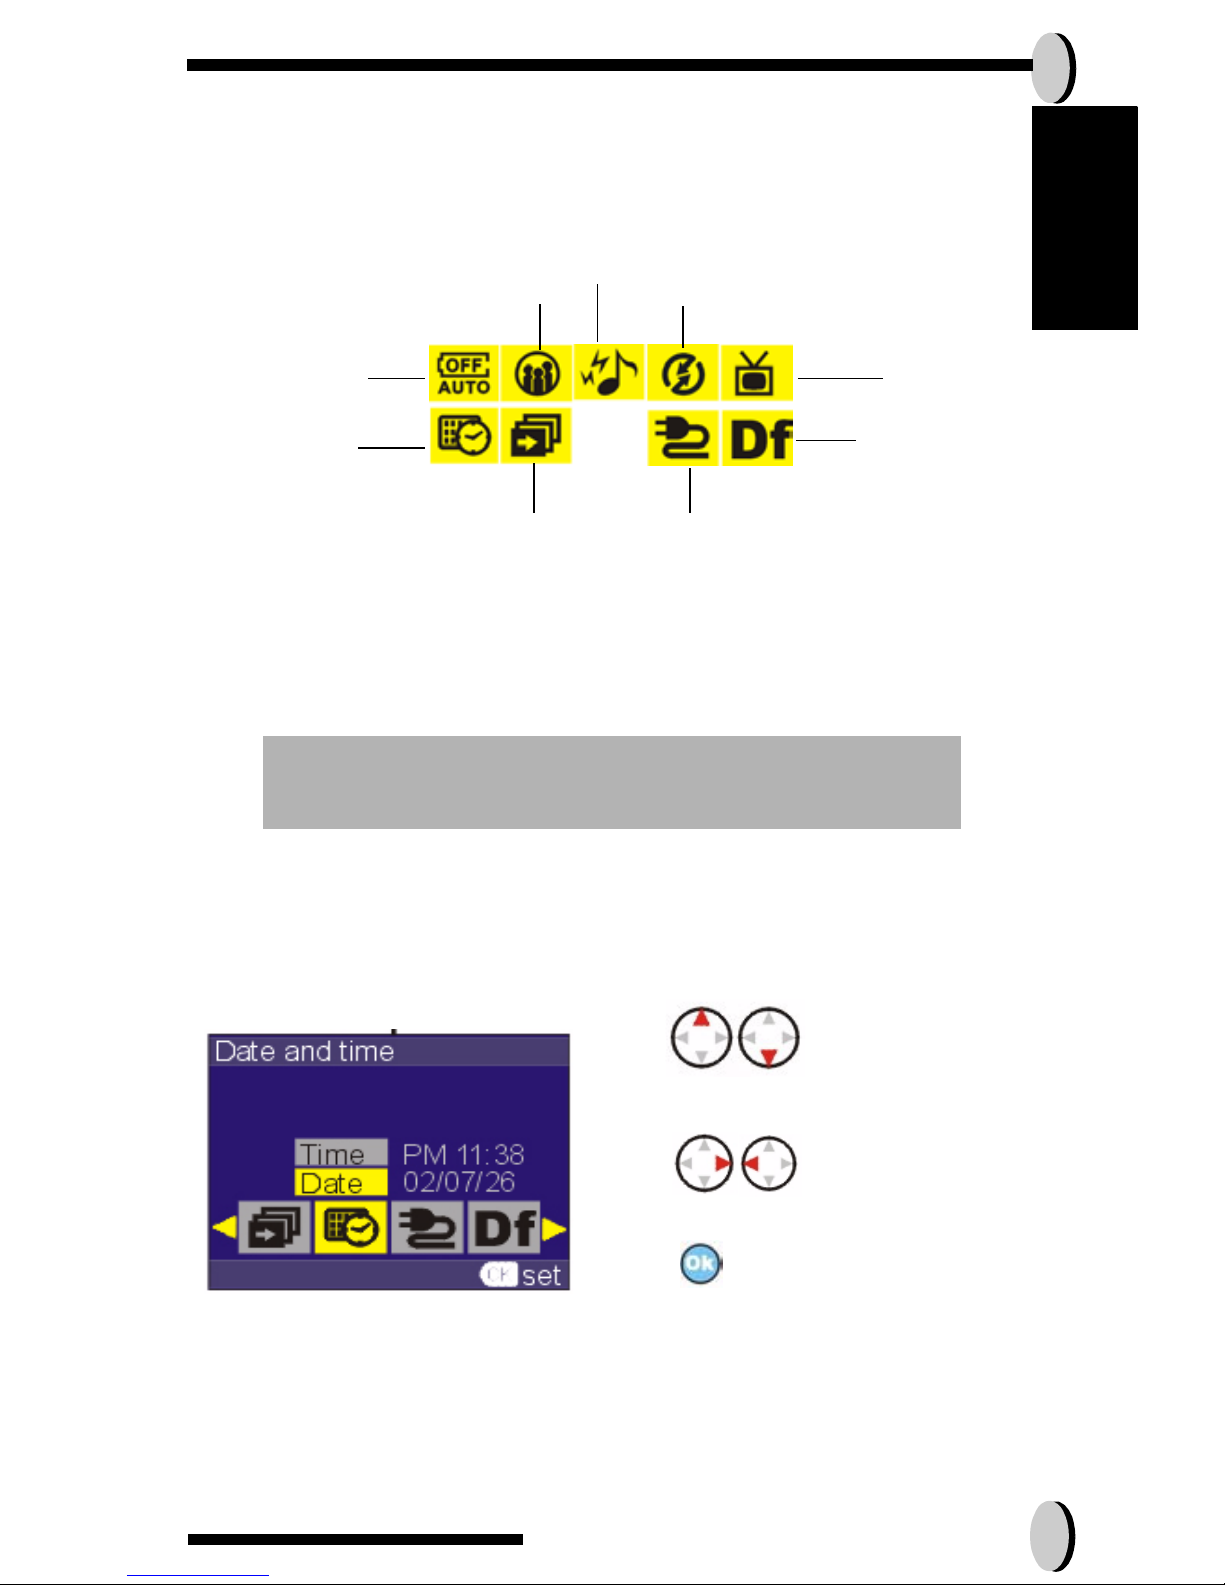
Under this mode, you will be able to set your desired settings. There are a
total of nine different settings.
1.To enter DSC system setup, simply turn the mode dial to the DSC Setup
Mode.
2.Once you are in the System Setup, you will find a list of icon on display.
3.Select the type of setup you want to perform by pushing the left or right button on the joystick switch.
• To set the DATE and TIME:
You can set the date and time in three different format.
NOTE: Press the OK button if you want to return to
the main DSC SETUP MODE.
Sound Effect
PC Mode
TV-out
Slide show order
Date and Time
Restoring
Auto Power Off
Languages
frequency
1.Press
to change the
(00-99 =2000-2099)
month, and day.
year,
2. Press
if you want to set
the month, date, or
year.
3. Press
after setting the date.
Page 26
26
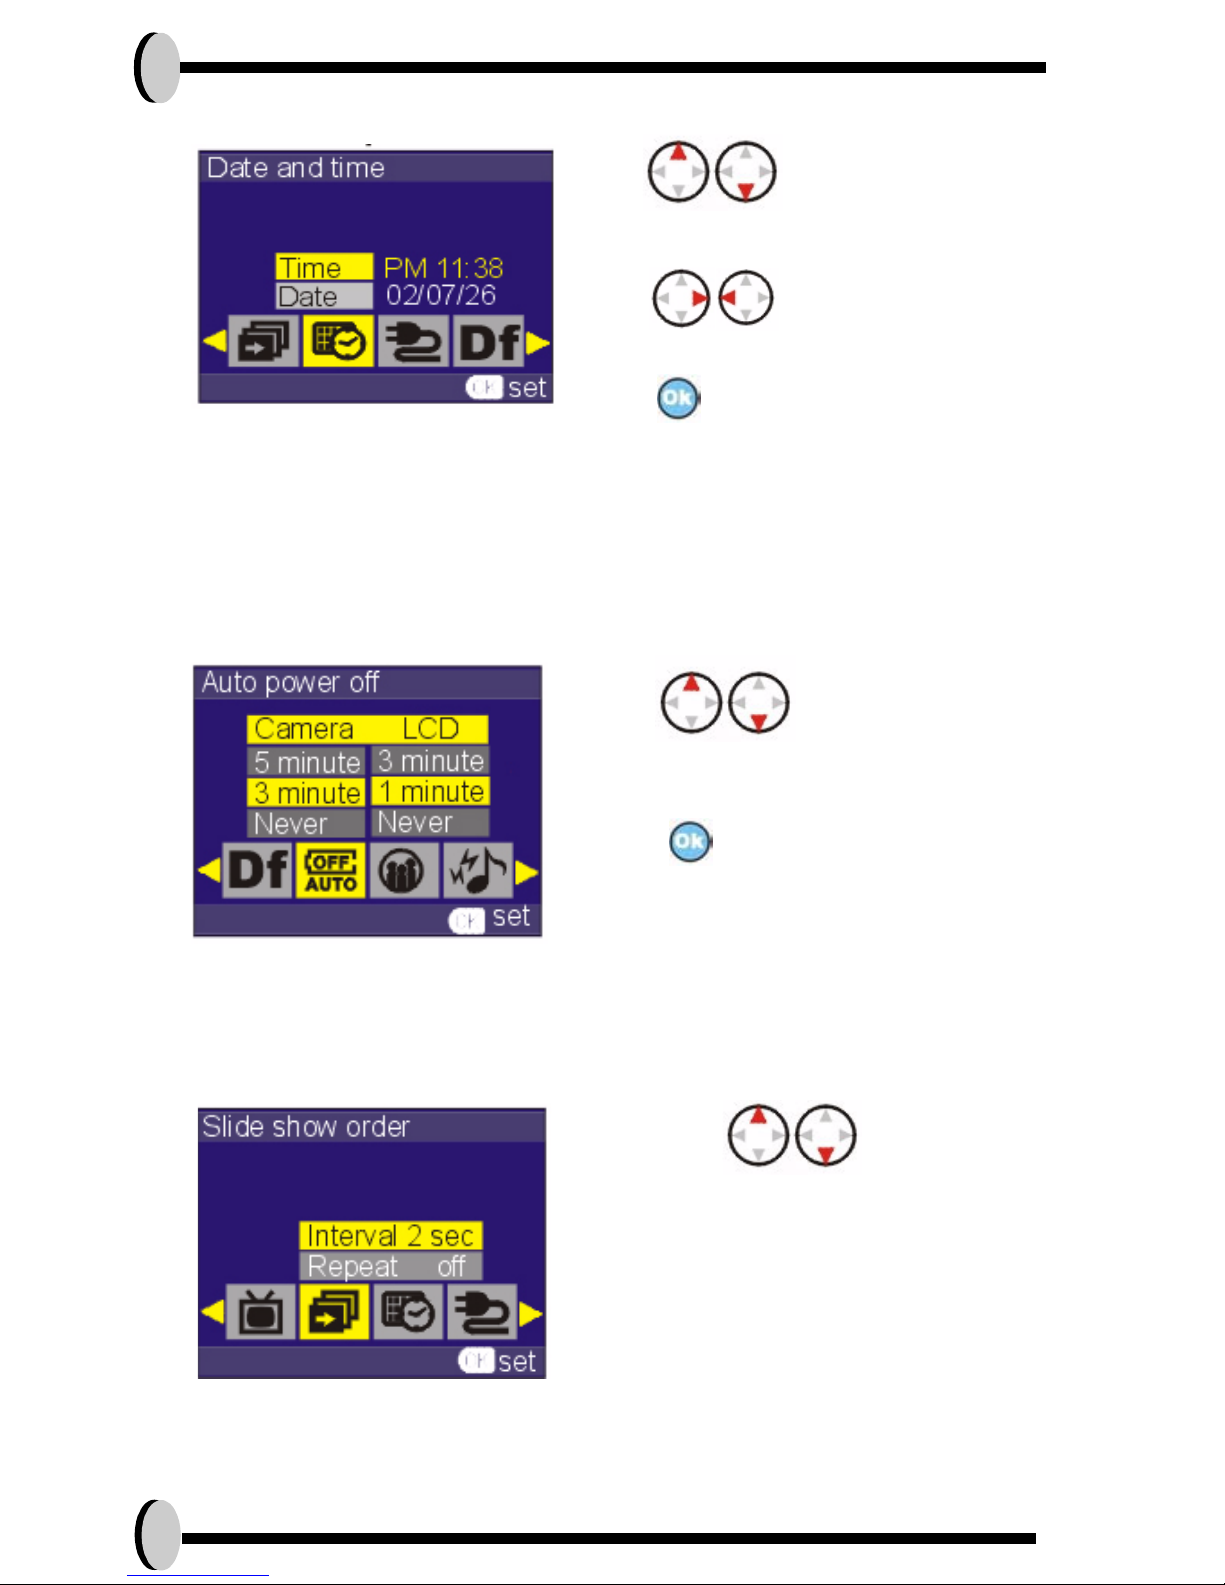
• To set Auto Power Off
This setting will automatically turn off the camera when it remains idle after a
certain number of minutes. Users can choose from these options to set the
Auto Power Off. When set to 5 minutes before fully shutting the power off, the
LCD will turn off during its first 3 minutes, and so forth.
• To set slide show order
Under this setting, you will be able to adjust the play time for each image. The
options are 1, 3, or 5 seconds.
1.Press
to change the
time format, AM/PM, hours and
2. Press
if you want to set
AM/PM, hours,and minutes
3. Press
when you are done.
minutes.
1.Press
to change the
select the desired minutes for the
2. Press
when you are done.
camera to shut off.
1. Press the
to make your selection.
2. Press OK when you are done.
button
Page 27
Camera Mode and Instructions 27
English
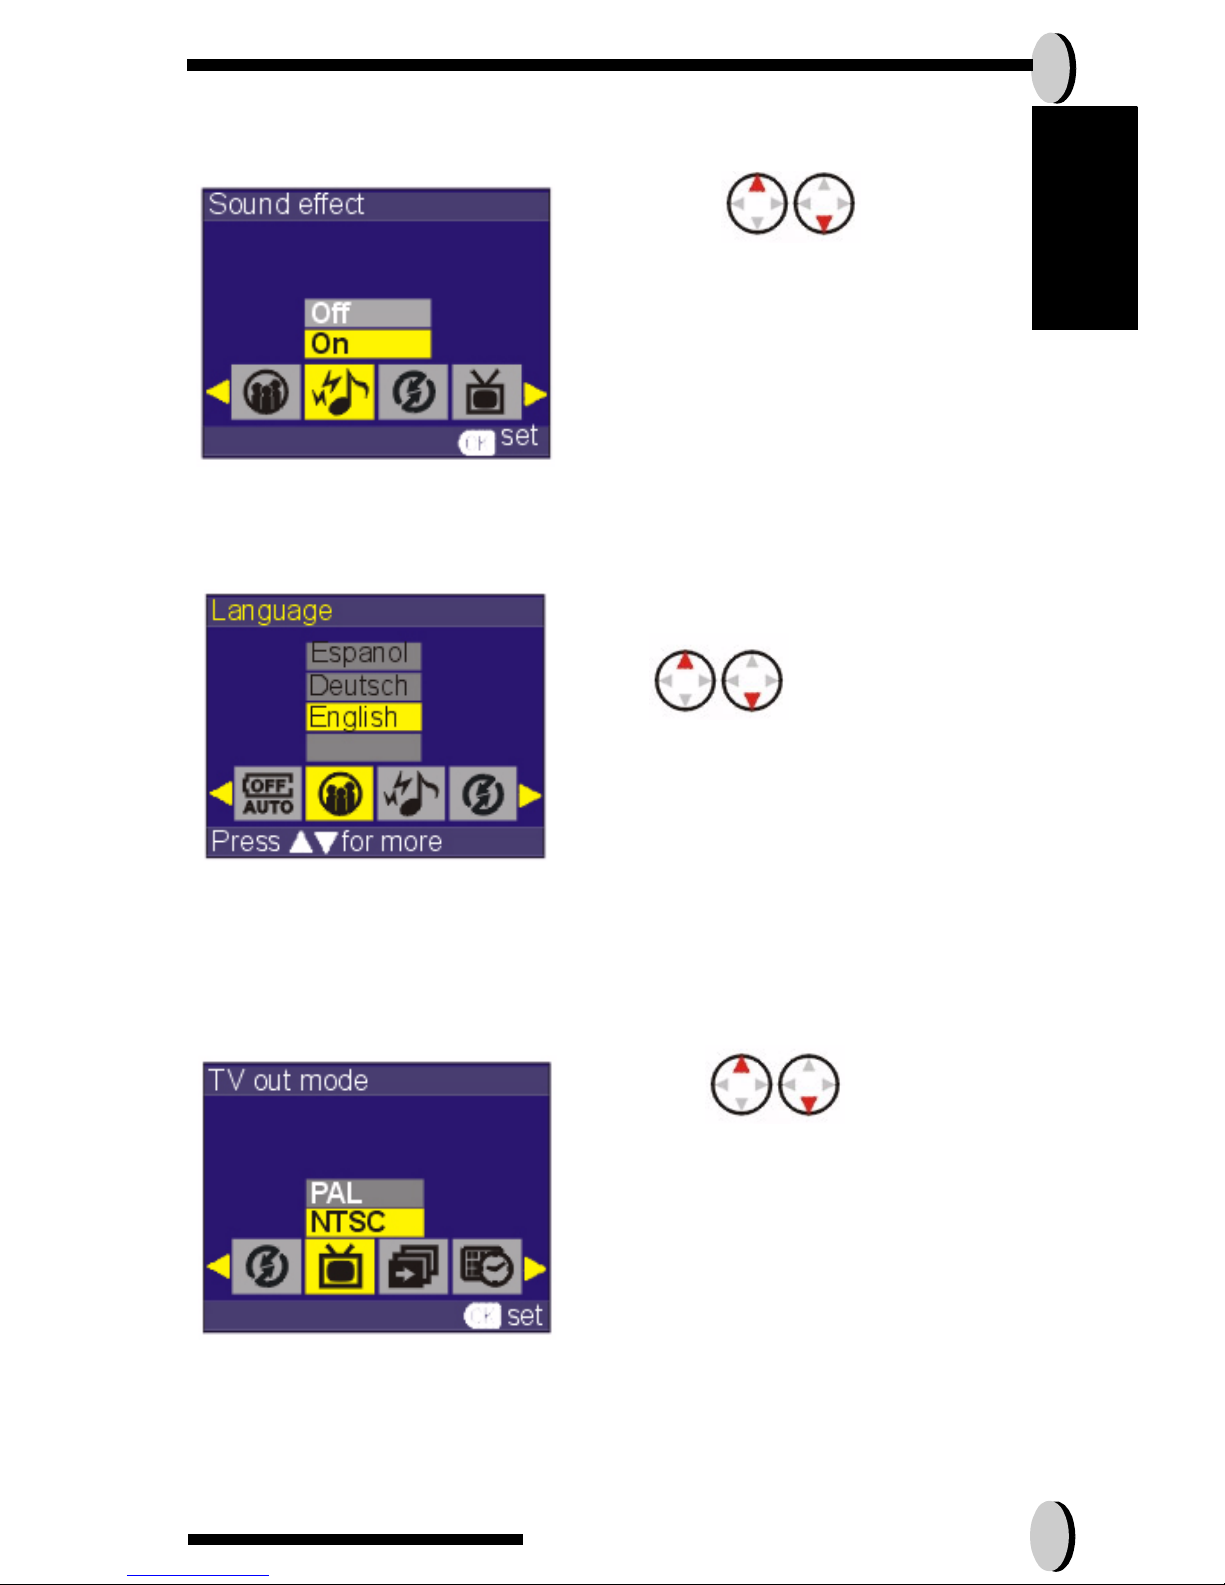
• To set the SOUND EFFECT:
This setting will allow users to set the sound effect for the camera. .
• To set LANGUAGES:
There are a total of nine languages you can choose to navigate this camera.
• To set the TV OUT: (Optional)
Depending on where your location, different region requires different system
for TV-out function.Please use your docking station to set the TV-out. Fix your
camera on the docking station, and set the appropriate setting. .
1. Press the button to
turn the sound ON or OFF.
2. Press OK to access the setting.
1.To select your desired language,
press
2.Push the OK button when you are done
1. Press the button to select
either PAL or NTSC.
2. Press OK when you are done.
Page 28
28
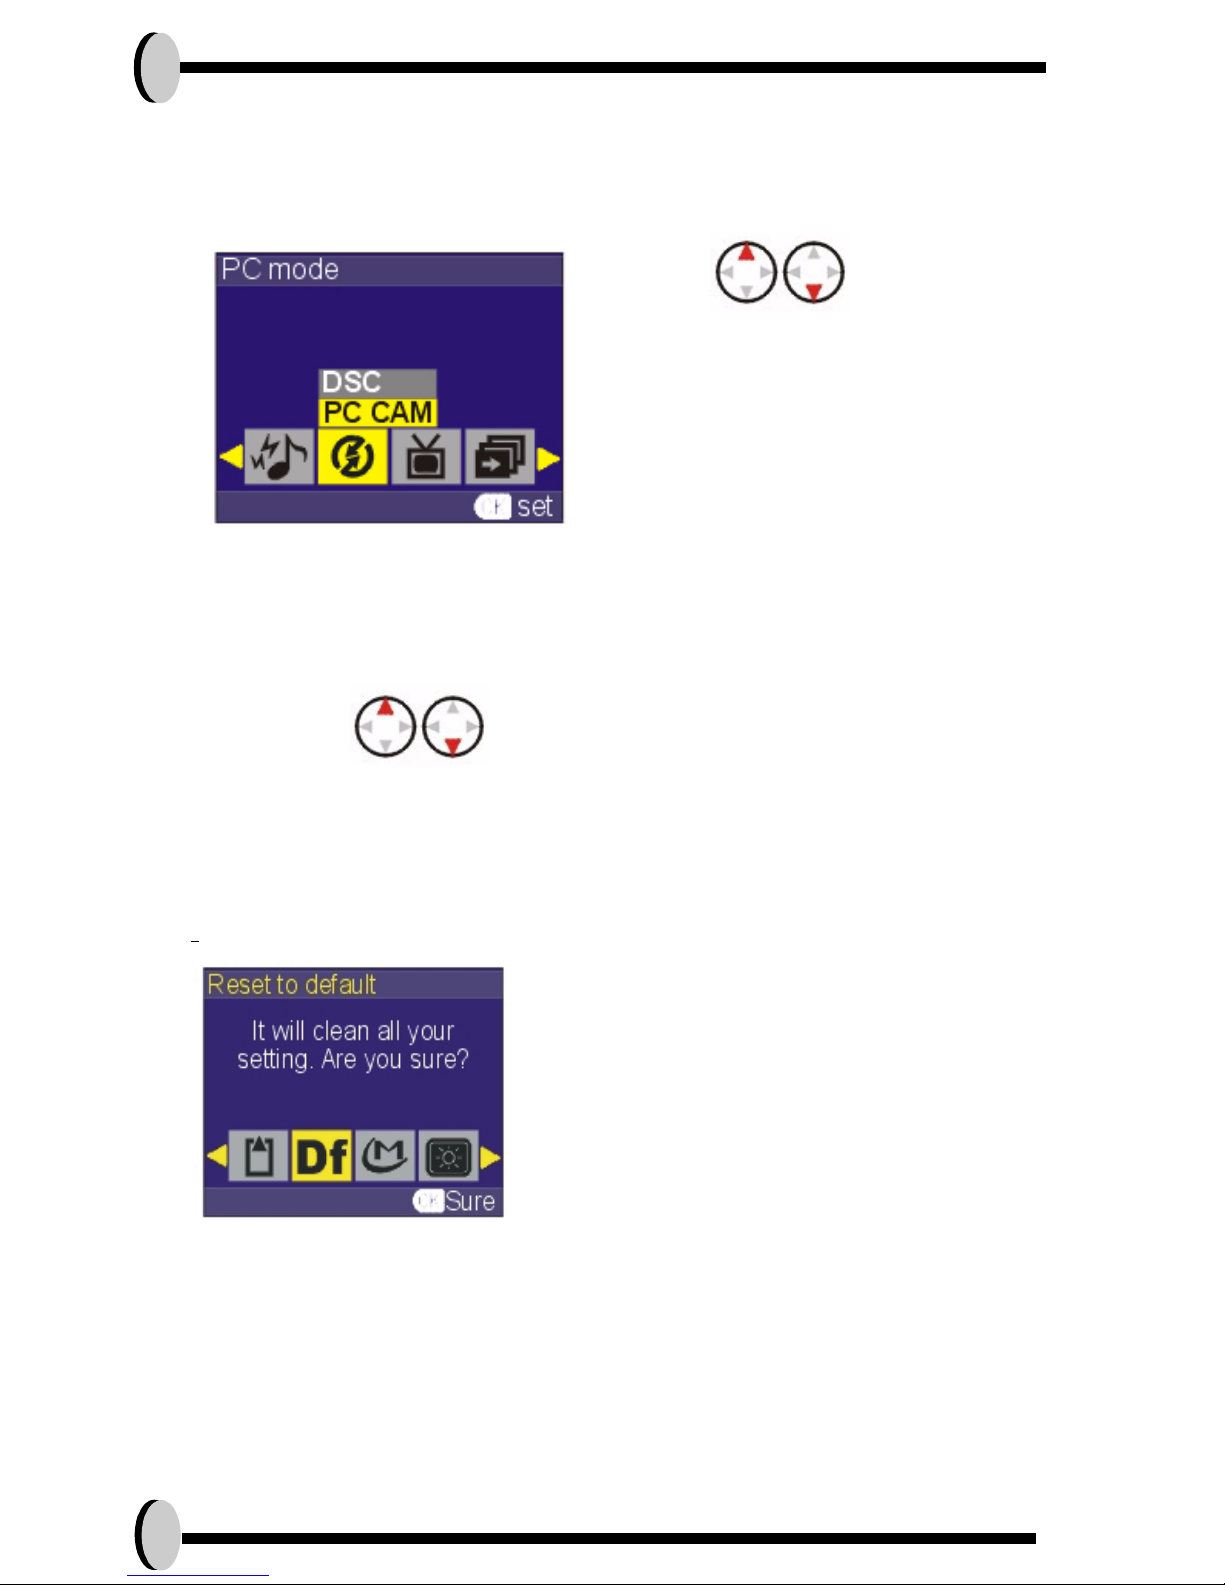
• To set the PC MODE (PC cam):
This setting allows users to set this camera as a regular digital camera or as a
PC camera. Please your mini USB cable to set to the desired PC Mode.
.
• To set the frequency
This setting allows users to set their frequency usage for the camera. Users
have the option of choosing from 50 HZ and 60 HZ. .
•Restoring
:
1. Press the button to select
the DSC or PC CAM.
2. Press OK when you are done.
* With DSC Mode, images can only
be copied from your camera to
your PC
1. Press the button
to select the desired frequency.
2. Press OK when you are done.
2. Press OK if you want to restore to the
1. You will be asked whether you want to
default setting.
3. If not, press the display button to cancel.
“Restore Factory Setting?”
Page 29
Making Connections 31
English
Making Connections
In this section you will be able to connect the camera to your PC (to download/ edit photo/ use camera as PC cam.) This softare is compatible with any
MAC OS 9.1 or higher.
• Installing software in autorun CD( Driver/
Direct X /Arcsoft photo impression)
For Windows:
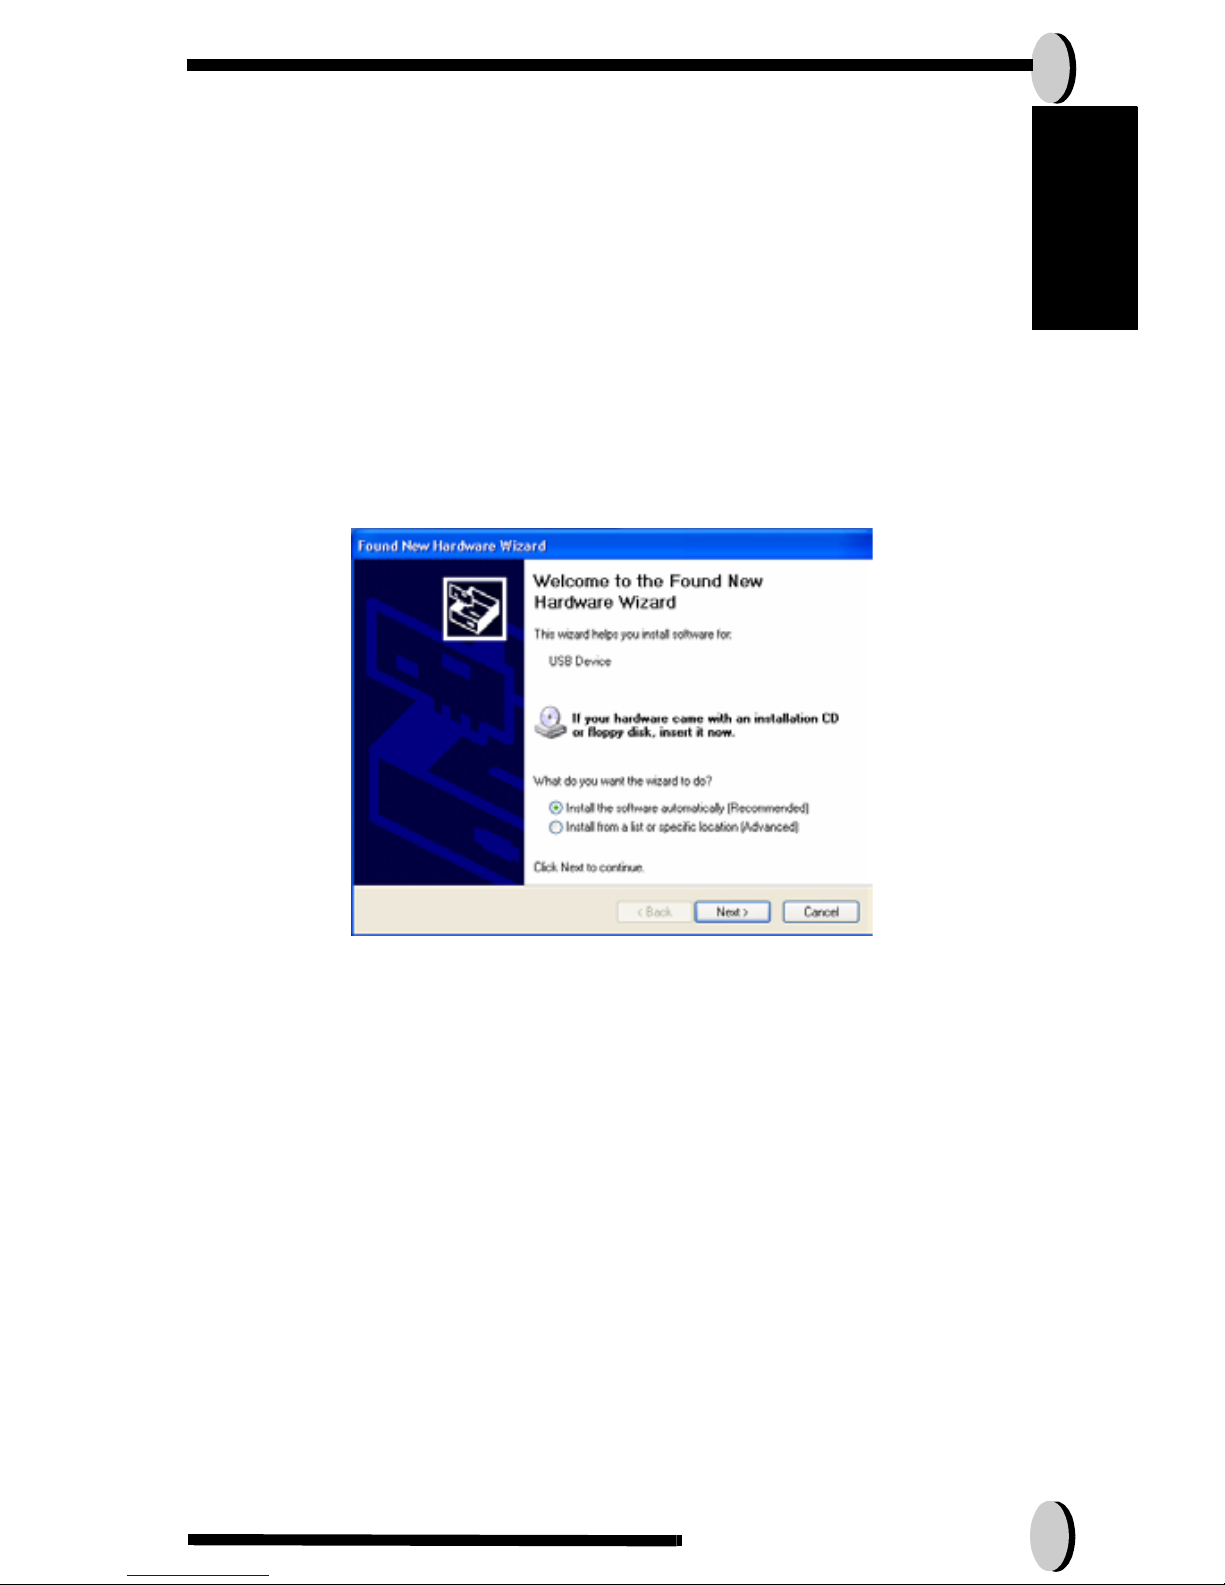
1.Insert the CD-ROM into your CD-ROM drive, and click “Install the software
automatically”.
Page 30
32
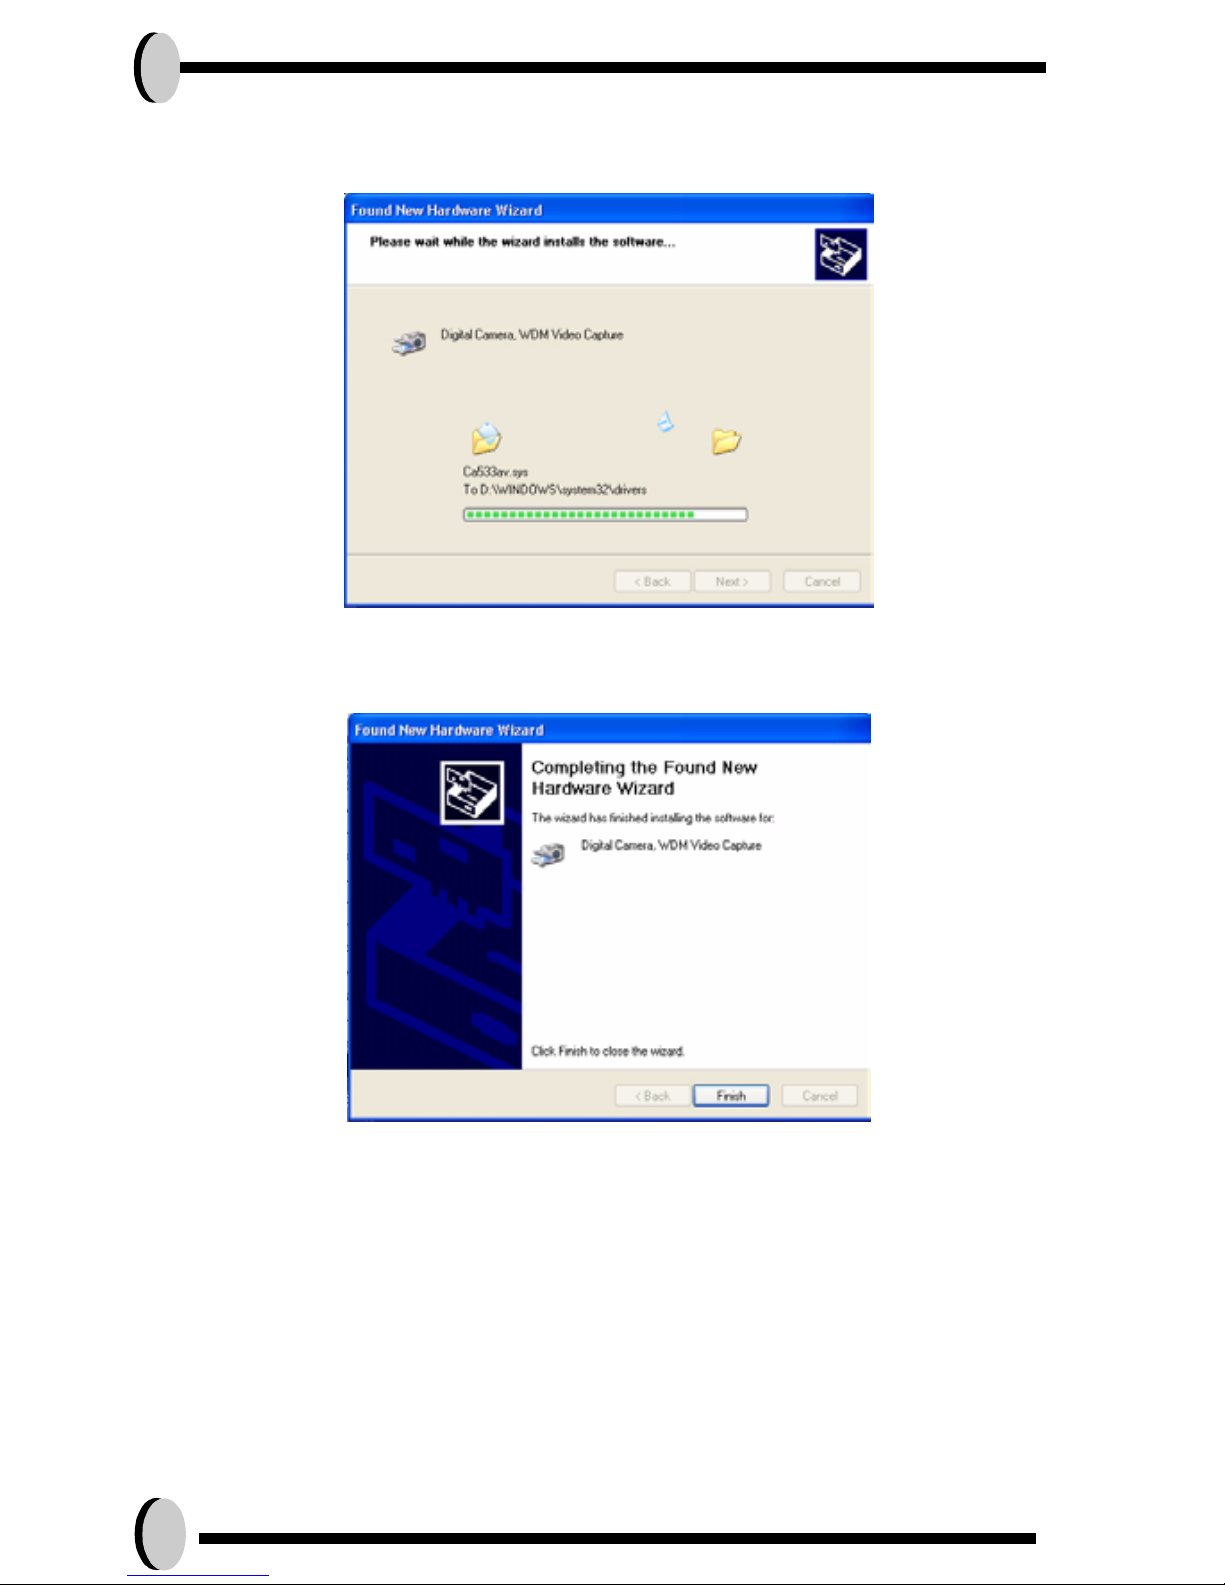
2.The Hardware Wizard will automatically search for the application from the
CD-ROM. Once the Hardware Wizard found the application, it will download
it into your computer.
3.)Click Finish when the Hardware Wizard informs you the completion.
• Viewing images on your TV (optional)
Before you proceed, please determine your corresponding TV-Out mode.
1. Turn the camera off.
2. Connect the video cable into the docking station’s video out connector.
3. Connect the other end of the video cable into the TV’s video-in jack.
4. Turn the TV to video channel.
5. Turn the camera ON, you should then be able to view the images or movie
from the TV.
Page 31
Making Connections 33
English
• Downloading images to your PC
When downloading images, please make sure the camera is in DSC mode.
Please refer to DSC Setup Mode (page xxx)
1. Turn the computer ON.
2. Connect the camera and the computer with the USB port cable.
3. Turn the camera ON.
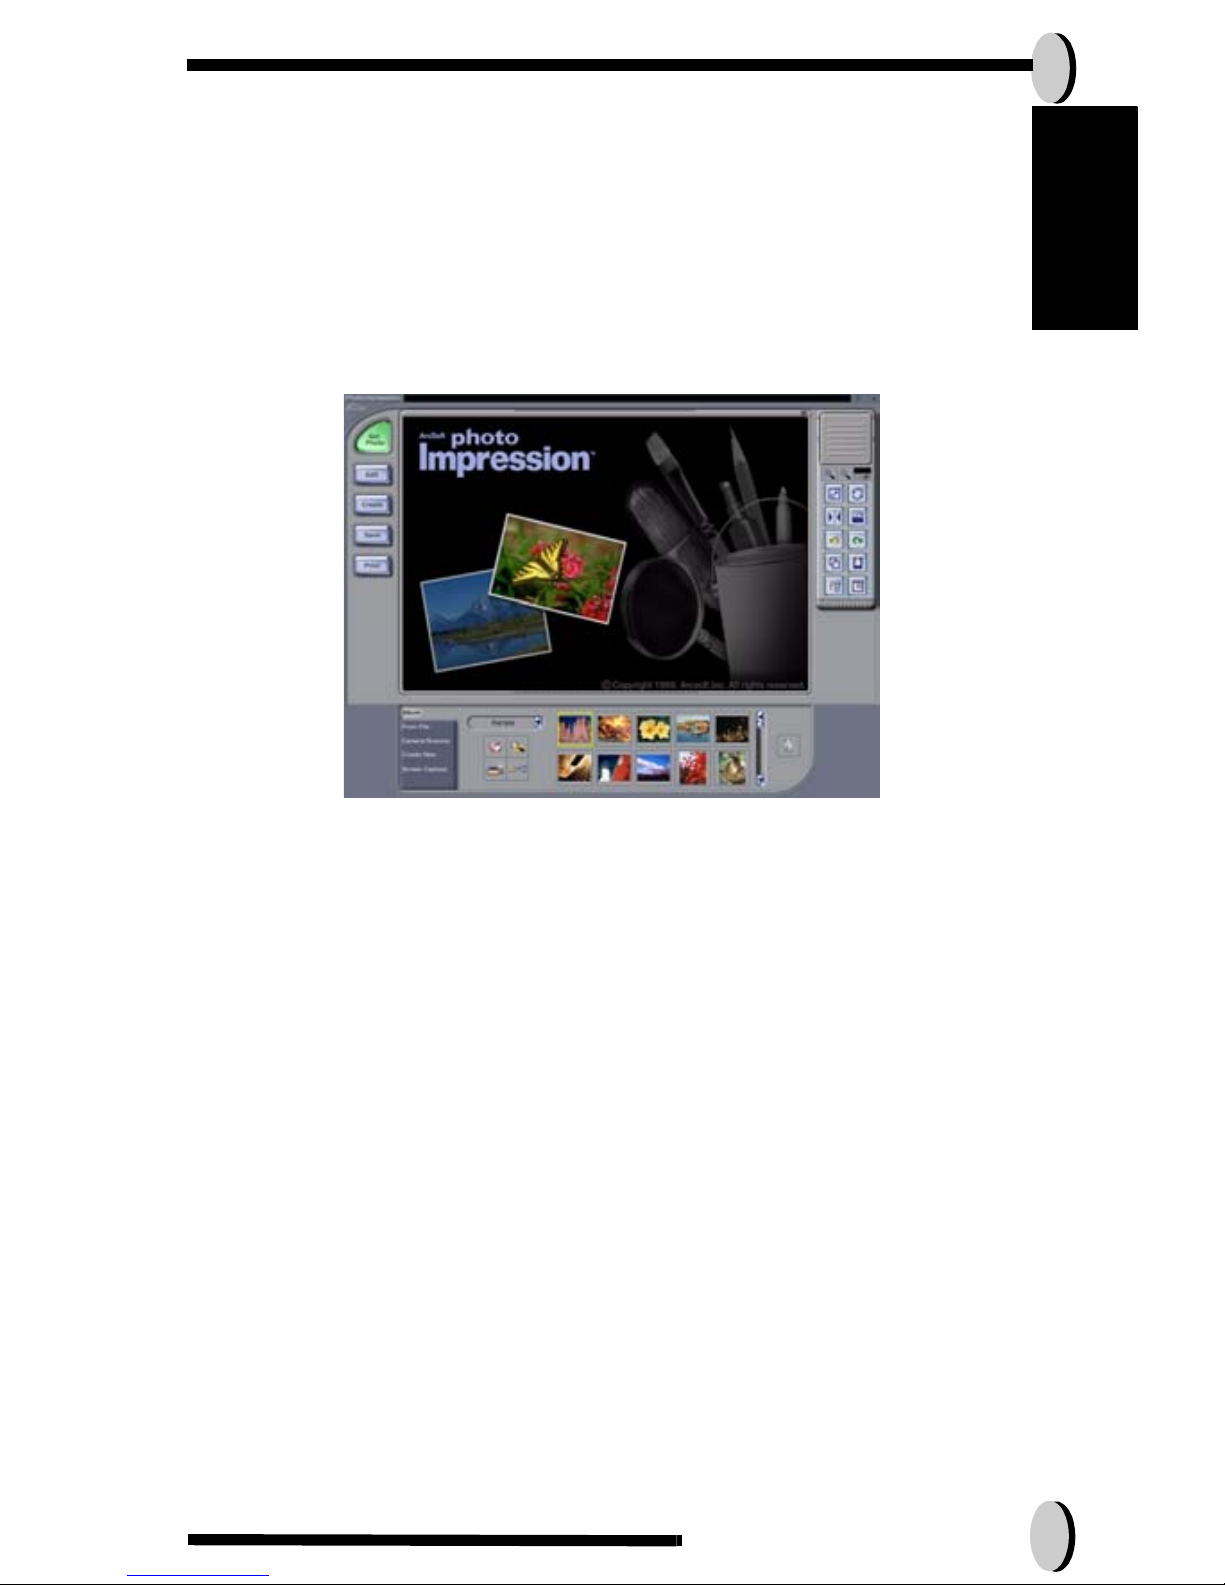
4. Launch Image Impression (the inclusive software which you have down-
loaded from the CD-ROM.)
5. Click “Get”
4. Shortly follow the prompts and you will start downloading your pictures to
the computer.
Page 32
34
Accessing images through your PC
1. Before downloading images from camera to your PC, please make sure the
camera is in DSC mode. ( Please refer back to DSC Setup Mode, under page
25)
2. This camera allows users to move the images or movies from camera to PC
by MSDC support.
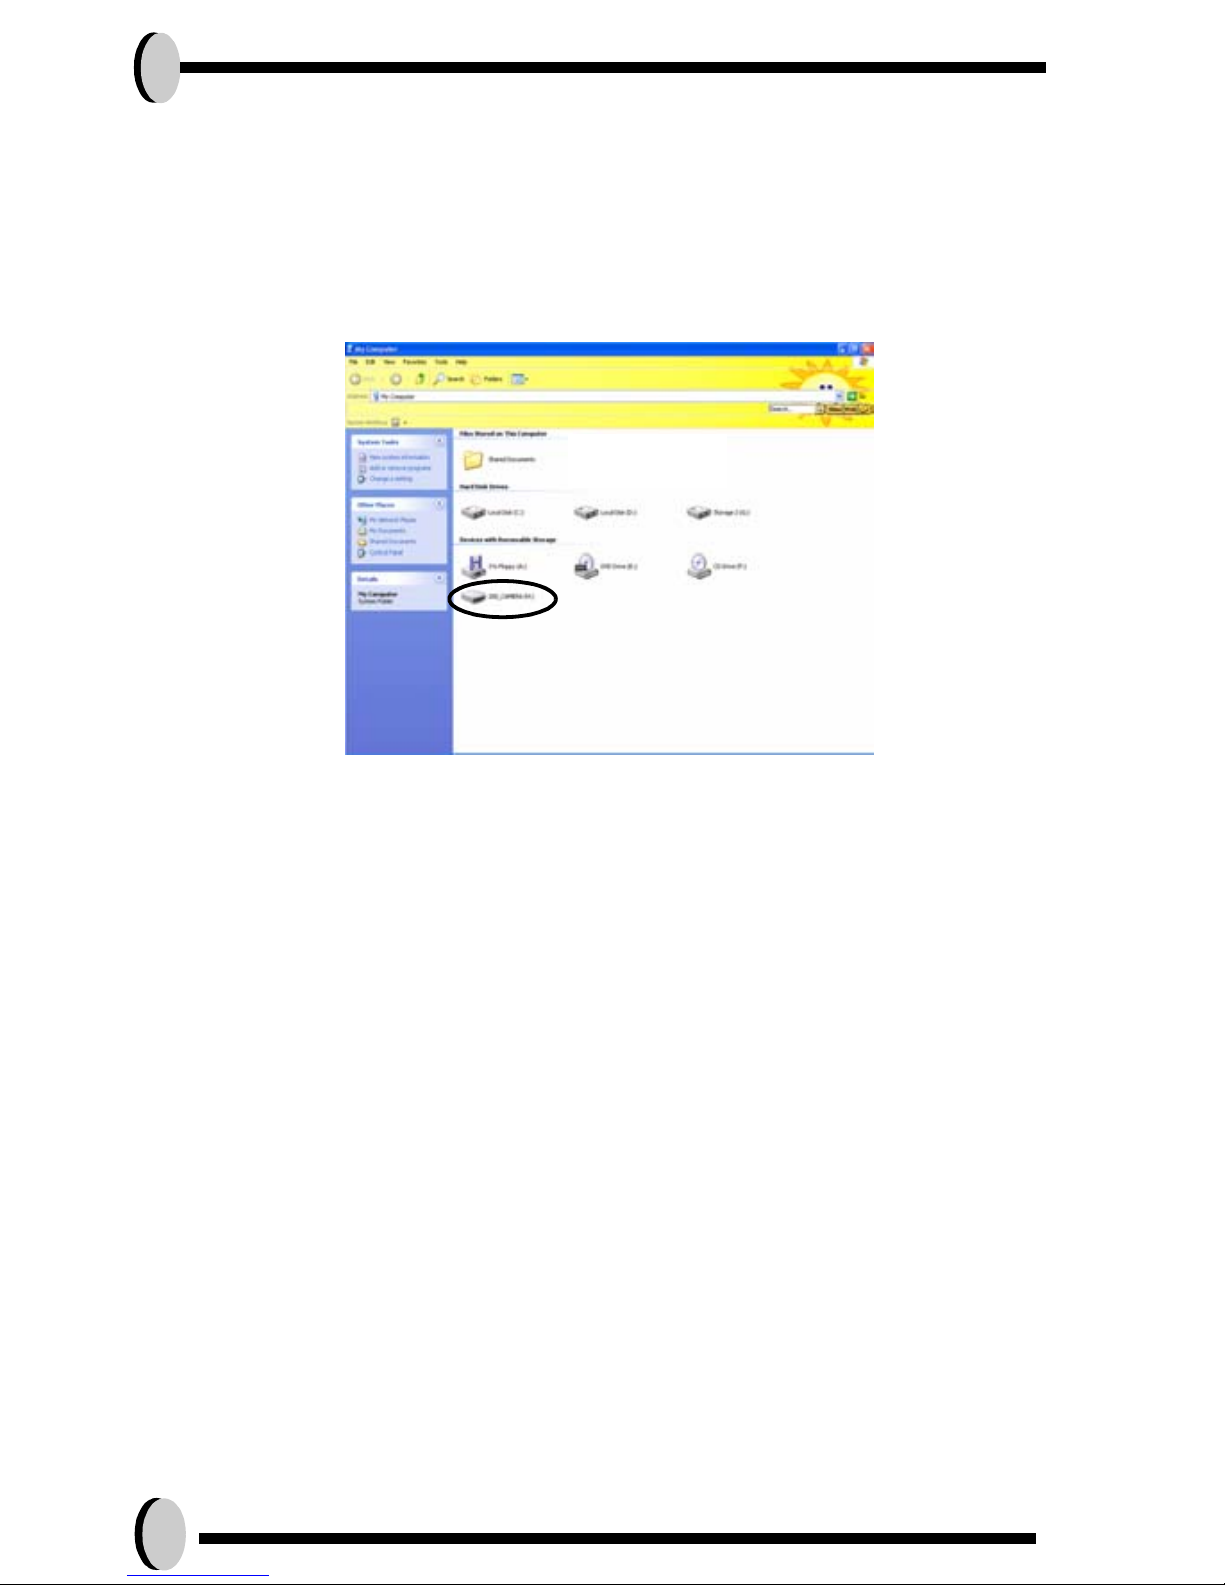
3. When the camera is connected to your PC, there will be an external storage
under “My computer” named “ 200_CAMERA”.
4. Simply click the folder named “200D-CAM”, you can find the images or
movies you taken.
5. Copy or remove these files to from camera to your PC. You can start to edit
the images according to your desired.
Page 33
Appendix 35
English
Appendix
Specifications
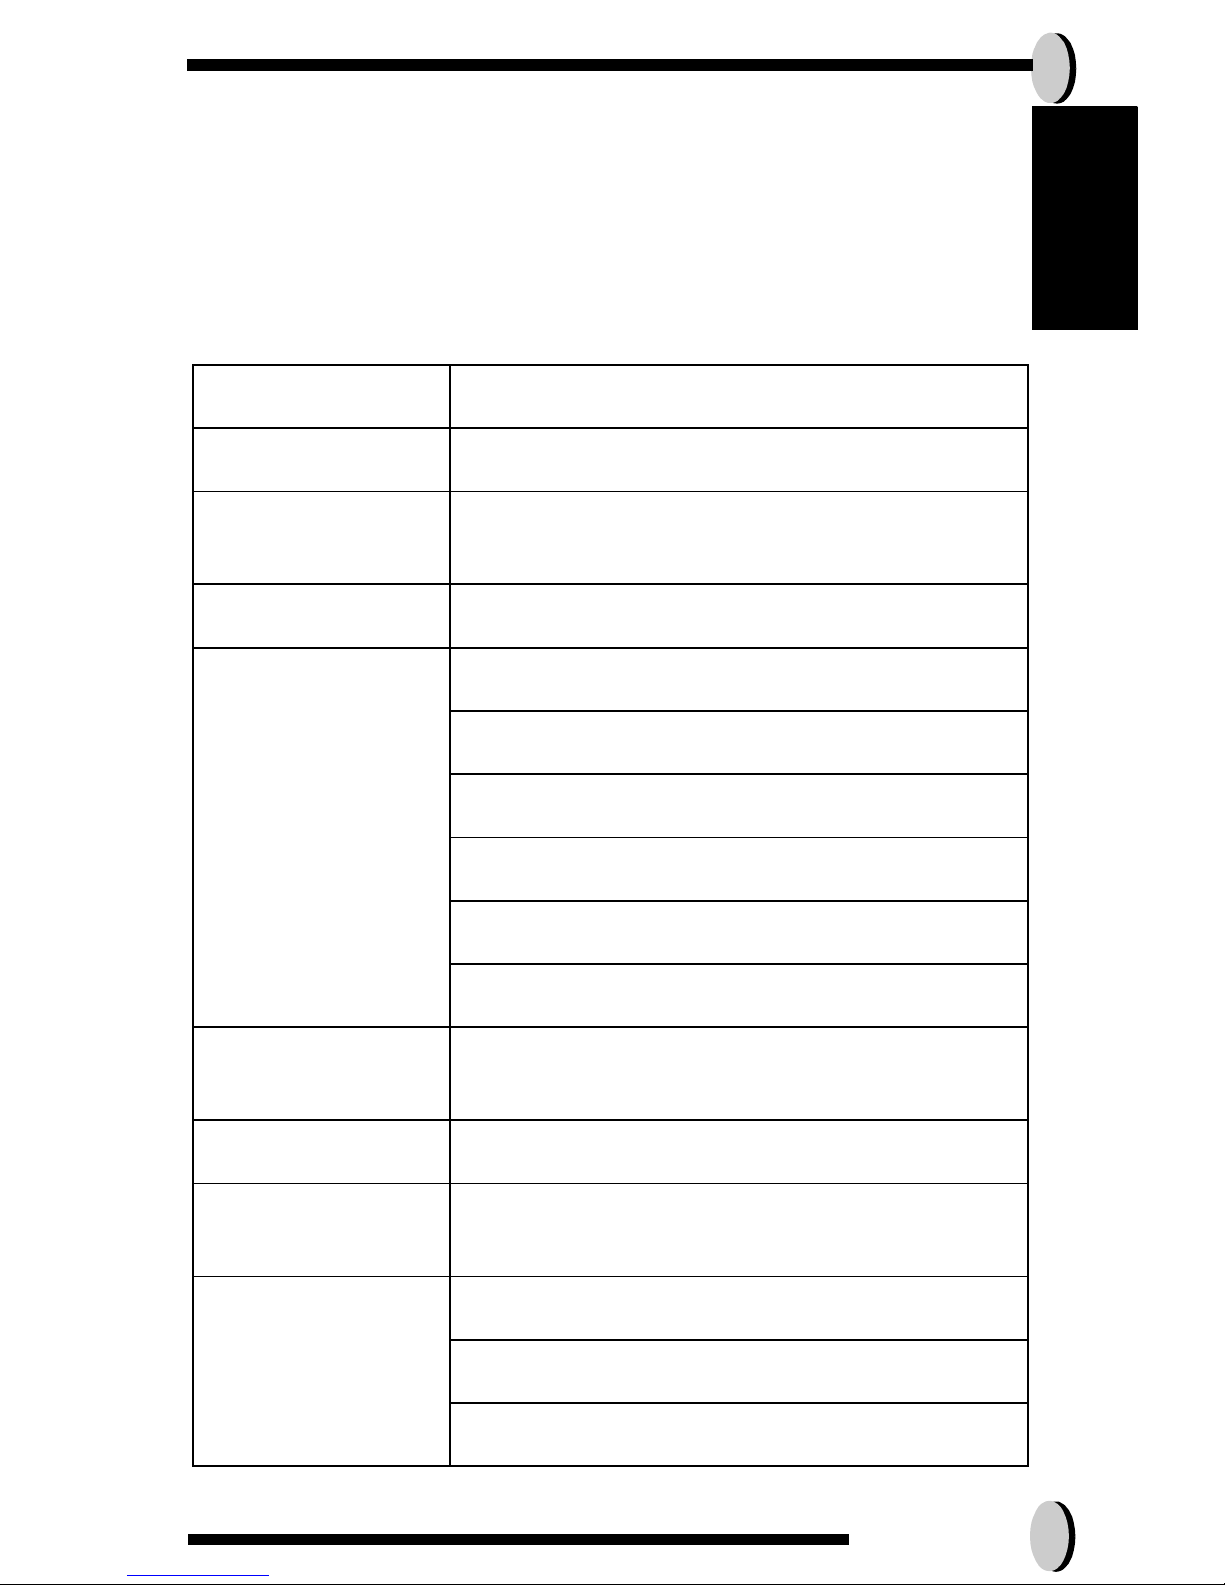
Features Content
Effective pixels 2.0M sensor, scale up to 4M
Removable storage card
SD/MMC
Internal memory 16MB NAND Flash Memory
EstimatedNumber
of storable pictures
Compression ratio@ 1 : 8, 16MB SD card
4.0M(S): 10 pictures
3.0M(S): 14 pictures
2.1M: 20 pictures
1.3M: 30 pictures
VGA:140 pictures
Movie mode display
QVGA @15~20fps
Lens F2.8
Digital/Optical
zoom
4x digital zoom
Focus/ Shooting
distance
2 step Fixed focus
Macro: 50~70 cm
Normal:160cm~ infinity
Page 34
36
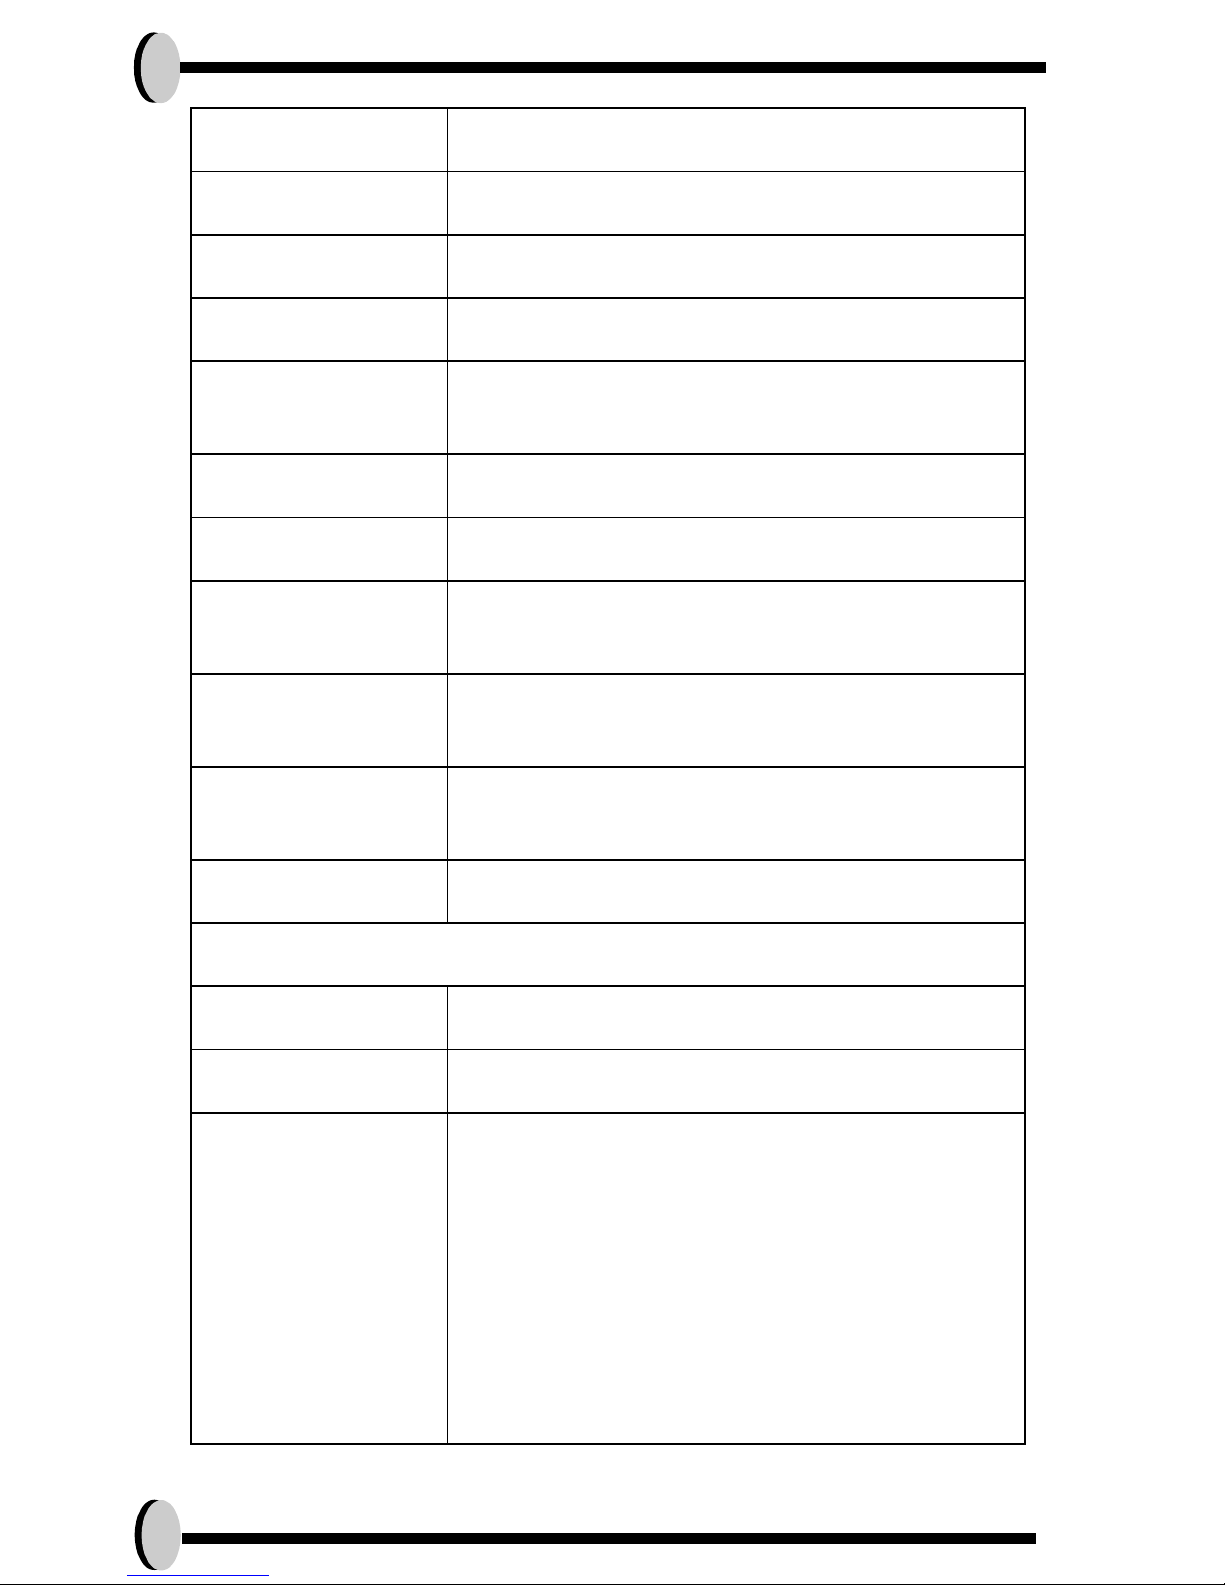
View finder Virtual image viewfinder
Flash mode Auto/ Force on/ Off (range 3-10 feet)
LCD monitor 1.5" TFT LCD
Camera Interface Mini USB
Multiple language
UI
E/F/G/I/S/J/TC/SC/K
Compatible Battery "2xAA Alkaline or NiMH battery
Battery Level High/ Middle/ Low/ Empty
AC Adapter
(optional)
5 V 2A
"Docking interface
(Optional)
Mini USB/ TV Out(through docking)/DC
In(through docking)"
Dimension
(WxHxD)
105x52x36 (mm)
Weight 120(g) without batteries
System requirements
Windows Win98,WinME,Win2000,WinXP
Macintosh Mac 9.1 and above
Packing content 2xAA Alkaline battery
mini USB cable
Application CD
Wrist Strap with Stylus
Camera Pouch
Intstruction Manual
Interchangable colorful plate
Docking station (Optional)
AC Adapter(Optional)
Video cable(Optional)
Page 35
Appendix 37
English
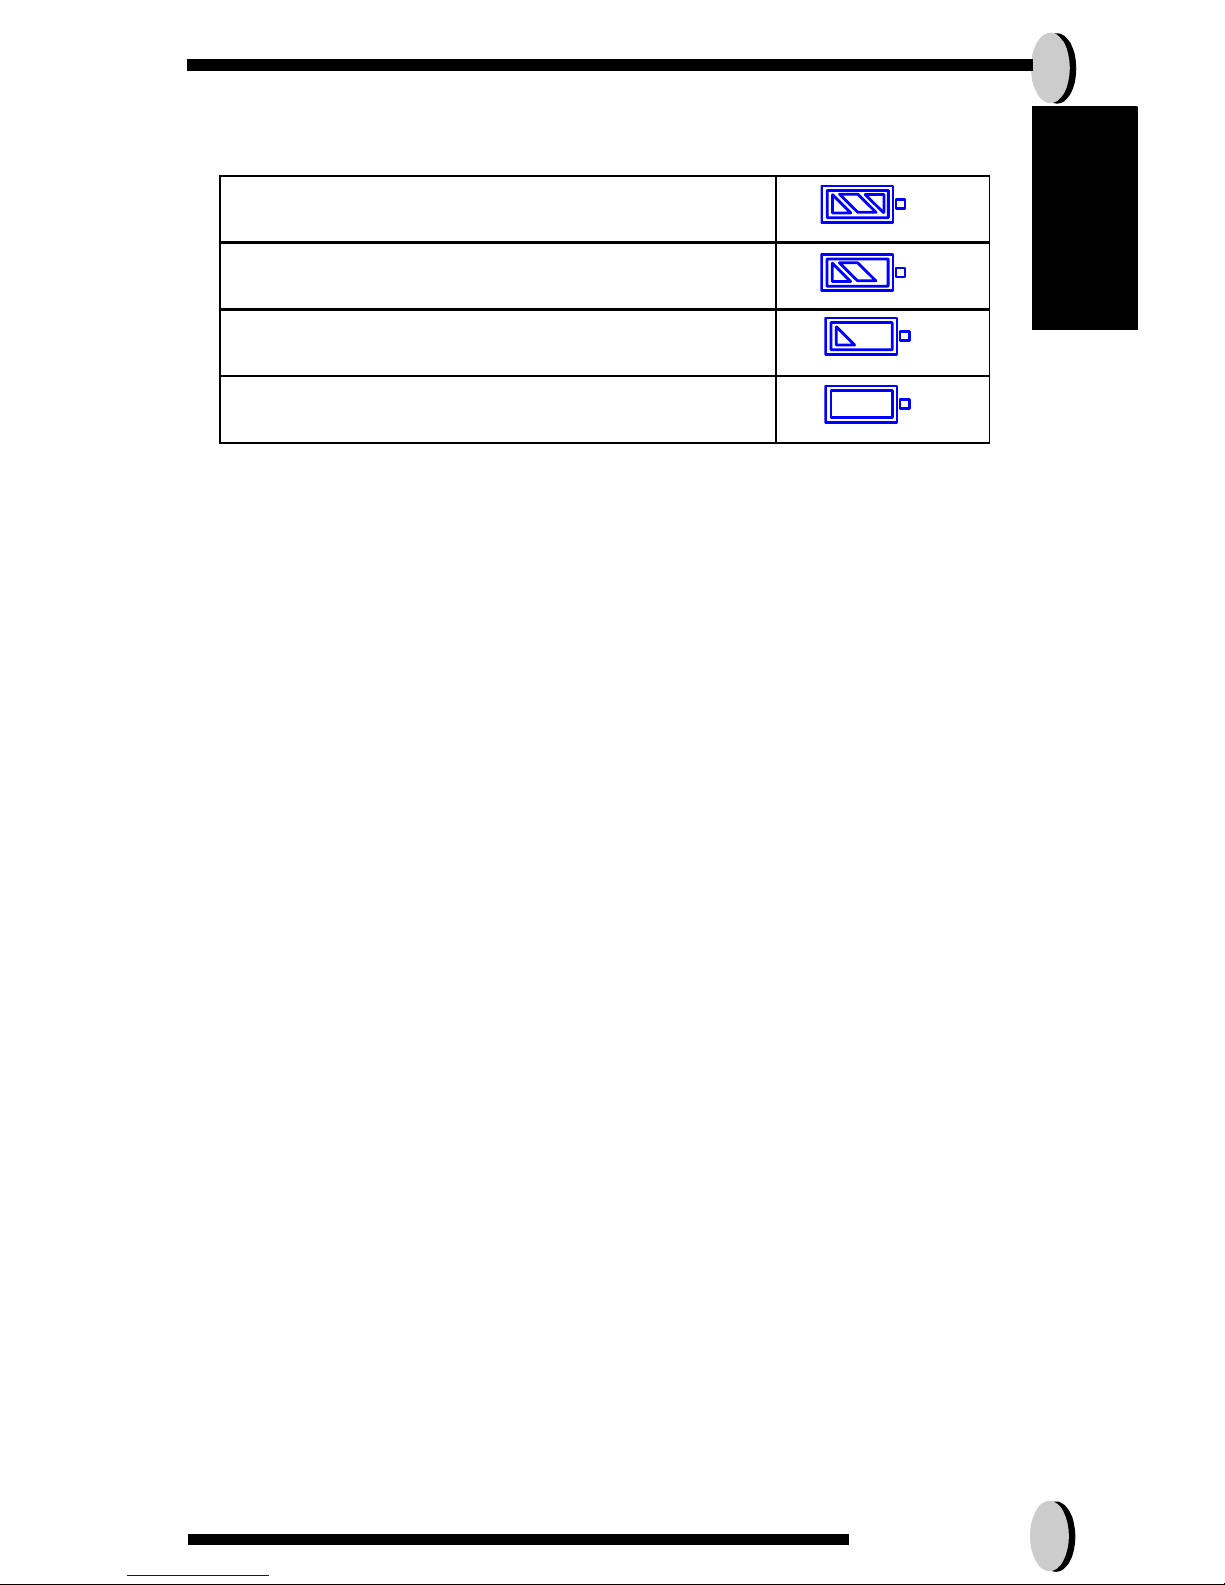
Battery Power Status
Summary of Warning Messages:
1. Memory Full
2. Battery Low
3. Protect one/all
4. Unprotect one/all
5. Delete
6. Format SD Card?
7. Format Internal Memory?
8. Restore Factory Setting
Full
Middle
Low
Empty
 Loading...