

Page 1
02 03
103mm+-1
140mm+1-2
103mm+-1
02 0302 03
註:快速安裝本 1.料 號:XR 90 00567 2.印刷顏色:單黑色 3 .材 質 :80 P 模造紙,騎碼釘
XR9000567
Thi s Quick Start Gu ide c an gu ide y ou to us e thi s pla yer w ith
pro per o per ati on and correct sett ing .
Ple ase r ead it care ful ly an d opt imi ze th e performance in
acc ord anc e wit h your preference.
Quick Start Guide
Appen dix
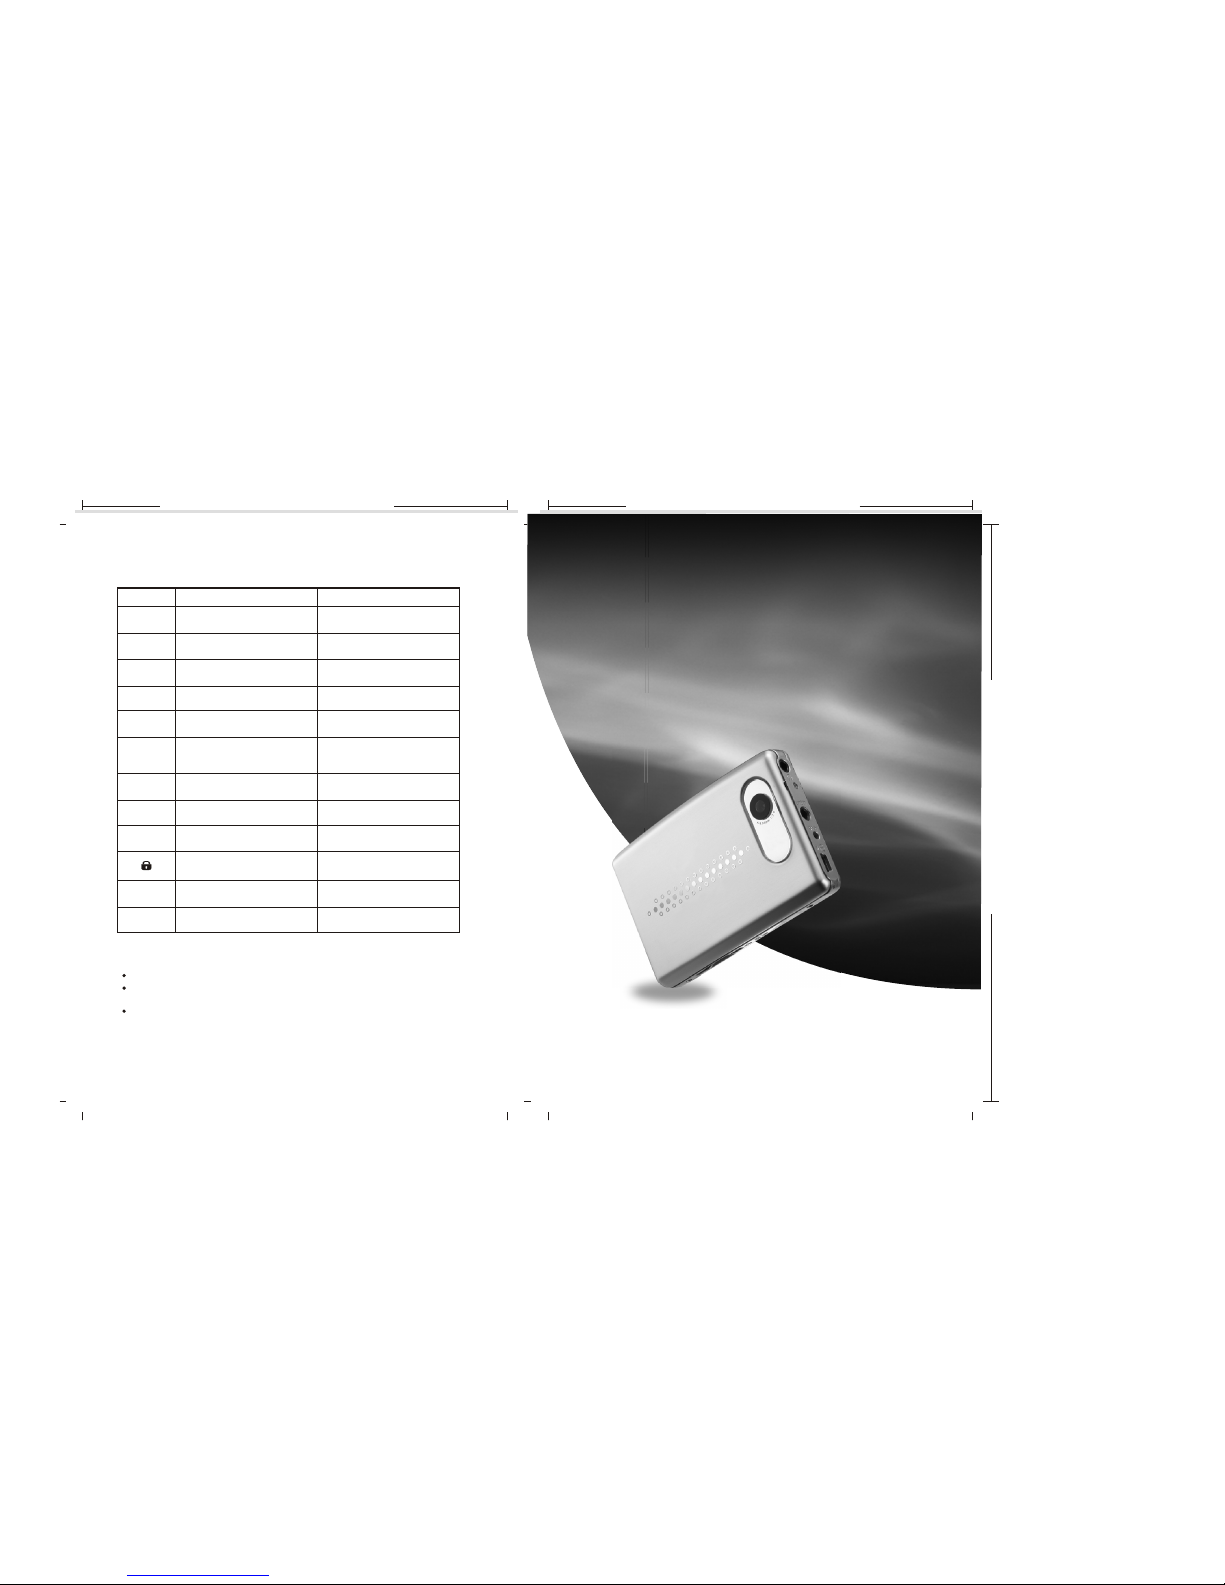
CAR D FULL!
MEM ORY FULL !
CAR D LOCKE D!
LOC K ( )
FIL E ERROR!
MEMO RY ERROR!
CAR D ERROR !
NO CA RD !
LOW B ATTERY !
Dele te the sto red im age(s ) in the fla sh mem ory.
Mes sages Ca uses So lut ions
NO FI LE!
LOW B ATTERY !
FORM AT ERROR!
Ther e is insu fficie nt car d memor y capac ity
for st oring a nothe r image .
Ther e is insu fficie nt int ernal m emory c apacit y
For st oring a nothe r file.
The SD c ard is un der pro tectio n.
The pla yer is lo cked , the loc k switc h is on.
File f ormat e rror.
Buil t-in me mory is d amage d or fail ed.
Card is damag ed or fail ed.
Ther e is no car d inser ted in th e playe r.
Batt ery pow er is dra ined.
There is no file store d in the me mory ca rd or
buil t-in fl ash mem ory. Or plea se ch eck/a djust
your s ettin gs on STO RAGE se tting s of SETU P
mode .
The en viron ment is t oo dark .
The fo rmat of S D/MMC c ard is no t corre ct.
Dele te the st ored im age(s ) in the me mory
card o r inser t a new mem ory car d.
Set th e card pr otect ion swit ch at no nprot ectio n posit ion.
Set th e lock sw itch at o ff.
Inse rt a new SD /MMC ca rd or for mat the
S/DM MC card o r bult- in flas h memor y.
Form at the S/ DMMC ca rd or bult -in fla sh
memo ry.
Inse rt a new SD /MMC ca rd
Need t o recha rge the p layer.
Plea se down load th e files f rom you r PC or
take p ictur es, rec ord vid eos, or v oices t o
crea te file s.
Find a b right er envir onme nt.
Set th e card pr otect ion wit h at non- prote ction
posit ion.
Re-f ormat t he SD/M MC card o r inser t a new
one.
Trou blesh ootin g
If yo u find th e playe r won't t urn on or r espon d:
Mak e sure th e LOCK Sw itch is o ff.
If th at does n't wor k, plea se conn ect you r playe r with ad aptor. T he
pla yer mig ht need t o be rech arged .
If th at does n't wor k, your p layer m ight ne ed to be re set. Pl ease us e a
bal lpoin t pen to st ab into t he Rese t butto n on the si de of the p layer.
Err or Mess age Tabl e
Page 2
02 03
103mm+-1
140mm+1-2
103mm+-1
02 0302 0302 03
The man ua l co nt ains th e im po rt ant saf et y in st ructi on s
and inf or ma ti on of the d ev ic e' s prope r us ag e. M ake
sure to r ea d ca re fully a nd u nd er stand a ll t he
instr uc ti on s to avoi d ac ci de nt.
Do not ex po se t he d evice t o ex tr em e tempe ra tu re
(abov e 40 C) , es pecia ll y in c ar s with sh ut ti ng
windo ws i n su mm er.
Do not ex po se t o mo istur e. D o no t st ore in hu mi d or
dirty a re as .
Avoi d th e de vice fall in g an d bumping s tr on gly. Do
not mak e LC D su ffer fr om v io lent shak e; o th erwise,
LCD cou ld b e da ma ged or di sp la ye d abnor ma ll y.
Choos e th e su it able vo lu me . Do n ot turn u p th e
volum e of t he e ar phone s to o hi gh w hile us in g it . If
you get r in gi ng i n your ea rs s to p us ing the d ev ic e or
turn th e vo lu me d own.
Do not di sa ss em ble the d ev ic e yo ursel f an d do n ot
wipe th e su rf ac e of devi ce w it h al cohol a nd b en ze ne
and thi nn er s.
Do not us in g th e de vice in a re as w it h prohi bi ti ng
elect ro ni c de vices , su ch a s in p lane.
Do not us e th e de vi ce whil e dr iv in g an auto mo bi le o r
walki ng i n th e st reet, o th er wi se, an ac ci de nt m ay
resul t.
Safet y Instructions
Overall Introduction
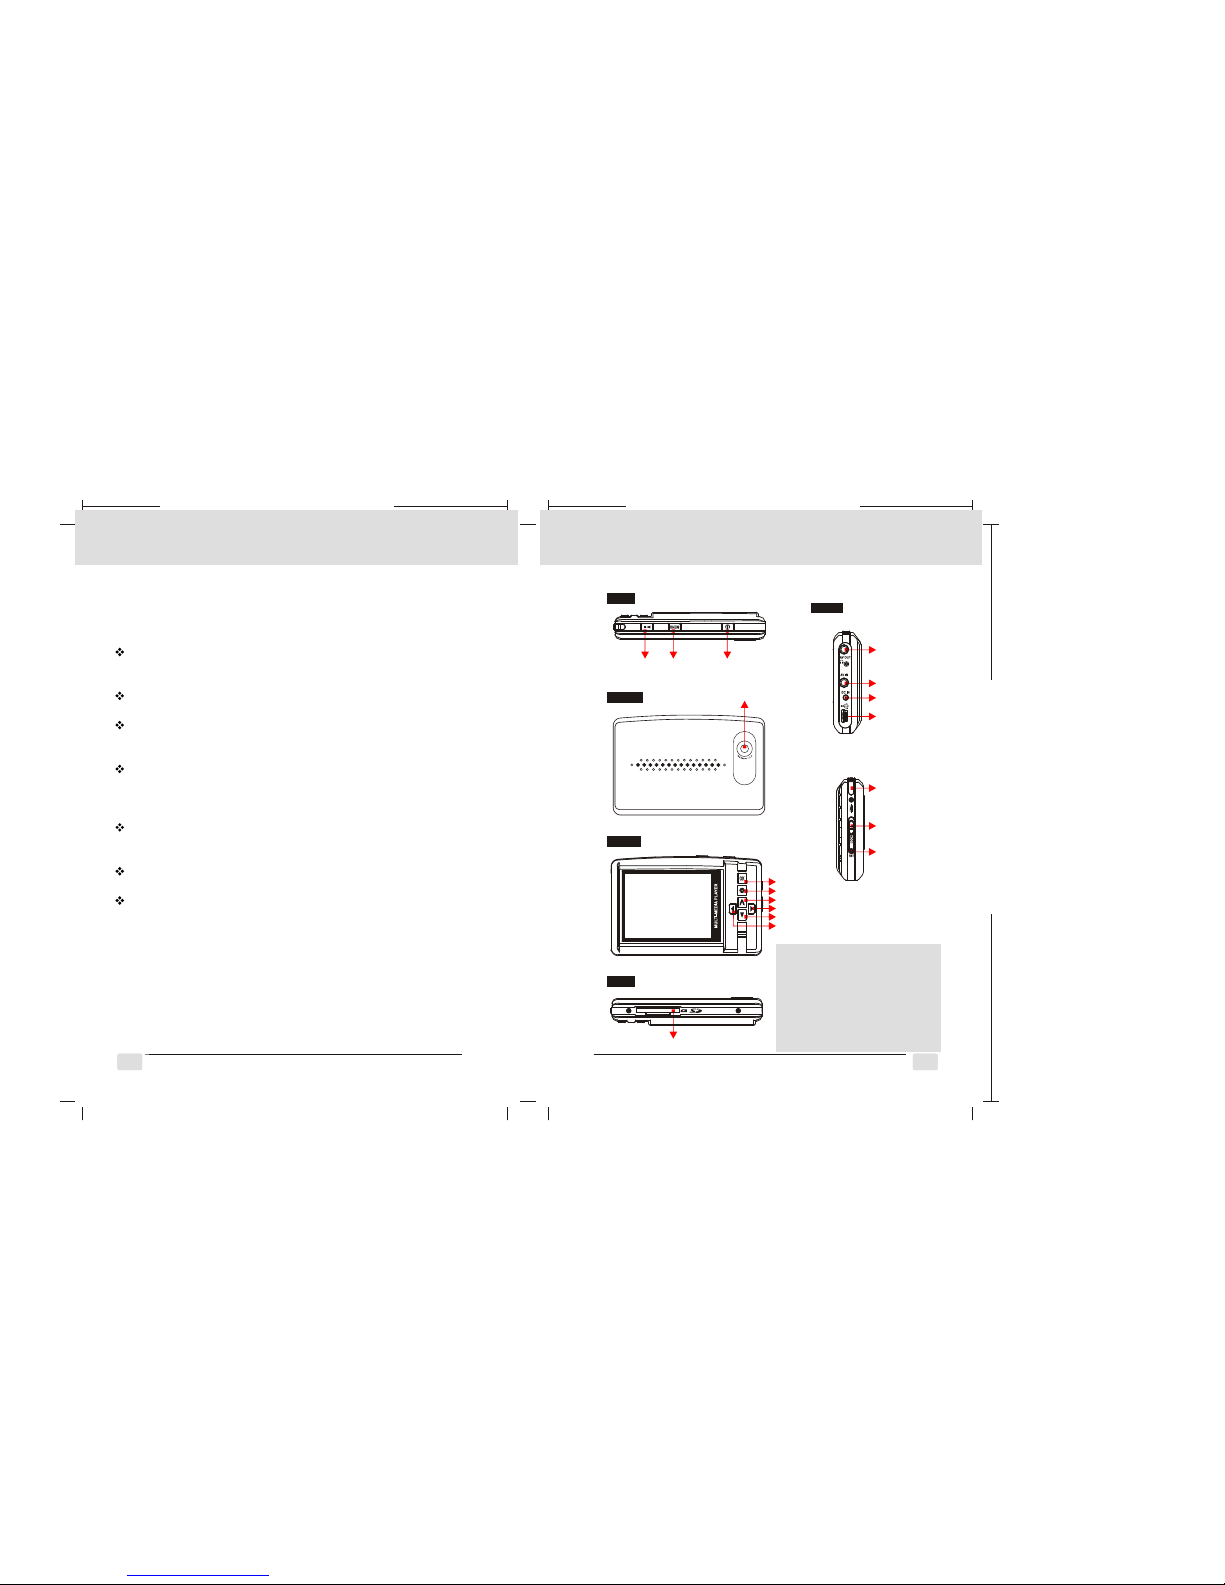
Exte rn al Vie w and Key Fun ct ion Butto ns
Pla y/
Pau se
(Sh utter )
Sid e
Top
Fro nt
Bac k
Mai n Menu
But ton
Pow er
On/ Off
Cam era Len s
OK Bu tton
LED
Up Bu tton
Rig ht Butt on
Dow n Butto n
Lef t Butto n
Top
SD Ca rd Sock et
Ear phone &
AVOUT
AV IN
DC IN
USB P ort
Str ap Evel et
Loc k Switc h
Res et Butt on
Note: About SD/MMC Card
1. Befor you insert card, plaese
make sure the performance
of this card is normal.
2. Never remove or insert a
memory card or disconnect
USB cable while data is
transmitted.
Page 3
02 03
103mm+-1
140mm+1-2
103mm+-1
02 0302 0304 05
Getti ng Ready
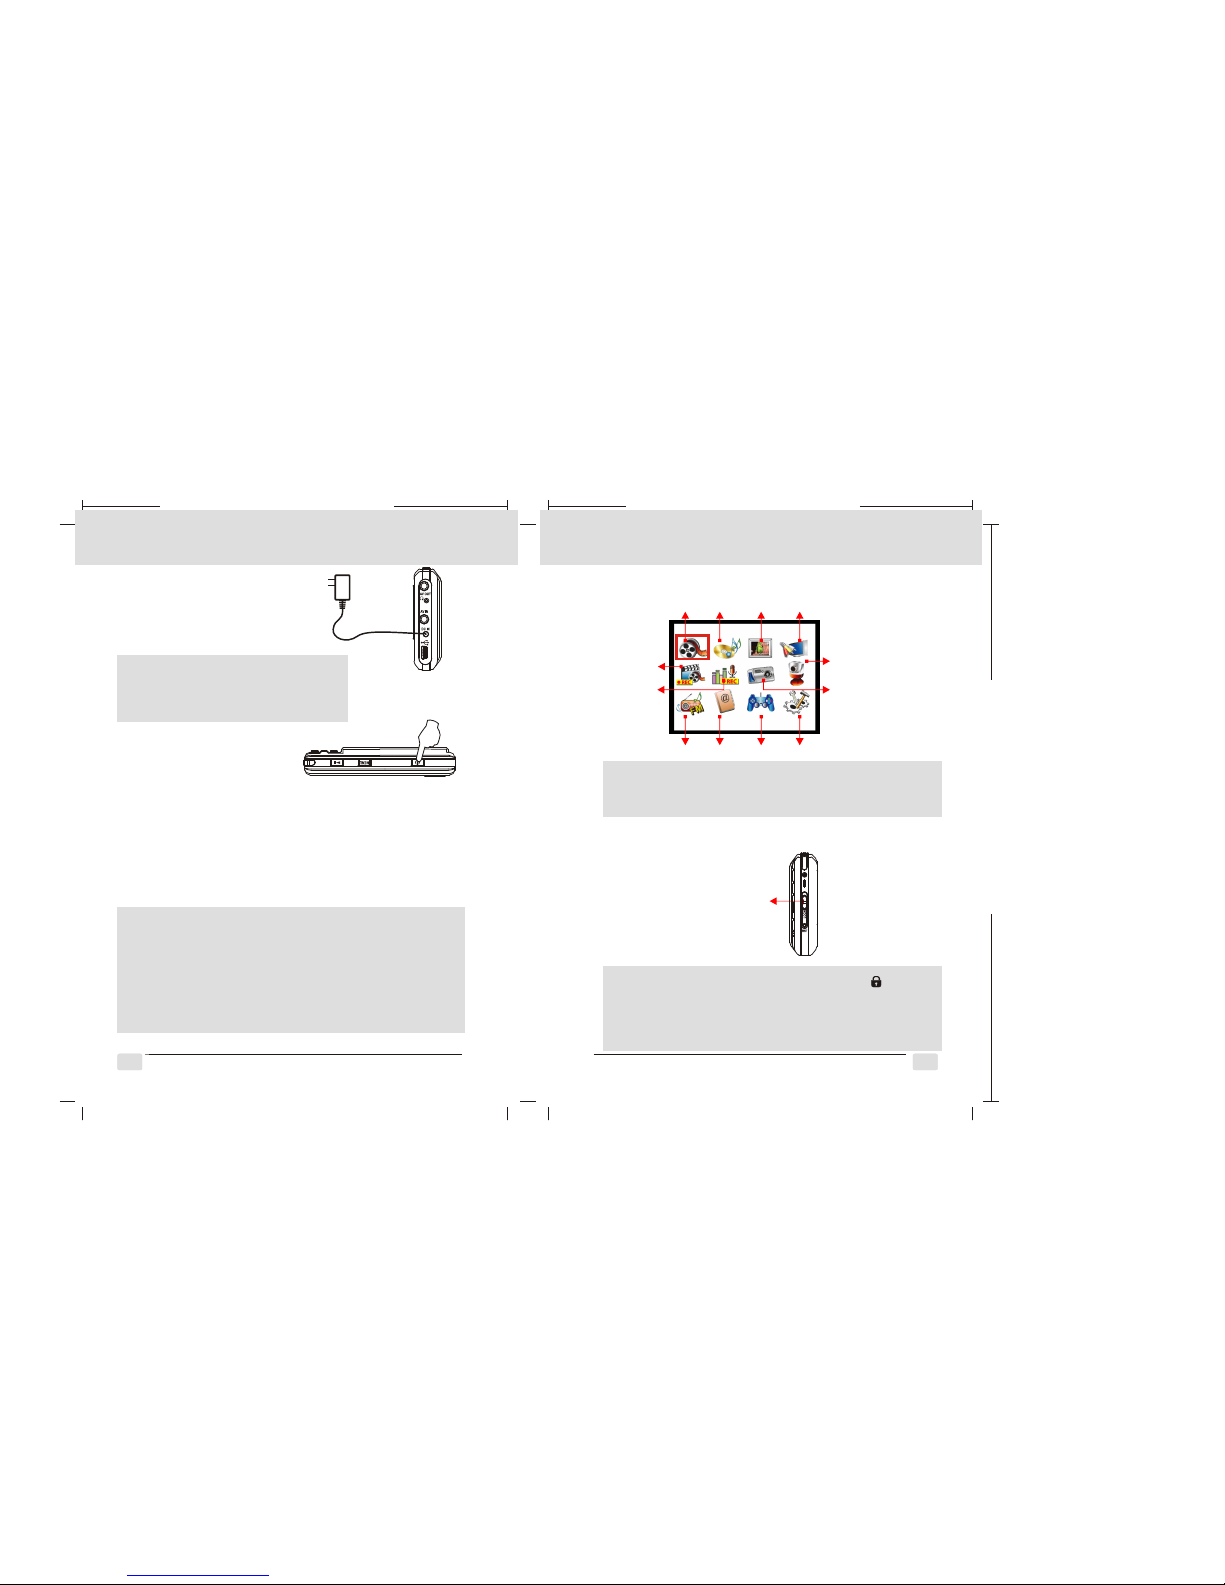
1. Batt er y Ch ar ging
You can cha rg e yo ur
batte ry b y co nn ectin g
the ada pt or i n DC I N
Port.
2. Turn On o r Of f the playe r
2.1 Trun O n
You can pre ss d ow n PO WER But to n on t he t op of
playe r. You wi ll s ee t he scre en i s sh ow ing a sta rt -u p
image a ft er y ou t urn on th e pl ay er.
2.2 Trun O ff
Press d ow n PO WE R Butto n ag ai n wi ll turn o ff
the pla ye r.
Not e:
Pow er Save : When th e playe r idles f or a time t hat rea ches
wha t the use r speci fies to t urn off t he p lay er, t he pl ay er wi ll
be tu rned of f au tom at ica ll y.
LCD S ave: Wh en the LC D monit or idle s for a tim e that
rea ches wh at the us er spec ifies t o turn of f th e LCD , th e
LCD w ill be tu rned of f au tom at ica ll y.(P lea se refe r to SETU P
Mod e for det ails. )
Note: Normally, the charging time for the
player is about 3.5 hours. When charging,
LED turns red. After complete charging,
LED is off.
3.Bas ic O pe ra tion
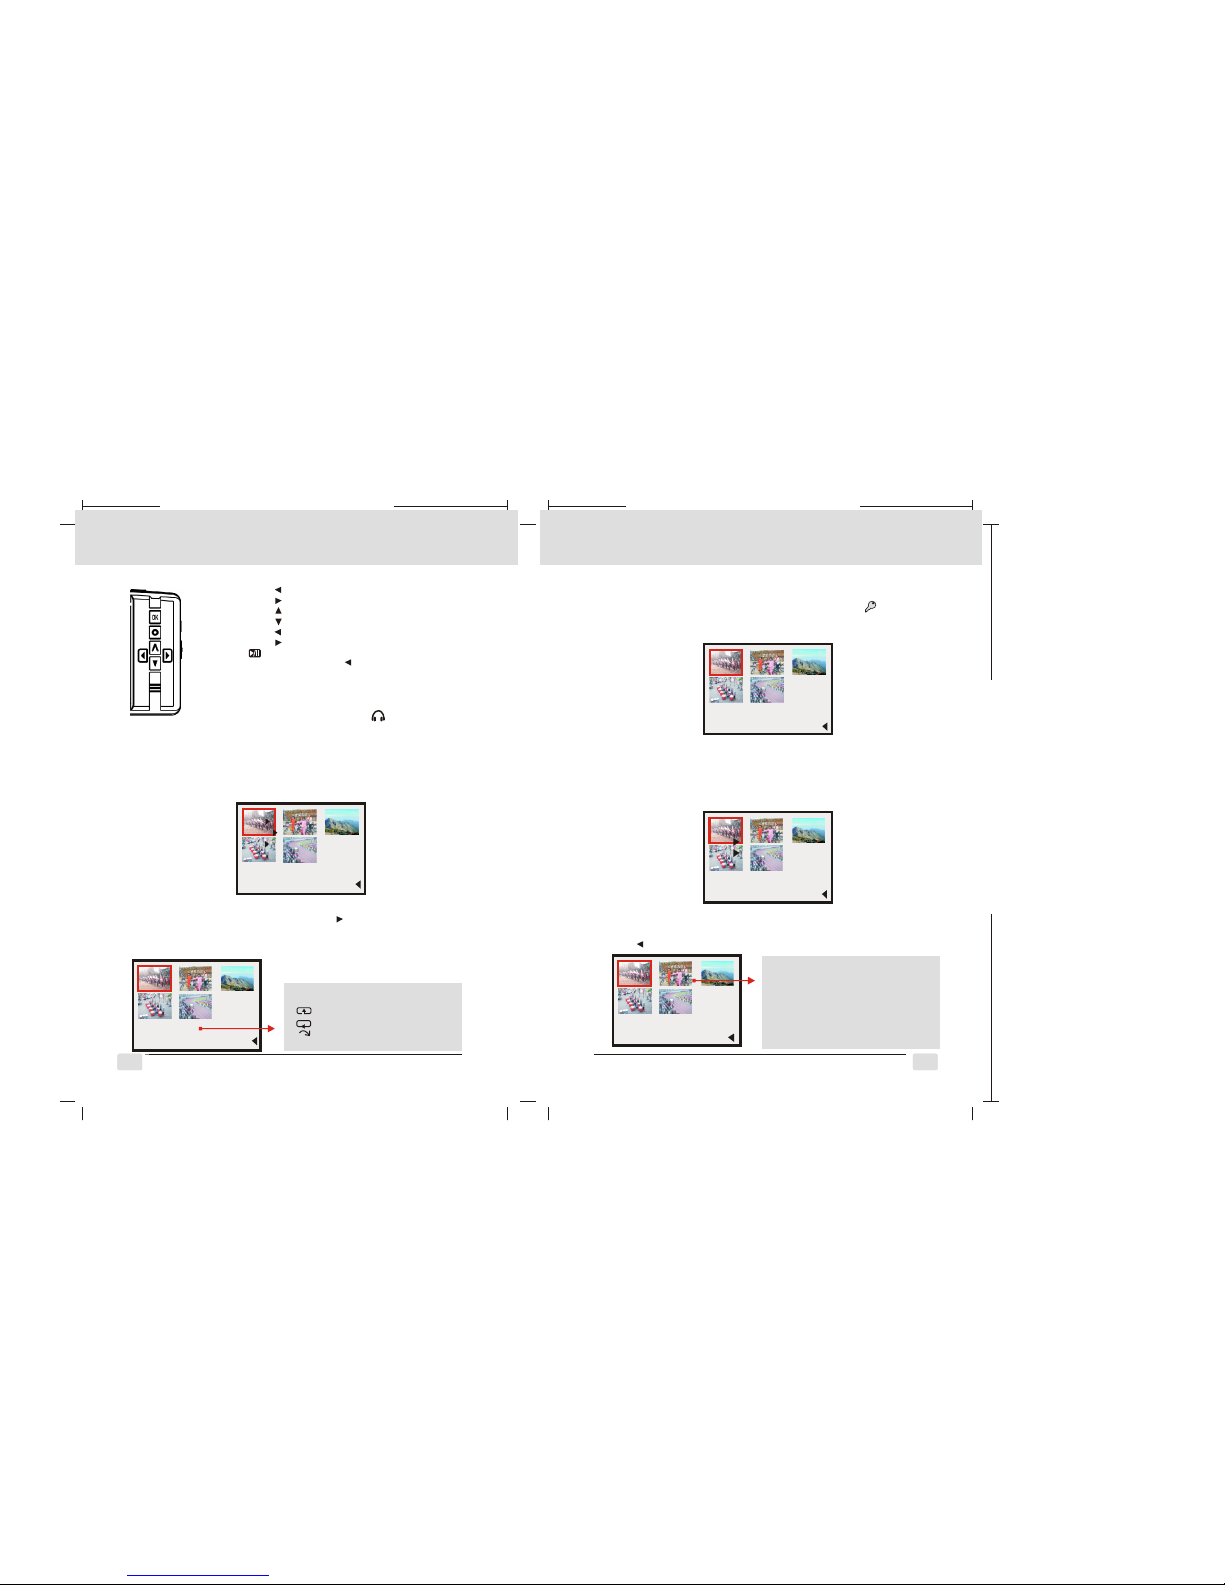
3.1 M enu Int roduc tion (i nclud ing 12 ic ons/m odes)
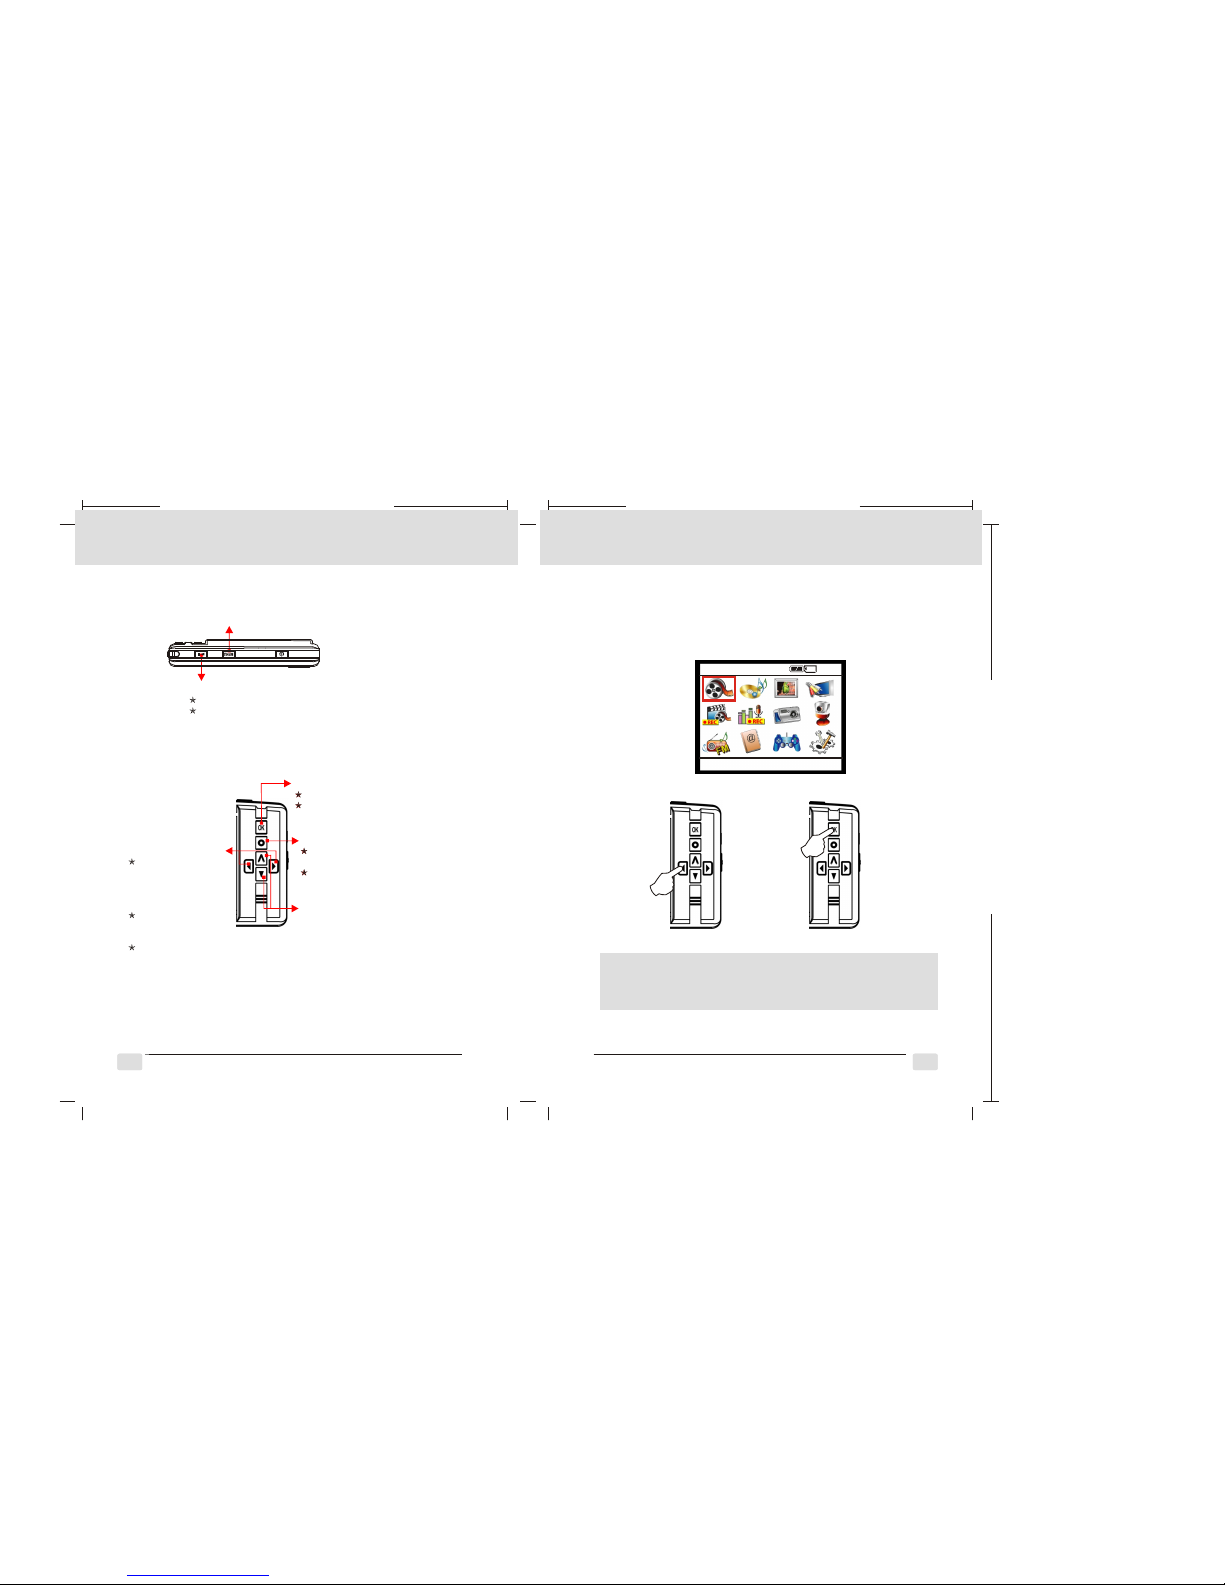
3.2 B asic Op erati on & Key Bu tton De finit ion
Not e: Each i con sta nds for o ne mode . You ca n use t he
dir ectio n butto ns to mov e the red f rame an d press O K
But ton to en ter the m ode you 've cho sen.
Vide o Audio Ph oto AV IN
FM Acc essor y Game Se tup
PC Ca mera
Cam era
Vide o
Rec ordin g
Voic e
Rec ordin g
Not e:
Tro ubl es hoo ti ng:
If yo u canno t power o n the pla yer, ple ase che ck and ma ke
sur e the LOC K Switc h is swit ch off.
Whe n lock is o n , the scr een wil l show “ ” to
rem ind you .
Swi tch dow n LOCK Sw itch to
dis able al l the ope ratio ns
Getti ng Ready
Page 4
02 03
103mm+-1
140mm+1-2
103mm+-1
02 0302 0306 07
Getti ng Ready
3.3 S elect a m ode
You can c hoose a ny mode f or play ing fil es or ope ratin g setup .
Whe n you pre ss dire ction b utton a nd sele ct one ic on on the
scr een (th e red fra me will c ircle t he icon ), plea se pres s OK
but ton to en ter the m ode you 've cho sen.
Getti ng Ready
VIDEO
15:2505/15
Main Menu
Mai n Menu Bu tton
Und er any mo de, you c an pres s MENU Bu tton
to go b ack to Ma in Menu .
OK Bu tton
Con firm yo ur sele ction
Und er Video , Audio, Photo ,and
Cam era mod es, you c an pres s it
for f urthe r adjus tment .
LED I ndica tor
Whe n turn on t he play er,
LED t urns gr een.
Whe n charg ing the p layer,
the L ED turn s red.
UP & Dow n Butto n
Und er Video , and Audi o modes ,
you c an pres s them to a djust Vo lume.
Pla y/Pau se Butt on
Key f uncti on is to pl ay or pau se the co ntent s.
Whe n under t he Came ra mode , you can o perat e
thi s butto n as a shut ter but ton.
Lef t & Right B utton
Und er Video , Audio
mod es, you c an
lon g-pre ss them t o
rew ind or fa st-fo rward
the c onten ts.
You can s hort- press
the m to go to pr eviou s
or ne xt file a nd play.
Und er FM mod es, you
can p ress th em to adj ust
Volu me.
Not e: Befo re you pl ay, plea se m ake s ur e you h av e vid eo
fil e in the pl ayer or i nsert ed the SD c ard int o it. If th ere's
no fi le, the p layer w ill rem ind you .
Page 5
02 03
103mm+-1
140mm+1-2
103mm+-1
02 0302 0308 09
03:10
00:35
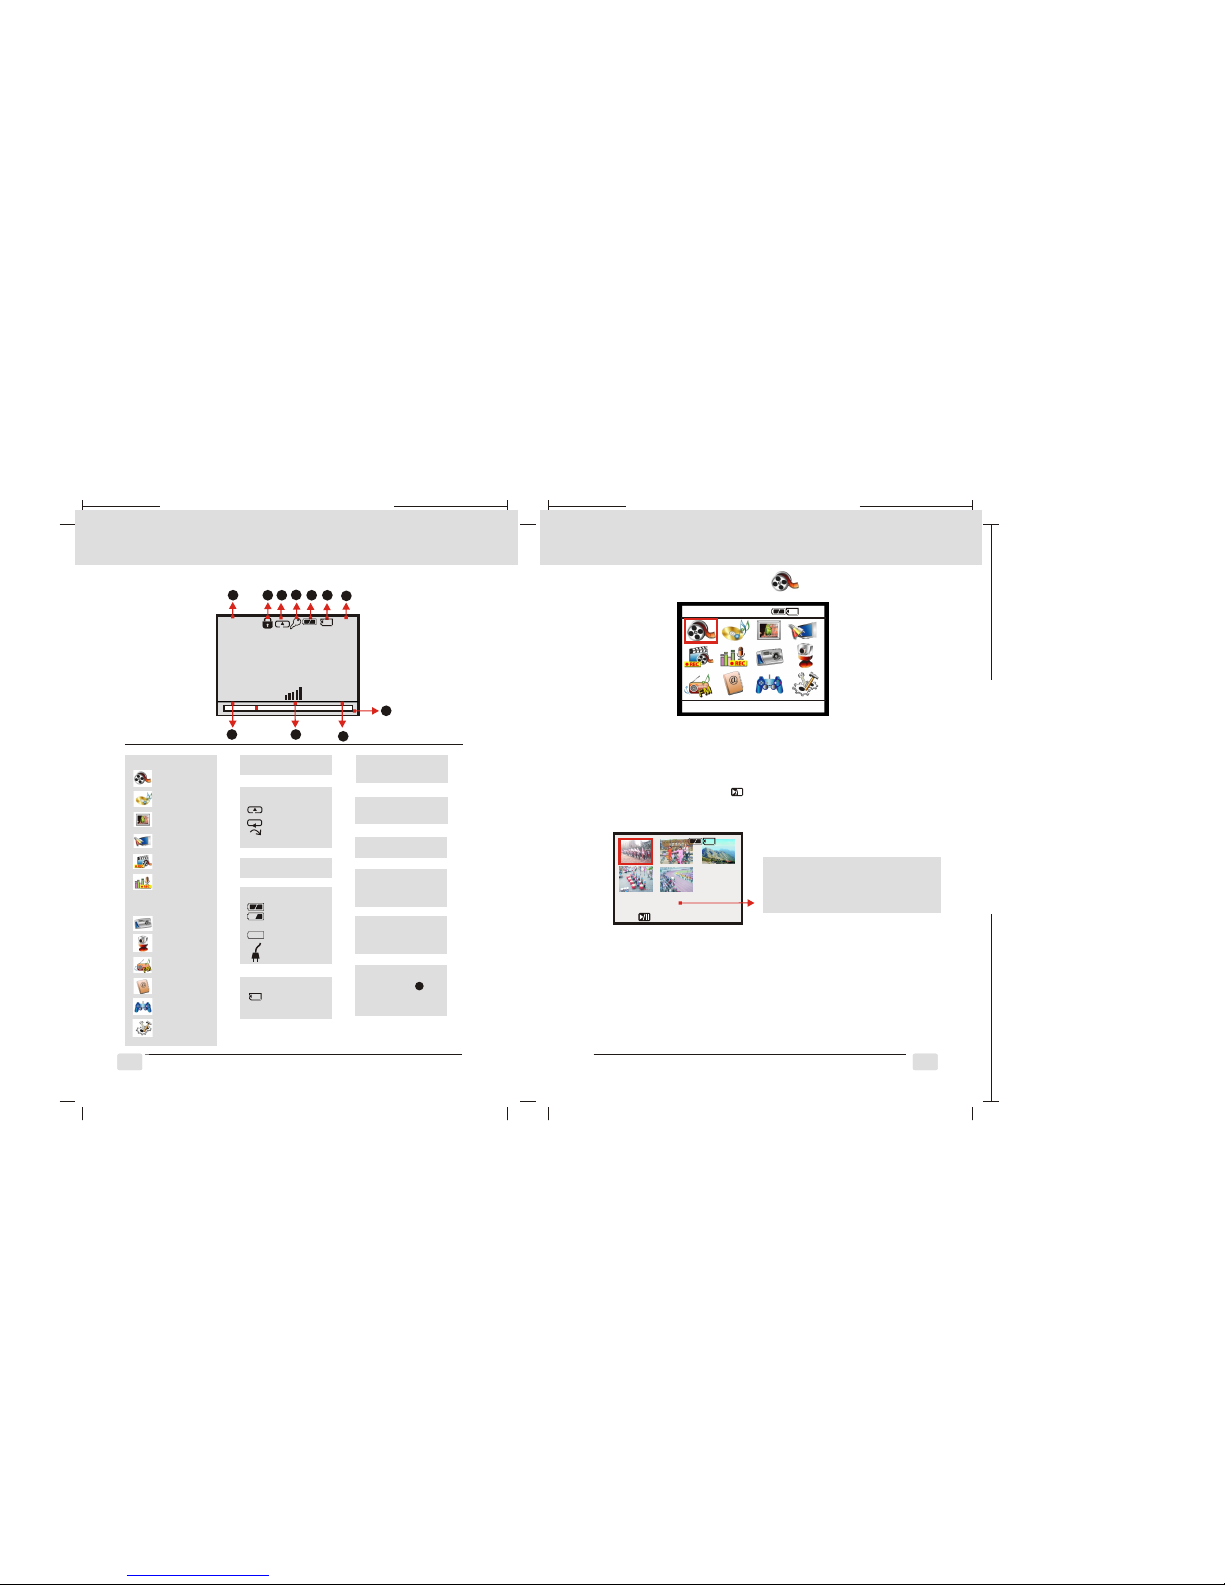
3.4 I con Dis play In trodu ction
7
2 3
8
4
5 6
9
10
1.Current Mode
( ) VIDEO
( ) AUDIO
( ) PHOTO
( ) AV IN
( ) RECORDING
( ) VOICE
RECORDING
( ) CAMERA
( ) PC CAMERA
( ) FM
( ) ACCESSORY
( ) GAME
( ) SETUP
5.Battery Status
( ) Battery Full
( ) Battery Half
Drained
( ) Battery Drained
( ) Charging
10.Available Playback
Time (Min : Sec.)
under Audio mode.
11. Fast-forward &
Rewind Bar
3. Repeat Mode
( ) ONE
( ) ALL
( ) RANDOM
6. Memory Status
( ) Memory card
4. Protectd File
7. Current Time
(Hour:Min.)
8. Current Playback
Position (Min: Sec.)
9. Volume Adjust Bar
Getti ng Ready
15:25
VIDEO
1
1
2. Lock
Not e: Only u nder
Mai n Menu, “ “ w ill
sho w “mont h/dat e
” as “0 5/15” .
1
1
1
2
3
VIDEO
Unde r Vi deo Mode ( )
Pla y Video
Und er Vide o mo de, y ou w ill s ee y our v id eo fi le s sho wing as
Thu mb nai ls o n scr ee n. You ca n ch oos e th e vid eo file y ou
wan t to play a nd pres s to play i t. If you w ant to go b ack to
Mai n Menu, p lease p ress ME NU butt on.
Advan ced Functionality Settings
MP4_0001.ASF
Play: EXIT: MENU
Not e: File n ame and f ormat o f
the v ideo fi le you ch oose wi ll
sho w in yell ow.
Video
15:25
Video Thumbnails
15:25
Page 6
02 03
103mm+-1
140mm+1-2
103mm+-1
02 0302 0310 11
Whe n Playi ng Vide o. ..
1. Sh ort pre ss to pla y the pre vious v ideo
2. Sh ort pre ss to pla y the nex t video
3. Sh ort pre ss to adj ust the v olume l ouder
4. Sh ort pre ss to adj ust the v olume l ower
5. Lo ng pres s to rewi nd the vi deo
6. Lo ng pres s to fast -forw ard the v ideo
7. Pr ess to pa use it.
8. Pr ess OK bu tton an d press t o retur n to Vide o
Thu mbnai ls
9.
OK Bu tton fo r advan ced set tings
If yo u press O K butto n under V id eo mo de , you c an h ave
adv anced s ettin gs as fol lows:
1.PL AY: It wi ll play t he file y ou choo se afte r you pre ss OK
but ton aga in.
2.R EPEAT:
You can c hoose R EPEAT an d pre ss t o ent er t he RE PEAT
mod e as foll ows to se lect th e way you w ant to pl ay and
pre ss OK but ton.
The s ound wi ll come o ut from t he buil t-in sp eaker i f
no ea rphon e is used . If you pr efer to p lay the m usic
thr ough an e arpho ne, ple ase hav e the ear phone
con necte d to the Ea rphon e Jack ( ).
PLAY: OK EXIT:
Not e:REP EAT Icon D isp la y
( ) Rep eat ONE f ile
( ) Rep eat ALL th e fil es
( ) Rep eat Ran domly
PLAY
REPEAT
PROTECT
DELETE
INFO.
SET: OK BACK:
REPEAT
OFF
ON
ALL
RANDOM
Advan ced Functionality Settings
1
2
3
3. PR OTECT:
Thi s fu nct io n all ow s you t o pr eve nt y our s pe cif ic vide os
fro m being d elete d. If you c hoose L OCK, th e “ “ icon wi ll
sho w on the sc reen wh en you se lect th e speci fic fil e. You
can s elect U NLOCK t o cance l the pro tecti on.
4.D ELETE :
You can d elete t he file y ou've s elect ed , if you s elect d elete
ONE . You ca n als o de let e al l vid eo file s once if y ou sele ct
del ete ALL.
5. IN FO.:
You can s ee the re lated i nform ation a bout th is vide o file an d
pre ss to EXI T (go b ack to Vi de o Thu mbn ai l pag e).
EXIT:
Fil e name an d file fo rmat
Vid eo l eng th
Fil e size
The a st Edit ig File Ti me
Loo ked or Un locke d
PROTECT
LOOK
UNLOCK
SET: OK BACK:
DELETE
ONE NO
ALL YES
MP4_0001.ASF
03:54
320X240
03/24/2006 15:00:48
PROTECTED!
Advan ced Functionality Settings
SET: OK BACK:
Page 7
02 03
103mm+-1
140mm+1-2
103mm+-1
02 0302 0312 13
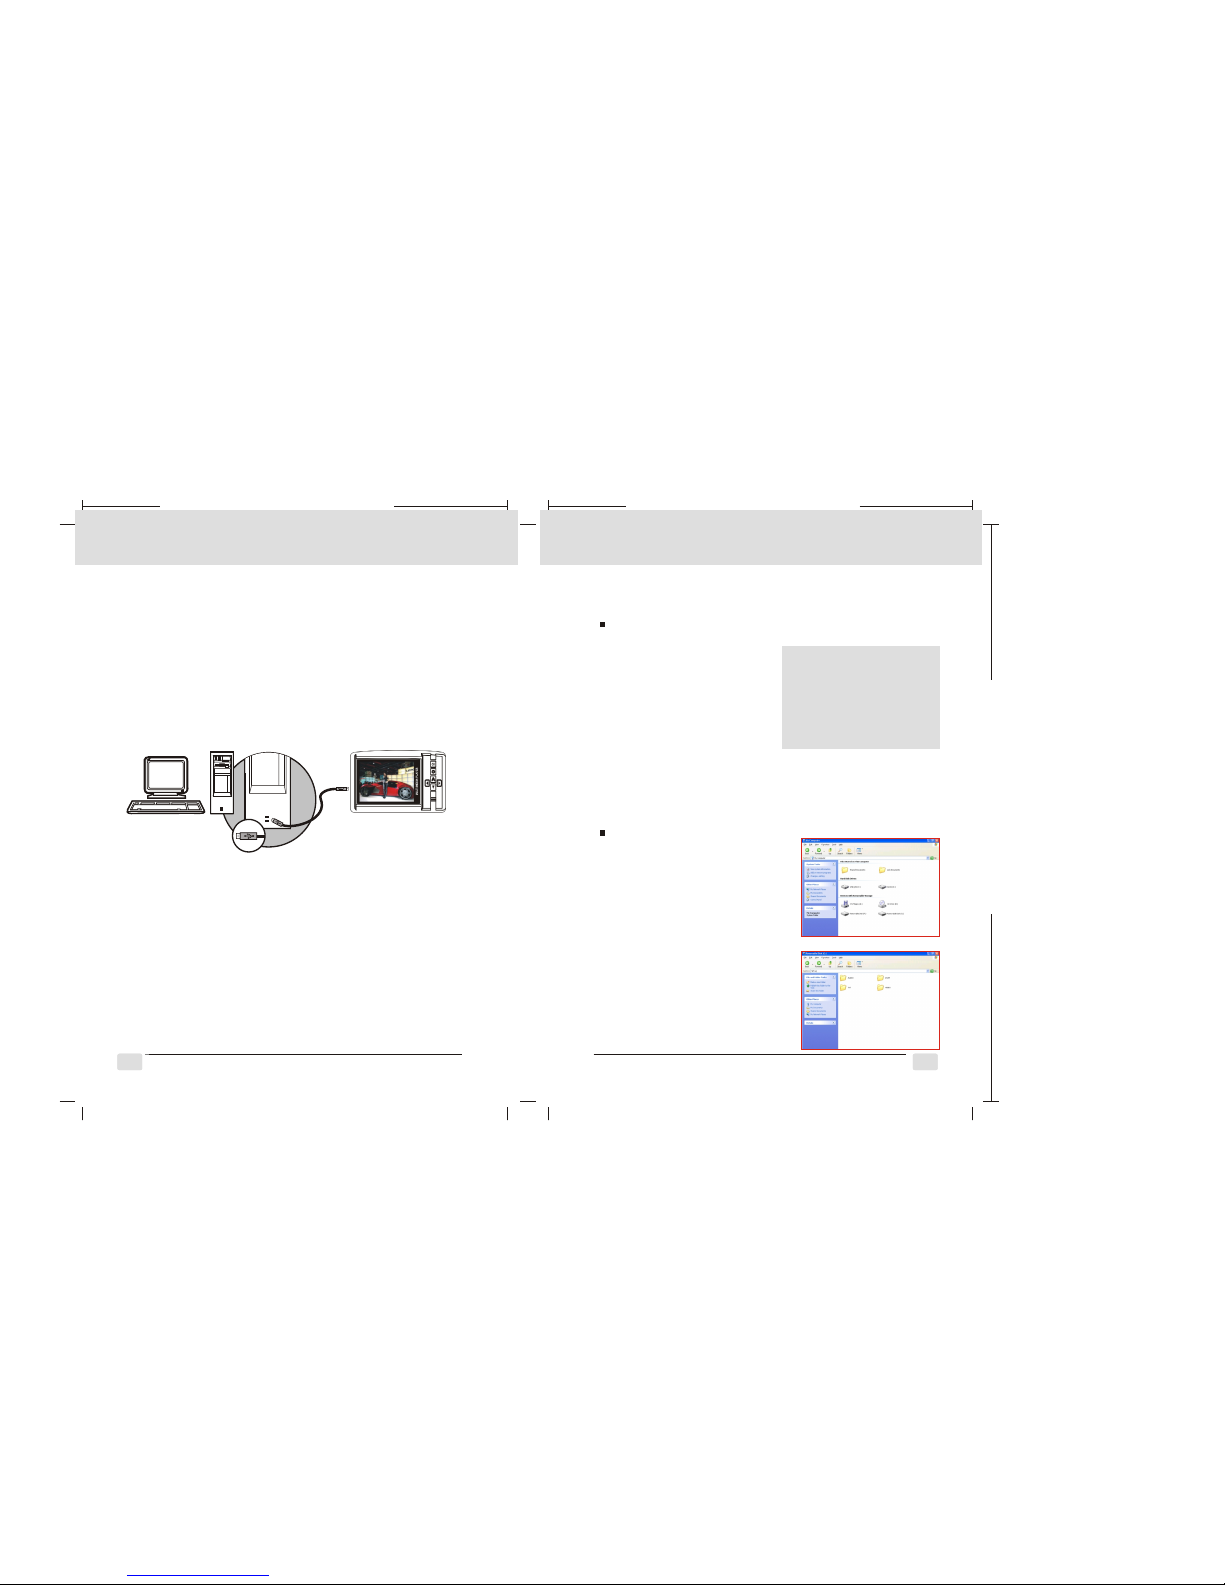
TV Connection
1.Vi de o-o ut :
(1)T urn o n th e pla ye r and T V se t.
(2)G o to SETU P mod e of the pl ayer an d set up th e Video
typ e. (NTS C or PAL)
(3)C onnec t AV Out po rt of the p layer t o Video i np ut po rt s
of th e TV se t with th e suppl ied Vid eo C abl e.
(4)E nter Vi de o/A ud io/ Ph oto m od e of th e pl aye r an d sel ect
the f ile you w ant to sh ow on scr een for T V vi ewi ng .
2.TV /VCD/ DVD pla yer rec oding :
(1)T urn o n th e pla ye r and T V se t/V CD /DV D pl aye r.
(2)M ake sur e the TV pr og ram o r VC D/D VD y ou wa nt t o rec or d
is re ady.
(3)C onnec t AV IN por t of the pl ayer to V id eo ou tp ut po rt s of
TV se t/ VCD /D VD pl ay er wi th t he su pp lie d Vi deo C ab le.
(4)E nter th e AV IN mod e and pre ss to sta rt reco rding .
Ple ase ref er to AV IN mod e.
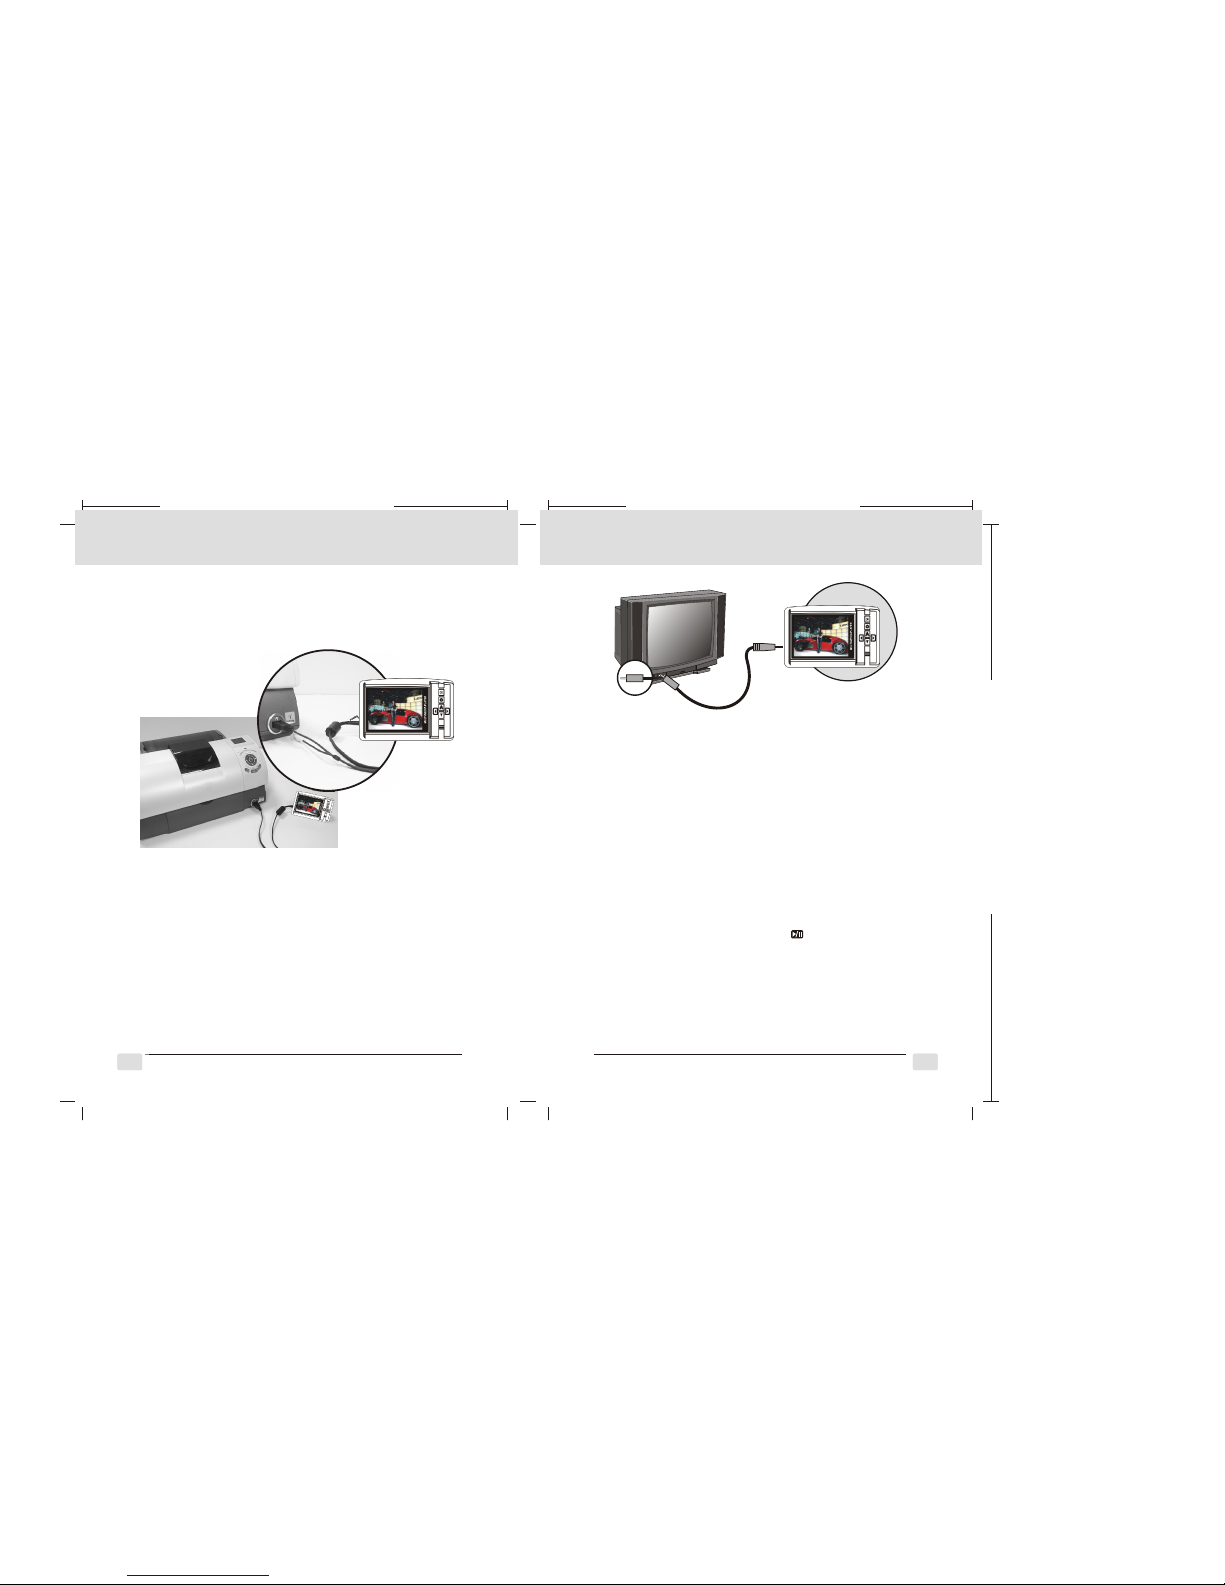
Con necti ng the Pl ayer to a P ictBr idge- suppo rt ed Pr inter
If th e print er you ha ve supp orts th e inter face of P ictBr idge,
the n you can h ave you r camer a conne cted wi th the pr inter b y
the s uppli ed USB ca ble to ha ve the st ored im ages pr int out
dir ectly.
1.Ha ve both o f the pla yer and t he prin ter pow ered on .
2.Go t o the SET UP mode o f th e pla ye r and s el ect t he U SB
set tings o n PRINT ER.
3.Us e the sup plied U SB cabl e to conn ect the p layer t o the
Pic tBrid ge-su pport ed prin ter as sh own abo ve.
Printer Connection (PictBridge settings)
Page 8
02 03
103mm+-1
140mm+1-2
103mm+-1
02 0302 0314 15
How to Connect with a Comput er
Com puter /Note book Co nnect ion
1.Do wnloa d files f rom you r compu ter: Pl ease re fer to
Acce ssory m ode, US B setti ngs. Aft er you ch oose th e
Com puter c onnec tion on U SB sett ings, y ou can st art to
dow nload f iles fr om your c omput er.
2.Fo r the pla yer sup ports C amera /DV fun ction , with US B
con necti on, you c an also d ownlo ad the im age/v ideo fi les
fro m the pla yer to yo ur comp uter.
Computer
PC Connection
PC Connection
Downloading the Image(s)
Under Windows Operating System (Windows 2000/ME/XP)
Dow nload ing Ima ge(s) F rom
Rem ovabl e Disk
1. Tur n on the PC .
2. Sw itch on t he play er.
Dow nload ing Ima ge(s) f rom
Your P C
1. Co nnect t he came ra to the P C by USB
cab le unde r any wor king
mod e: Plea se make s ure the U SB
cab le is wel l conne cted to b oth PC an d
pla yer.
2. You ca n find “r emova ble dis k”
sho wing on y our PC.
Whe n you ope n this di sk, you
can f ind the p layer w ill
aut omati cally g enera te 4
fol ders in cludi ng AUDIO ,
DCI M,TXT a nd VIDE O.
AUDI O is for mu sic fil e.
DCI M is for im age fil e.
TXT is f or word f ile (E- Book) .
3. You ca n downl oad you r files
fro m PC, and s ave the m by
typ e in the fo lders s epera tely.
3. Co nnect t he came ra to the P C by
USB c able un der any w orkin g
mod e. Plea se make s ure the U SB
cab le is wel l conne cted to b oth the
PC an d playe r.
4. Wh en the US B cable i s conne cted
to th e PC, the re will b e a new
har d disk na med Rem ovabl e Disk
sho wing on t he comp uter.
5. Th e store d “imag e(s) ca n be
fou nd in “Re movea ble Dis k/Dci m
/10 0medi a.
6. Vi ew the im age wit h a
dou ble-c licks .
Not e: If you ’ve ins erted me mory
car d in the pl ayer, wh en
con necti ng with P C, your P C will
sho w 2 new har d disks n amed
Remo vabl e Disk.
The f irst on e stand s for bui t-in
memo rys; t he seco nd one st ands
for c ard memo ry.
 Loading...