

Page 1

VF5
AC voltage detector with flashlight
Quick start guide
EN - FR - ES - ESLT - DE
Page 2

GSAFETY WARNINGS
Read, understand and follow Safety Warnings and Operating Instructions in the manual
before using this product.
The detector’s safety features may not protect the user if not used in accordance with the
manufacturer’s instructions.
Check on a known live source within the rated AC voltage range of the detector before use to
ensure it is in working order.
Insulation type and thickness, distance from the voltage source, shielded wires, and other
factors may affect reliable operation.
The VF5 may help in the indication of live AC circuits only and must not be used as verification
of a de-energised circuit. This is not a Safety Test Lamp.
Do not use if the detector appears damaged or if it is not operating property. If in doubt,
replace the product.
Do not use on voltages that are higher than as marked on the VF5.
Use caution with voltages above 30 V AC as a shock hazard may exist.
Comply with all applicable safety codes. Use approved personal protective equipment when
working near live electrical circuits-particularly with regard to arc-flash potential.
Do not operate detector if Low Battery warning occurs. Replace batteries immediately.
NOTE: The VF5 is unable to detect voltage on armoured or sheathed cable, or on cable in conduit,
behind panels or in metallic enclosures.
CATIV Measurement category IV: Equipment connected between the origin of the low-voltage
mains supply outside the building and the consumer unit.
CATIII Measurement category III: Equipment connected between the consumer unit and the
electrical outlets.
CATII Measurement category II: Equipment connected between the electrical outlets and the
user’s equipment.
Page 3
F INTERNATIONAL SAFETY SYMBOLS :
G Potential danger. Indicates the user must refer to the manual for important
safety information
F Indicates hazardous voltages may be present
t Equipment is protected by double or reinforced insulation
Equipment complies with current EU directives
End of life disposal
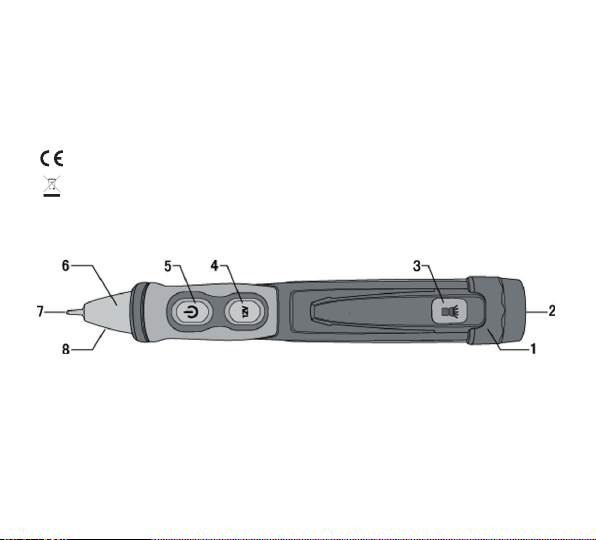
Detector Description
1. Screw on battery cover
2. Torch
3. Torch button
4. 12 V button
5. On/Off button
6. LED indicators
7. Detector tip
8. Work light
Page 4
Operation
1. Turning the VF5 on: Momentarily press the detector On/Off button. The
sounder will beep once, vibrate once and the green LED will illuminate to indicate
that the detector is on and ready for use.
2. Turning the VF5 off: Momentarily press the
beep twice, vibrate twice and the green LED will turn off.
3. Turning the Sounder off and Vibrating motor off: Turn the VF5 on as de-
scribed above. The VF5 will now operate with both the sounder and the vibrating
motor. To turn the sounder and vibrating motor off, press and hold the
button until the green LED flashes once. To turn the sounder and vibrating motor
back on press and hold the
sounder beeps and the unit vibrates.
4. Verify Operation: Before using VF5, (1) Make sure the green LED is glowing, (2)
Check VF5 on a known live AC voltage that is within the defined detection range
of the VF5.
5. Low Voltage Mode (12 V to 1000 V AC): Turn on the VF5. Press and hold the
12 V button. The green LED will change to orange to indicate the VF5 is in the low
voltage mode. While pressing the 12 V button place the tip of the VF5 near an AC
voltage. When AC voltage is detected the LED will turn red and flash, the sounder
will beep and the detector will vibrate. The flash, beeping and vibration rate will
increase as the VF5 gets closer to the voltage source. If the VF5 detects a medium
voltage (100 V – 1000 V) it will automatically change over to the medium voltage
mode, the red LED will change to a steady glow, the sounder will beep rapidly and
the detector will vibrate constantly.
On/Off button until the green LED flashes, the
On/Off button. The VF5 will
On/Off
Page 5

6. Medium Voltage Mode (100 V to 1000V AC): Place the tip of the VF5 near an
AC voltage. If the VF5 detects voltage within the defined detection range the green
LED will turn off, the red LED will turn on, the sounder will beep rapidly and the
detector will vibrate constantly.
NOTE: The detector cannot determine the actual voltage. The voltage level where the
detector switches from the low to medium voltage mode is affected by insulation type
and thickness, distance from the voltage source, and other factors.
7. Low Battery Indication: Replace the batteries if the green LED does not turn on.
When the detector is on and the battery voltage is too low for reliable operation,
the sounder will beep three times and the green LED will turn off indicating the
detector is not operational. Replace the batteries to restore operation.
8. Auto Power Off: To conserve battery life, the detector will automatically turn off
after approximately 5 minutes of inactivity. When powering down the detector will
beep twice and the green LED will turn off.
9. Torch: Momentarily press the torch
conserve battery life, the torch will automatically turn off after approximately 5
minutes.
NOTE: If the battery voltage is too low to operate the torch the detector will indicate
this condition by beeping three times and the torch will turn off. The voltage detector
has its own low battery threshold and may remain operational. Refer to Verify Operation
(Step 4) in this guide before using detector.
button to turn the torch on or off. To
Page 6

Battery replacement
1. Carefully unscrew battery cap at the rear (torch end) of the detector.
2. Replace batteries with 2 x AAA 1.5V batteries. Observe polarity.
3. Carefully align cap with detector as shown below.
4. Screw cover onto the detector until it feels tight; do not use excessive force.
5. Verify operation by using the detector on a known live AC voltage within the
defined detection range of the detector.
Page 7

Note: When batteries are loaded for the first time, please remove the white rectangular
security strip before installing.
When replacing the batteries, be sure to secure the cap firmly to maintain IP67 water
and dust protection. A loose or over tightened battery cap may compromise water and
dust protection.
Specifications
Detection voltage range 12 V AC to 1000 V AC, 100 V to 1000 V AC
Frequency range 50/60 Hz
Batteries 2 x AAA / LR03 1.5 V batteries
Ambient Operating temperature 0 °C to 50 °C (32 °F to 122 °F)
Storage temperature -10 °C to 60 °C (14 °F to 140 °F)
Humidity 80 % max.
Altitude 2000 metres
Pollution Degree 2
Safety Compliance CAT IV 1000 V
Auto Power Off 5 minutes
Ingress Protection Rating IP67
Page 8

Product manufactured in China
Note: For full details see the full VF5 User Guide at www.megger.com
Megger Limited
Archcliffe Road
Dover
Kent
CT17 9EN
Tel: +44 (0) 1304 502 101 Fax: +44 (0) 1304 207 342 www.megger.com
Page 9

VF5
Détecteur de tension CA
FR
Page 10

GAvertissements de sécurité
Avant d’utiliser ce produit, lisez attentivement les avertissements de sécurité et les instructions
d’utilisation du présent manuel, et respectez-les.
En cas d’utilisation non conforme aux instructions du fabricant, les dispositifs de sécurité du
détecteur pourraient ne pas protéger l’utilisateur.
Le bon fonctionnement du détecteur doit être vérifié avant son utilisation sur une source de
tension connue comprise dans la plage de tensions CA nominales du détecteur.
Le type et l’épaisseur de l’isolant, la distance par rapport à la source de tension, les câbles
blindés et d’autres facteurs peuvent avoir un impact sur la fiabilité du résultat.
Le VF5 peut détecter des circuits à courant alternatif sous tension uniquement, et ne doit
pas être utilisé pour contrôler un circuit hors tension. Il ne s’agit pas d’une lampe de test de
sécurité.
N’utilisez pas le détecteur s’il est endommagé ou s’il ne fonctionne pas correctement. En cas de
doute, remplacez le produit.
N’utilisez pas le détecteur pour des tensions supérieures à celles indiquées sur son boîtier.
Utilisez l’appareil avec précaution pour des tensions supérieures à 30 V CA, en raison du risque
de choc électrique.
Respectez l’ensemble des consignes de sécurité applicables. Utilisez un équipement de protec
tion individuelle approuvé lors d’interventions à proximité de circuits électriques sous tension,
pour vous protéger notamment d’éventuels arcs électriques.
N’utilisez pas le détecteur si l’avertissement Low Battery (Batterie faible) s’affiche. Remplacez les
piles immédiatement.
REMARQUE : Le VF5 ne peut pas détecter la tension sur des câbles blindés, ou des câbles passant
dans des gaines, derrière des cloisons ou dans des boîtiers métalliques.
CATIV Mesure de catégorie IV : Équipement connecté entre la source de l’alimentation électrique
basse tension à l’extérieur du bâtiment et l’installation de l’utilisateur
CATIII Mesure de catégorie III : Équipement connecté entre l’installation de l’utilisateur et les
prises de courant.
CATII Mesure de catégorie II : Équipement connecté entre les prises de courant et l’équipement
de l’utilisateur.
-
Page 11

F SYMBOLES INTERNATIONAUX DE SÉCURITÉ
G Danger potentiel. Indique que l’utilisateur doit consulter le manuel
d’utilisation pour prendre connaissance d’informations de sécurité importantes
F Indique la présence éventuelle de tensions dangereuses
t L’équipement est protégé par une double isolation ou une isolation renforcée
Équipement conforme aux directives européennes en vigueur
Mise au rebut en fin de vie
DESCRIPTION DU DÉTECTEUR
1. Bouchon à vis du compartiment
des piles
2. Lampe de poche
3. Bouton de la lampe de poche
4. Bouton 12 V
5. Bouton On/Off (Marche/Arrêt)
6. Voyants LED
7. Pointe du détecteur
8. Lumière de travail
Page 12

UTILISATION
1. Mise sous tension du VF5 : Appuyez sur le bouton On/Off du détecteur. Un
bip sonore retentit, le VF5 vibre une fois et la LED verte s’allume pour indiquer que
le détecteur est sous tension et prêt à être utilisé.
2. Mise hors tension du VF5 : Appuyez sur le bouton On/Off
deux bips sonores, vibre deux fois et la LED verte s’éteint.
3. Désactivation du bip sonore et du moteur vibrant : Mettez le VF5 sous
tension comme décrit ci-dessus. Le bip sonore et le moteur vibrant du VF5 sont
maintenant activés. Pour désactiver le bip sonore et le moteur vibrant, appuyez
sur le bouton On/Off
clignote. Pour réactiver le bip sonore et le moteur vibrant, appuyez sur le bouton
On/Off
bip sonore retentisse et que l’appareil vibre.
4. Vérification du fonctionnement : Avant d’utiliser le VF5, (1) vérifiez que la LED
verte est allumée en continu et (2) contrôlez son bon fonctionnement sur une
tension CA connue comprise dans la plage de détection définie.
5. Mode basse tension (12 V à 1 000 V CA) : Mise sous tension VF5. Appuyez
sur le bouton 12 V et maintenez-le enfoncé. La LED verte devient orange pour
indiquer que le VF5 est en mode basse tension. Tout en maintenant enfoncé le
bouton 12 V, placez la pointe du VF5 à proximité d’une tension CA. Lorsqu’une
tension CA est détectée, la LED devient rouge et clignote, un bip sonore retentit et
le détecteur vibre. La vitesse de clignotement, des bips et de la vibration augmente
lorsque le VF5 est rapproché de la source de tension. Si le VF5 détecte une tension
moyenne (100 V - 1 000 V), il passe automatiquement en mode moyenne tension.
La LED rouge s’allume en continu et le détecteur émet des bips rapprochés et vibre
en permanence.
et maintenez-le enfoncé jusqu’à ce que la LED verte clignote, qu’un
et maintenez-le enfoncé jusqu’à ce que la LED verte
. Le VF5 émet
Page 13

6. Mode moyenne tension (100 V à 1 000 V CA) : Placez la pointe du VF5 à prox-
imité d’une tension CA. Si le VF5 détecte une tension dans la plage de détection
définie, la LED verte s’éteint, la LED rouge s’allume et le détecteur émet des bips
rapprochés et vibre en continu.
REMARQUE : Le détecteur ne peut pas déterminer la tension réelle. Le niveau de
tension auquel le détecteur passe du mode basse tension à moyenne tension est
impacté par le type et l’épaisseur de l’isolation, la distance par rapport à la source de
tension et d’autres facteurs.
7. Indication Low Battery (Batterie faible) : Remplacez les piles si la LED verte ne
s’allume pas. Lorsque le détecteur est en marche et que la charge des piles est trop
faible pour un fonctionnement fiable, le VF5 émet trois bips sonores et la LED verte
s’éteint, indiquant que le détecteur n’est pas opérationnel. Remplacez les piles pour
rétablir le fonctionnement.
8. Arrêt automatique : Pour économiser les piles, le détecteur s’arrête automatique-
ment après environ 5 minutes d’inactivité. Lorsqu’il se coupe, le VF5 émet deux
bips sonores et la LED verte s’éteint.
9. Lampe de poche : Appuyez sur le bouton de la lampe de poche pour l’activer ou
la désactiver. Pour économiser les piles, la lampe de poche s’éteint automatique-
ment après environ 5 minutes.
REMARQUE :Si la charge des piles est trop faible pour activer la lampe de poche, le
détecteur l’indique par trois bips, et la lampe de poche s’éteint. Le détecteur de tension
possède son propre seuil de batterie faible et peut rester opérationnel. Reportez-vous
à la section Vérification du fonctionnement (étape 4) de ce manuel avant d’utiliser le
détecteur.
Page 14

REMPLACEMENT DES PILES
1. Dévissez doucement le bouchon du compartiment des piles à l’arrière (extrémité
lampe de poche) du détecteur.
2. Remplacez les piles par 2 piles AAA 1,5 V. Respectez la polarité.
3. Alignez soigneusement le bouchon sur le détecteur comme représenté ci-dessus.
4. Vissez le bouchon sur le détecteur jusqu’à ce qu’il soit suffisamment serré ; ne
forcez pas de manière excessive.
5. Avant d’utiliser le détecteur, vérifiez son fonctionnement sur une tension CA
connue comprise dans la plage de détection définie..
Extrémité du
testeur
Bouchon avec ressorts à
aligner
Insérez 2 piles AAA
(le + en premier)
Vissez le bouchon du compartiment des
piles en alignant les 2 ressorts sur les
2 contacts.
Page 15

Remarque : Avant de mettre des piles pour la première fois, retirez la languette de
sécurité rectangulaire blanche. Lors du remplacement des piles, assurez-vous de revisser
fermement le bouchon pour préserver la protection IP67 contre l’eau et la poussière. Si
le bouchon du compartiment des piles est mal vissé ou trop vissé, la protection contre
l’eau et la poussière peut être compromise.
CARACTÉRISTIQUES TECHNIQUES
Plage de détection de tension 12 V CA à 1 000 V CA, 100 V à 1 000 V CA
Plage de fréquence 50/60 Hz
Piles 2 piles AAA / LR03 1,5 V
Température ambiante en service
0 °C à 50 °C (32 °F à 122 °F)
Storage temperature -10 °C à 60 °C (14 °F à 140 °F)
Humidité 80 % max.
Altitude 2 000 mètres
Degré de pollution 2
Classe de sécurité CAT IV 1000 V
Arrêt automatique 5 minutes
Indice de protection IP67
Page 16

Produit fabriqué en Chine
Remarque : Pour de plus amples informations, consultez le Manuel utilisateur VF5
complet sur www.megger.com
Megger Limited
Archcliffe Road
Dover
Kent
CT17 9EN
Tel: +44 (0) 1304 502 101 Fax: +44 (0) 1304 207 342 www.megger.com
Megger est une marque de commerce déposée.
Les produits de Megger sont distribués dans 146 pays.
Cet instrument est fabriqué en Chine.
L’entreprise se réserve le droit de modifier les caractéristiques techniques ou
la conception sans préavis.
Page 17

VF5
Detector de tensión de CA
ES
Page 18

GADVERTENCIAS DE SEGURIDAD
Lea, comprenda y siga las advertencias de seguridad y las instrucciones de funcionamiento del
manual antes de utilizar este producto.
Es posible que las características de seguridad del detector no protejan al usuario si no se
utiliza de acuerdo con las instrucciones del fabricante.
Compruebe si existe una fuente con tensión conocida dentro del rango de tensión de CA
nominal del detector antes de utilizarlo para asegurarse de que esté en condiciones de
funcionamiento.
El tipo y espesor del aislamiento, la distancia a la fuente de tensión, el recubrimiento de los
cables y otros factores pueden afectar a la fiabilidad del funcionamiento.
El VF5 puede ayudar a detectar solamente circuitos de CA con tensión y no se debe utilizar
como medio de verificación de un circuito sin tensión. Esta no es una luz de comprobación
de seguridad.
No utilice el detector si parece dañado o si no funciona correctamente. En caso de duda,
reemplace el producto.
No lo utilice con tensiones superiores a las indicadas en el VF5.
Extreme las precauciones con tensiones superiores a 30 V CA, ya que puede existir peligro de
descarga eléctrica.
Cumpla con todos los códigos de seguridad aplicables. Utilice equipos de protección personal
aprobados cuando trabaje cerca de circuitos eléctricos con corriente, especialmente con
respecto al potencial de arco eléctrico.
No use el detector si se muestra una advertencia de batería baja. Reemplace las pilas de
inmediato.
NOTA: El VF5 no puede detectar tensión en cables apantallados o armados, ni en cables en tubo,
detrás de paneles o en recintos metálicos.
CATIV Categoría de medición IV: Equipos conectados entre la fuente de la red de suministro
eléctrico de baja tensión del exterior del edificio y el cuadro de distribución.
CATIII Categoría de medición III: Equipos conectados entre el cuadro de distribución y las tomas
de corriente.
CATII Categoría de medición II: Equipos conectados entre las tomas de corriente y los equipos
del usuario.the electrical outlets and the user’s equipment.
Page 19

F SÍMBOLOS DE SEGURIDAD INTERNACIONALES :
G Peligro potencial. Indica que el usuario debe consultar el manual para
obtener información de seguridad importante
F Indica que pueden existir tensiones peligrosas
t El equipo está protegido por aislamiento doble o reforzado.
El equipo cumple con las directivas actuales de la UE.
Eliminación al final de la vida útil
Descripción del detector
1. Tapa de batería con tornillo
2. Linterna
3. Botón de linterna
4. Botón de 12 V.
5. Botón de encendido/apagado
6. Indicadores LED
7. Punta detectora
8. Luz de trabajo
Page 20

FUNCIONAMIENTO
1. Encendido del VF5: Presione momentáneamente el botón de encendido/apa-
gado del detector. El detector emitirá un solo pitido, vibrará una vez y el LED verde
se iluminará para indicar que el detector está encendido y listo para su uso.
2. Apagado del VF5: Presione momentáneamente el
do. El VF5 emitirá dos pitidos, vibrará dos veces y el LED verde se apagará.
3. Desactivación del avisador acústico y de vibración: Encienda el VF5 como se
ha indicado anteriormente. El VF5 funcionará ahora con el avisador acústico y de
vibración. Para apagar el avisador acústico y de vibración, mantenga presionado el
botón de encendido/apagado hasta que la luz LED verde parpadee. Para volver
a encender el avisador acústico y de vibración, mantenga presionado el
de encendido/apagado hasta que la luz LED verde parpadee, el avisador emita un
pitido y vibre.
4. Comprobación del funcionamiento: Antes de usar el VF5, (1) asegúrese de
que el LED verde esté iluminado y (2) compruebe el VF5 con una tensión de CA
conocida que esté dentro del rango de detección definido del VF5.
5. Modo de baja tensión (12 V a 1000 V CA): Eliminación al final de la vida útil
mantenga pulsado el botón de 12 V. El LED verde cambiará a naranja para indicar
que VF5 está en el modo de baja tensión. Mientras presiona el botón de 12 V,
coloque la punta del VF5 cerca de una tensión de CA. Cuando se detecte tensión
de CA, el LED se encenderá en rojo y parpadeará, la alarma sonará y el detector vibrará. La frecuencia del parpadeo, el pitido y la vibración irá en aumento a medida
que el VF5 se aproxime a la fuente de tensión. Si el VF5 detecta una tensión media
(100 V – 1000 V), cambiará automáticamente al modo de media tensión, el LED
rojo brillará con luz fija, el avisador acústico emitirá un pitido rápido y el detector
botón de encendido/apaga-
botón
Page 21

vibrará continuamente.
6. Modo de media tensión (100 V a 1000V CA): Coloque la punta del VF5 cerca
de una tensión de CA. Si el VF5 detecta tensión dentro del rango de detección
definido, el LED verde se apagará, el LED rojo se encenderá, el avisador emitirá un
pitido rápido y el detector vibrará continuamente.
NOTA: El detector no puede determinar la tensión real. El nivel de tensión al que el
detector cambia del modo de baja a media tensión se ve afectado por el tipo y el
espesor del aislamiento, la distancia a la fuente de tensión y otros factores.
7. Indicación de batería baja: Reemplace las pilas si el LED verde no se enciende.
Cuando el detector esté encendido pero la tensión de la batería sea demasiado
baja para un funcionamiento fiable, la sonda emitirá un pitido tres veces y el LED
verde se apagará para indicar que el detector no está operativo. Cambie las pilas
para restablecer el funcionamiento.
8. Apagado automático: Para conservar la vida útil de la batería, el detector se
apagará automáticamente después de aproximadamente 5 minutos de inactividad.
Al apagarse, el detector emitirá dos pitidos y el LED verde se apagará.
9. Linterna:Pulse momentáneamente
o apagar la luz. Para conservar la vida útil de la batería, la linterna se apagará
automáticamente después de aproximadamente 5 minutos.
NOTA: Si la tensión de la batería es demasiado baja para poder usar la linterna, el detector sonará tres veces y la linterna se apagará. El detector de tensión tiene su propio
umbral de batería baja y podría seguir estando operativo. Consulte Comprobación del
funcionamiento (Paso 4) de esta guía antes de utilizar el detector..
bel botón de linterna para encender
Page 22

SUSTITUCIÓN DE LAS PILAS
1. Con cuidado, desatornille la tapa de la batería de la parte posterior (lado de la
linterna) del detector.
2. Sustituya las pilas por 2 pilas AAA de 1,5V. Respete la polaridad.
3. Alinee cuidadosamente la tapa con el detector tal como se muestra arriba.
4. Atornille la tapa de las baterías hasta que esté bien apretada; no aplique demasiada
fuerza.
5. Compruebe el funcionamiento utilizando el detector con un conductor con tensión
de CA conocida dentro del rango de detección definido del detector..
Extremo del
comprobador
Tapa con resortes para
alinearlos
Inserción de 2 pilas AAA
Alineación de la tapa de la
batería
Page 23

Nota: Si coloca las baterías por primera vez, retire la tira rectangular blanca de
seguridad antes de instalarlas.
Cuando sustituya las baterías, asegúrese de asegurar la tapa para mantener la
protección IP67 contra el agua y el polvo. Si la tapa de batería está floja o demasiado
apretada, puede comprometer la protección contra el agua y el polvo.
ESPECIFICACIONES
Rango de tensión de detección 12 V de CA a 1000 V de CA
100 V a 1000 V de CA
Rango de frecuencia 50/60 Hz
Baterías 2 pilas AAA / LR03 de 1,5 V,
Temperatura ambiente 0 °C a 50 °C (32 °F a 122 °F)
de funcionamiento
Temperatura de De -10 °C a 60 °C (14 °F a 140 °F)
almacenamiento
Humedad 80 % máx.
Altitud 2000 metros
Grado de contaminación 2
Normativa de seguridad CAT IV 1000 V
Apagado automático 5 minutos
Clasificación de
protección de entrada IP67
Page 24

Producto fabricado en China
Nota: Para obtener información detallada, consulte la Guía del usuario VF5 completa en
www.megger.com
Megger Instruments S.L. Nave 16,
Calle La Florida 1,
Parque Empresarial Villapark,
Villaviciosa de Odón (Madrid)
Tel. +34 91 616 5496
Correo electrónico: info.es@megger.com
Megger es una marca registrada.
Los productos de Megger se distribuyen en 146 países de todo el mundo. Este
instrumento se fabrica en China.
La empresa se reserva el derecho de modificar las especificaciones o el diseño
sin previo aviso
Page 25

VF5
Detector de tensión de CA
ES-LT
Page 26

GADVERTENCIAS DE SEGURIDAD
Lea, comprenda y siga las advertencias de seguridad y las instrucciones de funcionamiento
que se indican en manual antes de utilizar este producto.
Las funciones de seguridad del detector pueden no proteger al usuario si el producto no se
utiliza según las instrucciones del fabricante.
Revise el producto en una fuente que se sepa que está activa y que se encuentre dentro del
rango de tensión nominal de CA del detector antes de utilizarlo, para asegurarse de que esté
en buen estado.
El funcionamiento confiable se puede ver afectado por el tipo y el grosor del aislamiento, la
distancia desde la fuente de la tensión, los cables blindados y otros factores.
El VF5 solo puede ayudar a indicar si un circuito de CA está activo y no se debe utilizar para la
verificar si un circuito está desenergizado. Esta no es una luz de prueba de seguridad.
No utilice el detector si parece dañado o si no funciona correctamente. En caso de dudas,
reemplace el producto.
No lo utilice con tensiones superiores a las indicadas en el VF5.
Tenga cuidado al trabajar con tensiones superiores a 30 V CA, dado que puede existir el riesgo
de descarga eléctrica.
Cumpla con todos los códigos de seguridad correspondientes. Utilice un equipo de protección
personal adecuado al trabajar cerca de circuitos eléctricos activos, especialmente en lo relacio
nado con la posibilidad de formación de arcos eléctricos.
No opere el detector si está activa la advertencia de batería baja. Reemplace la batería de
inmediato.
NOTA: El VF5 no puede detectar tensiones en cables blindados o con fundas, en cables dentro de
conductos, detrás de paneles ni en gabinetes metálicos.
CATIV Categoría de medición IV: Equipo conectado entre el origen de la alimentación de la red
eléctrica de baja tensión afuera del edificio y la unidad del consumidor.
CATIII Categoría de medición III: Equipo conectado entre la unidad del consumidor y los
tomacorrientes
-
Page 27

CATII Categoría de medición II: Equipo conectado entre los tomacorrientes y el equipo del
usuario.
F SÍMBOLOS DE SEGURIDAD INTERNACIONALES:
G Peligro potencial. Indica que el usuario debe consultar el manual para
obtener información de seguridad importante.
F Indica que pueden existir tensiones peligrosas.
t El equipo está protegido por aislamiento doble o reforzado.
El equipo cumple con las directivas actuales de la UE.
Eliminación al final de la vida útil
Descripción del detector
1. Tornillo en la tapa de la batería
2. Linterna
3. Botón de la linterna
4. Botón de 12 V
5. Botón de encendido/apagado
6. Indicadores LED
7. Punta del detector
8. Luz de trabajo
Page 28

FUNCIONAMIENTO
1. Encendido de VF5: Presione momentáneamente el botón de encendido/apa-
gado del detector. El resonador emitirá un pitido, vibrará una vez, y el LED verde se
iluminará para indicar que el detector está encendido y listo para su uso.
2. Apagado del VF5: Presione momentáneamente el botón
gado. El VF5 emitirá dos pitidos, vibrará dos veces y el LED verde se apagará.
3. Apagado del resonador y del motor vibratorio: Encienda el VF5 según lo de-
scrito anteriormente. El VF5 funcionará con el resonador y el motor vibratorio. Para
apagar el resonador y el motor vibratorio, mantenga presionado el botón
encendido/apagado hasta que el LED verde parpadee. Para encender nuevamente
el resonador y el motor vibratorio, mantenga presionado el botón
dido/apagado hasta que el LED verde parpadee, el resonador emita un pitido, y la
unidad vibre.
4. Verifique el funcionamiento: Antes de utilizar el VF5, (1) asegúrese de que el
LED verde esté brillando, (2) revise el VF5 en una tensión de CA que se sepa que
está activa dentro del rango de detección definido del VF5.
5. Modo de baja tensión (de 12 V a 1000 V CA): Enciende el VF5. Mantenga
presionado el botón de 12 V. El LED verde cambiará a naranja para indicar que VF5
está en el modo de baja tensión. Mientras presiona el botón de 12 V, coloque la
punta del VF5 cerca de una tensión de CA. Cuando se detecta tensión de CA, el
LED cambia a rojo y parpadea, el resonador emite un pitido, y el detector vibra.
El parpadeo, los pitidos y la vibración aumentarán a medida que el VF5 se acerca
a la fuente de la tensión. Si el VF5 detecta una media tensión (de 100 V a 1000
V), cambiará automáticamente al modo de media tensión, el LED rojo quedará
encendido de manera constante, el resonador emitirá pitidos rápidos, y el detector
vibrará contantemente.
de encendido/apa-
de
de encen-
Page 29

6. Modo de media tensión (de 100 V a 1000 V CA): Coloque la punta del VF5 cer-
ca de una tensión de CA. Si el VF5 detecta tensión dentro del rango de detección
definido, el LED verde se apagará, el LED rojo se encenderá, el resonador emitirá
pitidos rápidos, y el detector vibrará contantemente.
NOTA:El detector no puede determinar la tensión real. El nivel de tensión en el que
el detector cambia del modo de baja tensión al de media tensión se ve afectado por
el tipo y el grosor del aislamiento, la distancia desde la fuente de la tensión y otros
factores.
7. Indicación de batería baja:Reemplace las baterías si el LED verde no se enciende.
Cuando el detector está encendido y la tensión de la batería es demasiado baja
para que sea posible un funcionamiento confiable, el resonador emitirá tres pitidos,
y el LED verde se apagará para indicar que el detector no se puede utilizar. Cambie
las baterías para poder volver a utilizar el producto.
8. Apagado automático: Para mantener la duración de la batería, el detector se
apaga automáticamente después de, aproximadamente, cinco minutos de inactivi-
dad. Al apagarse, el detector emitirá dos pitidos, y el LED verde se apagará
9. Linterna: Oprima momentáneamente el
o apagarla. Para mantener la duración de la batería, la linterna se apaga automáti-
camente después de, aproximadamente, cinco minutos.
NOTA: Si la tensión de la batería es demasiado baja para que funcione la linterna,
el detector indicará este estado emitiendo tres pitidos, y la linterna se apagará. El
detector de tensión cuenta con su propio umbral de batería baja y puede permanecer
operativo. Consulte el paso 4 de esta guía, “Verifique el funcionamiento”, antes de
utilizar el detector.
botón de la linterna para encenderla
Page 30

REEMPLAZO DE LA BATERÍA
1. Desatornille cuidadosamente la tapa de la batería en la parte posterior (extremo de
la linterna) del detector.
2. Reemplace las baterías por 2 baterías AAA de 1,5 V. Respete la polaridad.
3. Alinee con cuidado la tapa con el detector, según se muestra anteriormente.
4. Atornille la tapa en el detector hasta que esté apretada. No aplique demasiada
fuerza.
5. Verifique el funcionamiento del detector utilizándolo en una tensión de CA activa
que se encuentre dentro del rango de detección definido del detector.
Extremo del
comprobador
Inserción de 2 pilas AAA
Tapa con resortes para
alinearlos
Alineación de la tapa de la
batería
Page 31

Nota: Cuando cargue las baterías por primera vez, quite la tira de seguridad rectangular
antes de instalarlas.
Cuando reemplace las baterías, asegúrese de fijar la tapa antes para mantener la
protección IP67 contra el polvo y el agua. Si la tapa de las baterías está suelta o
demasiado apretada, esto puede perjudicar la protección contra el polvo y el agua.
ESPECIFICACIONES
Rango de tensión de detección De 12 V CA a 1000 V CA,
De 100 V a 1000 V CA
Rango de frecuencia 50/60 Hz
Baterías 2 baterías AAA/LR03 de 1,5 V
Temperatura operacional
ambiental De 0 °C a 50 °C (de 32 °F a 122 °F)
Temperatura de
almacenamiento De -10 °C a 60 °C (de 14 °F a 140 °F)
Humedad 80 % máx.
Altitud 2000 metros
Grado de contaminación 2
Cumplimiento de seguridad CAT IV 1000 V
Apagado automático 5 minutos
Clasificación de protección
de entrada IP67
Page 32

Producto fabricado en China
Nota: Para obtener detalles completos, consulte la Guía del usuario del VF5 completa
www.megger.com
Megger Limited
Archcliffe Road,
Dover Kent
CT17 9EN
Inglaterra
T +44 (0)1 304 502101
Fax: +44 (0)1 304 207342
Correo electrónico: uksales@megger.com
Megger es una marca comercial registrada
Los productos Megger se distribuyen en 146 países en todo el mundo. Este
instrumento está fabricado en China.
La empresa se reserva el derecho de modificar las especificaciones o el diseño
sin previo aviso
Page 33

VF5
Wechselspannungsdetektor
DE
Page 34

GSAFETY WARNINGS
Lesen Sie vor der Verwendung dieses Produkts die Sicherheitshinweise und die Bedienungsan-
leitung, machen Sie sich damit vertraut und befolgen Sie sie.
Die Sicherheitsfunktionen des Detektors schützen den Benutzer möglicherweise nicht, wenn
sie nicht gemäß den Anweisungen des Herstellers verwendet werden.
Prüfen Sie vor der Verwendung, ob eine bekannte Spannungsquelle innerhalb des
Nennwechselspannungsbereichs des Detektors vorhanden ist, um sicherzustellen, dass er
einwandfrei funktioniert.
Isolierungstyp und -stärke, Abstand zur Spannungsquelle, abgeschirmte Drähte und andere
Faktoren können den zuverlässigen Betrieb beeinträchtigen.
Der VF5 kann nur beim Aufspüren und Anzeigen von Spannung in Wechselstromkreisen
hilfreich sein und darf nicht zur Überprüfung eines stromlosen Stromkreises verwendet
werden. Dabei handelt es sich nicht um eine Sicherheitstestleuchte.
Verwenden Sie den Detektor nicht, wenn er beschädigt zu sein scheint oder nicht ordnungs
gemäß funktioniert. Tauschen Sie das Produkt im Zweifelsfall aus.
Verwenden Sie das Gerät nicht bei Spannungen, die höher sind als auf dem VF5 angegeben.
Gehen Sie bei Spannungen über 30 V AC vorsichtig vor, da Stromschlaggefahr besteht.
Halten Sie sich an alle geltenden Sicherheitscodes. Tragen Sie zugelassene persönliche
Schutzausrüstung bei Arbeiten in der Nähe stromführender Stromkreise, insbesondere bei
möglichen Lichtbogenüberschlägen.
Betreiben Sie den Detektor nicht, wenn die Warnung „Batterie schwach“ angezeigt wird.
Wechseln Sie sofort die Batterien
HINWEIS: Der VF5 kann keine Spannung an Panzerkabeln oder armierten Kabeln oder an Kabeln in
Leerrohren, hinter Schalttafeln oder in Metallgehäusen erkennen.
CATIV Messkategorie IV: Gerät ist zwischen der Niederspannungsversorgungsquelle außerhalb
des Gebäudes und dem Verbrauchergerät angeschlossen.
CATIII Messkategorie III: Gerät ist zwischen dem Verbrauchergerät und den Steckdosen
angeschlossen.
-
Page 35

CATII Messkategorie II: Gerät ist zwischen den Steckdosen und den Anlagen des Anwenders
angeschlossen.
F INTERNATIONALE SICHERHEITSSYMBOLE
G Potenzielle Gefahr. Weist darauf hin, dass der Benutzer wichtige
Sicherheitsinformationen im Handbuch nachschlagen muss
F Weist auf das mögliche Vorhandensein gefährlicher Spannungen hin.
t Gerät ist durch doppelte oder verstärkte Isolierung geschützt
Das Gerät entspricht den geltenden EU-Richtlinien
Entsorgung nach dem Ende der Nutzungsdauer
Detektorbeschreibung
1. Schraube an Batterieabdeckung
2. Taschenlampe
3. Taschenlampentaste
4. 12-V-Taste
5. Ein/Aus-Taste
6. LED-Anzeigen
7. Detektorspitze
8. Arbeitsleuchte
Page 36

BEDIENUNG
1. Einschalten des VF5: Drücken Sie kurz die Ein/Aus-Taste des Detektors. Der
Signaltongeber ertönt einmal, vibriert einmal und die grüne LED leuchtet auf, um
anzuzeigen, dass der Detektor eingeschaltet und betriebsbereit ist.
2. Ausschalten des VF5: Drücken Sie kurz die Ein/Aus-Taste
mal einen Signalton aus, vibriert zweimal und die grüne LED erlischt.
3. Ausschalten des Signaltongebers und des Vibrationsmotors: Schalten Sie den
VF5 wie oben beschrieben ein. Der VF5 funktioniert jetzt sowohl mit dem Signal-
tongeber als auch mit dem Vibrationsmotor. Um den Signaltongeber und den Vibra-
tionsmotor auszuschalten, halten Sie die Ein/Aus-Taste
LED blinkt. Um den Signaltongeber und den Vibrationsmotor wieder einzuschalten,
halten Sie die Ein/Aus-Taste
ber ertönt und das Gerät vibriert.
4. Überprüfen des Betriebs: Vor der Verwendung des VF5: (1) Stellen Sie sicher, dass
die grüne LED leuchtet, (2) Prüfen Sie den VF5 auf eine bekannte Wechselspannung,
die sich innerhalb des definierten Erfassungsbereichs des VF5 befindet.
5. Niederspannungsmodus (12 V bis 1000 V AC): Schalten Sie den VF5 ein.
Drücken Sie die 12-V-Taste und halten Sie sie gedrückt. Die grüne LED leuchtet nun
orange, um anzuzeigen, dass sich der VF5 im Niederspannungsmodus befindet.
Halten Sie die 12-V-Taste gedrückt, und halten Sie dabei die Spitze des VF5 in die
Nähe einer Wechselspannung. Wenn Wechselspannung erkannt wird, leuchtet die
LED rot und blinkt, ein Signalton ertönt, und der Detektor vibriert. Blinken, Piepton
und Vibrationsgrad werden stärker, wenn sich der VF5 der Spannungsquelle nähert.
Wenn der VF5 eine Mittelspannung erkennt (100 V - 1000 V), wechselt er automa-
tisch in den Mittelspannungsmodus, die rote LED leuchtet ständig, der Signaltonge-
ber piept schnell und der Detektor vibriert ständig.
gedrückt, bis die grüne LED blinkt. Der Signaltonge-
. Der VF5 gibt zwei-
gedrückt, bis die grüne
Page 37

6. Mittelspannungsmodus (100 V bis 1000 V AC): Halten Sie die Spitze des VF5
in der Nähe einer Wechselspannung. Wenn der VF5 eine Spannung innerhalb des
definierten Erfassungsbereichs erkennt, erlischt die grüne LED, die rote LED leuchtet
auf, der Signaltongeber piept schnell und der Detektor vibriert ständig.
HINWEIS: Der Detektor kann die tatsächliche Spannung nicht bestimmen. Die
Spannungsstufe, bei der der Detektor vom Niederspannungs- in den Mittelspannungsmodus wechselt, wird von Isolierungstyp und -stärke, der Entfernung von der
Spannungsquelle und anderen Faktoren beeinflusst.
7. Anzeige niedriger Batterieladestand: Wechseln Sie die Batterien, wenn die
grüne LED nicht aufleuchtet. Ist der Detektor eingeschaltet und die Batteriespan-
nung für einen zuverlässigen Betrieb zu niedrig, piept der Signaltongeber dreimal,
und die grüne LED erlischt, um anzuzeigen, dass der Detektor nicht betriebsbereit
ist. Wechseln Sie die Batterien, um den Betrieb wieder aufzunehmen.
8. Autom. Ausschalten: Um die Batterielebensdauer zu verlängern, schaltet sich der
Detektor nach ca. 5 Minuten Inaktivität automatisch aus. Beim Ausschalten des
Detektors ertönt zweimal ein Signalton, und die grüne LED erlischt.
9. Taschenlampe: Drücken Sie kurz die
lampe ein- oder auszuschalten. Um die Batterielebensdauer zu verlängern, schaltet
sich die Taschenlampe nach ca. 5 Minuten automatisch aus.
HINWEIS: Wenn die Batteriespannung für den Betrieb der Taschenlampe zu
niedrig ist, zeigt der Detektor diesen Zustand durch dreimaliges Piepen an, und die
Taschenlampe wird ausgeschaltet. Der Spannungsdetektor verfügt über einen eigenen
Schwellenwert für niedrigen Batterieladestand und kann in Betrieb bleiben. Lesen
Sie vor der Verwendung des Detektors die Informationen unter „Überprüfen des
Betriebs“ (Schritt 4) in dieser Anleitung.
Taschenlampentaste, um die Taschen-
Page 38

AUSTAUSCHEN DER BATTERIE
1. Schrauben Sie den Batteriedeckel vorsichtig an der Rückseite (Taschenlampenende)
des Detektors ab.
2. Ersetzen Sie die Batterien durch 2 AAA-Batterien mit 1,5 V. Beachten Sie die
Polarität.
3. Richten Sie den Deckel wie oben gezeigt am Detektor aus.
4. Schrauben Sie die Abdeckung auf den Detektor, bis sie fest sitzt, und üben Sie
dabei keine übermäßige Kraft aus.
5. Überprüfen Sie den Betrieb, indem Sie den Detektor mit einer bekannten Wechselspannung innerhalb des definierten Erfassungsbereichs des Detektors verwenden.
Hinterer Teil des
Spannungsprüfers
2 x AAA-Batterien einlegen (mit dem
Pluspol in Richtung Gerät)
Deckel mit Federn zum Ausrichten
Batteriedeckel durch Ausrichten von 2
Federn an 2 Kontakten anschließen
Page 39

Hinweis: Wenn die Batterien zum ersten Mal geladen sind, entfernen Sie bitte vor der
Installation den weißen rechteckigen Sicherheitsstreifen.
Achten Sie beim Austausch der Batterien darauf, zuerst den Deckel zu befestigen,
um Wasser- und Staubschutz gemäß IP67 zu gewährleisten. Ein loser oder zu fest
angezogener Batteriedeckel kann den Wasser- und Staubschutz beeinträchtigen.
TECHNISCHE DATEN
Erfassungsspannungsbereich 12 V AC bis 1000 V AC
100 bis 1000 V AC
Frequenzbereich 50/60 Hz
Batterien 2 x AAA / LR03 1,5 V Batterien
Betriebsumgebungstemperatur 0 °C to 50 °C (32 °F to 122 °F)
Lagertemperatur -10 °C to 60 °C (14 °F to 140 °F)
Feuchtigkeit 80 % max.
Höhe 2000 metres
Verschmutzungsgrad 2
Sicherheitskonformität CAT IV 1000 V
Automatische Abschaltung 5 minutes
Schutzart IP67
Page 40

In China hergestelltes Produkt
Hinweis: Weitere Informationen finden Sie im vollständigen Benutzerhandbuch unter
www.megger.com
Megger GmbH
Weststraße 59
52074
Aachen
Germany
T. +49 (0) 241 91380 500
E. info@megger.de
Megger ist ein eingetragenes Warenzeichen
Die Produkte von Megger werden in 146 Ländern weltweit
 Loading...