

Page 1

TORKEL
820/840/860
User's Manual
Battery Load Units
Page 2

Page 3

3P r o g r a mm a E l e ct r i c A B
Z P - B S0 6 E R 1 01
NOTICE OF COPYRIGHT & PROPRIETARY RIGHTS
© 2007, Programma Electric AB. All rights reserved.
The contents of this manual are the property of Programma Electric AB. No part of this work may be reproduced or transmitted in any form
or by any means, except as permitted in written license agreement with Programma Electric AB. Programma Electric AB has made every
reasonable attempt to ensure the completeness and accuracy of this document. However, the information contained in this manual is subject
to change without notice, and does not represent a commitment on the part of Programma Electric AB. Any attached hardware schematics
and technical descriptions, or software listings that disclose source code, are for informational purposes only. Reproduction in whole or in
part to create working hardware or software for other than Programma Electric AB products is strictly prohibited, except as permitted by
written license agreement with Programma Electric AB.
TRADEMARK NOTICES
Programma® is a registered trademark of Programma Electric AB. All other brand and product names mentioned in this document are
trademarks or registered trademarks of their respective companies.
Programma Electric AB
Eldarvägen 4
Box 2970
SE-187 29 TÄBY
Sweden
T +46 8 510 195 00
F +46 8 510 195 95
info@programma.se
www.programma.se
User's manual
TORKEL 820/840/860
Battery Load Units
Page 4

4
T O R K EL 8 2 0 / 84 0 / 8 6 0
P r o g r a mm a E l e ct r i c A B
Z P - B S0 6 E R 1 01
General ..................................................... 18
Preparations
.............................................. 18
Testing
...................................................... 19
Starting the test
........................................ 19
8 External current measurement ........ 20
General
..................................................... 20
Applications
............................................. 20
Setting up external current measurement
.. 21
TORKEL .................................................... 21
DC clamp-on ammeter
............................. 21
Connections
............................................. 22
Troubleshooting ........................................ 22
9 Alarm function .................................. 24
Description
............................................... 24
Resetting the alarm .................................. 24
10 Auto-limits ......................................... 26
Invoking the auto-limits function
............... 26
Activating auto-limits
............................... 26
11 TORKEL connected to a PC ............... 28
General
..................................................... 28
TORKEL Win program
............................... 28
TORKEL Win features .............................. 28
Installing TORKEL Win ............................... 29
Installation ............................................... 29
Setting up communication
....................... 29
Loading the software key
......................... 29
Changing the language used in TORKEL
... 30
Testing with TORKEL Win .......................... 30
Viewing the results ................................... 30
12 Starting and stopping from an external
device ..................................................... 32
Start/stop connector
................................. 32
Starting .................................................... 32
Stopping
.................................................. 32
13 How to obtain the desired current .. 34
General
..................................................... 34
TORKEL load capacity
................................ 34
Imax ......................................................... 34
Max power
............................................... 35
Final voltage
............................................. 35
Examples of load capacities
...................... 35
When a single TORKEL isn’t enough .......... 36
TXL Extra Loads connected to TORKEL ..... 36
Contents
1 Introduction ........................................ 6
General
....................................................... 6
TORKEL 820/840/860 ................................. 6
TXL830/850/870 (Extra Loads) ................... 6
TORKEL Win software (optional)
................. 6
2 Safety ................................................... 8
3 Menu system ..................................... 10
Main menu
............................................... 10
Results ..................................................... 10
Test battery
.............................................. 10
Auto-limits
............................................... 10
Memory
................................................... 10
Select
language ........................................ 10
Basic settings
............................................ 10
Test method
............................................. 10
4 Control panel..................................... 12
1 – Operator control ................................. 12
2 – External current measurement
............ 12
3 – Circuit breaker .................................... 13
4 – External control ................................. 13
5 – Mains ................................................. 13
6 – Connection terminals for the battery . 13
5 Conducting a test .............................. 14
Test at constant current
............................. 14
Safety precautions .................................... 14
Preparations for testing
............................ 14
Connecting the current cables to the
battery
..................................................... 14
Setting the current
................................... 15
Warning and stop limit parameters
........... 15
Starting the test
....................................... 15
Pausing the test
........................................ 15
Ending the test
......................................... 15
6 Testing at constant power / resistance
16
Constant power
........................................ 16
Configuring TORKEL for constant power .. 16
Constant resistance ................................... 16
Configuring TORKEL for constant
resistance ................................................. 16
7 Testing with a load profile ................ 18
Page 5

5
T O R K EL 8 2 0 / 84 0 / 8 6 0
P r o g r a mm a E l e ct r i c A B
Z P - B S0 6 E R 1 01
Calculating how many TORKELs and TXLs are
needed ..................................................... 36
TORKEL/TXL system examples
................... 37
Test conducted using a system comprising
TORKEL and TXL units
........................ 39
Hookup and settings ................................ 39
14 TXL Extra Loads ................................ 40
1 – Selector switch ................................... 40
2 – Circuit breaker
.................................... 40
3 – Connection terminals for the battery . 40
4 – Control
............................................... 40
5 – Mains
................................................. 40
Setting up the extra load ........................... 41
Testing
...................................................... 41
15
Optional accessories ......................... 42
Cables ...................................................... 42
Clamp-on DC ammeter
............................ 42
Software
.................................................. 42
Other
....................................................... 42
16 Troubleshooting ................................ 44
Messages on display ................................. 44
17 Calibration ......................................... 46
Calibration procedure
............................... 46
How to calibrate
....................................... 46
1. Calibrating zero levels ........................... 46
2. Calibrating internal current
................... 47
3. Calibrating internal and external
voltage ..................................................... 47
4. Calibrating of external current
.............. 48
Resetting TORKEL ..................................... 49
General .................................................... 49
Performing a reset
.................................... 49
18 Specifications .................................... 50
Torkel 820
................................................. 50
Torkel 840/860
.......................................... 51
TXL 830 /850 /870 .................................... 53
19 Index .................................................. 54
Page 6

6
T O R K EL 8 2 0 / 84 0 / 8 6 0
P r o g r a mm a E l e ct r i c A B
Z P - B S0 6 E R 1 01
1
Introduction
TXL830/850/870 (Extra
Loads)
The TXL830, TXL850 and TXL870 Extra Loads comprise resistive loads. They can be used together with
TORKEL Load Units to increase loading capability. The
TXL Extra Loads can not provide regulatation by themselves but TORKEL measures total current from the
battery and regulates the load characteristic. When
TORKEL is stopped it sends a stop signal to the TXL
Extra Load.
The three models have different maximum voltage
ratings:
TXL830 28 V
TXL850 56 V
TXL870 280 V
TORKEL Win software (optional)
The TORKEL Win program, which runs on a PC under
Windows®, builds up a voltage curve on the screen in
real time and displays the current, voltage and capacity readings. You can also use TORKEL Win to control
TORKEL during the test . The program stores the
results in a text file, and it can generate reports
General
This manual explains how to use TORKEL 820, TORKEL
840 and TORKEL 860 Battery Load Units, and it also
covers the TXL830, TXL850 and TXL870 Extra Loads.
Although performance differs from one model to
the next, all models are used in the same way. Unless
otherwise specified, what is set forth in this manual
applies to all models.
TORKEL 820/840/860
These Battery Load Units are sophisticated instruments designed mainly for capacity tests. All three
units can be programmed to test a battery bank at
constant current, constant power, or using a user-defined load profile. TORKEL can also be used for testing
battery chargers and other electrical equipment that
require resistive load testing.
The three models have different maximum voltage
ratings:
TORKEL 820 60 V DC
TORKEL 840 288 V DC
TORKEL 860 480 V DC
TORKEL has a number of functions that facilitate its
use. Examples include:
Warning and automatic stop functions for
time, discharged capacity and low battery
voltage.
9 memories where settings can be stored.
Voltage curve can be stored for later transfer
to a PC using the TORKEL Win program.
Discharging can be started/stopped from external equipment.
Testing can be carried out without disconnecting the regular load.
•
•
•
•
•
Page 7

7
T O R K EL 8 2 0 / 84 0 / 8 6 0
P r o g r a mm a E l e ct r i c A B
Z P - B S0 6 E R 1 01
Page 8
8
T O R K EL 8 2 0 / 84 0 / 8 6 0
P r o g r a mm a E l e ct r i c A B
Z P - B S0 6 E R 1 01
Safety instructions
Warning
The electrical voltage and current used in battery
testing is potentially lethal.
Ensure that the AC supply is isolated and any battery under test is disconnected before attempting
any cleaning or maintenance of TORKEL.
Do not connect or disconnect any of the cables
unless the circuit breaker F1 is in the lower (OFF)
position.
Connection and disconnection procedures are extremely important. Be sure to follow the instructions
faithfully.
Do not touch conducting parts of the clamps on the
current cables or the voltage sensing cables when
they are connected to TORKEL.
Explosion risk when using Torkel and TXL (all models)
When a lead acid battery is charged or discharged
i.e. when there is a current flow through the battery
it is always a risk that the battery can explode.
For new open (vented) batteries the risk is medium
to low but in old VRLA (sealed) batteries the risk is
medium to high.
If there is a bad connection inside the battery and
there is a current flow - the connection will burn off
and there will be an arc, which will ignite the oxyhydrogen gas in the battery.
To minimize the risk for personnel injuries:
Always place Torkel/TXL as far away from the battery as possible - use long current cables and/or
remote start/stop.Never stand close to a battery
during charge/discharge.
Too high discharge current applied on a battery can
cause the battery to explode or get over-heated. Be
sure to not set too high current.
If the external current measurement is interrupted
or giving false values during the test, the current will
rise to a higher level than the set value before the
test is shut down. If the battery is too small for this
current or in a bad condition - it may explode.
2
Safety
Symbols on the
instrumentI
Caution, refer to accompanying documents.
Caution, risk of electric shock.
Hot, do not cover
Protective conductor terminal.
WEEE, Waste Electrical and Electronic
Equipment. Please utilize your local
WEEE collection facilities in the disposition of this product and otherwise
observe all applicable requirements.
Page 9

9
T O R K EL 8 2 0 / 84 0 / 8 6 0
P r o g r a mm a E l e ct r i c A B
Z P - B S0 6 E R 1 01
When using the external current measurement function:
1. Check that the CT is connected in the right current direction.
2 Always replace the CT internal battery before a
test.
3 Set the correct current ratio in the external current
measurement menu.
Never use the TORKEL/TXL Extra Load in an explosive environment. Never put the TORKEL/TXL Extra
Load where it can be reached by battery gas.
Improperly connected cables carrying high current
can cause fire. Make sure that the cables are not
twisted in such a way that could cause them to turn
and come loose from the connector.
Position TORKEL/TXL Extra Load where air flow is
unobstructed and where it does not come into contact with any flammable or heat-sensitive material.
Keep a free distance of 1.5 m (5 ft) to the vertical sides of TORKEL/TXL and 2.0 m (6.5 ft) above
TORKEL/TXL.
Do not place TORKEL a) near another TORKEL, a TXL
Extra Load or any other heat source or b) where the
cooling airflow can be blocked. TORKEL will overheat if there is insufficient cooling.
External current shunt may not be used above
300 V DC
Important!
Make sure that the clamp-on ammeter is properly
connected and that its battery lasts throughout
the entire test. If external current measurement
malfunctions, TORKEL might provide a higher load
current than intended.
Do not use liquid detergents or aero-sols when
cleaning TORKEL or TXL units. Use a damp cloth.
If TORKEL has been stored below freezing for an
extended period of time, you must allow 3 hours for
it to adapt to room temperature.
Page 10

1 0
T O R K EL 8 2 0 / 84 0 / 8 6 0
P r o g r a mm a E l e ct r i c A B
Z P - B S0 6 E R 1 01
3
Menu system
Main menu
Results
Displays voltage, capacity, current and testing period
(time) from the last test.
Test battery
Submenu used to perform a test.
Auto-limits
Submenu used to provide automatic calculation and
setting of limit values. Here, you specify the desired
voltage per cell at which a) warnings are to be issued
and b) the test is to be stopped. Examples: warning
at 1.85 V/cell and stop at 1.75 V/cell. Then, when you
begin a test, TORKEL asks you to enter the number of
cells, whereupon it calculates the voltage and sets this
voltage as the limit.
Memory
You can save and recall the settings in any of 9 memories. Moreover, you can recall the factory (standard)
settings.
Select language
Here, you select the language that will be used in the
display.
Basic settings
Here, you specify whether the current is to be measured internally within TORKEL or by means of a clampon ammeter. You can also adjust TORKEL to the mV/A
ratio that appears on the clamp-on ammeter itself.
Test method
Here you specify one of the following test methods:
constant current, constant power, constant resistance,
current profile or power profile.
When you start a profile test you will be asked for the
number of steps, the test duration (time) and the load
value for each step.
Page 11

1 1
T O R K EL 8 2 0 / 84 0 / 8 6 0
P r o g r a mm a E l e ct r i c A B
Z P - B S0 6 E R 1 01
Page 12

1 2
T O R K EL 8 2 0 / 84 0 / 8 6 0
P r o g r a mm a E l e ct r i c A B
Z P - B S0 6 E R 1 01
4
Control panel
① Operator control
Display
Display settings during programming and measured
values during operation.
Keys
<LIMITS> key. Press to enter the LIMITS MENU
<ESC> key. Press to exit from a function without
changing any data or to go backwards in the menu
system.
Horizontal and vertical arrow keys,
. Used
to select data and to change values.
<SET LOAD> key. Press to change the load.
<ENTER> key. Press to select and confirm parameters.
<START> key. Press to start discharging.
<STOP> key. Press to stop/pause discharging.
Lamps
OPERATING
a) LED will glow steadily while TORKEL is discharging.
b) LED will flash when the current (or power) can not
be regulated to the desired value.
Vmin (V)
a) LED will glow steadily after TORKEL has shut down
because the voltage has dropped to the stop limit.
b) LED will flash when the voltage has decreased to
the warning limit.
I•t (Ah)
a) LED will glow steadily when TORKEL has shut down
because the discharged capacity has reached the stop
limit.
b) LED will flash when the discharged capacity has
exceeded the warning limit.
Time (h)
a) LED will glow steadily when TORKEL has shut down
after completing the preset time cycle
b) LED will flash when the time has exceeded the
warning limit.
② External current measurement
External current measurement
Input used to measure current in an external path by
means of a clamp-on ammeter or a current shunt.
Input impedance: 1 Mohm. Galvanically isolated.
Insulation voltage to battery current terminals: 2300 V
Insulation voltage to ground: 1350 V
③ Circuit breaker
F1
Voltage controlled circuit breaker that connects /
disconnects the loading circuits in TORKEL from the
battery.
Page 13

1 3
T O R K EL 8 2 0 / 84 0 / 8 6 0
P r o g r a mm a E l e ct r i c A B
Z P - B S0 6 E R 1 01
Note F1 will not latch in upper (ON) posi-
tion until TORKEL has issued a message
reading“Switch on F1”.
④ External control
ALARM
Output equipped with a relay contact for triggering
an external alarm device
Relay contact: 1 A / 100 VAC, 1 A / 50 VDC, 0.3 A /
250 VDC. This latter (250 V DC) is valid for resistive
load only.
Connector insulation: Voltage to ground may not
exceed 250 V
START/STOP
Input used for starting and stopping discharging from
an external device. Galvanically isolated.
TXL
Output used for control of TXL Extra Loads. Galvanically isolated.
SERIAL
Serial port used for connection to a PC or other controlling equipment.
⑤ Mains
MAINS
Connector for mains supply, equipped with ON/OFF
switch.
⑥ Connection terminals
for the battery
+
(Terminal)
Positive (+) current connection for battery being
tested.
– (Terminal)
Negative (-) current connection for battery being
tested.
Insulation voltage to ground: 2200 V
VOLTAGE SENSE
Input for sensing voltage at the battery terminals.
Impedance to the battery current terminals is
>1 Mohm.
Page 14
1 4
T O R K EL 8 2 0 / 84 0 / 8 6 0
P r o g r a mm a E l e ct r i c A B
Z P - B S0 6 E R 1 01
5
Conducting a test
Note Press ESC if you want to access the main
menu.
Important
Connection and disconnection procedures are extremely important. Be sure
to follow the the instructions faithfully.
Connecting the current
cables to the battery
Use the cables supplied with TORKEL or other cables
of suitable size. Follow the numbered steps that are
set forth below. Inspect each connection to make
sure it is securely fittted.
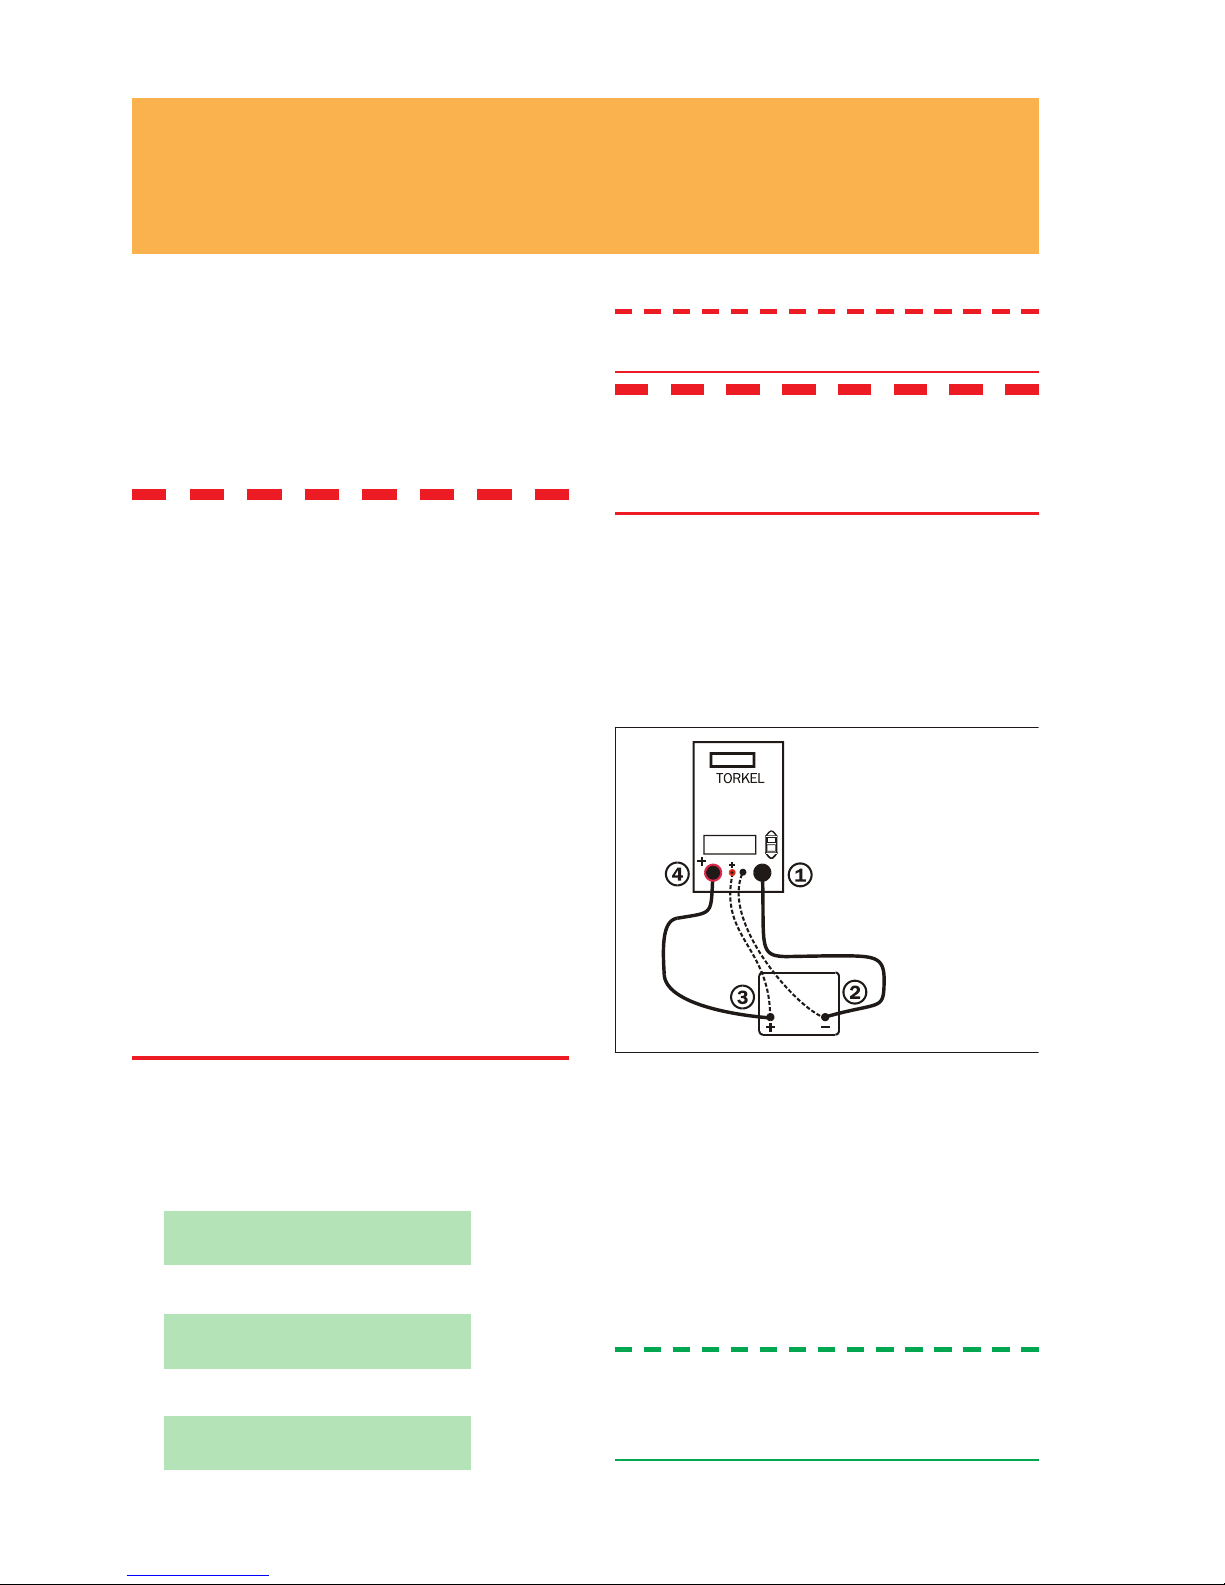
Connecting TORKEL to a battery.
Connect one end of the first cable to the negative (-) terminal on TORKEL.
Connect the other end of the first cable to the
negative (-) pole of the battery.
Connect one end of the second cable to the
positive (+) pole of the battery.
Connect the other end of the second cable to
the positive (+) terminal on TORKEL.
Tip To get a more accurate voltage read-
ing. Connect the voltage sensing cables
between the “VOLTAGE SENSE” input
on TORKEL and the battery terminals.
1]
2]
3]
4]
Test at constant
current
Safety precautions
Warning
Do not connect or disconnect any of the
cables unless the circuit breaker F1 is in
the lower (OFF) position.
Never use TORKEL/TXL Extra Load in
an explosive environment. Never put
TORKEL/TXL Extra Load in direct contact
with battery gas.
Position TORKEL/TXL Extra Load so that
the air flow is unobstructed and free from
contact with any flammable or heat-sensitive material.
Do not place TORKEL near another
TORKEL, a TXL Extra Load or any other
heat source. TORKEL will overheat if there
is insufficient cooling.
Inspect cable connections to make sure
there is no short circuit.
Preparations for testing
Connect TORKEL to the mains voltage.
Switch on TORKEL.
The following display will appear for a short time:
TORKEL 840 R01A
It will then change to:
MAIN MENU
Test battery
and then:
Connect battery
1]
2]
Page 15

1 5
T O R K EL 8 2 0 / 84 0 / 8 6 0
P r o g r a mm a E l e ct r i c A B
Z P - B S0 6 E R 1 01
Warning
Do not disconnect any of the above cables
until the test is completed and the circuit
breaker F1 is in the lower (OFF) position.
Note TORKEL automatically selects the volt-
age range when voltage is applied to the
high-current terminals.
Setting the current
Use the horizontal arrow keys ( or ) to select
the position and the vertical arrow keys ( or
) to set the value.
Set Current
0001
.0 A
Press <ENTER>.
After connecting the battery, about 30 seconds
must elapse before you can switch on the circuit
breaker F1 and start the test. TORKEL displays the
amount of time you must wait as follows:
Please wait...
25 sec
When the time shown has elapsed, the following
will appear:
Switch on F1
Press ENTER
Switch on F1 (press the lever upwards a second
time if it fails to latch immediately).
Confirm by pressing <ENTER>.
TORKEL now displays the values currently in effect:
51.6V 0.0 Ah
0.0 A 0:00:00
Tip You can change the current at any time
by pressing the <SET LOAD> key.
Warning and stop limit parameters
You can set TORKEL to issue a warning and/or to stop:
When the voltage has reached a certain level.
When a certain amount of capacity is discharged.
After a specified time.
The settings for the warning and stop levels are independent of each other.
When a limit is reached, the contacts in the ALARM
relay operate and a buzzer sounds. In addition, the
lamp associated with the parameter on the control
1]
2]
3]
4]
•
•
•
panel flashes when the warning level is reached and
starts to glow steadily if TORKEL is stopped. See also
the chapter headed” Alarm function”.
Limits set-up
Press <LIMITS>
Warning Umin
No 044.4 V
Use the horizontal arrow keys ( or ) to move
the cursor and the vertical arrow keys ( or )
to activate the warning (Yes) and to set the voltage level.
Press <ENTER>
Proceed in the same way for other parameters
you want to change.
Press <LIMITS> when you have finished setting
the parameters.
The limits can be changed at any time during a test.
Starting the test
Press <START>.
The current value (A) will be displayed and the
OPERATING lamp will light up.
Pausing the test
Press <STOP>.
Restart by pressing <START>.
Note Any TXL Extra Loads connected to
TORKEL must be restarted manually.
Ending the test
Press the <STOP> key.
Press <ESC>
End Test?
Yes No
Select ”Yes” and press <ENTER>.
1]
2]
3]
4]
5]
1]
1]
2]
1]
2]
3]
Page 16

1 6
T O R K EL 8 2 0 / 84 0 / 8 6 0
P r o g r a mm a E l e ct r i c A B
Z P - B S0 6 E R 1 01
Constant resistance
WARNING!
See the chapter "Conducting a test" for
safety precautions and how to prepare
the test
Configuring TORKEL for
constant resistance
Press <ESC> repeatedly until you see the ”MAIN
MENU”.
Select ”Test method” using the vertical arrow
keys (
or ) and press <ENTER>.
Select ”Constant R” and press <ENTER>.
Select ”Test battery” and press <ENTER>.
Set the resistance value in the same way that you
set the current value. See the chapter headed
“Conducting a test”.
1]
2]
3]
4]
5]
6
Testing at constant
power / resistance
Constant power
TORKEL can be used to conduct a discharge test at
constant power instead of constant current. All procedures are the same except that you must set TORKEL
differently before starting – you set the power instead
of the current.
Warning
See the chapter "Conducting a test" for
safety precautions and how to prepare
the test.
Important
When testing at constant power, the current will increase as the voltage decreases.
Calculate the current at the end of the
test (W / V = A). Then make sure that the
total current does not exceed 2999 A.
Also make sure that the TORKEL and TXL
units can provide the required current
load troughout the test.
Configuring TORKEL for
constant power
Calculate the current at the end of the test (divide
the power by the voltage). Then make sure that
the total current does not exceed 2999 A and
that the TORKEL and TXL units can load with the
required current throughout the test.
Press <ESC> repeatedly until you see the ”MAIN
MENU”.
Select ”Test method” using the vertical arrow
keys (
or ) and press <ENTER>.
Select ”Constant P” and press <ENTER>.
Select ”Test battery” and press <ENTER>.
Set the discharge power in the same way that
you set the current. See the chapter 5 "Conducting a test”.
1]
2]
3]
4]
5]
6]
Page 17

1 7
T O R K EL 8 2 0 / 84 0 / 8 6 0
P r o g r a mm a E l e ct r i c A B
Z P - B S0 6 E R 1 01
Page 18

1 8
T O R K EL 8 2 0 / 84 0 / 8 6 0
P r o g r a mm a E l e ct r i c A B
Z P - B S0 6 E R 1 01
7
Testing with a load
profile
Preparations
To configure TORKEL for a profile test, proceed as
follows:
Press <ESC> repeatedly until you see the ”MAIN
MENU”.
Select ”Test method” using the vertical arrow
keys (
or ) and press <ENTER>.
Select ”PROFILE I” for a current profile (or ”PROFILE P” for a power profile) and press <ENTER>.
1]
2]
3]
General
TORKEL can be used to conduct a test that incorporates a current profile or power profile. A profile can
consist of up to 19 time intervals. The duration and
the magnitude of the load can be specified for each
interval.
Page 19

1 9
T O R K EL 8 2 0 / 84 0 / 8 6 0
P r o g r a mm a E l e ct r i c A B
Z P - B S0 6 E R 1 01
Starting the test
Proceed in the same way as set forth in the chapter
headed “Conducting a test”.
Testing
Select ”Test battery” and press <ENTER>.
Set Prole?
Yes No
Select ”Yes” and press <ENTER> if you want to set
up the profile.
No. of Intervals?
02
Specify the number of time intervals you want to
include in the profile and press <ENTER>.
SET T1
0:00:01 001.0A
Set the duration of the first time interval and the
current (or power) value. Press <ENTER>.
Set the other intervals in the same way.
1]
2]
3]
4]
5]
Page 20

2 0
T O R K EL 8 2 0 / 84 0 / 8 6 0
P r o g r a mm a E l e ct r i c A B
Z P - B S0 6 E R 1 01
8
External current
measurement
Applications
• External current measurement must be used when
TORKEL is working together with TXL Extra Loads.
• Testing without disconnecting the regular load.
Since total current is measured, TORKEL can
compensate for changes attributable to the regular
load. The total current from the battery is then kept
at a constant value. This ensures accurate test
results.
TORKEL used together with TXL Extra Load
Constant current, regular load connected.
• Two or more TORKEL and TXL units ca be used for
discharging at up to 2 999 A.
General
The external current measurement function enables
TORKEL to measure the total current in an external
path and base regulation on this measurement.
A DC clamp-on ammeter (optional accessory) has to
be used for this measurement. It can be applied at
one of the battery terminals or at an inter-cell connector. The clamp-on ammeter must measure the total
current, including that which passes through TORKEL.
A current shunt can also be used, but this requires
opening the current path and connecting the shunt
in series. The current shunt must be conected to the
negative side of the battery.
Warning
External current shunt may not be used
above 300 V DC
Important
The current shunt must be connected on
the negative side of the battery.
Tip
For tests where it is important to obtain
the desired current within a few seconds
or less it is better to use internal current
measurement since it provides faster
regulation.
Page 21

2 1
T O R K EL 8 2 0 / 84 0 / 8 6 0
P r o g r a mm a E l e ct r i c A B
Z P - B S0 6 E R 1 01
Two TORKEL units operating together using the external
current measurement function.
Setting up
external current
measurement
TORKEL
Press <ESC> repeatedly until you see the ”MAIN
MENU”.
Select ”Basic settings” using the vertical arrow
keys (
or ) and press <ENTER>.
MAIN MENU
Basic settings
Press <ENTER> to obtain:
I MEASUREMENT
Internal
Press <ENTER>.
Select ”External” using the vertical arrow keys
(
or ) and press <ENTER>.
Set the mV/A value to the value specified on the
DC clamp-on ammeter and press ENTER.
I MEASUREMENT
Ext. 01.0 mV/A
The mV/A ratio for the input can be set to a value
between 0.3 mV/A and 19.9 mV/A.
Important
The clamp-on ammeter output voltage
must not exceed 1 V.
DC clamp-on ammeter
Note Make sure that the clamp-on ammeter
has fresh batteries. The batteries must last
throughout the entire test!
Place the clamp-on ammeter as far as possible
from any magnetic field
Connect a DC voltmeter (set to 2 V full scale) to
the clamp-on ammeter.
Switch on the clamp-on ammeter and adjust its
zero knob to set the output to 0.0 V
Note The clamp-on ammeter must be accurate
and calibrated and it must be able to
carry a load of 600 k
Ω. Please note that a
DC clamp-on ammeter is usually less accurate in the lowest part of its measurement
range.
1]
2]
3]
4]
5]
6]
1]
2]
3]
Page 22

2 2
T O R K EL 8 2 0 / 84 0 / 8 6 0
P r o g r a mm a E l e ct r i c A B
Z P - B S0 6 E R 1 01
Tip Always activate the warning and stop
limit functions when using external current measurement. This will protect your
batteries if the DC clamp-on ammeter
were to malfunction.
Connections
Warning
Make sure the polarity is correct.
Connect the clamp-on ammeter to the EXTERNAL
CURRENT MEASUREMENT input. Best results are
obtained if the cables running from the clamp-on
ammeter are twisted.
Apply the clamp-on ammeter to the conductor.
See the figures in the section headed “Applications”.
Note: The arrow on the clamp-on ammeter must
point in the same direction as the current flow.
Note: The clamp-on ammeter must always be applied in such a way that current through TORKEL is
included in the measurement.
Turn on the power switch on the clamp-on ammeter.
1]
2]
3]
Troubleshooting
If the following message appears when you start the
test:
Error:
External I
Check that the clamp-on ammeter is properly
connected to TORKEL. Also check the polarity.
Check that the clamp-on ammeter is switched
on.
Check that the clamp-on ammeter has fresh batteries.
Make sure that the clamp-on ammeter is
clamped in the correct direction. A DC clamp-on
ammeter normally has an arrow which should
point in the direction which current flows through
the conductor.
Check the folowing settings in “Basic setting”
submenu:
• “I measurement” must be set to “External”.
• The mV/A ratio must match the ratio that appears on the clamp-on ammeter itself.
1]
2]
3]
4]
5]
Page 23

2 3
T O R K EL 8 2 0 / 84 0 / 8 6 0
P r o g r a mm a E l e ct r i c A B
Z P - B S0 6 E R 1 01
Page 24

2 4
T O R K EL 8 2 0 / 84 0 / 8 6 0
P r o g r a mm a E l e ct r i c A B
Z P - B S0 6 E R 1 01
9
Alarm function
Note The alarm output will be activated if
TORKEL is switched off and also if no
mains voltage is present. When TORKEL
is switched on, the alarm is reset automatically provided that a test was not in
progress when the mains power was cut
off.
Resetting the alarm
You can reset the alarm by pressing any key.
Description
The TORKEL alarm function is provided by a buzzer
and a relay connected to the <ALARM> - connector.
An external alarm device can be connected to this
connector if so desired.
When an alarm is issued, the relay closes the circuit
between pin 2 and 3. (While no alarm is issued, the
circuit between pin 1 and 3 is closed.)
Male connector for this terminal is "Neutrik NC3MX".
Relay contact
8 A / 28 V DC
0.28 A / 250 V DC (resistive load only)
8 A / 240 V AC
Connector insulation
Voltage to ground must not exceed 250 V.
The following events can cause an alarm to
be issued
Warning level is passed.
Discharging is stopped because a stop level is
reached.
TORKEL can not regulate the current to the
desired level.
Thermal protection device trips or a fan has
stopped rotating.
The connection to the battery is broken.
The mains (line) power to TORKEL is interrupted while a test is in progress.
Other fault situations such as battery voltage too high or too low or excessive current
through TORKEL.
•
•
•
•
•
•
•
Page 25

2 5
T O R K EL 8 2 0 / 84 0 / 8 6 0
P r o g r a mm a E l e ct r i c A B
Z P - B S0 6 E R 1 01
Page 26

2 6
T O R K EL 8 2 0 / 84 0 / 8 6 0
P r o g r a mm a E l e ct r i c A B
Z P - B S0 6 E R 1 01
10
Auto-limits
Activating autolimits
Press <ESC> repeatedly until you see the “MAIN
MENU”.
Select ”Auto-limits” using the vertical arrow keys
and press <ENTER>.
Warning Vmin
No 1.85V/cell
Use the vertical arrow keys ( or ) to activate
the auto-limits function (”Yes”) so that it will issue
voltage warnings.
Set the voltage value/cell value.
Press <ENTER>.
Stop Vmin
No
1.80 V/cell
Use the vertical arrow keys ( or ) to activate
the auto-limits function so that it will provide
voltage stops.
Set the voltage value/cell value.
Press <ENTER>.
Using the same procedure as that set forth above, you
can set TORKEL to:
Issue a warning when, say, 50 % of the test
period (time) has elapsed.
Stop discharging when, say, 100% of the test
period (time) has elapsed.
Issue a warning when, say, 50% of the rated
capacity is discharged.
Stop discharging when, say, 100% of rated
capacity is discharged
When you start the test, TORKEL will ask you to enter
the number of cells, the length of the test period
(time) and the rated capacity.
1]
2]
3]
4]
5]
6]
7]
8]
•
•
•
•
Invoking the autolimits function
The auto-limits function automatically calculates and
sets the limit values. Here, you must specify the voltage per cell at which you want a warning to be issued
and the voltage per cell at which you want TORKEL to
stop discharging the battery.
When you start the test, TORKEL asks you to enter
number of cells and then sets the limits automatically.
This function can also be used to simplify the task of
setting capacity and time limits.
Page 27

2 7
T O R K EL 8 2 0 / 84 0 / 8 6 0
P r o g r a mm a E l e ct r i c A B
Z P - B S0 6 E R 1 01
Page 28

2 8
T O R K EL 8 2 0 / 84 0 / 8 6 0
P r o g r a mm a E l e ct r i c A B
Z P - B S0 6 E R 1 01
11
TORKEL connected
to a PC
TORKEL Win
program
The TORKEL Win program builds up a voltage curve
on the screen while the test is running and presents
the current, voltage and capacity values in a scrollable table. Moreover, you can control TORKEL from
TORKEL Win during the test, print out a report and
store the measured values in a text file, which can be
imported easily into Microsoft® EXCEL.
Because TORKEL always stores the total voltage curve
during the test (one curve can be stored), you can also
connect TORKEL to a PC after the test, transfer the
voltage curve, examine it and store it as a file using
TORKEL Win.
TORKEL Win features
Example of a discharge voltage curve
Displayed while test is running (or
retreived later from a file)
Voltage curve
Voltage, current and capacity in tabular
form.
Commands that can be issued to
TORKEL
Set the test method
Set the load (current, power or resistance)
•
•
•
•
General
TORKEL can be connected to a PC and controlled
by the TORKEL Win program. TORKEL also supports
communication with the TMC95 program that was
created to conduct capacity tests together with the
TMC4001 Multi-Channel Data Logger.
Page 29

2 9
T O R K EL 8 2 0 / 84 0 / 8 6 0
P r o g r a mm a E l e ct r i c A B
Z P - B S0 6 E R 1 01
Set current or power profile
Set warning and stop limits
Start the test
Pause the test
Restart the test
Reset the alarm
Lock / unlock TORKEL-panel
Set current measurement
Set sample rate
Reporting
Fill in report
Copy voltage curve to clipboard
Other commands
Transfer voltage curve from TORKEL
Load a new language into TORKEL
TORKEL Win is delivered with every TORKEL. However
a software key must be loaded into the TORKEL in
order to make it able to communicate with TORKEL
Win. This key can be purchased from Programma.
You can evaluate the program without the key since
a file containing test data is included. Select “Files”,
“Open” and double-click “demo”.
Note You do not need a software key for load-
ing a new language into TORKEL.
•
•
•
•
•
•
•
•
•
•
•
•
•
Installing
TORKEL Win
The TORKEL Win software package consists of:
• One diskette containing the TORKEL Win program.
Provided that you have ordered TORKEL Win, the
diskette also contains a software key.
• One CD containing TORKEL Win and other
languages than English
• Serial cable
Requirements on your PC
• PC with Pentium processor
• Display with at least 640 x 480 pixels
• Windows 95/98/2000/NT/XP
• An unoccupied serial port
Installation
Insert the program diskette or the CD.
Click ”Start” and then ”Run”.
Type ”A:\TORKEL Win_Setup” or the drive for CD
e.g. "D:\ TORKEL Win_Setup”.
Follow the installation wizard instructions which
guide you through the installation procedure.
Setting up communication
Connect the serial port on TORKEL to the serial
port on the PC using a straight pin-to-pin cable.
Start the TORKEL Win program.
Select the desired communication port (“Direct
to COM1” for example) when TORKEL Win asks for
device selection.
Switch on TORKEL.
Wait until TORKEL Win indicates “Online”. (This
appears under “Status” in the window.)
Loading the software key
Note If you purchase a TORKEL together with
TORKEL Win the software key is already
loaded.
If you do not have a diskette drive contact
GE Energy Programma for delivery of the
software key.
Proceed as stated in the section headed “Setting
up communication”
1]
2]
3]
4]
1]
2]
3]
4]
5]
1]
Page 30

3 0
T O R K EL 8 2 0 / 84 0 / 8 6 0
P r o g r a mm a E l e ct r i c A B
Z P - B S0 6 E R 1 01
Select “File” and click “Load Software key”. Put
the program diskette into the PC and instruct
TORKEL Win to open the file with extension .key
on the diskette.
Changing the language
used in TORKEL
You can replace one of the languages in TORKEL with
the contents in the language file.
Proceed as set forth in the section
headed“Setting up communication”
Select “TORKEL Commands,” and click “Download
Language”. Insert the Torkel Win CD into your
CD drive and instruct TORKEL Win to open the
desired language file.
2]
1]
2]
Testing with
TORKEL Win
Proceed as set forth in the section headed “Setting up communication”.
Proceed as set forth in the sections headed
”Preparations” and “Setting the current” in
the chapter headed “Conducting a test”. Note,
however, that F1 must be switched on before you
start conducting test with TORKEL Win.
Select test method. Select current or power or
resistance as desired. Set the desired warning
limits and start the test with TORKEL Win.
Viewing the results
Select the ”RESULT” submenu via which you can
read the values that were valid at the end of the
last test. Voltage and discharged capacity are
displayed in the first line.
Press the vertical up arrow key (
) key to view
current and time. You can scroll up and down
among the displayed items with the vertical arrow keys ( or ).
Press <ENTER> to leave the sub-menu.
1]
2]
3]
4]
5]
6]
1]
2]
3]
Page 31

3 1
T O R K EL 8 2 0 / 84 0 / 8 6 0
P r o g r a mm a E l e ct r i c A B
Z P - B S0 6 E R 1 01
Page 32

3 2
T O R K EL 8 2 0 / 84 0 / 8 6 0
P r o g r a mm a E l e ct r i c A B
Z P - B S0 6 E R 1 01
12
Starting and stopping
from an external device
Start/stop connector
Discharging can be started and stopped from external
equipment via the connector named START/STOP.
Male connector for this terminal is "Neutrik NC3MX".
The start/stop circuits are galvanically isolated from
other circuits in TORKEL.
Two or more TORKEL units can be started simultaneously since the START/STOP connectors can be connected in parallel and triggered by a single contact.
Starting
Connect a dry contact to pin 2 and pin 3 in the
connector.
Closing and then opening the contact will cause
TORKEL to start the discharge.
5 V is supplied for the dry contact and the current
is limited internally to about 5 mA.
Stopping
Connect a dry contact to pin 1 and pin 3 in the
connector.
Closing and then opening the contact will cause
TORKEL to stop the discharge.
5 V is supplied for the dry contact and the current
is limited internally to about 5 mA.
1]
1]
Page 33

3 3
T O R K EL 8 2 0 / 84 0 / 8 6 0
P r o g r a mm a E l e ct r i c A B
Z P - B S0 6 E R 1 01
Page 34

3 4
T O R K EL 8 2 0 / 84 0 / 8 6 0
P r o g r a mm a E l e ct r i c A B
Z P - B S0 6 E R 1 01
13
How to obtain the
desired current
TORKEL load
capacity
The following tables present the TORKEL built-in current limitation (Imax) and also the resistance of the
built-in resistance elements for the different voltage
ranges.
TORKEL 820
Range Max
current
(Imax)
Internal
resistance
(nominal)
Lowest voltage at which
Imax can be
obtained
1)
10-27.6 V 270 A 0.069 W 21.3 V
10-55.2 V 270 A 0.138 W 39.9 V
1) Requires use of two standard cables,
3
m (10 ft), 70mm2 (1.5 mΩ).
TORKEL 840/860
Range Max
current
(Imax)
Internal
resistance
(nominal)
Lowest voltage at which
Imax can be
obtained
2)
10 - 27.6 V 110 A 0.165 W 20.8 V
10 - 55.2 V 110 A 0.275 W 32.9 V
10 - 144 V 110 A 0.550 W 63.1 V
10 - 288 V 55 A 3.3 W 184 V
2) Requires use of two standard cables,
3
m (10 ft) / 25 mm2, (4 mΩ).
Calculating current
General
You must make some simple calculations before starting a test to find out whether or not TORKEL will be
able to provide the desired load current. You must
also make certain that TORKEL will be able to sustain
this current until the test ends. TORKEL regulates current by lowering its internal resistance as the voltage
drops. However, the resistance elements built into
TORKEL impose a limit beneath which further lowering
is impossible.
Page 35

3 5
T O R K EL 8 2 0 / 84 0 / 8 6 0
P r o g r a mm a E l e ct r i c A B
Z P - B S0 6 E R 1 01
Imax
Check that the desired current load is not greater than
the Imax for the TORKEL unit in question (column 2 in
the tables above).
Max power
For the 10 – 480 V range on TORKEL 860, you must
also check to see that current multiplied by maximum
voltage does not exceed the 15 kW power limit.
Final voltage
If the final voltage is lower than the value set forth in
column 4 (in the table above), the internal TORKEL
resistance will limit the current so that it will be impossible to reach Imax (column 2 in the table above). In
such case, you can calculate the current that will be
obtained at the final voltage as follows:
Add the TORKEL internal resistance (column
3) to the cable resistance (which is 1.5 mΩ for
TORKEL 820 and 4 mΩ for TORKEL 840/860 if you
are using standard cables).
Subtract 2.2 V from the final voltage and divide by the resistance you obtained in step one
(above).
Example: The final voltage is 10.8 V, and you want
to find the maximum possible current at this voltage if
you are using a TORKEL 840 and the voltage range is
10 – 27.6 V.
Calculate the resistance as follows:
0.165 Ω + 0.004 Ω = 0.169 Ω .
Calculate the maximum current as follows:
(10.8 V – 2.2 V) / 0.169 Ω = 50.9 A.
Examples of load capacities
TORKEL 820
12 V battery (6 cells)
1)
Final voltage Constant current Constant power
1.80 V / cell (10.8 V) 0 – 121 A 0 – 1.31 kW
1.75 V / cell (10.5 V) 0 – 117 A 0 – 1.23 kW
1.67 V / cell (10.0 V) 0 – 110 A 0 – 1.10 kW
24 V battery (12 cells)
1)
1.80 V / cell (21.6 V) 0 – 270 A 0 – 5.8 kW
1.75 V / cell (21.0 V) 0 – 266 A 0 – 5.59 kW
1.60 V / cell (19.2 V) 0 – 241 A 0 – 4.63 kW
48 V battery (24 cells)
1)
1]
2]
1.80 V / cell (43.2 V) 0 – 270 A 0 – 11.6 kW
1.75 V / cell (42.0 V) 0 – 270 A 0 – 11.3 kW
1.60 V / cell (38.4 V) 0 – 259 A 0 – 9,9 kW
1) 2.15 V per cell when test starts
TORKEL 840/860
12 V battery (6 cells)
1)
Final voltage Constant cur-
rent
Constant
power
1.80 V / cell (10.8 V) 0 – 50.0 A 0 – 0.54 kW
1.75 V / cell (10.5 V) 0 – 49.0 A 0 – 0.51 kW
1.67 V / cell (10.0 V) 0 – 46.0 A 0 – 0.46 kW
24 V battery (12 cells)
1)
1.80 V / cell (21.6 V) 0 – 110 A 0 – 2.37 kW
1.75 V / cell (21.0 V) 0 – 110 A 0 – 2.31 kW
1.60 V / cell (19.2 V) 0 – 100 A 0 – 1.92 kW
48 V battery (24 cells)
1)
1.80 V / cell (43.2 V) 0 – 110 A 0 – 4.75 kW
1.75 V / cell (42.0 V) 0 – 110 A 0 – 4.62 kW
1.60 V / cell (38.4 V) 0 – 110 A 0 – 4.22 kW
110 V battery (54 cells)
1)
1.80 V / cell (97.2 V) 0 – 110 A 0 – 10.7 kW
1.75 V / cell (94.5 V) 0 – 110 A 0 – 10.4 kW
1.60 V / cell (86.4 V) 0 – 110 A 0 – 9.5 kW
120 V battery (60 cells)
1)
1.80 V / cell (108 V) 0 – 110 A 0 – 11.9 kW
1.75 V / cell (105 V) 0 – 110 A 0 – 11.5 kW
1.60 V / cell (96 V) 0 – 110 A 0 – 10.5 kW
220 V battery (108 cells)
1)
1.80 V / cell (194 V) 0 – 55 A 0 – 10.7 kW
1.75 V / cell (189 V) 0 – 55 A 0 – 10.4 kW
1.60 V / cell (173 V) 0 – 51.0 A 0 – 8.82 kW
240 V battery (120 cells)
1)
1.80 V / cell (216 V) 0 – 55 A 0 – 11.9 kW
1.75 V / cell (210 V) 0 – 55 A 0 – 11.5 kW
1.60 V / cell (192 V) 0 – 55 A 0 – 10.5 kW
1) 2.15 V per cell when test starts
TORKEL 860
UPS battery (180 cells)
1)
(TORKEL 860)
1.70 V / cell (306 V) 0 – 38 A 0 – 15 kW
1.60 V / cell (288 V) 0 – 38 A 0 – 15 kW
UPS battery (204 cells) 1) (TORKEL 860)
1.80 V / cell (367 V) 0 – 34 A 0 – 15 kW
1.60 V / cell (326 V) 0 – 34 A 0 – 15 kW
1) 2.15 V per cell when test starts
Page 36

3 6
T O R K EL 8 2 0 / 84 0 / 8 6 0
P r o g r a mm a E l e ct r i c A B
Z P - B S0 6 E R 1 01
When a single
TORKEL isn’t
enough
When a single TORKEL cannot provide the current you
need, you can:
Connect one or more TXL Extra Loads to
TORKEL.
Connect two or more TORKELs in parallel.
Connect two or more TORKELs and two or
more TXL Extra Loads into a single system.
When two or more TORKELs are connected into a single system, you will normally use the “External current
measurement” function. But in situations where it is
important for current to be regulated to the correct
value within a second or so, it is better to use two or
more TORKEL units set for internal current measurement and no TXL Extra Loads since these latter must
be started manually. To obtain the total current, you
must then add the current values (amperages) shown
on all TORKEL units. The TORKEL units can be started
and stopped synchronously via the START/STOP input.
TXL Extra Loads connected
to TORKEL
TXLs are resistive loads which are unable to provide
any sort of regulation. Regulation is provided by
TORKEL which measures the total current and keeps
it constant. See the chapter headed “External current measurement” which shows how to connect the
TXL(s) and TORKEL(s).
When TXL Extra Loads are connected to TORKEL, you
must check:
That the current flowing through the TXLs
when the test is started is not higher than
intended.
That TORKEL has enough regulation capability a) to compensate for the drop in current
through the TXLs at the end of the test and
b) to set the current to the correct value at
the beginning of the test.
•
•
•
•
•
Calculating how many
TORKELs and TXLs are
needed
1. Number of TXLs – Current flowing through TXL(s) at beginning of
a test
At the beginning of the test, as high a percentage as
possible of the current must flow through the TXLs,
thereby providing the TORKEL(s) with as much reserve
regulation capability as possible. However, the current
through the TXLs must not, of course, exceed, the
desired current value (A).
Note Remember that the internal resistances of
the TXLs can be set manually. For accurate
calculation, add the cable resistance to
the internal resistance.
A. The current in an individual TXL can be obtained by
dividing the voltage at the beginning of the test by
the internal resistance of the TXL in question (see
tables below).
B. Calculate the number of TXLs that you can connect
without exceeding the desired total current.
2. Current flowing through TXL(s)
at final voltage
A. Multiply the total current through the TXL(s) which
you obtained in step 1 above by the final voltage,
and then divide by the voltage at the beginning of
the test.
3. Number of TORKELs – for the
current regulation
The TORKEL or TORKELs in the system must regulate
the current to the desired value and compensate for
the drop in current through the TXL(s) that occurs at
the final voltage.
A. The amount of regulation needed can be obtained
by subtracting the current value (A) obtained in step
2 above from the desired current.
B. Calculate the number of TORKELs required for the
current regulation.
4. Are all of the TXLs needed?
If the total load-providing capability of the TORKEL(s)
exceeds the amount of regulation needed by a wide
margin (as set fort in step 3 above), you can perhaps
conduct the test with fewer TXLs. If this margin is
wider than the current through one of the TXLs at the
final voltage, this TXL is not needed.
Page 37

3 7
T O R K EL 8 2 0 / 84 0 / 8 6 0
P r o g r a mm a E l e ct r i c A B
Z P - B S0 6 E R 1 01
TXL830
Max
voltage
Possible resistance
settings (nominal)
Position
28 V
0.275 W 1
0.138 W 2
0.092 W 3
TXL850
56 V
0.550 W 1
0.278 W 2
0.184 W 3
TXL870
140 V
2.480 W 2
1.240 W 3
280 V 4,950 W 1
Example
A lead-acid battery with 54 cells has to be tested at
250 A.
Voltage at the beginning of the test (Vstart) is:
116.1 V (54 x 2.15 V)
Voltage at end of the test (Vend) is:
97.2 V (54 x 1.80 V)
Since the current is so high, you must use TXLs . A
TXL870 is suitable since it is rated for the voltage in
question.
1 – Number of TXLs – Current flowing
through TXL(s) at beginning of a test.
The current through a TXL870 set for a resistance of
2.48 Ω is 46.8 A, and current through a TXL870 with
a resistance of 1.24 Ω is 93.6 A. If two TXLs are set to
1.24 Ω and one TXL is set to 2.48 Ω the current will
be 234 A, and they can be connected without having
the current exceed 250 A.
2 – Current flowing through TXL(s) at final
voltage.
234 A x 97.2 V / 116.1 V = 196 A
3 – Number of TORKELs – for the current
regulation.
250 A – 196 A = 54 A. A single TORKEL 840 is
enough for this.
4 – Are all of the TXLs needed?
The loading capability of the TORKEL unit is 110 A at
the final voltage. This exceeds the amount needed by
110 A – 54 A = 56 A. This unused margin is perhaps
wide enough to eliminate the need for one TXL. At
the end of the test, the current through the TXL that
is set to 2.48 Ω is 97.2 V / 2.48 Ω = 39 A. Since the
unused TORKEL margin is wider than 39 A, this TXL is
not needed.
TORKEL/TXL system examples
Systems containing TORKEL 820
and TXL830
12 V battery (6 cells)
Discharge from 2.15 to 1.8 V/cell
Maximum constant current (A)
Number of units
TORKEL 820
Number of units
TXL830
234 1 1
346 1 2
459 1 3
571 1 4
693 2 4
806 2 5
918 2 6
1031 2 7
24 V battery (12 cells)
Discharge from 2.15 to 1.8 V/cell
Maximum constant current (A)
Number of units
TORKEL 820
Number of units
TXL830
495 1 1
720 1 2
945 1 3
1170 1 4
1440 2 4
1665 2 5
1890 2 6
2115 2 7
2340 2 8
Page 38

3 8
T O R K EL 8 2 0 / 84 0 / 8 6 0
P r o g r a mm a E l e ct r i c A B
Z P - B S0 6 E R 1 01
Systems containing TORKEL 820
and TXL850
48 V battery (24 cells)
Discharge from 2.15 to 1.8 V/cell
Maximum constant current (A)
Number of units
TORKEL 820
Number of units
TXL850
499 1 1
729 1 2
959 1 3
1189 1 4
1459 2 4
1688 2 5
1918 2 6
2148 2 7
2378 2 8
2608 2 9
2837 2 10
Systems containing
TORKEL 840/860 and TXL830
24 V battery (12 cells)
Discharge from 2.15 to 1.8 V/cell
Maximum constant current (A)
Number of units
TORKEL 840/860
Number of units
TXL830
263 1 1
445 2 1
670 2 2
895 2 3
1005 3 3
1230 3 4
1455 3 5
Systems containing
TORKEL 840/860 and TXL850
48 V battery (24 cells)
Discharge from 2.15 to 1.8 V/cell
Maximum constant current (A)
Number of units
TORKEL 840/860
Number of units
TXL850
264 1 1
449 2 1
679 2 2
909 2 3
1019 3 3
1249 3 4
1478 3 5
Systems containing
TORKEL 840/860 and TXL870
110 V battery (54 cells)
Discharge from 2.15 to 1.8 V/cell
Maximum constant current (A)
Number of units TORKEL
840/860
Number of units
TXL870
188 1 1
266 1 2
344 1 3
422 1 4
532 2 4
610 2 5
688 2 6
766 2 7
845 2 8
923 2 9
1001 2 10
120 V battery (60 cells)
Discharge from 2.15 to 1.75 V/cell
Maximum constant current (A)
Number of units
TORKEL 840/860
Number of units
TXL870
194 1 1
278 1 2
363 1 3
473 2 3
557 2 4
642 2 5
726 2 6
810 2 7
895 2 8
979 2 9
220 V battery (108 cells)
Discharge from 2.15 to 1.8 V/cell
Maximum constant current (A)
Number of units
TORKEL 840/860
Number of units
TXL870
94 1 1
133 1 2
188 2 2
227 2 3
266 2 4
306 2 5
345 2 6
384 2 7
423 2 8
463 2 9
Page 39

3 9
T O R K EL 8 2 0 / 84 0 / 8 6 0
P r o g r a mm a E l e ct r i c A B
Z P - B S0 6 E R 1 01
Test conducted
using a system
comprising TORKEL
and TXL units
One of the TORKEL units (we shall call it TORKEL No.
1) is to measure the entire battery current. TORKEL
No. 2 measures all current except the current through
TORKEL No. 1. TORKEL No. 3 measures all current except the currents through TORKEL No. 2 and TORKEL
No. 1 (and so forth). The last TORKEL measures only
the current through itself and the TXLs.
Example of a system comprising TORKEL and TXL units.
Hookup and settings
Warning
The chapter headed “Conducting a test”
presents safety precautions and explains
how to prepare for testing. Be sure to
comply with what is set forth in this chapter.
Apply the clamp-on ammeters as illustrated
above.
1]
Set the desired total current (same value) on all
TORKEL units.
As a result, the maximum regulation capability of
all TORKEL units will be used. You do not need to
pay any attention to the message reading “Cannot regulate” as long as it does not appear on
TORKEL No. 1.
Set warning limits only on TORKEL No. 1.
Set the stop limits. The voltage and test period
(time) can be set on each individual TORKEL. Stopping after a certain capacity (Ah) is reached can
only be activated on TORKEL No. 1.
Note Only TORKEL No. 1 is to control the TXLs.
Only TORKEL No. 1 is to be connected to
the PC.
Starting discharge
Set switch <F1> to the upper (ON) position on the
TXLs.
Then start the TORKEL that has the highest
number (when numbered as set forth above).
Now start the TORKEL with the second highest
number, then the third highest, etc. Finally, start
TORKEL No. 1. Starting the TORKELs in this order
prevents the current from being higher than
desired at the beginning of the test.
2]
3]
4]
1]
2]
Page 40

4 0
T O R K EL 8 2 0 / 84 0 / 8 6 0
P r o g r a mm a E l e ct r i c A B
Z P - B S0 6 E R 1 01
14
TXL Extra Loads
3 – Connection terminals
for the battery
+
(Terminal)
Positive (+) current connection for battery being
tested.
- (Terminal)
Negative (-) current connection for battery being
tested.
Insulation voltage to ground: 2200 V
4 – Control
CONTROL IN
Input for control signal from TORKEL-unit. Galvani-
cally isolated.
CONTROL OUT
Output used for the control signal sent from TORKEL
to the adjacent TXL-unit. Galvanically isolated.
5 – Mains
MAINS
Connector used for mains supply, equipped with
ON/OFF switch.
1 – Selector switch
Selector switch used to set the desired voltage range
and/or resistance value.
2 – Circuit breaker
F1
Voltage-controlled circuit breaker that connects the
resistors in the TXL Extra Load to the battery.
Note F1 will not latch or remain at upper (ON)
position unless the mains switch is turned
on and a control signal from TORKEL
is present at the “CONTROL IN” input.
Furthermore, TORKEL must be in the ”Test
battery” sub-menu.
Page 41

4 1
T O R K EL 8 2 0 / 84 0 / 8 6 0
P r o g r a mm a E l e ct r i c A B
Z P - B S0 6 E R 1 01
Testing
WARNING!
See the chapter "Conducting a test" for
safety precautions and how to prepare
the test
Proceed in the same way as set forth in the
chapter headed “Conducting a test” but before
you start TORKEL you must set switch F1 to upper
(ON) position on the TXL. (You must do this manually.)
Start TORKEL by pressing <ENTER>.
TORKEL with one TXL
1]
2]
Setting up the extra
load
When an extra load is to be used, you must use the
external current measurement function (see the chapter headed “External current measurement”).
Important
Never connect a TXL to a voltage higher
than specified for the range in question.
Set the range selector switch to the desired position.
Connect as shown in the illustrations.
Connect the control wires between the “TXL”
output on TORKEL and the “CONTROL IN” input
on the TXL.
If two or more TXLs are to be used, provide a connection between the “CONTROL OUT” output on
the first TXL and the “CONTROL IN” input on the
second TXL, etc.
Connect the TXL to the mains voltage
Switch on the TXL.
1]
2]
3]
4]
5]
Page 42

4 2
T O R K EL 8 2 0 / 84 0 / 8 6 0
P r o g r a mm a E l e ct r i c A B
Z P - B S0 6 E R 1 01
15
Optional
accessories
Cables
Cable set, 2 x 3 m (10 ft), for connecting
TORKEL to the battery:
70 mm2 270 A cable for TORKEL 820.
25 mm2 110 A cable for TORKEL 840 and
TORKEL 860.
Cables for controlling a TXL Extra Load from
TORKEL.
Sensing leads, 2 x 5 m (16 ft), used to measure
voltage at the battery terminals.
Extension cable, 2 x 3 m (10 ft), 25 mm
2,
110
A.
Clamp-on DC ammeter
200 A clamp-on DC ammeter
1000 A clamp-on DC ammeter
Software
TORKEL Win software
Other
Transport case
TXL Extra Loads. The TXL830 is for up to 24 V
batteries, the TXL850 for up to 48 V batteries
and the TXL870 for up to 240 V batteries.
TMC2001d Data Logger
TMC4001 Multi-Channel Data Logger
•
•
•
•
•
•
•
•
•
•
•
Page 43

4 3
T O R K EL 8 2 0 / 84 0 / 8 6 0
P r o g r a mm a E l e ct r i c A B
Z P - B S0 6 E R 1 01
Page 44

4 4
T O R K EL 8 2 0 / 84 0 / 8 6 0
P r o g r a mm a E l e ct r i c A B
Z P - B S0 6 E R 1 01
16
Troubleshooting
When you first connect a higher
voltage to TORKEL and then a
lower voltage, you may have to
wait for some time.
•
“Error: Connection”
TORKEL has indicated that the battery voltage has
disappeared.
Check the connection to the battery.
•
“CHECK F1”
This message appears if the current is 0 A when current should be flowing.
Check that circuit breaker F1 is
switched on.
•
“CHECK F1 Input voltage “
Check that circuit breaker F1 is
switched on, that the battery is
properly connected and that the
battery voltage is not less than
10 V.
•
“Unable to regulate”
The message appears when TORKEL can not regulate
the current (or power or resistance) to the desired
value.
The TORKEL-unit can not regulate because it can not
decrease its resistance further.
You must decrease the current
or connect more TORKEL or TXL
units.
•
This is not a fault-situation if the
actual TORKEL is operating in a
system of several TORKEL units
and another TORKEL (TORKEL nr 1)
takes care of the total regulation.
•
"Error: External I”
The measured external current is less than the internal current
See also chapter headed “External Current Measurement”.
Display on TORKEL is dark.
Check that the mains cable is properly plugged in.
•
Check the mains voltage•
Impossible to switch on the circuit breaker
F1.
It is only possible to switch on F1 in the “Test battery”
submenu. Furthermore, you must:
Connect the battery to TORKEL
Set the current
Wait for message reading “Switch on
F1”.
Push the lever of F1 to the ON position a second time if it does not latch
directly.
1]
2]
3]
4]
Voltage reading on the display is lower
than the battery voltage.
You responded to the “Switch on F1” message by
pressing <ENTER> without switching on F1.
You have accidentally switched off F1 manually.
TXL connected to TORKEL
When a TXL and TORKEL are connected via the signal cable
connected to the ”Control In” input, the following can happen:
Impossible to switch on the circuit breaker
F1 on the TXL-unit.
You have not received the message “Switch on F1” on
TORKEL.
You have not connected the input CONTROL IN properly to TORKEL.
The TXL have no mains power. If the fans are not
running, check the mains connection and the mains
switch.
Messages on display
“Connect battery” does not disappear.
Check connection to the battery.•
Check the polarity of the connection to the battery.
•
Page 45

4 5
T O R K EL 8 2 0 / 84 0 / 8 6 0
P r o g r a mm a E l e ct r i c A B
Z P - B S0 6 E R 1 01
A calibration is recommended. TORKEL is now using
calculated and standardised calibration values.
“Checksum error! Switch off”
Read error in TORKEL's control-memory.
Switch off TORKEL and switch on
again. If the message remains it
might be necessary to perform
the reset procedure in the chapter
“Calibration”.
•
“Power failure”
TORKEL has lost the mains power for a while when a
test was in progress. TORKEL displays the values when
the test was interrupted.
You can choose to continue or end
the test.
•
"8X0"
You need to restore Torkel, follow instructions below.
Connect Torkel to the PC and start
Torkel. Press "ESC" to enter the main
menu.
Run the file "restore.exe" and select
the file xxxxxxx.set (contact our
Customer Service if you do not have
the file).
Click the icon "TORKEL Restore" and
select the "Com port".
When the message "Restoring complete" is shown, click "OK".
Calibrate Torkel.
1]
2]
3]
4]
5]
Check the setting in sub menu “Basic
setting”, “I measurement”.
Select “External” if you want to use
the input External Current Measurement.
Select “Internal” if you do not want to
use External Current Measurement
Check that the mV/A ratio complies
with the clamp-on ammeter
1]
2]
3]
4]
TORKEL is set for “External Current Measurement” but
the clamp-on ammeter:
is not properly connected
is not switched on
is not correctly applied on the
conductor.
has bad batteries
•
•
•
•
“Overheated”
The internal thermal protection device has tripped.
Check cooling and ambient temperature
•
A fan may be damaged (not rotating or slow).
Call for service.•
“Overcurrent”
The current through TORKEL is higher than allowed
because of a fault in TORKEL´s internal current limitation.
“Input voltage too high”.
The battery voltage is higher than specified for your
TORKEL.
“Input voltage > 27.6 V”
“Input voltage > 55.2 V”
“Input voltage > 144 V”
“Input voltage > 288 V”
“Input voltage > 480 V”
When you connect the battery, TORKEL will automatically select the voltage range and arrange the internal
resistors for highest possible current.
If one of the messages above appears, TORKEL has
stopped because the input voltage has increased and
exceeded the range. You can continue the test but
TORKEL will choose a higher voltage range and rearrange the internal resistors.
Note: The current rating for the new range is probably lower than the previous range (see chapter
headed “Specifications”).
“Input voltage too low”
The battery voltage is too low (less than 10 V, which
is frequent on defective batteries) for safe operation
with TORKEL.
“Calibrate!”
Page 46

4 6
T O R K EL 8 2 0 / 84 0 / 8 6 0
P r o g r a mm a E l e ct r i c A B
Z P - B S0 6 E R 1 01
17
Calibration
How to calibrate
Warning
Do not connect or disconnect any of the
cables unless the circuit breaker F1 is in
the lower (OFF) position.
Do not touch conducting parts of the
clamps on the current cables or the voltage sensing cables when they are connected to TORKEL.
Switch on TORKEL.
In the “MAIN MENU” select “BASIC SETTINGS”.
Set “I MEASUREMENT” to “INTERNAL”.
Switch off TORKEL.
Press the <Esc> and <Stop> keys simultaneously,
while switching on TORKEL.
1. Calibrating zero levels
Message reading:
Press ENTER
to calibrate
Press <ENTER>.
Message reading:
Short-circuit
inputs
Short-circuit the inputs.
a) ”EXTERNAL CURRENT MEASUREMENT”
b) Positive (+) and negative (-) terminals for battery current.
c) ”VOLTAGE SENSE”
Message reading:
Switch on F1
Press ENTER
Set switch F1 to its upper (ON) position.
1]
2]
3]
4]
5]
1]
2]
3]
4]
5]
Calibration
procedure
TORKEL has four circuits used for testing that require
calibration:
Internal current
Internal voltage
External voltage
External current
The calibration procedure has four main steps:
Calibrating zero levels
Calibrating internal current (Int I)
Calibrating internal and external voltage (V)
Calibrating external current (Ext +I)
For main steps 2, 3 and 4 you can decide whether or
not to perform them.
Note Calibrate once a year to maintain proper
accuracy.
Stable voltage and current sources (which vary
less than 1% per second) and accurate reference
instruments must be used. The current source
must be able to supply high current at a voltage
between 10 and 30 V. One or two 12 V batteries
can be used here.
•
•
•
•
1]
2]
3]
4]
Page 47

4 7
T O R K EL 8 2 0 / 84 0 / 8 6 0
P r o g r a mm a E l e ct r i c A B
Z P - B S0 6 E R 1 01
Press <ENTER>.
Message reading:
Calibrating
Zero levels
F1 will trip.
Remove all short circuits (see step 3).
2. Calibrating internal current
Message reading:
CALIBRATE Int.I ?
No
Change to ”Yes” using the vertical arrow keys (
or ).
Connect the current source (two car batteries in
series for example) to the battery current terminals on TORKEL.
Note: The current source must be able to supply a
high stable current.
Connect an accurate current measurement reference instrument (for instance a current shunt
with a voltmeter) in series with the batteries.
Press <ENTER>
Message reading:
000 000 0
R:135 T:123 F1
Change the displayed numbers to read as follows
by using the vertical arrow keys ( or ).
111 111 1
R:135 T:123 F1
17. Press <ENTER>
The fans will start.
Message reading:
Calib internal I
Input: 085.00A
Set switch <F1> to its upper (ON) position.
Change the current value on the display to the
value read from the reference instrument.
Press <ENTER>.
F1 will trip.
6]
7]
1]
2]
3]
4]
5]
6]
7]
8]
9]
10]
11]
Note If a message reading “Error: Unstable
current” appears, press <ENTER> and try
again. This can be caused by excessively
high current from the batteries. Repeat
the calibration at a lower current by changing the numbers in the message shown
in step 6 to
111 010 1 or 111 100 1.
Note
If a message reading“ Error: >15%”
appears, calibration has been rejected
because it deviates too much from a calculated standardized value. Press <ESC>
to repeat the calibration or to select ”No”
for this main step of the calibration. If
you skipped one of the main steps in the
calibration procedure (internal current
for example) the calibration value for the
skipped main step will be set to a calculated standardized value.
3. Calibrating internal and
external voltage
Message reading:
Calibrate V?
No
Change to ”Yes” using the vertical arrow keys (
or ).
The voltage measurement range must be calibrated at two points, hereinafter designated P1 and P2.
Recommendation: Calibrate P1 at 12 V and P2
close to the top of the range or close to the highest
voltage at which TORKEL is to be used.
Ranges:
TORKEL 820: 0-60 V
TORKEL 840: 0-288 V
TORKEL 860: 0-480 V
Connect a stable variable voltage source to the
battery current terminals on TORKEL.
Connect the same voltage source to the ”VOLTAGE SENSE” input.
Connect an accurate reference instrument (voltmeter) across the voltage source.
Adjust the voltage source to the first point (P1) at
which the voltage measurement is to be calibrated.
Recommended voltage: 12 V.
1]
2]
3]
4]
5]
6]
Page 48

4 8
T O R K EL 8 2 0 / 84 0 / 8 6 0
P r o g r a mm a E l e ct r i c A B
Z P - B S0 6 E R 1 01
Press <ENTER>
Message reading:
P1: 10mV
Input: 010.00mV
Connect the voltage source to the EXTERNAL
CURRENT MEASUREMENT input.
Adjust the voltage source to the value to be used
for point 1 (P1).
Measure the voltage with a reference instrument.
Change the voltage shown on the TORKEL display
to the value read from the reference instrument
(voltmeter).
Press <ENTER>.
Message reading:
P2: 900mV
Input: 900.00mV
Adjust the voltage source to the value to be used
for point 2 (P2).
Change the voltage shown on the TORKEL display
to the value read from the reference instrument
(voltmeter).
Press <ENTER>.
Message reading:
PRESS ENTER TO
STORE CALIB DATA
Press <ENTER>
Message reading:
MAIN MENU
Test battery
Connect
Battery !
Calibration is now completed.
3]
4]
5]
6]
7]
8]
Press <ENTER>.
Message reading:
Please wait…
20sec
Switch on F1
Press ENTER
Set switch F1 to its upper (ON) position.
Press <ENTER>
Message reading:
P1
Input: 012.00V
Change the voltage shown on the display to the
value read from the reference instrument (voltmeter).
Press <ENTER>.
Note: If a message reading ”Error !!! Input too
low” appears, check that the voltage source
is connected properly to the ”VOLTAGE SENSE”
input and also the terminals used for the battery
current.
Message reading:
P2: max. 480V
Input: 450.00V
Adjust the voltage source to the value to be used
for point 2 (P2).
Note: The P2 value suggested by TORKEL is different for TORKEL 820, TORKEL 840 and TORKEL
860.
Change the voltage shown on the TORKEL display
to the value read from the reference instrument
(voltmeter).
Press <ENTER>.
Message reading:
Disconnect
Battery!
Disconnect TORKEL from the voltage source.
F1 will trip.
4. Calibrating of external
current
Message reading:
CALIBRATE Ext.I ?
No
Change to ”Yes” using the vertical arrow keys (
or ).
Calibration must be done at two points, called P1
and P2.
7]
8]
9]
10]
11]
12]
13]
14]
1]
2]
Page 49

4 9
T O R K EL 8 2 0 / 84 0 / 8 6 0
P r o g r a mm a E l e ct r i c A B
Z P - B S0 6 E R 1 01
Resetting TORKEL
General
This procedure has two purposes:
• To set the calibration values to calculated
standardized values (useful if the calibration has
become invalid or is lost).
• To restore the contents of the control memory
after a message reading “Checksum error” has
appeared.
Resetting TORKEL can never be fully equivalent with
regular calibration carried out using accurate and
traceable reference instruments. However, it provides
you with a quick and simple way to deal with a situation in which no calibration values at all are available.
The result of the reset procedure is about 1 to 3%
accurate except for the external current measurement
where the accuracy will be poorer. Resetting must
always be followed by calibration of the zero levels,
which is a part of the regular calibration procedure. A
complete calibration procedure should be conducted
as soon as possible however.
It is possible to combine resetting and calibration. First
perform a reset and then calibrate the measurement
ranges for which required sources are available. Answer “No” for the ranges that cannot be calibrated.
Standard calibration values will then be used for these
ranges.
Note When a reset is performed on TORKEL the
settings will be changed to the factory
(default) settings.
Performing a reset
Press the <ESC> key and the arrow up () key
simultaneously while switching on TORKEL.
Press <ENTER> to confirm the reset as promted
on the display.
1]
2]
Page 50

5 0
T O R K EL 8 2 0 / 84 0 / 8 6 0
P r o g r a mm a E l e ct r i c A B
Z P - B S0 6 E R 1 01
18
Specifications
Display range 0.0 – 60 V
Basic inaccuracy ±(0.5% of reading +0.1 V)
Resolution 0.1 V
Display range 0.0 – 500 V
Basic inaccuracy ±(0.5% of reading +1 V)
Resolution 0.1 V
Time measurement
Basic inaccuracy ±0.1% of reading ±1 digit
Storage of measured values
Torkel stand alone
Time (max) 10 h
Time interval 6 s
Torkel Win
Time (max) 24 h
Time interval 1 – 24 s
Load section
Battery voltage 10 – 60 V DC
Max. current 270 A
Max. power 15 kW
Load patterns Constant current, constant power, con-
stant resistance, current or power profile
Current setting
0-270.0 A (2999.9 A)
1)
Power setting 0-15.00 kW (299.99 kW)
1)
Resistance setting 0.1-2999.8 Ω
Battery voltage
range
2 ranges, selected automatically at start
of test
Stabilization (For
internal current
measurement)
±(0.5% of reading + 0.5 A)
Batter y
voltage
Highest permissible current
Resistor element (Nominal
values)
Range 1 10 – 27.6 V 270 A 0.069 Ω
Range 2 10 – 55.2 V 270 A
0.138 Ω
1) Maximum value for a system with more than one load unit
Inputs, maximal values
EXTERNAL CURRENT
MEASUREMENT
1 V DC, 300 V DC to ground. Current
shunt should be connected to the negative side of the battery
START / STOP Closing / opening contact
Closing and then opening the contact
will start / stop Torkel. It is not possible
to keep the contacts in closed position.
(Min. time open is 25 ms).
Delay until
start
200 – 300 ms
Stop delay 100 – 200 ms
Battery 60 V DC, 500 V DC to ground
VOLTAGE SENSE 60 V DC, 500 V DC to ground
SERIAL < 15 V
ALARM 250 V DC 0.28 A
28 V DC 8 A
250 V AC 8 A
Outputs, maximal values
Torkel 820
Specifications are valid at nominal input voltage and an ambient
temperature of +25°C, (77°F). Specifications are subject to change
without notice.
Environment
Application field The instrument is intended for use in
high-voltage substations and industrial
environments.
Temperature
Operating
0°C to +40°C (32°F to +104°F)
Storage &
transport
-40°C to +70°C (-40°F to +158°F)
Humidity 5% – 95% RH, non-condensing
CE-marking
LVD Low Voltage Directive 73/23/ EEC am.
by 93/68/EEC
EMC EMC Directive 89/336/EEC am. by
91/263/EEC, 92/31/EEC and 93/68/EEC
Standards
Safety standards IEC 61010-1:2001 Incl. national dev. for
US and CA
EN 61010-1:2001
EMC standards
EN 61326: 1997+A1:1998+A2:2001
General
Mains voltage 100 – 240 V AC, 50 / 60 Hz
Power consump-
tion (max)
150 W
Protection Thermal cut-outs, automatic overload
protection
Dimensions
Instrument
210 x 353 x 700 mm
(8.3” x 13.9” x 27.6”)
Transport case 265 x 460 x 750 mm
(10.4” x 18.1” x 29.5”)
Weight
22.3 kg (49.2 lbs)
40.4 kg (89.1 lbs) with accessories and
transport case
Display LCD
Available lan-
guages
English, French, German, Spanish,
Swedish
Measurement section
Current measurement
Display range 0.0 – 2999 A
Basic inaccuracy ±(0.5% of reading +0.2 A)
Resolution 0.1 A
Internal current measurement
Range 0 – 300 A
Input for clamp-on ammeter
Range 0 – 1 V
mV/A-ratio
Software settable, 0.3 to 19.9 mV/A
Input impedance >1 MΩ
Voltage measurement
Page 51

5 1
T O R K EL 8 2 0 / 84 0 / 8 6 0
P r o g r a mm a E l e ct r i c A B
Z P - B S0 6 E R 1 01
Torkel 840/860
Specifications are valid at nominal input voltage and an ambient
temperature of +25°C, (77°F). Specifications are subject to change
without notice.
Environment
Application field The instrument is intended for use in
high-voltage substations and industrial environments.
Temperature
Operating
0°C to +40°C (32°F to +104°F)
Storage & transport
-40°C to +70°C (-40°F to +158°F)
Humidity 5% – 95% RH, non-condensing
CE-marking
LVD Low Voltage Directive 73/23/ EEC
am. by 93/68/EEC
EMC EMC Directive 89/336/EEC am.
by 91/263/EEC, 92/31/EEC and
93/68/EEC
General
Mains voltage 100 – 240 V AC, 50 / 60 Hz
Power consumption
(max)
150 W
Protection Thermal cut-outs, automatic over-
load protection
Dimensions
Instrument
210 x 353 x 700 mm
(8.3” x 13.9” x 27.6”)
Transport case 265 x 460 x 750 mm
(10.4” x 18.1” x 29.5”)
Weight 21.5 kg (47.4 lbs)
38 kg (83.8 lbs) with accessories and
transport case.
Display LCD
Available languages English, French, German, Spanish,
Swedish
Measurement section
Current measurement
Display range 0.0 – 2999 A
Basic inaccuracy ±(0.5% of reading +0.2 A)
Resolution 0.1 A
Internal current measurement
Range 0 – 300 A
Input for clamp-on ammeter
Range 0 – 1 V
mV/A-ratio
Software settable, 0.3 to 19.9 mV/A
Input impedance >1 MΩ
Voltage measurement
Display range 0.0 – 60 V
Basic inaccuracy ±(0.5% of reading +0.1 V)
Resolution 0.1 V
Display range 0.0 – 500 V
Basic inaccuracy ±(0.5% of reading +1 V)
Resolution 0.1 V
Time measurement
Basic inaccuracy ±0.1% of reading ±1 digit
Storage of measured values
Torkel stand alone
Time (max) 10 h
Time interval 6 s
Torkel Win
START / STOP 5 V, 6 mA
TXL Relay contact
SERIAL < 15 V
ALARM Relay contact
Discharging capacity, examples
12 V battery (6 cells)
2)
Final voltage Constant current Constant power
1.80 V / cell (10.8 V) 0 – 121 A 0 – 1.31 kW
1.75 V / cell (10.5 V) 0 – 117 A 0 – 1.23 kW
1.67 V / cell (10.0 V) 0 – 110 A 0 – 1.10 kW
24 V battery (12 cells)
2)
1.80 V / cell (21.6 V) 0 – 270 A 0 – 5.8 kW
1.75 V / cell (21.0 V) 0 – 266 A 0 – 5.59 kW
1.60 V / cell (19.2 V) 0 – 241 A 0 – 4.63 kW
48 V battery (24 cells)
2)
1.80 V / cell (43.2 V) 0 – 270 A 0 – 11.6 kW
1.75 V / cell (42.0 V) 0 – 270 A 0 – 11.3 kW
1.60 V / cell (38.4 V) 0 – 259 A 0 – 9,9 kW
2) 2.15 V per cell when test starts
Page 52

5 2
T O R K EL 8 2 0 / 84 0 / 8 6 0
P r o g r a mm a E l e ct r i c A B
Z P - B S0 6 E R 1 01
48 V battery (24 cells)
3)
1.80 V / cell (43.2 V) 0 – 110 A 0 – 4.75 kW
1.75 V / cell (42.0 V) 0 – 110 A 0 – 4.62 kW
1.60 V / cell (38.4 V) 0 – 110 A 0 – 4.22 kW
110 V battery (54 cells)
3)
1.80 V / cell (97.2 V) 0 – 110 A 0 – 10.7 kW
1.75 V / cell (94.5 V) 0 – 110 A 0 – 10.4 kW
1.60 V / cell (86.4 V) 0 – 110 A 0 – 9.5 kW
120 V battery (60 cells)
3)
1.80 V / cell (108 V) 0 – 110 A 0 – 11.9 kW
1.75 V / cell (105 V) 0 – 110 A 0 – 11.5 kW
1.60 V / cell (96 V) 0 – 110 A 0 – 10.5 kW
220 V battery (108 cells)
3)
1.80 V / cell (194 V) 0 – 55 A 0 – 10.7 kW
1.75 V / cell (189 V) 0 – 55 A 0 – 10.4 kW
1.60 V / cell (173 V) 0 – 51.0 A 0 – 8.82 kW
240 V battery (120 cells)
3)
1.80 V / cell (216 V) 0 – 55 A 0 – 11.9 kW
1.75 V / cell (210 V) 0 – 55 A 0 – 11.5 kW
1.60 V / cell (192 V) 0 – 55 A 0 – 10.5 kW
UPS battery (180 cells)
3)
(TORKEL 860)
1.70 V / cell (306 V) 0 – 38 A 0 – 15 kW
1.60 V / cell (288 V) 0 – 38 A 0 – 15 kW
UPS battery (204 cells) 3) (TORKEL 860)
1.80 V / cell (367 V) 0 – 34 A 0 – 15 kW
1.60 V / cell (326 V) 0 – 34 A 0 – 15 kW
3) 2.15 V per cell when test starts
Time (max) 24 h
Time interval 1 – 24 s
Load section
Max. battery voltage 288 V DC (TORKEL 840)
480 V DC (TORKEL 860)
Max. current 110 A
Max. power 15 kW
Load patterns Constant current, constant power,
constant resistance, current or
power profile
Current setting
0-110.0 A (2999.9 A)
1)
Power setting 0-15.00 kW (299.99 kW)
1)
Resistance setting 0.1-2999.8 Ω
Battery voltage range,
TORKEL 840
4 ranges, selected automatically at
start of test
Battery voltage range,
TORKEL 860
5 ranges, selected automatically at
start of test
Stabilization (For
internal current measurement)
±(0.5% of reading +0.5 A)
Batter y voltage
Highest permissible current
Resistor element (Nominal values)
Range 1 10 – 27.6 V 110 A 0.165 Ω
Range 2 10 – 55.2 V 110 A 0.275 Ω
Range 3 10 – 144 V 110 A 0.55 Ω
Range 4 10 – 288 V 55 A
3.3 Ω
Range
5
2)
10 – 480 V 55 A (max power
15 kW)
3.3 Ω
1) Maximum value for a system with more than one load unit
2) TORKEL 860
Inputs, maximal values
EXTERNAL CURRENT
MEASUREMENT
1 V DC, 300 V DC to ground. Current shunt should be connected to
the negative side of the battery
START / STOP Closing / opening contact
Closing and then opening the
contact will start / stop Torkel. It is
not possible to keep the contacts in
closed position. (Min. time open is
25 ms).
Delay until start
200 – 300 ms
Stop delay 100 – 200 ms
Battery 480 V DC, 500 V DC to ground
VOLTAGE SENSE 480 V DC, 500 V DC to ground
SERIAL < 15 V
ALARM 250 V DC 0.28 A
28 V DC 8 A
250 V AC 8 A
Outputs, maximal values
START / STOP 5 V, 6 mA
TXL Relay contact
SERIAL < 15 V
ALARM Relay contact
Discharging capacity, examples
12 V battery (6 cells)
3)
Final voltage Constant cur-
rent
Constant
power
1.80 V / cell (10.8 V) 0 – 50.0 A 0 – 0.54 kW
1.75 V / cell (10.5 V) 0 – 49.0 A 0 – 0.51 kW
1.67 V / cell (10.0 V) 0 – 46.0 A 0 – 0.46 kW
24 V battery (12 cells)
3)
1.80 V / cell (21.6 V) 0 – 110 A 0 – 2.37 kW
1.75 V / cell (21.0 V) 0 – 110 A 0 – 2.31 kW
1.60 V / cell (19.2 V) 0 – 100 A 0 – 1.92 kW
Page 53

5 3
T O R K EL 8 2 0 / 84 0 / 8 6 0
P r o g r a mm a E l e ct r i c A B
Z P - B S0 6 E R 1 01
300 A at 27.6 V at 55.2 V
(24 x 2.3 V)
–
235 A at 21.6 V
43.2 A
(24 x 1.8 V)
–
100 A – – at 124.2 V
(54 x 2.3 V)
78.4 A – – at 97.2 V
(54 x 1.8 V)
TXL 830 /850 /870
Specifications are valid at nominal input voltage and an ambient
temperature of +25°C, (77°F). Specifications are subject to change
without notice.
Environment
Application field The instrument is intended for use in
high-voltage substations and industrial environments.
Temperature
Operating 0°C to +40°C (32°F to +104°F)
Storage & transport -40°C to +70°C (-40°F to +158°F)
Humidity 5% – 95% RH, non-condensing
CE-marking
LVD Low Voltage Directive 73/23/ EEC
am. by 93/68/EEC
EMC EMC Directive 89/336/EEC am. by
91/263/EEC, 92/31/EEC and 93/68/
EEC
General
Mains voltage 100 – 240 V AC, 50 / 60 Hz
Power consumption
(max)
75 W
Protection Thermal cut-outs, automatic over-
load protection
Dimensions
Instrument
210 x 353 x 600 mm
(8.3” x 13.9” x 23.6”)
Transport case 265 x 460 x 750 mm
(10.4” x 18.1” x 29.5”)
Weight
13 kg (28.7 lbs)
21.4 kg (47.2 lbs) with transport case
Cable sets
for TXL830 / 850 2 x 3 m (9.8 ft), 70 mm2, 270 A, with
cable lug. Max. 100 V. 5 kg (11 lbs)
for TXL870
2 x 3 m (9.8 ft), 25 mm2, 110 A, with
cable clamp / lug. Max. 480 V. 3 kg
(6.6 lbs)
Load section
TXL830 TXL850 TXL870
Max. voltage (DC) 28 V 56 V 140 V/ 280 V
Max. current
300 A 300 A 112 A at
140 V
56 A at 280 V
Max. power
8.3 kW 16.4 kW 15.8 kW
Internal resistance, 3-position selector
Position 1
TXL830 TXL850 TXL870
Current 0.275 Ω 0.55 Ω 4.95 Ω
100 A at 27.6 V
(12 x 2.3 V)
at 55.2 V
(24 x 2.3 V)
–
78.5 A at 21.6 V
(12 x 1.8 V)
at 43.2 V
(24 x 1.8 V)
–
50.1 A – – at 248.4 V
(108 x 2.3 V)
39.2 A – – at 194.4 V
(108 x 1.8 V)
Position 2
TXL830 TXL850 TXL870
Current
0.138 Ω 0.275 Ω 2.48 Ω
200 A at 27.6 V at 55.2 V
(24 x 2.3 V)
–
156 A at 21.6 V
43.2 V
(24 x 1.8 V)–
–
Position 3
TXL830 TXL850 TXL870
Current 0.092 Ω 0.184 Ω 1.24 Ω
Page 54

5 4
T O R K EL 8 2 0 / 84 0 / 8 6 0
P r o g r a mm a E l e ct r i c A B
Z P - B S0 6 E R 1 01
19
Index
F
F1 ...........................................................................13
I
Installing TORKEL Win .............................................31
K
Keys ........................................................................12
L
Lamps .....................................................................12
Language
................................................................32
Load-providing capability
........................................38
Load capacities
.......................................................37
Load profile
............................................................18
M
Main menu .............................................................10
Memory
..................................................................10
N
New language into TORKEL ....................................31
O
Operator control .....................................................12
Overcurrent
............................................................47
Overheated
.............................................................47
P
Pausing the test ......................................................15
PC
..........................................................................30
Power failure
..........................................................47
R
Regulate current .....................................................36
Regulation time
................................................22, 38
Resetting the alarm
.................................................26
Resetting TORKEL
...................................................51
Results
....................................................................10
S
Select language ......................................................10
A
Alarm .....................................................................13
Ammeter ................................................................23
Auto-limits ..............................................................10
B
Basic settings ..........................................................10
C
Cables ....................................................................44
Calculating current
.................................................36
Calibrating internal and external voltage
.................49
Calibrating internal current
.....................................49
Calibrating of external current
................................50
Calibrating zero levels
.............................................48
Changing language in TORKEL
................................32
Changing the language used in TORKEL
.................32
Checksum error
......................................................51
Checksum error!
.....................................................47
Circuit breaker
........................................................13
Clamp-on Ammeter ................................................23
Connection to a PC .................................................30
Constant current
.....................................................14
Constant power
......................................................16
Constant resistance
.................................................16
Current, regulate
....................................................36
Current cables
........................................................14
Current limitation
...................................................36
Current shunt
.........................................................22
D
DC Clamp-on Ammeter ..........................................23
Desired current .......................................................36
Display
....................................................................12
E
Ending the test .......................................................15
Error: External I
.......................................................47
External control
.......................................................13
External current measurement ................................12
Extra Loads
.............................................................42
Page 55

5 5
T O R K EL 8 2 0 / 84 0 / 8 6 0
P r o g r a mm a E l e ct r i c A B
Z P - B S0 6 E R 1 01
SERIAL ....................................................................13
Serial ......................................................................13
Setting the current ..................................................15
Setting up communication
......................................31
Setting up the extra load
.........................................43
Software key ..................................................... 31, 51
START/STOP
............................................................13
Start/stop connector ...............................................34
Starting the test
......................................................15
Stop limit parameters
..............................................15
Store voltage curve
.................................................30
Systems
..................................................................39
System of TORKEL and TXL units
.............................41
System TORKEL and TXL units
.................................41
T
Testing with TORKEL Win ........................................32
Test at constant current
...........................................14
Test method
............................................................10
TORKEL load capacity
..............................................36
Torkel systems
.........................................................39
TORKEL Win
...........................................................30
TORKEL Win software
...............................................6
TXL
.........................................................................13
U
Unable to regulate ..................................................46
V
Voltage curve, store ............................................6, 30
Voltage range
...................................................15, 47
W
Warning limit parameters ........................................15
Page 56

Page 57

Page 58

Subject to change without notice. Printed matter: ZP-BS06E R101 Doc. No. BS2395FE 2007
 Loading...