

Page 1

Megger 4271 Bronze Way
Dallas TX 75237-1017 USA.
T +1 (800) 723 2861. (USA only)
T +1 (214) 330 3203. (International)
F +1 (214) 337 3038.
Megger PO Box 9007 Valley Forge
PA 19485-9007 USA.
T +1 (610) 676 8500.
F +1 (610) 676 8610.
T
ime Domain Reflectometer
Megger TDR900
USER’S
MANUAL
Www. megger.com
© Copyright 2003 Fine Instruments Corp. All right reserved.
Specifications subject to change without notice.
Litho in Korea.
Page 2
W A R N I N G !
SOURCES LI KE S MALL HAND-HELD RADIO
TR ANSCE I VE RS, FI X E D STA TION RA DIO
AND TE LEVISION TRANSMITTERS, V EHICLE
RA DIO TR ANSM ITTERS AND CE L LULAR
PHONES GENERATE ELECT ROMAG NETIC
RADIATION THAT MAY INDUCE VOLTAGES
IN THE TEST LEADS OF THE MULTIMETER.
IN SU CH CASES THE ACCURA CY O F T HE
MULTIME TE R C ANNOT BE GUARAN TEED
DUE TO PHYSICAL REASONS.
Basic Specifications
Maximum Range : Depends upon the V.O.P of the cables under test.
12,000 ft (3.7 km)@ V.O.P 99.9 %
9,800 ft (3.0 km)@ V.O.P 80.0 %
8,000 ft (2.4 km)@ V.O.P 66.0 %
6,200 ft (1.9 km)@ V.O.P 50.0 %
Range Selection : Automatic range control
Resolution : 20 inches (50 cm)
Accuracy : ± 2 % of reading + 20 inches (50 cm) < 300 ft
(100 m)
± 2 % of reading > 300 ft (100 m)
This accuracy is effective for Coaxial Cables up to 8,000 ft, Telephony
Cables up to 6,000 ft, and Structured Wiring up to 3,000 ft.
Output Impedance : 25, 50, 75, 100, 125 or 150 ohms
Impedance Selection : Automatic output impedance control
Velocity Factor : Adjustable from 1.0 % to 99.9 %
Tone Generator : Oscillating 810 - 1100 Hz (5 V
p-p
unloaded)
Cable Library : 39 standard cable types
Memory Location : 20 for custom cable types
Connector : BNC
Input Protection : 250 V RMS
Line Voltage Detection : 6.5 V
Warning
The product should not b e connected to any en ergized
circuits. Connection to mains supply voltages will damage
the Meter and could be hazardous to the user.
The product contains parts that can be damaged by static
disc harge. Disc harge the c able to b e test ed be fore
connecting the product to the cable.
Read “Safety Information” before using this Meter.
1
Page 3

CONTENTS
1. Safety Information
1. Safety Information 3
2. The TDR Cable Length Meter 4
3. Controls, Indicators, and Buttons Overview 5
4. Meter Operation 8
4.1 Principles of operation 8
4.2 How to connect a cable to the Meter 8
4.3 How to set the cable type 9
4.3.1 Selecting a library cable type 9
4.3.2 Cable library for 39 standard cable types 10
4.3.3 Testing cables not included in library 12
4.4 How to determine unknown V.O.P settings 14
4.4.1 Expanding cable library
for custom cable types using nonvolatile memory 15
4.5 How to measure cable length 19
4.6 How to check networks (Thin Ethernet) 19
5. Changing the measurement scale between English and Metric 20
6. Measurement accuracy 21
7. Theoretical and actual V.O.P 22
8. Special features 23
8.1 Low battery indication 23
8.2 Overrange indication 23
8.3 Enable or disable the auto-power-off mode 24
8.4 Tone Generator mode 25
8.5 Line Voltage Detection mode 25
9. Maintenance 26
10. Specifications 27
Repair and Warranty
Safety Warnings
This Meter c omplies with the safety requirements of IEC 1010-1 : 2 001. It is
designed for use on de-energized circuits o nly, however this Meter is protected
against telephone networking voltages (EN 60950 : 1999 Sec. 2.3). Connection to
any mains supply voltages may result in damage to the Meter and/or a hazard to
the user. Hence the user must assume responsibility for ensuring his or her own
safety.
International Symbols used on the Meter
Caution! Refer to the explanation in this manual.
Double insulation or Reinforced insulation
Battery
Meter complies with current EU Directives.
International Standards
Safety : IEC 1010-1 : 2001
EMC : EN 61326 : 1997+A1: 1998
EMC Standard Category of Pass
ESD IEC 1000-4-2 A
EM IEC 1000-4-3 A
Burst IEC 1000-4-4 A
Surge IEC 1000-4-5 A
Conducted RF IEC 1000-4-6 A
2 3
Page 4

2. The TDR Cable Length Meter
The Meter is a handheld a nd battery operated instrument capable of measuring
cable lengths and finding distance to an open or a short using TDR(Time Domain
Reflectometry) techniques, given access to one end only.
The Meter can be used for any cable consisting of at least two insulated metallic
elements, one of which may be the sheath or shield of the cable. The Meter has
automatic internal matching networks to allow testing of 25 , 50
125 , or 150 cables, which correspond to power, telephony, CATV, and LAN,
etc. cables.
The Meter can be closely matched to the cable under test using the menu selection
keys. The V.O.P(Velocity of Propagation) value can be similarly adjusted to match
the cable under test; thus ensuring an accurate distance measurement.
The M eter incorporates an oscillatin g tone generator, that is d etectable with a
standard tone probe (not supplied) available in the marketplaces, for use in the
tracing and identification of pairs within a cable .
The Meter displays “ ” message and stops operation if line voltage of the cable
under test exceeds 6.5 V when th e Meter is turned on. The BNC terminal is
protected up to 250 V RMS in o rder to prevent it from bein g demaged by its
misconnection to live circuits of networking.
, 75
, 100 ,
3. Controls, Indicators, and Buttons Overview
A
lt hou gh this manu al describe s t he operation of t he Meter for both Me tric
measurement and English measurement, all illustrations and examples assume use
of the Meter for English measurement.
( 2 )
( 1 )
( 3 )
( 4 )
( 5 )
You can s tore u p to 20 cable test resu lts for cu stom cable type s in internal
nonvolatile memory and the stored cable library provides quick and easy access to
39 standard c able types, wh ich enables accurate measurement without the
necessity of entering V.O.P (Velocity of Propagation).
The on-site measurement scale changing feature enables the Meter to be globally
used for both Metric measurement and English measurement without changing the
measurement scale at factory.
The Meter comes with an Alligator Clip adaptor, a user’s manual and a soft carrying
case.
( 6 )
( 7 )
54
Page 5

(1) DISPLAY
(3) MENU (on screen) SELECTION BUTTONS
Extra-large backlit (ICON type 7 segment) LCD. When the Meter is turned on,
all display segments and symbols appear briefly (during 1.5 seconds) for a
selftest and then the Meter defaults the following initial display.
Initial Display
When shipped out of factory
The Meter defaults V.O.P of 66.0 % and English scale.
Fig. 1
When turned on after having been used in the field
The Meter defaults the V.O.P (e.g. 68.0 %) having been used just before it
was turned off.
Fig. 2
Each setting of the Meter to a measurement function may activate one or more
menu selection button settings on the LCD. Press the corresponding menu
selection button to select the desired measurement.
Setup Mode
Use the menu selection buttons in order to edit desired setup values as follows :
Button
Pres s to mov e t o nex t
Setup.
Press to save all settings
and e xit Set up Mo de
when setting is ended.
Function
Press to step
to next digit in
setting value.
Press to
increase
setting value.
Press to
decrease
setting value.
(4) POWER ON/OFF BUTTON
Press the POWER button for more than 1 second to turn the Meter on.
Auto-Power-Off
This Meter is completely turned off after 30 minutes of no activities. Press the
POWER
button to turn the Meter on again. This feature can be disabled (refer
to Section 8.).
(5) BACKLIGHT ON/OFF BUTTON or EXIT BUTTON
Press this button for more than 1 second to turn the backlight on and press this
button again for more than 1 second to turn it off.
Press this button momentarily to always return to the initial display when the
meter is in either SELECT mode or Memory mode. And also press the button
momentarily to exit the Tone Generator mode.
(6) MEMORY BUTTON or TONE BUTTON
(2) BNC
A sh ielded connect or for either coaxia l cable or Alligat or Clip adaptor (a
standard accessory).
Press this button momentarily to activate the memory mode. The display shows
three menu selections : STORE, RECALL and CLEAR
.
Press this button for more than 1 second to activate the Tone Generator mode.
(Press the EXIT button to exit the Tone Generator mode.)
(7) TEST BUTTON
Press this b utton momentarily t o measure length, distance to an open or a
short, or V.O.P of cable under test.
76
Page 6

4. Meter Operation
Unshielded multi-core
cable : Connect the two clips to any two wires.
4.1 Principles of operation
The Meter works by measuring the time taken for a signal to travel to the far end of
the cable (or to an intermediate fault) and to return.
The velocity at which the signal is transmitted (Velocity of Propagation, that is,
V.O.P) will depend upon the characteristics of the cable to be tested.
The length is computed from the following formula :
travel time X (9.84 X 10⁸) X V.O.P (English measurement)
travel time X (3 X 10⁸) X V.O.P (Metric measurement)
The V.O.P is specified for standard cable types in this manual. However, do not rely
solely on the specified V.O.P because variations of up to 20 % can occur between
batches of cable. Therefore, if accuracy is critical to your situation, y ou must
determine the actual V. O.P of each ca ble. V erify t he length m easurement by
measuring a sample cable (longer than 30 ft, or 10 m) of the same cable type you
will be testing.
4.2 How to connect a cable to the Meter
Ensure that no power supply or equipment is connected to the cable to be tested.
Ensure that the far end of the cable to be tested is either open or shorted (not
fitted with a terminator).
Connect the Meter to one end of the cable to be tested.
The cable connection to the Meter is via a BNC connector located at the top of the
Meter. For unterminated cables use the Alligator Clip adaptor as follows.
4.3 How to set the cable type
The Meter needs to be set for the cable type to be tested before being used to take
measurements.
If the cable type is listed in the library, setting up is simply a matter of selecting the
appropriate cable type from the library.
4.3.1 Selecting a library cable type
The library cable type you will select determines the information about V.O.P and
the abbreviated trade name of the cable to be tested.
1. Turn the Meter on.
2. The Meter will display the previously selected cable setting (see Fig. 1 and
Fig. 2) with its V.O.P.
3.Press the SELECT b utton then the M eter will display both the LIBRARY
symbol (blinking) and the V.O.P symbol.
“ blinking ”
Coaxial cable : Connect t he red clip to the ce nter wire and the black
clip to the shield.
Shielded cable : Connect the red clip to a wire adjacent to the shield of
the cable and the black clip to the shield.
Unshielded twisted
pair cable : Separate one pair out and connect the two clips to the
two wires of a pair.
Fig. 3
4. Press the OK button to set the Meter to the LIBRARY mode. The Meter will
display the information of the LIBRARY No. 1, when the “ ” will be blinking.
98
Page 7

Fig. 4
4.3.2 Cable library for 39 standard cable types
“ blinking ”
5. Scroll through the library using the , and
cable type. The typ es are displayed in the Library Number o rder. The 3 9
standard cable types are listed in Section 4.3.2 and Section 4.3.3 will explain
you how to make the libra ry o f 20 customer cable types using the memory
mode.
6. Press the OK button to set the Meter to the required cable type.
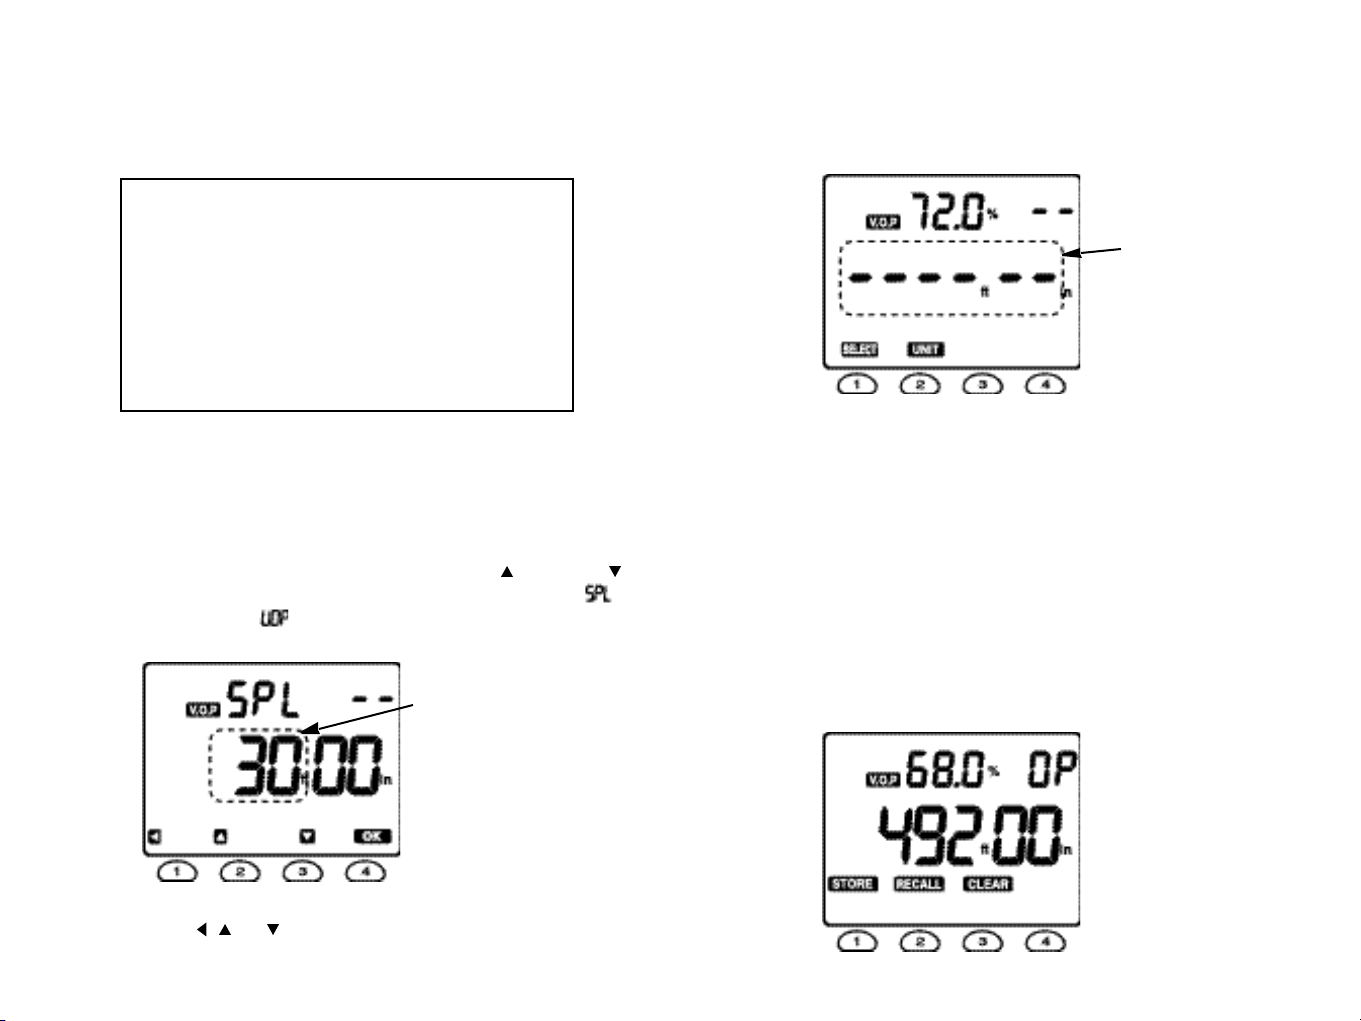
The center line segments of 6 digits in the lower display will be blinking until
the TEST button will be depressed.
7. Connect the cable to be tested to BNC connector of the Meter.
8. Press the TEST button to take the required measurements.
The displayed V.O.P will be remained on t he LCD even after the TEST
button was depressed in order to inform the user of the V.O.P of the cable
to be tested.
When the Meter will be continuously set to the just same cable type as the
preceding cable type, the Meter will show the preceding display until the
TEST button will be newly depressed.
When the Mete r is turned o ff it automatica lly stores the last se tting and will
display this setting when powered up.
buttons to find the required
1110
Page 8

4.3.3 Testing cables not included in library
If the cable type to be tested is not in the library, it can still be tested if the V.O.P is
known. If the V.O.P is unknown, refer to Section 4.4.
1 . Turn the Meter on.
2 . The Meter will displa y the previously selected cable settin g [see Initial Display of
Section 3.(1)] with its V.O.P.
3 . Press the SELECT button then the Meter will display both the LIBRARY symbol
(blinking) and the V.O.P symbol (see Fig. 3).
4 . Press the button then the LIBRARY symbol will stop blinking and the V.O.P
symbol will be blinking.
6. Press the OK button again then the default V.O.P value of 66.0 % will start to
blink.
“ blinking ”
Fig. 6
5 . Press the OK button to set the Meter to the V.O.P adjusting mode, when the
LIBRARY symbol will disappear, the V.O.P symbol will stop blin king, and the “ ”
segments will start to blink.
“ blinking ”
Fig. 5
The M eter can enter into the Calibrate Cable function to determine the
V.O.P for a known length of cable by pressing any button out of and
buttons when the Meter is in the V.O.P adjusting mode. Then, the will
appear replacing the and “ 30.00 ” will be blinking to alert the user that
a sample cable longer than 30 ft (10 m) is necessary.
7. Scroll through the V.O.P value between 1.0 % and 99.9 % by using the ,
and buttons to find the required V.O.P value.
8 . Press the OK button to set the Meter to the required V.O.P value.
9 . Connect the cable to be tested to BNC connector of the Meter.
1 0 . Press the TEST button to take the required measurements.
For example, the Meter can have the following display
.
Fig. 7
1312
Page 9
4.4 How to determine unknown V.O.P settings
The Calibrat e Cable function allows yo u to determine the V.O.P for a known length
of cable and save it for additional measurements of unknown lengths of the same
type of cable. V.O.P settings are stored in nonvolatile memory.
NOTE
5. Press the OK button.
6. Press the TEST button to read the V.O.P of the sample cable, when the center
line segment of 6 digits will blink waiting for the next measurement.
For example,
Lengths measurements a re o nly as accurate a s the V.O.
setting for the cable to be measured. V.O.P values can vary
substantially between cable manufacturers as well as between
cable lots.
Measure and record the V.O.P of a sample length of cable for
each cable manufacturer, then mark the V.O.P on each cable
drum before installation.
To ca librate a cable manually, perform the following steps :
1 . Ta ke a samp le of the c able at least 30 ft (10 m) in length to obtain the
sp ecified accuracy (longer le ngths improve accuracy).
2 . Mea su re its le ngth by direct measurement
3 . Repeat the step 1 to step 5 of Section 4.3.3 then press the button or the
button in order to set the Meter to the Calibrate Cable function, when the
will appear replacing the and “30.00” will be blinking to let you remind that
the length of a sample cable should be at least 30 ft (10 m).
.
“ blinking ”
P
“ blinking ”
Fig. 9
7. Connect the cable to be tested to the Meter.
8. Press the TEST button to take the required measurement.
4.4.1 E xpanding cable library for custom c able types using nonvol atile
memory
The nonvolatile memory of this Meter allows you to store V.O.P values measured in
Section 4.4 to expand the cable library up to 20 custom cable types.
Use the memory mode to store and recall the measured V.O.P values. Press the
MEMORY button momentarily in order to activate the memory mode. The display
shows three menu selections :
For example, if the below display was obtained in Section 4.4,
STORE, RECALL and CLEAR
.
Fig. 8
4 . Connect the sample cable to the Meter and set the actual length of the sample
ca ble using the , and buttons.
Fig. 10
1514
Page 10

STORE : This Meter has 20 internal memory locations from 01 to 20. Press the
STORE button to store the next availa ble me mory location when the memory
locations has been partially occupied. Then, the MEM symbol will appear and the
currently available location number will be blinking.
For example, if the location 04 was occupied, the display shows as the Fig. 11.
“ blinking ”
Fig. 11
When all the memory locations are not occupied, the V.O.P segments will display
“ ”.
If you want to cancel storing the V.O.P setting, press the EXIT button to have
the Meter exit memory mode.
RECALL : Select RECALL to review the stored value pressing the RECALL button
after having the Meter enter into the memory mode. The upper display will show the
V.O.P value of the memory location 01 and the 01 (blinking). Select the required
memory location number using the , and buttons. Press the EXIT button to
exit the memory mode.
For example, if the memory location 05 would be selected, the Meter will display as
follows :
Fig. 13
A particular memory location can be selected using the
Press the OK button to prepare storing the V.O.P value measured in Section 4.4 in
the location 05. Then, the display shows as the Fig. 12.
P
ress the STORE button th en the Meter will display b linking “ ” while the
measured V.O.P is being stored. The Meter will display “ ” replacing “
after the V.O.P has been stored.
, and buttons.
Fig. 12
If you want to cancel this RECALL function, press the EXIT button again to exit
the memory mode.
”
16 17
Page 11

CLEAR : Select CLEAR to erase the stored value pressing the CLEAR button after
having the Meter enter into the memory mode.
The upper display will show the V.O.P value of the memory location 01 and the 01
(blinking), Select the required memory location n umber using the , and
buttons. Press the OK ( ) button to exit the memory mode, when the lower
display will show “ ” while the Meter is performing CLEAR function.
For example, if the V.O .P of t he memory location 05 wo uld be require d to b e
erased, the Meter will display as follows :
4.5 How to measure cable length
( 1 ) Set the cable type or the V.O.P for the cable to be measured.
( 2 ) Connect the Meter to the cable as described in Section 4.2.
( 3 ) Press the TEST button.
If there are no shorts in the cable, the length of the cable will be displayed in
t
he lower display with “ ” in the upper right display.
If there is a sh ort in the cable, the distance to the short will be displayed in
the lower display with “ ” in the upper right display
If the cable is beyond the measurement range, the display will show “ ”
in the lower display.
4.6 How to check networks (Thin Ethernet)
.
Fig. 14
Press the CLEAR button to complete the CLEAR function.
If you want to cancel this CLEAR function, press the EXIT button again to exit
the memory mode.
Completing the CLEAR function, the Meter will show t he same display as that
which the Meter showed just before entering into the CLEAR function
If the MEMORY button is depressed while the Meter is performing the memory
mode, the Meter will return to the previous mode where the Meter was set before
entering into the memory mode.
When the memory location 01, 02, 03 and 05 were occupied and the memory
location 04 was unoc cupied, th e STORE f unction stores the data f rom the
memory location 04.
While performing the following tests, n o equipment should be connected t o the
n e t w o r k .
( 1 ) Set the Meter for a network cable type (e.g. Ethernet 9880).
( 2 ) Remove 50 W terminators from both ends of network.
( 3 ) Connect the Meter to one end of the network.
( 4 ) Press the TEST button. The lengt h of the network will be displayed in the
lo wer display with “
( 5 ) Repeat steps (3) and (4) from the other end of the network.
If the le ngth shown is just sa me from either end, this length indicates the
total length of the network.
If the lengths are dif fer and are less t han the expected, this is probably due
to an open circuit in the network at the distance displayed.
If the length is displaye d in the lower display with “ ”, this in dicates that a
short circuit exists in the network at the distance shown.
( 6 ) Disconnect the Meter and refit the terminators to the network.
”.
18 19
Page 12

5. Changing the Measurement Scale between English and Metric
6. Measurement Accuracy
Choic e of the me asurement units : This Meter can display cable le ngths in
ei ther Engli sh s ys tem (f t, i n) o r Met ric s ys tem ( m, cm). T o chan ge the
measurem ent sc ale system, press the UNIT button after the previo us length
measurement is carried out. Th en, the Meter will display “ ” in the lower
display as the following example for English to Metric measurement co nversion.
Press the TEST button to read the cable length in Metric scale.
Please note that this feature enables the Meter compatible with both English
scale system and Metric scale system very conveniently without returning the
Meter to factory.
Fig. 15
For coaxial, twiste d pa ir and shielded cable types, an accuracy of 2 % (o
rea ding) can be expected, or 20 in (0.5 m) for a cable less than 30 ft (10 m)
The V.O.P is less well defind with unshielded multicore cable (including mains
ca ble) and is lower when the ca ble is tightly wound o n a spool than when it is
in stalled. This is due t o capacitance and inductance effects between the t urns.
There fore, the accuracy for these cables can be a little bit deteriorated.
The BNC to Alligator Clip adaptor has an effective length of 8 inches (20 cm).
.
f
20 21
Page 13
7. Theoretical and Actual V.O.P
8. Special Features
Theoretically V.O.P can be calculated from the dielectric constant, but actual values
often differ slightly from the theoretical one. In an actual cable the dielectric may not
fill up the space between the conductors completely. This can cause the effect of
increasing V.O.P.
In twisted pair cables the V.O.P depends upon the pitch of the twist to some extent.
The tighter the pitch the more dielectric and the less air space so the V. O.P is
higher. For example, variation of V.O.P between pairs with CAT 5 is typically ± 2 %
because the different pairs of CAT 5 are deliberately given staggered pitches to
reduce crosstalk.
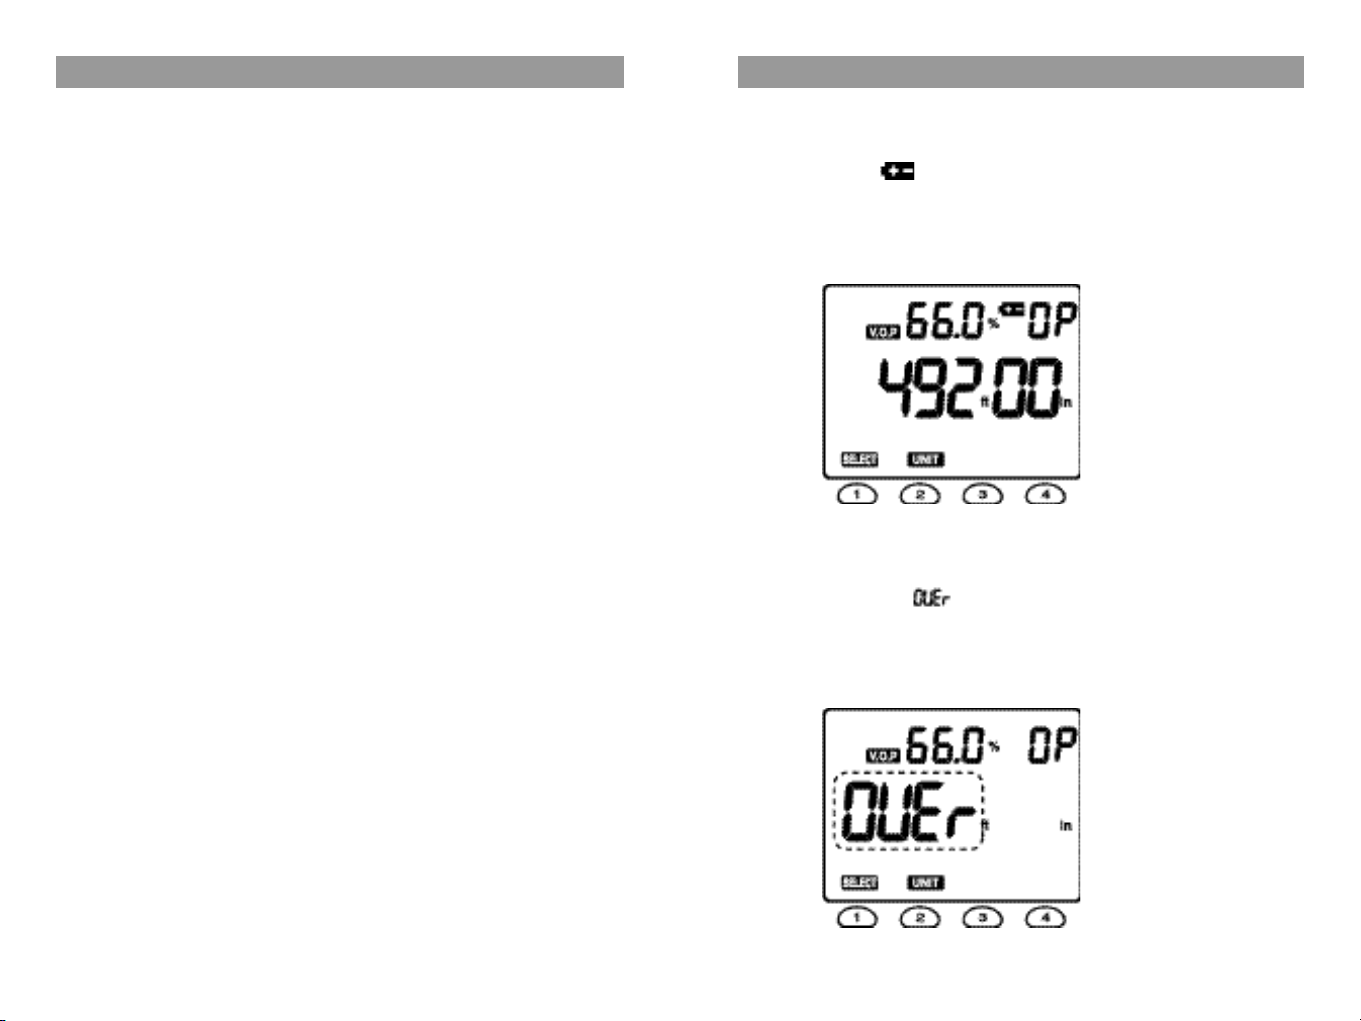
8.1 Low battery indication
The Meter displays “ ” in the upper display to in dicate the status of low battery.
Replace the batteries immediately. Never leave a weak or d ead battery in the
Meter. Even leak-proof types can leak and damage the Meter.
For example,
Fig. 16
8.2 Overrange indication
The Meter will displa y “ ” in the lower displa y if the TEST button will be
depressed when BNC of the Meter is improperly connected to either a cable to be
tested or Alligator Clip adaptor or when no cable is connected to the Meter.
For example,
Fig. 17
22 23
Page 14

8.3 Enable or disable the auto-power-off mode
8.4 Tone Generator mode
You can customize the required default setting between Enable and Disable settings
by pressing the POWER button for about 2 seconds during the button being
depressed, when the Meter will display “ ” in the upper display and “ ” in
the lower display.
Fig. 18
If yo u wa nt to dis able th e auto- pow er-o ff mo de duri ng y ou r ta ki ng
measurements, press the OK button.
If you wan t to enable the auto-power-off mode, press either the button or the
button, when the Meter will display “ ” replacing “ ” in the lower
display, and then press the OK button to return to the auto-power-off mode.
The Meter generates an o scillating (810 - 1100 Hz) tone, which is transmitted
down the ca ble under test and can be picked up with a standard tone probe (not
su pplied) available in the marketplaces. This facilitates cable tracing. To select
Tone Ge nerator mode, turn the Meter off, then press the TONE button for more
than 1 second. The message “ ” will appear on the display. To resume
normal operation, press the EXIT button.
8.5 Line Voltage Detection mode
The Meter displays “ ” message and stops operation if line voltage of the cable
under test exceeds 6.5 V when the Meter is turned o n.
Fig. 19
24 25
Page 15

9. Maintenance
10. Specifications
B a t t e r y
The Meter requires 4 LR6 (AA) type 1.5 vo lt alkaline batteries. When the batteries
need being replace d, the Meter disp lays “ ” in the upper d isplay (refer to
Section 8.).
To replace the batteries, turn the meter off, remove the battery cover and replace
the batteries installed in the battery holder. Ensure the battery cover is refitted.
Trouble shooting
If the Meter displays “ ” in the lower display, check the length of cable under
test is within t he sp ecified range of the Meter, o r check connections f rom the
Meter to the cable under test, or check if there is an open circuit in cable at less
than 15 ft (5 m).
To check the Alligator clip adaptor, connect two Clips together and press th e
TEST button. If the meter displays “ ” with “ ”, the Alligator Clip adapter
is OK. If the Meter displays “ ” with “ ”, the adaptor needs being replaced
or repaired.
If the Meter disp lays “ ” with “ ”, check the cable under test for a short
circuit at less than 15 ft (5 m), or check that terminators have been removed
from network. If the distance to a short circuit is beyond the sp ecif ied range of
the Meter, check again by reconnecting the Meter to the opposite end of the
cable unde r test, if possible.
Maxim um Range
:
D
epends upon the V.O.P of the cables under test.
12,000 ft (3.7 km)@ V.O.P 99.9 %
9,800 ft (3.0 km)@ V.O.P 80.0 %
8,000 ft (2.4 km)@ V.O.P 66.0 %
6,200 ft (1.9 km)@ V.O.P 50.0 %
Ran ge Selection : Automatic range control
R e s o l u t i o n : 20 inches (50 cm)
A c c u r a c y * : [ 2 % of reading + 20 in (50 cm) ] < 300 ft (100 m)
2 % of reading > 300 ft (100 m)
The a ccuracy is effective for Co axial Cables up to 8,000 ft, Telephony
Cables up to 6,000 ft and Structured Wiring up to 3,000 ft.
Output Impedance : 2 5, 50, 75, 100, 125 or 150 ohms
Impe dance Selection:Automatic output impedance control
Velocity Factor :Adjustable from 1.0 % to 99.9 % (in 0.1 % step)
Cab le Library : 39 standard cable types
Memory Location : 20 for custom cable types
Con nector Type : B N C
D i s p l a y : I CON type 7 segment LCD (Backlight stays on for 1
minute when act ivated.)
If the display is blank, check if the batteries are properly connected to the Meter
or replace the batteries.
If a cable length measurement appears t o be inaccurate, check that the cable
type or the V.O.P value has been correctly selected or check if conductors
within cable are broken.
Power Supply : 4 LR6 (AA) type 1.5 volt alkaline batteries
Battery Life
Operating Temperature : 0 F to 140 F (-18 C to 60 C)
S
torage Temperature : -4 F to 158 F (-20 C to 70 C)
Relative Humidity : 85 % at 95 F (35 C)
D i m e n s i o n s : 9.25 H x 3.94 W x 1.73 D in.
:
Approx. 5000 tests
(235 H x 100 W x 44 D mm)
26 27
Page 16

W e i g h t
P r o t e c t i o n : Ov erv ol tage protec tion ag ainst t eleph o ne ne two rk
S a f e t y : I E C 1010-1 : 2001
E M C
: Approx. 16 oz (450 g)
voltages (EN 60950 : 1999 Sec. 2.3)
:
EN 61326 : 1997+ A1: 1998
CE Certificated
Repair and Warranty
The Meter contains statically sensitive devices and is not user serviceable. If a unit
fails, or its protection has been impaired, it should not be used and sent for repair
by suitably trained and qualified personnel.
New Meters are guaranteed for 1 year from the date of the user’s purchase.
For service requirements contact the distributor from whom the Meter was originally
purchased.
28
 Loading...