

Page 1

TC3231
EN
Thermal Camera
User Guide
TC3231_ThermalCamera_UG_en_V01i 12 2019
Page 2

This document is copyright of:
Megger Limited, Archcliffe Road, Dover, Kent CT17 9EN. ENGLAND
T +44 (0)1304 502101 F +44 (0)1304 207342 www.megger.com
Megger Ltd reserves the right to alter the specification of its products from time to time without notice.
Although every effort is made to ensure the accuracy of the information contained within this document
it is not warranted or represented by Megger Ltd. to be a complete and up - to - date description.
Declaration of Conformity
Other equipment manufactured by Megger Instruments Limited described in this user guide is in compliance with
Directives 2014/30/EU and 2014/35/EU where they apply.
The full text of Megger Instruments EU declarations of conformity are available at the following internet address:
uk.megger.com/company/about-us/eu-dofc
This manual supersedes all previous issues of this manual. Please ensure that you are using the most recent issue of this
document. Destroy any copies that are of an older issue.
2 www.megger.com
Page 3

www.megger.com 3
Page 4

Contents
Contents
Safety Information
1. Description
2. Features
3. Front Panel Buttons and Camera Details
4. TC3231 LCD display details
5. Image Capture & Save (Measure Mode)
6. Setup Menu Options
7. Setup Menu Emissivity (includes Typical Emissivity Table)
8. Setup Menu Temperature Unit (°C / °F)
9. Setup Menu MAX / MIN settings
10. Setup Menu PLT (Thermal Display Palette) settings
11. Setup Menu DATE settings
12. Setup Menu TIME settings (24 hr)
13. Setup Menu MEMORY / Saved Images
14. Setup Menu BGT Background Temperature settings
15. Setup Menu High / Low Temperature Alarm settings
16. Setup Menu LCD Brightness
17. Setup Menu Image Blending (metric / imperial units)
18. Setup Menu Language Selection
19 Setup Menu Camera Information
Specifications
Maintenance
WEEE Directive
4 www.megger.com
Page 5

Safety Information
To ensure safe operation and service of the camera, follow these instructions.
Failure to observe warnings may result in personal injury or damage to the camera.
Do not use the camera if the instrument appears damaged
Do not use the camera if the instrument is not operating correctly or if it is wet.
Avoid pointing the camera directly at the eyes.
Precautions should be exercised when measuring in close proximity to exposed rotating parts.
Precautions should be exercised when measuring in close proximity to exposed live parts.
Symbols as marked on the instrument and instruction card
Contents
Conforms to EU directives
Do not discard or throw away this product
Universal Serial Bus
Micro SD Card
www.megger.com 5
Page 6

Contents
1. Description
The Megger TC3231 is a professional, easy to use, thermal imaging camera. Fast accurate readings are possible,
covering a wide range of surface temperatures with on-screen spot as well as max/min temperature measurement and
tracking. With the added convenience of image blending provided by combining a visual and full infrared image on
screen, troubleshooting and pinpointing problems is made far simpler. Captured images can be stored on the included
SD card for later viewing on MAC/PC. A range of thermal image display palettes, high/low user preset alarms and fully
adjustable emissivity make the Megger TC3231 an extremely versatile instrument for multiple applications.
2. Features
2.2 inch (55.88 mm) 320*240 TFT LCD display
IR temperature measurement with resolution 32 x 31 pixels
Range -20° to 300°C / -4°F to 572°F
Image capture frequency 9 Hz
Thermal sensitivity (NETD) ≤150 mK
Adjustable emissivity
Hot spot and cold spot tracking
High & Low Alarm (enable & disable)
Selectable colour palette
Image blending with selectable distance of 0.5 m, 1 m, 2 m or 3 m
Image storage (.BMP) (6000 images)
Micro SD memory card with SD card adapter
Date/time setup controls
Li-Ion rechargeable battery
USB interface for charging and downloading images from SD memory
Auto power off (10 minutes of inactivity)
Standard camera mount
6 www.megger.com
Page 7

3. Front Panel Buttons and Camera Details
Contents
MENU
Button
ENTER
Button
Navigation
Buttons
Retractable Lens Cover
LCD Display
Measurement
Trigger
Battery Cover
Visual Camera
IR Sensor
USB Port
Micro SD memory
card
Li-Ion Battery
Note: Before using the camera ensure the micro SD card is inserted in the card slot in the battery compartment The SD
card symbol will be visible at the top left of the LCD screen next to the battery symbol.
Note: The TC3231 has a rechargeable Li-Ion battery; before using the camera for the first time charge the battery.
The charger has suitable adapters for use around the world. Connect the micro USB connector to the USB port on the
camera. Connect the USB lead to the charger and connect to an AC outlet and the display will illuminate.
When the battery is charging
shows on the top left corner of the display. indicates the battery is fully
charged.
Typical charge time 0% to 100% = 3 to 4 hours.
Note: While charging switch the camera off.
3.1 Power On / Off
To switch on, briefly press the MENU button; after
a few seconds the LCD illuminates with the Megger
logo; the camera is now active.
To switch the camera off press and hold the MENU
button for 5 seconds until the display shutdown
symbol appears.
The unit will power off in a few seconds.
www.megger.com 7
Page 8

TC3231 LCD display details
4. TC3231 LCD display details
Current Emissivity
Blending Distance
Centre Temperature
Value
Image
Centre Temperature
Target
MAX Temperature
Value
Time
MIN Temperature
Micro SD
Value
5. Image Capture & Save (Measure Mode)
Battery Level
MIN Temperature Spot
MAX Temperature Spot
Current Colour Palette
The TC3231 can save up to 6000 images on the supplied micro SD memory card.
To capture the image and save it to memory:
Unclip and retract the lens cover. Point the camera at the object or area of
interest and pull the measurement trigger.
Press the Enter button to save the image.
Press the Menu button to cancel.
The image is now saved as a .BMP file on the Micro SD memory.
Note: Image numbers are automatically assigned by the camera.
To view the saved images use the setup menu MEMORY option.
(See section 13. Setup Menu MEMORY / Saved Images)
8 www.megger.com
Page 9

Setup Menu Options
5.1 Image Blending
Image blending makes it easier to understand infrared heat maps through the use of an aligned visible image and full
infrared heat map. The product captures a visible image with each infrared heat map to clearly show the target area.
It is possible to adjust the blending between visible images to a full infrared heat map in increments in the measure
mode.
The UP / DOWN buttons select the blending in increments. Once the required blend is selected, pull the measurement
trigger and then press the Enter button to store the image.
Note: Images for illustration only
6. Setup Menu Options
To enter the setup menu press the MENU button
The menu has options as listed below:
Setup menu
items
EMS Adjust emissivity
UNIT Select the temperature unit (°C / °F)
MAXMIN Display max / min value (On/Off)
PLT Select thermal colour palette
DATE Set date and time
MEMORY Display / Delete saved pictures
BGT Adjust background temperature
ALARM Enable / Disable / Adjust the high & low alarm levels
DISPLAY Adjust LCD brightness
DIST Select Image Blending distance
LANG Languages
INFO Camera information / SD card size
Description
www.megger.com 9
Page 10

Setup Menu Emissivity
Set up menu options continued
7. Setup Menu Emissivity
Note: All menu settings are retained when the instrument is
switched off
Press the MENU button to enter the setup menu. Use UP /
DOWN navigation buttons to highlight EMS.
The current emissivity is displayed. Press the Enter button
and press the UP / DOWN navigation buttons to adjust
emissivity. Press the MENU button; the new value is now
stored and displayed. Press the MENU button again to exit
the setup menu.
7.1 Emissivity
Definition of emissivity is the ratio of the energy radiated from a material’s or object’s surface to that radiated from a
perfect emitter, known as a blackbody.
It is a value between 0 (for a perfect reflector) and 1 (for a perfect emitter).
The emissivity of a surface depends on two variables; the material and the nature of the surface itself. A polished metal
surface will have a low emissivity, while an oxidized metal surface will have a fairly high emissivity. The emissivity is also
dependent on the temperature of the surface.
Typically, 90% of organic materials and painted or oxidized surfaces have an emissivity of 0.95. Inaccurate readings
will result from measuring shiny or polished metal surfaces. To compensate, cover the surface to be measured with
masking tape or matt / flat black paint and allow time for the tape/paint to reach the same temperature as the material
underneath it. An accurate measurement can then be made of the taped/painted surface.
10 www.megger.com
Page 11
Setup Menu Temperature Unit (°C / °F)
Typical Emissivity Values
Substance Emissivity Substance Emissivity
Asphalt 0.90 - 0.98 Aluminium Foil 0.04
Concrete 0.94 Aluminium (oxidized) 0.01 - 0.40
Cement 0.96 Brass (oxidized) 0.50 - 0.65
Sand 0.90 Chromium oxides 0.81
Earth 0.92 - 0.96 Copper oxides 0.78
Water 0.92 - 0.96 Copper (oxidized) 0.20 - 0.88
Ice 0.96 - 0.98 Steel (oxidized) 0.79 - 0.80
Snow 0.83 Zinc (oxidized) 0.10 - 0.11
Glass 0.90 - 0.95 Iron (oxidized) 0.50 - 0.90
Ceramic 0.90 - 0.94 Iron (rust) 0.65 - 0.96
Marble 0.94 Wood 0.80 - 0.90
Plaster 0.80 - 0.90 Graphite 0.70 - 0.80
Plasterboard 0.91 PVC 0.91 - 0.93
Mortar 0.89 - 0.91 Coal 0.80
Brick 0.93 - 0.96 Cardboard 0.81
Rubber (black) 0.94 Cloth (black) 0.98
Plastic 0.85 - 0.95 Human Skin 0.97 - 0.99
Textiles 0.90 Charcoal (powder) 0.96
Paper 0.70 - 0.94 Electrical Terminal Blocks 0.60
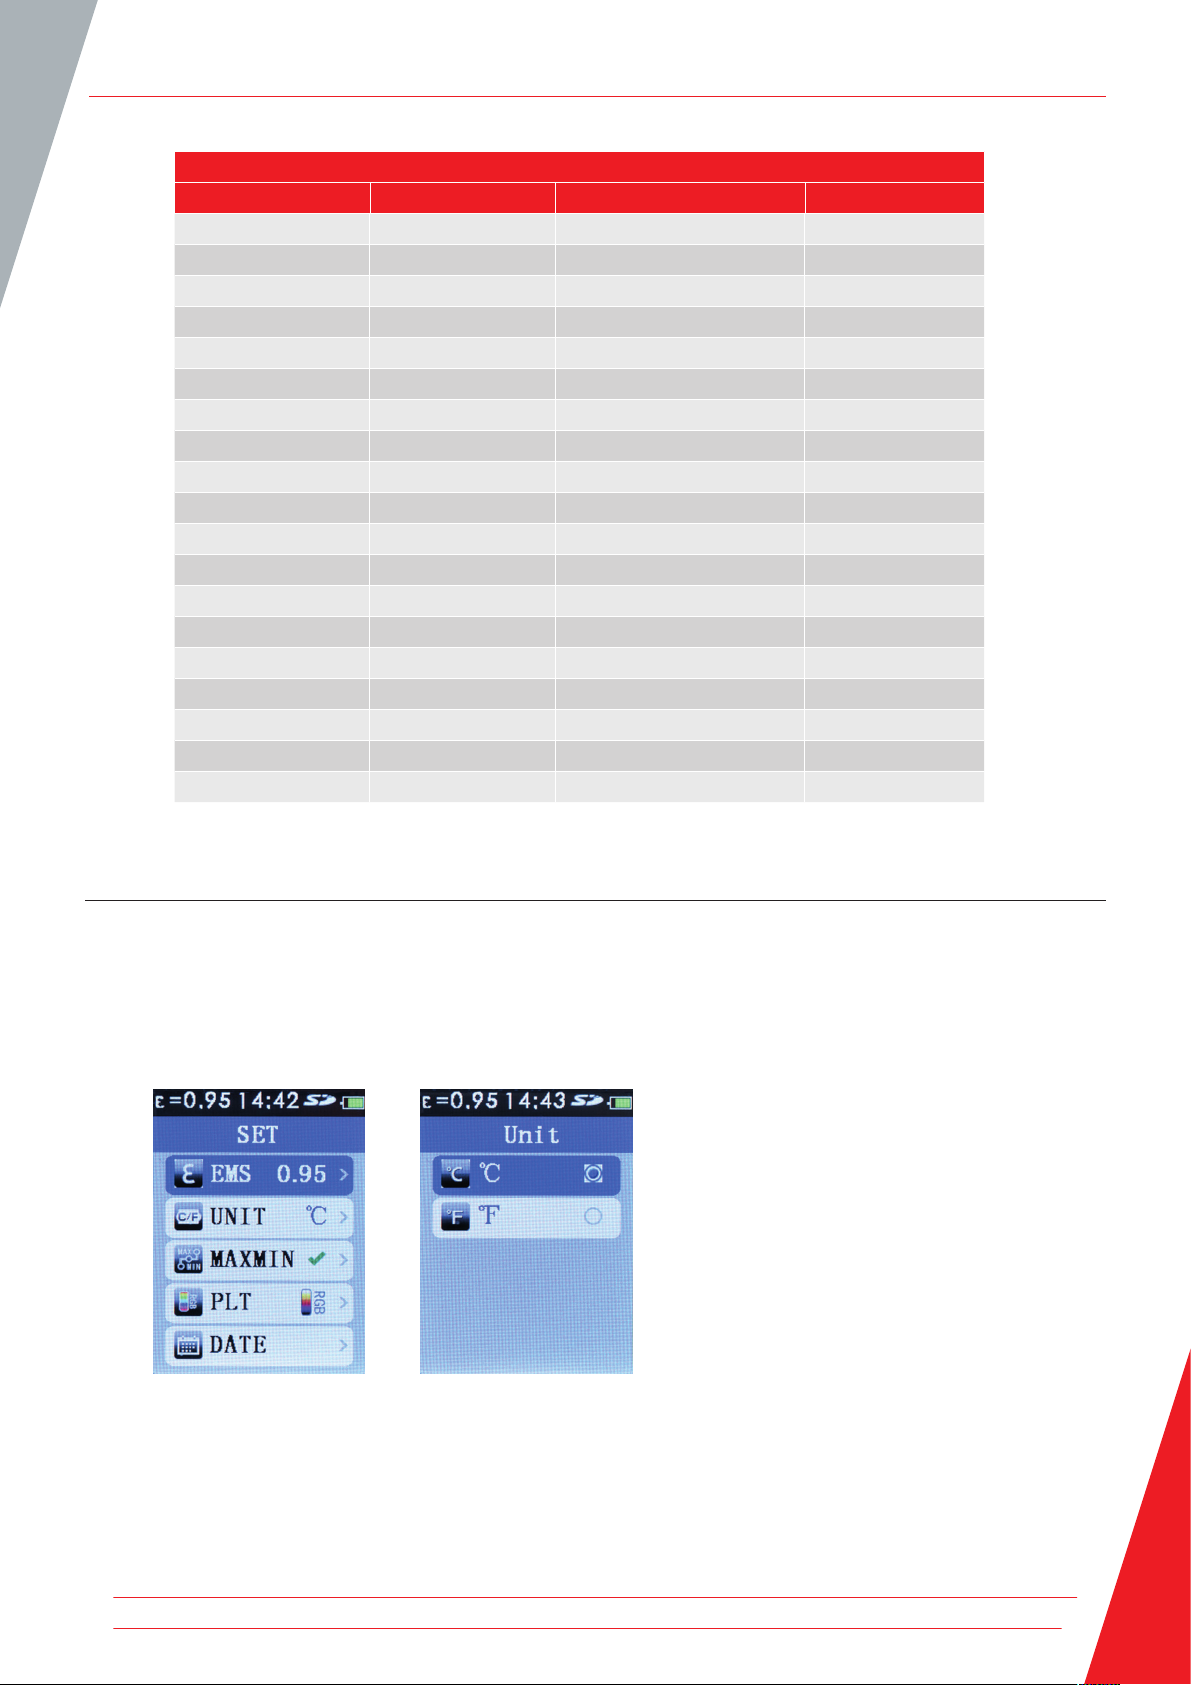
8. Setup Menu Temperature Unit (°C / °F)
Press the MENU button to enter the setup menu. Use the UP / DOWN navigation buttons to highlight UNIT.
The current temperature unit is displayed. Press the Enter button and press the UP / DOWN navigation buttons to
select °C or °F. Press the Enter button; the selection is now stored and displayed. Press the MENU button again to exit
the setup menu.
www.megger.com 11
Page 12

Setup Menu MAXMIN settings
9. Setup Menu MAXMIN settings
The MAXMIN setting, when enabled, indicates the position of
the highest and lowest temperatures as well as their values at
the bottom of the LCD display.
Red square x = Highest temperature
Green square n = Lowest temperature
Press the MENU button to enter the setup menu. Use the
UP / DOWN navigation buttons to highlight the MAXMIN
option. The MAXMIN option will either indicate
X (Off)
To enable or disable the MAXMIN option, press the Enter button. Use the Enter button again to enable or disable the
MAXMIN. Press the MENU button twice to exit the setup menu.
MAXMIN readings will not be displayed with MAXMIN disabled.
(On) or
10. Setup Menu PLT (Thermal Display Palette) settings
The PLT setting allows a user defined choice of the thermal
display palette on the LCD displayed images.
Press the MENU button to enter the setup menu. Use the UP
/ DOWN navigation buttons to highlight the PLT option. Press
the Enter button.
Use the UP / DOWN navigation buttons to highlight the
desired palette. Press the Enter button to store the selected
palette. Press the MENU button to exit the setup menu. The
selected palette is now displayed.
11. Setup Menu DATE settings
Press the MENU button to enter the
setup menu. Use the UP / DOWN
navigation buttons to highlight
the DATE option. Press the Enter
button.
Use the UP / DOWN navigation buttons to highlight the Date settings. Press the Enter button to set the date. Press
the Enter button repeatedly to select year / month / day.
The UP / DOWN navigation buttons change the year / month / day
Once the date is set press the MENU button 3 times to exit the setup menu.
12 www.megger.com
Page 13

Setup Menu TIME settings (24 hr)
12. Setup Menu TIME settings (24 hr)
Press the MENU button to enter the
setup menu. Use the UP / DOWN
navigation buttons to highlight the
DATE option. Press the Enter button.
Use the UP / DOWN navigation buttons to highlight the Time settings. Press the Enter button to set the time.
Press the Enter button repeatedly to select hour / minutes.
The UP / DOWN navigation buttons change the hour / minutes.
Once the time is set press the MENU button 3 times to exit the setup menu.
13. Setup Menu MEMORY / Saved Images
Press the Enter button, use the UP / DOWN navigation buttons
to scroll through the saved images.
As the saved images are selected the saved image number appears
briefly at the top right corner of the display next to the SD symbol.
To delete an unwanted image select the image with the UP /
DOWN navigation buttons. Press the Enter button to mark the
image for deletion (a dustbin symbol appears on the image). Press
the Enter button to delete the image.
The MEMORY setting allows the user to
view and delete unwanted images.
Press the MENU button to enter the
setup menu. Use the UP / DOWN
navigation buttons to highlight the
MEMORY option.
Note: When all the images are deleted the MEMORY empty
screen is shown. Press the MENU button twice to exit the setup MEMORY option.
Saved images can be accessed on a PC by attaching the supplied USB cable to a PC USB port. The Micro SD card is
recognised as a Removable Disk on the PC. The image files are located in a folder marked IMG. Alternatively, the Micro
SD card can be removed from the camera and inserted into the supplied SD card adapter for connection to a standard
PC SD card port.
www.megger.com 13
Page 14

Setup Menu BGT Background Temperature settings
14. Setup Menu BGT Background Temperature settings
The BGT setting allows the user to set the background
temperature.
Press the MENU button to enter the setup menu. Use the UP /
DOWN navigation buttons to highlight the BGT option. The set
background temperature is displayed.
Press the Enter button, use the UP / DOWN navigation buttons
to set the background temperature. Press the Enter button to
store the temperature.
Press the MENU button to exit the setup menu.
15. Setup Menu High / Low Temperature Alarm settings
If required, the ALARM setting allows user to preset either or both a high and low threshold
temperature alarm. A tone will sound when the high / low thresholds are viewed.
Press the MENU button to enter the setup menu. Use the UP / DOWN navigation button to
highlight the ALARM option. Press the Enter button to enable / disable / adjust the alarm
settings.
High level alarm option
Use the UP / DOWN navigation buttons to highlight the High
option. Press the Enter button.
Use the UP / DOWN navigation buttons to set the Hi Alarm level.
Press Enter button to enable the Hi Alarm
Press the MENU button 3 times to exit the ALARM and setup
menu or once to enable / disable / set the Low alarm .
Low level alarm option
.
Use the UP / DOWN navigation buttons to highlight the Low
option.
Use the UP / DOWN navigation buttons to set the Lo Alarm level.
Press Enter button to enable the Lo Alarm
Press the MENU button 3 times to exit the ALARM and setup
menu or once to enable / disable / set the High alarm (As above)
14 www.megger.com
Page 15

Setup Menu LCD Brightness
16. Setup Menu LCD Brightness
The DISPLAY setting allows the user to adjust the LCD brightness.
Press the MENU button to enter the setup menu. Use the UP /
DOWN navigation buttons to highlight the DISPLAY option.
Press the Enter button, use the UP / DOWN navigation buttons
to adjust the level. Press the MENU button twice to exit the setup
menu.
17. Setup Menu Image Blending (metric / imperial units)
Press the MENU button to enter the setup menu. Use the UP /
DOWN navigation buttons to highlight the DIST option. Press the
Enter button.
Use the UP / DOWN navigation buttons to select Unit (metres or
feet). Press the Enter button to store the selected Unit. Press the
MENU button to exit the setup menu.
In the Measure Mode, you can use the LEFT and RIGHT navigation buttons to adjust image blending distance.
18. Setup Menu Language Selection
Languages available: English, Italian, Espanol, Deutsch and French.
Press the MENU button to enter the setup menu. Use the UP /
DOWN navigation buttons to highlight the LANG option. Press the
Enter button.
Use the UP / DOWN navigation buttons to select the required
language. Press the Enter button to store the selection.
Press the MENU button to exit the setup menu
www.megger.com 15
Page 16

Setup Menu Camera Information
19. Setup Menu Camera Information
The setup option INFO displays the camera serial number, date
of manufacture, firmware version and size of the fitted micro SD
card.
To view press the MENU button to enter the setup menu. Use the
UP / DOWN navigation buttons to highlight the INFO option.
Press the Enter button.
Press the MENU button twice to exit the setup menu
16 www.megger.com
Page 17

20. Specifications
Specifications
Temperature
Temperature Measurement Range
-20 to 300 °C / -4° to 572°F
Temperature Measurement Accuracy
+/-2% +/-2°C as tested
(at 25 °C)
On-Screen Emissivity Correction
Yes
On-Screen Reflected Background
Temperature Compensation
Yes
Image Performance
Image Capture Frequency 9 Hz
Detector Type Un-cooled pyroelectric
ceramic
Thermal Sensitivity (NETD)
≤ 150 mK
Infrared Spectral Band 6.5 µm to 14 µm
Visual Camera 48608 pixels
Field of View 38 ° x 38 °
Focus Mechanism Fixed Focus
Image Presentation
Palettes Hot Metal, Ironbow,
Rainbow, Rainbow High
Contrast,
Grayscale (white hot) and
Grayscale (black hot)
Level and Span Auto
Blending Information
Parallax Correction of Visual and IR blending
0.5 m, 1.0 m, 2.0 m, 3.0 m
View Options Blending of the visual and
the infrared from full infrared
to full visual in 25 % steps
Hot Spot and Cold Spot Tracking Yes
Image capture and data storage
Image Capture Image available for review
before a saving
Storage Medium Micro SD memory card,
stores up to 6000 images on
the supplied micro SD card
File Format .bmp
Memory Review Scroll through all saved
images and view on-screen
images / delete unwanted
images
Operating Temperature 0 °C to +50 °C
Storage Temperature -20 °C to +60 °C
Relative Humidity 10 % to 90 %
non-condensing
Display 2.2 inch (55.88 mm)
diagonal 320 x 240 TFT LCD
Overload Display ----
Dimensions 208 mm (H) x 62 mm (W) x
150 mm (D)
Weight 406 g (including battery)
Battery (fitted) 18500 3.7 V 1400 mAh
Li-Ion
Auto Power Off 10 minutes
www.megger.com 17
Page 18

Maintenance
21. Maintenance
Do not attempt to repair this camera. It contains no user-serviceable parts.
Repair or servicing should only be performed by qualified personnel.
22. Cleaning
Periodically wipe the case with a dry cloth and detergent, do not use abrasives or solvents.
23. WEEE Directive
The crossed out wheeled bin symbol on the instrument and on the batteries isa reminder not to dispose of them
with general waste at the end of their life. Megger is registered in the UK as a Producer of Electrical and Electronic
equipment. The registration No is; WEE/DJ2235XR.
Users of Megger products in the UK may dispose of them at the end of their useful life by contacting B2B Compliance
at www.b2bcompliance.org.uk or by telephone on 01691 676124. Users of Megger products in other parts of the EU
should contact their local Megger company or distributor.
Battery Disposal
The battery in this product is classified as Portable Batteries under the Batteries Directive. Please contact Megger Ltd
for instructions on the safe disposal of this battery. For disposal of batteries in other parts of the EU contact your local
distributor. Megger is registered in the UK as a producer of batteries. The registration number is BPRN01235.
For further information see www.megger.com
18 www.megger.com
Page 19

Warranty (2 years)
24. Warranty (2 years)
This meter is warranted to the original purchaser against defects in material and workmanship for 2 year from the
date of purchase. During this warranty period, the manufacturer will, at its option, replace or repair the defective unit,
subject to verification of the defect or malfunction. This warranty does not cover fuses, disposable batteries, or damage
from abuse, neglect, accident, unauthorised repair, alteration, contamination, or abnormal conditions of operation or
handling.
Any implied warranties arising out of the sale of this product, including but not limited to implied warranties of
merchantability and fitness for a particular purpose, are limited to the above. The manufacturer shall not be liable for
loss of use of the instrument or other incidental or consequential damages, expenses, or economic loss, or for any claim
or claims for such damage, expense or economic loss. Some states or countries laws vary, so the above limitations or
exclusions may not apply to you.
Megger Limited
Archcliffe Road
Dover Kent
CT17 9EN
Tel: +44 (0) 1304 502 101
Fax: +44 (0) 1304 207 342
www.megger.com
www.megger.com 19
Page 20

Local Sales office
Megger Limited
Archcliffe Road
Dover
Kent
CT17 9EN
ENGLAND
T. +44 (0)1 304 502101
F. +44 (0)1 304 207342
Manufacturing sites
Megger Limited
Archcliffe Road
Dover
Kent
CT17 9EN
ENGLAND
T. +44 (0)1 304 502101
F. +44 (0)1 304 207342
Megger GmbH
Obere Zeil 2 61440
Oberursel,
GERMANY
T. 06171-92987-0
F. 06171-92987-19
Megger USA - Dallas
4271 Bronze Way
Dallas TX 75237-1019
USA
T 800 723 2861 (USA only)
T. +1 214 333 3201
F. +1 214 331 7399
USsales@megger.com
Megger USA - Valley Forge
Valley Forge Corporate Center
2621 Van Buren Avenue
Norristown
Pennsylvania, 19403
USA
T. 1-610 676 8500
F. 1-610-676-8610
Megger AB
Rinkebyvägen 19, Box 724,
SE-182 17
DANDERYD
T. 08 510 195 00
E. seinfo@megger.com
This instrument is manufactured in China
The company reserves the right to change the specification or
design without prior notice.
Megger is a registered trademark
TC3231_ThermalCamera_UG_en_V01i 12 2019
© Megger Limited 2019 www.megger.com
 Loading...