

Page 1

M
PowerSuite®On-Site
Featuring
PowerSuite Professional
Pro-Lite 16th software and
Ultra Mobile software
User Guides
Page 2

Ultra Mobile Product Features
■ Real-time Bluetooth
®
result capture from Megger MFT1553 Installation
Tester
■ Support for Palm v5, Windows Mobile 2003, Windows Mobile 2005,
Windows Mobile 5 for Smartphones and Symbian S60 Version 3 devices
■ Selective certificate template installation on mobile device
■ Easy to use split screen data entry
■ Create certificates on mobile device or in PowerSuite Professional
■ Simple Inbox/Outbox device synchronisation from PowerSuite
■ Support for multiple device licences from one PowerSuite installation
■ Device specific font zoom feature
■ Common interface across all mobile devices
■ Full screen list selection
■ Keyboard, button and stylus support
■ Supports portrait and landscape displays
PowerSuite Pro-Lite 16th Product Features
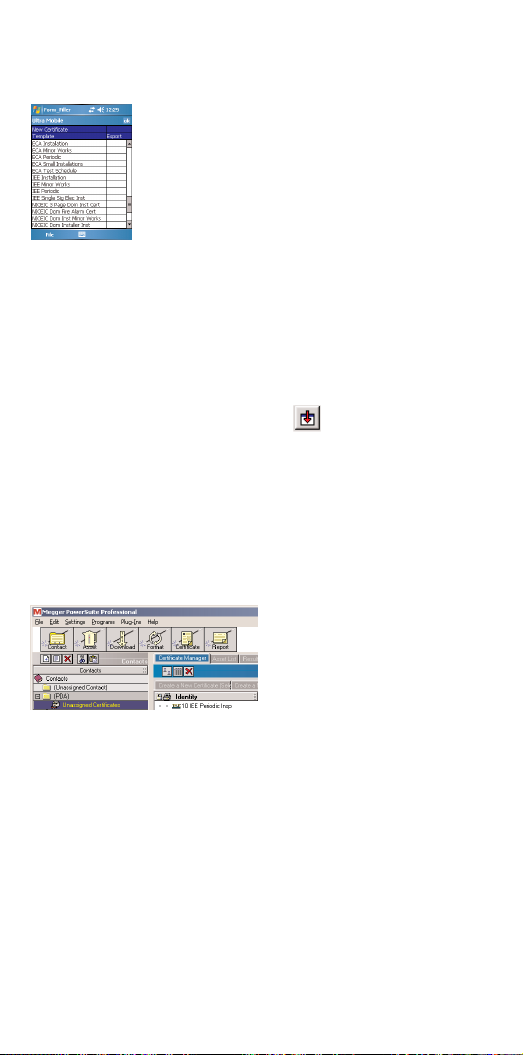
■ Integrated contact manager, download manager and certificate manager
■ Multi-level contact tree for storing companies, clients and locations
■ Real-time Bluetooth result capture from Megger MFT1553 Installation
Tester
■ Compatible with Megger downloading test instruments (CM500,
BMM/LCB, MIT330, LTW335, RCDT330)
■ Wizard driven tasks
■ Fast completion of on-screen forms with powerful editing features
■ Many certificate template styles supported
Recommended System Requirements (Mobile Device)
■ Windows mobile 2005 operating system
■ 64MB of RAM
■ Docking cradle or USB cable
■ Microsoft ActiveSync synchronization software
■ 50MB of free hard disk space on PC for Ultra Mobile installation
■ Integrated Bluetooth or Bluetooth adapter (for Megger MFT1553 real time
result capture)
PowerSuite Pro-Lite 16th Recommended System Requirements
(PC)
■ CD-ROM drive
■ PowerSuite Professional software installed
■ Pentium IV class processor 2.4GHZ
■ Microsoft Windows 2000 operating system (Microsoft Windows XP
recommended)
■ 256Mb recommended
■ 100 Mb Ram for typical PowerSuite installation
■ VGA or higher resolution monitor, minimum 800 x 600 resolution
■ Microsoft Mouse or compatible pointing device
■ A default printer needs to be made available for viewing/printing
certificates and reports
■ Integrated Bluetooth or Bluetooth dongle (for Megger MFT1553 real time
result capture)
Page 3
Installation
The software installation consists of the following steps:
Step 1 – Install the PowerSuite Pro-Lite 16th and Ultra Mobile software on
Step 2 – Run PowerSuite and complete the Setup wizard
*Step 3 – Install the Ultra Mobile software on your mobile device
*Step 4 – Synchronise with your mobile device in PowerSuite using the
* Required for Ultra Mobile users only
Pre-Installation Notes (Ultra Mobile)
N.B. Before installing the Ultra Mobile software, ensure that you have
installed and performed a successful synchronisation using the software that
was supplied with your mobile device. Megger Technical Services cannot
provide technical support on the installation and setup of this
synchronisation software.
Step 1 – PowerSuite Pro-Lite 16th and Ultra Mobile Installation
N.B. please close all Windows programs before installing as any running
programs may stop critical files from being installed correctly and result in an
incomplete installation.
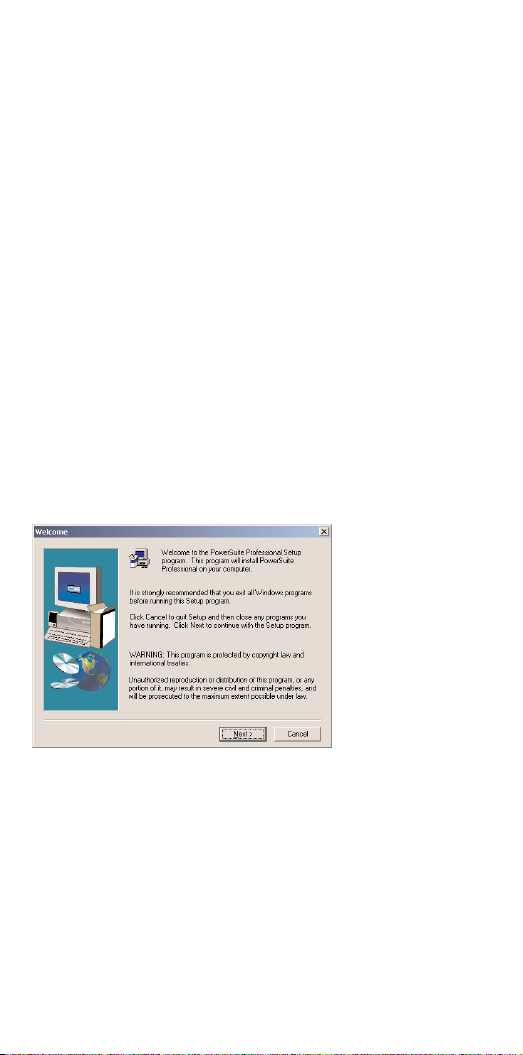
If the PowerSuite CD does not auto run when inserted, you will have to
manually run the Setup.exe program from your CD-ROM drive. (e.g.
"D:\Setup.exe") The following screen will be displayed:
your PC or laptop
‘Mobile’ module and install the required certificate templates
The PowerSuite software will be installed and updated at the same time as
the Ultra Mobile software is installed. Follow the installation prompts and
accept the default values where possible.
Registration
The registration card supplied with your software will have space for two 16
digit registration numbers. One of these numbers is for PowerSuite and the
other is for the Ultra Mobile software.
The prompt for the PowerSuite registration details and registration number
will be displayed first.
The 16-digit registration numbers for PowerSuite and Ultra Mobile can be
found at the foot of the registration card included with the software.
Page 4
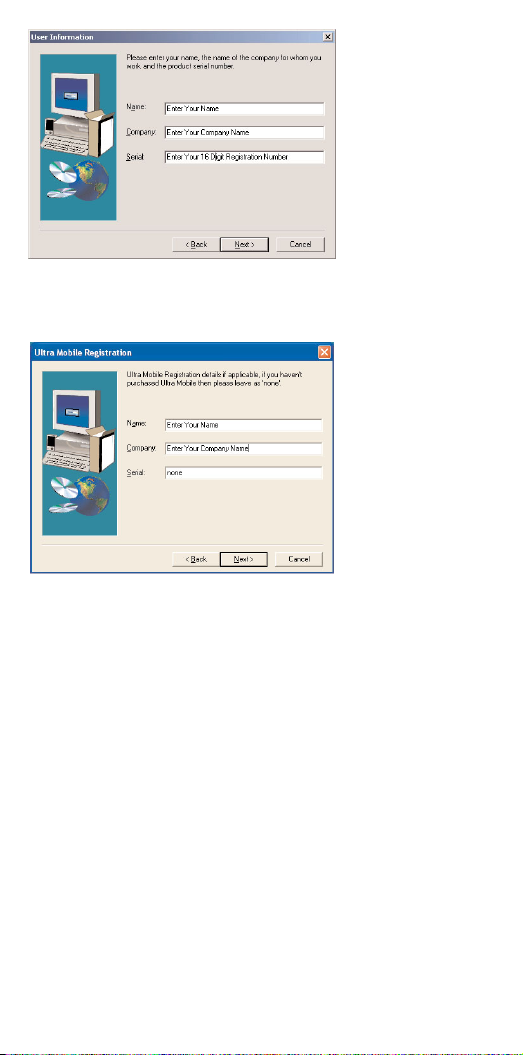
When these details have been entered (or confirmed if you already have
PowerSuite installed), you will then be prompted to enter your Ultra Mobile
registration number.
Any registration numbers should be entered in one string with no spaces or
dashes. To help identify numbers they will be underlined on the registration
card. Your registration number will be validated on the second stage of the
installation procedure.
N.B. Please complete and return your registration card to Megger Technical
Services as soon as possible to receive telephone support and software
updates.
N.B. If you have purchased a version of PowerSuite without the Ultra Mobile
software you can enter past the Ultra Mobile registration screen and leave the
registration number as ‘none’.
You will be required to restart your machine during the installation and once
it has been restarted, the remaining installation steps will be carried out.
Megger Download Manager will be installed and it is recommended that you
select the default options for this installation. You may be prompted with the
following screen to add test instrument drivers.
Page 5

Select the Megger downloading test instruments you currently use and click
the ‘Add Driver’ button (Hold down the control key and click to select
multiple instruments from the list).
When you close the Download Manager program, the remaining installation
steps will be carried out.
Once the remaining installation steps have been completed you can continue
with Step 2.
Step 2 - Run PowerSuite and complete the Setup wizard
From the windows menu , select PowerSuite Professional from the
Programs|PowerSuite Professional group.
Type ‘Supervisor’ in the ‘User ID’ field on the Login screen and click the
‘Start’ button to run the software.
Setup Wizard
The first time that you run the software, the setup wizard will guide you
through creating your own company contact
Page 6
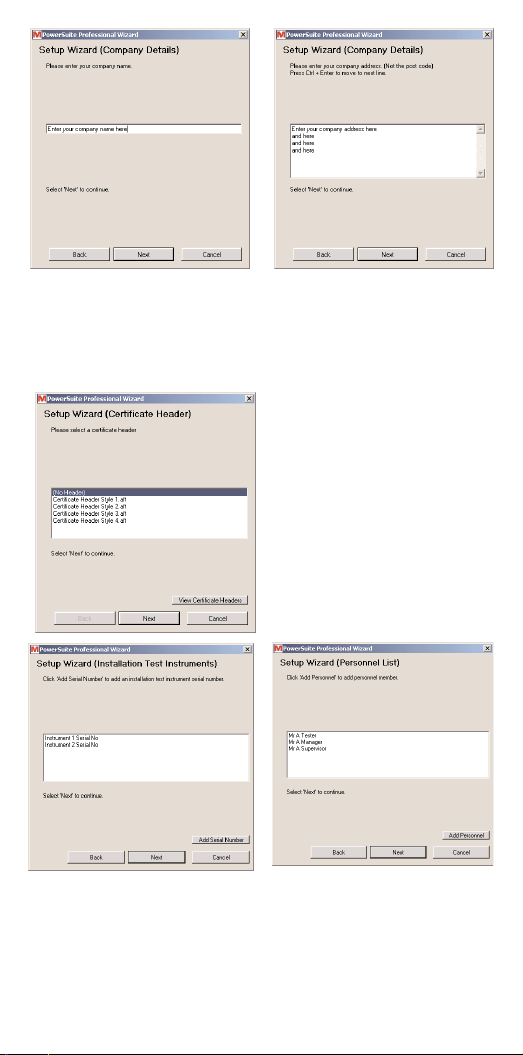
You will be prompted for company name, address, postcode and
telephone numbers.
You will then be prompted to select a certificate header page to append to
the fornt of any certificates that you generate.
Select ‘No Header’ if you do not
want a certificate header page.
You will be prompted by the wizard
to enter details of your test
instrument serial numbers and
personnel.
These details will be available as drop down lists when editing
certificates) You can amend these lists at any time in PowerSuite by
selecting the ‘List Editor…’ option from the ‘Programs’ menu on the
main PowerSuite shell.
Continue with steps 3 and 4 only if you wish to install the Ultra Mobile
software. Once you have completed the setups, you can continue with
the ‘Basic Operation’ sections for either Pro-Lite 16th or Ultra Mobile.
Page 7
Step 3 - Install the Ultra Mobile software on your mobile device
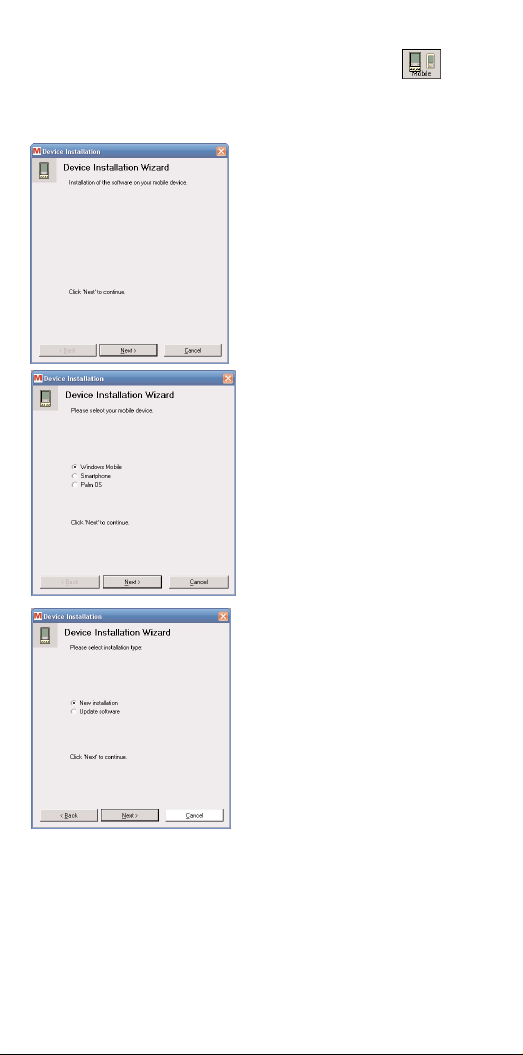
With PowerSuite running, click the large ‘Mobile’ button on the
PowerSuite toolbar to load the Ultra Mobile Module.
The Mobile Device installation Wizard should start automatically to display
the following screen:
If the Mobile Device Installation
Wizard does not automatically start,
select ‘Install Software on Mobile
Device’ from the Options menu.
The Mobile Device Installation
Wizard will ask you to select the
type of Mobile Device you intendto
use.
Select the required device and click
the ‘Next’ button.
The next screen will ask if this is a
new installation on this mobile
device or if you are updating the
software on the device.
The default prompt will be for a new
installation. Click the ‘Next’ button
and then follow the instructions for
the type of device you are installing
onto.
Page 8
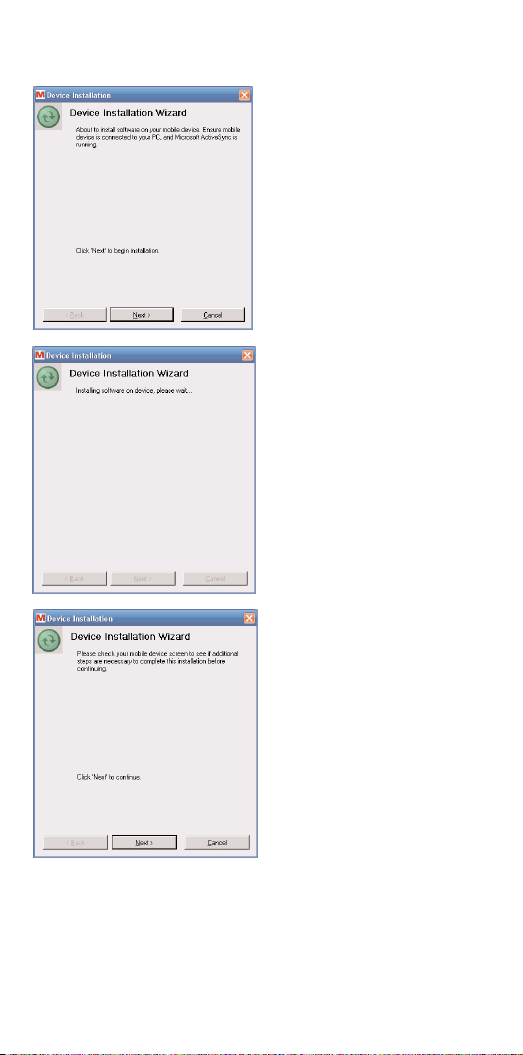
(Windows Mobile, Smartphone, Symbian S60 V3)
If you select ‘Windows Mobile’, ‘Smartphone’ or ‘Symbian S60 V3’ the
following prompt will be displayed:
Ensure the Mobile Device is
connected and Microsoft ActiveSync
is running before clicking the ‘Next’
button to start the software
installation.
Ultra Mobile software will be installed
on the Mobile Device. Once the
software installation has completed,
you will be prompted to check the
mobile device screen.
N.B. The software installation may
take a few minutes.
You may be required to initiate the
Ultra Mobile software installation on
the device. Once the Ultra Mobile
installation has completed, click the
‘OK’ button.
Once the software has been
successfully installed you will be
prompted to register a unique user id
with PowerSuite.
Page 9
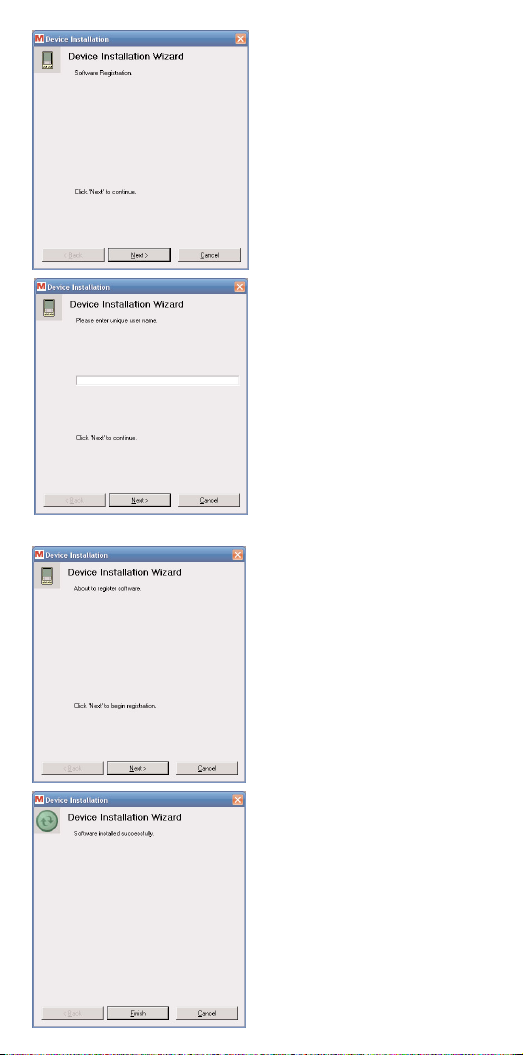
Click the ‘Next’ button to display a
prompt screen with an entry field
for a user id.
The user id you enter here is very
important and the Ultra Mobile
Module will use it to link specifically
with the device you have installed
the software onto. As it is possible
to install the Ultra Mobile software
onto multiple devices if you are
licenced to do so, each user will
have their own synchronising
settings. The user id could be
entered to identify the specific
mobile device or it could be the
name of an engineer. Once you
have entered your unique user id
click the ‘Next’ button.
You will be prompted to click the
‘Next’ button to register the user on
the device.
Once the user has been registered
the following screen will be
displayed:
Click the ‘Finish’ button and
continue with Step 4.
Page 10

There will also be a status of ‘Not
Synced’ against the Last Sync Date.
This status will be updated once you
have uploaded your selected
certificate templates in the next
step.
(Palm Only)
If you select ‘Palm’ from the device list the following prompt will be
displayed:
This screen displays a list of all
Mobile Device users that have been
‘HotSynced’ with your PC. Select
the required user id and click the
‘Next’ button.
A confirmation screen will be
displayed to inform you that the
software is about to be prepared for
installation onto the device. Click
the ‘Next’ button to continue.
The final Ultra Mobile Wizard screen
will be displayed for the Palm
installation.
The remaining installation steps
listed on this screen will need to be
followed to complete the
installation. First initiate a standard
HotSync with the Palm to install the
Ultra Mobile software.
Lastly click the ‘Finish’ button and
continue with the following step to
upload the required certificate
templates to the Palm.
Page 11
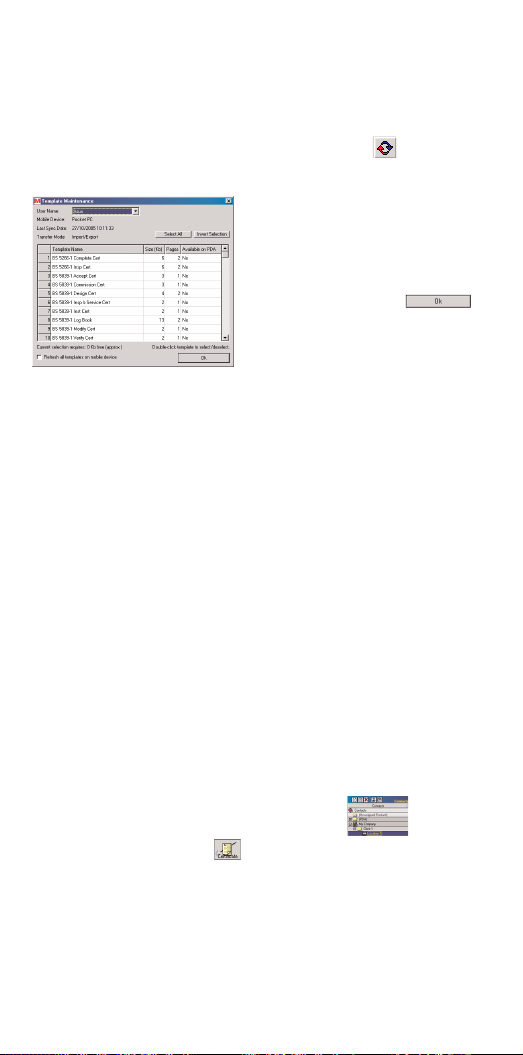
Step 4 - Synchronise with your mobile device in PowerSuite using
the ‘Mobile’ module and install the required certificate templates
You now need to synchronise with the device using the Ultra Mobile Module
and upload the required certificate templates. The following template
maintenance screen may be loaded automatically, otherwise click the
‘Synchronise’ button on the Ultra Mobile Module toolbar . The following
template maintenance screen should be displayed.
Scroll up and down the list to view all
the available certificate templates.
Double click on the required certificate
template name to change the status
from ‘No’ to ‘Yes’. Any templates with a
status of ‘Yes’ will be uploaded to the
Mobile Device. Click the
button to close the template
maintenance screen. The selected
templates will be automatically
uploaded to the device.
Once you have completed all the installation steps, you can continue with the
Basic Operation section for Ultra Mobile or Pro-Lite 16th.
Ultra Mobile - Basic Operation
The Ultra Mobile software has been designed to be flexible in it’s operation.
Certificates can be generated in PowerSuite and transferred to Ultra Mobile
via local synchronisation, removable media or email, or new certificates can
be created from scratch on your Mobile Device and transferred back to
PowerSuite for final certification.
Below are listed three methods of operation, Standard, Intermediate and
Advanced. These sections assume that you have already completed the
necessary steps to set up your clients and locations in PowerSuite and you are
familiar with the basic operation of creating new certificates.
Standard Operation - Synchronisation
This method of operation involves a direct connection between PC and
Mobile Device via a USB cable or cradle.
Method 1
1. (PC) Run the Certificate Wizard in PowerSuite to create a new Installation
Testing certificate for your selected location.
First highlight the correct location in the contact tree and click the
large Certificate Wizard button . When you are prompted to select the
type of certificate be sure to select ‘Installation Testing’. Complete the
remaining wizard prompts finally selecting the certificate number, then click
the ‘Finish’ button to create the certificate and display it on screen.
Page 12

You can part complete any data
fields on the certificate before
closing it and returning to the
Certificate Manager screen.
2. (PC) Export the certificate to the Ultra Mobile Module.
To export the certificate you have created to the Ultra Mobile Module first
ensure you have the ‘Edit/View an Existing Certificate’ tab highlighted in the
certificate manager in PowerSuite and you also have the correct location
highlighted. Right click on the certificate you wish to export to display a pop
up menu.
Select the 'Export Certificate to Mobile Device' option from the pop up menu,
and then select the Device User Name from the next pop up menu.
Select ‘Yes’ to the confirmation
prompt to upload to the Ultra
Mobile Module.
N.B. Once the certificate has been exported from PowerSuite into the
Ultra Mobile Module it will be locked and cannot be edited in PowerSuite.
3. (PC) Load the Ultra Mobile Module and check the certificate is in the
Mobile ‘Outbox’ ready to be synchronised with the Mobile Device.
You can now load the Ultra Mobile Module by clicking the large ‘Mobile’
button on the PowerSuite toolbar.
Once the module has loaded, ensure the required User Name is selected
from the drop down list, and click the ‘Outbox’ tab.
You should see your certificate in
the ‘Outbox’ ready to be
synchronised with the Mobile
Device.
Page 13

4. (PC) Ensure the device is connected to the PC via a USB cable or docking
station and the Ultra Mobile program is NOT running.
5. (PC) Synchronise from the Ultra Mobile Module to transfer the certificate
to Ultra Mobile.
Click the ‘Synchronise’ button on the Ultra Mobile Module toolbar . and
the certificate will be transferred from the Ultra Mobile Module ‘Outbox’ to
Ultra Mobile. Once the certificate has been transferred you can close the Ultra
Mobile Module.
N.B. Pressing F5 will refresh the ‘Outbox’, this is necessary if the Ultra Mobile
Module is open when a certificate is exported from PowerSuite.
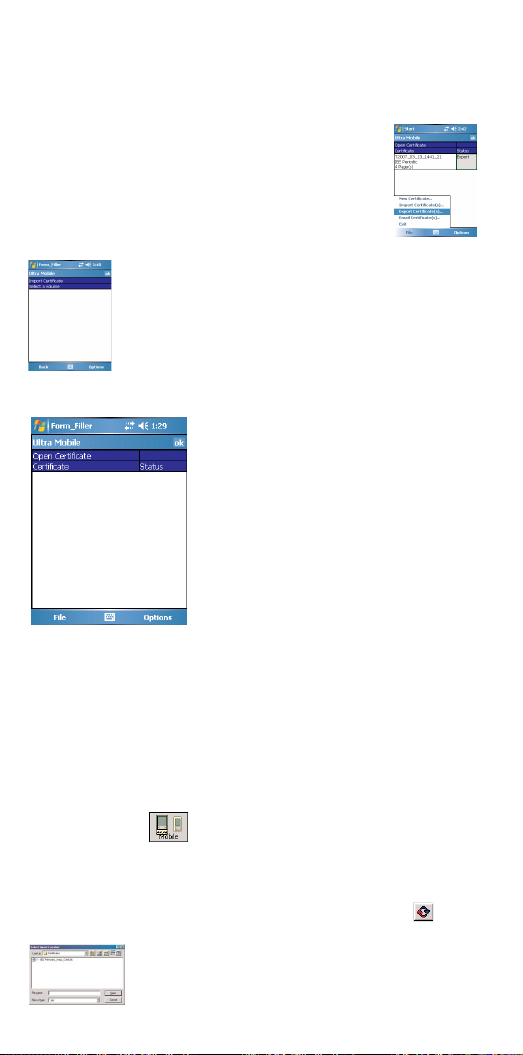
6. (Mobile Device) Run the Ultra Mobile program on the device and load and
edit the certificate as required.
To start the Ultra Mobile program on a Windows Mobile PDA, open the
Programs folder and click the ‘Ultra Mobile’ icon . To start the Ultra
Mobile program on the Palm, open the ‘All’ category and click the 'Ultra
Mobile’ icon .
To start the Ultra Mobile program on a Windows Mobile 5 SmartPhone, click
the‘Ultra Mobile’ icon from the Start menu.
To start the Ultra Mobile program on a Symbian S60 device, open the
‘Installations’ folder from the main Symbian start screen and click the ‘Ultra
Mobile’ icon .
The Ultra Mobile welcome screen will be displayed for 2 seconds
and you can click or tap the screen to load the program. (You can switch off
the welcome screen from the Preferences menu)
Like PowerSuite, the Ultra Mobile software has a simple to use built in
certificate manager. The certificate manager defaults to the ‘Open Certificate’
screen but can easily be switched from the File menu to create new
certificates.
The certificate you exported from
PowerSuite will be displayed and you can
highlight it and click or tap on the
certificate name to load it.
Page 14

The certificate pages will be loaded and the
first page of the certificate will be displayed
ready for editing. The top two rows show
the current page and section.
You can move between pages in three ways.
show a drop down list selection of the available pages in the certificate
.
Tap or click on the page you wish to load. You can also tap or click on the
Options menu at the bottom right of the screen and select ‘Select Page…’
.
Alternatively you can use the left and right navigation controls on your
mobile device to move between pages.
Clicking on the current page name will
All pages are split up into sections where possible to help make data entry
easier. The program defaults to showing the first section when loading the
page, but this can be changed to default to (All Sections) in the preferences.
You can move between sections on a page in three ways. Clicking or tapping
on the current section name will show a drop down selection of the available
sections on the page .
Tap or click on the section you wish to load. You will also have the option of
displaying (All Sections) on the page. You can also tap or click on the Options
Alternatively if you use the up and down navigation controls on your mobile
device you will see the section change automatically as you navigate beyond
the last/first field in the section.
menu at the bottom right of the screen and select ‘Select
Section…’
.
Page 15
The main area of the screen is divided into a two-column grid with labels in
the left hand column and space for entering data in the right hand column.
You can enter data by clicking in
one of the fields in the right hand
column and using one of the
available input methods on the
mobile device to enter text. Some of
the data entry fields will contain
drop down lists.
If a field has a list available you will
see a small drop down arrow at the
right hand edge when the field is
being edited. Tapping or clicking on
this arrow will display the drop
down list in the grid. You can scroll
up and down the list and tap or click
to make a selection. You can also
see the drop down list full screen by
clicking the button when the field is
being edited.
The current selected list item will be highlighted and you can scroll up and
down and tap or click to select an item from the list. If you select the Back
option from the menu, the list selection will be cancelled and you will be
returned to the grid. You also have the option of entering data manually for
these fields if you do not want to select an item from the list.
Some fields are defined as date input fields. If you click on one of these types
of fields a date selector will be displayed.
Once you have selected the
required date tap or click on the
‘OK’ menu option to return to the
certificate entry screen.
Page 16

Some fields allow you to enter more
than one line of text. When you click
on one of these multi-line input
fields a multi-line text input screen
will be displayed.
Once you have entered all the text in
a multi-line input field tap or click on
the ‘OK’ menu option to return to
the certificate entry screen.
Once you have finished editing the
certificate, select the ‘Close
Certificate’ option from the File
menu to return to the certificate
manager screen.
7. (Mobile Device) Mark the certificate as completed in the Ultra Mobile
software.
You can continue to edit and make changes to the certificate as required.
Once you have finished editing and wish to transfer the certificate back to
PowerSuite you will need to alter the status of the certificate in the Ultra
Mobile certificate manager.
The ‘Status’ column in the certificate
manager has three states for each
certificate, <blank> (work in
progress), 'Sync' (ready for
synchronisation), and 'Export'
(transfer to removable media or
email). Tap or click on this status
column to set it to 'Sync', and ready
for transferring back to PowerSuite.
Close the Ultra Mobile software by
selecting ‘Exit’ from the File menu in
the certificate manager.
8. (PC) Ensure the Mobile Device is connected to the PC via a USB cable or
docking station ready to be synchronised.
Load the Ultra Mobile Module by clicking the large ‘Mobile’ button on the
PowerSuite toolbar .
Ensure that the required User Name is selected from the drop down list, and
select the 'Inbox'. Click the ‘Synchronise’ button on the Ultra Mobile Module
toolbar .
The certificate will be transferred from the Mobile Device back into the
Page 17

‘Inbox’ in the Ultra Mobile Module.
The certificate is now ready to be
imported back into PowerSuite.
9. (PC) Import the certificate back into PowerSuite from the Ultra Mobile
Module.
Click on the ‘Transfer Certificate’ button and the certificate will be
moved from the Ultra Mobile Module back to the correct location in
PowerSuite.
Close the Ultra Mobile Module and press the F5 button to refresh the
PowerSuite Certificate Manager. The original certificate will be unlocked and
can be edited and printed as required.
Method 2
This method describes a new certificate being generated on the Mobile
Device.
1. (Mobile Device) Run the Ultra Mobile software on the Mobile Device and
create a new certificate from one of the available templates.
With this method of operation the first step is to create a new Installation
Testing certificate on the Mobile Device by selecting one of the available
templates.
To start the Ultra Mobile program on a Windows Mobile PDA, open the
Programs folder and click the ‘Ultra Mobile’ icon . To start the Ultra
Mobile program on the Palm, open the ‘All’ category and click the 'Ultra
Mobile’ icon .
To start the Ultra Mobile program on a Windows Mobile 5 SmartPhone, click
the‘Ultra Mobile’ icon from the Start menu.
To start the Ultra Mobile program on a Symbian S60 device, open the
‘Installations’ folder from the main Symbian start screen and click the‘Ultra
Mobile’ icon .
The Ultra Mobile welcome screen will be displayed for 2 seconds
and you can click or tap the screen to load the program. (You can switch off
the welcome screen from the Preferences menu)
Like PowerSuite, the Ultra Mobile software has a simple to use built in
certificate manager. The certificate manager defaults to the ‘Open Certificate’
Page 18
screen but can easily be switched from the File menu to create new
certificates.
Select the ‘New Certificate…’ option from the File menu.
2. (Mobile Device) Edit the new certificate in the Ultra Mobile software.
Refer to steps 6, 7 and 8 in Basic Operation Method 1 for information on
editing, marking the certificate as completed and synchronising with
PowerSuite.
3. (PC) Import the certificate back into PowerSuite from the Ultra Mobile
Module.
Click on the ‘Transfer Certificate’ button and the certificate will be
moved from the Ultra Mobile Module to the ‘(Mobile Device)’ contact in
PowerSuite.
4. (PC) Move the certificate from the ‘PDA Unassigned’ contact to the correct
PowerSuite location.
Close the Ultra Mobile Module and press the F5 button to refresh the
PowerSuite Certificate Manager.
A list of the available certificate templates will be
displayed. Tap or click on the required template to create
and load a new certificate.
The certificate pages will be loaded and the first page of
the certificate will be displayed ready for editing.
The ‘(Mobile Device)’ contact is
automatically created under the
‘(Unassigned Contact)’ at the top of
the contact tree and this is a
temporary storage location for
certificates and data that is not
tagged to a specific location.
You can move the certificate from the ‘(Mobile Device)’ contact by dragging
it over the required location in the contact tree and releasing the mouse. You
can then finish editing and printing the certificate.
Intermediate Operation - Removable Media
This operation involves the transfer of data via removable media, such as SD
card, or Compact Flash card.
Method 1
This method describes a new certificate being generated in PowerSuite.
1. (PC) Run the Certificate Wizard in PowerSuite to create a new Installation
Page 19

Testing certificate for your selected location in PowerSuite.
With this method of operation the first step is to create a new Installation
Testing certificate in PowerSuite. Highlight the correct location in the contact
tree and click the large Certificate Wizard button .
When you are prompted to select the type of certificate be sure to select
‘Installation Testing’. Complete the remaining wizard prompts finally
selecting the certificate number and click the ‘Finish’ button to display the
certificate on screen.
You can complete any additional
data fields on the certificate before
closing it and returning to the
certificate manager screen.
2. (PC) Export the certificate to the Ultra Mobile Module.
To export the certificate you have created to the Ultra Mobile Module first
ensure you have the ‘Edit/View an Existing Certificate’ tab highlighted in the
certificate manager and you also have the correct location highlighted. Right
click on the certificate you wish to export to display a pop up menu.
Select the 'Export Certificate to Mobile Device' option from the pop up menu,
and then select the Mobile Device User Name from the next pop up menu.
Select ‘Yes’ to the confirmation
prompt to upload to the Ultra
Mobile module.
N.B. Once the certificate has been exported from PowerSuite into the Ultra
Mobile Module it will be locked and cannot be edited in PowerSuite.
3. (PC) Load the Ultra Mobile Module and check the certificate is in the
Mobile Device ‘Outbox’ ready to be exported to the Mobile Device.
You can now load the Ultra Mobile Module by clicking the large ‘Mobile’
button on the PowerSuite toolbar.
Page 20

Once the module has loaded, ensure the required User Name is selected
from the drop down list, and click the ‘Outbox’ tab.
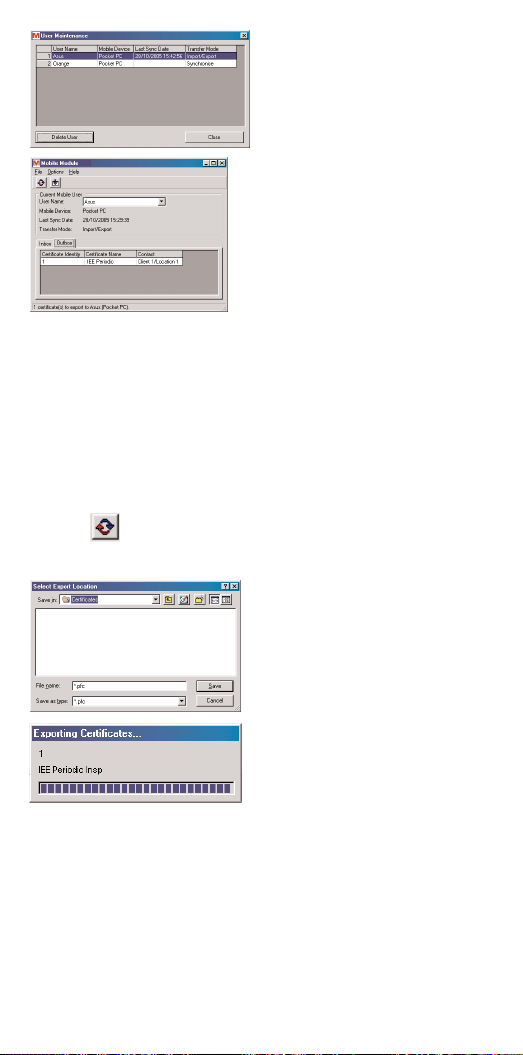
N.B. To use the Import/Export method, open the ‘Options’ menu, and select
‘User Maintenance…’. The ‘User Maintenance’ screen will appear:
For the required User Name, double
click in the ‘Transfer Mode’ field to
change from ‘Synchronise’ to
‘Import/Export’, and click ‘Close’.
You should see your certificate in
the ‘Outbox’ ready to be exported
to the Mobile Device.
4. (PC) Ensure the removable media
is connected to your PC.
If you are using an SD card or
Compact Flash card this will be via a
USB card reader.
5. (PC) Export the certificate to the removable media.
Click the I 'Export Certificates to Mobile Device...' button on the toolbar,
and a file selector will appear for you to select the export location.
Once you have selected the location
of the removable media, click 'Save'.
A window will appear showing the
export progress for the current
certificate. When finished the
window will disappear.
6. (Mobile Device) Transfer the removable media to the Mobile Device.
Disconnect the removable media from the PC, and connect it to the Mobile
Device.
7. (Mobile Device) Run the Ultra Mobile program on the Mobile Device.
To start the Ultra Mobile program on a Windows Mobile PDA, open the
Programs folder and click the ‘Ultra Mobile’ icon . To start the Ultra
Mobile program on the Palm, open the ‘All’ category and click the 'Ultra
Page 21

Mobile’ icon .
To start the Ultra Mobile program on a Windows Mobile 5 SmartPhone, click
the‘Ultra Mobile’ icon from the Start menu.
To start the Ultra Mobile program on a Symbian S60 device, open the
‘Installations’ folder from the main Symbian start screen and click the‘Ultra
Mobile’ icon .
The Ultra Mobile welcome screen will be displayed for 2 seconds
and you can click or tap the screen to load the program. (You can switch off
the welcome screen from the Preferences menu)
Like PowerSuite, the Ultra Mobile software has a simple to use built in
certificate manager. The certificate manager defaults to the ‘Open Certificate’
screen but can easily be switched from the File menu to create new
certificates.
8. (Mobile Device) Import the certificate into Ultra Mobile from the
removable media.
Ensure the Open Certificate screen is selected, and from the File menu select
the 'Import Certificate(s)...' option .
A file selector will appear prompting you to select a location.
Tap or click on the 'Select a volume'
row and select the removable
media.
You should see your certificate
appear in the list, click 'Select' to
import.
Once finished importing, you should see your certificate appear in the Open
Certificate’ screen.
Page 22

9. (Mobile Device) Edit the certificate in the Ultra Mobile software.
Tap or click on the certificate to select and load it.
Refer to step 6 in Basic Operation Method 1 for information on editing the
certificate details.
10. (Mobile Device) Mark the certificate as completed in Ultra Mobile and
export to removable media.
You can continue to edit and make changes to the certificate as required.
Once you have finished editing and wish to export the certificate back to
PowerSuite from the Mobile Device you have to mark it as ready to export in
the Ultra Mobile certificate manager.
The ‘Status’ column in the certificate
manager has three states for each
certificate, <blank> (work in progress),
'Sync' (ready for synchronisation), and
'Export'. Tap or click on this field to change
the status and set it to 'Export'.
From the File menu select
the 'Export Certificate(s)...'
option file selector will
appear prompting you to
select a location.
Tap or click on the 'Select a volume' row
and select the removable media and export
the certificate.
Once finished exporting, the certificate will
be removed from the ‘Open Certificate’
screen.
Page 23

Close the Ultra Mobile software by selecting ‘Exit’ from the File menu in the
certificate manager.
11. (PC) Transfer removable media to the PC.
Disconnect the removable media from the Mobile Device and connect it to
the PC.
12. (PC) Import the certificate from the removable media.
Load the Ultra Mobile Module by clicking the large ‘Mobile’ button on the
PowerSuite toolbar .
Once the module has loaded, ensure the required User Name is selected
from the drop down list, and click the ‘Inbox’ tab.
Click on the 'Import Certificate(s) from Mobile Device..." button , and a
file selector will appear prompting for you to select the import location
A window will appear showing the import progress for the current certificate.
When finished the window will disappear and the certificate will appear in the
'Inbox' .
The certificate is now ready to be imported back into PowerSuite.
13. (PC) Import the certificate back into PowerSuite from the Ultra Mobile
Module.
. Once you have selected the location of the removable
media, click 'Open'.
Click on the ‘Transfer Certificate’ button and the certificate will be
moved from the Ultra Mobile Module back to the correct location in
PowerSuite.
Close the Ultra Mobile Module and press the F5 button to refresh the
PowerSuite Certificate Manager. The original certificate will be unlocked and
can be edited and printed as required.
Page 24

Method 2
This method describes a new certificate being generated on the Mobile
Device.
1. (Mobile Device) Run the Ultra Mobile software on the Mobile Device and
create a new certificate from one of the available templates.
With this method of operation the first step is to create a new Installation
Testing certificate on the Mobile Device by selecting one of the available
templates.
To start the Ultra Mobile program on a Windows Mobile PDA, open the
Programs folder and click the ‘Ultra Mobile’ icon . To start the Ultra
Mobile program on the Palm, open the ‘All’ category and click the 'Ultra
Mobile’ icon .
To start the Ultra Mobile program on a Windows Mobile 5 SmartPhone, click
the‘Ultra Mobile’ icon from the Start menu.
To start the Ultra Mobile program on a Symbian S60 device, open the
‘Installations’ folder from the main Symbian start screen and click the‘Ultra
Mobile’ icon .
The Ultra Mobile welcome screen will be displayed for 2 seconds
and you can click or tap the screen to load the program. (You can switch off
the welcome screen from the Preferences menu)
Like PowerSuite, the Ultra Mobile software has a simple to use built in
certificate manager. The certificate manager defaults to the ‘Open Certificate’
screen but can easily be switched from the File menu to create new
certificates.
Select the ‘New Certificate…’ option from the File menu.
The certificate pages will be loaded and the first page of the certificate will be
displayed ready for editing.
2. (Mobile Device) Edit the new certificate using Ultra Mobile.
Refer to step 6 in Basic Operation Method 1 for information on editing the
certificate details.
3. (Mobile Device) Mark the certificate as completed in Ultra Mobile and
export to removable media.
You can continue to edit and make changes to the certificate as required.
Once you have finished editing and wish to export the certificate back to
PowerSuite from Ultra Mobile you have to mark it as ready to export in the
A list of the available certificate templates will be displayed.
Tap or click on the required template to create and load a new
certificate.
Page 25
Ultra Mobile certificate manager.
The ‘Status’ column in the certificate manager has three states for each
certificate, <blank> (work in progress), 'Sync' (ready for synchronisation),
and 'Export'. Click twice on this field for the certificate to set it to 'Export'.
From the File menu select the 'Export Certificate(s)...' option
A file selector will appear prompting you to select a location.
Once finished exporting, the certificate will be removed from the ‘Open
Certificate’ screen.
4. (PC) Transfer removable media to the PC.
Disconnect the removable media from the Mobile Device and connect it to
the PC.
5. (PC) Import the certificate from the removable media.
Load the Ultra Mobile module by clicking the large ‘Mobile’ button on the
PowerSuite toolbar .
Tap or click on the 'Select a volume' row and select the
removable media and export the certificate.
Close the Ultra Mobile software by selecting
‘Exit’ from the File menu in the certificate
manager.
Once the module has loaded, ensure the required User Name is selected
from the drop down list, and click the ‘Inbox’ tab.
Click on the 'Import Certificate(s) from Mobile Device..." button , and a
file selector will appear prompting for you to select the import location
. Once you have selected the location of the removable
media, click 'Open'.
Page 26

A window will appear showing the import progress for the current certificate.
When finished the window will disappear and the certificate will appear in the
'Inbox'
The certificate is now ready to be imported back into PowerSuite.
6. (PC) Import the certificate back into PowerSuite from the Ultra Mobile
module.
Click on the ‘Transfer Certificate’ button and the certificate will be
moved from the Ultra Mobile module to the ‘( Mobile Device)’ contact in
PowerSuite.
7. (PC) Move the certificate from the ‘Mobile Device’ contact to the correct
PowerSuite location.
Close the Ultra Mobile module and press the F5 button to refresh the
PowerSuite Certificate Manager.
The ‘(Mobile Device)’ contact is automatically created under the
‘(Unassigned Contact)’ at the top of the contact tree and this is a temporary
storage location for certificates and data that is not tagged to a specific
location.
You can move the certificate from the ‘(Mobile Device)’ contact by dragging
it over the required location in the contact tree and releasing the mouse. You
can then finish editing and printing the certificate.
Advanced Operation - Email
This operation involves the transfer of data via email.
The following sections presume you have already set up email on your PC
and your Mobile Device, and you can send and receive emails both ways
between the two. This requires a knowledge of SMTP Server settings.
Method 1
This method describes a new certificate being generated in PowerSuite.
1. (PC) Run the Certificate Wizard in PowerSuite to create a new Installation
Testing certificate for your selected location.
With this method of operation the first step is to create a new Installation
Testing certificate in PowerSuite. Highlight the correct location in the contact
tree and click the large Certificate Wizard button .
Page 27

When you are prompted to select the type of certificate be sure to select
‘Installation Testing’. Complete the remaining wizard prompts finally
selecting the certificate number and click the ‘Finish’ button to display the
certificate on screen.
You can complete any additional data fields on the certificate before closing it
and returning to the certificate manager screen.
2. (PC) Export the certificate to the Ultra Mobile module.
To export the certificate you have created to the Ultra Mobile module first
ensure you have the ‘Edit/View an Existing Certificate’ tab highlighted in the
certificate manager and you also have the correct location highlighted. Right
click on the certificate you wish to export to display a pop up menu.
Select the 'Export Certificate to Mobile Device' option from the pop up menu,
and then select the Mobile Device User Name from the next pop up menu.
Select ‘Yes’ to the confirmation
prompt to upload to the Ultra
Mobile module.
N.B. Once the certificate has been exported from PowerSuite into the Ultra
Mobile module it will be locked and cannot be edited in PowerSuite.
3. (PC) Load the Ultra Mobile Module and check the certificate is in the
Mobile ‘Outbox’ ready to be exported to the Mobile Device.
You can now load the Ultra Mobile module by clicking the large ‘Mobile’
button on the PowerSuite toolbar .
Once the module has loaded, ensure the required User Name is selected
from the drop down list, and click the ‘Outbox’ tab.
N.B. To use the Import/Export method, open the ‘Options’ menu, and select
‘User Maintenance…’. The ‘User Maintenance’ screen will appear:
Page 28
For the required User Name, double
click in the ‘Transfer Mode’ field to
change from ‘Synchronise’ to
‘Import/Export’, and click ‘Close’.
You should see your certificate in
the ‘Outbox’ ready to be exported
to the Mobile Device.
4. (PC) Export certificate to a folder ready for emailing.
Before exporting your certificate, it is recommended that you create a folder
for each Mobile Device user at a location, such as the desktop.
To create a folder on your desktop, minimise all running programs, and right
click on the desktop background and a popup menu should appear. Move
the mouse over the 'New' option, and another popup will appear. Left click
on the 'Folder' option. A new folder will appear ready for renaming. It is
recommended that you use the Mobile Device user name for the folder.
Click the 'Export Certificates to Mobile Device...' button and a file
selector will appear prompting you to select an export location.
Navigate to the desktop, and then
open the new folder you created.
Click 'Save' to export the certificate,
and a window will appear showing
the export progress, it will disappear
when finished.
5. (PC) Email certificate to Mobile Device and delete exported copy.
Using an email program, attach the exported certificate to a new message,
and send it to your Mobile Device. It is recommended that you delete the
exported copy of the certificate from the user folder you created. This
ensures that there is only one copy of the exported certificate in existence.
6. (Mobile Device) Receive email, and save certificate to a location.
On the Mobile Device, collect the email using your email software, and save
Page 29

the certificate attachment to a location, such as an SD, Compact Flash card,
or internal folder. It is recommended that you delete the email at this point
to keep ensure that there is only one copy of the exported certificate in
existence, and to save memory.
7. (Mobile Device) Import certificate into Ultra Mobile from a location.
To start the Ultra Mobile program on a Windows Mobile PDA, open the
Programs folder and click the ‘Ultra Mobile’ icon . To start the Ultra
Mobile program on the Palm, open the ‘All’ category and click the 'Ultra
Mobile’ icon .
To start the Ultra Mobile program on a Windows Mobile 5 SmartPhone, click
the‘Ultra Mobile’ icon from the Start menu.
To start the Ultra Mobile program on a Symbian S60 device, open the
‘Installations’ folder from the main Symbian start screen and click the‘Ultra
Mobile’ icon .
The Ultra Mobile welcome screen will be displayed for 2 seconds
and you can click or tap the screen to load the program. (You can switch off
the welcome screen from the Preferences menu)
Like PowerSuite, the Ultra Mobile software has a simple to use built in
certificate manager. The certificate manager defaults to the ‘Open Certificate’
screen but can easily be switched from the File menu to create new
certificates.
Ensure the ‘Open Certificate’ screen is selected,
and from the File menu select the 'Import
Certificate(s)...' option
A file selector will appear prompting you to
select a location.
Tap or click on the 'Select a volume' row and
select the removable media.
You should see your certificate appear in the
list, click 'Select' to import.
Once finished importing, you should see your
certificate appear in the Open Certificate’
screen.
Page 30

Tap or click on the certificate to select and load
it for editing.
8. (Mobile Device) Edit the certificate in the Ultra Mobile software.
The certificate pages will be loaded and the first page of the certificate will be
displayed ready for editing.
Refer to step 6 in Basic Operation Method 1 for
information on editing the certificate details.
9. (Mobile Device) Mark the certificate as completed in the Ultra Mobile
software.
You can continue to edit and make changes to the certificate as required.
Once you have finished editing and wish to email the certificate back to
PowerSuite from the Mobile Device you have to mark it as ready to export in
the Ultra Mobile certificate manager.
The ‘Status’ column in the certificate manager
has three states for each certificate, <blank>
(work in progress), 'Sync' (ready for
synchronisation), and 'Export'. Tap or click on
this field to set it to 'Export'.
The certificate is now ready to email back to
PowerSuite.
10. (Mobile Device) Email certificate to PowerSuite.
From the File menu select the 'Email Certificate(s)...' option
The 'Email Certificates' screen will appear.
Page 31

In the 'To:' field, enter the email address of the
PC you are sending the message to. Once sent
this will be remembered for future emails sent,
but can be changed at any time.
The 'Subject:' field will default to 'Certificate(s)'
but can be edited.
The 'Attach:' field will show how many
certificates are attached to the message.
The multi-line text field allows you to enter a message.
Click 'Send' to send the email. Once sent, click 'Close' and the certificate will
disappear from the 'Edit existing form' tab.
11. (PC) Receive email, and save to a location.
Using your email software, receive the message sent by the Mobile Device,
and save the certificate attachment to your Mobile user folder.
12. (PC) Import the certificate from a location.
Load the Ultra Mobile module by clicking the large ‘Mobile’ button on the
PowerSuite toolbar .
Once the module has loaded, ensure the required User Name is selected
from the drop down list, and click the ‘Inbox’ tab.
Click on the 'Import Certificate(s) from Mobile Device..." button , and a
file selector will appear prompting for you to select the import location
. Once you have selected the location of the certificate, click '
Open'.
A window will appear showing the import progress for the current certificate.
When finished the window will disappear and the certificate will appear in the
'Inbox'
The certificate is now ready to be imported back into PowerSuite.
13. (PC) Import the certificate back into PowerSuite from the Ultra Mobile
module.
Click on the ‘Transfer Certificate’ button and the certificate will be
moved from the Ultra Mobile module back to the correct location in
PowerSuite.
Close the Ultra Mobile module and press the F5 button to refresh the
PowerSuite Certificate Manager. The original certificate will be unlocked and
can be edited and printed as required.
Page 32
Method 2
This method describes a new certificate being generated on the Mobile
Device.
1. (Mobile Device) Run the Ultra Mobile sofftware on the Mobile Device and
create a new certificate from one of the available templates.
To start the Ultra Mobile program on a Windows Mobile PDA, open the
Programs folder and click the ‘Ultra Mobile’ icon . To start the Ultra
Mobile program on the Palm, open the ‘All’ category and click the 'Ultra
Mobile’ icon .
To start the Ultra Mobile program on a Windows Mobile 5 SmartPhone, click
the‘Ultra Mobile’ icon from the Start menu.
To start the Ultra Mobile program on a Symbian S60 device, open the
‘Installations’ folder from the main Symbian start screen and click the‘Ultra
Mobile’ icon .
The Ultra Mobile welcome screen will be displayed for 2 seconds
and you can click or tap the screen to load the program. (You can switch off
the welcome screen from the Preferences menu)
Like PowerSuite, the Ultra Mobile software has a simple to use built in
certificate manager. The certificate manager defaults to the ‘Open Certificate’
screen but can easily be switched from the File menu to create new
certificates.
Select the ‘New Certificate…’ option from the File menu.
The certificate pages will be loaded and the first page of the certificate will be
displayed ready for editing.
2. (Mobile Device) Edit the new certificate using Ultra Mobile.
Refer to step 6 in Basic Operation Method 1 for information on editing the
certificate details.
3. (Mobile Device) Mark the certificate as completed in the Ultra Mobile
You can continue to edit and make changes to the certificate as required.
Once you have finished editing and wish to email the certificate back to
PowerSuite from Ultra Mobile you have to mark it as ready to export in the
Ultra Mobile certificate manager.
A list of the available certificate templates will be displayed. Tap
or click on the required template to create and load a new
certificate.
software.
Page 33

The ‘Status’ column in the certificate manager
has three states for each certificate, <blank>
(work in progress), 'Sync' (ready for
synchronisation), and 'Export'. Tap or click on
this field and set the status to 'Export'.
The certificate is now ready to email back to
PowerSuite.
4. (Mobile Device) Email certificate to PowerSuite.
From the menu select the 'Email Certificate(s)...' option
The 'Email Certificates' screen will appear.
In the 'To:' field, enter the email address of
the PC you are sending the message to.
Once sent this will be remembered for
future emails sent, but can be changed at
any time.
The 'Subject:' field will default to
'Certificate(s)' but can be edited.
The 'Attach:' field will show how many
certificates are attached to the message.
The multi-line text field allows you to enter a message.
Click 'Send' to send the email. Once sent, click 'Close' and the certificate will
disappear from the 'Edit existing form' tab.
5. (PC) Receive email, and save to a location.
Using your email software, receive the message sent by the Mobile Device,
and save the certificate attachment to your Mobile Device user folder.
6. (PC) Import the certificate from a location.
Load the Ultra Mobile module by clicking the large ‘Mobile’ button on the
PowerSuite toolbar .
Once the module has loaded, ensure the required User Name is selected
from the drop down list, and click the ‘Inbox’ tab.
Click on the 'Import Certificate(s) from Mobile Device..." button , and a
file selector will appear prompting for you to select the import location .
Page 34
Once you have selected the location of the certificate, click
'Open'.
A window will appear showing the import progress for the current certificate.
When finished the window will disappear and the certificate will appear in the
'Inbox'
The certificate is now ready to be imported back into PowerSuite.
7. (PC) Import the certificate back into PowerSuite from the Ultra Mobile
module.
Click on the ‘Transfer Certificate’ button and the certificate will be
moved from the Ultra Mobile module to the ‘Mobile Device’ contact in
PowerSuite.
8. (PC) Move the certificate from the ‘Mobile Device’ contact to the correct
PowerSuite location.
Close the Ultra Mobile module and press the F5 button to refresh the
PowerSuite Certificate Manager.
The ‘(Mobile Device)’ contact is
automatically created under the
‘(Unassigned Contact)’ at the top of
the contact tree and this is a
temporary storage location for
certificates and data that is not
tagged to a specific location.
You can move the certificate from the ‘(Mobile Device)’ contact by dragging
it over the required location in the contact tree and releasing the mouse. You
can then finish editing and printing the certificate.
Other Features in PowerSuite Ultra Mobile Module
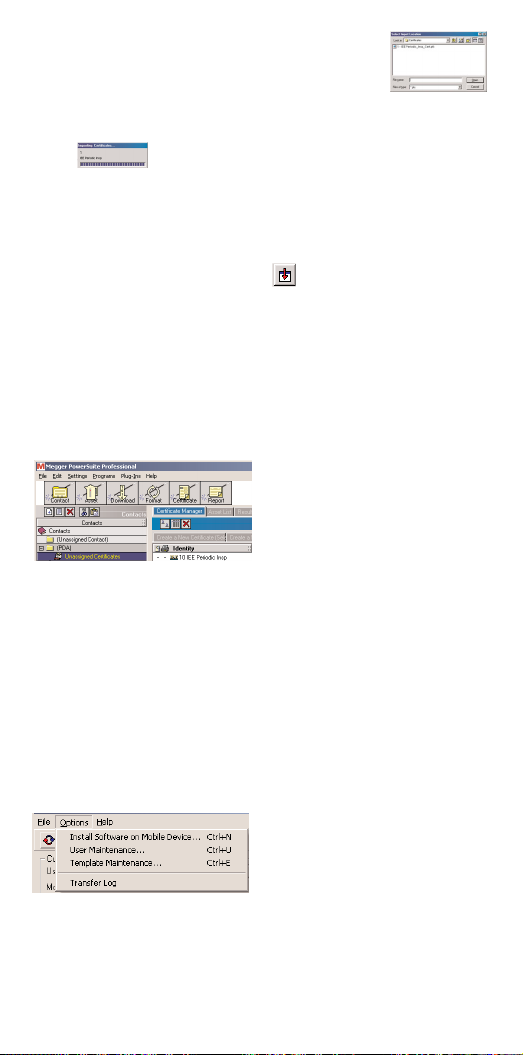
Transfer Log
The ‘Transfer Log’ provides a method for tracking all certificate transfers
between PowerSuite and your Mobile Devices.
To view the transfer log select ‘Transfer Log’ from the options menu.
The log can be saved out as a CSV file, and it can also be cleared at any time.
A list of all certificates transferred through the Ultra Mobile module will be
displayed.
Page 35

Click the ‘Save’ button to save the details
out into a CSV file. Click the ‘Clear’
button to empty the contents of the log.
When you have finished, click the ‘Close’
button to return to the Ultra Mobile
module.
Other Features in Ultra Mobile
Megger MFT1553 - Real Time Bluetooth Transfer
The Ultra Mobile software is capable of accepting real time test results
transferred via Bluetooth from the Megger MFT1553 test instrument.
These results are most common with BS7671 electrical test schedules where
results are recorded in a tabulated circuit by circuit format.
See the section entitled ‘Megger MFT1553 – Transferring Real Time Data’ for
instructions on how to use this feature.
Renaming a Certificate
If you want to rename a certificate tap and hold down for two seconds or
click and hold down for two seconds over the certificate name on the main
certificate manager.
A pop up edit menu will be displayed. Select
‘Rename Certificate...’ to display the following
rename screen.
Delete the existing name and enter new one, then
tap or click the ‘OK’ button at the bottom right
corner of the screen to return to the certificate
manager.
The certificate name will be updated with the new
name.
N.B. If your mobile device does not support the pop
up menu, you can select “Rename Certificate...” from
the “Options” menu.
Page 36

A selection screen will be displayed prompting
you to select a template to add. Tap or click on
the template name to display a list of the
available templates. Alternatively you can select
the ‘Select Template’ option from the ‘Options’
menu at the bottom of the screen.
Once you have selected the type of template you wish to insert you can then
select ‘Where’ you want the page inserted by tapping or clicking on the
‘Where’ field.
There are options to insert the page either at
the start or end of the certificate or before or
after a certain numbered page.
To add the page select ‘Add’ from the ‘Options’
menu.
To remove the current page from the certificate
select the ‘Remove Page…’ option from the
‘File’ menu.
A confirmation prompt will be displayed and
you will need to tap or click the ‘Yes’ button to
remove the page from the certificate.
Data Templates
Data templates are very useful if you find you are entering repetitive
information for a particular page. You can save a data template and load it
into a new certificate to help speed up data entry. Data templates are linked
to specific page layouts so you will only be able to load a data template into a
similar page design.
To save a data template first complete all the fields on the page you want to
save that have common information useful on other certificates.
Select the ‘Data Templates…’ option from the ‘File’ menu
Page 37

Deleting Certificates
If you want to delete a certificate, tap and hold down for two seconds or click
and hold down for two seconds over the certificate name on the main
certificate manager screen.
A pop up edit menu will be displayed. Select ‘Delete
Certificate’ to display the following prompt.
Tap or click on the ‘Yes’ option to delete the
certificate. You will be prompted once more with a
further confirmation message. Tap and click ‘Yes’
on this screen to return to the main certificate
manager and your chosen certificate will have been
deleted.
N.B. If your mobile device does not support the pop
up menu you can select “Delete Certificate” from
the “Options” menu.
Cut, Copy, Paste
You can cut, copy and paste data from one field to another when you are
editing certificates on the Mobile Device.
If you want to cut or copy the contents of one field to another tap and hold
down for two seconds or click and hold down for two seconds over the field
you wish cut or copy. A pop up edit menu will be displayed. (The pop up
menu will not be displayed if you are currently editing the field)
Then select either the ‘Cut’ or ‘Copy’ option from
this menu. Repeat the process by tapping and
holding down or clicking and holding down over
the field you wish to paste the data into. The pop
up menu will be displayed again and you can
select the ‘Paste’ option from the ‘Edit’ menu to
complete the operation.
Add, Remove Page(s)
You can easily add pages to your certificate or remove pages from your
certificate. To add a new page select the ‘Add Page…’ option from the ‘File’
menu.
Page 38

A list of available data templates will be displayed. Select the ‘Save Data
Template…’ option from the ‘Options’ menu
Enter in an appropriate name for the data template then select the ‘Select’
option from the ‘Options’ menu and the template will be saved.
When you create or are editing a new certificate you can easily load a
template by selecting the ‘Data Templates…’ option from the ‘File’ menu to
display a list of available templates then tap or click on the required template
to load it. You can also select the ‘Select’ option from the ‘Options’ menu to
load an existing template.
To delete an existing template, select the ‘Delete Data Template…’ option
from the ‘Options’ menu and tap or click on the template you wish to delete.
You can also select the ‘Select’ option from the ‘Options’ menu.
Update Formulas
The Ultra Mobile software has the ability to support simple formulas to help
automate some of the form filling process. An example of such a formula is
calculating the maximum permitted Zs value using tables from BS7671.
Formulas are not updated automatically so you will need to select the
‘Update Formulas’ option from the ‘Options’ menu to refresh any formulas
on the page you are working on.
Import / Export Templates
Certificate templates can be transferred either between the Ultra Mobile
Module in PowerSuite and a Mobile Device, or between two Mobile Devices.
To export templates from the Ultra Mobile Module in PowerSuite, select the
'Export Template(s) to Location...' option from the menu. In the list of
templates that appear, double click in the 'Export' column next to the
templates you wish to export. Click on the 'Export' button and a file selector
will appear prompting you to select an export location. The exported
templates can be saved to any location such as a folder for emailing, or to
removable media such as an SD, or Compact Flash cards. Click 'Save' to
export.
To export templates from the Ultra Mobile software, first select the 'New
Certificate' option from the main ‘File’ menu. Click on the 'Export' field for
each template you would like to export to change the export status to ‘Yes’.
When you have finished selecting templates, select the 'Export Template(s)...'
option from the ‘File’ menu. A file selector will appear prompting you to
select an export location. Click on the 'Select a volume' row to select an
export location, which can include removable media such as SD, or Compact
Flash cards. Click 'Select' to export. When you have selected the location,
select the ‘Select a directory’ option from the ‘Options’ menu to export the
selected templates.
To import templates into Ultra Mobile, select the 'Import Template(s)...'
Page 39

option from the ‘File’ menu. A file selector will appear prompting you to
select an import location. Click on the 'Select a volume' row to select an
import location, which can include removable media such as SD, or Compact
Flash cards. A list of templates will appear, tap or click on the required
template to load it.
Import Lists
Lists are useful in PowerSuite and in the Ultra Mobile software. They allow
you a quick and easy way to fill in certificate fields with standard, or user
defined information from drop down lists. This function allows you to keep
the lists on your Mobile Device up to date.
To export lists from the Ultra Mobile Module in PowerSuite, select the 'Export
Lists to Location' option in the menu. You will be prompted to select the list
export location, this could be a folder for emailing, or removable media such
as an SD, or Compact Flash card. Click 'Save' to export the lists to a file called
'Lists.pfl'.
You can then email this file to your Mobile Device, or transfer it via the
removable media.
In the Ultra Mobile software first select the 'New Certificate' option from the
main ‘File’ menu then select the 'Import Lists...' option from the ‘File’ menu,
and a file selector will appear prompting you to select a file. Navigate to the
location of the 'Lists.pfl' file and tap or click on the file.
The lists will be imported and ready to use.
Preferences
The preferences screen is used to set system wide settings. To access the
Preferences screen select ‘Preferences…’ from the main ‘Options’ menu.
A list of preferences and their current settings
will be displayed.
There follows a brief description of the
preferences and available settings.
Page 40

Show Welcome Screen
If this option is selected, the 'About' screen will be displayed when the
program is first loaded for two seconds.
Default To All Sections
If this option is set to ‘Yes’, all sections of a page will be shown when it is first
loaded.
If this option is set to ‘No’ (default) only the first section will be shown when
a page is first loaded.
Linked Section Descriptions
If this option is set to ‘Yes’, circuit descriptions will be appended to section
names on test schedule pages. This feature makes it easier to move between
circuits once they have been assigned descriptions.
Email SMTP Server
The address of the SMTP server used to connect to the internet.
Email From Address
The email address used on your Mobile Device.
Email User Name
The user name used to log on to the SMTP server, if applicable.
Email Password
The password used to log on to the SMTP server, if applicable.
Com Port
The serial com port used for Bluetooth communications with the Megger
MFT1553. This com port must match the incoming serial com port set up in
the Bluetooth Manager on your mobile device.
Font Size
A list of the available font sizes for the device will be shown in the drop down
list. Changing the font size could help improve the legibility of the text from a
distance but remember the larger the font size selected, the less information
that can be displayed on the screen.
Highlight Blank Fields and Highlight Colour
These options provide an easy way to highlight any blank fields on a page.
Click on the drop down list and change the option to ‘Yes’. The default
colour for blank fields is ‘Red’ but this can be changed to either ‘Yellow’ or
‘Magenta’ by selecting the required ‘Highlight Colour’ option from the list.
Page 41

Max Zs Percentage
This setting will be transferred from the associated PowerSuite preference
and will be used to calculate maximum permitted Zs values on circuit
schedules.
When you change any of the preferences you will need to select the ‘Save’
menu option for the changes to take effect.
Basic Operation – Pro-Lite 16th
PowerSuite Professional Pro-Lite 16th has been designed to work in
conjunction with the Megger storage instruments CM500, BMM/LCB, MIT330,
LTW335, RCDT330 and the Megger MFT1553 to produce installation testing
certification in a variety of ways.
The CM500, BMM/LCB, MIT330, LTW335, RCDT330 test instruments store
test result data and this data is downloaded via an RS232 cable and then
further processed in PowerSuite. The MFT1553 transfers real time test results
via Bluetooth directly into your test certificates.
Program Flow
Although there are many ways to operate the Pro-Lite 16th software, the
recommended procedure is as follows:
1. Run the Contact Wizard to set up your client and location structure
2. * Test the installation and store the results on the instrument
3. * Run Download Wizard and extract the test results from the instrument
4. * Edit the download file, split jobs/db’s and remove unwanted tests
5. Run the Certificate Wizard and create the required test certificate
6. * Select a download file to automatically create test results
7. Edit and complete certificate details
8. ~ Real time Bluetooth transfer of results into the test schedule
9. Validate certificate if required (NICEIC Installation, Minor Works and
Periodic)
* CM500, BMM/LCB, MIT330, LTW335, RCDT330
~ MFT1553 only
Contact Wizard
PowerSuite allows you to set up a tree structure of ‘COMPANY’, ‘CLIENT’ and
‘LOCATION’ to store your final certification. You can set up as many ‘CLIENT’
contacts as you wish under your ‘COMPANY’ contact and as many
‘LOCATION’ contacts as you wish against your ‘CLIENT’ contacts.
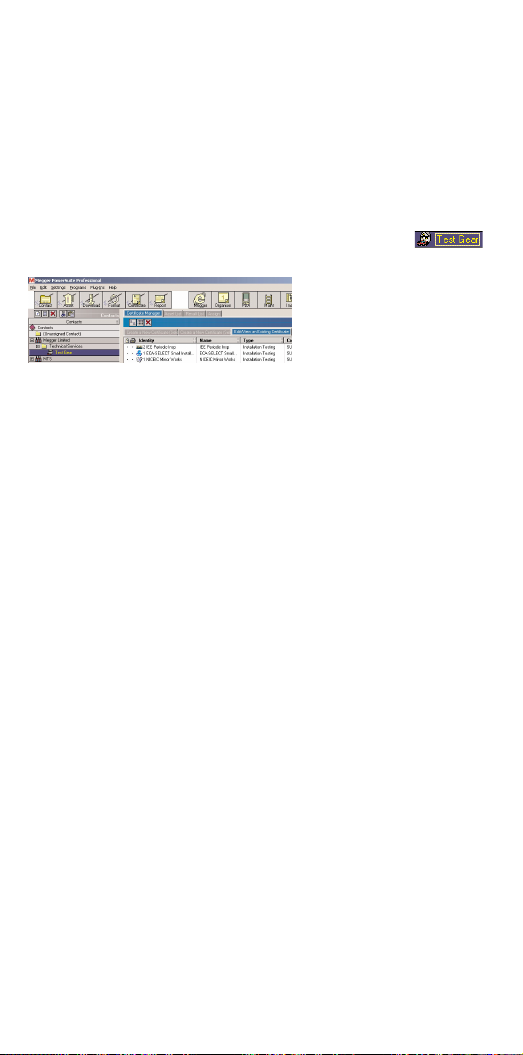
Click the contact wizard button to setup new client and location
contacts in PowerSuite.
Page 42

Follow the screen prompts ensuring that you first select to add a ‘CLIENT’
contact. Once the ‘CLIENT’ contact has been added, you will be prompted to
add ‘LOCATION’ contacts against it. Ensure that each client is added to the
contact tree under the ‘COMPANY’ contact.
Download Wizard (CM500, BMM/LCB, MIT330, LTW335,
RCDT330)
The download wizard will transfer the test results from the selected storage
instrument and create download files in the appropriate instrument ‘Inbox’ in
the Download Manager window. Before you download ensure that you have
the correct cable attached between the test instrument and pc/laptop.
Click the large download wizard button on the main PowerSuite
screen and follow the prompts to select the required instrument. The
download screen will indicate that PowerSuite is ready and give you
appropriate on screen instructions to start the download.
A new download file will be created in the appropriate ‘Inbox’. The current
date and time stamp will be used as the file name.
Edit the Download File
The download file may contain data from more than one job or distribution
board. You may wish to split up the file if you wish to process the data on
individual certificates or just delete some unwanted tests.
If you double click on a download file it will be loaded into
the CSV Viewer program.
Page 43

You can sort the file simply by right clicking on one of the column headings
and selecting ‘Quick Sort’. You can then highlight a group of records and use
the ‘Save Selection’ option from the ‘File’ menu to create a new file for the
selected group of records. You can also press the ‘Delete’ button to remove
the selected records.
Click the close button once you have finished editing the file.
Certificate Wizard
The certificate wizard is used to create new certificates and to optionally
import selected test results from download manager files.
Before you create a new certificate, ensure that you highlight the correct
location contact in the contact tree by clicking on it.
Click the certificate wizard button and select the style of certificate
you require. You will be prompted to select a download file to import into
the certificate.
If you do not have any data to import you can select the (No Data) option.
The next available certificate number for the type of certificate you are
creating will then be displayed and you can override this number if you wish.
The certificate will be created and displayed on screen and any selected test
data will be automatically imported.
Edit and Complete Certificate Details
Complete the certificate by tabbing around the fields on the form and enter
data using the keyboard or selecting items from the available drop down lists.
The certificate may be printed at any time by clicking the print button on the
toolbar.
The certificate may have more than one page and you can easily switch
between pages using the page controls.
Page 44
Megger MFT1553 - Real Time Bluetooth Transfer
The Pro-Lite 16th software is capable of accepting real time test results
transferred via Bluetooth from the Megger MFT1553 test instrument.
These results are most common with BS7671 electrical test schedules where
results are recorded in a tabulated circuit by circuit format.
See the section entitled ‘Megger MFT1553 – Transferring Real Time Data’ for
instructions on how to use this feature.
Editing Existing Certificates
To load an existing certificate, first highlight the location contact
and select the ‘Edit/View an Existing Certificate’ tab.
Double click on the required certificate to load it for reviewing, editing and
final printing.
NICEIC Computer Friendly Forms
PowerSuite has built in support for the completion, validation (where
applicable) and printing of NICEIC pre-printed computer friendly forms. The
‘Certificate Manager’ tab in the preferences program stores NICEIC specific
details and allows you to set the next certificate numbers for all the certificate
types. The certificate number can be edited on screen to ensure that it
matches up with the number on the pre-printed certificate.
To run the preferences program select the ‘Preferences…’ option from the
‘Settings’ menu and click the ‘Certificate Manager’ tab.
NICEIC Validation and Print Alignment
NICEIC Minor Works, Periodic and Electrical Installation certificates have built
in validation formulas. Once the certificate has been completed it is saved
(with the option of validating it) and it can then be printed out directly onto
the pre-printed stationery. You can also run the validation option by
highlighting the certificate in the ‘Edit/View an Existing Certificate’ tab and
clicking the validation button on the certificate manager toolbar.
It is recommended that you follow the Print Alignment procedure (available
from the PowerSuite Professional program group on the Windows start
menu) before printing directly onto the NICEIC forms. It is also a good idea
to generate and print a couple of test certificates onto plain paper to double
check the alignment before going live with the pre-printed certificates.
The computer friendly forms provided by the NICEIC have two copies of
each page, a White copy and a Yellow copy. The copies must be split up into
their respective coloured sets before they are passed through the printer.
You can then insert the White copies into the printer and print the certificate,
followed by the Yellow copies and re-print the certificate.
Megger MFT1553 - Transferring Real Time Data
Fields that can accept data automatically from the test instrument may be
Page 45
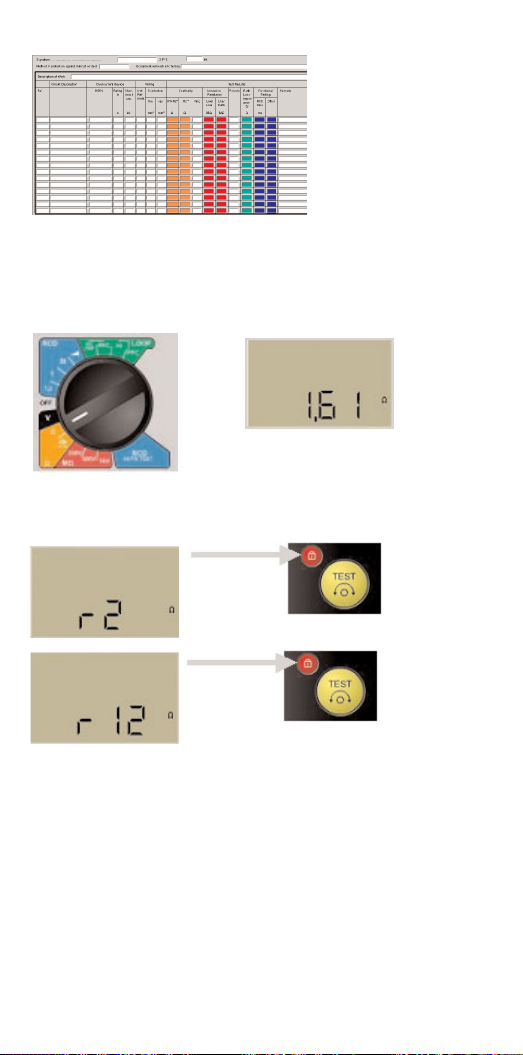
colour coded to match the type of test on the instrument.
To transfer a result from the instrument to the Pro-Lite 16th software, first
ensure that the certificate has been loaded and the test results page is
displayed. Then select the circuit to transfer the results into by highlighting
one of the fields on the required row e.g. circuit id or description. Next
perform the required test on the MFT1553 and ensure that the result is
displayed on the instrument display.
Press the small Red lock button on the MFT1553 Image 91 to cycle round the
available result types if applicable. (You will not need to perform this step for
rcd results)
If you skip past the required result type you can continue to press the lock
button and cycle around again.
Once the required result type has been chosen, hold down the lock button
until the result starts to flash on the MFT screen (a couple of seconds). A
beep will be emitted from the test instrument, and your pc or laptop (if you
have the system sounds enabled) will respond with a beep and the test result
will be transferred, decoded and displayed in the appropriate field on the
selected row.
The time taken from holding down the lock button to the result being
displayed on the pc or laptop will vary depending on how quickly the
Bluetooth communications can be established and how quickly the pc or
laptop can decode and translate the data. Typically the process will take no
more than a few seconds.
Page 46

If you are using a Mobile Device, the very first time that the Bluetooth
connection is established, you may see an authorisation prompt asking if you
would to allow the device to connect along with a check box to always allow
the device to connect. You will need to check the “always allow” box and
accept the prompt to receive subsequent data from the MFT1553 without the
authorisation screen being displayed again.
You can force a result into a particular field by double clicking on it first and
then transfer the result as previously described.
If a result already exists you will be prompted to overwrite the existing result
with the new result or to retain the existing result.
N.B. For further information on the initial pairing procedure between the
MTF1553 and your pc or laptop please consult the Megger MFT1553 - Pairing
Procedure section in this user guide.
Megger MFT1553 - Pairing Procedure
Before the MFT1553 test instrument can be used to transfer real time test
results via Bluetooth to the Ultra Mobile or Pro-Lite 16th software, it has to be
paired with your Mobile Device or pc/laptop.
N.B. Before you start the pairing procedure please ensure that you are
familiar with the operation of the Bluetooth Manager installed on your
mobile device or pc/laptop and understand how to add a new paired device.
You will also need to ensure that you have an incoming serial port configured
and set up on your mobile device or pc/laptop.
Switch the MFT1553 to the Bluetooth Setup position.
The display will show ‘bt’
Press the small Red lock button on the MFT1553 once to display
the current pairing status.
Page 47
The display will now show “- - -“ if no pairing exists or the last 3 digits of the
current paired address. e.g.
To start the pairing process press the lock button again. The Bluetooth
module will be initialised and the instrument will be placed in pairing
mode waiting for the mobile device to connect to it .
Using the Bluetooth manager on your mobile device or pc/laptop, select the
option to add a new paired device and when your MFT1553 appears in the
list of available devices, select it and key in the required pass code ‘1234’.
The MFT1553 will signify a successful pairing by displaying the last 3 digits of
the laptop or mobile devices address.
When you have completed the pairing process,
turn the instrument off and close the Bluetooth
Manager on your mobile device or pc/laptop.
PC/Laptop Com Port Setup
Once you have installed and setup the Bluetooth on your PC/laptop and
paired with your MFT1553 you will need to select your incoming Bluetooth
Com port in PowerSuite.
The “Bluetooth Preferences…” settings can be found the “Options” menu
when viewing/editing a certificate.
The following screen will be displayed which will display the three digit mac
address of your pc/laptop and provide a drop down list selector for you to
select your incoming Bluetooth serial port.
Available Bluetooth serial ports will have a (B) suffix against them in the list.
Once you have selected the port, you can test it by performing a test on the
MFT1553 and sending the result to the pc/laptop. If the port has been set up
successfully you will see a screen similar to the following displayed showing
details of the test result:
Page 48
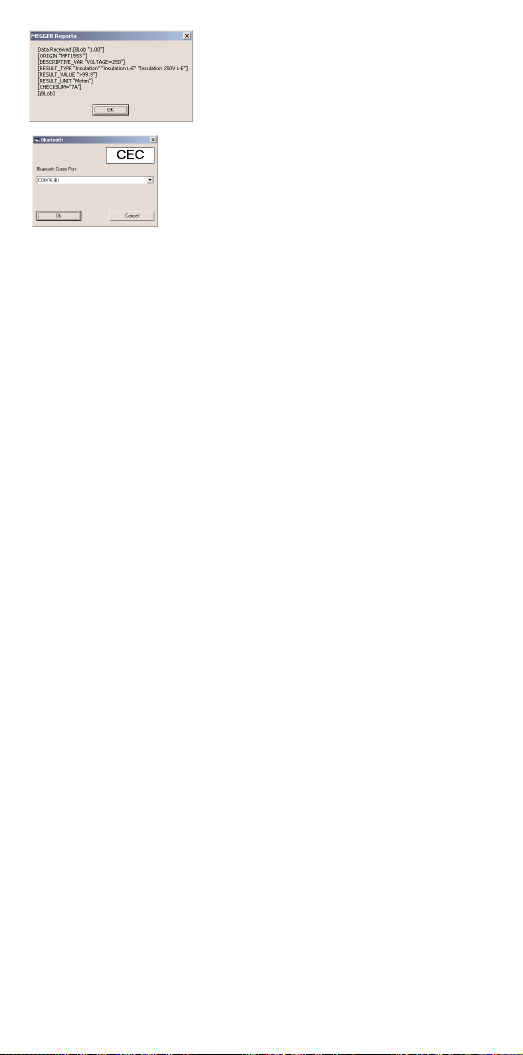
Click the ‘OK’ button to return to the serial
port selection screen
Click the ‘OK’ button to close the Bluetooth
preferences and return to your certificate. You
will now be able to send results from the MFT
directly into the test certificates on your
pc/laptop.
Example Mobile Device Pairing Instructions
Windows Mobile 5
From the main Windows desktop screen:
Select the “Start” menu
Open the “Settings” folder
Select the “Connections” tab
Select the “Bluetooth” Icon
Ensure Bluetooth is “ON”
Select “Bluetooth Manager” at the bottom of the screen
Select the right hand “Menu” option and select “Paired Devices”
Remove any existing MFT1553 devices
Select “Add”
Switch MFT1553 to SETUP position.
Press Red “Lock” button on MFT once. MFT will indicate current paring if
any.
Press “Lock” button again.
Select the “Magnifying Glass” icon to start the discovery process.
Select the “MFT” device from the displayed list of found devices
Enter pass key “1234”
Select “OK” and close the Bluetooth Manager screens
Windows Mobile 5 Smartphone
From the main Windows desktop screen:
Press the left hand menu button to select the “Start” menu
Open the “Settings” folder
Select “Connections”
Select “Bluetooth”
Press the right hand menu button to select “Menu”
Select “Devices”
Select “Menu”
Switch MFT1553 to SETUP position.
Press Red “Lock” button on MFT once. MFT will indicate current paring if
any.
Press “Lock” button again.
Select “New” on the Smartphone
Select the “MFT” device from the displayed devices
Page 49

Enter pass key (1234)
Press the left hand menu button to select “Next”
Press the left hand menu button to select “OK”
Press the left hand menu button to select “Next”
Press the left hand menu button to select “Done”
Continue to press the left hand button until get back to the Windows desktop
Palm v5
Select “Bluetooth” from the main Palm desktop
Ensure Bluetooth is set to “on”
Select “Setup Devices”
Select “Trusted Devices”
Switch MFT1553 to SETUP position.
Press Red “Lock” button on MFT once. MFT will indicate current paring if
any.
Press “Lock” button again.
Select “Add Device” on Palm
Select the “MFT” device from the displayed devices and select “OK”
Enter passkey (1234) and select “OK”
Select “Done” twice to get back to the Bluetooth screen
Select “Home” button to return to main Palm desktop
Symbian S60 Version 3
From the main Symbian desktop select the Bluetooth icon
Ensure Bluetooth is set to “on”
Select the right hand tab to show paired devices
Switch MFT1553 to SETUP position.
Press Red “Lock” button on MFT once. MFT will indicate current paring if
any.
Press “Lock” button again.
Select the top left hand menu button and select “New paired device”
Select the “MFT” device from the displayed devices and select “OK”
Enter passkey (1234) and select top left hand menu button “OK”
Select top left hand menu button “Yes” to Authorise device to make
connections automatically.
Select “Exit” to return to main Symbian desktop
N.B. If you are re-pairing an MFT1553 with a mobile device it is
recommended that you first remove any previous pairing.
Notes
Mobile device not included with PowerSuite On-site or Ultra Mobile software
The word ‘Megger’ is a registered trademark
The word ‘PowerSuite’ is a registered trademark of Megger Limited
The Bluetooth word mark and logo are owned by Bluetooth SIG. Inc.
Palm is a registered trademark of Palm Inc
Windows is a registered trademark of Microsoft Corp.
Symbian and Symbian OS are trademarks of Symbian Software Ltd.
Page 50

Technical Support
Free technical suppport is available as below:
PowerSuite On-site 3 months
(A further 12 months support package is available. Call Megger technical
services for details)
Megger PowerSuite technical support is only available to registered Megger
PowerSuite users, therefore complete your registration card and return it to
the support department at the below address as soon as possible.
Megger PowerSuite technical support is available in the following ways:
T +44 (0)1638 515 073 (Mon - Fri, 09:00 - 17:30)
F +44 (0)1638 515060
E mts@megger.com
www.megger.com
Megger Technical Services
4 King Street
Mildenhall
Suffolk
England
IP28 7ES
Before contacting technical support, please refer to all written
documentation and online help. Please be near your computer if possible and
be prepared to provide the following information:
The first six characters of your Megger PowerSuite registration number, eg.
PSDEMO. If you do not have your registration number at hand, it is available
from the About option on the main Help menu.
Software version number, also available from the About screen.
The wording and any relevant codes of any error messages.
The steps taken and operations performed leading up to the problem.
Page 51

License Agreement
LICENSE AGREEMENT (Single-User Products) This is a legal agreement
between you (either an individual or an entity) and Megger Limited. By
opening the sealed software packet you are agreeing to be bound by the
terms of this agreement. If you do not agree with the terms of this
agreement, promptly return the unopened software packet(s) and the
accompanying items (including written materials and binders or other
containers) to the place you obtained them for a full refund. SOFTWARE
LICENSE 1. GRANT OF LICENSE. Megger Limited grants you to the right to
use one copy of the enclosed PowerSuite software program (the “software”)
on a single computer. The software is in “use” on a computer when it is
loaded into temporary memory (i.e. RAM) or installed into permanent
memory (e.g. hard disk, or any other device). 2. COPYRIGHT. The software
is owned by Megger Limited or its suppliers and is protected by copyright
laws. Therefore you must treat the software like any other copyrighted
material (e.g. a book or musical recording) except that you may either (a)
make one copy of the software solely for backup or archival purposes, or (b)
transfer the software to a single hard disk provided you keep the original
solely for archival purposes. You may not copy the written materials
accompanying the software. 3. OTHER RESTRICTIONS. You may not rent or
lease the software, but you may transfer the software and the accompanying
written materials on a permanent basis provided you retain no copies and the
recipient agrees to the terms of this agreement. You may not reverse
engineer, decompile or disassemble the software. If the software is an update
or has been updated, any transfer must include the most recent update and
all prior versions. USE ON ONE COMPUTER ONLY. The purchase of a license
for the software allows it to be installed into the permanent memory of only
one computer at a time. LIMITED WARRANTY. Megger Limited warrants that
(a) the software will perform substantially in accordance with the
accompanying written materials for a period of one year from the date of
receipt. CUSTOMER REMEDIES. Megger Limited’s entire liability and your
exclusive remedy shall be at Megger Limitedl’s option, repair or replacement
of the software will only take place if the complete package is returned to
Megger Limited with a copy of the receipt. This limited warranty is void if
failure of the software has resulted from accident, abuse, or misapplication.
Any replacement software will be warranted for the remainder of the original
warranty period. NO LIABILITY FOR CONSEQUENTIAL DAMAGES. In no
event shall Megger Limited be liable for any damages whatsoever (including,
without limitation, damages for loss of business profits, business interruption,
loss of business information, or any other pecuniary loss) arising out of the
use or inability to use this Megger Limitedl product, even if Megger Limited
has been advised of the possibility of such damages. REGISTRATION.Within
seven days of opening this package, you are to register the software giving
full details of your name and address. By registering you acknowledge that
you have read this agreement, understand and agree to be bound by its terms
and conditions without exception, deletion or alteration. You also agree that
this agreement sets out in full the agreement between you and Megger
Limitedl which supersedes any proposal or prior agreement, oral or written,
and any other communication between you and Megger Limited relating to
the subject matter of this agreement. INDEMNITY. You agree to indemnify
Megger Limited against any loss, damage or expense arising out of or in
connection with the reproduction, sale and unauthorised use by you of the
software including any loss, damage or expense arising out of the subsequent
use of the software by any other person. GOVERNING LAW. This agreement
will be governed by the laws of England.
Page 52

M
Megger Limited T +44 (0)1 304 502101
Archcliffe Road, Dover F +44 (0)1 304 207342
Kent CT17 9EN E uksales@megger.com
England
Megger T +1 800 723 2861 (USA only)
4271 Bronze Way, Dallas, T +1 214 333 3201
Texas 75237-1019 F +1 214 331 7399
USA E ussales@megger.co
Megger T +33(0)1.30.16.08.90
Z.A. Du Buisson de la Couldre F +33 (0)1.34.61.23.77
23 rue Eugène Henaff E infos@megger.com
78190 TRAPPES
France
Megger Pty Limited T +61 (0)2 9659 200Unit
26 9 Hudson Avenue F +61 (0)2 9659 2201
Castle Hill E ausales@megger.com
Sydney NSW 2125
Australia
Megger Limited T +1 416 298 9688 (Canada only)
110 Milner Avenue Unit 1 T +1 416 298 6770
Scarborough Ontario M1S 3R2 F +1 416 298 0848
Canada E casales@megger.com
Megger products are distributed in 146 countries worldwide.
This instrument is manufactured in the UK.
The company reserves the right to change the specification or design
without prior notice.
Megger is a registered trademark
Part No. 6173-048_en_V01 Printed in England 0407
www.megger.com
 Loading...